# sim-finder.com — Full content for LLMs
> Complete article text from SimFinder's guides and blog (ja/en). SimFinder compares mobile SIM/eSIM plans across Japan and 11 countries using an independent scoring engine. Plan data is from official carrier sources, verified monthly/quarterly.
> Generated automatically at build time. 252 articles included.
================================================================================
# ASA Bans UW 'Unlimited Data' Ad Over Hidden 500GB Cap Wording
URL: https://sim-finder.com/en/blog/asa-utility-warehouse-unlimited-data-ruling-2026/
Type: blog (en)
Published: 2026-07-29T09:00:00+09:00
The UK's Advertising Standards Authority has ruled against a Utility Warehouse (Telecom Plus) web page advertising "unlimited data" SIM-only plans, in a decision published on 29 July 2026. The regulator did **not** find the word "unlimited" itself misleading — but it did find that a 500GB fair use threshold was buried in an expandable "The legal bit" section instead of sitting alongside the headline claims. For UK shoppers, the practical takeaway is that a fair use number on an unlimited plan should now be visible where you read the offer, not one click away.
The ruling (reference A26-1331986) is a part-upheld decision, meaning one of the two complaint points succeeded and the other did not.
## What was advertised
According to the ASA's ruling, the page on Utility Warehouse's website promoted SIM-only deals with claims including "Get the UK's best value SIM only deal", references to unlimited data, 99% UK coverage and free EU roaming. A linked page used the phrasing "Unlimited data" and described "endless surfing, streaming, and scrolling".
Neither page stated in the main body text that a fair use restriction applied. The qualification existed only inside an expandable block headed "The legal bit", which contained the line "Data consumption subject to 500GB personal usage cap" along with links to the full terms and the fair use policy.
## The complaint and what the ASA decided
A single complainant raised two challenges: whether the "unlimited" description was misleading given the 500GB fair use policy, and whether the restriction had been made sufficiently clear.
On the first point the ASA did not uphold the complaint. As reported by ISPreview and set out in the ruling itself, the regulator accepted that legitimate users who passed 500GB did not incur additional charges, service suspension or a reduction in speed. On that basis the threshold operated as an indicator of potential misuse rather than as a routine ceiling on ordinary use, so the unlimited description was not in itself misleading.
On the second point the ASA upheld the complaint. It treated the fair use policy as a significant condition that had to be clearly explained within the marketing communication. The regulator said consumers were unlikely to understand from the headline claims alone that any restriction applied, and would not necessarily click to expand "The legal bit" even where that section appeared beneath the main text — meaning the qualification could easily be overlooked.
The ad was found to breach CAP Code (Edition 12) rules 3.1 and 3.3 on misleading advertising, and rules 3.9 and 3.10 on qualifications.
## What happens next
The ASA told Utility Warehouse that the ad must not appear again in the form complained about, and that it must ensure unlimited claims are directly qualified with the terms of its fair use policy. The ruling does not require any change to the plans themselves or to the 500GB threshold — it is about how the condition is presented.
## Why this matters when comparing UK SIM plans
"Unlimited" is one of the most common words on UK SIM-only pages, and this ruling is a useful reminder of how to read it. Two things are worth separating:
- **Whether a limit exists at all.** Most unlimited plans carry some form of fair use or acceptable use policy. Its existence is normal, and the ASA has not treated it as automatically making an unlimited claim untrue.
- **What actually happens when you cross it.** This is the part that changes the value of a plan. In this case the ASA's reasoning turned on the fact that legitimate customers were not charged extra, suspended or slowed after 500GB. Where a provider does apply throttling or charges beyond a threshold, that is a materially different offer even if the headline word is identical.
For anyone genuinely likely to use hundreds of gigabytes a month — tethering, home broadband replacement, heavy streaming — it is worth opening the fair use policy directly rather than relying on the headline. Following this ruling, that number should be easier to find on Utility Warehouse's own pages.
Sources: the ASA ruling on Utility Warehouse Ltd (A26-1331986), published 29 July 2026, and ISPreview's report of the same date.
================================================================================
# Best eSIM for Japan 2026: Compare 11 Providers
URL: https://sim-finder.com/en/blog/best-esim-japan-2026/
Type: blog (en)
Published: 2026-03-23
## TL;DR: Top 3 eSIM Picks for Japan
| Best For | Provider | Plan | Price | Why |
|----------|----------|------|-------|-----|
| **Budget** | [eSIM2Fly](/en/travel/jp/search/) | 30 days / 5GB | $4.80 | Cheapest per-GB by far — AIS (Thailand) subsidiary |
| **Unlimited Data** | [Nomad](/en/travel/jp/search/) | 7 days / Unlimited | $23.00 | No daily cap disclosed, good app with Japanese support |
| **Best All-Round** | [Airalo](/en/travel/jp/search/) | 7 days / 1GB | $4.00 | Largest eSIM marketplace, wide device support, 1GB-20GB range |
**[Compare All Japan eSIM Plans on SimFinder -->](/en/travel/jp/search/)**
Japan is one of the most visited countries in the world, yet its mobile market can be confusing for visitors. Travel eSIMs remove that friction entirely: no ID required, no store visits, no rental returns. This guide compares every Japan plan from 11 eSIM providers using SimFinder's verified pricing database.
## Table of Contents
- [Why You Need an eSIM for Japan](#why-you-need-an-esim-for-japan)
- [Provider Comparison Table](#provider-comparison-table)
- [Best by Data Allowance](#best-by-data-allowance)
- [Best by Trip Length](#best-by-trip-length)
- [eSIM vs Airport SIM vs Pocket WiFi](#esim-vs-airport-sim-vs-pocket-wifi)
- [Setup Guide](#setup-guide)
- [Tips and Gotchas](#tips-and-gotchas)
- [Frequently Asked Questions](#frequently-asked-questions)
- [Key Takeaways](#key-takeaways)
---
## Why You Need an eSIM for Japan
Japan's mobile infrastructure ranks among the world's best. NTT [Docomo](/en/jp/carriers/docomo/) leads with 150.3 Mbps download speeds and a coverage score of 95/100 (OpenSignal Q1 2026). [au](/en/jp/carriers/au/)/[KDDI](/en/jp/carriers/au/) follows at 120.7 Mbps (93/100), [SoftBank](/en/jp/carriers/softbank/) at 110.5 Mbps (92/100), and [Rakuten Mobile](/en/jp/carriers/rakuten/) at 80.2 Mbps (82/100).
Travel eSIMs connect through these local carriers, giving visitors access to Japan's fast LTE/5G networks without a contract or Japanese ID.
### Why eSIM beats the alternatives
- **Instant activation** — Install before departure, connect on landing at Narita, Haneda, Kansai, or any airport
- **Keep your home number** — Dual SIM lets you receive SMS for 2FA on your primary line
- **No physical SIM swap** — No tiny SIM tools, no risk of losing your home SIM
- **No pickup or return** — Unlike pocket WiFi, nothing to collect at the airport or mail back
- **Cheaper than roaming** — T-Mobile's international plan gives only 256 Kbps in Japan; AT&T charges $12/day. A 7-day eSIM with 1GB costs just $2.20-$4.00
For day-to-day travel in Japan, you will rely on Google Maps (or Navitime for transit), LINE for local communication, translation apps, and mobile payments via Suica/PASMO in Apple Wallet. All of these need a data connection — free WiFi at konbini and train stations is too spotty and slow for practical use.
**[Compare Japan eSIM Plans on SimFinder -->](/en/travel/jp/search/)**
---
## Provider Comparison Table
SimFinder tracks **11 providers** offering Japan travel eSIM plans. All support tethering and multi-country plans. Below are representative prices at common data tiers.
### Capped Data Plans (1GB - 50GB)
| Provider | 7d/1GB | 30d/3GB | 30d/5GB | 30d/10GB | 30d/20GB | JP Support |
|----------|--------|---------|---------|----------|----------|------------|
| [**Airalo**](/en/travel/providers/airalo/) | $4.00 | $8.00 | $11.00 | $18.00 | $25.00 | Yes |
| [**aloSIM**](/en/travel/providers/alosim/) | $4.50 | — | — | — | — | Yes |
| [**eSIM2Fly**](/en/travel/providers/esim2fly/) | $2.20 | $3.60 | $4.80 | $7.40 | $12.00 | Yes |
| [**Flexiroam**](/en/travel/providers/flexiroam/) | — | — | — | $20.00 | — | Yes |
| [**GigSky**](/en/travel/providers/gigsky/) | $6.99 | — | $27.99 | $53.99 | — | Yes |
| [**Maya Mobile**](/en/travel/providers/maya/) | $3.99 | — | $11.99 | $18.99 | $28.99 | No |
| [**Nomad**](/en/travel/providers/nomad/) | $4.00 | $7.50 | $10.00 | $17.00 | $24.00 | Yes |
| [**Saily**](/en/travel/providers/saily/) | $3.99 | $7.99 | $10.99 | $17.99 | $24.99 | Yes |
| [**Ubigi**](/en/travel/providers/ubigi/) | — | $7.50 | $10.00 | $16.50 | — | Yes |
| [**Yesim**](/en/travel/providers/yesim/) | — | — | — | $17.00 | $26.00 | Yes |
*Prices as of March 2026. " — " means no plan at that tier. [Maya Mobile](/en/travel/providers/maya/) 7d/1GB is $3.99 for 5 days. [Ubigi](/en/travel/providers/ubigi/) offers 1GB/3d for $3.50 and 1GB/30d for $4.00.*
**Key takeaways:**
- **[eSIM2Fly](/en/travel/providers/esim2fly/) is the price leader at every tier** — 1GB for $2.20, 5GB for $4.80, 10GB for $7.40. This AIS (Thailand carrier) subsidiary consistently undercuts competitors by 40-60%
- **[Nomad](/en/travel/providers/nomad/) and [Saily](/en/travel/providers/saily/) cluster around $4 for 1GB** and scale linearly, making them safe mid-range choices
- **[GigSky](/en/travel/providers/gigsky/) is the most expensive** for capped plans — its 10GB plan costs $53.99 vs. $7.40 at [eSIM2Fly](/en/travel/providers/esim2fly/)
- **9 out of 11 providers offer Japanese-language support** — only [Maya Mobile](/en/travel/providers/maya/) lacks it
### Unlimited Data Plans
| Provider | 3 days | 5 days | 7 days | 10 days | 15 days | 30 days | Throttle |
|----------|--------|--------|--------|---------|---------|---------|----------|
| **[Airalo](/en/travel/providers/airalo/)** | — | — | — | $35.00 | — | — | 1 Mbps after 3GB/day |
| **[aloSIM](/en/travel/providers/alosim/)** | $11.50 | $19.50 | $27.00 | $35.00 | $49.00 | $74.00 | — |
| **[Flexiroam](/en/travel/providers/flexiroam/)** | — | $30.50 | $43.00 | $54.50 | $75.00 | $102.50 | — |
| [**Holafly**](/en/travel/providers/holafly/) | $11.70 | $19.50 | $27.30 | $36.90 | $50.90 | $74.90 | — |
| **[Maya Mobile](/en/travel/providers/maya/)** | — | $14.99 | — | $24.99 | $34.99 | $79.99 | — |
| **[Nomad](/en/travel/providers/nomad/)** | $11.00 | — | $23.00 | — | — | — | — |
| **[Saily](/en/travel/providers/saily/)** | — | $18.99 | $28.99 | $34.99 | $48.99 | $71.99 | — |
| **[Ubigi](/en/travel/providers/ubigi/)** | — | — | $25.00 | — | $39.00 | $65.00 | — |
| **[Yesim](/en/travel/providers/yesim/)** | — | — | $23.00 | $28.00 | $35.00 | $55.00 | — |
*[Holafly](/en/travel/providers/holafly/) sells 1-30 day plans in 1-day increments ($3.90/day for 1 day, $74.90 for 30 days). [Nomad](/en/travel/providers/nomad/) also offers 14d/$41.00 and 21d/$49.00 unlimited.*
**Key takeaways:**
- **[Nomad](/en/travel/providers/nomad/) offers the cheapest 7-day unlimited at $23.00**, tied with [Yesim](/en/travel/providers/yesim/)
- **[Holafly](/en/travel/providers/holafly/) stands out for flexibility** — buy exactly the days you need (1-30 days in daily increments)
- **[Airalo](/en/travel/providers/airalo/)'s "unlimited" has a significant catch** — speed drops to 1 Mbps after just 3GB per day, which is barely usable for video
- **[Yesim](/en/travel/providers/yesim/) is the cheapest for 30-day unlimited at $55.00**, followed by [Ubigi](/en/travel/providers/ubigi/) at $65.00 and [Saily](/en/travel/providers/saily/) at $71.99
- **[Flexiroam](/en/travel/providers/flexiroam/) is the most expensive** for unlimited plans across all durations
**[Compare Japan eSIM Plans on SimFinder -->](/en/travel/jp/search/)**
---
## Best by Data Allowance
### 1GB — Light User (WiFi-Primary)
**Use case:** Messaging, navigation check-ins, occasional translation. WiFi at hotels and cafes handles the rest.
| Provider | Plan | Price |
|----------|------|-------|
| [eSIM2Fly](/en/travel/providers/esim2fly/) | 7 days / 1GB | **$2.20** |
| [Saily](/en/travel/providers/saily/) | 7 days / 1GB | $3.99 |
| [Maya Mobile](/en/travel/providers/maya/) | 5 days / 1GB | $3.99 |
| [Airalo](/en/travel/providers/airalo/) | 7 days / 1GB | $4.00 |
| [Nomad](/en/travel/providers/nomad/) | 7 days / 1GB | $4.00 |
**Pick:** [eSIM2Fly](/en/travel/providers/esim2fly/) at $2.20 for 1GB. Nearly half the price of competitors.
### 3-5GB — Standard Traveler
**Use case:** Google Maps navigation throughout the day, LINE/WhatsApp messaging, social media browsing, restaurant searches. No video streaming.
| Provider | Plan | Price | Per GB |
|----------|------|-------|--------|
| [eSIM2Fly](/en/travel/providers/esim2fly/) | 30 days / 3GB | **$3.60** | $1.20 |
| [eSIM2Fly](/en/travel/providers/esim2fly/) | 30 days / 5GB | **$4.80** | $0.96 |
| [Nomad](/en/travel/providers/nomad/) | 30 days / 3GB | $7.50 | $2.50 |
| [Ubigi](/en/travel/providers/ubigi/) | 15 days / 3GB | $7.50 | $2.50 |
| [Saily](/en/travel/providers/saily/) | 30 days / 3GB | $7.99 | $2.66 |
**Pick:** [eSIM2Fly](/en/travel/providers/esim2fly/) 5GB for $4.80. At $0.96/GB with a 30-day validity, this is the best value for most travelers visiting Japan for 1-2 weeks.
### 10GB+ — Heavy User / Tethering
**Use case:** Video calls, streaming, tethering to laptop, heavy social media with photo/video uploads.
| Provider | Plan | Price | Per GB |
|----------|------|-------|--------|
| [eSIM2Fly](/en/travel/providers/esim2fly/) | 30 days / 10GB | **$7.40** | $0.74 |
| [eSIM2Fly](/en/travel/providers/esim2fly/) | 30 days / 20GB | **$12.00** | $0.60 |
| [Ubigi](/en/travel/providers/ubigi/) | 30 days / 10GB | $16.50 | $1.65 |
| [Nomad](/en/travel/providers/nomad/) | 30 days / 10GB | $17.00 | $1.70 |
| [Yesim](/en/travel/providers/yesim/) | 30 days / 10GB | $17.00 | $1.70 |
**Pick:** [eSIM2Fly](/en/travel/providers/esim2fly/) 10GB for $7.40. Even at the 20GB tier ($12.00), [eSIM2Fly](/en/travel/providers/esim2fly/) costs less than what most providers charge for 10GB. For ultra-heavy usage, [Nomad](/en/travel/providers/nomad/)'s 45-day/50GB plan at $39.00 ($0.78/GB) is worth considering.
### Unlimited — No Data Anxiety
| Provider | 7 days | Per Day | Notes |
|----------|--------|---------|-------|
| [Nomad](/en/travel/providers/nomad/) | **$23.00** | $3.29 | No disclosed daily cap |
| [Yesim](/en/travel/providers/yesim/) | $23.00 | $3.29 | No disclosed daily cap |
| [Ubigi](/en/travel/providers/ubigi/) | $25.00 | $3.57 | NTT Group backing |
| [Holafly](/en/travel/providers/holafly/) | $27.30 | $3.90 | Buy in 1-day increments |
| [Airalo](/en/travel/providers/airalo/) | $35.00 (10d) | $3.50 | **1 Mbps after 3GB/day** |
**Pick:** [Nomad](/en/travel/providers/nomad/) 7-day unlimited at $23.00. If you need a flexible duration, [Holafly](/en/travel/providers/holafly/) lets you buy 1-30 days exactly. Avoid [Airalo](/en/travel/providers/airalo/) unlimited if you plan to stream — the 3GB/day throttle at 1 Mbps is restrictive.
**[Compare Japan eSIM Plans on SimFinder -->](/en/travel/jp/search/)**
---
## Best by Trip Length
### Weekend Trip (2-3 Days)
Quick trips to Tokyo or Osaka. Prioritize simplicity.
| Option | Provider | Price | Data |
|--------|----------|-------|------|
| **Cheapest** | [eSIM2Fly](/en/travel/providers/esim2fly/) | $2.20 | 7 days / 1GB |
| **Unlimited (cheapest)** | [Nomad](/en/travel/providers/nomad/) | $11.00 | 3 days / Unlimited |
| **Unlimited (per-day)** | [Holafly](/en/travel/providers/holafly/) | $11.70 | 3 days / Unlimited |
**Pick:** For basic needs, [eSIM2Fly](/en/travel/providers/esim2fly/) 1GB at $2.20 covers a weekend. If you want unlimited freedom, [Nomad](/en/travel/providers/nomad/) at $11.00 for 3 days.
### 1 Week (5-7 Days)
The most common Japan trip length. The sweet spot for plan variety.
| Option | Provider | Price | Data |
|--------|----------|-------|------|
| **Budget** | [eSIM2Fly](/en/travel/providers/esim2fly/) | $4.80 | 30 days / 5GB |
| **Mid-range** | [Nomad](/en/travel/providers/nomad/) | $10.00 | 30 days / 5GB |
| **Unlimited (cheapest)** | [Nomad](/en/travel/providers/nomad/) | $23.00 | 7 days / Unlimited |
| **Unlimited (flexible)** | [Holafly](/en/travel/providers/holafly/) | $19.50-$27.30 | 5-7 days / Unlimited |
**Pick:** [eSIM2Fly](/en/travel/providers/esim2fly/) 5GB at $4.80 handles a week comfortably for navigation, messaging, and light browsing. Unlimited seekers should go with [Nomad](/en/travel/providers/nomad/) at $23.00 for 7 days.
### 2 Weeks (10-14 Days)
Extended Japan itineraries (Tokyo + Kyoto + Osaka + day trips). Higher data consumption likely.
| Option | Provider | Price | Data |
|--------|----------|-------|------|
| **Budget** | [eSIM2Fly](/en/travel/providers/esim2fly/) | $7.40 | 30 days / 10GB |
| **Mid-range** | [Nomad](/en/travel/providers/nomad/) | $17.00 | 30 days / 10GB |
| **Unlimited** | [Nomad](/en/travel/providers/nomad/) | $41.00 | 14 days / Unlimited |
| **Unlimited (per-day)** | [Holafly](/en/travel/providers/holafly/) | $47.90 | 14 days / Unlimited |
**Pick:** [eSIM2Fly](/en/travel/providers/esim2fly/) 10GB at $7.40 for most travelers. If you need unlimited, [Yesim](/en/travel/providers/yesim/) at $35.00 for 15 days is cheaper than [Nomad](/en/travel/providers/nomad/)'s 14-day option.
### 1 Month
Long stays, remote workers, extended travel.
| Option | Provider | Price | Data |
|--------|----------|-------|------|
| **Budget (capped)** | [eSIM2Fly](/en/travel/providers/esim2fly/) | $12.00 | 30 days / 20GB |
| **High volume** | [Nomad](/en/travel/providers/nomad/) | $39.00 | 45 days / 50GB |
| **Unlimited (cheapest)** | [Yesim](/en/travel/providers/yesim/) | $55.00 | 30 days / Unlimited |
| **Unlimited** | [Ubigi](/en/travel/providers/ubigi/) | $65.00 | 30 days / Unlimited |
| **Unlimited** | [Saily](/en/travel/providers/saily/) | $71.99 | 30 days / Unlimited |
**Pick:** For capped data, [eSIM2Fly](/en/travel/providers/esim2fly/) 20GB at $12.00 is unbeatable. For unlimited, [Yesim](/en/travel/providers/yesim/) at $55.00 is the most affordable 30-day unlimited option.
**[Compare Japan eSIM Plans on SimFinder -->](/en/travel/jp/search/)**
---
## eSIM vs Airport SIM vs Pocket WiFi
| Factor | Travel eSIM | Airport SIM Counter | Pocket WiFi Rental |
|--------|-------------|--------------------|--------------------|
| **Price (7 days)** | $2.20 - $23.00 | ~$15 - $30 | $5 - $8/day ($35-56/week) |
| **Setup** | Before departure | At airport counter | Pickup at airport |
| **Wait time** | None | 10-30 min queue | 5-15 min queue |
| **Phone number** | No | Sometimes | No |
| **Tethering** | Yes (all 11 providers) | Depends on plan | Built-in (shared device) |
| **Battery** | Uses phone battery | Uses phone battery | Separate device, needs charging |
| **Return** | Delete eSIM profile | Discard SIM | Return at airport or by mail |
| **Group use** | Tethering only | Per person | 1 device, multiple users |
**Bottom line:** Travel eSIMs win on price, convenience, and flexibility for solo travelers and couples. Pocket WiFi still makes sense for groups of 3+ who want to share one data connection without worrying about tethering limits. Airport SIM counters are rarely the best option — they charge premium prices for the convenience of an impulse purchase.
---
## Setup Guide
Setting up a Japan travel eSIM takes about 5 minutes. Do this before you leave home.
### Step 1: Purchase
Choose a provider and Japan plan from the comparison above (or use [SimFinder's search tool](/en/travel/jp/search/)). Complete payment — you will receive a QR code via email or in the provider's app.
### Step 2: Install (At Home, on WiFi)
**iPhone (XR/XS 2018 or later):**
1. Settings --> Cellular --> Add eSIM
2. Scan the QR code
3. Confirm the plan is added (do not activate yet)
**Android (Pixel 3a 2019+, Galaxy S20 2020+, etc.):**
1. Settings --> Network & Internet --> SIMs --> Add SIM
2. Scan the QR code
3. Confirm the plan is added
### Step 3: Activate on Arrival
1. Turn **off** data roaming on your home SIM (to avoid surprise charges)
2. Set the travel eSIM as your **mobile data** line
3. Keep your home SIM as the **default voice line** (for SMS/2FA)
Most Japan eSIMs auto-activate when they connect to a Japanese carrier. You should have data within seconds of clearing immigration.
For a detailed step-by-step walkthrough with screenshots, see our [Complete Travel eSIM Guide](/ja/blog/travel-esim-complete-guide-2026/) (Japanese).
---
## Tips and Gotchas
### Tethering
All 11 providers support tethering, but unlimited plans and tethering do not always mix well. [Airalo](/en/travel/providers/airalo/)'s unlimited plan throttles to 1 Mbps after 3GB of daily usage — that limit is easy to hit when tethering a laptop. If you need reliable tethering for work, consider a large capped plan (20-50GB) instead of unlimited. Capped plans typically maintain full speed until the data runs out.
### No Phone Number
Travel eSIMs are data-only. You will not get a Japanese phone number. This matters for:
- **Restaurant reservations** — Some systems require a Japanese number. Use Tabelog or Google Maps booking instead
- **Delivery apps** — Services like Uber Eats Japan accept non-Japanese numbers, but some local apps may not
- **Emergency calls** — 110 (police) and 119 (fire/ambulance) work from any phone, including those without a SIM
For voice calls, use LINE (dominant in Japan), WhatsApp, or FaceTime over your eSIM data connection.
### US Carrier Roaming Comparison
If you are coming from the US, here is how carrier roaming stacks up:
| US Carrier | Japan Roaming | Speed | Price |
|------------|--------------|-------|-------|
| T-Mobile (Magenta) | Included | 256 Kbps (unusable) | Free |
| T-Mobile (Go5G Plus) | Included | 5 Mbps | Free |
| AT&T International Day Pass | Full speed | Full speed | $12/day |
| Verizon TravelPass | Full speed | Full speed | $10/day |
Even T-Mobile's best free roaming (5 Mbps) is slower than what you get on a $4 travel eSIM. AT&T and Verizon's $10-12/day plans cost $70-84 per week — versus $2.20-$23.00 for a travel eSIM covering the same period. There is no scenario where carrier roaming beats a travel eSIM in Japan.
### Network Quality in Japan
Japan's four carriers all deliver solid coverage in urban areas. In rural areas (Hokkaido countryside, mountain regions, remote islands), [NTT Docomo](/en/jp/carriers/docomo/) has the widest reach:
| Carrier | Download Speed | Coverage Score | Best For |
|---------|---------------|----------------|----------|
| [NTT Docomo](/en/jp/carriers/docomo/) | 150.3 Mbps | 95/100 | Overall reliability, rural areas |
| [au](/en/jp/carriers/au/)/[KDDI](/en/jp/carriers/au/) | 120.7 Mbps | 93/100 | Balanced urban/suburban |
| [SoftBank](/en/jp/carriers/softbank/) | 110.5 Mbps | 92/100 | Urban areas |
| Rakuten | 80.2 Mbps | 82/100 | Budget, urban-only |
*Source: OpenSignal Q1 2026*
Most travel eSIM providers do not disclose which Japanese carrier they route through. [Ubigi](/en/travel/providers/ubigi/), being part of the NTT Group ([Docomo](/en/jp/carriers/docomo/)'s parent company), likely routes via [Docomo](/en/jp/carriers/docomo/). For general travel covering Tokyo, Osaka, and Kyoto, any carrier provides reliable service.
---
## Frequently Asked Questions
### What is the cheapest eSIM for Japan?
[eSIM2Fly](/en/travel/providers/esim2fly/) offers the lowest-priced Japan eSIM at $1.70 for 100MB/7 days. For a more usable amount, their 1GB/7-day plan costs just $2.20. Among popular providers, [Ubigi](/en/travel/providers/ubigi/) offers 1GB/3 days for $3.50, and [Saily](/en/travel/providers/saily/) and [Maya Mobile](/en/travel/providers/maya/) both start at $3.99 for 1GB.
### Do Japan eSIMs support tethering (hotspot)?
Yes. All 11 providers tracked by SimFinder support tethering on their Japan plans. However, heavy tethering on unlimited plans may trigger daily speed caps. [Airalo](/en/travel/providers/airalo/) throttles to 1 Mbps after 3GB/day on its unlimited plan.
### Can I use an eSIM in Japan without a Japanese phone number?
Yes. Travel eSIMs are data-only and do not include a Japanese phone number. Use VoIP apps (LINE, WhatsApp, FaceTime) for voice calls. Your home SIM stays active via dual SIM for SMS-based two-factor authentication.
### Which eSIM provider has the best coverage in Japan?
Coverage depends on which Japanese carrier the eSIM routes through. [NTT Docomo](/en/jp/carriers/docomo/) has the highest coverage score (95/100) and best download speed (150.3 Mbps). [Ubigi](/en/travel/providers/ubigi/) is part of the NTT Group, which may give it an edge. For standard tourist routes (Tokyo, Kyoto, Osaka), all carriers perform well.
### Should I buy an eSIM before or after arriving in Japan?
Buy and install before departure. eSIM installation requires WiFi and QR code scanning. Installing at home guarantees you have data the moment you land. If you forget, Narita and Haneda have free WiFi, but it requires registration and can be slow.
### Is unlimited data worth it for Japan?
For a 7-day trip, unlimited costs $23.00 ([Nomad](/en/travel/providers/nomad/)/[Yesim](/en/travel/providers/yesim/)) vs. $4.80 for 5GB ([eSIM2Fly](/en/travel/providers/esim2fly/)). If you stream video, use maps heavily, or tether to a laptop, unlimited prevents data anxiety. For messaging and navigation only, 3-5GB is sufficient and 4-5x cheaper.
### How does a travel eSIM compare to pocket WiFi?
Travel eSIMs cost $2-$23 for a week vs. $35-56 for pocket WiFi rental. eSIMs require no pickup, no return, no charging a second device. Pocket WiFi's only advantage is sharing one connection among a large group without using tethering data from each person's phone.
---
## Key Takeaways
1. **[eSIM2Fly](/en/travel/providers/esim2fly/) is the budget king** — cheapest at nearly every data tier, from $2.20/1GB to $23.40/50GB. The trade-off is a less polished app compared to [Airalo](/en/travel/providers/airalo/) or [Nomad](/en/travel/providers/nomad/).
2. **For unlimited data, [Nomad](/en/travel/providers/nomad/) and [Yesim](/en/travel/providers/yesim/) tie at $23.00/7 days.** [Holafly](/en/travel/providers/holafly/) charges slightly more ($27.30/7 days) but offers per-day purchasing flexibility.
3. **Avoid [Airalo](/en/travel/providers/airalo/)'s unlimited plan** unless light usage is your intent — the 1 Mbps throttle after 3GB/day is a meaningful limitation.
4. **All 11 providers support tethering** and Japanese-language support (except [Maya Mobile](/en/travel/providers/maya/)).
5. **Japan's networks are fast everywhere.** Even the "worst" carrier (Rakuten at 80 Mbps) is faster than what most countries offer. Do not overthink carrier selection.
6. **Buy before you fly.** Installing an eSIM takes 5 minutes on WiFi at home. There is no reason to wait until you land.
**[Find Your Japan eSIM Plan on SimFinder -->](/en/travel/jp/search/)**
---
*Prices were last verified on March 15-16, 2026, and are sourced from SimFinder's database. Actual prices may vary by currency and promotional offers. Network quality data is from OpenSignal Q1 2026. SimFinder may earn a commission from provider links at no extra cost to you.*
================================================================================
# Best eSIM for South Korea 2026: Complete Guide
URL: https://sim-finder.com/en/blog/best-esim-korea-2026/
Type: blog (en)
Published: 2026-03-24
## TL;DR: Top 3 eSIM Picks for South Korea
| Best For | Provider | Plan | Price | Why |
|----------|----------|------|-------|-----|
| **Budget** | [eSIM2Fly](/en/travel/kr/search/) | 30 days / 5GB | $6.20 | Cheapest per-GB at every tier — AIS subsidiary |
| **Unlimited Data** | [Nomad](/en/travel/kr/search/) | 7 days / Unlimited | $23.00 | No daily cap disclosed, Korean-language support |
| **Best All-Round** | [Airalo](/en/travel/kr/search/) | 7 days / 1GB | $4.50 | Largest eSIM marketplace, wide device support, 1GB-20GB range |
**[Compare All South Korea eSIM Plans on SimFinder -->](/en/travel/kr/search/)**
South Korea is a top destination for K-culture fans, foodies, and tech travelers alike — yet staying connected can trip up first-time visitors. Travel eSIMs solve this: no passport check at the airport counter, no rental device to return, and data from the moment you land. This guide compares every South Korea plan from 11 eSIM providers using SimFinder's verified pricing database.
## Table of Contents
- [Why You Need an eSIM for South Korea](#why-you-need-an-esim-for-south-korea)
- [Provider Comparison Table](#provider-comparison-table)
- [Best by Data Allowance](#best-by-data-allowance)
- [Best by Trip Length](#best-by-trip-length)
- [eSIM vs Airport SIM vs Pocket WiFi](#esim-vs-airport-sim-vs-pocket-wifi)
- [Setup Guide](#setup-guide)
- [Tips and Gotchas](#tips-and-gotchas)
- [Frequently Asked Questions](#frequently-asked-questions)
- [Key Takeaways](#key-takeaways)
---
## Why You Need an eSIM for South Korea
South Korea was the world's first country to launch commercial 5G (April 2019) and its mobile infrastructure remains among the fastest anywhere. [SK Telecom](/en/kr/carriers/skt/) leads with 200.0 Mbps download speeds and a coverage score of 97/100 (OpenSignal 2025). [KT](/en/kr/carriers/kt/) follows at 185.5 Mbps (96/100), and [LG U+](/en/kr/carriers/lguplus/) at 175.2 Mbps (95/100).
Travel eSIMs connect through these local carriers, giving visitors access to South Korea's fast LTE/5G networks without a contract or Alien Registration Card (ARC).
### Why eSIM beats the alternatives
- **Instant activation** — Install before departure, connect on landing at Incheon or Gimpo
- **Keep your home number** — Dual SIM lets you receive SMS for 2FA on your primary line
- **No physical SIM swap** — No tiny SIM tools, no risk of losing your home SIM
- **No pickup or return** — Unlike pocket WiFi, nothing to collect at the airport or mail back
- **Cheaper than roaming** — T-Mobile's international plan gives only 256 Kbps in South Korea; AT&T charges $12/day. A 7-day eSIM with 1GB costs just $2.50-$4.50
For day-to-day travel in South Korea, you will rely on Naver Maps (Google Maps has limited transit data in Korea), KakaoTalk for messaging, Kakao T for taxis, translation apps, and T-money/WOWPASS for payments. All of these require a data connection — free WiFi at convenience stores and subway stations is unreliable and often requires Korean phone number verification.
**[Compare South Korea eSIM Plans on SimFinder -->](/en/travel/kr/search/)**
---
## Provider Comparison Table
SimFinder tracks **11 providers** offering South Korea travel eSIM plans. All support tethering and multi-country plans. Below are representative prices at common data tiers.
### Capped Data Plans (1GB - 50GB)
| Provider | 7d/1GB | 30d/3GB | 30d/5GB | 30d/10GB | 30d/20GB | KR Support |
|----------|--------|---------|---------|----------|----------|------------|
| [**Airalo**](/en/travel/providers/airalo/) | $4.50 | $9.00 | $11.00 | $20.00 | $32.00 | Yes |
| [**aloSIM**](/en/travel/providers/alosim/) | $4.50 | — | — | — | — | Yes |
| [**eSIM2Fly**](/en/travel/providers/esim2fly/) | $2.50 | $4.60 | $6.20 | $9.90 | $15.60 | Yes |
| [**Flexiroam**](/en/travel/providers/flexiroam/) | — | — | — | $20.00 | — | Yes |
| [**GigSky**](/en/travel/providers/gigsky/) | $4.99 | — | $21.99 | $39.99 | — | Yes |
| [**Maya Mobile**](/en/travel/providers/maya/) | $3.99 | — | $9.99 | $16.99 | $27.99 | No |
| [**Nomad**](/en/travel/providers/nomad/) | $4.00 | $8.00 | $10.00 | $18.00 | $25.00 | Yes |
| [**Saily**](/en/travel/providers/saily/) | $3.99 | $8.99 | $10.99 | $18.99 | $29.99 | Yes |
| [**Ubigi**](/en/travel/providers/ubigi/) | $4.00 | $9.00 | — | $16.00 | $18.00 | Yes |
| [**Yesim**](/en/travel/providers/yesim/) | — | — | — | $16.00 | $26.00 | Yes |
*Prices as of March 2026. " — " means no plan at that exact tier. [Maya Mobile](/en/travel/providers/maya/) 7d/1GB is $3.99 for 5 days. [Ubigi](/en/travel/providers/ubigi/) 20GB is a 1,000-day validity plan. [Nomad](/en/travel/providers/nomad/) also offers 20GB/45 days for $25.00.*
**Key takeaways:**
- **[eSIM2Fly](/en/travel/providers/esim2fly/) is the price leader at every tier** — 1GB for $2.50, 5GB for $6.20, 10GB for $9.90. This AIS (Thailand carrier) subsidiary consistently undercuts competitors by 30-50%
- **[Ubigi](/en/travel/providers/ubigi/) offers strong value at 10GB ($16.00) and 20GB ($18.00)** — the 20GB plan has an unusual 1,000-day validity, ideal for repeat visitors
- **[Nomad](/en/travel/providers/nomad/) and [Saily](/en/travel/providers/saily/) cluster around $4 for 1GB** and scale linearly, making them safe mid-range choices
- **[GigSky](/en/travel/providers/gigsky/) is the most expensive** for capped plans — its 10GB plan costs $39.99 vs. $9.90 at [eSIM2Fly](/en/travel/providers/esim2fly/)
- **9 out of 11 providers offer Korean-language support** — only [Maya Mobile](/en/travel/providers/maya/) lacks it
### Unlimited Data Plans
| Provider | 3 days | 5 days | 7 days | 10 days | 15 days | 30 days | Throttle |
|----------|--------|--------|--------|---------|---------|---------|----------|
| **[Airalo](/en/travel/providers/airalo/)** | — | — | — | $32.00 | — | $62.00 | 5 Mbps after 3GB/day |
| **[aloSIM](/en/travel/providers/alosim/)** | $12.50 | $20.50 | $29.50 | $35.00 | $49.00 | $72.50 | — |
| **[Flexiroam](/en/travel/providers/flexiroam/)** | — | $30.50 | $43.00 | $54.50 | $75.00 | — | — |
| **[GigSky](/en/travel/providers/gigsky/)** | $19.99 | $28.99 | $37.99 | — | — | $89.99 | — |
| [**Holafly**](/en/travel/providers/holafly/) | $12.90 | $20.90 | $29.90 | $36.90 | $50.90 | $74.90 | — |
| **[Maya Mobile](/en/travel/providers/maya/)** | — | $14.99 | — | $19.99 | $29.99 | $59.99 | — |
| **[Nomad](/en/travel/providers/nomad/)** | $11.00 | $17.00 | $23.00 | $31.00 | — | — | — |
| **[Saily](/en/travel/providers/saily/)** | — | $18.99 | — | $34.99 | $48.99 | $71.99 | — |
| **[Ubigi](/en/travel/providers/ubigi/)** | — | — | $25.00 | — | $39.00 | $59.00 | — |
| **[Yesim](/en/travel/providers/yesim/)** | — | — | $23.00 | — | $36.00 | $55.00 | — |
*[Holafly](/en/travel/providers/holafly/) sells 1-30 day plans in 1-day increments ($6.90/day for 1 day, $74.90 for 30 days). [GigSky](/en/travel/providers/gigsky/) also offers 1d/$6.99, 14d/$59.99, and 21d/$74.99 unlimited. [Nomad](/en/travel/providers/nomad/) has no unlimited plans longer than 10 days for Korea.*
**Key takeaways:**
- **[Nomad](/en/travel/providers/nomad/) offers the cheapest 3-day unlimited at $11.00** and 7-day at $23.00, tied with [Yesim](/en/travel/providers/yesim/)
- **[Maya Mobile](/en/travel/providers/maya/) is the cheapest for 5-day ($14.99) and 10-day ($19.99) unlimited** — significantly less than competitors
- **[Yesim](/en/travel/providers/yesim/) is the cheapest for 30-day unlimited at $55.00**, followed by [Ubigi](/en/travel/providers/ubigi/) at $59.00 and [Maya Mobile](/en/travel/providers/maya/) at $59.99
- **[Holafly](/en/travel/providers/holafly/) stands out for flexibility** — buy exactly the days you need (1-30 days in daily increments)
- **[Airalo](/en/travel/providers/airalo/)'s "unlimited" has a catch** — speed drops to 5 Mbps after 3GB per day, which limits video streaming quality
- **[GigSky](/en/travel/providers/gigsky/) and [Flexiroam](/en/travel/providers/flexiroam/) are the most expensive** for unlimited plans across all durations
**[Compare South Korea eSIM Plans on SimFinder -->](/en/travel/kr/search/)**
---
## Best by Data Allowance
### 1GB — Light User (WiFi-Primary)
**Use case:** Messaging, quick navigation check-ins, occasional translation. WiFi at hotels and cafes handles the rest.
| Provider | Plan | Price |
|----------|------|-------|
| [eSIM2Fly](/en/travel/providers/esim2fly/) | 7 days / 1GB | **$2.50** |
| [Maya Mobile](/en/travel/providers/maya/) | 5 days / 1GB | $3.99 |
| [Saily](/en/travel/providers/saily/) | 7 days / 1GB | $3.99 |
| [Nomad](/en/travel/providers/nomad/) | 7 days / 1GB | $4.00 |
| [Ubigi](/en/travel/providers/ubigi/) | 7 days / 1GB | $4.00 |
**Pick:** [eSIM2Fly](/en/travel/providers/esim2fly/) at $2.50 for 1GB. About 37% cheaper than the next option.
### 3-5GB — Standard Traveler
**Use case:** Naver Maps navigation throughout the day, KakaoTalk messaging, social media browsing, restaurant searches. No video streaming.
| Provider | Plan | Price | Per GB |
|----------|------|-------|--------|
| [eSIM2Fly](/en/travel/providers/esim2fly/) | 15 days / 3GB | **$4.30** | $1.43 |
| [eSIM2Fly](/en/travel/providers/esim2fly/) | 30 days / 5GB | **$6.20** | $1.24 |
| [Maya Mobile](/en/travel/providers/maya/) | 5 days / 5GB | $5.99 | $1.20 |
| [Nomad](/en/travel/providers/nomad/) | 30 days / 3GB | $8.00 | $2.67 |
| [Ubigi](/en/travel/providers/ubigi/) | 30 days / 3GB | $9.00 | $3.00 |
**Pick:** [eSIM2Fly](/en/travel/providers/esim2fly/) 5GB for $6.20. At $1.24/GB with a 30-day validity, this is the best value for most travelers visiting Korea for 1-2 weeks. [Maya Mobile](/en/travel/providers/maya/)'s 5GB/5d for $5.99 ($1.20/GB) is slightly cheaper per GB but only valid for 5 days.
### 10GB+ — Heavy User / Tethering
**Use case:** Video calls, streaming, tethering to laptop, heavy social media with photo/video uploads.
| Provider | Plan | Price | Per GB |
|----------|------|-------|--------|
| [eSIM2Fly](/en/travel/providers/esim2fly/) | 30 days / 10GB | **$9.90** | $0.99 |
| [eSIM2Fly](/en/travel/providers/esim2fly/) | 30 days / 20GB | **$15.60** | $0.78 |
| [Ubigi](/en/travel/providers/ubigi/) | 30 days / 10GB | $16.00 | $1.60 |
| [Yesim](/en/travel/providers/yesim/) | 30 days / 10GB | $16.00 | $1.60 |
| [Nomad](/en/travel/providers/nomad/) | 30 days / 10GB | $18.00 | $1.80 |
**Pick:** [eSIM2Fly](/en/travel/providers/esim2fly/) 10GB for $9.90. Even at the 20GB tier ($15.60), [eSIM2Fly](/en/travel/providers/esim2fly/) costs less than what most providers charge for 10GB. For ultra-heavy usage, [eSIM2Fly](/en/travel/providers/esim2fly/)'s 50GB/30-day plan at $23.40 ($0.47/GB) is outstanding value.
### Unlimited — No Data Anxiety
| Provider | 7 days | Per Day | Notes |
|----------|--------|---------|-------|
| [Nomad](/en/travel/providers/nomad/) | **$23.00** | $3.29 | No disclosed daily cap |
| [Yesim](/en/travel/providers/yesim/) | $23.00 | $3.29 | No disclosed daily cap |
| [Ubigi](/en/travel/providers/ubigi/) | $25.00 | $3.57 | NTT Group backing |
| [Holafly](/en/travel/providers/holafly/) | $29.90 | $4.27 | Buy in 1-day increments |
| [Airalo](/en/travel/providers/airalo/) | $32.00 (10d) | $3.20 | **5 Mbps after 3GB/day** |
**Pick:** [Nomad](/en/travel/providers/nomad/) 7-day unlimited at $23.00. If you need a flexible duration, [Holafly](/en/travel/providers/holafly/) lets you buy 1-30 days exactly. If you are on a tight budget, [Maya Mobile](/en/travel/providers/maya/)'s 10-day unlimited at $19.99 ($2.00/day) is the cheapest per-day unlimited option.
**[Compare South Korea eSIM Plans on SimFinder -->](/en/travel/kr/search/)**
---
## Best by Trip Length
### Weekend Trip (2-3 Days)
Quick trips to Seoul. Prioritize simplicity.
| Option | Provider | Price | Data |
|--------|----------|-------|------|
| **Cheapest** | [eSIM2Fly](/en/travel/providers/esim2fly/) | $2.50 | 7 days / 1GB |
| **Unlimited (cheapest)** | [Nomad](/en/travel/providers/nomad/) | $11.00 | 3 days / Unlimited |
| **Unlimited (per-day)** | [Holafly](/en/travel/providers/holafly/) | $12.90 | 3 days / Unlimited |
**Pick:** For basic needs, [eSIM2Fly](/en/travel/providers/esim2fly/) 1GB at $2.50 covers a weekend. If you want unlimited freedom, [Nomad](/en/travel/providers/nomad/) at $11.00 for 3 days.
### 1 Week (5-7 Days)
The most common Korea trip length — Seoul, and perhaps a day trip to Busan or the DMZ. The sweet spot for plan variety.
| Option | Provider | Price | Data |
|--------|----------|-------|------|
| **Budget** | [eSIM2Fly](/en/travel/providers/esim2fly/) | $6.20 | 30 days / 5GB |
| **Mid-range** | [Nomad](/en/travel/providers/nomad/) | $10.00 | 30 days / 5GB |
| **Unlimited (cheapest)** | [Nomad](/en/travel/providers/nomad/) | $23.00 | 7 days / Unlimited |
| **Unlimited (flexible)** | [Holafly](/en/travel/providers/holafly/) | $20.90-$29.90 | 5-7 days / Unlimited |
**Pick:** [eSIM2Fly](/en/travel/providers/esim2fly/) 5GB at $6.20 handles a week comfortably for navigation, messaging, and light browsing. Unlimited seekers should go with [Nomad](/en/travel/providers/nomad/) at $23.00 for 7 days.
### 2 Weeks (10-14 Days)
Extended Korea itineraries (Seoul + Busan + Jeju + Gyeongju). Higher data consumption likely.
| Option | Provider | Price | Data |
|--------|----------|-------|------|
| **Budget** | [eSIM2Fly](/en/travel/providers/esim2fly/) | $9.90 | 30 days / 10GB |
| **Mid-range** | [Ubigi](/en/travel/providers/ubigi/) | $16.00 | 30 days / 10GB |
| **Unlimited (cheapest)** | [Maya Mobile](/en/travel/providers/maya/) | $19.99 | 10 days / Unlimited |
| **Unlimited** | [Nomad](/en/travel/providers/nomad/) | $31.00 | 10 days / Unlimited |
**Pick:** [eSIM2Fly](/en/travel/providers/esim2fly/) 10GB at $9.90 for most travelers. If you need unlimited, [Maya Mobile](/en/travel/providers/maya/) at $19.99 for 10 days is the cheapest option by far.
### 1 Month
Long stays, language courses, remote workers, extended travel.
| Option | Provider | Price | Data |
|--------|----------|-------|------|
| **Budget (capped)** | [eSIM2Fly](/en/travel/providers/esim2fly/) | $15.60 | 30 days / 20GB |
| **High volume** | [eSIM2Fly](/en/travel/providers/esim2fly/) | $23.40 | 30 days / 50GB |
| **Unlimited (cheapest)** | [Yesim](/en/travel/providers/yesim/) | $55.00 | 30 days / Unlimited |
| **Unlimited** | [Ubigi](/en/travel/providers/ubigi/) | $59.00 | 30 days / Unlimited |
| **Unlimited** | [Maya Mobile](/en/travel/providers/maya/) | $59.99 | 30 days / Unlimited |
**Pick:** For capped data, [eSIM2Fly](/en/travel/providers/esim2fly/) 20GB at $15.60 is the best value. For unlimited, [Yesim](/en/travel/providers/yesim/) at $55.00 is the most affordable 30-day unlimited option. If you are staying longer than a month, consider a local Korean SIM plan instead — see our [guide to Korean SIM plans for foreigners](/en/blog/best-sim-plans-korea-2026/).
**[Compare South Korea eSIM Plans on SimFinder -->](/en/travel/kr/search/)**
---
## eSIM vs Airport SIM vs Pocket WiFi
| Factor | Travel eSIM | Airport SIM Counter | Pocket WiFi Rental |
|--------|-------------|--------------------|--------------------|
| **Price (7 days)** | $2.50 - $23.00 | ~$20 - $35 | $5 - $8/day ($35-56/week) |
| **Setup** | Before departure | At airport counter | Pickup at airport |
| **Wait time** | None | 10-30 min queue | 5-15 min queue |
| **Phone number** | No | Sometimes | No |
| **Tethering** | Yes (all 11 providers) | Depends on plan | Built-in (shared device) |
| **Battery** | Uses phone battery | Uses phone battery | Separate device, needs charging |
| **Return** | Delete eSIM profile | Discard SIM | Return at airport or by mail |
| **Group use** | Tethering only | Per person | 1 device, multiple users |
**Bottom line:** Travel eSIMs win on price, convenience, and flexibility for solo travelers and couples. Pocket WiFi still makes sense for groups of 3+ who want to share one data connection without worrying about tethering limits. Airport SIM counters at Incheon (operated by SKT and [KT](/en/kr/carriers/kt/)) charge premium prices and require passport verification — a travel eSIM avoids all of this.
---
## Setup Guide
Setting up a South Korea travel eSIM takes about 5 minutes. Do this before you leave home.
### Step 1: Purchase
Choose a provider and South Korea plan from the comparison above (or use [SimFinder's search tool](/en/travel/kr/search/)). Complete payment — you will receive a QR code via email or in the provider's app.
### Step 2: Install (At Home, on WiFi)
**iPhone (XR/XS 2018 or later):**
1. Settings --> Cellular --> Add eSIM
2. Scan the QR code
3. Confirm the plan is added (do not activate yet)
**Android (Pixel 3a 2019+, Galaxy S20 2020+, etc.):**
1. Settings --> Network & Internet --> SIMs --> Add SIM
2. Scan the QR code
3. Confirm the plan is added
**Samsung users:** Samsung phones are popular in Korea, but note that carrier-locked Samsung devices sold in Korea may have eSIM restrictions. If you are using a phone purchased outside Korea, eSIM should work without issues.
### Step 3: Activate on Arrival
1. Turn **off** data roaming on your home SIM (to avoid surprise charges)
2. Set the travel eSIM as your **mobile data** line
3. Keep your home SIM as the **default voice line** (for SMS/2FA)
Most South Korea eSIMs auto-activate when they connect to a Korean carrier. You should have data within seconds of clearing immigration at Incheon or Gimpo.
For a detailed step-by-step walkthrough with screenshots, see our [Complete Travel eSIM Guide](/ja/blog/travel-esim-complete-guide-2026/) (Japanese).
---
## Tips and Gotchas
### Naver Maps, Not Google Maps
Google Maps has limited functionality in South Korea due to national security regulations that restrict map data export. Transit directions are incomplete and driving navigation is unreliable. Use **Naver Maps** or **Kakao Maps** instead — both are accurate and widely used by locals. Naver Maps has an English interface option.
### Tethering
All 11 providers support tethering, but unlimited plans and tethering do not always mix well. [Airalo](/en/travel/providers/airalo/)'s unlimited plan throttles to 5 Mbps after 3GB of daily usage — that limit can be hit quickly when tethering a laptop. If you need reliable tethering for work, consider a large capped plan (20-50GB) instead of unlimited. Capped plans typically maintain full speed until the data runs out.
### No Phone Number
Travel eSIMs are data-only. You will not get a Korean phone number. This matters for:
- **Korean app sign-ups** — Some apps (Coupang Eats, local delivery services) require a Korean phone number. Workaround: use international alternatives or WOWPASS for payments
- **Restaurant reservations** — Some online booking systems need a Korean number. Use Naver Place or Google Maps booking instead
- **Emergency calls** — 112 (police) and 119 (fire/ambulance) work from any phone
For voice calls, use KakaoTalk (dominant in Korea), WhatsApp, or FaceTime over your eSIM data connection.
### US Carrier Roaming Comparison
If you are coming from the US, here is how carrier roaming stacks up:
| US Carrier | Korea Roaming | Speed | Price |
|------------|--------------|-------|-------|
| T-Mobile (Magenta) | Included | 256 Kbps (unusable) | Free |
| T-Mobile (Go5G Plus) | Included | 5 Mbps | Free |
| AT&T International Day Pass | Full speed | Full speed | $12/day |
| Verizon TravelPass | Full speed | Full speed | $10/day |
Even T-Mobile's best free roaming (5 Mbps) is slower than what you get on a $4 travel eSIM. AT&T and Verizon's $10-12/day plans cost $70-84 per week — versus $2.50-$23.00 for a travel eSIM covering the same period.
### Network Quality in South Korea
South Korea's three carriers all deliver fast coverage nationwide, including inside subway systems (Seoul Metro has complete underground LTE/5G coverage):
| Carrier | Download Speed | Coverage Score | Best For |
|---------|---------------|----------------|----------|
| [SK Telecom](/en/kr/carriers/skt/) | 200.0 Mbps | 97/100 | Overall reliability, widest reach |
| [KT](/en/kr/carriers/kt/) | 185.5 Mbps | 96/100 | Strong urban/suburban coverage |
| [LG U+](/en/kr/carriers/lguplus/) | 175.2 Mbps | 95/100 | Balanced performance |
*Source: OpenSignal 2025*
Most travel eSIM providers do not disclose which Korean carrier they route through. Independent speed tests by third-party reviewers show [Ubigi](/en/travel/providers/ubigi/) achieving speeds over 350 Mbps in Seoul — suggesting routing through [SK Telecom](/en/kr/carriers/skt/). For general travel covering Seoul, Busan, and Jeju, any carrier provides reliable service.
---
## Frequently Asked Questions
### What is the cheapest eSIM for South Korea?
[eSIM2Fly](/en/travel/providers/esim2fly/) offers the lowest-priced South Korea eSIM at $1.70 for 100MB/7 days. For a more practical amount, their 1GB/7-day plan costs $2.50. Among mainstream providers, [Maya Mobile](/en/travel/providers/maya/) offers 1GB/5 days for $3.99, [Saily](/en/travel/providers/saily/) offers 1GB/7 days for $3.99, and [Nomad](/en/travel/providers/nomad/) and [Ubigi](/en/travel/providers/ubigi/) both offer 1GB/7 days for $4.00.
### Do South Korea eSIMs support tethering (hotspot)?
Yes. All 11 providers tracked by SimFinder support tethering on their South Korea plans. However, heavy tethering on unlimited plans may trigger daily speed caps. [Airalo](/en/travel/providers/airalo/) throttles to 5 Mbps after 3GB/day on its unlimited plan.
### Can I use an eSIM in South Korea without a Korean phone number?
Yes. Travel eSIMs are data-only and do not include a Korean phone number. Use KakaoTalk (the dominant messaging app in Korea), WhatsApp, or FaceTime for voice calls. Your home SIM stays active via dual SIM for SMS-based two-factor authentication.
### Which eSIM provider has the best coverage in South Korea?
Coverage depends on which Korean carrier the eSIM routes through. [SK Telecom](/en/kr/carriers/skt/) has the highest coverage score (97/100) and best download speed (200.0 Mbps). All three Korean carriers provide reliable coverage nationwide, including in subway systems. For standard tourist routes (Seoul, Busan, Jeju), all carriers perform well.
### Should I buy an eSIM before or after arriving in South Korea?
Buy and install before departure. eSIM installation requires WiFi and QR code scanning. Installing at home guarantees you have data the moment you land. Incheon Airport has free WiFi, but it requires registration and can be congested during peak arrival times.
### Is unlimited data worth it for South Korea?
For a 7-day trip, unlimited costs $23.00 ([Nomad](/en/travel/providers/nomad/)/[Yesim](/en/travel/providers/yesim/)) vs. $6.20 for 5GB ([eSIM2Fly](/en/travel/providers/esim2fly/)). If you stream video, use navigation heavily, or tether to a laptop, unlimited prevents data anxiety. For messaging and navigation only, 3-5GB is sufficient and 3-4x cheaper.
### How does a travel eSIM compare to pocket WiFi?
Travel eSIMs cost $2-$23 for a week vs. $35-56 for pocket WiFi rental. eSIMs require no pickup, no return, no charging a second device. Pocket WiFi's only advantage is sharing one connection among a large group without using tethering data from each person's phone.
---
## Key Takeaways
1. **[eSIM2Fly](/en/travel/providers/esim2fly/) is the budget leader** — cheapest at nearly every data tier, from $2.50/1GB to $23.40/50GB. The trade-off is a less polished app compared to [Airalo](/en/travel/providers/airalo/) or [Nomad](/en/travel/providers/nomad/).
2. **For unlimited data, [Nomad](/en/travel/providers/nomad/) and [Yesim](/en/travel/providers/yesim/) tie at $23.00/7 days.** [Maya Mobile](/en/travel/providers/maya/) is the cheapest for 5-day ($14.99) and 10-day ($19.99) unlimited.
3. **Avoid [Airalo](/en/travel/providers/airalo/)'s unlimited plan unless light usage is your intent** — the 5 Mbps throttle after 3GB/day limits video streaming and tethering.
4. **All 11 providers support tethering** and Korean-language support (except [Maya Mobile](/en/travel/providers/maya/)).
5. **South Korea's networks are among the world's fastest.** Even the "slowest" carrier ([LG U+](/en/kr/carriers/lguplus/) at 175 Mbps) outperforms most countries. Do not overthink carrier selection.
6. **Buy before you fly.** Installing an eSIM takes 5 minutes on WiFi at home. There is no reason to wait until you land at Incheon.
7. **Use Naver Maps, not Google Maps.** This is the single most important travel tech tip for South Korea.
**[Find Your South Korea eSIM Plan on SimFinder -->](/en/travel/kr/search/)**
---
*Prices were last verified on March 15-16, 2026, and are sourced from SimFinder's database. Actual prices may vary by currency and promotional offers. Network quality data is from OpenSignal 2025. SimFinder may earn a commission from provider links at no extra cost to you.*
================================================================================
# Best SIM Plans in Australia 2026: 8 Carriers, 25 Plans Compared
URL: https://sim-finder.com/en/blog/best-sim-plans-australia-2026/
Type: blog (en)
Published: 2026-03-19
## TL;DR: Top 3 Picks for Australia
| Best For | Plan | Price/mo | Why |
|---------|-------|------|---------|
| **Budget** | [ALDI Mobile](/en/au/carriers/aldi/) Basic 12GB | $23 | Cheapest plan, [Telstra](/en/au/carriers/telstra/) network, data rollover |
| **Most People** | [Belong](/en/au/carriers/belong/) 100GB | $49 | [Telstra](/en/au/carriers/telstra/) 5G, rollover, best balance of price & coverage |
| **Speed** | [amaysim](/en/au/carriers/amaysim/) 15GB | $30 | [Optus](/en/au/carriers/optus/) 5G (fastest at 145 Mbps), rollover included |
**[Compare All 25 Australian Plans on SimFinder →](/en/au/search/)**
Below, we break down the entire market using real plan data.
## Table of Contents
- [The Australian Mobile Landscape](#the-australian-mobile-landscape-who-owns-what)
- [Price Breakdown: What Every Carrier Charges](#price-breakdown-what-every-carrier-charges)
- [Best Value Plans by Use Case](#best-value-plans-by-use-case)
- [5G and eSIM: What's Available](#5g-and-esim-whats-available)
- [Data Rollover: The Hidden Advantage](#data-rollover-the-hidden-advantage-of-budget-carriers)
- [What Users Say](#what-users-say)
- [Frequently Asked Questions](#frequently-asked-questions)
- [Key Takeaways](#key-takeaways)
---
Australia's mobile market is dominated by three networks — [Telstra](/en/au/carriers/telstra/), [Optus](/en/au/carriers/optus/), and [Vodafone](/en/au/carriers/vodafone/) — but the real value often comes from the carriers that resell their networks at a fraction of the price.
SimFinder's database tracks **8 carriers and 25 plans** in Australia. Every single plan is contract-free, eSIM-compatible, and includes unlimited calls. Prices range from AUD $23/month to $99/month, with dramatic differences in what you get for your money.
This guide breaks down the entire Australian SIM market using actual plan data, network quality scores, and pricing analysis.
---
## The Australian Mobile Landscape: Who Owns What
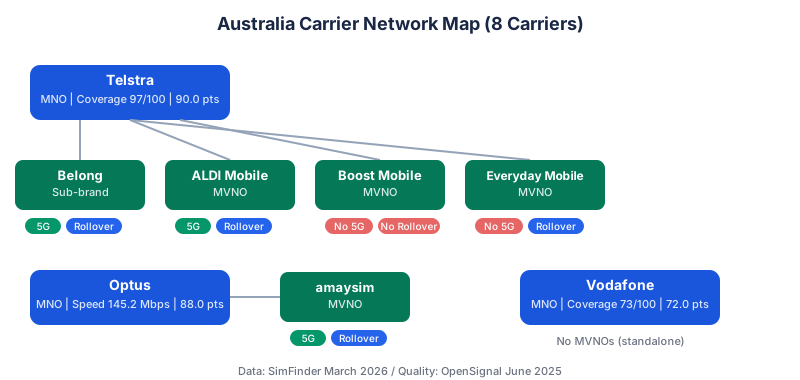 Understanding Australia's mobile market starts with one key fact: there are only **three physical networks**. Every carrier runs on one of these.
| Network Owner | Type | Coverage Score | Overall Score | Carriers Using This Network |
|---|---|---|---|---|
| **[Telstra](/en/au/carriers/telstra/)** | MNO | 97/100 | 90/100 | [Telstra](/en/au/carriers/telstra/), [Belong](/en/au/carriers/belong/), [ALDI Mobile](/en/au/carriers/aldi/), [Boost Mobile](/en/au/carriers/boost/), [Everyday Mobile](/en/au/carriers/woolworths/) |
| **[Optus](/en/au/carriers/optus/)** | MNO | 88/100 | 88/100 | [Optus](/en/au/carriers/optus/), [amaysim](/en/au/carriers/amaysim/) |
| **[Vodafone](/en/au/carriers/vodafone/)** | MNO | 73/100 | 72/100 | Vodafone only |
*Quality data: OpenSignal 2025, measured June 2025*
**[Telstra](/en/au/carriers/telstra/)'s network dominance is clear**: 5 out of 8 carriers run on it. With a coverage score of 97/100, [Telstra](/en/au/carriers/telstra/) is the only carrier that reliably works across Australia's vast rural and regional areas. This matters — Australia is roughly the same size as the contiguous United States, but with just 26 million people.
[Optus](/en/au/carriers/optus/) leads in raw download speed (145.2 Mbps vs [Telstra](/en/au/carriers/telstra/)'s 97.4 Mbps) and has the best latency (20ms). It's a strong choice in metro areas but has gaps in regional coverage.
Vodafone offers the most data per dollar but has the weakest coverage at just 73/100. Unless you live exclusively in a major city, this is a significant trade-off.
---
## Price Breakdown: What Every Carrier Charges
All 25 plans include unlimited voice calls, eSIM support, no contracts, and no cancellation fees. The key variables are price, data, 5G access, and data rollover.
### MNO Plans ([Telstra](/en/au/carriers/telstra/), [Optus](/en/au/carriers/optus/), Vodafone)
| Carrier | Plan | Price/mo | Data | 5G | Rollover |
|---|---|---|---|---|---|
| [Optus](/en/au/carriers/optus/) | Small Choice Plus 50GB | $55 | 50GB | Yes | No |
| Vodafone | Small 65GB | $58 | 65GB | Yes | No |
| [Optus](/en/au/carriers/optus/) | Medium Choice Plus 200GB | $65 | 200GB | Yes | No |
| Vodafone | Medium 220GB | $68 | 220GB | Yes | No |
| [Telstra](/en/au/carriers/telstra/) | Basic 50GB | $74 | 50GB | Yes | No |
| Vodafone | Large 420GB | $78 | 420GB | Yes | No |
| [Telstra](/en/au/carriers/telstra/) | Essential 180GB | $84 | 180GB | Yes | No |
| [Optus](/en/au/carriers/optus/) | Large Choice Plus 400GB | $85 | 400GB | Yes | No |
| [Telstra](/en/au/carriers/telstra/) | Premium 300GB | $99 | 300GB | Yes | No |
### Budget Carriers (Sub-brand + MVNOs)
| Carrier | Network | Plan | Price/mo | Data | 5G | Rollover |
|---|---|---|---|---|---|---|
| [ALDI Mobile](/en/au/carriers/aldi/) | [Telstra](/en/au/carriers/telstra/) | Basic 12GB | $23 | 12GB | No | Yes |
| [Everyday Mobile](/en/au/carriers/woolworths/) | [Telstra](/en/au/carriers/telstra/) | 22GB | $25 | 22GB | No | Yes |
| [ALDI Mobile](/en/au/carriers/aldi/) | [Telstra](/en/au/carriers/telstra/) | 5G 29GB | $29 | 29GB | Yes | Yes |
| [amaysim](/en/au/carriers/amaysim/) | [Optus](/en/au/carriers/optus/) | Unlimited 15GB | $30 | 15GB | Yes | Yes |
| [Everyday Mobile](/en/au/carriers/woolworths/) | [Telstra](/en/au/carriers/telstra/) | 30GB | $30 | 30GB | No | Yes |
| [Belong](/en/au/carriers/belong/) | [Telstra](/en/au/carriers/telstra/) | 25GB | $34 | 25GB | Yes | Yes |
| [Everyday Mobile](/en/au/carriers/woolworths/) | [Telstra](/en/au/carriers/telstra/) | 50GB | $35 | 50GB | No | Yes |
| [Boost Mobile](/en/au/carriers/boost/) | [Telstra](/en/au/carriers/telstra/) | 30GB | $39 | 30GB | No | No |
| [Belong](/en/au/carriers/belong/) | [Telstra](/en/au/carriers/telstra/) | 40GB | $39 | 40GB | Yes | Yes |
| [ALDI Mobile](/en/au/carriers/aldi/) | [Telstra](/en/au/carriers/telstra/) | 5G 75GB | $39 | 75GB | Yes | Yes |
| [amaysim](/en/au/carriers/amaysim/) | [Optus](/en/au/carriers/optus/) | Unlimited 80GB | $40 | 80GB | Yes | Yes |
| [Belong](/en/au/carriers/belong/) | [Telstra](/en/au/carriers/telstra/) | 100GB | $49 | 100GB | Yes | Yes |
| [amaysim](/en/au/carriers/amaysim/) | [Optus](/en/au/carriers/optus/) | Unlimited 120GB | $50 | 120GB | Yes | Yes |
| [Boost Mobile](/en/au/carriers/boost/) | [Telstra](/en/au/carriers/telstra/) | 45GB | $59 | 45GB | No | No |
| [Belong](/en/au/carriers/belong/) | [Telstra](/en/au/carriers/telstra/) | 160GB | $59 | 160GB | Yes | Yes |
| [Boost Mobile](/en/au/carriers/boost/) | [Telstra](/en/au/carriers/telstra/) | 100GB | $74 | 100GB | No | No |
A clear pattern: **budget carriers undercut MNOs by 30-55%** for comparable data. [Belong](/en/au/carriers/belong/) offers 100GB on [Telstra](/en/au/carriers/telstra/)'s 5G network for $49 — [Telstra](/en/au/carriers/telstra/)'s own 50GB plan costs $74.
---
## Best Value Plans by Use Case
### Lightest Use (Under $30/month)
**[ALDI Mobile](/en/au/carriers/aldi/) $23 12GB** — The cheapest plan in Australia. Runs on [Telstra](/en/au/carriers/telstra/)'s network, includes data rollover, and supports eSIM. No 5G, but at this price point that's a reasonable trade-off. For anyone who mainly uses WiFi and needs a basic mobile plan, this is hard to beat.
**[Everyday Mobile](/en/au/carriers/woolworths/) $25 22GB** — Just $2 more than ALDI, with almost double the data. Also on [Telstra](/en/au/carriers/telstra/)'s network with data rollover. No 5G.
### Best Balance of Price and Features
**[amaysim](/en/au/carriers/amaysim/) $30 15GB** — Runs on the [Optus](/en/au/carriers/optus/) network (145.2 Mbps download, 88/100 overall), with 5G, eSIM, and data rollover included. Its continuing data allowance dropped to 15GB once the introductory promo ended, so [ALDI Mobile](/en/au/carriers/aldi/)'s 5G 29GB at $29 now offers more data for less — amaysim is worth it mainly if you specifically want Optus's faster network over Telstra's coverage.
**[Belong](/en/au/carriers/belong/) $39 40GB** — If you need [Telstra](/en/au/carriers/telstra/)'s coverage (97/100), [Belong](/en/au/carriers/belong/) is the way in. 5G, eSIM, and data rollover included. [Belong](/en/au/carriers/belong/) is [Telstra](/en/au/carriers/telstra/)'s own sub-brand, so you're getting the same network for almost half the price.
### Heavy Data Users
**[Belong](/en/au/carriers/belong/) $59 160GB** — 160GB on [Telstra](/en/au/carriers/telstra/)'s 5G network for $59 is exceptional value. That's still less than [Telstra](/en/au/carriers/telstra/)'s own Basic 50GB plan ($74). Data rollover means unused gigabytes carry over to the next month.
**Vodafone Large $78 420GB** — The best raw data-per-dollar ratio in the market at 5.38 GB per dollar. If you're in a metro area where Vodafone's coverage is strong, 420GB at $78 is nearly impossible to match.
### The "Don't Think About It" Option
**[Belong](/en/au/carriers/belong/) $49 100GB** — For most people, 100GB is more than enough. On [Telstra](/en/au/carriers/telstra/)'s 5G network with data rollover, this plan hits the sweet spot of coverage, data, speed, and price. It's the plan SimFinder's data suggests works for the widest range of users.
---
## 5G and eSIM: What's Available
### eSIM
All 25 plans in Australia support eSIM — a 100% adoption rate. This is unusually high globally. If you're arriving in Australia and your phone supports eSIM, you can activate a plan before you even land.
### 5G
18 of 25 plans (72%) include 5G access. The exceptions:
| Carrier | 5G Status | Notes |
|---|---|---|
| [ALDI Mobile](/en/au/carriers/aldi/) (12GB plan) | 4G only | Budget tier; 5G on $29+ plans |
| [Boost Mobile](/en/au/carriers/boost/) (all plans) | 4G only | No 5G on any tier — a notable gap |
| [Everyday Mobile](/en/au/carriers/woolworths/) (all plans) | 4G only | No 5G on any tier |
[Boost Mobile](/en/au/carriers/boost/)'s lack of 5G on any plan is a significant disadvantage in 2026, especially given it runs on the same [Telstra](/en/au/carriers/telstra/) network that other MVNOs use with 5G enabled.
---
## Data Rollover: The Hidden Advantage of Budget Carriers
One pattern stands out in the data: **every budget carrier offers data rollover, but no MNO does**.
| Has Data Rollover | Carriers |
|---|---|
| **Yes** | [Belong](/en/au/carriers/belong/), [ALDI Mobile](/en/au/carriers/aldi/), [Everyday Mobile](/en/au/carriers/woolworths/), [amaysim](/en/au/carriers/amaysim/) |
| **No** | [Telstra](/en/au/carriers/telstra/), [Optus](/en/au/carriers/optus/), Vodafone, [Boost Mobile](/en/au/carriers/boost/) |
If your data usage varies month to month, a plan with rollover can be worth significantly more than its sticker price. A $39 [Belong](/en/au/carriers/belong/) 40GB plan with rollover could effectively give you 60-80GB in a heavy month if you had a light month before.
[Boost Mobile](/en/au/carriers/boost/) is the exception among budget carriers — no rollover and no 5G, making it the weakest value among [Telstra](/en/au/carriers/telstra/)-network resellers.
---
## Compare Plans on SimFinder
The data in this guide comes from SimFinder's database, which tracks 25 Australian plans across 8 carriers. If you want to filter by price, data, 5G, or eSIM, use the comparison tool to find your best match.
**[Compare Australian SIM Plans →](/en/au/search/)**
---
## What Users Say
Real experiences from people using Australian SIMs.
> "How can I easily get an Australian phone number? SIM card when I land there? — Needed an Australian number for a Woolworths account, which was a catch-22 before arrival."
> — @APurpleLifeBlog ([original post](https://x.com/APurpleLifeBlog/status/1638271331765571584))
*Individual experiences may vary based on location and network conditions.*
---
## Frequently Asked Questions
### Can I use an Australian SIM without a long-term contract?
Yes. All 25 plans tracked by SimFinder are contract-free with no cancellation fees. This is standard in Australia's prepaid/SIM-only market. You can switch carriers at any time.
### Which network should I choose for regional or rural areas?
[Telstra](/en/au/carriers/telstra/), without question. Its coverage score of 97/100 is far ahead of [Optus](/en/au/carriers/optus/) (88) and Vodafone (73). If you travel outside major cities, choose [Telstra](/en/au/carriers/telstra/) directly or a carrier on its network: [Belong](/en/au/carriers/belong/), [ALDI Mobile](/en/au/carriers/aldi/), [Boost Mobile](/en/au/carriers/boost/), or [Everyday Mobile](/en/au/carriers/woolworths/).
### Is 5G worth paying extra for in Australia?
In most cases, no — because the cheapest 5G plans are actually MVNOs. [ALDI Mobile](/en/au/carriers/aldi/) offers 5G 29GB for just $29/month, and [amaysim](/en/au/carriers/amaysim/) offers 5G 15GB for $30. You don't need to pay MNO prices for 5G access.
### What's the best SIM for a working holiday or backpacking trip?
For most backpackers, **[Belong](/en/au/carriers/belong/) $39 40GB** offers the best combination: [Telstra](/en/au/carriers/telstra/)'s regional coverage (essential if you're traveling beyond cities), 5G, eSIM, data rollover, and no contract. If you need less data, [ALDI Mobile](/en/au/carriers/aldi/)'s $23 12GB plan is the budget option with [Telstra](/en/au/carriers/telstra/) coverage.
### Do all plans support eSIM?
Yes. Every plan in SimFinder's Australian database supports eSIM. This is universal across all 8 carriers as of March 2026.
---
## Key Takeaways
The Australian SIM market in 2026:
- **8 carriers, 25 plans**, all contract-free with unlimited calls and eSIM support
- **Three networks matter**: [Telstra](/en/au/carriers/telstra/) (coverage king, 97/100), [Optus](/en/au/carriers/optus/) (speed king, 145.2 Mbps), Vodafone (value king, but 73/100 coverage)
- **Budget carriers save 30-55%**: [Belong](/en/au/carriers/belong/) 100GB on [Telstra](/en/au/carriers/telstra/) costs $49 vs [Telstra](/en/au/carriers/telstra/)'s own 50GB at $74
- **Data rollover is exclusive to budget carriers** — every MVNO and sub-brand offers it, no MNO does
- **5G is near-universal** (72% of plans), with [Boost Mobile](/en/au/carriers/boost/) as the notable exception
- **Price range**: $23/mo (ALDI 12GB) to $99/mo ([Telstra](/en/au/carriers/telstra/) Premium 300GB)
For most users, the best strategy is to pick the network you need first ([Telstra](/en/au/carriers/telstra/) for coverage, [Optus](/en/au/carriers/optus/) for speed), then find the cheapest carrier on that network.
**[Find Your Best Australian SIM Plan →](/en/au/search/)**
---
*Plan data is current as of July 2026. Prices and inclusions may change. Check carrier websites for the latest information.*
*Compare all plans side by side using [SimFinder's comparison tool](/en/au/search/).*
================================================================================
# Best SIM Plans in France 2026: From €2 to €47 Compared
URL: https://sim-finder.com/en/blog/best-sim-plans-france-2026/
Type: blog (en)
Published: 2026-03-20
## TL;DR: Top 3 Picks for France
| Best For | Plan | Price/mo | Why |
|---------|-------|------|---------|
| **Budget** | [Free Mobile](/en/fr/carriers/free/) Forfait 2€ | €2.00 | Cheapest plan in France, unlimited calls, 50MB data |
| **Most People** | [B&You](/en/fr/carriers/byou/) Forfait 100 Go 5G | €9.99 | 100GB 5G, no contract, eSIM, Bouygues network (83/100) |
| **Power User** | [Free Mobile](/en/fr/carriers/free/) 5G Illimite | €9.99 | Unlimited 5G data, no contract, eSIM |
**[Compare All 22 French Plans on SimFinder →](/en/fr/search/)**
Below, we break down the entire market using real plan data.
## Table of Contents
- [The French Mobile Landscape](#the-french-mobile-landscape-4-mnos-3-sub-brands)
- [Carrier Structure: Who Owns What](#carrier-structure-who-owns-what)
- [Price Breakdown: All 22 Plans Compared](#price-breakdown-all-22-plans-compared)
- [Best Value Plans by Use Case](#best-value-plans-by-use-case)
- [5G and eSIM Availability](#5g-and-esim-availability)
- [Frequently Asked Questions](#frequently-asked-questions)
- [Key Takeaways](#key-takeaways)
---
France has one of the most competitive mobile markets in Europe. Four network operators — [Orange](/en/fr/carriers/orange/), [SFR](/en/fr/carriers/sfr/), [Bouygues Telecom](/en/fr/carriers/bouygues/), and [Free Mobile](/en/fr/carriers/free/) — compete aggressively, and three of them also operate budget sub-brands that undercut their own premium offerings.
SimFinder's database tracks **7 carriers and 22 plans** in France. Prices range from just **€2/month** to **€46.99/month**, with 95% eSIM support and 77% offering 5G. Almost every plan includes unlimited voice calls.
This guide breaks down the entire French SIM market using actual plan data, network quality scores, and pricing analysis.
---
## The French Mobile Landscape: 4 MNOs, 3 Sub-brands
Understanding Australia's mobile market starts with one key fact: there are only **three physical networks**. Every carrier runs on one of these.
| Network Owner | Type | Coverage Score | Overall Score | Carriers Using This Network |
|---|---|---|---|---|
| **[Telstra](/en/au/carriers/telstra/)** | MNO | 97/100 | 90/100 | [Telstra](/en/au/carriers/telstra/), [Belong](/en/au/carriers/belong/), [ALDI Mobile](/en/au/carriers/aldi/), [Boost Mobile](/en/au/carriers/boost/), [Everyday Mobile](/en/au/carriers/woolworths/) |
| **[Optus](/en/au/carriers/optus/)** | MNO | 88/100 | 88/100 | [Optus](/en/au/carriers/optus/), [amaysim](/en/au/carriers/amaysim/) |
| **[Vodafone](/en/au/carriers/vodafone/)** | MNO | 73/100 | 72/100 | Vodafone only |
*Quality data: OpenSignal 2025, measured June 2025*
**[Telstra](/en/au/carriers/telstra/)'s network dominance is clear**: 5 out of 8 carriers run on it. With a coverage score of 97/100, [Telstra](/en/au/carriers/telstra/) is the only carrier that reliably works across Australia's vast rural and regional areas. This matters — Australia is roughly the same size as the contiguous United States, but with just 26 million people.
[Optus](/en/au/carriers/optus/) leads in raw download speed (145.2 Mbps vs [Telstra](/en/au/carriers/telstra/)'s 97.4 Mbps) and has the best latency (20ms). It's a strong choice in metro areas but has gaps in regional coverage.
Vodafone offers the most data per dollar but has the weakest coverage at just 73/100. Unless you live exclusively in a major city, this is a significant trade-off.
---
## Price Breakdown: What Every Carrier Charges
All 25 plans include unlimited voice calls, eSIM support, no contracts, and no cancellation fees. The key variables are price, data, 5G access, and data rollover.
### MNO Plans ([Telstra](/en/au/carriers/telstra/), [Optus](/en/au/carriers/optus/), Vodafone)
| Carrier | Plan | Price/mo | Data | 5G | Rollover |
|---|---|---|---|---|---|
| [Optus](/en/au/carriers/optus/) | Small Choice Plus 50GB | $55 | 50GB | Yes | No |
| Vodafone | Small 65GB | $58 | 65GB | Yes | No |
| [Optus](/en/au/carriers/optus/) | Medium Choice Plus 200GB | $65 | 200GB | Yes | No |
| Vodafone | Medium 220GB | $68 | 220GB | Yes | No |
| [Telstra](/en/au/carriers/telstra/) | Basic 50GB | $74 | 50GB | Yes | No |
| Vodafone | Large 420GB | $78 | 420GB | Yes | No |
| [Telstra](/en/au/carriers/telstra/) | Essential 180GB | $84 | 180GB | Yes | No |
| [Optus](/en/au/carriers/optus/) | Large Choice Plus 400GB | $85 | 400GB | Yes | No |
| [Telstra](/en/au/carriers/telstra/) | Premium 300GB | $99 | 300GB | Yes | No |
### Budget Carriers (Sub-brand + MVNOs)
| Carrier | Network | Plan | Price/mo | Data | 5G | Rollover |
|---|---|---|---|---|---|---|
| [ALDI Mobile](/en/au/carriers/aldi/) | [Telstra](/en/au/carriers/telstra/) | Basic 12GB | $23 | 12GB | No | Yes |
| [Everyday Mobile](/en/au/carriers/woolworths/) | [Telstra](/en/au/carriers/telstra/) | 22GB | $25 | 22GB | No | Yes |
| [ALDI Mobile](/en/au/carriers/aldi/) | [Telstra](/en/au/carriers/telstra/) | 5G 29GB | $29 | 29GB | Yes | Yes |
| [amaysim](/en/au/carriers/amaysim/) | [Optus](/en/au/carriers/optus/) | Unlimited 15GB | $30 | 15GB | Yes | Yes |
| [Everyday Mobile](/en/au/carriers/woolworths/) | [Telstra](/en/au/carriers/telstra/) | 30GB | $30 | 30GB | No | Yes |
| [Belong](/en/au/carriers/belong/) | [Telstra](/en/au/carriers/telstra/) | 25GB | $34 | 25GB | Yes | Yes |
| [Everyday Mobile](/en/au/carriers/woolworths/) | [Telstra](/en/au/carriers/telstra/) | 50GB | $35 | 50GB | No | Yes |
| [Boost Mobile](/en/au/carriers/boost/) | [Telstra](/en/au/carriers/telstra/) | 30GB | $39 | 30GB | No | No |
| [Belong](/en/au/carriers/belong/) | [Telstra](/en/au/carriers/telstra/) | 40GB | $39 | 40GB | Yes | Yes |
| [ALDI Mobile](/en/au/carriers/aldi/) | [Telstra](/en/au/carriers/telstra/) | 5G 75GB | $39 | 75GB | Yes | Yes |
| [amaysim](/en/au/carriers/amaysim/) | [Optus](/en/au/carriers/optus/) | Unlimited 80GB | $40 | 80GB | Yes | Yes |
| [Belong](/en/au/carriers/belong/) | [Telstra](/en/au/carriers/telstra/) | 100GB | $49 | 100GB | Yes | Yes |
| [amaysim](/en/au/carriers/amaysim/) | [Optus](/en/au/carriers/optus/) | Unlimited 120GB | $50 | 120GB | Yes | Yes |
| [Boost Mobile](/en/au/carriers/boost/) | [Telstra](/en/au/carriers/telstra/) | 45GB | $59 | 45GB | No | No |
| [Belong](/en/au/carriers/belong/) | [Telstra](/en/au/carriers/telstra/) | 160GB | $59 | 160GB | Yes | Yes |
| [Boost Mobile](/en/au/carriers/boost/) | [Telstra](/en/au/carriers/telstra/) | 100GB | $74 | 100GB | No | No |
A clear pattern: **budget carriers undercut MNOs by 30-55%** for comparable data. [Belong](/en/au/carriers/belong/) offers 100GB on [Telstra](/en/au/carriers/telstra/)'s 5G network for $49 — [Telstra](/en/au/carriers/telstra/)'s own 50GB plan costs $74.
---
## Best Value Plans by Use Case
### Lightest Use (Under $30/month)
**[ALDI Mobile](/en/au/carriers/aldi/) $23 12GB** — The cheapest plan in Australia. Runs on [Telstra](/en/au/carriers/telstra/)'s network, includes data rollover, and supports eSIM. No 5G, but at this price point that's a reasonable trade-off. For anyone who mainly uses WiFi and needs a basic mobile plan, this is hard to beat.
**[Everyday Mobile](/en/au/carriers/woolworths/) $25 22GB** — Just $2 more than ALDI, with almost double the data. Also on [Telstra](/en/au/carriers/telstra/)'s network with data rollover. No 5G.
### Best Balance of Price and Features
**[amaysim](/en/au/carriers/amaysim/) $30 15GB** — Runs on the [Optus](/en/au/carriers/optus/) network (145.2 Mbps download, 88/100 overall), with 5G, eSIM, and data rollover included. Its continuing data allowance dropped to 15GB once the introductory promo ended, so [ALDI Mobile](/en/au/carriers/aldi/)'s 5G 29GB at $29 now offers more data for less — amaysim is worth it mainly if you specifically want Optus's faster network over Telstra's coverage.
**[Belong](/en/au/carriers/belong/) $39 40GB** — If you need [Telstra](/en/au/carriers/telstra/)'s coverage (97/100), [Belong](/en/au/carriers/belong/) is the way in. 5G, eSIM, and data rollover included. [Belong](/en/au/carriers/belong/) is [Telstra](/en/au/carriers/telstra/)'s own sub-brand, so you're getting the same network for almost half the price.
### Heavy Data Users
**[Belong](/en/au/carriers/belong/) $59 160GB** — 160GB on [Telstra](/en/au/carriers/telstra/)'s 5G network for $59 is exceptional value. That's still less than [Telstra](/en/au/carriers/telstra/)'s own Basic 50GB plan ($74). Data rollover means unused gigabytes carry over to the next month.
**Vodafone Large $78 420GB** — The best raw data-per-dollar ratio in the market at 5.38 GB per dollar. If you're in a metro area where Vodafone's coverage is strong, 420GB at $78 is nearly impossible to match.
### The "Don't Think About It" Option
**[Belong](/en/au/carriers/belong/) $49 100GB** — For most people, 100GB is more than enough. On [Telstra](/en/au/carriers/telstra/)'s 5G network with data rollover, this plan hits the sweet spot of coverage, data, speed, and price. It's the plan SimFinder's data suggests works for the widest range of users.
---
## 5G and eSIM: What's Available
### eSIM
All 25 plans in Australia support eSIM — a 100% adoption rate. This is unusually high globally. If you're arriving in Australia and your phone supports eSIM, you can activate a plan before you even land.
### 5G
18 of 25 plans (72%) include 5G access. The exceptions:
| Carrier | 5G Status | Notes |
|---|---|---|
| [ALDI Mobile](/en/au/carriers/aldi/) (12GB plan) | 4G only | Budget tier; 5G on $29+ plans |
| [Boost Mobile](/en/au/carriers/boost/) (all plans) | 4G only | No 5G on any tier — a notable gap |
| [Everyday Mobile](/en/au/carriers/woolworths/) (all plans) | 4G only | No 5G on any tier |
[Boost Mobile](/en/au/carriers/boost/)'s lack of 5G on any plan is a significant disadvantage in 2026, especially given it runs on the same [Telstra](/en/au/carriers/telstra/) network that other MVNOs use with 5G enabled.
---
## Data Rollover: The Hidden Advantage of Budget Carriers
One pattern stands out in the data: **every budget carrier offers data rollover, but no MNO does**.
| Has Data Rollover | Carriers |
|---|---|
| **Yes** | [Belong](/en/au/carriers/belong/), [ALDI Mobile](/en/au/carriers/aldi/), [Everyday Mobile](/en/au/carriers/woolworths/), [amaysim](/en/au/carriers/amaysim/) |
| **No** | [Telstra](/en/au/carriers/telstra/), [Optus](/en/au/carriers/optus/), Vodafone, [Boost Mobile](/en/au/carriers/boost/) |
If your data usage varies month to month, a plan with rollover can be worth significantly more than its sticker price. A $39 [Belong](/en/au/carriers/belong/) 40GB plan with rollover could effectively give you 60-80GB in a heavy month if you had a light month before.
[Boost Mobile](/en/au/carriers/boost/) is the exception among budget carriers — no rollover and no 5G, making it the weakest value among [Telstra](/en/au/carriers/telstra/)-network resellers.
---
## Compare Plans on SimFinder
The data in this guide comes from SimFinder's database, which tracks 25 Australian plans across 8 carriers. If you want to filter by price, data, 5G, or eSIM, use the comparison tool to find your best match.
**[Compare Australian SIM Plans →](/en/au/search/)**
---
## What Users Say
Real experiences from people using Australian SIMs.
> "How can I easily get an Australian phone number? SIM card when I land there? — Needed an Australian number for a Woolworths account, which was a catch-22 before arrival."
> — @APurpleLifeBlog ([original post](https://x.com/APurpleLifeBlog/status/1638271331765571584))
*Individual experiences may vary based on location and network conditions.*
---
## Frequently Asked Questions
### Can I use an Australian SIM without a long-term contract?
Yes. All 25 plans tracked by SimFinder are contract-free with no cancellation fees. This is standard in Australia's prepaid/SIM-only market. You can switch carriers at any time.
### Which network should I choose for regional or rural areas?
[Telstra](/en/au/carriers/telstra/), without question. Its coverage score of 97/100 is far ahead of [Optus](/en/au/carriers/optus/) (88) and Vodafone (73). If you travel outside major cities, choose [Telstra](/en/au/carriers/telstra/) directly or a carrier on its network: [Belong](/en/au/carriers/belong/), [ALDI Mobile](/en/au/carriers/aldi/), [Boost Mobile](/en/au/carriers/boost/), or [Everyday Mobile](/en/au/carriers/woolworths/).
### Is 5G worth paying extra for in Australia?
In most cases, no — because the cheapest 5G plans are actually MVNOs. [ALDI Mobile](/en/au/carriers/aldi/) offers 5G 29GB for just $29/month, and [amaysim](/en/au/carriers/amaysim/) offers 5G 15GB for $30. You don't need to pay MNO prices for 5G access.
### What's the best SIM for a working holiday or backpacking trip?
For most backpackers, **[Belong](/en/au/carriers/belong/) $39 40GB** offers the best combination: [Telstra](/en/au/carriers/telstra/)'s regional coverage (essential if you're traveling beyond cities), 5G, eSIM, data rollover, and no contract. If you need less data, [ALDI Mobile](/en/au/carriers/aldi/)'s $23 12GB plan is the budget option with [Telstra](/en/au/carriers/telstra/) coverage.
### Do all plans support eSIM?
Yes. Every plan in SimFinder's Australian database supports eSIM. This is universal across all 8 carriers as of March 2026.
---
## Key Takeaways
The Australian SIM market in 2026:
- **8 carriers, 25 plans**, all contract-free with unlimited calls and eSIM support
- **Three networks matter**: [Telstra](/en/au/carriers/telstra/) (coverage king, 97/100), [Optus](/en/au/carriers/optus/) (speed king, 145.2 Mbps), Vodafone (value king, but 73/100 coverage)
- **Budget carriers save 30-55%**: [Belong](/en/au/carriers/belong/) 100GB on [Telstra](/en/au/carriers/telstra/) costs $49 vs [Telstra](/en/au/carriers/telstra/)'s own 50GB at $74
- **Data rollover is exclusive to budget carriers** — every MVNO and sub-brand offers it, no MNO does
- **5G is near-universal** (72% of plans), with [Boost Mobile](/en/au/carriers/boost/) as the notable exception
- **Price range**: $23/mo (ALDI 12GB) to $99/mo ([Telstra](/en/au/carriers/telstra/) Premium 300GB)
For most users, the best strategy is to pick the network you need first ([Telstra](/en/au/carriers/telstra/) for coverage, [Optus](/en/au/carriers/optus/) for speed), then find the cheapest carrier on that network.
**[Find Your Best Australian SIM Plan →](/en/au/search/)**
---
*Plan data is current as of July 2026. Prices and inclusions may change. Check carrier websites for the latest information.*
*Compare all plans side by side using [SimFinder's comparison tool](/en/au/search/).*
================================================================================
# Best SIM Plans in France 2026: From €2 to €47 Compared
URL: https://sim-finder.com/en/blog/best-sim-plans-france-2026/
Type: blog (en)
Published: 2026-03-20
## TL;DR: Top 3 Picks for France
| Best For | Plan | Price/mo | Why |
|---------|-------|------|---------|
| **Budget** | [Free Mobile](/en/fr/carriers/free/) Forfait 2€ | €2.00 | Cheapest plan in France, unlimited calls, 50MB data |
| **Most People** | [B&You](/en/fr/carriers/byou/) Forfait 100 Go 5G | €9.99 | 100GB 5G, no contract, eSIM, Bouygues network (83/100) |
| **Power User** | [Free Mobile](/en/fr/carriers/free/) 5G Illimite | €9.99 | Unlimited 5G data, no contract, eSIM |
**[Compare All 22 French Plans on SimFinder →](/en/fr/search/)**
Below, we break down the entire market using real plan data.
## Table of Contents
- [The French Mobile Landscape](#the-french-mobile-landscape-4-mnos-3-sub-brands)
- [Carrier Structure: Who Owns What](#carrier-structure-who-owns-what)
- [Price Breakdown: All 22 Plans Compared](#price-breakdown-all-22-plans-compared)
- [Best Value Plans by Use Case](#best-value-plans-by-use-case)
- [5G and eSIM Availability](#5g-and-esim-availability)
- [Frequently Asked Questions](#frequently-asked-questions)
- [Key Takeaways](#key-takeaways)
---
France has one of the most competitive mobile markets in Europe. Four network operators — [Orange](/en/fr/carriers/orange/), [SFR](/en/fr/carriers/sfr/), [Bouygues Telecom](/en/fr/carriers/bouygues/), and [Free Mobile](/en/fr/carriers/free/) — compete aggressively, and three of them also operate budget sub-brands that undercut their own premium offerings.
SimFinder's database tracks **7 carriers and 22 plans** in France. Prices range from just **€2/month** to **€46.99/month**, with 95% eSIM support and 77% offering 5G. Almost every plan includes unlimited voice calls.
This guide breaks down the entire French SIM market using actual plan data, network quality scores, and pricing analysis.
---
## The French Mobile Landscape: 4 MNOs, 3 Sub-brands
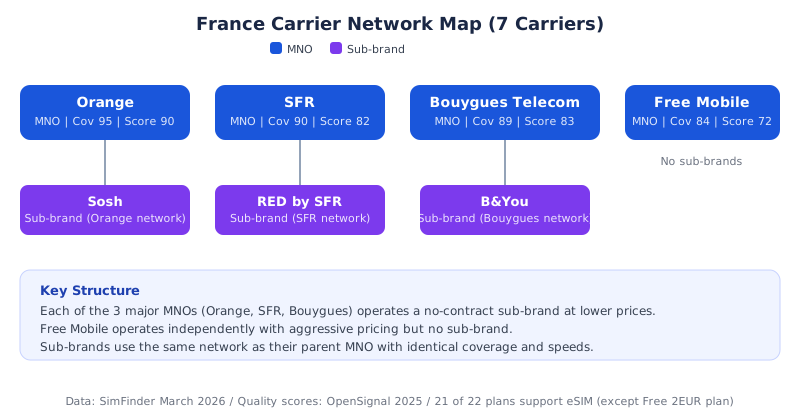 France's mobile market is structured around **four physical networks**. Three of the four MNOs operate no-contract sub-brands that run on the same infrastructure at lower prices.
| Network Owner | Type | Coverage | Overall Score | Sub-brand |
|---|---|---|---|---|
| **[Orange](/en/fr/carriers/orange/)** | MNO | 95/100 | 90/100 | [Sosh](/en/fr/carriers/sosh/) |
| **[Bouygues Telecom](/en/fr/carriers/bouygues/)** | MNO | 89/100 | 83/100 | [B&You](/en/fr/carriers/byou/) |
| **[SFR](/en/fr/carriers/sfr/)** | MNO | 90/100 | 82/100 | [RED by SFR](/en/fr/carriers/red/) |
| **[Free Mobile](/en/fr/carriers/free/)** | MNO | 84/100 | 72/100 | None |
*Quality data: OpenSignal 2025, measured November 2025*
**[Orange](/en/fr/carriers/orange/) leads in overall quality** with 90/100, the fastest download speeds (165.2 Mbps), and the best coverage (95/100). It is the network of choice for anyone who needs reliable connectivity across metropolitan and rural France alike.
**[SFR](/en/fr/carriers/sfr/) and [Bouygues Telecom](/en/fr/carriers/bouygues/)** are close competitors. [SFR](/en/fr/carriers/sfr/) edges ahead in coverage (90 vs 89) while Bouygues has a slightly higher overall score (83 vs 82). In practice, the difference between these two is marginal for most users.
**[Free Mobile](/en/fr/carriers/free/)** is the disruptor. With the lowest quality score (72/100) and the weakest coverage (84/100), it trades network quality for aggressive pricing. Its unlimited 5G plan at €9.99/month is unmatched anywhere else in Europe.
---
## Carrier Structure: Who Owns What
Understanding the MNO/sub-brand relationship is the key to getting the best value in France.
### MNOs vs Sub-brands
The three sub-brands — **[Sosh](/en/fr/carriers/sosh/)**, **RED by [SFR](/en/fr/carriers/sfr/)**, and **[B&You](/en/fr/carriers/byou/)** — use the exact same network infrastructure as their parent MNOs. The coverage and speeds are identical. What differs is:
- **No contract** — Sub-brand plans are all no-commitment (*sans engagement*)
- **Lower price** — Typically 30-60% cheaper than the parent MNO for equivalent data
- **Self-service** — Support is primarily online, no in-store assistance
- **No bundled phone** — SIM-only plans; buy your phone separately
For example, [B&You](/en/fr/carriers/byou/) offers 100GB 5G for €9.99/month on the Bouygues network. [Bouygues Telecom](/en/fr/carriers/bouygues/)'s own entry-level plan, Confort 130Go 5G, costs €19.99/month sans engagement — exactly double the price for 30GB more data on the same network.
### [Free Mobile](/en/fr/carriers/free/): The Odd One Out
[Free Mobile](/en/fr/carriers/free/) does not operate a sub-brand because it already *is* the low-cost option. It launched in 2012 with the explicit goal of disrupting French mobile pricing, and it succeeded. Its €2/month and €9.99/month plans reset price expectations across the entire market.
---
## Price Breakdown: All 22 Plans Compared
### Sub-brand Plans (No Contract)
| Carrier | Network | Plan | Price/mo | Data | 5G | eSIM |
|---|---|---|---|---|---|---|
| [B&You](/en/fr/carriers/byou/) | Bouygues | 5 Go | €6.99 | 5GB | No | Yes |
| [B&You](/en/fr/carriers/byou/) | Bouygues | 100 Go 5G | €9.99 | 100GB | Yes | Yes |
| [Sosh](/en/fr/carriers/sosh/) | [Orange](/en/fr/carriers/orange/) | 60 Go | €9.99 | 60GB | No | Yes |
| RED by [SFR](/en/fr/carriers/sfr/) | [SFR](/en/fr/carriers/sfr/) | 100 Go 5G | €11.99 | 100GB | Yes | Yes |
| [Sosh](/en/fr/carriers/sosh/) | [Orange](/en/fr/carriers/orange/) | 100 Go 5G | €12.99 | 100GB | Yes | Yes |
| [B&You](/en/fr/carriers/byou/) | Bouygues | 200 Go 5G | €13.99 | 200GB | Yes | Yes |
### [Free Mobile](/en/fr/carriers/free/) Plans (No Contract)
| Carrier | Plan | Price/mo | Data | 5G | eSIM |
|---|---|---|---|---|---|
| [Free Mobile](/en/fr/carriers/free/) | Forfait 2€ | €2.00 | 50MB | No | No |
| [Free Mobile](/en/fr/carriers/free/) | Série Free 110 Go 5G | €9.99 | 110GB | Yes | Yes |
| [Free Mobile](/en/fr/carriers/free/) | Forfait Free 5G Illimite | €9.99 | Unlimited | Yes | Yes |
| [Free Mobile](/en/fr/carriers/free/) | Forfait Free 350 Go 5G+ | €19.99 | 350GB | Yes | Yes |
### MNO Plans
| Carrier | Plan | Price/mo | Data | 5G | Contract | eSIM |
|---|---|---|---|---|---|---|
| [SFR](/en/fr/carriers/sfr/) | 1 Go 5G | €5.99 | 1GB | Yes | No | Yes |
| [Orange](/en/fr/carriers/orange/) | 5 Go | €9.99 | 5GB | No | No | Yes |
| [SFR](/en/fr/carriers/sfr/) | 20 Go 5G | €15.99 | 20GB | Yes | No | Yes |
| [Orange](/en/fr/carriers/orange/) | 20 Go | €17.99 | 20GB | No | No | Yes |
| [SFR](/en/fr/carriers/sfr/) | 80 Go 5G | €17.99 | 80GB | Yes | No | Yes |
| [SFR](/en/fr/carriers/sfr/) | 200 Go 5G | €19.99 | 200GB | Yes | No | Yes |
| Bouygues | Confort 130 Go 5G | €19.99 | 130GB | Yes | No | Yes |
| [Orange](/en/fr/carriers/orange/) | Série Spéciale 130 Go 5G | €20.99 | 130GB | Yes | No | Yes |
| [SFR](/en/fr/carriers/sfr/) | 250 Go 5G+ | €26.99 | 250GB | Yes | No | Yes |
| [Orange](/en/fr/carriers/orange/) | Illimite 5G | €34.99 | Unlimited | Yes | 24 mo | Yes |
| [SFR](/en/fr/carriers/sfr/) | Illimite 5G+ | €39.99 | Unlimited | Yes | 24 mo | Yes |
| Bouygues | Intégral 250 Go 5G | €46.99 | 250GB | Yes | No | Yes |
The pricing pattern is clear: **sub-brands and [Free Mobile](/en/fr/carriers/free/) deliver dramatically more data per euro** than their MNO counterparts. [B&You](/en/fr/carriers/byou/)'s 200GB 5G at €13.99 costs 30% less than [SFR](/en/fr/carriers/sfr/)'s own 200GB 5G plan at €19.99 — identical data allowance, lower price, no contract.
**[Compare and Filter All Plans →](/en/fr/search/)**
---
## Best Value Plans by Use Case
### Ultra-Budget (Under €7/month)
**[Free Mobile](/en/fr/carriers/free/) €2 Forfait** — The cheapest mobile plan in France, and arguably in all of Western Europe. For €2/month you get 50MB of data and unlimited calls with no contract. The catch: no eSIM, no 5G, and no tethering. This plan is for anyone who primarily uses WiFi and needs a basic phone line.
**[B&You](/en/fr/carriers/byou/) €6.99 5Go** — For just €4.99 more per month than Free's €2 plan, you get 2.5x the data (5GB) and eSIM support on the Bouygues network. There's no 5G at this tier, but if you use your phone for more than basic messaging, this is the minimum plan worth considering.
### Best Balance of Price and Features
**[B&You](/en/fr/carriers/byou/) €9.99 100Go 5G** — The standout value in the entire French market. 100GB of 5G data on the Bouygues network (83/100 overall) for under €10/month, with no contract and eSIM support. For the vast majority of users, this is more data than they will ever consume.
**RED by [SFR](/en/fr/carriers/sfr/) €11.99 100Go 5G** — A close second on the [SFR](/en/fr/carriers/sfr/) network (82/100 overall). Same 100GB 5G allowance as [B&You](/en/fr/carriers/byou/), but €2 more per month — worth considering only if you specifically prefer [SFR](/en/fr/carriers/sfr/)'s coverage in your area.
### Heavy Data and Streaming
**[Free Mobile](/en/fr/carriers/free/) €9.99 Unlimited 5G** — Unlimited 5G data for €9.99/month with no contract is a proposition that exists almost nowhere else. The trade-off is Free's lower network quality (72/100) and weaker rural coverage (84/100). In cities, Free's 5G performance is adequate for streaming. Outside urban areas, you may notice the gap.
**[B&You](/en/fr/carriers/byou/) €13.99 200Go 5G** — If you want a large data allowance on a higher-quality network, 200GB on Bouygues for €13.99 is the best option. No contract, eSIM included.
### Premium / Best Network Quality
**[Orange](/en/fr/carriers/orange/) Illimite 5G €34.99** — For users who want the absolute best network quality in France (90/100 overall, 165.2 Mbps download, 95/100 coverage), [Orange](/en/fr/carriers/orange/)'s unlimited 5G plan is the premium choice. It requires a 24-month commitment and costs more than 3x Free's unlimited plan, but the network experience is measurably superior.
**[Find Your Best French Plan →](/en/fr/search/)**
---
## 5G and eSIM Availability
### 5G
17 of 22 plans (77%) include 5G. France's 5G rollout is well advanced, with all four MNOs operating 5G networks. The plans without 5G span budget and legacy tiers:
| Plan | Carrier | Data | Price | Why No 5G |
|---|---|---|---|---|
| Forfait 2€ | [Free Mobile](/en/fr/carriers/free/) | 50MB | €2.00 | Budget tier |
| 5 Go | [B&You](/en/fr/carriers/byou/) | 5GB | €6.99 | Budget tier |
| 5 Go | [Orange](/en/fr/carriers/orange/) | 5GB | €9.99 | Budget tier |
| 60 Go | [Sosh](/en/fr/carriers/sosh/) | 60GB | €9.99 | Mid-range 4G |
| 20 Go | [Orange](/en/fr/carriers/orange/) | 20GB | €17.99 | Legacy tier |
For most users, 5G is effectively included at no extra cost. [B&You](/en/fr/carriers/byou/)'s 100GB 5G plan costs just €3 more than its own 5GB 4G-only plan.
### eSIM
21 of 22 plans (95%) support eSIM. The sole exception is the [Free Mobile](/en/fr/carriers/free/) €2 plan. This near-universal eSIM support means travellers can activate a French SIM before arriving in the country, as long as their phone supports eSIM.
For short-term visitors who need data-only connectivity, travel eSIM providers like [Airalo](/en/travel/providers/airalo/), [Holafly](/en/travel/providers/holafly/), and [Saily](/en/travel/providers/saily/) also cover France. However, French domestic plans are so competitively priced that a local SIM — especially a no-contract sub-brand plan — often costs less than a travel eSIM while providing more data and a French phone number.
---
## Frequently Asked Questions
### What is the cheapest SIM plan in France?
[Free Mobile](/en/fr/carriers/free/)'s Forfait 2€ at €2/month is the cheapest. It includes 50MB of data, unlimited calls, and no contract — but it lacks eSIM support. The next cheapest options with eSIM are [SFR](/en/fr/carriers/sfr/) 1Go at €5.99 and [B&You](/en/fr/carriers/byou/) 5Go at €6.99.
### Can I get a French SIM without a long-term contract?
Yes. 20 of the 22 plans tracked by SimFinder are contract-free (*sans engagement*). Only the unlimited plans from [Orange](/en/fr/carriers/orange/) and [SFR](/en/fr/carriers/sfr/) require 24-month commitments.
### Which French carrier has the best network coverage?
[Orange](/en/fr/carriers/orange/) leads with a coverage score of 95/100 and an overall quality score of 90/100 (OpenSignal 2025). [SFR](/en/fr/carriers/sfr/) (90/100 coverage) and [Bouygues Telecom](/en/fr/carriers/bouygues/) (89/100) follow closely. [Free Mobile](/en/fr/carriers/free/) has the weakest coverage at 84/100.
### Is 5G widely available in France?
Yes. 17 of the 22 plans (77%) include 5G access. All four MNOs offer 5G, and even budget sub-brands like RED by [SFR](/en/fr/carriers/sfr/) and [B&You](/en/fr/carriers/byou/) include 5G on their larger plans. The 5 plans without 5G are all budget or legacy tiers.
### Do French SIM plans support eSIM?
Almost all of them — 21 out of 22 plans (95%) support eSIM. The only exception is the [Free Mobile](/en/fr/carriers/free/) €2 plan. If your phone supports eSIM, you can activate most French plans remotely before arriving.
### What's the best SIM plan for a tourist visiting France?
For short visits, [Free Mobile](/en/fr/carriers/free/)'s Série Free 110Go 5G at €9.99/month is hard to beat — no contract, eSIM, 5G, 110GB of data. [B&You](/en/fr/carriers/byou/)'s 100Go 5G at the same €9.99 price point is a solid alternative on the Bouygues network. Both are no-commitment and can be cancelled immediately after your trip.
### How does [Free Mobile](/en/fr/carriers/free/) offer unlimited 5G data for €9.99?
[Free Mobile](/en/fr/carriers/free/) entered the French market in 2012 with a disruptive pricing strategy and lower infrastructure costs. Its Forfait Free 5G Illimite at €9.99/month includes truly unlimited 5G data with no contract. The trade-off is lower network quality (72/100 overall vs [Orange](/en/fr/carriers/orange/)'s 90/100).
---
## Key Takeaways
The French SIM market in 2026:
- **7 carriers, 22 plans** — prices range from €2/month (Free 2€) to €46.99/month (Bouygues Intégral 250Go 5G)
- **Four MNO networks**: [Orange](/en/fr/carriers/orange/) (90/100), Bouygues (83/100), [SFR](/en/fr/carriers/sfr/) (82/100), Free (72/100)
- **Sub-brands save 30-50%**: [B&You](/en/fr/carriers/byou/) 100GB 5G costs €9.99 vs [Bouygues Telecom](/en/fr/carriers/bouygues/)'s own Confort 130Go 5G at €19.99
- **[Free Mobile](/en/fr/carriers/free/) is unmatched on price**: unlimited 5G for €9.99/month exists nowhere else in Europe
- **5G is standard** (77% of plans), and **eSIM is near-universal** (95%)
- **20 of 22 plans are contract-free** — only 2 premium plans require a 24-month commitment
- **For most users**: [B&You](/en/fr/carriers/byou/) 100Go 5G at €9.99/month offers the best balance of data, price, and network quality
France's mobile market rewards those who choose sub-brands over MNOs. The networks are identical, the prices are not.
**[Find Your Best French SIM Plan →](/en/fr/search/)**
---
*Plan data is current as of July 2026. Prices and inclusions may change. Check carrier websites for the latest information.*
*Compare all plans side by side using [SimFinder's comparison tool](/en/fr/search/).*
================================================================================
# Best SIM Plans in Germany 2026: 7 Carriers Compared
URL: https://sim-finder.com/en/blog/best-sim-plans-germany-2026/
Type: blog (en)
Published: 2026-03-21
## TL;DR: Top 3 Picks for Germany
| Best For | Plan | Price/mo | Why |
|---------|-------|------|---------|
| **Budget** | [Fraenk](/en/de/carriers/fraenk/) 25 GB | €10.00 | [Telekom](/en/de/carriers/telekom/) network (92/100), no contract, eSIM, 5G |
| **Most People** | [Fraenk](/en/de/carriers/fraenk/) 50 GB | €15.00 | 50 GB 5G on [Telekom](/en/de/carriers/telekom/), no contract, eSIM — best value per GB |
| **Unlimited Data** | [O2](/en/de/carriers/o2de/) Unlimited Max | €29.99 | Unlimited 5G, no contract, eSIM — cheapest unlimited in DE |
**[Compare All 25 German Plans on SimFinder →](/en/de/search/)**
France's mobile market is structured around **four physical networks**. Three of the four MNOs operate no-contract sub-brands that run on the same infrastructure at lower prices.
| Network Owner | Type | Coverage | Overall Score | Sub-brand |
|---|---|---|---|---|
| **[Orange](/en/fr/carriers/orange/)** | MNO | 95/100 | 90/100 | [Sosh](/en/fr/carriers/sosh/) |
| **[Bouygues Telecom](/en/fr/carriers/bouygues/)** | MNO | 89/100 | 83/100 | [B&You](/en/fr/carriers/byou/) |
| **[SFR](/en/fr/carriers/sfr/)** | MNO | 90/100 | 82/100 | [RED by SFR](/en/fr/carriers/red/) |
| **[Free Mobile](/en/fr/carriers/free/)** | MNO | 84/100 | 72/100 | None |
*Quality data: OpenSignal 2025, measured November 2025*
**[Orange](/en/fr/carriers/orange/) leads in overall quality** with 90/100, the fastest download speeds (165.2 Mbps), and the best coverage (95/100). It is the network of choice for anyone who needs reliable connectivity across metropolitan and rural France alike.
**[SFR](/en/fr/carriers/sfr/) and [Bouygues Telecom](/en/fr/carriers/bouygues/)** are close competitors. [SFR](/en/fr/carriers/sfr/) edges ahead in coverage (90 vs 89) while Bouygues has a slightly higher overall score (83 vs 82). In practice, the difference between these two is marginal for most users.
**[Free Mobile](/en/fr/carriers/free/)** is the disruptor. With the lowest quality score (72/100) and the weakest coverage (84/100), it trades network quality for aggressive pricing. Its unlimited 5G plan at €9.99/month is unmatched anywhere else in Europe.
---
## Carrier Structure: Who Owns What
Understanding the MNO/sub-brand relationship is the key to getting the best value in France.
### MNOs vs Sub-brands
The three sub-brands — **[Sosh](/en/fr/carriers/sosh/)**, **RED by [SFR](/en/fr/carriers/sfr/)**, and **[B&You](/en/fr/carriers/byou/)** — use the exact same network infrastructure as their parent MNOs. The coverage and speeds are identical. What differs is:
- **No contract** — Sub-brand plans are all no-commitment (*sans engagement*)
- **Lower price** — Typically 30-60% cheaper than the parent MNO for equivalent data
- **Self-service** — Support is primarily online, no in-store assistance
- **No bundled phone** — SIM-only plans; buy your phone separately
For example, [B&You](/en/fr/carriers/byou/) offers 100GB 5G for €9.99/month on the Bouygues network. [Bouygues Telecom](/en/fr/carriers/bouygues/)'s own entry-level plan, Confort 130Go 5G, costs €19.99/month sans engagement — exactly double the price for 30GB more data on the same network.
### [Free Mobile](/en/fr/carriers/free/): The Odd One Out
[Free Mobile](/en/fr/carriers/free/) does not operate a sub-brand because it already *is* the low-cost option. It launched in 2012 with the explicit goal of disrupting French mobile pricing, and it succeeded. Its €2/month and €9.99/month plans reset price expectations across the entire market.
---
## Price Breakdown: All 22 Plans Compared
### Sub-brand Plans (No Contract)
| Carrier | Network | Plan | Price/mo | Data | 5G | eSIM |
|---|---|---|---|---|---|---|
| [B&You](/en/fr/carriers/byou/) | Bouygues | 5 Go | €6.99 | 5GB | No | Yes |
| [B&You](/en/fr/carriers/byou/) | Bouygues | 100 Go 5G | €9.99 | 100GB | Yes | Yes |
| [Sosh](/en/fr/carriers/sosh/) | [Orange](/en/fr/carriers/orange/) | 60 Go | €9.99 | 60GB | No | Yes |
| RED by [SFR](/en/fr/carriers/sfr/) | [SFR](/en/fr/carriers/sfr/) | 100 Go 5G | €11.99 | 100GB | Yes | Yes |
| [Sosh](/en/fr/carriers/sosh/) | [Orange](/en/fr/carriers/orange/) | 100 Go 5G | €12.99 | 100GB | Yes | Yes |
| [B&You](/en/fr/carriers/byou/) | Bouygues | 200 Go 5G | €13.99 | 200GB | Yes | Yes |
### [Free Mobile](/en/fr/carriers/free/) Plans (No Contract)
| Carrier | Plan | Price/mo | Data | 5G | eSIM |
|---|---|---|---|---|---|
| [Free Mobile](/en/fr/carriers/free/) | Forfait 2€ | €2.00 | 50MB | No | No |
| [Free Mobile](/en/fr/carriers/free/) | Série Free 110 Go 5G | €9.99 | 110GB | Yes | Yes |
| [Free Mobile](/en/fr/carriers/free/) | Forfait Free 5G Illimite | €9.99 | Unlimited | Yes | Yes |
| [Free Mobile](/en/fr/carriers/free/) | Forfait Free 350 Go 5G+ | €19.99 | 350GB | Yes | Yes |
### MNO Plans
| Carrier | Plan | Price/mo | Data | 5G | Contract | eSIM |
|---|---|---|---|---|---|---|
| [SFR](/en/fr/carriers/sfr/) | 1 Go 5G | €5.99 | 1GB | Yes | No | Yes |
| [Orange](/en/fr/carriers/orange/) | 5 Go | €9.99 | 5GB | No | No | Yes |
| [SFR](/en/fr/carriers/sfr/) | 20 Go 5G | €15.99 | 20GB | Yes | No | Yes |
| [Orange](/en/fr/carriers/orange/) | 20 Go | €17.99 | 20GB | No | No | Yes |
| [SFR](/en/fr/carriers/sfr/) | 80 Go 5G | €17.99 | 80GB | Yes | No | Yes |
| [SFR](/en/fr/carriers/sfr/) | 200 Go 5G | €19.99 | 200GB | Yes | No | Yes |
| Bouygues | Confort 130 Go 5G | €19.99 | 130GB | Yes | No | Yes |
| [Orange](/en/fr/carriers/orange/) | Série Spéciale 130 Go 5G | €20.99 | 130GB | Yes | No | Yes |
| [SFR](/en/fr/carriers/sfr/) | 250 Go 5G+ | €26.99 | 250GB | Yes | No | Yes |
| [Orange](/en/fr/carriers/orange/) | Illimite 5G | €34.99 | Unlimited | Yes | 24 mo | Yes |
| [SFR](/en/fr/carriers/sfr/) | Illimite 5G+ | €39.99 | Unlimited | Yes | 24 mo | Yes |
| Bouygues | Intégral 250 Go 5G | €46.99 | 250GB | Yes | No | Yes |
The pricing pattern is clear: **sub-brands and [Free Mobile](/en/fr/carriers/free/) deliver dramatically more data per euro** than their MNO counterparts. [B&You](/en/fr/carriers/byou/)'s 200GB 5G at €13.99 costs 30% less than [SFR](/en/fr/carriers/sfr/)'s own 200GB 5G plan at €19.99 — identical data allowance, lower price, no contract.
**[Compare and Filter All Plans →](/en/fr/search/)**
---
## Best Value Plans by Use Case
### Ultra-Budget (Under €7/month)
**[Free Mobile](/en/fr/carriers/free/) €2 Forfait** — The cheapest mobile plan in France, and arguably in all of Western Europe. For €2/month you get 50MB of data and unlimited calls with no contract. The catch: no eSIM, no 5G, and no tethering. This plan is for anyone who primarily uses WiFi and needs a basic phone line.
**[B&You](/en/fr/carriers/byou/) €6.99 5Go** — For just €4.99 more per month than Free's €2 plan, you get 2.5x the data (5GB) and eSIM support on the Bouygues network. There's no 5G at this tier, but if you use your phone for more than basic messaging, this is the minimum plan worth considering.
### Best Balance of Price and Features
**[B&You](/en/fr/carriers/byou/) €9.99 100Go 5G** — The standout value in the entire French market. 100GB of 5G data on the Bouygues network (83/100 overall) for under €10/month, with no contract and eSIM support. For the vast majority of users, this is more data than they will ever consume.
**RED by [SFR](/en/fr/carriers/sfr/) €11.99 100Go 5G** — A close second on the [SFR](/en/fr/carriers/sfr/) network (82/100 overall). Same 100GB 5G allowance as [B&You](/en/fr/carriers/byou/), but €2 more per month — worth considering only if you specifically prefer [SFR](/en/fr/carriers/sfr/)'s coverage in your area.
### Heavy Data and Streaming
**[Free Mobile](/en/fr/carriers/free/) €9.99 Unlimited 5G** — Unlimited 5G data for €9.99/month with no contract is a proposition that exists almost nowhere else. The trade-off is Free's lower network quality (72/100) and weaker rural coverage (84/100). In cities, Free's 5G performance is adequate for streaming. Outside urban areas, you may notice the gap.
**[B&You](/en/fr/carriers/byou/) €13.99 200Go 5G** — If you want a large data allowance on a higher-quality network, 200GB on Bouygues for €13.99 is the best option. No contract, eSIM included.
### Premium / Best Network Quality
**[Orange](/en/fr/carriers/orange/) Illimite 5G €34.99** — For users who want the absolute best network quality in France (90/100 overall, 165.2 Mbps download, 95/100 coverage), [Orange](/en/fr/carriers/orange/)'s unlimited 5G plan is the premium choice. It requires a 24-month commitment and costs more than 3x Free's unlimited plan, but the network experience is measurably superior.
**[Find Your Best French Plan →](/en/fr/search/)**
---
## 5G and eSIM Availability
### 5G
17 of 22 plans (77%) include 5G. France's 5G rollout is well advanced, with all four MNOs operating 5G networks. The plans without 5G span budget and legacy tiers:
| Plan | Carrier | Data | Price | Why No 5G |
|---|---|---|---|---|
| Forfait 2€ | [Free Mobile](/en/fr/carriers/free/) | 50MB | €2.00 | Budget tier |
| 5 Go | [B&You](/en/fr/carriers/byou/) | 5GB | €6.99 | Budget tier |
| 5 Go | [Orange](/en/fr/carriers/orange/) | 5GB | €9.99 | Budget tier |
| 60 Go | [Sosh](/en/fr/carriers/sosh/) | 60GB | €9.99 | Mid-range 4G |
| 20 Go | [Orange](/en/fr/carriers/orange/) | 20GB | €17.99 | Legacy tier |
For most users, 5G is effectively included at no extra cost. [B&You](/en/fr/carriers/byou/)'s 100GB 5G plan costs just €3 more than its own 5GB 4G-only plan.
### eSIM
21 of 22 plans (95%) support eSIM. The sole exception is the [Free Mobile](/en/fr/carriers/free/) €2 plan. This near-universal eSIM support means travellers can activate a French SIM before arriving in the country, as long as their phone supports eSIM.
For short-term visitors who need data-only connectivity, travel eSIM providers like [Airalo](/en/travel/providers/airalo/), [Holafly](/en/travel/providers/holafly/), and [Saily](/en/travel/providers/saily/) also cover France. However, French domestic plans are so competitively priced that a local SIM — especially a no-contract sub-brand plan — often costs less than a travel eSIM while providing more data and a French phone number.
---
## Frequently Asked Questions
### What is the cheapest SIM plan in France?
[Free Mobile](/en/fr/carriers/free/)'s Forfait 2€ at €2/month is the cheapest. It includes 50MB of data, unlimited calls, and no contract — but it lacks eSIM support. The next cheapest options with eSIM are [SFR](/en/fr/carriers/sfr/) 1Go at €5.99 and [B&You](/en/fr/carriers/byou/) 5Go at €6.99.
### Can I get a French SIM without a long-term contract?
Yes. 20 of the 22 plans tracked by SimFinder are contract-free (*sans engagement*). Only the unlimited plans from [Orange](/en/fr/carriers/orange/) and [SFR](/en/fr/carriers/sfr/) require 24-month commitments.
### Which French carrier has the best network coverage?
[Orange](/en/fr/carriers/orange/) leads with a coverage score of 95/100 and an overall quality score of 90/100 (OpenSignal 2025). [SFR](/en/fr/carriers/sfr/) (90/100 coverage) and [Bouygues Telecom](/en/fr/carriers/bouygues/) (89/100) follow closely. [Free Mobile](/en/fr/carriers/free/) has the weakest coverage at 84/100.
### Is 5G widely available in France?
Yes. 17 of the 22 plans (77%) include 5G access. All four MNOs offer 5G, and even budget sub-brands like RED by [SFR](/en/fr/carriers/sfr/) and [B&You](/en/fr/carriers/byou/) include 5G on their larger plans. The 5 plans without 5G are all budget or legacy tiers.
### Do French SIM plans support eSIM?
Almost all of them — 21 out of 22 plans (95%) support eSIM. The only exception is the [Free Mobile](/en/fr/carriers/free/) €2 plan. If your phone supports eSIM, you can activate most French plans remotely before arriving.
### What's the best SIM plan for a tourist visiting France?
For short visits, [Free Mobile](/en/fr/carriers/free/)'s Série Free 110Go 5G at €9.99/month is hard to beat — no contract, eSIM, 5G, 110GB of data. [B&You](/en/fr/carriers/byou/)'s 100Go 5G at the same €9.99 price point is a solid alternative on the Bouygues network. Both are no-commitment and can be cancelled immediately after your trip.
### How does [Free Mobile](/en/fr/carriers/free/) offer unlimited 5G data for €9.99?
[Free Mobile](/en/fr/carriers/free/) entered the French market in 2012 with a disruptive pricing strategy and lower infrastructure costs. Its Forfait Free 5G Illimite at €9.99/month includes truly unlimited 5G data with no contract. The trade-off is lower network quality (72/100 overall vs [Orange](/en/fr/carriers/orange/)'s 90/100).
---
## Key Takeaways
The French SIM market in 2026:
- **7 carriers, 22 plans** — prices range from €2/month (Free 2€) to €46.99/month (Bouygues Intégral 250Go 5G)
- **Four MNO networks**: [Orange](/en/fr/carriers/orange/) (90/100), Bouygues (83/100), [SFR](/en/fr/carriers/sfr/) (82/100), Free (72/100)
- **Sub-brands save 30-50%**: [B&You](/en/fr/carriers/byou/) 100GB 5G costs €9.99 vs [Bouygues Telecom](/en/fr/carriers/bouygues/)'s own Confort 130Go 5G at €19.99
- **[Free Mobile](/en/fr/carriers/free/) is unmatched on price**: unlimited 5G for €9.99/month exists nowhere else in Europe
- **5G is standard** (77% of plans), and **eSIM is near-universal** (95%)
- **20 of 22 plans are contract-free** — only 2 premium plans require a 24-month commitment
- **For most users**: [B&You](/en/fr/carriers/byou/) 100Go 5G at €9.99/month offers the best balance of data, price, and network quality
France's mobile market rewards those who choose sub-brands over MNOs. The networks are identical, the prices are not.
**[Find Your Best French SIM Plan →](/en/fr/search/)**
---
*Plan data is current as of July 2026. Prices and inclusions may change. Check carrier websites for the latest information.*
*Compare all plans side by side using [SimFinder's comparison tool](/en/fr/search/).*
================================================================================
# Best SIM Plans in Germany 2026: 7 Carriers Compared
URL: https://sim-finder.com/en/blog/best-sim-plans-germany-2026/
Type: blog (en)
Published: 2026-03-21
## TL;DR: Top 3 Picks for Germany
| Best For | Plan | Price/mo | Why |
|---------|-------|------|---------|
| **Budget** | [Fraenk](/en/de/carriers/fraenk/) 25 GB | €10.00 | [Telekom](/en/de/carriers/telekom/) network (92/100), no contract, eSIM, 5G |
| **Most People** | [Fraenk](/en/de/carriers/fraenk/) 50 GB | €15.00 | 50 GB 5G on [Telekom](/en/de/carriers/telekom/), no contract, eSIM — best value per GB |
| **Unlimited Data** | [O2](/en/de/carriers/o2de/) Unlimited Max | €29.99 | Unlimited 5G, no contract, eSIM — cheapest unlimited in DE |
**[Compare All 25 German Plans on SimFinder →](/en/de/search/)**
SPONSORED
Staying less than a month? Every plan above needs a German address, and most Telekom, Vodafone and O2 tariffs lock you into 24 months. A travel eSIM skips both — it activates before you land. Airalo's Germany data starts at $4.00 for 1 GB / 7 days, or $23.50 for 20 GB / 30 days. We may earn a commission if you buy through this link, at no extra cost to you.
See Airalo's Germany eSIM plans →
Below, we break down the entire market using real plan data from all 7 carriers.
## Table of Contents
- [The German Mobile Landscape](#the-german-mobile-landscape-3-mnos-4-budget-brands)
- [Carrier Structure: Who Owns What](#carrier-structure-who-owns-what)
- [Price Breakdown: All 24 Plans Compared](#price-breakdown-all-24-plans-compared)
- [Best Value Plans by Use Case](#best-value-plans-by-use-case)
- [5G and eSIM Availability](#5g-and-esim-availability)
- [Frequently Asked Questions](#frequently-asked-questions)
- [Key Takeaways](#key-takeaways)
---
Germany's mobile market is Europe's largest by subscriber count, but it has historically been one of the most expensive. That is changing. While the three network operators — [Deutsche Telekom](/en/de/carriers/telekom/), [Vodafone](/en/de/carriers/vodafone/), and [O2 (Telefonica DE)](/en/de/carriers/o2de/) — still charge premium prices for their flagship plans, a wave of budget sub-brands and MVNOs now offers the same network quality at a fraction of the cost.
SimFinder's database tracks **7 carriers and 25 plans** in Germany. Prices range from **€8.99/month** to **€84.95/month**, with 88% eSIM support and 100% offering 5G. The most striking value gap in the market: [Fraenk](/en/de/carriers/fraenk/) sells 25 GB on the [Telekom](/en/de/carriers/telekom/) network for **€10/month**, while [Telekom](/en/de/carriers/telekom/)'s own MagentaMobil XL costs **€84.95/month** — both run on the identical infrastructure.
This guide breaks down the entire German SIM market using actual plan data, network quality scores, and pricing analysis.
---
## The German Mobile Landscape: 3 MNOs, 4 Budget Brands
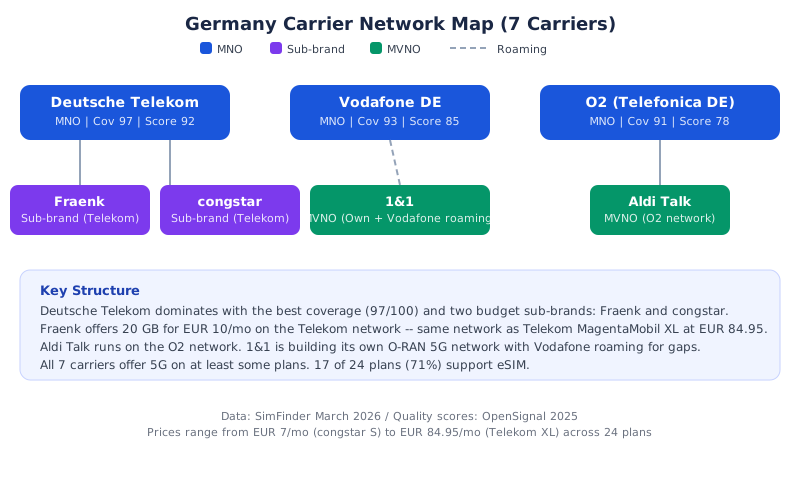 Germany's mobile market is structured around **three physical networks**. Unlike France with its four MNOs, Germany has three — but each network supports multiple budget brands that deliver the same connectivity at lower prices.
| Network Owner | Type | Coverage | Overall Score | Budget Brands |
|---|---|---|---|---|
| **[Deutsche Telekom](/en/de/carriers/telekom/)** | MNO | 97/100 | 92/100 | [Fraenk](/en/de/carriers/fraenk/), [congstar](/en/de/carriers/congstar/) |
| **[Vodafone DE](/en/de/carriers/vodafone/)** | MNO | 93/100 | 85/100 | — |
| **[O2 (Telefonica DE)](/en/de/carriers/o2de/)** | MNO | 91/100 | 78/100 | [Aldi Talk](/en/de/carriers/alditalk/) |
*Quality data: OpenSignal 2025, measured November 2025*
**Additionally:** [1&1](/en/de/carriers/oneandone/) is building its own O-RAN 5G network and currently uses Vodafone roaming for coverage gaps.
**Deutsche [Telekom](/en/de/carriers/telekom/) dominates network quality** with 92/100 overall, the fastest download speeds (173.8 Mbps), and the widest coverage (97/100). It is the clear leader, especially in rural areas where Vodafone and O2 coverage can be patchy.
**[Vodafone DE](/en/de/carriers/vodafone/)** sits in the middle with 85/100 overall and 93/100 coverage. Its download speeds (154.3 Mbps) are solid, and its urban performance is competitive with [Telekom](/en/de/carriers/telekom/).
**O2 (Telefonica DE)** has the weakest scores at 78/100 overall and 91/100 coverage. However, O2 has invested heavily in network expansion since 2020, and the gap has narrowed. Its 114.5 Mbps average download speed is adequate for most users, and its aggressive pricing (including the cheapest unlimited plan) makes it a strong value proposition.
---
## Carrier Structure: Who Owns What
Understanding the MNO/sub-brand relationship is the key to getting the best value in Germany.
### [Telekom](/en/de/carriers/telekom/)'s Two Sub-brands: [Fraenk](/en/de/carriers/fraenk/) and [congstar](/en/de/carriers/congstar/)
[Fraenk](/en/de/carriers/fraenk/) and [congstar](/en/de/carriers/congstar/) both run on the [Telekom](/en/de/carriers/telekom/) network — the same 97/100 coverage, the same 5G infrastructure, the same cell towers. What differs is the price and the service model.
**[Fraenk](/en/de/carriers/fraenk/)** is [Telekom](/en/de/carriers/telekom/)'s digital-only brand, managed entirely through a mobile app. No shops, no phone hotline. Two plans: 25 GB for €10 and 50 GB for €15. Both include 5G, eSIM, and no contract. [Fraenk](/en/de/carriers/fraenk/) targets tech-comfortable users who do not need hand-holding.
**[congstar](/en/de/carriers/congstar/)** is [Telekom](/en/de/carriers/telekom/)'s traditional budget brand, fully restructured in July 2026 into four plans from €15 to €29 (XS/S/M/L). Every tier now ships with 5G and eSIM — a major upgrade from its previous no-eSIM lineup. [congstar](/en/de/carriers/congstar/) now suits users who want more data (up to 200 GB) with the same eSIM convenience as [Fraenk](/en/de/carriers/fraenk/), through a more conventional provider with broader customer support.
### O2's MVNO: [Aldi Talk](/en/de/carriers/alditalk/)
[Aldi Talk](/en/de/carriers/alditalk/) operates on the O2 network and is sold through Aldi supermarkets across Germany. Its three Combo Paket plans (€8.99 to €18.99) are prepaid, no-contract, and include 5G. However, [Aldi Talk](/en/de/carriers/alditalk/) does not offer eSIM on any plan — now the only carrier in the German market without it.
### [1&1](/en/de/carriers/oneandone/): The Fourth Network (In Progress)
[1&1](/en/de/carriers/oneandone/) is Germany's newest mobile operator. It completed migrating all 12 million customers to its own O-RAN 5G network in late 2025, with Vodafone roaming filling coverage gaps. Its plans (€14.99 to €19.99) require 24-month contracts but include eSIM and 5G, with competitive data allowances up to 150 GB.
---
## Price Breakdown: All 25 Plans Compared
### Budget Sub-brands and MVNOs (No Contract)
| Carrier | Network | Plan | Price/mo | Data | 5G | eSIM |
|---|---|---|---|---|---|---|
| [Aldi Talk](/en/de/carriers/alditalk/) | O2 | Combo Paket S | €8.99 | 25 GB | Yes | No |
| [Fraenk](/en/de/carriers/fraenk/) | [Telekom](/en/de/carriers/telekom/) | 25 GB | €10.00 | 25 GB | Yes | Yes |
| [Aldi Talk](/en/de/carriers/alditalk/) | O2 | Combo Paket M | €13.99 | 50 GB | Yes | No |
| [congstar](/en/de/carriers/congstar/) | [Telekom](/en/de/carriers/telekom/) | Allnet-Flat XS | €15.00 | 15 GB | Yes | Yes |
| [Fraenk](/en/de/carriers/fraenk/) | [Telekom](/en/de/carriers/telekom/) | 50 GB | €15.00 | 50 GB | Yes | Yes |
| [Aldi Talk](/en/de/carriers/alditalk/) | O2 | Combo Paket L | €18.99 | 100 GB | Yes | No |
| [congstar](/en/de/carriers/congstar/) | [Telekom](/en/de/carriers/telekom/) | Allnet-Flat S | €20.00 | 50 GB | Yes | Yes |
| [congstar](/en/de/carriers/congstar/) | [Telekom](/en/de/carriers/telekom/) | Allnet-Flat M | €24.00 | 125 GB | Yes | Yes |
| [congstar](/en/de/carriers/congstar/) | [Telekom](/en/de/carriers/telekom/) | Allnet-Flat L | €29.00 | 200 GB | Yes | Yes |
### O2 Plans (Mix of Contract/No-Contract)
| Carrier | Plan | Price/mo | Data | 5G | Contract | eSIM |
|---|---|---|---|---|---|---|
| O2 | Mobile S | €19.99 | 10 GB | Yes | 24 mo | Yes |
| O2 | Mobile M Flex | €29.99 | 50 GB | Yes | No | Yes |
| O2 | Mobile Unlimited Max | €29.99 | Unlimited | Yes | No | Yes |
| O2 | Mobile L | €39.99 | 100 GB | Yes | 24 mo | Yes |
### [1&1](/en/de/carriers/oneandone/) Plans (24-Month Contract)
| Carrier | Plan | Price/mo | Data | 5G | eSIM |
|---|---|---|---|---|---|
| [1&1](/en/de/carriers/oneandone/) | Allnet-Flat S | €14.99 | 30 GB | Yes | Yes |
| [1&1](/en/de/carriers/oneandone/) | Allnet-Flat M | €14.99 | 50 GB | Yes | Yes |
| [1&1](/en/de/carriers/oneandone/) | Allnet-Flat L | €19.99 | 150 GB | Yes | Yes |
### [Telekom](/en/de/carriers/telekom/) and Vodafone MNO Plans (24-Month Contract)
| Carrier | Plan | Price/mo | Data | 5G | eSIM |
|---|---|---|---|---|---|
| Vodafone | GigaMobil M | €37.49 | 100 GB | Yes | Yes |
| [Telekom](/en/de/carriers/telekom/) | MagentaMobil S | €39.95 | 30 GB | Yes | Yes |
| Vodafone | GigaMobil L | €44.99 | 280 GB | Yes | Yes |
| [Telekom](/en/de/carriers/telekom/) | MagentaMobil M | €49.95 | 50 GB | Yes | Yes |
| [Telekom](/en/de/carriers/telekom/) | MagentaMobil L | €59.95 | 100 GB | Yes | Yes |
| Vodafone | GigaMobil XL | €59.99 | Unlimited | Yes | Yes |
| [Telekom](/en/de/carriers/telekom/) | MagentaMobil XL | €84.95 | Unlimited | Yes | Yes |
### [Telekom](/en/de/carriers/telekom/) Prepaid Plans (No Contract)
| Carrier | Plan | Price/mo | Data | 5G | eSIM |
|---|---|---|---|---|---|
| [Telekom](/en/de/carriers/telekom/) | MagentaMobil Prepaid M | €9.95 | 10 GB | Yes | Yes |
| [Telekom](/en/de/carriers/telekom/) | MagentaMobil Prepaid L | €14.95 | 40 GB | Yes | Yes |
The pricing pattern is clear: **sub-brands and MVNOs deliver dramatically more data per euro** than MNO postpaid plans. [Fraenk](/en/de/carriers/fraenk/)'s 25 GB at €10 costs one-quarter of [Telekom](/en/de/carriers/telekom/)'s own 30 GB MagentaMobil S at €39.95 — on the same network. [Aldi Talk](/en/de/carriers/alditalk/)'s 100 GB at €18.99 is less than half of [Telekom](/en/de/carriers/telekom/) MagentaMobil L at €59.95 for the same data amount (albeit on the O2 network instead of [Telekom](/en/de/carriers/telekom/)).
**[Compare and Filter All Plans →](/en/de/search/)**
---
## Best Value Plans by Use Case
### Ultra-Budget (Under €10/month)
**[Aldi Talk](/en/de/carriers/alditalk/) Combo Paket S €8.99** — The cheapest plan in Germany. 25 GB of data with 5G on the O2 network for €8.99/month with no contract. The trade-off: no eSIM, and rural coverage is weaker than [Telekom](/en/de/carriers/telekom/) (91/100 vs 97/100). Available at any Aldi supermarket in Germany — convenient for tourists who need a physical SIM.
**[Telekom](/en/de/carriers/telekom/) Prepaid M €9.95** — If you want to stay on the [Telekom](/en/de/carriers/telekom/) network with eSIM support, this prepaid plan offers 10 GB with 5G for €9.95. No contract, and you get [Telekom](/en/de/carriers/telekom/)'s full network quality.
### Best Balance of Price and Features
**[Fraenk](/en/de/carriers/fraenk/) 25 GB €10** — The standout value in the German market. 25 GB of 5G data on the [Telekom](/en/de/carriers/telekom/) network (92/100 overall quality) for €10/month. No contract, eSIM included, cancel anytime with two weeks' notice. For the vast majority of users, this is the plan to choose.
**[Fraenk](/en/de/carriers/fraenk/) 50 GB €15** — If 25 GB is not enough, the 50 GB plan at €15 remains a strong no-contract option on a premium network. Still no contract, still eSIM, still [Telekom](/en/de/carriers/telekom/) 5G.
**[congstar](/en/de/carriers/congstar/) Allnet-Flat M €24** — [congstar](/en/de/carriers/congstar/)'s July 2026 relaunch added eSIM and 5G across the board. The M tier now includes 125 GB — five times [Fraenk](/en/de/carriers/fraenk/)'s 50 GB allowance — for €9 more per month, still no contract. For data-hungry users who want to stay off a 24-month contract, this is now the best cost-per-GB value on the [Telekom](/en/de/carriers/telekom/) network.
### Heavy Data and Streaming
**O2 Mobile Unlimited Max €29.99** — The cheapest unlimited data plan in Germany, and it comes with no contract. Unlimited 5G on the O2 network with eSIM support. The trade-off is O2's lower network quality (78/100 overall, 114.5 Mbps average download). For urban users who stream heavily, this is sufficient. For rural users, consider the Vodafone or [Telekom](/en/de/carriers/telekom/) unlimited options. Note: O2 Mobile M Flex was repriced to €29.99/50 GB in 2026 — the same price as Unlimited Max — so there is no longer a reason to choose the capped plan over the unlimited one.
**[1&1](/en/de/carriers/oneandone/) Allnet-Flat L €19.99** — 150 GB on [1&1](/en/de/carriers/oneandone/)'s growing network with Vodafone roaming for just €19.99/month. Requires a 24-month contract, but the data-per-euro ratio is now the best among contract plans in the German market. A compelling middle ground between O2's unlimited plan and the premium Vodafone/[Telekom](/en/de/carriers/telekom/) options.
### Premium / Best Network Quality
**[Telekom](/en/de/carriers/telekom/) MagentaMobil XL €84.95** — For users who demand the absolute best network quality in Germany (92/100 overall, 173.8 Mbps download, 97/100 coverage), [Telekom](/en/de/carriers/telekom/)'s unlimited 5G plan is the premium choice. It requires a 24-month commitment and costs nearly 3x more than O2's unlimited plan. The MagentaEINS family discount saves €10/month per additional line.
**Vodafone GigaMobil XL €59.99** — Unlimited 5G on Vodafone's network (85/100 overall) for €25 less per month than [Telekom](/en/de/carriers/telekom/) XL. A 24-month contract is required. For users who want unlimited data on a high-quality network without [Telekom](/en/de/carriers/telekom/)'s premium pricing, Vodafone is the rational choice.
**[Find Your Best German SIM Plan →](/en/de/search/)**
---
## 5G and eSIM Availability
### 5G
All 25 plans (100%) include 5G. Germany's 5G rollout is among the most advanced in Europe, with all three MNOs operating extensive 5G networks. [congstar](/en/de/carriers/congstar/)'s July 2026 relaunch closed the last remaining gap — even its entry-level XS tier now ships with 5G.
For practical purposes, 5G is no longer a differentiator in the German market. Every carrier and every tier — including prepaid and MVNO plans from [Aldi Talk](/en/de/carriers/alditalk/), [Fraenk](/en/de/carriers/fraenk/), [congstar](/en/de/carriers/congstar/), and [1&1](/en/de/carriers/oneandone/) — includes 5G access.
### eSIM
22 of 25 plans (88%) support eSIM. The carriers that support eSIM:
| Carrier | eSIM Plans | Total Plans |
|---|---|---|
| Deutsche [Telekom](/en/de/carriers/telekom/) | 6/6 | 100% |
| Vodafone | 3/3 | 100% |
| O2 | 4/4 | 100% |
| [Fraenk](/en/de/carriers/fraenk/) | 2/2 | 100% |
| [1&1](/en/de/carriers/oneandone/) | 3/3 | 100% |
| [congstar](/en/de/carriers/congstar/) | 4/4 | 100% |
| [Aldi Talk](/en/de/carriers/alditalk/) | 0/3 | 0% |
**[Aldi Talk](/en/de/carriers/alditalk/) is now the only eSIM holdout.** [congstar](/en/de/carriers/congstar/) added eSIM support across its entire lineup in its July 2026 relaunch. If you need eSIM activation (especially useful for travellers who want to set up a German SIM before arriving), choose [Fraenk](/en/de/carriers/fraenk/), [congstar](/en/de/carriers/congstar/), [Telekom](/en/de/carriers/telekom/) Prepaid, O2, or [1&1](/en/de/carriers/oneandone/) instead.
For short-term visitors who need data-only connectivity, travel eSIM providers like [Airalo](/en/travel/providers/airalo/), [Holafly](/en/travel/providers/holafly/), and [Saily](/en/travel/providers/saily/) also cover Germany. However, German domestic plans from [Fraenk](/en/de/carriers/fraenk/) or O2 are often cheaper than travel eSIMs while providing more data and a German phone number. [Fraenk](/en/de/carriers/fraenk/)'s €10 for 25 GB on [Telekom](/en/de/carriers/telekom/)'s network is difficult to beat with any travel eSIM product.
The maths flips below roughly two weeks. A German plan bills a full month whatever you use, and signing up needs a local address — so for a 7-day trip, [Airalo's 1 GB Germany eSIM at $4.00](https://airalo.pxf.io/c/7089584/2071037/15608) or [Saily's 1 GB at $4.49](https://go.saily.site/aff_c?offer_id=101&aff_id=13072) costs less than Aldi Talk's €8.99 and needs no paperwork. Past two weeks, or if you need a German number, Fraenk wins again.
---
## Frequently Asked Questions
### What is the cheapest SIM plan in Germany?
[Aldi Talk](/en/de/carriers/alditalk/) Combo Paket S at €8.99/month is the cheapest, offering 25 GB of data with 5G on the O2 network and no contract. However, it lacks eSIM. For eSIM support, [Fraenk](/en/de/carriers/fraenk/) 25 GB at €10/month on the [Telekom](/en/de/carriers/telekom/) network is the best budget option.
### Can I get a German SIM without a long-term contract?
Yes. 13 of the 25 plans tracked by SimFinder are contract-free (*ohne Vertragsbindung*). All plans from [Fraenk](/en/de/carriers/fraenk/), [congstar](/en/de/carriers/congstar/), [Aldi Talk](/en/de/carriers/alditalk/), [Telekom](/en/de/carriers/telekom/) Prepaid, and O2 Mobile M Flex/Unlimited Max are no-commitment. [Telekom](/en/de/carriers/telekom/) MagentaMobil, Vodafone GigaMobil, O2 Mobile S/L, and [1&1](/en/de/carriers/oneandone/) plans require 24-month contracts.
### Which German carrier has the best network coverage?
Deutsche [Telekom](/en/de/carriers/telekom/) leads with a coverage score of 97/100 and an overall quality score of 92/100 (OpenSignal 2025). Vodafone follows at 93/100 coverage and 85/100 overall. O2 (Telefonica) has improved significantly but still trails at 91/100 coverage and 78/100 overall.
### Is 5G widely available in Germany?
Yes. All 25 plans (100%) include 5G access. All three MNOs have rolled out 5G nationally, and every budget brand — including [Fraenk](/en/de/carriers/fraenk/), [Aldi Talk](/en/de/carriers/alditalk/), [congstar](/en/de/carriers/congstar/), and [1&1](/en/de/carriers/oneandone/) — now includes 5G on every tier.
### Do German SIM plans support eSIM?
22 of 25 plans (88%) support eSIM. All plans from [Telekom](/en/de/carriers/telekom/), Vodafone, O2, [Fraenk](/en/de/carriers/fraenk/), [congstar](/en/de/carriers/congstar/), and [1&1](/en/de/carriers/oneandone/) offer eSIM. The only exception is [Aldi Talk](/en/de/carriers/alditalk/), which does not support eSIM on any of its plans.
### What is the best SIM plan for an expat or tourist in Germany?
[Fraenk](/en/de/carriers/fraenk/) 25 GB at €10/month is the top recommendation for newcomers. It requires no contract, supports eSIM (activate before arrival), runs on the [Telekom](/en/de/carriers/telekom/) network (97/100 coverage), and includes 5G and EU roaming. For heavier data use, [Fraenk](/en/de/carriers/fraenk/) 50 GB at €15/month or O2 Mobile Unlimited Max (unlimited data, €29.99/month, no contract) are strong alternatives.
### Why is [Fraenk](/en/de/carriers/fraenk/) so much cheaper than [Telekom](/en/de/carriers/telekom/) when they use the same network?
[Fraenk](/en/de/carriers/fraenk/) is [Telekom](/en/de/carriers/telekom/)'s own digital-only sub-brand. It offers lower prices by operating entirely through a mobile app with no physical stores and no phone support. [Fraenk](/en/de/carriers/fraenk/) 25 GB costs €10/month while [Telekom](/en/de/carriers/telekom/) MagentaMobil S with 30 GB costs €39.95/month — both on the identical [Telekom](/en/de/carriers/telekom/) network with the same coverage and 5G access.
### What is the cheapest unlimited data plan in Germany?
O2 Mobile Unlimited Max at €29.99/month offers unlimited 5G data with no contract. Vodafone GigaMobil XL is €59.99/month (24-month contract), and [Telekom](/en/de/carriers/telekom/) MagentaMobil XL is €84.95/month (24-month contract). O2's plan is the clear value winner for unlimited data, though its network quality (78/100) is lower than Vodafone (85/100) and [Telekom](/en/de/carriers/telekom/) (92/100).
---
## Key Takeaways
The German SIM market in 2026:
- **7 carriers, 25 plans** — prices range from €8.99/month ([Aldi Talk](/en/de/carriers/alditalk/) Combo Paket S) to €84.95/month ([Telekom](/en/de/carriers/telekom/) MagentaMobil XL)
- **Three MNO networks**: [Telekom](/en/de/carriers/telekom/) (92/100), Vodafone (85/100), O2 (78/100) — plus [1&1](/en/de/carriers/oneandone/) building a fourth
- **Sub-brands save 60-75%**: [Fraenk](/en/de/carriers/fraenk/) 25 GB costs €10 vs [Telekom](/en/de/carriers/telekom/) MagentaMobil S at €39.95 — same network, same coverage
- **O2 owns unlimited value**: Unlimited 5G for €29.99/month with no contract, 65% cheaper than [Telekom](/en/de/carriers/telekom/)'s unlimited plan
- **5G is universal** (100% of plans), and **eSIM covers 88%** — [Aldi Talk](/en/de/carriers/alditalk/) is now the only holdout
- **13 of 25 plans are contract-free** — 12 plans require a 24-month commitment
- **For most users**: [Fraenk](/en/de/carriers/fraenk/) 50 GB at €15/month offers the best balance of data, price, and network quality ([Telekom](/en/de/carriers/telekom/))
Germany's mobile market rewards those who look beyond the three MNO brands. The networks are identical; the prices are not.
**[Find Your Best German SIM Plan →](/en/de/search/)**
---
*Plan data updated July 2026 (carrier lineup changes: congstar restructure, O2/1&1 price updates). Prices and inclusions may change. Check carrier websites for the latest information.*
*Compare all plans side by side using [SimFinder's comparison tool](/en/de/search/).*
================================================================================
# Best SIM Plans in South Korea 2026: Guide for Foreigners
URL: https://sim-finder.com/en/blog/best-sim-plans-korea-2026/
Type: blog (en)
Published: 2026-03-18
## TL;DR: Top 3 Picks for Foreigners
| Best For | Plan | Price/mo | Why |
|---------|-------|------|---------|
| **Short Trip (eSIM)** | [Airalo](/en/travel/kr/search/) 1GB / 7 days | $4.50 | No ID needed, instant setup, SKT network |
| **Budget Resident** | [KT M Mobile](/en/kr/carriers/ktmmobile/) 3GB | 5,900 KRW | Unlimited calls, [KT](/en/kr/carriers/kt/) network (90/100) |
| **Best Value 5G** | [LG U+](/en/kr/carriers/lguplus/) 5G Slim 5GB | 37,000 KRW | Cheapest MNO 5G, eSIM, great coverage |
**[Compare All 23 Korean Plans on SimFinder →](/en/kr/search/)**
Whether you are visiting Seoul for a week or starting a semester at a Korean university, this guide covers every option — from travel eSIMs you can activate before landing to long-term domestic plans.
## Table of Contents
- [South Korea's Mobile Market at a Glance](#south-koreas-mobile-market-at-a-glance)
- [Carrier Structure: MNOs, MVNOs, and How They Connect](#carrier-structure-mnos-mvnos-and-how-they-connect)
- [All 23 Plans Compared](#all-23-plans-compared)
- [Travel eSIM Options for Foreigners](#travel-esim-options-for-foreigners)
- [Best Plan by Situation](#best-plan-by-situation)
- [5G and eSIM Availability](#5g-and-esim-availability)
- [What Users Say](#what-users-say)
- [Frequently Asked Questions](#frequently-asked-questions)
- [Key Takeaways](#key-takeaways)
---
## South Korea's Mobile Market at a Glance
South Korea's mobile infrastructure is among the fastest in the world. The country launched commercial 5G in April 2019 — a global first — and its three major carriers consistently rank among the top globally for download speeds.
SimFinder tracks **6 carriers and 23 domestic plans** in South Korea. Monthly prices range from 4,000 KRW (~$3) to 89,000 KRW (~$65). On top of that, **11 international eSIM providers** offer 144 travel data plans for visitors who do not need a Korean phone number.
For foreigners, the key distinction is between **domestic SIM plans** (requiring some form of ID) and **travel eSIMs** (data-only, no ID, instant activation). This guide covers both.
| Metric | [SK Telecom](/en/kr/carriers/skt/) | [KT](/en/kr/carriers/kt/) | [LG U+](/en/kr/carriers/lguplus/) |
|---|---|---|---|
| Overall Score | 93/100 | 90/100 | 88/100 |
| Coverage Score | 97/100 | 96/100 | 95/100 |
| Download Speed | 200.0 Mbps | 185.5 Mbps | 175.2 Mbps |
| Upload Speed | 25.0 Mbps | 22.0 Mbps | 21.5 Mbps |
| Latency | 18 ms | 20 ms | 21 ms |
*Quality data: OpenSignal 2025, measured June 2025*
Unlike many countries where one carrier dominates, South Korea's three MNOs are closely matched. Coverage scores range from 95 to 97 out of 100, meaning dead spots are rare — even on subways and in rural areas. The practical difference between them is small, so price and plan features matter more than network choice.
---
## Carrier Structure: MNOs, MVNOs, and How They Connect
Germany's mobile market is structured around **three physical networks**. Unlike France with its four MNOs, Germany has three — but each network supports multiple budget brands that deliver the same connectivity at lower prices.
| Network Owner | Type | Coverage | Overall Score | Budget Brands |
|---|---|---|---|---|
| **[Deutsche Telekom](/en/de/carriers/telekom/)** | MNO | 97/100 | 92/100 | [Fraenk](/en/de/carriers/fraenk/), [congstar](/en/de/carriers/congstar/) |
| **[Vodafone DE](/en/de/carriers/vodafone/)** | MNO | 93/100 | 85/100 | — |
| **[O2 (Telefonica DE)](/en/de/carriers/o2de/)** | MNO | 91/100 | 78/100 | [Aldi Talk](/en/de/carriers/alditalk/) |
*Quality data: OpenSignal 2025, measured November 2025*
**Additionally:** [1&1](/en/de/carriers/oneandone/) is building its own O-RAN 5G network and currently uses Vodafone roaming for coverage gaps.
**Deutsche [Telekom](/en/de/carriers/telekom/) dominates network quality** with 92/100 overall, the fastest download speeds (173.8 Mbps), and the widest coverage (97/100). It is the clear leader, especially in rural areas where Vodafone and O2 coverage can be patchy.
**[Vodafone DE](/en/de/carriers/vodafone/)** sits in the middle with 85/100 overall and 93/100 coverage. Its download speeds (154.3 Mbps) are solid, and its urban performance is competitive with [Telekom](/en/de/carriers/telekom/).
**O2 (Telefonica DE)** has the weakest scores at 78/100 overall and 91/100 coverage. However, O2 has invested heavily in network expansion since 2020, and the gap has narrowed. Its 114.5 Mbps average download speed is adequate for most users, and its aggressive pricing (including the cheapest unlimited plan) makes it a strong value proposition.
---
## Carrier Structure: Who Owns What
Understanding the MNO/sub-brand relationship is the key to getting the best value in Germany.
### [Telekom](/en/de/carriers/telekom/)'s Two Sub-brands: [Fraenk](/en/de/carriers/fraenk/) and [congstar](/en/de/carriers/congstar/)
[Fraenk](/en/de/carriers/fraenk/) and [congstar](/en/de/carriers/congstar/) both run on the [Telekom](/en/de/carriers/telekom/) network — the same 97/100 coverage, the same 5G infrastructure, the same cell towers. What differs is the price and the service model.
**[Fraenk](/en/de/carriers/fraenk/)** is [Telekom](/en/de/carriers/telekom/)'s digital-only brand, managed entirely through a mobile app. No shops, no phone hotline. Two plans: 25 GB for €10 and 50 GB for €15. Both include 5G, eSIM, and no contract. [Fraenk](/en/de/carriers/fraenk/) targets tech-comfortable users who do not need hand-holding.
**[congstar](/en/de/carriers/congstar/)** is [Telekom](/en/de/carriers/telekom/)'s traditional budget brand, fully restructured in July 2026 into four plans from €15 to €29 (XS/S/M/L). Every tier now ships with 5G and eSIM — a major upgrade from its previous no-eSIM lineup. [congstar](/en/de/carriers/congstar/) now suits users who want more data (up to 200 GB) with the same eSIM convenience as [Fraenk](/en/de/carriers/fraenk/), through a more conventional provider with broader customer support.
### O2's MVNO: [Aldi Talk](/en/de/carriers/alditalk/)
[Aldi Talk](/en/de/carriers/alditalk/) operates on the O2 network and is sold through Aldi supermarkets across Germany. Its three Combo Paket plans (€8.99 to €18.99) are prepaid, no-contract, and include 5G. However, [Aldi Talk](/en/de/carriers/alditalk/) does not offer eSIM on any plan — now the only carrier in the German market without it.
### [1&1](/en/de/carriers/oneandone/): The Fourth Network (In Progress)
[1&1](/en/de/carriers/oneandone/) is Germany's newest mobile operator. It completed migrating all 12 million customers to its own O-RAN 5G network in late 2025, with Vodafone roaming filling coverage gaps. Its plans (€14.99 to €19.99) require 24-month contracts but include eSIM and 5G, with competitive data allowances up to 150 GB.
---
## Price Breakdown: All 25 Plans Compared
### Budget Sub-brands and MVNOs (No Contract)
| Carrier | Network | Plan | Price/mo | Data | 5G | eSIM |
|---|---|---|---|---|---|---|
| [Aldi Talk](/en/de/carriers/alditalk/) | O2 | Combo Paket S | €8.99 | 25 GB | Yes | No |
| [Fraenk](/en/de/carriers/fraenk/) | [Telekom](/en/de/carriers/telekom/) | 25 GB | €10.00 | 25 GB | Yes | Yes |
| [Aldi Talk](/en/de/carriers/alditalk/) | O2 | Combo Paket M | €13.99 | 50 GB | Yes | No |
| [congstar](/en/de/carriers/congstar/) | [Telekom](/en/de/carriers/telekom/) | Allnet-Flat XS | €15.00 | 15 GB | Yes | Yes |
| [Fraenk](/en/de/carriers/fraenk/) | [Telekom](/en/de/carriers/telekom/) | 50 GB | €15.00 | 50 GB | Yes | Yes |
| [Aldi Talk](/en/de/carriers/alditalk/) | O2 | Combo Paket L | €18.99 | 100 GB | Yes | No |
| [congstar](/en/de/carriers/congstar/) | [Telekom](/en/de/carriers/telekom/) | Allnet-Flat S | €20.00 | 50 GB | Yes | Yes |
| [congstar](/en/de/carriers/congstar/) | [Telekom](/en/de/carriers/telekom/) | Allnet-Flat M | €24.00 | 125 GB | Yes | Yes |
| [congstar](/en/de/carriers/congstar/) | [Telekom](/en/de/carriers/telekom/) | Allnet-Flat L | €29.00 | 200 GB | Yes | Yes |
### O2 Plans (Mix of Contract/No-Contract)
| Carrier | Plan | Price/mo | Data | 5G | Contract | eSIM |
|---|---|---|---|---|---|---|
| O2 | Mobile S | €19.99 | 10 GB | Yes | 24 mo | Yes |
| O2 | Mobile M Flex | €29.99 | 50 GB | Yes | No | Yes |
| O2 | Mobile Unlimited Max | €29.99 | Unlimited | Yes | No | Yes |
| O2 | Mobile L | €39.99 | 100 GB | Yes | 24 mo | Yes |
### [1&1](/en/de/carriers/oneandone/) Plans (24-Month Contract)
| Carrier | Plan | Price/mo | Data | 5G | eSIM |
|---|---|---|---|---|---|
| [1&1](/en/de/carriers/oneandone/) | Allnet-Flat S | €14.99 | 30 GB | Yes | Yes |
| [1&1](/en/de/carriers/oneandone/) | Allnet-Flat M | €14.99 | 50 GB | Yes | Yes |
| [1&1](/en/de/carriers/oneandone/) | Allnet-Flat L | €19.99 | 150 GB | Yes | Yes |
### [Telekom](/en/de/carriers/telekom/) and Vodafone MNO Plans (24-Month Contract)
| Carrier | Plan | Price/mo | Data | 5G | eSIM |
|---|---|---|---|---|---|
| Vodafone | GigaMobil M | €37.49 | 100 GB | Yes | Yes |
| [Telekom](/en/de/carriers/telekom/) | MagentaMobil S | €39.95 | 30 GB | Yes | Yes |
| Vodafone | GigaMobil L | €44.99 | 280 GB | Yes | Yes |
| [Telekom](/en/de/carriers/telekom/) | MagentaMobil M | €49.95 | 50 GB | Yes | Yes |
| [Telekom](/en/de/carriers/telekom/) | MagentaMobil L | €59.95 | 100 GB | Yes | Yes |
| Vodafone | GigaMobil XL | €59.99 | Unlimited | Yes | Yes |
| [Telekom](/en/de/carriers/telekom/) | MagentaMobil XL | €84.95 | Unlimited | Yes | Yes |
### [Telekom](/en/de/carriers/telekom/) Prepaid Plans (No Contract)
| Carrier | Plan | Price/mo | Data | 5G | eSIM |
|---|---|---|---|---|---|
| [Telekom](/en/de/carriers/telekom/) | MagentaMobil Prepaid M | €9.95 | 10 GB | Yes | Yes |
| [Telekom](/en/de/carriers/telekom/) | MagentaMobil Prepaid L | €14.95 | 40 GB | Yes | Yes |
The pricing pattern is clear: **sub-brands and MVNOs deliver dramatically more data per euro** than MNO postpaid plans. [Fraenk](/en/de/carriers/fraenk/)'s 25 GB at €10 costs one-quarter of [Telekom](/en/de/carriers/telekom/)'s own 30 GB MagentaMobil S at €39.95 — on the same network. [Aldi Talk](/en/de/carriers/alditalk/)'s 100 GB at €18.99 is less than half of [Telekom](/en/de/carriers/telekom/) MagentaMobil L at €59.95 for the same data amount (albeit on the O2 network instead of [Telekom](/en/de/carriers/telekom/)).
**[Compare and Filter All Plans →](/en/de/search/)**
---
## Best Value Plans by Use Case
### Ultra-Budget (Under €10/month)
**[Aldi Talk](/en/de/carriers/alditalk/) Combo Paket S €8.99** — The cheapest plan in Germany. 25 GB of data with 5G on the O2 network for €8.99/month with no contract. The trade-off: no eSIM, and rural coverage is weaker than [Telekom](/en/de/carriers/telekom/) (91/100 vs 97/100). Available at any Aldi supermarket in Germany — convenient for tourists who need a physical SIM.
**[Telekom](/en/de/carriers/telekom/) Prepaid M €9.95** — If you want to stay on the [Telekom](/en/de/carriers/telekom/) network with eSIM support, this prepaid plan offers 10 GB with 5G for €9.95. No contract, and you get [Telekom](/en/de/carriers/telekom/)'s full network quality.
### Best Balance of Price and Features
**[Fraenk](/en/de/carriers/fraenk/) 25 GB €10** — The standout value in the German market. 25 GB of 5G data on the [Telekom](/en/de/carriers/telekom/) network (92/100 overall quality) for €10/month. No contract, eSIM included, cancel anytime with two weeks' notice. For the vast majority of users, this is the plan to choose.
**[Fraenk](/en/de/carriers/fraenk/) 50 GB €15** — If 25 GB is not enough, the 50 GB plan at €15 remains a strong no-contract option on a premium network. Still no contract, still eSIM, still [Telekom](/en/de/carriers/telekom/) 5G.
**[congstar](/en/de/carriers/congstar/) Allnet-Flat M €24** — [congstar](/en/de/carriers/congstar/)'s July 2026 relaunch added eSIM and 5G across the board. The M tier now includes 125 GB — five times [Fraenk](/en/de/carriers/fraenk/)'s 50 GB allowance — for €9 more per month, still no contract. For data-hungry users who want to stay off a 24-month contract, this is now the best cost-per-GB value on the [Telekom](/en/de/carriers/telekom/) network.
### Heavy Data and Streaming
**O2 Mobile Unlimited Max €29.99** — The cheapest unlimited data plan in Germany, and it comes with no contract. Unlimited 5G on the O2 network with eSIM support. The trade-off is O2's lower network quality (78/100 overall, 114.5 Mbps average download). For urban users who stream heavily, this is sufficient. For rural users, consider the Vodafone or [Telekom](/en/de/carriers/telekom/) unlimited options. Note: O2 Mobile M Flex was repriced to €29.99/50 GB in 2026 — the same price as Unlimited Max — so there is no longer a reason to choose the capped plan over the unlimited one.
**[1&1](/en/de/carriers/oneandone/) Allnet-Flat L €19.99** — 150 GB on [1&1](/en/de/carriers/oneandone/)'s growing network with Vodafone roaming for just €19.99/month. Requires a 24-month contract, but the data-per-euro ratio is now the best among contract plans in the German market. A compelling middle ground between O2's unlimited plan and the premium Vodafone/[Telekom](/en/de/carriers/telekom/) options.
### Premium / Best Network Quality
**[Telekom](/en/de/carriers/telekom/) MagentaMobil XL €84.95** — For users who demand the absolute best network quality in Germany (92/100 overall, 173.8 Mbps download, 97/100 coverage), [Telekom](/en/de/carriers/telekom/)'s unlimited 5G plan is the premium choice. It requires a 24-month commitment and costs nearly 3x more than O2's unlimited plan. The MagentaEINS family discount saves €10/month per additional line.
**Vodafone GigaMobil XL €59.99** — Unlimited 5G on Vodafone's network (85/100 overall) for €25 less per month than [Telekom](/en/de/carriers/telekom/) XL. A 24-month contract is required. For users who want unlimited data on a high-quality network without [Telekom](/en/de/carriers/telekom/)'s premium pricing, Vodafone is the rational choice.
**[Find Your Best German SIM Plan →](/en/de/search/)**
---
## 5G and eSIM Availability
### 5G
All 25 plans (100%) include 5G. Germany's 5G rollout is among the most advanced in Europe, with all three MNOs operating extensive 5G networks. [congstar](/en/de/carriers/congstar/)'s July 2026 relaunch closed the last remaining gap — even its entry-level XS tier now ships with 5G.
For practical purposes, 5G is no longer a differentiator in the German market. Every carrier and every tier — including prepaid and MVNO plans from [Aldi Talk](/en/de/carriers/alditalk/), [Fraenk](/en/de/carriers/fraenk/), [congstar](/en/de/carriers/congstar/), and [1&1](/en/de/carriers/oneandone/) — includes 5G access.
### eSIM
22 of 25 plans (88%) support eSIM. The carriers that support eSIM:
| Carrier | eSIM Plans | Total Plans |
|---|---|---|
| Deutsche [Telekom](/en/de/carriers/telekom/) | 6/6 | 100% |
| Vodafone | 3/3 | 100% |
| O2 | 4/4 | 100% |
| [Fraenk](/en/de/carriers/fraenk/) | 2/2 | 100% |
| [1&1](/en/de/carriers/oneandone/) | 3/3 | 100% |
| [congstar](/en/de/carriers/congstar/) | 4/4 | 100% |
| [Aldi Talk](/en/de/carriers/alditalk/) | 0/3 | 0% |
**[Aldi Talk](/en/de/carriers/alditalk/) is now the only eSIM holdout.** [congstar](/en/de/carriers/congstar/) added eSIM support across its entire lineup in its July 2026 relaunch. If you need eSIM activation (especially useful for travellers who want to set up a German SIM before arriving), choose [Fraenk](/en/de/carriers/fraenk/), [congstar](/en/de/carriers/congstar/), [Telekom](/en/de/carriers/telekom/) Prepaid, O2, or [1&1](/en/de/carriers/oneandone/) instead.
For short-term visitors who need data-only connectivity, travel eSIM providers like [Airalo](/en/travel/providers/airalo/), [Holafly](/en/travel/providers/holafly/), and [Saily](/en/travel/providers/saily/) also cover Germany. However, German domestic plans from [Fraenk](/en/de/carriers/fraenk/) or O2 are often cheaper than travel eSIMs while providing more data and a German phone number. [Fraenk](/en/de/carriers/fraenk/)'s €10 for 25 GB on [Telekom](/en/de/carriers/telekom/)'s network is difficult to beat with any travel eSIM product.
The maths flips below roughly two weeks. A German plan bills a full month whatever you use, and signing up needs a local address — so for a 7-day trip, [Airalo's 1 GB Germany eSIM at $4.00](https://airalo.pxf.io/c/7089584/2071037/15608) or [Saily's 1 GB at $4.49](https://go.saily.site/aff_c?offer_id=101&aff_id=13072) costs less than Aldi Talk's €8.99 and needs no paperwork. Past two weeks, or if you need a German number, Fraenk wins again.
---
## Frequently Asked Questions
### What is the cheapest SIM plan in Germany?
[Aldi Talk](/en/de/carriers/alditalk/) Combo Paket S at €8.99/month is the cheapest, offering 25 GB of data with 5G on the O2 network and no contract. However, it lacks eSIM. For eSIM support, [Fraenk](/en/de/carriers/fraenk/) 25 GB at €10/month on the [Telekom](/en/de/carriers/telekom/) network is the best budget option.
### Can I get a German SIM without a long-term contract?
Yes. 13 of the 25 plans tracked by SimFinder are contract-free (*ohne Vertragsbindung*). All plans from [Fraenk](/en/de/carriers/fraenk/), [congstar](/en/de/carriers/congstar/), [Aldi Talk](/en/de/carriers/alditalk/), [Telekom](/en/de/carriers/telekom/) Prepaid, and O2 Mobile M Flex/Unlimited Max are no-commitment. [Telekom](/en/de/carriers/telekom/) MagentaMobil, Vodafone GigaMobil, O2 Mobile S/L, and [1&1](/en/de/carriers/oneandone/) plans require 24-month contracts.
### Which German carrier has the best network coverage?
Deutsche [Telekom](/en/de/carriers/telekom/) leads with a coverage score of 97/100 and an overall quality score of 92/100 (OpenSignal 2025). Vodafone follows at 93/100 coverage and 85/100 overall. O2 (Telefonica) has improved significantly but still trails at 91/100 coverage and 78/100 overall.
### Is 5G widely available in Germany?
Yes. All 25 plans (100%) include 5G access. All three MNOs have rolled out 5G nationally, and every budget brand — including [Fraenk](/en/de/carriers/fraenk/), [Aldi Talk](/en/de/carriers/alditalk/), [congstar](/en/de/carriers/congstar/), and [1&1](/en/de/carriers/oneandone/) — now includes 5G on every tier.
### Do German SIM plans support eSIM?
22 of 25 plans (88%) support eSIM. All plans from [Telekom](/en/de/carriers/telekom/), Vodafone, O2, [Fraenk](/en/de/carriers/fraenk/), [congstar](/en/de/carriers/congstar/), and [1&1](/en/de/carriers/oneandone/) offer eSIM. The only exception is [Aldi Talk](/en/de/carriers/alditalk/), which does not support eSIM on any of its plans.
### What is the best SIM plan for an expat or tourist in Germany?
[Fraenk](/en/de/carriers/fraenk/) 25 GB at €10/month is the top recommendation for newcomers. It requires no contract, supports eSIM (activate before arrival), runs on the [Telekom](/en/de/carriers/telekom/) network (97/100 coverage), and includes 5G and EU roaming. For heavier data use, [Fraenk](/en/de/carriers/fraenk/) 50 GB at €15/month or O2 Mobile Unlimited Max (unlimited data, €29.99/month, no contract) are strong alternatives.
### Why is [Fraenk](/en/de/carriers/fraenk/) so much cheaper than [Telekom](/en/de/carriers/telekom/) when they use the same network?
[Fraenk](/en/de/carriers/fraenk/) is [Telekom](/en/de/carriers/telekom/)'s own digital-only sub-brand. It offers lower prices by operating entirely through a mobile app with no physical stores and no phone support. [Fraenk](/en/de/carriers/fraenk/) 25 GB costs €10/month while [Telekom](/en/de/carriers/telekom/) MagentaMobil S with 30 GB costs €39.95/month — both on the identical [Telekom](/en/de/carriers/telekom/) network with the same coverage and 5G access.
### What is the cheapest unlimited data plan in Germany?
O2 Mobile Unlimited Max at €29.99/month offers unlimited 5G data with no contract. Vodafone GigaMobil XL is €59.99/month (24-month contract), and [Telekom](/en/de/carriers/telekom/) MagentaMobil XL is €84.95/month (24-month contract). O2's plan is the clear value winner for unlimited data, though its network quality (78/100) is lower than Vodafone (85/100) and [Telekom](/en/de/carriers/telekom/) (92/100).
---
## Key Takeaways
The German SIM market in 2026:
- **7 carriers, 25 plans** — prices range from €8.99/month ([Aldi Talk](/en/de/carriers/alditalk/) Combo Paket S) to €84.95/month ([Telekom](/en/de/carriers/telekom/) MagentaMobil XL)
- **Three MNO networks**: [Telekom](/en/de/carriers/telekom/) (92/100), Vodafone (85/100), O2 (78/100) — plus [1&1](/en/de/carriers/oneandone/) building a fourth
- **Sub-brands save 60-75%**: [Fraenk](/en/de/carriers/fraenk/) 25 GB costs €10 vs [Telekom](/en/de/carriers/telekom/) MagentaMobil S at €39.95 — same network, same coverage
- **O2 owns unlimited value**: Unlimited 5G for €29.99/month with no contract, 65% cheaper than [Telekom](/en/de/carriers/telekom/)'s unlimited plan
- **5G is universal** (100% of plans), and **eSIM covers 88%** — [Aldi Talk](/en/de/carriers/alditalk/) is now the only holdout
- **13 of 25 plans are contract-free** — 12 plans require a 24-month commitment
- **For most users**: [Fraenk](/en/de/carriers/fraenk/) 50 GB at €15/month offers the best balance of data, price, and network quality ([Telekom](/en/de/carriers/telekom/))
Germany's mobile market rewards those who look beyond the three MNO brands. The networks are identical; the prices are not.
**[Find Your Best German SIM Plan →](/en/de/search/)**
---
*Plan data updated July 2026 (carrier lineup changes: congstar restructure, O2/1&1 price updates). Prices and inclusions may change. Check carrier websites for the latest information.*
*Compare all plans side by side using [SimFinder's comparison tool](/en/de/search/).*
================================================================================
# Best SIM Plans in South Korea 2026: Guide for Foreigners
URL: https://sim-finder.com/en/blog/best-sim-plans-korea-2026/
Type: blog (en)
Published: 2026-03-18
## TL;DR: Top 3 Picks for Foreigners
| Best For | Plan | Price/mo | Why |
|---------|-------|------|---------|
| **Short Trip (eSIM)** | [Airalo](/en/travel/kr/search/) 1GB / 7 days | $4.50 | No ID needed, instant setup, SKT network |
| **Budget Resident** | [KT M Mobile](/en/kr/carriers/ktmmobile/) 3GB | 5,900 KRW | Unlimited calls, [KT](/en/kr/carriers/kt/) network (90/100) |
| **Best Value 5G** | [LG U+](/en/kr/carriers/lguplus/) 5G Slim 5GB | 37,000 KRW | Cheapest MNO 5G, eSIM, great coverage |
**[Compare All 23 Korean Plans on SimFinder →](/en/kr/search/)**
Whether you are visiting Seoul for a week or starting a semester at a Korean university, this guide covers every option — from travel eSIMs you can activate before landing to long-term domestic plans.
## Table of Contents
- [South Korea's Mobile Market at a Glance](#south-koreas-mobile-market-at-a-glance)
- [Carrier Structure: MNOs, MVNOs, and How They Connect](#carrier-structure-mnos-mvnos-and-how-they-connect)
- [All 23 Plans Compared](#all-23-plans-compared)
- [Travel eSIM Options for Foreigners](#travel-esim-options-for-foreigners)
- [Best Plan by Situation](#best-plan-by-situation)
- [5G and eSIM Availability](#5g-and-esim-availability)
- [What Users Say](#what-users-say)
- [Frequently Asked Questions](#frequently-asked-questions)
- [Key Takeaways](#key-takeaways)
---
## South Korea's Mobile Market at a Glance
South Korea's mobile infrastructure is among the fastest in the world. The country launched commercial 5G in April 2019 — a global first — and its three major carriers consistently rank among the top globally for download speeds.
SimFinder tracks **6 carriers and 23 domestic plans** in South Korea. Monthly prices range from 4,000 KRW (~$3) to 89,000 KRW (~$65). On top of that, **11 international eSIM providers** offer 144 travel data plans for visitors who do not need a Korean phone number.
For foreigners, the key distinction is between **domestic SIM plans** (requiring some form of ID) and **travel eSIMs** (data-only, no ID, instant activation). This guide covers both.
| Metric | [SK Telecom](/en/kr/carriers/skt/) | [KT](/en/kr/carriers/kt/) | [LG U+](/en/kr/carriers/lguplus/) |
|---|---|---|---|
| Overall Score | 93/100 | 90/100 | 88/100 |
| Coverage Score | 97/100 | 96/100 | 95/100 |
| Download Speed | 200.0 Mbps | 185.5 Mbps | 175.2 Mbps |
| Upload Speed | 25.0 Mbps | 22.0 Mbps | 21.5 Mbps |
| Latency | 18 ms | 20 ms | 21 ms |
*Quality data: OpenSignal 2025, measured June 2025*
Unlike many countries where one carrier dominates, South Korea's three MNOs are closely matched. Coverage scores range from 95 to 97 out of 100, meaning dead spots are rare — even on subways and in rural areas. The practical difference between them is small, so price and plan features matter more than network choice.
---
## Carrier Structure: MNOs, MVNOs, and How They Connect
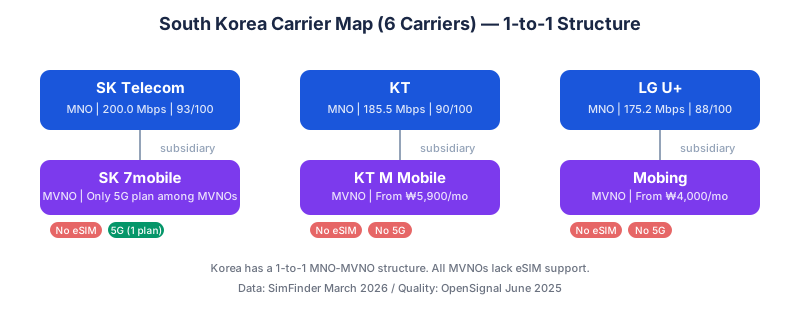 South Korea has a uniquely simple carrier structure: **each MNO has exactly one MVNO subsidiary**. There are no independent MVNOs competing across networks like in Australia, the US, or Japan.
| MNO | Overall Score | MVNO (Subsidiary) | MVNO Network |
|---|---|---|---|
| **[SK Telecom](/en/kr/carriers/skt/)** | 93/100 | [SK 7mobile](/en/kr/carriers/sevenmobile/) | SKT network |
| **[KT](/en/kr/carriers/kt/)** | 90/100 | [KT M Mobile](/en/kr/carriers/ktmmobile/) | [KT](/en/kr/carriers/kt/) network |
| **[LG U+](/en/kr/carriers/lguplus/)** | 88/100 | [Mobing](/en/kr/carriers/mobing/) | [LG U+](/en/kr/carriers/lguplus/) network |
This 1-to-1 structure means fewer choices than markets like Japan (which has dozens of MVNOs), but it also means less confusion. Each MVNO rides on its parent's network, offering dramatically lower prices at the cost of eSIM support, 5G access, and some features.
**What this means for foreigners**: If you need eSIM (common for travelers), your only options are the three MNOs. MVNOs require physical SIM cards and generally an Alien Registration Card (ARC).
---
## All 23 Plans Compared
### MNO Plans (SKT, [KT](/en/kr/carriers/kt/), [LG U+](/en/kr/carriers/lguplus/) — 14 Plans)
All MNO plans include unlimited voice calls, eSIM support, no contract, and no cancellation fees. Family discounts apply to all MNO plans with 2+ lines.
| Carrier | Plan | Price/mo | Data | 5G | Family Discount |
|---|---|---|---|---|---|
| [KT](/en/kr/carriers/kt/) | LTE Basic | 33,000 KRW | 1GB | No | 2,000 KRW |
| SKT | T Plan Save | 33,000 KRW | 2GB | No | 2,000 KRW |
| [LG U+](/en/kr/carriers/lguplus/) | 5G Slim 5GB | 37,000 KRW | 5GB | Yes | 3,000 KRW |
| SKT | 5GX Compact | 39,000 KRW | 6GB | Yes | 3,000 KRW |
| SKT | 5GX Compact Plus | 45,000 KRW | 8GB | Yes | 3,000 KRW |
| [KT](/en/kr/carriers/kt/) | 5G Slim 10GB | 50,000 KRW | 10GB | Yes | 4,000 KRW |
| [KT](/en/kr/carriers/kt/) | 5G Slim 21GB | 58,000 KRW | 21GB | Yes | 4,000 KRW |
| [LG U+](/en/kr/carriers/lguplus/) | 5G Standard 31GB | 61,000 KRW | 31GB | Yes | 5,000 KRW |
| [KT](/en/kr/carriers/kt/) | 5G Simple 50GB | 63,000 KRW | 50GB | Yes | 5,000 KRW |
| SKT | 5GX Regular | 69,000 KRW | 48GB | Yes | 5,000 KRW |
| [LG U+](/en/kr/carriers/lguplus/) | LTE Data Unlimited | 69,000 KRW | Unlimited | No | 5,000 KRW |
| [KT](/en/kr/carriers/kt/) | 5G Basic Unlimited | 80,000 KRW | Unlimited | Yes | 7,000 KRW |
| [LG U+](/en/kr/carriers/lguplus/) | 5G Premier Essential | 85,000 KRW | Unlimited | Yes | 7,000 KRW |
| SKT | 5GX Prime | 89,000 KRW | Unlimited | Yes | 7,000 KRW |
### MVNO Plans ([SK 7mobile](/en/kr/carriers/sevenmobile/), [KT](/en/kr/carriers/kt/) M Mobile, [Mobing](/en/kr/carriers/mobing/) — 9 Plans)
MVNOs have no eSIM support on any plan. Only one MVNO plan offers 5G.
| Carrier | Network | Plan | Price/mo | Data | Voice | 5G |
|---|---|---|---|---|---|---|
| [Mobing](/en/kr/carriers/mobing/) | [LG U+](/en/kr/carriers/lguplus/) | 3GB | 4,000 KRW | 3GB | 100 min | No |
| [KT](/en/kr/carriers/kt/) M Mobile | [KT](/en/kr/carriers/kt/) | 3GB | 5,900 KRW | 3GB | Unlimited | No |
| [SK 7mobile](/en/kr/carriers/sevenmobile/) | SKT | LTE 1GB | 9,920 KRW | 1GB | Unlimited | No |
| [KT](/en/kr/carriers/kt/) M Mobile | [KT](/en/kr/carriers/kt/) | 10GB | 11,900 KRW | 10GB | Unlimited | No |
| [Mobing](/en/kr/carriers/mobing/) | [LG U+](/en/kr/carriers/lguplus/) | 15GB+ | 25,370 KRW | 15GB | 100 min | No |
| [SK 7mobile](/en/kr/carriers/sevenmobile/) | SKT | LTE 11GB+ | 33,000 KRW | 11GB | Unlimited | No |
| [Mobing](/en/kr/carriers/mobing/) | [LG U+](/en/kr/carriers/lguplus/) | Daily 5GB+ | 37,000 KRW | Unlimited | Unlimited | No |
| [KT](/en/kr/carriers/kt/) M Mobile | [KT](/en/kr/carriers/kt/) | 100GB+ | 38,200 KRW | 100GB | Unlimited | No |
| [SK 7mobile](/en/kr/carriers/sevenmobile/) | SKT | 5G 110GB+ | 45,100 KRW | 110GB | Unlimited | Yes |
The price gap between MNOs and MVNOs is stark: **MNO plans start at 33,000 KRW while MVNOs start at just 4,000 KRW** — an 8x difference for access to the same underlying network.
**[Compare Korean SIM Plans Side by Side →](/en/kr/search/)**
---
## Travel eSIM Options for Foreigners
If you are visiting South Korea for a short trip, a travel eSIM is the easiest way to get connected. No Korean ID required, no store visits, and you can install it before you land. SimFinder tracks **144 plans from 11 providers** for South Korea.
### Best Travel eSIM Picks
| Provider | Plan | Price | Data | Duration | Best For |
|---|---|---|---|---|---|
| [eSIM2Fly](/en/travel/providers/esim2fly/) | 1GB | $2.50 | 1GB | 7 days | Ultra-budget, light use |
| [Nomad](/en/travel/providers/nomad/) | 1GB | $4.00 | 1GB | 7 days | Budget with good app |
| [Airalo](/en/travel/providers/airalo/) | 1GB | $4.50 | 1GB | 7 days | Most popular, wide support |
| [eSIM2Fly](/en/travel/providers/esim2fly/) | 5GB | $6.20 | 5GB | 30 days | Best value per GB |
| [Saily](/en/travel/providers/saily/) | 1GB | $3.99 | 1GB | 7 days | NordVPN team, good app |
| [Ubigi](/en/travel/providers/ubigi/) | 10GB | $16.00 | 10GB | 30 days | Heavy data, long stay |
| [Holafly](/en/travel/providers/holafly/) | Unlimited 7d | $29.90 | Unlimited | 7 days | No data worries, 1 week |
| [Nomad](/en/travel/providers/nomad/) | Unlimited 10d | $31.00 | Unlimited | 10 days | No data worries, 10 days |
### Unlimited Travel eSIM Comparison
For travelers who want unlimited data without thinking about usage:
| Provider | Duration | Price | Notes |
|---|---|---|---|
| [Holafly](/en/travel/providers/holafly/) | 1 day | $6.90 | Day-by-day flexibility |
| [Holafly](/en/travel/providers/holafly/) | 7 days | $29.90 | Most granular durations (1-30 days) |
| [Nomad](/en/travel/providers/nomad/) | 3 days | $11.00 | Good for weekend trips |
| [Maya Mobile](/en/travel/providers/maya/) | 5 days | $14.99 | Competitive short-stay price |
| [Saily](/en/travel/providers/saily/) | 5 days | $18.99 | NordVPN ecosystem |
| [Airalo](/en/travel/providers/airalo/) | 10 days | $32.00 | Throttled to 5 Mbps after 3GB/day |
| [Ubigi](/en/travel/providers/ubigi/) | 7 days | $25.00 | NTT Group backing |
| [Yesim](/en/travel/providers/yesim/) | 7 days | $23.00 | Strong app experience |
| [GigSky](/en/travel/providers/gigsky/) | 7 days | $37.99 | Premium pricing |
| [Holafly](/en/travel/providers/holafly/) | 30 days | $74.90 | Best for month-long stays |
**Important**: Most travel eSIMs are data-only. They do not provide a Korean phone number or voice calling. If you need a Korean number (for bank accounts, deliveries, etc.), you will need a domestic SIM plan from an MNO.
**[Compare Travel eSIMs for South Korea →](/en/travel/kr/search/)**
---
## Best Plan by Situation
### Tourist (1-14 days)
**Travel eSIM — [Airalo](/en/travel/providers/airalo/) 1GB/7 days at $4.50** is the safe default. For heavier use, [Nomad](/en/travel/providers/nomad/)'s unlimited 10-day plan at $31.00 removes data anxiety entirely. Install before departure, activate on arrival — no store, no wait, no ID.
If you must have a Korean phone number (for KakaoTalk verification, food delivery apps, or local services), pick up a prepaid SIM at Incheon Airport from [KT](/en/kr/carriers/kt/) or SKT. Expect to pay around 33,000 KRW for a basic plan. Bring your passport.
### Short-term Stay (2-4 weeks)
**[eSIM2Fly](/en/travel/providers/esim2fly/) 5GB/30 days at $6.20** is the best value if your usage is moderate. For unlimited data, **[Holafly](/en/travel/providers/holafly/)** offers daily-granularity pricing from $6.90/day up to $74.90 for a full 30 days.
If you plan to stay 3-4 weeks and need calls, consider an MNO eSIM plan. **[LG U+](/en/kr/carriers/lguplus/) 5G Slim 5GB at 37,000 KRW/month** gives you a Korean number, 5G speeds, and eSIM convenience.
### International Student
Students typically need a Korean phone number, decent data, and low monthly costs. The process requires an **Alien Registration Card (ARC)**, which takes 2-3 weeks after arrival to receive.
**Phase 1 (first 2-3 weeks)**: Use a travel eSIM while waiting for your ARC. [Ubigi](/en/travel/providers/ubigi/)'s 20GB/1,000 days plan at $18.00 is unusually flexible for this gap period.
**Phase 2 (with ARC)**: Switch to **[KT](/en/kr/carriers/kt/) M Mobile 10GB at 11,900 KRW/month** for a budget option on the [KT](/en/kr/carriers/kt/) network, or **[SK 7mobile](/en/kr/carriers/sevenmobile/) LTE 11GB+ at 33,000 KRW/month** for more data on the SKT network. Neither supports eSIM, so you will need a physical SIM from a carrier shop.
### Long-term Resident / Worker
For those staying 6+ months with stable income, MNO plans offer the best combination of features. **SKT 5GX Compact at 39,000 KRW/month** gives you 6GB with 5G, eSIM, unlimited calls, and family discount eligibility (3,000 KRW off per line with 2+ lines).
For heavy data users, **[KT](/en/kr/carriers/kt/) M Mobile 100GB+ at 38,200 KRW/month** is hard to beat — 100GB for less than what MNOs charge for 10GB on 5G. The trade-off is LTE-only and no eSIM.
**[Find Your Best Korean SIM Plan →](/en/kr/search/)**
---
## 5G and eSIM Availability
### eSIM
eSIM availability splits cleanly along the MNO/MVNO divide:
| Category | eSIM Support | Plans |
|---|---|---|
| MNO (SKT, [KT](/en/kr/carriers/kt/), [LG U+](/en/kr/carriers/lguplus/)) | **All plans** | 14/14 |
| MVNO ([SK 7mobile](/en/kr/carriers/sevenmobile/), [KT](/en/kr/carriers/kt/) M Mobile, [Mobing](/en/kr/carriers/mobing/)) | **No plans** | 0/9 |
| Total | | 14/23 (61%) |
For foreigners arriving without a physical SIM, this means **MNO plans are the only domestic option** unless you visit a carrier store for a physical SIM card. The cheapest eSIM-compatible domestic plan is [KT](/en/kr/carriers/kt/) LTE Basic or SKT T Plan Save at 33,000 KRW/month.
### 5G
12 out of 23 plans (52%) support 5G:
- **MNO**: 11 of 14 plans have 5G (the 3 LTE-only plans are entry-tier)
- **MVNO**: Only 1 of 9 plans — [SK 7mobile](/en/kr/carriers/sevenmobile/) 5G 110GB+ at 45,100 KRW
South Korea's 5G speeds are among the world's fastest. [SK Telecom](/en/kr/carriers/skt/) delivers 200.0 Mbps average download, [KT](/en/kr/carriers/kt/) hits 185.5 Mbps, and [LG U+](/en/kr/carriers/lguplus/) reaches 175.2 Mbps. If you have a 5G-capable phone, the speed difference over LTE is noticeable — especially for video streaming and large downloads.
---
## What Users Say
Real posts from travelers and residents about connectivity in South Korea.
> "Need an eSIM while exploring Korea? Conveniently purchase at WOWPASS machines located in hotels! Unlimited data, 4G LTE 100Mbps. Get a Korean phone number, calls & text functions available. Powered by SKT. 3 to 30-day plans available."
> — @wowpass_global ([original post](https://x.com/wowpass_global/status/1909536629150433378))
> "Heading to South Korea? Leave Google Maps behind (it's a bit wonky there). Here are some MUST-HAVE apps: [Airalo](/en/travel/providers/airalo/) - Stay connected with affordable local eSIMs. NaverMap - Your go-to map app in Korea."
> — @khyatimaloo ([original post](https://x.com/khyatimaloo/status/1717404481296490983))
> "Travel eSIM data plans for South Korea: 20GB / 30 Days at USD 12.99, 10GB / 15 Days at USD 7.99 from MobiMatter."
> — @esimdb ([original post](https://x.com/esimdb/status/1873351512195223979))
*Individual experiences may vary based on location and network conditions.*
---
## Frequently Asked Questions
### Can I get a Korean SIM card as a tourist without a Korean ID?
Yes, but with limitations. MNO plans (SKT, [KT](/en/kr/carriers/kt/), [LG U+](/en/kr/carriers/lguplus/)) can be purchased with a passport at airport counters or carrier shops. MVNOs generally require an Alien Registration Card (ARC). For short visits, travel eSIMs are the simplest option — [Airalo](/en/travel/providers/airalo/) offers plans from $4.50 and [Nomad](/en/travel/providers/nomad/) from $4.00 with no ID required.
### What is the cheapest way to get mobile data in South Korea?
For tourists, [eSIM2Fly](/en/travel/providers/esim2fly/) offers 1GB/7 days for just $2.50 and 3GB/30 days for $4.60. For residents with an ARC, the cheapest domestic plan is [Mobing](/en/kr/carriers/mobing/) at 4,000 KRW/month for 3GB on the [LG U+](/en/kr/carriers/lguplus/) network.
### Does South Korea have good 5G coverage?
Yes. South Korea was the first country to launch commercial 5G in 2019. [SK Telecom](/en/kr/carriers/skt/) leads with 200.0 Mbps download speeds. All three MNOs offer 5G plans with coverage scores of 95-97 out of 100. However, MVNOs mostly lack 5G — only [SK 7mobile](/en/kr/carriers/sevenmobile/) has one 5G plan.
### Should I buy a local SIM or use a travel eSIM?
It depends on your stay length. For trips under 30 days, travel eSIMs are simpler — no ID required, instant activation, and plans from $2.50. For stays over 1 month, a local MNO plan with eSIM (from 33,000 KRW/month) gives you a Korean phone number, better speeds, and is more cost-effective long-term.
### Do Korean MVNOs support eSIM?
No. As of March 2026, all three Korean MVNOs ([SK 7mobile](/en/kr/carriers/sevenmobile/), [KT](/en/kr/carriers/kt/) M Mobile, [Mobing](/en/kr/carriers/mobing/)) require physical SIM cards. Only the three MNOs ([SK Telecom](/en/kr/carriers/skt/), [KT](/en/kr/carriers/kt/), [LG U+](/en/kr/carriers/lguplus/)) support eSIM — 14 out of 23 plans total.
### Which carrier has the best coverage in South Korea?
[SK Telecom](/en/kr/carriers/skt/) leads with a coverage score of 97/100 and overall score of 93/100 (OpenSignal 2025). [KT](/en/kr/carriers/kt/) follows at 96/100, and [LG U+](/en/kr/carriers/lguplus/) at 95/100. The gap between carriers is small — all three provide reliable coverage across the country, including rural areas and subway systems.
### Can I keep my Korean number if I switch carriers?
Yes. South Korea supports mobile number portability (MNP). You can transfer your number between carriers, including from MNO to MVNO or vice versa. The process typically takes 1-2 hours at a carrier store.
---
## Key Takeaways
The South Korean mobile market in 2026, from a foreigner's perspective:
- **6 carriers, 23 domestic plans** — 3 MNOs and 3 MVNOs in a unique 1-to-1 structure
- **Network quality is world-class** — all MNOs score 88-93/100 overall, with 5G speeds up to 200.0 Mbps
- **Travel eSIMs start from $2.50** — 11 providers offer 144 plans for South Korea, no ID needed
- **Domestic eSIM is MNO-only** — 14 of 23 plans support eSIM, all from MNOs (from 33,000 KRW/month)
- **MVNOs are dramatically cheaper** — from 4,000 KRW/month, but require physical SIM and an ARC
- **5G on 52% of plans** (12/23) — mostly MNO; MVNO 5G is limited to one [SK 7mobile](/en/kr/carriers/sevenmobile/) plan
- **No data rollover** on any plan — unused data expires at month end, unlike Australia or Japan
For tourists: get a travel eSIM before departure. For residents: start with a travel eSIM while waiting for your ARC, then switch to a domestic plan.
**[Find Your Best Korean SIM Plan →](/en/kr/search/)**
---
*Plan data is current as of March 2026. Prices and inclusions may change. Check carrier websites for the latest information. Travel eSIM prices are in USD and were last verified March 2026.*
*Compare all plans side by side using [SimFinder's comparison tool](/en/kr/search/).*
================================================================================
# Best SIM Plans in Singapore 2026: 6 Carriers, 21 Plans Compared
URL: https://sim-finder.com/en/blog/best-sim-plans-singapore-2026/
Type: blog (en)
Published: 2026-03-21
## TL;DR: Top 3 Picks for Singapore
| Best For | Plan | Price/mo | Why |
|---------|-------|------|---------|
| **Budget** | [Circles.Life](/en/sg/carriers/circleslife/) 4G Core | S$10.80 | Cheapest plan, 350GB data, unlimited calls |
| **Most People** | [M1](/en/sg/carriers/m1/) SIM Only 150GB 5G | S$14.95 | 5G, eSIM, 150GB, no contract — hard to beat at this price |
| **Speed** | [Singtel](/en/sg/carriers/singtel/) Enhanced Core Unlimited 5G | S$40 | Unlimited data, fastest network (182.5 Mbps), 700 min calls |
**[Compare All 21 Singapore Plans on SimFinder →](/en/sg/search/)**
Below, we break down the entire market using real plan data.
## Table of Contents
- [The Singapore Mobile Landscape](#the-singapore-mobile-landscape-who-owns-what)
- [Price Breakdown: What Every Carrier Charges](#price-breakdown-what-every-carrier-charges)
- [Best Value Plans by Use Case](#best-value-plans-by-use-case)
- [5G and eSIM: What's Available](#5g-and-esim-whats-available)
- [What Users Say](#what-users-say)
- [Frequently Asked Questions](#frequently-asked-questions)
- [Key Takeaways](#key-takeaways)
---
Singapore's mobile market runs on three networks — [Singtel](/en/sg/carriers/singtel/), [StarHub](/en/sg/carriers/starhub/), and [M1](/en/sg/carriers/m1/) — each with at least one budget sub-brand or MVNO offering the same coverage at lower prices.
SimFinder's database tracks **6 carriers and 21 plans** in Singapore. Prices start at just S$10.80/month and go up to S$55/month. Nearly all plans are contract-free, and with Singapore being a compact city-state, coverage differences between the three MNOs are marginal.
This guide breaks down the entire Singapore SIM market using actual plan data, network quality scores, and pricing analysis.
---
## The Singapore Mobile Landscape: Who Owns What
South Korea has a uniquely simple carrier structure: **each MNO has exactly one MVNO subsidiary**. There are no independent MVNOs competing across networks like in Australia, the US, or Japan.
| MNO | Overall Score | MVNO (Subsidiary) | MVNO Network |
|---|---|---|---|
| **[SK Telecom](/en/kr/carriers/skt/)** | 93/100 | [SK 7mobile](/en/kr/carriers/sevenmobile/) | SKT network |
| **[KT](/en/kr/carriers/kt/)** | 90/100 | [KT M Mobile](/en/kr/carriers/ktmmobile/) | [KT](/en/kr/carriers/kt/) network |
| **[LG U+](/en/kr/carriers/lguplus/)** | 88/100 | [Mobing](/en/kr/carriers/mobing/) | [LG U+](/en/kr/carriers/lguplus/) network |
This 1-to-1 structure means fewer choices than markets like Japan (which has dozens of MVNOs), but it also means less confusion. Each MVNO rides on its parent's network, offering dramatically lower prices at the cost of eSIM support, 5G access, and some features.
**What this means for foreigners**: If you need eSIM (common for travelers), your only options are the three MNOs. MVNOs require physical SIM cards and generally an Alien Registration Card (ARC).
---
## All 23 Plans Compared
### MNO Plans (SKT, [KT](/en/kr/carriers/kt/), [LG U+](/en/kr/carriers/lguplus/) — 14 Plans)
All MNO plans include unlimited voice calls, eSIM support, no contract, and no cancellation fees. Family discounts apply to all MNO plans with 2+ lines.
| Carrier | Plan | Price/mo | Data | 5G | Family Discount |
|---|---|---|---|---|---|
| [KT](/en/kr/carriers/kt/) | LTE Basic | 33,000 KRW | 1GB | No | 2,000 KRW |
| SKT | T Plan Save | 33,000 KRW | 2GB | No | 2,000 KRW |
| [LG U+](/en/kr/carriers/lguplus/) | 5G Slim 5GB | 37,000 KRW | 5GB | Yes | 3,000 KRW |
| SKT | 5GX Compact | 39,000 KRW | 6GB | Yes | 3,000 KRW |
| SKT | 5GX Compact Plus | 45,000 KRW | 8GB | Yes | 3,000 KRW |
| [KT](/en/kr/carriers/kt/) | 5G Slim 10GB | 50,000 KRW | 10GB | Yes | 4,000 KRW |
| [KT](/en/kr/carriers/kt/) | 5G Slim 21GB | 58,000 KRW | 21GB | Yes | 4,000 KRW |
| [LG U+](/en/kr/carriers/lguplus/) | 5G Standard 31GB | 61,000 KRW | 31GB | Yes | 5,000 KRW |
| [KT](/en/kr/carriers/kt/) | 5G Simple 50GB | 63,000 KRW | 50GB | Yes | 5,000 KRW |
| SKT | 5GX Regular | 69,000 KRW | 48GB | Yes | 5,000 KRW |
| [LG U+](/en/kr/carriers/lguplus/) | LTE Data Unlimited | 69,000 KRW | Unlimited | No | 5,000 KRW |
| [KT](/en/kr/carriers/kt/) | 5G Basic Unlimited | 80,000 KRW | Unlimited | Yes | 7,000 KRW |
| [LG U+](/en/kr/carriers/lguplus/) | 5G Premier Essential | 85,000 KRW | Unlimited | Yes | 7,000 KRW |
| SKT | 5GX Prime | 89,000 KRW | Unlimited | Yes | 7,000 KRW |
### MVNO Plans ([SK 7mobile](/en/kr/carriers/sevenmobile/), [KT](/en/kr/carriers/kt/) M Mobile, [Mobing](/en/kr/carriers/mobing/) — 9 Plans)
MVNOs have no eSIM support on any plan. Only one MVNO plan offers 5G.
| Carrier | Network | Plan | Price/mo | Data | Voice | 5G |
|---|---|---|---|---|---|---|
| [Mobing](/en/kr/carriers/mobing/) | [LG U+](/en/kr/carriers/lguplus/) | 3GB | 4,000 KRW | 3GB | 100 min | No |
| [KT](/en/kr/carriers/kt/) M Mobile | [KT](/en/kr/carriers/kt/) | 3GB | 5,900 KRW | 3GB | Unlimited | No |
| [SK 7mobile](/en/kr/carriers/sevenmobile/) | SKT | LTE 1GB | 9,920 KRW | 1GB | Unlimited | No |
| [KT](/en/kr/carriers/kt/) M Mobile | [KT](/en/kr/carriers/kt/) | 10GB | 11,900 KRW | 10GB | Unlimited | No |
| [Mobing](/en/kr/carriers/mobing/) | [LG U+](/en/kr/carriers/lguplus/) | 15GB+ | 25,370 KRW | 15GB | 100 min | No |
| [SK 7mobile](/en/kr/carriers/sevenmobile/) | SKT | LTE 11GB+ | 33,000 KRW | 11GB | Unlimited | No |
| [Mobing](/en/kr/carriers/mobing/) | [LG U+](/en/kr/carriers/lguplus/) | Daily 5GB+ | 37,000 KRW | Unlimited | Unlimited | No |
| [KT](/en/kr/carriers/kt/) M Mobile | [KT](/en/kr/carriers/kt/) | 100GB+ | 38,200 KRW | 100GB | Unlimited | No |
| [SK 7mobile](/en/kr/carriers/sevenmobile/) | SKT | 5G 110GB+ | 45,100 KRW | 110GB | Unlimited | Yes |
The price gap between MNOs and MVNOs is stark: **MNO plans start at 33,000 KRW while MVNOs start at just 4,000 KRW** — an 8x difference for access to the same underlying network.
**[Compare Korean SIM Plans Side by Side →](/en/kr/search/)**
---
## Travel eSIM Options for Foreigners
If you are visiting South Korea for a short trip, a travel eSIM is the easiest way to get connected. No Korean ID required, no store visits, and you can install it before you land. SimFinder tracks **144 plans from 11 providers** for South Korea.
### Best Travel eSIM Picks
| Provider | Plan | Price | Data | Duration | Best For |
|---|---|---|---|---|---|
| [eSIM2Fly](/en/travel/providers/esim2fly/) | 1GB | $2.50 | 1GB | 7 days | Ultra-budget, light use |
| [Nomad](/en/travel/providers/nomad/) | 1GB | $4.00 | 1GB | 7 days | Budget with good app |
| [Airalo](/en/travel/providers/airalo/) | 1GB | $4.50 | 1GB | 7 days | Most popular, wide support |
| [eSIM2Fly](/en/travel/providers/esim2fly/) | 5GB | $6.20 | 5GB | 30 days | Best value per GB |
| [Saily](/en/travel/providers/saily/) | 1GB | $3.99 | 1GB | 7 days | NordVPN team, good app |
| [Ubigi](/en/travel/providers/ubigi/) | 10GB | $16.00 | 10GB | 30 days | Heavy data, long stay |
| [Holafly](/en/travel/providers/holafly/) | Unlimited 7d | $29.90 | Unlimited | 7 days | No data worries, 1 week |
| [Nomad](/en/travel/providers/nomad/) | Unlimited 10d | $31.00 | Unlimited | 10 days | No data worries, 10 days |
### Unlimited Travel eSIM Comparison
For travelers who want unlimited data without thinking about usage:
| Provider | Duration | Price | Notes |
|---|---|---|---|
| [Holafly](/en/travel/providers/holafly/) | 1 day | $6.90 | Day-by-day flexibility |
| [Holafly](/en/travel/providers/holafly/) | 7 days | $29.90 | Most granular durations (1-30 days) |
| [Nomad](/en/travel/providers/nomad/) | 3 days | $11.00 | Good for weekend trips |
| [Maya Mobile](/en/travel/providers/maya/) | 5 days | $14.99 | Competitive short-stay price |
| [Saily](/en/travel/providers/saily/) | 5 days | $18.99 | NordVPN ecosystem |
| [Airalo](/en/travel/providers/airalo/) | 10 days | $32.00 | Throttled to 5 Mbps after 3GB/day |
| [Ubigi](/en/travel/providers/ubigi/) | 7 days | $25.00 | NTT Group backing |
| [Yesim](/en/travel/providers/yesim/) | 7 days | $23.00 | Strong app experience |
| [GigSky](/en/travel/providers/gigsky/) | 7 days | $37.99 | Premium pricing |
| [Holafly](/en/travel/providers/holafly/) | 30 days | $74.90 | Best for month-long stays |
**Important**: Most travel eSIMs are data-only. They do not provide a Korean phone number or voice calling. If you need a Korean number (for bank accounts, deliveries, etc.), you will need a domestic SIM plan from an MNO.
**[Compare Travel eSIMs for South Korea →](/en/travel/kr/search/)**
---
## Best Plan by Situation
### Tourist (1-14 days)
**Travel eSIM — [Airalo](/en/travel/providers/airalo/) 1GB/7 days at $4.50** is the safe default. For heavier use, [Nomad](/en/travel/providers/nomad/)'s unlimited 10-day plan at $31.00 removes data anxiety entirely. Install before departure, activate on arrival — no store, no wait, no ID.
If you must have a Korean phone number (for KakaoTalk verification, food delivery apps, or local services), pick up a prepaid SIM at Incheon Airport from [KT](/en/kr/carriers/kt/) or SKT. Expect to pay around 33,000 KRW for a basic plan. Bring your passport.
### Short-term Stay (2-4 weeks)
**[eSIM2Fly](/en/travel/providers/esim2fly/) 5GB/30 days at $6.20** is the best value if your usage is moderate. For unlimited data, **[Holafly](/en/travel/providers/holafly/)** offers daily-granularity pricing from $6.90/day up to $74.90 for a full 30 days.
If you plan to stay 3-4 weeks and need calls, consider an MNO eSIM plan. **[LG U+](/en/kr/carriers/lguplus/) 5G Slim 5GB at 37,000 KRW/month** gives you a Korean number, 5G speeds, and eSIM convenience.
### International Student
Students typically need a Korean phone number, decent data, and low monthly costs. The process requires an **Alien Registration Card (ARC)**, which takes 2-3 weeks after arrival to receive.
**Phase 1 (first 2-3 weeks)**: Use a travel eSIM while waiting for your ARC. [Ubigi](/en/travel/providers/ubigi/)'s 20GB/1,000 days plan at $18.00 is unusually flexible for this gap period.
**Phase 2 (with ARC)**: Switch to **[KT](/en/kr/carriers/kt/) M Mobile 10GB at 11,900 KRW/month** for a budget option on the [KT](/en/kr/carriers/kt/) network, or **[SK 7mobile](/en/kr/carriers/sevenmobile/) LTE 11GB+ at 33,000 KRW/month** for more data on the SKT network. Neither supports eSIM, so you will need a physical SIM from a carrier shop.
### Long-term Resident / Worker
For those staying 6+ months with stable income, MNO plans offer the best combination of features. **SKT 5GX Compact at 39,000 KRW/month** gives you 6GB with 5G, eSIM, unlimited calls, and family discount eligibility (3,000 KRW off per line with 2+ lines).
For heavy data users, **[KT](/en/kr/carriers/kt/) M Mobile 100GB+ at 38,200 KRW/month** is hard to beat — 100GB for less than what MNOs charge for 10GB on 5G. The trade-off is LTE-only and no eSIM.
**[Find Your Best Korean SIM Plan →](/en/kr/search/)**
---
## 5G and eSIM Availability
### eSIM
eSIM availability splits cleanly along the MNO/MVNO divide:
| Category | eSIM Support | Plans |
|---|---|---|
| MNO (SKT, [KT](/en/kr/carriers/kt/), [LG U+](/en/kr/carriers/lguplus/)) | **All plans** | 14/14 |
| MVNO ([SK 7mobile](/en/kr/carriers/sevenmobile/), [KT](/en/kr/carriers/kt/) M Mobile, [Mobing](/en/kr/carriers/mobing/)) | **No plans** | 0/9 |
| Total | | 14/23 (61%) |
For foreigners arriving without a physical SIM, this means **MNO plans are the only domestic option** unless you visit a carrier store for a physical SIM card. The cheapest eSIM-compatible domestic plan is [KT](/en/kr/carriers/kt/) LTE Basic or SKT T Plan Save at 33,000 KRW/month.
### 5G
12 out of 23 plans (52%) support 5G:
- **MNO**: 11 of 14 plans have 5G (the 3 LTE-only plans are entry-tier)
- **MVNO**: Only 1 of 9 plans — [SK 7mobile](/en/kr/carriers/sevenmobile/) 5G 110GB+ at 45,100 KRW
South Korea's 5G speeds are among the world's fastest. [SK Telecom](/en/kr/carriers/skt/) delivers 200.0 Mbps average download, [KT](/en/kr/carriers/kt/) hits 185.5 Mbps, and [LG U+](/en/kr/carriers/lguplus/) reaches 175.2 Mbps. If you have a 5G-capable phone, the speed difference over LTE is noticeable — especially for video streaming and large downloads.
---
## What Users Say
Real posts from travelers and residents about connectivity in South Korea.
> "Need an eSIM while exploring Korea? Conveniently purchase at WOWPASS machines located in hotels! Unlimited data, 4G LTE 100Mbps. Get a Korean phone number, calls & text functions available. Powered by SKT. 3 to 30-day plans available."
> — @wowpass_global ([original post](https://x.com/wowpass_global/status/1909536629150433378))
> "Heading to South Korea? Leave Google Maps behind (it's a bit wonky there). Here are some MUST-HAVE apps: [Airalo](/en/travel/providers/airalo/) - Stay connected with affordable local eSIMs. NaverMap - Your go-to map app in Korea."
> — @khyatimaloo ([original post](https://x.com/khyatimaloo/status/1717404481296490983))
> "Travel eSIM data plans for South Korea: 20GB / 30 Days at USD 12.99, 10GB / 15 Days at USD 7.99 from MobiMatter."
> — @esimdb ([original post](https://x.com/esimdb/status/1873351512195223979))
*Individual experiences may vary based on location and network conditions.*
---
## Frequently Asked Questions
### Can I get a Korean SIM card as a tourist without a Korean ID?
Yes, but with limitations. MNO plans (SKT, [KT](/en/kr/carriers/kt/), [LG U+](/en/kr/carriers/lguplus/)) can be purchased with a passport at airport counters or carrier shops. MVNOs generally require an Alien Registration Card (ARC). For short visits, travel eSIMs are the simplest option — [Airalo](/en/travel/providers/airalo/) offers plans from $4.50 and [Nomad](/en/travel/providers/nomad/) from $4.00 with no ID required.
### What is the cheapest way to get mobile data in South Korea?
For tourists, [eSIM2Fly](/en/travel/providers/esim2fly/) offers 1GB/7 days for just $2.50 and 3GB/30 days for $4.60. For residents with an ARC, the cheapest domestic plan is [Mobing](/en/kr/carriers/mobing/) at 4,000 KRW/month for 3GB on the [LG U+](/en/kr/carriers/lguplus/) network.
### Does South Korea have good 5G coverage?
Yes. South Korea was the first country to launch commercial 5G in 2019. [SK Telecom](/en/kr/carriers/skt/) leads with 200.0 Mbps download speeds. All three MNOs offer 5G plans with coverage scores of 95-97 out of 100. However, MVNOs mostly lack 5G — only [SK 7mobile](/en/kr/carriers/sevenmobile/) has one 5G plan.
### Should I buy a local SIM or use a travel eSIM?
It depends on your stay length. For trips under 30 days, travel eSIMs are simpler — no ID required, instant activation, and plans from $2.50. For stays over 1 month, a local MNO plan with eSIM (from 33,000 KRW/month) gives you a Korean phone number, better speeds, and is more cost-effective long-term.
### Do Korean MVNOs support eSIM?
No. As of March 2026, all three Korean MVNOs ([SK 7mobile](/en/kr/carriers/sevenmobile/), [KT](/en/kr/carriers/kt/) M Mobile, [Mobing](/en/kr/carriers/mobing/)) require physical SIM cards. Only the three MNOs ([SK Telecom](/en/kr/carriers/skt/), [KT](/en/kr/carriers/kt/), [LG U+](/en/kr/carriers/lguplus/)) support eSIM — 14 out of 23 plans total.
### Which carrier has the best coverage in South Korea?
[SK Telecom](/en/kr/carriers/skt/) leads with a coverage score of 97/100 and overall score of 93/100 (OpenSignal 2025). [KT](/en/kr/carriers/kt/) follows at 96/100, and [LG U+](/en/kr/carriers/lguplus/) at 95/100. The gap between carriers is small — all three provide reliable coverage across the country, including rural areas and subway systems.
### Can I keep my Korean number if I switch carriers?
Yes. South Korea supports mobile number portability (MNP). You can transfer your number between carriers, including from MNO to MVNO or vice versa. The process typically takes 1-2 hours at a carrier store.
---
## Key Takeaways
The South Korean mobile market in 2026, from a foreigner's perspective:
- **6 carriers, 23 domestic plans** — 3 MNOs and 3 MVNOs in a unique 1-to-1 structure
- **Network quality is world-class** — all MNOs score 88-93/100 overall, with 5G speeds up to 200.0 Mbps
- **Travel eSIMs start from $2.50** — 11 providers offer 144 plans for South Korea, no ID needed
- **Domestic eSIM is MNO-only** — 14 of 23 plans support eSIM, all from MNOs (from 33,000 KRW/month)
- **MVNOs are dramatically cheaper** — from 4,000 KRW/month, but require physical SIM and an ARC
- **5G on 52% of plans** (12/23) — mostly MNO; MVNO 5G is limited to one [SK 7mobile](/en/kr/carriers/sevenmobile/) plan
- **No data rollover** on any plan — unused data expires at month end, unlike Australia or Japan
For tourists: get a travel eSIM before departure. For residents: start with a travel eSIM while waiting for your ARC, then switch to a domestic plan.
**[Find Your Best Korean SIM Plan →](/en/kr/search/)**
---
*Plan data is current as of March 2026. Prices and inclusions may change. Check carrier websites for the latest information. Travel eSIM prices are in USD and were last verified March 2026.*
*Compare all plans side by side using [SimFinder's comparison tool](/en/kr/search/).*
================================================================================
# Best SIM Plans in Singapore 2026: 6 Carriers, 21 Plans Compared
URL: https://sim-finder.com/en/blog/best-sim-plans-singapore-2026/
Type: blog (en)
Published: 2026-03-21
## TL;DR: Top 3 Picks for Singapore
| Best For | Plan | Price/mo | Why |
|---------|-------|------|---------|
| **Budget** | [Circles.Life](/en/sg/carriers/circleslife/) 4G Core | S$10.80 | Cheapest plan, 350GB data, unlimited calls |
| **Most People** | [M1](/en/sg/carriers/m1/) SIM Only 150GB 5G | S$14.95 | 5G, eSIM, 150GB, no contract — hard to beat at this price |
| **Speed** | [Singtel](/en/sg/carriers/singtel/) Enhanced Core Unlimited 5G | S$40 | Unlimited data, fastest network (182.5 Mbps), 700 min calls |
**[Compare All 21 Singapore Plans on SimFinder →](/en/sg/search/)**
Below, we break down the entire market using real plan data.
## Table of Contents
- [The Singapore Mobile Landscape](#the-singapore-mobile-landscape-who-owns-what)
- [Price Breakdown: What Every Carrier Charges](#price-breakdown-what-every-carrier-charges)
- [Best Value Plans by Use Case](#best-value-plans-by-use-case)
- [5G and eSIM: What's Available](#5g-and-esim-whats-available)
- [What Users Say](#what-users-say)
- [Frequently Asked Questions](#frequently-asked-questions)
- [Key Takeaways](#key-takeaways)
---
Singapore's mobile market runs on three networks — [Singtel](/en/sg/carriers/singtel/), [StarHub](/en/sg/carriers/starhub/), and [M1](/en/sg/carriers/m1/) — each with at least one budget sub-brand or MVNO offering the same coverage at lower prices.
SimFinder's database tracks **6 carriers and 21 plans** in Singapore. Prices start at just S$10.80/month and go up to S$55/month. Nearly all plans are contract-free, and with Singapore being a compact city-state, coverage differences between the three MNOs are marginal.
This guide breaks down the entire Singapore SIM market using actual plan data, network quality scores, and pricing analysis.
---
## The Singapore Mobile Landscape: Who Owns What
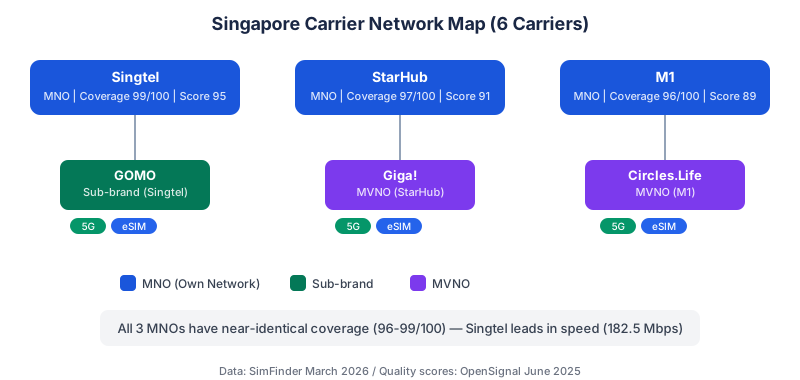 Singapore has **three physical networks**. Every carrier runs on one of these.
| Network Owner | Type | Download Speed | Coverage | Overall Score | Budget Carrier |
|---|---|---|---|---|---|
| **[Singtel](/en/sg/carriers/singtel/)** | MNO | 182.5 Mbps | 99/100 | 95/100 | [GOMO](/en/sg/carriers/gomo/) (sub-brand) |
| **[StarHub](/en/sg/carriers/starhub/)** | MNO | 155.8 Mbps | 97/100 | 91/100 | [Giga!](/en/sg/carriers/giga/) (MVNO) |
| **[M1](/en/sg/carriers/m1/)** | MNO | 148.2 Mbps | 96/100 | 89/100 | [Circles.Life](/en/sg/carriers/circleslife/) (MVNO) |
*Quality data: OpenSignal 2025, measured June 2025*
Unlike Australia or the US, where coverage varies dramatically between carriers, **Singapore's three networks are nearly identical in coverage** (96-99/100). This is the advantage of being a 734 km² city-state — no rural dead zones to worry about.
The meaningful differences are in **speed and price**:
- **[Singtel](/en/sg/carriers/singtel/)** leads in raw speed at 182.5 Mbps and has the lowest latency (12ms). It charges a premium for it — [Singtel](/en/sg/carriers/singtel/)'s cheapest postpaid plan is S$35/month.
- **[StarHub](/en/sg/carriers/starhub/)** sits in the middle at 155.8 Mbps. Its [Giga!](/en/sg/carriers/giga/) MVNO offers some of the best value in the market.
- **[M1](/en/sg/carriers/m1/)** is the most competitive on pricing through both its own plans and [Circles.Life](/en/sg/carriers/circleslife/). [M1](/en/sg/carriers/m1/)'s SIM Only 150GB at S$14.95 is the cheapest 5G plan from any MNO.
---
## Price Breakdown: What Every Carrier Charges
### MNO Plans ([Singtel](/en/sg/carriers/singtel/), [StarHub](/en/sg/carriers/starhub/), [M1](/en/sg/carriers/m1/))
| Carrier | Plan | Price/mo | Data | 5G | eSIM | Contract |
|---|---|---|---|---|---|---|
| [M1](/en/sg/carriers/m1/) | SIM Only 150GB 5G | S$14.95 | 150GB | Yes | Yes | No |
| [StarHub](/en/sg/carriers/starhub/) | Star Plan Senior 5G | S$15 | 100GB | Yes | Yes | No |
| [Singtel](/en/sg/carriers/singtel/) | hi! 5G+ Prepaid Monthly | S$15 | 500GB | Yes | Yes | No |
| [Singtel](/en/sg/carriers/singtel/) | hi! 4G Prepaid Monthly | S$12 | 500GB | No | No | No |
| [M1](/en/sg/carriers/m1/) | SIM Only 1TB 5G | S$17.95 | 1TB | Yes | Yes | No |
| [StarHub](/en/sg/carriers/starhub/) | Star Plan M 5G | S$22 | 150GB | Yes | Yes | No |
| [M1](/en/sg/carriers/m1/) | SIM Only 1TB + Worldwide 5G | S$22.95 | 1TB | Yes | Yes | No |
| [StarHub](/en/sg/carriers/starhub/) | Star Plan L 5G | S$32 | 200GB | Yes | Yes | No |
| [Singtel](/en/sg/carriers/singtel/) | Enhanced Lite 5G | S$35 | 300GB | Yes | Yes | 12 mo |
| [Singtel](/en/sg/carriers/singtel/) | Enhanced Core 5G | S$40 | Unlimited | Yes | Yes | No |
| [Singtel](/en/sg/carriers/singtel/) | Priority Plus 5G | S$55 | Unlimited | Yes | Yes | No |
### Budget Carriers ([GOMO](/en/sg/carriers/gomo/), [Circles.Life](/en/sg/carriers/circleslife/), [Giga!](/en/sg/carriers/giga/))
| Carrier | Network | Plan | Price/mo | Data | 5G | eSIM |
|---|---|---|---|---|---|---|
| [Circles.Life](/en/sg/carriers/circleslife/) | [M1](/en/sg/carriers/m1/) | 4G Core | S$10.80 | 350GB | No | Yes |
| [Giga!](/en/sg/carriers/giga/) | [StarHub](/en/sg/carriers/starhub/) | 4G 100GB | S$10.90 | 100GB | No | Yes |
| [GOMO](/en/sg/carriers/gomo/) | [Singtel](/en/sg/carriers/singtel/) | 4G Value | S$12 | 200GB | No | No |
| [Giga!](/en/sg/carriers/giga/) | [StarHub](/en/sg/carriers/starhub/) | 5G 300GB | S$15.90 | 300GB | Yes | Yes |
| [Circles.Life](/en/sg/carriers/circleslife/) | [M1](/en/sg/carriers/m1/) | 5G Plus | S$18 | 300GB | Yes | Yes |
| [GOMO](/en/sg/carriers/gomo/) | [Singtel](/en/sg/carriers/singtel/) | 5G+ Value | S$19.99 | 400GB | Yes | Yes |
| [Giga!](/en/sg/carriers/giga/) | [StarHub](/en/sg/carriers/starhub/) | 5G 400GB | S$18.90 | 400GB | Yes | Yes |
| [GOMO](/en/sg/carriers/gomo/) | [Singtel](/en/sg/carriers/singtel/) | 5G+ Core | S$21.99 | 700GB | Yes | Yes |
| [Giga!](/en/sg/carriers/giga/) | [StarHub](/en/sg/carriers/starhub/) | 5G 1TB | S$28.90 | 1TB | Yes | Yes |
| [Circles.Life](/en/sg/carriers/circleslife/) | [M1](/en/sg/carriers/m1/) | 5G Max 1TB | S$30 | 1TB | Yes | Yes |
A striking pattern: **budget carriers start below S$11/month** — roughly a third of what [Singtel](/en/sg/carriers/singtel/) charges for its cheapest postpaid plan. [Circles.Life](/en/sg/carriers/circleslife/) offers 350GB for S$10.80 — now the cheapest plan in the market after [Giga!](/en/sg/carriers/giga/) raised its 4G 100GB plan to S$10.90 in July 2026 — while [Singtel](/en/sg/carriers/singtel/)'s Enhanced Lite gives just 300GB for S$35 (and locks you into a 12-month contract).
**[Compare All Plans Side by Side on SimFinder →](/en/sg/search/)**
---
## Best Value Plans by Use Case
### Expats and Long-term Residents
**[M1](/en/sg/carriers/m1/) SIM Only 150GB 5G — S$14.95/month** — The standout all-rounder. 150GB is more than enough for most users, 5G and eSIM are included, no contract, and the price is lower than any comparable MNO plan. [M1](/en/sg/carriers/m1/)'s network scores 89/100 overall, which in Singapore's dense coverage landscape translates to consistent performance.
**[Circles.Life](/en/sg/carriers/circleslife/) 5G Plus — S$18/month** — If you want 5G on [M1](/en/sg/carriers/m1/)'s network but through a digital-first carrier with app-based management, [Circles.Life](/en/sg/carriers/circleslife/) offers 300GB with unlimited calls for S$18.
### Tourists and Short-term Visitors
**[Singtel](/en/sg/carriers/singtel/) hi! 5G+ Prepaid Monthly — S$15** — The best prepaid option for visitors. 500GB of data with 5G, 500 voice minutes, eSIM support (activate before you land), and no contract. [Singtel](/en/sg/carriers/singtel/)'s network is the fastest in Singapore at 182.5 Mbps.
**[Circles.Life](/en/sg/carriers/circleslife/) 4G Core — S$10.80** — If you want maximum data on a budget, 350GB with unlimited calls at S$10.80 is hard to argue with. No 5G, but 4G in Singapore is fast enough for streaming and navigation.
### Students and Budget Users
**[Circles.Life](/en/sg/carriers/circleslife/) 4G Core — S$10.80/month** — The cheapest plan in Singapore. 350GB with unlimited calls, running on [M1](/en/sg/carriers/m1/)'s network. Also the best per-GB value in the entire market.
**[Giga!](/en/sg/carriers/giga/) 4G 100GB — S$10.90/month** — Just S$0.10 more than [Circles.Life](/en/sg/carriers/circleslife/) but with less data (100GB vs 350GB). 100GB is still sufficient for social media, messaging, and moderate streaming, and it runs on [StarHub](/en/sg/carriers/starhub/)'s network (97/100 coverage) with eSIM support — a solid alternative if you prefer StarHub's network.
### Heavy Data Users and Power Users
**[M1](/en/sg/carriers/m1/) SIM Only 1TB 5G — S$17.95** — A terabyte of 5G data for under S$18. Unless you're tethering as a primary internet connection, this is effectively unlimited. No contract.
**[Giga!](/en/sg/carriers/giga/) 5G 1TB — S$28.90** — Another 1TB option on [StarHub](/en/sg/carriers/starhub/)'s network. More expensive than [M1](/en/sg/carriers/m1/) but includes 1,500 voice minutes compared to [M1](/en/sg/carriers/m1/)'s 1,000.
### Business Users
**[Singtel](/en/sg/carriers/singtel/) Enhanced Core Unlimited 5G — S$40** — True unlimited data with no caps, 700 voice minutes, and [Singtel](/en/sg/carriers/singtel/)'s network (fastest speeds, lowest latency). The only unlimited plan worth considering if reliable, high-speed connectivity is a business requirement.
**[Singtel](/en/sg/carriers/singtel/) Priority Plus 5G — S$55** — The premium tier adds 1,000 voice minutes and priority network access. Only justified if voice calls are a significant part of your workflow.
**[Find Your Best Singapore Plan →](/en/sg/search/)**
---
## 5G and eSIM: What's Available
### 5G
17 of 21 plans (81%) include 5G. The 4 plans without 5G are all budget-tier:
| Carrier | Plan | Price | 5G Status |
|---|---|---|---|
| [Circles.Life](/en/sg/carriers/circleslife/) | 4G Core | S$10.80 | 4G only |
| [Giga!](/en/sg/carriers/giga/) | 4G 100GB | S$10.90 | 4G only |
| [GOMO](/en/sg/carriers/gomo/) | 4G Value | S$12 | 4G only |
| [Singtel](/en/sg/carriers/singtel/) | hi! 4G Prepaid | S$12 | 4G only |
The cheapest 5G plan overall is **[M1](/en/sg/carriers/m1/) SIM Only 150GB at S$14.95**. For budget carriers, **[Giga!](/en/sg/carriers/giga/) 5G 300GB at S$15.90** is the entry point. The gap between 4G and 5G plans is narrow — just S$3-6 more in most cases — making 5G an easy upgrade in Singapore's market.
### eSIM
19 of 21 plans (90%) support eSIM. The two without eSIM are:
- [Singtel](/en/sg/carriers/singtel/) hi! 4G Prepaid (S$12) — 4G prepaid, physical SIM only
- [GOMO](/en/sg/carriers/gomo/) 4G Value (S$12) — budget 4G tier
Both are the cheapest offerings from their respective carriers. Every 5G plan in the database supports eSIM.
For travelers, this means you can activate a Singapore SIM before arriving — useful if you need data immediately upon landing at Changi Airport.
### Travel eSIM Alternative
If you only need data for a short visit, travel eSIM providers like [Airalo](/en/travel/providers/airalo/), [Holafly](/en/travel/providers/holafly/), and [Nomad](/en/travel/providers/nomad/) offer Singapore data plans. These are data-only (no local phone number) and typically cost more per GB than local plans, but require no local registration. Use SimFinder's [travel eSIM search](/en/travel/sg/) to compare options.
---
## What Users Say
Online discussions about Singapore's SIM market reflect a competitive landscape where budget MVNOs are gaining traction.
> "Who's offering the best deal in SIM-only, no contract plan right now? We find out by comparing [Circles.Life](/en/sg/carriers/circleslife/), [M1](/en/sg/carriers/m1/), MyRepublic, [Singtel](/en/sg/carriers/singtel/), [StarHub](/en/sg/carriers/starhub/), Zero1 and Zero Mobile."
> — @hardwarezone ([original post](https://x.com/hardwarezone/status/1103612291189219328))
Community forums like HardwareZone Singapore consistently highlight that **no-contract SIM-only plans are the default** in the Singapore market, with the main decision being whether to go with an MNO for speed or an MVNO for price.
*Individual experiences may vary based on location and network conditions.*
---
## Frequently Asked Questions
### Can I get a SIM plan in Singapore without a contract?
Yes. 20 of 21 plans tracked by SimFinder are contract-free. The only exception is [Singtel](/en/sg/carriers/singtel/)'s Enhanced Lite plan (12-month contract, S$35/month). All other plans from [Singtel](/en/sg/carriers/singtel/), [StarHub](/en/sg/carriers/starhub/), [M1](/en/sg/carriers/m1/), [GOMO](/en/sg/carriers/gomo/), [Circles.Life](/en/sg/carriers/circleslife/), and [Giga!](/en/sg/carriers/giga/) are no-contract with no cancellation fees.
### Which Singapore carrier has the best network?
[Singtel](/en/sg/carriers/singtel/) leads with a 95/100 overall score, 99/100 coverage, and the fastest download speed at 182.5 Mbps. [StarHub](/en/sg/carriers/starhub/) (91/100) and [M1](/en/sg/carriers/m1/) (89/100) are close behind. In a city-state like Singapore, all three networks deliver strong coverage practically everywhere.
### What is the cheapest SIM plan in Singapore?
[Circles.Life](/en/sg/carriers/circleslife/) 4G Core 350GB at S$10.80/month is the cheapest plan in Singapore. [Giga!](/en/sg/carriers/giga/) 4G 100GB, previously the cheapest option, rose to S$10.90/month in July 2026 — now S$0.10 more than [Circles.Life](/en/sg/carriers/circleslife/) for less than a third of the data. Both are MVNOs with no contracts.
### Is 5G available on budget carriers in Singapore?
Yes. MVNOs and sub-brands offer 5G from as low as S$14.95/month ([M1](/en/sg/carriers/m1/) SIM Only 150GB). [Giga!](/en/sg/carriers/giga/) offers 5G from S$15.90, [GOMO](/en/sg/carriers/gomo/) from S$19.99, and [Circles.Life](/en/sg/carriers/circleslife/) from S$18. You do not need an MNO premium plan to access 5G.
### Do Singapore SIM plans support eSIM?
19 of 21 plans (90%) support eSIM. The only plans without eSIM are [Singtel](/en/sg/carriers/singtel/) hi! 4G Prepaid (S$12) and [GOMO](/en/sg/carriers/gomo/) 4G Value (S$12) — both 4G-only entry-level plans. Every 5G plan supports eSIM.
### What's the best SIM for tourists visiting Singapore?
For short-term visitors, [Singtel](/en/sg/carriers/singtel/) hi! 5G+ Prepaid Monthly at S$15 is a strong choice: 500GB data, 5G, eSIM activation before arrival, and no contract. [Circles.Life](/en/sg/carriers/circleslife/) 4G Core (S$10.80, 350GB) is the budget alternative with unlimited calls.
### How does Singapore compare to other countries for mobile pricing?
Singapore offers some of the best value in Asia-Pacific. Plans with 100-350GB of data start below S$11/month. For context, comparable plans in Australia start around AUD $23-30 (roughly S$20-26). Singapore also has 90% eSIM adoption and 81% 5G availability across its 21 tracked plans.
---
## Key Takeaways
The Singapore SIM market in 2026:
- **6 carriers, 21 plans** — 20 of 21 are contract-free
- **Three near-identical networks**: [Singtel](/en/sg/carriers/singtel/) (fastest, 182.5 Mbps, 95/100), [StarHub](/en/sg/carriers/starhub/) (155.8 Mbps, 91/100), [M1](/en/sg/carriers/m1/) (148.2 Mbps, 89/100) — all with 96-99% coverage
- **Budget carriers deliver massive savings**: [Circles.Life](/en/sg/carriers/circleslife/) 350GB costs S$10.80 vs [Singtel](/en/sg/carriers/singtel/)'s 300GB at S$35
- **5G is widely available** (81% of plans) starting from S$14.95/month
- **eSIM is near-universal** (90% of plans) — activate before you arrive
- **Price range**: S$10.80/mo ([Circles.Life](/en/sg/carriers/circleslife/) 4G Core) to S$55/mo ([Singtel](/en/sg/carriers/singtel/) Priority Plus Unlimited)
- **No coverage anxiety**: Unlike larger countries, Singapore's compact geography means all three networks work everywhere
For most users, the decision is simple: pick any network (they all work), then find the cheapest plan that meets your data needs. In most cases, that's an MVNO.
**[Find Your Best Singapore SIM Plan →](/en/sg/search/)**
---
*Plan data is current as of March 2026; Giga! pricing re-verified and updated July 2026 (price increase across all four tiers). Prices are in Singapore Dollars (SGD). Check carrier websites for the latest information.*
*Compare all plans side by side using [SimFinder's comparison tool](/en/sg/search/).*
================================================================================
# Best SIM Plans in Taiwan 2026: Contracts, No-Contracts & Data-Only
URL: https://sim-finder.com/en/blog/best-sim-plans-taiwan-2026/
Type: blog (en)
Published: 2026-03-22
## TL;DR: Top 3 Picks for Taiwan
| Best For | Plan | Price/mo | Why |
|---------|-------|------|---------|
| **Budget** | [ibon Mobile](/en/tw/carriers/ibonmobile/) 4G 1GB | NT$180 | Cheapest plan, Chunghwa network, no contract |
| **Most People** | [Chunghwa Telecom](/en/tw/carriers/chunghwa/) 5G 999 | NT$999 | Best network (91/100), 60GB, 5G, eSIM |
| **No Contract** | [FarEasTone](/en/tw/carriers/fareastone/) 4G 399 | NT$399 | Unlimited calls, no contract, eSIM |
**[Compare All 15 Taiwan Plans on SimFinder →](/en/tw/search/)**
Below, we break down the entire market using real plan data.
## Table of Contents
- [The Taiwan Mobile Landscape](#the-taiwan-mobile-landscape-3-mnos-and-1-mvno)
- [Carrier Structure and Quality Scores](#carrier-structure-and-quality-scores)
- [All Plans Compared](#all-plans-compared-15-plans-across-4-carriers)
- [Best Plans by Use Case](#best-plans-by-use-case)
- [5G and eSIM in Taiwan](#5g-and-esim-in-taiwan)
- [What Users Say](#what-users-say)
- [Frequently Asked Questions](#frequently-asked-questions)
- [Key Takeaways](#key-takeaways)
---
## The [Taiwan Mobile](/en/tw/carriers/taiwanmobile/) Landscape: 3 MNOs and 1 MVNO
Singapore has **three physical networks**. Every carrier runs on one of these.
| Network Owner | Type | Download Speed | Coverage | Overall Score | Budget Carrier |
|---|---|---|---|---|---|
| **[Singtel](/en/sg/carriers/singtel/)** | MNO | 182.5 Mbps | 99/100 | 95/100 | [GOMO](/en/sg/carriers/gomo/) (sub-brand) |
| **[StarHub](/en/sg/carriers/starhub/)** | MNO | 155.8 Mbps | 97/100 | 91/100 | [Giga!](/en/sg/carriers/giga/) (MVNO) |
| **[M1](/en/sg/carriers/m1/)** | MNO | 148.2 Mbps | 96/100 | 89/100 | [Circles.Life](/en/sg/carriers/circleslife/) (MVNO) |
*Quality data: OpenSignal 2025, measured June 2025*
Unlike Australia or the US, where coverage varies dramatically between carriers, **Singapore's three networks are nearly identical in coverage** (96-99/100). This is the advantage of being a 734 km² city-state — no rural dead zones to worry about.
The meaningful differences are in **speed and price**:
- **[Singtel](/en/sg/carriers/singtel/)** leads in raw speed at 182.5 Mbps and has the lowest latency (12ms). It charges a premium for it — [Singtel](/en/sg/carriers/singtel/)'s cheapest postpaid plan is S$35/month.
- **[StarHub](/en/sg/carriers/starhub/)** sits in the middle at 155.8 Mbps. Its [Giga!](/en/sg/carriers/giga/) MVNO offers some of the best value in the market.
- **[M1](/en/sg/carriers/m1/)** is the most competitive on pricing through both its own plans and [Circles.Life](/en/sg/carriers/circleslife/). [M1](/en/sg/carriers/m1/)'s SIM Only 150GB at S$14.95 is the cheapest 5G plan from any MNO.
---
## Price Breakdown: What Every Carrier Charges
### MNO Plans ([Singtel](/en/sg/carriers/singtel/), [StarHub](/en/sg/carriers/starhub/), [M1](/en/sg/carriers/m1/))
| Carrier | Plan | Price/mo | Data | 5G | eSIM | Contract |
|---|---|---|---|---|---|---|
| [M1](/en/sg/carriers/m1/) | SIM Only 150GB 5G | S$14.95 | 150GB | Yes | Yes | No |
| [StarHub](/en/sg/carriers/starhub/) | Star Plan Senior 5G | S$15 | 100GB | Yes | Yes | No |
| [Singtel](/en/sg/carriers/singtel/) | hi! 5G+ Prepaid Monthly | S$15 | 500GB | Yes | Yes | No |
| [Singtel](/en/sg/carriers/singtel/) | hi! 4G Prepaid Monthly | S$12 | 500GB | No | No | No |
| [M1](/en/sg/carriers/m1/) | SIM Only 1TB 5G | S$17.95 | 1TB | Yes | Yes | No |
| [StarHub](/en/sg/carriers/starhub/) | Star Plan M 5G | S$22 | 150GB | Yes | Yes | No |
| [M1](/en/sg/carriers/m1/) | SIM Only 1TB + Worldwide 5G | S$22.95 | 1TB | Yes | Yes | No |
| [StarHub](/en/sg/carriers/starhub/) | Star Plan L 5G | S$32 | 200GB | Yes | Yes | No |
| [Singtel](/en/sg/carriers/singtel/) | Enhanced Lite 5G | S$35 | 300GB | Yes | Yes | 12 mo |
| [Singtel](/en/sg/carriers/singtel/) | Enhanced Core 5G | S$40 | Unlimited | Yes | Yes | No |
| [Singtel](/en/sg/carriers/singtel/) | Priority Plus 5G | S$55 | Unlimited | Yes | Yes | No |
### Budget Carriers ([GOMO](/en/sg/carriers/gomo/), [Circles.Life](/en/sg/carriers/circleslife/), [Giga!](/en/sg/carriers/giga/))
| Carrier | Network | Plan | Price/mo | Data | 5G | eSIM |
|---|---|---|---|---|---|---|
| [Circles.Life](/en/sg/carriers/circleslife/) | [M1](/en/sg/carriers/m1/) | 4G Core | S$10.80 | 350GB | No | Yes |
| [Giga!](/en/sg/carriers/giga/) | [StarHub](/en/sg/carriers/starhub/) | 4G 100GB | S$10.90 | 100GB | No | Yes |
| [GOMO](/en/sg/carriers/gomo/) | [Singtel](/en/sg/carriers/singtel/) | 4G Value | S$12 | 200GB | No | No |
| [Giga!](/en/sg/carriers/giga/) | [StarHub](/en/sg/carriers/starhub/) | 5G 300GB | S$15.90 | 300GB | Yes | Yes |
| [Circles.Life](/en/sg/carriers/circleslife/) | [M1](/en/sg/carriers/m1/) | 5G Plus | S$18 | 300GB | Yes | Yes |
| [GOMO](/en/sg/carriers/gomo/) | [Singtel](/en/sg/carriers/singtel/) | 5G+ Value | S$19.99 | 400GB | Yes | Yes |
| [Giga!](/en/sg/carriers/giga/) | [StarHub](/en/sg/carriers/starhub/) | 5G 400GB | S$18.90 | 400GB | Yes | Yes |
| [GOMO](/en/sg/carriers/gomo/) | [Singtel](/en/sg/carriers/singtel/) | 5G+ Core | S$21.99 | 700GB | Yes | Yes |
| [Giga!](/en/sg/carriers/giga/) | [StarHub](/en/sg/carriers/starhub/) | 5G 1TB | S$28.90 | 1TB | Yes | Yes |
| [Circles.Life](/en/sg/carriers/circleslife/) | [M1](/en/sg/carriers/m1/) | 5G Max 1TB | S$30 | 1TB | Yes | Yes |
A striking pattern: **budget carriers start below S$11/month** — roughly a third of what [Singtel](/en/sg/carriers/singtel/) charges for its cheapest postpaid plan. [Circles.Life](/en/sg/carriers/circleslife/) offers 350GB for S$10.80 — now the cheapest plan in the market after [Giga!](/en/sg/carriers/giga/) raised its 4G 100GB plan to S$10.90 in July 2026 — while [Singtel](/en/sg/carriers/singtel/)'s Enhanced Lite gives just 300GB for S$35 (and locks you into a 12-month contract).
**[Compare All Plans Side by Side on SimFinder →](/en/sg/search/)**
---
## Best Value Plans by Use Case
### Expats and Long-term Residents
**[M1](/en/sg/carriers/m1/) SIM Only 150GB 5G — S$14.95/month** — The standout all-rounder. 150GB is more than enough for most users, 5G and eSIM are included, no contract, and the price is lower than any comparable MNO plan. [M1](/en/sg/carriers/m1/)'s network scores 89/100 overall, which in Singapore's dense coverage landscape translates to consistent performance.
**[Circles.Life](/en/sg/carriers/circleslife/) 5G Plus — S$18/month** — If you want 5G on [M1](/en/sg/carriers/m1/)'s network but through a digital-first carrier with app-based management, [Circles.Life](/en/sg/carriers/circleslife/) offers 300GB with unlimited calls for S$18.
### Tourists and Short-term Visitors
**[Singtel](/en/sg/carriers/singtel/) hi! 5G+ Prepaid Monthly — S$15** — The best prepaid option for visitors. 500GB of data with 5G, 500 voice minutes, eSIM support (activate before you land), and no contract. [Singtel](/en/sg/carriers/singtel/)'s network is the fastest in Singapore at 182.5 Mbps.
**[Circles.Life](/en/sg/carriers/circleslife/) 4G Core — S$10.80** — If you want maximum data on a budget, 350GB with unlimited calls at S$10.80 is hard to argue with. No 5G, but 4G in Singapore is fast enough for streaming and navigation.
### Students and Budget Users
**[Circles.Life](/en/sg/carriers/circleslife/) 4G Core — S$10.80/month** — The cheapest plan in Singapore. 350GB with unlimited calls, running on [M1](/en/sg/carriers/m1/)'s network. Also the best per-GB value in the entire market.
**[Giga!](/en/sg/carriers/giga/) 4G 100GB — S$10.90/month** — Just S$0.10 more than [Circles.Life](/en/sg/carriers/circleslife/) but with less data (100GB vs 350GB). 100GB is still sufficient for social media, messaging, and moderate streaming, and it runs on [StarHub](/en/sg/carriers/starhub/)'s network (97/100 coverage) with eSIM support — a solid alternative if you prefer StarHub's network.
### Heavy Data Users and Power Users
**[M1](/en/sg/carriers/m1/) SIM Only 1TB 5G — S$17.95** — A terabyte of 5G data for under S$18. Unless you're tethering as a primary internet connection, this is effectively unlimited. No contract.
**[Giga!](/en/sg/carriers/giga/) 5G 1TB — S$28.90** — Another 1TB option on [StarHub](/en/sg/carriers/starhub/)'s network. More expensive than [M1](/en/sg/carriers/m1/) but includes 1,500 voice minutes compared to [M1](/en/sg/carriers/m1/)'s 1,000.
### Business Users
**[Singtel](/en/sg/carriers/singtel/) Enhanced Core Unlimited 5G — S$40** — True unlimited data with no caps, 700 voice minutes, and [Singtel](/en/sg/carriers/singtel/)'s network (fastest speeds, lowest latency). The only unlimited plan worth considering if reliable, high-speed connectivity is a business requirement.
**[Singtel](/en/sg/carriers/singtel/) Priority Plus 5G — S$55** — The premium tier adds 1,000 voice minutes and priority network access. Only justified if voice calls are a significant part of your workflow.
**[Find Your Best Singapore Plan →](/en/sg/search/)**
---
## 5G and eSIM: What's Available
### 5G
17 of 21 plans (81%) include 5G. The 4 plans without 5G are all budget-tier:
| Carrier | Plan | Price | 5G Status |
|---|---|---|---|
| [Circles.Life](/en/sg/carriers/circleslife/) | 4G Core | S$10.80 | 4G only |
| [Giga!](/en/sg/carriers/giga/) | 4G 100GB | S$10.90 | 4G only |
| [GOMO](/en/sg/carriers/gomo/) | 4G Value | S$12 | 4G only |
| [Singtel](/en/sg/carriers/singtel/) | hi! 4G Prepaid | S$12 | 4G only |
The cheapest 5G plan overall is **[M1](/en/sg/carriers/m1/) SIM Only 150GB at S$14.95**. For budget carriers, **[Giga!](/en/sg/carriers/giga/) 5G 300GB at S$15.90** is the entry point. The gap between 4G and 5G plans is narrow — just S$3-6 more in most cases — making 5G an easy upgrade in Singapore's market.
### eSIM
19 of 21 plans (90%) support eSIM. The two without eSIM are:
- [Singtel](/en/sg/carriers/singtel/) hi! 4G Prepaid (S$12) — 4G prepaid, physical SIM only
- [GOMO](/en/sg/carriers/gomo/) 4G Value (S$12) — budget 4G tier
Both are the cheapest offerings from their respective carriers. Every 5G plan in the database supports eSIM.
For travelers, this means you can activate a Singapore SIM before arriving — useful if you need data immediately upon landing at Changi Airport.
### Travel eSIM Alternative
If you only need data for a short visit, travel eSIM providers like [Airalo](/en/travel/providers/airalo/), [Holafly](/en/travel/providers/holafly/), and [Nomad](/en/travel/providers/nomad/) offer Singapore data plans. These are data-only (no local phone number) and typically cost more per GB than local plans, but require no local registration. Use SimFinder's [travel eSIM search](/en/travel/sg/) to compare options.
---
## What Users Say
Online discussions about Singapore's SIM market reflect a competitive landscape where budget MVNOs are gaining traction.
> "Who's offering the best deal in SIM-only, no contract plan right now? We find out by comparing [Circles.Life](/en/sg/carriers/circleslife/), [M1](/en/sg/carriers/m1/), MyRepublic, [Singtel](/en/sg/carriers/singtel/), [StarHub](/en/sg/carriers/starhub/), Zero1 and Zero Mobile."
> — @hardwarezone ([original post](https://x.com/hardwarezone/status/1103612291189219328))
Community forums like HardwareZone Singapore consistently highlight that **no-contract SIM-only plans are the default** in the Singapore market, with the main decision being whether to go with an MNO for speed or an MVNO for price.
*Individual experiences may vary based on location and network conditions.*
---
## Frequently Asked Questions
### Can I get a SIM plan in Singapore without a contract?
Yes. 20 of 21 plans tracked by SimFinder are contract-free. The only exception is [Singtel](/en/sg/carriers/singtel/)'s Enhanced Lite plan (12-month contract, S$35/month). All other plans from [Singtel](/en/sg/carriers/singtel/), [StarHub](/en/sg/carriers/starhub/), [M1](/en/sg/carriers/m1/), [GOMO](/en/sg/carriers/gomo/), [Circles.Life](/en/sg/carriers/circleslife/), and [Giga!](/en/sg/carriers/giga/) are no-contract with no cancellation fees.
### Which Singapore carrier has the best network?
[Singtel](/en/sg/carriers/singtel/) leads with a 95/100 overall score, 99/100 coverage, and the fastest download speed at 182.5 Mbps. [StarHub](/en/sg/carriers/starhub/) (91/100) and [M1](/en/sg/carriers/m1/) (89/100) are close behind. In a city-state like Singapore, all three networks deliver strong coverage practically everywhere.
### What is the cheapest SIM plan in Singapore?
[Circles.Life](/en/sg/carriers/circleslife/) 4G Core 350GB at S$10.80/month is the cheapest plan in Singapore. [Giga!](/en/sg/carriers/giga/) 4G 100GB, previously the cheapest option, rose to S$10.90/month in July 2026 — now S$0.10 more than [Circles.Life](/en/sg/carriers/circleslife/) for less than a third of the data. Both are MVNOs with no contracts.
### Is 5G available on budget carriers in Singapore?
Yes. MVNOs and sub-brands offer 5G from as low as S$14.95/month ([M1](/en/sg/carriers/m1/) SIM Only 150GB). [Giga!](/en/sg/carriers/giga/) offers 5G from S$15.90, [GOMO](/en/sg/carriers/gomo/) from S$19.99, and [Circles.Life](/en/sg/carriers/circleslife/) from S$18. You do not need an MNO premium plan to access 5G.
### Do Singapore SIM plans support eSIM?
19 of 21 plans (90%) support eSIM. The only plans without eSIM are [Singtel](/en/sg/carriers/singtel/) hi! 4G Prepaid (S$12) and [GOMO](/en/sg/carriers/gomo/) 4G Value (S$12) — both 4G-only entry-level plans. Every 5G plan supports eSIM.
### What's the best SIM for tourists visiting Singapore?
For short-term visitors, [Singtel](/en/sg/carriers/singtel/) hi! 5G+ Prepaid Monthly at S$15 is a strong choice: 500GB data, 5G, eSIM activation before arrival, and no contract. [Circles.Life](/en/sg/carriers/circleslife/) 4G Core (S$10.80, 350GB) is the budget alternative with unlimited calls.
### How does Singapore compare to other countries for mobile pricing?
Singapore offers some of the best value in Asia-Pacific. Plans with 100-350GB of data start below S$11/month. For context, comparable plans in Australia start around AUD $23-30 (roughly S$20-26). Singapore also has 90% eSIM adoption and 81% 5G availability across its 21 tracked plans.
---
## Key Takeaways
The Singapore SIM market in 2026:
- **6 carriers, 21 plans** — 20 of 21 are contract-free
- **Three near-identical networks**: [Singtel](/en/sg/carriers/singtel/) (fastest, 182.5 Mbps, 95/100), [StarHub](/en/sg/carriers/starhub/) (155.8 Mbps, 91/100), [M1](/en/sg/carriers/m1/) (148.2 Mbps, 89/100) — all with 96-99% coverage
- **Budget carriers deliver massive savings**: [Circles.Life](/en/sg/carriers/circleslife/) 350GB costs S$10.80 vs [Singtel](/en/sg/carriers/singtel/)'s 300GB at S$35
- **5G is widely available** (81% of plans) starting from S$14.95/month
- **eSIM is near-universal** (90% of plans) — activate before you arrive
- **Price range**: S$10.80/mo ([Circles.Life](/en/sg/carriers/circleslife/) 4G Core) to S$55/mo ([Singtel](/en/sg/carriers/singtel/) Priority Plus Unlimited)
- **No coverage anxiety**: Unlike larger countries, Singapore's compact geography means all three networks work everywhere
For most users, the decision is simple: pick any network (they all work), then find the cheapest plan that meets your data needs. In most cases, that's an MVNO.
**[Find Your Best Singapore SIM Plan →](/en/sg/search/)**
---
*Plan data is current as of March 2026; Giga! pricing re-verified and updated July 2026 (price increase across all four tiers). Prices are in Singapore Dollars (SGD). Check carrier websites for the latest information.*
*Compare all plans side by side using [SimFinder's comparison tool](/en/sg/search/).*
================================================================================
# Best SIM Plans in Taiwan 2026: Contracts, No-Contracts & Data-Only
URL: https://sim-finder.com/en/blog/best-sim-plans-taiwan-2026/
Type: blog (en)
Published: 2026-03-22
## TL;DR: Top 3 Picks for Taiwan
| Best For | Plan | Price/mo | Why |
|---------|-------|------|---------|
| **Budget** | [ibon Mobile](/en/tw/carriers/ibonmobile/) 4G 1GB | NT$180 | Cheapest plan, Chunghwa network, no contract |
| **Most People** | [Chunghwa Telecom](/en/tw/carriers/chunghwa/) 5G 999 | NT$999 | Best network (91/100), 60GB, 5G, eSIM |
| **No Contract** | [FarEasTone](/en/tw/carriers/fareastone/) 4G 399 | NT$399 | Unlimited calls, no contract, eSIM |
**[Compare All 15 Taiwan Plans on SimFinder →](/en/tw/search/)**
Below, we break down the entire market using real plan data.
## Table of Contents
- [The Taiwan Mobile Landscape](#the-taiwan-mobile-landscape-3-mnos-and-1-mvno)
- [Carrier Structure and Quality Scores](#carrier-structure-and-quality-scores)
- [All Plans Compared](#all-plans-compared-15-plans-across-4-carriers)
- [Best Plans by Use Case](#best-plans-by-use-case)
- [5G and eSIM in Taiwan](#5g-and-esim-in-taiwan)
- [What Users Say](#what-users-say)
- [Frequently Asked Questions](#frequently-asked-questions)
- [Key Takeaways](#key-takeaways)
---
## The [Taiwan Mobile](/en/tw/carriers/taiwanmobile/) Landscape: 3 MNOs and 1 MVNO
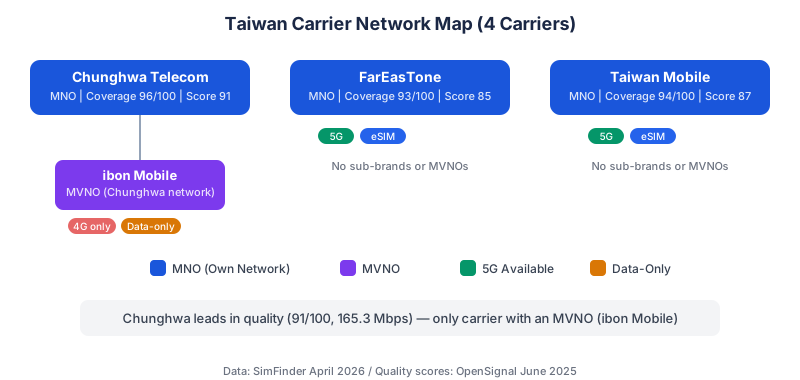 Taiwan's mobile market is compact compared to larger countries. After a series of mergers (Taiwan Star was absorbed by [Taiwan Mobile](/en/tw/carriers/taiwanmobile/) in 2023), the market has settled into **three MNOs and one notable MVNO**.
SimFinder's database tracks **4 carriers and 15 plans** in Taiwan. Prices range from NT$180/month (approximately US$5.50) to NT$1,799/month (approximately US$55). Unlike markets such as Australia where all plans are contract-free, Taiwan's market is split: most 5G plans require a 24-month contract, while budget and data-only plans are contract-free.
This guide breaks down the entire Taiwan SIM market using actual plan data, network quality scores, and pricing analysis.
---
## Carrier Structure and Quality Scores
Understanding Taiwan's mobile market starts with one key fact: **[Chunghwa Telecom](/en/tw/carriers/chunghwa/) dominates in quality**. It is the former state-owned telecom and still controls the most extensive infrastructure in the country.
| Carrier | Type | Coverage | Overall Score | Download Speed | Latency |
|---|---|---|---|---|---|
| **[Chunghwa Telecom](/en/tw/carriers/chunghwa/)** | MNO | 96/100 | **91/100** | 165.3 Mbps | 22ms |
| **[Taiwan Mobile](/en/tw/carriers/taiwanmobile/)** | MNO | 94/100 | 87/100 | 145.7 Mbps | 24ms |
| **[FarEasTone](/en/tw/carriers/fareastone/)** | MNO | 93/100 | 85/100 | 138.4 Mbps | 25ms |
| **[ibon Mobile](/en/tw/carriers/ibonmobile/)** | MVNO | — | — | — | — |
*Quality data: OpenSignal 2025, measured June 2025. [ibon Mobile](/en/tw/carriers/ibonmobile/) runs on Chunghwa's network but as an MVNO may experience reduced priority during congestion.*
**[Chunghwa Telecom](/en/tw/carriers/chunghwa/)'s quality score of 91 is among the highest of any carrier in SimFinder's global database.** Its download speed of 165.3 Mbps and latency of 22ms reflect a mature 5G rollout in a densely populated island. Taiwan's geography — roughly 36,000 km² with 23.5 million people — makes nationwide coverage relatively achievable, which is why all three MNOs score 93 or above for coverage.
[Taiwan Mobile](/en/tw/carriers/taiwanmobile/) sits in the middle with a solid 87/100 overall. Since absorbing Taiwan Star, it has expanded its spectrum holdings and improved coverage. It is the only MNO offering data rollover on select plans.
[FarEasTone](/en/tw/carriers/fareastone/) rounds out the three MNOs at 85/100. While its speeds and coverage are lower than the other two, it offers the only no-contract voice plan in the market — a significant advantage for flexibility.
[ibon Mobile](/en/tw/carriers/ibonmobile/) is the sole MVNO tracked by SimFinder in Taiwan. It runs on Chunghwa's network but is limited to 4G-only, data-only plans with no eSIM support. Its value lies in contract-free simplicity at low price points.
---
## All Plans Compared: 15 Plans Across 4 Carriers
**[Compare All 15 Taiwan Plans on SimFinder →](/en/tw/search/)**
### Contract Plans (24-Month Commitment)
Most 5G plans in Taiwan require a 24-month contract. The early termination fee across all carriers is NT$3,000.
| Carrier | Plan | Price/mo | Data | Voice | 5G | eSIM | Rollover |
|---|---|---|---|---|---|---|---|
| Chunghwa | 5G 599 | NT$599 | 24GB | 30 min | Yes | Yes | No |
| [FarEasTone](/en/tw/carriers/fareastone/) | 5G 599 | NT$599 | 24GB | 30 min | Yes | Yes | No |
| [Taiwan Mobile](/en/tw/carriers/taiwanmobile/) | 5G 599 | NT$599 | 24GB | Unlimited | Yes | Yes | No |
| [Taiwan Mobile](/en/tw/carriers/taiwanmobile/) | 4G 799 | NT$799 | 2GB | 30 min | No | Yes | **Yes** |
| Chunghwa | 5G 999 | NT$999 | 60GB | 60 min | Yes | Yes | No |
| [FarEasTone](/en/tw/carriers/fareastone/) | 5G 999 | NT$999 | 60GB | 60 min | Yes | Yes | No |
| [Taiwan Mobile](/en/tw/carriers/taiwanmobile/) | 5G 999 | NT$999 | 60GB | Unlimited | Yes | Yes | No |
| Chunghwa | 5G 1399 | NT$1,399 | 100GB | Unlimited | Yes | Yes | No |
| [FarEasTone](/en/tw/carriers/fareastone/) | 5G 1399 | NT$1,399 | Unlimited | Unlimited | Yes | Yes | No |
| [Taiwan Mobile](/en/tw/carriers/taiwanmobile/) | 5G 1399 | NT$1,399 | Unlimited | Unlimited | Yes | Yes | No |
| Chunghwa | 5G 1799 | NT$1,799 | 200GB | Unlimited | Yes | Yes | No |
### No-Contract Plans
| Carrier | Plan | Price/mo | Data | Voice | 5G | eSIM | Data-Only |
|---|---|---|---|---|---|---|---|
| [ibon Mobile](/en/tw/carriers/ibonmobile/) | 4G 1GB | NT$180 | 1GB | — | No | No | Yes |
| [FarEasTone](/en/tw/carriers/fareastone/) | 4G 399 | NT$399 | 300MB | Unlimited | No | Yes | No |
| [ibon Mobile](/en/tw/carriers/ibonmobile/) | 4G 5GB | NT$699 | 5GB | — | No | No | Yes |
| [ibon Mobile](/en/tw/carriers/ibonmobile/) | 4G Unlimited 30d | NT$899 | 40GB | — | No | No | Yes |
A pattern emerges: **the contract/no-contract split is stark**. If you want 5G or more than 300MB of data with voice, you are almost certainly signing a 24-month contract. The only exceptions are [ibon Mobile](/en/tw/carriers/ibonmobile/)'s data-only plans and [FarEasTone](/en/tw/carriers/fareastone/)'s basic 4G 399.
**[Compare All 15 Taiwan Plans on SimFinder →](/en/tw/search/)**
---
## Best Plans by Use Case
### Lightest Use / Budget (Under NT$500/month)
**[ibon Mobile](/en/tw/carriers/ibonmobile/) NT$180 4G 1GB** — The cheapest plan in Taiwan. Data-only, no contract, runs on Chunghwa's network. No eSIM, no 5G, no tethering — but at NT$180 (roughly US$5.50) it is hard to argue with. Ideal for a secondary SIM or light tablet usage.
**[FarEasTone](/en/tw/carriers/fareastone/) NT$399 4G 399** — The only no-contract plan with voice in Taiwan's market. Unlimited calls with 300MB of data. If you need a local phone number without a long-term commitment, this is your only option among the MNOs. eSIM supported.
### Best Balance of Price and Data
**[Chunghwa Telecom](/en/tw/carriers/chunghwa/) NT$999 5G 999** — The plan SimFinder's data suggests works for the widest range of users. You get 60GB of data on Taiwan's highest-quality network (91/100), 5G, eSIM, and 60 minutes of voice. The 24-month contract is the trade-off, but the quality-to-price ratio is strong. At NT$999 (roughly US$30/month), this is competitive globally.
**[FarEasTone](/en/tw/carriers/fareastone/) NT$999 5G 999** — Matches Chunghwa's data at the same price: 60GB and 60 minutes of voice. A reasonable alternative if Chunghwa is unavailable in your area, though Chunghwa's network advantage makes it the preferred pick when both are available.
### Heavy Data Users
**[FarEasTone](/en/tw/carriers/fareastone/) NT$1,399 5G 1399** and **[Taiwan Mobile](/en/tw/carriers/taiwanmobile/) NT$1,399 5G 1399** — The two unlimited data plans in Taiwan, both at the same price. Each includes unlimited data, unlimited voice, 5G, eSIM, and tethering. Choose based on network quality: FarEasTone scores 85/100 overall, Taiwan Mobile 87/100. If data limits are a concern, either plan eliminates them entirely. The 24-month contract and NT$3,000 termination fee apply to both.
**Chunghwa NT$1,799 5G 1799** — Taiwan's premium plan: 200GB on the best network (91/100), unlimited voice, 5G. For users who want the highest quality without unlimited data's potential throttling concerns, this is the ceiling.
### Data-Only / Secondary Device
**[ibon Mobile](/en/tw/carriers/ibonmobile/) NT$899 4G Unlimited 30d** — 40GB of data with tethering for NT$899/month, no contract. This is the best option for a tablet, hotspot device, or secondary SIM. It runs on Chunghwa's 4G network. The lack of eSIM means you need a physical SIM card.
### Short-Term Visitors
For tourists, Taiwan's contract-heavy market is a challenge. The best options:
1. **Travel eSIMs**: [Airalo](/en/travel/providers/airalo/) (from US$4.50/7 days), [Saily](/en/travel/providers/saily/), [Nomad](/en/travel/providers/nomad/), and others offer Taiwan data plans that activate instantly. No contract, no passport registration hassle. **[Compare travel eSIM plans for Taiwan →](/en/travel/tw/search/)**
2. **Airport SIM counters**: Chunghwa, [FarEasTone](/en/tw/carriers/fareastone/), and [Taiwan Mobile](/en/tw/carriers/taiwanmobile/) all operate counters at Taoyuan International Airport with short-term prepaid options.
3. **[FarEasTone](/en/tw/carriers/fareastone/) 4G 399**: If you need a local number, this no-contract plan works for any duration.
**[Find Your Best Taiwan Plan →](/en/tw/search/)**
---
## 5G and eSIM in Taiwan
### 5G Coverage
10 of 15 plans (67%) include 5G access. Taiwan's 5G rollout is concentrated in urban areas — Taipei, Kaohsiung, Taichung, and Tainan have strong coverage from all three MNOs. Rural and mountainous areas remain primarily 4G.
| Carrier | 5G Plans | 4G-Only Plans |
|---|---|---|
| [Chunghwa Telecom](/en/tw/carriers/chunghwa/) | 4 plans (all) | 0 |
| [FarEasTone](/en/tw/carriers/fareastone/) | 3 plans | 1 (4G 399, no contract) |
| [Taiwan Mobile](/en/tw/carriers/taiwanmobile/) | 3 plans | 1 (4G 799) |
| [ibon Mobile](/en/tw/carriers/ibonmobile/) | 0 | 3 (all, data-only) |
[Taiwan Mobile](/en/tw/carriers/taiwanmobile/) is the only MNO still selling a 4G-only contract plan (NT$799). It includes data rollover — the only plan in the entire market with this feature. This suggests [Taiwan Mobile](/en/tw/carriers/taiwanmobile/) positions its 4G plan as a niche product for users who prioritize rollover over 5G speed.
### eSIM Support
12 of 15 plans support eSIM — all MNO plans across Chunghwa, [FarEasTone](/en/tw/carriers/fareastone/), and [Taiwan Mobile](/en/tw/carriers/taiwanmobile/). The three [ibon Mobile](/en/tw/carriers/ibonmobile/) plans require a physical SIM card.
If your phone supports eSIM, you can activate an MNO plan remotely — useful for residents moving between carriers. For visitors arriving with an eSIM-compatible device, a travel eSIM from a provider like [Airalo](/en/travel/providers/airalo/) or [Saily](/en/travel/providers/saily/) may be simpler than navigating contract requirements.
---
## What Users Say
Real experiences from people using mobile services in Taiwan.
> "The first SIM card vending machine in Taiwan has now been introduced at terminal 1."
> — @taoyuanairport ([original post](https://x.com/taoyuanairport/status/773775430859972609))
Taoyuan Airport's SIM card infrastructure has improved over the years, making it straightforward for arriving travelers to get connected.
*Individual experiences may vary based on location and network conditions.*
---
## Compare Plans on SimFinder
The data in this guide comes from SimFinder's database, which tracks 15 Taiwan plans across 4 carriers. If you want to filter by price, data, 5G, or eSIM, use the comparison tool to find your best match.
**[Compare Taiwan SIM Plans →](/en/tw/search/)**
---
## Frequently Asked Questions
### Do I need a contract to get a SIM in Taiwan?
Not necessarily. [FarEasTone](/en/tw/carriers/fareastone/)'s 4G 399 plan (NT$399/month, unlimited calls, 300MB) requires no contract. All three [ibon Mobile](/en/tw/carriers/ibonmobile/) data-only plans are also contract-free. However, most 5G plans from the three MNOs require a 24-month commitment with a NT$3,000 early termination fee.
### Which carrier has the best coverage across Taiwan?
[Chunghwa Telecom](/en/tw/carriers/chunghwa/), with a coverage score of 96/100 and the highest overall quality score of 91/100. Its network reaches the most remote areas of Taiwan, including mountain regions and the east coast — where other carriers may have gaps.
### Can I get a data-only SIM without a phone number?
Yes. [ibon Mobile](/en/tw/carriers/ibonmobile/) offers three data-only plans starting at just NT$180/month for 1GB. These are contract-free, but note that [ibon Mobile](/en/tw/carriers/ibonmobile/) does not support eSIM — you need a physical SIM card.
### Is 5G widely available in Taiwan?
Yes. 10 of 15 plans in SimFinder's database include 5G. All three MNOs (Chunghwa, [FarEasTone](/en/tw/carriers/fareastone/), [Taiwan Mobile](/en/tw/carriers/taiwanmobile/)) offer 5G plans. The only carrier without 5G is [ibon Mobile](/en/tw/carriers/ibonmobile/), which operates as a 4G-only MVNO.
### Do any plans support eSIM?
Yes — all 12 MNO plans support eSIM. The three [ibon Mobile](/en/tw/carriers/ibonmobile/) plans do not. If you need eSIM, you must choose a plan from [Chunghwa Telecom](/en/tw/carriers/chunghwa/), [FarEasTone](/en/tw/carriers/fareastone/), or [Taiwan Mobile](/en/tw/carriers/taiwanmobile/).
### What is the cheapest way to get mobile data in Taiwan?
[ibon Mobile](/en/tw/carriers/ibonmobile/)'s 4G 1GB plan at NT$180/month is the cheapest option — data-only, no contract. For visitors, travel eSIMs from providers like [Airalo](/en/travel/providers/airalo/) start at US$4.50 for 1GB/7 days. For residents who need voice, [FarEasTone](/en/tw/carriers/fareastone/)'s 4G 399 (NT$399, unlimited calls, 300MB, no contract) is the most affordable.
### Which plan is best for tourists visiting Taiwan?
Short-term visitors should consider travel eSIMs ([Airalo](/en/travel/providers/airalo/), [Saily](/en/travel/providers/saily/), [Nomad](/en/travel/providers/nomad/)) for hassle-free data — plans start at US$4.50 for 7 days. If you need a local number, [FarEasTone](/en/tw/carriers/fareastone/)'s 4G 399 (NT$399, no contract, unlimited calls) is available at airport counters. [ibon Mobile](/en/tw/carriers/ibonmobile/)'s 40GB data-only plan (NT$899, no contract) is another option for heavy data users.
---
## Key Takeaways
The Taiwan SIM market in 2026:
- **4 carriers, 15 plans** with prices ranging from NT$180 to NT$1,799 per month
- **[Chunghwa Telecom](/en/tw/carriers/chunghwa/) leads in quality**: 91/100 overall, 165.3 Mbps download, 96/100 coverage — the benchmark for Taiwan's mobile networks
- **Contract vs. no-contract split is stark**: 11 of 15 plans require 24 months. Only [FarEasTone](/en/tw/carriers/fareastone/) 4G 399 and three [ibon Mobile](/en/tw/carriers/ibonmobile/) plans are contract-free
- **5G is widely available** (67% of plans), but limited to MNOs — [ibon Mobile](/en/tw/carriers/ibonmobile/) is 4G-only
- **eSIM is supported on all MNO plans** (12 of 15). [ibon Mobile](/en/tw/carriers/ibonmobile/) requires physical SIM
- **Two unlimited data plans exist at the same price**: [FarEasTone](/en/tw/carriers/fareastone/) 5G 1399 and [Taiwan Mobile](/en/tw/carriers/taiwanmobile/) 5G 1399, both NT$1,399/month
- **Data rollover is rare**: only [Taiwan Mobile](/en/tw/carriers/taiwanmobile/)'s 4G 799 plan offers it
- **For visitors**: travel eSIMs or [FarEasTone](/en/tw/carriers/fareastone/)'s no-contract 4G 399 are the practical options
For residents, the decision comes down to how much data you need and whether you accept a 24-month contract. If you do, Chunghwa's 5G 999 (NT$999, 60GB, quality score 91) offers the strongest value. If you don't, [FarEasTone](/en/tw/carriers/fareastone/)'s 4G 399 is the only voice option without strings attached.
**[Find Your Best Taiwan SIM Plan →](/en/tw/search/)**
---
*Plan data is current as of July 2026. Prices and inclusions may change. Check carrier websites for the latest information.*
*Compare all plans side by side using [SimFinder's comparison tool](/en/tw/search/).*
================================================================================
# Best SIM Plans in Thailand 2026: 3 Carriers, 16 Plans Compared
URL: https://sim-finder.com/en/blog/best-sim-plans-thailand-2026/
Type: blog (en)
Published: 2026-03-24
## TL;DR: Top 3 Picks for Thailand
| Best For | Plan | Price/mo | Why |
|---------|-------|------|---------|
| **Budget** | [DTAC](/en/th/carriers/dtac/) Prepaid 15GB | ฿299 | Cheapest tier in Thailand (tied with [AIS](/en/th/carriers/ais/) 1GB), unlimited calls, 15GB data |
| **Most People** | [TrueMove H](/en/th/carriers/truemove/) Prepaid 60GB | ฿300 | 60GB for just ฿300, unlimited calls, best value per GB |
| **Speed & eSIM** | [AIS](/en/th/carriers/ais/) Prepaid 50GB | ฿899 | Top network (95/100 coverage), 5G, eSIM, 50GB |
**[Compare All 16 Thai Plans on SimFinder →](/en/th/search/)**
Taiwan's mobile market is compact compared to larger countries. After a series of mergers (Taiwan Star was absorbed by [Taiwan Mobile](/en/tw/carriers/taiwanmobile/) in 2023), the market has settled into **three MNOs and one notable MVNO**.
SimFinder's database tracks **4 carriers and 15 plans** in Taiwan. Prices range from NT$180/month (approximately US$5.50) to NT$1,799/month (approximately US$55). Unlike markets such as Australia where all plans are contract-free, Taiwan's market is split: most 5G plans require a 24-month contract, while budget and data-only plans are contract-free.
This guide breaks down the entire Taiwan SIM market using actual plan data, network quality scores, and pricing analysis.
---
## Carrier Structure and Quality Scores
Understanding Taiwan's mobile market starts with one key fact: **[Chunghwa Telecom](/en/tw/carriers/chunghwa/) dominates in quality**. It is the former state-owned telecom and still controls the most extensive infrastructure in the country.
| Carrier | Type | Coverage | Overall Score | Download Speed | Latency |
|---|---|---|---|---|---|
| **[Chunghwa Telecom](/en/tw/carriers/chunghwa/)** | MNO | 96/100 | **91/100** | 165.3 Mbps | 22ms |
| **[Taiwan Mobile](/en/tw/carriers/taiwanmobile/)** | MNO | 94/100 | 87/100 | 145.7 Mbps | 24ms |
| **[FarEasTone](/en/tw/carriers/fareastone/)** | MNO | 93/100 | 85/100 | 138.4 Mbps | 25ms |
| **[ibon Mobile](/en/tw/carriers/ibonmobile/)** | MVNO | — | — | — | — |
*Quality data: OpenSignal 2025, measured June 2025. [ibon Mobile](/en/tw/carriers/ibonmobile/) runs on Chunghwa's network but as an MVNO may experience reduced priority during congestion.*
**[Chunghwa Telecom](/en/tw/carriers/chunghwa/)'s quality score of 91 is among the highest of any carrier in SimFinder's global database.** Its download speed of 165.3 Mbps and latency of 22ms reflect a mature 5G rollout in a densely populated island. Taiwan's geography — roughly 36,000 km² with 23.5 million people — makes nationwide coverage relatively achievable, which is why all three MNOs score 93 or above for coverage.
[Taiwan Mobile](/en/tw/carriers/taiwanmobile/) sits in the middle with a solid 87/100 overall. Since absorbing Taiwan Star, it has expanded its spectrum holdings and improved coverage. It is the only MNO offering data rollover on select plans.
[FarEasTone](/en/tw/carriers/fareastone/) rounds out the three MNOs at 85/100. While its speeds and coverage are lower than the other two, it offers the only no-contract voice plan in the market — a significant advantage for flexibility.
[ibon Mobile](/en/tw/carriers/ibonmobile/) is the sole MVNO tracked by SimFinder in Taiwan. It runs on Chunghwa's network but is limited to 4G-only, data-only plans with no eSIM support. Its value lies in contract-free simplicity at low price points.
---
## All Plans Compared: 15 Plans Across 4 Carriers
**[Compare All 15 Taiwan Plans on SimFinder →](/en/tw/search/)**
### Contract Plans (24-Month Commitment)
Most 5G plans in Taiwan require a 24-month contract. The early termination fee across all carriers is NT$3,000.
| Carrier | Plan | Price/mo | Data | Voice | 5G | eSIM | Rollover |
|---|---|---|---|---|---|---|---|
| Chunghwa | 5G 599 | NT$599 | 24GB | 30 min | Yes | Yes | No |
| [FarEasTone](/en/tw/carriers/fareastone/) | 5G 599 | NT$599 | 24GB | 30 min | Yes | Yes | No |
| [Taiwan Mobile](/en/tw/carriers/taiwanmobile/) | 5G 599 | NT$599 | 24GB | Unlimited | Yes | Yes | No |
| [Taiwan Mobile](/en/tw/carriers/taiwanmobile/) | 4G 799 | NT$799 | 2GB | 30 min | No | Yes | **Yes** |
| Chunghwa | 5G 999 | NT$999 | 60GB | 60 min | Yes | Yes | No |
| [FarEasTone](/en/tw/carriers/fareastone/) | 5G 999 | NT$999 | 60GB | 60 min | Yes | Yes | No |
| [Taiwan Mobile](/en/tw/carriers/taiwanmobile/) | 5G 999 | NT$999 | 60GB | Unlimited | Yes | Yes | No |
| Chunghwa | 5G 1399 | NT$1,399 | 100GB | Unlimited | Yes | Yes | No |
| [FarEasTone](/en/tw/carriers/fareastone/) | 5G 1399 | NT$1,399 | Unlimited | Unlimited | Yes | Yes | No |
| [Taiwan Mobile](/en/tw/carriers/taiwanmobile/) | 5G 1399 | NT$1,399 | Unlimited | Unlimited | Yes | Yes | No |
| Chunghwa | 5G 1799 | NT$1,799 | 200GB | Unlimited | Yes | Yes | No |
### No-Contract Plans
| Carrier | Plan | Price/mo | Data | Voice | 5G | eSIM | Data-Only |
|---|---|---|---|---|---|---|---|
| [ibon Mobile](/en/tw/carriers/ibonmobile/) | 4G 1GB | NT$180 | 1GB | — | No | No | Yes |
| [FarEasTone](/en/tw/carriers/fareastone/) | 4G 399 | NT$399 | 300MB | Unlimited | No | Yes | No |
| [ibon Mobile](/en/tw/carriers/ibonmobile/) | 4G 5GB | NT$699 | 5GB | — | No | No | Yes |
| [ibon Mobile](/en/tw/carriers/ibonmobile/) | 4G Unlimited 30d | NT$899 | 40GB | — | No | No | Yes |
A pattern emerges: **the contract/no-contract split is stark**. If you want 5G or more than 300MB of data with voice, you are almost certainly signing a 24-month contract. The only exceptions are [ibon Mobile](/en/tw/carriers/ibonmobile/)'s data-only plans and [FarEasTone](/en/tw/carriers/fareastone/)'s basic 4G 399.
**[Compare All 15 Taiwan Plans on SimFinder →](/en/tw/search/)**
---
## Best Plans by Use Case
### Lightest Use / Budget (Under NT$500/month)
**[ibon Mobile](/en/tw/carriers/ibonmobile/) NT$180 4G 1GB** — The cheapest plan in Taiwan. Data-only, no contract, runs on Chunghwa's network. No eSIM, no 5G, no tethering — but at NT$180 (roughly US$5.50) it is hard to argue with. Ideal for a secondary SIM or light tablet usage.
**[FarEasTone](/en/tw/carriers/fareastone/) NT$399 4G 399** — The only no-contract plan with voice in Taiwan's market. Unlimited calls with 300MB of data. If you need a local phone number without a long-term commitment, this is your only option among the MNOs. eSIM supported.
### Best Balance of Price and Data
**[Chunghwa Telecom](/en/tw/carriers/chunghwa/) NT$999 5G 999** — The plan SimFinder's data suggests works for the widest range of users. You get 60GB of data on Taiwan's highest-quality network (91/100), 5G, eSIM, and 60 minutes of voice. The 24-month contract is the trade-off, but the quality-to-price ratio is strong. At NT$999 (roughly US$30/month), this is competitive globally.
**[FarEasTone](/en/tw/carriers/fareastone/) NT$999 5G 999** — Matches Chunghwa's data at the same price: 60GB and 60 minutes of voice. A reasonable alternative if Chunghwa is unavailable in your area, though Chunghwa's network advantage makes it the preferred pick when both are available.
### Heavy Data Users
**[FarEasTone](/en/tw/carriers/fareastone/) NT$1,399 5G 1399** and **[Taiwan Mobile](/en/tw/carriers/taiwanmobile/) NT$1,399 5G 1399** — The two unlimited data plans in Taiwan, both at the same price. Each includes unlimited data, unlimited voice, 5G, eSIM, and tethering. Choose based on network quality: FarEasTone scores 85/100 overall, Taiwan Mobile 87/100. If data limits are a concern, either plan eliminates them entirely. The 24-month contract and NT$3,000 termination fee apply to both.
**Chunghwa NT$1,799 5G 1799** — Taiwan's premium plan: 200GB on the best network (91/100), unlimited voice, 5G. For users who want the highest quality without unlimited data's potential throttling concerns, this is the ceiling.
### Data-Only / Secondary Device
**[ibon Mobile](/en/tw/carriers/ibonmobile/) NT$899 4G Unlimited 30d** — 40GB of data with tethering for NT$899/month, no contract. This is the best option for a tablet, hotspot device, or secondary SIM. It runs on Chunghwa's 4G network. The lack of eSIM means you need a physical SIM card.
### Short-Term Visitors
For tourists, Taiwan's contract-heavy market is a challenge. The best options:
1. **Travel eSIMs**: [Airalo](/en/travel/providers/airalo/) (from US$4.50/7 days), [Saily](/en/travel/providers/saily/), [Nomad](/en/travel/providers/nomad/), and others offer Taiwan data plans that activate instantly. No contract, no passport registration hassle. **[Compare travel eSIM plans for Taiwan →](/en/travel/tw/search/)**
2. **Airport SIM counters**: Chunghwa, [FarEasTone](/en/tw/carriers/fareastone/), and [Taiwan Mobile](/en/tw/carriers/taiwanmobile/) all operate counters at Taoyuan International Airport with short-term prepaid options.
3. **[FarEasTone](/en/tw/carriers/fareastone/) 4G 399**: If you need a local number, this no-contract plan works for any duration.
**[Find Your Best Taiwan Plan →](/en/tw/search/)**
---
## 5G and eSIM in Taiwan
### 5G Coverage
10 of 15 plans (67%) include 5G access. Taiwan's 5G rollout is concentrated in urban areas — Taipei, Kaohsiung, Taichung, and Tainan have strong coverage from all three MNOs. Rural and mountainous areas remain primarily 4G.
| Carrier | 5G Plans | 4G-Only Plans |
|---|---|---|
| [Chunghwa Telecom](/en/tw/carriers/chunghwa/) | 4 plans (all) | 0 |
| [FarEasTone](/en/tw/carriers/fareastone/) | 3 plans | 1 (4G 399, no contract) |
| [Taiwan Mobile](/en/tw/carriers/taiwanmobile/) | 3 plans | 1 (4G 799) |
| [ibon Mobile](/en/tw/carriers/ibonmobile/) | 0 | 3 (all, data-only) |
[Taiwan Mobile](/en/tw/carriers/taiwanmobile/) is the only MNO still selling a 4G-only contract plan (NT$799). It includes data rollover — the only plan in the entire market with this feature. This suggests [Taiwan Mobile](/en/tw/carriers/taiwanmobile/) positions its 4G plan as a niche product for users who prioritize rollover over 5G speed.
### eSIM Support
12 of 15 plans support eSIM — all MNO plans across Chunghwa, [FarEasTone](/en/tw/carriers/fareastone/), and [Taiwan Mobile](/en/tw/carriers/taiwanmobile/). The three [ibon Mobile](/en/tw/carriers/ibonmobile/) plans require a physical SIM card.
If your phone supports eSIM, you can activate an MNO plan remotely — useful for residents moving between carriers. For visitors arriving with an eSIM-compatible device, a travel eSIM from a provider like [Airalo](/en/travel/providers/airalo/) or [Saily](/en/travel/providers/saily/) may be simpler than navigating contract requirements.
---
## What Users Say
Real experiences from people using mobile services in Taiwan.
> "The first SIM card vending machine in Taiwan has now been introduced at terminal 1."
> — @taoyuanairport ([original post](https://x.com/taoyuanairport/status/773775430859972609))
Taoyuan Airport's SIM card infrastructure has improved over the years, making it straightforward for arriving travelers to get connected.
*Individual experiences may vary based on location and network conditions.*
---
## Compare Plans on SimFinder
The data in this guide comes from SimFinder's database, which tracks 15 Taiwan plans across 4 carriers. If you want to filter by price, data, 5G, or eSIM, use the comparison tool to find your best match.
**[Compare Taiwan SIM Plans →](/en/tw/search/)**
---
## Frequently Asked Questions
### Do I need a contract to get a SIM in Taiwan?
Not necessarily. [FarEasTone](/en/tw/carriers/fareastone/)'s 4G 399 plan (NT$399/month, unlimited calls, 300MB) requires no contract. All three [ibon Mobile](/en/tw/carriers/ibonmobile/) data-only plans are also contract-free. However, most 5G plans from the three MNOs require a 24-month commitment with a NT$3,000 early termination fee.
### Which carrier has the best coverage across Taiwan?
[Chunghwa Telecom](/en/tw/carriers/chunghwa/), with a coverage score of 96/100 and the highest overall quality score of 91/100. Its network reaches the most remote areas of Taiwan, including mountain regions and the east coast — where other carriers may have gaps.
### Can I get a data-only SIM without a phone number?
Yes. [ibon Mobile](/en/tw/carriers/ibonmobile/) offers three data-only plans starting at just NT$180/month for 1GB. These are contract-free, but note that [ibon Mobile](/en/tw/carriers/ibonmobile/) does not support eSIM — you need a physical SIM card.
### Is 5G widely available in Taiwan?
Yes. 10 of 15 plans in SimFinder's database include 5G. All three MNOs (Chunghwa, [FarEasTone](/en/tw/carriers/fareastone/), [Taiwan Mobile](/en/tw/carriers/taiwanmobile/)) offer 5G plans. The only carrier without 5G is [ibon Mobile](/en/tw/carriers/ibonmobile/), which operates as a 4G-only MVNO.
### Do any plans support eSIM?
Yes — all 12 MNO plans support eSIM. The three [ibon Mobile](/en/tw/carriers/ibonmobile/) plans do not. If you need eSIM, you must choose a plan from [Chunghwa Telecom](/en/tw/carriers/chunghwa/), [FarEasTone](/en/tw/carriers/fareastone/), or [Taiwan Mobile](/en/tw/carriers/taiwanmobile/).
### What is the cheapest way to get mobile data in Taiwan?
[ibon Mobile](/en/tw/carriers/ibonmobile/)'s 4G 1GB plan at NT$180/month is the cheapest option — data-only, no contract. For visitors, travel eSIMs from providers like [Airalo](/en/travel/providers/airalo/) start at US$4.50 for 1GB/7 days. For residents who need voice, [FarEasTone](/en/tw/carriers/fareastone/)'s 4G 399 (NT$399, unlimited calls, 300MB, no contract) is the most affordable.
### Which plan is best for tourists visiting Taiwan?
Short-term visitors should consider travel eSIMs ([Airalo](/en/travel/providers/airalo/), [Saily](/en/travel/providers/saily/), [Nomad](/en/travel/providers/nomad/)) for hassle-free data — plans start at US$4.50 for 7 days. If you need a local number, [FarEasTone](/en/tw/carriers/fareastone/)'s 4G 399 (NT$399, no contract, unlimited calls) is available at airport counters. [ibon Mobile](/en/tw/carriers/ibonmobile/)'s 40GB data-only plan (NT$899, no contract) is another option for heavy data users.
---
## Key Takeaways
The Taiwan SIM market in 2026:
- **4 carriers, 15 plans** with prices ranging from NT$180 to NT$1,799 per month
- **[Chunghwa Telecom](/en/tw/carriers/chunghwa/) leads in quality**: 91/100 overall, 165.3 Mbps download, 96/100 coverage — the benchmark for Taiwan's mobile networks
- **Contract vs. no-contract split is stark**: 11 of 15 plans require 24 months. Only [FarEasTone](/en/tw/carriers/fareastone/) 4G 399 and three [ibon Mobile](/en/tw/carriers/ibonmobile/) plans are contract-free
- **5G is widely available** (67% of plans), but limited to MNOs — [ibon Mobile](/en/tw/carriers/ibonmobile/) is 4G-only
- **eSIM is supported on all MNO plans** (12 of 15). [ibon Mobile](/en/tw/carriers/ibonmobile/) requires physical SIM
- **Two unlimited data plans exist at the same price**: [FarEasTone](/en/tw/carriers/fareastone/) 5G 1399 and [Taiwan Mobile](/en/tw/carriers/taiwanmobile/) 5G 1399, both NT$1,399/month
- **Data rollover is rare**: only [Taiwan Mobile](/en/tw/carriers/taiwanmobile/)'s 4G 799 plan offers it
- **For visitors**: travel eSIMs or [FarEasTone](/en/tw/carriers/fareastone/)'s no-contract 4G 399 are the practical options
For residents, the decision comes down to how much data you need and whether you accept a 24-month contract. If you do, Chunghwa's 5G 999 (NT$999, 60GB, quality score 91) offers the strongest value. If you don't, [FarEasTone](/en/tw/carriers/fareastone/)'s 4G 399 is the only voice option without strings attached.
**[Find Your Best Taiwan SIM Plan →](/en/tw/search/)**
---
*Plan data is current as of July 2026. Prices and inclusions may change. Check carrier websites for the latest information.*
*Compare all plans side by side using [SimFinder's comparison tool](/en/tw/search/).*
================================================================================
# Best SIM Plans in Thailand 2026: 3 Carriers, 16 Plans Compared
URL: https://sim-finder.com/en/blog/best-sim-plans-thailand-2026/
Type: blog (en)
Published: 2026-03-24
## TL;DR: Top 3 Picks for Thailand
| Best For | Plan | Price/mo | Why |
|---------|-------|------|---------|
| **Budget** | [DTAC](/en/th/carriers/dtac/) Prepaid 15GB | ฿299 | Cheapest tier in Thailand (tied with [AIS](/en/th/carriers/ais/) 1GB), unlimited calls, 15GB data |
| **Most People** | [TrueMove H](/en/th/carriers/truemove/) Prepaid 60GB | ฿300 | 60GB for just ฿300, unlimited calls, best value per GB |
| **Speed & eSIM** | [AIS](/en/th/carriers/ais/) Prepaid 50GB | ฿899 | Top network (95/100 coverage), 5G, eSIM, 50GB |
**[Compare All 16 Thai Plans on SimFinder →](/en/th/search/)**
SPONSORED
Landing at Suvarnabhumi? Thai prepaid SIMs are cheaper per GB, but every one of them means queuing at an airport counter and handing over your passport for registration. An eSIM is live before you take off — Saily's Thailand data starts at $2.99 for 1 GB / 7 days, or $10.99 for 10 GB / 30 days. We may earn a commission if you buy through this link, at no extra cost to you.
See Saily's Thailand eSIM plans →
Below, we break down the entire market using real plan data.
## Table of Contents
- [The Thai Mobile Landscape](#the-thai-mobile-landscape-who-owns-what)
- [Price Breakdown: What Every Carrier Charges](#price-breakdown-what-every-carrier-charges)
- [Best Value Plans by Use Case](#best-value-plans-by-use-case)
- [5G and eSIM: What's Available](#5g-and-esim-whats-available)
- [Frequently Asked Questions](#frequently-asked-questions)
- [Key Takeaways](#key-takeaways)
---
Thailand's mobile market is built on three MNO networks — [AIS](/en/th/carriers/ais/), [TrueMove H](/en/th/carriers/truemove/), and [DTAC](/en/th/carriers/dtac/). The market's one budget MVNO, Penguin SIM, discontinued service in Thailand in August 2025 after its network partner NT's spectrum license lapsed, and has been removed from this guide.
SimFinder's database tracks **3 carriers and 16 plans** in Thailand. Every plan is contract-free with zero cancellation fees. Prices range from ฿299/month (~$8.25 USD) to ฿1,499/month (~$41.50 USD), making Thailand one of the most affordable mobile markets in Southeast Asia.
This guide breaks down the entire Thai SIM market using actual plan data, network quality scores, and pricing analysis.
---
## The Thai Mobile Landscape: Who Owns What
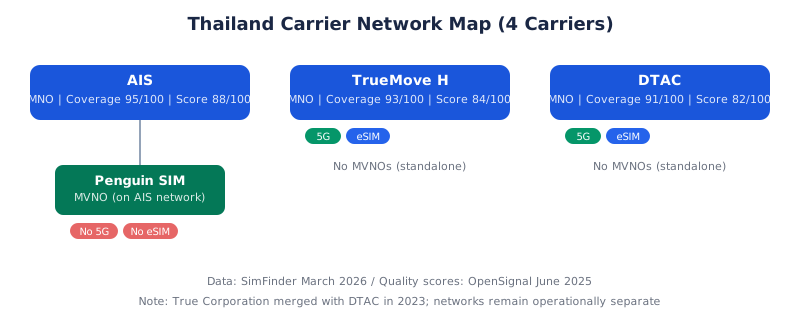 Thailand has **three physical networks** operated by three MNOs, plus one MVNO.
| Network Owner | Type | Coverage Score | Overall Score | Download Speed | Carriers Using This Network |
|---|---|---|---|---|---|
| **[AIS](/en/th/carriers/ais/)** | MNO | 95/100 | 88/100 | 98.4 Mbps | [AIS](/en/th/carriers/ais/) |
| **[TrueMove H](/en/th/carriers/truemove/)** | MNO | 93/100 | 84/100 | 87.3 Mbps | [TrueMove H](/en/th/carriers/truemove/) only |
| **[DTAC](/en/th/carriers/dtac/)** | MNO | 91/100 | 82/100 | 81.6 Mbps | [DTAC](/en/th/carriers/dtac/) only |
*Quality data: OpenSignal 2025, measured June 2025*
**[AIS](/en/th/carriers/ais/) is the clear network leader.** With a coverage score of 95/100 and the fastest download speeds at 98.4 Mbps, [AIS](/en/th/carriers/ais/) dominates across every quality metric. Its 20ms latency is the lowest among the three MNOs. This matters most outside of Bangkok — on the islands, in northern Thailand, and along intercity highways, [AIS](/en/th/carriers/ais/) maintains the most consistent signal.
[TrueMove H](/en/th/carriers/truemove/) holds second place at 93/100 coverage and 87.3 Mbps download speeds. It is strong in Bangkok and major tourist areas like Phuket and Chiang Mai.
[DTAC](/en/th/carriers/dtac/) is the third network at 91/100 coverage and 81.6 Mbps. The gap between [DTAC](/en/th/carriers/dtac/) and the other two is narrower than in many other markets — all three Thai networks provide solid urban coverage.
**The True-[DTAC](/en/th/carriers/dtac/) merger context:** True Corporation and [DTAC](/en/th/carriers/dtac/) merged in March 2023. Despite the corporate merger, [TrueMove H](/en/th/carriers/truemove/) and [DTAC](/en/th/carriers/dtac/) continue to operate as separate consumer brands with independent plan lineups and pricing. For SIM buyers, they remain effectively two different carriers.
Thailand currently has no MVNO tracked by SimFinder. Penguin SIM, the market's only budget MVNO, discontinued service in August 2025 after its network partner NT's spectrum license lapsed. All 16 tracked plans now come directly from the three MNOs.
---
## Price Breakdown: What Every Carrier Charges
All 16 plans are contract-free with no cancellation fees. The key variables are price, data, voice inclusions, 5G access, and eSIM support.
### Prepaid Plans (No Contract)
| Carrier | Plan | Price/mo | Data | Voice | 5G | eSIM |
|---|---|---|---|---|---|---|
| [AIS](/en/th/carriers/ais/) | Prepaid 1GB | ฿299 | 1GB | 100 min | No | No |
| [DTAC](/en/th/carriers/dtac/) | Prepaid 15GB | ฿299 | 15GB | Unlimited | No | No |
| [TrueMove H](/en/th/carriers/truemove/) | Prepaid 60GB | ฿300 | 60GB | Unlimited | No | No |
| [AIS](/en/th/carriers/ais/) | Prepaid 5GB | ฿399 | 5GB | Unlimited | No | No |
| [DTAC](/en/th/carriers/dtac/) | Prepaid 30GB | ฿499 | 30GB | Unlimited | Yes | No |
| [AIS](/en/th/carriers/ais/) | Prepaid 10GB | ฿599 | 10GB | Unlimited | Yes | Yes |
| [AIS](/en/th/carriers/ais/) | Prepaid 20GB | ฿699 | 20GB | Unlimited | Yes | Yes |
| [AIS](/en/th/carriers/ais/) | Prepaid 30GB | ฿899 | 30GB | Unlimited | Yes | Yes |
| [AIS](/en/th/carriers/ais/) | Prepaid 50GB | ฿899 | 50GB | Unlimited | Yes | Yes |
### 5G Postpaid-Style Plans (No Contract)
| Carrier | Plan | Price/mo | Data | Voice | 5G | eSIM |
|---|---|---|---|---|---|---|
| [TrueMove H](/en/th/carriers/truemove/) | 5G Super Netflix 25GB | ฿499 | 25GB | 150 min | Yes | Yes |
| [TrueMove H](/en/th/carriers/truemove/) | 5G Super Max 40GB | ฿499 | 40GB | 250 min | Yes | Yes |
| [DTAC](/en/th/carriers/dtac/) | 5G Super Max 40GB | ฿499 | 40GB | 250 min | Yes | Yes |
| [DTAC](/en/th/carriers/dtac/) | 5G Super Max 80GB | ฿899 | 80GB | 300 min | Yes | Yes |
| [TrueMove H](/en/th/carriers/truemove/) | 5G Super Streaming 90GB | ฿999 | 90GB | 300 min | Yes | Yes |
| [TrueMove H](/en/th/carriers/truemove/) | 5G Unlimited | ฿1,499 | Unlimited | 650 min | Yes | Yes |
| [DTAC](/en/th/carriers/dtac/) | 5G Unlimited | ฿1,499 | Unlimited | 650 min | Yes | Yes |
### Price per GB Analysis
When sorted by price per gigabyte, the value leaders become clear:
| Plan | Price/mo | Data | Price per GB |
|---|---|---|---|
| [TrueMove H](/en/th/carriers/truemove/) Prepaid 60GB | ฿300 | 60GB | **฿5.00/GB** |
| [AIS](/en/th/carriers/ais/) Prepaid 50GB | ฿899 | 50GB | ฿17.98/GB |
| [TrueMove H](/en/th/carriers/truemove/) 5G Super Streaming 90GB | ฿999 | 90GB | ฿11.10/GB |
| [DTAC](/en/th/carriers/dtac/) 5G Super Max 80GB | ฿899 | 80GB | ฿11.24/GB |
| [TrueMove H](/en/th/carriers/truemove/) 5G Super Max 40GB | ฿499 | 40GB | ฿12.48/GB |
| [DTAC](/en/th/carriers/dtac/) 5G Super Max 40GB | ฿499 | 40GB | ฿12.48/GB |
| [DTAC](/en/th/carriers/dtac/) Prepaid 15GB | ฿299 | 15GB | ฿19.93/GB |
| [DTAC](/en/th/carriers/dtac/) Prepaid 30GB | ฿499 | 30GB | ฿16.63/GB |
The [TrueMove H](/en/th/carriers/truemove/) Prepaid 60GB plan at ฿300/month is a significant outlier — at ฿5.00 per GB, it delivers more than 3x the value of the next closest plan. This is the standout deal in the Thai market.
**[Compare All 16 Thai Plans on SimFinder →](/en/th/search/)**
---
## Best Value Plans by Use Case
### Budget / Light Use (Under ฿300/month)
**[DTAC](/en/th/carriers/dtac/) Prepaid ฿299 15GB** — The cheapest plan in Thailand's SIM market since Penguin SIM discontinued service in August 2025. 15GB with unlimited calls for roughly $8.25 USD per month. No 5G or eSIM at this tier, but 15GB is enough for daily social media, messaging, and maps.
**[AIS](/en/th/carriers/ais/) Prepaid ฿299 1GB** — Ties [DTAC](/en/th/carriers/dtac/) on price but trades data for [AIS](/en/th/carriers/ais/)'s superior network (95/100 coverage) and 100 minutes of calls. Best for light users who value network reliability outside Bangkok over raw data volume.
### Most People (฿300–฿500/month)
**[TrueMove H](/en/th/carriers/truemove/) Prepaid ฿300 60GB** — This is the plan that breaks the market's pricing logic. At ฿300 for 60GB with unlimited calls, it delivers ฿5.00/GB — the best data value in all of Thailand by a wide margin. The trade-off: no 5G and no eSIM. If you can live without those two features, nothing else comes close on pure value.
**[TrueMove H](/en/th/carriers/truemove/) 5G Super Max ฿499 40GB** — If you need 5G and eSIM, this is the entry point. 40GB of 5G data on [TrueMove H](/en/th/carriers/truemove/)'s network (87.3 Mbps, 93/100 coverage), eSIM support for instant activation, and 250 voice minutes. [DTAC](/en/th/carriers/dtac/) offers a near-identical plan at the same price.
### Digital Nomads / Heavy Data Users
**[AIS](/en/th/carriers/ais/) Prepaid ฿899 50GB** — For remote workers who need the most reliable connection, [AIS](/en/th/carriers/ais/)'s network quality justifies the premium. 50GB of 5G data, eSIM support, unlimited calls, and 95/100 coverage with the lowest latency (20ms) in the country. At ฿899 ($25 USD), this is still remarkably affordable by global standards.
**[DTAC](/en/th/carriers/dtac/) 5G Super Max ฿899 80GB** — If raw data volume matters more than network ranking, [DTAC](/en/th/carriers/dtac/) delivers 80GB for the same ฿899 that [AIS](/en/th/carriers/ais/) charges for 50GB. [DTAC](/en/th/carriers/dtac/)'s 91/100 coverage is solid in urban areas where most digital nomads work.
### Maximum Speed / Unlimited Data
**[TrueMove H](/en/th/carriers/truemove/) 5G Unlimited ฿1,499** and **[DTAC](/en/th/carriers/dtac/) 5G Unlimited ฿1,499** — Both carriers offer unlimited 5G data at the same ฿1,499 price point (~$41.50 USD) with 650 voice minutes and eSIM support. Between the two, [TrueMove H](/en/th/carriers/truemove/) edges ahead on network quality (84/100 vs 82/100 overall). For heavy streamers, hotspot users, or anyone who simply does not want to think about data limits, these are the top-tier options.
**[Compare Thai SIM Plans by Your Needs →](/en/th/search/)**
---
## 5G and eSIM: What's Available
### 5G Coverage
12 of 16 plans (75%) include 5G access. All three MNOs offer 5G, but availability depends on the plan tier:
| Carrier | 5G Plans | 4G-Only Plans | Notes |
|---|---|---|---|
| [AIS](/en/th/carriers/ais/) | 10GB, 20GB, 30GB, 50GB | 1GB, 5GB | 5G starts at ฿599/mo |
| [TrueMove H](/en/th/carriers/truemove/) | All 5G-branded plans | Prepaid 60GB | 5G starts at ฿499/mo |
| [DTAC](/en/th/carriers/dtac/) | Prepaid 30GB, all 5G plans | Prepaid 15GB | 5G starts at ฿499/mo |
Thailand's 5G network is concentrated in Bangkok, Chiang Mai, Phuket, and other major urban centers. If you spend most of your time in cities, 5G delivers noticeably faster speeds. Outside urban areas, you will fall back to 4G on all carriers.
### eSIM Support
11 of 16 plans (69%) support eSIM. This is lower than some developed markets but improving:
| Carrier | eSIM Plans | No-eSIM Plans |
|---|---|---|
| [AIS](/en/th/carriers/ais/) | Prepaid 10GB, 20GB, 30GB, 50GB | Prepaid 1GB, 5GB |
| [TrueMove H](/en/th/carriers/truemove/) | All 5G plans (4) | Prepaid 60GB |
| [DTAC](/en/th/carriers/dtac/) | All 5G plans (3) | Prepaid 15GB, 30GB |
If eSIM is a priority — for example, if you want to activate a Thai SIM before arriving — your best options are [AIS](/en/th/carriers/ais/) Prepaid 10GB+ (฿599+), [TrueMove H](/en/th/carriers/truemove/) 5G plans (฿499+), or [DTAC](/en/th/carriers/dtac/) 5G plans (฿499+).
---
## Compare Plans on SimFinder
The data in this guide comes from SimFinder's database, which tracks 16 Thai plans across 3 carriers. If you want to filter by price, data, 5G, or eSIM, use the comparison tool to find your best match.
**[Compare Thai SIM Plans →](/en/th/search/)**
---
## Frequently Asked Questions
### What is the cheapest SIM plan in Thailand?
[DTAC](/en/th/carriers/dtac/) Prepaid 15GB and [AIS](/en/th/carriers/ais/) Prepaid 1GB are tied as the cheapest plans in SimFinder's database at ฿299/month (~$8.25 USD) each. [DTAC](/en/th/carriers/dtac/)'s option includes far more data with unlimited calls, while [AIS](/en/th/carriers/ais/)'s plan includes 100 minutes of calls on Thailand's top-rated network. (Penguin SIM, previously the cheapest option at ฿199, discontinued service in Thailand in August 2025.)
### Which Thai carrier has the best coverage?
[AIS](/en/th/carriers/ais/) leads with a coverage score of 95/100, followed by [TrueMove H](/en/th/carriers/truemove/) at 93/100 and [DTAC](/en/th/carriers/dtac/) at 91/100 (OpenSignal June 2025). For travel outside Bangkok and major tourist areas, [AIS](/en/th/carriers/ais/) is the most reliable choice.
### Can I get an eSIM in Thailand?
Yes. [AIS](/en/th/carriers/ais/) offers eSIM on its 10GB and above prepaid plans. [TrueMove H](/en/th/carriers/truemove/) and [DTAC](/en/th/carriers/dtac/) support eSIM on all their 5G postpaid plans. However, [TrueMove H](/en/th/carriers/truemove/)'s Prepaid 60GB and [DTAC](/en/th/carriers/dtac/)'s Prepaid 15GB and 30GB plans do not include eSIM. 11 of 16 plans (69%) in our database support eSIM.
### Is 5G widely available in Thailand?
5G is available on 12 of 16 plans (75%) in SimFinder's database. All three MNOs — [AIS](/en/th/carriers/ais/), [TrueMove H](/en/th/carriers/truemove/), and [DTAC](/en/th/carriers/dtac/) — offer 5G on their mid-range and premium plans. 5G coverage is concentrated in Bangkok and major cities. The cheapest 5G plan is [DTAC](/en/th/carriers/dtac/) Prepaid 30GB at ฿499.
### What's the best SIM for a tourist visiting Thailand?
[TrueMove H](/en/th/carriers/truemove/) Prepaid 60GB at ฿300/month (~$8.30 USD) is an outstanding deal — 60GB of data with unlimited calls and no contract. For the shortest stays needing minimal data, [DTAC](/en/th/carriers/dtac/) Prepaid 15GB at ฿299 is the cheapest option. If you need 5G and eSIM, [AIS](/en/th/carriers/ais/) Prepaid 10GB at ฿599 lets you activate before you land.
### Do I need a contract for a Thai SIM card?
No. All 16 plans tracked by SimFinder are contract-free (0-month contracts) with zero cancellation fees. You can switch carriers or cancel at any time without penalty.
### What happened with the True-[DTAC](/en/th/carriers/dtac/) merger?
True Corporation and [DTAC](/en/th/carriers/dtac/) completed their merger in March 2023, forming True Corporation Plc. However, the [TrueMove H](/en/th/carriers/truemove/) and [DTAC](/en/th/carriers/dtac/) brands continue to operate with separate plan lineups, pricing, and SIM products. Both networks remain functionally independent for consumers.
---
## Key Takeaways
The Thai SIM market in 2026:
- **3 carriers, 16 plans**, all contract-free with zero cancellation fees
- **Three MNO networks**: [AIS](/en/th/carriers/ais/) (coverage king, 95/100), [TrueMove H](/en/th/carriers/truemove/) (strong mid-range, 93/100), [DTAC](/en/th/carriers/dtac/) (competitive, 91/100) — Penguin SIM, the market's only MVNO, discontinued service in August 2025
- **Price range**: ฿299/mo (DTAC 15GB / AIS 1GB, ~$8.25) to ฿1,499/mo (Unlimited 5G, ~$41.50) — among the cheapest mobile markets globally
- **Best value**: [TrueMove H](/en/th/carriers/truemove/) Prepaid 60GB at ฿300 delivers ฿5.00/GB — 3x better than any other plan
- **5G on 75% of plans**, eSIM on 69% — available from all three MNOs but not on entry-level tiers
- **No data rollover** on any plan in the Thai market — use it or lose it each month
For most users, the decision comes down to priorities: choose **[TrueMove H](/en/th/carriers/truemove/) Prepaid 60GB** for raw value, **[AIS](/en/th/carriers/ais/)** for the best network quality, or **[DTAC](/en/th/carriers/dtac/) Prepaid 15GB** for the lowest possible entry price.
**[Find Your Best Thai SIM Plan →](/en/th/search/)**
---
*Plan data is current as of March 2026; Thai carrier lineup re-verified July 2026 (Penguin SIM discontinued service in August 2025 and has been removed from this guide). Prices include 7% VAT (tax-inclusive). Check carrier websites for the latest information.*
*Compare all plans side by side using [SimFinder's comparison tool](/en/th/search/).*
================================================================================
# Best SIM Plans in the UK 2026: 10 Carriers Compared
URL: https://sim-finder.com/en/blog/best-sim-plans-uk-2026/
Type: blog (en)
Published: 2026-03-18
## TL;DR: Top 3 Picks for the UK
| Best For | Plan | Price/mo | Why |
|---------|-------|------|---------|
| **Budget** | [Lebara](/en/uk/carriers/lebara/) 5GB | £5 | Cheapest UK plan, Vodafone 5G network, international minutes included |
| **Most People** | [VOXI](/en/uk/carriers/voxi/) 100GB | £12 | Vodafone 5G network, no contract, unlimited social media and music streaming |
| **Heavy Use** | [iD Mobile](/en/uk/carriers/id-mobile/) Unlimited | £16 | Cheapest unlimited data plan in the UK, data rollover, Three 5G network |
**[Compare All 33 UK Plans on SimFinder →](/en/uk/search/)**
Thailand has **three physical networks** operated by three MNOs, plus one MVNO.
| Network Owner | Type | Coverage Score | Overall Score | Download Speed | Carriers Using This Network |
|---|---|---|---|---|---|
| **[AIS](/en/th/carriers/ais/)** | MNO | 95/100 | 88/100 | 98.4 Mbps | [AIS](/en/th/carriers/ais/) |
| **[TrueMove H](/en/th/carriers/truemove/)** | MNO | 93/100 | 84/100 | 87.3 Mbps | [TrueMove H](/en/th/carriers/truemove/) only |
| **[DTAC](/en/th/carriers/dtac/)** | MNO | 91/100 | 82/100 | 81.6 Mbps | [DTAC](/en/th/carriers/dtac/) only |
*Quality data: OpenSignal 2025, measured June 2025*
**[AIS](/en/th/carriers/ais/) is the clear network leader.** With a coverage score of 95/100 and the fastest download speeds at 98.4 Mbps, [AIS](/en/th/carriers/ais/) dominates across every quality metric. Its 20ms latency is the lowest among the three MNOs. This matters most outside of Bangkok — on the islands, in northern Thailand, and along intercity highways, [AIS](/en/th/carriers/ais/) maintains the most consistent signal.
[TrueMove H](/en/th/carriers/truemove/) holds second place at 93/100 coverage and 87.3 Mbps download speeds. It is strong in Bangkok and major tourist areas like Phuket and Chiang Mai.
[DTAC](/en/th/carriers/dtac/) is the third network at 91/100 coverage and 81.6 Mbps. The gap between [DTAC](/en/th/carriers/dtac/) and the other two is narrower than in many other markets — all three Thai networks provide solid urban coverage.
**The True-[DTAC](/en/th/carriers/dtac/) merger context:** True Corporation and [DTAC](/en/th/carriers/dtac/) merged in March 2023. Despite the corporate merger, [TrueMove H](/en/th/carriers/truemove/) and [DTAC](/en/th/carriers/dtac/) continue to operate as separate consumer brands with independent plan lineups and pricing. For SIM buyers, they remain effectively two different carriers.
Thailand currently has no MVNO tracked by SimFinder. Penguin SIM, the market's only budget MVNO, discontinued service in August 2025 after its network partner NT's spectrum license lapsed. All 16 tracked plans now come directly from the three MNOs.
---
## Price Breakdown: What Every Carrier Charges
All 16 plans are contract-free with no cancellation fees. The key variables are price, data, voice inclusions, 5G access, and eSIM support.
### Prepaid Plans (No Contract)
| Carrier | Plan | Price/mo | Data | Voice | 5G | eSIM |
|---|---|---|---|---|---|---|
| [AIS](/en/th/carriers/ais/) | Prepaid 1GB | ฿299 | 1GB | 100 min | No | No |
| [DTAC](/en/th/carriers/dtac/) | Prepaid 15GB | ฿299 | 15GB | Unlimited | No | No |
| [TrueMove H](/en/th/carriers/truemove/) | Prepaid 60GB | ฿300 | 60GB | Unlimited | No | No |
| [AIS](/en/th/carriers/ais/) | Prepaid 5GB | ฿399 | 5GB | Unlimited | No | No |
| [DTAC](/en/th/carriers/dtac/) | Prepaid 30GB | ฿499 | 30GB | Unlimited | Yes | No |
| [AIS](/en/th/carriers/ais/) | Prepaid 10GB | ฿599 | 10GB | Unlimited | Yes | Yes |
| [AIS](/en/th/carriers/ais/) | Prepaid 20GB | ฿699 | 20GB | Unlimited | Yes | Yes |
| [AIS](/en/th/carriers/ais/) | Prepaid 30GB | ฿899 | 30GB | Unlimited | Yes | Yes |
| [AIS](/en/th/carriers/ais/) | Prepaid 50GB | ฿899 | 50GB | Unlimited | Yes | Yes |
### 5G Postpaid-Style Plans (No Contract)
| Carrier | Plan | Price/mo | Data | Voice | 5G | eSIM |
|---|---|---|---|---|---|---|
| [TrueMove H](/en/th/carriers/truemove/) | 5G Super Netflix 25GB | ฿499 | 25GB | 150 min | Yes | Yes |
| [TrueMove H](/en/th/carriers/truemove/) | 5G Super Max 40GB | ฿499 | 40GB | 250 min | Yes | Yes |
| [DTAC](/en/th/carriers/dtac/) | 5G Super Max 40GB | ฿499 | 40GB | 250 min | Yes | Yes |
| [DTAC](/en/th/carriers/dtac/) | 5G Super Max 80GB | ฿899 | 80GB | 300 min | Yes | Yes |
| [TrueMove H](/en/th/carriers/truemove/) | 5G Super Streaming 90GB | ฿999 | 90GB | 300 min | Yes | Yes |
| [TrueMove H](/en/th/carriers/truemove/) | 5G Unlimited | ฿1,499 | Unlimited | 650 min | Yes | Yes |
| [DTAC](/en/th/carriers/dtac/) | 5G Unlimited | ฿1,499 | Unlimited | 650 min | Yes | Yes |
### Price per GB Analysis
When sorted by price per gigabyte, the value leaders become clear:
| Plan | Price/mo | Data | Price per GB |
|---|---|---|---|
| [TrueMove H](/en/th/carriers/truemove/) Prepaid 60GB | ฿300 | 60GB | **฿5.00/GB** |
| [AIS](/en/th/carriers/ais/) Prepaid 50GB | ฿899 | 50GB | ฿17.98/GB |
| [TrueMove H](/en/th/carriers/truemove/) 5G Super Streaming 90GB | ฿999 | 90GB | ฿11.10/GB |
| [DTAC](/en/th/carriers/dtac/) 5G Super Max 80GB | ฿899 | 80GB | ฿11.24/GB |
| [TrueMove H](/en/th/carriers/truemove/) 5G Super Max 40GB | ฿499 | 40GB | ฿12.48/GB |
| [DTAC](/en/th/carriers/dtac/) 5G Super Max 40GB | ฿499 | 40GB | ฿12.48/GB |
| [DTAC](/en/th/carriers/dtac/) Prepaid 15GB | ฿299 | 15GB | ฿19.93/GB |
| [DTAC](/en/th/carriers/dtac/) Prepaid 30GB | ฿499 | 30GB | ฿16.63/GB |
The [TrueMove H](/en/th/carriers/truemove/) Prepaid 60GB plan at ฿300/month is a significant outlier — at ฿5.00 per GB, it delivers more than 3x the value of the next closest plan. This is the standout deal in the Thai market.
**[Compare All 16 Thai Plans on SimFinder →](/en/th/search/)**
---
## Best Value Plans by Use Case
### Budget / Light Use (Under ฿300/month)
**[DTAC](/en/th/carriers/dtac/) Prepaid ฿299 15GB** — The cheapest plan in Thailand's SIM market since Penguin SIM discontinued service in August 2025. 15GB with unlimited calls for roughly $8.25 USD per month. No 5G or eSIM at this tier, but 15GB is enough for daily social media, messaging, and maps.
**[AIS](/en/th/carriers/ais/) Prepaid ฿299 1GB** — Ties [DTAC](/en/th/carriers/dtac/) on price but trades data for [AIS](/en/th/carriers/ais/)'s superior network (95/100 coverage) and 100 minutes of calls. Best for light users who value network reliability outside Bangkok over raw data volume.
### Most People (฿300–฿500/month)
**[TrueMove H](/en/th/carriers/truemove/) Prepaid ฿300 60GB** — This is the plan that breaks the market's pricing logic. At ฿300 for 60GB with unlimited calls, it delivers ฿5.00/GB — the best data value in all of Thailand by a wide margin. The trade-off: no 5G and no eSIM. If you can live without those two features, nothing else comes close on pure value.
**[TrueMove H](/en/th/carriers/truemove/) 5G Super Max ฿499 40GB** — If you need 5G and eSIM, this is the entry point. 40GB of 5G data on [TrueMove H](/en/th/carriers/truemove/)'s network (87.3 Mbps, 93/100 coverage), eSIM support for instant activation, and 250 voice minutes. [DTAC](/en/th/carriers/dtac/) offers a near-identical plan at the same price.
### Digital Nomads / Heavy Data Users
**[AIS](/en/th/carriers/ais/) Prepaid ฿899 50GB** — For remote workers who need the most reliable connection, [AIS](/en/th/carriers/ais/)'s network quality justifies the premium. 50GB of 5G data, eSIM support, unlimited calls, and 95/100 coverage with the lowest latency (20ms) in the country. At ฿899 ($25 USD), this is still remarkably affordable by global standards.
**[DTAC](/en/th/carriers/dtac/) 5G Super Max ฿899 80GB** — If raw data volume matters more than network ranking, [DTAC](/en/th/carriers/dtac/) delivers 80GB for the same ฿899 that [AIS](/en/th/carriers/ais/) charges for 50GB. [DTAC](/en/th/carriers/dtac/)'s 91/100 coverage is solid in urban areas where most digital nomads work.
### Maximum Speed / Unlimited Data
**[TrueMove H](/en/th/carriers/truemove/) 5G Unlimited ฿1,499** and **[DTAC](/en/th/carriers/dtac/) 5G Unlimited ฿1,499** — Both carriers offer unlimited 5G data at the same ฿1,499 price point (~$41.50 USD) with 650 voice minutes and eSIM support. Between the two, [TrueMove H](/en/th/carriers/truemove/) edges ahead on network quality (84/100 vs 82/100 overall). For heavy streamers, hotspot users, or anyone who simply does not want to think about data limits, these are the top-tier options.
**[Compare Thai SIM Plans by Your Needs →](/en/th/search/)**
---
## 5G and eSIM: What's Available
### 5G Coverage
12 of 16 plans (75%) include 5G access. All three MNOs offer 5G, but availability depends on the plan tier:
| Carrier | 5G Plans | 4G-Only Plans | Notes |
|---|---|---|---|
| [AIS](/en/th/carriers/ais/) | 10GB, 20GB, 30GB, 50GB | 1GB, 5GB | 5G starts at ฿599/mo |
| [TrueMove H](/en/th/carriers/truemove/) | All 5G-branded plans | Prepaid 60GB | 5G starts at ฿499/mo |
| [DTAC](/en/th/carriers/dtac/) | Prepaid 30GB, all 5G plans | Prepaid 15GB | 5G starts at ฿499/mo |
Thailand's 5G network is concentrated in Bangkok, Chiang Mai, Phuket, and other major urban centers. If you spend most of your time in cities, 5G delivers noticeably faster speeds. Outside urban areas, you will fall back to 4G on all carriers.
### eSIM Support
11 of 16 plans (69%) support eSIM. This is lower than some developed markets but improving:
| Carrier | eSIM Plans | No-eSIM Plans |
|---|---|---|
| [AIS](/en/th/carriers/ais/) | Prepaid 10GB, 20GB, 30GB, 50GB | Prepaid 1GB, 5GB |
| [TrueMove H](/en/th/carriers/truemove/) | All 5G plans (4) | Prepaid 60GB |
| [DTAC](/en/th/carriers/dtac/) | All 5G plans (3) | Prepaid 15GB, 30GB |
If eSIM is a priority — for example, if you want to activate a Thai SIM before arriving — your best options are [AIS](/en/th/carriers/ais/) Prepaid 10GB+ (฿599+), [TrueMove H](/en/th/carriers/truemove/) 5G plans (฿499+), or [DTAC](/en/th/carriers/dtac/) 5G plans (฿499+).
---
## Compare Plans on SimFinder
The data in this guide comes from SimFinder's database, which tracks 16 Thai plans across 3 carriers. If you want to filter by price, data, 5G, or eSIM, use the comparison tool to find your best match.
**[Compare Thai SIM Plans →](/en/th/search/)**
---
## Frequently Asked Questions
### What is the cheapest SIM plan in Thailand?
[DTAC](/en/th/carriers/dtac/) Prepaid 15GB and [AIS](/en/th/carriers/ais/) Prepaid 1GB are tied as the cheapest plans in SimFinder's database at ฿299/month (~$8.25 USD) each. [DTAC](/en/th/carriers/dtac/)'s option includes far more data with unlimited calls, while [AIS](/en/th/carriers/ais/)'s plan includes 100 minutes of calls on Thailand's top-rated network. (Penguin SIM, previously the cheapest option at ฿199, discontinued service in Thailand in August 2025.)
### Which Thai carrier has the best coverage?
[AIS](/en/th/carriers/ais/) leads with a coverage score of 95/100, followed by [TrueMove H](/en/th/carriers/truemove/) at 93/100 and [DTAC](/en/th/carriers/dtac/) at 91/100 (OpenSignal June 2025). For travel outside Bangkok and major tourist areas, [AIS](/en/th/carriers/ais/) is the most reliable choice.
### Can I get an eSIM in Thailand?
Yes. [AIS](/en/th/carriers/ais/) offers eSIM on its 10GB and above prepaid plans. [TrueMove H](/en/th/carriers/truemove/) and [DTAC](/en/th/carriers/dtac/) support eSIM on all their 5G postpaid plans. However, [TrueMove H](/en/th/carriers/truemove/)'s Prepaid 60GB and [DTAC](/en/th/carriers/dtac/)'s Prepaid 15GB and 30GB plans do not include eSIM. 11 of 16 plans (69%) in our database support eSIM.
### Is 5G widely available in Thailand?
5G is available on 12 of 16 plans (75%) in SimFinder's database. All three MNOs — [AIS](/en/th/carriers/ais/), [TrueMove H](/en/th/carriers/truemove/), and [DTAC](/en/th/carriers/dtac/) — offer 5G on their mid-range and premium plans. 5G coverage is concentrated in Bangkok and major cities. The cheapest 5G plan is [DTAC](/en/th/carriers/dtac/) Prepaid 30GB at ฿499.
### What's the best SIM for a tourist visiting Thailand?
[TrueMove H](/en/th/carriers/truemove/) Prepaid 60GB at ฿300/month (~$8.30 USD) is an outstanding deal — 60GB of data with unlimited calls and no contract. For the shortest stays needing minimal data, [DTAC](/en/th/carriers/dtac/) Prepaid 15GB at ฿299 is the cheapest option. If you need 5G and eSIM, [AIS](/en/th/carriers/ais/) Prepaid 10GB at ฿599 lets you activate before you land.
### Do I need a contract for a Thai SIM card?
No. All 16 plans tracked by SimFinder are contract-free (0-month contracts) with zero cancellation fees. You can switch carriers or cancel at any time without penalty.
### What happened with the True-[DTAC](/en/th/carriers/dtac/) merger?
True Corporation and [DTAC](/en/th/carriers/dtac/) completed their merger in March 2023, forming True Corporation Plc. However, the [TrueMove H](/en/th/carriers/truemove/) and [DTAC](/en/th/carriers/dtac/) brands continue to operate with separate plan lineups, pricing, and SIM products. Both networks remain functionally independent for consumers.
---
## Key Takeaways
The Thai SIM market in 2026:
- **3 carriers, 16 plans**, all contract-free with zero cancellation fees
- **Three MNO networks**: [AIS](/en/th/carriers/ais/) (coverage king, 95/100), [TrueMove H](/en/th/carriers/truemove/) (strong mid-range, 93/100), [DTAC](/en/th/carriers/dtac/) (competitive, 91/100) — Penguin SIM, the market's only MVNO, discontinued service in August 2025
- **Price range**: ฿299/mo (DTAC 15GB / AIS 1GB, ~$8.25) to ฿1,499/mo (Unlimited 5G, ~$41.50) — among the cheapest mobile markets globally
- **Best value**: [TrueMove H](/en/th/carriers/truemove/) Prepaid 60GB at ฿300 delivers ฿5.00/GB — 3x better than any other plan
- **5G on 75% of plans**, eSIM on 69% — available from all three MNOs but not on entry-level tiers
- **No data rollover** on any plan in the Thai market — use it or lose it each month
For most users, the decision comes down to priorities: choose **[TrueMove H](/en/th/carriers/truemove/) Prepaid 60GB** for raw value, **[AIS](/en/th/carriers/ais/)** for the best network quality, or **[DTAC](/en/th/carriers/dtac/) Prepaid 15GB** for the lowest possible entry price.
**[Find Your Best Thai SIM Plan →](/en/th/search/)**
---
*Plan data is current as of March 2026; Thai carrier lineup re-verified July 2026 (Penguin SIM discontinued service in August 2025 and has been removed from this guide). Prices include 7% VAT (tax-inclusive). Check carrier websites for the latest information.*
*Compare all plans side by side using [SimFinder's comparison tool](/en/th/search/).*
================================================================================
# Best SIM Plans in the UK 2026: 10 Carriers Compared
URL: https://sim-finder.com/en/blog/best-sim-plans-uk-2026/
Type: blog (en)
Published: 2026-03-18
## TL;DR: Top 3 Picks for the UK
| Best For | Plan | Price/mo | Why |
|---------|-------|------|---------|
| **Budget** | [Lebara](/en/uk/carriers/lebara/) 5GB | £5 | Cheapest UK plan, Vodafone 5G network, international minutes included |
| **Most People** | [VOXI](/en/uk/carriers/voxi/) 100GB | £12 | Vodafone 5G network, no contract, unlimited social media and music streaming |
| **Heavy Use** | [iD Mobile](/en/uk/carriers/id-mobile/) Unlimited | £16 | Cheapest unlimited data plan in the UK, data rollover, Three 5G network |
**[Compare All 33 UK Plans on SimFinder →](/en/uk/search/)**
SPONSORED
iD Mobile Unlimited is £16/month — the cheapest unlimited data plan in the UK, on the Three 5G network, with no credit check on SIM-only and data rollover included. Order the SIM directly below. We may earn a commission if you buy through this link, at no extra cost to you.
See iD Mobile SIM-only deals →
Below, we break down the entire UK SIM market using real plan data from 10 carriers.
## Table of Contents
- [The UK Mobile Landscape](#the-uk-mobile-landscape-4-networks-10-carriers)
- [Price Breakdown: All 33 Plans](#price-breakdown-all-33-plans)
- [Best Plans by Use Case](#best-plans-by-use-case)
- [5G and eSIM Availability](#5g-and-esim-availability)
- [Travel eSIMs for UK Visitors](#travel-esims-for-uk-visitors)
- [Frequently Asked Questions](#frequently-asked-questions)
- [Key Takeaways](#key-takeaways)
---
The UK mobile market is one of the most competitive in Europe. Four network operators — [EE](/en/uk/carriers/ee/), [Three](/en/uk/carriers/three/), [Vodafone](/en/uk/carriers/vodafone/), and [O2](/en/uk/carriers/o2/) — power the infrastructure, while sub-brands and MVNOs resell that same connectivity at significantly lower prices.
SimFinder tracks **10 carriers and 43 plans** in the UK. Prices range from just £5/month to £35/month. Every plan includes eSIM support, and all of them include 5G. The newest addition, [iD Mobile](/en/uk/carriers/id-mobile/), undercuts much of the market: 120GB for £12/month with data rollover, and the cheapest unlimited plan in the UK at £16/month — both on [Three](/en/uk/carriers/three/)'s network.
This guide uses actual plan data, network quality measurements, and carrier ownership structures to help you find the right plan.
---
## The UK Mobile Landscape: 4 Networks, 10 Carriers
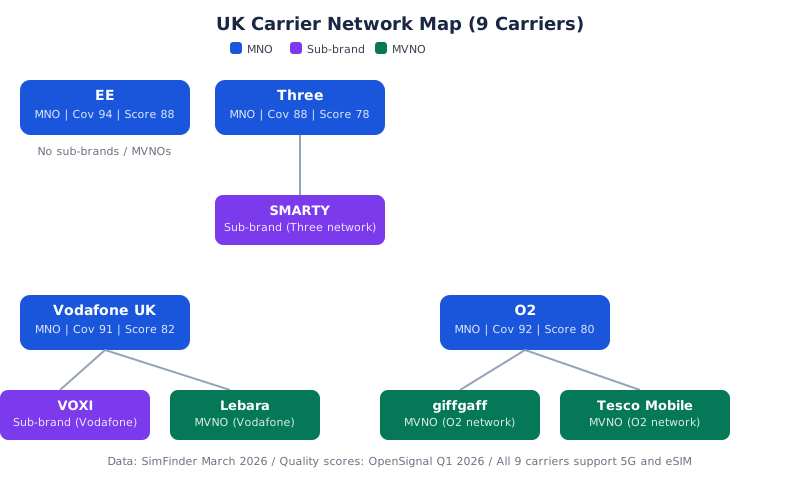 Understanding the UK market starts with one fact: there are only **four physical networks**. Every carrier runs on one of these.
| Network Owner | Type | Download Speed | Coverage Score | Overall Score | Carriers on Network |
|---|---|---|---|---|---|
| **[EE](/en/uk/carriers/ee/)** | MNO | 120.4 Mbps | 94/100 | 88/100 | [EE](/en/uk/carriers/ee/) only |
| **[O2](/en/uk/carriers/o2/)** | MNO | 95.1 Mbps | 92/100 | 80/100 | [O2](/en/uk/carriers/o2/), [giffgaff](/en/uk/carriers/giffgaff/), [Tesco Mobile](/en/uk/carriers/tesco/) |
| **[Vodafone](/en/uk/carriers/vodafone/)** | MNO | 100.5 Mbps | 91/100 | 82/100 | Vodafone, [VOXI](/en/uk/carriers/voxi/), [Lebara](/en/uk/carriers/lebara/) |
| **[Three](/en/uk/carriers/three/)** | MNO | 90.2 Mbps | 88/100 | 78/100 | [Three](/en/uk/carriers/three/), [SMARTY](/en/uk/carriers/smarty/), [iD Mobile](/en/uk/carriers/id-mobile/) |
*Quality data: OpenSignal Q1 2026*
**[EE](/en/uk/carriers/ee/) leads in every metric** — fastest download speeds (120.4 Mbps), best coverage (94/100), and the highest overall score (88/100). It's the only MNO with no sub-brands or MVNOs, which means the only way to access its network is through [EE](/en/uk/carriers/ee/) directly.
**[O2](/en/uk/carriers/o2/), Vodafone, and [Three](/en/uk/carriers/three/) each host two additional carriers** on their network. [O2](/en/uk/carriers/o2/) has [giffgaff](/en/uk/carriers/giffgaff/) and [Tesco Mobile](/en/uk/carriers/tesco/); Vodafone has [VOXI](/en/uk/carriers/voxi/) and [Lebara](/en/uk/carriers/lebara/); [Three](/en/uk/carriers/three/) has [SMARTY](/en/uk/carriers/smarty/) and the newer [iD Mobile](/en/uk/carriers/id-mobile/). In every case, the sub-carriers dramatically undercut the parent network's own pricing.
**Vodafone sits in the middle** with good speeds (100.5 Mbps) and coverage (91/100). Its sub-brand [VOXI](/en/uk/carriers/voxi/) targets younger users with unlimited social media data, while [Lebara](/en/uk/carriers/lebara/) focuses on international calling.
**[Three](/en/uk/carriers/three/) has the weakest scores** (88/100 coverage, 78/100 overall) but competes aggressively on price. [SMARTY](/en/uk/carriers/smarty/) offers some of the cheapest plans in the UK with a unique data rollover credit system, while [iD Mobile](/en/uk/carriers/id-mobile/) is the newest entrant — a 12-month-contract carrier that undercuts on raw data and now offers the UK's cheapest unlimited plan.
### Carrier Structure
| Carrier | Type | Parent Network | Contract Required |
|---|---|---|---|
| [EE](/en/uk/carriers/ee/) | MNO | Own network | Mixed (0-24 months) |
| [Three](/en/uk/carriers/three/) | MNO | Own network | 12 months |
| [Vodafone](/en/uk/carriers/vodafone/) | MNO | Own network | 12-24 months |
| [O2](/en/uk/carriers/o2/) | MNO | Own network | 12 months |
| [SMARTY](/en/uk/carriers/smarty/) | Sub-brand | [Three](/en/uk/carriers/three/) | No contract |
| [VOXI](/en/uk/carriers/voxi/) | Sub-brand | Vodafone | No contract |
| [giffgaff](/en/uk/carriers/giffgaff/) | MVNO | [O2](/en/uk/carriers/o2/) | No contract |
| [Lebara](/en/uk/carriers/lebara/) | MVNO | Vodafone | No contract |
| [Tesco Mobile](/en/uk/carriers/tesco/) | MVNO | [O2](/en/uk/carriers/o2/) | 24 months |
| [iD Mobile](/en/uk/carriers/id-mobile/) | MVNO | [Three](/en/uk/carriers/three/) | Mixed (0-12 months) |
A clear pattern emerges: **most sub-brands and MVNOs are contract-free**. The exceptions are [Tesco Mobile](/en/uk/carriers/tesco/) (24-month contracts on every plan) and [iD Mobile](/en/uk/carriers/id-mobile/) (12-month contracts on most plans, though its 60GB rolling-monthly plan has no contract).
---
## Price Breakdown: All 33 Plans
All 43 plans include eSIM support, unlimited calls and texts, and tethering.
### MNO Plans ([EE](/en/uk/carriers/ee/), [Three](/en/uk/carriers/three/), [O2](/en/uk/carriers/o2/), Vodafone)
| Carrier | Plan | Price/mo | Data | 5G | Contract |
|---|---|---|---|---|---|
| [O2](/en/uk/carriers/o2/) | 80GB | £10 | 80GB | Yes | 12 mo |
| [O2](/en/uk/carriers/o2/) | 100GB | £12 | 100GB | Yes | 12 mo |
| [Three](/en/uk/carriers/three/) | 25GB Lite | £14 | 25GB | Yes | 24 mo |
| [EE](/en/uk/carriers/ee/) | 20GB | £15 | 20GB | Yes | 24 mo |
| [O2](/en/uk/carriers/o2/) | 250GB | £15 | 250GB | Yes | 12 mo |
| [Three](/en/uk/carriers/three/) | 120GB Lite | £16 | 120GB | Yes | 24 mo |
| [Vodafone](/en/uk/carriers/vodafone/) | 1GB | £16 | 1GB | Yes | 24 mo |
| [EE](/en/uk/carriers/ee/) | 25GB | £19 | 25GB | Yes | 24 mo |
| [Vodafone](/en/uk/carriers/vodafone/) | 5GB | £19 | 5GB | Yes | 24 mo |
| [EE](/en/uk/carriers/ee/) | 100GB | £21 | 100GB | Yes | 24 mo |
| [Vodafone](/en/uk/carriers/vodafone/) | 120GB | £21 | 120GB | Yes | 24 mo |
| [Vodafone](/en/uk/carriers/vodafone/) | 50GB Red | £21 | 50GB | Yes | 24 mo |
| [Three](/en/uk/carriers/three/) | Unlimited Value (24-month) | £22 | Unlimited | Yes | 24 mo |
| [Vodafone](/en/uk/carriers/vodafone/) | 30GB | £22 | 30GB | Yes | 24 mo |
| [Three](/en/uk/carriers/three/) | Unlimited Value (1-month) | £25 | Unlimited | Yes | None |
| [Vodafone](/en/uk/carriers/vodafone/) | 150GB Red | £25 | 150GB | Yes | 24 mo |
| [EE](/en/uk/carriers/ee/) | Unlimited Essentials Plus Max | £26 | Unlimited | Yes | 24 mo |
| [Vodafone](/en/uk/carriers/vodafone/) | Unlimited Plus | £26 | Unlimited | Yes | 24 mo |
| [Vodafone](/en/uk/carriers/vodafone/) | Unlimited Premier | £30 | Unlimited | Yes | 24 mo |
| [Vodafone](/en/uk/carriers/vodafone/) | 30GB Plus | £31 | 30GB | Yes | 24 mo |
| [EE](/en/uk/carriers/ee/) | Unlimited All Rounder for iPhone | £33 | Unlimited | Yes | 24 mo |
### Sub-brand & MVNO Plans
| Carrier | Network | Plan | Price/mo | Data | 5G | Contract |
|---|---|---|---|---|---|---|
| [Lebara](/en/uk/carriers/lebara/) | Vodafone | 5GB | £5 | 5GB | Yes | None |
| [SMARTY](/en/uk/carriers/smarty/) | [Three](/en/uk/carriers/three/) | 15GB | £6 | 15GB | Yes | None |
| [iD Mobile](/en/uk/carriers/id-mobile/) | [Three](/en/uk/carriers/three/) | 30GB | £8 | 30GB | Yes | 12 mo |
| [Lebara](/en/uk/carriers/lebara/) | Vodafone | 30GB | £8 | 30GB | Yes | None |
| [SMARTY](/en/uk/carriers/smarty/) | [Three](/en/uk/carriers/three/) | 50GB | £8 | 50GB | Yes | None |
| [Lebara](/en/uk/carriers/lebara/) | Vodafone | 50GB | £9 | 50GB | Yes | None |
| [Tesco Mobile](/en/uk/carriers/tesco/) | [O2](/en/uk/carriers/o2/) | 12GB | £9 | 12GB | Yes | 24 mo |
| [giffgaff](/en/uk/carriers/giffgaff/) | [O2](/en/uk/carriers/o2/) | Goodybag 15GB | £10 | 15GB | Yes | None |
| [iD Mobile](/en/uk/carriers/id-mobile/) | [Three](/en/uk/carriers/three/) | 80GB | £10 | 80GB | Yes | 12 mo |
| [iD Mobile](/en/uk/carriers/id-mobile/) | [Three](/en/uk/carriers/three/) | 60GB (1 Month) | £10 | 60GB | Yes | None |
| [SMARTY](/en/uk/carriers/smarty/) | [Three](/en/uk/carriers/three/) | 100GB | £10 | 100GB | Yes | None |
| [VOXI](/en/uk/carriers/voxi/) | Vodafone | 20GB | £10 | 20GB | Yes | None |
| [giffgaff](/en/uk/carriers/giffgaff/) | [O2](/en/uk/carriers/o2/) | Goodybag 25GB | £12 | 25GB | Yes | None |
| [iD Mobile](/en/uk/carriers/id-mobile/) | [Three](/en/uk/carriers/three/) | 120GB | £12 | 120GB | Yes | 12 mo |
| [VOXI](/en/uk/carriers/voxi/) | Vodafone | 25GB | £12 | 25GB | Yes | None |
| [Tesco Mobile](/en/uk/carriers/tesco/) | [O2](/en/uk/carriers/o2/) | 30GB | £12.5 | 30GB | Yes | 24 mo |
| [giffgaff](/en/uk/carriers/giffgaff/) | [O2](/en/uk/carriers/o2/) | Goodybag 30GB | £15 | 30GB | Yes | None |
| [VOXI](/en/uk/carriers/voxi/) | Vodafone | 35GB | £15 | 35GB | Yes | None |
| [iD Mobile](/en/uk/carriers/id-mobile/) | [Three](/en/uk/carriers/three/) | Unlimited | £16 | Unlimited | Yes | 12 mo |
| [Tesco Mobile](/en/uk/carriers/tesco/) | [O2](/en/uk/carriers/o2/) | Unlimited | £20 | Unlimited | Yes | 24 mo |
| [VOXI](/en/uk/carriers/voxi/) | Vodafone | 100GB | £20 | 100GB | Yes | None |
| [VOXI](/en/uk/carriers/voxi/) | Vodafone | Unlimited | £35 | Unlimited | Yes | None |
The pricing gap is significant. **Budget carriers and MVNOs undercut MNOs by 30-60% for equivalent data.** [SMARTY](/en/uk/carriers/smarty/) offers 100GB for £10 with no contract — [Three](/en/uk/carriers/three/)'s own 120GB Advanced plan costs £12 with a 12-month commitment. The newest entrant, [iD Mobile](/en/uk/carriers/id-mobile/), matches that 120GB at £12 but adds data rollover, and its Unlimited plan at £16/month is the cheapest unlimited SIM in the UK market (12-month contract). For raw capacity, [O2](/en/uk/carriers/o2/)'s 250GB at £15 is now the largest non-unlimited plan tracked, though it requires 12 months.
Note that [giffgaff](/en/uk/carriers/giffgaff/)'s Goodybag tiers have shrunk considerably since our last update — the top Goodybag is now 30GB for £15, down from the 150GB it previously offered at the same price — so it's no longer the standout value pick it once was.
[EE](/en/uk/carriers/ee/) has replaced its old Essentials/Full Works split with a capacity-based lineup on 24-month terms. Its unlimited tiers (£26 Essentials Plus Max, £33 All Rounder for iPhone) still carry the UK's fastest network, but the entry plans now start at £15 for 20GB.
**[Compare Plans Side by Side on SimFinder →](/en/uk/search/)**
---
## Best Plans by Use Case
### Tightest Budget (Under £8/month)
**[Lebara](/en/uk/carriers/lebara/) 5GB — £5/month** — The cheapest plan in the UK. Runs on Vodafone's 5G network (100.5 Mbps, 91/100 coverage). Includes 100 international minutes to 42 countries and EU roaming at no extra cost. No contract. If you mainly use WiFi and want a basic plan for calls and light browsing, nothing is cheaper.
**[SMARTY](/en/uk/carriers/smarty/) 15GB — £6/month** — Just £1 more for triple the data. Runs on [Three](/en/uk/carriers/three/)'s network. The unique selling point: unused data gets credited back at £1 per GB. No annual price rises guaranteed. No contract.
At the £8 mark, three options compete: **[SMARTY](/en/uk/carriers/smarty/) 50GB** and **[Lebara](/en/uk/carriers/lebara/) 30GB** are both contract-free, while **[iD Mobile](/en/uk/carriers/id-mobile/) 30GB** matches the price and throws in data rollover on a 12-month contract.
### Best Value for Most Users
**[SMARTY](/en/uk/carriers/smarty/) 100GB — £10/month** — On [Three](/en/uk/carriers/three/)'s network (90.2 Mbps, 88/100 coverage), 100GB with no contract and data rollover credits (£1 per unused GB) makes this the best per-pound deal that doesn't require signing anything.
**[VOXI](/en/uk/carriers/voxi/) 100GB — £12/month** — Same data as SMARTY at a higher price, but on Vodafone's stronger network (100.5 Mbps, 91/100 coverage), with no contract and unlimited social media and music streaming that doesn't count against your allowance. Strong choice if you use Spotify, Instagram, or TikTok heavily.
**[iD Mobile](/en/uk/carriers/id-mobile/) 120GB — £12/month** — The newest carrier in our tracker wins on raw data: 120GB for £12 with rollover, though it requires a 12-month contract on [Three](/en/uk/carriers/three/)'s network.
### Heavy Data / Unlimited
**[iD Mobile](/en/uk/carriers/id-mobile/) Unlimited — £16/month** — The cheapest unlimited data plan in the UK market, on [Three](/en/uk/carriers/three/)'s network, with data rollover included as a bonus feature. Requires a 12-month contract.
**[Three](/en/uk/carriers/three/) Unlimited Value (24-month) — £22/month** — The cheapest unlimited plan from an MNO directly, on a 24-month term that rises to £24.30 in April 2027 and £26.60 in April 2028. [Three](/en/uk/carriers/three/)'s network scores lower than competitors (78/100 overall), but in urban areas the speeds are adequate.
**[Three](/en/uk/carriers/three/) Unlimited Value (1-month) — £25/month** — The cheapest contract-free unlimited plan in the UK, billed monthly with no commitment. [VOXI](/en/uk/carriers/voxi/) Unlimited is also contract-free on Vodafone's network with unlimited social media, music, and video streaming, but now costs £35/month.
### Premium / Best Network Quality
**[EE](/en/uk/carriers/ee/) Unlimited Essentials Plus Max — £26/month** — For those who want the UK's top network without watching a data allowance, this plan runs on the fastest infrastructure (120.4 Mbps, 94/100 coverage) and includes 50GB of EU roaming data. [EE](/en/uk/carriers/ee/) also sells a 100GB plan at £21 if you don't need unlimited data, and an All Rounder for iPhone tier at £33. All are 24-month terms that rise each 31 March (the £26 plan goes to £28.50 in 2027 and £31 in 2028).
**[Compare UK SIM Plans by Your Needs →](/en/uk/search/)**
---
## 5G and eSIM Availability
### eSIM
All 43 plans in the UK support eSIM — a 100% adoption rate. If you're visiting the UK and your phone supports eSIM, you can set up a plan before arriving.
### 5G
All 43 plans include 5G — a 100% adoption rate. EE's 4G-only "Essentials" tier (speed-capped at 25 Mbps) has been withdrawn, which removed the last non-5G plans from our UK dataset.
Every carrier we track — [EE](/en/uk/carriers/ee/), [Three](/en/uk/carriers/three/), [O2](/en/uk/carriers/o2/), Vodafone, [SMARTY](/en/uk/carriers/smarty/), [VOXI](/en/uk/carriers/voxi/), [giffgaff](/en/uk/carriers/giffgaff/), [Lebara](/en/uk/carriers/lebara/), [Tesco Mobile](/en/uk/carriers/tesco/), and [iD Mobile](/en/uk/carriers/id-mobile/) — now includes 5G on every plan.
---
## Travel eSIMs for UK Visitors
If you're visiting the UK short-term and only need data (no UK phone number), travel eSIM providers are an alternative. These are data-only plans that work in multiple countries.
Prices below are SimFinder's tracked rates for UK-only data plans as of August 2026. Links marked with ↗ are affiliate links — we may earn a commission at no extra cost to you.
| Provider | Short trip | 30 days / 10 GB | Tethering | |
|---|---|---|---|---|
| [Airalo](/en/travel/providers/airalo/) | $4.00 — 1 GB / 7 days | $19.50 | Yes | Check Airalo |
| [Nomad](/en/travel/providers/nomad/) | $4.50 — 1 GB / 7 days | **$16.00** | Yes | Check Nomad |
| [Saily](/en/travel/providers/saily/) | $4.49 — 1 GB / 7 days | $18.99 | Yes | Check Saily |
| [Ubigi](/en/travel/providers/ubigi/) | $9.00 — 10 GB / 7 days | **$11.00** | Yes | Check Ubigi |
| [Holafly](/en/travel/providers/holafly/) | Unlimited-data plans only | — | Yes | — |
**Cheapest for a week:** Airalo at $4.00. **Cheapest for a month:** Ubigi at $11.00 for 10 GB — less than a third of Airalo's 30-day rate, and the only provider here that beats [Lebara](/en/uk/carriers/lebara/)'s £5 plan on price without needing a UK address.
Travel eSIMs are typically more expensive per GB than local UK plans, but they offer the convenience of multi-country coverage and instant activation. For stays longer than a few days, a local SIM from [Lebara](/en/uk/carriers/lebara/) or [giffgaff](/en/uk/carriers/giffgaff/) will usually be better value.
For a full comparison of travel eSIM options, use [SimFinder's travel search](/en/travel/).
---
## Frequently Asked Questions
### Can I get a UK SIM without a long-term contract?
Yes. 16 of 43 plans in our database are rolling monthly with no contract. Carriers like [giffgaff](/en/uk/carriers/giffgaff/), [VOXI](/en/uk/carriers/voxi/), [SMARTY](/en/uk/carriers/smarty/), and [Lebara](/en/uk/carriers/lebara/) specialise in contract-free plans, and [EE](/en/uk/carriers/ee/)'s Essentials tier is also month-to-month. Even carriers that offer 12- or 24-month terms charge no cancellation fees on any plan we track.
### Which UK network has the best coverage?
[EE](/en/uk/carriers/ee/) leads with a coverage score of 94/100, followed by [O2](/en/uk/carriers/o2/) at 92/100, Vodafone at 91/100, and [Three](/en/uk/carriers/three/) at 88/100. If you travel to rural areas frequently, [EE](/en/uk/carriers/ee/) or [O2](/en/uk/carriers/o2/) are the safest choices. Sub-brands and MVNOs use the same towers as their parent network.
### What is the cheapest SIM plan in the UK?
[Lebara](/en/uk/carriers/lebara/) 5GB at just £5/month. It includes unlimited calls, 5G, eSIM, and 100 international minutes to 42 countries. For more data on a budget, [SMARTY](/en/uk/carriers/smarty/) 15GB costs £6/month with data rollover.
### Is 5G available on all UK plans?
Yes. All 43 plans we track include 5G. [EE](/en/uk/carriers/ee/)'s old 4G-only Essentials tier has been retired, so every plan in our UK dataset is now 5G-capable.
### Do all UK SIM plans support eSIM?
Yes. All 43 plans tracked by SimFinder support eSIM. This means you can activate a UK plan remotely before arriving in the country, provided your phone supports eSIM.
### What is the best SIM for visitors or tourists to the UK?
[Lebara](/en/uk/carriers/lebara/) 30GB at £8/month is a strong choice — it includes 100 international minutes to 42 countries, EU roaming, 5G, and eSIM. For a shorter stay, travel eSIM providers like [Airalo](/en/travel/providers/airalo/) or [Holafly](/en/travel/providers/holafly/) also cover the UK if you only need data.
### Which UK carrier offers the best value for heavy data users?
[O2](/en/uk/carriers/o2/) 250GB at £15/month offers the most data per pound of any non-unlimited plan (16.7GB per £), though it requires a 12-month contract. For a contract-free option, [SMARTY](/en/uk/carriers/smarty/) 100GB at £10/month is the best per-pound value without signing anything. For truly unlimited data, [iD Mobile](/en/uk/carriers/id-mobile/) Unlimited at £16/month is the cheapest unlimited plan in the UK (12-month contract) — [Three](/en/uk/carriers/three/) Unlimited Value at £25/month is the cheapest contract-free option.
---
## Key Takeaways
The UK SIM market in 2026:
- **10 carriers, 43 plans** — all with eSIM support and unlimited calls and texts
- **Four networks**: [EE](/en/uk/carriers/ee/) (fastest, best coverage at 94/100), [O2](/en/uk/carriers/o2/) (92/100), Vodafone (91/100), [Three](/en/uk/carriers/three/) (88/100)
- **Budget carriers save 30-60%**: [SMARTY](/en/uk/carriers/smarty/) 100GB costs £10 with no contract vs [O2](/en/uk/carriers/o2/)'s 80GB at £10 with a 12-month contract
- **5G is universal** — every plan we track includes it
- **No-contract plans dominate the budget tier**: [giffgaff](/en/uk/carriers/giffgaff/), [VOXI](/en/uk/carriers/voxi/), [SMARTY](/en/uk/carriers/smarty/), and [Lebara](/en/uk/carriers/lebara/) are all rolling monthly
- **Price range**: £5/month ([Lebara](/en/uk/carriers/lebara/) 5GB) to £35/month ([VOXI](/en/uk/carriers/voxi/) Unlimited)
- **New entrant**: [iD Mobile](/en/uk/carriers/id-mobile/) joined the market on [Three](/en/uk/carriers/three/)'s network with data rollover and the UK's cheapest unlimited plan at £16/month
- **Special features**: [SMARTY](/en/uk/carriers/smarty/) and [iD Mobile](/en/uk/carriers/id-mobile/) offer data rollover, [VOXI](/en/uk/carriers/voxi/) includes unlimited social media data, [Lebara](/en/uk/carriers/lebara/) includes international minutes
For most users, the best approach is: pick the network coverage you need ([EE](/en/uk/carriers/ee/) for best coverage, [O2](/en/uk/carriers/o2/) for strong coverage plus cheap MVNOs, or [Three](/en/uk/carriers/three/) for the cheapest carriers like [SMARTY](/en/uk/carriers/smarty/) and [iD Mobile](/en/uk/carriers/id-mobile/)), then find the cheapest carrier on that network.
**[Find Your Best UK SIM Plan →](/en/uk/search/)**
---
*Plan data is current as of July 2026. Prices and inclusions may change. Check carrier websites for the latest information.*
*Compare all plans side by side using [SimFinder's comparison tool](/en/uk/search/).*
================================================================================
# Best SIM Plans in the USA 2026: 10 Carriers, 35 Plans Compared
URL: https://sim-finder.com/en/blog/best-sim-plans-usa-2026/
Type: blog (en)
Published: 2026-03-17
## TL;DR: Top 3 Picks for the USA
| Best For | Plan | Price/mo | Why |
|---------|-------|------|---------|
| **Budget** | [Mint Mobile](/en/us/carriers/mint/) 6GB | $15 | Cheapest plan with 5G, eSIM, and data rollover |
| **Most People** | [Visible](/en/us/carriers/visible/) Base | $25 | Unlimited data on [Verizon](/en/us/carriers/verizon/)'s network, no contract |
| **Speed** | [T-Mobile](/en/us/carriers/tmobile/) Go5G | $75 | Fastest network (156.4 Mbps), full MNO priority |
**[Compare All 35 US Plans on SimFinder →](/en/us/search/)**
Below, we break down the entire market using real plan data.
## Table of Contents
- [The US Mobile Landscape](#the-us-mobile-landscape-who-owns-what)
- [Price Breakdown: What Every Carrier Charges](#price-breakdown-what-every-carrier-charges)
- [Best Value Plans by Use Case](#best-value-plans-by-use-case)
- [5G and eSIM: What's Available](#5g-and-esim-whats-available)
- [Family Plans and Multi-Line Discounts](#family-plans-and-multi-line-discounts)
- [What Users Say](#what-users-say)
- [Frequently Asked Questions](#frequently-asked-questions)
- [Key Takeaways](#key-takeaways)
---
The US wireless market looks complicated, but it comes down to a simple structure: three networks, seven resellers, and a massive price spread. SimFinder tracks **10 carriers and 40 plans** in the United States. Prices range from $10/month to $100/month, and nearly every plan includes unlimited calls, 5G, and eSIM support.
The question is not whether you can find a good plan — it's which combination of price, network, and features fits your needs. This guide breaks it all down using actual plan data, network quality scores, and pricing analysis.
---
## The [US Mobile](/en/us/carriers/usmobile/) Landscape: Who Owns What
Understanding the UK market starts with one fact: there are only **four physical networks**. Every carrier runs on one of these.
| Network Owner | Type | Download Speed | Coverage Score | Overall Score | Carriers on Network |
|---|---|---|---|---|---|
| **[EE](/en/uk/carriers/ee/)** | MNO | 120.4 Mbps | 94/100 | 88/100 | [EE](/en/uk/carriers/ee/) only |
| **[O2](/en/uk/carriers/o2/)** | MNO | 95.1 Mbps | 92/100 | 80/100 | [O2](/en/uk/carriers/o2/), [giffgaff](/en/uk/carriers/giffgaff/), [Tesco Mobile](/en/uk/carriers/tesco/) |
| **[Vodafone](/en/uk/carriers/vodafone/)** | MNO | 100.5 Mbps | 91/100 | 82/100 | Vodafone, [VOXI](/en/uk/carriers/voxi/), [Lebara](/en/uk/carriers/lebara/) |
| **[Three](/en/uk/carriers/three/)** | MNO | 90.2 Mbps | 88/100 | 78/100 | [Three](/en/uk/carriers/three/), [SMARTY](/en/uk/carriers/smarty/), [iD Mobile](/en/uk/carriers/id-mobile/) |
*Quality data: OpenSignal Q1 2026*
**[EE](/en/uk/carriers/ee/) leads in every metric** — fastest download speeds (120.4 Mbps), best coverage (94/100), and the highest overall score (88/100). It's the only MNO with no sub-brands or MVNOs, which means the only way to access its network is through [EE](/en/uk/carriers/ee/) directly.
**[O2](/en/uk/carriers/o2/), Vodafone, and [Three](/en/uk/carriers/three/) each host two additional carriers** on their network. [O2](/en/uk/carriers/o2/) has [giffgaff](/en/uk/carriers/giffgaff/) and [Tesco Mobile](/en/uk/carriers/tesco/); Vodafone has [VOXI](/en/uk/carriers/voxi/) and [Lebara](/en/uk/carriers/lebara/); [Three](/en/uk/carriers/three/) has [SMARTY](/en/uk/carriers/smarty/) and the newer [iD Mobile](/en/uk/carriers/id-mobile/). In every case, the sub-carriers dramatically undercut the parent network's own pricing.
**Vodafone sits in the middle** with good speeds (100.5 Mbps) and coverage (91/100). Its sub-brand [VOXI](/en/uk/carriers/voxi/) targets younger users with unlimited social media data, while [Lebara](/en/uk/carriers/lebara/) focuses on international calling.
**[Three](/en/uk/carriers/three/) has the weakest scores** (88/100 coverage, 78/100 overall) but competes aggressively on price. [SMARTY](/en/uk/carriers/smarty/) offers some of the cheapest plans in the UK with a unique data rollover credit system, while [iD Mobile](/en/uk/carriers/id-mobile/) is the newest entrant — a 12-month-contract carrier that undercuts on raw data and now offers the UK's cheapest unlimited plan.
### Carrier Structure
| Carrier | Type | Parent Network | Contract Required |
|---|---|---|---|
| [EE](/en/uk/carriers/ee/) | MNO | Own network | Mixed (0-24 months) |
| [Three](/en/uk/carriers/three/) | MNO | Own network | 12 months |
| [Vodafone](/en/uk/carriers/vodafone/) | MNO | Own network | 12-24 months |
| [O2](/en/uk/carriers/o2/) | MNO | Own network | 12 months |
| [SMARTY](/en/uk/carriers/smarty/) | Sub-brand | [Three](/en/uk/carriers/three/) | No contract |
| [VOXI](/en/uk/carriers/voxi/) | Sub-brand | Vodafone | No contract |
| [giffgaff](/en/uk/carriers/giffgaff/) | MVNO | [O2](/en/uk/carriers/o2/) | No contract |
| [Lebara](/en/uk/carriers/lebara/) | MVNO | Vodafone | No contract |
| [Tesco Mobile](/en/uk/carriers/tesco/) | MVNO | [O2](/en/uk/carriers/o2/) | 24 months |
| [iD Mobile](/en/uk/carriers/id-mobile/) | MVNO | [Three](/en/uk/carriers/three/) | Mixed (0-12 months) |
A clear pattern emerges: **most sub-brands and MVNOs are contract-free**. The exceptions are [Tesco Mobile](/en/uk/carriers/tesco/) (24-month contracts on every plan) and [iD Mobile](/en/uk/carriers/id-mobile/) (12-month contracts on most plans, though its 60GB rolling-monthly plan has no contract).
---
## Price Breakdown: All 33 Plans
All 43 plans include eSIM support, unlimited calls and texts, and tethering.
### MNO Plans ([EE](/en/uk/carriers/ee/), [Three](/en/uk/carriers/three/), [O2](/en/uk/carriers/o2/), Vodafone)
| Carrier | Plan | Price/mo | Data | 5G | Contract |
|---|---|---|---|---|---|
| [O2](/en/uk/carriers/o2/) | 80GB | £10 | 80GB | Yes | 12 mo |
| [O2](/en/uk/carriers/o2/) | 100GB | £12 | 100GB | Yes | 12 mo |
| [Three](/en/uk/carriers/three/) | 25GB Lite | £14 | 25GB | Yes | 24 mo |
| [EE](/en/uk/carriers/ee/) | 20GB | £15 | 20GB | Yes | 24 mo |
| [O2](/en/uk/carriers/o2/) | 250GB | £15 | 250GB | Yes | 12 mo |
| [Three](/en/uk/carriers/three/) | 120GB Lite | £16 | 120GB | Yes | 24 mo |
| [Vodafone](/en/uk/carriers/vodafone/) | 1GB | £16 | 1GB | Yes | 24 mo |
| [EE](/en/uk/carriers/ee/) | 25GB | £19 | 25GB | Yes | 24 mo |
| [Vodafone](/en/uk/carriers/vodafone/) | 5GB | £19 | 5GB | Yes | 24 mo |
| [EE](/en/uk/carriers/ee/) | 100GB | £21 | 100GB | Yes | 24 mo |
| [Vodafone](/en/uk/carriers/vodafone/) | 120GB | £21 | 120GB | Yes | 24 mo |
| [Vodafone](/en/uk/carriers/vodafone/) | 50GB Red | £21 | 50GB | Yes | 24 mo |
| [Three](/en/uk/carriers/three/) | Unlimited Value (24-month) | £22 | Unlimited | Yes | 24 mo |
| [Vodafone](/en/uk/carriers/vodafone/) | 30GB | £22 | 30GB | Yes | 24 mo |
| [Three](/en/uk/carriers/three/) | Unlimited Value (1-month) | £25 | Unlimited | Yes | None |
| [Vodafone](/en/uk/carriers/vodafone/) | 150GB Red | £25 | 150GB | Yes | 24 mo |
| [EE](/en/uk/carriers/ee/) | Unlimited Essentials Plus Max | £26 | Unlimited | Yes | 24 mo |
| [Vodafone](/en/uk/carriers/vodafone/) | Unlimited Plus | £26 | Unlimited | Yes | 24 mo |
| [Vodafone](/en/uk/carriers/vodafone/) | Unlimited Premier | £30 | Unlimited | Yes | 24 mo |
| [Vodafone](/en/uk/carriers/vodafone/) | 30GB Plus | £31 | 30GB | Yes | 24 mo |
| [EE](/en/uk/carriers/ee/) | Unlimited All Rounder for iPhone | £33 | Unlimited | Yes | 24 mo |
### Sub-brand & MVNO Plans
| Carrier | Network | Plan | Price/mo | Data | 5G | Contract |
|---|---|---|---|---|---|---|
| [Lebara](/en/uk/carriers/lebara/) | Vodafone | 5GB | £5 | 5GB | Yes | None |
| [SMARTY](/en/uk/carriers/smarty/) | [Three](/en/uk/carriers/three/) | 15GB | £6 | 15GB | Yes | None |
| [iD Mobile](/en/uk/carriers/id-mobile/) | [Three](/en/uk/carriers/three/) | 30GB | £8 | 30GB | Yes | 12 mo |
| [Lebara](/en/uk/carriers/lebara/) | Vodafone | 30GB | £8 | 30GB | Yes | None |
| [SMARTY](/en/uk/carriers/smarty/) | [Three](/en/uk/carriers/three/) | 50GB | £8 | 50GB | Yes | None |
| [Lebara](/en/uk/carriers/lebara/) | Vodafone | 50GB | £9 | 50GB | Yes | None |
| [Tesco Mobile](/en/uk/carriers/tesco/) | [O2](/en/uk/carriers/o2/) | 12GB | £9 | 12GB | Yes | 24 mo |
| [giffgaff](/en/uk/carriers/giffgaff/) | [O2](/en/uk/carriers/o2/) | Goodybag 15GB | £10 | 15GB | Yes | None |
| [iD Mobile](/en/uk/carriers/id-mobile/) | [Three](/en/uk/carriers/three/) | 80GB | £10 | 80GB | Yes | 12 mo |
| [iD Mobile](/en/uk/carriers/id-mobile/) | [Three](/en/uk/carriers/three/) | 60GB (1 Month) | £10 | 60GB | Yes | None |
| [SMARTY](/en/uk/carriers/smarty/) | [Three](/en/uk/carriers/three/) | 100GB | £10 | 100GB | Yes | None |
| [VOXI](/en/uk/carriers/voxi/) | Vodafone | 20GB | £10 | 20GB | Yes | None |
| [giffgaff](/en/uk/carriers/giffgaff/) | [O2](/en/uk/carriers/o2/) | Goodybag 25GB | £12 | 25GB | Yes | None |
| [iD Mobile](/en/uk/carriers/id-mobile/) | [Three](/en/uk/carriers/three/) | 120GB | £12 | 120GB | Yes | 12 mo |
| [VOXI](/en/uk/carriers/voxi/) | Vodafone | 25GB | £12 | 25GB | Yes | None |
| [Tesco Mobile](/en/uk/carriers/tesco/) | [O2](/en/uk/carriers/o2/) | 30GB | £12.5 | 30GB | Yes | 24 mo |
| [giffgaff](/en/uk/carriers/giffgaff/) | [O2](/en/uk/carriers/o2/) | Goodybag 30GB | £15 | 30GB | Yes | None |
| [VOXI](/en/uk/carriers/voxi/) | Vodafone | 35GB | £15 | 35GB | Yes | None |
| [iD Mobile](/en/uk/carriers/id-mobile/) | [Three](/en/uk/carriers/three/) | Unlimited | £16 | Unlimited | Yes | 12 mo |
| [Tesco Mobile](/en/uk/carriers/tesco/) | [O2](/en/uk/carriers/o2/) | Unlimited | £20 | Unlimited | Yes | 24 mo |
| [VOXI](/en/uk/carriers/voxi/) | Vodafone | 100GB | £20 | 100GB | Yes | None |
| [VOXI](/en/uk/carriers/voxi/) | Vodafone | Unlimited | £35 | Unlimited | Yes | None |
The pricing gap is significant. **Budget carriers and MVNOs undercut MNOs by 30-60% for equivalent data.** [SMARTY](/en/uk/carriers/smarty/) offers 100GB for £10 with no contract — [Three](/en/uk/carriers/three/)'s own 120GB Advanced plan costs £12 with a 12-month commitment. The newest entrant, [iD Mobile](/en/uk/carriers/id-mobile/), matches that 120GB at £12 but adds data rollover, and its Unlimited plan at £16/month is the cheapest unlimited SIM in the UK market (12-month contract). For raw capacity, [O2](/en/uk/carriers/o2/)'s 250GB at £15 is now the largest non-unlimited plan tracked, though it requires 12 months.
Note that [giffgaff](/en/uk/carriers/giffgaff/)'s Goodybag tiers have shrunk considerably since our last update — the top Goodybag is now 30GB for £15, down from the 150GB it previously offered at the same price — so it's no longer the standout value pick it once was.
[EE](/en/uk/carriers/ee/) has replaced its old Essentials/Full Works split with a capacity-based lineup on 24-month terms. Its unlimited tiers (£26 Essentials Plus Max, £33 All Rounder for iPhone) still carry the UK's fastest network, but the entry plans now start at £15 for 20GB.
**[Compare Plans Side by Side on SimFinder →](/en/uk/search/)**
---
## Best Plans by Use Case
### Tightest Budget (Under £8/month)
**[Lebara](/en/uk/carriers/lebara/) 5GB — £5/month** — The cheapest plan in the UK. Runs on Vodafone's 5G network (100.5 Mbps, 91/100 coverage). Includes 100 international minutes to 42 countries and EU roaming at no extra cost. No contract. If you mainly use WiFi and want a basic plan for calls and light browsing, nothing is cheaper.
**[SMARTY](/en/uk/carriers/smarty/) 15GB — £6/month** — Just £1 more for triple the data. Runs on [Three](/en/uk/carriers/three/)'s network. The unique selling point: unused data gets credited back at £1 per GB. No annual price rises guaranteed. No contract.
At the £8 mark, three options compete: **[SMARTY](/en/uk/carriers/smarty/) 50GB** and **[Lebara](/en/uk/carriers/lebara/) 30GB** are both contract-free, while **[iD Mobile](/en/uk/carriers/id-mobile/) 30GB** matches the price and throws in data rollover on a 12-month contract.
### Best Value for Most Users
**[SMARTY](/en/uk/carriers/smarty/) 100GB — £10/month** — On [Three](/en/uk/carriers/three/)'s network (90.2 Mbps, 88/100 coverage), 100GB with no contract and data rollover credits (£1 per unused GB) makes this the best per-pound deal that doesn't require signing anything.
**[VOXI](/en/uk/carriers/voxi/) 100GB — £12/month** — Same data as SMARTY at a higher price, but on Vodafone's stronger network (100.5 Mbps, 91/100 coverage), with no contract and unlimited social media and music streaming that doesn't count against your allowance. Strong choice if you use Spotify, Instagram, or TikTok heavily.
**[iD Mobile](/en/uk/carriers/id-mobile/) 120GB — £12/month** — The newest carrier in our tracker wins on raw data: 120GB for £12 with rollover, though it requires a 12-month contract on [Three](/en/uk/carriers/three/)'s network.
### Heavy Data / Unlimited
**[iD Mobile](/en/uk/carriers/id-mobile/) Unlimited — £16/month** — The cheapest unlimited data plan in the UK market, on [Three](/en/uk/carriers/three/)'s network, with data rollover included as a bonus feature. Requires a 12-month contract.
**[Three](/en/uk/carriers/three/) Unlimited Value (24-month) — £22/month** — The cheapest unlimited plan from an MNO directly, on a 24-month term that rises to £24.30 in April 2027 and £26.60 in April 2028. [Three](/en/uk/carriers/three/)'s network scores lower than competitors (78/100 overall), but in urban areas the speeds are adequate.
**[Three](/en/uk/carriers/three/) Unlimited Value (1-month) — £25/month** — The cheapest contract-free unlimited plan in the UK, billed monthly with no commitment. [VOXI](/en/uk/carriers/voxi/) Unlimited is also contract-free on Vodafone's network with unlimited social media, music, and video streaming, but now costs £35/month.
### Premium / Best Network Quality
**[EE](/en/uk/carriers/ee/) Unlimited Essentials Plus Max — £26/month** — For those who want the UK's top network without watching a data allowance, this plan runs on the fastest infrastructure (120.4 Mbps, 94/100 coverage) and includes 50GB of EU roaming data. [EE](/en/uk/carriers/ee/) also sells a 100GB plan at £21 if you don't need unlimited data, and an All Rounder for iPhone tier at £33. All are 24-month terms that rise each 31 March (the £26 plan goes to £28.50 in 2027 and £31 in 2028).
**[Compare UK SIM Plans by Your Needs →](/en/uk/search/)**
---
## 5G and eSIM Availability
### eSIM
All 43 plans in the UK support eSIM — a 100% adoption rate. If you're visiting the UK and your phone supports eSIM, you can set up a plan before arriving.
### 5G
All 43 plans include 5G — a 100% adoption rate. EE's 4G-only "Essentials" tier (speed-capped at 25 Mbps) has been withdrawn, which removed the last non-5G plans from our UK dataset.
Every carrier we track — [EE](/en/uk/carriers/ee/), [Three](/en/uk/carriers/three/), [O2](/en/uk/carriers/o2/), Vodafone, [SMARTY](/en/uk/carriers/smarty/), [VOXI](/en/uk/carriers/voxi/), [giffgaff](/en/uk/carriers/giffgaff/), [Lebara](/en/uk/carriers/lebara/), [Tesco Mobile](/en/uk/carriers/tesco/), and [iD Mobile](/en/uk/carriers/id-mobile/) — now includes 5G on every plan.
---
## Travel eSIMs for UK Visitors
If you're visiting the UK short-term and only need data (no UK phone number), travel eSIM providers are an alternative. These are data-only plans that work in multiple countries.
Prices below are SimFinder's tracked rates for UK-only data plans as of August 2026. Links marked with ↗ are affiliate links — we may earn a commission at no extra cost to you.
| Provider | Short trip | 30 days / 10 GB | Tethering | |
|---|---|---|---|---|
| [Airalo](/en/travel/providers/airalo/) | $4.00 — 1 GB / 7 days | $19.50 | Yes | Check Airalo |
| [Nomad](/en/travel/providers/nomad/) | $4.50 — 1 GB / 7 days | **$16.00** | Yes | Check Nomad |
| [Saily](/en/travel/providers/saily/) | $4.49 — 1 GB / 7 days | $18.99 | Yes | Check Saily |
| [Ubigi](/en/travel/providers/ubigi/) | $9.00 — 10 GB / 7 days | **$11.00** | Yes | Check Ubigi |
| [Holafly](/en/travel/providers/holafly/) | Unlimited-data plans only | — | Yes | — |
**Cheapest for a week:** Airalo at $4.00. **Cheapest for a month:** Ubigi at $11.00 for 10 GB — less than a third of Airalo's 30-day rate, and the only provider here that beats [Lebara](/en/uk/carriers/lebara/)'s £5 plan on price without needing a UK address.
Travel eSIMs are typically more expensive per GB than local UK plans, but they offer the convenience of multi-country coverage and instant activation. For stays longer than a few days, a local SIM from [Lebara](/en/uk/carriers/lebara/) or [giffgaff](/en/uk/carriers/giffgaff/) will usually be better value.
For a full comparison of travel eSIM options, use [SimFinder's travel search](/en/travel/).
---
## Frequently Asked Questions
### Can I get a UK SIM without a long-term contract?
Yes. 16 of 43 plans in our database are rolling monthly with no contract. Carriers like [giffgaff](/en/uk/carriers/giffgaff/), [VOXI](/en/uk/carriers/voxi/), [SMARTY](/en/uk/carriers/smarty/), and [Lebara](/en/uk/carriers/lebara/) specialise in contract-free plans, and [EE](/en/uk/carriers/ee/)'s Essentials tier is also month-to-month. Even carriers that offer 12- or 24-month terms charge no cancellation fees on any plan we track.
### Which UK network has the best coverage?
[EE](/en/uk/carriers/ee/) leads with a coverage score of 94/100, followed by [O2](/en/uk/carriers/o2/) at 92/100, Vodafone at 91/100, and [Three](/en/uk/carriers/three/) at 88/100. If you travel to rural areas frequently, [EE](/en/uk/carriers/ee/) or [O2](/en/uk/carriers/o2/) are the safest choices. Sub-brands and MVNOs use the same towers as their parent network.
### What is the cheapest SIM plan in the UK?
[Lebara](/en/uk/carriers/lebara/) 5GB at just £5/month. It includes unlimited calls, 5G, eSIM, and 100 international minutes to 42 countries. For more data on a budget, [SMARTY](/en/uk/carriers/smarty/) 15GB costs £6/month with data rollover.
### Is 5G available on all UK plans?
Yes. All 43 plans we track include 5G. [EE](/en/uk/carriers/ee/)'s old 4G-only Essentials tier has been retired, so every plan in our UK dataset is now 5G-capable.
### Do all UK SIM plans support eSIM?
Yes. All 43 plans tracked by SimFinder support eSIM. This means you can activate a UK plan remotely before arriving in the country, provided your phone supports eSIM.
### What is the best SIM for visitors or tourists to the UK?
[Lebara](/en/uk/carriers/lebara/) 30GB at £8/month is a strong choice — it includes 100 international minutes to 42 countries, EU roaming, 5G, and eSIM. For a shorter stay, travel eSIM providers like [Airalo](/en/travel/providers/airalo/) or [Holafly](/en/travel/providers/holafly/) also cover the UK if you only need data.
### Which UK carrier offers the best value for heavy data users?
[O2](/en/uk/carriers/o2/) 250GB at £15/month offers the most data per pound of any non-unlimited plan (16.7GB per £), though it requires a 12-month contract. For a contract-free option, [SMARTY](/en/uk/carriers/smarty/) 100GB at £10/month is the best per-pound value without signing anything. For truly unlimited data, [iD Mobile](/en/uk/carriers/id-mobile/) Unlimited at £16/month is the cheapest unlimited plan in the UK (12-month contract) — [Three](/en/uk/carriers/three/) Unlimited Value at £25/month is the cheapest contract-free option.
---
## Key Takeaways
The UK SIM market in 2026:
- **10 carriers, 43 plans** — all with eSIM support and unlimited calls and texts
- **Four networks**: [EE](/en/uk/carriers/ee/) (fastest, best coverage at 94/100), [O2](/en/uk/carriers/o2/) (92/100), Vodafone (91/100), [Three](/en/uk/carriers/three/) (88/100)
- **Budget carriers save 30-60%**: [SMARTY](/en/uk/carriers/smarty/) 100GB costs £10 with no contract vs [O2](/en/uk/carriers/o2/)'s 80GB at £10 with a 12-month contract
- **5G is universal** — every plan we track includes it
- **No-contract plans dominate the budget tier**: [giffgaff](/en/uk/carriers/giffgaff/), [VOXI](/en/uk/carriers/voxi/), [SMARTY](/en/uk/carriers/smarty/), and [Lebara](/en/uk/carriers/lebara/) are all rolling monthly
- **Price range**: £5/month ([Lebara](/en/uk/carriers/lebara/) 5GB) to £35/month ([VOXI](/en/uk/carriers/voxi/) Unlimited)
- **New entrant**: [iD Mobile](/en/uk/carriers/id-mobile/) joined the market on [Three](/en/uk/carriers/three/)'s network with data rollover and the UK's cheapest unlimited plan at £16/month
- **Special features**: [SMARTY](/en/uk/carriers/smarty/) and [iD Mobile](/en/uk/carriers/id-mobile/) offer data rollover, [VOXI](/en/uk/carriers/voxi/) includes unlimited social media data, [Lebara](/en/uk/carriers/lebara/) includes international minutes
For most users, the best approach is: pick the network coverage you need ([EE](/en/uk/carriers/ee/) for best coverage, [O2](/en/uk/carriers/o2/) for strong coverage plus cheap MVNOs, or [Three](/en/uk/carriers/three/) for the cheapest carriers like [SMARTY](/en/uk/carriers/smarty/) and [iD Mobile](/en/uk/carriers/id-mobile/)), then find the cheapest carrier on that network.
**[Find Your Best UK SIM Plan →](/en/uk/search/)**
---
*Plan data is current as of July 2026. Prices and inclusions may change. Check carrier websites for the latest information.*
*Compare all plans side by side using [SimFinder's comparison tool](/en/uk/search/).*
================================================================================
# Best SIM Plans in the USA 2026: 10 Carriers, 35 Plans Compared
URL: https://sim-finder.com/en/blog/best-sim-plans-usa-2026/
Type: blog (en)
Published: 2026-03-17
## TL;DR: Top 3 Picks for the USA
| Best For | Plan | Price/mo | Why |
|---------|-------|------|---------|
| **Budget** | [Mint Mobile](/en/us/carriers/mint/) 6GB | $15 | Cheapest plan with 5G, eSIM, and data rollover |
| **Most People** | [Visible](/en/us/carriers/visible/) Base | $25 | Unlimited data on [Verizon](/en/us/carriers/verizon/)'s network, no contract |
| **Speed** | [T-Mobile](/en/us/carriers/tmobile/) Go5G | $75 | Fastest network (156.4 Mbps), full MNO priority |
**[Compare All 35 US Plans on SimFinder →](/en/us/search/)**
Below, we break down the entire market using real plan data.
## Table of Contents
- [The US Mobile Landscape](#the-us-mobile-landscape-who-owns-what)
- [Price Breakdown: What Every Carrier Charges](#price-breakdown-what-every-carrier-charges)
- [Best Value Plans by Use Case](#best-value-plans-by-use-case)
- [5G and eSIM: What's Available](#5g-and-esim-whats-available)
- [Family Plans and Multi-Line Discounts](#family-plans-and-multi-line-discounts)
- [What Users Say](#what-users-say)
- [Frequently Asked Questions](#frequently-asked-questions)
- [Key Takeaways](#key-takeaways)
---
The US wireless market looks complicated, but it comes down to a simple structure: three networks, seven resellers, and a massive price spread. SimFinder tracks **10 carriers and 40 plans** in the United States. Prices range from $10/month to $100/month, and nearly every plan includes unlimited calls, 5G, and eSIM support.
The question is not whether you can find a good plan — it's which combination of price, network, and features fits your needs. This guide breaks it all down using actual plan data, network quality scores, and pricing analysis.
---
## The [US Mobile](/en/us/carriers/usmobile/) Landscape: Who Owns What
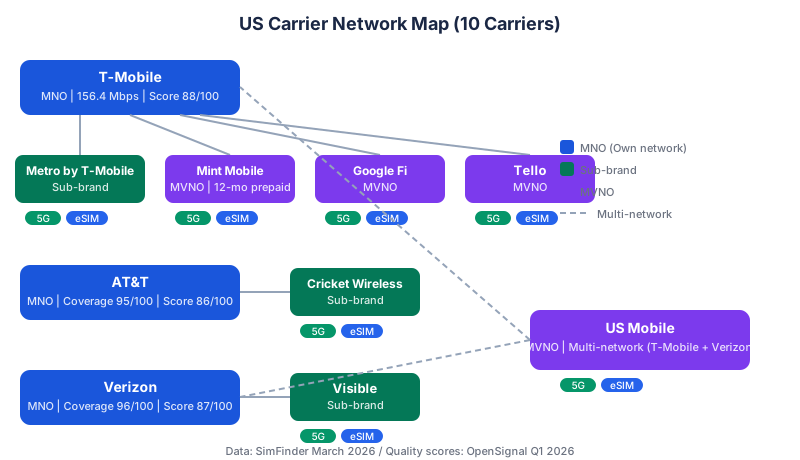 The US has **three physical networks**. Every carrier, no matter how it's branded, runs on one (or in [US Mobile](/en/us/carriers/usmobile/)'s case, two) of these.
| Network Owner | Type | Download Speed | Coverage Score | Overall Score | Carriers Using This Network |
|---|---|---|---|---|---|
| **[T-Mobile](/en/us/carriers/tmobile/)** | MNO | 156.4 Mbps | 92/100 | 88/100 | [T-Mobile](/en/us/carriers/tmobile/), [Metro](/en/us/carriers/metro/), [Mint Mobile](/en/us/carriers/mint/), [Google Fi](/en/us/carriers/googlefi/), [Tello](/en/us/carriers/tello/), [US Mobile](/en/us/carriers/usmobile/) |
| **[AT&T](/en/us/carriers/att/)** | MNO | 122.8 Mbps | 95/100 | 86/100 | [AT&T](/en/us/carriers/att/), [Cricket Wireless](/en/us/carriers/cricket/), [US Mobile](/en/us/carriers/usmobile/) |
| **[Verizon](/en/us/carriers/verizon/)** | MNO | 131.5 Mbps | 96/100 | 87/100 | [Verizon](/en/us/carriers/verizon/), [Visible](/en/us/carriers/visible/), [US Mobile](/en/us/carriers/usmobile/) |
*Quality data: OpenSignal Q1 2026, measured January 2026*
**[T-Mobile](/en/us/carriers/tmobile/) is the speed king** at 156.4 Mbps average download, and it also has the most carriers on its network — 6 out of 10 carriers in our database use [T-Mobile](/en/us/carriers/tmobile/)'s infrastructure. This makes [T-Mobile](/en/us/carriers/tmobile/) the backbone of the US budget carrier market.
**[Verizon](/en/us/carriers/verizon/) has the best coverage** (96/100) and narrowly edges out [AT&T](/en/us/carriers/att/) (95/100) in reach. For rural areas or cross-country road trips, [Verizon](/en/us/carriers/verizon/) or [AT&T](/en/us/carriers/att/) is the safer bet.
**[US Mobile](/en/us/carriers/usmobile/) is unique**: it operates on both [T-Mobile](/en/us/carriers/tmobile/) and [Verizon](/en/us/carriers/verizon/) networks, allowing customers to switch between them through the app — a feature they call "Super Carrier."
---
## Price Breakdown: What Every Carrier Charges
All 40 plans include eSIM support and 5G access. Most include unlimited voice calls. The key variables are price, data allowance, tethering, and contract requirements.
### MNO Plans ([T-Mobile](/en/us/carriers/tmobile/), [AT&T](/en/us/carriers/att/), [Verizon](/en/us/carriers/verizon/))
In March 2026, [AT&T](/en/us/carriers/att/) retired its Value Plus, Unlimited Starter, Unlimited Extra, and Unlimited Premium plans in favor of a "2.0" lineup. As of August 2026 that lineup is Value 2.0 ($40), Extra 2.0 ($50), Premium 2.0 ($60), and Elite 2.0 ($80) — all single-line prices after the $10/mo paperless billing discount, taxes and fees extra.
| Carrier | Plan | Price/mo | Data | Tethering | Contract |
|---|---|---|---|---|---|
| [AT&T](/en/us/carriers/att/) | Value 2.0 | $40 | Unlimited | Yes | No |
| [T-Mobile](/en/us/carriers/tmobile/) | Essentials Saver | $50 | Unlimited | Yes | No |
| [T-Mobile](/en/us/carriers/tmobile/) | Essentials | $60 | Unlimited | Yes | No |
| [Verizon](/en/us/carriers/verizon/) | Unlimited Welcome | $65 | Unlimited | No | No |
| [AT&T](/en/us/carriers/att/) | Extra 2.0 | $50 | Unlimited | Yes | No |
| [T-Mobile](/en/us/carriers/tmobile/) | Go5G | $75 | Unlimited | Yes | No |
| [Verizon](/en/us/carriers/verizon/) | Unlimited Plus | $80 | Unlimited | Yes | No |
| [T-Mobile](/en/us/carriers/tmobile/) | Go5G Plus | $85 | Unlimited | Yes | No |
| [AT&T](/en/us/carriers/att/) | Premium 2.0 | $60 | Unlimited | Yes | No |
| [AT&T](/en/us/carriers/att/) | Elite 2.0 | $80 | Unlimited | Yes | No |
| [Verizon](/en/us/carriers/verizon/) | Unlimited Ultimate | $95 | Unlimited | Yes | No |
| [T-Mobile](/en/us/carriers/tmobile/) | Go5G Next | $100 | Unlimited | Yes | No |
MNO prices range from $50/month ([AT&T](/en/us/carriers/att/) Value 2.0 and [T-Mobile](/en/us/carriers/tmobile/) Essentials Saver) to $100/month ([T-Mobile](/en/us/carriers/tmobile/) Go5G Next). Every MNO plan offers unlimited data — there are no capped-data plans from the Big Three.
### Sub-brand Plans (Cricket, Metro, [Visible](/en/us/carriers/visible/))
| Carrier | Network | Plan | Price/mo | Data | Tethering | Contract |
|---|---|---|---|---|---|---|
| Metro | [T-Mobile](/en/us/carriers/tmobile/) | Flex Unlimited | $25 | Unlimited | Yes | No |
| [Visible](/en/us/carriers/visible/) | [Verizon](/en/us/carriers/verizon/) | Base | $25 | Unlimited | Yes | No |
| Cricket | [AT&T](/en/us/carriers/att/) | Sensible 10GB | $30 | 10GB | Yes | No |
| Cricket | [AT&T](/en/us/carriers/att/) | Unlimited | $35 | Unlimited | No | No |
| [Visible](/en/us/carriers/visible/) | [Verizon](/en/us/carriers/verizon/) | [Visible](/en/us/carriers/visible/)+ | $35 | Unlimited | Yes | No |
| Metro | [T-Mobile](/en/us/carriers/tmobile/) | Flex Starter Plus | $40 | Unlimited | Yes | No |
| Cricket | [AT&T](/en/us/carriers/att/) | Smart Unlimited | $45 | Unlimited | Yes | No |
| [Visible](/en/us/carriers/visible/) | [Verizon](/en/us/carriers/verizon/) | [Visible](/en/us/carriers/visible/)+ Pro | $45 | Unlimited | Yes | No |
| Cricket | [AT&T](/en/us/carriers/att/) | Supreme Unlimited | $55 | Unlimited | Yes | No |
| Metro | [T-Mobile](/en/us/carriers/tmobile/) | Flex Plus | $60 | Unlimited | Yes | No |
Sub-brands start at **$25/month for unlimited data** — that's half the cheapest MNO plan. [Visible](/en/us/carriers/visible/) and Metro both hit this price point, on [Verizon](/en/us/carriers/verizon/) and [T-Mobile](/en/us/carriers/tmobile/) networks respectively.
### MVNO Plans (Mint, [US Mobile](/en/us/carriers/usmobile/), Google Fi, [Tello](/en/us/carriers/tello/))
| Carrier | Network | Plan | Price/mo | Data | Tethering | Contract |
|---|---|---|---|---|---|---|
| [Tello](/en/us/carriers/tello/) | [T-Mobile](/en/us/carriers/tmobile/) | 1GB | $10 | 1GB | Yes | No |
| [US Mobile](/en/us/carriers/usmobile/) | Multi | Light 2GB | $10 | 2GB | No | No |
| [Tello](/en/us/carriers/tello/) | [T-Mobile](/en/us/carriers/tmobile/) | 5GB | $15 | 5GB | Yes | No |
| Mint | [T-Mobile](/en/us/carriers/tmobile/) | 6GB | $15 | 6GB | Yes | 12-mo |
| [US Mobile](/en/us/carriers/usmobile/) | Multi | Unlimited Flex 10GB | $17.50 | 10GB | Yes | 12-mo |
| Mint | [T-Mobile](/en/us/carriers/tmobile/) | 17GB | $20 | 17GB | Yes | 12-mo |
| Google Fi | [T-Mobile](/en/us/carriers/tmobile/) | Flexible 1GB | $20 | 1GB | Yes | No |
| [US Mobile](/en/us/carriers/usmobile/) | Multi | Unlimited Starter | $25 | Unlimited | Yes | No |
| [Tello](/en/us/carriers/tello/) | [T-Mobile](/en/us/carriers/tmobile/) | Unlimited | $25 | Unlimited | Yes | No |
| Mint | [T-Mobile](/en/us/carriers/tmobile/) | 20GB | $25 | 20GB | Yes | 12-mo |
| [US Mobile](/en/us/carriers/usmobile/) | Multi | Unlimited Premium | $25 | Unlimited | Yes | No |
| Mint | [T-Mobile](/en/us/carriers/tmobile/) | Unlimited | $30 | Unlimited | Yes | 12-mo |
| Google Fi | [T-Mobile](/en/us/carriers/tmobile/) | Unlimited Essentials | $35 | Unlimited | Yes | No |
| Google Fi | [T-Mobile](/en/us/carriers/tmobile/) | Unlimited Standard | $50 | Unlimited | Yes | No |
| Google Fi | [T-Mobile](/en/us/carriers/tmobile/) | Unlimited Premium | $65 | Unlimited | Yes | No |
MVNOs are where the deepest discounts live. **[Tello](/en/us/carriers/tello/) starts at just $10/month** for 1GB with unlimited calls on [T-Mobile](/en/us/carriers/tmobile/)'s network. [US Mobile](/en/us/carriers/usmobile/) Unlimited Starter offers unlimited data for $25/month — that is $25 less than the cheapest MNO unlimited plan.
The trade-off: [Mint Mobile](/en/us/carriers/mint/) and [US Mobile](/en/us/carriers/usmobile/) Unlimited Flex require 12-month prepaid commitments for their lowest prices. If you want month-to-month flexibility with MVNO pricing, [Tello](/en/us/carriers/tello/), [US Mobile](/en/us/carriers/usmobile/) (Basic/Premium), and Google Fi are the options.
**[Find Your Best Match →](/en/us/search/)**
---
## Best Value Plans by Use Case
### Lightest Use (Under $15/month)
**[Tello](/en/us/carriers/tello/) 1GB — $10/month** — Tied for the cheapest plan in the US market. Runs on [T-Mobile](/en/us/carriers/tmobile/)'s network with 5G, eSIM, tethering, and unlimited calls. No contract. If you primarily use WiFi and just need a phone number with a small data cushion, this is as cheap as it gets.
**[US Mobile](/en/us/carriers/usmobile/) Light 2GB — $10/month** — Same price as [Tello](/en/us/carriers/tello/) but with double the data. Multi-network capability ([T-Mobile](/en/us/carriers/tmobile/) or [Verizon](/en/us/carriers/verizon/)). No tethering on this tier, but at $10/month for 2GB with 5G, the value is strong.
### Best Balance of Price and Features
**[Visible](/en/us/carriers/visible/) Base — $25/month** — The standout plan for most users. Unlimited data on [Verizon](/en/us/carriers/verizon/)'s network (coverage score 96/100), 5G, eSIM, tethering, and no contract. At $25 for unlimited on the carrier with the best coverage score, this is the plan SimFinder's data suggests works for the widest range of users. No family discount, but at $25 per line there is little room for one.
**Metro Flex Unlimited — $25/month** — The [T-Mobile](/en/us/carriers/tmobile/) network equivalent of [Visible](/en/us/carriers/visible/). Same $25 price, unlimited data, 5G, eSIM, and tethering. Choose between [Visible](/en/us/carriers/visible/) and Metro based on which network covers your area better: [Verizon](/en/us/carriers/verizon/) (96 coverage) or [T-Mobile](/en/us/carriers/tmobile/) (92 coverage).
### Budget-Conscious with More Data
**[Mint Mobile](/en/us/carriers/mint/) 17GB — $20/month** — If you can commit to 12 months upfront, Mint delivers 17GB with 5G, eSIM, tethering, and data rollover on [T-Mobile](/en/us/carriers/tmobile/)'s network. Data rollover is uncommon in the US market, and Mint is one of only two carriers in our database that offers it.
**[US Mobile](/en/us/carriers/usmobile/) Unlimited Starter — $25/month** — Unlimited data with no annual commitment. Runs on your choice of [T-Mobile](/en/us/carriers/tmobile/) or [Verizon](/en/us/carriers/verizon/). Includes 5G, eSIM, and tethering. The cheapest month-to-month unlimited plan in the US.
### Heavy Data Users Who Want Quality
**[T-Mobile](/en/us/carriers/tmobile/) Go5G — $75/month** — Full MNO priority on the fastest US network (156.4 Mbps). Unlimited everything with tethering. If speed and priority matter — for remote work, streaming, or gaming — this is the entry point for premium service.
**[Verizon](/en/us/carriers/verizon/) Unlimited Plus — $80/month** — If [Verizon](/en/us/carriers/verizon/) coverage is essential (96/100 coverage score), this mid-tier plan adds tethering and premium data priority. The $15 premium over [Verizon](/en/us/carriers/verizon/)'s entry-level Welcome plan ($65) buys significantly better tethering and data handling during congestion.
**[Find Your Best Match on SimFinder →](/en/us/search/)**
---
## 5G and eSIM: What's Available
### eSIM
All 40 plans in the US support eSIM — a **100% adoption rate**. The US market has fully embraced eSIM. If your phone supports it, you can activate any of these plans without a physical SIM card.
### 5G
All 40 plans include 5G access — also **100%**. Unlike some markets where 5G is reserved for premium tiers, the US market has made 5G standard across all price points. Even [Tello](/en/us/carriers/tello/)'s $10/month plan includes 5G.
This means the US market is unusually competitive on features — the differentiators are price, data allowance, network priority, and whether tethering is included. Features like 5G and eSIM are no longer a way for carriers to segment their plans.
---
## Family Plans and Multi-Line Discounts
Family discounts are a major differentiator in the US market. 30 of 40 plans offer some form of multi-line discount. Here are the most significant savings:
| Carrier | Plan | Single Line | Multi-Line Discount | Effective Price (2+ lines) |
|---|---|---|---|---|
| [AT&T](/en/us/carriers/att/) | Premium 2.0 | $60 | -$10.00/line | $50/line |
| [AT&T](/en/us/carriers/att/) | Extra 2.0 | $50 | -$10.00/line | $40/line |
| [T-Mobile](/en/us/carriers/tmobile/) | Go5G Next | $100 | -$40.00/line | $60/line |
| [AT&T](/en/us/carriers/att/) | Value 2.0 | $40 | -$10.00/line | $30/line |
| [T-Mobile](/en/us/carriers/tmobile/) | Go5G Plus | $85 | -$35.00/line | $50/line |
| [Verizon](/en/us/carriers/verizon/) | Unlimited Plus | $80 | -$35.00/line | $45/line |
| [Verizon](/en/us/carriers/verizon/) | Unlimited Ultimate | $95 | -$35.00/line | $60/line |
| [T-Mobile](/en/us/carriers/tmobile/) | Go5G | $75 | -$30.00/line | $45/line |
**MNO multi-line discounts can be dramatic**: [AT&T](/en/us/carriers/att/) Value 2.0 drops from $50 to $15 per line with 2+ lines — a 70% discount. At that price, it's competitive with MVNOs while keeping full MNO priority.
However, **[Visible](/en/us/carriers/visible/), [Tello](/en/us/carriers/tello/), and [US Mobile](/en/us/carriers/usmobile/) Light do not offer family discounts**. If you're a single-line user, these carriers remain the best value since their base prices are already low.
---
## Compare Plans on SimFinder
The data in this guide comes from SimFinder's database, which tracks 35 US plans across 10 carriers. Filter by price, data, 5G, eSIM, or tethering to find your best match.
**[Compare US SIM Plans →](/en/us/search/)**
---
## What Users Say
Real experiences from people using US SIMs.
> "TL;DR: most people with 1 line should trade their phone in to Apple, get the unlocked model, and go with a prepaid carrier such as [Visible](/en/us/carriers/visible/) or [US Mobile](/en/us/carriers/usmobile/). You can save even more with carriers such as [Mint Mobile](/en/us/carriers/mint/) depending on how much data you need."
> — @stetsondoggett ([original post](https://x.com/stetsondoggett/status/1965897263609532516))
> "[US Mobile](/en/us/carriers/usmobile/) launched a feature this year that enables customers to switch carrier networks on the same phone between [AT&T](/en/us/carriers/att/), [Verizon](/en/us/carriers/verizon/), and [T-Mobile](/en/us/carriers/tmobile/) (hence the name, Super Carrier). We call this 'teleporting.'"
> — @larryvc ([original post](https://x.com/larryvc/status/1874108405134368918))
*Individual experiences may vary based on location and network conditions.*
---
## Frequently Asked Questions
### What is the cheapest unlimited plan in the US?
[US Mobile](/en/us/carriers/usmobile/) Unlimited Starter at $25/month and [Tello](/en/us/carriers/tello/) Unlimited at $25/month are the cheapest unlimited plans. Metro Flex Unlimited and [Visible](/en/us/carriers/visible/) also offer unlimited data at $25/month. All four include 5G and eSIM support.
### Is there a real difference between MNO and MVNO plans?
MVNOs use the same towers as MNOs, so coverage maps are identical. The main difference is data priority — during network congestion, MNO postpaid customers get priority over MVNO users, which can mean slower speeds in crowded areas. For most users in most places, the difference is unnoticeable.
### Do all US plans support eSIM?
Yes. All 40 plans tracked by SimFinder across all 10 US carriers support eSIM. This is a 100% adoption rate as of August 2026.
### Which US network has the best coverage?
[Verizon](/en/us/carriers/verizon/) leads with a coverage score of 96/100, followed closely by [AT&T](/en/us/carriers/att/) at 95/100. [T-Mobile](/en/us/carriers/tmobile/) scores 92/100. For rural and remote areas, [Verizon](/en/us/carriers/verizon/) or [AT&T](/en/us/carriers/att/) is the safer choice. [T-Mobile](/en/us/carriers/tmobile/) leads in download speed at 156.4 Mbps.
### Are prepaid plans in the US contract-free?
Most are. 32 of 40 plans in our database are month-to-month with no contract. The exceptions are [Mint Mobile](/en/us/carriers/mint/) (12-month prepaid) and [US Mobile](/en/us/carriers/usmobile/) Unlimited Flex (12-month prepaid), which require upfront payment for a year but offer lower per-month pricing in return.
### What is the best SIM plan for someone visiting the US?
For short visits, [Visible](/en/us/carriers/visible/) at $25/month is ideal — unlimited data on [Verizon](/en/us/carriers/verizon/)'s network, no contract, eSIM activation before arrival, and 5G included. For longer stays where cost matters most, [Mint Mobile](/en/us/carriers/mint/) 17GB at $20/month offers strong value if you can commit to 12 months.
### Can I switch between [T-Mobile](/en/us/carriers/tmobile/) and [Verizon](/en/us/carriers/verizon/) networks?
[US Mobile](/en/us/carriers/usmobile/)'s "Super Carrier" feature lets you switch between [T-Mobile](/en/us/carriers/tmobile/) and [Verizon](/en/us/carriers/verizon/) networks on the same phone through their app. No other carrier offers this multi-network flexibility.
---
## Key Takeaways
The US SIM market in 2026:
- **10 carriers, 40 plans** — prices from $10/month ([Tello](/en/us/carriers/tello/) 1GB and [US Mobile](/en/us/carriers/usmobile/) Light 2GB) to $100/month ([T-Mobile](/en/us/carriers/tmobile/) Go5G Next)
- **Three networks matter**: [T-Mobile](/en/us/carriers/tmobile/) (speed king, 156.4 Mbps), [Verizon](/en/us/carriers/verizon/) (coverage king, 96/100), [AT&T](/en/us/carriers/att/) (balanced, 95/100 coverage)
- **Budget carriers save 50-75%**: [Visible](/en/us/carriers/visible/) offers unlimited on [Verizon](/en/us/carriers/verizon/) for $25 vs [Verizon](/en/us/carriers/verizon/)'s own $65 entry price. [US Mobile](/en/us/carriers/usmobile/) Unlimited Starter is $25 vs [T-Mobile](/en/us/carriers/tmobile/)'s $50.
- **5G and eSIM are universal** — every single plan in the US market supports both
- **Family discounts change the math**: [AT&T](/en/us/carriers/att/) Value 2.0 drops from $50 to $15/line with multi-line, making MNOs competitive with MVNOs for families
- **Data rollover is rare**: only [Mint Mobile](/en/us/carriers/mint/) offers it among the carriers tracked, making it a distinct advantage for moderate data users
- **[US Mobile](/en/us/carriers/usmobile/) stands alone** as the only carrier allowing network switching between [T-Mobile](/en/us/carriers/tmobile/) and [Verizon](/en/us/carriers/verizon/)
For single-line users, the strategy is simple: pick [Visible](/en/us/carriers/visible/) ($25 unlimited on [Verizon](/en/us/carriers/verizon/)) or [US Mobile](/en/us/carriers/usmobile/) Unlimited Starter ($25 unlimited, multi-network). For families, run the multi-line math on MNO plans — the per-line discounts can be significant.
**[Find Your Best US SIM Plan →](/en/us/search/)**
---
*Plan data is current as of March 2026; AT&T, Verizon, and Tello pricing re-verified July 2026 following AT&T's March 2026 "2.0" plan relaunch and Verizon's May 2026 Unlimited Ultimate price increase. Prices shown are pre-tax (US plans are quoted before sales tax, which varies by state). Check carrier websites for the latest information.*
*Compare all plans side by side using [SimFinder's comparison tool](/en/us/search/).*
================================================================================
# EE Launches 8Gbps Full Fibre at £74.99 in Guildford and Woking
URL: https://sim-finder.com/en/blog/ee-uk-8gbps-advanced-full-fibre-launch-2026/
Type: blog (en)
Published: 2026-08-02T09:00:00+09:00
EE has begun selling home broadband at up to 8Gbps, becoming the first major UK provider to offer that speed to consumers over Openreach's XGS-PON full fibre network. The new "Advanced Full Fibre" range starts from £54.99 a month for 2.3Gbps and £74.99 a month for 8Gbps, both on 24-month contracts, and is live now in eligible postcodes around Guildford and Woking. For most readers the practical impact is limited for now: this is a fixed broadband launch confined to a small corner of Surrey, and it does not change EE's mobile or SIM-only tariffs.
## What EE announced
EE confirmed the launch and pricing in a press release dated 31 July 2026, describing itself as the first major UK provider to offer 8Gbps speeds on advanced full fibre using XGS-PON technology. The two tiers follow a customer trial run earlier in 2026, which ISPreview had previously tracked as a pilot rather than a full commercial product.
According to ISPreview's report on the same day, the 2.3Gbps tier comes with upload speeds of 230Mbps, while the 8Gbps tier is quoted at 800Mbps or above on the upload side. Both are asymmetric, so the headline figures refer to download speeds only. ISPreview also notes that both plans carry EE's standard mid-contract price rise of £4 a month each April.
Hardware differs between the two tiers. ISPreview reports that 2.3Gbps customers receive EE's Smart Hub 7 Pro, while 8Gbps customers are initially supplied with a TP-Link router because the matching Smart Hub is still some months away. Either way, an Openreach engineer visit is required to fit a 10Gbps-capable optical network terminal.
## Where it is available
Availability is narrow at launch. EE's press release cites Guildford, Woking and surrounding areas, and ISPreview lists eligible locations including Brookwood, Puttenham, Clandon, Shere and Worplesdon. EE says the footprint will grow as Openreach continues its XGS-PON rollout, but has not published a timetable or a target number of premises. ISPreview adds that existing EE broadband customers in those areas will be able to move onto the new tiers over the coming weeks, rather than on day one.
Luciano Oliveira, EE's Director of Product, Home and TV, said the company is "investing in the technologies that will power the next generation of digital experiences," as quoted by Mobile News on 31 July 2026.
## Why XGS-PON matters
The technical story here is the network rather than the speed. Openreach's existing full fibre network largely runs on GPON, which caps consumer products well below these figures. XGS-PON is a 10-Gigabit-capable successor that can run alongside GPON on the same fibre, which is why EE is able to sell multi-gigabit tiers without new cable being pulled to the home. That is what makes the launch a milestone for the wider UK market: once Openreach's upgraded platform reaches an area, any ISP selling over Openreach — not just EE — has the option to build multi-gigabit products on it.
## What it means for mobile and SIM buyers
Nothing in this announcement changes EE's mobile side. The press release covers fixed-line broadband exclusively, with no mobile plan, SIM bundle or converged discount attached, and both ISPreview and Mobile News report it the same way. If you are shopping for a UK SIM-only or mobile plan, EE's tariffs, allowances and pricing are unaffected by this launch.
It is also worth being realistic about the speeds themselves. Wi-Fi and the devices in a typical home are the usual bottleneck well before 8Gbps, and EE has not published guidance on what equipment is needed to see those rates in practice. For the vast majority of households, including heavy streaming and gaming users, gigabit-class connections already sit far above real-world demand. The more meaningful development for most people is the upload improvement and the fact that Openreach's platform is moving to a technology with far more headroom — benefits that will arrive gradually as coverage expands beyond the initial Surrey postcodes.
We will update this article if EE publishes a wider rollout schedule or extends the tiers to customers outside the launch area.
================================================================================
# EE Launches Early Phone Swap: Upgrade Up to 12 Months Early
URL: https://sim-finder.com/en/blog/ee-uk-early-phone-swap-flex-pay-2026/
Type: blog (en)
Published: 2026-08-13T09:00:00+09:00
EE has launched **Early Phone Swap**, a scheme that lets eligible Flex Pay customers hand back their current handset and upgrade up to 12 months before their device agreement ends, without paying an early-upgrade fee. The operator announced the change on 11 August 2026 and says it is available immediately to around one million customers. For readers on an EE device plan, the practical effect is that the remaining balance on a phone no longer has to be settled in a lump sum before moving to a new model — but the swap is conditional on signing a fresh 24-month airtime plan.
## How the swap works
According to EE's announcement, the customer returns their existing device and the trade-in value is applied against what is still owed on the current Device Credit Agreement. If the returned handset is valued above the outstanding balance, EE says it pays the difference directly into the customer's bank account. Both new and refurbished handsets can be taken as the replacement.
EE's Sharon Meadows, quoted in the company's press release, framed the change around upgrade timing, saying Early Phone Swap "puts that power firmly in their hands, letting them swap their old phone and get something new every year."
## The eligibility conditions
The scheme is narrower than the headline suggests, and the conditions are where readers should focus. As set out by EE and summarised by ISPreview and Mobile News on the same day, a customer qualifies only if:
- the current phone was bought from EE on a Device Credit Agreement alongside a 24-month airtime plan;
- at least 12 monthly device payments have been made;
- 12 months or less remain on the device agreement, and the customer is not in its final month;
- the account is up to date, with a credit check applied.
The handset being returned must also power on and be in full working order, have security features such as activation locks switched off, and must not have been reported lost, blocked or stolen. Damaged or non-functional devices therefore fall outside the scheme.
Crucially, there is no standalone Early Phone Swap charge, but the swap requires taking out a **new device credit agreement with a 24-month airtime plan**. In other words, the cost is not an exit fee — it is a reset of the contract clock.
## Flex Pay term lengths widened
Alongside the launch, EE has broadened its Flex Pay device financing terms. Reporting on the announcement notes the addition of 12-month and 48-month options to the existing line-up, giving customers a wider spread of monthly device payments. Longer terms lower the monthly figure but extend the period over which the handset is being paid off, which is worth modelling before comparing headline monthly prices between providers.
## Is it actually new?
Commentary published alongside the launch was sceptical about how novel the mechanic is. ISPreview's coverage records readers pointing out that Sky Mobile has offered a comparable swap arrangement for some time, and questioning EE's framing that the approach differs from most other providers. A second thread of criticism concerns whether annual upgrades make sense at all, given the modest year-on-year differences between recent handset generations and the cost of restarting a 24-month commitment.
## What it means for buyers
For anyone comparing UK mobile deals, the takeaway is that the sticker attraction — upgrading a year early at no extra cost — is real but tied to recommitting. Readers weighing a swap should check the trade-in valuation EE offers against the outstanding device balance, since any surplus is paid out, and compare the total cost of a new 24-month airtime plan against simply finishing the current agreement and moving to a SIM-only plan, which typically costs far less per month once a handset is paid off.
Sources: EE's press release of 11 August 2026 and same-day coverage from ISPreview and Mobile News.
================================================================================
# eSIM vs SIM Card for International Travel: Which Is Better?
URL: https://sim-finder.com/en/blog/esim-vs-sim-card-international-travel/
Type: blog (en)
Published: 2026-03-23
## TL;DR: Quick Verdict
| Best For | Winner | Why |
|----------|--------|-----|
| **Most travelers** | **eSIM** | Cheaper, instant setup, no store visits, dual SIM support |
| **Long stays (1+ month)** | **Physical SIM** | Local number, potentially cheaper unlimited plans, wider device support |
| **Multi-country trips** | **eSIM** | One regional plan covers multiple countries — no swapping |
**For the majority of international trips, eSIM is the better option.** It's cheaper, faster to set up, and eliminates the hassle of finding a SIM shop abroad. Physical SIM cards still have advantages for long-term stays and travelers who need a local phone number.
**[Compare eSIM Plans for Your Destination on SimFinder →](/en/travel/)**
---
## Table of Contents
- [What Is an eSIM?](#what-is-an-esim)
- [What Is a Physical SIM Card?](#what-is-a-physical-sim-card)
- [Head-to-Head Comparison](#head-to-head-comparison-esim-vs-physical-sim)
- [When eSIM Wins](#when-esim-wins)
- [When Physical SIM Wins](#when-physical-sim-wins)
- [Cost Comparison: Japan 7-Day Trip](#cost-comparison-japan-7-day-trip)
- [How to Choose](#how-to-choose-a-decision-framework)
- [Frequently Asked Questions](#frequently-asked-questions)
- [Key Takeaways](#key-takeaways)
---
## What Is an eSIM?
An eSIM (embedded SIM) is a digital SIM built into your smartphone. Instead of inserting a physical card, you download a carrier profile — typically by scanning a QR code or through an app. The eSIM stores the same information as a traditional SIM card (carrier identity, phone number, authentication keys), but without the plastic.
For travelers, eSIM means you can buy a data plan for your destination **before you leave home**, install it in minutes, and start using mobile data the moment you land. No airport kiosk, no language barrier, no fumbling with a SIM ejector tool.
As of 2026, **11 major eSIM providers** offer travel plans covering 200+ countries. Providers like [Airalo](/en/travel/providers/airalo/), [Holafly](/en/travel/providers/holafly/), [Nomad](/en/travel/providers/nomad/), [Saily](/en/travel/providers/saily/), and [eSIM2Fly](/en/travel/providers/esim2fly/) compete on price, making travel eSIM plans increasingly affordable — some starting at just $1.70 for 7 days.
---
## What Is a Physical SIM Card?
A physical SIM card is a small chip you insert into your phone's SIM tray. It connects your device to a mobile network. When traveling internationally, you typically buy a prepaid SIM card at the airport, a convenience store, or a carrier shop in your destination country.
Physical SIMs have been the standard for mobile connectivity since the 1990s. They work in virtually every phone ever made (with the right size adapter), require no special device features, and often come with a local phone number included.
The physical SIM experience for travelers usually involves: landing at your destination, finding a SIM vendor, showing your passport (many countries require ID registration), waiting for activation, and manually inserting the card. This process takes anywhere from 10 minutes to over an hour depending on the airport and country.
---
## Head-to-Head Comparison: eSIM vs Physical SIM
| Criteria | eSIM | Physical SIM | Winner |
|----------|------|-------------|--------|
| **Cost (7-day trip)** | $4–35 depending on data | $10–30 at airport vendors | eSIM |
| **Convenience** | Buy online, scan QR code | Find a shop, show ID, wait | eSIM |
| **Setup Time** | 5–10 minutes (from home) | 15–60+ minutes (at destination) | eSIM |
| **Device Compatibility** | Requires eSIM-capable phone (2018+) | Works in any unlocked phone | Physical SIM |
| **Multi-Country Support** | One regional plan covers many countries | Need a new SIM per country | eSIM |
| **Security** | Cannot be physically removed/stolen | Can be lost, stolen, or swapped | eSIM |
| **Local Phone Number** | Usually data-only (no number) | Typically includes a local number | Physical SIM |
| **Data Top-Up** | Instant via app | Visit a shop or use carrier app | eSIM |
| **Keep Home Number Active** | Yes (dual SIM) | Yes (if phone has dual SIM slots) | Tie |
| **Long-Term Value (30+ days)** | Competitive but varies | Often cheaper for local unlimited plans | Physical SIM |
**Overall: eSIM wins in 6 out of 10 criteria**, with physical SIM holding the advantage in device compatibility and local number access.
---
## When eSIM Wins
### Short Trips (1–14 days)
For a typical vacation or business trip, eSIM is almost always the better choice. You avoid wasting travel time at a SIM shop, and prices are competitive or cheaper than airport SIM vendors. A 7-day Japan eSIM from [Airalo](/en/travel/providers/airalo/) costs $4 for 1GB — enough for maps, messaging, and light browsing.
### Multi-Country Itineraries
This is where eSIM has no competition. Providers like [Airalo](/en/travel/providers/airalo/), [Holafly](/en/travel/providers/holafly/), and [Nomad](/en/travel/providers/nomad/) offer regional plans that cover entire continents. An Asia regional eSIM works across Japan, South Korea, Thailand, and more — with a single plan. With physical SIMs, you'd need to buy (and swap) a new card at every border crossing.
### Last-Minute Trips
Forgot to arrange connectivity? With eSIM, you can purchase and install a plan from the airport departure lounge, the airplane (on WiFi-equipped flights), or even after landing. Physical SIM shops may be closed, sold out, or have long queues.
### Solo Travelers
One person, one device, one eSIM. No sharing concerns, no extra equipment. The economics are straightforward: eSIM is the cheapest per-person option for solo travel.
### Travelers Who Want to Keep Their Home Number Active
With dual SIM capability (physical SIM + eSIM), you can keep your home carrier's SIM in the physical slot for calls and texts, while using the eSIM for local data. This is the setup most frequent travelers use — it's seamless.
---
## When Physical SIM Wins
### You Need a Local Phone Number
Some situations require a local number: receiving SMS verification codes from local banks or services, making local calls to restaurants and businesses, or registering for ride-sharing apps that require a local number. Travel eSIMs are typically data-only and don't provide this.
### Your Phone Doesn't Support eSIM
While eSIM adoption is growing fast, not all phones support it. Budget Android phones, phones manufactured before 2018, and some regional phone models lack eSIM capability. If your phone doesn't support eSIM, a physical SIM is your only option (besides portable WiFi).
### Long-Term Stays (1+ Month)
For extended stays, a local physical SIM with a monthly plan can be cheaper than travel eSIM plans. For example, a 30-day unlimited data plan from a local carrier in Thailand might cost $10–15, while the equivalent eSIM plan could be $30–50 depending on the provider.
### Budget Destinations with Cheap Local SIMs
In countries like India, Thailand, Vietnam, and Indonesia, local SIM cards are extremely affordable — sometimes $3–5 for a week of generous data. In these markets, the price advantage of eSIM narrows or disappears. If you're comfortable buying a local SIM, the savings can be significant.
### You Want Maximum Speed and Reliability
Local physical SIMs connect directly to a local carrier's network. Some travel eSIM providers route traffic through intermediate networks or use roaming agreements that can result in slower speeds. As one commenter on X noted: "The problem with these global travel eSIMs is that normally they just VPN all traffic through Singapore or something. You rarely get a local IP address and they are slow." ([source](https://x.com/edandersen/status/2023936527651483653)) This isn't universal — many eSIM providers deliver excellent speeds — but it's a factor to consider.
---
## Cost Comparison: Japan 7-Day Trip
Let's compare real costs for a 7-day trip to Japan — one of the most popular international travel destinations.
### eSIM Plans (SimFinder Database)
| Provider | Data | Duration | Price (USD) |
|----------|------|----------|-------------|
| **[eSIM2Fly](/en/travel/providers/esim2fly/)** | 1GB | 7 days | $2.20 |
| **[Airalo](/en/travel/providers/airalo/)** | 1GB | 7 days | $4.00 |
| [**aloSIM**](/en/travel/providers/alosim/) | varies | 7 days | $4.50 |
| **[Saily](/en/travel/providers/saily/)** | 1GB | 7 days | $3.99 |
| **[Airalo](/en/travel/providers/airalo/)** | 3GB | 30 days | $8.00 |
| **[Holafly](/en/travel/providers/holafly/)** | Unlimited | 7 days | ~$27.00 |
*Prices from SimFinder database, verified March 2026.*
### Airport Physical SIM (Typical Japan Prices)
| Vendor | Data | Duration | Price (USD) |
|--------|------|----------|-------------|
| Major airport vendor | 3GB | 7 days | ~$20–25 |
| Convenience store SIM | 3GB | 7 days | ~$15–20 |
| Carrier shop (city) | 3GB | 30 days | ~$25–30 |
*Prices are approximate based on typical Narita/Haneda airport SIM vendors.*
### Verdict
For a standard 7-day Japan trip, **eSIM saves $10–20 compared to an airport SIM card**. The cheapest eSIM option ([eSIM2Fly](/en/travel/providers/esim2fly/), $2.20 for 1GB/7 days) is roughly 10x cheaper than a typical airport SIM. Even for heavier data users, [Airalo](/en/travel/providers/airalo/)'s 3GB/30-day plan at $8 beats most physical SIM options.
The cost advantage holds across most popular destinations. Here's a quick comparison of eSIM starting prices from SimFinder's database:
| Destination | Cheapest eSIM (7 days) | Typical Airport SIM |
|-------------|----------------------|---------------------|
| Japan | $2.20 ([eSIM2Fly](/en/travel/providers/esim2fly/) 1GB) | ~$20 |
| Thailand | $1.70 ([eSIM2Fly](/en/travel/providers/esim2fly/) 0.5GB) | ~$8 |
| South Korea | $2.20 ([eSIM2Fly](/en/travel/providers/esim2fly/) 1GB) | ~$15 |
**[Compare eSIM Plans by Destination →](/en/travel/)**
---
## How to Choose: A Decision Framework
Answer these questions to determine which option suits your trip:
**1. Does your phone support eSIM?**
- No → Physical SIM is your only option
- Yes → Continue
**2. How long is your trip?**
- Under 2 weeks → eSIM (almost always cheaper and more convenient)
- 2–4 weeks → Either works; compare specific prices for your destination
- Over 1 month → Consider a local physical SIM for better long-term value
**3. Are you visiting multiple countries?**
- Yes → eSIM with a regional plan (one plan, multiple countries)
- No → Either works
**4. Do you need a local phone number?**
- Yes → Physical SIM (or use both: physical for number + eSIM for data)
- No → eSIM
**5. What's your comfort level with technology?**
- Comfortable with phone settings → eSIM
- Prefer someone else to set it up → Physical SIM (airport shop staff will do it)
For most travelers in 2026, the answer is eSIM. The technology has matured, prices have dropped, and the convenience gap is significant. Physical SIMs remain the right choice for specific scenarios — long stays, local number needs, or older devices.
**[Find the Best eSIM Plan for Your Trip →](/en/travel/)**
---
## What Travelers Say
Real experiences from travelers comparing eSIM and physical SIM options:
> "Here's my hack: I use an eSIM from [Airalo](/en/travel/providers/airalo/). No more insane roaming fees. No more long airport lines hunting for SIM cards."
> — @gotravelyourway ([original post](https://x.com/gotravelyourway/status/1961710351688650793))
> "Over the last 4 years, this eSIM has saved me countless dollars and headaches while traveling."
> — @AndroidAuth ([original post](https://x.com/AndroidAuth/status/1917905794277798161))
> "Physical SIM cards are going the way of the dinosaur. The iPhone 17 Air is 100% eSIM-only."
> — @airalocom ([original post](https://x.com/airalocom/status/1966512614185283638))
*Individual experiences may vary based on destination, device, and provider.*
---
## Frequently Asked Questions
### Can I use eSIM and a physical SIM at the same time?
Yes. Most modern smartphones support dual SIM — one eSIM and one physical SIM (or two eSIMs on newer iPhones). This lets you keep your home number active on the physical SIM while using an eSIM for local data abroad. It's the setup most experienced travelers use.
### Is eSIM cheaper than buying a local SIM card at the airport?
It depends on the destination. For a 7-day trip to Japan, eSIM plans start at $2.20 ([eSIM2Fly](/en/travel/providers/esim2fly/) 1GB) while airport SIM cards typically cost $15–30. In countries like Thailand or India, local SIM cards can be extremely cheap ($3–5 for generous data), sometimes matching or beating eSIM prices. However, eSIM eliminates the time and hassle of finding a shop.
### What happens if my eSIM runs out of data mid-trip?
You can purchase an additional eSIM plan directly from the provider's app while abroad — no store visit needed. Most providers like [Airalo](/en/travel/providers/airalo/), [Nomad](/en/travel/providers/nomad/), and [Holafly](/en/travel/providers/holafly/) let you top up or buy a new plan instantly. This is a major advantage over physical SIMs, which may require visiting a local shop to recharge.
### Does my phone support eSIM?
Most phones released after 2020 support eSIM. This includes iPhone XR/XS and later, Google Pixel 3a and later, Samsung Galaxy S20 and later, and most recent OnePlus, Xiaomi, and Oppo models. Check your phone's settings under "Cellular" or "Mobile Network" for an "Add eSIM" option.
### Can I get a local phone number with an eSIM?
Most travel eSIMs are data-only and do not include a local phone number. If you need a local number for receiving calls or SMS (e.g., for bank verification), a physical SIM is the better choice. For most travelers, messaging apps like WhatsApp, LINE, or Telegram handle communication without needing a local number.
### Are there countries where eSIM doesn't work?
eSIM coverage has expanded rapidly, but some countries have limited provider support. As of 2026, major travel eSIM providers like [Airalo](/en/travel/providers/airalo/) cover 200+ destinations. However, coverage quality varies — in less-visited countries, you may have fewer provider options or slower speeds compared to a local physical SIM.
### Is eSIM more secure than a physical SIM?
Yes, in several ways. An eSIM cannot be physically stolen or swapped without your knowledge, reducing SIM-swap fraud risk. It's embedded in your device and protected by your phone's security. A physical SIM can be removed and used in another device, or lost during travel.
---
## Key Takeaways
The eSIM vs physical SIM decision in 2026:
- **eSIM wins for most travelers**: cheaper (starting at $1.70/7 days), instant setup from home, no store visits, works across multiple countries with one plan
- **Physical SIM wins for specific cases**: local phone number needed, long-term stays (1+ month), budget destinations with cheap local SIMs, or eSIM-incompatible phones
- **Dual SIM is the power move**: keep your home SIM in the physical slot, add an eSIM for travel data — best of both worlds
- **Cost gap is significant**: for a 7-day Japan trip, eSIM saves $10–20 compared to airport SIM cards
- **The industry is moving toward eSIM**: Apple's iPhone 17 Air is eSIM-only, and all 11 providers tracked by SimFinder support tethering and multi-country plans
- **The best choice depends on your trip**: short multi-country trips favor eSIM; long single-country stays may favor physical SIM
For the majority of international trips, eSIM is the better, cheaper, and more convenient option.
**[Compare eSIM Plans for Your Next Trip →](/en/travel/)**
---
*Plan data is from SimFinder's database of 11 eSIM providers, verified as of March 2026. Airport SIM prices are approximate and vary by vendor, location, and season. Prices and availability may change. Check provider websites for the latest information.*
*Compare travel eSIM plans side by side using [SimFinder's travel comparison tool](/en/travel/).*
================================================================================
# Openreach Adds 1.6Tbps Wavelengths to OSEA, Orders Open 16 Sept
URL: https://sim-finder.com/en/blog/openreach-uk-osea-1-6tbps-wavelength-2026/
Type: blog (en)
Published: 2026-08-20T09:00:00+09:00
Openreach has upgraded its wholesale optical portfolio so that a single wavelength can now carry up to 1.6 terabits per second — double the previous top figure — with pre-order quotes available immediately and formal orders opening on 16 September 2026. The change was set out in Openreach's communications provider briefing ETH029/26, published on 18 August 2026, and reported independently by ISPreview on 19 August 2026.
For consumers, nothing changes today: this is a wholesale, business-to-business product bought by data centres and network operators, not a retail SIM or broadband tariff. But it is a useful marker of how the capacity underneath UK mobile and fixed networks is being scaled.
## What Openreach announced
The upgrade sits within Openreach's Optical Spectrum Extended Access (OSEA) portfolio, which sells high-capacity point-to-point optical connectivity between sites. According to the ETH029/26 briefing, the new option is built on a compact 2RU chassis — 88.9mm of vertical rack space — that can house up to four WaveServer modules and support up to eight 1.6Tb wavelengths.
ISPreview reports that this works out at up to 12.8Tbps of aggregate wavelength capacity per chassis, or up to 32 × 400GE client interfaces. The same report notes that the existing OSEA solution, based on Ciena's WaveServer and WaveLogic optical platform, previously offered up to 800Gbps per card over a single wavelength. The headline improvement is therefore a doubling of per-wavelength capacity within roughly the same physical footprint.
Openreach's briefing states that updated product documentation and Suppliers Information Note 514 accompany the launch.
## Pricing and timing
Openreach's briefing itself points to Access Charge Change Notice OR1121 for the commercial terms rather than listing prices inline. ISPreview reports the connection charge for a 1.6Tbps wavelength as £16,500 excluding VAT, with an annual rental of £2,700 across either a 36-month or 60-month term.
On timing, the briefing confirms two distinct dates. Pre-order designs and quotes became available on 18 August 2026 — so operators can start scoping deployments now — while orders can only be placed from 16 September 2026. That makes this a live product announcement rather than a speculative roadmap item, though the first services will not be ordered for roughly another month.
## Why it matters for mobile users
OSEA is not a mobile product, and Openreach has not linked this announcement to any consumer service. The connection is indirect but real: the kind of high-capacity links OSEA sells are the sort of infrastructure operators use between core sites and data centres, and mobile traffic growth is one of the pressures driving demand for more capacity between those sites.
It is worth being precise about the limits of what has been confirmed. Openreach has not published any distance or route detail for the 1.6Tbps option in the material reviewed here, has not named which communications providers intend to take it, and has not indicated any effect on retail pricing. Anyone reading this as a signal about future consumer speeds should treat it as background rather than evidence.
## What to watch next
The practical test will be uptake after 16 September. OSEA competes for the same customers as other wholesale and dark-fibre options, and pricing at £16,500 connection plus £2,700 per year positions it firmly at the hyperscale and carrier end of the market rather than at regional ISPs.
For SimFinder readers comparing UK SIM plans, there is no action to take. Consumer tariffs, allowances and network quality scores are unaffected by this announcement, and we will only revisit it if Openreach or a retail provider connects the capacity upgrade to a customer-facing change.
Sources: Openreach communications provider briefing ETH029/26 (18 August 2026) and ISPreview (19 August 2026).
================================================================================
# TfW's Railway Fibre Links South Wales Valleys to Vantage Data Centres
URL: https://sim-finder.com/en/blog/tfw-ffeibr-railway-fibre-data-centre-link-2026/
Type: blog (en)
Published: 2026-08-24T09:00:00+09:00
Transport for Wales' fibre arm, ffeibr, announced on 21 August 2026 that its railway-based full fibre network now provides a direct connection between colocation provider Cloud Centres and Vantage Data Centres in South Wales. The link is wholesale infrastructure rather than a consumer product, so there is no new tariff or broadband package for readers to sign up to today. Its significance is structural: fibre laid alongside the Core Valley Lines during Metro electrification is now carrying commercial traffic into a major data centre campus, which over time gives ISPs and network operators another route into the Valleys.
## What was announced
According to the announcement on the Transport for Wales news site, the ffeibr network now links Cloud Centres Networks directly to Vantage Data Centres, giving businesses on the network a path to cloud computing and AI infrastructure hosted at the campus. Nation.Cymru, reporting on 22 August, described the same development and noted that the network now extends into Cardiff as well as running through the Core Valley Lines corridor.
Transport for Wales did not publish bandwidth, latency or capacity figures, and no pricing was disclosed. ISPreview, which also covered the story on 22 August, likewise reported no speed measurements — so anyone comparing this to a headline consumer speed announcement should treat it as an infrastructure milestone rather than a performance claim.
## Why railway fibre matters here
ffeibr's network was built during the South Wales Metro electrification works, using railway land to reach valley communities where conventional fibre builds are awkward and expensive. That origin story is the whole point of the announcement: it turns a transport asset into telecoms capacity without a separate civils programme.
Guy Reiffer, managing director of ffeibr, framed the change in terms of location rather than raw speed. Access to the highest-quality digital infrastructure has historically been concentrated around major cities, he said, and connecting sites like Church Village to resilient, high-performance networks "changes how and where they choose to invest." Adam Price MS, quoted in the Transport for Wales release, described it as an example of "using the assets we already have, to build the infrastructure we need for the future."
## Background: how ffeibr got here
ffeibr launched in November 2024, offering wholesale access to the fibre built alongside local railways. Cloud Centres Networks was its first commercial contract, connected in partnership with Cardiff University in 2025. This week's announcement extends that relationship into a direct data centre-to-data centre link.
TfW Fibre Limited operates as a not-for-profit subsidiary of Transport for Wales, and reinvests its commercial returns into the Welsh public sector — a different model from the commercial altnets that make up most of the UK's alternative fibre market.
Vantage's South Wales presence is well established: its Welsh campus, acquired from Next Generation Data, has long been described in industry coverage as one of Europe's largest, and the company has been expanding in the region. Transport for Wales' release did not itself break down the campus's capacity.
## What this means for consumers
For mobile and broadband customers in Wales, nothing changes immediately. ffeibr sells to ISPs and network operators via wholesale, so any retail impact depends on whether providers choose to build on the route. The realistic effect over the next few years is more competitive backhaul options for serving valley towns — a precondition for better retail coverage rather than better coverage in itself.
If you are shopping for a SIM or broadband deal in Wales today, this announcement should not affect your choice. It is worth watching for what follows: which providers, if any, announce services riding on the ffeibr network.
================================================================================
# Report Grades BT and Sky C- on UK Social Tariff Clarity
URL: https://sim-finder.com/en/blog/uk-social-tariff-transparency-report-2026/
Type: blog (en)
Published: 2026-08-26T09:00:00+09:00
UK broadband analyst thinkbroadband published a social tariff transparency report on 24 August 2026 that grades several of the country's largest providers poorly on how easy their discounted packages are to find and understand. BT and Sky Broadband both received a C-, Virgin Media a C and Vodafone Broadband a C+, while community and altnet providers B4RN, B4SH, Community Fibre and Hyperoptic all scored an A. For low-income households, the practical takeaway is that the cheapest package you qualify for is often not the one shown on a provider's main site — you may have to search for it specifically.
## What the report measured
The study ranked ISPs offering social tariffs across five criteria: how easy the packages are to find, the quality of the detail published (pricing, terms and conditions, contract limits), download speed, price, and how flexible the eligibility requirements are. According to ISPreview's coverage on the same day, the sharpest criticism landed on discoverability. The report challenges readers to "go to bt.com and find where social tariffs are without using a search engine," adding that once found, the page does not make clear how much the tariff costs because BT offers multiple packages whose details sit elsewhere.
thinkbroadband notes this is not unique to BT. Its write-up describes pricing that is sometimes missing or incomplete, contract terms that are unclear, and qualifying criteria that vary between packages from the same provider. Some social tariffs were buried in FAQ pages or left off site navigation entirely.
At the other end of the scale, the report singles out B4RN as "by far the best example in good practice," because the community altnet lists its social tariff alongside its regular packages on the main menu and does not cap the speed of the service. B4SH was credited for putting the same information on its standard product page. Virgin Media was noted as having improved.
## Why the grades matter now
The timing is what gives the report weight. The Government's Telecoms Consumer Charter launched in April 2026 and requires signatories to ensure social tariffs are "easy to find and signposted to eligible customers in communications." As of August 2026, signatories include BT Group (BT, EE and Plusnet), Virgin Media O2, VodafoneThree, Sky, TalkTalk, KCOM, Community Fibre, WightFibre, Hyperoptic and Olilo — meaning several of the lowest-scoring providers have already committed publicly to the standard they are being marked down against.
Awareness remains the underlying problem. Ofcom found that only 34% of eligible broadband users knew social tariffs existed as of April 2026, and that 532,000 customers were on a social broadband or mobile tariff — around 8.6% of the 6.2 million Universal Credit claimants who might qualify. ISPreview's summary of the report puts a standard commercial plan for a Universal Credit recipient at roughly £27 a month against social tariffs averaging around £15, so the gap between knowing and not knowing is worth about £144 a year.
## What this means for mobile customers
One limitation worth stating plainly: this report assessed fixed broadband ISPs only, not mobile operators. Ofcom's 532,000 figure covers both, and mobile social tariffs are offered separately by some operators, but the letter grades above should not be read as a verdict on any provider's mobile pricing or its mobile SIM range.
Still, the discoverability point generalises. If you or someone in your household receives Universal Credit, Pension Credit, Employment and Support Allowance, Jobseeker's Allowance or Income Support, it is worth checking directly with your current provider rather than assuming their public price list is complete. Ofcom maintains its own list of available social tariffs, and the report's core finding is that a search engine — or a third-party list — will often get you there faster than the provider's own homepage.
================================================================================
# VodafoneThree: ~100 London Mobile Sites Offline by End of 2026
URL: https://sim-finder.com/en/blog/vodafonethree-london-ntq-mobile-sites-2026/
Type: blog (en)
Published: 2026-09-16T09:00:00+09:00
VodafoneThree said on 16 September 2026 that around 100 of its mobile sites in London are either already switched off or expected to go offline by the end of this year, because landowners have served Notices to Quit ahead of building redevelopment. The operator says replacement sites take an average of five years to bring into service, far longer than the 18 months' notice it typically receives. For London users, that means coverage gaps on some high streets and at some stations are likely to persist for years rather than months, regardless of which network or SIM plan they are on.
The claims come from a report the operator commissioned, *Lost Sites, Lost Signal: The Impact of Notices to Quit on Londoners*, published alongside a press release on its corporate site. ISPreview UK covered the warning the same day.
## What a Notice to Quit actually does
A Notice to Quit (NTQ) is a legal notice a landowner serves on a mobile operator to require the removal of equipment — usually rooftop antennas — when a building is being renovated, redeveloped or demolished. The operator has to take the kit down whether or not an alternative location is ready.
That is the core of VodafoneThree's complaint. It says the standard 18-month notice period is not enough time to find, agree and commission a replacement. A replacement site has to be technically suitable, physically available, acceptable to the site owner, viable under planning rules, and connectable back into the wider network. In London, where rooftop space is contested and planning is split across many boroughs, clearing all five conditions is slow.
## The numbers in the report
VodafoneThree puts the economic cost of NTQ-driven coverage loss in London at around £2.7 billion a year, which it describes as the equivalent of £7.4 million a day. The report also says one in five London high streets have what it calls functional not-spots, and that roughly 60 rail, Underground and Overground stations are affected — including three of the five busiest National Rail stations.
The underlying research combines two methods. Survation polled 1,008 London adults aged 18 and over between 15 and 20 May 2026 via an online panel, weighted by demographics and geography. The economic modelling used Geolytix town classifications and population data to assign productivity values to areas affected by NTQs.
These are operator-commissioned figures, and the economic estimate in particular rests on modelling assumptions rather than measured losses. The site count and the notice-period mismatch are the more concrete parts of the claim.
## Not just one operator
The issue has been raised before by a rival. In June 2026, Virgin Media O2 warned that outdated planning rules had forced it to switch off dozens of London mobile sites, saying replacements took more than two years on average and that some locations had been offline for more than seven years. VodafoneThree's five-year average is a longer estimate than O2's two-year figure, but both operators are describing the same structural problem: equipment is coming down faster than it can go back up.
## What VodafoneThree is asking for
Andrea Donà, VodafoneThree's Chief Network Officer, is quoted in the release saying that mobile networks are critical national infrastructure, and that when infrastructure is removed before replacements are in place, local communities face years of reduced connectivity.
The report sets out four asks: extend temporary mobile site permissions to 36 months nationally; bring mobile operators into the planning process at the pre-application stage; give the Greater London Authority a stronger coordinating role across boroughs; and identify replacement sites proactively as part of redevelopment projects rather than after the fact.
## What it means for SIM users
Nothing changes on any tariff or plan as a result of this announcement — it is a policy intervention, not a product change. But it is a useful reminder that headline network rankings are national averages. If you are choosing a SIM primarily on coverage in a specific part of London, the operator-level coverage checkers remain the practical tool, and this report suggests results in redevelopment-heavy areas may shift over the coming year as sites come down.
There is also no confirmed timeline for any of the planning changes VodafoneThree is requesting. The proposals would require action from central government and the Greater London Authority, and neither has announced a response.
================================================================================
# VodafoneThree Sees Record 4.6Tbps Mobile Peak on England World Cup Matches
URL: https://sim-finder.com/en/blog/vodafonethree-world-cup-data-traffic-2026/
Type: blog (en)
Published: 2026-07-11T09:00:00+09:00
VodafoneThree says England's run at the FIFA World Cup 2026 pushed its network to record levels, with a peak of 4.6Tbps of mobile data during the DR Congo match on 1 July — the highest mobile data peak the combined Vodafone and Three network has ever recorded. In a press release published on 9 July, the operator reported spikes around every England fixture, including tripled overnight usage after the win over Mexico. For readers on VodafoneThree, Vodafone or Three SIM plans, the figures are a snapshot of how heavily the network is being used at peak moments — and the company's claim that it coped without degrading service.
## What VodafoneThree reported
According to the official VodafoneThree announcement, England's last-32 win against DR Congo on 1 July delivered the standout numbers: mobile data peaked at 4.6Tbps, roughly a third higher than an average Wednesday evening in June, while fixed broadband traffic climbed to 8.7Tbps, up around 9%. The operator framed the DR Congo game as its highest mobile data peak on record.
The earlier group-stage matches also drove notable increases. VodafoneThree cited mobile peaks of 4.3Tbps for the Ghana fixture on 23 June (with usage up about 34% later in the evening), 4.1Tbps during the Croatia match on 17 June, and 3.8Tbps against Panama on 27 June, when overall usage rose roughly 19% by late evening. Broadband traffic for several of these games peaked between 8:30pm and 9:30pm, tracking kick-off and full-time.
The most dramatic pattern came with the Mexico match on 6 July, which was shown in the early hours of Monday morning in the UK. VodafoneThree said usage tripled between 3am and 4am and doubled between 4am and 5am compared with a normal Monday, as fans stayed up to watch the delayed broadcast and posted celebrations online afterwards.
Andrea Dona, Chief Network Officer at VodafoneThree, said in the release: "Our network has been providing fast, strong and reliable coverage whatever time of the day the game is shown here in the UK."
## Why the network held up
VodafoneThree attributed its ability to absorb the surges partly to the ongoing integration of the Vodafone and Three networks and to the use of content delivery networks (CDNs), which cache popular streaming and social content closer to users. As industry site ISPreview noted in its 9 July report on the figures, CDNs help operators manage event-driven traffic spikes without placing the full load on external network links — a practical factor behind the operator's claim that quality held steady during the peaks.
The context matters because live sport concentrates demand into narrow windows. Rather than a steady all-day rise, the data shows sharp peaks clustered around kick-off, half-time and full-time, when large numbers of viewers stream simultaneously and then flood social platforms with reactions. Trade publication Mobile News, reporting on 10 July, echoed the same headline figures and framed the tournament as a stress test for the newly merged operator.
## What it means for readers
For people choosing or already holding a UK SIM plan, this is a network-performance story rather than a change to any tariff, price or allowance. VodafoneThree has not announced new plans, promotions or data caps off the back of the World Cup, and the reported figures describe total network throughput — not limits applied to individual customers.
Still, the data is a useful signal. VodafoneThree is roughly a year into merging two of the UK's four mobile networks, and how it copes with predictable demand surges like a major football tournament is one visible test of that integration. The operator's message is that even record peaks — including its highest-ever mobile data reading — were handled without customers noticing a drop in service.
England's tournament run was continuing at the time of the announcement, so further peaks are possible if the team progresses. Readers comparing VodafoneThree, Vodafone and Three plans may want to weigh this alongside independent coverage and speed testing rather than a single operator's own traffic figures, but the reported numbers suggest headroom during high-demand events.
Sources: [VodafoneThree press release (9 July 2026)](https://www.vodafonethree.com/england-victory-surge-mobile-use/), [ISPreview UK (9 July 2026)](https://www.ispreview.co.uk/index.php/2026/07/vodafonethree-reveal-mobile-data-traffic-for-englands-world-cup-matches.html), [Mobile News (10 July 2026)](https://mobilenewscwp.co.uk/uncategorised/article/england-fixtures-send-vodafone-three-data-usage-through-the-roof/).
================================================================================
# VOXI For Now £10 Social Tariff Now on Physical SIMs via UK Councils
URL: https://sim-finder.com/en/blog/voxi-for-now-social-tariff-offline-sim-2026/
Type: blog (en)
Published: 2026-07-07T09:00:00+09:00
VOXI, Vodafone's youth-focused sub-brand, is now handing out its £10 "VOXI For Now" social tariff as a physical SIM card through local councils, housing teams, charities and prison resettlement programmes. Announced on 6 July 2026, the change adds an offline route to a tariff that was previously only available to sign up for online — a shift aimed at benefit claimants who are digitally excluded and may never encounter the deal on the web. For readers on a qualifying benefit, it means a genuinely affordable, contract-free plan can now be picked up in person through a trusted local organisation.
## What VOXI announced
According to Vodafone's press release, VOXI For Now costs £10 a month and includes unlimited data, calls and texts for up to six months, with no contract and the option to pause or cancel at any time. After that six-month period, eligible customers move onto a standard £10-a-month VOXI plan with 20GB of data while keeping the same flexibility.
The tariff is open to people receiving one of the following government benefits: Jobseeker's Allowance, Universal Credit, Employment and Support Allowance, Disability Allowance, Personal Independence Payment or Pension Credit. That eligibility has not changed — what is new is how people can obtain the SIM.
## The offline distribution push
Until now, VOXI For Now could only be ordered online. VOXI is now working with local councils, housing teams, support charities and prison resettlement programmes to hand out physical SIM cards directly. Vodafone's charity partner, the Good Things Foundation, will also distribute the SIMs through a selection of its community hubs as part of a new pilot, as reported by both Vodafone and industry outlet Mobile News.
The logic is straightforward: the people most likely to benefit from a social tariff are often the least likely to see an online offer. Mobile News notes that around five million people who could qualify for a cheaper mobile tariff are unaware such deals exist. Putting the SIM in the hands of frontline organisations is intended to close that awareness gap.
## Why connectivity matters for job seekers
Vodafone framed the expansion around employment. Nicki Lyons, Chief Corporate Affairs and Sustainability Officer at VodafoneThree, said: "By making VOXI For Now available through trusted local partners as a physical SIM, we're bringing affordable connectivity directly into communities."
The company cited its own research indicating that a smartphone is essential for many people's job searches, and that some had missed employment opportunities or held back from applying because of worries about running out of data. Mobile News reported that over half of those surveyed rely on mobile data as their main way to get online, with a significant share regularly exhausting their monthly allowance. An unlimited-data tariff for the first six months is positioned squarely at that problem.
## How it compares
Social tariffs from UK operators typically sit in the £10–£20 range and are aimed at Universal Credit and other benefit recipients. VOXI For Now's headline draw is the six months of unlimited data at £10, which is more generous on data than many fixed-allowance social tariffs during that initial window, before stepping down to a still-competitive 20GB. Because it runs on Vodafone's network, it also carries 5G access where available.
For eligible readers, the practical takeaway is that there are now two ways in: sign up online at VOXI, or ask a participating council, housing team, charity or resettlement service for a physical SIM. If you receive one of the qualifying benefits and rely heavily on mobile data, it is worth checking whether a local partner in your area is taking part in the rollout.
## Sources
- Vodafone press release, "Job seekers missing out on opportunities due to lack of connectivity" (6 July 2026).
- Mobile News, "VOXI expands £10 social tariff distribution to councils and charities" (6 July 2026).
================================================================================
# 4G/LTE vs 5G: What They Are and How They Differ
URL: https://sim-finder.com/en/guides/4g-5g-explained/
Type: guides (en)
Published: 2026-06-04
4G LTE and 5G are both standardised by 3GPP — the same technical body — but they represent distinct generations with different core architectures, spectrum strategies, and design goals. Understanding the key differences matters when choosing a SIM plan, evaluating coverage, or deciding whether a 5G device provides a practical benefit in a given location.
The key points covered in this article:
- What 4G LTE is and how it differs technically from 3G predecessors
- How 5G NR is structured, including the critical difference between NSA and SA deployments
- How Sub-6 GHz and mmWave 5G serve different use cases
- What the 3GPP Release system means and which Releases introduced each generation
- How 4G and 5G handle speed, latency, and connection density differently
- How voice calls work across both generations (VoLTE and VoNR)
For more on how voice calls work on LTE and 5G networks, see [VoLTE and VoNR Explained](/en/guides/volte-vonr/). For definitions of terms used in this article, see the [SIM & Mobile Glossary](/en/guides/glossary-index/).
The table below gives an orientation before the detailed sections.
| | 4G LTE | 5G NSA | 5G SA |
|---|---|---|---|
| 3GPP standard from | Release 8 (2008) | Release 15 (2017) | Release 15 (2018) |
| Core network | LTE EPC | LTE EPC (anchor) | 5G Core (5GC) |
| Voice technology | VoLTE | VoLTE (on LTE layer) | VoNR |
| Network slicing | No | No | Yes |
| Primary spectrum | Sub-6 GHz | Sub-6 GHz + mmWave | Sub-6 GHz + mmWave |
---
## What Is 4G LTE?
**4G** refers to the fourth generation of mobile network standards. The ITU-R defined the requirements for 4G under the IMT-Advanced framework, which operators and standards bodies worked to satisfy through the 2000s and 2010s.
**LTE** stands for **Long-Term Evolution**. It is the specific radio access technology that became the dominant implementation of 4G. LTE was standardised in **3GPP Release 8**, which was frozen in December 2008. Release 8 defined LTE as a purely packet-switched network — meaning all traffic, including data and eventually voice, is carried as IP packets. There is no circuit-switched voice plane in LTE, which is why VoLTE (the IMS-based system for carrying voice over LTE) had to be developed separately.
The 3G predecessor, UMTS/HSPA (defined in 3GPP Releases 5–7), carried voice over a circuit-switched domain and data over a packet-switched domain. LTE eliminated the circuit-switched domain entirely, representing a fundamental architectural change rather than an incremental evolution.
### LTE-Advanced and LTE-Advanced Pro
The base LTE specification was extended in two significant later Releases:
- **LTE-Advanced (Release 10, 2011)**: Introduced **carrier aggregation (CA)**, which allows a device to combine multiple frequency bands simultaneously to increase throughput. Release 10 also introduced enhanced MIMO (Multiple Input, Multiple Output) antenna configurations and added relay nodes to improve coverage.
- **LTE-Advanced Pro (Release 13, 2016)**: Added features including licensed-assisted access (LTE-U/LAA), narrowband IoT (NB-IoT), enhanced carrier aggregation, and support for up to 32 component carriers. Marketing terms such as "4.5G" and "Gigabit LTE" typically refer to LTE-Advanced Pro devices and networks.
These extensions kept LTE technically competitive through the late 2010s while 5G was under development.
---
## What Is 5G NR?
**5G NR** (New Radio) is the radio access technology of the fifth generation, standardised in **3GPP Release 15**. The NSA (Non-Standalone) variant of Release 15 was frozen in December 2017; the SA (Standalone) variant's physical layer was frozen in June 2018, with the ASN.1 (protocol encoding) freeze completed in September 2018.
5G NR covers two frequency ranges defined in 3GPP:
- **FR1 (Sub-6 GHz)**: Frequencies from 410 MHz to 7125 MHz. This range includes re-farmed low-band spectrum (600–900 MHz), mid-band spectrum widely used for 5G capacity (2.5–3.7 GHz, including the internationally co-ordinated n77/n78/n79 bands), and extended mid-band up to 7.125 GHz.
- **FR2 (mmWave)**: Frequencies from 24.25 GHz to 52.6 GHz. This range enables very high bandwidth but with limited propagation distance and sensitivity to physical obstructions.
5G NR uses **Orthogonal Frequency-Division Multiplexing (OFDM)** as its underlying modulation scheme, the same approach as LTE. However, 5G NR introduces a more flexible subcarrier spacing (numerology) that allows the same physical layer to operate efficiently across both low-latency mmWave links and wide-coverage Sub-6 GHz links.
---
## NSA vs SA: The Architecture Divide
The distinction between **NSA (Non-Standalone)** and **SA (Standalone)** is among the most practically important aspects of 5G deployments.
### Non-Standalone (NSA)
In NSA mode, 5G NR is deployed as an additional radio access layer on top of an existing **4G LTE Evolved Packet Core (EPC)**. The LTE cell provides the control plane (signalling, session management, mobility), while the 5G NR cell adds a second data plane for higher throughput. This architecture is defined in 3GPP as Option 3 (EN-DC: E-UTRA/NR Dual Connectivity).
Practical consequences of NSA:
- The device must maintain an LTE connection at all times. If LTE signal is lost, the 5G NR connection also falls.
- Voice calls continue to use **VoLTE** on the LTE layer. 5G NR does not handle voice in NSA mode.
- Network slicing and URLLC (ultra-reliable low-latency communications) features require 5G SA and are not available in NSA.
- NSA was the primary deployment mode for the first wave of commercial 5G networks from 2019 onward because it allowed carriers to add 5G NR capacity without replacing the LTE core.
### Standalone (SA)
In SA mode, 5G NR connects directly to a **5G Core (5GC)**, which is an entirely new core network architecture defined in 3GPP Release 15. The 5GC uses a **Service-Based Architecture (SBA)** with new network functions: the AMF (Access and Mobility Management Function) replaces the LTE MME, the SMF (Session Management Function) replaces PGW/SGW, and the UPF (User Plane Function) handles forwarding.
SA enables:
- **VoNR** (Voice over New Radio): voice calls carried natively over 5G NR via IMS
- **Network slicing**: logical partitioning of the network for different traffic types or customers
- **URLLC** (ultra-reliable low-latency communications): designed for industrial and mission-critical applications
- Full independence from LTE infrastructure, allowing carriers to eventually retire LTE spectrum
As of 2026, 5G SA networks are operational in a growing number of markets, including South Korea, China, parts of the United States, and Japan, but LTE-anchored NSA coverage continues to represent the majority of 5G connections globally. The transition to SA is carrier-specific: operators that have invested in 5G SA cores can offer VoNR and network slicing, while operators still on NSA 5G cannot, regardless of the device's hardware capability.
From a consumer perspective, a practical way to identify whether you are on 5G SA is to check whether VoNR is active. On Android, field test modes that show IMS registration may indicate VoNR registration separately from VoLTE. On iPhone, iOS does not expose VoNR status directly; VoNR operation on supported carriers is handled automatically.
---
## Sub-6 GHz vs mmWave: Two Very Different 5G Experiences
The two frequency ranges used for 5G NR have fundamentally different physical characteristics, leading to distinct deployment strategies.
### Sub-6 GHz 5G
Sub-6 GHz 5G behaves similarly to LTE in terms of coverage: the signal propagates over kilometres from a single site, penetrates buildings, and provides broad area coverage. Low-band 5G (600–900 MHz) covers the widest areas but has lower peak throughput. Mid-band 5G (2.5–4.2 GHz, especially the 3.5 GHz band standardised as n77/n78) provides the best balance of coverage and throughput and is the workhorse of most national 5G deployments.
For most consumers, the 5G connection they experience daily is Sub-6 GHz mid-band. The practical throughput improvement over LTE-Advanced depends on network loading, spectrum allocation, and device capability, but mid-band 5G consistently delivers higher median throughput than LTE in controlled conditions.
### mmWave 5G (FR2)
mmWave 5G uses frequencies from roughly 24 GHz to 52.6 GHz. Electromagnetic waves at these frequencies have very short wavelengths that are absorbed by building materials, trees, and even rainfall. A typical mmWave small cell covers an area of hundreds of metres rather than kilometres. Line-of-sight or near-line-of-sight conditions are generally required for reliable connection.
The peak throughput achievable on mmWave significantly exceeds Sub-6 GHz because the available bandwidth at mmWave frequencies is much larger. However, consistent mmWave coverage in a large geographic area is not economically or physically feasible, so mmWave deployment is concentrated in specific high-density environments: major transit hubs, stadiums, convention centres, and fixed wireless access for homes and businesses.
Consumers in most markets will rarely encounter mmWave 5G in everyday use. A device's 5G specification sheet distinguishes FR1-only and FR1+FR2 support; the latter adds mmWave antenna modules that increase device cost and complexity.
---
## Speed, Latency, and Connection Density
The three primary design objectives that 3GPP defined for 5G NR under the IMT-2020 framework differ from those of 4G LTE in emphasis and scale. IMT-2020 defined three use case categories for 5G: **eMBB** (Enhanced Mobile Broadband), **URLLC** (Ultra-Reliable Low-Latency Communications), and **mMTC** (Massive Machine-Type Communications). Most consumer 5G services focus on eMBB; URLLC and mMTC are primarily relevant for industrial and IoT deployments.
### Throughput
LTE (Release 8) was specified with a theoretical peak downlink of 300 Mbps under ideal conditions (4×4 MIMO, 20 MHz bandwidth). LTE-Advanced extended this through carrier aggregation. 5G NR can aggregate much wider bandwidths — especially at mmWave — leading to higher theoretical peaks. However, real-world throughput on both technologies depends on spectrum allocation, cell loading, device capability, and distance from the base station.
This article does not cite specific speed figures because real-world performance varies significantly by market, operator, and location. Independent measurement organisations such as Opensignal and Ookla publish country-level benchmarks; searching for the specific operator's name alongside "5G speed test" will return recent measurement data for a given market.
### Latency
LTE has a theoretical user-plane latency specification in the single-digit milliseconds range under ideal conditions. 5G NR was designed with additional latency reduction targets, particularly for URLLC applications in 5G SA. For the vast majority of consumer applications — web browsing, video streaming, messaging — the latency difference between LTE and mid-band 5G SA is not perceptible in practice. URLLC latency targets are relevant for industrial automation, remote surgery, and vehicle-to-everything (V2X) communications, which require consistent low latency guarantees that cannot be met with best-effort scheduling.
### Connection Density
LTE was designed with a connection density target that became a bottleneck in dense event venues and transit hubs under high load. 5G NR's IMT-2020 specification increases the target connection density per unit area, and the flexible numerology of 5G NR allows the system to handle many short transmissions efficiently. The mMTC use case specifically targets large numbers of low-power IoT devices per cell. For consumers, this translates to more stable connections in stadiums, conference centres, and busy transport hubs where LTE networks can become congested.
### MIMO and Beamforming
LTE introduced MIMO antenna techniques, with practical deployments reaching 4×4 MIMO on mid-band LTE-Advanced networks. 5G NR introduces **Massive MIMO**, where base station antenna arrays can contain dozens to hundreds of antenna elements. Combined with **beamforming** — shaping the radio signal toward specific devices rather than broadcasting in all directions — Massive MIMO improves spectral efficiency and allows multiple users to be served on the same frequency resource simultaneously. This is particularly effective in mid-band 5G deployments using bands such as n77/n78, where antenna arrays of 64 or more elements are commonly deployed.
---
## 3GPP Releases: The Versioning System Behind Each Generation
3GPP defines mobile network specifications in numbered **Releases**, each representing a functionally stable snapshot of the specification set. New features are always tied to a specific Release.
| Release | Freeze year | Key introduction |
|---------|-------------|-----------------|
| Release 8 | December 2008 | LTE (4G) |
| Release 10 | 2011 | LTE-Advanced, carrier aggregation |
| Release 13 | 2016 | LTE-Advanced Pro, NB-IoT |
| Release 15 | NSA: Dec 2017 / SA: Jun–Sep 2018 | 5G NR (NSA and SA) |
| Release 16 | July 2020 | 5G enhancements: URLLC, V2X, NR-U (unlicensed) |
| Release 17 | June 2022 (functional March 2022, ASN.1 June 2022) | NR-Light (RedCap), sidelink enhancements, NTN (satellite) |
| Release 18 | 2024 | 5G-Advanced: AI/ML integration, XR enhancements |
Understanding Release numbers is relevant when evaluating device specifications. A device described as supporting "5G" may implement Release 15 features only, while a later device may implement Release 16 or Release 17 features that add measurable improvements for specific use cases. When a carrier advertises a network feature — such as network slicing or satellite connectivity — checking which 3GPP Release introduced that feature will clarify whether a given device supports it. Device specification sheets often list supported 3GPP Release or explicitly list supported features by name.
---
## How Voice Calls Work Across Both Generations
Voice call handling is one of the clearest practical differences between 4G, 5G NSA, and 5G SA deployments.
On **4G LTE**, all voice calls use **VoLTE** (Voice over LTE) — carried as IP packets over the LTE network via an IMS (IP Multimedia Subsystem) core. The 3G circuit-switched fallback (CSFB) that earlier LTE devices used has been eliminated in all markets that have completed their 3G shutdown.
On **5G NSA**, the device maintains an LTE anchor for the control plane. Voice calls still use **VoLTE** on the LTE layer. The 5G NR radio does not carry voice in NSA mode.
On **5G SA**, voice calls use **VoNR** (Voice over New Radio), standardised in GSMA NG.114 and 3GPP Release 15. VoNR routes the call directly over the 5G NR bearer via IMS, using the same IMS infrastructure as VoLTE but with a 5G-native bearer and support for the **EVS (Enhanced Voice Services)** codec, which delivers higher audio quality than the AMR-WB codec used in VoLTE. For devices on a 5G SA network without VoNR support, fallback to VoLTE on LTE is the standard behaviour.
For the complete technical explanation of IMS, SIP signalling, QoS bearers, and what happens when VoLTE is not supported, see [VoLTE and VoNR Explained](/en/guides/volte-vonr/).
---
## What This Means When Choosing a SIM
The distinction between 4G and 5G, and between 5G NSA and SA, has practical consequences when selecting a carrier or plan.
**Network coverage layer.** A carrier's 5G coverage map reflects where 5G NR is deployed, but 4G LTE remains the coverage layer in most areas. Evaluating a carrier's LTE coverage is at least as important as 5G availability, particularly for travellers and users in suburban or rural locations. For more on how MNOs and MVNOs differ in network access, see [What Is an MNO?](/en/guides/what-is-mno/).
**SIM and eSIM compatibility.** 5G capability depends on the device, not the SIM card. A 5G-capable device on a 4G-only SIM plan will connect at 4G speeds. Conversely, a 4G-only device with a 5G plan will connect at 4G speeds. The SIM provides authentication and plan entitlements; the network selects the highest radio technology the device supports. For more on SIM vs eSIM, see [SIM vs eSIM](/en/guides/sim-vs-esim/).
**Data efficiency.** 5G does not reduce the data volume your applications consume. If you are on a limited data plan, a faster connection will deplete your allowance more quickly unless you use data-saving settings. For practical tips on reducing mobile data use, see [Data-Saving Techniques](/en/guides/save-data/).
**Roaming.** When roaming internationally, your device connects to the visited network's technology. A 5G device will use 4G LTE on a visited network that has not yet enabled 5G roaming agreements. Roaming data speeds depend on the visited network's LTE or 5G capability and the roaming agreement between your home carrier and the visited operator. See [International Roaming](/en/guides/international-roaming/) for how roaming agreements and data usage work across borders.
**MVNOs and 5G.** MVNOs lease network capacity from MNOs and typically pass through the host network's radio technology, including 5G, where the wholesale agreement permits it. Whether an MVNO's plan includes 5G access depends on the specific agreement with the host MNO. Some MVNOs offer 5G-capable plans; others remain limited to 4G LTE even on a host network that has 5G. Confirm 5G availability with the specific MVNO before selecting a plan if 5G is a priority. See [What Is an MNO?](/en/guides/what-is-mno/) for how the MNO–MVNO wholesale relationship works.
**Device band compatibility.** Not all 5G devices support all 5G bands. A device sold in one market may lack the n78 (3.5 GHz) band widely used for 5G in another market, or the specific low-band 5G frequency a carrier uses. When using an unlocked device internationally, checking band compatibility is as important for 5G as it is for 4G LTE.
You can filter and compare SIM plans by network generation on [SimFinder](/en/).
---
## FAQ
See the frontmatter above for structured FAQ entries compatible with schema.org/FAQPage. The questions below cover additional topics.
**When did commercial 5G first launch?**
The first commercial 5G NR service launched in South Korea on 3 April 2019, when SK Telecom, KT Corporation, and LG Uplus activated 5G NSA service simultaneously. The United States saw its first commercial 5G deployments from Verizon (fixed wireless, October 2018) and AT&T and T-Mobile (mobile 5G NR, late 2018–2019). These dates refer to the first commercial availability; widespread consumer coverage developed over subsequent years.
**Can a 4G SIM card be used on a 5G device?**
Yes. A 4G SIM provides authentication credentials that are valid on any network generation the carrier and device support. The SIM authenticates the subscriber; the radio access technology is negotiated between the device modem and the base station. However, some carriers issue updated SIMs or eSIM profiles to support specific 5G SA features. If a carrier requires an updated profile for 5G SA features, the carrier's support page will confirm this.
**What does "5G UC", "5G+", or "5G UW" mean on a phone's status bar?**
These are carrier-specific indicators for different 5G capability tiers. "5G UW" (Ultra Wideband, Verizon) and "5G+" (AT&T) indicate mmWave or high-band mid-band connections. "5G UC" (Ultra Capacity, T-Mobile) indicates mid-band 5G (primarily n41 2.5 GHz). Plain "5G" typically indicates low-band 5G. These labels are branding decisions by individual carriers, not standardised 3GPP terminology.
**Is 5G available when roaming internationally?**
5G roaming availability depends on whether both the home carrier and the visited network have established 5G roaming agreements and whether the visited network has deployed compatible 5G bands. As of 2026, 5G roaming agreements are expanding but are not universal; many roaming connections default to 4G LTE. The specific countries and bands supported for roaming are listed on each carrier's roaming information page. See [International Roaming](/en/guides/international-roaming/) for how roaming agreements work.
**What is 5G Standalone (SA) network slicing?**
Network slicing is a 5G SA feature defined in 3GPP Release 15 that allows a carrier to create multiple logically isolated virtual networks on the same physical infrastructure. Each slice can have different QoS parameters — for example, one slice with guaranteed low latency for emergency services and another optimised for high-throughput consumer data. Network slicing requires the 5G Core's NSSAI (Network Slice Selection Assistance Information) framework and is not available on 5G NSA or LTE networks.
---
## Related Guides
- [VoLTE and VoNR Explained](/en/guides/volte-vonr/) — How voice calls travel over 4G and 5G networks via IMS, and what VoNR requires from a 5G SA core
- [What Is an MNO?](/en/guides/what-is-mno/) — How mobile network operators hold spectrum licences and build the infrastructure that 4G and 5G run on
- [SIM vs eSIM](/en/guides/sim-vs-esim/) — How the SIM authenticates you to the network regardless of whether you are on 4G or 5G
- [International Roaming](/en/guides/international-roaming/) — How 4G and 5G roaming agreements determine which network technology is available abroad
- [Data-Saving Techniques](/en/guides/save-data/) — How to manage data consumption on faster 5G connections
================================================================================
# 5G Bands: Sub-6 vs mmWave Explained
URL: https://sim-finder.com/en/guides/5g-bands/
Type: guides (en)
Published: 2026-06-04
5G New Radio (NR) uses two distinct frequency ranges with fundamentally different propagation characteristics: Sub-6 GHz (FR1) and millimeter wave (FR2, commonly called mmWave). Sub-6 GHz bands behave similarly to LTE — they travel long distances, penetrate walls, and form the backbone of broad 5G coverage. mmWave bands carry significantly more data per cell but cover only short distances and struggle with obstacles. Understanding which range your device and carrier use determines what 5G actually means in practice.
Key points covered in this article:
- How 3GPP defines FR1 and FR2, with the specific frequency ranges and band numbers assigned to each
- The physics behind the coverage-versus-throughput trade-off between Sub-6 GHz and mmWave
- Why indoor performance differs so sharply between the two ranges
- How NSA and SA network architecture affects which bands a device uses
- How to read a device spec sheet to identify supported 5G NR bands
- Global deployment patterns and what they mean for travellers
For the technical background on how 5G voice calls work on top of this radio layer, see [VoLTE and VoNR Explained](/en/guides/volte-vonr/). For guidance on matching your device's band support to a specific carrier before selecting a plan, see [How to Choose a SIM Plan](/en/guides/how-to-choose/).
---
## The 3GPP Framework: FR1 and FR2
3GPP — the international body that defines mobile network standards — divides 5G NR spectrum into two frequency ranges, defined in 3GPP TS 38.104.
**FR1 (Frequency Range 1)** covers 410 MHz to 7.125 GHz. This range is commonly called Sub-6 GHz, though the actual upper boundary is 7.125 GHz. FR1 encompasses low-band frequencies below 1 GHz (such as 600 MHz and 700 MHz), widely deployed mid-band frequencies around 2.5–3.7 GHz, and upper mid-band frequencies up to 7.125 GHz. The majority of commercial 5G deployments worldwide use FR1 bands.
**FR2 (Frequency Range 2)** covers 24.25 GHz to 52.6 GHz as specified in 3GPP Release 15. Signals in this range have wavelengths measured in millimetres — hence the common name "millimeter wave" or "mmWave." FR2 enables very high spectral efficiency per cell but with a propagation range measured in hundreds of metres under ideal outdoor conditions.
The distinction between FR1 and FR2 is not marketing terminology; it is a defined technical boundary in the 3GPP specification that determines which hardware components a device or base station uses. An FR1 radio and an FR2 radio require different antenna designs, RF front-end components, and beamforming approaches.
---
## 5G NR Band Numbering: FR1 and FR2
5G NR bands are identified by the prefix "n" followed by a number. FR1 bands are defined in 3GPP TS 38.101-1; FR2 bands in 3GPP TS 38.101-2. Many FR1 NR bands reuse the same frequencies as LTE bands with the same or similar numbers, which simplifies spectrum refarming — the process of reassigning existing spectrum from LTE to 5G NR.
### Sub-6 GHz (FR1) bands
The following table lists the most widely deployed FR1 NR bands globally.
| Band | Frequency Range | Duplex | Common Deployment Context |
|------|----------------|--------|--------------------------|
| n1 | 1920–2170 MHz | FDD | Europe, Asia — legacy 3G refarmed |
| n3 | 1710–2170 MHz | FDD | Europe, Asia — high-density coverage |
| n5 | 824–894 MHz | FDD | Americas, Asia — low-band coverage |
| n28 | 703–803 MHz | FDD | Asia-Pacific, Europe — sub-1 GHz coverage |
| n41 | 2496–2690 MHz | TDD | USA (T-Mobile), China — primary mid-band |
| n66 | 1710–2200 MHz | FDD | Americas |
| n71 | 617–698 MHz | FDD | USA (T-Mobile) — low-band coverage |
| n77 | 3300–4200 MHz | TDD | Europe, Asia, Americas — primary mid-band |
| n78 | 3300–3800 MHz | TDD | Europe, Asia — primary mid-band |
| n79 | 4400–5000 MHz | TDD | Japan (NTT Docomo, au, SoftBank, Rakuten) |
Bands n77 and n78 are the most broadly deployed 5G NR bands in Europe, many Asian markets, and parts of the Americas. They occupy the 3.5 GHz range and offer a practical balance: cell radii of several hundred metres to a few kilometres depending on terrain, and substantially higher throughput than LTE on equivalent spectrum.
Band n79 (4.4–5.0 GHz) is used primarily in Japan, where the Ministry of Internal Affairs and Communications assigned this range to domestic carriers. Devices sold specifically for the Japanese market include n79 support; many international handsets do not.
### mmWave (FR2) bands
All FR2 bands use TDD (Time Division Duplex), because designing separate FDD uplink and downlink at these frequencies would require excessively large frequency separations.
| Band | Frequency Range | Key Market |
|------|----------------|------------|
| n257 | 26.5–29.5 GHz | USA (Verizon 28 GHz), Japan, South Korea |
| n258 | 24.25–27.5 GHz | Europe (26 GHz), South Korea |
| n259 | 39.5–43.5 GHz | Japan, USA |
| n260 | 37.0–40.0 GHz | USA |
| n261 | 27.5–28.35 GHz | USA (Verizon, AT&T, T-Mobile) |
In the United States, the FCC licensed mmWave spectrum in three major blocks: the 24 GHz band (close to n258), the 28 GHz band (n261), and the 39 GHz band (n260). US carriers were the first to deploy mmWave commercially at scale, beginning in 2019. Other mmWave deployments include Japan (n257 at 28 GHz, by NTT Docomo, au, SoftBank, and Rakuten) and South Korea (n257 and n258).
mmWave deployments outside these markets remain limited as of 2026. The European 26 GHz band (corresponding closely to n258) has seen licensing activity but limited large-scale commercial rollout compared to mid-band 5G.
---
## Why Coverage and Speed Trade Off
The difference in performance between FR1 and FR2 follows directly from the physics of radio wave propagation.
**Wavelength and diffraction.** Radio waves diffract (bend) around obstacles roughly in proportion to their wavelength relative to the obstacle size. At 700 MHz (FR1, ~43 cm wavelength), signals diffract around buildings, foliage, and terrain features to a meaningful degree. At 28 GHz (FR2, ~11 mm wavelength), diffraction is negligible. A building in the signal path results in a deep shadow zone with no service.
**Free-space path loss.** Path loss increases with both distance and frequency. The Friis transmission equation shows that for a given antenna gain, doubling the frequency doubles the path loss (adds approximately 6 dB). Moving from 700 MHz to 28 GHz represents a 40× increase in frequency, which translates to roughly 32 dB additional free-space path loss at the same distance. This forces mmWave base stations to operate at shorter ranges to maintain a usable signal level.
**Atmospheric and material absorption.** At 28 GHz and above, oxygen and water vapour in the atmosphere absorb radio energy at a measurable rate. Standard glass reduces a 28 GHz signal depending on composition: plain clear glass typically 3–10 dB, while coated or low-emissivity glass (common in modern buildings) can reach 20–40 dB. Concrete walls can attenuate a 28 GHz signal by 40 dB or more. FR1 signals pass through these same obstacles with much lower loss — standard glass reduces a 3.5 GHz signal by roughly 3–5 dB.
**Available bandwidth.** mmWave bands offer much wider channel widths. 3GPP allows channel bandwidths up to 400 MHz per component carrier in FR2 (versus a maximum of 100 MHz per component carrier in FR1 for Sub-6 GHz). This wider bandwidth is the primary mechanism behind mmWave's higher peak throughput.
The net result: FR1 mid-band (n77/n78) cells cover urban areas and reach indoors with moderate penetration loss. FR2 cells are deployed outdoors in dense pedestrian environments — shopping districts, stadiums, transport terminals — where a direct line of sight to the antenna is likely and cell range of a few hundred metres is acceptable.
The table below summarises the key differences:
| Property | FR1 Sub-6 GHz | FR2 mmWave |
|----------|--------------|------------|
| Typical cell range | Hundreds of metres to several km | Up to ~200–300 m outdoors |
| Building penetration | Moderate (low-band: good; mid-band: usable near windows) | Poor to none without indoor cells |
| Max channel bandwidth (3GPP) | 100 MHz per component carrier | 400 MHz per component carrier |
| Beamforming requirement | Helpful for capacity; not mandatory | Mandatory for link budget |
| Primary use case | Coverage layer, mass-market 5G | High-density outdoor hotspots |
---
## Indoor Performance
Indoor behaviour is where the FR1-vs-FR2 distinction is most consequential for everyday users.
A Sub-6 GHz 5G NR signal on mid-band (3.5 GHz) entering a modern office building typically loses 10–20 dB through exterior walls, leaving a usable indoor signal for devices near windows or on outer floors. Low-band 5G (below 1 GHz, such as n28 or n71) penetrates to interior floors and basements with less loss, similar to how 700 MHz LTE performs in building interiors today.
mmWave signals entering a building are effectively blocked by standard construction materials. Any mmWave 5G service inside a building requires an indoor small cell or distributed antenna system (DAS) with mmWave radios placed within the interior. Such indoor deployments exist in some venues — large US arenas and airports, for instance — but they are infrastructure-intensive and not the typical residential or office scenario.
For a subscriber choosing a SIM plan with 5G access, this means: if the carrier's 5G relies entirely on mmWave, indoor service in most buildings will default to LTE. If the carrier has deployed FR1 mid-band 5G, indoor coverage on upper floors or near windows is realistic.
Low-band FR1 (n28, n71) offers the best indoor reach of any 5G tier, but the narrowest available channel bandwidth of the three sub-ranges.
---
## NSA vs SA Architecture and Band Selection
5G NR can be deployed in two architectures defined by 3GPP:
**NSA (Non-Standalone)**, standardised in 3GPP Release 15 Option 3, uses an LTE anchor for the control plane (signalling) while adding a 5G NR layer for user-plane data throughput. In NSA, the device must first connect to LTE; the 5G NR layer is then added as a secondary cell. This is called EN-DC (E-UTRAN New Radio Dual Connectivity). Because NSA relies on an LTE anchor, the LTE bands the device supports directly affect whether 5G can activate — a device that lacks the carrier's LTE anchor band will not use 5G even if it supports the NR band.
**SA (Standalone)**, standardised in 3GPP Release 15 with the 5G Core (5GC), allows a device to connect entirely over 5G NR without an LTE anchor. SA enables features that NSA cannot support, including 5G-native network slicing, lower latency (because signalling also runs on 5G NR), and VoNR (Voice over New Radio). SA requires the carrier to have deployed the full 5G Core network, which involves more infrastructure investment than NSA.
For devices checking band support: on an NSA network, the device's spec sheet should list both the NR bands and the LTE bands that serve as anchors. On an SA network, only the NR bands matter for 5G connection. Most carriers specify which architecture they use on their network information pages.
---
## How to Check Device Band Support
Manufacturer spec sheets are the definitive source for band information. The process is the same for any device:
**Step 1: Find the exact model number.** Manufacturers often sell regional variants of the same commercial model under identical marketing names but with different internal model numbers and different band support. On Android, the model number is under Settings → About Phone → Model Number. On iPhone, it is under Settings → General → About → Model Number. The box and SIM tray also carry the model number.
**Step 2: Look up the spec sheet on the manufacturer's website.** Search for the model number on the manufacturer's support or specifications page. For iPhones, Apple's technical specifications page lists supported bands per region variant. For Android devices, the manufacturer's product page or a direct search for "[model number] specifications" typically returns the official spec sheet.
**Step 3: Identify the 5G NR band list.** The spec sheet will list Sub-6 GHz NR bands (FR1) separately from mmWave NR bands (FR2). FR1 bands appear in the format n1, n3, n28, n77, n78, etc. FR2 bands appear as n257, n258, n260, n261. A device without any FR2 entries does not support mmWave.
**Step 4: Cross-reference with the carrier's published band plan.** Major carriers publish their 5G frequency band allocations on their network or technology pages. Match the carrier's bands against the device's supported list. If the carrier uses n78 and the device supports n78, 5G should connect on that network.
Regional variant mismatch is the most common source of unexpected non-connectivity. A phone purchased in Japan and used in Europe may lack n77 or n78, which are the primary 5G bands for European carriers. A US-market iPhone supports a different set of FR2 mmWave bands than a European-market iPhone because the FCC licensed different mmWave blocks than European national regulators.
For how carrier-locking or country restrictions can additionally block certain bands or features, see [SIM Lock and SIM-Free Explained](/en/guides/sim-lock/). For how roaming on a foreign network affects which bands your device can use, see [International Roaming: How It Works](/en/guides/international-roaming/).
---
## 5G Deployment Patterns Globally
Understanding how carriers have deployed 5G frequencies helps set realistic expectations when travelling or switching plans.
**South Korea and Japan** deployed Sub-6 GHz 5G (primarily n77/n78/n79) at scale beginning in 2019. South Korea also deployed 28 GHz mmWave (n257) in limited urban areas. Japan's major carriers (NTT Docomo, au, SoftBank, Rakuten) all hold n79 licenses and have deployed it alongside n77/n78.
**China** deployed 5G on n41 (2.6 GHz, TDD) and n78 (3.5 GHz) extensively through China Mobile, China Unicom, and China Telecom. China's scale of deployment makes it one of the largest 5G markets by subscriber count.
**Europe** primarily uses n78 (3.5 GHz) as the main 5G band, with n28 (700 MHz) as a low-band complement for coverage extension. mmWave deployment is limited; the 26 GHz range has been licensed in some countries but large-scale commercial service is not yet widespread.
**United States** is unusual in having significant mmWave deployments (n260, n261) alongside mid-band (n41, n77) and low-band (n71) 5G. Verizon launched 5G using 28 GHz (n261) and 39 GHz (n260) mmWave as its initial 5G offering. T-Mobile's primary mid-band 5G uses n41 (2.5 GHz). AT&T uses n77 (3.5 GHz) mid-band alongside n14 (700 MHz) low-band.
For an international traveller, this means: a device with broad FR1 support (n1, n3, n28, n41, n71, n77, n78) will access 5G in most major markets. mmWave support is relevant primarily within the United States. If your device includes n79 and you travel to Japan, you may access 5G on bands unavailable in your home country — but only if the device is not SIM-locked or network-restricted.
For guidance on choosing a SIM that matches your travel destination and your device's band support, [SimFinder](/en/) allows filtering by country and carrier to compare plan options. For advice on which type of carrier (MNO or MVNO) gives access to the underlying 5G bands, see [What Is an MNO?](/en/guides/what-is-mno/).
---
## Carrier Aggregation and Reading a Carrier's Band Plan
### NR Carrier Aggregation
Carriers can combine multiple NR component carriers — on the same band or on different bands — to increase effective throughput. This is called NR Carrier Aggregation (NR CA), defined in 3GPP Release 15 and expanded in later releases.
Common NR CA combinations include:
- Two FR1 carriers on the same band (intra-band CA), which uses wider total bandwidth within a single carrier's spectrum block
- Two FR1 carriers on different bands (inter-band CA), such as n28 + n78, combining low-band coverage reach with mid-band throughput
- FR1 + FR2 (inter-band FR1-FR2 CA), combining Sub-6 GHz coverage with mmWave throughput where both are available
For NR CA to activate, the device, the base station, and the carrier's network configuration must all support the specific CA combination. Not all devices that support both n28 and n78 will support inter-band CA between them; the combination must appear explicitly in the device's supported CA combination list, which is typically in the detailed modem specification rather than the summary spec sheet.
The practical consumer implication: NR CA extends the performance ceiling of 5G connections but is not required for basic 5G access. A device that supports only one NR band per network will still connect to 5G; it will not benefit from CA-boosted throughput.
### Where to find a carrier's band plan
Carriers publish their frequency band assignments in several places:
- **Official network pages**: Most major carriers maintain a "Network Technology" or "Frequencies" section on their website listing 4G and 5G bands by region.
- **National regulator databases**: Spectrum licensing is a matter of public record. National telecom regulators (FCC in the US, Ofcom in the UK, BNetzA in Germany, MIC in Japan, etc.) publish spectrum assignment databases showing which operator holds which band in which geographic area.
- **GSMA data**: The GSMA maintains operator and network information that includes frequency band data.
- **Third-party band databases**: Sites that compile operator band information exist but vary in accuracy and currency; cross-check against official carrier or regulator sources for critical decisions.
When comparing SIM plans for a trip or a long-term switch, confirming that the carrier's 5G bands match your device's supported bands is the final step before committing. Even if two carriers both offer 5G service, one may use n78 (which your device supports) and the other n79 (which it does not), producing different real-world results from the same hardware.
---
## FAQ
See the frontmatter for structured FAQ entries compatible with schema.org/FAQPage. Additional context follows.
**What does "Sub-6 GHz" mean exactly?**
The term is a shorthand referring to the FR1 frequency range, which 3GPP defines as 410 MHz to 7.125 GHz in TS 38.104. Industry usage of "Sub-6 GHz" conventionally means the bands below 6 GHz used for 5G NR — primarily the 600 MHz–5 GHz range. The 7.125 GHz upper boundary (sometimes called "upper-mid-band" or "FR1-High") was added in later 3GPP releases and is used in some markets including the United States.
**Can a device lose 5G and fall back to LTE?**
Yes. This is by design. When a device moves out of 5G NR coverage — because the cell edge is reached, because the device enters a location with poor 5G signal, or because the network temporarily offloads traffic — it falls back to LTE. On NSA networks, this happens silently as the 5G secondary cell is dropped. The device icon changes from "5G" to "4G" or "LTE." LTE service continues normally during fallback.
**Is 5G NR backward compatible with LTE?**
5G NR and LTE use different physical layer standards (different waveforms, numerologies, and frame structures). A 5G NR base station cannot serve an LTE-only device on the NR carrier, and vice versa. However, in NSA deployments, the same tower can run both LTE and NR radios; an LTE-only device uses the LTE radio while a 5G NR device uses both. In standalone NR, only NR-capable devices benefit.
**What is upper mid-band (FR1-High) 5G?**
3GPP Release 17 and later releases expanded FR1 upward to 7.125 GHz (sometimes referenced as the "7 GHz band"). The US FCC has auctioned spectrum in the 3.45 GHz range (near n77) and is examining 7 GHz range spectrum. Japan's MIC has designated the 4.9 GHz range (n79) and explores upper mid-band allocations. These upper FR1 bands offer greater available bandwidth than the congested 3.5 GHz range while retaining better propagation than FR2.
---
## Related Guides
- [VoLTE and VoNR Explained](/en/guides/volte-vonr/) — How voice calls use IMS over the 4G and 5G NR radio layers described in this article
- [What Is an MNO?](/en/guides/what-is-mno/) — How licensed spectrum is held by MNOs and passed through to MVNOs
- [International Roaming: How It Works](/en/guides/international-roaming/) — How visited-network band support affects which 5G bands you can use abroad
- [SIM Lock and SIM-Free Explained](/en/guides/sim-lock/) — How carrier locking can restrict access to bands your device hardware supports
- [How to Choose a SIM Plan](/en/guides/how-to-choose/) — A practical decision framework that includes matching device bands to carrier networks
================================================================================
# SIM Activation: How to Get Your Line Working
URL: https://sim-finder.com/en/guides/activation/
Type: guides (en)
Published: 2026-06-04
Activating a SIM or eSIM involves three distinct steps: obtaining and installing the SIM or profile, completing any required identity verification, and confirming that data and calls are working. This guide covers all three, from the moment you insert a physical SIM or download an eSIM profile through to a verified working connection. Where steps differ between physical SIM and eSIM, both are covered.
Key points:
- Physical SIM and eSIM follow different activation paths, but both require network registration after installation
- Identity verification requirements vary significantly by country and carrier
- A successful profile install does not automatically mean a working data connection
---
## Physical SIM vs eSIM: Which Activation Path Applies to You?
The activation process diverges at the start depending on which type of SIM you are using.
**Physical SIM:** You receive a card, insert it into the device, and the carrier activates the line — either automatically when you insert the SIM, or after you complete a required activation step (such as calling an activation number or verifying identity online or in-store).
**eSIM:** You receive a QR code, an SM-DP+ activation code, or a push from the carrier's app. You download a carrier profile to your device's embedded chip (eUICC). The carrier then enables the plan on their network side. No physical card changes hands.
Both paths converge at the same end state: a registered line that can make calls, send SMS, and use mobile data. The practical difference is that eSIM activation happens entirely through software, and physical SIM activation requires the card to be physically present in the device first.
For a full comparison of physical SIM and eSIM — including travel, device loss, and carrier-switching considerations — see [Physical SIM vs eSIM](/en/guides/sim-vs-esim/).
---
## Installing Your SIM or eSIM Profile
**Physical SIM:** Almost all current smartphones use a Nano-SIM (4FF, 12.3 × 8.8 mm). The card has a notched corner that aligns with a matching cutout in the tray, ensuring it can only be inserted in one orientation. Power the device off, eject the tray, seat the card flush, and restart. The full step-by-step procedure — including how to read the orientation notch and confirm the card is detected — is in [How to Insert and Remove a SIM Card](/en/guides/sim-insertion/).
After insertion and device restart, look for the carrier name and signal bars in the status bar. If the SIM is detected but shows "No Service", it may require carrier activation before network registration can succeed — see the section below.
Some new SIM cards are not active when you receive them. Common activation methods include logging into a carrier's online portal, calling a printed activation number, or completing the process at the point of sale. Pre-activated SIMs — common with travel SIMs — begin service as soon as they connect to a network. Check your provider's documentation to confirm which applies.
**eSIM:** Your device downloads a carrier profile from a remote server (the SM-DP+ server defined in GSMA SGP.22). You initiate this by one of four methods, depending on what your carrier supports:
1. **QR code scan** — display the QR code on a second device or printed page and scan it with your phone's camera through Settings → Cellular → Add eSIM. The QR code encodes the SM-DP+ server address and a matching activation code in a single scannable image. Each QR code is single-use: once successfully scanned, the code is invalidated on the server. If you scan a QR code on the same screen that will display the camera viewfinder, you will not be able to scan it — always use a second screen or a printed copy.
2. **Manual activation code entry** — if you cannot scan the QR code, select "Enter Details Manually" and type the SM-DP+ address and activation code that your carrier provided. These two strings together identify both the server and your specific profile. Entering either string incorrectly prevents the download; double-check each character, particularly letters that resemble numbers (O vs 0, I vs 1).
3. **Carrier app** — some carriers push the eSIM profile automatically through their official app after you log in or complete purchase. The app communicates with the carrier backend to trigger the download without exposing a QR code or activation code to you. This method requires the app to be installed and you to be signed in before starting.
4. **eSIM Quick Transfer** — on supported devices and carriers, transfer an eSIM directly from another device without a QR code. On iPhone, this is called Quick Transfer and requires both devices to be nearby, on the same Wi-Fi network, and signed in to the same Apple ID.
For iPhone QR code setup step by step, see [How to Set Up eSIM on iPhone via QR Code](/en/guides/qr-code-iphone/).
Prerequisites before starting eSIM setup:
- Your device must support eSIM (check Settings → Cellular on iPhone; if "Add eSIM" appears, it is supported)
- The device must be carrier-unlocked — a locked device can only accept eSIM profiles from the carrier it is locked to
- You need an active internet connection: Wi-Fi or an existing mobile data line
Once the profile downloads, the line appears in Settings. Installing the profile is not the same as having a working data connection — additional steps are usually needed.
---
## Identity Verification: What to Expect
Many countries require carriers to verify a subscriber's identity before activating a SIM or eSIM. The specific requirements vary by country and carrier, and the methods available differ accordingly.
**Why it is required:** Telecommunications regulations in many jurisdictions mandate subscriber registration as a measure against fraud, crime, and misuse of the network. As of 2021, more than 155 countries required some form of identity verification for SIM registration, according to a GSMA report. The practical implication for you as a customer is that your line may not activate until this check is complete.
**Methods your carrier may offer:**
| Method | What it involves |
|--------|-----------------|
| In-person at a store | Present a government-issued ID or passport to a carrier representative |
| eKYC — document upload | Upload photos of your ID or passport and a selfie through a carrier app or website |
| eKYC — video call | A live video session with a carrier agent who views your document in real time |
| eKYC — electronic ID | Use a national electronic identity card (where supported) to authenticate digitally |
**Country differences:** Identity verification rules differ materially across countries.
- **Biometric verification**: Some countries require a biometric check during registration. Thailand mandated biometric liveness detection for all SIM registrations from August 2025. Liveness detection means you must complete a short face-movement sequence — such as blinking or turning your head — to prove that the selfie is from a live person rather than a printed photo. This is typically done through the carrier's app.
- **eKYC with document upload**: Countries including Japan, South Korea, and several EU member states allow electronic identity checks where you upload photos of your ID document and take a selfie. The document images are processed by OCR and cross-referenced with government databases or document-verification services. Approval can be near-instant for automated checks, or take up to a few hours if a human reviewer is involved.
- **In-person only**: Some countries or carriers accept only in-person verification at a store, particularly for postpaid contracts. Online purchases in these cases may ship the SIM in an unactivated state, requiring a store visit to complete.
- **No mandatory registration**: A smaller number of countries do not impose mandatory SIM registration. In these cases, your carrier may still ask for an email address or phone number for account management, but presenting a government ID is not required.
Your carrier will inform you of the specific documents required.
**Document types commonly accepted:** Government-issued photo ID, national identity card, or passport. Requirements for foreign nationals may differ from those for residents — many carriers require passport presentation from visitors.
**Timing:** After you submit verification documents, the carrier reviews them — automatically in most eKYC flows, or manually for some. Automated review can be near-instant; manual review may take minutes to several hours. Your line does not activate until the carrier confirms verification.
---
## Line-Switch Timing: When Does the Old Line Go Inactive?
If you are switching from an existing carrier to a new one, understanding the timing of the switch prevents gaps in service.
**New SIM from a new carrier (no number porting):** Your new line activates independently of your old one. Your old line stays active until you cancel it.
**Number porting (keeping your existing number):** The port-out process transfers your number from the old carrier to the new one. During the port, your old SIM typically stops working at the moment the number transfers to the new carrier. This transition is usually fast — often within minutes in most countries — but may take longer in some cases. Do not cancel your old plan before the port completes, as this can cause the port to fail.
**eSIM to eSIM within the same device:** If you are switching between eSIM profiles on the same device, you can disable the old eSIM profile and enable the new one in Settings without the old line going inactive until you explicitly turn it off. This makes back-to-back testing possible.
**What happens during the brief downtime window:** At the moment the number transfers, the old SIM loses its network registration and the new SIM must register on the new network. The device with the new SIM typically prompts for a restart or automatically re-registers within seconds. If the new SIM does not register automatically, toggle Airplane Mode off and on, or restart the device. Incoming calls during the window go to voicemail if the old carrier has voicemail configured; SMS messages are queued by the sender's network and delivered once the new line is active. If the port takes longer than expected, contact the new carrier — a stalled port can sometimes be caused by a mismatch between the account name or address provided and the information held by the old carrier.
**Key point:** During any number port, there is typically a brief window — seconds to minutes — when neither SIM is active. Plan accordingly if you need uninterrupted service.
---
## Post-Activation Connectivity Check
A working line shows signal bars and the carrier name in the status bar. However, voice and data are separate systems — confirming one does not confirm the other. Run through all three checks.
**Signal bars:** One to four signal bars (or dots, depending on the device) indicate the strength of the radio connection between your device and the nearest cell tower. Zero bars or the "No Service" indicator means the device cannot see the network. If signal is weak in a building, move closer to a window before concluding activation has failed — poor signal in a specific location is not the same as a non-functioning line.
**1. Voice and SMS**
Make a test call to a known number (a voicemail service or a contact who can confirm receipt). Let it ring long enough to confirm it connects rather than going directly to a network error message. Send a test SMS to the same number and verify it is delivered. If calls work but SMS does not, or vice versa, contact your carrier — some plan types exclude SMS or require separate activation for messaging. Some prepaid plans activate voice and data at the time of purchase but enable SMS only after a first top-up or a specific activation step in the carrier app.
**2. Mobile data**
Open a browser and load any page over the cellular connection (turn off Wi-Fi first). If the page loads, mobile data is working.
If signal bars are present but data does not load, the most common cause is a missing or incorrect APN (Access Point Name) setting. The APN is a configuration string that routes your data traffic through the carrier's gateway.
On iPhone, most carrier SIMs and eSIMs configure the APN automatically. If data does not work after activation, check Settings → Cellular → Cellular Data Network and compare the APN field to what your carrier documents. For detailed steps, see [APN Setup Guide for iPhone](/en/guides/apn-setup-iphone/).
On Android, some MVNOs and smaller carriers require manual APN entry. See [APN Setup Guide for Android](/en/guides/apn-setup-android/) for the full procedure.
**3. Data Roaming (for travel SIMs)**
Travel eSIMs and local SIMs used outside your home country connect via a roaming session at the network protocol level. iOS and Android treat this as roaming even when you are physically present in the destination country, meaning Data Roaming must be enabled for data to flow.
- **iPhone**: Settings → Cellular → tap the SIM line → Cellular Data Options → turn on Data Roaming
- **Android (Pixel)**: Settings → Network & Internet → SIMs → tap the SIM → turn on Roaming
- **Android (Samsung)**: Settings → Connections → SIM card manager → tap the SIM → turn on Data Roaming
---
## Dual-SIM Setup After Activation
If your device has two lines active — a physical SIM and an eSIM, or two eSIMs — you need to specify which line handles each function. The device will not do this automatically in a way that always matches your intent.
**Settings to configure:**
| Function | iPhone path | Android (Pixel) |
|----------|-------------|-----------------|
| Mobile data | Settings → Cellular → Cellular Data | Settings → Network & Internet → SIMs → Mobile data |
| Default calls | Settings → Cellular → Default Voice Line | Settings → Network & Internet → SIMs → Calls |
| SMS/messages | Settings → Cellular → Default Line for SMS | Settings → Network & Internet → SIMs → SMS |
**Allow Cellular Data Switching (iPhone):** When this is on, iOS can use either SIM for data depending on coverage. If you have a travel eSIM and a home SIM in the device at the same time, turn this off to prevent the home SIM from accidentally using roaming data.
---
## Understanding the Three Stages of eSIM Activation
A common source of confusion: downloading an eSIM profile and having a working connection are not the same event. There are three distinct stages:
1. **Profile download** — The eSIM data is transferred from the carrier's SM-DP+ server to your device's eUICC chip. This requires an internet connection (Wi-Fi or existing mobile data) and completes when the profile appears in Settings.
2. **Plan activation** — The carrier enables the plan on their network side. This happens after the profile download and after any identity verification requirement is met. It can take a few seconds or, with some carriers, a few minutes.
3. **Service configuration** — The device selects the network, applies the APN, and establishes a data session. In a dual-SIM setup, you may need to manually set which SIM handles data.
If your eSIM shows as installed in Settings but data is not working, the issue is typically at stage 3, not in the original activation. Work through the connectivity check steps in the section above.
---
## If Activation Stalls: What to Do While Waiting
Activation does not always complete instantly. If your profile is installed and verification is submitted but the line is not yet active, the following steps cover the most common reasons for a delay.
**Wait and re-check:** Carrier-side activation after eKYC submission can take several minutes in automated systems and up to a few hours in systems that route some submissions to manual review. Before troubleshooting, check the carrier's confirmation email or app notification for an estimated activation time. If that time has not passed, waiting is the correct action.
**Restart the device:** A device restart forces the modem to re-register on the network. After the restart, watch for the carrier name to appear in the status bar within 30–60 seconds. If it does not appear, the line is not yet active rather than the restart having failed.
**Toggle Airplane Mode:** If a full restart is not convenient, toggling Airplane Mode on for 10 seconds and then off triggers a new network search without rebooting the device. This is useful when a line appears to be registered (carrier name visible) but data is not flowing.
**Re-check the APN:** For physical SIMs and some eSIM profiles, the device may not receive the APN configuration automatically. If signal is present but a web page does not load over mobile data, the APN is the most likely cause. Verify the APN value against your carrier's documentation and enter it manually if needed. See [APN Setup Guide for iPhone](/en/guides/apn-setup-iphone/) or [APN Setup Guide for Android](/en/guides/apn-setup-android/).
**Check your verification status:** Log in to the carrier's app or website and look for a verification status indicator. Common statuses include "pending", "under review", "additional information required", and "approved". If the status shows "additional information required", the carrier could not process the document you submitted and you need to re-submit or use a different verification method.
**Contact carrier support:** If the expected activation window has passed and the line is still not active, contact the carrier directly. Have your order confirmation number, the device IMEI, and the EID (for eSIM) ready. The carrier can check the activation status on their backend and re-trigger the process if it stalled.
---
## Troubleshooting: Activation Fails or Service Does Not Start
If activation does not complete or you cannot get service after following the steps above, the most common causes are:
- **Device is carrier-locked**: a locked device cannot accept SIM profiles from other carriers. On iPhone, check Settings → General → About → Carrier Lock. If it shows anything other than "No SIM restrictions", contact your original carrier to unlock the device.
- **Identity verification not completed**: the carrier's system will not activate the line until verification clears. Check your email or the carrier's app for a pending verification step.
- **APN not applied**: see the APN guides linked above.
- **QR code already used or expired** (eSIM): each eSIM QR code is single-use. If it was already scanned or has expired, request a new one from your carrier.
- **eSIM profile storage full**: iPhones can store 8 or more eSIM profiles, but the device has a limit based on eUICC memory. Delete an unused profile if you receive an "Unable to add cellular plan" error.
For a full symptom-by-symptom troubleshooting sequence, see [eSIM Won't Activate? How to Fix Common Setup Issues](/en/guides/activation-failed/).
---
## Frequently Asked Questions
### How long does SIM activation take?
For physical SIMs, network registration typically completes within seconds to a few minutes after the device restarts with the SIM inserted. If the carrier requires identity verification first, the line does not activate until that check is cleared. For eSIMs, profile download takes a few seconds to about a minute; the carrier then enables the plan on their side, which can take a few additional seconds or, with some carriers, up to a few minutes. eKYC-based verification — where you upload documents through an app or website — can add minutes to hours to this process depending on automated review speed.
### Do I need Wi-Fi to activate an eSIM?
Yes, in most cases. Downloading an eSIM profile requires an active internet connection — Wi-Fi or an existing mobile data line. Connect to Wi-Fi before starting. On eSIM-only iPhone models (no physical SIM slot) in certain countries and regions, Apple states that activation is possible without Wi-Fi; this exception does not apply to standard iPhones or Android devices.
### What is identity verification and why does my carrier require it?
Many countries require carriers to confirm the identity of new subscribers before activating a SIM. This is typically done by presenting a government-issued ID or passport — either in person at a store or through an electronic process (eKYC) using a carrier app or website. Requirements vary significantly by country: some require biometric checks, others accept a scanned document, and a few have no mandatory registration requirement. Carriers cannot bypass these legal obligations.
### My physical SIM is inserted but shows "No Service". Is it activated?
Not necessarily. A SIM that is physically inserted and detected by the device still needs to register on the network. If the carrier requires activation (for example, by calling an activation line, visiting a website, or completing identity verification), "No Service" with the SIM visible in Settings indicates the SIM is detected but the network has not enabled the line yet. Complete the carrier's required activation steps, then toggle Airplane Mode off and on to prompt the device to re-register.
### Can I activate an eSIM before I travel?
Yes. For travel eSIMs, activating before departure — on reliable home Wi-Fi — is strongly recommended. Most travel eSIM providers allow you to install the profile in advance and configure a future start date, or the data balance activates automatically once you connect to a local network abroad. Check your provider's documentation for whether activation is triggered at purchase or at first use.
---
## Related Guides
- [How to Insert and Remove a SIM Card](/en/guides/sim-insertion/) — step-by-step SIM tray procedure, orientation guide, and recognition checks
- [APN Setup Guide for iPhone](/en/guides/apn-setup-iphone/) — configure the APN after SIM or eSIM activation on iPhone
- [APN Setup Guide for Android](/en/guides/apn-setup-android/) — configure the APN after SIM or eSIM activation on Android
- [How to Set Up eSIM on iPhone via QR Code](/en/guides/qr-code-iphone/) — detailed QR code eSIM setup flow for iPhone
- [eSIM Won't Activate? How to Fix Common Setup Issues](/en/guides/activation-failed/) — symptom-by-symptom troubleshooting when activation fails
Use [SimFinder](/en/) to compare SIM and eSIM plans by country.
================================================================================
# eSIM Won't Activate? How to Fix Common Setup Issues
URL: https://sim-finder.com/en/guides/activation-failed/
Type: guides (en)
Published: 2026-04-13
Most eSIM activation failures come down to one of four root causes: the device is carrier-locked, the device does not support eSIM, the QR code has already been used or expired, or there is no internet connection during setup. This guide walks through each scenario with specific steps for iPhone and Android.
---
## Pre-Activation Checklist
Before attempting eSIM setup, confirm all four conditions below. Skipping any one of them will cause activation to fail.
### Check 1: Your device supports eSIM
Not all smartphones support eSIM. Here is what to look for:
**iPhone:**
- iPhone XS, XS Max, and XR (2018) and all later models support eSIM
- iPhone 13 series and later support dual eSIM (two eSIMs active at the same time)
- iPhones sold in the US from iPhone 14 onwards are eSIM-only (no physical SIM slot)
- iPhone Air is eSIM-only in all markets (no physical SIM slot)
**Android:**
- Google Pixel 3 and later generally support eSIM (exceptions exist for some regional and carrier variants)
- Google Pixel 7 and later support dual eSIM
- Samsung Galaxy S20 and later flagship models generally support eSIM (carrier-locked and some regional variants may not)
- Budget models and older devices may not support eSIM — check your device specifications
**How to verify:**
- **iPhone**: Go to Settings > Cellular. If you see "Add eSIM" or "Set Up Cellular", the device supports eSIM
- **Android (Pixel)**: Go to Settings > Network & internet > SIMs > Add SIM. If the option exists, eSIM is supported
- **Android (Samsung)**: Go to Settings > Connections > SIM card manager > Add mobile plan
If these menus are absent, the device either does not support eSIM or it is carrier-locked.
### Check 2: The device is carrier-unlocked
A carrier-locked device cannot use eSIM profiles from other carriers, including travel eSIMs.
**How to check on iPhone:**
Go to Settings > General > About > Carrier Lock. If it reads "No SIM restrictions", the device is unlocked.
**How to check on Android:**
Insert a physical SIM from a different carrier. If calls and data work normally, the device is unlocked. Alternatively, contact your original carrier directly.
**How to unlock:**
Contact the carrier that sold you the device. Most carriers unlock devices online through their account portal, often at no charge once the device is paid off or the contract term has ended. The specific unlock policies vary by carrier and country.
After unlocking, restart the device before attempting eSIM setup again.
### Check 3: You have an internet connection
eSIM profile download requires an active internet connection. Connect to Wi-Fi, or use mobile data from a second SIM already in the device.
Without internet access, you will see errors such as "Couldn't download the eSIM", "Unable to connect to server", or the setup will simply time out.
Avoid using networks with heavy filtering (such as some hotel or enterprise Wi-Fi). A regular home or mobile Wi-Fi network is the safest choice.
### Check 4: eSIM profile storage is not full
iPhones can store 8 or more eSIM profiles, but the exact limit depends on the eUICC chip memory. If the limit is reached, you will see "Unable to add cellular plan" or a similar error.
To free up space, delete eSIM profiles you no longer use:
- **iPhone**: Settings > Cellular > tap the plan > Remove Cellular Plan
- **Android (Pixel)**: Settings > Network & internet > SIMs > tap the eSIM > Delete
Note: Some carriers do not allow a deleted eSIM to be reinstalled. Check your carrier's policy before deleting.
---
## Symptom-by-Symptom Fixes
### Symptom A: "SIM locked" or "This carrier is not supported"
**Cause:** The device is carrier-locked.
**Fix:** Follow the unlock steps in Check 2 above. Restart the device after unlocking, then retry eSIM setup.
---
### Symptom B: QR code won't scan, or "Invalid QR code" error
**Cause and fix:**
| Cause | Fix |
|-------|-----|
| QR code already used on another device | Contact your carrier or eSIM provider for a new QR code |
| QR code has expired | Same as above — expiry periods vary by provider (hours to weeks) |
| Screen too dim or glare on the screen | Set brightness to maximum on the device displaying the QR code |
| QR code displayed too small | Enlarge the image on a PC or tablet screen |
| Trying to scan a QR code on your own screen | The QR code must be displayed on a *different* device. You cannot scan a code shown on the same phone you are setting up |
**Switch to manual entry if QR scanning keeps failing:**
Manual entry uses the SM-DP+ address (also called the activation server address) and an activation code provided by your carrier.
**On iPhone:**
1. Settings > Cellular > Add eSIM
2. Tap "Use QR Code"
3. Tap "Enter Details Manually" at the bottom
4. Enter the SM-DP+ address and activation code exactly as provided
**On Android (Pixel):**
1. Settings > Network & internet > SIMs > Add SIM
2. Tap "Enter code manually" or "Help"
3. Enter the activation code
---
### Symptom C: "Couldn't connect to server" or timeout error
**Cause:** Network issue on your end, or a temporary problem on the carrier's server.
**Fix (try in order):**
1. Confirm the Wi-Fi connection is actually working — open a browser and load any page
2. Try a different Wi-Fi network (some networks block the eSIM provisioning servers)
3. Turn Airplane Mode on, wait 10 seconds, then turn it off
4. Restart the device
5. Wait 15–30 minutes and try again — carrier servers occasionally experience brief outages
If you are on a corporate or hotel Wi-Fi, switch to a mobile hotspot or a standard home network instead.
---
### Symptom D: eSIM is installed but there is no data connection
Installing a profile and activating data are two separate steps. After a successful install, work through the following:
**Step 1: Confirm the eSIM line is enabled**
- **iPhone**: Settings > Cellular > tap the eSIM plan > turn on "Turn On This Line"
- **Android**: Settings > Network & internet > SIMs > confirm the eSIM toggle is on
**Step 2: Set the eSIM as the preferred data line (dual-SIM devices)**
With two SIMs in the device, you must explicitly choose which one handles mobile data.
- **iPhone**: Settings > Cellular > Cellular Data > select the eSIM
- **Android (Pixel)**: Settings > Network & internet > SIMs > Mobile data > select the eSIM
- **Android (Samsung)**: Settings > Connections > SIM card manager > Preferred SIMs > Mobile data > select the eSIM
**Step 3: Enable Data Roaming if using a travel or international eSIM**
Travel eSIMs and eSIMs from carriers in a different country require Data Roaming to be on.
- **iPhone**: Settings > Cellular > tap the eSIM > turn on Data Roaming
- **Android**: Settings > Network & internet > SIMs > tap the eSIM > turn on Roaming
**Step 4: Set network selection to automatic**
If you previously set network selection to manual, it may be pointing to the wrong network.
- **iPhone**: Settings > Cellular > tap the eSIM > Network Selection > turn on Automatic
- **Android**: Settings > Network & internet > SIMs > tap the eSIM > turn on Automatically select network
**Step 5: Verify the APN setting**
APN (Access Point Name) is the gateway configuration that enables mobile data. It is defined in 3GPP TS 23.003. Most eSIM profiles set the APN automatically during installation, but occasionally the profile does not apply it correctly.
If data still does not work after the steps above, contact your carrier's support and ask them to confirm the correct APN for your plan. Do not use APN values found on third-party websites — always get them from the carrier directly.
---
### Symptom E: "Unable to add cellular plan" (profile storage full)
**Cause:** The device has reached its eSIM profile storage limit.
**Fix:** Delete an eSIM profile you no longer need (see the deletion steps in Check 4 above), then retry. Confirm with your carrier first whether the deleted eSIM can be reinstalled.
---
## If Nothing Works: Network Settings Reset
If all the steps above fail, resetting the network settings will remove any corrupted configuration. This also deletes saved Wi-Fi passwords, VPN settings, and Bluetooth pairings, so note those down first.
**iPhone:**
1. Settings > General > Transfer or Reset iPhone > Reset
2. Tap "Reset Network Settings"
3. Restart, then retry eSIM setup
**Android (Pixel):**
1. Settings > System > Reset options
2. Tap "Reset Wi-Fi, mobile & Bluetooth"
3. Confirm and restart
If activation still fails after a network reset, contact your carrier or eSIM provider's support team. Provide the error message text, your device model, the device IMEI (dial `*#06#` to display it), and the EID (found in Settings > General > About on iPhone, or Settings > About phone on Android).
---
## Understanding What "Activation" Actually Means
A common point of confusion: downloading an eSIM profile to your device and having a working data connection are not the same event.
The process has three distinct stages:
1. **Profile download** — The eSIM data is transferred from the carrier's server (SM-DP+) to your device's eUICC chip. This requires internet access (Wi-Fi or existing mobile data).
2. **Profile activation** — The carrier enables the plan on their network side. This can take a few seconds or, with some carriers, up to a few minutes.
3. **Service configuration** — The device selects the network, applies the APN, and establishes a data session. In a dual-SIM setup, you may need to manually select which SIM handles data.
If your eSIM profile shows as installed in Settings but data is not working, the issue is in stage 3 — not in the original activation itself.
---
## Frequently Asked Questions
### Do I need Wi-Fi to activate an eSIM?
Yes. Downloading an eSIM profile requires an internet connection. Connect to Wi-Fi or use mobile data from a second SIM before starting the setup. On eSIM-only iPhones in supported regions, activation may work without Wi-Fi in some cases, but Wi-Fi is the reliable option.
### My QR code says "Invalid QR code" — what should I do?
eSIM QR codes are single-use. If the code has already been scanned on any device, or if it has expired, it will no longer work. Contact your carrier or eSIM provider and ask them to issue a new QR code. You can also try switching to manual entry using the SM-DP+ address and activation code instead.
### How do I check if my phone is carrier-locked?
On iPhone, go to Settings > General > About and look for the "Carrier Lock" field. If it says "No SIM restrictions", the device is unlocked. On Android, try inserting a SIM from a different carrier — if calls and data work, the device is unlocked. You can also contact your original carrier to confirm.
### I installed the eSIM but I have no data connection. Why?
Installing an eSIM profile and activating data are separate steps. First, confirm the eSIM line is enabled in Settings. If you have two SIMs, explicitly set the eSIM as the preferred line for mobile data. For travel or international eSIMs, turn on Data Roaming for that line. If data still does not work, check the APN settings with your carrier.
### I get "Unable to add cellular plan" — what does that mean?
This error typically means one of four things: the device is carrier-locked, the eSIM profile storage is full, the QR code or activation code has already been used, or there is no internet connection. Work through the pre-activation checklist above to identify the cause.
---
For background on how eSIM technology works, see [What Is an eSIM?](/en/guides/what-is-esim/). For definitions of terms like SM-DP+, eUICC, and APN used in this article, see [SIM & Mobile Glossary](/en/guides/glossary-index/). If you are deciding between eSIM providers for travel, [4 Ways to Stay Connected Abroad](/en/guides/four-options/) covers the full range of options. Use [SimFinder](/en/) to compare eSIM plans by country.
================================================================================
# SIM Not Working After Returning Home: Fixes
URL: https://sim-finder.com/en/guides/after-return/
Type: guides (en)
Published: 2026-06-06
You land home, take out the foreign SIM (or leave the travel eSIM in), and your regular line still shows no service or no data. The fix is almost always one of six things — and the most likely culprit is either a roaming toggle left in the wrong state or a device that is still treating your home SIM as a secondary line.
Work through the steps below in order. Most users are back online after steps 1 or 2.
---
## Step 1: Check Data Roaming — Turn It Off for Home Use
Data Roaming enables your device to use mobile data on foreign networks. When you are home, Data Roaming on your home SIM line is not needed and, if accidentally left on, can prevent the home line from connecting normally by routing data through an incorrect path.
**iPhone:**
1. Settings → Cellular (or Mobile Data in some regions).
2. Tap your home SIM line name.
3. Tap **Cellular Data Options** (or Mobile Data Options).
4. Confirm **Data Roaming** is toggled **off**.
On dual-SIM iPhones, each line has its own Data Roaming toggle. Check both the home SIM line and any travel eSIM line — leaving the travel eSIM line with Data Roaming on while at home is unnecessary and can cause background connection attempts.
**Android (Pixel):**
1. Settings → Network & internet → SIMs.
2. Select your home SIM.
3. Confirm **Roaming** is toggled **off**.
**Android (Samsung One UI):**
1. Settings → Connections → Mobile networks.
2. Confirm **Data roaming** is toggled **off**.
If Data Roaming was already off and data still does not work, continue to Step 2. For a full explanation of what the Data Roaming toggle does and does not control, see [Data Roaming Settings: How to Turn It On/Off Safely](/en/guides/roaming-settings/).
---
## Step 2: Check Which Line Is Active for Cellular Data
When you travel with two lines — a home SIM and a travel eSIM — the device must be configured to use the home SIM for data after you return. If the travel eSIM was set as the active data line during your trip, it remains the active line until you change it. The home SIM can show a carrier name and accept calls while the travel eSIM handles (or attempts to handle) data, producing a situation where everything appears connected but data does not work.
**iPhone:**
1. Settings → Cellular.
2. Tap **Cellular Data** (at the top of the SIM list section).
3. Confirm your home SIM line is selected.
4. If the travel eSIM is selected instead, tap the home SIM line to switch.
**Android (Pixel):**
1. Settings → Network & internet → SIMs.
2. Under **Preferred SIMs** (or SIM preferences), check which SIM is set for **Mobile Data**.
3. Tap to switch to your home SIM.
**Android (Samsung):**
1. Settings → Connections → SIM card manager.
2. Under **Preferred SIMs**, tap **Data** and select your home SIM.
After switching the active data line, wait 10–15 seconds and test data. If it still does not work, move to Step 3.
---
## Step 3: Disable the Travel eSIM Line (If Still Installed)
Even if your home SIM is set as the active data line, leaving the travel eSIM line powered on can cause interference — the device may continue attempting to register the travel eSIM on a network at home, consuming radio resources and occasionally disrupting the home SIM's connection.
The standard approach after returning home is to turn off the travel eSIM line. You do not need to delete the profile — keeping it installed means you can reactivate it on your next trip without repurchasing.
**iPhone:**
1. Settings → Cellular.
2. Tap the travel eSIM plan name.
3. Toggle **Turn On This Line** to **off** (grey).
**Android (Pixel):**
1. Settings → Network & internet → SIMs.
2. Tap the travel eSIM entry.
3. Toggle it **off**.
**Android (Samsung):**
1. Settings → Connections → SIM card manager.
2. Tap the travel eSIM entry.
3. Toggle it **off**.
After disabling the travel eSIM line, the home SIM becomes the only active line. Test data again before continuing.
---
## Step 4: Reset the APN for Your Home SIM
APN (Access Point Name) is the configuration string that tells the network which data gateway to use for your connection. If you manually entered an APN during your trip for a foreign SIM or travel eSIM, that configuration may still be active on the wrong line, or it may have overwritten your home SIM's settings.
**How to check the current APN on iPhone:**
1. Settings → Cellular → tap your home SIM line.
2. Scroll to **Cellular Data Network** (visible if your carrier allows APN editing).
3. Check the APN value under **Cellular Data**.
If the value does not match your home carrier's documented APN, either clear it or enter the correct value.
If the **Cellular Data Network** menu is not visible, your carrier pushes the APN automatically via a carrier profile — you cannot edit it manually, and the correct APN is already in place. In this case, the issue is not the APN; skip to Step 5.
**How to check the current APN on Android (Pixel):**
1. Settings → Network & internet → SIMs → tap your home SIM.
2. Tap **Access Point Names**.
3. Review the active APN entry.
**How to check the current APN on Android (Samsung):**
1. Settings → Connections → Mobile networks → Access Point Names.
2. Review the active entry.
**Resetting the APN to carrier defaults:**
On Android, an APN reset option is available:
- **Pixel**: in the Access Point Names screen, tap the three-dot menu and select **Reset to default**.
- **Samsung**: in the Access Point Names screen, tap the three-dot menu and select **Reset to default**.
On iPhone, if the Cellular Data Network menu is accessible and the APN is wrong, either type the correct value from your carrier's documentation or restore the carrier settings profile. If you cannot locate the correct APN value, consult your carrier or MVNO's support documentation.
Note: APN values and the method for setting them are carrier-dependent. MNOs (major carriers) typically push the APN automatically; MVNOs often require manual entry. For full iPhone APN setup instructions, see [APN Setup Guide for iPhone](/en/guides/apn-setup-iphone/). For Android, see [APN Setup Guide for Android](/en/guides/apn-setup-android/).
---
## Step 5: Force a Network Re-Registration with Airplane Mode
After adjusting line settings or APN, the device may not immediately re-register on the home network. Toggling Airplane Mode forces the modem to drop any stale registration state and scan for networks from scratch.
**iPhone and Android:**
1. Open Control Center (swipe down on iPhone; swipe from top on Android, or use the notification shade).
2. Tap the **Airplane Mode** icon to turn it **on**.
3. Wait **15 seconds**.
4. Tap Airplane Mode again to turn it **off**.
5. Watch the status bar — the home carrier name and signal bars should appear within 30 seconds.
If the carrier name reappears but data still does not load, open a browser and try navigating to a page. If nothing loads, continue to Step 6.
**Restart the device if Airplane Mode toggle does not help:**
- **iPhone**: Hold side button + volume button → slide to power off → wait 10 seconds → hold side button to power on.
- **Android**: Hold power button → tap Restart (or Power off, wait 10 seconds, power on).
A restart reloads the carrier profile and clears any transient state in the modem subsystem that an Airplane Mode toggle does not reach.
---
## Step 6: Manual Network Selection
In rare cases, the device's automatic network selection remains locked to a foreign carrier even after returning home — this can happen when the modem cached a network preference during international travel. Manual network selection forces a fresh scan.
**iPhone:**
1. Settings → Cellular → tap your home SIM line.
2. Tap **Network Selection**.
3. Turn off **Automatic**.
4. Wait for the scan to complete (15–30 seconds).
5. Select your home carrier from the list.
6. Turn **Automatic** back on after confirming the home carrier appears — this prevents the fixed selection from causing problems later.
**Android (Pixel):**
1. Settings → Network & internet → Internet → tap your home SIM.
2. Disable **Automatically select network**.
3. Tap your home carrier from the scan results.
4. Re-enable **Automatically select network** once connected.
**Android (Samsung):**
1. Settings → Connections → Mobile networks → Network operators.
2. Tap **Search now**.
3. Select your home carrier from the results.
After selecting manually, wait 10–20 seconds for registration to complete, then re-enable automatic selection.
---
## Step 7: Reset Network Settings
If every step above has been followed and data still does not work, a corrupted network configuration stored on the device may be preventing the home SIM from functioning correctly. A network settings reset clears all stored APN, cellular preferences, VPN profiles, and Wi-Fi passwords — but does not delete eSIM profiles or personal data.
Have your Wi-Fi passwords ready to re-enter before performing this step, as all saved networks are removed.
**iPhone:**
1. Settings → General → Transfer or Reset iPhone → Reset.
2. Tap **Reset Network Settings**.
3. Enter your passcode. The device restarts automatically.
4. After restart, wait for the home carrier name to appear in the status bar (30–60 seconds).
5. Re-check Cellular settings: confirm the home SIM is the active data line, Data Roaming is off, and the travel eSIM line (if installed) is turned off.
On iPhone, Reset Network Settings preserves all installed eSIM profiles.
**Android (Pixel):**
1. Settings → System → Reset options.
2. Tap **Reset Wi-Fi, mobile & Bluetooth**.
3. Confirm. Wait 30–60 seconds for network registration.
**Android (Samsung):**
1. Settings → General management → Reset → Reset mobile network settings.
2. Confirm. Wait for completion.
On Android (Pixel and Samsung), installed eSIM profiles are preserved through a network settings reset.
After the reset, go back to Step 1 of this guide and re-apply the correct settings — active data line, Data Roaming off, correct APN — from the beginning.
For a complete guide to what a network reset removes and how to reconfigure each setting afterward, see [How to Reset Network Settings (and What It Affects)](/en/guides/network-reset/).
---
## Why This Happens: Common Causes Explained
Understanding why the home SIM stops working after a trip helps prevent the same problem on future travel.
**Data Roaming left in the wrong state.** Some carrier SIM profiles set Data Roaming to on by default, and the toggle does not automatically reset to off when you arrive home. Always verify the Data Roaming toggle for your home SIM line after returning.
**Travel eSIM still active and interfering.** When a travel eSIM is set as the primary data line, the home SIM is demoted to a secondary line. Many users do not notice this during the trip because data works correctly via the eSIM. After landing home, the eSIM may lose signal while remaining set as the active data line — preventing any data from flowing.
**APN overwritten or missing.** On Android, manually entering an APN for a travel SIM can leave an incorrect entry active even after removing that SIM. On iPhone, some configurations that lock APN editing can be affected by a carrier settings change that occurred during the trip. In both cases, returning the APN to the correct home carrier value restores data.
**Stale network registration.** Mobile devices cache network preferences and sometimes lock onto a previously registered network. Airplane Mode toggle, restart, or manual network selection forces a fresh registration scan that clears the cached state.
**Carrier profile out of date.** On iPhone, an available carrier settings update may be waiting. Check Settings → General → About — if an update is available, a dialog appears. Installing it refreshes the carrier profile including any APN data it contains.
---
## If the Problem Is a Physical SIM (Not a Line Configuration Issue)
The steps above assume the home SIM is present and the device can detect it. If the home SIM shows as not detected, or the line itself does not appear in Settings, the issue may be the SIM card rather than the configuration:
- Remove and reinsert the physical SIM. Ensure it is seated fully in the tray with no debris on the contacts.
- Try the SIM in a different known-working device to rule out a SIM card fault.
- A SIM card exposed to extreme heat, water, or physical pressure during travel may be damaged. If the SIM does not register in any device, contact your carrier to request a replacement SIM.
For no-service conditions including SIM lock, IMEI issues, and account-level causes, see [No Connection Abroad? How to Fix It](/en/guides/no-connection-abroad/) — many of the diagnostic steps there also apply when the no-connection problem continues after returning home.
---
## FAQ
### Why does my home SIM show a carrier name but still have no data after returning?
Registering on the home network (which gives you the carrier name in the status bar) and having a working data session are two separate states. The most common reason data fails while the carrier name shows is that Data Roaming is still turned on and the device is trying to route data through a foreign network, or the APN stored on the device was overwritten by the foreign SIM during your trip. Turn off Data Roaming first, then check the APN settings for the home SIM line.
### I removed the foreign SIM but my phone still won't connect — what's wrong?
Removing the physical foreign SIM is not always enough. If you also have an eSIM installed from the trip, it may still be the active line for cellular data. Go to Settings → Cellular on iPhone or Settings → Network & internet → SIMs on Android and confirm which line is set as the active data SIM. Switch it to your home SIM line. Also check whether the foreign eSIM line is toggled on — if it is still on and searching for a network, it can interfere with the home line.
### After returning home, do I need to re-enter my APN settings?
It depends on your carrier. Most major MNO plans push APN configuration automatically — either when you reinsert the physical SIM or the next time the phone registers on the home network. If you use an MVNO, or if you manually edited the APN during your trip, you may need to re-enter the home APN manually. Check your carrier or MVNO's setup documentation for the correct APN string.
### Will resetting network settings delete my travel eSIM profile?
No. On both iPhone and Android (Pixel and Samsung), Reset Network Settings does not delete installed eSIM profiles. Your travel eSIM profile remains on the device and can be turned off rather than deleted if you travel again. The reset only clears network configuration — Wi-Fi passwords, VPN profiles, APN settings, and cellular preferences.
---
## Related Guides
- [No Connection Abroad? How to Fix It](/en/guides/no-connection-abroad/) — step-by-step fixes for when the connection problem started during your trip
- [APN Setup Guide for iPhone](/en/guides/apn-setup-iphone/) — full instructions for checking and entering APN settings on iPhone
- [APN Setup Guide for Android](/en/guides/apn-setup-android/) — full instructions for checking and entering APN settings on Pixel and Samsung
- [Data Roaming Settings: How to Turn It On/Off Safely](/en/guides/roaming-settings/) — what the Data Roaming toggle does and does not control
- [How to Reset Network Settings (and What It Affects)](/en/guides/network-reset/) — complete guide to network settings reset: what is removed, what is preserved, and what to reconfigure afterward
================================================================================
# APN Setup Guide for Android — Pixel and Samsung Galaxy Step by Step
URL: https://sim-finder.com/en/guides/apn-setup-android/
Type: guides (en)
Published: 2026-04-25
Your Android phone shows signal bars but mobile data does not work after switching to an MVNO or inserting a travel SIM. In most cases, the missing step is the APN (Access Point Name) — a short configuration string that tells the network which packet data gateway to use for your connection.
**This guide explains what an APN is, when Android configures it automatically, and how to enter it manually on Google Pixel and Samsung Galaxy devices.** It also covers other Android manufacturers, lists verified APN strings for common US, UK, and Australian carriers, and explains how travel eSIM APN works differently on Android.
If your phone shows no bars at all rather than a data failure, start with signal troubleshooting in [No Mobile Data? How to Fix Data Connection Problems](/en/guides/no-data/) before setting an APN.
---
## What Is an APN?
APN stands for **Access Point Name**. It is defined in **3GPP TS 23.003** as the identifier that selects a packet data gateway on the carrier's core network. When your device requests internet access over the cellular network, the network reads the APN to route your data session to the correct gateway — the carrier's internet exchange point.
An APN has two parts:
- **Network Identifier** (mandatory) — identifies the external packet data network, such as `internet` or `fast.t-mobile.com`
- **Operator Identifier** (optional) — encodes the PLMN (Public Land Mobile Network) of the serving gateway; most consumer APN configurations omit this field
The maximum encoded length is **100 octets**, as specified in TS 23.003.
In 5G networks, the equivalent concept is the **DNN (Data Network Name)**, defined in 3GPP TS 23.003 Clause 9A. It works the same way for device configuration purposes — the APN string you enter functions across 4G and 5G networks. For full definitions of APN, DNN, and related terms, see the [SIM & Mobile Glossary](/en/guides/glossary-index/).
For a complete explanation of the APN concept including iPhone-specific setup steps, see the [APN Setup Guide for iPhone](/en/guides/apn-setup-iphone/), which this guide is designed to complement.
---
## When Android Auto-Configures APN vs When Manual Is Needed
Android handles APN configuration through two automatic paths. Understanding which applies to your SIM tells you whether you need to act.
### Automatic: SIM Carrier Bundle
When you insert a SIM from a major carrier, Android (and the modem firmware) may recognise the SIM's PLMN code and apply a pre-loaded APN profile from the carrier database included in the OS or carrier service pack. This works reliably for the major MNOs — AT&T, T-Mobile, Verizon in the US; EE, O2, Three, Vodafone in the UK; Telstra, Optus, Vodafone in Australia.
Google Pixel devices receive carrier updates through the **Carrier Services** app (updated via the Play Store independently of the Android OS version). Samsung Galaxy devices receive equivalent configuration through carrier-specific software packages.
### Automatic: eSIM Profile
When you download an eSIM profile, the profile itself can include APN parameters. If the provider has embedded APN data in the profile, Android applies it during eSIM activation. Unlike iPhone, Android has no single universal profile format (there is no `.mobileconfig` equivalent), so each provider implements this differently. Some Android eSIM providers include APN data in the profile; others require manual entry after activation.
### Manual Required: When Auto Does Not Apply
| Situation | Why Manual Is Needed |
|-----------|----------------------|
| MVNO SIM not in Android's carrier database | No automatic profile is loaded for the PLMN |
| Travel eSIM provider that omits APN from the profile | Profile is installed but APN is missing |
| SIM inserted after a network settings reset | Reset clears saved APN customisations |
| Carrier-locked device from a different carrier | APN may be pre-set to the original carrier's value |
| Prepaid SIM from a regional or niche MVNO | Carrier database coverage is inconsistent |
The most common real-world case: you buy a prepaid MVNO SIM, insert it, get signal, but cannot load any web page. The MVNO uses the host MNO's towers but its own APN — and since the MVNO is not in Android's carrier database, no automatic configuration happens.
Understanding how [MVNOs](/en/guides/what-is-mvno/) operate on host networks explains why a Visible SIM (on Verizon's towers) needs the APN `vsblinternet` rather than `vzwinternet`, and why Mint Mobile (on T-Mobile's towers) needs `wholesale` rather than `fast.t-mobile.com`.
---
## APN Setup on Google Pixel (Android)
The following path applies to stock Android on Google Pixel devices running Android 12 through Android 15. The menu labels are consistent across these versions, with minor wording variations in Android 15.
### Step 1: Open SIM Settings
Go to **Settings → Network & Internet → SIMs**.
If you have two SIMs (physical SIM + eSIM, or two physical SIMs), tap the SIM you want to configure. The SIM name is usually the carrier name or a label you assigned during setup.
### Step 2: Open Access Point Names
Inside the SIM settings screen, scroll down and tap **Access Point Names**.
You will see a list of APN profiles. There may be one or more pre-loaded entries from your carrier. If the correct APN is already listed and marked with a filled circle, data should work — but if it is not working, the existing entry may have incorrect values.
### Step 3: Add or Edit an APN
To add a new APN, tap the **+ (plus)** icon in the top-right corner.
To edit an existing entry, tap on it.
Fill in the fields as follows:
| Field | What to Enter |
|-------|--------------|
| Name | A label for your own reference (e.g., `T-Mobile Prepaid`) |
| APN | The APN string from your carrier (e.g., `fast.t-mobile.com`) |
| Proxy | Leave blank unless your carrier specifies one |
| Port | Leave blank unless your carrier specifies one |
| Username | Leave blank unless your carrier specifies one |
| Password | Leave blank unless your carrier specifies one |
| Server | Leave blank |
| MMSC | Your carrier's MMS centre URL (for MMS only; leave blank if you only need data) |
| MMS Proxy / MMS Port | For MMS only; leave blank if not needed |
| MCC | Filled automatically from your SIM; do not change |
| MNC | Filled automatically from your SIM; do not change |
| Authentication Type | See the [APN Type, Authentication, and IP Protocol section](#apn-type-authentication-and-ip-protocol-fields) below |
| APN Type | `default,supl,mms,dun` for full functionality, or `default` for data only |
| APN Protocol | `IPv4/IPv6` recommended; fall back to `IPv4` if issues arise |
| APN Roaming Protocol | `IPv4/IPv6` recommended |
| Bearer | Leave as `Unspecified` |
| MVNO Type / MVNO Value | Leave blank unless your carrier specifies these |
### Step 4: Save and Select
Tap the **three-dot menu → Save** (or the Save button, depending on Android version).
After saving, tap the radio button next to your new APN entry to select it as the active APN.
### Step 5: Test the Connection
Toggle **Airplane Mode** on for 5–10 seconds, then off. This forces the modem to re-register and use the new APN. Open a browser and load a page to confirm data is working.
If the new APN does not appear selectable (the radio button is greyed out), your carrier may have locked APN editing on your device. Contact your carrier's support.
---
## APN Setup on Samsung Galaxy (One UI)
Samsung Galaxy devices run One UI on top of Android. The APN path differs from stock Android, and the exact menu location depends on the One UI version.
### One UI 6 and One UI 7 (Galaxy S24 / S25 series, recent mid-range)
**Settings → Connections → Mobile Networks → Access Point Names**
If you have two SIMs, select the correct SIM from the **SIM card manager** tab at the top of the Connections screen before navigating to Mobile Networks.
### One UI 5 (Galaxy S23 series, A-series from 2023)
**Settings → Connections → Mobile Networks → Access Point Names**
The path is the same as One UI 6. Some One UI 5 builds show **Mobile Data** as the entry point instead of **Mobile Networks** — navigate to whichever is present and look for Access Point Names within it.
### One UI 4 and earlier (Galaxy S22 and older)
**Settings → Connections → Mobile Networks → Access Point Names**
The path is consistent going back to One UI 4. On very old Samsung devices running Android 10 or earlier, the path may be **Settings → Connections → More Connection Settings → Mobile Networks → Access Point Names**.
### Entering APN Values on Samsung
The field layout on Samsung is the same as stock Android. Tap the **+ (Add)** button to create a new APN, fill in the fields using the same table above, and tap **Save** from the three-dot menu. Tap the radio button to select the new APN as active.
### Samsung-Specific Notes
- **Two-SIM selection**: On dual-SIM Galaxy devices, the APN list is per-SIM. If you configure the wrong SIM's APN, data will still not work on the target SIM. Confirm which slot your MVNO SIM is in before editing.
- **Reset to default**: If the APN list is corrupted or you want to start fresh, tap **three-dot menu → Reset to default** inside the Access Point Names screen. This restores Samsung's factory APN entries for your carrier.
- **Greyed-out fields**: Some Galaxy devices sold by US carriers (AT&T, T-Mobile, Verizon) have certain APN fields locked. If fields are greyed out, you can typically still add a new APN entry with the unlocked fields and have it work alongside the locked entry.
- **One UI Internet app APN shortcut**: On some One UI versions, opening the **Internet** app and navigating to **Settings → Advanced → APN Settings** provides an alternate path to the same screen.
---
## Other Manufacturers (OPPO, Xiaomi, OnePlus)
The APN setting exists on all Android devices, but the path varies by manufacturer's UI skin. The most reliable approach is to search "APN" in the device's Settings search bar.
### OPPO and realme (ColorOS)
**Settings → SIM Card & Mobile Data → [select SIM] → Mobile Network → Access Point Names**
On ColorOS 14 (Android 14): **Settings → Mobile network → Tap SIM → Access Point Names** (label and intermediate steps may vary by region/model)
### Xiaomi and POCO (MIUI / HyperOS)
**Settings → SIM Cards & Mobile Networks → [select SIM] → Advanced Settings → Access Point Names**
On HyperOS (Xiaomi 14 series): **Settings → SIM cards & Mobile Networks → [select SIM] → Access Point Names**
### OnePlus (OxygenOS)
**Settings → Wi-Fi & Network → SIM & Network → [select SIM] → Access Point Names**
### General Method: Settings Search
On any Android phone, open **Settings** and search for **"APN"** or **"Access Point"**. The search result will link directly to the APN list for your current SIM. This method bypasses manufacturer UI differences and works on all recent Android versions.
For [physical SIM vs. eSIM](/en/guides/what-is-sim/) configuration differences, the APN setting location is the same regardless of whether you are configuring a nano-SIM or an eSIM — both appear in the SIM settings area and share the same APN list.
---
## Common Carrier APN Examples (US / UK / AU)
The following APN values are published in official carrier documentation. APN strings can change when carriers update their infrastructure — always verify the current value at your carrier's official support page before entering.
### United States
| Carrier | APN String | Notes |
|---------|-----------|-------|
| T-Mobile (postpaid) | `fast.t-mobile.com` | T-Mobile official support |
| T-Mobile (prepaid) | `fast.t-mobile.com` | Same APN for prepaid |
| Mint Mobile (T-Mobile MVNO) | `wholesale` | Mint Mobile setup guide; T-Mobile sub-brand |
| Metro by T-Mobile | `fast.metropcs.com` | Metro by T-Mobile official support |
| Visible (Verizon sub-brand) | `vsblinternet` | Visible APN guide |
| AT&T (postpaid, 5G) | `ENHANCEDPHONE` | AT&T official support (username/password: blank) |
| AT&T (postpaid, LTE) | `phone` | AT&T official support (username/password: blank). Legacy LTE APN — most postpaid AT&T users on 5G should use ENHANCEDPHONE; this row is provided for older LTE-only devices |
| AT&T (prepaid) | `NXTGENPHONE` | AT&T official support (username/password: blank) |
| AT&T (hotspot/tethering) | `Broadband` | Required for Personal Hotspot / tethering on AT&T |
| Cricket Wireless (AT&T sub-brand) | `ndo` | Cricket official support |
| Verizon (postpaid) | `vzwinternet` | Verizon official support |
> **Note on Mint Mobile**: Mint runs on T-Mobile's network. The official APN is `wholesale` as documented in Mint Mobile's setup guide. Some users report `fast.t-mobile.com` works as an unofficial fallback, but `wholesale` is the primary recommended value.
> **Note on Visible**: Visible is a Verizon sub-brand (owned and operated by Verizon). It uses the APN `vsblinternet`, which is separate from Verizon's `vzwinternet`.
### United Kingdom
| Carrier | APN String | Notes |
|---------|-----------|-------|
| EE | `everywhere` | EE official support |
| O2 | `mobile.o2.co.uk` | O2 official support (pay monthly only; PAYG uses payandgo.o2.co.uk) |
| Three | `three.co.uk` | Three official support |
| Vodafone UK | `wap.vodafone.co.uk` | Username: `wap`, Password: `wap`. Check Vodafone UK official support for the most current guidance |
| giffgaff (O2 MVNO) | `giffgaff.com` | Username: `giffgaff`, Password: `password`. giffgaff official support |
| Tesco Mobile (O2 MVNO) | `prepay.tesco-mobile.com` | Tesco Mobile official support |
### Australia
| Carrier | APN String | Notes |
|---------|-----------|-------|
| Telstra | `telstra.internet` | Telstra official support |
| Optus | `yesinternet` | Optus official support |
| Vodafone AU (postpaid) | `vfinternet.au` | Vodafone AU official support |
| Vodafone AU (prepaid / 4G) | `live.vodafone.com` | Vodafone AU official support |
**Important**: These values are correct as of April 2026 but are subject to change. Always confirm at the carrier's official support site. Third-party APN databases are frequently outdated.
---
## Travel eSIM APN Behavior on Android
Travel eSIMs behave differently from domestic SIMs when it comes to APN configuration, and Android handles them differently from iPhone in one important way.
### How Travel eSIM APN Works on Android
When you download and install a travel eSIM profile on Android, some providers include APN configuration in the profile download. If they do, the APN is set automatically after the eSIM activates and you will not need to do anything.
However, unlike iPhone where APN delivery via `.mobileconfig` is a standard mechanism, Android's eSIM profile format (GSMA SGP.22) does not have a standardised field for APN data. Each provider chooses whether and how to push APN settings. Major providers like Airalo, Holafly, Nomad, and Saily include APN setup in their Android onboarding documentation; some push it via the profile, others instruct you to enter it manually.
**If your travel eSIM shows signal on Android but data does not work**: check the provider's Android-specific setup page for the APN string and enter it using the steps above for your device model.
### Data Roaming Must Be Enabled
Even with a correct APN, a travel eSIM will not pass data on Android if **Data Roaming** is turned off. Android treats a travel eSIM's connection as a roaming session (because it authenticates to a foreign network), so the roaming toggle must be on even when you are physically in the destination country.
To enable Data Roaming on a Pixel:
1. **Settings → Network & Internet → SIMs**
2. Tap the travel eSIM line
3. Enable **Roaming**
To enable Data Roaming on Samsung Galaxy:
1. **Settings → Connections → Mobile Networks**
2. Select the travel eSIM SIM slot at the top if dual-SIM
3. Enable **Data Roaming**
### Dual-SIM Setup with a Travel eSIM
If you are using your home SIM alongside a travel eSIM, confirm that the travel eSIM is set as the **preferred data SIM**:
- **Pixel**: Settings → Network & Internet → SIMs → Preferred SIM → Data → select the travel eSIM
- **Samsung**: Settings → Connections → SIM card manager → Mobile Data → select the travel eSIM
Also consider turning off data roaming on your home SIM to prevent it from connecting to local networks at roaming rates while the travel eSIM handles data.
---
## APN Type, Authentication, and IP Protocol Fields
When adding or editing an APN on Android, several fields beyond the main APN string affect how the connection is established. Getting these right matters for tethering, MMS, and protocol compatibility.
### APN Type
The **APN Type** field tells Android which services this APN handles. Common values:
| Value | Purpose |
|-------|---------|
| `default` | Standard internet data |
| `supl` | Secure User Plane Location (assisted GPS) |
| `mms` | Multimedia Messaging Service |
| `dun` | Dial-up networking (tethering / mobile hotspot) |
For most use cases, enter **`default,supl,mms,dun`** to cover internet data, GPS, MMS, and tethering with a single APN entry. If your carrier provides separate APN strings for MMS or tethering, create separate entries with the corresponding type.
If you leave the APN Type field blank, Android treats it as `default` only.
### Authentication Type
The **Authentication Type** field specifies the protocol used to authenticate your device to the carrier's gateway:
| Value | When to Use |
|-------|------------|
| None | Most modern carriers; use when username/password are blank |
| PAP | Password Authentication Protocol; used by some UK/EU carriers (e.g., giffgaff with username and password) |
| CHAP | Challenge Handshake Authentication Protocol; less common |
| PAP or CHAP | Let the gateway choose; safest default when unsure and carrier requires credentials |
If your carrier provides a username and password, set Authentication Type to **PAP or CHAP** unless they specify otherwise.
### IP Protocol (APN Protocol / APN Roaming Protocol)
| Value | Meaning |
|-------|---------|
| `IPv4` | IPv4 only |
| `IPv6` | IPv6 only |
| `IPv4/IPv6` | Dual-stack; prefers IPv6, falls back to IPv4 |
**Recommendation**: Use **IPv4/IPv6** (dual-stack) for both APN Protocol and APN Roaming Protocol. This is the correct setting for all modern carriers that support IPv6. If you experience connection issues with IPv4/IPv6, try switching to **IPv4** only — some older MVNOs and some travel eSIM providers do not fully support IPv6.
---
## Troubleshooting: Data Still Doesn't Work
If you have entered the APN correctly and data still does not work, go through this checklist in order.
### 1. Confirm the APN Is Selected
Open the APN list (Settings → Network & Internet → SIMs → Access Point Names on Pixel, or Settings → Connections → Mobile Networks → Access Point Names on Samsung). The active APN has a filled circle next to it. If your new APN entry is not selected, tap it to select it.
### 2. Check the APN String Carefully
Compare the APN string character by character with your carrier's official documentation. Common mistakes:
- Extra space at the start or end of the string
- A period instead of a hyphen, or vice versa
- Wrong capitalisation (some carrier APNs are case-sensitive; e.g., `ENHANCEDPHONE` must be uppercase)
- Incorrect MCC or MNC values (leave these at the auto-filled values from your SIM)
### 3. Verify Mobile Data Is Enabled
Pixel: Settings → Network & Internet → SIMs → [your SIM] → **Mobile Data** toggle on.
Samsung: Settings → Connections → Mobile Networks → **Mobile Data** toggle on (or pull down the notification shade and tap the Mobile Data quick tile).
### 4. Check Data Roaming
If your SIM or eSIM routes data via a roaming session (common with travel eSIMs and some MVNOs that use a different network), Data Roaming must be on. See the Travel eSIM section above for the exact path.
### 5. Toggle Airplane Mode
Airplane Mode off for 10 seconds, then off. This forces the modem to drop its current registration and re-register using the new APN. Wait 15 seconds after turning Airplane Mode off before testing.
### 6. Restart the Device
A full restart re-initialises the modem stack and can resolve issues that an Airplane Mode cycle does not. Power off completely, wait 10 seconds, power on.
### 7. Check APN Type and Protocol
If data works but tethering (mobile hotspot) does not, add `dun` to the APN Type field or create a separate tethering APN entry. If IPv4/IPv6 causes issues, switch the APN Protocol to IPv4 only.
### 8. Reset Network Settings (Last Resort)
On Pixel: Settings → System → Reset options → **Reset Wi-Fi, mobile & Bluetooth**. This clears Wi-Fi passwords, Bluetooth pairings, and APN customisations. eSIM profiles are preserved (they are stored separately from network settings).
On Samsung (One UI 6): Settings → General Management → Reset → **Reset Network Settings**. eSIM profiles are preserved.
After the reset, Android may automatically restore the carrier's default APN. If not, re-enter the APN manually.
For a full data troubleshooting sequence covering all causes beyond APN — including data caps, VPN interference, and DNS issues — see [No Mobile Data? How to Fix Data Connection Problems](/en/guides/no-data/).
---
## FAQ
### What is an APN and why does my Android phone need it?
APN stands for Access Point Name. It is defined in 3GPP TS 23.003 as the identifier that selects the packet data gateway on the carrier's core network. Without the correct APN your phone can show full signal bars but cannot route any internet traffic. Most MNOs push the APN automatically when you insert a SIM. You need to set it manually mainly with MVNOs and some travel eSIMs that do not push configuration automatically.
### Where is the APN setting on a Google Pixel?
Go to Settings → Network & Internet → SIMs → tap your SIM → Access Point Names. If you have two SIMs, select the correct one first. Tap the plus icon to add a new APN or tap an existing entry to edit it.
### Where is the APN setting on a Samsung Galaxy (One UI)?
Go to Settings → Connections → Mobile Networks → Access Point Names. On some One UI versions the path is Settings → Connections → Mobile Networks → Network Operators → Access Point Names, or Settings → General Management → Reset → Reset Network Settings if the APN menu is locked. If you have two SIMs, select the correct SIM from the top of the screen first.
### Why is the APN menu greyed out or missing on my Android phone?
Some carriers lock the APN menu to prevent changes. This is common on carrier-sold devices in the US. If the menu is greyed out or absent, try inserting the SIM from a different carrier (if available) or check your carrier's support page for a pre-configured APN profile or an unlock method. On Samsung devices, restoring the APN to default and re-entering values sometimes resolves the greyed-out state.
### Do travel eSIMs need manual APN setup on Android?
Many travel eSIM providers embed APN configuration in the eSIM profile, so no manual setup is required after activation. However, manual APN entry is more common on Android than on iPhone because Android does not have a universal profile mechanism equivalent to Apple's .mobileconfig. If your travel eSIM has signal but no data, check your provider's setup page for the APN string and enter it manually.
### What should I enter in the APN Type field?
For basic internet data, enter `default` in the APN Type field. For full functionality including tethering, multimedia messaging, and supplementary location, use `default,supl,mms,dun`. If your carrier specifies a different value, use exactly what they document. Leaving the field blank or entering incorrect types can prevent data from routing correctly.
### My APN is set correctly but data still does not work on Android. What else should I check?
Verify in order: (1) Mobile data toggle is on (Settings → Network & Internet → SIMs → Mobile Data), (2) Data Roaming is on if your SIM connects via a roaming session — required for most travel eSIMs, (3) the correct SIM is set as the default data SIM if you have two SIMs, (4) toggle Airplane Mode off and on to force a modem reconnect, (5) restart the device. For a full diagnostic sequence, see the [No Mobile Data guide](/en/guides/no-data/).
---
## Related Guides
- [APN Setup Guide for iPhone](/en/guides/apn-setup-iphone/) — configuration profiles and manual setup on iOS
- [What Is a SIM Card?](/en/guides/what-is-sim/) — how SIM and eSIM store carrier credentials
- [What Is an MVNO?](/en/guides/what-is-mvno/) — why MVNOs use different APN values than the host carrier
- [No Mobile Data? How to Fix Data Connection Problems](/en/guides/no-data/) — full troubleshooting sequence when data does not work
- [SIM & Mobile Glossary](/en/guides/glossary-index/) — definitions for APN, DNN, carrier settings, and related terms
Use [SimFinder](/en/) to compare domestic mobile plans, or [SimFinder Travel](/en/travel/) to find and compare travel eSIM plans for your destination.
================================================================================
# APN Setup Guide for iPhone — Configuration Profiles and Manual Setup
URL: https://sim-finder.com/en/guides/apn-setup-iphone/
Type: guides (en)
Published: 2026-04-24
Your iPhone shows signal bars, but mobile data does not work after switching to an MVNO or activating a travel eSIM. In most cases, the missing step is the APN (Access Point Name) — a small configuration string that connects your device to the carrier's data gateway.
**This guide explains what an APN is, when iPhone sets it automatically versus when you need to act, and how to install or enter the correct settings.** It also lists verified APN strings for common US, UK, and Australian MVNOs, and covers travel eSIM scenarios.
If your device shows zero bars or "No Service" rather than a data failure, start with the signal troubleshooting steps in [No Mobile Data? How to Fix Data Connection Problems](/en/guides/no-data/) first.
---
## What Is an APN?
APN stands for **Access Point Name**. It is defined in **3GPP TS 23.003** (the 3GPP specification for numbering, addressing, and identification) as the identifier that selects a packet data gateway on the carrier's core network. When your device connects to a cellular network and requests internet access, the network uses the APN to route your data session to the correct gateway.
An APN has two parts:
- **Network Identifier** (mandatory) — identifies the external packet data network, such as `internet` or `fast.t-mobile.com`
- **Operator Identifier** (optional) — encodes the PLMN (Public Land Mobile Network) of the serving GPRS support node; most consumer APN configurations omit this field
The maximum encoded length is 100 octets, as specified in TS 23.003.
In 5G networks, the equivalent concept is the **DNN (Data Network Name)**, defined in 3GPP TS 23.003 Clause 9A. Functionally it behaves the same way — the term changes in the 5G core architecture, but for device setup purposes the APN string you enter works across 4G and 5G. For quick definitions of APN, DNN, and related terms, see the [SIM & Mobile Glossary](/en/guides/glossary-index/).
Understanding what an APN does is especially useful when using an [MVNO](/en/guides/what-is-mvno/) — since MVNOs run their own billing and gateway infrastructure on top of a host network, they use different APN values than the host carrier even though they share the same towers.
---
## When iPhone Needs APN Setup vs. When It Is Automatic
iPhone handles APN configuration through two mechanisms. Knowing which one applies to your situation tells you whether you need to do anything at all.
### Automatic: Carrier Settings Updates
When you insert a physical SIM from a carrier that has submitted a carrier bundle to Apple, iOS prompts "Carrier Settings Update" and installs the correct APN automatically. This works for the major MNOs (AT&T, T-Mobile, Verizon in the US; EE, O2, Three, Vodafone in the UK; Telstra, Optus, Vodafone in Australia) and for many MVNOs that have their own Apple carrier bundle.
After any iOS upgrade or SIM swap, you may see this prompt again. Always accept it.
### Automatic: eSIM Profile Push
When you activate an eSIM, the eSIM provider can embed the APN configuration inside the carrier profile that is downloaded to your device. If the provider has done this, the APN is installed silently as part of the eSIM activation process, and you do not need to take any further steps. Most major travel eSIM providers include APN configuration in their profiles.
### Manual Required: When Automatic Does Not Apply
You will need to set the APN manually in the following situations:
| Situation | Why Manual Is Needed |
|-----------|----------------------|
| MVNO SIM with no Apple carrier bundle | No automatic profile push occurs |
| Travel eSIM provider that omits APN from their profile | Profile exists but does not include APN data |
| SIM inserted after a network settings reset | Reset clears saved APN configuration |
| Carrier profile installed for a different carrier is active | Wrong profile overrides the APN |
| Device purchased from a carrier that locked APN editing | APN field is read-only; need a specific profile from the MVNO |
The most common real-world scenario: you buy a prepaid SIM from a US MVNO at an airport or convenience store, insert it, get signal, but no data. The MVNO runs on T-Mobile or AT&T infrastructure but uses its own APN — and since there is no Apple carrier bundle for that reseller, iOS never configured the APN automatically.
For a broader explanation of how [physical SIMs and eSIMs](/en/guides/what-is-sim/) differ in how they deliver configuration, see the SIM basics guide.
---
## Installing a Configuration Profile (.mobileconfig)
The standard method for iPhone APN setup is a **configuration profile** — a file with the `.mobileconfig` extension that iOS can install and manage. Your MVNO or travel eSIM provider will typically publish this on their website or include a download link in the onboarding email.
### Step 1: Obtain the Profile from Your Provider
Navigate to your provider's official support or setup page. The profile download is usually labelled something like "APN Profile for iOS," "iPhone Configuration Profile," or "Download for iOS." Confirm you are downloading from the provider's official domain.
### Step 2: Download the Profile to Your iPhone
Open the link in **Safari** (not Chrome or another browser). iOS only triggers the profile installation dialog from Safari. When you tap the download link, iOS shows: **"This website is trying to download a configuration profile. Do you want to allow this?"** Tap **Allow**.
### Step 3: Open Settings to Install
After tapping Allow, go to **Settings**. Near the top of the Settings screen you will see a new banner: **"Profile Downloaded"**. Tap it.
Alternatively, go to **Settings → General → VPN & Device Management → Downloaded Profile**.
### Step 4: Review and Install
You will see the profile name, issuer, and a summary of what it contains. For an APN-only profile the description typically says "APN settings" or "Cellular Network Configuration." Tap **Install**, enter your device passcode when prompted, and tap **Install** again on the confirmation screen.
### Step 5: Confirm and Test
After installation, go to **Settings → General → VPN & Device Management**. The profile should now appear under **Configuration Profiles**. Tap it to see the full contents — you can verify the APN string that was installed.
Toggle Airplane Mode on, wait 5 seconds, then toggle it off. This forces the modem to reconnect and use the new APN. Open Safari and load a page to confirm data is working.
### iOS Version Notes
- **iOS 17 and iOS 18**: the configuration profile installation flow for APN purposes is the same as described above. The "Profile Downloaded" banner appears in Settings as expected.
- **iOS 18**: no significant changes to the profile installation process for APN configuration have been reported. If you encounter a different UI path, refer to [Apple Support](https://support.apple.com/en-us/102483) for the latest guidance.
- On all recent iOS versions, the profile is installed under **Settings → General → VPN & Device Management** (not the older "Profiles" path that appeared in iOS 14 and earlier).
---
## Manually Configuring APN When No Profile Is Provided
Some MVNOs do not publish a `.mobileconfig` profile and instead instruct you to enter APN settings manually. This is only possible if the **Cellular Data Network** menu is accessible — many carrier profiles hide this menu to prevent accidental changes.
### Accessing the Cellular Data Network Menu
Go to **Settings → Cellular → Cellular Data Network**.
The menu name and path vary by iOS version and region:
- iOS 17/18, US region: **Settings → Cellular → Cellular Data Network**
- International builds (non-US): **Settings → Mobile Data → Mobile Data Network**
- On some carrier profiles: the menu is entirely absent
> **Note**: Apple removed the intermediate **Cellular Data Options** step in recent iOS versions. The correct path is directly **Settings → Cellular → Cellular Data Network** (source: [Apple Support](https://support.apple.com/en-us/102483)).
If the menu is missing, your carrier has locked APN editing. In this case, manual entry is not possible through the standard Settings path — you must either obtain and install a `.mobileconfig` profile from your provider, or contact their support.
### Entering APN Values
The Cellular Data Network screen has three sections: **Cellular Data**, **LTE Setup (Optional)**, and **Personal Hotspot**. For basic internet connectivity, only the **Cellular Data** section needs to be filled:
| Field | What to Enter |
|-------|--------------|
| APN | The APN string from your provider (e.g., `internet`, `wholesale`, `fast.t-mobile.com`) |
| Username | Leave blank unless your provider specifies one |
| Password | Leave blank unless your provider specifies one |
Enter the APN string **exactly as provided** — it is case-sensitive in some implementations, and extra spaces will prevent the connection from working.
After entering the values, press the Home button or swipe up to go back. Then toggle Airplane Mode off and on to apply the new settings.
### The LTE Setup and Personal Hotspot Fields
The **LTE Setup** APN field is used for certain carrier-specific LTE provisioning. On most consumer plans, leaving it blank is correct — only fill it in if your provider explicitly gives you a separate LTE APN value.
The **Personal Hotspot** APN field controls the APN used when sharing your connection. For most MVNOs, this is the same as the Cellular Data APN or left blank. Use the value your provider documents.
---
## Common Carrier APN Examples (US / UK / AU)
The following APN values are published in official carrier documentation. APN strings can change when carriers update their infrastructure — always verify the current value at your carrier's official support page before entering.
### United States
| Carrier | APN String | Notes |
|---------|-----------|-------|
| T-Mobile (postpaid) | `fast.t-mobile.com` | Published on T-Mobile support |
| T-Mobile (prepaid) | `fast.t-mobile.com` | Same APN for prepaid |
| Mint Mobile (T-Mobile MVNO) | `wholesale` | Mint Mobile setup guide |
| Metro by T-Mobile | `fast.metropcs.com` | Metro by T-Mobile official support |
| Visible (Verizon sub-brand) | `vsblinternet` | Visible APN guide |
| AT&T (postpaid, 5G) | `ENHANCEDPHONE` | AT&T official support (username/password: blank) |
| AT&T (postpaid, LTE) | `phone` | AT&T official support (username/password: blank) |
| AT&T (prepaid) | `NXTGENPHONE` | AT&T official support (username/password: blank) |
| AT&T (hotspot/MiFi) | `Broadband` | Required when using Personal Hotspot on AT&T |
| Cricket Wireless (AT&T sub-brand) | `ndo` | Cricket support |
| Verizon (postpaid) | `vzwinternet` | Verizon support |
> **Note on Mint Mobile**: Mint runs on T-Mobile's network. The official APN is `wholesale` as documented on Mint Mobile's setup guide. Some users report that `fast.t-mobile.com` works as an unofficial fallback, but the official value `wholesale` should be used as the primary setting. Always check Mint's official support page for the current recommended value.
### United Kingdom
| Carrier | APN String | Notes |
|---------|-----------|-------|
| EE | `everywhere` | EE support |
| O2 | `mobile.o2.co.uk` | O2 support |
| Three | `three.co.uk` | Three support |
| Vodafone | `wap.vodafone.co.uk` | Username: `wap`, Password: `wap`. Check Vodafone UK official support for the most current guidance |
| giffgaff (O2 MVNO) | `giffgaff.com` | giffgaff support — username: `giffgaff`, password: `password` |
| Tesco Mobile (O2 MVNO) | `prepay.tesco-mobile.com` | Tesco Mobile support |
### Australia
| Carrier | APN String | Notes |
|---------|-----------|-------|
| Telstra | `telstra.internet` | Telstra support |
| Optus | `yesinternet` | Optus support |
| Vodafone AU (postpaid) | `vfinternet.au` | Vodafone AU official support |
| Vodafone AU (prepaid/4G) | `live.vodafone.com` | Vodafone AU official support |
**Important**: These values are correct as of April 2026 but are subject to change. Always confirm at the carrier's official support site. Do not rely on third-party APN databases — they are frequently outdated and may list deprecated values.
---
## APN for Travel eSIMs
Travel eSIMs have a different configuration model compared to domestic SIMs. Understanding how they work prevents most APN-related confusion.
### How Travel eSIM APN Works
When you download a travel eSIM profile, the profile itself can embed the APN configuration. Most major providers — including Airalo, Holafly, Nomad, and Saily — include APN settings in their profiles, so installation is complete once the eSIM is activated.
If a provider does not include APN data in the profile, they publish the required APN string in their setup documentation or onboarding email. Manual entry follows the same steps as domestic MVNO setup above.
### Travel eSIM and Data Roaming
Even with a correct APN, data will not flow on a travel eSIM if **Data Roaming** is disabled. This surprises many users: a travel eSIM is technically connecting to the local network as a roaming session at the protocol layer, so iOS treats it as roaming even though you are physically present in that country.
To enable Data Roaming on iPhone:
1. Settings → Cellular.
2. Tap the travel eSIM line name.
3. Tap **Cellular Data Options**.
4. Turn on **Data Roaming**.
If you are using a dual-SIM setup with a home SIM and a travel eSIM, also confirm which line is set as the **Cellular Data** line (Settings → Cellular → Cellular Data → select the travel eSIM line).
For a complete dual-SIM travel setup, including how to prevent your home SIM from accidentally using data abroad, see [What Is an eSIM?](/en/guides/what-is-esim/).
### When Manual APN Entry Is Needed for Travel eSIMs
Manual APN entry for travel eSIMs is more common on Android than on iPhone, but it does occur on iOS when:
- The provider's profile omits APN data (less common with major providers)
- You are using a regional or niche provider whose profile is not fully configured for iOS
- You reinstalled the eSIM profile after deleting it, and the reinstall did not include APN data
In these cases, the provider's support page will list the APN string. Enter it in the Cellular Data Network menu as described in the Manual Configuration section above.
---
## Troubleshooting: Data Still Doesn't Work
If you have installed a profile or entered the APN manually and data still does not work, go through this checklist in order.
### 1. Confirm the Profile Is Active
Settings → General → VPN & Device Management → Configuration Profiles. Verify the profile is listed. If it says "Not Verified" or shows a warning triangle, the profile may have an untrusted certificate — delete it and re-download from the provider's official site.
### 2. Check the Cellular Data Toggle
Settings → Cellular → **Cellular Data** must be toggled on (green). This is separate from the APN setting.
### 3. Check Data Roaming
Settings → Cellular → tap the SIM line → Cellular Data Options → **Data Roaming** on. Required for travel eSIMs and some MVNOs.
### 4. Confirm the Correct SIM Is Handling Data
On dual-SIM iPhones, Settings → Cellular → **Cellular Data** shows which line is currently providing data. If the wrong line is selected, tap it and switch to the correct one.
### 5. Verify the APN String
Go back to the Cellular Data Network menu (or the installed profile) and compare the APN string character by character with your provider's documentation. Common mistakes: capital letters in the wrong place, a period instead of a hyphen, or a trailing space.
### 6. Toggle Airplane Mode
Toggle Airplane Mode on for 10 seconds, then off. This forces the modem to re-establish the data session using the new APN.
### 7. Restart the iPhone
A full restart (power off, then power on) re-initialises the modem stack and can resolve issues that an Airplane Mode toggle does not.
### 8. Reset Network Settings (Last Resort)
Settings → General → Transfer or Reset iPhone → Reset → **Reset Network Settings**. This clears all Wi-Fi passwords, VPN configurations, and APN customisations but **preserves eSIM profiles**. After the reset, the carrier may push an updated profile automatically. If not, reinstall the profile or re-enter the APN manually.
### iOS-Specific Issues
- **iOS 17.x and iOS 18.x**: There are no known iOS 17 or 18 bugs that prevent APN settings from taking effect under normal circumstances. If a specific iOS update broke data for your MVNO, check the provider's community forum for announcements.
- **Carrier settings out of date**: Settings → General → About. If a carrier settings update is available, a dialog will appear. Install it. Outdated carrier bundles can cause APN-related mismatches.
For a full step-by-step data troubleshooting sequence that covers all causes beyond APN — including data caps, VPN interference, and DNS issues — see [No Mobile Data? How to Fix Data Connection Problems](/en/guides/no-data/).
---
## Removing and Switching Profiles
### Removing a Configuration Profile
Settings → General → VPN & Device Management → Configuration Profiles → tap the profile → **Remove Profile**. Enter your device passcode to confirm.
After removal, iOS may automatically download a fresh carrier settings update if your carrier has one available. If data worked before installing the profile, removing it should restore the previous state.
### Profile Priority When Multiple Profiles Are Installed
If you have two configuration profiles that both define APN settings, iOS applies the APN from the **most recently activated profile**. There is no visual indicator in Settings that shows which profile's APN is currently in use — you can only infer this from the order of installation.
To avoid conflicts, keep only one APN-defining profile active at a time. Remove old profiles before installing a new one, especially when switching from one MVNO to another.
### Carrier Settings vs. Configuration Profiles
Apple's carrier settings (delivered automatically as Carrier Settings Updates) and manually installed configuration profiles are different mechanisms:
- **Carrier settings** are maintained by Apple in partnership with carriers and updated automatically
- **Configuration profiles** are installed by the user and managed under VPN & Device Management
A manually installed configuration profile takes precedence over the carrier's automatic APN setting for the same field. If a carrier settings update arrives after you have installed a manual profile, the update does not overwrite the profile's APN — you would need to remove the profile first.
---
## FAQ
### What is an APN and why does my iPhone need it?
APN stands for Access Point Name. It is defined in 3GPP TS 23.003 as the identifier that connects your device to the carrier's packet data gateway. Without the correct APN, your iPhone can show signal bars but cannot route internet traffic. Most carriers push the APN automatically when you insert a SIM or activate an eSIM. You only need to set it manually when automatic configuration does not happen — most commonly with MVNOs and some travel eSIMs.
### Why can't I see the Cellular Data Network menu on my iPhone?
The Cellular Data Network (or Mobile Data Network) menu is hidden when your carrier or MVNO has locked APN editing through a carrier configuration profile. This is standard practice on many carrier-managed plans. To set the APN, you need to install the .mobileconfig profile that your MVNO or eSIM provider supplies. If no profile is available, contact their support to request one.
### What is a .mobileconfig file and is it safe to install?
A .mobileconfig file is an Apple-format configuration profile that can push APN settings, Wi-Fi credentials, VPN configs, and other parameters to an iPhone. For APN setup, only install profiles provided directly by your MVNO or eSIM provider from their official website or onboarding email. A profile from an unknown source could modify DNS, VPN, or other sensitive settings. After installation, you can review exactly what a profile contains at Settings → General → VPN & Device Management.
### Will installing a carrier profile override my existing settings?
A carrier configuration profile installs its APN values into a managed layer that takes precedence over the manual Cellular Data Network fields. If you already had working APN settings, installing a second profile can override them. iOS applies the APN from the most recently installed active profile. If two profiles conflict, remove the old one first (Settings → General → VPN & Device Management), then install the new one.
### Do travel eSIMs need APN setup on iPhone?
Most major travel eSIM providers (Airalo, Holafly, Nomad, Saily) push APN configuration automatically when you activate the eSIM, so no manual setup is required in most cases. Some smaller providers do require manual APN entry. Check your provider's setup documentation or onboarding email for the specific APN string. If your eSIM is active and shows a signal but data does not work, the APN is the most likely cause.
### How do I remove a carrier profile from my iPhone?
Go to Settings → General → VPN & Device Management. Under Configuration Profiles, tap the profile name, then tap Remove Profile. You will be prompted to enter your device passcode. After removal, restart your iPhone and check whether your carrier pushes a fresh APN profile automatically. If it does not, you will need to install a new profile or enter APN settings manually.
### My APN is set correctly but data still does not work. What else should I check?
APN is one of several prerequisites for mobile data. Also verify: (1) Cellular Data toggle is on (Settings → Cellular), (2) Data Roaming is enabled if your SIM routes data via a roaming session — common with travel eSIMs and some MVNOs, (3) your plan has remaining data and is not expired, (4) no VPN is intercepting traffic. For a full diagnostic sequence, see the [No Mobile Data guide](/en/guides/no-data/).
---
## Related Guides
- [What Is a SIM Card?](/en/guides/what-is-sim/) — how SIM and eSIM store carrier credentials
- [What Is an eSIM?](/en/guides/what-is-esim/) — how eSIM profiles deliver configuration to your device
- [What Is an MVNO?](/en/guides/what-is-mvno/) — why MVNOs use different APN values than the host carrier
- [No Mobile Data? How to Fix Data Connection Problems](/en/guides/no-data/) — full troubleshooting sequence when data does not work
- [SIM & Mobile Glossary](/en/guides/glossary-index/) — definitions for APN, DNN, carrier settings, and related terms
Use [SimFinder](/en/) to compare domestic mobile plans, or [SimFinder Travel](/en/travel/) to find and compare travel eSIM plans for your destination.
================================================================================
# How to Set Up an eSIM via an App
URL: https://sim-finder.com/en/guides/app-setup/
Type: guides (en)
Published: 2026-06-06
Many carriers and travel eSIM providers offer a dedicated app that handles eSIM installation and ongoing management in one place. Instead of scanning a QR code or typing an activation code, you log in, select a plan, and the app downloads the profile directly to your device. The same app then gives you a dashboard for data balance, top-ups, and line switching.
If you are new to eSIM technology, read [What Is an eSIM?](/en/guides/what-is-esim/) before continuing. To check whether your device supports eSIM at all, see [eSIM-Compatible Devices](/en/guides/esim-compatible-devices/).
---
## How App-Based Setup Differs from QR and Manual Entry
There are three common ways to install an eSIM profile: QR code scanning, manual code entry, and a carrier or provider app. All three methods end with the same result — an eSIM profile installed on your device — but the input path differs.
With QR code setup — covered in detail for [iPhone](/en/guides/qr-code-iphone/) and [Android](/en/guides/qr-code-android/) — the carrier generates a one-time code image that your device camera decodes and uses to contact the provisioning server. With [manual code entry](/en/guides/manual-code/), you type the SM-DP+ address and activation code directly into your device settings. Both methods require you to have the code in hand before starting.
App-based setup replaces the code handoff entirely. The app authenticates your account, selects the plan you want, and triggers the profile download — all from within a single interface. You do not receive or enter a QR code or activation string. The app communicates directly with the carrier's provisioning server on your behalf.
This distinction matters in a few practical ways:
| Factor | QR / Manual | App-based |
|--------|-------------|-----------|
| Code required before starting | Yes | No |
| Account login required | Usually not for setup | Yes |
| Post-install management | Via device Settings | Via app + device Settings |
| Re-download on new device | New QR/code from carrier | Usually possible from app |
| Works without internet on device | No | No |
App-based setup is not inherently faster or slower than QR code scanning. The profile download time is determined by the carrier's server and your connection speed, not the input method.
---
## Which Providers Use App-Based eSIM Setup
App-based eSIM activation is common across two categories of providers.
**Mobile carriers (your primary SIM):** Many carriers that issue long-term postpaid or prepaid plans allow eSIM activation through their official account app. After signing up for a plan online or in-store, you download the carrier app, log in, and activate your eSIM from within it. This is increasingly the preferred flow for carriers that want to reduce in-store visits and eliminate physical SIM card distribution.
**Travel eSIM providers:** A large portion of travel eSIM providers — companies that specialize in data-only plans for international travelers — use their app as the primary interface for purchasing a plan, downloading the profile, monitoring data usage, and buying top-ups. Many providers also support QR code and manual code installation alongside the app. For some smaller providers, the app is the only installation path, but most major providers offer multiple methods.
If you are comparing travel eSIM providers, SimFinder's travel search shows which plans are available for your destination. [Compare travel eSIM plans →](/en/travel/)
---
## App-Based vs. Other Methods: When to Choose Each
The installation method is often determined for you — the provider supports what they support. But when you have a choice, the following guidance helps.
**Choose app-based setup when:**
- You will use the same provider for ongoing management (top-ups, renewals, or multiple trips) and want everything in one place.
- The provider's app supports profile re-download, which makes device upgrades straightforward.
- You prefer not to handle QR codes or activation strings, which can be misplaced or expire.
**Choose QR code setup when:**
- You are setting up an eSIM on behalf of someone else and they do not need account access on their device.
- The provider issues a QR code and does not have an app, or the app is not available in your region's app store.
- You are doing an in-store eSIM switch and the carrier provides a printed or on-screen QR code.
**Choose manual code entry when:**
- Your device camera is not functioning.
- The QR code will not scan reliably due to damage, low resolution, or screen glare.
- The provider sends the SM-DP+ address and activation code as plain text (common in some business or enterprise provisioning flows).
In practice, for personal travel eSIMs, the app-based flow is often the most convenient path for the entire lifecycle of the plan — from purchase to expiry.
---
## What You Need Before Starting
Before opening the app, confirm the following:
**An eSIM-compatible, carrier-unlocked device.** The device must support eSIM — check [eSIM-Compatible Devices](/en/guides/esim-compatible-devices/) if you are unsure. It must also be carrier-unlocked. A carrier-locked device can only activate eSIM plans from the carrier it is locked to, regardless of which app you use.
**An account with the carrier or provider.** App-based setup requires a valid account. For new signups, you create the account during the plan purchase flow. For existing customers switching from a physical SIM to eSIM, you log in with your existing credentials.
**A stable internet connection.** The app needs internet access to authenticate your account and to download the eSIM profile from the carrier's server. Use Wi-Fi when possible, especially for the initial profile download.
**Sufficient device storage.** eSIM profiles are small, but the device must have space for the profile file. This is rarely an issue in practice.
---
## Typical App-Based eSIM Setup Flow
The exact steps vary by provider, but most app-based eSIM setups follow the same general sequence.
### Step 1 — Download and Open the App
Download the official app from the App Store (iOS) or Google Play (Android). Use only the official app published by the carrier or provider. Unofficial third-party apps cannot install eSIM profiles.
### Step 2 — Create an Account or Log In
New users complete registration — typically an email address, password, and sometimes identity verification depending on the carrier. Existing customers log in directly. Some carriers also support login via SMS verification to the number associated with the account.
### Step 3 — Choose a Plan or Locate Your Existing Order
For new activations, browse available plans and select one. The app will present options by data volume, validity period, and sometimes by region or country. For customers who already purchased a plan online, the order appears in the app under a section like "My eSIMs", "Orders", or "Active Plans".
### Step 4 — Initiate the eSIM Download
Tap the install or activate button. The label varies by app — common labels include **Download eSIM**, **Activate**, **Install Profile**, or **Get eSIM**. The app sends a request to the carrier's provisioning server (SM-DP+) tied to your account.
On iOS, the system displays a permission prompt asking you to confirm that you want to add a cellular plan. Tap **Allow** or **Continue** to proceed. On Android, a similar system dialog appears. You must grant permission for the profile to install.
### Step 5 — Wait for the Profile to Download
The profile downloads from the carrier's server to your device. This typically takes a few seconds to about a minute. Do not close the app or lock the screen during the download — interrupting the process can cause an incomplete installation that requires a support request to resolve.
### Step 6 — Label and Configure the New Line
Once the profile installs, your device prompts you to label the new line (for example, "Travel" or "Work"). On iOS, you are also asked to set default line preferences for calls, SMS, and data. On Android, similar options appear in Settings after the profile installs.
For most travel eSIMs that are data-only, set the eSIM line as the active data line and keep your home SIM active for calls and SMS only.
---
## After Installation: What the App Lets You Do
The app's role does not end after installation. For most providers, the app is the primary management interface for the eSIM throughout its lifetime.
### Monitor Data Balance
The app shows how much data remains on your plan in real time, or with a short delay depending on the provider. This is the most reliable way to track usage — more convenient than navigating device Settings, and more accurate than relying on the device's built-in data counter, which does not always align with what the carrier measures.
### Top Up or Renew a Plan
When your data runs low or your plan expires, the app lets you purchase additional data or a renewal plan without reinstalling the profile. The new allocation is added to the existing eSIM profile. This is one of the significant advantages of app-based management: adding data takes seconds from within the app, without any QR code or activation code needed.
### Switch Between Multiple eSIM Profiles
If you have installed multiple eSIM profiles, the app may let you toggle between them — activating one and deactivating another — directly from within the interface. The same can also be done from device Settings (Settings > Cellular on iOS; SIM manager on Android), but some provider apps offer a simplified view that shows only their own profiles.
### Request a Re-download on a New Device
If you upgrade your phone or need to reinstall the eSIM profile, many provider apps support profile re-download — you log in on the new device, locate your plan, and install it again without contacting support. Not all carriers support this; some require a support request or issue a new activation code. Check the provider's policy before assuming re-download is available.
---
## Benefits of App-Based eSIM Management
**No codes to store or lose.** With QR or manual code methods, losing the activation code or QR image means contacting support for a replacement. With app-based setup, your account is the credential — as long as you can log in, you can access your plan and reinstall if needed.
**Top-ups without new profiles.** App-based providers typically add data to the existing profile rather than issuing a new one. This avoids the need to install a new profile every time you run out of data.
**Centralized view of multiple eSIMs.** If you use a provider for frequent travel across multiple destinations, the app accumulates your purchase history and active profiles in one place. You can see current balance, past trips, and available plans without navigating device menus.
**In-app support access.** Most provider apps include a support channel — chat, FAQ, or a contact form — accessible from the same interface where you manage your eSIM. This is useful when something goes wrong and you need help without switching between apps.
---
## Caveats to Know
**The app requires an internet connection for management.** If your data runs out completely and you have no other internet connection, you cannot use the app to top up. With most GB-based plans, the data connection stops immediately when the balance reaches zero — there is no automatic grace period. Some unlimited plans reduce speeds rather than cutting off entirely, which may allow a top-up through the app. Check your provider's policy before relying on continued connectivity at zero balance. Planning ahead — topping up before reaching zero — avoids this situation.
**App availability depends on the provider's continued operation.** If a small travel eSIM provider shuts down or removes their app, you may lose access to management features. The installed eSIM profile itself may continue to function if it was already activated and paid for, but top-ups and re-downloads would no longer be possible. This is a consideration when choosing between established carriers and newer travel eSIM startups.
**App permissions and data access.** To manage your eSIM, the app needs certain device permissions — cellular network access, in some cases location for regional plan selection, and notification permissions for usage alerts. Review the permissions requested during installation and grant only what you consider necessary.
**Provider apps do not replace device Settings for core line management.** Fundamental line configuration — which line handles calls, which handles data, toggling a line on or off — is controlled through your device's Settings, not the provider app. The app supplements device Settings with provider-specific features; it does not replace the system-level controls.
---
## Troubleshooting App-Based Installation Issues
**The app shows an error during profile download.**
Common causes: the app is not up to date, the account has not completed identity verification, or the plan is not yet provisioned on the server side. Update the app to the latest version. Confirm in the app that your account status is active and any required verification steps are complete. If the plan was purchased moments ago, wait a few minutes and retry — provisioning sometimes takes time to propagate.
**The system permission prompt does not appear.**
On iOS, if the system dialog asking you to add a cellular plan does not appear, it may mean your iPhone has reached the eSIM profile limit (Apple states iPhones can store 8 or more profiles, but check the device's current count under Settings > Cellular). Delete an unused eSIM profile and try again. On Android, check that the app has the necessary permissions in device Settings.
**The profile installs but data does not work.**
Installing the profile and routing data through it are separate steps. Go to Settings > Cellular (iOS) or your device's SIM manager (Android) and confirm that the new eSIM line is selected as the active data line. For travel eSIMs, also ensure that data roaming is enabled on that line. If data still does not work after these checks, open the app to verify the plan is active and the validity period has not expired.
**You cannot log in to the app on a new device.**
If you replaced your device and cannot log in, use the account recovery option (typically email or SMS verification). Do not create a new account — creating a duplicate account will not give you access to plans purchased under the original account.
**The app is no longer available in your region's app store.**
Regional app store restrictions occasionally prevent downloading an app in a specific country. If this happens, the provider's QR code or manual code method is the fallback. Check whether the provider offers these alternative setup methods on their website. If not, contact support before purchasing a plan.
---
## FAQ
### Do I need a separate account to set up an eSIM via an app?
Yes. App-based eSIM setup requires an account with the carrier or provider. You create the account during signup, or log in to an existing one. The app uses your account to verify eligibility, generate the eSIM profile, and push it to your device. Without a valid account, the app cannot issue a profile.
### Can I use the app to manage an eSIM I installed via QR code?
In most cases, yes. If the eSIM was issued by the same carrier or provider that runs the app, logging in to the app gives you access to account management features — data balance, top-ups, line toggles, and renewal. The installation method (QR vs. app) does not affect what you can manage afterward, as long as the profile is tied to your account.
### What happens if I delete the provider app after installing the eSIM?
Deleting the app does not remove the installed eSIM profile from your device. The profile remains active and usable. However, you lose access to the app's management features — data balance monitoring, top-ups, and profile re-download — until you reinstall the app. If you need to reinstall the eSIM profile on a new device, you will need the app or another method provided by the carrier.
---
## Related Guides
- [How to Set Up eSIM on iPhone via QR Code](/en/guides/qr-code-iphone/) — ES-01: camera scan method, iOS 17.4 long-press trick, and dual-SIM configuration
- [How to Set Up eSIM on Android via QR Code](/en/guides/qr-code-android/) — ES-02: Pixel and Samsung QR setup flows
- [Set Up eSIM with a Manual Code (SM-DP+ Address)](/en/guides/manual-code/) — ES-03: the text-entry fallback when QR scanning is not possible
- [What Is an eSIM?](/en/guides/what-is-esim/) — how eUICC, SM-DP+ servers, and the GSMA SGP.22 specification fit together
- [eSIM-Compatible Devices](/en/guides/esim-compatible-devices/) — which iPhone, Android, and other device models support eSIM
To compare eSIM plans for your destination, use [SimFinder Travel →](/en/travel/)
---
Sources:
- [Set up eSIM on iPhone - Apple Support](https://support.apple.com/en-us/118669)
- [eSIM Consumer and IoT Specifications - GSMA](https://www.gsma.com/solutions-and-impact/technologies/esim/esim-specification/)
- [Get a SIM or eSIM & add it to your Pixel phone - Pixel Phone Help](https://support.google.com/pixelphone/answer/7086887)
================================================================================
# The Best Dual-SIM Combinations
URL: https://sim-finder.com/en/guides/best-combinations/
Type: guides (en)
Published: 2026-06-06
Running two SIMs on one phone is useful in four distinct situations: international travel, everyday cost management, keeping work and personal numbers separate, and protecting against carrier outages. Each situation calls for a different combination of plans. Understanding which pattern fits your goal — and what to look for in each SIM — is the starting point before you compare specific plans.
This guide covers the four most practical dual-SIM combinations, the rationale behind each, and the criteria to use when selecting each SIM in the pair.
---
## Why the Combination Matters as Much as the Plan
Most dual-SIM advice focuses on a single SIM — which carrier to choose, how much data to get, whether to go prepaid or postpaid. The combination is the part that often goes unexamined.
Two SIMs that make sense individually can fail as a pair. A backup line on the same host network as your primary provides zero protection against outages. A travel eSIM with poor tethering allowance does not work as a hotspot for your laptop. A data SIM without VoLTE support drops to 3G during your primary SIM's calls if your device is DSDS.
Choosing a combination means matching two SIMs to a clear goal, then evaluating each against criteria specific to the role it plays. The four patterns below define those roles.
---
## Pattern 1: Home SIM + Travel eSIM
### What it is
You keep your existing home SIM active during travel and add a local travel eSIM for data. The home SIM handles calls and SMS; the travel eSIM handles internet access at local rates.
### Who it suits
Anyone who travels internationally and wants to avoid international roaming charges while keeping their home number reachable. This is the most widely used dual-SIM travel setup.
### Why it works
Most travel eSIMs are data-only — they provide internet access without a local phone number. This makes them a natural complement to a home SIM rather than a replacement. You retain access to your home number for SMS two-factor authentication codes from banking apps, inbound calls from contacts who do not know you are abroad, and any service that uses your home number for verification.
The two SIMs have entirely separate jobs with no overlap:
| Line | Role |
|------|------|
| Home SIM | Calls, SMS, 2FA codes — your identity on the network |
| Travel eSIM | Data — internet access at local cost |
The practical result is internet connectivity at local rates with no change to how people reach you on your home number. For the full configuration walkthrough — line assignment, Data Roaming settings, and what to do when you return — see [Using Dual SIM for Travel](/en/guides/dual-sim-for-travel/).
### What to look for in the travel eSIM
**Coverage confirmation.** Verify the eSIM covers the specific country (or countries) you are visiting. Regional plans cover multiple countries but cost more per gigabyte than single-country plans. If you are visiting one country, a single-country plan is usually more cost-effective.
**Data allowance.** Light browsing, maps, and messaging for one week typically requires 3–5 GB. Add video streaming or remote work and the figure rises quickly. Use [SimFinder Travel](/en/travel/) to compare data amounts and validity periods for your destination.
**Tethering (hotspot) allowance.** Many travel eSIM plans explicitly permit tethering; some restrict or cap it. If you plan to connect a laptop or tablet through your phone's hotspot, confirm the plan allows this before purchasing.
**Activation timing.** Travel eSIM validity periods start at different points depending on the provider: some start on the installation date, others on the first network connection at the destination, others on the first data session. Install the profile before departure while on Wi-Fi, but confirm when the countdown begins so you choose a validity period that covers your stay.
**Network bands.** Verify that the travel eSIM uses a network that supports the frequency bands your phone uses. A plan running on a network your device cannot reach is worthless regardless of data allowance. Check your device's supported bands against the network's published band list.
---
## Pattern 2: Cost Optimization — Minimal Voice + High-Data MVNO
### What it is
Your primary SIM handles voice calls on a plan with a modest call allowance. A second SIM — typically from an [MVNO](/en/guides/what-is-mvno/) (Mobile Virtual Network Operator) — handles most or all of your data at lower cost.
### Who it suits
Users in markets where large carriers charge a premium for data but provide reliable call quality. Common in regions where MVNOs lease capacity from large carriers and offer competitive data pricing on the same underlying network.
### Why it works
Voice calls and data are technically independent services on a mobile network. There is no requirement that both come from the same plan. In markets where MNO (large carrier) data is significantly more expensive than equivalent MVNO data, separating the two services can reduce total monthly spend without sacrificing call reliability.
Because both SIMs are active simultaneously on a DSDV device, you make and receive calls on the voice SIM while all data routing goes through the data SIM. The device handles the separation automatically once you configure which line is default for data in Settings.
This setup requires a [DSDV-capable device](/en/guides/what-is-dual-sim/) — one where both SIMs maintain a 4G/5G connection simultaneously. On a DSDS device, the data SIM may drop to 3G during calls on the voice SIM, which affects data performance during calls. On DSDV, both SIMs maintain a 4G/5G network registration simultaneously — neither drops to 3G during a call. However, data on the non-active data SIM pauses while a call is in progress on the other SIM; to keep data flowing during calls, the device switches cellular data to the line handling the call for the duration.
### What to look for in each SIM
**Voice SIM:** Reliable call quality matters more than data allowance. Look for a plan on an MNO with strong VoLTE coverage in your area. Confirm the plan includes VoLTE (Voice over LTE) — this keeps calls on 4G rather than dropping to 3G, which preserves data performance on the other SIM in a DSDV setup.
**Data SIM:** Prioritize data allowance per unit cost. Verify which MNO the MVNO uses and whether that network covers the areas where you use data most. Check that the MVNO plan allows tethering if you use your phone as a hotspot. Review the MVNO's traffic management policy — some throttle speeds during peak hours or after a certain data threshold.
Compare available plans for your market using [SimFinder](/en/) before committing. MVNO pricing changes frequently, and the most cost-effective option varies by region.
---
## Pattern 3: Work + Personal Separation
### What it is
One SIM carries your work number; the other carries your personal number. Both run on the same device simultaneously.
### Who it suits
Freelancers, small business owners, remote workers, or anyone who wants a professional number separate from their personal line without carrying two phones.
### Why it works
Dual SIM eliminates the need for a second handset when you need two numbers. You configure separate ringtones and notification tones for each line, making it immediately clear which number is ringing. Calls and messages to each number reach you without switching modes or checking a second device.
At end of day or on weekends, you can temporarily disable the work SIM in Settings to stop receiving work calls without changing your number or plan. The work SIM profile remains installed; re-enabling it takes seconds. This is simpler than forwarding or using Do Not Disturb, which affects both lines.
For device-specific setup steps — line labeling, default call line, ringtone assignment — see [Dual SIM Setup on iPhone](/en/guides/dual-sim-iphone/) or [Dual SIM Setup on Android](/en/guides/dual-sim-android/).
### What to look for in each SIM
**Work SIM:** VoLTE support and consistent call quality are the primary requirements. If clients or employers call on this number, dropped calls or poor audio quality reflect on your professionalism. A postpaid plan with reliable coverage in the areas where you work most is the standard choice. Confirm number portability terms if you ever want to move the number to a different carrier.
**Personal SIM:** You likely already have this. The considerations are whether your current plan works as the secondary SIM in a dual-SIM configuration — specifically, whether it supports DSDV on your device and whether any carrier restrictions affect eSIM operation if you plan to use an eSIM for the work number.
**Data assignment:** Decide in advance which SIM handles data. Many users route all data through the personal SIM to keep work and personal billing separate. Some route all data through the work SIM for expense reporting purposes. Either approach works; configure the default data SIM in Settings to match your preference.
---
## Pattern 4: Redundancy — Two Different Carriers
### What it is
Your primary SIM runs on one carrier. A second SIM on a different carrier — often a low-cost prepaid or MVNO plan — stays active as a backup for calls, SMS, and data if the primary carrier experiences an outage.
### Who it suits
Anyone who depends on mobile connectivity for work, remote access, or critical communication and cannot afford hours without a working connection. Also valuable for travelers who want a fallback if their primary carrier's roaming partner has problems in a specific region.
### Why it works
Carrier outages happen. Well-documented incidents — spanning hours to nearly a full day — have left tens of millions of subscribers without service. The outage affects a carrier's network, not individual devices. A phone with SIMs from two independent carriers retains one working line throughout an outage on either network.
The critical requirement is network independence. An MVNO running on the same host MNO as your primary SIM is vulnerable to the same outage. If your primary plan uses Carrier A, the backup must use Carrier B at the infrastructure level — not just a different brand on the same towers. For a detailed breakdown of how to identify the host network for any MVNO, see [Backup Line: Adding a Second SIM for Outage Resilience](/en/guides/sub-line/).
### What to look for in each SIM
**Primary SIM:** Your existing plan. No changes are typically needed.
**Backup SIM:**
- **Different host network.** This is the only non-negotiable requirement. Confirm that the backup runs on infrastructure independent from your primary.
- **eSIM format.** eSIM is the practical choice for a backup line — no physical SIM to lose or manage, the profile stays installed on the device, and you switch to it in Settings during an outage. An eSIM-capable device with one physical SIM slot can carry both the primary physical SIM and a backup eSIM simultaneously.
- **Low maintenance cost.** A backup line does not need a large data allowance. Look for a prepaid plan with low or no monthly minimum. Pay-as-you-go options keep costs near zero while the line stays dormant.
- **Minimum usage requirements.** Many prepaid SIMs require at least one call, text, or data session within a rolling window to keep the number active. Check the specific terms and set a calendar reminder to make a minimal use before the window closes.
- **Activate before you need it.** eSIM activation requires a working internet connection. If your primary carrier is already down when you try to activate the backup, activation fails. Install and test the backup eSIM while both networks are available.
---
## Combining Patterns
The four patterns are not mutually exclusive. Some users run combinations of combinations:
**Travel + redundancy:** A travel eSIM on a different regional carrier than your primary roaming partner gives you a fallback if roaming coverage is poor in a specific area.
**Cost optimization + work/personal:** A low-cost MVNO data SIM can serve as both the data-heavy SIM and the personal line, while the work SIM handles voice calls only.
**Redundancy + travel:** A backup SIM on a domestic carrier can also serve as a data source during travel if you have a regional plan. This reduces the total number of SIMs you carry from three to two.
When combining patterns, verify that your device supports the dual-SIM mode needed for all the functions you require. If you need continuous data on both lines simultaneously — for example, running a VoIP call on one line while the other handles streaming — check whether your device supports DSDA. Most current smartphones support DSDV, where data on the second SIM pauses during an active call on the first.
---
## Decision Criteria Summary
Before selecting a specific plan, work through these questions for each SIM in the pair:
### Network diversity
- Are the two SIMs on different network infrastructures (not just different brands)?
- If one SIM is an MVNO, which MNO hosts it, and is that different from the other SIM?
### Band support
- Does each SIM's network support the frequency bands your device uses in the regions where you plan to use it?
- For travel eSIMs, does the coverage map include your specific destination (not just the country name)?
### Tethering allowance
- If you use your phone as a hotspot for a laptop or tablet, does the plan explicitly allow tethering?
- Is there a tethering data cap separate from the main allowance?
### eSIM vs physical SIM
- Does your device support eSIM? (Most phones released after 2018 do.)
- Does your device support dual eSIM (two eSIM profiles active simultaneously)?
- For the backup or travel role, eSIM is generally more convenient — no physical card to swap, instant activation, profile stays installed when dormant.
### VoLTE support
- For any SIM used for voice calls in a DSDV setup, does the SIM and carrier support VoLTE?
- Without VoLTE on both SIMs, a DSDV device may behave like DSDS during calls — one SIM drops to 3G to handle the voice call, temporarily interrupting 4G data on the other SIM.
### Plan maintenance
- For backup and travel eSIMs, what is the minimum usage or top-up requirement to keep the number active?
- What happens if the prepaid balance runs out — does the line suspend immediately, or is there a grace period?
Use [SimFinder](/en/) to compare plans across these criteria for your market, or [SimFinder Travel](/en/travel/) for travel eSIM options by destination.
---
## What Each Pattern Does Not Solve
No dual-SIM combination addresses every connectivity risk:
- **Device failure** takes both SIMs offline regardless of how many carriers you use.
- **Physical area without coverage** — very remote regions, aircraft, underground infrastructure — affects all carriers simultaneously.
- **Power infrastructure outages** that knock out towers can affect all networks in a geographic area at once.
The four patterns above address carrier-specific outages and cost structure, not device or infrastructure failure. For those scenarios, the alternative is a backup communication channel — a satellite-capable device, a separate pocket Wi-Fi device from a different provider, or pre-arranged communication protocols that do not depend on a specific device.
---
## Related Guides
The patterns described here connect directly to several more detailed guides:
- **What the modes mean:** [What Is Dual SIM?](/en/guides/what-is-dual-sim/) — DSDS, DSDV, and DSDA explained, plus device support by model
- **Travel configuration in detail:** [Using Dual SIM for Travel](/en/guides/dual-sim-for-travel/) — line assignment, Data Roaming settings, SMS 2FA, and what to restore when you return home
- **Backup line setup:** [Backup Line: Adding a Second SIM for Outage Resilience](/en/guides/sub-line/) — how to identify host networks, choose a low-maintenance backup plan, and switch during an outage
- **iPhone-specific setup:** [Dual SIM Setup on iPhone](/en/guides/dual-sim-iphone/) — line labeling, default data assignment, Allow Cellular Data Switching, and iMessage configuration
- **Android-specific setup:** [Dual SIM Setup on Android](/en/guides/dual-sim-android/) — SIM manager settings for Pixel, Samsung, and other Android devices
To compare plans for any of these combinations, use [SimFinder](/en/) to filter by carrier, network, and data allowance in your market.
================================================================================
# The Best Time to Switch Carriers
URL: https://sim-finder.com/en/guides/best-timing/
Type: guides (en)
Published: 2026-06-04
The best time to switch carriers is when three conditions align: your current billing cycle is ending, your minimum contract term (if any) has passed, and any active promotional benefits have been used or accounted for. Switching at the wrong moment in any of these cycles can result in paying for service you do not use, an early-termination fee, or losing promotional value you have already paid for. This guide explains each timing consideration and what to check in your own contract.
---
## Why Timing Matters When Switching
Switching carriers involves at least two billing systems running in parallel for a brief period: the account you are leaving and the account you are joining. Both can generate charges if the transition is not timed carefully.
The specific rules vary by carrier and country. There is no universal standard for how carriers handle final billing, proration, or cancellation notice. The principles in this guide apply internationally; the exact rules in your case depend on your contract terms and the regulations in your market.
Three distinct timing considerations apply to most carrier switches:
1. **Billing-cycle timing** — whether and how your final month is charged
2. **Contract end date and renewal window** — when you can leave without a penalty
3. **Promotional and device installment timing** — when leaving costs you something beyond an explicit fee
Understanding each of these before you initiate a switch prevents avoidable costs.
---
## Billing-Cycle Timing: Proration and Full-Month Charges
Your mobile plan is billed in cycles — typically monthly. When you cancel mid-cycle, what happens to the days you did not use?
**Two rules exist, and carriers differ:**
- **Full-month billing:** The carrier charges the full billing period regardless of when in the cycle you cancel. If your billing cycle runs from the 1st to the 31st and you cancel on the 10th, you pay for the entire month.
- **Prorated final billing:** The carrier charges only for the days up to the cancellation date. If you cancel on the 10th of a 31-day cycle, you pay approximately 10/31 of the monthly amount.
Which rule applies to your account is stated in your service agreement — look for the section on cancellation or final billing. If it is not clear, contact your carrier before cancelling.
**How to use this information:**
- If your carrier uses full-month billing, time your cancellation to the last day or the last few days of a billing cycle. Cancelling on the first day of a new cycle means paying for an entire additional month.
- If your carrier prorates, you have more flexibility on timing — but confirming this in advance avoids surprises.
**Important:** Even carriers that prorate may have specific notice period requirements. If the contract requires 30 days' written notice, and you give notice on the 10th of the month, service may not end until the 10th of the next month — not the end of the current billing cycle.
---
## Avoiding Double-Billing Overlap
During a carrier switch, there is a period when both the old and new carrier's billing are active. This overlap is unavoidable if the new carrier bills from the date of sign-up — but the length of the overlap is controllable.
**Common sources of double-billing:**
- **New carrier billing starts at sign-up, old carrier bills to end of cycle.** If you sign up with a new carrier on the 5th and the old carrier bills until the 31st, you pay for both from the 5th to the 31st.
- **Port takes longer than expected, extending active service on both accounts.** Number porting typically completes within hours in markets with efficient portability processes, but delays occur. During a delay, your old SIM remains active and the old account continues billing.
- **New carrier charges a partial first month plus the following full month on the first invoice.** Some carriers invoice the prorated days from sign-up to the billing cycle start, plus the first full month — resulting in an unusually large first invoice.
**How to minimise overlap:**
1. Confirm how your new carrier bills the first month before signing up.
2. Sign up with the new carrier close to — ideally on the same day as — the end of your old billing cycle.
3. Initiate the number port as soon as your new account is open, so the old account closes promptly on port completion.
4. Check whether your old carrier closes the account automatically on port-out or requires a separate cancellation step.
---
## Checking Your Contract End Date
If your current plan has a minimum term, the contract end date is the most important date in your switching timeline.
**Where to find it:**
- Your original contract document or service agreement
- The carrier's account portal or app — most carriers display the contract end date in the account or plan section
- Your monthly bill — some carriers include the contract end date or remaining months in the bill summary
**What to calculate:**
From the contract start date and the minimum term length (commonly 12 or 24 months), calculate the end date. Confirm whether the term begins on the activation date or the contract signing date — these can differ, and the carrier's calculation is what governs.
**What you owe if you leave early:**
Leaving before the minimum term ends typically triggers an early-termination fee (ETF). The calculation method varies: some carriers charge a flat amount; others prorate it based on the number of months remaining. The ETF is stated in your contract. For a detailed explanation of how ETFs are structured and how regulations differ by country, see [Contract Terms: Lock-In, Termination Fees, and Setup Costs](/en/guides/contract-terms/).
**When it is worth paying the ETF:**
Compare the ETF against the savings available by switching now versus waiting. If a new carrier offers significantly lower rates and the savings over the remaining contract months exceed the ETF, switching early is financially rational — but this calculation requires knowing your exact ETF amount and the new carrier's total monthly cost over the same period.
---
## The Renewal Window: The Period That Determines Your Exit Timing
Many contracts auto-renew into a new minimum term if you do not act within a defined window before the end of the current term. This window is where most customers miss their optimal exit point.
**How renewal windows work:**
A renewal window is a defined range of days before the contract end date during which you can give notice to switch or cancel without committing to a new term. For example:
- "You may cancel without a new minimum term commitment if you give notice between 30 and 90 days before your contract end date."
If you give notice:
- **Before the window opens** (more than 90 days before the end date): your notice may not be accepted, or the cancellation may be processed at the end of the window — potentially leaving you locked in for a new term. Check your contract — some carriers accept early notice and simply process the cancellation at end of term without creating a new commitment.
- **After the window closes** (fewer than 30 days before the end date, in the example above): the contract may auto-renew into a new minimum term, and your notice takes effect only at the end of the new term.
- **Within the window** (between 30 and 90 days before the end date): your switch or cancellation proceeds without penalty.
**How to track your renewal window:**
1. Record your contract end date.
2. Read your contract to identify the renewal window (the notice period range before the end date).
3. Mark the date the window opens in your calendar — this is the earliest safe date to give notice.
4. Do not rely solely on the carrier to notify you. Some regulations require advance notification of an approaching auto-renewal; others do not. The rules differ by country.
If your carrier sends an end-of-term notification, use it as a prompt to review your options — but confirm the renewal window dates in your contract rather than relying on the notification alone.
---
## Minimum Term and Notice Period: Two Separate Clocks
These are frequently confused, but they operate independently:
**Minimum term:** The period during which you cannot cancel without paying an ETF. Once the minimum term ends, the ETF no longer applies.
**Notice period:** The advance warning required before any cancellation, including after the minimum term ends. If a plan requires 30 days' notice, you must notify the carrier 30 days before the date you want service to end — even if your minimum term expired six months ago.
**Combined effect:**
If your minimum term ends on 31 July and the plan requires 30 days' notice, giving notice on 1 August means service ends 31 August. You do not owe an ETF (the minimum term has ended), but you pay for August's service regardless.
If you want service to end on 31 July — the day the minimum term ends — you must give notice by 1 July (or whenever 30 days before 31 July falls). To hit this date, you need to be tracking the contract end date at least 30 days in advance.
This is why diariesing the **start of the renewal window** — not just the contract end date — is the practical approach.
---
## Device Installment Plans: When the Phone Affects Your Timing
If you purchased a phone through your carrier on a device financing or installment plan, the balance is a separate financial obligation from your service contract. The two interact with your switch timing in specific ways.
**What to check:**
- **Outstanding balance:** The remaining amount owed on the device. This is on your bill or in the account portal.
- **Unlock eligibility:** Some carriers require the device installment balance to be paid in full before they will unlock the phone. A locked phone does not work on a new carrier's network, even if the number port succeeds. Check whether your carrier ties unlock eligibility to balance payment, and what the unlock processing time is.
- **Ongoing billing after the port:** In most countries, a carrier cannot block a number port because of an outstanding device balance — but the balance continues to be owed after the port. Some carriers bill the installment separately from the service; others combine them. After porting, confirm where and how the remaining installment will be billed.
**Timing considerations:**
If you are close to paying off the device installment, waiting until it is fully paid simplifies the switch: the phone unlocks, the balance is zero, and you can port without parallel financial obligations. If the remaining balance is large and the savings from switching are significant, paying the balance early and switching immediately may still result in net savings — calculate both scenarios.
For a step-by-step approach to verifying all switch prerequisites including device balance, see [Pre-Switch Checklist: What to Check Before Changing Carriers](/en/guides/pre-switch-checklist/).
---
## End-of-Promotion Timing: Protecting the Value You Have Paid For
Carriers frequently offer introductory rates, bonus data, or other promotional terms for a defined period. These are account-level benefits — they do not follow your phone number to a new carrier.
**Common promotional structures and their timing implications:**
- **Introductory rate for the first N months:** After the promotional period, the rate increases to the standard price. If you plan to switch anyway, switching at the end of the promotional period is financially efficient — you benefit from the lower rate until it expires, then switch before paying the higher rate.
- **Bonus data allocation for a defined period:** Similar logic. Use the bonus allocation through its expiry; do not abandon it prematurely.
- **Loyalty or long-term customer discounts:** If you have accumulated a loyalty discount, check whether it resets on plan change or carrier switch. Some loyalty structures reward staying; others simply reflect a current-account discount that applies regardless.
- **New carrier sign-up promotion:** Conversely, some promotional offers from new carriers are time-limited to new customers. If a compelling new-carrier offer exists now, factor in how long it is available.
**The overlap to avoid:** Do not switch away from your current carrier during an active promotional period unless the new carrier's standard rate — after accounting for all fees — still offers better value than the remaining promotional months with your current carrier. Account for the full remaining promotional value, not just the headline monthly difference.
---
## Proration Rules Differ by Country and Carrier
The examples in this guide are illustrative. Actual proration practices vary by carrier and by jurisdiction. What is true in one market may not apply in another.
**Known differences in market practice:**
- Some markets have consumer protection rules that require proration of the final month on cancellation. Others do not mandate it, leaving it to each carrier's contract terms.
- In markets with mandatory notice periods, the effective date of cancellation may be the date notice is received rather than the date of the port — meaning billing continues through the notice period regardless of when the port completes.
- Prepaid plans operate differently from postpaid plans: prepaid credit typically expires at the end of its validity period, and unused credit is generally not refunded at cancellation unless the carrier's terms specifically provide for this.
- Some carriers distinguish between contract cancellation (closing the account) and number porting (moving the number to another carrier). Account closure on port-out may be automatic or may require a separate step.
**What to verify in your specific situation:**
1. Read the cancellation and billing sections of your current service agreement.
2. Check your carrier's FAQ or contact support to confirm whether the final month is prorated or full.
3. Confirm the notice period and how it interacts with the billing cycle.
4. If your market has a telecoms regulator with consumer guidance, check that guidance for any mandatory rules on final billing.
For a broader understanding of how carrier types — MNO, MVNO, and sub-brands — differ in their contract structures and billing practices, see [MNO vs MVNO vs Sub-Brand — Which Carrier Type Is Right for You?](/en/guides/mno-vs-mvno-comparison/).
---
## Constructing Your Optimal Switch Date
With the above considerations in hand, finding the optimal switch date is a matter of identifying the latest-binding constraint.
Work through these questions:
1. **Does my current plan have a minimum term?** If yes, determine the end date and whether you are inside or outside the renewal window. If inside the window: proceed. If outside: either wait for the window to open, or calculate whether paying the ETF is worthwhile.
2. **Am I in an active promotional period?** If yes, estimate the remaining promotional value and factor it into the decision.
3. **Is there an outstanding device installment balance?** If yes, decide whether to pay it off, carry it, or factor ongoing payments into the total cost comparison.
4. **When does my current billing cycle end?** This is the date to target for service termination — cancelling or completing a port on or near this date minimises paying for unused days (if the carrier charges full-month billing) or simplifies the proration calculation.
5. **How does the new carrier bill the first month?** Plan the sign-up date relative to the new carrier's billing cycle to control the overlap period.
The optimal switch date sits at the intersection of: end of promotional period + start of renewal window + close to billing cycle end. In practice these rarely align perfectly. The billing cycle end date is the easiest to control; the renewal window and promo expiry are fixed. Work backward from the renewal window opening date to set the latest safe date for giving notice, and align the actual switch as close to billing cycle end as is practical within that window.
Use [SimFinder](/en/) to compare what carriers are offering at the point you are ready to switch — plan offerings and promotional terms change, so the comparison is most useful close to your actual decision date rather than months in advance. For a structured comparison of travel and multi-carrier options, see [Travel eSIM Provider Comparison](/en/guides/provider-comparison/).
---
## FAQ
*(See structured FAQ items in the frontmatter above for display in site search and rich results.)*
### My carrier says I am in a "no-contract" or "month-to-month" plan. Do any of these timing considerations apply?
Most do, but the ETF and renewal window concerns are removed. A month-to-month plan does not carry a minimum term, so there is no ETF and no renewal window to manage. However, billing-cycle timing still applies — if the carrier charges a full month rather than prorating, switching at the end of a billing cycle avoids paying for unused days. The notice period also applies: even month-to-month plans typically require a notice period (commonly 30 days) before cancellation. Check the notice requirement in your plan terms.
### What if I cannot identify the exact contract end date?
Log in to your carrier's account portal — most carriers display the plan details and contract end date in the account or plan section. If it is not there, check your original sign-up confirmation email, or call carrier support and ask for your contract start date and minimum term length. With those two values, you can calculate the end date yourself.
### Does switching affect my credit score or financial record?
Closing a mobile account in good standing generally does not affect a credit score. However, an outstanding ETF or unpaid device installment balance that is sent to a collections agency can appear as a negative item in credit records in some markets. Confirm that your balance is zero and your account is closed in good standing after the switch, and retain any written confirmation from the carrier.
### I want to switch now but I am early in my contract. What are my options?
Three options exist: (1) Pay the ETF and switch immediately — worthwhile if the savings on the new plan exceed the ETF over the remaining contract period. (2) Wait until the minimum term ends or the renewal window opens. (3) Check whether your current carrier will waive or reduce the ETF — some carriers do this as a retention measure or as part of a promotional offer. For the MNP process once you have decided to switch, see [Mobile Number Portability (MNP) Explained](/en/guides/what-is-mnp/).
---
## Related Guides
- [Contract Terms: Lock-In, Termination Fees, and Setup Costs](/en/guides/contract-terms/) — Detailed explanation of minimum terms, ETF calculation methods, and renewal clause structures
- [Pre-Switch Checklist: What to Check Before Changing Carriers](/en/guides/pre-switch-checklist/) — Step-by-step verification of all prerequisites before initiating a carrier switch
- [Mobile Number Portability (MNP) Explained](/en/guides/what-is-mnp/) — How number porting works technically, country-by-country timing, and how to avoid common port failures
- [MNO vs MVNO vs Sub-Brand — Which Carrier Type Is Right for You?](/en/guides/mno-vs-mvno-comparison/) — How carrier type affects contract structure, flexibility, and billing practices
- [Travel eSIM Provider Comparison](/en/guides/provider-comparison/) — Major travel eSIM providers compared; most travel plans carry no minimum term, ETF, or renewal window
================================================================================
# How to Choose a Voice Call Plan
URL: https://sim-finder.com/en/guides/call-plans/
Type: guides (en)
Published: 2026-06-06
Choosing a voice plan means matching a plan's calling structure to how many minutes you actually use — and deciding whether cellular calling or VoIP apps is the right tool for your pattern. There are four distinct voice plan structures used by carriers worldwide: metered per-minute, bundled minutes, unlimited calling, and VoIP-supplemented data-only. Each has a different cost profile, a different risk of overage, and a different dependence on network technology. This guide explains each structure, when each suits which user, and what to verify beyond the headline "calls" label.
The guide also covers how call delivery technology — VoLTE, VoNR, and Wi-Fi Calling — affects audio quality and simultaneous data use; how voicemail availability varies across prepaid, postpaid, and MVNO plans; and the three mechanisms for international calling (roaming, add-ons, and VoIP apps), so you can choose the right combination for your situation. A decision framework for estimating your actual monthly minute needs and a checklist of common pitfalls round out the coverage.
## The Four Voice Plan Structures
### Metered (Pay-Per-Minute)
On a metered plan, each outgoing call is charged at a per-minute rate, usually applied in one-minute increments (some carriers bill in six-second increments). There is no monthly minimum for calls — you pay only for what you use.
Metered calling is common on:
- True pay-as-you-go prepaid plans (see [how pay-as-you-go plans work](/en/guides/pay-as-you-go/))
- Entry-level prepaid bundles where data is the primary product and calling is an optional add-on
- International SIMs and travel plans sold for short-duration connectivity
Metered plans are cost-effective for light callers who make fewer than a handful of calls per month. They can become expensive quickly for moderate callers, because per-minute rates on metered plans are almost always higher than the effective per-minute cost of a bundled-minute plan at the same usage level. Before choosing a metered plan, calculate the number of minutes you actually used over the past one to three months — most smartphone operating systems log total call duration per contact or in aggregate.
Billing increment matters on metered plans. A plan that bills in one-minute increments charges you for a full minute even if your call lasts 10 seconds. A plan that bills in six-second increments charges you proportionally for the fraction of a minute used. For callers who make many short calls (such as quick confirmation calls or customer-service interactions that are answered quickly), the billing increment can substantially affect the monthly total. This detail is often buried in plan documentation rather than displayed on comparison pages.
### Bundled Minutes
A bundled-minute plan includes a fixed number of calling minutes per billing cycle as part of the plan price. Common allowances range from a few dozen minutes on entry plans to several hundred on mid-tier plans. If you exceed the included minutes, calls continue but are charged at a per-minute overage rate (on older plan structures) or are blocked or degraded (on plans with hard caps).
Bundled plans are predictable within the included allowance but expose callers to overage risk. The key question before selecting a bundle size is whether the included minutes match your average monthly usage plus a reasonable buffer. Underestimating your call volume on a bundled plan is more costly than overestimating — overage rates for out-of-bundle minutes are typically well above the effective in-bundle rate.
Some carriers also sell minute add-ons — small top-up bundles of additional minutes that can be purchased mid-cycle. These are useful if you occasionally exceed your allowance but do not want to upgrade to a larger plan permanently. Note that mid-cycle minute add-ons typically expire at the end of the current billing cycle, not after a fixed number of days from purchase — unused top-up minutes may not roll over.
On some plans, incoming calls count against the minute allowance and on others they do not. This distinction is not always clearly stated in headline plan descriptions. If you receive a high volume of inbound calls, confirm whether the minute allowance applies to incoming calls as well as outgoing calls before selecting a bundle size.
### Unlimited Calling
Unlimited calling plans include voice calls without a per-minute cap. As the term "unlimited" implies, you can make calls for as long as you like without generating overage charges. Most unlimited calling plans in practice have one important restriction: they apply only to domestic calls within the country of your home carrier. International calls typically require a separate add-on or are billed at metered rates even on an unlimited plan.
A secondary restriction that varies by carrier: some unlimited plans limit calls to specific destination types. For example, unlimited calls may apply to standard geographic numbers but exclude non-geographic or premium-rate numbers — always check the plan's fair-use terms for destination restrictions.
As with unlimited data plans, unlimited voice carries fair-use clauses in some markets. These typically address unusually high call volumes that suggest commercial use rather than personal use, rather than imposing hard per-month limits on normal calling. For a detailed explanation of how fair-use policies work in the "unlimited" context, the [unlimited data plan guide](/en/guides/unlimited-reality/) covers the parallel mechanics for data, which often apply to voice plans structured similarly.
### VoIP Apps: Calls Over Data
Voice calls placed through apps such as WhatsApp, Signal, FaceTime Audio, Google Meet, and Microsoft Teams travel over your data connection rather than through your carrier's voice network. The calls use your data allowance — not your calling plan minutes.
The data cost of a VoIP audio call is low. WhatsApp voice calls use approximately 15–50 MB per hour, making even a one-hour VoIP call negligible in the context of a modern data plan. This makes VoIP a practical substitute for cellular calling in several scenarios:
- **International calls**: VoIP calls between app users are generally free regardless of the destination country, as long as both parties have a data connection.
- **Travel eSIM users**: Most travel eSIM plans are data-only and carry no voice plan. VoIP apps provide the calling layer on top.
- **Low-signal environments**: Some VoIP apps can maintain a call on a weak data signal where the cellular radio would drop a call.
The limitation of VoIP is reachability. A contact can only call you on WhatsApp if they have WhatsApp and know your account. You cannot receive inbound calls from contacts who do not use the same app. For this reason, VoIP works best as a supplement to a cellular calling plan, not as a full replacement — unless you have migrated all your regular contacts to the same app and do not receive calls from unknown numbers.
A further limitation is emergency calling. VoIP apps cannot be used to dial emergency services (such as 911, 999, or 112). Emergency calls require a SIM with an active calling plan connected to the cellular network. If you are using a data-only SIM or eSIM as your sole connectivity, you will not be able to call emergency services via VoIP. This is a hard limitation of the VoIP architecture and is not carrier or app-specific.
## A Decision Framework: Estimating Your Monthly Call Minutes
The right structure depends on how many minutes per month you actually use, not on what you think you use. A three-month average of your actual call log is the most reliable input for this decision.
**Step 1 — Read your actual call log**: Both iOS and Android log total outgoing and incoming call duration. On iOS, the Phone app shows recent calls with duration per call; a third-party screen-time app can show aggregate call time. On Android, the Phone app's call history records duration per call, and some device manufacturers include aggregate statistics in Digital Wellbeing. Tally your outgoing minutes over the last three months and calculate a monthly average. Incoming call time does not consume your outgoing allowance on most plans, but it can affect your calculation if your plan charges per-minute for both directions. If your current plan is a metered plan, your carrier's billing statement or app will show the exact number of minutes billed — this is the most accurate source for the calculation, since it reflects the billing-increment rounding used by the carrier.
**Step 2 — Segment by destination type**: Separate your calls into domestic (same-country) and international. The plan structure that is optimal for domestic calling may not cover international calls at all, so the two should be evaluated independently. Also identify any premium-rate or non-geographic numbers you call regularly — these are frequently excluded even from unlimited domestic plans.
Also note whether your calls are primarily to mobile numbers or to landlines. Some bundled-minute plans differentiate between calls to mobile numbers and calls to geographic landlines in their allowance and overage rates, though this distinction is less common on newer plans than on legacy ones.
**Step 3 — Apply the usage band**:
- **Under 30 minutes per month**: A metered or low-cost [pay-as-you-go plan](/en/guides/pay-as-you-go/) is likely cheapest. Compare the total metered cost against the cheapest available bundle. If the bundle cost is within a small margin of the metered cost, the bundle may be worth choosing for the predictability it provides — you will not face overage charges if usage spikes one month.
- **30–200 minutes per month**: A bundled-minute plan with an allowance of at least 150–250 minutes (adding a buffer above your average) typically provides the best value. Confirm the overage rate for out-of-bundle minutes — if the overage rate is high, opt for a plan with a larger allowance or consider upgrading to unlimited calling.
- **Over 200 minutes per month**: Unlimited calling plans become cost-competitive and eliminate overage risk. Compare the total monthly cost of an unlimited-calling plan against a large bundled plan and its likely overage charges at your usage level.
- **Frequent international callers**: For international calls, evaluate both the plan's international calling add-on and VoIP apps for specific contacts. A combination of unlimited domestic calling plus VoIP for international calls is a common and cost-effective approach. International calling add-ons that include a defined number of minutes to specific countries can be compared with the effective per-minute cost of a metered international rate.
**Step 4 — Apply a buffer**: Build a 20–30% buffer above your three-month average when selecting a bundle size. One unusually call-heavy month can push you into overage, and overage rates on out-of-bundle minutes are typically punitive compared to the in-bundle rate. If your call volume is variable month-to-month — for example, if you make many calls during certain periods and very few in others — a larger buffer or unlimited calling is the lower-risk choice. The cost of buying slightly more minutes than you need is almost always lower than the cost of overage charges in a high-usage month.
**Step 5 — Reassess after three months**: Call volume changes over time. A plan that was well-matched when you selected it may become poorly matched if your circumstances change — a new job with more phone-based communication, a period of intensive international contact, or a shift toward VoIP. Reviewing your actual usage against your plan allowance after three months of use is a low-effort way to catch mismatches before they become ongoing costs.
For families with multiple lines sharing a pool of minutes, see [how family plans work](/en/guides/family-plans/) — shared minute pools change the calculation significantly by allowing high-use members to draw from the pool rather than each line sizing its individual allowance. The buffer calculation also applies at the pool level: the combined allowance should cover the sum of all lines' average usage plus a pooled buffer.
## How VoLTE and VoNR Affect Call Quality
The technology used to carry your call affects audio quality, call-setup speed, and whether you can use data during a call. Understanding these technologies helps you choose both a plan and a device that will deliver the call quality you need.
**VoLTE (Voice over LTE)**: VoLTE carries voice calls over the LTE data network using the IMS (IP Multimedia Subsystem) protocol stack. It delivers HD audio using wideband codecs (such as AMR-WB), which capture a broader frequency range than narrowband codecs used on 2G and 3G calls. The audible difference is a noticeably clearer, more natural voice — particularly for sibilants and consonants that narrowband codecs suppress. VoLTE also allows simultaneous voice and data on LTE, so your data connection remains active during a call. Legacy 2G/3G calls required the device to drop to the voice circuit and suspend data.
VoLTE quality is realised only when:
1. Your handset supports VoLTE and it is enabled in the device settings
2. Your carrier has enabled VoLTE on your plan and SIM
3. The call recipient is also on a VoLTE-compatible connection (or the call degrades gracefully to narrowband on their end)
MVNOs that operate on borrowed network capacity may or may not pass through VoLTE to their subscribers. Some MVNOs fully support VoLTE; others do not, defaulting subscribers to circuit-switched fallback on 2G or 3G for calls. This is worth verifying before choosing an MVNO if call quality matters to you.
**VoNR (Voice over New Radio)**: On 5G standalone (SA) networks, calls may use VoNR, which carries voice natively over the 5G NR radio. VoNR enables even lower call-setup latency — typically under one second — compared to the several seconds that VoLTE over LTE can take. VoNR also maintains voice service on the 5G radio without fallback to LTE, which is important for users in areas where 5G coverage is available but LTE fallback is patchy. VoNR is not universally deployed as of 2026 — most 5G networks worldwide still operate in non-standalone (NSA) mode, which relies on the LTE core and uses VoLTE for calls while 5G handles data throughput. SA 5G networks with VoNR are more common in South Korea, parts of China, and selected European deployments.
**Call-setup latency**: One practical difference between legacy and modern call technologies is how long it takes from pressing "call" to the first ring. Circuit-switched 2G/3G calls typically have 5–8 second setup times. VoLTE reduces this to approximately 1–2 seconds. VoNR can reduce it further. This difference is noticeable in everyday use.
**Codec variation**: Not all VoLTE calls use the same codec. In addition to AMR-WB (HD Voice), some carriers support EVS (Enhanced Voice Services), which provides even higher audio quality and better performance at low bitrates. EVS is less common than AMR-WB but is deployed on some major carriers and is supported by flagship Android and iOS handsets. The codec used for any given call is negotiated between both endpoints at call setup — you cannot manually select a codec on consumer devices.
**Wi-Fi Calling (VoWiFi)**: Wi-Fi Calling routes calls over a Wi-Fi connection when cellular signal is weak or unavailable. The call enters your carrier's IMS core via an encrypted tunnel, reaching the same voice infrastructure as VoLTE. This is useful at home if your indoor cellular signal is poor, and in locations where Wi-Fi is available but cellular coverage is absent. Not all carriers and plans support Wi-Fi Calling. For full setup details and prerequisites, see the [Wi-Fi Calling guide](/en/guides/wifi-calling/).
**What this means for plan selection**: If call quality is a priority, verify that the carrier — and specifically the MVNO if you are not using the host MNO — supports VoLTE on the plan you are considering. A [postpaid plan](/en/guides/prepaid-vs-postpaid/) from a major MNO is the most reliable path to consistent VoLTE support; prepaid and MVNO plans require individual verification.
## Voicemail and Visual Voicemail Across Plan Types
Voicemail is not a universal feature — it depends on carrier support, plan tier, and sometimes a separate activation step. The gap between major MNO postpaid plans and entry-level prepaid or MVNO plans is widest here.
**Standard voicemail**: Standard voicemail stores a recorded message when a call goes unanswered or the line is busy. The caller is directed to leave a message, which you retrieve by calling your carrier's voicemail service number or through the carrier's app. Voicemail is included at no additional charge on most postpaid plans from major carriers, but may be absent or require activation on some prepaid or MVNO plans. On prepaid plans in particular, voicemail may be provisioned as a feature that you must explicitly enable through the carrier's app or website before it works.
**Visual voicemail**: Visual voicemail presents voicemail messages as a list in an app — iPhone users see this in the Phone app natively; Android users may see it in the Phone or Messages app depending on the carrier, device manufacturer, and Android version. Visual voicemail requires a specific protocol handshake between the device, the carrier's voicemail server, and the operating system. This means visual voicemail requires both carrier support and device support simultaneously. Not all MVNOs implement the carrier-side protocol required for visual voicemail, even when the host MNO supports it.
**Voicemail-to-text transcription**: Voicemail-to-text transcription converts the audio message to a text transcript displayed in the app, so you can read a voicemail without listening to it. On iOS, this feature is built into the Phone app when the carrier supports it. On Android, Google's Phone app provides transcription via on-device processing on supported devices, partially independent of carrier support. Availability and quality of carrier-provided transcription varies. Some carriers include it across all plan tiers; others restrict it to higher-tier plans.
**Postpaid vs prepaid voicemail availability**: On postpaid plans from major MNOs, all three voicemail types — standard, visual, and transcription — are commonly available. On prepaid plans from the same MNO, visual voicemail and transcription may be excluded or require upgrade to a higher-tier prepaid plan. On MVNO plans, voicemail support ranges from full (standard + visual) to standard-only to absent entirely. The [prepaid vs postpaid guide](/en/guides/prepaid-vs-postpaid/) covers the broader difference in feature availability between billing structures.
**MVNO-specific voicemail gaps**: MVNOs that run on a host network do not automatically inherit all of the host's voicemail features. The MVNO must separately implement voicemail provisioning on its platform. Some smaller MVNOs — particularly data-focused ones targeting travel or short-duration use cases — skip voicemail entirely, reasoning that their target users will use VoIP apps instead.
If voicemail is important to you, confirm its availability explicitly for any MVNO or prepaid plan you are considering before purchasing. The carrier's support documentation or FAQ is the most reliable source — headline plan comparisons rarely mention voicemail support.
## International Calling: Roaming vs Apps vs Add-Ons
Domestic unlimited calling plans almost universally exclude international destinations. Making an international call from a plan without international coverage will trigger either a per-minute rate or, on some plans, a complete block on international dialling. There are three main mechanisms for handling international calling, each with different cost structures and use cases.
### Roaming: Using Your Home SIM Abroad
When you travel to another country and use your home SIM, your device connects to a visited network. Outgoing calls you place in the visited country are typically charged at roaming voice rates, which are determined by your home carrier's roaming agreements. Incoming calls to your home number while abroad may also incur roaming charges — including incoming calls, depending on your carrier and the direction of the roaming tariff.
Key facts about roaming voice:
- **EU RLAH regulation**: Within the European Union, the Roam Like at Home (RLAH) regulation requires that EU-based carriers allow their subscribers to use their domestic plan's calls, SMS, and data within other EU/EEA member states (the EU plus Iceland, Liechtenstein, and Norway) at no surcharge. This covers all EU/EEA member states and is a legal requirement, not a carrier choice. Fair-use limits apply for extended stays.
- **Outside the EU**: Roaming voice rates outside the EU vary widely and are determined by bilateral roaming agreements between your home carrier and visited networks. Some carriers include roaming in higher-tier plans (sometimes called "global roaming" or "travel passes"); others charge per-minute at rates that can be several multiples of the domestic rate. Check your carrier's roaming rate card for the specific country you are visiting before travelling.
- **Roaming on prepaid plans**: Prepaid plans may restrict or disable roaming entirely. Not all prepaid plans include roaming, and some that do require advance activation. The [prepaid vs postpaid guide](/en/guides/prepaid-vs-postpaid/) covers how billing structure affects roaming availability.
### International Calling Add-Ons: Calling from Your Home Country
International calling add-ons extend your plan to cover calls placed from your home country to international destinations. These are different from roaming — add-ons cover outgoing calls from your home country to foreign numbers, not calls placed while you are physically abroad.
Before purchasing an international calling add-on, verify two things:
1. **Covered destinations**: Whether the specific countries you call are on the covered list. "International calling" add-ons vary from covering a handful of common destinations to covering 100+ countries. Destination lists are usually published on the carrier's website; the fact that a country appears in the list does not guarantee geographic coverage of all numbers within it — some destination lists cover mobile numbers only or exclude specific prefixes.
2. **VoIP competitiveness**: Whether the add-on is competitive with VoIP rates for the same destinations. For contacts who have a smartphone with a common messaging app, VoIP is often free and carries no per-minute charge at all.
### VoIP Apps: Calling Over Data Without Carrier Rates
For calls to contacts on WhatsApp, FaceTime (Apple-to-Apple), Signal, or other cross-platform apps, the call uses your data allowance and avoids your carrier's international rates entirely. This applies both to calls placed from your home country and to calls placed while roaming — VoIP calls made over data use your data allowance, not your voice calling plan.
The practical limitation is that the recipient must have the app installed, be on a data connection, and be reachable by their app identity rather than a phone number. For calls to landlines or to contacts without a smartphone, a traditional international calling add-on or a VoIP service that provides PSTN dialling (such as a calling app with a credits or subscription model) is necessary.
**Choosing between roaming, add-ons, and VoIP** depends on who you are calling and from where:
| Scenario | Recommended approach |
|---|---|
| Calling international contacts who use a messaging app | VoIP app (WhatsApp, Signal, FaceTime) — free over data |
| Calling international landlines or non-app users from home | International calling add-on |
| Travelling abroad, using your home SIM for local calls | Check roaming rates; consider a local SIM or travel eSIM for extended stays |
| Travelling abroad, calling home | VoIP app over data, or roaming if both parties lack a common app |
## Common Pitfalls When Choosing a Call Plan
Call plans contain several categories of exclusion and restriction that are not prominently advertised on plan comparison pages. These pitfalls affect a significant proportion of callers once they encounter them.
**Pitfall 1 — "Unlimited" that excludes international calls**: The most widespread pitfall. An unlimited calling plan's unlimited designation applies to domestic calls only, in the vast majority of cases. International calls on such a plan are either blocked by default or billed at per-minute rates that can be substantially higher than the base plan's effective per-minute domestic rate. Always confirm international calling treatment separately from the domestic unlimited label. See the [contract terms guide](/en/guides/contract-terms/) for what to look for in plan documentation.
**Pitfall 2 — "Unlimited" that excludes premium-rate numbers**: In many countries, numbers prefixed with specific short-code ranges, 1-900 or equivalent numbers, and non-geographic service numbers are excluded from unlimited calling. This affects callers who routinely call customer-service helplines, government services, or business lines that operate on non-geographic numbers. The exclusion is typically stated in the fair-use terms rather than the main plan description. Check the destination exclusion list in the plan's terms before assuming all domestic numbers are included.
**Pitfall 3 — Overage rates that far exceed the in-bundle rate**: On bundled-minute plans, the per-minute rate for minutes used beyond the included allowance is often several times the effective in-bundle rate. A plan that looks cost-effective at or below its allowance can become expensive in months where usage spikes. This is particularly common on older-generation bundled plans that were designed before unlimited plans became the norm. If you are selecting a bundled plan, always check the overage rate — not just the included minute count — before committing.
**Pitfall 4 — MVNO VoLTE or voicemail gaps discovered after purchase**: As covered in the VoLTE section and voicemail section above, not all MVNO plans support VoLTE or visual voicemail, even when the host MNO offers both. This is rarely disclosed on plan comparison pages and is sometimes not clearly stated even on the MVNO's own plan page. Discovering this after purchase — on a plan with a minimum contract term — is a common source of dissatisfaction. MVNOs that are transparent about VoLTE and voicemail support usually state it explicitly in their FAQ; if you cannot find a clear statement, contact support before purchasing. For a broader discussion of how MVNO plan commitments compare to postpaid contracts, see the [prepaid vs postpaid guide](/en/guides/prepaid-vs-postpaid/).
**Pitfall 5 — Roaming voice rates not checked before travel**: As noted in the international calling section, roaming voice rates can be substantially higher than domestic rates outside regulatory zones like the EU. A single missed check before an international trip can result in unexpectedly high bills. If your plan includes a travel roaming add-on, verify that it covers the specific country and that it must be manually activated before travel — some roaming passes do not activate retroactively.
**Pitfall 6 — Conflating data-only eSIM with a full SIM for calls**: Travel eSIMs and many prepaid data SIMs are data-only and carry no voice plan. If you install a data-only eSIM as your primary SIM, you will have no ability to make or receive traditional phone calls. This is appropriate for travel scenarios where VoIP covers your calling needs, but is a common source of confusion for users who install a travel eSIM without understanding its calling limitations. Check whether any SIM you are considering includes a calling plan or is data-only — this is distinct from the "unlimited" or "bundled" question and applies before you evaluate the calling plan structure at all.
**Pitfall 7 — Minute allowances that reset on a different date than data**: Some bundled plans reset calling minutes on the plan anniversary date rather than a calendar month boundary, or vice versa. If your calling and data allowances reset on different dates, you may find yourself out of minutes before the end of the calendar period you are budgeting against. Verify the reset date for both allowances when choosing a bundled plan.
## Pre-Purchase Checklist
The following items are often omitted from headline plan comparisons but materially affect the value of a calling plan. They also relate to the broader contract terms — minimum period, setup fees, and termination conditions — covered in the [contract terms guide](/en/guides/contract-terms/).
1. **Destination scope**: Does "unlimited calls" mean all domestic numbers, or does it exclude non-geographic numbers, premium-rate numbers, or numbers beginning with specific prefixes? Check the fair-use terms for destination restrictions.
2. **VoLTE support**: Does the carrier or MVNO support VoLTE on this specific plan? Is VoLTE enabled by default or does it require a device setting change or APN update?
3. **Voicemail availability**: Is voicemail provisioned automatically, or does it require a separate activation step? Is visual voicemail supported, and is voicemail-to-text included or restricted to higher tiers?
4. **Wi-Fi Calling support**: If you have weak indoor coverage, does the plan support Wi-Fi Calling? This is particularly relevant for plans from smaller MVNOs where Wi-Fi Calling is less commonly implemented.
5. **International calling terms**: If you call abroad, what is the per-minute rate to your most common international destinations, and is an add-on available that reduces that cost? Confirm whether the add-on must be activated before calls are placed.
6. **Overage rate**: If you are on a bundled-minute plan, what is the per-minute rate for out-of-bundle calls? Confirm this rate before signing up — it determines the financial risk of a high-call month.
7. **Roaming treatment**: If you travel, confirm whether roaming voice is included, requires a separate pass, or is blocked. If a roaming pass is available, verify it covers your destination country and any activation requirements.
SimFinder scores plans by voice option selection — factoring in whether a plan's calling structure (metered, bundled, or unlimited) matches the parameters you enter — rather than listing raw plan prices. Use [SimFinder](/en/) to compare calling plans in your market based on your actual call pattern rather than headline labels.
## Using SimFinder to Compare Voice Plans
When using SimFinder to search for a plan, the voice call parameters you set affect the scoring of each plan. Plans with unlimited calling receive different scores than metered or bundled plans depending on the call volume you specify. This reflects the real cost difference between structures at different usage levels — a metered plan that appears cheap at the headline level may score lower at moderate usage because its effective per-minute cost exceeds a bundled alternative.
For the most accurate comparison, input a realistic call volume estimate rather than an aspirational one. The results will surface plans where the voice structure is well-matched to your usage, not just plans with the lowest nominal price. Where voice calling is not the primary need and VoIP covers most of your calling, setting a lower call-minute input will correctly deprioritise unlimited-calling plans in favour of plans that optimise for data.
If you are also evaluating plans for a family, the call volume you enter in SimFinder should reflect the combined usage across all lines if you are comparing family-plan options. The [family plans guide](/en/guides/family-plans/) explains how shared minute pools are structured and how to estimate the pool size needed for a household with varied calling patterns.
For users whose primary concern is international calling, SimFinder's country and region filters help narrow results to plans with international coverage in the markets that matter to you. Combining a plan search with the decision framework in this guide — estimating your domestic minute needs separately from your international calling approach — gives the most complete picture of which plan provides the best fit.
The pitfalls listed in this guide — in particular the destination-scope and overage-rate checks — are worth revisiting whenever you review your plan at contract renewal time. A plan that was well-suited at the time of selection may have changed its terms, or your usage pattern may have shifted. The [contract terms guide](/en/guides/contract-terms/) covers what to review at renewal and how mid-contract changes by the carrier affect your options.
---
## Related Guides
- [Prepaid vs Postpaid](/en/guides/prepaid-vs-postpaid/) — How the billing model affects roaming, contract terms, and call plan availability
- [Contract Terms: Lock-In, Termination Fees, and Setup Costs](/en/guides/contract-terms/) — What to verify in a plan agreement before committing
- [How Family Plans Work](/en/guides/family-plans/) — Shared minute pools and multi-line calling plan options
- [The Reality of Unlimited Data Plans](/en/guides/unlimited-reality/) — How fair-use policies and throttling apply to "unlimited" plans
- [How Pay-As-You-Go and Tiered Plans Work](/en/guides/pay-as-you-go/) — Metered billing mechanics and when PAYG is the right structure
================================================================================
# Poor Call Quality: Causes and Fixes
URL: https://sim-finder.com/en/guides/call-quality/
Type: guides (en)
Published: 2026-06-04
Poor call quality — choppy audio, muffled voices, one-second delays, or calls that drop mid-conversation — resolves with a targeted fix once the cause is identified. The cause almost always falls into one of four categories: signal conditions, a missing or misconfigured VoLTE or Wi-Fi Calling setting, a device hardware issue, or a network-level condition. This guide covers each category in order of how often it is the actual cause.
Key points:
- Weak signal (RSRP below −100 dBm) is a common contributor to choppy and dropped calls on modern LTE networks; the threshold is operator-dependent, and consistent degradation is typically observed below −110 dBm
- VoLTE must be enabled and registered for HD-quality voice; a phone on 3G fallback gets narrowband audio
- Wi-Fi Calling routes calls over a Wi-Fi connection using the same IMS core as VoLTE — it is the most effective fix for poor indoor coverage
- 3G network shutdowns in the US, Japan, Australia, and UK mean devices without VoLTE support cannot make calls at all on those networks
- Echo and muffled audio are usually hardware or acoustic issues, not network problems
For background on how VoLTE and VoNR work technically, including IMS, QoS bearers, and the 3G shutdown context, see [VoLTE and VoNR Explained](/en/guides/volte-vonr/).
---
## Check Signal Strength First
Signal quality is the primary variable in voice call quality on any cellular network. A VoLTE call uses a dedicated QCI 1 bearer with a 100 ms target packet delay budget and guaranteed bit-rate — but if the radio signal itself is weak or noisy, packets are lost before they reach the network, and the dedicated bearer cannot compensate.
**How to check signal strength in dBm:**
On **iPhone**, dial `*3001#12345#*` to open field test mode (iOS 16 or later; availability of individual metrics like RSRP varies by iOS version). The RSRP (Reference Signal Received Power) value indicates signal strength: −80 dBm or better is strong, −80 to −100 dBm is acceptable, below −100 dBm is weak and may cause audio artifacts; consistent degradation is typically observed below −110 dBm.
On **Android (Pixel)**, go to Settings → About phone → SIM status → Signal strength. On **Samsung**, the same reading appears at Settings → About phone → Status → SIM card status → Signal strength.
Signal bars on the status bar are not a reliable indicator of VoLTE call quality, because bars represent a rough range and do not reflect signal-to-noise ratio or packet error rate.
**What weak signal causes on voice calls:**
VoLTE audio uses the AMR-WB (Adaptive Multi-Rate Wideband) codec, which adjusts its bitrate (between approximately 6.6 kbps and 23.85 kbps) in response to channel conditions. At very weak signal, the codec shifts to lower bitrates, producing audible quality degradation. At severe packet loss, audio becomes choppy or robotic even at the lowest codec rate.
**Practical fixes for weak signal:**
- Move to a location with better coverage: near a window, outside, or to a higher floor
- Enable Wi-Fi Calling (covered below) to route the call over Wi-Fi when cellular signal is inadequate
- Contact your carrier if the poor-signal area is your home or regular workplace — carriers maintain coverage improvement request processes
---
## Verify VoLTE Is Enabled and Registered
VoLTE must be both supported by the device on your carrier's network and enabled in settings. A device making calls without VoLTE active will either fall back to 3G circuit-switched voice (if 3G is still available) or be unable to make calls at all (if 3G has been shut down). 3G fallback produces narrowband audio (8 kHz sampling, 3.1 kHz audio bandwidth) — noticeably worse than VoLTE HD Voice (16 kHz sampling via AMR-WB).
**How to check VoLTE status:**
On **iPhone**, go to Settings → Cellular → tap the active SIM line → Voice & Data. The option should be set to **LTE** or **5G**, not 3G. A "VoLTE" or "HD Voice" indicator in the status bar during an active call confirms IMS registration is successful.
On **Android (Pixel)**, go to Settings → Network & internet → SIMs → tap the SIM → "Enhanced 4G LTE Mode" or "VoLTE" toggle. The exact label varies by Android version and carrier. Confirm the toggle is on.
On **Android (Samsung)**, go to Settings → Connections → Mobile networks → VoLTE calls. Enable the toggle if it is off.
**If the VoLTE toggle is missing or greyed out:**
A missing VoLTE option most often means the carrier's IMS profile is not present on the device. This is common on:
- Phones purchased in a different market from where the SIM is used
- Older or budget Android devices that were not certified for the carrier
- MVNOs where the host carrier's IMS profile is required but not included in the MVNO's device list
Check your carrier's approved device list or IMEI compatibility checker. If your device is not listed, the carrier has not certified it for VoLTE on their network. See [VoLTE and VoNR Explained](/en/guides/volte-vonr/) for a full explanation of IMS profile requirements and how to verify compatibility.
---
## Enable Wi-Fi Calling for Indoor Coverage
Wi-Fi Calling (formally VoWiFi — Voice over Wi-Fi) routes calls over a Wi-Fi connection using the same IMS core as VoLTE. The call travels through an IPsec tunnel to the carrier's ePDG (evolved Packet Data Gateway), then into the IMS, where it is handled identically to a VoLTE call. Audio quality, codec, and caller ID are the same.
Wi-Fi Calling is the most effective countermeasure for poor indoor cellular signal. Concrete walls, underground spaces, and building materials that attenuate radio frequencies have no effect on a Wi-Fi connection from an indoor router.
**How to enable Wi-Fi Calling:**
On **iPhone**, go to Settings → Cellular → tap the active SIM line → Wi-Fi Calling → turn on "Wi-Fi Calling on This iPhone". The status bar shows "Wi-Fi" next to the carrier name when a call is being routed over Wi-Fi.
On **Android (Pixel)**, go to Settings → Network & internet → SIMs → tap the SIM → Wi-Fi calling → enable.
On **Samsung**, go to Settings → Connections → Wi-Fi Calling → enable.
**Prerequisites:**
- Your carrier must support Wi-Fi Calling and it must be enabled on your account
- The device must have the carrier's IMS profile with the ePDG address configured (the same profile requirement as VoLTE)
- The Wi-Fi network must be stable; a congested or high-latency Wi-Fi connection will cause the same audio artifacts as a weak cellular signal
**Emergency calls over Wi-Fi Calling:**
When Wi-Fi Calling is active and the carrier supports it, emergency calls (such as 911 in the US or 112 in Europe) can be placed over Wi-Fi. Carriers that support this require a registered address for emergency location purposes. iPhone prompts for this address during Wi-Fi Calling setup. This is carrier-specific — confirm with your carrier whether emergency Wi-Fi Calling is supported.
For a detailed guide on Wi-Fi Calling setup, prerequisites, and international use, see [Wi-Fi Calling (VoWiFi)](/en/guides/wifi-calling/).
---
## The 3G Shutdown and Its Impact on Call Quality
3G shutdowns are directly relevant to call quality because they affect which voice path the device uses.
Before VoLTE, 4G LTE devices made voice calls via CS Fallback (CSFB): the device temporarily dropped from LTE to 3G for the duration of the call. Once 3G is shut down, CSFB is impossible — there is no circuit-switched network to fall back to. A device without VoLTE support cannot make or receive calls at all on a post-3G-shutdown network.
**Confirmed 3G shutdown dates for major markets** (from carrier announcements):
| Market | Operator | Shutdown completed |
|--------|----------|-------------------|
| United States | AT&T | February 2022 |
| United States | T-Mobile (including Sprint legacy) | July 2022 |
| United States | Verizon | December 2022 |
| Japan | KDDI (au) | March 2022 |
| Japan | SoftBank | April 2024 |
| Japan | NTT Docomo | March 2026 |
| Australia | Telstra | October 2024 |
| Australia | Optus | October 2024 |
If you are experiencing calls that work for data but produce no audio or fail entirely, and the device is older or was purchased for a different market, VoLTE incompatibility after 3G shutdown is the likely cause. See [No Service on Your Phone?](/en/guides/no-service/) for the full diagnostic sequence when the device cannot register on the network at all.
---
## Isolating Echo and Noise
Echo and background noise on voice calls have distinct causes depending on where the audio problem is heard.
### Echo — Who Hears It
**You hear your own voice echoed back:** The echo is generated at the remote end. Their earpiece speaker is leaking audio into their microphone, and the network sends that captured audio back to you. This is called acoustic echo. Ask the other party to reduce their earpiece volume, switch to a headset, or move to a quieter location.
**The other party hears an echo of their own voice:** The echo is generated at your end. Your earpiece or speaker is leaking into your microphone. Solutions:
- Reduce your earpiece volume (the echo canceller in your device is overwhelmed at high volumes)
- Switch to a headset with an integrated microphone (places the microphone away from the earpiece)
- Do not use speakerphone unless in a quiet space — speakerphone on high volume almost always leaks acoustic echo
Most smartphones implement AEC (Acoustic Echo Cancellation) in the voice processing stack. AEC is effective within its design range, but it cannot cancel echo caused by the earpiece being pressed directly against a surface or by very high volume levels.
### Background Noise
If the other party complains about background noise from your end, the fix depends on the noise type:
- **Wind noise**: move the microphone away from direct airflow; cup your hand around the device if needed. Many carriers use AMR-WB's noise suppression features, but wind directly over the microphone exceeds what software suppression can remove.
- **Constant hum or electrical interference**: move away from sources of electromagnetic interference (motors, fluorescent lights, unshielded power cables). Check that the phone case does not cover the microphone opening.
- **Room noise**: enable noise suppression in your dialler app if available (some Android manufacturers include an "Enhanced noise cancellation" option in call settings), or move to a quieter location.
---
## Check for Network-Level Issues (Calls vs. Data)
A useful diagnostic distinction: is the call quality problem confined to voice calls, or does it also affect data?
**Poor voice quality but normal data speeds:**
This pattern points to a VoLTE-specific issue rather than general radio conditions. VoLTE uses a dedicated bearer (QCI 1), separate from the data bearer (QCI 9). Problems on the dedicated bearer that do not affect data can indicate:
- An IMS registration issue on your account (carrier-side, resolvable by contacting support)
- A codec mismatch between your device and the network (the network falls back to a lower-quality codec)
- A carrier configuration issue — try a network settings reset (see below)
**Poor voice quality and poor data speeds:**
Both using the same radio path means the problem is the signal itself. Follow the signal strength diagnostic steps in the first section of this guide. For a full walkthrough of diagnosing and fixing slow mobile data — including throttling, congestion, and MVNO-specific causes — see [Slow Mobile Data Speeds](/en/guides/slow-speed/).
**Calls fail entirely but data works:**
A device registered for data but not for IMS cannot make VoLTE calls. This occurs after 3G shutdown on non-VoLTE devices, or when VoLTE is disabled in settings. See [VoLTE and VoNR Explained](/en/guides/volte-vonr/) for the IMS registration requirements.
---
## Device Hardware Checks
Two hardware issues produce call quality symptoms that no network fix can resolve.
### Microphone Obstruction
The primary microphone on most smartphones is a small aperture on the bottom edge of the device. Cases — particularly thick or poorly fitting ones — can partially or fully block it. Symptoms: your voice sounds muffled or the other party says you are very quiet.
**Test:** make a call with the case removed. If audio quality improves, the case is covering or dampening the microphone opening. Look for a case with a clearly cut opening at the microphone position.
**Test:** make the same call on speakerphone. If the other party hears you clearly on speakerphone (which uses the front-facing microphone on most devices), the bottom microphone is the issue.
### Speaker or Earpiece Issues
If you have difficulty hearing the other party clearly even at maximum volume, and the problem persists with good signal and VoLTE active, the earpiece speaker may be partially obstructed by dust or debris. The earpiece grille on the top edge of the device is a common dust accumulation point.
**Test:** make the call on speakerphone or with a headset. If audio is clear through both, the earpiece opening is the problem. Clean the grille with a dry, soft brush. Do not insert objects into the grille.
---
## Network Settings Reset
A network settings reset clears the device's stored radio and carrier configuration, which can fix call quality issues that began after an OS update, a SIM change, or a software glitch affecting the modem's carrier profile.
**What it resets:** saved Wi-Fi passwords, VPN configurations, Bluetooth pairings, APN settings, and cellular network preferences.
**What it does not reset:** eSIM profiles, apps, photos, contacts, or any personal data.
**When it is worth trying:**
- Call quality degraded immediately after an iOS or Android update
- Call quality degraded after switching to a new SIM or eSIM
- VoLTE was working previously but the IMS registration indicator has disappeared
**Procedure:**
On **iPhone**: Settings → General → Transfer or Reset iPhone → Reset → **Reset Network Settings**. The device restarts. Allow 30–60 seconds for network re-registration.
On **Android (Pixel)**: Settings → System → Reset options → **Reset Wi-Fi, mobile & Bluetooth**. No full restart required; wait 30 seconds.
On **Android (Samsung)**: Settings → General management → Reset → **Reset network settings** → confirm.
After the reset, check that VoLTE and Wi-Fi Calling are re-enabled in settings, as they may revert to defaults. For the full scope of what a reset affects and does not affect, see [How to Reset Network Settings](/en/guides/network-reset/).
---
## When to Contact Your Carrier
Contact your carrier's support if:
- Call quality is poor regardless of location and signal strength, suggesting an IMS account-level issue
- Wi-Fi Calling cannot be enabled — the carrier may need to activate it on the account
- VoLTE indicator was working and has disappeared without any change on your end
- Call drops occur consistently in locations where you previously had good signal, which may indicate a tower configuration change
When contacting support, provide: your device model, IMEI (dial `*#06#`), the exact symptoms (choppy audio, echo, dropped calls), whether data works normally, and whether the issue occurs on Wi-Fi Calling as well as cellular. This information reduces back-and-forth and directs the agent to the correct team.
---
## Frequently Asked Questions
**Why does my call sound choppy or robotic?**
Choppy or robotic audio during a VoLTE call is almost always caused by packet loss or high jitter on the radio path. The most common triggers are weak signal (RSRP below −100 dBm), moving through coverage gaps, or interference. Moving to a location with stronger signal or enabling Wi-Fi Calling typically resolves it.
**The other party says my voice sounds muffled or distant. What should I check?**
Muffled outgoing audio is almost always a device hardware issue: a blocked or dirty microphone opening. Check that the microphone is not obstructed by a case. Test by making a call with the case removed, or on speakerphone. If audio is clear without the case, the case is partially covering the microphone.
**Why do I hear an echo during calls?**
If you hear your own voice echoed back, the leak is at the remote end. If the other party hears an echo, the leak is at your end — reduce earpiece volume or switch to a headset. Speakerphone at high volume almost always produces acoustic echo. Most smartphones implement AEC (Acoustic Echo Cancellation), but it cannot cancel echo at extreme volume levels.
**My calls drop at the same spot every day. Is there anything I can do?**
Consistent drops at a specific location indicate a coverage gap there, not a device or plan issue. Enable Wi-Fi Calling so calls can continue over Wi-Fi when cellular signal is lost. You can also report the coverage gap to your carrier — most carriers have a coverage improvement request process via their website or app.
**Does VoLTE use data from my plan allowance?**
VoLTE uses a dedicated QCI 1 bearer separate from the general data bearer. Many carriers do not count VoLTE traffic against the monthly data allowance. However, carrier policies vary — check your carrier's fair-use documentation for your specific plan.
**Will resetting network settings fix call quality problems?**
A reset can help if quality degraded after an OS update or SIM change. It clears Wi-Fi passwords, VPN configs, and Bluetooth pairings but preserves eSIM profiles. It will not help if the cause is signal strength, VoLTE incompatibility, or hardware.
---
## Related Guides
- [VoLTE and VoNR Explained](/en/guides/volte-vonr/) — how voice calls work on 4G and 5G, IMS architecture, QoS bearers, and device compatibility requirements
- [No Service on Your Phone?](/en/guides/no-service/) — step-by-step fix for when the device cannot register on the network at all
- [Slow Mobile Data Speeds — How to Diagnose and Fix](/en/guides/slow-speed/) — diagnosing data speed issues including signal, throttling, and MVNO-specific causes
- [Wi-Fi Calling (VoWiFi)](/en/guides/wifi-calling/) — complete setup guide for calling over Wi-Fi, international use, and prerequisites
- [How to Reset Network Settings (and What It Affects)](/en/guides/network-reset/) — exact procedure for iPhone, Pixel, and Samsung, and what the reset does and does not clear
================================================================================
# Calls and SMS Abroad: How to Save
URL: https://sim-finder.com/en/guides/calls-abroad/
Type: guides (en)
Published: 2026-06-06
Using your home carrier plan for calls and SMS abroad is often the most expensive connectivity mistake travelers make. Both outgoing and incoming calls can incur roaming charges, and many people are surprised to find charges on received calls they did not expect to pay for. Four practical strategies eliminate or significantly reduce these costs: routing calls through VoIP apps over data, enabling Wi-Fi Calling on your home line, using a local SIM or travel eSIM combined with VoIP, or using a dedicated international calling app. This guide explains how each option works and when each makes sense.
---
## Why Calls and SMS Cost More Abroad
When you use your home SIM in another country, your calls and texts are routed through the visited network. That network charges your home carrier a wholesale rate for handling each call and SMS. Your home carrier then applies its retail pricing on top — which is how the charges on your bill are generated.
The structure covers three usage types:
**Outgoing calls** — you call someone from your home number while abroad. The visited network handles the outgoing leg of the call and charges your home carrier. Your home carrier charges you a per-minute rate, which is typically higher than your domestic calling rate.
**Incoming calls** — someone calls your home number while you are abroad. The call is first routed to your home carrier's network, then forwarded internationally to the visited network where you are registered. The visited network charges for receiving and delivering the call. Your home carrier passes this charge to you. This surprises many travelers: you pay to receive a call you did not initiate.
**SMS** — outbound SMS is generally billed per message at a standard roaming rate. Incoming SMS is less commonly charged, but this depends on your carrier and destination.
The exception is the EU/EEA zone for EU/EEA subscribers. Under the Roam Like At Home (RLAH) regulation, carriers licensed in the EU or EEA cannot apply roaming surcharges to calls or SMS when their subscribers travel within the EU/EEA zone. See [EU Roaming Explained](/en/guides/eu-roaming/) for the full detail on who qualifies and which countries are covered.
For subscribers outside the EU/EEA framework — or EU subscribers traveling outside the EU/EEA — all three usage types are subject to carrier-set roaming rates. See [International Roaming Explained](/en/guides/international-roaming/) for a breakdown of the three main pricing models (pay-per-use, day passes, and included roaming).
---
## The Incoming Call Problem
Incoming call charges are the most misunderstood part of roaming bills. Many travelers assume that only the calls they make cost money. In practice:
- If your home SIM is registered on a foreign network, anyone calling your home number triggers a forwarding cost.
- You are billed for the leg of the call from your home country to the visited network — even if the caller did not pay international rates from their end.
- Letting calls go to voicemail does not always prevent the charge: on many networks, the call is still delivered to the visited network and the forwarding cost is incurred before voicemail intercepts it.
To avoid incoming call charges when you do not want to pay roaming rates:
1. **Enable call forwarding to voicemail at the home network level** (before you go abroad, via your carrier's app or settings), so calls never reach the visited network.
2. **Use a VoIP number or virtual number** as your accessible contact point while traveling, and have people call that instead of your home number.
3. **Turn off Data Roaming and rely on Wi-Fi** for call-via-app access — your home SIM is still registered for SMS but incoming voice calls may not connect if the network does not support voice without data.
4. **Check whether your carrier allows you to disable call forwarding to the visited network** — some carriers offer a "roaming call divert" setting that prevents the international forwarding leg.
If maintaining your home number for incoming calls is important, the cleanest solution is a plan that explicitly includes inbound calls in a day pass or roaming bundle, so you know exactly what you are paying.
---
## Option 1: VoIP and Messaging Apps Over Data
The most widely used approach to avoiding call and SMS roaming charges is to route all voice communication through internet-based apps: WhatsApp, FaceTime, Signal, Google Meet, Telegram, Viber, or similar. These apps use data rather than the carrier's voice circuit, so they do not trigger per-minute roaming call charges.
**How it works in practice:**
- Over Wi-Fi, VoIP calls cost nothing beyond your internet connection.
- Over mobile data (roaming), calls consume your data allowance — typically around 0.3–1 MB per minute depending on app and network conditions, which is low compared to streaming but still counts against a roaming data pass.
- You need data connectivity (Wi-Fi or mobile data) at both ends of the call.
**Requirements:**
- The person you are calling also needs the same app, or the app must support outgoing calls to regular phone numbers (WhatsApp and Viber support this as a paid feature; Google Voice supports calls to US numbers without charge; FaceTime audio works between Apple devices).
- Calls to landlines or non-app users still require either carrier minutes or a VoIP-to-PSTN service.
**When this strategy works best:**
- Trips where your primary contacts also use messaging apps.
- Countries where Wi-Fi is widely available at hotels, restaurants, and transit hubs.
- When you have a data roaming plan or travel eSIM providing mobile data, so you can make calls without needing to find Wi-Fi.
**A note on app availability:** Some countries restrict or block VoIP services at the network level. Verify whether your destination restricts specific apps before relying on this strategy as your sole calling option. A VPN may help in some cases, but it adds complexity and is subject to its own restrictions in certain jurisdictions.
For connectivity across a broad set of destinations, see [Regional Overview: Calls and Data Options by Area](/en/guides/regional-overview/) which maps out where VoIP and data connectivity conditions differ most significantly.
---
## Option 2: Wi-Fi Calling on Your Home Number
Wi-Fi Calling is a carrier feature — not a third-party app — that allows your phone to route calls and SMS through a Wi-Fi internet connection while still using your home carrier's network and your home phone number. From the recipient's perspective, the call looks and behaves like a normal call from your home number.
**Key characteristics:**
- Calls are billed at your home carrier's Wi-Fi Calling rate, not at roaming rates. Many carriers charge Wi-Fi Calls at the same rate as domestic calls, which is typically much lower than roaming rates.
- No app is needed on the other end — calls go through normally to any phone number.
- Your home number is the caller ID.
- SMS sent via Wi-Fi Calling is routed through your home carrier network; delivery is typically reliable.
**How to enable Wi-Fi Calling:**
On iPhone: Settings > Cellular > Wi-Fi Calling > Wi-Fi Calling on This iPhone. Your carrier must support the feature.
On Android: Settings > Connections > Mobile Networks > Wi-Fi Calling (path varies by manufacturer and carrier).
Wi-Fi Calling must be enabled before you travel and requires carrier support at both the device and account level. Not all carriers enable Wi-Fi Calling for roaming scenarios — check with your carrier whether Wi-Fi Calling works when you are registered on a foreign network, as some carriers restrict it to domestic use only.
For a full explanation of how Wi-Fi Calling works, the HD Voice relationship (EVS/AMR-WB codecs), and troubleshooting steps, see [Wi-Fi Calling Explained](/en/guides/wifi-calling/).
---
## Option 3: Local SIM or Travel eSIM Combined With VoIP
If your main goal is eliminating roaming charges entirely for both calls and data, combining a local SIM or travel eSIM for data with VoIP apps for calls is the most cost-effective approach on longer trips.
**The basic structure:**
1. Insert a local prepaid SIM or activate a travel eSIM in your device for local-rate data at the destination.
2. Keep your home SIM active (using a dual-SIM device) for SMS and incoming calls, but with Data Roaming turned off on the home SIM line.
3. Make all outgoing calls via VoIP apps over the local/travel data connection.
4. Receive calls to your home number via Wi-Fi Calling (if supported) or by forwarding callers to a VoIP number they can reach for free.
**Why this combination works:**
- The local SIM or travel eSIM provides data at local rates — no roaming surcharges.
- VoIP calls over that local data connection are effectively free of carrier charges.
- Your home SIM receives SMS (including 2FA codes) without Data Roaming, since SMS delivery on most networks does not require mobile data to be active.
- Incoming calls to your home number can be handled via Wi-Fi Calling if your carrier supports it while roaming, or managed via voicemail and callbacks via VoIP.
**Device requirement:** A dual-SIM device or eSIM-capable device that can hold both your home SIM (physical or eSIM profile) and the travel eSIM simultaneously. Most modern flagship smartphones meet this requirement.
Use [SimFinder's travel search](/en/travel/) to compare travel eSIM plans for your destination by data allowance, validity, and provider.
---
## Option 4: International Calling Apps and Services
For travelers who need to call landlines or mobile numbers that do not use messaging apps, dedicated international calling services offer per-minute rates that are substantially lower than standard carrier roaming rates.
**How these services work:**
International calling apps (such as Rebtel, Skype, or Google Voice for US-based users) connect calls via internet infrastructure rather than traditional carrier circuits, purchasing international termination at wholesale rates and passing savings to users. You dial via the app, the call is connected over the internet, and the recipient's phone rings normally — no app required on their end.
**Common structures:**
- **Per-minute rates to specific countries**: the app charges per minute at a fixed rate, which is typically far below standard carrier roaming rates for international calls.
- **Subscription plans**: monthly packages covering a set number of minutes to a list of countries.
- **Destination-specific apps**: some services specialize in calls to a specific country or region, offering the lowest rates for that destination.
**When this option is useful:**
- You need to call non-app users (businesses, government services, relatives who do not use messaging apps).
- The volume of calls is high enough that a per-minute calling app rate is worth the minor setup friction.
- You are already using a local SIM or travel eSIM for data, so the calls route over that connection.
**Limitations:** Call quality depends on the internet connection quality at both ends and on the app's routing infrastructure. Some services have higher latency than native calls. Verify the app's country coverage and per-minute rate for your destination before relying on it.
---
## SMS Abroad: What to Expect
SMS behavior while roaming is distinct from voice calls and worth understanding separately.
**Outgoing SMS:** Billed at your carrier's roaming SMS rate, which is a flat per-message charge. Day passes often include a fixed number of outbound SMS or an unlimited SMS allowance. Where messaging apps are available, using WhatsApp or iMessage (for Apple-to-Apple) over data is effectively free and bypasses carrier SMS charges entirely.
**Incoming SMS:** On most networks and most carrier plans, incoming SMS while roaming is not charged extra. However, this varies — some carriers and some destination networks do apply a small incoming SMS charge. Check your carrier's published roaming SMS policy for the specific destination.
**RCS (Rich Communication Services):** RCS messages are routed over data rather than the SMS network. If you are using Google Messages or another RCS-capable app and both parties support RCS, messages travel as data rather than SMS — no per-message SMS charges, but data consumption applies.
**OTP and 2FA codes via SMS:** Receiving SMS 2FA codes while roaming is generally reliable, but there are specific scenarios where delivery fails or is delayed. This is covered in detail in [Receiving SMS Verification Codes Abroad](/en/guides/sms-2fa-abroad/).
---
## Keeping Your Home Number Reachable Without Paying Roaming Voice Rates
If your goal is to stay reachable on your home number without paying per-minute incoming call charges, several approaches work depending on your carrier and device:
**Wi-Fi Calling (preferred where available):** Enable before departure. Calls to your home number are received over Wi-Fi, billed at your carrier's domestic or Wi-Fi Calling rate, which is typically much lower than international roaming rates. See [Wi-Fi Calling Explained](/en/guides/wifi-calling/) for setup and carrier compatibility.
**Call forwarding to a VoIP number:** Set up a free or low-cost VoIP number (Google Voice for US users, for example) and forward your home number to it before traveling. Callers dial your home number; it forwards to your VoIP number; you receive it via app over data. The forwarding cost is borne by your home carrier at their domestic forwarding rate, not at international roaming rates.
**Voicemail-only mode:** Forward all incoming calls directly to voicemail at the network level — before the visited network is involved. Callers leave a message; you retrieve it via visual voicemail over data or Wi-Fi. No incoming call roaming charge is incurred.
**Separate number for travel:** Some travelers use a secondary number service (like Google Voice, or a temporary eSIM line) as their travel contact number, giving that number to contacts for the duration of the trip. The home number is kept accessible only for critical services.
---
## Practical Setup Before You Travel
Regardless of which strategy you choose, a few steps before departure reduce friction and the risk of unexpected charges:
1. **Confirm your carrier's roaming voice and SMS rates** for your specific destination. Do not assume what applied last year still applies.
2. **Enable Wi-Fi Calling** on your device if your carrier supports it for roaming. Test it at home by putting the device in Airplane Mode, connecting to Wi-Fi, and making a call.
3. **Install and configure your primary VoIP app** — log in, test audio, verify your contacts are on the same platform or that you have credits for PSTN calls if needed.
4. **Turn off Data Roaming** on your home SIM unless you have confirmed the rates are acceptable or have an appropriate pass. Background apps will otherwise generate data charges without prompting.
5. **Set up call forwarding** if you want to manage incoming calls actively. Decide in advance whether to forward to voicemail, to a VoIP number, or to leave calls coming through under Wi-Fi Calling.
6. **Notify contacts** of your preferred contact method during the trip. This avoids callers ringing your home number and generating charges you might not expect.
The [Pre-Trip Connectivity Checklist](/en/guides/pre-trip-checklist/) covers these steps in context with the full range of settings — data, calling, and device configuration — that should be confirmed before departure.
---
## How Destination Affects Your Options
Not every strategy is equally practical in every destination. A few structural differences matter:
**Wi-Fi availability:** In destinations with extensive public Wi-Fi (major hotels, cafes, transit hubs), VoIP and Wi-Fi Calling over Wi-Fi are highly practical. In remote areas or destinations with limited public Wi-Fi infrastructure, mobile data becomes the primary fallback.
**VoIP restrictions:** Some countries restrict or throttle VoIP services at the national network level. Where VoIP apps are restricted, Wi-Fi Calling via your carrier (if supported) or a dedicated calling service may still function, but app-based VoIP may not. Research your specific destination before assuming WhatsApp or FaceTime will be freely accessible.
**eSIM support:** Travel eSIM availability varies by destination and carrier. Most major destinations have multiple travel eSIM plan options. Less-visited destinations may have fewer plan options or require a physical local SIM.
**Local SIM registration requirements:** Many countries require passport identity verification for SIM purchases. Germany's Telekommunikationsgesetz requires verified identity registration for all SIM purchases — prepaid and postpaid — via in-store, PostIdent, or VideoIdent verification. Other countries have similar requirements. Factor this into your plan if you want to buy a local SIM on arrival.
For a destination-by-destination overview of connectivity conditions including VoIP restrictions and eSIM availability, see [Regional Overview: Calls and Data Options by Area](/en/guides/regional-overview/).
---
## Comparing the Four Strategies
| Strategy | Call quality | Requires mobile data | Works to non-app users | Keeps home number |
|----------|-------------|---------------------|----------------------|-------------------|
| VoIP/messaging apps | Good (data-dependent) | Yes (or Wi-Fi) | No (or paid add-on) | No |
| Wi-Fi Calling | Same as native calls | Wi-Fi only | Yes | Yes |
| Local SIM + VoIP | Good (local data) | Yes (local) | No (or paid add-on) | Separate config needed |
| International calling app | Good (data-dependent) | Yes (or Wi-Fi) | Yes | No |
No single strategy is best for all travelers. A practical approach for most trips is to combine Wi-Fi Calling (for home-number continuity) with VoIP apps over a travel eSIM data connection (for low-cost outgoing calls), and to use an international calling app as a backup for calls to non-app users. Use [SimFinder's travel search](/en/travel/) to find a travel eSIM plan that fits your destination and data needs.
---
## Related Guides
- [International Roaming Explained](/en/guides/international-roaming/) — How roaming charges are structured and what the three main pricing models look like
- [EU Roaming Explained](/en/guides/eu-roaming/) — Roam Like At Home regulation in full detail, including who qualifies and which countries are covered
- [Wi-Fi Calling Explained](/en/guides/wifi-calling/) — How to enable and use Wi-Fi Calling, carrier compatibility, and how it interacts with roaming settings
- [Receiving SMS Verification Codes Abroad](/en/guides/sms-2fa-abroad/) — What to do when 2FA SMS codes are delayed or not delivered while roaming
- [Regional Overview: Calls and Data Options by Area](/en/guides/regional-overview/) — Destination-by-destination conditions for VoIP, eSIM, and connectivity options
================================================================================
# Contract Terms: Lock-In, Termination Fees, and Setup Costs
URL: https://sim-finder.com/en/guides/contract-terms/
Type: guides (en)
Published: 2026-06-04
Understanding a mobile contract before signing it is the clearest way to avoid unexpected charges when your situation changes. Minimum terms, early-termination fees, and setup costs follow predictable structures once you know what to look for. This guide explains each element, how regulations shape them in different markets, and what to compare when choosing between a SIM-only plan and a device-bundled one.
---
## What a Contract Term Actually Means
A **contract term** is the minimum period you agree to remain a customer of a carrier under a specific plan. During this period, the carrier commits to providing service at the agreed price; you commit to paying regardless of whether you use the service.
Contract terms exist in several forms:
- **No-term (month-to-month):** You can cancel at any time, typically with a short notice period (commonly 30 days). No early-termination fee applies. This is the standard structure for prepaid plans and many SIM-only postpaid plans.
- **Fixed-term:** You commit for a defined period — 12 or 24 months are the most common in markets where device financing is embedded in the service plan. Cancelling early triggers a termination fee.
- **Rolling term:** A fixed term that automatically renews at expiry unless you take action. The renewal window — the period in which you can cancel without incurring a new commitment — varies by carrier and is stated in the contract.
The term structure is disclosed in the plan's key terms, the contract summary document, or the service agreement. Read the section labelled "minimum term," "commitment period," or "contract duration" before signing.
---
## Minimum Term: What the Clock Covers
The **minimum term** is the shortest period for which you must pay, even if you cancel immediately. A 24-month minimum term means 24 months of service charges are owed; a month-to-month plan has a minimum term equal to the notice period only.
On device-bundled plans, the minimum term is long enough to recover the handset cost through monthly repayments. On SIM-only plans, the minimum term — if any — reflects only the service commitment and is usually shorter (12 months or less).
Key questions to answer before signing:
1. **When does the term begin?** Most carriers start the term from the date of activation, not the date of order. If there is a delay between order and activation, confirm which date the carrier uses.
2. **Does a plan change reset the term?** Upgrading to a new handset mid-contract or switching to a different plan tier can trigger a new minimum term at some carriers. Confirm before making any mid-contract changes.
3. **What is the notice period at end of term?** Even after the minimum term ends, cancelling typically requires a notice period — often 30 days. If you miss the notice deadline, you may owe an additional month of charges.
---
## Early-Termination Fees: How They Are Calculated
An **early-termination fee (ETF)** is the amount you owe if you cancel before the minimum term ends. Two calculation methods are common:
**Flat-rate ETF:** A fixed amount stated in the contract, payable regardless of when in the term you cancel. Less common in current markets.
**Prorated ETF:** The fee decreases as you progress through the term. The most common approach charges for the remaining months of the minimum term at the monthly service rate. Under this model, an ETF in month 3 of a 24-month contract is larger than one in month 22.
On device-bundled plans, the ETF may be calculated separately for the service component and the device financing component. Alternatively, it may equal the full outstanding device balance plus a service-component fee. Read the contract to understand whether the two components are treated independently.
Some jurisdictions set caps on how large an ETF may be, or specify how it must be calculated. The EU Electronic Communications Code, for example, imposes proportionality requirements on ETFs — meaning compensation owed on early termination must bear a proportionate relationship to the remaining contract value; exact rules and formulae are set by each member state under national transposition (not harmonised across the EU). Similar consumer protection rules exist in other markets with active telecoms regulators.
Prepaid plans and month-to-month postpaid plans do not have ETFs.
---
## Setup, Activation, and SIM Fees
Beyond the recurring monthly charge, carriers may collect non-recurring fees at the start of service. These are sometimes disclosed clearly and sometimes buried in the sign-up flow. The main categories are:
**Activation fee:** A one-time administrative charge for opening a new account or line. Common in the US market, less common in European markets. It is typically non-refundable.
**SIM card fee:** A charge for the physical SIM card. The amount varies and may be zero (particularly for online sign-ups where the SIM is posted to you) or a nominal amount at point of sale.
**eSIM issuance fee:** A fee for generating an eSIM profile. Many carriers include this at no cost; some apply a small charge for eSIM re-issuance (replacing a lost or damaged profile), though the initial issuance is usually free.
**Connection fee:** A charge associated with establishing your line on the network — distinct from the SIM fee in some markets. More common in markets with a tradition of fixed upfront charges.
**Device setup or insurance fee:** If you purchase a handset through the carrier, fees for device protection plans or insurance products are sometimes included in the initial invoice as optional or mandatory items. Read the itemised breakdown before confirming any order.
Regulations differ on which of these fees must be disclosed upfront and whether any are prohibited. In many markets, consumer protection rules require carriers to provide a clear summary of all costs before contract formation — look for a "key facts" or "pre-contract information" document in the sign-up flow.
---
## SIM-Only Plans vs Device-Bundled Plans
This is one of the most consequential contract decisions because it determines what you are actually paying for and how much flexibility you retain.
**SIM-only plans:**
- Provide mobile service (data, calls, and SMS) only.
- You supply your own unlocked handset.
- Typically available on month-to-month or short fixed-term (12-month) contracts.
- Monthly cost reflects only the service fee — no device repayment is bundled in.
- Easier to switch carriers mid-cycle because ETF exposure is low or zero.
**Device-bundled plans:**
- Combine mobile service with a handset, which is effectively financed over the contract term.
- The monthly payment covers both the service fee and a portion of the device cost. Some carriers itemise these separately on the bill; others present a single figure.
- Contracts are commonly 24 months — long enough to recover the handset cost.
- Switching before the term ends requires either paying an ETF (on the service component), the outstanding device balance, or both.
- The headline monthly cost may appear lower than buying the handset outright and taking a SIM-only plan, but the total cost over the term may be higher once interest, service fees, and device cost are combined.
When comparing a device-bundled plan against a SIM-only plan plus a separately purchased handset, calculate the **total cost over the same period** — typically 24 months — including all fees. This is the accurate basis for comparison.
If you want to retain the ability to switch carriers with minimal penalty, a SIM-only plan is the structurally more flexible choice.
For a broader framework for evaluating plans, see [How to Choose a Travel eSIM: 5 Key Criteria](/en/guides/how-to-choose/) — many of the evaluation principles apply to domestic plan selection as well.
---
## Lock-In Regulations: How Countries Differ
The degree to which carriers can lock customers into contracts varies significantly by jurisdiction. Regulatory frameworks range from permissive to restrictive:
**Contract length caps:** Some regulators prohibit contracts beyond a certain duration. In the EU, the Electronic Communications Code (Directive 2018/1972) requires that contracts offered to consumers must include an option with a maximum commitment of 24 months; carriers must also offer a 12-month version. This does not mean 24-month contracts are banned — it means customers must be offered a shorter option.
**Lock-in prohibitions for certain plan types:** In some markets, certain plan types are required to be month-to-month. Rules vary by regulator and product category.
**ETF proportionality requirements:** Regulators in several jurisdictions require that ETFs be proportional — they may not exceed the financial benefit remaining to the carrier from the contract. Some markets specify the exact formula.
**Ban on device lock combined with service contract:** Some markets have moved toward separating handset financing from service contracts at a regulatory level, requiring these to be disclosed and in some cases structured as genuinely separate agreements.
**Number portability rights:** The right to port your number when leaving a carrier is a separate regulatory protection from ETF rules. In most markets with significant mobile penetration, number portability is mandated — carriers cannot block a port because of a contract dispute. For a full explanation of portability, see [Mobile Number Portability (MNP) Explained](/en/guides/what-is-mnp/).
No single global standard exists. The regulatory environment in your specific country determines what protections apply. Check your national telecoms regulator's consumer guidance for the rules in your market.
---
## Renewal Windows: The Period That Matters Most
A **renewal window** is the period before your contract's end date during which you can give notice to cancel or switch without triggering a new term.
Most carriers define a renewal window in the contract terms — for example, "you may cancel without a new minimum term commitment if you give notice between 30 and 90 days before the contract end date." If you give notice outside this window:
- **Too early** (before the window opens): Your notice may not be accepted, or it may be processed at the end of the window — meaning you could be locked in for a new term before the notice takes effect.
- **Too late** (after the window closes): The contract may auto-renew into a new minimum term, and your notice will only take effect at the end of the new term.
To navigate this correctly:
1. Record your contract start date and term length.
2. Calculate the contract end date (add the term in months).
3. Read the contract to identify the renewal window (the range of days before the end date).
4. Diarise the opening of the renewal window — not the end date, but when the window opens.
If your carrier sends an end-of-term notification, that is useful, but do not rely on it as your only reminder. Carriers are not uniformly required to proactively notify customers of approaching auto-renewals, though some regulations mandate this.
---
## What to Check Before Signing Any Contract
The following items appear in nearly all mobile contracts and are the minimum to verify before committing:
**Minimum term and start date:** How long is the commitment, and when does it begin?
**Early-termination fee:** Is there one? How is it calculated? Does it prorate over time?
**Renewal clause:** Does the contract auto-renew? What is the renewal window?
**Setup and one-time fees:** What is owed at sign-up beyond the first month's charge?
**SIM vs device structure:** If a handset is included, are the service fee and device financing itemised separately? What is the outstanding device balance if you cancel early?
**Price change rights:** Can the carrier raise the monthly price during the fixed term? If so, what right to exit does that give you? Some jurisdictions require carriers to offer a right to exit penalty-free when they raise prices mid-term.
**Roaming and fair-use caps:** Are there conditions on the plan that could cause charges to increase mid-term — for example, excessive data or extended international use?
The pre-switch process involves verifying your current contract status — particularly the end date and any outstanding ETF — before initiating a carrier change. For a structured walkthrough of what to check before switching, see [Pre-Switch Checklist: What to Check Before Changing Carriers](/en/guides/pre-switch-checklist/).
---
## Reading the Pre-Contract Summary Document
Most jurisdictions require carriers to provide a standardised summary of key terms before a contract is formed. These documents go by different names — "Contract Summary" (UK Ofcom / General Condition C1), "Contract Information" (EU ECC), "Schumer Box" for the credit-disclosure component of financed-device agreements in the US (this applies to the device-financing element, not the mobile service contract itself) — but they serve the same function: presenting the essential terms in a standardised format before you sign.
When you receive a pre-contract summary, prioritise reading:
- **Total cost over the minimum term.** The monthly rate multiplied by the term months, plus all non-recurring fees. This is the figure that allows accurate comparison between plans with different term structures.
- **Termination conditions and fees.** The exact ETF, how it is calculated, and whether it prorate.
- **Price change clause.** Whether the carrier can raise the monthly price during the fixed term, and what right to exit that triggers.
- **Dispute resolution process.** Which body handles complaints if you and the carrier disagree on contract terms.
If the carrier does not provide a pre-contract summary document — or provides it only at the moment of physical signature rather than before — this may constitute a regulatory violation in your jurisdiction. Regulators that oversee pre-contract disclosure include Ofcom (UK), ARCEP (France), Bundesnetzagentur (Germany), AGCOM (Italy), and equivalent authorities in other markets.
If something in the summary document is unclear, ask for clarification before signing. Once you have signed, the terms are binding even if you misunderstood them.
---
## SIM Lock and Its Relationship to Contract Terms
SIM lock — where a phone is restricted to one carrier's network — is a separate issue from contract terms, but the two are often conflated.
A carrier may sell a SIM-locked handset on a device-bundled plan and require the lock to remain in place during the minimum term. Once the minimum term ends, or once the device financing is paid off, the carrier may unlock the device on request (or automatically, depending on the market and carrier policy).
Regulatory rules on SIM locking vary. In the UK, Ofcom prohibited the sale of locked handsets from December 2021 — phones purchased after that date are sold unlocked. In the US, carriers commit to unlocking devices once a customer's obligations are met, under industry standards endorsed by the FCC (a binding FCC rule was proposed in 2024 but its status should be verified). In other markets, locking is still permitted during the financing term.
Understanding whether a handset is locked — and when it becomes eligible for unlocking — is particularly relevant if you plan to use a local SIM while travelling, or if you switch carriers before the term ends. For a full breakdown of how to check lock status and how unlock policies differ, see [SIM Lock and SIM-Free Explained](/en/guides/sim-lock/).
---
## Comparing Plans on SimFinder
Contract terms — minimum period, ETF structure, and setup costs — are distinct from the ongoing monthly price, but they affect the total cost of a plan significantly. A plan with a lower monthly charge but a large ETF may cost more overall if your circumstances change before the term ends.
When comparing domestic plans, calculate the total cost over the expected usage period, not only the headline monthly figure. SimFinder lets you search and filter plans by carrier, data amount, and contract type. Use the search to identify which plans are month-to-month and which carry minimum terms, so you can compare total costs rather than monthly rates alone.
For travel connectivity options where contract terms are typically absent (most travel eSIM plans are single-purchase with no minimum commitment), see [Travel eSIM Provider Comparison](/en/guides/provider-comparison/).
---
## FAQ
*(See structured FAQ items in the frontmatter for display in site search and rich results.)*
### If I cancel my plan early, will my phone number be cancelled too?
Not necessarily. If you initiate a number port to a new carrier before cancelling your current service, your number transfers to the new carrier and the old account closes on port completion. If you cancel your account outright without porting, your number returns to the carrier's pool and is eventually reassigned. To keep your number, always port before cancelling. See [Mobile Number Portability (MNP) Explained](/en/guides/what-is-mnp/) for the full process.
### Can a carrier change my monthly price during a fixed-term contract?
This depends on the contract terms and the applicable regulations. Some contracts contain a price escalation clause that permits the carrier to raise prices by a defined amount (for example, by a fixed percentage or linked to an inflation index). In some jurisdictions, price increases during a fixed term must give the customer a right to exit without penalty. Read your contract for the price change clause, and check your national regulator's guidance on your right to exit following a price change.
### What is the difference between a notice period and a minimum term?
A minimum term is the period during which you cannot leave without paying an ETF. A notice period is the advance warning required before any cancellation — it applies even after the minimum term ends. For example, a plan with a 24-month minimum term and a 30-day notice period requires you to give 30 days' notice after month 24 to end service at month 25. If you give notice in month 23, the notice takes effect in month 24, but you still owe the ETF for the remaining time in the minimum term.
---
## Related Guides
- [How to Choose a Travel eSIM: 5 Key Criteria](/en/guides/how-to-choose/) — Evaluation framework applicable to both travel and domestic plan selection
- [Mobile Number Portability (MNP) Explained](/en/guides/what-is-mnp/) — How to port your number when switching carriers, and what happens to your number if you cancel
- [SIM Lock and SIM-Free Explained](/en/guides/sim-lock/) — How lock status interacts with device-bundled contracts and when a phone becomes eligible for unlocking
- [Pre-Switch Checklist: What to Check Before Changing Carriers](/en/guides/pre-switch-checklist/) — Step-by-step verification of contract end date, ETF, and other switch prerequisites
- [Travel eSIM Provider Comparison](/en/guides/provider-comparison/) — Major travel eSIM providers compared; most travel plans carry no minimum term or ETF
================================================================================
# How Much Mobile Data Do You Need?
URL: https://sim-finder.com/en/guides/data-usage-guide/
Type: guides (en)
Published: 2026-04-13
Most people need between 3 GB and 20 GB of mobile data per month. Light users who rely on Wi-Fi at home and work can manage on 3–5 GB. Commuters who stream video or browse social media on the go typically need 10–15 GB. Remote workers who join video calls away from Wi-Fi should plan for 20–25 GB. Only those who stream HD video on mobile daily without Wi-Fi access need 30 GB or more.
This article breaks down how much data each major app and activity actually consumes, then shows you how to calculate your own estimate — and how to check what you are already using.
---
## How Much Data Each App Uses
Understanding where your data goes is the first step to choosing the right plan.
### Video Streaming
| Service | Quality | Data per hour |
|---------|---------|--------------|
| YouTube | 360p (low) | ~0.3–0.45 GB |
| YouTube | 480p (standard) | ~0.5–0.7 GB |
| YouTube | 720p HD | ~1.2–1.8 GB |
| YouTube | 1080p Full HD | ~2.0–3.0 GB |
| Netflix | Low | up to 0.3 GB |
| Netflix | Medium | up to 0.7 GB |
| Netflix | HD | up to 3.0 GB |
| Netflix | Ultra HD (4K) | up to 7.0 GB |
Netflix figures come directly from the official Netflix Help Center. YouTube figures are based on independent measurements, as YouTube does not publish an official data-per-quality table. YouTube uses variable bitrate encoding, which means actual consumption can vary depending on the content.
The difference between quality levels is dramatic. Watching YouTube at 1080p instead of 360p uses roughly five to seven times more data for the same video. If you watch one hour of YouTube daily at 720p on mobile, that alone adds up to roughly 36–54 GB per month.
### Social Media and Messaging
| App | Activity | Data per hour |
|-----|----------|--------------|
| WhatsApp | Text messages | ~0.001 GB |
| WhatsApp | Voice call | ~0.015–0.02 GB |
| WhatsApp | Video call | ~0.3–0.5 GB |
| Instagram | Browsing feed and Stories | ~1.0 GB |
| TikTok | Video browsing | ~0.5–1.0 GB |
| X (formerly Twitter) | Browsing timeline | ~0.15 GB |
Text messaging consumes almost no data. Voice calls are also light — even an hour-long call uses around 15 to 20 MB. However, apps built around video content such as TikTok and Instagram use significant data, comparable to watching a YouTube video. Scrolling Instagram for just one hour per day adds up to roughly 30 GB per month.
### Video Calls
| Service | Mode | Data per hour |
|---------|------|--------------|
| Zoom | Video on | ~1.0–2.0 GB |
| Zoom | Audio only | ~0.07 GB |
| Google Meet | Video on | ~0.8–1.0 GB |
| Microsoft Teams | Video on | ~0.5–1.2 GB |
Zoom figures reflect the range between one-on-one HD calls (approximately 1.08 GB/hour at 720p) and group video meetings (approximately 1.98 GB/hour at 720p), as specified in Zoom's official system requirements. Google Meet and Microsoft Teams figures are derived from their respective official network preparation documentation. Actual consumption varies with call quality, number of participants, and network conditions.
A one-hour video call consumes roughly as much data as watching a high-quality YouTube video. If you regularly join video calls away from Wi-Fi, this category alone can push your monthly usage past 15 GB.
### Music Streaming
| Service | Quality | Data per hour |
|---------|---------|--------------|
| Spotify | Normal (~96 kbps) | ~43 MB (0.04 GB) |
| Spotify | High (~160 kbps) | ~72 MB (0.07 GB) |
| Spotify | Very High (~320 kbps, Premium) | ~144 MB (0.14 GB) |
Music streaming is comparatively data-light. Listening for two hours per day at Normal quality uses roughly 2.6 GB per month — a small fraction of what video streaming consumes. Downloading playlists over Wi-Fi for offline listening eliminates this entirely.
### Other Common Activities
| Activity | Data estimate |
|----------|--------------|
| Web browsing | ~0.1 GB/hour |
| Google Maps navigation | ~0.01–0.03 GB/hour |
| App updates | ~0.05–0.3 GB per update |
| OS updates | ~1–5 GB per update (major releases can exceed 5 GB) |
Operating system updates can consume several gigabytes in a single download. Running an update over mobile data can exhaust a significant portion of a monthly allowance unexpectedly. It is advisable to perform OS updates on Wi-Fi only.
---
## Estimating Your Monthly Data Need
Once you understand per-app consumption, you can estimate your total monthly need by matching your actual habits to one of these usage patterns.
### Pattern 1: Wi-Fi Mostly — Estimate 3–5 GB
**Typical profile:** Home and work both have Wi-Fi. Mobile data is used mainly for messages, maps, and occasional web browsing when out. No video streaming on mobile.
**Example monthly breakdown:**
- Messaging apps (text and voice): ~0.2 GB
- Web browsing (15 min/day on mobile): ~0.8 GB
- Maps and other apps: ~0.2 GB
- **Total: approximately 1.2 GB**
A 3 GB plan provides comfortable headroom for this pattern.
### Pattern 2: Commuter — Estimate 10–15 GB
**Typical profile:** Commutes 30–60 minutes each way by public transport. Watches YouTube at standard quality or scrolls social media during the commute.
**Example monthly breakdown:**
- X and light social browsing (30 min/day): ~2.5 GB
- YouTube at 480p (30 min/day commute): ~9 GB
- Web browsing and maps: ~0.5 GB
- Spotify Normal quality (1 hour/day): ~1.2 GB
- **Total: approximately 13 GB**
A 10 GB plan is tight for this pattern; 15 GB provides a reasonable buffer.
### Pattern 3: Remote Worker — Estimate 20–25 GB
**Typical profile:** Works from cafes or other locations several days per week. Joins Zoom or similar video calls two to three times per week away from Wi-Fi.
**Example monthly breakdown:**
- Social media, browsing, email: ~4 GB
- Video calls, 2–3 per week at 1 hour each: ~10–15 GB
- Cloud sync and other background data: ~2 GB
- **Total: approximately 16–21 GB**
20 GB is a reasonable target; consider 25 GB if video calls frequently involve groups.
### Pattern 4: Heavy Streamer — Estimate 30 GB or more
**Typical profile:** Watches YouTube or Netflix in HD on mobile daily, or has no home Wi-Fi and uses mobile data for everything.
**Example monthly breakdown:**
- YouTube at 720p HD (1 hour/day): ~36–54 GB
- Social media and messaging: ~3 GB
- Other browsing: ~1 GB
- **Total: approximately 40–58 GB**
Even a 30 GB plan may not be sufficient for this profile. If your home also lacks Wi-Fi and you use mobile data as your primary internet connection, an unlimited data plan warrants consideration.
---
## How to Check Your Current Data Usage
The most reliable starting point is not an estimate — it is your actual usage history. Check your usage before selecting a plan.
### On iPhone
1. Open the Settings app.
2. Tap **Mobile Data** (or **Cellular** depending on your region).
3. Scroll down to see **Mobile Data Usage** — the total at the top shows cumulative data since the last reset.
4. Below the total, you can see per-app data usage.
**Important note:** iPhone tracks cumulative usage since the last reset, not the current billing cycle. Tap **Reset Statistics** at the start of each month (or the start of your billing cycle) to get an accurate monthly figure. The statistics cover the period since the last reset regardless of calendar month.
### On Android
1. Open the Settings app.
2. Tap **Network & Internet** (exact menu name may vary by manufacturer).
3. Tap **Data usage** or **Mobile data**.
4. Set the date range to match your billing cycle.
Android typically allows you to configure a billing cycle start date, so the displayed usage automatically aligns with your monthly allowance.
### Via Your Carrier App
Most carriers provide an official app showing real-time remaining data and usage history. Many also offer data usage alerts by SMS or push notification when you reach 80% or 100% of your allowance — enabling these alerts helps avoid unexpected overages.
**Recommended approach before choosing a plan:**
1. Check your usage for the current month.
2. Track usage for one to two full billing cycles.
3. Identify the difference between high-usage and low-usage months.
4. Base your plan choice on your higher-usage months to avoid throttling.
---
## A Note on Data Caps and Throttling
Many plans labelled "unlimited" apply speed throttling once you exceed a defined threshold — commonly between 3 GB and 50 GB depending on the provider. After that threshold, download speeds may be reduced to 1 Mbps or lower, making HD video streaming impractical. When comparing plans, check both the total data allowance and any fair-use speed limits that apply after the cap.
Use SimFinder to compare plans side by side, including data caps and throttling thresholds, so you can find an option that matches your actual usage.
**[Search for SIM plans on SimFinder →](/en/)**
================================================================================
# Connectivity Strategy for Digital Nomads
URL: https://sim-finder.com/en/guides/digital-nomad/
Type: guides (en)
Published: 2026-06-06
Digital nomads crossing many countries face a connectivity problem that most travel guides do not address: you are not a tourist who needs data for a week, and you are not an expat settling permanently in one place. You need reliable, professional-grade connectivity that adapts as you move from country to country, often on short notice and with a client call scheduled for the morning after you arrive.
The practical answer is a three-layer stack: a global or regional eSIM to bridge every border crossing, local SIMs for countries where you stay long enough to make the economics work, and your home number preserved in a dual-SIM setup so clients and banks can always reach you. Each layer serves a different time horizon and cost profile. Handled in combination, they eliminate the two failure modes that most affect nomads — running out of data mid-client-call in an unfamiliar city, and losing access to accounts tied to your home number.
---
## The Three-Layer Stack: Why One Approach Does Not Cover All Scenarios
No single connectivity solution works well across all three phases of nomad travel: the arrival window (hours to a few days), the settling-in period (one to several weeks in one place), and the long stay (a month or more where cost optimization matters).
| Layer | Tool | When It Applies |
|-------|------|-----------------|
| 1 | Global or regional eSIM | Arrival window; multi-country travel without a fixed base |
| 2 | Local SIM from in-country carrier | Extended stay in a single country; cost optimization |
| 3 | Home number on second SIM | Always active for calls, SMS, and account authentication |
The layers interact: Layer 3 is permanent background infrastructure that never changes. Layers 1 and 2 rotate depending on where you are and how long you plan to stay. The decision point is roughly two to four weeks: below that threshold, the convenience of a pre-installed eSIM outweighs the cost premium. Above it, the economics of a local plan usually win.
---
## Layer 1: Global and Regional eSIMs for Border Crossings
A global or regional eSIM is the right tool for the moment you cross a border — or when your itinerary covers multiple countries too quickly to justify purchasing individual local SIMs for each.
### Choosing Between Global and Regional Plans
A **regional plan** covers a defined set of countries under one purchase — Europe (typically 40+ countries), Southeast Asia, Latin America, and similar geographic bundles. These work well for nomads whose itinerary stays within a single region for a month or two. The per-GB cost is higher than a local SIM but substantially lower than international roaming on a home carrier.
A **global plan** covers 100+ countries under a single purchase and is the right choice when your itinerary spans multiple continents or when your movements are unpredictable enough that you cannot commit to a regional plan in advance. The per-GB cost is the highest of any option, but the operational simplicity — one plan, no decisions at each border — has real value when your time is booked.
For a structured comparison of the providers that offer strong regional and global plan catalogs, see [Travel eSIM Provider Comparison](/en/guides/provider-comparison/).
### Evaluating a Plan for Remote Work
Not all eSIM plans serve remote workers equally. Before purchasing any plan for professional use, verify three things:
**Tethering (hotspot) is permitted.** Most major travel eSIM providers allow tethering, but individual plans within a provider's catalog may restrict it. Tethering on a travel eSIM turns your phone into a mobile hotspot for your laptop — if the plan blocks it, you cannot use your phone's data connection for your computer. Always confirm the plan's tethering policy at purchase time, not just the provider's general policy.
**Data speed tier is sufficient for video calls.** A stable video call at 720p HD requires roughly 1.5–2.5 Mbps of sustained upload and download bandwidth. Most travel eSIM plans on 4G/LTE networks in well-covered areas comfortably exceed this. The practical risk is not peak speed but consistency: a plan that throttles to low speeds after a daily threshold is reached will degrade video call quality mid-meeting. For unlimited plans, confirm the daily high-speed data threshold before purchasing.
**Network partner quality at your destination.** A travel eSIM's real-world performance depends entirely on which local carrier it connects to. Two plans covering the same country may use different partner networks, with significantly different results in the cities or areas where you will be working. The provider pages that list the named network partner for each country in a plan give you the most useful signal. [SimFinder Travel](/en/travel/) lists the local network partner for each plan so you can compare coverage quality before purchasing.
---
## Layer 2: Local SIMs for Extended Stays
Once you plan to stay in a country for two to four weeks or more, a local prepaid SIM from an in-country carrier almost always beats a travel eSIM on cost. The per-GB cost difference is typically significant: local prepaid plans in most markets are priced for residents, not for short-stay travelers.
### When to Make the Switch
The break-even point depends on the specific market and the data volume you need. In markets where local prepaid data is inexpensive — Southeast Asia, South Asia, parts of Latin America — the cost difference can justify switching after just one to two weeks. In markets with higher local plan costs, the threshold extends. The correct calculation compares your remaining travel eSIM cost against the full cost of a local SIM (including any registration friction) for the same number of days.
For the countries and contexts where a local plan is clearly the right choice, the extended framework in [Connectivity Strategy for Moving Abroad](/en/guides/expat-strategy/) is the right reference — it covers situations where a longer-term local contract becomes practical.
### SIM Registration Requirements
Many countries require identity verification to purchase or activate a local SIM. The practical implications for nomads:
- **Passport-only markets** (most of Western Europe, US, Canada, Australia, New Zealand): registration is straightforward and adds no meaningful friction.
- **Biometric verification markets** (Thailand as of August 2025, some others): requires in-person registration with a physical passport and liveness check. The process takes longer and can only be completed at designated retail locations.
- **Local ID number markets** (many Latin American countries): requires a national tax number or ID that tourists generally do not have. A travel eSIM or a SIM product specifically marketed to tourists is the only practical option in these markets.
- **Japan, South Korea, Vietnam**: require passport-based registration; available at airports and carrier stores. The process is manageable but adds a step.
Understanding the registration environment before you arrive determines whether Layer 1 or Layer 2 is even feasible in a given country. For a full regional breakdown of where these friction points apply, see [Regional Connectivity Guide for Travelers](/en/guides/regional-overview/).
### Local eSIM vs Physical SIM
In markets with strong eSIM infrastructure — Japan, South Korea, Singapore, Western Europe, the US — you may be able to activate a local carrier's eSIM directly rather than purchasing a physical SIM. This keeps your Layer 1 eSIM slot free for the next destination. The practical limitation is that local eSIM availability from individual carriers varies; not all carriers in every market offer tourist-facing eSIM products.
---
## Layer 3: Keeping Your Home Number Active
Your home number is professional and financial infrastructure. It is linked to bank authentication codes, two-factor login for services you use daily, and contacts who have only that number. Cancelling it when you start nomad travel — or letting it expire through inactivity — creates problems that are genuinely difficult to fix from abroad.
### Why Home Number Loss Has Serious Consequences
The specific risk: your home number is tied to SMS-based two-factor authentication for financial accounts, email services, and software tools. If that number is deactivated and reassigned to a different person, one-time passwords sent to it reach a stranger. You may find yourself locked out of accounts at the worst possible time — mid-trip, in a country with limited support options.
The parallel risk is for incoming calls and SMS from clients, services, and government agencies in your home country who have no other way to reach you.
### Practical Options for Number Retention
The right retention approach depends on your home carrier and how long you plan to travel:
- **Downgrade to a minimal-cost plan**: The lowest-cost plan your carrier offers, often a basic prepaid option. Keeps the number active at low monthly cost.
- **eSIM number retention**: If your home carrier supports eSIM, you can keep the home number as the second SIM in a dual-SIM setup while using a travel eSIM or local SIM for data. This is the most seamless approach for dual-SIM devices.
- **Carrier suspension service**: Some carriers offer long-term suspension for subscribers living or traveling abroad. Number is preserved; active service is paused. Availability varies by carrier and country.
- **Port to a VoIP service**: Services that accept number ports can hold the number independently of any mobile carrier. Incoming calls and SMS are delivered over an app. Useful for extremely long-term travel where ongoing carrier costs are not justified.
For a full comparison of all five retention options with carrier-specific examples, see the [Number Storage and Retention Guide](/en/guides/number-storage/).
### Dual-SIM Configuration for Daily Use
Most modern smartphones support dual-SIM operation — one physical SIM plus one eSIM, or two eSIMs on newer devices. In a nomad setup:
- **Home SIM**: designated for calls and SMS only. Data roaming turned **off** on this line to prevent unintended roaming charges.
- **Data SIM** (travel eSIM or local SIM): designated for all data. Tethering enabled for laptop use when needed.
On iPhone, the "Allow Cellular Data Switching" setting should be turned **off** so the home SIM cannot automatically take over data when the travel SIM has poor signal. On Android, configure the default data SIM in the SIM card manager to the travel or local SIM explicitly.
---
## Using SimFinder Travel at Each Border Crossing
The three-layer stack requires one recurring action: when you approach a new destination, check what plans are available there before you cross the border, not after you land without connectivity.
The practical workflow:
1. **Before departure**: Open [SimFinder Travel](/en/travel/), search for your next destination. Review available plans — regional plans already active on your device may cover the destination; if not, identify a new plan to purchase.
2. **Compare on the five criteria**: coverage (named network partner), data amount, validity period, pricing structure, and tethering policy. For the evaluation framework behind these criteria, see [How to Choose a Travel eSIM](/en/guides/how-to-choose/).
3. **Purchase and install on Wi-Fi before leaving**: eSIM profile downloads require a reliable connection. Completing the installation while you still have connectivity at your current location removes the activation dependency from arrival.
4. **Evaluate local SIM economics**: If you plan to stay for more than two to four weeks, note the local carrier options in the destination. After arrival, compare the local prepaid SIM cost against continuing with your travel eSIM.
This workflow keeps you continuously connected from the moment you land at each new destination, with no gap between the moment the plane door opens and the moment you have a working data connection.
---
## Remote Work Stability: What the Numbers Mean
For nomads who depend on connectivity for client-facing work, the reliability requirements are different from tourist use. A tourist who loses signal for an hour is inconvenienced. A nomad who loses signal during a client call has a professional problem.
### Video Calls
A video call at 720p HD requires roughly 1.5–2.5 Mbps sustained (upload and download). Most 4G/LTE connections in well-covered urban areas sustain well above this. The practical failure modes are:
- **Unstable connection in weaker coverage areas**: hotels or coworking spaces where the mobile signal is marginal. Test your connection before a scheduled call, not during it.
- **Throttled speeds on unlimited plans**: If your travel eSIM plan throttles after a daily high-speed data cap, a video call scheduled after that threshold is reached will degrade. Know your plan's throttle threshold and schedule important calls for earlier in the day.
- **Network congestion in dense areas**: Airports, conference centers, and crowded urban areas can have degraded speeds even with full signal bars, because capacity is shared across many simultaneous users.
### Latency
Video calls, real-time collaboration tools, and VPN connections are more sensitive to latency than to raw speed. A connection with 20 Mbps download but 200 ms latency performs worse for video calls than a 5 Mbps connection with 40 ms latency. Travel eSIMs that route traffic through international hubs rather than connecting directly to local networks may show elevated latency. This is one reason a local SIM with direct carrier routing often provides a qualitatively better remote-work experience than a global eSIM, particularly in markets where the travel eSIM's local network partner is limited.
### Tethering for Laptop Use
When you tether your laptop through your phone, your data usage multiplies. All applications running on the laptop — background syncs, cloud storage clients, operating system updates — consume data through the phone's connection. Practical recommendations:
- Disable automatic updates on the laptop while tethering on mobile data.
- Set cloud storage clients (Google Drive, Dropbox, OneDrive) to pause sync when on metered connections.
- Use the laptop's "metered connection" setting (Windows) or equivalent to prevent background data use on the phone's hotspot.
For a full guide on managing tethering on eSIM plans, see the [Tethering Guide](/en/guides/tethering/).
---
## SIM Registration Requirements: The Nomad-Specific Risk
The standard advice for tourists — buy a SIM at the airport — often does not work for nomads in markets with complex registration requirements. The specific risks:
**Thailand (biometric verification)**: As of August 2025, all SIM registrations require biometric liveness detection and a physical passport presented in person. This requirement applies to tourist prepaid SIMs as well as standard plans. Plan for this step when scheduling arrival; it cannot be completed remotely.
**Germany**: All SIM purchases require identity verification under German telecommunications law. This is manageable at major carrier stores or airports but adds a step compared to markets where prepaid SIMs are registration-free.
**Latin American countries with local ID requirements**: In countries where a national tax number is required, standard tourist SIMs from the country's carriers may not be available. Check in advance whether tourist-oriented prepaid products exist in the specific market.
**Countries where eSIM infrastructure is limited**: In some African markets, parts of South Asia, and several Pacific Island nations, travel eSIM coverage from major international providers is either absent or relies on a single low-quality local partner. A local physical SIM from the dominant carrier is the only way to get a strong signal in these destinations. For a full regional breakdown, see [Regional Connectivity Guide for Travelers](/en/guides/regional-overview/).
A travel eSIM installed before arrival completely sidesteps all in-country registration requirements — it is the most friction-free solution in markets with complex registration rules. The cost premium over a local SIM is the price of that convenience.
---
## Managing Multiple eSIM Profiles
Modern smartphones support storing multiple eSIM profiles, but the number of simultaneously active profiles is limited by the device. Most current iPhones and Android flagship devices support two active SIM lines at a time (one physical SIM and one eSIM, or two eSIMs on newer devices). The stored but inactive profile count varies by device model.
Practical implications for nomads:
- You can keep previous eSIM profiles stored on your device for countries you plan to return to, without them using a line slot. They can be reactivated when needed.
- Switching the active data eSIM as you move between countries takes a few seconds in device settings — no QR code scan required for a previously installed profile.
- Check your specific device's eSIM profile storage limit before relying on this approach. For device-specific eSIM storage information, see the [eSIM Profile Limits Guide](/en/guides/esim-profile-limits/).
For the risks and procedures involved when an eSIM profile needs to be transferred to a new device, the [International Roaming Explained](/en/guides/international-roaming/) guide covers the technical underpinnings of how eSIM profiles interact with carrier systems.
---
## Building a Country-Entry Checklist
The operational overhead of nomad connectivity management is low once you build a repeatable process. Before entering each new country, run through the following:
**Connectivity check (before departure from current location):**
- Does my current regional/global eSIM cover the destination?
- If yes: no action needed. Verify data remaining is sufficient.
- If no: purchase and install a plan on current Wi-Fi before departure.
**Registration check (before arrival):**
- Does the destination require passport registration for local SIMs?
- Does it require biometric verification or a local ID number?
- If high friction: rely on travel eSIM for the stay; do not plan on purchasing a local SIM.
- If low friction: plan to evaluate local SIM options after arrival for stays over two weeks.
**Remote work check (first day in new location):**
- Test connection speed and latency from your accommodation or coworking space.
- Identify backup connectivity options (coworking space Wi-Fi, café with reliable internet) for critical calls if mobile signal is weaker than expected.
- Confirm tethering works on the active data SIM before a scheduled client call.
---
## FAQ
See the FAQ items in the frontmatter for answers to the following:
- Do I need a new eSIM every time I cross a border?
- How much data does a typical remote workday consume?
- Which countries have SIM registration requirements that affect nomads?
---
## Related Guides
- [Travel eSIM Provider Comparison](/en/guides/provider-comparison/) — Airalo, Holafly, Nomad, Saily, and others compared by coverage, plan types, and tethering support
- [How to Choose a Travel eSIM](/en/guides/how-to-choose/) — 5 criteria for evaluating any travel eSIM plan: coverage, data, validity, pricing, activation
- [Regional Connectivity Guide for Travelers](/en/guides/regional-overview/) — How connectivity works across Asia, Europe, North America, Oceania, Latin America, and Africa
- [International Roaming Explained](/en/guides/international-roaming/) — How roaming works technically and how to avoid bill shock on your home SIM
- [Connectivity Strategy for Moving Abroad](/en/guides/expat-strategy/) — The expat-specific version of this framework for those making a permanent move
================================================================================
# Dual SIM Setup on Android: Google Pixel and Samsung Galaxy Configuration Guide
URL: https://sim-finder.com/en/guides/dual-sim-android/
Type: guides (en)
Published: 2026-04-22
This guide covers the complete dual SIM setup process on Android — adding a second line, labeling SIMs, assigning default lines, and managing active SIMs. [What Is Dual SIM?](/en/guides/what-is-dual-sim/) explains the underlying technology (DSDS, DSDV, DSDA) and which modes Android devices support. [Using Dual SIM for Travel](/en/guides/dual-sim-for-travel/) covers the operational setup once you are abroad. This guide focuses on the Android configuration steps.
iPhone users should refer to [Dual SIM Setup on iPhone](/en/guides/dual-sim-iphone/) instead — the settings menus and configuration paths differ significantly between iOS and Android.
---
## Supported Android Devices
Dual SIM support on Android depends on the device model, production region, and carrier lock status.
### Google Pixel
| Model | Configuration |
|-------|---------------|
| Pixel 3a and later | Physical SIM + eSIM (DSDS) |
| Pixel 7 and Pixel 7 Pro (2022) and later | Dual eSIM — two eSIM profiles active simultaneously |
| Pixel 10, 10 Pro, 10 Pro XL (US) | eSIM-only — no physical SIM slot |
| Pixel 10 Pro Fold (all regions) | Physical SIM slot retained |
Dual eSIM on Pixel 7 and later is enabled by MEP (Multiple Enabled Profiles), introduced in Android 13 and defined in GSMA SGP.22 v3.0.
Source: [Get a SIM or eSIM & add it to your Pixel phone — Google Pixel Phone Help](https://support.google.com/pixelphone/answer/7086887)
### Samsung Galaxy
Samsung Galaxy S20 and later flagship models support eSIM alongside a physical SIM on most regional variants. Galaxy Z Fold and Z Flip series also support eSIM.
eSIM availability varies by region and carrier lock status. Some carrier-locked Galaxy models and China-market variants do not expose the eSIM option even if the hardware is capable. Confirm eSIM support for your specific model and region on [Samsung's eSIM support page](https://www.samsung.com/sg/support/mobile-devices/galaxy-esim-and-supported-network-carriers/).
### Other Android Brands
Many recent OnePlus, OPPO, Motorola, and Xiaomi flagship models include eSIM support. The quickest check is to look for **Add eSIM** or **Download SIM** under your mobile network settings. If the option is absent, the device may not support eSIM, or it is carrier-locked.
---
## Before You Start
Before adding a second SIM or eSIM, confirm the following three things.
### Check Carrier Lock Status
A carrier-locked Android device will either hide the eSIM menu entirely or reject activation attempts from a second carrier. To check:
- Insert a SIM from a different carrier. If the device displays "No SIM" or "SIM not supported," it is carrier-locked.
- On Samsung, go to **Settings > Connections > Mobile networks > Network operators**. If only your current carrier appears, the device may be locked.
Contact your original carrier to request an unlock. Most carriers provide an unlock process once any installment plan or contract period is complete.
### Connect to Wi-Fi
Downloading an eSIM profile requires an active internet connection. Use Wi-Fi for reliability. Once the profile is installed, Wi-Fi is no longer needed to use the eSIM.
### Prepare Your QR Code or Activation Code
Your carrier or travel eSIM provider sends a QR code by email or displays it in their app. Display it on a second device — a laptop, tablet, or second phone — before you start. If the QR code is only available on the Android phone you are configuring, take a screenshot of it before beginning the setup flow.
For the complete eSIM installation walkthrough on Android, see [How to Set Up eSIM on Android via QR Code](/en/guides/qr-code-android/). This guide focuses on the dual SIM configuration after installation.
---
## Adding a Second SIM — Google Pixel
These steps apply to Pixel 3a and later running Android 11 or later.
### Step 1 — Open SIM Settings
Go to **Settings > Network & internet > SIMs**.
If you have one SIM already active, it appears listed here. You will also see an option to add a new SIM.
### Step 2 — Add a New SIM
Tap **Add SIM** or the **+** icon.
On the next screen, tap **Download a SIM instead** if you are adding an eSIM. If you are inserting a physical SIM, eject the SIM tray, insert the new card, and return to this screen — the physical SIM appears automatically.
### Step 3 — Scan the QR Code
Point the camera at the QR code on a second screen.
When your carrier name appears, tap **Download**, then tap **Activate** after the profile installs.
**If the QR code is only on this device:** Tap **Use photo instead** on the scan screen and select the screenshot you saved earlier.
### Step 4 — Assign the New SIM to Its Role
After activation, go to **Settings > Network & internet > SIMs** and configure each SIM:
- Under **Your primary SIMs**, tap **Mobile data** and select the SIM for data
- Tap **Calls** and select the SIM (or choose **Ask every time**) for outgoing calls
- Tap **Texts** and select the SIM for outgoing text messages
You can also set **Ask every time** for calls if you want the device to ask which SIM to use for each outgoing call.
---
## Adding a Second SIM — Samsung Galaxy
These steps apply to Galaxy S20 series and later running One UI 4.1 or later.
### Step 1 — Open SIM Card Manager
Go to **Settings > Connections > SIM card manager**.
> On One UI 6 and later, the menu label may read **SIM manager** (without "card").
If you have one SIM active, it appears here. A physical SIM appears automatically once inserted; an eSIM requires manual installation.
### Step 2 — Add a Mobile Plan (eSIM)
Tap **Add mobile plan** or **Add eSIM**.
Select **Scan carrier's QR code** and point the camera at the QR code on a second screen.
Tap **Add** or **Download** when prompted. After the profile downloads, the device may prompt a restart — follow the on-screen instruction.
### Step 3 — Configure Preferred SIM
After restart, return to **Settings > Connections > SIM card manager**.
Under **Preferred SIM**, assign each SIM:
- **Calls** — select the SIM for outgoing calls
- **Texts** — select the SIM for outgoing SMS
- **Mobile data** — select the SIM for data traffic
You can also enable **Auto data switching** if you want the device to automatically move data to a stronger signal. Turn this off if you want to keep data fixed to one SIM — for example, when using a travel eSIM abroad and you do not want the device switching to your home SIM's roaming data.
---
## Adding a Second SIM — Other Android
For OnePlus, OPPO, Motorola, Xiaomi, and other Android brands, the path to the eSIM installation screen varies. Look for one of the following:
- **Settings > Network > SIM settings > Add eSIM**
- **Settings > Mobile network > Add mobile plan**
- **Settings > Connections > Mobile networks > Add eSIM**
If none of these appear, search for "eSIM" or "SIM" in the Settings search bar. Once you find the screen to add or download a new SIM, the QR scan process is identical to the Pixel steps above.
After installation, look for a **SIM management** or **SIM preferences** section to assign calls, data, and SMS to each SIM.
---
## Labeling and Default Line Setup
Clear SIM labels make subsequent configuration straightforward and prevent confusion when calls arrive or when switching lines.
### Google Pixel: Rename a SIM
1. Go to **Settings > Network & internet > SIMs**
2. Tap the SIM you want to rename
3. Tap the name field at the top and type a new label
4. Tap **Save** or press the checkmark
### Samsung Galaxy: Rename a SIM
1. Go to **Settings > Connections > SIM card manager**
2. Tap the SIM you want to rename
3. Tap **SIM name** and type a new label
4. Tap **Save**
### Suggested Labels
| Use case | Label |
|----------|-------|
| Home plan / primary carrier | "Personal" or carrier name |
| Work plan | "Work" |
| Travel eSIM | "Travel" or destination (e.g., "Travel EU") |
| Backup line | "Backup" |
The label appears on incoming call screens, in the SIM manager, and in the notification when the device connects to a network — making it easy to confirm which line is active.
### Default Line Assignment
After labeling, explicitly assign each SIM to its role:
**On Pixel:** Settings > Network & internet > SIMs > under **Your primary SIMs**, tap **Mobile data**, **Calls**, **Texts** and select the SIM for each
**On Samsung:** Settings > Connections > SIM card manager > Preferred SIM > set Calls, Texts, Mobile data
Do not leave these at the device's default. The device may default to the first-installed SIM for all traffic, which may not be what you intend — particularly if one SIM is a data-only travel eSIM.
---
## Switching Active Data Line
You may need to change which SIM handles data mid-use — for example, when you arrive at your travel destination and want to switch from your home SIM to the travel eSIM.
### Google Pixel
1. Go to **Settings > Network & internet > SIMs**
2. Tap the SIM you want for data
3. Tap **Mobile data** and select the SIM you want for data
The previously active data SIM's internet toggle turns off automatically.
### Samsung Galaxy
1. Go to **Settings > Connections > SIM card manager**
2. Under **Preferred SIM**, tap **Mobile data**
3. Select the SIM you want for data
### Quick Access via Notification Panel
On some Android versions, a SIM card shortcut appears in the notification panel Quick Settings tiles. If available, tapping it opens the SIM manager directly — faster than navigating through the full Settings menu.
---
## Managing SIMs (Turn Off, Remove)
### Turn Off a SIM Without Deleting It
Turning a SIM off suspends it — it will not receive calls, SMS, or use data — without removing the profile from the device.
**On Pixel:**
1. Go to **Settings > Network & internet > SIMs**
2. Tap the SIM
3. Toggle the SIM off (the toggle at the top of the SIM details screen)
**On Samsung:**
1. Go to **Settings > Connections > SIM card manager**
2. Toggle off the SIM you want to suspend
To re-enable, follow the same steps and toggle it back on. The profile stays installed and does not need to be reinstalled.
### Delete an eSIM Profile
Deleting an eSIM removes the profile from the device permanently. Before deleting, confirm your provider's reinstall policy — some providers allow reinstallation via their app or a new QR code; others do not allow reinstallation or charge for it.
**On Pixel:**
1. Go to **Settings > Network & internet > SIMs**
2. Tap the eSIM
3. Tap **Delete SIM** or **Erase SIM**
4. Confirm deletion
**On Samsung:**
1. Go to **Settings > Connections > SIM card manager**
2. Tap the eSIM
3. Tap **Delete** or **Remove**
4. Confirm deletion
### Remove a Physical SIM
Eject the SIM tray using a SIM eject tool. Android removes the SIM from the SIM manager automatically once the tray is out. No in-settings action is required.
---
## Android-Specific Considerations
### Data Roaming on Travel eSIMs
Travel eSIMs use roaming agreements to connect to local networks in foreign countries. Unlike your home SIM, the travel eSIM requires **data roaming to be enabled** to function. After assigning the travel eSIM as your data SIM, confirm data roaming is on for that SIM:
**On Pixel:** Settings > Network & internet > SIMs > [travel eSIM] > **Roaming** — on
**On Samsung:** Settings > Connections > SIM card manager > [travel eSIM] > **Data roaming** — on
At the same time, keep data roaming off on your home SIM to prevent it from incurring international roaming charges.
### Private DNS and Dual SIM
Android's Private DNS setting (Settings > Network & internet > Private DNS) applies globally to all network connections on the device — it is not configurable per-SIM. If you use a custom DNS provider via Private DNS, it applies to both SIMs simultaneously. This is generally not a problem, but if a travel eSIM or local carrier blocks external DNS queries, it can cause connectivity issues. In that case, switch Private DNS to **Off** temporarily.
### Background Data Per SIM
Android does not natively restrict background data to a specific SIM — background data uses whichever SIM is set as the data SIM. If you want to prevent certain apps from using a particular SIM's data, use per-app data restrictions in **Settings > Network & internet > Data usage > App data usage**, or enable a data limit on the SIM.
### APN Configuration
Most carriers configure the APN (Access Point Name) automatically when you download the eSIM profile. If mobile data is not working after installation, check the APN settings:
**On Pixel:** Settings > Network & internet > SIMs > [SIM] > **Access Point Names**
**On Samsung:** Settings > Connections > Mobile networks > Access Point Names
Contact your carrier or travel eSIM provider for the correct APN values if the default does not work.
---
## FAQ
### Which Android phones support dual SIM with eSIM?
Google Pixel 3a and later support physical SIM + eSIM (DSDS). Pixel 7 and later support dual eSIM — two eSIM profiles active simultaneously. Samsung Galaxy S20 and later flagship models support eSIM alongside a physical SIM on most regional variants. eSIM availability depends on the region and whether the device is carrier-locked.
### How do I set a default data SIM on Android?
On Google Pixel, go to **Settings > Network & internet > SIMs**, then under **Your primary SIMs** tap **Mobile data** and select the SIM you want for data. On Samsung Galaxy, go to **Settings > Connections > SIM card manager > Preferred SIM > Mobile data** and select the SIM. Set this explicitly before you need data — the device does not always default to the intended SIM.
### Can I turn off one SIM without deleting it on Android?
Yes. On Pixel, go to **Settings > Network & internet > SIMs**, tap the SIM, and toggle it off. On Samsung, go to **Settings > Connections > SIM card manager** and toggle the SIM off. The profile stays on the device and can be re-enabled at any time.
### What is the difference between the Pixel and Samsung dual SIM menus?
Google Pixel uses **Settings > Network & internet > SIMs**. Samsung Galaxy uses **Settings > Connections > SIM card manager**. The underlying functionality is the same — assign each SIM to data, calls, and SMS — but the menu paths and UI labels differ because Samsung runs One UI on top of Android.
### How do I check if my Android phone is carrier-locked?
Insert a SIM from a different carrier. If the device shows "No SIM" or "SIM not supported," it is carrier-locked. Contact your original carrier to request an unlock. Most carriers provide an unlock process once any installment plan or contract term is complete.
### Do travel eSIMs on Android need data roaming enabled?
Yes. Travel eSIMs use roaming agreements to provide connectivity abroad. After assigning the travel eSIM as your data SIM, enable data roaming for that specific SIM. This is separate from your home SIM's roaming setting — enable roaming on the travel eSIM, keep it off on the home SIM.
---
## Related Guides
- [What Is Dual SIM?](/en/guides/what-is-dual-sim/) — DSDS, DSDV, and DSDA modes explained; which modes Android supports
- [Dual SIM Setup on iPhone](/en/guides/dual-sim-iphone/) — The equivalent setup guide for iOS
- [Using Dual SIM for Travel](/en/guides/dual-sim-for-travel/) — Line assignments, roaming charge prevention, and SMS 2FA when abroad
- [How to Set Up eSIM on Android via QR Code](/en/guides/qr-code-android/) — Full eSIM installation walkthrough for Pixel and Samsung
- [What Is an eSIM?](/en/guides/what-is-esim/) — How eSIM technology works and which devices support it
To compare available SIM and eSIM plans for your destination, use [SimFinder Travel](/en/travel/).
---
Sources:
- [Use dual SIMs on your Google Pixel phone — Pixel Phone Help](https://support.google.com/pixelphone/answer/9449293)
- [Get a SIM or eSIM & add it to your Pixel phone — Pixel Phone Help](https://support.google.com/pixelphone/answer/7086887)
- [Galaxy eSIM and supported network carriers — Samsung Support](https://www.samsung.com/sg/support/mobile-devices/galaxy-esim-and-supported-network-carriers/)
- [How do I add an eSIM on my Samsung Galaxy phone? — Samsung Support](https://www.samsung.com/ae/support/mobile-devices/how-do-i-add-an-esim-on-my-samsung-galaxy-phone/)
================================================================================
# Using Dual SIM for Travel: Keep Your Home Number While Using a Local eSIM
URL: https://sim-finder.com/en/guides/dual-sim-for-travel/
Type: guides (en)
Published: 2026-04-20
You have set up your travel eSIM and it is installed on your device. The next question is how to use it effectively while you are actually traveling — which line handles data, which keeps your home number available, what to turn off to prevent charges on your home SIM, and what to restore when you return. That is what this guide covers.
For background on how dual SIM technology works (DSDS, DSDV, DSDA modes), see [What Is Dual SIM?](/en/guides/what-is-dual-sim/). For the step-by-step eSIM installation process, see [Your First Travel eSIM](/en/guides/first-time-guide/). For the full pre-departure checklist, see the [Pre-Trip Smartphone Checklist](/en/guides/pre-trip-checklist/).
---
## The Standard Dual SIM Setup for Travel
The most common travel configuration uses two lines with clearly separated roles:
| Line | Role |
|------|------|
| **Home SIM** | Voice calls and SMS — keeps your home number reachable |
| **Travel eSIM** | Cellular data — connects to local networks at local rates |
This setup gives you two things that matter most when traveling: a data connection that does not depend on international roaming rates, and a home phone number that stays active so you can receive SMS and inbound calls.
Most travel eSIMs are data-only — they provide internet access but no phone number or SMS capability. This is by design: the data-only model covers the primary use case (internet access abroad) at lower cost, while your home SIM handles everything that requires your actual number.
If you have not yet chosen a travel eSIM plan for your destination, [SimFinder Travel](/en/travel/) lists current plans with coverage, data amount, and validity period for each.
---
## Assign Each Line to Its Job
Once your travel eSIM is installed and you are at your destination, configure the line assignments explicitly. Do not rely on the default — devices vary in which line they default to for data, and defaulting to the home SIM abroad is a costly mistake.
### iPhone: Cellular Line Settings
On iPhone, go to **Settings > Cellular**.
**Set the travel eSIM as your cellular data line:**
1. Tap **Cellular Data**
2. Select the travel eSIM line
**Set your home SIM as the default voice line:**
1. Under the line list, tap **Default Voice Line**
2. Select your home SIM
**Turn off Allow Cellular Data Switching:**
1. Tap **Cellular Data**
2. Toggle **Allow Cellular Data Switching** to off
This last step is critical. With Allow Cellular Data Switching on, your device automatically routes data through your home SIM if the travel eSIM signal drops. Abroad, that means roaming charges on your home plan. Turn it off so the device stays on the travel eSIM for data regardless of signal fluctuation.
**iMessage and FaceTime:**
If you use iMessage or FaceTime, check which address (phone number or Apple ID email) your messages are sent from. Go to **Settings > Messages > Send & Receive** and **Settings > FaceTime > You Can Be Reached At**. Using your Apple ID email address rather than your home number as the primary address ensures iMessage works over the travel eSIM data connection without requiring SMS delivery through your home SIM.
### Android (Google Pixel): SIM Settings
1. Go to **Settings > Network & Internet > SIMs**
2. Set the travel eSIM as the **Preferred SIM for data**
3. Set your home SIM as the **Preferred SIM for calls**
4. Under your home SIM settings, confirm **Mobile data** is disabled for that line
On Pixel, you can also set a per-call preference — the device can ask which SIM to use for each outgoing call, which is useful if you want to occasionally make calls through the travel eSIM.
### Samsung Galaxy: SIM Card Manager
1. Go to **Settings > Connections > SIM card manager**
2. Under **Preferred SIM**, set:
- **Calls**: home SIM
- **Texts**: home SIM
- **Mobile data**: travel eSIM
3. Disable **Auto data switching** if the option appears — this behaves similarly to iPhone's Allow Cellular Data Switching and can route data back to a roaming home SIM
---
## Receiving SMS While Traveling
If you use SMS-based two-factor authentication for banking, email, or other accounts, receiving those codes while abroad depends on your home SIM staying active in a specific configuration.
### Why the Home SIM Must Stay in Voice/SMS Mode
SMS and voice registration on a mobile network are separate from data roaming. When your home SIM line is active (not disabled), your device registers with the visited network in roaming mode — this is how the network knows to route inbound calls and SMS to you even though you are not on your home carrier's network. Data roaming is a separate toggle that controls whether the SIM can use the visited network for internet access.
The configuration that receives SMS without incurring roaming data charges:
- Home SIM line: **enabled**
- Data Roaming for home SIM: **off**
- Voice Roaming for home SIM: depends on your carrier (see below)
With this setup, your home SIM registers on the visited network for voice and SMS purposes only. SMS 2FA codes sent to your home number arrive as they would domestically.
### Voice Roaming and SMS Reception
Some carriers require Voice Roaming to be explicitly turned on for the home SIM to receive inbound SMS abroad. Others include SMS reception in the default roaming registration regardless of the Voice Roaming toggle.
If you are unsure how your carrier handles this, the safe approach is to leave Voice Roaming enabled on your home SIM. Enabling Voice Roaming does not in itself incur charges — charges apply only when you actually make or receive a call. The roaming registration that enables SMS delivery does not cost anything on most carriers.
Check your home carrier's international roaming documentation before departure. Some carriers send a welcome SMS when you land abroad that confirms your roaming registration is active; that is a reliable indicator that SMS will be received.
### Wi-Fi Calling as a Fallback
If your home carrier supports Wi-Fi Calling and your device is connected to Wi-Fi, your home number may receive calls and SMS over the Wi-Fi connection rather than the cellular network. This works even with the home SIM's cellular data disabled and voice roaming off.
Wi-Fi Calling availability varies by carrier and country. On iPhone, check **Settings > Cellular > [home SIM line] > Wi-Fi Calling**. On Android, check **Settings > Network & Internet > SIMs > [home SIM] > Wi-Fi calling**.
If your home carrier supports it and you expect to be in areas with good Wi-Fi but poor cellular coverage, enabling Wi-Fi Calling on your home SIM before departure is a reliable backup for SMS delivery.
For an alternative approach to SMS 2FA that does not depend on your home SIM being reachable at all — including before you travel — see the [Pre-Trip Smartphone Checklist](/en/guides/pre-trip-checklist/), which covers migrating time-sensitive accounts to an authenticator app.
---
## Incoming Calls on Your Home Number
Your home number remains reachable while you are traveling, but answering calls on it has cost implications that depend on your home carrier's plan.
### How Inbound Roaming Calls Work
When someone calls your home number abroad, the call is routed from your home carrier to the visited network operator. You receive the call normally. The charge for this varies:
- Some plans include a number of international roaming minutes at no additional cost
- Some plans charge per-minute for incoming international roaming calls
- EU travelers with an EU SIM within the European Economic Area are covered by Roam Like at Home regulations, which eliminate additional charges for calls and data within the EEA
Because rates vary significantly by carrier and plan, check your home carrier's international roaming rates before departure. Do not assume inbound calls are free.
### Call Forwarding Before Departure
If your home carrier charges for incoming roaming calls and you want to avoid those charges, set up call forwarding before you leave. Options:
- **Forward to a VoIP number**: Services that provide a VoIP number can receive calls and deliver them as push notifications. The forwarded call arrives over the internet rather than the cellular network, so no roaming charges apply on the receiving end.
- **Forward to voicemail**: Route inbound calls directly to voicemail. You listen to messages when connected to the travel eSIM data, at no additional cost.
To set call forwarding on iPhone, go to **Settings > Phone > Call Forwarding** and enter the forwarding number. On Android, call forwarding is typically found in the Phone app settings under **Supplementary Services** or **Additional Settings**. The exact path varies by device manufacturer.
### VoIP Apps for Free Inbound Communication
The most practical alternative for travelers who do not want to manage call forwarding is to ask regular contacts to reach them via a VoIP app. WhatsApp, FaceTime (Apple to Apple), LINE, and Messenger all route calls over the internet — they use the travel eSIM data connection and incur no carrier roaming charges.
The limitation is that only contacts who know to use the app will reach you this way. For contacts who do not use any VoIP app, call forwarding to voicemail remains the cleaner solution.
---
## What to Turn Off on Your Home SIM
Preventing unintended charges from your home SIM while using the travel eSIM requires turning off specific settings. These settings exist at the line level in your device's cellular menu.
### Data Roaming: Off
This is the most important setting. Data Roaming controls whether your home SIM can use mobile data on the visited network. With this off, your home SIM cannot incur roaming data charges even if the device briefly registers on a foreign network.
- **On iPhone**: Settings > Cellular > [home SIM line] > **Data Roaming** — off
- **On Android**: Settings > Network & Internet > SIMs > [home SIM] > **Roaming** — off
Confirm this setting before boarding your first flight. The device may have roaming on from a previous configuration.
### Allow Cellular Data Switching: Off (iPhone only)
As described in the line assignment section above, this setting allows the device to automatically move data to the home SIM when the travel eSIM drops signal. Turning it off ensures the device stays on the travel eSIM for data at all times.
Location: **Settings > Cellular > Cellular Data > Allow Cellular Data Switching**
### Mobile Data on the Home SIM Line: Off (Android)
On Android, you can disable mobile data specifically for the home SIM line without disabling the line itself. The line remains active for voice and SMS registration, but the SIM cannot use cellular data.
- **On Pixel**: Settings > Network & Internet > SIMs > [home SIM] > toggle **Mobile data** off
- **On Samsung**: Settings > Connections > SIM card manager > [home SIM] > toggle the data option off
### What You Do Not Need to Turn Off
You do not need to disable the home SIM line entirely to prevent charges. The goal is a home SIM that remains registered on the network for voice and SMS, but cannot use roaming data. Disabling the line entirely would prevent it from receiving SMS 2FA codes, which is the opposite of what you want.
---
## Switching Data Back to Your Home SIM
When you return home, the line assignments you configured for travel need to be reversed. Your travel eSIM is still set as the data line; your home SIM has Data Roaming off. Neither is correct for domestic use.
### After Returning Home
**On iPhone:**
1. Go to **Settings > Cellular > Cellular Data**
2. Select your home SIM line as the data source
3. Go to **Settings > Cellular > [home SIM line] > Data Roaming** — if you want data roaming available for future domestic roaming, turn it back on. If you are now on your home network, it does not matter — roaming applies only to foreign networks.
4. Go to **Settings > Cellular > Cellular Data > Allow Cellular Data Switching** — you may re-enable this if you want the fallback behavior domestically
**On Android:**
1. Go to Settings > Network & Internet > SIMs
2. Change the Preferred SIM for data back to your home SIM
3. Re-enable Mobile data for your home SIM line
### Keeping or Removing the Travel eSIM Profile
There is no need to delete the travel eSIM immediately after returning. The profile stays dormant on your device and does not consume data or incur charges when disabled.
If you return to the same region, you may be able to reactivate the same profile or top up data through the provider's app — faster than purchasing and installing a new plan. Check your provider's documentation for whether the profile supports reactivation.
If the plan has fully expired and the provider does not support reactivation or top-up, you can delete the profile to keep your SIM list manageable.
**To delete on iPhone:** Settings > Cellular > [travel eSIM line] > Delete eSIM
**To delete on Android:** SIM manager settings > [travel eSIM line] > Delete or Remove
Before deleting, confirm whether the provider issues a new QR code for reinstallation at no charge. Some providers allow reinstallation from their app; others generate a new profile at additional cost. If you anticipate returning to the same destination, keeping the expired profile installed until you are ready to purchase again costs nothing.
---
## Device Limitations
Not all devices support dual SIM operation. Understanding the constraints of your specific device prevents surprises while traveling.
### iPhone
iPhones operate in DSDS mode (Dual SIM Dual Standby). Both SIMs remain on standby and can receive calls and SMS simultaneously. During an active call on one line, data on the other line pauses — so a call on the home SIM briefly interrupts data on the travel eSIM.
iPhones do not support DSDA (Dual SIM Dual Active), which would keep both lines fully independent. For most travel use cases — background navigation data plus home number availability for SMS — DSDS behavior is sufficient.
**Dual SIM configurations by model:**
- iPhone XS, XS Max, XR (2018) and later: physical SIM + eSIM
- iPhone 13 series and later (including SE 3rd generation): dual eSIM (two eSIM profiles active simultaneously, no physical SIM required)
- iPhone 14 and later sold in the United States: eSIM-only, no physical SIM slot
If your home carrier provides only a physical SIM and you have an iPhone 14 US model with no physical SIM slot, you will need to ask your home carrier if they can convert your physical SIM to an eSIM before departure.
### Google Pixel
- Pixel 3a and later: physical SIM + eSIM (DSDS)
- Pixel 7 and Pixel 7 Pro (2022) and later: dual eSIM — two eSIM profiles active simultaneously, enabled by MEP (Multiple Enabled Profiles) introduced in GSMA SGP.22 v3.0
Pixel 10, 10 Pro, and 10 Pro XL sold in the United States are eSIM-only. The Pixel 10 Pro Fold retains a physical SIM slot.
### Samsung Galaxy
Samsung Galaxy S20 and later support eSIM alongside a physical SIM on most variants. eSIM availability depends on the region and whether the device is carrier-locked — a carrier-locked Samsung may not expose the eSIM option even if the hardware supports it.
Samsung devices do not universally support dual eSIM (two simultaneous eSIM profiles). Confirm your specific model's capabilities in Samsung's device specifications before assuming dual eSIM is available.
### Devices Without Dual SIM
Older devices with a single SIM slot and no eSIM support cannot run a dual SIM configuration. On these devices, inserting a local SIM at your destination means losing access to your home number for the duration of the trip — no SMS 2FA on the home number, no inbound calls. If this is your situation, the alternatives are: retain the home SIM and use international roaming for all connectivity, or before departure, migrate time-sensitive accounts to an authenticator app so SMS 2FA is not required while abroad.
For a comparison of all connectivity options including pocket Wi-Fi and local SIM, see [4 Ways to Stay Connected Abroad](/en/guides/four-options/).
---
## Frequently Asked Questions
### Can I receive SMS on my home number while using a travel eSIM for data?
Yes, as long as your home SIM remains active alongside the travel eSIM. Keep Data Roaming off on your home SIM so it does not incur charges, but leave the line itself enabled — the device registers on the home carrier network in roaming mode for voice and SMS even without data roaming. Some carriers require Voice Roaming to be enabled for the home SIM to receive SMS abroad. Check your home carrier's roaming policy before departure.
### What is Allow Cellular Data Switching and should I turn it off?
Allow Cellular Data Switching (iPhone) lets your device automatically move data to your home SIM if the travel eSIM signal drops. This is useful domestically but creates a roaming charge risk when traveling — if the device switches data to your home SIM abroad, your home carrier's international roaming data rates apply. Turn it off in **Settings > Cellular > Cellular Data > Allow Cellular Data Switching** when abroad with a travel eSIM.
### Do I need to keep Voice Roaming on for my home SIM?
It depends on your home carrier's policy. On many carriers, the SIM registers on the visited network for voice and SMS as long as the line is active, regardless of the Voice Roaming toggle. On others, Voice Roaming must be explicitly enabled to receive inbound calls and SMS. If you are unsure, leave Voice Roaming on — charges apply only when you make or receive calls, not when the SIM is merely registered on the network.
### What happens to incoming calls on my home number while I am abroad?
Your caller dials your home number normally. Your phone rings if you are registered on a roaming network with voice roaming active. Answering typically incurs incoming international roaming charges that depend on your carrier and plan. Alternatives include call forwarding to a VoIP number before departure, or directing regular contacts to reach you via WhatsApp or another internet-based app.
### Can I use dual SIM on any phone?
Not all devices support dual SIM. On iPhone, dual SIM (physical SIM + eSIM) is available on iPhone XS and later. On Android, Google Pixel 3a and later support physical SIM + eSIM; Pixel 7 and later support dual eSIM. Samsung Galaxy S20 and later support eSIM alongside a physical SIM on most variants. Older devices with a single SIM slot and no eSIM support cannot run a dual SIM setup.
### Should I delete my travel eSIM after returning home?
Not necessarily. If the provider supports it, keep the profile installed for your next trip to the same region — re-enabling a saved profile is faster than purchasing and reinstalling. If the plan has expired and the provider does not allow reactivation, delete it to keep your SIM list manageable. Check your provider's reinstall policy before deleting — some issue a new QR code at no charge; others charge for a new profile.
---
## Related Guides
If you are still in the planning phase, these guides cover earlier steps in the process:
- [What Is Dual SIM?](/en/guides/what-is-dual-sim/) — How DSDS, DSDV, and DSDA work, and what your device supports
- [Your First Travel eSIM](/en/guides/first-time-guide/) — Step-by-step installation on iPhone, Pixel, and Samsung
- [4 Ways to Stay Connected Abroad](/en/guides/four-options/) — Compare travel eSIM against local SIM, roaming, and pocket Wi-Fi
- [How to Choose a Travel eSIM](/en/guides/how-to-choose/) — Coverage, data volume, validity, and provider considerations
- [Pre-Trip Smartphone Checklist](/en/guides/pre-trip-checklist/) — Staged timeline from 2 weeks before departure through arrival
- [SIM Swap Fraud Guide](/en/guides/sim-swap/) — Why SMS 2FA has structural risks and how authenticator apps remove the dependency
To compare current travel eSIM plans for your destination, use **[SimFinder Travel](/en/travel/)** — filter by country, data amount, and validity period.
================================================================================
# Dual SIM Setup on iPhone: Complete Configuration Guide
URL: https://sim-finder.com/en/guides/dual-sim-iphone/
Type: guides (en)
Published: 2026-04-20
This guide covers the complete iPhone dual SIM configuration process — from adding a second line through every setting you need to configure before using both lines reliably. [What Is Dual SIM?](/en/guides/what-is-dual-sim/) explains the underlying technology (DSDS, DSDV, DSDA). [Using Dual SIM for Travel](/en/guides/dual-sim-for-travel/) covers the operational details of using a travel eSIM abroad. This guide focuses on the setup itself.
---
## Supported iPhone Models
The dual SIM capability on iPhone depends on the model and how the second line is added.
### Physical SIM + eSIM
Any iPhone from iPhone XS (2018) onward supports one physical SIM card plus one eSIM active simultaneously. On these models, inserting a nano-SIM into the tray and adding an eSIM profile creates a two-line configuration.
### Dual eSIM (Two eSIMs, No Physical SIM Required)
Starting with iPhone 13 (2021) and iPhone SE 3rd generation, two eSIM profiles can be active simultaneously without any physical SIM card. This is the only configuration available on eSIM-only models.
### eSIM-Only Models
Some models have no physical SIM slot at all. Adding a second line on these devices means installing a second eSIM profile.
| Model / Region | Configuration |
|----------------|---------------|
| iPhone XS / XS Max / XR through iPhone 12 series | Physical SIM + 1 eSIM |
| iPhone 13 series, iPhone SE (3rd gen) and later (most regions) | Physical SIM + eSIM **or** dual eSIM |
| iPhone 14–16e (US models) | eSIM-only — dual eSIM only |
| iPhone 17 series (US, Canada, Mexico, Japan, and several other regions) | eSIM-only — dual eSIM only |
| iPhone Air (all regions) | eSIM-only — dual eSIM only |
Source: [Apple Support — Learn which type SIM your iPhone or iPad uses](https://support.apple.com/en-us/118569)
> **Check your model:** Open **Settings > Cellular**. If you see an **Add eSIM** option, your iPhone supports adding a second eSIM. If you see a physical SIM listed alongside an eSIM slot, your model supports the physical + eSIM configuration.
---
## Before You Start
Before adding a second line, confirm the following.
**Your iPhone is carrier-unlocked.** A carrier-locked iPhone restricts eSIM activation to the locking carrier. Go to **Settings > General > About** and look for **Carrier Lock**. If it reads "No SIM restrictions," your iPhone is unlocked. If it shows a carrier name, contact that carrier to request an unlock before proceeding.
**You have a stable Wi-Fi connection.** Downloading an eSIM profile requires an active internet connection. Connect to Wi-Fi before starting. If you already have one active SIM with data, that connection works too.
**You have your QR code or activation code ready.** Your carrier or eSIM provider sends a QR code by email or displays it in their app. Keep it accessible on a separate device — you cannot scan a QR code from the same iPhone you are configuring. On iOS 17.4 or later, you can long-press a QR code image in Mail or Photos to trigger the installation without a second device.
For the full QR code installation walkthrough, see [How to Set Up eSIM on iPhone via QR Code](/en/guides/qr-code-iphone/).
---
## Adding a Second Line (eSIM)
If you are new to eSIM technology, see [What Is an eSIM?](/en/guides/what-is-esim/) for the underlying concepts before continuing.
### Step 1 — Open Cellular Settings
Go to **Settings > Cellular**.
If you have one line active, you will see it listed along with an **Add eSIM** button (or **Add Cellular Plan** on some iOS versions).
### Step 2 — Tap "Add eSIM"
Tap **Add eSIM**. iOS presents three options:
- **Use QR Code** — scan a QR code provided by your carrier
- **Enter Details Manually** — type the SM-DP+ server address and activation code
- **Use Carrier's App** — open the carrier's app to complete activation automatically
Select the method your carrier or provider supports.
### Step 3 — Scan or Enter the Activation Code
**QR code method:** Point your iPhone camera at the QR code on a second screen. When recognized, tap **Cellular Plan Detected**, then tap **Continue** and **Add Cellular Plan**.
**Manual method:** Enter the SM-DP+ address and activation code exactly as provided. A single character error will cause the activation to fail.
**iOS 17.4 long-press method (same-device QR code):** If the QR code is in an email or photo on the same iPhone, open the image in Mail, Photos, or Safari, long-press the image, and tap **Add eSIM**.
### Step 4 — Wait for the Profile to Download
The download typically completes within a few seconds to one minute. When the status bar shows **Cellular Plan Added**, the profile is installed. Do not close Settings or lose your Wi-Fi connection during this step.
### Step 5 — Complete the Configuration Prompts
iOS will prompt you to:
1. Set a label for the new line
2. Choose your default line for calls
3. Choose your default line for data
4. Review iMessage and FaceTime settings
Complete these prompts now, or skip them and configure each setting manually in the following sections.
---
## Naming and Labeling Your Lines
Clear line labels make every subsequent setting easier to understand. When a call comes in, the lock screen shows the label of the line being called. When you compose an iMessage, the label appears in the send-from picker. When you review the Cellular Data settings, the labels identify which line is which.
### How to Set or Change a Label
1. Go to **Settings > Cellular**
2. Tap the line you want to label
3. Tap **Cellular Plan Label** (Apple's official UI label)
4. Type the label and tap **Done**
There is no fixed list of labels — you can type any name. Practical options:
| Use case | Suggested label |
|----------|----------------|
| Home or personal plan | "Personal" or your carrier name |
| Work plan | "Work" |
| Travel eSIM | "Travel" or destination name (e.g., "Travel Japan") |
| Backup line | "Backup" |
The label you set appears in the iOS status bar's SIM indicator, on the call screen, and in iMessage thread headers when switching between lines.
---
## Setting Default Lines (Voice / Data / iMessage)
Each line assignment is configured separately. Leaving any of these at the wrong default — especially the data line — can result in unexpected charges.
### Default Voice Line
The default voice line handles all outgoing calls unless you override it per-call.
1. Go to **Settings > Cellular**
2. Tap **Default Voice Line**
3. Select the line you want for outgoing calls
> **If you are using a travel eSIM:** set your home SIM as the default voice line. Most travel eSIMs are data-only and cannot make voice calls directly. Outgoing calls on a data-only eSIM would either fail or route through a VoIP app. For the complete travel setup walkthrough, see [Your First Travel eSIM: Step-by-Step Guide](/en/guides/first-time-guide/).
### Default Line for Data
1. Go to **Settings > Cellular**
2. Tap **Cellular Data**
3. Select the line to use for mobile data
> **If you are using a travel eSIM abroad:** select the travel eSIM here. If you leave the home SIM as the data line while abroad, the home SIM will use international roaming data, which may incur charges.
### Default Line for SMS (Non-iMessage Texts)
1. Go to **Settings > Cellular**
2. Tap **Default Voice Line** (the SMS default follows the voice default on most iOS versions)
SMS messages use the Default Voice Line — there is no separate SMS line setting in iOS.
> SMS sent from your device goes out on the line set here. Replies arrive on the line the original message was sent from, not necessarily the line the recipient dialed.
### iMessage Send & Receive
iMessage is configured separately from the voice and SMS defaults.
1. Go to **Settings > Messages > Send & Receive**
2. Under **You Can Be Reached By iMessage At**, confirm both your phone numbers and Apple ID email appear
3. Under **Start New Conversations From**, select the address or number you want to use as the default sender
> **Recommendation:** set your Apple ID email address as the default sender for new iMessage conversations. This routes iMessages over the data connection (any active line) rather than tying delivery to a specific phone number. When using a travel eSIM abroad, this ensures iMessages continue working even if your home SIM has no data roaming active.
### FaceTime
1. Go to **Settings > FaceTime**
2. Under **You Can Be Reached At**, confirm both numbers and your Apple ID email are enabled
3. Under **Caller ID**, select the number or email to display when you initiate a FaceTime call
---
## Allow Cellular Data Switching
**Location:** Settings > Cellular > Cellular Data > Allow Cellular Data Switching
When this toggle is on, iOS can automatically move data traffic to the non-default SIM if the default data SIM loses signal. This provides seamless connectivity in areas where one network has weaker coverage.
### When to Turn It Off
Turn Allow Cellular Data Switching **off** in any situation where switching to the other SIM would cause unexpected charges:
- **Traveling abroad with a travel eSIM:** if the travel eSIM signal drops momentarily and the home SIM is the fallback, the home SIM begins using international roaming data. International roaming data rates apply.
- **When one line has no data plan:** if your second line is a voice-only plan, and cellular data switches to it, data connectivity stops or the SIM may be charged for individual data sessions depending on the carrier.
### When to Leave It On
Keep Allow Cellular Data Switching on when:
- Both SIMs have valid domestic data plans and you want the device to use whichever has the stronger signal at any moment.
- You are traveling within a region where both SIMs are covered by the same or equivalent plans (for example, two domestic plans on the same network).
---
## Switching Active Lines
### Per-Call Line Selection
When making an outgoing call, you can choose which line to use regardless of the default voice setting.
1. Open the **Phone** app
2. Dial the number
3. Before tapping the call button, tap the line name displayed at the top of the Phone screen to switch to the other line for this call
4. Select the line you want for this call
5. Tap the call button
Alternatively, from the Contacts or Recents tab, tap the phone icon and then tap the line selector that appears before the call connects.
### Switching the Data Line Mid-Use
To switch which line handles data without changing your default settings permanently:
1. Go to **Settings > Cellular > Cellular Data**
2. Tap the line to activate for data
This changes the active data line immediately. Turn off Allow Cellular Data Switching if you want the line to stay fixed.
### Quick Access via Status Bar / Control Center
On iPhone models with a dual SIM indicator in the status bar, you can see which line is active for data at a glance. There is no single-tap toggle in Control Center for switching lines — the switch is made in Settings > Cellular.
---
## Managing Lines (Turn Off, Remove)
### Turn Off a Line Without Deleting It
Turning a line off suspends it without removing the profile. The line will not receive calls, texts, or use data while off.
1. Go to **Settings > Cellular**
2. Tap the line
3. Toggle **Turn On This Line** off
To reactivate, follow the same path and toggle it back on.
This is useful when you return home from a trip and no longer need the travel eSIM to be active — the profile stays on the device, ready to re-enable for your next trip.
### Delete an eSIM
Deleting an eSIM removes the profile from the device. This is permanent — you cannot recover the profile after deletion. To use the same plan again, you will need to request a new QR code or activation code from your provider (some providers allow this at no charge; others charge for a new profile).
1. Go to **Settings > Cellular**
2. Tap the eSIM line
3. Scroll to the bottom and tap **Delete eSIM** (labeled **Delete Plan** when multiple plans are installed on the device)
4. Confirm deletion
> Before deleting, check your provider's reinstall policy. If they support free reinstallation via their app or a new QR code, you can delete and reinstall easily. If they do not support reinstallation, deleting the profile means losing access to that plan.
### Remove a Physical SIM
To remove a physical SIM, eject the SIM tray using a SIM eject tool or a straightened paper clip. The line is removed from **Settings > Cellular** automatically once the tray is ejected. No in-settings action is required.
---
## FAQ
### How do I set a default data line on iPhone?
Go to **Settings > Cellular > Cellular Data**, then tap the line you want to use for mobile data. This sets it as the default for all data traffic. If you are using a travel eSIM abroad, select it here and turn off Allow Cellular Data Switching to prevent the device from falling back to your home SIM's roaming data.
### Can I assign a specific line to a contact on iPhone?
Yes. Open the **Contacts** app, tap a contact, tap **Edit**, scroll down to the phone number, and tap the label field next to the number. You can select which SIM line to use for calls to that contact. This setting applies to outgoing calls only — incoming calls arrive on whichever line the caller dialed.
### What does Allow Cellular Data Switching do?
When enabled, iOS automatically routes data to the non-default SIM if the default data SIM loses signal. This is useful domestically but creates a roaming charge risk when traveling — if the device switches data to your home SIM abroad, that SIM's international roaming rates apply. Turn it off at **Settings > Cellular > Cellular Data > Allow Cellular Data Switching** when using a travel eSIM.
### How do I rename a SIM line on iPhone?
Go to **Settings > Cellular**, tap the line you want to rename, then tap **Cellular Plan Label** (Apple's official UI label) and type a new label. Common labels include "Personal," "Work," "Travel," or the carrier name. The label appears in the status bar, call screen, and iMessage thread headers.
### Which iPhones support dual eSIM (two eSIMs without a physical SIM)?
iPhone 13, iPhone 13 mini, iPhone 13 Pro, iPhone 13 Pro Max, iPhone SE (3rd generation), and all later models. These can run two eSIM profiles simultaneously with no physical SIM card required. iPhone XS through iPhone 12 series support one physical SIM plus one eSIM only.
### Can I turn off one SIM without deleting it?
Yes. Go to **Settings > Cellular**, tap the line, then toggle **Turn On This Line** off. The eSIM profile stays stored on your device. Turning a line off stops it from making or receiving calls and using data, but the profile remains installed and can be re-enabled at any time without reinstalling.
---
## Related Guides
- [What Is Dual SIM?](/en/guides/what-is-dual-sim/) — DSDS, DSDV, and DSDA explained; what mode iPhone uses
- [Using Dual SIM for Travel](/en/guides/dual-sim-for-travel/) — Line assignments, roaming charge prevention, and SMS 2FA when abroad
- [How to Set Up eSIM on iPhone via QR Code](/en/guides/qr-code-iphone/) — Full installation walkthrough for adding an eSIM
- [What Is an eSIM?](/en/guides/what-is-esim/) — How eSIM technology works and supported devices
- [Your First Travel eSIM](/en/guides/first-time-guide/) — Choosing and installing a travel eSIM from scratch
To compare available eSIM plans for your destination, use [SimFinder Travel](/en/travel/).
---
Sources:
- [Use dual SIM with two nano-SIM cards or two eSIMs on iPhone - Apple Support](https://support.apple.com/en-us/109317)
- [Learn which type SIM your iPhone or iPad uses - Apple Support](https://support.apple.com/en-us/118569)
- [Set up eSIM on iPhone - Apple Support](https://support.apple.com/en-us/118669)
================================================================================
# eSIM-Compatible Devices and How to Check Yours
URL: https://sim-finder.com/en/guides/esim-compatible-devices/
Type: guides (en)
Published: 2026-06-04
Your device supports eSIM if it has an embedded eUICC chip and your carrier has deployed eSIM provisioning infrastructure. The fastest way to confirm: open Settings and look for an "Add eSIM" or "Add Data Plan" option, or dial `*#06#` and check whether an EID (a 32-character identifier distinct from the IMEI) appears. On iPhone, eSIM support starts with iPhone XS (2018). On Android, Google Pixel 3 and later generally support eSIM; Samsung Galaxy S20 and later flagship models support eSIM on most variants. For a broader overview of how eSIM technology works, see [What Is an eSIM?](/en/guides/what-is-esim/)
One critical caveat applies throughout: the **same model name sold in different regions can have different eSIM capabilities**. Always verify using your specific model number on the manufacturer's official support page.
---
## How to Check If Your Device Supports eSIM
There are three reliable methods. Use the first one that applies to your situation.
### Method 1: Settings Menu
On iPhone:
1. Open **Settings**
2. Tap **Cellular** (or **Mobile Data** in some regions)
3. Look for **Add eSIM**, **Add Data Plan**, or **Add Mobile Plan**
If that option is present, your device supports eSIM. If the menu shows only your current plan with no option to add another, the device either does not support eSIM or eSIM has been disabled by the carrier.
On Android:
1. Open **Settings**
2. Tap **Network & internet** (or **Connections** on Samsung)
3. Tap **SIMs** or **Mobile network**
4. Look for **Add eSIM**, **Download a SIM**, or a similar option
The exact menu path varies by Android version and manufacturer skin. If you do not see any eSIM-related option, try searching "eSIM" within the Settings search bar.
### Method 2: Dial *#06# for the EID
Open the **Phone** app and dial `*#06#` on the keypad. A screen will appear showing your device identifiers. Look for:
- **IMEI** — a 15-digit number that identifies the device hardware (all phones have this)
- **EID** — a 32-character alphanumeric string that identifies the embedded SIM chip
If an EID is listed, your device has eSIM hardware. If only an IMEI is shown and no EID appears, the device does not support eSIM.
On some devices, the EID also appears at **Settings > General > About > EID** (iPhone) or **Settings > About phone > EID** (Android).
### Method 3: Manufacturer Support Page
Look up your exact model number on the manufacturer's official support page:
- **Apple**: [support.apple.com/en-us/118569](https://support.apple.com/en-us/118569) — lists every iPhone and iPad model with SIM type details
- **Google**: [support.google.com/pixelphone/answer/7086887](https://support.google.com/pixelphone/answer/7086887) — Pixel eSIM support by model
- **Samsung**: Samsung's eSIM support page lists Galaxy models and supported carriers by region
When checking, use your device's model number (e.g., A2403, SM-S921B) rather than just the marketing name. The model number appears on the device's packaging, on the SIM tray label, or at Settings > About.
---
## eSIM-Compatible iPhone Models
eSIM support on iPhone begins with the 2018 lineup. The table below shows the key milestones; all models within each generation released after XS/XR also support eSIM.
| iPhone Generation | eSIM Support | Notes |
|---|---|---|
| iPhone XS, XS Max, XR (2018) | Yes | First eSIM-capable iPhones |
| iPhone 11 series (2019) | Yes | Physical SIM + eSIM |
| iPhone SE (2nd gen, 2020) | Yes | Physical SIM + eSIM |
| iPhone 12 series (2020) | Yes | Physical SIM + eSIM |
| iPhone 13 series (2021) | Yes, dual eSIM | Two eSIMs active simultaneously |
| iPhone SE (3rd gen, 2022) | Yes, dual eSIM | Two eSIMs simultaneously (Apple spec) |
| iPhone 14 series (2022) | Yes | US models: eSIM-only |
| iPhone 15 series (2023) | Yes | US models: eSIM-only |
| iPhone 16 series (2024) | Yes | US models: eSIM-only |
| iPhone 16e (2025) | Yes | US models: eSIM-only |
| iPhone 17 series (2025) | Yes | eSIM-only in US, Canada, Mexico, Japan, UAE, Saudi Arabia, Bahrain, Kuwait, Qatar, Oman, Guam, U.S. Virgin Islands |
| iPhone Air (2025) | Yes | eSIM-only in US, Canada, Mexico, Japan, UAE, Saudi Arabia, Bahrain, Kuwait, Qatar, Oman, Guam, and U.S. Virgin Islands; dual eSIM + nano-SIM in other regions |
**iPhone XS through iPhone 12**: support one physical SIM + one eSIM. Two eSIMs simultaneously is not possible on these models.
**iPhone 13, SE (3rd gen), and later**: support dual eSIM — two eSIM profiles active at the same time, without requiring a physical SIM card for the second line. See the [dual SIM setup guide for iPhone](/en/guides/dual-sim-iphone/) for step-by-step configuration.
**eSIM-only models**: have no physical SIM slot. Plans can only be activated via eSIM. If you travel to a region where carriers do not yet support eSIM provisioning, you cannot use a local physical SIM card as a fallback.
**Important — mainland China and Hong Kong**: eSIM availability on iPhone is limited in mainland China (iPhone 17e and iPhone Air are exceptions). Hong Kong and Macao support eSIM on some models but not all. Check the Apple support page linked above for the most current regional breakdown.
iPhone can store 8 or more eSIM profiles according to Apple, and you switch between them in Settings > Cellular. Once you have confirmed compatibility, follow the [iPhone eSIM setup guide (QR code method)](/en/guides/qr-code-iphone/) to activate a plan.
---
## eSIM-Compatible Android: Google Pixel
Google Pixel has the most clearly documented eSIM support among Android manufacturers.
| Pixel Model | eSIM Support | Notes |
|---|---|---|
| Pixel 3 (2018) | Limited | Varies by carrier and region; not all variants supported |
| Pixel 3a (2019) | Yes (most variants) | DSDS support |
| Pixel 4, 4a, 4 XL (2019–2020) | Yes | |
| Pixel 5, 5a (2020–2021) | Yes | |
| Pixel 6 series (2021) | Yes | eSIM supported (carrier-locked variants may restrict to the locking carrier) |
| Pixel 7, 7 Pro (2022) | Yes, dual eSIM | First Android phones to support dual eSIM (via Android 13 update) |
| Pixel 7a, Pixel Fold (2023) | Yes, dual eSIM | |
| Pixel 8 series (2023) | Yes, dual eSIM | |
| Pixel 9 series (2024) | Yes, dual eSIM | |
| Pixel 10, 10 Pro, 10 Pro XL (2025) | Yes, eSIM-only (US) | Physical SIM slot removed for US market |
| Pixel 10 Pro Fold (2025) | Yes, dual eSIM | Physical SIM slot retained in all regions |
**Pixel 7 and later**: support dual eSIM — two eSIM profiles active simultaneously using Android 13's MEP (Multiple Enabled Profiles) implementation under GSMA SGP.22 v3.0.
**Carrier-locked Pixel devices**: eSIM may be restricted to the locking carrier's plans. An unlocked Pixel purchased directly from Google is generally the most eSIM-flexible option. To activate an eSIM on a Pixel or other Android device, see the [Android eSIM setup guide (QR code method)](/en/guides/qr-code-android/).
---
## eSIM-Compatible Android: Samsung Galaxy
Samsung's eSIM support spans its flagship Galaxy S, Z Fold, and Z Flip lines.
| Galaxy Line | First eSIM Model | Notes |
|---|---|---|
| Galaxy S series | S20 (2020) | S20, S20+, S20 Ultra and later S-series flagships |
| Galaxy Z Fold | Z Fold series (multiple generations) | Confirmed on Samsung's eSIM support page |
| Galaxy Z Flip | Z Flip series (multiple generations) | Confirmed on Samsung's eSIM support page |
| Galaxy S FE (Fan Edition) | Varies | Galaxy S20 FE does not support eSIM in most regions |
**Regional variation**: Samsung sells the same model name across different regions with different hardware configurations. A Galaxy S-series phone bought in one country may support eSIM while the same model bought in another country (or from a carrier) does not. Confirm using your model number (e.g., SM-S921B) on Samsung's official eSIM support page.
**Carrier-locked Samsung devices**: carrier-locked Galaxy phones may have eSIM disabled even when the hardware supports it. An unlocked ("open market") variant is more likely to offer full eSIM functionality.
---
## eSIM-Compatible Tablets and Other Devices
### iPad
| iPad Model | eSIM Support | Notes |
|---|---|---|
| iPad Pro (M4) | Yes, eSIM-only | No physical SIM slot |
| iPad Air (M2) | Yes, eSIM-only | No physical SIM slot |
| iPad Pro 11-inch (1st–4th gen), Wi-Fi + Cellular | Yes | Physical SIM + eSIM |
| iPad Pro 12.9-inch (3rd–6th gen), Wi-Fi + Cellular | Yes | Physical SIM + eSIM |
| iPad Air (3rd–5th gen), Wi-Fi + Cellular | Yes | Physical SIM + eSIM |
Only cellular-capable iPad models support eSIM. Wi-Fi-only iPads have no SIM hardware at all.
### Other Device Categories
eSIM support is increasingly appearing in:
- **Laptops**: select Windows laptops with LTE/5G connectivity support eSIM (Microsoft Surface Pro, certain Dell and Lenovo models with built-in cellular)
- **Smartwatches**: Apple Watch (Series 3 and later, cellular models) and select Wear OS watches support eSIM for standalone cellular
This guide focuses on smartphones and tablets. For laptop or smartwatch eSIM, consult the manufacturer's documentation for your specific model.
---
## SIM-Free vs. Carrier-Locked: Why It Matters for eSIM
A device sold as **SIM-free** (also called "unlocked") can activate plans from any compatible carrier. A **carrier-locked** device is restricted to the locking carrier's plans, and may have eSIM functionality partially or fully disabled for other carriers. For a direct comparison of physical SIM and eSIM trade-offs, see [Physical SIM vs eSIM: Differences and How to Choose](/en/guides/sim-vs-esim/).
For eSIM specifically, carrier locking creates two scenarios:
1. **eSIM fully disabled**: the device has eSIM hardware, but the carrier's software configuration prevents any eSIM activation. The "Add eSIM" option may be absent entirely.
2. **eSIM restricted to one carrier**: the device allows eSIM activation but only accepts profiles from the locking carrier.
If you purchase a device directly from the manufacturer (Apple Store, Google Store, Samsung.com) without a carrier contract, it is typically sold SIM-free and supports eSIM from any compatible carrier.
If you received a device through a carrier promotion or installment plan, check the carrier's unlock policy. Most carriers allow unlocking after the service contract or installment plan is completed.
---
## The eSIM-Only Trend
A growing number of flagship devices are shipping without a physical SIM card slot.
**iPhone**: eSIM-only has expanded from the US market (iPhone 14 onward) to 12 regions with iPhone 17 (2025). iPhone Air is eSIM-only in US, Canada, Mexico, Japan, UAE, Saudi Arabia, Bahrain, Kuwait, Qatar, Oman, Guam, and U.S. Virgin Islands; in other regions it ships with dual eSIM + nano-SIM. This trend is expected to continue as manufacturers reclaim internal space from the SIM tray.
**Google Pixel**: US-market Pixel 10, Pixel 10 Pro, and Pixel 10 Pro XL ship without a physical SIM slot. Pixel 10 Pro Fold retains a physical SIM slot in all regions.
**Practical implications of eSIM-only devices**:
- You cannot fall back to a physical SIM card in regions where eSIM is not yet supported by local carriers
- If your device is lost or damaged, you cannot immediately transfer a SIM card to a replacement — the carrier must re-issue the eSIM profile
- Some older vehicles' in-car Wi-Fi hotspots and IoT devices accept physical SIM cards only; an eSIM-only phone cannot serve as a hotspot for these using a physical card
Before purchasing an eSIM-only device, confirm that carriers in your primary region support eSIM activation.
---
## Regional Variant Warning
The single most common source of eSIM incompatibility surprises is **regional model variants**. The same model marketed under the same name can have meaningfully different hardware depending on where it was manufactured for sale.
**Known cases where regional variants affect eSIM support**:
- **iPhone in mainland China**: most iPhone generations have restricted or absent eSIM support for mainland China models (a different model number is used). iPhone Air and iPhone 17e are exceptions.
- **Samsung Galaxy in certain markets**: carrier-specific or regional variants sold in some markets omit eSIM even on otherwise eSIM-capable S-series models.
- **Pixel 3**: regional variants for Japan, Australia, and Taiwan, as well as most US/Canada carrier versions other than Sprint and Google Fi, do not support eSIM.
**How to avoid this problem**:
1. Note your device's model number from the box, SIM tray sticker, or Settings > About
2. Look up that exact model number on the manufacturer's official support page
3. Do not assume eSIM support based on the marketing name alone
---
## What to Do If Your Device Does Not Support eSIM
If your device does not support eSIM, you still have options for eSIM-based plans — but they require new hardware.
For travel plans specifically, a physical travel SIM card provides the same function (local data at local rates) without requiring eSIM hardware. You can also use a dedicated travel Wi-Fi router or hotspot device that connects to a local data network and shares it over Wi-Fi — no eSIM required on your phone.
If you are planning a device upgrade and eSIM support is important to you, choose a current-generation device from the lists above and purchase it unlocked from the manufacturer to ensure full eSIM flexibility.
Use [SimFinder](/en/) to search for eSIM plans filtered by your destination — plans are tagged by activation method so you can see which require eSIM and which offer physical SIM alternatives.
---
## Summary
| Device | First eSIM-Capable Model | Dual eSIM From | eSIM-Only (Selected Regions) |
|---|---|---|---|
| iPhone | iPhone XS / XR (2018) | iPhone 13 / SE 3rd gen | iPhone 14 (US, 2022) |
| Google Pixel | Pixel 3 (limited) / Pixel 3a (2019) | Pixel 7 (2022) | Pixel 10 (US, 2025) |
| Samsung Galaxy S | Galaxy S20 (2020) | Varies by model | Not yet (as of 2025) |
| Samsung Galaxy Z | Multiple Z Fold / Z Flip generations | — | Not yet (as of 2025) |
| iPad | iPad Pro 11-inch 1st gen / iPad Air 3rd gen | — | iPad Pro M4 / iPad Air M2 |
**Three ways to check your device**:
1. Settings > Cellular > Add eSIM — if the option exists, eSIM is supported
2. Dial `*#06#` — an EID in the result confirms eSIM hardware
3. Manufacturer support page — look up your exact model number
**Always verify with your model number**, not just the model name, when checking eSIM support for a specific device — especially for devices purchased outside your home country.
---
## Related Guides
- [What Is an eSIM? How It Works, Benefits, and Supported Devices](/en/guides/what-is-esim/)
- [Physical SIM vs eSIM: Differences and How to Choose](/en/guides/sim-vs-esim/)
- [How to Set Up eSIM on iPhone via QR Code](/en/guides/qr-code-iphone/)
- [How to Set Up eSIM on Android via QR Code](/en/guides/qr-code-android/)
- [Dual SIM Setup on iPhone: Complete Configuration Guide](/en/guides/dual-sim-iphone/)
================================================================================
# How to Use eSIM on an iPad
URL: https://sim-finder.com/en/guides/esim-on-ipad/
Type: guides (en)
Published: 2026-06-04
Wi-Fi + Cellular iPads support eSIM for data connectivity, and the setup process follows the same pattern as iPhone: open Settings, navigate to Cellular Data, and add a plan via QR code, carrier app, or manual code. The key practical difference from iPhone is that iPad cellular plans are data-only — there is no phone number, and cellular voice calls are not supported over the iPad's mobile line.
iPad Pro (M4), iPad Air (M2), iPad mini (A17 Pro, 2024), and iPad (A16, 2024) are eSIM-only — they have no physical SIM card slot. Earlier Wi-Fi + Cellular models support both a physical SIM and an eSIM. Wi-Fi-only iPad models have no SIM hardware at all and cannot use any cellular plan.
For background on how eSIM technology works, see [What Is an eSIM?](/en/guides/what-is-esim/). For a full list of compatible iPad models, see [eSIM-Compatible Devices and How to Check Yours](/en/guides/esim-compatible-devices/).
---
## Which iPads Support eSIM
Only Wi-Fi + Cellular models include SIM hardware. Within that category, eSIM support depends on the generation.
| iPad Model | eSIM Support | Physical SIM Slot |
|---|---|---|
| iPad Pro M4 (2024) | Yes — eSIM only | No |
| iPad Air M2 (2024) | Yes — eSIM only | No |
| iPad mini (A17 Pro, 2024) | Yes — eSIM only | No |
| iPad (A16, 2024) | Yes — eSIM only | No |
| iPad Pro 11-inch, 1st–4th gen (2018–2022), Wi-Fi + Cellular | Yes | Yes |
| iPad Pro 12.9-inch, 3rd–6th gen (2018–2022), Wi-Fi + Cellular | Yes | Yes |
| iPad Air, 3rd–5th gen (2019–2022), Wi-Fi + Cellular | Yes | Yes |
| iPad mini, 5th gen (2019), Wi-Fi + Cellular | Yes | Yes |
| iPad mini, 6th gen (2021), Wi-Fi + Cellular | Yes | Yes |
Source: Apple Support — [Learn which type SIM your iPhone or iPad uses](https://support.apple.com/en-us/118569).
**Wi-Fi-only models**: do not have any SIM hardware. Even if the model name looks identical to a cellular model, a Wi-Fi-only iPad cannot use eSIM or any mobile plan.
**eSIM-only models (iPad Pro M4, iPad Air M2, iPad mini A17 Pro, iPad A16, and potentially future models)**: have no physical SIM slot. All cellular plans must be activated via eSIM. If you are in a region where a carrier does not yet support eSIM provisioning, you cannot fall back to a physical SIM card.
To confirm whether your specific iPad model supports eSIM, go to **Settings > Cellular Data**. If the menu includes an option to **Add eSIM** or **Add Data Plan**, the device supports eSIM. If there is no Cellular Data menu at all, the device is a Wi-Fi-only model.
---
## iPad eSIM vs iPhone eSIM: Key Differences
Understanding what iPad eSIM can and cannot do prevents surprises when you sign up for a plan.
| Feature | iPhone eSIM | iPad eSIM |
|---|---|---|
| Data | Yes | Yes |
| Voice calls over cellular | Yes | No |
| SMS / phone number | Yes | No |
| Dual eSIM (two active at once) | Yes (iPhone 13 and later) | No |
| Travel eSIM compatibility | Yes | Yes |
| Carrier plan availability | Broad | Narrower — not all carriers offer iPad plans |
### Data-Only Plans
iPad cellular plans are structured as data-only. The device connects to the mobile network for internet access, but it does not have a phone number. You cannot receive a voice call on the iPad's cellular line, and SMS messages cannot be received on that line either.
Voice and video calling on iPad is available over the internet via FaceTime, WhatsApp, Skype, and similar apps — these use data (Wi-Fi or cellular), not the cellular voice channel.
### No Dual eSIM
Unlike iPhone 13 and later, which support two simultaneously active eSIM profiles, iPad supports only one active eSIM at a time. You can store multiple eSIM profiles on the device and switch between them in Settings, but only one can be active at any given moment. There is no iPad equivalent of iPhone's dual-eSIM configuration.
For an explanation of how dual eSIM works on iPhone, see [Dual SIM Setup on iPhone: Complete Configuration Guide](/en/guides/dual-sim-iphone/).
### Carrier Availability
Not every carrier that supports iPhone eSIM also offers a dedicated iPad plan. Some carriers allow you to add an iPad as a secondary device on an existing account (sometimes called a companion plan or connected device plan), while others sell standalone iPad data plans. Check your carrier's device plan options, as the iPad plan section is often separate from the phone plan section on carrier websites.
---
## Before You Start
Before adding an eSIM to your iPad, confirm the following:
**1. Confirm your iPad is a Wi-Fi + Cellular model with eSIM support.**
Open Settings. If a **Cellular Data** menu is present, the device has cellular hardware. Within that menu, look for **Add eSIM** or **Add Data Plan** to confirm eSIM is supported.
**2. Confirm your iPad is carrier-unlocked.**
Go to **Settings > General > About** and look for a **Carrier Lock** field. If it shows **No SIM restrictions**, the device is unlocked. A carrier-locked iPad can only use plans from the locking carrier. Contact that carrier to request an unlock if needed.
**3. Have a Wi-Fi connection ready.**
Downloading an eSIM profile requires an internet connection. If your iPad is not already connected to cellular data via a physical SIM, connect to Wi-Fi before starting.
**4. Obtain a QR code or activation code from your carrier or eSIM provider.**
Most carriers deliver the QR code by email or display it in their app. Travel eSIM providers typically send it by email and show it in their app after purchase.
---
## How to Add an eSIM to iPad
The steps below apply to all supported Wi-Fi + Cellular iPad models running a compatible version of iPadOS.
### Step 1 — Open Settings and Go to Cellular Data
Tap the **Settings** app, then tap **Cellular Data** in the left panel.
### Step 2 — Follow the On-Screen Prompts to Add a Plan
Tap the option to add a new plan. The exact label varies by iPadOS version; in current iPadOS it may appear as **Find a New Plan**, **Add eSIM**, or **Add Data Plan**. Follow the on-screen prompts to proceed.
If you do not see this option, either your iPad does not support eSIM, or the carrier has disabled eSIM provisioning. Contact your carrier to confirm.
### Step 3 — Choose Your Setup Method
iPad offers three ways to add an eSIM profile:
- **Scan a QR code** — point the camera at the QR code provided by your carrier
- **Use carrier's app** — some carriers offer a direct in-app setup flow
- **Enter activation code manually** — type the SM-DP+ server address and activation code by hand (select **Enter Details Manually** at the bottom of the scan screen)
The QR code method is the most common for both carrier plans and travel eSIMs.
### Step 4 — Scan the QR Code
Display the QR code on a separate screen (laptop, printed page, or another device). The QR code cannot be scanned from the same iPad screen it is displayed on.
Point your iPad camera at the code. When detected, a banner appears: **Cellular Plan Detected**. Tap **Continue**. The iPad QR scan flow mirrors the iPhone process — see [How to Set Up eSIM on iPhone via QR Code](/en/guides/qr-code-iphone/) for a detailed walkthrough of each prompt.
> **If the QR code is in an email on the same iPad**: forward the email to another device, open it there, and scan normally — or take a screenshot and display it on another screen.
### Step 5 — Confirm and Download
Tap **Add Cellular Plan**. Your carrier may prompt for a confirmation code sent to your email or via SMS to a linked phone number. Enter it when asked.
The iPad downloads the profile from the carrier's SM-DP+ server. This typically takes a few seconds to about one minute. When the status shows the plan is active, setup is complete.
### Step 6 — Verify the Connection
After installation, return to **Settings > Cellular Data** and confirm:
- The eSIM plan is listed and shows as **Active** or **On**
- The signal indicator in the iPadOS status bar shows bars
Open a browser and load a webpage to confirm data is flowing. For a step-by-step guide to confirming your line is active and what to do if it is not, see [SIM Activation: How to Get Your Line Working](/en/guides/activation/). If data does not work, see [Troubleshooting](#troubleshooting) below.
---
## Adding a Travel eSIM to iPad
A travel eSIM provides data connectivity in a foreign country at local rates, without the roaming charges your home carrier applies. The setup process on iPad is the same as for a domestic plan — scan a QR code in Settings > Cellular Data > Add eSIM.
**Before your trip:**
- Purchase the travel eSIM from a provider such as Airalo, Holafly, Nomad, or Sabil before departure
- Download the eSIM profile at home on reliable Wi-Fi — do not wait until you land
- The profile installs immediately; activation (the plan's data clock starting) may be set to begin automatically when you connect to the destination network, or you may need to enable it manually in Settings
**At your destination:**
- Go to **Settings > Cellular Data** and ensure the travel eSIM is selected as the active plan
- If you have a home plan also installed (on eSIM-only models or after switching), ensure it is turned off or set to a lower priority to avoid unintended roaming charges
**Travel eSIM on iPad is data-only**, as with all iPad cellular plans. If you need to receive voice calls or SMS while abroad, those must come through an internet-based app (FaceTime, WhatsApp, etc.) using the travel eSIM's data.
Use [SimFinder Travel](/en/travel/) to search for travel eSIM plans by destination, filtered to show iPad-compatible options.
---
## Managing Multiple eSIM Profiles
You can store multiple eSIM profiles on your iPad and switch between them as needed — for example, keeping a home plan and a travel plan both installed, then activating the appropriate one.
To manage plans, go to **Settings > Cellular Data**. Installed profiles appear as a list. Tap a plan to:
- Turn it **on** or **off** (without deleting it)
- Rename it for clarity (e.g., "Home Plan", "Japan Travel")
- View the plan details or remove it
**Switching active plans**: only one eSIM can be active at a time on iPad. Enabling a second profile automatically disables the one currently active.
**Deleting a profile**: once deleted, most eSIM profiles cannot be reinstalled from the same QR code — each code is single-use. Before deleting a travel eSIM, confirm the provider's reinstall policy. Some providers allow re-download via their app; others require purchasing a new plan.
---
## Troubleshooting
**Settings > Cellular Data has no "Add eSIM" option**
Two possible causes: the iPad is a Wi-Fi-only model (no SIM hardware), or the iPad is carrier-locked and the carrier has disabled eSIM activation for non-supported plans. If the Cellular Data menu exists but Add eSIM is absent, contact your carrier to verify whether eSIM provisioning is enabled for your plan.
**"Unable to Add Cellular Plan" error**
This error typically means the QR code has already been used on another device, or the activation code has expired. Request a new QR code from your carrier or eSIM provider. Each QR code is single-use and tied to one device.
**eSIM installed but no data**
After the profile downloads, verify in **Settings > Cellular Data** that the plan is toggled on. Confirm that **Cellular Data** is enabled at the top of the menu. If the plan is on but data is not flowing, check whether the APN settings are correct — some carriers require manual APN configuration. Contact your carrier for the correct APN values.
**QR code scan fails**
Ensure good lighting and a steady hand. Hold the iPad camera 15–30 cm from the code. If the code is on a screen, adjust screen brightness to maximum. If scanning still fails, use the manual entry option: tap **Enter Details Manually** on the scan screen and type the SM-DP+ address and activation code from your carrier's confirmation email.
For a more detailed troubleshooting reference, see [eSIM Activation Failed: Troubleshooting](/en/guides/activation-failed/).
---
## Apple SIM and the Transition to eSIM on iPad
Earlier Wi-Fi + Cellular iPads shipped with **Apple SIM** — a removable, reprogrammable SIM card (nano-SIM form factor) that functioned similarly to eSIM in allowing carrier selection without swapping physical cards. Apple SIM was available in the United States, United Kingdom, Canada, and a small number of other markets (including Germany and Australia) through participating carriers.
Apple SIM was distinct from the built-in eSIM chip. Some iPad models shipped with both: an Apple SIM in the nano-SIM slot and a separate eSIM chip on the motherboard.
As of the current iPad lineup (iPad Pro M4, iPad Air M2), Apple SIM is no longer included. These models use eSIM only, following the same embedded eUICC standard ([GSMA SGP.22](https://www.gsma.com/solutions-and-impact/technologies/esim/)) used in eSIM-capable iPhones and Android devices.
If you have an older iPad with Apple SIM and are unsure which SIM type is active on your device, go to **Settings > General > About**. The presence of an **EID** field confirms that an eSIM chip is present.
---
## Summary
- **Wi-Fi + Cellular iPads** from iPad Pro 11-inch (1st gen, 2018) and iPad Air (3rd gen, 2019) onward support eSIM
- **iPad Pro (M4), iPad Air (M2), iPad mini (A17 Pro, 2024), and iPad (A16, 2024)** are eSIM-only — no physical SIM slot
- **Setup**: Settings → Cellular Data → Add eSIM → scan QR code
- **iPad eSIM is data-only** — no phone number, no cellular voice calls
- **No dual eSIM** on iPad — only one profile can be active at a time
- **Travel eSIMs** work on iPad the same way as on iPhone; download before departure on Wi-Fi
- **Carrier availability** for iPad plans varies; not all carriers that support iPhone eSIM offer iPad plans
---
## Related Guides
- [eSIM-Compatible Devices and How to Check Yours](/en/guides/esim-compatible-devices/)
- [What Is an eSIM? How It Works, Benefits, and Supported Devices](/en/guides/what-is-esim/)
- [How to Set Up eSIM on iPhone via QR Code](/en/guides/qr-code-iphone/)
- [Dual SIM Setup on iPhone: Complete Configuration Guide](/en/guides/dual-sim-iphone/)
- [SIM Activation: How to Get Your Line Working](/en/guides/activation/)
================================================================================
# How to Use eSIM on a Smartwatch
URL: https://sim-finder.com/en/guides/esim-on-smartwatch/
Type: guides (en)
Published: 2026-06-06
A cellular smartwatch — such as Apple Watch GPS+Cellular or a Galaxy Watch cellular model — contains its own eSIM chip, which allows the watch to connect to a mobile network independently from your paired phone. Under the most common carrier model, the watch shares the same phone number as the paired phone: incoming calls and messages reach both devices, and you can use the watch for calls and data when your phone is out of range.
Cellular smartwatch plans require explicit carrier support. Not every carrier that supports eSIM on a phone also supports watch number-sharing, and where it is available, it typically requires a separate monthly add-on plan for the watch. Travel eSIM profiles for smartphones cannot be used on a smartwatch.
For a foundational explanation of how eSIM technology works, see [What Is an eSIM?](/en/guides/what-is-esim/). For a broader look at which devices — including wearables — support eSIM, see [eSIM-Compatible Devices and How to Check Yours](/en/guides/esim-compatible-devices/).
---
## How Cellular Works on a Smartwatch
A cellular smartwatch operates differently from a cellular tablet like an iPad. Rather than being an independent device with its own subscription and phone number, the watch functions as an extension of the paired phone's line.
### Number-Sharing vs. Multi-SIM
The dominant model for cellular smartwatches is **number-sharing** (also called a companion plan or connected-device plan):
- The watch uses the **same phone number** as the paired phone
- Incoming calls and messages ring on both the phone and the watch
- When the phone is nearby (via Bluetooth), the watch routes cellular traffic through the phone
- When the phone is out of Bluetooth range, the watch connects directly to the mobile network using its own eSIM
Some carriers structure this as **multi-SIM**, where the watch is treated as a secondary line sharing the primary account's data pool and number. The practical behavior is similar to number-sharing.
In either model, the watch's eSIM is not an independent subscription — it is linked to the phone account by the carrier. The watch cannot function as a standalone phone on a separate number under these plans.
### What the Watch eSIM Stores
The eSIM chip inside a cellular smartwatch conforms to the same GSMA SGP.22 standard used in smartphones and tablets. It stores a carrier profile provisioned by your carrier. Unlike iPhone — which can store 8 or more eSIM profiles — smartwatch eSIMs support fewer stored profiles: Apple Watch supports up to five carrier plans, and Google Pixel Watch can store more than one. Only one profile is active at a time. Provisioning is managed through the companion app on the paired phone rather than directly on the watch.
---
## Apple Watch GPS+Cellular and eSIM
Apple Watch models labeled **GPS+Cellular** include an eSIM chip and an LTE radio. Models labeled **GPS** (or **Apple Watch SE GPS**) have neither and cannot connect to a mobile network independently. The GPS+Cellular designation has been present since Apple Watch Series 3.
### How to Identify a Cellular Apple Watch
The red circle on the Digital Crown is a visual indicator used on many Apple Watch Cellular models, though it is not universal across all generations and colors. The most reliable method: check **Settings > Cellular** on the watch itself — if the menu is present, the watch supports cellular. Alternatively, check the product page on Apple's website using the watch's model number.
### Carrier Support for Apple Watch
Apple maintains an official list of supported carriers for Apple Watch Cellular. Carrier availability varies significantly by country:
- In the United States, all three major carriers (AT&T, T-Mobile, Verizon) support Apple Watch Cellular plans
- In other countries, support depends on the carrier's network infrastructure and agreements with Apple
- Some smaller carriers and MVNOs do not support Apple Watch even if they offer iPhone eSIM plans
Before purchasing an Apple Watch GPS+Cellular, confirm that your carrier is listed on Apple's supported carriers page for your country. If your carrier is not listed, the cellular features of the watch will not work.
### Setting Up Cellular on Apple Watch
Setup is managed entirely through the **Apple Watch app** on the paired iPhone:
1. Open the **Watch** app on iPhone
2. Tap **Cellular**, then tap **Set Up Cellular**
3. The app displays supported carriers in your region; select yours
4. Follow the carrier's activation flow — this typically redirects to a carrier screen within the app
5. Your carrier provisions an eSIM profile to the watch over the air
An active data connection (Wi-Fi or iPhone cellular) is required during setup. The watch downloads its eSIM profile from the carrier's provisioning server. Once the profile is installed, the watch can connect to the network independently.
You cannot set up Apple Watch Cellular by scanning a QR code directly on the watch or through any eSIM setup flow on the watch itself. The provisioning is initiated and completed entirely through the Apple Watch companion app.
### What Apple Watch Cellular Supports
When away from the paired iPhone, Apple Watch Cellular can:
- Make and receive phone calls (using the same number as the iPhone)
- Send and receive messages (iMessage and SMS via your number)
- Use apps that require data connectivity (maps, weather, streaming music)
- Use emergency SOS
The watch **cannot** make calls to phone numbers not in your contacts without the paired iPhone nearby, as Siri on Apple Watch requires the phone or a server connection for some functions.
---
## Wear OS and Galaxy Watch Cellular
Android smartwatch platforms — primarily **Wear OS** and Samsung's **Galaxy Watch** series — also support cellular connectivity via eSIM on qualifying models.
### Galaxy Watch Cellular Models
Samsung Galaxy Watch models sold as **LTE** or **cellular** variants include an eSIM. Wi-Fi-only variants do not. Samsung's LTE-capable models have spanned multiple generations of Galaxy Watch, Galaxy Watch Active, Galaxy Watch 3, and the current Galaxy Watch series.
Galaxy Watch cellular typically pairs with Android phones running Samsung's **Galaxy Wearable** app, but selected Galaxy Watch models also support pairing with non-Samsung Android phones and iPhones for certain features. Carrier plan availability and setup flow depend on which phone is paired.
### Wear OS Cellular Models
Various manufacturers — including Google (Pixel Watch series) and others — produce Wear OS watches with LTE capability. These include their own eSIM chip and follow the same carrier-dependent setup model. The companion app used for setup depends on the watch manufacturer (e.g., the Pixel Watch app for Google's watches).
### Carrier Support for Wear OS and Galaxy Watch
As with Apple Watch, cellular functionality on Android smartwatches requires that your carrier specifically supports watch plans. Carrier support for Wear OS and Galaxy Watch is **not** guaranteed just because the carrier supports eSIM on Android phones.
- In markets where watch plans are available, setup is initiated through the companion app (Galaxy Wearable, Google Pixel Watch app, or the manufacturer's equivalent)
- The watch eSIM profile is provisioned by the carrier through the app, not through a standalone QR code scan
- Carrier plans for Android watches are subject to the same number-sharing model described above
Check your carrier's connected-device or smartwatch plan page to confirm compatibility before purchasing a cellular watch model.
---
## Carrier Requirements and Plan Structure
Cellular smartwatch functionality depends on three layers of support:
1. **Carrier eSIM support for watches** — distinct from phone eSIM support; the carrier must have deployed specific watch provisioning infrastructure
2. **Carrier plan availability** — a watch add-on or connected-device plan must exist and be available for your account type
3. **Companion app integration** — the carrier must be integrated into the watch companion app's setup flow (Apple Watch app, Galaxy Wearable, etc.)
### Monthly Watch Plans
Carriers that support cellular watches typically offer a monthly add-on fee that links the watch to an existing phone account. The watch shares the phone's number and, in most cases, draws from a shared data pool. The structure is similar to adding a tablet or other connected device to a mobile account.
No pricing is listed here — plan costs vary by carrier and region and change over time. Check your carrier's website for current watch plan options. Carriers typically list these under "connected devices," "add a device," or "wearables."
### MVNOs and Watch Plans
Most MVNOs do not offer watch plans. MVNO infrastructure is generally built for smartphone SIM activation and does not include the watch-specific provisioning system that Apple and Samsung require. If you are on an MVNO and want cellular watch functionality, the most practical path is to check with the parent MNO — if they support watch plans, your MVNO may or may not pass that capability through.
For an explanation of the difference between MNOs and MVNOs, see [What Is a Dual SIM?](/en/guides/what-is-dual-sim/) provides context on how multiple lines and profiles work across devices.
---
## Travel eSIMs Cannot Be Used on a Smartwatch
This is one of the most common points of confusion for users who rely on travel eSIM profiles for international connectivity.
**Travel eSIM profiles designed for smartphones cannot be installed on Apple Watch, Galaxy Watch, or Wear OS watches.** The reasons are structural:
- Smartwatch eSIM provisioning is handled exclusively through the carrier-integrated companion app. There is no mechanism on the watch to scan a QR code or enter an activation code from a travel eSIM provider.
- Travel eSIM providers issue profiles that work within the GSMA SGP.22 standard for smartphones. Watch provisioning uses the same standard, but the provisioning flow is controlled end-to-end by the carrier and the companion app — third-party profiles cannot be injected.
- Apple, Samsung, and Google have not opened their watch eSIM provisioning flows to third-party travel eSIM providers.
**Practical consequence for travelers**: When you travel internationally with a cellular smartwatch, the watch will either:
- Roam on its home carrier's network (roaming charges apply, subject to your carrier's watch roaming policy)
- Lose cellular connectivity if the home carrier's roaming is not active in the destination country
To maintain watch cellular connectivity abroad at local rates, you would need a watch plan from a carrier in the destination country — which is not practically available to most travelers. Most users with cellular watches rely on the phone's data connection (via Bluetooth) for watch connectivity abroad, rather than independent watch cellular.
For travel data connectivity on a smartphone with eSIM, see [How to Use eSIM on an iPad](/en/guides/esim-on-ipad/) for context on how travel eSIM profiles work on tablets, and the travel section on [SimFinder Travel](/en/travel/) to compare travel eSIM plans for smartphones.
---
## Managing the Watch eSIM Profile
Unlike smartphones — which can store many eSIM profiles and switch between them — smartwatches support fewer stored profiles and only one active carrier profile at a time. Profile management is handled through the companion app on the paired phone.
For context on how eSIM profile storage limits work on phones, see [eSIM Profile Limits: How Many You Can Store and Use](/en/guides/esim-profile-limits/).
### Adding and Removing Plans
- **To add a plan**: use the Watch app (Apple Watch), Galaxy Wearable (Samsung), or the equivalent companion app. The carrier's setup flow is embedded within the app.
- **To remove a plan**: navigate to the Cellular settings in the companion app and select the option to remove or cancel the plan. This deletes the eSIM profile from the watch. Notify the carrier to cancel the monthly charge.
- **To switch carriers**: remove the existing plan through the companion app, then set up a new plan with the new carrier through the same app.
### If the Watch or Phone Is Lost
If the paired phone is lost, the watch retains its eSIM profile and can continue to operate independently as long as the carrier plan remains active. To cancel the watch plan, contact the carrier directly. If the watch itself is lost, contact the carrier to deactivate the watch's eSIM profile and stop billing.
---
## Compatibility Summary
| Platform | Cellular Capability | eSIM Standard | Setup Method | Travel eSIM |
|---|---|---|---|---|
| Apple Watch GPS+Cellular | Yes (number-sharing) | GSMA SGP.22 | Apple Watch app on iPhone | Not supported |
| Samsung Galaxy Watch LTE | Yes (number-sharing) | GSMA SGP.22 | Galaxy Wearable app | Not supported |
| Wear OS (LTE models) | Yes (number-sharing) | GSMA SGP.22 | Manufacturer companion app | Not supported |
| Apple Watch GPS (no Cellular) | No | — | — | — |
| Wi-Fi-only watches | No | — | — | — |
Cellular capability on a smartwatch requires:
- A GPS+Cellular or LTE model (not a GPS/Wi-Fi-only variant)
- A carrier that supports watch plans in your country
- An active watch add-on plan from that carrier
---
## Troubleshooting Common Issues
**"Cellular unavailable" on Apple Watch**
The most common causes are: the carrier plan has not been fully provisioned, the watch is out of range of a cellular network, or the watch's software needs an update. In the Apple Watch app on iPhone, navigate to **Cellular** and check whether the plan shows as active. If the plan is listed as inactive or shows an error, tap to re-add the plan, which re-initiates the carrier's provisioning flow.
**Watch cellular works on some networks but not others while traveling**
This is roaming behavior. If your carrier's watch plan does not include roaming in a given country, the watch cannot connect to local networks there. Check your carrier's roaming policy specifically for watch plans — roaming terms for watch add-ons are often different (and more restrictive) than those for the primary phone line.
**eSIM provisioning fails during setup**
Ensure the paired phone has an active data connection (Wi-Fi or cellular) during watch setup. If the setup consistently fails, contact the carrier — the issue is usually on the carrier's provisioning infrastructure side, not the watch itself. Restarting the companion app and retrying often resolves transient errors.
---
## Summary
- **Cellular smartwatches** (Apple Watch GPS+Cellular, Galaxy Watch LTE, Wear OS LTE models) use an embedded eSIM to connect to mobile networks independently from the paired phone
- **Number-sharing** is the standard model: the watch shares the same phone number as the paired phone
- **Carrier support is required** and varies by country; not all carriers that offer eSIM for phones also offer watch plans
- **A separate monthly watch plan** is typically required as an add-on to an existing phone account
- **Setup is managed through the companion app** (Apple Watch app, Galaxy Wearable, etc.) — not via QR code scanning on the watch
- **Travel eSIMs cannot be used on smartwatches** — third-party eSIM profiles cannot be installed through watch provisioning flows
- **MVNOs generally do not offer watch plans**; check the parent MNO if cellular watch functionality is important
---
## Related Guides
- [eSIM-Compatible Devices and How to Check Yours](/en/guides/esim-compatible-devices/)
- [What Is an eSIM? How It Works, Benefits, and Supported Devices](/en/guides/what-is-esim/)
- [How to Use eSIM on an iPad](/en/guides/esim-on-ipad/)
- [What Is a Dual SIM?](/en/guides/what-is-dual-sim/)
- [eSIM Profile Limits: How Many You Can Store and Use](/en/guides/esim-profile-limits/)
================================================================================
# eSIM Profile Limits: How Many You Can Store and Use
URL: https://sim-finder.com/en/guides/esim-profile-limits/
Type: guides (en)
Published: 2026-06-04
A single iPhone can store 8 or more eSIM profiles, but under the baseline GSMA SGP.22 v2.x standard, only one can be active at a time. iPhone 13 and later support dual eSIM — two profiles active simultaneously — and Android 13 and later support MEP (Multiple Enabled Profiles), which also enables multiple simultaneous active profiles on a single eUICC chip. When storage is full, you must delete a profile before adding a new one; whether you can recover a deleted profile depends on your provider's reinstallation policy. For a direct comparison of how eSIM handles profiles relative to physical SIM cards, see [Physical SIM vs eSIM](/en/guides/sim-vs-esim/).
---
## Storage Limit vs. Activation Limit: Two Different Things
When people ask "how many eSIMs can I have," there are two separate questions with two different answers:
1. **How many profiles can I store?** — This is the storage limit, determined by the eUICC chip's memory.
2. **How many profiles can be active (in use) at the same time?** — This is the activation limit, determined by the GSMA specification version and device model.
Understanding both is essential before you install profiles, because running out of storage forces a deletion decision that may be irreversible.
---
## How Many eSIM Profiles Can You Store?
### The Specification Has No Fixed Number
The GSMA SGP.22 specification — which governs eSIM on consumer devices — does not set a fixed upper limit on the number of profiles an eUICC can store. The practical limit is the available memory on the eUICC chip, which varies by device model.
### iPhone: 8 or More
Apple states on its official support page that iPhone can store **8 or more eSIM profiles**. The exact number depends on the specific model's eUICC chip. Apple does not publish a per-model breakdown beyond this figure.
This means you can install profiles from your home carrier, a work carrier, and several travel eSIM providers — all stored simultaneously — and switch between them from Settings without reinstalling.
### Android: Varies by Device
Android devices do not share a single manufacturer-published storage figure. Storage capacity depends on the eUICC chip inside each device. Android manufacturers — including Google, Samsung, Motorola, and others — do not universally publish a per-model storage limit. The storage capacity for specific models such as Pixel 4a and Pixel 5 is not officially published per model. Check the specification sheet or support page for your specific model.
### The Practical Takeaway
For most users, 8 or more stored profiles is enough to maintain a home plan, a work plan, and several travel eSIMs across different regions, all pre-installed and ready to activate without reinstalling.
To check whether your device supports eSIM and how to confirm it has eUICC hardware, see [eSIM-Compatible Devices and How to Check Yours](/en/guides/esim-compatible-devices/).
---
## How Many eSIMs Can Be Active at Once?
### SGP.22 v2.x: One Active Profile at a Time
Under GSMA SGP.22 v2.x — the version that covers the vast majority of eSIM-capable devices sold through 2023 — a single eUICC can have only **one profile in the Enabled (active) state** at any moment. All other stored profiles are in a Disabled state: they remain on the chip and can be switched to, but they are not transmitting or receiving data until activated.
Switching the active profile is done through the device's Settings app. On iPhone: **Settings → Cellular → [select a stored plan] → Turn On This Line**. The switch takes effect within seconds.
This one-at-a-time restriction is why dual-SIM configurations on earlier eSIM phones used one physical SIM plus one eSIM — a physical SIM for one line and a single active eSIM for the other.
### SGP.22 v3.0: MEP Allows Multiple Active Profiles
GSMA SGP.22 v3.0 introduced **MEP (Multiple Enabled Profiles)** as an optional feature. MEP allows more than one eSIM profile to be in the Enabled state simultaneously on a single eUICC — meaning a device with no physical SIM slot can function as a dual-SIM or multi-SIM phone using only eSIM profiles.
MEP is optional: a device manufacturer must choose to implement it. Not every device released after v3.0 supports MEP.
For a broader overview of how the SGP.22 specification versions relate to consumer device features, see [What Is an eSIM?](/en/guides/what-is-esim/).
---
## MEP on Android
### Android 13 and MEP
Android 13 introduced OS-level MEP (Multiple Enabled Profiles) support that is variant-independent — meaning the OS can handle multiple simultaneously active profiles on a single eUICC regardless of which specific MEP variant the hardware implements.
Android 14 introduced named support for **MEP-A1 and MEP-B** as defined in GSMA SGP.22 v3.0. MEP-A1 enables two eSIM profiles to be active simultaneously on a single eUICC; MEP-B is the second variant. The AOSP (Android Open Source Project) documentation covering MEP support is available at the Android Open Source Project site.
### What MEP Means in Practice
On Android phones with MEP support:
- Two eSIM profiles can be active simultaneously — each on its own data and voice session
- No physical SIM slot is required for dual-SIM operation
- eSIM-only flagship Android devices (such as US-market Pixel 10 models) can operate as full dual-SIM devices
On Android phones without MEP support — including most devices running Android 12 or earlier, and some Android 13/14 devices whose hardware does not include MEP — only one eSIM profile can be active at a time, even if the OS supports MEP.
---
## Dual eSIM on iPhone
### iPhone 13 and Later: Two Simultaneous eSIMs
Starting with iPhone 13 (2021) and iPhone SE 3rd generation, Apple implemented dual eSIM support — **two eSIM profiles active at the same time**, with no physical SIM required.
| iPhone Generation | Dual-SIM Configuration |
|---|---|
| iPhone XS / XS Max / XR through iPhone 12 series | Physical SIM + 1 eSIM (one active eSIM at a time) |
| iPhone 13 / 13 mini / 13 Pro / 13 Pro Max / SE (3rd gen) and later | Physical SIM + eSIM **or** two eSIMs simultaneously |
| iPhone 14–16e (US models) | eSIM-only: two eSIMs simultaneously |
| iPhone 17 (US, Canada, Mexico, Japan, and several other regions) | eSIM-only: two eSIMs simultaneously |
| iPhone Air (all regions) | eSIM-only: two eSIMs simultaneously |
Source: [Apple Support — Learn which type SIM your iPhone or iPad uses](https://support.apple.com/en-us/118569)
### Stored Profiles vs. Active Profiles on Dual eSIM iPhone
Even on dual eSIM iPhones, the 8-or-more storage limit still applies to the total number of stored profiles. The change is in the activation limit: you can now have **two profiles in the Enabled state simultaneously** rather than one.
The remaining stored profiles (profiles 3 through 8+) stay Disabled and can be switched to at any time.
For configuration details — line labels, default data line, Allow Cellular Data Switching, and per-contact line assignment — see [Dual SIM Setup on iPhone](/en/guides/dual-sim-iphone/).
---
## What Happens When Storage Is Full
### You Must Delete Before Adding
If you attempt to add a new eSIM profile when the storage limit is reached, your device will prompt you to delete an existing profile to make room. There is no way to exceed the eUICC's storage capacity.
### Deletion May Be Permanent
This is the most consequential aspect of storage limits. Deleting an eSIM profile removes it from the eUICC. Whether you can reinstall the same profile depends entirely on your carrier or eSIM provider:
- **Home carrier plans**: Most carriers allow re-provisioning via their app or website. Some charge a re-issue fee. Check your carrier's policy.
- **Travel eSIM providers**: Many third-party travel eSIM providers do not allow reinstallation after deletion. Once deleted, the profile cannot be re-downloaded from the same QR code or activation link — a new purchase is required.
Before deleting any eSIM profile, confirm the provider's reinstallation policy. If the provider does not allow reinstallation, consider whether you still need that profile before removing it.
If you need to add a profile again after deleting it, you will have to re-enter the activation details provided by your carrier. For a step-by-step walkthrough of that process, see [Set Up eSIM with a Manual Code (SM-DP+ Address)](/en/guides/manual-code/).
---
## Managing Multiple Profiles Efficiently
### Naming and Labeling
Both iPhone and most Android devices let you rename stored eSIM profiles. Giving each profile a recognizable label — such as "Home", "Work", "Japan Data", or "EU Travel" — makes switching faster and reduces errors, especially when several profiles are stored.
On iPhone: **Settings → Cellular → [tap a plan] → Cellular Plan Label**.
### Turning Off Lines Without Deleting
On iPhone, you can turn a line off without deleting the eSIM profile. Go to **Settings → Cellular → [tap a plan] → Turn On This Line** (toggle off). The profile stays stored on the device and can be re-enabled at any time without reinstalling. This is useful for plans you do not use regularly but want to keep available.
### Disabling vs. Deleting
| Action | Profile Remains on Device | Can Reactivate Without Reinstalling |
|---|---|---|
| Turn Off Line (disable) | Yes | Yes |
| Delete eSIM | No | Depends on provider policy |
For plans you are finished with permanently — such as a used travel eSIM — deletion frees storage space. For plans you might use again, disabling is safer than deleting.
---
## Profile Lifecycle: When to Add, When to Disable, When to Delete
### Before You Install a New Profile
Confirm two things before downloading a new eSIM profile:
1. **Is there storage space?** On iPhone, you can check the number of stored profiles at **Settings → Cellular** — each installed plan is listed. If you are close to 8, assess which profiles you no longer need before adding another.
2. **What is the provider's reinstallation policy?** If you may need to delete a profile in the future, know in advance whether you can re-download it or whether deletion is permanent.
### Profiles You Are Actively Using
Keep these enabled. If you are using dual eSIM (iPhone 13+ or an Android device with MEP), two profiles can be enabled simultaneously. Switching the default data line is done at **Settings → Cellular → Cellular Data** on iPhone.
### Profiles You Use Occasionally (e.g., Travel Plans with Remaining Data)
Disable rather than delete. Disabling a line removes it from active use without touching the stored profile. The data balance on prepaid travel eSIMs is tied to the carrier's backend, not to the profile state on your device — disabling the line does not forfeit unused data, but verify the provider's data expiry terms, as prepaid data has a validity period set by the carrier.
### Profiles You Are Finished With
Delete to free storage. Before deleting:
- Confirm you have used all remaining data if it is a prepaid plan.
- Confirm the provider's reinstallation policy (can you re-download if needed?).
- If using iPhone: consider using [eSIM Quick Transfer](/en/guides/transfer-iphone/) to move the profile to a new device before deleting from the old one.
---
## Comparison: Storage and Activation Limits by Platform
| Platform / Standard | Max Stored Profiles | Max Simultaneously Active |
|---|---|---|
| GSMA SGP.22 v2.x (baseline) | Hardware-dependent; no spec limit | 1 |
| GSMA SGP.22 v3.0 MEP | Hardware-dependent; no spec limit | 2+ (optional feature) |
| iPhone XS–12 series | 8 or more (Apple) | 1 eSIM + 1 physical SIM |
| iPhone 13 and later | 8 or more (Apple) | 2 eSIMs simultaneously |
| Google Pixel 4a / 5 | Not officially published per model | 1 (v2.x) |
| Google Pixel 7 and later | Not published per-model | 2 eSIMs simultaneously |
| Android 13+ with MEP | Hardware-dependent | 2+ (if MEP implemented by OEM) |
Sources: Apple Support (support.apple.com/en-us/118569), Android Open Source Project (source.android.com/docs/core/connect/esim-mep), GSMA SGP.22 specification.
---
## Key Facts Summary
- **Storage limit**: Hardware-determined; the GSMA specification sets no fixed upper limit. Apple states 8 or more on iPhone; per-model figures for Android devices are generally not officially published.
- **One active at a time (SGP.22 v2.x)**: The baseline standard allows only one Enabled profile on a single eUICC. All others are Disabled until you switch.
- **Dual eSIM (iPhone 13+)**: Two profiles active simultaneously. No physical SIM required on eSIM-only models.
- **MEP (Android 13+)**: Multiple Enabled Profiles from SGP.22 v3.0. Android 13 introduced OS-level MEP support (variant-independent); Android 14 introduced named MEP-A1 and MEP-B support as defined in GSMA SGP.22 v3.0. Device must implement MEP in hardware.
- **Deleting to make room**: Required when storage is full. Deletion may be irreversible — check provider policy before proceeding.
- **Disabling without deleting**: Available on iPhone; keeps the profile on-device without consuming an active slot.
To find carriers and travel eSIM providers that support eSIM in your destination, use the eSIM filter on [SimFinder](/en/).
---
## Related Guides
- [What Is an eSIM?](/en/guides/what-is-esim/) — How eUICC works, the SGP.22 standard, and profile downloading
- [eSIM-Compatible Devices and How to Check Yours](/en/guides/esim-compatible-devices/) — Which iPhones and Android phones support eSIM, and how to verify your device
- [Physical SIM vs eSIM: Differences and How to Choose](/en/guides/sim-vs-esim/) — Side-by-side comparison of both technologies across all key dimensions
- [Set Up eSIM with a Manual Code (SM-DP+ Address)](/en/guides/manual-code/) — How to enter eSIM activation details manually when a QR code is unavailable or after re-adding a deleted profile
- [Dual SIM Setup on iPhone: Complete Configuration Guide](/en/guides/dual-sim-iphone/) — Line labels, default data line, and per-contact assignment for dual eSIM
================================================================================
# EU Roaming Explained — Roam Like At Home (RLAH) in Full Detail
URL: https://sim-finder.com/en/guides/eu-roaming/
Type: guides (en)
Published: 2026-05-20
The EU's Roam Like At Home (RLAH) regulation is one of the most significant consumer protections in telecommunications. Since June 2017, EU and EEA residents can use their home mobile plan in any other EU or EEA country without paying extra roaming surcharges. This guide explains exactly how the regulation works, which countries are included and excluded, the fair use rules that apply, and — critically — who does and does not benefit.
**Key facts up front:**
- RLAH has been in force since June 15, 2017, based on EU Regulation 531/2012 as amended.
- The 2022 revision (Regulation 2022/612) extends RLAH through June 30, 2032, and adds quality of service requirements.
- 32 countries are covered: 27 EU member states, Iceland, Norway, and Liechtenstein, plus Ukraine and Moldova (from 1 January 2026).
- Switzerland, the UK (post-Brexit), and micro-states such as Monaco and Vatican City are **not** covered.
- RLAH applies only to subscribers with EU/EEA-issued SIM contracts. Travelers from outside the EU using a non-EU SIM do **not** benefit.
For a broader comparison of all travel connectivity options, see [4 Ways to Stay Connected Abroad](/en/guides/four-options/). For definitions of terms used throughout this article — EEA, PLMN, wholesale cap, and others — see the [Glossary of Mobile and eSIM Terms](/en/guides/glossary-index/).
---
## What Is Roam Like At Home (RLAH)?
Roam Like At Home is a regulatory framework that prohibits mobile carriers licensed in EU and EEA member states from charging their domestic subscribers additional roaming surcharges when those subscribers travel within the EU/EEA zone.
In practical terms: if your carrier is based in, say, Germany, France, or Sweden, and you travel to Italy, Spain, or any of the other covered countries, your plan's calls, texts, and data allowances apply as if you were at home. The carrier cannot add a per-minute roaming fee, a per-SMS surcharge, or a per-megabyte data roaming charge on top of your normal plan rate.
The legal foundation is **Regulation (EU) 531/2012** on roaming on public mobile communications networks. This regulation was progressively amended — most importantly by Regulation (EU) 2017/920, which abolished the final retail roaming surcharges from June 15, 2017. The regulation was then substantially revised and extended by **Regulation (EU) 2022/612**, adopted in April 2022 and largely applicable from July 1, 2022, which runs through June 30, 2032.
RLAH did not happen overnight. The EU progressively reduced roaming charges over many years before the full abolition:
- 2012–2016: declining price caps on calls, SMS, and data
- June 15, 2017: retail roaming surcharges fully abolished for EU/EEA subscribers
For general context on how international roaming works technically — the AA.12 agreements, IPX infrastructure, and wholesale pricing — see [International Roaming Explained](/en/guides/international-roaming/).
---
## Countries Covered and Excluded
### The 32 Covered Countries
RLAH applies within the **European Economic Area (EEA)** plus two additional countries integrated by individual agreement:
**27 EU member states:**
Austria, Belgium, Bulgaria, Croatia, Cyprus, Czechia, Denmark, Estonia, Finland, France, Germany, Greece, Hungary, Ireland, Italy, Latvia, Lithuania, Luxembourg, Malta, Netherlands, Poland, Portugal, Romania, Slovakia, Slovenia, Spain, Sweden.
**3 EEA non-EU countries (through separate EEA Agreement):**
Iceland, Liechtenstein, Norway.
**2 additional countries integrated from 1 January 2026:**
Ukraine, Moldova.
On 1 January 2026, Ukraine and Moldova became the first non-EU/non-EEA countries integrated into the EU roaming area, following Council decisions adopted on 25 July 2025. This is a unique arrangement — both countries have individual roaming integration agreements with the EU, separate from EEA membership.
When you travel between any two of these 32 countries and your carrier is based in one of them, RLAH applies.
### Countries Explicitly Not Covered
Several European countries are frequently mistaken for being covered, but are not:
| Country | Status | Reason |
|---------|--------|--------|
| **Switzerland** | Not covered | Not an EEA member; voted against EEA membership in 1992. Switzerland has its own national telecom regulation. |
| **United Kingdom** | Not covered (as of January 1, 2021) | Left the EU and EEA on Brexit. Regulation 531/2012 no longer applies to UK-licensed carriers. |
| **Monaco** | Not covered | Not an EU or EEA member state. |
| **Vatican City** | Not covered | Not an EU or EEA member state. |
| **San Marino** | Not covered | Not an EU or EEA member state. |
| **Andorra** | Not covered | Not an EU or EEA member state. |
| **Turkey** | Not covered | EU candidate country; unlike Ukraine and Moldova, Turkey has no individual roaming integration agreement with the EU, so candidacy alone does not grant RLAH rights. |
**Switzerland is a common mistake.** It is surrounded by EU countries and has many bilateral agreements with the EU, but it is not part of the EEA and is not covered by RLAH. Travelers crossing into Switzerland from France or Italy on an EU SIM will typically trigger standard international roaming charges on their plan. Check your carrier's policy before crossing the Swiss border.
---
## Who Benefits: Eligible Contracts
RLAH protects **EU/EEA-licensed carrier subscribers** traveling within the EU/EEA. Specifically:
- Your contract must be with a carrier that holds a license under an EU or EEA member state's regulatory framework.
- The subscriber (you) must be a customer of that carrier — RLAH does not depend on your nationality or residency, only on where your carrier is licensed.
- Both prepaid and postpaid contracts issued by EU/EEA carriers qualify, provided the plan is a domestic plan (not a roaming-specific or visiting-travelers plan).
### Who Does NOT Benefit from RLAH
**Travelers from outside the EU using a non-EU SIM card do not benefit from RLAH.** This is a firm boundary.
If you travel to France using a SIM from the United States, Canada, Japan, Australia, the UK, India, or any country whose carrier is not licensed under an EU/EEA framework, RLAH does not apply. Your carrier will charge whatever international roaming rate applies under its own commercial agreements — which may be significantly higher than domestic EU rates.
For non-EU travelers visiting the EU, the practical alternatives are:
- **A travel eSIM** covering EU/EEA countries — typically the most convenient option, installable before departure. See [Your First Travel eSIM](/en/guides/first-time-guide/) for setup instructions.
- **A local prepaid SIM** purchased in an EU country — cost-effective for longer stays but requires in-store registration (Germany, for example, requires in-person identity verification for all SIM purchases).
- **Home carrier international roaming day pass** — check your carrier's published pass options and destination coverage before relying on this.
The [Pre-Trip Connectivity Checklist](/en/guides/pre-trip-checklist/) covers what to confirm before departure regardless of which option you choose.
---
## The 4-Month Rule and Fair Use Policy
RLAH is designed for travelers and people who genuinely live in one EU/EEA country and occasionally travel to others. It is not intended to allow someone who has permanently relocated to another EU country to continue using a cheaper home-country contract indefinitely as if they were still a domestic user.
To address this, the regulation includes a **fair use policy (FUP)** framework.
### The Stability-of-Link Rule
A carrier may apply a surcharge if **both** of the following conditions are met:
1. **The subscriber's presence in the visited country exceeds their presence at home.** The carrier analyzes the subscriber's usage pattern. If over a rolling period (typically assessed over the most recent 4 months), the subscriber is spending more time roaming in other EU/EEA countries than at their home-country network, this is a signal.
2. **The subscriber cannot demonstrate signs of a stable link to their home country.** Indicators of a stable link include: the subscriber having an active contract at the home-country address, regular voice call activity in the home country, consistent use of the home network when at home, and similar patterns. If the subscriber shows no signs of being genuinely based in the home country, the carrier may conclude there is no stable link.
Only when both conditions are present together — predominantly non-domestic presence **and** no stable link — can the carrier apply an additional charge. Carriers cannot apply a surcharge based on duration alone without also assessing the stable-link indicators.
### The 4-Month Practical Benchmark
While the regulation does not set a fixed 4-month rule as a hard cutoff, the **Commission's implementation guidelines** treat a period of more than 4 consecutive months of predominantly roaming usage as a threshold that can prompt a carrier's assessment. Carriers are required to give the subscriber **two weeks' written notice** before applying any surcharge, and the subscriber can dispute the assessment.
### Who Typically Triggers the FUP
In practice, the FUP is not triggered for:
- Tourists and leisure travelers making multi-week or multi-month trips.
- Business travelers frequently moving between EU countries.
- Students doing an exchange semester abroad, who typically retain clear links to their home country.
It can be relevant for:
- Expats who have moved permanently to another EU country but kept a home-country SIM for cheaper rates.
- Retired people who spend the majority of the year abroad.
---
## Data Caps Formula
RLAH abolished retail roaming surcharges, but the regulation does not require carriers to provide unlimited roaming data at all price points. Instead, a **minimum roaming data volume** must be included in domestic plans at no extra charge, calculated using a formula tied to wholesale roaming costs.
### The Regulatory Framework
The data cap formula is established by **Commission Implementing Regulation (EU) 2016/2286**, which defines the method for calculating the minimum data volume that must be made available for roaming.
The formula is based on the **regulated maximum wholesale roaming rate** (the price a home carrier pays the visited network for data):
> **IDV (Included Data Volume) ≥ 2 × (domestic plan monthly price excl. VAT ÷ regulated wholesale data cap per GB)**
This is the exact formula defined in Commission Implementing Regulation (EU) 2016/2286, Annex I. The **factor of 2** is explicit in the regulation — the minimum included roaming data is at least twice the simple price-to-cap ratio. As the wholesale cap decreases over time (it has been progressively lowered since 2017), the minimum included data volume increases proportionally.
### Evolution of Wholesale Data Caps
The regulated wholesale data cap has fallen significantly:
- 2017 (from 15 June): €7.70/GB
- 2018: €6.00/GB
- 2019: €4.50/GB
- 2020: €3.50/GB
- 2021: €3.00/GB
- 2022 (January–June): €2.50/GB
- 2022 (from 1 July, Regulation 2022/612): €2.00/GB
- 2023: €1.80/GB
- 2024: €1.55/GB
- 2025: €1.30/GB
- 2026: €1.10/GB
- 2027–2032 (through 30 June 2032): €1.00/GB
As the wholesale cap falls, the formula produces a **higher minimum included data volume** for the same plan price. This is why the practical impact of the data cap rule has become less visible over time — most typical plans now cover a substantial amount of roaming data under the formula.
### Practical Implications
- **Carriers cannot charge a per-GB roaming surcharge** on data consumed within the calculated minimum volume.
- **Beyond the minimum**, carriers may restrict further roaming data use (for example, by throttling speed or requiring the purchase of a roaming add-on), but they cannot charge a rate that exceeds the regulated wholesale rate plus a small permitted margin.
- **Unlimited domestic data plans**: carriers with unlimited domestic plans must allow at minimum the volume calculated by the formula at roaming; they cannot cut off roaming data entirely, but they are not required to provide unlimited roaming data unless the formula calculation results in a very large minimum.
If you are planning heavy data use (streaming, remote work) during an extended EU trip and you have an EU SIM, check your carrier's published roaming data policy to understand whether they apply a speed throttle or volume cap after the regulated minimum.
---
## Quality of Service Guarantees (Reg 2022/612)
The original RLAH framework focused on price. **Regulation 2022/612** added explicit quality of service requirements that came into force in 2022.
### Same Generation Network Access
Under Regulation 2022/612, carriers and their roaming partners are required to ensure that subscribers can access **the same generation of mobile network** when roaming as they would at home, provided the visited network supports that generation.
In practice:
- If you have a 4G plan at home and travel to a country where the roaming partner operates a 4G network, you must be able to access that 4G network for data — the carrier cannot restrict you to 2G or 3G connectivity.
- If you have a 5G plan and travel to a partner network operating 5G, you should be able to access 5G, subject to coverage at your location.
This requirement prevents a situation where subscribers are silently downgraded to a slower network generation while roaming, even though faster infrastructure is physically available.
### Emergency Services Access
Regulation 2022/612 also strengthened requirements around access to emergency services (112 and other national emergency numbers) while roaming, ensuring that emergency calls function regardless of the subscriber's roaming status.
### Transparency Requirements
Carriers are required to provide clear information about roaming conditions, including any data volume caps or speed limitations that apply when roaming, before or at the time the subscriber enters roaming. This is typically delivered via an SMS notification when you arrive in a foreign EU/EEA country. These notifications often include links to your carrier's roaming information page — worth checking if you are unsure about your plan's roaming terms.
---
## Travelers Using a Non-EU SIM in the EU
This section is for travelers from outside the EU/EEA — from the US, UK, Japan, Australia, or elsewhere — visiting EU countries with a SIM card issued by a non-EU carrier.
**RLAH does not apply to you.** Your carrier is not subject to EU roaming regulation. You will be charged according to your home carrier's international roaming agreements and pricing, which is set entirely by commercial terms, not by EU regulation.
### What This Means in Practice
Your options when visiting EU countries with a non-EU SIM:
**Option 1: Home carrier roaming (day pass or included benefit)**
Many major non-EU carriers offer international day passes or trip passes that give you access to your domestic-style allowance while abroad. The quality and pricing vary widely. Check your carrier's current international roaming page — specifically:
- Whether the EU country you are visiting is covered
- Whether it is a pay-per-use charge or a flat-rate pass
- Whether the pass activates automatically on first network contact (triggering a charge at the airport) or requires manual activation
See [International Roaming Explained](/en/guides/international-roaming/) for a detailed breakdown of the three main roaming pricing models.
**Option 2: Travel eSIM**
A travel eSIM installed before departure gives you local-rate data access without triggering home-carrier roaming. Major travel eSIM providers offer European regional plans covering 40+ countries. You keep your home SIM active for calls and messages while routing data through the travel eSIM.
- Install the eSIM profile before you leave home (requires a Wi-Fi connection).
- Keep Data Roaming off on your home SIM while in the EU.
- Use VoIP apps for calls if your home SIM is on a non-EU plan without included EU calling.
For a step-by-step installation guide, see [Your First Travel eSIM](/en/guides/first-time-guide/).
**Option 3: Local prepaid SIM**
Buying a SIM card in an EU country gives you domestic rates for that country. Note that most EU countries require in-person identity verification — you will need your passport. Germany's Telekommunikationsgesetz requires full ID verification for all SIM purchases, prepaid or postpaid (in force since July 2017). Other EU countries have similar requirements.
For a full side-by-side comparison of these options including setup effort, cost considerations, and device requirements, see [4 Ways to Stay Connected Abroad](/en/guides/four-options/).
---
## Post-Brexit UK and Switzerland Situations
### United Kingdom
The UK formally left the EU and its single market on January 1, 2021. From that date, UK-licensed mobile carriers are no longer subject to Regulation 531/2012 or any of its amendments, including Regulation 2022/612.
**Consequences for UK subscribers traveling to the EU:**
- UK carriers are free to set their own roaming policies for EU travel.
- As of publication, the UK market is divided: some operators have voluntarily maintained free EU roaming as a commercial feature (typically as part of higher-tier plans), while others have reintroduced roaming surcharges.
- Policies have changed multiple times since 2021 and continue to vary by carrier, plan tier, and destination.
**What to check before EU travel with a UK SIM:**
- Your carrier's current EU roaming policy page
- Whether your specific plan tier includes EU roaming or requires an add-on
- Any fair-use data caps that apply to EU roaming under your plan
- Whether there is a per-day charge, a per-month charge, or usage-based billing
There is no regulatory guarantee of free EU roaming for UK subscribers. Treat it the same way a US or Australian traveler would: verify before departure, and have a backup option (travel eSIM or local SIM) if your carrier's policy is expensive.
**EU subscribers traveling to the UK:**
RLAH does not cover the UK. An EU-licensed subscriber traveling from Germany to the UK will have their carrier apply international roaming rates for UK usage. Some EU carriers include the UK in broader international bundles, but this is a commercial decision, not a regulatory requirement.
### Switzerland
Switzerland is not and has never been an EEA member. The country's voters rejected EEA membership in a 1992 referendum, and Switzerland's relationship with the EU is governed by a separate set of bilateral agreements that do not include RLAH-equivalent roaming provisions.
Switzerland has its own national telecommunications law (Fernmeldegesetz / Loi sur les télécommunications), which includes some consumer roaming protection measures under its 2021 revision, but these are not equivalent to RLAH.
**In practice:**
- EU subscribers traveling to Switzerland will trigger international roaming charges on their home carrier.
- Swiss subscribers traveling to EU countries are subject to their Swiss carrier's commercial international roaming terms.
- Non-EU travelers visiting both Switzerland and EU countries should plan their SIM/eSIM strategy to cover both — many European travel eSIM plans include Switzerland alongside EU countries, but verify the specific plan's country list.
If you are planning a trip that includes both EU countries and Switzerland (for example, a tour through France, Switzerland, and Italy), check your connectivity plan carefully. A travel eSIM that covers both EU and Swiss territory avoids the issue entirely — use the [SimFinder travel search](/en/travel/) to filter by destination countries and find plans covering your full itinerary.
---
## FAQ
See the FAQ items above for answers to:
- Which countries are covered by RLAH
- Whether RLAH applies to non-EU SIM cards
- How the fair use policy works
- The data cap formula and quality of service obligations
- The validity of RLAH through 2032
- The UK post-Brexit situation
- Best options for non-EU travelers visiting the EU
---
## Related Guides
- [International Roaming Explained](/en/guides/international-roaming/) — How home-carrier roaming works technically and the three main pricing models
- [4 Ways to Stay Connected Abroad](/en/guides/four-options/) — Full comparison of roaming, local SIM, travel eSIM, and portable Wi-Fi
- [Your First Travel eSIM](/en/guides/first-time-guide/) — Step-by-step guide to installing and activating a travel eSIM
- [Pre-Trip Connectivity Checklist](/en/guides/pre-trip-checklist/) — What to verify and configure before departure
- [Glossary of Mobile and eSIM Terms](/en/guides/glossary-index/) — Definitions for RLAH, EEA, IPX, and related terms
================================================================================
# Connectivity Strategy for Moving Abroad
URL: https://sim-finder.com/en/guides/expat-strategy/
Type: guides (en)
Published: 2026-06-06
When you move abroad as an expat, your mobile connectivity situation changes in three distinct ways: your home number becomes a liability if mismanaged, your usual phone plan stops being the right tool, and you need to build a permanent local setup in a market you may know little about. Each of these changes needs to be handled at a different time and in a specific order.
This article frames the move as three stages: what to do with your home number before or shortly after you leave, how to cover the gap from landing day until you are settled, and how to establish a permanent local line once you are in place. Handle them in sequence and you avoid the most common expat connectivity mistakes — a lapsed home number that deletes your bank account access, a roaming bill from using your home SIM carelessly, and weeks on an expensive travel plan because you delayed setting up a local one.
---
## Stage Overview: Three Decisions, Three Timelines
The three decisions are independent but they interact. Making the wrong call on the first one (your home number) can create problems that are hard to fix after the fact. Getting the second one right (arrival connectivity) is about bridging days to weeks, not months. The third decision (permanent local line) takes the most time because it depends on having arrived, settled, and gathered the documentation carriers in your destination typically require.
| Stage | Decision | Timing |
|---|---|---|
| 1 | What to do with your home number | Before you leave or in first weeks |
| 2 | Arrival connectivity | Before you leave (install eSIM in advance) |
| 3 | Permanent local line | After settling — weeks to months in |
---
## Stage 1 — Your Home Number: Keep It or Let It Go
### Why Your Home Number Matters More Than It Seems
The default option — cancelling your home plan when you leave — is the right call only if you have no accounts, no contacts, and no services that depend on that number. For most people, that is not the case.
Your home number is likely linked to:
- **Bank and financial account SMS authentication.** Many banks send one-time passwords (OTPs) by SMS when you log in or authorise a transaction. If the number is cancelled and reassigned to someone else, those codes reach a stranger. You may lose access to the account before you realise what has happened.
- **Two-factor authentication (2FA) for online services.** Any account configured to send a login verification code to that number will fail to reach you if the number is gone.
- **Contacts in your home country.** Family, doctors, government agencies, and employers may only have your home number. If you cancel without updating them, you become unreachable via that channel.
- **A return to your home country.** If there is any realistic chance you will return, keeping the number preserves your options. Porting a number back to a carrier after it has been reassigned is not possible.
### The Two Paths: Retain or Let Expire
**Retain the number** — through a cheap plan, a suspension service, or a port to a low-cost carrier — if any of the above applies. The [number storage guide](/en/guides/number-storage/) covers five specific approaches in detail: downgrading to your carrier's cheapest plan, keeping the number on an eSIM, porting to a low-cost MVNO or prepaid, using a carrier suspension service (available in some markets — Japan's au/KDDI, for example, offers a formal long-term suspension for subscribers living abroad), and porting to a VoIP service.
**Let it expire** only after you have completed an audit of every account that uses that number for SMS OTP and updated them to either a new number you are keeping or to an authenticator app. That audit takes time. Do not cancel the number before it is done.
### The SMS 2FA Problem Is the Critical Path
Before doing anything else, make a list of every account that uses your home number for SMS authentication. Common categories to check:
- Online banking and investment accounts
- Email and social media accounts with SMS 2FA enabled
- Messaging apps tied to your phone number (WhatsApp, Signal, iMessage)
- Work accounts, VPN access, and company authentication systems
- Government services and health portals
For each one, either migrate to an authenticator app (where the service allows it) or update the phone number to one you will keep active. This step takes longer than it sounds — financial institutions in particular often have multi-day verification processes for phone number changes.
This is not optional. A cancelled home number that was attached to your bank account creates account recovery problems that can take weeks to resolve and may require in-person visits to a branch in your home country.
---
## Stage 2 — Arrival Connectivity: Bridging the Gap
### What You Need on Day One
When you land, you need connectivity immediately: for navigation, for communication with whoever is picking you up or meeting you, and for the practical steps of early settlement (finding your accommodation, coordinating movers, researching local services). You need this before you have had any opportunity to set up a local plan.
Two options work for this:
**Travel eSIM (recommended).** Install a travel eSIM on your phone before you leave your home country, while you still have access to your home Wi-Fi. The eSIM profile downloads over Wi-Fi and installs in minutes. When your phone registers on the destination network after landing, you have working mobile data immediately — no airport SIM kiosk, no queue, no registration form in an unfamiliar language. Note: if data does not start automatically, open Settings and confirm the travel eSIM line is set as the active data source; most devices do this automatically, but on some you may need to switch manually. For a step-by-step guide to installing a travel eSIM, see [Your First Travel eSIM](/en/guides/first-time-guide/).
**International roaming on your home plan.** If your home carrier includes international roaming coverage in your plan at a cost that is acceptable for a few days to a couple of weeks, this is the zero-setup option. You land, your phone registers on a partner network, and you are connected. The risk is the cost: roaming rates on plans without a specific international allowance can add up quickly if you stay on roaming longer than planned. See [International Roaming Explained](/en/guides/international-roaming/) for how to check what your plan includes and how to avoid bill shock.
### How Long to Stay on a Temporary Connection
The answer depends on how quickly you can acquire the documentation and connectivity needed for a local plan. In some markets — the United States, Canada, and much of Western Europe — you can get a prepaid local SIM at an airport without any documentation. In others — Japan, South Korea, Germany, and various other countries — a local contract requires more: a registered address, a local ID or residence card, a bank account, or some combination. See [Regional Connectivity Guide](/en/guides/regional-overview/) for how registration requirements and local SIM availability differ across regions.
A reasonable expectation: you will be on a temporary connection for anywhere from a few days (if you can buy a local prepaid SIM immediately on arrival) to several weeks (if you need residency documentation before a carrier will accept your application for a contract).
### Keeping Your Home Number Reachable During the Gap
During the arrival period, you will likely be running two lines simultaneously: a travel eSIM or roaming data connection for internet, and your home SIM for calls and SMS to your home contacts. On a dual-SIM device, this is the standard setup: home SIM handles voice and SMS, travel eSIM handles data. Keep Data Roaming turned off on the home SIM to prevent it from generating data charges while the travel eSIM is handling data.
If your device supports it, this dual-SIM arrangement can continue even after you get a local line — you keep the home eSIM or physical SIM active on a cheap retention plan while the local SIM becomes your primary data and local calling line.
---
## Stage 3 — Permanent Local Line: Getting Set Up Like a Resident
### Why You Need a Local Line Eventually
Travel eSIMs are priced for short stays. They deliver good value for a week or two, but most expats find that the cost becomes hard to justify once they are settled and their usage patterns look more like a resident than a tourist. The crossover point varies by market, but a local monthly plan from a carrier in your destination country will almost always cost less per gigabyte than a travel eSIM at the same data volume.
Beyond cost, a local line gives you:
- **A local phone number**, which is required for many local services — registering for utilities, signing up for local apps, verifying delivery accounts.
- **Access to local carrier features** — VoLTE, Wi-Fi calling, and other network services that travel eSIM providers may not expose.
- **Network-appropriate quality**. A local SIM from a dominant carrier routes data directly through the local network; a travel eSIM may add a routing hop that affects speed.
### What You Typically Need to Apply
Requirements vary significantly by country. The [regional overview](/en/guides/regional-overview/) covers the major patterns. Common requirements include:
**In most markets:** a passport or national ID, a phone (obviously), and a payment method.
**In many markets for postpaid/contract plans:** proof of address (a utility bill, a lease, a bank statement addressed to you at the local address), and in some cases a local bank account for direct debit.
**In some markets:** a local residence registration document — in Japan, the primary identity document accepted by carriers is the Residence Card (在留カード / Zairyu Card), with a juminhyo address certificate sometimes required as supplementary proof of address; Germany uses the "Anmeldung" registration certificate; other countries with mandatory address registration have similar documents.
If you arrive before you have a registered address or local ID, a prepaid SIM — available at airports or convenience stores in most markets without extensive documentation — bridges the gap until you can apply for a contract plan.
### Prepaid vs. Contract: What Makes Sense for Expats
This decision mirrors the [how to choose a local plan](/en/guides/local-contract/) discussion, but with an expat-specific lens:
**Prepaid** is the right starting point if you are uncertain about your stay length, do not yet have the documentation for a contract, or want to test a carrier before committing. Prepaid plans in many markets are genuinely competitive with postpaid and do not require a credit check or long-term commitment. The trade-off is that auto-renewing monthly is a manual step on some carriers.
**Contract / postpaid** becomes the better choice once you are settled, have the documentation, and know you will stay for long enough to make the commitment worthwhile. Postpaid plans in most markets offer more data, sometimes better network priority, and easier customer service access. The lock-in term (commonly 12 or 24 months in many markets) is the main trade-off.
For expats who plan to stay for at least a year, a postpaid contract is usually the right long-term answer once you have residency documentation in place.
### The MNO vs. MVNO Question
In most markets, you have a choice between a contract with a major network operator (MNO) and a plan from a reseller (MVNO) that operates on an MNO's network. MVNOs are typically cheaper but may offer lower priority on congested networks, slower customer service, and fewer local features. For an expat whose primary concern is data for everyday life, an MVNO on a strong underlying network is often the better value.
What matters most is the quality of the underlying MNO's network at the locations where you will actually use it — your home, your workplace, and the areas you frequent. Use [SimFinder](/en/sim/) to compare local plans and carriers in your destination country, with coverage and network quality information for your area.
---
## Regional Differences Matter
The three-stage framework applies everywhere, but the specific steps within each stage vary by region. The [Regional Connectivity Guide](/en/guides/regional-overview/) covers these differences in detail. A few headline patterns:
**Europe (EU/EEA expats moving within the bloc):** If you are an EU resident moving to another EU country, your existing EU SIM likely continues to work under the Roam Like At Home regulation — though this was not designed for long-term residence and fair-use thresholds mean it is not a permanent substitute for a local line.
**Asia:** SIM registration requirements are among the most varied in the world. Japan and South Korea require documented identity registration. Some countries (Thailand as of 2025) require biometric checks. In markets with strict registration, getting a local contract as a foreigner can take longer and may require your residence registration to be in place first.
**North America:** Low-friction prepaid options are widely available, including eSIM prepaid, without registration requirements. Getting a postpaid contract as a new arrival may require building local credit history first.
**Other regions:** See the regional overview for Africa, Latin America, and Oceania specifics. Africa and Latin America in particular show wide variation in registration requirements and travel eSIM availability — in some markets, a local prepaid SIM purchased in-country from the dominant carrier is the only practical option for reliable coverage outside major cities.
**A practical note for all regions:** The documentation requirements for a postpaid contract are always stricter than for a prepaid SIM. If you arrive before you have gathered all required documents, start with a prepaid SIM. Upgrade to a contract plan once your residency paperwork is in place.
---
## Device Readiness: SIM-Lock and eSIM Compatibility
Before any of the above steps work, your device needs to be compatible with the destination network and unlocked from your home carrier.
**SIM lock:** If your phone was purchased from a carrier under a subsidy or contract, it may be locked to that carrier and refuse to accept SIMs from other carriers. In most markets, carriers are required to unlock a device after the contract period ends or when you settle any outstanding balance. Before leaving, confirm your phone is unlocked — contact your carrier if you are unsure.
**Frequency bands:** Different countries use different radio frequency bands for 4G/LTE and 5G. A device designed only for your home market may lack the frequency bands used by networks in your destination. Check the device's supported band list against the bands used by carriers in your destination country before your move. This matters most for 5G mid-band coverage — 4G/LTE band overlap between regions is generally broader. Device specification pages (on the manufacturer's site) list supported bands; carrier websites in the destination country list which bands their network uses.
**eSIM support:** If you plan to use a travel eSIM for arrival connectivity and keep a home eSIM on the device simultaneously, confirm your device supports multiple eSIM profiles. Most modern smartphones support this, but profile limits vary by device and operating system. On iPhone, iOS manages eSIM profiles in Settings > Cellular. On Android, the path varies by manufacturer but is typically under Settings > Network & Internet > SIMs.
---
## Managing Two Lines Long-Term
Many expats end up running two lines simultaneously for months or longer: a home number on a cheap retention plan and a local number as the primary line. This is entirely workable and is the standard dual-SIM setup described in the [dual SIM for travel guide](/en/guides/dual-sim-for-travel/).
A few practical considerations for long-term dual-SIM operation:
**Keep home Data Roaming off.** As long as the home SIM is active in a foreign country, it can generate roaming charges if Data Roaming is left on. Turn it off in Settings and leave it off unless you deliberately need to use it.
**Battery considerations.** Running two active lines increases battery drain, particularly if one line has a weak signal and the radio is frequently searching for a stronger connection. If you rarely use the home line, consider disabling it (not deleting it — just disabling the line) when you do not need it active, and re-enabling it when you expect calls.
**Home number periodic checks.** If the home SIM is on a plan that requires minimum activity to stay active, calendar a recurring reminder to trigger that activity before the window closes. Most prepaid plans expire if there is no usage within a window ranging from 60 days to 12 months.
---
## What This Looks Like in Practice
To make the framework concrete, here is a typical expat timeline:
**4–6 weeks before departure:** Audit every account using your home number for SMS authentication. Begin migrating accounts to authenticator apps. Contact your carrier to discuss the cheapest retention option (suspension, cheap plan, or MVNO port).
**1–2 weeks before departure:** Purchase and install a travel eSIM on home Wi-Fi. Confirm the home line situation is resolved and the number is secure.
**Day of arrival:** Travel eSIM provides immediate data. Home SIM is active for calls and SMS. Data Roaming is off on the home SIM.
**First weeks in destination:** Gather documentation for a local plan application (address registration, ID, bank account as needed). Use the travel eSIM or a local prepaid SIM in the interim.
**Once settled (weeks to a few months in):** Apply for a local postpaid or prepaid plan. Use [SimFinder](/en/sim/) to compare available options. Transition the travel eSIM off once the local line is working well.
**Ongoing:** Home line on minimal retention plan, local line as primary. Periodic check that home SIM activity requirements are met.
### Common Mistakes to Avoid
**Cancelling the home number before the SMS 2FA audit is complete.** This is the single most consequential mistake. It takes longer than expected because some financial institutions require multi-day or in-person verification for phone number updates. Do the audit before you do anything else.
**Relying on a travel eSIM for months without switching to a local plan.** A travel eSIM is a bridge. Using it as a long-term solution costs more than it should and often means operating at slower speeds or without full access to local network features. The moment you have a settled address and the right documentation, evaluate local plans.
**Forgetting that the home SIM can generate roaming charges passively.** If Data Roaming is left on, background processes — app updates, cloud sync, email polling — will use roaming data without prompting. This is avoidable. Turn Data Roaming off on the home SIM and leave it off.
**Not checking SIM lock before leaving.** Discovering your phone is locked to your home carrier after you have landed abroad complicates everything. Unlock requests can take days to process. Handle this before departure.
---
## FAQ
*(Structured FAQ items are in the frontmatter above for schema.org/FAQPage display.)*
**Can I use my home carrier's roaming plan as my permanent expat connectivity solution?**
Not sustainably for most expats. International roaming is designed for travel, not long-term residence. Rates are set accordingly, and using a home carrier's roaming plan as a primary data source over months would generate costs far above what a local plan would cost for equivalent usage. Some home plans include international roaming as a benefit, but these typically have data caps, speed throttles in roaming mode, or fair-use thresholds that make them unsuitable for heavy daily use. Roaming as a bridge while you set up a local line is the intended use.
**What if my bank will not let me update my phone number to a foreign number?**
Some banks restrict the phone number on file to domestic numbers only. In that case, the only option that preserves SMS OTP access is to keep your home number active on a plan that receives calls and texts. This is a common reason expats maintain a home number long-term. If the bank supports authenticator-app-based login, migrating to that approach removes the dependency on the phone number entirely.
**What if I plan to keep moving between countries rather than settling in one place?**
The three-stage framework above assumes you are settling in one destination. If you are moving between countries on an ongoing basis — as a digital nomad — the strategy shifts: you rely more heavily on travel eSIMs and global data plans rather than committing to a local contract in each country. The [Connectivity Guide for Digital Nomads](/en/guides/digital-nomad/) covers that use case in full, including how to choose between regional eSIM plans and country-specific SIMs for multi-country itineraries.
**Do I need to tell my home carrier I am moving abroad?**
Not necessarily for account purposes — your home plan remains active regardless of where you physically are, as long as you continue paying. However, if you intend to cancel or downgrade, notifying the carrier and arranging the transition formally (rather than letting a plan lapse) avoids unexpected charges and preserves the ability to port the number cleanly. If you are using a carrier suspension service, you will need to contact the carrier to initiate it.
---
## Related Guides
- [How to Keep a Phone Number You're Not Using](/en/guides/number-storage/) — Five approaches to holding a home number while abroad: downgrade, eSIM, port to MVNO, suspension, or VoIP
- [How to Get a Local SIM Contract Abroad](/en/guides/local-contract/) — Documentation requirements, prepaid vs. postpaid, and MNO vs. MVNO for expats
- [International Roaming Explained](/en/guides/international-roaming/) — How roaming works, what it costs, and when to use it as a bridge
- [Regional Connectivity Guide](/en/guides/regional-overview/) — How SIM registration rules, eSIM adoption, and local plan availability differ across Asia, Europe, North America, and beyond
- [Connectivity Guide for Digital Nomads](/en/guides/digital-nomad/) — Ongoing connectivity strategy for location-independent workers moving between multiple countries
================================================================================
# Family Plans and Student Discounts Explained
URL: https://sim-finder.com/en/guides/family-plans/
Type: guides (en)
Published: 2026-06-06
Family plans and student discounts are among the most effective ways to reduce per-person mobile costs — but the structures differ considerably between carriers and markets. Four main categories exist internationally: multi-line discounts, shared data pools, student and youth discounts, and dedicated kids plans. Each has different eligibility rules, enrolment steps, and caveats. This guide explains how each category works, what to verify before enrolling, and where MNOs and MVNOs differ in their family-plan offerings. Use [SimFinder](/en/) to compare current plan terms side by side before committing.
---
## The Four Categories of Family and Group Mobile Discounts
Not all "family plans" work the same way. The label covers at least four structurally different discount mechanisms, and a carrier's plan may combine more than one:
**1. Multi-line discounts** — the per-line monthly price drops as you add lines to a single account. Lines are priced individually but receive a lower rate because they belong to the same account. Data allowances remain per-line.
**2. Shared data pools** — a single block of data is purchased for the account and all lines draw from it. The account holder chooses total data volume once rather than per person.
**3. Student and youth discounts** — time-limited price reductions tied to verified enrolment at a qualifying institution. Usually require periodic re-verification and expire when student status ends.
**4. Kids and junior plans** — age-restricted plans for children, often with lower data caps, calling restrictions, and parental control features built in. Some carriers market these as part of a family account; others sell them as standalone plans.
Understanding which category a carrier is offering tells you what the actual savings mechanism is — and what its limitations are.
---
## Multi-Line Discounts: How Per-Line Pricing Scales
Multi-line discounts are the most common family plan structure on major MNOs. The pricing logic is straightforward: the first line pays the standard rate, and each additional line costs less per month. The discount is applied automatically because all lines share one account.
**How it works in practice:**
- All lines must be on the same postpaid account, billed together.
- The account holder is responsible for all charges on the account.
- Each line retains its own data allowance — lines do not share data in this model.
- The discount typically applies from the second line onward, with the deepest discount on the third or fourth line.
- Carriers commonly cap family accounts at four to six lines.
**Who counts as "family":**
Carriers define family commercially, not legally. Any individual whose line is added to the account qualifies. There is no requirement in most markets to demonstrate kinship — housemates or colleagues can share an account if the account holder permits. The account holder bears full billing responsibility for all lines.
**What to verify before adding a line:**
1. Whether each line requires a separate credit check or whether the account holder's credit covers the group.
2. Whether adding a line resets any minimum commitment on the account or individual lines. For more on minimum terms, see [Contract Terms: Lock-In, Termination Fees, and Setup Costs](/en/guides/contract-terms/).
3. Whether the discount applies to the plan tier you want, or only to specific tiers.
4. What happens to individual lines if one person leaves — whether the remaining lines retain their discounted rates or revert to single-line pricing.
---
## Shared Data Pools: One Allowance, Multiple Users
A shared data pool is a different structure: instead of each line having its own data allowance, the account purchases a combined data block and all lines draw from it.
**Advantages of shared pools:**
- Works well when usage is uneven. A heavy user and a light user share a total block, which may cost less than two separate lines with individual allowances sized for the heavy user.
- Simpler to manage for the account holder — one data budget instead of several.
**Limitations of shared pools:**
- If one user exhausts their portion of the pool early, they affect the remaining allowance for others unless the carrier enforces per-line sub-limits.
- Some carriers allow per-line data caps within the pool; others do not and allow any line to consume the entire pool.
- Overage charges or speed throttling, when they apply, affect the shared pool rather than individual lines — one heavy user can slow the experience for everyone.
- Shared pool pricing may not always be cheaper than separate per-line plans. Compare the total cost of a shared pool plan against individual line pricing before assuming the pool is the better deal.
**Shared pools and calling:**
Data pools are the most common form of shared allowance. Shared call-minute pools — where a combined minute total is shared across lines — are less common but exist on some carriers in specific markets. For a detailed breakdown of how calling allowances work within plans, see [Understanding Your Call Plan: Minutes, VoLTE, and Calling Options](/en/guides/call-plans/).
---
## Student and Youth Discounts: Eligibility, Verification, and Expiry
Student discounts offer reduced plan pricing to individuals enrolled in qualifying educational institutions — most commonly universities and colleges, sometimes secondary schools. The discount is time-limited and tied to continued enrolment.
**Eligibility:**
- Most carriers require enrolment in a qualifying institution — criteria vary and typically include universities, colleges, and sometimes vocational or technical institutions.
- Part-time enrolment may or may not qualify; full-time student status is the standard requirement.
- Faculty, staff, and alumni are not usually eligible for student rates.
**Verification methods:**
Carriers use one of two approaches to verify student status:
- **University email address:** A discount is applied when you sign up with an institutional email address. Ongoing verification may check whether the email remains active at annual renewal.
- **Third-party student verification services:** Services such as SheerID and UNiDAYS are used by some carriers to verify enrolment against institutional records without requiring an institutional email.
Verification methods differ by carrier and by country. If you cannot complete verification through the carrier's default process, contact the carrier directly — some carriers offer manual verification for students whose institutions are not in the verification database.
**Time limits and renewal:**
Student discounts are not permanent. The typical pattern is:
- Discount is applied at sign-up upon initial verification.
- Annual re-verification is required to continue receiving the discount.
- If re-verification fails — because you have graduated, changed enrolment status, or the verification service cannot confirm your status — the discount is removed at the next billing cycle.
- The plan continues at standard pricing; you are not automatically moved to a different plan.
Set a reminder before each annual renewal to proactively complete re-verification. Do not rely on the carrier to notify you that verification is expiring.
**Youth or age-based discounts:**
Separately from student status, some carriers offer discounts based on age — typically for customers under 25 to under 28, depending on the carrier and market. These do not require enrolment verification; they require proof of age, usually from identity documents. Age-based discounts expire automatically when you reach the cutoff age. For plans that combine billing models with these discount structures, see [Prepaid vs Postpaid: Differences and How to Choose](/en/guides/prepaid-vs-postpaid/).
---
## Kids and Junior Plans: What They Offer and What to Check
Kids plans — also called junior plans or children's plans in some markets — are designed for younger users, typically under 12 or 13, and often integrate features beyond basic connectivity.
**Common features:**
- Lower data allowances than adult plans, reflecting lighter typical usage.
- Restricted or disabled international calling and texting, reducing accidental charge risk.
- Simplified account management, where the parent or guardian controls the plan settings.
- Integration with parental control tools — either the carrier's own application or compatibility with OS-level controls.
**Parental controls and kids plans:**
A kids plan from a carrier is not a substitute for device-level parental controls. Carrier-side controls — such as number filtering, content category blocking, and data speed restrictions — operate at the network level. Device-level controls, such as iOS Screen Time and Android Family Link, operate on the device itself and can restrict app use, screen time, and content regardless of network.
For child accounts, both layers are typically needed. Carrier filtering prevents access to certain content types at the network level; device controls restrict app access, screen time, and in-app purchases at the device level. For a detailed guide to setting up device-level controls, see [How to Set Up Parental Controls on a Child's Phone](/en/guides/parental-control/).
**Eligibility and account structure:**
Kids plans typically require the child's line to be part of a family account controlled by an adult. The adult account holder is responsible for all charges. Carriers typically require the adult to be the primary account holder and may require the adult to be present (physically or via identity verification) when adding a child's line.
Age verification for kids plans is handled differently across markets. In some markets the carrier requires only a declaration of the child's age; in others, documentation is required. In the US, carriers' online account-management apps and portals may have data-handling obligations under COPPA (Children's Online Privacy Protection Act) if they have actual knowledge that a child under 13 is using the service; some carriers also voluntarily exclude children's lines from marketing data programmes. Equivalent children's data-privacy laws apply in other jurisdictions.
---
## How to Enrol a Family Plan: The Standard Process
The enrolment process for a family plan follows a broadly consistent pattern across carriers, though specific steps vary:
1. **Establish the primary account.** A family plan requires one account holder who is responsible for billing. If you are not already a customer, you will go through standard identity and credit checks at this step.
2. **Add lines.** Each additional line is added through the carrier's app, online account portal, or in-store. Depending on the carrier and market, each added line may require:
- A separate identity check for the person joining.
- A credit check, or reliance on the primary account holder's credit.
- The new person's consent and agreement to the account terms.
3. **Select a plan tier for each line.** On multi-line accounts, each line may have its own plan tier (data allowance, calling options, etc.), or all lines may be required to be on the same tier. Verify whether mixed-tier accounts are permitted before enrolling.
4. **Complete any number transfers.** If any new member is bringing an existing number, a number port is required. The port must be initiated before cancelling the old plan. Number portability is a separate right from the family plan discount — porting your number does not automatically apply the family discount, and it does not reset the port right.
5. **Verify the discount is applied.** Once all lines are active, check the first bill to confirm the expected discount is reflected. Errors at enrolment are easier to correct before the first billing cycle closes.
---
## MVNOs and Family Plans: Why the Offer Is Usually Weaker
Most major multi-line discounts and shared data pool plans are offered by MNOs under their flagship brands. MVNOs and sub-brands tend to have weaker family plan structures for structural reasons:
**Lower margin per line:** MVNOs purchase network access wholesale from MNOs and operate on thinner margins. Stacking further discounts across multiple lines reduces revenue to levels that are difficult to sustain.
**Simplified account structures:** Many MVNOs operate simpler billing systems designed for individual customers. Family account management, shared pools, and multi-line discount logic require more complex account infrastructure that not all MVNOs have built.
**Prepaid concentration:** MVNOs and sub-brands are concentrated in prepaid and month-to-month plans. Multi-line discounts on prepaid plans are uncommon because each prepaid account is typically independent; a family of four on an MVNO's prepaid plan will generally pay four separate plan prices.
**The trade-off:**
A family of four on separate MVNO plans may still cost less per person than the same family on a discounted MNO family plan, depending on the specific plans. The discount mechanism on the MNO plan does not guarantee the lowest per-person cost — it guarantees a lower per-person cost than the carrier's own individual-line pricing. Comparing across carrier types is necessary to find the actual lowest cost for a specific usage pattern.
For a full breakdown of how MNOs, MVNOs, and sub-brands differ on coverage, priority, and price, see [MNO vs MVNO vs Sub-Brand](/en/guides/mno-vs-mvno-comparison/).
---
## What to Compare When Evaluating a Family Plan
When evaluating a family plan offer, the following dimensions determine whether the advertised discount translates to real savings:
**Per-person total cost:** Calculate the total monthly bill for the family account divided by the number of lines. Compare this against the best available individual-line pricing for equivalent data allowances.
**Minimum term:** Family plans on MNOs are frequently postpaid with a 12 or 24-month commitment. Locking all family members into a single account means one member wanting to leave triggers questions about remaining discount eligibility for the others. Confirm what happens to pricing for remaining lines if one line leaves the account.
**Discount tier structure:** Some carriers offer deeper discounts when all lines are on the same plan tier. If family members have significantly different data needs, forcing all lines onto a single tier to maximise the discount may not be cost-efficient.
**Included extras:** Family plans often bundle streaming services, international call minutes, or device insurance. Evaluate whether these extras have value in your household. Extras that nobody uses do not contribute to the plan's cost-effectiveness.
**Data per line vs shared pool:** Determine which structure the plan uses. A plan that advertises a large shared data total may work well for your household's usage pattern, or it may work poorly if usage is dominated by one heavy user.
---
## When Family Plans Do Not Save Money
Family plans do not automatically produce savings in every situation. Common scenarios where they may not deliver value:
- **Household members have very different contract end dates.** Consolidating to a family account may require early termination fees on existing contracts, which can offset months of discount.
- **Usage patterns are too different.** A shared pool plan optimised for even distribution may not suit a household with one heavy user and several light users.
- **The bundled extras are not used.** Streaming add-ons or device insurance bundles embedded in the family plan price add cost without benefit if no one in the household uses them.
- **A sub-brand or MVNO offers lower individual pricing.** Some MVNOs price individual lines below the per-person cost on an MNO family plan even at the maximum discount tier.
The correct comparison is always total household cost — not the advertised per-line discount percentage.
---
## Using SimFinder to Compare Family and Individual Plan Options
Family plan pricing changes frequently, and the gap between family and individual pricing varies by market and carrier tier. [SimFinder](/en/) lets you search plans by data amount, carrier type, and country. To evaluate a family plan effectively:
1. Search for individual-line plans that match each household member's data needs.
2. Note the total if all members were on separate individual plans.
3. Compare that total against the family plan's household bill.
4. Account for any minimum term differences and extras bundled into the family plan.
This approach gives you the actual savings figure rather than the discount percentage, which can be misleading if the baseline individual pricing is inflated. Student and age-based discounts should be evaluated the same way — compare the discounted plan against the current best individual-line offer, not against the carrier's standard rate.
---
## FAQ
*(See structured FAQ items in the frontmatter for display in site search and rich results.)*
### Can I split a family plan bill so each person pays their share separately?
The account holder is responsible for the entire bill. Most carriers issue one invoice for the full account. Some carriers offer autopay arrangements where individual lines can be set up to pay their portion directly, but this is a payment management feature, not a change to the legal billing responsibility. The account holder remains liable if a line member does not pay. Confirm the carrier's billing arrangement options before enrolling members who will pay their own share.
### What happens to a student discount if I transfer to a different university?
Re-verification at renewal uses your current institution. As long as you are enrolled at a qualifying institution and can verify that status — through an active institutional email address or via the carrier's verification service — a transfer to a different qualifying university does not disqualify you. If the new institution is not in the verification database, contact the carrier to request manual verification.
### Can my child's line be on a family account if they are abroad for a school year?
This depends on the carrier's roaming terms and whether the account supports international roaming on all lines. A line added to a family account for discounted domestic pricing does not automatically include international roaming. Check the family account's roaming options and whether a separate international roaming add-on is required. Data used abroad through roaming may draw from a separate allowance or incur different charges from domestic data.
---
## Related Guides
- [Understanding Your Call Plan: Minutes, VoLTE, and Calling Options](/en/guides/call-plans/) — How calling allowances work within plans, including shared minute pools
- [Contract Terms: Lock-In, Termination Fees, and Setup Costs](/en/guides/contract-terms/) — Minimum terms and ETF structure that apply to family postpaid accounts
- [Prepaid vs Postpaid: Differences and How to Choose](/en/guides/prepaid-vs-postpaid/) — Billing model comparison relevant to choosing between family postpaid and separate prepaid plans
- [MNO vs MVNO vs Sub-Brand](/en/guides/mno-vs-mvno-comparison/) — How carrier type affects family plan availability and pricing depth
- [How to Set Up Parental Controls on a Child's Phone](/en/guides/parental-control/) — Device-level controls that complement carrier-side kids plan features
================================================================================
# Your First Travel eSIM: Step-by-Step Guide
URL: https://sim-finder.com/en/guides/first-time-guide/
Type: guides (en)
Published: 2026-04-13
A travel eSIM lets you buy a data plan online, install it before you leave, and start using local mobile data the moment you land — no physical SIM card required. This guide walks through the entire process in order: confirming your device is compatible, choosing a plan, installing the eSIM profile, activating it abroad, and managing it when you return home.
---
## Step 1: Confirm Your Device is eSIM-Compatible and Unlocked
Before purchasing any travel eSIM, verify two things: your device supports eSIM, and it is not carrier-locked to your home operator.
### Check eSIM Support
**On iPhone**, go to **Settings > Cellular** (or Mobile Data). If you see an option labeled "Add eSIM" or "Add Data Plan," your device supports eSIM. iPhone XS, XS Max, and XR (2018) and all later iPhone models support eSIM.
**On Android (Google Pixel)**, go to **Settings > Network & Internet > SIMs > Add SIM**. If an eSIM setup option appears, your device is compatible. Google Pixel 3 and later generally support eSIM, though support on Pixel 3 varies by region and carrier variant.
**On Samsung Galaxy**, go to **Settings > Connections > SIM card manager**. Look for "Add mobile plan" or "Download SIM." Samsung Galaxy S20 and later support eSIM on most variants.
If no eSIM option appears in your settings, your device does not support eSIM or the feature has been disabled by your home carrier.
### Confirm the Device is SIM-Unlocked
A carrier-locked device typically cannot use eSIM profiles from other carriers. If you purchased your phone directly from a manufacturer or retailer (not through a carrier on contract), it is typically unlocked. If you purchased through a carrier, contact them to confirm your unlock status. In many countries, carriers are required to unlock devices at the end of a contract period.
---
## Step 2: Choose a Travel eSIM Plan
### Single-Country vs. Multi-Country Plans
Travel eSIM plans fall into two categories:
- **Single-country plans** — cover one specific destination. They typically offer better value for trips to one country.
- **Multi-country or regional plans** — cover a group of countries (for example, a Europe-wide plan or an Asia plan). Useful if you are visiting several countries on one trip. Coverage and speeds vary by country within the plan depending on the provider's local network partners.
### Data Volume
Estimate your data needs before purchasing. As a reference, navigation apps such as Google Maps use approximately 3–20 MB per hour. Streaming video (such as Netflix at standard quality) can use up to 0.7 GB per hour. For most travelers on a one-week trip using maps, messaging, and light browsing, 5–10 GB covers typical usage. If you plan to stream video or work remotely, consider 10–20 GB or an unlimited plan.
See [How Much Mobile Data Do You Need?](/en/guides/data-usage-guide/) for detailed estimates by app.
### Validity Period
Travel eSIM plans have a fixed validity window — commonly 7, 14, 30, or 90 days — that starts either from the moment of installation or from first activation. Confirm when the clock starts: some plans begin the moment you scan the QR code; others start on first use. Choose a plan whose validity window matches your trip length with a few extra days of margin.
### Data-Only Plans
Most travel eSIMs are data-only. They provide an internet connection but no separate phone number for outgoing voice calls or SMS. Voice calls and text messages abroad can be handled through internet apps such as WhatsApp, FaceTime Audio, or Signal. If your device supports dual SIM and you keep your home SIM active, you can still receive calls and SMS on your home number while your data runs through the travel eSIM.
**[Compare travel eSIM plans for your destination on SimFinder →](/en/travel/)**
---
## Step 3: Purchase and Receive Your eSIM
Travel eSIMs are sold through the provider's website or app. After completing the purchase, you receive either:
- A **QR code** (delivered by email or displayed in the provider's app)
- A **manual activation code** containing an SM-DP+ server address and an activation code string
Save the QR code or code details somewhere accessible without mobile data — you will need them when installing the profile. Screenshot the QR code or note down the activation code before you leave home.
Do not share your QR code with anyone. Each QR code is tied to a single device and can only be scanned once.
---
## Step 4: Install the eSIM Profile Before Departure
Install the eSIM profile while you have a reliable Wi-Fi connection at home. Downloading the profile requires an active internet connection.
### On iPhone
1. Go to **Settings > Cellular** (or Mobile Data)
2. Tap **Add eSIM**
3. Tap **Use QR Code** and scan the QR code from your provider
4. If entering manually, tap **Enter Details Manually** and type in the SM-DP+ server address and activation code
5. Follow the on-screen prompts to complete the download
6. When asked to label the plan, give it a recognizable name such as "Travel eSIM"
7. When asked which line to use for data, **do not switch to the travel eSIM yet** — keep your home SIM or home eSIM as the active data line for now
If your device asks whether you want to activate the plan immediately, choose to keep it turned off until you arrive at your destination.
### On Android (Google Pixel)
1. Go to **Settings > Network & Internet > SIMs**
2. Tap **Add SIM**
3. Select **Scan QR code** and scan the code from your provider, or tap **Enter activation code** to enter manually
4. Follow the prompts to download the profile
5. When the installation completes, keep the travel eSIM toggled off — do not set it as the active data line until you arrive
### On Samsung Galaxy
1. Go to **Settings > Connections > SIM card manager**
2. Tap **Add mobile plan** or **Download SIM**
3. Scan the QR code or enter the activation code manually
4. Follow the prompts to complete the installation
5. Keep the plan inactive until you arrive at your destination
After installation, the profile is stored on your device's eUICC chip. The profile does not consume data until you activate it.
---
## Step 5: Activate the eSIM When You Arrive
Once you land and your device detects a local network, switch to the travel eSIM.
### Enable the Travel eSIM Line
**On iPhone:**
1. Go to **Settings > Cellular**
2. Tap the travel eSIM line you installed
3. Toggle **Turn On This Line** to enabled
4. Go back to **Cellular Data** and select the travel eSIM as your data line
5. Enable **Data Roaming** for the travel eSIM line
**On Android / Samsung:**
1. Go to your SIM manager settings
2. Enable the travel eSIM line
3. Set it as the preferred data SIM
### Managing Dual SIM
If you are running your home SIM alongside the travel eSIM, confirm which line handles which function:
- **Calls and SMS**: use your home SIM (to keep your home number active)
- **Mobile data**: use the travel eSIM
- On iPhone, disable **Allow Cellular Data Switching** to prevent the device from automatically switching data back to your home SIM when signal is weak
### If the eSIM Does Not Connect
If the travel eSIM does not connect automatically after activation:
1. Confirm **Data Roaming** is enabled for the travel eSIM line
2. Toggle **Airplane Mode** on, wait five seconds, then turn it off
3. Go to **Settings > Cellular > Network Selection** (iPhone) or **Mobile Network** settings (Android) and try selecting the operator manually
4. Contact your eSIM provider's customer support — most offer chat support through their app or website
---
## Step 6: Use the eSIM During Your Trip
### Monitor Your Data Usage
Check your remaining data balance regularly, especially on long trips. Most providers show a usage counter in their app or on a dashboard on their website. On iPhone, you can also see data used by each line under **Settings > Cellular > [line name]**.
If you are approaching your data limit and need more, some providers offer top-ups through their app without requiring a new QR code.
### Make Calls and Send Messages
Because most travel eSIMs are data-only, use internet-based apps for voice calls and text messages:
- **WhatsApp**: voice calls use approximately 15–50 MB per hour; text messages use negligible data
- **FaceTime Audio**: available between Apple users
- **Signal**: encrypted calls and messages for all platforms
- **Google Meet / Zoom**: for video calls; 1:1 video at HD quality uses approximately 0.9–1.1 GB per hour
If you kept your home SIM active in a dual SIM setup, outgoing calls on your home number use your home carrier's rates (standard international call rates apply).
### Preserve Battery Life
Running two SIM lines simultaneously — dual SIM mode — increases battery drain compared to a single SIM. If battery life is a concern on a long day out, switch your home SIM line to a standby mode that does not actively search for signal. On iPhone, you can disable data for the home line while keeping it enabled for the travel eSIM.
---
## Step 7: After Your Trip
### Switch Back to Your Home Line
When you return home:
1. Go to **Settings > Cellular**
2. Set your home SIM or home eSIM as the active data line
3. Disable **Data Roaming** on the travel eSIM (or disable the travel eSIM line entirely)
### Manage the Remaining Profile
If the travel eSIM still has unused data and the provider allows it, keep the profile on your device for future trips to the same region.
If the plan has expired and you do not plan to return to that region, delete the profile to keep your eSIM list manageable:
**On iPhone**: Settings > Cellular > [travel eSIM line] > Delete eSIM
**On Android**: SIM manager settings > [travel eSIM line] > Delete or Remove
Before deleting, confirm the provider's reinstall policy. Some providers allow reinstallation from their app; others issue a new profile at additional cost if you want to use the same region again.
---
## Checklist: Travel eSIM from Start to Finish
Use this list before and during your trip.
**Before departure**
- [ ] Confirm device supports eSIM (Settings > Cellular on iPhone, SIM manager on Android)
- [ ] Confirm device is SIM-unlocked
- [ ] Estimate data needs for the trip
- [ ] Purchase a travel eSIM plan with the right country coverage and data volume
- [ ] Save the QR code or activation code (screenshot or print)
- [ ] Install the eSIM profile over Wi-Fi at home
- [ ] Label the plan clearly (e.g., "Travel eSIM")
- [ ] Keep travel eSIM toggled off — do not activate yet
**Upon arrival**
- [ ] Enable the travel eSIM line in Settings
- [ ] Set the travel eSIM as the data line
- [ ] Enable Data Roaming for the travel eSIM
- [ ] Confirm the device has connected to a local network
- [ ] Test with a browser or app to confirm data is working
**During the trip**
- [ ] Monitor data balance through the provider's app
- [ ] Use WhatsApp, FaceTime, or similar apps for calls and messages
- [ ] Top up data if running low (if supported by provider)
**After the trip**
- [ ] Switch data line back to home SIM or home eSIM
- [ ] Decide whether to keep or delete the travel eSIM profile
- [ ] Check provider's reinstall policy before deleting
---
## Frequently Asked Questions
### Do I need to install the travel eSIM before I leave home?
Yes. Install the eSIM profile while you still have a reliable Wi-Fi connection at home. Downloading a profile requires an internet connection. Do not activate the plan until you land — keep it toggled off until arrival to avoid premature data usage.
### Will my phone number still work while I use a travel eSIM?
If your device supports dual SIM, yes. Keep your home SIM active alongside the travel eSIM. Your home number continues to receive calls and SMS. Set the travel eSIM as the data line in your cellular settings.
### Do travel eSIMs include a phone number for calls and SMS?
Most travel eSIMs are data-only. They provide an internet connection but no separate phone number for outgoing calls or SMS. Voice calls and text messages are handled through internet-based apps such as WhatsApp, FaceTime Audio, or Signal.
### What if the eSIM does not connect after I land?
First, confirm that Data Roaming is enabled for the travel eSIM line in your cellular settings. Then toggle Airplane Mode on and off to force the device to search for a local network. If the issue persists, manually select the network operator in your carrier settings. Contact your eSIM provider's support if none of these steps resolve the problem.
### Can I reuse the same eSIM on my next trip?
It depends on the provider and plan type. Some providers allow you to top up an existing profile or reuse it if the data has not expired. Others issue a single-use profile that cannot be reinstalled once deleted. Check the provider's reinstall policy before deleting the eSIM from your device.
### What should I do with the travel eSIM after returning home?
Switch your cellular data line back to your home SIM or eSIM. If the travel eSIM has remaining data, keep the profile on your device for future trips (if supported by the provider). If the plan has expired and you no longer need the profile, delete it from Settings to keep your eSIM list tidy.
---
## Related Guides
- [4 Ways to Stay Connected Abroad](/en/guides/four-options/) — Compare travel eSIM against local SIM, international roaming, and portable Wi-Fi hotspots
- [What Is an eSIM?](/en/guides/what-is-esim/) — Understand how eSIM technology works before your first setup
- [How Much Mobile Data Do You Need?](/en/guides/data-usage-guide/) — Estimate your data requirements by app and usage pattern
- [SIM & Mobile Glossary](/en/guides/glossary-index/) — Definitions for technical terms used in this guide
- [How to Choose a Travel eSIM: 5 Key Criteria](/en/guides/how-to-choose/) — Selection criteria, provider comparison, and red flags
- [Using Dual SIM for Travel](/en/guides/dual-sim-for-travel/) — How to keep your home number active alongside a travel eSIM
================================================================================
# 4 Ways to Stay Connected Abroad — Cost, Convenience, and Quality Compared
URL: https://sim-finder.com/en/guides/four-options/
Type: guides (en)
Published: 2026-04-13
There are four ways to use your phone abroad: international roaming, a local SIM card, a travel eSIM, and a portable Wi-Fi hotspot. Each option involves a different trade-off between cost, setup effort, and connection quality. The right choice depends on your device, trip length, and whether you are traveling alone or in a group.
---
## The Four Options at a Glance
### 1. International Roaming
International roaming lets you use your existing home carrier's SIM abroad. Your carrier routes your connection through a local network in the destination country under a roaming agreement — specifically, a bilateral agreement governed by the GSMA AA.12 standard.
The main advantage is simplicity. You land, your phone connects, and your home number works as usual. No hardware changes, no new accounts. This matters when you need to receive calls or SMS on your existing number — for banking authentication codes, for example.
The main drawback is cost unpredictability. Roaming charges vary widely by carrier and destination. Some carriers include a daily or monthly roaming allowance within their standard plans; others charge per megabyte or per day. Confirm your carrier's roaming rates before departure. Unexpected data charges are a common travel mistake.
Most modern smartphones automatically enable roaming when a home SIM is inserted, but data roaming may be switched off by default. Enable it in your device settings before you arrive, or you may have connectivity issues at the destination.
### 2. Local SIM Card
A local SIM card is purchased at the destination — from an airport kiosk, a carrier store, or a convenience store. You insert it into your unlocked phone and use a local number and local data rates.
Because you connect directly to the local carrier's network, you typically get the same speeds and coverage as local residents. Data costs are often significantly lower than international roaming, especially for longer stays.
The trade-off is setup friction. You need to:
- Have a SIM-unlocked device
- Find a retailer at the destination
- Present a passport or ID (required by law in many countries)
- Swap your SIM card, potentially losing access to your home number while abroad
Registration requirements vary by country. Some destinations require biometric verification or device registration. If staying connected on your home number matters — for two-factor authentication, or to receive calls — you will need a second device or a dual SIM phone to keep your home SIM active alongside the local one.
### 3. Travel eSIM
A travel eSIM is a data plan purchased online before or during your trip. The plan is delivered as a digital profile that you download over the internet and activate directly on your device's built-in eSIM chip (the eUICC). No physical card is involved.
The eSIM technology is standardized by the GSMA under SGP.22, which defines how carriers remotely provision and manage mobile plans on a device. Once downloaded, the profile typically activates when you land and your device registers on a local partner network.
Setup usually involves scanning a QR code in your phone's cellular settings. The entire process takes a few minutes and can be done from home before you travel.
Travel eSIMs are typically data-only. They do not include a new phone number. Voice calls and SMS are handled through internet-based apps such as WhatsApp, FaceTime Audio, or other VoIP services. If you have a dual SIM device, you can keep your home SIM active for calls while routing data through the travel eSIM.
Providers such as Airalo, Holafly, Saily, and Nomad offer destination-specific or multi-country plans. Prices and coverage vary by provider and destination, so comparison is worthwhile before purchasing.
**[Compare travel eSIM plans on SimFinder →](/en/travel/)**
### 4. Portable Wi-Fi Hotspot
A portable Wi-Fi hotspot (also called a pocket Wi-Fi or MiFi device) is a dedicated mobile router you rent before your trip. It connects to local mobile networks and creates a personal Wi-Fi zone that multiple devices can join.
This option suits group travel or situations where several devices need connectivity. A typical pocket Wi-Fi device supports five to ten simultaneous Wi-Fi connections. Since any Wi-Fi-capable device can connect — smartphones, tablets, laptops — device compatibility is not an issue.
The drawbacks are physical: you need to rent, charge, carry, and return the device. Battery life is typically six to twelve hours of active use, so a separate power bank may be useful on long days. Rental services are available from airport counters or through advance booking and mail delivery.
---
## Side-by-Side Comparison
| | International Roaming | Local SIM | Travel eSIM | Portable Hotspot |
|---|---|---|---|---|
| **Setup required** | Confirm plan; enable data roaming | Purchase at destination; swap SIM | Purchase online; scan QR code | Book in advance; collect device |
| **Ease of use** | Minimal — works with existing device | Moderate — requires SIM swap | Low — QR scan only | Moderate — charge and carry device |
| **Relative cost** | Varies widely; can be high | Low (local rates) | Low to moderate | Moderate; scales with trip length |
| **Home number** | Active | Unavailable (unless dual SIM) | Unavailable (data only) | Depends on device's own SIM |
| **Connection quality** | Depends on roaming agreement | Same as local users | Depends on provider's local partner | Depends on device's local connection |
| **Group use** | One person per SIM | One person per SIM | One person (tethering possible) | Multiple devices on one plan |
| **Device requirement** | Any compatible device | SIM-unlocked device | eSIM-compatible device | Any Wi-Fi device |
| **After the trip** | Nothing required | Dispose or keep SIM | Delete profile | Return device |
---
## Which Option Fits Your Situation
### Short trip, minimum setup
International roaming is the path of least resistance for trips of a few days where you want zero setup. Confirm your carrier's roaming rates in advance and enable data roaming before departure. Your home number stays active throughout.
### Solo traveler with an eSIM-compatible phone
A travel eSIM offers the best balance of cost and convenience. Purchase the plan online before departure, scan the QR code to install it, and activate it when you land. No hardware to carry, no SIM to swap.
Use SimFinder's travel search to compare providers and find a plan that matches your destination and data needs.
**[Compare travel eSIM plans on SimFinder →](/en/travel/)**
### Group travel or eSIM-incompatible devices
A portable Wi-Fi hotspot allows the group to share one data plan. This is particularly useful when some devices in the group are older models that do not support eSIM.
### Extended stay — one week or more
For longer stays, the cost savings of a local SIM or travel eSIM are more significant relative to international roaming. A local SIM provides the deepest integration with local networks and the widest choice of data plans, at the cost of losing your home number unless you use a dual SIM device.
---
## Checking eSIM Compatibility
Travel eSIM requires a device that supports eSIM. The following are confirmed eSIM-compatible:
**iPhone**: iPhone XS, XS Max, and XR (2018) and all later iPhone models support eSIM. Note that iPhone 14 and later sold in the United States are eSIM-only (no physical SIM slot). Starting with iPhone 17 (released September 2025), eSIM-only models also became available in Canada, Mexico, Japan, and several other markets. iPhone 14 through iPhone 16 sold outside the United States still include a physical nano-SIM slot alongside eSIM.
**Android**: Google Pixel 3 and later generally support eSIM, though support depends on the region and carrier lock status. Samsung Galaxy S20 and later support eSIM in most markets. Other Android manufacturers vary — check your device specifications.
To confirm on iPhone: go to Settings > Cellular. If "Add eSIM" or "Add Data Plan" appears, eSIM is supported.
To confirm on Android: go to Settings > Network & Internet > SIMs (path varies by manufacturer). Look for "Download SIM" or "Add mobile plan."
If your device is carrier-locked, eSIM from another carrier may not work. Contact your home carrier to confirm unlock status before purchasing a travel eSIM.
---
## Local SIM: What to Expect at the Destination
Requirements for purchasing a local SIM vary by country. Common requirements include:
- **Passport presentation**: Required in most countries for tourist SIM purchases
- **Biometric registration**: Required in some countries (Thailand requires biometric verification for SIM registration; Germany requires identity verification — via VideoIdent, PostIdent, eID, or in-store ID check — for all SIM purchases)
- **Purchase limits**: Some countries limit the number of SIMs a single person can register
- **Registration apps**: Some carriers require in-app registration during or after SIM purchase
Airport carrier counters and major electronics retailers are reliable purchase points in most destinations. Staff at airport counters are typically accustomed to serving international travelers and can help with setup.
Before inserting a local SIM, confirm your device is SIM-unlocked. Also verify that the destination carrier's frequency bands are compatible with your device. Band incompatibility is rare for flagship phones, but it is worth checking if you are using an older model or a phone purchased in a region with different band configurations.
---
## Keeping Your Home Number Active Abroad
If receiving calls or SMS on your home number while traveling is important — for two-factor authentication, for example — the simplest approach is to keep your home SIM active in a dual SIM phone alongside a travel eSIM or local SIM.
iPhone 13 and later support two simultaneously active eSIMs (on devices that are eSIM-compatible in the relevant market). iPhone XS through iPhone 12 support one physical SIM and one eSIM simultaneously.
Google Pixel 7 and later support two simultaneously active eSIMs. Earlier Pixel models support one physical SIM and one eSIM.
If your device does not support dual SIM, you will need to choose between maintaining your home number and using a local plan. For most travelers, switching calls to a VoIP app (WhatsApp, FaceTime Audio, Google Meet) is a practical alternative to keeping the home SIM active.
See [What Is an eSIM?](/en/guides/what-is-esim/) for more detail on how eSIM technology works.
---
## Summary
- **International roaming**: Zero setup. Cost depends entirely on your carrier's plan — confirm rates before departure.
- **Local SIM**: Lowest cost for extended stays. Requires SIM-unlocked device and in-person purchase at the destination.
- **Travel eSIM**: Best balance of cost and convenience for eSIM-compatible devices. Purchase and install before you leave.
- **Portable Wi-Fi hotspot**: Best for groups and for devices that do not support eSIM. Requires renting, charging, and returning a physical device.
For any trip, preparation before departure reduces problems at the destination. Check your roaming plan, confirm your device's unlock status, install your travel eSIM, or book your hotspot rental before you board.
Use SimFinder to compare travel eSIM plans by destination and filter by data volume, price, and provider.
**[Find travel eSIM plans on SimFinder →](/en/travel/)**
---
## Related Guides
The following guides are referenced or relevant to this article.
- [How Much Mobile Data Do You Need?](/en/guides/data-usage-guide/) — Estimate how much data your trip requires
- [SIM & Mobile Glossary](/en/guides/glossary-index/) — Definitions for terms used in this article
- [What Is an eSIM?](/en/guides/what-is-esim/)
- [How to Choose a Travel eSIM: 5 Key Criteria](/en/guides/how-to-choose/)
- [Your First Travel eSIM: Step-by-Step Guide](/en/guides/first-time-guide/)
- [Pre-Trip Connectivity Checklist](/en/guides/pre-trip-checklist/)
- [Using Dual SIM for Travel](/en/guides/dual-sim-for-travel/)
================================================================================
# Frequency Bands and Device Compatibility — How to Verify Before You Buy
URL: https://sim-finder.com/en/guides/frequency-bands/
Type: guides (en)
Published: 2026-06-04
Frequency bands determine whether your device can actually connect to a carrier's network — not just whether a SIM activates. A phone that supports LTE in principle may still miss the specific bands a carrier uses for voice calls, high-speed data, or 5G in a given country.
The key points covered in this article:
- What frequency bands are and how the numbering system works across LTE and 5G NR
- Why device variants engineered for one region often lack critical bands in another
- How to read a device spec sheet and compare it against a carrier's band list
- A practical method for verifying compatibility before purchasing an imported device
- How band support relates to VoLTE, 5G, and carrier aggregation
For context on why VoLTE depends on specific LTE bands, see [VoLTE and VoNR Explained](/en/guides/volte-vonr/). For the process of verifying whether a device is locked to a specific carrier, see [SIM Lock and SIM-Free Explained](/en/guides/sim-lock/).
---
## What Is a Frequency Band?
A **frequency band** is a defined slice of the radio spectrum allocated by a national regulator for a specific use. Mobile operators are licensed to transmit on particular bands within their country; your device must support those same bands to communicate with the network.
Bands are described by a centre frequency or frequency range — for example, **700 MHz**, **1800 MHz**, or **3.5 GHz** — and each band has a standardised number assigned by 3GPP. The number is the same worldwide: LTE Band 3 always refers to 1800 MHz, and 5G NR band n78 always refers to the 3.5 GHz range. This consistency means a spec sheet from any manufacturer uses the same numbering, regardless of country.
Not all bands behave the same way. Lower frequencies (below 1 GHz, such as 700 MHz or 850 MHz) propagate farther and penetrate buildings more effectively, making them suitable for wide-area coverage and rural deployment. Higher frequencies (above 2 GHz) carry more data capacity but have shorter range. Millimetre-wave bands (above 24 GHz) deliver very high throughput but only over short distances with direct line of sight.
Carriers in each country hold licences for specific bands, which are determined by national spectrum auctions and regulatory allocations. The same frequency may be assigned to a different band number in different regions — or may not be allocated for mobile use at all in some countries — which is the root cause of cross-region compatibility gaps.
---
## LTE Band Numbering
3GPP defines LTE frequency bands in the specification series **3GPP TS 36.101**. Bands are numbered sequentially and cover both FDD (Frequency Division Duplex) and TDD (Time Division Duplex) variants. FDD bands use separate paired frequencies for uplink and downlink; TDD bands use a single frequency for both directions, alternating in time.
The table below lists a selection of widely deployed LTE bands and the regions where they are commonly used.
| Band | Frequency | Duplex | Common deployment regions |
|------|-----------|--------|--------------------------|
| 1 | 2100 MHz | FDD | Europe, Asia-Pacific, Japan |
| 2 | 1900 MHz | FDD | Americas |
| 3 | 1800 MHz | FDD | Europe, Asia, Africa, Australia |
| 4 | 1700/2100 MHz AWS | FDD | Americas |
| 5 | 850 MHz | FDD | Americas, Australia |
| 7 | 2600 MHz | FDD | Europe, Americas, Asia |
| 8 | 900 MHz | FDD | Europe, Asia, Africa |
| 12 | 700 MHz | FDD | United States |
| 17 | 700 MHz | FDD | United States |
| 18 | 850 MHz | FDD | Japan (KDDI/au) |
| 19 | 800 MHz | FDD | Japan (NTT Docomo) |
| 20 | 800 MHz | FDD | Europe |
| 26 | 850 MHz | FDD | Japan, Americas |
| 28 | 700 MHz | FDD | Asia-Pacific, Europe, Africa |
| 38 | 2600 MHz | TDD | China, Europe |
| 40 | 2300 MHz | TDD | India, Asia |
| 41 | 2500 MHz | TDD | United States (T-Mobile), China |
| 42 | 3500 MHz | TDD | Europe, Asia |
| 66 | 1700/2100 MHz | FDD | Americas |
This list is illustrative, not exhaustive. The complete 3GPP TS 36.101 table covers over 70 FDD and TDD bands. Carriers in each country hold licences for a subset of these bands.
---
## 5G NR Band Numbering
5G New Radio (NR) band numbering is defined in **3GPP TS 38.101**. To distinguish 5G NR bands from LTE bands, 3GPP prefixes them with the letter **n** — so Band 78 in 5G NR is written as **n78**, distinct from LTE Band 78.
5G NR bands are split into two frequency ranges:
- **FR1 (Sub-6 GHz)**: 410 MHz to 7125 MHz. Includes the majority of deployed 5G bands worldwide.
- **FR2 (mmWave)**: 24250 MHz to 52600 MHz (FR2-1); Release 17 added FR2-2 up to 71000 MHz. High-capacity, short-range bands currently deployed primarily in dense urban environments in the United States, Japan, South Korea, and a small number of other markets.
A selection of commonly deployed 5G NR bands:
| Band | Frequency | Range | Common deployment regions |
|------|-----------|-------|--------------------------|
| n1 | 2100 MHz | FR1 | Europe, Asia-Pacific, Japan |
| n3 | 1800 MHz | FR1 | Europe, Asia |
| n5 | 850 MHz | FR1 | Americas, Australia |
| n7 | 2600 MHz | FR1 | Europe |
| n8 | 900 MHz | FR1 | Europe, Asia |
| n20 | 800 MHz | FR1 | Europe |
| n25 | 1900 MHz | FR1 | United States |
| n28 | 700 MHz | FR1 | Asia-Pacific, Europe, Africa |
| n38 | 2600 MHz | FR1 | China, Europe |
| n40 | 2300 MHz | FR1 | India, Asia |
| n41 | 2500 MHz | FR1 | United States, China, Japan |
| n66 | 1700/2100 MHz | FR1 | Americas |
| n71 | 600 MHz | FR1 | United States (T-Mobile) |
| n77 | 3.3–4.2 GHz | FR1 | Europe, Australia, Japan |
| n78 | 3300–3800 MHz (3.3–3.8 GHz) | FR1 | Europe, Asia-Pacific, globally dominant |
| n79 | 4.4–5.0 GHz | FR1 | China, Japan |
| n258 | 26 GHz | FR2 | Japan, South Korea |
| n260 | 39 GHz | FR2 | United States |
| n261 | 28 GHz | FR2 | United States, Japan |
n78 (3.5 GHz) is the most widely deployed 5G NR band globally and is present in the majority of European, Australian, and many Asian 5G networks. A device lacking n78 support will miss 5G data entirely on a large share of international networks.
---
## Why Regional Variants Differ
Phone manufacturers do not build a single universally compatible radio module. Instead, they produce regional variants, each with a modem configured to support the band set required for their target market. A **model number** identifies the variant — for example, two phones sold under the same commercial name may carry different model numbers for North American and European markets, with distinct band configurations in each.
This practice has two technical roots.
First, **modem hardware constraints**: supporting every possible frequency band would require additional RF components (filters, amplifiers, antenna tuning elements) that add cost, space, and power consumption. Manufacturers limit the band set to what is commercially necessary in each region.
Second, **regulatory certification**: each variant must pass radio frequency certification (FCC in the United States, CE in Europe, MIC in Japan, and equivalents elsewhere) for the specific bands it will use. Certifying a device for all bands globally is not the standard approach.
The practical result: a North American-market phone may support LTE Bands 2, 4, 5, 12, 17, 25, 26, 41, 66 and 5G NR n25, n41, n66, n71, n77 — none of which overlap significantly with the primary LTE Band 1, 3, 8, 19 and 5G NR n1, n78, n79 bands used in Japan. The same phone in Japan may receive some LTE signal on a shared band but will miss VoLTE-designated bands and 5G coverage entirely.
For this reason, a device that is physically unlocked — no carrier restriction — can still fail to deliver full service simply because its modem was not built for the local band plan. Unlocking removes carrier restrictions; it does not add hardware support for missing bands. See [SIM Lock and SIM-Free Explained](/en/guides/sim-lock/) for the distinction between unlock status and hardware compatibility.
---
## How to Read a Device Spec Sheet
Every manufacturer publishes a technical specifications page for each model variant. The spec sheet is the authoritative source for supported bands.
**Step 1: Identify your exact model number.** The model number is printed on the device (usually on the back or in the SIM tray slot) and accessible under Settings → About Phone (Android) or Settings → General → About (iOS). Commercial names like "iPhone 16" or "Galaxy S25" are not sufficient — the model number (e.g., A2846, SM-S931B) distinguishes regional variants with different band sets.
**Step 2: Locate the official spec page.** Use the manufacturer's support or product page for your model number. Key sources:
- Apple: [apple.com/iphone/compare](https://www.apple.com/iphone/compare/) or the direct tech-specs URL for your model
- Samsung: samsung.com product page for the specific model number
- Google Pixel: [store.google.com/product/pixel_specs](https://store.google.com/product/pixel_specs)
**Step 3: Find the cellular bands section.** Spec sheets list bands in a section typically titled "Cellular and Wireless," "Connectivity," or "Network." LTE bands appear as "LTE Bands: 1, 2, 3, 4, 5..." and 5G NR bands as "5G NR: Sub-6 GHz n1/n3/n5..." with FR2/mmWave listed separately.
**Step 4: Note the model-specific band list.** The same product page may list multiple model variants side by side. Confirm you are reading the row for your specific model number, not a different regional variant.
Once you have the supported band list, compare it against the target carrier's deployed bands, which are published on the carrier's network information page or available from the national telecom regulator.
---
## Checking Carrier Band Requirements
A device spec sheet shows what bands your phone supports; the carrier's documentation shows which bands it actually uses for service. Both are needed.
**Primary coverage bands** are the bands a carrier uses for its main LTE or 5G NR signal in most locations. A device must support at least one of these to connect at all.
**VoLTE bands** are the specific LTE bands on which a carrier carries voice calls. Carriers designate one or more bands as the VoLTE bearer band. If your device supports LTE on a coverage band but lacks the VoLTE band, it may receive data but be unable to make or receive voice calls on networks where 3G has been retired. For the full explanation of why this matters, see [VoLTE and VoNR Explained](/en/guides/volte-vonr/).
**5G NR bands** are listed separately. A device may support LTE fully while lacking any of the carrier's 5G NR bands — in which case the device will operate on 4G LTE only, even in 5G coverage areas.
**Carrier aggregation (CA) band combinations** describe which bands the carrier combines to deliver higher speeds. 3GPP Release 10 standardised carrier aggregation. A device that supports individual bands but not the specific CA combination used by a carrier will still connect and receive data, but at lower peak speeds.
Where to find carrier band lists:
- The carrier's official website, typically under "Network," "Technology," or "Coverage" sections
- National telecom regulator spectrum databases (FCC in the US, Ofcom in the UK, ACMA in Australia, MIC in Japan, BNetzA in Germany)
- The GSMA's network coverage tools, which aggregate band information by country and operator
---
## Practical Compatibility Check Before Buying an Imported Device
The following method applies before purchasing any device intended for use in a country other than its origin market.
**1. Identify the target carrier and its bands.** Look up the carrier's official network page or the national regulator's spectrum assignment. Note the primary LTE bands, the VoLTE band, and the 5G NR bands (if 5G coverage is required).
**2. Identify the device model number for the import market.** Find the variant that was sold in the country where you plan to purchase. Do not assume the same commercial name means the same hardware.
**3. Compare band lists.** Match the device's supported LTE bands against the carrier's LTE bands, line by line. Then do the same for 5G NR bands. The overlap should cover:
- At least one primary coverage band
- The carrier's VoLTE-designated band
- The carrier's primary 5G NR band (if 5G is a requirement)
**4. Check the carrier's device compatibility list.** Many carriers maintain a list of approved or tested devices. Even if bands match, the carrier's IMS (VoLTE) profile may be absent from the device firmware, preventing voice registration. The approved device list is the fastest way to confirm full compatibility, including VoLTE profile availability.
**5. Verify SIM-lock status.** An imported device may be locked to its original carrier. Confirm it can be unlocked before purchase. An unlocked device with the correct band support and IMS profile should work fully on the target carrier.
If any of steps 3 or 4 reveal a mismatch, the device will deliver degraded service — potentially no voice calls, no 5G, or limited coverage. The risk is highest when importing between North America and Asia, or between the Americas and Europe, where primary band plans diverge most significantly.
For a framework to evaluate carrier options for your needs, see [How to Choose a SIM Plan](/en/guides/how-to-choose/) and [What Is an MNO?](/en/guides/what-is-mno/).
---
## Band Compatibility and International Roaming
When using your home SIM card on a visited network abroad — roaming — the roaming agreement determines which visited network your device connects to, but band compatibility still governs the quality of that connection.
A roaming arrangement established under a GSMA AA.12 agreement routes your device through the visited carrier's network. Your device must still physically support the bands that visited carrier uses. If the visited carrier's primary LTE band is absent from your device's hardware, your device may fall back to an older or lower-priority band — or fail to register on data at all.
In practice, many globally released devices support a broad enough band set to cover major roaming destinations. The risk is most pronounced with budget and regional devices that have narrow band support, or with devices imported from markets with band plans that diverge sharply from the destination country.
Some 5G bands, particularly n77 and n78 (3.5 GHz), are now widely enough deployed that many flagship devices include them regardless of their primary market — but older flagship devices from 2020–2022 may omit them for some regional variants.
For a full explanation of how roaming works and how it is priced, see [International Roaming Explained](/en/guides/international-roaming/).
---
## 5G Deployment Models and Band Implications
Not all 5G deployments are equivalent, and the deployment model affects which bands matter for your device.
**5G NSA (Non-Standalone)**: The 5G NR radio is added alongside an existing LTE core network. The LTE layer handles control signalling; 5G NR provides additional data capacity. A device on NSA 5G must support both the LTE anchor band and the 5G NR data band. If the LTE anchor band is missing from the device, 5G NR connection is also unavailable. NSA was the first deployment model for most carriers starting around 2019.
**5G SA (Standalone)**: The 5G NR radio connects to a 5G core network directly. SA removes the dependency on an LTE anchor band. SA deployments are expanding but as of mid-2026 remain less prevalent than NSA for consumer data. SA is required for VoNR (Voice over New Radio).
**mmWave 5G (FR2)**: Deployed in the United States, Japan, South Korea, and limited other markets, primarily for fixed-wireless access and dense venue coverage. FR2 bands are only present in device variants specifically designed for those markets; global or European variants commonly omit them. A device without FR2 support in a market that has deployed mmWave will still connect on Sub-6 GHz 5G or LTE without issue — FR2 is a supplementary layer, not the primary coverage band.
The practical takeaway for band verification: confirm Sub-6 GHz FR1 band support first, since FR1 bands carry the primary 5G coverage signal worldwide.
---
## Summary: The Band Verification Checklist
Before using a device on a carrier in an unfamiliar country, work through each item in order.
1. **Find your exact model number** from the device, not the commercial name.
2. **Look up the official spec sheet** for that specific model number on the manufacturer's website.
3. **Identify the carrier's band list** from the carrier's network page or the national regulator's spectrum database.
4. **Confirm primary LTE coverage band overlap** — the device must support at least one of the carrier's main LTE bands.
5. **Confirm VoLTE band support** — the device must support the carrier's designated VoLTE band. If not, voice calls will fail on any network that has retired 3G.
6. **Confirm 5G NR band overlap** if 5G is required — check both the band number and whether the carrier uses NSA (requiring an LTE anchor) or SA.
7. **Check the carrier's approved device list** — confirms IMS profile availability for VoLTE, independently of band support.
8. **Verify SIM-lock status** — ensure the device can accept the target carrier's SIM.
Completing all eight steps before purchase eliminates the most common compatibility failures. Skipping step 5 in a market where 3G has been retired is the highest-risk omission.
---
## FAQ
See the frontmatter for structured FAQ entries compatible with schema.org/FAQPage. Additional questions are addressed below.
**Do all 5G phones support all 5G bands?**
No. A device labelled "5G-capable" supports only the specific 5G NR bands listed in its spec sheet. These vary by regional variant. A device may support Sub-6 GHz 5G but not mmWave (FR2), or may support n78 but not n41 or n71. Always check the band list for your specific model number.
**If my phone shows "5G" on screen, does that mean full 5G connectivity?**
The "5G" indicator confirms the device has registered on a 5G NR connection on at least one supported band. It does not guarantee support for all of a carrier's 5G bands, nor does it indicate mmWave capability. The indicator reflects the active connection, which may be on a secondary or lower-capacity 5G band.
**Can a software update add support for a missing band?**
No. Band support is determined by the device's radio hardware (modem and RF components). Software updates can add carrier profiles, adjust band preferences, or enable carrier aggregation combinations, but they cannot make a hardware-absent band available.
**What if I only need data, not calls — does band compatibility matter less?**
Data-only use still requires the device to connect on a coverage band. If the device is missing the carrier's primary coverage bands, data will be slow or unavailable. The key simplification for data-only use is that the VoLTE band requirement is less critical — a device can receive data on a coverage band without VoLTE band support, as long as voice calls are not needed.
---
## Related Guides
- [VoLTE and VoNR Explained](/en/guides/volte-vonr/) — Why specific LTE bands are required for voice calls and what happens when they are missing
- [SIM Lock and SIM-Free Explained](/en/guides/sim-lock/) — How carrier locks differ from band compatibility issues and how to resolve them
- [What Is an MNO?](/en/guides/what-is-mno/) — How licensed spectrum ownership determines which bands a carrier deploys
- [International Roaming Explained](/en/guides/international-roaming/) — How GSMA roaming agreements work and how band support affects roaming quality
- [How to Choose a SIM Plan](/en/guides/how-to-choose/) — Framework for evaluating SIM options once device compatibility is confirmed
================================================================================
# SIM & Mobile Glossary
URL: https://sim-finder.com/en/guides/glossary-index/
Type: guides (en)
Published: 2026-04-13
This glossary covers the core terms you will encounter when comparing SIM plans, setting up an eSIM, or switching carriers. Definitions are ordered by topic: start with the basics, then move to setup, network technology, and number portability. When you hit an unfamiliar term in any SimFinder guide, come back here.
## Core Terms: SIM, eSIM, and Carrier Types
### SIM
**Subscriber Identity Module.** A circuit that stores your carrier identity (IMSI — International Mobile Subscriber Identity), authentication key (Ki), and network credentials. Every mobile device needs a valid SIM to authenticate with a carrier's network. Standardised as part of GSM in the early 1990s.
Physical SIM cards come in three current sizes defined by ETSI TS 102 221:
| Name | Standard | Size |
|------|----------|------|
| Mini-SIM | 2FF | 25 × 15 mm |
| Micro-SIM | 3FF | 15 × 12 mm |
| Nano-SIM | 4FF | 12.3 × 8.8 mm |
Most smartphones released in the past five years use Nano-SIM (4FF).
### eSIM
**Embedded SIM.** An eUICC chip soldered into the device at manufacture. Instead of inserting a physical card, you download a carrier profile over the internet — usually by scanning a QR code or through a carrier app. Governed by the GSMA SGP.22 specification for consumer devices.
Key behaviours under SGP.22:
- **Multiple profiles can be stored** on one eUICC. The storage limit depends on the chip's memory, not a fixed specification cap.
- **SGP.22 v2.x:** Only one profile can be active at a time.
- **SGP.22 v3.0+:** MEP (Multiple Enabled Profiles) allows multiple profiles to be active simultaneously — the technology that enables eSIM-only dual-SIM phones.
**US-specific note:** iPhones sold in the US from the iPhone 14 onwards are eSIM-only — they have no physical SIM slot. This includes the iPhone 14, 15, 16, 16e, and iPhone 17 series models sold in the US.
### iSIM
**Integrated SIM.** The SIM function is built directly into the device's main chipset (SoC) rather than on a separate eUICC chip. This allows even thinner and lower-power devices. The GSMA SGP.32 specification (published May 2023) covers IoT-focused iSIM deployments. Consumer iSIM devices are an emerging category.
### MNO
**Mobile Network Operator.** A carrier that holds a government radio-spectrum licence and owns its own network infrastructure — towers, core network, and radio equipment. All mobile traffic in any given country ultimately runs through an MNO's network. Examples: AT&T, T-Mobile, Verizon (US); EE, Three, O2, Vodafone (UK); Telstra, Optus, TPG (AU).
### MVNO
**Mobile Virtual Network Operator.** A carrier that sells mobile service without owning its own radio network. MVNOs buy wholesale network access from an MNO and resell it under their own brand. The ITU defines an MVNO as "an operator that provides mobile services without holding a government radio-spectrum licence."
As of 2022, more than 1,986 active MVNOs operated across 80+ countries (GSMA Intelligence). MVNOs typically offer lower prices than the MNO they ride on, because they carry less overhead. However, they share capacity with the MNO's primary customers, which can affect speeds during peak hours.
### Sub-brand
A lower-price service operated by an MNO's subsidiary or affiliate, using the parent carrier's own network. Sub-brands sit between an MNO and an independent MVNO in terms of both price and quality. Because they use the full parent network, they generally deliver more consistent performance than independent MVNOs. Examples: Visible (Verizon), Cricket (AT&T), SMARTY (Three UK).
### Prepaid
A service model where you pay before you use. You purchase a fixed amount of data, calls, or time credit upfront. When the allowance or expiry date runs out, service stops until you top up. Most travel eSIMs use a prepaid model.
### Postpaid
A service model where you pay after you use. The carrier bills you at the end of each month based on your plan or usage. The standard contract form in most developed markets.
---
## Setup and Configuration Terms
### APN
**Access Point Name.** The gateway identifier that tells your device how to connect to mobile data. Defined in 3GPP TS 23.003. Every data session requires a valid APN. In 5G systems the equivalent term is DNN (Data Network Name), defined in 3GPP TS 23.003 Clause 9A.
You usually do not need to set the APN manually — most carriers push the correct settings automatically. Manual configuration is sometimes required with MVNOs or travel SIMs when automatic setup does not trigger.
### eSIM Profile
The bundle of carrier data downloaded to an eUICC: network authentication credentials, APN settings, phone number, and related configuration. Profiles are delivered from the carrier's SM-DP+ server to your device's LPA (Local Profile Assistant). Once downloaded, you activate, deactivate, or delete profiles from your phone's settings.
### QR Code Setup
The most common way to install an eSIM. The carrier generates a single-use QR code containing the SM-DP+ server address and an activation code. You scan it with your phone's camera (or through the carrier settings screen) to download and activate the profile. Each QR code can only be used once.
### SM-DP+
**Subscription Manager Data Preparation+.** The server infrastructure that creates, stores, and delivers eSIM profiles to devices. Defined in GSMA SGP.22. Operated by the carrier or eSIM provider. When you scan an eSIM QR code, your phone connects to the SM-DP+ server to retrieve your profile.
### SIM PIN and PUK
**PIN (Personal Identification Number):** A 4–8 digit code that prevents unauthorised use of your SIM. After three consecutive incorrect PIN entries the SIM locks.
**PUK (PIN Unblocking Key):** An 8-digit code used to unlock a PIN-locked SIM. After ten consecutive incorrect PUK entries the SIM is permanently disabled. PUK codes are set by the carrier and cannot be changed by the user. They are printed on the SIM packaging or available from the carrier's support team.
### IMEI
**International Mobile Equipment Identity.** A 15-digit number that uniquely identifies a mobile device, defined in 3GPP TS 23.003. Used by carriers to identify equipment on the network and to block stolen devices. To find your IMEI: dial `*#06#` or go to Settings > About Phone.
---
## Network Technology Terms
### 3G, 4G/LTE, and 5G
The successive generations of mobile network standards.
**3G** — Third generation. Standards include WCDMA and CDMA2000. Several markets have completed 3G shutdown: Australia finished its 3G switchoff in 2024, meaning any device that cannot make VoLTE calls cannot place voice calls on Australian networks.
**4G / LTE** — Fourth generation. LTE (Long-Term Evolution) was standardised in 3GPP Release 8, frozen in December 2008. The dominant network type in most developed markets today.
**5G** — Fifth generation. Standardised from 3GPP Release 15 onwards (NSA version frozen December 2017; SA version frozen mid-2018). Uses Sub-6 GHz and millimetre-wave spectrum for high throughput, low latency, and massive device density.
### Frequency Band
A specific portion of the radio spectrum allocated for mobile use, identified by a band number (e.g., Band 3, Band 28, n77). Carriers in different countries use different bands. When buying a device abroad or using a travel SIM, confirm that the device supports the carrier's bands — otherwise you may get reduced speeds or no signal.
### SIM Lock
A software restriction that prevents a device from working with SIM cards from carriers other than the one that sold it. Regulations on SIM lock vary by country:
- **US:** No unified federal requirement — carriers set their own unlock policies (typically after a device is fully paid off or after a lock period).
- **UK:** Ofcom banned mandatory SIM locking for new phones from December 2021.
- **EU:** Rules vary by member state. Some have banned SIM locking under the European Electronic Communications Code (EECC); others still permit it.
- **AU:** No specific regulation bans SIM locking, but in practice most devices are sold unlocked.
A SIM-free (unlocked) device works with any compatible carrier's SIM worldwide.
### Dual SIM
The ability to use two SIM cards — physical or eSIM — simultaneously on one device. Defined in GSMA TS.37. Two common implementations:
**DSDS (Dual SIM Dual Standby):** Both SIMs are registered to their networks and can receive calls, but only one radio transceiver is shared. An active call on SIM 1 temporarily disconnects SIM 2 from the network.
**DSDA (Dual SIM Dual Active):** Two separate transceivers keep both SIMs live simultaneously. Calls on either line do not interrupt the other. Consumes more power.
**eSIM dual-SIM milestones:**
- iPhone 13 series and later support two active eSIMs simultaneously (no physical SIM slot required on US iPhone 14+).
- Google Pixel 7 was the first Android device to support dual eSIM, launching in October 2022.
### VoLTE
**Voice over LTE.** Carries voice calls and SMS as IP packets over the 4G LTE network using IMS (IP Multimedia Subsystem). Defined in GSMA PRD IR.92 and based on 3GPP IMS MMTel. The first commercial VoLTE service launched on 7 August 2012 (MetroPCS, USA).
VoLTE provides better call quality and allows simultaneous voice and full-speed data use. In markets where 3G has been shut down — most notably Australia — VoLTE support is mandatory for any voice calls.
### VoNR
**Voice over New Radio.** The 5G equivalent of VoLTE, carrying voice over 5G NR (New Radio) using IMS. Standardised in 3GPP Release 15 (2018). Requires a 5G Standalone (SA) network and supports the EVS (Enhanced Voice Services) codec for higher audio quality than VoLTE.
### Roaming
The ability to use your home carrier's service on a partner carrier's network in another country or region. Governed by bilateral roaming agreements between carriers (GSMA AA.12 standard). Data roaming is typically disabled by default and must be enabled in your device settings. Charges apply at your home carrier's international roaming rates unless a specific roaming plan is active.
### RLAH (Roam Like At Home)
The EU/EEA regulation that requires carriers to charge domestic rates for roaming within the EU and EEA (European Economic Area). In force since 15 June 2017, extended and strengthened by EU Regulation 2022/612 through 2032. Fair-use limits apply for extended stays abroad.
Note: Switzerland is not an EEA member and is **not** covered by RLAH, despite bordering EU countries.
### Wi-Fi Calling
Making voice calls over a Wi-Fi connection instead of a cellular signal, also known as VoWiFi. Useful in areas with weak cellular coverage. Requires both device and carrier support. Availability varies significantly by carrier and country — widely available in the US and UK; less common elsewhere.
### Tethering
Sharing your device's mobile data connection with other devices. Three modes: Wi-Fi hotspot, USB, and Bluetooth. Some carriers restrict or charge extra for tethering, particularly on lower-tier or MVNO plans. Check your plan's terms before relying on it.
### Carrier Aggregation (CA)
Combining multiple frequency bands simultaneously to increase throughput. First standardised in 3GPP Release 10 (LTE-Advanced, specification frozen 2011). Release 10 allows up to five component carriers (each up to 20 MHz) for a combined bandwidth of up to 100 MHz. Used in both 4G and 5G networks.
---
## Number Portability Terms
### MNP (Mobile Number Portability)
The right to keep your phone number when switching carriers. Singapore was the first country to implement MNP in 1997. The ITU standardised the technical framework in Recommendation Q.769.1 (1999). Most developed markets now mandate MNP by law.
The process differs by country:
| Country / Region | Method |
|-----------------|--------|
| UK | Text 'PAC' to 65075. Receive a PAC code by return SMS. Provide it to the new carrier. Port completes within one working day. |
| US | No single standard. Contact your current carrier to confirm the account number and transfer PIN, then initiate the port with the new carrier. |
| AU | Contact the new carrier. They initiate the port on your behalf. |
| EU (most markets) | Recipient-driven porting — the new carrier handles the process. Timelines and specific steps vary by country. |
### PAC Code (UK)
**Porting Authorisation Code.** The UK method for number porting. Text 'PAC' to 65075 from the phone number you want to keep. You receive the code by SMS immediately at no charge. The code is valid for 30 days. Give it to your new carrier to complete the port.
---
## Frequently Asked Questions
---
## Articles Referenced in This Glossary (Coming Soon)
The following SimFinder guides expand on topics introduced here. They are in production and will be published shortly.
- [What Is a SIM Card?](/en/guides/what-is-sim/)
- [What Is an eSIM?](/en/guides/what-is-esim/)
- [What Is an MVNO?](/en/guides/what-is-mvno/)
- [SIM Lock and SIM-Free Explained](/en/guides/sim-lock/)
- [What Is Dual SIM?](/en/guides/what-is-dual-sim/)
- [How to Set Up eSIM on iPhone via QR Code](/en/guides/qr-code-iphone/)
- [How to Set Up eSIM on Android via QR Code](/en/guides/qr-code-android/)
- [Mobile Number Portability (MNP) Explained](/en/guides/what-is-mnp/)
- [VoLTE and VoNR Explained](/en/guides/volte-vonr/)
- [APN Setup Guide for iPhone](/en/guides/apn-setup-iphone/)
- [APN Setup Guide for Android](/en/guides/apn-setup-android/)
================================================================================
# How to Choose a Travel eSIM: 5 Key Criteria
URL: https://sim-finder.com/en/guides/how-to-choose/
Type: guides (en)
Published: 2026-04-16
Choosing the wrong travel eSIM means paying for data you cannot use or finding yourself without signal in the places that matter. This guide covers the 5 criteria that determine whether a plan is right for your trip, explains the difference between single-country, regional, and global plans, and provides a checklist to verify before you buy.
## The 5 Criteria That Matter
### 1. Coverage and Network Quality
Coverage is the single criterion where a mistake cannot be fixed after purchase. A plan backed by a weak local network delivers poor service regardless of how much data it includes.
Before buying, confirm:
- **Which local network(s) the eSIM connects to** in your destination. The provider's coverage page should name the partner network (for example, "T-Mobile" in the US or "Vodafone" in Germany), not just show a generic map.
- **Whether the plan supports the frequency bands your device uses.** If you travel with a device purchased in a different region, check that its radio bands match the destination network. See the [glossary](/en/guides/glossary-index/) for band terminology.
- **Whether the plan includes 5G or is limited to 4G/LTE.** For most travelers, LTE is sufficient. If you need 5G, confirm the eSIM provider explicitly supports it.
Regional and global plans often route traffic through a single international network rather than a local one. This can result in noticeably slower speeds compared to a local partner plan. When connection quality matters, a country-specific eSIM with a named local carrier partner is preferred.
### 2. Data Amount and Usage Patterns
Travel eSIMs are sold in fixed data packages (for example, 1 GB, 5 GB, 10 GB, 20 GB) or as "unlimited" plans with a daily fair-use cap.
**Fixed data plans** suit travelers who primarily use maps, messaging, and occasional browsing. Five to ten gigabytes covers a typical week-long trip with moderate use. If you plan to stream video or work remotely, estimate higher — HD video streaming consumes approximately 2–3 GB per hour. For a reference by app, see the [data usage guide](/en/guides/data-usage-guide/).
**Unlimited plans** are typically more expensive but remove the anxiety of watching your balance. Read the fine print: most "unlimited" plans throttle speed after a daily threshold (commonly 0.5–2 GB at full speed, then drop to 128–512 kbps). This is often sufficient for messaging but not for video.
**How data is counted** varies by provider. Some plans count only download data; others count both upload and download. If you use video calls or upload photos frequently, this distinction matters.
### 3. Validity Period
Travel eSIM plans are sold with a fixed validity window — commonly 7, 14, 15, or 30 days. The clock starts at different points depending on the provider:
- **Installation date** — the validity period begins as soon as you install the eSIM profile on your device, even if you have not yet traveled.
- **First network connection** — the validity period starts when your device connects to the provider's network at your destination. This is the most traveler-friendly model.
- **First data use** — starts when you activate data for the first time.
Always verify which model the provider uses before purchasing. Installing the eSIM too early on an installation-date plan wastes days before your trip begins.
For multi-leg trips, check whether unused data rolls over if you buy a top-up, or whether remaining data is forfeited at the end of the validity window.
### 4. Pricing Model
Travel eSIM providers use several pricing structures:
| Model | Best for | Watch out for |
|-------|----------|---------------|
| **Fixed data (per GB)** | Predictable, moderate users | Running out mid-trip |
| **Unlimited (per day or per trip)** | Heavy users, video streamers | Throttle thresholds |
| **Pay-per-use / rollover** | Rare; some providers offer this | Complexity, higher per-GB cost |
Specific prices change frequently and vary by destination. Use SimFinder's travel eSIM search to compare current plans for your destination — the tool shows provider, data volume, validity, and price side by side.
Avoid comparing only the headline price. Calculate the effective cost per gigabyte for fixed-data plans, and read the fair-use policy carefully for unlimited plans.
### 5. Activation Method
Travel eSIMs are activated through one of four methods:
- **QR code** — the most common method. Scan a QR code sent by email or shown in the provider's app. Works on all eSIM-capable devices.
- **Provider app** — some providers require their own app to install and manage eSIM profiles. Convenient for top-ups but adds a dependency.
- **Manual code (SM-DP+ address)** — enter the server address and activation code manually. Useful when a QR code cannot be scanned, for example when reading a QR code from the same screen you need to scan it on.
- **Direct push** — the carrier pushes the profile to your device automatically. Less common for travel eSIMs.
For a detailed walkthrough of each method, see [Your First Travel eSIM](/en/guides/first-time-guide/).
One restriction applies universally: **eSIM QR codes are single-use.** Each code can be scanned exactly once and linked to one device. If the installation fails partway through, contact the provider for a new code rather than attempting to scan the original code again.
---
## Single-Country vs. Regional vs. Global Plans
The plan scope should match your itinerary. Mismatching scope is one of the most common causes of unnecessary expense.
### Single-Country Plans
A plan sold for one specific country connects to one or two local network partners and is typically the cheapest and fastest option for that destination. If you spend your entire trip in one country, start here.
Limitations: the plan becomes unusable — or switches to expensive roaming — the moment you cross the border.
### Regional Plans
Regional plans cover a group of countries under one purchase. Common groupings include Europe (typically 30–40 countries), Asia, Latin America, and Middle East & Africa. One eSIM covers multiple stops without needing to buy a new plan at each border.
The trade-off: regional plans often cost more per gigabyte than a dedicated single-country plan, and network quality may vary between countries in the bundle. Some countries in a regional plan may have weaker coverage than others.
Regional plans work well for travelers crossing 2–3 borders on a single trip, particularly within Europe where the regional footprint is dense and network quality is generally high.
### Global Plans
Global plans aim to cover most destinations worldwide under a single eSIM. They are the most flexible option for travelers visiting 4 or more countries or embarking on extended multi-continent trips.
Expect a higher price per gigabyte and potentially slower speeds compared to local network-backed plans. Verify your specific destinations are included and check the listed network partner for each country in the provider's coverage details.
---
## Data-Only vs. Data + Calls Plans
Most travel eSIMs are **data-only**. They do not include a phone number, cannot receive traditional SMS messages, and cannot make standard calls to local numbers.
This is sufficient for most international travelers who use apps like WhatsApp, FaceTime (on Apple devices), or Skype for communication. These VoIP apps transmit voice and text over the data connection included in any travel eSIM.
However, a data-only eSIM is not sufficient if you need to:
- Receive SMS-based two-factor authentication codes from banks or services that do not support authenticator apps. (For a workaround, see [How to Receive SMS 2FA Codes Abroad](/en/guides/sms-2fa-abroad/).)
- Make or receive standard calls to local numbers at the destination.
- Verify identity with services that require a local phone number.
In these cases, consider keeping your home SIM active in a dual-SIM configuration. Your home SIM handles calls and SMS through international roaming (which may incur charges but handles authentication reliably), while the travel eSIM provides affordable data. For more on dual-SIM setup, see [What Is Dual SIM?](/en/guides/what-is-dual-sim/).
A small number of providers offer travel plans that include a local voice number. These plans are more expensive and less common. Evaluate whether the additional cost is justified for your specific needs.
---
## Pre-Purchase Checklist
Before completing a purchase, confirm each of the following:
**Device compatibility**
- [ ] Your phone supports eSIM (iPhone XS/XR or later; Pixel 3 or later; Samsung Galaxy S20 or later — check your device's settings for an "Add eSIM" option)
- [ ] Your phone is not carrier-locked (SIM-locked devices cannot install eSIMs from other providers; on iPhone, check Settings > General > About > Carrier Lock)
- [ ] Your phone supports the frequency bands used by the provider's partner network in your destination
**Plan details**
- [ ] The provider lists the local network partner(s) for your specific destination
- [ ] Validity period start trigger is confirmed (installation date vs. first connection)
- [ ] Tethering/hotspot is permitted if you plan to share data with other devices
- [ ] Top-up or additional data purchase is possible if needed mid-trip
- [ ] Refund or cancellation policy is acceptable
**Practical setup**
- [ ] Install the eSIM profile on Wi-Fi at home, before departure
- [ ] Do not activate (toggle on) the travel eSIM until you land — activating early may start the validity clock or consume data
- [ ] If using dual SIM, confirm "Allow Cellular Data Switching" on iPhone is turned off to prevent your home SIM from being used for data abroad
- [ ] Back up the QR code or activation details in case reinstallation is needed
---
## Finding the Right Plan on SimFinder
SimFinder's travel eSIM search lets you filter by destination, data amount, validity, and provider. Results show the local network partner so you can evaluate coverage quality before purchasing.
Use the search to compare current plans rather than relying on prices in any article — provider pricing changes frequently and any specific number published here will become outdated. The search reflects live plan data.
For a step-by-step guide to the purchase and installation process, see [Your First Travel eSIM](/en/guides/first-time-guide/).
If something goes wrong during or after installation, see [eSIM Activation Failed: Troubleshooting Guide](/en/guides/activation-failed/).
================================================================================
# IMEI Blacklist Explained: What to Check When Buying a Used Phone
URL: https://sim-finder.com/en/guides/imei-blacklist/
Type: guides (en)
Published: 2026-06-04
A phone reported as lost, stolen, or tied to an unpaid device payment plan can be blocked from all mobile networks, even with a new SIM inserted. This block is applied to the device's IMEI — a 15-digit hardware identifier — through a system called the Equipment Identity Register (EIR). Checking a used phone's IMEI against the blacklist before purchase is the single most effective way to avoid buying a device that will not work on any carrier.
The key points covered here:
- How the IMEI blacklist and the EIR work
- Why a phone ends up blacklisted (theft reports, unpaid balances, fraud)
- How to run an IMEI check before buying a used phone
- How blacklist status differs from SIM lock status
- What to do if a device you already own has been incorrectly blacklisted
---
## How the IMEI Identifies Your Device
IMEI stands for **International Mobile Equipment Identity**. It is a 15-digit number assigned to every mobile device, defined in **3GPP TS 23.003**. The IMEI identifies the hardware — the phone itself — independently of which [SIM card](/en/guides/what-is-sim/) is inserted or which carrier the device is used with. While the IMEI identifies the device, the SIM identifies the subscriber.
The 15 digits consist of three fields:
| Field | Digits | Name | Meaning |
|---|---|---|---|
| TAC | 1–8 | Type Allocation Code | Identifies the device model and manufacturer |
| SNR | 9–14 | Serial Number | Uniquely identifies one unit within that model |
| CD | 15 | Check Digit | Computed by the Luhn algorithm (ISO/IEC 7812) |
When a phone connects to a mobile network, it transmits its IMEI alongside the SIM's credentials. The network can check this IMEI against the EIR in real time and decide whether to allow the device to register.
**How to find your IMEI:**
1. Dial `*#06#` — the IMEI displays immediately without placing a call
2. iPhone: Settings → General → About → IMEI
3. Android: Settings → About Phone → Status → IMEI Information
4. Printed on the original retail box, and on many phones on the SIM tray
For a full breakdown of IMEI structure and its relationship to SIM PIN and PUK codes, see [IMEI, PIN, and PUK Codes Explained](/en/guides/imei-pin-puk/).
---
## What the Equipment Identity Register (EIR) Is
The **Equipment Identity Register (EIR)** is a database, defined in **3GPP TS 23.002**, that stores IMEI records and assigns each one a status. When a device attempts to register on a network, the network queries the EIR and uses the result to allow or deny service.
The EIR maintains three lists:
| List | Status | Effect |
|---|---|---|
| **White list** | Device is allowed on the network | Registration proceeds normally |
| **Grey list** | Device is under observation | Carrier logs connections; network access may or may not be restricted |
| **Black list** | Device is blocked | Registration is denied; the device cannot make calls or use mobile data |
A device that is blacklisted in the EIR cannot register on any participating carrier's network, regardless of which SIM is inserted. The block is applied at the device level, not the SIM level.
---
## The GSMA's Role in Sharing Blacklists
The GSMA (the international mobile industry organisation) operates the **GSMA IMEI Database**, formerly known as the Central Equipment Identity Register (CEIR). This database aggregates IMEI records from carriers in participating countries and makes them available for cross-operator and cross-border checks.
In countries where carriers share blacklist data through the GSMA IMEI Database or a national EIR:
- A phone reported stolen by Carrier A is also blocked by Carrier B, C, and any other participating carrier in that country
- In some regions, blacklist sharing extends across borders, though coverage varies
Countries including the United States, United Kingdom, Canada, and Australia have established national IMEI databases or participate in shared EIR schemes. Coverage and enforcement differ: not all carriers in every country query the same database, and a device blocked in one country is not automatically blocked in all countries.
---
## Why a Phone Ends Up on the Blacklist
Phones are added to the EIR blacklist for several distinct reasons. Understanding these categories helps when evaluating a used device.
### Reported Lost or Stolen
The most common reason. When a phone owner reports their device lost or stolen to their carrier, the carrier submits the IMEI to the EIR. Once added, the phone cannot register on any cooperating network regardless of the SIM inside. This makes the device worthless for normal use, which is the primary deterrent against theft.
The carrier that submitted the IMEI is the only party that can remove it from the blacklist. If a stolen phone is recovered, the owner must contact their carrier to request removal.
### Unpaid Device Payment Plan (Financed Device)
In markets where phones are sold on instalment plans through carriers, an IMEI can be blacklisted if the buyer defaults on the remaining payments. The device is considered unpaid-for by the carrier, and service is denied until the balance is cleared.
This is a significant risk when buying a used phone: the previous owner may have stopped making payments, or the phone may have been resold while still under a carrier financing agreement. Checking the IMEI before purchase reveals this status.
### Insurance Fraud
A device reported as lost to an insurance company and replaced, but then recovered or sold by the original owner, may be submitted to the EIR as part of an insurance fraud case. The original device ends up blacklisted while the original owner keeps both the replacement and any sale proceeds.
### Counterfeit or Invalid IMEI
Devices with IMEIs that do not conform to the 3GPP TS 23.003 specification — including some counterfeit devices and grey-market handsets — may be flagged. Devices found to have duplicate IMEIs (which can occur in batches of counterfeit phones) may also be restricted.
---
## Blacklist vs. SIM Lock: Two Different Things
A common source of confusion is treating IMEI blacklist status and SIM lock status as the same issue. They are entirely separate:
| | IMEI Blacklist | SIM Lock |
|---|---|---|
| **What it restricts** | The device, at the network level | The device, to one specific carrier |
| **Applied by** | EIR (carrier reports, shared database) | The carrier that sold the device |
| **Effect** | Device blocked on all participating networks, any SIM | Device only works with the original carrier's SIM |
| **Removable by** | Carrier that reported the IMEI | Original carrier (via unlock request) |
| **Bypassed by inserting a different SIM?** | No | Yes (if unlocked) |
| **Check method** | IMEI check service | Settings → Carrier Lock (iPhone) or different-SIM test (Android) |
A phone can be:
- **Unlocked and clean:** works with any carrier — the ideal used phone
- **Locked and clean:** tied to one carrier but can be used there; unlockable
- **Unlocked and blacklisted:** accepts any SIM but blocked on all networks
- **Locked and blacklisted:** the worst case — restricted to one carrier and blocked there too
When buying a used phone, run both checks independently. A seller claiming the phone is "unlocked" says nothing about its blacklist status.
For a detailed explanation of SIM lock and how to check and remove it, see [SIM Lock and SIM-Free Explained](/en/guides/sim-lock/).
---
## How to Check a Phone's IMEI Before Buying
### Step 1 — Find the IMEI
Before running any check, confirm the IMEI you will look up is the one on the actual device, not a number someone has written on a label.
- Power on the device and dial `*#06#`. The IMEI displayed is the one the device transmits to networks.
- Cross-reference with the IMEI printed on the SIM tray and the original box if available. All three should match. Mismatches indicate a possible IMEI modification, which is a serious warning sign.
On dual-SIM devices, two IMEIs are displayed (IMEI and IMEI2). Check both.
### Step 2 — Run the IMEI Check
**Official GSMA check:** The GSMA provides an official IMEI check service at devicecheck.gsma.com (GSMA Device Check), which reports whether a device is flagged on the GSMA Block List as lost or stolen. In the US, the CTIA Stolen Phone Checker (stolenphonechecker.org) is powered by GSMA Device Check. This returns the device model associated with the TAC and, in participating regions, blacklist status.
**Carrier checks:** Most major carriers offer a free IMEI check on their websites. These are particularly useful because the carrier's database may reflect local blacklist data not fully propagated to international services. If you know which country and carrier the phone was used with, check that carrier's IMEI tool directly.
**Third-party services:** Numerous third-party IMEI check services exist. Coverage and accuracy vary. For a definitive result, use the GSMA or carrier check first.
### Step 3 — Interpret the Results
| Result | Meaning | Action |
|---|---|---|
| Clean / Not reported | No blacklist record found in the checked database | Proceed, but verify the database covers the seller's country and carrier |
| Blacklisted / Blocked | IMEI has been reported; device cannot register on participating networks | Do not purchase unless you have a confirmed, documented path to removal |
| Unpaid / Financed | Carrier reports an outstanding payment balance | Do not purchase; the original carrier can blacklist at any time |
| Invalid IMEI | IMEI does not pass the Luhn check or is not registered in the GSMA database | Do not purchase; likely counterfeit or tampered |
A "clean" result from one service does not guarantee the phone is clean in every country's database. A phone used in a country not covered by the service you checked may carry a blacklist record that the service does not have access to.
---
## Blacklist Coverage Varies by Country
The IMEI blacklist is not a single global system. Coverage depends on which carriers in which countries submit to and query the GSMA IMEI Database or a national EIR.
Key facts:
- Countries including the **US, UK, Canada, and Australia** have established national databases and strong carrier participation in EIR sharing
- In some countries, only certain carriers query the EIR; a phone blocked by one carrier may still work on another carrier's network in the same country
- A device blacklisted in one country may function normally in a country whose carriers do not share that blacklist data
- The GSMA facilitates international blacklist sharing, but participation is not universal
This variation has a practical consequence for cross-border phone sales: a phone listed as stolen in the UK could be imported and used on networks in a country that does not share the UK blacklist. However, this is not a risk-free path — if the phone is later taken back to a country with shared databases, it will be blocked.
---
## What Happens When a Blacklisted Phone Tries to Connect
When a blacklisted phone attempts to register on a network that queries the EIR:
1. The device transmits its IMEI alongside the SIM's IMSI during the registration handshake
2. The network queries the EIR
3. The EIR returns a "blacklisted" status
4. The network rejects the registration request
5. The phone shows "No service," "SIM not supported," or a similar error message
The process is invisible to the user — the phone simply fails to connect. Inserting a different SIM does not change the outcome because the block is on the IMEI, not the SIM.
Wi-Fi connectivity is unaffected. A blacklisted phone can still connect to Wi-Fi networks, use apps over Wi-Fi, and make Wi-Fi calls where the calling app does not require mobile network registration.
---
## If Your Own Phone Is Incorrectly Blacklisted
Incorrect blacklisting can occur in several scenarios:
- A theft report was filed and the phone was later recovered, but the IMEI was not removed from the blacklist
- A device payment was settled, but the carrier's record was not updated
- A phone was reported by insurance fraud committed by a previous owner you had no knowledge of
**Steps to resolve an incorrect blacklist:**
1. Identify which carrier submitted the IMEI. The carrier's IMEI check tool often indicates which carrier's database holds the record.
2. Contact that carrier's customer service directly. Provide proof of ownership (original purchase receipt, account details if you were the original owner).
3. If you purchased the phone secondhand and it was later blacklisted due to the previous owner's actions, you may need to pursue a claim against the seller, as the carrier is generally not obligated to remove an IMEI from the blacklist at a third-party buyer's request.
---
## IMEI Blacklist and SIM Swap Fraud
IMEI blacklisting and SIM swap fraud are related in that both can result in losing mobile service, but they operate through different mechanisms.
SIM swap fraud is an attack at the carrier account level: an attacker convinces the carrier to transfer your phone number to a SIM they control. This does not affect your IMEI and does not blacklist your device. Your physical phone retains its IMEI but loses service because your number has been ported away — if the original device is blacklisted, [porting your number via MNP](/en/guides/what-is-mnp/) to a new, clean device is the practical path to restoring mobile service.
IMEI blacklisting blocks the device. SIM swap fraud hijacks the number. Both affect your ability to use mobile service, but through different layers of the mobile network infrastructure.
For more on how SIM swap fraud works and how to protect against it, see [SIM Swap Fraud Explained](/en/guides/sim-swap/).
---
## Summary Checklist Before Buying a Used Phone
Before completing any used phone purchase:
- [ ] Dial `*#06#` on the device to confirm the live IMEI
- [ ] Cross-check the displayed IMEI against the SIM tray and original box (all three must match)
- [ ] Run the IMEI through the GSMA check or the carrier's IMEI tool
- [ ] Run a second check using the carrier associated with the seller's country if different
- [ ] Confirm the result is "clean" and not "unpaid" or "financed"
- [ ] Separately check the SIM lock status (Settings → Carrier Lock on iPhone, or insert a different SIM on Android)
- [ ] If buying from a private seller, ask for original purchase documentation
A blacklist check and a SIM lock check together take under five minutes and protect against the two most common causes of a used phone being unusable after purchase.
---
## FAQ
See the frontmatter for structured FAQ entries compatible with schema.org/FAQPage.
**Does a factory reset clear a blacklist record?**
No. A factory reset wipes the device's user data and returns software settings to defaults. It has no effect on the IMEI or on the EIR blacklist record held by the carrier. The IMEI is stored in a read-protected area of the device firmware and cannot be changed by a software reset.
**If a phone is blacklisted in one country, is it blacklisted everywhere?**
Not necessarily. Blacklist sharing across countries depends on participation agreements between carriers and national databases. A phone blacklisted in the UK through the GSMA IMEI Database may be flagged in countries that query the same database, but a phone blacklisted only in a country whose operators do not share data internationally may function in other markets. Do not rely on geographic separation as a workaround — network coverage of blacklists continues to expand.
**Can I buy a blacklisted phone and get it unblocked?**
Only the carrier that submitted the IMEI can remove it from the blacklist. Legitimate removal requires documenting that the original basis for blacklisting no longer applies — for example, a theft report withdrawn after recovery, or proof that a device payment has been settled. If you are not the original owner and the seller cannot demonstrate the basis for removal no longer applies, purchasing a blacklisted device is a significant financial risk.
---
## Related Guides
- [IMEI, PIN, and PUK Codes Explained](/en/guides/imei-pin-puk/) — How the 15-digit IMEI is structured, how to find it, and how SIM PIN and PUK codes protect access to the SIM
- [SIM Lock and SIM-Free Explained](/en/guides/sim-lock/) — How carrier locks differ from IMEI blacklisting, and how to check and remove a SIM lock
- [SIM Swap Fraud Explained](/en/guides/sim-swap/) — How attackers hijack your phone number at the carrier level, and how to protect your account
- [What Is MNP (Number Portability)?](/en/guides/what-is-mnp/) — How your phone number moves between carriers, independent of the device's IMEI
- [What Is a SIM Card?](/en/guides/what-is-sim/) — How SIM cards store credentials, authenticate to networks, and the five form factors from 1FF to eSIM
================================================================================
# IMEI, PIN, and PUK Codes Explained
URL: https://sim-finder.com/en/guides/imei-pin-puk/
Type: guides (en)
Published: 2026-06-04
Your phone uses three types of codes that are frequently confused: the IMEI identifies the device hardware, the SIM PIN protects access to the SIM card, and the PUK unlocks a PIN-blocked SIM. Each has a different purpose, a different length, and a different consequence if entered incorrectly.
The key points covered here:
- What the IMEI is, how its 15 digits are structured, and where to find it
- What the SIM PIN does and whether you should enable it
- What the PUK is and what happens when it is entered incorrectly ten times (permanent SIM destruction)
- Step-by-step instructions for recovering from a PIN-blocked SIM
If you want to understand what the SIM card itself stores before reading about the codes that protect it, see [What Is a SIM Card?](/en/guides/what-is-sim/)
---
## What Is an IMEI?
IMEI stands for **International Mobile Equipment Identity**. It is a 15-digit number assigned to every individual mobile device and defined in **3GPP TS 23.003**. The IMEI identifies the hardware — the phone itself — independently of which SIM card is inserted.
### Structure of the 15 Digits
The 15 digits are divided into three fields:
| Field | Digits | Name | Meaning |
|---|---|---|---|
| TAC | 1–8 | Type Allocation Code | Identifies the device model and manufacturer |
| SNR | 9–14 | Serial Number | Uniquely identifies one unit of that model |
| CD | 15 | Check Digit | Computed by the Luhn algorithm (ISO/IEC 7812) to detect transcription errors |
The TAC is assigned by the GSMA's Global Decimal Administrator (GDA). Checking any IMEI against a GSMA or carrier database will return the device manufacturer, model, and — in most countries — whether the device has been reported as stolen.
### How to Find Your IMEI
Three reliable methods work on any phone:
1. **Dial `*#06#`** — the IMEI appears on screen immediately. No call is placed; it is a service code.
2. **Settings menu:**
- iPhone: Settings → General → About → IMEI
- Android: Settings → About Phone → Status → IMEI Information (path varies by manufacturer)
3. **Physical label:**
- On the original retail box
- Printed on the SIM tray ejected from the device on many models
- Under a removable back cover on older models
On dual-SIM devices, two IMEIs are displayed — one per SIM slot (IMEI and IMEI2). Both are distinct 15-digit numbers.
### What the IMEI Is Used For
**Network registration.** When a device registers with a mobile network, it sends its IMEI alongside the SIM's IMSI. The network can cross-check the IMEI against the GSMA's IMEI Database (formerly CEIR) to confirm the device is not blacklisted.
**Stolen device blocking.** If a phone is stolen, you can report the IMEI to your carrier. The carrier adds it to the GSMA Equipment Identity Register (EIR), which is shared among participating operators. A blacklisted IMEI can be blocked from registering on all cooperating networks in the country — rendering the device unable to make calls or use data even with a different SIM inserted.
**Warranty and repair identification.** Manufacturers use the TAC portion of the IMEI to identify the exact model and production batch during warranty claims or safety recalls.
**Note:** IMEI blocking coverage depends on the country and on which carriers participate in the EIR sharing agreement. Devices sold to different markets and IMEI databases differ in their completeness.
---
## What Is a SIM PIN?
The SIM PIN (Personal Identification Number) is a **4- to 8-digit code** that controls access to the SIM card at power-on. It is defined in **ETSI ETS 300 922** and **3GPP TS 51.011**.
When the SIM PIN is enabled, the phone prompts for the code every time it powers on or the SIM is reinserted. The network authentication step — which requires the SIM to respond to a cryptographic challenge — does not proceed until the correct PIN is entered.
### Default PIN and First-Use Caution
Most carriers ship SIM cards with PIN protection **disabled by default**. Carriers that ship SIMs with PIN enabled typically set the default PIN to `0000` or `1234`. This default is printed on the SIM card packaging.
If you receive a SIM with an enabled PIN and do not change the default immediately, anyone who obtains the card knows the PIN. Change the default to a unique code before using the SIM.
### Why Enable the SIM PIN?
The SIM PIN is a hardware-layer protection. If someone removes your SIM card and inserts it into a different phone, they cannot use it without the PIN code — even if your device itself is turned off or reset. This is distinct from a device screen lock, which protects only the phone's storage.
Enabling the SIM PIN is most relevant when:
- You carry high-value SIM data (corporate account, primary phone number)
- Your device could be physically separated from you (for example, during travel)
- You use SMS-based two-factor authentication for sensitive accounts
If your device screen lock is strong and full-disk encryption is enabled, removing and misusing the physical SIM is the primary remaining vector that the SIM PIN addresses.
### How to Enable or Disable the SIM PIN
**On iPhone:**
Settings → Mobile Data (or Cellular) → SIM PIN → toggle on/off
**On Android (path varies by manufacturer):**
Settings → Security → SIM Card Lock → Lock SIM Card
Enabling the PIN for the first time asks for the current PIN (use the default printed on the SIM packaging if you have never changed it).
---
## What Is a PUK?
PUK stands for **Personal Unblocking Key** (also called PIN Unblocking Key in some documentation). It is an **8-digit code** supplied by your carrier that can unlock a SIM after the PIN retry counter is exhausted. PUK is defined in **ETSI ETS 300 922** and **3GPP TS 51.011**.
Unlike the PIN, you cannot set or change the PUK — it is a carrier-issued code fixed at the time the SIM is manufactured.
### When Is the PUK Needed?
The PUK is only needed when the SIM PIN has been entered incorrectly **three consecutive times**. At that point, the SIM refuses all further PIN attempts. The phone displays a message such as "SIM blocked — enter PUK" or "Enter PUK code".
A single correct entry in between resets the counter to zero. The three-attempt limit applies to three *consecutive* wrong entries.
### Where to Find the PUK
1. **Original SIM packaging.** Most carriers print the PUK on the card the SIM was packaged in, often behind a scratch-off panel or on the reverse side of a credit-card-sized holder. If you kept the original packaging, check there first.
2. **Carrier's online account portal.** Many carriers allow you to retrieve the PUK through the account management website after logging in.
3. **Carrier customer service.** Call your carrier and request the PUK. The representative will ask you to verify your identity before revealing it.
### The 10-Attempt Limit — Permanent SIM Destruction
The PUK also has a retry limit. After **ten consecutive incorrect PUK entries**, the SIM is **permanently disabled** and cannot be recovered under any circumstances. This is not a software lock — it is a hardware counter built into the SIM chip that cannot be reset.
A permanently locked SIM must be replaced. Your carrier can issue a replacement SIM linked to the same phone number and account, but the original physical card (or eSIM profile) cannot be revived.
**Do not guess the PUK.** If you do not have the PUK, retrieve it from one of the three sources above before attempting any entry.
---
## PIN Blocked: Step-by-Step Recovery
If your SIM displays a "SIM blocked" or "enter PUK" message, follow these steps.
### Step 1 — Do Not Guess
Stop entering codes until you have located the correct PUK. You have ten attempts total; wasting attempts on guesses risks permanent SIM loss.
### Step 2 — Find the PUK
Check the original SIM packaging first. If you do not have it, log in to your carrier's account portal or call customer service. Have your account credentials ready; carriers verify identity before disclosing PUK codes.
### Step 3 — Enter the PUK
When prompted on your phone:
- Enter the 8-digit PUK exactly as provided.
- You will then be asked to set a new PIN. Choose a 4–8 digit code that is not a simple sequence (avoid `0000`, `1234`, `1111`).
- Confirm the new PIN.
The SIM unlocks and connects to the network immediately after a correct PUK entry. The new PIN you set during PUK entry becomes the current PIN.
### Step 4 — If 10 Attempts Are Exhausted
Contact your carrier and request a SIM replacement. Provide your account number and identity verification. The carrier issues a new SIM (physical or eSIM profile) linked to your existing account and phone number. The process typically takes a few minutes at a carrier store or up to a few business days if ordered by post.
---
## IMEI vs SIM PIN vs PUK — Summary Comparison
| | IMEI | SIM PIN | PUK |
|---|---|---|---|
| **What it identifies/protects** | The hardware device | The SIM card against unauthorised use | Unlocks a PIN-blocked SIM |
| **Length** | 15 digits | 4–8 digits | 8 digits |
| **Who assigns it** | GSMA GDA (via TAC) + manufacturer | Carrier default; user can change it | Carrier (fixed at SIM manufacture) |
| **Can user change it?** | No | Yes | No |
| **Wrong-entry limit** | No limit | 3 consecutive → SIM blocked | 10 consecutive → SIM permanently destroyed |
| **Where to find it** | *#06#, Settings, device box | SIM packaging (default) | SIM packaging, carrier portal, customer service |
| **Standard** | 3GPP TS 23.003 | ETSI ETS 300 922, 3GPP TS 51.011 | ETSI ETS 300 922, 3GPP TS 51.011 |
---
## IMEI Uses: Stolen Phone Reporting and Dual SIM
### Stolen Phone Reporting
If your phone is stolen, the IMEI enables two independent actions:
**1. Report to your carrier.** Contact your carrier immediately and provide the IMEI (have it written down in advance or stored in a cloud document). The carrier can add it to the EIR and block the device from connecting to their network.
**2. File a police report.** In many countries, a police report referencing the IMEI is required before carriers will block the device. The IMEI also helps identify a recovered device as yours.
**Important limitation:** IMEI blacklisting applies only to carriers that participate in the shared EIR. A device stolen in one country and used in another may not be blocked if the receiving country's operators do not check or share the same blacklist. Coverage varies by country and operator.
For context on how SIM-level carrier restrictions (SIM lock) differ from IMEI blocking, see [SIM Lock and SIM-Free Explained](/en/guides/sim-lock/).
### Dual-SIM Devices and Multiple IMEIs
A phone with two SIM slots — whether physical or eSIM — has two IMEIs. Each SIM slot is assigned a separate 15-digit identifier. When the device registers both SIMs simultaneously, both IMEIs are reported to the respective networks.
Each SIM slot also has its own independent PIN and PUK. If you have two SIMs active and enter the wrong PIN three times on one, only that SIM's slot is blocked — the other SIM slot continues to function.
Some dual-SIM devices display both IMEIs at once when you dial `*#06#`. Others show them separately in Settings. Check your device's manufacturer documentation if only one is shown.
---
## What the IMEI Does Not Tell You
Several beliefs about IMEI are common but incorrect.
**The IMEI does not reveal your location.** The IMEI is used for network registration, not GPS or real-time tracking. Law enforcement with a court order can request network logs showing which cell towers a device connected to, but the IMEI alone does not expose location data to ordinary observers.
**The IMEI does not determine which carriers you can use.** Carrier compatibility is determined by the frequency bands the device supports and whether it is SIM-locked — not the IMEI. To verify band compatibility before travelling or buying a used device, see [Frequency Bands and Device Compatibility](/en/guides/frequency-bands/).
**A factory reset does not change the IMEI.** The IMEI is stored in a read-protected area of the device's firmware. Resetting the device to factory settings has no effect on it.
**Changing the IMEI is illegal in many countries.** Several jurisdictions criminalise modification of the IMEI, as it is commonly done to conceal stolen devices.
---
## Troubleshooting: No Service After Entering PUK
If your phone shows no network after a successful PUK entry, do not re-enter codes. Try the following:
1. **Restart the phone.** The network registration process restarts on reboot.
2. **Check for airplane mode.** Confirm that airplane mode is off and mobile data is enabled.
3. **Verify the APN settings.** Some devices reset APN configuration alongside SIM parameters. If data does not work after the PIN is accepted, verify the APN is set correctly for your carrier.
4. **Contact your carrier.** If the SIM still shows no service after the above steps, the SIM card itself may have been damaged by the blocking event. Your carrier can verify from their side whether the SIM is active and, if necessary, issue a replacement.
For a broader diagnostic checklist when the phone shows no signal, see [No Service: How to Diagnose and Fix a Lost Signal](/en/guides/no-service/). If you cannot activate a new or replacement SIM, see [Activation Failed: Why Your eSIM or SIM Won't Activate](/en/guides/activation-failed/).
---
## FAQ
See the frontmatter for structured FAQ entries compatible with schema.org/FAQPage.
**Can two different phones have the same IMEI?**
Each IMEI should be unique. However, counterfeits and some grey-market devices have been documented with duplicated IMEIs. If you are buying a used device, you can check the IMEI against the GSMA's IMEI check service (imeicheck.net links to the GSMA) to verify that it has not been reported stolen or flagged.
**My phone says "Invalid SIM" — is that a PUK issue?**
No. "Invalid SIM" usually means the network does not recognise the SIM at all, which is a different problem from PIN or PUK blocking. A PIN-blocked SIM shows a specific message asking for the PUK. "Invalid SIM" or "No SIM" errors are typically hardware, APN, or network compatibility issues. See [No Service: How to Diagnose and Fix a Lost Signal](/en/guides/no-service/) for a step-by-step diagnosis.
**Does the SIM PIN protect against SIM swap fraud?**
No. SIM swap fraud is an attack at the carrier level — an attacker convinces the carrier's customer service to transfer your number to a SIM they control. This happens before the SIM reaches a device, so the PIN (which is enforced by the device at power-on) provides no protection. Protecting against SIM swap requires securing your carrier account with a strong account PIN and, where available, a port freeze or SIM lock feature offered by the carrier.
---
## Related Guides
- [What Is a SIM Card?](/en/guides/what-is-sim/) — How SIM cards store credentials, authenticate to networks, and the five form factors from 1FF to eSIM
- [SIM Lock and SIM-Free Explained](/en/guides/sim-lock/) — How carrier locks differ from SIM PIN locks and how to check and remove them
- [Frequency Bands and Device Compatibility](/en/guides/frequency-bands/) — How to verify whether a device supports the bands used by your carrier or destination country
- [No Service: How to Diagnose and Fix a Lost Signal](/en/guides/no-service/) — Step-by-step diagnosis for no-signal errors beyond PIN and PUK issues
- [Activation Failed: Why Your eSIM or SIM Won't Activate](/en/guides/activation-failed/) — Fixes for SIM and eSIM activation errors after a SIM replacement or new plan
================================================================================
# International Roaming Explained — How Using Your Home SIM Abroad Works
URL: https://sim-finder.com/en/guides/international-roaming/
Type: guides (en)
Published: 2026-04-22
International roaming lets you use your home SIM card abroad without swapping or buying a new one. Your calls, texts, and data still go through your home carrier account — but the physical signal comes from a partner network at your destination. This guide explains how that process works technically, what the three main pricing models look like, and what you can do before and during your trip to avoid unexpected charges.
For a broader comparison of all connectivity options — roaming, local SIM, travel eSIM, and portable Wi-Fi — see [4 Ways to Stay Connected Abroad](/en/guides/four-options/).
---
## What Is International Roaming?
International roaming is the mechanism that allows a mobile subscriber to make and receive calls, send SMS, and use mobile data while outside their home carrier's network coverage area — typically in another country.
The technical foundation is a bilateral agreement between carriers known as a **GSMA AA.12 International Roaming Agreement**. Under this framework (administered by the GSMA's Wholesale Agreements and Solutions group), your home carrier and a foreign operator agree to accept each other's subscribers, handle signaling, and settle wholesale charges between themselves. If no AA.12-based agreement exists between the two carriers, your SIM will not register on the foreign network, regardless of signal strength.
The scope of roaming includes:
- **Voice calls** — dialing and receiving calls via the visited network's circuit-switched or VoLTE infrastructure
- **SMS** — text messages routed through the home carrier's messaging gateway
- **Mobile data** — internet access over the visited network, with traffic routed back through the home carrier's infrastructure
Not all carriers have agreements with all networks globally. Before traveling, check your carrier's published roaming coverage page to confirm which destination networks are covered.
---
## How Roaming Works — Home Carrier and Roaming Partner
When you land in a foreign country and your phone searches for a signal, the following sequence occurs:
**1. Network discovery.** Your device scans for available networks. When it finds one, it reads the network's identifier (PLMN code — a combination of the Mobile Country Code and Mobile Network Code).
**2. Roaming partner check.** Your SIM's home carrier has provided the device with a preferred roaming list. The device selects the highest-priority available network that has an active AA.12 agreement with your home carrier.
**3. HLR/HSS signaling.** Your device sends an attach request to the visited network. The visited network queries your home carrier's **HLR (Home Location Register)** or its 4G/5G successor, the **HSS (Home Subscriber Server)**, via SS7 or Diameter signaling to authenticate your subscription and retrieve your profile. If authentication succeeds, the visited network grants you access.
**4. IPX routing for data.** Once registered, mobile data traffic travels via the **IPX (IP eXchange) network** — an interconnected set of private IP hubs operated by GSMA-connected carriers and intermediaries. Rather than going directly to the internet from the visited network, your data packets typically transit the IPX back to your home carrier's GGSN or PGW gateway, then out to the internet. This indirect path adds latency compared to a local data connection, which is why roaming data can feel slower even on a fast LTE network.
**5. Wholesale settlement.** The visited network bills your home carrier at a negotiated wholesale roaming rate. Your home carrier then applies its retail pricing model to your account — which is where the three main pricing models come in.
This architecture means that your phone number, account settings, and billing all remain with your home carrier. The visited network is simply providing radio access.
---
## Three Roaming Pricing Models
How much you pay for roaming depends almost entirely on the pricing model your home carrier applies. Three main models exist:
### 1. Pay-Per-Use (Standard Roaming Rates)
This is the default on many plans that do not include an explicit roaming option. Each unit of usage — per minute of voice, per SMS, per megabyte of data — is billed at a rate set by your home carrier. These rates are typically the most expensive way to use your phone abroad and can accumulate quickly if you forget to disable data roaming.
Pay-per-use is occasionally the only option for travelers visiting destinations where no day-pass or bundle option is available. It can also be useful for very occasional, brief roaming needs where the cost of a pass would exceed actual usage.
Check your carrier's current published rates before relying on this model, and consider turning off Data Roaming in your device settings as a safeguard.
### 2. Roaming Day Passes and Period Passes
Many major carriers offer **add-on passes** that give a fixed allowance — or access to a standard domestic-style allowance — for a set period. Common structures include:
- **Daily passes**: activated for each calendar day or each 24-hour window you use the phone abroad. Your carrier's daily domestic data allowance (or a specified cap) applies for that day, and a flat fee is charged per day of use.
- **Weekly or trip passes**: a single fee covering a defined number of days, often activated at the start of the trip and running continuously until the period ends.
The key question with day passes is **activation trigger**: does the pass activate the first time your phone registers on a roaming network (including passively, at the airport), or only when you actively use data? Passive registration can trigger a day's charge before you intend to start using your phone. As of publication, check your carrier's current documentation on this point.
Passes typically apply only to a defined list of destination countries. Coverage lists change, so confirm before departure that your destination is included.
### 3. Included Roaming in Postpaid Plans
Some postpaid plans incorporate a roaming allowance as a standard benefit rather than an add-on. Roaming behavior under these plans varies:
- **Full-speed data included**: a defined data allowance at full (domestic) speeds in covered countries.
- **Reduced-speed data included**: unlimited data in covered countries, but served at a throttled speed. As of publication, several higher-tier postpaid plans from US carriers include this type of benefit — data at reduced speeds in many international destinations is available without an additional fee, with the option to purchase higher-speed passes for individual days.
- **Voice and SMS included, data separate**: calls and texts are covered but data requires an add-on.
The practical value of included roaming depends on whether your destinations are in the carrier's covered zone and whether the speed tier is sufficient for your needs. Light tasks like messaging and maps often work acceptably at reduced speeds. Video calls and streaming may not.
---
## Regional Patterns
Roaming pricing and regulation vary significantly by region. The following is a high-level overview; details change frequently, so verify current policies with your carrier before departure.
### European Union and EEA — Roam Like At Home
The most significant regulatory intervention in roaming pricing is the EU's **Roam Like At Home (RLAH)** regulation. In effect since June 15, 2017 (based on EU Regulation 531/2012 as amended), RLAH prohibits carriers licensed in EU and EEA member states from charging domestic customers additional roaming surcharges when traveling within the EU/EEA zone. A 2022 revision (EU Regulation 2022/612) extended and strengthened the framework through June 30, 2032, adding quality assurance requirements alongside the pricing rules.
In practical terms: if your carrier is based in an EU or EEA country, you should be able to use your plan in other EU/EEA countries at your domestic rate, subject to any fair-use threshold your carrier applies.
Important limits:
- **Switzerland** is not an EEA member and is not covered by RLAH. Swiss-based carriers and non-EU travelers using non-EU SIMs are outside the regulation's scope.
- **UK post-Brexit**: since the UK left the EU, UK carriers are no longer bound by RLAH. As of publication, some UK operators have voluntarily maintained free EU roaming for their customers, while others have reintroduced charges. Check your carrier's current position.
- RLAH does not benefit travelers from outside the EU/EEA using a non-EU SIM.
For a detailed breakdown of EU roaming rules and which countries are covered, see [EU Roaming Explained](/en/guides/eu-roaming/).
### United States — Carrier Plans and International Add-Ons
US carriers generally operate on a carrier-plan model with optional international add-ons. Patterns that have been common among major US carriers include:
- Some higher-tier postpaid plans from major US carriers have included basic international data (often at reduced speeds) in a long list of countries as a standard plan benefit, without requiring a separate pass purchase. As of publication, verify whether your specific plan tier includes this benefit and which countries are covered.
- Day-pass or weekly-pass add-ons are commonly available for users who need full-speed data or whose plan does not include a base international benefit.
- AT&T and Verizon have historically offered international day-pass add-ons that activate per day of use. As of publication, check each carrier's current international plan pages for available options, since product names and pricing structures change regularly.
The US has no equivalent of the EU's RLAH regulation — pricing is entirely determined by individual carrier policy.
### United Kingdom — Post-RLAH Landscape
Following the UK's departure from the EU, UK carriers have taken varying approaches to EU roaming:
- Some operators have continued to offer free EU roaming as a competitive feature. Several UK carriers market patterns similar to the former EU Roam Like At Home framework — included EU data within the domestic plan allowance — as of publication.
- Others have reintroduced roaming surcharges for EU travel.
The UK's regulatory situation for roaming is distinct from the EU framework. As of publication, check your specific UK carrier's current EU roaming policy before traveling.
Outside the EU, most UK carriers offer international day passes or per-use rates similar to the patterns described in the general pricing section above.
---
## When Roaming Makes Sense
International roaming with your home SIM is not always the right choice, but it fits well in specific scenarios:
**Short trips with a strong included-roaming plan.** If your postpaid plan already includes data at usable speeds in your destination, roaming may cost nothing extra and require no setup.
**Destinations where local SIMs are difficult to obtain.** In some countries, purchasing a prepaid SIM requires local registration, a local ID document, or involves language barriers. Roaming removes this friction.
**When you need your home number available.** Calls and SMS to your home number work automatically on roaming. If you need to receive two-factor authentication codes or calls from people who only have your home number, roaming keeps that line reachable without a separate dual-SIM configuration.
**Brief layovers and transit.** For a few hours in a connecting airport, activating a full local SIM or travel eSIM may not be worth the effort. A day pass or pay-per-use session for light data use can be more practical.
**When roaming is not the right choice:** on longer trips, in countries your plan does not cover cheaply, or when you need high-speed data continuously, alternatives such as a travel eSIM or local SIM card will typically give better value. See [4 Ways to Stay Connected Abroad](/en/guides/four-options/) for a full comparison, or [Your First Travel eSIM](/en/guides/first-time-guide/) if you have decided to use a travel eSIM instead.
---
## Pre-Departure and On-Arrival Settings
A few settings steps taken before and after landing significantly reduce the risk of unintended charges.
### Before You Depart
**1. Check your plan's roaming coverage and cost.**
Log in to your carrier's app or website and verify: (a) whether your destination is covered, (b) which pricing model applies — pay-per-use, a pass, or included — and (c) the current rates or pass fees. Do not rely on memory from a previous trip; carrier policies change.
**2. Consider your data needs.** Review your typical daily data consumption. Our [Data Usage Guide](/en/guides/data-usage-guide/) covers how much data common activities use, which helps you decide whether a pass is worth buying or whether reducing usage will keep you within a reasonable pay-per-use budget.
**3. Disable Data Roaming if you are not ready to pay roaming rates.**
On iPhone: Settings > Cellular > Cellular Data Options > Data Roaming. Toggle off.
On Android: Settings > Network & Internet > Mobile Network > Roaming. Toggle off (path varies by manufacturer).
With Data Roaming off, your device registers on the visited network for calls and SMS but does not use mobile data. This prevents background app refreshes and automatic updates from generating charges.
**4. Turn off Wi-Fi Calling if it uses your home carrier's data connection internationally.** Some carriers route Wi-Fi calling through a home-country gateway even when you are abroad, which can interact with data settings. Check your carrier's documentation.
**5. If you plan to use a travel eSIM instead, install it before departure.** eSIM profile downloads require an internet connection. Install and verify the profile at home over Wi-Fi before you travel. For step-by-step instructions, see [Your First Travel eSIM](/en/guides/first-time-guide/).
### On Arrival
**6. Allow the device to find the roaming network.** After landing, take the device out of Airplane Mode and wait a few minutes for it to register on the visited network. The network name in the status bar should change to the local operator's name.
**7. Confirm which network you have connected to.** If you expected to connect to a specific carrier (the one listed as your carrier's preferred roaming partner), verify the network name. If the device has attached to an unexpected network, manually select the preferred partner in network settings.
**8. Enable Data Roaming only when you are ready.** If your plan includes roaming or you have activated a pass, enable Data Roaming at this point. If using a travel eSIM for data instead, leave Data Roaming off on the home SIM.
**9. Confirm hotspot and app background refresh settings.** Mobile hotspot over roaming can generate significant data usage quickly. Consider disabling it or using it only when connected to Wi-Fi. For advice on managing dual-SIM configurations to keep the home SIM protected, see [Using Dual SIM for Travel](/en/guides/dual-sim-for-travel/).
---
## How to Avoid Bill Shock
Bill shock — an unexpectedly large mobile bill resulting from roaming usage — is common but largely preventable.
**Understand your plan before you fly.** The single most effective step is confirming your current plan's roaming behavior before departure. Many travelers assume roaming is included in their plan, or that a day pass must be manually activated and will therefore not trigger on arrival. Neither assumption is always correct.
**Use data wisely.** Even with a pass, data consumption can be higher than expected if you stream video, use navigation continuously, or forget to put apps into low-data modes. See our [Data Usage Guide](/en/guides/data-usage-guide/) for per-activity data estimates that help you plan realistically.
**Set a data usage alert or cap.** Both iOS and Android allow you to set mobile data usage warnings or hard limits per line. Set a warning at a level that triggers well before you approach your plan's threshold or budget.
iOS: Settings > Cellular > [line name] (iOS does not have a hard cap built in, but third-party apps and some carrier apps offer this).
Android: Settings > Network & Internet > Mobile Network > Data Warning & Limit.
**Keep Data Roaming off on lines you are not using for data.** If you have a travel eSIM handling data, keep Data Roaming off on the home SIM. Even background app activity — email checking, iCloud sync, app updates — can accumulate charges if Data Roaming is inadvertently left on.
**Watch for pass activation timing.** If your carrier's day pass activates on first network contact rather than first data use, arriving at midnight in a destination timezone may consume a full day's pass before you start using your phone for the day. Check the activation model and time zones involved.
**Disable iCloud Backup, automatic app updates, and video autoplay over mobile data** before crossing into roaming territory. These services do not distinguish between home and roaming data and will consume large amounts without prompting.
For the full pre-departure checklist including these settings in context, see the [Pre-Trip Connectivity Checklist](/en/guides/pre-trip-checklist/).
---
## Roaming vs. Alternatives
International roaming is one of four main options for connectivity abroad. The right choice depends on your trip length, destination, and whether your plan already includes roaming at an acceptable cost.
**[4 Ways to Stay Connected Abroad](/en/guides/four-options/)** compares roaming, local SIM cards, travel eSIMs, and portable Wi-Fi hotspots across dimensions including cost, setup effort, and device requirements.
**[Using Dual SIM for Travel](/en/guides/dual-sim-for-travel/)** explains how to run a travel eSIM alongside your home SIM — keeping your home number for calls and SMS while using a local data connection for everything else. This is the most common alternative to paying full roaming data rates.
**[Your First Travel eSIM](/en/guides/first-time-guide/)** is the step-by-step guide for installing and activating a travel eSIM if you decide to use one instead of, or alongside, your roaming plan.
For terminology used throughout this article — PLMN, HLR, IPX, and related terms — see the [Glossary of Mobile and eSIM Terms](/en/guides/glossary-index/).
---
## FAQ
See the FAQ items in the frontmatter above for answers to common questions including:
- What is GSMA AA.12?
- Why is roaming data slower than local data?
- What is a roaming day pass?
- Will my phone work automatically when I land?
- How do I know which network I am connected to?
- Can I use a travel eSIM to avoid bill shock?
- Is EU roaming free for all European travelers?
---
## Related Guides
- [4 Ways to Stay Connected Abroad](/en/guides/four-options/) — Full comparison of roaming, local SIM, travel eSIM, and portable Wi-Fi
- [Your First Travel eSIM: Step-by-Step Guide](/en/guides/first-time-guide/) — How to install and activate a travel eSIM
- [Using Dual SIM for Travel](/en/guides/dual-sim-for-travel/) — Keeping your home number while using a local data connection
- [Data Usage Guide](/en/guides/data-usage-guide/) — How much data common apps and activities use
- [Glossary of Mobile and eSIM Terms](/en/guides/glossary-index/) — Definitions for technical terms used in this article
================================================================================
# How to Sign Up With a Local Carrier Abroad
URL: https://sim-finder.com/en/guides/local-contract/
Type: guides (en)
Published: 2026-06-06
Getting a local SIM or mobile contract when you arrive in another country is straightforward in many markets and genuinely difficult in others. The core challenge for foreigners is identity verification: most countries require document registration for any SIM purchase, and postpaid contracts layer credit and address checks on top. This guide covers the general process for both prepaid and postpaid sign-ups, the documents you are likely to need, how registration requirements vary by region, and what to expect when buying in-store versus online.
For a broader look at how connectivity options compare — including travel eSIMs and roaming — see [4 Ways to Stay Connected Abroad](/en/guides/four-options/). If you are planning a long-term move rather than a trip, the considerations are different; see [Expat SIM Strategy](/en/guides/expat-strategy/) for guidance on establishing mobile service as a resident.
---
## Prepaid vs Postpaid: The Core Difference for Foreign Visitors
The choice between prepaid and postpaid is the most important decision when signing up with a local carrier abroad. The two models differ not just in billing but in how accessible they are to someone without a local identity footprint.
**Prepaid** (also called pay-as-you-go or top-up SIM) requires payment before service. You purchase a SIM or bundle, load credit, and consume your allowance. When it runs out, service stops until you top up. Prepaid does not require a credit history or a local bank account. It is available to visitors in almost every country where SIM registration is permitted at all.
**Postpaid** (monthly contract) bills you after the fact. The carrier extends you credit — network access before payment — which means it needs confidence you will pay. For a local resident with an established credit history and a domestic bank account, this is a routine process. For a foreigner on a tourist visa or a short-term visa, the barriers are higher: most carriers require at minimum a local address and a local bank account, and many also require a credit check against local bureaus that have no data on you.
The practical consequence is that **prepaid is the accessible default for most visitors abroad**. Postpaid becomes worth pursuing when you are in a country for an extended period — a working holiday, a student placement, a multi-year assignment — and the cost savings or plan features of a postpaid contract justify navigating the additional requirements.
For a full explanation of how prepaid and postpaid billing work, see [Prepaid vs Postpaid: Differences and How to Choose](/en/guides/prepaid-vs-postpaid/).
---
## Documents You Are Likely to Need
The exact documents required depend on the country and carrier, but a few categories appear consistently across markets.
### Passport
A valid passport is the universal baseline for foreign SIM registration. In countries that require SIM registration — which covers the large majority of markets globally — a passport is the standard identity document for non-residents. Some carriers also accept a national identity card from certain countries, but for international travel, a passport is the most reliably accepted document.
Carry your physical passport for in-store purchases. Some carriers require staff to scan or photocopy it; others record only the passport number. A digital photo of your passport is often not accepted for in-store registration.
### Visa or Entry Status
Your visa or entry stamp is not universally required for prepaid SIM purchase, but it may be requested in some markets. It establishes that you are legally in the country and can indicate your expected length of stay. In countries with SIM validity restrictions for foreigners — where a tourist SIM may be limited to 30 or 60 days of validity — your entry date and visa type may affect which products you are eligible for.
### Local Address
Many carriers ask for an address during SIM registration, even for prepaid. A hotel address, a temporary accommodation address, or a hostel address is typically accepted for tourist prepaid SIMs. The address requirement is less about verifying residence and more about completing the registration record.
For postpaid applications, a verifiable local address becomes a meaningful requirement: the carrier may cross-check it against local records or send billing correspondence there.
### Local Bank Account
Not required for prepaid SIM purchase in most markets. Required or strongly preferred for postpaid contracts in the majority of markets. A local bank account serves as both a payment channel and an additional identity anchor. Foreigners on short-term visas typically cannot open a full local bank account quickly; some markets have simplified bank accounts available to newcomers, while others effectively shut out foreign postpaid applicants without this.
### Security Deposit
Some carriers offer foreigners access to postpaid service against a refundable security deposit in lieu of a local credit history. The deposit is held for a defined period — often six to twelve months — and returned if the account remains in good standing. This is not universal; it depends on the carrier's specific policy for non-resident applications.
---
## SIM Registration Requirements by Law
SIM registration — the legal requirement to tie a SIM to an identified individual before or shortly after activation — is mandated by telecommunications law in the large majority of countries. A 2021 GSMA study found that SIM registration requirements applied in 157 countries globally, covering the vast majority of prepaid SIM sales worldwide.
The registration process varies:
- **At point of sale (in-store)**: Staff verify your documents and record the required information before handing over the SIM. The most common process for tourist SIMs.
- **Self-registration online**: Some markets allow you to purchase a SIM and complete registration via a carrier website or app, uploading a scan or photo of your passport.
- **Post-purchase registration**: In some markets, a SIM can be purchased without immediate identity verification but must be registered within a defined window (e.g., 48 hours) or it is deactivated. This model has become less common as enforcement has tightened.
**Biometric registration** is an increasingly common requirement in certain markets. Thailand requires biometric liveness detection for all SIM registrations as of August 2025 — applicable to foreign visitors who must present a physical passport. The liveness check is conducted via an app or a licensed dealer terminal.
Some countries place limits on how many SIMs a foreign national can hold — Thailand's post-2025 rules limit foreigners to three SIMs per provider, as one example. These limits vary significantly by country.
Countries with no SIM registration requirement for prepaid — which include the United States and (as of publication) a small number of other markets — are the exception, not the rule.
---
## Regional Variation in Signup Requirements
The signup process for a local SIM differs substantially across regions. For a full regional breakdown including coverage infrastructure and eSIM adoption, see the [Regional Connectivity Guide](/en/guides/regional-overview/).
### Asia
Asia has the widest variation in SIM registration requirements of any region. Japan, South Korea, and Vietnam require passport-based identity verification for all SIM purchases. Thailand requires biometric verification in addition to passport presentation. Singapore and Hong Kong have historically had lighter requirements for tourist SIMs, but policies change. Several countries in Southeast and South Asia require registration but the in-store process varies by carrier and outlet.
In-store purchase is the most reliable channel in much of Asia, particularly in countries where carrier apps are only available in local languages or require a local phone number to activate.
### Europe
Western European countries generally allow tourist SIM purchases with passport verification, sometimes completed online. Germany is the notable exception: identity verification is required for all SIM purchases, prepaid included, under the Telekommunikationsgesetz. Verification can be completed through VideoIdent, PostIdent (at post offices), eID, or in-person at carrier stores. Tourist SIMs in Germany take more steps to obtain than in most other European markets.
Eastern and Central European markets generally follow lighter registration procedures, with passport-only verification at point of sale being common.
For travelers whose home carrier is based in an EU or EEA member state, the EU's Roam Like At Home regulation means they may not need a local SIM at all for multi-country EU travel — their domestic plan is usable within the EU zone at domestic rates. For non-EU travelers, a local SIM or travel eSIM is typically more cost-effective than roaming. See [International Roaming Explained](/en/guides/international-roaming/) for how roaming costs work when using a non-EU SIM in Europe.
### North America
The United States and Canada have no SIM registration requirement for prepaid purchases. A visitor can walk into a carrier store or a supermarket, purchase a prepaid SIM or top-up starter pack, and activate it without presenting identity documents. This makes North America the most frictionless region globally for local SIM acquisition.
Postpaid contracts in the US and Canada still require standard credit checks and a local address — the absence of registration requirements applies only to prepaid.
### Latin America and Africa
Many countries in Latin America require a local tax number or national ID for SIM registration, which creates genuine barriers for tourists who lack these documents. In tourist-heavy coastal and urban areas, some carriers have adapted prepaid offerings for visitors, but this varies by carrier and changes over time. Language is a practical factor: many carrier retail experiences operate in Spanish or Portuguese only.
Africa similarly requires passport or national ID registration in most markets. The in-store process at airport kiosks in major cities is generally straightforward; more remote areas may have fewer options. Registration limits and SIM validity windows for foreign nationals vary by country.
---
## In-Store Purchase
In-store purchase from a carrier outlet, airport kiosk, or authorized dealer is the most common channel for tourists obtaining a local SIM.
**What to expect at a carrier store:**
1. Present your passport. Staff will scan or record the document number, your name, and date of birth at minimum.
2. Complete any required registration form — often a paper form or a tablet-based entry.
3. Select a plan or starter pack. For prepaid, you will typically choose a data and call bundle at the time of purchase.
4. The SIM is activated at the counter, or you activate it yourself with a PIN provided on the packaging.
5. In countries with biometric requirements, you may need to complete a liveness check on the staff member's device.
**Airport kiosks** are the most convenient entry point for many travelers. The tradeoff is that airport kiosks typically offer a narrower selection of plans than in-town carrier stores, and the plans available to tourists at airports are occasionally priced higher or with lower data allowances than equivalent city-center offerings. If you have a few hours before needing connectivity, shopping at a carrier store in town may offer better value.
**Authorized dealers and convenience stores** (common in Asia and parts of Europe) can sell prepaid SIMs but may not be able to handle all registration requirements on-site. Some dealers process registration through a central system; others require you to complete registration via the carrier's app or website after purchase.
---
## Online and eSIM Sign-Up
Some local carriers offer eSIM activation online or through a carrier app, which removes the need for a store visit.
**How local carrier eSIM sign-up typically works:**
1. Download the carrier's app or visit the carrier's website.
2. Choose a plan and pay online.
3. Complete identity verification — usually by uploading a passport scan and, in some markets, a selfie or liveness check.
4. Download the eSIM profile via a QR code or automatic push to the app.
The convenience of online eSIM purchase depends heavily on the market. In countries where carriers have built robust digital onboarding flows — Japan's major carriers, UK carriers, many US and Australian carriers — the process can be completed before you land and the eSIM activates as soon as your device connects to the local network.
In markets where carrier apps are in the local language only, identity verification is required in-person regardless of channel, or eSIM issuance is limited to contract holders, online sign-up may not be a practical option for visitors.
**One practical note on eSIM downloads:** eSIM profile installation requires an internet connection. If you need connectivity before you can access Wi-Fi, you cannot download a local carrier eSIM at the airport without a pre-existing connection. A travel eSIM installed before departure solves this problem — it is already on the device and activates when your plane lands. For the tradeoffs between a travel eSIM and a locally purchased eSIM, see [How to Choose a Travel eSIM](/en/guides/how-to-choose/).
---
## Postpaid Contracts: The Specific Hurdles for Foreigners
Postpaid monthly contracts abroad are worth understanding in detail, because the barriers for foreigners are higher than the standard signup experience suggests.
### Credit Checks Without a Local History
The central problem with postpaid for foreigners is that credit bureaus in most countries have no information about you. Your credit history at home is not visible to the bureau in the country you are visiting. From the carrier's perspective, you have no track record, which puts you in the highest-risk category.
Carriers respond to this in different ways:
- **Security deposit**: Some carriers offer postpaid to foreigners against an upfront deposit, typically equivalent to one or two months of the planned service.
- **Lower initial credit limit**: Approval with a restricted plan — limited data, lower device financing amount — until a track record is established.
- **Decline and redirect to prepaid**: Many carriers simply decline postpaid applications from foreigners without local credit history and direct them to prepaid products.
### Local Address Verification
Most postpaid carriers require a verifiable local address. Hotel addresses are generally not accepted for postpaid applications. A rental lease, a utility statement, or a letter from an employer or educational institution is typically required. For workers on assignment or students at a local institution, this is obtainable. For tourists or short-term visitors, it is not.
Some countries have simplified registration schemes for certain visa categories — working holiday visa holders in Australia and New Zealand, for example, may qualify for postpaid accounts on the basis of their visa and an employer letter. These pathways are carrier-specific and change over time.
For guidance on establishing mobile service across a multi-year assignment or immigration process, see [Expat SIM Strategy](/en/guides/expat-strategy/). For working holiday visa holders navigating the first steps in a new country, see [Working Holiday SIM Guide](/en/guides/working-holiday/).
### Visa Duration and Contract Length
Carriers are reluctant to enter 12 or 24-month contracts with applicants whose visa expires in three months. The practical result is that postpaid contracts for foreigners — where they are available at all — are more often month-to-month than long-term. This removes the device financing benefits that are the main attraction of long-term postpaid contracts.
If a fixed-term postpaid contract is genuinely useful for your situation — you have a multi-year work visa, a long-term rental lease, and a local bank account — postpaid is accessible in most markets with those credentials. The requirements are high, but they are the same requirements any local resident would provide.
---
## Comparing Plans Before You Sign
Once you have confirmed which products you are eligible for based on your documents and visa status, the plan comparison step is the same as for any other market: evaluate data allowance, validity period, call and SMS inclusion, and any fair-use or throttling rules.
**Do not assume the plans visible at airport kiosks are your best options.** Tourist-targeted products at arrival points are designed for convenience, not for price. Once you have a working local number or SIM, shopping at a city-center carrier store or through the carrier's website will typically reveal a wider range of products at different price points.
Use [SimFinder](/en/) to compare current local plans by country, including data volume, carrier network, and plan type, so you know what the market looks like before committing to a plan at the airport.
Also consider the practical support question: if the SIM stops working mid-trip and you need help, can you reach carrier support in a language you understand? Many local carriers in Asia, Latin America, and Africa offer support in local languages only. Travel eSIM providers are often better positioned to offer English-language support, which is one reason some travelers prefer a travel eSIM even when a cheaper local option is available.
---
## What Happens When You Leave
If you are on a tourist prepaid SIM, the plan validity period typically runs out within 30 to 60 days of activation regardless of whether you are still in the country. Most carriers allow you to simply let the SIM expire without any cancellation process. In most markets, unused credit or data on an expired prepaid SIM is forfeited; some carriers offer a grace period during which the SIM can be reactivated by topping up, but this varies by carrier and country.
If you have entered into a postpaid contract, you need to cancel it before or when you leave. The cancellation process — how much notice is required, whether there is an early termination fee, and how to return any rented equipment — varies by carrier and contract terms. Cancelling from abroad after the fact can be difficult; if you know your departure date, initiate cancellation before you leave.
Keep a record of your local SIM phone number before you leave, even if you do not plan to keep the SIM active. Some verification services, banking apps, and subscription accounts you set up abroad may have that number registered for two-factor authentication. Updating those accounts before the number goes inactive avoids lockout problems later.
For a guide to wrapping up mobile service arrangements when returning home from a period abroad, see [After You Return: Closing Accounts and Re-Establishing Home Service](/en/guides/after-return/).
---
## Summary: General Signup Process
The general sequence for obtaining a local SIM abroad:
1. **Check registration requirements for your destination** before you travel. Know what documents are required and whether biometric verification applies.
2. **Bring your physical passport** and, if available, your visa documentation.
3. **Decide between prepaid and postpaid**. If you lack a local address and bank account, default to prepaid — it is accessible without those requirements in most markets.
4. **Choose your purchase channel**: airport kiosk for immediate connectivity, city-center store or online for broader plan selection.
5. **Complete identity registration** at point of sale or through the carrier's app, per the country's requirements.
6. **Select a plan** that matches your expected stay duration and data usage.
7. **Keep track of your plan's validity period** and top up or renew as needed.
8. **If you signed a postpaid contract**, note the notice period and any early termination fee so you can cancel correctly when you leave.
The most common mistake travelers make is underestimating the registration friction in their destination country. Arriving with a physical passport and a local address (even a hotel address) already noted down avoids delays at the point of sale. If your destination has known biometric requirements, confirm in advance which carrier outlets are equipped to handle the check — not all authorized dealers support every verification method.
---
## Related Guides
- [Expat SIM Strategy](/en/guides/expat-strategy/) — How to establish mobile service as a longer-term resident abroad
- [Working Holiday SIM Guide](/en/guides/working-holiday/) — SIM and contract guidance specific to working holiday visa holders
- [Regional Connectivity Guide](/en/guides/regional-overview/) — How local SIM availability and registration requirements vary across six regions
- [International Roaming Explained](/en/guides/international-roaming/) — How using your home SIM abroad works, and when roaming costs make a local SIM the better choice
- [After You Return: Closing Accounts and Re-Establishing Home Service](/en/guides/after-return/) — How to cancel foreign mobile accounts and restore your home setup when you leave
================================================================================
# What to Do If Your Phone Is Lost or Stolen
URL: https://sim-finder.com/en/guides/lost-stolen/
Type: guides (en)
Published: 2026-06-04
If your phone is lost or stolen, the first 30 minutes determine how much damage is done. Act in this order: attempt to locate the device, lock or erase it remotely, suspend the line with your carrier, freeze any mobile payment services, and change passwords for accounts that were accessible on the phone. File a police report regardless of whether you expect to recover the device.
This guide walks through each step in sequence, explains what each action does, and covers the SIM swap protection dimension that a phone theft can trigger.
---
## Step 1 — Attempt to Locate the Device
Before locking or erasing, try to locate the device. Location data is destroyed by a remote erase and unavailable after a lock in some configurations.
### Apple Find My (iPhone, iPad, Apple Watch, Mac)
Apple Find My requires that the device was signed in to an Apple ID with Find My enabled before it was lost. Access it at [icloud.com/find](https://www.icloud.com/find) from any browser, or through the Find My app on another Apple device signed in to the same Apple ID.
Find My shows the device's last known location on a map. If the device is online and location services are active, the position updates in near real time. If the device is offline, Find My displays the last recorded location with the time it was recorded.
From Find My you can:
- **Play Sound** — causes the device to emit an alert tone even if it is on silent, useful if the device is nearby.
- **Mark as Lost** — activates Lost Mode, which locks the device with your passcode, displays a custom message and contact number on the lock screen, and suspends Apple Pay. The device continues to report its location to Find My while Lost Mode is active.
- **Erase This Device** — remotely wipes all data. After an erase, the device can no longer be tracked through Find My.
Apple Activation Lock, which is part of Find My, ties the device to your Apple ID. A device with Activation Lock enabled cannot be set up or reactivated without your Apple ID credentials, even after a factory reset.
### Google Find My Device (Android)
Google Find My Device requires that the device was signed in to a Google account with Find My Device enabled before it was lost. Access it at [google.com/android/find](https://www.google.com/android/find) from any browser, or through the Find My Device app on another Android device.
From Find My Device you can:
- **Play Sound** — plays an alert at full volume for five minutes even if the device is on silent.
- **Secure Device** — locks the device with your screen lock PIN, pattern, or password. You can optionally set a recovery message and phone number displayed on the lock screen. The device can no longer be used to make Google Pay purchases in stores.
- **Erase Device** — remotely wipes all data. Once erased, the device can no longer be tracked.
If the device is offline at the time you issue a command, the command queues and executes the next time the device connects to the internet.
### What to Do If You Did Not Enable Find My or Find My Device
Remote location, lock, and erase functions require the tracking service to have been enabled before the loss occurred. If it was not enabled, these options are not available. In this case:
- Proceed directly to suspending your line (Step 2).
- Provide your IMEI to your carrier to request device blacklisting.
- File a police report with the IMEI (Step 6).
---
## Step 2 — Contact Your Carrier to Suspend the Line
Once you have attempted to locate the device (or confirmed location is not possible), contact your carrier immediately to suspend the line.
### What a Line Suspension Does
A temporary suspension stops your SIM from making or receiving calls, sending or receiving texts, and using mobile data. It also prevents anyone who has the device — or has removed the SIM — from racking up charges on your account.
Importantly, a suspension is different from cancelling your contract. Your phone number is preserved during a suspension, and you can reactivate the line when you recover the device or obtain a replacement. For strategies to hold a number long-term during a replacement period, see [How to Keep a Phone Number You're Not Using](/en/guides/number-storage/).
### How to Request a Suspension
Contact your carrier through one of the following channels from a device other than the lost phone:
- **Carrier app or website.** Most major carriers provide a self-service option to suspend a line through their account portal. This is typically the fastest method.
- **Carrier customer service phone line.** Use the number on your carrier's website. Do not rely on a number stored only in the lost device.
- **Carrier retail store.** Bring a government-issued photo ID and any account information you have access to.
You will need to verify your identity. Carriers typically require your account number, account PIN, or answers to security questions. The specific requirements vary by carrier and country.
### Billing During Suspension
Carrier policies on billing during a suspension differ. Some carriers suspend all billing for the duration; others continue charging a reduced plan fee or the full monthly plan cost. Ask your carrier explicitly what charges, if any, continue during the suspension period.
---
## Step 3 — Request a SIM Reissue
Once the line is suspended, the existing SIM (whether physical or eSIM) linked to your number is deactivated. To restore service on a new or replacement device, you will need a new SIM.
### Physical SIM Replacement
Visit a carrier store or, in some cases, request a replacement SIM by post through the carrier's website. Bring government-issued photo ID and your account credentials. The carrier issues a new physical SIM linked to your existing phone number and account. The deactivated SIM — including any SIM that may remain in the lost or stolen device — becomes permanently inactive.
### eSIM Reissue
For eSIM accounts, the carrier issues a new eSIM profile. This is typically done through the carrier's app or website. The process generates a new QR code or activation code that you install on the replacement device. The previous eSIM profile is deactivated.
Because eSIM transfer does not require a physical card, the reissue can often be completed entirely online. The specific steps depend on your carrier and the device you are transferring to.
### What Happens to the Lost Device
After a SIM replacement or reissue, the SIM linked to the lost device is no longer active. If the device was locked remotely or wiped, it cannot be accessed without your credentials. Your phone number is preserved on the new SIM.
---
## Step 4 — Stop Carrier Billing and Freeze Mobile Payments
### Mobile Payment Services (Apple Pay, Google Pay)
Remote lock via Find My (Lost Mode) or Find My Device (Secure Device) suspends Apple Pay and Google Pay on the device immediately. If you have not been able to issue a remote lock, you can also suspend these services through the respective account portals:
- **Apple Pay:** Log in to [icloud.com](https://www.icloud.com) → Account Settings → your device → Remove. This removes all cards from Apple Pay on that device.
- **Google Pay:** Log in to [pay.google.com](https://pay.google.com) → Payment methods, and remove cards associated with the lost device or contact your bank to freeze any cards linked to Google Pay.
Contact your bank or card issuer directly if you suspect any fraudulent charges have already occurred.
### Carrier Billing and Premium Services
Some carriers allow you to add charges to your phone bill — for app purchases, premium SMS services, or carrier-billed subscriptions. If your account was accessible on the lost device, contact your carrier to review recent charges and request a billing freeze or investigation if unauthorised charges appear.
---
## Step 5 — Change Passwords for Apps Accessible on the Device
A stolen unlocked device — or a device where someone has bypassed the screen lock — gives access to every app that was logged in. Act quickly on accounts in this priority order:
### Priority 1: Email Accounts
Your email account controls password recovery for almost every other service. If an attacker resets your email password, they can then reset passwords for banking, social media, and other accounts.
- Change your email password from a device or browser that was not the lost phone.
- Revoke all active sessions (most email providers have a "Sign out of all other sessions" or "Manage devices" option).
- Check that the recovery email address and phone number on the account have not been changed.
### Priority 2: Banking and Financial Apps
- Change passwords for any banking, brokerage, or payment apps that were installed on the device.
- Review recent transaction history for unauthorised activity.
- Contact your bank's fraud line if you see any suspicious transactions.
### Priority 3: Social Media and Other Accounts
- Change passwords for social media accounts, especially any with payment methods attached or a large following.
- Review connected apps and third-party access grants, and revoke any you do not recognise.
### Session Revocation
Most modern platforms allow you to sign out of all active sessions from an account settings page. Do this for any account that was logged in on the lost device, regardless of whether the account has a strong password, because the session token on the device may still be valid until explicitly revoked.
---
## Step 6 — File a Police Report
File a report with your local police, even if you do not expect the device to be recovered. A police report serves several concrete functions:
- **Insurance claims.** Device insurance policies almost universally require a police report number before processing a theft claim.
- **IMEI blacklisting.** Carriers in many countries will add a device to the stolen device registry (Equipment Identity Register) only after a police report has been filed. An IMEI-blacklisted device cannot register on cooperating networks regardless of which SIM is inserted.
- **Fraudulent account activity.** Financial institutions often require a police report number to process fraud claims related to the loss of a device.
- **Carrier investigation.** If the theft results in SIM swap fraud or unauthorised port-out, the carrier's security team will ask for a police report reference.
Provide the police with: the device make and model, the IMEI (if you recorded it in advance), the approximate time and location of the loss, and any serial number from the original packaging.
### Record Your IMEI Before You Need It
The most effective preparation is to record your IMEI before a loss occurs, so it is available from another device when you need it.
Your IMEI can be found by dialling `*#06#` on any phone — the number appears on screen without placing a call. It is also in Settings (iPhone: Settings → General → About; Android: Settings → About Phone → Status → IMEI Information) and printed on the original device box.
Store the IMEI in at least one location that is not on the phone itself: a password manager, a cloud document, or on the original device box in a safe place. On a dual-SIM device, record both IMEI numbers.
For a full explanation of how the IMEI is structured and how stolen device blacklisting works, see [IMEI, PIN, and PUK Codes Explained](/en/guides/imei-pin-puk/).
---
## Step 7 — Check for SIM Swap Fraud
Phone theft is sometimes accompanied by a SIM swap attempt. An attacker who physically possesses your phone may be able to extract your account details (from stored emails, messages, or account apps) and use those details to impersonate you to your carrier and request a SIM swap — transferring your number to a SIM they control.
Signs that a SIM swap has occurred alongside the theft:
- Your line shows "No Service" not because of the suspension you requested, but before you had a chance to contact the carrier.
- You receive notifications that account passwords have been changed for services you did not touch.
- Your email or banking login is rejected despite the correct credentials.
If you suspect a SIM swap occurred, contact your carrier immediately and ask whether any SIM swap or port-out request was made on your account in the past 24 to 72 hours.
After recovering your line, take these steps to prevent future SIM swap attacks:
- Enable your carrier's account lock or SIM lock feature (called Wireless Lock at AT&T, Number Lock at Verizon, SIM lock at T-Mobile, or an equivalent at your carrier).
- Set a carrier account PIN that is not derived from your date of birth, address, or account number digits.
- Move high-value accounts away from SMS-based two-factor authentication to authenticator apps or hardware security keys. See [How to Receive SMS 2FA Codes Abroad](/en/guides/sms-2fa-abroad/) for guidance on stronger alternatives to SMS 2FA.
- If your carrier's SIM is not already SIM-locked to your device, enable [SIM Lock](/en/guides/sim-lock/) features where available to reduce unauthorised port-out risk.
For the full SIM swap prevention guide, see [SIM Swap Fraud: How It Works and How to Protect Yourself](/en/guides/sim-swap/).
---
## International Considerations
The steps above apply universally, but the specific procedures differ by carrier and country.
**Carrier suspension.** All major carriers in every market offer temporary line suspension, but the method (app, website, phone, or store) and the identity verification required vary. Some carriers require in-person verification with photo ID for a suspension; others allow it entirely online. Contact your carrier's support channel directly.
**IMEI blacklisting coverage.** IMEI blacklisting is effective only if carriers in the country where the device is being used participate in the Equipment Identity Register and share data with the country where the theft occurred. International IMEI blacklist sharing exists between some countries (particularly within the EU and between the US, UK, Canada, and Australia) but is not universal. A device stolen in one country may still function on networks in another country that does not participate in the shared registry.
**Police reporting.** The process for filing a police report varies by country. In some countries this can be done online; in others you must attend a police station in person. If you were travelling when the device was lost or stolen, you may need to file a report in the country where the incident occurred in addition to (or instead of) your home country.
**Mobile payment regulations.** Regulations governing liability for fraudulent mobile payments differ by country. In the EU, EU payment services rules (PSD2 and its successors) provide consumer protections for unauthorised electronic payments. In the US, Regulation E covers unauthorised electronic fund transfers. Contact your card issuer or bank for specific guidance under the applicable rules in your jurisdiction.
### Quick-Reference Checklist
| Action | When | Notes |
|---|---|---|
| Open Find My / Find My Device | Immediately | Lock (not erase) first if you may recover the device |
| Play sound | Immediately | Useful if the device is nearby |
| Issue remote lock | Within first minutes | Suspends Apple Pay / Google Pay |
| Call carrier to suspend line | Within first hour | Preserve phone number; confirm billing during suspension |
| Request SIM reissue | When you have a replacement device | Physical SIM or eSIM depending on your carrier |
| Remove cards from Apple Pay / Google Pay | Within first hour | Via icloud.com or pay.google.com from another device |
| Change email password and revoke sessions | Within first hour | Email controls recovery for all other accounts |
| Change banking passwords and check transactions | Within first hour | Contact fraud line if suspicious activity found |
| Change other account passwords | Same day | Prioritise accounts with payment methods attached |
| File police report | Same day | Required for insurance and IMEI blacklisting |
| Report IMEI to carrier | Same day | Enables device blacklisting across cooperating networks |
| Check for SIM swap on account | Same day | Ask carrier if any SIM swap or port-out was requested |
| Enable carrier account lock | After line is restored | Prevents future SIM swap attempts |
---
## FAQ
See the frontmatter for structured FAQ entries compatible with schema.org/FAQPage.
**Can I track a phone that has been turned off?**
A device that is powered off cannot transmit its location in real time. Apple Find My can show the last location recorded before the device lost power. On supported Apple devices, the Find My network (which uses Bluetooth signals detected by other Apple devices nearby) can report an approximate location even when the device is powered off, though this depends on the device model and iOS version. Google Find My Device relies on an active internet connection and does not have an equivalent offline network.
**What if I did not enable a screen lock on the lost phone?**
A device without a screen lock gives whoever has it immediate access to all installed apps and their stored sessions. If your phone was not screen-locked, treat every account that was installed on the device as potentially compromised. Prioritise changing email and banking passwords and revoking sessions before changing anything else.
**My carrier is asking for a PIN or account number I do not remember — what can I do?**
Carriers have fallback identity verification procedures for customers who cannot recall their account PIN. You will typically be asked to verify with other account information: billing address, the last four digits of a national ID number, a recent invoice amount, or an email-based verification link sent to the address on the account. Visit a carrier store with government-issued photo ID as a last resort, as in-person verification typically has fewer restrictions.
**Does a remote erase void my carrier contract or insurance?**
No. A remote erase deletes data from the device but has no effect on your carrier contract, insurance policy, or your phone number. Your contract obligations and insurance coverage remain unchanged after an erase. If you later recover the device, contact your carrier and Apple or Google support to determine whether data backed up to iCloud or Google One can be restored.
---
## Related Guides
- [SIM Swap Fraud: How It Works and How to Protect Yourself](/en/guides/sim-swap/) — How attackers hijack your phone number after a theft, and the carrier locks that prevent it
- [IMEI, PIN, and PUK Codes Explained](/en/guides/imei-pin-puk/) — How to find and record your IMEI, how SIM PIN protection works, and the 10-attempt PUK limit
- [SIM Lock and SIM-Free Explained](/en/guides/sim-lock/) — How carrier locks differ from device locks, and how to check your phone's lock status
- [How to Keep a Phone Number You're Not Using](/en/guides/number-storage/) — Options for holding your phone number during a suspension or replacement period
- [How to Receive SMS Two-Factor Authentication (2FA) Codes Abroad](/en/guides/sms-2fa-abroad/) — Why SMS 2FA becomes a security risk when a SIM is compromised, and stronger alternatives
================================================================================
# Set Up eSIM with a Manual Code (SM-DP+ Address) When QR Won't Work
URL: https://sim-finder.com/en/guides/manual-code/
Type: guides (en)
Published: 2026-04-20
If you cannot scan a QR code to install an eSIM, manual code entry is the alternative defined in the GSMA SGP.22 specification. You enter two pieces of text — an SM-DP+ address and an activation code — directly into your device's Settings, and the eSIM profile downloads exactly as it would from a QR code scan. The result is identical; only the input method differs.
This guide covers when manual entry is needed, what information you require, how to get it, and the exact steps for iPhone and Android.
---
## When Manual Code Entry Is Needed
Manual entry is the correct approach in three specific situations:
**Camera failure or hardware issue.** If the camera on the device you are setting up is broken or unavailable, QR scanning is not possible. Manual entry is the only path that does not require a second device.
**QR code scan fails repeatedly.** A damaged QR code, low-resolution printout, or persistent scan errors can make QR-based setup unreliable. If the QR code is present but will not scan cleanly, entering the underlying code strings manually is faster than continuing to troubleshoot the scan.
**QR code is on the same device you are setting up.** When you buy an eSIM and the QR code is sent to the same device you intend to configure, you cannot use that device's camera to scan a code on its own screen. On iOS 17.4 and later, you can long-press the QR code image to trigger eSIM setup directly — see [How to Set Up eSIM on iPhone via QR Code](/en/guides/qr-code-iphone/) for that method. On Google Pixel, you can use the "Use photo instead" option — see [How to Set Up eSIM on Android via QR Code](/en/guides/qr-code-android/). If neither of those workarounds applies to your situation, manual entry resolves the problem without requiring a second device.
---
## What You Need
Before starting, gather the following from your carrier or eSIM provider:
**SM-DP+ Address** (also called the activation server address or RSP server address)
A domain name such as `rsp.example.com` or `consumer.globalplatform.com`. This is the address of the server that holds your eSIM profile. Without it, your device does not know where to connect.
**Activation Code** (also called Matching ID or Confirmation Code Token)
A string of characters — typically alphanumeric — that identifies your specific eSIM profile on the SM-DP+ server. It functions as a one-time access token.
**Confirmation Code** (optional — carrier-dependent)
Some carriers require a secondary verification code at the point of installation. If yours does, the code is usually delivered by email or SMS at the time you initiate the setup. Not all providers use this.
**EID** (sometimes required before issuance)
The EID (eUICC Identifier) is a permanent 32-digit serial number identifying your device's eUICC chip. Some carriers ask you to submit your EID before they issue an activation code, so they can bind the profile to your specific hardware. To find your EID:
- **iPhone**: Settings > General > About — scroll to "EID"
- **Android (Pixel)**: Settings > About phone > SIM status — or Settings > About phone and search for "EID"
- **Android (Samsung)**: Settings > About phone > Status information > EID
---
## How to Get the SM-DP+ Address and Activation Code
### From Your Carrier or eSIM Provider
The most direct route: check the confirmation email from your carrier or eSIM provider. Most providers include the SM-DP+ address and activation code as plain text alongside the QR code image, specifically to enable manual entry.
If not in email, log in to your carrier's app or member portal and look for an option labeled **SIM Management**, **eSIM Settings**, **Add eSIM**, or **Manage Plans**. The SM-DP+ address and activation code are often displayed there once a plan is provisioned.
If you cannot locate them in either place, contact the carrier's support and ask for the activation code and SM-DP+ server address for your plan. Every carrier that issues eSIM profiles via QR code must have these values available.
### By Decoding the QR Code
If you have the QR code but cannot scan it with the device you are configuring, you can decode it using another device to read the text it contains. The QR code for eSIM encodes a text string in the LPA activation code format (described in the [Understanding the LPA Activation Code Format](#understanding-the-lpa-activation-code-format) section below). Decoding gives you the SM-DP+ address and activation code as readable text that you can then type in manually.
**On a second smartphone:** Open the camera app and point it at the QR code. Instead of tapping "Add eSIM", tap the text that appears in the camera view to copy the full string. The SM-DP+ address and activation code are the second and third segments of that string, separated by `$` characters.
**On a computer:** Use any QR code reader app or an online QR code decoder (search for "QR code decoder" in your browser). Paste or photograph the QR code to reveal the encoded text.
---
## Manual Entry on iPhone
Apple documents manual eSIM entry as a standard option on all eSIM-capable iPhones. The menu path differs slightly between iOS versions.
### On iOS 17.4 and Later
1. Open **Settings**
2. Tap **Cellular**
3. Tap **Add eSIM** (or **Add Cellular Plan**)
4. Tap **Use QR Code** (this intermediate screen may appear on some iOS versions)
5. At the bottom of the screen, tap **Enter Details Manually**
6. Enter the **SM-DP+ Address** in the first field
7. Enter the **Activation Code** in the second field
8. Tap **Next** — the download begins
9. If prompted for a **Confirmation Code**, enter it and tap **Next**
10. Tap **Done** when the profile is installed
### On iOS 17.3 and Earlier
The path to manual entry is slightly different on older iOS versions:
1. Open **Settings**
2. Tap **Cellular** (or **Mobile Data**)
3. Tap **Add Cellular Plan**
4. Tap **Enter Details Manually** (this option may appear directly without the "Use QR Code" intermediate screen)
5. Enter the SM-DP+ Address and Activation Code, then proceed
### After Installation
iOS will prompt you to label the new line (for example, "Travel" or "Work") and configure dual-SIM settings. If you are using the eSIM for travel, go to **Settings > Cellular** and make sure **Cellular Data** is set to the new eSIM line. If the eSIM is from a carrier in another country, also enable **Data Roaming** for that line.
If installation succeeds but data does not work, see [eSIM Activation Failed: Troubleshooting](/en/guides/activation-failed/) for a step-by-step diagnosis.
---
## Manual Entry on Android
### Google Pixel
1. Open **Settings**
2. Tap **Network & internet**
3. Tap **SIMs**
4. Tap **Add SIM** or the **+** icon
5. On the "Download a SIM instead?" screen, tap **Next**
6. On the QR scan screen, look for **Need help?** and tap **Enter it manually** (label may appear as **Enter code manually** on older Android versions)
7. Enter the activation code in the format `LPA:1$$` — or enter the SM-DP+ address and activation code in separate fields if the screen provides them separately
8. Tap **Download** and wait for the profile to install
If a Confirmation Code is required, a prompt appears after step 8.
### Samsung Galaxy (One UI)
1. Open **Settings**
2. Tap **Connections**
3. Tap **SIM card manager** or **SIM manager** (label depends on model, region, and One UI version)
4. Tap **Add mobile plan** or **Add eSIM**
5. Tap **Enter activation code** (Samsung's official label; some builds or carrier versions may show **Add manually**)
6. Enter the SM-DP+ address and activation code as prompted
7. Tap **Add** or **Download** to proceed
After installation, Samsung may prompt a device restart. Once restarted, go to **Settings > Connections > SIM card manager** to assign mobile data, calls, and SMS to the correct SIM.
### Other Android Phones
The manual entry option follows the same pattern on other Android brands (OnePlus, Motorola, Xiaomi, and others). Navigate to your SIM or eSIM settings, initiate "Add eSIM" or "Download SIM", and look for an option to enter a code manually rather than scan a QR code. The entry fields and the activation process are the same regardless of manufacturer.
---
## Understanding the LPA Activation Code Format
When a carrier generates an eSIM QR code, the QR code encodes a text string following the LPA (Local Profile Assistant) activation code format defined in GSMA SGP.22. Understanding this format explains how the SM-DP+ address and activation code relate to each other and to the QR code.
The format is:
```
LPA:1$$[$]
```
Each segment is separated by a `$` character. The optional confirmation code segment appears in brackets — it is present only when the carrier requires a secondary verification step.
**Example:**
```
LPA:1$rsp.example.com$ABCD-EFGH-1234-5678
```
In this example:
- `LPA:1` — indicates this is a version 1 LPA activation string (defined in SGP.22)
- `rsp.example.com` — is the SM-DP+ address (enter this in the "server address" field)
- `ABCD-EFGH-1234-5678` — is the activation code / Matching ID (enter this in the "activation code" field)
When you scan a QR code, your device decodes this string automatically and populates the fields. Manual entry bypasses the scan step and puts the same values in directly.
This specification is defined in GSMA SGP.22 (RSP Technical Specification for Consumer Devices). For background on how SM-DP+ servers and eUICC chips work in the broader eSIM architecture, see [What Is an eSIM?](/en/guides/what-is-esim/).
---
## Troubleshooting Manual Code Issues
### "Invalid Activation Code" or "Invalid Code" Error
**Most likely cause:** A typo in the SM-DP+ address or activation code. These strings are case-sensitive on some systems and must be entered exactly as provided.
**What to check:**
- Re-read the code character by character. Common typos include confusing `0` (zero) with `O` (letter O), `1` (one) with `I` (letter I) or `l` (lowercase L), and `$` separators with spaces
- If you copied the code from an email, make sure you did not include a trailing space or line break
- Confirm with your carrier that the activation code is still valid — expiration windows vary widely by provider, from a few hours for some traditional carriers to 30+ days or longer for most travel eSIM providers
**If the code is correct but still rejected:** Contact your carrier and confirm that the eSIM profile has been provisioned on the SM-DP+ server for your account. Occasionally a profile is created on the carrier's system but not yet pushed to the server.
---
### "Cannot Connect to SM-DP+ Server" or Timeout
**Most likely cause:** A network connectivity issue, or the SM-DP+ address was entered incorrectly.
**What to check:**
1. Confirm you have a working internet connection — open a browser and load a webpage
2. Re-enter the SM-DP+ address carefully. It should be a domain name (e.g., `rsp.example.com`) — not a URL path (do not include `https://` or `/` characters)
3. Try a different Wi-Fi network. Some hotel or corporate networks block the ports used by eSIM provisioning servers
4. Restart the device and try again — the device's LPA client may have cached a failed state
5. Wait 15–30 minutes and retry. SM-DP+ servers occasionally have brief downtime
For more network-related troubleshooting, including APN settings and roaming configuration, see [eSIM Activation Failed: Troubleshooting](/en/guides/activation-failed/).
---
### Confirmation Code Required (Unexpected Prompt)
If a Confirmation Code prompt appears and you were not provided with one, the carrier requires secondary verification that was not communicated to you.
**What to do:** Check your email (including spam/junk) for a message from your carrier sent at the moment you initiated the manual entry. The Confirmation Code is often sent in real time as a separate email or SMS when the device contacts the SM-DP+ server.
If you do not receive it, contact your carrier and ask them to resend the Confirmation Code for your pending eSIM installation request.
---
### Profile Installs but No Data Connection
Manual code entry and QR code scanning produce the same installed profile — so if data does not work after successful manual entry, the cause is the same as in any other eSIM setup: data routing, data roaming, or APN configuration.
Work through the full diagnosis in [eSIM Activation Failed: Troubleshooting](/en/guides/activation-failed/), starting from Symptom D.
---
## FAQ
### What is an SM-DP+ address?
SM-DP+ (Subscription Manager Data Preparation) is the server that stores and delivers eSIM profiles. The SM-DP+ address is the server's domain name — for example, `rsp.yourcarrier.com`. It tells your device where to connect to download the eSIM profile. This server is defined in the GSMA SGP.22 specification.
### Where do I find my SM-DP+ address and activation code?
Your carrier or eSIM provider supplies both pieces of information. Check the confirmation email you received after purchase, your carrier's app under "SIM Management" or "eSIM Settings", or the carrier's member portal. If you have a QR code but cannot scan it, you can decode the QR code to extract the SM-DP+ address and activation code as text.
### Can I use the same activation code more than once?
No. An activation code is single-use. Once the eSIM profile has been downloaded using that code, the code is invalidated on the SM-DP+ server. If you need to reinstall the eSIM on the same or a different device, contact your carrier or provider to issue a new code.
### My iPhone asks for a Confirmation Code during manual setup. What is it?
A Confirmation Code is an optional secondary security check defined in GSMA SGP.22. Not all carriers require it. If yours does, it is typically a short numeric code sent to your email or phone number at the time of eSIM setup. Check your inbox or SMS for a message from your carrier at that moment.
### What is the difference between an activation code and an EID?
An activation code (also called Matching ID) authenticates the download request to the SM-DP+ server. An EID (eUICC Identifier) is a permanent serial number identifying your device's eUICC chip — analogous to an IMEI for the eSIM hardware. Some carriers ask for your EID to pre-register the device before issuing an activation code.
### Can I use manual code entry on any Android phone, not just Pixel and Samsung?
The manual entry option is available on any Android device that supports eSIM. The exact menu path varies by manufacturer. Look for "Enter code manually", "Manual activation", or a similar option on your device's Add eSIM screen. If the manual entry option is not present, check your manufacturer's support page for the correct path.
---
## Related Guides
This guide covers the manual code entry path specifically. For the QR code path, see the setup guides for your device:
- [How to Set Up eSIM on iPhone via QR Code](/en/guides/qr-code-iphone/) — ES-01: standard iPhone setup via camera scan, including the iOS 17.4 long-press workaround
- [How to Set Up eSIM on Android via QR Code](/en/guides/qr-code-android/) — ES-02: Google Pixel and Samsung Galaxy QR setup, including the Pixel "Use photo instead" option
- [What Is an eSIM?](/en/guides/what-is-esim/) — how eUICC chips, SM-DP+ servers, and the SGP.22 specification fit together
- [eSIM Activation Failed: Troubleshooting](/en/guides/activation-failed/) — FE-01: diagnosis and fixes for every common activation error, regardless of whether you used a QR code or manual entry
- [Your First Travel eSIM: Complete Guide](/en/guides/first-time-guide/) — TE-02: end-to-end walkthrough for purchasing and using a travel eSIM abroad
To compare eSIM plans for your destination, use [SimFinder Travel →](/en/travel/)
---
Sources:
- [Set up eSIM on iPhone - Apple Support](https://support.apple.com/en-us/118669)
- [eSIM Consumer and IoT Specifications - GSMA](https://www.gsma.com/solutions-and-impact/technologies/esim/esim-specification/)
- [Get a SIM or eSIM & add it to your Pixel phone - Pixel Phone Help](https://support.google.com/pixelphone/answer/7086887)
- [How do I add an eSIM on my Samsung Galaxy phone? - Samsung Support](https://www.samsung.com/ae/support/mobile-devices/how-do-i-add-an-esim-on-my-samsung-galaxy-phone/)
================================================================================
# MNO vs MVNO vs Sub-Brand — Which Carrier Type Is Right for You?
URL: https://sim-finder.com/en/guides/mno-vs-mvno-comparison/
Type: guides (en)
Published: 2026-05-20
When you shop for a mobile plan, you will encounter three types of operator: the major carriers (MNOs), their in-house sub-brands, and independent MVNOs. All three sell you phone service. All three may run on the same towers. But their ownership structure, pricing, network priority, and service model differ in ways that matter in daily use.
This article compares the three types across eight practical dimensions and ends with a decision tree to match your usage profile to the right category. If you are new to MVNOs, [What Is an MVNO?](/en/guides/what-is-mvno/) covers the technical foundation — this article assumes that background.
---
## The Three Operator Types: At a Glance
**MNO (Mobile Network Operator)**
An MNO holds a government-issued radio spectrum licence and owns the physical infrastructure: towers, base stations, antennas, and core network. In the US, the three national MNOs are AT&T, T-Mobile, and Verizon. In the UK: EE, O2, and VodafoneThree (formed by the merger of Vodafone UK and Three UK, which completed in May 2025). In Australia: Telstra and Optus are the primary MNOs with nationwide coverage.
**Sub-Brand**
A sub-brand is a brand owned and operated by an MNO, positioned at a lower price point than the parent's flagship plans. It runs on the same network as the parent. Examples:
- US: Cricket (AT&T), Metro by T-Mobile, Visible (Verizon), Mint Mobile (T-Mobile, acquired May 2024)
- UK: giffgaff (O2-owned), VOXI (Vodafone), Smarty (Three/VodafoneThree)
- The line between "sub-brand" and "wholly-owned MVNO" is sometimes blurred — what matters is whether the parent MNO controls the brand's network access terms
**Independent MVNO**
An independent MVNO leases wholesale capacity from an MNO and operates as a separate company with no ownership tie to its host network. Examples:
- US: US Mobile, Consumer Cellular (primarily AT&T), Google Fi (T-Mobile and others)
- UK: Lebara (Vodafone network), Tesco Mobile (O2 joint venture)
- AU: Aldi Mobile (Telstra network)
For plain-English definitions of all terms in this article, see the [SIM & Mobile Glossary](/en/guides/glossary-index/).
---
## Comparison Table — 8 Axes
| Axis | MNO | Sub-Brand | Independent MVNO |
|------|-----|-----------|-----------------|
| **Network coverage** | Maximum — owns the infrastructure | Same as parent MNO | Same as host MNO |
| **Peak-time speed** | Highest priority | Higher than independent MVNOs | Lowest priority (shared POI) |
| **Price** | Highest | Moderate | Often lowest |
| **Customer service** | Full retail + phone + online | Varies; sometimes shares MNO stores | Mostly online-only |
| **Contract flexibility** | Postpaid contracts common; some prepaid | Mix of prepaid and postpaid | Predominantly month-to-month |
| **Perks and bundles** | Streaming, device trade-in, family discounts | Limited | Rare |
| **5G access** | Full, subject to rollout | Typically yes (inherited from parent) | Requires specific wholesale negotiation |
| **International roaming** | Widest coverage | Varies by brand | Often limited |
The table is a generalisation. Individual plans within each category vary considerably — use [SimFinder](/en/) to compare specific plans in your market.
---
## Network Coverage and Quality
All three operator types deliver service over the same physical towers. If you are on an AT&T MVNO in the US, your signal comes from AT&T towers. If you are on a Vodafone MVNO in the UK, your signal comes from VodafoneThree towers. Coverage maps for any operator type are therefore a proxy for the host MNO's coverage.
This has a practical consequence: before choosing between an MNO and any MVNO or sub-brand, the first question to answer is **which MNO's network you need**. If AT&T has better coverage in your area than T-Mobile or Verizon, then AT&T, Cricket, and Consumer Cellular will all give you that same coverage — regardless of which brand you choose.
What does differ is how that coverage is allocated to you during congestion. That is the subject of the next section.
**A note on coverage edge cases:** In very rural fringe areas, some wholesale agreements restrict MVNOs from accessing domestic roaming (partner networks that fill gaps). MNO direct subscribers may be able to connect to a partner network in a fringe area while an MVNO subscriber on the same host cannot. This is not universal, but it is worth checking if you live or work in a marginal coverage area.
---
## Speed at Peak Times: Deprioritization
Deprioritization is the most important structural difference between MNOs, sub-brands, and independent MVNOs. Understanding it precisely helps you decide how much it matters for your use case.
### How Deprioritization Works
An MNO's radio network has finite capacity. When demand exceeds available capacity — typically during morning and evening rush hours, at concerts, sports venues, or major public events — the network must queue traffic. The MNO's own direct subscribers are served first. After them come sub-brand subscribers (the MNO controls this priority internally). Independent MVNO traffic is delivered through a shared Point of Interface (POI) and is typically served last.
The result is not an outage. It is a slowdown: page loads take longer, videos buffer, real-time apps like video calls may degrade in quality. During off-peak periods — late evenings, early mornings, low-density areas — the difference between MNO and MVNO speeds is often negligible because the network is not congested.
### What This Actually Looks Like
A user on an independent MVNO in a dense urban area during the evening commute might experience speeds that are noticeably slower than a user on the same host MNO's direct plan. The same MVNO user at noon in a suburban area may see speeds functionally identical to the MNO.
The severity of deprioritization depends on:
- **The host MNO's total network capacity in your area** — a well-invested network experiences less congestion
- **The MVNO's total subscriber load** — a smaller MVNO with fewer subscribers competing for the same POI bandwidth
- **How much bandwidth the MVNO has purchased** at the POI — this is invisible to consumers but affects peak-time performance
### Sub-Brands: A Middle Ground
Sub-brands (wholly MNO-owned) generally receive better treatment than independent MVNOs because the MNO can configure its internal priority policy. Visible, for example, runs on Verizon's network and benefits from that ownership relationship — though it may still be deprioritized relative to Verizon's premium direct plans during heavy congestion. The gap between sub-brand and full MNO is typically smaller than the gap between independent MVNO and full MNO.
---
## Price and Plan Flexibility
### Why MVNOs Are Cheaper
MVNOs carry none of the capital expenditure that drives MNO costs: no spectrum licence fees, no tower construction, no antenna upgrades. Their cost base is structurally lower, and that saving is partly passed on through lower monthly charges. Independent MVNOs can price more aggressively than sub-brands, which must avoid cannibalising the parent MNO's own plan sales.
No specific prices are quoted in this article because they change frequently. Use [SimFinder](/en/) to compare current pricing in your market.
### Contract Flexibility
Independent MVNOs are overwhelmingly prepaid and month-to-month. This is one of their strongest advantages for consumers who dislike lock-in: cancel anytime, no exit fees. Sub-brands vary — some offer postpaid options, others are prepaid-only. MNOs offer the full range, including long-term postpaid contracts that may come with device financing but also with early termination fees.
If you want to try a carrier without commitment, an independent MVNO or prepaid sub-brand is the right category. If you need a device subsidy or corporate billing, an MNO postpaid plan is more likely to meet that need.
### "Unlimited" Plan Fine Print
All three carrier types now offer "unlimited" plans. In most cases, "unlimited" means unlimited data at full speed up to a threshold, after which speeds are reduced (throttled) or deprioritized. Read the Fair Use Policy carefully:
- What is the high-speed threshold?
- After throttling, what speed can you expect?
- Are video streaming speeds capped?
These terms vary significantly between plans, and the difference between a well-specified unlimited plan and a poorly specified one matters more than the nominal price.
---
## Customer Service and Perks
### Service Channels
MNOs maintain large retail networks with in-store staff capable of handling SIM activations, device issues, and account problems in person. This is a meaningful advantage if you are not comfortable troubleshooting technical issues online, or if you need a SIM activation while travelling with no access to a computer.
Sub-brands vary considerably. Cricket and Metro (both US) have extensive retail presences because they inherited store infrastructure from their parent carriers. VOXI (Vodafone UK) and Smarty (Three UK) are primarily online. giffgaff (O2 UK) operates entirely through community forums and online support — no phone line, no store.
Independent MVNOs are mostly online-only. Google Fi has broad user documentation. US Mobile has active community channels. Consumer Cellular targets older adults and specifically offers telephone support, making it an outlier in the MVNO category. For most independent MVNOs, if you need help with APN configuration, eSIM activation, or a billing dispute, your support channel is chat or email.
If you are likely to need in-person help — for example, if you are setting up a plan for a family member who is not comfortable with online accounts — consider a sub-brand with a physical retail presence, or the MNO itself.
For setup questions like APN configuration after switching, [What Is a SIM Card?](/en/guides/what-is-sim/) covers the underlying mechanics, and the [SIM & Mobile Glossary](/en/guides/glossary-index/) is a useful reference for technical terms you may encounter.
### Perks and Bundles
MNOs bundle streaming subscriptions, device trade-in programmes, roadside assistance, international calling credits, and family plan discounts into their higher-tier plans. These perks have real value for some users and zero value for others. If you already subscribe to the streaming services being bundled, the effective cost of an MNO plan after accounting for the bundle may be competitive with an MVNO.
Sub-brands occasionally offer limited perks (Visible's device deals, for example). Independent MVNOs rarely offer perks beyond the plan itself — their value proposition is price and simplicity.
---
## Decision Tree by User Profile
Use this as a starting point, not a prescription. Individual plans within each category vary widely.
### Budget Shoppers
**Profile:** Price is the primary criterion; willing to manage online; usage is mostly off-peak (evenings at home, light daytime use).
**Likely fit:** Independent MVNO on the MNO with the best coverage in your area. The peak-time deprioritization trade-off matters least for off-peak users. Month-to-month flexibility is a bonus.
**Watch out for:** Roaming terms if you travel. Check whether the MVNO has negotiated the 5G access tier you expect.
---
### Heavy Data Users (Video, Remote Work)
**Profile:** Streams video daily, uses mobile data as a primary connection, sensitive to speed drops during peak hours.
**Likely fit:** MNO direct plan or a well-funded sub-brand (e.g. Visible Plus tier or Metro by T-Mobile's top tier, which offer deprioritization protections at an additional cost). The peak-time speed advantage of being on the MNO directly is most valuable for this profile.
**Watch out for:** "Unlimited" plan throttling thresholds. Even on an MNO, verify that your plan tier does not deprioritize after a usage cap.
---
### International Travelers
**Profile:** Needs a usable connection in multiple countries; roaming is a regular need.
**Likely fit:** Either an MNO with a strong international roaming plan, or a travel eSIM supplementing your home SIM. Independent MVNOs often have limited roaming; check terms before relying on them abroad. For a full comparison of connectivity options while travelling, see [4 Ways to Stay Connected Abroad](/en/guides/four-options/). If your device supports eSIM, [What Is an eSIM?](/en/guides/what-is-esim/) covers how to add a travel profile alongside your home SIM.
**Watch out for:** MVNOs with no or restricted roaming. Budget sub-brands sometimes exclude international roaming entirely from their lowest-tier plans.
---
### Families
**Profile:** Multiple lines, mix of heavy and light users, potentially includes children or older adults who may need in-person support.
**Likely fit:** MNO family plan, or a sub-brand that offers multi-line discounts (Metro by T-Mobile, Cricket). The in-store support availability is particularly relevant when setting up plans for less technically confident family members.
**Watch out for:** Per-line pricing on MVNOs — sometimes buying 4–5 MVNO lines is competitive with a family plan; calculate carefully before assuming an MNO family plan is cheaper.
---
### Business Users
**Profile:** Needs reliable speed during business hours, device management, invoicing, SLA guarantees.
**Likely fit:** MNO postpaid business plan. Independent MVNOs rarely offer the account management features, SLA commitments, or IoT/fleet connectivity options that business plans require.
**Watch out for:** Overpaying for consumer-oriented MNO perks (streaming bundles) if your business plan includes them unnecessarily.
---
### IoT / Data-Only Devices
**Profile:** Fleet tracking, point-of-sale terminals, connected sensors; needs low-cost data without voice.
**Likely fit:** Specialised MVNO with data-only IoT plans, or MNO directly for large-volume commercial contracts. Some MVNOs offer exceptionally competitive data-only rates at IoT scale. The standard consumer comparison (MNO vs MVNO on peak-time speed) is less relevant here — reliability, API management, and SIM lifecycle management matter more.
---
## Ownership Changes to Watch
The mobile market changes faster than most consumers realise. Brands that appear independent may become MNO subsidiaries, and network relationships between MVNOs and host MNOs can change. Key examples:
**Mint Mobile (US):** Acquired by T-Mobile in May 2024. Mint is now a T-Mobile subsidiary, not an independent MVNO. Plans remain distinct from T-Mobile's main line-up, but the independence that defined Mint's original positioning is gone.
**Visible (US):** Has been a wholly-owned Verizon subsidiary since its launch (rebranded "Visible by Verizon" in 2022). Often listed alongside independent MVNOs in comparison articles, but it is not independent.
**VodafoneThree (UK):** The merger of Vodafone UK and Three UK completed on 31 May 2025, creating VodafoneThree. MVNOs that previously hosted on either Vodafone or Three now sit under the same corporate entity. Network integration is ongoing; wholesale agreements are not necessarily affected immediately, but the competitive landscape for UK MVNOs has changed.
**Smarty (UK):** Owned by Three UK / VodafoneThree post-merger. Positioned as an independent-feeling brand, but fully owned by the same parent as the host network.
**TracFone (US):** Became a Verizon subsidiary in 2021. TracFone's brands (Straight Talk, Total by Verizon, Simple Mobile, Walmart Family Mobile) are Verizon-owned.
**Amaysim (AU):** Acquired by Optus in 2021. Now an Optus subsidiary, not an independent MVNO.
The practical implication: before choosing a brand because it appears independent, verify its current ownership. Check the operator's "About" page or an authoritative telecommunications news source. Ownership changes the network priority dynamics, customer service integration, and long-term pricing independence of the brand.
---
## FAQ
The structured FAQ answers are in the frontmatter above for schema.org/FAQPage compatibility.
**Can a sub-brand get deprioritized too?**
Yes, but generally less than independent MVNOs. The parent MNO can configure its own internal traffic policy to give its sub-brands different priority levels than wholesale MVNOs. In practice, some sub-brands (particularly lower-tier plans within a sub-brand) may still be deprioritized relative to the parent MNO's premium postpaid customers. Read the plan's terms for any explicit deprioritization language.
**Does switching from an MNO to an MVNO require a new SIM?**
Yes, in most cases. An MVNO issues its own SIM or eSIM profile with its own credentials. You cannot simply change a billing profile; you need a new SIM or eSIM from the new carrier. The exception is if you are switching between plans within the same parent company (for example, from AT&T to Cricket), where some streamlined migration paths may exist.
**Is 5G on an MVNO as fast as 5G on the MNO?**
Not necessarily. 5G access must be specifically negotiated in the wholesale agreement. Even if an MVNO offers 5G, the agreement may cover only mid-band 5G (the widely available, broadly useful tier) and not mmWave 5G (the ultra-fast, short-range tier). Additionally, sub-brand and MVNO 5G traffic is subject to the same deprioritization dynamics as 4G LTE. Peak-time 5G speeds on an MVNO may be slower than peak-time 5G speeds on the host MNO's direct plan.
---
## Related Guides
- [What Is an MVNO?](/en/guides/what-is-mvno/) — Technical foundation: POI leasing, deprioritization mechanics, and the MVNO business model
- [What Is a SIM Card?](/en/guides/what-is-sim/) — How SIM credentials work across all three operator types
- [What Is an eSIM?](/en/guides/what-is-esim/) — How to add a second carrier profile to your device (relevant for adding a travel plan alongside your main plan)
- [4 Ways to Stay Connected Abroad](/en/guides/four-options/) — Full comparison of roaming, local SIM, travel eSIM, and pocket Wi-Fi
- [SIM & Mobile Glossary](/en/guides/glossary-index/) — Plain-English definitions of MNO, MVNO, POI, deprioritization, and 20+ more terms
================================================================================
# Number Porting Step by Step: How to Keep Your Number When Switching
URL: https://sim-finder.com/en/guides/mnp-step-by-step/
Type: guides (en)
Published: 2026-06-04
Number porting follows the same underlying sequence in every country: obtain a transfer credential from your current carrier, provide it to your new carrier, and wait for the port to complete. The differences lie in what that credential is called and how you obtain it — and in whether you need to contact your old carrier at all.
This guide walks through the complete port process step by step, with the exact credential and method for the UK, US, France, Australia, and Japan. It then covers what happens on the day of cutover and how to confirm the port is complete.
For a technical explanation of how number portability databases and call routing work, see [Mobile Number Portability (MNP) Explained](/en/guides/what-is-mnp/).
---
## The Universal Port Sequence
Every country with mandated number portability follows the same five-stage process. What varies is the credential name and who contacts whom.
1. **Gather your account details.** Before doing anything else, collect your account number with the current carrier and the exact registered name and billing address on the account. A mismatch at any point causes the port to be rejected.
2. **Obtain a transfer credential from your current carrier** — or authorise your new carrier to request it on your behalf. The credential type and how you get it differs by country; each is described in the sections below.
3. **Sign up with your new carrier and provide the credential.** The new carrier submits a port-in request to the national number portability database. At this point, the clock starts on the regulatory completion window.
4. **Wait for the cutover.** Your old SIM loses service first. A few minutes to a couple of hours later, your new SIM acquires signal with the ported number.
5. **Verify the port is complete.** Make a test call and send a test SMS before treating the switch as finished.
Before completing step 1, confirm that your device is SIM-unlocked — a successful port on a locked device leaves you with a working number but no usable service. For how to check, see [SIM Lock and SIM-Free Explained](/en/guides/sim-lock/).
---
## Step 1 — Gather Your Account Information
The information you need varies slightly by country, but most port-in forms ask for the same core set:
| Field | Where to find it |
|-------|-----------------|
| Phone number to port | Your own number |
| Account number | Billing statement or carrier account portal |
| Registered name | Account portal — copy the name character for character |
| Billing address | Account portal or latest bill |
| Transfer credential | Varies by country — see below |
The account number is an internal identifier, not your phone number. It is on your bill or visible in your carrier's online account portal after login.
**Name matching is critical.** A difference of one character — a hyphen, a middle initial, "Jr." appended or missing — is sufficient to cause a rejection. Before submitting the port request, log in to your current carrier's portal and screenshot the exact name as displayed. Use that spelling when filling in the new carrier's form.
If your line is on a family or shared plan, confirm whether you are listed as the primary account holder. In most markets, a port request must be authorised by the account holder. If you are not the account holder, the holder may need to provide the transfer credential or authorise the transfer on your behalf.
---
## Step 2 — Obtain Your Transfer Credential
This is the step that differs most by country.
### United Kingdom — PAC Code (text 65075)
Text **PAC** to **65075** from the number you want to port. Ofcom rules require your current carrier to send the Porting Authorisation Code (PAC) within 60 seconds, free of charge. The PAC is valid for 30 days.
If you want to leave your carrier without keeping your number, text **STAC** to **75075** instead. This returns a Service Termination Authorisation Code.
Give the PAC to your new carrier. Ofcom rules require the port to complete within one working day of the new carrier receiving a valid PAC.
Source: [Ofcom: Switching — mobile](https://www.ofcom.org.uk/phones-and-broadband/switching-provider/switching-mobile)
### United States — Number Transfer PIN
In the US, porting is governed by the FCC's Local Number Portability (LNP) mandate. To port your number, you need:
- Your **account number** with the current carrier.
- A **Number Transfer PIN** — a code that is distinct from your account login password, billing PIN, or SIM card PIN.
Most US carriers now require customers to set up a Number Transfer PIN in their account portal or app. If you have not set one, do this before contacting the new carrier. The new carrier submits the port request using the account number and transfer PIN together.
The FCC mandates that simple ports be processed within one business day.
Source: [FCC: Porting — Keeping Your Phone Number When You Change Providers](https://www.fcc.gov/consumers/guides/porting-keeping-your-phone-number-when-you-change-providers)
### France — RIO Code (call 3179)
Call **3179** from the mobile number you want to port. The call is free of charge and available 24 hours a day, seven days a week. An automated message reads out your RIO (Relevé d'Identité Opérateur) code. The RIO remains valid while your contract is active.
Provide the RIO to your new carrier when signing up. The gaining carrier submits the port request. Under ARCEP Decision No. 2022-2148, simple prepaid ports must complete within one working day; postpaid ports may take up to three working days.
Porting is free of charge in France.
### Australia — Gaining-Carrier Model
In Australia, you do not need to contact your current carrier or obtain a transfer code. The gaining carrier handles the entire port-out process on your behalf.
When you sign up with the new carrier, they will ask you to authorise the transfer and will verify your identity before proceeding. This identity verification step — which may include an SMS OTP sent to the number being ported or another approved verification method — was introduced by the *Telecommunications (Mobile Number Pre-Porting Additional Identity Verification) Industry Standard 2020* to combat port-out fraud.
ACMA industry service levels require 90% of simple mobile ports to complete within three hours. Porting is free.
Source: [ACMA: Keep or transfer your phone number](https://www.acma.gov.au/keep-or-port-your-phone-number)
### Japan — One-Stop MNP and Reservation Number
Japan operates two parallel methods.
**One-Stop MNP (since May 24, 2023):** Complete the entire transfer on the new carrier's website without contacting the old carrier at all. This method is available online only and for eligible carrier combinations. The new carrier requests the transfer directly from the current carrier's system.
**Traditional MNP:** Obtain an MNP reservation number (MNP予約番号) from your current carrier — by phone, app, or in-store. The reservation number is valid for 15 days. Provide it when signing up with the new carrier.
Source: [MIC Japan — One-Stop MNP](https://www.soumu.go.jp/menu_kyotsuu/important/kinkyu02_000515.html)
### Other Markets
In Germany, the gaining carrier initiates the port request on your behalf under §59 TKG; you do not need a separate code, though the carrier will verify your identity. In Canada, you provide your account number and transfer PIN to the new carrier, which submits the port under CRTC number-portability rules (Telecom Decision CRTC 2005-72); simple wireless ports must complete within 2.5 hours.
EU member states generally follow one of two models: a customer-obtained code (similar to the UK or France) or a gaining-carrier-initiates model (similar to Australia or Germany). Within the EU, the European Electronic Communications Code (Directive 2018/1972) requires that porting complete within one working day and be free of charge. Individual member states determine the specific credential mechanism.
---
## Step 3 — Sign Up with Your New Carrier
During the sign-up flow, your new carrier will ask for the account details you gathered in step 1 and the transfer credential from step 2.
**Timing matters here.** Do not sign up with the new carrier and activate your new SIM or eSIM before you have the transfer credential in hand. Activating the new SIM without a port request means the SIM gets a new number, and any subsequent port request has to start from scratch.
When filling in the sign-up form:
- Use the registered name exactly as it appears on your current carrier's account.
- Use the account number, not your phone number, in the account number field.
- Enter the transfer credential (PAC, Number Transfer PIN, RIO, or equivalent) exactly as received.
Once the new carrier submits the port request, you will typically receive a confirmation — by email or SMS to a secondary number — with an estimated completion time.
While selecting a new carrier, compare current plans using [SimFinder](/en/sim/) — plans change frequently, so check current offers before committing.
---
## Step 4 — Wait for the Cutover
After the port request is submitted, the number moves through a technical process: the current carrier updates its porting database record, routing tables propagate across networks, and the new carrier's switch activates the number on its infrastructure.
During this window, which typically lasts from a few minutes to a few hours depending on the country:
- Your old SIM will lose service first. This is normal.
- SMS messages may not be reliably delivered to either SIM.
- Calls to your number may fail intermittently.
**Do not trigger any SMS-based two-factor authentication logins during this period.** If you need to log in to a banking, email, or work account during the port window, use an authenticator app or a backup code instead of waiting for an SMS code. For a full explanation of how to prepare for this, see [Pre-Switch Checklist](/en/guides/pre-switch-checklist/).
Do not cancel your current account. In most markets, the current carrier automatically closes the account when the port completes. If you cancel manually before the port is done, your number returns to the carrier's number pool and may be impossible to recover.
**If you are porting to an eSIM:** Some platforms prompt you to download and activate the eSIM profile during the sign-up flow, before the port-out from the old carrier completes. Do not activate the eSIM profile until your new carrier explicitly confirms the port is complete. Activating early can create a state where the eSIM has network access but the ported number is not yet routed to it. Wait for the confirmation, then tap activate.
---
## Step 5 — Day-of Cutover Verification
When the port completes, your new SIM will show network signal and your ported number will be active on the new carrier.
**Verify the port is complete before discarding the old SIM:**
1. **Make a test call.** Call a known number — a friend, a voicemail service, or a secondary line — and confirm it connects through the new carrier.
2. **Send a test SMS.** Send a message to yourself from another device, or ask a contact to send one. Confirm it arrives.
3. **Check mobile data.** Open a website that does not use cached content to confirm data connectivity on the new plan.
4. **Confirm your number is displayed correctly.** Some devices take a few minutes to refresh the displayed number in Settings after a port.
If the new SIM shows signal but calls fail, the routing update may still be propagating. Wait 15–30 minutes before concluding there is a problem.
If the port has not completed within the regulatory window for your country — one working day in the UK and most EU markets, 2.5 hours in Canada, three hours for 90% of Australian simple ports — contact your new carrier's support first. They can check the port request status and identify whether it was rejected. If neither carrier resolves the issue within the regulatory window, contact the relevant authority: Ofcom (UK), FCC (US), ACMA (Australia), ARCEP (France), or Bundesnetzagentur (Germany).
---
## What Cannot Be Ported
Number portability transfers one thing only: the phone number. Nothing else moves between carriers automatically.
| What moves | What does not move |
|------------|-------------------|
| Your phone number | Voicemail messages |
| — | Call logs and SMS history |
| — | Carrier app loyalty points or credits |
| — | Carrier email addresses |
| — | Promotional data credits or roaming packages |
| — | Any data stored on the old carrier's servers |
**Voicemail:** Messages stored on your old carrier's voicemail servers remain accessible only through the old carrier's system, for a limited time after the account closes. Listen to and note any important voicemails before the port begins. If you use visual voicemail, take screenshots or notes of any messages you need to keep.
**Carrier email:** Addresses in a carrier's domain stop working when the account closes. This is a separate issue from number portability. Switch to a provider-independent address before the switch and update every service that uses your carrier address.
**Numbers between countries:** MNP is a national framework. A number cannot be ported from one country to another. If you need to maintain a number from one country while using a carrier in another, a VoIP number or dual-SIM setup is the available workaround — not porting.
---
## Common Port Rejection Reasons
Most failed ports fall into one of four categories:
**Name or address mismatch.** The name submitted to the losing carrier does not exactly match the account. Check character for character — a hyphen, a middle initial, or abbreviated company name is enough to cause rejection.
**Wrong credential type.** Providing an account login password, billing PIN, or SIM card PIN instead of the specific Number Transfer PIN (US) or PAC code (UK). These are different. Request the specific transfer credential before starting the port.
**Account lock.** In the US, carriers offer voluntary account locking features (such as Verizon's Number Lock or AT&T's Wireless Account Lock, introduced in 2025) as fraud prevention. If you have enabled such a lock, disable it in your carrier's app before requesting a port. Some carriers also apply a temporary hold after a recent SIM swap or account modification.
**Inactive or closed account.** A prepaid account with a zero or very low balance may have expired, making it ineligible to port. Top up to confirm the account is active before submitting the port request.
If your port is rejected, the new carrier is required to notify you of the reason. Fix the specific issue — do not start over from scratch — and resubmit. The process restarts from step 3, not step 1.
---
## Checklist Summary
Use this before the day of the switch:
- [ ] Account number with current carrier located
- [ ] Registered name on account confirmed — exact spelling noted
- [ ] Billing address on account confirmed
- [ ] Transfer credential obtained or method confirmed (PAC / Number Transfer PIN / RIO / gaining-carrier model / one-stop)
- [ ] Device SIM-unlock status confirmed
- [ ] SMS 2FA services identified — logged in or authenticator app configured
- [ ] Voicemail messages noted or saved
- [ ] Carrier email address migration planned
- [ ] Contract end date and ETF confirmed
- [ ] Device installment balance confirmed
For full preparation detail on each of these items, see [Pre-Switch Checklist](/en/guides/pre-switch-checklist/).
---
## FAQ
*(See structured FAQ items in the frontmatter above for display in site search and rich results.)*
### What if my old carrier refuses to give me a PAC or transfer code?
In the UK, Ofcom rules require carriers to deliver a PAC within 60 seconds of texting 65075 — refusal or delay is a regulatory violation. In France, the 3179 service is mandated by ARCEP. In the US, the FCC prohibits carriers from refusing or delaying a port based on an outstanding balance. If your carrier fails to provide the credential or stalls the process without a valid reason, file a complaint with the relevant national regulator.
### My port completed but my phone shows the old network name. Is that a problem?
No — this is typically a display cache issue. Restart the device, or toggle Airplane Mode off and on. If the problem persists after 30 minutes, go to Settings and manually select your new carrier's network. Confirm that the correct network name appears in the carrier settings on your new SIM's account page.
### Can I port a number that is currently on a prepaid account?
Yes — prepaid number portability is mandated in the same countries as postpaid. The process is identical. The one practical difference: ensure your prepaid account is active (not expired due to zero balance) before initiating the port. An expired prepaid number may have already been released back to the carrier's pool.
### How do I check which carrier to switch to before porting?
Choosing a new carrier involves comparing coverage, data allocation, contract terms, and pricing. Use [SimFinder](/en/sim/) to compare current plans, and [How to Choose a Travel eSIM: 5 Key Criteria](/en/guides/how-to-choose/) for a framework covering the factors that matter most. For a side-by-side breakdown of plan structures across providers, see [Travel eSIM Provider Comparison](/en/guides/provider-comparison/).
---
## Related Guides
- [Mobile Number Portability (MNP) Explained](/en/guides/what-is-mnp/) — Technical background on how porting databases and call routing work, plus country-by-country timing tables.
- [Pre-Switch Checklist](/en/guides/pre-switch-checklist/) — Full preparation checklist: SIM lock, 2FA migration, ETF, voicemail, carrier email, and device backup.
- [SIM Lock and SIM-Free Explained](/en/guides/sim-lock/) — How to confirm your device is unlocked before the port, and how carrier unlock policies work by region.
- [How to Choose a Travel eSIM: 5 Key Criteria](/en/guides/how-to-choose/) — Framework for evaluating a new carrier before you commit to switching.
- [Travel eSIM Provider Comparison](/en/guides/provider-comparison/) — Side-by-side comparison of major plan providers for those switching to a global or travel plan.
================================================================================
# How to Reset Network Settings (and What It Affects)
URL: https://sim-finder.com/en/guides/network-reset/
Type: guides (en)
Published: 2026-06-04
Resetting network settings removes all saved Wi-Fi passwords, Bluetooth pairings, VPN profiles, APN configuration, and cellular preferences from your device. It does not erase personal data, apps, or installed eSIM profiles. On iPhone and Android, this reset takes under two minutes and is one of the most effective ways to resolve persistent connectivity problems that survive simpler fixes.
**When to use it:** after a [No Service](/en/guides/no-service/) or [mobile data failure](/en/guides/no-data/) has not responded to the standard steps (Airplane Mode toggle, restart, network selection, APN correction), a network settings reset clears any corrupted stored configuration that may be preventing the device from connecting.
---
## What a Network Settings Reset Removes
A network settings reset is scoped exclusively to connectivity configuration. The following table shows exactly what is and is not affected.
| Setting | Removed by reset? |
|---------|-------------------|
| Saved Wi-Fi networks and passwords | Yes — all |
| Bluetooth pairings | Yes — all |
| APN settings (manual and carrier-pushed) | Yes — reset to carrier defaults |
| VPN configurations and profiles | Yes — all |
| Cellular network preferences | Yes — reset to automatic |
| Preferred network type (5G/LTE/3G setting) | Yes — reset to automatic |
| eSIM profiles | **No — preserved** |
| Physical SIM settings | **No — preserved** |
| Personal data (photos, contacts, messages) | **No — unaffected** |
| Installed apps and app data | **No — unaffected** |
| Apple ID, Google account, email accounts | **No — unaffected** |
| Device passcode and Face/Touch ID | **No — unaffected** |
The key point for eSIM users: on both iPhone and Android (Pixel and Samsung), installed eSIM profiles are managed by the LPA (Local Profile Assistant) and stored in the eUICC chip — architecturally separate from the network settings layer that is cleared by a reset. In practice, eSIM profiles are not removed by a network reset. However, Google and Samsung do not explicitly document this behavior; if you are concerned, confirm with your eSIM provider before performing the reset.
---
## When to Reset Network Settings
A network settings reset is appropriate after other targeted fixes have not resolved the problem. It is not a first step — it removes settings (especially Wi-Fi passwords and VPN configs) that must be re-entered manually, so use it when there is a clear reason to do so.
### No Service That Persists After Restart and Airplane Mode Toggle
If your device continues to show "No Service," "Searching," or zero signal bars after:
- Toggling Airplane Mode on and off
- Restarting the device
- Setting network selection to Automatic
- Confirming the SIM line is enabled
...then the network registration configuration stored on the device may be corrupted. A reset clears it. For the full no-service diagnostic sequence before reaching this step, see [No Service on Your Phone?](/en/guides/no-service/).
### Mobile Data Not Working After APN Is Confirmed Correct
If you have verified the APN settings, confirmed Data Roaming is on (where required), and confirmed your plan is active and has data remaining, but mobile data still does not work, a reset removes any conflicting or corrupted cellular configuration that may be overriding the correct APN. For the complete data troubleshooting sequence, see [No Mobile Data?](/en/guides/no-data/).
### Unstable Connection After Carrier or Plan Change
When you switch carriers, move from a physical SIM to an eSIM, or change plans within the same carrier, the device may retain old network configuration that conflicts with the new setup. A network reset starts from a clean state. If data connects after the reset but speeds remain consistently slow or unstable, see [Slow Mobile Data Speeds — How to Diagnose and Fix](/en/guides/slow-speed/) for further steps. If the issue started when a new eSIM or SIM would not activate correctly in the first place, see [eSIM Won't Activate? How to Fix Common Setup Issues](/en/guides/activation-failed/) — a network reset is one of the steps covered there.
### Persistent Wi-Fi or Bluetooth Problems
A network reset also clears corrupted Wi-Fi state (for example, a device that keeps disconnecting from the same network despite correct password entry) or Bluetooth pairing issues. Note that all Wi-Fi passwords are erased, not just the problematic one.
---
## How to Reset Network Settings on iPhone
Apple's path for resetting network settings on iPhone has remained consistent since iOS 15. The option is located in the device reset menu, not in the network settings menu itself.
**Steps:**
1. Open **Settings**.
2. Tap **General**.
3. Scroll to the bottom and tap **Transfer or Reset iPhone**.
4. Tap **Reset**.
5. Tap **Reset Network Settings**.
6. Enter your device passcode when prompted.
7. Tap **Reset Network Settings** on the confirmation dialog.
The device restarts automatically. After restart, the carrier name and signal bars should reappear within 30–60 seconds as the device re-registers on the network.
**What happens during the reset:**
- All saved Wi-Fi networks are removed.
- Bluetooth pairings are cleared (paired devices must be reconnected).
- VPN profiles installed via Settings are removed.
- APN settings are reset. If your carrier has an automatic carrier settings update, iOS will re-apply it. If not, you will need to re-enter APN values manually.
- eSIM profiles are not affected.
**Note:** The "Reset Network Settings" option is separate from "Erase All Content and Settings," which performs a full factory reset. Confirm you are tapping the correct option.
---
## How to Reset Network Settings on Android (Pixel)
Google Pixel devices use "Reset Wi-Fi, mobile & Bluetooth" as the network settings reset function.
**Steps:**
1. Open **Settings**.
2. Tap **System**.
3. Tap **Reset options**.
4. Tap **Reset Wi-Fi, mobile & Bluetooth**.
5. Review the summary of what will be reset, then tap **Reset settings**.
6. Enter your PIN, pattern, or password if prompted.
The reset completes without a full device restart on most Pixel versions. Wait 30–60 seconds and check the status bar for network registration.
**Note on Android versions:** The path above applies to Pixel devices running Android 12 through Android 15. On older Android versions, the path may differ — check Settings → System for available reset options.
**Note on Android 14+ Pixel models:** On some Pixel devices running Android 14 or later, the unified "Reset Wi-Fi, mobile & Bluetooth" option may be split into two separate entries: **"Reset Mobile Network Settings"** and **"Reset Bluetooth & Wi-Fi"**. If you see this split, select both options to perform a complete network reset equivalent to the unified option on earlier versions.
---
## How to Reset Network Settings on Android (Samsung)
Samsung Galaxy devices use a separate "Reset mobile network settings" option within the General management menu.
**Steps:**
1. Open **Settings**.
2. Tap **General management**.
3. Tap **Reset**.
4. Tap **Reset mobile network settings**.
5. If you have multiple SIM cards, select which SIM's settings to reset, or select both.
6. Tap **Reset settings** and confirm.
The reset completes without a full restart. Check signal after 30–60 seconds.
**One UI version note:** On older One UI versions (prior to One UI 4), the path is Settings → General management → Reset → Reset mobile network settings. The option name and location have been consistent across recent One UI releases.
---
## How to Reset Network Settings on Other Android Devices
Android network reset paths vary by manufacturer. The general principle is the same across devices: look for a "Reset" or "Reset options" section within System or General management settings.
**Common paths by manufacturer:**
| Manufacturer | Path |
|---|---|
| OnePlus / OxygenOS | Settings → System → Reset options → Reset Wi-Fi, mobile & Bluetooth |
| Xiaomi / MIUI | Settings → Additional settings → Backup and reset → Reset network settings |
| Oppo / ColorOS | Settings → Additional settings → Back up and reset → Reset network settings |
| Sony Xperia | Settings → System → Reset options → Reset Wi-Fi, mobile & Bluetooth |
| Motorola | Settings → System → Reset options → Reset Wi-Fi, mobile & Bluetooth |
If your device is not listed, search within Settings for "reset network" or "reset Wi-Fi." The option is present on all Android devices as it is part of the Android base system, though the path varies by manufacturer skin.
---
## What to Reconfigure After the Reset
A network settings reset removes configuration that must be re-entered manually. Prepare for these steps before performing the reset.
### Wi-Fi Passwords
All saved Wi-Fi networks are removed. You will need to rejoin each network and re-enter the password. On iPhone, if you use iCloud Keychain, the passwords may be restored automatically from iCloud — this depends on your iCloud settings and whether the password was saved to Keychain rather than stored locally only.
### VPN Profiles
VPN configurations installed through Settings are removed. Reinstall the VPN app's configuration or re-import the VPN profile from your VPN provider.
### APN Settings
This is the most important reconfiguration step for users on MVNOs or travel eSIMs.
- **MNO (major carrier) users**: the carrier typically pushes APN settings automatically after the reset, via a carrier settings update on iPhone or an OTA profile on Android. No manual action needed in most cases.
- **MVNO users**: MVNOs often do not push automatic APN profiles. You will need to re-enter the APN values manually. For iPhone users, see the full APN setup instructions in [APN Setup Guide for iPhone](/en/guides/apn-setup-iphone/).
- **Travel eSIM users**: most major travel eSIM providers (such as Airalo, Holafly, Nomad, and Saily) embed APN configuration inside the eSIM profile itself. Because the eSIM profile is preserved through the reset, APN configuration from these providers is typically restored automatically. If data does not work after the reset, check your provider's setup documentation for manual APN values.
### Bluetooth Devices
All paired Bluetooth devices (headphones, car systems, smartwatches, keyboards) must be re-paired. Power each device into pairing mode and reconnect from Settings → Bluetooth on iPhone, or Settings → Connected devices on Android.
### Cellular Preferences
The device reverts to automatic network selection and the default preferred network type (which allows the full range from 5G down to 3G where available). If you had manually set a specific network type — for example, LTE-only to avoid 5G instability in a specific area — you will need to re-apply that setting.
---
## Verifying the Reset Worked
After the reset and device registration, verify connectivity with these checks.
### Check Cellular Registration
Look at the status bar. The carrier name and signal bars should reappear within 60 seconds. If "No Service" or "Searching" persists beyond 60 seconds, check that the SIM line is enabled:
- **iPhone:** Settings → Cellular → confirm the line toggle is on.
- **Android (Pixel):** Settings → Network & internet → SIMs → confirm the SIM toggle is on.
- **Android (Samsung):** Settings → Connections → SIM card manager → confirm the SIM toggle is on.
### Test Mobile Data
Open a browser and navigate to a simple, reliable page. If data does not connect:
1. Confirm the Cellular Data (iPhone) or Mobile data (Android) toggle is on.
2. Confirm Data Roaming is on if your plan requires it (travel eSIMs and some MVNOs).
3. Check that the APN is configured correctly — see [APN Setup Guide for iPhone](/en/guides/apn-setup-iphone/) or your Android carrier's setup documentation.
### Check Bluetooth
Open Settings → Bluetooth (iPhone) or Settings → Connected devices (Android) and re-pair any devices you need. Paired devices from before the reset will not reconnect automatically — they must go through the pairing process again.
---
## Network Reset vs. Factory Reset: Key Difference
A network settings reset and a full factory reset are not the same operation.
| | Network Settings Reset | Factory Reset (Erase All) |
|---|---|---|
| Wi-Fi passwords | Erased | Erased |
| APN / VPN / cellular config | Reset | Erased |
| eSIM profiles | Preserved | Erased (varies by device) |
| Apps | Preserved | Erased |
| Photos and personal data | Preserved | Erased |
| Accounts (Apple ID, Google) | Preserved | Signed out |
A factory reset erases everything and should only be performed when a network settings reset and all other troubleshooting steps have failed. For network connectivity issues, a network settings reset is the appropriate tool.
---
## Frequently Asked Questions
### Will resetting network settings delete my photos, apps, or contacts?
No. Reset Network Settings only removes network-related configuration: saved Wi-Fi passwords, Bluetooth pairings, APN settings, VPN profiles, and cellular network preferences. Personal data — photos, apps, contacts, messages, and app data — is completely unaffected.
### Will resetting network settings delete my eSIM?
On iPhone, Reset Network Settings does not delete eSIM profiles stored on the device. Your installed eSIM plans remain intact. On Android (Pixel), the equivalent "Reset Wi-Fi, mobile & Bluetooth" also preserves installed eSIM profiles. On Android (Samsung), "Reset mobile network settings" likewise preserves eSIM profiles. In all cases, eSIM profiles are managed by the LPA/eUICC, which is architecturally separate from the network settings layer — in practice they are not removed, but Google and Samsung do not explicitly document this; confirm with your eSIM provider if concerned.
### How long does a network settings reset take?
On iPhone, the device restarts automatically and is ready in about 60–90 seconds. On Android (Pixel and Samsung), the reset completes without a full restart and typically takes under 30 seconds. After the reset, wait an additional 30–60 seconds for the device to register on the cellular network before testing.
### After the reset, do I need to re-enter my APN settings?
It depends on your carrier. Most major carriers (MNOs) push APN configuration automatically after a network reset. If you use an MVNO, a travel eSIM, or any carrier that does not push automatic APN profiles, you will need to re-enter the APN manually. Have your APN values from your carrier's setup documentation ready before performing the reset.
### When should I reset network settings versus doing a full factory reset?
Reset Network Settings is appropriate when the problem is connectivity-specific — persistent No Service, mobile data that will not work, or an unstable connection that other steps have not resolved. A full factory reset (which erases all data) is a much more drastic step and is not warranted for network issues alone. Try Reset Network Settings first.
---
## Related Guides
- [No Service on Your Phone? A Step-by-Step Fix](/en/guides/no-service/) — full diagnostic sequence for zero signal bars or "No Service" before using a network reset
- [No Mobile Data? How to Fix Data Connection Problems](/en/guides/no-data/) — step-by-step fix for when signal is present but mobile data does not work
- [APN Setup Guide for iPhone](/en/guides/apn-setup-iphone/) — how to reconfigure APN settings on iPhone after a network reset
- [Slow Mobile Data Speeds — How to Diagnose and Fix](/en/guides/slow-speed/) — if data connects but speed is poor after the reset
- [eSIM Won't Activate? How to Fix Common Setup Issues](/en/guides/activation-failed/) — if the issue started after a new eSIM installation and a reset did not resolve it
Use [SimFinder](/en/) to compare mobile plans, or [SimFinder Travel](/en/travel/) to find travel eSIM plans compatible with your destination and device.
================================================================================
# No Connection Abroad? How to Fix It
URL: https://sim-finder.com/en/guides/no-connection-abroad/
Type: guides (en)
Published: 2026-06-04
When you land abroad and your phone has no data or signal, the cause is almost always one of six things: Data Roaming is off, the eSIM profile is not active, the network selection is stuck on the wrong operator, the APN is missing, your device lacks the frequency bands used locally, or your home carrier has no roaming agreement with the destination. This guide works through each in a logical order, starting with the fastest fixes.
For pre-departure preparation that prevents most of these problems, skip to [Before You Depart](#before-you-depart) first.
---
## First: Toggle Airplane Mode and Check the Basics
Before changing any settings, perform two quick resets that resolve most connection failures.
**Toggle Airplane Mode:**
1. Open Control Center (swipe down on iPhone; swipe from the top or bottom on Android depending on model).
2. Tap the Airplane Mode icon to turn it **on**.
3. Wait **10 seconds** to let the radio fully power down.
4. Tap Airplane Mode again to turn it **off**.
5. Wait up to 30 seconds. Watch the status bar for the carrier name and network type (5G, LTE, 4G) to appear.
This forces the modem to drop its current (failed) registration and re-scan every available network from scratch. A stale or failed registration attempt is the most common cause of no-connection symptoms immediately after landing.
**Restart the device** if Airplane Mode toggle does not help:
- **iPhone**: Hold side button + volume button → slide to power off → wait 10 seconds → hold side button to power on.
- **Android**: Hold power button → tap Restart.
A restart reloads the carrier profile and clears any software state in the radio subsystem that the Airplane Mode toggle does not reach.
---
## Check That Data Roaming Is On
Data Roaming is a device-level switch that must be explicitly turned on to use mobile data on a visited network. Most devices default to Data Roaming off. Voice calls and SMS work even with Data Roaming off; mobile data does not.
**iPhone:**
1. Settings → Cellular (or Mobile Data in some regions).
2. Tap the SIM line you are using abroad.
3. Tap **Cellular Data Options** (or Mobile Data Options).
4. Find **Data Roaming** and turn it on.
On dual-SIM iPhones (iPhone XS and later), each line has its own Data Roaming toggle. Check the correct line — the home SIM and the travel eSIM each have their own switch. For a full guide on running both lines together, including which line to set as primary for data, see [Using Dual SIM for Travel](/en/guides/dual-sim-for-travel/).
**Android (Pixel):**
1. Settings → Network & internet → SIMs.
2. Select the SIM you want to use abroad.
3. Enable **Roaming**.
**Android (Samsung One UI):**
1. Settings → Connections → Mobile networks.
2. Enable **Data roaming**.
For other Android manufacturers: use the Settings search function and search "roaming" if the path differs. The toggle is present on all Android devices.
For a full walkthrough of Data Roaming settings across all device types, including dual-SIM configuration, see [Data Roaming Settings: How to Turn It On/Off Safely](/en/guides/roaming-settings/).
---
## Confirm Your eSIM Profile Is Active
An installed eSIM profile and an active cellular line are not the same state. A profile can be installed on the device but not turned on.
**iPhone:**
1. Settings → Cellular.
2. Under SIM & Cellular Plans, confirm your plan appears in the list.
3. Tap the plan name. Confirm **Turn On This Line** is enabled (green toggle).
4. If you have two lines, confirm the correct line is set as the data SIM: Settings → Cellular → Cellular Data → select the travel eSIM.
**Android (Pixel):**
1. Settings → Network & internet → SIMs.
2. Confirm the toggle for the travel eSIM is on.
3. Confirm it is selected for Mobile Data.
**Android (Samsung):**
1. Settings → Connections → SIM card manager.
2. Confirm the eSIM is toggled on.
3. Under Preferred SIMs, confirm Data is assigned to the travel eSIM.
If the line is on and Data Roaming is on but there is still no data, check whether the plan has a validity period that may not have started yet, or has already expired. Travel eSIM validity typically starts on first connection in the destination country, but the exact trigger varies by provider — check the provider's app or account page.
---
## Select the Right Local Network Manually
Your device selects a network automatically by default. When automatic selection picks a network that has no roaming agreement with your home carrier, or picks a travel eSIM partner that is temporarily unavailable, you get no data. Manual selection lets you override this.
**iPhone:**
1. Settings → Cellular → tap the SIM line in use.
2. Scroll to **Network Selection**.
3. Turn off **Automatic**.
4. The device scans for available networks. This takes 15–30 seconds.
5. Select a network from the list. Try the first result; if data does not work, try the next one.
6. Turn Automatic back on after the trip to prevent the selected network from causing issues when you return home.
**Android (Pixel):**
1. Settings → Network & internet → Internet → tap the SIM.
2. Disable **Automatically select network**.
3. Tap the network you want from the scan list.
4. If data still does not work, try another network from the list.
**Android (Samsung):**
1. Settings → Connections → Mobile networks → Network operators.
2. Tap **Search now**.
3. Select a network from the results.
When selecting manually, look for networks that match your home carrier's stated roaming partner for the destination. Your carrier's roaming coverage page lists which local operators it partners with in each country.
If you are using a travel eSIM, the eSIM's coverage depends on the specific networks the provider has contracted with in the destination country, not your home carrier's agreements. The eSIM provider's app or support page lists the covered local operators.
---
## Check and Configure Your APN
APN (Access Point Name) is the configuration that routes your device's mobile data through the correct network gateway. Without a valid APN, your device registers on the network but cannot transmit data — you may see a carrier name in the status bar with no data working.
**When APN configuration is automatic:**
Physical SIMs from major carriers push APN settings automatically via the carrier profile on the SIM. Travel eSIMs also deliver APN settings as part of the eSIM profile in most cases. If automatic configuration worked correctly, you do not need to enter APN settings manually.
**When to configure APN manually:**
If you installed a travel eSIM and data is not working despite the line being active with Data Roaming on, the APN may be missing. This can happen when:
- The eSIM profile was installed without an internet connection, and the carrier profile did not fully download.
- The provider requires manual APN entry as part of setup (documented in the provider's setup guide).
**iPhone — manual APN entry:**
1. Settings → Cellular → Cellular Data Network (if visible; some carrier SIM profiles hide this menu).
2. Under Cellular Data, enter the APN name provided by the eSIM provider.
3. Enter Username and Password if the provider specifies them (many travel eSIMs leave these blank).
4. Return to the main settings screen. The device reconnects using the new APN.
If the Cellular Data Network option does not appear, the SIM profile locks those fields. Contact the eSIM provider for assistance — they can push a corrected carrier profile.
**Android — manual APN entry:**
1. Settings → Network & internet → SIMs → select the eSIM.
2. Tap **Access Point Names**.
3. Tap the **+** icon to add a new APN.
4. Enter the APN name, Username, and Password as specified by the provider.
5. Tap the three-dot menu and select **Save**.
6. Select the new APN entry to activate it.
---
## Verify Band and Frequency Compatibility
Every mobile network uses specific radio frequency bands. A device designed for one region may not support all the bands used in your destination country. This is a hardware limitation — settings changes cannot override it.
**Common mismatch scenarios:**
- A phone purchased in North America used in Europe, Southeast Asia, or Japan — LTE band allocations differ significantly.
- A phone purchased in Asia used in the US — US carriers use specific LTE bands that many non-US devices do not include.
- A budget or import device with a limited band list used in a country that relies on a newer band for coverage.
- 5G mmWave vs sub-6 GHz: mmWave 5G (deployed in a limited number of venues and dense urban zones, even in countries that have launched it) requires specific hardware support. Devices without mmWave still connect via sub-6 GHz 5G or LTE.
**How to check:**
- Your device's official specifications page (manufacturer's website) lists supported frequency bands.
- Your home carrier and travel eSIM provider's coverage page specifies which bands they use at the destination.
- Use [SimFinder Travel](/en/travel/) to search travel eSIM plans and filter by your device and destination — plan listings indicate coverage approach.
**What to do if bands are incompatible:**
- Change the preferred network type from 5G to LTE: Settings → Cellular → [SIM line] → Voice & Data → select LTE (iPhone); Settings → Network & internet → SIMs → [SIM] → Preferred network type → LTE (Android Pixel). This forces the device to use 4G LTE bands, which are more broadly compatible than 5G bands.
- If LTE bands are also incompatible, the device cannot get signal in that area regardless of settings. In this case, a portable Wi-Fi router with a local SIM, or Wi-Fi calling over a Wi-Fi connection, are the practical alternatives.
---
## Check Your Carrier's Roaming Agreement
Your home SIM connects abroad through a bilateral roaming agreement (GSMA AA.12) between your home carrier and the destination carrier. If no agreement exists for your destination, the home SIM cannot register for data on any network there — regardless of signal strength.
**How to verify:**
- Check your home carrier's roaming coverage page before departure. Most carriers publish a searchable list of destination countries and the partner networks available there.
- If the destination is listed, confirm whether data is included or whether it requires activating a roaming pass.
- If the destination is not listed, your home SIM will not work for data there.
**If no agreement exists:**
A travel eSIM from a provider with dedicated coverage in the destination country is the standard alternative. Travel eSIM providers establish their own network partnerships, which are independent of your home carrier's agreements.
For travelers within the EU and EEA (plus Ukraine and Moldova from January 2026), the Roam Like At Home (RLAH) regulation means that carriers based in EU/EEA countries cannot charge extra roaming surcharges within the zone. See [EU Roaming Explained](/en/guides/eu-roaming/) for the full list of covered countries and applicable rules.
For a comparison of home SIM roaming versus travel eSIM as connectivity options, see [International Roaming Explained](/en/guides/international-roaming/).
---
## Before You Depart
Most connection problems abroad are preventable with checks done before leaving home.
**1. Verify your carrier's roaming coverage for the destination.**
Log in to your carrier's app or website and confirm the destination country is covered and which pricing model applies — pay-per-use, a day pass, or included in your plan.
**2. Check device band compatibility.**
If you are traveling with a device purchased in a different region from your destination, compare the device's supported LTE/5G bands against the bands used by carriers in the destination country.
**3. Confirm SIM lock status.**
A carrier-locked device can only register on its locked carrier's network. On iPhone: Settings → General → About → Carrier Lock. "No SIM restrictions" means unlocked. If locked, contact your carrier to request an unlock before travel.
**4. Install and activate the travel eSIM before departure.**
eSIM profiles require an internet connection to download. Install the profile at home over Wi-Fi. After installation, confirm the line appears in Cellular settings. Do not scan the QR code at the airport — eSIM QR codes are single-use by GSMA design and cannot be re-scanned if the download is interrupted.
**5. Configure Data Roaming intentionally.**
Decide in advance which line will carry data: your home SIM on a roaming plan, or a travel eSIM. Set Data Roaming on for that line and off for the other. Leaving Data Roaming on for the home SIM while also using a travel eSIM for data can result in unexpected home-carrier data charges if the device switches lines.
**6. Note the APN for your travel eSIM.**
Open the provider's setup guide before you travel and note the manual APN settings in case automatic configuration fails abroad without a Wi-Fi connection.
**7. Enable Wi-Fi Calling as a fallback.**
If your carrier supports Wi-Fi Calling, enable it before departure. Wi-Fi Calling lets you make and receive calls and SMS on your home number over any Wi-Fi connection, with no cellular signal required. This provides a baseline fallback if the cellular connection does not work at your destination.
For the full pre-departure setup checklist — including offline maps, cloud backup settings, and SMS 2FA preparation — see [Pre-Trip Connectivity Checklist](/en/guides/pre-trip-checklist/).
---
## Reset Network Settings as a Last Resort
If every step above has been followed and mobile data is still not working, a corrupted network configuration stored on the device may be the cause. Resetting network settings removes this configuration without affecting apps, photos, or accounts. It does erase saved Wi-Fi passwords, VPN profiles, and any manually entered APN settings — note those before proceeding.
**iPhone:**
1. Settings → General → Transfer or Reset iPhone → Reset.
2. Tap **Reset Network Settings**.
3. Enter your passcode. The device restarts.
4. After restart, re-enter Wi-Fi passwords and re-check Cellular settings (Data Roaming, active line, APN).
Note: on iPhone, Reset Network Settings does not delete installed eSIM profiles. Your cellular plans remain intact.
**Android (Pixel):**
1. Settings → System → Reset options.
2. Tap **Reset Wi-Fi, mobile & Bluetooth**.
3. Confirm. Wait 30 seconds, then check signal.
**Android (Samsung):**
1. Settings → General management → Reset → Reset network settings.
2. Confirm and wait for completion.
On Android, Reset Network Settings also preserves installed eSIM profiles.
After the reset, return to the beginning of this guide and re-apply Data Roaming, APN, and network selection settings from the beginning.
For further troubleshooting of "No Service" conditions — including SIM lock, IMEI blacklisting, and carrier account issues — see [No Service on Your Phone? A Step-by-Step Fix](/en/guides/no-service/).
---
## FAQ
See the FAQ items in the frontmatter above for answers to common questions including:
- Phone shows carrier name abroad but no data
- Whether you need to enter APN settings for a travel eSIM
- How to manually select a network when abroad
- Travel eSIM installed but showing no signal
- Phone worked abroad last trip but not this one
---
## Related Guides
- [International Roaming Explained](/en/guides/international-roaming/) — How GSMA AA.12 agreements and IPX routing keep your home SIM working abroad, and the three roaming pricing models
- [Data Roaming Settings: How to Turn It On/Off Safely](/en/guides/roaming-settings/) — Full walkthrough of the Data Roaming toggle on iPhone and Android, including dual-SIM configuration
- [No Service on Your Phone? A Step-by-Step Fix](/en/guides/no-service/) — Fixes for no signal and no carrier registration, including SIM lock and IMEI issues
- [EU Roaming Explained](/en/guides/eu-roaming/) — Roam Like At Home regulation: 32 covered countries and the rules that apply
- [Using Dual SIM for Travel](/en/guides/dual-sim-for-travel/) — Running your home SIM alongside a travel eSIM: line assignment, SMS 2FA, and returning home
================================================================================
# No Mobile Data? How to Fix Data Connection Problems on iPhone and Android
URL: https://sim-finder.com/en/guides/no-data/
Type: guides (en)
Published: 2026-04-19
Your phone shows signal bars — one, two, or even full bars — but when you open Safari, Chrome, or any app that needs the internet, nothing loads. This is a data connection failure, not a signal problem.
**This guide covers the situation where signal is present but mobile data does not work.** If your device shows zero bars, "No Service," or "Searching," the cause is different — see [No Service on Your Phone? A Step-by-Step Fix](/en/guides/no-service/) first. Come back here once signal is confirmed but data still does not work.
---
## Is It Actually a Data Problem? (Quick Diagnostic)
Before changing any settings, confirm which problem you actually have. These two checks take under a minute.
### Check 1: Signal vs. No Internet
Look at the top of your screen (the status bar):
- **Carrier name + signal bars visible** — your device is registered on a network. This is the starting point for this guide.
- **"No Service" / "Searching" / zero bars** — your device is not registered on any network. Stop here and go to [No Service on Your Phone?](/en/guides/no-service/).
After confirming signal is present, open a browser and try to load a simple, reliable page such as `google.com`. If you get a "No internet connection," "Could not connect to server," or similar error — not a DNS error page from your carrier — mobile data is the issue.
### Check 2: Is It Mobile Data or the App?
If only one app is not working (say, a specific social media app) but others load fine, the problem is app-level, not connection-level. Jump to [App-Specific Data Problems](#app-specific-data-problems) below.
If no app can reach the internet — browser, maps, messaging — continue with the steps in order.
### Check 3: Try Airplane Mode Toggle
Toggle Airplane Mode on, wait 10 seconds, then toggle it off. This forces the modem to reconnect to the network and re-establish the data path. If data works immediately after the toggle, the issue was a transient state glitch. If data still does not work, continue.
---
## Check Data Roaming and Cellular Data Toggles
The two most common and fastest-to-fix causes of missing mobile data are a disabled Cellular Data toggle and an off Data Roaming switch.
### Cellular Data Toggle
**iPhone:**
1. Settings → Cellular (or Mobile Data depending on your region).
2. Confirm the top toggle — **Cellular Data** — is on (green).
3. If it was off, turn it on and wait 5–10 seconds for data to connect.
**Android (Pixel):**
1. Settings → Network & internet → SIMs.
2. Tap the SIM name.
3. Confirm **Mobile data** is toggled on.
**Android (Samsung):**
1. Settings → Connections → Mobile networks.
2. Confirm **Mobile data** is on.
### Data Roaming
Data Roaming is a separate switch that allows your device to send data through a network other than your home carrier's. This switch must be on in two situations:
- You are travelling internationally and using your home SIM.
- You are using a travel eSIM or MVNO SIM that routes data via a host carrier (roaming by design).
Many users are surprised to find that Data Roaming must be enabled even for a travel eSIM that is supposedly "local" — this is because the eSIM connects your device to the local network as a roaming session at the protocol level.
**iPhone:**
1. Settings → Cellular → tap the active SIM line (or Cellular Data Options if you have one line). Data Roaming is toggled from the same screen (under Cellular Data Options on single-SIM devices).
2. Find **Data Roaming** and turn it on.
**Android (Pixel):**
1. Settings → Network & internet → SIMs → tap the SIM → Roaming → enable.
**Android (Samsung):**
1. Settings → Connections → Mobile networks → **Data roaming** → enable.
### Low Data Mode
If Low Data Mode is on, iOS restricts background app refresh and some automatic data tasks, but it does not block all data. However, if it is on together with other issues, it can make symptoms harder to identify.
**iPhone:** Settings → Cellular → tap the SIM line (or **Cellular Data Options** on single-SIM devices) → **Low Data Mode** → turn off for troubleshooting.
**Android (Pixel):** Settings → Network & internet → Data Saver → confirm it is off.
---
## Verify Your Data Plan Status
If the toggles are correct but data is still not working, the next step is to confirm your plan is active and has remaining data.
### Check Data Usage on the Device
**iPhone:**
1. Settings → Cellular → scroll down past the toggle list.
2. The list shows how much data each app has used since the last reset.
3. The total at the top ("Current Period") shows cumulative usage. Note that this counter does not reset automatically with your billing cycle — you need to tap **Reset Statistics** manually at the end of each billing period to keep it aligned with your plan's reset date.
**Android (Pixel):**
1. Settings → Network & internet → SIMs → tap the SIM name.
2. Tap **Data usage** to see your current cycle total and app-by-app breakdown.
3. You can also set a warning or hard limit from this screen.
**Android (Samsung):**
1. Settings → Connections → Data usage → Mobile data usage.
2. The cycle period is shown at the top with total usage.
### Data Cap and Throttling
Most mobile plans (prepaid and postpaid) have either a hard data cap or a soft cap with speed throttling:
- **Hard cap**: when you reach the limit, data stops entirely until the plan renews or you purchase an add-on.
- **Soft cap (throttling)**: after the limit, data continues at a very low speed — typically too slow for most apps to function usefully.
If you have reached the cap, the carrier's app or account portal will show this. Options are to wait for the billing cycle to reset, purchase a data add-on, or upgrade your plan.
### Check Your Carrier Account
Log in to your carrier's app or website to see:
- Current plan status (active, suspended, expired)
- Remaining data balance
- Any account-level holds or payment issues
For prepaid plans, an expired validity period stops service even if you have remaining data — the validity date and the data balance are two separate counters.
---
## APN Settings
APN (Access Point Name) is a configuration string that tells your device's modem which gateway to use when routing mobile data traffic. Without the correct APN, the device is registered on the network (so signal bars appear) but cannot send or receive internet data.
### How APN Configuration Works
When you insert a physical SIM or activate an eSIM, the carrier typically sends an APN configuration profile to the device automatically. On iPhone, this arrives as a carrier settings update. On Android, the values are usually pre-loaded or pushed over the air. For background on how eSIMs handle profiles differently from physical SIMs, see [What Is an eSIM?](/en/guides/what-is-esim/).
Automatic configuration does not always happen, or can be overwritten. Situations where you typically need to set APN manually include:
- **MVNO SIMs**: MVNOs often use the same network as a major carrier but use their own APN values, not the host carrier's.
- **Travel eSIM**: most major travel eSIMs (Airalo, Holafly, Nomad, Saily) auto-configure the APN on modern devices. Manual entry is occasionally required — more commonly on Android than on iOS. The required values are published in the provider's setup documentation or onboarding email.
- **Manually transferred SIMs**: a SIM moved from a different device that stored different APN values.
- **After a factory reset or network settings reset**: saved APN configurations are cleared.
### How to Check and Edit APN on iPhone
On iPhone, APN settings are accessed at:
Settings → Cellular → Cellular Data Network (the exact menu name varies by iOS version and carrier — it may also appear as "Mobile Data Network" or simply not be visible).
**If the menu is not visible**, your carrier has locked APN editing through a carrier profile. This is common on locked devices and carrier-managed plans. For details on how to check if your device itself is carrier-locked, see [SIM Lock and SIM-Free Explained](/en/guides/sim-lock/). In this case, you cannot edit the APN directly from Settings. Contact your carrier's support and ask them to push the correct APN profile, or follow their documented instructions for your plan.
**If the menu is visible**, you will see fields for:
- **APN** — the access point name string (e.g., `internet` or `data.carrier.com`)
- **Username** — usually blank for consumer plans
- **Password** — usually blank for consumer plans
Enter the values exactly as published by your carrier or eSIM provider. The values are case-sensitive.
After saving, toggle Airplane Mode off and on to force the modem to reconnect using the new APN.
### How to Check and Edit APN on Android
**Android (Pixel):**
1. Settings → Network & internet → SIMs → tap the SIM name.
2. Tap **Access Point Names**.
3. If the list is empty, tap the **+** icon to add a new APN.
4. If an entry exists, tap it to review the current values.
**Android (Samsung):**
1. Settings → Connections → Mobile networks → **Access Point Names**.
2. Tap the **+** or the three-dot menu → **New APN** to add one.
Enter the APN name, APN value, and any username or password provided by your carrier. Tap **Save**, then tap the new entry to select it as the active APN. Toggle mobile data off and on to apply.
### Travel eSIM and APN
Travel eSIMs are a particularly common source of APN problems, for two reasons:
1. **Carrier profile not pushed**: unlike a domestic SIM with a long-standing carrier relationship, a travel eSIM provider may not push an automatic APN profile.
2. **Profile is correct but Data Roaming is off**: even with a correct APN, data will not flow if Data Roaming is disabled (see the Data Roaming section above).
Always check your travel eSIM provider's setup guide for the APN values specific to your plan. If you installed the eSIM but never set up the APN, start there. For a complete travel eSIM setup walkthrough, see [Your First Travel eSIM: Step-by-Step Guide](/en/guides/first-time-guide/). If the eSIM itself failed to activate, see [eSIM Won't Activate? How to Fix Common Setup Issues](/en/guides/activation-failed/).
---
## App-Specific Data Problems
If one specific app cannot reach the internet while others work fine, the issue is app-level rather than a system-wide data failure.
### Cellular Data Permission for Individual Apps
iOS and Android both allow you to restrict which apps can use mobile data. If an app's cellular data permission was revoked — either deliberately or after an OS update — it will show no content on mobile data while Wi-Fi still works.
**iPhone:**
1. Settings → Cellular → scroll down to the app list.
2. Find the app that is not working.
3. If the toggle next to it is off (grey), turn it on.
**Android (Pixel):**
1. Settings → Apps → tap the app name.
2. Tap **Mobile data & Wi-Fi**.
3. Confirm **Background data** and the main data toggle are on.
**Android (Samsung):**
1. Settings → Apps → tap the app → Mobile data.
2. Confirm **Allow background data usage** is on.
### Background App Refresh (iPhone)
If an app only fails to load content when it is in the background (but works when opened directly), Background App Refresh may be off for that app.
Settings → General → Background App Refresh → find the app and enable it.
### Restricted Data (Android)
Android's Data Saver mode or a per-app "Restrict data usage" setting can prevent background data. Even with Data Saver off, some apps have an individual "restrict background data" flag set.
Settings → Apps → [app name] → Data usage → turn off **Restrict app data usage**.
### App Cache and Stale Configuration
Some apps cache network configuration internally. If an app's internal configuration is stale or corrupted, clearing the app cache can resolve connectivity issues that affect only that app.
**Android:** Settings → Apps → [app name] → Storage → **Clear Cache**.
**iPhone:** iOS does not offer a direct per-app cache clear from Settings. The equivalent is to offload the app (Settings → General → iPhone Storage → [app] → Offload App) and reinstall it.
---
## DNS and VPN Issues
### VPN Profile Interference
A VPN profile left active — or a VPN that is set to auto-connect — can route all traffic through a server that is currently unavailable, resulting in no data appearing to work even though the cellular connection is functional.
**iPhone:**
1. Settings → VPN & Device Management → VPN.
2. If any VPN is shown as Connected, tap the (i) button next to it and disconnect.
3. To prevent auto-reconnect: Settings → General → VPN & Device Management → VPN → tap the (i) on the profile → **Connect On Demand** → turn off.
**Android (Pixel):**
1. Settings → Network & internet → VPN.
2. If a VPN is connected, tap it and tap **Disconnect**.
If data works after disconnecting the VPN, the VPN server or its configuration is the cause. Contact the VPN service or reconfigure the profile.
### Private DNS Override (Android)
Android's **Private DNS** feature (also known as DNS-over-TLS) sends all DNS queries to a specified server. If that server is down, misconfigured, or blocked by your carrier, all DNS resolution fails and no app can reach the internet — even though the cellular data connection itself is working.
**Android (Pixel):**
1. Settings → Network & internet → Private DNS.
2. If set to a custom hostname (e.g., `dns.google` or a custom provider), try changing it to **Automatic** temporarily.
3. If data returns, the custom DNS server was the cause. You can restore it later once the DNS issue is resolved.
**Android (Samsung):**
1. Settings → Connections → More connection settings → Private DNS.
2. Switch to **Automatic** to test.
### Carrier-Side DNS Blocking
Some carriers block specific services or domains at the network level. If all browsing fails except for pages hosted on the carrier's own infrastructure, this can indicate a carrier-side issue rather than a device issue. If this is suspected, using a different network (Wi-Fi) to confirm that the same sites load correctly is the clearest diagnostic step.
---
## Reset Options
If no specific cause has been found, resetting network settings removes all stored network configuration and returns it to factory defaults. This resolves issues caused by corrupted APN settings, leftover VPN configs, or conflicting cellular settings.
### What Gets Erased by a Network Settings Reset
| Setting | iPhone | Android (Pixel) |
|---------|--------|-----------------|
| Wi-Fi passwords | Erased | Erased |
| Bluetooth pairings | Erased | Erased |
| VPN configurations | Erased | Erased |
| APN settings | Reset to defaults | Reset to defaults |
| eSIM profiles | **Preserved** | **Preserved** |
| App data, photos, contacts | Not affected | Not affected |
Note your Wi-Fi passwords and VPN details before proceeding.
### iPhone: Reset Network Settings
1. Settings → General → Transfer or Reset iPhone → Reset.
2. Tap **Reset Network Settings**.
3. Enter your passcode. The device restarts.
4. After restart, check cellular data. If the carrier does not push APN settings automatically, re-enter them manually.
### Android (Pixel): Reset Network Settings
1. Settings → System → Reset options.
2. Tap **Reset Wi-Fi, mobile & Bluetooth**.
3. Tap **Reset settings** and confirm.
4. Check mobile data after the process completes.
### Android (Samsung): Reset Network Settings
1. Settings → General management → Reset.
2. Tap **Reset network settings** → confirm.
### APN Reset to Default
If you suspect only the APN is the issue and do not want to lose all network settings, you can reset only the APN entries.
**iPhone:** Delete the carrier profile if one was manually installed (Settings → General → VPN & Device Management), then restart to trigger a fresh automatic profile push.
**Android:** In the Access Point Names screen, tap the three-dot menu → **Reset to default**. This removes any manually added APN entries and restores the carrier defaults. If the carrier defaults are also missing, you will need to re-enter your APN settings manually.
---
## Frequently Asked Questions
### My signal bars are full but Safari and Chrome won't load anything. What is wrong?
Signal bars only confirm that your device is registered on a cellular network — they do not indicate that mobile data is working. The most common causes when bars are present but data is not working are: Data Roaming is off (especially on a travel or international SIM), a data cap has been reached and the carrier has throttled or cut the connection, the APN settings are incorrect or missing, or a VPN profile is blocking traffic. Start by checking Data Roaming and Cellular Data toggles in Settings, then verify your data plan balance with your carrier.
### Why does my mobile data stop working after I reach a certain amount of usage?
Many mobile plans enforce a data cap — a fixed limit on how much high-speed data you can use per billing period. Once you exceed the cap, the carrier either cuts data access entirely or reduces speed to a very low rate (sometimes called throttling). On iPhone, go to Settings → Cellular and scroll down to the app-by-app usage list to see how much data has been used since the last reset. On Android (Pixel), go to Settings → Network & internet → SIMs, tap the SIM, and check data usage. Log in to your carrier's app or account portal to confirm your plan's current status and remaining balance.
### What is APN and why does it affect my data connection?
APN stands for Access Point Name. It is a configuration parameter that tells your device how to connect to the carrier's data gateway. Without correct APN settings, the device cannot route internet traffic even if it is registered on the network. Most carriers push APN settings automatically when you insert a SIM or activate an eSIM. When automatic configuration does not happen — most often with MVNOs, travel eSIMs, or manually managed profiles — you need to enter the APN values manually. Your carrier or eSIM provider will publish the required APN name, username, and password in their setup documentation.
### How do I check APN settings on iPhone and Android?
On iPhone: Settings → Cellular → Cellular Data Network (or Mobile Data Network, depending on iOS version). If this menu is not visible, your carrier may have hidden it through a carrier profile — check your carrier's support site for their APN values and instructions. On Android (Pixel): Settings → Network & internet → SIMs, tap the SIM name, then Access Point Names. On Samsung: Settings → Connections → Mobile networks → Access Point Names. If the list is empty or shows incorrect values, add the APN settings provided by your carrier.
### Will resetting network settings fix my data connection?
Resetting network settings removes all saved Wi-Fi passwords, Bluetooth pairings, and VPN configurations, and restores cellular settings to defaults. This can resolve data problems caused by corrupted APN settings or conflicting VPN profiles. On iPhone, it does not delete eSIM profiles. On Android (Pixel), "Reset Wi-Fi, mobile & Bluetooth" also preserves installed eSIM profiles. After the reset, you may need to re-enter your APN settings manually if your carrier does not push them automatically.
### My data works on Wi-Fi but not on mobile. Is this an APN issue?
If Wi-Fi works but mobile data does not, the issue is specific to the cellular data path — not your device's software or your account in general. The most likely causes are: APN settings are missing or incorrect, Data Roaming is off and your SIM requires roaming to route data (common with MVNOs and travel eSIMs), or your data plan is exhausted. Check the APN settings section of this guide and verify your plan status with your carrier.
---
## Related Guides
- [No Service on Your Phone? A Step-by-Step Fix](/en/guides/no-service/) — if the problem is zero signal bars rather than missing data
- [eSIM Won't Activate? How to Fix Common Setup Issues](/en/guides/activation-failed/) — if data never worked since first installing an eSIM
- [Your First Travel eSIM: Step-by-Step Guide](/en/guides/first-time-guide/) — end-to-end travel eSIM setup including APN and Data Roaming
- [What Is an eSIM?](/en/guides/what-is-esim/) — how eSIM profiles and carrier configuration work
- [SIM Lock and SIM-Free Explained](/en/guides/sim-lock/) — if your device may be carrier-locked and rejecting a different carrier's SIM
Use [SimFinder Travel](/en/travel/) to compare travel eSIM plans by destination, or [SimFinder](/en/) to compare domestic mobile plans.
================================================================================
# No Service on Your Phone? A Step-by-Step Fix for Signal Problems
URL: https://sim-finder.com/en/guides/no-service/
Type: guides (en)
Published: 2026-04-18
Your phone is showing "No Service," "Out of Service," or zero signal bars. In most cases, this resolves in under a minute with an Airplane Mode toggle or a device restart. If it does not, the cause is usually one of four things: a network registration glitch, a misconfigured setting, a SIM or device issue, or a genuine coverage problem. This guide walks through each systematically so you can identify the exact cause.
**This guide covers no-service conditions that occur after setup.** If you cannot connect immediately after installing an eSIM for the first time, the issue is likely an activation problem rather than a signal problem — see [eSIM Won't Activate? How to Fix Common Setup Issues](/en/guides/activation-failed/) first.
---
## Quick Checks (30 Seconds)
Start here before changing any settings. These two steps resolve the majority of no-service incidents.
### Toggle Airplane Mode
1. Open Control Center (swipe down on iPhone, swipe down or up on Android depending on model).
2. Tap the Airplane Mode icon to turn it **on**.
3. Wait **10 seconds** — long enough for the radio to fully power down.
4. Tap Airplane Mode again to turn it **off**.
5. Watch the status bar for the carrier name and signal bars to reappear. This typically takes 5–15 seconds.
What this does: it forces the modem to drop its network registration and re-scan for available networks from scratch. A brief signal loss or a stale network association is the most common cause of a sudden No Service display, and Airplane Mode toggle clears it immediately.
### Restart the Device
If toggling Airplane Mode does not restore service, restart the device.
**iPhone:** Press and hold the side button and a volume button until the slide to power off slider appears. Slide to turn off. Wait 10 seconds, then hold the side button to power on.
**Android:** Press and hold the power button (or power + volume down on some models) and tap Restart.
A full restart reinitialises the radio stack, reloads the carrier profile, and clears any software state that the radio subsystem may be stuck in.
### Confirm the Signal Bars Location
After restart, look at the status bar at the top of the screen. Check:
- **Carrier name** — is your carrier name shown next to the signal bars? If it shows "No Service" or is blank, the device is not registered.
- **Network type indicator** — do you see 5G, LTE, 4G, or 3G next to the bars? If absent, the modem has not established a connection.
- **Signal bar count** — one or two bars is weak but functional. Zero bars or the word "Searching" indicates no network contact.
If the carrier name appears but data or calls still do not work, move to the Verify Your Carrier Connection section.
---
## Verify Your Carrier Connection
### Check the Carrier Name in Settings
The status bar can sometimes be too small to read clearly. Verify the carrier registration directly in Settings.
**iPhone:** Settings → Cellular → the carrier name is shown at the top of the screen under the active SIM line label.
**Android (Pixel):** Settings → Network & internet → Internet → the carrier name appears next to the SIM entry.
**Android (Samsung):** Settings → Connections → SIM card manager → the carrier name is shown next to each active SIM.
If the carrier name is missing or replaced by "Unknown" or "No service", the device is not registered on any network. Continue with the steps below.
### Confirm the SIM or eSIM Line Is Active
**iPhone:**
1. Settings → Cellular.
2. Under SIM & Cellular Plans, check that your plan line is listed.
3. Tap the line — confirm "Turn On This Line" is enabled (green toggle).
4. If the line is off, turn it on and wait 10–15 seconds for registration.
**Android (Pixel):**
1. Settings → Network & internet → SIMs.
2. Confirm the SIM toggle next to your carrier is on.
3. If multiple SIMs are listed, confirm the correct one is set as the active mobile data SIM.
**Android (Samsung):**
1. Settings → Connections → SIM card manager.
2. Confirm the SIM or eSIM toggle is on.
3. Under Preferred SIMs, check that the correct line is assigned to calls and mobile data.
### Check the Active Line on Dual-SIM Setups
When two SIMs are active — whether two physical SIMs, one physical and one eSIM, or two eSIMs — each must be explicitly assigned. A device with two active lines but no line assigned to mobile data will show connectivity for calls but not data, or vice versa.
**iPhone:** Settings → Cellular → Default Voice Line / Cellular Data → confirm the correct line is selected for each.
**Android (Pixel):** Settings → Network & internet → SIMs → Mobile data → select the correct SIM.
**Android (Samsung):** Settings → Connections → SIM card manager → Preferred SIMs → confirm Data and Calls are set to the intended lines.
For eSIM-specific dual-SIM configuration, see [What Is an eSIM?](/en/guides/what-is-esim/) for a detailed explanation of how eSIM lines are managed.
---
## Network Selection and Preferred Network Type
### Switch Network Selection to Automatic
Manual network selection — where you pick a specific carrier by name — is sometimes left on by accident, particularly after international travel. If the manually selected network is no longer available in your current location, the device shows No Service even when other networks are present.
**iPhone:**
1. Settings → Cellular → tap the active SIM line.
2. Scroll down to Network Selection.
3. Turn on **Automatic** (disable manual selection).
4. The phone will scan and register on the best available network within 10–30 seconds.
**Android (Pixel):**
1. Settings → Network & internet → Internet → tap the SIM name.
2. Tap **Automatically select network** to enable it.
3. If it was already on, turn it off, wait 5 seconds, then turn it on again to force a new scan.
**Android (Samsung):**
1. Settings → Connections → Mobile networks → Network operators.
2. Tap **Select automatically**.
### Change Preferred Network Type
If your device is set to use only 5G but the area has no 5G coverage, it may fail to fall back to LTE. Similarly, if set to 3G only, it will miss LTE coverage.
**iPhone:**
1. Settings → Cellular → tap the SIM line → Voice & Data.
2. Options are typically 5G On, 5G Auto, LTE, and 3G. **LTE** or **5G Auto** (which falls back to LTE automatically) is the most broadly compatible choice.
**Android (Pixel):**
1. Settings → Network & internet → Internet → tap the SIM name → Preferred network type.
2. **LTE (recommended)** or **Automatic (recommended)** gives the widest coverage.
**Android (Samsung):**
1. Settings → Connections → Mobile networks → Network mode.
2. **LTE/3G/2G (auto connect)** is the broadest fallback option.
### Band Compatibility Note
Every carrier uses specific radio frequency bands. A device purchased in a different country may not support all the bands used in your current location, which limits coverage even when other phones nearby work fine.
This is most common in these scenarios:
- A phone purchased in Asia used in North America (or vice versa)
- A budget or import device used with a carrier that relies heavily on newer bands
- A phone that supports a band on paper but only at lower power levels
To check whether your device supports a specific carrier's bands, use [SimFinder](/en/travel/) to filter by device compatibility, or check your carrier's official device compatibility page. The technical band requirements are carrier-specific and change as networks expand.
---
## SIM Lock and Physical SIM Issues
### Check for Carrier Lock
A carrier-locked device can only register on the network of the carrier that sold it. If you are trying to use a SIM or eSIM from a different carrier — including a travel eSIM, an MVNO plan, or a SIM from another country — a carrier lock will cause No Service or an immediate error.
How to check:
**iPhone:** Settings → General → About → Carrier Lock. "No SIM restrictions" means unlocked.
**Android:** Insert a physical SIM from a different carrier. If calls and data work, the device is unlocked. A network scan (Settings → Network & internet → Mobile network → Network operators) can list available carriers, but a successful SIM swap test is the more reliable check.
For a full explanation of carrier lock, how to check your status, and how to request an unlock from your carrier, see [SIM Lock and SIM-Free Explained](/en/guides/sim-lock/).
### Reseat the Physical SIM (Physical SIM Only)
If you use a physical SIM card rather than eSIM, the SIM may have shifted in the tray or accumulated dust on its contacts.
1. Power off the device completely before removing the SIM tray.
2. Use the SIM ejector tool (or a straightened paperclip) to open the tray.
3. Remove the SIM card and inspect the gold contacts on the chip.
4. If visible dust or debris is present, gently clean the contacts with a dry, lint-free cloth. Do not use liquids.
5. Re-seat the SIM firmly in the tray, confirm the orientation is correct (the notched corner aligns with the tray cutout), and reinsert the tray until it clicks.
6. Power the device on and check for signal.
### Clean the SIM Tray
Even without visible dirt, the SIM tray contacts inside the phone can oxidise or accumulate fine dust over time. Use a can of compressed air to clear the slot before reinserting the SIM. Avoid metal tools inside the SIM slot.
---
## Device-Specific Troubleshooting
If none of the steps above have restored service, the issue may be a corrupted network configuration stored on the device. Resetting network settings removes this without affecting apps, photos, or accounts. However, it does erase saved Wi-Fi passwords, VPN profiles, and Bluetooth pairings — note those before proceeding.
### iPhone: Reset Network Settings
1. Settings → General → Transfer or Reset iPhone → Reset.
2. Tap **Reset Network Settings**.
3. Enter your passcode when prompted.
4. The device restarts. After restart, wait 30–60 seconds for network registration.
5. Test for signal. If service returns, re-enter your Wi-Fi passwords and reconfigure VPN if needed.
### Android (Pixel): Reset Network Settings
1. Settings → System → Reset options.
2. Tap **Reset Wi-Fi, mobile & Bluetooth**.
3. Tap Reset settings and confirm.
4. The device applies the reset (no full restart required on some versions). Check signal after 30 seconds.
### Android (Samsung): Reset Network Settings
1. Settings → General management → Reset.
2. Tap **Reset network settings**.
3. Confirm and wait for completion.
### IMEI Check
If service does not return after a network settings reset, the device's IMEI may have been blacklisted. This happens when a device is reported stolen or lost to a carrier — the carrier reports it to a shared blacklist database, and participating networks refuse to register it.
To display your IMEI: dial `*#06#` on any device. On iPhone, it also appears at Settings → General → About → IMEI.
If you suspect a blacklisted IMEI — especially on a second-hand device — check [GSMA Device Check](https://devicecheck.gsma.com/) or your carrier's own IMEI lookup page. A blacklisted device can only be cleared by the carrier that reported it (usually the original selling carrier, but not always if a subsequent owner reported a theft or loss); there is no third-party workaround.
---
## International Travel Scenarios
### Verify Data Roaming Is On
When using your home SIM abroad, data roaming must be explicitly enabled. On most devices, it is off by default. Voice calls may still work in some configurations even with roaming off, but data will not.
**iPhone:** Settings → Cellular → tap your plan line → Data Roaming → turn on.
**Android (Pixel):** Settings → Network & internet → Internet → tap the SIM → Roaming → enable.
**Android (Samsung):** Settings → Connections → Mobile networks → Data roaming → enable.
If roaming is already on but data is not working, confirm that the carrier you are registered on (visible in the status bar) actually has a roaming agreement with your home carrier. Manual network selection (see the section above) can help you switch to a different local network if the auto-selected one has no agreement.
### Travel eSIM-Specific Issues
A travel eSIM that was working stops showing signal, or shows the carrier name but no data:
1. **Confirm the travel eSIM line is set as the active data line** — not your home SIM. Check Settings → Cellular → Cellular Data (iPhone) or the SIM data assignment on Android.
2. **Check that Data Roaming is on for the travel eSIM line** — travel eSIMs route data through the local network as a roaming session, so Data Roaming must be enabled even though it is the "local" SIM for your trip.
3. **Verify the eSIM plan has not expired** — travel eSIM validity periods range from days to weeks depending on the provider and plan. If the plan has expired, service stops.
4. **Check your remaining data balance** — if the plan's data allowance is exhausted, some travel eSIM providers cut service entirely rather than throttling.
If the travel eSIM was never showing signal since you installed it, the issue is more likely an activation problem. See [eSIM Won't Activate?](/en/guides/activation-failed/) and [Your First Travel eSIM: A Complete Setup Guide](/en/guides/first-time-guide/).
For help choosing a travel eSIM before your next trip, [4 Ways to Stay Connected Abroad](/en/guides/four-options/) covers travel eSIM, local SIM, roaming, and pocket Wi-Fi. Use [SimFinder Travel](/en/travel/) to compare plans by destination.
### Band and Frequency Compatibility Abroad
When travelling, the network bands available in your destination country may differ from those your device was designed for. This is not a settings problem — it is a hardware limitation.
Common mismatch patterns:
- **North America vs Europe/Asia**: Different 4G LTE band allocations. A device optimised for one region may have partial coverage in another.
- **5G millimeter-wave (mmWave) vs sub-6 GHz**: mmWave is used in dense urban areas in a small number of countries. Devices without mmWave support cannot use it, but they still connect via sub-6 GHz 5G or LTE.
- **Older 3G band shutdowns**: Many carriers have shut down 3G networks. Devices that relied on 3G as a fallback may show No Service in areas where only 4G is available, if the device does not support the local 4G bands.
To check whether a specific travel eSIM provider's coverage is compatible with your device, use [SimFinder Travel](/en/travel/) to search by destination. For technical band specifications, refer to your device manufacturer's specifications page.
---
## When to Contact Your Carrier
If every step in this guide has been followed and service has not returned, the remaining causes require carrier-side investigation.
### Check for a Carrier Outage
Before calling support, check whether there is a network outage in your area. Most carriers publish outage status pages. Independent outage trackers also collect real-time user reports. A widespread outage is not something you can fix on your end — wait it out and monitor the carrier's status page.
### Account-Level Issues
Carriers can suspend service at the account level for reasons including:
- **Non-payment** — a missed payment can result in immediate service suspension on some plans.
- **Suspicious activity flag** — automated fraud detection systems can lock accounts without notice.
- **Port-out request** — if a number port request was initiated (by you or fraudulently), the original service may stop before the port completes.
- **Contract or plan expiry** — prepaid plans with a set validity period stop service at the end of the term.
Log in to your carrier's account portal to check for notifications. If you cannot log in, contact carrier support directly.
### What to Provide When Contacting Support
To speed up diagnosis, have the following ready:
- Your phone number and account PIN or password
- Device model and IMEI (dial `*#06#` or check Settings → General → About)
- EID (for eSIM — Settings → General → About → EID on iPhone; Settings → About phone → EID on Android)
- The exact error message shown on the device
- Steps already tried (Airplane Mode toggle, restart, network settings reset)
- Whether the issue is new or has recurred before
---
## Frequently Asked Questions
### Why does my phone say "No Service" after I restart it?
A restart clears the radio stack, which is often enough to recover a dropped network registration. If No Service persists after restart, check that Airplane Mode is fully off, that the correct SIM or eSIM line is set as the active cellular line, and that automatic network selection is turned on in the mobile network settings.
### Is "No Service" the same as "Out of Service"?
The two messages mean the same thing: the device is not registered on any cellular network. The exact wording varies by device manufacturer and iOS/Android version. Some devices show a signal bar with an X, an empty bar area, or the text "Searching" instead.
### My eSIM shows as installed but the signal bars are empty — what should I do?
An installed eSIM profile and an active cellular connection are not the same. First, confirm the eSIM line is turned on in Settings. If you have two SIMs, set the eSIM as the preferred data line. For travel or international eSIMs, verify that Data Roaming is enabled for that line. If the profile was just installed and no service appears after 5 minutes, the issue may be eSIM activation — see the [eSIM activation troubleshooting guide](/en/guides/activation-failed/).
### Why do I have No Service in a specific area but full bars elsewhere?
This is almost always a coverage gap — the carrier's physical network does not reach that location. Underground parking, basements, rural areas, and dense urban canyons are common dead zones. Moving to a window or outdoors often resolves it. If the issue affects areas where you previously had signal, check for a carrier outage at that time.
### Will resetting network settings delete my eSIM?
On iPhone, "Reset Network Settings" does not delete eSIM profiles stored on the device — it only removes Wi-Fi passwords, VPN configs, and Bluetooth pairings. Your cellular plans stay intact. On Android (Pixel), "Reset Wi-Fi, mobile & Bluetooth" also preserves installed eSIM profiles.
### My phone shows No Service only when I use 5G. How do I fix it?
Some areas have 5G coverage that is inconsistent or uses millimeter-wave (mmWave) frequencies with limited range. Open your mobile network settings and change the preferred network type from "5G Auto" or "5G On" to "LTE/4G". If service returns, the 5G coverage in your area is insufficient for stable use. You can set it back to 5G later once you are in a reliably covered area.
---
## Related Guides
- [eSIM Won't Activate? How to Fix Common Setup Issues](/en/guides/activation-failed/) — if the problem started immediately after eSIM installation
- [SIM Lock and SIM-Free Explained](/en/guides/sim-lock/) — carrier lock check and unlock request process
- [What Is an eSIM?](/en/guides/what-is-esim/) — how eSIM profiles work and why they differ from physical SIM
- [Your First Travel eSIM: A Complete Setup Guide](/en/guides/first-time-guide/) — end-to-end setup for travel eSIM
- [4 Ways to Stay Connected Abroad](/en/guides/four-options/) — comparing travel eSIM, roaming, local SIM, and pocket Wi-Fi
Use [SimFinder](/en/) to compare mobile plans, or [SimFinder Travel](/en/travel/) to find travel eSIM plans compatible with your destination and device.
================================================================================
# How to Keep a Phone Number You're Not Using
URL: https://sim-finder.com/en/guides/number-storage/
Type: guides (en)
Published: 2026-06-04
If you are moving abroad, taking an extended break from a device, or simply pausing a second line you use irregularly, the default outcome is straightforward: do nothing, and the number eventually disappears. Most carriers reclaim inactive numbers and reassign them to new subscribers. Once reassigned, a number cannot be recovered.
There are five practical ways to prevent that: stay on the cheapest available plan, keep the number on an eSIM or secondary line, port to a low-cost prepaid or MVNO, use a carrier suspension service if one is offered, or move the number to a VoIP service. Each approach has a different cost profile, reachability level, and level of effort. This guide explains how each works and when to choose it.
---
## Why Phone Numbers Get Reclaimed
Phone numbers are a finite resource, allocated to carriers by national numbering authorities under the ITU-T E.164 framework. Carriers are required to return numbers they are not actively using to ensure the pool does not run dry. When your account closes — or when a prepaid SIM goes inactive long enough — the carrier treats the number as unused and eventually makes it available to a new subscriber.
The reclamation timeline is not standardised. In the United States, regulations set a minimum of 45 days before reassignment, though carriers often wait longer; timelines differ significantly in other countries. Carriers do not typically notify you before reassignment begins.
The practical consequence is that any service you have registered to that number — SMS two-factor authentication for banking, accounts, or messaging — will send codes to a stranger after reassignment. This is both a continuity problem and a [security risk](/en/guides/sim-swap/). Maintaining an active account that holds the number is the only reliable way to prevent it.
---
## Option 1: Downgrade to the Cheapest Available Plan
The simplest approach to holding a number is to stay with your current carrier on the lowest-cost plan available. Rather than cancelling, you change to a minimal plan — often a low-data or voice-only tier — and pay the reduced monthly cost to keep the line active.
### When This Makes Sense
- You want minimal setup effort and no change of carrier.
- You may return to heavier usage within a predictable timeframe.
- Your current carrier offers a meaningful step-down in price.
- You want the number to remain fully reachable (calls, texts, data) during the hold period.
### Trade-offs
A downgraded plan keeps your number on the same carrier with the same number reachability it always had. Inbound calls and SMS arrive normally; eSIM profiles and device settings remain unchanged.
The cost depends entirely on what your carrier offers at the low end. Some carriers offer significant reductions; others do not have a meaningful low tier — they offer only their standard plans or nothing. If the cheapest available plan still represents a significant monthly cost for a number you may not use at all, one of the other approaches below is worth considering.
Check your [contract terms](/en/guides/contract-terms/) before downgrading. Some carriers impose a plan-change fee or require you to remain on a new plan for a minimum period. If you are within a minimum-term commitment on your current plan, early plan changes may trigger penalties.
A useful reference point: many carriers also offer a formal suspension service (covered in Option 4 below) that is cheaper than their cheapest active plan. Check both options before deciding.
---
## Option 2: Keep the Number on an eSIM or Secondary Line
If you already have a [dual-SIM capable device](/en/guides/dual-sim-for-travel/), keeping a number as a secondary eSIM alongside a primary SIM is one of the most flexible approaches. The number stays active on its original carrier, the eSIM profile remains installed on the device, and you can receive calls or texts on that number whenever the eSIM is enabled.
### How eSIM Retention Works
An eSIM profile is a software credential stored on your device's eUICC (embedded Universal Integrated Circuit Card) chip. Once installed, it persists on the device even when the line is disabled — you do not need to download it again when you re-enable the line. The profile corresponds to a real active account on the carrier's network, so the number remains registered and reachable as long as the account stays in good standing.
You can disable the eSIM line in Settings when you do not want it to consume data or battery, and re-enable it when you need to receive calls or check messages. Switching takes seconds.
### Limitations to Understand
An eSIM profile is tied to the device on which it was activated. If you replace your phone, you will need to re-provision the eSIM on the new device by contacting the carrier. Most carriers support this online, but some require a support request.
eSIM profiles can also be deleted accidentally during a device reset or software restoration. Before performing a factory reset or major OS migration, confirm whether your eSIM profile will survive or whether you need to re-download it first. On iPhone, iOS 16 and later provide an option to back up and transfer eSIM profiles to a new device, but only during a device-to-device transfer — not from a backup restore.
The secondary line still needs to be on an active plan with some cost. The goal is to choose the cheapest plan the carrier offers for that secondary line, not to avoid cost entirely.
---
## Option 3: Port the Number to a Low-Cost Prepaid or MVNO
[Mobile Number Portability (MNP)](/en/guides/what-is-mnp/) lets you transfer a number from one carrier to another while keeping the number unchanged. Porting to a carrier with a cheaper entry-level plan or pay-as-you-go option reduces the holding cost, often substantially.
### Why an MVNO or Prepaid Carrier Can Be Cheaper
[MVNOs](/en/guides/mno-vs-mvno-comparison/) lease capacity from MNOs and resell it, often at lower prices for low-usage or no-frills tiers. For holding a number without significant usage, the specific data speed and coverage tier matter less — what matters is cost and whether the account can remain active with minimal activity.
Pay-as-you-go prepaid options are especially relevant here: you pay only when you actually use the number. If months pass without a call or text, you pay only what is necessary to prevent the SIM from deactivating (see the caveat about minimum activity below).
### The Port Process
Porting requires a transfer credential from your current carrier (a PAC code in the UK, a Number Transfer PIN in the US, a RIO code in France, and similar credentials in other markets) and a new account opened at the receiving carrier. In most countries with mandated MNP, the process completes within one working day for a simple consumer port, and porting is free of charge. See the [MNP guide](/en/guides/what-is-mnp/) for country-specific steps.
Once ported, the number lives on the new carrier. Any calls or texts sent to that number route to the new carrier's network.
### Minimum Activity Requirements on Prepaid Plans
Most prepaid plans require at least one qualifying activity — a call, text, data session, or top-up — within a rolling window, typically ranging from 60 days to 12 months depending on the carrier, to keep the line active. If the window passes with no activity, the SIM deactivates and the number enters the reclamation queue.
Before porting to a prepaid carrier for number holding, confirm:
- What counts as qualifying activity (some plans require a purchase, not just network usage).
- How long the activity window is.
- Whether there is a minimum balance required to keep the account open.
- Whether the number can be ported out again later if you want to return to a full-service carrier.
---
## Option 4: Use a Number Parking or Suspension Service
Some carriers offer a formal account suspension or number-hold service. Under this arrangement, the number remains registered in the carrier's system — not in the active number pool — but the account is not fully active. Monthly cost is typically lower than the cheapest active plan, and sometimes nominal.
### Where Number Parking Exists
Carrier-level suspension services are not universal. Their availability, cost, and duration limits vary by carrier and country.
**United Kingdom**: Some UK carriers offer account suspension for documented reasons (travel, medical grounds). The terms vary by carrier, and most have duration limits.
**Australia**: Some Australian carriers may offer temporary account suspension on request — terms vary and should be confirmed directly with the carrier.
**Japan**: au (KDDI) offers a temporary suspension service specifically designed for subscribers living or travelling abroad (up to 5 years). The number is preserved while the account is suspended, and service can be reactivated on return. Other Japanese carriers have their own suspension programs with varying terms.
**United States**: No major carrier offers a standardised number-parking product for the general public. Verizon, AT&T, and T-Mobile offer military deployment suspensions, which pause billing for active-duty members. Outside of military status, the closest US equivalent is moving the line to the lowest available plan, or porting the number to a VoIP service. Some carriers also allow a temporary suspension for documented medical situations, but these are case-by-case and not universally available.
**Germany and EU**: Under the European Electronic Communications Code (Directive 2018/1972), subscribers retain number portability rights regardless of account status, but no standardised suspension product exists at the EU regulatory level. Individual carriers in Germany and other EU countries may offer voluntary suspension programs.
### What to Verify Before Using a Suspension Service
- Maximum suspension duration (most carriers cap it at 90 days, 6 months, or 12 months).
- Whether the number can be ported out during or after the suspension.
- Whether the suspension renews automatically or requires manual extension.
- Cost during suspension (sometimes a nominal fee, sometimes zero).
- What happens at the end of the suspension period if you do not act — does the account return to a standard plan automatically, or does it cancel?
Contact your carrier's customer service directly to confirm current suspension terms. Published terms on carrier websites for these programs may not be updated frequently.
---
## Option 5: Port the Number to a VoIP Service
Porting a number to a Voice over IP (VoIP) service transfers it out of the mobile carrier network entirely and places it on an internet-based voice infrastructure. The number remains yours, inbound calls and texts arrive via the VoIP app, and the cost is typically lower than maintaining a mobile plan.
### How VoIP Number Holding Works
VoIP providers that accept mobile number ports — such as Google Voice in the United States, or similar services in other markets — take over the number through the same MNP process used for carrier-to-carrier ports. Once ported, inbound calls arrive through the VoIP app on any internet-connected device. SMS messages can be received through the app interface.
Because the number is no longer on a mobile carrier's network, it does not require a SIM card, an eSIM profile, or any hardware. The account stays active as long as you maintain the VoIP service.
### Trade-offs and Limitations
**SMS OTP compatibility**: Some financial institutions, banks, and online services restrict SMS-based one-time password delivery to numbers registered on carrier networks, and block or fail to deliver to numbers identified as VoIP or landline. If any of your accounts require SMS OTP delivery, test delivery to the VoIP number before fully committing to this approach. Alternatively, migrate those accounts to authenticator-app-based two-factor authentication before porting.
**Outbound calling**: Outbound calls from a VoIP number may display as "Unknown" or show a different caller ID on some recipients' phones, depending on the VoIP provider and the recipient's carrier.
**Emergency calls**: VoIP numbers may have limited or no emergency services (911 in the US, 999 in the UK, 112 in the EU) connectivity compared to mobile carrier lines. Do not rely on a VoIP-only number as your primary contact for emergency situations.
**Portability back to mobile**: VoIP numbers are generally portable back to a mobile carrier under MNP rules, but this depends on whether the VoIP provider supports port-out requests. Confirm port-out support before committing to a VoIP holding strategy, especially if you plan to return the number to a carrier at some point.
**Geographic restrictions**: VoIP number porting is available in some countries (notably the US, UK, Canada, and Australia) but not universally. In countries without regulated VoIP number portability, this option may not be available.
---
## Comparing the Five Approaches
The right choice depends on three factors: how long you need to hold the number, whether you need it to be reachable in real time, and what cost is acceptable.
| Approach | Reachability | Minimum Ongoing Cost | Best For |
|---|---|---|---|
| Downgrade to cheapest plan | Full (calls, SMS, data) | Low monthly fee | Short to medium holds; same carrier preferred |
| eSIM / secondary line | Full when enabled | Low monthly fee | Device already supports dual eSIM; flexible enable/disable |
| Port to prepaid / MVNO | Full | Pay-as-you-go or low monthly | Long holds; cost reduction is the priority |
| Carrier suspension service | None or limited | Nominal or zero | Short holds where carrier offers the service |
| Port to VoIP | Inbound via app; no mobile SMS | Low or zero | Number rarely used; no SMS OTP dependency |
No approach is cost-free: maintaining any number on any platform requires some ongoing engagement, whether a monthly fee, a periodic minimum usage event, or a subscription to a VoIP service.
---
## The SMS Two-Factor Authentication Dependency
Across all five approaches, the most practically important question is whether any of your accounts send SMS-based one-time passwords to the number you are holding.
If yes, and you let the number expire or port it to a VoIP service that those accounts do not recognise, you may lose access to those accounts entirely — or the codes may be delivered to whoever eventually receives the reassigned number.
Before pausing, suspending, or porting a number:
1. Identify every account that uses this number for SMS OTP.
2. For each account: either update the SMS OTP to a different number you are keeping active, or migrate to an authenticator app where the service allows it.
3. For accounts that only support SMS OTP and cannot be updated easily (some financial institutions), ensure the number remains reachable throughout the hold period.
The [SIM swap fraud guide](/en/guides/sim-swap/) covers the broader security implications of SMS OTP dependency on mobile numbers and why authenticator apps are preferable for sensitive accounts.
---
## eSIM Retention When Changing Devices
If you are holding a number on an eSIM and plan to change your device during the hold period, understand that the eSIM profile does not automatically transfer.
Steps to preserve the eSIM when switching devices:
1. Before resetting or surrendering the old device, confirm whether your carrier supports eSIM transfer online or requires a support request.
2. On iPhone, use the direct device-to-device transfer (Quick Start) method — iOS 16 and later support eSIM transfer during this process. A restore from iCloud backup does not transfer eSIM profiles.
3. On Android, contact the carrier to re-issue the eSIM profile to the new device. The process varies by carrier but typically involves logging into your account and selecting the new device.
4. After setting up the new device, verify that the held eSIM line appears in Settings and that the number is still active.
If you are holding a number for an extended period without actively using the device it is on, consider whether porting to a low-cost prepaid SIM on a physical card — or to a VoIP service — simplifies the situation, since those approaches are device-agnostic.
---
## Choosing an Approach by Situation
**Moving abroad for six months or less**: If your current carrier offers a suspension service, that is the simplest option. If not, downgrade to the cheapest active plan or port to a pay-as-you-go prepaid at home.
**Moving abroad indefinitely**: Port the number to a VoIP service or to a pay-as-you-go prepaid that a trusted contact can maintain if needed. Assess SMS OTP dependencies before acting.
**Pausing a second line you use infrequently**: Keep it on a low-cost prepaid with minimal monthly or periodic cost — or consider a dedicated [sub-line](/en/guides/sub-line/) designed for exactly this purpose. eSIM works well here if the device supports it — the line can be disabled when not needed and re-enabled in seconds.
**Preserving a number for eventual return**: Port to a low-cost prepaid or MVNO. Confirm that MNP port-out is available from that carrier when you eventually want to return the number to full service.
**Number with significant SMS OTP registrations**: Do not port to VoIP until you have audited and migrated or updated all dependent accounts. A downgrade or suspension service that keeps the number on the mobile network is safer in this case.
---
## FAQ
*(Structured FAQ items are in the frontmatter above for schema.org/FAQPage display.)*
**Can a carrier refuse to let me port my number to a prepaid plan or VoIP service?**
In markets with mandated MNP — including the US, UK, Australia, EU member states, Canada, and Japan — carriers generally cannot refuse a valid port request on the basis of account type or destination. They can reject a port if the account credentials do not match or if there is an active account lock. Outstanding contract balances or early termination fees are still owed after the port completes, but the balance cannot be used to block the port itself. See the [MNP guide](/en/guides/what-is-mnp/) for country-specific details on port refusal and escalation to regulators.
**How do I know when a prepaid SIM is about to deactivate?**
Most carriers send an SMS reminder before the activity window closes, but this is not universal and some carriers do not send any warning. Do not rely on reminder messages alone. Instead, record the carrier's expiry policy in a calendar application and set a recurring reminder to trigger a qualifying usage event (a call, a text, a small data session, or a top-up, depending on what the carrier requires) well before the deadline.
**If my number gets reassigned to someone else, can I get it back?**
Generally no. Once a number has been reassigned and the new subscriber's account is established, the original holder has no recourse through normal carrier processes. Some carriers maintain a grace period after reclamation before the number is actively reassigned, but this period is not standardised and carriers do not advertise it. Attempting to port a number that has already been reassigned will fail because the account credentials no longer match. If the number was associated with critical accounts, contact those services immediately to update or disable the SMS OTP linked to that number.
**Does keeping a number on a prepaid SIM affect its portability later?**
No — MNP applies regardless of whether a number is held on a prepaid or postpaid account. When you want to port the number back to a full-service carrier, you initiate the port through the new carrier, provide the transfer credential from the prepaid carrier, and the port completes normally. Some prepaid carriers impose a minimum account age before allowing port-out (typically 30–90 days from activation), so if you have recently ported in, there may be a brief waiting period before you can port out again. Check the specific carrier's port-out terms when setting up the holding arrangement.
---
## Related Guides
- [Mobile Number Portability (MNP) Explained](/en/guides/what-is-mnp/) — How MNP works, country-specific steps, and what to prepare before initiating a port.
- [Backup Line: Adding a Second SIM for Outage Resilience](/en/guides/sub-line/) — How to set up a low-cost secondary SIM for network redundancy and SMS 2FA continuity.
- [Using Dual SIM for Travel](/en/guides/dual-sim-for-travel/) — Running a home SIM alongside a travel eSIM, with line assignment and SMS 2FA strategy.
- [Contract Terms: Lock-In, Termination Fees, and Setup Costs](/en/guides/contract-terms/) — How minimum-term commitments and early-termination fees affect your options when pausing a plan.
- [SIM Swap Fraud: How It Works and How to Protect Yourself](/en/guides/sim-swap/) — The security implications of SMS OTP dependency and how to protect accounts tied to a number you are holding.
================================================================================
# How to Set Up Parental Controls on a Child's Phone
URL: https://sim-finder.com/en/guides/parental-control/
Type: guides (en)
Published: 2026-06-05
Parental controls cannot substitute for a conversation with your child about what a phone is for — but they provide a technical backstop while those conversations happen over years. The short version: iOS Screen Time and Android Family Link both cover daily time limits, app and content restrictions, purchase approval, and location sharing; neither is unbypassable; carrier-level filtering adds a network layer that neither replaces. Set controls with your child rather than around them.
This guide covers what each platform's controls actually do (per Apple and Google official documentation), how carrier-level filtering works, and how to approach the setup as your child grows.
---
## What iOS Screen Time Does
Screen Time is Apple's built-in parental control system, available on iPhone, iPad, and iPod touch. It is configured on the device itself and, when enabled as a Family Sharing child account, can be managed remotely from a parent's device via the Screen Time section of Settings.
**Daily time limits (App Limits and Downtime)**
App Limits let you set a maximum daily usage time for individual apps or app categories (Social, Entertainment, Games, and so on). When the limit is reached, the app icon dims and shows a timer icon. The child can request more time, which sends a notification to the parent's device for approval. Downtime schedules a period during which only allowed apps and phone calls are accessible — this is useful for enforcing no-phone hours at bedtime or during school.
**Content and privacy restrictions**
The Content & Privacy Restrictions section lets you:
- Set a maximum age rating for App Store apps, movies, TV shows, books, and music (explicit content toggle)
- Restrict web content in Safari to "Unrestricted", "Limit Adult Websites" (automatic filtering), or "Allowed Websites Only" (allowlist-only mode)
- Block specific websites by URL
- Prevent changes to accounts, passcode, location settings, or cellular data settings
On "Limit Adult Websites" mode, Safari uses Apple's on-device content classification to block known adult sites and allows you to add explicit allows and blocks manually. This filtering applies in Safari only — third-party browsers are not controlled by this setting unless blocked via App Limits.
**App purchases and downloads**
Under Content & Privacy Restrictions → iTunes & App Store Purchases, you can require a password for every purchase (including free downloads), or set purchases to "Don't Allow" entirely. For children under 18 in a Family Sharing group, Ask to Buy is available: the child initiates a purchase, and a notification is sent to the family organiser's device for approval or denial.
**Location sharing and Find My**
A child's device can be shared in the family's Find My group, making their location visible to family members on the Find My app. The child sees that location sharing is enabled. This uses the same Apple network described in [What to Do If Your Phone Is Lost or Stolen](/en/guides/lost-stolen/) — the device location is visible even when the device is offline on supported models.
**Communication limits**
Screen Time can restrict who the child can call and message during allowed hours and during Downtime, based on contacts in the phone's address book. This applies to Phone, FaceTime, and Messages.
**Setting a Screen Time passcode**
When Screen Time is managed remotely (Family Sharing + Screen Time), the parent sets a four-digit Screen Time passcode that is separate from the device's unlock PIN or passcode. The child cannot change Screen Time settings without this code. If this passcode is not set, Screen Time settings are accessible to anyone who unlocks the device.
For the complete configuration path: on the child's device, go to **Settings → Screen Time**. If managing from the parent's device via Family Sharing: **Settings → Screen Time → Family → [child's name]**.
Source: [Apple Support — Use parental controls on your child's iPhone, iPad, and iPod touch](https://support.apple.com/en-us/105121)
---
## What Android Family Link Does
Family Link is Google's parental supervision system for Android devices and Chromebooks. Unlike Screen Time, which is configured device-locally, Family Link works through supervised Google Accounts: the child's Google Account is a supervised account, and the parent manages it from the Family Link app on their own Android or iOS device.
**Daily time limits and Downtime**
Family Link lets you set daily screen time limits by app or as a total device limit. You can also lock the device at a scheduled time (Bedtime) or remotely lock it immediately from the Family Link app. When the child reaches their daily limit, they can send a request for more time, which appears as a notification on the parent's device.
**App approvals and Google Play**
By default, Family Link requires parental approval for every app download and in-app purchase from Google Play. The parent receives a notification with the app name, category, and rating, and can approve or decline. You can also allow certain apps without per-download approval by marking them as "always approved" in the Family Link app.
**Content filters in Chrome and Google Search**
Family Link can set Google SafeSearch to locked (preventing the child from changing it) and can restrict Chrome browsing to approved sites only, or to block explicit content using Google's filters. As with iOS, this filtering applies in Chrome — other installed browsers are not covered by this setting.
**App visibility and activity reports**
The Family Link app shows the parent a weekly activity report: how much time the child spent in each app, how many times the device was unlocked, and which apps were most used. The parent can view the child's installed apps and remotely uninstall apps they find inappropriate.
**Location sharing**
Family Link shares the child's device location with the parent in the Family Link app, updated periodically. The child's device shows a "supervised by [parent name]" indicator in Settings, so the child is aware of the supervision.
**Age of digital consent and account graduation**
Family Link supervision continues until the child's Google Account reaches the age of digital consent in their country — typically 13 in most markets. When that age is reached, Google notifies both parent and child that the child is now old enough to manage their own account. However, a child under 18 needs a parent's approval to stop supervision; turning 13 does not let the child remove supervision on their own. A parent can also choose to stop supervision at any time once the child has reached the age of consent. Once a child turns 18, they can manage their account independently.
For the setup process: the parent downloads the Family Link app on their device, then uses it to create or link the child's Google Account. The child's Android device must then be signed in to that supervised account.
Source: [Google Family Link Help — Set up parental controls](https://support.google.com/families/answer/7103025)
---
## Carrier-Level Content Filtering
Many mobile carriers offer network-level content filtering as an opt-in (or sometimes opt-out) service. This filtering operates at the carrier's network infrastructure, blocking or categorising traffic before it reaches the device, regardless of which browser or app the device uses.
**What carrier filtering covers**
Network-level filtering typically blocks by content category — adult content, gambling, violence — using URL classification databases maintained by the carrier or a third-party filtering provider. Because it operates at the network level, it applies to any app or browser on the device, including third-party browsers that are not covered by device-level content restrictions.
**What carrier filtering does not cover**
- Wi-Fi connections: carrier filtering applies only to the carrier's mobile data network. When the device is connected to Wi-Fi (home, school, public), carrier filtering has no effect.
- Screen time limits and usage monitoring: carrier filtering does not know or control how long a child uses a device or individual apps.
- In-app purchases and app downloads: these go through the platform's app store, not through carrier filtering.
- End-to-end encrypted traffic: filtering systems cannot inspect content carried over end-to-end encrypted protocols (for example, some messaging apps) and can only act on destination URLs and IP addresses.
**Legal obligations vary by country**
Some countries have legislation requiring carriers to offer child-safe filtering options or to block specific categories of illegal content by default. These obligations differ significantly between jurisdictions — what is legally mandated in one country may be entirely voluntary in another. Check your carrier's account settings or customer service page to see what filtering options are available and whether any are pre-enabled on your plan.
**Using carrier filtering alongside device controls**
Carrier filtering and device-level controls (Screen Time, Family Link) are complementary. Carrier filtering provides network-level coverage that applies to all apps and survives the removal of device-level apps. Device-level controls provide time limits, purchase approval, and location sharing that carrier filtering cannot offer. Using both provides broader coverage than either alone.
If you are concerned about what your child accesses over public Wi-Fi — where carrier filtering does not apply — see [How to Use Public Wi-Fi Safely](/en/guides/public-wifi-safety/) for network-level risks and mitigations.
---
## Age-Appropriate Setup: A Graduated Approach
The right level of restriction depends on the child's age and maturity. Applying maximum restriction to a 15-year-old is less appropriate than applying it to an 8-year-old, and a single static configuration rarely serves a child well as they grow.
**Younger children (roughly 6–10)**
At this stage, the goal is to establish healthy habits from the start rather than correct entrenched ones. Tight defaults work well: short daily time limits, Allowed Websites Only or equivalent in the browser, app approval required for all downloads, and no social media or messaging apps. Location sharing is appropriate for safety reasons and is usually accepted without friction at this age.
Downtime set to align with bedtime and school hours avoids battles about putting the phone down — the limit is presented as a rule the phone follows, not a negotiation point.
**Older children (roughly 11–14)**
The approach shifts from blocking to shaping. Moving from Allowed Websites Only to content filtering (Limit Adult Websites) gives more browsing freedom while maintaining a backstop. App Limits can be widened or set by category rather than total time. Purchase approval remains important at this age, as in-app purchases can accumulate quickly in games.
Involving the child in setting the limits — "you have two hours of free time on weeknights, how do you want to split it between YouTube and games?" — is more effective than unilateral configuration. Controls that the child understands and has partially agreed to are harder to resent and easier to enforce.
**Teenagers (roughly 15+)**
At this stage, moving toward monitoring rather than blocking is developmentally appropriate. Android Family Link automatically prompts a graduation discussion at 13; iOS Screen Time requires a conscious parental decision to reduce restrictions.
Keeping location sharing active (with explicit agreement from the teenager) serves safety without functioning as a restriction. Moving App Limits to advisory (notifications without hard locks) allows the teenager to self-regulate while maintaining awareness. Regular check-ins about what they are seeing online are more valuable than content filters that can be circumvented.
---
## Establishing a Family Agreement Before Handing Over the Device
Technical controls are more effective when they accompany a clear family agreement. Setting controls without discussion invites adversarial behaviour — the child's goal becomes bypassing the restriction rather than understanding its purpose.
A family agreement for a child's first phone might cover:
- What the phone is for (school, staying in touch with family, specific apps agreed in advance)
- Daily time limits and why they exist (sleep, homework, family time)
- Which apps require a conversation before downloading
- Privacy expectations: that the parent may ask to review the phone, and under what circumstances
- Consequences for breaking the agreement, agreed in advance
The agreement changes as the child grows. Reviewing it annually — or when the child asks for more freedom — is a practical cadence.
For families who are concerned about SMS-based two-factor authentication on accounts the child uses, see [Why SMS Two-Factor Authentication Is Not Enough](/en/guides/sms-2fa-risk/) for an explanation of why authenticator apps are preferable. If you are setting up accounts for your child, use an authenticator app rather than SMS 2FA where the service supports it.
---
## Setting Up Location Sharing Correctly
Both platforms provide location sharing as a feature of parental supervision. The setup details differ.
**iOS Family Sharing + Find My**
In a Family Sharing group, all members can optionally share their location with other family members. Location sharing for the family group is managed via Find My and Screen Time settings; each family member's device appears in the Find My app once sharing is enabled.
The child sees that their location is being shared and can see the parent's location as well (sharing is mutual within the family group). To share only in one direction, the child would need to turn off their own location sharing in Find My, which they can do unless location settings are restricted in Screen Time.
**Android Family Link**
Location sharing is built into the supervised account model — the parent sees the child's device location in the Family Link app by default. The child cannot disable this while the supervised account is active.
**What location sharing does and does not tell you**
Device location sharing shows the location of the device, not necessarily the location of the child. A child who leaves their phone at home before going somewhere they should not be has circumvented location sharing without any technical bypass. Location sharing is a safety tool for genuine emergencies, not a comprehensive monitoring system.
If a device is lost or stolen, location sharing via Find My or Find My Device can assist in recovery — see [What to Do If Your Phone Is Lost or Stolen](/en/guides/lost-stolen/) for the full recovery process.
---
## Protecting the Child's SIM and Account
A child's SIM is exposed to the same security risks as an adult's. For a child's account, where a parent may be managing the carrier account, the relevant protections are the same as for any account.
SIM swap fraud — where an attacker convinces a carrier to transfer a number to a new SIM — can affect any account, including a child's. Carriers in several countries have introduced account lock features and notification requirements in response to regulatory guidance. Enabling any available account lock or SIM swap notification on the carrier account is a practical step. For a full explanation of how SIM swap works and how to protect against it, see [SIM Swap: What It Is and How to Protect Your Number](/en/guides/sim-swap/).
For accounts the child uses independently (school email, gaming platforms, social media), prefer authenticator apps over SMS for two-factor authentication where the service supports it. If the child is old enough to use a VPN — particularly on public Wi-Fi — [How to Choose and Use a VPN](/en/guides/vpn-guide/) covers what a VPN does and does not protect.
---
## What Parental Controls Cannot Do
Being clear about the limits of these systems avoids false confidence.
**Technical controls cannot replace ongoing conversation.** A child who understands why certain content or time limits exist is less likely to seek workarounds than one who sees controls as arbitrary restrictions. Technical enforcement is a supplement to trust, not a substitute.
**Neither Screen Time nor Family Link is unbypassable.** Both can be circumvented by determined children with access to technical resources (online bypass guides exist for both platforms). A second device without controls, a friend's device, or a factory reset can all defeat device-level controls. The goal is friction, not an absolute barrier.
**Content filters have false positives and false negatives.** "Limit Adult Websites" in Safari and Google SafeSearch will miss some inappropriate content and block some legitimate content. They are heuristic filters, not curated allowlists.
**Carrier filtering does not cover Wi-Fi.** Every session on a home router, school Wi-Fi, or public hotspot bypasses carrier filtering entirely. Device-level controls are the relevant layer for Wi-Fi connections.
**Location sharing shows device location, not child location.** A phone left at home, lent to a friend, or switched to airplane mode does not accurately represent the child's location.
---
## Summary: A Practical Setup Checklist
For iOS (managed via Family Sharing):
1. Add the child as a Family Sharing member under 18 and enable Ask to Buy.
2. On the child's device, open **Settings → Screen Time → Turn On Screen Time** → select "This is my child's iPhone".
3. Set a Screen Time passcode (different from the device unlock code).
4. Configure Downtime and App Limits to match agreed daily limits.
5. Under Content & Privacy Restrictions: set age-appropriate app, movie, and content ratings; set web content to Limit Adult Websites or Allowed Websites Only.
6. Enable location sharing via Find My (family members appear in Find My once sharing is active).
For Android (Family Link):
1. Install the Family Link app on the parent's device.
2. Follow the in-app setup to create or link the child's supervised Google Account.
3. On the child's Android device, sign in with the supervised Google Account.
4. In the Family Link app: set Daily screen time limits and Bedtime.
5. Set app approval to required for all downloads.
6. Review the web filter settings in the child's Chrome profile.
In both cases: discuss the setup with your child, explain what the controls do, and agree on a review schedule for when limits will be revisited.
---
## Related Guides
- [How to Use Public Wi-Fi Safely](/en/guides/public-wifi-safety/) — risks on shared networks that carrier filtering does not cover, and what to do about them
- [How to Choose and Use a VPN](/en/guides/vpn-guide/) — what a VPN does and when it is useful for an older child's device
- [What to Do If Your Phone Is Lost or Stolen](/en/guides/lost-stolen/) — how Find My and Find My Device work for recovery, and what to do if a child's phone goes missing
- [Why SMS Two-Factor Authentication Is Not Enough](/en/guides/sms-2fa-risk/) — why authenticator apps are preferable to SMS 2FA on accounts a child uses
- [SIM Swap: What It Is and How to Protect Your Number](/en/guides/sim-swap/) — protecting the SIM account that underlies a child's phone number
================================================================================
# How Pay-As-You-Go and Tiered Plans Work
URL: https://sim-finder.com/en/guides/pay-as-you-go/
Type: guides (en)
Published: 2026-06-04
Pay-as-you-go and tiered billing models give you control over spending by linking what you pay to what you actually use. The core distinction: tiered plans charge a fixed fee per allowance bracket and, in many markets, auto-step to the next bracket when you exceed the limit — though some carriers instead apply overage charges or throttle speed rather than stepping to a higher bracket fee; true metered PAYG charges only for units consumed with no fixed minimum; top-up models add purchasable add-ons on top of a base plan. Each suits different usage patterns — variable, low, or unpredictable consumption in particular.
All three models sit at the flexible end of a spectrum between rigid monthly contracts (fixed cost, fixed allowance, fixed term) and fully open-ended billing (no commitment, no ceiling, pay as events occur). The trade-off across the spectrum is between cost certainty and cost optimisation: rigid contracts are more predictable but may over-provision; PAYG optimises for low-usage periods but produces higher per-unit costs when usage rises.
## What "Pay Only for What You Use" Actually Means
The phrase "pay only for what you use" appears across three distinct billing structures that work differently in practice. Understanding the mechanic behind each prevents bill surprises.
**Tiered (stepped) billing** divides plans into brackets. You pay the fee for a given bracket and receive its included allowance. If you stay within the bracket, you pay that bracket's fee. If you exceed it, the plan automatically steps to the next bracket up — and you pay the higher fee, not just the excess. The jump is automatic; you do not need to opt in. Some carriers notify you by SMS or push notification before or at the moment of a step; others apply the step silently. Verify the notification policy of any tiered plan before committing.
**True metered PAYG** charges per unit of consumption — typically per megabyte of data, per minute of voice, or per SMS message — without a fixed monthly base fee. You pay nothing in months where you use nothing (or pay only a minimum SIM-active fee if one exists). The per-unit rate is usually higher than the effective per-GB rate on a monthly plan, making this model cost-effective only when usage is genuinely low or infrequent.
**Top-up (base + add-on)** combines a base plan — which may include a small monthly allowance or charge zero per month — with purchasable add-on packages. When your base allowance runs out, you buy a data pack, voice pack, or combined topping. This model gives you the predictability of a base plan for expected usage and the flexibility of on-demand additions for unexpectedly heavy months.
These three structures share the common principle that higher consumption should produce a higher bill. The difference lies in how that relationship is structured — in steps, per unit, or through add-on purchase decisions.
One additional distinction matters across all three models: the difference between prepaid and postpaid billing. In a prepaid context, tier steps or PAYG charges are drawn from your prepaid balance immediately; if the balance cannot cover the step, service may be suspended. In a postpaid context, tier steps and overages accumulate and appear on your end-of-cycle invoice. The billing model (prepaid vs postpaid) and the usage pricing model (tiered, PAYG, top-up) are independent variables — tiered plans exist in both prepaid and postpaid forms.
See [How to Choose a Travel eSIM: 5 Key Criteria](/en/guides/how-to-choose/) for how pricing model fits into the broader set of plan selection factors.
## Tiered Plans: How Steps Work in Practice
In a tiered structure, the key detail is the step trigger and what the step costs. Steps are triggered by crossing the top of a data bracket. The new fee applies for the full remainder of that billing period or grants the new bracket's full allowance — the exact implementation varies by carrier.
Two common implementations exist:
**Automatic upgrade**: When you exceed the current tier's data cap, the plan automatically moves to the next tier and you are billed the difference between the two tiers' fees. If you exceed that tier too, it steps again. This continues until you reach the plan's ceiling tier, at which point some carriers throttle speed rather than adding further charges.
**Overage charges**: Instead of stepping to a new tier, the carrier charges a per-MB or per-GB rate for every unit consumed above the included allowance. Overage rates are frequently higher per gigabyte than the effective rate within the tier. This is technically distinct from tiered billing but appears in similar market contexts — read the plan terms carefully to distinguish the two before assuming a plan is capped.
The predictability of tiered billing is conditional: if your usage consistently falls within one bracket, your bill is stable. If your usage varies across bracket boundaries from month to month, the bill fluctuates. The frequency of crossing a tier boundary determines how much variability to expect. Reviewing at least three months of actual usage history before selecting a tier helps identify whether usage is bracket-stable or bracket-crossing.
One practical implication of tiered billing: deliberately managing usage near a tier boundary can reduce your bill. If you know a tier boundary is approaching and you can defer a large data transfer (such as a software update or a file download) to a Wi-Fi network, you may avoid a tier step for that month. Techniques for reducing mobile data consumption are covered in [Data-Saving Techniques](/en/guides/save-data/).
For detailed guidance on estimating which data bracket your usage habits fall into, see [How Much Mobile Data Do You Need?](/en/guides/data-usage-guide/).
## True Metered PAYG: When Per-Unit Billing Applies
True metered PAYG is structurally the simplest model: consumption directly produces cost, with no bracket effects. It is most cost-effective in the following scenarios:
- **Backup or emergency SIMs**: A SIM kept for infrequent use — a tablet used occasionally, a device left in a vehicle for emergencies, or a second phone used only while travelling — where the cost of a monthly plan would exceed the value of actual usage.
- **Variable-income or seasonal users**: People whose usage drops to near-zero in certain months and rises in others, where a fixed monthly plan charge would represent a significant overpayment in low periods.
- **Secondary lines kept barely active**: A second number maintained for a specific purpose (for example, receiving specific contacts or keeping an old number from lapsing) where usage is minimal and the objective is low cost, not high usage.
- **Short-term visitors**: Travellers purchasing a local SIM for a brief stay who need only a small, defined amount of data and voice.
The critical variable in any PAYG plan is the per-unit rate and what constitutes a "unit." Some plans charge per kilobyte; others per megabyte; others in larger increments. The billing unit determines how much is charged for small data transfers, which matters for users who check email frequently or use low-data apps regularly.
One structural feature to confirm before selecting PAYG is whether unused credit rolls over between periods. In some PAYG structures, credit expires after a defined period regardless of whether it was used — commonly 30, 90, or 180 days from the last top-up or last chargeable event. In others, credit accumulates indefinitely until spent. Credit expiry combined with a mandatory minimum top-up to keep the SIM active can significantly raise the effective monthly cost for infrequent users who fail to account for it.
Another feature to verify: whether true PAYG includes a zero-fee option for keeping the SIM active without use, or whether some minimum activity (a chargeable event, or a minimum balance top-up) is required within a defined window to prevent the number from being recycled. Carriers periodically reclaim numbers from inactive SIMs — the inactivity window before this occurs varies significantly by carrier and country. For users maintaining a backup SIM over many months without regular use, confirming the inactivity threshold prevents the unexpected loss of the number.
## Top-Up Models: Base Plan Plus Add-Ons
Top-up (or topping) models separate the base plan from additional capacity. The base plan may carry a fixed monthly fee, a zero monthly fee that merely keeps the number active, or a small minimum charge required to prevent SIM inactivity. When the base allowance is exhausted, additional capacity is purchased on demand.
When the base allowance runs out, three outcomes are possible depending on the carrier's policy:
- The carrier throttles data speed to a low floor (commonly 128 kbps to 1 Mbps) rather than cutting data off entirely, until you purchase a top-up to restore full speed.
- The carrier cuts data access entirely until a top-up is purchased or the next billing cycle begins.
- The carrier allows voice calls and SMS to continue while blocking data, requiring a data-specific top-up to restore mobile internet access.
Top-up packages are sold in fixed increments — a defined number of gigabytes valid for a defined period. The validity window of a top-up may differ from your main billing cycle. A 7-day data pack purchased on day 20 of a 30-day cycle may expire before your cycle renews, creating a gap. Where your billing cycle and top-up validity do not align, you may end up buying a second top-up to cover the period before your next cycle — a cost that should be factored into monthly estimates.
For travel users, top-ups serve a specific function: extending data mid-trip without purchasing an entirely new plan. The [Travel eSIM Provider Comparison](/en/guides/provider-comparison/) covers which providers support mid-trip top-ups versus requiring a full new plan purchase — a relevant distinction when you are in a location with limited Wi-Fi access and need data quickly.
One practical detail for top-up users: confirm which network the top-up purchase process itself requires. Some top-up flows require an active internet connection to complete the in-app or web purchase — which creates a circular problem if you have run out of data and have no Wi-Fi available. Providers that allow top-up via SMS command or via a dedicated USSD shortcode (a phone number sequence dialled from the call screen) avoid this dependency, since those methods work even without a data connection.
## Who Tiered and PAYG Models Suit
These billing structures are not universally optimal. They match specific usage profiles and circumstances. Identifying which profile describes your situation is the key to selecting the right model.
**Tiered plans suit users who:**
- Have usage that consistently falls within a single bracket month after month.
- Want a predictable monthly cost without needing to monitor usage continuously.
- Occasionally exceed their typical amount but want a structured ceiling above which costs are defined in advance rather than open-ended.
- Can tolerate the automatic step charge in exchange for not needing to manually purchase add-ons.
**True PAYG suits users who:**
- Use mobile data infrequently — a few days or a few hours per month.
- Need a backup line active and available but rarely use it.
- Travel occasionally and need a local SIM for a brief stay without committing to a recurring monthly plan.
- Have reliable Wi-Fi access for most tasks and use mobile data only as a fallback when Wi-Fi is unavailable.
- Have usage so irregular that averaging across months would result in chronic overpayment on a fixed plan.
**Top-up models suit users who:**
- Want a low base cost with the ability to add capacity on demand in months when more is needed.
- Have usage that is near-zero some months and moderately high in others, and prefer paying for the variation only when it occurs.
- Prefer the control of actively deciding to buy more data over the automation of a tier step.
For users with consistently moderate to high usage, a flat-rate monthly allowance plan typically offers a lower effective cost per gigabyte than any of these three structures. The comparison between models becomes most meaningful when usage is variable, low, or unpredictable. Review your actual usage history before choosing — see [How Much Mobile Data Do You Need?](/en/guides/data-usage-guide/) for a step-by-step method.
One nuance worth noting: carrier type interacts with model availability. Large MNOs typically offer the widest range of tiered options across multiple brackets. MVNOs — which resell capacity on an MNO's network — more commonly offer fixed monthly bundles and may have a limited top-up infrastructure or fewer tier options. If PAYG or top-up flexibility is important to you, verify that the specific carrier you are considering actually offers that structure for your market, rather than assuming the model is available because the carrier appears in a general PAYG search. See [What Is an MVNO?](/en/guides/what-is-mvno/) for context on how MVNOs differ from the network operators whose infrastructure they use.
## How Top-Up Mechanics Vary by Carrier and Market
The term "top-up" describes several distinct mechanics depending on the carrier and market. Knowing which type a plan uses matters for planning.
**Balance top-up**: You add monetary credit to a prepaid account balance. That balance is drawn down at the per-unit rates applicable to your plan — per MB of data, per minute of voice, per message. This form gives flexibility across services (voice, data, SMS) from a single balance pool but offers less price certainty per unit than a data-specific package.
**Data add-on package**: You purchase a defined quantity of data valid for a defined period, sold at a package rate. The rate per gigabyte in the add-on is often lower than the base PAYG per-MB rate for that carrier. This is the most common modern implementation of "topping" for data-centric plans, and the one most relevant for users who primarily need additional mobile internet access.
**Validity extension**: Some carriers sell products that extend the active life of your SIM and preserve your existing balance or allowance without adding new data. This addresses the specific problem of SIM inactivity expiry for users who want to keep a number active during a low-usage period without purchasing data they will not consume.
**Voice or SMS add-on**: Separate from data, some plans allow purchase of additional voice minutes or message bundles. These are relevant for users whose PAYG base rate for calls or messages is high and who occasionally make a volume of calls that warrants a specific bundle.
Market conventions for purchasing top-ups vary. In some markets, top-up credit has historically been loaded via physical scratch cards available at convenience stores and petrol stations. In others, top-up is handled entirely through a carrier app or online portal. For MVNOs, the channels available for top-up are typically narrower than for the host network operator — the MVNO's own app or website is usually the only option rather than retail vouchers. See [What Is an MVNO?](/en/guides/what-is-mvno/) for background on how MVNOs differ structurally from full network operators.
## Watching for Hidden Mechanics in PAYG Plans
Several plan terms affect the real-world cost of PAYG and tiered plans in ways the headline rate does not reveal. These terms are almost always documented in the carrier's full plan details or fair-use policy rather than on marketing pages.
**Minimum charge per session**: Some PAYG plans apply a connection fee or minimum charge per data session regardless of how much data is actually consumed in that session. If you connect frequently for small transfers — checking email, receiving a push notification, opening a map briefly — session minimums accumulate and can make the effective per-MB cost much higher than the stated rate. Verify whether a per-session charge exists before comparing plans on a raw per-MB basis.
**Daily activation fees**: Certain plans — particularly some travel-focused or low-usage plans — charge a daily access fee that activates data for the calendar day, above which usage is charged at a per-MB rate or drawn from a daily included allowance. This model is cost-effective for consecutive-day trips but expensive for users who connect briefly on many separate days separated by inactive periods.
**Data rounding**: Some carriers round each session's consumption up to the nearest megabyte, 100 kilobytes, or other increment. For users who transfer many small amounts — receiving notifications, syncing email headers, loading brief web pages — rounding applied per-session can add up to significantly more than the stated rate per MB of actual payload. Rounding rules are documented in the plan's terms and conditions.
**Expiry of credit versus expiry of data packs**: When you hold both a monetary balance and a purchased data pack, each may carry different expiry dates. The data pack may expire before your general credit, or vice versa. Allowing either to expire without use is effectively wasted spend. Track the expiry schedules for each element separately.
**Throttle behaviour at tier ceiling**: In tiered plans with a maximum tier, reaching that ceiling may result in throttling rather than additional charges. The throttle speed at the ceiling varies by carrier — some floor at 1 Mbps, others lower. If your usage regularly approaches or exceeds the maximum tier, know the throttle speed before selecting the plan.
**Rollover policy**: Some tiered plans carry unused data from the current period into the next if you renew before expiry. Others do not roll over any unused allowance. The rollover policy affects the real value of a tier: a plan with rollover delivers more value to users who fluctuate below their tier ceiling, while a plan without rollover produces zero residual value from unused capacity. Rollover is more commonly found in postpaid tiered plans than in prepaid bundles.
**Family or multi-line sharing**: Some carriers allow multiple lines to share a single tiered data pool. In a shared pool, the tier step is triggered by the combined consumption of all lines rather than per-line. This can make a higher-tier plan cost-effective for a household where usage is uneven across members — one heavy user and two light users may fit comfortably within a shared pool that all three would individually exceed in a per-line tiered structure.
## Understanding Value in Each Model
Selecting the lowest-cost model requires calculating the effective total cost under your actual usage pattern, not comparing headline rates in isolation. The calculation differs by model type.
| Model | Key calculation |
|-------|-----------------|
| Tiered | Identify which bracket your average monthly usage lands in. Then calculate the annual cost assuming your usage crosses to the next tier N times per year. |
| True PAYG | Multiply your average monthly data volume by the PAYG per-GB equivalent rate. Compare against the cost of the cheapest fixed monthly plan that covers the same volume. |
| Top-up | Add the base plan fee to your average monthly top-up spend. Compare the total against a flat plan that covers your typical combined volume. |
The calculation should include both average months and high-usage months. A model that is cheapest on average but produces a large spike in high-usage months may have a higher annual total than a slightly more expensive but stable alternative.
For each model, specific terms to obtain before finalising the calculation:
- **Tiered**: the fee for each available bracket; the fee difference between brackets; whether notification is sent before a step; whether the plan has a ceiling tier and what happens at that ceiling.
- **True PAYG**: the per-unit rate; the billing increment (per KB, per MB, or other); whether a per-session connection fee applies; the credit expiry policy.
- **Top-up**: the base plan fee; available add-on package sizes and their validity windows; whether add-ons can be purchased mid-cycle; the throttle policy when the base allowance is exhausted.
Use SimFinder to compare current plans by structure and filter for the type relevant to your situation. Comparing plans side by side with your estimated usage as the anchor point — rather than evaluating each plan's price without a reference usage level — produces a more accurate cost comparison.
For guidance on reducing consumption to stay within a lower tier or to reduce top-up frequency, see [Data-Saving Techniques](/en/guides/save-data/).
## PAYG and Tiered Plans in International Context
Pay-as-you-go as a category exists in mobile markets worldwide but is implemented differently, and the terminology does not map consistently across markets. The label "PAYG," "pay-per-use," "prepaid," or "flex" does not guarantee the same billing mechanic in every market. In some markets, "prepaid" refers to any plan paid in advance — including fixed monthly allowance plans — rather than specifically to per-unit billing.
**Markets with traditional per-unit PAYG**: Many European markets have regulatory requirements that carriers publish per-unit rates clearly for voice, SMS, and data, in part to satisfy consumer protection obligations. Per-second voice billing and per-KB or per-MB data billing have existed as standard prepaid options in several European markets for many years. These are not universal — specific carrier and plan terms apply.
**Markets where fixed-allowance prepaid dominates**: In several markets across Asia, the Middle East, and Latin America, prepaid plans are predominantly sold as fixed-allowance bundles valid for 7, 30, or 90 days. Unused allowance at the end of the validity period typically expires rather than rolling over. The concept of a running per-unit balance exists but is less common than the fixed-window bundle.
**Top-up access as a near-universal feature**: Across markets and billing models, the ability to add credit or data to an existing prepaid account is nearly universal. The purchase channel (carrier app, website, retail voucher, ATM, convenience store) varies by carrier, market maturity, and whether the carrier is an MNO or MVNO.
When evaluating international plans — whether comparing a local SIM in a destination country against a travel eSIM, or comparing plans across markets in SimFinder — verify the billing model in the plan's actual terms. The label on a marketing page does not reliably identify the billing mechanic. Use the [Travel eSIM Provider Comparison](/en/guides/provider-comparison/) to see which providers offer plans with explicit top-up support for specific destinations.
The international variation in PAYG terminology is also relevant when reading reviews or forum discussions about plans: a review written about a "PAYG plan" in one country may describe a fixed-allowance bundle with automatic renewal, while the same phrase in another country's context describes genuine per-KB billing. When drawing on secondary sources to evaluate a plan, confirm the market context before applying the conclusions.
## Choosing Between Models When Usage Is Variable
Variable usage is the scenario where model selection has the largest financial impact. In a low-usage month, true PAYG or a low-tier plan wins. In a high-usage month, a higher flat plan often wins. Since you typically choose a plan structure before knowing how usage will vary across months, the selection requires estimating a usage distribution across time — not just an average.
A structured approach to choosing:
1. **Review at least three months of historical usage** to identify your low, typical, and high-usage months. Device settings on both iPhone and Android show per-app and total usage; carrier apps typically show billing-cycle history.
2. **Calculate the effective monthly cost under each model for your low month and your high month separately.** The model that produces the lowest total across the full year — weighting your typical month most heavily — is likely the better fit.
3. **Factor in the consequence of running out.** In true PAYG, running out means your data stops unless you top up. In a tiered plan with automatic step-up, your service continues but at a higher cost. In a capped tiered plan, speed may throttle. Determine which consequence is more disruptive for your use case — and which carrier response better matches your risk tolerance.
4. **Estimate top-up frequency realistically.** If you choose a low base-cost plan with the expectation of occasional top-ups, count how many top-up events realistically occur in a year and include that cost in your comparison. Underestimating top-up frequency is a common cause of disappointment with these models.
For users whose usage is genuinely unpredictable month to month, a mid-range monthly flat plan often reduces cognitive overhead — the ongoing need to monitor usage and decide whether to top up — and reduces total cost variance even when it is not the theoretical minimum in every individual month.
A final consideration: switching cost. If you choose a PAYG or tiered model and find it does not match your actual usage after two or three months, switching to a different plan type incurs at minimum the effort of cancellation and setup. Prepaid plans generally allow switching without contract-break fees, but any remaining balance or unused data may not be refunded. Factor the risk of a mismatch into your initial selection, particularly if your usage pattern is new (for example, a new job, a new commute, or a change in work-from-home frequency) and historical data is limited.
If you want to keep your phone number when switching between plan types, Mobile Number Portability (MNP) applies — you can carry your existing number to a new plan or carrier. Check that the new plan supports inbound number ports before initiating the transfer, and confirm the timing: porting typically cancels your existing plan at the point of completion, so any remaining prepaid balance or unused allowance on the old plan is usually forfeited.
## Finding PAYG and Tiered Plans on SimFinder
SimFinder's plan search lets you compare prepaid, PAYG, and top-up-capable plans side by side. Filter by your market and usage level to see how plans compare — the pricing in SimFinder reflects current plan data, not the rates in this article, which contains no specific prices.
When using SimFinder to compare these plan types:
- Compare the effective cost per gigabyte across tiered brackets by anchoring to your expected monthly usage.
- Look for whether a plan explicitly describes top-up support or whether data add-ons are available.
- Check the plan's validity period and whether unused data rolls over or expires.
- Note which plans include automatic step notifications and which do not.
- For prepaid plans, check whether there is a minimum top-up amount to keep the SIM active and whether unused credit expires on a fixed schedule.
- For tiered plans on postpaid contracts, confirm whether a minimum term commitment applies and whether the tier structure can be changed mid-contract without penalty.
- For true PAYG, confirm the per-unit billing increment and whether any fixed fee applies per day or per session regardless of usage volume.
The plan-type filter in SimFinder removes the need to manually read through dozens of plan documents to identify which ones match your billing model preference. Once you have identified candidate plans, review the full terms for each — particularly the points on tier steps, top-up validity, and inactivity policies — before committing. The combination of SimFinder's structured plan data and the full plan document from the carrier's own website gives you the information needed to make a well-grounded choice.
**[Search and compare plans on SimFinder →](/en/)**
---
Choosing the right billing model for variable usage is primarily a data problem: the more accurately you can characterise your own usage distribution — not just the average but the variance — the more confidently you can select a tier level, decide whether true PAYG is cost-effective, or estimate how often you will need to top up. Take the time to gather that usage data before committing to a structure.
## Related Guides
- [How to Choose a Travel eSIM: 5 Key Criteria](/en/guides/how-to-choose/)
- [How Much Mobile Data Do You Need?](/en/guides/data-usage-guide/)
- [What Is an MVNO?](/en/guides/what-is-mvno/)
- [Travel eSIM Provider Comparison](/en/guides/provider-comparison/)
- [Data-Saving Techniques](/en/guides/save-data/)
================================================================================
# After Switching Carriers: Post-Switch Setup
URL: https://sim-finder.com/en/guides/post-switch-setup/
Type: guides (en)
Published: 2026-06-04
Switching to a new carrier involves more than inserting a SIM or downloading an eSIM profile. The line activates, but several services — mobile data, SMS-based authentication, messaging apps, and mobile wallets — each require their own post-activation check. This guide covers every step in order, from APN configuration through 2FA re-authentication and mobile payments, so nothing gets missed.
Key points:
- Major MNOs push APN configuration automatically; MVNOs often require manual setup
- Connectivity should be verified for voice, SMS, and data separately — each uses different network systems
- Apps that use your phone number for authentication need attention whenever your number changes
---
## Step 1: APN Configuration
The APN (Access Point Name) is the identifier that connects your device to your carrier's mobile data gateway. Without the correct APN, your device can register on the network and show signal bars, but no data will flow.
### When APN Is Configured Automatically
Major network operators (MNOs) — typically including AT&T, T-Mobile, and Verizon in the US; EE, O2, Three, and Vodafone in the UK; Telstra, Optus, and Vodafone in Australia — submit carrier bundles to Apple and maintain OTA configuration profiles for Android. If your carrier supports automatic configuration (iOS 16+ / recent Android), the device receives APN settings automatically when you insert their SIM or activate their eSIM. You do not need to take any action.
eSIM profiles from major providers embed the APN data inside the profile itself. If you downloaded an eSIM from a well-established carrier, APN configuration is typically included.
### When APN Requires Manual Setup
MVNOs (virtual operators) frequently require manual APN entry because they operate their own billing and data gateway infrastructure separate from the host network. The MVNO may not have an Apple carrier bundle or an Android OTA configuration profile.
Signs that manual APN setup is needed:
- Signal bars are present but no web pages load over mobile data
- The APN field in Settings is blank
- Your carrier's setup documentation includes an APN string
**iPhone:** Settings → Cellular → Cellular Data Network. Enter the APN string from your carrier's official support page exactly as documented — the string is case-sensitive on some carrier implementations. If the Cellular Data Network menu is not visible, your carrier has locked APN editing; install the `.mobileconfig` profile from your provider's website instead. Full instructions: [APN Setup Guide for iPhone](/en/guides/apn-setup-iphone/).
**Android (Pixel):** Settings → Network & Internet → SIMs → tap the SIM → Access Point Names → tap the existing entry or add a new one. **Android (Samsung):** Settings → Connections → Mobile networks → Access Point Names. Enter the APN name, APN string, and any username or password your carrier specifies. Full instructions: [APN Setup Guide for Android](/en/guides/apn-setup-android/).
After entering APN values, toggle Airplane Mode on for 10 seconds, then off. This forces the modem to open a new data session using the updated configuration.
---
## Step 2: Connectivity Verification
Voice, SMS, and mobile data are separate services at the network level. Confirming one works does not confirm the others. Run all three checks before assuming setup is complete.
### Voice Call Test
Dial a known number — a voicemail service or a contact who can confirm receipt. Let the call ring long enough to confirm it connects rather than reaching a network error tone. A brief ring followed by voicemail pickup indicates the line is registered. A fast busy tone or "call failed" message indicates the line is not yet active or has a configuration issue; contact your carrier.
If you ported your number from the old carrier, the port is complete when calls to your old number route to the new SIM. During the port window, there is typically a brief period — seconds to minutes — when neither SIM is active. The [SIM Activation guide](/en/guides/activation/) covers number port timing in detail.
### SMS Test
Send a text message to a contact and ask them to reply. Verify both outbound delivery and inbound receipt. Some prepaid plans require a first top-up or a specific activation step before SMS is enabled, even if the voice line works. If SMS is not working after a few minutes, check your carrier's app or dashboard for any pending activation steps.
If you changed your phone number as part of the switch, note that apps and services still have your old number on file. You will need to update them individually — this is covered in the sections below.
### Mobile Data Test
Turn off Wi-Fi (Settings → Wi-Fi → off on iPhone; Settings → Network & Internet → Wi-Fi → off on Android). Open a browser and navigate to any page. If the page loads, mobile data is working.
If data does not load but signal bars are present, check APN settings as described in Step 1. Also confirm that the Cellular Data toggle (iPhone) or Mobile data toggle (Android) is enabled, and that Data Roaming is on if your plan routes data via a roaming session — common with travel eSIMs and some MVNOs even when you are physically in the plan's coverage region.
---
## Step 3: Two-Factor Authentication and SMS-Based Verification
This is the step most commonly overlooked after switching carriers. Many services use your phone number to send one-time codes (OTPs) for login and for transaction verification. If you kept the same number (via number porting), SMS-based 2FA codes will arrive on the new SIM automatically — no reconfiguration is needed for the OTP delivery itself.
If you changed your phone number, you must update it in every service that holds the old number as a 2FA method **before** the old number is cancelled or reassigned. Attempting to update 2FA after losing access to the old number typically requires identity verification directly with each service, which can be time-consuming.
### Banking and Financial Services
Most banking apps detect SIM changes or device changes and trigger an additional identity verification step — this is a deliberate anti-fraud measure, not a malfunction. After your new SIM is active, open your banking apps. If prompted to re-verify your identity, complete the verification using the method the app offers (biometric confirmation, in-app code, or a call to customer support). This step protects against SIM swap fraud and is standard practice for regulated financial services.
If you changed your number: log in to your bank's website and update the phone number registered for OTP delivery before your old number is cancelled. Banks typically require a separate, out-of-band verification step to change your 2FA phone number.
### Other Online Services
Review any service that uses SMS for:
- Login verification (two-step authentication)
- Account recovery codes sent via SMS
- Transaction approvals
Common categories that use SMS 2FA: email providers, social media accounts, e-commerce accounts, and work productivity tools. If you changed your number, update the registered phone number in each service's security settings.
**Authenticator apps (Google Authenticator, Authy, Microsoft Authenticator):** These generate codes locally on the device and do not depend on your SIM or phone number. They continue to work after a carrier switch without any changes. No re-registration is needed unless you also changed devices.
---
## Step 4: Messaging Apps That Use Your Phone Number
Messaging apps that tie accounts to a phone number require action if your number changed. If you kept the same number via porting, these apps continue to work on the active device without reconfiguration.
### If You Changed Your Phone Number
**WhatsApp:** Go to Settings → Account → Change Number. WhatsApp's built-in number-change flow migrates your account, contacts, and group memberships to the new number. Completing this before cancelling the old number is recommended — the process sends a verification code to the new number. Group members see the number change automatically; to notify individual contacts, enable Notify Contacts in the Change Number flow.
**Signal:** In Signal, go to Settings → Account → Change Phone Number. Signal sends a verification code to the new number and migrates your account and contacts. After the change, your existing conversations remain on the device.
**Telegram:** Go to Settings → Phone Number → Change Number. Telegram sends a verification code to the new number. Your messages, groups, and channel subscriptions transfer to the new number.
**iMessage and FaceTime (iPhone):** If you changed your number, go to Settings → Messages → Send & Receive and Settings → FaceTime → You can be reached. Remove the old number and confirm the new number is listed. If the new number does not appear automatically after activation, sign out of iMessage and FaceTime (Settings → Messages → toggle iMessage off, then on), which triggers the number registration process.
**RCS (Android):** Google Messages RCS is tied to your phone number and Google account. RCS re-registration after a carrier switch is not always automatic and may take longer or require carrier action. Do NOT toggle Chat features off and on — Google Messages warns this can remove you from group chats. If RCS shows as disabled after switching, confirm Google Messages is your default messaging app, ensure mobile data is on, and if it persists, contact your new carrier to confirm RCS support.
---
## Step 5: Carrier Email Address (If Applicable)
Some carriers provide an email address that uses the carrier's domain (for example, `@t-mobile.com`, `@verizon.net`, or country-specific equivalents). These addresses belong to the carrier and cease to function after you leave that carrier unless you take specific action.
**Before cancelling the old plan:**
- Forward any important contacts and messages to a non-carrier email address (Gmail, Outlook, or a custom domain)
- Notify contacts of the address change
- Update the email registered with any services that use the carrier email for login or recovery
**Carrier email portability services:** Some carriers offer a paid email retention service that allows you to keep using the address for a period after leaving. The availability and pricing of these services vary by carrier and country. If this option is important to you, check with your old carrier before cancelling the line — enrollment windows are typically limited to a short period around the cancellation date.
If you did not use a carrier email address, this step does not apply.
---
## Step 6: Mobile Wallet and Contactless Payments
**Apple Pay and Google Pay** store payment card credentials on the device's secure element, linked to your bank account — not to your SIM or carrier. Switching carriers does not remove stored cards, and contactless payments continue to work without any changes.
**What may require attention:**
If your bank sends OTPs to your phone number to authorise high-value transactions, contactless payments for large amounts may prompt for a code. As long as SMS is working on your new SIM, these codes will arrive as normal. If you changed your phone number, update it in your banking app before making the first large payment.
**Transit cards and NFC passes:** Cards stored in Apple Wallet (iPhone) or Google Wallet (Android) — including transit cards, boarding passes, and loyalty cards — are tied to the device and the relevant app account, not to the carrier. They continue to function after a carrier switch.
**Carrier-billing payment methods:** If you used "charge to phone bill" for in-app purchases (Google Play carrier billing, Apple App Store direct carrier billing), these may need to be re-activated with the new carrier. Open the relevant store's payment settings and confirm whether the new carrier is listed as an available billing option. Not all carriers support carrier billing.
---
## Step 7: Update Your Phone Number in Key Services
If your number changed, the following categories of service commonly need updating:
| Service category | Where to update |
|---|---|
| Banking and financial apps | App settings → Profile or Security → Phone number |
| Email providers | Account security settings → Recovery phone |
| Social media accounts | Account settings → Security or Privacy → Phone number |
| Workplace tools (Slack, Microsoft 365) | Account security settings or IT administrator |
| Delivery and e-commerce accounts | Profile → Contact information |
| Healthcare portals | Patient portal → Contact preferences |
Work through this list while your old number is still active. If any service requires sending a verification code to the old number for the update, you can complete that step immediately while the old SIM is still in service or the old number is still active.
---
## Step 8: What to Do If It Does Not Connect
If the new line is active but voice, SMS, or data is not working, work through these steps in order before concluding there is a network fault.
### Toggle Airplane Mode
Turn Airplane Mode on, wait 10 seconds, then turn it off. This clears the current network registration and forces the device to search again. Many connectivity failures after a carrier switch resolve with this single step.
### Restart the Device
A full device restart reinitialises the modem stack and forces a new network search from a clean state. After restart, wait 60 seconds and check the status bar for the carrier name and signal indicator.
### Re-check the APN
If data still does not connect after an Airplane Mode toggle and restart, return to the APN settings and verify every character of the APN string against your carrier's official documentation. The APN string is case-sensitive on some implementations, and a single incorrect character (a hyphen instead of a period, an extra space, a wrong letter case) prevents data from connecting.
Common APN errors:
- Leaving the APN field blank after a network reset
- Entering an outdated APN string from an unofficial source
- Using the host network's APN instead of the MVNO's specific APN
### Reset Network Settings
If APN verification and restarts have not resolved the issue, a network settings reset clears all stored cellular configuration and forces the device to start from a clean state. On iPhone: Settings → General → Transfer or Reset iPhone → Reset → Reset Network Settings. On Pixel: Settings → System → Reset options → Reset Wi-Fi, mobile & Bluetooth. On Samsung: Settings → General management → Reset → Reset mobile network settings.
**What is preserved:** eSIM profiles and personal data are not removed. **What is cleared:** Wi-Fi passwords, VPN profiles, APN settings, and Bluetooth pairings. After the reset, re-enter the APN manually and reconnect to Wi-Fi networks. Full details: [How to Reset Network Settings](/en/guides/network-reset/).
### Check for No Service
If the status bar shows "No Service" or zero bars after all the above steps, the device may not be finding the network at all. Common causes after a carrier switch: the device is carrier-locked to the old carrier, or the SIM has not been fully activated on the carrier's backend. Full diagnostic sequence: [No Service on Your Phone?](/en/guides/no-service/).
To check if your iPhone is carrier-locked: Settings → General → About → Carrier Lock. If the value is not "No SIM restrictions," contact your previous carrier to complete the unlock before using the new SIM. Carrier lock status can be checked on Android devices in the SIM card management section, though the exact path varies by manufacturer.
---
## FAQ
### Do I need to set up an APN after switching carriers?
It depends on your new carrier. Major MNOs push APN configuration automatically when you insert the SIM or download the eSIM profile. MVNOs frequently require manual APN setup because they maintain their own gateway infrastructure separate from the host network. Check your new provider's setup documentation immediately after activation — if data does not connect within a few minutes of activation, the APN is the most likely missing step.
### My new SIM has signal bars but no data. What should I do first?
Signal bars confirm the radio link to the tower, but data requires a correctly configured APN. Open your carrier's setup guide and verify the APN string in Settings → Cellular → Cellular Data Network (iPhone) or Settings → Network & Internet → SIMs → Access Point Names (Android). If the field is blank or contains outdated values, enter the correct APN from your carrier's official support page. Then toggle Airplane Mode off and on to force a new data session.
### Which apps typically need re-authentication after a SIM swap?
Banking apps and financial services re-verify your identity when they detect a SIM change or new device — this is a deliberate security measure. Any app that uses SMS-based two-factor authentication will send a code to your new number as soon as it is active; the authentication itself does not require re-setup unless you also changed your phone number. Messaging apps (WhatsApp, Telegram, Signal) tie their account to your phone number and require you to re-register with the new number if you changed it.
### Will my mobile wallet stop working after I switch carriers?
Apple Pay and Google Pay are tied to your device and payment card, not to your SIM or carrier. Switching carriers does not disable stored cards. However, if your bank uses your mobile number for payment verification — for example, to send an OTP for large transactions — update your number in the banking app before making high-value payments. Transit cards and loyalty-based NFC passes should continue to work without any changes.
### How do I know if my number port completed successfully?
Your old SIM will lose network registration at the moment the number transfers. The new SIM gains registration within seconds to a few minutes. Make a test call or send a test SMS from the new SIM — if the call connects and SMS delivers, the port is complete. You can also ask a contact to call your old number; it should now ring the new SIM.
### Should I keep my old SIM after switching?
Do not discard the old SIM immediately. Keep it for at least a few days as a backup while you confirm all services (data, calls, SMS, app authentication) are working on the new line. Once you have verified 2FA re-registration and received at least one OTP on the new number, it is safe to discard or store the old SIM.
---
## Related Guides
- [APN Setup Guide for iPhone](/en/guides/apn-setup-iphone/) — full instructions for configuring APN settings on iPhone, including profile installation and manual entry
- [APN Setup Guide for Android](/en/guides/apn-setup-android/) — step-by-step APN configuration for Pixel and Samsung Galaxy after a carrier switch
- [SIM Activation: How to Get Your Line Working](/en/guides/activation/) — covers the activation process, identity verification, number port timing, and post-activation connectivity checks
- [How to Reset Network Settings (and What It Affects)](/en/guides/network-reset/) — when and how to perform a network reset on iPhone, Pixel, and Samsung if connectivity problems persist
- [No Service on Your Phone? A Step-by-Step Fix](/en/guides/no-service/) — full diagnostic sequence for zero signal bars or "No Service" after a carrier switch
Use [SimFinder](/en/) to compare SIM and mobile plans by country, or [SimFinder Travel](/en/travel/) to find travel eSIM plans.
================================================================================
# Pre-Switch Checklist: What to Check Before Changing Carriers
URL: https://sim-finder.com/en/guides/pre-switch-checklist/
Type: guides (en)
Published: 2026-06-04
Switching carriers takes less than an hour on the day itself, but the preparation matters. Arriving at the new carrier's sign-up flow without a transfer code, with a locked phone, or without migrating your two-factor authentication (2FA) accounts can cause delays, failed ports, or temporary loss of access to critical services.
This checklist covers the eight categories to verify before you switch. Work through them in the order shown — each step builds on the one before. Allow two to four weeks for the full preparation so no single step becomes a last-minute blocker.
---
## 1. Confirm Your Phone Number Portability Status
Number portability — the right to keep your number when switching carriers — is a legal mandate in most countries with significant mobile markets. The process requires a transfer credential from your current carrier. Without it, your new carrier cannot initiate the port.
The name of this credential varies by country:
| Country / Region | Transfer credential | How to obtain it |
|-----------------|---------------------|------------------|
| United Kingdom | PAC (Porting Authorisation Code) | Text "PAC" to 65075; delivered in 60 seconds |
| United States | Number Transfer PIN | Set up in your carrier's account portal or app |
| France | RIO (Relevé d'Identité Opérateur) | Call 3179 from your mobile (free, 24/7) |
| Germany | Rufnummernmitnahme-Code | Request via your carrier's portal or hotline |
| Canada | Account number + transfer PIN | Available in your account portal |
| Australia | Not required separately | The gaining carrier verifies your identity directly; under ACMA 2020 pre-porting identity verification rules, the carrier must confirm your identity — typically via an SMS OTP or a callback to the number being ported — before the port proceeds |
Confirm that your account is eligible for porting. Most carriers require your account to be active and in good standing. Some carriers apply a temporary porting hold after recent account changes such as a SIM swap or address update; the duration varies by carrier, so check before requesting a transfer credential.
For a full explanation of how number portability works and what to do if a port fails, see [Mobile Number Portability (MNP) Explained](/en/guides/what-is-mnp/).
---
## 2. Check Your Phone's SIM Lock Status
A carrier-locked phone only connects to the carrier that applied the lock. Even if your number ports successfully, a locked device will show no service on the new carrier's SIM until the lock is removed.
**iPhone:** Open Settings → General → About → Carrier Lock. If it reads "No SIM restrictions," your phone is unlocked. Any other message means it is locked.
**Android:** Insert a SIM card from a different carrier. If mobile data and calls work, the phone is unlocked. If you see "SIM not supported" or "Invalid SIM," the phone is locked.
If your phone is locked, request an unlock from your current carrier before initiating the switch. Processing times vary:
- In the **UK**, Ofcom banned the sale of locked handsets from 17 December 2021. Phones bought after that date are already unlocked.
- In the **US**, each carrier sets its own policy. Verizon unlocks automatically once the device payment plan is paid off. AT&T requires at least 60 days from purchase plus a paid-off balance. T-Mobile unlocks devices purchased on or after January 27, 2026 once fully paid.
- In most other markets, request an unlock through the carrier's website or app. Online requests are typically free; in-store requests may carry a fee at some carriers.
Allow several business days for the unlock to process. Confirm the unlock is active before the day you switch.
For a full breakdown of how to check lock status and how unlock policies work by region, see [SIM Lock and SIM-Free Explained](/en/guides/sim-lock/).
---
## 3. Audit Your Two-Factor Authentication (2FA) Methods
This is the most time-sensitive preparation step. Many services use your phone number for SMS-based two-factor authentication. During a carrier switch, there is a window — ranging from a few minutes to a couple of hours — when SMS delivery is unreliable on both the old and new SIM. Triggering an SMS 2FA request during this window can lock you out of a service temporarily.
**Before switching, do the following:**
1. List every account that sends a verification code or login alert to your phone number. Start with banking, email, brokerage, and any work account.
2. Log in to each account before the switch begins, while SMS delivery is reliable.
3. Where possible, migrate from SMS 2FA to an authenticator app (such as Google Authenticator, Apple Passwords, or Authy). Authenticator apps generate codes locally and are unaffected by carrier transitions.
4. If SMS 2FA is the only option for a service, note it, and avoid logging out of that service on any device until after the port completes.
Backup codes for authenticator apps and recovery codes for accounts are distinct from SMS codes. Download and store them securely before the switch.
If you use SMS 2FA specifically for secure access to your email or cloud backup, resolve this before your phone number moves to a new carrier.
A further risk worth noting: some financial institutions and workplace systems automatically flag a number change as suspicious activity and may freeze login access pending a manual review. If you manage accounts with this behaviour, notify the relevant institution in advance or confirm their process for number changes.
---
## 4. Check Your Contract End Date and Early-Termination Fees
Switching before a minimum contract term ends typically triggers an early-termination fee (ETF). The fee amount and calculation method vary by carrier and country.
**What to check:**
- The contract end date. This is shown in your carrier's account portal, on your paper contract, or on your monthly bill.
- Whether an ETF applies and, if so, how it is calculated. Some carriers calculate it as a flat fee; others base it on the number of months remaining.
- Whether the ETF reduces over time (many contracts pro-rate it across the term).
In most countries, carriers are not permitted to use an outstanding ETF to block a number port — they can only demand payment. However, the obligation to pay the fee remains after the port completes.
If you are within a few weeks of your contract end date, it is generally worth waiting to avoid the fee. If you are early in a contract, compare the ETF against the savings from switching — use the [provider comparison](/en/guides/provider-comparison/) to size up what competing carriers currently offer before you run the numbers. Factor in the first month of the new carrier's service when making this comparison — some carriers bill a partial first month plus the following full month on the first invoice.
Also check whether your current carrier is in a promotional period that provides a discount or bonus data allocation. These perks are account-level and expire when the account closes; they do not transfer with the number.
Prepaid accounts typically do not have ETFs. Month-to-month postpaid contracts also typically do not carry ETFs.
---
## 5. Check Your Device Installment Balance
If you purchased your phone through the carrier on a device financing or installment plan, the balance is separate from your service contract. In most countries, you can port your number even with an outstanding balance — carriers cannot block the port — but you remain liable for the remaining payments.
**What to check:**
- The remaining installment balance. This is on your monthly bill or in the account portal.
- Whether your carrier requires the balance to be paid in full before they will unlock the device. Unlock eligibility and porting eligibility are separate. Even if the port proceeds, a locked phone will not work on the new network.
- Whether paying off the balance early incurs any interest or fee.
If the installment plan balance is large and you want to avoid parallel payments, pay it off before switching — or factor those payments into the total cost comparison between your current and new carrier.
---
## 6. Collect the Account Details Your New Carrier Will Ask For
Porting requires your new carrier to submit a request on your behalf. A mismatch between the details you provide and what the current carrier holds on file is the most common reason ports fail.
**Gather the following before starting sign-up:**
- **Phone number** you want to port.
- **Account number** with the current carrier — this is an internal identifier, not your phone number. It is on your bill or in your carrier's online portal.
- **Transfer credential** (PAC, Number Transfer PIN, RIO, or equivalent — see section 1 above).
- **Registered name** on the account, exactly as it appears. A middle name or suffix difference can cause a rejection.
- **Billing address** on the account.
- **Account PIN** if your carrier uses one (distinct from the transfer PIN in some systems).
If you are on a family or shared plan, confirm whether your line is owned by a primary account holder and whether that person needs to authorise the port.
If any detail is uncertain, log in to your current carrier's account portal and download or screenshot the account summary page. Having this on hand prevents delays during the new carrier's sign-up form.
---
## 7. Back Up Your Device and Note What Will Not Transfer
The port transfers only your phone number. Content stored on your device or the carrier's servers does not move automatically.
**What to back up before switching:**
- **Device backup**: Use iCloud (iPhone) or Google One / Google Photos (Android) to create a full backup. This preserves contacts, messages, app data, and photos if anything goes wrong during the transition.
- **Voicemail messages**: Voicemail stored on your carrier's servers is not ported. It remains accessible on the old carrier's system for a limited time after the account closes. Listen to and note any important messages. If you use visual voicemail, screenshotting or noting the content is the simplest approach.
- **Call logs and SMS history**: These are stored on the device, not on the carrier. A device backup preserves them.
- **Carrier app data**: Some carriers store loyalty points, usage credits, or promotional balances in their apps. These do not transfer. Redeem or note them before closing the account.
- **eSIM profile**: If you are switching away from an eSIM-only setup, confirm whether the new carrier requires you to delete the old eSIM profile before or after the port. On most devices, the old eSIM profile becomes inactive automatically after the port completes, but check the new carrier's instructions to avoid activation errors.
A device backup also ensures you can restore your phone quickly if something goes wrong during the transition — for example, if you need to factory-reset to fix an activation issue.
---
## 8. Decide What to Do with Your Carrier Email Address
Carrier email addresses — addresses that end in the carrier's domain — are tied to your service account. When the account closes, those addresses stop receiving mail, typically within a few weeks to a few months — check your carrier's policy for the exact window.
**Options:**
1. **Switch to a provider-independent address before you switch carriers.** Free services such as Gmail, Outlook, and iCloud Mail belong to you regardless of which carrier you use. Update every service that uses your carrier address to the new one.
2. **Use a paid mail portability service if your carrier offers one.** In Japan, NTT Docomo, au, and SoftBank each offer a paid carrier email portability service (application must be made within 31 days of account closure in the case of Docomo). Similar services are not universally available; check your carrier's website.
3. **Set up a mail forwarding rule from the carrier address** while you still have access, redirecting incoming mail to a permanent address.
The safest long-term approach is option 1. Carrier email addresses cannot be transferred to another carrier's domain, and the portability services that exist require ongoing payment and vendor lock-in to the old carrier.
---
## The Day-of-Switch Sequence
Once all eight checklist items are complete, the day of the switch follows a fixed order:
1. **Do not cancel your current account first.** Cancelling before porting releases your number back to the carrier's pool.
2. **Sign up with your new carrier** and provide your number portability transfer credential.
3. **Do not trigger any SMS 2FA logins** during the porting window.
4. **Wait for the port to complete.** Your old SIM will lose service, and your new SIM will acquire signal and the ported number.
5. **Test with a call and a message** before treating the switch as done.
6. **Confirm your old account is closed** or follow up if your carrier does not automatically close it on port-out.
**Timing tip:** Initiate the switch on a weekday morning if possible. Most carriers have support staff available to resolve port issues during business hours. Starting on a Friday evening or over a public holiday risks the port stalling with no support available until the next working day.
---
## Common Pre-Switch Mistakes
**Requesting the transfer code too early.** PAC codes (UK) and equivalent codes in other markets have expiry dates — typically 30 days from issue. If your carrier switch takes longer than expected, the code may expire and need to be reissued.
**Skipping the lock status check.** A successful port to an unlocked number on a locked phone leaves you with a working number but no usable service. Check before, not after.
**Assuming the new carrier holds the account open.** Some carriers automatically close the old account on port-out; others require a separate cancellation call. Check your current carrier's policy to avoid being charged for a service month you are not using.
**Overlooking paired devices.** Smartwatches and tablets on a cellular plan are often on a separate line within the same account. Verify whether you want to port or cancel those lines separately.
**Forgetting about roaming add-ons or promotional credits.** Pre-paid international roaming packages and promotional data credits are account-level, not number-level. They do not follow the number to the new carrier.
**Not confirming the new carrier's coverage at your locations.** A cheaper plan on a carrier with worse coverage in your home, workplace, or commute route provides less value than it appears. Check coverage maps for the specific addresses that matter to you — not just the city-level overview — before committing. If you are still deciding which carrier to move to, [how to choose](/en/guides/how-to-choose/) covers the five criteria worth evaluating before you sign up.
---
## FAQ
*(See structured FAQ items in the frontmatter above for display in site search and rich results.)*
### What if I need to switch immediately with no preparation time?
The minimum viable preparation is: (1) obtain your transfer credential, (2) confirm your phone is unlocked or request an unlock on an expedited basis, and (3) log in to any critical banking or email account before the port starts so you have an active session during the SMS 2FA gap. Everything else — voicemail backup, carrier email migration, 2FA app migration — can be done after the switch completes, though it is easier before.
### My phone is still under a financing plan. Can I still switch?
Yes. In most countries, a carrier cannot block a port because of an outstanding device installment balance. However, the carrier can and will continue billing you for the remaining installments after the port. Additionally, confirm that the installment balance being outstanding does not affect the carrier's willingness to unlock your device — some carriers tie unlock eligibility to payment completion.
### What should I do if the port does not complete within the expected window?
Contact your new carrier's support first. They can check the port request status and identify whether it was rejected by the current carrier. Common rejection reasons are a name mismatch, an incorrect or expired transfer credential, or an active account lock. If the port stalls and neither carrier resolves it within the timeframe set by your country's regulator, file a complaint with the relevant authority (FCC in the US, Ofcom in the UK, ACMA in Australia, ARCEP in France, Bundesnetzagentur in Germany).
### Can I switch and keep the same phone number on two separate SIMs (dual SIM)?
No. Number portability moves the number from one carrier to another. A phone number can only be active on one carrier at a time. If you want two active numbers, you need two separate numbers on two lines. For information on running two lines simultaneously on one phone, see the guides on [dual-SIM setups for travel](/en/guides/dual-sim-for-travel/) and [eSIM Quick Transfer for iPhones](/en/guides/transfer-iphone/).
---
## Related Guides
- [Mobile Number Portability (MNP) Explained](/en/guides/what-is-mnp/) — How number porting works technically, country-by-country timing, and common failure modes.
- [SIM Lock and SIM-Free Explained](/en/guides/sim-lock/) — How to check your lock status in seconds and how unlock policies work by carrier and region.
- [How to Choose a Travel eSIM: 5 Key Criteria](/en/guides/how-to-choose/) — Evaluating new carrier plans before committing to a switch.
- [Travel eSIM Provider Comparison](/en/guides/provider-comparison/) — Side-by-side comparison of major eSIM providers if you are switching to a travel or global plan.
- [eSIM Quick Transfer: Move an eSIM to Another iPhone](/en/guides/transfer-iphone/) — How to move an eSIM profile to a new device during or after a carrier switch.
================================================================================
# Pre-Trip Connectivity Checklist — From 2 Weeks Out to Airport Departure
URL: https://sim-finder.com/en/guides/pre-trip-checklist/
Type: guides (en)
Published: 2026-04-23
Connectivity problems abroad are almost always avoidable. The most common issues — bill shock from unexpected roaming charges, no signal on arrival, 2FA codes that never arrive — share one root cause: preparation left to the last minute.
This checklist walks you through every step from two weeks before departure to the moment you clear customs. Follow it in order, and you will arrive connected, aware of your costs, and with a fallback plan ready.
---
## Why a Pre-Trip Checklist Matters
Leaving connectivity to chance costs money and wastes time. Roaming charges on an unmanaged home SIM can become significant for a week abroad, depending on your carrier's per-megabyte or per-day rates. An eSIM that fails to install at the airport — because the only available Wi-Fi is behind a captive portal — leaves you without data in an unfamiliar place.
None of this is difficult to prevent. The steps below take roughly 30 minutes in total, spread over two weeks. The payoff is a trip where connectivity is never a distraction.
---
## 2 Weeks Before: Choose Your Connectivity and Book
Your first decision is which connectivity option you will use. The four main options are international roaming, a local SIM card, a travel eSIM, and a portable Wi-Fi hotspot. Our guide to [the four ways to stay connected abroad](/en/guides/four-options/) walks through the cost, setup effort, and quality trade-offs in detail. The short summary:
- **International roaming** is the easiest option but can be the most expensive. Confirm your home carrier's exact rates or pass options before committing.
- **Local SIM card** gives you local pricing and full network access, but requires an unlocked device and a stop at a carrier store or kiosk on arrival. *(Local SIM purchasing guide — coming soon.)*
- **Travel eSIM** combines the convenience of pre-purchase with competitive data rates. No physical card, no store visit, but your device must support eSIM and be carrier-unlocked.
- **Portable Wi-Fi hotspot** shares one connection across multiple devices. Worth considering for groups or for devices with no SIM slot. *(Wi-Fi rental guide — coming soon.)*
### Checklist: 2 Weeks Before
- [ ] Decide which connectivity option(s) you will use
- [ ] If using a travel eSIM: confirm your device supports eSIM (see below) and purchase the plan
- [ ] If using international roaming: check your carrier's destination roaming rates or day-pass options
- [ ] If using a local SIM: identify which carrier to use at the destination and note airport or store locations
- [ ] Check your device's SIM lock status (see the next section)
### Checking eSIM Compatibility
On iPhone, go to **Settings → Cellular** (or Mobile Data). If you see an option labeled **Add eSIM** or **Add Data Plan**, your device supports eSIM. iPhone XS, XR, and all later models support eSIM, as documented in Apple's official compatibility data.
On Android, the path varies by manufacturer. On Google Pixel, go to **Settings → Network & internet → SIMs → Add SIM**. On Samsung Galaxy, go to **Settings → Connections → SIM card manager → Add mobile plan**. Google Pixel 4 and later broadly support eSIM (Pixel 3 support is limited by region and carrier variant); Samsung Galaxy S20 and later support eSIM on most variants, though regional and carrier-lock exceptions exist.
---
## 1 Week Before: Prepare Your Device
### Check and Remove SIM Lock
A SIM-locked device cannot use a SIM or eSIM from a carrier other than the one that sold it. If you plan to use a travel eSIM or local SIM, resolve this before departure — carrier unlock requests typically take one to several business days to process, and turnaround varies by carrier.
**iPhone**: Go to **Settings → General → About → Carrier Lock**. If it shows **No SIM restrictions**, your device is unlocked. If it shows a carrier name, contact that carrier to request an unlock. Most carriers unlock devices at no charge once any contract or installment period is complete, as confirmed by AT&T and T-Mobile official unlock policies.
**Android**: The most reliable check is a SIM swap test — insert a SIM from a different carrier and verify that calls and data work. Network scanning alone is not reliable, as some locked devices still display other carriers in scan results but reject them at connection time.
### Verify APN Settings
APN (Access Point Name) settings tell your device how to connect to your carrier's data network. Most travel eSIM providers configure APN automatically when the profile installs. Some, however, require manual configuration — this is documented in the provider's setup guide. Check your provider's instructions and note the APN details in case you need to enter them manually at the destination.
### Decide on Data Roaming Policy
Choose now — not on the plane — whether Data Roaming should be on or off for your home SIM.
If you are using a travel eSIM for data and want to keep your home SIM active only for calls and SMS, turn off Data Roaming on the home SIM line. On iPhone: **Settings → Cellular → [home SIM line] → Cellular Data Options → Data Roaming: Off**. Also turn off **Allow Cellular Data Switching** to prevent your device from silently falling back to the home SIM for data if the travel eSIM signal drops.
If you are relying on international roaming, enable Data Roaming — but only after confirming your carrier's rates or activating a roaming pass. For a full breakdown of how roaming charges work and how to control them, see our [international roaming guide](/en/guides/international-roaming/).
### Migrate SMS-Based 2FA Before You Travel
Travel eSIMs are data-only. They cannot receive SMS. If any of your accounts use SMS-based two-factor authentication — banking, email, social platforms — those codes will only arrive on your home SIM line. If your home SIM is roaming without a voice plan, or if SMS delivery is unreliable in the destination country, you risk being locked out of an account mid-trip.
The solution is to migrate critical accounts to an authenticator app (Google Authenticator, Microsoft Authenticator, or Authy) before departure. Do this at home, confirm each account works with the app, then proceed.
### Checklist: 1 Week Before
- [ ] Check SIM lock status; submit unlock request if needed
- [ ] Review eSIM APN requirements with your provider
- [ ] Set Data Roaming policy for each SIM line
- [ ] Migrate critical SMS-based 2FA accounts to an authenticator app
- [ ] Verify your bank or payment apps work internationally
---
## Day Before Departure: Install eSIM and Pre-Download
The day before departure is the right time for tasks that require a reliable home Wi-Fi connection.
### Install Your Travel eSIM Profile
If you are using a travel eSIM, install the profile today — not at the airport.
Your provider will send a QR code by email or display it in their app. On iPhone: go to **Settings → Cellular → Set Up Cellular** (labelled **Add eSIM** or **Add Cellular Plan** on some iOS versions) and scan the QR code. On iOS 17.4 and later, you can also long-press a QR code image in Mail, Photos, or Safari to trigger the eSIM setup directly.
On Android (Google Pixel): go to **Settings → Network & internet → SIMs → Add SIM**. On Samsung Galaxy: **Settings → Connections → SIM card manager → Add mobile plan**.
**Install, but do not activate yet.** Most travel eSIM validity periods start on first network connection in the destination country, not on installation — but this varies by provider. Activating at home may start consuming your allotted days before the trip begins. Our [first-time travel eSIM guide](/en/guides/first-time-guide/) covers the install and activation sequence in full detail.
eSIM QR codes are single-use by GSMA design. Once scanned and linked to your device, the code cannot be used again. Save or screenshot the QR code image before scanning, in case you need to contact your provider for a replacement profile.
### Pre-Download Offline Maps
Google Maps uses roughly 3–20 MB per hour for turn-by-turn navigation, based on third-party measurements. But map search lookups and initial map loading require a live data connection. Downloading your destination region now means navigation works even without signal.
**Google Maps**: Search for a city or region → tap the area name at the bottom → three-dot menu → Download offline map.
**Apple Maps** (iOS 17 and later): Tap your profile icon → Offline Maps → Download New Map → select the region.
Download over Wi-Fi today, not at the airport.
### Pre-Download Entertainment for the Flight
Streaming HD video consumes 3 GB or more per hour. Downloading in advance costs nothing after the fact. See our [data usage guide](/en/guides/data-usage-guide/) for consumption figures by app and quality setting if you want to estimate how much mobile data your trip activities will require.
### Checklist: Day Before
- [ ] Install travel eSIM profile over home Wi-Fi (do not activate yet)
- [ ] Screenshot or save the QR code image before scanning
- [ ] Verify eSIM appears in Settings under Cellular / SIM
- [ ] Download offline maps for destination region(s)
- [ ] Download entertainment for the flight (Netflix, Spotify, etc.) over Wi-Fi
- [ ] Charge all devices and portable battery to full
---
## Departure Day / Airport: Final Checks and Airplane Mode
### At Home Before You Leave
Run a final settings review before walking out the door:
- Confirm Data Roaming is set correctly on each SIM line
- Confirm Allow Cellular Data Switching is off (iPhone, if using a travel eSIM for data)
- Confirm the travel eSIM profile is installed and visible in Settings, but not yet set as the active data line
### At the Airport
Most airports offer free Wi-Fi, but it typically requires accepting terms via a captive portal — a browser page that blocks all other traffic until you tap "Accept." If you still need to complete any connectivity setup and only have airport Wi-Fi, connect to the network first and complete the captive portal step in your browser before going into Settings.
**Enable Airplane Mode** when you board. This prevents your home SIM from attempting to register on any network during the flight, which on some carriers can trigger unexpected roaming charges. Your downloaded maps, offline entertainment, and the installed eSIM profile remain on the device regardless of Airplane Mode.
### Checklist: Departure Day
- [ ] Final settings review — Data Roaming and Allow Cellular Data Switching
- [ ] Travel eSIM installed, not yet activated as data line
- [ ] Phone and portable battery fully charged
- [ ] Emergency contacts saved offline (screenshot or written copy)
- [ ] Enable Airplane Mode at boarding
---
## On Arrival: Connect and Fallback
### Activating Your Travel eSIM
After landing and clearing customs, disable Airplane Mode. If using a travel eSIM:
1. Go to **Settings → Cellular**
2. Select the travel eSIM line
3. Enable it and set it as the **Cellular Data** line
4. Confirm **Data Roaming is on** for the travel eSIM line (required for the eSIM to connect to the local network)
5. Confirm **Data Roaming is off** on your home SIM line
Wait 30–60 seconds for the device to register on a local network. The network name should appear in the status bar.
Our [dual SIM for travel guide](/en/guides/dual-sim-for-travel/) explains the full line-assignment configuration for running your home SIM alongside a travel eSIM — including which line handles calls, which handles data, and how to prevent accidental home-SIM roaming charges.
### Troubleshooting: No Signal on Arrival
Work through these steps in order:
1. **Toggle Airplane Mode**: On for 10–15 seconds, then off. Forces a fresh network search.
2. **Check Data Roaming**: Confirm it is enabled for the active SIM line.
3. **Select network manually**: iPhone: **Settings → Cellular → Network Selection → Manual**. Android: **Settings → Network & internet → Mobile Network → Network Operators**. Select any available carrier to test.
4. **Verify APN settings**: If your provider requires manual APN configuration, confirm the values match the provider's documentation.
5. **Contact your provider**: Most travel eSIM providers offer live chat support through their app or website. Use airport Wi-Fi if mobile data is unavailable.
As a fallback, most international airports have physical SIM card kiosks near the arrivals area. A locally purchased SIM is a reliable backup if your travel eSIM cannot connect after exhausting the steps above.
---
## Essential Apps Checklist
Install these before departure. App stores require an internet connection to download.
### Navigation
- **Google Maps** — offline map download, turn-by-turn navigation, transit directions; available on iOS and Android
- **Apple Maps** (iOS 17+) — offline maps; integrated with iPhone and Apple Watch
- **Maps.me** — detailed offline maps useful for hiking trails and areas with limited coverage
### Messaging and Calls
Travel eSIMs are data-only. Voice calls and SMS must go through an internet-based app:
- **WhatsApp** — widely used globally; voice calls, video calls, group chats
- **Signal** — end-to-end encrypted; voice and video calls; smaller global install base than WhatsApp
- **Telegram** — large file support, channels, voice calls; useful where WhatsApp is less common
On Apple devices, **FaceTime Audio** works over Wi-Fi and mobile data between Apple users at no additional setup.
### Translation
- **Google Translate** — offline language pack downloads; camera-based text and sign translation; iOS and Android
- **DeepL** — higher accuracy for European and East Asian languages; iOS and Android
Download offline language packs while on Wi-Fi at home.
### Two-Factor Authentication
- **Google Authenticator** (iOS / Android)
- **Microsoft Authenticator** (iOS / Android)
- **Authy** (iOS / Android) — multi-device cloud backup of tokens
### Payments
- Your bank's official app — confirm it works internationally and note the customer support number in case a card is blocked abroad
- **Google Pay** or **Apple Pay** — verify your cards are loaded before departure
- A currency converter (or simply ask Google: "100 USD to EUR")
---
## Bill-Shock Prevention Settings Summary
Bill shock — unexpectedly large charges on your home carrier bill — most commonly results from: Data Roaming left on, Allow Cellular Data Switching left on (iPhone), or background apps sending data through the wrong SIM line.
### Key Settings for Travel eSIM Users
| Setting | Location | Recommended |
|---|---|---|
| Data Roaming — home SIM | Settings → Cellular → [home SIM] | **Off** |
| Data Roaming — travel eSIM | Settings → Cellular → [travel eSIM] | **On** |
| Allow Cellular Data Switching | Settings → Cellular → Cellular Data | **Off** |
| Cellular Data line | Settings → Cellular → Cellular Data | Travel eSIM |
### Data Usage Alerts
**iPhone**: Review per-app cellular usage under **Settings → Cellular → [travel eSIM line]**. iOS does not have a built-in hard data cap, so use your travel eSIM provider's companion app for remaining data alerts if one is available.
**Android**: **Settings → Network & internet → Data usage → Data warning & limit**. Set a warning threshold slightly below your plan's allotment.
### Restrict Background Data
Some apps — cloud photo sync, app updates, news feeds — consume data in the background without any action from you.
**iPhone**: **Settings → [App name] → Cellular Data → Off** (per app). Or enable **Low Data Mode** for the travel eSIM line: **Settings → Cellular → [travel eSIM] → Low Data Mode: On**.
**Android**: **Settings → Network & internet → Data usage → [App name] → Background data: Off**.
For a full breakdown of per-app data consumption and the most effective ways to reduce usage, see our [data usage guide](/en/guides/data-usage-guide/).
---
## FAQ
**When should I install my travel eSIM?**
Install before leaving home on your own Wi-Fi. See frontmatter FAQ item 1 for full details.
**Do I need to unlock my phone?**
Yes, if you plan to use a travel eSIM or local SIM. See frontmatter FAQ item 2.
**How do I avoid roaming charges?**
Turn off Data Roaming on the home SIM and Allow Cellular Data Switching. See frontmatter FAQ item 3.
**Which apps do I need?**
Maps, messaging, translation, and an authenticator app. See frontmatter FAQ item 4.
**No signal after landing — what do I do?**
Cycle Airplane Mode, check Data Roaming, select network manually. See frontmatter FAQ item 5.
**How much data do I need for a week?**
3–5 GB for light use; 5–10 GB for moderate; 10+ GB for heavy or streaming. See frontmatter FAQ item 6.
**Can I reuse my travel eSIM?**
Depends on the provider's reinstall policy. See frontmatter FAQ item 7.
---
## Related Guides
- [4 Ways to Stay Connected Abroad](/en/guides/four-options/) — compare roaming, local SIM, travel eSIM, and pocket Wi-Fi at a glance
- [International Roaming Explained](/en/guides/international-roaming/) — how GSMA AA.12 roaming agreements work and how to avoid bill shock
- [Your First Travel eSIM: Step-by-Step Guide](/en/guides/first-time-guide/) — detailed install and activation walkthrough for first-time eSIM users
- [Using Dual SIM for Travel](/en/guides/dual-sim-for-travel/) — run your home number alongside a travel eSIM with correct line assignment
- [How Much Mobile Data Do You Need?](/en/guides/data-usage-guide/) — per-app consumption figures and how to estimate your data needs
================================================================================
# Prepaid vs Postpaid: Differences and How to Choose
URL: https://sim-finder.com/en/guides/prepaid-vs-postpaid/
Type: guides (en)
Published: 2026-06-04
Prepaid and postpaid are the two fundamental billing models for mobile service. Prepaid charges you in advance; postpaid charges you after the fact. The billing difference flows through to contract terms, identity requirements, flexibility, and the type of plan available. This guide explains how each model works, where the two differ in practice, and which suits which usage profile.
## How Prepaid Billing Works
On a prepaid plan, you pay — or load credit — before the service is available to use. There is no monthly invoice; your balance or allowance is consumed as you make calls, send messages, and use data. When it runs out, service stops until you top up or renew.
The two common prepaid structures are:
- **Credit-based prepaid**: You maintain a monetary balance that is drawn down at per-unit rates for calls, texts, and data. Once the balance reaches zero, service is suspended.
- **Bundle-based prepaid**: You purchase a defined allowance — for example, a set amount of data, a number of call minutes, and SMS — that is valid for a fixed period (commonly 30 days). Unused allowance at the end of the period expires unless explicitly rolled over.
Some carriers combine both structures: a data bundle is purchased upfront, and once the bundle is exhausted, usage continues against a credit balance at pay-per-use rates.
Prepaid accounts can be topped up through multiple channels depending on the carrier: online account portals, carrier apps, convenience stores, retail vouchers, or in-store at carrier points of sale. The method varies by country and carrier.
Because prepaid service stops when the balance or allowance is exhausted, the spending ceiling is fixed. This is structurally different from postpaid, where usage beyond the included allowance can generate additional charges. For users who want to avoid unexpected bills, prepaid provides a hard limit on monthly spending.
## How Postpaid Billing Works
On a postpaid plan, the carrier extends you access to the network first and bills you at the end of each billing cycle — typically monthly. The bill reflects usage that has already occurred.
Most postpaid plans are structured as monthly allowances: a defined amount of data, calls, and messages is included in the base fee. If you exceed your allowance, excess charges are applied (on older plan types) or speeds are reduced or service is temporarily suspended (on more modern plans with soft caps).
Because the carrier is effectively extending credit — you use the service before paying — a credit assessment is standard practice before a postpaid account is approved.
Postpaid accounts may also support direct billing for third-party purchases, device insurance, or carrier-managed services that are added to the monthly invoice. These features are not available on prepaid, where no billing relationship exists.
## Identity Checks vs Credit Checks: A Critical Distinction
This is one of the most practically important differences between prepaid and postpaid.
**Prepaid: identity check only**
Regulators in most jurisdictions require carriers to verify the identity of anyone purchasing a SIM, including prepaid SIMs. This is typically accomplished with a government-issued photo ID — a passport, national identity card, or driver's licence. The purpose is to associate a SIM with an identifiable person, not to assess creditworthiness.
An identity check does not access your credit history and does not affect your credit score. It confirms who you are, not how you pay your bills.
Mandatory SIM registration requirements exist in a large number of countries. The specific documents accepted, whether registration is done at point of sale or online, and the data retained by carriers are governed by national telecommunications regulations. These differ country to country.
**Postpaid: identity check plus credit check**
Because postpaid service is consumed before payment is made, the carrier needs to assess the likelihood that you will pay. This requires a credit check — a review of your financial track record with banks, lenders, or credit bureaus.
A credit check may result in:
- Approval with a standard plan and credit limit
- Approval with a lower credit limit or a security deposit requirement
- Rejection, in which case the carrier may offer a prepaid alternative
Credit checks typically leave a record on your credit report (a "hard inquiry" in markets like the US, UK, and Australia — particularly for plans that include device financing; SIM-only postpaid may involve only a soft check in some markets), which can affect your credit score if you apply to multiple carriers in a short period. Prepaid applications do not create this record.
In markets where credit bureaus are not widely used, carriers may rely on internal scoring, deposit requirements, or local bank account verification instead of a formal credit report.
## Contract Terms and Lock-In
Prepaid and postpaid differ significantly in the degree of commitment they require.
**Prepaid: no lock-in**
Prepaid plans carry no minimum contract period. You pay for a period of service and you are free to switch carriers, let the plan expire, or move to a different plan at any time without penalty. Early termination fees do not apply because there is no term to terminate early.
This freedom is one of the clearest structural advantages of prepaid. It is particularly relevant in competitive markets where better offers appear frequently, or for users who are uncertain how long they will remain in a location.
**Postpaid: contracts vary widely**
Postpaid plans range from month-to-month arrangements with no commitment to 12 or 24-month contracts. Longer contracts often come with:
- **Device financing**: The cost of a handset is spread over the contract term. If you cancel early, the remaining device balance becomes due.
- **Early termination fees**: A fee charged when you exit a fixed-term contract before it ends. The amount is often tied to the number of remaining months.
- **Lower monthly rate**: Some carriers discount the monthly service fee in exchange for a longer commitment.
Month-to-month postpaid plans exist and share the flexibility of prepaid, but they may not include device financing and may cost more per month than equivalent fixed-term plans.
## Network Priority and Available Plans
The prepaid/postpaid distinction interacts with carrier type — MNO, sub-brand, and MVNO — in ways that affect both network priority and plan selection.
On most carriers, postpaid subscribers receive higher network priority than prepaid subscribers during congestion. This mirrors the broader deprioritisation pattern where paying customers on higher-tier plans are served before those on lower-tier or prepaid plans. The gap varies by carrier and becomes noticeable primarily during busy periods in high-density areas.
In practice, many consumers who choose prepaid through an MVNO experience this deprioritisation effect not because of the prepaid billing model itself, but because MVNOs are subject to deprioritisation relative to the host MNO's own subscribers. Billing model and carrier type are separate variables, but they frequently appear together in the same plan.
Independently, MNOs typically offer their widest range of plans — including postpaid device financing, family multi-line discounts, and streaming bundles — under their flagship brand. MVNOs and sub-brands lean predominantly toward prepaid and month-to-month postpaid. For a detailed breakdown of how carrier types compare, see [MNO vs MVNO vs Sub-Brand](/en/guides/mno-vs-mvno-comparison/).
The overlap between prepaid and MVNO plans is significant: many MVNO plans are technically prepaid (or month-to-month with no lock-in), which is why budget-focused options frequently appear in the prepaid category. The carrier-type and billing-model dimensions are separate but correlated. For a deeper explanation of MVNOs, see [What Is an MVNO?](/en/guides/what-is-mvno/).
## Roaming Differences
International roaming availability and cost can differ between prepaid and postpaid.
Postpaid plans on major carriers typically include roaming options — either bundled international access or add-on day passes. The carrier extends roaming credit because the billing relationship is established.
Prepaid plans vary considerably. Many prepaid plans from MVNOs or budget sub-brands offer limited or no international roaming. Larger MNO prepaid plans often include roaming capabilities, but the options are usually narrower than on postpaid.
For frequent travellers, a travel eSIM purchased separately — a separate data-only profile added to your device alongside your home SIM — is often more practical than relying on any home plan's roaming terms. For a comparison of travel connectivity options and a methodology for evaluating travel eSIM plans, see [How to Choose a Travel eSIM](/en/guides/how-to-choose/).
## The Market Distribution Differs by Country
Prepaid and postpaid are not equally distributed globally. In some markets, prepaid is the dominant or near-universal model; in others, postpaid is standard for most subscribers.
Markets where prepaid is prevalent tend to share characteristics: large populations with limited credit infrastructure, high price sensitivity, or a tradition of pay-as-you-go mobile use. In these markets, postpaid plans may exist but are concentrated among business users and high-income segments.
Markets where postpaid is prevalent tend to have well-established credit systems, high smartphone penetration financed through carrier contracts, and a strong MNO retail presence offering device subsidies.
Neither model is inherently better. The right choice depends on your individual circumstances, not on which model is most common in your market. If you are moving to or visiting a new country, check which model is most accessible to newcomers — prepaid is typically easier to obtain without a local credit history.
## Prepaid eSIM Plans
The prepaid model extends to eSIM plans, including travel eSIMs. A travel eSIM — a downloadable carrier profile added to a device that supports eSIM — is almost always prepaid: you purchase a data package in advance, and it is consumed until it runs out or the validity period ends.
This makes travel eSIMs a practical option for visitors or short-term travellers who need data without entering into a local postpaid agreement. No local credit history is required. The purchase is completed online, and the eSIM profile is downloaded before or during travel.
For a structured comparison of travel eSIM providers, including coverage and plan types, see [Travel eSIM Provider Comparison](/en/guides/provider-comparison/).
One practical note: because a travel eSIM is always prepaid, there is no credit check or local address requirement. This makes it accessible regardless of your credit standing in the destination country — a meaningful advantage over local postpaid SIMs that might require a national ID or residency proof. The purchase is completed online, and the profile is downloaded to the device without visiting a store or waiting for a physical SIM.
## Estimating How Much Data You Need
Whether you choose prepaid or postpaid, you will need to select a plan with enough data for your actual usage. Overestimating data need costs money; underestimating leads to overage charges or throttled speeds.
On prepaid bundle plans this question is especially important because unused data at period end is typically forfeited. Choosing a bundle that matches your actual consumption — rather than rounding up significantly — reduces waste.
The [data usage guide](/en/guides/data-usage-guide/) provides per-app consumption figures — streaming video, video calls, navigation, messaging — that help you estimate a realistic monthly figure before committing to a plan. Working through that estimate before selecting a plan size is a practical step for both prepaid and postpaid.
## Which Billing Model Suits Which Profile
The following profiles are starting points. Individual plans within each category vary, and the best plan for your situation depends on specific terms, not just billing model.
**Prepaid suits you if:**
- You want no lock-in and the ability to switch at any time
- You have limited or no local credit history
- You are a visitor or short-term resident in a country
- You want predictable spending with no risk of unexpected overage charges
- You use mobile data sporadically rather than continuously
- You are purchasing a travel data plan for a specific trip duration
**Postpaid suits you if:**
- You want device financing included in your plan
- You travel internationally and need carrier-backed roaming
- Your employer pays the bill (corporate plans are typically postpaid)
- You want access to multi-line family discounts
- You value bundled extras — streaming subscriptions, technical support — and have verified that the bundle value exceeds the plan premium
- You need a billing relationship for direct-carrier billing services
**Neither is strictly required for families or heavy users.** A family on prepaid plans from a sub-brand or MVNO can spend less than a family on an MNO postpaid family plan, depending on the specific plans involved. Use [SimFinder](/en/) to compare actual plan terms side by side rather than assuming that postpaid is the right fit for high usage or families.
## A Note on "Unlimited" Plans in Both Models
Both prepaid and postpaid plans are now widely sold as "unlimited." In nearly all cases, "unlimited" means unlimited at full speed up to a threshold, after which speeds are reduced. The fair-use threshold varies significantly between plans and is not always prominently disclosed.
When evaluating an "unlimited" plan — regardless of billing model — read the fine print:
- What is the high-speed data threshold per billing cycle?
- What speed applies after the threshold is reached?
- Are video streaming speeds separately capped?
A well-specified unlimited plan with a generous threshold and a reasonable throttle speed is functionally different from one with a low threshold and severe speed reduction. The plan label is not sufficient; the terms determine the experience.
This applies equally to prepaid unlimited plans (common in the travel eSIM market, where daily unlimited data plans with a fair-use cap are sold) and postpaid unlimited plans from MNOs.
The term "unlimited" is used across both billing models and all carrier types. Its meaning is determined entirely by the fair-use policy in the plan's terms and conditions — not by the billing model. Evaluating the threshold and post-threshold speed is necessary regardless of whether the plan is prepaid or postpaid.
## Switching Between Prepaid and Postpaid
Switching billing models does not require you to lose your phone number. Mobile Number Portability (MNP) allows you to transfer your existing number when moving between carriers regardless of billing model — from prepaid to postpaid, postpaid to prepaid, or between carriers of the same type.
To port your number:
1. Do not cancel your current plan before the transfer is complete. Cancelling first releases the number and you will lose it.
2. Contact the new carrier and initiate the port. You will need your current account details and, in some markets, a porting authorisation code from your existing carrier.
3. The transfer typically completes within one business day in many markets (e.g. UK Ofcom and US FCC both require simple ports within one business day), though complex ports can take a few business days.
4. Once porting is confirmed, your old plan is automatically cancelled.
When switching from postpaid to prepaid mid-contract, verify whether early termination fees apply. If your current postpaid plan includes a financed device, the remaining device balance may become due at cancellation.
## Prepaid vs Postpaid in Practice: A Summary Table
| Dimension | Prepaid | Postpaid |
|-----------|---------|----------|
| Payment timing | Before use | After use (end of cycle) |
| Credit check | No | Yes (typically) |
| Identity check | Yes (most countries) | Yes |
| Contract commitment | None | Month-to-month to 24 months |
| Early termination fee | Not applicable | Possible on fixed-term contracts |
| Device financing | Not available | Available on fixed-term contracts |
| Network priority | Often lower | Often higher |
| International roaming | Limited to none (varies) | Typically available |
| Overage risk | Service stops (no surprise bill) | Possible excess charges on older plans |
| Who it suits | Budget users, visitors, short stays | Device buyers, frequent travellers, corporate |
This table is a generalisation. Individual plans vary — verify the specific terms of any plan you are considering.
## Using SimFinder to Compare Plans
SimFinder lets you search and filter plans in your market by data amount, price, carrier type, and contract term. Use the search to compare current prepaid and postpaid options side by side rather than relying on any published price, which changes frequently.
For estimating how much data a plan needs to include, the [data usage guide](/en/guides/data-usage-guide/) provides per-app figures as a starting point. Combining a realistic data estimate with a live plan comparison gives you the information needed to choose a plan that matches both your usage pattern and your billing model preference.
Remember that billing model is one variable among several — carrier type, network coverage, and specific plan terms all matter. The goal is a plan that fits your actual situation, not one that merely belongs to the "right" billing category.
---
## Related Guides
- [How to Choose a Travel eSIM](/en/guides/how-to-choose/) — Criteria for selecting a travel data plan, including validity periods and pricing models
- [What Is an MVNO?](/en/guides/what-is-mvno/) — How virtual operators work and why they are predominantly prepaid or month-to-month
- [Travel eSIM Provider Comparison](/en/guides/provider-comparison/) — Side-by-side comparison of major travel eSIM providers
- [MNO vs MVNO vs Sub-Brand](/en/guides/mno-vs-mvno-comparison/) — How carrier type interacts with contract flexibility and network priority
- [How Much Mobile Data Do You Need?](/en/guides/data-usage-guide/) — Per-app data consumption figures to size your plan correctly
================================================================================
# Travel eSIM Provider Comparison: Airalo vs Holafly vs Nomad vs Saily and More
URL: https://sim-finder.com/en/guides/provider-comparison/
Type: guides (en)
Published: 2026-04-18
You already know what to look for in a travel eSIM — coverage network quality, data volume, validity period, pricing model, and activation method. If you have not covered those foundations yet, start with [How to Choose a Travel eSIM: 5 Key Criteria](/en/guides/how-to-choose/) before continuing here.
This article takes the next step: applying those criteria to the actual providers available to you. Each provider below has a distinct profile — different strengths, coverage approaches, and plan structures. The goal is to give you an honest picture of each so you can narrow down to two or three candidates, then use [SimFinder Travel](/en/travel/) to compare their current plans for your specific destination.
Specific prices are not included in this article. Plan pricing changes frequently, and any number published here will become outdated. All price comparisons are available in real time through SimFinder Travel.
---
## Major Travel eSIM Providers at a Glance
The table below summarizes the providers covered in this article. All data is sourced from provider records in SimFinder's database.
| Provider | Primary Strength | Plan Types | Coverage Style | Multi-country | Tethering | Support Languages |
|----------|-----------------|------------|----------------|:-------------:|:---------:|-------------------|
| **Airalo** | Broad plan catalog, multilingual | Single-country, regional, global | Marketplace (many local partners) | Yes | Yes | Multilingual |
| **Holafly** | Unlimited data plans | Single-country, regional | Direct provider | Yes | Yes | 20 languages |
| **Nomad** | Clear pricing display, simple UX | Single-country, regional | Direct provider | Yes | Yes | Multilingual |
| **Saily** | Affordable + security credibility | Single-country, regional | Direct provider | Yes | Yes | 14 languages |
| **aloSIM** | 200+ country coverage | Single-country, regional | Direct provider | Yes | Yes | Multilingual |
| **Ubigi** | NTT Group backing, iPad integration | Single-country, regional, global | Direct provider (NTT Group via Transatel) | Yes | Yes | Multilingual |
| **GigSky** | Global coverage, cruise & in-flight plans | Single-country, regional, global | Direct provider (MVNO, 400+ networks) | Yes | Yes | Multilingual |
---
## Provider Profiles
### Airalo
Airalo operates as a marketplace for travel eSIMs — rather than selling only its own plans, it aggregates plans from multiple local provider partners around the world. This model gives Airalo broad destination coverage and a large number of plan options among consumer travel eSIM stores. The tagline on SimFinder's records describes it as the "World's First eSIM Store," reflecting its early entry into the category.
The marketplace structure has a practical advantage for travelers: you can often find a country-specific plan backed by a named local carrier, which tends to deliver better network quality than plans routed through a single international hub. Before purchasing, confirm which local carrier the specific plan uses for your destination.
Airalo's app and website support an extensive range of languages, making it accessible to travelers across most major language markets. Multi-country and regional plans are available alongside single-country options.
**Best for:** Travelers who want a broad selection of country-specific plans in one place, travelers who need support in a less common language, and first-time eSIM buyers who prefer a large platform with established customer service.
---
### Holafly
Holafly's market position centers on unlimited data plans. Rather than selling fixed data packages, Holafly's primary offering is plans with no data cap — travelers pay for a set number of days rather than a specific gigabyte amount. This removes the anxiety of watching a data balance during a trip.
The trade-off is the fair-use throttle that applies after the daily high-speed threshold. Once that daily limit is reached, speeds drop significantly for the remainder of the day. This throttled speed is generally sufficient for messaging and light browsing but not for continuous video streaming or large uploads. Check the specific plan's fair-use policy before purchasing — the daily threshold varies by plan and destination.
One important note: most Holafly plans are data-only. They do not include a local phone number for voice calls or SMS. For calls, you will need a VoIP app over the data connection, and for SMS-based authentication codes, keeping your home SIM active in a dual-SIM setup is the reliable approach. For more on managing calls and SMS while traveling, see [Your First Travel eSIM](/en/guides/first-time-guide/).
Holafly supports 20 languages and offers both single-country and regional multi-country plans.
**Best for:** Travelers who use a lot of data and prefer not to track a balance, remote workers who plan moderate video calls but not extended streaming, and travelers who want a straightforward per-trip pricing model.
---
### Nomad
Nomad covers 200+ destinations with single-country and regional plans. It presents itself as a direct provider with a clean, uncomplicated purchasing experience — the plan catalog is focused rather than exhaustive, and pricing information is presented clearly at each step.
Tethering is supported, making Nomad a workable option for travelers who want to share data from their phone with a laptop or tablet. Multi-country plans are available for travelers crossing multiple borders on a single trip.
Nomad's app and website support 13 languages, including English, Japanese, Korean, Chinese, Thai, Vietnamese, German, French, Spanish, Portuguese, Italian, and Indonesian.
**Best for:** Travelers who want a direct purchasing experience without navigating a large marketplace, users comfortable with a focused plan catalog, and travelers in Asia who prefer multilingual support in regional languages.
---
### Saily
Saily is developed by the team behind NordVPN, a company established in the cybersecurity space. Its positioning combines travel eSIM functionality with pricing that sits at the more affordable end of the market compared to some competitors.
The connection to NordVPN's development team is primarily a credibility signal rather than a technical feature difference — Saily functions as a standard travel eSIM provider with single-country and regional plans, tethering support, and app-based management. It does not bundle VPN functionality into eSIM plans.
Saily supports 14 languages including English, Japanese, Korean, Chinese (Simplified and Traditional), German, French, Spanish, Portuguese, Italian, Czech, Lithuanian, Polish, and Dutch.
**Best for:** Budget-conscious travelers who want a recognizable brand with a security-focused company background, and travelers in European markets where Saily's supported languages are a good fit.
---
### aloSIM
aloSIM covers 200+ countries and territories with both single-country and regional plans. Tethering is supported across its plan catalog. The provider's app supports multiple languages; specific language coverage varies by app store listing and region, so verify support for your preferred language before purchase.
aloSIM's app is available on both iOS and Android, and plan management — including purchasing additional data — is handled through the app.
**Best for:** Travelers heading to destinations in the Middle East, South Asia, or less common regions where some providers have limited coverage, and travelers who want a provider focused on fixed-data single-country plans across a wide country range.
---
### Ubigi
Ubigi is operated by Transatel, a subsidiary of NTT Communications since 2019 (NTT Group). This corporate backing gives Ubigi infrastructure stability less common among newer travel eSIM entrants. Ubigi has been in the eSIM market longer than most consumer-facing providers, with integrations across several connected-car manufacturers (BMW, MINI, Toyota, Stellantis, Jaguar Land Rover) and Apple — Ubigi is selectable from an iPad's **Settings → Cellular Data → Add a New Plan** menu, enabling plan purchase directly from the device without installing the Ubigi app.
A distinguishing feature of Ubigi's account model is long eSIM profile validity: the profile remains active for up to 18 months of inactivity without being removed. This suits travelers who take multiple international trips over a year without wanting to reinstall the profile each time.
Ubigi supports multiple languages and offers single-country, regional, and global plan options with tethering.
**Best for:** iPad users who want direct plan purchase from device settings, travelers who take multiple trips across a year and want their eSIM profile to remain active between trips, and travelers who prefer a provider with established carrier-level infrastructure behind it.
---
### GigSky
GigSky offers single-country, regional, and global plans with a focus on broad international coverage. As a full MVNO, GigSky maintains roaming agreements with 400+ mobile networks across 190+ destinations. A notable differentiator is support for cruise ships and in-flight connectivity plans, which most travel-eSIM providers do not address.
Tethering is supported, and GigSky's plan catalog includes global options suited to travelers visiting multiple regions on extended trips. The provider offers multilingual app support; verify specific language availability on the App Store or Google Play listing before purchase.
**Best for:** Travelers visiting multiple continents or undertaking extended international travel, users who want global plan flexibility with carrier partnership coverage in key markets.
---
## How to Match a Provider to Your Trip
The profiles above give you the "what" for each provider. This section maps trip types to which providers are worth comparing first.
**Single-country trip of one to two weeks (Europe, Asia, or Americas)**
Start with Airalo and Nomad for single-country plan options. Both support a wide range of destinations and display the local carrier partner for each plan, which lets you evaluate network quality before purchasing. Compare current plan pricing and data amounts on SimFinder Travel.
**Unlimited data for remote work or frequent video calls**
Holafly's unlimited plans are the most direct fit. Confirm the daily high-speed threshold for your destination plan before purchasing — if the threshold is too low for your usage pattern, a large fixed-data plan from Nomad or Airalo may serve you better without unexpected throttling.
**Multi-country trip crossing three or more borders**
Evaluate Airalo's and GigSky's regional or global plans, and check Nomad's multi-country plan coverage. Compare which plan covers all your specific destinations — not just the region name — and check the listed network partner for each country included. Ubigi is also worth checking for its global plan if the trip spans multiple continents.
**Extended stay or multiple trips over a year**
Ubigi's eSIM profile stays active for up to 18 months without a top-up, which suits travelers who alternate short trips over several months without wanting to reinstall the profile each time. Check current plan terms for your region before purchase.
**First-time eSIM user who wants accessible customer support**
Airalo's broad multilingual support and established platform make it an accessible starting point for first-time users. A large platform with documented support processes reduces friction if something goes wrong. Read [Your First Travel eSIM](/en/guides/first-time-guide/) before purchasing to understand what to expect during installation.
**Travelers prioritizing cost over brand**
Compare Saily and aloSIM alongside Nomad for the destination in question. Pricing varies by destination and plan length, so use SimFinder Travel to compare current rates rather than assuming a fixed ranking. Per-gigabyte cost is the metric to calculate for fixed-data plans.
---
## Red Flags to Avoid
Not all travel eSIM providers operate with the same transparency. When evaluating any provider — including ones not covered in this article — watch for the following:
**Coverage claims without named network partners**
A trustworthy provider lists the local carrier partner for each destination plan, not just a shaded map. If the provider's website shows only a colored map with no mention of which network your device will connect to, you cannot verify coverage quality. Ask before purchasing, or choose a provider that discloses this information clearly.
**5G claims without verifiable partner networks**
5G availability in travel eSIM plans depends entirely on whether the local partner network in your destination supports 5G and whether the eSIM plan explicitly enables it. Vague 5G branding without a named local carrier offering 5G service is a marketing claim, not a functional guarantee. If 5G matters for your trip, confirm the specific partner network and its 5G footprint at your destination.
**Unclear refund and top-up policies**
Before purchasing, verify two things: whether you can get a refund if your trip is cancelled before you activate the eSIM, and whether you can purchase additional data mid-trip without buying an entirely new plan. Providers with unclear or restrictive policies on both points create unnecessary friction if your plans change.
**No app-based management**
Managing a travel eSIM — tracking data usage, purchasing top-ups, contacting support — is significantly easier through a provider app than through email or a website alone. If a provider offers no app, plan management during the trip becomes more cumbersome. All seven providers profiled in this article offer app-based management.
**Unusually low pricing without explanation**
Pricing that is substantially lower than comparable plans from established providers warrants scrutiny. Travel eSIM providers incur real network costs. Plans priced far below market norms sometimes indicate limited local network access (routing through lower-quality international hubs), very restrictive data throttling terms, or simply inaccurate advertised prices. Verify the terms carefully before purchasing.
---
## FAQ
For answers to common questions about this comparison, see the FAQ section above.
For foundational questions about what travel eSIMs are and how they work, see [What is an eSIM?](/en/guides/what-is-esim/) and [Four Options for Staying Connected Abroad](/en/guides/four-options/).
For estimating how much data you need, see [How Much Mobile Data Do You Need?](/en/guides/data-usage-guide/).
---
## Compare Plans with SimFinder Travel
Provider profiles are useful for narrowing your shortlist, but plan details — data amount, validity, pricing — change regularly and differ by destination. The comparison in this article reflects general provider characteristics, not live plan data.
[SimFinder Travel](/en/travel/) lets you search by destination and see current plans from multiple providers side by side, including the local network partner for each plan. Use it to compare the specific plans available for your trip rather than relying on any static article.
**[Search travel eSIM plans for your destination →](/en/travel/)**
================================================================================
# How to Use Public Wi-Fi Safely
URL: https://sim-finder.com/en/guides/public-wifi-safety/
Type: guides (en)
Published: 2026-06-04
Public Wi-Fi risks are real but manageable. The spread of HTTPS (TLS) across the web has significantly reduced the harm a passive attacker on the same network can cause — your data in transit is encrypted to the destination server. The remaining risks come from rogue access points, evil-twin networks, and apps or services that do not use encryption. Five measures address the majority of practical risk: verify you are connecting to the correct network, use a VPN, keep HTTPS-only mode on, turn off auto-join for public networks, and switch to mobile data for banking and sensitive logins.
This guide explains each threat and what to do about it, without speculation about attacker capabilities that cannot be verified.
---
## Why Public Wi-Fi Is Different From Your Home Network
On your home or office Wi-Fi, you control who has the password and who has physical access to the router. On a public network in a café, hotel, airport, or library, anyone in range can join the same network — including attackers.
On a shared network, another device on the same subnet can:
- Passively observe unencrypted traffic (traffic sent without HTTPS)
- Attempt ARP spoofing or similar techniques to redirect traffic through their device
- Set up a rogue access point mimicking the legitimate network
What an attacker on the same network **cannot** do, assuming correct HTTPS implementation on the site you are visiting:
- Read the content of your HTTPS-encrypted sessions
- Learn which specific pages within an HTTPS site you are viewing (though the domain name may be visible via DNS or TLS Server Name Indication)
The practical implication: widespread adoption of HTTPS has reduced but not eliminated the risk of using public Wi-Fi. The threats that remain are worth understanding and defending against.
---
## Threat 1: Passive Eavesdropping on Unencrypted Traffic
When a website or application sends data without encryption — using plain HTTP rather than HTTPS — any other device on the same network can read that traffic. This includes login credentials, session cookies, and any information you submit in forms.
Most major websites now redirect HTTP connections to HTTPS automatically. However, some older or poorly maintained sites and applications still send data in plaintext. Apps that use unencrypted API connections are particularly difficult to identify because the user sees no visible difference.
**What to do:**
- In your browser, enable HTTPS-only mode. In Chrome and Firefox on desktop, this can be configured in security settings. On iOS, Safari enforces HTTPS warnings by default.
- Check for the padlock icon (or equivalent) in your browser's address bar before submitting any login or payment information.
- Treat any site that serves over plain HTTP on a public network as insecure for any sensitive interaction.
---
## Threat 2: Man-in-the-Middle Attacks
A man-in-the-middle (MITM) attack occurs when a device positions itself between your device and the router, intercepting traffic before it reaches the internet. This can be accomplished on a local network through ARP spoofing (also called ARP poisoning), where the attacker convinces your device that their MAC address corresponds to the router's IP address.
If the attacker can intercept your traffic before a TLS connection is established, they can potentially see the content of that traffic — or serve you a fake version of a site to capture credentials.
TLS certificate validation is a defence against MITM: if an attacker tries to impersonate an HTTPS site, the browser will warn you that the certificate is invalid (unless the attacker has somehow installed a trusted root certificate on your device, which would require prior compromise of the device).
**What to do:**
- Do not dismiss browser certificate warnings on public networks. A certificate error on a public network may indicate a MITM attack rather than a simple configuration issue.
- Use a VPN (see the VPN section below). A VPN establishes an encrypted tunnel to a server before any application traffic is sent, so a local MITM attacker sees only VPN-encrypted data.
---
## Threat 3: Evil-Twin and Rogue Access Points
An evil-twin attack involves setting up a Wi-Fi access point with the same network name (SSID) as a legitimate network. If you — or your device's auto-join — connects to the attacker's access point, all your traffic passes through the attacker's equipment before reaching the internet.
Unlike a MITM attack on a shared network, an evil-twin positions the attacker as the network infrastructure itself. The attacker does not need to exploit any protocol weakness to intercept your traffic — they see it by design.
Rogue access points can also be set up in locations without any legitimate network, advertising open Wi-Fi to attract connections.
**What to do:**
- Confirm the exact network name and, where possible, the network password with a staff member before connecting in airports, hotels, or cafés.
- Disable auto-join for all public networks (see the auto-join section below).
- Use a VPN immediately upon connecting to any public network, before performing any browsing or application activity.
---
## Threat 4: Auto-Join Connecting You Without Your Knowledge
Most operating systems save the name (SSID) of every Wi-Fi network you join and automatically reconnect when that SSID is detected again. An attacker can broadcast any SSID — including common names like "Starbucks", "Airport WiFi", or the name of your home network — and nearby devices with auto-join enabled may connect automatically.
This is not a theoretical risk. Network probing by devices broadcasting saved SSIDs is a known technique used in wireless security assessments.
**What to do:**
On iPhone and iPad (as of publication):
- Go to **Settings → Wi-Fi**, tap the **More Info button (shown as (i) on older iOS)** next to any saved public network → set **Auto-Join** to off, or tap **Forget This Network** after each session.
- **Settings → Wi-Fi → Auto-Join Hotspot** controls automatic joining of personal hotspots from contacts, not general public networks — these are separate settings.
On Android (as of publication, varies by manufacturer):
- Go to **Settings → Network & Internet → Wi-Fi → Saved networks** to view and remove saved public networks after use.
- Some manufacturers offer a per-network auto-connect toggle in the network detail screen.
For any public network you do not intend to return to: remove it from saved networks rather than simply turning auto-join off. An SSID that is saved but has auto-join disabled on iOS will still appear in the network list and may auto-join if a policy changes in an OS update.
---
## The Role of HTTPS (TLS) in Reducing Wi-Fi Risk
HTTPS uses TLS (Transport Layer Security) to encrypt the content of communications between your browser and the server. As of publication, [Let's Encrypt](https://letsencrypt.org/), a free certificate authority operated by the non-profit Internet Security Research Group (ISRG), has significantly reduced the cost and friction of deploying HTTPS, contributing to broad adoption across websites and applications.
HTTPS protects the **content** of your communication — what you submit in forms, what the server sends back — from a passive observer on the same network. It does not conceal the destination domain (visible in DNS queries and TLS Server Name Indication by default) or the fact that you are communicating with a given server.
Browser initiatives have pushed HTTP towards effective deprecation for authenticated interactions. The major browsers — Chrome, Firefox, Safari, Edge — display warnings or block forms submitted over plain HTTP.
**What HTTPS does not protect against:**
- Connecting to an evil-twin AP before a TLS session is established with the legitimate server
- Applications that do not implement HTTPS (this is increasingly rare for major services but still exists)
- Certificate errors that users dismiss without understanding the risk
**What this means in practice:** HTTPS has substantially reduced the risk of passive eavesdropping on public Wi-Fi. For ordinary browsing of major HTTPS sites, a passive attacker on the network learns very little. Active attacks — rogue APs, MITM — require more effort and remain possible, which is why additional measures (VPN, auto-join controls) are still warranted.
---
## Using a VPN on Public Wi-Fi
A VPN (Virtual Private Network) creates an encrypted tunnel between your device and a VPN server before routing your internet traffic. From the perspective of the local network — including any rogue access point — all outbound traffic from your device is the VPN tunnel; the contents are opaque.
**What a VPN provides on public Wi-Fi:**
- Encrypts traffic between your device and the VPN server, preventing local network observers from reading it
- Prevents local ARP spoofing or evil-twin attacks from seeing your application traffic
- Routes DNS queries through the VPN tunnel, preventing local observation of your DNS lookups
**What a VPN does not provide:**
- Protection against the VPN server itself (the VPN provider can see your traffic if they choose to log it)
- Anonymity on the destination server side — the destination sees the VPN server's IP address, but your traffic is visible to the VPN provider
- Protection if the VPN is not connected at the moment of attack (a VPN that drops connection and fails open does not protect against a race condition)
**Choosing a VPN provider:**
- Look for providers with independently audited no-logs policies. Several established commercial VPN providers have published audit reports from firms such as Cure53 or KPMG. Audits confirm the technical architecture but cannot guarantee future behaviour — they audit a snapshot.
- Operating system built-in VPN (IKEv2/IPsec, L2TP, WireGuard) can be configured with a self-hosted VPN server if you prefer to route traffic through infrastructure you control.
- A VPN built into a browser (such as the Opera browser VPN) only protects traffic from that browser, not from other apps.
**On mobile (iOS and Android):** Enable the VPN before connecting to a public network. If your VPN app supports an "always-on VPN" or "kill switch" mode, enable it — this prevents your device from sending any traffic outside the VPN tunnel if the VPN connection drops.
On iOS (as of publication): **Settings → General → VPN & Device Management → VPN** — you can configure an always-on VPN here if your MDM profile supports it, or use a VPN app that implements the kill switch via the Network Extension framework.
On Android (as of publication): **Settings → Network & Internet → VPN** — tap the gear icon on your configured VPN and enable **Always-on VPN** and **Block connections without VPN**.
---
## Captive Portals and What Happens When You First Connect
Many public Wi-Fi networks — in hotels, airports, cafés, and transit systems — use a captive portal: a web page that intercepts your first HTTP request after connection and requires you to accept terms, enter a room number, or pay before granting full internet access.
Captive portals present a specific security challenge: to display the portal page, your device must send unencrypted HTTP traffic that the portal can intercept and respond to. During this window, before you authenticate to the portal, your device is on the network without a VPN tunnel established, because the VPN itself may be blocked until the portal is completed.
**What to do with captive portals:**
- Complete captive portal authentication before attempting to connect your VPN, or enable the VPN in the device settings so it attempts to connect automatically after portal authentication.
- Use your browser's captive portal login page rather than entering credentials into an app or other interface — the browser displays the site's certificate, giving you a basis to verify you are on the legitimate portal.
- Some VPN apps include a "captive portal detection" mode that temporarily allows unencrypted traffic for portal authentication only. Check your VPN provider's documentation.
- On iOS (as of publication), the system automatically detects captive portals and opens a browser window for authentication. On Android, a notification appears prompting you to sign in.
Do not submit any personal account credentials (email, passwords) during the captive portal flow itself — captive portals require only network-level authentication (terms acceptance, payment code, or room number), not your personal account passwords.
After completing captive portal authentication, connect your VPN before proceeding to any other application or website.
---
## Avoid Sensitive Actions on Public Wi-Fi — Use Mobile Data Instead
Even with a VPN, some situations call for extra caution. For financial transactions, online banking, accessing email accounts, or any service where a credential compromise carries significant consequences, the lowest-risk approach is to switch to mobile data (turn Wi-Fi off entirely) before proceeding.
Mobile data travels over the cellular network. An attacker in a coffee shop or airport cannot passively observe your cellular traffic — they would need access to cellular network infrastructure. This is a categorically different threat model from public Wi-Fi.
**The practical workflow:**
1. Before logging into your bank, payment service, or work email from a public location: turn Wi-Fi off.
2. Perform the sensitive action over mobile data.
3. Turn Wi-Fi back on after completing the session and logging out.
For travellers using a dual-SIM setup with a local eSIM for data and a home SIM kept in reserve, your home SIM's data connection can serve as a fallback for sensitive tasks. See [Using Dual SIM for Travel](/en/guides/dual-sim-for-travel/) for how to configure line assignments. If you are on a limited data plan, be aware of data costs — see [How Much Mobile Data Do You Need?](/en/guides/data-usage-guide/) and [Data-Saving Techniques](/en/guides/save-data/) for context on consumption.
---
## Keep Your Operating System and Apps Updated
Operating system updates frequently include security patches for network-related vulnerabilities. The same applies to browser updates, which address TLS implementation issues, certificate validation bugs, and other security weaknesses.
An unpatched operating system on a public network is a more exposed target than a fully patched one — vulnerabilities in network stack components can sometimes be exploited by other devices on the same network without any action from the user.
**Practical steps:**
- On iPhone: **Settings → General → Software Update → Automatic Updates** — enable both "Download iOS Updates" and "Install iOS Updates". Allow major updates to download on Wi-Fi at home.
- On Android: **Settings → System → System Update** — enable automatic updates. The path varies by manufacturer.
- Update your browser independently of the OS on platforms where this applies (Chrome and Firefox update independently of the OS on Windows and macOS).
Perform major OS updates on a trusted network (your home Wi-Fi or mobile data) rather than a public Wi-Fi connection. Major updates can be several gigabytes in size — see [Data-Saving Techniques](/en/guides/save-data/) for how to restrict large downloads to Wi-Fi or mobile data you trust.
---
## Summary: Five Steps for Safer Public Wi-Fi Use
1. **Verify before connecting.** Confirm the exact network name with a staff member. Avoid connecting to open networks you did not seek out.
2. **Enable a VPN immediately.** Connect your VPN before doing anything else on the network. Use always-on / kill switch mode if available.
3. **Keep HTTPS-only mode active.** Do not dismiss certificate warnings.
4. **Turn off auto-join for public networks.** Remove public networks from saved networks after each session.
5. **Use mobile data for sensitive actions.** Switch to your cellular connection for banking, financial accounts, and sensitive logins — do not rely on Wi-Fi for those tasks even with a VPN.
If you use public Wi-Fi frequently when travelling, a Wi-Fi Calling–enabled SIM can let you receive calls and messages over trusted Wi-Fi at home or abroad without exposing your call content to the local network — see [Wi-Fi Calling (VoWiFi)](/en/guides/wifi-calling/) for how that works. For managing connectivity across multiple countries, [International Roaming Explained](/en/guides/international-roaming/) covers how your home SIM behaves abroad.
---
## Related Guides
- [Wi-Fi Calling (VoWiFi): Calling Where Signal Is Weak](/en/guides/wifi-calling/) — how calls and SMS over Wi-Fi work, and how they differ from public Wi-Fi browsing
- [How Much Mobile Data Do You Need?](/en/guides/data-usage-guide/) — per-app data consumption figures to inform your mobile-data-for-sensitive-tasks decision
- [Data-Saving Techniques](/en/guides/save-data/) — iOS and Android settings to reduce mobile data use when switching off Wi-Fi for security
- [Using Dual SIM for Travel](/en/guides/dual-sim-for-travel/) — keeping your home number active alongside a travel eSIM, with line assignment for data and calls
- [International Roaming Explained](/en/guides/international-roaming/) — how your home SIM works abroad and when it may be preferable to public Wi-Fi for data
================================================================================
# How to Set Up eSIM on Android via QR Code
URL: https://sim-finder.com/en/guides/qr-code-android/
Type: guides (en)
Published: 2026-04-16
Setting up an eSIM on Android takes under 10 minutes when you have the QR code ready. The exact menu path differs by manufacturer — Google Pixel and Samsung Galaxy are the two most common cases and are covered in detail below.
A stable Wi-Fi connection and an unlocked device are the two requirements you must confirm before you start.
## Before You Begin
### 1. Verify eSIM compatibility
Check that your device supports eSIM:
- **Google Pixel**: Pixel 3 and later generally support eSIM. Pixel 7 and later support two active eSIMs simultaneously (dual eSIM). US-market Pixel 10, 10 Pro, and 10 Pro XL are eSIM-only (no physical SIM slot).
- **Samsung Galaxy**: Galaxy S20 and later flagship models support eSIM. Galaxy Z Fold and Z Flip series also support eSIM. Availability varies by region and carrier variant — some carrier-locked or China-market models do not support eSIM.
- **Other Android brands**: Many recent OnePlus, OPPO, Motorola, and Xiaomi models support eSIM. The quickest check is to open Settings and look for an "Add eSIM" or "Download SIM" option under your mobile network settings. If the option is absent, the device likely does not support eSIM.
### 2. Confirm your device is unlocked
A carrier-locked device will either hide the eSIM menu or fail during activation. If you purchased your phone through a carrier, check with them to confirm unlock status or submit an unlock request before proceeding.
### 3. Connect to Wi-Fi
eSIM profile downloads require a stable internet connection. Wi-Fi is recommended for reliability. Set up the eSIM at home or on a reliable network. Once the profile is downloaded, you do not need Wi-Fi to use the eSIM for mobile data.
### 4. Have your QR code ready
Obtain the QR code from your carrier or travel eSIM provider:
- **Mobile carriers**: After completing eSIM activation online, the carrier sends the QR code to your registered email or displays it in their app or member portal.
- **Travel eSIM providers** (Airalo, Holafly, Nomad, and others): The QR code is delivered via email and inside the provider's app immediately after purchase.
Display the QR code on a second device (laptop, tablet, or a second phone) or print it. If the QR code is only available on the phone you are setting up, take a screenshot before starting — you will need it.
---
## Setup on Google Pixel
Google Pixel phones run Android as developed by Google directly, with minimal manufacturer UI customization compared to Samsung One UI or other Android skins, so these steps also apply to many non-Samsung Android phones.
**Steps:**
1. Open **Settings**
2. Tap **Network & internet**
3. Tap **SIMs**
4. Tap **Add SIM** or the **+** icon
5. On the "Download a SIM instead?" screen, tap **Next**
6. Point the camera at your QR code to scan it
7. When your carrier name appears, tap **Download**
8. After the download completes, tap **Activate**
**If your QR code is only on this phone:** At step 6, tap **Use photo instead** and select the screenshot you saved earlier.
**If "Add SIM" does not appear:** The device may not support eSIM, or it is carrier-locked. See the [eSIM activation troubleshooting guide](/en/guides/activation-failed/) for next steps.
---
## Setup on Samsung Galaxy (One UI)
Samsung's One UI uses different menu names from stock Android. These steps apply to Galaxy S20 through S25 series and Z Fold/Flip series running One UI 4.1 or later.
**Steps:**
1. Open **Settings**
2. Tap **Connections**
3. Tap **SIM card manager**
4. Tap **Add mobile plan** or **Add eSIM**
5. Select **Scan carrier's QR code**
6. Point the camera at your QR code to scan it
7. Tap **Add** or **Download** when prompted
8. After installation, you may be prompted to restart the device — follow the on-screen instruction
**After restart:** Go to **Settings > Connections > SIM card manager** to set which SIM handles mobile data, calls, and SMS.
---
## Setup on Other Android Phones
For OnePlus, OPPO, Motorola, Xiaomi, and other Android brands, the underlying process is the same. Look for one of these menu paths:
- **Settings > Network > SIM settings > Add eSIM**
- **Settings > Mobile network > Add mobile plan**
- **Settings > Connections > Mobile networks > Add eSIM**
Menu names vary by manufacturer and Android version, but you are looking for an option to add or download a new SIM or mobile plan. Once you find that screen, the QR scan process is identical to the steps above.
---
## Dual SIM Setup After Installation
Once your eSIM is installed, configure how your two SIMs (eSIM + physical SIM, or eSIM + eSIM) divide tasks.
**On Google Pixel:**
Go to **Settings > Network & internet > SIMs** and assign each SIM to:
- **Mobile data** — which SIM carries data traffic
- **Calls** — which SIM is used for outgoing calls (or ask each time)
- **SMS** — which SIM sends text messages
**On Samsung Galaxy:**
Go to **Settings > Connections > SIM card manager** for the same options.
**Common dual SIM setup for travelers:** Set the travel eSIM as the mobile data SIM and keep your home SIM active for calls and SMS. This lets you use local data rates without losing access to your regular phone number. For a full walkthrough of using dual SIM with a travel eSIM, see the [first travel eSIM guide](/en/guides/first-time-guide/).
---
## Troubleshooting
### QR code scan fails or shows an error
- Check that the QR code display is clean, undamaged, and free from screen glare
- Verify your Wi-Fi connection is stable
- Confirm the QR code has not already been used — eSIM QR codes are single-use
- Switch to manual entry: your carrier should provide an SM-DP+ server address and an activation code alongside the QR code
### The eSIM installs but data does not work
- Confirm mobile data is assigned to the new eSIM in your SIM settings
- For travel eSIMs, enable **data roaming** — travel eSIMs use roaming agreements to provide connectivity
- If your carrier requires a specific APN, enter it manually under mobile network settings
### "Add SIM" option is missing entirely
- Verify eSIM support on your device manufacturer's support page
- Check whether the device is carrier-locked and request an unlock if necessary
- Ensure you are running Android 11 or later (required for eSIM on most devices)
For additional error codes and carrier-specific issues, see the [eSIM activation troubleshooting guide](/en/guides/activation-failed/).
---
## Related Articles
For an overview of what eSIM is and how it compares to a physical SIM, see [What Is an eSIM?](/en/guides/what-is-esim/). If you plan to use two SIMs together, [What Is Dual SIM?](/en/guides/what-is-dual-sim/) explains DSDS, DSDV, and DSDA configurations.
If you are setting up a travel eSIM for an international trip, the [First Travel eSIM Guide](/en/guides/first-time-guide/) covers the full flow from purchase to first connection abroad.
For a broader comparison of eSIM and physical SIM across cost, convenience, and security, see the blog article [eSIM vs SIM Card for International Travel](/en/blog/esim-vs-sim-card-international-travel/).
The iPhone QR code setup process is covered in a separate guide — [How to Set Up eSIM on iPhone via QR Code](/en/guides/qr-code-iphone/).
================================================================================
# How to Set Up eSIM on iPhone via QR Code
URL: https://sim-finder.com/en/guides/qr-code-iphone/
Type: guides (en)
Published: 2026-04-16
To add an eSIM to your iPhone via QR code, you need three things in place: a compatible iPhone, a Wi-Fi connection (or an active SIM), and a QR code from your carrier. The setup itself takes under five minutes.
If you're new to eSIM technology, read [What Is an eSIM?](/en/guides/what-is-esim/) first. If your setup fails partway through, [eSIM Activation Failed: Troubleshooting](/en/guides/activation-failed/) covers every common error.
---
## Before You Start: 3 Prerequisites
### 1. Confirm Your iPhone Supports eSIM
QR code eSIM setup works on iPhone XS (2018) and every model released after it. Here is the current compatibility breakdown based on Apple's official support page:
| Model | Configuration |
|-------|---------------|
| iPhone XS / XS Max / XR (2018) | Physical SIM + 1 eSIM |
| iPhone 11 / 11 Pro / 11 Pro Max | Physical SIM + 1 eSIM |
| iPhone SE (2nd generation) | Physical SIM + 1 eSIM |
| iPhone 12 series | Physical SIM + 1 eSIM |
| iPhone 13 series | Physical SIM + 2 eSIMs (dual eSIM) |
| iPhone SE (3rd generation) | Physical SIM + 2 eSIMs (dual eSIM) |
| iPhone 14 series (outside the US) | Physical SIM + eSIM |
| iPhone 15 series (outside the US) | Physical SIM + eSIM |
| iPhone 16 series (outside the US) | Physical SIM + eSIM |
| iPhone 16e | Physical SIM + eSIM (most regions) |
| **iPhone 14–16e (US models)** | **eSIM-only — no physical SIM slot** |
| **iPhone 17 series (US, Canada, Mexico, Japan, and several other regions)** | **eSIM-only — no physical SIM slot** |
| iPhone Air (all regions) | eSIM-only — no physical SIM slot |
**US travelers and US-purchased iPhones:** If you bought an iPhone 14 or later in the United States, your phone has no physical SIM slot. It can only use eSIM. This makes QR code setup the standard activation method — you do not need to visit a store or handle a card.
To check eSIM support on your device without looking it up: open **Settings > Cellular**. If you see **Add eSIM** or **Set Up Cellular**, your iPhone supports eSIM.
### 2. Check That Your iPhone Is Carrier-Unlocked
A carrier-locked iPhone can only use eSIM plans from the carrier it's locked to.
To check: go to **Settings > General > About** and look for **Carrier Lock**. If it says **No SIM restrictions**, your iPhone is unlocked and compatible with any carrier's eSIM.
If it says locked, contact your current carrier to request an unlock. Most carriers unlock devices online at no charge once any contract or installment period is complete.
### 3. Have a Stable Internet Connection
You need internet access to download the eSIM profile from the carrier's server. Connect to a Wi-Fi network before starting. If you have a physical SIM with active data in the same iPhone, that connection also works.
**If you're setting up a travel eSIM before a trip:** do it at home on reliable Wi-Fi. Airport Wi-Fi is often unstable, and a failed download just before boarding is stressful.
---
## How to Get a QR Code
The QR code comes from whoever sold you the eSIM plan.
### From a Mobile Carrier (New Plan or eSIM Switch)
Log in to your carrier's app or website. Look for an option labeled **Switch to eSIM**, **Add eSIM**, **eSIM Activation**, or **SIM Management**. After you complete any required identity verification, the carrier generates your QR code — usually displayed on screen or sent to your email.
The exact location of this option varies by carrier. If you don't see it, use the carrier's live chat or call support.
### From a Travel eSIM Provider
Providers like Airalo, Holafly, Nomad, and Saily send your QR code by email and also display it in their app after purchase. Most travel eSIMs are data-only — they do not include a voice or SMS line. For a full walkthrough of buying and using a travel eSIM, see [Your First Travel eSIM: Complete Guide](/en/guides/first-time-guide/).
---
## Step-by-Step Setup Instructions
### Standard Method (Scanning with Camera)
Use this when the QR code is on a separate screen or printed on paper.
**Step 1 — Open the QR code on a second device**
Display the QR code on a laptop, tablet, or another phone — not on the iPhone you're configuring. If the QR code is printed, have it in front of you.
**Step 2 — Go to Settings > Cellular**
On your iPhone, open the **Settings** app and tap **Cellular** (or **Mobile Data** in some regions).
**Step 3 — Tap "Add eSIM"**
Tap **Add eSIM** or **Add Cellular Plan**. The label differs slightly depending on your iOS version and whether you already have a line active.
**Step 4 — Scan the QR code**
The camera activates. Point it at the QR code. When the code is recognized, a notification or pop-up appears: **Cellular Plan Detected**.
**Step 5 — Confirm and add**
Tap **Continue** and then **Add Cellular Plan**. Your carrier may ask for a confirmation code at this point — check your email or SMS for a short numeric code.
**Step 6 — Wait for the download**
The eSIM profile downloads from your carrier's server. This takes a few seconds to about a minute depending on your connection. When you see **Cellular Plan Added**, the installation is complete.
**Step 7 — Configure your lines**
iOS will prompt you to set a label for the new line (for example, "Travel" or "Work") and to choose default settings. See the [Dual SIM setup section](#setting-up-dual-sim-after-adding-an-esim) below for what to configure.
---
### If the QR Code Is Already on Your iPhone (iOS 17.4 and Later)
When the carrier sends the QR code by email or you have it saved as a photo, you cannot use the camera to scan it from the same device. iOS 17.4 added a direct workaround:
1. Open the QR code image in the **Mail**, **Photos**, or **Safari** app.
2. **Long-press** the image.
3. Tap **Add eSIM** from the pop-up menu.
This triggers the same installation flow as the camera scan.
**On iOS 17.3 and earlier:** transfer the QR code to a second device and scan it normally with your iPhone's camera.
---
### During Initial iPhone Setup (Out-of-Box)
When setting up a brand-new iPhone for the first time, iOS shows a **Set Up Cellular** screen. Tap **Use QR Code**, then scan with the camera. The process is identical to the standard method above.
This is the primary activation path for eSIM-only iPhones (US iPhone 14 and later), since there is no physical SIM to insert.
---
## Setting Up Dual SIM After Adding an eSIM
Adding an eSIM creates a two-line (dual SIM) configuration. You need to decide how each line is used.
Go to **Settings > Cellular** to see both lines and configure the following:
| Setting | What to Choose |
|---------|----------------|
| **Default Voice Line** | The line you use for outgoing calls |
| **Default Line for SMS/iMessage** | The line used for non-iMessage texts |
| **Cellular Data** | The line used for mobile data |
| **Allow Cellular Data Switching** | See note below |
**Allow Cellular Data Switching:** When enabled, iOS can use either line for data depending on coverage. If you add a travel eSIM and leave this on, your home SIM may use roaming data without warning. **Turn it off** when using a travel eSIM abroad to keep data usage on the travel line only.
For a deeper explanation of dual SIM modes (DSDS vs dual eSIM), see [What Is Dual SIM?](/en/guides/what-is-dual-sim/).
---
## Troubleshooting Common Problems
**"Unable to Add Cellular Plan" error**
This usually means one of the following: the QR code has already been used on another device, the QR code has expired, or you have reached the number of stored eSIM profiles your device allows (iPhones can store 8 or more eSIMs, but check with your carrier if you frequently install and delete plans). Request a new QR code from your carrier.
**QR code scans but nothing happens**
Clean your camera lens. Try adjusting the distance between the code and the camera to around 10–30 cm. Make sure the code is in focus and well-lit. If the code is damaged or very low resolution, switch to the manual entry method: [Set Up eSIM with a Manual Code (SM-DP+ Address)](/en/guides/manual-code/).
**eSIM installed but no mobile data**
Installing the profile and turning on data are separate actions. In **Settings > Cellular**, find your new eSIM line and verify that **Cellular Data** is switched on. Then confirm it is selected under **Cellular Data** as the active line. If data roaming is required (e.g., you're using a local SIM abroad), also enable **Data Roaming**.
**Carrier Lock message during setup**
Your iPhone is locked to another carrier. Contact your carrier to unlock it before proceeding. Unlocking is typically free once your device is paid off or your contract term has ended.
For issues not listed here, see [eSIM Activation Failed: Troubleshooting](/en/guides/activation-failed/).
---
## After Setup: What Comes Next
Once your eSIM is running, you can manage it fully from **Settings > Cellular**:
- Rename the line for clarity (e.g., "Home", "Travel Japan")
- Toggle the line on or off without deleting it
- Switch which line handles calls, SMS, or data at any time
**Transferring or reinstalling your eSIM:** If you upgrade your iPhone or need to reinstall the eSIM, note that each QR code is single-use. You will need to request a new QR code from your carrier. Some carriers support [eSIM Quick Transfer](/en/guides/transfer-iphone/), which lets compatible iPhones transfer an eSIM directly without a QR code.
To browse eSIM plans for your destination, [search on SimFinder Travel →](/en/travel/)
---
Sources:
- [Set up eSIM on iPhone - Apple Support](https://support.apple.com/en-us/118669)
================================================================================
# How to Read Network Quality Metrics
URL: https://sim-finder.com/en/guides/quality-metrics/
Type: guides (en)
Published: 2026-06-05
Choosing a mobile plan based on advertised download speed is like judging a road by its maximum speed limit without checking whether there are traffic jams, potholes, or dead ends. Download speed is one data point. Six dimensions together define network quality: download and upload throughput, latency, jitter, packet loss, geographic coverage, and congestion stability. Each affects a different aspect of daily use. Understanding all six is essential for making a genuinely informed comparison.
The key points covered in this article:
- What each of the six quality dimensions measures and why it matters
- How each dimension affects real-world applications: video, voice calls, gaming, web browsing
- Why speed is a poor single proxy for quality
- How to self-measure and what the limitations of speed tests are
- How SimFinder's quality score brings these dimensions together for multi-carrier comparison
---
## Why Speed Alone Is Misleading
Most carrier advertising leads with peak download speed. The figure is memorable, easy to compare, and looks impressive in a headline. However, it describes only one aspect of a connection — and not the aspect that matters most for many common tasks.
Consider two hypothetical connections on the same device, same location:
- **Connection A**: 200 Mbps download, 80 ms latency, 25 ms jitter
- **Connection B**: 60 Mbps download, 20 ms latency, 3 ms jitter
For downloading a large file, Connection A finishes faster. For everything else a smartphone typically does — loading a webpage (dozens of small parallel requests each requiring a round-trip), making a video call (continuous low-latency bidirectional stream), navigating maps (frequent small requests), playing an online game (response time measured in milliseconds) — Connection B delivers a noticeably better experience.
Speed tests measure throughput under a single ideal burst. They do not capture latency under load, jitter variability, how performance degrades during peak hours, or how consistent coverage is across the geography you actually use. A balanced quality assessment requires all six dimensions examined below.
---
## Dimension 1: Download and Upload Speed (Mbps)
**What it measures.** Throughput is the volume of data transferred per unit of time, expressed in megabits per second (Mbps). Download speed describes the transfer from network to device; upload speed describes the reverse.
**How it affects real experience.**
| Application | Minimum workable | Comfortable |
|-------------|-----------------|-------------|
| Web browsing | 1–2 Mbps | 5+ Mbps |
| HD video streaming (1080p) | 5–8 Mbps sustained | 15+ Mbps |
| 4K video streaming | 20–25 Mbps sustained | 40+ Mbps |
| Video call (HD) | 1.5–2.5 Mbps up+down | 5+ Mbps |
| Large file download | Higher is better | — |
Upload speed matters for video calls (your camera stream), cloud backup, and sharing files. Carriers often provision significantly less upload capacity than download capacity on mobile networks because the traffic pattern of most consumer devices is asymmetric — they download far more than they upload. An upload speed of 10–20 Mbps supports HD video calls comfortably; upload speeds below 2 Mbps will constrain video call quality.
**Limitation.** Advertised speeds are peak figures measured in ideal single-user conditions. Real-world speeds depend on distance from the base station, signal strength, number of concurrent users on the cell, and device capability. For context on the underlying radio technology that sets the ceiling on achievable speeds, see [4G/LTE vs 5G: What They Are and How They Differ](/en/guides/4g-5g-explained/).
---
## Dimension 2: Latency (ms, Ping)
**What it measures.** Latency — commonly called ping — is the round-trip time for a small data packet to travel from a device to a server and back, measured in milliseconds (ms). A lower number is better.
**How it affects real experience.** Latency is the governing metric for anything interactive. When you tap a link, the browser sends a request and waits for the server's response before rendering content. That wait is dominated by latency, not throughput. A connection with 10 Mbps but 15 ms latency will load most pages faster than a connection with 100 Mbps but 120 ms latency, because each of the dozens of resources on a modern webpage requires its own round-trip.
For voice and video calls, latency above 150 ms in one direction (300 ms round-trip) creates noticeable conversational awkwardness because one party is still speaking when the other perceives silence and begins to respond. At 300 ms one-way (600 ms round-trip), most people find conversation frustrating.
For online gaming, the required latency depends on the game type. Turn-based or strategy games are tolerant of 100–200 ms. First-person shooters and real-time competitive games require consistent sub-50 ms latency to avoid the hit-registration problems commonly described as "lag."
**Typical mobile latency ranges.** On a well-maintained 4G LTE network with moderate load, round-trip latency is typically in the 20–60 ms range. 5G Standalone networks are designed with lower latency targets, with typical consumer connections in the 10–30 ms range on mid-band 5G SA. These figures vary by carrier, load, and geography; they are not guarantees.
---
## Dimension 3: Jitter
**What it measures.** Jitter is the statistical variation in round-trip latency across successive packets. If ten consecutive packets arrive with round-trip times of 22 ms, 21 ms, 23 ms, 22 ms, the jitter is very low. If they arrive at 22 ms, 55 ms, 18 ms, 80 ms, the jitter is high even if the average latency appears moderate.
**How it affects real experience.** Real-time applications that depend on a steady stream of data — voice calls, video calls, live audio, online gaming — are most sensitive to jitter. These applications use a technique called a jitter buffer: incoming packets are held briefly and released at a steady rate, smoothing out delivery. When jitter is low, the buffer can be small and end-to-end latency remains low. When jitter is high, the application must use a larger buffer to avoid dropouts, which increases effective latency. If jitter exceeds the buffer size, the application drops packets, resulting in choppy audio, frozen video frames, or missed inputs in a game.
Jitter is rarely displayed in standard speed test results. Applications designed for VoIP quality testing — such as those conforming to ITU-T P-series recommendations — report jitter separately. For most consumers, high jitter manifests as intermittent audio dropouts during calls despite an apparently adequate average speed.
**What causes jitter on mobile.** Radio interference, handover between base stations as a device moves, and network congestion at intermediate routing points all contribute to jitter. It is more pronounced on mobile networks than on wireline connections because the radio medium is inherently variable.
---
## Dimension 4: Packet Loss
**What it measures.** Packet loss is the percentage of data packets sent that never reach their destination. In a lossless connection, every packet sent arrives; in practice, no wireless network achieves this. Packet loss is expressed as a percentage and is considered a quality indicator when measured over a sustained period.
**How it affects real experience.** The impact of packet loss depends on the application protocol:
- **TCP applications** (web browsing, file downloads, most app traffic): TCP automatically detects lost packets and retransmits them. The user experiences a slowdown rather than a visible error, because the sender must wait for an acknowledgement before sending subsequent data. High packet loss causes throughput to degrade significantly and can cause TCP connections to stall.
- **UDP applications** (voice calls, video streaming, gaming): UDP does not retransmit lost packets. Applications built on UDP use their own application-layer mechanisms to handle loss. Voice codecs can interpolate over brief gaps, but sustained loss above approximately 1–2% causes perceptible audio degradation. Video conferencing applications similarly degrade — freezes, pixelation, and dropped frames all indicate packet loss.
A packet loss rate below 0.5% is generally considered acceptable for mobile networks in normal conditions. Rates above 2–3% indicate a problem — insufficient signal, severe congestion, or a network configuration issue. Loss rates above 5% will degrade nearly all real-time applications noticeably.
---
## Dimension 5: Coverage
**What it measures.** Coverage describes the geographic area within which a network provides a usable signal. It is typically presented as a percentage of population covered or as a map. Coverage is distinct from throughput: a cell on the edge of coverage may provide adequate signal for voice and basic data but insufficient signal strength for high-speed data or 5G.
**How it affects real experience.** Coverage is the binary precondition for all other quality dimensions. No amount of low latency or high throughput helps if the device has no signal. Coverage quality considerations include:
- **Indoor penetration.** Low-band frequencies (below 1 GHz) propagate through building materials more effectively than mid-band and high-band frequencies. A carrier's 5G coverage map may show coverage based on outdoor signal; indoor coverage at the same location may rely on 4G LTE low-band.
- **Rural and suburban coverage.** A carrier may have 5G coverage in dense urban areas but revert to 4G LTE or even 3G in rural regions. For users who travel outside major cities, the breadth of 4G LTE coverage is often more relevant than 5G peak speeds.
- **MVNOs and host network coverage.** MVNOs lease capacity from MNOs and generally inherit the host network's geographic coverage. However, the coverage available to an MVNO subscriber may be subject to restrictions in the wholesale agreement. For more on how this relationship works, see [What Is an MVNO?](/en/guides/what-is-mvno/).
For information on how specific frequency bands influence indoor penetration and range, see [Frequency Bands and Device Compatibility](/en/guides/frequency-bands/).
---
## Dimension 6: Congestion Stability
**What it measures.** Congestion stability describes how consistently a network performs when the cell or backhaul is heavily loaded — typically during peak hours (evening commutes, lunch breaks, large public events). A network may show excellent quality metrics in off-peak testing but degrade significantly when demand on the cell peaks.
**How it affects real experience.** For most users, congestion is the most frustrating source of poor performance because it appears as unpredictable slowdowns that are difficult to diagnose. A speed test run at 2 AM may show 80 Mbps; the same location at 7 PM may deliver 5 Mbps with elevated latency and jitter. Both measurements are technically accurate for the time they were taken.
Congestion affects MVNOs differently from MNOs. The capacity an MVNO purchases from its host MNO is provisioned at a wholesale connection point (POI — Point of Interface). When demand from the MVNO's subscriber base exceeds the provisioned capacity at the POI, all MVNO subscribers on that connection experience speed throttling simultaneously, even if the host MNO's own customers on the same cell are unaffected. This is the structural mechanism behind the common observation that MVNO speeds degrade more severely during peak hours than MNO speeds on the same physical network. Why MVNOs slow down at peak times and how to evaluate carriers for congestion resilience is covered in depth in [Why MVNOs Slow Down at Peak Hours](/en/guides/why-mvno-slow/).
Network quality in congested conditions is the hardest dimension for consumers to measure independently because it requires testing at different times and locations over multiple days.
---
## How to Self-Measure Network Quality
Speed test applications — available for both iOS and Android — measure download speed, upload speed, and round-trip latency with a single button press. Results are reported in Mbps (speed) and ms (latency). Running a test takes under 30 seconds.
**Steps for a meaningful self-assessment.**
1. **Test at multiple times of day.** Run tests in the morning, at midday, in the evening peak (roughly 18:00–22:00 in most markets), and late at night. Evening and midday results reveal congestion behaviour; off-peak results show the best-case performance.
2. **Test in representative locations.** Test where you actually use your device — at home, at work, on your commute, in locations you frequent. A single result from one location is not representative.
3. **Note the connected technology.** Check whether the device is on 4G LTE, 5G NSA, or 5G SA when each test runs. The radio generation significantly affects throughput and latency results.
4. **Run multiple tests in sequence.** Latency and speed can vary significantly between tests on the same connection. Three to five runs in the same location gives a more reliable picture than a single result.
5. **Record and compare.** Manual tracking across carriers, times, and locations is the most rigorous way to compare options in your specific geography.
**Limitations of speed tests.**
Speed tests are useful but have structural limitations as quality indicators:
- They measure a single sustained download or upload, not the many small parallel requests that constitute real browsing.
- Latency is reported as a point-in-time figure, not as a distribution. Jitter is not included in most consumer speed test reports.
- Packet loss is not measured by most speed tests.
- Server location affects results; a test server near the device underestimates real-world latency for connections to distant services.
- Performance may be influenced by the device's processor and Wi-Fi chip, not only the network.
- Results at one time of day do not predict peak-hour behaviour.
Specialist network measurement tools — used by independent benchmarking organisations such as Ookla and Opensignal — address some of these limitations by aggregating millions of measurements across diverse conditions. Country-level median speed and latency benchmarks from these sources provide a more statistically reliable picture of carrier quality than individual speed tests, but they still cannot capture your specific location and usage pattern.
---
## The SimFinder Quality Score
Because real-world network quality is multidimensional, SimFinder's quality score is designed to reflect more than peak download speed. When you compare plans on [SimFinder](/en/), the quality score for each carrier synthesises available data across the dimensions described in this article — including coverage breadth and congestion-period performance where data is available — to give a single comparable figure that weights dimensions relevant to typical consumer use.
No single number can capture every nuance of network quality for every user in every location. The score is a starting point for comparison, not a substitute for personal testing in your area. Where an MVNO uses a host MNO's infrastructure, the score reflects the network quality of that host, adjusted for the typical impact of POI capacity constraints on peak-hour performance.
The [SimFinder quality score methodology](/en/guides/simfinder-score/) is documented separately, including the sources used, update cadence, and the weighting of each quality dimension. The underlying network quality data is updated periodically from independent benchmark sources; the methodology page describes how those sources are applied.
---
## Practical Implications When Choosing a SIM
Understanding the six quality dimensions translates into more targeted questions when evaluating a carrier or plan.
**For video and music streaming:** Download speed is the primary concern, with coverage across your commute route a secondary consideration. A minimum of 5–8 Mbps sustained is needed for 1080p streaming; 25 Mbps or more for 4K. Jitter and latency matter less for buffered streaming than for live content.
**For voice and video calls:** Latency and jitter are more important than raw speed. An upload speed of at least 1.5–2.5 Mbps is needed for HD video call quality. Packet loss above 1–2% will cause noticeable audio degradation.
**For remote work:** All dimensions matter. Latency affects responsiveness of cloud applications and collaboration tools. Upload speed determines the quality of your video call stream. Congestion stability during business hours is critical — a connection that degrades at 10 AM in your home office is a practical problem regardless of its off-peak performance.
**For gaming:** Latency consistency and low jitter are the defining factors. Peak download speed has minimal relevance to gaming experience once the game is loaded.
**For general browsing and app use:** Latency and a moderate download speed (10–20 Mbps) cover the majority of use cases. Geographic coverage in all locations you use your device is the baseline requirement.
**For MVNOs specifically:** Congestion stability during peak hours and the quality of the host MNO's underlying network are key considerations, alongside the advertised speeds. See [What Is an MVNO?](/en/guides/what-is-mvno/) for a full explanation of how MVNOs access the host network and why performance can differ from the host MNO even on the same physical infrastructure.
---
## Per-Use-Case Quick Reference
The table below consolidates the quality thresholds discussed in this article. Values represent typical requirements for a smooth experience under normal conditions; demanding scenarios (4K streaming, competitive gaming) are noted separately.
| Use Case | Min Download | Comfortable Download | Min Upload | Max Latency (round-trip) | Max Jitter | Max Packet Loss |
|----------|-------------|---------------------|-----------|--------------------------|------------|-----------------|
| Web browsing | 2 Mbps | 10+ Mbps | — | 200 ms | 50 ms | 2% |
| HD video streaming (1080p) | 5 Mbps | 15+ Mbps | — | 500 ms† | 100 ms† | 1% |
| 4K video streaming | 20 Mbps | 40+ Mbps | — | 500 ms† | 100 ms† | 0.5% |
| VoIP / voice call | 0.1 Mbps | 0.5 Mbps | 0.1 Mbps | 150 ms | 30 ms | 1% |
| HD video call | 1.5 Mbps | 5+ Mbps | 1.5 Mbps | 100 ms | 20 ms | 0.5% |
| Remote desktop / cloud apps | 2 Mbps | 10+ Mbps | 1 Mbps | 80 ms | 20 ms | 0.5% |
| Casual online gaming | 1 Mbps | 5+ Mbps | 0.5 Mbps | 150 ms | 30 ms | 1% |
| Competitive / FPS gaming | 1 Mbps | 5+ Mbps | 0.5 Mbps | 50 ms | 10 ms | 0.1% |
| Large file download | Higher is better | — | — | Not critical | Not critical | 2% |
| Cloud backup / upload | — | — | 10+ Mbps | Not critical | Not critical | 1% |
†Buffered video streaming is tolerant of higher latency because the player pre-loads content. These thresholds apply to live streaming; on-demand content with a large buffer can tolerate latency in the seconds range without any visible effect.
The critical observation from this table is that most everyday use cases are not limited by download speed once a moderate threshold is crossed, but are instead constrained by latency, jitter, and packet loss — dimensions that speed test headlines do not convey.
---
## How to Interpret a Speed Test Result
Speed test applications report three primary figures: download speed (Mbps), upload speed (Mbps), and ping (round-trip latency in ms). Here is what each number actually tells you and what it does not.
**Download speed result.** The test opens a TCP connection to a nearby server and saturates it with data for several seconds, measuring how fast data arrives. This models a single large file download. It does not model the request-response pattern of web browsing, where the browser makes dozens of small requests, each requiring a full round-trip before the next batch can be fetched. A connection that scores high on download may still feel sluggish for browsing if latency is elevated.
**Upload speed result.** The symmetric measurement in the opposite direction. This is the primary constraint for video calls, cloud backup, and file sharing. Upload speeds on mobile networks are typically 20–50% of download speeds, reflecting the asymmetric provisioning of most consumer mobile services.
**Ping result.** The test sends a small probe packet to the server and measures the round-trip time. This is a single measurement — not an average and not a distribution. A ping of 35 ms on one test could coexist with occasional spikes to 200 ms that would cause noticeable disruption on a video call. To get a more reliable latency picture, look for applications that run continuous ping tests and report both the average and the maximum, or observe the variance across five to ten individual tests run in quick succession.
**What the result does not tell you.** A standard speed test result contains no information about jitter, packet loss, performance under load (when the cell is shared with many other users), or how the result will change at peak hours. It also reflects conditions at one point in time; the same test run one hour later during a local congestion event may yield significantly different numbers. Use speed test results as one data point in a larger picture, not as a definitive quality assessment.
**Server proximity effects.** Most speed test applications automatically select the nearest available server. This minimises measured latency and maximises measured throughput — giving the most favourable possible figures for the connection. When you actually use the internet, requests travel to servers that may be located in different cities or countries. Real-world latency to a distant service will be higher than the speed test ping result to a local server.
---
## Coverage Versus Speed: The Real Tradeoff
A common mistake when evaluating carriers is optimising for peak speed at the expense of consistent coverage. In practice, having a signal is always more valuable than having a fast signal, and the tradeoff is not merely theoretical — it is built into the physics of radio frequency propagation.
High-band frequencies (above 3 GHz, including most 5G mmWave and some mid-band deployments) carry far more data per unit of time than low-band frequencies, but their signals attenuate rapidly with distance and are blocked by building materials. A 5G cell operating on high-band frequencies may cover only a few hundred metres in urban conditions and provide negligible indoor coverage. Moving outside that small radius drops the device to a lower-frequency fallback.
Low-band frequencies (below 1 GHz) carry less data per unit time but propagate over kilometres and penetrate buildings effectively. A single low-band cell can provide baseline coverage over a rural area where a high-band cell would be inaudible.
**What this means for users.** A carrier that has invested heavily in high-band 5G infrastructure will show impressive peak speeds in dense urban environments but may deliver a worse practical experience than a carrier with extensive low-band 4G LTE coverage in locations where users are indoors, on the urban periphery, or in suburban and rural areas. For the majority of time that a typical device spends connected — inside homes, offices, and transit infrastructure — low-band coverage quality is more consequential than peak 5G speed.
When comparing carriers, check coverage maps for the specific areas you use your device most, and distinguish between outdoor and indoor coverage claims. For a detailed explanation of how frequency bands influence coverage, indoor penetration, and achievable speeds, see [Frequency Bands and Device Compatibility](/en/guides/frequency-bands/).
---
## FAQ
See the frontmatter above for structured FAQ entries. The questions below address additional topics.
**How do I check latency without a speed test app?**
On Android and iOS, dedicated network diagnostic applications can display real-time latency and packet loss. Some speed test applications include a "ping" or "latency" tab that allows continuous monitoring rather than a single point-in-time test. For a rough check on any device, loading a simple, low-resource webpage and noting how quickly it responds gives an approximate sense of latency — though this conflates server response time with network latency.
**What is a realistic download speed on 4G LTE?**
Median real-world 4G LTE download speeds on well-maintained networks in urban areas typically fall in the 20–80 Mbps range, with significant variation by country, carrier, time of day, and device. Peak theoretical figures (300 Mbps for base LTE Release 8) are achievable only under ideal single-user conditions with maximum spectrum allocation. The figures published by independent benchmarking organisations for a specific market and carrier are the most reliable reference.
**Does network quality affect battery life?**
Indirectly, yes. A device in weak-signal conditions increases transmit power to maintain the connection, which increases power consumption. Devices that frequently switch between network technologies — for example, cycling between 5G and 4G as coverage boundaries are crossed — also consume additional power during the transition. A network with consistent strong signal and stable technology selection will generally result in lower battery drain from the radio modem than a network with patchy coverage.
**What is upload speed used for on a smartphone?**
Upload speed governs any data sent from the device to a remote server: the video stream in a video call, photos and videos backed up to cloud storage, files shared with colleagues, social media posts, and data reported by apps. For users who primarily consume content rather than produce it, 5–10 Mbps upload is adequate for most tasks. For users who make frequent HD video calls or upload large files regularly, higher upload speeds provide a tangible benefit.
---
## Related Guides
- [What Is an MVNO?](/en/guides/what-is-mvno/) — How MVNOs lease network capacity from MNOs and why POI constraints affect peak-hour performance
- [4G/LTE vs 5G: What They Are and How They Differ](/en/guides/4g-5g-explained/) — The radio technology generations that set the ceiling on achievable speed and latency
- [Frequency Bands and Device Compatibility](/en/guides/frequency-bands/) — How different frequency bands affect coverage range, indoor penetration, and achievable throughput
- [SimFinder Quality Score Methodology](/en/guides/simfinder-score/) — How the six dimensions are weighted in SimFinder's carrier quality score
- [Why MVNOs Slow Down at Peak Hours](/en/guides/why-mvno-slow/) — A detailed explanation of POI capacity constraints and congestion behaviour
================================================================================
# Regional Connectivity Guide for Travelers
URL: https://sim-finder.com/en/guides/regional-overview/
Type: guides (en)
Published: 2026-06-06
Connectivity works differently depending on which region of the world you visit. The regulatory environment, local SIM rules, eSIM adoption, and network infrastructure vary enough across Asia, Europe, North America, Oceania, Latin America, and Africa that the same strategy does not serve all destinations equally well. This guide maps those differences region by region, then explains the general conditions under which a travel eSIM outperforms a local SIM — and vice versa.
For a full comparison of all four connectivity options — roaming, local SIM, travel eSIM, and portable Wi-Fi — see [4 Ways to Stay Connected Abroad](/en/guides/four-options/).
---
## Regional Snapshot
The table below summarizes the key characteristics of each region at a glance. Each row reflects general tendencies as of publication — individual countries within each region vary.
| Region | eSIM Adoption | SIM Registration | Rural Coverage | Travel eSIM Suitability |
|--------|--------------|-----------------|---------------|------------------------|
| **Asia** | High (JP/KR/SG) to low (SE Asia, South Asia) | Varies widely by country; biometric required in Thailand | Sparse outside cities in most countries | Strong for JP/KR/SG; mixed for SE Asia |
| **Europe** | High in Western Europe | Generally passport-only; stricter in Germany | Good in Western Europe; more variable in Balkans | Excellent for multi-country EU trips; EU carriers use RLAH domestically |
| **North America** | High (US, Canada) | No registration required for prepaid | Variable in rural US/Canada interior | Very strong; low friction |
| **Oceania** | High in AU/NZ | No registration required | Major rural gaps in Australia outback | Good for AU/NZ urban; local SIM better for rural AU |
| **Latin America** | Growing; uneven | Local ID often required | Major gap outside cities | Good for multi-country trips; local SIM better for extended stays |
| **Africa** | Growing; uneven | Passport/ID required in most markets | Sparse outside major cities | Good for urban-itinerary trips; local SIM better for rural reach |
---
## Asia
Asia covers the widest spectrum of connectivity conditions of any region. Network infrastructure in major urban centers — Tokyo, Seoul, Singapore, Bangkok, Hong Kong — is among the strongest in the world, with dense 4G/LTE coverage and rapidly expanding 5G. Rural and mountainous areas in countries such as Nepal, Myanmar, Cambodia, and parts of Indonesia tell a different story, with coverage dropping off quickly outside main roads and populated centers.
**SIM registration requirements vary significantly by country.** Japan requires passport-based identity verification for all SIM purchases, including tourist prepaid SIMs sold at airports and electronics stores. South Korea requires registration and, for some operators, in-person verification. Thailand tightened its rules substantially: as of August 2025, biometric liveness detection is required for all SIM registrations, and foreign visitors must present a physical passport. Vietnam similarly requires passport registration. In contrast, Hong Kong and Singapore have historically had lighter registration requirements for tourist SIMs, though policies can change.
**eSIM adoption varies widely across the continent.** Japan, South Korea, and Singapore are among the earliest and most complete eSIM markets globally, with major carriers offering eSIM onboarding through apps or QR codes and near-universal device support in the premium segment. Much of South and Southeast Asia is still building out eSIM infrastructure at the carrier level, meaning local eSIM options from national carriers may be limited or available only from a subset of operators. Travel eSIM providers serving these markets typically use a roaming-based model rather than a true local network integration, which can affect speeds compared to a country-specific plan with a named local carrier partner.
**China** is in a category of its own: international visitor SIM access is managed through dedicated roaming services and specific prepaid SIM products, and most overseas travel eSIM providers do not offer local network integration there. Travelers should research China connectivity separately from the rest of Asia.
**South Asia** (India, Sri Lanka, Bangladesh, Nepal) ranges from India's large, competitive LTE market with mature prepaid options to Nepal and Bhutan, where coverage outside the Kathmandu Valley and major trekking corridors is sparse. India now allows eSIM for domestic subscribers, but tourist SIM options have specific registration requirements that vary by telecom circle.
**For Japan, South Korea, and Singapore**, a travel eSIM from a major provider is often the lowest-friction option: no registration queue, no physical SIM, and strong local network partnerships mean good speeds in urban areas. **For Southeast Asia**, the calculus is more mixed: local physical SIMs are inexpensive and widely available, but registration requirements and language barriers at point of sale add friction. A travel eSIM removes the in-store step at the cost of a higher per-GB price.
For per-country plan comparisons across Asia, including coverage maps by local carrier
partner, use [SimFinder Travel](/).
---
## Europe
Europe is the most regulated and traveler-friendly mobile market for roaming in the world, largely because of the EU's **Roam Like At Home (RLAH)** framework. Established by EU Regulation 531/2012 and extended through June 2032 by Regulation (EU) 2022/612, RLAH prohibits carriers licensed in EU and EEA member states from charging domestic customers additional roaming surcharges when traveling within the EU/EEA zone. The result: if your home carrier is based in an EU or EEA country, you can use your existing plan in other EU/EEA countries at domestic rates, up to the fair-use threshold your carrier applies.
**RLAH covers the 27 EU member states plus Iceland, Norway, and Liechtenstein — 30 countries in total under the original framework.** Switzerland — despite its geographic position inside Europe — is not an EEA member and falls outside RLAH's scope. The UK departed the EU and is no longer bound by RLAH; as of publication, UK carriers have taken varying approaches to EU roaming, with some voluntarily maintaining free EU roaming and others reintroducing charges. For the full country list and the implications for non-EU travelers, see [EU Roaming Explained](/en/guides/eu-roaming/).
**For non-EU travelers visiting Europe**, RLAH provides no benefit. A US, Japanese, Australian, or any non-EU SIM is subject to the home carrier's standard international roaming rates when used in EU countries. For these travelers, a Europe-focused regional eSIM from a travel provider is typically the most cost-effective approach for multi-country trips. Regional eSIM providers offer plans spanning 40+ European countries under a single purchase, which removes the need to buy a new SIM at each border.
Western European networks (Germany, France, Netherlands, UK) are generally mature, with strong 4G coverage and growing 5G deployment in urban areas. Eastern European and Balkan countries have solid urban coverage but more variable rural reach. Switzerland, despite its geographic quirks, has strong independent network coverage across most of its territory including major ski areas.
**Prepaid physical SIMs are available across Europe**, typically at airports, convenience stores, and phone shops. Many countries allow tourist SIM purchases without identity registration (or with only a passport scan), though Germany requires identity verification for all SIM purchases under its telecommunications law. For EU travelers, the RLAH framework typically makes their existing domestic plan the most convenient and cost-effective option — no new SIM required at all.
For travelers from outside the EU wondering how roaming costs work when their home carrier charges full international rates, see [International Roaming Explained](/en/guides/international-roaming/).
---
## North America
North America — primarily the United States and Canada — is characterized by strong prepaid and postpaid eSIM availability, a competitive travel eSIM market, and no roaming regulatory framework equivalent to the EU's RLAH. Pricing is determined entirely by individual carrier policy, and there is no regulation capping what carriers can charge for international roaming.
**The United States** has three major network operators (AT&T, T-Mobile/Metro by T-Mobile, and Verizon) whose combined coverage reaches the vast majority of populated areas. Coverage in rural areas, national parks, and the interior West can be highly variable depending on which carrier's infrastructure is present. There is no federal requirement for carriers to roam on each other's networks in the US, which means coverage gaps exist that are specific to individual carriers. Urban 5G coverage is dense in major metro areas across the country.
**Prepaid eSIM options** are widely available for visitors, both from US carriers directly (often requiring no long-term contract) and from international travel eSIM providers. The US has no SIM registration requirement for prepaid purchases, which means setup is low-friction: a visitor can purchase and activate a travel eSIM before departure or upon arrival without presenting identity documents. This makes North America one of the most frictionless regions for travel eSIM setup.
**Canada** follows a similar pattern in urban areas, with Rogers, Bell, and Telus (via sub-brands including Koodo and Fido) providing strong coverage in populated corridors along the US border and in major cities. Remote and northern Canada — the Yukon, Northwest Territories, Nunavut, and much of the interior — has significant coverage gaps where no carrier provides reliable signal. Travel eSIMs for Canada often operate on roaming agreements with one of the major Canadian carriers.
**Cross-border US-Canada use** is a common scenario for travelers. Regional eSIM plans covering both countries are available and can simplify travel that crosses the border — though individual country plans from each market are also straightforward given low registration barriers on both sides. Mexico is often included in North America regional plans as well; see the Latin America section for Mexico-specific context.
For how to handle voice calls when using a data-only travel eSIM in North America, see [Calling Abroad: Voice Options for International Travelers](/en/guides/calls-abroad/).
---
## Oceania
Oceania — principally Australia, New Zealand, and the Pacific Island nations — presents a distinctive challenge: large geographic footprints with most of the population concentrated in a small number of coastal urban centers, leaving vast rural and outback areas with limited or no coverage.
**Australia** completed its 3G network shutdown in 2024 (Telstra in October 2024, Optus in November 2024, TPG Telecom in January 2024). All networks now operate on 4G/LTE as the baseline, with 5G deployment concentrated in major cities. Telstra holds the broadest rural coverage footprint by geography, though its prepaid plans are priced higher than competitors. Optus and TPG (Vodafone) have denser urban coverage at lower price points. For international travelers, prepaid SIMs are readily available at airports and supermarkets without identity registration requirements. Travel eSIMs serving Australia typically partner with one of these three networks — the partner choice matters for rural destinations.
**Rural and outback coverage gaps are significant.** The Australian outback, much of Western Australia, and large parts of the Northern Territory have coverage only along major highways — and sometimes not even that. Travelers planning off-road, four-wheel-drive, or remote camping itineraries should research satellite-based connectivity options rather than relying on cellular coverage, regardless of which SIM or eSIM they use. Cellular coverage maps from each carrier can help identify where signal ends.
**New Zealand** has a more compact geography that makes nationwide coverage more achievable, though the South Island's terrain creates gaps in alpine areas. Spark, One NZ (formerly Vodafone NZ), and 2degrees are the main networks. Prepaid SIMs are available at airports without registration barriers. New Zealand is often included in Oceania-focused regional eSIM plans alongside Australia.
**Pacific Island nations** (Fiji, Vanuatu, Samoa, Tonga, and others) vary widely. Main islands typically have urban 4G coverage; outer islands may have no cellular service at all. Local SIMs on the dominant carrier for each island nation are generally the only practical option; travel eSIM coverage in these markets is limited or non-existent. Travelers to remote Pacific destinations should plan for extended connectivity gaps and consider satellite-based personal locator beacons for safety in areas without cellular.
---
## Latin America
Latin America encompasses 20+ countries with highly variable regulatory environments, infrastructure maturity, and SIM availability — making it one of the more complex regions to navigate as a traveler.
**Country-to-country variation is high.** Brazil has a large, sophisticated telecommunications market with nationwide LTE and growing 5G in urban centers. Mexico similarly has mature coverage in cities and major tourist destinations, with a dominant operator holding a large share of the market and competitors providing alternatives. Argentina, Chile, and Colombia have solid urban coverage with more variable reach in rural areas. Countries such as Bolivia, Paraguay, Honduras, Guatemala, and Nicaragua have more limited infrastructure, with coverage often concentrated in capital cities and main road corridors.
**Prepaid SIM availability and registration rules vary.** Many Latin American countries require a local tax identification number or national ID for SIM purchases, which is a barrier for tourists who lack these documents. Some carriers in tourist-heavy markets — Mexico's Pacific and Caribbean coastal zones, major Brazilian cities — have adapted their prepaid offerings for visitors, but practices differ by carrier and change over time. Language is also a practical factor: many carrier retail experiences are conducted in Spanish or Portuguese only, with limited English-language support.
**Regional eSIM plans for Latin America** are available from major providers and can cover 15–20 countries under one purchase, which is practical for travelers visiting multiple countries on a single trip. However, regional plans in Latin America tend to show more variation in partner network quality than their European counterparts, reflecting the underlying diversity in national carrier maturity across the continent.
**Urban vs. rural connectivity gap** is pronounced across most of the region. Major cities and coastal tourist zones are generally well covered. Highland areas, the Amazon basin, and remote rural regions can have no signal at all. Travelers planning adventure itineraries in Peru's highlands, Bolivia's Andes, Ecuador's cloud forests, or remote Patagonia should plan accordingly and research satellite options where cellular coverage is unlikely.
For selecting between a single-country eSIM and a regional plan when crossing multiple Latin American borders, see [How to Choose a Travel eSIM](/en/guides/how-to-choose/).
---
## Africa
Africa is the region where the gap between urban and rural connectivity is most extreme, and where prepaid mobile adoption is highest in the world by subscriber percentage — yet where the infrastructure supporting those subscribers is most concentrated in cities and along main transport corridors.
**Urban-centric coverage is the defining characteristic.** Nairobi, Lagos, Cairo, Cape Town, Accra, Addis Ababa, and other major urban centers often have strong 4G LTE coverage and, in some cases, early 5G rollouts. Outside urban boundaries, coverage diminishes quickly. Rural sub-Saharan Africa has significant areas with 2G-only coverage or no coverage at all. Travelers to game reserves, remote national parks, or off-road destinations should not expect reliable cellular data and should research the specific coverage of the dominant carrier in each area before departure.
**Prepaid SIM adoption is very high.** In most African markets, prepaid SIMs account for the large majority of mobile subscriptions. Local prepaid SIMs are inexpensive and widely available at airports, carrier shops, and informal street markets. Many countries require a passport or national ID for registration. In some markets, there are limits on how many SIMs a foreign national can hold, and the registration process can involve in-person steps. Purchasing a local SIM on arrival is generally straightforward in major cities and airports.
**Travel eSIM availability in Africa is growing but uneven.** Major providers offer eSIM coverage in South Africa, Kenya, Nigeria, Egypt, Ghana, and several other markets, but the partner networks available are sometimes limited to one carrier in each country. Data speeds over a travel eSIM in Africa can vary more than in Europe or North America, depending on the quality of the specific local partner network. Before purchasing an Africa regional eSIM plan, verify which network is listed as the partner for each country on your itinerary.
**South Africa** stands out as the most developed travel connectivity market on the continent, with Vodacom, MTN, and Cell C offering competitive prepaid options and reasonable tourist SIM access. Kenya (Safaricom) is another strong market with widespread coverage and a mature mobile infrastructure. **North Africa** (Egypt, Morocco, Tunisia) has generally better coverage continuity than sub-Saharan Africa and more developed tourist SIM options, with major carriers in Morocco and Egypt offering airport SIM availability.
For travelers on fixed itineraries passing through well-covered African cities, a regional Africa travel eSIM from a major provider is a low-friction option. For extended travel across multiple markets including rural areas, purchasing a local SIM in each country from the dominant carrier gives the best coverage reach and typically the lowest per-GB cost. For comparing providers available for African destinations, see [Travel eSIM Provider Comparison](/en/guides/provider-comparison/).
---
## When a Travel eSIM Works Well
A travel eSIM is the right choice in most of the following situations:
**Short to medium trips (1–4 weeks) to countries with strong eSIM infrastructure.**
Japan, South Korea, Western Europe, the US, Canada, and Australia all have mature eSIM
markets where travel eSIM providers partner with quality local networks. Setup before
departure is seamless and avoids any in-country registration step.
**Multi-country itineraries within a single region.**
A Europe regional eSIM covering 40+ countries, or a Latin America plan covering 15+
countries, removes the need to buy a new SIM at each border. The convenience premium
over country-specific SIMs is usually justified when crossing two or more borders.
**Destinations with SIM registration barriers.**
Where buying a local SIM requires a passport, biometric check, or local ID number — as
in Thailand, Japan, Germany, and many Latin American markets — a pre-installed travel
eSIM removes that friction entirely.
**When you need a working connection immediately on landing.**
A travel eSIM installed on home Wi-Fi before departure connects to a local network as
soon as your plane lands, without queuing at an airport SIM kiosk.
**Dual-SIM configuration.**
Keeping your home SIM active for calls and SMS while using a travel eSIM for data is the
most common setup for travelers who need to remain reachable on their home number.
This setup keeps your home number available for receiving two-factor authentication codes
and calls, while the travel eSIM handles data at local rates.
**When your home carrier's roaming coverage or rates are unfavorable.**
In destinations where your home carrier has no roaming agreement, or where roaming
charges would be high, a travel eSIM provides a cost-predictable alternative. Use
[International Roaming Explained](/en/guides/international-roaming/) to understand how
to check whether your plan includes a meaningful roaming benefit before deciding.
---
## When a Local SIM Wins
A local SIM from a carrier in your destination typically beats a travel eSIM in the
following situations:
**Long stays (one month or longer).**
Monthly prepaid plans from local carriers are usually substantially cheaper per gigabyte
than travel eSIM plans priced for short trips. Beyond a certain length of stay, the
registration process and in-store purchase are worth the effort.
**Destinations with limited travel eSIM coverage.**
Pacific Island nations, remote African markets, and parts of Latin America may have no
travel eSIM provider offering meaningful local network coverage. A local SIM from the
dominant carrier in that country is the only way to get a strong local signal.
**Rural and off-road itineraries where carrier selection matters.**
In large-geography countries like Australia, the US, and Brazil, the difference in rural
coverage between carriers is significant enough that choosing the right local carrier —
and its SIM — can determine whether you have signal at all. Travel eSIMs are not always
backed by the carrier with the best rural coverage in a given country.
**When cost is the primary concern and you will be in one country for more than a few days.**
Local prepaid SIMs are almost always cheaper on a per-GB basis than travel eSIMs. For a
week or more in a single country, the cost difference can be meaningful, particularly in
markets where prepaid data is inexpensive — Southeast Asia, South Asia, and parts of
Africa often fall into this category.
**When you need a local phone number.**
Most travel eSIMs are data-only and do not include a voice number in the destination
country. If you need a local number — for example, to call local businesses, receive
a delivery, or verify an account with a local service — a local SIM with a voice plan
is the right tool. For VoIP-based alternatives that work over a travel eSIM's data
connection, see [Calling Abroad: Voice Options for International Travelers](/en/guides/calls-abroad/).
---
## Finding the Right Plan for Your Destination
The regional summaries above describe general tendencies. Network quality, carrier availability, SIM registration rules, and eSIM partner depth all change over time and vary at the country level within each region. A plan that worked well in one country may not reflect what is available in a neighboring country with a very different regulatory and market environment.
Use [SimFinder Travel](/) to compare current travel eSIM plans by destination, data volume, validity, and provider — with the local network partner listed for each plan so you can evaluate coverage quality before purchasing. For background on the criteria to evaluate when choosing between plans, see [How to Choose a Travel eSIM](/en/guides/how-to-choose/) and [Travel eSIM Provider Comparison](/en/guides/provider-comparison/).
---
## FAQ
See the FAQ items in the frontmatter for answers to the following:
- Is a travel eSIM always cheaper than roaming abroad?
- Which regions have the most SIM registration barriers?
- Does a regional eSIM plan work equally well across all countries in the plan?
---
## Related Guides
- [International Roaming Explained](/en/guides/international-roaming/) — How roaming works technically and how to avoid bill shock
- [EU Roaming Explained](/en/guides/eu-roaming/) — Roam Like At Home in full detail: covered countries, fair use policy, data caps
- [Calling Abroad: Voice Options for International Travelers](/en/guides/calls-abroad/) — Voice call options when using a data-only travel eSIM
- [How to Choose a Travel eSIM](/en/guides/how-to-choose/) — 5 criteria for evaluating plans: coverage, data, validity, pricing, activation
- [Travel eSIM Provider Comparison](/en/guides/provider-comparison/) — Airalo, Holafly, Nomad, Saily and more compared by coverage and plan type
================================================================================
# Data Roaming Settings: How to Turn It On/Off Safely
URL: https://sim-finder.com/en/guides/roaming-settings/
Type: guides (en)
Published: 2026-06-04
Data Roaming is the device-level switch that controls whether your phone uses mobile data on a visited network abroad. Turning it off blocks all background and foreground mobile data over the foreign network while leaving calls and SMS working. Turning it on lets data flow — and lets charges accumulate if your plan does not cover roaming. This guide explains exactly where to find the toggle on iPhone and Android, what the setting does and does not control, and the additional settings that prevent bill shock.
For a full explanation of how international roaming works at the network level — GSMA AA.12 agreements, IPX routing, and pricing models — see [International Roaming Explained](/en/guides/international-roaming/).
---
## What Data Roaming Is and What Controlling It Does
Data Roaming is the use of mobile data on a network other than your home carrier's network. When you travel abroad and your phone connects to a local carrier's network, any data your device sends or receives passes through that foreign network and is billed at roaming rates — either pay-per-use, a pass fee, or consumed from an included roaming allowance, depending on your home carrier's plan.
The Data Roaming toggle in your device settings controls mobile data on that foreign connection. When it is off:
- Your phone registers on the visited network and can make and receive voice calls and SMS normally.
- All mobile data — foreground apps, background sync, automatic updates, iCloud or Google account sync — is blocked over the visited network.
- Wi-Fi continues to work normally and is unaffected by this toggle.
When Data Roaming is on, your device behaves on the visited network roughly as it does on your home network: all apps that have permission to use mobile data will use it, including in the background.
The default state of Data Roaming depends on your device and, more specifically, on the carrier profile loaded on your SIM. Some carrier SIM profiles set Data Roaming to off by default; others set it to on. Do not assume a default — check the toggle before traveling.
If you have a SIM from an EU or EEA carrier and are traveling within the EU/EEA, you may not incur any extra roaming charge at all — the [EU Roaming Regulation (Roam Like At Home)](/en/guides/eu-roaming/) requires carriers to let customers use their domestic allowance across all 32 participating countries without surcharges (27 EU member states, Iceland, Norway, and Liechtenstein, plus Ukraine and Moldova from 1 January 2026).
---
## How to Toggle Data Roaming on iPhone
Apple's iOS exposes a Data Roaming toggle per SIM line, accessible in the Cellular settings.
### Single-SIM iPhone
1. Open **Settings**.
2. Tap **Cellular** (labeled "Mobile Data" in some regions).
3. Tap **Cellular Data Options** (or "Mobile Data Options").
4. Find the **Data Roaming** toggle.
5. Turn it on or off as needed.
When Data Roaming is off, the toggle appears grey. When it is on, it appears green. iOS displays a confirmation dialog when you attempt to enable Data Roaming, warning that it may incur additional charges — this dialog appears as a reminder, not a permission request.
### Dual-SIM iPhone (iPhone XS and Later)
On iPhone models that support dual SIM (a physical nano-SIM plus an eSIM, or two eSIMs), each line has its own Data Roaming toggle.
1. Open **Settings**.
2. Tap **Cellular**.
3. Tap the name of the line you want to configure (for example, "Primary" or "Travel").
4. Tap **Cellular Data Options**.
5. Adjust the **Data Roaming** toggle for that line.
6. Repeat for the second line if needed.
If you are using a travel eSIM for data and want to keep your home SIM protected, disable Data Roaming on the home SIM line and enable it (or leave it on) for the travel eSIM line. See [Using Dual SIM for Travel](/en/guides/dual-sim-for-travel/) for the full dual-SIM configuration process.
### Confirming the Setting
After adjusting the toggle, return to the main Cellular screen. Under your SIM line name, the description line will reflect whether Data Roaming is active. When you land abroad and your phone connects to the visited network, the carrier name in the status bar changes to the local operator — that is confirmation your phone has registered on the roaming network.
---
## How to Toggle Data Roaming on Android
Android's roaming setting is in a similar location across most devices, though the exact path varies by manufacturer and Android version.
### Stock Android (Pixel and Similar)
On Android 12 and later with stock Android (Pixel devices and Android One devices):
1. Open **Settings**.
2. Tap **Network & internet**.
3. Tap **SIMs** (or "Mobile network" on older Android versions).
4. Select the SIM you want to configure.
5. Find the **Roaming** toggle and enable or disable it.
On Android 11 and earlier stock builds, the path is typically **Settings > Network & internet > Mobile network > Roaming**.
### Samsung One UI
On Samsung devices running One UI (Galaxy S and A series):
1. Open **Settings**.
2. Tap **Connections**.
3. Tap **Mobile networks**.
4. Find **Data roaming** and toggle it.
Samsung may show a confirmation dialog when you enable Data Roaming, reminding you of potential charges — behavior varies by One UI version and region.
### Other Android Manufacturers
The Roaming toggle is present on all Android devices but the path varies:
- **OnePlus / OxygenOS**: Settings > Wi-Fi & network > SIM & network > [SIM name] > Data roaming
- **Xiaomi / MIUI**: Settings > SIM cards & mobile networks > [SIM name] > Data roaming
- **Sony Xperia**: Settings > Network & internet > Mobile network > Data roaming
- **Motorola**: Settings > Network & internet > Mobile network > Roaming
If you cannot locate the toggle, use the Settings search function and search for "roaming."
### Dual-SIM Android
On dual-SIM Android devices, the Roaming toggle appears separately for each installed SIM. Navigate to the SIM selection screen (typically **Settings > Network & internet > SIMs**) and configure each SIM independently.
---
## Settings That Prevent Bill Shock
Turning Data Roaming off is the most direct protection, but several additional settings reduce risk when you need to use data while roaming.
### Data Usage Warnings and Limits (Android)
Android provides a built-in data usage monitor with configurable warning and hard-limit thresholds:
1. Go to **Settings > Network & internet > Mobile network** (or **Data usage**).
2. Tap **Data warning & limit**.
3. Enable **Set data warning** and enter a threshold — for example, the amount included in your roaming pass.
4. Enable **Set data limit** to set a hard cap. When this limit is reached, Android cuts off mobile data for all apps until the counter resets or you raise the limit.
Set the warning well below your actual budget or pass limit to give yourself time to react before hitting the ceiling.
iOS does not have a built-in hard data cap, but Settings > Cellular shows cumulative data usage per line. Tap **Reset Statistics** at the start of each billing cycle or trip to track roaming usage from a known baseline.
### Per-App Data Restrictions on iPhone
iOS lets you disable mobile data access for individual apps:
1. Go to **Settings > Cellular**.
2. Scroll down to the app list.
3. Toggle off any app that should not use mobile data.
This applies to both home and roaming contexts. For travel, consider turning off apps that generate large background traffic: photo library sync, podcast auto-download, video streaming apps, and cloud backup services. For a list of high-consumption apps and their typical data rates, see the [Data Usage Guide](/en/guides/data-usage-guide/).
### Data Saver and Background Data on Android
Android's Data Saver mode (Android 7.0 and later) blocks background data for all apps except those you explicitly allow:
1. Go to **Settings > Network & internet > Data Saver**.
2. Enable **Use Data Saver**.
3. Tap **Unrestricted data** to allow specific apps through the restriction.
With Data Saver on, apps can only receive data when they are actively in the foreground, preventing background sync, push notifications over data, and automatic updates from running silently. The [Data-Saving Techniques guide](/en/guides/save-data/) covers additional per-app controls for high-consumption services.
### Disable Automatic App Updates
Both iOS and Android can download app updates automatically over mobile data.
- **iPhone**: On iOS 18: Settings > Apps > App Store > turn off **App Updates** under Automatic Downloads. On iOS 17 and earlier: Settings > App Store > turn off **App Updates** under Automatic Downloads.
- **Android**: Google Play Store > Settings > Network preferences > Auto-update apps > select "Over Wi-Fi only."
App updates can be large — tens or hundreds of megabytes per app — and will run in the background without prompting you.
---
## Roaming Control in Dual-SIM Devices
Dual-SIM devices introduce a configuration that is increasingly common for travelers: running a home SIM alongside a travel eSIM or local SIM. In this setup, roaming control becomes per-line rather than per-device.
### The Standard Travel Dual-SIM Configuration
The most common and cost-effective dual-SIM travel setup:
- **Home SIM**: Data Roaming **off**. Voice calls and SMS continue to work on your home number. No mobile data runs on this line, so your home carrier does not see any roaming data usage.
- **Travel eSIM (or local SIM)**: Data Roaming **on** (or simply set as the primary data SIM). All data traffic runs on the travel SIM at local or regional rates.
Your home number remains reachable for calls and messages without any roaming data cost. When a caller dials your home number, the call still routes through the visited network's voice path — but voice is not controlled by the Data Roaming toggle.
### Line Assignment for Data
On both iPhone and Android, you designate which SIM handles mobile data:
- **iPhone**: Settings > Cellular > Cellular Data — select the SIM to use for data. This is typically the travel SIM when traveling.
- **Android**: Settings > Network & internet > SIMs > Mobile data — select the SIM.
Setting the travel SIM as the data SIM means Data Roaming is not engaged on the home line even if it is technically turned on — the home SIM is not being asked to provide data. However, explicitly turning Data Roaming off on the home SIM provides an additional safeguard against any background data switching.
For the complete step-by-step setup, including SMS two-factor authentication considerations and returning to home-only configuration, see [Using Dual SIM for Travel](/en/guides/dual-sim-for-travel/).
---
## The Difference Between Data Roaming, SMS Roaming, and Voice Roaming
Data Roaming is one of three types of roaming service:
| Type | Controlled by Data Roaming toggle | Notes |
|------|----------------------------------|-------|
| **Data roaming** | Yes | Mobile internet access on the visited network |
| **SMS roaming** | No | Text messages work independently of the Data Roaming toggle |
| **Voice roaming** | No | Calls work independently of the Data Roaming toggle |
When you turn Data Roaming off, your phone does not go silent. Incoming and outgoing voice calls and SMS continue to function through the visited network's circuit-switched and SMS paths, which are separate from the data infrastructure.
If you want to block voice and SMS roaming charges as well, you must either:
- Enable **Airplane Mode** (blocks all radio), then re-enable Wi-Fi manually, or
- Contact your home carrier to restrict international voice and SMS at the account level.
Some carriers offer account-level controls through their apps or web portals that restrict roaming usage by service type. Check your carrier's app for these options before traveling.
---
## Resetting After Returning Home
When you return to your home country, your phone reconnects to your home carrier's network automatically. A few settings are worth confirming to restore normal operation:
**1. Verify Data Roaming state.**
Whether you want it on or off at home is a personal preference, but confirm it is in the state you expect. Some carrier SIM profiles toggle it back automatically; most do not.
**2. Reassign the data SIM (dual-SIM devices).**
If you switched mobile data to a travel eSIM while abroad, switch it back to your home SIM. The travel SIM may no longer have active data once its plan expires or the destination-limited plan becomes inactive.
**3. Re-enable automatic app updates and background data.**
If you disabled these to save roaming data, re-enable them after returning to your home network.
**4. Reset the data usage counter.**
On iPhone (Settings > Cellular > Reset Statistics), reset the counter at the start of each billing cycle. This gives you an accurate view of next month's usage separate from any roaming consumption.
**5. Check your carrier app for usage charges.**
Review your account before the billing period closes to catch any unexpected roaming charges while there is still time to raise a query with your carrier.
---
## What to Check Before Your Next Trip
A brief pre-departure checklist for data roaming settings:
1. **Confirm your plan's roaming coverage** — verify your destination is covered and which pricing model applies (pay-per-use, day pass, or included).
2. **Decide your data strategy** — home SIM roaming, travel eSIM, or local SIM. This determines which lines should have Data Roaming on or off.
3. **Set Data Roaming** to the correct state on each SIM line.
4. **Configure data usage warnings** — set a threshold on Android, or note the current Usage counter baseline on iPhone.
5. **Disable automatic app updates** over mobile data.
6. **Turn off apps you do not need abroad** using per-app controls.
7. **Install a travel eSIM before departure** if using one — eSIM profile downloads require an internet connection, ideally done over Wi-Fi at home.
For a comprehensive list of settings to verify before any international trip, see the [Pre-Trip Connectivity Checklist](/en/guides/pre-trip-checklist/).
---
## FAQ
See the FAQ items above for answers to:
- Where to find Data Roaming on iPhone
- Where to find Data Roaming on Android (including Samsung One UI and Pixel)
- What happens when Data Roaming is off
- Whether turning Data Roaming off affects calls and SMS
- How to set a data warning or cap
- How to restrict individual apps from using roaming data
- How to configure Data Roaming on dual-SIM devices
---
## Related Guides
- [International Roaming Explained](/en/guides/international-roaming/) — How GSMA AA.12 agreements and IPX routing keep your home SIM working abroad
- [EU Roaming Explained](/en/guides/eu-roaming/) — Roam Like At Home regulation: 32 countries covered (27 EU + EEA + Ukraine/Moldova from 2026) and who benefits
- [How Much Mobile Data Do You Need?](/en/guides/data-usage-guide/) — Per-app data consumption estimates to plan your roaming budget
- [Using Dual SIM for Travel](/en/guides/dual-sim-for-travel/) — Keep your home number while routing data through a travel eSIM
- [Data-Saving Techniques](/en/guides/save-data/) — iOS and Android settings that cut mobile data use
================================================================================
# Satellite Connectivity: Direct-to-Phone Is Here
URL: https://sim-finder.com/en/guides/satellite/
Type: guides (en)
Published: 2026-06-04
Satellite-to-phone connectivity has moved from a specialised tool requiring dedicated handsets into mainstream smartphones. Two distinct implementations are now commercially active: Apple's Emergency SOS via satellite, which routes emergency messages through a dedicated satellite link built into iPhone 14 and later; and Starlink Direct to Cell, a SpaceX service designed to allow standard LTE phones to connect to LEO satellites as if they were ground-based cell towers. Both operate under the 3GPP Non-Terrestrial Network (NTN) framework standardised in Release 17 (2022).
Key points in this article:
- What Direct-to-Cell (NTN) satellite connectivity is and how it differs from legacy satellite phones
- How Apple Emergency SOS via satellite works and what it can and cannot do
- How Starlink Direct to Cell works, its phased capability rollout, and which carriers have launched it
- What 3GPP NTN standardisation means for device compatibility
- The limitations that apply to all current satellite-to-phone services — indoors, for voice, for data
- What to expect from satellite connectivity when you have [no service](/en/guides/no-service/) in a remote area
---
## What Is Direct-to-Cell Satellite Connectivity?
**Direct-to-Cell** — also called **Direct-to-Device** or **Non-Terrestrial Network (NTN)** in 3GPP specifications — describes a satellite link between a standard smartphone and a low Earth orbit (LEO) satellite acting as a flying base station.
This is architecturally different from traditional satellite phones such as those using Iridium or Thuraya networks, which required proprietary handsets with specialised antennas, dedicated satellite modems, and separate subscription plans. Direct-to-Cell is designed to work with unmodified smartphones by having the satellite emulate the radio interface of a standard cellular base station.
The 3GPP NTN framework is defined in **Release 17**, published in June 2022. Release 17 introduced changes to NR (New Radio) and LTE specifications to account for the characteristics of satellite links: propagation delay longer than terrestrial cells (for LEO at ~600 km, one-way delay is approximately 2 ms, rising with lower elevation angles), Doppler shift caused by satellite movement, and the need for timing advance adjustments to compensate for the changing distance between the satellite and the device.
LEO satellites orbit at approximately 500–2,000 km altitude. This is substantially lower than geostationary (GEO) satellites at approximately 35,786 km, which are the basis of older satellite broadband and satellite phone systems. The lower altitude reduces round-trip propagation delay and allows smartphones to communicate using their existing cellular radio, rather than requiring the high-gain antennas that GEO communication demands.
Apple's approach and Starlink's approach represent two distinct technical paths within the broader Direct-to-Cell/NTN space, and they have different capability scopes.
---
## Apple Emergency SOS via Satellite
Apple introduced Emergency SOS via satellite with the **iPhone 14** lineup in September 2022. It was the first mass-market smartphone satellite connectivity feature aimed at consumer safety.
### What It Does
Emergency SOS via satellite allows an iPhone 14 or later — in a location with no cellular or Wi-Fi signal — to send an emergency text message to emergency services. The feature also includes **Find My** location sharing via satellite, allowing users to share their GPS coordinates with trusted contacts even in areas with no cellular coverage.
iPhone 14 and later include a Qualcomm-based modem plus custom Apple-designed RF hardware and software that enable the satellite link (Globalstar band n53). This hardware is present only in iPhone 14 and later — it is not a software update for older models.
### How It Works
When a user initiates Emergency SOS with no cellular signal available, the iPhone displays a guided interface pointing toward the satellite. Because satellite bandwidth on this link is narrow, the interface asks the user a set of structured questions (type of emergency, number of people, medical conditions) and compresses the response into a short message for transmission. The process can take approximately 15 seconds to several minutes depending on satellite positioning and obstruction.
Apple operates this service through a partnership with **Globalstar** and its LEO satellite constellation. The feature's satellite link uses band n53 (in the 2.4 GHz range, 2483.5–2500 MHz), which is distinct from the LTE/NR bands used by terrestrial cellular networks.
### What It Cannot Do
Emergency SOS via satellite is specifically scoped to:
- Emergency service messaging
- Find My location sharing via satellite
It does **not** support:
- Standard SMS or iMessage to arbitrary contacts
- Voice calls
- Mobile data / internet access
Apple has separately introduced **Roadside Assistance via Satellite** (launched in the US in 2023 for iPhone 14 and later), extending the satellite messaging capability to non-emergency roadside assistance services. This uses the same underlying infrastructure and is not a general-purpose messaging service.
### Regional Availability
Apple has progressively expanded Emergency SOS via satellite since its initial launch in the United States and Canada in November 2022. As of publication, the service covers a number of countries across North America, Europe, Australia, and other regions. Apple publishes a current country list on its support pages; availability continues to expand. The service is not available in all countries where iPhone 14 or later is sold.
---
## Starlink Direct to Cell
SpaceX's **Starlink Direct to Cell** is a different architectural approach: it places the equivalent of a cellular base station on LEO satellites, allowing standard unmodified LTE smartphones to connect to satellites using existing cellular protocols, without any satellite-specific app or configuration.
### Architecture
Direct to Cell satellites carry an eNodeB (LTE base station) payload. From the perspective of an LTE smartphone, the satellite appears as a standard LTE cell. The phone uses its existing LTE radio to register, send, and receive data — the 3GPP NTN timing and frequency corrections are handled at the network side.
In the United States, the service uses T-Mobile's PCS 1900 MHz spectrum (LTE Band 25), with the FCC authorizing roughly 5 MHz for supplemental coverage from space. This spectrum arrangement is country- and carrier-specific; other markets use the spectrum of their respective partner carriers. Partner agreements with terrestrial carriers are required for the service to work, as the subscriber's SIM must be authenticated through the carrier's network.
### Phased Rollout
SpaceX has publicly expanded Direct to Cell capabilities in stages: SMS first (live 2025), then data (added October 2025), with voice in beta as of late 2025; IoT is also part of the 2025 expansion. As of publication, SMS and data are commercially available with select carrier partners, while voice remains in beta. Specific availability by country and carrier should be verified against current SpaceX announcements.
### Carrier Partnerships
Direct to Cell requires a carrier agreement, because the satellite acts as an extension of the carrier's network and the subscriber's SIM is authenticated through the carrier's existing infrastructure. Carrier partners announced as of publication include T-Mobile (United States), which publicly disclosed its Direct to Cell partnership with SpaceX in August 2022. Partnerships with carriers in other countries have been separately announced; the specific list of carriers and countries with active commercial service is subject to change and should be verified on SpaceX's Starlink website.
### Device Compatibility
Because the satellite emulates an LTE base station using 3GPP NTN protocols, SpaceX has stated that standard LTE-capable smartphones should be compatible without hardware changes. This includes both Android and iPhone models that support LTE on the relevant spectrum band. Actual compatibility in practice depends on whether the device's modem supports the specific LTE band used and whether the carrier has enabled the NTN cell selection logic on the SIM profile.
---
## The 3GPP NTN Standards Foundation
Both Direct-to-Cell services — and future satellite-to-phone services from other providers — are grounded in the 3GPP **Non-Terrestrial Network (NTN)** specifications introduced in Release 17.
### Release 17: NR-NTN and IoT-NTN
3GPP Release 17 (Stage 3 frozen June 2022) defined two NTN tracks:
- **NR-NTN**: New Radio (5G NR) over non-terrestrial networks, including LEO and GEO orbits. Specified in 3GPP TS 38.811 (study item) and updated in subsequent technical specifications.
- **IoT-NTN**: NB-IoT and eMTC over non-terrestrial networks, targeting low-power devices. Starlink Direct to Cell's LTE-based approach for smartphones is more accurately described as supplemental coverage from space (SCS) rather than a formal IoT-NTN deployment.
The key technical adaptations in NTN specifications address:
- **Propagation delay compensation**: NTN cells have timing advance values far larger than terrestrial cells. For LEO at ~600 km altitude, the one-way propagation delay is approximately 2 ms, compared to under 0.1 ms for a typical terrestrial cell. The NTN specifications extend the HARQ process timing and random-access procedures to accommodate this.
- **Doppler shift correction**: A LEO satellite moves at approximately 7.5 km/s relative to the Earth's surface. This causes a Doppler frequency shift that must be corrected before the device's LTE/NR signal can be decoded. In NTN, frequency pre-compensation can be applied at the satellite (transparent relay) or at the network side.
- **Ephemeris data**: The device may receive satellite orbit parameters (ephemeris) to assist with timing and frequency pre-correction, reducing the burden on the satellite.
### Release 18 and Beyond
3GPP Release 18 (5G Advanced, Stage 3 frozen 2024) extended NTN support with improvements to IoT-NTN (for low-power devices), enhanced mobility between terrestrial and satellite cells, and reduced-capability (RedCap) NTN device profiles. These extensions are relevant for future generations of Direct-to-Cell services that may provide higher throughput or more seamless integration with terrestrial networks.
---
## What Satellite Connectivity Can and Cannot Do Today
Current Direct-to-Cell implementations — both Apple's and Starlink's — operate under structural constraints that define what is realistically possible.
### What It Can Do
- **Emergency messaging**: Apple Emergency SOS via satellite delivers structured emergency messages to emergency services in supported countries.
- **Location sharing**: Find My via satellite shares GPS coordinates with trusted contacts without cellular or Wi-Fi.
- **SMS (Starlink phase 1)**: Standard SMS text messages to and from any phone number, via carrier partners that have enabled the service.
### What It Cannot Do
- **Voice calls**: As of publication, no current mass-market Direct-to-Cell implementation supports standard voice calls in a no-coverage area on an unmodified smartphone. (Legacy satellite phone services such as Iridium support voice, but require dedicated devices.)
- **Mobile data / internet access**: Browsing, app use, streaming, and VoIP over a satellite data connection are not available in current phases.
- **Indoor use**: All current implementations require a clear sky view. The satellite signal does not penetrate building materials.
- **Real-time communication**: The structured, compressed message flow used in emergency satellite messaging is not equivalent to a real-time text conversation. Latency and bandwidth constraints mean that the experience is fundamentally different from cellular SMS.
- **Roaming SIM compatibility**: Satellite connectivity currently works through specific carrier agreements. A SIM from a carrier without a Direct to Cell partnership will not register on the satellite, even if the device hardware supports it. See [International Roaming Explained](/en/guides/international-roaming/) for how carrier agreements govern network access in general.
---
## Device and Region Availability
Availability of Direct-to-Cell satellite connectivity is governed by three independent variables: hardware, carrier, and country.
### Hardware
**Apple Emergency SOS via satellite** requires:
- iPhone 14 or later (includes the Qualcomm-based modem and custom Apple RF hardware that enable the Globalstar band n53 satellite link)
- iOS 16.0 or later for the initial Emergency SOS feature
- iOS 17.0 or later for Find My via satellite and Roadside Assistance via Satellite
**Starlink Direct to Cell** is designed for:
- Any LTE-capable smartphone supporting the relevant LTE band
- No hardware modification required — the feature works through existing radio hardware if the carrier enables it
### Carrier
Both services require an active carrier relationship. Apple's Emergency SOS via satellite is operated by Apple directly through its Globalstar partnership — subscribers do not need a carrier agreement because emergency services bypass normal carrier billing. Starlink Direct to Cell requires the subscriber's home carrier to have a Direct to Cell partnership with SpaceX. A SIM from a carrier without this agreement will not connect.
### Country / Regulatory Approval
Satellite spectrum use requires regulatory approval in each country. SpaceX must obtain national regulatory clearance for Starlink Direct to Cell in each market. Apple's Emergency SOS via satellite availability is similarly country-specific. Both providers publish current country lists that should be verified before relying on satellite connectivity for a specific destination. Country lists change as approvals are granted.
---
## Satellite Connectivity vs. No Service on a Terrestrial Network
Satellite Direct-to-Cell is specifically designed for situations where [no terrestrial network signal is available](/en/guides/no-service/). Understanding the difference matters for setting expectations.
When your phone shows "No Service" in a remote area, it means no terrestrial cell tower is within range. Satellite connectivity fills this gap — but only within the capability scope described above (emergency messaging, SMS via participating carrier, and future phases).
Satellite connectivity is not a substitute for choosing [how to stay connected abroad](/en/guides/four-options/). If you are traveling internationally and your home SIM has no roaming agreement in the destination country, satellite messaging (if available via your carrier) may be the only connectivity option in rural or remote areas. But in areas with any terrestrial coverage, a local SIM or travel eSIM will always provide more capability than satellite messaging.
For travelers using [dual SIM configurations](/en/guides/dual-sim-for-travel/), satellite connectivity (if supported by the home carrier) could serve as a backstop on the home SIM while a travel eSIM handles regular data. In practice, satellite emergency messaging works without a data connection on the travel SIM.
---
## Limitations and Practical Expectations
Several structural limitations apply to all current satellite-to-phone implementations and are worth stating plainly.
**Satellite connectivity is not always-on.** In current NTN implementations, the phone does not maintain a permanent satellite connection. The satellite link is established when needed (for an emergency message, for example) and requires pointing toward a visible satellite. In areas with dense obstructions, this may take longer or fail.
**Bandwidth is narrow.** The satellite link in current implementations is designed for short messages, not continuous data streams. Emergency SOS via satellite compresses structured responses into a small number of bytes. Starlink Direct to Cell SMS operates at SMS data volumes. Neither provides broadband connectivity.
**Latency is higher than terrestrial cellular.** For LEO at ~600 km, one-way propagation delay is approximately 2 ms, giving a round-trip of roughly 4 ms at zenith; this rises with lower satellite elevation angles. Both figures are small by GEO standards but still higher than typical terrestrial LTE latency of under 1 ms in good conditions. For emergency messaging, this is irrelevant. For any real-time application (voice, video, live messaging), it becomes a constraint.
**Service continuity depends on the satellite's pass.** A LEO satellite at ~600 km altitude has a horizon-to-horizon pass duration of approximately 10–15 minutes over a fixed point on the ground. Continuous connectivity requires either a dense enough constellation that another satellite is always in view (as Starlink is designed to provide) or a session model that completes the transaction within a single pass.
**Feature availability is expanding.** Both Apple and SpaceX have disclosed roadmaps for additional capabilities. What satellite connectivity can do in 12 or 24 months from publication will likely be broader than what it can do today. This guide describes verifiable, currently launched capabilities only.
---
## What This Means for SIM and Plan Choice
Satellite connectivity does not yet change the fundamentals of choosing a SIM or plan for everyday use. The factors covered in [What Is a SIM Card?](/en/guides/what-is-sim/) — authentication, carrier agreements, network coverage — still determine whether your phone works in a given location.
For most users, satellite connectivity is a safety net for rare situations: emergencies in remote areas, SMS in a dead zone via a participating carrier. It does not affect the daily calculus of which plan to buy, how much data you need, or whether a local SIM makes sense for a trip abroad.
Where satellite connectivity does matter for plan choice:
- If you travel frequently to remote areas (backcountry, offshore, rural), an iPhone 14+ on a carrier with Emergency SOS via satellite in your destination country provides meaningful safety coverage that no terrestrial plan can replicate.
- If your home carrier has a Starlink Direct to Cell agreement, the ability to send and receive SMS in a dead zone is available without buying any additional device or subscription.
- If you are evaluating carriers for a plan and your carrier does not have a Direct to Cell agreement, this is a differentiating feature to compare — particularly if you spend time in areas with partial or no terrestrial coverage.
Use [SimFinder](/en/) to compare plans by carrier and country, including network coverage data.
---
## FAQ
See the frontmatter for structured FAQ entries compatible with schema.org/FAQPage.
**When did satellite-to-phone connectivity become available on consumer smartphones?**
Apple Emergency SOS via satellite launched commercially on November 15, 2022, for iPhone 14 models in the United States and Canada. This was the first mass-market satellite connectivity feature on a standard consumer smartphone. The service reached additional countries through 2023 and 2024.
**How is Direct-to-Cell different from a satellite phone service like Iridium?**
Traditional satellite phone services such as Iridium require a dedicated handset with a proprietary satellite modem and a large, external antenna. They operate on their own networks and require separate subscriptions. Direct-to-Cell uses standard LTE (Starlink's approach) or a Qualcomm-based modem with custom Apple RF hardware (in Apple's case) built into a regular smartphone, and is designed to work without any additional equipment. The tradeoff is capability: current Direct-to-Cell services support only messaging (and emergency messaging), while dedicated satellite phones support voice calls.
**Will satellite connectivity replace terrestrial mobile networks?**
No. LEO satellite constellations have finite channel capacity that is shared across all users on a beam footprint. Terrestrial cellular networks — with densely deployed base stations — provide far greater per-user throughput and lower latency. Satellite NTN is designed for coverage extension in areas where terrestrial infrastructure is absent, not to replace it where it exists.
**What does "3GPP NTN Release 17" mean in practice?**
3GPP Release 17 is the specification that allows standard LTE and 5G NR protocols to be adapted for satellite links. In practice it means that a phone's existing LTE radio hardware can — if the carrier and satellite operator implement it — communicate with a satellite using the same protocol stack as a ground cell tower, with adjustments for timing and Doppler. This is what enables Direct-to-Cell to work with unmodified handsets on the Starlink network, rather than requiring dedicated satellite modems in every phone.
---
## Related Guides
- [International Roaming Explained](/en/guides/international-roaming/) — How carrier agreements govern network access when you cross borders, including what happens in areas with no terrestrial coverage
- [No Service: Why Your Phone Has No Signal and How to Fix It](/en/guides/no-service/) — Diagnosing and resolving loss of signal, and when satellite connectivity is the only fallback
- [4 Ways to Stay Connected Abroad](/en/guides/four-options/) — Full comparison of roaming, local SIM, travel eSIM, and satellite options for international travel
- [What Is a SIM Card?](/en/guides/what-is-sim/) — How IMSI and carrier authentication work — the foundation that satellite carrier agreements build on
- [Using Dual SIM for Travel](/en/guides/dual-sim-for-travel/) — How to combine a travel eSIM with your home SIM, including how satellite emergency coverage interacts with a dual-SIM setup
================================================================================
# Data-Saving Techniques — iPhone and Android App Settings That Cut Mobile Data Use
URL: https://sim-finder.com/en/guides/save-data/
Type: guides (en)
Published: 2026-04-22
The biggest data drains on most phones are video quality settings and background activity you never chose to turn on. Fixing those two areas can cut monthly data consumption by 30–60% without changing how you use your phone day-to-day.
This guide covers the practical settings across iOS and Android — plus the major streaming, audio, and social apps — that have the largest impact. For background on how much data specific apps consume, see the companion article [How Much Mobile Data Do You Need?](/en/guides/data-usage-guide/).
---
## Data-Saving Strategy: Measure First, Target the Biggest Sources
Before touching any settings, check where your data actually goes. Changing the wrong settings costs you effort for minimal gain.
**On iPhone (as of publication):**
Settings → Mobile Data (or Cellular) → scroll down. You will see cumulative data used per app since the last reset. Tap **Reset Statistics** at the start of each billing cycle so the numbers reflect the current month.
**On Android (stock Android, as of publication):**
Settings → Network & Internet → Data Usage. Select your SIM, set the date range to match your billing cycle, and view per-app consumption sorted by highest first.
Once you know which apps are consuming the most, the rest of this guide helps you address them in order of impact. Video streaming apps are almost always at the top.
---
## OS-Level Settings: Low Data Mode (iOS) and Data Saver (Android)
These system-wide settings are the fastest way to reduce background data consumption across all apps at once.
### iOS: Low Data Mode
**As of publication**, Low Data Mode is available on iOS 13 and later.
To enable it for cellular: **Settings → Cellular → Cellular Data Options → Data Mode → Low Data Mode** (toggle on).
If you use a dual-SIM setup, each line has its own Low Data Mode toggle. You can enable it for one SIM while leaving it off for another — useful if one line has a limited data plan and the other does not.
What Low Data Mode does:
- Signals apps to reduce background network activity
- Pauses automatic iCloud Photo syncing over cellular
- Reduces background fetch in Mail, News, and other system apps
- Prevents automatic app updates over cellular
What it does not do: it does not block apps from using data when you are actively using them, and not all third-party apps implement the signal.
You can also enable Low Data Mode for **Wi-Fi** separately (Settings → Wi-Fi → tap the network name → Low Data Mode). This is useful on metered or capped Wi-Fi connections.
### Android: Data Saver
**As of publication**, on stock Android (Pixel phones): **Settings → Network & Internet → Data Saver**.
On Samsung Galaxy devices, the path may differ: **Settings → Connections → Data Usage → Data Saver**.
What Data Saver does:
- Blocks background data for all apps unless individually whitelisted
- Apps can still use data when you are actively in the foreground
- Notifications from apps that require background data (e.g., some messaging apps) may be delayed
To whitelist an app that needs background data (for example, a messaging app you need to receive notifications from): go into Data Saver settings and find the **Unrestricted data** or **Allow app while Data Saver on** option.
### Android: Per-App Mobile Data Restriction
Beyond Data Saver, you can restrict individual apps from using mobile data entirely.
**As of publication** on stock Android: **Settings → Network & Internet → Data Usage → tap the app → toggle off "Mobile data"**. The app will only connect to the internet when Wi-Fi is available.
This is a harder restriction than Data Saver — the app gets no cellular data at all, even in the foreground. Reserve this for apps you only want to use on Wi-Fi (large download managers, backup apps, etc.).
### Android: Data Usage Warning and Limit
Stock Android lets you set a data warning and a data limit for a billing cycle.
Settings → Network & Internet → Data Usage → (SIM name) → **Data warning & limit**.
- **Data warning**: you receive a notification when you reach the specified amount
- **Data limit**: the phone cuts off all mobile data when the limit is reached
Set the limit slightly below your plan's included data to avoid overage charges. Note that carrier apps typically show more accurate remaining data figures than the OS counter, as system measurements do not always account for carrier promotions or rollover data.
---
## Video Apps: YouTube, Netflix, Amazon Prime Video, TikTok
Video is the dominant data consumer on most phones. Quality settings are the most impactful change you can make.
### YouTube
YouTube defaults to **Auto** quality, which selects the highest resolution the connection supports — often 720p or 1080p on a strong 4G/5G signal. On a limited data plan, this can consume 1.2–3.0 GB per hour.
**To set a data-saving default (as of publication):**
YouTube app → profile icon → Settings → Video Quality Preferences → **Mobile networks** → set to **Data saver (lower picture quality)**.
On **Data saver**, YouTube selects a lower resolution (typically around 360p) regardless of connection speed. At 360p, estimated consumption drops to roughly 0.3–0.45 GB per hour, compared to approximately 1.2–1.8 GB at 720p — a reduction of around 75%.
You can also change quality on a per-video basis by tapping the three-dot menu → Quality while a video is playing.
### Netflix
Netflix provides dedicated mobile data controls in its app.
**As of publication:** Netflix app → profile icon → App Settings → **Video Playback** → **Mobile Data Usage** (or **Cellular Data Usage** on some versions).
Options:
- **Automatic**: approximately 1 GB per 4 hours of viewing
- **Save Data**: approximately 1 GB per 6 hours of viewing
- **Maximum Data**: highest quality, consumes significantly more data
- **Wi-Fi Only**: prevents all streaming over cellular
Select **Save Data** to get the best tradeoff between data usage and video quality on a limited plan. You can still adjust quality per-title from the playback screen.
Netflix also allows **offline downloads** for mobile viewing. Download series episodes and films on Wi-Fi before leaving home to eliminate streaming data entirely. Downloads are available in the Netflix app for most (not all) titles depending on licensing.
### Amazon Prime Video
**As of publication:** Prime Video app → profile icon → Settings → **Stream & Download** (or similar path depending on app version) → **Streaming Quality** → set to **Good** or **Better** rather than **Best** for cellular use.
You can set separate quality levels for Wi-Fi and cellular. Setting cellular to **Good** (approximately equivalent to 480p) reduces consumption significantly versus **Best** (HD or higher).
Prime Video also supports offline downloads. Set download quality in **Download Quality** to **Good** to save storage space and keep file sizes manageable.
### TikTok
TikTok streams short videos continuously, which can consume 0.5–1.0 GB per hour at default settings.
**As of publication:** TikTok app → Profile → three-line menu (top right) → Settings and Privacy → **Data Saver** (toggle on).
Data Saver in TikTok reduces video quality and disables autoplay for some content. The exact reduction depends on your connection and content type.
Note: Screen Time Management (under Digital Wellbeing settings) limits total daily usage time and indirectly reduces data consumption, but it is a usage-time control rather than a data-quality setting.
---
## Audio Apps: Spotify, Apple Music, Podcasts
Audio consumes far less data than video, but streaming music all day still adds up. Downloading for offline use is the most effective strategy.
### Spotify
Spotify offers granular quality controls per connection type.
**As of publication:** Spotify app → profile picture → Settings and privacy → **Media Quality** → set **Cellular streaming** to **Normal** (approximately 96 kbps, ~43 MB/hour) or **Low** (approximately 24 kbps, ~11 MB/hour) rather than **High** (approximately 160 kbps, ~72 MB/hour) or **Very High** (approximately 320 kbps, ~144 MB/hour, Premium only).
Also in Settings → **Downloads**: enable **Only download over Wi-Fi** to prevent accidental large downloads on cellular.
For maximum data savings: use Spotify's **Download** feature (Premium) to save playlists and albums offline over Wi-Fi. Once downloaded, music plays with zero streaming data.
**Data Saver mode** is also available: Settings and privacy → Data Saver → toggle on. This reduces streaming quality and disables Canvas (animated art) and other visual elements. It does not affect offline playback.
### Apple Music
**As of publication (iOS 18 and later):** Settings → Apps → Music → **Audio Quality** → set **Cellular Streaming** to **High Efficiency** rather than **High Quality** or **Lossless**. On earlier iOS versions, the path is Settings → Music → Cellular Data.
Hi-Res Lossless (24-bit/192 kHz) can consume significantly more data than standard High Quality. Unless you are connected to high-quality audio equipment, the difference is inaudible on typical mobile headphones.
Download playlists and albums over Wi-Fi for offline listening: tap the download icon (cloud with downward arrow) on any playlist, album, or song.
### Apple Podcasts and Other Podcast Apps
**As of publication:** Settings → Apps → Podcasts → **Cellular Data** (iOS 18 and later; on earlier iOS: Settings → Podcasts → Cellular Data) — you can allow or disallow both streaming and downloads over cellular independently.
In the Podcasts app itself: Settings → **Downloads** → disable **Download Episodes on Cellular** to ensure new episodes only download on Wi-Fi.
Most other podcast apps (Overcast, Pocket Casts, etc.) have similar settings under Download or Network preferences.
---
## Social and Messaging Apps: Instagram, X, WhatsApp, Messenger
Social apps consume more data than most users expect, because they autoplay video in feeds and preload upcoming content in the background.
### Instagram
Instagram autoplays Reels and Stories videos in the feed, which accounts for most of its data consumption. Browsing can use approximately 0.3–1.0 GB per hour depending on how video-heavy the content is.
**As of publication:** Instagram app → profile icon → three-line menu → Settings and privacy → **Data usage and media quality** → toggle **Use less mobile data** on.
This reduces video quality in the feed when on cellular. Instagram does not provide a numerical quality setting — it is a binary toggle.
### X (formerly Twitter)
X autoplays videos in the timeline. Text-heavy browsing uses roughly 100–200 MB per hour, but video-heavy sessions can use significantly more.
**As of publication:** X app → profile icon → Settings and Support → Settings and privacy → **Accessibility, display, and languages** → **Data usage** → set **Video autoplay** to **Never** or **Wi-Fi only**.
Disabling autoplay stops videos from loading until you tap them, which eliminates most incidental video data consumption on X.
### WhatsApp
WhatsApp's main data cost comes from automatic media downloads. Voice and text messages use very little data — text messages use negligible amounts, and voice calls use approximately 15–50 MB per hour.
**As of publication:** WhatsApp → Settings → Storage and Data → **Media auto-download** → under "When using mobile data", set Photos, Audio, Videos, and Documents to **Never** or limit to Photos only.
This prevents WhatsApp from automatically downloading large files (videos especially) to your camera roll when you receive them in chats.
You can also reduce call quality: Settings → Storage and Data → **Use less data for calls** (toggle on). This reduces audio quality slightly but cuts call data consumption.
### Facebook Messenger and Other Messaging Apps
Most messaging apps have similar media auto-download controls. In Messenger: profile icon → Phone/Data → **Data Saver** (toggle on). This stops automatic video and GIF playback in chat and reduces media auto-download.
---
## Stop Unnecessary Background Activity
Several background processes consume data without any direct user action.
### iOS: Disable Automatic App Updates Over Cellular
**As of publication:** Settings → App Store → under **Automatic Downloads**, turn off **App Updates**.
iOS major updates range from 3–5 GB; app updates vary from tens of MB to several hundred MB each. Keeping these Wi-Fi-only prevents unexpected large downloads on a limited plan.
Also turn off: **Apps** (prevents automatic re-download of apps from iCloud) and optionally **App Downloads** if you prefer to manually trigger all installs.
### Android: Disable Automatic App Updates Over Mobile Data
**As of publication (Google Play Store):** Play Store app → profile icon → Settings → Network preferences → **Auto-update apps** → select **Over Wi-Fi only**.
### iOS: Restrict iCloud Photo Sync to Wi-Fi
If you use iCloud Photos, your camera roll uploads to iCloud continuously. On a busy day with many photos or videos, this can consume significant data.
**As of publication:** Settings → Photos → **Mobile Data** → toggle off to block all cellular syncing, or leave on and disable **Unlimited Updates** to prevent iCloud from uploading large batches of photos and videos over cellular in the background.
### Android: Google Photos / Backup Settings
**As of publication:** Google Photos app → profile icon → Photos settings → Backup → **Backup over mobile data** → toggle off (or set a size limit for videos).
### iOS: Background App Refresh
**As of publication:** Settings → General → **Background App Refresh** → set to **Off** or **Wi-Fi** instead of **Wi-Fi & Mobile Data**.
You can also control this per-app: scroll down in the same screen to see individual toggles. Disable Background App Refresh for apps that do not need to stay current (games, utilities, less-used social apps) and keep it enabled for apps where fresh content matters (calendar, email, navigation).
### Analytics and Diagnostics
**On iPhone:** Settings → Privacy & Security → Analytics & Improvements → turn off **Share iPhone Analytics** and **Share iCloud Analytics**. These periodically send usage data to Apple and may consume small amounts of data on cellular.
**On Android:** Settings → Privacy → **Usage & diagnostics** → toggle off. Location: may vary by manufacturer.
---
## Wi-Fi Strategy and Pre-Downloading
The most reliable way to reduce mobile data consumption is to complete data-heavy tasks before leaving a Wi-Fi network.
### Pre-Download Before You Leave
- **Netflix**: download episodes and films from the app on home Wi-Fi the night before travel
- **Spotify**: download playlists and podcasts for the commute or journey
- **YouTube Premium**: download videos for offline viewing
- **Maps**: download offline map areas in Google Maps (tap your profile icon → Offline maps → Select your own map) or Apple Maps (search an area → tap the location name → Download)
Downloaded content consumes zero mobile data during playback or navigation.
### Trust Known Wi-Fi Networks
On both iOS and Android, you can configure your device to automatically connect to saved Wi-Fi networks. When you are on a trusted network, data-intensive tasks (backups, updates, large file transfers) happen automatically without touching your mobile data.
**Caution**: avoid performing sensitive tasks (banking, email with attachments, large file transfers) on public Wi-Fi without a VPN. If you use public Wi-Fi frequently while traveling, consider a VPN. For more on travel connectivity options, see [The Four Ways to Get Data Abroad](/en/guides/four-options/).
### Set Apps to Wi-Fi-Only for Heavy Tasks
Many apps let you restrict heavy operations to Wi-Fi:
- **Dropbox / Google Drive / OneDrive**: set sync and camera backup to Wi-Fi only in each app's settings
- **Podcast apps**: download new episodes on Wi-Fi only
- **Cloud storage apps**: disable automatic photo uploads over cellular
If you are planning an international trip and want to understand how eSIM options compare to roaming or pocket Wi-Fi, the [first-time buyer's guide](/en/guides/first-time-guide/) walks through what to look for. If you are unfamiliar with the technology itself, [What Is an eSIM?](/en/guides/what-is-esim/) covers how it works and which phones support it.
---
## Monitor Your Usage
Knowing your consumption pattern helps you decide whether your current plan is right-sized, or whether specific data-saving measures are working. For a detailed explanation of typical app consumption figures, refer to [How Much Mobile Data Do You Need?](/en/guides/data-usage-guide/).
### iPhone: Monthly Tracking
Settings → Mobile Data → scroll to the bottom → **Reset Statistics**. Do this on the same day each month (or match your billing cycle start date). After a month, return to the same screen to see total cellular usage and per-app breakdown.
Notable limitation: iPhone statistics show cumulative data and do not reset automatically. You must reset them manually to get a per-month view.
### Android: Usage Period and Warnings
Settings → Network & Internet → Data Usage → (SIM card) → you can set a **Billing cycle** start date, a **Data warning** threshold, and a **Data limit**. Android will notify you when you reach the warning level and (optionally) cut data when you hit the limit.
### Carrier Apps
Most carriers have official apps that show real-time remaining data for the current billing period. These tend to be more accurate than OS-level counters because they are sourced from the carrier's billing system, which accounts for rollover data, bonus data, and promotional allowances that the phone's own counter does not know about.
### Third-Party Usage Monitors
If you want more granular visibility, apps like My Data Manager (iOS and Android) provide per-session tracking and alerting. However, be aware that third-party data monitors require a VPN permission to intercept traffic for measurement purposes, which introduces its own tradeoffs.
---
## Related Guides
If this guide raised questions about which plan type suits you, or how to get data when traveling:
- [How Much Mobile Data Do You Need?](/en/guides/data-usage-guide/) — per-app consumption figures and a method to estimate your monthly needs
- [What Is an eSIM?](/en/guides/what-is-esim/) — how eSIM technology works, and which phones support it
- [The Four Ways to Get Data Abroad](/en/guides/four-options/) — roaming, local SIM, travel eSIM, and pocket Wi-Fi compared
- [First-Time Buyer's Guide to Travel eSIMs](/en/guides/first-time-guide/) — what to look for when buying your first travel eSIM
- [Mobile Terms Glossary](/en/guides/glossary-index/) — definitions for technical terms used across these guides
---
## FAQ
See the FAQ items in the frontmatter above for structured answers to common questions. Additional context below.
**Q: Does using 5G consume more data than 4G LTE?**
Not inherently — 5G does not use more data than 4G for the same task. However, a faster connection means apps may default to higher-quality streams (for example, YouTube's auto-quality algorithm may select 4K on a strong 5G signal rather than 720p on 4G). The data-saving settings in this guide apply regardless of connection type.
**Q: My plan is marketed as "unlimited." Do I still need to save data?**
Possibly. Many unlimited plans apply speed throttling after a defined high-speed threshold (often in the range of a few GB to tens of GB per month, depending on the carrier and plan tier). After that threshold, speeds may drop to levels that make video streaming impractical. Check your plan's terms for the specific fair-use or speed management policy. For a breakdown of what "unlimited" typically means in practice, the [glossary](/en/guides/glossary-index/) covers throttling and fair-use policies.
**Q: Is there a way to see exactly which app downloaded what, and when?**
iOS does not provide a per-session log in the native data usage screen — only cumulative totals. Android's built-in Data Usage screen shows totals per app over a selected period but not individual download events. For that level of detail, a dedicated data monitoring app is required (see the Third-Party Usage Monitors section above).
================================================================================
# How to Insert and Remove a SIM Card
URL: https://sim-finder.com/en/guides/sim-insertion/
Type: guides (en)
Published: 2026-06-04
Inserting a SIM card correctly takes less than a minute, but incorrect orientation or skipping the power-off step can leave you with a "No SIM" error or a bent tray. The physical SIM card — a Nano-SIM in nearly all current devices — must be inserted in the correct direction, with gold contacts facing the right way and the notched corner aligned to the tray's matching cutout. This guide covers the complete process: opening the tray, reading the orientation notch, loading single and dual-SIM trays on iPhone and Android, confirming the card is recognised, and what to do when things go wrong.
Key points covered:
- How to eject the tray safely with a SIM pin or paperclip
- How to read the notched-corner orientation on any SIM card or tray
- iPhone and Android insertion sequences, including dual-SIM trays
- How to confirm recognition and trigger network registration
- What to check if the tray won't open or the SIM is not detected
For background on what a SIM card stores and how it works, see [What Is a SIM Card?](/en/guides/what-is-sim/) If you are deciding between a physical SIM and an eSIM, [Physical SIM vs eSIM](/en/guides/sim-vs-esim/) compares activation, profile storage, and travel use.
---
## What You Need Before You Start
You need three things before opening the tray:
1. **A SIM card** — Nano-SIM (4FF, 12.3 × 8.8 × 0.67 mm) in almost all cases. This has been the standard for smartphones since 2012. If you are unsure of the size your device requires, check the manufacturer's specification page or inspect the slot shape in the tray from the previous SIM.
2. **A SIM eject pin** — most boxed smartphones include one in the packaging. A straightened standard paper clip also works. Do not use a sewing needle or any tool with a tapered tip that could score the ejection hole.
3. **A clean, flat surface** — SIM trays and cards are small. Working over a table prevents loss.
If the device is on, power it off before proceeding. Manufacturers including Apple recommend this to allow the modem to shut down cleanly and avoid file system activity on the SIM when it is physically displaced.
**Check for SIM lock before inserting a different carrier's SIM.** If you are inserting a SIM from a different carrier than the one the device was originally set up with, the device must be unlocked (SIM-free) to accept it. A SIM-locked device will reject SIMs from other carriers with an "Invalid SIM" or similar error. If you are inserting your existing carrier's SIM into a new device — or re-inserting after a reset — SIM lock is not a concern. For details on how to check lock status and request an unlock, see [Physical SIM vs eSIM](/en/guides/sim-vs-esim/).
**Deciding between physical SIM and eSIM:** If your device supports eSIM, you have the option to activate a carrier line without inserting any physical card. This is often faster for travel SIMs and for carriers that support remote provisioning. See [Physical SIM vs eSIM](/en/guides/sim-vs-esim/) for a full comparison to help decide which is the better option for your situation.
---
## How to Open the SIM Tray
The SIM tray sits in a slot on the side of the device — on current iPhones (iPhone 12 and later) it is on the left side; older models were on the right — confirm for your specific model. On Android the tray is on the right or left side depending on the manufacturer and model. Beside the slot is a circular ejection hole, approximately 0.8 mm in diameter.
**To open the tray:**
1. Hold the device with the ejection hole visible and accessible.
2. Insert the SIM pin or straightened paper clip straight into the hole — not at an angle.
3. Apply light, steady pressure until you feel a soft click and the tray springs out a few millimetres.
4. Pull the tray out fully with your fingertips.
The mechanism is spring-loaded and requires only light pressure — roughly the force of pressing a ballpoint pen tip. If the tray does not move with moderate straight pressure, stop. Forcing it can bend the internal spring or the tray. See the troubleshooting section below for alternatives.
**After the tray is out:** Keep the tray in view at all times once you remove it. Trays are small and easy to lose. Place it on a flat surface directly in front of you while working with the SIM card. If the tray falls and you cannot find it, contact the device manufacturer or a third-party parts supplier — SIM trays are available as replacement parts for most major phone models.
**If the tray won't open:** Confirm the pin is entering straight and that no protective case is covering or misaligning the ejection hole. Remove any case completely before trying again. If the hole is visibly obstructed by lint or debris, use a wooden toothpick to clear it before inserting the pin. If the tray still does not release with moderate straight pressure, take the device to an authorised repair centre rather than applying more force — a broken spring requires a tray replacement.
---
## Reading the SIM Card Orientation
Every SIM card has one corner cut at an angle — the **orientation notch**. The tray has a matching cutout in the same position. These features ensure the card can only be inserted one way.
**Before placing the card:**
- Identify which corner has the notch.
- Locate the matching notch cutout in the tray.
- Align the two: the notched corner of the SIM goes into the cutout corner of the tray.
Follow the tray's printed silhouette and the notch alignment, which ensures correct seating regardless of contact direction. Confirm the card lies flat and flush in the tray recess before sliding it back in.
If the card does not sit flush without any force, it is in the wrong orientation. Flip it or rotate it 180 degrees and try again. Never press a card that is not correctly seated — this can bend the contacts or crack the card.
**The notch is the same regardless of size.** The orientation notch is present on all physical SIM sizes — Mini-SIM (2FF), Micro-SIM (3FF), and Nano-SIM (4FF). The chip area and contact pad arrangement are the same across all three sizes; only the surrounding plastic frame changes. If you are transitioning from an older device that used Micro-SIM, the notch orientation logic is identical on the smaller Nano-SIM.
**Trays with a diagram:** Many device trays have a small printed silhouette showing the correct card orientation. If your tray has one, match the card to the diagram. This is the fastest orientation check available and eliminates guesswork.
---
## Inserting a SIM on iPhone
Apple has used a Nano-SIM slot on iPhones since the iPhone 5 (2012). The procedure is the same across all models with a physical SIM slot; on current iPhones (iPhone 12 and later) the tray is on the left side of the device — older models were on the right, so confirm for your specific model.
**Steps:**
1. Power off the iPhone (hold side button + volume button → slide to power off, or Settings → General → Shut Down).
2. Locate the SIM tray — on the left side on current iPhones (iPhone 12 and later); older models were on the right. It has a small circular ejection hole.
3. Insert the SIM pin into the ejection hole and press gently until the tray ejects.
4. Pull the tray out fully.
5. Place the Nano-SIM in the tray following the tray's printed silhouette and aligning the notched corner with the tray cutout.
6. Slide the tray back into the device in the same orientation it came out — there is only one correct direction. Do not force it.
7. Press in until the tray sits flush with the device body.
8. Power the iPhone on.
After startup, the carrier name and signal bars appear in the status bar within a few seconds to one minute once network registration succeeds. On the iPhone, a "No SIM" alert at startup means the tray is not fully seated — press it in until flush and restart.
**Note on eSIM-only models:** iPhone 14 models sold in the United States do not have a physical SIM slot — they are eSIM-only. If your iPhone has no visible tray, it is a US iPhone 14 or later model. See [Physical SIM vs eSIM](/en/guides/sim-vs-esim/) for activation options.
**Note on dual SIM on iPhone:** iPhone models from iPhone XS (2018) onward support one physical SIM and one eSIM simultaneously. This is implemented as DSDS (Dual SIM Dual Standby) — both lines can receive calls and messages, but only one line uses mobile data at a time. The physical SIM insertion process is the same whether you are using one line or both.
**If the tray slides in unevenly:** The SIM tray has a keyed profile that allows it to enter in one orientation only. If it does not slide back in smoothly, do not force it. Pull it back out, rotate 180 degrees, and try again. A tray pushed in with incorrect orientation can jam inside the slot.
---
## Inserting a SIM on Android
Android devices vary in tray location and orientation across manufacturers; the ejection mechanism is the same as on iPhone. Common locations include the upper-right side (many Pixel models), the left side (many Samsung Galaxy models), and the top edge on some older devices. If you cannot locate the tray, consult the device's quick-start guide or search the manufacturer's support site for your model name and "SIM tray location".
**Steps:**
1. Power off the device.
2. Locate the SIM tray and the ejection hole.
3. Eject the tray using the SIM pin or paper clip.
4. Note the tray orientation before inserting the card — some Android trays hold the card contacts-up (gold pads visible when you look down at the tray), others contacts-down. Many Android trays have a printed silhouette diagram showing the correct card direction. The recess is shaped to accept the SIM in one orientation only.
5. Place the Nano-SIM so the notched corner aligns with the tray cutout and the card lies flat.
6. Slide the tray back into the device in the correct orientation.
7. Power the device on.
After startup, look for the carrier name in the status bar. On Android you can also check **Settings → Network & Internet → SIMs** (Google Pixel) or **Settings → Connections → SIM card manager** (Samsung Galaxy) to confirm the SIM is detected. On Android, a notification "SIM card added" may appear when the SIM is detected at startup — this is a normal indication that the SIM registration process has begun.
**Note on first-time activation:** A brand-new SIM purchased from a carrier may not be active when you receive it. Activation can require calling the carrier's activation line, visiting a store, or completing a step on the carrier's website or app. If the SIM is correctly inserted but shows "No Service" and the carrier is not listed in the status bar, check whether the SIM still needs to be activated through your carrier's required activation process.
**Note on SIM card adapters on Android:** If you are using a SIM adapter (for example, placing a Nano-SIM into a Micro-SIM adapter frame for an older device), ensure the adapter and card are flush and stable before inserting the tray. A loose adapter can jam inside the slot. When in doubt, use the correct form factor for the device rather than an adapter.
---
## Dual-SIM Trays
Many Android phones and some iPhones support two SIMs simultaneously. Physical implementations vary.
**Single tray with two SIM recesses:** Some devices have one tray with two separate shaped recesses side by side or stacked. Insert each Nano-SIM into its respective recess with the correct orientation. After insertion, go to Settings to assign which SIM handles calls, SMS, and mobile data — on most devices, the primary SIM defaults to all functions and can be changed independently per function.
**Hybrid tray (SIM + microSD):** Some Android devices share one slot between a second SIM and a microSD card. The tray has two recesses of different sizes: the smaller for Nano-SIM, the larger for microSD. Check the device manual to confirm which is which before inserting — they are not always labelled on the tray itself.
**One physical SIM + eSIM:** Devices supporting one physical SIM and one eSIM do not have a second tray. Insert the physical card normally and configure the eSIM separately in Settings. For eSIM setup steps, see [Set Up eSIM with a Manual Code](/en/guides/manual-code/).
When both physical slots are used, label or note which slot is SIM 1 and SIM 2. The device assigns these slots fixed roles in Settings; swapping physical cards between slots may require reassigning data or call settings.
**Assigning data and call functions:** On a dual-SIM Android device, after both SIMs are inserted and detected, the first-time setup screen typically prompts you to assign which SIM handles mobile data and which handles calls. You can change this at any time in Settings → Network & Internet → SIMs (Pixel) or Settings → Connections → SIM Manager (Samsung). On iPhone with physical SIM + eSIM, the assignment is at Settings → Cellular → Default Voice Line and Default Mobile Data.
**Labelling SIMs:** When two physical SIMs are in use, Android allows you to assign a custom name to each line (for example, "Work" and "Personal"). Set these names at the time of first insertion so the correct line is selected when making calls or sending SMS. Mis-selecting the line when making international calls from a roaming SIM can result in unexpected charges.
---
## Confirming Recognition and Network Registration
After inserting the SIM and powering the device on, allow up to one minute for network registration to complete.
**Signs the SIM is recognised and active:**
- Carrier name is visible in the status bar
- Signal bars or a network-generation indicator (4G, 5G) appears
- Settings shows the SIM with the carrier name under the cellular or mobile network section
**If nothing appears after one minute:**
1. Toggle Airplane Mode on, wait five seconds, then off. This forces the modem to re-scan and re-register.
2. Restart the device.
3. Open Settings and navigate to the cellular or SIM section. If the SIM is listed but shows "No Service", the hardware is detecting the card but registration is failing — likely a coverage, activation, or APN issue rather than a physical problem.
4. If the SIM does not appear at all in Settings after restart, remove it, check orientation, clean the contacts with a dry cloth, and re-insert.
**When the SIM is detected but mobile data is not working:**
The carrier name and signal bars show that authentication succeeded. The most common remaining issue is an APN (Access Point Name) that has not been applied automatically. On Android, see [APN Setup Guide for Android](/en/guides/apn-setup-android/) for the manual setup path. On iPhone, go to Settings → Cellular → Cellular Data Network and verify the APN field matches your carrier's published APN string.
For a systematic fix if the status bar continues to show "No Service" after the steps above, see [No Service on Your Phone?](/en/guides/no-service/)
**SIM not recognised vs SIM not registered:** These are different failure modes. "No SIM" or an empty SIM slot in Settings means the hardware is not detecting the physical card — a tray, orientation, or contact issue. "No Service" with the SIM listed in Settings means the hardware detects the SIM but the network is not accepting registration — an activation, coverage, APN, or SIM-lock issue.
---
## Removal Precautions and Safe Storage
**Power off first.** Removing a SIM while the modem is active can cause write errors to the SIM's internal file system (contacts stored on SIM, PLMN preference list). Powering off is the manufacturer-recommended procedure.
**Do not touch the gold contact pads.** Oils and debris from fingers can impede the electrical connection between the SIM and the device's tray pins. Hold the card by its edges.
**Do not bend the card.** Nano-SIM is 0.67 mm thick and will crack if flexed. When removing from the tray, press up from the short edge rather than prying from the centre.
**Store removed SIMs immediately.** A SIM left loose on a desk is easily lost, scratched, or confused with another card. Place it in a SIM card holder, a small labelled envelope, or the original SIM packaging.
**Keep the SIM PIN in mind.** If you have enabled a SIM PIN on the outgoing SIM, that PIN is specific to that SIM card — it does not transfer to a replacement SIM. Write the PIN down before moving or storing the card, and request the PUK (Personal Unblocking Key) from your carrier if you ever need to unblock a locked SIM. The PUK is typically printed on the original SIM packaging. Entering the PUK incorrectly ten consecutive times permanently disables the SIM, so request a new one from your carrier rather than guessing.
**Do not leave the SIM slot exposed for extended periods.** The contact pins inside the slot can collect dust and lint, which may cause intermittent read failures. If you remove the SIM and do not intend to insert another card immediately, slide the empty tray back into the slot to protect the internal pins.
**Environment precautions.** Avoid inserting or removing a SIM in very humid environments or immediately after transitioning from a cold environment into a warm one. Condensation on the card or tray pins can cause temporary connection failures. If the device or SIM appears to have moisture on it, wait until both are dry before proceeding.
---
## FAQ
See the frontmatter above for structured FAQ entries (compatible with schema.org/FAQPage). Additional answers:
**Can I insert the SIM while the phone is on?**
Many devices tolerate SIM insertion during standby. However, device manufacturers recommend powering off before insertion or removal to avoid modem errors. Powering off first is the safest practice.
**The SIM tray came out but the SIM is stuck inside the slot — what do I do?**
Power off the device immediately. Do not insert any tool into the slot. Take the device to a manufacturer-authorised repair centre. Attempting extraction with a pin or clip risks damaging the internal contact pins.
**My carrier sent a multi-size punch-out card. Which size do I use?**
Push out the Nano-SIM — the smallest piece in the punch-out card. Almost all smartphones released after 2014 use Nano-SIM (12.3 × 8.8 mm). Verify your device's required size on the manufacturer's website before punching out any portion, as a punched card cannot be reassembled.
**After inserting the SIM, can I start using data immediately?**
Voice and SMS registration typically completes within seconds. Mobile data requires a working APN. On many devices the correct APN is applied automatically when the SIM is inserted. If data does not work after a few minutes, check the APN settings manually.
**How do I know if my SIM card is damaged?**
Signs of a damaged SIM include: the device does not detect the SIM at all, intermittent "No SIM" errors that come and go, and visible cracks or scratches across the gold contact pads. A chip that is scratched along the contacts may read inconsistently. If the card appears physically intact but the device still cannot detect it after trying in a second compatible device, the SIM's internal chip may have failed — contact your carrier for a replacement.
**Can I reuse my old SIM card in a new phone?**
Yes, as long as the form factor is compatible and the SIM has not been damaged. If your new phone uses Nano-SIM and your old SIM is also Nano-SIM, you can transfer it directly. If the form factors differ, ask your carrier for a free SIM replacement of the correct size — your number and account settings transfer automatically with a replacement SIM from the same carrier.
**What should I do with an old SIM card I no longer need?**
Do not throw a SIM card in general waste. The card stores subscriber credentials. Contact your carrier to formally deactivate the SIM before disposal. Once deactivated, the card can be disposed of as electronic waste according to your local recycling rules. Physically cutting the card before disposal adds a practical step against misuse.
---
## Related Guides
- [What Is a SIM Card?](/en/guides/what-is-sim/) — How a SIM works, size generations (1FF through Nano-SIM), and what IMSI and Ki do
- [Physical SIM vs eSIM](/en/guides/sim-vs-esim/) — Full comparison of physical SIM and eSIM for activation, switching carriers, travel, and device loss scenarios
- [APN Setup Guide for Android](/en/guides/apn-setup-android/) — How to configure mobile data settings on Android after inserting a SIM
- [No Service on Your Phone?](/en/guides/no-service/) — Step-by-step fix for "No Service" or zero-bar problems after SIM insertion
- [Set Up eSIM with a Manual Code](/en/guides/manual-code/) — eSIM activation by entering an SM-DP+ address manually, the fallback when QR scanning is unavailable
================================================================================
# SIM Lock and SIM-Free Explained: How to Check and Unlock Your Phone
URL: https://sim-finder.com/en/guides/sim-lock/
Type: guides (en)
Published: 2026-04-16
A SIM-locked phone only works with the carrier that sold it. Check your iPhone in three taps — Settings → General → About → Carrier Lock — or test an Android by inserting a different carrier's SIM. If your phone is locked, unlocking is free in many countries, though the exact steps and waiting periods vary by carrier and region.
---
## What SIM Lock and SIM-Free Mean
### SIM Lock (Carrier Lock)
A SIM-locked phone contains a software restriction that prevents it from connecting to any mobile network other than the one that applied the lock. The restriction is set by the carrier, not by the device hardware or any cellular standard. For example, a phone locked to Carrier A will reject SIM cards from Carrier B, C, or any travel eSIM from another provider.
Carriers historically used SIM locks to recoup the subsidy paid on devices sold below retail price on postpaid contracts. The economics have shifted in many markets — subsidised bundles are less common — but SIM locks still appear on devices sold by carriers in countries without a mandatory ban.
### SIM-Free (Unlocked)
An unlocked phone accepts any SIM card compatible with its supported radio frequencies. Buying travel eSIMs, swapping to a cheaper local SIM abroad, or switching carriers without buying a new device all require an unlocked phone. The term "SIM-free" is used primarily in the UK and parts of Europe; "unlocked" is the more common term in the US and globally.
### SIM Lock and eSIM
The lock applies to eSIMs as well as physical SIMs. A carrier-locked iPhone or Android phone may refuse to install or activate an eSIM profile from a different carrier. If you try to add a travel eSIM and receive an error during activation, the first thing to check is whether your phone is carrier-locked. The [eSIM activation troubleshooting guide](/en/guides/activation-failed/) covers the most common errors and their causes.
---
## How to Check Your Phone's Lock Status
### iPhone
Apple provides a built-in carrier lock status indicator in every iPhone. The check takes under a minute:
1. Open **Settings**
2. Tap **General**
3. Tap **About**
4. Scroll to find **Carrier Lock**
If the field reads **"No SIM restrictions"**, the phone is unlocked. Any other message — for example, a carrier name or "SIM locked" — indicates the phone is restricted to that carrier.
This check is available on all iPhones running modern iOS versions and is confirmed by Apple's official support page.
### Android
Android does not have a single unified carrier lock indicator across all manufacturers. There are two reliable methods:
**Method 1: Insert a different carrier's SIM card**
The most direct test. If calls and mobile data work normally with the new SIM, the phone is unlocked. If you see "SIM not supported," "Invalid SIM," or "No service" after inserting a valid SIM from a different carrier, the phone is locked.
**Method 2: Network operator scan (Pixel and stock Android)**
Go to Settings → Network & Internet → Mobile Network → Network Operators, then tap "Search networks." If multiple carriers appear in the results, the phone is likely unlocked — but the physical SIM test described above remains the most reliable confirmation.
**Samsung Galaxy**
Go to Settings → Connections → SIM card manager. Some Samsung models show a lock indicator there. The safest test remains inserting a different carrier's SIM.
**Finding your IMEI**
Dial `*#06#` from the phone app, or check Settings → About Phone → IMEI. The IMEI is required when requesting an unlock from a carrier.
---
## How SIM Lock Policy Varies by Region
### United States — No Unified Rule
The US has no federal regulation mandating SIM-free sales. Each carrier sets its own unlock policy. The main conditions as of early 2026:
| Carrier | Postpaid unlock | Prepaid unlock |
|---------|----------------|----------------|
| **Verizon** | Automatic once device payment plan is paid off | 365 days of paid active service required |
| **T-Mobile** | Devices bought from 27 Jan 2026: unlocked once paid. Devices bought before that date: unlock eligible after 40 days of active service | Varies by plan |
| **AT&T** | Must be at least 60 days from purchase; balance paid and account in good standing | At least 6 months of active service required |
Carrier unlock policies change. Check your carrier's current policy page before submitting a request.
### United Kingdom — Locked Sales Banned Since December 2021
Ofcom banned UK mobile operators from selling locked handsets from **17 December 2021**. Phones purchased after that date from EE, Vodafone, Three, O2, and Tesco Mobile are sold unlocked. Phones bought before that date may still carry a lock — contact the carrier to request a free unlock.
### European Union — Largely Unlocked in Practice
EU member states each set their own rules, but competitive market pressure means most new phones sold through carriers in France, Germany, and other EU countries are sold unlocked or with short lock periods. Some carriers in specific countries still apply brief lock periods on heavily subsidised contracts; check local regulations or the carrier's terms.
### Other Regions
Policies in Australia, Canada, South Korea, Japan, Singapore, and elsewhere vary considerably. As a general rule, a phone purchased directly from the device manufacturer (Apple Store, Samsung Store, Google Store) or from a retailer rather than a carrier is more likely to be unlocked. Always verify before buying a used phone internationally.
---
## How to Get Your Phone Unlocked
### US Carriers
Contact your carrier through their website, app, or customer service line and submit an unlock request. Most US carriers process eligible requests automatically within one to two business days. You will need your IMEI and account information. Once the unlock is applied, restart the phone with a different carrier's SIM inserted (for physical SIM locks) or attempt to add an eSIM from another provider.
The [best SIM plans for the US](/en/blog/best-sim-plans-usa-2026/) article covers carriers and plans available once your phone is unlocked.
### UK Carriers
If your phone was purchased before 17 December 2021, contact the carrier to request a free unlock. Processing times differ by carrier but are typically a few business days. Phones purchased after that date do not need an unlock request — they are already sold unlocked.
### Third-Party Unlock Services
Avoid paid third-party unlock services when the manufacturer or carrier provides a free official route. Official unlocks update the device's lock status on the carrier's servers; unofficial methods may not work on newer devices and can void warranties.
---
## Buying a Used Phone — What to Check
Used phones present additional risks because the SIM lock status and history may not be transparent.
### Verify Carrier Lock Status Before Buying
Use the iPhone settings check or Android SIM test described above. Do not rely solely on the seller's claim that the phone is "unlocked." On iPhones, the Settings → General → About → Carrier Lock screen is the definitive check.
### Check the IMEI Blacklist
Phones reported stolen, lost, or flagged for fraud may be added to carrier blacklists and blocked from activating on any network. Run the IMEI through a reputable IMEI check service before purchasing a used device.
### eSIM and Used Phones
On a used iPhone or Android, check whether a previous eSIM profile is still installed:
- **iPhone:** Settings → Cellular (or Mobile Service) — look for any active eSIM line
- **Android (Pixel):** Settings → Network & Internet → SIMs — check for any installed eSIM
A previous owner's eSIM profile on a phone can be deleted, but on some devices the eSIM slot may remain locked to the previous carrier if the device was not properly reset. Factory-resetting the phone before use is the safest approach when buying secondhand.
---
## SIM-Free Status and Traveling Internationally
Using a travel eSIM or a local SIM card at your destination requires an unlocked phone. If your phone is carrier-locked, neither a physical local SIM nor a travel eSIM from a third-party provider will activate.
For an overview of all the options for staying connected while traveling — including international roaming, travel eSIMs, local SIMs, and portable Wi-Fi — see [4 Ways to Stay Connected Abroad](/en/guides/four-options/).
If you have confirmed your phone is unlocked and want to set up a travel eSIM, [Your First Travel eSIM: Step-by-Step Guide](/en/guides/first-time-guide/) walks through the full process from purchase to first connection.
---
## Summary
- A SIM-locked phone only connects to the carrier network that applied the lock. The restriction is software-based and removable.
- Check lock status on iPhone via Settings → General → About → Carrier Lock ("No SIM restrictions" = unlocked).
- Check lock status on Android by inserting a SIM from a different carrier, or scanning available networks.
- The UK has banned the sale of locked handsets since 17 December 2021. US carriers apply their own individual unlock policies — most require the device payment to be paid off plus a minimum period of service.
- Travel eSIMs and local SIMs abroad require an unlocked phone. Unlock your device before your trip.
================================================================================
# SIM Card Not Detected? How to Fix It
URL: https://sim-finder.com/en/guides/sim-not-detected/
Type: guides (en)
Published: 2026-06-04
A "No SIM" or "Invalid SIM" error means your device cannot detect or authenticate the SIM card. In most cases, the fix takes less than two minutes: remove the SIM, check the orientation, clean the contacts, re-insert, and restart. This guide covers every fix in order from fastest to most involved — starting with the physical steps for a standard SIM card, then eSIM-specific steps, then network settings reset, and finally what to do when the issue requires carrier involvement.
Key points:
- "No SIM" (hardware cannot detect the card) and "Invalid SIM" (card detected but rejected) have different causes and different fixes
- Testing the SIM in a second device isolates whether the problem is the SIM or the phone
- eSIM "No SIM" errors are caused by a disabled line or a carrier activation issue, not a physical contact problem
---
## Understand the Error Before You Start
Two distinct error messages appear when a SIM is not working. Identifying which one you see determines where to begin.
**"No SIM" / "No SIM Card Installed"**
The device modem cannot detect any SIM card in the slot. This is a hardware-level failure: the electrical contact between the SIM's gold pads and the tray pins is not being made. Causes include incorrect orientation, a partially ejected tray, debris on the contacts, or a damaged SIM or tray.
**"Invalid SIM" / "SIM Not Supported" / "SIM Failure"**
The modem detects a card but cannot authenticate or accept it. The physical connection is working. Causes include carrier lock (the device is locked to a different carrier), an unactivated SIM that has never been provisioned by the carrier, or a SIM that has been damaged in a way that corrupts the stored credentials.
For a physical SIM: start with [Reseat and Inspect the SIM Card](#reseat-and-inspect-the-sim-card) below.
For an eSIM showing "No SIM": jump to [eSIM-Specific Steps](#esim-specific-steps).
For "Invalid SIM": skip to [Invalid SIM Errors](#invalid-sim-errors).
---
## Reseat and Inspect the SIM Card
The most common cause of "No SIM" is that the SIM card is not making a solid electrical contact with the tray pins. Reseating corrects this in most cases.
**Step 1: Power the device off completely.**
It is good practice to power off first; removing a SIM while the modem is active can cause registration errors. This step is recommended, not mandatory, but skipping it occasionally leads to the device failing to detect the SIM until restarted.
**Step 2: Eject the tray.**
Insert the SIM ejection pin (or a straightened paperclip) straight into the ejection hole — not at an angle. Apply light, steady pressure until you feel the spring release and the tray ejects a few millimetres. Pull the tray out fully with your fingertips.
**Step 3: Remove the SIM and inspect it.**
Pick up the SIM card by its edges only — do not touch the gold contact pads. Look at the gold pads under a light source. Check for:
- Visible dust, lint, or debris in the pad area
- Scratches running across the contact pads
- Cracks in the plastic body or the chip area
If the pads are clean and the card shows no physical damage, proceed to the orientation check. If there is visible debris, clean it first (see next section).
**Step 4: Check the orientation.**
Every SIM card has one corner cut at an angle — the orientation notch. The tray has a matching cutout in the same position. The card can only be inserted correctly when the notched corner aligns with the cutout. The tray also carries a printed silhouette on many devices: match the card to that diagram. If there is no diagram, align the notched corner with the notched corner of the tray recess.
Lay the SIM flat in the tray recess. It should sit flush and level without any pressure. If it does not sit flush, it is in the wrong orientation — flip or rotate it and try again. Never press a card that is not correctly seated.
For a full illustrated explanation of SIM orientation and tray mechanics, see [How to Insert and Remove a SIM Card](/en/guides/sim-insertion/).
**Step 5: Re-insert the tray and power on.**
Slide the tray back into the slot in the same orientation it came out — there is one correct direction. Press until flush with the device body. Power the device on and wait up to 60 seconds for the carrier name to appear in the status bar.
---
## Clean the SIM Contacts
If the SIM pads or the tray contacts have debris or light oxidation, the electrical connection is intermittent or absent. Cleaning often resolves persistent "No SIM" errors that reseating alone does not fix.
**To clean the SIM card:**
Wipe the gold contacts with a dry, lint-free cloth — the microfiber cloth included with glasses is ideal. Wipe gently in one direction. Do not use abrasive materials or liquids on the SIM card.
**To clean the SIM tray slot on the device:**
Use a can of compressed air to blow out the SIM slot briefly before reinserting the tray. Hold the can upright and use short bursts at a safe distance. Do not insert any metal object into the slot itself — the contact pins inside are fragile.
**After cleaning:**
Re-insert the SIM using the orientation steps above, power the device on, and check the status bar.
---
## Restart and Toggle Airplane Mode
After reseating and cleaning, if the error persists, two software-level steps force the modem to re-scan.
**Restart the device.**
A full restart reinitialises the radio stack. On iPhone, hold the side button and a volume button until the power slider appears, slide to power off, wait 10 seconds, then press the side button to power on. On Android, hold the power button and tap Restart.
**Toggle Airplane Mode.**
If a full restart is not practical, toggling Airplane Mode achieves a similar effect for the radio subsystem:
1. Enable Airplane Mode in Control Center (iPhone) or the Quick Settings panel (Android).
2. Wait 10 seconds.
3. Disable Airplane Mode.
4. Watch the status bar for the carrier name to appear within 15–30 seconds.
What this does: it forces the modem to drop its current state and begin a fresh network registration scan. A stale modem state is a common cause of a "No SIM" display that appears after the device wakes from sleep or recovers from a brief battery issue.
---
## Test the SIM in a Second Device
Testing the SIM in a different compatible device isolates whether the problem is with the SIM card itself or with your original phone.
**To test:**
1. Power off both devices.
2. Remove the SIM from the problem device.
3. Insert it into the second device (confirm the second device accepts Nano-SIM and is SIM-unlocked or on the same carrier).
4. Power the second device on.
5. Wait 60 seconds and check whether the SIM is detected.
**What the result tells you:**
| Result | Conclusion |
|--------|------------|
| SIM detected in second device | SIM is functional; problem is in the original device (tray damage, SIM lock, or device-level fault) |
| SIM not detected in second device | SIM itself is faulty or unactivated; contact the carrier for a replacement |
| "Invalid SIM" in second device | SIM may be locked to a specific carrier; the original device may be from a different carrier |
If the SIM is detected in the second device but not in the original, continue with the device-specific steps below.
---
## Check the SIM Tray for Physical Damage
If reseating and cleaning did not resolve the error, inspect the tray and slot for physical damage.
**SIM tray:**
- Are the contact pins on the underside of the tray (the metal pins that press against the SIM pads) bent, broken, or missing?
- Is the tray warped or cracked?
- Does the tray slide in and out smoothly, or does it stick?
A tray with bent or missing pins cannot make a reliable electrical contact with the SIM. Replacement SIM trays are available as official spare parts for most major phone models from the manufacturer or authorised service centres.
**SIM slot inside the device:**
If the tray appears undamaged, the issue may be with the contact pins inside the device's SIM slot. This requires inspection by an authorised repair centre — do not insert tools or sharp objects into the slot to check.
---
## Invalid SIM Errors
"Invalid SIM", "SIM Not Supported", or "SIM Failure" messages mean the device detects the card but rejects it. The physical connection is working. The causes differ from "No SIM".
### Check for Carrier Lock
A carrier-locked device only accepts SIM cards from the carrier that sold it. Inserting a SIM from a different carrier — including SIMs from MVNOs, travel SIMs, or SIMs purchased in another country — will produce an "Invalid SIM" or "SIM Not Supported" error.
**How to check:**
- **iPhone:** Settings → General → About → Carrier Lock. "No SIM restrictions" means the device is unlocked.
- **Android:** There is no universal check. Insert a SIM from a different carrier — if it is rejected with a clear error message, the device is likely carrier-locked. Contact the original carrier to confirm.
**How to unlock:**
Contact the carrier that originally sold the device. Most carriers unlock devices through their online account portal, typically at no charge once the device payment is complete or the contract has ended. The specific conditions vary by carrier and country. After unlocking, restart the device before inserting a SIM from a different carrier.
For a full guide to carrier lock and the unlock process, see [No Service on Your Phone?](/en/guides/no-service/) which covers the carrier lock check in detail.
### Confirm the SIM Is Activated
A brand-new SIM purchased from a carrier is not always active when you receive it. Some carriers require a separate activation step — calling an activation line, visiting a web page, or completing a step in the carrier's app — before the SIM is provisioned on the network.
An unactivated SIM may show "Invalid SIM", "No Service", or may simply show the carrier name with no signal. Check whether your carrier requires an activation step by reviewing the documentation that came with the SIM or by calling the carrier's support line.
---
## eSIM-Specific Steps
For an eSIM, "No SIM" does not indicate a physical contact failure — it means the device has no active eSIM line turned on, or the installed eSIM profile has a problem.
### Confirm the eSIM Line Is Enabled
An installed eSIM profile and an active cellular line are not the same. After installation, the line must be explicitly enabled.
**iPhone:**
1. Settings → Cellular.
2. Under SIM & Cellular Plans, locate the eSIM entry.
3. Tap it and confirm "Turn On This Line" is toggled on (green).
**Android (Pixel):**
1. Settings → Network & internet → SIMs.
2. Confirm the toggle next to the eSIM line is on.
**Android (Samsung):**
1. Settings → Connections → SIM card manager.
2. Confirm the eSIM toggle is on.
If the line is already on but the status bar shows "No SIM", toggle the line off, wait five seconds, toggle it back on, then restart the device.
### Confirm No SIM Profile Was Accidentally Deleted
If an eSIM profile was deleted from the device — either manually or after a factory reset or device transfer — reinstalling it requires the carrier to re-issue the profile. Many eSIM profiles — particularly from travel and prepaid providers — are single-use once deleted; the original QR code or activation code no longer works. Major domestic carriers, however, typically allow re-provisioning via their account portal without issuing a new code.
Contact the carrier or eSIM provider and request a new provisioning code. You will need to provide your account details and, in most cases, the device EID (the eSIM hardware identifier).
**To find the EID:**
- **iPhone:** Settings → General → About → EID
- **Android (Pixel/Samsung):** Settings → About phone → Status information → EID (path varies by One UI version)
### eSIM Activation Issues
If the eSIM was just installed and immediately shows "No SIM" or "No Service", the issue may be an activation problem rather than an eSIM detection problem. For a complete symptom-by-symptom walkthrough of eSIM activation failures, see [eSIM Won't Activate? How to Fix Common Setup Issues](/en/guides/activation-failed/).
---
## Reset Network Settings
If all physical and eSIM-specific steps have been followed and the SIM is still not detected or not working, resetting network settings removes corrupted device-level configuration that may be interfering with SIM detection.
**What network settings reset removes:** Wi-Fi passwords, VPN configurations, Bluetooth pairings, and saved cellular settings (including APN configurations). It does not remove apps, photos, contacts, or accounts. On iPhone and Samsung, the reset does not delete stored eSIM profiles. On Pixel devices using a Google Fi eSIM, the network reset may delete eSIM data and require reactivation — check with Google Fi before proceeding if that applies to your setup.
**iPhone:**
1. Settings → General → Transfer or Reset iPhone → Reset.
2. Tap Reset Network Settings.
3. Enter your passcode and confirm.
4. The device restarts. After restart, wait 60 seconds for the SIM to be re-detected.
**Android (Pixel):**
1. Settings → System → Reset options.
2. Tap Reset Wi-Fi, mobile & Bluetooth.
3. Confirm.
**Android (Samsung):**
1. Settings → General management → Reset.
2. Tap Reset network settings.
3. Confirm.
After the reset, re-enter your Wi-Fi credentials and check whether the SIM is now detected. For a full breakdown of what network settings reset does and does not affect on each device type, see [How to Reset Network Settings (and What It Affects)](/en/guides/network-reset/).
If the SIM is detected after the reset, the previous configuration was the cause. You may also need to re-enter your APN settings if mobile data does not work after the reset. For APN setup, see [What Is an APN? Why You Need to Configure It](/en/guides/what-is-apn/).
---
## When to Contact Your Carrier
If none of the steps above have resolved the error, the remaining causes require carrier-side access.
**Reasons to contact your carrier:**
- The SIM was never activated — the carrier needs to provision it on their network
- The SIM appears damaged (cracked, deeply scratched contacts) — the carrier can issue a replacement SIM for the same number and account
- An eSIM profile cannot be re-downloaded — the carrier needs to issue a new provisioning code
- Carrier lock is confirmed and needs to be removed — only the original carrier can do this
- Suspected account-level suspension — non-payment or a fraud flag can prevent SIM registration
**What to have ready when you call:**
- Your phone number and account PIN or password
- Device model and IMEI (dial `*#06#` on any phone, or find it at Settings → General → About on iPhone)
- EID if using eSIM (Settings → General → About → EID on iPhone; Settings → About phone → Status information → EID on Android, path varies by One UI version)
- The exact error message the device is showing
- Whether the SIM was previously working in this device, and when it stopped
Most carriers can provision or replace a SIM over the phone or through their account portal without requiring a store visit.
---
## Frequently Asked Questions
See the structured FAQ entries in the frontmatter above (compatible with schema.org/FAQPage). Additional answers:
**The SIM works intermittently — sometimes detected, sometimes not. What causes this?**
Intermittent detection is almost always a contact problem. The SIM tray pin contacts may be slightly bent, or there may be microscopic debris causing an unreliable connection. Remove the tray, clean the SIM contacts and the tray with a dry lint-free cloth, and re-insert firmly. If intermittent errors continue, the tray contact pins may need replacement by an authorised service centre.
**Can I damage my phone by inserting the SIM incorrectly?**
Forcing a SIM into an incorrect position can bend the tray's contact pins. However, a SIM in the wrong orientation that is placed in the tray without force and simply does not sit flush will not cause damage — remove it, re-orient it, and try again. The tray is designed so a correctly sized SIM in the wrong orientation will not drop fully into the recess.
**I dropped my phone and now the SIM is not detected. Is the SIM damaged?**
A physical shock can cause the SIM tray to shift slightly in the slot, breaking the electrical contact. Remove and re-seat the tray first. If the SIM is detected in a second device but still not in the dropped phone, the SIM slot pins inside the device may have been displaced by the impact — take the device to an authorised repair centre.
---
## Related Guides
- [How to Insert and Remove a SIM Card](/en/guides/sim-insertion/) — correct orientation, tray mechanics, and dual-SIM trays on iPhone and Android
- [No Service on Your Phone?](/en/guides/no-service/) — step-by-step fix for signal problems after the SIM is detected
- [eSIM Won't Activate? How to Fix Common Setup Issues](/en/guides/activation-failed/) — eSIM-specific activation failures including QR code errors and carrier lock
- [What Is an APN? Why You Need to Configure It](/en/guides/what-is-apn/) — how to configure mobile data after the SIM is successfully detected
- [How to Reset Network Settings (and What It Affects)](/en/guides/network-reset/) — full breakdown of what the network reset removes and preserves on each device
================================================================================
# SIM Card Sizes and How to Convert Between Them
URL: https://sim-finder.com/en/guides/sim-sizes/
Type: guides (en)
Published: 2026-06-04
SIM cards have shrunk from the size of a credit card to smaller than a fingernail across four removable form factors — and then disappeared into the device altogether as eSIM. The standard in every modern smartphone is the Nano-SIM (4FF), measuring 12.3 × 8.8 mm per ETSI TS 102 221. All four removable form factors carry the same electrical chip; only the surrounding plastic frame differs.
The key points covered in this article:
- Exact dimensions and ETSI designations for each form factor (2FF, 3FF, 4FF)
- Why all three sizes are electrically interchangeable despite different physical dimensions
- How SIM cutters and carrier adapters work, and where the chip-damage risk lies
- How to identify an unknown SIM size without tools
- How eSIM relates to (and replaces) the physical card
- What to do when switching to a device that requires a different SIM size
For a broader explanation of what a SIM card does and how it authenticates to a mobile network, see [What Is a SIM Card?](/en/guides/what-is-sim/) For a direct comparison of physical SIM and eSIM, see [Physical SIM vs eSIM: Differences and How to Choose](/en/guides/sim-vs-esim/).
---
## The Four Physical Form Factors (ETSI TS 102 221)
ETSI TS 102 221 — "Smart Cards; UICC-Terminal interface; Physical and logical characteristics" — is the primary standard that defines the physical dimensions, contact pad layout, and electrical characteristics of removable UICC cards. The latest version is available from etsi.org (release 18 series).
The standard defines four removable form factors, referred to as FF (Form Factor) designations:
| Form Factor | Common Name | Dimensions | Thickness | Approximate Introduction |
|---|---|---|---|---|
| 1FF | Full-size SIM | 85.6 × 54 mm | 0.76 mm | ~1991 |
| 2FF | Mini-SIM | 25 × 15 mm | 0.76 mm | ~1996 |
| 3FF | Micro-SIM | 15 × 12 mm | 0.76 mm | ~2010 (ETSI TS 102 671, April 2010) |
| 4FF | Nano-SIM | 12.3 × 8.8 mm | 0.67 mm | 2012 |
The 1FF format follows the ISO/IEC 7816 ID-1 credit card standard. The 2FF through 4FF formats progressively trim the plastic carrier around the same chip area. The 4FF (Nano-SIM) is also slightly thinner at 0.67 mm, compared to 0.76 mm for all earlier removable formats.
Note that eSIM (eUICC) is not listed here as a "form factor" in the removable-card sense. It is covered in the section below on the eSIM relationship.
---
## Full-Size SIM (1FF) — The Credit Card Era
The first commercial SIM cards, deployed with GSM networks in the early 1990s, matched the ISO/IEC 7816 ID-1 format used by payment and identity cards: 85.6 × 54 mm, the same footprint as a standard credit card. Early GSM handsets (such as the Nokia 1011, launched November 1992) were large enough to accommodate a dedicated slot of this size.
The 1FF is obsolete in consumer devices. No smartphone manufactured in the past two decades uses a 1FF slot. The contact pad geometry defined in ISO/IEC 7816 for the 1FF — the C1–C7 pad arrangement — is the same geometry inherited, at reduced scale, by every subsequent form factor.
---
## Mini-SIM (2FF) — The Long-Running Standard
The Mini-SIM, measuring 25 × 15 × 0.76 mm, became the dominant form factor from the mid-1990s through to approximately 2010–2012. It remains the format most people associate with "a SIM card." The plastic body is trimmed significantly relative to the 1FF, but the chip and contact pad region — the functional area — are unchanged.
Carrier multi-punch cards issued since the Micro-SIM era often include the Mini-SIM footprint as the outermost breakout. If you receive a new SIM with three nested punch lines, the largest size is the 2FF.
Mini-SIM trays are now uncommon in smartphones but still found in some older feature phones, M2M modems, and industrial routers. If your device is more than ten years old and has never had its SIM replaced, it likely uses a 2FF.
---
## Micro-SIM (3FF) — The Transition Size
The Micro-SIM (3FF) measures 15 × 12 × 0.76 mm. It retains the same 0.76 mm thickness as the 2FF and the same chip and contact pad area — the reduction is entirely in the surrounding plastic border.
ETSI standardised the 3FF in ETSI TS 102 671, published April 2010. Mass consumer adoption came immediately, catalysed by Apple's use of Micro-SIM in the iPhone 4 (released June 2010). Most Android flagship phones adopted 3FF during 2011–2012, and carriers began issuing combination Mini/Micro punch-out cards as a standard.
The 3FF is now a transitional size. It appears in devices from roughly 2010 to 2014. If your current phone is from that era, or if you are handing down a phone from that period, it likely requires a Micro-SIM.
---
## Nano-SIM (4FF) — The Current Standard
The Nano-SIM (4FF) measures 12.3 × 8.8 × 0.67 mm. The chip and contact pad area are the same as on 2FF and 3FF; only the plastic border is trimmed further, and the card is slightly thinner (0.67 mm vs 0.76 mm).
Apple introduced 4FF with the iPhone 5 in September 2012. The format was adopted across Android flagships during 2013–2014, and by 2015 it had become the universal standard for new consumer smartphones. Today, any smartphone released within the past decade almost certainly uses a Nano-SIM slot.
The slight thickness reduction to 0.67 mm is relevant when using adapters: adapters designed for 3FF (0.76 mm) will be too thick for a 4FF card without shims, and an adapter that is too thick can jam the SIM tray or prevent the drawer from closing.
---
## How iPhone and Android Drove the Transition to Nano-SIM
The history of consumer SIM miniaturisation is largely the history of Apple iPhone hardware decisions, with Android following within one to two years each time.
**iPhone SIM history:**
- **iPhone (2007) through iPhone 3GS (2009):** standard SIM (2FF, which Apple labels "original SIM").
- **iPhone 4 (2010):** Apple switched to Micro-SIM (3FF), making it the first major consumer device to mandate 3FF at scale. Carriers responded by issuing combination Mini/Micro punch-out cards within months.
- **iPhone 5 (2012):** Apple introduced Nano-SIM (4FF) alongside ETSI's formal ratification of the standard. The iPhone 5 remains the reference point for the 4FF transition. Every iPhone model from the 5 onward uses Nano-SIM (or eSIM only, from the iPhone 16 in the United States).
- **iPhone XS / XR (2018):** Apple added dual SIM support via a physical Nano-SIM slot plus an eSIM.
- **iPhone 14 (US, 2022):** Nano-SIM slot removed in the US market; US models are eSIM-only.
**Android convergence on Nano-SIM:**
Android flagship phones adopted 3FF (Micro-SIM) during 2011–2012 and began transitioning to 4FF (Nano-SIM) during 2013–2014. By 2015, Nano-SIM was the universal default across Android flagships from Samsung, Google, LG, Sony, and HTC. Mid-range and budget Android phones completed the transition to Nano-SIM by approximately 2016–2017.
The practical result: if your Android device was released in 2016 or later, it almost certainly uses a Nano-SIM (4FF). Devices from 2013–2015 may use either Nano-SIM or Micro-SIM depending on manufacturer and release date; check the product specification page to confirm.
---
## Why All Three Sizes Are Electrically Identical
Despite the size differences, 2FF, 3FF, and 4FF cards are electrically identical. ETSI TS 102 221 specifies the same contact pad geometry (C1–C7, per ISO/IEC 7816-2) and the same electrical interface for all form factors. The chip itself — the integrated circuit that holds the IMSI, authentication key, and subscriber data — does not change between sizes.
This means:
- A carrier can manufacture a single chip and mount it in any of the three form factors.
- SIM data (IMSI, carrier profile, contacts if stored on SIM) is on the chip, not on the plastic carrier, and survives any size conversion.
- Signal quality, data speed, 4G/5G compatibility, and all network functions are identical regardless of physical size.
The practical implication: if your carrier provides a replacement SIM of a different size for the same account, no information is lost and no network capability changes.
---
## SIM Cutters: How They Work and Where the Risk Lies
A SIM cutter is a guillotine-type tool with a die cut to the exact 3FF or 4FF outline. You place the larger SIM in the tray, press the handle, and the blade punches out the smaller footprint. They are sold by aftermarket accessory retailers and are not an official carrier service.
**How the cut works mechanically:** The die aligns the chip area to the centre of the new footprint. Because the chip occupies only a small portion of the overall card, trimming the plastic border can be done without touching the chip — provided the SIM is seated correctly in the cutter's tray and the die dimensions are accurate.
**Where damage occurs:**
- **Misalignment:** If the SIM is not seated squarely, the blade may cut across the chip or its bond wires rather than through plastic only. The chip is approximately 12 mm × 8 mm, which leaves almost no margin for error when cutting to 4FF dimensions.
- **Thin plastic residue / burrs:** Even a well-aligned cut can leave a small plastic burr along the edge. Inserting a card with a rough edge can scratch the SIM tray contacts or cause the card to seat unevenly.
- **Thickness inconsistency:** The cutter does not thin the card. A 2FF or 3FF card cut to 4FF dimensions retains its original 0.76 mm thickness. For most devices this difference (0.76 mm vs the specified 0.67 mm) is accommodated by tray tolerance, but in tight trays the card may be difficult to remove.
**Practical guidance:** Cutting is most reliable when going from 2FF to 3FF (Mini to Micro), because the margins around the chip are larger. Cutting from 2FF or 3FF to 4FF leaves minimal margin and carries higher damage risk. Requesting a free or low-cost replacement SIM from your carrier is the recommended approach whenever possible.
---
## Carrier Adapters: Going from Smaller to Larger
A carrier adapter (also called a SIM adapter or SIM tray adapter) is a thin plastic shell that holds a smaller SIM card within the footprint of a larger slot. Common configurations:
- **4FF in a 3FF slot:** Nano-SIM in a Micro-SIM adapter
- **4FF in a 2FF slot:** Nano-SIM in a Mini-SIM adapter
- **3FF in a 2FF slot:** Micro-SIM in a Mini-SIM adapter
Adapters do not modify the SIM electrically; they purely provide the mechanical mounting to fill the larger tray.
**Using adapters safely:**
- Ensure the adapter thickness matches the target form factor. A 3FF slot is 0.76 mm deep; a 4FF card is 0.67 mm thick. A properly made 4FF→3FF adapter adds 0.09 mm of plastic to reach the correct thickness.
- Do not use adapters that are warped, cracked, or do not grip the SIM securely. A loose SIM inside an adapter can slide, jam the tray, or leave the card stuck in the slot when the tray is withdrawn.
- Remove the SIM from the adapter before inserting it into a new device, and insert the SIM alone (without the adapter) into any 4FF slot — adapters are for up-sizing only.
**Tray-jam failure cases:**
The most common adapter failure mode is the SIM separating from the adapter inside the tray. When the tray is pushed back into the device, the SIM card alone can slip below the tray edge into the internal slot housing. Retrieving a stuck SIM from inside the slot requires either a carrier service appointment or careful extraction with a thin tool — some devices require partial disassembly. This risk is highest with:
- Low-quality adapters that do not grip the SIM firmly around all four edges.
- Adapters that have been used many times and have lost clamping tension.
- Nano-SIM cards whose edges have been trimmed (e.g., by a SIM cutter), leaving a narrower card that sits loosely in the adapter.
If you need to use an adapter regularly (for example, when alternating a card between two devices of different sizes), replace the adapter once it shows any sign of loose grip.
---
## Identifying an Unknown SIM Size Without Tools
If you have a SIM of unknown size — for example, from an old device or a foreign carrier — you can identify it by measurement or comparison:
**By measurement:**
- 12.3 mm × 8.8 mm → Nano-SIM (4FF)
- 15 mm × 12 mm → Micro-SIM (3FF)
- 25 mm × 15 mm → Mini-SIM (2FF)
- 85.6 mm × 54 mm → Full-size (1FF, obsolete)
A standard ruler is sufficient. Measure the longest edge (length) and the shorter edge (width) of the plastic body.
**By visual comparison:**
- Nano-SIM is roughly the size of a small fingernail — noticeably smaller on both dimensions than Micro-SIM.
- Micro-SIM is clearly smaller than a Mini-SIM but larger than Nano-SIM, with a visible plastic border around the chip on all sides.
- Mini-SIM has a wide plastic border with the chip centred, and is about the size of a small postage stamp.
**By tray fit:**
Place the SIM next to a known tray (from a current smartphone). A Nano-SIM tray is the smallest; if the SIM is clearly wider or taller, it is a larger format.
**By the multi-punch card:**
If you have the original carrier packaging and it is a multi-punch card, the outermost perforation is 2FF, the middle is 3FF, and the innermost punch is 4FF.
---
## Checking Your SIM Size When Changing Devices
When moving a SIM from an old device to a new one — or purchasing a new SIM for a new device — confirm the form factor before ordering or visiting a carrier store.
**Step 1: Find the new device's SIM specification.** Check the manufacturer's product page under "Specifications" or "Connectivity." The entry will state "Nano-SIM," "Micro-SIM," or a dual-SIM combination such as "Nano-SIM + eSIM."
**Step 2: Check your current SIM.** Compare against the size table above, or measure with a ruler.
**Step 3: If sizes differ:**
- **Current SIM is larger than required:** Request a free SIM swap from your carrier (most carriers provide this at no charge or for a nominal fee). Your number and plan transfer automatically. Alternatively, use a SIM cutter if you accept the risk described above.
- **Current SIM is smaller than required:** Use a carrier adapter as described above.
- **New device uses eSIM only:** Contact your carrier to convert your number to an eSIM profile. For the activation process, see [What Is an eSIM?](/en/guides/what-is-esim/) and, for iPhone specifically, [How to Set Up eSIM on iPhone via QR Code](/en/guides/apn-setup-iphone/).
**Step 4: After inserting the new SIM**, verify that the device shows carrier name and signal bars. If mobile data does not connect automatically, you may need to configure the APN. For iPhone, see [APN Settings on iPhone: How to View and Configure](/en/guides/apn-setup-iphone/). For activation codes from your carrier app, see [How to Activate eSIM with a Manual Code](/en/guides/manual-code/).
---
## eSIM and Its Relationship to Physical Form Factors
eSIM (embedded SIM) is not a fifth physical form factor in the removable-card sense. It is a chip soldered directly to the device's mainboard. The underlying standard is still ETSI TS 102 221 for the UICC logic and GSMA SGP.22 for the consumer remote provisioning protocol.
Key distinctions:
- **No removable card.** There is no card slot; the chip is physically part of the device and cannot be transferred.
- **Remote profile download.** Instead of inserting a carrier-issued card, you download a carrier profile over the internet (via QR code, carrier app, or activation code).
- **Same electrical functions.** The eUICC chip performs the same four functions as a physical SIM: subscriber authentication, phone number binding, encryption key generation, and subscriber data storage.
- **Multiple profiles.** A single eUICC can store multiple carrier profiles and switch between them in Settings without physically swapping anything.
For devices that support both a physical SIM slot and eSIM (the most common configuration in current smartphones), you can run two lines simultaneously — one physical SIM and one eSIM. For a full side-by-side comparison, see [Physical SIM vs eSIM: Differences and How to Choose](/en/guides/sim-vs-esim/).
**eSIM eliminates the physical-size problem entirely.** Every question covered in this article — which form factor fits your device, whether cutting is safe, how to use an adapter without jamming the tray — becomes irrelevant for lines provisioned on eSIM. There is no card to cut, no adapter to carry, and no tray to jam. When switching carriers or adding a second line on an eSIM-capable device, the only step is downloading the new carrier profile. This is the practical advantage that has driven manufacturers toward eSIM-only designs for at least one SIM slot on flagship devices since 2018, and eSIM-only devices (no physical slot at all) in certain markets since 2022.
---
## FAQ
**What is the difference between 2FF, 3FF, and 4FF?**
These are the ETSI TS 102 221 designations for Mini-SIM (25 × 15 mm), Micro-SIM (15 × 12 mm), and Nano-SIM (12.3 × 8.8 mm) respectively. The "FF" stands for Form Factor. Each number corresponds to a generation of miniaturisation. All three carry the same electrical chip and contact pads; only the surrounding plastic border differs in size.
**My carrier sent a "triple-cut" SIM. What does that mean?**
A triple-cut (or triple-punch) SIM card is a single card produced at Mini-SIM dimensions with two additional perforated punch lines scored into the plastic. Pressing out the outermost punch gives a Mini-SIM (2FF); pressing the next gives a Micro-SIM (3FF); pressing the innermost gives a Nano-SIM (4FF). This allows carriers to ship one card that fits any device. The chip is always at the centre, and all three sizes are pre-scored on the same blank.
**Can a SIM chip survive cutting if I use a good-quality cutter?**
A high-quality, correctly sized cutter with a sharp, well-aligned die reduces — but does not eliminate — the risk of chip damage. The margin between the edge of the chip area and the 4FF border is minimal (approximately 0.15 mm on the narrow side) (engineering estimate based on published card dimensions). If you proceed, test the cut SIM immediately in the target device before discarding the original packaging, so you can request a carrier replacement if the card does not register.
**Do all four contact pads on the SIM work the same way across sizes?**
Yes. ISO/IEC 7816-2 defines the contact pad layout (C1 = VCC, C2 = RST, C3 = CLK, C5 = GND, C6 = VPP, C7 = I/O) and this layout is identical across 1FF, 2FF, 3FF, and 4FF. The device's SIM reader makes electrical contact with these pads regardless of the physical form factor. This is why the same reader hardware, with appropriate tray geometry, can support any of the removable sizes.
---
## Related Guides
- [What Is a SIM Card?](/en/guides/what-is-sim/) — How IMSI, Ki, and UICC authentication work underneath the physical card
- [Physical SIM vs eSIM: Differences and How to Choose](/en/guides/sim-vs-esim/) — Side-by-side comparison of removable and embedded options
- [What Is an eSIM?](/en/guides/what-is-esim/) — How eUICC and GSMA SGP.22 work, and which devices support eSIM
- [APN Settings on iPhone: How to View and Configure](/en/guides/apn-setup-iphone/) — Required after a SIM swap if mobile data does not connect automatically
- [How to Activate eSIM with a Manual Code](/en/guides/manual-code/) — Entering a carrier activation code when switching to eSIM
================================================================================
# SIM Swap Fraud: How It Works and How to Protect Yourself
URL: https://sim-finder.com/en/guides/sim-swap/
Type: guides (en)
Published: 2026-04-16
SIM swap fraud gives an attacker control of your phone number — and within minutes they can drain your bank account, take over your email, and empty a crypto wallet. The attack does not require malware on your device; it relies entirely on social engineering your mobile carrier.
This guide explains exactly how SIM swap works, how to recognize it before or as it happens, and the specific steps you can take today to make your account significantly harder to attack.
## How SIM Swap Fraud Works
### The attack chain
A SIM swap attack typically follows this sequence:
1. **Reconnaissance.** The attacker gathers your personal information — name, address, phone number, last four digits of your Social Security Number (or equivalent), account number, and email address. This data comes from data breaches, phishing emails, social media, or the dark web.
2. **Impersonation.** The attacker contacts your carrier's customer service — by phone, chat, or in person at a retail store — and claims to be you. They say your SIM was lost or damaged and ask to transfer your number to a new SIM they control.
3. **Social engineering the carrier.** If the agent is convinced by the information provided, they execute the transfer. Authentication failures on the agent's part are the primary enabling factor in most reported attacks.
4. **Number takeover.** Your phone immediately loses service. The attacker's device now receives all calls and SMS messages sent to your number.
5. **Account takeover.** The attacker triggers "forgot password" flows on your email, banking, or crypto accounts. Password reset codes arrive via SMS to their device. They set new passwords and lock you out — often within minutes.
### Why SMS-based 2FA is the critical vulnerability
SMS two-factor authentication was designed to add a second layer of security. In the context of SIM swap, it becomes the attack's primary target. Once an attacker controls your number, SMS codes are delivered directly to them. The protection inverts: the 2FA mechanism intended to protect you now helps the attacker take over your account.
This is why security researchers and regulators recommend moving high-value accounts away from SMS-based 2FA toward authenticator apps or hardware security keys.
### Who are the primary targets?
Any account that uses SMS-based 2FA is theoretically at risk, but attackers concentrate effort where the payoff is highest:
- Cryptocurrency exchange accounts and wallets
- Online banking and brokerage accounts
- Primary email accounts (which are used for password recovery on everything else)
- Social media accounts with large followings or monetization
Prominent cases have involved losses in the hundreds of thousands to millions of dollars. The FBI's IC3 recorded 982 SIM swap complaints in the US in 2024, with reported losses of approximately $26 million — averaging over $26,000 per victim.
## Warning Signs and Immediate Response
### Signs you are under attack right now
- **Sudden loss of mobile service.** Your phone shows "No Service," "SOS Only," or similar, even in an area with normal coverage. This is the most reliable real-time indicator.
- **Unexpected carrier notification.** A text or email from your carrier saying a SIM change was requested or completed.
- **Locked out of accounts.** You receive "password changed" or "new login" alerts for accounts you did not touch.
- **Calls and texts not being received.** Friends report calling you but reaching a different voicemail or getting no answer.
### What to do immediately
If you suspect a SIM swap is in progress:
1. Call your carrier from a landline or a different phone immediately. Do not wait.
2. Ask the carrier to reverse the SIM swap and lock your account against further changes.
3. Change your email password from a device not connected to your phone number.
4. Revoke active sessions on email, banking, and cryptocurrency accounts.
5. Enable a new, stronger authentication method on critical accounts.
6. File reports with:
- FBI Internet Crime Complaint Center: [ic3.gov](https://www.ic3.gov)
- US Federal Trade Commission: [reportfraud.ftc.gov](https://reportfraud.ftc.gov)
- Your local police (required by some financial institutions for fraud claims)
## How to Protect Yourself
### Step 1: Enable your carrier's SIM lock or account lock
This is the single highest-impact protective action. All three major US carriers now offer free account lock features:
**AT&T — Wireless Lock**
AT&T introduced Wireless Account Lock in 2025. When enabled, it blocks 12 categories of account changes, including SIM swaps, device changes, number transfers (port-outs), and certain billing modifications. Enable it via the myAT&T app under account security settings.
**Verizon — SIM Protection and Number Lock**
Verizon offers two separate controls: SIM Protection (blocks unauthorized SIM or device changes) and Number Lock (prevents your number from being ported out). Both are free and available through the My Verizon app.
**T-Mobile — SIM Lock**
T-Mobile allows customers to lock their SIM against swaps and block unauthorized port-outs through the T-Mobile app or their online account.
Carriers in other countries have equivalent features under various names — check your carrier's account security settings or security center.
**Important:** Under FCC rules adopted in 2023 and fully effective in 2025, US wireless providers are required to offer customers a free account lock option and to notify customers immediately when a SIM swap or port-out request is received on their account. If your carrier does not appear to offer this, contact their support and request it explicitly.
### Step 2: Set a carrier account PIN
A separate PIN (distinct from your phone's screen lock) adds a second authentication factor that a customer service agent must verify before making account changes. Choose a PIN that is not derived from your birthday, address, or the last four digits of your Social Security Number — all of which may be available to an attacker.
### Step 3: Replace SMS 2FA on high-value accounts
Move your most critical accounts from SMS-based 2FA to one of these stronger alternatives:
- **Authenticator app** (Google Authenticator, Authy, Microsoft Authenticator): Generates time-based one-time passwords (TOTP) locally on your device. Not vulnerable to SIM swap because codes are never sent over your phone number.
- **Hardware security key** (YubiKey, Google Titan Key): Physical device that must be plugged in or tapped near your phone. The strongest protection available for consumer accounts.
- **Passkeys**: A newer standard replacing passwords entirely, tied to your device's biometrics. Increasingly supported by major platforms as of 2024–2025.
Priority order for migrating away from SMS 2FA: primary email account first (because it controls password recovery everywhere else), then financial accounts, then cryptocurrency, then other accounts.
### Step 4: Minimize your public footprint
Attackers build their dossier from publicly available information. Audit what personal data is visible:
- Review your social media profiles and remove or restrict your phone number, address, and date of birth.
- Opt out of data broker sites that aggregate and sell personal information (services like DeleteMe or manual opt-outs).
- Use a separate email address for financial accounts — one that is not publicly associated with your name or phone number.
- Be cautious about what you post after travel, purchases, or financial events that might mark you as a high-value target.
### Step 5: Add a passphrase or verbal password to your carrier account
Many carriers allow you to set a verbal passphrase or secondary password that agents must ask for when handling account changes in person or over the phone. This is different from the account PIN used for automated authentication. Enable both if your carrier supports them.
## eSIM and SIM Swap Risk
### Does eSIM eliminate the risk?
eSIM (embedded SIM) offers meaningful security improvements over physical SIM in the context of SIM swap:
- There is no physical card to claim was "lost" or "damaged." This removes the most common pretext used in in-store attacks.
- eSIM activation requires digital authentication, typically involving QR codes, account passwords, and device-level verification.
- Your carrier can see that the eSIM is bound to a specific device, making unauthorized transfers more detectable.
As a result, eSIM is considered more resistant to social engineering attacks at the physical point of sale.
However, eSIM does not eliminate all risk. Account-level attacks — where an attacker convinces a carrier's phone support team to transfer an eSIM profile to a new device — remain possible. UK data shows eSIM-related fraud cases rising from 18 in 2022 to 763 in 2024 as eSIM adoption increased.
**The practical conclusion:** Switching to eSIM and enabling your carrier's account lock together provide substantially better protection than either measure alone. eSIM without an account lock leaves you exposed to phone-based social engineering.
For more on how eSIM works and its security architecture, see the [eSIM guide](/en/guides/what-is-esim/).
### Dual SIM and SMS 2FA abroad
A related concern: if you travel internationally with a travel eSIM for data, ensure your home SIM remains active for receiving 2FA codes. Removing or deactivating your home SIM while abroad can leave you unable to receive authentication codes for banking and other services. See the [travel eSIM guide](/en/guides/first-time-guide/) for how to set up dual SIM correctly for travel.
## International Perspective
SIM swap fraud is a global problem, with particularly high case volumes in the United States, United Kingdom, and South Africa.
- **United States:** The most documented market. FBI IC3 data shows 2,026 complaints in 2022 ($72.6M in losses), dropping to 1,075 in 2023 and 982 in 2024 ($26M in losses). The decrease coincides with FCC rule changes and carrier security improvements.
- **United Kingdom:** Cifas reported nearly 3,000 unauthorized SIM swaps in 2024, with a reported 1,055% surge in cases. UK cases often involve telecom insider threats where retail employees are recruited by criminal networks.
- **Australia:** IDCARE reported a 240% increase in people seeking help for phone porting and SIM swap fraud in 2024 versus 2023.
- **South Africa:** Reports high rates of SIM swap fraud, commonly used against banking customers via "one-time password" interception.
The underlying mechanism is identical across markets — only the carrier procedures and regulatory protections vary. The protective steps in this guide apply universally; the specific lock/PIN feature names vary by carrier and country.
## Summary: Your Protection Checklist
| Action | Priority | Effort |
|--------|----------|--------|
| Enable carrier account lock (AT&T Wireless Lock / Verizon Number Lock / T-Mobile SIM lock) | Critical | 5 minutes |
| Set a carrier account PIN (not birthday or SSN digits) | Critical | 5 minutes |
| Move primary email to authenticator app 2FA | High | 15 minutes |
| Move banking accounts to authenticator app 2FA | High | 15 minutes |
| Move crypto accounts to hardware key or authenticator app | High | 30 minutes |
| Remove phone number from public social media profiles | Medium | 15 minutes |
| Set a verbal passphrase on your carrier account | Medium | 10 minutes |
| Consider switching to eSIM | Medium | Varies by carrier |
No single measure provides complete protection. Combining a carrier account lock, a strong carrier PIN, and authenticator-app-based 2FA on your most important accounts eliminates the overwhelming majority of SIM swap attack vectors.
================================================================================
# Physical SIM vs eSIM: Differences and How to Choose
URL: https://sim-finder.com/en/guides/sim-vs-esim/
Type: guides (en)
Published: 2026-06-04
The choice between physical SIM and eSIM comes down to four questions: Can you move the SIM between devices without contacting your carrier? Do you need multiple profiles on one device? Is eSIM supported by your carrier? And does your device support eSIM? This article compares both technologies across every dimension that matters for everyday use and helps you choose based on your actual situation.
Key findings:
- Physical SIM wins when you need instant device portability or are in a carrier/country where eSIM is not yet offered.
- eSIM wins when you want instant remote activation, multiple stored profiles, or a dual-SIM travel setup without carrying a second card.
- Most modern smartphones support both; the decision is made by your carrier options and use case, not the hardware.
For the technical background on how each technology works, see [What Is a SIM Card?](/en/guides/what-is-sim/) and [What Is an eSIM?](/en/guides/what-is-esim/).
---
## The Core Technical Difference
A physical SIM card — in its current Nano-SIM (4FF) form — is a removable UICC (Universal Integrated Circuit Card) defined in ETSI TS 102 221. It is manufactured with carrier credentials pre-loaded: the IMSI (International Mobile Subscriber Identity) and Ki (Authentication Key) that authenticate your device to the network. To activate a physical SIM, you insert the card and the device reads those credentials directly.
An eSIM uses an eUICC (embedded Universal Integrated Circuit Card) — the same underlying UICC technology, but soldered to the device's motherboard. Credentials are not pre-loaded at manufacture; instead, a carrier profile is downloaded from a remote SM-DP+ server (Subscription Manager Data Preparation+, defined in GSMA SGP.22) after you sign up. The GSMA SGP.22 specification — currently at v2.6.1 (April 2025) and v3.1 (December 2023) — governs how profiles are issued, stored, switched, and deleted on consumer devices.
Both technologies authenticate to mobile networks using the same underlying mechanism (3GPP TS 31.102 for USIM). The difference is entirely in how credentials reach the chip: physical delivery for SIM cards, remote provisioning for eSIM.
---
## Side-by-Side Comparison
The table below covers the axes that matter most for a subscriber choosing between physical SIM and eSIM.
| Dimension | Physical SIM (Nano-SIM / UICC) | eSIM (eUICC / SGP.22) |
|---|---|---|
| **Hardware** | Removable card inserted into a slot | Chip soldered to the device motherboard |
| **Standard** | ETSI TS 102 221 (4FF) | GSMA SGP.22 (consumer devices) |
| **How to activate** | Insert card; sometimes configure APN manually | Scan QR code, enter activation code, or use carrier app; requires internet connection |
| **Switching carriers** | Swap physical cards | Download a new profile in device Settings |
| **Profiles per device** | One card = one active carrier | Store 8+ profiles (iPhone); switch in Settings |
| **Simultaneous profiles** | Not possible (one slot = one carrier) | Possible on SGP.22 v3.0 MEP devices (Android 13+); dual-SIM physical+eSIM on most devices |
| **Device loss or failure** | Move card to replacement instantly | Carrier must re-issue profile to new device |
| **Carrier availability** | Universal among carriers with a SIM issuing process | Requires carrier to deploy SGP.22 provisioning infrastructure |
| **Device compatibility** | Any device with a compatible slot and bands | Requires eUICC hardware and carrier eSIM support |
| **Profile reinstallation** | Not applicable | Some providers restrict reinstallation; verify policy before deleting |
| **Initial setup connectivity** | None required | Wi-Fi or mobile data required (eSIM-only iPhone models may activate without Wi-Fi in some regions) |
---
## How Issuance and Activation Differ
### Physical SIM Issuance
A carrier manufactures SIM cards in bulk, loading each with a unique IMSI and Ki pair. Cards are distributed through retail stores, by post, or at airport vending machines. The subscriber inserts the card and the device is immediately authenticated to the carrier's network. No internet connection is needed for this step.
Because the credentials are on the physical card, anyone who possesses the card can use it in any compatible, unlocked device. This is both the main strength and the main security consideration of physical SIM.
### eSIM Issuance
When a carrier activates an eSIM plan, their system prepares a profile on an SM-DP+ server defined in GSMA SGP.22. The subscriber receives a QR code (or an activation code for manual entry) that contains the SM-DP+ server address and a matching token. The device connects to that server and downloads the profile. From that point, the eUICC authenticates to the carrier network as a traditional SIM would.
Three standard methods exist for downloading a profile: scanning a QR code, entering an activation code by hand, and using a carrier app that handles the download automatically. A fourth method — eSIM Quick Transfer — moves a profile directly between devices without a new server download (supported on iPhone and select Android models with carrier approval).
An internet connection is required for the initial profile download. This dependency is worth planning around: if you are setting up a new SIM in a location without Wi-Fi, a physical SIM does not have this constraint.
---
## Profile Storage and Switching
### Physical SIM: One Card, One Carrier
A physical SIM stores the credentials for exactly one carrier subscription. If you want to use a second carrier — for travel, for a data-only line, or for a work number — you either swap the card or carry a second device. Dual-physical-SIM devices exist (two SIM slots) but are less common in flagship smartphones since eSIM has become standard.
### eSIM: Multiple Profiles, Selectable in Settings
Under SGP.22 v2.x, an eUICC can store multiple carrier profiles but only one can be active at a time. The number of profiles that can be stored is limited by the eUICC chip's memory, not by a fixed specification limit. Apple states that iPhone can store 8 or more eSIM profiles. You switch between them from the device's Settings app — no card handling required.
SGP.22 v3.0 introduced MEP (Multiple Enabled Profiles) as an optional feature. MEP allows more than one profile to be active simultaneously on a single eUICC. Android 13 and later support MEP (Multiple Enabled Profiles); Android 14 and later additionally support the MEP-A1 and MEP-B variants. This enables eSIM-only devices to function as dual-SIM phones without any physical SIM slot.
The practical result: with eSIM you can maintain a home plan, a travel profile, and a data-only plan all on one device, switching between them without physical card management.
---
## Device Loss, Failure, and Switching Phones
This is the most consequential difference between physical SIM and eSIM for most users.
### Physical SIM: Instant Portability
If your phone is damaged, lost, or stolen, and you have the physical SIM card, you can insert it into any compatible unlocked device and be back on the network immediately. No carrier contact is needed. This instant portability is a meaningful practical advantage when continuity of service matters.
If the SIM itself is lost alongside the phone, contact your carrier to deactivate it (to prevent misuse) and request a replacement SIM linked to the same number.
### eSIM: Carrier Re-issue Required
Because the eUICC is soldered into the device, you cannot physically remove and transfer an eSIM to a replacement phone. If you change devices — whether due to upgrade, loss, or damage — you must contact your carrier to re-issue the eSIM profile to the new device. The carrier provisions a new profile via QR code or app. Some carriers charge a re-issue fee; check your carrier's policy in advance.
One exception: eSIM Quick Transfer on iPhone (and cross-platform via iOS 26 and Android 16 with supported carriers) lets you transfer a profile directly between compatible devices without a full carrier re-issue. Carrier support for Quick Transfer varies by region.
---
## Dual SIM: Combining Physical SIM and eSIM
Most eSIM-capable smartphones support dual SIM in a physical SIM + eSIM configuration. This means you can use both technologies simultaneously on a single device. Common configurations:
- **Home SIM (physical) + travel eSIM**: Keep your primary number and data plan on a physical SIM while adding a local travel eSIM when abroad.
- **Work SIM (eSIM) + personal SIM (physical)**: Separate lines for each context without carrying two phones.
- **Two eSIMs**: On devices supporting MEP (Android 13+) or dual eSIM (iPhone 13+), both lines can be eSIM with no physical card needed.
Dual SIM operates in one of two primary modes defined in GSMA TS.37:
- **DSDS (Dual SIM Dual Standby):** both SIMs receive calls and messages, but only one transmits data at a time. Apple implements dual SIM as DSDS.
- **DSDA (Dual SIM Dual Active):** both SIMs maintain independent network connections simultaneously, at the cost of higher battery usage. Supported on select Android flagships using Qualcomm Snapdragon 8 Gen 2 and later SoCs.
For the complete dual SIM picture on iPhone specifically, see [Dual SIM on iPhone: How to Use Physical SIM and eSIM Together](/en/guides/dual-sim-iphone/).
---
## Travel Use Cases
### Physical SIM for Travel
To use a local data plan abroad with a physical SIM, you either: (a) purchase a local SIM card on arrival and swap it out, storing your home SIM safely; or (b) use international roaming on your home SIM. Swapping means your home number is unreachable while the travel SIM is inserted, unless your device has a second SIM slot.
### eSIM for Travel
eSIM removes the card-swap step. You purchase a travel eSIM profile before departure — or after landing if you have Wi-Fi access — download it, and activate it. Your home SIM (whether physical or eSIM) remains on a separate line, so you can keep receiving calls and SMS on your home number while the travel eSIM handles local data.
This dual-SIM travel setup is particularly useful for receiving SMS-based two-factor authentication codes from banks and online services, which are sent to your home number. For a full guide to planning connectivity before a trip, see [The Four Options for Mobile Data Abroad](/en/guides/four-options/).
---
## Carrier and Device Support Considerations
### Carrier Support Is Not Universal
The GSMA SGP.22 specification defines a global technical standard, but each carrier must independently build and deploy the SM-DP+ provisioning infrastructure to issue eSIM profiles. As of 2026, major carriers in North America, Europe, Japan, South Korea, and Australia generally offer eSIM. Coverage is more limited in parts of Southeast Asia, Africa, and Latin America, where some carriers have not yet deployed eSIM provisioning systems. Physical SIM remains universally available wherever a carrier operates.
Before choosing an eSIM-based plan, confirm that the specific carrier and the specific country support eSIM issuance, not just that eSIM hardware exists in your phone.
### Device Compatibility
A device must have eUICC hardware to use eSIM. eSIM support on smartphones began with the iPhone XS, XS Max, and XR (2018) and with the Google Pixel 3 (2018, limited to Google Fi/Sprint; broader carrier support began with the Pixel 3a). Most flagship Android devices released since 2020 include eUICC hardware, though carrier-locked variants may have eSIM disabled.
Some devices — iPhone 14 through iPhone 16e (US market), iPhone 17 (US, Canada, Mexico, Japan, and additional regions), and US-market Google Pixel 10 — are eSIM-only with no physical SIM slot. The iPhone Air ships eSIM-only in many regions including the US and Japan; configuration varies by region (see the [eSIM-Compatible Devices guide](/en/guides/esim-compatible-devices/) for details). On these devices, you have no choice but to use eSIM.
Budget Android devices released before 2022 often lack eUICC hardware entirely. Check the device manufacturer's specification page to confirm.
---
## How to Choose: A Decision Framework
The right choice depends on your specific situation. Use these axes to decide.
### Choose physical SIM if:
- Your carrier does not support eSIM issuance in your country.
- Your device does not have eUICC hardware.
- You frequently swap the same SIM between multiple devices (e.g., between a phone and a tablet, or between your phone and a backup device).
- You need to hand your SIM to someone else immediately (e.g., a family member using your phone temporarily).
- You are travelling to a destination where eSIM carrier support is limited and you plan to buy a local SIM on arrival.
### Choose eSIM if:
- Your carrier supports eSIM and your device has eUICC hardware.
- You want to activate a new plan instantly without visiting a store or waiting for post.
- You travel frequently and want to add local data profiles without swapping cards.
- You want to run two lines on one device without a second physical SIM slot.
- You want to store multiple carrier profiles and switch between them on demand.
### If you have both options available:
Many users with eSIM-capable devices end up using eSIM as their primary plan and keeping a physical SIM slot open (or a stored eSIM profile inactive) as a backup. This is a valid configuration that maximises flexibility.
For a broader view of your options — including roaming, Wi-Fi calling, and portable routers — see [The Four Options for Mobile Data Abroad](/en/guides/four-options/).
---
## Profile Deletion and Reinstallation
One asymmetry between physical SIM and eSIM that frequently catches users off guard: what happens when you delete a profile or cancel a plan.
With a physical SIM, cancelling a plan does not destroy the card. You can keep the SIM in a drawer and reactivate it or port the number later. Deactivated SIMs remain physically intact.
With eSIM, deleting a profile from your device removes the downloaded credentials from the eUICC. Whether you can reinstall the same profile depends entirely on the carrier or eSIM provider's policy. Travel eSIM providers frequently restrict reinstallation: once deleted, the profile cannot be re-downloaded, and a new purchase is required. Some carriers allow re-provisioning via their app at no charge; others charge a fee. Check the provider's policy before deleting any eSIM profile you may want to use again.
For more on this, including how to transfer an eSIM before deleting it, see [How to Transfer Your eSIM to a New iPhone](/en/guides/transfer-iphone/).
---
## Setting Up Your First eSIM
If you have decided to try eSIM, the most common activation method is QR code scanning. Your carrier emails or displays a QR code that encodes the SM-DP+ server address and your activation token. On iPhone:
1. Go to **Settings → Cellular (or Mobile Data) → Add Cellular Plan**.
2. Scan the QR code your carrier provided.
3. When the "Cellular Plan Detected" notification appears, follow the prompts to confirm.
On iOS 17.4 and later, you can also long-press a QR code image in Mail, Photos, or Safari to get an "Add eSIM" option directly.
For the complete step-by-step process, see [How to Set Up eSIM on iPhone via QR Code](/en/guides/qr-code-iphone/).
---
## Summary
| | Physical SIM | eSIM |
|---|---|---|
| **Standard** | ETSI TS 102 221 (UICC, 4FF Nano-SIM) | GSMA SGP.22 (eUICC) |
| **Activation** | Insert card; no internet needed | Download profile; internet required |
| **Carrier switch** | Swap cards | Download new profile in Settings |
| **Device change** | Move card instantly | Carrier re-issue required |
| **Multiple profiles** | One card = one carrier | Store 8+ profiles; switch in Settings |
| **Simultaneous active profiles** | Not possible | Yes, on MEP-capable devices (SGP.22 v3.0+) |
| **Profile deletion** | Card persists; reactivate anytime | Provider policy governs reinstallation |
| **Best for** | Universal compatibility; instant device swap | Instant remote activation; travel; multi-line |
Physical SIM and eSIM are not opposites — most modern devices support both, and the most flexible setup uses them together. The decision is primarily about which carriers are available to you and which use cases you need to cover.
Use [SimFinder](/en/) to search and compare plans with eSIM and physical SIM filters across multiple countries.
---
## Related Guides
- [What Is an eSIM?](/en/guides/what-is-esim/) — How eUICC works, the SGP.22 standard, and which devices support eSIM
- [What Is a SIM Card?](/en/guides/what-is-sim/) — IMSI, Ki, UICC form factors, and the shift to eSIM
- [The Four Options for Mobile Data Abroad](/en/guides/four-options/) — Roaming, local SIM, travel eSIM, and Wi-Fi router compared
- [How to Set Up eSIM on iPhone via QR Code](/en/guides/qr-code-iphone/) — Step-by-step QR code activation on iPhone
- [Dual SIM on iPhone: How to Use Physical SIM and eSIM Together](/en/guides/dual-sim-iphone/) — Configuration guide for running two lines on one iPhone
- [How to Transfer Your eSIM to a New iPhone](/en/guides/transfer-iphone/) — How to move your eSIM profile before switching devices
================================================================================
# How the SimFinder Quality Score Works
URL: https://sim-finder.com/en/guides/simfinder-score/
Type: guides (en)
Published: 2026-06-05
SimFinder assigns every mobile plan a **quality score** — a 0–100 number that represents estimated network quality, separate from price. In the default search view, quality contributes 50% to the plan ranking, and you can adjust that weight to prioritise whichever axis matters more to you.
The score is computed from carrier quality data stored in SimFinder's database, adjusted by a degradation factor based on carrier type. MNOs receive their base score unchanged. Sub-brands receive 95% of their parent MNO's score. MVNOs receive 85%.
Key points this article covers:
- What the quality score represents and what it does not
- How the score is computed from the implementation in `src/lib/scoring/engine.ts` and `src/lib/scoring/types.ts`
- Why MVNO and sub-brand plans score below their host MNO, and by how much
- How the score combines with price to produce the total ranking
- How to read the score display and adjust the Quality Weight slider
- Honest limitations: this is a design-based indicator, not a live field measurement
---
## What the Quality Score Is
The quality score is an estimate of the **network quality level you can expect** when using a particular plan, expressed on a 0–100 scale. A higher number means better estimated quality. It is derived from per-carrier quality data that SimFinder collects and stores, then adjusted for carrier type.
The score does not represent price, data allowance, or any contract term. It is a single-axis quality signal designed to sit alongside the price axis in the ranking formula. If you care only about the cheapest plan, you can weight quality to zero. If you care about network reliability and are willing to pay more for it, you can weight quality higher.
The quality axis is also **independent of data allowance**. A plan offering 3 GB and a plan offering unlimited data from the same carrier will receive the same quality score — data volume is handled separately by the price score and the search filters.
The score is also **not a live measurement**. It reflects data collected as of the last update cycle. For real-time field conditions, external speed-test services such as Ookla Speedtest Intelligence or nperf are the appropriate tool.
Each plan card shows a `qualityVerified` indicator. When this is `true`, the score is based on quality data collected specifically for that carrier or its confirmed parent MNO. When it is `false`, the score is an estimate derived from the average across other carriers in the dataset.
---
## The Three Carrier Types and Their Degradation Factors
SimFinder distinguishes three carrier types — `mno`, `sub_brand`, and `mvno` — and applies a multiplier to each when computing the quality score. These values come directly from `DEFAULT_SCORING_CONFIG` in `src/lib/scoring/types.ts`:
| Carrier type | Quality factor |
|---|---|
| MNO | 1.0 (no change) |
| Sub-brand | 0.95 |
| MVNO | 0.85 |
An MNO receives 100% of its own stored quality score. A sub-brand receives 95%. An MVNO receives 85%.
These factors reflect a structural reality of how wholesale mobile networks work. MVNOs do not own spectrum. They purchase capacity from an MNO through a Point of Interface (POI) and share that bandwidth with the MNO's own subscribers. When the network is congested, the MNO's direct subscribers are served first; MVNO traffic can be deprioritised. Sub-brands are MNO-owned and typically receive better internal priority than independent MVNOs — hence a smaller degradation (0.95 rather than 0.85).
The factor values are applied uniformly across all carriers of each type. There is no per-MVNO tuning in the default configuration. Whether one MVNO has a better wholesale agreement than another, or a sub-brand is more tightly integrated with its parent than another, is not captured by these factors. The factors model a category-level structural tendency, not an operator-specific measurement.
For a deeper explanation of how MVNO network architecture drives this speed difference, the [Why Is My MVNO Plan Slow?](/en/guides/why-mvno-slow/) guide covers POI congestion in detail. For a side-by-side comparison of the three carrier types across multiple dimensions, see [MNO vs MVNO vs Sub-Brand](/en/guides/mno-vs-mvno-comparison/).
---
## How MVNOs Inherit the Parent MNO's Score
When SimFinder computes the quality score for an MVNO plan, it looks up the plan's `carrierId` in the quality map. If no quality data exists for that carrier directly, it falls back to the `parentMnoId` field on the plan and uses that MNO's `overallScore` instead.
The relevant logic from `src/lib/scoring/engine.ts`:
```
let baseScore = qualityMap[plan.carrierId]?.overallScore ?? null;
if (baseScore === null && plan.parentMnoId) {
baseScore = qualityMap[plan.parentMnoId]?.overallScore ?? null;
}
```
After finding the base score, the MVNO factor (0.85) is applied:
```
const factor = config.mvnoQualityFactors[plan.carrierType] ?? 1.0;
const score = baseScore * factor;
```
The result is clamped to the 0–100 range.
This means that **two MVNOs running on the same host MNO will receive the same base quality score before the factor is applied**. The factor itself is uniform across all MVNOs. Individual MVNO differences — customer service, app quality, specific network agreements — are not captured by this score.
The `isVerified` flag on the quality data entry carries through to the plan card. If a carrier's quality data is marked unverified in SimFinder's dataset, the plan's `qualityVerified` field shows `false` even when a base score is available. An unverified score should be read with more caution than a verified one.
For background on what MVNOs are and how they operate, [What Is an MVNO?](/en/guides/what-is-mvno/) is the foundational reference.
---
## What Happens When Quality Data Is Missing
If SimFinder has no quality data for a carrier and no `parentMnoId` to inherit from, the engine computes the average `overallScore` across all carriers that do have data. If no quality data exists at all, the fallback value is 50. In both fallback cases, the `qualityVerified` flag is set to `false`.
There are three distinct situations that lead to `qualityVerified: false`:
1. **No carrier-level data and no parent MNO** — the score is set to the dataset average.
2. **Inheriting from a parent MNO whose data is marked unverified** — the inherited score is used but the unverified status carries through.
3. **Carrier data exists but is marked unverified** — the score is used but the flag is false.
In all three cases, the MVNO or sub-brand factor is still applied normally. The flag only indicates the verification status of the underlying quality data, not whether the factor was applied.
You can see this flag on each plan card. When `qualityVerified` is false, the score shown is an estimate that should be weighted less heavily in your decision. Plans from well-documented carriers show `qualityVerified: true`, meaning their score comes from confirmed quality data for that carrier or its verified parent MNO.
---
## How the Quality Score Combines With Price
The quality score is one of three components in the total ranking score. The other two are the price score and the bonus score. All three are added together using the formula below, and the result is what determines plan order in the results list.
```
totalScore = priceScore × (1 − w) + qualityScore × w + bonusScore
```
Where `w` is the quality weight (0 to 1), set by the Quality Weight slider in the search interface. The default is 0.5 (50%), which weights price and quality equally.
**priceScore** is a 0–100 normalised score within the current search result set. The cheapest plan in the results scores 100; the most expensive scores 0. This means price score is relative to the plans shown — it is not an absolute affordability measure.
**bonusScore** adds up to 10 points for two features: data rollover (+3 points) and family discount (+5 points if you have selected the family discount filter). These bonuses are capped at 10 total. They are independent of both quality and price. A plan that qualifies for both features gains 8 bonus points — below the 10-point cap. The two removed bonus types (`exactDataMatch` and `unlimitedForHeavyUser`) are defined in the config but are no longer applied by the engine, as noted in the source code comments.
The total score is rounded to two decimal places. When two plans tie on total score, the ranking tie-breaks first by lower predicted monthly price (after adding any voice option fees), then by more data. Unlimited data plans are ranked above capped plans in the data tie-break.
This means a plan's position in the list can shift depending on the voice minute input in the search form, because voice costs affect the predicted monthly price, which in turn affects the price score normalisation.
---
## Reading the Score in Search Results
Each plan card in SimFinder search results displays three score values:
- **Total score** — the weighted combination used for ranking (shown prominently)
- **Price score** — where this plan sits on the price axis within your current results
- **Quality score** — the adjusted quality estimate for this plan's carrier type
When you filter by carrier type (for example, showing only MVNOs), the price score recalculates relative to that filtered set. The quality score does not change based on filtering — it is an absolute value for the carrier, not relative to the visible result set.
**Sorting by quality** surfaces plans where the combination of network quality and your chosen weight is highest. Because an MNO plan at the top of a quality-sorted list may cost substantially more than an MVNO plan near it, comparing the two alongside the price column gives a complete picture.
The carrier type label on each card — MNO, sub-brand, or MVNO — directly indicates which factor was applied to compute the quality score. If you see two plans with identical quality scores from different carriers, they are likely on the same host network with the same base data.
The [MNO vs MVNO vs Sub-Brand](/en/guides/mno-vs-mvno-comparison/) comparison article describes how these carrier types differ in practice, which can help you calibrate what quality difference actually matters for your usage pattern.
---
## The Quality Weight Slider
The Quality Weight slider in the SimFinder search interface controls the `qualityWeight` parameter passed to the scoring engine. Moving it to 0% ranks results by price alone; moving it to 100% ranks by quality alone. The default of 50% balances both.
Adjusting this slider does not change which plans are shown — it reorders them. A plan that ranks first at 0% quality weight (cheapest) may rank much lower at 100% if its quality score is below average for the result set.
Note that the slider setting is not saved between sessions by default. If you return to SimFinder with a fresh search, the weight resets to 50. If you have a strong preference for one axis, adjust the slider as the first step of any search session.
Practical guidance on when to move the slider:
- If you use mobile data heavily during commute hours in a dense urban area, a higher quality weight helps surface plans less likely to be congested.
- If most of your usage is on home Wi-Fi and you want the lowest monthly outlay, a lower quality weight is more appropriate.
- If you are comparing plans in a country where you have little prior experience with local carriers, a moderate quality weight (the default 50%) is a reasonable starting point.
- If you are specifically comparing MNO-only plans, quality differences between them may be smaller than quality differences between carrier types; at that point, moving the weight lower may give more useful ordering by price.
For an explanation of the underlying quality metrics — speed, latency, and coverage — that feed into the `overallScore` stored in SimFinder's data, see [Understanding Mobile Network Quality Metrics](/en/guides/quality-metrics/).
---
## Limitations of the Quality Score
The quality score is a useful comparative signal, but it has several structural constraints you should be aware of:
**It is design-based, not field-measured.** The score reflects stored quality data, not real-time conditions on the network. Network conditions vary by location, time of day, and device. A plan with a score of 80 may perform better or worse than a plan with a score of 75 depending on where you use it.
**MVNO factor is uniform.** All MVNOs on the same host MNO receive the same 0.85 factor. This does not distinguish between MVNOs with dedicated bandwidth agreements and those running on shared wholesale capacity. Actual MVNO performance varies considerably by operator.
**Sub-brand factor is uniform.** All sub-brands receive 0.95 of their parent MNO's score regardless of how integrated they actually are with the parent network. Some MNO-owned sub-brands effectively operate at MNO priority; others do not.
**Quality data has a lag.** The `overallScore` in the quality data was accurate as of its collection date. Carrier infrastructure changes — network upgrades, congestion increases, new spectrum deployments — are not reflected until the data is updated.
**It is country-scoped.** The quality data and scoring configuration apply to the country selected in your search. Quality assessments from one country do not transfer to another.
**Missing data falls back to averages.** A plan showing `qualityVerified: false` has a score estimated from the average of other carriers in the dataset, not from direct measurement of that carrier.
For limitations specific to the connection between MVNO network architecture and real-world speed, [What Is an MVNO?](/en/guides/what-is-mvno/) explains the underlying POI mechanism that the degradation factor models.
---
## How the Score Is Not Used
Knowing what the score excludes is as useful as knowing what it includes:
- The quality score has **no influence on which plans appear** in search results. Filtering (by data size, carrier type, voice, family discount) determines the candidate set. Scoring only determines the order within that set.
- The score does **not reflect customer service quality**, app usability, SIM delivery speed, or contract flexibility.
- The score does **not factor in 5G vs 4G availability** as a separate dimension. Network generation differences may be partially captured in the `overallScore` data, but there is no explicit 5G weighting in the scoring engine.
- The score does **not penalise for data caps or speed throttling**. A plan with a 3 GB hard cap and a plan with an unlimited-but-throttled allowance on the same carrier receive the same quality score.
- The score does **not reflect geographic coverage differences** within a carrier. A carrier may have excellent urban coverage but poor rural coverage; the `overallScore` is a single aggregate, not a location-specific value.
- The bonus score (data rollover, family discount) is **separate from the quality score** and adds directly to the total. A plan with a lower quality score can rank above a higher-quality plan if it offers rollover and family discount and the user has those filters active.
---
## Using the Score to Make a Decision
The quality score is most useful as a **tie-breaker and a filter for eliminating outliers**, rather than as a primary selection criterion.
A practical approach:
1. Set your data requirement and any voice filter in the search form.
2. Leave the Quality Weight at 50% to see a balanced ranking.
3. Identify plans in the top 5–10 results. Check whether any have `qualityVerified: false` — those carry more uncertainty.
4. If two plans are close in total score but one has a higher quality score, consider whether the quality difference matters for your typical usage (urban commute vs home-heavy usage).
5. Use the [MNO vs MVNO vs Sub-Brand](/en/guides/mno-vs-mvno-comparison/) guide to understand what the carrier type difference means in practice before finalising.
If the top-ranked plans are all from the same carrier type (for example, all MVNOs), the quality score differences between them reflect only the quality data differences of their respective host MNOs — not individual MVNO quality. In that case, the quality score is less useful as a differentiator and price or bonus features may be the better selection axis.
What the score cannot do is replace a short trial period with the carrier. A score of 78 vs 74 is a marginal difference; a score of 90 vs 60 is a larger signal worth weighing. Many carriers offer short-term plans or trial periods — combining the SimFinder ranking with a direct trial gives the most reliable outcome.
For an explanation of the sub-brand category — MNO-owned brands that occupy the space between full MVNOs and the main carrier — see [What Is a Sub-Brand?](/en/guides/what-is-sub-brand/).
---
## Related Guides
- [What Is an MVNO?](/en/guides/what-is-mvno/)
- [MNO vs MVNO vs Sub-Brand](/en/guides/mno-vs-mvno-comparison/)
- [Understanding Mobile Network Quality Metrics](/en/guides/quality-metrics/)
- [Why Is My MVNO Plan Slow?](/en/guides/why-mvno-slow/)
- [What Is a Sub-Brand?](/en/guides/what-is-sub-brand/)
================================================================================
# Slow Mobile Data Speeds — How to Diagnose and Fix
URL: https://sim-finder.com/en/guides/slow-speed/
Type: guides (en)
Published: 2026-04-25
Your mobile data worked fine yesterday, but now pages load slowly, videos buffer constantly, or speed tests return results far below what your plan promises. Slow data is one of the most common mobile problems — and one of the most varied, because the cause can sit anywhere from your device's settings to a congested cell tower to a carrier-applied speed cap.
**This guide walks through each major cause of slow mobile data in order of likelihood and ease of diagnosis.** Start with the speed test to establish a baseline, then work through the sections that match your situation.
If your mobile data has stopped working entirely rather than just running slowly, see [No Mobile Data? How to Fix Data Connection Problems](/en/guides/no-data/) first — that covers the case where no data flows at all.
---
## Why Mobile Data Slows Down — Main Causes
Slow data falls into four broad categories. Knowing which category applies tells you where to look first.
### Device-Side Causes
- Outdated modem firmware or carrier settings
- Airplane Mode toggled recently and modem state not fully recovered
- Misconfigured APN (Access Point Name) — correct enough to connect, but not optimal
- Background apps consuming bandwidth
- VPN routing traffic through a distant or overloaded server
- Network mode locked to 3G instead of 4G/5G
### Network-Side Causes
- Cell tower congestion at peak times (rush hours, events, dense locations)
- Weak signal forcing the device to fall back to a slower generation (5G → 4G → 3G)
- Physical obstructions — buildings, underground car parks, dense urban areas
- MVNO bandwidth limits at the Point of Interface (POI) — see [What Is an MVNO?](/en/guides/what-is-mvno/)
### Plan-Side Causes
- Data cap reached — carrier applies throttling (speed floor) or cuts high-speed data
- "Unlimited" plan with a daily or monthly fair-use threshold beyond which speed is reduced
- Deprioritization policy on lower-tier plans during congestion
### Environment-Side Causes
- Inside a building with poor signal penetration
- Moving vehicle passing through coverage gaps
- Interference from other wireless devices or industrial equipment
- Weather rarely affects mobile signals meaningfully, but it can degrade microwave backhaul on some tower links
Understanding which bucket your problem falls into is the first diagnostic step. The sections below guide you through each one.
---
## How to Run a Reliable Speed Test
A speed test gives you a concrete number — download speed in Mbps (megabits per second), upload speed in Mbps, and ping (latency in milliseconds). Without a measurement, you are guessing.
### Recommended Tools
Three tools are widely used and produce comparable results:
- **Speedtest by Ookla** — speedtest.net or the iOS/Android app. Connects to a nearby server from a large global network. Shows download, upload, and ping. Results are generally representative of peak single-connection throughput.
- **Cloudflare Speed Test** — speed.cloudflare.com (browser-based). Also tests latency and network responsiveness (RPM — round trips per minute). Useful for diagnosing high-latency situations.
- **Fast.com** — powered by Netflix infrastructure. Measures download only in a simple interface. Useful for a quick check without signing up or installing an app.
Each tool measures slightly differently (server location, measurement methodology), so results will not be identical. For troubleshooting purposes, consistency across time matters more than the exact number.
### How to Run a Meaningful Speed Test
1. **Disable Wi-Fi before testing.** On iPhone: Settings → Wi-Fi → toggle off. On Android: Settings → Wi-Fi → toggle off. Running a speed test on Wi-Fi does not measure cellular speed.
2. **Disable VPN if active.** VPN overhead skews results; test the raw cellular connection first.
3. **Run three tests** 30 seconds apart and note the median result, not just the single highest.
4. **Note your location and time.** Results from your desk at 9 AM Tuesday will differ from results at a park on a Saturday afternoon.
5. **Check the result against your plan.** If your plan advertises up to 150 Mbps on 4G and you are getting 2 Mbps consistently in the same location, something is wrong. If you are getting 0.2 Mbps and your plan has a throttle speed of 200 kbps after the cap, the numbers are consistent with a throttle being applied.
### What the Numbers Mean
| Speed range | Practical capability |
|-------------|----------------------|
| Below 1 Mbps | Messaging and basic maps work; web pages load slowly; streaming fails |
| 1–5 Mbps | Standard web browsing works; SD video (480p) may work with buffering |
| 5–25 Mbps | Comfortable for most browsing, HD video (720p), video calls |
| 25–100 Mbps | Smooth HD streaming, fast downloads, reliable video conferencing |
| 100+ Mbps | 4K streaming, large file transfers, no practical limitation for typical use |
Note that Mbps (megabits per second) is not the same as MB/s (megabytes per second). Network speeds are almost always quoted in Mbps. To convert: divide by 8. A 10 Mbps connection downloads roughly 1.25 MB per second. For definitions of these and other mobile terms, see the [SIM and Mobile Glossary](/en/guides/glossary-index/).
For context on how different apps consume data, see [How Much Mobile Data Do You Need?](/en/guides/data-usage-guide/).
---
## Diagnosing Data Cap Throttling
Throttling is one of the most common and easiest-to-confirm causes of persistently slow speeds. If your speed is consistently slow across all locations and times of day, throttling is the first thing to rule out.
### What Throttling Looks Like
A throttled connection shows:
- Consistently low speed (often 128 kbps–1 Mbps) at all hours and locations
- Speed is the same whether you are in a clear outdoor area or a building
- The problem appeared mid-billing-cycle or right after unusually heavy usage
- Speed returns to normal at the start of your next billing cycle
### Throttling vs. Deprioritization
These are two different mechanisms that produce similar symptoms:
**Throttling** is a hard speed cap applied by the carrier once you cross a data threshold. Your speed is reduced to a fixed ceiling — commonly 128 kbps, 512 kbps, or 1 Mbps depending on your plan — and stays there until the billing cycle resets or you purchase an add-on.
**Deprioritization** is a dynamic policy. Your traffic is ranked lower than subscribers on premium tiers. During quiet periods, you get full speed. During congestion (rush hour, crowded venues), your speed drops because higher-priority traffic gets served first. Deprioritization alone, without a hard throttle, will produce variable rather than consistently low speeds.
Many MVNO plans and budget MNO tiers combine both: a hard throttle after a cap, plus deprioritization during congestion on any remaining capacity.
### How to Check If You Have Been Throttled
1. **Check your carrier's app or account portal.** Log in and look for remaining high-speed data. If it reads "0 GB remaining" or "high-speed data exhausted," you are throttled.
2. **Check plan documents.** Your plan's fair-use policy or product description will specify the throttle speed and the threshold that triggers it.
3. **Run a speed test at 2–4 AM local time** when network congestion is minimal. If the result is still the same low number (e.g., 0.2 Mbps), the cause is throttling rather than congestion.
### Options When Throttled
- **Wait for the billing cycle to reset.** The cap resets automatically on your plan's renewal date.
- **Purchase a data add-on (top-up).** Most carriers offer this via their app. Check whether the top-up restores full speed or a different speed tier.
- **Upgrade to a higher-tier plan.** If you regularly hit the cap, a higher-allowance plan may be more cost-effective.
- **Use Wi-Fi.** While throttled on cellular, route as much traffic as possible through trusted Wi-Fi networks to preserve the remaining high-speed cellular allocation for when you need it.
---
## Time of Day and Location Congestion
Even without throttling, a fast plan can feel slow when the tower serving your location is handling too many simultaneous connections.
### When Congestion Typically Peaks
Congestion follows human activity patterns:
- **Morning commute (7–9 AM)** — high smartphone activity on trains, buses, and at transit hubs
- **Lunchtime (noon–1 PM)** — people step outside and check phones in dense areas
- **Evening commute (5–7 PM)** — often the worst period in dense urban areas
- **Large events** — stadiums, concert venues, festivals, and convention centres can overwhelm the nearest towers even with good signal
These patterns vary by country and city density. If your slow speed follows this pattern — fast in the morning, slow at lunchtime, fast late at night — the cause is almost certainly congestion rather than a device or plan issue.
### Congestion vs. Coverage
Congestion and poor coverage produce similar symptoms (slow speed) but have different solutions:
- **Congestion**: signal bars are normal or good (2–4 bars), but speed is slow. Speed improves significantly off-peak or in a less busy area nearby.
- **Coverage gap**: signal bars are low (0–1 bar), device may show 3G or "E" (EDGE), and speed is slow regardless of time of day.
If you are in a coverage gap, moving to a window or stepping outside may help. Switching network mode is covered in [5G/4G, APN, and Network Mode Checks](#5g4g-apn-and-network-mode-checks) below.
### MVNO Users and POI Congestion
For MVNO subscribers, there is an additional congestion point beyond the tower: the Point of Interface (POI). This is where MVNO traffic merges with the host MNO's core network. The MVNO buys a fixed bandwidth allocation at this interface — if many MVNO subscribers are active simultaneously, they share that allocation. This can cause slow speeds even when the local tower is not congested and even when MNO subscribers on the same tower are getting full speed. This is discussed further in [MVNO-Specific Considerations](#mvno-specific-considerations-deprioritization) below.
---
## Device-Side Fixes (Restart, Airplane Mode, Network Reset)
Try these steps before investigating configuration or carrier issues — they take minutes and resolve a substantial proportion of slow-data complaints.
1. **Toggle Airplane Mode on, wait 10 seconds, toggle off.** Forces a fresh modem registration and clears transient data-session issues. **iPhone:** Control Centre or Settings → Airplane Mode. **Android:** quick settings tile or Settings → Network & internet → Airplane mode.
2. **Restart the device.** A full power cycle clears modem state and DNS caches more thoroughly than Airplane Mode alone.
3. **Check for a carrier settings update (iPhone).** Settings → General → About. If a prompt appears, tap **Update**. Carrier updates can include modem optimisations and APN corrections.
4. **Check for an OS update.** Outdated modem firmware can degrade radio performance. **iPhone:** Settings → General → Software Update. **Android (Pixel):** Settings → System → System update.
5. **Reset network settings** if slowness started after a SIM change or OS update. Erases Wi-Fi passwords, VPN configs, and custom APN settings, but does **not** delete eSIM profiles.
- **iPhone:** Settings → General → Transfer or Reset iPhone → Reset → **Reset Network Settings**
- **Android (Pixel):** Settings → System → Reset options → **Reset Wi-Fi, mobile & Bluetooth**
- **Android (Samsung):** Settings → General management → Reset → **Reset network settings**
After the reset, re-enter APN settings if your carrier does not push them automatically. For APN specifics on iPhone, see [APN Setup Guide for iPhone](/en/guides/apn-setup-iphone/).
---
## 5G/4G, APN, and Network Mode Checks
### Forcing 4G LTE When 5G Causes Problems
5G mmWave has very short range and can produce unstable throughput at the edge of its coverage area — the device shows "5G" but signal is marginal. Locking the network mode to 4G LTE can produce higher, more stable speeds in these cases.
- **iPhone:** Settings → Cellular → tap the active SIM → **Voice & Data** → switch from **5G Auto** to **LTE**. Test speed; switch back to 5G Auto for general use.
- **Android (Pixel):** Settings → Network & internet → SIMs → tap the SIM → **Preferred network type** → **LTE** or **LTE/3G/2G (auto)**.
- **Android (Samsung):** Settings → Connections → Mobile networks → **Network mode** → **LTE/3G/2G (auto connect)**.
### APN and Slow Data
A misconfigured APN can reduce speed even when data flows. This is more likely after an OS update or SIM profile change. Verify your APN matches your carrier's published settings. For iPhone procedures and common MVNO APN strings, see [APN Setup Guide for iPhone](/en/guides/apn-setup-iphone/).
### Signal Strength Check (Advanced)
Signal strength in dBm is more informative than the bar display. On **iPhone**, dial `*3001#12345#*` to enter field test mode — values between −50 and −80 dBm are strong; −100 to −110 dBm is weak; below −110 dBm is very weak. (Note: detailed signal information was reduced in some intermediate iOS versions; iOS 18 reliably exposes RSRP/SINR readings.) On **Android (Pixel)**, check Settings → About phone → SIM status → Signal strength. If signal is at or below −100 dBm, moving closer to a window or outside may improve both signal and speed.
---
## Background Apps, Priority, and VPN Impact
### Background Apps Consuming Bandwidth
Background processes — cloud photo uploads, app updates, streaming caches, sync services — compete for the same cellular bandwidth as your foreground app. If your browser or maps feel slow, check whether a large sync or update is running.
**iPhone:** Settings → Cellular → scroll down and toggle off cellular access for apps that do not need background data. Or enable **Low Data Mode** (Settings → Cellular → Cellular Data Options → Low Data Mode) to pause most background activity.
**Android:** Settings → Network & internet → Data Saver → turn on, then add essential apps to the unrestricted list.
### App and OS Updates Running in the Background
A large OS update or app download can consume most available bandwidth. On iPhone, long-press a loading app icon in the dock and tap **Pause Download**. On Android, open Google Play → library to check for active downloads and pause them.
### VPN Impact on Speed
A VPN encrypts traffic and routes it through a remote server, adding latency and reducing throughput — especially if the server is in a distant region or under load. To test: disconnect the VPN, run a speed test, then reconnect and compare.
If VPN is the cause: switch to a closer server, try WireGuard protocol (lower overhead than OpenVPN on cellular), or configure split tunnelling so only specific apps use the VPN.
---
## Tethering and Wi-Fi Router Issues
If you are using a mobile hotspot or pocket Wi-Fi router, the bottleneck may be the Wi-Fi link rather than the cellular connection.
**Isolate the bottleneck:** run a speed test directly on the hotspot device (or a device with its own SIM), then run the same test on a device connected via Wi-Fi. If the Wi-Fi-connected result is significantly slower, the issue is between the hotspot and your device — not the carrier.
Common Wi-Fi hotspot causes of slow speeds:
- Distance or obstructions between the hotspot and your device
- 2.4 GHz band congestion from neighbouring networks (switch to 5 GHz if the router supports it — look for a `_5G` suffix in the network name)
- Too many devices sharing the hotspot simultaneously (most portable hotspots support 5–10 devices, depending on model and chipset; performance degrades as connections increase)
- Hotspot plan has a separate, lower data cap or different priority tier than a direct SIM — confirm remaining data on the hotspot plan specifically
---
## MVNO-Specific Considerations (Deprioritization)
If you are on an MVNO plan (sometimes called a budget carrier or virtual operator), slow speeds during peak hours have a specific technical explanation that differs from MNO congestion.
### How MVNO Speed Works
An MVNO does not own radio towers. It buys wholesale network access from a licensed MNO (the physical network owner) and resells it. The interface between the MVNO's network and the MNO's core is called the **Point of Interface (POI)**. The MVNO pays for a fixed bandwidth allocation at this interface.
When many MVNO subscribers are active simultaneously, they share this fixed allocation. If the POI allocation is undersized relative to demand, all MVNO subscribers on that host network experience speed reduction — even when the cell tower itself is not congested. This is why MVNO subscribers sometimes see slowdowns that MNO subscribers on the same tower do not experience.
For a detailed explanation of how MVNOs lease network capacity, see [What Is an MVNO?](/en/guides/what-is-mvno/).
### Deprioritization During Congestion
Most MVNO wholesale agreements include a deprioritization clause: during network congestion, the MNO routes its own subscriber traffic first. MVNO traffic is queued behind MNO traffic. This means:
- On a lightly loaded network: MVNO subscribers get full speed.
- During congestion: MVNO speeds drop more than MNO speeds on the same tower.
This is a fundamental trade-off in MVNO pricing — lower monthly cost in exchange for lower network priority.
### Distinguishing POI Congestion from Coverage Issues
| Symptom | POI/Deprioritization | Coverage |
|---------|---------------------|----------|
| Speed during off-peak (2 AM) | Normal | Still slow |
| Speed in a different location (less dense area) | Often better | May still be slow if coverage is thin |
| Signal bars | Normal (2–4) | Low (0–1) |
| Affects all MVNO users at similar times | Yes | No — coverage is individual |
### What to Do About MVNO Slow Speeds
1. **Verify the slowness is peak-time only.** Run speed tests at 2–4 AM. If speeds are much faster, POI congestion or deprioritization is the cause, not a plan or device issue.
2. **Check whether a higher-tier plan on the same MVNO offers better priority.** Some MVNOs sell "premium" tiers with better POI capacity or higher deprioritization ranking.
3. **Consider switching host networks.** In many markets, the same MVNO offers plans on multiple MNO networks. The MNO with better coverage in your area will generally perform better.
4. **Consider a sub-brand.** MNO-owned sub-brands (such as Cricket by AT&T, Metro by T-Mobile, or UQ Mobile by KDDI in Japan) typically receive higher network priority than independent MVNOs, because the sub-brand's traffic and the parent MNO's traffic are handled under the same company.
### When to Contact Carrier Support
Contact your carrier or MVNO's support if:
- Speed test results are consistently below the throttle speed stated in your plan documentation (e.g., your plan says throttle speed is 1 Mbps but you are getting 0.1 Mbps) — this suggests a technical issue, not just a policy limit.
- Speed is slow even in areas with excellent coverage and during off-peak hours, and your data balance shows high-speed data remaining.
- Speed issues started immediately after an account change (plan upgrade, SIM swap, profile change).
- You are experiencing slow speeds on a new SIM or eSIM that has not connected properly since activation — this may be an APN or network registration issue rather than a speed problem. See [No Mobile Data](/en/guides/no-data/) for activation-stage troubleshooting.
When contacting support, provide: the results of at least three speed tests (tool used, time, location), your current plan name, and your approximate data balance. This gives the support agent the information needed to diagnose without back-and-forth.
---
## Frequently Asked Questions
### What is the difference between throttling and deprioritization?
Throttling is a hard speed cap the carrier applies once you cross a data threshold — your speed drops to a fixed floor (often 128 kbps–1 Mbps) regardless of network conditions. Deprioritization is conditional: during congestion, higher-priority subscribers are served first and your speed drops only when the cell is busy. Throttling affects you on an empty network; deprioritization does not.
### My speed test shows 0.2 Mbps. Is my plan throttled?
Speeds in the 100–500 kbps range mid-billing-cycle are consistent with a throttle. Check your carrier's app for remaining high-speed data. If the balance reads zero, a soft cap has been applied. Throttled speeds of 128 kbps are sufficient only for messaging and basic maps.
### Why is my mobile data fast at home but slow at work or a stadium?
Location-based congestion. A single tower serving a dense area can be overwhelmed at peak times (lunchtime, rush hour, events). Speed typically returns once the area clears. Switching between 5G and 4G may help if one band has more headroom at that moment.
### Does a VPN slow down mobile data?
Yes. VPN traffic is encrypted, routed to a remote server, then forwarded — adding latency and reducing throughput. Test with VPN off versus on to confirm the impact. Switching to a closer server or to WireGuard protocol can reduce overhead.
### How do I distinguish MVNO throttling from network congestion?
Run speed tests at off-peak hours (2–6 AM). If speeds recover, the cause is congestion or deprioritization. If speeds stay consistently low regardless of time after you hit your data cap, throttling is more likely.
### Will resetting network settings fix slow data?
It can help if slowness started after a software update or SIM change, by clearing stale APN or radio settings. It will not fix congestion, throttling, or a weak signal. Note that it erases Wi-Fi passwords and VPN configs.
### Can background apps slow my connection?
They do not slow the cellular link itself, but they compete for bandwidth. With multiple apps syncing simultaneously, your foreground app receives only leftover throughput. Use Low Data Mode (iPhone) or Data Saver (Android) to restrict background consumption.
---
## Related Guides
- [No Mobile Data? How to Fix Data Connection Problems](/en/guides/no-data/) — for when data has stopped working entirely rather than just slowing down
- [How Much Mobile Data Do You Need?](/en/guides/data-usage-guide/) — understanding data consumption by app and estimating your needs
- [What Is an MVNO?](/en/guides/what-is-mvno/) — how MVNO network access and deprioritization work
- [APN Setup Guide for iPhone](/en/guides/apn-setup-iphone/) — APN configuration and troubleshooting for iPhone and MVNO plans
- [SIM and Mobile Glossary](/en/guides/glossary-index/) — definitions for throttling, deprioritization, POI, Mbps, and other terms
Use [SimFinder](/en/) to compare domestic mobile plans, or [SimFinder Travel](/en/travel/) to compare travel eSIM plans by destination.
================================================================================
# How to Receive SMS Two-Factor Authentication (2FA) Codes Abroad
URL: https://sim-finder.com/en/guides/sms-2fa-abroad/
Type: guides (en)
Published: 2026-06-03
Receiving SMS two-factor authentication codes abroad is straightforward when you understand which settings to configure. The three reliable methods are: keeping your home SIM active in a dual SIM setup with Data Roaming off, enabling international roaming on the home SIM for SMS, and using Wi-Fi Calling if your carrier supports it. The root-cause solution — which removes the dependency entirely — is migrating time-sensitive accounts to an authenticator app or passkey before you travel.
This guide covers all four methods and closes with a pre-departure checklist so you can verify your setup before you board.
---
## Why SMS 2FA Delivery Can Fail Abroad
SMS-based two-factor authentication works by having the service send a short text message containing a one-time code to your registered phone number. For that message to reach you, two things must be true: your home carrier must be able to route the SMS to a network where your device is reachable, and your device must be registered on that network.
Failures happen for three reasons:
**Home SIM not registered on a visited network.** If the home SIM line is disabled, or if your device has no cellular coverage from a roaming partner, the carrier has no path to deliver the SMS. The message may queue and deliver late, or the service may time out the code before it arrives.
**Data Roaming confusion.** Data Roaming controls whether your SIM can use the visited network for internet access. It does not control SMS delivery. Some travelers turn off the entire SIM line thinking this prevents charges — but disabling the line also prevents SMS reception. The correct configuration is: SIM line enabled, Data Roaming off, home SIM's data not in use.
**No roaming agreement at the destination.** Your home carrier's SMS gateway routes messages via SS7/Diameter signaling to the visited network. If your carrier has no roaming partner at your destination, incoming SMS cannot be delivered over cellular. This is the one scenario where cellular-based methods fail completely, and Wi-Fi Calling or an authenticator app becomes the only option.
Understanding this separation — SMS travels on the signaling network, not on the data plane — is the key insight this guide builds on.
---
## Method 1: Dual SIM with Home SIM Active for SMS
The most common and practical configuration for travelers is to run a travel eSIM for data alongside the home SIM for calls and SMS. This is the standard dual SIM travel setup described in [Using Dual SIM for Travel](/en/guides/dual-sim-for-travel/).
### How SMS Reception Works in This Configuration
When your home SIM line is active, your device registers on a partner carrier's network at your destination — the same registration process that handles voice calls. The visited network stores your location in its Visitor Location Register (VLR) and notifies your home carrier's Home Location Register (HLR) or Home Subscriber Server (HSS). When a service sends an SMS to your home number, your home carrier's SMS gateway routes it via SS7 signaling to the visited network, which delivers it to your device.
This signaling path is entirely separate from mobile data. The message arrives regardless of whether Data Roaming is on or off for your home SIM.
### The Correct Settings
| Setting | Home SIM | Travel eSIM |
|---------|----------|-------------|
| Line enabled | On | On |
| Data Roaming | **Off** | On |
| Cellular data source | No | Yes |
| Voice / SMS | Yes | No (data-only plans have no number) |
With Data Roaming off on the home SIM, the SIM registers on the visited network for voice and SMS purposes only. Background apps cannot use the home SIM for internet access, so no roaming data charges accumulate.
### Voice Roaming and SMS
On most carriers, the SIM registers on the visited network for voice and SMS simply by having the line active — the Voice Roaming toggle only enables or disables whether you can make and receive calls, not whether the registration happens. On some carriers, Voice Roaming must be explicitly enabled for inbound SMS to be delivered.
If you are uncertain about your carrier's behavior, leave Voice Roaming enabled on the home SIM. The registration costs nothing; charges apply only when you make or receive an actual call.
Verify your home carrier's roaming policy in their international roaming documentation before departure. The [International Roaming guide](/en/guides/international-roaming/) explains the carrier agreements (GSMA AA.12) that determine which networks your home SIM can register on at your destination.
### One Risk: Home-SIM Data Roaming Charges
If Data Roaming is accidentally left on for your home SIM while the travel eSIM is also active, your home SIM can accumulate roaming data charges from background app activity — email syncing, push notifications, app updates — without you noticing. Confirm Data Roaming is off before boarding.
On iPhone: Settings > Cellular > [home SIM line] > Data Roaming — set to off.
On Android (Pixel): Settings > Network & Internet > SIMs > [home SIM] > toggle Mobile data to off.
On Samsung: Settings > Connections > SIM card manager > [home SIM] — disable mobile data for that line.
---
## Method 2: International Roaming on the Home SIM for SMS
If you are not using a travel eSIM and are relying on your home SIM for all connectivity, enabling international roaming on that SIM also ensures SMS 2FA codes are delivered. The difference from Method 1 is that here the home SIM handles data as well — at roaming rates.
SMS delivery itself works the same way: when Data Roaming is on, the SIM is registered on the visited network, and inbound SMS arrives via the carrier's signaling network.
The practical concern with this method is cost management for data. Roaming data charges vary significantly by carrier and destination — some postpaid plans include data in covered countries at no extra cost, while others charge per-megabyte or per-day rates. The [International Roaming guide](/en/guides/international-roaming/) describes the three main pricing models (pay-per-use, day passes, and included roaming) in detail.
For SMS-only needs — receiving 2FA codes without using the home SIM for browsing — Data Roaming can remain off even in this scenario. The key point: enabling Data Roaming is not required for SMS receipt, but if your home SIM is your only SIM, you will want it on for general internet access anyway.
To compare whether roaming or a travel eSIM is the better connectivity approach for your trip, see [4 Ways to Stay Connected Abroad](/en/guides/four-options/).
---
## Method 3: Wi-Fi Calling for SMS Reception
Wi-Fi Calling (also called Voice over Wi-Fi or VoWiFi) allows your home carrier to deliver calls and SMS to your device over an internet connection rather than over the cellular network. When your device is connected to Wi-Fi and Wi-Fi Calling is active, your home number remains reachable — including for SMS 2FA codes — even if your home SIM has no cellular signal at the destination.
This method is particularly useful in two situations: when your carrier has no roaming partner at your destination, and when you want to avoid any cellular roaming registration on the home SIM entirely.
### Technical Basis
Wi-Fi Calling uses IPsec-encrypted tunnels to connect your device to your home carrier's IMS (IP Multimedia Subsystem) core over the internet. The carrier delivers SMS through this tunnel the same way it would over a cellular connection. From the SMS sending service's perspective, the message was delivered to your number — the underlying transport is transparent.
### How to Enable It
**On iPhone:** Settings > Cellular > [home SIM line] > Wi-Fi Calling. Enable the toggle. The option is only visible if your carrier supports Wi-Fi Calling for that line.
**On Android (Pixel):** Settings > Network & Internet > SIMs > [home SIM] > Wi-Fi calling. Enable the toggle.
**On Samsung:** Settings > Connections > SIM card manager > [home SIM] > Wi-Fi calling.
Enable it while still on your home network and verify the status bar shows "Wi-Fi Calling" or equivalent text. Some carriers require you to register an emergency address before Wi-Fi Calling activates.
### Limitations
Wi-Fi Calling availability varies by carrier. Not all carriers offer it, and some that do restrict it to domestic use or to certain destination countries. If your home carrier disables Wi-Fi Calling in the country you are visiting, this method will not work there.
Additionally, Wi-Fi Calling requires a working Wi-Fi connection. If you are in a location with no Wi-Fi — a moving train, a remote area — it provides no SMS coverage.
Because of these limitations, Wi-Fi Calling works best as a complement to Method 1 (dual SIM), not as a standalone solution for all destinations.
---
## Method 4: Migrate to an Authenticator App or Passkeys
The methods above all preserve SMS 2FA — they keep the system working while you travel. This method eliminates the dependency: if your accounts use a TOTP authenticator app or passkey instead of SMS, you never need to worry about SMS delivery at all.
### TOTP Authenticator Apps
TOTP (Time-based One-Time Password) authenticator apps implement RFC 6238. They generate a 6-digit code every 30 seconds using a shared secret (set up at enrollment) and the current time. The code is computed on-device — no network connection is needed. Common options include Google Authenticator, Microsoft Authenticator, and Authy.
To migrate an account:
1. Go to the account's security settings and look for "authenticator app," "TOTP," or "two-factor authentication."
2. The service displays a QR code containing the shared secret.
3. Open your authenticator app and scan the QR code.
4. The app begins generating codes. Enter the current code in the service's enrollment flow to confirm it is working.
5. Store the backup codes the service provides (see the Pre-Departure Checklist section below).
Do this migration before traveling. Some services impose a short delay after changing 2FA methods, and you want to verify the authenticator is working on your home Wi-Fi before you need it abroad.
### Passkeys
Passkeys use public-key cryptography (FIDO2/WebAuthn specification) to authenticate without a password or a second factor. The private key stays on your device, protected by biometrics or a device PIN. There is no code to enter and no SMS required. Authentication works offline — you do not need any network connection on the device for the passkey operation itself (though a connection may be required to complete the login flow on the service side).
Support for passkeys varies by service. Check whether your bank, email provider, or other high-sensitivity services offer passkeys as an authentication option in their security settings.
### Priority Accounts to Migrate
Before traveling, migrate these account categories first:
- Online banking and financial services
- Primary email accounts
- Password managers
- Work or enterprise accounts
- Any service where account lockout would create a serious problem during your trip
Less time-sensitive accounts — streaming services, social media — can be lower priority if the service allows backup code entry or has account recovery options that work without a second factor.
---
## Pre-Departure Checklist for SMS 2FA
Run through this before departure. The [Pre-Trip Smartphone Checklist](/en/guides/pre-trip-checklist/) covers the full connectivity setup; this section focuses on 2FA specifically.
### Two Weeks Before
**Identify which accounts use SMS 2FA.** Review your most-used and highest-sensitivity accounts. Most services list the active 2FA method in account security settings.
**Migrate critical accounts to an authenticator app.** Follow the steps in Method 4 above. Verify each migration is working before moving to the next account.
**Download backup codes for each migrated account.** Most services provide 8–10 single-use backup codes when you set up a new 2FA method. Download or print them and store them in a password manager or secure offline location.
### One Week Before
**Check your home carrier's roaming coverage for your destination.** Confirm that your carrier has a roaming partner where you are traveling. Log in to your carrier's app or website — coverage maps on roaming pages reflect active GSMA AA.12 agreements.
**Check whether your carrier requires Voice Roaming for SMS delivery.** Review the carrier's international roaming FAQ or call support if the documentation is unclear.
**Enable Wi-Fi Calling on your home SIM** if your carrier supports it. Do this while on your home network so you can confirm it activates correctly.
### Day Before / At the Airport
**Confirm Data Roaming is off on your home SIM** (if using a travel eSIM for data).
**Confirm the home SIM line is enabled** — not just present, but active in Settings.
**Test SMS receipt.** Ask a contact to send you an SMS to verify delivery works before you lose access to your home network. Alternatively, trigger a test 2FA code from a non-critical account.
**Confirm your authenticator app is working.** Open the app and verify it generates codes for your migrated accounts. Codes refresh every 30 seconds; watch one cycle to confirm timing is correct.
**Note your backup codes are accessible.** Confirm you can open your password manager or access your offline backup while in a scenario with no mobile data.
---
## Device Considerations for Dual SIM
Not all devices support dual SIM. If your device does not, Method 1 is not available — you must rely on roaming (Method 2), Wi-Fi Calling (Method 3), or the authenticator app migration (Method 4).
**iPhone:** Dual SIM (physical SIM + eSIM) is supported on iPhone XS and later. Dual eSIM (two eSIM profiles simultaneously active) is supported on iPhone 13, iPhone SE (3rd generation), and later models. iPhones use DSDS (Dual SIM Dual Standby) as confirmed by Apple's support documentation — both SIMs remain on standby and receive calls and SMS simultaneously, but during an active call on one line, the other line's data pauses.
iPhone 14 and later models sold in the United States have no physical SIM slot (eSIM-only). If your home carrier provides only a physical SIM, ask them to convert it to an eSIM before departure.
**Google Pixel:** Pixel 3a and later support physical SIM + eSIM. Pixel 7 and later support dual eSIM via the MEP (Multiple Enabled Profiles) feature introduced in GSMA SGP.22 v3.0. Pixel 10, 10 Pro, and 10 Pro XL sold in the United States are eSIM-only; the Pixel 10 Pro Fold retains a physical SIM slot.
**Samsung Galaxy:** Galaxy S20 and later support eSIM alongside a physical SIM on most variants. eSIM availability depends on region and whether the device is carrier-locked. Dual eSIM support (two simultaneous eSIM profiles) is not universal across Samsung models — confirm your specific device's specifications.
For a broader comparison of dual SIM modes (DSDS, DSDV, DSDA), see [What Is Dual SIM?](/en/guides/what-is-dual-sim/).
---
## Which Method Is Right for Your Trip?
| Scenario | Recommended method |
|----------|--------------------|
| Traveling with a dual SIM-capable device and a travel eSIM | Method 1: dual SIM, home SIM active for SMS |
| Single SIM device, short trip, strong included-roaming plan | Method 2: international roaming on home SIM |
| Home carrier supports Wi-Fi Calling, good Wi-Fi coverage expected | Method 3: Wi-Fi Calling as supplement to Method 1 or 2 |
| Destination with no roaming partner for your home carrier | Method 3 (Wi-Fi Calling) + Method 4 (authenticator app) |
| High-security accounts (banking, email) on any trip | Method 4: migrate to authenticator app or passkey |
| Single SIM device traveling to a destination with no roaming coverage | Method 4 only — no cellular SMS path is available |
The most resilient setup combines Methods 1 and 4: a dual SIM configuration ensures SMS codes still arrive for services not yet migrated, while authenticator apps handle critical accounts without any cellular dependency.
For travelers setting up their first travel eSIM, [SimFinder Travel](/en/travel/) lists current plans with coverage, data amount, and validity period by destination. Use it to find a plan that works alongside your home SIM for the dual SIM configuration described in Method 1.
---
## Frequently Asked Questions
### Will I receive SMS 2FA codes if my home SIM has Data Roaming turned off?
Yes. SMS delivery does not require Data Roaming to be enabled. When your home SIM line is active and the device is registered on a visited network in roaming mode, inbound SMS are routed through the carrier's signaling network (SS7/Diameter), not through the data plane. Turn Data Roaming off to avoid data charges, but leave the home SIM line itself enabled.
### What is a TOTP authenticator app and how does it replace SMS 2FA?
A TOTP app such as Google Authenticator, Microsoft Authenticator, or Authy generates a 6-digit code on your device using a shared secret and the current time, following the algorithm defined in RFC 6238. It works entirely offline — no SMS or network connection is required. Migrate accounts in the service's security settings by scanning the QR code the service provides.
### Does my home carrier need Voice Roaming turned on for me to receive SMS abroad?
It depends on the carrier. Many carriers deliver inbound SMS as long as the SIM is registered on a visited network, regardless of the Voice Roaming toggle. Others require Voice Roaming to be explicitly enabled. Check your home carrier's roaming documentation before departure. If unsure, leave Voice Roaming on — charges apply only when you actually make or receive a call, not for the registration itself.
### What are backup codes and how should I use them?
Backup codes are single-use recovery codes generated by a service when you set up 2FA. Each code works once and bypasses the 2FA requirement. Download and store them in a password manager or secure offline location before traveling. Treat them as credentials — a backup code grants the same account access as a second factor.
### Can Wi-Fi Calling deliver SMS from my home number while abroad?
Yes, when supported. If your home carrier offers Wi-Fi Calling and your device is connected to Wi-Fi, the carrier routes calls and SMS over an IPsec-encrypted tunnel to your device using your home number. This works even if the home SIM has no cellular signal. Wi-Fi Calling availability varies by carrier and by destination country — verify your carrier's coverage before relying on it.
---
## Related Guides
- [Using Dual SIM for Travel](/en/guides/dual-sim-for-travel/) — Full configuration for keeping your home number active alongside a travel eSIM
- [Pre-Trip Smartphone Checklist](/en/guides/pre-trip-checklist/) — Complete timeline from two weeks out to departure, including connectivity and 2FA preparation
- [International Roaming Explained](/en/guides/international-roaming/) — How GSMA AA.12 agreements work and the three roaming pricing models
- [4 Ways to Stay Connected Abroad](/en/guides/four-options/) — Compare roaming, local SIM, travel eSIM, and portable Wi-Fi
- [What Is Dual SIM?](/en/guides/what-is-dual-sim/) — DSDS, DSDV, and DSDA modes explained, and which your device supports
================================================================================
# The Risks of SMS Two-Factor Authentication and Safer Alternatives
URL: https://sim-finder.com/en/guides/sms-2fa-risk/
Type: guides (en)
Published: 2026-06-04
SMS one-time passwords are the weakest form of two-factor authentication still in widespread use. NIST SP 800-63B classifies them as a "restricted" authenticator because the delivery channel — the public telephone network — was not designed for authentication and carries exploitable vulnerabilities. The two primary attacks are SIM swap fraud, which redirects your number to a device an attacker controls, and SS7 signaling exploitation, which can intercept SMS in transit without affecting your SIM at all. Phishing and real-time relay attacks round out the threat model.
Migrating high-value accounts from SMS OTP to a TOTP authenticator app or a passkey eliminates the delivery-channel risk entirely. TOTP generates codes locally on the device with no carrier involvement; passkeys (FIDO2/WebAuthn) are additionally phishing-resistant because the private key is cryptographically bound to the legitimate service domain.
This guide explains each threat in detail, covers the NIST SP 800-63B classification, and provides a concrete migration path for moving from SMS OTP to a stronger alternative.
---
## What Makes SMS OTP Structurally Weak
An SMS one-time password depends on two assumptions: that your phone number reaches only your device, and that the message is delivered privately. Both assumptions can be broken.
**The phone number assumption fails in SIM swap.** Your phone number is a carrier-level identifier, not a device-level one. A carrier can reassign it to any SIM card — including one an attacker controls. The reassignment requires no access to your device and no knowledge of your passwords.
**The private delivery assumption fails in SS7 exploitation.** The signaling protocol that routes SMS between carriers worldwide was designed for a closed network of trusted operators in an era before adversarial network access. Entities with SS7 access can issue commands that reroute or copy your SMS without visible indication on your device.
**Phishing compounds both.** Even without SIM swap or SS7 access, an attacker can build a real-time phishing proxy that relays your SMS code to a target service within the code's validity window. You enter the code into what appears to be the real login page; the proxy forwards it instantly and completes the attacker's login.
These are not theoretical edge cases. NIST SP 800-63B restricts PSTN-based OTP because the telephone network was not designed for authentication — SIM swap and SS7 exploitation are the documented real-world attack mechanisms that make that restriction necessary.
---
## NIST SP 800-63B: The Restricted Authenticator Classification
NIST Special Publication 800-63B — *Digital Identity Guidelines: Authentication and Lifecycle Management* — is the US federal standard for authenticator assurance levels. The current edition (SP 800-63B-4, 2025) defines the category of "restricted authenticators" in Section 3.2.9, with PSTN-based delivery addressed in Section 3.1.3.3.
A restricted authenticator is one that the NIST guidelines allow agencies to use, but only with additional conditions:
- The agency must monitor and assess threats against the authenticator type and offer users an alternative.
- The agency must provide a migration path away from the restricted authenticator when risk levels increase.
- Users must be informed that the authenticator is restricted and offered the alternative.
NIST SP 800-63B identifies the public switched telephone network (PSTN) as the delivery channel under restriction, covering both SMS OTP and voice call OTP delivery. The concern is that the security of authentication depends on the PSTN, which was not built for this purpose.
The practical implication: any organization following NIST guidance must treat SMS OTP as a transitional mechanism, not a long-term security control.
---
## SIM Swap Fraud: Redirecting Your Number
SIM swap fraud exploits the carrier's account management process. An attacker who has gathered enough personal information — typically from data breaches, phishing, or social engineering — contacts your carrier and impersonates you to request a SIM replacement. If the agent is convinced, your number is transferred to a SIM the attacker controls.
From that moment, every SMS sent to your number arrives on the attacker's device. Any account using SMS OTP as its second factor is now accessible: the attacker triggers a password reset, the code arrives on their device, and they set a new password before you notice your own service has been disrupted.
The visible sign of an active SIM swap is the sudden loss of mobile service on your device. Calls stop connecting. SMS stops arriving. Your phone shows no service in an area where it normally has coverage. By that point, the attacker may already have received their first authentication codes.
The FBI's Internet Crime Complaint Center recorded 982 SIM swap complaints in the United States in 2024, with reported losses of approximately $26 million — an average of more than $26,000 per victim. The UK's Cifas reported nearly 3,000 unauthorized SIM swaps in 2024. South Africa has documented SIM swap as a primary vector for banking fraud. The attack is not limited to any single market.
For the full attack chain and carrier-level protections (SIM locks, account PINs, port-out blocking), see the [SIM Swap Fraud guide](/en/guides/sim-swap/).
---
## SS7 Signaling Vulnerabilities: Interception Without Touching the SIM
SS7 (Signaling System No. 7) is a suite of telephony signaling protocols developed from the 1970s and standardized by the ITU in the 1980s, still used to route calls and SMS between carriers worldwide. SS7 was designed for a network of trusted telecommunications operators — mutual authentication between network nodes was not built in, because the assumption was that only authorized carriers could send SS7 messages.
That assumption no longer holds. Research published by Positive Technologies and presented at the 2014 Chaos Communication Congress demonstrated that an entity with access to an SS7 node — which can include rogue carriers, compromised network equipment, or parties who purchase wholesale SS7 access — can send MAP (Mobile Application Part) protocol commands to redirect or intercept SMS messages.
The specific SS7 capability exploited for SMS interception is the `SendRoutingInfoForSM` query, which is used legitimately by carriers to locate a subscriber before delivering an SMS. When this query is answered with attacker-controlled routing information, subsequent SMS messages intended for the victim can be delivered to the attacker's equipment instead.
In 2017, attackers exploited SS7 to intercept SMS banking OTPs and drain German bank accounts, with the attacks reported through carrier O2 Telefónica and affecting ordinary banking customers. Senator Ron Wyden and Rep. Ted Lieu also pressed the FCC on SS7 vulnerabilities in 2017. The FCC opened a formal inquiry into SS7 and SS7-based attacks on US networks.
Unlike SIM swap, an SS7 attack leaves no visible sign on the victim's device. Your phone continues to show service. Messages appear to be sent. The interception occurs in the network before the message reaches your carrier's delivery infrastructure.
SS7-based SMS interception requires access to SS7 infrastructure, which limits it to actors with carrier-level resources. It is not a mass-scale consumer attack. However, for high-value targets — financial accounts, government personnel, individuals with significant assets — it represents a credible threat that SMS OTP cannot defend against.
---
## Phishing and Real-Time OTP Relay
A third attack category requires neither SS7 access nor a SIM swap. A phishing proxy attack works as follows:
1. The attacker creates a convincing copy of a login page (bank, email provider, or similar).
2. The victim visits the fake page and enters their username, password, and — when prompted — their SMS OTP.
3. The proxy relays the credentials and OTP to the real service in real time, completing a login as the victim.
4. The SMS OTP is valid only for a short window (typically 30–120 seconds), but the relay is automated and fast enough to use it before it expires.
This attack works because SMS OTP provides no binding to the legitimate site. The code is a number; it does not encode the site's identity or the session. The victim has no way to know the code is being used on a different session.
TOTP authenticator apps are equally vulnerable to real-time phishing proxy attacks — the 6-digit TOTP code has the same relay window problem. Passkeys (FIDO2/WebAuthn) are specifically designed to resist this attack: the private key only responds to a cryptographic challenge from the legitimate origin domain. A phishing site on a different domain receives a response that is cryptographically invalid for the real service.
---
## Authenticator Apps (TOTP): Eliminating the Delivery Channel
A TOTP (Time-based One-Time Password) authenticator app removes the telephone network from the authentication path entirely. The app implements RFC 6238 and generates a 6-digit code every 30 seconds using a shared secret established at enrollment and the current time. The code is computed locally on the device; no SMS, no carrier, and no network connection is required.
Common authenticator apps include Google Authenticator, Microsoft Authenticator, and Authy. All implement RFC 6238 and are interchangeable for most services.
**What TOTP protects against:**
- SIM swap: No SMS is sent, so redirecting your number accomplishes nothing.
- SS7 interception: There is no SMS to intercept.
**What TOTP does not protect against:**
- Real-time phishing proxy: A TOTP code can be relayed in the same way as an SMS OTP if the attacker's fake page submits it fast enough.
- Malware on the device that reads the authenticator app's codes.
**Migration steps:**
1. Open the target account's security settings and select the option to add an authenticator app or change the 2FA method.
2. The service displays a QR code containing the shared secret.
3. Open your authenticator app and tap the option to add a new account. Scan the QR code.
4. The app immediately begins generating codes. Enter the current code in the service's enrollment flow to confirm it works.
5. Download and securely store the backup codes the service provides. These are single-use recovery codes that bypass 2FA if you lose access to the authenticator.
6. Once confirmed, remove SMS as the active 2FA method if the service allows it.
Migrate in priority order: primary email first (since email is used for password recovery on most other services), then banking, then any account where compromise would have serious consequences.
---
## Passkeys (FIDO2/WebAuthn): Phishing-Resistant Authentication
Passkeys implement the FIDO2 standard, which consists of the W3C Web Authentication (WebAuthn) API and the FIDO Client to Authenticator Protocol (CTAP). They replace both the password and the second factor with a single, phishing-resistant credential.
**How passkeys work:**
When you register a passkey with a service, the device generates an asymmetric key pair. The private key is stored in the device's secure enclave, protected by biometrics (fingerprint or face) or a device PIN. The service stores the public key. The private key never leaves the device.
When you authenticate, the service sends a challenge. Your device signs the challenge with the private key after verifying your biometrics or PIN. The service verifies the signature with the stored public key. No code is generated or transmitted.
**Phishing resistance:** The private key is bound to the service's origin (domain). The FIDO2 protocol embeds the requesting origin in the signed assertion. A phishing site operating on a different domain receives a signature that is cryptographically invalid for the real service — the relay attack that works against SMS OTP and TOTP codes does not work against passkeys.
**Current support:** Passkey support varies by service. As of 2024–2025, major platforms (Google, Apple, Microsoft) and a growing number of banks and web services support passkey enrollment in account security settings. The FIDO Alliance publishes a directory of services with passkey support at passkeys.dev.
**Hardware security keys** (such as YubiKey or Google Titan Key) implement the same FIDO2 standard using a physical device rather than the platform authenticator. They provide the same phishing resistance properties and work across devices without requiring device-specific enrollment.
---
## If SMS Is Your Only Option
Some services do not offer TOTP or passkey alternatives. When SMS OTP is the only available second factor:
**Enable your carrier's SIM lock.** All major US carriers offer a free account lock feature that blocks unauthorized SIM swaps and number port-outs. AT&T's Wireless Lock, Verizon's SIM Protection and Number Lock, and T-Mobile's SIM lock all block the social engineering step that enables SIM swap. Carriers in other countries offer equivalent features under various names — check your carrier's account security settings. Under FCC rules effective in 2025, US wireless providers are required to offer customers a free account lock option.
**Set a carrier account PIN.** A separate PIN (distinct from your screen lock) that carrier agents must verify before making account changes adds an additional barrier to impersonation. Choose a PIN that is not derivable from publicly available information — not your birthday, address, or national ID digits.
**Enable carrier notifications for SIM changes.** Many carriers send immediate alerts when a SIM swap or port-out is requested. Enabling these notifications gives you a narrow window to contact your carrier and halt an attack before it completes.
**Use a number not publicly associated with your identity** for accounts where SMS OTP is mandatory. A number used only for authentication and not shared on social media or public registrations is harder for attackers to target by name.
These measures reduce SIM swap risk substantially. They do not address SS7 interception, which requires carrier-level resources to exploit and is a less common threat for most individuals.
For SIM lock setup instructions by carrier, see the [SIM Lock guide](/en/guides/sim-lock/).
**If you suspect an active SIM swap** — sudden loss of mobile service is the primary real-time indicator — act immediately:
1. Call your carrier from a landline or a different phone. Report the unauthorized SIM swap and ask them to reverse it and lock the account against further changes.
2. From a device not dependent on your phone number, change your primary email password first. Email is the recovery path for most other accounts.
3. Revoke active sessions on banking, email, and any account that used SMS 2FA. Most services offer a "sign out all devices" option in security settings.
4. Re-enroll each account with an authenticator app or passkey as you regain access.
5. File a report with the relevant authority:
- United States: FBI IC3 at ic3.gov; FTC at reportfraud.ftc.gov
- United Kingdom: Action Fraud at actionfraud.police.uk
- Australia: ReportCyber at cyber.gov.au
- Other markets: your national cybercrime reporting agency
If you travel internationally and rely on SMS OTP, see [How to Receive SMS 2FA Codes Abroad](/en/guides/sms-2fa-abroad/) for roaming configuration guidance.
**Authenticator method comparison:**
| Method | SIM Swap Risk | SS7 Interception Risk | Phishing Resistance | Works Offline |
|--------|--------------|----------------------|---------------------|---------------|
| SMS OTP | High | Present | None | No |
| TOTP (authenticator app) | None | None | Low (relay window) | Yes |
| Passkey / FIDO2 hardware key | None | None | High (origin-bound) | Yes (auth step) |
The migration priority is: passkey where supported → TOTP authenticator app → SMS OTP with carrier lock and PIN enabled.
For MNP (number portability) and its implications for phone number security when switching carriers, see the [MNP guide](/en/guides/what-is-mnp/). For device and SIM PIN security features, see the [IMEI, PIN, and PUK guide](/en/guides/imei-pin-puk/).
---
## Frequently Asked Questions
The questions below address the most common points of confusion about SMS OTP security and the migration to stronger alternatives. For SIM-swap-specific questions, additional detail is in the [SIM Swap Fraud guide](/en/guides/sim-swap/).
### Why does NIST classify SMS OTP as a restricted authenticator?
NIST SP 800-63B (current edition: SP 800-63B-4, 2025) designates SMS OTP as a restricted authenticator because the delivery channel — the public switched telephone network — was not designed for authentication. The restriction is grounded in the PSTN's structural inability to provide authentication-grade security; SIM swap and SS7 exploitation are the documented real-world attack mechanisms. Agencies subject to NIST guidelines must offer users an alternative authenticator and provide a migration path away from SMS OTP.
### What is SS7 and how can it be used to intercept SMS?
SS7 (Signaling System No. 7) is the protocol suite that routes calls and SMS between carriers worldwide, developed from the 1970s and standardized by the ITU in the 1980s for a closed network of trusted operators. It lacks strong mutual authentication between network nodes. An entity with SS7 access can send MAP protocol commands — specifically `SendRoutingInfoForSM` — that redirect SMS delivery to attacker-controlled equipment, intercepting one-time passwords without any visible indicator on the victim's device.
### Is SMS 2FA better than no 2FA at all?
Yes. CISA states that enabling any form of MFA substantially reduces the risk of account compromise from automated attacks. The recommendation to move away from SMS OTP applies specifically to high-value accounts where an attacker has strong motivation to invest in SIM swap or SS7 exploitation. For most accounts, SMS OTP is a meaningful improvement over a password alone.
### How do I migrate from SMS 2FA to a TOTP authenticator app?
In the account's security settings, select the option to add an authenticator app. Scan the QR code with your authenticator app (Google Authenticator, Microsoft Authenticator, or Authy). Enter the code displayed to confirm enrollment. Save the backup codes the service provides in a password manager or secure offline location. Remove SMS as the active 2FA method once the authenticator is confirmed working.
### What is a passkey and how is it different from a TOTP code?
A passkey uses FIDO2/WebAuthn public-key cryptography. The private key stays on your device, protected by biometrics or a PIN, and never leaves the device. Authentication uses a signed cryptographic challenge — no code is generated or entered. Unlike TOTP, passkeys are origin-bound: the private key only responds to the legitimate service domain, blocking phishing proxy relay attacks that work against both SMS OTP and TOTP codes.
### What should I do if SMS is the only 2FA option available?
Enable your carrier's SIM lock feature (AT&T Wireless Lock, Verizon SIM Protection, T-Mobile SIM Lock, or your carrier's equivalent) to block unauthorized SIM swaps. Set a carrier account PIN. Enable carrier notifications for SIM changes. Use a phone number not publicly associated with your identity for mandatory SMS OTP accounts. These steps substantially reduce SIM swap risk. SS7 interception risk requires carrier-level resources to exploit and affects a narrower threat population.
---
## Related Guides
- [How to Receive SMS 2FA Codes Abroad](/en/guides/sms-2fa-abroad/) — Configuration for SMS OTP delivery while traveling internationally
- [SIM Swap Fraud: How It Works and How to Protect Yourself](/en/guides/sim-swap/) — Full SIM swap attack chain, carrier lock setup, and immediate response steps
- [SIM Lock: How to Lock Your SIM Card](/en/guides/sim-lock/) — Carrier SIM lock and account lock by carrier
- [What Is MNP (Mobile Number Portability)?](/en/guides/what-is-mnp/) — How number porting works and its implications for phone number security
- [IMEI, SIM PIN, and PUK Explained](/en/guides/imei-pin-puk/) — Device and SIM-level identifiers and PIN security
================================================================================
# Backup Line: Adding a Second SIM for Outage Resilience
URL: https://sim-finder.com/en/guides/sub-line/
Type: guides (en)
Published: 2026-04-25
A single SIM line on a single carrier is a single point of failure. Major outages — some lasting hours, one stretching to nearly a full day — have demonstrated that even large, well-established carriers can go dark without warning. A second SIM on a different network is the most straightforward way to stay connected when that happens.
This guide covers what a backup line is, what makes a good one, which providers to consider in the US and UK, and how to handle the practical details around SMS two-factor authentication and plan maintenance.
---
## What Is a Backup Line and Why Have One
A backup line (sometimes called a sub-line or secondary SIM) is a second mobile plan, kept active on a separate carrier alongside your primary SIM. It sits dormant on most days, serving as insurance rather than a daily driver. When your primary carrier goes offline, you switch your data or calls to the backup — no waiting for the outage to clear.
### Real Outages That Would Have Made a Backup Line Useful
Carrier outages are not hypothetical. Several high-profile incidents illustrate the pattern:
**October 2021 — Facebook / Meta infrastructure outage.** The Facebook BGP routing error took down Facebook, Instagram, and WhatsApp globally for approximately six hours. Because WhatsApp is the primary messaging and voice-call channel for hundreds of millions of people worldwide, many users found themselves suddenly without a functional communication channel. The underlying cause was unrelated to any mobile carrier, but it underscores how a single dependency can eliminate communication capability without warning.
**July 2022 — Rogers Communications Canada.** A Rogers network failure caused by a routing policy update during a maintenance window disabled voice, data, and SMS for approximately 12 million Canadian subscribers, with most critical services restored within approximately 15 hours and full restoration taking up to 26 hours. Emergency services (911) access was impaired in some areas. Subscribers on Bell or Telus were unaffected. Customers with a backup SIM on either of those carriers had working phones throughout the outage.
**July 2022 — KDDI Japan.** A KDDI (au) communications failure originating from a router malfunction affected approximately 39 million users affected, with the total disruption lasting approximately 61 hours and 25 minutes per KDDI's official incident report to Japan's Ministry of Internal Affairs and Communications. Calls on au and its MVNO partners running on the au network were affected. Subscribers with a secondary SIM on NTT Docomo or SoftBank were not affected.
**February 2024 — AT&T United States.** An AT&T network outage disabled voice and data for a reported tens of millions of users for approximately 12 hours (per FCC report). T-Mobile and Verizon customers were unaffected. The incident prompted significant media coverage of the value of having a second line on a different carrier.
These incidents share a common lesson: the outage affects a carrier, not a device. A phone with SIMs from two different carriers survived each of these events with one working line.
---
## Three Core Requirements
Not every second SIM makes a good backup. Three requirements set an effective backup line apart from one that fails when you actually need it.
### 1. Different Carrier (and Different Network Infrastructure)
The backup SIM must run on a different network from your primary SIM — not just a different brand. An MVNO on the same host network as your primary SIM is vulnerable to the same outage. If your primary plan uses Carrier A, your backup must use Carrier B's physical towers and infrastructure.
This matters particularly in markets where [MVNOs](/en/guides/what-is-mvno/) are common. An MVNO running on the same host MNO as your primary carrier provides no outage protection. When choosing a backup MVNO, verify which MNO it uses and confirm it is different from your primary.
### 2. Low Maintenance Cost
A backup line should be cheap to maintain. You are not paying for high-speed data or a large monthly allowance — you are paying to keep a number active and usable in an emergency. Pay-as-you-go plans, low-minimum monthly plans, or plans that accept minimal periodic top-ups are the right category. Plans that require a significant monthly spend to stay active increase the total cost of ownership without providing additional resilience.
### 3. eSIM Support
[eSIM](/en/guides/what-is-esim/) is the most practical format for a backup line on supported devices. There is no physical SIM to lose or damage, the profile is installed once and persists on the device, and you can disable the line when it is not needed to avoid battery drain. When an outage occurs, you switch to the backup line in Settings. On a device with a physical SIM slot and eSIM support, you can carry your primary physical SIM and a backup eSIM simultaneously at no additional hardware cost.
---
## Backup Line Candidates by Market
The following examples illustrate the type of low-cost, low-maintenance plans that suit a backup line. Prices change frequently — use [SimFinder](/en/) to verify current pricing in your market before signing up.
### United States
The US market has several providers that offer low-cost or pay-as-you-go options well suited to a backup role.
**T-Mobile Prepaid** — T-Mobile operates its own infrastructure independently of AT&T and Verizon. T-Mobile prepaid plans include eSIM activation. If your primary SIM is on AT&T or Verizon (or an MVNO hosted on either), T-Mobile prepaid is a natural backup choice.
**US Mobile** — An [MVNO](/en/guides/what-is-mvno/) that offers access to both T-Mobile and Verizon networks, with the ability to choose which network to use. This flexibility allows you to pick a network that is different from your primary carrier's infrastructure.
**Mint Mobile** — Runs on T-Mobile's network. Mint Mobile is a T-Mobile subsidiary following its 2024 acquisition. Suitable as a backup if your primary is on AT&T or Verizon; not suitable if your primary is also T-Mobile or a T-Mobile-hosted MVNO.
**Visible** — A Verizon subsidiary (rebranded as Visible by Verizon). Suitable as a backup if your primary is on AT&T or T-Mobile infrastructure.
**Carrier diversification for US users:**
- Primary on AT&T or AT&T MVNO → backup on T-Mobile or Verizon infrastructure
- Primary on T-Mobile or T-Mobile MVNO → backup on AT&T or Verizon infrastructure
- Primary on Verizon or Verizon MVNO → backup on AT&T or T-Mobile infrastructure
### United Kingdom
The UK has three main network owners: EE (owned by BT), O2 (owned by Virgin Media O2), and Vodafone. Three operated its own network and merged with Vodafone on 31 May 2025 to form VodafoneThree. Diversification means choosing a backup on a different underlying network.
**giffgaff PAYG** — giffgaff is an O2-owned flanker brand running on O2's network. PAYG (pay-as-you-go) credit does not expire as long as the SIM is used at least once every 180 days and the account is kept active. Suitable as a backup if your primary is not on O2 or an O2-hosted MVNO.
**Lebara** — Uses Vodafone's network. Suitable as a backup if your primary is not on Vodafone infrastructure.
**Tesco Mobile** — A joint venture operating on O2's network. Similar diversification logic to giffgaff.
**Carrier diversification for UK users:**
- Primary on EE/BT → backup on O2 or Vodafone infrastructure
- Primary on O2 or O2 MVNO → backup on EE, Vodafone, or Three
- Primary on Vodafone or Vodafone MVNO → backup on EE, O2, or Three
### General Principle: Any Low-Cost Prepaid eSIM
Beyond these specific markets, the principle is the same everywhere: look for a prepaid eSIM plan with no monthly minimum or pay-as-you-go charging, from a provider on a different network from your primary. Many regional operators and MVNOs offer SIM-only plans that can be kept dormant for months at minimal cost.
---
## Main + Backup Carrier Diversification
Choosing the right combination is more important than choosing any particular plan. The goal is zero shared infrastructure at the network layer.
**Questions to ask before choosing a backup:**
1. Which MNO does my primary SIM connect to (directly or via MVNO)?
2. Does my backup candidate use a different MNO at the infrastructure level?
3. If my backup is an MVNO, which host network does it use — and is that network different from my primary?
In markets with only two major network owners (common in smaller countries), diversification is still possible — it just means your backup must be on the other one. In markets with three or four network owners (US, UK, Japan), you have more options.
**Watch out for MVNO overlap.** In the US, a large share of MVNOs run on T-Mobile's infrastructure. If your primary carrier is T-Mobile and you add a Mint Mobile, Metro by T-Mobile, or Google Fi backup — all of which use T-Mobile infrastructure — you have not achieved any network redundancy. The 2024 AT&T outage would have left customers with these backup SIMs just as dependent on T-Mobile as before.
---
## Dual SIM Operation
Running a backup line and a primary line simultaneously is the most convenient configuration — you receive calls and data on either line without manually switching. This requires a [dual SIM](/en/guides/what-is-dual-sim/) device.
Most modern smartphones support dual SIM in some form:
- **iPhone 13 and later**: supports dual eSIM (two eSIM profiles active simultaneously) on most models. iPhone 14 and later US models are eSIM-only.
- **iPhone XS through iPhone 12**: physical SIM + one eSIM active simultaneously.
- **Google Pixel 7 and later**: dual eSIM supported.
- **Android devices with a physical SIM slot + eSIM support**: primary physical SIM + backup eSIM.
For iPhone-specific configuration, including line labeling, setting default data, and the Allow Cellular Data Switching option, see [Dual SIM Setup on iPhone](/en/guides/dual-sim-iphone/). For Android setup details, see [Dual SIM Setup on Android](/en/guides/dual-sim-android/).
In a dual SIM configuration, you can leave both lines active and configure which line handles data by default. During an outage on the primary carrier, switch the default data line to the backup in Settings — the change takes effect immediately.
If your device only supports a single SIM at a time, a backup line still has value. Keep the backup eSIM installed and inactive. When your primary carrier goes down, enable the backup line in Settings. This takes slightly longer than switching in a dual SIM configuration but is still faster than waiting for the outage to resolve.
---
## Activating and Switching to Your Backup
### Initial Setup
1. **Install the backup eSIM before you need it.** eSIM activation requires a working internet connection (Wi-Fi or mobile data). If your primary carrier is already down when you try to activate the backup, you cannot complete the activation. Install the backup eSIM while both networks are available.
2. **Make a test call or send a test message.** Confirm the backup line is active and functioning. Some prepaid plans require an initial activation step beyond profile installation.
3. **Label both lines clearly.** In Settings, name your lines (e.g., "Primary" and "Backup") so there is no confusion during an outage.
### Switching During an Outage
**On iPhone:**
- Settings > Cellular > Cellular Data → select the backup line
- Optionally, turn off the primary line under Settings > Cellular > [Primary Line Name] → Turn On This Line (off)
**On Android (varies by manufacturer):**
- Settings > Network & internet > SIMs → select the preferred SIM for data
- On Samsung: Settings > Connections > SIM card manager → select default data SIM
The process takes under a minute. No call to customer service is required.
### Keeping the Backup Active
After the outage ends and you switch back to your primary, return the data SIM setting to normal. Do not delete the backup eSIM profile — leave it installed so it is ready for the next incident.
---
## SMS 2FA: Backup vs. Main Carrier
Two-factor authentication (2FA) via SMS — where a one-time code is sent to your phone number — is the most common form of 2FA for banking, payments, and online services. This creates a direct dependency between your phone number and your access to critical accounts.
### The Core Decision
Which phone number do you register with your bank, financial accounts, and other critical services?
- **Register your primary number only**: convenient, but if your primary SIM fails or is inaccessible, you may not receive OTP codes during the outage.
- **Register your backup number for critical accounts**: ensures OTP delivery continues during a primary carrier outage. However, you must keep the backup number active and ensure the SIM stays accessible.
- **Use an authenticator app instead of SMS where possible**: TOTP apps (Google Authenticator, Authy, Apple Passwords, etc.) generate codes on the device itself without requiring any carrier connectivity. This eliminates the carrier dependency entirely for those services.
### Practical Guidance
For most users, the most robust approach is:
1. **Migrate high-value accounts (banking, email, brokerage) to authenticator-app-based 2FA** wherever the service supports it. This removes carrier dependency for the accounts where loss of access is most damaging.
2. **For services that only offer SMS 2FA**, consider which number they use and whether that SIM will be accessible during an outage on your primary carrier. If a service is registered to your primary number and that carrier goes down, having a backup data SIM does not help you receive that OTP.
3. **Do not assume SMS 2FA is secure against determined attackers.** SIM-swap fraud targets SMS 2FA specifically. An authenticator app is resistant to SIM-swap attacks; an SMS OTP is not.
The backup line solves the outage problem for SMS 2FA. It does not solve the security problem — that requires moving away from SMS 2FA entirely for sensitive accounts.
---
## Caveats
### Minimum Usage Requirements
Many prepaid plans require some form of activity to keep the number alive. This may be:
- A minimum monthly spend
- At least one call, text, or data session within a rolling window (commonly 60 days to 12 months depending on the provider, with some plans requiring usage every 90 or 180 days to keep the line active)
- A mandatory top-up within a set period
Check your backup plan's specific terms. Set a recurring calendar reminder to trigger before the expiry window closes. A small data session — even loading a single webpage — typically counts as sufficient activity for providers that use session-based activity requirements.
### Auto-Renewals
Some plans marketed as "prepaid" auto-renew by charging a stored payment method. If you do not want automatic charges, check whether auto-renewal is enabled and disable it, or choose a plan that does not auto-renew. The alternative is to top up manually each time and track expiry dates yourself.
### Prepaid Expiry and Number Reclamation
When a prepaid SIM expires, the associated number is eventually returned to the carrier's number pool and reassigned to a new customer. If you lose your backup number, any services registered to that number for SMS 2FA will send codes to whoever receives the reassigned number. This is both a usability issue and a security risk.
Avoid expiry by treating the minimum-usage requirement as a non-optional maintenance task. For a backup line carrying SMS 2FA for critical accounts, this is especially important.
### Number Portability
If you want to port your backup number away from its original carrier at some point — for example, if the provider discontinues a plan or raises prices — check the port-out terms before signing up. Most carriers in the US, UK, and other major markets support Mobile Number Portability (MNP), but some prepaid plans impose a minimum account age or activity requirement before porting is permitted.
### eSIM Profile and Device Lock-In
An eSIM profile is tied to the device on which it was activated. If you replace your phone, you will need to re-provision the backup eSIM on the new device. Contact your backup carrier before or shortly after switching devices to transfer the profile. Some carriers allow this online; others require a support request.
---
## FAQ
The structured FAQ answers are in the frontmatter above for schema.org/FAQPage compatibility. Below are additional details.
**Can I use a travel eSIM as a permanent backup line?**
Travel eSIMs (from providers like Airalo, Holafly, and similar) are designed for short-term international use and are typically data-only — they do not provide a local phone number or SMS capability. They are not suitable as a backup for SMS 2FA or for receiving calls. A backup line for outage resilience should come from a domestic carrier with a local number and SMS support.
**Does the backup line need to be on a postpaid contract?**
No. A prepaid plan is usually preferable for a backup line specifically because it avoids long-term commitments. The requirement is that the plan stays active, not that it provides a large monthly data allowance.
**What if I am in a country with only one or two carriers?**
In smaller markets with limited carrier choice, you may not have the option of full network diversification. In that case, consider whether a second SIM on the other available carrier provides partial resilience. An MVNO on a different host network from your primary is better than nothing, even if the choice is between two networks rather than three.
**Will a backup line on a different carrier always work when my primary fails?**
Not necessarily. Some outage scenarios — such as device failure, widespread power infrastructure failure, or natural disasters damaging tower density in a specific area — affect all carriers simultaneously. A backup line provides resilience against carrier-specific outages, not against all possible failure modes.
---
## Related Guides
- [What Is Dual SIM?](/en/guides/what-is-dual-sim/) — How DSDS, DSDV, and DSDA work, and which mode your device supports
- [Dual SIM Setup on iPhone](/en/guides/dual-sim-iphone/) — Step-by-step configuration for line labels, default data, and Allow Cellular Data Switching
- [Dual SIM Setup on Android](/en/guides/dual-sim-android/) — Android-specific dual SIM configuration by device type
- [What Is an eSIM?](/en/guides/what-is-esim/) — How eSIM profiles work, how to install them, and which devices support them
- [What Is an MVNO?](/en/guides/what-is-mvno/) — How MVNOs lease capacity from MNOs, and why MVNO choice affects outage resilience
================================================================================
# How to Switch from a Physical SIM to an eSIM
URL: https://sim-finder.com/en/guides/switch-physical-to-esim/
Type: guides (en)
Published: 2026-06-04
Switching from a physical SIM to an eSIM does not change your number or carrier. Your carrier reissues your existing subscription as an eSIM profile; you download it to your device, and the physical card is deactivated. The conversion takes under fifteen minutes in most cases. The main prerequisites are that your device supports eSIM and that your carrier offers an eSIM reissue for existing subscribers.
For background on what eSIM is and how it differs from a physical SIM, read [What Is an eSIM?](/en/guides/what-is-esim/) and [Physical SIM vs eSIM](/en/guides/sim-vs-esim/) before continuing. For setting up eSIM via QR code on iPhone, see [How to Set Up eSIM on iPhone via QR Code](/en/guides/qr-code-iphone/).
---
## Before You Start: Data Backup and Compatibility Check
Back up your device before making any carrier-level change — use iCloud Backup (iPhone) or Google One / local backup (Android). Switching SIM type does not affect device storage, but a backup provides a recovery point if something goes wrong.
Also confirm your account is in good standing. Some carriers temporarily block eSIM issuance for accounts with a past-due balance or a recent SIM swap.
---
## Check the Prerequisites
Before contacting your carrier, confirm three things.
### 1. Your Device Supports eSIM
Not every device has eUICC hardware. eSIM on iPhone begins with iPhone XS, XS Max, and XR (2018). On Android, Google Pixel 3 and later generally support eSIM; Samsung Galaxy S20 and later, and flagship devices from other manufacturers, also include eSIM on most variants. Budget Android phones released before 2022 often lack eUICC hardware entirely.
To check quickly on iPhone: go to **Settings > Cellular**. If you see **Add eSIM** or **Set Up Cellular**, your device supports eSIM.
For a full device compatibility reference, see [eSIM-Compatible Devices](/en/guides/esim-compatible-devices/).
### 2. Your Device Is Carrier-Unlocked
A carrier-locked device can only use eSIM profiles from the carrier it is locked to. If you are converting your SIM with your current carrier, this is not an issue — your locked phone can still accept an eSIM from the same carrier. If you plan to switch carriers as part of or after this conversion, unlock your device first.
On iPhone: **Settings > General > About > Carrier Lock**. If it reads **No SIM restrictions**, the device is unlocked.
### 3. Your Carrier Offers eSIM Reissue for Existing Subscribers
eSIM reissue for existing customers (as opposed to new activations) requires the carrier to have deployed SM-DP+ provisioning infrastructure for this purpose. Most major carriers in North America, Europe, Japan, South Korea, and Australia support it. Confirm the option is available on your carrier's website or app before proceeding.
---
## Online Conversion Method
Most carriers allow existing subscribers to request an eSIM reissue through their website or app without visiting a store. The exact steps vary by carrier, but the general flow is consistent.
**Step 1 — Log in to your carrier's website or app**
Open your carrier's official app or website and sign in to your account.
**Step 2 — Find the SIM management section**
Look for a section labeled **SIM Management**, **Manage SIM**, **Switch to eSIM**, or **eSIM Conversion**. This is often under account settings or device settings.
**Step 3 — Verify your identity**
Carriers require identity verification before issuing a new eSIM. This step varies by carrier and may include:
- Confirming your account PIN or password
- Entering a verification code sent by SMS to your current number
- Completing an ID check via a third-party identity verification service (uploading a government-issued ID and a selfie)
The purpose is to prevent unauthorized SIM swaps.
**Step 4 — Receive your eSIM profile**
After identity verification, the carrier generates an eSIM profile. You receive it as:
- A **QR code** displayed on screen or sent by email, or
- An **activation link** that redirects you to your device's eSIM setup, or
- A notification to open the **carrier app** on your device, which initiates the download automatically
**Step 5 — Download the eSIM profile to your device**
Follow the instructions for your device:
- **iPhone (QR code method):** Go to **Settings > Cellular > Add eSIM > Use QR Code** and scan the code. Full instructions: [How to Set Up eSIM on iPhone via QR Code](/en/guides/qr-code-iphone/).
- **Android (QR code method):** Go to **Settings > Network & Internet > SIMs > Add eSIM** and scan the code. Full instructions: [How to Set Up eSIM on Android via QR Code](/en/guides/qr-code-android/).
- **Carrier app:** Follow the in-app prompts. The app communicates directly with the carrier's SM-DP+ server and handles the download automatically.
**Step 6 — Confirm the switch**
Once the profile is downloaded, your carrier deactivates the physical SIM and activates the eSIM profile on your number. This transition typically takes a few minutes. Keep your physical SIM in the device until the eSIM is confirmed active.
---
## In-Store Conversion Method
If your carrier does not offer online eSIM reissue, or if you prefer in-person assistance, visit a carrier store or authorized retailer.
Bring the following:
- **Your device** (with the physical SIM installed)
- **Government-issued photo ID** — the same ID you used when you opened the account, or current government ID if the account was opened long ago
- **Your account credentials or PIN** — in most cases you will need to verify ownership of the account
A store representative will initiate the eSIM reissue from the carrier's backend system, then guide you through the profile download on your device. The physical SIM is deactivated when the eSIM becomes active. The process takes approximately ten to thirty minutes at the store, depending on queue and system response time.
Some carriers charge a conversion or SIM swap fee when the conversion is done in-store but process it at no charge online. Check your carrier's fee schedule in advance.
---
## The "Convert to eSIM" Option on iPhone
On iPhone, iOS offers a built-in shortcut for converting a physical SIM to eSIM on supported carriers — without initiating the process through the carrier's website or app first.
To access it: **Settings > Cellular > Convert to eSIM**
This option appears only if:
- Your iPhone model supports eSIM (iPhone XS or later), and
- Your installed physical SIM is from a carrier that has enabled this conversion path with Apple
When you tap **Convert to eSIM**, your iPhone communicates with the carrier's systems directly to initiate the reissue. You may still be required to complete identity verification steps on your device as part of the flow. After the carrier approves the conversion, the eSIM profile downloads automatically and the physical SIM is deactivated.
If **Convert to eSIM** does not appear in Settings, use the standard online or in-store method described above.
---
## What Happens to the Physical SIM Card
Once the eSIM profile is active and your carrier confirms the transition, the physical SIM is deactivated by the carrier's system. It can no longer connect to any network.
You can safely discard the physical SIM card. The card itself holds only the IMSI and Ki credentials needed to authenticate to the carrier's network; the deactivation voids those credentials on the carrier's end. No personal data such as contacts or messages is stored on modern SIM cards in a way that would pose a risk after deactivation.
If your device has a physical SIM slot, leaving the deactivated card in the slot after conversion causes no harm. However, removing it prevents potential confusion — for example, if you later factory-reset the device and iOS or Android prompts you to set up the SIM found in the slot.
---
## Brief Service Downtime During the Conversion
Expect a short period — typically a few minutes — when your phone has no mobile service. This occurs because the carrier must deactivate the physical SIM profile on their system before the eSIM profile becomes active. The timing gap between these two steps is brief but unavoidable.
To minimize disruption:
- Complete the conversion when you do not need mobile connectivity urgently.
- Download the eSIM profile onto your device before the physical SIM is deactivated, if your carrier's flow allows this sequence.
- If you need to make calls during the transition, use Wi-Fi calling or a messaging app over Wi-Fi.
If your service does not restore within fifteen minutes after the eSIM profile is marked as active, restart your device. If service is still absent, contact your carrier — the eSIM profile may not have been activated on the carrier's backend.
---
## Dual SIM Configuration After Conversion
If your device has a physical SIM slot that remains empty after the conversion, you can add a second eSIM or, on devices that support it, insert a physical SIM from another carrier. This creates a dual-SIM configuration.
After installing the eSIM profile, configure how each line is used from **Settings > Cellular** (iPhone) or **Settings > SIMs** (Android):
| Setting | What to configure |
|---|---|
| Default voice line | Which line is used for outgoing calls |
| Default SMS / iMessage line | Which line sends text messages |
| Mobile data line | Which line handles data traffic |
For a complete explanation of dual SIM options on iPhone, see [How to Set Up eSIM on iPhone via QR Code](/en/guides/qr-code-iphone/).
---
## If the Conversion Fails
### The QR code does not work
eSIM QR codes are single-use. If you scanned the code but the download failed (for example, due to a dropped Wi-Fi connection), the code may be invalidated. Contact your carrier and request a new QR code.
If your carrier provides an SM-DP+ address (also called an activation code or LPA string) instead of or in addition to a QR code, you can enter it manually. On iPhone, go to **Settings > Cellular > Add eSIM > Enter Details Manually** and type in the SM-DP+ address and activation code. On Android, look for **Add eSIM > Enter activation code manually** in your SIM settings. Manual entry produces the same result as scanning the QR code.
### The eSIM is installed but the physical SIM is still active
Some carriers' systems take a few minutes to complete the deactivation on their backend. Wait up to fifteen minutes, then restart your device. If the physical SIM is still active and the eSIM is not, call your carrier to confirm the backend activation was completed.
### "Unable to Add Cellular Plan" error on iPhone
This error typically means one of the following: the QR code has already been used or expired, your iPhone is carrier-locked to a different carrier, or your account has not yet been cleared for eSIM issuance on the carrier's system. Confirm each with your carrier before requesting a new code.
### Carrier says your device is not eSIM-eligible
Some carriers maintain device eligibility lists that restrict eSIM issuance to specific models. If your device is listed as incompatible but you believe it supports eSIM, escalate to carrier support with your device model and IMEI. Carriers update eligibility lists periodically.
---
## Reissue Fees
Carrier policies on fees for converting a physical SIM to eSIM vary. Some carriers process the conversion at no additional charge regardless of channel; others charge a SIM reissue or conversion fee, particularly for in-store conversions. A small number of carriers charge a fee for any SIM type change. Check your carrier's current fee schedule on their website or in their app before initiating the conversion — the FAQ entry at the top of this guide covers the general landscape.
---
## Keep Your eSIM Details Until Activation Is Confirmed
Save or screenshot your eSIM QR code, SM-DP+ address, or any carrier-issued activation details before beginning the installation. Retain them until the eSIM profile is visible in your device's SIM settings and you have confirmed mobile service on that line. Some failures are silent — the profile appears to install but is not active on the carrier's backend — and having the original details lets you retry without contacting carrier support again.
---
## When to Remove the Physical SIM Card
Leave the physical SIM in the tray until the eSIM profile is downloaded, your number is on the eSIM line, and the carrier has confirmed the physical SIM is deactivated. Once those conditions are met, remove it if you want the slot for a second SIM, or leave it — a deactivated card causes no interference. Do not remove it during the conversion itself, as some carrier flows require the physical SIM present in the device to verify account ownership before issuing the eSIM profile.
---
## Cautions and Things to Verify First
**Device must support eSIM hardware.** This is a hardware requirement — a software update cannot add eSIM support to a device that lacks an eUICC chip.
**Carrier must support eSIM reissue for existing subscribers.** Not all carriers that offer eSIM for new activations also support converting existing physical SIM subscriptions to eSIM. Verify before starting.
**eSIM QR codes may be invalidated after a download attempt.** Scan only after you are ready to complete the installation. If the download fails partway, the code may be invalidated; if it is, request a new code from your carrier.
**Some eSIM profiles have reinstallation restrictions.** Once you delete an eSIM profile from your device, reinstatement requires another reissue from your carrier. Some carriers restrict re-provisioning frequency. Keep the eSIM profile active unless you have a reason to delete it.
**Downtime is short but real.** If you rely on your phone number for two-factor authentication (SMS codes from banks or other services), schedule the conversion at a time when you will not urgently need those codes.
---
## Summary
| Step | Online | In-Store | Convert to eSIM (iPhone) |
|---|---|---|---|
| Start | Carrier website or app | Visit a carrier store | Settings > Cellular > Convert to eSIM |
| Identity verification | Account PIN, SMS code, or ID upload | Government photo ID | Device-based, carrier-dependent |
| Profile delivery | QR code, activation link, or carrier app | Staff-assisted, QR code or app | Automatic, in Settings |
| Physical SIM | Deactivated by carrier system | Deactivated by carrier system | Deactivated by carrier system |
| Typical time | Under 15 minutes | 10–30 minutes at store | Under 15 minutes |
To find eSIM-compatible plans, use [SimFinder](/en/).
---
## Related Guides
- [What Is an eSIM?](/en/guides/what-is-esim/) — How eUICC and the GSMA SGP.22 standard work, and which devices support eSIM
- [Physical SIM vs eSIM](/en/guides/sim-vs-esim/) — Full comparison of both technologies across activation, portability, and profiles
- [How to Set Up eSIM on iPhone via QR Code](/en/guides/qr-code-iphone/) — Step-by-step QR code activation on iPhone
- [How to Set Up eSIM on Android via QR Code](/en/guides/qr-code-android/) — Step-by-step QR code activation on Android
- [eSIM-Compatible Devices](/en/guides/esim-compatible-devices/) — Full device compatibility reference for iPhone, Android, and tablets
================================================================================
# SIM and eSIM for a Temporary Return Home
URL: https://sim-finder.com/en/guides/temporary-return/
Type: guides (en)
Published: 2026-06-06
When you live abroad and return home for a visit, you face a connectivity problem that is the reverse of the usual travel scenario: you need to function in a country you know well but no longer have a local line for. This guide is written specifically for that situation — short stays measured in days to weeks, not a permanent return.
The core question is whether to roam on your current foreign line, buy a short-stay prepaid SIM or eSIM, or revive a home-country number you kept stored. The right answer depends on how long you will be there, whether you need a local phone number for calls and SMS, and what each option actually costs for your specific itinerary.
For the separate question of what to do with your home number before you leave — how to park it, suspend it, or port it — see the [number storage guide](/en/guides/number-storage/). For a broader framework on managing connectivity when you first move abroad, see [Connectivity Strategy for Moving Abroad](/en/guides/expat-strategy/).
---
## Why a Temporary Return Is a Distinct Connectivity Problem
A standard travel scenario — visiting a foreign country — means dealing with a network you have no prior relationship with. A temporary return is different in three ways.
**You may already have infrastructure to revive.** If you held onto a home-country number through a suspension, a cheap plan, or a VoIP port, you already have a number that contacts can reach. The question is whether it is in a usable state and what it costs to activate it for the duration of your visit.
**Your foreign line may not roam well at home.** Not all foreign carriers have strong roaming agreements with home-country networks. Even if your destination is covered, roaming rates on a foreign plan can be high precisely because your home country is a common destination for your carrier's subscribers. Check the rates before assuming roaming is the convenient option.
**You have local identity documents.** As a returning citizen or resident, you typically satisfy any SIM registration requirements immediately, without the friction that foreign visitors face. This makes buying a prepaid SIM faster and cheaper for you than for a tourist visiting for the first time.
---
## Option 1: Roam on Your Current Foreign Line
The zero-effort option is to leave your foreign SIM active and let your phone roam on a home-country network. No new SIM, no new eSIM, no account setup.
### When This Works Well
Roaming on your foreign line makes sense when:
- Your foreign carrier's roaming rates or day passes for your home country are reasonable relative to the length of your stay.
- You need your foreign number available for calls or messages — colleagues abroad, apps tied to your current number, or services that require a callback on your foreign line.
- Your visit is very short — a few days where the cost of acquiring and returning a SIM is not worth the savings.
- You already have a postpaid plan that includes roaming as a standard benefit, making the effective incremental cost minimal.
### When Roaming Becomes Expensive
The cost calculation shifts quickly. If your foreign carrier charges day-pass rates that accumulate over a longer stay, or if you need high volumes of data for work, the per-day cost of roaming will typically exceed what a short-stay prepaid SIM would cost for the same usage.
Also check whether your foreign carrier has strong coverage in your home country at all. The fact that a carrier has a roaming agreement does not mean the selected partner network has good signal everywhere you plan to go. For the technical detail on how roaming agreements work and how your device selects a partner network, see [International Roaming Explained](/en/guides/international-roaming/).
### Practical Steps for Roaming on Your Foreign Line
1. Before departure, confirm your home country is covered on your foreign carrier's roaming page.
2. Verify the pricing model: pay-per-use, day pass, or included.
3. If using a day pass, check whether it activates on first network contact or first data use — arriving late at night in a new time zone can trigger a full day's charge before you intend to start using your phone.
4. Keep Data Roaming off until you have confirmed the rates and are ready to use data.
---
## Option 2: Short-Stay Prepaid SIM or eSIM
A prepaid SIM or eSIM from a home-country carrier gives you local rates for calls and data, a local number if the plan includes voice, and no ongoing commitment after you leave. This is the most cost-effective option for stays of around a week or more, and it avoids accumulating roaming charges on your foreign line.
### Data-Only vs. Voice-Capable Plans
**Data-only prepaid SIMs and eSIMs** are available from most carriers and many MVNOs. They are typically the cheapest option if you do not need a local phone number — you handle calls through WhatsApp, FaceTime, or similar apps over data, and SMS is not required. Most travel eSIMs fall into this category. The [How to Choose a Travel eSIM guide](/en/guides/how-to-choose/) covers the criteria for selecting a data-only plan in detail, including coverage, data amount, validity period, and activation method.
**Voice-capable prepaid plans** assign you a local number and support standard calls and SMS. They are more expensive than data-only plans but necessary if you need to receive calls at a local number — from family who do not use messaging apps, from businesses, or to receive SMS verification codes from home-country services. Not all carriers offer voice-capable prepaid plans alongside their eSIM product line; some require a physical SIM for plans that include a local number.
### eSIM Voice Plans for Short Stays
Some home-country carriers now offer eSIM plans that include both a data allowance and a local voice number. These can be downloaded before you leave — installed on your home Wi-Fi abroad — so you arrive with a working home-country number and data connection already in place. The activation model varies: some plans start the validity clock on install, others on first network connection in the home country.
Before purchasing a voice-capable eSIM from your home-country carrier, confirm:
- The plan includes a phone number (not all carrier eSIM products do, even for voice plans)
- Whether installation before arrival starts the validity period
- Whether the eSIM can coexist with your foreign line in a dual-SIM configuration
For a step-by-step guide to installing a new eSIM profile, see [Your First Travel eSIM](/en/guides/first-time-guide/).
### Short-Stay Plan Lengths
Prepaid and travel plans cluster around standard durations:
| Stay length | Typical plan options |
|---|---|
| 1–3 days | Day-pass roaming on foreign line, or short-validity prepaid (3–7 day plans) |
| 4–7 days | Short-stay prepaid SIM or eSIM (7-day plans are common) |
| 2–4 weeks | Standard prepaid (14-day, 15-day, or 30-day plans) |
| 1–3 months | Monthly prepaid or a low-cost MVNO plan, possibly with auto-renewal |
| 3+ months | Consider a full local plan; see [After Returning Home](/en/guides/after-return/) |
For stays of three months or more, you are likely past the point where a short-stay approach makes financial or practical sense. A longer-term local plan — possibly postpaid if you qualify — typically costs less per month and provides better service.
---
## Option 3: Reviving a Stored Home-Country Number
If you kept a home-country number active while living abroad, a temporary return is an opportunity to use it in its intended network. The practicalities depend on how the number is being held.
### If the Number Is on a Low-Cost Plan or Carrier Suspension
The simplest case: the number is already on an active account. If the SIM is a physical card, you may need to locate it and ensure the account is topped up or out of suspension. If it was on an eSIM, you may need to re-enable the profile or confirm the account is in active status.
Check with your home carrier whether the suspension terms require any action to reactivate for the period of your visit. Some suspension services transition automatically to normal billing when you use the line; others require a manual reactivation request.
### If the Number Was Ported to a VoIP Service
A number held on a VoIP platform such as Google Voice (in the United States) or similar services in other markets remains reachable via the VoIP app regardless of where you are in the world. During your home visit, the number continues to route through the VoIP platform — you receive calls and SMS through the app, not through a local carrier network. Inbound calls work the same as when you are abroad. Outbound calls to local numbers are possible through the app, subject to the VoIP service's calling rates.
One practical constraint: some services reject VoIP numbers for SMS two-factor authentication. If you need to receive OTP codes from home-country banks or services during your visit, a VoIP-held number may not be sufficient. In that case, you may need a physical SIM or a voice-capable eSIM for the period of your return.
For a full comparison of number retention approaches — downgrading plans, using a sub-line, porting to VoIP, and more — see the [number storage guide](/en/guides/number-storage/).
### If the Number Has Been Cancelled
If you cancelled your home-country line without a retention strategy and the number has been reclaimed and reassigned by the carrier, recovery is not possible. Phone numbers are returned to the national numbering pool and reallocated to new subscribers once reclamation timelines have passed. A cancelled number cannot be transferred back.
In this case, a short-stay prepaid SIM is your only option for a local number. It will be a new number, not your former one.
---
## Identity Verification for Short-Stay SIMs
Most countries require identity verification for prepaid SIM purchases. For a citizen or registered resident returning home, this is typically straightforward, but the exact requirements and process depend on the country and carrier.
### Common Documentation Requirements
In most markets, prepaid SIM registration requires at least one form of government-issued identification. Common accepted documents include:
- National identity card
- Passport
- Driver's licence
- Residency registration document (in countries where this is a separate document)
As a returning citizen, your national ID or passport is almost always sufficient. Carriers do not typically require proof of a current local address for prepaid SIM activation, though postpaid contract applications often do require one.
### eSIM Registration
Registering an eSIM at a home-country carrier typically follows the same identity verification process as a physical SIM, with the difference that installation is digital. Most carriers allow eSIM registration and plan purchase through their app or website with identity document upload, rather than requiring a visit to a carrier store. This makes it practical to complete the registration process before you travel and have the profile ready to install on arrival — or to install it on home Wi-Fi abroad and have it auto-connect when your phone lands.
### Countries with Strict Real-ID Registration
Some countries apply strict real-name SIM registration requirements, including requirements to match SIM ownership to government databases. In these markets, the registration process may take longer than a walk-in purchase at a carrier kiosk, particularly if the verification system needs to confirm your identity against records that have not been updated since you left. Allow more time for activation in markets with stricter registration systems.
---
## Airport Pickup vs. Pre-Installed eSIM
Two practical timing choices exist: buying a SIM at the airport upon landing, or installing an eSIM before departure and arriving already connected.
### Airport SIM Kiosk Purchase
Most major airports in developed markets have carrier-operated kiosks or retail stores selling prepaid SIMs in the arrivals hall. Advantages:
- No advance planning required.
- You can evaluate plans on arrival with current pricing.
- Physical SIM cards are available for devices without eSIM support.
Disadvantages:
- Airport kiosk pricing is sometimes higher than online or in-store pricing elsewhere.
- You have no data connection while queuing for the SIM — useful if you need to reach someone immediately after landing.
- If your device uses a nano-SIM or has a tray you would need to eject, you need to handle the physical swap at the airport with your baggage.
### Pre-Installed eSIM
For eSIM-capable devices, the alternative is to purchase a plan from a home-country carrier or travel eSIM provider before you leave, download the profile over Wi-Fi, and arrive with the line already installed. Advantages:
- Data is active the moment your phone connects to the home-country network on landing.
- No time spent at a kiosk or store.
- You can compare plans carefully before purchasing, without the time pressure of the arrival process.
Disadvantages:
- Requires advance planning and eSIM-compatible device.
- Some plans start their validity period on installation, not first use — check before purchasing to avoid wasting days before you land.
- If you need a physical SIM for any reason (device not eSIM-capable, plan requires physical SIM for voice), this option is not available.
The pre-installed eSIM approach is particularly effective for expats who return to the same home country regularly. Once you identify a reliable short-stay plan, you can reuse the same provider for each return trip.
---
## Choosing by Stay Length
The right approach shifts significantly with the duration of your visit.
### A Few Days (1–4 days)
At this length, the effort of acquiring a new SIM may not justify the savings over roaming. If your foreign carrier has a reasonable day-pass option for your home country, or if your plan includes roaming as a standard benefit, roaming is the path of least resistance.
If you do need a local number — to make or receive local calls, or to receive SMS from home-country services — a short-validity prepaid SIM or a pre-installed eSIM makes sense even for a short stay.
### About a Week (5–10 days)
For a typical week-long visit, a short-stay prepaid SIM or eSIM (7-day plans are widely available) usually costs less than accumulated roaming charges and provides better local service quality. Pre-installing an eSIM before departure is particularly practical for this duration.
Consider whether you need voice. A data-only plan plus VoIP apps handles most communication needs; add voice if you have contacts who will call your number directly or services that send SMS to a local number.
### Two to Four Weeks
At this length, a standard monthly prepaid plan from a home-country carrier or MVNO typically represents the best value. Many carriers offer 30-day plans with data and voice at prices significantly below what travel plans charge for the same period.
If you already have a stored number from a carrier suspension or low-cost plan, this is also the length of stay where reactivating that number for a month makes the most sense — you use it during your visit and return it to suspended or minimal status before you leave.
### Several Months (3 months or more)
At this length, you are no longer in a short-stay situation. You are returning home for an extended period and should evaluate whether to re-establish a full local plan. The considerations for that decision — reconnecting to the home carrier ecosystem, updating account details, and planning for another departure — are covered in [After Returning Home](/en/guides/after-return/).
---
## Managing Two Lines During Your Visit
If you maintain your foreign line during a home visit — whether to remain reachable at your abroad number or to preserve ongoing commitments — you will be running two SIM lines simultaneously. Modern smartphones support this natively through dual-SIM or eSIM, but the configuration requires attention.
### Dual-SIM Configuration
On a device with physical + eSIM, or eSIM + eSIM (on supported devices), you can run both your foreign line and a home-country SIM simultaneously. Each line handles its own calls and SMS independently. For data, you designate one line as the primary data line — typically the home-country line during your visit, to use local rates.
The important setting on iPhone is "Allow Cellular Data Switching" (Settings > Cellular > Cellular Data > Allow Cellular Data Switching). This controls whether the device can fall back to the secondary line's data if the primary has no signal. For most visits, this should be set to Off on the foreign line to prevent your foreign SIM from roaming for data when you are temporarily outside the home-country SIM's coverage.
On Android, the default data SIM setting is at Settings > Network & Internet > SIMs > Mobile Data. Set the home-country SIM as the default data SIM for the duration of your visit.
### Keeping Your Foreign Number Reachable
Your foreign number continues to receive calls and SMS when your foreign SIM is in roaming mode at home. This is typically low-cost for incoming calls and SMS even if outgoing calls are expensive, but confirm your foreign carrier's inbound roaming rates before relying on this.
For managing the long-term balance between your abroad line and your home-country presence, see [Connectivity Strategy for Moving Abroad](/en/guides/expat-strategy/) for the full framework.
---
## Using SimFinder to Compare Short-Stay Options
SimFinder's travel eSIM search lets you filter by destination, data amount, and validity period. When your destination is your home country, the same tool applies — enter your home country as the destination to see plans available from travel eSIM providers, including short-validity options.
Home-country carriers may not appear in travel eSIM search results (as they target visitors rather than returning residents), but their own eSIM products are available directly through their apps or websites. Compare provider plans through SimFinder for data-only travel eSIM pricing, then check your home carrier directly for voice-capable plans.
---
## FAQ
See the frontmatter above for answers to these questions:
- Do I need to buy a local SIM for a short trip back?
- Can I use my foreign eSIM line while visiting my home country?
- How do I get my old home-country number working again temporarily?
- Can I buy a prepaid SIM at the airport on arrival?
---
## Related Guides
- [How to Choose a Travel eSIM: 5 Key Criteria](/en/guides/how-to-choose/) — Criteria and checklist for selecting a short-stay data or voice eSIM plan
- [Connectivity Strategy for Moving Abroad](/en/guides/expat-strategy/) — The full framework for managing connectivity when you live abroad long-term
- [How to Keep a Phone Number You're Not Using](/en/guides/number-storage/) — Five strategies for holding a home-country number while you are away
- [International Roaming Explained](/en/guides/international-roaming/) — How roaming works technically and when it makes sense vs. a local SIM
- [After Returning Home](/en/guides/after-return/) — What to do with your connectivity setup when a temporary return becomes permanent
================================================================================
# How Tethering Works and How to Set It Up
URL: https://sim-finder.com/en/guides/tethering/
Type: guides (en)
Published: 2026-06-04
Tethering lets you share your phone's mobile data connection with other devices — a laptop, tablet, or another phone. Your phone acts as a router, bridging the cellular network and the tethered device. Three connection methods are available on most smartphones: Wi-Fi hotspot, USB, and Bluetooth, each with different speed, battery, and setup trade-offs.
This guide explains how each method works, how to enable tethering on iPhone and Android, and when plans restrict or block tethering entirely.
---
## What Tethering Is and How It Works
When you enable tethering, your phone creates a network access point that other devices can join. The phone's cellular radio continues to communicate with the carrier's mobile network as normal; tethering adds a second radio layer (Wi-Fi, USB, or Bluetooth) that forwards traffic between the tethered device and the carrier network.
From the carrier's perspective, tethered traffic and direct phone traffic both consume from the same mobile data allocation — tethering does not create a separate data stream from the carrier side unless the plan explicitly separates hotspot data from device data (which many plans do).
The term "mobile hotspot" refers specifically to the Wi-Fi variant of tethering. "Tethering" covers all three connection methods. The functions are often grouped together in phone settings under a single menu.
---
## The Three Connection Methods: Speed and Trade-offs
### Wi-Fi Hotspot
The phone's Wi-Fi radio switches into access point mode, broadcasting a network that other devices join using a password. This is the most common method because it works wirelessly and supports multiple connected devices simultaneously.
**Typical speeds**: limited by the cellular connection; the Wi-Fi link itself is rarely the bottleneck on modern phones supporting Wi-Fi 5 (802.11ac) or Wi-Fi 6 (802.11ax).
**Maximum simultaneous devices**: varies by phone model, OS version, and carrier plan. Check your device documentation and plan terms for the limit that applies to your setup.
**Battery impact**: running the Wi-Fi radio in access point mode is more power-intensive than using Wi-Fi as a client. Expect noticeably faster battery drain compared to normal use.
**Best for**: general use when no USB cable is available, connecting multiple devices, connecting devices that lack USB-C or USB-A ports compatible with the phone.
**2.4 GHz vs 5 GHz**: 2.4 GHz has longer range and better wall penetration, but is more congested in areas with many Wi-Fi networks. 5 GHz offers higher throughput at shorter range. If the phone and tethered device are within a meter of each other, 5 GHz generally performs better. If walls or distance are a factor, 2.4 GHz is more reliable.
### USB Tethering
The phone connects to the computer via USB cable. The computer treats the phone as a network adapter. No wireless radio is involved on the tethered connection side.
**Typical speeds**: USB removes the wireless overhead, so tethered speeds more closely reflect the raw cellular connection speed. USB 2.0 has a theoretical maximum throughput of 480 Mbps, well above any current cellular connection speed.
**Battery impact**: the computer typically provides power to the phone through the USB cable during tethering, which can slow battery drain or maintain charge level. Under heavy data use the balance depends on the cable, adapter, and computer output.
**Device limit**: one device per USB connection.
**Best for**: sustained heavy use on a single laptop where battery preservation matters, situations where Wi-Fi interference is a concern.
### Bluetooth Tethering
The phone creates a Bluetooth PAN (Personal Area Network) connection to another device. This is the slowest method.
**Typical speeds**: Bluetooth Classic (BR/EDR) used for PAN offers practical throughput significantly below Wi-Fi — roughly 1–3 Mbps in practice (gross air rate has been 3 Mbps since Bluetooth 2.0+EDR; usable net throughput is lower). PAN is suitable for light browsing and email but not video streaming or large downloads.
**Battery impact**: Bluetooth radio consumes less power than the Wi-Fi radio in hotspot mode, making this the lowest-drain wireless option.
**Best for**: emergencies or situations where Wi-Fi is unavailable and only minimal data transfer is needed — for example, checking email on a tablet when the Wi-Fi radio is malfunctioning.
---
## Setting Up a Wi-Fi Hotspot on iPhone
**As of publication**, the path on iOS is:
**Settings → Personal Hotspot → Allow Others to Join** (toggle on).
Set a Wi-Fi password on the same screen. Apple requires a password for Personal Hotspot; connecting without a password is not supported.
**Name of the hotspot**: the network name defaults to your iPhone's device name (Settings → General → About → Name).
**Band selection**: on iPhone models that support it, you can select the Wi-Fi band for the hotspot. Older devices (Wi-Fi 4/5) broadcast on 2.4 GHz only; newer models support 2.4 GHz and 5 GHz. The 5 GHz band offers higher speeds and lower interference in congested environments but shorter range.
**Maximize Compatibility**: iOS includes a toggle under Personal Hotspot settings labeled "Maximize Compatibility." Enabling it broadcasts at 2.4 GHz only, which is slower but connects older devices that do not support 5 GHz. Turn it off if all devices you connect support 5 GHz.
**USB tethering on iPhone**: connect the iPhone to a Mac or Windows PC via Lightning or USB-C cable. iOS prompts you to trust the computer the first time. Once trusted, the computer recognizes the iPhone as a network adapter and routes traffic through it automatically, provided Personal Hotspot is enabled.
**Bluetooth tethering on iPhone**: pair the iPhone with the target device via Bluetooth (Settings → Bluetooth), then on the target device, connect to the iPhone as a Bluetooth network device.
**Auto-join and visibility**: when Personal Hotspot is active and "Allow Others to Join" is on, nearby Apple devices signed into the same iCloud account can join the hotspot without entering a password (using Apple's Instant Hotspot feature via Continuity). Devices on other Apple accounts must enter the password manually. The hotspot network is visible in the Wi-Fi list of nearby devices.
---
## Setting Up a Wi-Fi Hotspot on Android
The path varies by manufacturer and Android version. On stock Android (Pixel phones) **as of publication**:
**Settings → Network & Internet → Hotspot & tethering → Wi-Fi hotspot** (toggle on).
On Samsung Galaxy devices, the path is typically:
**Settings → Connections → Mobile Hotspot and Tethering → Mobile Hotspot** (toggle on).
**Configure the hotspot**: tap the hotspot name or gear icon to set the network name (SSID), password, and security type (WPA3 or WPA2; WPA3 is recommended for modern devices).
**Band selection**: Android allows selecting 2.4 GHz, 5 GHz, or automatic. The automatic setting selects the band based on which devices are connected. On newer Pixels and Samsung flagships, 6 GHz (Wi-Fi 6E) is also available on supported hardware.
**USB tethering on Android**: connect the phone to a computer via USB-C cable. On stock Android: **Settings → Network & Internet → Hotspot & tethering → USB tethering** (toggle on). The computer installs drivers automatically on most systems. On macOS, USB tethering requires no additional drivers; the phone appears as a network adapter.
**Bluetooth tethering on Android**: **Settings → Network & Internet → Hotspot & tethering → Bluetooth tethering** (toggle on). Pair the phone to the target device via Bluetooth first if not already paired.
**Auto-off (timeout) setting**: many Android phones include an option to automatically turn off the hotspot after no devices have been connected for a set period (for example, 5 or 10 minutes). This is useful for preserving battery when you walk away from the tethered setup. The setting is found inside the Wi-Fi hotspot configuration screen on stock Android and Samsung devices.
---
## How Much Data Tethering Uses
Tethering itself does not add data overhead to what the tethered device is doing. A laptop loading a 2 MB webpage consumes approximately 2 MB from the mobile plan, the same as if that page were loaded on the phone directly.
The practical issue is behavioral: tethered devices often consume more data than phones because:
- **Default quality settings are higher**: browsers on laptops load full desktop page resources; video services default to higher resolutions on larger screens.
- **Background processes activate**: OS updates, cloud backups, and application auto-updates may start automatically on a laptop connected to a new network. Windows and macOS include "metered connection" options that reduce background data on limited connections (see below).
- **Multiple devices multiply consumption**: if five devices are connected to a hotspot, each device's consumption adds to the total.
For a breakdown of how much data specific activities consume, see [How Much Mobile Data Do You Need?](/en/guides/data-usage-guide/).
To avoid rapid data consumption when tethering:
**On Windows (as of publication)**: connect to the tethered Wi-Fi network, then go to **Settings → Network & Internet → Wi-Fi → [network name] → Metered connection** and toggle it on. This setting applies to the currently connected network and reduces automatic updates and background sync over that connection.
**On macOS**: macOS does not have a built-in metered connection toggle equivalent to Windows. Manually pause iCloud syncing, defer OS updates, and check that Time Machine backup is not running over the tethered connection.
For more techniques to reduce data consumption on tethered devices, see [Data-Saving Techniques](/en/guides/save-data/).
---
## When Tethering Is Restricted or Blocked
Several situations exist where tethering may be unavailable or limited even when the phone has an active data connection.
### Plan-Level Tethering Restrictions
Many mobile plans separate "hotspot data" from general on-device data. Common structures include:
- **No tethering allowed**: some budget plans, particularly on MVNOs, block tethering entirely. The phone detects the device type and blocks hotspot traffic at the carrier network level. [Understanding what an MVNO is](/en/guides/what-is-mvno/) can help you anticipate where these restrictions are most common.
- **Separate hotspot allowance**: the plan includes a defined amount of hotspot data (for example, 20 GB) at full speed; after that, hotspot speeds are throttled to a lower rate while on-device data continues at full speed.
- **Throttled tethering from the start**: some plans allow tethering but cap hotspot speeds at a fixed rate (for example, 1 Mbps or 5 Mbps) regardless of the available network speed.
If you experience speed differences between on-device browsing and tethered browsing, a carrier-applied tethering speed cap is a likely cause. See [Slow Mobile Data Speeds](/en/guides/slow-speed/) for a diagnostic approach.
The distinction between "no tethering allowed" and "throttled tethering" matters when choosing a plan: a throttled plan still lets you check email on a laptop, while a blocked plan produces no connectivity at all on tethered devices. Check the plan documentation, not just the marketing description, to identify which applies.
### Roaming Tethering Restrictions
International roaming plans frequently restrict tethering more severely than domestic plans. Some roaming add-ons exclude hotspot use entirely. Travel eSIM plans from third-party providers vary: some allow tethering on all data, others apply a separate tethering data cap or prohibit it.
Always verify tethering permissions in the plan terms before purchasing a roaming add-on or travel eSIM for use cases that depend on laptop connectivity.
### How Carriers Detect Tethering
Carriers detect tethered traffic through several mechanisms: TTL (Time To Live) inspection (tethered devices typically send packets with a different TTL than the phone itself), DPI (Deep Packet Inspection) of HTTP User-Agent headers, and DNS traffic patterns that indicate a desktop operating system. If a carrier's plan blocks tethering, the restriction is enforced at the network level using these signals, not solely by the phone's settings. Enabling a VPN on the phone can in some cases alter detection behavior, but using a VPN to circumvent carrier tethering restrictions may violate the carrier's terms of service.
### Network-Type Limitations
On some older network configurations, tethering requires specific APN settings distinct from the default data APN. If tethering connects but produces no internet access on the tethered device, an APN configuration issue may be the cause. Most modern SIM activations configure tethering APNs automatically.
### Device-Level Carrier Locks
Some carrier-sold phones are configured to block or charge for tethering independently of the data plan. This is more common on older devices and in markets where tethering was historically a separately billed feature. Unlocking the phone does not necessarily remove carrier-applied tethering restrictions; those are typically enforced at the network level using IMEI-based or APN-based detection.
---
## Tethering and Battery Management
Running a mobile hotspot accelerates battery drain from two sources: the Wi-Fi radio in access point mode and the cellular radio handling increased data throughput.
Practical steps to reduce drain during extended tethering sessions:
- **Use USB tethering** when a cable is available and the computer can supply charge to the phone. Even if the net power flow is neutral, this prevents rapid battery depletion.
- **Reduce screen brightness or keep the screen off**: iOS and Android keep the screen on while Personal Hotspot is active by default on some versions. Locking the screen manually reduces display power consumption.
- **Disconnect unused devices**: each connected device's traffic adds load on the cellular radio.
- **Enable Low Power Mode (iOS) or Battery Saver (Android)** if hotspot performance is acceptable at reduced processor speeds.
- **Use the Android auto-off timeout**: if running a hotspot intermittently, the auto-off timeout (described in the Android setup section above) prevents the hotspot from running in the background when no devices are connected.
- **Airplane mode is not compatible with tethering**: enabling Airplane mode cuts all radios including cellular. Toggling cellular off while leaving Wi-Fi on (possible on iOS and most Android versions) does not maintain tethering because tethering depends on the cellular connection.
---
## Security Considerations for Wi-Fi Hotspot
A mobile hotspot that other devices can connect to is a network access point with the same security considerations as any Wi-Fi network.
**Use WPA2 or WPA3 security**: both iOS and Android default to WPA2 or WPA3. Do not set the hotspot to "open" (no password) unless the use case specifically requires it, as any nearby device could connect and consume your data.
**Set a strong password**: default hotspot passwords generated by iOS are randomly generated and reasonably strong. Android defaults vary by manufacturer; replace any short or predictable default with a stronger one (12+ characters recommended).
**Monitor connected devices**: on iOS, the Personal Hotspot screen shows the number of connected devices. On Android, the hotspot settings show a connected device list. If an unexpected device appears, change the password.
**Hotspot on public transport or in public spaces**: connected clients on the hotspot network can potentially communicate with each other depending on client isolation behavior. Client isolation behavior varies by phone model and OS version. Do not assume devices connected to your hotspot are isolated from each other; treat it like any shared Wi-Fi network, especially with devices you do not control.
---
## Checking Tethering Permissions Before You Buy
Before selecting a plan for a use case that involves regular laptop tethering, confirm the following in the plan's terms:
1. **Is tethering permitted?** Some plans explicitly prohibit it.
2. **Is there a separate hotspot data allowance?** If so, how much, and at what speed?
3. **Does roaming use apply to tethering?** If the plan includes international roaming data, does tethering count against the same allowance?
4. **Are there speed caps on tethered data?** A plan marketed as "unlimited" may still apply lower speeds to hotspot use.
For guidance on evaluating travel SIM and eSIM plan terms, see [How to Choose a Travel eSIM](/en/guides/how-to-choose/).
Use SimFinder to compare plans side-by-side — filter by country and check each plan's tethering policy before committing to a data allowance sized for laptop use.
---
## Related Guides
- [How Much Mobile Data Do You Need?](/en/guides/data-usage-guide/) — per-app consumption figures and a method to estimate monthly needs, relevant for calculating how much data tethering sessions will consume
- [Data-Saving Techniques](/en/guides/save-data/) — iOS and Android settings to reduce background data consumption on tethered devices
- [Slow Mobile Data Speeds — How to Diagnose and Fix](/en/guides/slow-speed/) — troubleshooting steps when tethered connections are slower than expected
- [How to Choose a Travel eSIM: 5 Key Criteria](/en/guides/how-to-choose/) — evaluating plan terms including tethering permissions before purchase
- [What Is an MVNO?](/en/guides/what-is-mvno/) — understanding why MVNO plans more commonly restrict tethering than MNO plans
================================================================================
# Tethering Not Working? Causes and Fixes
URL: https://sim-finder.com/en/guides/tethering-blocked/
Type: guides (en)
Published: 2026-06-04
Your phone has a strong signal and mobile data works on the phone itself — but when you turn on the hotspot and connect a laptop or tablet, nothing loads. This guide identifies every common cause of tethering failure and gives a step-by-step fix for each.
The most time-efficient approach is to work through the causes in order: plan restrictions and data caps first (account-level issues you cannot fix on the device), then APN settings, then device and OS configuration.
**Quick diagnostic — which symptom applies?**
| Symptom | Most likely cause |
|---------|------------------|
| Hotspot toggle turns on but tethered device finds no network to join | Plan does not include tethering; carrier blocks the hotspot at the network level |
| Tethered device joins the hotspot but shows "No Internet" or "Limited" | Hotspot data exhausted, wrong tethering APN, or wrong password entered |
| Tethered device joins and internet works, but very slowly | Hotspot data cap reached and speed is throttled; or carrier-applied hotspot speed limit |
| Hotspot option is missing from phone settings entirely | Plan not provisioned for tethering; carrier profile may need updating |
| Only the phone has internet after connecting via USB | USB tethering not enabled in phone settings; computer driver not installed |
Use this table to jump directly to the relevant cause below.
---
## Cause 1: The Plan Does Not Include Tethering
Many mobile plans, particularly budget plans and older MVNO plans, do not permit tethering at all. When tethering is blocked at the carrier network level, the phone's hotspot toggle may turn on without error, but tethered devices receive no internet access regardless of any device-side settings.
**How to check:**
1. Open your carrier's official app or log in to the account portal.
2. Navigate to the active plan details — specifically the full plan terms, not the marketing summary.
3. Search for "hotspot", "tethering", or "Personal Hotspot".
4. If tethering is permitted, the terms will state the allowance. If there is no mention, contact carrier support directly.
**Fix:**
If the plan excludes tethering, the only solutions are to upgrade to a plan that includes it or to add a tethering add-on if the carrier offers one. No device-side setting can enable tethering that the carrier network blocks.
For context on why MVNOs more commonly restrict tethering than MNOs, see [How Tethering Works and How to Set It Up](/en/guides/tethering/).
---
## Cause 2: The Hotspot Data Allowance Is Exhausted
Many plans separate "hotspot data" from general on-device data. A plan may allow, for example, 20 GB of full-speed hotspot data; after that, hotspot speeds are throttled to a very low rate — often 600 kbps or lower — while on-device data continues at full speed.
When the hotspot allowance is exhausted, the tethered device may appear to connect to the hotspot but receives no usable internet access because the data rate is too low to complete requests.
**How to identify this cause:**
- Check your carrier app for remaining hotspot data. This figure is usually shown separately from your general data balance.
- If both phone and tethered device have had zero connectivity since a specific date in the billing cycle, that date may correspond to when the hotspot allowance ran out.
**Fix:**
Wait for the billing cycle to reset, or purchase a hotspot data add-on if your carrier offers one. Throttled hotspot data is a plan-level restriction — it cannot be resolved on the device.
**Note on unlimited plans:** A plan marketed as "unlimited data" may still apply a separate hotspot data cap. General device data and hotspot data are frequently tracked as separate allowances within the same plan, so exhausting hotspot data does not affect the phone's own browsing or streaming.
For a breakdown of how quickly different activities consume hotspot data, see [How Much Mobile Data Do You Need?](/en/guides/data-usage-guide/).
---
## Cause 3: Missing or Wrong Tethering APN
The APN (Access Point Name) governs how your device's traffic is routed through the carrier's network. On many carriers — particularly MVNOs — the APN configuration has a separate field for tethering or "Personal Hotspot" traffic in addition to the standard data APN. If this tethering APN is blank or incorrect, the phone's data works normally, but tethered devices either get no internet or connect to the hotspot network without receiving an IP address from the carrier.
**On iPhone:**
1. Go to **Settings → Cellular → Cellular Data Network** (or **Settings → Mobile Data → Mobile Data Network** on international builds).
2. Locate the **Personal Hotspot** section at the bottom.
3. Compare the **APN** field in that section to your carrier's documented tethering APN.
If the Cellular Data Network menu is not visible, your carrier has locked APN editing through a carrier profile. Install the configuration profile from your carrier's support page. See [APN Setup Guide for iPhone](/en/guides/apn-setup-iphone/) for the full installation procedure.
**On Android:**
The path varies by manufacturer. On stock Android (Pixel): **Settings → Network & Internet → Internet → [carrier name] → APN → [active APN]**, then check the **Type** field. A tethering-capable APN entry typically includes `dun` in the type list (e.g., `default,dun`). If there is no APN entry with the `dun` type, add one using the values from your carrier's support page, or add `dun` to the type field of the existing APN.
On Samsung Galaxy: **Settings → Connections → Mobile Networks → Access Point Names → [active APN]**, then look at the **APN type** field.
**Why the DUN APN matters:**
`dun` stands for Dial-Up Networking. It is the APN type that carriers use to route tethering traffic through a separate gateway or to apply the tethering data policy. When a carrier wants to track or throttle hotspot traffic separately from device traffic, they require tethered devices to use the DUN APN. If only the `default` type is configured, the carrier may block tethering traffic at the network edge.
---
## Cause 4: Wrong Hotspot Password on the Client Device
This is the simplest cause and is worth checking early. If the tethered device entered an incorrect password, it may show "connected" or "obtaining IP address" indefinitely without completing the connection.
**Fix:**
1. On the tethered device, forget the hotspot network: go to Wi-Fi settings, find the hotspot network name, and select "Forget" (iOS) or "Forget network" (Android/Windows/macOS).
2. On the phone, go to hotspot settings and note the current password exactly, including capitalisation and any symbols.
3. On the tethered device, reconnect to the hotspot and enter the password again carefully.
**iPhone hotspot password location:** Settings → Personal Hotspot → Wi-Fi Password.
**Android hotspot password location:** Settings → Network & Internet → Hotspot & tethering → Wi-Fi hotspot → [tap hotspot name or gear icon].
**Changing the hotspot password:** If you change the password after devices have already connected, all previously connected devices lose their connection and must reconnect using the new password. This is useful if you suspect an unknown device is using your hotspot and consuming data.
---
## Cause 5: OS and Software Settings Blocking Connectivity
Even when the hotspot connection succeeds, software settings on either the phone or the tethered device can block internet access.
### On the phone:
**Check that Cellular Data is on:** On iPhone, Settings → Cellular → Cellular Data must be toggled on (green). On Android, Settings → Network & Internet → Data usage → Mobile data must be on. A phone can share its Wi-Fi connection via hotspot even with mobile data off, resulting in the tethered device connecting to a network with no internet route.
**Check that the correct SIM provides data on dual-SIM phones:** On iPhone with two SIMs, Settings → Cellular → Cellular Data shows which line handles data. The hotspot shares only the active data SIM. If the wrong SIM is selected, and that SIM does not have an active data plan, the hotspot produces no internet access.
**Check VPN on the phone:** If a VPN app is running on the phone with a configuration that routes all tethered traffic, a VPN server outage or authentication failure can block tethered connectivity even though the phone itself still has internet. Disable the VPN temporarily to test.
### On the tethered device:
**Windows metered connection settings:** A metered connection flag does not block internet access, but it causes Windows to defer automatic updates and some background sync — this is expected and not a fault.
**Firewall or security software:** Corporate security software on a laptop may block connections on networks classified as unknown or public. If the laptop connects successfully to other Wi-Fi networks but not the hotspot, check whether security software is interfering.
**IP address not obtained:** If the tethered device shows "connected" but "No Internet" or "Limited", confirm it has received a valid IP address. On Windows: **ipconfig** in Command Prompt — the assigned address should be in the 172.20.x.x range (the typical hotspot subnet used by iOS) or a similar private range. If the address shows 169.254.x.x, the DHCP process failed. Toggling the hotspot off and on on the phone and reconnecting on the client usually resolves this.
**Data Roaming required for travel SIMs:** If you are using a travel SIM or travel eSIM and the phone itself has internet but the hotspot does not work, verify that Data Roaming is enabled for that SIM line. Travel eSIMs connect via a roaming session at the protocol layer; if Data Roaming is off, the tethering session cannot establish a data path even though the phone's own traffic works through a cached session. On iPhone: Settings → Cellular → [travel SIM line] → Data Roaming (on). For a full diagnostic sequence when the phone itself shows no data, see [No Mobile Data? How to Fix Data Connection Problems](/en/guides/no-data/).
---
## Cause 6: Device-Level Carrier Restrictions
Some phones sold by carriers are configured to block tethering, or to redirect tethering traffic to a carrier add-on purchase page, independently of the current plan. This configuration is applied at the device level by the carrier's firmware profile, not at the network level.
**Identifying device-level restrictions:**
- The hotspot toggle turns on, but attempting to connect a device opens a browser page on the tethered device prompting you to add a tethering feature to your plan.
- This behaviour persists even when tethering is listed as included on your plan.
- The phone's Personal Hotspot toggle is greyed out or hidden entirely, even though the carrier's plan documentation states tethering is permitted.
**Fix:**
Contact the carrier to confirm tethering is provisioned for your account. In some cases, the carrier needs to send a provisioning message (a behind-the-scenes SMS or data update that re-enables the hotspot feature at the account level) or update the account settings on their end.
Unlocking the phone (SIM unlock) does not remove carrier-applied tethering restrictions, as these are typically enforced through the carrier's APN-based detection methods at the network level rather than through the phone's unlock status.
If the Personal Hotspot option is missing from Settings on iPhone, one additional step is to verify that Cellular Data is enabled and that the SIM is fully activated. iOS hides the Personal Hotspot option on some MVNO plans until a provisioning update from the carrier is received. Toggling Airplane Mode on and off, or rebooting the phone after contacting the carrier, allows the provisioning update to take effect.
---
## Cause 7: How Carriers Detect Tethering — TTL and DPI
Understanding how carriers identify tethered traffic explains why some detection-based restrictions are difficult to bypass and why device-side changes alone cannot override network-level blocks.
Carriers use two primary detection methods:
**TTL (Time To Live) inspection:** Every IP packet includes a TTL field that decrements by one at each network hop. Your phone's own packets reach the carrier at the phone's default TTL (64 on iOS/Android). When you tether, the phone acts as a NAT router and decrements the tethered device's packet TTL by 1 before forwarding it. If the tethered device starts at a different default TTL — for example, Windows uses 128 — its packets arrive at the carrier at 127, a value the carrier recognises as not originating from the phone itself. (Devices that also start at TTL 64, like macOS, arrive at 63 and may instead be identified by other signals such as User-Agent strings.) Carriers read these differences to identify tethered traffic.
**DPI (Deep Packet Inspection) of User-Agent headers:** HTTP/HTTPS traffic from desktop browsers includes User-Agent strings identifying the operating system (e.g., "Windows NT 10.0"). A carrier can identify that the request originated from a Windows device rather than the phone itself, even though the traffic flows through the phone.
If a carrier's plan blocks tethering, the restriction is enforced at the network level using these signals. The phone's own setting to enable hotspot is not the enforcement point — the enforcement is upstream at the carrier's packet gateway.
This is informational context only. Whether to use methods that alter TTL or packet headers is a decision governed by your carrier's terms of service; using any method to circumvent a carrier's tethering restriction may be a breach of those terms.
---
## Restart and Reset Steps
After checking causes 1–7, if tethering still does not work, these steps resolve many persistent issues caused by modem state and cached settings.
### Step 1: Toggle Airplane Mode
On the phone, toggle Airplane Mode on, wait 10 seconds, then toggle it off. This forces the modem to re-establish the data session with fresh parameters. Wait 20–30 seconds for the cellular connection to restore before testing the hotspot.
### Step 2: Restart the Phone
A full power cycle (power off completely, then power on) re-initialises the modem stack. This resolves stuck states that an Airplane Mode toggle does not.
### Step 3: Reset Network Settings
If the above two steps do not resolve the issue and you have already confirmed the plan includes tethering and the APN values are correct, a network settings reset removes all APN customisations and prompts the carrier to push a fresh profile.
**On iPhone:** Settings → General → Transfer or Reset iPhone → Reset → Reset Network Settings. This clears Wi-Fi passwords, VPN configurations, and APN settings. eSIM profiles are preserved.
**On Android (Pixel):** Settings → System → Reset options → Reset Wi-Fi, mobile & Bluetooth.
**On Samsung Galaxy:** Settings → General management → Reset → Reset network settings.
After the reset, the carrier may automatically push a new APN profile when you reconnect to the cellular network. Test tethering again before manually entering APN settings. See [How to Reset Network Settings (and What It Affects)](/en/guides/network-reset/) for details on what each platform's reset does and does not clear.
---
## Checking Carrier Restrictions Before You Buy
If you rely on tethering regularly — for example, using a laptop at locations without Wi-Fi — verify tethering terms before purchasing a plan rather than after.
When reading a plan's terms, look for:
1. **Is tethering explicitly permitted?** Some plans prohibit it without mentioning restrictions in the marketing copy.
2. **Is there a separate hotspot data allowance?** If so, what happens after the allowance is exhausted — complete block or speed throttle?
3. **Does tethering apply to roaming?** International roaming plans frequently exclude tethering or apply a smaller separate allowance to hotspot use.
4. **Are there speed caps on tethered data?** A plan described as "unlimited" may throttle hotspot data to a lower speed from the start.
If tethering is critical for your use case, select a plan where the full plan terms — not the marketing description — explicitly state tethering is included at the speed you need.
Plans that include a listed hotspot GB allowance are preferable to plans that mention tethering only in fine print or fair-use policies, because the allowance amount and post-cap behaviour are stated in advance.
Use [SimFinder](/en/) to compare plans, filter by tethering support, and check hotspot data allowances before committing to a plan.
---
## Related Guides
- [How Tethering Works and How to Set It Up](/en/guides/tethering/) — explains what tethering is, the three connection methods, and how to enable it on iPhone and Android, which provides useful context for diagnosing when it fails
- [How Much Mobile Data Do You Need?](/en/guides/data-usage-guide/) — per-activity consumption figures for estimating how quickly a hotspot data cap will be reached
- [APN Setup Guide for iPhone](/en/guides/apn-setup-iphone/) — full procedure for installing a carrier configuration profile or manually entering APN values, including the Personal Hotspot APN field
- [No Mobile Data? How to Fix Data Connection Problems](/en/guides/no-data/) — the broader mobile data troubleshooting sequence for when the phone itself has no data, as distinct from hotspot-specific failures
- [How to Reset Network Settings (and What It Affects)](/en/guides/network-reset/) — detailed breakdown of what a network reset clears on iPhone, Pixel, and Samsung, and what is preserved
================================================================================
# How to Move an eSIM Between iPhone and Android
URL: https://sim-finder.com/en/guides/transfer-cross-platform/
Type: guides (en)
Published: 2026-06-06
Moving an eSIM between iPhone and Android requires your carrier to issue a new eSIM profile for the destination device. Unlike moving from one iPhone to another — where Apple's eSIM Quick Transfer handles the process device-to-device — there is no equivalent cross-platform mechanism supported by most carriers. You contact your carrier, they re-issue the eSIM profile, and you install it on the new device via QR code or a carrier app.
This guide covers the full process in both directions (iPhone to Android and Android to iPhone), what to expect, and a recent exception on the newest OS versions that changes this picture for some carrier and device combinations.
---
## Why Direct Cross-Platform Transfer Is Not Available
eSIM Quick Transfer is an Apple feature. It relies on a short-range wireless connection between two iPhones and requires carrier support on the network side. Google has not built an equivalent feature for Android devices, and Apple has not extended Quick Transfer to Android (with the narrow exception described below).
The underlying reason is architectural: an eSIM profile is tied to the eUICC chip of the receiving device. Moving a profile from one eUICC to another requires the carrier's SM-DP+ server to authorize the transfer and issue a new profile bound to the destination chip. Apple's Quick Transfer automates this handshake between two iPhones when the carrier supports it. No equivalent automation exists for the iPhone-to-Android or Android-to-iPhone path for most carriers.
For background on how eSIM profiles are managed at the chip and specification level, see [What Is an eSIM?](/en/guides/what-is-esim/) and [eSIM Profile Limits: How Many You Can Store and Use](/en/guides/esim-profile-limits/).
---
## The Cross-Platform Quick Transfer Exception
Apple introduced an extension to eSIM Quick Transfer: when both the carrier and the destination Android device support the feature, eSIM Quick Transfer can operate across platforms (iPhone to Android). The reverse direction — Android to iPhone — follows a similar path where supported.
This extension is available only on the newest OS versions and only where the carrier has explicitly enabled it. Apple's support pages note the iPhone must run the latest iOS version that supports the feature and the Android device a recent compatible Android version, with the exact minimum versions differing by transfer direction. Support is limited and carrier-specific, so check your carrier's and Apple's current support pages ([Transfer an eSIM from iPhone or iPad to Android](https://support.apple.com/en-us/126058), [Transfer your eSIM from Android to iPhone](https://support.apple.com/en-us/123878)) for the requirements that apply.
Carrier support for this feature is limited. In Japan, KDDI (covering its au, UQ mobile, and povo brands) was the first carrier to enable cross-platform Quick Transfer, in early 2026. Support elsewhere varies — check your carrier. If your carrier has not announced cross-platform Quick Transfer support, assume the standard carrier re-issue process applies.
If your use case is iPhone to iPhone, the full Quick Transfer guide is at [eSIM Quick Transfer: Move an eSIM to Another iPhone](/en/guides/transfer-iphone/).
---
## Before You Start: Back Up and Note Your Details
Before making any carrier-level change, complete these steps on the old device:
1. **Back up the device fully.** Use iCloud Backup for iPhone or Google One / a local backup for Android. A backup provides a recovery point if the transfer process encounters an error.
2. **Note your carrier account credentials.** You will need your account login, PIN, or password to verify identity during the re-issue request.
3. **Do not delete the eSIM profile from the old device yet.** Keep it active until the new profile is confirmed working on the new device. Deleting the profile before the new one is active causes a gap in service.
4. **Check that your new device supports eSIM.** eSIM support is a hardware requirement. For a full compatibility reference, see [eSIM-Compatible Devices and How to Check Yours](/en/guides/esim-compatible-devices/).
5. **Note your plan name and phone number.** After completing the transfer, verify that the plan name and number shown in the new device's SIM settings match. Discrepancies indicate a provisioning issue that needs carrier attention before relying on the new device for service.
6. **Confirm your two-factor authentication (2FA) situation.** If your phone number is registered as a 2FA method for email, banking, or other accounts, schedule the eSIM transfer at a time when you will not urgently need to receive SMS verification codes. Service is typically interrupted for a few minutes during provisioning.
---
## General Cross-Platform Transfer Flow
Regardless of direction (iPhone to Android or Android to iPhone), the process follows the same three-stage structure.
### Stage 1: Remove or Disable the eSIM on the Old Device
You do not need to delete the eSIM profile before contacting your carrier — in fact, it is better not to. The carrier deactivates the old profile when they issue the new one. However, if your carrier instructs you to delete the profile first as part of their verification process, follow their guidance.
To remove an eSIM on iPhone: **Settings → Cellular → tap the plan → Remove Cellular Plan**.
To remove an eSIM on Android: the exact path varies by manufacturer. On Pixel devices: **Settings → Network & Internet → SIMs → tap the eSIM → Delete eSIM**. On Samsung Galaxy: **Settings → Connections → SIM card manager → tap the eSIM → Delete**.
### Stage 2: Contact Your Carrier and Request a Re-Issue
Reach your carrier through their app, website, or phone support. Tell them you are switching to a new device on a different platform and need an eSIM profile re-issued for the new device.
Carriers use various terms for this process: "eSIM transfer", "eSIM re-issue", "profile transfer to new device", or "eSIM swap". The key information you will need to provide:
- Your account verification credentials (PIN, password, or last four digits of your ID)
- The **EID** of the new device — the unique identifier for the eUICC chip, equivalent to an IMEI but for the eSIM slot
On Android: dial `*#06#` to display the EID (it appears alongside the IMEI). Alternatively, go to **Settings → About Phone → SIM status** and look for the EID field.
On iPhone: go to **Settings → General → About** and scroll to the **EID** field.
**Possible re-issue fee:** Some carriers charge a SIM reissue fee for issuing a new profile to a different device. The amount varies by carrier and whether the request is made online or in-store. Check your carrier's fee schedule before proceeding.
### Stage 3: Install the eSIM on the New Device
After the carrier issues the new profile, they provide either a QR code or an activation code (SM-DP+ address). Install it on the new device using the standard method for that platform.
**For iPhone (QR code):** Go to **Settings → Cellular → Add eSIM → Use QR Code** and scan the code. See [How to Set Up eSIM on iPhone via QR Code](/en/guides/qr-code-iphone/) for the full step-by-step.
**For Android (QR code):** Go to **Settings → Network & Internet → SIMs → Add eSIM** (on Pixel) or **Settings → Connections → SIM card manager → Add mobile plan** (on Samsung). Scan the QR code when prompted.
Once the new profile is downloaded and active, the carrier deactivates the old profile automatically.
---
## iPhone to Android: Specific Notes
When moving from iPhone to Android, confirm the following before contacting your carrier:
**Carrier lock status on the Android device.** A carrier-locked Android device can only accept eSIM profiles from the carrier it is locked to. If your new Android device is locked to a different carrier, unlock it before proceeding.
**Android version and eSIM support.** eSIM on Android became broadly available with Android 9 and later, but actual support depends on the device manufacturer and model. Budget Android devices released before 2022 often lack eUICC hardware. Verify by checking **Settings → Network & Internet → SIMs** for an "Add eSIM" option, or by dialing `*#06#` and checking whether an EID is displayed.
**APN settings.** After installing the eSIM on Android, you may need to configure APN settings manually if your carrier's profile does not set them automatically. Your carrier's support page lists the correct APN values for Android.
**Dual SIM configuration after the move.** If your Android device has a physical SIM slot, that slot is available for a second line after the eSIM is active. Configure which line handles calls, SMS, and data from **Settings → Network & Internet → SIMs** (Pixel) or **Settings → Connections → SIM card manager** (Samsung).
---
## Android to iPhone: Specific Notes
When moving from Android to iPhone, Apple's support documentation ([Transfer your eSIM from Android to iPhone](https://support.apple.com/en-us/123878)) notes that some carrier and device combinations support a transfer from Android to iPhone directly, while others require contacting the carrier for a new eSIM profile. Check Apple's documentation and your carrier's guidance for your specific combination.
For the standard carrier re-issue path, the process is the same as described in the general flow: contact your carrier, request a new eSIM profile for your iPhone, then install it using the QR code or manual entry method. See [How to Set Up eSIM on iPhone via QR Code](/en/guides/qr-code-iphone/) for installation instructions.
**Physical SIM to eSIM conversion at the same time.** If you are also switching from a physical SIM to eSIM as part of this device change, the process is the same — your carrier re-issues your subscription as an eSIM profile for the new iPhone. For the full conversion flow, see [How to Switch from a Physical SIM to an eSIM](/en/guides/switch-physical-to-esim/).
---
## Contrast: iPhone to iPhone (Same Platform)
For reference, same-platform transfers between two iPhones work differently. If your carrier supports eSIM Quick Transfer, you can move the eSIM from the old iPhone to the new iPhone device-to-device — no carrier contact required, no QR code, and the process completes in a few minutes.
Quick Transfer requires iOS 16 or later on both devices, physical proximity, and carrier support on the network side. The full process is documented in [eSIM Quick Transfer: Move an eSIM to Another iPhone](/en/guides/transfer-iphone/).
If your carrier does not support Quick Transfer for iPhone-to-iPhone moves either, the same carrier re-issue flow described in this guide applies.
**Android-to-Android transfers** follow the same general pattern as cross-platform moves: no direct device-to-device transfer mechanism exists. Contact your carrier, request a new eSIM profile for the new Android device, and install it via QR code or activation code.
---
## What Happens to the Old eSIM Profile
When the carrier issues a new eSIM profile for the new device, they deactivate the old profile on their system. You do not need to take action on the old device for this — the carrier's network deactivates the old profile when the new one activates.
However, the deactivated profile may remain visible in the old device's settings until you delete it manually. To keep settings tidy:
- **iPhone:** Settings → Cellular → tap the old plan → Remove Cellular Plan.
- **Android:** Settings → Network & Internet → SIMs → tap the eSIM → Delete eSIM.
If you are handing the old device to someone else, erase all content and settings before doing so. On iPhone: **Settings → General → Transfer or Reset iPhone → Erase All Content and Settings**. On Android: **Settings → General management → Reset → Factory data reset**.
---
## Troubleshooting
### Carrier says your new device is not eSIM-eligible
Some carriers maintain device eligibility lists and restrict eSIM issuance to specific models. If the carrier says your device is not eligible but you believe it supports eSIM, escalate with your device model and EID. Carriers update eligibility lists periodically.
### QR code does not work
eSIM QR codes are single-use. If the code was scanned but the download did not complete, the code may be invalidated. Contact your carrier and request a new QR code. Do not attempt to reuse a code from a previous failed attempt.
### New eSIM installed but no mobile service
After installing the eSIM profile, wait two to five minutes for the network to register the new device. If service does not appear, toggle Airplane Mode on and off to force network re-registration. If the problem persists, restart the device. Confirm with your carrier that the new profile is marked as active on their backend — silent provisioning failures are possible.
### "Transfer From Nearby iPhone" option does not appear (cross-platform Quick Transfer)
This option appears only on the newest OS versions when your carrier supports cross-platform Quick Transfer. If the option does not appear, your carrier likely does not support the feature for your specific combination, or your OS version does not meet the requirement. Use the standard carrier re-issue process described in this guide.
### Service not restored after re-issue on Android
If the eSIM profile appears installed in Settings but data or calls do not work, check the APN configuration. On Pixel: **Settings → Network & Internet → SIMs → tap the eSIM → Access Point Names**. On Samsung: **Settings → Connections → Mobile networks → Access Point Names**. If no APN is listed, add one manually using the values from your carrier's support page. Restart the device after saving APN settings.
### Carrier charges a re-issue fee you did not expect
If your carrier applies a fee and you believe it should not apply — for example, because their website describes the service as free — gather evidence before contacting support: a screenshot of the relevant support page or terms, the date you accessed it, and the channel you used for the request (app, website, or in-store). Fees and their conditions change, and customer service agents can sometimes waive a fee or match what a published policy states. If the carrier's online self-service channel charges a fee but their in-store channel does not (or vice versa), completing the request through the other channel is a practical alternative.
### Old device still shows the eSIM as active after re-issue
After the carrier issues a new profile for the new device, the old profile is deactivated on the network side. The old device's Settings may still display the profile as present — and in some cases as "active" — because the device cannot check its own network deactivation status without a data connection. This is cosmetic: the profile cannot register to the network after deactivation. To remove the stale entry, delete the profile manually: on iPhone, go to **Settings → Cellular → tap the plan → Remove Cellular Plan**; on Android, follow the path for your manufacturer noted above. If you are selling or transferring the old device, delete all eSIM profiles and perform a factory reset before handing it over.
---
## Transfer Method Comparison
| Scenario | Direct device-to-device? | Carrier contact needed? | Typical time |
|---|---|---|---|
| iPhone → iPhone (Quick Transfer, carrier supported) | Yes | No | A few minutes |
| iPhone → iPhone (no Quick Transfer support) | No | Yes — new QR code | 10–30 minutes |
| iPhone → Android (most carriers) | No | Yes — new QR code | 10–30 minutes |
| iPhone → Android (newest OS + carrier supported) | Yes | No | A few minutes |
| Android → iPhone | No (in most cases) | Yes — new QR code | 10–30 minutes |
| Android → Android | No | Yes — new QR code | 10–30 minutes |
---
## FAQ
### Can I transfer my eSIM directly from iPhone to Android?
In most cases, no. Direct eSIM transfer between iPhone and Android is not supported by the majority of carriers. You need to contact your carrier and request a new eSIM profile (re-issue) for the Android device. The exception is the cross-platform Quick Transfer feature on the newest OS versions: Apple extended eSIM Quick Transfer to cross-platform pairs where the carrier has specifically enabled the feature. Check your carrier's support page to confirm.
### Will my phone number change when I move my eSIM to a new platform?
No. Moving your eSIM to a different device — whether iPhone or Android — is a profile transfer, not a number port. Your phone number, plan, and contract stay the same. Only the eSIM profile is re-issued to a new device.
### Does my carrier charge a fee to re-issue an eSIM for a new device?
Carrier policies vary. Some carriers re-issue at no additional charge; others apply a SIM reissue or conversion fee. Check your carrier's website or contact their support before initiating the process. The fee structure can differ between online and in-store requests.
### What should I do before removing my eSIM from the old device?
Back up the old device fully before making any carrier-level change. Note down your carrier's customer support contact and account credentials. Do not delete the eSIM profile from the old device until the new profile is confirmed active on the new device.
### Can I use the same QR code to install the eSIM on the new device?
No. eSIM QR codes are single-use. Once a QR code has been scanned and used for a profile download — even if the download did not complete — the code is invalidated. When your carrier re-issues an eSIM profile for your new device, they will provide a new QR code or activation code.
---
## Related Guides
- [eSIM Quick Transfer: Move an eSIM to Another iPhone](/en/guides/transfer-iphone/) — ES-06: the iPhone-to-iPhone transfer path, including Quick Start setup-time and post-setup flows
- [How to Switch from a Physical SIM to an eSIM](/en/guides/switch-physical-to-esim/) — full conversion guide for existing subscribers switching SIM type
- [What Is an eSIM?](/en/guides/what-is-esim/) — how eUICC chips and the GSMA SGP.22 specification work
- [eSIM Profile Limits: How Many You Can Store and Use](/en/guides/esim-profile-limits/) — how many profiles your device can hold and what happens when it reaches capacity
- [eSIM-Compatible Devices and How to Check Yours](/en/guides/esim-compatible-devices/) — full compatibility reference for iPhone, Android phones, and tablets
To compare eSIM plans for your destination, use [SimFinder Travel →](/en/travel/)
---
Sources:
- [Set up eSIM on iPhone - Apple Support](https://support.apple.com/en-us/118669)
- [Transfer your eSIM from Android to iPhone - Apple Support](https://support.apple.com/en-us/123878)
- [Transfer your eSIM to a new iPhone - Apple Support](https://support.apple.com/en-us/108349)
- [Get a SIM or eSIM & add it to your Pixel phone - Google Pixel Help](https://support.google.com/pixelphone/answer/7086887)
- [Multiple enabled profiles - Android Open Source Project](https://source.android.com/docs/core/connect/esim-mep)
================================================================================
# eSIM Quick Transfer: Move an eSIM to Another iPhone
URL: https://sim-finder.com/en/guides/transfer-iphone/
Type: guides (en)
Published: 2026-04-20
When you get a new iPhone, you have two paths for moving your eSIM. If your carrier supports it, **eSIM Quick Transfer** handles the entire transfer device-to-device in a few minutes — no carrier app, no QR code, no store visit. If your carrier does not support Quick Transfer, you contact them to get a new QR code or activation code and install the eSIM on the new iPhone from scratch.
This guide covers both paths. Quick Transfer is specific to iPhone (iOS 16 and later) and requires carrier support. The carrier re-issue fallback works regardless of carrier.
---
## When You Need to Transfer an eSIM
An eSIM is embedded in your device (see [What Is an eSIM?](/en/guides/what-is-esim/) for the technical background). You cannot physically remove it and insert it into another iPhone the way you would a nano-SIM card. This means any of the following situations require deliberate action to move your plan to a new device:
- **Upgrading to a new iPhone** — the eSIM does not move automatically when you restore from a backup.
- **Device replacement after loss or theft** — the eSIM remains associated with the lost device until your carrier transfers or re-issues it.
- **Hardware repair requiring a device swap** — if Apple or a repair center replaces your iPhone unit, your eSIM does not carry over.
In all three situations, the starting point is the same: confirm whether your carrier supports eSIM Quick Transfer. If yes, use the Quick Transfer method. If not, use the carrier re-issue method.
---
## eSIM Quick Transfer: What It Is and What It Requires
eSIM Quick Transfer is an Apple feature available on iPhone that lets you move an eSIM from one iPhone to another without requesting a new profile from your carrier. Apple introduced this with iOS 16 in 2022.
The transfer works over a short-range wireless connection. Your carrier's network validates the request on the server side and authorizes the profile to move to the new device.
**Requirements for eSIM Quick Transfer:**
| Requirement | Detail |
|-------------|--------|
| iOS version | iOS 16 or later on **both** the source and destination iPhone |
| Proximity | Both iPhones must be physically close to each other during the transfer |
| Connectivity | Both iPhones need an internet connection (Wi-Fi or an active mobile line) |
| Carrier support | The carrier that issued the eSIM must support Quick Transfer |
**Carriers known to support eSIM Quick Transfer:**
In the United States, AT&T, T-Mobile, and Verizon document eSIM Quick Transfer flows on their own support pages and appear in Apple's carrier support list. Support outside the United States varies by carrier and region. Check your carrier's support page or contact them directly to confirm.
If your carrier is not listed as supporting Quick Transfer — or if you cannot confirm support — use the carrier re-issue method described later in this guide.
---
## Transfer During iPhone Setup (Quick Start)
The easiest time to transfer an eSIM is when you are setting up a new iPhone for the first time. iOS presents the option automatically as part of the Quick Start setup flow.
**What you need before starting:**
- Your current (source) iPhone nearby, turned on, and running iOS 16 or later
- Your new (destination) iPhone, powered on and not yet set up
- Both devices connected to power or with sufficient battery
**Steps:**
1. **Place both iPhones close together.** When you power on the new iPhone, the Quick Start screen appears. Bring your current iPhone close to it.
2. **Follow the Quick Start prompts.** Your current iPhone shows an animation. Use it to scan the pattern displayed on the new iPhone. This authenticates the transfer.
3. **Choose how to transfer data.** You can restore from an iCloud backup, restore from a local backup, or transfer directly from the old iPhone. All three paths preserve your eSIM transfer option.
4. **When prompted to transfer your phone number.** During setup, iOS displays a screen asking whether to transfer your cellular plan. Tap **Transfer** when this screen appears.
5. **Confirm on the source iPhone.** Your current iPhone displays a confirmation prompt. Tap **Transfer** to approve. The eSIM transfer begins.
6. **Wait for the transfer to complete.** A progress indicator appears. Keep both devices close together and do not interrupt the process. When complete, the eSIM is active on the new iPhone.
7. **Verify the transfer.** On the new iPhone, go to **Settings > Cellular** and confirm the plan appears and shows as active. Make a test call or open a webpage using cellular data to verify connectivity.
The eSIM is removed from the old iPhone once the transfer is confirmed. If no other cellular line remains active on the old iPhone, the status bar shows "No SIM".
---
## Transfer After Setup (Settings → Cellular)
If you have already completed the initial setup of your new iPhone without transferring the eSIM, you can still initiate a Quick Transfer afterward — as long as your carrier supports it and both devices meet the requirements.
**Steps:**
1. **On the destination iPhone (your new iPhone),** open **Settings**.
2. **Tap Cellular.**
3. **Tap Add eSIM** (or **Add Cellular Plan**, depending on your iOS version).
4. **Tap Transfer From Nearby iPhone** (this option appears if iOS detects a compatible source device nearby).
5. **On the source iPhone (your old iPhone),** a notification or prompt appears asking you to confirm the transfer. Tap **Transfer**.
6. **Wait for the transfer to complete.** Keep both iPhones close together. A progress screen is shown on the destination iPhone.
7. **Verify the eSIM is active.** In **Settings > Cellular** on the new iPhone, confirm the plan is present and the line is turned on.
If the **Transfer From Nearby iPhone** option does not appear in step 4, it means either the source iPhone is not nearby, one of the devices does not meet the iOS version requirement, or your carrier does not support Quick Transfer. In that case, proceed to the carrier re-issue method.
---
## If Your Carrier Does Not Support Quick Transfer
When Quick Transfer is not available, the process shifts to a standard eSIM re-issue. Your carrier issues a new eSIM profile for your existing plan, and you install it on the new iPhone. Your plan, phone number, and contract remain unchanged — only the eSIM profile is replaced.
**Step 1: Contact your carrier.**
Reach your carrier through their app, website, or phone support. Tell them you are moving to a new iPhone and need to transfer your eSIM. Carriers refer to this process using various terms: "eSIM transfer", "eSIM switch", "re-issue", or "port eSIM to new device".
**Step 2: Complete any verification required.**
Your carrier will verify your identity before issuing the new profile. This typically involves confirming your account details or entering a verification code sent to your registered email or number.
**Step 3: Receive the new QR code or activation code.**
The carrier provides one of the following:
- A QR code (delivered on-screen or by email)
- An SM-DP+ address and activation code (for manual entry)
**Step 4: Install the eSIM on the new iPhone.**
- For a QR code: follow the steps in [How to Set Up eSIM on iPhone via QR Code](/en/guides/qr-code-iphone/)
- For manual entry: follow the steps in [Set Up eSIM with a Manual Code (SM-DP+ Address)](/en/guides/manual-code/)
Once the new profile is installed and active, your old eSIM profile is invalidated. You do not need to take any action on the old iPhone for this — the carrier's network deactivates the old profile when the new one activates.
---
## Transferring Between Different Operating Systems (iPhone to Android)
eSIM Quick Transfer is an Apple feature. It does not work between iPhone and Android.
If you are switching from an iPhone to an Android device, there is no device-to-device transfer mechanism. You must contact your carrier and request a new eSIM profile for the Android device. The carrier issues either a QR code or an activation code. The setup process on the Android side follows the standard Android eSIM installation flow, not the iPhone Quick Transfer process.
The reverse direction is more nuanced: Apple's ["Transfer your eSIM from Android to iPhone"](https://support.apple.com/en-us/123878) support page indicates that some carrier/device combinations support a transfer from Android to iPhone, while others require contacting the carrier for a new eSIM profile. Check Apple's documentation and your carrier's guidance for your specific case.
---
## After the Transfer
### On the New iPhone
After a successful transfer, verify the following in **Settings > Cellular**:
- The plan appears under your cellular lines
- **Turn On This Line** is enabled
- **Cellular Data** is set to the transferred eSIM (especially important if you have more than one line)
- The plan name and phone number are correct
Make a test call and load a webpage over cellular data to confirm the line is fully active.
### On the Old iPhone
After a Quick Transfer, the eSIM is removed from the source iPhone automatically. You do not need to delete it manually. However, if you are handing the old iPhone to someone else — or selling it — you should erase all content and settings: **Settings > General > Transfer or Reset iPhone > Erase All Content and Settings**.
If the transfer was done via carrier re-issue, the old eSIM profile remains visible in Settings on the old iPhone but is deactivated on the carrier's network. Delete it to keep your Settings tidy: **Settings > Cellular > tap the old plan > Remove Cellular Plan**.
---
## Troubleshooting
### "Transfer From Nearby iPhone" option does not appear
This option appears only when iOS detects a compatible source device nearby. Check the following:
- Both iPhones are running iOS 16 or later (confirm in **Settings > General > About > Software Version**)
- The source iPhone is powered on, unlocked, and within Bluetooth/Wi-Fi range
- Both devices have Wi-Fi or cellular internet enabled
- Your carrier supports eSIM Quick Transfer — if not, this option will not appear regardless of device conditions
If all conditions are met and the option still does not appear, restart both devices and try again.
---
### Transfer appears to complete but eSIM is not active on new iPhone
1. Go to **Settings > Cellular** on the new iPhone. If the eSIM line is listed but turned off, tap it and enable **Turn On This Line**.
2. Confirm **Cellular Data** is set to the transferred line.
3. Toggle Airplane Mode on and off to force the device to re-register on the network.
4. Wait two to five minutes — network-side propagation can take a short time after a transfer.
If the plan does not appear at all in Settings, contact your carrier. Provide your account details and the IMEI of the new iPhone (found in **Settings > General > About**).
---
### "This carrier doesn't support this feature"
This message confirms your carrier does not support eSIM Quick Transfer. Use the carrier re-issue method described above. The carrier will provide a new QR code or activation code to install the eSIM on your new iPhone.
---
### eSIM missing from both iPhones after a failed transfer
If a transfer was interrupted and the eSIM no longer appears on either device, contact your carrier immediately. The carrier can see the current status of your eSIM profile on their system and can re-issue it or restore it to the source device. Do not attempt to reinstall from a previously saved QR code — that code is single-use and will not work after the transfer was initiated. For broader activation errors not specific to transfer, see [eSIM Won't Activate? How to Fix Common Setup Issues](/en/guides/activation-failed/).
---
## FAQ
### Does eSIM Quick Transfer delete the eSIM from my old iPhone?
Yes. eSIM Quick Transfer moves the profile — it does not copy it. Once the transfer is confirmed, the eSIM is removed from the source iPhone and activated on the destination iPhone. The carrier's network reflects this change automatically.
### Which carriers support eSIM Quick Transfer?
In the United States, AT&T, T-Mobile, and Verizon support eSIM Quick Transfer. Support varies by country and carrier. Check your carrier's support page or contact them directly to confirm whether they support the feature before starting a transfer.
### Do both iPhones need to be on iOS 16 or later?
Yes. eSIM Quick Transfer requires iOS 16 or later on both devices (Apple introduced Quick Transfer in iOS 16 in 2022). Apple's current documentation recommends iOS 18.4 or later on both devices for the most reliable experience. If either device runs an older iOS version, the transfer option will not appear. Update both devices before attempting the transfer.
### Can I transfer an eSIM from iPhone to Android?
No. eSIM Quick Transfer is an Apple feature and does not work between iPhone and Android. To use an eSIM on an Android phone, you need to contact your carrier and request a new QR code or activation code for the Android device.
### What happens if the transfer is interrupted halfway through?
If the transfer is interrupted — for example, by the devices moving out of range or a network error — the eSIM may remain on the source iPhone or be left in an inconsistent state. Do not move the devices apart during transfer. If the transfer fails, restart both devices and try again. If the eSIM is no longer visible on either device, contact your carrier to re-issue it.
### Can I transfer a travel eSIM using Quick Transfer?
eSIM Quick Transfer requires carrier support on the network side. Travel eSIM providers generally do not support Quick Transfer. To move a travel eSIM to another device, contact the provider and ask whether they can re-issue the profile. Policies vary widely by provider. If you are installing a travel eSIM on a new device for the first time, see [Your First Travel eSIM: Step-by-Step Guide](/en/guides/first-time-guide/).
---
## Related Guides
- [How to Set Up eSIM on iPhone via QR Code](/en/guides/qr-code-iphone/) — ES-01: installing a new eSIM via QR code scan, including the iOS 17.4 long-press workaround
- [Set Up eSIM with a Manual Code (SM-DP+ Address)](/en/guides/manual-code/) — ES-03: entering the SM-DP+ address and activation code by hand when QR scanning is not available
- [What Is an eSIM?](/en/guides/what-is-esim/) — B-02: how eUICC chips, SM-DP+ servers, and the SGP.22 specification work together
- [eSIM Won't Activate? How to Fix Common Setup Issues](/en/guides/activation-failed/) — FE-01: diagnosis and fixes for every common activation error after installing a new eSIM profile
- [Your First Travel eSIM: Complete Guide](/en/guides/first-time-guide/) — TE-02: end-to-end walkthrough for purchasing and using a travel eSIM abroad
To compare eSIM plans for your destination, use [SimFinder Travel →](/en/travel/)
---
Sources:
- [Set up eSIM on iPhone - Apple Support](https://support.apple.com/en-us/118669)
- [Transfer your eSIM to a new iPhone - Apple Support](https://support.apple.com/en-us/108349)
- [Learn which type SIM your iPhone or iPad uses - Apple Support](https://support.apple.com/en-us/118569)
================================================================================
# The Reality of Unlimited Data Plans
URL: https://sim-finder.com/en/guides/unlimited-reality/
Type: guides (en)
Published: 2026-06-04
Nearly every plan labelled "unlimited" imposes speed limits after a defined data threshold. The word "unlimited" means you will not be charged extra for using more data — it does not mean all your data is delivered at the same speed throughout the billing cycle. Understanding the conditions attached to unlimited plans lets you choose the right tier and avoid unexpected slowdowns.
This guide explains fair-use policies, throttling, deprioritization, hotspot caps, and how to evaluate the terms that matter when comparing unlimited plans.
---
## What "Unlimited" Actually Means
The term "unlimited" in a mobile plan context means that your connection will not be cut off and you will not receive an overage charge when you consume beyond a specified amount of data. It does not guarantee consistent speed across all usage.
Most unlimited plans are structured in layers:
1. **High-speed allocation** — a defined quantity of data (the FUP threshold) delivered at the plan's advertised peak speed.
2. **Throttled tier** — once the high-speed allocation is consumed, speeds drop to a floor defined in the plan terms, typically between 128 kbps and 3 Mbps.
3. **Congestion management** — regardless of where you are in the billing cycle, speeds may further reduce during peak hours based on network load and your plan's priority level.
The practical implication: a plan marketed as "unlimited 5G" may deliver fast speeds for the first 30–50 GB of a billing cycle, then revert to speeds that make HD video streaming impossible for the remaining days of the month.
---
## Fair-Use Policies (FUP): The Threshold That Matters
A Fair-Use Policy (FUP) is the clause in a plan's terms and conditions that defines when speed management begins. It is the most important number to find when comparing unlimited plans.
**What the FUP specifies:**
- The quantity of high-speed data included (e.g., 30 GB, 50 GB, 100 GB, or sometimes "unlimited" with a note about network management)
- The speed that applies after that threshold (commonly 1 Mbps, 3 Mbps, or "up to" a stated figure)
- Whether the high-speed allocation resets each billing cycle or carries over
- Whether video streaming is treated differently from other traffic (some plans reduce video resolution to 480p or 720p by default, separate from the FUP threshold)
**Where to find it:** The FUP is almost never in the headline advertising copy. It appears in the plan's full terms and conditions, product description page, or a separate "network management policy" document. Checking these before signing up avoids surprises.
A practical reference point: at 1 Mbps (a common post-threshold speed), standard-definition video streaming (480p) is marginal, HD video at 720p is generally not possible, and video calls are degraded. At 128 kbps, only messaging and basic text browsing work reliably. The [How Much Mobile Data Do You Need?](/en/guides/data-usage-guide/) guide provides per-activity bandwidth requirements for comparison.
---
## Throttling After the Cap
Throttling is the carrier's mechanism for enforcing the FUP. Once your high-speed data allocation is exhausted, the carrier applies a hard speed cap to your connection.
**Key characteristics of throttling:**
- It is deterministic — the speed reduction applies regardless of network congestion or time of day
- It persists until the billing cycle resets (or until you purchase a data add-on, if your carrier offers one)
- It applies to the SIM card, not the device, so switching to a different phone does not remove a throttle
**Throttle speeds vary significantly by plan tier.** Budget-tier unlimited plans often throttle to 128 kbps–512 kbps. Mid-tier plans may throttle to 1 Mbps–3 Mbps. Some premium unlimited plans throttle to speeds of 5 Mbps or higher, which is sufficient for standard-definition streaming and video calls. Note that the lower end of this range (128 kbps) is more characteristic of MVNO and prepaid tiers; current major-carrier postpaid unlimited plans typically throttle to higher floor speeds.
At 1 Mbps throttle speed, the practical experience is:
| Activity | Usable at 1 Mbps? |
|----------|--------------------|
| Text messaging | Yes |
| Web browsing (text-heavy pages) | Yes, with slow load times |
| Voice calls (VoIP) | Yes |
| Maps and navigation | Yes |
| Video calls (Zoom, Meet) | Degraded — acceptable for audio-only |
| SD video (480p) streaming | Marginal — depends on service and buffering |
| HD video (720p+) streaming | No |
| Large file downloads | Very slow |
If you regularly stream video or join video calls away from Wi-Fi, the post-threshold speed is a critical factor. For data-reduction techniques that extend your high-speed allocation, see [Data-Saving Techniques](/en/guides/save-data/).
---
## Deprioritization During Congestion
Deprioritization is separate from throttling and operates on a different mechanism. Instead of a hard speed cap, deprioritization is a traffic management policy that applies during network congestion.
**How it works:**
When a cell tower is handling more simultaneous traffic than it can serve at full speed for everyone, the carrier's network equipment sorts subscribers by priority tier and serves higher-priority traffic first. Lower-priority subscribers receive available capacity after higher-priority subscribers have been served.
**When deprioritization affects you:**
- During rush hours in dense urban areas
- At large events (concerts, stadiums, conventions)
- In locations served by a single tower with many simultaneous users
If the network is not congested, deprioritized subscribers receive the same speeds as other subscribers. The impact of deprioritization is therefore variable — speeds may be normal at 2 AM and significantly reduced at 6 PM in the same location.
**Priority tiers on the same network:**
Carriers typically assign higher priority to subscribers on premium unlimited plans compared to those on budget or prepaid unlimited plans, even if both plans share the same underlying infrastructure. A subscriber on a carrier's highest-tier unlimited plan will generally see less speed degradation during congestion than one on the entry-level unlimited plan of the same carrier.
MVNO subscribers (virtual operators leasing capacity from a licensed network operator) are typically deprioritized relative to the host carrier's own subscribers. This is a structural feature of wholesale network agreements, not an anomaly. For a detailed explanation, see [Slow Mobile Data Speeds](/en/guides/slow-speed/).
---
## Hotspot and Tethering Caps
Many unlimited plans treat on-device data and tethering (hotspot) data as separate buckets with different speed limits and thresholds.
**Common structure:**
- On-device data: unlimited at high speed up to the FUP threshold, then throttled
- Tethering data: a separate allocation, often smaller — for example, 20 GB of full-speed hotspot, then throttled to 600 kbps–1 Mbps regardless of the status of the on-device allowance
This means a plan that provides 50 GB of high-speed on-device data may simultaneously cap high-speed tethering at 15 GB or 20 GB. A user who relies on their phone's hotspot for laptop or tablet use will reach the tethering throttle well before the general data allowance.
**What to check for tethering:**
1. Whether tethering is permitted at all (some plans prohibit it entirely)
2. The high-speed tethering threshold (not the general data threshold)
3. The throttle speed for tethered connections after that threshold
4. Whether international roaming plans apply the same tethering policy or a stricter one
Some premium unlimited tiers remove the separate tethering cap or set it equal to the general FUP threshold. These plans are typically priced higher. If you regularly use your phone as a hotspot for other devices, this distinction determines whether the plan is practical for your use case.
---
## Video Streaming Restrictions
Some carriers apply video quality caps as a separate layer from the general FUP, restricting streaming resolution on unlimited plans regardless of how much high-speed data remains.
**Common implementations:**
- SD cap: entry-tier unlimited plans may restrict video to 480p (SD) by default; higher tiers typically allow HD (720p+) or offer it as an opt-in
- HD unlock: subscribers must opt into an add-on or a higher-tier plan to stream at 720p or above
- Resolution reduction without speed throttling: the carrier intercepts the video stream and transcodes it to a lower resolution, which reduces data consumption but also reduces quality
These restrictions are independent of the FUP threshold. A subscriber who has used only 5 GB of a 50 GB allocation may still have video capped at 480p if their plan tier includes a streaming quality limit.
Where this applies, it is stated in the plan's terms. Look for terms such as "video streaming optimized to SD quality" or "HD video available on premium plans."
---
## International Roaming and Unlimited Plans
Unlimited plan benefits typically do not extend automatically to international roaming. Most plans that advertise unlimited domestic data apply stricter limits when the device is roaming on a foreign network.
**Common roaming structures on unlimited plans:**
- A separate, smaller roaming data allowance (e.g., 5–15 GB of high-speed roaming data at normal plan speeds, after which roaming is throttled or blocked)
- Reduced roaming speeds from the start of the trip, regardless of consumption
- A roaming add-on required to activate data abroad
- Roaming blocked entirely until an add-on is purchased
**EU exception:** Within the European Union, regulations require carriers licensed in EU or EEA member states to allow subscribers to use their domestic data allowance while roaming across the EU/EEA at no additional charge, within a fair-use limit. For plans with a finite high-speed allocation, that allocation generally applies during EU travel. For plans marketed as unlimited, EU regulations (Regulation 2022/612) permit carriers to apply a calculated fair-use roaming data cap, which may be significantly lower than the domestic unlimited allocation. The fair-use limits under this framework are governed by regulation rather than individual carrier policy.
For travel-specific considerations, the [How to Choose a Travel eSIM](/en/guides/how-to-choose/) guide and the [Travel eSIM Provider Comparison](/en/guides/provider-comparison/) cover how travel eSIM plans handle data limits and speed.
---
## Network Generations and Speed Labelling
A plan described as "unlimited 5G" means the plan includes access to the carrier's 5G network where available — it does not guarantee 5G speeds everywhere or at all times.
**What affects the actual speed you receive:**
- 5G coverage is not universal; outside covered areas, devices fall back to 4G LTE or 3G
- 5G sub-6 GHz (the most widely deployed form) delivers speeds broadly comparable to 4G LTE in many real-world conditions
- 5G mmWave offers much higher speeds but has very limited range and is concentrated in specific indoor and outdoor locations
- The FUP and deprioritization policies described above apply to 5G data exactly as they apply to 4G
An unlimited plan on a 4G LTE network may deliver consistently higher practical speeds than an unlimited plan on a 5G network with aggressive deprioritization, if the latter plan has a lower priority tier or a lower FUP threshold.
---
## Five Things to Check Before Choosing an Unlimited Plan
Before selecting a plan based on "unlimited" marketing, locate and compare these five terms:
1. **FUP threshold** — the quantity of high-speed data before throttling begins. Higher is better; "truly unlimited" at full speed (no FUP) is rare and usually premium-priced.
2. **Post-threshold speed** — the speed floor after the FUP is reached. The difference between 128 kbps and 3 Mbps is the difference between a connection that supports only text and one that supports SD video.
3. **Deprioritization policy** — whether your plan tier receives lower priority during congestion, and how the carrier describes this. Plans labelled "premium" or "priority" data often include a buffer before deprioritization begins.
4. **Tethering allowance** — the separate high-speed hotspot threshold and the tethered throttle speed. If you use a hotspot regularly, this figure matters as much as the general FUP.
5. **Video streaming cap** — whether video quality is restricted independently of data consumption, and what resolution limit applies to your plan tier.
Use SimFinder to compare plans side by side, including data thresholds and plan conditions, to find an option matched to your actual usage pattern.
**[Compare mobile plans on SimFinder →](/en/)**
---
## Related Guides
- [How Much Mobile Data Do You Need?](/en/guides/data-usage-guide/) — per-app consumption figures and a method to calculate your monthly data needs before choosing a plan
- [Data-Saving Techniques](/en/guides/save-data/) — iOS and Android settings that extend your high-speed allocation before the FUP threshold is reached
- [Slow Mobile Data Speeds](/en/guides/slow-speed/) — how to diagnose whether slow data is caused by throttling, deprioritization, congestion, or a device issue
- [How to Choose a Travel eSIM: 5 Key Criteria](/en/guides/how-to-choose/) — applying similar criteria to travel data plans, where FUP and speed limits vary widely between providers
- [Travel eSIM Provider Comparison](/en/guides/provider-comparison/) — how major travel eSIM providers structure their unlimited and high-volume plans
---
## Frequently Asked Questions
See the FAQ items in the frontmatter above for structured answers to the most common questions about unlimited plan terms.
**Q: Why do carriers call plans "unlimited" if they apply speed limits?**
The term is technically accurate in a narrow sense: there is no hard cap on the total volume of data you may consume, and you will not receive an overage charge for high usage. The speed restrictions are disclosed in the plan's fair-use or network management terms. Regulatory standards for what carriers may claim in advertising vary by country — in some markets, regulators have required greater transparency in how speed-limited plans are described.
**Q: If I buy a data add-on after throttling, will full speed be restored?**
In most cases, yes — purchasing a top-up or add-on through your carrier's app restores high-speed data until the top-up allocation is exhausted. However, the top-up's price-per-GB is typically higher than the base plan's effective rate. If you consistently exhaust the FUP threshold before the end of your billing cycle, comparing a higher-tier plan against the cost of frequent add-ons often makes economic sense.
**Q: Do unlimited plans on MVNOs work the same way?**
The same FUP, throttling, and deprioritization structures apply, but MVNO subscribers have an additional layer to consider: wholesale bandwidth purchased from the host network. Even before hitting their personal FUP threshold, MVNO subscribers may experience slower speeds during peak hours if the MVNO's shared bandwidth allocation at the network interface is under heavy load from other subscribers on the same MVNO. This is separate from the general network deprioritization policy and is discussed in [Slow Mobile Data Speeds](/en/guides/slow-speed/).
**Q: Does the billing cycle reset date affect when throttling lifts?**
Yes. Throttling from a depleted FUP allocation lifts at the start of your next billing cycle — not at the end of the calendar month, unless your plan renews on the first of each month. If your plan renews on the 15th and you exhaust the allocation on the 20th, you will be on reduced speeds until the 15th of the following month. Check your carrier's app to confirm your exact renewal date, not just the date you signed up. Some carriers also offer mid-cycle top-ups to restore high-speed data before the renewal date.
================================================================================
# VoLTE and VoNR Explained — How Voice Calls Work on 4G and 5G
URL: https://sim-finder.com/en/guides/volte-vonr/
Type: guides (en)
Published: 2026-04-24
When you make a phone call on a modern smartphone, the voice almost certainly travels as IP packets over your 4G or 5G connection — not through a separate circuit-switched path as it did in the 2G and 3G era. That shift is what VoLTE and VoNR describe, and understanding it matters far more than it used to: with 3G networks now shut down across the United States, much of Europe, Australia, and Japan, a device that cannot register for VoLTE on your carrier simply cannot make calls.
The key points covered in this article:
- What VoLTE is, the IMS architecture that makes it work, and how SIP signalling and dedicated QoS bearers separate a voice call from ordinary data traffic
- How VoNR extends the same system to 5G Standalone networks
- Why 3G network shutdowns raised the stakes for VoLTE compatibility, with specific dates for major markets
- The practical steps for checking whether an unlocked phone will work with VoLTE on a target carrier
- How Wi-Fi Calling (VoWiFi) relates to VoLTE and why the two complement each other
- What actually happens — including to emergency calls — when a device lacks VoLTE support
For background on what a SIM card is and how it authenticates you to a network, see [What Is a SIM Card?](/en/guides/what-is-sim/) For plain-English definitions of every term used in this article, the [SIM & Mobile Glossary](/en/guides/glossary-index/) is the reference starting point.
---
## What Is VoLTE?
**VoLTE** stands for **Voice over LTE**. It is the technology that carries voice calls and SMS as IP packets over a 4G LTE network, using an IMS (IP Multimedia Subsystem) core. The commercial specification is defined by GSMA PRD IR.92 ("IMS Profile for Voice and SMS"), which builds on 3GPP's IMS MMTel (Multimedia Telephony) solution.
Before VoLTE, 4G LTE was a data-only technology. LTE was specified in 3GPP Release 8 (frozen December 2008) as a purely packet-switched network: it had no native mechanism to carry traditional circuit-switched (CS) voice. When a 2G or 3G subscriber made a call, the network switched to a dedicated circuit — a physical or virtual channel reserved exclusively for that conversation. LTE had no such circuit plane.
The interim solution was **CS Fallback (CSFB)**: when a VoLTE-incapable device or a carrier without IMS needed to make a call, the LTE device would temporarily fall back to the 3G (or even 2G) network for the duration of the call, then return to LTE for data. CSFB works, but it adds several seconds of call-setup delay, interrupts the LTE data connection, and depends entirely on having a 3G network to fall back to.
VoLTE eliminates CSFB. The call stays on LTE from start to finish, using a dedicated QoS bearer — a concept explained in detail in the next section. The world's first commercial VoLTE service launched on 7 August 2012, when US operator MetroPCS deployed voice calls on LTE using the LG Connect 4G, the first VoLTE-capable smartphone. By September 2020, 226 operators across 97 countries had launched commercial VoLTE services.
---
## How VoLTE Works: IMS, SIP, and QoS Bearers
VoLTE is not simply "voice over data." It is a precisely engineered system that allocates dedicated network resources for each voice session and applies the same signalling protocol used in fixed-line telephony infrastructure.
### The IMS Core
The **IP Multimedia Subsystem (IMS)** is a standardised framework developed by 3GPP (first introduced in Release 5, 2002) for delivering multimedia services — voice, video, messaging — over IP networks. IMS provides:
- A **SIP (Session Initiation Protocol)** layer for call signalling: setting up, modifying, and tearing down sessions
- **SDP (Session Description Protocol)** for negotiating codec parameters (bitrate, codec type)
- A policy and charging function that ties each session to the subscriber's account
When you dial a number on a VoLTE device, your phone registers with the carrier's IMS core over the LTE data bearer. The IMS P-CSCF (Proxy Call Session Control Function) receives the SIP INVITE message, routes it through the S-CSCF (Serving CSCF), and completes the session setup to the called party. This is conceptually identical to how a SIP softphone on a corporate IP-PBX works, but the IMS adds carrier-grade authentication, charging hooks, and tight integration with the 3GPP access network.
### Dedicated QoS Bearers
On LTE, all traffic does not travel on the same pipe. The network supports multiple **EPS bearers** (Evolved Packet System bearers), each with its own Quality of Service class. An LTE device always has a default bearer for general data (best-effort, QCI 9). When a VoLTE call begins, the network establishes a **dedicated bearer** for the voice session with a specific **QCI (QoS Class Identifier)**:
- **QCI 1**: used for the voice media (RTP stream) — guaranteed bit-rate, very low target packet-error rate, 100 ms target packet delay budget
- **QCI 5**: used for the IMS SIP signalling — non-guaranteed bit-rate but high priority
This is what separates VoLTE from simply running a VoIP app like WhatsApp over LTE data. A VoIP app competes for the best-effort data bearer. A VoLTE call gets its own bearer with network-enforced priority and bandwidth guarantees. The carrier's Policy and Charging Enforcement Function (PCEF) activates these bearers dynamically at the start of each call and releases them at the end, based on instructions from the IMS core.
The voice codec most commonly used in VoLTE is **AMR-WB (Adaptive Multi-Rate Wideband)**, which delivers the audio improvement referred to commercially as **HD Voice**. AMR-WB samples audio at 16 kHz (versus 8 kHz for older narrowband AMR), capturing frequencies up to 7 kHz and producing noticeably clearer, more natural-sounding calls.
### The Result: Simultaneous Voice and Data
Because the voice call occupies a dedicated bearer rather than the entire LTE connection, VoLTE allows **full simultaneous voice and LTE data use**. With CSFB, your phone dropped to 3G (or paused LTE data) for the duration of the call. With VoLTE, you can browse, stream, or use any data service during a call without interruption.
---
## Benefits of VoLTE
VoLTE improves on legacy circuit-switched voice in three measurable ways.
**HD Voice quality.** The AMR-WB codec samples at 16 kHz rather than the 3.1 kHz bandwidth of traditional narrowband voice. This allows speech in the range of 50–7,000 Hz to be transmitted, making voices sound fuller and more natural, and making it significantly easier to distinguish similar-sounding consonants. Background noise is also reduced because the wideband codec encodes it differently from speech.
**Faster call setup.** CSFB typically added 5–8 seconds to call setup time while the device dropped to 3G and re-registered on a CS network. VoLTE call setup over IMS typically completes in under 3 seconds.
**Simultaneous voice and data.** As described above, VoLTE's dedicated bearer means data services are not interrupted during a call. This matters for navigation, email, and any app that maintains a background connection.
Beyond individual call quality, VoLTE also increases spectral efficiency at the network level. Because IP packet transmission is more efficient than circuit switching for encoding and transmitting voice, a given amount of spectrum can support roughly three times as many VoLTE calls as the equivalent 2G circuit-switched voice, according to 3GPP documentation. This freed spectrum is part of what enabled carriers to retire 3G and reallocate those frequencies to LTE and 5G.
---
## VoNR: Voice on 5G
**VoNR** stands for **Voice over New Radio**. It is the 5G equivalent of VoLTE, defined in GSMA NG.114 and standardised in 3GPP Release 15 (5G NR SA specification, Main drop functionally frozen June 2018, ASN.1 freeze completed September 2018).
### What Changes with VoNR
The IMS architecture is essentially the same: SIP signalling, QoS bearers, AMR-WB codec compatibility. What changes is the access layer:
- **5G NR radio** replaces the LTE radio access network. VoNR uses a 5QI (5G QoS Identifier) — the 5G equivalent of LTE's QCI — to request dedicated resources for voice traffic.
- **5G SA Core (5GC)** replaces the LTE EPC (Evolved Packet Core). The 5G core uses a service-based architecture with new network functions: AMF (Access and Mobility Management Function) replaces MME, SMF replaces PGW/SGW, and UPF handles user-plane forwarding.
- **EVS (Enhanced Voice Services)** codec support becomes practical. EVS (3GPP TS 26.445) is a superwideband and fullband codec sampling at up to 32 kHz, delivering even higher audio quality than AMR-WB. It was introduced in 3GPP Release 12 but is more consistently implemented in VoNR-capable devices and networks.
### VoNR Requires 5G SA
This is a critical constraint: VoNR requires a **5G Standalone (SA) network**. Many carriers launched 5G as **NSA (Non-Standalone)**, where 5G NR handles data but the control plane still runs on an LTE core. On NSA 5G networks, voice calls fall back to VoLTE on the LTE layer. True VoNR only works once a carrier has deployed a full 5G SA core.
### VoNR Deployment Status
As of 2026, VoNR is in commercial service on a growing number of SA-capable networks, including several major carriers in South Korea, China, the United States (T-Mobile), and Japan (NTT Docomo); KDDI also operates 5G SA commercially. However, VoLTE remains the dominant voice technology on 4G-first networks globally, and many VoNR-compatible devices fall back to VoLTE when the 5G SA signal is unavailable.
---
## The 3G Shutdown Context
The retirement of 3G networks across major markets transformed VoLTE from a premium feature into a basic requirement. The table below lists confirmed shutdown dates for several major markets.
| Market | Operator | Shutdown completed |
|---|---|---|
| United States | AT&T | February 2022 |
| United States | T-Mobile (including Sprint legacy) | July 2022 |
| United States | Verizon | December 2022 |
| Japan | KDDI (au) | March 2022 |
| Japan | NTT Docomo | March 2026 |
| Japan | SoftBank | April 2024 |
| Australia | Telstra | October 2024 |
| Australia | Optus | October 2024 |
| United Kingdom | EE, Three, Vodafone, O2 | Various: EE/Vodafone 2024, Three 2025, O2 early 2026 |
When 3G was shut down, CSFB became impossible: there was no longer a circuit-switched network to fall back to. Any device that relied on CSFB for voice — meaning any device that could not register for VoLTE on the new 4G-only network — lost the ability to make and receive calls entirely. Data and text over LTE might still function, but voice would show "No service" or "Emergency calls only."
This is why the 3G shutdown directly impacts anyone using an older unlocked device or a phone purchased in a different market. A handset that worked perfectly for calls in 2019 on CSFB may be unable to make any calls on the same carrier's network today.
For consumers choosing a SIM or carrier, it is also worth noting that MVNOs inherit their host network's VoLTE infrastructure. An MVNO running on an MNO that has completed its VoLTE rollout will generally pass VoLTE through to subscribers — but the MVNO must negotiate VoLTE explicitly in its wholesale agreement, and device IMS profile support must still be present. See [What Is an MVNO?](/en/guides/what-is-mvno/) for how MVNOs lease network services from host carriers.
---
## Checking VoLTE Compatibility on an Unlocked Phone
Band compatibility and IMS profile support are the two independent requirements for VoLTE on a specific carrier. Both must be satisfied.
### Step 1: Verify Band Compatibility
VoLTE operates on specific LTE frequency bands. Carriers designate one or more bands as their primary VoLTE bearer band. For example:
- AT&T deploys VoLTE primarily on Band 17 (700 MHz) and Band 4 (AWS)
- T-Mobile deploys VoLTE on Band 12 (700 MHz), Band 4, and Band 66
- EE (UK) uses Band 20 (800 MHz) for VoLTE
- KDDI (Japan) uses Band 18/26 (850 MHz) for VoLTE
If your device's modem does not support the carrier's designated VoLTE band, it cannot register. Check your phone's supported bands against the carrier's VoLTE band list. This information is available on the carrier's network page or from third-party databases such as GSMA's terminal compatibility information.
Buying a device unlocked in the US and using it in Japan, or vice versa, is a common mismatch scenario: US-market phones are often engineered for North American band plans, while Japanese-market phones target a different set. Even if the device technically supports LTE on some overlapping band, the VoLTE-specific band required by the local carrier may be absent.
### Step 2: Verify IMS Profile (Carrier Bundle / Carrier Configuration)
Band support is necessary but not sufficient. VoLTE also requires that the device's modem firmware contain the **carrier's IMS profile** — sometimes called a carrier bundle, carrier configuration, or carrier profile. This is a set of parameters that tells the device how to connect to the IMS core of that specific carrier: the P-CSCF discovery address, authentication parameters, and policy settings.
On iPhones, Apple manages carrier bundles and distributes them as part of iOS updates. A carrier must be on Apple's list for VoLTE to be enabled on that carrier's network. On Android, carrier profiles are often embedded by the manufacturer at the factory for the market the device is destined for. A global unlocked phone sold for one market may lack the IMS profile for a carrier in a different market.
Practical ways to check:
1. **The carrier's device compatibility page.** Most major carriers publish a list of approved or certified devices. If your model is on the list, VoLTE is expected to work. If it is not on the list, the carrier has not tested it, and VoLTE may not function even if bands match.
2. **The carrier's IMEI checker.** Enter your device's 15-digit IMEI (dial `*#06#` to retrieve it). Some carriers' online tools will confirm whether VoLTE is supported for that specific IMEI.
3. **Test SIM method.** Insert a trial or pay-as-you-go SIM from the target carrier. Go to mobile network settings (Settings → Cellular → Calls or equivalent) and look for a "VoLTE" or "HD Voice" toggle or indicator. If the option does not appear or cannot be enabled, the IMS profile is missing.
4. **Signal diagnostic apps.** On Android, field test modes (accessible via codes such as `*#*#4636#*#*`) can show whether the device is registered on an IMS network. An IMS registration status of "Registered" confirms VoLTE is active.
### A Note on eSIM and VoLTE
An eSIM profile downloaded from a carrier typically includes the carrier's IMS configuration. If you are setting up a new line via eSIM — particularly on a travel eSIM — confirm with the eSIM provider whether VoLTE and SMS are included, since many travel data-only eSIMs explicitly exclude voice registration. See [What Is an eSIM?](/en/guides/what-is-esim/) for how eSIM profiles are structured and what they contain.
---
## VoLTE and Wi-Fi Calling (VoWiFi)
**VoWiFi** — commonly marketed as **Wi-Fi Calling** — uses the same IMS core infrastructure as VoLTE, but the access network is a Wi-Fi connection rather than the LTE radio interface.
When Wi-Fi Calling is enabled on a supported device and carrier, the phone establishes a secure IPsec tunnel to the carrier's **ePDG (evolved Packet Data Gateway)** over the Wi-Fi connection. The voice and signalling traffic then enter the IMS core exactly as they would over LTE. The call quality, codec, and charging rules are the same; only the first-mile transport differs.
This has several practical consequences:
- **Indoor coverage gaps.** If you have weak LTE signal inside a building but a strong Wi-Fi connection, Wi-Fi Calling can take calls that would otherwise drop or fail to connect.
- **International travel.** On some carriers, Wi-Fi Calling allows you to receive calls to your home number even while connected to a foreign Wi-Fi network, without incurring roaming charges — depending on carrier policy.
- **Seamless handoff.** Devices with both VoLTE and VoWiFi can move a live call between LTE and Wi-Fi without interruption, provided both the device and carrier support it. This is handled transparently at the IMS level.
VoWiFi availability on an unlocked phone is subject to the same IMS profile requirement as VoLTE. The carrier bundle must include the ePDG address and the IPsec credentials for the Wi-Fi interface. An unlocked phone that lacks the carrier's IMS profile will not be able to use Wi-Fi Calling on that carrier, even if it technically supports the feature on other networks.
For a SIM-locked device, the relationship is even closer: a carrier-locked phone that supports VoLTE and VoWiFi on the locking carrier will lose those features if used with a foreign SIM, even after the lock is removed if the IMS profile for the new carrier is not loaded. See [SIM Lock and SIM-Free Explained](/en/guides/sim-lock/) for how to verify and remove carrier restrictions.
---
## Risks if Your Device Doesn't Support VoLTE
In a market where 3G has been retired, a VoLTE-incapable device faces a clear set of problems.
### No Voice Calls
The most immediate risk is the inability to make or receive any voice call. The device may still connect to 4G LTE for data — web browsing, apps, streaming — because data does not require IMS registration. But the voice call path has been severed: there is no 3G CS network to fall back to, and the 4G network will not route a call to a device that has not registered on IMS.
This affects not just outgoing calls but also incoming: if your number is associated with that SIM and device, callers to your number will reach voicemail or receive an unavailable signal.
### Emergency Call Restrictions
Emergency calls (911 in the US, 112 in Europe, 110 in Japan) are subject to special handling. Regulatory rules in most markets require carriers to attempt emergency calls from any device on the network, including devices without a SIM or with a locked SIM. However, on a fully 4G-only network, if the device cannot register for VoLTE, some networks may be unable to complete even an emergency call to that device. The precise behaviour depends on whether the carrier has implemented emergency fallback over IMS or another access technology such as Wi-Fi Calling.
Carriers are aware of this risk and typically maintain some form of emergency VoLTE registration that works independently of full IMS profile support — but this cannot be universally guaranteed across all unlocked or foreign-market devices. The practical advice is not to rely on an incompatible device for emergency communication.
### SMS and Messaging
Traditional SMS (Short Message Service) has two paths. On a VoLTE-enabled network, SMS is delivered over the IMS as SMs over IMS (SMs over IP), part of the same IR.92 profile. Some carriers also route SMS through a separate channel. Devices without VoLTE registration may or may not receive SMS depending on whether the carrier has maintained a legacy SMS gateway path. Rich Communications Services (RCS), the successor to SMS, is always IMS-dependent and will not function on non-VoLTE devices.
### What to Do
If you are using an older or foreign-market device and suspect it lacks VoLTE support:
1. Check the carrier's approved device list or IMEI checker before committing to a plan.
2. If possible, test with a short-term SIM before porting your number.
3. If VoLTE is confirmed unsupported, consider upgrading to a device that includes the carrier's IMS profile, or use an unlocked device sold specifically for your target market.
You can compare plan options across carriers — including filtering by network features — on [SimFinder](/en/).
---
## FAQ
See the frontmatter for structured FAQ entries compatible with schema.org/FAQPage. The questions below address topics not covered in the main body.
**When did VoLTE first launch commercially?**
The world's first commercial VoLTE service launched on 7 August 2012, when US carrier MetroPCS deployed voice over LTE using the LG Connect 4G smartphone. South Korean operator SK Telecom followed on 8 August 2012, within hours.
**Does VoLTE work on MVNOs?**
VoLTE on an MVNO depends on two conditions: the host MNO must have deployed VoLTE and agreed to pass it through to the MVNO in the wholesale agreement, and the device must carry the host carrier's IMS profile — not the MVNO's brand profile, because MVNOs typically do not maintain separate IMS cores. Most MVNOs on major VoLTE-capable networks do pass VoLTE through, but it is worth confirming with the specific MVNO before switching. See [What Is an MVNO?](/en/guides/what-is-mvno/) for the technical relationship between MVNOs and their host networks.
**Can I force my phone to use VoLTE?**
In most cases, the VoLTE indicator is determined by the carrier's IMS registration, not a user-accessible setting. On Android, a "VoLTE" or "Enhanced 4G LTE" toggle may appear in mobile network settings — but this toggle only works if the IMS profile is already loaded. Toggling it does not install a missing profile. On iPhone, the option appears as "Voice & Data" → "LTE" or "5G" with a VoLTE indicator; again, it requires the carrier bundle to be present.
**What is the difference between VoLTE and RCS?**
VoLTE handles voice calls; RCS (Rich Communication Services) handles enhanced messaging — group chats, high-resolution media sharing, read receipts, and so on. Both run over IMS and use the same network registration. RCS is defined in GSMA IR.94 and requires IMS just as VoLTE does. A device without IMS registration cannot use either. Google's rollout of RCS on Android and Apple's addition of RCS in iOS 18 have made the distinction more visible to consumers.
---
## Related Guides
- [What Is a SIM Card?](/en/guides/what-is-sim/) — How IMSI and Ki authenticate you to any mobile network
- [SIM Lock and SIM-Free Explained](/en/guides/sim-lock/) — How to check and remove carrier restrictions that can block VoLTE on foreign SIMs
- [What Is an MVNO?](/en/guides/what-is-mvno/) — How virtual operators inherit VoLTE from their host MNO
- [What Is an eSIM?](/en/guides/what-is-esim/) — How eSIM profiles carry IMS configuration for VoLTE activation
- [SIM & Mobile Glossary](/en/guides/glossary-index/) — Plain-English definitions of IMS, SIP, QCI, EPS bearer, and related terms
================================================================================
# VPN Basics and How to Choose One
URL: https://sim-finder.com/en/guides/vpn-guide/
Type: guides (en)
Published: 2026-06-05
A VPN (Virtual Private Network) creates an encrypted tunnel between your device and a VPN server before your internet traffic reaches the local network. On an untrusted network — public Wi-Fi in a café, hotel, or airport — this prevents local observers, including rogue access points, from reading your traffic. What a VPN does not do: it does not stop malware or phishing, it does not make you anonymous, and it does not replace HTTPS. Understanding what a VPN actually protects is as important as knowing when to use one. If you have access to mobile data, using it instead of public Wi-Fi is often the simpler and more robust choice.
This guide covers how a VPN works at a practical level, how it relates to HTTPS, what to look for in a provider, when to use mobile data instead, and what the common misconceptions are. It does not recommend specific VPN products by name, because provider quality and policies change over time; the criteria here let you evaluate any provider on their current merits.
---
## How a VPN Works: The Encrypted Tunnel
When you connect to the internet without a VPN, your traffic flows from your device to the local network (your home router, or a public Wi-Fi access point), then to your internet service provider or mobile carrier, and then to the destination server. Each of these intermediary points can observe your traffic unless it is encrypted at the application layer.
A VPN inserts an additional step. Before sending any application traffic, your device establishes an encrypted connection — the tunnel — to a VPN server operated by your VPN provider. All subsequent traffic is wrapped inside this tunnel. From the perspective of:
- **The local network** (including any rogue access point or attacker on the same Wi-Fi): all outbound traffic from your device appears as encrypted VPN data. The attacker cannot read its contents.
- **Your ISP or mobile carrier**: they see encrypted traffic to the VPN server's IP address, not the destinations you are visiting.
- **The VPN server**: it can see your traffic in plaintext (for HTTP) or the domain and metadata (for HTTPS), because it decrypts the tunnel to forward requests to the internet on your behalf.
- **Destination websites and services**: they see the VPN server's IP address, not your device's IP address.
The key implication: **the VPN provider replaces your ISP and local network as the party with visibility into your traffic**. This is why the trustworthiness of the VPN provider matters as much as the technology.
One additional detail matters in practice. A VPN protects traffic that passes through the tunnel. If a VPN app is configured in split-tunnel mode — where only some traffic routes through the VPN and the rest goes directly — then the directly-routed traffic is not protected. Most VPN apps default to routing all traffic through the tunnel (full-tunnel mode), but this is worth confirming in the app's settings, particularly on mobile where battery or performance considerations can influence the default.
---
## What a VPN Protects — and What It Does Not
Understanding the exact scope of VPN protection prevents the most common mistakes in using one.
**What a VPN does protect:**
- Traffic from passive eavesdropping on a shared local network (the primary use case for public Wi-Fi)
- Traffic from rogue or evil-twin access points (since the tunnel is established before application traffic is sent)
- DNS queries, which are routed through the VPN tunnel rather than to a DNS server visible to the local network
- Your IP address from destination services (they see the VPN server's IP)
**What a VPN does not protect:**
- **Malware already on your device.** A VPN is a network-layer control. If malware is running on your device, it can exfiltrate data through the VPN tunnel along with your legitimate traffic — the VPN encrypts both.
- **Phishing attacks.** If you navigate to a fake login page and enter your credentials, the VPN transmits those credentials to the phishing server faithfully. The VPN has no way to distinguish a legitimate site from a spoofed one.
- **Your identity on services where you are logged in.** Logging in to an account tells the service who you are, regardless of which IP address the request came from.
- **Content you submit.** A VPN encrypts traffic in transit, but the destination server receives your data in plaintext once the tunnel terminates at the VPN server.
- **Traffic if the VPN is not connected.** This sounds obvious but matters: if the VPN connection drops momentarily and no kill switch is active, your device may send traffic directly.
- **Account takeover via credential reuse.** If an attacker obtains your password from a data breach elsewhere and reuses it on another service, the attacker authenticates as you — the VPN is uninvolved in this attack path.
---
## A VPN and HTTPS: How They Relate
Most internet traffic today uses HTTPS (TLS), which encrypts the content of communications between your browser and the destination server. HTTPS is independent of a VPN and applies end-to-end: even the VPN provider cannot read the content of your HTTPS-protected communications.
This raises a reasonable question: if HTTPS already encrypts your traffic, what does a VPN add?
The answer depends on the threat. HTTPS protects the **content** of a connection that has been correctly established with the legitimate server. It does not protect against:
- An evil-twin access point that intercepts your traffic before your device can establish a TLS connection with the legitimate server
- A local attacker who can observe which domains you are visiting (visible in DNS queries and TLS Server Name Indication before ECH is universally deployed)
- An attacker who can present a fraudulent certificate if the user accepts a certificate warning
A VPN addresses these gaps differently. By establishing the encrypted tunnel before any application traffic is sent, a VPN ensures that the local network sees only tunnel traffic — the evil-twin attack has nothing to observe before the TLS connection reaches the legitimate server.
**In practice:** HTTPS-only mode in your browser is a necessary baseline. A VPN is an additional layer that specifically addresses the local-network threat. For public Wi-Fi, both together provide the strongest practical protection. For ordinary browsing on your home network or mobile data, HTTPS alone is generally sufficient for most threat models.
One nuance worth noting: Encrypted Client Hello (ECH), a TLS extension designed to encrypt the SNI field and prevent domain leakage to local observers, is an emerging standard that partially addresses one of the gaps that VPNs fill. ECH is not yet universally deployed by servers or supported across all networks, so it does not replace a VPN's local-network protections in practice as of publication.
If you want to understand the related risk of mobile identity — particularly where SMS-based authentication intersects with network security — see [SMS 2FA Security Risks](/en/guides/sms-2fa-risk/) for how SS7-based interception differs from local Wi-Fi threats.
---
## Choosing a VPN Provider: Key Criteria
**No-logs policy, independently audited**
A no-logs policy is a provider's commitment not to store records of your traffic, IP addresses, or connection timestamps. The strength of this claim depends on whether it has been verified. Several established VPN providers have commissioned independent audits of their logging architecture from security firms (such as Cure53, Deloitte, or KPMG). Published audit reports are a meaningful signal, but audits evaluate a snapshot in time and cannot guarantee future behaviour or policy changes following an acquisition or ownership change.
Look for providers that publish their audit reports, specify which firm conducted the audit, and include the date. Avoid providers who describe themselves as "no-logs" without any independent verification.
**Jurisdiction**
The country where a VPN provider is incorporated determines which legal frameworks can compel data disclosure. Providers in countries with strong data protection laws and no mandatory data retention requirements have fewer legal obligations to hand over records. This matters most in high-sensitivity use cases; for the typical public-Wi-Fi use case, jurisdiction is a secondary concern relative to the no-logs policy itself.
**Protocol**
The VPN protocol determines the cryptographic mechanisms and handshake used to establish and maintain the tunnel. Current options and their practical implications:
- **WireGuard**: A modern protocol with a small, auditable codebase (less than 4,000 lines of code for the Linux kernel implementation, compared to tens of thousands for OpenVPN including its cryptographic library dependencies). Delivers high throughput and low latency. Widely adopted by commercial VPN providers as a default option.
- **OpenVPN**: A mature, open-source protocol with a long audit history. More complex than WireGuard but highly configurable. A safe choice, particularly for users who need a proven, well-understood implementation.
- **IKEv2/IPsec**: Well-suited to mobile devices because it re-establishes connections quickly after a network change (e.g., switching from Wi-Fi to cellular). Supported natively by iOS and Android for manual VPN configuration.
- **Avoid PPTP**: PPTP uses cryptographic mechanisms that are considered broken by current standards. No new deployment should use PPTP.
Most commercial VPN apps select the protocol automatically and default to WireGuard where available. Manual protocol selection is rarely necessary.
**Kill switch**
A kill switch blocks all internet traffic if the VPN connection drops, preventing your device from falling back to an unprotected direct connection. On public Wi-Fi, a momentary VPN disconnect without a kill switch can expose traffic during the reconnection window. A kill switch is an important feature for security-focused VPN use. Confirm that the VPN app you choose includes a kill switch and that it is enabled by default or requires explicit opt-in.
**Speed and infrastructure**
VPN performance depends on server locations, server load, and the protocol used. A VPN adds latency because traffic is routed through an additional server. Providers with large server networks in many countries generally offer better performance by allowing connection to a server geographically close to you. Speed is a practical concern for video calls and streaming, but not a security consideration.
**Multi-hop and additional features**
Some VPN providers offer multi-hop configurations (also called double VPN), where traffic routes through two VPN servers before reaching the destination. This increases the cost for an adversary trying to correlate your traffic across both endpoints, but also increases latency. For most public-Wi-Fi use cases, a single-hop VPN is sufficient. Multi-hop is relevant for users with specific, elevated privacy requirements.
A related feature is DNS leak protection: when active, it ensures that DNS queries are resolved exclusively through the VPN tunnel and not sent to your ISP or the local network's DNS server if the VPN connection is interrupted. Confirm that any VPN app you evaluate includes and enables DNS leak protection.
---
## The Risk with Free VPNs
Providing VPN infrastructure — servers, bandwidth, support, security audits — has real ongoing costs. Free VPN services must cover those costs through some mechanism.
Documented issues with some free VPN services include:
- Logging and selling user traffic data to third parties
- Injecting advertising into web pages served through the VPN
- Sharing bandwidth with other users, effectively turning devices into exit nodes
- Bundling malware or adware in the application
None of these apply to all free VPN services, but the business model creates structural incentives that conflict with the stated purpose of protecting user traffic. For a service whose value is precisely that it handles your network traffic, the question of how the provider sustains itself financially is directly relevant.
Paid VPN subscriptions with a clear business model and published independent audits provide stronger guarantees. Some providers in this category offer free tiers with data or speed limits that are sufficient for limited use on public Wi-Fi.
One category worth distinguishing: VPN features built into browsers (such as Opera's integrated VPN or Brave's optional VPN product) only encrypt traffic from that specific browser. Other apps on your device — system processes, other browsers, mail clients — are not routed through the tunnel. For general device protection on public Wi-Fi, a system-level VPN app that routes all traffic is more appropriate than a browser-level VPN.
---
## Setting Up and Using a VPN Effectively
**On iPhone and iPad**
Most VPN providers offer an app available through the App Store. Within the app, enable the kill switch option if one is available. You can also configure VPN connections manually at **Settings → General → VPN & Device Management → VPN** for IKEv2 connections.
For always-on VPN enforcement across all apps — where the device blocks all traffic if the VPN is not connected — full enforcement requires a Mobile Device Management (MDM) profile, which is typically only applicable in enterprise environments. VPN apps implement a software-level kill switch via the Network Extension framework, which provides practical protection for most users.
**On Android**
Go to **Settings → Network & Internet → VPN** → tap the gear icon on your configured VPN → enable **Always-on VPN** and **Block connections without VPN**. This is a system-level kill switch, separate from any toggle within a VPN app.
**When to connect**
Connect the VPN before doing anything else on an untrusted network, including before the captive portal login on hotel or airport Wi-Fi. Note that some captive portals require unencrypted HTTP traffic to display their login page; your device or VPN app may need to temporarily allow this. After completing captive portal authentication, reconnect the VPN before any other activity.
**On an ongoing basis**
If you use public Wi-Fi regularly — in your daily commute, at a co-working space, or while travelling — enabling always-on VPN or kill switch at the system level removes the need to remember to connect manually. The cost is a small increase in battery consumption and a slightly higher chance of connection issues in environments with unusual network configurations (some corporate networks, for example, block common VPN ports). For most users, the security benefit on untrusted networks outweighs the occasional connectivity friction.
For more context on captive portals and the sequencing of VPN connection on public Wi-Fi, see [How to Use Public Wi-Fi Safely](/en/guides/public-wifi-safety/).
---
## Mobile Data as an Alternative to Public Wi-Fi
The scenarios where a VPN matters most — public Wi-Fi with a rogue access point, an evil-twin network, passive eavesdropping by other network users — do not apply to mobile data. When your device uses a cellular data connection, traffic travels over the radio link between your device and the carrier's cell tower, encrypted at the cellular layer. An attacker in the same coffee shop cannot passively observe your cellular traffic; that would require access to the carrier's network infrastructure.
This has a practical implication: for sensitive activities — online banking, accessing work systems, logging in to accounts that control financial or identity assets — switching to mobile data entirely is a simpler and often more reliable protection than running a VPN on public Wi-Fi.
If you frequently travel internationally and use your home SIM's data abroad, the cost of switching to cellular for sensitive tasks depends on your roaming plan. See [Roaming Settings](/en/guides/roaming-settings/) for how to configure data roaming, and see [Lost or Stolen Device](/en/guides/lost-stolen/) for what to do if the device carrying your SIM is compromised.
For travellers who use a separate local eSIM for data abroad, having a local data connection on the destination network reduces reliance on public Wi-Fi throughout the trip — removing the context in which VPN is most needed. This is a practical benefit of the local eSIM approach that is worth factoring into your connectivity planning before departure. Using [SimFinder](/) to compare local SIM or eSIM options for your destination can identify whether a local data plan is cost-effective compared to relying on public Wi-Fi.
---
## Common Misconceptions About VPNs
**"A VPN makes me anonymous."**
A VPN replaces your ISP and local network as the party observing your traffic with the VPN provider. Services you log in to still know who you are. Your device's fingerprint, browser fingerprint, and authentication cookies are unaffected by a VPN.
**"A VPN protects me from hackers."**
The phrase is vague. A VPN protects against specific threats: traffic interception on a shared local network, and exposure of your IP address. It does not protect against phishing, credential theft, software vulnerabilities, or malware. Account security — strong passwords, hardware security keys or authenticator apps rather than SMS for two-factor authentication — addresses the risks that a VPN cannot. See [SIM Swap Fraud: What It Is and How to Protect Yourself](/en/guides/sim-swap/) for an example of an attack that bypasses VPN entirely by targeting your phone number.
**"HTTPS makes a VPN unnecessary on public Wi-Fi."**
HTTPS protects the content of connections that are correctly established with legitimate servers. It does not prevent interception at the local network layer before the TLS connection is established, which is where evil-twin and MITM attacks operate. A VPN specifically addresses this gap.
**"A VPN encrypts everything on my device."**
A VPN encrypts traffic sent through the VPN tunnel. Some apps or operating system components may use network interfaces that bypass the VPN tunnel; VPN app documentation typically clarifies whether all traffic is routed through the tunnel or only selected traffic.
**"Any VPN is better than no VPN."**
Not necessarily. A free VPN run by an unknown provider with no audit history and a data-monetisation business model may introduce risks that are worse than operating without a VPN on a specific network.
---
## Summary: What to Look For and When to Use It
A VPN is a targeted tool that addresses a specific threat: traffic interception on untrusted networks. It is most useful when you are on a network you do not control — particularly public Wi-Fi. Key criteria when choosing:
1. **No-logs policy with published independent audit** — the single most important selection factor
2. **WireGuard or OpenVPN protocol** — current, well-audited cryptographic implementations
3. **Kill switch enabled** — prevents traffic leakage on VPN disconnect
4. **DNS leak protection** — ensures DNS queries stay within the tunnel
5. **Clear business model** — avoid free services with no disclosed revenue source
What a VPN does not replace:
- Strong, unique passwords and a password manager
- Hardware security keys or authenticator apps (rather than SMS) for two-factor authentication
- Keeping your operating system and apps up to date
- Caution about which links you click and which files you open
VPN use is one layer in a broader set of security practices. Its specific contribution is protecting traffic in transit on networks you do not control. The other layers protect your accounts and device regardless of what network you are on.
When you are on mobile data, the local-network threat that VPNs address is absent. For sensitive tasks on any connection, switching to mobile data is the lowest-friction protection — no VPN required, no configuration risk. Where a local SIM option exists at your destination, using it reduces your dependence on public Wi-Fi and the scenarios in which a VPN is critical.
---
## Related Guides
- [How to Use Public Wi-Fi Safely](/en/guides/public-wifi-safety/) — detailed breakdown of each public Wi-Fi threat and the role of VPN in context
- [SMS 2FA Security Risks](/en/guides/sms-2fa-risk/) — why SMS-based two-factor authentication has weaknesses that a VPN cannot address
- [SIM Swap Fraud: What It Is and How to Protect Yourself](/en/guides/sim-swap/) — phone-number-based attacks that operate independently of your network connection
- [Lost or Stolen Device](/en/guides/lost-stolen/) — steps to take when the physical device carrying your SIM and credentials is compromised
- [Roaming Settings](/en/guides/roaming-settings/) — how to configure mobile data roaming so you can use cellular as a fallback for sensitive tasks abroad
================================================================================
# What Is an APN? Why You Need to Configure It
URL: https://sim-finder.com/en/guides/what-is-apn/
Type: guides (en)
Published: 2026-06-04
An APN (Access Point Name) is a short configuration string that tells your device which gateway to use when connecting to the mobile internet. Without a valid APN, your phone can show full signal bars but cannot load any data. This is the most common reason mobile data fails after switching to an MVNO or activating a travel eSIM.
**This article explains what an APN is technically, why carriers require it, why MVNOs often need manual configuration, and how to approach fixing it.** For step-by-step setup instructions on a specific device, see the [APN Setup Guide for iPhone](/en/guides/apn-setup-iphone/) or the [APN Setup Guide for Android](/en/guides/apn-setup-android/).
---
## What an APN Is — the Technical Definition
APN stands for **Access Point Name**. It is defined in **3GPP TS 23.003** — the 3GPP specification for numbering, addressing, and identification — as the identifier that selects a **packet data gateway** (called the PGW in 4G LTE, or the UPF in 5G) on the carrier's core network.
When your device connects to a cellular network and requests a data session, the network reads the APN to determine which gateway to route your traffic through. That gateway connects the mobile network to the external internet (or a private data network).
An APN string has two logical components:
- **Network Identifier** (mandatory): identifies the external packet data network, such as `internet`, `wholesale`, or `fast.t-mobile.com`
- **Operator Identifier** (optional): encodes the PLMN (Public Land Mobile Network) of the GPRS support node; most consumer APN strings omit this component
The maximum encoded length of an APN is **100 octets**, as specified in 3GPP TS 23.003.
The APN is not a password or a security credential — it is a routing label. It tells the network core where to send your data, not whether you are authorised to access it (that is handled by the SIM credentials and network authentication).
---
## How the APN Fits Into the Mobile Network Architecture
To understand why the APN matters, it helps to see where it appears in the network path.
When you open an app that needs internet access, the following sequence occurs:
1. Your device requests a **PDN connection** (Packet Data Network connection) from the serving base station
2. The base station forwards the request to the **MME** (Mobility Management Entity in 4G) or **AMF** (Access and Mobility Management Function in 5G)
3. The MME/AMF reads the APN from the request and selects the appropriate **PGW** (Packet Gateway in 4G) or **UPF** (User Plane Function in 5G)
4. The selected gateway establishes a data tunnel between the network and your device
5. Your data traffic flows through that gateway to and from the internet
The APN is the critical input at step 3. If it is missing or incorrect, the network cannot identify the gateway, and the data session fails to establish. Your device is on the network — it just cannot get anywhere.
---
## Why 5G Uses DNN Instead of APN
In **5G systems**, the equivalent concept is the **DNN (Data Network Name)**, defined in **3GPP TS 23.003 Clause 9A**. The DNN serves the same routing function as the APN but is used within the 5G core architecture (5GC).
From a device-configuration standpoint, the APN string you enter in your device settings applies to both 4G and 5G connections. Devices that support 5G use the same APN field in their settings menus; the underlying protocol translates it to a DNN when communicating with a 5G core.
You do not need to configure anything differently for 5G. The distinction between APN and DNN exists in network architecture documents and carrier back-end systems, not in what you type into your phone.
---
## Why MVNOs Require APN Configuration
This is the most practical reason most users encounter the APN concept. Understanding it explains why switching from a major MNO to an MVNO so often requires an extra setup step.
### How MVNOs Use the Host Network
An [MVNO (Mobile Virtual Network Operator)](/en/guides/what-is-mvno/) does not own radio towers. It purchases wholesale network access from an MNO and resells it under its own brand. The MVNO typically operates its own:
- Billing and account management systems
- Customer-facing support
- Packet data gateway (in some cases)
Even though an MVNO's SIM uses the same physical towers as the host MNO, the data traffic is routed differently. The MVNO's APN directs data to the MVNO's own gateway infrastructure, where the MVNO can apply its own data policies, throttling rules, and billing logic.
### Why the APN String Differs
Because the MVNO has its own gateway, the APN for that MVNO is a different string than the MNO's APN. For example, an MVNO running on T-Mobile's network might use `wholesale` as its APN, while T-Mobile's own postpaid APN is `fast.t-mobile.com`. Both use the same radio infrastructure, but the data is routed to completely different backend systems.
When you insert an MVNO SIM, the network needs to know which gateway to use. If no APN is configured (or if your device is still using the previous carrier's APN), the network either cannot establish a data session or routes you to the wrong gateway — both result in no data.
### When Configuration Is Automatic vs. Manual
Many MVNOs handle this automatically:
- **iOS carrier settings update**: If the MVNO has submitted a carrier bundle to Apple, iOS downloads and installs the correct APN automatically when you insert the SIM
- **eSIM profile push**: When an MVNO or travel eSIM provider delivers an eSIM profile, they can embed APN configuration in that profile
- **Android provisioning**: Some Android devices receive APN settings over-the-air from the network when they register
Manual configuration is required when none of the above applies. This is most common with smaller MVNOs and regional resellers that have not submitted carrier bundles to Apple or Google. It is also required after a device network settings reset, which clears saved APN data.
---
## The Structure of an APN String
APN strings look like domain names but function as routing identifiers, not internet addresses. Examples:
| APN String | Usage |
|-----------|-------|
| `internet` | Generic, used by many carriers globally |
| `fast.t-mobile.com` | T-Mobile US postpaid (published on T-Mobile support) |
| `wholesale` | Mint Mobile US (T-Mobile MVNO), per Mint Mobile setup guide |
| `everywhere` | EE UK (published on EE support) |
| `telstra.internet` | Telstra Australia (published on Telstra support) |
The string is not a URL you can visit in a browser. It is interpreted by the carrier's core network equipment to look up the correct gateway configuration. This is why a typo — even just a missing period or a capital letter — prevents data from working.
---
## When You Will Encounter APN Configuration
You are likely to need APN information in these situations:
**Switching to an MVNO**: The most common trigger. If your MVNO does not configure the APN automatically, you need to enter it manually. The correct string is always published on the MVNO's official support or setup page.
**No mobile data after SIM swap**: If you replaced a SIM (whether from a carrier swap or a damaged SIM replacement) and data stopped working, the APN may not have carried over. This is especially common when switching between carriers on Android.
**Data stopped working after a settings reset**: Resetting network settings on iOS or Android clears APN configuration. After a reset, you may need to re-enter the APN or wait for automatic provisioning.
**Travel eSIM without automatic configuration**: Most major travel eSIM providers embed APN settings in their profiles. Some smaller providers require manual entry. If a travel eSIM connects but data does not flow, a missing APN is the primary suspect. For a complete diagnostic sequence, see [No Mobile Data?](/en/guides/no-data/).
**"No Service" scenarios**: If your device shows "No Service" rather than a data failure with signal present, the issue is likely not the APN — it is a network registration problem. Start with [No Service? How to Troubleshoot Signal Problems](/en/guides/no-service/) instead.
---
## What an APN Does Not Control
Understanding the scope of APN helps avoid misdiagnosis.
The APN controls:
- Which packet data gateway handles your data session
- Which external network (internet, corporate intranet, etc.) your data is routed to
The APN does not control:
- Voice calls (handled by a separate IMS/circuit-switched path)
- SMS (routed separately from data)
- Network authentication (handled by the SIM's IMSI and Ki via USIM authentication)
- Signal strength or network registration
- Data speeds or throughput
If calls and SMS work but data does not, the APN is the first thing to check. If nothing works (no signal, no calls, no SMS), the APN is not the problem — see [No Service?](/en/guides/no-service/).
---
## APN and Multiple Data Profiles
Some carriers and devices support multiple APN entries simultaneously, each for a different purpose:
- **Default / Internet APN**: used for general mobile data
- **MMS APN**: used specifically for sending/receiving MMS picture messages (often a different APN string)
- **Tethering / Hotspot APN**: some carriers use a separate APN for mobile hotspot traffic to apply different policies
On most consumer setups, only the default internet APN needs to be configured. The MMS APN is separate — having the correct internet APN will not fix MMS if the MMS APN is wrong, and vice versa.
If you are troubleshooting MMS specifically (picture messages not sending or receiving), check whether your carrier requires a separate MMS APN. The internet APN and MMS APN can have different strings, and your device's settings may require both to be entered.
---
## How to Find the Correct APN for Your Carrier
The only reliable source for an APN string is your carrier's official support documentation. Third-party APN databases are frequently outdated and may list deprecated values.
To find your APN:
1. Go to your carrier or MVNO's official website
2. Search for "APN settings," "APN setup," or "network settings"
3. Locate the APN string for your country and device type (iOS or Android may have different instructions)
Once you have the correct string, follow the setup steps for your device:
- **iPhone users**: [APN Setup Guide for iPhone](/en/guides/apn-setup-iphone/) — covers configuration profiles (.mobileconfig) and manual entry
- **Android users**: [APN Setup Guide for Android](/en/guides/apn-setup-android/) — covers the Settings > Mobile Networks > APN path and manual entry fields
If your carrier is not publishing an APN string, it is likely because your device receives the configuration automatically. In that case, check that you have accepted any carrier settings update prompts.
---
## Entering the APN Manually — What to Expect
If you need to enter APN settings by hand, you will typically encounter these fields in your device settings:
| Field | What to Enter |
|-------|---------------|
| **APN** | The APN string from your carrier (required) |
| **Username** | Carrier-specified value, or leave blank |
| **Password** | Carrier-specified value, or leave blank |
| **MCC** | Mobile Country Code — usually auto-filled |
| **MNC** | Mobile Network Code — usually auto-filled |
| **Authentication type** | PAP, CHAP, or None — follow carrier guidance |
| **APN type** | `default` for internet; `mms` for MMS — follow carrier guidance |
Enter the APN string exactly as your carrier specifies. Although the 3GPP standard treats APN labels as case-insensitive, some carrier provisioning systems are stricter, so enter the APN exactly as your carrier publishes it (including case). Do not add spaces before or after the string.
For the manual code (network selection) process when switching carriers, see the [Manual Network Code Entry guide](/en/guides/manual-code/).
---
## FAQ
### What does APN stand for?
APN stands for Access Point Name. It is defined in 3GPP TS 23.003 as the identifier that selects a packet data gateway on the carrier's core network. Every mobile device that uses cellular data must have a valid APN configured.
### Why do MVNOs need a different APN than the host carrier?
An MVNO operates its own billing systems and packet data gateway on top of the host MNO's radio network. The APN routes your data session to that MVNO-specific gateway rather than the MNO's own gateway. Even though both use the same towers, the backend destination is different, so the APN string is different.
### What happens if the APN is wrong or missing?
Your device will show signal bars and can make calls, but mobile data will not work. The network has no valid gateway to route your data session to. You may see a "No internet connection" error or pages will simply fail to load despite having cellular signal.
### Is an APN the same as a 5G DNN?
Functionally yes. In 5G systems, the equivalent concept is the DNN (Data Network Name), defined in 3GPP TS 23.003 Clause 9A. The APN string you enter on a device works for both 4G and 5G connections. The term changes in the 5G core architecture documents, but from a device-configuration perspective the setting is identical.
### Does my carrier set the APN automatically?
Major MNOs and many MVNOs push APN configuration automatically when you insert a SIM or activate an eSIM — either via a carrier settings update (on iPhone) or a provisioned configuration. However, some MVNOs, especially smaller resellers, do not have automatic configuration, which is why manual setup is sometimes required.
### Can I use any APN string, or does it have to be exact?
It must match exactly what your carrier specifies. Although the 3GPP standard treats APN labels as case-insensitive, some carrier provisioning systems are stricter, so enter the APN exactly as your carrier publishes it (including case). Extra spaces or incorrect characters will also prevent the data session from establishing. Always copy the APN from your carrier's official support documentation.
---
## Related Guides
- [APN Setup Guide for iPhone](/en/guides/apn-setup-iphone/) — configuration profiles, manual entry, and carrier-specific APN strings for iOS
- [APN Setup Guide for Android](/en/guides/apn-setup-android/) — manual APN entry steps for Android devices
- [No Service? How to Troubleshoot Signal Problems](/en/guides/no-service/) — when the issue is network registration, not APN
- [No Mobile Data? How to Fix Data Connection Problems](/en/guides/no-data/) — full diagnostic sequence when data does not work
- [What Is an MVNO?](/en/guides/what-is-mvno/) — how virtual carriers work and why they use different network settings
================================================================================
# What Is Dual SIM? — DSDS, DSDV, and DSDA Explained
URL: https://sim-finder.com/en/guides/what-is-dual-sim/
Type: guides (en)
Published: 2026-04-13
Dual SIM lets you run two phone lines on a single device — each with its own number, carrier, and data plan. The key difference between modes is whether both lines stay active simultaneously, and what happens to one line when the other is in a call. Understanding the mode your device supports helps you choose the right setup.
---
## The Four Dual SIM Modes
There are four distinct modes for dual SIM operation. Each defines how many SIMs can stay on standby, which network generations are supported, and whether both lines remain active during a call.
### DSSS (Dual SIM Single Standby)
Only one SIM is active at a time. You can insert two SIMs, but you must manually switch which one is active. The inactive SIM cannot receive calls or texts while the other is in use. This mode is found only on older devices and is rarely encountered today.
### DSDS (Dual SIM Dual Standby)
Both SIMs are on standby simultaneously, so you can receive calls and texts on either number without switching. However, when one SIM uses a 4G or 5G connection, the other SIM is pushed down to 3G. In regions where 3G has been shut down, this can mean the second SIM loses connectivity during active data use on the first.
### DSDV (Dual SIM Dual VoLTE)
Both SIMs maintain 4G or 5G connections at the same time. Because both lines use VoLTE (Voice over LTE), calls are delivered over the data network rather than a 3G circuit — making DSDS's 3G fallback unnecessary. This is the current mainstream mode on modern smartphones.
One limitation remains: during an active call on one SIM, data on the other SIM is paused. You cannot, for example, take a call on SIM A while streaming video over SIM B.
### DSDA (Dual SIM Dual Active)
Two separate radio transceivers are used — one per SIM. Both SIMs remain fully active and independent at all times. You can take a call on SIM A while SIM B continues data transmission without interruption. This eliminates all the restrictions of DSDS and DSDV.
The tradeoff is higher battery consumption, since two transceivers draw power simultaneously. DSDA is found on select high-end Android devices.
### Mode Comparison
| Mode | Both SIMs on standby | Both SIMs on 4G/5G | Data during call |
|------|:---:|:---:|:---:|
| DSSS | No | No | No |
| DSDS | Yes | No (one drops to 3G) | No |
| DSDV | Yes | Yes | Second SIM paused |
| DSDA | Yes | Yes | Yes (both active) |
---
## Device Support
### iPhone
iPhones support DSDS but do not support DSDA. Apple's official documentation uses the term DSDS. Both SIMs can make and receive calls, send texts, and use data — though data on the second SIM pauses during an active call on the first.
- **iPhone XS, XS Max, XR (2018) and later**: physical SIM + eSIM dual SIM configuration
- **iPhone 13 series and later (including iPhone SE 3rd gen)**: dual eSIM — two eSIM profiles active simultaneously
- **US-sold iPhone 14 and later**: eSIM-only (no physical SIM slot); dual eSIM only
In Settings > Cellular, you can assign each line to calls and data independently. The detailed setup walkthrough is covered in [Dual SIM Setup on iPhone: Complete Configuration Guide](/en/guides/dual-sim-iphone/).
### Google Pixel
- **Pixel 3a and later**: DSDS — physical SIM + eSIM
- **Pixel 7 and Pixel 7 Pro (2022) and later**: dual eSIM — the first Android devices to support two eSIMs simultaneously
- **US-sold Pixel 10, 10 Pro, and 10 Pro XL**: eSIM-only (Pixel 10 Pro Fold retains a physical SIM slot)
Dual eSIM on Pixel 7+ is implemented via MEP (Multiple Enabled Profiles), introduced in Android 13 and defined in GSMA SGP.22 v3.0.
### Samsung Galaxy
Samsung Galaxy S20 and later flagship models support eSIM alongside physical SIM for dual SIM configurations. eSIM availability depends on the region and whether the device is carrier-locked. A carrier-locked Galaxy may not expose the eSIM option even if the hardware supports it.
---
## Common Use Cases
### Separate Work and Personal Numbers
Keep a work number and a personal number on one device. You can assign different ringtones to each line, route calls to the correct number, and avoid carrying two phones. You set which line handles calls and which handles data — each independently.
### Reduce Data Costs Without Sacrificing Call Quality
Use your primary carrier for voice calls while routing all data through a lower-cost plan on the second SIM. This is a common setup in markets where MNOs (large carriers) charge a premium for data but offer reliable call quality, while MVNOs provide cheaper data on the same underlying network. Use [SimFinder](/en/) to compare available plans side by side.
### Backup Line for Network Outages
Carrier networks experience outages. With a second SIM on a different network, your connectivity continues even if your primary carrier goes down. This is especially relevant for people who rely on mobile data for work or remote access.
### Travel: Keep Your Home Number + Add Local Data
This is the most widely used travel configuration:
- Keep your home SIM active for calls and SMS
- Add a local travel eSIM for data at local rates (no international roaming charges)
- Your home number remains reachable for SMS two-factor authentication codes from banks and apps
Most travel eSIMs are data-only — they do not include a phone number or SMS capability. Voice calls over the travel eSIM are handled via VoIP apps such as WhatsApp or FaceTime. This is covered in detail in [4 Ways to Stay Connected Abroad](/en/guides/four-options/).
Install the travel eSIM profile before departure while on a Wi-Fi connection, and it typically activates when your device first connects to a supported network at your destination.
---
## Things to Know Before You Start
### Explicitly Set Your Preferred Data SIM
In a dual SIM setup, the device needs to know which SIM to use for mobile data. If you do not configure this, the device may default to the more expensive line. On iPhone, go to Settings > Cellular > Cellular Data and select the SIM you want for data.
### Calls Interrupt Data on the Other SIM (DSDV/DSDS)
On DSDV and DSDS devices, answering a call on SIM A pauses data on SIM B for the duration of the call. This affects background downloads, active VoIP calls, and streaming. If continuous data on both lines is a requirement — for example, running a video call through one SIM while the other handles incoming calls — you need a DSDA-capable device.
### eSIM + Physical SIM Requires No Extra Slots
If your device has one physical SIM slot and eSIM support, you already have everything needed for a dual SIM configuration. The physical SIM handles one line; the eSIM handles the other. You do not need a dual-SIM hardware variant. For more on how eSIM works, see [What Is eSIM?](/en/guides/what-is-esim/).
### Carrier Lock Can Block eSIM Access
A device purchased through a carrier may be SIM-locked or have eSIM activation restricted to that carrier. Even if the hardware supports eSIM, the option may be hidden or disabled until the device is unlocked. Check your carrier's unlock policy if you plan to add a second line from a different provider.
---
## Summary
| Topic | Detail |
|-------|--------|
| Definition | Use two SIMs on one device simultaneously. Defined in GSMA TS.37. |
| Modes | DSSS (legacy) → DSDS (3G fallback) → DSDV (both 4G/5G, mainstream) → DSDA (fully simultaneous) |
| iPhone support | DSDS. Dual eSIM from iPhone 13+. No DSDA. |
| Pixel support | DSDS from Pixel 3a+. Dual eSIM from Pixel 7+. |
| Main use cases | Work + personal lines, cheaper data plan, backup connectivity, travel eSIM |
To compare plans for a dual SIM setup, use [SimFinder](/en/) to search by carrier, data, and price.
================================================================================
# What Is an eSIM? How It Works, Benefits, and Supported Devices
URL: https://sim-finder.com/en/guides/what-is-esim/
Type: guides (en)
Published: 2026-04-13
An eSIM is a chip permanently built into your device that lets you activate a mobile plan by downloading a carrier profile — no physical card required. Activation takes minutes, and you can store multiple profiles on a single device and switch between them from your settings. The trade-off: if your device is lost or broken, you cannot pull out the eSIM and swap it into another phone.
This article explains how eSIM works, its advantages and limitations, and which devices support it. For step-by-step activation guides, see [How to Set Up eSIM on iPhone via QR Code](/en/guides/qr-code-iphone/) and [How to Set Up eSIM on Android via QR Code](/en/guides/qr-code-android/).
---
## How eSIM Works
### The eUICC Chip and Profiles
An eSIM (embedded SIM) follows a global standard defined by the GSMA known as SGP.22 (RSP Technical Specification for Consumer Devices). The latest published versions are SGP.22 v2.6.1 (released April 2025) and SGP.22 v3.1 (released December 2023).
The hardware is an eUICC (embedded Universal Integrated Circuit Card) — a chip soldered to the device's motherboard. It securely stores carrier profiles, which contain the credentials needed to authenticate with a mobile network.
When you sign up with a carrier, their system prepares a profile on an SM-DP+ server (Subscription Manager Data Preparation, defined in GSMA SGP.22). Your device connects to that server and downloads the profile. From that point on, the device can authenticate to the carrier's network just as a traditional SIM card would.
### How to Add a Carrier Profile
There are three standard ways to download an eSIM profile from a carrier's SM-DP+ server:
1. **Scan a QR code** — the carrier emails or displays a QR code you scan in Settings
2. **Enter an activation code manually** — type the SM-DP+ server address and activation code by hand
3. **Use a carrier app** — some carriers offer an app that handles the download automatically
A fourth option — **eSIM Quick Transfer** — lets you transfer an eSIM between compatible devices without re-issuing from the carrier (supported on iPhone and select Android models with carrier approval). This is a device-to-device transfer, not a download from an SM-DP+ server.
### Storing and Switching Profiles
Under SGP.22 v2.x, an eUICC can store multiple carrier profiles, but only one profile can be active at a time. The number of profiles a device can store depends on the eUICC chip's memory — there is no fixed limit in the specification itself. Apple states that iPhone can store 8 or more eSIMs, and profiles can be switched from the device's Settings app.
SGP.22 v3.0 introduced MEP (Multiple Enabled Profiles) as an optional feature, allowing more than one profile to be active simultaneously on a single eUICC. Android 13 and later support MEP-A1; Android 14 and later additionally support MEP-B. This enables eSIM-only dual SIM devices without a physical SIM slot.
### GSMA Specifications at a Glance
| Specification | Purpose |
|---|---|
| SGP.22 | Consumer devices (smartphones, tablets) |
| SGP.02 | Machine-to-machine (M2M) devices |
| SGP.32 | IoT devices (published May 2023) |
---
## Benefits of eSIM
### Instant Activation — No Waiting for a Card
With a physical SIM, you wait for a card to arrive by post, which can take several days. With eSIM, once a carrier approves your application, you download the profile and start using your plan within minutes. This is especially useful when you need connectivity immediately — at an airport, upon arriving in a new country, or after switching carriers on a weekend.
### Easier Dual SIM
Most eSIM-capable smartphones support dual SIM: one physical SIM slot plus one eSIM, or two eSIMs simultaneously. This means you can keep your primary number active while adding a local data plan for travel, or separate work and personal lines on a single device — without needing two physical SIM slots or swapping cards.
Dual SIM works in two main modes, defined in GSMA TS.37:
- **DSDS (Dual SIM Dual Standby):** both SIMs receive calls and messages, but only one can transmit data at a time
- **DSDA (Dual SIM Dual Active):** both SIMs maintain independent network connections simultaneously, at the cost of higher battery usage
### Store Multiple Profiles and Switch Freely
You can keep several carrier profiles on your device at once. For example: your home plan, a travel eSIM for Europe, and a separate data eSIM for Asia. Switching between them takes a few taps — no physical card exchange required. iPhone can store 8 or more eSIM profiles according to Apple.
### Slimmer Devices and Better Water Resistance
Removing the physical SIM slot gives manufacturers more flexibility to reduce device thickness, improve waterproofing, and use the freed space for battery or other components. The eSIM-only design adopted by iPhone 14 and later (for the US market) is a direct consequence of this trend.
### Convenient for International Travel
You can purchase and install a travel eSIM before you leave home, then activate it the moment you land. If your home SIM is also an eSIM, you can run both simultaneously: keep receiving calls and SMS on your home number while using the travel eSIM for data. This dual-SIM setup is also useful for receiving SMS-based two-factor authentication codes from your bank or other services while abroad.
---
## Limitations of eSIM
### Re-issue Required When Changing Devices
Because the eSIM chip is soldered inside the device, you cannot physically move it to another phone. If you upgrade, lose, or break your device, you need to contact your carrier to re-issue the eSIM to the new device. Some carriers charge a fee for this, and the process may take longer than simply inserting a physical SIM. Check your carrier's re-issue policy before you rely on eSIM as your only SIM.
### Not All Devices Support eSIM
eSIM support varies by device model, production region, and carrier lock status. Carrier-locked devices may not support eSIM even if the hardware is otherwise capable. Budget Android phones released in 2022 or earlier often lack eSIM support. Always confirm eSIM compatibility on the manufacturer's official support page before purchasing a plan.
### Some eSIM Profiles Cannot Be Reinstalled
Travel eSIM providers and some carriers restrict reinstallation: once you delete a profile, you may not be able to download it again without purchasing a new plan. This is particularly common with travel eSIMs from third-party providers. Before deleting any eSIM profile, confirm the provider's reinstall policy.
### Internet Connection Required for Initial Setup
Downloading an eSIM profile requires an active Wi-Fi or mobile data connection. If you are setting up a new device in a location without connectivity, you cannot activate an eSIM until you have access to the internet. Plan ahead — download your travel eSIM profile before departure, while you still have a reliable Wi-Fi connection.
---
## Supported Devices
### iPhone
eSIM support on iPhone starts with the iPhone XS, iPhone XS Max, and iPhone XR (2018 models). All iPhone models released since then support eSIM.
iPhone 13 and later (including iPhone SE 3rd generation) support dual eSIM — two eSIM profiles active at the same time, without needing a physical SIM slot for the second line.
iPhone 14 through iPhone 16e sold in the US are eSIM-only with no physical SIM card slot. Starting with iPhone 17 (2025), eSIM-only models expanded to additional regions: Canada, Mexico, Japan, UAE, Saudi Arabia, Bahrain, Kuwait, Oman, Qatar, Guam, and the U.S. Virgin Islands.
For a full list of eSIM-compatible iPhone models by region, see Apple's official support page.
### Android (Google Pixel)
Google Pixel 3 and later generally support eSIM, though support on Pixel 3 varies by region and carrier variant. Google Pixel 7 and Pixel 7 Pro were the first Android smartphones to support dual eSIM — two eSIM profiles simultaneously active — at launch in October 2022. Pixel 7 and all later Pixel models support dual eSIM. US-market Pixel 10 models are eSIM-only with no physical SIM slot.
Samsung Galaxy S20 and later, as well as flagship models from other Android manufacturers (Motorola, Nokia, and others), also support eSIM on many variants. Availability depends on the region and whether the device is carrier-locked. Always verify on the manufacturer's support page.
### iPad and Tablets
iPad Pro (M4) and iPad Air (M2) are eSIM-only (no physical SIM slot). Earlier iPad Pro and iPad Air models with Wi-Fi + Cellular connectivity generally support eSIM as well. Cellular-capable tablets from other manufacturers increasingly include eSIM support; check device specifications before purchasing.
---
## Summary
| | Physical SIM | eSIM |
|---|---|---|
| Form | Removable card (nano, micro, mini) | Chip soldered inside the device |
| Activation | Insert card, sometimes configure APN | Download profile via QR code, app, or manual code |
| Switching carriers | Swap cards | Download new profile in Settings |
| When device is lost | Move card to replacement instantly | Carrier re-issue required |
| Multiple profiles | One card = one carrier | Store 8+ profiles, switch in Settings |
| Specification | ETSI TS 102 221 | GSMA SGP.22 |
To find plans that support eSIM, use the eSIM filter on [SimFinder](/en/).
================================================================================
# What Is iSIM? The Next Step After eSIM
URL: https://sim-finder.com/en/guides/what-is-isim/
Type: guides (en)
Published: 2026-06-04
iSIM (integrated SIM) takes the SIM function one step further than eSIM: instead of a discrete eUICC chip soldered to the motherboard, the SIM's secure element is built directly into the device's SoC (System-on-Chip). The result is no separate SIM component at all — subscriber authentication is handled inside the main processor package. Like eSIM, iSIM uses GSMA remote provisioning, so carrier profiles are downloaded over the air rather than delivered on a physical card.
Key points:
- iSIM eliminates the separate eUICC chip by integrating the secure element into the SoC.
- The remote provisioning protocol (GSMA SGP.22 for consumer devices, SGP.32 for IoT) is the same as eSIM — carriers issue profiles the same way.
- iSIM is in early commercial deployment as of mid-2026, primarily in IoT and select smartphone chipsets.
- For everyday consumers, eSIM is the practical technology today; iSIM becomes relevant when evaluating wearables, IoT modules, and next-generation chipset designs.
For background on how eSIM works before reading this article, see [What Is an eSIM?](/en/guides/what-is-esim/).
---
## The SIM Evolution: From Physical Card to Integrated Silicon
To understand where iSIM fits, it helps to trace the SIM's hardware evolution.
The original SIM was a full-size removable card (1FF, defined in ETSI GSM 11.11) containing a dedicated integrated circuit that stored the IMSI, authentication key (Ki), and network credentials — for a detailed look at how a SIM card works, see [What Is a SIM Card?](/en/guides/what-is-sim/). Over time, the card shrank through Mini-SIM (2FF), Micro-SIM (3FF), and Nano-SIM (4FF) — each change reduced the card area while keeping the same contact interface.
eSIM (embedded SIM) removed the removable form factor entirely. An eUICC (embedded Universal Integrated Circuit Card) chip is soldered to the device motherboard and loaded with carrier profiles remotely, following the GSMA SGP.22 standard for consumer devices. The credential store moved off the swappable card and onto a chip that is permanently part of the device.
iSIM continues this trajectory by eliminating even that discrete chip. Instead of an eUICC soldered alongside the application processor, iSIM places the secure element function inside the SoC itself — in a hardware-isolated partition called a secure enclave or Trusted Execution Environment (TEE). The result is that the SIM function is no longer a separate component on the PCB.
This progression — removable card → soldered discrete chip → integrated into SoC — reflects the sustained industry pressure to reduce device size, component count, and power consumption, especially for IoT and wearable applications.
---
## How iSIM Works: The Hardware Architecture
### The Secure Element Inside the SoC
A traditional eSIM uses a separate eUICC chip that communicates with the application processor over an ISO/IEC 7816 or SPI interface. The eUICC contains its own secure memory, cryptographic coprocessor, and operating environment, isolated from the main processor.
iSIM moves this secure element inside the SoC boundary. The SoC vendor (Qualcomm, MediaTek, Samsung LSI, or others) integrates a hardware-isolated security domain — sometimes referred to as an iSIM partition — within the same silicon package as the application processor and modem. This partition has:
- Dedicated secure storage for IMSI, Ki, and carrier profiles
- A cryptographic processor for authentication computations
- Hardware isolation from the rest of the SoC, preventing unauthorized access by the application processor or operating system
From the network's perspective, iSIM authenticates identically to a traditional UICC or eUICC. The 3GPP authentication algorithms (MILENAGE, TUAK) run inside the secure partition; the resulting authentication vectors are passed to the modem. The carrier's network sees no difference.
### Remote Provisioning
iSIM retains the remote provisioning model that eSIM introduced. Carrier profiles — containing credentials, network configuration, and IMSI — are downloaded from an SM-DP+ server (Subscription Manager Data Preparation, defined in GSMA SGP.22) for consumer devices, or managed by an eIM (eSIM IoT Remote Manager) for IoT devices following GSMA SGP.32.
Profile download and management follow the same GSMA-defined procedures as eSIM:
- For consumer devices: QR code scan, activation code entry, or carrier app
- For IoT devices (SGP.32): server-initiated push via eIM, without requiring user interaction
Multiple carrier profiles can be stored within the SoC's secure element. Profile switching is handled the same way as eSIM — through the device's settings interface on consumer devices, or through the eIM on IoT devices.
---
## iSIM vs eSIM: What Actually Differs
Both technologies use the same GSMA remote provisioning standards and the same underlying authentication protocols. The functional difference is solely in hardware placement.
| Dimension | eSIM (eUICC) | iSIM |
|---|---|---|
| **Hardware location** | Discrete chip soldered to motherboard | Integrated into SoC secure enclave |
| **PCB footprint** | Requires dedicated chip area and routing | No separate chip; part of SoC package |
| **Remote provisioning** | GSMA SGP.22 (consumer) / SGP.32 (IoT) | Same standards |
| **Profile storage** | eUICC chip memory | SoC secure element memory |
| **Authentication** | On eUICC chip | Inside SoC secure partition |
| **Carrier support** | Requires carrier SGP.22/SGP.32 infrastructure | Same requirement |
| **Consumer availability** | Mainstream — standard on flagship smartphones | Early commercial — selected chipsets |
The table shows that from a subscriber perspective — how you activate, switch, and manage carrier plans — iSIM and eSIM are functionally equivalent. The difference is entirely in the hardware that implements those functions.
---
## GSMA Specifications Governing iSIM
The GSMA maintains three eSIM specifications. Understanding which applies to iSIM depends on the device type.
### SGP.22 — Consumer Devices
GSMA SGP.22 (RSP Technical Specification for Consumer Devices) defines remote provisioning for smartphones, tablets, and wearables. The GSMA publishes multiple active version branches of SGP.22; refer to the GSMA website for the current release.
SGP.22 governs the SM-DP+ provisioning server, the LPA (Local Profile Assistant) on the device, and the profile download and management procedures. iSIM implementations on consumer devices — where the secure element is in the SoC — operate under the same SGP.22 procedures as conventional eSIM. The specification does not mandate a specific hardware form; it defines the software and protocol interfaces.
### SGP.32 — IoT Devices
GSMA SGP.32 v1.0, published May 2023, is specifically designed for constrained IoT devices — sensors, trackers, meters — that typically lack a user interface. The key architectural difference from SGP.22 is that SGP.32 uses an eIM (eSIM IoT Remote Manager) for server-initiated profile management: the eIM can push profile changes to the device without user interaction.
SGP.32 is particularly relevant to iSIM because the primary commercial driver for iSIM integration has been IoT. Devices using Qualcomm's Snapdragon X35, for example, combine LTE-M/NB-IoT connectivity with an integrated iSIM and are positioned for IoT deployments where an external SIM chip would be too large, too power-hungry, or too costly.
### SGP.02 — Machine-to-Machine (M2M)
SGP.02 is the earlier M2M specification, predating consumer eSIM. It uses a push-based provisioning model managed by an SM-SR (Subscription Manager Secure Routing). SGP.32 is the successor specification for IoT devices; new designs typically target SGP.32 rather than SGP.02.
---
## Benefits of iSIM
### Board Space Reduction
Removing the discrete eUICC chip frees PCB area. For a smartphone, the gain is relatively modest — eUICC chips are small. For IoT devices — particularly wearables, medical sensors, and miniaturized trackers where every square millimeter matters — eliminating an external component can be the difference between a feasible design and one that does not fit within physical constraints.
### Power Efficiency
A discrete eUICC chip requires its own power supply circuitry and draws standby current independently. Integrating the SIM function into the SoC allows the SIM's power state to be managed alongside other SoC subsystems, enabling more coordinated power gating. In battery-constrained IoT devices — especially those targeting multi-year battery life — this is a meaningful efficiency gain.
### Reduced Component Count and Supply Chain Complexity
Every discrete component added to a device introduces procurement risk, assembly steps, and potential failure points. Integrating iSIM into the SoC removes one vendor, one component, and one solder joint from the BOM. For high-volume IoT deployments this simplification has manufacturing and logistics value.
### Same Security Model
iSIM does not reduce security by integrating the secure element into the SoC. The SoC vendor implements hardware isolation — verified through industry certification programs such as GlobalPlatform TEE and Common Criteria EAL — to ensure that the iSIM partition cannot be accessed by the application processor or operating system. The cryptographic operations and credential storage remain isolated even though they share the same silicon package.
---
## Current Adoption Status
iSIM has moved from research and prototype stages into early commercial chipset integration. Adoption is concentrated in IoT modules and wearable-class SoCs rather than flagship consumer smartphones, reflecting where the space and power benefits are greatest relative to the cost of integration.
### Chipsets with Integrated iSIM
iSIM integration in commercially available chipsets is in early deployment as of mid-2026. Verified examples include:
- **Qualcomm + Thales GSMA-compliant iSIM** (announced MWC February 2023): built on a modified Snapdragon 8 Gen 2 variant — a reference/early-commercial platform demonstrating on-SoC iSIM, not a standard shipping consumer SKU.
- **Qualcomm Snapdragon X35 5G Modem-RF System** (announced MWC February 2023): targets LTE-M/NB-IoT IoT applications; reported to include iSIM capability in conjunction with the modem subsystem.
- **Arm Kigen iSIM**: Arm's dedicated iSIM IP family, targeting IoT and wearable SoC designs; licensable by chipset vendors for integration into their own SoCs.
- **Galaxy Watch4 / Watch5**: use eSIM via a discrete eUICC chip — not an on-SoC iSIM. The Exynos W920 SoC in these devices does not integrate iSIM.
Mainstream consumer smartphone SoCs — Qualcomm Snapdragon 8 Gen series, Apple A-series, Samsung Exynos flagship — as of mid-2026 continue to use a discrete eUICC chip for eSIM rather than an on-SoC iSIM integration. The transition to iSIM in flagship smartphones has not yet reached broad commercial availability.
### IoT as the Primary Adoption Driver
The earliest and most consistent deployment of iSIM has been in IoT and wearable segments, where the space and power arguments are strongest. Industrial IoT, cellular-connected wearables, asset tracking, and smart metering are the primary application areas where iSIM's component-reduction advantage is most relevant.
### Carrier and Ecosystem Support
Carriers that have deployed GSMA SGP.22 provisioning infrastructure for eSIM can support iSIM on consumer devices without additional carrier-side changes. For IoT deployments using SGP.32, carriers and connectivity platform providers must support the eIM interface. The remote provisioning protocol is the same; the change is on the device hardware side.
For IoT connectivity at scale, some enterprises use connectivity management platforms (from providers such as Emnify, Eseye, or Tele2 IoT) that sit between the carrier and the device fleet, managing profile assignment and switching across multiple carrier agreements. These platforms must support the SGP.32 eIM interface to manage iSIM-equipped IoT devices. The underlying GSMA standard defines the interface; platform support varies by vendor.
---
## Limitations and Considerations
### Limited Consumer Device Availability
As of mid-2026, iSIM is not yet available in mainstream consumer smartphones from Apple, Samsung (flagship Android), or Google (Pixel). Users evaluating iSIM as a consumer technology will find eSIM far more widely supported across the current device market. For device compatibility information, see [eSIM-Compatible Devices](/en/guides/esim-compatible-devices/).
### SoC Vendor Dependency
With eSIM, the eUICC chip vendor is separate from the SoC vendor. Manufacturers can select a preferred eUICC supplier (Infineon, ST, NXP, and others) and change suppliers independently of the SoC. With iSIM, the secure element is part of the SoC, making the SIM capability dependent on the SoC vendor's implementation and certification. This reduces design flexibility.
### Re-issue Logistics on Device Failure
Because iSIM is inside the SoC — which is part of the device motherboard — device failure or damage means the SIM function is inaccessible along with the rest of the hardware. This is the same situation as eSIM: carriers must re-issue the profile to a replacement device. There is no physical SIM card to extract.
### Certification and Compliance
SoC-integrated secure elements must obtain relevant security certifications (GlobalPlatform, Common Criteria) to be accepted by carriers and regulators. The certification process for iSIM is analogous to eUICC certification for eSIM, but it must be conducted for each SoC design where iSIM is integrated. This adds cost and time to chipset development.
The GSMA also maintains a Security Accreditation Scheme (SAS) for remote provisioning infrastructure. Both the device-side secure element and the carrier-side SM-DP+ (or eIM for SGP.32) must meet defined security requirements. These requirements apply equally to eSIM and iSIM deployments.
---
## iSIM and IoT: The Core Use Case
The GSMA SGP.32 specification, published in May 2023, was developed specifically in response to the needs of IoT device manufacturers. SGP.32 differs from the consumer eSIM specification (SGP.22) in a critical way: it does not require user interaction for profile management.
In a consumer eSIM setup, the user scans a QR code or taps through a carrier app. An IoT sensor embedded in agricultural equipment or a utility meter has no screen and no user. SGP.32 addresses this with the eIM (eSIM IoT Remote Manager), which manages profile operations — download, enable, disable, delete — from the server side, without requiring any interaction at the device.
iSIM's hardware characteristics align with SGP.32's use case: IoT devices benefit from reduced component count, low power draw, and small form factor. The combination of iSIM hardware and SGP.32 provisioning is positioned as the basis for large-scale cellular IoT deployments where deploying and managing SIMs manually would be operationally infeasible.
SGP.32 also supports constrained network environments. Unlike SGP.22, which is designed for devices with stable broadband connectivity, SGP.32 includes support for CoAP over UDP with DTLS — lightweight protocols suitable for NB-IoT and LTE-M networks where bandwidth and packet size are restricted. This makes iSIM with SGP.32 suitable for devices that communicate intermittently over low-bandwidth cellular links.
---
## How iSIM Relates to Frequency Bands and Network Access
iSIM does not change which frequency bands a device supports. Band support is determined by the modem and RF front end, not by the SIM or iSIM. A device with an iSIM accesses the same LTE, 5G NR, NB-IoT, or LTE-M frequencies as a device with a conventional SIM, provided the modem supports those bands.
One area where integration matters: when iSIM is combined with the modem in the same SoC package — as in Qualcomm's X35 design — the modem and SIM can share a more tightly integrated power management scheme. This does not affect which bands are supported, but it can reduce the overall power budget for the connectivity subsystem.
For background on how frequency bands affect coverage and roaming, see [Frequency Bands Explained](/en/guides/frequency-bands/).
One important note for roaming: iSIM devices use the same roaming authentication procedures as devices with physical SIM or eSIM. Band support determines which networks are accessible; the SIM technology (iSIM, eSIM, or physical) does not affect roaming eligibility.
---
## Summary: Physical SIM vs eSIM vs iSIM — and How to Choose
For a practical side-by-side comparison of physical SIM and eSIM — including which to choose for travel, flexibility, and everyday use — see [Physical SIM vs eSIM: Differences and How to Choose](/en/guides/sim-vs-esim/).
| | Physical SIM | eSIM | iSIM |
|---|---|---|---|
| **Hardware** | Removable card (Nano-SIM 4FF) | Discrete eUICC chip on motherboard | SIM function inside SoC |
| **Standard** | ETSI TS 102 221 | GSMA SGP.22 (consumer), SGP.32 (IoT) | GSMA SGP.22 / SGP.32 (same) |
| **Carrier activation** | Insert card | Download profile (QR / app / code) | Download profile (QR / app / eIM) |
| **Profile management** | One card = one profile | Remote provisioning; multiple stored profiles | Remote provisioning; multiple stored profiles |
| **PCB footprint** | SIM slot + card | Discrete eUICC chip | No separate SIM component |
| **Primary use case** | Universal consumer and IoT | Consumer smartphones, tablets, wearables | IoT, wearables, next-gen devices |
| **Consumer availability** | Universal | Standard on flagship smartphones | Early commercial (selected chipsets) |
iSIM is not a new provisioning standard — it reuses the GSMA remote SIM provisioning infrastructure that carriers have already built for eSIM. What changes is the hardware: the secure element moves into the SoC, removing a discrete component and enabling smaller, lower-power designs.
For users comparing plans on current devices, eSIM is the relevant technology. iSIM becomes the practical consideration when evaluating IoT module specifications, wearables, or next-generation chipsets. Use [SimFinder](/en/) to search and filter plans by eSIM support across multiple countries.
---
## Related Guides
- [What Is an eSIM?](/en/guides/what-is-esim/) — How eUICC works, the SGP.22 standard, and which devices support eSIM
- [Physical SIM vs eSIM: Differences and How to Choose](/en/guides/sim-vs-esim/) — Side-by-side comparison and a use-case decision framework
- [eSIM-Compatible Devices](/en/guides/esim-compatible-devices/) — Which iPhones, Android phones, and tablets support eSIM
- [What Is a SIM Card?](/en/guides/what-is-sim/) — IMSI, Ki, UICC form factors, and the shift from physical SIM to eSIM
- [Frequency Bands Explained](/en/guides/frequency-bands/) — How LTE and 5G frequency bands affect coverage, speed, and roaming
================================================================================
# What Is an MNO? How Mobile Network Operators Differ from MVNOs
URL: https://sim-finder.com/en/guides/what-is-mno/
Type: guides (en)
Published: 2026-06-04
An MNO — Mobile Network Operator — is the type of operator that owns the licensed radio spectrum and physical network infrastructure that every mobile phone ultimately depends on. MVNOs, sub-brands, and resellers all deliver service through MNO infrastructure. Understanding what makes an operator an MNO clarifies why coverage, network priority, and pricing work the way they do across all carrier types.
The key points covered in this article:
- The ITU definition of an MNO and what spectrum licensing means in practice
- What physical infrastructure an MNO owns and operates
- How MNOs differ from MVNOs, sub-brands, and resellers
- Why MNO status affects network priority and what that means for subscribers
- How to identify which MNO underlies any plan you are considering
If you are already familiar with MNOs and want a direct side-by-side comparison of all three carrier types, jump to [MNO vs MVNO vs Sub-Brand](/en/guides/mno-vs-mvno-comparison/). If you are new to the space, this article is the right starting point — it explains the foundation that the comparison builds on.
For definitions of all terms used here, see the [SIM & Mobile Glossary](/en/guides/glossary-index/).
---
## The ITU Definition: Spectrum Licensing as the Threshold
The International Telecommunication Union (ITU) identifies spectrum ownership as the defining threshold between an MNO and an MVNO. An MNO holds a government-issued licence to use specific radio frequency bands within a defined territory. An MVNO does not hold such a licence — it is the absence of licensed spectrum that makes an operator "virtual."
This distinction has structural consequences. A spectrum licence is issued by the national telecommunications regulator of the territory concerned — the FCC in the US, Ofcom in the UK, BNetzA in Germany, and equivalent bodies elsewhere. Licences are typically awarded through competitive auctions or beauty contests and carry legal obligations: network coverage targets, build-out timelines, quality-of-service minimums, and, in some jurisdictions, wholesale access requirements.
Because spectrum is a finite shared resource, regulators limit the number of licences per frequency band. This is why most developed markets have only a small number of MNOs — spectrum scarcity prevents unlimited entry. In contrast, there is no licence barrier to becoming an MVNO: any company that can negotiate a wholesale agreement with an MNO can in principle enter the market, which is why more than 1,986 active MVNOs were operating globally at the end of 2022, according to GSMA Intelligence.
---
## What an MNO Actually Owns
### The Radio Access Network
The radio access network (RAN) is the part of the mobile network that communicates wirelessly with subscriber devices. An MNO builds, maintains, and upgrades the RAN, which consists of:
- **Base stations and antennas** — the equipment installed on towers, rooftops, and other structures that transmits and receives radio signals on licensed frequencies
- **Backhaul connections** — the links (often fibre, but also microwave) that connect each base station to the rest of the network
- **Radio access controllers** — systems that coordinate how radio resources are allocated across devices in a cell
Building out a RAN requires substantial capital and ongoing operational expenditure. Sites must be leased, equipment purchased, planning permissions obtained, and maintenance performed continuously. This infrastructure cost is the primary reason MNO plan prices are structurally higher than MVNO prices: MNOs must recover the cost of the physical network, while MVNOs do not.
Because the RAN is an MNO's most significant asset, its quality — density of sites, spectrum used per cell, upgrade cycle — directly determines what every operator on that network can deliver to subscribers, regardless of whether they are MNO direct, sub-brand, or MVNO.
### The Core Network
Behind the radio access network sits the core network, which handles:
- **Authentication** — verifying that each SIM is permitted to access the network
- **Routing** — directing calls, texts, and data to their destinations
- **Subscriber records** — maintaining databases (historically called HLR; in 4G and 5G, called HSS and UDM) that track which SIM belongs to which subscriber and what services they are entitled to
- **Interconnect** — the points where the MNO's network connects to other mobile networks, the public telephone network, and the internet
MVNOs that operate as "full MVNOs" may own portions of a core network, but they still rely on the MNO for the radio access layer. Simpler MVNO types (light MVNOs, resellers) rely on the MNO for both the radio access and core network functions.
### Spectrum Bands and Generations
A spectrum licence specifies which frequency bands the MNO may use. Different bands have different propagation characteristics: lower frequencies (e.g. 700 MHz, 850 MHz) travel farther and penetrate buildings better, making them suited for wide-area and rural coverage. Higher frequencies (e.g. 3.5 GHz for 5G mid-band, mmWave for ultra-fast short-range 5G) carry more data but over shorter distances.
An MNO's spectrum portfolio shapes the character of its network. An operator with strong low-band holdings can cover large rural areas efficiently. An operator with mid-band and high-band spectrum can deliver higher throughput in dense urban areas. Because MVNOs and sub-brands inherit coverage from their host MNO's spectrum portfolio, the choice of host MNO is effectively a choice about which spectrum assets back your service.
---
## How MNOs Relate to MVNOs
### The Wholesale Agreement
An MNO that hosts MVNOs grants them access to its radio network at the Point of Interface (POI) — a logical connection point between the MNO's core network and the MVNO's systems. The MVNO purchases a defined amount of bandwidth through this connection, measures like 100 Mbps or 1 Gbps, and uses it to serve all its subscribers simultaneously.
The terms of the wholesale agreement determine:
- Which network generations (4G, 5G) the MVNO can offer
- What roaming agreements (if any) the MVNO can extend to its subscribers
- The priority level the MVNO's traffic receives relative to the MNO's own direct subscribers
From a consumer perspective, choosing an MVNO means choosing the host MNO's coverage area while accepting that the network priority terms are set by wholesale agreement rather than by direct subscription. For a detailed explanation of how the POI model and deprioritization work, see [What Is an MVNO?](/en/guides/what-is-mvno/)
### Network Priority: The Structural Difference
During congestion, an MNO's traffic management systems must decide whose data gets served first. The MNO's own direct subscribers are served before MVNO traffic passing through the shared POI. This is not a sign of poor MVNO quality — it is a built-in property of the wholesale access model.
In practical terms: during off-peak hours (evenings, early mornings, low-density areas), the POI bandwidth is typically under-utilised and MNO and MVNO speeds are similar. During congestion — morning and evening commutes, large events, dense urban areas — MVNO subscribers may experience slower speeds than direct MNO subscribers on the same physical network.
An MNO direct subscriber avoids this bottleneck because their traffic never passes through a shared POI — it is handled on the MNO's dedicated capacity.
The severity of this difference in practice depends on three variables: how congested the MNO's network is in your area, how much bandwidth the specific MVNO has purchased at its POI, and how many subscribers that MVNO has competing for that bandwidth at any given moment. These variables are not visible to consumers, which makes real-world speed tests in your specific location a more reliable guide than operator type alone.
---
## Sub-Brands: MNO-Owned, Lower-Priced
Sub-brands occupy a distinct middle position between the MNO's flagship plans and independent MVNOs. A sub-brand is a brand **fully owned and operated by an MNO**, positioned at a lower price point.
Examples:
- **Cricket Wireless** — owned by AT&T; operates on AT&T's network
- **Metro by T-Mobile** — owned by T-Mobile; operates on T-Mobile's network
- **Visible** — a wholly-owned Verizon subsidiary (branded "Visible by Verizon" since June 2022)
- **UQ mobile** (Japan) — owned by KDDI (au)
- **Y!mobile** (Japan) — owned by SoftBank
Because a sub-brand is part of the same corporate structure as the MNO, the MNO can configure its internal traffic policy to give sub-brand traffic better treatment than wholesale MVNO traffic. Sub-brands typically sit between the MNO's premium direct plans and independent MVNOs on the network priority hierarchy.
Sub-brands also usually share the parent MNO's retail store network for activations and in-person support, which independent MVNOs — mostly online-only operators — cannot offer.
The distinction matters when comparing plans: a sub-brand priced between the MNO and a budget MVNO often reflects a genuine difference in network priority, not just marketing. For a detailed comparison of all three types across eight practical dimensions, see [MNO vs MVNO vs Sub-Brand](/en/guides/mno-vs-mvno-comparison/).
---
## How Many MNOs Are There?
The number of licensed MNOs in a market is set by the availability of spectrum and regulatory policy. Most developed markets have between two and four national MNOs.
Fewer MNOs means less network-level competition; more MNOs means more wholesale capacity for MVNOs to lease, which generally benefits MVNO pricing and availability. This structural dynamic is one reason why MVNO ecosystems vary so widely between countries — a three-MNO market with mandated wholesale access will typically support a more competitive MVNO landscape than a two-MNO market with voluntary wholesale arrangements.
| Market | Primary National MNOs |
|--------|-----------------------|
| United States | AT&T, T-Mobile, Verizon |
| United Kingdom | EE, O2, VodafoneThree (formed May 2025) |
| Germany | Deutsche Telekom, Vodafone, Telefónica (O2) |
| Australia | Telstra, Optus, TPG Telecom |
| Japan | NTT Docomo, KDDI (au), SoftBank, Rakuten Mobile |
| South Korea | SK Telecom, KT, LG Uplus |
This list covers primary national MNOs and is not exhaustive. Some countries have regional MNOs in addition to national operators. Market structure changes over time through mergers, acquisitions, and new spectrum awards — the 2025 merger of Vodafone UK and Three UK into VodafoneThree is a recent example.
The number of MNOs matters to consumers because every MVNO and sub-brand in a market is hosted on one of the MNOs in that market. If a country has three MNOs, then every MVNO in that country is ultimately dependent on one of those three networks. Identifying which MNO underlies any plan you consider is the first step in evaluating coverage.
---
## What MNO Status Means for 5G
An MNO deploys and manages its own 5G network, including spectrum allocation, base station rollout, and the introduction of 5G Standalone (SA) architecture as it matures. MNO direct subscribers gain access to whatever 5G tier the carrier has deployed in their area.
MVNOs and sub-brands do not automatically inherit the same 5G access:
- A sub-brand hosted on an MNO typically receives 5G access, but at the priority level determined by the parent MNO's internal policy.
- An independent MVNO must specifically negotiate 5G access in its wholesale agreement. Even if an MVNO offers 5G, the agreement may cover only certain 5G tiers (for example, sub-6 GHz 5G but not mmWave).
This means that when evaluating 5G coverage claims from any operator other than a direct MNO, it is worth confirming which 5G tiers are included and whether the underlying host MNO's 5G rollout covers your area.
---
## MNO Advantages for Specific User Profiles
### Heavy Data Users
For users who rely on fast mobile data during commuting hours or at crowded events — video calls, real-time streaming, cloud-connected work tools — being on an MNO direct plan provides the most predictable peak-time performance. The absence of POI-based deprioritization means congestion affects MNO direct subscribers last.
### International Travelers
MNOs negotiate their own international roaming agreements with partner networks around the world. These agreements are typically broader in geographic scope than what an MVNO can offer its subscribers, since MVNO roaming rights are a subset of the host MNO's roaming rights and must be specifically negotiated in the wholesale agreement. For users who need reliable connectivity in multiple countries, an MNO's direct roaming plan is often the most straightforward option. For travel-specific alternatives, [4 Ways to Stay Connected Abroad](/en/guides/four-options/) covers the full range of options including travel eSIMs, which can be more cost-effective than roaming. If you decide a travel eSIM fits your needs better than your home MNO's roaming plan, [How to Choose a Travel eSIM](/en/guides/how-to-choose/) walks through the five criteria to evaluate, and [Travel eSIM Provider Comparison](/en/guides/provider-comparison/) compares the leading providers by coverage and plan structure.
### Users Who Need In-Person Support
MNOs maintain retail store networks staffed to handle SIM activations, device issues, and account problems in person. Independent MVNOs are predominantly online-only. If you anticipate needing face-to-face support — for example, when setting up service for a family member who is not comfortable with online account management — an MNO or a sub-brand with a shared retail presence is the more accessible choice.
### Business Users
MNOs offer business and enterprise plans with dedicated account management, SLA commitments, and IoT fleet connectivity options that independent MVNOs rarely match. For companies managing dozens or hundreds of SIMs across multiple devices, an MNO business plan provides the account control and reliability guarantees that consumer-grade MVNO plans do not.
---
## MNO vs MVNO: When the MVNO Is the Better Choice
Being clear about what an MNO is does not mean an MNO direct plan is always the right choice. For users whose mobile data use is primarily off-peak, who are comfortable with online-only support, and who want month-to-month flexibility, an independent MVNO on the same host network can provide essentially the same day-to-day experience at a lower monthly cost.
The structural advantage of an MNO — higher network priority — is most valuable during peak-time congestion. If your usage pattern is not congestion-sensitive, paying for that advantage may not be necessary.
Use [SimFinder](/en/) to compare current plans across MNOs and MVNOs in your country and see whether the price difference reflects a trade-off that matters for your specific usage. For guidance on which type of carrier fits different usage profiles, the [MNO vs MVNO vs Sub-Brand](/en/guides/mno-vs-mvno-comparison/) comparison walks through a decision framework by user type.
---
## Identifying the MNO Behind Any Plan
Because every MVNO and sub-brand is hosted on an MNO, identifying the underlying MNO is the first practical step when evaluating coverage. Methods:
1. **Check the operator's website.** Most MVNOs disclose their host network under a "Coverage" or "How it works" section, often in legal terms or FAQs.
2. **Check your phone's network name after inserting the SIM.** In some configurations, the status bar shows the underlying MNO name rather than the MVNO brand.
3. **Use the host MNO's coverage map.** Once you know which MNO underlies a plan, check that MNO's coverage map directly — it is the most accurate indicator of signal strength in specific locations.
If you are evaluating a backup or secondary SIM on a different MNO's network for resilience, [Backup Line: Adding a Second SIM for Outage Resilience](/en/guides/sub-line/) explains the options and trade-offs.
### A Note on "Network" vs "Coverage" Claims
Operators and comparison sites sometimes use the terms "network" and "coverage" loosely. A claim that an MVNO "uses the Verizon network" tells you about the underlying infrastructure — it does not mean the MVNO plan includes every feature Verizon offers (such as domestic roaming onto partner networks in fringe areas, or full 5G tier access). Read the plan's terms alongside the coverage claim to understand exactly what is and is not included.
---
## FAQ
The structured FAQ answers are in the frontmatter above for schema.org/FAQPage compatibility. Below are expanded answers to common questions.
**Is an MNO always more expensive than an MVNO?**
Structurally, yes — MNOs carry capital and operational costs that MVNOs do not, so their baseline cost structure is higher. However, the price gap varies by market, plan tier, and promotional pricing. An MNO's mid-tier prepaid plan may be competitively priced against a well-established MVNO in the same market. No specific prices are quoted in this article because pricing changes frequently. Use [SimFinder](/en/) to compare current pricing in your country.
**Can an MNO block an MVNO from accessing its network?**
This depends on the regulatory environment. In some markets, regulators mandate that MNOs offer wholesale access to MVNOs. In others, wholesale access is voluntary and commercial. Where access is mandatory, MNOs must offer it on regulated terms. Where it is voluntary, an MNO can decline to host MVNOs or can decline to renew existing agreements.
**What happens to MVNO subscribers if their host MNO is acquired or merges?**
Wholesale agreements are commercial contracts; a merger or acquisition does not automatically terminate them. However, the new parent entity may renegotiate terms, absorb the MVNO into its own sub-brand portfolio, or allow the agreement to lapse. The VodafoneThree merger in the UK (May 2025) is a recent example of a structural change that affected MVNOs hosted on both predecessor networks. Subscribers are typically notified in advance of any service changes.
**Does choosing an MNO guarantee the best network performance?**
An MNO direct plan gives you the highest network priority on that MNO's infrastructure, but network performance also depends on the MNO's investment level, spectrum holdings, and network density in your specific area. An MNO with lighter investment in a given region may deliver weaker real-world performance than a well-funded competitor's sub-brand in the same area. Coverage maps and independent speed test data are more reliable indicators of real-world performance than operator type alone.
---
## Related Guides
- [What Is an MVNO?](/en/guides/what-is-mvno/) — How MVNOs lease capacity from MNOs, how the POI model works, and what deprioritization means in practice
- [MNO vs MVNO vs Sub-Brand](/en/guides/mno-vs-mvno-comparison/) — Side-by-side comparison across eight dimensions: coverage, peak-time speed, price, customer service, 5G access, roaming, perks, and contract flexibility
- [Travel eSIM Provider Comparison](/en/guides/provider-comparison/) — When an MNO roaming plan is not the most cost-effective travel option, these providers offer alternatives
- [Backup Line: Adding a Second SIM for Outage Resilience](/en/guides/sub-line/) — How to use a second MNO's network as a backup to your primary carrier
- [How to Choose a Travel eSIM](/en/guides/how-to-choose/) — Five criteria for evaluating travel data plans when you are away from your home MNO's network
================================================================================
# Mobile Number Portability (MNP) Explained — How to Keep Your Number When Switching Carriers
URL: https://sim-finder.com/en/guides/what-is-mnp/
Type: guides (en)
Published: 2026-05-20
Mobile Number Portability (MNP) lets you keep your phone number when you move to a different carrier. You do not need to hand out a new number to contacts, update business cards, or re-register with every service you use.
The process involves three things: collecting a transfer credential from your current carrier, providing it to your new carrier, and waiting for the port to complete — a matter of hours in most countries.
This guide explains how the system works technically, the exact steps for the US, UK, and Australia, what can go wrong, and how to protect services that rely on SMS during the switch.
---
## What Is Mobile Number Portability?
MNP is a regulatory and technical framework that allows a mobile subscriber to retain their phone number when transferring service to a different carrier. Without it, your number would belong to the carrier, not to you, and switching would mean losing it permanently.
Phone numbers are assigned within the ITU-T E.164 numbering plan, which gives each country a country code and allocates number ranges to carriers. Historically, this meant a number was permanently tied to the carrier that owned the range. MNP breaks that tie by introducing a routing layer that redirects calls and messages to wherever the number currently lives.
The first country to implement MNP was Singapore in 1997. The ITU subsequently published Recommendation Q.769.1 (1999), which defined the signalling protocol for number portability within SS7 networks. Today, most countries with significant mobile markets have mandated MNP by law.
The regulatory goal is competition: if switching carriers means losing your number, many customers will stay with a carrier they dislike rather than go through the disruption. MNP removes that barrier.
---
## How MNP Works Technically
Understanding the technical mechanics helps explain why porting takes time and why certain failure modes exist.
### The Porting Database
When a number is ported, it is registered in a central or distributed porting database — sometimes called a Number Portability Database (NPDB) or a Ported Number Register. Different countries use different architectures: some use a single national database, others use decentralised query systems between carriers.
Every time a call or message is routed toward a ported number, the originating network queries this database to find which carrier currently hosts the number, then routes traffic accordingly. This lookup happens in real time using SS7 signalling.
### ENUM and IP Routing
For VoIP and IP-based messaging networks, ENUM (E.164 Number Mapping, defined in IETF RFC 6116) provides an equivalent DNS-based lookup mechanism. ENUM maps a telephone number to a URI, allowing VoIP systems to locate the correct endpoint without relying solely on SS7. This is how services like WhatsApp and iMessage can find the right destination for a number that has been ported.
### MSRN and Call Routing
In GSM and UMTS networks, a Mobile Station Roaming Number (MSRN) is used for call delivery. When a call arrives at the carrier that previously owned the number range, that carrier (or the routing layer) uses the ported number database to obtain an MSRN, which points to the number's current home network. The call is then forwarded transparently — the caller hears nothing unusual.
### The Port-In / Port-Out Model
Every port has two sides:
- **Port-out**: your current (losing) carrier releases the number.
- **Port-in**: your new (gaining) carrier claims it and updates the routing database.
In most countries, the gaining carrier initiates the process after you provide authorisation. The losing carrier validates your identity details, confirms no contractual block exists, and releases the number on the agreed date.
---
## The MNP Process: Step-by-Step
The exact steps differ by country, but the underlying sequence is the same.
1. **Gather your account details** — You need your account number with the current carrier and a transfer credential (PIN, transfer code, or authorisation code depending on the country). In most markets, these are not the same as your online login password.
2. **Request a transfer code from your current carrier** — In the US this is called a Number Transfer PIN. In the UK it is a PAC code obtained by texting 65075. In Australia the gaining carrier handles identity verification directly, so you do not need a separate code.
3. **Sign up with your new carrier** — During the sign-up flow, provide your number and the transfer credential. The new carrier submits the port request to the database on your behalf.
4. **Activate your new SIM or eSIM** — Your new carrier will issue a physical [SIM card](/en/guides/what-is-sim/) or an [eSIM](/en/guides/what-is-esim/) profile. Do not activate it until the port request has been submitted; activating early can sometimes interfere with the transfer.
5. **Wait for the port to complete** — You will lose service on your old SIM for a period ranging from a few minutes to a few hours. When the new SIM shows signal and your number works for calls and texts, the port is done.
6. **Confirm and keep your old SIM until verified** — Before discarding or returning the old SIM, send a test message to yourself and receive a call. Only then is it safe to dispose of the old SIM.
---
## How Long Does Porting Take?
Port timing is set by national regulation and varies significantly.
| Country | Typical completion time | Regulatory basis |
|---------|------------------------|-----------------|
| United Kingdom | Within 1 working day of PAC submission | Ofcom switching rules (2019) |
| Australia | ~3 hours for simple ports | ACMA industry standard |
| United States | 1 business day (simple port) | FCC Local Number Portability rules |
| European Union | Within 1 working day | Directive 2002/22/EC / EECC 2018/1972 |
| Germany | 1 working day (gaining carrier initiates) | Bundesnetzagentur, §59 TKG |
| France | 1 working day for prepaid; up to 3 days for postpaid | ARCEP Decision No. 2022-2148 |
| Canada | 2.5 hours for wireless simple ports | CRTC Wireless Code (2013, revised 2017) |
| Japan | Same day to next business day (online) | Ministry of Internal Affairs guidelines |
"Simple port" typically means a standard postpaid or prepaid consumer line. Business accounts with multiple lines, or ports involving a change of account holder name, may take longer.
---
## Country-Specific Rules
### United States
The FCC's Local Number Portability (LNP) mandate requires US carriers to port numbers upon a valid customer request. To port your number, you need:
- Your **account number** — visible on your bill or in your carrier's account portal.
- A **Number Transfer PIN** — a separate code (distinct from your account password or billing PIN) that most carriers now require you to set up in advance. If you have not set one, do this before contacting the new carrier.
In practice, US carriers generally do not charge porting fees, and the FCC prohibits carriers from refusing a port due to an outstanding balance. ([FCC: Porting — Keeping Your Phone Number When You Change Providers](https://www.fcc.gov/consumers/guides/porting-keeping-your-phone-number-when-you-change-providers))
The FCC mandates that simple ports be processed within one business day, though the actual SIM activation window may extend several hours into that period.
### United Kingdom
Ofcom introduced the Text-to-Switch system in July 2019. To get your PAC code:
1. Text **PAC** to **65075** from the number you want to port.
2. Your current carrier must send the PAC within 60 seconds, free of charge.
3. The PAC is valid for 30 days.
4. Give the PAC to your new carrier when signing up. The port must complete within one working day of the new carrier receiving a valid PAC.
([Ofcom: Switching — mobile](https://www.ofcom.org.uk/phones-and-broadband/switching-provider/switching-mobile))
If you want to leave your carrier without keeping your number, text **STAC** to 75075 instead. You will receive a Service Termination Authorisation Code.
### Australia
In Australia, the gaining carrier — not the customer — handles the port-out process. You authorise the new carrier to request the transfer on your behalf. ACMA rules require the gaining carrier to verify your identity before proceeding, as a measure against fraudulent porting.
Industry service levels require 90% of simple mobile ports to complete within 3 hours and 99% within 2 business days. There is no fee for porting. ([ACMA: Keep or transfer your phone number](https://www.acma.gov.au/keep-or-port-your-phone-number))
The pre-porting identity verification requirement was strengthened by the *Telecommunications (Mobile Number Pre-Porting Additional Identity Verification) Industry Standard 2020*, introduced specifically to combat port-out fraud.
### European Union
EU Directive 2002/22/EC (the Universal Service Directive) requires that subscribers be able to retain their phone numbers when switching providers, and that the process must complete within one working day. Porting must be free of charge. Note: this directive has been superseded by the European Electronic Communications Code (Directive 2018/1972), which maintains and reinforces these number portability obligations for member states.
Individual member states vary in how they implement the request process — some use a PAC-style code system, others have the gaining carrier handle the transfer directly.
### Germany
Germany implements the EU number portability rules through §59 of the Telekommunikationsgesetz (TKG). The gaining carrier initiates the port request on the customer's behalf. The Bundesnetzagentur (Federal Network Agency) mandates completion within one working day for standard consumer ports. The process is free of charge for the subscriber. If you hold a German number under a contract with a minimum term, you remain liable for any early termination fee, but the fee cannot be used to block the port itself.
### France
French number portability is regulated by ARCEP (Autorité de Régulation des Communications Électroniques et des Postes). Decision No. 2022-2148 requires that simple mobile ports complete within one working day for prepaid lines. Postpaid ports may take up to three working days in practice. Porting is free of charge. The gaining carrier handles the port request after you provide your RIO (Relevé d'Identité Opérateur) code — obtain it by calling 3179 from your current mobile line (free of charge, available 24/7). The RIO is valid for 30 days.
### Canada
The CRTC (Canadian Radio-television and Telecommunications Commission) Wireless Code mandates that simple wireless port requests complete within 2.5 hours. Porting is free. You provide your account number and transfer PIN to the new carrier, which initiates the port. The CRTC Code also prohibits carriers from imposing a cancellation fee solely for porting away; however, remaining device financing obligations or contract early termination fees still apply.
### Japan (brief note)
Japan operates two parallel systems. The traditional method requires obtaining a reservation number (MNP予約番号) from the current carrier, valid for 15 days. Since May 24, 2023, a One-Stop MNP system allows the entire transfer to be completed on the new carrier's website, without contacting the old carrier. The One-Stop system is online-only. ([MIC Japan](https://www.soumu.go.jp/menu_kyotsuu/important/kinkyu02_000515.html))
---
## What You Need to Provide
Regardless of country, you will be asked for some combination of the following:
- **Phone number** to be ported (the number you want to keep).
- **Account number** with the current carrier — this is not your phone number; it is an internal identifier on your billing account.
- **Transfer credential** — a PIN, transfer code, or authorisation code (PAC in the UK; Number Transfer PIN in the US). In Australia, the gaining carrier verifies your identity directly.
- **Registered name** — the name exactly as it appears on the account. Even small discrepancies (a middle name, a hyphen) can cause the port to be rejected.
- **Registered address** — the billing or service address on the account.
For [eSIM](/en/guides/what-is-esim/) ports, the process is the same. After the port completes, your eSIM profile on the new carrier's network will respond to your ported number.
If your current carrier's device is [SIM-locked](/en/guides/sim-lock/), resolve that before initiating a port. A locked device will not connect to the new carrier even after the number transfers successfully.
Some carriers require you to have been a customer for a minimum period (typically 30–90 days) before they will unlock a device. Plan ahead if you are approaching the end of a contract and want to port out immediately upon expiry.
---
## Common Failure Modes
The majority of failed or delayed ports fall into a small number of categories.
**Name or address mismatch** — The most frequent cause. The name submitted to the losing carrier must match the account exactly. If your account shows "Robert Smith" and you submit "Bob Smith," the port will be rejected. Check your carrier's online portal for the exact registered name before initiating a switch.
**Wrong transfer credential** — Using your account login password, billing PIN, or SIM card PIN instead of the specific Number Transfer PIN (US) or PAC code (UK). These are different things. Request the correct credential from your current carrier before starting the process.
**Account under contract lock or administrative hold** — Some carriers place a 60-day lock on accounts after a recent SIM swap or account change. If your account has been recently modified, contact your carrier to confirm whether a porting hold applies.
**Outstanding balance** — While carriers in the US and most other markets cannot legally refuse to port because of a balance, some carriers may attempt to delay the process or notify the customer. If this happens, contact your national regulator.
**Prepaid account with insufficient balance** — Some prepaid accounts must have a non-zero balance to remain active long enough to complete a port. Top up before initiating if in doubt.
**eSIM activation race condition** — When porting to a carrier that issues an eSIM, some platforms prompt you to download and activate the eSIM profile immediately after submission — before the port-out from the old carrier has completed. If you activate the eSIM too early, the profile may bind to the new carrier's network before the number transfer registers, resulting in the eSIM showing signal but the ported number not yet routed correctly. The fix is to wait for an explicit confirmation from the new carrier that the port is complete before tapping "Activate" on the eSIM install prompt. Typically this takes 15–60 minutes after submission; do not rush the activation step.
**Account locked by the customer** — Since the FCC's 2023 SIM-Swap and Port-Out Fraud rules (FCC 23-95) came into effect, US carriers offer free account locking features that block port-out requests as a fraud prevention measure. Verizon offers separate SIM Protection and Number Lock features; AT&T introduced Wireless Account Lock in 2025. If you have enabled such a lock, disable it before requesting a port.
---
## Risks During the Port
### SMS 2FA Interruption
The most practically important risk. During the window when the number is transitioning — which can range from minutes to a couple of hours — SMS messages may not be reliably delivered to either SIM. If you trigger an SMS-based two-factor authentication request (for a bank, email account, trading platform, etc.) during this window, you may not receive the code and could be locked out temporarily.
**Mitigation:** Before you start the port, identify any critical services that send 2FA codes to your number. Log in to those services before initiating the port, or wait until you have confirmed the port is complete before using them.
A further mitigation strategy is to temporarily switch critical accounts from SMS-based 2FA to an authenticator app (such as Google Authenticator, Authy, or Apple Passwords) before the port. Authenticator apps generate codes locally and do not depend on SMS delivery, so they continue to work without interruption throughout the port window. After the port completes, you can keep the authenticator app active — doing so also improves your long-term security posture, since SMS 2FA is vulnerable to SIM-swap attacks.
### Voicemail Loss
Voicemail messages stored on your old carrier's servers are not transferred during a port. They remain accessible only on the losing carrier's system, usually for a limited period after the account closes. Download or note any important voicemails before the port completes.
To preserve access to voicemails that arrive during the transition window, set up call forwarding on your old number to a secondary number or a VoIP number before initiating the port. This way, any calls that land on the old routing path can still reach you while the porting database updates propagate across networks — a process that can take several hours for international carriers.
Alternatively, consider switching to a third-party visual voicemail application (such as Google Voice in the US, or YouMail) before the port. These services store voicemails in the cloud independently of your carrier, so they survive a carrier switch without any data loss. Once the port completes, re-link the app to your ported number on the new carrier.
### Family Plan and Shared Account Complications
If your line is part of a shared family plan, porting one line may affect billing for the whole account. The remaining lines may move to a different pricing tier. Confirm with your carrier how a partial port-out affects the remaining plan members.
Most family plans use line-count tiers for pricing — for example, a four-line plan at a lower per-line rate than a three-line plan. Removing one line via a port-out may automatically bump the remaining lines to the higher-priced tier, increasing the monthly bill for everyone still on the account. Before porting, ask your current carrier for the exact new rate that would apply to the remaining lines.
Additionally, lines on a family plan are typically owned by the primary account holder, not by the individual line user. If you are not the primary account holder, you may need the account holder to authorise the port-out on your behalf — either by providing the account PIN or by contacting the carrier directly. Without this authorisation, the losing carrier will reject the port request. In some cases, where the primary account holder is no longer reachable (e.g., a deceased family member or a former employer), you may need to initiate a formal account ownership transfer before the port can proceed.
### Business Accounts
Business accounts with multiple lines often have different porting procedures. They may require a letter of authorisation (LOA) or involve longer processing times. Individual lines on a business account generally cannot be ported individually without the account holder's authorisation.
For bulk ports — where a company is moving all lines from one carrier to another — carriers typically provide a dedicated migration team and a structured port window (often scheduled overnight or over a weekend to minimise operational disruption). Bulk ports require a signed LOA listing all numbers to be transferred, and the account's tax identification number or business registration number is usually required for identity verification. Allow at least two weeks of lead time when coordinating a bulk business port.
### International Number Porting
MNP is a national framework — numbers cannot be ported between countries. If you are an international resident who wants to keep a foreign number while using a local carrier, you will need a separate solution (such as a VoIP number or a dual-SIM setup). For more on how [MVNOs](/en/guides/what-is-mvno/) compare on international features, see the [MNO vs MVNO comparison guide](/en/guides/mno-vs-mvno-comparison/).
Some travellers and expatriates use a dual-SIM or dual-eSIM device to maintain both a home country number and a local data SIM simultaneously. On modern iPhones and Android devices that support two active eSIM profiles, this allows receiving SMS on a home number (important for 2FA) while routing data calls through a cheaper local plan. This is not number porting — both numbers remain on their original carriers — but it is an effective workaround when cross-border porting is not possible.
---
## FAQ
*(See structured FAQ items in the frontmatter above for display in site search and rich results.)*
### Will I lose my number if I cancel first?
Yes. Never cancel your old account before the port completes. Cancellation releases the number back to the carrier's pool. Once released, it can be reassigned to another subscriber, and recovery is either impossible or requires a lengthy dispute process with the carrier. Always wait for explicit confirmation from your new carrier that the port is complete before contacting your old carrier about cancellation.
### What if my port is rejected?
The new carrier is required to inform you of the rejection reason. The most common reasons are a name or address mismatch, an incorrect transfer PIN, or an active account lock. Fix the specific mismatch, re-request the port with corrected details, and the process restarts. If the losing carrier refuses to port without a valid regulatory reason, you can file a complaint with your national regulator (FCC in the US, Ofcom in the UK, ACMA in Australia, or Bundesnetzagentur in Germany).
### Can I port an eSIM to a physical SIM, or vice versa?
Yes. The port process is credential-based, not tied to the physical form of the SIM. When porting from a physical SIM carrier to a carrier that issues eSIMs, the new carrier will provide a QR code or activation code after the port completes. When moving from eSIM back to a physical SIM, the new carrier ships or provides a physical card, and the port transfers the number onto it. The transition window and risks are the same regardless of SIM type.
---
## Related Guides
- [What Is a SIM Card?](/en/guides/what-is-sim/) — Understanding the physical credential that MNP transfers between carriers.
- [What Is an eSIM?](/en/guides/what-is-esim/) — How porting works when your new carrier issues an eSIM instead of a physical card.
- [SIM Lock Explained](/en/guides/sim-lock/) — Check whether your device is locked to your current carrier before you port.
- [What Is an MVNO?](/en/guides/what-is-mvno/) — Many people port to an MVNO to reduce costs; understand what you are moving to.
- [MNO vs MVNO vs Sub-Brand Comparison](/en/guides/mno-vs-mvno-comparison/) — Side-by-side analysis of network quality, peak-time speeds, pricing, customer service, and 5G access by carrier type, with a decision tree by user profile.
================================================================================
# What Is an MVNO? — How Mobile Virtual Network Operators Work
URL: https://sim-finder.com/en/guides/what-is-mvno/
Type: guides (en)
Published: 2026-04-24
An MVNO — Mobile Virtual Network Operator — lets you buy mobile service from a company that has no radio towers of its own. The operator leases network capacity from a licensed carrier and sells it under its own brand and pricing structure. The result: competitive plans without the infrastructure overhead that drives up prices at traditional carriers.
The key points covered in this article:
- The formal ITU definition and how MVNOs differ legally from MNOs
- How network capacity is leased through the Point of Interface (POI), and the role of MVNE and MVNA intermediaries
- The spectrum from full MVNOs to light MVNOs to resellers — and why the distinction matters to you as a consumer
- Who the major MVNOs are in the US, UK, and other markets
- Where the price advantage comes from, and what you give up
- How to tell an independent MVNO apart from an MNO-owned sub-brand
For a quick look at how a SIM card works in general — whether issued by an MNO or an MVNO — see [What Is a SIM Card?](/en/guides/what-is-sim/) For plain-English definitions of every term used in this article, the [SIM & Mobile Glossary](/en/guides/glossary-index/) is the reference starting point.
---
## What Is an MVNO?
### The ITU Definition
The International Telecommunication Union (ITU) defines an MVNO as an operator that provides mobile services to end users **without holding a government licence for radio spectrum**. That single distinction separates MVNOs from all traditional carriers (MNOs, or Mobile Network Operators): an MNO wins a spectrum auction, builds towers, and transmits signals over licensed frequencies. An MVNO does none of those things.
The ITU's framing — from its 2001 overview and reiterated in subsequent policy documents — identifies spectrum ownership as the threshold. Everything else an MVNO does (billing, customer service, pricing, app development, SIM manufacturing) is optional and varies by business model.
### The MNO Behind Every MVNO
Because an MVNO has no radio network, every call you make, every text you send, and every megabyte of data you consume physically travels over an MNO's infrastructure. The MVNO is a commercial layer on top of that infrastructure, not a separate radio network. When you see "No service" on an MVNO SIM, the problem is almost certainly the host MNO's coverage, not the MVNO itself.
At the end of 2022, GSMA Intelligence counted more than **1,986 active MVNOs** operating in over 80 countries. MVNOs range from global travel SIM providers to hyper-local brands targeting specific communities or use cases.
An MNO (Mobile Network Operator) holds a spectrum licence from the government of the territory in which it operates and owns the radio access network — antennas, base stations, backhaul, and core network — that makes wireless communication physically possible. You can read more about how SIMs work across both MNO and MVNO networks in [What Is a SIM Card?](/en/guides/what-is-sim/)
---
## How an MVNO Leases Network Capacity
### The Point of Interface (POI)
The most technically significant concept in MVNO economics is the **Point of Interface**, commonly abbreviated POI. The POI is the logical connection point at which an MNO's network hands off traffic to (or receives traffic from) an MVNO's systems.
Picture it as a shared data pipe between the MNO's core network and the MVNO's infrastructure. The MVNO purchases a specified amount of bandwidth through this pipe — measured in units such as 100 Mbps or 1 Gbps. That capacity is the ceiling for all traffic combined across every subscriber on that MVNO at any given moment.
This has a direct consequence for users: **when many MVNO subscribers are active simultaneously, the shared POI bandwidth fills up, and speeds slow down.** The MNO's own direct subscribers are not subject to this bottleneck because their traffic does not pass through the MVNO's POI — it remains on the MNO's own dedicated capacity. This is the structural root of network deprioritization, which is covered in detail later in this article.
### MVNE and MVNA — The Middlemen
Not every company that wants to launch an MVNO service builds its own interconnect with an MNO. Two types of intermediary make it easier to enter the market:
**MVNE (Mobile Virtual Network Enabler)**
An MVNE is a technology and services platform provider. It builds and operates the back-end infrastructure that an MVNO needs: SIM management, billing systems, customer management platforms, and the technical connection to the host MNO's POI. An MVNO using an MVNE focuses entirely on its brand, marketing, and customer relationships, while the MVNE handles the plumbing.
**MVNA (Mobile Virtual Network Aggregator)**
An MVNA sits one layer above. It negotiates wholesale capacity agreements with one or more MNOs, then sub-licenses that capacity to multiple MVNOs at commercial terms. The MVNA consolidates volume across many small brands, enabling each one to access better wholesale rates than they could negotiate individually.
The chain therefore runs: **MNO → MVNA (optional) → MVNE (optional) → MVNO → End user.** In practice, some operators combine roles — a company may be both an MVNA and an MVNE, or an MVNO may negotiate directly with an MNO and build its own enabler infrastructure.
### Types of MVNO by Infrastructure Depth
The MVNO label covers a broad range of business models depending on how much of the mobile infrastructure the operator controls:
| Type | What the operator owns | Typical examples |
|------|------------------------|-----------------|
| **Full MVNO** | Its own core network (HLR/HSS, billing, authentication), negotiates directly with MNO for radio only | Large, sophisticated MVNOs with millions of subscribers |
| **Light MVNO** (Thick MVNO) | SIM management and some back-end functions; relies on MVNE for deeper infrastructure | Mid-size retail brands entering mobile |
| **Reseller / Branded Reseller** | Essentially nothing — resells MNO plans under a different brand with its own pricing | Smallest operators, loyalty schemes, retail chains |
A **full MVNO** has maximum control over pricing, features, and network configuration. It can implement its own quality of service policies and innovate independently of the host MNO. A **reseller** has minimum overhead but is almost entirely dependent on the host MNO for every technical capability.
From a consumer perspective, the depth of MVNO infrastructure rarely changes your day-to-day experience — what matters is the host MNO's coverage in your area and the terms of the wholesale agreement.
---
## Examples of MVNOs Around the World
MVNOs exist in virtually every developed mobile market. The following are illustrative examples; this is not an exhaustive list.
### United States
The US market has hundreds of MVNOs operating on the networks of AT&T, T-Mobile, and Verizon. Well-known independent MVNOs include:
- **Consumer Cellular** — primarily AT&T network (historically T-Mobile too); targeted at older adults; strong customer service reputation
- **US Mobile** — T-Mobile and Verizon networks; flexible multi-network plans
- **Google Fi Wireless** — T-Mobile, US Cellular, and Wi-Fi calling; targeted at Android users
Note: Some brands commonly grouped with independent MVNOs are actually carrier-owned. **Mint Mobile** was acquired by T-Mobile in May 2024 and is now a T-Mobile subsidiary. **Visible** is a wholly-owned Verizon subsidiary (rebranded as "Visible by Verizon" in June 2022). **TracFone** has been a Verizon subsidiary since 2021. These are covered in the [MVNO vs Sub-Brand section](#mvno-vs-sub-brand-whats-the-difference) below.
Note that some brands commonly grouped with MVNOs in casual conversation are actually MNO-owned sub-brands — this distinction is covered in the [MVNO vs Sub-Brand section](#mvno-vs-sub-brand-whats-the-difference) below.
### United Kingdom
- **giffgaff** — O2 network; community-run support model; popular prepaid SIMs. Note: giffgaff is an O2-owned flanker brand (technically a sub-brand), not a fully independent MVNO.
- **Tesco Mobile** — O2 network (joint venture with Tesco); large subscriber base driven by retail presence
- **Lebara** — Vodafone network; targets international calling markets
- **Lyca Mobile** — multiple host networks; strong international calling features
### Australia
- **Amaysim** — Optus network (Optus-owned since 2021); popular for no-contract plans
- **Aldi Mobile** — Telstra network; broad national coverage at low prices
### Europe
- **MVNO penetration is particularly high** in countries such as Germany, France, the Netherlands, and Belgium. Major retail chains, banks, and media companies frequently operate MVNOs as complementary services to their core offering.
### Asia-Pacific and Japan
In Japan, dozens of MVNOs (locally called 格安SIM, *kakuyasu SIM*, meaning "cheap SIM") operate on NTT Docomo, KDDI (au), and SoftBank networks. Well-known examples include IIJmio, OCN Mobile ONE, and mineo.
To compare available plans and their real-world pricing across countries, use the [SimFinder plan comparison tool](/en/).
---
## Benefits of Choosing an MVNO
### Lower Plan Prices
The primary reason most people choose an MVNO is price. Because MVNOs carry none of the capital expenditure associated with building and maintaining a radio network — no spectrum licence fees, no tower construction, no antenna upgrades — their cost base is structurally lower than an MNO's. That saving is partly passed on to consumers through lower monthly charges.
An IoT Analytics benchmark study found that MVNO pricing averages roughly 32% lower than MNO pricing for comparable data volumes (MNO average approximately USD 7.30/month vs MVNO average approximately USD 4.98/month in the IoT data segment). In some markets, independent MVNOs undercut the cheapest MNO plan by up to 84%. While those figures are drawn from IoT plan data, the directional trend holds for consumer plans as well.
No specific plan prices are quoted in this article because they change frequently. Use [SimFinder](/en/) to compare current pricing in your country.
### Flexible, Short-Term Commitments
Many MVNOs — especially in prepaid markets — offer month-to-month or even shorter-term plans with no lock-in contracts. This is particularly useful if you need data connectivity for a trip, want to test a network before committing, or simply dislike long-term contracts. For context on how prepaid and contract options compare for different travel scenarios, see [4 Ways to Stay Connected Abroad](/en/guides/four-options/).
### Specialised Plans for Specific Needs
Because MVNOs are not trying to serve every possible customer, many focus on niches:
- International calling plans for diaspora communities (e.g. Lebara, Lyca)
- Data-heavy plans for streaming-focused users
- Basic voice-and-text plans for older users who prefer simplicity
- Business-oriented plans with device management features
This specialisation can deliver better value than a generic MNO plan if your usage profile matches the MVNO's focus.
### Online-First Management
Many MVNOs operate primarily or entirely online: no physical store, manage everything via an app or website. For users comfortable with self-service, this means faster account changes and sometimes lower prices (the overhead of maintaining retail stores is eliminated). For those who prefer face-to-face support, this can be a drawback — which leads into the next section.
---
## Drawbacks and the Deprioritization Question
### Network Deprioritization at Congestion
Deprioritization is the most consequential practical limitation of most MVNO plans, and it is worth understanding precisely.
When an MNO's network becomes congested — typically during commuting hours, at large events, or in dense urban areas — the MNO must decide whose traffic gets served first. In most wholesale agreements, the MNO's own direct subscribers take priority. MVNO traffic, flowing through the shared POI, is queued behind it.
The result: during congestion, MVNO subscribers may experience noticeably slower data speeds than subscribers on the host MNO's direct plans. This is not a sign of a bad MVNO; it is a built-in structural characteristic of the POI model. It does not typically cause complete outages — it manifests as slower-than-usual page loads, video buffering, or reduced streaming quality during busy periods.
Understanding your data consumption needs before choosing a plan helps you assess how much this matters in practice. The [How Much Mobile Data Do You Need?](/en/guides/data-usage-guide/) guide walks through data consumption by app category and can help you estimate whether a lower-bandwidth MVNO plan will meet your needs.
### Fewer Customer Service Channels
MNO-owned stores, phone support lines, and online chat represent a considerable overhead — but they also provide accessible help when things go wrong. Many MVNOs, particularly online-only operators, offer support primarily through chat, email, or community forums. If you are not comfortable troubleshooting technical issues without in-person help, the support model of a given MVNO is worth investigating before signing up.
### Potential Roaming Limitations
International roaming agreements for MVNOs are negotiated separately from the host MNO's roaming agreements. An MVNO may offer roaming in fewer countries than its host MNO, may charge higher roaming rates, or may restrict data roaming entirely on budget plans. Always check the roaming terms before travelling if you plan to use your MVNO SIM abroad.
### No Carrier-Specific Perks
MNOs often bundle streaming subscriptions, device trade-in programmes, family plan discounts, and priority support into their higher-tier plans. MVNOs rarely offer equivalent perks — the value proposition is price and simplicity rather than ecosystem benefits.
### Emergency Services and Coverage Edge Cases
Both MNO and MVNO SIMs must support emergency calling as required by national regulations — your MVNO SIM will connect to emergency services even with no credit remaining. However, in fringe coverage areas where the host MNO's signal is marginal, MVNO subscribers may have less access to alternative networks (domestic roaming) depending on their wholesale agreement.
---
## MVNO vs Sub-Brand: What's the Difference?
A common source of confusion is the distinction between an independent MVNO and an MNO-owned sub-brand. Both offer lower prices than the parent MNO's flagship plans, but they are structurally very different.
### MNO-Owned Sub-Brands
A sub-brand is a brand created and fully owned by an MNO, operated as a lower-cost tier of the same network. Examples:
- **Cricket Wireless** — owned by AT&T; runs on AT&T's network
- **Metro by T-Mobile** — owned by T-Mobile; runs on T-Mobile's network
- **Boost Mobile** — owned by EchoStar. Previously operated as a fourth national carrier with its own spectrum, but following large spectrum sales to AT&T and SpaceX in 2025, Boost shut down its own wireless network in November 2025 and now operates primarily as an MVNO on AT&T's network.
- **UQ mobile** (Japan) — owned by KDDI (au)
- **Y!mobile** (Japan) — owned by SoftBank
Because the sub-brand is part of the same corporate structure as the MNO, it often receives **higher network priority** than independent MVNOs on the same physical network. The MNO controls how much bandwidth the sub-brand receives and can configure its network policy to favour its own brands.
Sub-brands also typically have access to the MNO's retail store network for activations and support — a significant advantage for users who want in-person help.
### Independent MVNOs
An independent MVNO — such as US Mobile (T-Mobile/Verizon networks), Lebara (Vodafone network), giffgaff (O2 network; see note below), or Tesco Mobile (O2 network) — is a separate company with no ownership relationship to its host MNO. It negotiates wholesale terms at arm's length.
Key practical differences:
| Dimension | MNO Sub-Brand | Independent MVNO |
|-----------|--------------|-----------------|
| Corporate ownership | Subsidiary of the MNO | Separate company |
| Network priority | Typically higher (MNO sets the policy) | Subject to standard POI wholesale terms |
| Plan prices vs MNO flagship | Moderately lower | Often significantly lower |
| Retail store presence | Often yes (shared with MNO) | Varies — many are online-only |
| Innovation independence | Limited by parent MNO | Higher — can differentiate on features |
### Why Does This Matter?
When comparing plans, knowing whether a brand is a sub-brand or an independent MVNO helps you set realistic expectations for network performance. A sub-brand on the same MNO network will generally outperform an independent MVNO during peak hours — but it will also typically cost more. The right trade-off depends on how congestion-sensitive your use case is.
---
## How to Choose an MVNO
Choosing an MVNO comes down to five questions.
### 1. Which Network Does It Use in Your Area?
An MVNO is only as good as its host MNO in the places you actually use your phone. If the host MNO has weak coverage in your home, office, or commute route, the MVNO will have the same problem. Check the MNO's coverage map before choosing an MVNO on that network.
### 2. How Congestion-Sensitive Is Your Usage?
If you rely on fast data during commuting hours or at events, deprioritization may noticeably affect your experience. Consider:
- Do you mainly use mobile data in off-peak hours (evenings at home)?
- Do you mostly need data for messaging, email, and occasional maps — or for video streaming and video calls?
For data-heavy users, the [How Much Mobile Data Do You Need?](/en/guides/data-usage-guide/) article is worth reading to quantify your needs before choosing a plan.
### 3. What Support Model Is Acceptable to You?
If you are comfortable managing everything online and can troubleshoot activation or APN settings yourself, the online-only MVNO model works well. If you anticipate needing in-person help — especially for things like SIM activation problems, eSIM transfer, or device unlocking — look for an MVNO with physical support options or a sub-brand affiliated with an MNO's retail network.
### 4. Do You Need Roaming?
If you travel internationally and want to use one SIM across multiple countries, check the MVNO's roaming terms before committing. An MVNO with limited roaming coverage may cost you more when travelling than a more expensive MNO plan with broad roaming included. For travel-specific connectivity options, [4 Ways to Stay Connected Abroad](/en/guides/four-options/) compares roaming, local SIMs, travel eSIMs, and pocket Wi-Fi. If you are considering an eSIM-capable MVNO plan, [What Is an eSIM?](/en/guides/what-is-esim/) covers the technical side.
### 5. What Are the Contract Terms?
Many MVNOs offer genuinely no-contract options — cancel any time, no exit fees. Others may require a minimum commitment period or automatic rollover. Read the terms for:
- Minimum term and cancellation conditions
- Fair Use Policy — especially for "unlimited" plans, which almost always carry a deprioritization or throttling threshold
- Data rollover — does unused data carry forward?
---
## FAQ
The structured FAQ answers are in the frontmatter above for schema.org/FAQPage compatibility. Below are expanded answers to common questions.
**Is an MVNO SIM slower than an MNO SIM?**
Not inherently. During off-peak hours when the shared POI bandwidth is under-utilised, MVNO speeds can match or closely approach the host MNO's speeds. The difference becomes evident during congestion: MVNO traffic queues behind MNO direct subscribers at the POI. How much this matters in practice depends on the host MNO's network density in your area, the MVNO's total subscriber load, and how much bandwidth the MVNO has purchased.
**Can I use a 5G phone on an MVNO?**
Yes — if the MVNO has negotiated 5G access in its wholesale agreement, has the right host MNO, and your device supports the relevant 5G bands. 5G is not automatically included in an MVNO's capacity lease; it must be specifically contracted. Check the MVNO's plan descriptions to confirm 5G availability and the host network's 5G coverage in your area.
**What happens when I switch from an MNO to an MVNO — can I keep my number?**
Yes. Mobile Number Portability (MNP) is available in most markets, including the US, UK, EU, Japan, and Australia. Initiate the port through your new MVNO — they will handle the transfer from your current carrier. Do not cancel your current service first; cancelling before porting is complete can result in losing your number.
**How do I know which MNO my MVNO uses?**
The MVNO is required to disclose its host network in most jurisdictions as part of consumer protection regulations. The information is typically on the MVNO's website under "coverage" or "how it works." You can also check the network name displayed in your phone's status bar after inserting the SIM: in some configurations it shows the MVNO brand, in others it shows the underlying MNO, depending on how the MVNO has set up its network identification.
**Are MVNOs safe and legitimate?**
MVNOs operate under the same consumer protection and telecommunications regulations as MNOs in their jurisdiction. In the EU, they are regulated by national telecom authorities. In the US, by the FCC. In the UK, by Ofcom. A legitimate MVNO is a licensed operator — the "virtual" in its name refers to the absence of radio infrastructure, not to any lack of legal standing or accountability.
---
## Related Guides
- [What Is a SIM Card?](/en/guides/what-is-sim/) — How SIM credentials work, and the difference between a carrier SIM and an MVNO SIM
- [What Is an eSIM?](/en/guides/what-is-esim/) — How the SIM chip evolved into an embedded, remotely programmable component
- [SIM & Mobile Glossary](/en/guides/glossary-index/) — Plain-English definitions of MVNO, MNO, POI, MVNE, MVNA, and 20+ more terms
- [4 Ways to Stay Connected Abroad](/en/guides/four-options/) — Comparing roaming, local SIM, travel eSIM, and pocket Wi-Fi
- [How Much Mobile Data Do You Need?](/en/guides/data-usage-guide/) — Data consumption by app category to help you choose the right plan size
================================================================================
# What Is a SIM Card? — How It Works, Sizes, and the Shift to eSIM
URL: https://sim-finder.com/en/guides/what-is-sim/
Type: guides (en)
Published: 2026-04-24
A SIM card is the small chip that proves your identity to a mobile network. Without it, your phone cannot register to any carrier, make calls, send SMS, or use mobile data. Even on the newest smartphones — many of which have replaced the physical card with a built-in eSIM — the same underlying logic applies: your device must present a subscriber credential to the network before it can communicate.
This article explains what a SIM card actually does, how it has shrunk from the size of a credit card to something smaller than a fingernail, and how the industry is moving away from physical cards entirely.
The key points covered:
- What IMSI and Ki are, and why they are never transmitted over the air
- The four distinct functions every SIM performs every time you connect
- How dimensions changed across five generations, from the credit-card-sized 1FF to the sub-centimetre Nano-SIM, and then to the embedded eSIM
- How to handle loss, theft, SIM lock, and replacement
- The practical differences between a carrier (MNO) SIM and a virtual operator (MVNO) SIM
For a closer look at the eSIM technology replacing physical SIMs, see [What Is an eSIM?](/en/guides/what-is-esim/) For definitions of terms used throughout, see the [SIM & Mobile Glossary](/en/guides/glossary-index/). If you need two lines on a single device, [What Is Dual SIM?](/en/guides/what-is-dual-sim/) covers DSDS, DSDV, and DSDA modes.
---
## What Is a SIM Card?
### The Formal Definition
SIM stands for **Subscriber Identity Module**. It is an integrated circuit that stores the credentials a mobile subscriber needs to authenticate to a cellular network. The SIM application was originally defined for GSM networks in the early 1990s under ETSI GSM 11.11.
In practice, what most people call a "SIM card" is a **UICC** — Universal Integrated Circuit Card — defined in ETSI TS 102 221 (current version V18.2.0, published June 2024). The UICC is the physical hardware. The SIM application runs on top of that hardware, alongside the USIM (Universal Subscriber Identity Module) application introduced for UMTS (3G) networks. Because modern UICC chips run both applications simultaneously, the terms "SIM card" and "UICC" are used interchangeably in everyday language.
The GSMA defines the global ecosystem of SIM standards and ensures interoperability between manufacturers, carriers, and devices.
### IMSI and Ki — the Two Core Credentials
Two pieces of data make a SIM unique:
- **IMSI (International Mobile Subscriber Identity):** a 15-digit number that uniquely identifies you as a subscriber on any network worldwide. It encodes the country code (MCC), network code (MNC), and your subscriber number (MSIN). Your carrier's network looks up your account using the IMSI.
- **Ki (Authentication Key):** a 128-bit secret key stored on both the SIM and the carrier's Authentication Centre (AuC). The network sends the device a random challenge; the SIM applies a cryptographic algorithm using Ki to generate a response. If the response matches what the AuC computed independently, authentication succeeds. The Ki itself never travels over the air.
This challenge-response mechanism is defined in 3GPP TS 31.102 for USIM and forms the basis of all authentication on 2G through 5G networks.
---
## The Four Roles a SIM Performs
A SIM card does more than prove identity. Every time your phone connects to a mobile network, the SIM is performing four distinct functions in the background.
### 1. Subscriber Authentication
When your phone powers on or moves to a new cell, it registers with the network by presenting its IMSI and responding to a cryptographic challenge using the Ki. The network verifies the response without ever receiving Ki directly. This mutual authentication prevents rogue base stations from impersonating legitimate networks — a protection significantly strengthened with each generation, from GSM to UMTS to LTE and 5G.
### 2. Phone Number Binding
Your mobile phone number (MSISDN) is not stored on the SIM itself. It is stored in the carrier's Home Subscriber Server (HSS) or, in 5G, the Unified Data Management (UDM) function, and linked to your IMSI. This is why you can keep the same phone number when you move your SIM to a different handset: the number follows the IMSI, not the device hardware. Number portability across carriers works on the same principle — the IMSI changes when you get a new SIM from the new carrier, but your number is re-mapped accordingly.
### 3. Encryption Key Generation
In addition to authentication, the SIM generates the session keys used to encrypt voice and data traffic over the air interface. On LTE networks, the EPS-AKA procedure defined in 3GPP TS 33.401 derives CK (Cipher Key) and IK (Integrity Key) from the underlying UMTS AKA mechanism in 3GPP TS 33.102, then uses them to derive the K_ASME key that secures the LTE air interface. On 5G networks, the key derivation is further enhanced (5G-AKA, SUPI/SUCI). Without the SIM's cryptographic computation, the air interface would remain unencrypted and susceptible to interception.
### 4. Storage of Subscriber Data
A UICC can store a limited amount of data on the card itself. Under 3GPP TS 31.102, writable files include:
- **ADN (Abbreviated Dialling Numbers):** contact entries saved to the SIM (typically 200–250 depending on memory)
- **SMS messages** stored directly on the card
- **PLMN (Public Land Mobile Network) preferences:** the priority list of networks the device should prefer when roaming
- **Service parameters:** indicators of which bearer services and supplementary services the subscription supports
In practice, most users do not actively manage SIM storage — smartphones store contacts in the cloud or device memory — but this storage layer was central to early mobile phones.
---
## Evolution of SIM Sizes
The physical size of SIM cards has shrunk dramatically over five generations, each reduction driven by the need to fit more components into smaller devices.
### The Five Form Factors (ETSI TS 102 221)
ETSI TS 102 221 defines four physical form factors for UICC cards:
| Generation | Code | Dimensions | Approximate intro |
|---|---|---|---|
| Full-size SIM | 1FF | 85.6 × 54 mm (credit card) | ~1991 |
| Mini-SIM | 2FF | 25 × 15 × 0.76 mm | ~1996 |
| Micro-SIM | 3FF | 15 × 12 × 0.76 mm | ~2003 (popularised ~2010) |
| Nano-SIM | 4FF | 12.3 × 8.8 × 0.67 mm | 2012 |
| eSIM | eUICC | No removable card | 2016 (consumer, GSMA SGP.22) |
A note on eSIM: while eSIM is not a "form factor" in the traditional sense — it is a chip soldered to the motherboard rather than a removable card — it represents the logical continuation of miniaturisation, taking the UICC from a card slot to an embedded component.
### Full-size SIM (1FF) — The Credit Card Era
The first commercial SIM cards, deployed with GSM networks in the early 1990s, were the size of a standard credit card (ISO/IEC 7816 ID-1 format). They were designed to fit into dedicated slots on early mobile handsets, which were larger and heavier than today's devices. The gold contact pads that communicate with the device are still defined by the same ISO/IEC 7816 electrical standard used today.
### Mini-SIM (2FF) — The Dominant Standard for Two Decades
The Mini-SIM, measuring 25 × 15 mm, became the de facto standard from the mid-1990s onward and remained the most common form factor until smartphones began their ascent around 2010. If you owned a basic phone in the 2000s, it almost certainly used a Mini-SIM. The card you receive from a carrier today is typically still produced at Micro-SIM or a punched card size but includes the larger frame as a breakable adapter.
### Micro-SIM (3FF) — The iPhone 4 Catalyst
The Micro-SIM was defined as 3FF in the ETSI specifications around 2003, but it was Apple's decision to use it in the iPhone 4 (2010) that drove mass adoption. At 15 × 12 mm, it is the same thickness as a Mini-SIM but has the surrounding plastic trimmed away, exposing more of the chip. Many carriers began pre-cutting SIM cards as punch-out Micro-SIM trays around 2011–2012.
### Nano-SIM (4FF) — Today's Standard
The Nano-SIM measures 12.3 × 8.8 mm and is slightly thinner (0.67 mm vs 0.76 mm). Apple introduced it in the iPhone 5 in September 2012. Today, virtually every smartphone sold uses a Nano-SIM slot. The physical chip itself has not changed between 2FF, 3FF, and 4FF — only the surrounding plastic frame differs, which is why cutting adaptations are possible.
### eSIM — The Shift to Embedded
The GSMA published the SGP.22 specification for consumer-facing eSIM in 2016. An eSIM (embedded SIM) replaces the removable card with a chip soldered to the device's mainboard. Rather than inserting a physical card, you download a carrier profile over the air. The underlying UICC standard (ETSI TS 102 221) still applies — the difference is hardware integration rather than a new electrical interface.
For the full picture of how eSIM works and which devices support it, see [What Is an eSIM?](/en/guides/what-is-esim/)
---
## Physical SIM vs eSIM
The table below compares the practical differences between a physical SIM card and an eSIM for everyday use.
| | Physical SIM (Nano-SIM 4FF) | eSIM |
|---|---|---|
| Form | Removable chip in a tray | Soldered to device motherboard |
| Activation | Insert card, sometimes configure APN | Download profile via QR code, app, or manual code |
| Switching carriers | Swap cards physically | Download new profile in Settings |
| When device is lost or broken | Move SIM to replacement instantly | Carrier re-issue required |
| Multiple profiles on one device | One card = one carrier at a time | Store 8+ profiles, switch in Settings |
| Physical specification | ETSI TS 102 221 (4FF) | GSMA SGP.22 |
| Main advantage | Works on any compatible device immediately | No card to handle; instant remote activation |
| Main limitation | Easy to lose; can be removed by others | Cannot be physically transferred to a new device |
### Which Should You Choose?
If your device supports eSIM, it is usually the more convenient option: activation takes minutes, you can keep multiple carrier profiles, and there is no card to lose. The main scenario where physical SIM wins is when you need to hand a SIM to someone else immediately, or when you are in a country where eSIM support is limited at the carrier level.
If you are setting up an eSIM for the first time on an iPhone, [How to Set Up eSIM on iPhone via QR Code](/en/guides/qr-code-iphone/) walks through the process step by step.
---
## SIM Management: Lock, Replacement, and Loss
### SIM Lock and SIM-Free
A **SIM-locked** (carrier-locked) device contains a software restriction that prevents it from connecting to any carrier other than the one that applied the lock. This restriction applies to both physical SIMs and eSIM profiles: a locked iPhone will refuse to install an eSIM from a different carrier, just as it would reject a physical SIM.
A **SIM-free** (unlocked) device accepts any SIM card or eSIM profile compatible with its supported frequency bands.
Key points:
- The lock is software-based, not hardware. It can be removed by the carrier once eligibility conditions are met (typically: device payment complete and minimum service period elapsed).
- The UK banned the sale of locked handsets from 17 December 2021 (Ofcom ruling).
- Japan prohibited carriers from applying SIM locks to new devices from 1 October 2021 (Ministry of Internal Affairs and Communications guideline).
- The US has no federal ban; each carrier sets its own unlock policy under voluntary CTIA commitments from 2014. The FCC published an NPRM for a mandatory 60-day unlock rule in 2024, but it is not yet enacted as binding regulation.
For a full explanation — including how to check your lock status in seconds and how to request an unlock from US, UK, and other carriers — see [SIM Lock and SIM-Free Explained](/en/guides/sim-lock/).
### Replacing a SIM Card
Carriers replace SIM cards in three common situations:
1. **Upgrade from a larger form factor.** If you are moving to a newer phone that takes a Nano-SIM and you have a Mini- or Micro-SIM, the carrier issues a replacement Nano-SIM with the same number.
2. **Damaged or worn SIM.** A SIM that reads intermittently, shows "No SIM" errors, or has a visibly damaged chip can be replaced. Most carriers provide a replacement at a store or by post.
3. **Carrier switch with number portability.** When you move your number to a new carrier (MNP — Mobile Number Portability), the new carrier issues a fresh SIM bound to your ported number.
### SIM Loss and Theft
If your SIM card is lost or stolen:
1. **Contact your carrier immediately** to deactivate (bar) the SIM. Once barred, it cannot be used to make calls or access data.
2. **Request a replacement SIM** bound to the same number.
3. **Change passwords for accounts** that use your number for SMS-based two-factor authentication, since a thief in possession of your SIM could receive those one-time codes before you manage to bar it.
A lost SIM is also the attack vector for SIM swap fraud, where an attacker convinces a carrier to transfer your number to a SIM they control. Keep your carrier account secured with a strong PIN and, where available, an account lock feature. The FBI IC3 2024 Annual Report recorded 982 SIM-swap complaints with reported losses of approximately USD 26 million.
### SIM PIN and PUK
A SIM PIN (Personal Identification Number) is an optional 4–8 digit code that locks access to the SIM. When enabled, your phone prompts for the PIN each time it powers on. After three consecutive incorrect PIN entries, the SIM locks. It can then only be unlocked using the PUK (Personal Unblocking Key), an 8-digit code supplied by your carrier. Entering the PUK incorrectly ten times in a row permanently disables the SIM. The PIN and PUK mechanism is defined in ETSI ETS 300 922 and 3GPP TS 51.011.
Most carriers disable SIM PIN protection by default. Enabling it adds a meaningful layer of security: even if someone physically removes your SIM, they cannot use it without the code.
---
## Carrier SIM vs MVNO SIM
### MNO (Carrier) SIM
An MNO (Mobile Network Operator) is a carrier that holds a government spectrum licence and owns its own radio access network — the towers, antennas, and core network infrastructure. Examples include AT&T, Verizon, T-Mobile (US), EE, Vodafone, Three (UK), Telstra, Optus (Australia), NTT Docomo, KDDI, SoftBank (Japan). When you buy a SIM directly from one of these operators, you are connecting to their proprietary network.
MNO SIMs typically offer the widest network coverage, priority data access, and the most straightforward customer service. They also tend to cost more, particularly for high-data plans.
### MVNO SIM
An MVNO (Mobile Virtual Network Operator) is a carrier that does not own radio infrastructure. Under the ITU definition, it is an operator that provides mobile services without holding a government wireless licence. MVNOs buy wholesale network capacity from one or more MNOs through a Point of Interface (POI) and resell it under their own brand.
Because MVNOs share bandwidth capacity through the POI, you may notice slower speeds during peak hours when that shared capacity reaches its limit. In exchange, MVNO SIMs are generally cheaper than MNO plans for comparable data allowances. GSMA Intelligence reported more than 1,986 active MVNOs at the end of 2022, operating in dozens of countries worldwide.
A detailed side-by-side comparison of how MNOs and MVNOs differ on speed, coverage, price, and customer service is the subject of [MNO vs MVNO vs Sub-Brand: Which Is Right for You?](/en/guides/mno-vs-mvno-comparison/). For now, comparing specific carriers in your country side by side on [SimFinder](/en/) is the most practical way to evaluate the trade-off.
### Which SIM Type Should You Choose?
The right choice depends on your priorities:
- **Prioritise coverage and reliability:** MNO SIM, especially if you travel to rural or low-coverage areas.
- **Prioritise cost savings with acceptable trade-offs:** MVNO SIM on the same network, with the expectation of occasional congestion during peak hours.
- **Using a device SIM-locked to a specific carrier:** you are limited to that carrier's SIM until the device is unlocked.
You can compare plans from both MNOs and MVNOs across multiple countries on [SimFinder](/en/).
---
## Common Misconceptions
### "My phone number is stored on the SIM"
Your MSISDN (phone number) is not stored in permanent memory on the SIM card. It is stored in your carrier's subscriber database and linked to your IMSI. The SIM stores the IMSI; the carrier's system maps that IMSI to your phone number. This is why changing your SIM to a new carrier changes your IMSI — but number portability keeps the external number pointing to you.
### "A bigger SIM has more storage or better signal"
All modern UICC-based SIMs follow the same electrical standard regardless of physical size. A Nano-SIM and a Mini-SIM cut from the same carrier stock are electrically identical. The form factor change is purely mechanical — the chip area and the contact pads remain the same. Signal quality is determined by the network and the device's antenna, not by the SIM card.
### "Removing the SIM protects my data"
Removing the SIM prevents your phone from authenticating to a cellular network and sending SMS — but it does not protect data stored on the device itself. If your phone is lost or stolen, the device memory, contacts, and photos remain accessible without a SIM. Use a strong device PIN and full-device encryption to protect local data.
### "SIM cards can be used in any phone"
A SIM will work in any device that: (a) uses the same physical form factor, or accepts it via an adapter; (b) supports the same frequency bands for the carrier you use; and (c) is not carrier-locked to a different operator. Frequency band compatibility is especially relevant when buying a phone for use in another country — a device sold for the US market may lack the bands used by European carriers and vice versa.
### "eSIM is a completely different technology from SIM"
The eSIM is the same UICC technology in a different physical form. The chip performs the same four functions: authentication, number binding, key generation, and storage. The difference is that the chip is soldered into the device and programmed remotely rather than manufactured with credentials pre-loaded and handed to you as a card.
---
## FAQ
See the frontmatter for structured FAQ entries compatible with schema.org/FAQPage. Below are answers to the most common questions in long-form.
**Can I use a SIM card from another country in my phone?**
Yes, as long as your phone is unlocked and supports the frequency bands used by the foreign carrier. Inserting a foreign SIM and using it in your home country is known as international roaming in reverse — you will be charged according to the foreign carrier's plans. Many travellers instead use a local SIM purchased at the destination, or a travel eSIM purchased in advance, to avoid high roaming rates.
**How do I know which SIM size my phone needs?**
Check the manufacturer's product page or the specifications section of your device's manual. Almost all smartphones released after 2014 use Nano-SIM (4FF). If your carrier's SIM is a larger size, ask for a replacement Nano-SIM at a carrier store — the number and account stay the same.
**Is a SIM card the same as a memory card?**
No. A SIM card authenticates you to a mobile network and stores a small amount of subscriber data. A microSD (memory card) stores files such as photos, music, and apps. They go into separate slots on phones that accept both, and they serve entirely different functions.
**What is a SIM PIN and what happens if I enter it wrong?**
A SIM PIN is a 4–8 digit code that prevents anyone who obtains your SIM from using it without authorisation. When enabled, the phone prompts for the PIN at every power-on before connecting to the network. If you enter the PIN incorrectly three times in a row, the SIM locks and can only be unblocked with a PUK (Personal Unblocking Key) — an 8-digit code provided by your carrier. If you enter the PUK incorrectly ten consecutive times, the SIM is permanently disabled and must be replaced. The PIN and PUK mechanism is standardised in ETSI ETS 300 922. Most carriers ship SIMs with PIN protection disabled by default; you can enable it in your phone's settings.
**Can two people share the same SIM card?**
No. A SIM card is associated with a single subscriber account and a single IMSI. Sharing the physical card between two devices is possible (by physically swapping it), but it cannot be used in two devices simultaneously. eSIM makes this even more explicit: the profile is bound to one device's eUICC. If you need two people to be reachable on separate numbers, each person needs their own SIM or eSIM profile linked to their own carrier account.
---
## Related Guides
- [What Is an eSIM?](/en/guides/what-is-esim/) — How the SIM chip evolved into an embedded, remotely programmable component
- [SIM Lock and SIM-Free Explained](/en/guides/sim-lock/) — How to check and remove carrier restrictions on your device
- [What Is Dual SIM?](/en/guides/what-is-dual-sim/) — DSDS, DSDV, and DSDA modes for running two lines on a single device
- [SIM & Mobile Glossary](/en/guides/glossary-index/) — Plain-English definitions of IMSI, Ki, UICC, USIM, and 20+ more terms
- [How to Set Up eSIM on iPhone via QR Code](/en/guides/qr-code-iphone/) — Step-by-step activation guide once you are ready to move to eSIM
================================================================================
# What Is a Carrier Sub-Brand?
URL: https://sim-finder.com/en/guides/what-is-sub-brand/
Type: guides (en)
Published: 2026-06-05
A carrier sub-brand is a budget-tier label that an MNO (Mobile Network Operator) owns and runs directly — not a separate company leasing capacity, but an internal brand on the same network. This ownership distinction is what separates sub-brands structurally from independent MVNOs and is why sub-brand subscribers typically receive better network treatment than MVNO subscribers on the same physical infrastructure.
The key points covered in this article:
- What makes an operator a sub-brand versus an independent MVNO
- Where sub-brands sit in the network priority hierarchy (flagship MNO → sub-brand → MVNO)
- Illustrative examples from multiple markets — with important caveats about how ownership details can change
- A comparison table across the three main carrier types
- Pros, cons, and which user profiles sub-brands suit best
---
## The Core Distinction: Ownership vs. Capacity Leasing
To understand what a sub-brand is, the clearest starting point is what it is not.
An independent MVNO — as explained in detail in [What Is an MVNO?](/en/guides/what-is-mvno/) — is a company that buys wholesale network access from a licensed MNO at arm's length. There is no common ownership between the two; the commercial relationship is governed by a wholesale capacity agreement. The MVNO's traffic travels through a shared Point of Interface (POI), and during network congestion, MNO subscribers are generally served before MVNO traffic queued at that POI.
A sub-brand has a fundamentally different structure. It is a brand that the MNO itself created, owns, and operates — a lower-priced tier of the same company, presented under a different name. There is no capacity leasing, no external wholesale agreement, and no separate corporate entity. The sub-brand is simply another product line of the MNO.
The practical consequence: because the MNO controls its own internal traffic policy, it can and typically does give its sub-brand subscribers higher network priority than it gives independent MVNOs. This places sub-brands in a distinct middle tier: lower-priced than the parent MNO's flagship plans, but generally better-treated during congestion than independent MVNOs on the same physical network.
This is the structural foundation that [What Is an MNO?](/en/guides/what-is-mno/) describes when explaining how network priority works across carrier types.
---
## Where Sub-Brands Fit in the Carrier Hierarchy
Mobile carrier types form a three-tier structure, from the highest network priority to the lowest:
1. **MNO flagship plans** — the parent carrier's own premium tiers; highest priority by definition because the MNO controls the entire network
2. **MNO-owned sub-brands** — a lower-priced label owned and operated by the same MNO; the MNO sets internal policy to give sub-brand traffic priority over external wholesale customers
3. **Independent MVNOs** — separate companies leasing capacity through a POI; their traffic is subject to the wholesale terms negotiated with the host MNO, and during congestion they are typically served last
This three-tier model is the framework used in the full side-by-side analysis at [MNO vs MVNO vs Sub-Brand](/en/guides/mno-vs-mvno-comparison/). This article focuses specifically on the sub-brand tier: what it is, where it appears, and what it means in practice.
---
## Illustrative Examples Across Markets
The following brands are commonly cited as sub-brands in their respective markets. Ownership structures in the mobile industry change over time through acquisitions, corporate restructuring, and regulatory interventions, so the descriptions below represent general understanding as of the article's publication date rather than legally verified ownership statements. For the current status of any carrier, the operator's own website and official corporate filings are the authoritative sources.
### United States
- **Metro by T-Mobile** — commonly cited as a T-Mobile-owned sub-brand, having operated as MetroPCS before T-Mobile's acquisition. It operates on T-Mobile's network.
- **Visible** — marketed as "Visible by Verizon" and generally described as a Verizon subsidiary. Operates on Verizon's network with an online-only, no-contract model.
- **Cricket Wireless** — generally described as an AT&T subsidiary operating on AT&T's network.
The US market is one of the clearer examples of sub-brand structures, though the line between "sub-brand" and "MNO-owned MVNO" is not always defined consistently across industry sources.
### United Kingdom
- **VOXI** — offered by Vodafone UK; marketed as a younger-demographic brand. Generally described as a Vodafone label rather than an independent MVNO.
The UK market underwent significant consolidation when Vodafone UK and Three UK merged (reported as completing in 2025). Brand structures associated with the merged entity may continue to evolve.
### Australia
- **Telstra's Belong** — commonly cited as a Telstra-operated budget brand. Telstra's corporate filings and public statements describe Belong as a Telstra brand.
Note on **Boost Mobile Australia**: Boost Mobile Australia has historically been associated with Telstra's network, but corporate structures for Boost vary significantly between Australia and the US — these should not be assumed to be equivalent arrangements.
### Japan
Japan's market has well-established sub-brand examples that are transparently owned:
- **UQ mobile** — a KDDI (au) group brand
- **Y!mobile** — a SoftBank group brand
In Japan, these are sometimes classified by the regulator and industry as distinct from independent MVNOs (locally called 格安SIM, *kakuyasu SIM*), and the network priority difference is formally acknowledged in carrier documentation.
### A Note on Market Variation
The sub-brand category is not equally distinct in every country. In some markets, the practical and regulatory boundary between a sub-brand, an MNO-owned MVNO, and a prepaid label is blurry:
- Some MNOs operate brands through wholly owned subsidiary legal entities — which some analysts call "sub-brands" and others call "MNO-owned MVNOs"
- Prepaid labels offered directly by an MNO may function identically to sub-brands despite lacking a distinct brand identity
- Regulatory disclosure requirements vary by jurisdiction, meaning the ownership of some brands is not always publicly transparent
The safest approach when evaluating any budget-tier carrier: check whether the brand is owned by the MNO or is a separate entity with a wholesale capacity agreement. That distinction — not the marketing label — determines where the brand sits in the network priority structure.
---
## Sub-Brand vs MVNO vs Flagship MNO: Comparison Table
The table below summarises the practical differences across the three carrier types on dimensions that matter most to consumers. These are general patterns, not universal rules — individual operators vary.
| Dimension | Flagship MNO | Sub-Brand | Independent MVNO |
|-----------|-------------|-----------|-----------------|
| **Corporate ownership** | The MNO itself | Owned by the MNO | Separate company |
| **Network infrastructure** | MNO owns it | Uses parent MNO's network | Leases from an MNO via POI |
| **Network priority during congestion** | Highest — served first | Typically between flagship and MVNO | Lowest — queued at the POI |
| **Price positioning** | Highest | Moderate — lower than flagship | Often lowest |
| **Retail store presence** | Full MNO retail network | Often shared with parent MNO | Mostly online-only |
| **Customer support channels** | In-store, phone, online | Often in-store + online | Primarily online / chat |
| **5G access** | Full access on rollout | Typically available; priority level set by parent | Must be specifically negotiated |
| **Roaming terms** | Broadest; MNO negotiates directly | Subset of parent's roaming; check terms | Separately negotiated; often narrower |
| **Plan flexibility** | Varies; often contract options | Often prepaid / no-contract | Often month-to-month |
| **Innovation independence** | Full | Limited — parent sets network policy | Higher — can differentiate on features |
For a deeper analysis of how network priority affects real-world speeds during peak hours, [Why MVNO Speeds Slow Down](/en/guides/why-mvno-slow/) explains the POI mechanism in detail.
---
## Why Sub-Brands Exist: The Business Logic
MNOs operate sub-brands for two complementary reasons.
**Price-sensitive customer retention.** Without a lower-cost option under their own umbrella, MNOs risk losing subscribers who want cheaper plans to independent MVNOs. A sub-brand captures those subscribers while keeping them on the parent's network — and keeping their data in-house.
**Market segmentation.** Sub-brands allow MNOs to serve different customer segments under different brand identities without cannibalising their flagship plans. A younger-demographic or online-only brand can be marketed differently from the parent MNO without undermining the flagship brand's premium positioning.
From a consumer perspective, this means sub-brands are a deliberate strategic tool — not an accidental pricing tier. Their existence reflects the MNO's interest in keeping you on its network, which is part of why sub-brands tend to receive better treatment than external MVNOs.
---
## Advantages of Sub-Brands
### Better Network Treatment Than Independent MVNOs
During network congestion, sub-brand subscribers typically receive higher priority than independent MVNO traffic queued at the POI. This is the most structurally significant advantage. For users who need reliable data speeds during rush hours, commutes, or crowded events, a sub-brand on a strong MNO is likely to deliver more consistent performance than an independent MVNO on the same physical network.
The degree of priority difference varies. Not all MNOs configure their networks identically, and not all sub-brands receive the same internal priority level. Real-world speed tests in your specific location are a more reliable indicator than operator type alone.
### Shared Retail Infrastructure
Many sub-brands have access to the parent MNO's store network for activations, SIM replacements, and in-person support. This matters for users who are not comfortable handling everything online — a significant advantage over independent MVNOs, which are predominantly online-only.
### Lower Price Than the Parent MNO's Flagship
Sub-brands are positioned to cost less than the parent MNO's premium tiers. The trade-off is that they may lack some features of the flagship plans — check the specific terms for items like 5G tier access, roaming, hotspot/tethering, and international calling.
### No Capacity Leasing Overhead
Because the sub-brand does not pay a wholesale capacity premium to access the network, more of its cost savings can be passed to consumers compared to an independent MVNO that must build a margin into its wholesale cost structure.
---
## Limitations of Sub-Brands
### Still More Expensive Than Many Independent MVNOs
The price advantage of a sub-brand is real relative to the parent MNO's flagship, but independent MVNOs on the same network often undercut sub-brand pricing further. If cost is the primary driver, an independent MVNO may offer lower monthly charges — at the cost of lower network priority. Use [SimFinder](/en/) to compare current plans and see whether that cost gap is large enough to matter for your budget.
### Limited Differentiation From Parent MNO
Sub-brands are constrained by their parent's network policy, technology roadmap, and feature set. An independent MVNO can innovate beyond what the host MNO offers in its wholesale terms — building niche products for specific communities or use cases. Sub-brands rarely have that freedom.
### Ownership Changes Over Time
Mobile industry consolidation means that a brand's ownership status can change. A brand that was an independent MVNO can become a sub-brand through acquisition; a sub-brand can be absorbed into the parent's flagship; corporate structures that existed when a plan was marketed may not reflect current reality. Always verify current ownership directly with the operator.
### Geographic Availability
Sub-brands are market-specific. The sub-brands described in this article exist in specific countries and are not available globally. Travellers or people relocating internationally will need to evaluate local options from scratch.
---
## Who Sub-Brands Suit Best
Sub-brands tend to be a strong fit for users who meet most of these criteria:
- **Want lower prices than the parent MNO's flagship**, but are willing to pay more than the absolute cheapest independent MVNO
- **Value network performance during peak hours** and are not prepared to accept the lowest-priority MVNO tier
- **Prefer in-person support** or want the option to visit a store (where the sub-brand shares the MNO's retail network)
- **Are on the parent MNO's coverage area** — sub-brands inherit the parent's coverage exactly; if the parent MNO has weak signal in your area, a sub-brand will have the same problem
- **Want a no-contract or prepaid model** — many sub-brands are structured as prepaid or no-contract products
Sub-brands are typically not the best fit for:
- **Pure price minimisers** — independent MVNOs on the same network usually offer lower monthly costs
- **Users who need the full flagship feature set** — premium roaming bundles, highest 5G tiers, device trade-in programmes, and enterprise features are typically restricted to the parent MNO's flagship plans
- **Users in markets without sub-brands** — not every country has clearly defined sub-brand tiers; in those markets, the choice is between MNO flagship plans and independent MVNOs
---
## How to Identify Whether a Brand Is a Sub-Brand
There is no universal labelling requirement that forces carriers to disclose their ownership structure in plain terms. To determine whether a brand is a sub-brand or an independent MVNO:
1. **Check the "About" or "Legal" section of the carrier's website.** Sub-brands are often registered under the parent MNO's corporate name, which may appear in the Terms and Conditions or company registration details.
2. **Look for explicit disclosure.** Some operators, especially in markets with strong consumer protection requirements, disclose the host network or parent company on their coverage page or FAQ.
3. **Check coverage maps.** If a budget brand's coverage map is identical to a major MNO's map, it is likely either a sub-brand or an MVNO on that network. Identical maps do not distinguish sub-brand from MVNO, but they narrow down the host network.
4. **Read independent analysis.** Telecommunications industry publications and regulator filings often document ownership structures in detail.
If you cannot determine the ownership structure, the functionally important question remains the same: which MNO's towers does this plan use, and what are the priority terms? Those two factors determine real-world performance more directly than the label.
---
## The Blurry Edges: Where Sub-Brand Definitions Break Down
In practice, the term "sub-brand" is used loosely in different markets and by different analysts. Several types of ambiguity are worth being aware of:
**MNO-owned MVNOs.** Some MNOs have acquired previously independent MVNOs. The acquired MVNO continues to operate as a separate legal entity, but is now ultimately owned by the MNO. Whether this should be called a "sub-brand" or an "MNO-owned MVNO" depends on how the network policy is configured — specifically, whether the acquired brand's subscribers receive higher priority than other external MVNOs.
**Wholly-owned subsidiaries vs internal brand teams.** A brand can be legally structured as a wholly-owned subsidiary company while still having its network policy set entirely by the parent. The corporate structure matters less for consumer purposes than the actual network priority treatment.
**Prepaid labels.** Some MNOs sell prepaid plans under a distinct brand identity that is, in practice, indistinguishable from a sub-brand. The distinction between "sub-brand" and "MNO's own prepaid tier with a different name" is essentially marketing.
The key takeaway: when evaluating any budget-tier carrier, focus on the ownership relationship and the network priority treatment, not on whether it carries the "sub-brand" label. The [MNO vs MVNO vs Sub-Brand](/en/guides/mno-vs-mvno-comparison/) comparison guide walks through how to apply this framework across a range of real decisions.
Understanding how network speed and quality are measured — including what "network priority" actually translates to in download speeds and latency — is covered in [Understanding Network Quality Metrics](/en/guides/quality-metrics/).
---
## FAQ
The structured FAQ answers are in the frontmatter above for schema.org/FAQPage compatibility. Below are expanded answers to common questions.
**Is a sub-brand available in every country?**
No. Sub-brands are market-specific products. Some markets have clearly structured sub-brand tiers — the US has well-known examples, as does Japan. Others have a less distinct landscape where the line between an MNO's own budget label and an independent MVNO is blurry or where the regulatory environment does not require disclosure of ownership structure.
**If a sub-brand uses the same towers as the parent MNO, why is it cheaper?**
Sub-brands typically cost less because they offer fewer features, lighter support, and are often prepaid or online-only. The parent MNO invests heavily in store networks, enterprise support, premium device deals, and the highest tiers of 5G deployment — none of which is included in a sub-brand plan at the same price. The infrastructure is shared; the feature set is not.
**How do I know if an MVNO I'm considering was recently acquired?**
Acquisitions in the mobile industry are covered in telecommunications news sources and regulatory filings. The operator's own website is the most direct reference: after an acquisition, operators typically update their Terms and Conditions and "About" pages to reflect the new corporate structure. Industry news sources covering telecom M&A are also useful for tracking ownership changes.
**Do sub-brand subscribers get the same 5G access as flagship subscribers?**
Not automatically. The parent MNO sets internal policy on which 5G tiers — sub-6 GHz, mmWave in the US, SA vs NSA architectures — are available to sub-brand subscribers versus flagship subscribers. In many cases, sub-brands receive access to the same physical 5G infrastructure, but may be deprioritised on 5G bands during congestion. Check the sub-brand's plan terms for specific 5G access details.
**Should I choose a sub-brand or an independent MVNO?**
This depends on how you weigh price against network priority. If you need consistently fast data during commuting hours or in crowded areas, a sub-brand's better network treatment may be worth the higher price over an independent MVNO. If your data usage is mostly off-peak and price is the primary driver, an independent MVNO on the same host network may deliver similar day-to-day performance at a lower monthly cost. [SimFinder](/en/) lets you compare current plans across both types.
---
## Related Guides
- [What Is an MVNO?](/en/guides/what-is-mvno/) — How MVNOs lease capacity from MNOs, how the POI model works, and what deprioritization means for subscribers
- [What Is an MNO?](/en/guides/what-is-mno/) — Licensed spectrum ownership, radio infrastructure, and why MNO status determines network priority
- [MNO vs MVNO vs Sub-Brand](/en/guides/mno-vs-mvno-comparison/) — Side-by-side comparison across eight dimensions: coverage, peak-time speed, price, customer service, 5G access, roaming, perks, and contract flexibility
- [Why MVNO Speeds Slow Down](/en/guides/why-mvno-slow/) — The POI mechanism and deprioritization explained in depth
- [Understanding Network Quality Metrics](/en/guides/quality-metrics/) — What speed, latency, and stability figures mean in practice
================================================================================
# Why Are MVNO Speeds Slower?
URL: https://sim-finder.com/en/guides/why-mvno-slow/
Type: guides (en)
Published: 2026-06-05
Budget SIM plans are structurally slower during peak hours — not because of weaker hardware, but because MVNOs purchase shared capacity at a Point of Interface (POI) with the host MNO, and MNO direct subscribers are served first when that capacity fills up. Understanding this mechanism helps you predict when slowdowns will occur and decide whether an MVNO plan is the right fit for your usage.
Key points in this article:
- The POI capacity model that limits total MVNO bandwidth
- How network deprioritization works and when it affects you
- Why sub-brands are less affected than independent MVNOs
- The economics behind why MVNOs accept these terms
- How to detect whether slowdowns are deprioritization-related
- How the SimFinder quality score reflects these differences
For background on what an MVNO is and how it leases network capacity, see [What Is an MVNO?](/en/guides/what-is-mvno/) For an explanation of what an MNO owns that an MVNO does not, see [What Is an MNO?](/en/guides/what-is-mno/)
---
## The POI Capacity Model — Root Cause of MVNO Speed Limits
### What the Point of Interface Is
When an MVNO signs a wholesale agreement with a host MNO, the two networks connect at a logical junction called the **Point of Interface** (POI). All traffic — data, calls, SMS — flowing between the MVNO's subscribers and the wider internet passes through this connection point.
The MVNO pays for a defined amount of bandwidth at the POI. Think of it as a pipe with a fixed diameter. The total throughput available to every subscriber on that MVNO at any given moment is capped by the size of that pipe.
This is the structural origin of MVNO speed limitations. It is not a flaw or a sign of a poor-quality operator — it is how the wholesale capacity market works. Every MVNO that leases capacity from an MNO operates through some version of this model.
### Shared Capacity vs Dedicated Capacity
MNO direct subscribers do not pass through the MVNO's POI. Their traffic stays within the MNO's own dedicated capacity pools, which are sized to serve the MNO's own subscriber base. This means the capacity constraint that limits MVNO throughput simply does not apply to MNO direct subscribers.
The practical consequence: when many MVNO subscribers are active at the same time — such as during a weekday morning commute — the shared POI bandwidth fills up and the excess traffic is queued. MNO direct subscribers on the same physical towers experience no equivalent bottleneck during the same period.
### Interconnect Capacity Purchasing
MVNOs negotiate with MNOs over how much bandwidth to buy at the POI. Buying more capacity reduces congestion but increases the MVNO's wholesale costs, which in turn limits the price advantage it can pass on to consumers. This trade-off is at the heart of the MVNO cost model: lower prices are partly funded by purchasing less total capacity than the MNO keeps for its own subscribers.
---
## Network Deprioritization — The Second Layer of Slowdown
### How Deprioritization Works
Deprioritization is a traffic management policy, not a hardware limitation. When an MNO's radio network becomes congested — meaning demand for airtime exceeds available capacity in a given cell or area — the network must decide in what order to serve competing traffic. In standard wholesale agreements, the MNO's own direct subscribers are served first. MVNO traffic is served after.
This operates at the network level, not the device level. Your MVNO SIM and an MNO direct SIM on the same phone would experience different throughput during the same congestion event — the MNO direct SIM would receive faster service, not because the signal is different, but because the scheduling firmware in the base station assigns it higher priority.
Deprioritization does not cause disconnection. It causes slower data transfer — longer page loads, video buffering pauses, and degraded streaming quality. Outside congested periods, MVNO speeds can closely approach the MNO's headline network speeds because the priority hierarchy only activates under load.
### When Congestion Occurs
Congestion follows predictable patterns driven by human behaviour:
- **Weekday commute hours**: 07:30–09:30 and 17:00–21:00 in urban and suburban areas
- **Lunch breaks**: 12:00–13:30, particularly in city centres
- **Large public gatherings**: concerts, sporting events, crowded tourist sites
- **Dense urban areas at any time**: high-density cell sites serving many simultaneous users
Rural and low-traffic areas experience significantly less congestion. An MVNO plan used primarily in rural or suburban off-peak contexts may rarely trigger deprioritization at all.
### The Deprioritization Threshold Concept
Some MVNO plans include a usage-based layer of deprioritization on top of the standard network-level policy. Plan terms may note that after a subscriber has consumed a certain amount of high-speed data within a billing period, their traffic may be deprioritized further during congestion — even relative to other MVNO subscribers who have not yet crossed that threshold.
This is distinct from hard throttling, where the entire plan's speed is capped regardless of network conditions. Usage-triggered deprioritization only takes effect when the network is actually congested. During off-peak hours, subscribers past the threshold may still experience speeds close to the POI's available capacity.
The specific thresholds at which this applies vary by MVNO and plan tier. These terms are typically disclosed in the MVNO's Fair Use Policy or plan terms and conditions rather than in headline marketing materials.
---
## Why Sub-Brands Are Less Affected
### Corporate Structure and Priority Policy
An MNO-owned sub-brand is not a separate company leasing capacity at arm's length — it is a brand within the same corporate group as the host network. The parent MNO controls how its internal traffic scheduling system categorises different subscriber classes.
Because the MNO sets the priority rules and manages capacity allocation for its own brands directly, sub-brands occupy a structurally advantaged position relative to independent MVNOs that negotiate at arm's length. However, the actual congestion priority tier assigned to a sub-brand may in practice be similar to that of independent MVNOs on the same network — for example, Cricket (AT&T-owned) and Metro (T-Mobile-owned) are deprioritized below their respective parent's postpaid customers. The key difference is not necessarily a strict priority uplift over every independent MVNO, but rather the parent MNO's direct control over how capacity is allocated and how scheduling policies evolve over time.
This is the central practical difference between a sub-brand and an independent MVNO: both run on the same towers, but the sub-brand benefits from being inside the parent's infrastructure decisions rather than subject to fixed wholesale terms negotiated at arm's length. See [What Is a Sub-Brand?](/en/guides/what-is-sub-brand/) for a full comparison of sub-brands and independent MVNOs.
### The Trade-Off for Consumers
Sub-brands bridge the gap between the lowest-priority MVNO tier and full MNO-flagship priority. They typically cost more than independent MVNOs on the same network while costing less than the parent carrier's flagship plans. If you use data heavily during peak urban hours, the extra cost of a sub-brand plan may be justified by materially better peak-hour performance.
---
## The Economics of Why MVNOs Accept Lower Priority
### Cost Structure of MVNO Operations
MVNOs exist to offer cheaper mobile plans. Their structural cost advantage comes from not owning spectrum or radio infrastructure — but that same lack of ownership is why they accept subordinate network priority.
An MNO has every incentive to protect the quality of service for its own direct subscribers. Wholesale capacity agreements are commercial transactions, not partnerships. The MNO sells excess capacity to MVNOs at a price that reflects the fact that MVNO traffic will be served residually — after the MNO's own subscribers. This lower service tier is what makes the wholesale capacity affordable enough for MVNOs to undercut MNO pricing at the retail level.
If MVNOs paid for guaranteed equal priority with MNO direct subscribers, their wholesale costs would be much higher, and the retail price difference that motivates consumers to choose them would shrink or disappear.
### Volume Aggregation
MVNOs that route through an MVNA (Mobile Virtual Network Aggregator) — an intermediary that bundles multiple MVNOs' capacity purchases from the same MNO — typically achieve lower wholesale rates by aggregating volume. However, aggregation doesn't change the priority class; it only reduces per-unit cost. For a full description of how the MVNO leasing chain works, see [What Is an MVNO?](/en/guides/what-is-mvno/)
### Why This Matters for the Market
The deprioritization model is not a consumer protection failure — it is the mechanism that enables price-competitive mobile plans to exist. In many markets, regulators permit it provided the terms are disclosed, because wholesale MVNOs are legally required to disclose their network priority status in plan terms. The disclosure obligation exists specifically so consumers can make informed trade-offs between price and peak-hour performance.
---
## Full MVNO vs Light MVNO vs Reseller — Does the Type Matter?
### Infrastructure Depth and Control
MVNO types differ in how much of their own network infrastructure they operate. A full MVNO runs its own core network (HLR/HSS) and negotiates directly with the MNO for radio access only. A light MVNO delegates more infrastructure to an MVNE intermediary. A reseller effectively just repackages MNO or MVNE plans under a different brand.
From a network priority perspective, the type of MVNO has limited direct impact. Priority is determined by the wholesale agreement between the MNO and the MVNO (or MVNA), not by how much back-end infrastructure the MVNO owns. A full MVNO with its own core network negotiating directly with the MNO is in a better position to negotiate tighter SLA terms around quality — but the fundamental deprioritization structure remains.
### What the Wholesale Agreement Actually Covers
A typical MVNO wholesale agreement covers:
- Total POI bandwidth purchased
- Data priority class (standard MVNO tier vs elevated)
- Permitted use cases (consumer, IoT, data-only, etc.)
- Roaming terms (separate from domestic capacity)
- 5G access (specifically negotiated, not automatically included)
MVNOs that negotiate elevated priority — sometimes called "premium MVNO" or "enhanced quality" agreements — exist in some markets, but they pay higher wholesale rates, which reduces their ability to compete on price.
---
## How to Detect Whether Your Slowdowns Are Deprioritization
### Speed Testing Protocol
The most reliable way to diagnose deprioritization is systematic speed testing across different times of day using a consistent test server:
1. Run a speed test during peak commute hours (07:30–09:30 or 17:00–21:00 local time)
2. Run the same test in the same physical location during off-peak hours (22:00–06:00)
3. Compare the two results
A large discrepancy — fast off-peak, slow during rush hour — in the same location is the characteristic signature of congestion-driven deprioritization. It rules out coverage issues, APN misconfiguration, and device problems, all of which cause consistently poor performance regardless of time of day.
### Other Causes of Slow MVNO Speeds
Not every speed problem on an MVNO plan is deprioritization. Before attributing slowdowns to the POI model, rule out:
- **APN misconfiguration**: An incorrect APN setting can prevent the device from connecting at full speed or prevent data from working at all. Check the MVNO's published APN settings and verify the device configuration.
- **Coverage edge cases**: Near the edge of a network's coverage area, signal strength is low regardless of subscriber tier. Both MNO direct and MVNO subscribers experience poor speeds in genuine coverage gaps.
- **Device band compatibility**: If your device does not support the frequency bands used by the host MNO in your area, it may fall back to slower bands (e.g., 3G or lower-frequency LTE) even when the MNO's preferred bands are available.
- **Network reset required**: Background radio stack states occasionally become stale. Toggling airplane mode on/off or performing a network settings reset can restore normal speeds in some cases.
- **Tethering restrictions**: Some MVNO plans restrict mobile hotspot (tethering) use or apply separate, lower speed caps to tethered devices.
---
## How to Mitigate MVNO Speed Slowdowns
### Time-Shift Data-Heavy Tasks
The simplest mitigation is temporal: schedule large data downloads, software updates, video streaming sessions, and cloud backups for off-peak hours. If you work irregular hours or work from home, this may be straightforward. If your usage is concentrated in commute hours, the trade-off needs to be weighed against the cost difference.
### Choose an MVNO on a Less Congested Host Network
Not all host MNOs experience the same level of congestion in a given area. In markets with multiple national MNOs, the carrier with the largest subscriber base in a given city may have more congested cells than a carrier with a smaller urban base, even if both provide the same geographic coverage. Comparing the host networks of competing MVNOs in your area can be a meaningful differentiator.
### Consider a Sub-Brand If Peak Hours Are Critical
If your use case requires reliable speeds during peak commute hours — mobile hotspot for a laptop, video calls during lunch breaks, navigation in dense urban areas — a sub-brand plan on the same network provides materially better peak-hour priority at a moderate price premium over independent MVNOs. Use [SimFinder](/en/) to compare current plan pricing across MVNO and sub-brand tiers on the same host network.
### Check the Plan's Fair Use Policy Before You Buy
Review the MVNO plan's terms for any usage-triggered deprioritization threshold before committing. If the plan states that speeds may be reduced after a monthly data threshold during congestion, assess whether your typical monthly usage puts you above or below that threshold.
---
## SimFinder Quality Score and MVNO Comparisons
### What the Quality Score Reflects
SimFinder's quality score for each plan incorporates network tier as a key factor. The score accounts for whether a plan is on an MNO direct tier, an MNO sub-brand tier, or an independent MVNO tier, and weights the congestion risk associated with each. Plans on the same host network but at different priority tiers will receive different quality scores, making the tier difference visible in a side-by-side comparison.
The quality score methodology is documented in the [SimFinder Score](/en/guides/simfinder-score/) guide. For a plain-language explanation of the metrics used to evaluate mobile plan quality, see the [Quality Metrics](/en/guides/quality-metrics/) guide.
### Comparing Plans Across the Priority Spectrum
When using [SimFinder](/en/) to compare plans, sorting by quality score rather than price alone surfaces the priority-tier trade-off. A low-cost MVNO plan and a more expensive sub-brand plan on the same network may have similar headline data allowances, but the quality score reflects the expected difference in congestion performance.
For a structured comparison of MNO direct, sub-brand, and independent MVNO across multiple dimensions — not just speed — the [What Is an MNO?](/en/guides/what-is-mno/) guide covers the full spectrum.
---
## FAQ
The structured FAQ answers are in the frontmatter above for schema.org/FAQPage compatibility. Expanded answers to common questions are below.
**Does off-peak MVNO speed match the MNO's advertised speed?**
During genuine off-peak periods when the shared POI bandwidth is under-utilised, MVNO speeds can approach the MNO's advertised network speed. The gap between advertised and actual is not primarily an MVNO-specific problem — advertised speeds reflect maximum theoretical throughput under ideal conditions, not average real-world performance. What is MVNO-specific is the additional congestion penalty during peak hours.
**Is 5G on an MVNO affected by the same deprioritization?**
Yes. 5G access on an MVNO must be explicitly negotiated in the wholesale agreement — it is not automatically included with 4G/LTE capacity. An MVNO that has 5G access is still subject to the standard POI capacity model and deprioritization relative to MNO direct subscribers on the same 5G cells. The faster headline speeds of 5G reduce the absolute magnitude of congestion slowdowns, but the relative priority structure remains the same.
**Can I check my MVNO plan's priority tier?**
Most MVNOs do not prominently advertise their priority tier, but the information is typically disclosed in plan terms, Fair Use Policy documents, or network coverage FAQs. Phrases such as "traffic may be managed during periods of congestion," "data speeds may be reduced during network congestion," or "subject to network management" indicate standard MVNO deprioritization terms. The absence of such language — combined with explicit MNO-level priority claims — would indicate an elevated agreement.
**Does using Wi-Fi calling help during peak hours?**
Wi-Fi calling routes voice calls and SMS through a broadband internet connection rather than the cellular network. It bypasses the cellular congestion issue entirely for calls and texts during peak hours — useful if you have reliable Wi-Fi access. However, it does not help with mobile data performance, which still routes through the cellular connection and is subject to the POI capacity and deprioritization constraints described in this article.
---
## Related Guides
- [What Is an MVNO?](/en/guides/what-is-mvno/) — How MVNOs lease capacity, the POI model, and full vs light vs reseller types
- [What Is an MNO?](/en/guides/what-is-mno/) — What a licensed network operator owns and how that determines subscriber priority
- [What Is a Sub-Brand?](/en/guides/what-is-sub-brand/) — How MNO-owned sub-brands differ from independent MVNOs in terms of priority and cost
- [SimFinder Score Explained](/en/guides/simfinder-score/) — How the SimFinder quality score is calculated and what it measures
- [Quality Metrics for Mobile Plans](/en/guides/quality-metrics/) — The signal, congestion, and reliability metrics behind plan quality ratings
================================================================================
# Wi-Fi Calling (VoWiFi): Calling Where Signal Is Weak
URL: https://sim-finder.com/en/guides/wifi-calling/
Type: guides (en)
Published: 2026-06-04
Wi-Fi Calling routes voice calls and SMS through a Wi-Fi connection rather than the cellular radio, using a secure tunnel to your carrier's network. It is most useful when you are indoors or in an area with weak cellular signal but have access to Wi-Fi. Support varies by carrier and device: both must be on the approved list, and the feature must be enabled in settings before it activates.
The key points covered in this article:
- How Wi-Fi Calling works technically (IPsec/IKEv2, ePDG, IMS)
- The relationship between Wi-Fi Calling and VoLTE
- Prerequisites: carrier support, compatible device, and settings
- What happens when you move between Wi-Fi and cellular mid-call
- How Wi-Fi Calling helps with receiving calls and SMS while abroad
- Emergency call support over Wi-Fi Calling
- How to enable it on iPhone and Android
For the technical foundation of how voice calls work over 4G and 5G using IMS, see [VoLTE and VoNR Explained](/en/guides/volte-vonr/). For the broader context of keeping your home SIM working abroad, see [International Roaming Explained](/en/guides/international-roaming/).
---
## What Wi-Fi Calling Is
**Wi-Fi Calling** — also referred to as **VoWiFi** (Voice over Wi-Fi) — is a carrier-managed service that allows voice calls and SMS to be sent and received over a Wi-Fi connection instead of the cellular radio interface. Once a call is placed via Wi-Fi Calling, your phone number and caller ID remain unchanged. The call is billed under your standard plan, just as a cellular voice call would be, unless your carrier applies a specific Wi-Fi Calling rate.
The technology is standardised in GSMA IR.51, "IMS Profile for Voice, Video and SMS over untrusted Wi-Fi access," which is the companion document to GSMA IR.92, the standard that defines VoLTE. IR.51 defines how the same IMS core used for VoLTE is accessed over a Wi-Fi path rather than the LTE radio.
Wi-Fi Calling is not a third-party VoIP application. It does not use a separate VoIP account or a different phone number. It is an extension of the carrier's voice infrastructure, accessible over Wi-Fi through a defined gateway architecture.
---
## How the Connection Works: ePDG and IPsec/IKEv2
When a device initiates Wi-Fi Calling, it does not send voice traffic directly to the carrier's core. Instead, it establishes a secure tunnel through a dedicated network element.
### The ePDG
The **ePDG (evolved Packet Data Gateway)** is a carrier-operated gateway defined in 3GPP TS 23.402 that provides secure access to the carrier's packet core from untrusted non-3GPP access networks — of which Wi-Fi is the primary example. "Untrusted" in this context means that the Wi-Fi network is not operated by the carrier and its security cannot be assumed.
The ePDG sits at the boundary between the public internet and the carrier's IMS core. Its role is to:
1. Authenticate the device using IKEv2 (Internet Key Exchange version 2), validating the device's credentials via AAA/HSS (Home Subscriber Server).
2. Establish an **IPsec ESP (Encapsulating Security Payload)** tunnel between the device and the ePDG, encrypting all traffic end-to-end across the untrusted Wi-Fi and internet path.
3. Forward authenticated traffic into the carrier's PDN (Packet Data Network) gateway and on to the IMS core.
The combination of IKEv2 for authentication and IPsec ESP for encryption means that voice traffic over Wi-Fi Calling is protected even if the Wi-Fi network itself is open or insecure.
### IMS Registration Over Wi-Fi
Once the IPsec tunnel is established, the device registers with the carrier's IMS P-CSCF (Proxy Call Session Control Function) over that tunnel, using the same SIP signalling used by VoLTE. From the IMS core's perspective, the access path is transparent: it sees an authenticated subscriber registration and handles the call through the same call routing, charging, and number management as any VoLTE session.
This architecture is why Wi-Fi Calling preserves your real phone number, integrates with voicemail, and can be handed off mid-call to the cellular network — all are properties of IMS, not of Wi-Fi itself.
---
## The Relationship Between Wi-Fi Calling and VoLTE
Wi-Fi Calling and VoLTE share the same underlying IMS infrastructure. The difference is the access path:
| | VoLTE | Wi-Fi Calling (VoWiFi) |
|---|---|---|
| Access network | 4G LTE radio | Wi-Fi (untrusted) |
| Security layer | LTE air-interface encryption | IPsec/IKEv2 tunnel |
| Gateway | eNB → EPC | Wi-Fi router → internet → ePDG |
| IMS registration | Over LTE bearer | Over IPsec tunnel |
| Call quality codec | AMR-WB (HD Voice) | AMR-WB (HD Voice) |
| Phone number | Unchanged | Unchanged |
Because both use the same IMS core, a carrier can hand off a live call from Wi-Fi Calling to VoLTE — or vice versa — without interrupting the conversation. This is called **seamless handover**, and it is defined in GSMA IR.51. The handover is transparent: a call that starts on Wi-Fi inside a building can transition to LTE as you walk outside, or switch to Wi-Fi if cellular signal drops indoors.
Not all devices and carriers support seamless handover. On devices or networks without it, moving between Wi-Fi and cellular may drop the call and require it to be re-established.
For a detailed explanation of how IMS, SIP signalling, and QoS bearers work in VoLTE, see [VoLTE and VoNR Explained](/en/guides/volte-vonr/).
---
## Benefits of Wi-Fi Calling
Wi-Fi Calling is useful in specific situations that cellular radio does not handle well.
### Indoor Coverage
Cellular signals attenuate significantly as they pass through building materials — concrete, metal, and low-emission glass all reduce signal strength. A device showing one or two bars indoors may struggle to establish or maintain a call. Wi-Fi, by contrast, is typically deployed specifically for indoor coverage. If a Wi-Fi access point is reachable, Wi-Fi Calling can deliver a full-quality call regardless of cellular signal.
### Basements and Underground Spaces
The same attenuation applies to basements, underground transit stations, and parking structures where cellular coverage may be absent but Wi-Fi is deployed.
### Areas with Carrier Coverage Gaps
Rural or remote areas with weak carrier coverage may have Wi-Fi at specific locations (a hotel, a café, a house). Wi-Fi Calling allows calls and SMS to reach you at those locations using your home number.
### Receiving Calls and SMS While Connected to Foreign Wi-Fi
For travellers, this is a significant use case. If your home carrier supports Wi-Fi Calling internationally, you can receive calls and SMS to your home number over any Wi-Fi connection, without needing cellular coverage on your home SIM. This is discussed further in the section on international use below.
---
## Prerequisites
Three things must be in place for Wi-Fi Calling to work.
### 1. Carrier Support
Your carrier must operate an ePDG and support VoWiFi on your account. Availability varies by carrier and country. Wi-Fi Calling is widely available on major carriers in the United States (AT&T, T-Mobile, Verizon), the United Kingdom (EE, Vodafone, Three, O2), and many carriers in Western Europe, South Korea, Japan, and Australia. Smaller carriers and MVNOs may or may not support it depending on their wholesale agreement with the host MNO.
Because carrier support changes over time, the most reliable check is your carrier's official feature page or its device compatibility list. SimFinder's carrier information pages link to official feature documentation where available.
### 2. Compatible Device with Carrier IMS Profile
Your device must support VoWiFi and carry the carrier's IMS profile for Wi-Fi Calling. This is the same IMS profile requirement that applies to VoLTE: the device's modem firmware must contain the carrier's ePDG address, IKEv2 credentials, and policy parameters.
On iPhones, Apple distributes carrier bundles via iOS updates. If your carrier is on Apple's list, the Wi-Fi Calling configuration is included in the carrier bundle. On Android, manufacturers embed IMS profiles for the markets their devices are sold in; an unlocked device sold for a different market may not include the ePDG profile for your carrier.
An unlocked device that can use VoLTE on a carrier will generally also be able to use Wi-Fi Calling on the same carrier, provided the carrier bundle includes the ePDG configuration. However, this is not guaranteed: some carriers deploy VoLTE and VoWiFi on separate approval timelines, and device compatibility lists for each may differ.
### 3. Enabling the Feature in Device Settings
Wi-Fi Calling is typically off by default and must be enabled in the device's cellular or SIM settings. On iPhone, the path is **Settings → Cellular → Wi-Fi Calling**. On Android (stock), it is usually under **Settings → Network & Internet → Calls & SMS** or **Settings → Connections → Wi-Fi Calling**, depending on the manufacturer. The toggle will only appear if both the carrier and the device support the feature.
When you first enable Wi-Fi Calling on many carriers, the device prompts you to confirm or enter a registered address for emergency call location purposes.
---
## Wi-Fi Calling and International Use
The behaviour of Wi-Fi Calling abroad is carrier-policy-dependent and should be verified before travel.
**Carriers that allow international Wi-Fi Calling** will route calls and SMS to your home number over any Wi-Fi connection regardless of country. This means you can receive calls to your home number — and receive SMS 2FA codes — over the hotel Wi-Fi in another country, even if your home SIM has no cellular coverage there. Some carriers charge a per-minute rate for Wi-Fi Calling internationally; others treat it identically to domestic Wi-Fi Calling.
**Carriers that restrict Wi-Fi Calling to domestic use** will not activate the ePDG tunnel when the device is outside the home country. The feature will appear inactive even if Wi-Fi is available.
**Carriers that disable Wi-Fi Calling in specific countries** may do so due to local regulatory restrictions. Some countries require communications to traverse domestic infrastructure, which a foreign carrier's ePDG may not satisfy.
Before relying on Wi-Fi Calling abroad to receive SMS 2FA codes or stay reachable on your home number, check your carrier's international Wi-Fi Calling documentation explicitly. For a full strategy on receiving SMS 2FA codes while travelling — including Wi-Fi Calling, dual SIM, and roaming options — see [How to Receive SMS 2FA Codes Abroad](/en/guides/sms-2fa-abroad/).
For the broader question of how your home SIM operates in a foreign country's cellular network, see [International Roaming Explained](/en/guides/international-roaming/).
---
## Wi-Fi Calling on Dual SIM Devices
On a dual SIM device, Wi-Fi Calling typically applies to the SIM line designated for calls — the "primary" or "preferred" voice line. Some devices support Wi-Fi Calling independently on both lines; others support it only on one line at a time.
A common travel configuration is to keep a home SIM for receiving calls and SMS (with Wi-Fi Calling enabled, Data Roaming off) and add a local data eSIM for mobile data. In this setup:
- The home SIM receives incoming calls and SMS via Wi-Fi Calling when connected to Wi-Fi, without incurring cellular roaming data charges.
- The local eSIM provides mobile data for apps and browsing.
This configuration depends on the home carrier supporting international Wi-Fi Calling (as described above). If it does not, the home SIM will need roaming enabled to receive calls and SMS.
For a detailed guide to this dual SIM travel configuration, see [Using Dual SIM for Travel](/en/guides/dual-sim-for-travel/).
---
## Emergency Calls Over Wi-Fi Calling
Wi-Fi Calling can support emergency calls when no cellular signal is available. In the United States, the FCC requires carriers that offer Wi-Fi Calling to support 911 over it under the FCC's E911 rules for wireless providers (47 CFR Part 9). Because Wi-Fi Calling has no cell-tower location data, the device transmits the registered emergency address you provide when enabling the feature; device-derived location (such as GPS) is also used where available. Carriers must transmit location information with emergency calls placed over Wi-Fi Calling.
Outside the US, emergency call support over Wi-Fi Calling varies by country and carrier. Not all carriers in all countries have implemented emergency services over VoWiFi. Where it is supported, the device typically sends its registered address (entered when Wi-Fi Calling was first activated) as the emergency location.
A key limitation: **Wi-Fi Calling emergency support is carrier- and country-specific and cannot be assumed to work in all situations.** If you are in a location with no cellular signal and need to place an emergency call, attempt the call even with no bars — the device may be able to route it — but do not rely solely on Wi-Fi Calling if other options are available.
For the broader issue of what to do when your phone shows no service, see [No Service on Your Phone?](/en/guides/no-service/).
---
## How to Enable Wi-Fi Calling
### On iPhone
1. Open **Settings → Cellular** (or **Settings → Mobile Service** in some regions).
2. Tap the SIM line you want to configure (on dual SIM devices, each line has separate settings).
3. Tap **Wi-Fi Calling**.
4. Toggle **Wi-Fi Calling on This iPhone** on.
5. If prompted, enter or confirm your emergency address.
The Wi-Fi Calling icon (a phone handset with Wi-Fi signal bars) will appear in the status bar when an active Wi-Fi Calling connection is established.
### On Android (Stock)
The path varies by manufacturer and Android version. Common locations:
- **Settings → Network & Internet → Calls & SMS → Wi-Fi Calling**
- **Settings → Connections → Wi-Fi Calling** (Samsung One UI)
- **Settings → Mobile network → Wi-Fi Calling** (some Qualcomm-based devices)
If the Wi-Fi Calling option does not appear in any of these locations, the feature is not supported for your SIM on your device. This may be because the carrier is not supported, the device lacks the IMS profile for your carrier, or the device manufacturer has not enabled the feature for your market variant.
---
## Limitations and Things to Check
**No cellular required, but carrier registration is.** Wi-Fi Calling works when there is zero cellular signal, but it requires the carrier to authenticate your subscription. A suspended account, an expired plan, or a SIM that has not been activated on the network will fail to establish the ePDG tunnel.
**NAT traversal.** The IPsec/IKEv2 protocol used by Wi-Fi Calling requires the device to be reachable through the Wi-Fi router's NAT. Most home and hotel routers handle this correctly, but corporate firewalls or heavily restricted networks (captive portals that do not pass IPsec traffic) may block the tunnel. If Wi-Fi Calling fails to connect on a specific network, the most common cause is firewall or NAT policy.
**MVNOs and host network profiles.** An MVNO's subscribers use Wi-Fi Calling only if the host MNO passes VoWiFi through in the wholesale agreement and the device carries an IMS profile that includes the host MNO's ePDG. An MVNO does not operate its own ePDG. Some MVNOs explicitly advertise Wi-Fi Calling support; others do not — check with the MVNO directly.
**Travel eSIMs are typically data-only.** Travel eSIMs sold by third-party providers for international data are almost universally data-only: they do not include voice or IMS registration, and Wi-Fi Calling is not available through them. Wi-Fi Calling for your home number requires using your home carrier's SIM, not a travel eSIM.
---
## FAQ
See the frontmatter for structured FAQ entries compatible with schema.org/FAQPage.
**Is Wi-Fi Calling the same as using WhatsApp or FaceTime over Wi-Fi?**
No. WhatsApp, FaceTime, and similar apps use their own signalling servers and peer-to-peer media paths over the data connection, independent of the carrier's infrastructure. Wi-Fi Calling uses the carrier's IMS core via the ePDG and carries the call on your registered phone number, interoperating with all phones on the PSTN. The two are technically unrelated.
**Does Wi-Fi Calling consume mobile data?**
No. Wi-Fi Calling routes voice traffic over the Wi-Fi connection, not the cellular data connection. It does not consume your mobile data allowance. It does use Wi-Fi bandwidth, though the amount is small — AMR-WB voice, the codec used in IMS calls, typically produces 12–25 kbps.
**If my carrier supports Wi-Fi Calling, why might the option not appear in my settings?**
The most common reason is that the device does not carry the carrier's IMS profile for VoWiFi — either because it was sold for a different market, is an older model that predates the carrier's VoWiFi deployment, or the manufacturer disabled the feature in the firmware for that device variant. Check the carrier's approved device list, or test by inserting a SIM from the carrier and looking for the Wi-Fi Calling toggle.
**Can I use Wi-Fi Calling if I am on an MVNO?**
Only if the MVNO explicitly supports it. The host MNO must enable VoWiFi pass-through in the wholesale agreement, and the MVNO must provision it for subscribers. Some MVNOs on major carriers do support Wi-Fi Calling; others do not. Check the MVNO's feature list or its support documentation.
---
## Related Guides
- [VoLTE and VoNR Explained](/en/guides/volte-vonr/) — How IMS, SIP, and QoS bearers work for voice calls on 4G and 5G — the same core infrastructure Wi-Fi Calling uses
- [International Roaming Explained](/en/guides/international-roaming/) — How your home SIM connects to foreign networks, and what charges to expect when abroad
- [How to Receive SMS 2FA Codes Abroad](/en/guides/sms-2fa-abroad/) — Strategies for keeping 2FA codes reachable while travelling, including Wi-Fi Calling, dual SIM, and TOTP migration
- [Using Dual SIM for Travel](/en/guides/dual-sim-for-travel/) — How to run your home SIM alongside a local data eSIM, with Wi-Fi Calling on the home line
- [No Service on Your Phone?](/en/guides/no-service/) — Step-by-step diagnostics when your phone shows no signal, including what to check if Wi-Fi Calling is not activating
================================================================================
# SIM Choices for a Working Holiday or Study Abroad
URL: https://sim-finder.com/en/guides/working-holiday/
Type: guides (en)
Published: 2026-06-06
A working holiday or extended study abroad program puts you in a different category from a tourist. You need connectivity that works on arrival, scales to months or over a year of use, and costs less than a succession of tourist SIM purchases. The right strategy depends on two factors above all else: how long you are staying, and what your visa allows in terms of obtaining local services.
The short version: use a travel eSIM or airport SIM for the first days of arrival. Once you have a local address — typically within the first two to four weeks — move to a local carrier plan. If you need your home number reachable, keep your home SIM active in a dual-SIM setup.
---
## Arrival Days: Start With a Travel eSIM or Airport SIM
The first 24 to 72 hours in a new country are when connectivity is most critical and hardest to arrange. You need maps, translation apps, accommodation confirmations, and a way to contact people — before you have a local address or know which carrier to choose.
A **travel eSIM** installed on home Wi-Fi before departure is the lowest-friction option. It activates automatically when you land and connects to a local partner network, with no queue, no language barrier, and no in-store registration step. For countries with a strong local eSIM infrastructure — Australia, New Zealand, the United Kingdom, Japan, South Korea, much of Western Europe, Canada — travel eSIM coverage and speeds are generally reliable in urban areas.
An **airport SIM** — a physical prepaid SIM sold at arrival terminals — is the alternative for countries where travel eSIM coverage is thinner, or if your device does not support eSIM. Airport SIMs from a major local carrier typically offer better local coverage than a travel eSIM's roaming-based connection in markets where carrier eSIM depth is limited.
For a full comparison of the four connectivity options — roaming, travel eSIM, local SIM, and portable Wi-Fi — see [How to Choose a Travel eSIM](/en/guides/how-to-choose/).
**How long to use arrival connectivity:** most working holiday and study abroad travelers transition to a local carrier plan within two to four weeks, once they have a registered address. Some transition in the first few days if an arrival address (such as a student dormitory or shared accommodation) is available immediately.
---
## Short Stays (Up to 4 Weeks): Travel eSIM May Be Sufficient
If your program or working holiday is four weeks or shorter, a travel eSIM or tourist prepaid SIM may cover the entire stay without needing to engage with local carrier onboarding.
**Travel eSIM** plans with 30-day validity are widely available and can be the entire SIM solution for a month-long language course or short-term academic exchange. Compare plans for your destination using [SimFinder Travel](/) — look at the local network partner for each plan, not just the headline data amount.
**Tourist prepaid SIMs** from local carriers are another option for this length of stay. In many markets, these are sold at airports, electronics stores, and convenience stores without a local address requirement. Refer to the [Regional Connectivity Guide](/en/guides/regional-overview/) for which countries have low-friction tourist SIM access and which have registration barriers.
For stays of under four weeks, a local carrier contract is rarely worth the setup cost in time and paperwork. The main exception: if your destination has very strong local prepaid plans available to foreigners on arrival (common in parts of Southeast Asia and South Asia), a local prepaid SIM often undercuts travel eSIM pricing substantially, especially for high-data usage.
---
## Long Stays (1 Month to 1 Year): Move to a Local Carrier Plan
For stays of one month or longer, a local carrier plan is almost always the right long-term solution.
### Why Local Plans Win on Cost
Local carrier prepaid and postpaid plans are priced for residents, not tourists. They offer substantially more data per unit of cost than travel eSIM plans, which carry a convenience premium for short-trip use. For a stay measured in months, this cost difference compounds significantly.
Use [SimFinder Travel](/) to compare travel eSIM plans for your destination, then check the local carrier offerings in the country to get a sense of the relative value. For a framework on choosing between plan types, see [Travel eSIM Provider Comparison](/en/guides/provider-comparison/).
### What Local SIM Onboarding Typically Requires
Local carrier onboarding requirements for working holiday and study abroad visitors typically include one or more of the following:
- **Passport** — universally required for identity verification
- **Proof of local address** — a rental agreement, dormitory enrollment letter, or similar document
- **Local tax number or resident ID** — required in some countries, particularly for postpaid plans
- **Visa documentation** — some carriers verify visa type and duration; a working holiday or student visa is generally acceptable
**Prepaid plans** usually have lighter requirements than postpaid. Many countries allow foreigners on working holiday or student visas to access prepaid plans with only a passport and an address. Postpaid plans — which include monthly contracts and often better per-GB pricing — may require a local bank account or credit record in addition to the above.
**eSIM onboarding at local carriers** varies. In countries with mature eSIM infrastructure (Australia, New Zealand, UK, Japan, South Korea, Germany), the major carriers support eSIM activation through their apps or QR codes with no physical SIM needed. In countries where eSIM rollout at local carriers is less complete, a physical SIM from the carrier may be the only option.
### Getting a Local Voice Number
Most travel eSIMs are data-only. A local carrier SIM gives you a phone number in the destination country, which matters for:
- Calling local landlords, employers, or schools
- Receiving SMS verification codes from local services
- Setting up local bank accounts or payment apps (common in Japan, South Korea, and parts of Southeast Asia)
- Job applications that require a local contact number
For working holiday participants who plan to work in their destination country, a local voice number is often practically necessary within the first weeks.
---
## Extended Stays (1 Year or More): Consider a Full Local Contract
For stays of a year or more, a postpaid contract with a local carrier is worth pursuing if your visa and circumstances allow. Postpaid contracts in many markets offer significantly better per-GB pricing, priority network access, and monthly carryover of unused data compared to prepaid.
Requirements for postpaid contracts as a foreign national vary substantially by country:
- **Australia and New Zealand:** major carriers typically offer month-to-month postpaid plans to working holiday visa holders with a valid passport and Australian/NZ address. No permanent residency is required, though credit checks may apply.
- **UK:** postpaid SIM-only plans are widely available to residents on any valid visa category. A UK bank account is useful but some carriers accept international accounts or require a deposit.
- **Japan:** postpaid contracts require a Japanese address, passport, and in most cases a Japanese bank account. Working holiday visa holders are eligible but the process requires in-person registration at a carrier shop. MVNOs may have lighter requirements than the three major carriers.
- **South Korea:** postpaid contracts require a registration number from the foreigner registration card (외국인등록증), which is issued after 90 days of residency. Working holiday and student visa holders can apply for the card at their local immigration office.
- **Germany and EU countries:** postpaid contracts are available to long-term residents with a registered address (Anmeldung in Germany). A German bank account (IBAN) is typically required for direct debit. Registration requirements for prepaid plans also apply in Germany.
For a detailed look at the long-term local carrier strategy including MVNO options and plan transitions, see [Local Carrier Contracts for Long-Term Stays](/en/guides/local-contract/) and [Expat SIM Strategy](/en/guides/expat-strategy/).
---
## General Tendencies by Common Destination
The following describes general patterns for countries frequently visited on working holiday visas. Individual carrier policies, registration rules, and eSIM availability change over time — treat these as starting points for your own research.
### Australia and New Zealand
Both markets generally have low-friction local SIM onboarding. In Australia, major carriers sell prepaid SIMs at airports, supermarkets, and convenience stores with a passport; an address is not required at point of sale, though it may be collected for account management. In New Zealand, registration requirements vary by carrier — some allow activation without an address while others require it upfront, so check the specific carrier's current onboarding process. eSIM is widely supported by all major carriers. For rural Australia, the choice of carrier matters significantly for coverage — see the [Regional Connectivity Guide](/en/guides/regional-overview/) for the rural coverage context.
### United Kingdom
Prepaid SIMs are available without registration. Postpaid SIM-only plans are accessible to residents on most visa types, typically requiring a UK address and bank details. eSIM is fully supported by all major UK carriers. The UK is outside the EU's RLAH framework, so EU roaming is not guaranteed and depends entirely on the home carrier's own policy. Some UK carriers include EU roaming at no extra charge under their own commercial terms; others apply a daily fee.
### Japan
All SIM purchases — including tourist prepaid SIMs — require passport-based identity verification. Airport and electronics store tourist SIMs are widely available with passport registration. For longer stays, working holiday visa holders can access local carrier plans after registering an address, but the registration process is in-person at carrier shops and largely conducted in Japanese. Some MVNOs specifically targeting foreign residents — including English-language services such as Sakura Mobile and GTN Mobile — offer simpler onboarding for foreigners. Most mainstream value MVNOs operate in Japanese only. eSIM is widely available from major carriers and most MVNOs. A Japanese bank account is required for most postpaid contracts.
### South Korea
SIM registration requires passport verification for all purchases. Tourist SIMs are available at airports and convenience stores. For postpaid access, the foreigner registration card is required, which is available after 90 days of residency under a working holiday or student visa. eSIM is widely available from major carriers.
### Western Europe (EU countries)
Registration requirements vary by country. Germany requires identity verification for all SIM purchases. Most other EU countries allow tourist SIM purchases with a passport or light documentation. EU carriers operating under RLAH can use their domestic plan across EU/EEA countries — if your home carrier is EU-based, your existing plan may cover travel within the EU at domestic rates. For non-EU visitors, a local SIM in your EU destination country provides the most cost-effective connectivity for a longer stay. The [Regional Connectivity Guide](/en/guides/regional-overview/) covers EU roaming in more detail.
### Canada
Prepaid SIMs require no registration and are available without identity verification. Major carrier postpaid plans are accessible to residents on valid visas. eSIM is widely supported. Rural coverage in the interior and northern Canada is limited regardless of carrier.
---
## Keeping Your Home Number Reachable
Working holiday participants frequently need to stay reachable on their home number for banking, professional contacts, and family communication. The most common approach is a **dual-SIM setup**: keep your home SIM active in the phone alongside a local SIM or travel eSIM for data.
On a dual-SIM device (most modern smartphones support physical SIM + eSIM simultaneously), you can:
- Receive calls and SMS on your home number via international roaming
- Use a local SIM or travel eSIM for data at local rates
- Make outgoing calls using VoIP apps over the data connection
**Data switching control:** on iPhone, turn off "Allow Cellular Data Switching" in Settings to ensure data uses the local SIM only. Without this setting, the phone may switch to the roaming home SIM for data, incurring unexpected charges.
**Home carrier cost management:** if you need your home SIM only for incoming calls and SMS — not outgoing calls or data — check whether your carrier offers a low-cost retention option, a suspension plan, or a minimum-spend plan that keeps the number active. Some carriers allow a temporary suspension for extended travel.
**Number forwarding:** some home carriers allow calls to your home number to be forwarded to a destination number or VoIP app. This can reduce or eliminate roaming charges while keeping your home number reachable.
For more on managing calls across two numbers and handling SMS-based authentication abroad, see [Expat SIM Strategy](/en/guides/expat-strategy/).
---
## eSIM Compatibility and Carrier Lock Checks
Before departure, verify:
- **Your device supports eSIM.** On iPhone, check Settings > Cellular — an "Add eSIM" or "Add Cellular Plan" option confirms eSIM support. On Android, check Settings > Network & internet > SIMs for an "Add SIM" option.
- **Your device is not carrier-locked.** A SIM-locked device cannot use SIMs from other carriers, including local SIMs and travel eSIMs. On iPhone, check Settings > General > About > Carrier Lock. If the device is locked, contact your home carrier to request an unlock before departure.
- **Your device supports the frequency bands used in your destination.** Most recent flagship devices sold globally support the main frequency bands used in popular working holiday destinations. Devices purchased in one region may have limited band support in others — check your device's specifications against the destination carrier's band list if in doubt.
For a full device compatibility check and eSIM profile limits (some devices limit the number of stored eSIM profiles), see [eSIM Compatible Devices](/en/guides/esim-compatible-devices/).
---
## Planning Your Transition
The practical sequence for most working holiday and study abroad travelers:
1. **Before departure:** install a travel eSIM on home Wi-Fi. Check device eSIM support and carrier lock status. Identify which local carrier plans are available in your destination for the medium term.
2. **On arrival:** use the travel eSIM for immediate connectivity. Find your accommodation and register an address as soon as possible — this is the key prerequisite for most local SIM onboarding.
3. **Within the first 2–4 weeks:** visit a local carrier shop or complete online onboarding for a local prepaid or postpaid plan. Transfer data usage to the local SIM. Deactivate or pause the travel eSIM.
4. **For stays of 1 year+:** evaluate postpaid contract options once your visa status and residency situation is established. Consider whether a local bank account (often required for postpaid) is practical to set up.
5. **Throughout:** keep your home SIM active in a dual-SIM setup if you need your home number reachable for banking, professional contacts, or family calls.
Use [SimFinder Travel](/) to compare travel eSIM plans for your arrival period, and refer to the [Regional Connectivity Guide](/en/guides/regional-overview/) for country-specific context on SIM registration rules and eSIM availability in your destination.
---
## Visa Length and How It Shapes Your SIM Choice
Working holiday and study abroad visas span a wide range of durations, and the permitted length of stay is the single most important variable in your SIM strategy.
**Stays of under 4 weeks** sit closest to the tourist experience. A travel eSIM or airport prepaid SIM handles the full stay without requiring local carrier onboarding. You may not need a local phone number at all, and the higher per-GB cost of a travel eSIM is an acceptable trade-off for the convenience of not dealing with carrier registration in a foreign language.
**Stays of 1 to 3 months** are the transition zone. A travel eSIM for the first week or two remains practical, but the cost difference versus a local carrier plan grows week by week. For this length of stay, the question is whether you will be in one place long enough to justify the setup cost of local carrier onboarding — usually yes if you have a fixed accommodation address from the start.
**Stays of 3 to 6 months** nearly always benefit from a local carrier plan as the primary SIM. The cumulative cost of running a travel eSIM for this duration is substantial, and a local plan gives you a real phone number, which is increasingly necessary as you interact with local employers, landlords, banks, and services.
**Stays of 6 months to 1 year** — the standard working holiday visa duration in many countries — make a local carrier plan essentially mandatory for cost and practicality. For the latter part of the stay, if postpaid plans are accessible under your visa, they often offer substantially better value than month-to-month prepaid top-ups. The [Local Carrier Contracts for Long-Term Stays](/en/guides/local-contract/) guide covers the transition from prepaid to postpaid in detail.
**Stays beyond 1 year** move into expat territory. Visa extensions, changes in residency status, and accumulating local financial history (credit records, bank accounts) all open additional options. The [Expat SIM Strategy](/en/guides/expat-strategy/) guide addresses the considerations specific to multi-year stays.
---
## Budgeting Connectivity Over a Long Stay
Connectivity is a recurring monthly cost that is easy to underestimate at the planning stage. A few principles help keep it predictable.
**Separate arrival costs from ongoing costs.** A travel eSIM or airport SIM is a one-time arrival expense — budget it as such, not as a model for what you will pay monthly. The ongoing cost is what you pay once you have transitioned to a local carrier plan, and that figure is typically much lower per gigabyte.
**Factor in your home SIM.** If you intend to keep your home number active throughout the stay, your home carrier's minimum monthly cost is a recurring expense on top of your local SIM costs. Check your home carrier's retention, suspension, and minimum-spend options before you leave — some carriers allow a reduced-cost hold for extended travel periods, which can cut this cost significantly.
**Data requirements tend to grow with stay length.** In the first weeks you may rely heavily on Wi-Fi at accommodation. As you settle into regular routines — commuting, working, navigating less-familiar areas — mobile data usage often increases. Budget for a plan with room to grow rather than optimising for minimum data on arrival.
**Roaming from your destination is a separate cost.** If your working holiday or study program involves travel to nearby countries — for example, weekend travel within Europe or between Southeast Asian countries — your local SIM's roaming policy matters. Some local prepaid plans offer no roaming, making a travel eSIM the practical supplement for side trips. The [Travel eSIM Provider Comparison](/en/guides/provider-comparison/) covers the major providers whose plans are suited for multi-country use from a fixed base.
**Compare total cost of ownership, not headline prices.** When evaluating local carrier plans, compare the effective monthly cost inclusive of any activation fees, mandatory SIM costs, or minimum top-up requirements. A plan with a lower headline price but a high upfront SIM cost may cost more over a three-month stay than a slightly more expensive plan with no activation fee.
---
## What to Arrange Before You Fly
Preparation before departure reduces friction on arrival and prevents the scenarios where you land without connectivity for hours or days while resolving an avoidable issue.
**Check eSIM compatibility and carrier lock status.** Verify that your device supports eSIM (Settings > Cellular on iPhone; Settings > Network on Android) and is not carrier-locked. A locked device cannot use foreign SIMs or travel eSIMs until unlocked. Contact your home carrier to request an unlock at least a week before departure — processing times vary. See [How to Choose a Travel eSIM](/en/guides/how-to-choose/) for the full device compatibility checklist.
**Install a travel eSIM before departure.** Once you have confirmed eSIM support, purchase and install a travel eSIM plan for your destination while on home Wi-Fi. Downloading an eSIM profile requires a stable internet connection and takes a few minutes; doing this at home eliminates the risk of needing to download a profile on airport Wi-Fi or a slow cellular connection on arrival.
**Research local carrier options for your medium-term plan.** Identify two or three local carrier or MVNO options for your destination before you leave. Note their onboarding requirements — specifically whether they need an address, a tax ID, or an in-person visit. Knowing this in advance means you arrive with a plan rather than starting research from scratch when you are tired from travel. The [Regional Connectivity Guide](/en/guides/regional-overview/) provides a useful starting point for the documentation and registration context in common working holiday destinations.
**Arrange your home SIM's status.** Decide whether you will keep your home SIM fully active, switch to a minimal retention plan, or suspend it. Contact your home carrier to make this change before departure if a lead time is required. For banking SMS codes and two-factor authentication, keeping your home number active in a dual-SIM configuration is the most reliable approach.
**Note accommodation address details.** Local carrier SIM onboarding almost always requires a proof-of-address document or at minimum a local address to enter. If you have pre-arranged accommodation — a dormitory, a guesthouse, or a short-term rental — note the full address, including any post code or administrative code format required in the destination country.
---
## Common Mistakes Working-Holiday Travellers Make With SIMs
**Using a travel eSIM for the entire stay.** Travel eSIMs are priced for the short-trip market. Running one for six or twelve months costs substantially more than a local carrier plan would for the same data. The most common version of this mistake is staying on the arrival eSIM out of inertia after settling into accommodation — the setup of a local SIM gets postponed and never happens.
**Assuming a tourist SIM is the only option.** Many working holiday travellers assume their visa status limits them to tourist-tier SIM access. In most popular destinations, a working holiday or student visa is sufficient for standard local prepaid plans — and often for postpaid plans too, once you have a registered address. Check the actual requirements rather than assuming the most restrictive case.
**Letting home carrier roaming run unchecked.** Some devices default to using the home SIM for data if the local SIM connection is briefly unavailable, or if data-switching is not disabled. On a dual-SIM phone keeping a home SIM active, a few days of accidental roaming data charges can be unexpectedly large. Disable data roaming on the home SIM explicitly, and confirm the setting after switching to your local SIM.
**Not getting a local phone number early enough.** A local voice number is needed earlier than most travellers expect: for confirming rental accommodation, for employer contact during job applications, and for setting up local bank accounts or payment apps. Planning to get a local number "eventually" can create real friction in the first weeks when the number is needed most. Treating local number acquisition as a week-one task rather than a later step makes subsequent logistics significantly smoother.
**Overlooking MVNO options.** Major carrier shops are the most visible option in most countries, but MVNOs — which resell capacity on the same networks at lower cost — frequently offer better value for working holiday travellers, and often provide English-language customer support. The [Local Carrier Contracts for Long-Term Stays](/en/guides/local-contract/) and [Expat SIM Strategy](/en/guides/expat-strategy/) guides both cover MVNO access as part of the long-term SIM strategy.
---
## Related Guides
- [Local Carrier Contracts for Long-Term Stays](/en/guides/local-contract/) — Onboarding requirements, prepaid vs postpaid, and MVNO options for extended stays
- [Expat SIM Strategy](/en/guides/expat-strategy/) — Managing home and local SIMs for multi-year stays, number retention, and dual-SIM setups
- [Regional Connectivity Guide for Travelers](/en/guides/regional-overview/) — eSIM adoption, SIM registration rules, and rural coverage across 6 regions
- [How to Choose a Travel eSIM](/en/guides/how-to-choose/) — 5 criteria for evaluating travel eSIM plans: coverage, data, validity, pricing, activation
- [Travel eSIM Provider Comparison](/en/guides/provider-comparison/) — Major providers compared by coverage, plan structure, and destination depth
================================================================================
# ahamo vs LINEMO 徹底比較2026 — 料金・速度・機能の違いを解説
URL: https://sim-finder.com/ja/blog/ahamo-vs-linemo-comparison-2026/
Type: blog (ja)
Published: 2026-03-26T00:00:00+09:00
## 【結論】ahamoとLINEMO、あなたに合うのはどっち?
先に結論を述べる。
- **月30GB使う人で通信速度を重視するなら → [ahamo](/ja/jp/carriers/jp-ahamo/)**
- **月10GB以下で十分、またはLINEを大量に使うなら → [LINEMO](/ja/jp/carriers/jp-linemo/)**
- **月110GBの大容量が必要なら → ahamoの大盛りプラン一択**
両社とも大手キャリアのオンライン専用ブランドで、料金・品質ともに高水準だ。30GBプランは月額2,970円で完全に同額のため、差が出るのは「通信品質」「小容量プランの有無」「独自機能」の3点になる。
以下、全項目を比較していく。
**[SimFinderで自分に合ったプランを検索する →](/ja/jp/search/)**
---
## 目次
- [基本スペック比較表](#基本スペック比較表)
- [料金比較 — 同データ量で並べると](#料金比較)
- [通信品質比較 — docomo vs SoftBank](#通信品質比較)
- [通話オプション比較](#通話オプション比較)
- [独自機能比較 — 海外利用 vs LINEギガフリー](#独自機能比較)
- [こんな人におすすめ](#こんな人におすすめ)
- [ユーザーの声(SNS)](#ユーザーの声)
- [よくある質問(FAQ)](#よくある質問)
- [まとめ](#まとめ)
---
## 基本スペック比較表
全プランを横並びで比較する。
| 項目 | [ahamo 30GB](/ja/jp/plans/ahamo-30gb/) | [ahamo大盛り 110GB](/ja/jp/plans/ahamo-110gb/) | [LINEMO ベストプラン 3GB](/ja/jp/plans/linemo-best-3gb/) | [LINEMO ベストプラン 10GB](/ja/jp/plans/linemo-best-10gb/) | [LINEMO ベストプランV 30GB](/ja/jp/plans/linemo-bestv-30gb/) |
|------|-------|---------|---------|---------|---------|
| 月額料金 | 2,970円 | 4,950円 | 990円 | 2,090円 | 2,970円 |
| データ容量 | 30GB | 110GB | 3GB | 10GB | 30GB |
| eSIM対応 | ○ | ○ | ○ | ○ | ○ |
| 5分かけ放題 | 無料(標準付帯) | 無料(標準付帯) | 550円/月 | 550円/月 | 無料(標準付帯) |
| 完全かけ放題 | 1,100円/月 | 1,100円/月 | 1,650円/月 | 1,650円/月 | 1,100円/月 |
| 回線 | docomo 5G | docomo 5G | SoftBank 5G | SoftBank 5G | SoftBank 5G |
| 契約期間 | なし | なし | なし | なし | なし |
| 解約金 | 0円 | 0円 | 0円 | 0円 | 0円 |
| データ繰り越し | × | × | × | × | × |
| 家族割引 | × | × | × | × | × |
両社ともeSIM対応・契約縛りなしで、オンラインブランドとしての基本構成は共通している。違いはプランの刻み方と付帯サービスに現れる。
---
## 料金比較
### 同データ量で並べた場合
| 月間データ使用量 | ahamo | LINEMO | 差額 |
|----------------|-------|--------|------|
| 3GB以下 | 2,970円(30GBプランのみ) | 990円 | **LINEMOが1,980円安い** |
| 10GB | 2,970円(30GBプランのみ) | 2,090円 | **LINEMOが880円安い** |
| 30GB | 2,970円 | 2,970円 | **同額** |
| 110GB | 4,950円 | 提供なし | ahamo一択 |
### 料金面のポイント
**月10GB以下の人はLINEMOが明確に有利。** ahamoには30GB未満のプランが存在しないため、月に3GBしか使わない人でも2,970円を支払うことになる。LINEMOなら990円で済む。年間で23,760円の差が出る計算だ。
**30GBプランは完全に同額(2,970円)。** 料金では差がつかないため、後述する通信品質・独自機能が選択の決め手になる。なお、LINEMOのベストプランは段階制を採用しており、3GB→10GBの間でデータ使用量に応じて料金が自動で調整される。月によって使用量にバラつきがある人にとっては合理的な仕組みだ。
**110GBの大容量はahamoのみ。** 動画視聴やテザリングを多用する人は[ahamo大盛り 110GB](/ja/jp/plans/ahamo-110gb/)(月額4,950円)が選択肢になる。LINEMOには30GBを超えるプランがない。
---
## 通信品質比較
両社の回線品質を、OpenSignal Q1 2026のデータに基づいて比較する。SimFinderでは独自の[品質スコアリング](/ja/blog/scoring-system-guide/)を用いて各キャリアを評価している。
| 指標 | ahamo(docomo 5G) | LINEMO(SoftBank 5G) |
|------|-------------------|---------------------|
| **品質スコア(総合)** | **90** | 83 |
| 下り平均速度 | **150.3 Mbps** | 110.5 Mbps |
| 上り平均速度 | **18.5 Mbps** | 14.8 Mbps |
| レイテンシ | **22 ms** | 26 ms |
| カバレッジ | **95%** | 92% |
出典: OpenSignal Japan Mobile Network Experience Report Q1 2026
### 通信品質の評価
**全指標でahamoが上回っている。** 特に下り速度は150.3Mbps対110.5Mbpsで約36%の差がある。動画のストリーミングや大容量ファイルのダウンロードでは体感差が出る場面がある。
レイテンシ(遅延)はahamo 22ms、LINEMO 26msで、いずれもオンラインゲームや動画通話に十分な水準だ。ただし、ahamoの方が4ms低く、リアルタイム性が求められる用途ではわずかに有利になる。
カバレッジはahamo 95%、LINEMO 92%。docomoは山間部や地方での基地局展開に歴史的な強みがあり、地方在住や登山・キャンプが趣味の人にはこの3%の差が意味を持つ場合がある。
一方で、110.5Mbpsという下り速度は日常利用においてまったく不足のない速度であり、LINEMOの通信品質が低いわけではない。都市部での通常利用であれば、体感差はほぼないと考えてよい。
なお、ahamo・LINEMOはそれぞれdocomo・SoftBankの[サブブランド(MNO回線)](/ja/blog/mno-mvno-difference-guide/)であり、MVNO(格安SIM)と異なり回線品質の低下が起きにくい構造になっている。
---
## 通話オプション比較
| 項目 | ahamo | LINEMO(ベストプラン 3GB/10GB) | LINEMO(ベストプランV 30GB) |
|------|-------|------|------|
| 5分以内かけ放題 | **無料(標準付帯)** | 550円/月 | **無料(標準付帯)** |
| 完全かけ放題 | 1,100円/月 | 1,650円/月 | **1,100円/月** |
### 通話面のポイント
**ahamoは全プランで5分かけ放題が標準付帯。** 短い電話を頻繁にかける人には追加費用がかからない点で有利だ。
**LINEMOは30GBプラン(ベストプランV)ならahamoと同条件。** 5分かけ放題が標準付帯で、完全かけ放題も同額の1,100円。しかし、3GB・10GBプランでは5分かけ放題が月額550円のオプション扱いとなるため、通話が多い人は月額に加算して考える必要がある。
例として、10GBプランで5分かけ放題を付けた場合:
- LINEMO: 2,090円 + 550円 = **2,640円**
- ahamo: **2,970円**(5分かけ放題込み)
差額は330円で、ahamoの方が高いが30GBまで使える。通話を含めたコストパフォーマンスでは、使い方次第で逆転する。
---
## 独自機能比較
ahamo・LINEMOにはそれぞれ他社にない独自機能がある。この2つが選択における最大の差別化ポイントだ。
### ahamoの独自機能:海外82カ国データ利用
- 82カ国・地域で月間20GBまで追加料金なし
- 別途申し込み不要。現地に着いたらそのまま使える
- SIMカード交換や海外用Wi-Fiルーターのレンタルが不要
海外渡航が年に1回以上ある人にとっては、これだけでahamoを選ぶ理由になる。海外用Wi-Fiルーターのレンタル費用(1日500〜1,500円程度)を考えると、数日の渡航で数千円の節約になる計算だ。
### LINEMOの独自機能:LINEギガフリー
- LINEアプリのトーク・音声通話・ビデオ通話がデータ消費ゼロ
- 全プランに標準搭載(追加料金なし)
- データ容量を使い切った速度制限中でもLINEは通常速度で利用可能
LINEでの通話・ビデオ通話を日常的に使う人にとっては、実質的にデータ容量の節約になる。特に3GBプランのような小容量で運用する場合、LINEのデータがカウントされないことで容量不足を回避できる。
### 独自機能まとめ
| 機能 | ahamo | LINEMO |
|------|-------|--------|
| 海外データ利用 | **82カ国・20GBまで無料** | なし |
| LINEギガフリー | なし | **全プランで標準搭載** |
| 段階制料金 | なし | **ベストプラン(3GB/10GB)で採用** |
---
## こんな人におすすめ
### ahamoがおすすめな人
1. **月30GB以上使う人** — 30GB/110GBの2プランで大容量ニーズに対応。LINEMOには30GBを超えるプランがない
2. **通信速度を重視する人** — docomo回線の品質スコア90は業界トップクラス。テレワークのビデオ会議や動画視聴が多い人に向く
3. **海外渡航が多い人** — 82カ国・20GBの追加料金なし海外利用は他社にない強力な特典
4. **短い通話を頻繁にする人(30GB未満は不要な場合)** — 5分かけ放題が標準付帯で追加料金なし
→ [ahamoの詳細を見る](/ja/jp/carriers/jp-ahamo/)
### LINEMOがおすすめな人
1. **月10GB以下で十分な人** — 990円(3GB)〜2,090円(10GB)でahamoより大幅に安い
2. **LINEでの通話・ビデオ通話が多い人** — LINEギガフリーでデータ消費ゼロ。LINEを主な連絡手段にしている人に最適
3. **月によって使用量が変動する人** — 段階制料金(3GB↔10GB自動調整)で無駄が少ない
4. **とにかく月額を抑えたい人** — 月額990円は大手キャリア系ブランドで最安水準
→ [LINEMOの詳細を見る](/ja/jp/carriers/jp-linemo/)
**[あなたに合ったプランをSimFinderで比較する →](/ja/jp/search/)**
---
## ユーザーの声
X(旧Twitter)上での実際のユーザーの投稿を紹介する。
> 「人混みでahamoが激遅になるので乗り換えました!ahamoとLINEMO、30GBなら2970円で毎月の料金が同じです。5分通話無料もついてる。」
> — @kayococco_1224([元の投稿](https://x.com/kayococco_1224/status/1950862503027818876))
> 「ついでにahamoからLINEMOに乗り換えるか、マジで繋がらなさすぎる」
> — @gien0honnin([元の投稿](https://x.com/gien0honnin/status/2009807187632431612))
通信品質のデータではahamoが全国平均で上回っているが、特定のエリアや混雑時間帯では逆転するケースもあるようだ。通信品質は地域差が大きいため、全国平均だけで判断せず、自分の生活圏での実績も考慮に入れるとよい。
*※ 上記はX(旧Twitter)上の実際の投稿から引用しています。個人の感想であり、通信品質は地域・時間帯により異なります。*
---
## よくある質問
### Q. ahamoとLINEMOはどちらが安いですか?
使うデータ量による。月3GB以下ならLINEMOが月額990円で圧倒的に安く、10GBでもLINEMOが2,090円。30GBでは両社とも2,970円で同額。110GB必要な場合はahamoの大盛りプラン(4,950円)が唯一の選択肢になる。
### Q. 通信速度はどちらが速いですか?
OpenSignal Q1 2026のデータでは、ahamo(docomo回線)が下り150.3Mbps、LINEMO(SoftBank回線)が下り110.5Mbpsで、ahamoが約36%速い。レイテンシもahamo 22ms vs LINEMO 26msとahamoが優位。ただし、これは全国平均であり、エリアや時間帯によって変動する。
### Q. LINEMOのLINEギガフリーとは何ですか?
LINEアプリのトーク・音声通話・ビデオ通話のデータ消費がゼロになる機能。全プランに標準搭載で追加料金はかからない。データ容量を使い切った速度制限中でもLINEは通常速度で利用できる。
### Q. ahamoの海外利用はどのような仕組みですか?
82カ国・地域で、月間のデータ容量のうち20GBまでを追加料金なしでそのまま使える。別途申し込みや現地SIM購入が不要で、到着後すぐにデータ通信が可能。
### Q. ahamoからLINEMOへの乗り換えに手数料はかかりますか?
どちらも契約期間の縛りはなく、解約金は0円。MNP転出手数料も無料のため、乗り換えにかかる費用は基本的にない。LINEMOは期間限定で事務手数料無料キャンペーンを実施していることもある。
### Q. データの繰り越しはできますか?
ahamo・LINEMOともにデータの翌月繰り越しには対応していない。余ったデータは月末にリセットされる。
### Q. 家族割引はありますか?
ahamo・LINEMOともに家族割引の設定はない。ただし、ahamoはdocomoの家族グループにカウント対象として参加でき、docomo回線の家族の割引額に貢献できる(ahamo自体の料金は変わらない)。
---
## まとめ
| 比較軸 | 優位 | 理由 |
|--------|------|------|
| 月額料金(小容量) | **LINEMO** | 3GB 990円、10GB 2,090円で大幅に安い |
| 月額料金(30GB) | **引き分け** | 両社とも2,970円 |
| 月額料金(大容量) | **ahamo** | 110GB 4,950円、LINEMOには30GB超のプランなし |
| 通信速度 | **ahamo** | 下り150.3Mbps vs 110.5Mbps |
| カバレッジ | **ahamo** | 95% vs 92% |
| 通話オプション(30GB) | **引き分け** | 両社とも5分かけ放題無料 |
| 海外利用 | **ahamo** | 82カ国・20GB無料 |
| LINEヘビーユーザー | **LINEMO** | LINEギガフリー標準搭載 |
| 料金の柔軟性 | **LINEMO** | 段階制で使った分だけ |
どちらも大手キャリアのサブブランドとして高品質な通信を提供しており、「どちらを選んでも失敗」というレベルの差はない。自分の使い方(データ量・通話頻度・海外渡航・LINE依存度)に合わせて選ぶのが正解だ。
**[SimFinderであなたに最適なプランを見つける →](/ja/jp/search/)**
---
※ 料金は税込表記です。2026年3月時点の情報に基づいています。最新の情報は各キャリアの公式サイトでご確認ください。
※ 通信速度・カバレッジデータの出典: OpenSignal Japan Mobile Network Experience Report Q1 2026。品質スコアはSimFinder独自の評価基準によるものです([スコアリングの詳細](/ja/blog/scoring-system-guide/))。
※ 実際の通信速度は利用エリア・時間帯・端末・ネットワーク混雑状況により異なります。
================================================================================
# Airalo完全ガイド — 料金・使い方・メリット・デメリット
URL: https://sim-finder.com/ja/blog/airalo-review-guide-2026/
Type: blog (ja)
Published: 2026-03-25
## 結論: [Airalo](/ja/travel/providers/airalo/)は「必要な分だけ安く買いたい人」に最適
| 評価項目 | スコア |
|---------|-------|
| 料金の安さ | ★★★★★ |
| プランの豊富さ | ★★★★★ |
| 対応国の多さ | ★★★★★ |
| 日本語対応 | ★★★★☆ |
| 使いやすさ | ★★★★☆ |
| 速度・品質 | ★★★★☆ |
[Airalo](/ja/travel/providers/airalo/)は、世界200以上の国・地域に対応し、1GB $4(約600円)からデータを購入できる旅行eSIMプロバイダーだ。無制限プランに頼らず「必要なデータ量を必要な分だけ買う」スタイルのユーザーにとって、料金面で最も優れた選択肢になる。
一方で、無制限プランには1日3GBの実質的な速度制限があり、電話番号が付かないプランが大半を占める。データ使用量を気にしたくない人には[Holafly](/ja/travel/providers/holafly/)、通話も必要な場合は渡航先に応じた他のプロバイダーも検討する価値がある。
**[SimFinderで渡航先のeSIMプランを比較する →](/ja/travel/)**
---
## 目次
- [Airaloとは](#airaloとは)
- [料金体系 — 国別プラン一覧](#料金体系--国別プラン一覧)
- [メリット — Airaloが選ばれる理由](#メリット--airaloが選ばれる理由)
- [デメリット — 購入前に知っておくべきこと](#デメリット--購入前に知っておくべきこと)
- [他社との比較 — Airalo vs Holafly vs Nomad](#他社との比較--airalo-vs-holafly-vs-nomad)
- [使い方ガイド — 購入から利用開始まで](#使い方ガイド--購入から利用開始まで)
- [おすすめの人 / おすすめしない人](#おすすめの人--おすすめしない人)
- [よくある質問](#よくある質問)
- [まとめ](#まとめ)
---
## [Airalo](/ja/travel/providers/airalo/)とは
[Airalo](/ja/travel/providers/airalo/)(エアラロ)は、2019年にシンガポールで設立された**世界初のeSIMマーケットプレイス**だ。2026年現在、全世界で2,000万人以上のユーザーを抱え、旅行eSIM市場で最大級のシェアを持つ。
### 基本情報
| 項目 | 内容 |
|------|------|
| 設立 | 2019年(シンガポール) |
| 対応国・地域 | 200以上 |
| ユーザー数 | 2,000万人以上 |
| プラン形態 | 国別プラン / リージョナル(周遊)プラン / グローバルプラン |
| テザリング | 全プラン対応 |
| サポート言語 | 44言語(日本語対応) |
| アプリ | iOS / Android |
[Airalo](/ja/travel/providers/airalo/)の最大の特徴は「マーケットプレイス」型のモデルだ。渡航先の現地通信事業者が提供するeSIMプランを、[Airalo](/ja/travel/providers/airalo/)のアプリやウェブサイトから一括で比較・購入できる。そのため、同じ渡航先でも複数のプラン(データ量・期間・価格の組み合わせ)が用意されている。
---
## 料金体系 — 国別プラン一覧
[Airalo](/ja/travel/providers/airalo/)の料金は渡航先・データ量・期間によって異なる。以下は日本人旅行者に人気の4カ国のプラン一覧だ。
### 日本向けプラン
| データ量 | 期間 | 料金(USD) | 料金(円換算) |
|---------|------|-----------|-------------|
| 1 GB | 7日間 | $4.00 | 約600円 |
| 2 GB | 15日間 | $6.50 | 約975円 |
| 3 GB | 30日間 | $8.00 | 約1,200円 |
| 5 GB | 30日間 | $11.00 | 約1,650円 |
| 10 GB | 30日間 | $18.00 | 約2,700円 |
| 20 GB | 30日間 | $25.00 | 約3,750円 |
| 無制限 | 10日間 | $35.00 | 約5,250円 |
※ 無制限プランは1日3GB超過後1Mbpsに速度制限
### 韓国向けプラン
| データ量 | 期間 | 料金(USD) | 料金(円換算) |
|---------|------|-----------|-------------|
| 1 GB | 7日間 | $4.50 | 約675円 |
| 2 GB | 15日間 | $7.00 | 約1,050円 |
| 3 GB | 30日間 | $9.00 | 約1,350円 |
| 5 GB | 30日間 | $11.00 | 約1,650円 |
| 10 GB | 30日間 | $20.00 | 約3,000円 |
| 20 GB | 30日間 | $32.00 | 約4,800円 |
| 無制限 | 10日間 | $32.00 | 約4,800円 |
| 無制限 | 30日間 | $62.00 | 約9,300円 |
※ 無制限プランは1日3GB超過後5Mbpsに速度制限
### タイ向けプラン
| データ量 | 期間 | 料金(USD) | 備考 |
|---------|------|-----------|------|
| 1 GB | 7日間 | $4.00 | データのみ |
| 2 GB | 15日間 | $5.50 | データのみ |
| 3 GB | 30日間 | $6.00 | データのみ |
| 5 GB | 30日間 | $8.00 | データのみ |
| 50 GB | 10日間 | $9.90 | 通話100分付き |
| 10 GB | 30日間 | $11.00 | データのみ |
| 20 GB | 30日間 | $18.00 | データのみ |
| 無制限 | 10日間 | $35.00 | 3GB/日超過後1Mbps |
タイ向けには通話付きの50GB/10日間プラン($9.90)があり、コストパフォーマンスに優れる。
### アメリカ向けプラン(主要プラン抜粋)
| データ量 | 期間 | 料金(USD) | 備考 |
|---------|------|-----------|------|
| 1 GB | 7日間 | $4.00 | データのみ |
| 2 GB | 15日間 | $7.00 | データのみ |
| 3 GB | 30日間 | $9.00 | データのみ |
| 5 GB | 30日間 | $14.00 | データのみ |
| 5 GB | 30日間 | $19.00 | 通話50分+SMS50通 |
| 10 GB | 30日間 | $23.00 | データのみ |
| 10 GB | 30日間 | $30.00 | 通話100分+SMS100通 |
| 20 GB | 30日間 | $37.00 | データのみ |
| 50 GB | 30日間 | $59.00 | 通話500分+SMS500通 |
| 無制限 | 10日間 | $35.00 | 3GB/日超過後1Mbps |
アメリカ向けはデータのみプランと通話付きプランの2系統がある。通話が不要ならデータのみプランを選ぶことで大幅に節約できる。
**料金は2026年3月時点のデータです。最新料金は [SimFinderの旅行eSIM検索](/ja/travel/) で確認できます。**
---
## メリット — [Airalo](/ja/travel/providers/airalo/)が選ばれる理由
### 1. 圧倒的な料金の安さ
[Airalo](/ja/travel/providers/airalo/)の最大の強みは、少量データプランの安さだ。1GB/7日間が$4(約600円)から購入でき、レンタルWiFiの1日あたり500〜1,000円、キャリアの海外ローミング(1日最大2,980円)と比較すると破格の安さとなる。
特に「地図アプリとメッセージアプリが使えれば十分」というライトユーザーにとって、1〜3GBプランのコストパフォーマンスは他社を含めても最高水準だ。
### 2. 200以上の国・地域に対応
[Airalo](/ja/travel/providers/airalo/)は200以上の渡航先をカバーしている。アジア、ヨーロッパ、北米、南米、アフリカ、オセアニアのほぼ全域で利用可能だ。1つのアプリで世界中のeSIMを購入できるため、複数国を周遊する場合でもアプリを使い分ける必要がない。
また、リージョナルプラン(アジア周遊、ヨーロッパ周遊など)やグローバルプラン(Discover+: 137カ国対応)も提供しており、複数国の旅行にも対応する。
### 3. テザリング全プラン対応
[Airalo](/ja/travel/providers/airalo/)は全プランでテザリング(インターネット共有)に対応している。スマートフォンをWiFiルーター代わりにして、PCやタブレットでもデータ通信を利用可能だ。テザリング非対応の旅行eSIMプロバイダーも存在する中、[Airalo](/ja/travel/providers/airalo/)は全プランで対応している点は大きなメリットとなる。
### 4. 日本語サポートを含む44言語対応
[Airalo](/ja/travel/providers/airalo/)のアプリとウェブサイトは日本語を含む44言語に対応している。チャットサポートも日本語で利用可能だ。英語に不安がある場合でも、購入から設定、トラブル対応まで日本語で完結できる。
### 5. アプリ完結で簡単操作
プランの検索・購入からeSIMのインストール、データ残量の確認、追加購入(トップアップ)まで、すべて[Airalo](/ja/travel/providers/airalo/)アプリ内で完結する。QRコードの読み取りすら不要で、アプリから直接eSIMをインストールできる。操作画面もシンプルで、eSIMを初めて使うユーザーでも迷いにくい設計になっている。
### 6. プランの選択肢が豊富
同じ渡航先でも、データ量(1GB〜50GB〜無制限)と期間(3日〜30日)の組み合わせで複数のプランが用意されている。「短期旅行で少量」「長期滞在で大容量」など、自分の旅行スタイルに合った最適なプランを選べる柔軟性がある。
---
## デメリット — 購入前に知っておくべきこと
### 1. 電話番号が付かないプランが大半
[Airalo](/ja/travel/providers/airalo/)のプランは大半がデータ通信専用で、電話番号は付与されない。一部の国(アメリカ、タイなど)では通話・SMS付きプランもあるが、選択肢は限られる。レストランの予約確認やタクシーの手配で現地の電話番号が必要な場合は不便に感じる場面がある。
対処法としては、LINEやWhatsAppなどのVoIPアプリを活用するか、通話付きプランがある渡航先ではそちらを選択する。
### 2. 無制限プランの速度制限
[Airalo](/ja/travel/providers/airalo/)の「無制限」プランには実質的な制限がある。1日あたり3GBを超えると、速度が1Mbps(渡航先によっては5Mbps)に制限される。1Mbpsではメッセージの送受信やSNSの閲覧は可能だが、動画のストリーミングやビデオ通話は難しい。
「データ量を気にせず使いたい」という理由で無制限プランを選ぶ場合は、この制限を理解した上で購入する必要がある。速度制限なしの無制限データが必要な場合は、[Holafly](/ja/travel/providers/holafly/)など他のプロバイダーを検討した方がよい。
### 3. 通話付きプランは割高
通話・SMS付きプランは、データのみのプランと比較して大幅に割高になる。例えばアメリカ向け5GB/30日間の場合、データのみは$14.00だが、通話50分+SMS50通付きは$19.00と$5の差がある。通話をほとんど使わない場合は、データのみプランを選んでVoIPアプリで通話する方がコスパが良い。
### 4. 事前のeSIM対応確認が必須
これは[Airalo](/ja/travel/providers/airalo/)に限らないが、eSIM自体がすべてのスマートフォンに対応しているわけではない。iPhone XR/XS(2018年)以降、Google Pixel 3a(2019年)以降など、対応端末であることを渡航前に確認する必要がある。
---
## 他社との比較 — [Airalo](/ja/travel/providers/airalo/) vs [Holafly](/ja/travel/providers/holafly/) vs [Nomad](/ja/travel/providers/nomad/)
旅行eSIM市場で特に人気のある3社を比較する。
### 基本スペック比較
| 項目 | [Airalo](/ja/travel/providers/airalo/) | [Holafly](/ja/travel/providers/holafly/) | [Nomad](/ja/travel/providers/nomad/) |
|------|--------|---------|-------|
| 対応国 | 200以上 | 200以上 | 200以上 |
| 最低料金 | $4(1GB/7日) | $3.90(無制限/1日) | $4(1GB/7日) |
| テザリング | 対応 | 対応 | 対応 |
| 日本語サポート | 対応(44言語) | 対応(20言語) | 対応(13言語) |
| 複数国プラン | あり | あり | あり |
| 通話付きプラン | 一部あり | なし | なし |
### 日本向けプラン料金比較
| プラン | [Airalo](/ja/travel/providers/airalo/) | [Holafly](/ja/travel/providers/holafly/) | [Nomad](/ja/travel/providers/nomad/) |
|-------|--------|---------|-------|
| 1GB/7日 | **$4.00** | — | $4.00 |
| 3GB/30日 | $8.00 | — | **$7.50** |
| 5GB/30日 | **$11.00** | — | $10.00 |
| 10GB/30日 | $18.00 | — | **$17.00** |
| 無制限/7日 | — | **$27.30** | $23.00 |
| 無制限/10日 | $35.00 | $36.90(10日) | — |
※ [Holafly](/ja/travel/providers/holafly/)は無制限プランのみ。[Nomad](/ja/travel/providers/nomad/)は容量プラン+無制限プランの両方を提供
### 使い分けの指針
- **[Airalo](/ja/travel/providers/airalo/)** → 必要なデータ量が決まっている人、最安値で購入したい人。少量〜中量データの料金は3社中最安水準
- **[Holafly](/ja/travel/providers/holafly/)** → データ量を気にしたくない人。全プランが無制限データで速度制限の公開情報なし(ただし1日あたりの料金は高め)
- **[Nomad](/ja/travel/providers/nomad/)** → [Airalo](/ja/travel/providers/airalo/)と似た料金体系で、容量プランの一部は[Airalo](/ja/travel/providers/airalo/)より安い場合がある。無制限プランもあり、バランス型
料金は渡航先や時期によって変動する。**[SimFinderの旅行eSIM検索](/ja/travel/)** で最新の料金を渡航先ごとに比較できる。
**[SimFinderで渡航先のeSIMプランを比較する →](/ja/travel/)**
---
## 使い方ガイド — 購入から利用開始まで
[Airalo](/ja/travel/providers/airalo/)の利用は4ステップで完了する。詳しい端末別の設定手順は **[旅行用eSIMの設定方法 — iPhone/Android完全図解ガイド](/ja/blog/esim-setup-guide-iphone-android/)** を参照。
### ステップ1: アプリのダウンロードとアカウント登録
1. App Store(iPhone)またはGoogle Play(Android)から「[Airalo](/ja/travel/providers/airalo/)」アプリをダウンロード
2. メールアドレスまたはGoogleアカウントで登録
3. アプリの言語設定を日本語に変更
### ステップ2: プランの検索と購入
1. 渡航先の国名で検索
2. データ量・期間・料金を比較してプランを選択
3. 支払い方法を選択(クレジットカード、Apple Pay、Google Pay対応)
4. 購入完了
### ステップ3: eSIMのインストール(出発前に実施推奨)
1. 購入完了後、「マイeSIM」からインストールを開始
2. 方法1: アプリから直接インストール(推奨)
3. 方法2: QRコードを読み取ってインストール
4. インストールが完了したら、eSIMの名称を「旅行用」など分かりやすい名前に変更しておく
**WiFi環境が必要なため、出発前の自宅で済ませておくのがポイント。** インストールしただけではデータ消費は始まらない。
### ステップ4: 現地到着後の利用開始
1. 渡航先に到着したら、スマートフォンの設定でデータ通信を[Airalo](/ja/travel/providers/airalo/)のeSIMに切り替える
2. 自動でアクティベーション(利用開始)される
3. [Airalo](/ja/travel/providers/airalo/)アプリでデータ残量を確認可能
4. データが足りなくなった場合は、アプリから追加購入(トップアップ)
---
## おすすめの人 / おすすめしない人
### [Airalo](/ja/travel/providers/airalo/)をおすすめする人
- **少量データで十分な人** — 地図、メッセージ、SNS閲覧が中心で、動画はホテルのWiFiで見る
- **コスト重視の人** — 1GBあたりの単価を最小限に抑えたい
- **複数国を周遊する人** — リージョナルプランやグローバルプランで1つのeSIMで完結
- **海外出張が多い人** — 200以上の渡航先をアプリ1つで管理
- **eSIM初心者** — 日本語対応のアプリとサポートで安心
### [Airalo](/ja/travel/providers/airalo/)をおすすめしない人
- **データ量を一切気にしたくない人** → [Holafly](/ja/travel/providers/holafly/)の無制限プランの方が適している
- **現地の電話番号が必要な人** → 対応国が限られるため、現地SIMカードの方が確実
- **動画視聴やビデオ通話を大量に行う人** → 無制限プランの速度制限(1Mbps)に注意
- **通信速度を最優先する人** → 現地キャリアの直接契約の方が安定する場合がある
**[SimFinderで渡航先のeSIMプランを比較する →](/ja/travel/)**
---
## よくある質問
**Q. [Airalo](/ja/travel/providers/airalo/)は日本語に対応している?**
はい。[Airalo](/ja/travel/providers/airalo/)のアプリとウェブサイトは日本語に対応している。サポート対応言語も日本語を含む44言語に対応しており、日本語でのチャットサポートが利用可能だ。
**Q. [Airalo](/ja/travel/providers/airalo/)のテザリング(インターネット共有)は使える?**
はい。[Airalo](/ja/travel/providers/airalo/)は全プランでテザリングに対応している。スマートフォンをモバイルルーター代わりにして、PCやタブレットでもデータ通信を共有できる。
**Q. [Airalo](/ja/travel/providers/airalo/)の無制限プランは本当に無制限?**
実質的には制限がある。[Airalo](/ja/travel/providers/airalo/)の無制限プランでは、1日あたり3GBを超えると速度が1Mbps(国によっては5Mbps)に制限される。メッセージやSNSの閲覧は可能だが、動画視聴やビデオ通話には支障が出る場合がある。
**Q. [Airalo](/ja/travel/providers/airalo/)で電話はできる?**
ほとんどのプランはデータ通信専用で電話番号は付与されない。ただし、一部の国(アメリカ、タイなど)では通話・SMS付きプランも提供されている。通話が必要な場合はLINEやWhatsAppなどのVoIPアプリの利用が現実的だ。
**Q. [Airalo](/ja/travel/providers/airalo/)は出発前に設定できる?**
はい。出発前にeSIMのインストール(QRコード読み取りまたはアプリからの直接インストール)まで済ませておける。アクティベーション(利用開始)は渡航先で現地ネットワークに接続した時点で自動的に行われるため、データ消費は現地到着後から始まる。
**Q. [Airalo](/ja/travel/providers/airalo/)とレンタルWiFiはどちらがお得?**
短期旅行で少量のデータなら、[Airalo](/ja/travel/providers/airalo/)の方が大幅に安い。例えば日本向け1GB/7日間は$4(約600円)で、レンタルWiFiの1日500〜1,000円と比べて圧倒的に安価だ。ただし大容量データが必要で複数人でシェアする場合は、レンタルWiFiの方がコスパが良い場合もある。
**Q. [Airalo](/ja/travel/providers/airalo/)のデータを追加購入(トップアップ)できる?**
はい。有効期限内であれば、アプリから同じ渡航先のデータパッケージを追加購入できる。旅行中にデータが足りなくなった場合でも、その場で容量を追加できるため便利だ。
---
## まとめ
[Airalo](/ja/travel/providers/airalo/)は「必要な分だけ、安く」データを購入したい旅行者にとって最適なeSIMプロバイダーだ。200以上の渡航先対応、1GB $4〜の業界最安水準の料金、テザリング全プラン対応、日本語サポートという基本スペックの高さが強みとなる。
一方、無制限プランの速度制限(1日3GB超過後1Mbps)や、電話番号が付かないプランが大半という点は購入前に理解しておく必要がある。
旅行eSIMプロバイダーの選択に迷ったら、まず[Airalo](/ja/travel/providers/airalo/)の少量プランから試してみるのが手堅い選択だ。1GB $4(約600円)と失敗してもダメージが小さく、アプリの使い勝手や通信品質を実体験で判断できる。
**[SimFinderで渡航先のeSIMプランを比較する →](/ja/travel/)**
渡航先が決まっている場合は、SimFinderの検索機能で[Airalo](/ja/travel/providers/airalo/)を含む11社のプランを料金・データ量・期間で横断比較できる。最適なプランを見つけてほしい。
旅行eSIMの全体像や他のプロバイダーの詳細については **[海外旅行用eSIM完全ガイド2026](/ja/blog/travel-esim-complete-guide-2026/)** を参照。端末別の設定手順は **[旅行用eSIMの設定方法 — iPhone/Android完全図解ガイド](/ja/blog/esim-setup-guide-iphone-android/)** で解説している。
---
*この記事にはアフィリエイトリンクが含まれています。リンク経由で購入された場合、SimFinderに紹介手数料が支払われます。記事内容(レビュー・評価・推奨)は広告主の影響を受けず、実データに基づいて記述しています。料金データは2026年3月16日時点の情報です。最新料金は各プロバイダーの公式サイトまたは [SimFinderの旅行eSIM検索](/ja/travel/) でご確認ください。*
================================================================================
# Android 17、iPhoneからeSIMもアプリ不要で移行可能に
URL: https://sim-finder.com/ja/blog/android-17-iphone-esim-transfer-2026/
Type: blog (ja)
Published: 2026-07-23T09:00:00+09:00
Googleは2026年7月22日(日本時間)、Android 17に搭載される新しいデータ移行機能を発表しました。最大の注目点は、iPhoneからAndroid端末への乗り換え時に、写真や連絡先といった基本データに加えて、**Wi-Fi認証情報やeSIMまでアプリ不要で無線引き継ぎできる**ようになったことです。SIMの乗り換えや端末の買い替えを検討している人にとって、移行のハードルが下がる動きといえます。
## 何が発表されたのか
Google公式ブログ「[Switch from iPhone to Android](https://blog.google/products-and-platforms/platforms/android/galaxy-unpacked-switch-from-iphone-to-android/)」(2026年7月22日)によると、Android 17に組み込まれた新しい移行機能では、iPhoneから次のデータを引き継げます。
- 写真・動画
- 連絡先・メッセージ・カレンダー
- Googleアカウント情報
- パスワード
- **Wi-Fi認証情報**
- **eSIM**
このうちWi-Fi認証情報とeSIMは今回新たに移行対象へ加わったデータです。Googleは公式ブログで「移行用アプリのダウンロードが不要で、重要なデータを無線で引き継げる」と説明しています。国内でもImpress Watch([2026年7月23日の記事](https://www.watch.impress.co.jp/docs/news/2127172.html))やケータイWatchが同様の内容を報じています。
## 対応端末と提供状況
Google公式ブログによれば、この移行機能は一部のPixelシリーズで既にロールアウトが始まっています。また、同じく7月22日に発表されたSamsungの新型折りたたみスマートフォン「Galaxy Z Flip8」「Galaxy Z Fold8」シリーズでも利用可能です。Googleは今後、より多くのAndroid端末へ対応を広げる予定としています。
なお、移行に必要なiOS側の条件については、今回参照した各記事では具体的なバージョンが明記されていません。実際に移行を行う際は、Googleの案内ページで最新の対応条件を確認するのが確実です。
## SIM乗り換えユーザーへの影響
この機能がSimFinderの読者にとって重要なのは、**eSIMが移行対象に含まれた点**です。従来、iPhoneからAndroidへ乗り換える際にeSIMを使い続けるには、キャリアでのeSIM再発行や、新端末でのプロファイル再設定といった手間が発生するケースがありました。移行フローにeSIMが組み込まれることで、こうした作業が簡素化される可能性があります。
ただし、eSIMの移行が実際にスムーズに行えるかどうかは、契約している通信事業者(MNO/MVNO)側の対応状況にも左右されます。格安SIMを含め、事業者ごとにeSIMの取り扱いや再発行手数料の有無は異なるため、乗り換え前に自分の契約先の案内を確認しておくと安心です。
## まとめ
Android 17の新移行機能は、iPhoneからの乗り換えで長年の課題だった「連携データの引き継ぎ」を大きく前進させるものです。特にeSIMとWi-Fi認証情報がアプリ不要で移せるようになった点は、端末の買い替えやSIMの見直しを考えるユーザーにとって実務的なメリットになります。まずはPixelおよびGalaxy Z Flip8/Fold8から順次利用可能となっており、今後の対応端末拡大が期待されます。
*出典: [Google公式ブログ(2026年7月22日)](https://blog.google/products-and-platforms/platforms/android/galaxy-unpacked-switch-from-iphone-to-android/) / [Impress Watch(2026年7月23日)](https://www.watch.impress.co.jp/docs/news/2127172.html)*
================================================================================
# オーストラリアのSIMカード完全ガイド2026 — 8社25プランを徹底比較
URL: https://sim-finder.com/ja/blog/best-sim-plans-australia-2026/
Type: blog (ja)
Published: 2026-03-19
> **この記事はワーホリ・留学・駐在などオーストラリアに長期滞在する方向けの、現地SIMプラン比較ガイドです。**
> 短期旅行用のeSIMをお探しの方は「[海外旅行用eSIM完全ガイド](/ja/blog/travel-esim-complete-guide-2026/)」をご覧ください。
## 結論: オーストラリアSIMのおすすめ3選
| おすすめ | プラン | 月額 | ポイント |
|---------|-------|------|---------|
| **最安** | [ALDI Mobile](/ja/au/carriers/aldi/) Basic 12GB | $23 | [Telstra](/ja/au/carriers/telstra/)ネットワーク、繰り越しあり |
| **バランス** | [Belong](/ja/au/carriers/belong/) 100GB | $49 | [Telstra](/ja/au/carriers/telstra/) 5G、繰り越しあり、最も多くの人に最適 |
| **速度重視** | [amaysim](/ja/au/carriers/amaysim/) 15GB | $30 | [Optus](/ja/au/carriers/optus/) 5G(最速145 Mbps)、繰り越しあり |
**[SimFinderでオーストラリアの全25プランを比較する →](/ja/au/search/)**
以下、8社25プランのデータを元に詳しく解説する。
## 目次
- [3大ネットワーク — カバレッジが全てを決める](#オーストラリアの3大ネットワーク--カバレッジが全てを決める)
- [格安キャリアの圧倒的なコスパ](#格安キャリアの圧倒的なコスパ--mnoとの価格差3055)
- [目的別おすすめプラン](#目的別おすすめプラン)
- [データ繰り越し — 隠れた優位性](#データ繰り越し--格安キャリアだけの隠れた優位性)
- [5GとeSIM対応状況](#5gとesim--対応状況)
- [ワーホリ・留学生向けポイント](#ワーホリ留学生が知っておくべきポイント)
- [ユーザーの声](#ユーザーの声)
- [よくある質問](#よくある質問)
- [まとめ](#まとめ)
---
オーストラリアには物理ネットワークが3つしかない。[Telstra](/ja/au/carriers/telstra/)、[Optus](/ja/au/carriers/optus/)、[Vodafone](/ja/au/carriers/vodafone/)だ。残りの5社は、この3社のネットワークを借りて割安にサービスを提供する格安キャリア(MVNO・サブブランド)にすぎない。
SimFinderのデータベースでは**8社25プラン**を追跡している。全プランが契約縛りなし、eSIM対応、通話かけ放題。月額AUD $23〜$99の範囲で、同じネットワーク上でも価格差は最大2倍以上ある。
---
## オーストラリアの3大ネットワーク — カバレッジが全てを決める
The US has **three physical networks**. Every carrier, no matter how it's branded, runs on one (or in [US Mobile](/en/us/carriers/usmobile/)'s case, two) of these.
| Network Owner | Type | Download Speed | Coverage Score | Overall Score | Carriers Using This Network |
|---|---|---|---|---|---|
| **[T-Mobile](/en/us/carriers/tmobile/)** | MNO | 156.4 Mbps | 92/100 | 88/100 | [T-Mobile](/en/us/carriers/tmobile/), [Metro](/en/us/carriers/metro/), [Mint Mobile](/en/us/carriers/mint/), [Google Fi](/en/us/carriers/googlefi/), [Tello](/en/us/carriers/tello/), [US Mobile](/en/us/carriers/usmobile/) |
| **[AT&T](/en/us/carriers/att/)** | MNO | 122.8 Mbps | 95/100 | 86/100 | [AT&T](/en/us/carriers/att/), [Cricket Wireless](/en/us/carriers/cricket/), [US Mobile](/en/us/carriers/usmobile/) |
| **[Verizon](/en/us/carriers/verizon/)** | MNO | 131.5 Mbps | 96/100 | 87/100 | [Verizon](/en/us/carriers/verizon/), [Visible](/en/us/carriers/visible/), [US Mobile](/en/us/carriers/usmobile/) |
*Quality data: OpenSignal Q1 2026, measured January 2026*
**[T-Mobile](/en/us/carriers/tmobile/) is the speed king** at 156.4 Mbps average download, and it also has the most carriers on its network — 6 out of 10 carriers in our database use [T-Mobile](/en/us/carriers/tmobile/)'s infrastructure. This makes [T-Mobile](/en/us/carriers/tmobile/) the backbone of the US budget carrier market.
**[Verizon](/en/us/carriers/verizon/) has the best coverage** (96/100) and narrowly edges out [AT&T](/en/us/carriers/att/) (95/100) in reach. For rural areas or cross-country road trips, [Verizon](/en/us/carriers/verizon/) or [AT&T](/en/us/carriers/att/) is the safer bet.
**[US Mobile](/en/us/carriers/usmobile/) is unique**: it operates on both [T-Mobile](/en/us/carriers/tmobile/) and [Verizon](/en/us/carriers/verizon/) networks, allowing customers to switch between them through the app — a feature they call "Super Carrier."
---
## Price Breakdown: What Every Carrier Charges
All 40 plans include eSIM support and 5G access. Most include unlimited voice calls. The key variables are price, data allowance, tethering, and contract requirements.
### MNO Plans ([T-Mobile](/en/us/carriers/tmobile/), [AT&T](/en/us/carriers/att/), [Verizon](/en/us/carriers/verizon/))
In March 2026, [AT&T](/en/us/carriers/att/) retired its Value Plus, Unlimited Starter, Unlimited Extra, and Unlimited Premium plans in favor of a "2.0" lineup. As of August 2026 that lineup is Value 2.0 ($40), Extra 2.0 ($50), Premium 2.0 ($60), and Elite 2.0 ($80) — all single-line prices after the $10/mo paperless billing discount, taxes and fees extra.
| Carrier | Plan | Price/mo | Data | Tethering | Contract |
|---|---|---|---|---|---|
| [AT&T](/en/us/carriers/att/) | Value 2.0 | $40 | Unlimited | Yes | No |
| [T-Mobile](/en/us/carriers/tmobile/) | Essentials Saver | $50 | Unlimited | Yes | No |
| [T-Mobile](/en/us/carriers/tmobile/) | Essentials | $60 | Unlimited | Yes | No |
| [Verizon](/en/us/carriers/verizon/) | Unlimited Welcome | $65 | Unlimited | No | No |
| [AT&T](/en/us/carriers/att/) | Extra 2.0 | $50 | Unlimited | Yes | No |
| [T-Mobile](/en/us/carriers/tmobile/) | Go5G | $75 | Unlimited | Yes | No |
| [Verizon](/en/us/carriers/verizon/) | Unlimited Plus | $80 | Unlimited | Yes | No |
| [T-Mobile](/en/us/carriers/tmobile/) | Go5G Plus | $85 | Unlimited | Yes | No |
| [AT&T](/en/us/carriers/att/) | Premium 2.0 | $60 | Unlimited | Yes | No |
| [AT&T](/en/us/carriers/att/) | Elite 2.0 | $80 | Unlimited | Yes | No |
| [Verizon](/en/us/carriers/verizon/) | Unlimited Ultimate | $95 | Unlimited | Yes | No |
| [T-Mobile](/en/us/carriers/tmobile/) | Go5G Next | $100 | Unlimited | Yes | No |
MNO prices range from $50/month ([AT&T](/en/us/carriers/att/) Value 2.0 and [T-Mobile](/en/us/carriers/tmobile/) Essentials Saver) to $100/month ([T-Mobile](/en/us/carriers/tmobile/) Go5G Next). Every MNO plan offers unlimited data — there are no capped-data plans from the Big Three.
### Sub-brand Plans (Cricket, Metro, [Visible](/en/us/carriers/visible/))
| Carrier | Network | Plan | Price/mo | Data | Tethering | Contract |
|---|---|---|---|---|---|---|
| Metro | [T-Mobile](/en/us/carriers/tmobile/) | Flex Unlimited | $25 | Unlimited | Yes | No |
| [Visible](/en/us/carriers/visible/) | [Verizon](/en/us/carriers/verizon/) | Base | $25 | Unlimited | Yes | No |
| Cricket | [AT&T](/en/us/carriers/att/) | Sensible 10GB | $30 | 10GB | Yes | No |
| Cricket | [AT&T](/en/us/carriers/att/) | Unlimited | $35 | Unlimited | No | No |
| [Visible](/en/us/carriers/visible/) | [Verizon](/en/us/carriers/verizon/) | [Visible](/en/us/carriers/visible/)+ | $35 | Unlimited | Yes | No |
| Metro | [T-Mobile](/en/us/carriers/tmobile/) | Flex Starter Plus | $40 | Unlimited | Yes | No |
| Cricket | [AT&T](/en/us/carriers/att/) | Smart Unlimited | $45 | Unlimited | Yes | No |
| [Visible](/en/us/carriers/visible/) | [Verizon](/en/us/carriers/verizon/) | [Visible](/en/us/carriers/visible/)+ Pro | $45 | Unlimited | Yes | No |
| Cricket | [AT&T](/en/us/carriers/att/) | Supreme Unlimited | $55 | Unlimited | Yes | No |
| Metro | [T-Mobile](/en/us/carriers/tmobile/) | Flex Plus | $60 | Unlimited | Yes | No |
Sub-brands start at **$25/month for unlimited data** — that's half the cheapest MNO plan. [Visible](/en/us/carriers/visible/) and Metro both hit this price point, on [Verizon](/en/us/carriers/verizon/) and [T-Mobile](/en/us/carriers/tmobile/) networks respectively.
### MVNO Plans (Mint, [US Mobile](/en/us/carriers/usmobile/), Google Fi, [Tello](/en/us/carriers/tello/))
| Carrier | Network | Plan | Price/mo | Data | Tethering | Contract |
|---|---|---|---|---|---|---|
| [Tello](/en/us/carriers/tello/) | [T-Mobile](/en/us/carriers/tmobile/) | 1GB | $10 | 1GB | Yes | No |
| [US Mobile](/en/us/carriers/usmobile/) | Multi | Light 2GB | $10 | 2GB | No | No |
| [Tello](/en/us/carriers/tello/) | [T-Mobile](/en/us/carriers/tmobile/) | 5GB | $15 | 5GB | Yes | No |
| Mint | [T-Mobile](/en/us/carriers/tmobile/) | 6GB | $15 | 6GB | Yes | 12-mo |
| [US Mobile](/en/us/carriers/usmobile/) | Multi | Unlimited Flex 10GB | $17.50 | 10GB | Yes | 12-mo |
| Mint | [T-Mobile](/en/us/carriers/tmobile/) | 17GB | $20 | 17GB | Yes | 12-mo |
| Google Fi | [T-Mobile](/en/us/carriers/tmobile/) | Flexible 1GB | $20 | 1GB | Yes | No |
| [US Mobile](/en/us/carriers/usmobile/) | Multi | Unlimited Starter | $25 | Unlimited | Yes | No |
| [Tello](/en/us/carriers/tello/) | [T-Mobile](/en/us/carriers/tmobile/) | Unlimited | $25 | Unlimited | Yes | No |
| Mint | [T-Mobile](/en/us/carriers/tmobile/) | 20GB | $25 | 20GB | Yes | 12-mo |
| [US Mobile](/en/us/carriers/usmobile/) | Multi | Unlimited Premium | $25 | Unlimited | Yes | No |
| Mint | [T-Mobile](/en/us/carriers/tmobile/) | Unlimited | $30 | Unlimited | Yes | 12-mo |
| Google Fi | [T-Mobile](/en/us/carriers/tmobile/) | Unlimited Essentials | $35 | Unlimited | Yes | No |
| Google Fi | [T-Mobile](/en/us/carriers/tmobile/) | Unlimited Standard | $50 | Unlimited | Yes | No |
| Google Fi | [T-Mobile](/en/us/carriers/tmobile/) | Unlimited Premium | $65 | Unlimited | Yes | No |
MVNOs are where the deepest discounts live. **[Tello](/en/us/carriers/tello/) starts at just $10/month** for 1GB with unlimited calls on [T-Mobile](/en/us/carriers/tmobile/)'s network. [US Mobile](/en/us/carriers/usmobile/) Unlimited Starter offers unlimited data for $25/month — that is $25 less than the cheapest MNO unlimited plan.
The trade-off: [Mint Mobile](/en/us/carriers/mint/) and [US Mobile](/en/us/carriers/usmobile/) Unlimited Flex require 12-month prepaid commitments for their lowest prices. If you want month-to-month flexibility with MVNO pricing, [Tello](/en/us/carriers/tello/), [US Mobile](/en/us/carriers/usmobile/) (Basic/Premium), and Google Fi are the options.
**[Find Your Best Match →](/en/us/search/)**
---
## Best Value Plans by Use Case
### Lightest Use (Under $15/month)
**[Tello](/en/us/carriers/tello/) 1GB — $10/month** — Tied for the cheapest plan in the US market. Runs on [T-Mobile](/en/us/carriers/tmobile/)'s network with 5G, eSIM, tethering, and unlimited calls. No contract. If you primarily use WiFi and just need a phone number with a small data cushion, this is as cheap as it gets.
**[US Mobile](/en/us/carriers/usmobile/) Light 2GB — $10/month** — Same price as [Tello](/en/us/carriers/tello/) but with double the data. Multi-network capability ([T-Mobile](/en/us/carriers/tmobile/) or [Verizon](/en/us/carriers/verizon/)). No tethering on this tier, but at $10/month for 2GB with 5G, the value is strong.
### Best Balance of Price and Features
**[Visible](/en/us/carriers/visible/) Base — $25/month** — The standout plan for most users. Unlimited data on [Verizon](/en/us/carriers/verizon/)'s network (coverage score 96/100), 5G, eSIM, tethering, and no contract. At $25 for unlimited on the carrier with the best coverage score, this is the plan SimFinder's data suggests works for the widest range of users. No family discount, but at $25 per line there is little room for one.
**Metro Flex Unlimited — $25/month** — The [T-Mobile](/en/us/carriers/tmobile/) network equivalent of [Visible](/en/us/carriers/visible/). Same $25 price, unlimited data, 5G, eSIM, and tethering. Choose between [Visible](/en/us/carriers/visible/) and Metro based on which network covers your area better: [Verizon](/en/us/carriers/verizon/) (96 coverage) or [T-Mobile](/en/us/carriers/tmobile/) (92 coverage).
### Budget-Conscious with More Data
**[Mint Mobile](/en/us/carriers/mint/) 17GB — $20/month** — If you can commit to 12 months upfront, Mint delivers 17GB with 5G, eSIM, tethering, and data rollover on [T-Mobile](/en/us/carriers/tmobile/)'s network. Data rollover is uncommon in the US market, and Mint is one of only two carriers in our database that offers it.
**[US Mobile](/en/us/carriers/usmobile/) Unlimited Starter — $25/month** — Unlimited data with no annual commitment. Runs on your choice of [T-Mobile](/en/us/carriers/tmobile/) or [Verizon](/en/us/carriers/verizon/). Includes 5G, eSIM, and tethering. The cheapest month-to-month unlimited plan in the US.
### Heavy Data Users Who Want Quality
**[T-Mobile](/en/us/carriers/tmobile/) Go5G — $75/month** — Full MNO priority on the fastest US network (156.4 Mbps). Unlimited everything with tethering. If speed and priority matter — for remote work, streaming, or gaming — this is the entry point for premium service.
**[Verizon](/en/us/carriers/verizon/) Unlimited Plus — $80/month** — If [Verizon](/en/us/carriers/verizon/) coverage is essential (96/100 coverage score), this mid-tier plan adds tethering and premium data priority. The $15 premium over [Verizon](/en/us/carriers/verizon/)'s entry-level Welcome plan ($65) buys significantly better tethering and data handling during congestion.
**[Find Your Best Match on SimFinder →](/en/us/search/)**
---
## 5G and eSIM: What's Available
### eSIM
All 40 plans in the US support eSIM — a **100% adoption rate**. The US market has fully embraced eSIM. If your phone supports it, you can activate any of these plans without a physical SIM card.
### 5G
All 40 plans include 5G access — also **100%**. Unlike some markets where 5G is reserved for premium tiers, the US market has made 5G standard across all price points. Even [Tello](/en/us/carriers/tello/)'s $10/month plan includes 5G.
This means the US market is unusually competitive on features — the differentiators are price, data allowance, network priority, and whether tethering is included. Features like 5G and eSIM are no longer a way for carriers to segment their plans.
---
## Family Plans and Multi-Line Discounts
Family discounts are a major differentiator in the US market. 30 of 40 plans offer some form of multi-line discount. Here are the most significant savings:
| Carrier | Plan | Single Line | Multi-Line Discount | Effective Price (2+ lines) |
|---|---|---|---|---|
| [AT&T](/en/us/carriers/att/) | Premium 2.0 | $60 | -$10.00/line | $50/line |
| [AT&T](/en/us/carriers/att/) | Extra 2.0 | $50 | -$10.00/line | $40/line |
| [T-Mobile](/en/us/carriers/tmobile/) | Go5G Next | $100 | -$40.00/line | $60/line |
| [AT&T](/en/us/carriers/att/) | Value 2.0 | $40 | -$10.00/line | $30/line |
| [T-Mobile](/en/us/carriers/tmobile/) | Go5G Plus | $85 | -$35.00/line | $50/line |
| [Verizon](/en/us/carriers/verizon/) | Unlimited Plus | $80 | -$35.00/line | $45/line |
| [Verizon](/en/us/carriers/verizon/) | Unlimited Ultimate | $95 | -$35.00/line | $60/line |
| [T-Mobile](/en/us/carriers/tmobile/) | Go5G | $75 | -$30.00/line | $45/line |
**MNO multi-line discounts can be dramatic**: [AT&T](/en/us/carriers/att/) Value 2.0 drops from $50 to $15 per line with 2+ lines — a 70% discount. At that price, it's competitive with MVNOs while keeping full MNO priority.
However, **[Visible](/en/us/carriers/visible/), [Tello](/en/us/carriers/tello/), and [US Mobile](/en/us/carriers/usmobile/) Light do not offer family discounts**. If you're a single-line user, these carriers remain the best value since their base prices are already low.
---
## Compare Plans on SimFinder
The data in this guide comes from SimFinder's database, which tracks 35 US plans across 10 carriers. Filter by price, data, 5G, eSIM, or tethering to find your best match.
**[Compare US SIM Plans →](/en/us/search/)**
---
## What Users Say
Real experiences from people using US SIMs.
> "TL;DR: most people with 1 line should trade their phone in to Apple, get the unlocked model, and go with a prepaid carrier such as [Visible](/en/us/carriers/visible/) or [US Mobile](/en/us/carriers/usmobile/). You can save even more with carriers such as [Mint Mobile](/en/us/carriers/mint/) depending on how much data you need."
> — @stetsondoggett ([original post](https://x.com/stetsondoggett/status/1965897263609532516))
> "[US Mobile](/en/us/carriers/usmobile/) launched a feature this year that enables customers to switch carrier networks on the same phone between [AT&T](/en/us/carriers/att/), [Verizon](/en/us/carriers/verizon/), and [T-Mobile](/en/us/carriers/tmobile/) (hence the name, Super Carrier). We call this 'teleporting.'"
> — @larryvc ([original post](https://x.com/larryvc/status/1874108405134368918))
*Individual experiences may vary based on location and network conditions.*
---
## Frequently Asked Questions
### What is the cheapest unlimited plan in the US?
[US Mobile](/en/us/carriers/usmobile/) Unlimited Starter at $25/month and [Tello](/en/us/carriers/tello/) Unlimited at $25/month are the cheapest unlimited plans. Metro Flex Unlimited and [Visible](/en/us/carriers/visible/) also offer unlimited data at $25/month. All four include 5G and eSIM support.
### Is there a real difference between MNO and MVNO plans?
MVNOs use the same towers as MNOs, so coverage maps are identical. The main difference is data priority — during network congestion, MNO postpaid customers get priority over MVNO users, which can mean slower speeds in crowded areas. For most users in most places, the difference is unnoticeable.
### Do all US plans support eSIM?
Yes. All 40 plans tracked by SimFinder across all 10 US carriers support eSIM. This is a 100% adoption rate as of August 2026.
### Which US network has the best coverage?
[Verizon](/en/us/carriers/verizon/) leads with a coverage score of 96/100, followed closely by [AT&T](/en/us/carriers/att/) at 95/100. [T-Mobile](/en/us/carriers/tmobile/) scores 92/100. For rural and remote areas, [Verizon](/en/us/carriers/verizon/) or [AT&T](/en/us/carriers/att/) is the safer choice. [T-Mobile](/en/us/carriers/tmobile/) leads in download speed at 156.4 Mbps.
### Are prepaid plans in the US contract-free?
Most are. 32 of 40 plans in our database are month-to-month with no contract. The exceptions are [Mint Mobile](/en/us/carriers/mint/) (12-month prepaid) and [US Mobile](/en/us/carriers/usmobile/) Unlimited Flex (12-month prepaid), which require upfront payment for a year but offer lower per-month pricing in return.
### What is the best SIM plan for someone visiting the US?
For short visits, [Visible](/en/us/carriers/visible/) at $25/month is ideal — unlimited data on [Verizon](/en/us/carriers/verizon/)'s network, no contract, eSIM activation before arrival, and 5G included. For longer stays where cost matters most, [Mint Mobile](/en/us/carriers/mint/) 17GB at $20/month offers strong value if you can commit to 12 months.
### Can I switch between [T-Mobile](/en/us/carriers/tmobile/) and [Verizon](/en/us/carriers/verizon/) networks?
[US Mobile](/en/us/carriers/usmobile/)'s "Super Carrier" feature lets you switch between [T-Mobile](/en/us/carriers/tmobile/) and [Verizon](/en/us/carriers/verizon/) networks on the same phone through their app. No other carrier offers this multi-network flexibility.
---
## Key Takeaways
The US SIM market in 2026:
- **10 carriers, 40 plans** — prices from $10/month ([Tello](/en/us/carriers/tello/) 1GB and [US Mobile](/en/us/carriers/usmobile/) Light 2GB) to $100/month ([T-Mobile](/en/us/carriers/tmobile/) Go5G Next)
- **Three networks matter**: [T-Mobile](/en/us/carriers/tmobile/) (speed king, 156.4 Mbps), [Verizon](/en/us/carriers/verizon/) (coverage king, 96/100), [AT&T](/en/us/carriers/att/) (balanced, 95/100 coverage)
- **Budget carriers save 50-75%**: [Visible](/en/us/carriers/visible/) offers unlimited on [Verizon](/en/us/carriers/verizon/) for $25 vs [Verizon](/en/us/carriers/verizon/)'s own $65 entry price. [US Mobile](/en/us/carriers/usmobile/) Unlimited Starter is $25 vs [T-Mobile](/en/us/carriers/tmobile/)'s $50.
- **5G and eSIM are universal** — every single plan in the US market supports both
- **Family discounts change the math**: [AT&T](/en/us/carriers/att/) Value 2.0 drops from $50 to $15/line with multi-line, making MNOs competitive with MVNOs for families
- **Data rollover is rare**: only [Mint Mobile](/en/us/carriers/mint/) offers it among the carriers tracked, making it a distinct advantage for moderate data users
- **[US Mobile](/en/us/carriers/usmobile/) stands alone** as the only carrier allowing network switching between [T-Mobile](/en/us/carriers/tmobile/) and [Verizon](/en/us/carriers/verizon/)
For single-line users, the strategy is simple: pick [Visible](/en/us/carriers/visible/) ($25 unlimited on [Verizon](/en/us/carriers/verizon/)) or [US Mobile](/en/us/carriers/usmobile/) Unlimited Starter ($25 unlimited, multi-network). For families, run the multi-line math on MNO plans — the per-line discounts can be significant.
**[Find Your Best US SIM Plan →](/en/us/search/)**
---
*Plan data is current as of March 2026; AT&T, Verizon, and Tello pricing re-verified July 2026 following AT&T's March 2026 "2.0" plan relaunch and Verizon's May 2026 Unlimited Ultimate price increase. Prices shown are pre-tax (US plans are quoted before sales tax, which varies by state). Check carrier websites for the latest information.*
*Compare all plans side by side using [SimFinder's comparison tool](/en/us/search/).*
================================================================================
# EE Launches 8Gbps Full Fibre at £74.99 in Guildford and Woking
URL: https://sim-finder.com/en/blog/ee-uk-8gbps-advanced-full-fibre-launch-2026/
Type: blog (en)
Published: 2026-08-02T09:00:00+09:00
EE has begun selling home broadband at up to 8Gbps, becoming the first major UK provider to offer that speed to consumers over Openreach's XGS-PON full fibre network. The new "Advanced Full Fibre" range starts from £54.99 a month for 2.3Gbps and £74.99 a month for 8Gbps, both on 24-month contracts, and is live now in eligible postcodes around Guildford and Woking. For most readers the practical impact is limited for now: this is a fixed broadband launch confined to a small corner of Surrey, and it does not change EE's mobile or SIM-only tariffs.
## What EE announced
EE confirmed the launch and pricing in a press release dated 31 July 2026, describing itself as the first major UK provider to offer 8Gbps speeds on advanced full fibre using XGS-PON technology. The two tiers follow a customer trial run earlier in 2026, which ISPreview had previously tracked as a pilot rather than a full commercial product.
According to ISPreview's report on the same day, the 2.3Gbps tier comes with upload speeds of 230Mbps, while the 8Gbps tier is quoted at 800Mbps or above on the upload side. Both are asymmetric, so the headline figures refer to download speeds only. ISPreview also notes that both plans carry EE's standard mid-contract price rise of £4 a month each April.
Hardware differs between the two tiers. ISPreview reports that 2.3Gbps customers receive EE's Smart Hub 7 Pro, while 8Gbps customers are initially supplied with a TP-Link router because the matching Smart Hub is still some months away. Either way, an Openreach engineer visit is required to fit a 10Gbps-capable optical network terminal.
## Where it is available
Availability is narrow at launch. EE's press release cites Guildford, Woking and surrounding areas, and ISPreview lists eligible locations including Brookwood, Puttenham, Clandon, Shere and Worplesdon. EE says the footprint will grow as Openreach continues its XGS-PON rollout, but has not published a timetable or a target number of premises. ISPreview adds that existing EE broadband customers in those areas will be able to move onto the new tiers over the coming weeks, rather than on day one.
Luciano Oliveira, EE's Director of Product, Home and TV, said the company is "investing in the technologies that will power the next generation of digital experiences," as quoted by Mobile News on 31 July 2026.
## Why XGS-PON matters
The technical story here is the network rather than the speed. Openreach's existing full fibre network largely runs on GPON, which caps consumer products well below these figures. XGS-PON is a 10-Gigabit-capable successor that can run alongside GPON on the same fibre, which is why EE is able to sell multi-gigabit tiers without new cable being pulled to the home. That is what makes the launch a milestone for the wider UK market: once Openreach's upgraded platform reaches an area, any ISP selling over Openreach — not just EE — has the option to build multi-gigabit products on it.
## What it means for mobile and SIM buyers
Nothing in this announcement changes EE's mobile side. The press release covers fixed-line broadband exclusively, with no mobile plan, SIM bundle or converged discount attached, and both ISPreview and Mobile News report it the same way. If you are shopping for a UK SIM-only or mobile plan, EE's tariffs, allowances and pricing are unaffected by this launch.
It is also worth being realistic about the speeds themselves. Wi-Fi and the devices in a typical home are the usual bottleneck well before 8Gbps, and EE has not published guidance on what equipment is needed to see those rates in practice. For the vast majority of households, including heavy streaming and gaming users, gigabit-class connections already sit far above real-world demand. The more meaningful development for most people is the upload improvement and the fact that Openreach's platform is moving to a technology with far more headroom — benefits that will arrive gradually as coverage expands beyond the initial Surrey postcodes.
We will update this article if EE publishes a wider rollout schedule or extends the tiers to customers outside the launch area.
================================================================================
# EE Launches Early Phone Swap: Upgrade Up to 12 Months Early
URL: https://sim-finder.com/en/blog/ee-uk-early-phone-swap-flex-pay-2026/
Type: blog (en)
Published: 2026-08-13T09:00:00+09:00
EE has launched **Early Phone Swap**, a scheme that lets eligible Flex Pay customers hand back their current handset and upgrade up to 12 months before their device agreement ends, without paying an early-upgrade fee. The operator announced the change on 11 August 2026 and says it is available immediately to around one million customers. For readers on an EE device plan, the practical effect is that the remaining balance on a phone no longer has to be settled in a lump sum before moving to a new model — but the swap is conditional on signing a fresh 24-month airtime plan.
## How the swap works
According to EE's announcement, the customer returns their existing device and the trade-in value is applied against what is still owed on the current Device Credit Agreement. If the returned handset is valued above the outstanding balance, EE says it pays the difference directly into the customer's bank account. Both new and refurbished handsets can be taken as the replacement.
EE's Sharon Meadows, quoted in the company's press release, framed the change around upgrade timing, saying Early Phone Swap "puts that power firmly in their hands, letting them swap their old phone and get something new every year."
## The eligibility conditions
The scheme is narrower than the headline suggests, and the conditions are where readers should focus. As set out by EE and summarised by ISPreview and Mobile News on the same day, a customer qualifies only if:
- the current phone was bought from EE on a Device Credit Agreement alongside a 24-month airtime plan;
- at least 12 monthly device payments have been made;
- 12 months or less remain on the device agreement, and the customer is not in its final month;
- the account is up to date, with a credit check applied.
The handset being returned must also power on and be in full working order, have security features such as activation locks switched off, and must not have been reported lost, blocked or stolen. Damaged or non-functional devices therefore fall outside the scheme.
Crucially, there is no standalone Early Phone Swap charge, but the swap requires taking out a **new device credit agreement with a 24-month airtime plan**. In other words, the cost is not an exit fee — it is a reset of the contract clock.
## Flex Pay term lengths widened
Alongside the launch, EE has broadened its Flex Pay device financing terms. Reporting on the announcement notes the addition of 12-month and 48-month options to the existing line-up, giving customers a wider spread of monthly device payments. Longer terms lower the monthly figure but extend the period over which the handset is being paid off, which is worth modelling before comparing headline monthly prices between providers.
## Is it actually new?
Commentary published alongside the launch was sceptical about how novel the mechanic is. ISPreview's coverage records readers pointing out that Sky Mobile has offered a comparable swap arrangement for some time, and questioning EE's framing that the approach differs from most other providers. A second thread of criticism concerns whether annual upgrades make sense at all, given the modest year-on-year differences between recent handset generations and the cost of restarting a 24-month commitment.
## What it means for buyers
For anyone comparing UK mobile deals, the takeaway is that the sticker attraction — upgrading a year early at no extra cost — is real but tied to recommitting. Readers weighing a swap should check the trade-in valuation EE offers against the outstanding device balance, since any surplus is paid out, and compare the total cost of a new 24-month airtime plan against simply finishing the current agreement and moving to a SIM-only plan, which typically costs far less per month once a handset is paid off.
Sources: EE's press release of 11 August 2026 and same-day coverage from ISPreview and Mobile News.
================================================================================
# eSIM vs SIM Card for International Travel: Which Is Better?
URL: https://sim-finder.com/en/blog/esim-vs-sim-card-international-travel/
Type: blog (en)
Published: 2026-03-23
## TL;DR: Quick Verdict
| Best For | Winner | Why |
|----------|--------|-----|
| **Most travelers** | **eSIM** | Cheaper, instant setup, no store visits, dual SIM support |
| **Long stays (1+ month)** | **Physical SIM** | Local number, potentially cheaper unlimited plans, wider device support |
| **Multi-country trips** | **eSIM** | One regional plan covers multiple countries — no swapping |
**For the majority of international trips, eSIM is the better option.** It's cheaper, faster to set up, and eliminates the hassle of finding a SIM shop abroad. Physical SIM cards still have advantages for long-term stays and travelers who need a local phone number.
**[Compare eSIM Plans for Your Destination on SimFinder →](/en/travel/)**
---
## Table of Contents
- [What Is an eSIM?](#what-is-an-esim)
- [What Is a Physical SIM Card?](#what-is-a-physical-sim-card)
- [Head-to-Head Comparison](#head-to-head-comparison-esim-vs-physical-sim)
- [When eSIM Wins](#when-esim-wins)
- [When Physical SIM Wins](#when-physical-sim-wins)
- [Cost Comparison: Japan 7-Day Trip](#cost-comparison-japan-7-day-trip)
- [How to Choose](#how-to-choose-a-decision-framework)
- [Frequently Asked Questions](#frequently-asked-questions)
- [Key Takeaways](#key-takeaways)
---
## What Is an eSIM?
An eSIM (embedded SIM) is a digital SIM built into your smartphone. Instead of inserting a physical card, you download a carrier profile — typically by scanning a QR code or through an app. The eSIM stores the same information as a traditional SIM card (carrier identity, phone number, authentication keys), but without the plastic.
For travelers, eSIM means you can buy a data plan for your destination **before you leave home**, install it in minutes, and start using mobile data the moment you land. No airport kiosk, no language barrier, no fumbling with a SIM ejector tool.
As of 2026, **11 major eSIM providers** offer travel plans covering 200+ countries. Providers like [Airalo](/en/travel/providers/airalo/), [Holafly](/en/travel/providers/holafly/), [Nomad](/en/travel/providers/nomad/), [Saily](/en/travel/providers/saily/), and [eSIM2Fly](/en/travel/providers/esim2fly/) compete on price, making travel eSIM plans increasingly affordable — some starting at just $1.70 for 7 days.
---
## What Is a Physical SIM Card?
A physical SIM card is a small chip you insert into your phone's SIM tray. It connects your device to a mobile network. When traveling internationally, you typically buy a prepaid SIM card at the airport, a convenience store, or a carrier shop in your destination country.
Physical SIMs have been the standard for mobile connectivity since the 1990s. They work in virtually every phone ever made (with the right size adapter), require no special device features, and often come with a local phone number included.
The physical SIM experience for travelers usually involves: landing at your destination, finding a SIM vendor, showing your passport (many countries require ID registration), waiting for activation, and manually inserting the card. This process takes anywhere from 10 minutes to over an hour depending on the airport and country.
---
## Head-to-Head Comparison: eSIM vs Physical SIM
| Criteria | eSIM | Physical SIM | Winner |
|----------|------|-------------|--------|
| **Cost (7-day trip)** | $4–35 depending on data | $10–30 at airport vendors | eSIM |
| **Convenience** | Buy online, scan QR code | Find a shop, show ID, wait | eSIM |
| **Setup Time** | 5–10 minutes (from home) | 15–60+ minutes (at destination) | eSIM |
| **Device Compatibility** | Requires eSIM-capable phone (2018+) | Works in any unlocked phone | Physical SIM |
| **Multi-Country Support** | One regional plan covers many countries | Need a new SIM per country | eSIM |
| **Security** | Cannot be physically removed/stolen | Can be lost, stolen, or swapped | eSIM |
| **Local Phone Number** | Usually data-only (no number) | Typically includes a local number | Physical SIM |
| **Data Top-Up** | Instant via app | Visit a shop or use carrier app | eSIM |
| **Keep Home Number Active** | Yes (dual SIM) | Yes (if phone has dual SIM slots) | Tie |
| **Long-Term Value (30+ days)** | Competitive but varies | Often cheaper for local unlimited plans | Physical SIM |
**Overall: eSIM wins in 6 out of 10 criteria**, with physical SIM holding the advantage in device compatibility and local number access.
---
## When eSIM Wins
### Short Trips (1–14 days)
For a typical vacation or business trip, eSIM is almost always the better choice. You avoid wasting travel time at a SIM shop, and prices are competitive or cheaper than airport SIM vendors. A 7-day Japan eSIM from [Airalo](/en/travel/providers/airalo/) costs $4 for 1GB — enough for maps, messaging, and light browsing.
### Multi-Country Itineraries
This is where eSIM has no competition. Providers like [Airalo](/en/travel/providers/airalo/), [Holafly](/en/travel/providers/holafly/), and [Nomad](/en/travel/providers/nomad/) offer regional plans that cover entire continents. An Asia regional eSIM works across Japan, South Korea, Thailand, and more — with a single plan. With physical SIMs, you'd need to buy (and swap) a new card at every border crossing.
### Last-Minute Trips
Forgot to arrange connectivity? With eSIM, you can purchase and install a plan from the airport departure lounge, the airplane (on WiFi-equipped flights), or even after landing. Physical SIM shops may be closed, sold out, or have long queues.
### Solo Travelers
One person, one device, one eSIM. No sharing concerns, no extra equipment. The economics are straightforward: eSIM is the cheapest per-person option for solo travel.
### Travelers Who Want to Keep Their Home Number Active
With dual SIM capability (physical SIM + eSIM), you can keep your home carrier's SIM in the physical slot for calls and texts, while using the eSIM for local data. This is the setup most frequent travelers use — it's seamless.
---
## When Physical SIM Wins
### You Need a Local Phone Number
Some situations require a local number: receiving SMS verification codes from local banks or services, making local calls to restaurants and businesses, or registering for ride-sharing apps that require a local number. Travel eSIMs are typically data-only and don't provide this.
### Your Phone Doesn't Support eSIM
While eSIM adoption is growing fast, not all phones support it. Budget Android phones, phones manufactured before 2018, and some regional phone models lack eSIM capability. If your phone doesn't support eSIM, a physical SIM is your only option (besides portable WiFi).
### Long-Term Stays (1+ Month)
For extended stays, a local physical SIM with a monthly plan can be cheaper than travel eSIM plans. For example, a 30-day unlimited data plan from a local carrier in Thailand might cost $10–15, while the equivalent eSIM plan could be $30–50 depending on the provider.
### Budget Destinations with Cheap Local SIMs
In countries like India, Thailand, Vietnam, and Indonesia, local SIM cards are extremely affordable — sometimes $3–5 for a week of generous data. In these markets, the price advantage of eSIM narrows or disappears. If you're comfortable buying a local SIM, the savings can be significant.
### You Want Maximum Speed and Reliability
Local physical SIMs connect directly to a local carrier's network. Some travel eSIM providers route traffic through intermediate networks or use roaming agreements that can result in slower speeds. As one commenter on X noted: "The problem with these global travel eSIMs is that normally they just VPN all traffic through Singapore or something. You rarely get a local IP address and they are slow." ([source](https://x.com/edandersen/status/2023936527651483653)) This isn't universal — many eSIM providers deliver excellent speeds — but it's a factor to consider.
---
## Cost Comparison: Japan 7-Day Trip
Let's compare real costs for a 7-day trip to Japan — one of the most popular international travel destinations.
### eSIM Plans (SimFinder Database)
| Provider | Data | Duration | Price (USD) |
|----------|------|----------|-------------|
| **[eSIM2Fly](/en/travel/providers/esim2fly/)** | 1GB | 7 days | $2.20 |
| **[Airalo](/en/travel/providers/airalo/)** | 1GB | 7 days | $4.00 |
| [**aloSIM**](/en/travel/providers/alosim/) | varies | 7 days | $4.50 |
| **[Saily](/en/travel/providers/saily/)** | 1GB | 7 days | $3.99 |
| **[Airalo](/en/travel/providers/airalo/)** | 3GB | 30 days | $8.00 |
| **[Holafly](/en/travel/providers/holafly/)** | Unlimited | 7 days | ~$27.00 |
*Prices from SimFinder database, verified March 2026.*
### Airport Physical SIM (Typical Japan Prices)
| Vendor | Data | Duration | Price (USD) |
|--------|------|----------|-------------|
| Major airport vendor | 3GB | 7 days | ~$20–25 |
| Convenience store SIM | 3GB | 7 days | ~$15–20 |
| Carrier shop (city) | 3GB | 30 days | ~$25–30 |
*Prices are approximate based on typical Narita/Haneda airport SIM vendors.*
### Verdict
For a standard 7-day Japan trip, **eSIM saves $10–20 compared to an airport SIM card**. The cheapest eSIM option ([eSIM2Fly](/en/travel/providers/esim2fly/), $2.20 for 1GB/7 days) is roughly 10x cheaper than a typical airport SIM. Even for heavier data users, [Airalo](/en/travel/providers/airalo/)'s 3GB/30-day plan at $8 beats most physical SIM options.
The cost advantage holds across most popular destinations. Here's a quick comparison of eSIM starting prices from SimFinder's database:
| Destination | Cheapest eSIM (7 days) | Typical Airport SIM |
|-------------|----------------------|---------------------|
| Japan | $2.20 ([eSIM2Fly](/en/travel/providers/esim2fly/) 1GB) | ~$20 |
| Thailand | $1.70 ([eSIM2Fly](/en/travel/providers/esim2fly/) 0.5GB) | ~$8 |
| South Korea | $2.20 ([eSIM2Fly](/en/travel/providers/esim2fly/) 1GB) | ~$15 |
**[Compare eSIM Plans by Destination →](/en/travel/)**
---
## How to Choose: A Decision Framework
Answer these questions to determine which option suits your trip:
**1. Does your phone support eSIM?**
- No → Physical SIM is your only option
- Yes → Continue
**2. How long is your trip?**
- Under 2 weeks → eSIM (almost always cheaper and more convenient)
- 2–4 weeks → Either works; compare specific prices for your destination
- Over 1 month → Consider a local physical SIM for better long-term value
**3. Are you visiting multiple countries?**
- Yes → eSIM with a regional plan (one plan, multiple countries)
- No → Either works
**4. Do you need a local phone number?**
- Yes → Physical SIM (or use both: physical for number + eSIM for data)
- No → eSIM
**5. What's your comfort level with technology?**
- Comfortable with phone settings → eSIM
- Prefer someone else to set it up → Physical SIM (airport shop staff will do it)
For most travelers in 2026, the answer is eSIM. The technology has matured, prices have dropped, and the convenience gap is significant. Physical SIMs remain the right choice for specific scenarios — long stays, local number needs, or older devices.
**[Find the Best eSIM Plan for Your Trip →](/en/travel/)**
---
## What Travelers Say
Real experiences from travelers comparing eSIM and physical SIM options:
> "Here's my hack: I use an eSIM from [Airalo](/en/travel/providers/airalo/). No more insane roaming fees. No more long airport lines hunting for SIM cards."
> — @gotravelyourway ([original post](https://x.com/gotravelyourway/status/1961710351688650793))
> "Over the last 4 years, this eSIM has saved me countless dollars and headaches while traveling."
> — @AndroidAuth ([original post](https://x.com/AndroidAuth/status/1917905794277798161))
> "Physical SIM cards are going the way of the dinosaur. The iPhone 17 Air is 100% eSIM-only."
> — @airalocom ([original post](https://x.com/airalocom/status/1966512614185283638))
*Individual experiences may vary based on destination, device, and provider.*
---
## Frequently Asked Questions
### Can I use eSIM and a physical SIM at the same time?
Yes. Most modern smartphones support dual SIM — one eSIM and one physical SIM (or two eSIMs on newer iPhones). This lets you keep your home number active on the physical SIM while using an eSIM for local data abroad. It's the setup most experienced travelers use.
### Is eSIM cheaper than buying a local SIM card at the airport?
It depends on the destination. For a 7-day trip to Japan, eSIM plans start at $2.20 ([eSIM2Fly](/en/travel/providers/esim2fly/) 1GB) while airport SIM cards typically cost $15–30. In countries like Thailand or India, local SIM cards can be extremely cheap ($3–5 for generous data), sometimes matching or beating eSIM prices. However, eSIM eliminates the time and hassle of finding a shop.
### What happens if my eSIM runs out of data mid-trip?
You can purchase an additional eSIM plan directly from the provider's app while abroad — no store visit needed. Most providers like [Airalo](/en/travel/providers/airalo/), [Nomad](/en/travel/providers/nomad/), and [Holafly](/en/travel/providers/holafly/) let you top up or buy a new plan instantly. This is a major advantage over physical SIMs, which may require visiting a local shop to recharge.
### Does my phone support eSIM?
Most phones released after 2020 support eSIM. This includes iPhone XR/XS and later, Google Pixel 3a and later, Samsung Galaxy S20 and later, and most recent OnePlus, Xiaomi, and Oppo models. Check your phone's settings under "Cellular" or "Mobile Network" for an "Add eSIM" option.
### Can I get a local phone number with an eSIM?
Most travel eSIMs are data-only and do not include a local phone number. If you need a local number for receiving calls or SMS (e.g., for bank verification), a physical SIM is the better choice. For most travelers, messaging apps like WhatsApp, LINE, or Telegram handle communication without needing a local number.
### Are there countries where eSIM doesn't work?
eSIM coverage has expanded rapidly, but some countries have limited provider support. As of 2026, major travel eSIM providers like [Airalo](/en/travel/providers/airalo/) cover 200+ destinations. However, coverage quality varies — in less-visited countries, you may have fewer provider options or slower speeds compared to a local physical SIM.
### Is eSIM more secure than a physical SIM?
Yes, in several ways. An eSIM cannot be physically stolen or swapped without your knowledge, reducing SIM-swap fraud risk. It's embedded in your device and protected by your phone's security. A physical SIM can be removed and used in another device, or lost during travel.
---
## Key Takeaways
The eSIM vs physical SIM decision in 2026:
- **eSIM wins for most travelers**: cheaper (starting at $1.70/7 days), instant setup from home, no store visits, works across multiple countries with one plan
- **Physical SIM wins for specific cases**: local phone number needed, long-term stays (1+ month), budget destinations with cheap local SIMs, or eSIM-incompatible phones
- **Dual SIM is the power move**: keep your home SIM in the physical slot, add an eSIM for travel data — best of both worlds
- **Cost gap is significant**: for a 7-day Japan trip, eSIM saves $10–20 compared to airport SIM cards
- **The industry is moving toward eSIM**: Apple's iPhone 17 Air is eSIM-only, and all 11 providers tracked by SimFinder support tethering and multi-country plans
- **The best choice depends on your trip**: short multi-country trips favor eSIM; long single-country stays may favor physical SIM
For the majority of international trips, eSIM is the better, cheaper, and more convenient option.
**[Compare eSIM Plans for Your Next Trip →](/en/travel/)**
---
*Plan data is from SimFinder's database of 11 eSIM providers, verified as of March 2026. Airport SIM prices are approximate and vary by vendor, location, and season. Prices and availability may change. Check provider websites for the latest information.*
*Compare travel eSIM plans side by side using [SimFinder's travel comparison tool](/en/travel/).*
================================================================================
# Openreach Adds 1.6Tbps Wavelengths to OSEA, Orders Open 16 Sept
URL: https://sim-finder.com/en/blog/openreach-uk-osea-1-6tbps-wavelength-2026/
Type: blog (en)
Published: 2026-08-20T09:00:00+09:00
Openreach has upgraded its wholesale optical portfolio so that a single wavelength can now carry up to 1.6 terabits per second — double the previous top figure — with pre-order quotes available immediately and formal orders opening on 16 September 2026. The change was set out in Openreach's communications provider briefing ETH029/26, published on 18 August 2026, and reported independently by ISPreview on 19 August 2026.
For consumers, nothing changes today: this is a wholesale, business-to-business product bought by data centres and network operators, not a retail SIM or broadband tariff. But it is a useful marker of how the capacity underneath UK mobile and fixed networks is being scaled.
## What Openreach announced
The upgrade sits within Openreach's Optical Spectrum Extended Access (OSEA) portfolio, which sells high-capacity point-to-point optical connectivity between sites. According to the ETH029/26 briefing, the new option is built on a compact 2RU chassis — 88.9mm of vertical rack space — that can house up to four WaveServer modules and support up to eight 1.6Tb wavelengths.
ISPreview reports that this works out at up to 12.8Tbps of aggregate wavelength capacity per chassis, or up to 32 × 400GE client interfaces. The same report notes that the existing OSEA solution, based on Ciena's WaveServer and WaveLogic optical platform, previously offered up to 800Gbps per card over a single wavelength. The headline improvement is therefore a doubling of per-wavelength capacity within roughly the same physical footprint.
Openreach's briefing states that updated product documentation and Suppliers Information Note 514 accompany the launch.
## Pricing and timing
Openreach's briefing itself points to Access Charge Change Notice OR1121 for the commercial terms rather than listing prices inline. ISPreview reports the connection charge for a 1.6Tbps wavelength as £16,500 excluding VAT, with an annual rental of £2,700 across either a 36-month or 60-month term.
On timing, the briefing confirms two distinct dates. Pre-order designs and quotes became available on 18 August 2026 — so operators can start scoping deployments now — while orders can only be placed from 16 September 2026. That makes this a live product announcement rather than a speculative roadmap item, though the first services will not be ordered for roughly another month.
## Why it matters for mobile users
OSEA is not a mobile product, and Openreach has not linked this announcement to any consumer service. The connection is indirect but real: the kind of high-capacity links OSEA sells are the sort of infrastructure operators use between core sites and data centres, and mobile traffic growth is one of the pressures driving demand for more capacity between those sites.
It is worth being precise about the limits of what has been confirmed. Openreach has not published any distance or route detail for the 1.6Tbps option in the material reviewed here, has not named which communications providers intend to take it, and has not indicated any effect on retail pricing. Anyone reading this as a signal about future consumer speeds should treat it as background rather than evidence.
## What to watch next
The practical test will be uptake after 16 September. OSEA competes for the same customers as other wholesale and dark-fibre options, and pricing at £16,500 connection plus £2,700 per year positions it firmly at the hyperscale and carrier end of the market rather than at regional ISPs.
For SimFinder readers comparing UK SIM plans, there is no action to take. Consumer tariffs, allowances and network quality scores are unaffected by this announcement, and we will only revisit it if Openreach or a retail provider connects the capacity upgrade to a customer-facing change.
Sources: Openreach communications provider briefing ETH029/26 (18 August 2026) and ISPreview (19 August 2026).
================================================================================
# TfW's Railway Fibre Links South Wales Valleys to Vantage Data Centres
URL: https://sim-finder.com/en/blog/tfw-ffeibr-railway-fibre-data-centre-link-2026/
Type: blog (en)
Published: 2026-08-24T09:00:00+09:00
Transport for Wales' fibre arm, ffeibr, announced on 21 August 2026 that its railway-based full fibre network now provides a direct connection between colocation provider Cloud Centres and Vantage Data Centres in South Wales. The link is wholesale infrastructure rather than a consumer product, so there is no new tariff or broadband package for readers to sign up to today. Its significance is structural: fibre laid alongside the Core Valley Lines during Metro electrification is now carrying commercial traffic into a major data centre campus, which over time gives ISPs and network operators another route into the Valleys.
## What was announced
According to the announcement on the Transport for Wales news site, the ffeibr network now links Cloud Centres Networks directly to Vantage Data Centres, giving businesses on the network a path to cloud computing and AI infrastructure hosted at the campus. Nation.Cymru, reporting on 22 August, described the same development and noted that the network now extends into Cardiff as well as running through the Core Valley Lines corridor.
Transport for Wales did not publish bandwidth, latency or capacity figures, and no pricing was disclosed. ISPreview, which also covered the story on 22 August, likewise reported no speed measurements — so anyone comparing this to a headline consumer speed announcement should treat it as an infrastructure milestone rather than a performance claim.
## Why railway fibre matters here
ffeibr's network was built during the South Wales Metro electrification works, using railway land to reach valley communities where conventional fibre builds are awkward and expensive. That origin story is the whole point of the announcement: it turns a transport asset into telecoms capacity without a separate civils programme.
Guy Reiffer, managing director of ffeibr, framed the change in terms of location rather than raw speed. Access to the highest-quality digital infrastructure has historically been concentrated around major cities, he said, and connecting sites like Church Village to resilient, high-performance networks "changes how and where they choose to invest." Adam Price MS, quoted in the Transport for Wales release, described it as an example of "using the assets we already have, to build the infrastructure we need for the future."
## Background: how ffeibr got here
ffeibr launched in November 2024, offering wholesale access to the fibre built alongside local railways. Cloud Centres Networks was its first commercial contract, connected in partnership with Cardiff University in 2025. This week's announcement extends that relationship into a direct data centre-to-data centre link.
TfW Fibre Limited operates as a not-for-profit subsidiary of Transport for Wales, and reinvests its commercial returns into the Welsh public sector — a different model from the commercial altnets that make up most of the UK's alternative fibre market.
Vantage's South Wales presence is well established: its Welsh campus, acquired from Next Generation Data, has long been described in industry coverage as one of Europe's largest, and the company has been expanding in the region. Transport for Wales' release did not itself break down the campus's capacity.
## What this means for consumers
For mobile and broadband customers in Wales, nothing changes immediately. ffeibr sells to ISPs and network operators via wholesale, so any retail impact depends on whether providers choose to build on the route. The realistic effect over the next few years is more competitive backhaul options for serving valley towns — a precondition for better retail coverage rather than better coverage in itself.
If you are shopping for a SIM or broadband deal in Wales today, this announcement should not affect your choice. It is worth watching for what follows: which providers, if any, announce services riding on the ffeibr network.
================================================================================
# Report Grades BT and Sky C- on UK Social Tariff Clarity
URL: https://sim-finder.com/en/blog/uk-social-tariff-transparency-report-2026/
Type: blog (en)
Published: 2026-08-26T09:00:00+09:00
UK broadband analyst thinkbroadband published a social tariff transparency report on 24 August 2026 that grades several of the country's largest providers poorly on how easy their discounted packages are to find and understand. BT and Sky Broadband both received a C-, Virgin Media a C and Vodafone Broadband a C+, while community and altnet providers B4RN, B4SH, Community Fibre and Hyperoptic all scored an A. For low-income households, the practical takeaway is that the cheapest package you qualify for is often not the one shown on a provider's main site — you may have to search for it specifically.
## What the report measured
The study ranked ISPs offering social tariffs across five criteria: how easy the packages are to find, the quality of the detail published (pricing, terms and conditions, contract limits), download speed, price, and how flexible the eligibility requirements are. According to ISPreview's coverage on the same day, the sharpest criticism landed on discoverability. The report challenges readers to "go to bt.com and find where social tariffs are without using a search engine," adding that once found, the page does not make clear how much the tariff costs because BT offers multiple packages whose details sit elsewhere.
thinkbroadband notes this is not unique to BT. Its write-up describes pricing that is sometimes missing or incomplete, contract terms that are unclear, and qualifying criteria that vary between packages from the same provider. Some social tariffs were buried in FAQ pages or left off site navigation entirely.
At the other end of the scale, the report singles out B4RN as "by far the best example in good practice," because the community altnet lists its social tariff alongside its regular packages on the main menu and does not cap the speed of the service. B4SH was credited for putting the same information on its standard product page. Virgin Media was noted as having improved.
## Why the grades matter now
The timing is what gives the report weight. The Government's Telecoms Consumer Charter launched in April 2026 and requires signatories to ensure social tariffs are "easy to find and signposted to eligible customers in communications." As of August 2026, signatories include BT Group (BT, EE and Plusnet), Virgin Media O2, VodafoneThree, Sky, TalkTalk, KCOM, Community Fibre, WightFibre, Hyperoptic and Olilo — meaning several of the lowest-scoring providers have already committed publicly to the standard they are being marked down against.
Awareness remains the underlying problem. Ofcom found that only 34% of eligible broadband users knew social tariffs existed as of April 2026, and that 532,000 customers were on a social broadband or mobile tariff — around 8.6% of the 6.2 million Universal Credit claimants who might qualify. ISPreview's summary of the report puts a standard commercial plan for a Universal Credit recipient at roughly £27 a month against social tariffs averaging around £15, so the gap between knowing and not knowing is worth about £144 a year.
## What this means for mobile customers
One limitation worth stating plainly: this report assessed fixed broadband ISPs only, not mobile operators. Ofcom's 532,000 figure covers both, and mobile social tariffs are offered separately by some operators, but the letter grades above should not be read as a verdict on any provider's mobile pricing or its mobile SIM range.
Still, the discoverability point generalises. If you or someone in your household receives Universal Credit, Pension Credit, Employment and Support Allowance, Jobseeker's Allowance or Income Support, it is worth checking directly with your current provider rather than assuming their public price list is complete. Ofcom maintains its own list of available social tariffs, and the report's core finding is that a search engine — or a third-party list — will often get you there faster than the provider's own homepage.
================================================================================
# VodafoneThree: ~100 London Mobile Sites Offline by End of 2026
URL: https://sim-finder.com/en/blog/vodafonethree-london-ntq-mobile-sites-2026/
Type: blog (en)
Published: 2026-09-16T09:00:00+09:00
VodafoneThree said on 16 September 2026 that around 100 of its mobile sites in London are either already switched off or expected to go offline by the end of this year, because landowners have served Notices to Quit ahead of building redevelopment. The operator says replacement sites take an average of five years to bring into service, far longer than the 18 months' notice it typically receives. For London users, that means coverage gaps on some high streets and at some stations are likely to persist for years rather than months, regardless of which network or SIM plan they are on.
The claims come from a report the operator commissioned, *Lost Sites, Lost Signal: The Impact of Notices to Quit on Londoners*, published alongside a press release on its corporate site. ISPreview UK covered the warning the same day.
## What a Notice to Quit actually does
A Notice to Quit (NTQ) is a legal notice a landowner serves on a mobile operator to require the removal of equipment — usually rooftop antennas — when a building is being renovated, redeveloped or demolished. The operator has to take the kit down whether or not an alternative location is ready.
That is the core of VodafoneThree's complaint. It says the standard 18-month notice period is not enough time to find, agree and commission a replacement. A replacement site has to be technically suitable, physically available, acceptable to the site owner, viable under planning rules, and connectable back into the wider network. In London, where rooftop space is contested and planning is split across many boroughs, clearing all five conditions is slow.
## The numbers in the report
VodafoneThree puts the economic cost of NTQ-driven coverage loss in London at around £2.7 billion a year, which it describes as the equivalent of £7.4 million a day. The report also says one in five London high streets have what it calls functional not-spots, and that roughly 60 rail, Underground and Overground stations are affected — including three of the five busiest National Rail stations.
The underlying research combines two methods. Survation polled 1,008 London adults aged 18 and over between 15 and 20 May 2026 via an online panel, weighted by demographics and geography. The economic modelling used Geolytix town classifications and population data to assign productivity values to areas affected by NTQs.
These are operator-commissioned figures, and the economic estimate in particular rests on modelling assumptions rather than measured losses. The site count and the notice-period mismatch are the more concrete parts of the claim.
## Not just one operator
The issue has been raised before by a rival. In June 2026, Virgin Media O2 warned that outdated planning rules had forced it to switch off dozens of London mobile sites, saying replacements took more than two years on average and that some locations had been offline for more than seven years. VodafoneThree's five-year average is a longer estimate than O2's two-year figure, but both operators are describing the same structural problem: equipment is coming down faster than it can go back up.
## What VodafoneThree is asking for
Andrea Donà, VodafoneThree's Chief Network Officer, is quoted in the release saying that mobile networks are critical national infrastructure, and that when infrastructure is removed before replacements are in place, local communities face years of reduced connectivity.
The report sets out four asks: extend temporary mobile site permissions to 36 months nationally; bring mobile operators into the planning process at the pre-application stage; give the Greater London Authority a stronger coordinating role across boroughs; and identify replacement sites proactively as part of redevelopment projects rather than after the fact.
## What it means for SIM users
Nothing changes on any tariff or plan as a result of this announcement — it is a policy intervention, not a product change. But it is a useful reminder that headline network rankings are national averages. If you are choosing a SIM primarily on coverage in a specific part of London, the operator-level coverage checkers remain the practical tool, and this report suggests results in redevelopment-heavy areas may shift over the coming year as sites come down.
There is also no confirmed timeline for any of the planning changes VodafoneThree is requesting. The proposals would require action from central government and the Greater London Authority, and neither has announced a response.
================================================================================
# VodafoneThree Sees Record 4.6Tbps Mobile Peak on England World Cup Matches
URL: https://sim-finder.com/en/blog/vodafonethree-world-cup-data-traffic-2026/
Type: blog (en)
Published: 2026-07-11T09:00:00+09:00
VodafoneThree says England's run at the FIFA World Cup 2026 pushed its network to record levels, with a peak of 4.6Tbps of mobile data during the DR Congo match on 1 July — the highest mobile data peak the combined Vodafone and Three network has ever recorded. In a press release published on 9 July, the operator reported spikes around every England fixture, including tripled overnight usage after the win over Mexico. For readers on VodafoneThree, Vodafone or Three SIM plans, the figures are a snapshot of how heavily the network is being used at peak moments — and the company's claim that it coped without degrading service.
## What VodafoneThree reported
According to the official VodafoneThree announcement, England's last-32 win against DR Congo on 1 July delivered the standout numbers: mobile data peaked at 4.6Tbps, roughly a third higher than an average Wednesday evening in June, while fixed broadband traffic climbed to 8.7Tbps, up around 9%. The operator framed the DR Congo game as its highest mobile data peak on record.
The earlier group-stage matches also drove notable increases. VodafoneThree cited mobile peaks of 4.3Tbps for the Ghana fixture on 23 June (with usage up about 34% later in the evening), 4.1Tbps during the Croatia match on 17 June, and 3.8Tbps against Panama on 27 June, when overall usage rose roughly 19% by late evening. Broadband traffic for several of these games peaked between 8:30pm and 9:30pm, tracking kick-off and full-time.
The most dramatic pattern came with the Mexico match on 6 July, which was shown in the early hours of Monday morning in the UK. VodafoneThree said usage tripled between 3am and 4am and doubled between 4am and 5am compared with a normal Monday, as fans stayed up to watch the delayed broadcast and posted celebrations online afterwards.
Andrea Dona, Chief Network Officer at VodafoneThree, said in the release: "Our network has been providing fast, strong and reliable coverage whatever time of the day the game is shown here in the UK."
## Why the network held up
VodafoneThree attributed its ability to absorb the surges partly to the ongoing integration of the Vodafone and Three networks and to the use of content delivery networks (CDNs), which cache popular streaming and social content closer to users. As industry site ISPreview noted in its 9 July report on the figures, CDNs help operators manage event-driven traffic spikes without placing the full load on external network links — a practical factor behind the operator's claim that quality held steady during the peaks.
The context matters because live sport concentrates demand into narrow windows. Rather than a steady all-day rise, the data shows sharp peaks clustered around kick-off, half-time and full-time, when large numbers of viewers stream simultaneously and then flood social platforms with reactions. Trade publication Mobile News, reporting on 10 July, echoed the same headline figures and framed the tournament as a stress test for the newly merged operator.
## What it means for readers
For people choosing or already holding a UK SIM plan, this is a network-performance story rather than a change to any tariff, price or allowance. VodafoneThree has not announced new plans, promotions or data caps off the back of the World Cup, and the reported figures describe total network throughput — not limits applied to individual customers.
Still, the data is a useful signal. VodafoneThree is roughly a year into merging two of the UK's four mobile networks, and how it copes with predictable demand surges like a major football tournament is one visible test of that integration. The operator's message is that even record peaks — including its highest-ever mobile data reading — were handled without customers noticing a drop in service.
England's tournament run was continuing at the time of the announcement, so further peaks are possible if the team progresses. Readers comparing VodafoneThree, Vodafone and Three plans may want to weigh this alongside independent coverage and speed testing rather than a single operator's own traffic figures, but the reported numbers suggest headroom during high-demand events.
Sources: [VodafoneThree press release (9 July 2026)](https://www.vodafonethree.com/england-victory-surge-mobile-use/), [ISPreview UK (9 July 2026)](https://www.ispreview.co.uk/index.php/2026/07/vodafonethree-reveal-mobile-data-traffic-for-englands-world-cup-matches.html), [Mobile News (10 July 2026)](https://mobilenewscwp.co.uk/uncategorised/article/england-fixtures-send-vodafone-three-data-usage-through-the-roof/).
================================================================================
# VOXI For Now £10 Social Tariff Now on Physical SIMs via UK Councils
URL: https://sim-finder.com/en/blog/voxi-for-now-social-tariff-offline-sim-2026/
Type: blog (en)
Published: 2026-07-07T09:00:00+09:00
VOXI, Vodafone's youth-focused sub-brand, is now handing out its £10 "VOXI For Now" social tariff as a physical SIM card through local councils, housing teams, charities and prison resettlement programmes. Announced on 6 July 2026, the change adds an offline route to a tariff that was previously only available to sign up for online — a shift aimed at benefit claimants who are digitally excluded and may never encounter the deal on the web. For readers on a qualifying benefit, it means a genuinely affordable, contract-free plan can now be picked up in person through a trusted local organisation.
## What VOXI announced
According to Vodafone's press release, VOXI For Now costs £10 a month and includes unlimited data, calls and texts for up to six months, with no contract and the option to pause or cancel at any time. After that six-month period, eligible customers move onto a standard £10-a-month VOXI plan with 20GB of data while keeping the same flexibility.
The tariff is open to people receiving one of the following government benefits: Jobseeker's Allowance, Universal Credit, Employment and Support Allowance, Disability Allowance, Personal Independence Payment or Pension Credit. That eligibility has not changed — what is new is how people can obtain the SIM.
## The offline distribution push
Until now, VOXI For Now could only be ordered online. VOXI is now working with local councils, housing teams, support charities and prison resettlement programmes to hand out physical SIM cards directly. Vodafone's charity partner, the Good Things Foundation, will also distribute the SIMs through a selection of its community hubs as part of a new pilot, as reported by both Vodafone and industry outlet Mobile News.
The logic is straightforward: the people most likely to benefit from a social tariff are often the least likely to see an online offer. Mobile News notes that around five million people who could qualify for a cheaper mobile tariff are unaware such deals exist. Putting the SIM in the hands of frontline organisations is intended to close that awareness gap.
## Why connectivity matters for job seekers
Vodafone framed the expansion around employment. Nicki Lyons, Chief Corporate Affairs and Sustainability Officer at VodafoneThree, said: "By making VOXI For Now available through trusted local partners as a physical SIM, we're bringing affordable connectivity directly into communities."
The company cited its own research indicating that a smartphone is essential for many people's job searches, and that some had missed employment opportunities or held back from applying because of worries about running out of data. Mobile News reported that over half of those surveyed rely on mobile data as their main way to get online, with a significant share regularly exhausting their monthly allowance. An unlimited-data tariff for the first six months is positioned squarely at that problem.
## How it compares
Social tariffs from UK operators typically sit in the £10–£20 range and are aimed at Universal Credit and other benefit recipients. VOXI For Now's headline draw is the six months of unlimited data at £10, which is more generous on data than many fixed-allowance social tariffs during that initial window, before stepping down to a still-competitive 20GB. Because it runs on Vodafone's network, it also carries 5G access where available.
For eligible readers, the practical takeaway is that there are now two ways in: sign up online at VOXI, or ask a participating council, housing team, charity or resettlement service for a physical SIM. If you receive one of the qualifying benefits and rely heavily on mobile data, it is worth checking whether a local partner in your area is taking part in the rollout.
## Sources
- Vodafone press release, "Job seekers missing out on opportunities due to lack of connectivity" (6 July 2026).
- Mobile News, "VOXI expands £10 social tariff distribution to councils and charities" (6 July 2026).
================================================================================
# 4G/LTE vs 5G: What They Are and How They Differ
URL: https://sim-finder.com/en/guides/4g-5g-explained/
Type: guides (en)
Published: 2026-06-04
4G LTE and 5G are both standardised by 3GPP — the same technical body — but they represent distinct generations with different core architectures, spectrum strategies, and design goals. Understanding the key differences matters when choosing a SIM plan, evaluating coverage, or deciding whether a 5G device provides a practical benefit in a given location.
The key points covered in this article:
- What 4G LTE is and how it differs technically from 3G predecessors
- How 5G NR is structured, including the critical difference between NSA and SA deployments
- How Sub-6 GHz and mmWave 5G serve different use cases
- What the 3GPP Release system means and which Releases introduced each generation
- How 4G and 5G handle speed, latency, and connection density differently
- How voice calls work across both generations (VoLTE and VoNR)
For more on how voice calls work on LTE and 5G networks, see [VoLTE and VoNR Explained](/en/guides/volte-vonr/). For definitions of terms used in this article, see the [SIM & Mobile Glossary](/en/guides/glossary-index/).
The table below gives an orientation before the detailed sections.
| | 4G LTE | 5G NSA | 5G SA |
|---|---|---|---|
| 3GPP standard from | Release 8 (2008) | Release 15 (2017) | Release 15 (2018) |
| Core network | LTE EPC | LTE EPC (anchor) | 5G Core (5GC) |
| Voice technology | VoLTE | VoLTE (on LTE layer) | VoNR |
| Network slicing | No | No | Yes |
| Primary spectrum | Sub-6 GHz | Sub-6 GHz + mmWave | Sub-6 GHz + mmWave |
---
## What Is 4G LTE?
**4G** refers to the fourth generation of mobile network standards. The ITU-R defined the requirements for 4G under the IMT-Advanced framework, which operators and standards bodies worked to satisfy through the 2000s and 2010s.
**LTE** stands for **Long-Term Evolution**. It is the specific radio access technology that became the dominant implementation of 4G. LTE was standardised in **3GPP Release 8**, which was frozen in December 2008. Release 8 defined LTE as a purely packet-switched network — meaning all traffic, including data and eventually voice, is carried as IP packets. There is no circuit-switched voice plane in LTE, which is why VoLTE (the IMS-based system for carrying voice over LTE) had to be developed separately.
The 3G predecessor, UMTS/HSPA (defined in 3GPP Releases 5–7), carried voice over a circuit-switched domain and data over a packet-switched domain. LTE eliminated the circuit-switched domain entirely, representing a fundamental architectural change rather than an incremental evolution.
### LTE-Advanced and LTE-Advanced Pro
The base LTE specification was extended in two significant later Releases:
- **LTE-Advanced (Release 10, 2011)**: Introduced **carrier aggregation (CA)**, which allows a device to combine multiple frequency bands simultaneously to increase throughput. Release 10 also introduced enhanced MIMO (Multiple Input, Multiple Output) antenna configurations and added relay nodes to improve coverage.
- **LTE-Advanced Pro (Release 13, 2016)**: Added features including licensed-assisted access (LTE-U/LAA), narrowband IoT (NB-IoT), enhanced carrier aggregation, and support for up to 32 component carriers. Marketing terms such as "4.5G" and "Gigabit LTE" typically refer to LTE-Advanced Pro devices and networks.
These extensions kept LTE technically competitive through the late 2010s while 5G was under development.
---
## What Is 5G NR?
**5G NR** (New Radio) is the radio access technology of the fifth generation, standardised in **3GPP Release 15**. The NSA (Non-Standalone) variant of Release 15 was frozen in December 2017; the SA (Standalone) variant's physical layer was frozen in June 2018, with the ASN.1 (protocol encoding) freeze completed in September 2018.
5G NR covers two frequency ranges defined in 3GPP:
- **FR1 (Sub-6 GHz)**: Frequencies from 410 MHz to 7125 MHz. This range includes re-farmed low-band spectrum (600–900 MHz), mid-band spectrum widely used for 5G capacity (2.5–3.7 GHz, including the internationally co-ordinated n77/n78/n79 bands), and extended mid-band up to 7.125 GHz.
- **FR2 (mmWave)**: Frequencies from 24.25 GHz to 52.6 GHz. This range enables very high bandwidth but with limited propagation distance and sensitivity to physical obstructions.
5G NR uses **Orthogonal Frequency-Division Multiplexing (OFDM)** as its underlying modulation scheme, the same approach as LTE. However, 5G NR introduces a more flexible subcarrier spacing (numerology) that allows the same physical layer to operate efficiently across both low-latency mmWave links and wide-coverage Sub-6 GHz links.
---
## NSA vs SA: The Architecture Divide
The distinction between **NSA (Non-Standalone)** and **SA (Standalone)** is among the most practically important aspects of 5G deployments.
### Non-Standalone (NSA)
In NSA mode, 5G NR is deployed as an additional radio access layer on top of an existing **4G LTE Evolved Packet Core (EPC)**. The LTE cell provides the control plane (signalling, session management, mobility), while the 5G NR cell adds a second data plane for higher throughput. This architecture is defined in 3GPP as Option 3 (EN-DC: E-UTRA/NR Dual Connectivity).
Practical consequences of NSA:
- The device must maintain an LTE connection at all times. If LTE signal is lost, the 5G NR connection also falls.
- Voice calls continue to use **VoLTE** on the LTE layer. 5G NR does not handle voice in NSA mode.
- Network slicing and URLLC (ultra-reliable low-latency communications) features require 5G SA and are not available in NSA.
- NSA was the primary deployment mode for the first wave of commercial 5G networks from 2019 onward because it allowed carriers to add 5G NR capacity without replacing the LTE core.
### Standalone (SA)
In SA mode, 5G NR connects directly to a **5G Core (5GC)**, which is an entirely new core network architecture defined in 3GPP Release 15. The 5GC uses a **Service-Based Architecture (SBA)** with new network functions: the AMF (Access and Mobility Management Function) replaces the LTE MME, the SMF (Session Management Function) replaces PGW/SGW, and the UPF (User Plane Function) handles forwarding.
SA enables:
- **VoNR** (Voice over New Radio): voice calls carried natively over 5G NR via IMS
- **Network slicing**: logical partitioning of the network for different traffic types or customers
- **URLLC** (ultra-reliable low-latency communications): designed for industrial and mission-critical applications
- Full independence from LTE infrastructure, allowing carriers to eventually retire LTE spectrum
As of 2026, 5G SA networks are operational in a growing number of markets, including South Korea, China, parts of the United States, and Japan, but LTE-anchored NSA coverage continues to represent the majority of 5G connections globally. The transition to SA is carrier-specific: operators that have invested in 5G SA cores can offer VoNR and network slicing, while operators still on NSA 5G cannot, regardless of the device's hardware capability.
From a consumer perspective, a practical way to identify whether you are on 5G SA is to check whether VoNR is active. On Android, field test modes that show IMS registration may indicate VoNR registration separately from VoLTE. On iPhone, iOS does not expose VoNR status directly; VoNR operation on supported carriers is handled automatically.
---
## Sub-6 GHz vs mmWave: Two Very Different 5G Experiences
The two frequency ranges used for 5G NR have fundamentally different physical characteristics, leading to distinct deployment strategies.
### Sub-6 GHz 5G
Sub-6 GHz 5G behaves similarly to LTE in terms of coverage: the signal propagates over kilometres from a single site, penetrates buildings, and provides broad area coverage. Low-band 5G (600–900 MHz) covers the widest areas but has lower peak throughput. Mid-band 5G (2.5–4.2 GHz, especially the 3.5 GHz band standardised as n77/n78) provides the best balance of coverage and throughput and is the workhorse of most national 5G deployments.
For most consumers, the 5G connection they experience daily is Sub-6 GHz mid-band. The practical throughput improvement over LTE-Advanced depends on network loading, spectrum allocation, and device capability, but mid-band 5G consistently delivers higher median throughput than LTE in controlled conditions.
### mmWave 5G (FR2)
mmWave 5G uses frequencies from roughly 24 GHz to 52.6 GHz. Electromagnetic waves at these frequencies have very short wavelengths that are absorbed by building materials, trees, and even rainfall. A typical mmWave small cell covers an area of hundreds of metres rather than kilometres. Line-of-sight or near-line-of-sight conditions are generally required for reliable connection.
The peak throughput achievable on mmWave significantly exceeds Sub-6 GHz because the available bandwidth at mmWave frequencies is much larger. However, consistent mmWave coverage in a large geographic area is not economically or physically feasible, so mmWave deployment is concentrated in specific high-density environments: major transit hubs, stadiums, convention centres, and fixed wireless access for homes and businesses.
Consumers in most markets will rarely encounter mmWave 5G in everyday use. A device's 5G specification sheet distinguishes FR1-only and FR1+FR2 support; the latter adds mmWave antenna modules that increase device cost and complexity.
---
## Speed, Latency, and Connection Density
The three primary design objectives that 3GPP defined for 5G NR under the IMT-2020 framework differ from those of 4G LTE in emphasis and scale. IMT-2020 defined three use case categories for 5G: **eMBB** (Enhanced Mobile Broadband), **URLLC** (Ultra-Reliable Low-Latency Communications), and **mMTC** (Massive Machine-Type Communications). Most consumer 5G services focus on eMBB; URLLC and mMTC are primarily relevant for industrial and IoT deployments.
### Throughput
LTE (Release 8) was specified with a theoretical peak downlink of 300 Mbps under ideal conditions (4×4 MIMO, 20 MHz bandwidth). LTE-Advanced extended this through carrier aggregation. 5G NR can aggregate much wider bandwidths — especially at mmWave — leading to higher theoretical peaks. However, real-world throughput on both technologies depends on spectrum allocation, cell loading, device capability, and distance from the base station.
This article does not cite specific speed figures because real-world performance varies significantly by market, operator, and location. Independent measurement organisations such as Opensignal and Ookla publish country-level benchmarks; searching for the specific operator's name alongside "5G speed test" will return recent measurement data for a given market.
### Latency
LTE has a theoretical user-plane latency specification in the single-digit milliseconds range under ideal conditions. 5G NR was designed with additional latency reduction targets, particularly for URLLC applications in 5G SA. For the vast majority of consumer applications — web browsing, video streaming, messaging — the latency difference between LTE and mid-band 5G SA is not perceptible in practice. URLLC latency targets are relevant for industrial automation, remote surgery, and vehicle-to-everything (V2X) communications, which require consistent low latency guarantees that cannot be met with best-effort scheduling.
### Connection Density
LTE was designed with a connection density target that became a bottleneck in dense event venues and transit hubs under high load. 5G NR's IMT-2020 specification increases the target connection density per unit area, and the flexible numerology of 5G NR allows the system to handle many short transmissions efficiently. The mMTC use case specifically targets large numbers of low-power IoT devices per cell. For consumers, this translates to more stable connections in stadiums, conference centres, and busy transport hubs where LTE networks can become congested.
### MIMO and Beamforming
LTE introduced MIMO antenna techniques, with practical deployments reaching 4×4 MIMO on mid-band LTE-Advanced networks. 5G NR introduces **Massive MIMO**, where base station antenna arrays can contain dozens to hundreds of antenna elements. Combined with **beamforming** — shaping the radio signal toward specific devices rather than broadcasting in all directions — Massive MIMO improves spectral efficiency and allows multiple users to be served on the same frequency resource simultaneously. This is particularly effective in mid-band 5G deployments using bands such as n77/n78, where antenna arrays of 64 or more elements are commonly deployed.
---
## 3GPP Releases: The Versioning System Behind Each Generation
3GPP defines mobile network specifications in numbered **Releases**, each representing a functionally stable snapshot of the specification set. New features are always tied to a specific Release.
| Release | Freeze year | Key introduction |
|---------|-------------|-----------------|
| Release 8 | December 2008 | LTE (4G) |
| Release 10 | 2011 | LTE-Advanced, carrier aggregation |
| Release 13 | 2016 | LTE-Advanced Pro, NB-IoT |
| Release 15 | NSA: Dec 2017 / SA: Jun–Sep 2018 | 5G NR (NSA and SA) |
| Release 16 | July 2020 | 5G enhancements: URLLC, V2X, NR-U (unlicensed) |
| Release 17 | June 2022 (functional March 2022, ASN.1 June 2022) | NR-Light (RedCap), sidelink enhancements, NTN (satellite) |
| Release 18 | 2024 | 5G-Advanced: AI/ML integration, XR enhancements |
Understanding Release numbers is relevant when evaluating device specifications. A device described as supporting "5G" may implement Release 15 features only, while a later device may implement Release 16 or Release 17 features that add measurable improvements for specific use cases. When a carrier advertises a network feature — such as network slicing or satellite connectivity — checking which 3GPP Release introduced that feature will clarify whether a given device supports it. Device specification sheets often list supported 3GPP Release or explicitly list supported features by name.
---
## How Voice Calls Work Across Both Generations
Voice call handling is one of the clearest practical differences between 4G, 5G NSA, and 5G SA deployments.
On **4G LTE**, all voice calls use **VoLTE** (Voice over LTE) — carried as IP packets over the LTE network via an IMS (IP Multimedia Subsystem) core. The 3G circuit-switched fallback (CSFB) that earlier LTE devices used has been eliminated in all markets that have completed their 3G shutdown.
On **5G NSA**, the device maintains an LTE anchor for the control plane. Voice calls still use **VoLTE** on the LTE layer. The 5G NR radio does not carry voice in NSA mode.
On **5G SA**, voice calls use **VoNR** (Voice over New Radio), standardised in GSMA NG.114 and 3GPP Release 15. VoNR routes the call directly over the 5G NR bearer via IMS, using the same IMS infrastructure as VoLTE but with a 5G-native bearer and support for the **EVS (Enhanced Voice Services)** codec, which delivers higher audio quality than the AMR-WB codec used in VoLTE. For devices on a 5G SA network without VoNR support, fallback to VoLTE on LTE is the standard behaviour.
For the complete technical explanation of IMS, SIP signalling, QoS bearers, and what happens when VoLTE is not supported, see [VoLTE and VoNR Explained](/en/guides/volte-vonr/).
---
## What This Means When Choosing a SIM
The distinction between 4G and 5G, and between 5G NSA and SA, has practical consequences when selecting a carrier or plan.
**Network coverage layer.** A carrier's 5G coverage map reflects where 5G NR is deployed, but 4G LTE remains the coverage layer in most areas. Evaluating a carrier's LTE coverage is at least as important as 5G availability, particularly for travellers and users in suburban or rural locations. For more on how MNOs and MVNOs differ in network access, see [What Is an MNO?](/en/guides/what-is-mno/).
**SIM and eSIM compatibility.** 5G capability depends on the device, not the SIM card. A 5G-capable device on a 4G-only SIM plan will connect at 4G speeds. Conversely, a 4G-only device with a 5G plan will connect at 4G speeds. The SIM provides authentication and plan entitlements; the network selects the highest radio technology the device supports. For more on SIM vs eSIM, see [SIM vs eSIM](/en/guides/sim-vs-esim/).
**Data efficiency.** 5G does not reduce the data volume your applications consume. If you are on a limited data plan, a faster connection will deplete your allowance more quickly unless you use data-saving settings. For practical tips on reducing mobile data use, see [Data-Saving Techniques](/en/guides/save-data/).
**Roaming.** When roaming internationally, your device connects to the visited network's technology. A 5G device will use 4G LTE on a visited network that has not yet enabled 5G roaming agreements. Roaming data speeds depend on the visited network's LTE or 5G capability and the roaming agreement between your home carrier and the visited operator. See [International Roaming](/en/guides/international-roaming/) for how roaming agreements and data usage work across borders.
**MVNOs and 5G.** MVNOs lease network capacity from MNOs and typically pass through the host network's radio technology, including 5G, where the wholesale agreement permits it. Whether an MVNO's plan includes 5G access depends on the specific agreement with the host MNO. Some MVNOs offer 5G-capable plans; others remain limited to 4G LTE even on a host network that has 5G. Confirm 5G availability with the specific MVNO before selecting a plan if 5G is a priority. See [What Is an MNO?](/en/guides/what-is-mno/) for how the MNO–MVNO wholesale relationship works.
**Device band compatibility.** Not all 5G devices support all 5G bands. A device sold in one market may lack the n78 (3.5 GHz) band widely used for 5G in another market, or the specific low-band 5G frequency a carrier uses. When using an unlocked device internationally, checking band compatibility is as important for 5G as it is for 4G LTE.
You can filter and compare SIM plans by network generation on [SimFinder](/en/).
---
## FAQ
See the frontmatter above for structured FAQ entries compatible with schema.org/FAQPage. The questions below cover additional topics.
**When did commercial 5G first launch?**
The first commercial 5G NR service launched in South Korea on 3 April 2019, when SK Telecom, KT Corporation, and LG Uplus activated 5G NSA service simultaneously. The United States saw its first commercial 5G deployments from Verizon (fixed wireless, October 2018) and AT&T and T-Mobile (mobile 5G NR, late 2018–2019). These dates refer to the first commercial availability; widespread consumer coverage developed over subsequent years.
**Can a 4G SIM card be used on a 5G device?**
Yes. A 4G SIM provides authentication credentials that are valid on any network generation the carrier and device support. The SIM authenticates the subscriber; the radio access technology is negotiated between the device modem and the base station. However, some carriers issue updated SIMs or eSIM profiles to support specific 5G SA features. If a carrier requires an updated profile for 5G SA features, the carrier's support page will confirm this.
**What does "5G UC", "5G+", or "5G UW" mean on a phone's status bar?**
These are carrier-specific indicators for different 5G capability tiers. "5G UW" (Ultra Wideband, Verizon) and "5G+" (AT&T) indicate mmWave or high-band mid-band connections. "5G UC" (Ultra Capacity, T-Mobile) indicates mid-band 5G (primarily n41 2.5 GHz). Plain "5G" typically indicates low-band 5G. These labels are branding decisions by individual carriers, not standardised 3GPP terminology.
**Is 5G available when roaming internationally?**
5G roaming availability depends on whether both the home carrier and the visited network have established 5G roaming agreements and whether the visited network has deployed compatible 5G bands. As of 2026, 5G roaming agreements are expanding but are not universal; many roaming connections default to 4G LTE. The specific countries and bands supported for roaming are listed on each carrier's roaming information page. See [International Roaming](/en/guides/international-roaming/) for how roaming agreements work.
**What is 5G Standalone (SA) network slicing?**
Network slicing is a 5G SA feature defined in 3GPP Release 15 that allows a carrier to create multiple logically isolated virtual networks on the same physical infrastructure. Each slice can have different QoS parameters — for example, one slice with guaranteed low latency for emergency services and another optimised for high-throughput consumer data. Network slicing requires the 5G Core's NSSAI (Network Slice Selection Assistance Information) framework and is not available on 5G NSA or LTE networks.
---
## Related Guides
- [VoLTE and VoNR Explained](/en/guides/volte-vonr/) — How voice calls travel over 4G and 5G networks via IMS, and what VoNR requires from a 5G SA core
- [What Is an MNO?](/en/guides/what-is-mno/) — How mobile network operators hold spectrum licences and build the infrastructure that 4G and 5G run on
- [SIM vs eSIM](/en/guides/sim-vs-esim/) — How the SIM authenticates you to the network regardless of whether you are on 4G or 5G
- [International Roaming](/en/guides/international-roaming/) — How 4G and 5G roaming agreements determine which network technology is available abroad
- [Data-Saving Techniques](/en/guides/save-data/) — How to manage data consumption on faster 5G connections
================================================================================
# 5G Bands: Sub-6 vs mmWave Explained
URL: https://sim-finder.com/en/guides/5g-bands/
Type: guides (en)
Published: 2026-06-04
5G New Radio (NR) uses two distinct frequency ranges with fundamentally different propagation characteristics: Sub-6 GHz (FR1) and millimeter wave (FR2, commonly called mmWave). Sub-6 GHz bands behave similarly to LTE — they travel long distances, penetrate walls, and form the backbone of broad 5G coverage. mmWave bands carry significantly more data per cell but cover only short distances and struggle with obstacles. Understanding which range your device and carrier use determines what 5G actually means in practice.
Key points covered in this article:
- How 3GPP defines FR1 and FR2, with the specific frequency ranges and band numbers assigned to each
- The physics behind the coverage-versus-throughput trade-off between Sub-6 GHz and mmWave
- Why indoor performance differs so sharply between the two ranges
- How NSA and SA network architecture affects which bands a device uses
- How to read a device spec sheet to identify supported 5G NR bands
- Global deployment patterns and what they mean for travellers
For the technical background on how 5G voice calls work on top of this radio layer, see [VoLTE and VoNR Explained](/en/guides/volte-vonr/). For guidance on matching your device's band support to a specific carrier before selecting a plan, see [How to Choose a SIM Plan](/en/guides/how-to-choose/).
---
## The 3GPP Framework: FR1 and FR2
3GPP — the international body that defines mobile network standards — divides 5G NR spectrum into two frequency ranges, defined in 3GPP TS 38.104.
**FR1 (Frequency Range 1)** covers 410 MHz to 7.125 GHz. This range is commonly called Sub-6 GHz, though the actual upper boundary is 7.125 GHz. FR1 encompasses low-band frequencies below 1 GHz (such as 600 MHz and 700 MHz), widely deployed mid-band frequencies around 2.5–3.7 GHz, and upper mid-band frequencies up to 7.125 GHz. The majority of commercial 5G deployments worldwide use FR1 bands.
**FR2 (Frequency Range 2)** covers 24.25 GHz to 52.6 GHz as specified in 3GPP Release 15. Signals in this range have wavelengths measured in millimetres — hence the common name "millimeter wave" or "mmWave." FR2 enables very high spectral efficiency per cell but with a propagation range measured in hundreds of metres under ideal outdoor conditions.
The distinction between FR1 and FR2 is not marketing terminology; it is a defined technical boundary in the 3GPP specification that determines which hardware components a device or base station uses. An FR1 radio and an FR2 radio require different antenna designs, RF front-end components, and beamforming approaches.
---
## 5G NR Band Numbering: FR1 and FR2
5G NR bands are identified by the prefix "n" followed by a number. FR1 bands are defined in 3GPP TS 38.101-1; FR2 bands in 3GPP TS 38.101-2. Many FR1 NR bands reuse the same frequencies as LTE bands with the same or similar numbers, which simplifies spectrum refarming — the process of reassigning existing spectrum from LTE to 5G NR.
### Sub-6 GHz (FR1) bands
The following table lists the most widely deployed FR1 NR bands globally.
| Band | Frequency Range | Duplex | Common Deployment Context |
|------|----------------|--------|--------------------------|
| n1 | 1920–2170 MHz | FDD | Europe, Asia — legacy 3G refarmed |
| n3 | 1710–2170 MHz | FDD | Europe, Asia — high-density coverage |
| n5 | 824–894 MHz | FDD | Americas, Asia — low-band coverage |
| n28 | 703–803 MHz | FDD | Asia-Pacific, Europe — sub-1 GHz coverage |
| n41 | 2496–2690 MHz | TDD | USA (T-Mobile), China — primary mid-band |
| n66 | 1710–2200 MHz | FDD | Americas |
| n71 | 617–698 MHz | FDD | USA (T-Mobile) — low-band coverage |
| n77 | 3300–4200 MHz | TDD | Europe, Asia, Americas — primary mid-band |
| n78 | 3300–3800 MHz | TDD | Europe, Asia — primary mid-band |
| n79 | 4400–5000 MHz | TDD | Japan (NTT Docomo, au, SoftBank, Rakuten) |
Bands n77 and n78 are the most broadly deployed 5G NR bands in Europe, many Asian markets, and parts of the Americas. They occupy the 3.5 GHz range and offer a practical balance: cell radii of several hundred metres to a few kilometres depending on terrain, and substantially higher throughput than LTE on equivalent spectrum.
Band n79 (4.4–5.0 GHz) is used primarily in Japan, where the Ministry of Internal Affairs and Communications assigned this range to domestic carriers. Devices sold specifically for the Japanese market include n79 support; many international handsets do not.
### mmWave (FR2) bands
All FR2 bands use TDD (Time Division Duplex), because designing separate FDD uplink and downlink at these frequencies would require excessively large frequency separations.
| Band | Frequency Range | Key Market |
|------|----------------|------------|
| n257 | 26.5–29.5 GHz | USA (Verizon 28 GHz), Japan, South Korea |
| n258 | 24.25–27.5 GHz | Europe (26 GHz), South Korea |
| n259 | 39.5–43.5 GHz | Japan, USA |
| n260 | 37.0–40.0 GHz | USA |
| n261 | 27.5–28.35 GHz | USA (Verizon, AT&T, T-Mobile) |
In the United States, the FCC licensed mmWave spectrum in three major blocks: the 24 GHz band (close to n258), the 28 GHz band (n261), and the 39 GHz band (n260). US carriers were the first to deploy mmWave commercially at scale, beginning in 2019. Other mmWave deployments include Japan (n257 at 28 GHz, by NTT Docomo, au, SoftBank, and Rakuten) and South Korea (n257 and n258).
mmWave deployments outside these markets remain limited as of 2026. The European 26 GHz band (corresponding closely to n258) has seen licensing activity but limited large-scale commercial rollout compared to mid-band 5G.
---
## Why Coverage and Speed Trade Off
The difference in performance between FR1 and FR2 follows directly from the physics of radio wave propagation.
**Wavelength and diffraction.** Radio waves diffract (bend) around obstacles roughly in proportion to their wavelength relative to the obstacle size. At 700 MHz (FR1, ~43 cm wavelength), signals diffract around buildings, foliage, and terrain features to a meaningful degree. At 28 GHz (FR2, ~11 mm wavelength), diffraction is negligible. A building in the signal path results in a deep shadow zone with no service.
**Free-space path loss.** Path loss increases with both distance and frequency. The Friis transmission equation shows that for a given antenna gain, doubling the frequency doubles the path loss (adds approximately 6 dB). Moving from 700 MHz to 28 GHz represents a 40× increase in frequency, which translates to roughly 32 dB additional free-space path loss at the same distance. This forces mmWave base stations to operate at shorter ranges to maintain a usable signal level.
**Atmospheric and material absorption.** At 28 GHz and above, oxygen and water vapour in the atmosphere absorb radio energy at a measurable rate. Standard glass reduces a 28 GHz signal depending on composition: plain clear glass typically 3–10 dB, while coated or low-emissivity glass (common in modern buildings) can reach 20–40 dB. Concrete walls can attenuate a 28 GHz signal by 40 dB or more. FR1 signals pass through these same obstacles with much lower loss — standard glass reduces a 3.5 GHz signal by roughly 3–5 dB.
**Available bandwidth.** mmWave bands offer much wider channel widths. 3GPP allows channel bandwidths up to 400 MHz per component carrier in FR2 (versus a maximum of 100 MHz per component carrier in FR1 for Sub-6 GHz). This wider bandwidth is the primary mechanism behind mmWave's higher peak throughput.
The net result: FR1 mid-band (n77/n78) cells cover urban areas and reach indoors with moderate penetration loss. FR2 cells are deployed outdoors in dense pedestrian environments — shopping districts, stadiums, transport terminals — where a direct line of sight to the antenna is likely and cell range of a few hundred metres is acceptable.
The table below summarises the key differences:
| Property | FR1 Sub-6 GHz | FR2 mmWave |
|----------|--------------|------------|
| Typical cell range | Hundreds of metres to several km | Up to ~200–300 m outdoors |
| Building penetration | Moderate (low-band: good; mid-band: usable near windows) | Poor to none without indoor cells |
| Max channel bandwidth (3GPP) | 100 MHz per component carrier | 400 MHz per component carrier |
| Beamforming requirement | Helpful for capacity; not mandatory | Mandatory for link budget |
| Primary use case | Coverage layer, mass-market 5G | High-density outdoor hotspots |
---
## Indoor Performance
Indoor behaviour is where the FR1-vs-FR2 distinction is most consequential for everyday users.
A Sub-6 GHz 5G NR signal on mid-band (3.5 GHz) entering a modern office building typically loses 10–20 dB through exterior walls, leaving a usable indoor signal for devices near windows or on outer floors. Low-band 5G (below 1 GHz, such as n28 or n71) penetrates to interior floors and basements with less loss, similar to how 700 MHz LTE performs in building interiors today.
mmWave signals entering a building are effectively blocked by standard construction materials. Any mmWave 5G service inside a building requires an indoor small cell or distributed antenna system (DAS) with mmWave radios placed within the interior. Such indoor deployments exist in some venues — large US arenas and airports, for instance — but they are infrastructure-intensive and not the typical residential or office scenario.
For a subscriber choosing a SIM plan with 5G access, this means: if the carrier's 5G relies entirely on mmWave, indoor service in most buildings will default to LTE. If the carrier has deployed FR1 mid-band 5G, indoor coverage on upper floors or near windows is realistic.
Low-band FR1 (n28, n71) offers the best indoor reach of any 5G tier, but the narrowest available channel bandwidth of the three sub-ranges.
---
## NSA vs SA Architecture and Band Selection
5G NR can be deployed in two architectures defined by 3GPP:
**NSA (Non-Standalone)**, standardised in 3GPP Release 15 Option 3, uses an LTE anchor for the control plane (signalling) while adding a 5G NR layer for user-plane data throughput. In NSA, the device must first connect to LTE; the 5G NR layer is then added as a secondary cell. This is called EN-DC (E-UTRAN New Radio Dual Connectivity). Because NSA relies on an LTE anchor, the LTE bands the device supports directly affect whether 5G can activate — a device that lacks the carrier's LTE anchor band will not use 5G even if it supports the NR band.
**SA (Standalone)**, standardised in 3GPP Release 15 with the 5G Core (5GC), allows a device to connect entirely over 5G NR without an LTE anchor. SA enables features that NSA cannot support, including 5G-native network slicing, lower latency (because signalling also runs on 5G NR), and VoNR (Voice over New Radio). SA requires the carrier to have deployed the full 5G Core network, which involves more infrastructure investment than NSA.
For devices checking band support: on an NSA network, the device's spec sheet should list both the NR bands and the LTE bands that serve as anchors. On an SA network, only the NR bands matter for 5G connection. Most carriers specify which architecture they use on their network information pages.
---
## How to Check Device Band Support
Manufacturer spec sheets are the definitive source for band information. The process is the same for any device:
**Step 1: Find the exact model number.** Manufacturers often sell regional variants of the same commercial model under identical marketing names but with different internal model numbers and different band support. On Android, the model number is under Settings → About Phone → Model Number. On iPhone, it is under Settings → General → About → Model Number. The box and SIM tray also carry the model number.
**Step 2: Look up the spec sheet on the manufacturer's website.** Search for the model number on the manufacturer's support or specifications page. For iPhones, Apple's technical specifications page lists supported bands per region variant. For Android devices, the manufacturer's product page or a direct search for "[model number] specifications" typically returns the official spec sheet.
**Step 3: Identify the 5G NR band list.** The spec sheet will list Sub-6 GHz NR bands (FR1) separately from mmWave NR bands (FR2). FR1 bands appear in the format n1, n3, n28, n77, n78, etc. FR2 bands appear as n257, n258, n260, n261. A device without any FR2 entries does not support mmWave.
**Step 4: Cross-reference with the carrier's published band plan.** Major carriers publish their 5G frequency band allocations on their network or technology pages. Match the carrier's bands against the device's supported list. If the carrier uses n78 and the device supports n78, 5G should connect on that network.
Regional variant mismatch is the most common source of unexpected non-connectivity. A phone purchased in Japan and used in Europe may lack n77 or n78, which are the primary 5G bands for European carriers. A US-market iPhone supports a different set of FR2 mmWave bands than a European-market iPhone because the FCC licensed different mmWave blocks than European national regulators.
For how carrier-locking or country restrictions can additionally block certain bands or features, see [SIM Lock and SIM-Free Explained](/en/guides/sim-lock/). For how roaming on a foreign network affects which bands your device can use, see [International Roaming: How It Works](/en/guides/international-roaming/).
---
## 5G Deployment Patterns Globally
Understanding how carriers have deployed 5G frequencies helps set realistic expectations when travelling or switching plans.
**South Korea and Japan** deployed Sub-6 GHz 5G (primarily n77/n78/n79) at scale beginning in 2019. South Korea also deployed 28 GHz mmWave (n257) in limited urban areas. Japan's major carriers (NTT Docomo, au, SoftBank, Rakuten) all hold n79 licenses and have deployed it alongside n77/n78.
**China** deployed 5G on n41 (2.6 GHz, TDD) and n78 (3.5 GHz) extensively through China Mobile, China Unicom, and China Telecom. China's scale of deployment makes it one of the largest 5G markets by subscriber count.
**Europe** primarily uses n78 (3.5 GHz) as the main 5G band, with n28 (700 MHz) as a low-band complement for coverage extension. mmWave deployment is limited; the 26 GHz range has been licensed in some countries but large-scale commercial service is not yet widespread.
**United States** is unusual in having significant mmWave deployments (n260, n261) alongside mid-band (n41, n77) and low-band (n71) 5G. Verizon launched 5G using 28 GHz (n261) and 39 GHz (n260) mmWave as its initial 5G offering. T-Mobile's primary mid-band 5G uses n41 (2.5 GHz). AT&T uses n77 (3.5 GHz) mid-band alongside n14 (700 MHz) low-band.
For an international traveller, this means: a device with broad FR1 support (n1, n3, n28, n41, n71, n77, n78) will access 5G in most major markets. mmWave support is relevant primarily within the United States. If your device includes n79 and you travel to Japan, you may access 5G on bands unavailable in your home country — but only if the device is not SIM-locked or network-restricted.
For guidance on choosing a SIM that matches your travel destination and your device's band support, [SimFinder](/en/) allows filtering by country and carrier to compare plan options. For advice on which type of carrier (MNO or MVNO) gives access to the underlying 5G bands, see [What Is an MNO?](/en/guides/what-is-mno/).
---
## Carrier Aggregation and Reading a Carrier's Band Plan
### NR Carrier Aggregation
Carriers can combine multiple NR component carriers — on the same band or on different bands — to increase effective throughput. This is called NR Carrier Aggregation (NR CA), defined in 3GPP Release 15 and expanded in later releases.
Common NR CA combinations include:
- Two FR1 carriers on the same band (intra-band CA), which uses wider total bandwidth within a single carrier's spectrum block
- Two FR1 carriers on different bands (inter-band CA), such as n28 + n78, combining low-band coverage reach with mid-band throughput
- FR1 + FR2 (inter-band FR1-FR2 CA), combining Sub-6 GHz coverage with mmWave throughput where both are available
For NR CA to activate, the device, the base station, and the carrier's network configuration must all support the specific CA combination. Not all devices that support both n28 and n78 will support inter-band CA between them; the combination must appear explicitly in the device's supported CA combination list, which is typically in the detailed modem specification rather than the summary spec sheet.
The practical consumer implication: NR CA extends the performance ceiling of 5G connections but is not required for basic 5G access. A device that supports only one NR band per network will still connect to 5G; it will not benefit from CA-boosted throughput.
### Where to find a carrier's band plan
Carriers publish their frequency band assignments in several places:
- **Official network pages**: Most major carriers maintain a "Network Technology" or "Frequencies" section on their website listing 4G and 5G bands by region.
- **National regulator databases**: Spectrum licensing is a matter of public record. National telecom regulators (FCC in the US, Ofcom in the UK, BNetzA in Germany, MIC in Japan, etc.) publish spectrum assignment databases showing which operator holds which band in which geographic area.
- **GSMA data**: The GSMA maintains operator and network information that includes frequency band data.
- **Third-party band databases**: Sites that compile operator band information exist but vary in accuracy and currency; cross-check against official carrier or regulator sources for critical decisions.
When comparing SIM plans for a trip or a long-term switch, confirming that the carrier's 5G bands match your device's supported bands is the final step before committing. Even if two carriers both offer 5G service, one may use n78 (which your device supports) and the other n79 (which it does not), producing different real-world results from the same hardware.
---
## FAQ
See the frontmatter for structured FAQ entries compatible with schema.org/FAQPage. Additional context follows.
**What does "Sub-6 GHz" mean exactly?**
The term is a shorthand referring to the FR1 frequency range, which 3GPP defines as 410 MHz to 7.125 GHz in TS 38.104. Industry usage of "Sub-6 GHz" conventionally means the bands below 6 GHz used for 5G NR — primarily the 600 MHz–5 GHz range. The 7.125 GHz upper boundary (sometimes called "upper-mid-band" or "FR1-High") was added in later 3GPP releases and is used in some markets including the United States.
**Can a device lose 5G and fall back to LTE?**
Yes. This is by design. When a device moves out of 5G NR coverage — because the cell edge is reached, because the device enters a location with poor 5G signal, or because the network temporarily offloads traffic — it falls back to LTE. On NSA networks, this happens silently as the 5G secondary cell is dropped. The device icon changes from "5G" to "4G" or "LTE." LTE service continues normally during fallback.
**Is 5G NR backward compatible with LTE?**
5G NR and LTE use different physical layer standards (different waveforms, numerologies, and frame structures). A 5G NR base station cannot serve an LTE-only device on the NR carrier, and vice versa. However, in NSA deployments, the same tower can run both LTE and NR radios; an LTE-only device uses the LTE radio while a 5G NR device uses both. In standalone NR, only NR-capable devices benefit.
**What is upper mid-band (FR1-High) 5G?**
3GPP Release 17 and later releases expanded FR1 upward to 7.125 GHz (sometimes referenced as the "7 GHz band"). The US FCC has auctioned spectrum in the 3.45 GHz range (near n77) and is examining 7 GHz range spectrum. Japan's MIC has designated the 4.9 GHz range (n79) and explores upper mid-band allocations. These upper FR1 bands offer greater available bandwidth than the congested 3.5 GHz range while retaining better propagation than FR2.
---
## Related Guides
- [VoLTE and VoNR Explained](/en/guides/volte-vonr/) — How voice calls use IMS over the 4G and 5G NR radio layers described in this article
- [What Is an MNO?](/en/guides/what-is-mno/) — How licensed spectrum is held by MNOs and passed through to MVNOs
- [International Roaming: How It Works](/en/guides/international-roaming/) — How visited-network band support affects which 5G bands you can use abroad
- [SIM Lock and SIM-Free Explained](/en/guides/sim-lock/) — How carrier locking can restrict access to bands your device hardware supports
- [How to Choose a SIM Plan](/en/guides/how-to-choose/) — A practical decision framework that includes matching device bands to carrier networks
================================================================================
# SIM Activation: How to Get Your Line Working
URL: https://sim-finder.com/en/guides/activation/
Type: guides (en)
Published: 2026-06-04
Activating a SIM or eSIM involves three distinct steps: obtaining and installing the SIM or profile, completing any required identity verification, and confirming that data and calls are working. This guide covers all three, from the moment you insert a physical SIM or download an eSIM profile through to a verified working connection. Where steps differ between physical SIM and eSIM, both are covered.
Key points:
- Physical SIM and eSIM follow different activation paths, but both require network registration after installation
- Identity verification requirements vary significantly by country and carrier
- A successful profile install does not automatically mean a working data connection
---
## Physical SIM vs eSIM: Which Activation Path Applies to You?
The activation process diverges at the start depending on which type of SIM you are using.
**Physical SIM:** You receive a card, insert it into the device, and the carrier activates the line — either automatically when you insert the SIM, or after you complete a required activation step (such as calling an activation number or verifying identity online or in-store).
**eSIM:** You receive a QR code, an SM-DP+ activation code, or a push from the carrier's app. You download a carrier profile to your device's embedded chip (eUICC). The carrier then enables the plan on their network side. No physical card changes hands.
Both paths converge at the same end state: a registered line that can make calls, send SMS, and use mobile data. The practical difference is that eSIM activation happens entirely through software, and physical SIM activation requires the card to be physically present in the device first.
For a full comparison of physical SIM and eSIM — including travel, device loss, and carrier-switching considerations — see [Physical SIM vs eSIM](/en/guides/sim-vs-esim/).
---
## Installing Your SIM or eSIM Profile
**Physical SIM:** Almost all current smartphones use a Nano-SIM (4FF, 12.3 × 8.8 mm). The card has a notched corner that aligns with a matching cutout in the tray, ensuring it can only be inserted in one orientation. Power the device off, eject the tray, seat the card flush, and restart. The full step-by-step procedure — including how to read the orientation notch and confirm the card is detected — is in [How to Insert and Remove a SIM Card](/en/guides/sim-insertion/).
After insertion and device restart, look for the carrier name and signal bars in the status bar. If the SIM is detected but shows "No Service", it may require carrier activation before network registration can succeed — see the section below.
Some new SIM cards are not active when you receive them. Common activation methods include logging into a carrier's online portal, calling a printed activation number, or completing the process at the point of sale. Pre-activated SIMs — common with travel SIMs — begin service as soon as they connect to a network. Check your provider's documentation to confirm which applies.
**eSIM:** Your device downloads a carrier profile from a remote server (the SM-DP+ server defined in GSMA SGP.22). You initiate this by one of four methods, depending on what your carrier supports:
1. **QR code scan** — display the QR code on a second device or printed page and scan it with your phone's camera through Settings → Cellular → Add eSIM. The QR code encodes the SM-DP+ server address and a matching activation code in a single scannable image. Each QR code is single-use: once successfully scanned, the code is invalidated on the server. If you scan a QR code on the same screen that will display the camera viewfinder, you will not be able to scan it — always use a second screen or a printed copy.
2. **Manual activation code entry** — if you cannot scan the QR code, select "Enter Details Manually" and type the SM-DP+ address and activation code that your carrier provided. These two strings together identify both the server and your specific profile. Entering either string incorrectly prevents the download; double-check each character, particularly letters that resemble numbers (O vs 0, I vs 1).
3. **Carrier app** — some carriers push the eSIM profile automatically through their official app after you log in or complete purchase. The app communicates with the carrier backend to trigger the download without exposing a QR code or activation code to you. This method requires the app to be installed and you to be signed in before starting.
4. **eSIM Quick Transfer** — on supported devices and carriers, transfer an eSIM directly from another device without a QR code. On iPhone, this is called Quick Transfer and requires both devices to be nearby, on the same Wi-Fi network, and signed in to the same Apple ID.
For iPhone QR code setup step by step, see [How to Set Up eSIM on iPhone via QR Code](/en/guides/qr-code-iphone/).
Prerequisites before starting eSIM setup:
- Your device must support eSIM (check Settings → Cellular on iPhone; if "Add eSIM" appears, it is supported)
- The device must be carrier-unlocked — a locked device can only accept eSIM profiles from the carrier it is locked to
- You need an active internet connection: Wi-Fi or an existing mobile data line
Once the profile downloads, the line appears in Settings. Installing the profile is not the same as having a working data connection — additional steps are usually needed.
---
## Identity Verification: What to Expect
Many countries require carriers to verify a subscriber's identity before activating a SIM or eSIM. The specific requirements vary by country and carrier, and the methods available differ accordingly.
**Why it is required:** Telecommunications regulations in many jurisdictions mandate subscriber registration as a measure against fraud, crime, and misuse of the network. As of 2021, more than 155 countries required some form of identity verification for SIM registration, according to a GSMA report. The practical implication for you as a customer is that your line may not activate until this check is complete.
**Methods your carrier may offer:**
| Method | What it involves |
|--------|-----------------|
| In-person at a store | Present a government-issued ID or passport to a carrier representative |
| eKYC — document upload | Upload photos of your ID or passport and a selfie through a carrier app or website |
| eKYC — video call | A live video session with a carrier agent who views your document in real time |
| eKYC — electronic ID | Use a national electronic identity card (where supported) to authenticate digitally |
**Country differences:** Identity verification rules differ materially across countries.
- **Biometric verification**: Some countries require a biometric check during registration. Thailand mandated biometric liveness detection for all SIM registrations from August 2025. Liveness detection means you must complete a short face-movement sequence — such as blinking or turning your head — to prove that the selfie is from a live person rather than a printed photo. This is typically done through the carrier's app.
- **eKYC with document upload**: Countries including Japan, South Korea, and several EU member states allow electronic identity checks where you upload photos of your ID document and take a selfie. The document images are processed by OCR and cross-referenced with government databases or document-verification services. Approval can be near-instant for automated checks, or take up to a few hours if a human reviewer is involved.
- **In-person only**: Some countries or carriers accept only in-person verification at a store, particularly for postpaid contracts. Online purchases in these cases may ship the SIM in an unactivated state, requiring a store visit to complete.
- **No mandatory registration**: A smaller number of countries do not impose mandatory SIM registration. In these cases, your carrier may still ask for an email address or phone number for account management, but presenting a government ID is not required.
Your carrier will inform you of the specific documents required.
**Document types commonly accepted:** Government-issued photo ID, national identity card, or passport. Requirements for foreign nationals may differ from those for residents — many carriers require passport presentation from visitors.
**Timing:** After you submit verification documents, the carrier reviews them — automatically in most eKYC flows, or manually for some. Automated review can be near-instant; manual review may take minutes to several hours. Your line does not activate until the carrier confirms verification.
---
## Line-Switch Timing: When Does the Old Line Go Inactive?
If you are switching from an existing carrier to a new one, understanding the timing of the switch prevents gaps in service.
**New SIM from a new carrier (no number porting):** Your new line activates independently of your old one. Your old line stays active until you cancel it.
**Number porting (keeping your existing number):** The port-out process transfers your number from the old carrier to the new one. During the port, your old SIM typically stops working at the moment the number transfers to the new carrier. This transition is usually fast — often within minutes in most countries — but may take longer in some cases. Do not cancel your old plan before the port completes, as this can cause the port to fail.
**eSIM to eSIM within the same device:** If you are switching between eSIM profiles on the same device, you can disable the old eSIM profile and enable the new one in Settings without the old line going inactive until you explicitly turn it off. This makes back-to-back testing possible.
**What happens during the brief downtime window:** At the moment the number transfers, the old SIM loses its network registration and the new SIM must register on the new network. The device with the new SIM typically prompts for a restart or automatically re-registers within seconds. If the new SIM does not register automatically, toggle Airplane Mode off and on, or restart the device. Incoming calls during the window go to voicemail if the old carrier has voicemail configured; SMS messages are queued by the sender's network and delivered once the new line is active. If the port takes longer than expected, contact the new carrier — a stalled port can sometimes be caused by a mismatch between the account name or address provided and the information held by the old carrier.
**Key point:** During any number port, there is typically a brief window — seconds to minutes — when neither SIM is active. Plan accordingly if you need uninterrupted service.
---
## Post-Activation Connectivity Check
A working line shows signal bars and the carrier name in the status bar. However, voice and data are separate systems — confirming one does not confirm the other. Run through all three checks.
**Signal bars:** One to four signal bars (or dots, depending on the device) indicate the strength of the radio connection between your device and the nearest cell tower. Zero bars or the "No Service" indicator means the device cannot see the network. If signal is weak in a building, move closer to a window before concluding activation has failed — poor signal in a specific location is not the same as a non-functioning line.
**1. Voice and SMS**
Make a test call to a known number (a voicemail service or a contact who can confirm receipt). Let it ring long enough to confirm it connects rather than going directly to a network error message. Send a test SMS to the same number and verify it is delivered. If calls work but SMS does not, or vice versa, contact your carrier — some plan types exclude SMS or require separate activation for messaging. Some prepaid plans activate voice and data at the time of purchase but enable SMS only after a first top-up or a specific activation step in the carrier app.
**2. Mobile data**
Open a browser and load any page over the cellular connection (turn off Wi-Fi first). If the page loads, mobile data is working.
If signal bars are present but data does not load, the most common cause is a missing or incorrect APN (Access Point Name) setting. The APN is a configuration string that routes your data traffic through the carrier's gateway.
On iPhone, most carrier SIMs and eSIMs configure the APN automatically. If data does not work after activation, check Settings → Cellular → Cellular Data Network and compare the APN field to what your carrier documents. For detailed steps, see [APN Setup Guide for iPhone](/en/guides/apn-setup-iphone/).
On Android, some MVNOs and smaller carriers require manual APN entry. See [APN Setup Guide for Android](/en/guides/apn-setup-android/) for the full procedure.
**3. Data Roaming (for travel SIMs)**
Travel eSIMs and local SIMs used outside your home country connect via a roaming session at the network protocol level. iOS and Android treat this as roaming even when you are physically present in the destination country, meaning Data Roaming must be enabled for data to flow.
- **iPhone**: Settings → Cellular → tap the SIM line → Cellular Data Options → turn on Data Roaming
- **Android (Pixel)**: Settings → Network & Internet → SIMs → tap the SIM → turn on Roaming
- **Android (Samsung)**: Settings → Connections → SIM card manager → tap the SIM → turn on Data Roaming
---
## Dual-SIM Setup After Activation
If your device has two lines active — a physical SIM and an eSIM, or two eSIMs — you need to specify which line handles each function. The device will not do this automatically in a way that always matches your intent.
**Settings to configure:**
| Function | iPhone path | Android (Pixel) |
|----------|-------------|-----------------|
| Mobile data | Settings → Cellular → Cellular Data | Settings → Network & Internet → SIMs → Mobile data |
| Default calls | Settings → Cellular → Default Voice Line | Settings → Network & Internet → SIMs → Calls |
| SMS/messages | Settings → Cellular → Default Line for SMS | Settings → Network & Internet → SIMs → SMS |
**Allow Cellular Data Switching (iPhone):** When this is on, iOS can use either SIM for data depending on coverage. If you have a travel eSIM and a home SIM in the device at the same time, turn this off to prevent the home SIM from accidentally using roaming data.
---
## Understanding the Three Stages of eSIM Activation
A common source of confusion: downloading an eSIM profile and having a working connection are not the same event. There are three distinct stages:
1. **Profile download** — The eSIM data is transferred from the carrier's SM-DP+ server to your device's eUICC chip. This requires an internet connection (Wi-Fi or existing mobile data) and completes when the profile appears in Settings.
2. **Plan activation** — The carrier enables the plan on their network side. This happens after the profile download and after any identity verification requirement is met. It can take a few seconds or, with some carriers, a few minutes.
3. **Service configuration** — The device selects the network, applies the APN, and establishes a data session. In a dual-SIM setup, you may need to manually set which SIM handles data.
If your eSIM shows as installed in Settings but data is not working, the issue is typically at stage 3, not in the original activation. Work through the connectivity check steps in the section above.
---
## If Activation Stalls: What to Do While Waiting
Activation does not always complete instantly. If your profile is installed and verification is submitted but the line is not yet active, the following steps cover the most common reasons for a delay.
**Wait and re-check:** Carrier-side activation after eKYC submission can take several minutes in automated systems and up to a few hours in systems that route some submissions to manual review. Before troubleshooting, check the carrier's confirmation email or app notification for an estimated activation time. If that time has not passed, waiting is the correct action.
**Restart the device:** A device restart forces the modem to re-register on the network. After the restart, watch for the carrier name to appear in the status bar within 30–60 seconds. If it does not appear, the line is not yet active rather than the restart having failed.
**Toggle Airplane Mode:** If a full restart is not convenient, toggling Airplane Mode on for 10 seconds and then off triggers a new network search without rebooting the device. This is useful when a line appears to be registered (carrier name visible) but data is not flowing.
**Re-check the APN:** For physical SIMs and some eSIM profiles, the device may not receive the APN configuration automatically. If signal is present but a web page does not load over mobile data, the APN is the most likely cause. Verify the APN value against your carrier's documentation and enter it manually if needed. See [APN Setup Guide for iPhone](/en/guides/apn-setup-iphone/) or [APN Setup Guide for Android](/en/guides/apn-setup-android/).
**Check your verification status:** Log in to the carrier's app or website and look for a verification status indicator. Common statuses include "pending", "under review", "additional information required", and "approved". If the status shows "additional information required", the carrier could not process the document you submitted and you need to re-submit or use a different verification method.
**Contact carrier support:** If the expected activation window has passed and the line is still not active, contact the carrier directly. Have your order confirmation number, the device IMEI, and the EID (for eSIM) ready. The carrier can check the activation status on their backend and re-trigger the process if it stalled.
---
## Troubleshooting: Activation Fails or Service Does Not Start
If activation does not complete or you cannot get service after following the steps above, the most common causes are:
- **Device is carrier-locked**: a locked device cannot accept SIM profiles from other carriers. On iPhone, check Settings → General → About → Carrier Lock. If it shows anything other than "No SIM restrictions", contact your original carrier to unlock the device.
- **Identity verification not completed**: the carrier's system will not activate the line until verification clears. Check your email or the carrier's app for a pending verification step.
- **APN not applied**: see the APN guides linked above.
- **QR code already used or expired** (eSIM): each eSIM QR code is single-use. If it was already scanned or has expired, request a new one from your carrier.
- **eSIM profile storage full**: iPhones can store 8 or more eSIM profiles, but the device has a limit based on eUICC memory. Delete an unused profile if you receive an "Unable to add cellular plan" error.
For a full symptom-by-symptom troubleshooting sequence, see [eSIM Won't Activate? How to Fix Common Setup Issues](/en/guides/activation-failed/).
---
## Frequently Asked Questions
### How long does SIM activation take?
For physical SIMs, network registration typically completes within seconds to a few minutes after the device restarts with the SIM inserted. If the carrier requires identity verification first, the line does not activate until that check is cleared. For eSIMs, profile download takes a few seconds to about a minute; the carrier then enables the plan on their side, which can take a few additional seconds or, with some carriers, up to a few minutes. eKYC-based verification — where you upload documents through an app or website — can add minutes to hours to this process depending on automated review speed.
### Do I need Wi-Fi to activate an eSIM?
Yes, in most cases. Downloading an eSIM profile requires an active internet connection — Wi-Fi or an existing mobile data line. Connect to Wi-Fi before starting. On eSIM-only iPhone models (no physical SIM slot) in certain countries and regions, Apple states that activation is possible without Wi-Fi; this exception does not apply to standard iPhones or Android devices.
### What is identity verification and why does my carrier require it?
Many countries require carriers to confirm the identity of new subscribers before activating a SIM. This is typically done by presenting a government-issued ID or passport — either in person at a store or through an electronic process (eKYC) using a carrier app or website. Requirements vary significantly by country: some require biometric checks, others accept a scanned document, and a few have no mandatory registration requirement. Carriers cannot bypass these legal obligations.
### My physical SIM is inserted but shows "No Service". Is it activated?
Not necessarily. A SIM that is physically inserted and detected by the device still needs to register on the network. If the carrier requires activation (for example, by calling an activation line, visiting a website, or completing identity verification), "No Service" with the SIM visible in Settings indicates the SIM is detected but the network has not enabled the line yet. Complete the carrier's required activation steps, then toggle Airplane Mode off and on to prompt the device to re-register.
### Can I activate an eSIM before I travel?
Yes. For travel eSIMs, activating before departure — on reliable home Wi-Fi — is strongly recommended. Most travel eSIM providers allow you to install the profile in advance and configure a future start date, or the data balance activates automatically once you connect to a local network abroad. Check your provider's documentation for whether activation is triggered at purchase or at first use.
---
## Related Guides
- [How to Insert and Remove a SIM Card](/en/guides/sim-insertion/) — step-by-step SIM tray procedure, orientation guide, and recognition checks
- [APN Setup Guide for iPhone](/en/guides/apn-setup-iphone/) — configure the APN after SIM or eSIM activation on iPhone
- [APN Setup Guide for Android](/en/guides/apn-setup-android/) — configure the APN after SIM or eSIM activation on Android
- [How to Set Up eSIM on iPhone via QR Code](/en/guides/qr-code-iphone/) — detailed QR code eSIM setup flow for iPhone
- [eSIM Won't Activate? How to Fix Common Setup Issues](/en/guides/activation-failed/) — symptom-by-symptom troubleshooting when activation fails
Use [SimFinder](/en/) to compare SIM and eSIM plans by country.
================================================================================
# eSIM Won't Activate? How to Fix Common Setup Issues
URL: https://sim-finder.com/en/guides/activation-failed/
Type: guides (en)
Published: 2026-04-13
Most eSIM activation failures come down to one of four root causes: the device is carrier-locked, the device does not support eSIM, the QR code has already been used or expired, or there is no internet connection during setup. This guide walks through each scenario with specific steps for iPhone and Android.
---
## Pre-Activation Checklist
Before attempting eSIM setup, confirm all four conditions below. Skipping any one of them will cause activation to fail.
### Check 1: Your device supports eSIM
Not all smartphones support eSIM. Here is what to look for:
**iPhone:**
- iPhone XS, XS Max, and XR (2018) and all later models support eSIM
- iPhone 13 series and later support dual eSIM (two eSIMs active at the same time)
- iPhones sold in the US from iPhone 14 onwards are eSIM-only (no physical SIM slot)
- iPhone Air is eSIM-only in all markets (no physical SIM slot)
**Android:**
- Google Pixel 3 and later generally support eSIM (exceptions exist for some regional and carrier variants)
- Google Pixel 7 and later support dual eSIM
- Samsung Galaxy S20 and later flagship models generally support eSIM (carrier-locked and some regional variants may not)
- Budget models and older devices may not support eSIM — check your device specifications
**How to verify:**
- **iPhone**: Go to Settings > Cellular. If you see "Add eSIM" or "Set Up Cellular", the device supports eSIM
- **Android (Pixel)**: Go to Settings > Network & internet > SIMs > Add SIM. If the option exists, eSIM is supported
- **Android (Samsung)**: Go to Settings > Connections > SIM card manager > Add mobile plan
If these menus are absent, the device either does not support eSIM or it is carrier-locked.
### Check 2: The device is carrier-unlocked
A carrier-locked device cannot use eSIM profiles from other carriers, including travel eSIMs.
**How to check on iPhone:**
Go to Settings > General > About > Carrier Lock. If it reads "No SIM restrictions", the device is unlocked.
**How to check on Android:**
Insert a physical SIM from a different carrier. If calls and data work normally, the device is unlocked. Alternatively, contact your original carrier directly.
**How to unlock:**
Contact the carrier that sold you the device. Most carriers unlock devices online through their account portal, often at no charge once the device is paid off or the contract term has ended. The specific unlock policies vary by carrier and country.
After unlocking, restart the device before attempting eSIM setup again.
### Check 3: You have an internet connection
eSIM profile download requires an active internet connection. Connect to Wi-Fi, or use mobile data from a second SIM already in the device.
Without internet access, you will see errors such as "Couldn't download the eSIM", "Unable to connect to server", or the setup will simply time out.
Avoid using networks with heavy filtering (such as some hotel or enterprise Wi-Fi). A regular home or mobile Wi-Fi network is the safest choice.
### Check 4: eSIM profile storage is not full
iPhones can store 8 or more eSIM profiles, but the exact limit depends on the eUICC chip memory. If the limit is reached, you will see "Unable to add cellular plan" or a similar error.
To free up space, delete eSIM profiles you no longer use:
- **iPhone**: Settings > Cellular > tap the plan > Remove Cellular Plan
- **Android (Pixel)**: Settings > Network & internet > SIMs > tap the eSIM > Delete
Note: Some carriers do not allow a deleted eSIM to be reinstalled. Check your carrier's policy before deleting.
---
## Symptom-by-Symptom Fixes
### Symptom A: "SIM locked" or "This carrier is not supported"
**Cause:** The device is carrier-locked.
**Fix:** Follow the unlock steps in Check 2 above. Restart the device after unlocking, then retry eSIM setup.
---
### Symptom B: QR code won't scan, or "Invalid QR code" error
**Cause and fix:**
| Cause | Fix |
|-------|-----|
| QR code already used on another device | Contact your carrier or eSIM provider for a new QR code |
| QR code has expired | Same as above — expiry periods vary by provider (hours to weeks) |
| Screen too dim or glare on the screen | Set brightness to maximum on the device displaying the QR code |
| QR code displayed too small | Enlarge the image on a PC or tablet screen |
| Trying to scan a QR code on your own screen | The QR code must be displayed on a *different* device. You cannot scan a code shown on the same phone you are setting up |
**Switch to manual entry if QR scanning keeps failing:**
Manual entry uses the SM-DP+ address (also called the activation server address) and an activation code provided by your carrier.
**On iPhone:**
1. Settings > Cellular > Add eSIM
2. Tap "Use QR Code"
3. Tap "Enter Details Manually" at the bottom
4. Enter the SM-DP+ address and activation code exactly as provided
**On Android (Pixel):**
1. Settings > Network & internet > SIMs > Add SIM
2. Tap "Enter code manually" or "Help"
3. Enter the activation code
---
### Symptom C: "Couldn't connect to server" or timeout error
**Cause:** Network issue on your end, or a temporary problem on the carrier's server.
**Fix (try in order):**
1. Confirm the Wi-Fi connection is actually working — open a browser and load any page
2. Try a different Wi-Fi network (some networks block the eSIM provisioning servers)
3. Turn Airplane Mode on, wait 10 seconds, then turn it off
4. Restart the device
5. Wait 15–30 minutes and try again — carrier servers occasionally experience brief outages
If you are on a corporate or hotel Wi-Fi, switch to a mobile hotspot or a standard home network instead.
---
### Symptom D: eSIM is installed but there is no data connection
Installing a profile and activating data are two separate steps. After a successful install, work through the following:
**Step 1: Confirm the eSIM line is enabled**
- **iPhone**: Settings > Cellular > tap the eSIM plan > turn on "Turn On This Line"
- **Android**: Settings > Network & internet > SIMs > confirm the eSIM toggle is on
**Step 2: Set the eSIM as the preferred data line (dual-SIM devices)**
With two SIMs in the device, you must explicitly choose which one handles mobile data.
- **iPhone**: Settings > Cellular > Cellular Data > select the eSIM
- **Android (Pixel)**: Settings > Network & internet > SIMs > Mobile data > select the eSIM
- **Android (Samsung)**: Settings > Connections > SIM card manager > Preferred SIMs > Mobile data > select the eSIM
**Step 3: Enable Data Roaming if using a travel or international eSIM**
Travel eSIMs and eSIMs from carriers in a different country require Data Roaming to be on.
- **iPhone**: Settings > Cellular > tap the eSIM > turn on Data Roaming
- **Android**: Settings > Network & internet > SIMs > tap the eSIM > turn on Roaming
**Step 4: Set network selection to automatic**
If you previously set network selection to manual, it may be pointing to the wrong network.
- **iPhone**: Settings > Cellular > tap the eSIM > Network Selection > turn on Automatic
- **Android**: Settings > Network & internet > SIMs > tap the eSIM > turn on Automatically select network
**Step 5: Verify the APN setting**
APN (Access Point Name) is the gateway configuration that enables mobile data. It is defined in 3GPP TS 23.003. Most eSIM profiles set the APN automatically during installation, but occasionally the profile does not apply it correctly.
If data still does not work after the steps above, contact your carrier's support and ask them to confirm the correct APN for your plan. Do not use APN values found on third-party websites — always get them from the carrier directly.
---
### Symptom E: "Unable to add cellular plan" (profile storage full)
**Cause:** The device has reached its eSIM profile storage limit.
**Fix:** Delete an eSIM profile you no longer need (see the deletion steps in Check 4 above), then retry. Confirm with your carrier first whether the deleted eSIM can be reinstalled.
---
## If Nothing Works: Network Settings Reset
If all the steps above fail, resetting the network settings will remove any corrupted configuration. This also deletes saved Wi-Fi passwords, VPN settings, and Bluetooth pairings, so note those down first.
**iPhone:**
1. Settings > General > Transfer or Reset iPhone > Reset
2. Tap "Reset Network Settings"
3. Restart, then retry eSIM setup
**Android (Pixel):**
1. Settings > System > Reset options
2. Tap "Reset Wi-Fi, mobile & Bluetooth"
3. Confirm and restart
If activation still fails after a network reset, contact your carrier or eSIM provider's support team. Provide the error message text, your device model, the device IMEI (dial `*#06#` to display it), and the EID (found in Settings > General > About on iPhone, or Settings > About phone on Android).
---
## Understanding What "Activation" Actually Means
A common point of confusion: downloading an eSIM profile to your device and having a working data connection are not the same event.
The process has three distinct stages:
1. **Profile download** — The eSIM data is transferred from the carrier's server (SM-DP+) to your device's eUICC chip. This requires internet access (Wi-Fi or existing mobile data).
2. **Profile activation** — The carrier enables the plan on their network side. This can take a few seconds or, with some carriers, up to a few minutes.
3. **Service configuration** — The device selects the network, applies the APN, and establishes a data session. In a dual-SIM setup, you may need to manually select which SIM handles data.
If your eSIM profile shows as installed in Settings but data is not working, the issue is in stage 3 — not in the original activation itself.
---
## Frequently Asked Questions
### Do I need Wi-Fi to activate an eSIM?
Yes. Downloading an eSIM profile requires an internet connection. Connect to Wi-Fi or use mobile data from a second SIM before starting the setup. On eSIM-only iPhones in supported regions, activation may work without Wi-Fi in some cases, but Wi-Fi is the reliable option.
### My QR code says "Invalid QR code" — what should I do?
eSIM QR codes are single-use. If the code has already been scanned on any device, or if it has expired, it will no longer work. Contact your carrier or eSIM provider and ask them to issue a new QR code. You can also try switching to manual entry using the SM-DP+ address and activation code instead.
### How do I check if my phone is carrier-locked?
On iPhone, go to Settings > General > About and look for the "Carrier Lock" field. If it says "No SIM restrictions", the device is unlocked. On Android, try inserting a SIM from a different carrier — if calls and data work, the device is unlocked. You can also contact your original carrier to confirm.
### I installed the eSIM but I have no data connection. Why?
Installing an eSIM profile and activating data are separate steps. First, confirm the eSIM line is enabled in Settings. If you have two SIMs, explicitly set the eSIM as the preferred line for mobile data. For travel or international eSIMs, turn on Data Roaming for that line. If data still does not work, check the APN settings with your carrier.
### I get "Unable to add cellular plan" — what does that mean?
This error typically means one of four things: the device is carrier-locked, the eSIM profile storage is full, the QR code or activation code has already been used, or there is no internet connection. Work through the pre-activation checklist above to identify the cause.
---
For background on how eSIM technology works, see [What Is an eSIM?](/en/guides/what-is-esim/). For definitions of terms like SM-DP+, eUICC, and APN used in this article, see [SIM & Mobile Glossary](/en/guides/glossary-index/). If you are deciding between eSIM providers for travel, [4 Ways to Stay Connected Abroad](/en/guides/four-options/) covers the full range of options. Use [SimFinder](/en/) to compare eSIM plans by country.
================================================================================
# SIM Not Working After Returning Home: Fixes
URL: https://sim-finder.com/en/guides/after-return/
Type: guides (en)
Published: 2026-06-06
You land home, take out the foreign SIM (or leave the travel eSIM in), and your regular line still shows no service or no data. The fix is almost always one of six things — and the most likely culprit is either a roaming toggle left in the wrong state or a device that is still treating your home SIM as a secondary line.
Work through the steps below in order. Most users are back online after steps 1 or 2.
---
## Step 1: Check Data Roaming — Turn It Off for Home Use
Data Roaming enables your device to use mobile data on foreign networks. When you are home, Data Roaming on your home SIM line is not needed and, if accidentally left on, can prevent the home line from connecting normally by routing data through an incorrect path.
**iPhone:**
1. Settings → Cellular (or Mobile Data in some regions).
2. Tap your home SIM line name.
3. Tap **Cellular Data Options** (or Mobile Data Options).
4. Confirm **Data Roaming** is toggled **off**.
On dual-SIM iPhones, each line has its own Data Roaming toggle. Check both the home SIM line and any travel eSIM line — leaving the travel eSIM line with Data Roaming on while at home is unnecessary and can cause background connection attempts.
**Android (Pixel):**
1. Settings → Network & internet → SIMs.
2. Select your home SIM.
3. Confirm **Roaming** is toggled **off**.
**Android (Samsung One UI):**
1. Settings → Connections → Mobile networks.
2. Confirm **Data roaming** is toggled **off**.
If Data Roaming was already off and data still does not work, continue to Step 2. For a full explanation of what the Data Roaming toggle does and does not control, see [Data Roaming Settings: How to Turn It On/Off Safely](/en/guides/roaming-settings/).
---
## Step 2: Check Which Line Is Active for Cellular Data
When you travel with two lines — a home SIM and a travel eSIM — the device must be configured to use the home SIM for data after you return. If the travel eSIM was set as the active data line during your trip, it remains the active line until you change it. The home SIM can show a carrier name and accept calls while the travel eSIM handles (or attempts to handle) data, producing a situation where everything appears connected but data does not work.
**iPhone:**
1. Settings → Cellular.
2. Tap **Cellular Data** (at the top of the SIM list section).
3. Confirm your home SIM line is selected.
4. If the travel eSIM is selected instead, tap the home SIM line to switch.
**Android (Pixel):**
1. Settings → Network & internet → SIMs.
2. Under **Preferred SIMs** (or SIM preferences), check which SIM is set for **Mobile Data**.
3. Tap to switch to your home SIM.
**Android (Samsung):**
1. Settings → Connections → SIM card manager.
2. Under **Preferred SIMs**, tap **Data** and select your home SIM.
After switching the active data line, wait 10–15 seconds and test data. If it still does not work, move to Step 3.
---
## Step 3: Disable the Travel eSIM Line (If Still Installed)
Even if your home SIM is set as the active data line, leaving the travel eSIM line powered on can cause interference — the device may continue attempting to register the travel eSIM on a network at home, consuming radio resources and occasionally disrupting the home SIM's connection.
The standard approach after returning home is to turn off the travel eSIM line. You do not need to delete the profile — keeping it installed means you can reactivate it on your next trip without repurchasing.
**iPhone:**
1. Settings → Cellular.
2. Tap the travel eSIM plan name.
3. Toggle **Turn On This Line** to **off** (grey).
**Android (Pixel):**
1. Settings → Network & internet → SIMs.
2. Tap the travel eSIM entry.
3. Toggle it **off**.
**Android (Samsung):**
1. Settings → Connections → SIM card manager.
2. Tap the travel eSIM entry.
3. Toggle it **off**.
After disabling the travel eSIM line, the home SIM becomes the only active line. Test data again before continuing.
---
## Step 4: Reset the APN for Your Home SIM
APN (Access Point Name) is the configuration string that tells the network which data gateway to use for your connection. If you manually entered an APN during your trip for a foreign SIM or travel eSIM, that configuration may still be active on the wrong line, or it may have overwritten your home SIM's settings.
**How to check the current APN on iPhone:**
1. Settings → Cellular → tap your home SIM line.
2. Scroll to **Cellular Data Network** (visible if your carrier allows APN editing).
3. Check the APN value under **Cellular Data**.
If the value does not match your home carrier's documented APN, either clear it or enter the correct value.
If the **Cellular Data Network** menu is not visible, your carrier pushes the APN automatically via a carrier profile — you cannot edit it manually, and the correct APN is already in place. In this case, the issue is not the APN; skip to Step 5.
**How to check the current APN on Android (Pixel):**
1. Settings → Network & internet → SIMs → tap your home SIM.
2. Tap **Access Point Names**.
3. Review the active APN entry.
**How to check the current APN on Android (Samsung):**
1. Settings → Connections → Mobile networks → Access Point Names.
2. Review the active entry.
**Resetting the APN to carrier defaults:**
On Android, an APN reset option is available:
- **Pixel**: in the Access Point Names screen, tap the three-dot menu and select **Reset to default**.
- **Samsung**: in the Access Point Names screen, tap the three-dot menu and select **Reset to default**.
On iPhone, if the Cellular Data Network menu is accessible and the APN is wrong, either type the correct value from your carrier's documentation or restore the carrier settings profile. If you cannot locate the correct APN value, consult your carrier or MVNO's support documentation.
Note: APN values and the method for setting them are carrier-dependent. MNOs (major carriers) typically push the APN automatically; MVNOs often require manual entry. For full iPhone APN setup instructions, see [APN Setup Guide for iPhone](/en/guides/apn-setup-iphone/). For Android, see [APN Setup Guide for Android](/en/guides/apn-setup-android/).
---
## Step 5: Force a Network Re-Registration with Airplane Mode
After adjusting line settings or APN, the device may not immediately re-register on the home network. Toggling Airplane Mode forces the modem to drop any stale registration state and scan for networks from scratch.
**iPhone and Android:**
1. Open Control Center (swipe down on iPhone; swipe from top on Android, or use the notification shade).
2. Tap the **Airplane Mode** icon to turn it **on**.
3. Wait **15 seconds**.
4. Tap Airplane Mode again to turn it **off**.
5. Watch the status bar — the home carrier name and signal bars should appear within 30 seconds.
If the carrier name reappears but data still does not load, open a browser and try navigating to a page. If nothing loads, continue to Step 6.
**Restart the device if Airplane Mode toggle does not help:**
- **iPhone**: Hold side button + volume button → slide to power off → wait 10 seconds → hold side button to power on.
- **Android**: Hold power button → tap Restart (or Power off, wait 10 seconds, power on).
A restart reloads the carrier profile and clears any transient state in the modem subsystem that an Airplane Mode toggle does not reach.
---
## Step 6: Manual Network Selection
In rare cases, the device's automatic network selection remains locked to a foreign carrier even after returning home — this can happen when the modem cached a network preference during international travel. Manual network selection forces a fresh scan.
**iPhone:**
1. Settings → Cellular → tap your home SIM line.
2. Tap **Network Selection**.
3. Turn off **Automatic**.
4. Wait for the scan to complete (15–30 seconds).
5. Select your home carrier from the list.
6. Turn **Automatic** back on after confirming the home carrier appears — this prevents the fixed selection from causing problems later.
**Android (Pixel):**
1. Settings → Network & internet → Internet → tap your home SIM.
2. Disable **Automatically select network**.
3. Tap your home carrier from the scan results.
4. Re-enable **Automatically select network** once connected.
**Android (Samsung):**
1. Settings → Connections → Mobile networks → Network operators.
2. Tap **Search now**.
3. Select your home carrier from the results.
After selecting manually, wait 10–20 seconds for registration to complete, then re-enable automatic selection.
---
## Step 7: Reset Network Settings
If every step above has been followed and data still does not work, a corrupted network configuration stored on the device may be preventing the home SIM from functioning correctly. A network settings reset clears all stored APN, cellular preferences, VPN profiles, and Wi-Fi passwords — but does not delete eSIM profiles or personal data.
Have your Wi-Fi passwords ready to re-enter before performing this step, as all saved networks are removed.
**iPhone:**
1. Settings → General → Transfer or Reset iPhone → Reset.
2. Tap **Reset Network Settings**.
3. Enter your passcode. The device restarts automatically.
4. After restart, wait for the home carrier name to appear in the status bar (30–60 seconds).
5. Re-check Cellular settings: confirm the home SIM is the active data line, Data Roaming is off, and the travel eSIM line (if installed) is turned off.
On iPhone, Reset Network Settings preserves all installed eSIM profiles.
**Android (Pixel):**
1. Settings → System → Reset options.
2. Tap **Reset Wi-Fi, mobile & Bluetooth**.
3. Confirm. Wait 30–60 seconds for network registration.
**Android (Samsung):**
1. Settings → General management → Reset → Reset mobile network settings.
2. Confirm. Wait for completion.
On Android (Pixel and Samsung), installed eSIM profiles are preserved through a network settings reset.
After the reset, go back to Step 1 of this guide and re-apply the correct settings — active data line, Data Roaming off, correct APN — from the beginning.
For a complete guide to what a network reset removes and how to reconfigure each setting afterward, see [How to Reset Network Settings (and What It Affects)](/en/guides/network-reset/).
---
## Why This Happens: Common Causes Explained
Understanding why the home SIM stops working after a trip helps prevent the same problem on future travel.
**Data Roaming left in the wrong state.** Some carrier SIM profiles set Data Roaming to on by default, and the toggle does not automatically reset to off when you arrive home. Always verify the Data Roaming toggle for your home SIM line after returning.
**Travel eSIM still active and interfering.** When a travel eSIM is set as the primary data line, the home SIM is demoted to a secondary line. Many users do not notice this during the trip because data works correctly via the eSIM. After landing home, the eSIM may lose signal while remaining set as the active data line — preventing any data from flowing.
**APN overwritten or missing.** On Android, manually entering an APN for a travel SIM can leave an incorrect entry active even after removing that SIM. On iPhone, some configurations that lock APN editing can be affected by a carrier settings change that occurred during the trip. In both cases, returning the APN to the correct home carrier value restores data.
**Stale network registration.** Mobile devices cache network preferences and sometimes lock onto a previously registered network. Airplane Mode toggle, restart, or manual network selection forces a fresh registration scan that clears the cached state.
**Carrier profile out of date.** On iPhone, an available carrier settings update may be waiting. Check Settings → General → About — if an update is available, a dialog appears. Installing it refreshes the carrier profile including any APN data it contains.
---
## If the Problem Is a Physical SIM (Not a Line Configuration Issue)
The steps above assume the home SIM is present and the device can detect it. If the home SIM shows as not detected, or the line itself does not appear in Settings, the issue may be the SIM card rather than the configuration:
- Remove and reinsert the physical SIM. Ensure it is seated fully in the tray with no debris on the contacts.
- Try the SIM in a different known-working device to rule out a SIM card fault.
- A SIM card exposed to extreme heat, water, or physical pressure during travel may be damaged. If the SIM does not register in any device, contact your carrier to request a replacement SIM.
For no-service conditions including SIM lock, IMEI issues, and account-level causes, see [No Connection Abroad? How to Fix It](/en/guides/no-connection-abroad/) — many of the diagnostic steps there also apply when the no-connection problem continues after returning home.
---
## FAQ
### Why does my home SIM show a carrier name but still have no data after returning?
Registering on the home network (which gives you the carrier name in the status bar) and having a working data session are two separate states. The most common reason data fails while the carrier name shows is that Data Roaming is still turned on and the device is trying to route data through a foreign network, or the APN stored on the device was overwritten by the foreign SIM during your trip. Turn off Data Roaming first, then check the APN settings for the home SIM line.
### I removed the foreign SIM but my phone still won't connect — what's wrong?
Removing the physical foreign SIM is not always enough. If you also have an eSIM installed from the trip, it may still be the active line for cellular data. Go to Settings → Cellular on iPhone or Settings → Network & internet → SIMs on Android and confirm which line is set as the active data SIM. Switch it to your home SIM line. Also check whether the foreign eSIM line is toggled on — if it is still on and searching for a network, it can interfere with the home line.
### After returning home, do I need to re-enter my APN settings?
It depends on your carrier. Most major MNO plans push APN configuration automatically — either when you reinsert the physical SIM or the next time the phone registers on the home network. If you use an MVNO, or if you manually edited the APN during your trip, you may need to re-enter the home APN manually. Check your carrier or MVNO's setup documentation for the correct APN string.
### Will resetting network settings delete my travel eSIM profile?
No. On both iPhone and Android (Pixel and Samsung), Reset Network Settings does not delete installed eSIM profiles. Your travel eSIM profile remains on the device and can be turned off rather than deleted if you travel again. The reset only clears network configuration — Wi-Fi passwords, VPN profiles, APN settings, and cellular preferences.
---
## Related Guides
- [No Connection Abroad? How to Fix It](/en/guides/no-connection-abroad/) — step-by-step fixes for when the connection problem started during your trip
- [APN Setup Guide for iPhone](/en/guides/apn-setup-iphone/) — full instructions for checking and entering APN settings on iPhone
- [APN Setup Guide for Android](/en/guides/apn-setup-android/) — full instructions for checking and entering APN settings on Pixel and Samsung
- [Data Roaming Settings: How to Turn It On/Off Safely](/en/guides/roaming-settings/) — what the Data Roaming toggle does and does not control
- [How to Reset Network Settings (and What It Affects)](/en/guides/network-reset/) — complete guide to network settings reset: what is removed, what is preserved, and what to reconfigure afterward
================================================================================
# APN Setup Guide for Android — Pixel and Samsung Galaxy Step by Step
URL: https://sim-finder.com/en/guides/apn-setup-android/
Type: guides (en)
Published: 2026-04-25
Your Android phone shows signal bars but mobile data does not work after switching to an MVNO or inserting a travel SIM. In most cases, the missing step is the APN (Access Point Name) — a short configuration string that tells the network which packet data gateway to use for your connection.
**This guide explains what an APN is, when Android configures it automatically, and how to enter it manually on Google Pixel and Samsung Galaxy devices.** It also covers other Android manufacturers, lists verified APN strings for common US, UK, and Australian carriers, and explains how travel eSIM APN works differently on Android.
If your phone shows no bars at all rather than a data failure, start with signal troubleshooting in [No Mobile Data? How to Fix Data Connection Problems](/en/guides/no-data/) before setting an APN.
---
## What Is an APN?
APN stands for **Access Point Name**. It is defined in **3GPP TS 23.003** as the identifier that selects a packet data gateway on the carrier's core network. When your device requests internet access over the cellular network, the network reads the APN to route your data session to the correct gateway — the carrier's internet exchange point.
An APN has two parts:
- **Network Identifier** (mandatory) — identifies the external packet data network, such as `internet` or `fast.t-mobile.com`
- **Operator Identifier** (optional) — encodes the PLMN (Public Land Mobile Network) of the serving gateway; most consumer APN configurations omit this field
The maximum encoded length is **100 octets**, as specified in TS 23.003.
In 5G networks, the equivalent concept is the **DNN (Data Network Name)**, defined in 3GPP TS 23.003 Clause 9A. It works the same way for device configuration purposes — the APN string you enter functions across 4G and 5G networks. For full definitions of APN, DNN, and related terms, see the [SIM & Mobile Glossary](/en/guides/glossary-index/).
For a complete explanation of the APN concept including iPhone-specific setup steps, see the [APN Setup Guide for iPhone](/en/guides/apn-setup-iphone/), which this guide is designed to complement.
---
## When Android Auto-Configures APN vs When Manual Is Needed
Android handles APN configuration through two automatic paths. Understanding which applies to your SIM tells you whether you need to act.
### Automatic: SIM Carrier Bundle
When you insert a SIM from a major carrier, Android (and the modem firmware) may recognise the SIM's PLMN code and apply a pre-loaded APN profile from the carrier database included in the OS or carrier service pack. This works reliably for the major MNOs — AT&T, T-Mobile, Verizon in the US; EE, O2, Three, Vodafone in the UK; Telstra, Optus, Vodafone in Australia.
Google Pixel devices receive carrier updates through the **Carrier Services** app (updated via the Play Store independently of the Android OS version). Samsung Galaxy devices receive equivalent configuration through carrier-specific software packages.
### Automatic: eSIM Profile
When you download an eSIM profile, the profile itself can include APN parameters. If the provider has embedded APN data in the profile, Android applies it during eSIM activation. Unlike iPhone, Android has no single universal profile format (there is no `.mobileconfig` equivalent), so each provider implements this differently. Some Android eSIM providers include APN data in the profile; others require manual entry after activation.
### Manual Required: When Auto Does Not Apply
| Situation | Why Manual Is Needed |
|-----------|----------------------|
| MVNO SIM not in Android's carrier database | No automatic profile is loaded for the PLMN |
| Travel eSIM provider that omits APN from the profile | Profile is installed but APN is missing |
| SIM inserted after a network settings reset | Reset clears saved APN customisations |
| Carrier-locked device from a different carrier | APN may be pre-set to the original carrier's value |
| Prepaid SIM from a regional or niche MVNO | Carrier database coverage is inconsistent |
The most common real-world case: you buy a prepaid MVNO SIM, insert it, get signal, but cannot load any web page. The MVNO uses the host MNO's towers but its own APN — and since the MVNO is not in Android's carrier database, no automatic configuration happens.
Understanding how [MVNOs](/en/guides/what-is-mvno/) operate on host networks explains why a Visible SIM (on Verizon's towers) needs the APN `vsblinternet` rather than `vzwinternet`, and why Mint Mobile (on T-Mobile's towers) needs `wholesale` rather than `fast.t-mobile.com`.
---
## APN Setup on Google Pixel (Android)
The following path applies to stock Android on Google Pixel devices running Android 12 through Android 15. The menu labels are consistent across these versions, with minor wording variations in Android 15.
### Step 1: Open SIM Settings
Go to **Settings → Network & Internet → SIMs**.
If you have two SIMs (physical SIM + eSIM, or two physical SIMs), tap the SIM you want to configure. The SIM name is usually the carrier name or a label you assigned during setup.
### Step 2: Open Access Point Names
Inside the SIM settings screen, scroll down and tap **Access Point Names**.
You will see a list of APN profiles. There may be one or more pre-loaded entries from your carrier. If the correct APN is already listed and marked with a filled circle, data should work — but if it is not working, the existing entry may have incorrect values.
### Step 3: Add or Edit an APN
To add a new APN, tap the **+ (plus)** icon in the top-right corner.
To edit an existing entry, tap on it.
Fill in the fields as follows:
| Field | What to Enter |
|-------|--------------|
| Name | A label for your own reference (e.g., `T-Mobile Prepaid`) |
| APN | The APN string from your carrier (e.g., `fast.t-mobile.com`) |
| Proxy | Leave blank unless your carrier specifies one |
| Port | Leave blank unless your carrier specifies one |
| Username | Leave blank unless your carrier specifies one |
| Password | Leave blank unless your carrier specifies one |
| Server | Leave blank |
| MMSC | Your carrier's MMS centre URL (for MMS only; leave blank if you only need data) |
| MMS Proxy / MMS Port | For MMS only; leave blank if not needed |
| MCC | Filled automatically from your SIM; do not change |
| MNC | Filled automatically from your SIM; do not change |
| Authentication Type | See the [APN Type, Authentication, and IP Protocol section](#apn-type-authentication-and-ip-protocol-fields) below |
| APN Type | `default,supl,mms,dun` for full functionality, or `default` for data only |
| APN Protocol | `IPv4/IPv6` recommended; fall back to `IPv4` if issues arise |
| APN Roaming Protocol | `IPv4/IPv6` recommended |
| Bearer | Leave as `Unspecified` |
| MVNO Type / MVNO Value | Leave blank unless your carrier specifies these |
### Step 4: Save and Select
Tap the **three-dot menu → Save** (or the Save button, depending on Android version).
After saving, tap the radio button next to your new APN entry to select it as the active APN.
### Step 5: Test the Connection
Toggle **Airplane Mode** on for 5–10 seconds, then off. This forces the modem to re-register and use the new APN. Open a browser and load a page to confirm data is working.
If the new APN does not appear selectable (the radio button is greyed out), your carrier may have locked APN editing on your device. Contact your carrier's support.
---
## APN Setup on Samsung Galaxy (One UI)
Samsung Galaxy devices run One UI on top of Android. The APN path differs from stock Android, and the exact menu location depends on the One UI version.
### One UI 6 and One UI 7 (Galaxy S24 / S25 series, recent mid-range)
**Settings → Connections → Mobile Networks → Access Point Names**
If you have two SIMs, select the correct SIM from the **SIM card manager** tab at the top of the Connections screen before navigating to Mobile Networks.
### One UI 5 (Galaxy S23 series, A-series from 2023)
**Settings → Connections → Mobile Networks → Access Point Names**
The path is the same as One UI 6. Some One UI 5 builds show **Mobile Data** as the entry point instead of **Mobile Networks** — navigate to whichever is present and look for Access Point Names within it.
### One UI 4 and earlier (Galaxy S22 and older)
**Settings → Connections → Mobile Networks → Access Point Names**
The path is consistent going back to One UI 4. On very old Samsung devices running Android 10 or earlier, the path may be **Settings → Connections → More Connection Settings → Mobile Networks → Access Point Names**.
### Entering APN Values on Samsung
The field layout on Samsung is the same as stock Android. Tap the **+ (Add)** button to create a new APN, fill in the fields using the same table above, and tap **Save** from the three-dot menu. Tap the radio button to select the new APN as active.
### Samsung-Specific Notes
- **Two-SIM selection**: On dual-SIM Galaxy devices, the APN list is per-SIM. If you configure the wrong SIM's APN, data will still not work on the target SIM. Confirm which slot your MVNO SIM is in before editing.
- **Reset to default**: If the APN list is corrupted or you want to start fresh, tap **three-dot menu → Reset to default** inside the Access Point Names screen. This restores Samsung's factory APN entries for your carrier.
- **Greyed-out fields**: Some Galaxy devices sold by US carriers (AT&T, T-Mobile, Verizon) have certain APN fields locked. If fields are greyed out, you can typically still add a new APN entry with the unlocked fields and have it work alongside the locked entry.
- **One UI Internet app APN shortcut**: On some One UI versions, opening the **Internet** app and navigating to **Settings → Advanced → APN Settings** provides an alternate path to the same screen.
---
## Other Manufacturers (OPPO, Xiaomi, OnePlus)
The APN setting exists on all Android devices, but the path varies by manufacturer's UI skin. The most reliable approach is to search "APN" in the device's Settings search bar.
### OPPO and realme (ColorOS)
**Settings → SIM Card & Mobile Data → [select SIM] → Mobile Network → Access Point Names**
On ColorOS 14 (Android 14): **Settings → Mobile network → Tap SIM → Access Point Names** (label and intermediate steps may vary by region/model)
### Xiaomi and POCO (MIUI / HyperOS)
**Settings → SIM Cards & Mobile Networks → [select SIM] → Advanced Settings → Access Point Names**
On HyperOS (Xiaomi 14 series): **Settings → SIM cards & Mobile Networks → [select SIM] → Access Point Names**
### OnePlus (OxygenOS)
**Settings → Wi-Fi & Network → SIM & Network → [select SIM] → Access Point Names**
### General Method: Settings Search
On any Android phone, open **Settings** and search for **"APN"** or **"Access Point"**. The search result will link directly to the APN list for your current SIM. This method bypasses manufacturer UI differences and works on all recent Android versions.
For [physical SIM vs. eSIM](/en/guides/what-is-sim/) configuration differences, the APN setting location is the same regardless of whether you are configuring a nano-SIM or an eSIM — both appear in the SIM settings area and share the same APN list.
---
## Common Carrier APN Examples (US / UK / AU)
The following APN values are published in official carrier documentation. APN strings can change when carriers update their infrastructure — always verify the current value at your carrier's official support page before entering.
### United States
| Carrier | APN String | Notes |
|---------|-----------|-------|
| T-Mobile (postpaid) | `fast.t-mobile.com` | T-Mobile official support |
| T-Mobile (prepaid) | `fast.t-mobile.com` | Same APN for prepaid |
| Mint Mobile (T-Mobile MVNO) | `wholesale` | Mint Mobile setup guide; T-Mobile sub-brand |
| Metro by T-Mobile | `fast.metropcs.com` | Metro by T-Mobile official support |
| Visible (Verizon sub-brand) | `vsblinternet` | Visible APN guide |
| AT&T (postpaid, 5G) | `ENHANCEDPHONE` | AT&T official support (username/password: blank) |
| AT&T (postpaid, LTE) | `phone` | AT&T official support (username/password: blank). Legacy LTE APN — most postpaid AT&T users on 5G should use ENHANCEDPHONE; this row is provided for older LTE-only devices |
| AT&T (prepaid) | `NXTGENPHONE` | AT&T official support (username/password: blank) |
| AT&T (hotspot/tethering) | `Broadband` | Required for Personal Hotspot / tethering on AT&T |
| Cricket Wireless (AT&T sub-brand) | `ndo` | Cricket official support |
| Verizon (postpaid) | `vzwinternet` | Verizon official support |
> **Note on Mint Mobile**: Mint runs on T-Mobile's network. The official APN is `wholesale` as documented in Mint Mobile's setup guide. Some users report `fast.t-mobile.com` works as an unofficial fallback, but `wholesale` is the primary recommended value.
> **Note on Visible**: Visible is a Verizon sub-brand (owned and operated by Verizon). It uses the APN `vsblinternet`, which is separate from Verizon's `vzwinternet`.
### United Kingdom
| Carrier | APN String | Notes |
|---------|-----------|-------|
| EE | `everywhere` | EE official support |
| O2 | `mobile.o2.co.uk` | O2 official support (pay monthly only; PAYG uses payandgo.o2.co.uk) |
| Three | `three.co.uk` | Three official support |
| Vodafone UK | `wap.vodafone.co.uk` | Username: `wap`, Password: `wap`. Check Vodafone UK official support for the most current guidance |
| giffgaff (O2 MVNO) | `giffgaff.com` | Username: `giffgaff`, Password: `password`. giffgaff official support |
| Tesco Mobile (O2 MVNO) | `prepay.tesco-mobile.com` | Tesco Mobile official support |
### Australia
| Carrier | APN String | Notes |
|---------|-----------|-------|
| Telstra | `telstra.internet` | Telstra official support |
| Optus | `yesinternet` | Optus official support |
| Vodafone AU (postpaid) | `vfinternet.au` | Vodafone AU official support |
| Vodafone AU (prepaid / 4G) | `live.vodafone.com` | Vodafone AU official support |
**Important**: These values are correct as of April 2026 but are subject to change. Always confirm at the carrier's official support site. Third-party APN databases are frequently outdated.
---
## Travel eSIM APN Behavior on Android
Travel eSIMs behave differently from domestic SIMs when it comes to APN configuration, and Android handles them differently from iPhone in one important way.
### How Travel eSIM APN Works on Android
When you download and install a travel eSIM profile on Android, some providers include APN configuration in the profile download. If they do, the APN is set automatically after the eSIM activates and you will not need to do anything.
However, unlike iPhone where APN delivery via `.mobileconfig` is a standard mechanism, Android's eSIM profile format (GSMA SGP.22) does not have a standardised field for APN data. Each provider chooses whether and how to push APN settings. Major providers like Airalo, Holafly, Nomad, and Saily include APN setup in their Android onboarding documentation; some push it via the profile, others instruct you to enter it manually.
**If your travel eSIM shows signal on Android but data does not work**: check the provider's Android-specific setup page for the APN string and enter it using the steps above for your device model.
### Data Roaming Must Be Enabled
Even with a correct APN, a travel eSIM will not pass data on Android if **Data Roaming** is turned off. Android treats a travel eSIM's connection as a roaming session (because it authenticates to a foreign network), so the roaming toggle must be on even when you are physically in the destination country.
To enable Data Roaming on a Pixel:
1. **Settings → Network & Internet → SIMs**
2. Tap the travel eSIM line
3. Enable **Roaming**
To enable Data Roaming on Samsung Galaxy:
1. **Settings → Connections → Mobile Networks**
2. Select the travel eSIM SIM slot at the top if dual-SIM
3. Enable **Data Roaming**
### Dual-SIM Setup with a Travel eSIM
If you are using your home SIM alongside a travel eSIM, confirm that the travel eSIM is set as the **preferred data SIM**:
- **Pixel**: Settings → Network & Internet → SIMs → Preferred SIM → Data → select the travel eSIM
- **Samsung**: Settings → Connections → SIM card manager → Mobile Data → select the travel eSIM
Also consider turning off data roaming on your home SIM to prevent it from connecting to local networks at roaming rates while the travel eSIM handles data.
---
## APN Type, Authentication, and IP Protocol Fields
When adding or editing an APN on Android, several fields beyond the main APN string affect how the connection is established. Getting these right matters for tethering, MMS, and protocol compatibility.
### APN Type
The **APN Type** field tells Android which services this APN handles. Common values:
| Value | Purpose |
|-------|---------|
| `default` | Standard internet data |
| `supl` | Secure User Plane Location (assisted GPS) |
| `mms` | Multimedia Messaging Service |
| `dun` | Dial-up networking (tethering / mobile hotspot) |
For most use cases, enter **`default,supl,mms,dun`** to cover internet data, GPS, MMS, and tethering with a single APN entry. If your carrier provides separate APN strings for MMS or tethering, create separate entries with the corresponding type.
If you leave the APN Type field blank, Android treats it as `default` only.
### Authentication Type
The **Authentication Type** field specifies the protocol used to authenticate your device to the carrier's gateway:
| Value | When to Use |
|-------|------------|
| None | Most modern carriers; use when username/password are blank |
| PAP | Password Authentication Protocol; used by some UK/EU carriers (e.g., giffgaff with username and password) |
| CHAP | Challenge Handshake Authentication Protocol; less common |
| PAP or CHAP | Let the gateway choose; safest default when unsure and carrier requires credentials |
If your carrier provides a username and password, set Authentication Type to **PAP or CHAP** unless they specify otherwise.
### IP Protocol (APN Protocol / APN Roaming Protocol)
| Value | Meaning |
|-------|---------|
| `IPv4` | IPv4 only |
| `IPv6` | IPv6 only |
| `IPv4/IPv6` | Dual-stack; prefers IPv6, falls back to IPv4 |
**Recommendation**: Use **IPv4/IPv6** (dual-stack) for both APN Protocol and APN Roaming Protocol. This is the correct setting for all modern carriers that support IPv6. If you experience connection issues with IPv4/IPv6, try switching to **IPv4** only — some older MVNOs and some travel eSIM providers do not fully support IPv6.
---
## Troubleshooting: Data Still Doesn't Work
If you have entered the APN correctly and data still does not work, go through this checklist in order.
### 1. Confirm the APN Is Selected
Open the APN list (Settings → Network & Internet → SIMs → Access Point Names on Pixel, or Settings → Connections → Mobile Networks → Access Point Names on Samsung). The active APN has a filled circle next to it. If your new APN entry is not selected, tap it to select it.
### 2. Check the APN String Carefully
Compare the APN string character by character with your carrier's official documentation. Common mistakes:
- Extra space at the start or end of the string
- A period instead of a hyphen, or vice versa
- Wrong capitalisation (some carrier APNs are case-sensitive; e.g., `ENHANCEDPHONE` must be uppercase)
- Incorrect MCC or MNC values (leave these at the auto-filled values from your SIM)
### 3. Verify Mobile Data Is Enabled
Pixel: Settings → Network & Internet → SIMs → [your SIM] → **Mobile Data** toggle on.
Samsung: Settings → Connections → Mobile Networks → **Mobile Data** toggle on (or pull down the notification shade and tap the Mobile Data quick tile).
### 4. Check Data Roaming
If your SIM or eSIM routes data via a roaming session (common with travel eSIMs and some MVNOs that use a different network), Data Roaming must be on. See the Travel eSIM section above for the exact path.
### 5. Toggle Airplane Mode
Airplane Mode off for 10 seconds, then off. This forces the modem to drop its current registration and re-register using the new APN. Wait 15 seconds after turning Airplane Mode off before testing.
### 6. Restart the Device
A full restart re-initialises the modem stack and can resolve issues that an Airplane Mode cycle does not. Power off completely, wait 10 seconds, power on.
### 7. Check APN Type and Protocol
If data works but tethering (mobile hotspot) does not, add `dun` to the APN Type field or create a separate tethering APN entry. If IPv4/IPv6 causes issues, switch the APN Protocol to IPv4 only.
### 8. Reset Network Settings (Last Resort)
On Pixel: Settings → System → Reset options → **Reset Wi-Fi, mobile & Bluetooth**. This clears Wi-Fi passwords, Bluetooth pairings, and APN customisations. eSIM profiles are preserved (they are stored separately from network settings).
On Samsung (One UI 6): Settings → General Management → Reset → **Reset Network Settings**. eSIM profiles are preserved.
After the reset, Android may automatically restore the carrier's default APN. If not, re-enter the APN manually.
For a full data troubleshooting sequence covering all causes beyond APN — including data caps, VPN interference, and DNS issues — see [No Mobile Data? How to Fix Data Connection Problems](/en/guides/no-data/).
---
## FAQ
### What is an APN and why does my Android phone need it?
APN stands for Access Point Name. It is defined in 3GPP TS 23.003 as the identifier that selects the packet data gateway on the carrier's core network. Without the correct APN your phone can show full signal bars but cannot route any internet traffic. Most MNOs push the APN automatically when you insert a SIM. You need to set it manually mainly with MVNOs and some travel eSIMs that do not push configuration automatically.
### Where is the APN setting on a Google Pixel?
Go to Settings → Network & Internet → SIMs → tap your SIM → Access Point Names. If you have two SIMs, select the correct one first. Tap the plus icon to add a new APN or tap an existing entry to edit it.
### Where is the APN setting on a Samsung Galaxy (One UI)?
Go to Settings → Connections → Mobile Networks → Access Point Names. On some One UI versions the path is Settings → Connections → Mobile Networks → Network Operators → Access Point Names, or Settings → General Management → Reset → Reset Network Settings if the APN menu is locked. If you have two SIMs, select the correct SIM from the top of the screen first.
### Why is the APN menu greyed out or missing on my Android phone?
Some carriers lock the APN menu to prevent changes. This is common on carrier-sold devices in the US. If the menu is greyed out or absent, try inserting the SIM from a different carrier (if available) or check your carrier's support page for a pre-configured APN profile or an unlock method. On Samsung devices, restoring the APN to default and re-entering values sometimes resolves the greyed-out state.
### Do travel eSIMs need manual APN setup on Android?
Many travel eSIM providers embed APN configuration in the eSIM profile, so no manual setup is required after activation. However, manual APN entry is more common on Android than on iPhone because Android does not have a universal profile mechanism equivalent to Apple's .mobileconfig. If your travel eSIM has signal but no data, check your provider's setup page for the APN string and enter it manually.
### What should I enter in the APN Type field?
For basic internet data, enter `default` in the APN Type field. For full functionality including tethering, multimedia messaging, and supplementary location, use `default,supl,mms,dun`. If your carrier specifies a different value, use exactly what they document. Leaving the field blank or entering incorrect types can prevent data from routing correctly.
### My APN is set correctly but data still does not work on Android. What else should I check?
Verify in order: (1) Mobile data toggle is on (Settings → Network & Internet → SIMs → Mobile Data), (2) Data Roaming is on if your SIM connects via a roaming session — required for most travel eSIMs, (3) the correct SIM is set as the default data SIM if you have two SIMs, (4) toggle Airplane Mode off and on to force a modem reconnect, (5) restart the device. For a full diagnostic sequence, see the [No Mobile Data guide](/en/guides/no-data/).
---
## Related Guides
- [APN Setup Guide for iPhone](/en/guides/apn-setup-iphone/) — configuration profiles and manual setup on iOS
- [What Is a SIM Card?](/en/guides/what-is-sim/) — how SIM and eSIM store carrier credentials
- [What Is an MVNO?](/en/guides/what-is-mvno/) — why MVNOs use different APN values than the host carrier
- [No Mobile Data? How to Fix Data Connection Problems](/en/guides/no-data/) — full troubleshooting sequence when data does not work
- [SIM & Mobile Glossary](/en/guides/glossary-index/) — definitions for APN, DNN, carrier settings, and related terms
Use [SimFinder](/en/) to compare domestic mobile plans, or [SimFinder Travel](/en/travel/) to find and compare travel eSIM plans for your destination.
================================================================================
# APN Setup Guide for iPhone — Configuration Profiles and Manual Setup
URL: https://sim-finder.com/en/guides/apn-setup-iphone/
Type: guides (en)
Published: 2026-04-24
Your iPhone shows signal bars, but mobile data does not work after switching to an MVNO or activating a travel eSIM. In most cases, the missing step is the APN (Access Point Name) — a small configuration string that connects your device to the carrier's data gateway.
**This guide explains what an APN is, when iPhone sets it automatically versus when you need to act, and how to install or enter the correct settings.** It also lists verified APN strings for common US, UK, and Australian MVNOs, and covers travel eSIM scenarios.
If your device shows zero bars or "No Service" rather than a data failure, start with the signal troubleshooting steps in [No Mobile Data? How to Fix Data Connection Problems](/en/guides/no-data/) first.
---
## What Is an APN?
APN stands for **Access Point Name**. It is defined in **3GPP TS 23.003** (the 3GPP specification for numbering, addressing, and identification) as the identifier that selects a packet data gateway on the carrier's core network. When your device connects to a cellular network and requests internet access, the network uses the APN to route your data session to the correct gateway.
An APN has two parts:
- **Network Identifier** (mandatory) — identifies the external packet data network, such as `internet` or `fast.t-mobile.com`
- **Operator Identifier** (optional) — encodes the PLMN (Public Land Mobile Network) of the serving GPRS support node; most consumer APN configurations omit this field
The maximum encoded length is 100 octets, as specified in TS 23.003.
In 5G networks, the equivalent concept is the **DNN (Data Network Name)**, defined in 3GPP TS 23.003 Clause 9A. Functionally it behaves the same way — the term changes in the 5G core architecture, but for device setup purposes the APN string you enter works across 4G and 5G. For quick definitions of APN, DNN, and related terms, see the [SIM & Mobile Glossary](/en/guides/glossary-index/).
Understanding what an APN does is especially useful when using an [MVNO](/en/guides/what-is-mvno/) — since MVNOs run their own billing and gateway infrastructure on top of a host network, they use different APN values than the host carrier even though they share the same towers.
---
## When iPhone Needs APN Setup vs. When It Is Automatic
iPhone handles APN configuration through two mechanisms. Knowing which one applies to your situation tells you whether you need to do anything at all.
### Automatic: Carrier Settings Updates
When you insert a physical SIM from a carrier that has submitted a carrier bundle to Apple, iOS prompts "Carrier Settings Update" and installs the correct APN automatically. This works for the major MNOs (AT&T, T-Mobile, Verizon in the US; EE, O2, Three, Vodafone in the UK; Telstra, Optus, Vodafone in Australia) and for many MVNOs that have their own Apple carrier bundle.
After any iOS upgrade or SIM swap, you may see this prompt again. Always accept it.
### Automatic: eSIM Profile Push
When you activate an eSIM, the eSIM provider can embed the APN configuration inside the carrier profile that is downloaded to your device. If the provider has done this, the APN is installed silently as part of the eSIM activation process, and you do not need to take any further steps. Most major travel eSIM providers include APN configuration in their profiles.
### Manual Required: When Automatic Does Not Apply
You will need to set the APN manually in the following situations:
| Situation | Why Manual Is Needed |
|-----------|----------------------|
| MVNO SIM with no Apple carrier bundle | No automatic profile push occurs |
| Travel eSIM provider that omits APN from their profile | Profile exists but does not include APN data |
| SIM inserted after a network settings reset | Reset clears saved APN configuration |
| Carrier profile installed for a different carrier is active | Wrong profile overrides the APN |
| Device purchased from a carrier that locked APN editing | APN field is read-only; need a specific profile from the MVNO |
The most common real-world scenario: you buy a prepaid SIM from a US MVNO at an airport or convenience store, insert it, get signal, but no data. The MVNO runs on T-Mobile or AT&T infrastructure but uses its own APN — and since there is no Apple carrier bundle for that reseller, iOS never configured the APN automatically.
For a broader explanation of how [physical SIMs and eSIMs](/en/guides/what-is-sim/) differ in how they deliver configuration, see the SIM basics guide.
---
## Installing a Configuration Profile (.mobileconfig)
The standard method for iPhone APN setup is a **configuration profile** — a file with the `.mobileconfig` extension that iOS can install and manage. Your MVNO or travel eSIM provider will typically publish this on their website or include a download link in the onboarding email.
### Step 1: Obtain the Profile from Your Provider
Navigate to your provider's official support or setup page. The profile download is usually labelled something like "APN Profile for iOS," "iPhone Configuration Profile," or "Download for iOS." Confirm you are downloading from the provider's official domain.
### Step 2: Download the Profile to Your iPhone
Open the link in **Safari** (not Chrome or another browser). iOS only triggers the profile installation dialog from Safari. When you tap the download link, iOS shows: **"This website is trying to download a configuration profile. Do you want to allow this?"** Tap **Allow**.
### Step 3: Open Settings to Install
After tapping Allow, go to **Settings**. Near the top of the Settings screen you will see a new banner: **"Profile Downloaded"**. Tap it.
Alternatively, go to **Settings → General → VPN & Device Management → Downloaded Profile**.
### Step 4: Review and Install
You will see the profile name, issuer, and a summary of what it contains. For an APN-only profile the description typically says "APN settings" or "Cellular Network Configuration." Tap **Install**, enter your device passcode when prompted, and tap **Install** again on the confirmation screen.
### Step 5: Confirm and Test
After installation, go to **Settings → General → VPN & Device Management**. The profile should now appear under **Configuration Profiles**. Tap it to see the full contents — you can verify the APN string that was installed.
Toggle Airplane Mode on, wait 5 seconds, then toggle it off. This forces the modem to reconnect and use the new APN. Open Safari and load a page to confirm data is working.
### iOS Version Notes
- **iOS 17 and iOS 18**: the configuration profile installation flow for APN purposes is the same as described above. The "Profile Downloaded" banner appears in Settings as expected.
- **iOS 18**: no significant changes to the profile installation process for APN configuration have been reported. If you encounter a different UI path, refer to [Apple Support](https://support.apple.com/en-us/102483) for the latest guidance.
- On all recent iOS versions, the profile is installed under **Settings → General → VPN & Device Management** (not the older "Profiles" path that appeared in iOS 14 and earlier).
---
## Manually Configuring APN When No Profile Is Provided
Some MVNOs do not publish a `.mobileconfig` profile and instead instruct you to enter APN settings manually. This is only possible if the **Cellular Data Network** menu is accessible — many carrier profiles hide this menu to prevent accidental changes.
### Accessing the Cellular Data Network Menu
Go to **Settings → Cellular → Cellular Data Network**.
The menu name and path vary by iOS version and region:
- iOS 17/18, US region: **Settings → Cellular → Cellular Data Network**
- International builds (non-US): **Settings → Mobile Data → Mobile Data Network**
- On some carrier profiles: the menu is entirely absent
> **Note**: Apple removed the intermediate **Cellular Data Options** step in recent iOS versions. The correct path is directly **Settings → Cellular → Cellular Data Network** (source: [Apple Support](https://support.apple.com/en-us/102483)).
If the menu is missing, your carrier has locked APN editing. In this case, manual entry is not possible through the standard Settings path — you must either obtain and install a `.mobileconfig` profile from your provider, or contact their support.
### Entering APN Values
The Cellular Data Network screen has three sections: **Cellular Data**, **LTE Setup (Optional)**, and **Personal Hotspot**. For basic internet connectivity, only the **Cellular Data** section needs to be filled:
| Field | What to Enter |
|-------|--------------|
| APN | The APN string from your provider (e.g., `internet`, `wholesale`, `fast.t-mobile.com`) |
| Username | Leave blank unless your provider specifies one |
| Password | Leave blank unless your provider specifies one |
Enter the APN string **exactly as provided** — it is case-sensitive in some implementations, and extra spaces will prevent the connection from working.
After entering the values, press the Home button or swipe up to go back. Then toggle Airplane Mode off and on to apply the new settings.
### The LTE Setup and Personal Hotspot Fields
The **LTE Setup** APN field is used for certain carrier-specific LTE provisioning. On most consumer plans, leaving it blank is correct — only fill it in if your provider explicitly gives you a separate LTE APN value.
The **Personal Hotspot** APN field controls the APN used when sharing your connection. For most MVNOs, this is the same as the Cellular Data APN or left blank. Use the value your provider documents.
---
## Common Carrier APN Examples (US / UK / AU)
The following APN values are published in official carrier documentation. APN strings can change when carriers update their infrastructure — always verify the current value at your carrier's official support page before entering.
### United States
| Carrier | APN String | Notes |
|---------|-----------|-------|
| T-Mobile (postpaid) | `fast.t-mobile.com` | Published on T-Mobile support |
| T-Mobile (prepaid) | `fast.t-mobile.com` | Same APN for prepaid |
| Mint Mobile (T-Mobile MVNO) | `wholesale` | Mint Mobile setup guide |
| Metro by T-Mobile | `fast.metropcs.com` | Metro by T-Mobile official support |
| Visible (Verizon sub-brand) | `vsblinternet` | Visible APN guide |
| AT&T (postpaid, 5G) | `ENHANCEDPHONE` | AT&T official support (username/password: blank) |
| AT&T (postpaid, LTE) | `phone` | AT&T official support (username/password: blank) |
| AT&T (prepaid) | `NXTGENPHONE` | AT&T official support (username/password: blank) |
| AT&T (hotspot/MiFi) | `Broadband` | Required when using Personal Hotspot on AT&T |
| Cricket Wireless (AT&T sub-brand) | `ndo` | Cricket support |
| Verizon (postpaid) | `vzwinternet` | Verizon support |
> **Note on Mint Mobile**: Mint runs on T-Mobile's network. The official APN is `wholesale` as documented on Mint Mobile's setup guide. Some users report that `fast.t-mobile.com` works as an unofficial fallback, but the official value `wholesale` should be used as the primary setting. Always check Mint's official support page for the current recommended value.
### United Kingdom
| Carrier | APN String | Notes |
|---------|-----------|-------|
| EE | `everywhere` | EE support |
| O2 | `mobile.o2.co.uk` | O2 support |
| Three | `three.co.uk` | Three support |
| Vodafone | `wap.vodafone.co.uk` | Username: `wap`, Password: `wap`. Check Vodafone UK official support for the most current guidance |
| giffgaff (O2 MVNO) | `giffgaff.com` | giffgaff support — username: `giffgaff`, password: `password` |
| Tesco Mobile (O2 MVNO) | `prepay.tesco-mobile.com` | Tesco Mobile support |
### Australia
| Carrier | APN String | Notes |
|---------|-----------|-------|
| Telstra | `telstra.internet` | Telstra support |
| Optus | `yesinternet` | Optus support |
| Vodafone AU (postpaid) | `vfinternet.au` | Vodafone AU official support |
| Vodafone AU (prepaid/4G) | `live.vodafone.com` | Vodafone AU official support |
**Important**: These values are correct as of April 2026 but are subject to change. Always confirm at the carrier's official support site. Do not rely on third-party APN databases — they are frequently outdated and may list deprecated values.
---
## APN for Travel eSIMs
Travel eSIMs have a different configuration model compared to domestic SIMs. Understanding how they work prevents most APN-related confusion.
### How Travel eSIM APN Works
When you download a travel eSIM profile, the profile itself can embed the APN configuration. Most major providers — including Airalo, Holafly, Nomad, and Saily — include APN settings in their profiles, so installation is complete once the eSIM is activated.
If a provider does not include APN data in the profile, they publish the required APN string in their setup documentation or onboarding email. Manual entry follows the same steps as domestic MVNO setup above.
### Travel eSIM and Data Roaming
Even with a correct APN, data will not flow on a travel eSIM if **Data Roaming** is disabled. This surprises many users: a travel eSIM is technically connecting to the local network as a roaming session at the protocol layer, so iOS treats it as roaming even though you are physically present in that country.
To enable Data Roaming on iPhone:
1. Settings → Cellular.
2. Tap the travel eSIM line name.
3. Tap **Cellular Data Options**.
4. Turn on **Data Roaming**.
If you are using a dual-SIM setup with a home SIM and a travel eSIM, also confirm which line is set as the **Cellular Data** line (Settings → Cellular → Cellular Data → select the travel eSIM line).
For a complete dual-SIM travel setup, including how to prevent your home SIM from accidentally using data abroad, see [What Is an eSIM?](/en/guides/what-is-esim/).
### When Manual APN Entry Is Needed for Travel eSIMs
Manual APN entry for travel eSIMs is more common on Android than on iPhone, but it does occur on iOS when:
- The provider's profile omits APN data (less common with major providers)
- You are using a regional or niche provider whose profile is not fully configured for iOS
- You reinstalled the eSIM profile after deleting it, and the reinstall did not include APN data
In these cases, the provider's support page will list the APN string. Enter it in the Cellular Data Network menu as described in the Manual Configuration section above.
---
## Troubleshooting: Data Still Doesn't Work
If you have installed a profile or entered the APN manually and data still does not work, go through this checklist in order.
### 1. Confirm the Profile Is Active
Settings → General → VPN & Device Management → Configuration Profiles. Verify the profile is listed. If it says "Not Verified" or shows a warning triangle, the profile may have an untrusted certificate — delete it and re-download from the provider's official site.
### 2. Check the Cellular Data Toggle
Settings → Cellular → **Cellular Data** must be toggled on (green). This is separate from the APN setting.
### 3. Check Data Roaming
Settings → Cellular → tap the SIM line → Cellular Data Options → **Data Roaming** on. Required for travel eSIMs and some MVNOs.
### 4. Confirm the Correct SIM Is Handling Data
On dual-SIM iPhones, Settings → Cellular → **Cellular Data** shows which line is currently providing data. If the wrong line is selected, tap it and switch to the correct one.
### 5. Verify the APN String
Go back to the Cellular Data Network menu (or the installed profile) and compare the APN string character by character with your provider's documentation. Common mistakes: capital letters in the wrong place, a period instead of a hyphen, or a trailing space.
### 6. Toggle Airplane Mode
Toggle Airplane Mode on for 10 seconds, then off. This forces the modem to re-establish the data session using the new APN.
### 7. Restart the iPhone
A full restart (power off, then power on) re-initialises the modem stack and can resolve issues that an Airplane Mode toggle does not.
### 8. Reset Network Settings (Last Resort)
Settings → General → Transfer or Reset iPhone → Reset → **Reset Network Settings**. This clears all Wi-Fi passwords, VPN configurations, and APN customisations but **preserves eSIM profiles**. After the reset, the carrier may push an updated profile automatically. If not, reinstall the profile or re-enter the APN manually.
### iOS-Specific Issues
- **iOS 17.x and iOS 18.x**: There are no known iOS 17 or 18 bugs that prevent APN settings from taking effect under normal circumstances. If a specific iOS update broke data for your MVNO, check the provider's community forum for announcements.
- **Carrier settings out of date**: Settings → General → About. If a carrier settings update is available, a dialog will appear. Install it. Outdated carrier bundles can cause APN-related mismatches.
For a full step-by-step data troubleshooting sequence that covers all causes beyond APN — including data caps, VPN interference, and DNS issues — see [No Mobile Data? How to Fix Data Connection Problems](/en/guides/no-data/).
---
## Removing and Switching Profiles
### Removing a Configuration Profile
Settings → General → VPN & Device Management → Configuration Profiles → tap the profile → **Remove Profile**. Enter your device passcode to confirm.
After removal, iOS may automatically download a fresh carrier settings update if your carrier has one available. If data worked before installing the profile, removing it should restore the previous state.
### Profile Priority When Multiple Profiles Are Installed
If you have two configuration profiles that both define APN settings, iOS applies the APN from the **most recently activated profile**. There is no visual indicator in Settings that shows which profile's APN is currently in use — you can only infer this from the order of installation.
To avoid conflicts, keep only one APN-defining profile active at a time. Remove old profiles before installing a new one, especially when switching from one MVNO to another.
### Carrier Settings vs. Configuration Profiles
Apple's carrier settings (delivered automatically as Carrier Settings Updates) and manually installed configuration profiles are different mechanisms:
- **Carrier settings** are maintained by Apple in partnership with carriers and updated automatically
- **Configuration profiles** are installed by the user and managed under VPN & Device Management
A manually installed configuration profile takes precedence over the carrier's automatic APN setting for the same field. If a carrier settings update arrives after you have installed a manual profile, the update does not overwrite the profile's APN — you would need to remove the profile first.
---
## FAQ
### What is an APN and why does my iPhone need it?
APN stands for Access Point Name. It is defined in 3GPP TS 23.003 as the identifier that connects your device to the carrier's packet data gateway. Without the correct APN, your iPhone can show signal bars but cannot route internet traffic. Most carriers push the APN automatically when you insert a SIM or activate an eSIM. You only need to set it manually when automatic configuration does not happen — most commonly with MVNOs and some travel eSIMs.
### Why can't I see the Cellular Data Network menu on my iPhone?
The Cellular Data Network (or Mobile Data Network) menu is hidden when your carrier or MVNO has locked APN editing through a carrier configuration profile. This is standard practice on many carrier-managed plans. To set the APN, you need to install the .mobileconfig profile that your MVNO or eSIM provider supplies. If no profile is available, contact their support to request one.
### What is a .mobileconfig file and is it safe to install?
A .mobileconfig file is an Apple-format configuration profile that can push APN settings, Wi-Fi credentials, VPN configs, and other parameters to an iPhone. For APN setup, only install profiles provided directly by your MVNO or eSIM provider from their official website or onboarding email. A profile from an unknown source could modify DNS, VPN, or other sensitive settings. After installation, you can review exactly what a profile contains at Settings → General → VPN & Device Management.
### Will installing a carrier profile override my existing settings?
A carrier configuration profile installs its APN values into a managed layer that takes precedence over the manual Cellular Data Network fields. If you already had working APN settings, installing a second profile can override them. iOS applies the APN from the most recently installed active profile. If two profiles conflict, remove the old one first (Settings → General → VPN & Device Management), then install the new one.
### Do travel eSIMs need APN setup on iPhone?
Most major travel eSIM providers (Airalo, Holafly, Nomad, Saily) push APN configuration automatically when you activate the eSIM, so no manual setup is required in most cases. Some smaller providers do require manual APN entry. Check your provider's setup documentation or onboarding email for the specific APN string. If your eSIM is active and shows a signal but data does not work, the APN is the most likely cause.
### How do I remove a carrier profile from my iPhone?
Go to Settings → General → VPN & Device Management. Under Configuration Profiles, tap the profile name, then tap Remove Profile. You will be prompted to enter your device passcode. After removal, restart your iPhone and check whether your carrier pushes a fresh APN profile automatically. If it does not, you will need to install a new profile or enter APN settings manually.
### My APN is set correctly but data still does not work. What else should I check?
APN is one of several prerequisites for mobile data. Also verify: (1) Cellular Data toggle is on (Settings → Cellular), (2) Data Roaming is enabled if your SIM routes data via a roaming session — common with travel eSIMs and some MVNOs, (3) your plan has remaining data and is not expired, (4) no VPN is intercepting traffic. For a full diagnostic sequence, see the [No Mobile Data guide](/en/guides/no-data/).
---
## Related Guides
- [What Is a SIM Card?](/en/guides/what-is-sim/) — how SIM and eSIM store carrier credentials
- [What Is an eSIM?](/en/guides/what-is-esim/) — how eSIM profiles deliver configuration to your device
- [What Is an MVNO?](/en/guides/what-is-mvno/) — why MVNOs use different APN values than the host carrier
- [No Mobile Data? How to Fix Data Connection Problems](/en/guides/no-data/) — full troubleshooting sequence when data does not work
- [SIM & Mobile Glossary](/en/guides/glossary-index/) — definitions for APN, DNN, carrier settings, and related terms
Use [SimFinder](/en/) to compare domestic mobile plans, or [SimFinder Travel](/en/travel/) to find and compare travel eSIM plans for your destination.
================================================================================
# How to Set Up an eSIM via an App
URL: https://sim-finder.com/en/guides/app-setup/
Type: guides (en)
Published: 2026-06-06
Many carriers and travel eSIM providers offer a dedicated app that handles eSIM installation and ongoing management in one place. Instead of scanning a QR code or typing an activation code, you log in, select a plan, and the app downloads the profile directly to your device. The same app then gives you a dashboard for data balance, top-ups, and line switching.
If you are new to eSIM technology, read [What Is an eSIM?](/en/guides/what-is-esim/) before continuing. To check whether your device supports eSIM at all, see [eSIM-Compatible Devices](/en/guides/esim-compatible-devices/).
---
## How App-Based Setup Differs from QR and Manual Entry
There are three common ways to install an eSIM profile: QR code scanning, manual code entry, and a carrier or provider app. All three methods end with the same result — an eSIM profile installed on your device — but the input path differs.
With QR code setup — covered in detail for [iPhone](/en/guides/qr-code-iphone/) and [Android](/en/guides/qr-code-android/) — the carrier generates a one-time code image that your device camera decodes and uses to contact the provisioning server. With [manual code entry](/en/guides/manual-code/), you type the SM-DP+ address and activation code directly into your device settings. Both methods require you to have the code in hand before starting.
App-based setup replaces the code handoff entirely. The app authenticates your account, selects the plan you want, and triggers the profile download — all from within a single interface. You do not receive or enter a QR code or activation string. The app communicates directly with the carrier's provisioning server on your behalf.
This distinction matters in a few practical ways:
| Factor | QR / Manual | App-based |
|--------|-------------|-----------|
| Code required before starting | Yes | No |
| Account login required | Usually not for setup | Yes |
| Post-install management | Via device Settings | Via app + device Settings |
| Re-download on new device | New QR/code from carrier | Usually possible from app |
| Works without internet on device | No | No |
App-based setup is not inherently faster or slower than QR code scanning. The profile download time is determined by the carrier's server and your connection speed, not the input method.
---
## Which Providers Use App-Based eSIM Setup
App-based eSIM activation is common across two categories of providers.
**Mobile carriers (your primary SIM):** Many carriers that issue long-term postpaid or prepaid plans allow eSIM activation through their official account app. After signing up for a plan online or in-store, you download the carrier app, log in, and activate your eSIM from within it. This is increasingly the preferred flow for carriers that want to reduce in-store visits and eliminate physical SIM card distribution.
**Travel eSIM providers:** A large portion of travel eSIM providers — companies that specialize in data-only plans for international travelers — use their app as the primary interface for purchasing a plan, downloading the profile, monitoring data usage, and buying top-ups. Many providers also support QR code and manual code installation alongside the app. For some smaller providers, the app is the only installation path, but most major providers offer multiple methods.
If you are comparing travel eSIM providers, SimFinder's travel search shows which plans are available for your destination. [Compare travel eSIM plans →](/en/travel/)
---
## App-Based vs. Other Methods: When to Choose Each
The installation method is often determined for you — the provider supports what they support. But when you have a choice, the following guidance helps.
**Choose app-based setup when:**
- You will use the same provider for ongoing management (top-ups, renewals, or multiple trips) and want everything in one place.
- The provider's app supports profile re-download, which makes device upgrades straightforward.
- You prefer not to handle QR codes or activation strings, which can be misplaced or expire.
**Choose QR code setup when:**
- You are setting up an eSIM on behalf of someone else and they do not need account access on their device.
- The provider issues a QR code and does not have an app, or the app is not available in your region's app store.
- You are doing an in-store eSIM switch and the carrier provides a printed or on-screen QR code.
**Choose manual code entry when:**
- Your device camera is not functioning.
- The QR code will not scan reliably due to damage, low resolution, or screen glare.
- The provider sends the SM-DP+ address and activation code as plain text (common in some business or enterprise provisioning flows).
In practice, for personal travel eSIMs, the app-based flow is often the most convenient path for the entire lifecycle of the plan — from purchase to expiry.
---
## What You Need Before Starting
Before opening the app, confirm the following:
**An eSIM-compatible, carrier-unlocked device.** The device must support eSIM — check [eSIM-Compatible Devices](/en/guides/esim-compatible-devices/) if you are unsure. It must also be carrier-unlocked. A carrier-locked device can only activate eSIM plans from the carrier it is locked to, regardless of which app you use.
**An account with the carrier or provider.** App-based setup requires a valid account. For new signups, you create the account during the plan purchase flow. For existing customers switching from a physical SIM to eSIM, you log in with your existing credentials.
**A stable internet connection.** The app needs internet access to authenticate your account and to download the eSIM profile from the carrier's server. Use Wi-Fi when possible, especially for the initial profile download.
**Sufficient device storage.** eSIM profiles are small, but the device must have space for the profile file. This is rarely an issue in practice.
---
## Typical App-Based eSIM Setup Flow
The exact steps vary by provider, but most app-based eSIM setups follow the same general sequence.
### Step 1 — Download and Open the App
Download the official app from the App Store (iOS) or Google Play (Android). Use only the official app published by the carrier or provider. Unofficial third-party apps cannot install eSIM profiles.
### Step 2 — Create an Account or Log In
New users complete registration — typically an email address, password, and sometimes identity verification depending on the carrier. Existing customers log in directly. Some carriers also support login via SMS verification to the number associated with the account.
### Step 3 — Choose a Plan or Locate Your Existing Order
For new activations, browse available plans and select one. The app will present options by data volume, validity period, and sometimes by region or country. For customers who already purchased a plan online, the order appears in the app under a section like "My eSIMs", "Orders", or "Active Plans".
### Step 4 — Initiate the eSIM Download
Tap the install or activate button. The label varies by app — common labels include **Download eSIM**, **Activate**, **Install Profile**, or **Get eSIM**. The app sends a request to the carrier's provisioning server (SM-DP+) tied to your account.
On iOS, the system displays a permission prompt asking you to confirm that you want to add a cellular plan. Tap **Allow** or **Continue** to proceed. On Android, a similar system dialog appears. You must grant permission for the profile to install.
### Step 5 — Wait for the Profile to Download
The profile downloads from the carrier's server to your device. This typically takes a few seconds to about a minute. Do not close the app or lock the screen during the download — interrupting the process can cause an incomplete installation that requires a support request to resolve.
### Step 6 — Label and Configure the New Line
Once the profile installs, your device prompts you to label the new line (for example, "Travel" or "Work"). On iOS, you are also asked to set default line preferences for calls, SMS, and data. On Android, similar options appear in Settings after the profile installs.
For most travel eSIMs that are data-only, set the eSIM line as the active data line and keep your home SIM active for calls and SMS only.
---
## After Installation: What the App Lets You Do
The app's role does not end after installation. For most providers, the app is the primary management interface for the eSIM throughout its lifetime.
### Monitor Data Balance
The app shows how much data remains on your plan in real time, or with a short delay depending on the provider. This is the most reliable way to track usage — more convenient than navigating device Settings, and more accurate than relying on the device's built-in data counter, which does not always align with what the carrier measures.
### Top Up or Renew a Plan
When your data runs low or your plan expires, the app lets you purchase additional data or a renewal plan without reinstalling the profile. The new allocation is added to the existing eSIM profile. This is one of the significant advantages of app-based management: adding data takes seconds from within the app, without any QR code or activation code needed.
### Switch Between Multiple eSIM Profiles
If you have installed multiple eSIM profiles, the app may let you toggle between them — activating one and deactivating another — directly from within the interface. The same can also be done from device Settings (Settings > Cellular on iOS; SIM manager on Android), but some provider apps offer a simplified view that shows only their own profiles.
### Request a Re-download on a New Device
If you upgrade your phone or need to reinstall the eSIM profile, many provider apps support profile re-download — you log in on the new device, locate your plan, and install it again without contacting support. Not all carriers support this; some require a support request or issue a new activation code. Check the provider's policy before assuming re-download is available.
---
## Benefits of App-Based eSIM Management
**No codes to store or lose.** With QR or manual code methods, losing the activation code or QR image means contacting support for a replacement. With app-based setup, your account is the credential — as long as you can log in, you can access your plan and reinstall if needed.
**Top-ups without new profiles.** App-based providers typically add data to the existing profile rather than issuing a new one. This avoids the need to install a new profile every time you run out of data.
**Centralized view of multiple eSIMs.** If you use a provider for frequent travel across multiple destinations, the app accumulates your purchase history and active profiles in one place. You can see current balance, past trips, and available plans without navigating device menus.
**In-app support access.** Most provider apps include a support channel — chat, FAQ, or a contact form — accessible from the same interface where you manage your eSIM. This is useful when something goes wrong and you need help without switching between apps.
---
## Caveats to Know
**The app requires an internet connection for management.** If your data runs out completely and you have no other internet connection, you cannot use the app to top up. With most GB-based plans, the data connection stops immediately when the balance reaches zero — there is no automatic grace period. Some unlimited plans reduce speeds rather than cutting off entirely, which may allow a top-up through the app. Check your provider's policy before relying on continued connectivity at zero balance. Planning ahead — topping up before reaching zero — avoids this situation.
**App availability depends on the provider's continued operation.** If a small travel eSIM provider shuts down or removes their app, you may lose access to management features. The installed eSIM profile itself may continue to function if it was already activated and paid for, but top-ups and re-downloads would no longer be possible. This is a consideration when choosing between established carriers and newer travel eSIM startups.
**App permissions and data access.** To manage your eSIM, the app needs certain device permissions — cellular network access, in some cases location for regional plan selection, and notification permissions for usage alerts. Review the permissions requested during installation and grant only what you consider necessary.
**Provider apps do not replace device Settings for core line management.** Fundamental line configuration — which line handles calls, which handles data, toggling a line on or off — is controlled through your device's Settings, not the provider app. The app supplements device Settings with provider-specific features; it does not replace the system-level controls.
---
## Troubleshooting App-Based Installation Issues
**The app shows an error during profile download.**
Common causes: the app is not up to date, the account has not completed identity verification, or the plan is not yet provisioned on the server side. Update the app to the latest version. Confirm in the app that your account status is active and any required verification steps are complete. If the plan was purchased moments ago, wait a few minutes and retry — provisioning sometimes takes time to propagate.
**The system permission prompt does not appear.**
On iOS, if the system dialog asking you to add a cellular plan does not appear, it may mean your iPhone has reached the eSIM profile limit (Apple states iPhones can store 8 or more profiles, but check the device's current count under Settings > Cellular). Delete an unused eSIM profile and try again. On Android, check that the app has the necessary permissions in device Settings.
**The profile installs but data does not work.**
Installing the profile and routing data through it are separate steps. Go to Settings > Cellular (iOS) or your device's SIM manager (Android) and confirm that the new eSIM line is selected as the active data line. For travel eSIMs, also ensure that data roaming is enabled on that line. If data still does not work after these checks, open the app to verify the plan is active and the validity period has not expired.
**You cannot log in to the app on a new device.**
If you replaced your device and cannot log in, use the account recovery option (typically email or SMS verification). Do not create a new account — creating a duplicate account will not give you access to plans purchased under the original account.
**The app is no longer available in your region's app store.**
Regional app store restrictions occasionally prevent downloading an app in a specific country. If this happens, the provider's QR code or manual code method is the fallback. Check whether the provider offers these alternative setup methods on their website. If not, contact support before purchasing a plan.
---
## FAQ
### Do I need a separate account to set up an eSIM via an app?
Yes. App-based eSIM setup requires an account with the carrier or provider. You create the account during signup, or log in to an existing one. The app uses your account to verify eligibility, generate the eSIM profile, and push it to your device. Without a valid account, the app cannot issue a profile.
### Can I use the app to manage an eSIM I installed via QR code?
In most cases, yes. If the eSIM was issued by the same carrier or provider that runs the app, logging in to the app gives you access to account management features — data balance, top-ups, line toggles, and renewal. The installation method (QR vs. app) does not affect what you can manage afterward, as long as the profile is tied to your account.
### What happens if I delete the provider app after installing the eSIM?
Deleting the app does not remove the installed eSIM profile from your device. The profile remains active and usable. However, you lose access to the app's management features — data balance monitoring, top-ups, and profile re-download — until you reinstall the app. If you need to reinstall the eSIM profile on a new device, you will need the app or another method provided by the carrier.
---
## Related Guides
- [How to Set Up eSIM on iPhone via QR Code](/en/guides/qr-code-iphone/) — ES-01: camera scan method, iOS 17.4 long-press trick, and dual-SIM configuration
- [How to Set Up eSIM on Android via QR Code](/en/guides/qr-code-android/) — ES-02: Pixel and Samsung QR setup flows
- [Set Up eSIM with a Manual Code (SM-DP+ Address)](/en/guides/manual-code/) — ES-03: the text-entry fallback when QR scanning is not possible
- [What Is an eSIM?](/en/guides/what-is-esim/) — how eUICC, SM-DP+ servers, and the GSMA SGP.22 specification fit together
- [eSIM-Compatible Devices](/en/guides/esim-compatible-devices/) — which iPhone, Android, and other device models support eSIM
To compare eSIM plans for your destination, use [SimFinder Travel →](/en/travel/)
---
Sources:
- [Set up eSIM on iPhone - Apple Support](https://support.apple.com/en-us/118669)
- [eSIM Consumer and IoT Specifications - GSMA](https://www.gsma.com/solutions-and-impact/technologies/esim/esim-specification/)
- [Get a SIM or eSIM & add it to your Pixel phone - Pixel Phone Help](https://support.google.com/pixelphone/answer/7086887)
================================================================================
# The Best Dual-SIM Combinations
URL: https://sim-finder.com/en/guides/best-combinations/
Type: guides (en)
Published: 2026-06-06
Running two SIMs on one phone is useful in four distinct situations: international travel, everyday cost management, keeping work and personal numbers separate, and protecting against carrier outages. Each situation calls for a different combination of plans. Understanding which pattern fits your goal — and what to look for in each SIM — is the starting point before you compare specific plans.
This guide covers the four most practical dual-SIM combinations, the rationale behind each, and the criteria to use when selecting each SIM in the pair.
---
## Why the Combination Matters as Much as the Plan
Most dual-SIM advice focuses on a single SIM — which carrier to choose, how much data to get, whether to go prepaid or postpaid. The combination is the part that often goes unexamined.
Two SIMs that make sense individually can fail as a pair. A backup line on the same host network as your primary provides zero protection against outages. A travel eSIM with poor tethering allowance does not work as a hotspot for your laptop. A data SIM without VoLTE support drops to 3G during your primary SIM's calls if your device is DSDS.
Choosing a combination means matching two SIMs to a clear goal, then evaluating each against criteria specific to the role it plays. The four patterns below define those roles.
---
## Pattern 1: Home SIM + Travel eSIM
### What it is
You keep your existing home SIM active during travel and add a local travel eSIM for data. The home SIM handles calls and SMS; the travel eSIM handles internet access at local rates.
### Who it suits
Anyone who travels internationally and wants to avoid international roaming charges while keeping their home number reachable. This is the most widely used dual-SIM travel setup.
### Why it works
Most travel eSIMs are data-only — they provide internet access without a local phone number. This makes them a natural complement to a home SIM rather than a replacement. You retain access to your home number for SMS two-factor authentication codes from banking apps, inbound calls from contacts who do not know you are abroad, and any service that uses your home number for verification.
The two SIMs have entirely separate jobs with no overlap:
| Line | Role |
|------|------|
| Home SIM | Calls, SMS, 2FA codes — your identity on the network |
| Travel eSIM | Data — internet access at local cost |
The practical result is internet connectivity at local rates with no change to how people reach you on your home number. For the full configuration walkthrough — line assignment, Data Roaming settings, and what to do when you return — see [Using Dual SIM for Travel](/en/guides/dual-sim-for-travel/).
### What to look for in the travel eSIM
**Coverage confirmation.** Verify the eSIM covers the specific country (or countries) you are visiting. Regional plans cover multiple countries but cost more per gigabyte than single-country plans. If you are visiting one country, a single-country plan is usually more cost-effective.
**Data allowance.** Light browsing, maps, and messaging for one week typically requires 3–5 GB. Add video streaming or remote work and the figure rises quickly. Use [SimFinder Travel](/en/travel/) to compare data amounts and validity periods for your destination.
**Tethering (hotspot) allowance.** Many travel eSIM plans explicitly permit tethering; some restrict or cap it. If you plan to connect a laptop or tablet through your phone's hotspot, confirm the plan allows this before purchasing.
**Activation timing.** Travel eSIM validity periods start at different points depending on the provider: some start on the installation date, others on the first network connection at the destination, others on the first data session. Install the profile before departure while on Wi-Fi, but confirm when the countdown begins so you choose a validity period that covers your stay.
**Network bands.** Verify that the travel eSIM uses a network that supports the frequency bands your phone uses. A plan running on a network your device cannot reach is worthless regardless of data allowance. Check your device's supported bands against the network's published band list.
---
## Pattern 2: Cost Optimization — Minimal Voice + High-Data MVNO
### What it is
Your primary SIM handles voice calls on a plan with a modest call allowance. A second SIM — typically from an [MVNO](/en/guides/what-is-mvno/) (Mobile Virtual Network Operator) — handles most or all of your data at lower cost.
### Who it suits
Users in markets where large carriers charge a premium for data but provide reliable call quality. Common in regions where MVNOs lease capacity from large carriers and offer competitive data pricing on the same underlying network.
### Why it works
Voice calls and data are technically independent services on a mobile network. There is no requirement that both come from the same plan. In markets where MNO (large carrier) data is significantly more expensive than equivalent MVNO data, separating the two services can reduce total monthly spend without sacrificing call reliability.
Because both SIMs are active simultaneously on a DSDV device, you make and receive calls on the voice SIM while all data routing goes through the data SIM. The device handles the separation automatically once you configure which line is default for data in Settings.
This setup requires a [DSDV-capable device](/en/guides/what-is-dual-sim/) — one where both SIMs maintain a 4G/5G connection simultaneously. On a DSDS device, the data SIM may drop to 3G during calls on the voice SIM, which affects data performance during calls. On DSDV, both SIMs maintain a 4G/5G network registration simultaneously — neither drops to 3G during a call. However, data on the non-active data SIM pauses while a call is in progress on the other SIM; to keep data flowing during calls, the device switches cellular data to the line handling the call for the duration.
### What to look for in each SIM
**Voice SIM:** Reliable call quality matters more than data allowance. Look for a plan on an MNO with strong VoLTE coverage in your area. Confirm the plan includes VoLTE (Voice over LTE) — this keeps calls on 4G rather than dropping to 3G, which preserves data performance on the other SIM in a DSDV setup.
**Data SIM:** Prioritize data allowance per unit cost. Verify which MNO the MVNO uses and whether that network covers the areas where you use data most. Check that the MVNO plan allows tethering if you use your phone as a hotspot. Review the MVNO's traffic management policy — some throttle speeds during peak hours or after a certain data threshold.
Compare available plans for your market using [SimFinder](/en/) before committing. MVNO pricing changes frequently, and the most cost-effective option varies by region.
---
## Pattern 3: Work + Personal Separation
### What it is
One SIM carries your work number; the other carries your personal number. Both run on the same device simultaneously.
### Who it suits
Freelancers, small business owners, remote workers, or anyone who wants a professional number separate from their personal line without carrying two phones.
### Why it works
Dual SIM eliminates the need for a second handset when you need two numbers. You configure separate ringtones and notification tones for each line, making it immediately clear which number is ringing. Calls and messages to each number reach you without switching modes or checking a second device.
At end of day or on weekends, you can temporarily disable the work SIM in Settings to stop receiving work calls without changing your number or plan. The work SIM profile remains installed; re-enabling it takes seconds. This is simpler than forwarding or using Do Not Disturb, which affects both lines.
For device-specific setup steps — line labeling, default call line, ringtone assignment — see [Dual SIM Setup on iPhone](/en/guides/dual-sim-iphone/) or [Dual SIM Setup on Android](/en/guides/dual-sim-android/).
### What to look for in each SIM
**Work SIM:** VoLTE support and consistent call quality are the primary requirements. If clients or employers call on this number, dropped calls or poor audio quality reflect on your professionalism. A postpaid plan with reliable coverage in the areas where you work most is the standard choice. Confirm number portability terms if you ever want to move the number to a different carrier.
**Personal SIM:** You likely already have this. The considerations are whether your current plan works as the secondary SIM in a dual-SIM configuration — specifically, whether it supports DSDV on your device and whether any carrier restrictions affect eSIM operation if you plan to use an eSIM for the work number.
**Data assignment:** Decide in advance which SIM handles data. Many users route all data through the personal SIM to keep work and personal billing separate. Some route all data through the work SIM for expense reporting purposes. Either approach works; configure the default data SIM in Settings to match your preference.
---
## Pattern 4: Redundancy — Two Different Carriers
### What it is
Your primary SIM runs on one carrier. A second SIM on a different carrier — often a low-cost prepaid or MVNO plan — stays active as a backup for calls, SMS, and data if the primary carrier experiences an outage.
### Who it suits
Anyone who depends on mobile connectivity for work, remote access, or critical communication and cannot afford hours without a working connection. Also valuable for travelers who want a fallback if their primary carrier's roaming partner has problems in a specific region.
### Why it works
Carrier outages happen. Well-documented incidents — spanning hours to nearly a full day — have left tens of millions of subscribers without service. The outage affects a carrier's network, not individual devices. A phone with SIMs from two independent carriers retains one working line throughout an outage on either network.
The critical requirement is network independence. An MVNO running on the same host MNO as your primary SIM is vulnerable to the same outage. If your primary plan uses Carrier A, the backup must use Carrier B at the infrastructure level — not just a different brand on the same towers. For a detailed breakdown of how to identify the host network for any MVNO, see [Backup Line: Adding a Second SIM for Outage Resilience](/en/guides/sub-line/).
### What to look for in each SIM
**Primary SIM:** Your existing plan. No changes are typically needed.
**Backup SIM:**
- **Different host network.** This is the only non-negotiable requirement. Confirm that the backup runs on infrastructure independent from your primary.
- **eSIM format.** eSIM is the practical choice for a backup line — no physical SIM to lose or manage, the profile stays installed on the device, and you switch to it in Settings during an outage. An eSIM-capable device with one physical SIM slot can carry both the primary physical SIM and a backup eSIM simultaneously.
- **Low maintenance cost.** A backup line does not need a large data allowance. Look for a prepaid plan with low or no monthly minimum. Pay-as-you-go options keep costs near zero while the line stays dormant.
- **Minimum usage requirements.** Many prepaid SIMs require at least one call, text, or data session within a rolling window to keep the number active. Check the specific terms and set a calendar reminder to make a minimal use before the window closes.
- **Activate before you need it.** eSIM activation requires a working internet connection. If your primary carrier is already down when you try to activate the backup, activation fails. Install and test the backup eSIM while both networks are available.
---
## Combining Patterns
The four patterns are not mutually exclusive. Some users run combinations of combinations:
**Travel + redundancy:** A travel eSIM on a different regional carrier than your primary roaming partner gives you a fallback if roaming coverage is poor in a specific area.
**Cost optimization + work/personal:** A low-cost MVNO data SIM can serve as both the data-heavy SIM and the personal line, while the work SIM handles voice calls only.
**Redundancy + travel:** A backup SIM on a domestic carrier can also serve as a data source during travel if you have a regional plan. This reduces the total number of SIMs you carry from three to two.
When combining patterns, verify that your device supports the dual-SIM mode needed for all the functions you require. If you need continuous data on both lines simultaneously — for example, running a VoIP call on one line while the other handles streaming — check whether your device supports DSDA. Most current smartphones support DSDV, where data on the second SIM pauses during an active call on the first.
---
## Decision Criteria Summary
Before selecting a specific plan, work through these questions for each SIM in the pair:
### Network diversity
- Are the two SIMs on different network infrastructures (not just different brands)?
- If one SIM is an MVNO, which MNO hosts it, and is that different from the other SIM?
### Band support
- Does each SIM's network support the frequency bands your device uses in the regions where you plan to use it?
- For travel eSIMs, does the coverage map include your specific destination (not just the country name)?
### Tethering allowance
- If you use your phone as a hotspot for a laptop or tablet, does the plan explicitly allow tethering?
- Is there a tethering data cap separate from the main allowance?
### eSIM vs physical SIM
- Does your device support eSIM? (Most phones released after 2018 do.)
- Does your device support dual eSIM (two eSIM profiles active simultaneously)?
- For the backup or travel role, eSIM is generally more convenient — no physical card to swap, instant activation, profile stays installed when dormant.
### VoLTE support
- For any SIM used for voice calls in a DSDV setup, does the SIM and carrier support VoLTE?
- Without VoLTE on both SIMs, a DSDV device may behave like DSDS during calls — one SIM drops to 3G to handle the voice call, temporarily interrupting 4G data on the other SIM.
### Plan maintenance
- For backup and travel eSIMs, what is the minimum usage or top-up requirement to keep the number active?
- What happens if the prepaid balance runs out — does the line suspend immediately, or is there a grace period?
Use [SimFinder](/en/) to compare plans across these criteria for your market, or [SimFinder Travel](/en/travel/) for travel eSIM options by destination.
---
## What Each Pattern Does Not Solve
No dual-SIM combination addresses every connectivity risk:
- **Device failure** takes both SIMs offline regardless of how many carriers you use.
- **Physical area without coverage** — very remote regions, aircraft, underground infrastructure — affects all carriers simultaneously.
- **Power infrastructure outages** that knock out towers can affect all networks in a geographic area at once.
The four patterns above address carrier-specific outages and cost structure, not device or infrastructure failure. For those scenarios, the alternative is a backup communication channel — a satellite-capable device, a separate pocket Wi-Fi device from a different provider, or pre-arranged communication protocols that do not depend on a specific device.
---
## Related Guides
The patterns described here connect directly to several more detailed guides:
- **What the modes mean:** [What Is Dual SIM?](/en/guides/what-is-dual-sim/) — DSDS, DSDV, and DSDA explained, plus device support by model
- **Travel configuration in detail:** [Using Dual SIM for Travel](/en/guides/dual-sim-for-travel/) — line assignment, Data Roaming settings, SMS 2FA, and what to restore when you return home
- **Backup line setup:** [Backup Line: Adding a Second SIM for Outage Resilience](/en/guides/sub-line/) — how to identify host networks, choose a low-maintenance backup plan, and switch during an outage
- **iPhone-specific setup:** [Dual SIM Setup on iPhone](/en/guides/dual-sim-iphone/) — line labeling, default data assignment, Allow Cellular Data Switching, and iMessage configuration
- **Android-specific setup:** [Dual SIM Setup on Android](/en/guides/dual-sim-android/) — SIM manager settings for Pixel, Samsung, and other Android devices
To compare plans for any of these combinations, use [SimFinder](/en/) to filter by carrier, network, and data allowance in your market.
================================================================================
# The Best Time to Switch Carriers
URL: https://sim-finder.com/en/guides/best-timing/
Type: guides (en)
Published: 2026-06-04
The best time to switch carriers is when three conditions align: your current billing cycle is ending, your minimum contract term (if any) has passed, and any active promotional benefits have been used or accounted for. Switching at the wrong moment in any of these cycles can result in paying for service you do not use, an early-termination fee, or losing promotional value you have already paid for. This guide explains each timing consideration and what to check in your own contract.
---
## Why Timing Matters When Switching
Switching carriers involves at least two billing systems running in parallel for a brief period: the account you are leaving and the account you are joining. Both can generate charges if the transition is not timed carefully.
The specific rules vary by carrier and country. There is no universal standard for how carriers handle final billing, proration, or cancellation notice. The principles in this guide apply internationally; the exact rules in your case depend on your contract terms and the regulations in your market.
Three distinct timing considerations apply to most carrier switches:
1. **Billing-cycle timing** — whether and how your final month is charged
2. **Contract end date and renewal window** — when you can leave without a penalty
3. **Promotional and device installment timing** — when leaving costs you something beyond an explicit fee
Understanding each of these before you initiate a switch prevents avoidable costs.
---
## Billing-Cycle Timing: Proration and Full-Month Charges
Your mobile plan is billed in cycles — typically monthly. When you cancel mid-cycle, what happens to the days you did not use?
**Two rules exist, and carriers differ:**
- **Full-month billing:** The carrier charges the full billing period regardless of when in the cycle you cancel. If your billing cycle runs from the 1st to the 31st and you cancel on the 10th, you pay for the entire month.
- **Prorated final billing:** The carrier charges only for the days up to the cancellation date. If you cancel on the 10th of a 31-day cycle, you pay approximately 10/31 of the monthly amount.
Which rule applies to your account is stated in your service agreement — look for the section on cancellation or final billing. If it is not clear, contact your carrier before cancelling.
**How to use this information:**
- If your carrier uses full-month billing, time your cancellation to the last day or the last few days of a billing cycle. Cancelling on the first day of a new cycle means paying for an entire additional month.
- If your carrier prorates, you have more flexibility on timing — but confirming this in advance avoids surprises.
**Important:** Even carriers that prorate may have specific notice period requirements. If the contract requires 30 days' written notice, and you give notice on the 10th of the month, service may not end until the 10th of the next month — not the end of the current billing cycle.
---
## Avoiding Double-Billing Overlap
During a carrier switch, there is a period when both the old and new carrier's billing are active. This overlap is unavoidable if the new carrier bills from the date of sign-up — but the length of the overlap is controllable.
**Common sources of double-billing:**
- **New carrier billing starts at sign-up, old carrier bills to end of cycle.** If you sign up with a new carrier on the 5th and the old carrier bills until the 31st, you pay for both from the 5th to the 31st.
- **Port takes longer than expected, extending active service on both accounts.** Number porting typically completes within hours in markets with efficient portability processes, but delays occur. During a delay, your old SIM remains active and the old account continues billing.
- **New carrier charges a partial first month plus the following full month on the first invoice.** Some carriers invoice the prorated days from sign-up to the billing cycle start, plus the first full month — resulting in an unusually large first invoice.
**How to minimise overlap:**
1. Confirm how your new carrier bills the first month before signing up.
2. Sign up with the new carrier close to — ideally on the same day as — the end of your old billing cycle.
3. Initiate the number port as soon as your new account is open, so the old account closes promptly on port completion.
4. Check whether your old carrier closes the account automatically on port-out or requires a separate cancellation step.
---
## Checking Your Contract End Date
If your current plan has a minimum term, the contract end date is the most important date in your switching timeline.
**Where to find it:**
- Your original contract document or service agreement
- The carrier's account portal or app — most carriers display the contract end date in the account or plan section
- Your monthly bill — some carriers include the contract end date or remaining months in the bill summary
**What to calculate:**
From the contract start date and the minimum term length (commonly 12 or 24 months), calculate the end date. Confirm whether the term begins on the activation date or the contract signing date — these can differ, and the carrier's calculation is what governs.
**What you owe if you leave early:**
Leaving before the minimum term ends typically triggers an early-termination fee (ETF). The calculation method varies: some carriers charge a flat amount; others prorate it based on the number of months remaining. The ETF is stated in your contract. For a detailed explanation of how ETFs are structured and how regulations differ by country, see [Contract Terms: Lock-In, Termination Fees, and Setup Costs](/en/guides/contract-terms/).
**When it is worth paying the ETF:**
Compare the ETF against the savings available by switching now versus waiting. If a new carrier offers significantly lower rates and the savings over the remaining contract months exceed the ETF, switching early is financially rational — but this calculation requires knowing your exact ETF amount and the new carrier's total monthly cost over the same period.
---
## The Renewal Window: The Period That Determines Your Exit Timing
Many contracts auto-renew into a new minimum term if you do not act within a defined window before the end of the current term. This window is where most customers miss their optimal exit point.
**How renewal windows work:**
A renewal window is a defined range of days before the contract end date during which you can give notice to switch or cancel without committing to a new term. For example:
- "You may cancel without a new minimum term commitment if you give notice between 30 and 90 days before your contract end date."
If you give notice:
- **Before the window opens** (more than 90 days before the end date): your notice may not be accepted, or the cancellation may be processed at the end of the window — potentially leaving you locked in for a new term. Check your contract — some carriers accept early notice and simply process the cancellation at end of term without creating a new commitment.
- **After the window closes** (fewer than 30 days before the end date, in the example above): the contract may auto-renew into a new minimum term, and your notice takes effect only at the end of the new term.
- **Within the window** (between 30 and 90 days before the end date): your switch or cancellation proceeds without penalty.
**How to track your renewal window:**
1. Record your contract end date.
2. Read your contract to identify the renewal window (the notice period range before the end date).
3. Mark the date the window opens in your calendar — this is the earliest safe date to give notice.
4. Do not rely solely on the carrier to notify you. Some regulations require advance notification of an approaching auto-renewal; others do not. The rules differ by country.
If your carrier sends an end-of-term notification, use it as a prompt to review your options — but confirm the renewal window dates in your contract rather than relying on the notification alone.
---
## Minimum Term and Notice Period: Two Separate Clocks
These are frequently confused, but they operate independently:
**Minimum term:** The period during which you cannot cancel without paying an ETF. Once the minimum term ends, the ETF no longer applies.
**Notice period:** The advance warning required before any cancellation, including after the minimum term ends. If a plan requires 30 days' notice, you must notify the carrier 30 days before the date you want service to end — even if your minimum term expired six months ago.
**Combined effect:**
If your minimum term ends on 31 July and the plan requires 30 days' notice, giving notice on 1 August means service ends 31 August. You do not owe an ETF (the minimum term has ended), but you pay for August's service regardless.
If you want service to end on 31 July — the day the minimum term ends — you must give notice by 1 July (or whenever 30 days before 31 July falls). To hit this date, you need to be tracking the contract end date at least 30 days in advance.
This is why diariesing the **start of the renewal window** — not just the contract end date — is the practical approach.
---
## Device Installment Plans: When the Phone Affects Your Timing
If you purchased a phone through your carrier on a device financing or installment plan, the balance is a separate financial obligation from your service contract. The two interact with your switch timing in specific ways.
**What to check:**
- **Outstanding balance:** The remaining amount owed on the device. This is on your bill or in the account portal.
- **Unlock eligibility:** Some carriers require the device installment balance to be paid in full before they will unlock the phone. A locked phone does not work on a new carrier's network, even if the number port succeeds. Check whether your carrier ties unlock eligibility to balance payment, and what the unlock processing time is.
- **Ongoing billing after the port:** In most countries, a carrier cannot block a number port because of an outstanding device balance — but the balance continues to be owed after the port. Some carriers bill the installment separately from the service; others combine them. After porting, confirm where and how the remaining installment will be billed.
**Timing considerations:**
If you are close to paying off the device installment, waiting until it is fully paid simplifies the switch: the phone unlocks, the balance is zero, and you can port without parallel financial obligations. If the remaining balance is large and the savings from switching are significant, paying the balance early and switching immediately may still result in net savings — calculate both scenarios.
For a step-by-step approach to verifying all switch prerequisites including device balance, see [Pre-Switch Checklist: What to Check Before Changing Carriers](/en/guides/pre-switch-checklist/).
---
## End-of-Promotion Timing: Protecting the Value You Have Paid For
Carriers frequently offer introductory rates, bonus data, or other promotional terms for a defined period. These are account-level benefits — they do not follow your phone number to a new carrier.
**Common promotional structures and their timing implications:**
- **Introductory rate for the first N months:** After the promotional period, the rate increases to the standard price. If you plan to switch anyway, switching at the end of the promotional period is financially efficient — you benefit from the lower rate until it expires, then switch before paying the higher rate.
- **Bonus data allocation for a defined period:** Similar logic. Use the bonus allocation through its expiry; do not abandon it prematurely.
- **Loyalty or long-term customer discounts:** If you have accumulated a loyalty discount, check whether it resets on plan change or carrier switch. Some loyalty structures reward staying; others simply reflect a current-account discount that applies regardless.
- **New carrier sign-up promotion:** Conversely, some promotional offers from new carriers are time-limited to new customers. If a compelling new-carrier offer exists now, factor in how long it is available.
**The overlap to avoid:** Do not switch away from your current carrier during an active promotional period unless the new carrier's standard rate — after accounting for all fees — still offers better value than the remaining promotional months with your current carrier. Account for the full remaining promotional value, not just the headline monthly difference.
---
## Proration Rules Differ by Country and Carrier
The examples in this guide are illustrative. Actual proration practices vary by carrier and by jurisdiction. What is true in one market may not apply in another.
**Known differences in market practice:**
- Some markets have consumer protection rules that require proration of the final month on cancellation. Others do not mandate it, leaving it to each carrier's contract terms.
- In markets with mandatory notice periods, the effective date of cancellation may be the date notice is received rather than the date of the port — meaning billing continues through the notice period regardless of when the port completes.
- Prepaid plans operate differently from postpaid plans: prepaid credit typically expires at the end of its validity period, and unused credit is generally not refunded at cancellation unless the carrier's terms specifically provide for this.
- Some carriers distinguish between contract cancellation (closing the account) and number porting (moving the number to another carrier). Account closure on port-out may be automatic or may require a separate step.
**What to verify in your specific situation:**
1. Read the cancellation and billing sections of your current service agreement.
2. Check your carrier's FAQ or contact support to confirm whether the final month is prorated or full.
3. Confirm the notice period and how it interacts with the billing cycle.
4. If your market has a telecoms regulator with consumer guidance, check that guidance for any mandatory rules on final billing.
For a broader understanding of how carrier types — MNO, MVNO, and sub-brands — differ in their contract structures and billing practices, see [MNO vs MVNO vs Sub-Brand — Which Carrier Type Is Right for You?](/en/guides/mno-vs-mvno-comparison/).
---
## Constructing Your Optimal Switch Date
With the above considerations in hand, finding the optimal switch date is a matter of identifying the latest-binding constraint.
Work through these questions:
1. **Does my current plan have a minimum term?** If yes, determine the end date and whether you are inside or outside the renewal window. If inside the window: proceed. If outside: either wait for the window to open, or calculate whether paying the ETF is worthwhile.
2. **Am I in an active promotional period?** If yes, estimate the remaining promotional value and factor it into the decision.
3. **Is there an outstanding device installment balance?** If yes, decide whether to pay it off, carry it, or factor ongoing payments into the total cost comparison.
4. **When does my current billing cycle end?** This is the date to target for service termination — cancelling or completing a port on or near this date minimises paying for unused days (if the carrier charges full-month billing) or simplifies the proration calculation.
5. **How does the new carrier bill the first month?** Plan the sign-up date relative to the new carrier's billing cycle to control the overlap period.
The optimal switch date sits at the intersection of: end of promotional period + start of renewal window + close to billing cycle end. In practice these rarely align perfectly. The billing cycle end date is the easiest to control; the renewal window and promo expiry are fixed. Work backward from the renewal window opening date to set the latest safe date for giving notice, and align the actual switch as close to billing cycle end as is practical within that window.
Use [SimFinder](/en/) to compare what carriers are offering at the point you are ready to switch — plan offerings and promotional terms change, so the comparison is most useful close to your actual decision date rather than months in advance. For a structured comparison of travel and multi-carrier options, see [Travel eSIM Provider Comparison](/en/guides/provider-comparison/).
---
## FAQ
*(See structured FAQ items in the frontmatter above for display in site search and rich results.)*
### My carrier says I am in a "no-contract" or "month-to-month" plan. Do any of these timing considerations apply?
Most do, but the ETF and renewal window concerns are removed. A month-to-month plan does not carry a minimum term, so there is no ETF and no renewal window to manage. However, billing-cycle timing still applies — if the carrier charges a full month rather than prorating, switching at the end of a billing cycle avoids paying for unused days. The notice period also applies: even month-to-month plans typically require a notice period (commonly 30 days) before cancellation. Check the notice requirement in your plan terms.
### What if I cannot identify the exact contract end date?
Log in to your carrier's account portal — most carriers display the plan details and contract end date in the account or plan section. If it is not there, check your original sign-up confirmation email, or call carrier support and ask for your contract start date and minimum term length. With those two values, you can calculate the end date yourself.
### Does switching affect my credit score or financial record?
Closing a mobile account in good standing generally does not affect a credit score. However, an outstanding ETF or unpaid device installment balance that is sent to a collections agency can appear as a negative item in credit records in some markets. Confirm that your balance is zero and your account is closed in good standing after the switch, and retain any written confirmation from the carrier.
### I want to switch now but I am early in my contract. What are my options?
Three options exist: (1) Pay the ETF and switch immediately — worthwhile if the savings on the new plan exceed the ETF over the remaining contract period. (2) Wait until the minimum term ends or the renewal window opens. (3) Check whether your current carrier will waive or reduce the ETF — some carriers do this as a retention measure or as part of a promotional offer. For the MNP process once you have decided to switch, see [Mobile Number Portability (MNP) Explained](/en/guides/what-is-mnp/).
---
## Related Guides
- [Contract Terms: Lock-In, Termination Fees, and Setup Costs](/en/guides/contract-terms/) — Detailed explanation of minimum terms, ETF calculation methods, and renewal clause structures
- [Pre-Switch Checklist: What to Check Before Changing Carriers](/en/guides/pre-switch-checklist/) — Step-by-step verification of all prerequisites before initiating a carrier switch
- [Mobile Number Portability (MNP) Explained](/en/guides/what-is-mnp/) — How number porting works technically, country-by-country timing, and how to avoid common port failures
- [MNO vs MVNO vs Sub-Brand — Which Carrier Type Is Right for You?](/en/guides/mno-vs-mvno-comparison/) — How carrier type affects contract structure, flexibility, and billing practices
- [Travel eSIM Provider Comparison](/en/guides/provider-comparison/) — Major travel eSIM providers compared; most travel plans carry no minimum term, ETF, or renewal window
================================================================================
# How to Choose a Voice Call Plan
URL: https://sim-finder.com/en/guides/call-plans/
Type: guides (en)
Published: 2026-06-06
Choosing a voice plan means matching a plan's calling structure to how many minutes you actually use — and deciding whether cellular calling or VoIP apps is the right tool for your pattern. There are four distinct voice plan structures used by carriers worldwide: metered per-minute, bundled minutes, unlimited calling, and VoIP-supplemented data-only. Each has a different cost profile, a different risk of overage, and a different dependence on network technology. This guide explains each structure, when each suits which user, and what to verify beyond the headline "calls" label.
The guide also covers how call delivery technology — VoLTE, VoNR, and Wi-Fi Calling — affects audio quality and simultaneous data use; how voicemail availability varies across prepaid, postpaid, and MVNO plans; and the three mechanisms for international calling (roaming, add-ons, and VoIP apps), so you can choose the right combination for your situation. A decision framework for estimating your actual monthly minute needs and a checklist of common pitfalls round out the coverage.
## The Four Voice Plan Structures
### Metered (Pay-Per-Minute)
On a metered plan, each outgoing call is charged at a per-minute rate, usually applied in one-minute increments (some carriers bill in six-second increments). There is no monthly minimum for calls — you pay only for what you use.
Metered calling is common on:
- True pay-as-you-go prepaid plans (see [how pay-as-you-go plans work](/en/guides/pay-as-you-go/))
- Entry-level prepaid bundles where data is the primary product and calling is an optional add-on
- International SIMs and travel plans sold for short-duration connectivity
Metered plans are cost-effective for light callers who make fewer than a handful of calls per month. They can become expensive quickly for moderate callers, because per-minute rates on metered plans are almost always higher than the effective per-minute cost of a bundled-minute plan at the same usage level. Before choosing a metered plan, calculate the number of minutes you actually used over the past one to three months — most smartphone operating systems log total call duration per contact or in aggregate.
Billing increment matters on metered plans. A plan that bills in one-minute increments charges you for a full minute even if your call lasts 10 seconds. A plan that bills in six-second increments charges you proportionally for the fraction of a minute used. For callers who make many short calls (such as quick confirmation calls or customer-service interactions that are answered quickly), the billing increment can substantially affect the monthly total. This detail is often buried in plan documentation rather than displayed on comparison pages.
### Bundled Minutes
A bundled-minute plan includes a fixed number of calling minutes per billing cycle as part of the plan price. Common allowances range from a few dozen minutes on entry plans to several hundred on mid-tier plans. If you exceed the included minutes, calls continue but are charged at a per-minute overage rate (on older plan structures) or are blocked or degraded (on plans with hard caps).
Bundled plans are predictable within the included allowance but expose callers to overage risk. The key question before selecting a bundle size is whether the included minutes match your average monthly usage plus a reasonable buffer. Underestimating your call volume on a bundled plan is more costly than overestimating — overage rates for out-of-bundle minutes are typically well above the effective in-bundle rate.
Some carriers also sell minute add-ons — small top-up bundles of additional minutes that can be purchased mid-cycle. These are useful if you occasionally exceed your allowance but do not want to upgrade to a larger plan permanently. Note that mid-cycle minute add-ons typically expire at the end of the current billing cycle, not after a fixed number of days from purchase — unused top-up minutes may not roll over.
On some plans, incoming calls count against the minute allowance and on others they do not. This distinction is not always clearly stated in headline plan descriptions. If you receive a high volume of inbound calls, confirm whether the minute allowance applies to incoming calls as well as outgoing calls before selecting a bundle size.
### Unlimited Calling
Unlimited calling plans include voice calls without a per-minute cap. As the term "unlimited" implies, you can make calls for as long as you like without generating overage charges. Most unlimited calling plans in practice have one important restriction: they apply only to domestic calls within the country of your home carrier. International calls typically require a separate add-on or are billed at metered rates even on an unlimited plan.
A secondary restriction that varies by carrier: some unlimited plans limit calls to specific destination types. For example, unlimited calls may apply to standard geographic numbers but exclude non-geographic or premium-rate numbers — always check the plan's fair-use terms for destination restrictions.
As with unlimited data plans, unlimited voice carries fair-use clauses in some markets. These typically address unusually high call volumes that suggest commercial use rather than personal use, rather than imposing hard per-month limits on normal calling. For a detailed explanation of how fair-use policies work in the "unlimited" context, the [unlimited data plan guide](/en/guides/unlimited-reality/) covers the parallel mechanics for data, which often apply to voice plans structured similarly.
### VoIP Apps: Calls Over Data
Voice calls placed through apps such as WhatsApp, Signal, FaceTime Audio, Google Meet, and Microsoft Teams travel over your data connection rather than through your carrier's voice network. The calls use your data allowance — not your calling plan minutes.
The data cost of a VoIP audio call is low. WhatsApp voice calls use approximately 15–50 MB per hour, making even a one-hour VoIP call negligible in the context of a modern data plan. This makes VoIP a practical substitute for cellular calling in several scenarios:
- **International calls**: VoIP calls between app users are generally free regardless of the destination country, as long as both parties have a data connection.
- **Travel eSIM users**: Most travel eSIM plans are data-only and carry no voice plan. VoIP apps provide the calling layer on top.
- **Low-signal environments**: Some VoIP apps can maintain a call on a weak data signal where the cellular radio would drop a call.
The limitation of VoIP is reachability. A contact can only call you on WhatsApp if they have WhatsApp and know your account. You cannot receive inbound calls from contacts who do not use the same app. For this reason, VoIP works best as a supplement to a cellular calling plan, not as a full replacement — unless you have migrated all your regular contacts to the same app and do not receive calls from unknown numbers.
A further limitation is emergency calling. VoIP apps cannot be used to dial emergency services (such as 911, 999, or 112). Emergency calls require a SIM with an active calling plan connected to the cellular network. If you are using a data-only SIM or eSIM as your sole connectivity, you will not be able to call emergency services via VoIP. This is a hard limitation of the VoIP architecture and is not carrier or app-specific.
## A Decision Framework: Estimating Your Monthly Call Minutes
The right structure depends on how many minutes per month you actually use, not on what you think you use. A three-month average of your actual call log is the most reliable input for this decision.
**Step 1 — Read your actual call log**: Both iOS and Android log total outgoing and incoming call duration. On iOS, the Phone app shows recent calls with duration per call; a third-party screen-time app can show aggregate call time. On Android, the Phone app's call history records duration per call, and some device manufacturers include aggregate statistics in Digital Wellbeing. Tally your outgoing minutes over the last three months and calculate a monthly average. Incoming call time does not consume your outgoing allowance on most plans, but it can affect your calculation if your plan charges per-minute for both directions. If your current plan is a metered plan, your carrier's billing statement or app will show the exact number of minutes billed — this is the most accurate source for the calculation, since it reflects the billing-increment rounding used by the carrier.
**Step 2 — Segment by destination type**: Separate your calls into domestic (same-country) and international. The plan structure that is optimal for domestic calling may not cover international calls at all, so the two should be evaluated independently. Also identify any premium-rate or non-geographic numbers you call regularly — these are frequently excluded even from unlimited domestic plans.
Also note whether your calls are primarily to mobile numbers or to landlines. Some bundled-minute plans differentiate between calls to mobile numbers and calls to geographic landlines in their allowance and overage rates, though this distinction is less common on newer plans than on legacy ones.
**Step 3 — Apply the usage band**:
- **Under 30 minutes per month**: A metered or low-cost [pay-as-you-go plan](/en/guides/pay-as-you-go/) is likely cheapest. Compare the total metered cost against the cheapest available bundle. If the bundle cost is within a small margin of the metered cost, the bundle may be worth choosing for the predictability it provides — you will not face overage charges if usage spikes one month.
- **30–200 minutes per month**: A bundled-minute plan with an allowance of at least 150–250 minutes (adding a buffer above your average) typically provides the best value. Confirm the overage rate for out-of-bundle minutes — if the overage rate is high, opt for a plan with a larger allowance or consider upgrading to unlimited calling.
- **Over 200 minutes per month**: Unlimited calling plans become cost-competitive and eliminate overage risk. Compare the total monthly cost of an unlimited-calling plan against a large bundled plan and its likely overage charges at your usage level.
- **Frequent international callers**: For international calls, evaluate both the plan's international calling add-on and VoIP apps for specific contacts. A combination of unlimited domestic calling plus VoIP for international calls is a common and cost-effective approach. International calling add-ons that include a defined number of minutes to specific countries can be compared with the effective per-minute cost of a metered international rate.
**Step 4 — Apply a buffer**: Build a 20–30% buffer above your three-month average when selecting a bundle size. One unusually call-heavy month can push you into overage, and overage rates on out-of-bundle minutes are typically punitive compared to the in-bundle rate. If your call volume is variable month-to-month — for example, if you make many calls during certain periods and very few in others — a larger buffer or unlimited calling is the lower-risk choice. The cost of buying slightly more minutes than you need is almost always lower than the cost of overage charges in a high-usage month.
**Step 5 — Reassess after three months**: Call volume changes over time. A plan that was well-matched when you selected it may become poorly matched if your circumstances change — a new job with more phone-based communication, a period of intensive international contact, or a shift toward VoIP. Reviewing your actual usage against your plan allowance after three months of use is a low-effort way to catch mismatches before they become ongoing costs.
For families with multiple lines sharing a pool of minutes, see [how family plans work](/en/guides/family-plans/) — shared minute pools change the calculation significantly by allowing high-use members to draw from the pool rather than each line sizing its individual allowance. The buffer calculation also applies at the pool level: the combined allowance should cover the sum of all lines' average usage plus a pooled buffer.
## How VoLTE and VoNR Affect Call Quality
The technology used to carry your call affects audio quality, call-setup speed, and whether you can use data during a call. Understanding these technologies helps you choose both a plan and a device that will deliver the call quality you need.
**VoLTE (Voice over LTE)**: VoLTE carries voice calls over the LTE data network using the IMS (IP Multimedia Subsystem) protocol stack. It delivers HD audio using wideband codecs (such as AMR-WB), which capture a broader frequency range than narrowband codecs used on 2G and 3G calls. The audible difference is a noticeably clearer, more natural voice — particularly for sibilants and consonants that narrowband codecs suppress. VoLTE also allows simultaneous voice and data on LTE, so your data connection remains active during a call. Legacy 2G/3G calls required the device to drop to the voice circuit and suspend data.
VoLTE quality is realised only when:
1. Your handset supports VoLTE and it is enabled in the device settings
2. Your carrier has enabled VoLTE on your plan and SIM
3. The call recipient is also on a VoLTE-compatible connection (or the call degrades gracefully to narrowband on their end)
MVNOs that operate on borrowed network capacity may or may not pass through VoLTE to their subscribers. Some MVNOs fully support VoLTE; others do not, defaulting subscribers to circuit-switched fallback on 2G or 3G for calls. This is worth verifying before choosing an MVNO if call quality matters to you.
**VoNR (Voice over New Radio)**: On 5G standalone (SA) networks, calls may use VoNR, which carries voice natively over the 5G NR radio. VoNR enables even lower call-setup latency — typically under one second — compared to the several seconds that VoLTE over LTE can take. VoNR also maintains voice service on the 5G radio without fallback to LTE, which is important for users in areas where 5G coverage is available but LTE fallback is patchy. VoNR is not universally deployed as of 2026 — most 5G networks worldwide still operate in non-standalone (NSA) mode, which relies on the LTE core and uses VoLTE for calls while 5G handles data throughput. SA 5G networks with VoNR are more common in South Korea, parts of China, and selected European deployments.
**Call-setup latency**: One practical difference between legacy and modern call technologies is how long it takes from pressing "call" to the first ring. Circuit-switched 2G/3G calls typically have 5–8 second setup times. VoLTE reduces this to approximately 1–2 seconds. VoNR can reduce it further. This difference is noticeable in everyday use.
**Codec variation**: Not all VoLTE calls use the same codec. In addition to AMR-WB (HD Voice), some carriers support EVS (Enhanced Voice Services), which provides even higher audio quality and better performance at low bitrates. EVS is less common than AMR-WB but is deployed on some major carriers and is supported by flagship Android and iOS handsets. The codec used for any given call is negotiated between both endpoints at call setup — you cannot manually select a codec on consumer devices.
**Wi-Fi Calling (VoWiFi)**: Wi-Fi Calling routes calls over a Wi-Fi connection when cellular signal is weak or unavailable. The call enters your carrier's IMS core via an encrypted tunnel, reaching the same voice infrastructure as VoLTE. This is useful at home if your indoor cellular signal is poor, and in locations where Wi-Fi is available but cellular coverage is absent. Not all carriers and plans support Wi-Fi Calling. For full setup details and prerequisites, see the [Wi-Fi Calling guide](/en/guides/wifi-calling/).
**What this means for plan selection**: If call quality is a priority, verify that the carrier — and specifically the MVNO if you are not using the host MNO — supports VoLTE on the plan you are considering. A [postpaid plan](/en/guides/prepaid-vs-postpaid/) from a major MNO is the most reliable path to consistent VoLTE support; prepaid and MVNO plans require individual verification.
## Voicemail and Visual Voicemail Across Plan Types
Voicemail is not a universal feature — it depends on carrier support, plan tier, and sometimes a separate activation step. The gap between major MNO postpaid plans and entry-level prepaid or MVNO plans is widest here.
**Standard voicemail**: Standard voicemail stores a recorded message when a call goes unanswered or the line is busy. The caller is directed to leave a message, which you retrieve by calling your carrier's voicemail service number or through the carrier's app. Voicemail is included at no additional charge on most postpaid plans from major carriers, but may be absent or require activation on some prepaid or MVNO plans. On prepaid plans in particular, voicemail may be provisioned as a feature that you must explicitly enable through the carrier's app or website before it works.
**Visual voicemail**: Visual voicemail presents voicemail messages as a list in an app — iPhone users see this in the Phone app natively; Android users may see it in the Phone or Messages app depending on the carrier, device manufacturer, and Android version. Visual voicemail requires a specific protocol handshake between the device, the carrier's voicemail server, and the operating system. This means visual voicemail requires both carrier support and device support simultaneously. Not all MVNOs implement the carrier-side protocol required for visual voicemail, even when the host MNO supports it.
**Voicemail-to-text transcription**: Voicemail-to-text transcription converts the audio message to a text transcript displayed in the app, so you can read a voicemail without listening to it. On iOS, this feature is built into the Phone app when the carrier supports it. On Android, Google's Phone app provides transcription via on-device processing on supported devices, partially independent of carrier support. Availability and quality of carrier-provided transcription varies. Some carriers include it across all plan tiers; others restrict it to higher-tier plans.
**Postpaid vs prepaid voicemail availability**: On postpaid plans from major MNOs, all three voicemail types — standard, visual, and transcription — are commonly available. On prepaid plans from the same MNO, visual voicemail and transcription may be excluded or require upgrade to a higher-tier prepaid plan. On MVNO plans, voicemail support ranges from full (standard + visual) to standard-only to absent entirely. The [prepaid vs postpaid guide](/en/guides/prepaid-vs-postpaid/) covers the broader difference in feature availability between billing structures.
**MVNO-specific voicemail gaps**: MVNOs that run on a host network do not automatically inherit all of the host's voicemail features. The MVNO must separately implement voicemail provisioning on its platform. Some smaller MVNOs — particularly data-focused ones targeting travel or short-duration use cases — skip voicemail entirely, reasoning that their target users will use VoIP apps instead.
If voicemail is important to you, confirm its availability explicitly for any MVNO or prepaid plan you are considering before purchasing. The carrier's support documentation or FAQ is the most reliable source — headline plan comparisons rarely mention voicemail support.
## International Calling: Roaming vs Apps vs Add-Ons
Domestic unlimited calling plans almost universally exclude international destinations. Making an international call from a plan without international coverage will trigger either a per-minute rate or, on some plans, a complete block on international dialling. There are three main mechanisms for handling international calling, each with different cost structures and use cases.
### Roaming: Using Your Home SIM Abroad
When you travel to another country and use your home SIM, your device connects to a visited network. Outgoing calls you place in the visited country are typically charged at roaming voice rates, which are determined by your home carrier's roaming agreements. Incoming calls to your home number while abroad may also incur roaming charges — including incoming calls, depending on your carrier and the direction of the roaming tariff.
Key facts about roaming voice:
- **EU RLAH regulation**: Within the European Union, the Roam Like at Home (RLAH) regulation requires that EU-based carriers allow their subscribers to use their domestic plan's calls, SMS, and data within other EU/EEA member states (the EU plus Iceland, Liechtenstein, and Norway) at no surcharge. This covers all EU/EEA member states and is a legal requirement, not a carrier choice. Fair-use limits apply for extended stays.
- **Outside the EU**: Roaming voice rates outside the EU vary widely and are determined by bilateral roaming agreements between your home carrier and visited networks. Some carriers include roaming in higher-tier plans (sometimes called "global roaming" or "travel passes"); others charge per-minute at rates that can be several multiples of the domestic rate. Check your carrier's roaming rate card for the specific country you are visiting before travelling.
- **Roaming on prepaid plans**: Prepaid plans may restrict or disable roaming entirely. Not all prepaid plans include roaming, and some that do require advance activation. The [prepaid vs postpaid guide](/en/guides/prepaid-vs-postpaid/) covers how billing structure affects roaming availability.
### International Calling Add-Ons: Calling from Your Home Country
International calling add-ons extend your plan to cover calls placed from your home country to international destinations. These are different from roaming — add-ons cover outgoing calls from your home country to foreign numbers, not calls placed while you are physically abroad.
Before purchasing an international calling add-on, verify two things:
1. **Covered destinations**: Whether the specific countries you call are on the covered list. "International calling" add-ons vary from covering a handful of common destinations to covering 100+ countries. Destination lists are usually published on the carrier's website; the fact that a country appears in the list does not guarantee geographic coverage of all numbers within it — some destination lists cover mobile numbers only or exclude specific prefixes.
2. **VoIP competitiveness**: Whether the add-on is competitive with VoIP rates for the same destinations. For contacts who have a smartphone with a common messaging app, VoIP is often free and carries no per-minute charge at all.
### VoIP Apps: Calling Over Data Without Carrier Rates
For calls to contacts on WhatsApp, FaceTime (Apple-to-Apple), Signal, or other cross-platform apps, the call uses your data allowance and avoids your carrier's international rates entirely. This applies both to calls placed from your home country and to calls placed while roaming — VoIP calls made over data use your data allowance, not your voice calling plan.
The practical limitation is that the recipient must have the app installed, be on a data connection, and be reachable by their app identity rather than a phone number. For calls to landlines or to contacts without a smartphone, a traditional international calling add-on or a VoIP service that provides PSTN dialling (such as a calling app with a credits or subscription model) is necessary.
**Choosing between roaming, add-ons, and VoIP** depends on who you are calling and from where:
| Scenario | Recommended approach |
|---|---|
| Calling international contacts who use a messaging app | VoIP app (WhatsApp, Signal, FaceTime) — free over data |
| Calling international landlines or non-app users from home | International calling add-on |
| Travelling abroad, using your home SIM for local calls | Check roaming rates; consider a local SIM or travel eSIM for extended stays |
| Travelling abroad, calling home | VoIP app over data, or roaming if both parties lack a common app |
## Common Pitfalls When Choosing a Call Plan
Call plans contain several categories of exclusion and restriction that are not prominently advertised on plan comparison pages. These pitfalls affect a significant proportion of callers once they encounter them.
**Pitfall 1 — "Unlimited" that excludes international calls**: The most widespread pitfall. An unlimited calling plan's unlimited designation applies to domestic calls only, in the vast majority of cases. International calls on such a plan are either blocked by default or billed at per-minute rates that can be substantially higher than the base plan's effective per-minute domestic rate. Always confirm international calling treatment separately from the domestic unlimited label. See the [contract terms guide](/en/guides/contract-terms/) for what to look for in plan documentation.
**Pitfall 2 — "Unlimited" that excludes premium-rate numbers**: In many countries, numbers prefixed with specific short-code ranges, 1-900 or equivalent numbers, and non-geographic service numbers are excluded from unlimited calling. This affects callers who routinely call customer-service helplines, government services, or business lines that operate on non-geographic numbers. The exclusion is typically stated in the fair-use terms rather than the main plan description. Check the destination exclusion list in the plan's terms before assuming all domestic numbers are included.
**Pitfall 3 — Overage rates that far exceed the in-bundle rate**: On bundled-minute plans, the per-minute rate for minutes used beyond the included allowance is often several times the effective in-bundle rate. A plan that looks cost-effective at or below its allowance can become expensive in months where usage spikes. This is particularly common on older-generation bundled plans that were designed before unlimited plans became the norm. If you are selecting a bundled plan, always check the overage rate — not just the included minute count — before committing.
**Pitfall 4 — MVNO VoLTE or voicemail gaps discovered after purchase**: As covered in the VoLTE section and voicemail section above, not all MVNO plans support VoLTE or visual voicemail, even when the host MNO offers both. This is rarely disclosed on plan comparison pages and is sometimes not clearly stated even on the MVNO's own plan page. Discovering this after purchase — on a plan with a minimum contract term — is a common source of dissatisfaction. MVNOs that are transparent about VoLTE and voicemail support usually state it explicitly in their FAQ; if you cannot find a clear statement, contact support before purchasing. For a broader discussion of how MVNO plan commitments compare to postpaid contracts, see the [prepaid vs postpaid guide](/en/guides/prepaid-vs-postpaid/).
**Pitfall 5 — Roaming voice rates not checked before travel**: As noted in the international calling section, roaming voice rates can be substantially higher than domestic rates outside regulatory zones like the EU. A single missed check before an international trip can result in unexpectedly high bills. If your plan includes a travel roaming add-on, verify that it covers the specific country and that it must be manually activated before travel — some roaming passes do not activate retroactively.
**Pitfall 6 — Conflating data-only eSIM with a full SIM for calls**: Travel eSIMs and many prepaid data SIMs are data-only and carry no voice plan. If you install a data-only eSIM as your primary SIM, you will have no ability to make or receive traditional phone calls. This is appropriate for travel scenarios where VoIP covers your calling needs, but is a common source of confusion for users who install a travel eSIM without understanding its calling limitations. Check whether any SIM you are considering includes a calling plan or is data-only — this is distinct from the "unlimited" or "bundled" question and applies before you evaluate the calling plan structure at all.
**Pitfall 7 — Minute allowances that reset on a different date than data**: Some bundled plans reset calling minutes on the plan anniversary date rather than a calendar month boundary, or vice versa. If your calling and data allowances reset on different dates, you may find yourself out of minutes before the end of the calendar period you are budgeting against. Verify the reset date for both allowances when choosing a bundled plan.
## Pre-Purchase Checklist
The following items are often omitted from headline plan comparisons but materially affect the value of a calling plan. They also relate to the broader contract terms — minimum period, setup fees, and termination conditions — covered in the [contract terms guide](/en/guides/contract-terms/).
1. **Destination scope**: Does "unlimited calls" mean all domestic numbers, or does it exclude non-geographic numbers, premium-rate numbers, or numbers beginning with specific prefixes? Check the fair-use terms for destination restrictions.
2. **VoLTE support**: Does the carrier or MVNO support VoLTE on this specific plan? Is VoLTE enabled by default or does it require a device setting change or APN update?
3. **Voicemail availability**: Is voicemail provisioned automatically, or does it require a separate activation step? Is visual voicemail supported, and is voicemail-to-text included or restricted to higher tiers?
4. **Wi-Fi Calling support**: If you have weak indoor coverage, does the plan support Wi-Fi Calling? This is particularly relevant for plans from smaller MVNOs where Wi-Fi Calling is less commonly implemented.
5. **International calling terms**: If you call abroad, what is the per-minute rate to your most common international destinations, and is an add-on available that reduces that cost? Confirm whether the add-on must be activated before calls are placed.
6. **Overage rate**: If you are on a bundled-minute plan, what is the per-minute rate for out-of-bundle calls? Confirm this rate before signing up — it determines the financial risk of a high-call month.
7. **Roaming treatment**: If you travel, confirm whether roaming voice is included, requires a separate pass, or is blocked. If a roaming pass is available, verify it covers your destination country and any activation requirements.
SimFinder scores plans by voice option selection — factoring in whether a plan's calling structure (metered, bundled, or unlimited) matches the parameters you enter — rather than listing raw plan prices. Use [SimFinder](/en/) to compare calling plans in your market based on your actual call pattern rather than headline labels.
## Using SimFinder to Compare Voice Plans
When using SimFinder to search for a plan, the voice call parameters you set affect the scoring of each plan. Plans with unlimited calling receive different scores than metered or bundled plans depending on the call volume you specify. This reflects the real cost difference between structures at different usage levels — a metered plan that appears cheap at the headline level may score lower at moderate usage because its effective per-minute cost exceeds a bundled alternative.
For the most accurate comparison, input a realistic call volume estimate rather than an aspirational one. The results will surface plans where the voice structure is well-matched to your usage, not just plans with the lowest nominal price. Where voice calling is not the primary need and VoIP covers most of your calling, setting a lower call-minute input will correctly deprioritise unlimited-calling plans in favour of plans that optimise for data.
If you are also evaluating plans for a family, the call volume you enter in SimFinder should reflect the combined usage across all lines if you are comparing family-plan options. The [family plans guide](/en/guides/family-plans/) explains how shared minute pools are structured and how to estimate the pool size needed for a household with varied calling patterns.
For users whose primary concern is international calling, SimFinder's country and region filters help narrow results to plans with international coverage in the markets that matter to you. Combining a plan search with the decision framework in this guide — estimating your domestic minute needs separately from your international calling approach — gives the most complete picture of which plan provides the best fit.
The pitfalls listed in this guide — in particular the destination-scope and overage-rate checks — are worth revisiting whenever you review your plan at contract renewal time. A plan that was well-suited at the time of selection may have changed its terms, or your usage pattern may have shifted. The [contract terms guide](/en/guides/contract-terms/) covers what to review at renewal and how mid-contract changes by the carrier affect your options.
---
## Related Guides
- [Prepaid vs Postpaid](/en/guides/prepaid-vs-postpaid/) — How the billing model affects roaming, contract terms, and call plan availability
- [Contract Terms: Lock-In, Termination Fees, and Setup Costs](/en/guides/contract-terms/) — What to verify in a plan agreement before committing
- [How Family Plans Work](/en/guides/family-plans/) — Shared minute pools and multi-line calling plan options
- [The Reality of Unlimited Data Plans](/en/guides/unlimited-reality/) — How fair-use policies and throttling apply to "unlimited" plans
- [How Pay-As-You-Go and Tiered Plans Work](/en/guides/pay-as-you-go/) — Metered billing mechanics and when PAYG is the right structure
================================================================================
# Poor Call Quality: Causes and Fixes
URL: https://sim-finder.com/en/guides/call-quality/
Type: guides (en)
Published: 2026-06-04
Poor call quality — choppy audio, muffled voices, one-second delays, or calls that drop mid-conversation — resolves with a targeted fix once the cause is identified. The cause almost always falls into one of four categories: signal conditions, a missing or misconfigured VoLTE or Wi-Fi Calling setting, a device hardware issue, or a network-level condition. This guide covers each category in order of how often it is the actual cause.
Key points:
- Weak signal (RSRP below −100 dBm) is a common contributor to choppy and dropped calls on modern LTE networks; the threshold is operator-dependent, and consistent degradation is typically observed below −110 dBm
- VoLTE must be enabled and registered for HD-quality voice; a phone on 3G fallback gets narrowband audio
- Wi-Fi Calling routes calls over a Wi-Fi connection using the same IMS core as VoLTE — it is the most effective fix for poor indoor coverage
- 3G network shutdowns in the US, Japan, Australia, and UK mean devices without VoLTE support cannot make calls at all on those networks
- Echo and muffled audio are usually hardware or acoustic issues, not network problems
For background on how VoLTE and VoNR work technically, including IMS, QoS bearers, and the 3G shutdown context, see [VoLTE and VoNR Explained](/en/guides/volte-vonr/).
---
## Check Signal Strength First
Signal quality is the primary variable in voice call quality on any cellular network. A VoLTE call uses a dedicated QCI 1 bearer with a 100 ms target packet delay budget and guaranteed bit-rate — but if the radio signal itself is weak or noisy, packets are lost before they reach the network, and the dedicated bearer cannot compensate.
**How to check signal strength in dBm:**
On **iPhone**, dial `*3001#12345#*` to open field test mode (iOS 16 or later; availability of individual metrics like RSRP varies by iOS version). The RSRP (Reference Signal Received Power) value indicates signal strength: −80 dBm or better is strong, −80 to −100 dBm is acceptable, below −100 dBm is weak and may cause audio artifacts; consistent degradation is typically observed below −110 dBm.
On **Android (Pixel)**, go to Settings → About phone → SIM status → Signal strength. On **Samsung**, the same reading appears at Settings → About phone → Status → SIM card status → Signal strength.
Signal bars on the status bar are not a reliable indicator of VoLTE call quality, because bars represent a rough range and do not reflect signal-to-noise ratio or packet error rate.
**What weak signal causes on voice calls:**
VoLTE audio uses the AMR-WB (Adaptive Multi-Rate Wideband) codec, which adjusts its bitrate (between approximately 6.6 kbps and 23.85 kbps) in response to channel conditions. At very weak signal, the codec shifts to lower bitrates, producing audible quality degradation. At severe packet loss, audio becomes choppy or robotic even at the lowest codec rate.
**Practical fixes for weak signal:**
- Move to a location with better coverage: near a window, outside, or to a higher floor
- Enable Wi-Fi Calling (covered below) to route the call over Wi-Fi when cellular signal is inadequate
- Contact your carrier if the poor-signal area is your home or regular workplace — carriers maintain coverage improvement request processes
---
## Verify VoLTE Is Enabled and Registered
VoLTE must be both supported by the device on your carrier's network and enabled in settings. A device making calls without VoLTE active will either fall back to 3G circuit-switched voice (if 3G is still available) or be unable to make calls at all (if 3G has been shut down). 3G fallback produces narrowband audio (8 kHz sampling, 3.1 kHz audio bandwidth) — noticeably worse than VoLTE HD Voice (16 kHz sampling via AMR-WB).
**How to check VoLTE status:**
On **iPhone**, go to Settings → Cellular → tap the active SIM line → Voice & Data. The option should be set to **LTE** or **5G**, not 3G. A "VoLTE" or "HD Voice" indicator in the status bar during an active call confirms IMS registration is successful.
On **Android (Pixel)**, go to Settings → Network & internet → SIMs → tap the SIM → "Enhanced 4G LTE Mode" or "VoLTE" toggle. The exact label varies by Android version and carrier. Confirm the toggle is on.
On **Android (Samsung)**, go to Settings → Connections → Mobile networks → VoLTE calls. Enable the toggle if it is off.
**If the VoLTE toggle is missing or greyed out:**
A missing VoLTE option most often means the carrier's IMS profile is not present on the device. This is common on:
- Phones purchased in a different market from where the SIM is used
- Older or budget Android devices that were not certified for the carrier
- MVNOs where the host carrier's IMS profile is required but not included in the MVNO's device list
Check your carrier's approved device list or IMEI compatibility checker. If your device is not listed, the carrier has not certified it for VoLTE on their network. See [VoLTE and VoNR Explained](/en/guides/volte-vonr/) for a full explanation of IMS profile requirements and how to verify compatibility.
---
## Enable Wi-Fi Calling for Indoor Coverage
Wi-Fi Calling (formally VoWiFi — Voice over Wi-Fi) routes calls over a Wi-Fi connection using the same IMS core as VoLTE. The call travels through an IPsec tunnel to the carrier's ePDG (evolved Packet Data Gateway), then into the IMS, where it is handled identically to a VoLTE call. Audio quality, codec, and caller ID are the same.
Wi-Fi Calling is the most effective countermeasure for poor indoor cellular signal. Concrete walls, underground spaces, and building materials that attenuate radio frequencies have no effect on a Wi-Fi connection from an indoor router.
**How to enable Wi-Fi Calling:**
On **iPhone**, go to Settings → Cellular → tap the active SIM line → Wi-Fi Calling → turn on "Wi-Fi Calling on This iPhone". The status bar shows "Wi-Fi" next to the carrier name when a call is being routed over Wi-Fi.
On **Android (Pixel)**, go to Settings → Network & internet → SIMs → tap the SIM → Wi-Fi calling → enable.
On **Samsung**, go to Settings → Connections → Wi-Fi Calling → enable.
**Prerequisites:**
- Your carrier must support Wi-Fi Calling and it must be enabled on your account
- The device must have the carrier's IMS profile with the ePDG address configured (the same profile requirement as VoLTE)
- The Wi-Fi network must be stable; a congested or high-latency Wi-Fi connection will cause the same audio artifacts as a weak cellular signal
**Emergency calls over Wi-Fi Calling:**
When Wi-Fi Calling is active and the carrier supports it, emergency calls (such as 911 in the US or 112 in Europe) can be placed over Wi-Fi. Carriers that support this require a registered address for emergency location purposes. iPhone prompts for this address during Wi-Fi Calling setup. This is carrier-specific — confirm with your carrier whether emergency Wi-Fi Calling is supported.
For a detailed guide on Wi-Fi Calling setup, prerequisites, and international use, see [Wi-Fi Calling (VoWiFi)](/en/guides/wifi-calling/).
---
## The 3G Shutdown and Its Impact on Call Quality
3G shutdowns are directly relevant to call quality because they affect which voice path the device uses.
Before VoLTE, 4G LTE devices made voice calls via CS Fallback (CSFB): the device temporarily dropped from LTE to 3G for the duration of the call. Once 3G is shut down, CSFB is impossible — there is no circuit-switched network to fall back to. A device without VoLTE support cannot make or receive calls at all on a post-3G-shutdown network.
**Confirmed 3G shutdown dates for major markets** (from carrier announcements):
| Market | Operator | Shutdown completed |
|--------|----------|-------------------|
| United States | AT&T | February 2022 |
| United States | T-Mobile (including Sprint legacy) | July 2022 |
| United States | Verizon | December 2022 |
| Japan | KDDI (au) | March 2022 |
| Japan | SoftBank | April 2024 |
| Japan | NTT Docomo | March 2026 |
| Australia | Telstra | October 2024 |
| Australia | Optus | October 2024 |
If you are experiencing calls that work for data but produce no audio or fail entirely, and the device is older or was purchased for a different market, VoLTE incompatibility after 3G shutdown is the likely cause. See [No Service on Your Phone?](/en/guides/no-service/) for the full diagnostic sequence when the device cannot register on the network at all.
---
## Isolating Echo and Noise
Echo and background noise on voice calls have distinct causes depending on where the audio problem is heard.
### Echo — Who Hears It
**You hear your own voice echoed back:** The echo is generated at the remote end. Their earpiece speaker is leaking audio into their microphone, and the network sends that captured audio back to you. This is called acoustic echo. Ask the other party to reduce their earpiece volume, switch to a headset, or move to a quieter location.
**The other party hears an echo of their own voice:** The echo is generated at your end. Your earpiece or speaker is leaking into your microphone. Solutions:
- Reduce your earpiece volume (the echo canceller in your device is overwhelmed at high volumes)
- Switch to a headset with an integrated microphone (places the microphone away from the earpiece)
- Do not use speakerphone unless in a quiet space — speakerphone on high volume almost always leaks acoustic echo
Most smartphones implement AEC (Acoustic Echo Cancellation) in the voice processing stack. AEC is effective within its design range, but it cannot cancel echo caused by the earpiece being pressed directly against a surface or by very high volume levels.
### Background Noise
If the other party complains about background noise from your end, the fix depends on the noise type:
- **Wind noise**: move the microphone away from direct airflow; cup your hand around the device if needed. Many carriers use AMR-WB's noise suppression features, but wind directly over the microphone exceeds what software suppression can remove.
- **Constant hum or electrical interference**: move away from sources of electromagnetic interference (motors, fluorescent lights, unshielded power cables). Check that the phone case does not cover the microphone opening.
- **Room noise**: enable noise suppression in your dialler app if available (some Android manufacturers include an "Enhanced noise cancellation" option in call settings), or move to a quieter location.
---
## Check for Network-Level Issues (Calls vs. Data)
A useful diagnostic distinction: is the call quality problem confined to voice calls, or does it also affect data?
**Poor voice quality but normal data speeds:**
This pattern points to a VoLTE-specific issue rather than general radio conditions. VoLTE uses a dedicated bearer (QCI 1), separate from the data bearer (QCI 9). Problems on the dedicated bearer that do not affect data can indicate:
- An IMS registration issue on your account (carrier-side, resolvable by contacting support)
- A codec mismatch between your device and the network (the network falls back to a lower-quality codec)
- A carrier configuration issue — try a network settings reset (see below)
**Poor voice quality and poor data speeds:**
Both using the same radio path means the problem is the signal itself. Follow the signal strength diagnostic steps in the first section of this guide. For a full walkthrough of diagnosing and fixing slow mobile data — including throttling, congestion, and MVNO-specific causes — see [Slow Mobile Data Speeds](/en/guides/slow-speed/).
**Calls fail entirely but data works:**
A device registered for data but not for IMS cannot make VoLTE calls. This occurs after 3G shutdown on non-VoLTE devices, or when VoLTE is disabled in settings. See [VoLTE and VoNR Explained](/en/guides/volte-vonr/) for the IMS registration requirements.
---
## Device Hardware Checks
Two hardware issues produce call quality symptoms that no network fix can resolve.
### Microphone Obstruction
The primary microphone on most smartphones is a small aperture on the bottom edge of the device. Cases — particularly thick or poorly fitting ones — can partially or fully block it. Symptoms: your voice sounds muffled or the other party says you are very quiet.
**Test:** make a call with the case removed. If audio quality improves, the case is covering or dampening the microphone opening. Look for a case with a clearly cut opening at the microphone position.
**Test:** make the same call on speakerphone. If the other party hears you clearly on speakerphone (which uses the front-facing microphone on most devices), the bottom microphone is the issue.
### Speaker or Earpiece Issues
If you have difficulty hearing the other party clearly even at maximum volume, and the problem persists with good signal and VoLTE active, the earpiece speaker may be partially obstructed by dust or debris. The earpiece grille on the top edge of the device is a common dust accumulation point.
**Test:** make the call on speakerphone or with a headset. If audio is clear through both, the earpiece opening is the problem. Clean the grille with a dry, soft brush. Do not insert objects into the grille.
---
## Network Settings Reset
A network settings reset clears the device's stored radio and carrier configuration, which can fix call quality issues that began after an OS update, a SIM change, or a software glitch affecting the modem's carrier profile.
**What it resets:** saved Wi-Fi passwords, VPN configurations, Bluetooth pairings, APN settings, and cellular network preferences.
**What it does not reset:** eSIM profiles, apps, photos, contacts, or any personal data.
**When it is worth trying:**
- Call quality degraded immediately after an iOS or Android update
- Call quality degraded after switching to a new SIM or eSIM
- VoLTE was working previously but the IMS registration indicator has disappeared
**Procedure:**
On **iPhone**: Settings → General → Transfer or Reset iPhone → Reset → **Reset Network Settings**. The device restarts. Allow 30–60 seconds for network re-registration.
On **Android (Pixel)**: Settings → System → Reset options → **Reset Wi-Fi, mobile & Bluetooth**. No full restart required; wait 30 seconds.
On **Android (Samsung)**: Settings → General management → Reset → **Reset network settings** → confirm.
After the reset, check that VoLTE and Wi-Fi Calling are re-enabled in settings, as they may revert to defaults. For the full scope of what a reset affects and does not affect, see [How to Reset Network Settings](/en/guides/network-reset/).
---
## When to Contact Your Carrier
Contact your carrier's support if:
- Call quality is poor regardless of location and signal strength, suggesting an IMS account-level issue
- Wi-Fi Calling cannot be enabled — the carrier may need to activate it on the account
- VoLTE indicator was working and has disappeared without any change on your end
- Call drops occur consistently in locations where you previously had good signal, which may indicate a tower configuration change
When contacting support, provide: your device model, IMEI (dial `*#06#`), the exact symptoms (choppy audio, echo, dropped calls), whether data works normally, and whether the issue occurs on Wi-Fi Calling as well as cellular. This information reduces back-and-forth and directs the agent to the correct team.
---
## Frequently Asked Questions
**Why does my call sound choppy or robotic?**
Choppy or robotic audio during a VoLTE call is almost always caused by packet loss or high jitter on the radio path. The most common triggers are weak signal (RSRP below −100 dBm), moving through coverage gaps, or interference. Moving to a location with stronger signal or enabling Wi-Fi Calling typically resolves it.
**The other party says my voice sounds muffled or distant. What should I check?**
Muffled outgoing audio is almost always a device hardware issue: a blocked or dirty microphone opening. Check that the microphone is not obstructed by a case. Test by making a call with the case removed, or on speakerphone. If audio is clear without the case, the case is partially covering the microphone.
**Why do I hear an echo during calls?**
If you hear your own voice echoed back, the leak is at the remote end. If the other party hears an echo, the leak is at your end — reduce earpiece volume or switch to a headset. Speakerphone at high volume almost always produces acoustic echo. Most smartphones implement AEC (Acoustic Echo Cancellation), but it cannot cancel echo at extreme volume levels.
**My calls drop at the same spot every day. Is there anything I can do?**
Consistent drops at a specific location indicate a coverage gap there, not a device or plan issue. Enable Wi-Fi Calling so calls can continue over Wi-Fi when cellular signal is lost. You can also report the coverage gap to your carrier — most carriers have a coverage improvement request process via their website or app.
**Does VoLTE use data from my plan allowance?**
VoLTE uses a dedicated QCI 1 bearer separate from the general data bearer. Many carriers do not count VoLTE traffic against the monthly data allowance. However, carrier policies vary — check your carrier's fair-use documentation for your specific plan.
**Will resetting network settings fix call quality problems?**
A reset can help if quality degraded after an OS update or SIM change. It clears Wi-Fi passwords, VPN configs, and Bluetooth pairings but preserves eSIM profiles. It will not help if the cause is signal strength, VoLTE incompatibility, or hardware.
---
## Related Guides
- [VoLTE and VoNR Explained](/en/guides/volte-vonr/) — how voice calls work on 4G and 5G, IMS architecture, QoS bearers, and device compatibility requirements
- [No Service on Your Phone?](/en/guides/no-service/) — step-by-step fix for when the device cannot register on the network at all
- [Slow Mobile Data Speeds — How to Diagnose and Fix](/en/guides/slow-speed/) — diagnosing data speed issues including signal, throttling, and MVNO-specific causes
- [Wi-Fi Calling (VoWiFi)](/en/guides/wifi-calling/) — complete setup guide for calling over Wi-Fi, international use, and prerequisites
- [How to Reset Network Settings (and What It Affects)](/en/guides/network-reset/) — exact procedure for iPhone, Pixel, and Samsung, and what the reset does and does not clear
================================================================================
# Calls and SMS Abroad: How to Save
URL: https://sim-finder.com/en/guides/calls-abroad/
Type: guides (en)
Published: 2026-06-06
Using your home carrier plan for calls and SMS abroad is often the most expensive connectivity mistake travelers make. Both outgoing and incoming calls can incur roaming charges, and many people are surprised to find charges on received calls they did not expect to pay for. Four practical strategies eliminate or significantly reduce these costs: routing calls through VoIP apps over data, enabling Wi-Fi Calling on your home line, using a local SIM or travel eSIM combined with VoIP, or using a dedicated international calling app. This guide explains how each option works and when each makes sense.
---
## Why Calls and SMS Cost More Abroad
When you use your home SIM in another country, your calls and texts are routed through the visited network. That network charges your home carrier a wholesale rate for handling each call and SMS. Your home carrier then applies its retail pricing on top — which is how the charges on your bill are generated.
The structure covers three usage types:
**Outgoing calls** — you call someone from your home number while abroad. The visited network handles the outgoing leg of the call and charges your home carrier. Your home carrier charges you a per-minute rate, which is typically higher than your domestic calling rate.
**Incoming calls** — someone calls your home number while you are abroad. The call is first routed to your home carrier's network, then forwarded internationally to the visited network where you are registered. The visited network charges for receiving and delivering the call. Your home carrier passes this charge to you. This surprises many travelers: you pay to receive a call you did not initiate.
**SMS** — outbound SMS is generally billed per message at a standard roaming rate. Incoming SMS is less commonly charged, but this depends on your carrier and destination.
The exception is the EU/EEA zone for EU/EEA subscribers. Under the Roam Like At Home (RLAH) regulation, carriers licensed in the EU or EEA cannot apply roaming surcharges to calls or SMS when their subscribers travel within the EU/EEA zone. See [EU Roaming Explained](/en/guides/eu-roaming/) for the full detail on who qualifies and which countries are covered.
For subscribers outside the EU/EEA framework — or EU subscribers traveling outside the EU/EEA — all three usage types are subject to carrier-set roaming rates. See [International Roaming Explained](/en/guides/international-roaming/) for a breakdown of the three main pricing models (pay-per-use, day passes, and included roaming).
---
## The Incoming Call Problem
Incoming call charges are the most misunderstood part of roaming bills. Many travelers assume that only the calls they make cost money. In practice:
- If your home SIM is registered on a foreign network, anyone calling your home number triggers a forwarding cost.
- You are billed for the leg of the call from your home country to the visited network — even if the caller did not pay international rates from their end.
- Letting calls go to voicemail does not always prevent the charge: on many networks, the call is still delivered to the visited network and the forwarding cost is incurred before voicemail intercepts it.
To avoid incoming call charges when you do not want to pay roaming rates:
1. **Enable call forwarding to voicemail at the home network level** (before you go abroad, via your carrier's app or settings), so calls never reach the visited network.
2. **Use a VoIP number or virtual number** as your accessible contact point while traveling, and have people call that instead of your home number.
3. **Turn off Data Roaming and rely on Wi-Fi** for call-via-app access — your home SIM is still registered for SMS but incoming voice calls may not connect if the network does not support voice without data.
4. **Check whether your carrier allows you to disable call forwarding to the visited network** — some carriers offer a "roaming call divert" setting that prevents the international forwarding leg.
If maintaining your home number for incoming calls is important, the cleanest solution is a plan that explicitly includes inbound calls in a day pass or roaming bundle, so you know exactly what you are paying.
---
## Option 1: VoIP and Messaging Apps Over Data
The most widely used approach to avoiding call and SMS roaming charges is to route all voice communication through internet-based apps: WhatsApp, FaceTime, Signal, Google Meet, Telegram, Viber, or similar. These apps use data rather than the carrier's voice circuit, so they do not trigger per-minute roaming call charges.
**How it works in practice:**
- Over Wi-Fi, VoIP calls cost nothing beyond your internet connection.
- Over mobile data (roaming), calls consume your data allowance — typically around 0.3–1 MB per minute depending on app and network conditions, which is low compared to streaming but still counts against a roaming data pass.
- You need data connectivity (Wi-Fi or mobile data) at both ends of the call.
**Requirements:**
- The person you are calling also needs the same app, or the app must support outgoing calls to regular phone numbers (WhatsApp and Viber support this as a paid feature; Google Voice supports calls to US numbers without charge; FaceTime audio works between Apple devices).
- Calls to landlines or non-app users still require either carrier minutes or a VoIP-to-PSTN service.
**When this strategy works best:**
- Trips where your primary contacts also use messaging apps.
- Countries where Wi-Fi is widely available at hotels, restaurants, and transit hubs.
- When you have a data roaming plan or travel eSIM providing mobile data, so you can make calls without needing to find Wi-Fi.
**A note on app availability:** Some countries restrict or block VoIP services at the network level. Verify whether your destination restricts specific apps before relying on this strategy as your sole calling option. A VPN may help in some cases, but it adds complexity and is subject to its own restrictions in certain jurisdictions.
For connectivity across a broad set of destinations, see [Regional Overview: Calls and Data Options by Area](/en/guides/regional-overview/) which maps out where VoIP and data connectivity conditions differ most significantly.
---
## Option 2: Wi-Fi Calling on Your Home Number
Wi-Fi Calling is a carrier feature — not a third-party app — that allows your phone to route calls and SMS through a Wi-Fi internet connection while still using your home carrier's network and your home phone number. From the recipient's perspective, the call looks and behaves like a normal call from your home number.
**Key characteristics:**
- Calls are billed at your home carrier's Wi-Fi Calling rate, not at roaming rates. Many carriers charge Wi-Fi Calls at the same rate as domestic calls, which is typically much lower than roaming rates.
- No app is needed on the other end — calls go through normally to any phone number.
- Your home number is the caller ID.
- SMS sent via Wi-Fi Calling is routed through your home carrier network; delivery is typically reliable.
**How to enable Wi-Fi Calling:**
On iPhone: Settings > Cellular > Wi-Fi Calling > Wi-Fi Calling on This iPhone. Your carrier must support the feature.
On Android: Settings > Connections > Mobile Networks > Wi-Fi Calling (path varies by manufacturer and carrier).
Wi-Fi Calling must be enabled before you travel and requires carrier support at both the device and account level. Not all carriers enable Wi-Fi Calling for roaming scenarios — check with your carrier whether Wi-Fi Calling works when you are registered on a foreign network, as some carriers restrict it to domestic use only.
For a full explanation of how Wi-Fi Calling works, the HD Voice relationship (EVS/AMR-WB codecs), and troubleshooting steps, see [Wi-Fi Calling Explained](/en/guides/wifi-calling/).
---
## Option 3: Local SIM or Travel eSIM Combined With VoIP
If your main goal is eliminating roaming charges entirely for both calls and data, combining a local SIM or travel eSIM for data with VoIP apps for calls is the most cost-effective approach on longer trips.
**The basic structure:**
1. Insert a local prepaid SIM or activate a travel eSIM in your device for local-rate data at the destination.
2. Keep your home SIM active (using a dual-SIM device) for SMS and incoming calls, but with Data Roaming turned off on the home SIM line.
3. Make all outgoing calls via VoIP apps over the local/travel data connection.
4. Receive calls to your home number via Wi-Fi Calling (if supported) or by forwarding callers to a VoIP number they can reach for free.
**Why this combination works:**
- The local SIM or travel eSIM provides data at local rates — no roaming surcharges.
- VoIP calls over that local data connection are effectively free of carrier charges.
- Your home SIM receives SMS (including 2FA codes) without Data Roaming, since SMS delivery on most networks does not require mobile data to be active.
- Incoming calls to your home number can be handled via Wi-Fi Calling if your carrier supports it while roaming, or managed via voicemail and callbacks via VoIP.
**Device requirement:** A dual-SIM device or eSIM-capable device that can hold both your home SIM (physical or eSIM profile) and the travel eSIM simultaneously. Most modern flagship smartphones meet this requirement.
Use [SimFinder's travel search](/en/travel/) to compare travel eSIM plans for your destination by data allowance, validity, and provider.
---
## Option 4: International Calling Apps and Services
For travelers who need to call landlines or mobile numbers that do not use messaging apps, dedicated international calling services offer per-minute rates that are substantially lower than standard carrier roaming rates.
**How these services work:**
International calling apps (such as Rebtel, Skype, or Google Voice for US-based users) connect calls via internet infrastructure rather than traditional carrier circuits, purchasing international termination at wholesale rates and passing savings to users. You dial via the app, the call is connected over the internet, and the recipient's phone rings normally — no app required on their end.
**Common structures:**
- **Per-minute rates to specific countries**: the app charges per minute at a fixed rate, which is typically far below standard carrier roaming rates for international calls.
- **Subscription plans**: monthly packages covering a set number of minutes to a list of countries.
- **Destination-specific apps**: some services specialize in calls to a specific country or region, offering the lowest rates for that destination.
**When this option is useful:**
- You need to call non-app users (businesses, government services, relatives who do not use messaging apps).
- The volume of calls is high enough that a per-minute calling app rate is worth the minor setup friction.
- You are already using a local SIM or travel eSIM for data, so the calls route over that connection.
**Limitations:** Call quality depends on the internet connection quality at both ends and on the app's routing infrastructure. Some services have higher latency than native calls. Verify the app's country coverage and per-minute rate for your destination before relying on it.
---
## SMS Abroad: What to Expect
SMS behavior while roaming is distinct from voice calls and worth understanding separately.
**Outgoing SMS:** Billed at your carrier's roaming SMS rate, which is a flat per-message charge. Day passes often include a fixed number of outbound SMS or an unlimited SMS allowance. Where messaging apps are available, using WhatsApp or iMessage (for Apple-to-Apple) over data is effectively free and bypasses carrier SMS charges entirely.
**Incoming SMS:** On most networks and most carrier plans, incoming SMS while roaming is not charged extra. However, this varies — some carriers and some destination networks do apply a small incoming SMS charge. Check your carrier's published roaming SMS policy for the specific destination.
**RCS (Rich Communication Services):** RCS messages are routed over data rather than the SMS network. If you are using Google Messages or another RCS-capable app and both parties support RCS, messages travel as data rather than SMS — no per-message SMS charges, but data consumption applies.
**OTP and 2FA codes via SMS:** Receiving SMS 2FA codes while roaming is generally reliable, but there are specific scenarios where delivery fails or is delayed. This is covered in detail in [Receiving SMS Verification Codes Abroad](/en/guides/sms-2fa-abroad/).
---
## Keeping Your Home Number Reachable Without Paying Roaming Voice Rates
If your goal is to stay reachable on your home number without paying per-minute incoming call charges, several approaches work depending on your carrier and device:
**Wi-Fi Calling (preferred where available):** Enable before departure. Calls to your home number are received over Wi-Fi, billed at your carrier's domestic or Wi-Fi Calling rate, which is typically much lower than international roaming rates. See [Wi-Fi Calling Explained](/en/guides/wifi-calling/) for setup and carrier compatibility.
**Call forwarding to a VoIP number:** Set up a free or low-cost VoIP number (Google Voice for US users, for example) and forward your home number to it before traveling. Callers dial your home number; it forwards to your VoIP number; you receive it via app over data. The forwarding cost is borne by your home carrier at their domestic forwarding rate, not at international roaming rates.
**Voicemail-only mode:** Forward all incoming calls directly to voicemail at the network level — before the visited network is involved. Callers leave a message; you retrieve it via visual voicemail over data or Wi-Fi. No incoming call roaming charge is incurred.
**Separate number for travel:** Some travelers use a secondary number service (like Google Voice, or a temporary eSIM line) as their travel contact number, giving that number to contacts for the duration of the trip. The home number is kept accessible only for critical services.
---
## Practical Setup Before You Travel
Regardless of which strategy you choose, a few steps before departure reduce friction and the risk of unexpected charges:
1. **Confirm your carrier's roaming voice and SMS rates** for your specific destination. Do not assume what applied last year still applies.
2. **Enable Wi-Fi Calling** on your device if your carrier supports it for roaming. Test it at home by putting the device in Airplane Mode, connecting to Wi-Fi, and making a call.
3. **Install and configure your primary VoIP app** — log in, test audio, verify your contacts are on the same platform or that you have credits for PSTN calls if needed.
4. **Turn off Data Roaming** on your home SIM unless you have confirmed the rates are acceptable or have an appropriate pass. Background apps will otherwise generate data charges without prompting.
5. **Set up call forwarding** if you want to manage incoming calls actively. Decide in advance whether to forward to voicemail, to a VoIP number, or to leave calls coming through under Wi-Fi Calling.
6. **Notify contacts** of your preferred contact method during the trip. This avoids callers ringing your home number and generating charges you might not expect.
The [Pre-Trip Connectivity Checklist](/en/guides/pre-trip-checklist/) covers these steps in context with the full range of settings — data, calling, and device configuration — that should be confirmed before departure.
---
## How Destination Affects Your Options
Not every strategy is equally practical in every destination. A few structural differences matter:
**Wi-Fi availability:** In destinations with extensive public Wi-Fi (major hotels, cafes, transit hubs), VoIP and Wi-Fi Calling over Wi-Fi are highly practical. In remote areas or destinations with limited public Wi-Fi infrastructure, mobile data becomes the primary fallback.
**VoIP restrictions:** Some countries restrict or throttle VoIP services at the national network level. Where VoIP apps are restricted, Wi-Fi Calling via your carrier (if supported) or a dedicated calling service may still function, but app-based VoIP may not. Research your specific destination before assuming WhatsApp or FaceTime will be freely accessible.
**eSIM support:** Travel eSIM availability varies by destination and carrier. Most major destinations have multiple travel eSIM plan options. Less-visited destinations may have fewer plan options or require a physical local SIM.
**Local SIM registration requirements:** Many countries require passport identity verification for SIM purchases. Germany's Telekommunikationsgesetz requires verified identity registration for all SIM purchases — prepaid and postpaid — via in-store, PostIdent, or VideoIdent verification. Other countries have similar requirements. Factor this into your plan if you want to buy a local SIM on arrival.
For a destination-by-destination overview of connectivity conditions including VoIP restrictions and eSIM availability, see [Regional Overview: Calls and Data Options by Area](/en/guides/regional-overview/).
---
## Comparing the Four Strategies
| Strategy | Call quality | Requires mobile data | Works to non-app users | Keeps home number |
|----------|-------------|---------------------|----------------------|-------------------|
| VoIP/messaging apps | Good (data-dependent) | Yes (or Wi-Fi) | No (or paid add-on) | No |
| Wi-Fi Calling | Same as native calls | Wi-Fi only | Yes | Yes |
| Local SIM + VoIP | Good (local data) | Yes (local) | No (or paid add-on) | Separate config needed |
| International calling app | Good (data-dependent) | Yes (or Wi-Fi) | Yes | No |
No single strategy is best for all travelers. A practical approach for most trips is to combine Wi-Fi Calling (for home-number continuity) with VoIP apps over a travel eSIM data connection (for low-cost outgoing calls), and to use an international calling app as a backup for calls to non-app users. Use [SimFinder's travel search](/en/travel/) to find a travel eSIM plan that fits your destination and data needs.
---
## Related Guides
- [International Roaming Explained](/en/guides/international-roaming/) — How roaming charges are structured and what the three main pricing models look like
- [EU Roaming Explained](/en/guides/eu-roaming/) — Roam Like At Home regulation in full detail, including who qualifies and which countries are covered
- [Wi-Fi Calling Explained](/en/guides/wifi-calling/) — How to enable and use Wi-Fi Calling, carrier compatibility, and how it interacts with roaming settings
- [Receiving SMS Verification Codes Abroad](/en/guides/sms-2fa-abroad/) — What to do when 2FA SMS codes are delayed or not delivered while roaming
- [Regional Overview: Calls and Data Options by Area](/en/guides/regional-overview/) — Destination-by-destination conditions for VoIP, eSIM, and connectivity options
================================================================================
# Contract Terms: Lock-In, Termination Fees, and Setup Costs
URL: https://sim-finder.com/en/guides/contract-terms/
Type: guides (en)
Published: 2026-06-04
Understanding a mobile contract before signing it is the clearest way to avoid unexpected charges when your situation changes. Minimum terms, early-termination fees, and setup costs follow predictable structures once you know what to look for. This guide explains each element, how regulations shape them in different markets, and what to compare when choosing between a SIM-only plan and a device-bundled one.
---
## What a Contract Term Actually Means
A **contract term** is the minimum period you agree to remain a customer of a carrier under a specific plan. During this period, the carrier commits to providing service at the agreed price; you commit to paying regardless of whether you use the service.
Contract terms exist in several forms:
- **No-term (month-to-month):** You can cancel at any time, typically with a short notice period (commonly 30 days). No early-termination fee applies. This is the standard structure for prepaid plans and many SIM-only postpaid plans.
- **Fixed-term:** You commit for a defined period — 12 or 24 months are the most common in markets where device financing is embedded in the service plan. Cancelling early triggers a termination fee.
- **Rolling term:** A fixed term that automatically renews at expiry unless you take action. The renewal window — the period in which you can cancel without incurring a new commitment — varies by carrier and is stated in the contract.
The term structure is disclosed in the plan's key terms, the contract summary document, or the service agreement. Read the section labelled "minimum term," "commitment period," or "contract duration" before signing.
---
## Minimum Term: What the Clock Covers
The **minimum term** is the shortest period for which you must pay, even if you cancel immediately. A 24-month minimum term means 24 months of service charges are owed; a month-to-month plan has a minimum term equal to the notice period only.
On device-bundled plans, the minimum term is long enough to recover the handset cost through monthly repayments. On SIM-only plans, the minimum term — if any — reflects only the service commitment and is usually shorter (12 months or less).
Key questions to answer before signing:
1. **When does the term begin?** Most carriers start the term from the date of activation, not the date of order. If there is a delay between order and activation, confirm which date the carrier uses.
2. **Does a plan change reset the term?** Upgrading to a new handset mid-contract or switching to a different plan tier can trigger a new minimum term at some carriers. Confirm before making any mid-contract changes.
3. **What is the notice period at end of term?** Even after the minimum term ends, cancelling typically requires a notice period — often 30 days. If you miss the notice deadline, you may owe an additional month of charges.
---
## Early-Termination Fees: How They Are Calculated
An **early-termination fee (ETF)** is the amount you owe if you cancel before the minimum term ends. Two calculation methods are common:
**Flat-rate ETF:** A fixed amount stated in the contract, payable regardless of when in the term you cancel. Less common in current markets.
**Prorated ETF:** The fee decreases as you progress through the term. The most common approach charges for the remaining months of the minimum term at the monthly service rate. Under this model, an ETF in month 3 of a 24-month contract is larger than one in month 22.
On device-bundled plans, the ETF may be calculated separately for the service component and the device financing component. Alternatively, it may equal the full outstanding device balance plus a service-component fee. Read the contract to understand whether the two components are treated independently.
Some jurisdictions set caps on how large an ETF may be, or specify how it must be calculated. The EU Electronic Communications Code, for example, imposes proportionality requirements on ETFs — meaning compensation owed on early termination must bear a proportionate relationship to the remaining contract value; exact rules and formulae are set by each member state under national transposition (not harmonised across the EU). Similar consumer protection rules exist in other markets with active telecoms regulators.
Prepaid plans and month-to-month postpaid plans do not have ETFs.
---
## Setup, Activation, and SIM Fees
Beyond the recurring monthly charge, carriers may collect non-recurring fees at the start of service. These are sometimes disclosed clearly and sometimes buried in the sign-up flow. The main categories are:
**Activation fee:** A one-time administrative charge for opening a new account or line. Common in the US market, less common in European markets. It is typically non-refundable.
**SIM card fee:** A charge for the physical SIM card. The amount varies and may be zero (particularly for online sign-ups where the SIM is posted to you) or a nominal amount at point of sale.
**eSIM issuance fee:** A fee for generating an eSIM profile. Many carriers include this at no cost; some apply a small charge for eSIM re-issuance (replacing a lost or damaged profile), though the initial issuance is usually free.
**Connection fee:** A charge associated with establishing your line on the network — distinct from the SIM fee in some markets. More common in markets with a tradition of fixed upfront charges.
**Device setup or insurance fee:** If you purchase a handset through the carrier, fees for device protection plans or insurance products are sometimes included in the initial invoice as optional or mandatory items. Read the itemised breakdown before confirming any order.
Regulations differ on which of these fees must be disclosed upfront and whether any are prohibited. In many markets, consumer protection rules require carriers to provide a clear summary of all costs before contract formation — look for a "key facts" or "pre-contract information" document in the sign-up flow.
---
## SIM-Only Plans vs Device-Bundled Plans
This is one of the most consequential contract decisions because it determines what you are actually paying for and how much flexibility you retain.
**SIM-only plans:**
- Provide mobile service (data, calls, and SMS) only.
- You supply your own unlocked handset.
- Typically available on month-to-month or short fixed-term (12-month) contracts.
- Monthly cost reflects only the service fee — no device repayment is bundled in.
- Easier to switch carriers mid-cycle because ETF exposure is low or zero.
**Device-bundled plans:**
- Combine mobile service with a handset, which is effectively financed over the contract term.
- The monthly payment covers both the service fee and a portion of the device cost. Some carriers itemise these separately on the bill; others present a single figure.
- Contracts are commonly 24 months — long enough to recover the handset cost.
- Switching before the term ends requires either paying an ETF (on the service component), the outstanding device balance, or both.
- The headline monthly cost may appear lower than buying the handset outright and taking a SIM-only plan, but the total cost over the term may be higher once interest, service fees, and device cost are combined.
When comparing a device-bundled plan against a SIM-only plan plus a separately purchased handset, calculate the **total cost over the same period** — typically 24 months — including all fees. This is the accurate basis for comparison.
If you want to retain the ability to switch carriers with minimal penalty, a SIM-only plan is the structurally more flexible choice.
For a broader framework for evaluating plans, see [How to Choose a Travel eSIM: 5 Key Criteria](/en/guides/how-to-choose/) — many of the evaluation principles apply to domestic plan selection as well.
---
## Lock-In Regulations: How Countries Differ
The degree to which carriers can lock customers into contracts varies significantly by jurisdiction. Regulatory frameworks range from permissive to restrictive:
**Contract length caps:** Some regulators prohibit contracts beyond a certain duration. In the EU, the Electronic Communications Code (Directive 2018/1972) requires that contracts offered to consumers must include an option with a maximum commitment of 24 months; carriers must also offer a 12-month version. This does not mean 24-month contracts are banned — it means customers must be offered a shorter option.
**Lock-in prohibitions for certain plan types:** In some markets, certain plan types are required to be month-to-month. Rules vary by regulator and product category.
**ETF proportionality requirements:** Regulators in several jurisdictions require that ETFs be proportional — they may not exceed the financial benefit remaining to the carrier from the contract. Some markets specify the exact formula.
**Ban on device lock combined with service contract:** Some markets have moved toward separating handset financing from service contracts at a regulatory level, requiring these to be disclosed and in some cases structured as genuinely separate agreements.
**Number portability rights:** The right to port your number when leaving a carrier is a separate regulatory protection from ETF rules. In most markets with significant mobile penetration, number portability is mandated — carriers cannot block a port because of a contract dispute. For a full explanation of portability, see [Mobile Number Portability (MNP) Explained](/en/guides/what-is-mnp/).
No single global standard exists. The regulatory environment in your specific country determines what protections apply. Check your national telecoms regulator's consumer guidance for the rules in your market.
---
## Renewal Windows: The Period That Matters Most
A **renewal window** is the period before your contract's end date during which you can give notice to cancel or switch without triggering a new term.
Most carriers define a renewal window in the contract terms — for example, "you may cancel without a new minimum term commitment if you give notice between 30 and 90 days before the contract end date." If you give notice outside this window:
- **Too early** (before the window opens): Your notice may not be accepted, or it may be processed at the end of the window — meaning you could be locked in for a new term before the notice takes effect.
- **Too late** (after the window closes): The contract may auto-renew into a new minimum term, and your notice will only take effect at the end of the new term.
To navigate this correctly:
1. Record your contract start date and term length.
2. Calculate the contract end date (add the term in months).
3. Read the contract to identify the renewal window (the range of days before the end date).
4. Diarise the opening of the renewal window — not the end date, but when the window opens.
If your carrier sends an end-of-term notification, that is useful, but do not rely on it as your only reminder. Carriers are not uniformly required to proactively notify customers of approaching auto-renewals, though some regulations mandate this.
---
## What to Check Before Signing Any Contract
The following items appear in nearly all mobile contracts and are the minimum to verify before committing:
**Minimum term and start date:** How long is the commitment, and when does it begin?
**Early-termination fee:** Is there one? How is it calculated? Does it prorate over time?
**Renewal clause:** Does the contract auto-renew? What is the renewal window?
**Setup and one-time fees:** What is owed at sign-up beyond the first month's charge?
**SIM vs device structure:** If a handset is included, are the service fee and device financing itemised separately? What is the outstanding device balance if you cancel early?
**Price change rights:** Can the carrier raise the monthly price during the fixed term? If so, what right to exit does that give you? Some jurisdictions require carriers to offer a right to exit penalty-free when they raise prices mid-term.
**Roaming and fair-use caps:** Are there conditions on the plan that could cause charges to increase mid-term — for example, excessive data or extended international use?
The pre-switch process involves verifying your current contract status — particularly the end date and any outstanding ETF — before initiating a carrier change. For a structured walkthrough of what to check before switching, see [Pre-Switch Checklist: What to Check Before Changing Carriers](/en/guides/pre-switch-checklist/).
---
## Reading the Pre-Contract Summary Document
Most jurisdictions require carriers to provide a standardised summary of key terms before a contract is formed. These documents go by different names — "Contract Summary" (UK Ofcom / General Condition C1), "Contract Information" (EU ECC), "Schumer Box" for the credit-disclosure component of financed-device agreements in the US (this applies to the device-financing element, not the mobile service contract itself) — but they serve the same function: presenting the essential terms in a standardised format before you sign.
When you receive a pre-contract summary, prioritise reading:
- **Total cost over the minimum term.** The monthly rate multiplied by the term months, plus all non-recurring fees. This is the figure that allows accurate comparison between plans with different term structures.
- **Termination conditions and fees.** The exact ETF, how it is calculated, and whether it prorate.
- **Price change clause.** Whether the carrier can raise the monthly price during the fixed term, and what right to exit that triggers.
- **Dispute resolution process.** Which body handles complaints if you and the carrier disagree on contract terms.
If the carrier does not provide a pre-contract summary document — or provides it only at the moment of physical signature rather than before — this may constitute a regulatory violation in your jurisdiction. Regulators that oversee pre-contract disclosure include Ofcom (UK), ARCEP (France), Bundesnetzagentur (Germany), AGCOM (Italy), and equivalent authorities in other markets.
If something in the summary document is unclear, ask for clarification before signing. Once you have signed, the terms are binding even if you misunderstood them.
---
## SIM Lock and Its Relationship to Contract Terms
SIM lock — where a phone is restricted to one carrier's network — is a separate issue from contract terms, but the two are often conflated.
A carrier may sell a SIM-locked handset on a device-bundled plan and require the lock to remain in place during the minimum term. Once the minimum term ends, or once the device financing is paid off, the carrier may unlock the device on request (or automatically, depending on the market and carrier policy).
Regulatory rules on SIM locking vary. In the UK, Ofcom prohibited the sale of locked handsets from December 2021 — phones purchased after that date are sold unlocked. In the US, carriers commit to unlocking devices once a customer's obligations are met, under industry standards endorsed by the FCC (a binding FCC rule was proposed in 2024 but its status should be verified). In other markets, locking is still permitted during the financing term.
Understanding whether a handset is locked — and when it becomes eligible for unlocking — is particularly relevant if you plan to use a local SIM while travelling, or if you switch carriers before the term ends. For a full breakdown of how to check lock status and how unlock policies differ, see [SIM Lock and SIM-Free Explained](/en/guides/sim-lock/).
---
## Comparing Plans on SimFinder
Contract terms — minimum period, ETF structure, and setup costs — are distinct from the ongoing monthly price, but they affect the total cost of a plan significantly. A plan with a lower monthly charge but a large ETF may cost more overall if your circumstances change before the term ends.
When comparing domestic plans, calculate the total cost over the expected usage period, not only the headline monthly figure. SimFinder lets you search and filter plans by carrier, data amount, and contract type. Use the search to identify which plans are month-to-month and which carry minimum terms, so you can compare total costs rather than monthly rates alone.
For travel connectivity options where contract terms are typically absent (most travel eSIM plans are single-purchase with no minimum commitment), see [Travel eSIM Provider Comparison](/en/guides/provider-comparison/).
---
## FAQ
*(See structured FAQ items in the frontmatter for display in site search and rich results.)*
### If I cancel my plan early, will my phone number be cancelled too?
Not necessarily. If you initiate a number port to a new carrier before cancelling your current service, your number transfers to the new carrier and the old account closes on port completion. If you cancel your account outright without porting, your number returns to the carrier's pool and is eventually reassigned. To keep your number, always port before cancelling. See [Mobile Number Portability (MNP) Explained](/en/guides/what-is-mnp/) for the full process.
### Can a carrier change my monthly price during a fixed-term contract?
This depends on the contract terms and the applicable regulations. Some contracts contain a price escalation clause that permits the carrier to raise prices by a defined amount (for example, by a fixed percentage or linked to an inflation index). In some jurisdictions, price increases during a fixed term must give the customer a right to exit without penalty. Read your contract for the price change clause, and check your national regulator's guidance on your right to exit following a price change.
### What is the difference between a notice period and a minimum term?
A minimum term is the period during which you cannot leave without paying an ETF. A notice period is the advance warning required before any cancellation — it applies even after the minimum term ends. For example, a plan with a 24-month minimum term and a 30-day notice period requires you to give 30 days' notice after month 24 to end service at month 25. If you give notice in month 23, the notice takes effect in month 24, but you still owe the ETF for the remaining time in the minimum term.
---
## Related Guides
- [How to Choose a Travel eSIM: 5 Key Criteria](/en/guides/how-to-choose/) — Evaluation framework applicable to both travel and domestic plan selection
- [Mobile Number Portability (MNP) Explained](/en/guides/what-is-mnp/) — How to port your number when switching carriers, and what happens to your number if you cancel
- [SIM Lock and SIM-Free Explained](/en/guides/sim-lock/) — How lock status interacts with device-bundled contracts and when a phone becomes eligible for unlocking
- [Pre-Switch Checklist: What to Check Before Changing Carriers](/en/guides/pre-switch-checklist/) — Step-by-step verification of contract end date, ETF, and other switch prerequisites
- [Travel eSIM Provider Comparison](/en/guides/provider-comparison/) — Major travel eSIM providers compared; most travel plans carry no minimum term or ETF
================================================================================
# How Much Mobile Data Do You Need?
URL: https://sim-finder.com/en/guides/data-usage-guide/
Type: guides (en)
Published: 2026-04-13
Most people need between 3 GB and 20 GB of mobile data per month. Light users who rely on Wi-Fi at home and work can manage on 3–5 GB. Commuters who stream video or browse social media on the go typically need 10–15 GB. Remote workers who join video calls away from Wi-Fi should plan for 20–25 GB. Only those who stream HD video on mobile daily without Wi-Fi access need 30 GB or more.
This article breaks down how much data each major app and activity actually consumes, then shows you how to calculate your own estimate — and how to check what you are already using.
---
## How Much Data Each App Uses
Understanding where your data goes is the first step to choosing the right plan.
### Video Streaming
| Service | Quality | Data per hour |
|---------|---------|--------------|
| YouTube | 360p (low) | ~0.3–0.45 GB |
| YouTube | 480p (standard) | ~0.5–0.7 GB |
| YouTube | 720p HD | ~1.2–1.8 GB |
| YouTube | 1080p Full HD | ~2.0–3.0 GB |
| Netflix | Low | up to 0.3 GB |
| Netflix | Medium | up to 0.7 GB |
| Netflix | HD | up to 3.0 GB |
| Netflix | Ultra HD (4K) | up to 7.0 GB |
Netflix figures come directly from the official Netflix Help Center. YouTube figures are based on independent measurements, as YouTube does not publish an official data-per-quality table. YouTube uses variable bitrate encoding, which means actual consumption can vary depending on the content.
The difference between quality levels is dramatic. Watching YouTube at 1080p instead of 360p uses roughly five to seven times more data for the same video. If you watch one hour of YouTube daily at 720p on mobile, that alone adds up to roughly 36–54 GB per month.
### Social Media and Messaging
| App | Activity | Data per hour |
|-----|----------|--------------|
| WhatsApp | Text messages | ~0.001 GB |
| WhatsApp | Voice call | ~0.015–0.02 GB |
| WhatsApp | Video call | ~0.3–0.5 GB |
| Instagram | Browsing feed and Stories | ~1.0 GB |
| TikTok | Video browsing | ~0.5–1.0 GB |
| X (formerly Twitter) | Browsing timeline | ~0.15 GB |
Text messaging consumes almost no data. Voice calls are also light — even an hour-long call uses around 15 to 20 MB. However, apps built around video content such as TikTok and Instagram use significant data, comparable to watching a YouTube video. Scrolling Instagram for just one hour per day adds up to roughly 30 GB per month.
### Video Calls
| Service | Mode | Data per hour |
|---------|------|--------------|
| Zoom | Video on | ~1.0–2.0 GB |
| Zoom | Audio only | ~0.07 GB |
| Google Meet | Video on | ~0.8–1.0 GB |
| Microsoft Teams | Video on | ~0.5–1.2 GB |
Zoom figures reflect the range between one-on-one HD calls (approximately 1.08 GB/hour at 720p) and group video meetings (approximately 1.98 GB/hour at 720p), as specified in Zoom's official system requirements. Google Meet and Microsoft Teams figures are derived from their respective official network preparation documentation. Actual consumption varies with call quality, number of participants, and network conditions.
A one-hour video call consumes roughly as much data as watching a high-quality YouTube video. If you regularly join video calls away from Wi-Fi, this category alone can push your monthly usage past 15 GB.
### Music Streaming
| Service | Quality | Data per hour |
|---------|---------|--------------|
| Spotify | Normal (~96 kbps) | ~43 MB (0.04 GB) |
| Spotify | High (~160 kbps) | ~72 MB (0.07 GB) |
| Spotify | Very High (~320 kbps, Premium) | ~144 MB (0.14 GB) |
Music streaming is comparatively data-light. Listening for two hours per day at Normal quality uses roughly 2.6 GB per month — a small fraction of what video streaming consumes. Downloading playlists over Wi-Fi for offline listening eliminates this entirely.
### Other Common Activities
| Activity | Data estimate |
|----------|--------------|
| Web browsing | ~0.1 GB/hour |
| Google Maps navigation | ~0.01–0.03 GB/hour |
| App updates | ~0.05–0.3 GB per update |
| OS updates | ~1–5 GB per update (major releases can exceed 5 GB) |
Operating system updates can consume several gigabytes in a single download. Running an update over mobile data can exhaust a significant portion of a monthly allowance unexpectedly. It is advisable to perform OS updates on Wi-Fi only.
---
## Estimating Your Monthly Data Need
Once you understand per-app consumption, you can estimate your total monthly need by matching your actual habits to one of these usage patterns.
### Pattern 1: Wi-Fi Mostly — Estimate 3–5 GB
**Typical profile:** Home and work both have Wi-Fi. Mobile data is used mainly for messages, maps, and occasional web browsing when out. No video streaming on mobile.
**Example monthly breakdown:**
- Messaging apps (text and voice): ~0.2 GB
- Web browsing (15 min/day on mobile): ~0.8 GB
- Maps and other apps: ~0.2 GB
- **Total: approximately 1.2 GB**
A 3 GB plan provides comfortable headroom for this pattern.
### Pattern 2: Commuter — Estimate 10–15 GB
**Typical profile:** Commutes 30–60 minutes each way by public transport. Watches YouTube at standard quality or scrolls social media during the commute.
**Example monthly breakdown:**
- X and light social browsing (30 min/day): ~2.5 GB
- YouTube at 480p (30 min/day commute): ~9 GB
- Web browsing and maps: ~0.5 GB
- Spotify Normal quality (1 hour/day): ~1.2 GB
- **Total: approximately 13 GB**
A 10 GB plan is tight for this pattern; 15 GB provides a reasonable buffer.
### Pattern 3: Remote Worker — Estimate 20–25 GB
**Typical profile:** Works from cafes or other locations several days per week. Joins Zoom or similar video calls two to three times per week away from Wi-Fi.
**Example monthly breakdown:**
- Social media, browsing, email: ~4 GB
- Video calls, 2–3 per week at 1 hour each: ~10–15 GB
- Cloud sync and other background data: ~2 GB
- **Total: approximately 16–21 GB**
20 GB is a reasonable target; consider 25 GB if video calls frequently involve groups.
### Pattern 4: Heavy Streamer — Estimate 30 GB or more
**Typical profile:** Watches YouTube or Netflix in HD on mobile daily, or has no home Wi-Fi and uses mobile data for everything.
**Example monthly breakdown:**
- YouTube at 720p HD (1 hour/day): ~36–54 GB
- Social media and messaging: ~3 GB
- Other browsing: ~1 GB
- **Total: approximately 40–58 GB**
Even a 30 GB plan may not be sufficient for this profile. If your home also lacks Wi-Fi and you use mobile data as your primary internet connection, an unlimited data plan warrants consideration.
---
## How to Check Your Current Data Usage
The most reliable starting point is not an estimate — it is your actual usage history. Check your usage before selecting a plan.
### On iPhone
1. Open the Settings app.
2. Tap **Mobile Data** (or **Cellular** depending on your region).
3. Scroll down to see **Mobile Data Usage** — the total at the top shows cumulative data since the last reset.
4. Below the total, you can see per-app data usage.
**Important note:** iPhone tracks cumulative usage since the last reset, not the current billing cycle. Tap **Reset Statistics** at the start of each month (or the start of your billing cycle) to get an accurate monthly figure. The statistics cover the period since the last reset regardless of calendar month.
### On Android
1. Open the Settings app.
2. Tap **Network & Internet** (exact menu name may vary by manufacturer).
3. Tap **Data usage** or **Mobile data**.
4. Set the date range to match your billing cycle.
Android typically allows you to configure a billing cycle start date, so the displayed usage automatically aligns with your monthly allowance.
### Via Your Carrier App
Most carriers provide an official app showing real-time remaining data and usage history. Many also offer data usage alerts by SMS or push notification when you reach 80% or 100% of your allowance — enabling these alerts helps avoid unexpected overages.
**Recommended approach before choosing a plan:**
1. Check your usage for the current month.
2. Track usage for one to two full billing cycles.
3. Identify the difference between high-usage and low-usage months.
4. Base your plan choice on your higher-usage months to avoid throttling.
---
## A Note on Data Caps and Throttling
Many plans labelled "unlimited" apply speed throttling once you exceed a defined threshold — commonly between 3 GB and 50 GB depending on the provider. After that threshold, download speeds may be reduced to 1 Mbps or lower, making HD video streaming impractical. When comparing plans, check both the total data allowance and any fair-use speed limits that apply after the cap.
Use SimFinder to compare plans side by side, including data caps and throttling thresholds, so you can find an option that matches your actual usage.
**[Search for SIM plans on SimFinder →](/en/)**
================================================================================
# Connectivity Strategy for Digital Nomads
URL: https://sim-finder.com/en/guides/digital-nomad/
Type: guides (en)
Published: 2026-06-06
Digital nomads crossing many countries face a connectivity problem that most travel guides do not address: you are not a tourist who needs data for a week, and you are not an expat settling permanently in one place. You need reliable, professional-grade connectivity that adapts as you move from country to country, often on short notice and with a client call scheduled for the morning after you arrive.
The practical answer is a three-layer stack: a global or regional eSIM to bridge every border crossing, local SIMs for countries where you stay long enough to make the economics work, and your home number preserved in a dual-SIM setup so clients and banks can always reach you. Each layer serves a different time horizon and cost profile. Handled in combination, they eliminate the two failure modes that most affect nomads — running out of data mid-client-call in an unfamiliar city, and losing access to accounts tied to your home number.
---
## The Three-Layer Stack: Why One Approach Does Not Cover All Scenarios
No single connectivity solution works well across all three phases of nomad travel: the arrival window (hours to a few days), the settling-in period (one to several weeks in one place), and the long stay (a month or more where cost optimization matters).
| Layer | Tool | When It Applies |
|-------|------|-----------------|
| 1 | Global or regional eSIM | Arrival window; multi-country travel without a fixed base |
| 2 | Local SIM from in-country carrier | Extended stay in a single country; cost optimization |
| 3 | Home number on second SIM | Always active for calls, SMS, and account authentication |
The layers interact: Layer 3 is permanent background infrastructure that never changes. Layers 1 and 2 rotate depending on where you are and how long you plan to stay. The decision point is roughly two to four weeks: below that threshold, the convenience of a pre-installed eSIM outweighs the cost premium. Above it, the economics of a local plan usually win.
---
## Layer 1: Global and Regional eSIMs for Border Crossings
A global or regional eSIM is the right tool for the moment you cross a border — or when your itinerary covers multiple countries too quickly to justify purchasing individual local SIMs for each.
### Choosing Between Global and Regional Plans
A **regional plan** covers a defined set of countries under one purchase — Europe (typically 40+ countries), Southeast Asia, Latin America, and similar geographic bundles. These work well for nomads whose itinerary stays within a single region for a month or two. The per-GB cost is higher than a local SIM but substantially lower than international roaming on a home carrier.
A **global plan** covers 100+ countries under a single purchase and is the right choice when your itinerary spans multiple continents or when your movements are unpredictable enough that you cannot commit to a regional plan in advance. The per-GB cost is the highest of any option, but the operational simplicity — one plan, no decisions at each border — has real value when your time is booked.
For a structured comparison of the providers that offer strong regional and global plan catalogs, see [Travel eSIM Provider Comparison](/en/guides/provider-comparison/).
### Evaluating a Plan for Remote Work
Not all eSIM plans serve remote workers equally. Before purchasing any plan for professional use, verify three things:
**Tethering (hotspot) is permitted.** Most major travel eSIM providers allow tethering, but individual plans within a provider's catalog may restrict it. Tethering on a travel eSIM turns your phone into a mobile hotspot for your laptop — if the plan blocks it, you cannot use your phone's data connection for your computer. Always confirm the plan's tethering policy at purchase time, not just the provider's general policy.
**Data speed tier is sufficient for video calls.** A stable video call at 720p HD requires roughly 1.5–2.5 Mbps of sustained upload and download bandwidth. Most travel eSIM plans on 4G/LTE networks in well-covered areas comfortably exceed this. The practical risk is not peak speed but consistency: a plan that throttles to low speeds after a daily threshold is reached will degrade video call quality mid-meeting. For unlimited plans, confirm the daily high-speed data threshold before purchasing.
**Network partner quality at your destination.** A travel eSIM's real-world performance depends entirely on which local carrier it connects to. Two plans covering the same country may use different partner networks, with significantly different results in the cities or areas where you will be working. The provider pages that list the named network partner for each country in a plan give you the most useful signal. [SimFinder Travel](/en/travel/) lists the local network partner for each plan so you can compare coverage quality before purchasing.
---
## Layer 2: Local SIMs for Extended Stays
Once you plan to stay in a country for two to four weeks or more, a local prepaid SIM from an in-country carrier almost always beats a travel eSIM on cost. The per-GB cost difference is typically significant: local prepaid plans in most markets are priced for residents, not for short-stay travelers.
### When to Make the Switch
The break-even point depends on the specific market and the data volume you need. In markets where local prepaid data is inexpensive — Southeast Asia, South Asia, parts of Latin America — the cost difference can justify switching after just one to two weeks. In markets with higher local plan costs, the threshold extends. The correct calculation compares your remaining travel eSIM cost against the full cost of a local SIM (including any registration friction) for the same number of days.
For the countries and contexts where a local plan is clearly the right choice, the extended framework in [Connectivity Strategy for Moving Abroad](/en/guides/expat-strategy/) is the right reference — it covers situations where a longer-term local contract becomes practical.
### SIM Registration Requirements
Many countries require identity verification to purchase or activate a local SIM. The practical implications for nomads:
- **Passport-only markets** (most of Western Europe, US, Canada, Australia, New Zealand): registration is straightforward and adds no meaningful friction.
- **Biometric verification markets** (Thailand as of August 2025, some others): requires in-person registration with a physical passport and liveness check. The process takes longer and can only be completed at designated retail locations.
- **Local ID number markets** (many Latin American countries): requires a national tax number or ID that tourists generally do not have. A travel eSIM or a SIM product specifically marketed to tourists is the only practical option in these markets.
- **Japan, South Korea, Vietnam**: require passport-based registration; available at airports and carrier stores. The process is manageable but adds a step.
Understanding the registration environment before you arrive determines whether Layer 1 or Layer 2 is even feasible in a given country. For a full regional breakdown of where these friction points apply, see [Regional Connectivity Guide for Travelers](/en/guides/regional-overview/).
### Local eSIM vs Physical SIM
In markets with strong eSIM infrastructure — Japan, South Korea, Singapore, Western Europe, the US — you may be able to activate a local carrier's eSIM directly rather than purchasing a physical SIM. This keeps your Layer 1 eSIM slot free for the next destination. The practical limitation is that local eSIM availability from individual carriers varies; not all carriers in every market offer tourist-facing eSIM products.
---
## Layer 3: Keeping Your Home Number Active
Your home number is professional and financial infrastructure. It is linked to bank authentication codes, two-factor login for services you use daily, and contacts who have only that number. Cancelling it when you start nomad travel — or letting it expire through inactivity — creates problems that are genuinely difficult to fix from abroad.
### Why Home Number Loss Has Serious Consequences
The specific risk: your home number is tied to SMS-based two-factor authentication for financial accounts, email services, and software tools. If that number is deactivated and reassigned to a different person, one-time passwords sent to it reach a stranger. You may find yourself locked out of accounts at the worst possible time — mid-trip, in a country with limited support options.
The parallel risk is for incoming calls and SMS from clients, services, and government agencies in your home country who have no other way to reach you.
### Practical Options for Number Retention
The right retention approach depends on your home carrier and how long you plan to travel:
- **Downgrade to a minimal-cost plan**: The lowest-cost plan your carrier offers, often a basic prepaid option. Keeps the number active at low monthly cost.
- **eSIM number retention**: If your home carrier supports eSIM, you can keep the home number as the second SIM in a dual-SIM setup while using a travel eSIM or local SIM for data. This is the most seamless approach for dual-SIM devices.
- **Carrier suspension service**: Some carriers offer long-term suspension for subscribers living or traveling abroad. Number is preserved; active service is paused. Availability varies by carrier and country.
- **Port to a VoIP service**: Services that accept number ports can hold the number independently of any mobile carrier. Incoming calls and SMS are delivered over an app. Useful for extremely long-term travel where ongoing carrier costs are not justified.
For a full comparison of all five retention options with carrier-specific examples, see the [Number Storage and Retention Guide](/en/guides/number-storage/).
### Dual-SIM Configuration for Daily Use
Most modern smartphones support dual-SIM operation — one physical SIM plus one eSIM, or two eSIMs on newer devices. In a nomad setup:
- **Home SIM**: designated for calls and SMS only. Data roaming turned **off** on this line to prevent unintended roaming charges.
- **Data SIM** (travel eSIM or local SIM): designated for all data. Tethering enabled for laptop use when needed.
On iPhone, the "Allow Cellular Data Switching" setting should be turned **off** so the home SIM cannot automatically take over data when the travel SIM has poor signal. On Android, configure the default data SIM in the SIM card manager to the travel or local SIM explicitly.
---
## Using SimFinder Travel at Each Border Crossing
The three-layer stack requires one recurring action: when you approach a new destination, check what plans are available there before you cross the border, not after you land without connectivity.
The practical workflow:
1. **Before departure**: Open [SimFinder Travel](/en/travel/), search for your next destination. Review available plans — regional plans already active on your device may cover the destination; if not, identify a new plan to purchase.
2. **Compare on the five criteria**: coverage (named network partner), data amount, validity period, pricing structure, and tethering policy. For the evaluation framework behind these criteria, see [How to Choose a Travel eSIM](/en/guides/how-to-choose/).
3. **Purchase and install on Wi-Fi before leaving**: eSIM profile downloads require a reliable connection. Completing the installation while you still have connectivity at your current location removes the activation dependency from arrival.
4. **Evaluate local SIM economics**: If you plan to stay for more than two to four weeks, note the local carrier options in the destination. After arrival, compare the local prepaid SIM cost against continuing with your travel eSIM.
This workflow keeps you continuously connected from the moment you land at each new destination, with no gap between the moment the plane door opens and the moment you have a working data connection.
---
## Remote Work Stability: What the Numbers Mean
For nomads who depend on connectivity for client-facing work, the reliability requirements are different from tourist use. A tourist who loses signal for an hour is inconvenienced. A nomad who loses signal during a client call has a professional problem.
### Video Calls
A video call at 720p HD requires roughly 1.5–2.5 Mbps sustained (upload and download). Most 4G/LTE connections in well-covered urban areas sustain well above this. The practical failure modes are:
- **Unstable connection in weaker coverage areas**: hotels or coworking spaces where the mobile signal is marginal. Test your connection before a scheduled call, not during it.
- **Throttled speeds on unlimited plans**: If your travel eSIM plan throttles after a daily high-speed data cap, a video call scheduled after that threshold is reached will degrade. Know your plan's throttle threshold and schedule important calls for earlier in the day.
- **Network congestion in dense areas**: Airports, conference centers, and crowded urban areas can have degraded speeds even with full signal bars, because capacity is shared across many simultaneous users.
### Latency
Video calls, real-time collaboration tools, and VPN connections are more sensitive to latency than to raw speed. A connection with 20 Mbps download but 200 ms latency performs worse for video calls than a 5 Mbps connection with 40 ms latency. Travel eSIMs that route traffic through international hubs rather than connecting directly to local networks may show elevated latency. This is one reason a local SIM with direct carrier routing often provides a qualitatively better remote-work experience than a global eSIM, particularly in markets where the travel eSIM's local network partner is limited.
### Tethering for Laptop Use
When you tether your laptop through your phone, your data usage multiplies. All applications running on the laptop — background syncs, cloud storage clients, operating system updates — consume data through the phone's connection. Practical recommendations:
- Disable automatic updates on the laptop while tethering on mobile data.
- Set cloud storage clients (Google Drive, Dropbox, OneDrive) to pause sync when on metered connections.
- Use the laptop's "metered connection" setting (Windows) or equivalent to prevent background data use on the phone's hotspot.
For a full guide on managing tethering on eSIM plans, see the [Tethering Guide](/en/guides/tethering/).
---
## SIM Registration Requirements: The Nomad-Specific Risk
The standard advice for tourists — buy a SIM at the airport — often does not work for nomads in markets with complex registration requirements. The specific risks:
**Thailand (biometric verification)**: As of August 2025, all SIM registrations require biometric liveness detection and a physical passport presented in person. This requirement applies to tourist prepaid SIMs as well as standard plans. Plan for this step when scheduling arrival; it cannot be completed remotely.
**Germany**: All SIM purchases require identity verification under German telecommunications law. This is manageable at major carrier stores or airports but adds a step compared to markets where prepaid SIMs are registration-free.
**Latin American countries with local ID requirements**: In countries where a national tax number is required, standard tourist SIMs from the country's carriers may not be available. Check in advance whether tourist-oriented prepaid products exist in the specific market.
**Countries where eSIM infrastructure is limited**: In some African markets, parts of South Asia, and several Pacific Island nations, travel eSIM coverage from major international providers is either absent or relies on a single low-quality local partner. A local physical SIM from the dominant carrier is the only way to get a strong signal in these destinations. For a full regional breakdown, see [Regional Connectivity Guide for Travelers](/en/guides/regional-overview/).
A travel eSIM installed before arrival completely sidesteps all in-country registration requirements — it is the most friction-free solution in markets with complex registration rules. The cost premium over a local SIM is the price of that convenience.
---
## Managing Multiple eSIM Profiles
Modern smartphones support storing multiple eSIM profiles, but the number of simultaneously active profiles is limited by the device. Most current iPhones and Android flagship devices support two active SIM lines at a time (one physical SIM and one eSIM, or two eSIMs on newer devices). The stored but inactive profile count varies by device model.
Practical implications for nomads:
- You can keep previous eSIM profiles stored on your device for countries you plan to return to, without them using a line slot. They can be reactivated when needed.
- Switching the active data eSIM as you move between countries takes a few seconds in device settings — no QR code scan required for a previously installed profile.
- Check your specific device's eSIM profile storage limit before relying on this approach. For device-specific eSIM storage information, see the [eSIM Profile Limits Guide](/en/guides/esim-profile-limits/).
For the risks and procedures involved when an eSIM profile needs to be transferred to a new device, the [International Roaming Explained](/en/guides/international-roaming/) guide covers the technical underpinnings of how eSIM profiles interact with carrier systems.
---
## Building a Country-Entry Checklist
The operational overhead of nomad connectivity management is low once you build a repeatable process. Before entering each new country, run through the following:
**Connectivity check (before departure from current location):**
- Does my current regional/global eSIM cover the destination?
- If yes: no action needed. Verify data remaining is sufficient.
- If no: purchase and install a plan on current Wi-Fi before departure.
**Registration check (before arrival):**
- Does the destination require passport registration for local SIMs?
- Does it require biometric verification or a local ID number?
- If high friction: rely on travel eSIM for the stay; do not plan on purchasing a local SIM.
- If low friction: plan to evaluate local SIM options after arrival for stays over two weeks.
**Remote work check (first day in new location):**
- Test connection speed and latency from your accommodation or coworking space.
- Identify backup connectivity options (coworking space Wi-Fi, café with reliable internet) for critical calls if mobile signal is weaker than expected.
- Confirm tethering works on the active data SIM before a scheduled client call.
---
## FAQ
See the FAQ items in the frontmatter for answers to the following:
- Do I need a new eSIM every time I cross a border?
- How much data does a typical remote workday consume?
- Which countries have SIM registration requirements that affect nomads?
---
## Related Guides
- [Travel eSIM Provider Comparison](/en/guides/provider-comparison/) — Airalo, Holafly, Nomad, Saily, and others compared by coverage, plan types, and tethering support
- [How to Choose a Travel eSIM](/en/guides/how-to-choose/) — 5 criteria for evaluating any travel eSIM plan: coverage, data, validity, pricing, activation
- [Regional Connectivity Guide for Travelers](/en/guides/regional-overview/) — How connectivity works across Asia, Europe, North America, Oceania, Latin America, and Africa
- [International Roaming Explained](/en/guides/international-roaming/) — How roaming works technically and how to avoid bill shock on your home SIM
- [Connectivity Strategy for Moving Abroad](/en/guides/expat-strategy/) — The expat-specific version of this framework for those making a permanent move
================================================================================
# Dual SIM Setup on Android: Google Pixel and Samsung Galaxy Configuration Guide
URL: https://sim-finder.com/en/guides/dual-sim-android/
Type: guides (en)
Published: 2026-04-22
This guide covers the complete dual SIM setup process on Android — adding a second line, labeling SIMs, assigning default lines, and managing active SIMs. [What Is Dual SIM?](/en/guides/what-is-dual-sim/) explains the underlying technology (DSDS, DSDV, DSDA) and which modes Android devices support. [Using Dual SIM for Travel](/en/guides/dual-sim-for-travel/) covers the operational setup once you are abroad. This guide focuses on the Android configuration steps.
iPhone users should refer to [Dual SIM Setup on iPhone](/en/guides/dual-sim-iphone/) instead — the settings menus and configuration paths differ significantly between iOS and Android.
---
## Supported Android Devices
Dual SIM support on Android depends on the device model, production region, and carrier lock status.
### Google Pixel
| Model | Configuration |
|-------|---------------|
| Pixel 3a and later | Physical SIM + eSIM (DSDS) |
| Pixel 7 and Pixel 7 Pro (2022) and later | Dual eSIM — two eSIM profiles active simultaneously |
| Pixel 10, 10 Pro, 10 Pro XL (US) | eSIM-only — no physical SIM slot |
| Pixel 10 Pro Fold (all regions) | Physical SIM slot retained |
Dual eSIM on Pixel 7 and later is enabled by MEP (Multiple Enabled Profiles), introduced in Android 13 and defined in GSMA SGP.22 v3.0.
Source: [Get a SIM or eSIM & add it to your Pixel phone — Google Pixel Phone Help](https://support.google.com/pixelphone/answer/7086887)
### Samsung Galaxy
Samsung Galaxy S20 and later flagship models support eSIM alongside a physical SIM on most regional variants. Galaxy Z Fold and Z Flip series also support eSIM.
eSIM availability varies by region and carrier lock status. Some carrier-locked Galaxy models and China-market variants do not expose the eSIM option even if the hardware is capable. Confirm eSIM support for your specific model and region on [Samsung's eSIM support page](https://www.samsung.com/sg/support/mobile-devices/galaxy-esim-and-supported-network-carriers/).
### Other Android Brands
Many recent OnePlus, OPPO, Motorola, and Xiaomi flagship models include eSIM support. The quickest check is to look for **Add eSIM** or **Download SIM** under your mobile network settings. If the option is absent, the device may not support eSIM, or it is carrier-locked.
---
## Before You Start
Before adding a second SIM or eSIM, confirm the following three things.
### Check Carrier Lock Status
A carrier-locked Android device will either hide the eSIM menu entirely or reject activation attempts from a second carrier. To check:
- Insert a SIM from a different carrier. If the device displays "No SIM" or "SIM not supported," it is carrier-locked.
- On Samsung, go to **Settings > Connections > Mobile networks > Network operators**. If only your current carrier appears, the device may be locked.
Contact your original carrier to request an unlock. Most carriers provide an unlock process once any installment plan or contract period is complete.
### Connect to Wi-Fi
Downloading an eSIM profile requires an active internet connection. Use Wi-Fi for reliability. Once the profile is installed, Wi-Fi is no longer needed to use the eSIM.
### Prepare Your QR Code or Activation Code
Your carrier or travel eSIM provider sends a QR code by email or displays it in their app. Display it on a second device — a laptop, tablet, or second phone — before you start. If the QR code is only available on the Android phone you are configuring, take a screenshot of it before beginning the setup flow.
For the complete eSIM installation walkthrough on Android, see [How to Set Up eSIM on Android via QR Code](/en/guides/qr-code-android/). This guide focuses on the dual SIM configuration after installation.
---
## Adding a Second SIM — Google Pixel
These steps apply to Pixel 3a and later running Android 11 or later.
### Step 1 — Open SIM Settings
Go to **Settings > Network & internet > SIMs**.
If you have one SIM already active, it appears listed here. You will also see an option to add a new SIM.
### Step 2 — Add a New SIM
Tap **Add SIM** or the **+** icon.
On the next screen, tap **Download a SIM instead** if you are adding an eSIM. If you are inserting a physical SIM, eject the SIM tray, insert the new card, and return to this screen — the physical SIM appears automatically.
### Step 3 — Scan the QR Code
Point the camera at the QR code on a second screen.
When your carrier name appears, tap **Download**, then tap **Activate** after the profile installs.
**If the QR code is only on this device:** Tap **Use photo instead** on the scan screen and select the screenshot you saved earlier.
### Step 4 — Assign the New SIM to Its Role
After activation, go to **Settings > Network & internet > SIMs** and configure each SIM:
- Under **Your primary SIMs**, tap **Mobile data** and select the SIM for data
- Tap **Calls** and select the SIM (or choose **Ask every time**) for outgoing calls
- Tap **Texts** and select the SIM for outgoing text messages
You can also set **Ask every time** for calls if you want the device to ask which SIM to use for each outgoing call.
---
## Adding a Second SIM — Samsung Galaxy
These steps apply to Galaxy S20 series and later running One UI 4.1 or later.
### Step 1 — Open SIM Card Manager
Go to **Settings > Connections > SIM card manager**.
> On One UI 6 and later, the menu label may read **SIM manager** (without "card").
If you have one SIM active, it appears here. A physical SIM appears automatically once inserted; an eSIM requires manual installation.
### Step 2 — Add a Mobile Plan (eSIM)
Tap **Add mobile plan** or **Add eSIM**.
Select **Scan carrier's QR code** and point the camera at the QR code on a second screen.
Tap **Add** or **Download** when prompted. After the profile downloads, the device may prompt a restart — follow the on-screen instruction.
### Step 3 — Configure Preferred SIM
After restart, return to **Settings > Connections > SIM card manager**.
Under **Preferred SIM**, assign each SIM:
- **Calls** — select the SIM for outgoing calls
- **Texts** — select the SIM for outgoing SMS
- **Mobile data** — select the SIM for data traffic
You can also enable **Auto data switching** if you want the device to automatically move data to a stronger signal. Turn this off if you want to keep data fixed to one SIM — for example, when using a travel eSIM abroad and you do not want the device switching to your home SIM's roaming data.
---
## Adding a Second SIM — Other Android
For OnePlus, OPPO, Motorola, Xiaomi, and other Android brands, the path to the eSIM installation screen varies. Look for one of the following:
- **Settings > Network > SIM settings > Add eSIM**
- **Settings > Mobile network > Add mobile plan**
- **Settings > Connections > Mobile networks > Add eSIM**
If none of these appear, search for "eSIM" or "SIM" in the Settings search bar. Once you find the screen to add or download a new SIM, the QR scan process is identical to the Pixel steps above.
After installation, look for a **SIM management** or **SIM preferences** section to assign calls, data, and SMS to each SIM.
---
## Labeling and Default Line Setup
Clear SIM labels make subsequent configuration straightforward and prevent confusion when calls arrive or when switching lines.
### Google Pixel: Rename a SIM
1. Go to **Settings > Network & internet > SIMs**
2. Tap the SIM you want to rename
3. Tap the name field at the top and type a new label
4. Tap **Save** or press the checkmark
### Samsung Galaxy: Rename a SIM
1. Go to **Settings > Connections > SIM card manager**
2. Tap the SIM you want to rename
3. Tap **SIM name** and type a new label
4. Tap **Save**
### Suggested Labels
| Use case | Label |
|----------|-------|
| Home plan / primary carrier | "Personal" or carrier name |
| Work plan | "Work" |
| Travel eSIM | "Travel" or destination (e.g., "Travel EU") |
| Backup line | "Backup" |
The label appears on incoming call screens, in the SIM manager, and in the notification when the device connects to a network — making it easy to confirm which line is active.
### Default Line Assignment
After labeling, explicitly assign each SIM to its role:
**On Pixel:** Settings > Network & internet > SIMs > under **Your primary SIMs**, tap **Mobile data**, **Calls**, **Texts** and select the SIM for each
**On Samsung:** Settings > Connections > SIM card manager > Preferred SIM > set Calls, Texts, Mobile data
Do not leave these at the device's default. The device may default to the first-installed SIM for all traffic, which may not be what you intend — particularly if one SIM is a data-only travel eSIM.
---
## Switching Active Data Line
You may need to change which SIM handles data mid-use — for example, when you arrive at your travel destination and want to switch from your home SIM to the travel eSIM.
### Google Pixel
1. Go to **Settings > Network & internet > SIMs**
2. Tap the SIM you want for data
3. Tap **Mobile data** and select the SIM you want for data
The previously active data SIM's internet toggle turns off automatically.
### Samsung Galaxy
1. Go to **Settings > Connections > SIM card manager**
2. Under **Preferred SIM**, tap **Mobile data**
3. Select the SIM you want for data
### Quick Access via Notification Panel
On some Android versions, a SIM card shortcut appears in the notification panel Quick Settings tiles. If available, tapping it opens the SIM manager directly — faster than navigating through the full Settings menu.
---
## Managing SIMs (Turn Off, Remove)
### Turn Off a SIM Without Deleting It
Turning a SIM off suspends it — it will not receive calls, SMS, or use data — without removing the profile from the device.
**On Pixel:**
1. Go to **Settings > Network & internet > SIMs**
2. Tap the SIM
3. Toggle the SIM off (the toggle at the top of the SIM details screen)
**On Samsung:**
1. Go to **Settings > Connections > SIM card manager**
2. Toggle off the SIM you want to suspend
To re-enable, follow the same steps and toggle it back on. The profile stays installed and does not need to be reinstalled.
### Delete an eSIM Profile
Deleting an eSIM removes the profile from the device permanently. Before deleting, confirm your provider's reinstall policy — some providers allow reinstallation via their app or a new QR code; others do not allow reinstallation or charge for it.
**On Pixel:**
1. Go to **Settings > Network & internet > SIMs**
2. Tap the eSIM
3. Tap **Delete SIM** or **Erase SIM**
4. Confirm deletion
**On Samsung:**
1. Go to **Settings > Connections > SIM card manager**
2. Tap the eSIM
3. Tap **Delete** or **Remove**
4. Confirm deletion
### Remove a Physical SIM
Eject the SIM tray using a SIM eject tool. Android removes the SIM from the SIM manager automatically once the tray is out. No in-settings action is required.
---
## Android-Specific Considerations
### Data Roaming on Travel eSIMs
Travel eSIMs use roaming agreements to connect to local networks in foreign countries. Unlike your home SIM, the travel eSIM requires **data roaming to be enabled** to function. After assigning the travel eSIM as your data SIM, confirm data roaming is on for that SIM:
**On Pixel:** Settings > Network & internet > SIMs > [travel eSIM] > **Roaming** — on
**On Samsung:** Settings > Connections > SIM card manager > [travel eSIM] > **Data roaming** — on
At the same time, keep data roaming off on your home SIM to prevent it from incurring international roaming charges.
### Private DNS and Dual SIM
Android's Private DNS setting (Settings > Network & internet > Private DNS) applies globally to all network connections on the device — it is not configurable per-SIM. If you use a custom DNS provider via Private DNS, it applies to both SIMs simultaneously. This is generally not a problem, but if a travel eSIM or local carrier blocks external DNS queries, it can cause connectivity issues. In that case, switch Private DNS to **Off** temporarily.
### Background Data Per SIM
Android does not natively restrict background data to a specific SIM — background data uses whichever SIM is set as the data SIM. If you want to prevent certain apps from using a particular SIM's data, use per-app data restrictions in **Settings > Network & internet > Data usage > App data usage**, or enable a data limit on the SIM.
### APN Configuration
Most carriers configure the APN (Access Point Name) automatically when you download the eSIM profile. If mobile data is not working after installation, check the APN settings:
**On Pixel:** Settings > Network & internet > SIMs > [SIM] > **Access Point Names**
**On Samsung:** Settings > Connections > Mobile networks > Access Point Names
Contact your carrier or travel eSIM provider for the correct APN values if the default does not work.
---
## FAQ
### Which Android phones support dual SIM with eSIM?
Google Pixel 3a and later support physical SIM + eSIM (DSDS). Pixel 7 and later support dual eSIM — two eSIM profiles active simultaneously. Samsung Galaxy S20 and later flagship models support eSIM alongside a physical SIM on most regional variants. eSIM availability depends on the region and whether the device is carrier-locked.
### How do I set a default data SIM on Android?
On Google Pixel, go to **Settings > Network & internet > SIMs**, then under **Your primary SIMs** tap **Mobile data** and select the SIM you want for data. On Samsung Galaxy, go to **Settings > Connections > SIM card manager > Preferred SIM > Mobile data** and select the SIM. Set this explicitly before you need data — the device does not always default to the intended SIM.
### Can I turn off one SIM without deleting it on Android?
Yes. On Pixel, go to **Settings > Network & internet > SIMs**, tap the SIM, and toggle it off. On Samsung, go to **Settings > Connections > SIM card manager** and toggle the SIM off. The profile stays on the device and can be re-enabled at any time.
### What is the difference between the Pixel and Samsung dual SIM menus?
Google Pixel uses **Settings > Network & internet > SIMs**. Samsung Galaxy uses **Settings > Connections > SIM card manager**. The underlying functionality is the same — assign each SIM to data, calls, and SMS — but the menu paths and UI labels differ because Samsung runs One UI on top of Android.
### How do I check if my Android phone is carrier-locked?
Insert a SIM from a different carrier. If the device shows "No SIM" or "SIM not supported," it is carrier-locked. Contact your original carrier to request an unlock. Most carriers provide an unlock process once any installment plan or contract term is complete.
### Do travel eSIMs on Android need data roaming enabled?
Yes. Travel eSIMs use roaming agreements to provide connectivity abroad. After assigning the travel eSIM as your data SIM, enable data roaming for that specific SIM. This is separate from your home SIM's roaming setting — enable roaming on the travel eSIM, keep it off on the home SIM.
---
## Related Guides
- [What Is Dual SIM?](/en/guides/what-is-dual-sim/) — DSDS, DSDV, and DSDA modes explained; which modes Android supports
- [Dual SIM Setup on iPhone](/en/guides/dual-sim-iphone/) — The equivalent setup guide for iOS
- [Using Dual SIM for Travel](/en/guides/dual-sim-for-travel/) — Line assignments, roaming charge prevention, and SMS 2FA when abroad
- [How to Set Up eSIM on Android via QR Code](/en/guides/qr-code-android/) — Full eSIM installation walkthrough for Pixel and Samsung
- [What Is an eSIM?](/en/guides/what-is-esim/) — How eSIM technology works and which devices support it
To compare available SIM and eSIM plans for your destination, use [SimFinder Travel](/en/travel/).
---
Sources:
- [Use dual SIMs on your Google Pixel phone — Pixel Phone Help](https://support.google.com/pixelphone/answer/9449293)
- [Get a SIM or eSIM & add it to your Pixel phone — Pixel Phone Help](https://support.google.com/pixelphone/answer/7086887)
- [Galaxy eSIM and supported network carriers — Samsung Support](https://www.samsung.com/sg/support/mobile-devices/galaxy-esim-and-supported-network-carriers/)
- [How do I add an eSIM on my Samsung Galaxy phone? — Samsung Support](https://www.samsung.com/ae/support/mobile-devices/how-do-i-add-an-esim-on-my-samsung-galaxy-phone/)
================================================================================
# Using Dual SIM for Travel: Keep Your Home Number While Using a Local eSIM
URL: https://sim-finder.com/en/guides/dual-sim-for-travel/
Type: guides (en)
Published: 2026-04-20
You have set up your travel eSIM and it is installed on your device. The next question is how to use it effectively while you are actually traveling — which line handles data, which keeps your home number available, what to turn off to prevent charges on your home SIM, and what to restore when you return. That is what this guide covers.
For background on how dual SIM technology works (DSDS, DSDV, DSDA modes), see [What Is Dual SIM?](/en/guides/what-is-dual-sim/). For the step-by-step eSIM installation process, see [Your First Travel eSIM](/en/guides/first-time-guide/). For the full pre-departure checklist, see the [Pre-Trip Smartphone Checklist](/en/guides/pre-trip-checklist/).
---
## The Standard Dual SIM Setup for Travel
The most common travel configuration uses two lines with clearly separated roles:
| Line | Role |
|------|------|
| **Home SIM** | Voice calls and SMS — keeps your home number reachable |
| **Travel eSIM** | Cellular data — connects to local networks at local rates |
This setup gives you two things that matter most when traveling: a data connection that does not depend on international roaming rates, and a home phone number that stays active so you can receive SMS and inbound calls.
Most travel eSIMs are data-only — they provide internet access but no phone number or SMS capability. This is by design: the data-only model covers the primary use case (internet access abroad) at lower cost, while your home SIM handles everything that requires your actual number.
If you have not yet chosen a travel eSIM plan for your destination, [SimFinder Travel](/en/travel/) lists current plans with coverage, data amount, and validity period for each.
---
## Assign Each Line to Its Job
Once your travel eSIM is installed and you are at your destination, configure the line assignments explicitly. Do not rely on the default — devices vary in which line they default to for data, and defaulting to the home SIM abroad is a costly mistake.
### iPhone: Cellular Line Settings
On iPhone, go to **Settings > Cellular**.
**Set the travel eSIM as your cellular data line:**
1. Tap **Cellular Data**
2. Select the travel eSIM line
**Set your home SIM as the default voice line:**
1. Under the line list, tap **Default Voice Line**
2. Select your home SIM
**Turn off Allow Cellular Data Switching:**
1. Tap **Cellular Data**
2. Toggle **Allow Cellular Data Switching** to off
This last step is critical. With Allow Cellular Data Switching on, your device automatically routes data through your home SIM if the travel eSIM signal drops. Abroad, that means roaming charges on your home plan. Turn it off so the device stays on the travel eSIM for data regardless of signal fluctuation.
**iMessage and FaceTime:**
If you use iMessage or FaceTime, check which address (phone number or Apple ID email) your messages are sent from. Go to **Settings > Messages > Send & Receive** and **Settings > FaceTime > You Can Be Reached At**. Using your Apple ID email address rather than your home number as the primary address ensures iMessage works over the travel eSIM data connection without requiring SMS delivery through your home SIM.
### Android (Google Pixel): SIM Settings
1. Go to **Settings > Network & Internet > SIMs**
2. Set the travel eSIM as the **Preferred SIM for data**
3. Set your home SIM as the **Preferred SIM for calls**
4. Under your home SIM settings, confirm **Mobile data** is disabled for that line
On Pixel, you can also set a per-call preference — the device can ask which SIM to use for each outgoing call, which is useful if you want to occasionally make calls through the travel eSIM.
### Samsung Galaxy: SIM Card Manager
1. Go to **Settings > Connections > SIM card manager**
2. Under **Preferred SIM**, set:
- **Calls**: home SIM
- **Texts**: home SIM
- **Mobile data**: travel eSIM
3. Disable **Auto data switching** if the option appears — this behaves similarly to iPhone's Allow Cellular Data Switching and can route data back to a roaming home SIM
---
## Receiving SMS While Traveling
If you use SMS-based two-factor authentication for banking, email, or other accounts, receiving those codes while abroad depends on your home SIM staying active in a specific configuration.
### Why the Home SIM Must Stay in Voice/SMS Mode
SMS and voice registration on a mobile network are separate from data roaming. When your home SIM line is active (not disabled), your device registers with the visited network in roaming mode — this is how the network knows to route inbound calls and SMS to you even though you are not on your home carrier's network. Data roaming is a separate toggle that controls whether the SIM can use the visited network for internet access.
The configuration that receives SMS without incurring roaming data charges:
- Home SIM line: **enabled**
- Data Roaming for home SIM: **off**
- Voice Roaming for home SIM: depends on your carrier (see below)
With this setup, your home SIM registers on the visited network for voice and SMS purposes only. SMS 2FA codes sent to your home number arrive as they would domestically.
### Voice Roaming and SMS Reception
Some carriers require Voice Roaming to be explicitly turned on for the home SIM to receive inbound SMS abroad. Others include SMS reception in the default roaming registration regardless of the Voice Roaming toggle.
If you are unsure how your carrier handles this, the safe approach is to leave Voice Roaming enabled on your home SIM. Enabling Voice Roaming does not in itself incur charges — charges apply only when you actually make or receive a call. The roaming registration that enables SMS delivery does not cost anything on most carriers.
Check your home carrier's international roaming documentation before departure. Some carriers send a welcome SMS when you land abroad that confirms your roaming registration is active; that is a reliable indicator that SMS will be received.
### Wi-Fi Calling as a Fallback
If your home carrier supports Wi-Fi Calling and your device is connected to Wi-Fi, your home number may receive calls and SMS over the Wi-Fi connection rather than the cellular network. This works even with the home SIM's cellular data disabled and voice roaming off.
Wi-Fi Calling availability varies by carrier and country. On iPhone, check **Settings > Cellular > [home SIM line] > Wi-Fi Calling**. On Android, check **Settings > Network & Internet > SIMs > [home SIM] > Wi-Fi calling**.
If your home carrier supports it and you expect to be in areas with good Wi-Fi but poor cellular coverage, enabling Wi-Fi Calling on your home SIM before departure is a reliable backup for SMS delivery.
For an alternative approach to SMS 2FA that does not depend on your home SIM being reachable at all — including before you travel — see the [Pre-Trip Smartphone Checklist](/en/guides/pre-trip-checklist/), which covers migrating time-sensitive accounts to an authenticator app.
---
## Incoming Calls on Your Home Number
Your home number remains reachable while you are traveling, but answering calls on it has cost implications that depend on your home carrier's plan.
### How Inbound Roaming Calls Work
When someone calls your home number abroad, the call is routed from your home carrier to the visited network operator. You receive the call normally. The charge for this varies:
- Some plans include a number of international roaming minutes at no additional cost
- Some plans charge per-minute for incoming international roaming calls
- EU travelers with an EU SIM within the European Economic Area are covered by Roam Like at Home regulations, which eliminate additional charges for calls and data within the EEA
Because rates vary significantly by carrier and plan, check your home carrier's international roaming rates before departure. Do not assume inbound calls are free.
### Call Forwarding Before Departure
If your home carrier charges for incoming roaming calls and you want to avoid those charges, set up call forwarding before you leave. Options:
- **Forward to a VoIP number**: Services that provide a VoIP number can receive calls and deliver them as push notifications. The forwarded call arrives over the internet rather than the cellular network, so no roaming charges apply on the receiving end.
- **Forward to voicemail**: Route inbound calls directly to voicemail. You listen to messages when connected to the travel eSIM data, at no additional cost.
To set call forwarding on iPhone, go to **Settings > Phone > Call Forwarding** and enter the forwarding number. On Android, call forwarding is typically found in the Phone app settings under **Supplementary Services** or **Additional Settings**. The exact path varies by device manufacturer.
### VoIP Apps for Free Inbound Communication
The most practical alternative for travelers who do not want to manage call forwarding is to ask regular contacts to reach them via a VoIP app. WhatsApp, FaceTime (Apple to Apple), LINE, and Messenger all route calls over the internet — they use the travel eSIM data connection and incur no carrier roaming charges.
The limitation is that only contacts who know to use the app will reach you this way. For contacts who do not use any VoIP app, call forwarding to voicemail remains the cleaner solution.
---
## What to Turn Off on Your Home SIM
Preventing unintended charges from your home SIM while using the travel eSIM requires turning off specific settings. These settings exist at the line level in your device's cellular menu.
### Data Roaming: Off
This is the most important setting. Data Roaming controls whether your home SIM can use mobile data on the visited network. With this off, your home SIM cannot incur roaming data charges even if the device briefly registers on a foreign network.
- **On iPhone**: Settings > Cellular > [home SIM line] > **Data Roaming** — off
- **On Android**: Settings > Network & Internet > SIMs > [home SIM] > **Roaming** — off
Confirm this setting before boarding your first flight. The device may have roaming on from a previous configuration.
### Allow Cellular Data Switching: Off (iPhone only)
As described in the line assignment section above, this setting allows the device to automatically move data to the home SIM when the travel eSIM drops signal. Turning it off ensures the device stays on the travel eSIM for data at all times.
Location: **Settings > Cellular > Cellular Data > Allow Cellular Data Switching**
### Mobile Data on the Home SIM Line: Off (Android)
On Android, you can disable mobile data specifically for the home SIM line without disabling the line itself. The line remains active for voice and SMS registration, but the SIM cannot use cellular data.
- **On Pixel**: Settings > Network & Internet > SIMs > [home SIM] > toggle **Mobile data** off
- **On Samsung**: Settings > Connections > SIM card manager > [home SIM] > toggle the data option off
### What You Do Not Need to Turn Off
You do not need to disable the home SIM line entirely to prevent charges. The goal is a home SIM that remains registered on the network for voice and SMS, but cannot use roaming data. Disabling the line entirely would prevent it from receiving SMS 2FA codes, which is the opposite of what you want.
---
## Switching Data Back to Your Home SIM
When you return home, the line assignments you configured for travel need to be reversed. Your travel eSIM is still set as the data line; your home SIM has Data Roaming off. Neither is correct for domestic use.
### After Returning Home
**On iPhone:**
1. Go to **Settings > Cellular > Cellular Data**
2. Select your home SIM line as the data source
3. Go to **Settings > Cellular > [home SIM line] > Data Roaming** — if you want data roaming available for future domestic roaming, turn it back on. If you are now on your home network, it does not matter — roaming applies only to foreign networks.
4. Go to **Settings > Cellular > Cellular Data > Allow Cellular Data Switching** — you may re-enable this if you want the fallback behavior domestically
**On Android:**
1. Go to Settings > Network & Internet > SIMs
2. Change the Preferred SIM for data back to your home SIM
3. Re-enable Mobile data for your home SIM line
### Keeping or Removing the Travel eSIM Profile
There is no need to delete the travel eSIM immediately after returning. The profile stays dormant on your device and does not consume data or incur charges when disabled.
If you return to the same region, you may be able to reactivate the same profile or top up data through the provider's app — faster than purchasing and installing a new plan. Check your provider's documentation for whether the profile supports reactivation.
If the plan has fully expired and the provider does not support reactivation or top-up, you can delete the profile to keep your SIM list manageable.
**To delete on iPhone:** Settings > Cellular > [travel eSIM line] > Delete eSIM
**To delete on Android:** SIM manager settings > [travel eSIM line] > Delete or Remove
Before deleting, confirm whether the provider issues a new QR code for reinstallation at no charge. Some providers allow reinstallation from their app; others generate a new profile at additional cost. If you anticipate returning to the same destination, keeping the expired profile installed until you are ready to purchase again costs nothing.
---
## Device Limitations
Not all devices support dual SIM operation. Understanding the constraints of your specific device prevents surprises while traveling.
### iPhone
iPhones operate in DSDS mode (Dual SIM Dual Standby). Both SIMs remain on standby and can receive calls and SMS simultaneously. During an active call on one line, data on the other line pauses — so a call on the home SIM briefly interrupts data on the travel eSIM.
iPhones do not support DSDA (Dual SIM Dual Active), which would keep both lines fully independent. For most travel use cases — background navigation data plus home number availability for SMS — DSDS behavior is sufficient.
**Dual SIM configurations by model:**
- iPhone XS, XS Max, XR (2018) and later: physical SIM + eSIM
- iPhone 13 series and later (including SE 3rd generation): dual eSIM (two eSIM profiles active simultaneously, no physical SIM required)
- iPhone 14 and later sold in the United States: eSIM-only, no physical SIM slot
If your home carrier provides only a physical SIM and you have an iPhone 14 US model with no physical SIM slot, you will need to ask your home carrier if they can convert your physical SIM to an eSIM before departure.
### Google Pixel
- Pixel 3a and later: physical SIM + eSIM (DSDS)
- Pixel 7 and Pixel 7 Pro (2022) and later: dual eSIM — two eSIM profiles active simultaneously, enabled by MEP (Multiple Enabled Profiles) introduced in GSMA SGP.22 v3.0
Pixel 10, 10 Pro, and 10 Pro XL sold in the United States are eSIM-only. The Pixel 10 Pro Fold retains a physical SIM slot.
### Samsung Galaxy
Samsung Galaxy S20 and later support eSIM alongside a physical SIM on most variants. eSIM availability depends on the region and whether the device is carrier-locked — a carrier-locked Samsung may not expose the eSIM option even if the hardware supports it.
Samsung devices do not universally support dual eSIM (two simultaneous eSIM profiles). Confirm your specific model's capabilities in Samsung's device specifications before assuming dual eSIM is available.
### Devices Without Dual SIM
Older devices with a single SIM slot and no eSIM support cannot run a dual SIM configuration. On these devices, inserting a local SIM at your destination means losing access to your home number for the duration of the trip — no SMS 2FA on the home number, no inbound calls. If this is your situation, the alternatives are: retain the home SIM and use international roaming for all connectivity, or before departure, migrate time-sensitive accounts to an authenticator app so SMS 2FA is not required while abroad.
For a comparison of all connectivity options including pocket Wi-Fi and local SIM, see [4 Ways to Stay Connected Abroad](/en/guides/four-options/).
---
## Frequently Asked Questions
### Can I receive SMS on my home number while using a travel eSIM for data?
Yes, as long as your home SIM remains active alongside the travel eSIM. Keep Data Roaming off on your home SIM so it does not incur charges, but leave the line itself enabled — the device registers on the home carrier network in roaming mode for voice and SMS even without data roaming. Some carriers require Voice Roaming to be enabled for the home SIM to receive SMS abroad. Check your home carrier's roaming policy before departure.
### What is Allow Cellular Data Switching and should I turn it off?
Allow Cellular Data Switching (iPhone) lets your device automatically move data to your home SIM if the travel eSIM signal drops. This is useful domestically but creates a roaming charge risk when traveling — if the device switches data to your home SIM abroad, your home carrier's international roaming data rates apply. Turn it off in **Settings > Cellular > Cellular Data > Allow Cellular Data Switching** when abroad with a travel eSIM.
### Do I need to keep Voice Roaming on for my home SIM?
It depends on your home carrier's policy. On many carriers, the SIM registers on the visited network for voice and SMS as long as the line is active, regardless of the Voice Roaming toggle. On others, Voice Roaming must be explicitly enabled to receive inbound calls and SMS. If you are unsure, leave Voice Roaming on — charges apply only when you make or receive calls, not when the SIM is merely registered on the network.
### What happens to incoming calls on my home number while I am abroad?
Your caller dials your home number normally. Your phone rings if you are registered on a roaming network with voice roaming active. Answering typically incurs incoming international roaming charges that depend on your carrier and plan. Alternatives include call forwarding to a VoIP number before departure, or directing regular contacts to reach you via WhatsApp or another internet-based app.
### Can I use dual SIM on any phone?
Not all devices support dual SIM. On iPhone, dual SIM (physical SIM + eSIM) is available on iPhone XS and later. On Android, Google Pixel 3a and later support physical SIM + eSIM; Pixel 7 and later support dual eSIM. Samsung Galaxy S20 and later support eSIM alongside a physical SIM on most variants. Older devices with a single SIM slot and no eSIM support cannot run a dual SIM setup.
### Should I delete my travel eSIM after returning home?
Not necessarily. If the provider supports it, keep the profile installed for your next trip to the same region — re-enabling a saved profile is faster than purchasing and reinstalling. If the plan has expired and the provider does not allow reactivation, delete it to keep your SIM list manageable. Check your provider's reinstall policy before deleting — some issue a new QR code at no charge; others charge for a new profile.
---
## Related Guides
If you are still in the planning phase, these guides cover earlier steps in the process:
- [What Is Dual SIM?](/en/guides/what-is-dual-sim/) — How DSDS, DSDV, and DSDA work, and what your device supports
- [Your First Travel eSIM](/en/guides/first-time-guide/) — Step-by-step installation on iPhone, Pixel, and Samsung
- [4 Ways to Stay Connected Abroad](/en/guides/four-options/) — Compare travel eSIM against local SIM, roaming, and pocket Wi-Fi
- [How to Choose a Travel eSIM](/en/guides/how-to-choose/) — Coverage, data volume, validity, and provider considerations
- [Pre-Trip Smartphone Checklist](/en/guides/pre-trip-checklist/) — Staged timeline from 2 weeks before departure through arrival
- [SIM Swap Fraud Guide](/en/guides/sim-swap/) — Why SMS 2FA has structural risks and how authenticator apps remove the dependency
To compare current travel eSIM plans for your destination, use **[SimFinder Travel](/en/travel/)** — filter by country, data amount, and validity period.
================================================================================
# Dual SIM Setup on iPhone: Complete Configuration Guide
URL: https://sim-finder.com/en/guides/dual-sim-iphone/
Type: guides (en)
Published: 2026-04-20
This guide covers the complete iPhone dual SIM configuration process — from adding a second line through every setting you need to configure before using both lines reliably. [What Is Dual SIM?](/en/guides/what-is-dual-sim/) explains the underlying technology (DSDS, DSDV, DSDA). [Using Dual SIM for Travel](/en/guides/dual-sim-for-travel/) covers the operational details of using a travel eSIM abroad. This guide focuses on the setup itself.
---
## Supported iPhone Models
The dual SIM capability on iPhone depends on the model and how the second line is added.
### Physical SIM + eSIM
Any iPhone from iPhone XS (2018) onward supports one physical SIM card plus one eSIM active simultaneously. On these models, inserting a nano-SIM into the tray and adding an eSIM profile creates a two-line configuration.
### Dual eSIM (Two eSIMs, No Physical SIM Required)
Starting with iPhone 13 (2021) and iPhone SE 3rd generation, two eSIM profiles can be active simultaneously without any physical SIM card. This is the only configuration available on eSIM-only models.
### eSIM-Only Models
Some models have no physical SIM slot at all. Adding a second line on these devices means installing a second eSIM profile.
| Model / Region | Configuration |
|----------------|---------------|
| iPhone XS / XS Max / XR through iPhone 12 series | Physical SIM + 1 eSIM |
| iPhone 13 series, iPhone SE (3rd gen) and later (most regions) | Physical SIM + eSIM **or** dual eSIM |
| iPhone 14–16e (US models) | eSIM-only — dual eSIM only |
| iPhone 17 series (US, Canada, Mexico, Japan, and several other regions) | eSIM-only — dual eSIM only |
| iPhone Air (all regions) | eSIM-only — dual eSIM only |
Source: [Apple Support — Learn which type SIM your iPhone or iPad uses](https://support.apple.com/en-us/118569)
> **Check your model:** Open **Settings > Cellular**. If you see an **Add eSIM** option, your iPhone supports adding a second eSIM. If you see a physical SIM listed alongside an eSIM slot, your model supports the physical + eSIM configuration.
---
## Before You Start
Before adding a second line, confirm the following.
**Your iPhone is carrier-unlocked.** A carrier-locked iPhone restricts eSIM activation to the locking carrier. Go to **Settings > General > About** and look for **Carrier Lock**. If it reads "No SIM restrictions," your iPhone is unlocked. If it shows a carrier name, contact that carrier to request an unlock before proceeding.
**You have a stable Wi-Fi connection.** Downloading an eSIM profile requires an active internet connection. Connect to Wi-Fi before starting. If you already have one active SIM with data, that connection works too.
**You have your QR code or activation code ready.** Your carrier or eSIM provider sends a QR code by email or displays it in their app. Keep it accessible on a separate device — you cannot scan a QR code from the same iPhone you are configuring. On iOS 17.4 or later, you can long-press a QR code image in Mail or Photos to trigger the installation without a second device.
For the full QR code installation walkthrough, see [How to Set Up eSIM on iPhone via QR Code](/en/guides/qr-code-iphone/).
---
## Adding a Second Line (eSIM)
If you are new to eSIM technology, see [What Is an eSIM?](/en/guides/what-is-esim/) for the underlying concepts before continuing.
### Step 1 — Open Cellular Settings
Go to **Settings > Cellular**.
If you have one line active, you will see it listed along with an **Add eSIM** button (or **Add Cellular Plan** on some iOS versions).
### Step 2 — Tap "Add eSIM"
Tap **Add eSIM**. iOS presents three options:
- **Use QR Code** — scan a QR code provided by your carrier
- **Enter Details Manually** — type the SM-DP+ server address and activation code
- **Use Carrier's App** — open the carrier's app to complete activation automatically
Select the method your carrier or provider supports.
### Step 3 — Scan or Enter the Activation Code
**QR code method:** Point your iPhone camera at the QR code on a second screen. When recognized, tap **Cellular Plan Detected**, then tap **Continue** and **Add Cellular Plan**.
**Manual method:** Enter the SM-DP+ address and activation code exactly as provided. A single character error will cause the activation to fail.
**iOS 17.4 long-press method (same-device QR code):** If the QR code is in an email or photo on the same iPhone, open the image in Mail, Photos, or Safari, long-press the image, and tap **Add eSIM**.
### Step 4 — Wait for the Profile to Download
The download typically completes within a few seconds to one minute. When the status bar shows **Cellular Plan Added**, the profile is installed. Do not close Settings or lose your Wi-Fi connection during this step.
### Step 5 — Complete the Configuration Prompts
iOS will prompt you to:
1. Set a label for the new line
2. Choose your default line for calls
3. Choose your default line for data
4. Review iMessage and FaceTime settings
Complete these prompts now, or skip them and configure each setting manually in the following sections.
---
## Naming and Labeling Your Lines
Clear line labels make every subsequent setting easier to understand. When a call comes in, the lock screen shows the label of the line being called. When you compose an iMessage, the label appears in the send-from picker. When you review the Cellular Data settings, the labels identify which line is which.
### How to Set or Change a Label
1. Go to **Settings > Cellular**
2. Tap the line you want to label
3. Tap **Cellular Plan Label** (Apple's official UI label)
4. Type the label and tap **Done**
There is no fixed list of labels — you can type any name. Practical options:
| Use case | Suggested label |
|----------|----------------|
| Home or personal plan | "Personal" or your carrier name |
| Work plan | "Work" |
| Travel eSIM | "Travel" or destination name (e.g., "Travel Japan") |
| Backup line | "Backup" |
The label you set appears in the iOS status bar's SIM indicator, on the call screen, and in iMessage thread headers when switching between lines.
---
## Setting Default Lines (Voice / Data / iMessage)
Each line assignment is configured separately. Leaving any of these at the wrong default — especially the data line — can result in unexpected charges.
### Default Voice Line
The default voice line handles all outgoing calls unless you override it per-call.
1. Go to **Settings > Cellular**
2. Tap **Default Voice Line**
3. Select the line you want for outgoing calls
> **If you are using a travel eSIM:** set your home SIM as the default voice line. Most travel eSIMs are data-only and cannot make voice calls directly. Outgoing calls on a data-only eSIM would either fail or route through a VoIP app. For the complete travel setup walkthrough, see [Your First Travel eSIM: Step-by-Step Guide](/en/guides/first-time-guide/).
### Default Line for Data
1. Go to **Settings > Cellular**
2. Tap **Cellular Data**
3. Select the line to use for mobile data
> **If you are using a travel eSIM abroad:** select the travel eSIM here. If you leave the home SIM as the data line while abroad, the home SIM will use international roaming data, which may incur charges.
### Default Line for SMS (Non-iMessage Texts)
1. Go to **Settings > Cellular**
2. Tap **Default Voice Line** (the SMS default follows the voice default on most iOS versions)
SMS messages use the Default Voice Line — there is no separate SMS line setting in iOS.
> SMS sent from your device goes out on the line set here. Replies arrive on the line the original message was sent from, not necessarily the line the recipient dialed.
### iMessage Send & Receive
iMessage is configured separately from the voice and SMS defaults.
1. Go to **Settings > Messages > Send & Receive**
2. Under **You Can Be Reached By iMessage At**, confirm both your phone numbers and Apple ID email appear
3. Under **Start New Conversations From**, select the address or number you want to use as the default sender
> **Recommendation:** set your Apple ID email address as the default sender for new iMessage conversations. This routes iMessages over the data connection (any active line) rather than tying delivery to a specific phone number. When using a travel eSIM abroad, this ensures iMessages continue working even if your home SIM has no data roaming active.
### FaceTime
1. Go to **Settings > FaceTime**
2. Under **You Can Be Reached At**, confirm both numbers and your Apple ID email are enabled
3. Under **Caller ID**, select the number or email to display when you initiate a FaceTime call
---
## Allow Cellular Data Switching
**Location:** Settings > Cellular > Cellular Data > Allow Cellular Data Switching
When this toggle is on, iOS can automatically move data traffic to the non-default SIM if the default data SIM loses signal. This provides seamless connectivity in areas where one network has weaker coverage.
### When to Turn It Off
Turn Allow Cellular Data Switching **off** in any situation where switching to the other SIM would cause unexpected charges:
- **Traveling abroad with a travel eSIM:** if the travel eSIM signal drops momentarily and the home SIM is the fallback, the home SIM begins using international roaming data. International roaming data rates apply.
- **When one line has no data plan:** if your second line is a voice-only plan, and cellular data switches to it, data connectivity stops or the SIM may be charged for individual data sessions depending on the carrier.
### When to Leave It On
Keep Allow Cellular Data Switching on when:
- Both SIMs have valid domestic data plans and you want the device to use whichever has the stronger signal at any moment.
- You are traveling within a region where both SIMs are covered by the same or equivalent plans (for example, two domestic plans on the same network).
---
## Switching Active Lines
### Per-Call Line Selection
When making an outgoing call, you can choose which line to use regardless of the default voice setting.
1. Open the **Phone** app
2. Dial the number
3. Before tapping the call button, tap the line name displayed at the top of the Phone screen to switch to the other line for this call
4. Select the line you want for this call
5. Tap the call button
Alternatively, from the Contacts or Recents tab, tap the phone icon and then tap the line selector that appears before the call connects.
### Switching the Data Line Mid-Use
To switch which line handles data without changing your default settings permanently:
1. Go to **Settings > Cellular > Cellular Data**
2. Tap the line to activate for data
This changes the active data line immediately. Turn off Allow Cellular Data Switching if you want the line to stay fixed.
### Quick Access via Status Bar / Control Center
On iPhone models with a dual SIM indicator in the status bar, you can see which line is active for data at a glance. There is no single-tap toggle in Control Center for switching lines — the switch is made in Settings > Cellular.
---
## Managing Lines (Turn Off, Remove)
### Turn Off a Line Without Deleting It
Turning a line off suspends it without removing the profile. The line will not receive calls, texts, or use data while off.
1. Go to **Settings > Cellular**
2. Tap the line
3. Toggle **Turn On This Line** off
To reactivate, follow the same path and toggle it back on.
This is useful when you return home from a trip and no longer need the travel eSIM to be active — the profile stays on the device, ready to re-enable for your next trip.
### Delete an eSIM
Deleting an eSIM removes the profile from the device. This is permanent — you cannot recover the profile after deletion. To use the same plan again, you will need to request a new QR code or activation code from your provider (some providers allow this at no charge; others charge for a new profile).
1. Go to **Settings > Cellular**
2. Tap the eSIM line
3. Scroll to the bottom and tap **Delete eSIM** (labeled **Delete Plan** when multiple plans are installed on the device)
4. Confirm deletion
> Before deleting, check your provider's reinstall policy. If they support free reinstallation via their app or a new QR code, you can delete and reinstall easily. If they do not support reinstallation, deleting the profile means losing access to that plan.
### Remove a Physical SIM
To remove a physical SIM, eject the SIM tray using a SIM eject tool or a straightened paper clip. The line is removed from **Settings > Cellular** automatically once the tray is ejected. No in-settings action is required.
---
## FAQ
### How do I set a default data line on iPhone?
Go to **Settings > Cellular > Cellular Data**, then tap the line you want to use for mobile data. This sets it as the default for all data traffic. If you are using a travel eSIM abroad, select it here and turn off Allow Cellular Data Switching to prevent the device from falling back to your home SIM's roaming data.
### Can I assign a specific line to a contact on iPhone?
Yes. Open the **Contacts** app, tap a contact, tap **Edit**, scroll down to the phone number, and tap the label field next to the number. You can select which SIM line to use for calls to that contact. This setting applies to outgoing calls only — incoming calls arrive on whichever line the caller dialed.
### What does Allow Cellular Data Switching do?
When enabled, iOS automatically routes data to the non-default SIM if the default data SIM loses signal. This is useful domestically but creates a roaming charge risk when traveling — if the device switches data to your home SIM abroad, that SIM's international roaming rates apply. Turn it off at **Settings > Cellular > Cellular Data > Allow Cellular Data Switching** when using a travel eSIM.
### How do I rename a SIM line on iPhone?
Go to **Settings > Cellular**, tap the line you want to rename, then tap **Cellular Plan Label** (Apple's official UI label) and type a new label. Common labels include "Personal," "Work," "Travel," or the carrier name. The label appears in the status bar, call screen, and iMessage thread headers.
### Which iPhones support dual eSIM (two eSIMs without a physical SIM)?
iPhone 13, iPhone 13 mini, iPhone 13 Pro, iPhone 13 Pro Max, iPhone SE (3rd generation), and all later models. These can run two eSIM profiles simultaneously with no physical SIM card required. iPhone XS through iPhone 12 series support one physical SIM plus one eSIM only.
### Can I turn off one SIM without deleting it?
Yes. Go to **Settings > Cellular**, tap the line, then toggle **Turn On This Line** off. The eSIM profile stays stored on your device. Turning a line off stops it from making or receiving calls and using data, but the profile remains installed and can be re-enabled at any time without reinstalling.
---
## Related Guides
- [What Is Dual SIM?](/en/guides/what-is-dual-sim/) — DSDS, DSDV, and DSDA explained; what mode iPhone uses
- [Using Dual SIM for Travel](/en/guides/dual-sim-for-travel/) — Line assignments, roaming charge prevention, and SMS 2FA when abroad
- [How to Set Up eSIM on iPhone via QR Code](/en/guides/qr-code-iphone/) — Full installation walkthrough for adding an eSIM
- [What Is an eSIM?](/en/guides/what-is-esim/) — How eSIM technology works and supported devices
- [Your First Travel eSIM](/en/guides/first-time-guide/) — Choosing and installing a travel eSIM from scratch
To compare available eSIM plans for your destination, use [SimFinder Travel](/en/travel/).
---
Sources:
- [Use dual SIM with two nano-SIM cards or two eSIMs on iPhone - Apple Support](https://support.apple.com/en-us/109317)
- [Learn which type SIM your iPhone or iPad uses - Apple Support](https://support.apple.com/en-us/118569)
- [Set up eSIM on iPhone - Apple Support](https://support.apple.com/en-us/118669)
================================================================================
# eSIM-Compatible Devices and How to Check Yours
URL: https://sim-finder.com/en/guides/esim-compatible-devices/
Type: guides (en)
Published: 2026-06-04
Your device supports eSIM if it has an embedded eUICC chip and your carrier has deployed eSIM provisioning infrastructure. The fastest way to confirm: open Settings and look for an "Add eSIM" or "Add Data Plan" option, or dial `*#06#` and check whether an EID (a 32-character identifier distinct from the IMEI) appears. On iPhone, eSIM support starts with iPhone XS (2018). On Android, Google Pixel 3 and later generally support eSIM; Samsung Galaxy S20 and later flagship models support eSIM on most variants. For a broader overview of how eSIM technology works, see [What Is an eSIM?](/en/guides/what-is-esim/)
One critical caveat applies throughout: the **same model name sold in different regions can have different eSIM capabilities**. Always verify using your specific model number on the manufacturer's official support page.
---
## How to Check If Your Device Supports eSIM
There are three reliable methods. Use the first one that applies to your situation.
### Method 1: Settings Menu
On iPhone:
1. Open **Settings**
2. Tap **Cellular** (or **Mobile Data** in some regions)
3. Look for **Add eSIM**, **Add Data Plan**, or **Add Mobile Plan**
If that option is present, your device supports eSIM. If the menu shows only your current plan with no option to add another, the device either does not support eSIM or eSIM has been disabled by the carrier.
On Android:
1. Open **Settings**
2. Tap **Network & internet** (or **Connections** on Samsung)
3. Tap **SIMs** or **Mobile network**
4. Look for **Add eSIM**, **Download a SIM**, or a similar option
The exact menu path varies by Android version and manufacturer skin. If you do not see any eSIM-related option, try searching "eSIM" within the Settings search bar.
### Method 2: Dial *#06# for the EID
Open the **Phone** app and dial `*#06#` on the keypad. A screen will appear showing your device identifiers. Look for:
- **IMEI** — a 15-digit number that identifies the device hardware (all phones have this)
- **EID** — a 32-character alphanumeric string that identifies the embedded SIM chip
If an EID is listed, your device has eSIM hardware. If only an IMEI is shown and no EID appears, the device does not support eSIM.
On some devices, the EID also appears at **Settings > General > About > EID** (iPhone) or **Settings > About phone > EID** (Android).
### Method 3: Manufacturer Support Page
Look up your exact model number on the manufacturer's official support page:
- **Apple**: [support.apple.com/en-us/118569](https://support.apple.com/en-us/118569) — lists every iPhone and iPad model with SIM type details
- **Google**: [support.google.com/pixelphone/answer/7086887](https://support.google.com/pixelphone/answer/7086887) — Pixel eSIM support by model
- **Samsung**: Samsung's eSIM support page lists Galaxy models and supported carriers by region
When checking, use your device's model number (e.g., A2403, SM-S921B) rather than just the marketing name. The model number appears on the device's packaging, on the SIM tray label, or at Settings > About.
---
## eSIM-Compatible iPhone Models
eSIM support on iPhone begins with the 2018 lineup. The table below shows the key milestones; all models within each generation released after XS/XR also support eSIM.
| iPhone Generation | eSIM Support | Notes |
|---|---|---|
| iPhone XS, XS Max, XR (2018) | Yes | First eSIM-capable iPhones |
| iPhone 11 series (2019) | Yes | Physical SIM + eSIM |
| iPhone SE (2nd gen, 2020) | Yes | Physical SIM + eSIM |
| iPhone 12 series (2020) | Yes | Physical SIM + eSIM |
| iPhone 13 series (2021) | Yes, dual eSIM | Two eSIMs active simultaneously |
| iPhone SE (3rd gen, 2022) | Yes, dual eSIM | Two eSIMs simultaneously (Apple spec) |
| iPhone 14 series (2022) | Yes | US models: eSIM-only |
| iPhone 15 series (2023) | Yes | US models: eSIM-only |
| iPhone 16 series (2024) | Yes | US models: eSIM-only |
| iPhone 16e (2025) | Yes | US models: eSIM-only |
| iPhone 17 series (2025) | Yes | eSIM-only in US, Canada, Mexico, Japan, UAE, Saudi Arabia, Bahrain, Kuwait, Qatar, Oman, Guam, U.S. Virgin Islands |
| iPhone Air (2025) | Yes | eSIM-only in US, Canada, Mexico, Japan, UAE, Saudi Arabia, Bahrain, Kuwait, Qatar, Oman, Guam, and U.S. Virgin Islands; dual eSIM + nano-SIM in other regions |
**iPhone XS through iPhone 12**: support one physical SIM + one eSIM. Two eSIMs simultaneously is not possible on these models.
**iPhone 13, SE (3rd gen), and later**: support dual eSIM — two eSIM profiles active at the same time, without requiring a physical SIM card for the second line. See the [dual SIM setup guide for iPhone](/en/guides/dual-sim-iphone/) for step-by-step configuration.
**eSIM-only models**: have no physical SIM slot. Plans can only be activated via eSIM. If you travel to a region where carriers do not yet support eSIM provisioning, you cannot use a local physical SIM card as a fallback.
**Important — mainland China and Hong Kong**: eSIM availability on iPhone is limited in mainland China (iPhone 17e and iPhone Air are exceptions). Hong Kong and Macao support eSIM on some models but not all. Check the Apple support page linked above for the most current regional breakdown.
iPhone can store 8 or more eSIM profiles according to Apple, and you switch between them in Settings > Cellular. Once you have confirmed compatibility, follow the [iPhone eSIM setup guide (QR code method)](/en/guides/qr-code-iphone/) to activate a plan.
---
## eSIM-Compatible Android: Google Pixel
Google Pixel has the most clearly documented eSIM support among Android manufacturers.
| Pixel Model | eSIM Support | Notes |
|---|---|---|
| Pixel 3 (2018) | Limited | Varies by carrier and region; not all variants supported |
| Pixel 3a (2019) | Yes (most variants) | DSDS support |
| Pixel 4, 4a, 4 XL (2019–2020) | Yes | |
| Pixel 5, 5a (2020–2021) | Yes | |
| Pixel 6 series (2021) | Yes | eSIM supported (carrier-locked variants may restrict to the locking carrier) |
| Pixel 7, 7 Pro (2022) | Yes, dual eSIM | First Android phones to support dual eSIM (via Android 13 update) |
| Pixel 7a, Pixel Fold (2023) | Yes, dual eSIM | |
| Pixel 8 series (2023) | Yes, dual eSIM | |
| Pixel 9 series (2024) | Yes, dual eSIM | |
| Pixel 10, 10 Pro, 10 Pro XL (2025) | Yes, eSIM-only (US) | Physical SIM slot removed for US market |
| Pixel 10 Pro Fold (2025) | Yes, dual eSIM | Physical SIM slot retained in all regions |
**Pixel 7 and later**: support dual eSIM — two eSIM profiles active simultaneously using Android 13's MEP (Multiple Enabled Profiles) implementation under GSMA SGP.22 v3.0.
**Carrier-locked Pixel devices**: eSIM may be restricted to the locking carrier's plans. An unlocked Pixel purchased directly from Google is generally the most eSIM-flexible option. To activate an eSIM on a Pixel or other Android device, see the [Android eSIM setup guide (QR code method)](/en/guides/qr-code-android/).
---
## eSIM-Compatible Android: Samsung Galaxy
Samsung's eSIM support spans its flagship Galaxy S, Z Fold, and Z Flip lines.
| Galaxy Line | First eSIM Model | Notes |
|---|---|---|
| Galaxy S series | S20 (2020) | S20, S20+, S20 Ultra and later S-series flagships |
| Galaxy Z Fold | Z Fold series (multiple generations) | Confirmed on Samsung's eSIM support page |
| Galaxy Z Flip | Z Flip series (multiple generations) | Confirmed on Samsung's eSIM support page |
| Galaxy S FE (Fan Edition) | Varies | Galaxy S20 FE does not support eSIM in most regions |
**Regional variation**: Samsung sells the same model name across different regions with different hardware configurations. A Galaxy S-series phone bought in one country may support eSIM while the same model bought in another country (or from a carrier) does not. Confirm using your model number (e.g., SM-S921B) on Samsung's official eSIM support page.
**Carrier-locked Samsung devices**: carrier-locked Galaxy phones may have eSIM disabled even when the hardware supports it. An unlocked ("open market") variant is more likely to offer full eSIM functionality.
---
## eSIM-Compatible Tablets and Other Devices
### iPad
| iPad Model | eSIM Support | Notes |
|---|---|---|
| iPad Pro (M4) | Yes, eSIM-only | No physical SIM slot |
| iPad Air (M2) | Yes, eSIM-only | No physical SIM slot |
| iPad Pro 11-inch (1st–4th gen), Wi-Fi + Cellular | Yes | Physical SIM + eSIM |
| iPad Pro 12.9-inch (3rd–6th gen), Wi-Fi + Cellular | Yes | Physical SIM + eSIM |
| iPad Air (3rd–5th gen), Wi-Fi + Cellular | Yes | Physical SIM + eSIM |
Only cellular-capable iPad models support eSIM. Wi-Fi-only iPads have no SIM hardware at all.
### Other Device Categories
eSIM support is increasingly appearing in:
- **Laptops**: select Windows laptops with LTE/5G connectivity support eSIM (Microsoft Surface Pro, certain Dell and Lenovo models with built-in cellular)
- **Smartwatches**: Apple Watch (Series 3 and later, cellular models) and select Wear OS watches support eSIM for standalone cellular
This guide focuses on smartphones and tablets. For laptop or smartwatch eSIM, consult the manufacturer's documentation for your specific model.
---
## SIM-Free vs. Carrier-Locked: Why It Matters for eSIM
A device sold as **SIM-free** (also called "unlocked") can activate plans from any compatible carrier. A **carrier-locked** device is restricted to the locking carrier's plans, and may have eSIM functionality partially or fully disabled for other carriers. For a direct comparison of physical SIM and eSIM trade-offs, see [Physical SIM vs eSIM: Differences and How to Choose](/en/guides/sim-vs-esim/).
For eSIM specifically, carrier locking creates two scenarios:
1. **eSIM fully disabled**: the device has eSIM hardware, but the carrier's software configuration prevents any eSIM activation. The "Add eSIM" option may be absent entirely.
2. **eSIM restricted to one carrier**: the device allows eSIM activation but only accepts profiles from the locking carrier.
If you purchase a device directly from the manufacturer (Apple Store, Google Store, Samsung.com) without a carrier contract, it is typically sold SIM-free and supports eSIM from any compatible carrier.
If you received a device through a carrier promotion or installment plan, check the carrier's unlock policy. Most carriers allow unlocking after the service contract or installment plan is completed.
---
## The eSIM-Only Trend
A growing number of flagship devices are shipping without a physical SIM card slot.
**iPhone**: eSIM-only has expanded from the US market (iPhone 14 onward) to 12 regions with iPhone 17 (2025). iPhone Air is eSIM-only in US, Canada, Mexico, Japan, UAE, Saudi Arabia, Bahrain, Kuwait, Qatar, Oman, Guam, and U.S. Virgin Islands; in other regions it ships with dual eSIM + nano-SIM. This trend is expected to continue as manufacturers reclaim internal space from the SIM tray.
**Google Pixel**: US-market Pixel 10, Pixel 10 Pro, and Pixel 10 Pro XL ship without a physical SIM slot. Pixel 10 Pro Fold retains a physical SIM slot in all regions.
**Practical implications of eSIM-only devices**:
- You cannot fall back to a physical SIM card in regions where eSIM is not yet supported by local carriers
- If your device is lost or damaged, you cannot immediately transfer a SIM card to a replacement — the carrier must re-issue the eSIM profile
- Some older vehicles' in-car Wi-Fi hotspots and IoT devices accept physical SIM cards only; an eSIM-only phone cannot serve as a hotspot for these using a physical card
Before purchasing an eSIM-only device, confirm that carriers in your primary region support eSIM activation.
---
## Regional Variant Warning
The single most common source of eSIM incompatibility surprises is **regional model variants**. The same model marketed under the same name can have meaningfully different hardware depending on where it was manufactured for sale.
**Known cases where regional variants affect eSIM support**:
- **iPhone in mainland China**: most iPhone generations have restricted or absent eSIM support for mainland China models (a different model number is used). iPhone Air and iPhone 17e are exceptions.
- **Samsung Galaxy in certain markets**: carrier-specific or regional variants sold in some markets omit eSIM even on otherwise eSIM-capable S-series models.
- **Pixel 3**: regional variants for Japan, Australia, and Taiwan, as well as most US/Canada carrier versions other than Sprint and Google Fi, do not support eSIM.
**How to avoid this problem**:
1. Note your device's model number from the box, SIM tray sticker, or Settings > About
2. Look up that exact model number on the manufacturer's official support page
3. Do not assume eSIM support based on the marketing name alone
---
## What to Do If Your Device Does Not Support eSIM
If your device does not support eSIM, you still have options for eSIM-based plans — but they require new hardware.
For travel plans specifically, a physical travel SIM card provides the same function (local data at local rates) without requiring eSIM hardware. You can also use a dedicated travel Wi-Fi router or hotspot device that connects to a local data network and shares it over Wi-Fi — no eSIM required on your phone.
If you are planning a device upgrade and eSIM support is important to you, choose a current-generation device from the lists above and purchase it unlocked from the manufacturer to ensure full eSIM flexibility.
Use [SimFinder](/en/) to search for eSIM plans filtered by your destination — plans are tagged by activation method so you can see which require eSIM and which offer physical SIM alternatives.
---
## Summary
| Device | First eSIM-Capable Model | Dual eSIM From | eSIM-Only (Selected Regions) |
|---|---|---|---|
| iPhone | iPhone XS / XR (2018) | iPhone 13 / SE 3rd gen | iPhone 14 (US, 2022) |
| Google Pixel | Pixel 3 (limited) / Pixel 3a (2019) | Pixel 7 (2022) | Pixel 10 (US, 2025) |
| Samsung Galaxy S | Galaxy S20 (2020) | Varies by model | Not yet (as of 2025) |
| Samsung Galaxy Z | Multiple Z Fold / Z Flip generations | — | Not yet (as of 2025) |
| iPad | iPad Pro 11-inch 1st gen / iPad Air 3rd gen | — | iPad Pro M4 / iPad Air M2 |
**Three ways to check your device**:
1. Settings > Cellular > Add eSIM — if the option exists, eSIM is supported
2. Dial `*#06#` — an EID in the result confirms eSIM hardware
3. Manufacturer support page — look up your exact model number
**Always verify with your model number**, not just the model name, when checking eSIM support for a specific device — especially for devices purchased outside your home country.
---
## Related Guides
- [What Is an eSIM? How It Works, Benefits, and Supported Devices](/en/guides/what-is-esim/)
- [Physical SIM vs eSIM: Differences and How to Choose](/en/guides/sim-vs-esim/)
- [How to Set Up eSIM on iPhone via QR Code](/en/guides/qr-code-iphone/)
- [How to Set Up eSIM on Android via QR Code](/en/guides/qr-code-android/)
- [Dual SIM Setup on iPhone: Complete Configuration Guide](/en/guides/dual-sim-iphone/)
================================================================================
# How to Use eSIM on an iPad
URL: https://sim-finder.com/en/guides/esim-on-ipad/
Type: guides (en)
Published: 2026-06-04
Wi-Fi + Cellular iPads support eSIM for data connectivity, and the setup process follows the same pattern as iPhone: open Settings, navigate to Cellular Data, and add a plan via QR code, carrier app, or manual code. The key practical difference from iPhone is that iPad cellular plans are data-only — there is no phone number, and cellular voice calls are not supported over the iPad's mobile line.
iPad Pro (M4), iPad Air (M2), iPad mini (A17 Pro, 2024), and iPad (A16, 2024) are eSIM-only — they have no physical SIM card slot. Earlier Wi-Fi + Cellular models support both a physical SIM and an eSIM. Wi-Fi-only iPad models have no SIM hardware at all and cannot use any cellular plan.
For background on how eSIM technology works, see [What Is an eSIM?](/en/guides/what-is-esim/). For a full list of compatible iPad models, see [eSIM-Compatible Devices and How to Check Yours](/en/guides/esim-compatible-devices/).
---
## Which iPads Support eSIM
Only Wi-Fi + Cellular models include SIM hardware. Within that category, eSIM support depends on the generation.
| iPad Model | eSIM Support | Physical SIM Slot |
|---|---|---|
| iPad Pro M4 (2024) | Yes — eSIM only | No |
| iPad Air M2 (2024) | Yes — eSIM only | No |
| iPad mini (A17 Pro, 2024) | Yes — eSIM only | No |
| iPad (A16, 2024) | Yes — eSIM only | No |
| iPad Pro 11-inch, 1st–4th gen (2018–2022), Wi-Fi + Cellular | Yes | Yes |
| iPad Pro 12.9-inch, 3rd–6th gen (2018–2022), Wi-Fi + Cellular | Yes | Yes |
| iPad Air, 3rd–5th gen (2019–2022), Wi-Fi + Cellular | Yes | Yes |
| iPad mini, 5th gen (2019), Wi-Fi + Cellular | Yes | Yes |
| iPad mini, 6th gen (2021), Wi-Fi + Cellular | Yes | Yes |
Source: Apple Support — [Learn which type SIM your iPhone or iPad uses](https://support.apple.com/en-us/118569).
**Wi-Fi-only models**: do not have any SIM hardware. Even if the model name looks identical to a cellular model, a Wi-Fi-only iPad cannot use eSIM or any mobile plan.
**eSIM-only models (iPad Pro M4, iPad Air M2, iPad mini A17 Pro, iPad A16, and potentially future models)**: have no physical SIM slot. All cellular plans must be activated via eSIM. If you are in a region where a carrier does not yet support eSIM provisioning, you cannot fall back to a physical SIM card.
To confirm whether your specific iPad model supports eSIM, go to **Settings > Cellular Data**. If the menu includes an option to **Add eSIM** or **Add Data Plan**, the device supports eSIM. If there is no Cellular Data menu at all, the device is a Wi-Fi-only model.
---
## iPad eSIM vs iPhone eSIM: Key Differences
Understanding what iPad eSIM can and cannot do prevents surprises when you sign up for a plan.
| Feature | iPhone eSIM | iPad eSIM |
|---|---|---|
| Data | Yes | Yes |
| Voice calls over cellular | Yes | No |
| SMS / phone number | Yes | No |
| Dual eSIM (two active at once) | Yes (iPhone 13 and later) | No |
| Travel eSIM compatibility | Yes | Yes |
| Carrier plan availability | Broad | Narrower — not all carriers offer iPad plans |
### Data-Only Plans
iPad cellular plans are structured as data-only. The device connects to the mobile network for internet access, but it does not have a phone number. You cannot receive a voice call on the iPad's cellular line, and SMS messages cannot be received on that line either.
Voice and video calling on iPad is available over the internet via FaceTime, WhatsApp, Skype, and similar apps — these use data (Wi-Fi or cellular), not the cellular voice channel.
### No Dual eSIM
Unlike iPhone 13 and later, which support two simultaneously active eSIM profiles, iPad supports only one active eSIM at a time. You can store multiple eSIM profiles on the device and switch between them in Settings, but only one can be active at any given moment. There is no iPad equivalent of iPhone's dual-eSIM configuration.
For an explanation of how dual eSIM works on iPhone, see [Dual SIM Setup on iPhone: Complete Configuration Guide](/en/guides/dual-sim-iphone/).
### Carrier Availability
Not every carrier that supports iPhone eSIM also offers a dedicated iPad plan. Some carriers allow you to add an iPad as a secondary device on an existing account (sometimes called a companion plan or connected device plan), while others sell standalone iPad data plans. Check your carrier's device plan options, as the iPad plan section is often separate from the phone plan section on carrier websites.
---
## Before You Start
Before adding an eSIM to your iPad, confirm the following:
**1. Confirm your iPad is a Wi-Fi + Cellular model with eSIM support.**
Open Settings. If a **Cellular Data** menu is present, the device has cellular hardware. Within that menu, look for **Add eSIM** or **Add Data Plan** to confirm eSIM is supported.
**2. Confirm your iPad is carrier-unlocked.**
Go to **Settings > General > About** and look for a **Carrier Lock** field. If it shows **No SIM restrictions**, the device is unlocked. A carrier-locked iPad can only use plans from the locking carrier. Contact that carrier to request an unlock if needed.
**3. Have a Wi-Fi connection ready.**
Downloading an eSIM profile requires an internet connection. If your iPad is not already connected to cellular data via a physical SIM, connect to Wi-Fi before starting.
**4. Obtain a QR code or activation code from your carrier or eSIM provider.**
Most carriers deliver the QR code by email or display it in their app. Travel eSIM providers typically send it by email and show it in their app after purchase.
---
## How to Add an eSIM to iPad
The steps below apply to all supported Wi-Fi + Cellular iPad models running a compatible version of iPadOS.
### Step 1 — Open Settings and Go to Cellular Data
Tap the **Settings** app, then tap **Cellular Data** in the left panel.
### Step 2 — Follow the On-Screen Prompts to Add a Plan
Tap the option to add a new plan. The exact label varies by iPadOS version; in current iPadOS it may appear as **Find a New Plan**, **Add eSIM**, or **Add Data Plan**. Follow the on-screen prompts to proceed.
If you do not see this option, either your iPad does not support eSIM, or the carrier has disabled eSIM provisioning. Contact your carrier to confirm.
### Step 3 — Choose Your Setup Method
iPad offers three ways to add an eSIM profile:
- **Scan a QR code** — point the camera at the QR code provided by your carrier
- **Use carrier's app** — some carriers offer a direct in-app setup flow
- **Enter activation code manually** — type the SM-DP+ server address and activation code by hand (select **Enter Details Manually** at the bottom of the scan screen)
The QR code method is the most common for both carrier plans and travel eSIMs.
### Step 4 — Scan the QR Code
Display the QR code on a separate screen (laptop, printed page, or another device). The QR code cannot be scanned from the same iPad screen it is displayed on.
Point your iPad camera at the code. When detected, a banner appears: **Cellular Plan Detected**. Tap **Continue**. The iPad QR scan flow mirrors the iPhone process — see [How to Set Up eSIM on iPhone via QR Code](/en/guides/qr-code-iphone/) for a detailed walkthrough of each prompt.
> **If the QR code is in an email on the same iPad**: forward the email to another device, open it there, and scan normally — or take a screenshot and display it on another screen.
### Step 5 — Confirm and Download
Tap **Add Cellular Plan**. Your carrier may prompt for a confirmation code sent to your email or via SMS to a linked phone number. Enter it when asked.
The iPad downloads the profile from the carrier's SM-DP+ server. This typically takes a few seconds to about one minute. When the status shows the plan is active, setup is complete.
### Step 6 — Verify the Connection
After installation, return to **Settings > Cellular Data** and confirm:
- The eSIM plan is listed and shows as **Active** or **On**
- The signal indicator in the iPadOS status bar shows bars
Open a browser and load a webpage to confirm data is flowing. For a step-by-step guide to confirming your line is active and what to do if it is not, see [SIM Activation: How to Get Your Line Working](/en/guides/activation/). If data does not work, see [Troubleshooting](#troubleshooting) below.
---
## Adding a Travel eSIM to iPad
A travel eSIM provides data connectivity in a foreign country at local rates, without the roaming charges your home carrier applies. The setup process on iPad is the same as for a domestic plan — scan a QR code in Settings > Cellular Data > Add eSIM.
**Before your trip:**
- Purchase the travel eSIM from a provider such as Airalo, Holafly, Nomad, or Sabil before departure
- Download the eSIM profile at home on reliable Wi-Fi — do not wait until you land
- The profile installs immediately; activation (the plan's data clock starting) may be set to begin automatically when you connect to the destination network, or you may need to enable it manually in Settings
**At your destination:**
- Go to **Settings > Cellular Data** and ensure the travel eSIM is selected as the active plan
- If you have a home plan also installed (on eSIM-only models or after switching), ensure it is turned off or set to a lower priority to avoid unintended roaming charges
**Travel eSIM on iPad is data-only**, as with all iPad cellular plans. If you need to receive voice calls or SMS while abroad, those must come through an internet-based app (FaceTime, WhatsApp, etc.) using the travel eSIM's data.
Use [SimFinder Travel](/en/travel/) to search for travel eSIM plans by destination, filtered to show iPad-compatible options.
---
## Managing Multiple eSIM Profiles
You can store multiple eSIM profiles on your iPad and switch between them as needed — for example, keeping a home plan and a travel plan both installed, then activating the appropriate one.
To manage plans, go to **Settings > Cellular Data**. Installed profiles appear as a list. Tap a plan to:
- Turn it **on** or **off** (without deleting it)
- Rename it for clarity (e.g., "Home Plan", "Japan Travel")
- View the plan details or remove it
**Switching active plans**: only one eSIM can be active at a time on iPad. Enabling a second profile automatically disables the one currently active.
**Deleting a profile**: once deleted, most eSIM profiles cannot be reinstalled from the same QR code — each code is single-use. Before deleting a travel eSIM, confirm the provider's reinstall policy. Some providers allow re-download via their app; others require purchasing a new plan.
---
## Troubleshooting
**Settings > Cellular Data has no "Add eSIM" option**
Two possible causes: the iPad is a Wi-Fi-only model (no SIM hardware), or the iPad is carrier-locked and the carrier has disabled eSIM activation for non-supported plans. If the Cellular Data menu exists but Add eSIM is absent, contact your carrier to verify whether eSIM provisioning is enabled for your plan.
**"Unable to Add Cellular Plan" error**
This error typically means the QR code has already been used on another device, or the activation code has expired. Request a new QR code from your carrier or eSIM provider. Each QR code is single-use and tied to one device.
**eSIM installed but no data**
After the profile downloads, verify in **Settings > Cellular Data** that the plan is toggled on. Confirm that **Cellular Data** is enabled at the top of the menu. If the plan is on but data is not flowing, check whether the APN settings are correct — some carriers require manual APN configuration. Contact your carrier for the correct APN values.
**QR code scan fails**
Ensure good lighting and a steady hand. Hold the iPad camera 15–30 cm from the code. If the code is on a screen, adjust screen brightness to maximum. If scanning still fails, use the manual entry option: tap **Enter Details Manually** on the scan screen and type the SM-DP+ address and activation code from your carrier's confirmation email.
For a more detailed troubleshooting reference, see [eSIM Activation Failed: Troubleshooting](/en/guides/activation-failed/).
---
## Apple SIM and the Transition to eSIM on iPad
Earlier Wi-Fi + Cellular iPads shipped with **Apple SIM** — a removable, reprogrammable SIM card (nano-SIM form factor) that functioned similarly to eSIM in allowing carrier selection without swapping physical cards. Apple SIM was available in the United States, United Kingdom, Canada, and a small number of other markets (including Germany and Australia) through participating carriers.
Apple SIM was distinct from the built-in eSIM chip. Some iPad models shipped with both: an Apple SIM in the nano-SIM slot and a separate eSIM chip on the motherboard.
As of the current iPad lineup (iPad Pro M4, iPad Air M2), Apple SIM is no longer included. These models use eSIM only, following the same embedded eUICC standard ([GSMA SGP.22](https://www.gsma.com/solutions-and-impact/technologies/esim/)) used in eSIM-capable iPhones and Android devices.
If you have an older iPad with Apple SIM and are unsure which SIM type is active on your device, go to **Settings > General > About**. The presence of an **EID** field confirms that an eSIM chip is present.
---
## Summary
- **Wi-Fi + Cellular iPads** from iPad Pro 11-inch (1st gen, 2018) and iPad Air (3rd gen, 2019) onward support eSIM
- **iPad Pro (M4), iPad Air (M2), iPad mini (A17 Pro, 2024), and iPad (A16, 2024)** are eSIM-only — no physical SIM slot
- **Setup**: Settings → Cellular Data → Add eSIM → scan QR code
- **iPad eSIM is data-only** — no phone number, no cellular voice calls
- **No dual eSIM** on iPad — only one profile can be active at a time
- **Travel eSIMs** work on iPad the same way as on iPhone; download before departure on Wi-Fi
- **Carrier availability** for iPad plans varies; not all carriers that support iPhone eSIM offer iPad plans
---
## Related Guides
- [eSIM-Compatible Devices and How to Check Yours](/en/guides/esim-compatible-devices/)
- [What Is an eSIM? How It Works, Benefits, and Supported Devices](/en/guides/what-is-esim/)
- [How to Set Up eSIM on iPhone via QR Code](/en/guides/qr-code-iphone/)
- [Dual SIM Setup on iPhone: Complete Configuration Guide](/en/guides/dual-sim-iphone/)
- [SIM Activation: How to Get Your Line Working](/en/guides/activation/)
================================================================================
# How to Use eSIM on a Smartwatch
URL: https://sim-finder.com/en/guides/esim-on-smartwatch/
Type: guides (en)
Published: 2026-06-06
A cellular smartwatch — such as Apple Watch GPS+Cellular or a Galaxy Watch cellular model — contains its own eSIM chip, which allows the watch to connect to a mobile network independently from your paired phone. Under the most common carrier model, the watch shares the same phone number as the paired phone: incoming calls and messages reach both devices, and you can use the watch for calls and data when your phone is out of range.
Cellular smartwatch plans require explicit carrier support. Not every carrier that supports eSIM on a phone also supports watch number-sharing, and where it is available, it typically requires a separate monthly add-on plan for the watch. Travel eSIM profiles for smartphones cannot be used on a smartwatch.
For a foundational explanation of how eSIM technology works, see [What Is an eSIM?](/en/guides/what-is-esim/). For a broader look at which devices — including wearables — support eSIM, see [eSIM-Compatible Devices and How to Check Yours](/en/guides/esim-compatible-devices/).
---
## How Cellular Works on a Smartwatch
A cellular smartwatch operates differently from a cellular tablet like an iPad. Rather than being an independent device with its own subscription and phone number, the watch functions as an extension of the paired phone's line.
### Number-Sharing vs. Multi-SIM
The dominant model for cellular smartwatches is **number-sharing** (also called a companion plan or connected-device plan):
- The watch uses the **same phone number** as the paired phone
- Incoming calls and messages ring on both the phone and the watch
- When the phone is nearby (via Bluetooth), the watch routes cellular traffic through the phone
- When the phone is out of Bluetooth range, the watch connects directly to the mobile network using its own eSIM
Some carriers structure this as **multi-SIM**, where the watch is treated as a secondary line sharing the primary account's data pool and number. The practical behavior is similar to number-sharing.
In either model, the watch's eSIM is not an independent subscription — it is linked to the phone account by the carrier. The watch cannot function as a standalone phone on a separate number under these plans.
### What the Watch eSIM Stores
The eSIM chip inside a cellular smartwatch conforms to the same GSMA SGP.22 standard used in smartphones and tablets. It stores a carrier profile provisioned by your carrier. Unlike iPhone — which can store 8 or more eSIM profiles — smartwatch eSIMs support fewer stored profiles: Apple Watch supports up to five carrier plans, and Google Pixel Watch can store more than one. Only one profile is active at a time. Provisioning is managed through the companion app on the paired phone rather than directly on the watch.
---
## Apple Watch GPS+Cellular and eSIM
Apple Watch models labeled **GPS+Cellular** include an eSIM chip and an LTE radio. Models labeled **GPS** (or **Apple Watch SE GPS**) have neither and cannot connect to a mobile network independently. The GPS+Cellular designation has been present since Apple Watch Series 3.
### How to Identify a Cellular Apple Watch
The red circle on the Digital Crown is a visual indicator used on many Apple Watch Cellular models, though it is not universal across all generations and colors. The most reliable method: check **Settings > Cellular** on the watch itself — if the menu is present, the watch supports cellular. Alternatively, check the product page on Apple's website using the watch's model number.
### Carrier Support for Apple Watch
Apple maintains an official list of supported carriers for Apple Watch Cellular. Carrier availability varies significantly by country:
- In the United States, all three major carriers (AT&T, T-Mobile, Verizon) support Apple Watch Cellular plans
- In other countries, support depends on the carrier's network infrastructure and agreements with Apple
- Some smaller carriers and MVNOs do not support Apple Watch even if they offer iPhone eSIM plans
Before purchasing an Apple Watch GPS+Cellular, confirm that your carrier is listed on Apple's supported carriers page for your country. If your carrier is not listed, the cellular features of the watch will not work.
### Setting Up Cellular on Apple Watch
Setup is managed entirely through the **Apple Watch app** on the paired iPhone:
1. Open the **Watch** app on iPhone
2. Tap **Cellular**, then tap **Set Up Cellular**
3. The app displays supported carriers in your region; select yours
4. Follow the carrier's activation flow — this typically redirects to a carrier screen within the app
5. Your carrier provisions an eSIM profile to the watch over the air
An active data connection (Wi-Fi or iPhone cellular) is required during setup. The watch downloads its eSIM profile from the carrier's provisioning server. Once the profile is installed, the watch can connect to the network independently.
You cannot set up Apple Watch Cellular by scanning a QR code directly on the watch or through any eSIM setup flow on the watch itself. The provisioning is initiated and completed entirely through the Apple Watch companion app.
### What Apple Watch Cellular Supports
When away from the paired iPhone, Apple Watch Cellular can:
- Make and receive phone calls (using the same number as the iPhone)
- Send and receive messages (iMessage and SMS via your number)
- Use apps that require data connectivity (maps, weather, streaming music)
- Use emergency SOS
The watch **cannot** make calls to phone numbers not in your contacts without the paired iPhone nearby, as Siri on Apple Watch requires the phone or a server connection for some functions.
---
## Wear OS and Galaxy Watch Cellular
Android smartwatch platforms — primarily **Wear OS** and Samsung's **Galaxy Watch** series — also support cellular connectivity via eSIM on qualifying models.
### Galaxy Watch Cellular Models
Samsung Galaxy Watch models sold as **LTE** or **cellular** variants include an eSIM. Wi-Fi-only variants do not. Samsung's LTE-capable models have spanned multiple generations of Galaxy Watch, Galaxy Watch Active, Galaxy Watch 3, and the current Galaxy Watch series.
Galaxy Watch cellular typically pairs with Android phones running Samsung's **Galaxy Wearable** app, but selected Galaxy Watch models also support pairing with non-Samsung Android phones and iPhones for certain features. Carrier plan availability and setup flow depend on which phone is paired.
### Wear OS Cellular Models
Various manufacturers — including Google (Pixel Watch series) and others — produce Wear OS watches with LTE capability. These include their own eSIM chip and follow the same carrier-dependent setup model. The companion app used for setup depends on the watch manufacturer (e.g., the Pixel Watch app for Google's watches).
### Carrier Support for Wear OS and Galaxy Watch
As with Apple Watch, cellular functionality on Android smartwatches requires that your carrier specifically supports watch plans. Carrier support for Wear OS and Galaxy Watch is **not** guaranteed just because the carrier supports eSIM on Android phones.
- In markets where watch plans are available, setup is initiated through the companion app (Galaxy Wearable, Google Pixel Watch app, or the manufacturer's equivalent)
- The watch eSIM profile is provisioned by the carrier through the app, not through a standalone QR code scan
- Carrier plans for Android watches are subject to the same number-sharing model described above
Check your carrier's connected-device or smartwatch plan page to confirm compatibility before purchasing a cellular watch model.
---
## Carrier Requirements and Plan Structure
Cellular smartwatch functionality depends on three layers of support:
1. **Carrier eSIM support for watches** — distinct from phone eSIM support; the carrier must have deployed specific watch provisioning infrastructure
2. **Carrier plan availability** — a watch add-on or connected-device plan must exist and be available for your account type
3. **Companion app integration** — the carrier must be integrated into the watch companion app's setup flow (Apple Watch app, Galaxy Wearable, etc.)
### Monthly Watch Plans
Carriers that support cellular watches typically offer a monthly add-on fee that links the watch to an existing phone account. The watch shares the phone's number and, in most cases, draws from a shared data pool. The structure is similar to adding a tablet or other connected device to a mobile account.
No pricing is listed here — plan costs vary by carrier and region and change over time. Check your carrier's website for current watch plan options. Carriers typically list these under "connected devices," "add a device," or "wearables."
### MVNOs and Watch Plans
Most MVNOs do not offer watch plans. MVNO infrastructure is generally built for smartphone SIM activation and does not include the watch-specific provisioning system that Apple and Samsung require. If you are on an MVNO and want cellular watch functionality, the most practical path is to check with the parent MNO — if they support watch plans, your MVNO may or may not pass that capability through.
For an explanation of the difference between MNOs and MVNOs, see [What Is a Dual SIM?](/en/guides/what-is-dual-sim/) provides context on how multiple lines and profiles work across devices.
---
## Travel eSIMs Cannot Be Used on a Smartwatch
This is one of the most common points of confusion for users who rely on travel eSIM profiles for international connectivity.
**Travel eSIM profiles designed for smartphones cannot be installed on Apple Watch, Galaxy Watch, or Wear OS watches.** The reasons are structural:
- Smartwatch eSIM provisioning is handled exclusively through the carrier-integrated companion app. There is no mechanism on the watch to scan a QR code or enter an activation code from a travel eSIM provider.
- Travel eSIM providers issue profiles that work within the GSMA SGP.22 standard for smartphones. Watch provisioning uses the same standard, but the provisioning flow is controlled end-to-end by the carrier and the companion app — third-party profiles cannot be injected.
- Apple, Samsung, and Google have not opened their watch eSIM provisioning flows to third-party travel eSIM providers.
**Practical consequence for travelers**: When you travel internationally with a cellular smartwatch, the watch will either:
- Roam on its home carrier's network (roaming charges apply, subject to your carrier's watch roaming policy)
- Lose cellular connectivity if the home carrier's roaming is not active in the destination country
To maintain watch cellular connectivity abroad at local rates, you would need a watch plan from a carrier in the destination country — which is not practically available to most travelers. Most users with cellular watches rely on the phone's data connection (via Bluetooth) for watch connectivity abroad, rather than independent watch cellular.
For travel data connectivity on a smartphone with eSIM, see [How to Use eSIM on an iPad](/en/guides/esim-on-ipad/) for context on how travel eSIM profiles work on tablets, and the travel section on [SimFinder Travel](/en/travel/) to compare travel eSIM plans for smartphones.
---
## Managing the Watch eSIM Profile
Unlike smartphones — which can store many eSIM profiles and switch between them — smartwatches support fewer stored profiles and only one active carrier profile at a time. Profile management is handled through the companion app on the paired phone.
For context on how eSIM profile storage limits work on phones, see [eSIM Profile Limits: How Many You Can Store and Use](/en/guides/esim-profile-limits/).
### Adding and Removing Plans
- **To add a plan**: use the Watch app (Apple Watch), Galaxy Wearable (Samsung), or the equivalent companion app. The carrier's setup flow is embedded within the app.
- **To remove a plan**: navigate to the Cellular settings in the companion app and select the option to remove or cancel the plan. This deletes the eSIM profile from the watch. Notify the carrier to cancel the monthly charge.
- **To switch carriers**: remove the existing plan through the companion app, then set up a new plan with the new carrier through the same app.
### If the Watch or Phone Is Lost
If the paired phone is lost, the watch retains its eSIM profile and can continue to operate independently as long as the carrier plan remains active. To cancel the watch plan, contact the carrier directly. If the watch itself is lost, contact the carrier to deactivate the watch's eSIM profile and stop billing.
---
## Compatibility Summary
| Platform | Cellular Capability | eSIM Standard | Setup Method | Travel eSIM |
|---|---|---|---|---|
| Apple Watch GPS+Cellular | Yes (number-sharing) | GSMA SGP.22 | Apple Watch app on iPhone | Not supported |
| Samsung Galaxy Watch LTE | Yes (number-sharing) | GSMA SGP.22 | Galaxy Wearable app | Not supported |
| Wear OS (LTE models) | Yes (number-sharing) | GSMA SGP.22 | Manufacturer companion app | Not supported |
| Apple Watch GPS (no Cellular) | No | — | — | — |
| Wi-Fi-only watches | No | — | — | — |
Cellular capability on a smartwatch requires:
- A GPS+Cellular or LTE model (not a GPS/Wi-Fi-only variant)
- A carrier that supports watch plans in your country
- An active watch add-on plan from that carrier
---
## Troubleshooting Common Issues
**"Cellular unavailable" on Apple Watch**
The most common causes are: the carrier plan has not been fully provisioned, the watch is out of range of a cellular network, or the watch's software needs an update. In the Apple Watch app on iPhone, navigate to **Cellular** and check whether the plan shows as active. If the plan is listed as inactive or shows an error, tap to re-add the plan, which re-initiates the carrier's provisioning flow.
**Watch cellular works on some networks but not others while traveling**
This is roaming behavior. If your carrier's watch plan does not include roaming in a given country, the watch cannot connect to local networks there. Check your carrier's roaming policy specifically for watch plans — roaming terms for watch add-ons are often different (and more restrictive) than those for the primary phone line.
**eSIM provisioning fails during setup**
Ensure the paired phone has an active data connection (Wi-Fi or cellular) during watch setup. If the setup consistently fails, contact the carrier — the issue is usually on the carrier's provisioning infrastructure side, not the watch itself. Restarting the companion app and retrying often resolves transient errors.
---
## Summary
- **Cellular smartwatches** (Apple Watch GPS+Cellular, Galaxy Watch LTE, Wear OS LTE models) use an embedded eSIM to connect to mobile networks independently from the paired phone
- **Number-sharing** is the standard model: the watch shares the same phone number as the paired phone
- **Carrier support is required** and varies by country; not all carriers that offer eSIM for phones also offer watch plans
- **A separate monthly watch plan** is typically required as an add-on to an existing phone account
- **Setup is managed through the companion app** (Apple Watch app, Galaxy Wearable, etc.) — not via QR code scanning on the watch
- **Travel eSIMs cannot be used on smartwatches** — third-party eSIM profiles cannot be installed through watch provisioning flows
- **MVNOs generally do not offer watch plans**; check the parent MNO if cellular watch functionality is important
---
## Related Guides
- [eSIM-Compatible Devices and How to Check Yours](/en/guides/esim-compatible-devices/)
- [What Is an eSIM? How It Works, Benefits, and Supported Devices](/en/guides/what-is-esim/)
- [How to Use eSIM on an iPad](/en/guides/esim-on-ipad/)
- [What Is a Dual SIM?](/en/guides/what-is-dual-sim/)
- [eSIM Profile Limits: How Many You Can Store and Use](/en/guides/esim-profile-limits/)
================================================================================
# eSIM Profile Limits: How Many You Can Store and Use
URL: https://sim-finder.com/en/guides/esim-profile-limits/
Type: guides (en)
Published: 2026-06-04
A single iPhone can store 8 or more eSIM profiles, but under the baseline GSMA SGP.22 v2.x standard, only one can be active at a time. iPhone 13 and later support dual eSIM — two profiles active simultaneously — and Android 13 and later support MEP (Multiple Enabled Profiles), which also enables multiple simultaneous active profiles on a single eUICC chip. When storage is full, you must delete a profile before adding a new one; whether you can recover a deleted profile depends on your provider's reinstallation policy. For a direct comparison of how eSIM handles profiles relative to physical SIM cards, see [Physical SIM vs eSIM](/en/guides/sim-vs-esim/).
---
## Storage Limit vs. Activation Limit: Two Different Things
When people ask "how many eSIMs can I have," there are two separate questions with two different answers:
1. **How many profiles can I store?** — This is the storage limit, determined by the eUICC chip's memory.
2. **How many profiles can be active (in use) at the same time?** — This is the activation limit, determined by the GSMA specification version and device model.
Understanding both is essential before you install profiles, because running out of storage forces a deletion decision that may be irreversible.
---
## How Many eSIM Profiles Can You Store?
### The Specification Has No Fixed Number
The GSMA SGP.22 specification — which governs eSIM on consumer devices — does not set a fixed upper limit on the number of profiles an eUICC can store. The practical limit is the available memory on the eUICC chip, which varies by device model.
### iPhone: 8 or More
Apple states on its official support page that iPhone can store **8 or more eSIM profiles**. The exact number depends on the specific model's eUICC chip. Apple does not publish a per-model breakdown beyond this figure.
This means you can install profiles from your home carrier, a work carrier, and several travel eSIM providers — all stored simultaneously — and switch between them from Settings without reinstalling.
### Android: Varies by Device
Android devices do not share a single manufacturer-published storage figure. Storage capacity depends on the eUICC chip inside each device. Android manufacturers — including Google, Samsung, Motorola, and others — do not universally publish a per-model storage limit. The storage capacity for specific models such as Pixel 4a and Pixel 5 is not officially published per model. Check the specification sheet or support page for your specific model.
### The Practical Takeaway
For most users, 8 or more stored profiles is enough to maintain a home plan, a work plan, and several travel eSIMs across different regions, all pre-installed and ready to activate without reinstalling.
To check whether your device supports eSIM and how to confirm it has eUICC hardware, see [eSIM-Compatible Devices and How to Check Yours](/en/guides/esim-compatible-devices/).
---
## How Many eSIMs Can Be Active at Once?
### SGP.22 v2.x: One Active Profile at a Time
Under GSMA SGP.22 v2.x — the version that covers the vast majority of eSIM-capable devices sold through 2023 — a single eUICC can have only **one profile in the Enabled (active) state** at any moment. All other stored profiles are in a Disabled state: they remain on the chip and can be switched to, but they are not transmitting or receiving data until activated.
Switching the active profile is done through the device's Settings app. On iPhone: **Settings → Cellular → [select a stored plan] → Turn On This Line**. The switch takes effect within seconds.
This one-at-a-time restriction is why dual-SIM configurations on earlier eSIM phones used one physical SIM plus one eSIM — a physical SIM for one line and a single active eSIM for the other.
### SGP.22 v3.0: MEP Allows Multiple Active Profiles
GSMA SGP.22 v3.0 introduced **MEP (Multiple Enabled Profiles)** as an optional feature. MEP allows more than one eSIM profile to be in the Enabled state simultaneously on a single eUICC — meaning a device with no physical SIM slot can function as a dual-SIM or multi-SIM phone using only eSIM profiles.
MEP is optional: a device manufacturer must choose to implement it. Not every device released after v3.0 supports MEP.
For a broader overview of how the SGP.22 specification versions relate to consumer device features, see [What Is an eSIM?](/en/guides/what-is-esim/).
---
## MEP on Android
### Android 13 and MEP
Android 13 introduced OS-level MEP (Multiple Enabled Profiles) support that is variant-independent — meaning the OS can handle multiple simultaneously active profiles on a single eUICC regardless of which specific MEP variant the hardware implements.
Android 14 introduced named support for **MEP-A1 and MEP-B** as defined in GSMA SGP.22 v3.0. MEP-A1 enables two eSIM profiles to be active simultaneously on a single eUICC; MEP-B is the second variant. The AOSP (Android Open Source Project) documentation covering MEP support is available at the Android Open Source Project site.
### What MEP Means in Practice
On Android phones with MEP support:
- Two eSIM profiles can be active simultaneously — each on its own data and voice session
- No physical SIM slot is required for dual-SIM operation
- eSIM-only flagship Android devices (such as US-market Pixel 10 models) can operate as full dual-SIM devices
On Android phones without MEP support — including most devices running Android 12 or earlier, and some Android 13/14 devices whose hardware does not include MEP — only one eSIM profile can be active at a time, even if the OS supports MEP.
---
## Dual eSIM on iPhone
### iPhone 13 and Later: Two Simultaneous eSIMs
Starting with iPhone 13 (2021) and iPhone SE 3rd generation, Apple implemented dual eSIM support — **two eSIM profiles active at the same time**, with no physical SIM required.
| iPhone Generation | Dual-SIM Configuration |
|---|---|
| iPhone XS / XS Max / XR through iPhone 12 series | Physical SIM + 1 eSIM (one active eSIM at a time) |
| iPhone 13 / 13 mini / 13 Pro / 13 Pro Max / SE (3rd gen) and later | Physical SIM + eSIM **or** two eSIMs simultaneously |
| iPhone 14–16e (US models) | eSIM-only: two eSIMs simultaneously |
| iPhone 17 (US, Canada, Mexico, Japan, and several other regions) | eSIM-only: two eSIMs simultaneously |
| iPhone Air (all regions) | eSIM-only: two eSIMs simultaneously |
Source: [Apple Support — Learn which type SIM your iPhone or iPad uses](https://support.apple.com/en-us/118569)
### Stored Profiles vs. Active Profiles on Dual eSIM iPhone
Even on dual eSIM iPhones, the 8-or-more storage limit still applies to the total number of stored profiles. The change is in the activation limit: you can now have **two profiles in the Enabled state simultaneously** rather than one.
The remaining stored profiles (profiles 3 through 8+) stay Disabled and can be switched to at any time.
For configuration details — line labels, default data line, Allow Cellular Data Switching, and per-contact line assignment — see [Dual SIM Setup on iPhone](/en/guides/dual-sim-iphone/).
---
## What Happens When Storage Is Full
### You Must Delete Before Adding
If you attempt to add a new eSIM profile when the storage limit is reached, your device will prompt you to delete an existing profile to make room. There is no way to exceed the eUICC's storage capacity.
### Deletion May Be Permanent
This is the most consequential aspect of storage limits. Deleting an eSIM profile removes it from the eUICC. Whether you can reinstall the same profile depends entirely on your carrier or eSIM provider:
- **Home carrier plans**: Most carriers allow re-provisioning via their app or website. Some charge a re-issue fee. Check your carrier's policy.
- **Travel eSIM providers**: Many third-party travel eSIM providers do not allow reinstallation after deletion. Once deleted, the profile cannot be re-downloaded from the same QR code or activation link — a new purchase is required.
Before deleting any eSIM profile, confirm the provider's reinstallation policy. If the provider does not allow reinstallation, consider whether you still need that profile before removing it.
If you need to add a profile again after deleting it, you will have to re-enter the activation details provided by your carrier. For a step-by-step walkthrough of that process, see [Set Up eSIM with a Manual Code (SM-DP+ Address)](/en/guides/manual-code/).
---
## Managing Multiple Profiles Efficiently
### Naming and Labeling
Both iPhone and most Android devices let you rename stored eSIM profiles. Giving each profile a recognizable label — such as "Home", "Work", "Japan Data", or "EU Travel" — makes switching faster and reduces errors, especially when several profiles are stored.
On iPhone: **Settings → Cellular → [tap a plan] → Cellular Plan Label**.
### Turning Off Lines Without Deleting
On iPhone, you can turn a line off without deleting the eSIM profile. Go to **Settings → Cellular → [tap a plan] → Turn On This Line** (toggle off). The profile stays stored on the device and can be re-enabled at any time without reinstalling. This is useful for plans you do not use regularly but want to keep available.
### Disabling vs. Deleting
| Action | Profile Remains on Device | Can Reactivate Without Reinstalling |
|---|---|---|
| Turn Off Line (disable) | Yes | Yes |
| Delete eSIM | No | Depends on provider policy |
For plans you are finished with permanently — such as a used travel eSIM — deletion frees storage space. For plans you might use again, disabling is safer than deleting.
---
## Profile Lifecycle: When to Add, When to Disable, When to Delete
### Before You Install a New Profile
Confirm two things before downloading a new eSIM profile:
1. **Is there storage space?** On iPhone, you can check the number of stored profiles at **Settings → Cellular** — each installed plan is listed. If you are close to 8, assess which profiles you no longer need before adding another.
2. **What is the provider's reinstallation policy?** If you may need to delete a profile in the future, know in advance whether you can re-download it or whether deletion is permanent.
### Profiles You Are Actively Using
Keep these enabled. If you are using dual eSIM (iPhone 13+ or an Android device with MEP), two profiles can be enabled simultaneously. Switching the default data line is done at **Settings → Cellular → Cellular Data** on iPhone.
### Profiles You Use Occasionally (e.g., Travel Plans with Remaining Data)
Disable rather than delete. Disabling a line removes it from active use without touching the stored profile. The data balance on prepaid travel eSIMs is tied to the carrier's backend, not to the profile state on your device — disabling the line does not forfeit unused data, but verify the provider's data expiry terms, as prepaid data has a validity period set by the carrier.
### Profiles You Are Finished With
Delete to free storage. Before deleting:
- Confirm you have used all remaining data if it is a prepaid plan.
- Confirm the provider's reinstallation policy (can you re-download if needed?).
- If using iPhone: consider using [eSIM Quick Transfer](/en/guides/transfer-iphone/) to move the profile to a new device before deleting from the old one.
---
## Comparison: Storage and Activation Limits by Platform
| Platform / Standard | Max Stored Profiles | Max Simultaneously Active |
|---|---|---|
| GSMA SGP.22 v2.x (baseline) | Hardware-dependent; no spec limit | 1 |
| GSMA SGP.22 v3.0 MEP | Hardware-dependent; no spec limit | 2+ (optional feature) |
| iPhone XS–12 series | 8 or more (Apple) | 1 eSIM + 1 physical SIM |
| iPhone 13 and later | 8 or more (Apple) | 2 eSIMs simultaneously |
| Google Pixel 4a / 5 | Not officially published per model | 1 (v2.x) |
| Google Pixel 7 and later | Not published per-model | 2 eSIMs simultaneously |
| Android 13+ with MEP | Hardware-dependent | 2+ (if MEP implemented by OEM) |
Sources: Apple Support (support.apple.com/en-us/118569), Android Open Source Project (source.android.com/docs/core/connect/esim-mep), GSMA SGP.22 specification.
---
## Key Facts Summary
- **Storage limit**: Hardware-determined; the GSMA specification sets no fixed upper limit. Apple states 8 or more on iPhone; per-model figures for Android devices are generally not officially published.
- **One active at a time (SGP.22 v2.x)**: The baseline standard allows only one Enabled profile on a single eUICC. All others are Disabled until you switch.
- **Dual eSIM (iPhone 13+)**: Two profiles active simultaneously. No physical SIM required on eSIM-only models.
- **MEP (Android 13+)**: Multiple Enabled Profiles from SGP.22 v3.0. Android 13 introduced OS-level MEP support (variant-independent); Android 14 introduced named MEP-A1 and MEP-B support as defined in GSMA SGP.22 v3.0. Device must implement MEP in hardware.
- **Deleting to make room**: Required when storage is full. Deletion may be irreversible — check provider policy before proceeding.
- **Disabling without deleting**: Available on iPhone; keeps the profile on-device without consuming an active slot.
To find carriers and travel eSIM providers that support eSIM in your destination, use the eSIM filter on [SimFinder](/en/).
---
## Related Guides
- [What Is an eSIM?](/en/guides/what-is-esim/) — How eUICC works, the SGP.22 standard, and profile downloading
- [eSIM-Compatible Devices and How to Check Yours](/en/guides/esim-compatible-devices/) — Which iPhones and Android phones support eSIM, and how to verify your device
- [Physical SIM vs eSIM: Differences and How to Choose](/en/guides/sim-vs-esim/) — Side-by-side comparison of both technologies across all key dimensions
- [Set Up eSIM with a Manual Code (SM-DP+ Address)](/en/guides/manual-code/) — How to enter eSIM activation details manually when a QR code is unavailable or after re-adding a deleted profile
- [Dual SIM Setup on iPhone: Complete Configuration Guide](/en/guides/dual-sim-iphone/) — Line labels, default data line, and per-contact assignment for dual eSIM
================================================================================
# EU Roaming Explained — Roam Like At Home (RLAH) in Full Detail
URL: https://sim-finder.com/en/guides/eu-roaming/
Type: guides (en)
Published: 2026-05-20
The EU's Roam Like At Home (RLAH) regulation is one of the most significant consumer protections in telecommunications. Since June 2017, EU and EEA residents can use their home mobile plan in any other EU or EEA country without paying extra roaming surcharges. This guide explains exactly how the regulation works, which countries are included and excluded, the fair use rules that apply, and — critically — who does and does not benefit.
**Key facts up front:**
- RLAH has been in force since June 15, 2017, based on EU Regulation 531/2012 as amended.
- The 2022 revision (Regulation 2022/612) extends RLAH through June 30, 2032, and adds quality of service requirements.
- 32 countries are covered: 27 EU member states, Iceland, Norway, and Liechtenstein, plus Ukraine and Moldova (from 1 January 2026).
- Switzerland, the UK (post-Brexit), and micro-states such as Monaco and Vatican City are **not** covered.
- RLAH applies only to subscribers with EU/EEA-issued SIM contracts. Travelers from outside the EU using a non-EU SIM do **not** benefit.
For a broader comparison of all travel connectivity options, see [4 Ways to Stay Connected Abroad](/en/guides/four-options/). For definitions of terms used throughout this article — EEA, PLMN, wholesale cap, and others — see the [Glossary of Mobile and eSIM Terms](/en/guides/glossary-index/).
---
## What Is Roam Like At Home (RLAH)?
Roam Like At Home is a regulatory framework that prohibits mobile carriers licensed in EU and EEA member states from charging their domestic subscribers additional roaming surcharges when those subscribers travel within the EU/EEA zone.
In practical terms: if your carrier is based in, say, Germany, France, or Sweden, and you travel to Italy, Spain, or any of the other covered countries, your plan's calls, texts, and data allowances apply as if you were at home. The carrier cannot add a per-minute roaming fee, a per-SMS surcharge, or a per-megabyte data roaming charge on top of your normal plan rate.
The legal foundation is **Regulation (EU) 531/2012** on roaming on public mobile communications networks. This regulation was progressively amended — most importantly by Regulation (EU) 2017/920, which abolished the final retail roaming surcharges from June 15, 2017. The regulation was then substantially revised and extended by **Regulation (EU) 2022/612**, adopted in April 2022 and largely applicable from July 1, 2022, which runs through June 30, 2032.
RLAH did not happen overnight. The EU progressively reduced roaming charges over many years before the full abolition:
- 2012–2016: declining price caps on calls, SMS, and data
- June 15, 2017: retail roaming surcharges fully abolished for EU/EEA subscribers
For general context on how international roaming works technically — the AA.12 agreements, IPX infrastructure, and wholesale pricing — see [International Roaming Explained](/en/guides/international-roaming/).
---
## Countries Covered and Excluded
### The 32 Covered Countries
RLAH applies within the **European Economic Area (EEA)** plus two additional countries integrated by individual agreement:
**27 EU member states:**
Austria, Belgium, Bulgaria, Croatia, Cyprus, Czechia, Denmark, Estonia, Finland, France, Germany, Greece, Hungary, Ireland, Italy, Latvia, Lithuania, Luxembourg, Malta, Netherlands, Poland, Portugal, Romania, Slovakia, Slovenia, Spain, Sweden.
**3 EEA non-EU countries (through separate EEA Agreement):**
Iceland, Liechtenstein, Norway.
**2 additional countries integrated from 1 January 2026:**
Ukraine, Moldova.
On 1 January 2026, Ukraine and Moldova became the first non-EU/non-EEA countries integrated into the EU roaming area, following Council decisions adopted on 25 July 2025. This is a unique arrangement — both countries have individual roaming integration agreements with the EU, separate from EEA membership.
When you travel between any two of these 32 countries and your carrier is based in one of them, RLAH applies.
### Countries Explicitly Not Covered
Several European countries are frequently mistaken for being covered, but are not:
| Country | Status | Reason |
|---------|--------|--------|
| **Switzerland** | Not covered | Not an EEA member; voted against EEA membership in 1992. Switzerland has its own national telecom regulation. |
| **United Kingdom** | Not covered (as of January 1, 2021) | Left the EU and EEA on Brexit. Regulation 531/2012 no longer applies to UK-licensed carriers. |
| **Monaco** | Not covered | Not an EU or EEA member state. |
| **Vatican City** | Not covered | Not an EU or EEA member state. |
| **San Marino** | Not covered | Not an EU or EEA member state. |
| **Andorra** | Not covered | Not an EU or EEA member state. |
| **Turkey** | Not covered | EU candidate country; unlike Ukraine and Moldova, Turkey has no individual roaming integration agreement with the EU, so candidacy alone does not grant RLAH rights. |
**Switzerland is a common mistake.** It is surrounded by EU countries and has many bilateral agreements with the EU, but it is not part of the EEA and is not covered by RLAH. Travelers crossing into Switzerland from France or Italy on an EU SIM will typically trigger standard international roaming charges on their plan. Check your carrier's policy before crossing the Swiss border.
---
## Who Benefits: Eligible Contracts
RLAH protects **EU/EEA-licensed carrier subscribers** traveling within the EU/EEA. Specifically:
- Your contract must be with a carrier that holds a license under an EU or EEA member state's regulatory framework.
- The subscriber (you) must be a customer of that carrier — RLAH does not depend on your nationality or residency, only on where your carrier is licensed.
- Both prepaid and postpaid contracts issued by EU/EEA carriers qualify, provided the plan is a domestic plan (not a roaming-specific or visiting-travelers plan).
### Who Does NOT Benefit from RLAH
**Travelers from outside the EU using a non-EU SIM card do not benefit from RLAH.** This is a firm boundary.
If you travel to France using a SIM from the United States, Canada, Japan, Australia, the UK, India, or any country whose carrier is not licensed under an EU/EEA framework, RLAH does not apply. Your carrier will charge whatever international roaming rate applies under its own commercial agreements — which may be significantly higher than domestic EU rates.
For non-EU travelers visiting the EU, the practical alternatives are:
- **A travel eSIM** covering EU/EEA countries — typically the most convenient option, installable before departure. See [Your First Travel eSIM](/en/guides/first-time-guide/) for setup instructions.
- **A local prepaid SIM** purchased in an EU country — cost-effective for longer stays but requires in-store registration (Germany, for example, requires in-person identity verification for all SIM purchases).
- **Home carrier international roaming day pass** — check your carrier's published pass options and destination coverage before relying on this.
The [Pre-Trip Connectivity Checklist](/en/guides/pre-trip-checklist/) covers what to confirm before departure regardless of which option you choose.
---
## The 4-Month Rule and Fair Use Policy
RLAH is designed for travelers and people who genuinely live in one EU/EEA country and occasionally travel to others. It is not intended to allow someone who has permanently relocated to another EU country to continue using a cheaper home-country contract indefinitely as if they were still a domestic user.
To address this, the regulation includes a **fair use policy (FUP)** framework.
### The Stability-of-Link Rule
A carrier may apply a surcharge if **both** of the following conditions are met:
1. **The subscriber's presence in the visited country exceeds their presence at home.** The carrier analyzes the subscriber's usage pattern. If over a rolling period (typically assessed over the most recent 4 months), the subscriber is spending more time roaming in other EU/EEA countries than at their home-country network, this is a signal.
2. **The subscriber cannot demonstrate signs of a stable link to their home country.** Indicators of a stable link include: the subscriber having an active contract at the home-country address, regular voice call activity in the home country, consistent use of the home network when at home, and similar patterns. If the subscriber shows no signs of being genuinely based in the home country, the carrier may conclude there is no stable link.
Only when both conditions are present together — predominantly non-domestic presence **and** no stable link — can the carrier apply an additional charge. Carriers cannot apply a surcharge based on duration alone without also assessing the stable-link indicators.
### The 4-Month Practical Benchmark
While the regulation does not set a fixed 4-month rule as a hard cutoff, the **Commission's implementation guidelines** treat a period of more than 4 consecutive months of predominantly roaming usage as a threshold that can prompt a carrier's assessment. Carriers are required to give the subscriber **two weeks' written notice** before applying any surcharge, and the subscriber can dispute the assessment.
### Who Typically Triggers the FUP
In practice, the FUP is not triggered for:
- Tourists and leisure travelers making multi-week or multi-month trips.
- Business travelers frequently moving between EU countries.
- Students doing an exchange semester abroad, who typically retain clear links to their home country.
It can be relevant for:
- Expats who have moved permanently to another EU country but kept a home-country SIM for cheaper rates.
- Retired people who spend the majority of the year abroad.
---
## Data Caps Formula
RLAH abolished retail roaming surcharges, but the regulation does not require carriers to provide unlimited roaming data at all price points. Instead, a **minimum roaming data volume** must be included in domestic plans at no extra charge, calculated using a formula tied to wholesale roaming costs.
### The Regulatory Framework
The data cap formula is established by **Commission Implementing Regulation (EU) 2016/2286**, which defines the method for calculating the minimum data volume that must be made available for roaming.
The formula is based on the **regulated maximum wholesale roaming rate** (the price a home carrier pays the visited network for data):
> **IDV (Included Data Volume) ≥ 2 × (domestic plan monthly price excl. VAT ÷ regulated wholesale data cap per GB)**
This is the exact formula defined in Commission Implementing Regulation (EU) 2016/2286, Annex I. The **factor of 2** is explicit in the regulation — the minimum included roaming data is at least twice the simple price-to-cap ratio. As the wholesale cap decreases over time (it has been progressively lowered since 2017), the minimum included data volume increases proportionally.
### Evolution of Wholesale Data Caps
The regulated wholesale data cap has fallen significantly:
- 2017 (from 15 June): €7.70/GB
- 2018: €6.00/GB
- 2019: €4.50/GB
- 2020: €3.50/GB
- 2021: €3.00/GB
- 2022 (January–June): €2.50/GB
- 2022 (from 1 July, Regulation 2022/612): €2.00/GB
- 2023: €1.80/GB
- 2024: €1.55/GB
- 2025: €1.30/GB
- 2026: €1.10/GB
- 2027–2032 (through 30 June 2032): €1.00/GB
As the wholesale cap falls, the formula produces a **higher minimum included data volume** for the same plan price. This is why the practical impact of the data cap rule has become less visible over time — most typical plans now cover a substantial amount of roaming data under the formula.
### Practical Implications
- **Carriers cannot charge a per-GB roaming surcharge** on data consumed within the calculated minimum volume.
- **Beyond the minimum**, carriers may restrict further roaming data use (for example, by throttling speed or requiring the purchase of a roaming add-on), but they cannot charge a rate that exceeds the regulated wholesale rate plus a small permitted margin.
- **Unlimited domestic data plans**: carriers with unlimited domestic plans must allow at minimum the volume calculated by the formula at roaming; they cannot cut off roaming data entirely, but they are not required to provide unlimited roaming data unless the formula calculation results in a very large minimum.
If you are planning heavy data use (streaming, remote work) during an extended EU trip and you have an EU SIM, check your carrier's published roaming data policy to understand whether they apply a speed throttle or volume cap after the regulated minimum.
---
## Quality of Service Guarantees (Reg 2022/612)
The original RLAH framework focused on price. **Regulation 2022/612** added explicit quality of service requirements that came into force in 2022.
### Same Generation Network Access
Under Regulation 2022/612, carriers and their roaming partners are required to ensure that subscribers can access **the same generation of mobile network** when roaming as they would at home, provided the visited network supports that generation.
In practice:
- If you have a 4G plan at home and travel to a country where the roaming partner operates a 4G network, you must be able to access that 4G network for data — the carrier cannot restrict you to 2G or 3G connectivity.
- If you have a 5G plan and travel to a partner network operating 5G, you should be able to access 5G, subject to coverage at your location.
This requirement prevents a situation where subscribers are silently downgraded to a slower network generation while roaming, even though faster infrastructure is physically available.
### Emergency Services Access
Regulation 2022/612 also strengthened requirements around access to emergency services (112 and other national emergency numbers) while roaming, ensuring that emergency calls function regardless of the subscriber's roaming status.
### Transparency Requirements
Carriers are required to provide clear information about roaming conditions, including any data volume caps or speed limitations that apply when roaming, before or at the time the subscriber enters roaming. This is typically delivered via an SMS notification when you arrive in a foreign EU/EEA country. These notifications often include links to your carrier's roaming information page — worth checking if you are unsure about your plan's roaming terms.
---
## Travelers Using a Non-EU SIM in the EU
This section is for travelers from outside the EU/EEA — from the US, UK, Japan, Australia, or elsewhere — visiting EU countries with a SIM card issued by a non-EU carrier.
**RLAH does not apply to you.** Your carrier is not subject to EU roaming regulation. You will be charged according to your home carrier's international roaming agreements and pricing, which is set entirely by commercial terms, not by EU regulation.
### What This Means in Practice
Your options when visiting EU countries with a non-EU SIM:
**Option 1: Home carrier roaming (day pass or included benefit)**
Many major non-EU carriers offer international day passes or trip passes that give you access to your domestic-style allowance while abroad. The quality and pricing vary widely. Check your carrier's current international roaming page — specifically:
- Whether the EU country you are visiting is covered
- Whether it is a pay-per-use charge or a flat-rate pass
- Whether the pass activates automatically on first network contact (triggering a charge at the airport) or requires manual activation
See [International Roaming Explained](/en/guides/international-roaming/) for a detailed breakdown of the three main roaming pricing models.
**Option 2: Travel eSIM**
A travel eSIM installed before departure gives you local-rate data access without triggering home-carrier roaming. Major travel eSIM providers offer European regional plans covering 40+ countries. You keep your home SIM active for calls and messages while routing data through the travel eSIM.
- Install the eSIM profile before you leave home (requires a Wi-Fi connection).
- Keep Data Roaming off on your home SIM while in the EU.
- Use VoIP apps for calls if your home SIM is on a non-EU plan without included EU calling.
For a step-by-step installation guide, see [Your First Travel eSIM](/en/guides/first-time-guide/).
**Option 3: Local prepaid SIM**
Buying a SIM card in an EU country gives you domestic rates for that country. Note that most EU countries require in-person identity verification — you will need your passport. Germany's Telekommunikationsgesetz requires full ID verification for all SIM purchases, prepaid or postpaid (in force since July 2017). Other EU countries have similar requirements.
For a full side-by-side comparison of these options including setup effort, cost considerations, and device requirements, see [4 Ways to Stay Connected Abroad](/en/guides/four-options/).
---
## Post-Brexit UK and Switzerland Situations
### United Kingdom
The UK formally left the EU and its single market on January 1, 2021. From that date, UK-licensed mobile carriers are no longer subject to Regulation 531/2012 or any of its amendments, including Regulation 2022/612.
**Consequences for UK subscribers traveling to the EU:**
- UK carriers are free to set their own roaming policies for EU travel.
- As of publication, the UK market is divided: some operators have voluntarily maintained free EU roaming as a commercial feature (typically as part of higher-tier plans), while others have reintroduced roaming surcharges.
- Policies have changed multiple times since 2021 and continue to vary by carrier, plan tier, and destination.
**What to check before EU travel with a UK SIM:**
- Your carrier's current EU roaming policy page
- Whether your specific plan tier includes EU roaming or requires an add-on
- Any fair-use data caps that apply to EU roaming under your plan
- Whether there is a per-day charge, a per-month charge, or usage-based billing
There is no regulatory guarantee of free EU roaming for UK subscribers. Treat it the same way a US or Australian traveler would: verify before departure, and have a backup option (travel eSIM or local SIM) if your carrier's policy is expensive.
**EU subscribers traveling to the UK:**
RLAH does not cover the UK. An EU-licensed subscriber traveling from Germany to the UK will have their carrier apply international roaming rates for UK usage. Some EU carriers include the UK in broader international bundles, but this is a commercial decision, not a regulatory requirement.
### Switzerland
Switzerland is not and has never been an EEA member. The country's voters rejected EEA membership in a 1992 referendum, and Switzerland's relationship with the EU is governed by a separate set of bilateral agreements that do not include RLAH-equivalent roaming provisions.
Switzerland has its own national telecommunications law (Fernmeldegesetz / Loi sur les télécommunications), which includes some consumer roaming protection measures under its 2021 revision, but these are not equivalent to RLAH.
**In practice:**
- EU subscribers traveling to Switzerland will trigger international roaming charges on their home carrier.
- Swiss subscribers traveling to EU countries are subject to their Swiss carrier's commercial international roaming terms.
- Non-EU travelers visiting both Switzerland and EU countries should plan their SIM/eSIM strategy to cover both — many European travel eSIM plans include Switzerland alongside EU countries, but verify the specific plan's country list.
If you are planning a trip that includes both EU countries and Switzerland (for example, a tour through France, Switzerland, and Italy), check your connectivity plan carefully. A travel eSIM that covers both EU and Swiss territory avoids the issue entirely — use the [SimFinder travel search](/en/travel/) to filter by destination countries and find plans covering your full itinerary.
---
## FAQ
See the FAQ items above for answers to:
- Which countries are covered by RLAH
- Whether RLAH applies to non-EU SIM cards
- How the fair use policy works
- The data cap formula and quality of service obligations
- The validity of RLAH through 2032
- The UK post-Brexit situation
- Best options for non-EU travelers visiting the EU
---
## Related Guides
- [International Roaming Explained](/en/guides/international-roaming/) — How home-carrier roaming works technically and the three main pricing models
- [4 Ways to Stay Connected Abroad](/en/guides/four-options/) — Full comparison of roaming, local SIM, travel eSIM, and portable Wi-Fi
- [Your First Travel eSIM](/en/guides/first-time-guide/) — Step-by-step guide to installing and activating a travel eSIM
- [Pre-Trip Connectivity Checklist](/en/guides/pre-trip-checklist/) — What to verify and configure before departure
- [Glossary of Mobile and eSIM Terms](/en/guides/glossary-index/) — Definitions for RLAH, EEA, IPX, and related terms
================================================================================
# Connectivity Strategy for Moving Abroad
URL: https://sim-finder.com/en/guides/expat-strategy/
Type: guides (en)
Published: 2026-06-06
When you move abroad as an expat, your mobile connectivity situation changes in three distinct ways: your home number becomes a liability if mismanaged, your usual phone plan stops being the right tool, and you need to build a permanent local setup in a market you may know little about. Each of these changes needs to be handled at a different time and in a specific order.
This article frames the move as three stages: what to do with your home number before or shortly after you leave, how to cover the gap from landing day until you are settled, and how to establish a permanent local line once you are in place. Handle them in sequence and you avoid the most common expat connectivity mistakes — a lapsed home number that deletes your bank account access, a roaming bill from using your home SIM carelessly, and weeks on an expensive travel plan because you delayed setting up a local one.
---
## Stage Overview: Three Decisions, Three Timelines
The three decisions are independent but they interact. Making the wrong call on the first one (your home number) can create problems that are hard to fix after the fact. Getting the second one right (arrival connectivity) is about bridging days to weeks, not months. The third decision (permanent local line) takes the most time because it depends on having arrived, settled, and gathered the documentation carriers in your destination typically require.
| Stage | Decision | Timing |
|---|---|---|
| 1 | What to do with your home number | Before you leave or in first weeks |
| 2 | Arrival connectivity | Before you leave (install eSIM in advance) |
| 3 | Permanent local line | After settling — weeks to months in |
---
## Stage 1 — Your Home Number: Keep It or Let It Go
### Why Your Home Number Matters More Than It Seems
The default option — cancelling your home plan when you leave — is the right call only if you have no accounts, no contacts, and no services that depend on that number. For most people, that is not the case.
Your home number is likely linked to:
- **Bank and financial account SMS authentication.** Many banks send one-time passwords (OTPs) by SMS when you log in or authorise a transaction. If the number is cancelled and reassigned to someone else, those codes reach a stranger. You may lose access to the account before you realise what has happened.
- **Two-factor authentication (2FA) for online services.** Any account configured to send a login verification code to that number will fail to reach you if the number is gone.
- **Contacts in your home country.** Family, doctors, government agencies, and employers may only have your home number. If you cancel without updating them, you become unreachable via that channel.
- **A return to your home country.** If there is any realistic chance you will return, keeping the number preserves your options. Porting a number back to a carrier after it has been reassigned is not possible.
### The Two Paths: Retain or Let Expire
**Retain the number** — through a cheap plan, a suspension service, or a port to a low-cost carrier — if any of the above applies. The [number storage guide](/en/guides/number-storage/) covers five specific approaches in detail: downgrading to your carrier's cheapest plan, keeping the number on an eSIM, porting to a low-cost MVNO or prepaid, using a carrier suspension service (available in some markets — Japan's au/KDDI, for example, offers a formal long-term suspension for subscribers living abroad), and porting to a VoIP service.
**Let it expire** only after you have completed an audit of every account that uses that number for SMS OTP and updated them to either a new number you are keeping or to an authenticator app. That audit takes time. Do not cancel the number before it is done.
### The SMS 2FA Problem Is the Critical Path
Before doing anything else, make a list of every account that uses your home number for SMS authentication. Common categories to check:
- Online banking and investment accounts
- Email and social media accounts with SMS 2FA enabled
- Messaging apps tied to your phone number (WhatsApp, Signal, iMessage)
- Work accounts, VPN access, and company authentication systems
- Government services and health portals
For each one, either migrate to an authenticator app (where the service allows it) or update the phone number to one you will keep active. This step takes longer than it sounds — financial institutions in particular often have multi-day verification processes for phone number changes.
This is not optional. A cancelled home number that was attached to your bank account creates account recovery problems that can take weeks to resolve and may require in-person visits to a branch in your home country.
---
## Stage 2 — Arrival Connectivity: Bridging the Gap
### What You Need on Day One
When you land, you need connectivity immediately: for navigation, for communication with whoever is picking you up or meeting you, and for the practical steps of early settlement (finding your accommodation, coordinating movers, researching local services). You need this before you have had any opportunity to set up a local plan.
Two options work for this:
**Travel eSIM (recommended).** Install a travel eSIM on your phone before you leave your home country, while you still have access to your home Wi-Fi. The eSIM profile downloads over Wi-Fi and installs in minutes. When your phone registers on the destination network after landing, you have working mobile data immediately — no airport SIM kiosk, no queue, no registration form in an unfamiliar language. Note: if data does not start automatically, open Settings and confirm the travel eSIM line is set as the active data source; most devices do this automatically, but on some you may need to switch manually. For a step-by-step guide to installing a travel eSIM, see [Your First Travel eSIM](/en/guides/first-time-guide/).
**International roaming on your home plan.** If your home carrier includes international roaming coverage in your plan at a cost that is acceptable for a few days to a couple of weeks, this is the zero-setup option. You land, your phone registers on a partner network, and you are connected. The risk is the cost: roaming rates on plans without a specific international allowance can add up quickly if you stay on roaming longer than planned. See [International Roaming Explained](/en/guides/international-roaming/) for how to check what your plan includes and how to avoid bill shock.
### How Long to Stay on a Temporary Connection
The answer depends on how quickly you can acquire the documentation and connectivity needed for a local plan. In some markets — the United States, Canada, and much of Western Europe — you can get a prepaid local SIM at an airport without any documentation. In others — Japan, South Korea, Germany, and various other countries — a local contract requires more: a registered address, a local ID or residence card, a bank account, or some combination. See [Regional Connectivity Guide](/en/guides/regional-overview/) for how registration requirements and local SIM availability differ across regions.
A reasonable expectation: you will be on a temporary connection for anywhere from a few days (if you can buy a local prepaid SIM immediately on arrival) to several weeks (if you need residency documentation before a carrier will accept your application for a contract).
### Keeping Your Home Number Reachable During the Gap
During the arrival period, you will likely be running two lines simultaneously: a travel eSIM or roaming data connection for internet, and your home SIM for calls and SMS to your home contacts. On a dual-SIM device, this is the standard setup: home SIM handles voice and SMS, travel eSIM handles data. Keep Data Roaming turned off on the home SIM to prevent it from generating data charges while the travel eSIM is handling data.
If your device supports it, this dual-SIM arrangement can continue even after you get a local line — you keep the home eSIM or physical SIM active on a cheap retention plan while the local SIM becomes your primary data and local calling line.
---
## Stage 3 — Permanent Local Line: Getting Set Up Like a Resident
### Why You Need a Local Line Eventually
Travel eSIMs are priced for short stays. They deliver good value for a week or two, but most expats find that the cost becomes hard to justify once they are settled and their usage patterns look more like a resident than a tourist. The crossover point varies by market, but a local monthly plan from a carrier in your destination country will almost always cost less per gigabyte than a travel eSIM at the same data volume.
Beyond cost, a local line gives you:
- **A local phone number**, which is required for many local services — registering for utilities, signing up for local apps, verifying delivery accounts.
- **Access to local carrier features** — VoLTE, Wi-Fi calling, and other network services that travel eSIM providers may not expose.
- **Network-appropriate quality**. A local SIM from a dominant carrier routes data directly through the local network; a travel eSIM may add a routing hop that affects speed.
### What You Typically Need to Apply
Requirements vary significantly by country. The [regional overview](/en/guides/regional-overview/) covers the major patterns. Common requirements include:
**In most markets:** a passport or national ID, a phone (obviously), and a payment method.
**In many markets for postpaid/contract plans:** proof of address (a utility bill, a lease, a bank statement addressed to you at the local address), and in some cases a local bank account for direct debit.
**In some markets:** a local residence registration document — in Japan, the primary identity document accepted by carriers is the Residence Card (在留カード / Zairyu Card), with a juminhyo address certificate sometimes required as supplementary proof of address; Germany uses the "Anmeldung" registration certificate; other countries with mandatory address registration have similar documents.
If you arrive before you have a registered address or local ID, a prepaid SIM — available at airports or convenience stores in most markets without extensive documentation — bridges the gap until you can apply for a contract plan.
### Prepaid vs. Contract: What Makes Sense for Expats
This decision mirrors the [how to choose a local plan](/en/guides/local-contract/) discussion, but with an expat-specific lens:
**Prepaid** is the right starting point if you are uncertain about your stay length, do not yet have the documentation for a contract, or want to test a carrier before committing. Prepaid plans in many markets are genuinely competitive with postpaid and do not require a credit check or long-term commitment. The trade-off is that auto-renewing monthly is a manual step on some carriers.
**Contract / postpaid** becomes the better choice once you are settled, have the documentation, and know you will stay for long enough to make the commitment worthwhile. Postpaid plans in most markets offer more data, sometimes better network priority, and easier customer service access. The lock-in term (commonly 12 or 24 months in many markets) is the main trade-off.
For expats who plan to stay for at least a year, a postpaid contract is usually the right long-term answer once you have residency documentation in place.
### The MNO vs. MVNO Question
In most markets, you have a choice between a contract with a major network operator (MNO) and a plan from a reseller (MVNO) that operates on an MNO's network. MVNOs are typically cheaper but may offer lower priority on congested networks, slower customer service, and fewer local features. For an expat whose primary concern is data for everyday life, an MVNO on a strong underlying network is often the better value.
What matters most is the quality of the underlying MNO's network at the locations where you will actually use it — your home, your workplace, and the areas you frequent. Use [SimFinder](/en/sim/) to compare local plans and carriers in your destination country, with coverage and network quality information for your area.
---
## Regional Differences Matter
The three-stage framework applies everywhere, but the specific steps within each stage vary by region. The [Regional Connectivity Guide](/en/guides/regional-overview/) covers these differences in detail. A few headline patterns:
**Europe (EU/EEA expats moving within the bloc):** If you are an EU resident moving to another EU country, your existing EU SIM likely continues to work under the Roam Like At Home regulation — though this was not designed for long-term residence and fair-use thresholds mean it is not a permanent substitute for a local line.
**Asia:** SIM registration requirements are among the most varied in the world. Japan and South Korea require documented identity registration. Some countries (Thailand as of 2025) require biometric checks. In markets with strict registration, getting a local contract as a foreigner can take longer and may require your residence registration to be in place first.
**North America:** Low-friction prepaid options are widely available, including eSIM prepaid, without registration requirements. Getting a postpaid contract as a new arrival may require building local credit history first.
**Other regions:** See the regional overview for Africa, Latin America, and Oceania specifics. Africa and Latin America in particular show wide variation in registration requirements and travel eSIM availability — in some markets, a local prepaid SIM purchased in-country from the dominant carrier is the only practical option for reliable coverage outside major cities.
**A practical note for all regions:** The documentation requirements for a postpaid contract are always stricter than for a prepaid SIM. If you arrive before you have gathered all required documents, start with a prepaid SIM. Upgrade to a contract plan once your residency paperwork is in place.
---
## Device Readiness: SIM-Lock and eSIM Compatibility
Before any of the above steps work, your device needs to be compatible with the destination network and unlocked from your home carrier.
**SIM lock:** If your phone was purchased from a carrier under a subsidy or contract, it may be locked to that carrier and refuse to accept SIMs from other carriers. In most markets, carriers are required to unlock a device after the contract period ends or when you settle any outstanding balance. Before leaving, confirm your phone is unlocked — contact your carrier if you are unsure.
**Frequency bands:** Different countries use different radio frequency bands for 4G/LTE and 5G. A device designed only for your home market may lack the frequency bands used by networks in your destination. Check the device's supported band list against the bands used by carriers in your destination country before your move. This matters most for 5G mid-band coverage — 4G/LTE band overlap between regions is generally broader. Device specification pages (on the manufacturer's site) list supported bands; carrier websites in the destination country list which bands their network uses.
**eSIM support:** If you plan to use a travel eSIM for arrival connectivity and keep a home eSIM on the device simultaneously, confirm your device supports multiple eSIM profiles. Most modern smartphones support this, but profile limits vary by device and operating system. On iPhone, iOS manages eSIM profiles in Settings > Cellular. On Android, the path varies by manufacturer but is typically under Settings > Network & Internet > SIMs.
---
## Managing Two Lines Long-Term
Many expats end up running two lines simultaneously for months or longer: a home number on a cheap retention plan and a local number as the primary line. This is entirely workable and is the standard dual-SIM setup described in the [dual SIM for travel guide](/en/guides/dual-sim-for-travel/).
A few practical considerations for long-term dual-SIM operation:
**Keep home Data Roaming off.** As long as the home SIM is active in a foreign country, it can generate roaming charges if Data Roaming is left on. Turn it off in Settings and leave it off unless you deliberately need to use it.
**Battery considerations.** Running two active lines increases battery drain, particularly if one line has a weak signal and the radio is frequently searching for a stronger connection. If you rarely use the home line, consider disabling it (not deleting it — just disabling the line) when you do not need it active, and re-enabling it when you expect calls.
**Home number periodic checks.** If the home SIM is on a plan that requires minimum activity to stay active, calendar a recurring reminder to trigger that activity before the window closes. Most prepaid plans expire if there is no usage within a window ranging from 60 days to 12 months.
---
## What This Looks Like in Practice
To make the framework concrete, here is a typical expat timeline:
**4–6 weeks before departure:** Audit every account using your home number for SMS authentication. Begin migrating accounts to authenticator apps. Contact your carrier to discuss the cheapest retention option (suspension, cheap plan, or MVNO port).
**1–2 weeks before departure:** Purchase and install a travel eSIM on home Wi-Fi. Confirm the home line situation is resolved and the number is secure.
**Day of arrival:** Travel eSIM provides immediate data. Home SIM is active for calls and SMS. Data Roaming is off on the home SIM.
**First weeks in destination:** Gather documentation for a local plan application (address registration, ID, bank account as needed). Use the travel eSIM or a local prepaid SIM in the interim.
**Once settled (weeks to a few months in):** Apply for a local postpaid or prepaid plan. Use [SimFinder](/en/sim/) to compare available options. Transition the travel eSIM off once the local line is working well.
**Ongoing:** Home line on minimal retention plan, local line as primary. Periodic check that home SIM activity requirements are met.
### Common Mistakes to Avoid
**Cancelling the home number before the SMS 2FA audit is complete.** This is the single most consequential mistake. It takes longer than expected because some financial institutions require multi-day or in-person verification for phone number updates. Do the audit before you do anything else.
**Relying on a travel eSIM for months without switching to a local plan.** A travel eSIM is a bridge. Using it as a long-term solution costs more than it should and often means operating at slower speeds or without full access to local network features. The moment you have a settled address and the right documentation, evaluate local plans.
**Forgetting that the home SIM can generate roaming charges passively.** If Data Roaming is left on, background processes — app updates, cloud sync, email polling — will use roaming data without prompting. This is avoidable. Turn Data Roaming off on the home SIM and leave it off.
**Not checking SIM lock before leaving.** Discovering your phone is locked to your home carrier after you have landed abroad complicates everything. Unlock requests can take days to process. Handle this before departure.
---
## FAQ
*(Structured FAQ items are in the frontmatter above for schema.org/FAQPage display.)*
**Can I use my home carrier's roaming plan as my permanent expat connectivity solution?**
Not sustainably for most expats. International roaming is designed for travel, not long-term residence. Rates are set accordingly, and using a home carrier's roaming plan as a primary data source over months would generate costs far above what a local plan would cost for equivalent usage. Some home plans include international roaming as a benefit, but these typically have data caps, speed throttles in roaming mode, or fair-use thresholds that make them unsuitable for heavy daily use. Roaming as a bridge while you set up a local line is the intended use.
**What if my bank will not let me update my phone number to a foreign number?**
Some banks restrict the phone number on file to domestic numbers only. In that case, the only option that preserves SMS OTP access is to keep your home number active on a plan that receives calls and texts. This is a common reason expats maintain a home number long-term. If the bank supports authenticator-app-based login, migrating to that approach removes the dependency on the phone number entirely.
**What if I plan to keep moving between countries rather than settling in one place?**
The three-stage framework above assumes you are settling in one destination. If you are moving between countries on an ongoing basis — as a digital nomad — the strategy shifts: you rely more heavily on travel eSIMs and global data plans rather than committing to a local contract in each country. The [Connectivity Guide for Digital Nomads](/en/guides/digital-nomad/) covers that use case in full, including how to choose between regional eSIM plans and country-specific SIMs for multi-country itineraries.
**Do I need to tell my home carrier I am moving abroad?**
Not necessarily for account purposes — your home plan remains active regardless of where you physically are, as long as you continue paying. However, if you intend to cancel or downgrade, notifying the carrier and arranging the transition formally (rather than letting a plan lapse) avoids unexpected charges and preserves the ability to port the number cleanly. If you are using a carrier suspension service, you will need to contact the carrier to initiate it.
---
## Related Guides
- [How to Keep a Phone Number You're Not Using](/en/guides/number-storage/) — Five approaches to holding a home number while abroad: downgrade, eSIM, port to MVNO, suspension, or VoIP
- [How to Get a Local SIM Contract Abroad](/en/guides/local-contract/) — Documentation requirements, prepaid vs. postpaid, and MNO vs. MVNO for expats
- [International Roaming Explained](/en/guides/international-roaming/) — How roaming works, what it costs, and when to use it as a bridge
- [Regional Connectivity Guide](/en/guides/regional-overview/) — How SIM registration rules, eSIM adoption, and local plan availability differ across Asia, Europe, North America, and beyond
- [Connectivity Guide for Digital Nomads](/en/guides/digital-nomad/) — Ongoing connectivity strategy for location-independent workers moving between multiple countries
================================================================================
# Family Plans and Student Discounts Explained
URL: https://sim-finder.com/en/guides/family-plans/
Type: guides (en)
Published: 2026-06-06
Family plans and student discounts are among the most effective ways to reduce per-person mobile costs — but the structures differ considerably between carriers and markets. Four main categories exist internationally: multi-line discounts, shared data pools, student and youth discounts, and dedicated kids plans. Each has different eligibility rules, enrolment steps, and caveats. This guide explains how each category works, what to verify before enrolling, and where MNOs and MVNOs differ in their family-plan offerings. Use [SimFinder](/en/) to compare current plan terms side by side before committing.
---
## The Four Categories of Family and Group Mobile Discounts
Not all "family plans" work the same way. The label covers at least four structurally different discount mechanisms, and a carrier's plan may combine more than one:
**1. Multi-line discounts** — the per-line monthly price drops as you add lines to a single account. Lines are priced individually but receive a lower rate because they belong to the same account. Data allowances remain per-line.
**2. Shared data pools** — a single block of data is purchased for the account and all lines draw from it. The account holder chooses total data volume once rather than per person.
**3. Student and youth discounts** — time-limited price reductions tied to verified enrolment at a qualifying institution. Usually require periodic re-verification and expire when student status ends.
**4. Kids and junior plans** — age-restricted plans for children, often with lower data caps, calling restrictions, and parental control features built in. Some carriers market these as part of a family account; others sell them as standalone plans.
Understanding which category a carrier is offering tells you what the actual savings mechanism is — and what its limitations are.
---
## Multi-Line Discounts: How Per-Line Pricing Scales
Multi-line discounts are the most common family plan structure on major MNOs. The pricing logic is straightforward: the first line pays the standard rate, and each additional line costs less per month. The discount is applied automatically because all lines share one account.
**How it works in practice:**
- All lines must be on the same postpaid account, billed together.
- The account holder is responsible for all charges on the account.
- Each line retains its own data allowance — lines do not share data in this model.
- The discount typically applies from the second line onward, with the deepest discount on the third or fourth line.
- Carriers commonly cap family accounts at four to six lines.
**Who counts as "family":**
Carriers define family commercially, not legally. Any individual whose line is added to the account qualifies. There is no requirement in most markets to demonstrate kinship — housemates or colleagues can share an account if the account holder permits. The account holder bears full billing responsibility for all lines.
**What to verify before adding a line:**
1. Whether each line requires a separate credit check or whether the account holder's credit covers the group.
2. Whether adding a line resets any minimum commitment on the account or individual lines. For more on minimum terms, see [Contract Terms: Lock-In, Termination Fees, and Setup Costs](/en/guides/contract-terms/).
3. Whether the discount applies to the plan tier you want, or only to specific tiers.
4. What happens to individual lines if one person leaves — whether the remaining lines retain their discounted rates or revert to single-line pricing.
---
## Shared Data Pools: One Allowance, Multiple Users
A shared data pool is a different structure: instead of each line having its own data allowance, the account purchases a combined data block and all lines draw from it.
**Advantages of shared pools:**
- Works well when usage is uneven. A heavy user and a light user share a total block, which may cost less than two separate lines with individual allowances sized for the heavy user.
- Simpler to manage for the account holder — one data budget instead of several.
**Limitations of shared pools:**
- If one user exhausts their portion of the pool early, they affect the remaining allowance for others unless the carrier enforces per-line sub-limits.
- Some carriers allow per-line data caps within the pool; others do not and allow any line to consume the entire pool.
- Overage charges or speed throttling, when they apply, affect the shared pool rather than individual lines — one heavy user can slow the experience for everyone.
- Shared pool pricing may not always be cheaper than separate per-line plans. Compare the total cost of a shared pool plan against individual line pricing before assuming the pool is the better deal.
**Shared pools and calling:**
Data pools are the most common form of shared allowance. Shared call-minute pools — where a combined minute total is shared across lines — are less common but exist on some carriers in specific markets. For a detailed breakdown of how calling allowances work within plans, see [Understanding Your Call Plan: Minutes, VoLTE, and Calling Options](/en/guides/call-plans/).
---
## Student and Youth Discounts: Eligibility, Verification, and Expiry
Student discounts offer reduced plan pricing to individuals enrolled in qualifying educational institutions — most commonly universities and colleges, sometimes secondary schools. The discount is time-limited and tied to continued enrolment.
**Eligibility:**
- Most carriers require enrolment in a qualifying institution — criteria vary and typically include universities, colleges, and sometimes vocational or technical institutions.
- Part-time enrolment may or may not qualify; full-time student status is the standard requirement.
- Faculty, staff, and alumni are not usually eligible for student rates.
**Verification methods:**
Carriers use one of two approaches to verify student status:
- **University email address:** A discount is applied when you sign up with an institutional email address. Ongoing verification may check whether the email remains active at annual renewal.
- **Third-party student verification services:** Services such as SheerID and UNiDAYS are used by some carriers to verify enrolment against institutional records without requiring an institutional email.
Verification methods differ by carrier and by country. If you cannot complete verification through the carrier's default process, contact the carrier directly — some carriers offer manual verification for students whose institutions are not in the verification database.
**Time limits and renewal:**
Student discounts are not permanent. The typical pattern is:
- Discount is applied at sign-up upon initial verification.
- Annual re-verification is required to continue receiving the discount.
- If re-verification fails — because you have graduated, changed enrolment status, or the verification service cannot confirm your status — the discount is removed at the next billing cycle.
- The plan continues at standard pricing; you are not automatically moved to a different plan.
Set a reminder before each annual renewal to proactively complete re-verification. Do not rely on the carrier to notify you that verification is expiring.
**Youth or age-based discounts:**
Separately from student status, some carriers offer discounts based on age — typically for customers under 25 to under 28, depending on the carrier and market. These do not require enrolment verification; they require proof of age, usually from identity documents. Age-based discounts expire automatically when you reach the cutoff age. For plans that combine billing models with these discount structures, see [Prepaid vs Postpaid: Differences and How to Choose](/en/guides/prepaid-vs-postpaid/).
---
## Kids and Junior Plans: What They Offer and What to Check
Kids plans — also called junior plans or children's plans in some markets — are designed for younger users, typically under 12 or 13, and often integrate features beyond basic connectivity.
**Common features:**
- Lower data allowances than adult plans, reflecting lighter typical usage.
- Restricted or disabled international calling and texting, reducing accidental charge risk.
- Simplified account management, where the parent or guardian controls the plan settings.
- Integration with parental control tools — either the carrier's own application or compatibility with OS-level controls.
**Parental controls and kids plans:**
A kids plan from a carrier is not a substitute for device-level parental controls. Carrier-side controls — such as number filtering, content category blocking, and data speed restrictions — operate at the network level. Device-level controls, such as iOS Screen Time and Android Family Link, operate on the device itself and can restrict app use, screen time, and content regardless of network.
For child accounts, both layers are typically needed. Carrier filtering prevents access to certain content types at the network level; device controls restrict app access, screen time, and in-app purchases at the device level. For a detailed guide to setting up device-level controls, see [How to Set Up Parental Controls on a Child's Phone](/en/guides/parental-control/).
**Eligibility and account structure:**
Kids plans typically require the child's line to be part of a family account controlled by an adult. The adult account holder is responsible for all charges. Carriers typically require the adult to be the primary account holder and may require the adult to be present (physically or via identity verification) when adding a child's line.
Age verification for kids plans is handled differently across markets. In some markets the carrier requires only a declaration of the child's age; in others, documentation is required. In the US, carriers' online account-management apps and portals may have data-handling obligations under COPPA (Children's Online Privacy Protection Act) if they have actual knowledge that a child under 13 is using the service; some carriers also voluntarily exclude children's lines from marketing data programmes. Equivalent children's data-privacy laws apply in other jurisdictions.
---
## How to Enrol a Family Plan: The Standard Process
The enrolment process for a family plan follows a broadly consistent pattern across carriers, though specific steps vary:
1. **Establish the primary account.** A family plan requires one account holder who is responsible for billing. If you are not already a customer, you will go through standard identity and credit checks at this step.
2. **Add lines.** Each additional line is added through the carrier's app, online account portal, or in-store. Depending on the carrier and market, each added line may require:
- A separate identity check for the person joining.
- A credit check, or reliance on the primary account holder's credit.
- The new person's consent and agreement to the account terms.
3. **Select a plan tier for each line.** On multi-line accounts, each line may have its own plan tier (data allowance, calling options, etc.), or all lines may be required to be on the same tier. Verify whether mixed-tier accounts are permitted before enrolling.
4. **Complete any number transfers.** If any new member is bringing an existing number, a number port is required. The port must be initiated before cancelling the old plan. Number portability is a separate right from the family plan discount — porting your number does not automatically apply the family discount, and it does not reset the port right.
5. **Verify the discount is applied.** Once all lines are active, check the first bill to confirm the expected discount is reflected. Errors at enrolment are easier to correct before the first billing cycle closes.
---
## MVNOs and Family Plans: Why the Offer Is Usually Weaker
Most major multi-line discounts and shared data pool plans are offered by MNOs under their flagship brands. MVNOs and sub-brands tend to have weaker family plan structures for structural reasons:
**Lower margin per line:** MVNOs purchase network access wholesale from MNOs and operate on thinner margins. Stacking further discounts across multiple lines reduces revenue to levels that are difficult to sustain.
**Simplified account structures:** Many MVNOs operate simpler billing systems designed for individual customers. Family account management, shared pools, and multi-line discount logic require more complex account infrastructure that not all MVNOs have built.
**Prepaid concentration:** MVNOs and sub-brands are concentrated in prepaid and month-to-month plans. Multi-line discounts on prepaid plans are uncommon because each prepaid account is typically independent; a family of four on an MVNO's prepaid plan will generally pay four separate plan prices.
**The trade-off:**
A family of four on separate MVNO plans may still cost less per person than the same family on a discounted MNO family plan, depending on the specific plans. The discount mechanism on the MNO plan does not guarantee the lowest per-person cost — it guarantees a lower per-person cost than the carrier's own individual-line pricing. Comparing across carrier types is necessary to find the actual lowest cost for a specific usage pattern.
For a full breakdown of how MNOs, MVNOs, and sub-brands differ on coverage, priority, and price, see [MNO vs MVNO vs Sub-Brand](/en/guides/mno-vs-mvno-comparison/).
---
## What to Compare When Evaluating a Family Plan
When evaluating a family plan offer, the following dimensions determine whether the advertised discount translates to real savings:
**Per-person total cost:** Calculate the total monthly bill for the family account divided by the number of lines. Compare this against the best available individual-line pricing for equivalent data allowances.
**Minimum term:** Family plans on MNOs are frequently postpaid with a 12 or 24-month commitment. Locking all family members into a single account means one member wanting to leave triggers questions about remaining discount eligibility for the others. Confirm what happens to pricing for remaining lines if one line leaves the account.
**Discount tier structure:** Some carriers offer deeper discounts when all lines are on the same plan tier. If family members have significantly different data needs, forcing all lines onto a single tier to maximise the discount may not be cost-efficient.
**Included extras:** Family plans often bundle streaming services, international call minutes, or device insurance. Evaluate whether these extras have value in your household. Extras that nobody uses do not contribute to the plan's cost-effectiveness.
**Data per line vs shared pool:** Determine which structure the plan uses. A plan that advertises a large shared data total may work well for your household's usage pattern, or it may work poorly if usage is dominated by one heavy user.
---
## When Family Plans Do Not Save Money
Family plans do not automatically produce savings in every situation. Common scenarios where they may not deliver value:
- **Household members have very different contract end dates.** Consolidating to a family account may require early termination fees on existing contracts, which can offset months of discount.
- **Usage patterns are too different.** A shared pool plan optimised for even distribution may not suit a household with one heavy user and several light users.
- **The bundled extras are not used.** Streaming add-ons or device insurance bundles embedded in the family plan price add cost without benefit if no one in the household uses them.
- **A sub-brand or MVNO offers lower individual pricing.** Some MVNOs price individual lines below the per-person cost on an MNO family plan even at the maximum discount tier.
The correct comparison is always total household cost — not the advertised per-line discount percentage.
---
## Using SimFinder to Compare Family and Individual Plan Options
Family plan pricing changes frequently, and the gap between family and individual pricing varies by market and carrier tier. [SimFinder](/en/) lets you search plans by data amount, carrier type, and country. To evaluate a family plan effectively:
1. Search for individual-line plans that match each household member's data needs.
2. Note the total if all members were on separate individual plans.
3. Compare that total against the family plan's household bill.
4. Account for any minimum term differences and extras bundled into the family plan.
This approach gives you the actual savings figure rather than the discount percentage, which can be misleading if the baseline individual pricing is inflated. Student and age-based discounts should be evaluated the same way — compare the discounted plan against the current best individual-line offer, not against the carrier's standard rate.
---
## FAQ
*(See structured FAQ items in the frontmatter for display in site search and rich results.)*
### Can I split a family plan bill so each person pays their share separately?
The account holder is responsible for the entire bill. Most carriers issue one invoice for the full account. Some carriers offer autopay arrangements where individual lines can be set up to pay their portion directly, but this is a payment management feature, not a change to the legal billing responsibility. The account holder remains liable if a line member does not pay. Confirm the carrier's billing arrangement options before enrolling members who will pay their own share.
### What happens to a student discount if I transfer to a different university?
Re-verification at renewal uses your current institution. As long as you are enrolled at a qualifying institution and can verify that status — through an active institutional email address or via the carrier's verification service — a transfer to a different qualifying university does not disqualify you. If the new institution is not in the verification database, contact the carrier to request manual verification.
### Can my child's line be on a family account if they are abroad for a school year?
This depends on the carrier's roaming terms and whether the account supports international roaming on all lines. A line added to a family account for discounted domestic pricing does not automatically include international roaming. Check the family account's roaming options and whether a separate international roaming add-on is required. Data used abroad through roaming may draw from a separate allowance or incur different charges from domestic data.
---
## Related Guides
- [Understanding Your Call Plan: Minutes, VoLTE, and Calling Options](/en/guides/call-plans/) — How calling allowances work within plans, including shared minute pools
- [Contract Terms: Lock-In, Termination Fees, and Setup Costs](/en/guides/contract-terms/) — Minimum terms and ETF structure that apply to family postpaid accounts
- [Prepaid vs Postpaid: Differences and How to Choose](/en/guides/prepaid-vs-postpaid/) — Billing model comparison relevant to choosing between family postpaid and separate prepaid plans
- [MNO vs MVNO vs Sub-Brand](/en/guides/mno-vs-mvno-comparison/) — How carrier type affects family plan availability and pricing depth
- [How to Set Up Parental Controls on a Child's Phone](/en/guides/parental-control/) — Device-level controls that complement carrier-side kids plan features
================================================================================
# Your First Travel eSIM: Step-by-Step Guide
URL: https://sim-finder.com/en/guides/first-time-guide/
Type: guides (en)
Published: 2026-04-13
A travel eSIM lets you buy a data plan online, install it before you leave, and start using local mobile data the moment you land — no physical SIM card required. This guide walks through the entire process in order: confirming your device is compatible, choosing a plan, installing the eSIM profile, activating it abroad, and managing it when you return home.
---
## Step 1: Confirm Your Device is eSIM-Compatible and Unlocked
Before purchasing any travel eSIM, verify two things: your device supports eSIM, and it is not carrier-locked to your home operator.
### Check eSIM Support
**On iPhone**, go to **Settings > Cellular** (or Mobile Data). If you see an option labeled "Add eSIM" or "Add Data Plan," your device supports eSIM. iPhone XS, XS Max, and XR (2018) and all later iPhone models support eSIM.
**On Android (Google Pixel)**, go to **Settings > Network & Internet > SIMs > Add SIM**. If an eSIM setup option appears, your device is compatible. Google Pixel 3 and later generally support eSIM, though support on Pixel 3 varies by region and carrier variant.
**On Samsung Galaxy**, go to **Settings > Connections > SIM card manager**. Look for "Add mobile plan" or "Download SIM." Samsung Galaxy S20 and later support eSIM on most variants.
If no eSIM option appears in your settings, your device does not support eSIM or the feature has been disabled by your home carrier.
### Confirm the Device is SIM-Unlocked
A carrier-locked device typically cannot use eSIM profiles from other carriers. If you purchased your phone directly from a manufacturer or retailer (not through a carrier on contract), it is typically unlocked. If you purchased through a carrier, contact them to confirm your unlock status. In many countries, carriers are required to unlock devices at the end of a contract period.
---
## Step 2: Choose a Travel eSIM Plan
### Single-Country vs. Multi-Country Plans
Travel eSIM plans fall into two categories:
- **Single-country plans** — cover one specific destination. They typically offer better value for trips to one country.
- **Multi-country or regional plans** — cover a group of countries (for example, a Europe-wide plan or an Asia plan). Useful if you are visiting several countries on one trip. Coverage and speeds vary by country within the plan depending on the provider's local network partners.
### Data Volume
Estimate your data needs before purchasing. As a reference, navigation apps such as Google Maps use approximately 3–20 MB per hour. Streaming video (such as Netflix at standard quality) can use up to 0.7 GB per hour. For most travelers on a one-week trip using maps, messaging, and light browsing, 5–10 GB covers typical usage. If you plan to stream video or work remotely, consider 10–20 GB or an unlimited plan.
See [How Much Mobile Data Do You Need?](/en/guides/data-usage-guide/) for detailed estimates by app.
### Validity Period
Travel eSIM plans have a fixed validity window — commonly 7, 14, 30, or 90 days — that starts either from the moment of installation or from first activation. Confirm when the clock starts: some plans begin the moment you scan the QR code; others start on first use. Choose a plan whose validity window matches your trip length with a few extra days of margin.
### Data-Only Plans
Most travel eSIMs are data-only. They provide an internet connection but no separate phone number for outgoing voice calls or SMS. Voice calls and text messages abroad can be handled through internet apps such as WhatsApp, FaceTime Audio, or Signal. If your device supports dual SIM and you keep your home SIM active, you can still receive calls and SMS on your home number while your data runs through the travel eSIM.
**[Compare travel eSIM plans for your destination on SimFinder →](/en/travel/)**
---
## Step 3: Purchase and Receive Your eSIM
Travel eSIMs are sold through the provider's website or app. After completing the purchase, you receive either:
- A **QR code** (delivered by email or displayed in the provider's app)
- A **manual activation code** containing an SM-DP+ server address and an activation code string
Save the QR code or code details somewhere accessible without mobile data — you will need them when installing the profile. Screenshot the QR code or note down the activation code before you leave home.
Do not share your QR code with anyone. Each QR code is tied to a single device and can only be scanned once.
---
## Step 4: Install the eSIM Profile Before Departure
Install the eSIM profile while you have a reliable Wi-Fi connection at home. Downloading the profile requires an active internet connection.
### On iPhone
1. Go to **Settings > Cellular** (or Mobile Data)
2. Tap **Add eSIM**
3. Tap **Use QR Code** and scan the QR code from your provider
4. If entering manually, tap **Enter Details Manually** and type in the SM-DP+ server address and activation code
5. Follow the on-screen prompts to complete the download
6. When asked to label the plan, give it a recognizable name such as "Travel eSIM"
7. When asked which line to use for data, **do not switch to the travel eSIM yet** — keep your home SIM or home eSIM as the active data line for now
If your device asks whether you want to activate the plan immediately, choose to keep it turned off until you arrive at your destination.
### On Android (Google Pixel)
1. Go to **Settings > Network & Internet > SIMs**
2. Tap **Add SIM**
3. Select **Scan QR code** and scan the code from your provider, or tap **Enter activation code** to enter manually
4. Follow the prompts to download the profile
5. When the installation completes, keep the travel eSIM toggled off — do not set it as the active data line until you arrive
### On Samsung Galaxy
1. Go to **Settings > Connections > SIM card manager**
2. Tap **Add mobile plan** or **Download SIM**
3. Scan the QR code or enter the activation code manually
4. Follow the prompts to complete the installation
5. Keep the plan inactive until you arrive at your destination
After installation, the profile is stored on your device's eUICC chip. The profile does not consume data until you activate it.
---
## Step 5: Activate the eSIM When You Arrive
Once you land and your device detects a local network, switch to the travel eSIM.
### Enable the Travel eSIM Line
**On iPhone:**
1. Go to **Settings > Cellular**
2. Tap the travel eSIM line you installed
3. Toggle **Turn On This Line** to enabled
4. Go back to **Cellular Data** and select the travel eSIM as your data line
5. Enable **Data Roaming** for the travel eSIM line
**On Android / Samsung:**
1. Go to your SIM manager settings
2. Enable the travel eSIM line
3. Set it as the preferred data SIM
### Managing Dual SIM
If you are running your home SIM alongside the travel eSIM, confirm which line handles which function:
- **Calls and SMS**: use your home SIM (to keep your home number active)
- **Mobile data**: use the travel eSIM
- On iPhone, disable **Allow Cellular Data Switching** to prevent the device from automatically switching data back to your home SIM when signal is weak
### If the eSIM Does Not Connect
If the travel eSIM does not connect automatically after activation:
1. Confirm **Data Roaming** is enabled for the travel eSIM line
2. Toggle **Airplane Mode** on, wait five seconds, then turn it off
3. Go to **Settings > Cellular > Network Selection** (iPhone) or **Mobile Network** settings (Android) and try selecting the operator manually
4. Contact your eSIM provider's customer support — most offer chat support through their app or website
---
## Step 6: Use the eSIM During Your Trip
### Monitor Your Data Usage
Check your remaining data balance regularly, especially on long trips. Most providers show a usage counter in their app or on a dashboard on their website. On iPhone, you can also see data used by each line under **Settings > Cellular > [line name]**.
If you are approaching your data limit and need more, some providers offer top-ups through their app without requiring a new QR code.
### Make Calls and Send Messages
Because most travel eSIMs are data-only, use internet-based apps for voice calls and text messages:
- **WhatsApp**: voice calls use approximately 15–50 MB per hour; text messages use negligible data
- **FaceTime Audio**: available between Apple users
- **Signal**: encrypted calls and messages for all platforms
- **Google Meet / Zoom**: for video calls; 1:1 video at HD quality uses approximately 0.9–1.1 GB per hour
If you kept your home SIM active in a dual SIM setup, outgoing calls on your home number use your home carrier's rates (standard international call rates apply).
### Preserve Battery Life
Running two SIM lines simultaneously — dual SIM mode — increases battery drain compared to a single SIM. If battery life is a concern on a long day out, switch your home SIM line to a standby mode that does not actively search for signal. On iPhone, you can disable data for the home line while keeping it enabled for the travel eSIM.
---
## Step 7: After Your Trip
### Switch Back to Your Home Line
When you return home:
1. Go to **Settings > Cellular**
2. Set your home SIM or home eSIM as the active data line
3. Disable **Data Roaming** on the travel eSIM (or disable the travel eSIM line entirely)
### Manage the Remaining Profile
If the travel eSIM still has unused data and the provider allows it, keep the profile on your device for future trips to the same region.
If the plan has expired and you do not plan to return to that region, delete the profile to keep your eSIM list manageable:
**On iPhone**: Settings > Cellular > [travel eSIM line] > Delete eSIM
**On Android**: SIM manager settings > [travel eSIM line] > Delete or Remove
Before deleting, confirm the provider's reinstall policy. Some providers allow reinstallation from their app; others issue a new profile at additional cost if you want to use the same region again.
---
## Checklist: Travel eSIM from Start to Finish
Use this list before and during your trip.
**Before departure**
- [ ] Confirm device supports eSIM (Settings > Cellular on iPhone, SIM manager on Android)
- [ ] Confirm device is SIM-unlocked
- [ ] Estimate data needs for the trip
- [ ] Purchase a travel eSIM plan with the right country coverage and data volume
- [ ] Save the QR code or activation code (screenshot or print)
- [ ] Install the eSIM profile over Wi-Fi at home
- [ ] Label the plan clearly (e.g., "Travel eSIM")
- [ ] Keep travel eSIM toggled off — do not activate yet
**Upon arrival**
- [ ] Enable the travel eSIM line in Settings
- [ ] Set the travel eSIM as the data line
- [ ] Enable Data Roaming for the travel eSIM
- [ ] Confirm the device has connected to a local network
- [ ] Test with a browser or app to confirm data is working
**During the trip**
- [ ] Monitor data balance through the provider's app
- [ ] Use WhatsApp, FaceTime, or similar apps for calls and messages
- [ ] Top up data if running low (if supported by provider)
**After the trip**
- [ ] Switch data line back to home SIM or home eSIM
- [ ] Decide whether to keep or delete the travel eSIM profile
- [ ] Check provider's reinstall policy before deleting
---
## Frequently Asked Questions
### Do I need to install the travel eSIM before I leave home?
Yes. Install the eSIM profile while you still have a reliable Wi-Fi connection at home. Downloading a profile requires an internet connection. Do not activate the plan until you land — keep it toggled off until arrival to avoid premature data usage.
### Will my phone number still work while I use a travel eSIM?
If your device supports dual SIM, yes. Keep your home SIM active alongside the travel eSIM. Your home number continues to receive calls and SMS. Set the travel eSIM as the data line in your cellular settings.
### Do travel eSIMs include a phone number for calls and SMS?
Most travel eSIMs are data-only. They provide an internet connection but no separate phone number for outgoing calls or SMS. Voice calls and text messages are handled through internet-based apps such as WhatsApp, FaceTime Audio, or Signal.
### What if the eSIM does not connect after I land?
First, confirm that Data Roaming is enabled for the travel eSIM line in your cellular settings. Then toggle Airplane Mode on and off to force the device to search for a local network. If the issue persists, manually select the network operator in your carrier settings. Contact your eSIM provider's support if none of these steps resolve the problem.
### Can I reuse the same eSIM on my next trip?
It depends on the provider and plan type. Some providers allow you to top up an existing profile or reuse it if the data has not expired. Others issue a single-use profile that cannot be reinstalled once deleted. Check the provider's reinstall policy before deleting the eSIM from your device.
### What should I do with the travel eSIM after returning home?
Switch your cellular data line back to your home SIM or eSIM. If the travel eSIM has remaining data, keep the profile on your device for future trips (if supported by the provider). If the plan has expired and you no longer need the profile, delete it from Settings to keep your eSIM list tidy.
---
## Related Guides
- [4 Ways to Stay Connected Abroad](/en/guides/four-options/) — Compare travel eSIM against local SIM, international roaming, and portable Wi-Fi hotspots
- [What Is an eSIM?](/en/guides/what-is-esim/) — Understand how eSIM technology works before your first setup
- [How Much Mobile Data Do You Need?](/en/guides/data-usage-guide/) — Estimate your data requirements by app and usage pattern
- [SIM & Mobile Glossary](/en/guides/glossary-index/) — Definitions for technical terms used in this guide
- [How to Choose a Travel eSIM: 5 Key Criteria](/en/guides/how-to-choose/) — Selection criteria, provider comparison, and red flags
- [Using Dual SIM for Travel](/en/guides/dual-sim-for-travel/) — How to keep your home number active alongside a travel eSIM
================================================================================
# 4 Ways to Stay Connected Abroad — Cost, Convenience, and Quality Compared
URL: https://sim-finder.com/en/guides/four-options/
Type: guides (en)
Published: 2026-04-13
There are four ways to use your phone abroad: international roaming, a local SIM card, a travel eSIM, and a portable Wi-Fi hotspot. Each option involves a different trade-off between cost, setup effort, and connection quality. The right choice depends on your device, trip length, and whether you are traveling alone or in a group.
---
## The Four Options at a Glance
### 1. International Roaming
International roaming lets you use your existing home carrier's SIM abroad. Your carrier routes your connection through a local network in the destination country under a roaming agreement — specifically, a bilateral agreement governed by the GSMA AA.12 standard.
The main advantage is simplicity. You land, your phone connects, and your home number works as usual. No hardware changes, no new accounts. This matters when you need to receive calls or SMS on your existing number — for banking authentication codes, for example.
The main drawback is cost unpredictability. Roaming charges vary widely by carrier and destination. Some carriers include a daily or monthly roaming allowance within their standard plans; others charge per megabyte or per day. Confirm your carrier's roaming rates before departure. Unexpected data charges are a common travel mistake.
Most modern smartphones automatically enable roaming when a home SIM is inserted, but data roaming may be switched off by default. Enable it in your device settings before you arrive, or you may have connectivity issues at the destination.
### 2. Local SIM Card
A local SIM card is purchased at the destination — from an airport kiosk, a carrier store, or a convenience store. You insert it into your unlocked phone and use a local number and local data rates.
Because you connect directly to the local carrier's network, you typically get the same speeds and coverage as local residents. Data costs are often significantly lower than international roaming, especially for longer stays.
The trade-off is setup friction. You need to:
- Have a SIM-unlocked device
- Find a retailer at the destination
- Present a passport or ID (required by law in many countries)
- Swap your SIM card, potentially losing access to your home number while abroad
Registration requirements vary by country. Some destinations require biometric verification or device registration. If staying connected on your home number matters — for two-factor authentication, or to receive calls — you will need a second device or a dual SIM phone to keep your home SIM active alongside the local one.
### 3. Travel eSIM
A travel eSIM is a data plan purchased online before or during your trip. The plan is delivered as a digital profile that you download over the internet and activate directly on your device's built-in eSIM chip (the eUICC). No physical card is involved.
The eSIM technology is standardized by the GSMA under SGP.22, which defines how carriers remotely provision and manage mobile plans on a device. Once downloaded, the profile typically activates when you land and your device registers on a local partner network.
Setup usually involves scanning a QR code in your phone's cellular settings. The entire process takes a few minutes and can be done from home before you travel.
Travel eSIMs are typically data-only. They do not include a new phone number. Voice calls and SMS are handled through internet-based apps such as WhatsApp, FaceTime Audio, or other VoIP services. If you have a dual SIM device, you can keep your home SIM active for calls while routing data through the travel eSIM.
Providers such as Airalo, Holafly, Saily, and Nomad offer destination-specific or multi-country plans. Prices and coverage vary by provider and destination, so comparison is worthwhile before purchasing.
**[Compare travel eSIM plans on SimFinder →](/en/travel/)**
### 4. Portable Wi-Fi Hotspot
A portable Wi-Fi hotspot (also called a pocket Wi-Fi or MiFi device) is a dedicated mobile router you rent before your trip. It connects to local mobile networks and creates a personal Wi-Fi zone that multiple devices can join.
This option suits group travel or situations where several devices need connectivity. A typical pocket Wi-Fi device supports five to ten simultaneous Wi-Fi connections. Since any Wi-Fi-capable device can connect — smartphones, tablets, laptops — device compatibility is not an issue.
The drawbacks are physical: you need to rent, charge, carry, and return the device. Battery life is typically six to twelve hours of active use, so a separate power bank may be useful on long days. Rental services are available from airport counters or through advance booking and mail delivery.
---
## Side-by-Side Comparison
| | International Roaming | Local SIM | Travel eSIM | Portable Hotspot |
|---|---|---|---|---|
| **Setup required** | Confirm plan; enable data roaming | Purchase at destination; swap SIM | Purchase online; scan QR code | Book in advance; collect device |
| **Ease of use** | Minimal — works with existing device | Moderate — requires SIM swap | Low — QR scan only | Moderate — charge and carry device |
| **Relative cost** | Varies widely; can be high | Low (local rates) | Low to moderate | Moderate; scales with trip length |
| **Home number** | Active | Unavailable (unless dual SIM) | Unavailable (data only) | Depends on device's own SIM |
| **Connection quality** | Depends on roaming agreement | Same as local users | Depends on provider's local partner | Depends on device's local connection |
| **Group use** | One person per SIM | One person per SIM | One person (tethering possible) | Multiple devices on one plan |
| **Device requirement** | Any compatible device | SIM-unlocked device | eSIM-compatible device | Any Wi-Fi device |
| **After the trip** | Nothing required | Dispose or keep SIM | Delete profile | Return device |
---
## Which Option Fits Your Situation
### Short trip, minimum setup
International roaming is the path of least resistance for trips of a few days where you want zero setup. Confirm your carrier's roaming rates in advance and enable data roaming before departure. Your home number stays active throughout.
### Solo traveler with an eSIM-compatible phone
A travel eSIM offers the best balance of cost and convenience. Purchase the plan online before departure, scan the QR code to install it, and activate it when you land. No hardware to carry, no SIM to swap.
Use SimFinder's travel search to compare providers and find a plan that matches your destination and data needs.
**[Compare travel eSIM plans on SimFinder →](/en/travel/)**
### Group travel or eSIM-incompatible devices
A portable Wi-Fi hotspot allows the group to share one data plan. This is particularly useful when some devices in the group are older models that do not support eSIM.
### Extended stay — one week or more
For longer stays, the cost savings of a local SIM or travel eSIM are more significant relative to international roaming. A local SIM provides the deepest integration with local networks and the widest choice of data plans, at the cost of losing your home number unless you use a dual SIM device.
---
## Checking eSIM Compatibility
Travel eSIM requires a device that supports eSIM. The following are confirmed eSIM-compatible:
**iPhone**: iPhone XS, XS Max, and XR (2018) and all later iPhone models support eSIM. Note that iPhone 14 and later sold in the United States are eSIM-only (no physical SIM slot). Starting with iPhone 17 (released September 2025), eSIM-only models also became available in Canada, Mexico, Japan, and several other markets. iPhone 14 through iPhone 16 sold outside the United States still include a physical nano-SIM slot alongside eSIM.
**Android**: Google Pixel 3 and later generally support eSIM, though support depends on the region and carrier lock status. Samsung Galaxy S20 and later support eSIM in most markets. Other Android manufacturers vary — check your device specifications.
To confirm on iPhone: go to Settings > Cellular. If "Add eSIM" or "Add Data Plan" appears, eSIM is supported.
To confirm on Android: go to Settings > Network & Internet > SIMs (path varies by manufacturer). Look for "Download SIM" or "Add mobile plan."
If your device is carrier-locked, eSIM from another carrier may not work. Contact your home carrier to confirm unlock status before purchasing a travel eSIM.
---
## Local SIM: What to Expect at the Destination
Requirements for purchasing a local SIM vary by country. Common requirements include:
- **Passport presentation**: Required in most countries for tourist SIM purchases
- **Biometric registration**: Required in some countries (Thailand requires biometric verification for SIM registration; Germany requires identity verification — via VideoIdent, PostIdent, eID, or in-store ID check — for all SIM purchases)
- **Purchase limits**: Some countries limit the number of SIMs a single person can register
- **Registration apps**: Some carriers require in-app registration during or after SIM purchase
Airport carrier counters and major electronics retailers are reliable purchase points in most destinations. Staff at airport counters are typically accustomed to serving international travelers and can help with setup.
Before inserting a local SIM, confirm your device is SIM-unlocked. Also verify that the destination carrier's frequency bands are compatible with your device. Band incompatibility is rare for flagship phones, but it is worth checking if you are using an older model or a phone purchased in a region with different band configurations.
---
## Keeping Your Home Number Active Abroad
If receiving calls or SMS on your home number while traveling is important — for two-factor authentication, for example — the simplest approach is to keep your home SIM active in a dual SIM phone alongside a travel eSIM or local SIM.
iPhone 13 and later support two simultaneously active eSIMs (on devices that are eSIM-compatible in the relevant market). iPhone XS through iPhone 12 support one physical SIM and one eSIM simultaneously.
Google Pixel 7 and later support two simultaneously active eSIMs. Earlier Pixel models support one physical SIM and one eSIM.
If your device does not support dual SIM, you will need to choose between maintaining your home number and using a local plan. For most travelers, switching calls to a VoIP app (WhatsApp, FaceTime Audio, Google Meet) is a practical alternative to keeping the home SIM active.
See [What Is an eSIM?](/en/guides/what-is-esim/) for more detail on how eSIM technology works.
---
## Summary
- **International roaming**: Zero setup. Cost depends entirely on your carrier's plan — confirm rates before departure.
- **Local SIM**: Lowest cost for extended stays. Requires SIM-unlocked device and in-person purchase at the destination.
- **Travel eSIM**: Best balance of cost and convenience for eSIM-compatible devices. Purchase and install before you leave.
- **Portable Wi-Fi hotspot**: Best for groups and for devices that do not support eSIM. Requires renting, charging, and returning a physical device.
For any trip, preparation before departure reduces problems at the destination. Check your roaming plan, confirm your device's unlock status, install your travel eSIM, or book your hotspot rental before you board.
Use SimFinder to compare travel eSIM plans by destination and filter by data volume, price, and provider.
**[Find travel eSIM plans on SimFinder →](/en/travel/)**
---
## Related Guides
The following guides are referenced or relevant to this article.
- [How Much Mobile Data Do You Need?](/en/guides/data-usage-guide/) — Estimate how much data your trip requires
- [SIM & Mobile Glossary](/en/guides/glossary-index/) — Definitions for terms used in this article
- [What Is an eSIM?](/en/guides/what-is-esim/)
- [How to Choose a Travel eSIM: 5 Key Criteria](/en/guides/how-to-choose/)
- [Your First Travel eSIM: Step-by-Step Guide](/en/guides/first-time-guide/)
- [Pre-Trip Connectivity Checklist](/en/guides/pre-trip-checklist/)
- [Using Dual SIM for Travel](/en/guides/dual-sim-for-travel/)
================================================================================
# Frequency Bands and Device Compatibility — How to Verify Before You Buy
URL: https://sim-finder.com/en/guides/frequency-bands/
Type: guides (en)
Published: 2026-06-04
Frequency bands determine whether your device can actually connect to a carrier's network — not just whether a SIM activates. A phone that supports LTE in principle may still miss the specific bands a carrier uses for voice calls, high-speed data, or 5G in a given country.
The key points covered in this article:
- What frequency bands are and how the numbering system works across LTE and 5G NR
- Why device variants engineered for one region often lack critical bands in another
- How to read a device spec sheet and compare it against a carrier's band list
- A practical method for verifying compatibility before purchasing an imported device
- How band support relates to VoLTE, 5G, and carrier aggregation
For context on why VoLTE depends on specific LTE bands, see [VoLTE and VoNR Explained](/en/guides/volte-vonr/). For the process of verifying whether a device is locked to a specific carrier, see [SIM Lock and SIM-Free Explained](/en/guides/sim-lock/).
---
## What Is a Frequency Band?
A **frequency band** is a defined slice of the radio spectrum allocated by a national regulator for a specific use. Mobile operators are licensed to transmit on particular bands within their country; your device must support those same bands to communicate with the network.
Bands are described by a centre frequency or frequency range — for example, **700 MHz**, **1800 MHz**, or **3.5 GHz** — and each band has a standardised number assigned by 3GPP. The number is the same worldwide: LTE Band 3 always refers to 1800 MHz, and 5G NR band n78 always refers to the 3.5 GHz range. This consistency means a spec sheet from any manufacturer uses the same numbering, regardless of country.
Not all bands behave the same way. Lower frequencies (below 1 GHz, such as 700 MHz or 850 MHz) propagate farther and penetrate buildings more effectively, making them suitable for wide-area coverage and rural deployment. Higher frequencies (above 2 GHz) carry more data capacity but have shorter range. Millimetre-wave bands (above 24 GHz) deliver very high throughput but only over short distances with direct line of sight.
Carriers in each country hold licences for specific bands, which are determined by national spectrum auctions and regulatory allocations. The same frequency may be assigned to a different band number in different regions — or may not be allocated for mobile use at all in some countries — which is the root cause of cross-region compatibility gaps.
---
## LTE Band Numbering
3GPP defines LTE frequency bands in the specification series **3GPP TS 36.101**. Bands are numbered sequentially and cover both FDD (Frequency Division Duplex) and TDD (Time Division Duplex) variants. FDD bands use separate paired frequencies for uplink and downlink; TDD bands use a single frequency for both directions, alternating in time.
The table below lists a selection of widely deployed LTE bands and the regions where they are commonly used.
| Band | Frequency | Duplex | Common deployment regions |
|------|-----------|--------|--------------------------|
| 1 | 2100 MHz | FDD | Europe, Asia-Pacific, Japan |
| 2 | 1900 MHz | FDD | Americas |
| 3 | 1800 MHz | FDD | Europe, Asia, Africa, Australia |
| 4 | 1700/2100 MHz AWS | FDD | Americas |
| 5 | 850 MHz | FDD | Americas, Australia |
| 7 | 2600 MHz | FDD | Europe, Americas, Asia |
| 8 | 900 MHz | FDD | Europe, Asia, Africa |
| 12 | 700 MHz | FDD | United States |
| 17 | 700 MHz | FDD | United States |
| 18 | 850 MHz | FDD | Japan (KDDI/au) |
| 19 | 800 MHz | FDD | Japan (NTT Docomo) |
| 20 | 800 MHz | FDD | Europe |
| 26 | 850 MHz | FDD | Japan, Americas |
| 28 | 700 MHz | FDD | Asia-Pacific, Europe, Africa |
| 38 | 2600 MHz | TDD | China, Europe |
| 40 | 2300 MHz | TDD | India, Asia |
| 41 | 2500 MHz | TDD | United States (T-Mobile), China |
| 42 | 3500 MHz | TDD | Europe, Asia |
| 66 | 1700/2100 MHz | FDD | Americas |
This list is illustrative, not exhaustive. The complete 3GPP TS 36.101 table covers over 70 FDD and TDD bands. Carriers in each country hold licences for a subset of these bands.
---
## 5G NR Band Numbering
5G New Radio (NR) band numbering is defined in **3GPP TS 38.101**. To distinguish 5G NR bands from LTE bands, 3GPP prefixes them with the letter **n** — so Band 78 in 5G NR is written as **n78**, distinct from LTE Band 78.
5G NR bands are split into two frequency ranges:
- **FR1 (Sub-6 GHz)**: 410 MHz to 7125 MHz. Includes the majority of deployed 5G bands worldwide.
- **FR2 (mmWave)**: 24250 MHz to 52600 MHz (FR2-1); Release 17 added FR2-2 up to 71000 MHz. High-capacity, short-range bands currently deployed primarily in dense urban environments in the United States, Japan, South Korea, and a small number of other markets.
A selection of commonly deployed 5G NR bands:
| Band | Frequency | Range | Common deployment regions |
|------|-----------|-------|--------------------------|
| n1 | 2100 MHz | FR1 | Europe, Asia-Pacific, Japan |
| n3 | 1800 MHz | FR1 | Europe, Asia |
| n5 | 850 MHz | FR1 | Americas, Australia |
| n7 | 2600 MHz | FR1 | Europe |
| n8 | 900 MHz | FR1 | Europe, Asia |
| n20 | 800 MHz | FR1 | Europe |
| n25 | 1900 MHz | FR1 | United States |
| n28 | 700 MHz | FR1 | Asia-Pacific, Europe, Africa |
| n38 | 2600 MHz | FR1 | China, Europe |
| n40 | 2300 MHz | FR1 | India, Asia |
| n41 | 2500 MHz | FR1 | United States, China, Japan |
| n66 | 1700/2100 MHz | FR1 | Americas |
| n71 | 600 MHz | FR1 | United States (T-Mobile) |
| n77 | 3.3–4.2 GHz | FR1 | Europe, Australia, Japan |
| n78 | 3300–3800 MHz (3.3–3.8 GHz) | FR1 | Europe, Asia-Pacific, globally dominant |
| n79 | 4.4–5.0 GHz | FR1 | China, Japan |
| n258 | 26 GHz | FR2 | Japan, South Korea |
| n260 | 39 GHz | FR2 | United States |
| n261 | 28 GHz | FR2 | United States, Japan |
n78 (3.5 GHz) is the most widely deployed 5G NR band globally and is present in the majority of European, Australian, and many Asian 5G networks. A device lacking n78 support will miss 5G data entirely on a large share of international networks.
---
## Why Regional Variants Differ
Phone manufacturers do not build a single universally compatible radio module. Instead, they produce regional variants, each with a modem configured to support the band set required for their target market. A **model number** identifies the variant — for example, two phones sold under the same commercial name may carry different model numbers for North American and European markets, with distinct band configurations in each.
This practice has two technical roots.
First, **modem hardware constraints**: supporting every possible frequency band would require additional RF components (filters, amplifiers, antenna tuning elements) that add cost, space, and power consumption. Manufacturers limit the band set to what is commercially necessary in each region.
Second, **regulatory certification**: each variant must pass radio frequency certification (FCC in the United States, CE in Europe, MIC in Japan, and equivalents elsewhere) for the specific bands it will use. Certifying a device for all bands globally is not the standard approach.
The practical result: a North American-market phone may support LTE Bands 2, 4, 5, 12, 17, 25, 26, 41, 66 and 5G NR n25, n41, n66, n71, n77 — none of which overlap significantly with the primary LTE Band 1, 3, 8, 19 and 5G NR n1, n78, n79 bands used in Japan. The same phone in Japan may receive some LTE signal on a shared band but will miss VoLTE-designated bands and 5G coverage entirely.
For this reason, a device that is physically unlocked — no carrier restriction — can still fail to deliver full service simply because its modem was not built for the local band plan. Unlocking removes carrier restrictions; it does not add hardware support for missing bands. See [SIM Lock and SIM-Free Explained](/en/guides/sim-lock/) for the distinction between unlock status and hardware compatibility.
---
## How to Read a Device Spec Sheet
Every manufacturer publishes a technical specifications page for each model variant. The spec sheet is the authoritative source for supported bands.
**Step 1: Identify your exact model number.** The model number is printed on the device (usually on the back or in the SIM tray slot) and accessible under Settings → About Phone (Android) or Settings → General → About (iOS). Commercial names like "iPhone 16" or "Galaxy S25" are not sufficient — the model number (e.g., A2846, SM-S931B) distinguishes regional variants with different band sets.
**Step 2: Locate the official spec page.** Use the manufacturer's support or product page for your model number. Key sources:
- Apple: [apple.com/iphone/compare](https://www.apple.com/iphone/compare/) or the direct tech-specs URL for your model
- Samsung: samsung.com product page for the specific model number
- Google Pixel: [store.google.com/product/pixel_specs](https://store.google.com/product/pixel_specs)
**Step 3: Find the cellular bands section.** Spec sheets list bands in a section typically titled "Cellular and Wireless," "Connectivity," or "Network." LTE bands appear as "LTE Bands: 1, 2, 3, 4, 5..." and 5G NR bands as "5G NR: Sub-6 GHz n1/n3/n5..." with FR2/mmWave listed separately.
**Step 4: Note the model-specific band list.** The same product page may list multiple model variants side by side. Confirm you are reading the row for your specific model number, not a different regional variant.
Once you have the supported band list, compare it against the target carrier's deployed bands, which are published on the carrier's network information page or available from the national telecom regulator.
---
## Checking Carrier Band Requirements
A device spec sheet shows what bands your phone supports; the carrier's documentation shows which bands it actually uses for service. Both are needed.
**Primary coverage bands** are the bands a carrier uses for its main LTE or 5G NR signal in most locations. A device must support at least one of these to connect at all.
**VoLTE bands** are the specific LTE bands on which a carrier carries voice calls. Carriers designate one or more bands as the VoLTE bearer band. If your device supports LTE on a coverage band but lacks the VoLTE band, it may receive data but be unable to make or receive voice calls on networks where 3G has been retired. For the full explanation of why this matters, see [VoLTE and VoNR Explained](/en/guides/volte-vonr/).
**5G NR bands** are listed separately. A device may support LTE fully while lacking any of the carrier's 5G NR bands — in which case the device will operate on 4G LTE only, even in 5G coverage areas.
**Carrier aggregation (CA) band combinations** describe which bands the carrier combines to deliver higher speeds. 3GPP Release 10 standardised carrier aggregation. A device that supports individual bands but not the specific CA combination used by a carrier will still connect and receive data, but at lower peak speeds.
Where to find carrier band lists:
- The carrier's official website, typically under "Network," "Technology," or "Coverage" sections
- National telecom regulator spectrum databases (FCC in the US, Ofcom in the UK, ACMA in Australia, MIC in Japan, BNetzA in Germany)
- The GSMA's network coverage tools, which aggregate band information by country and operator
---
## Practical Compatibility Check Before Buying an Imported Device
The following method applies before purchasing any device intended for use in a country other than its origin market.
**1. Identify the target carrier and its bands.** Look up the carrier's official network page or the national regulator's spectrum assignment. Note the primary LTE bands, the VoLTE band, and the 5G NR bands (if 5G coverage is required).
**2. Identify the device model number for the import market.** Find the variant that was sold in the country where you plan to purchase. Do not assume the same commercial name means the same hardware.
**3. Compare band lists.** Match the device's supported LTE bands against the carrier's LTE bands, line by line. Then do the same for 5G NR bands. The overlap should cover:
- At least one primary coverage band
- The carrier's VoLTE-designated band
- The carrier's primary 5G NR band (if 5G is a requirement)
**4. Check the carrier's device compatibility list.** Many carriers maintain a list of approved or tested devices. Even if bands match, the carrier's IMS (VoLTE) profile may be absent from the device firmware, preventing voice registration. The approved device list is the fastest way to confirm full compatibility, including VoLTE profile availability.
**5. Verify SIM-lock status.** An imported device may be locked to its original carrier. Confirm it can be unlocked before purchase. An unlocked device with the correct band support and IMS profile should work fully on the target carrier.
If any of steps 3 or 4 reveal a mismatch, the device will deliver degraded service — potentially no voice calls, no 5G, or limited coverage. The risk is highest when importing between North America and Asia, or between the Americas and Europe, where primary band plans diverge most significantly.
For a framework to evaluate carrier options for your needs, see [How to Choose a SIM Plan](/en/guides/how-to-choose/) and [What Is an MNO?](/en/guides/what-is-mno/).
---
## Band Compatibility and International Roaming
When using your home SIM card on a visited network abroad — roaming — the roaming agreement determines which visited network your device connects to, but band compatibility still governs the quality of that connection.
A roaming arrangement established under a GSMA AA.12 agreement routes your device through the visited carrier's network. Your device must still physically support the bands that visited carrier uses. If the visited carrier's primary LTE band is absent from your device's hardware, your device may fall back to an older or lower-priority band — or fail to register on data at all.
In practice, many globally released devices support a broad enough band set to cover major roaming destinations. The risk is most pronounced with budget and regional devices that have narrow band support, or with devices imported from markets with band plans that diverge sharply from the destination country.
Some 5G bands, particularly n77 and n78 (3.5 GHz), are now widely enough deployed that many flagship devices include them regardless of their primary market — but older flagship devices from 2020–2022 may omit them for some regional variants.
For a full explanation of how roaming works and how it is priced, see [International Roaming Explained](/en/guides/international-roaming/).
---
## 5G Deployment Models and Band Implications
Not all 5G deployments are equivalent, and the deployment model affects which bands matter for your device.
**5G NSA (Non-Standalone)**: The 5G NR radio is added alongside an existing LTE core network. The LTE layer handles control signalling; 5G NR provides additional data capacity. A device on NSA 5G must support both the LTE anchor band and the 5G NR data band. If the LTE anchor band is missing from the device, 5G NR connection is also unavailable. NSA was the first deployment model for most carriers starting around 2019.
**5G SA (Standalone)**: The 5G NR radio connects to a 5G core network directly. SA removes the dependency on an LTE anchor band. SA deployments are expanding but as of mid-2026 remain less prevalent than NSA for consumer data. SA is required for VoNR (Voice over New Radio).
**mmWave 5G (FR2)**: Deployed in the United States, Japan, South Korea, and limited other markets, primarily for fixed-wireless access and dense venue coverage. FR2 bands are only present in device variants specifically designed for those markets; global or European variants commonly omit them. A device without FR2 support in a market that has deployed mmWave will still connect on Sub-6 GHz 5G or LTE without issue — FR2 is a supplementary layer, not the primary coverage band.
The practical takeaway for band verification: confirm Sub-6 GHz FR1 band support first, since FR1 bands carry the primary 5G coverage signal worldwide.
---
## Summary: The Band Verification Checklist
Before using a device on a carrier in an unfamiliar country, work through each item in order.
1. **Find your exact model number** from the device, not the commercial name.
2. **Look up the official spec sheet** for that specific model number on the manufacturer's website.
3. **Identify the carrier's band list** from the carrier's network page or the national regulator's spectrum database.
4. **Confirm primary LTE coverage band overlap** — the device must support at least one of the carrier's main LTE bands.
5. **Confirm VoLTE band support** — the device must support the carrier's designated VoLTE band. If not, voice calls will fail on any network that has retired 3G.
6. **Confirm 5G NR band overlap** if 5G is required — check both the band number and whether the carrier uses NSA (requiring an LTE anchor) or SA.
7. **Check the carrier's approved device list** — confirms IMS profile availability for VoLTE, independently of band support.
8. **Verify SIM-lock status** — ensure the device can accept the target carrier's SIM.
Completing all eight steps before purchase eliminates the most common compatibility failures. Skipping step 5 in a market where 3G has been retired is the highest-risk omission.
---
## FAQ
See the frontmatter for structured FAQ entries compatible with schema.org/FAQPage. Additional questions are addressed below.
**Do all 5G phones support all 5G bands?**
No. A device labelled "5G-capable" supports only the specific 5G NR bands listed in its spec sheet. These vary by regional variant. A device may support Sub-6 GHz 5G but not mmWave (FR2), or may support n78 but not n41 or n71. Always check the band list for your specific model number.
**If my phone shows "5G" on screen, does that mean full 5G connectivity?**
The "5G" indicator confirms the device has registered on a 5G NR connection on at least one supported band. It does not guarantee support for all of a carrier's 5G bands, nor does it indicate mmWave capability. The indicator reflects the active connection, which may be on a secondary or lower-capacity 5G band.
**Can a software update add support for a missing band?**
No. Band support is determined by the device's radio hardware (modem and RF components). Software updates can add carrier profiles, adjust band preferences, or enable carrier aggregation combinations, but they cannot make a hardware-absent band available.
**What if I only need data, not calls — does band compatibility matter less?**
Data-only use still requires the device to connect on a coverage band. If the device is missing the carrier's primary coverage bands, data will be slow or unavailable. The key simplification for data-only use is that the VoLTE band requirement is less critical — a device can receive data on a coverage band without VoLTE band support, as long as voice calls are not needed.
---
## Related Guides
- [VoLTE and VoNR Explained](/en/guides/volte-vonr/) — Why specific LTE bands are required for voice calls and what happens when they are missing
- [SIM Lock and SIM-Free Explained](/en/guides/sim-lock/) — How carrier locks differ from band compatibility issues and how to resolve them
- [What Is an MNO?](/en/guides/what-is-mno/) — How licensed spectrum ownership determines which bands a carrier deploys
- [International Roaming Explained](/en/guides/international-roaming/) — How GSMA roaming agreements work and how band support affects roaming quality
- [How to Choose a SIM Plan](/en/guides/how-to-choose/) — Framework for evaluating SIM options once device compatibility is confirmed
================================================================================
# SIM & Mobile Glossary
URL: https://sim-finder.com/en/guides/glossary-index/
Type: guides (en)
Published: 2026-04-13
This glossary covers the core terms you will encounter when comparing SIM plans, setting up an eSIM, or switching carriers. Definitions are ordered by topic: start with the basics, then move to setup, network technology, and number portability. When you hit an unfamiliar term in any SimFinder guide, come back here.
## Core Terms: SIM, eSIM, and Carrier Types
### SIM
**Subscriber Identity Module.** A circuit that stores your carrier identity (IMSI — International Mobile Subscriber Identity), authentication key (Ki), and network credentials. Every mobile device needs a valid SIM to authenticate with a carrier's network. Standardised as part of GSM in the early 1990s.
Physical SIM cards come in three current sizes defined by ETSI TS 102 221:
| Name | Standard | Size |
|------|----------|------|
| Mini-SIM | 2FF | 25 × 15 mm |
| Micro-SIM | 3FF | 15 × 12 mm |
| Nano-SIM | 4FF | 12.3 × 8.8 mm |
Most smartphones released in the past five years use Nano-SIM (4FF).
### eSIM
**Embedded SIM.** An eUICC chip soldered into the device at manufacture. Instead of inserting a physical card, you download a carrier profile over the internet — usually by scanning a QR code or through a carrier app. Governed by the GSMA SGP.22 specification for consumer devices.
Key behaviours under SGP.22:
- **Multiple profiles can be stored** on one eUICC. The storage limit depends on the chip's memory, not a fixed specification cap.
- **SGP.22 v2.x:** Only one profile can be active at a time.
- **SGP.22 v3.0+:** MEP (Multiple Enabled Profiles) allows multiple profiles to be active simultaneously — the technology that enables eSIM-only dual-SIM phones.
**US-specific note:** iPhones sold in the US from the iPhone 14 onwards are eSIM-only — they have no physical SIM slot. This includes the iPhone 14, 15, 16, 16e, and iPhone 17 series models sold in the US.
### iSIM
**Integrated SIM.** The SIM function is built directly into the device's main chipset (SoC) rather than on a separate eUICC chip. This allows even thinner and lower-power devices. The GSMA SGP.32 specification (published May 2023) covers IoT-focused iSIM deployments. Consumer iSIM devices are an emerging category.
### MNO
**Mobile Network Operator.** A carrier that holds a government radio-spectrum licence and owns its own network infrastructure — towers, core network, and radio equipment. All mobile traffic in any given country ultimately runs through an MNO's network. Examples: AT&T, T-Mobile, Verizon (US); EE, Three, O2, Vodafone (UK); Telstra, Optus, TPG (AU).
### MVNO
**Mobile Virtual Network Operator.** A carrier that sells mobile service without owning its own radio network. MVNOs buy wholesale network access from an MNO and resell it under their own brand. The ITU defines an MVNO as "an operator that provides mobile services without holding a government radio-spectrum licence."
As of 2022, more than 1,986 active MVNOs operated across 80+ countries (GSMA Intelligence). MVNOs typically offer lower prices than the MNO they ride on, because they carry less overhead. However, they share capacity with the MNO's primary customers, which can affect speeds during peak hours.
### Sub-brand
A lower-price service operated by an MNO's subsidiary or affiliate, using the parent carrier's own network. Sub-brands sit between an MNO and an independent MVNO in terms of both price and quality. Because they use the full parent network, they generally deliver more consistent performance than independent MVNOs. Examples: Visible (Verizon), Cricket (AT&T), SMARTY (Three UK).
### Prepaid
A service model where you pay before you use. You purchase a fixed amount of data, calls, or time credit upfront. When the allowance or expiry date runs out, service stops until you top up. Most travel eSIMs use a prepaid model.
### Postpaid
A service model where you pay after you use. The carrier bills you at the end of each month based on your plan or usage. The standard contract form in most developed markets.
---
## Setup and Configuration Terms
### APN
**Access Point Name.** The gateway identifier that tells your device how to connect to mobile data. Defined in 3GPP TS 23.003. Every data session requires a valid APN. In 5G systems the equivalent term is DNN (Data Network Name), defined in 3GPP TS 23.003 Clause 9A.
You usually do not need to set the APN manually — most carriers push the correct settings automatically. Manual configuration is sometimes required with MVNOs or travel SIMs when automatic setup does not trigger.
### eSIM Profile
The bundle of carrier data downloaded to an eUICC: network authentication credentials, APN settings, phone number, and related configuration. Profiles are delivered from the carrier's SM-DP+ server to your device's LPA (Local Profile Assistant). Once downloaded, you activate, deactivate, or delete profiles from your phone's settings.
### QR Code Setup
The most common way to install an eSIM. The carrier generates a single-use QR code containing the SM-DP+ server address and an activation code. You scan it with your phone's camera (or through the carrier settings screen) to download and activate the profile. Each QR code can only be used once.
### SM-DP+
**Subscription Manager Data Preparation+.** The server infrastructure that creates, stores, and delivers eSIM profiles to devices. Defined in GSMA SGP.22. Operated by the carrier or eSIM provider. When you scan an eSIM QR code, your phone connects to the SM-DP+ server to retrieve your profile.
### SIM PIN and PUK
**PIN (Personal Identification Number):** A 4–8 digit code that prevents unauthorised use of your SIM. After three consecutive incorrect PIN entries the SIM locks.
**PUK (PIN Unblocking Key):** An 8-digit code used to unlock a PIN-locked SIM. After ten consecutive incorrect PUK entries the SIM is permanently disabled. PUK codes are set by the carrier and cannot be changed by the user. They are printed on the SIM packaging or available from the carrier's support team.
### IMEI
**International Mobile Equipment Identity.** A 15-digit number that uniquely identifies a mobile device, defined in 3GPP TS 23.003. Used by carriers to identify equipment on the network and to block stolen devices. To find your IMEI: dial `*#06#` or go to Settings > About Phone.
---
## Network Technology Terms
### 3G, 4G/LTE, and 5G
The successive generations of mobile network standards.
**3G** — Third generation. Standards include WCDMA and CDMA2000. Several markets have completed 3G shutdown: Australia finished its 3G switchoff in 2024, meaning any device that cannot make VoLTE calls cannot place voice calls on Australian networks.
**4G / LTE** — Fourth generation. LTE (Long-Term Evolution) was standardised in 3GPP Release 8, frozen in December 2008. The dominant network type in most developed markets today.
**5G** — Fifth generation. Standardised from 3GPP Release 15 onwards (NSA version frozen December 2017; SA version frozen mid-2018). Uses Sub-6 GHz and millimetre-wave spectrum for high throughput, low latency, and massive device density.
### Frequency Band
A specific portion of the radio spectrum allocated for mobile use, identified by a band number (e.g., Band 3, Band 28, n77). Carriers in different countries use different bands. When buying a device abroad or using a travel SIM, confirm that the device supports the carrier's bands — otherwise you may get reduced speeds or no signal.
### SIM Lock
A software restriction that prevents a device from working with SIM cards from carriers other than the one that sold it. Regulations on SIM lock vary by country:
- **US:** No unified federal requirement — carriers set their own unlock policies (typically after a device is fully paid off or after a lock period).
- **UK:** Ofcom banned mandatory SIM locking for new phones from December 2021.
- **EU:** Rules vary by member state. Some have banned SIM locking under the European Electronic Communications Code (EECC); others still permit it.
- **AU:** No specific regulation bans SIM locking, but in practice most devices are sold unlocked.
A SIM-free (unlocked) device works with any compatible carrier's SIM worldwide.
### Dual SIM
The ability to use two SIM cards — physical or eSIM — simultaneously on one device. Defined in GSMA TS.37. Two common implementations:
**DSDS (Dual SIM Dual Standby):** Both SIMs are registered to their networks and can receive calls, but only one radio transceiver is shared. An active call on SIM 1 temporarily disconnects SIM 2 from the network.
**DSDA (Dual SIM Dual Active):** Two separate transceivers keep both SIMs live simultaneously. Calls on either line do not interrupt the other. Consumes more power.
**eSIM dual-SIM milestones:**
- iPhone 13 series and later support two active eSIMs simultaneously (no physical SIM slot required on US iPhone 14+).
- Google Pixel 7 was the first Android device to support dual eSIM, launching in October 2022.
### VoLTE
**Voice over LTE.** Carries voice calls and SMS as IP packets over the 4G LTE network using IMS (IP Multimedia Subsystem). Defined in GSMA PRD IR.92 and based on 3GPP IMS MMTel. The first commercial VoLTE service launched on 7 August 2012 (MetroPCS, USA).
VoLTE provides better call quality and allows simultaneous voice and full-speed data use. In markets where 3G has been shut down — most notably Australia — VoLTE support is mandatory for any voice calls.
### VoNR
**Voice over New Radio.** The 5G equivalent of VoLTE, carrying voice over 5G NR (New Radio) using IMS. Standardised in 3GPP Release 15 (2018). Requires a 5G Standalone (SA) network and supports the EVS (Enhanced Voice Services) codec for higher audio quality than VoLTE.
### Roaming
The ability to use your home carrier's service on a partner carrier's network in another country or region. Governed by bilateral roaming agreements between carriers (GSMA AA.12 standard). Data roaming is typically disabled by default and must be enabled in your device settings. Charges apply at your home carrier's international roaming rates unless a specific roaming plan is active.
### RLAH (Roam Like At Home)
The EU/EEA regulation that requires carriers to charge domestic rates for roaming within the EU and EEA (European Economic Area). In force since 15 June 2017, extended and strengthened by EU Regulation 2022/612 through 2032. Fair-use limits apply for extended stays abroad.
Note: Switzerland is not an EEA member and is **not** covered by RLAH, despite bordering EU countries.
### Wi-Fi Calling
Making voice calls over a Wi-Fi connection instead of a cellular signal, also known as VoWiFi. Useful in areas with weak cellular coverage. Requires both device and carrier support. Availability varies significantly by carrier and country — widely available in the US and UK; less common elsewhere.
### Tethering
Sharing your device's mobile data connection with other devices. Three modes: Wi-Fi hotspot, USB, and Bluetooth. Some carriers restrict or charge extra for tethering, particularly on lower-tier or MVNO plans. Check your plan's terms before relying on it.
### Carrier Aggregation (CA)
Combining multiple frequency bands simultaneously to increase throughput. First standardised in 3GPP Release 10 (LTE-Advanced, specification frozen 2011). Release 10 allows up to five component carriers (each up to 20 MHz) for a combined bandwidth of up to 100 MHz. Used in both 4G and 5G networks.
---
## Number Portability Terms
### MNP (Mobile Number Portability)
The right to keep your phone number when switching carriers. Singapore was the first country to implement MNP in 1997. The ITU standardised the technical framework in Recommendation Q.769.1 (1999). Most developed markets now mandate MNP by law.
The process differs by country:
| Country / Region | Method |
|-----------------|--------|
| UK | Text 'PAC' to 65075. Receive a PAC code by return SMS. Provide it to the new carrier. Port completes within one working day. |
| US | No single standard. Contact your current carrier to confirm the account number and transfer PIN, then initiate the port with the new carrier. |
| AU | Contact the new carrier. They initiate the port on your behalf. |
| EU (most markets) | Recipient-driven porting — the new carrier handles the process. Timelines and specific steps vary by country. |
### PAC Code (UK)
**Porting Authorisation Code.** The UK method for number porting. Text 'PAC' to 65075 from the phone number you want to keep. You receive the code by SMS immediately at no charge. The code is valid for 30 days. Give it to your new carrier to complete the port.
---
## Frequently Asked Questions
---
## Articles Referenced in This Glossary (Coming Soon)
The following SimFinder guides expand on topics introduced here. They are in production and will be published shortly.
- [What Is a SIM Card?](/en/guides/what-is-sim/)
- [What Is an eSIM?](/en/guides/what-is-esim/)
- [What Is an MVNO?](/en/guides/what-is-mvno/)
- [SIM Lock and SIM-Free Explained](/en/guides/sim-lock/)
- [What Is Dual SIM?](/en/guides/what-is-dual-sim/)
- [How to Set Up eSIM on iPhone via QR Code](/en/guides/qr-code-iphone/)
- [How to Set Up eSIM on Android via QR Code](/en/guides/qr-code-android/)
- [Mobile Number Portability (MNP) Explained](/en/guides/what-is-mnp/)
- [VoLTE and VoNR Explained](/en/guides/volte-vonr/)
- [APN Setup Guide for iPhone](/en/guides/apn-setup-iphone/)
- [APN Setup Guide for Android](/en/guides/apn-setup-android/)
================================================================================
# How to Choose a Travel eSIM: 5 Key Criteria
URL: https://sim-finder.com/en/guides/how-to-choose/
Type: guides (en)
Published: 2026-04-16
Choosing the wrong travel eSIM means paying for data you cannot use or finding yourself without signal in the places that matter. This guide covers the 5 criteria that determine whether a plan is right for your trip, explains the difference between single-country, regional, and global plans, and provides a checklist to verify before you buy.
## The 5 Criteria That Matter
### 1. Coverage and Network Quality
Coverage is the single criterion where a mistake cannot be fixed after purchase. A plan backed by a weak local network delivers poor service regardless of how much data it includes.
Before buying, confirm:
- **Which local network(s) the eSIM connects to** in your destination. The provider's coverage page should name the partner network (for example, "T-Mobile" in the US or "Vodafone" in Germany), not just show a generic map.
- **Whether the plan supports the frequency bands your device uses.** If you travel with a device purchased in a different region, check that its radio bands match the destination network. See the [glossary](/en/guides/glossary-index/) for band terminology.
- **Whether the plan includes 5G or is limited to 4G/LTE.** For most travelers, LTE is sufficient. If you need 5G, confirm the eSIM provider explicitly supports it.
Regional and global plans often route traffic through a single international network rather than a local one. This can result in noticeably slower speeds compared to a local partner plan. When connection quality matters, a country-specific eSIM with a named local carrier partner is preferred.
### 2. Data Amount and Usage Patterns
Travel eSIMs are sold in fixed data packages (for example, 1 GB, 5 GB, 10 GB, 20 GB) or as "unlimited" plans with a daily fair-use cap.
**Fixed data plans** suit travelers who primarily use maps, messaging, and occasional browsing. Five to ten gigabytes covers a typical week-long trip with moderate use. If you plan to stream video or work remotely, estimate higher — HD video streaming consumes approximately 2–3 GB per hour. For a reference by app, see the [data usage guide](/en/guides/data-usage-guide/).
**Unlimited plans** are typically more expensive but remove the anxiety of watching your balance. Read the fine print: most "unlimited" plans throttle speed after a daily threshold (commonly 0.5–2 GB at full speed, then drop to 128–512 kbps). This is often sufficient for messaging but not for video.
**How data is counted** varies by provider. Some plans count only download data; others count both upload and download. If you use video calls or upload photos frequently, this distinction matters.
### 3. Validity Period
Travel eSIM plans are sold with a fixed validity window — commonly 7, 14, 15, or 30 days. The clock starts at different points depending on the provider:
- **Installation date** — the validity period begins as soon as you install the eSIM profile on your device, even if you have not yet traveled.
- **First network connection** — the validity period starts when your device connects to the provider's network at your destination. This is the most traveler-friendly model.
- **First data use** — starts when you activate data for the first time.
Always verify which model the provider uses before purchasing. Installing the eSIM too early on an installation-date plan wastes days before your trip begins.
For multi-leg trips, check whether unused data rolls over if you buy a top-up, or whether remaining data is forfeited at the end of the validity window.
### 4. Pricing Model
Travel eSIM providers use several pricing structures:
| Model | Best for | Watch out for |
|-------|----------|---------------|
| **Fixed data (per GB)** | Predictable, moderate users | Running out mid-trip |
| **Unlimited (per day or per trip)** | Heavy users, video streamers | Throttle thresholds |
| **Pay-per-use / rollover** | Rare; some providers offer this | Complexity, higher per-GB cost |
Specific prices change frequently and vary by destination. Use SimFinder's travel eSIM search to compare current plans for your destination — the tool shows provider, data volume, validity, and price side by side.
Avoid comparing only the headline price. Calculate the effective cost per gigabyte for fixed-data plans, and read the fair-use policy carefully for unlimited plans.
### 5. Activation Method
Travel eSIMs are activated through one of four methods:
- **QR code** — the most common method. Scan a QR code sent by email or shown in the provider's app. Works on all eSIM-capable devices.
- **Provider app** — some providers require their own app to install and manage eSIM profiles. Convenient for top-ups but adds a dependency.
- **Manual code (SM-DP+ address)** — enter the server address and activation code manually. Useful when a QR code cannot be scanned, for example when reading a QR code from the same screen you need to scan it on.
- **Direct push** — the carrier pushes the profile to your device automatically. Less common for travel eSIMs.
For a detailed walkthrough of each method, see [Your First Travel eSIM](/en/guides/first-time-guide/).
One restriction applies universally: **eSIM QR codes are single-use.** Each code can be scanned exactly once and linked to one device. If the installation fails partway through, contact the provider for a new code rather than attempting to scan the original code again.
---
## Single-Country vs. Regional vs. Global Plans
The plan scope should match your itinerary. Mismatching scope is one of the most common causes of unnecessary expense.
### Single-Country Plans
A plan sold for one specific country connects to one or two local network partners and is typically the cheapest and fastest option for that destination. If you spend your entire trip in one country, start here.
Limitations: the plan becomes unusable — or switches to expensive roaming — the moment you cross the border.
### Regional Plans
Regional plans cover a group of countries under one purchase. Common groupings include Europe (typically 30–40 countries), Asia, Latin America, and Middle East & Africa. One eSIM covers multiple stops without needing to buy a new plan at each border.
The trade-off: regional plans often cost more per gigabyte than a dedicated single-country plan, and network quality may vary between countries in the bundle. Some countries in a regional plan may have weaker coverage than others.
Regional plans work well for travelers crossing 2–3 borders on a single trip, particularly within Europe where the regional footprint is dense and network quality is generally high.
### Global Plans
Global plans aim to cover most destinations worldwide under a single eSIM. They are the most flexible option for travelers visiting 4 or more countries or embarking on extended multi-continent trips.
Expect a higher price per gigabyte and potentially slower speeds compared to local network-backed plans. Verify your specific destinations are included and check the listed network partner for each country in the provider's coverage details.
---
## Data-Only vs. Data + Calls Plans
Most travel eSIMs are **data-only**. They do not include a phone number, cannot receive traditional SMS messages, and cannot make standard calls to local numbers.
This is sufficient for most international travelers who use apps like WhatsApp, FaceTime (on Apple devices), or Skype for communication. These VoIP apps transmit voice and text over the data connection included in any travel eSIM.
However, a data-only eSIM is not sufficient if you need to:
- Receive SMS-based two-factor authentication codes from banks or services that do not support authenticator apps. (For a workaround, see [How to Receive SMS 2FA Codes Abroad](/en/guides/sms-2fa-abroad/).)
- Make or receive standard calls to local numbers at the destination.
- Verify identity with services that require a local phone number.
In these cases, consider keeping your home SIM active in a dual-SIM configuration. Your home SIM handles calls and SMS through international roaming (which may incur charges but handles authentication reliably), while the travel eSIM provides affordable data. For more on dual-SIM setup, see [What Is Dual SIM?](/en/guides/what-is-dual-sim/).
A small number of providers offer travel plans that include a local voice number. These plans are more expensive and less common. Evaluate whether the additional cost is justified for your specific needs.
---
## Pre-Purchase Checklist
Before completing a purchase, confirm each of the following:
**Device compatibility**
- [ ] Your phone supports eSIM (iPhone XS/XR or later; Pixel 3 or later; Samsung Galaxy S20 or later — check your device's settings for an "Add eSIM" option)
- [ ] Your phone is not carrier-locked (SIM-locked devices cannot install eSIMs from other providers; on iPhone, check Settings > General > About > Carrier Lock)
- [ ] Your phone supports the frequency bands used by the provider's partner network in your destination
**Plan details**
- [ ] The provider lists the local network partner(s) for your specific destination
- [ ] Validity period start trigger is confirmed (installation date vs. first connection)
- [ ] Tethering/hotspot is permitted if you plan to share data with other devices
- [ ] Top-up or additional data purchase is possible if needed mid-trip
- [ ] Refund or cancellation policy is acceptable
**Practical setup**
- [ ] Install the eSIM profile on Wi-Fi at home, before departure
- [ ] Do not activate (toggle on) the travel eSIM until you land — activating early may start the validity clock or consume data
- [ ] If using dual SIM, confirm "Allow Cellular Data Switching" on iPhone is turned off to prevent your home SIM from being used for data abroad
- [ ] Back up the QR code or activation details in case reinstallation is needed
---
## Finding the Right Plan on SimFinder
SimFinder's travel eSIM search lets you filter by destination, data amount, validity, and provider. Results show the local network partner so you can evaluate coverage quality before purchasing.
Use the search to compare current plans rather than relying on prices in any article — provider pricing changes frequently and any specific number published here will become outdated. The search reflects live plan data.
For a step-by-step guide to the purchase and installation process, see [Your First Travel eSIM](/en/guides/first-time-guide/).
If something goes wrong during or after installation, see [eSIM Activation Failed: Troubleshooting Guide](/en/guides/activation-failed/).
================================================================================
# IMEI Blacklist Explained: What to Check When Buying a Used Phone
URL: https://sim-finder.com/en/guides/imei-blacklist/
Type: guides (en)
Published: 2026-06-04
A phone reported as lost, stolen, or tied to an unpaid device payment plan can be blocked from all mobile networks, even with a new SIM inserted. This block is applied to the device's IMEI — a 15-digit hardware identifier — through a system called the Equipment Identity Register (EIR). Checking a used phone's IMEI against the blacklist before purchase is the single most effective way to avoid buying a device that will not work on any carrier.
The key points covered here:
- How the IMEI blacklist and the EIR work
- Why a phone ends up blacklisted (theft reports, unpaid balances, fraud)
- How to run an IMEI check before buying a used phone
- How blacklist status differs from SIM lock status
- What to do if a device you already own has been incorrectly blacklisted
---
## How the IMEI Identifies Your Device
IMEI stands for **International Mobile Equipment Identity**. It is a 15-digit number assigned to every mobile device, defined in **3GPP TS 23.003**. The IMEI identifies the hardware — the phone itself — independently of which [SIM card](/en/guides/what-is-sim/) is inserted or which carrier the device is used with. While the IMEI identifies the device, the SIM identifies the subscriber.
The 15 digits consist of three fields:
| Field | Digits | Name | Meaning |
|---|---|---|---|
| TAC | 1–8 | Type Allocation Code | Identifies the device model and manufacturer |
| SNR | 9–14 | Serial Number | Uniquely identifies one unit within that model |
| CD | 15 | Check Digit | Computed by the Luhn algorithm (ISO/IEC 7812) |
When a phone connects to a mobile network, it transmits its IMEI alongside the SIM's credentials. The network can check this IMEI against the EIR in real time and decide whether to allow the device to register.
**How to find your IMEI:**
1. Dial `*#06#` — the IMEI displays immediately without placing a call
2. iPhone: Settings → General → About → IMEI
3. Android: Settings → About Phone → Status → IMEI Information
4. Printed on the original retail box, and on many phones on the SIM tray
For a full breakdown of IMEI structure and its relationship to SIM PIN and PUK codes, see [IMEI, PIN, and PUK Codes Explained](/en/guides/imei-pin-puk/).
---
## What the Equipment Identity Register (EIR) Is
The **Equipment Identity Register (EIR)** is a database, defined in **3GPP TS 23.002**, that stores IMEI records and assigns each one a status. When a device attempts to register on a network, the network queries the EIR and uses the result to allow or deny service.
The EIR maintains three lists:
| List | Status | Effect |
|---|---|---|
| **White list** | Device is allowed on the network | Registration proceeds normally |
| **Grey list** | Device is under observation | Carrier logs connections; network access may or may not be restricted |
| **Black list** | Device is blocked | Registration is denied; the device cannot make calls or use mobile data |
A device that is blacklisted in the EIR cannot register on any participating carrier's network, regardless of which SIM is inserted. The block is applied at the device level, not the SIM level.
---
## The GSMA's Role in Sharing Blacklists
The GSMA (the international mobile industry organisation) operates the **GSMA IMEI Database**, formerly known as the Central Equipment Identity Register (CEIR). This database aggregates IMEI records from carriers in participating countries and makes them available for cross-operator and cross-border checks.
In countries where carriers share blacklist data through the GSMA IMEI Database or a national EIR:
- A phone reported stolen by Carrier A is also blocked by Carrier B, C, and any other participating carrier in that country
- In some regions, blacklist sharing extends across borders, though coverage varies
Countries including the United States, United Kingdom, Canada, and Australia have established national IMEI databases or participate in shared EIR schemes. Coverage and enforcement differ: not all carriers in every country query the same database, and a device blocked in one country is not automatically blocked in all countries.
---
## Why a Phone Ends Up on the Blacklist
Phones are added to the EIR blacklist for several distinct reasons. Understanding these categories helps when evaluating a used device.
### Reported Lost or Stolen
The most common reason. When a phone owner reports their device lost or stolen to their carrier, the carrier submits the IMEI to the EIR. Once added, the phone cannot register on any cooperating network regardless of the SIM inside. This makes the device worthless for normal use, which is the primary deterrent against theft.
The carrier that submitted the IMEI is the only party that can remove it from the blacklist. If a stolen phone is recovered, the owner must contact their carrier to request removal.
### Unpaid Device Payment Plan (Financed Device)
In markets where phones are sold on instalment plans through carriers, an IMEI can be blacklisted if the buyer defaults on the remaining payments. The device is considered unpaid-for by the carrier, and service is denied until the balance is cleared.
This is a significant risk when buying a used phone: the previous owner may have stopped making payments, or the phone may have been resold while still under a carrier financing agreement. Checking the IMEI before purchase reveals this status.
### Insurance Fraud
A device reported as lost to an insurance company and replaced, but then recovered or sold by the original owner, may be submitted to the EIR as part of an insurance fraud case. The original device ends up blacklisted while the original owner keeps both the replacement and any sale proceeds.
### Counterfeit or Invalid IMEI
Devices with IMEIs that do not conform to the 3GPP TS 23.003 specification — including some counterfeit devices and grey-market handsets — may be flagged. Devices found to have duplicate IMEIs (which can occur in batches of counterfeit phones) may also be restricted.
---
## Blacklist vs. SIM Lock: Two Different Things
A common source of confusion is treating IMEI blacklist status and SIM lock status as the same issue. They are entirely separate:
| | IMEI Blacklist | SIM Lock |
|---|---|---|
| **What it restricts** | The device, at the network level | The device, to one specific carrier |
| **Applied by** | EIR (carrier reports, shared database) | The carrier that sold the device |
| **Effect** | Device blocked on all participating networks, any SIM | Device only works with the original carrier's SIM |
| **Removable by** | Carrier that reported the IMEI | Original carrier (via unlock request) |
| **Bypassed by inserting a different SIM?** | No | Yes (if unlocked) |
| **Check method** | IMEI check service | Settings → Carrier Lock (iPhone) or different-SIM test (Android) |
A phone can be:
- **Unlocked and clean:** works with any carrier — the ideal used phone
- **Locked and clean:** tied to one carrier but can be used there; unlockable
- **Unlocked and blacklisted:** accepts any SIM but blocked on all networks
- **Locked and blacklisted:** the worst case — restricted to one carrier and blocked there too
When buying a used phone, run both checks independently. A seller claiming the phone is "unlocked" says nothing about its blacklist status.
For a detailed explanation of SIM lock and how to check and remove it, see [SIM Lock and SIM-Free Explained](/en/guides/sim-lock/).
---
## How to Check a Phone's IMEI Before Buying
### Step 1 — Find the IMEI
Before running any check, confirm the IMEI you will look up is the one on the actual device, not a number someone has written on a label.
- Power on the device and dial `*#06#`. The IMEI displayed is the one the device transmits to networks.
- Cross-reference with the IMEI printed on the SIM tray and the original box if available. All three should match. Mismatches indicate a possible IMEI modification, which is a serious warning sign.
On dual-SIM devices, two IMEIs are displayed (IMEI and IMEI2). Check both.
### Step 2 — Run the IMEI Check
**Official GSMA check:** The GSMA provides an official IMEI check service at devicecheck.gsma.com (GSMA Device Check), which reports whether a device is flagged on the GSMA Block List as lost or stolen. In the US, the CTIA Stolen Phone Checker (stolenphonechecker.org) is powered by GSMA Device Check. This returns the device model associated with the TAC and, in participating regions, blacklist status.
**Carrier checks:** Most major carriers offer a free IMEI check on their websites. These are particularly useful because the carrier's database may reflect local blacklist data not fully propagated to international services. If you know which country and carrier the phone was used with, check that carrier's IMEI tool directly.
**Third-party services:** Numerous third-party IMEI check services exist. Coverage and accuracy vary. For a definitive result, use the GSMA or carrier check first.
### Step 3 — Interpret the Results
| Result | Meaning | Action |
|---|---|---|
| Clean / Not reported | No blacklist record found in the checked database | Proceed, but verify the database covers the seller's country and carrier |
| Blacklisted / Blocked | IMEI has been reported; device cannot register on participating networks | Do not purchase unless you have a confirmed, documented path to removal |
| Unpaid / Financed | Carrier reports an outstanding payment balance | Do not purchase; the original carrier can blacklist at any time |
| Invalid IMEI | IMEI does not pass the Luhn check or is not registered in the GSMA database | Do not purchase; likely counterfeit or tampered |
A "clean" result from one service does not guarantee the phone is clean in every country's database. A phone used in a country not covered by the service you checked may carry a blacklist record that the service does not have access to.
---
## Blacklist Coverage Varies by Country
The IMEI blacklist is not a single global system. Coverage depends on which carriers in which countries submit to and query the GSMA IMEI Database or a national EIR.
Key facts:
- Countries including the **US, UK, Canada, and Australia** have established national databases and strong carrier participation in EIR sharing
- In some countries, only certain carriers query the EIR; a phone blocked by one carrier may still work on another carrier's network in the same country
- A device blacklisted in one country may function normally in a country whose carriers do not share that blacklist data
- The GSMA facilitates international blacklist sharing, but participation is not universal
This variation has a practical consequence for cross-border phone sales: a phone listed as stolen in the UK could be imported and used on networks in a country that does not share the UK blacklist. However, this is not a risk-free path — if the phone is later taken back to a country with shared databases, it will be blocked.
---
## What Happens When a Blacklisted Phone Tries to Connect
When a blacklisted phone attempts to register on a network that queries the EIR:
1. The device transmits its IMEI alongside the SIM's IMSI during the registration handshake
2. The network queries the EIR
3. The EIR returns a "blacklisted" status
4. The network rejects the registration request
5. The phone shows "No service," "SIM not supported," or a similar error message
The process is invisible to the user — the phone simply fails to connect. Inserting a different SIM does not change the outcome because the block is on the IMEI, not the SIM.
Wi-Fi connectivity is unaffected. A blacklisted phone can still connect to Wi-Fi networks, use apps over Wi-Fi, and make Wi-Fi calls where the calling app does not require mobile network registration.
---
## If Your Own Phone Is Incorrectly Blacklisted
Incorrect blacklisting can occur in several scenarios:
- A theft report was filed and the phone was later recovered, but the IMEI was not removed from the blacklist
- A device payment was settled, but the carrier's record was not updated
- A phone was reported by insurance fraud committed by a previous owner you had no knowledge of
**Steps to resolve an incorrect blacklist:**
1. Identify which carrier submitted the IMEI. The carrier's IMEI check tool often indicates which carrier's database holds the record.
2. Contact that carrier's customer service directly. Provide proof of ownership (original purchase receipt, account details if you were the original owner).
3. If you purchased the phone secondhand and it was later blacklisted due to the previous owner's actions, you may need to pursue a claim against the seller, as the carrier is generally not obligated to remove an IMEI from the blacklist at a third-party buyer's request.
---
## IMEI Blacklist and SIM Swap Fraud
IMEI blacklisting and SIM swap fraud are related in that both can result in losing mobile service, but they operate through different mechanisms.
SIM swap fraud is an attack at the carrier account level: an attacker convinces the carrier to transfer your phone number to a SIM they control. This does not affect your IMEI and does not blacklist your device. Your physical phone retains its IMEI but loses service because your number has been ported away — if the original device is blacklisted, [porting your number via MNP](/en/guides/what-is-mnp/) to a new, clean device is the practical path to restoring mobile service.
IMEI blacklisting blocks the device. SIM swap fraud hijacks the number. Both affect your ability to use mobile service, but through different layers of the mobile network infrastructure.
For more on how SIM swap fraud works and how to protect against it, see [SIM Swap Fraud Explained](/en/guides/sim-swap/).
---
## Summary Checklist Before Buying a Used Phone
Before completing any used phone purchase:
- [ ] Dial `*#06#` on the device to confirm the live IMEI
- [ ] Cross-check the displayed IMEI against the SIM tray and original box (all three must match)
- [ ] Run the IMEI through the GSMA check or the carrier's IMEI tool
- [ ] Run a second check using the carrier associated with the seller's country if different
- [ ] Confirm the result is "clean" and not "unpaid" or "financed"
- [ ] Separately check the SIM lock status (Settings → Carrier Lock on iPhone, or insert a different SIM on Android)
- [ ] If buying from a private seller, ask for original purchase documentation
A blacklist check and a SIM lock check together take under five minutes and protect against the two most common causes of a used phone being unusable after purchase.
---
## FAQ
See the frontmatter for structured FAQ entries compatible with schema.org/FAQPage.
**Does a factory reset clear a blacklist record?**
No. A factory reset wipes the device's user data and returns software settings to defaults. It has no effect on the IMEI or on the EIR blacklist record held by the carrier. The IMEI is stored in a read-protected area of the device firmware and cannot be changed by a software reset.
**If a phone is blacklisted in one country, is it blacklisted everywhere?**
Not necessarily. Blacklist sharing across countries depends on participation agreements between carriers and national databases. A phone blacklisted in the UK through the GSMA IMEI Database may be flagged in countries that query the same database, but a phone blacklisted only in a country whose operators do not share data internationally may function in other markets. Do not rely on geographic separation as a workaround — network coverage of blacklists continues to expand.
**Can I buy a blacklisted phone and get it unblocked?**
Only the carrier that submitted the IMEI can remove it from the blacklist. Legitimate removal requires documenting that the original basis for blacklisting no longer applies — for example, a theft report withdrawn after recovery, or proof that a device payment has been settled. If you are not the original owner and the seller cannot demonstrate the basis for removal no longer applies, purchasing a blacklisted device is a significant financial risk.
---
## Related Guides
- [IMEI, PIN, and PUK Codes Explained](/en/guides/imei-pin-puk/) — How the 15-digit IMEI is structured, how to find it, and how SIM PIN and PUK codes protect access to the SIM
- [SIM Lock and SIM-Free Explained](/en/guides/sim-lock/) — How carrier locks differ from IMEI blacklisting, and how to check and remove a SIM lock
- [SIM Swap Fraud Explained](/en/guides/sim-swap/) — How attackers hijack your phone number at the carrier level, and how to protect your account
- [What Is MNP (Number Portability)?](/en/guides/what-is-mnp/) — How your phone number moves between carriers, independent of the device's IMEI
- [What Is a SIM Card?](/en/guides/what-is-sim/) — How SIM cards store credentials, authenticate to networks, and the five form factors from 1FF to eSIM
================================================================================
# IMEI, PIN, and PUK Codes Explained
URL: https://sim-finder.com/en/guides/imei-pin-puk/
Type: guides (en)
Published: 2026-06-04
Your phone uses three types of codes that are frequently confused: the IMEI identifies the device hardware, the SIM PIN protects access to the SIM card, and the PUK unlocks a PIN-blocked SIM. Each has a different purpose, a different length, and a different consequence if entered incorrectly.
The key points covered here:
- What the IMEI is, how its 15 digits are structured, and where to find it
- What the SIM PIN does and whether you should enable it
- What the PUK is and what happens when it is entered incorrectly ten times (permanent SIM destruction)
- Step-by-step instructions for recovering from a PIN-blocked SIM
If you want to understand what the SIM card itself stores before reading about the codes that protect it, see [What Is a SIM Card?](/en/guides/what-is-sim/)
---
## What Is an IMEI?
IMEI stands for **International Mobile Equipment Identity**. It is a 15-digit number assigned to every individual mobile device and defined in **3GPP TS 23.003**. The IMEI identifies the hardware — the phone itself — independently of which SIM card is inserted.
### Structure of the 15 Digits
The 15 digits are divided into three fields:
| Field | Digits | Name | Meaning |
|---|---|---|---|
| TAC | 1–8 | Type Allocation Code | Identifies the device model and manufacturer |
| SNR | 9–14 | Serial Number | Uniquely identifies one unit of that model |
| CD | 15 | Check Digit | Computed by the Luhn algorithm (ISO/IEC 7812) to detect transcription errors |
The TAC is assigned by the GSMA's Global Decimal Administrator (GDA). Checking any IMEI against a GSMA or carrier database will return the device manufacturer, model, and — in most countries — whether the device has been reported as stolen.
### How to Find Your IMEI
Three reliable methods work on any phone:
1. **Dial `*#06#`** — the IMEI appears on screen immediately. No call is placed; it is a service code.
2. **Settings menu:**
- iPhone: Settings → General → About → IMEI
- Android: Settings → About Phone → Status → IMEI Information (path varies by manufacturer)
3. **Physical label:**
- On the original retail box
- Printed on the SIM tray ejected from the device on many models
- Under a removable back cover on older models
On dual-SIM devices, two IMEIs are displayed — one per SIM slot (IMEI and IMEI2). Both are distinct 15-digit numbers.
### What the IMEI Is Used For
**Network registration.** When a device registers with a mobile network, it sends its IMEI alongside the SIM's IMSI. The network can cross-check the IMEI against the GSMA's IMEI Database (formerly CEIR) to confirm the device is not blacklisted.
**Stolen device blocking.** If a phone is stolen, you can report the IMEI to your carrier. The carrier adds it to the GSMA Equipment Identity Register (EIR), which is shared among participating operators. A blacklisted IMEI can be blocked from registering on all cooperating networks in the country — rendering the device unable to make calls or use data even with a different SIM inserted.
**Warranty and repair identification.** Manufacturers use the TAC portion of the IMEI to identify the exact model and production batch during warranty claims or safety recalls.
**Note:** IMEI blocking coverage depends on the country and on which carriers participate in the EIR sharing agreement. Devices sold to different markets and IMEI databases differ in their completeness.
---
## What Is a SIM PIN?
The SIM PIN (Personal Identification Number) is a **4- to 8-digit code** that controls access to the SIM card at power-on. It is defined in **ETSI ETS 300 922** and **3GPP TS 51.011**.
When the SIM PIN is enabled, the phone prompts for the code every time it powers on or the SIM is reinserted. The network authentication step — which requires the SIM to respond to a cryptographic challenge — does not proceed until the correct PIN is entered.
### Default PIN and First-Use Caution
Most carriers ship SIM cards with PIN protection **disabled by default**. Carriers that ship SIMs with PIN enabled typically set the default PIN to `0000` or `1234`. This default is printed on the SIM card packaging.
If you receive a SIM with an enabled PIN and do not change the default immediately, anyone who obtains the card knows the PIN. Change the default to a unique code before using the SIM.
### Why Enable the SIM PIN?
The SIM PIN is a hardware-layer protection. If someone removes your SIM card and inserts it into a different phone, they cannot use it without the PIN code — even if your device itself is turned off or reset. This is distinct from a device screen lock, which protects only the phone's storage.
Enabling the SIM PIN is most relevant when:
- You carry high-value SIM data (corporate account, primary phone number)
- Your device could be physically separated from you (for example, during travel)
- You use SMS-based two-factor authentication for sensitive accounts
If your device screen lock is strong and full-disk encryption is enabled, removing and misusing the physical SIM is the primary remaining vector that the SIM PIN addresses.
### How to Enable or Disable the SIM PIN
**On iPhone:**
Settings → Mobile Data (or Cellular) → SIM PIN → toggle on/off
**On Android (path varies by manufacturer):**
Settings → Security → SIM Card Lock → Lock SIM Card
Enabling the PIN for the first time asks for the current PIN (use the default printed on the SIM packaging if you have never changed it).
---
## What Is a PUK?
PUK stands for **Personal Unblocking Key** (also called PIN Unblocking Key in some documentation). It is an **8-digit code** supplied by your carrier that can unlock a SIM after the PIN retry counter is exhausted. PUK is defined in **ETSI ETS 300 922** and **3GPP TS 51.011**.
Unlike the PIN, you cannot set or change the PUK — it is a carrier-issued code fixed at the time the SIM is manufactured.
### When Is the PUK Needed?
The PUK is only needed when the SIM PIN has been entered incorrectly **three consecutive times**. At that point, the SIM refuses all further PIN attempts. The phone displays a message such as "SIM blocked — enter PUK" or "Enter PUK code".
A single correct entry in between resets the counter to zero. The three-attempt limit applies to three *consecutive* wrong entries.
### Where to Find the PUK
1. **Original SIM packaging.** Most carriers print the PUK on the card the SIM was packaged in, often behind a scratch-off panel or on the reverse side of a credit-card-sized holder. If you kept the original packaging, check there first.
2. **Carrier's online account portal.** Many carriers allow you to retrieve the PUK through the account management website after logging in.
3. **Carrier customer service.** Call your carrier and request the PUK. The representative will ask you to verify your identity before revealing it.
### The 10-Attempt Limit — Permanent SIM Destruction
The PUK also has a retry limit. After **ten consecutive incorrect PUK entries**, the SIM is **permanently disabled** and cannot be recovered under any circumstances. This is not a software lock — it is a hardware counter built into the SIM chip that cannot be reset.
A permanently locked SIM must be replaced. Your carrier can issue a replacement SIM linked to the same phone number and account, but the original physical card (or eSIM profile) cannot be revived.
**Do not guess the PUK.** If you do not have the PUK, retrieve it from one of the three sources above before attempting any entry.
---
## PIN Blocked: Step-by-Step Recovery
If your SIM displays a "SIM blocked" or "enter PUK" message, follow these steps.
### Step 1 — Do Not Guess
Stop entering codes until you have located the correct PUK. You have ten attempts total; wasting attempts on guesses risks permanent SIM loss.
### Step 2 — Find the PUK
Check the original SIM packaging first. If you do not have it, log in to your carrier's account portal or call customer service. Have your account credentials ready; carriers verify identity before disclosing PUK codes.
### Step 3 — Enter the PUK
When prompted on your phone:
- Enter the 8-digit PUK exactly as provided.
- You will then be asked to set a new PIN. Choose a 4–8 digit code that is not a simple sequence (avoid `0000`, `1234`, `1111`).
- Confirm the new PIN.
The SIM unlocks and connects to the network immediately after a correct PUK entry. The new PIN you set during PUK entry becomes the current PIN.
### Step 4 — If 10 Attempts Are Exhausted
Contact your carrier and request a SIM replacement. Provide your account number and identity verification. The carrier issues a new SIM (physical or eSIM profile) linked to your existing account and phone number. The process typically takes a few minutes at a carrier store or up to a few business days if ordered by post.
---
## IMEI vs SIM PIN vs PUK — Summary Comparison
| | IMEI | SIM PIN | PUK |
|---|---|---|---|
| **What it identifies/protects** | The hardware device | The SIM card against unauthorised use | Unlocks a PIN-blocked SIM |
| **Length** | 15 digits | 4–8 digits | 8 digits |
| **Who assigns it** | GSMA GDA (via TAC) + manufacturer | Carrier default; user can change it | Carrier (fixed at SIM manufacture) |
| **Can user change it?** | No | Yes | No |
| **Wrong-entry limit** | No limit | 3 consecutive → SIM blocked | 10 consecutive → SIM permanently destroyed |
| **Where to find it** | *#06#, Settings, device box | SIM packaging (default) | SIM packaging, carrier portal, customer service |
| **Standard** | 3GPP TS 23.003 | ETSI ETS 300 922, 3GPP TS 51.011 | ETSI ETS 300 922, 3GPP TS 51.011 |
---
## IMEI Uses: Stolen Phone Reporting and Dual SIM
### Stolen Phone Reporting
If your phone is stolen, the IMEI enables two independent actions:
**1. Report to your carrier.** Contact your carrier immediately and provide the IMEI (have it written down in advance or stored in a cloud document). The carrier can add it to the EIR and block the device from connecting to their network.
**2. File a police report.** In many countries, a police report referencing the IMEI is required before carriers will block the device. The IMEI also helps identify a recovered device as yours.
**Important limitation:** IMEI blacklisting applies only to carriers that participate in the shared EIR. A device stolen in one country and used in another may not be blocked if the receiving country's operators do not check or share the same blacklist. Coverage varies by country and operator.
For context on how SIM-level carrier restrictions (SIM lock) differ from IMEI blocking, see [SIM Lock and SIM-Free Explained](/en/guides/sim-lock/).
### Dual-SIM Devices and Multiple IMEIs
A phone with two SIM slots — whether physical or eSIM — has two IMEIs. Each SIM slot is assigned a separate 15-digit identifier. When the device registers both SIMs simultaneously, both IMEIs are reported to the respective networks.
Each SIM slot also has its own independent PIN and PUK. If you have two SIMs active and enter the wrong PIN three times on one, only that SIM's slot is blocked — the other SIM slot continues to function.
Some dual-SIM devices display both IMEIs at once when you dial `*#06#`. Others show them separately in Settings. Check your device's manufacturer documentation if only one is shown.
---
## What the IMEI Does Not Tell You
Several beliefs about IMEI are common but incorrect.
**The IMEI does not reveal your location.** The IMEI is used for network registration, not GPS or real-time tracking. Law enforcement with a court order can request network logs showing which cell towers a device connected to, but the IMEI alone does not expose location data to ordinary observers.
**The IMEI does not determine which carriers you can use.** Carrier compatibility is determined by the frequency bands the device supports and whether it is SIM-locked — not the IMEI. To verify band compatibility before travelling or buying a used device, see [Frequency Bands and Device Compatibility](/en/guides/frequency-bands/).
**A factory reset does not change the IMEI.** The IMEI is stored in a read-protected area of the device's firmware. Resetting the device to factory settings has no effect on it.
**Changing the IMEI is illegal in many countries.** Several jurisdictions criminalise modification of the IMEI, as it is commonly done to conceal stolen devices.
---
## Troubleshooting: No Service After Entering PUK
If your phone shows no network after a successful PUK entry, do not re-enter codes. Try the following:
1. **Restart the phone.** The network registration process restarts on reboot.
2. **Check for airplane mode.** Confirm that airplane mode is off and mobile data is enabled.
3. **Verify the APN settings.** Some devices reset APN configuration alongside SIM parameters. If data does not work after the PIN is accepted, verify the APN is set correctly for your carrier.
4. **Contact your carrier.** If the SIM still shows no service after the above steps, the SIM card itself may have been damaged by the blocking event. Your carrier can verify from their side whether the SIM is active and, if necessary, issue a replacement.
For a broader diagnostic checklist when the phone shows no signal, see [No Service: How to Diagnose and Fix a Lost Signal](/en/guides/no-service/). If you cannot activate a new or replacement SIM, see [Activation Failed: Why Your eSIM or SIM Won't Activate](/en/guides/activation-failed/).
---
## FAQ
See the frontmatter for structured FAQ entries compatible with schema.org/FAQPage.
**Can two different phones have the same IMEI?**
Each IMEI should be unique. However, counterfeits and some grey-market devices have been documented with duplicated IMEIs. If you are buying a used device, you can check the IMEI against the GSMA's IMEI check service (imeicheck.net links to the GSMA) to verify that it has not been reported stolen or flagged.
**My phone says "Invalid SIM" — is that a PUK issue?**
No. "Invalid SIM" usually means the network does not recognise the SIM at all, which is a different problem from PIN or PUK blocking. A PIN-blocked SIM shows a specific message asking for the PUK. "Invalid SIM" or "No SIM" errors are typically hardware, APN, or network compatibility issues. See [No Service: How to Diagnose and Fix a Lost Signal](/en/guides/no-service/) for a step-by-step diagnosis.
**Does the SIM PIN protect against SIM swap fraud?**
No. SIM swap fraud is an attack at the carrier level — an attacker convinces the carrier's customer service to transfer your number to a SIM they control. This happens before the SIM reaches a device, so the PIN (which is enforced by the device at power-on) provides no protection. Protecting against SIM swap requires securing your carrier account with a strong account PIN and, where available, a port freeze or SIM lock feature offered by the carrier.
---
## Related Guides
- [What Is a SIM Card?](/en/guides/what-is-sim/) — How SIM cards store credentials, authenticate to networks, and the five form factors from 1FF to eSIM
- [SIM Lock and SIM-Free Explained](/en/guides/sim-lock/) — How carrier locks differ from SIM PIN locks and how to check and remove them
- [Frequency Bands and Device Compatibility](/en/guides/frequency-bands/) — How to verify whether a device supports the bands used by your carrier or destination country
- [No Service: How to Diagnose and Fix a Lost Signal](/en/guides/no-service/) — Step-by-step diagnosis for no-signal errors beyond PIN and PUK issues
- [Activation Failed: Why Your eSIM or SIM Won't Activate](/en/guides/activation-failed/) — Fixes for SIM and eSIM activation errors after a SIM replacement or new plan
================================================================================
# International Roaming Explained — How Using Your Home SIM Abroad Works
URL: https://sim-finder.com/en/guides/international-roaming/
Type: guides (en)
Published: 2026-04-22
International roaming lets you use your home SIM card abroad without swapping or buying a new one. Your calls, texts, and data still go through your home carrier account — but the physical signal comes from a partner network at your destination. This guide explains how that process works technically, what the three main pricing models look like, and what you can do before and during your trip to avoid unexpected charges.
For a broader comparison of all connectivity options — roaming, local SIM, travel eSIM, and portable Wi-Fi — see [4 Ways to Stay Connected Abroad](/en/guides/four-options/).
---
## What Is International Roaming?
International roaming is the mechanism that allows a mobile subscriber to make and receive calls, send SMS, and use mobile data while outside their home carrier's network coverage area — typically in another country.
The technical foundation is a bilateral agreement between carriers known as a **GSMA AA.12 International Roaming Agreement**. Under this framework (administered by the GSMA's Wholesale Agreements and Solutions group), your home carrier and a foreign operator agree to accept each other's subscribers, handle signaling, and settle wholesale charges between themselves. If no AA.12-based agreement exists between the two carriers, your SIM will not register on the foreign network, regardless of signal strength.
The scope of roaming includes:
- **Voice calls** — dialing and receiving calls via the visited network's circuit-switched or VoLTE infrastructure
- **SMS** — text messages routed through the home carrier's messaging gateway
- **Mobile data** — internet access over the visited network, with traffic routed back through the home carrier's infrastructure
Not all carriers have agreements with all networks globally. Before traveling, check your carrier's published roaming coverage page to confirm which destination networks are covered.
---
## How Roaming Works — Home Carrier and Roaming Partner
When you land in a foreign country and your phone searches for a signal, the following sequence occurs:
**1. Network discovery.** Your device scans for available networks. When it finds one, it reads the network's identifier (PLMN code — a combination of the Mobile Country Code and Mobile Network Code).
**2. Roaming partner check.** Your SIM's home carrier has provided the device with a preferred roaming list. The device selects the highest-priority available network that has an active AA.12 agreement with your home carrier.
**3. HLR/HSS signaling.** Your device sends an attach request to the visited network. The visited network queries your home carrier's **HLR (Home Location Register)** or its 4G/5G successor, the **HSS (Home Subscriber Server)**, via SS7 or Diameter signaling to authenticate your subscription and retrieve your profile. If authentication succeeds, the visited network grants you access.
**4. IPX routing for data.** Once registered, mobile data traffic travels via the **IPX (IP eXchange) network** — an interconnected set of private IP hubs operated by GSMA-connected carriers and intermediaries. Rather than going directly to the internet from the visited network, your data packets typically transit the IPX back to your home carrier's GGSN or PGW gateway, then out to the internet. This indirect path adds latency compared to a local data connection, which is why roaming data can feel slower even on a fast LTE network.
**5. Wholesale settlement.** The visited network bills your home carrier at a negotiated wholesale roaming rate. Your home carrier then applies its retail pricing model to your account — which is where the three main pricing models come in.
This architecture means that your phone number, account settings, and billing all remain with your home carrier. The visited network is simply providing radio access.
---
## Three Roaming Pricing Models
How much you pay for roaming depends almost entirely on the pricing model your home carrier applies. Three main models exist:
### 1. Pay-Per-Use (Standard Roaming Rates)
This is the default on many plans that do not include an explicit roaming option. Each unit of usage — per minute of voice, per SMS, per megabyte of data — is billed at a rate set by your home carrier. These rates are typically the most expensive way to use your phone abroad and can accumulate quickly if you forget to disable data roaming.
Pay-per-use is occasionally the only option for travelers visiting destinations where no day-pass or bundle option is available. It can also be useful for very occasional, brief roaming needs where the cost of a pass would exceed actual usage.
Check your carrier's current published rates before relying on this model, and consider turning off Data Roaming in your device settings as a safeguard.
### 2. Roaming Day Passes and Period Passes
Many major carriers offer **add-on passes** that give a fixed allowance — or access to a standard domestic-style allowance — for a set period. Common structures include:
- **Daily passes**: activated for each calendar day or each 24-hour window you use the phone abroad. Your carrier's daily domestic data allowance (or a specified cap) applies for that day, and a flat fee is charged per day of use.
- **Weekly or trip passes**: a single fee covering a defined number of days, often activated at the start of the trip and running continuously until the period ends.
The key question with day passes is **activation trigger**: does the pass activate the first time your phone registers on a roaming network (including passively, at the airport), or only when you actively use data? Passive registration can trigger a day's charge before you intend to start using your phone. As of publication, check your carrier's current documentation on this point.
Passes typically apply only to a defined list of destination countries. Coverage lists change, so confirm before departure that your destination is included.
### 3. Included Roaming in Postpaid Plans
Some postpaid plans incorporate a roaming allowance as a standard benefit rather than an add-on. Roaming behavior under these plans varies:
- **Full-speed data included**: a defined data allowance at full (domestic) speeds in covered countries.
- **Reduced-speed data included**: unlimited data in covered countries, but served at a throttled speed. As of publication, several higher-tier postpaid plans from US carriers include this type of benefit — data at reduced speeds in many international destinations is available without an additional fee, with the option to purchase higher-speed passes for individual days.
- **Voice and SMS included, data separate**: calls and texts are covered but data requires an add-on.
The practical value of included roaming depends on whether your destinations are in the carrier's covered zone and whether the speed tier is sufficient for your needs. Light tasks like messaging and maps often work acceptably at reduced speeds. Video calls and streaming may not.
---
## Regional Patterns
Roaming pricing and regulation vary significantly by region. The following is a high-level overview; details change frequently, so verify current policies with your carrier before departure.
### European Union and EEA — Roam Like At Home
The most significant regulatory intervention in roaming pricing is the EU's **Roam Like At Home (RLAH)** regulation. In effect since June 15, 2017 (based on EU Regulation 531/2012 as amended), RLAH prohibits carriers licensed in EU and EEA member states from charging domestic customers additional roaming surcharges when traveling within the EU/EEA zone. A 2022 revision (EU Regulation 2022/612) extended and strengthened the framework through June 30, 2032, adding quality assurance requirements alongside the pricing rules.
In practical terms: if your carrier is based in an EU or EEA country, you should be able to use your plan in other EU/EEA countries at your domestic rate, subject to any fair-use threshold your carrier applies.
Important limits:
- **Switzerland** is not an EEA member and is not covered by RLAH. Swiss-based carriers and non-EU travelers using non-EU SIMs are outside the regulation's scope.
- **UK post-Brexit**: since the UK left the EU, UK carriers are no longer bound by RLAH. As of publication, some UK operators have voluntarily maintained free EU roaming for their customers, while others have reintroduced charges. Check your carrier's current position.
- RLAH does not benefit travelers from outside the EU/EEA using a non-EU SIM.
For a detailed breakdown of EU roaming rules and which countries are covered, see [EU Roaming Explained](/en/guides/eu-roaming/).
### United States — Carrier Plans and International Add-Ons
US carriers generally operate on a carrier-plan model with optional international add-ons. Patterns that have been common among major US carriers include:
- Some higher-tier postpaid plans from major US carriers have included basic international data (often at reduced speeds) in a long list of countries as a standard plan benefit, without requiring a separate pass purchase. As of publication, verify whether your specific plan tier includes this benefit and which countries are covered.
- Day-pass or weekly-pass add-ons are commonly available for users who need full-speed data or whose plan does not include a base international benefit.
- AT&T and Verizon have historically offered international day-pass add-ons that activate per day of use. As of publication, check each carrier's current international plan pages for available options, since product names and pricing structures change regularly.
The US has no equivalent of the EU's RLAH regulation — pricing is entirely determined by individual carrier policy.
### United Kingdom — Post-RLAH Landscape
Following the UK's departure from the EU, UK carriers have taken varying approaches to EU roaming:
- Some operators have continued to offer free EU roaming as a competitive feature. Several UK carriers market patterns similar to the former EU Roam Like At Home framework — included EU data within the domestic plan allowance — as of publication.
- Others have reintroduced roaming surcharges for EU travel.
The UK's regulatory situation for roaming is distinct from the EU framework. As of publication, check your specific UK carrier's current EU roaming policy before traveling.
Outside the EU, most UK carriers offer international day passes or per-use rates similar to the patterns described in the general pricing section above.
---
## When Roaming Makes Sense
International roaming with your home SIM is not always the right choice, but it fits well in specific scenarios:
**Short trips with a strong included-roaming plan.** If your postpaid plan already includes data at usable speeds in your destination, roaming may cost nothing extra and require no setup.
**Destinations where local SIMs are difficult to obtain.** In some countries, purchasing a prepaid SIM requires local registration, a local ID document, or involves language barriers. Roaming removes this friction.
**When you need your home number available.** Calls and SMS to your home number work automatically on roaming. If you need to receive two-factor authentication codes or calls from people who only have your home number, roaming keeps that line reachable without a separate dual-SIM configuration.
**Brief layovers and transit.** For a few hours in a connecting airport, activating a full local SIM or travel eSIM may not be worth the effort. A day pass or pay-per-use session for light data use can be more practical.
**When roaming is not the right choice:** on longer trips, in countries your plan does not cover cheaply, or when you need high-speed data continuously, alternatives such as a travel eSIM or local SIM card will typically give better value. See [4 Ways to Stay Connected Abroad](/en/guides/four-options/) for a full comparison, or [Your First Travel eSIM](/en/guides/first-time-guide/) if you have decided to use a travel eSIM instead.
---
## Pre-Departure and On-Arrival Settings
A few settings steps taken before and after landing significantly reduce the risk of unintended charges.
### Before You Depart
**1. Check your plan's roaming coverage and cost.**
Log in to your carrier's app or website and verify: (a) whether your destination is covered, (b) which pricing model applies — pay-per-use, a pass, or included — and (c) the current rates or pass fees. Do not rely on memory from a previous trip; carrier policies change.
**2. Consider your data needs.** Review your typical daily data consumption. Our [Data Usage Guide](/en/guides/data-usage-guide/) covers how much data common activities use, which helps you decide whether a pass is worth buying or whether reducing usage will keep you within a reasonable pay-per-use budget.
**3. Disable Data Roaming if you are not ready to pay roaming rates.**
On iPhone: Settings > Cellular > Cellular Data Options > Data Roaming. Toggle off.
On Android: Settings > Network & Internet > Mobile Network > Roaming. Toggle off (path varies by manufacturer).
With Data Roaming off, your device registers on the visited network for calls and SMS but does not use mobile data. This prevents background app refreshes and automatic updates from generating charges.
**4. Turn off Wi-Fi Calling if it uses your home carrier's data connection internationally.** Some carriers route Wi-Fi calling through a home-country gateway even when you are abroad, which can interact with data settings. Check your carrier's documentation.
**5. If you plan to use a travel eSIM instead, install it before departure.** eSIM profile downloads require an internet connection. Install and verify the profile at home over Wi-Fi before you travel. For step-by-step instructions, see [Your First Travel eSIM](/en/guides/first-time-guide/).
### On Arrival
**6. Allow the device to find the roaming network.** After landing, take the device out of Airplane Mode and wait a few minutes for it to register on the visited network. The network name in the status bar should change to the local operator's name.
**7. Confirm which network you have connected to.** If you expected to connect to a specific carrier (the one listed as your carrier's preferred roaming partner), verify the network name. If the device has attached to an unexpected network, manually select the preferred partner in network settings.
**8. Enable Data Roaming only when you are ready.** If your plan includes roaming or you have activated a pass, enable Data Roaming at this point. If using a travel eSIM for data instead, leave Data Roaming off on the home SIM.
**9. Confirm hotspot and app background refresh settings.** Mobile hotspot over roaming can generate significant data usage quickly. Consider disabling it or using it only when connected to Wi-Fi. For advice on managing dual-SIM configurations to keep the home SIM protected, see [Using Dual SIM for Travel](/en/guides/dual-sim-for-travel/).
---
## How to Avoid Bill Shock
Bill shock — an unexpectedly large mobile bill resulting from roaming usage — is common but largely preventable.
**Understand your plan before you fly.** The single most effective step is confirming your current plan's roaming behavior before departure. Many travelers assume roaming is included in their plan, or that a day pass must be manually activated and will therefore not trigger on arrival. Neither assumption is always correct.
**Use data wisely.** Even with a pass, data consumption can be higher than expected if you stream video, use navigation continuously, or forget to put apps into low-data modes. See our [Data Usage Guide](/en/guides/data-usage-guide/) for per-activity data estimates that help you plan realistically.
**Set a data usage alert or cap.** Both iOS and Android allow you to set mobile data usage warnings or hard limits per line. Set a warning at a level that triggers well before you approach your plan's threshold or budget.
iOS: Settings > Cellular > [line name] (iOS does not have a hard cap built in, but third-party apps and some carrier apps offer this).
Android: Settings > Network & Internet > Mobile Network > Data Warning & Limit.
**Keep Data Roaming off on lines you are not using for data.** If you have a travel eSIM handling data, keep Data Roaming off on the home SIM. Even background app activity — email checking, iCloud sync, app updates — can accumulate charges if Data Roaming is inadvertently left on.
**Watch for pass activation timing.** If your carrier's day pass activates on first network contact rather than first data use, arriving at midnight in a destination timezone may consume a full day's pass before you start using your phone for the day. Check the activation model and time zones involved.
**Disable iCloud Backup, automatic app updates, and video autoplay over mobile data** before crossing into roaming territory. These services do not distinguish between home and roaming data and will consume large amounts without prompting.
For the full pre-departure checklist including these settings in context, see the [Pre-Trip Connectivity Checklist](/en/guides/pre-trip-checklist/).
---
## Roaming vs. Alternatives
International roaming is one of four main options for connectivity abroad. The right choice depends on your trip length, destination, and whether your plan already includes roaming at an acceptable cost.
**[4 Ways to Stay Connected Abroad](/en/guides/four-options/)** compares roaming, local SIM cards, travel eSIMs, and portable Wi-Fi hotspots across dimensions including cost, setup effort, and device requirements.
**[Using Dual SIM for Travel](/en/guides/dual-sim-for-travel/)** explains how to run a travel eSIM alongside your home SIM — keeping your home number for calls and SMS while using a local data connection for everything else. This is the most common alternative to paying full roaming data rates.
**[Your First Travel eSIM](/en/guides/first-time-guide/)** is the step-by-step guide for installing and activating a travel eSIM if you decide to use one instead of, or alongside, your roaming plan.
For terminology used throughout this article — PLMN, HLR, IPX, and related terms — see the [Glossary of Mobile and eSIM Terms](/en/guides/glossary-index/).
---
## FAQ
See the FAQ items in the frontmatter above for answers to common questions including:
- What is GSMA AA.12?
- Why is roaming data slower than local data?
- What is a roaming day pass?
- Will my phone work automatically when I land?
- How do I know which network I am connected to?
- Can I use a travel eSIM to avoid bill shock?
- Is EU roaming free for all European travelers?
---
## Related Guides
- [4 Ways to Stay Connected Abroad](/en/guides/four-options/) — Full comparison of roaming, local SIM, travel eSIM, and portable Wi-Fi
- [Your First Travel eSIM: Step-by-Step Guide](/en/guides/first-time-guide/) — How to install and activate a travel eSIM
- [Using Dual SIM for Travel](/en/guides/dual-sim-for-travel/) — Keeping your home number while using a local data connection
- [Data Usage Guide](/en/guides/data-usage-guide/) — How much data common apps and activities use
- [Glossary of Mobile and eSIM Terms](/en/guides/glossary-index/) — Definitions for technical terms used in this article
================================================================================
# How to Sign Up With a Local Carrier Abroad
URL: https://sim-finder.com/en/guides/local-contract/
Type: guides (en)
Published: 2026-06-06
Getting a local SIM or mobile contract when you arrive in another country is straightforward in many markets and genuinely difficult in others. The core challenge for foreigners is identity verification: most countries require document registration for any SIM purchase, and postpaid contracts layer credit and address checks on top. This guide covers the general process for both prepaid and postpaid sign-ups, the documents you are likely to need, how registration requirements vary by region, and what to expect when buying in-store versus online.
For a broader look at how connectivity options compare — including travel eSIMs and roaming — see [4 Ways to Stay Connected Abroad](/en/guides/four-options/). If you are planning a long-term move rather than a trip, the considerations are different; see [Expat SIM Strategy](/en/guides/expat-strategy/) for guidance on establishing mobile service as a resident.
---
## Prepaid vs Postpaid: The Core Difference for Foreign Visitors
The choice between prepaid and postpaid is the most important decision when signing up with a local carrier abroad. The two models differ not just in billing but in how accessible they are to someone without a local identity footprint.
**Prepaid** (also called pay-as-you-go or top-up SIM) requires payment before service. You purchase a SIM or bundle, load credit, and consume your allowance. When it runs out, service stops until you top up. Prepaid does not require a credit history or a local bank account. It is available to visitors in almost every country where SIM registration is permitted at all.
**Postpaid** (monthly contract) bills you after the fact. The carrier extends you credit — network access before payment — which means it needs confidence you will pay. For a local resident with an established credit history and a domestic bank account, this is a routine process. For a foreigner on a tourist visa or a short-term visa, the barriers are higher: most carriers require at minimum a local address and a local bank account, and many also require a credit check against local bureaus that have no data on you.
The practical consequence is that **prepaid is the accessible default for most visitors abroad**. Postpaid becomes worth pursuing when you are in a country for an extended period — a working holiday, a student placement, a multi-year assignment — and the cost savings or plan features of a postpaid contract justify navigating the additional requirements.
For a full explanation of how prepaid and postpaid billing work, see [Prepaid vs Postpaid: Differences and How to Choose](/en/guides/prepaid-vs-postpaid/).
---
## Documents You Are Likely to Need
The exact documents required depend on the country and carrier, but a few categories appear consistently across markets.
### Passport
A valid passport is the universal baseline for foreign SIM registration. In countries that require SIM registration — which covers the large majority of markets globally — a passport is the standard identity document for non-residents. Some carriers also accept a national identity card from certain countries, but for international travel, a passport is the most reliably accepted document.
Carry your physical passport for in-store purchases. Some carriers require staff to scan or photocopy it; others record only the passport number. A digital photo of your passport is often not accepted for in-store registration.
### Visa or Entry Status
Your visa or entry stamp is not universally required for prepaid SIM purchase, but it may be requested in some markets. It establishes that you are legally in the country and can indicate your expected length of stay. In countries with SIM validity restrictions for foreigners — where a tourist SIM may be limited to 30 or 60 days of validity — your entry date and visa type may affect which products you are eligible for.
### Local Address
Many carriers ask for an address during SIM registration, even for prepaid. A hotel address, a temporary accommodation address, or a hostel address is typically accepted for tourist prepaid SIMs. The address requirement is less about verifying residence and more about completing the registration record.
For postpaid applications, a verifiable local address becomes a meaningful requirement: the carrier may cross-check it against local records or send billing correspondence there.
### Local Bank Account
Not required for prepaid SIM purchase in most markets. Required or strongly preferred for postpaid contracts in the majority of markets. A local bank account serves as both a payment channel and an additional identity anchor. Foreigners on short-term visas typically cannot open a full local bank account quickly; some markets have simplified bank accounts available to newcomers, while others effectively shut out foreign postpaid applicants without this.
### Security Deposit
Some carriers offer foreigners access to postpaid service against a refundable security deposit in lieu of a local credit history. The deposit is held for a defined period — often six to twelve months — and returned if the account remains in good standing. This is not universal; it depends on the carrier's specific policy for non-resident applications.
---
## SIM Registration Requirements by Law
SIM registration — the legal requirement to tie a SIM to an identified individual before or shortly after activation — is mandated by telecommunications law in the large majority of countries. A 2021 GSMA study found that SIM registration requirements applied in 157 countries globally, covering the vast majority of prepaid SIM sales worldwide.
The registration process varies:
- **At point of sale (in-store)**: Staff verify your documents and record the required information before handing over the SIM. The most common process for tourist SIMs.
- **Self-registration online**: Some markets allow you to purchase a SIM and complete registration via a carrier website or app, uploading a scan or photo of your passport.
- **Post-purchase registration**: In some markets, a SIM can be purchased without immediate identity verification but must be registered within a defined window (e.g., 48 hours) or it is deactivated. This model has become less common as enforcement has tightened.
**Biometric registration** is an increasingly common requirement in certain markets. Thailand requires biometric liveness detection for all SIM registrations as of August 2025 — applicable to foreign visitors who must present a physical passport. The liveness check is conducted via an app or a licensed dealer terminal.
Some countries place limits on how many SIMs a foreign national can hold — Thailand's post-2025 rules limit foreigners to three SIMs per provider, as one example. These limits vary significantly by country.
Countries with no SIM registration requirement for prepaid — which include the United States and (as of publication) a small number of other markets — are the exception, not the rule.
---
## Regional Variation in Signup Requirements
The signup process for a local SIM differs substantially across regions. For a full regional breakdown including coverage infrastructure and eSIM adoption, see the [Regional Connectivity Guide](/en/guides/regional-overview/).
### Asia
Asia has the widest variation in SIM registration requirements of any region. Japan, South Korea, and Vietnam require passport-based identity verification for all SIM purchases. Thailand requires biometric verification in addition to passport presentation. Singapore and Hong Kong have historically had lighter requirements for tourist SIMs, but policies change. Several countries in Southeast and South Asia require registration but the in-store process varies by carrier and outlet.
In-store purchase is the most reliable channel in much of Asia, particularly in countries where carrier apps are only available in local languages or require a local phone number to activate.
### Europe
Western European countries generally allow tourist SIM purchases with passport verification, sometimes completed online. Germany is the notable exception: identity verification is required for all SIM purchases, prepaid included, under the Telekommunikationsgesetz. Verification can be completed through VideoIdent, PostIdent (at post offices), eID, or in-person at carrier stores. Tourist SIMs in Germany take more steps to obtain than in most other European markets.
Eastern and Central European markets generally follow lighter registration procedures, with passport-only verification at point of sale being common.
For travelers whose home carrier is based in an EU or EEA member state, the EU's Roam Like At Home regulation means they may not need a local SIM at all for multi-country EU travel — their domestic plan is usable within the EU zone at domestic rates. For non-EU travelers, a local SIM or travel eSIM is typically more cost-effective than roaming. See [International Roaming Explained](/en/guides/international-roaming/) for how roaming costs work when using a non-EU SIM in Europe.
### North America
The United States and Canada have no SIM registration requirement for prepaid purchases. A visitor can walk into a carrier store or a supermarket, purchase a prepaid SIM or top-up starter pack, and activate it without presenting identity documents. This makes North America the most frictionless region globally for local SIM acquisition.
Postpaid contracts in the US and Canada still require standard credit checks and a local address — the absence of registration requirements applies only to prepaid.
### Latin America and Africa
Many countries in Latin America require a local tax number or national ID for SIM registration, which creates genuine barriers for tourists who lack these documents. In tourist-heavy coastal and urban areas, some carriers have adapted prepaid offerings for visitors, but this varies by carrier and changes over time. Language is a practical factor: many carrier retail experiences operate in Spanish or Portuguese only.
Africa similarly requires passport or national ID registration in most markets. The in-store process at airport kiosks in major cities is generally straightforward; more remote areas may have fewer options. Registration limits and SIM validity windows for foreign nationals vary by country.
---
## In-Store Purchase
In-store purchase from a carrier outlet, airport kiosk, or authorized dealer is the most common channel for tourists obtaining a local SIM.
**What to expect at a carrier store:**
1. Present your passport. Staff will scan or record the document number, your name, and date of birth at minimum.
2. Complete any required registration form — often a paper form or a tablet-based entry.
3. Select a plan or starter pack. For prepaid, you will typically choose a data and call bundle at the time of purchase.
4. The SIM is activated at the counter, or you activate it yourself with a PIN provided on the packaging.
5. In countries with biometric requirements, you may need to complete a liveness check on the staff member's device.
**Airport kiosks** are the most convenient entry point for many travelers. The tradeoff is that airport kiosks typically offer a narrower selection of plans than in-town carrier stores, and the plans available to tourists at airports are occasionally priced higher or with lower data allowances than equivalent city-center offerings. If you have a few hours before needing connectivity, shopping at a carrier store in town may offer better value.
**Authorized dealers and convenience stores** (common in Asia and parts of Europe) can sell prepaid SIMs but may not be able to handle all registration requirements on-site. Some dealers process registration through a central system; others require you to complete registration via the carrier's app or website after purchase.
---
## Online and eSIM Sign-Up
Some local carriers offer eSIM activation online or through a carrier app, which removes the need for a store visit.
**How local carrier eSIM sign-up typically works:**
1. Download the carrier's app or visit the carrier's website.
2. Choose a plan and pay online.
3. Complete identity verification — usually by uploading a passport scan and, in some markets, a selfie or liveness check.
4. Download the eSIM profile via a QR code or automatic push to the app.
The convenience of online eSIM purchase depends heavily on the market. In countries where carriers have built robust digital onboarding flows — Japan's major carriers, UK carriers, many US and Australian carriers — the process can be completed before you land and the eSIM activates as soon as your device connects to the local network.
In markets where carrier apps are in the local language only, identity verification is required in-person regardless of channel, or eSIM issuance is limited to contract holders, online sign-up may not be a practical option for visitors.
**One practical note on eSIM downloads:** eSIM profile installation requires an internet connection. If you need connectivity before you can access Wi-Fi, you cannot download a local carrier eSIM at the airport without a pre-existing connection. A travel eSIM installed before departure solves this problem — it is already on the device and activates when your plane lands. For the tradeoffs between a travel eSIM and a locally purchased eSIM, see [How to Choose a Travel eSIM](/en/guides/how-to-choose/).
---
## Postpaid Contracts: The Specific Hurdles for Foreigners
Postpaid monthly contracts abroad are worth understanding in detail, because the barriers for foreigners are higher than the standard signup experience suggests.
### Credit Checks Without a Local History
The central problem with postpaid for foreigners is that credit bureaus in most countries have no information about you. Your credit history at home is not visible to the bureau in the country you are visiting. From the carrier's perspective, you have no track record, which puts you in the highest-risk category.
Carriers respond to this in different ways:
- **Security deposit**: Some carriers offer postpaid to foreigners against an upfront deposit, typically equivalent to one or two months of the planned service.
- **Lower initial credit limit**: Approval with a restricted plan — limited data, lower device financing amount — until a track record is established.
- **Decline and redirect to prepaid**: Many carriers simply decline postpaid applications from foreigners without local credit history and direct them to prepaid products.
### Local Address Verification
Most postpaid carriers require a verifiable local address. Hotel addresses are generally not accepted for postpaid applications. A rental lease, a utility statement, or a letter from an employer or educational institution is typically required. For workers on assignment or students at a local institution, this is obtainable. For tourists or short-term visitors, it is not.
Some countries have simplified registration schemes for certain visa categories — working holiday visa holders in Australia and New Zealand, for example, may qualify for postpaid accounts on the basis of their visa and an employer letter. These pathways are carrier-specific and change over time.
For guidance on establishing mobile service across a multi-year assignment or immigration process, see [Expat SIM Strategy](/en/guides/expat-strategy/). For working holiday visa holders navigating the first steps in a new country, see [Working Holiday SIM Guide](/en/guides/working-holiday/).
### Visa Duration and Contract Length
Carriers are reluctant to enter 12 or 24-month contracts with applicants whose visa expires in three months. The practical result is that postpaid contracts for foreigners — where they are available at all — are more often month-to-month than long-term. This removes the device financing benefits that are the main attraction of long-term postpaid contracts.
If a fixed-term postpaid contract is genuinely useful for your situation — you have a multi-year work visa, a long-term rental lease, and a local bank account — postpaid is accessible in most markets with those credentials. The requirements are high, but they are the same requirements any local resident would provide.
---
## Comparing Plans Before You Sign
Once you have confirmed which products you are eligible for based on your documents and visa status, the plan comparison step is the same as for any other market: evaluate data allowance, validity period, call and SMS inclusion, and any fair-use or throttling rules.
**Do not assume the plans visible at airport kiosks are your best options.** Tourist-targeted products at arrival points are designed for convenience, not for price. Once you have a working local number or SIM, shopping at a city-center carrier store or through the carrier's website will typically reveal a wider range of products at different price points.
Use [SimFinder](/en/) to compare current local plans by country, including data volume, carrier network, and plan type, so you know what the market looks like before committing to a plan at the airport.
Also consider the practical support question: if the SIM stops working mid-trip and you need help, can you reach carrier support in a language you understand? Many local carriers in Asia, Latin America, and Africa offer support in local languages only. Travel eSIM providers are often better positioned to offer English-language support, which is one reason some travelers prefer a travel eSIM even when a cheaper local option is available.
---
## What Happens When You Leave
If you are on a tourist prepaid SIM, the plan validity period typically runs out within 30 to 60 days of activation regardless of whether you are still in the country. Most carriers allow you to simply let the SIM expire without any cancellation process. In most markets, unused credit or data on an expired prepaid SIM is forfeited; some carriers offer a grace period during which the SIM can be reactivated by topping up, but this varies by carrier and country.
If you have entered into a postpaid contract, you need to cancel it before or when you leave. The cancellation process — how much notice is required, whether there is an early termination fee, and how to return any rented equipment — varies by carrier and contract terms. Cancelling from abroad after the fact can be difficult; if you know your departure date, initiate cancellation before you leave.
Keep a record of your local SIM phone number before you leave, even if you do not plan to keep the SIM active. Some verification services, banking apps, and subscription accounts you set up abroad may have that number registered for two-factor authentication. Updating those accounts before the number goes inactive avoids lockout problems later.
For a guide to wrapping up mobile service arrangements when returning home from a period abroad, see [After You Return: Closing Accounts and Re-Establishing Home Service](/en/guides/after-return/).
---
## Summary: General Signup Process
The general sequence for obtaining a local SIM abroad:
1. **Check registration requirements for your destination** before you travel. Know what documents are required and whether biometric verification applies.
2. **Bring your physical passport** and, if available, your visa documentation.
3. **Decide between prepaid and postpaid**. If you lack a local address and bank account, default to prepaid — it is accessible without those requirements in most markets.
4. **Choose your purchase channel**: airport kiosk for immediate connectivity, city-center store or online for broader plan selection.
5. **Complete identity registration** at point of sale or through the carrier's app, per the country's requirements.
6. **Select a plan** that matches your expected stay duration and data usage.
7. **Keep track of your plan's validity period** and top up or renew as needed.
8. **If you signed a postpaid contract**, note the notice period and any early termination fee so you can cancel correctly when you leave.
The most common mistake travelers make is underestimating the registration friction in their destination country. Arriving with a physical passport and a local address (even a hotel address) already noted down avoids delays at the point of sale. If your destination has known biometric requirements, confirm in advance which carrier outlets are equipped to handle the check — not all authorized dealers support every verification method.
---
## Related Guides
- [Expat SIM Strategy](/en/guides/expat-strategy/) — How to establish mobile service as a longer-term resident abroad
- [Working Holiday SIM Guide](/en/guides/working-holiday/) — SIM and contract guidance specific to working holiday visa holders
- [Regional Connectivity Guide](/en/guides/regional-overview/) — How local SIM availability and registration requirements vary across six regions
- [International Roaming Explained](/en/guides/international-roaming/) — How using your home SIM abroad works, and when roaming costs make a local SIM the better choice
- [After You Return: Closing Accounts and Re-Establishing Home Service](/en/guides/after-return/) — How to cancel foreign mobile accounts and restore your home setup when you leave
================================================================================
# What to Do If Your Phone Is Lost or Stolen
URL: https://sim-finder.com/en/guides/lost-stolen/
Type: guides (en)
Published: 2026-06-04
If your phone is lost or stolen, the first 30 minutes determine how much damage is done. Act in this order: attempt to locate the device, lock or erase it remotely, suspend the line with your carrier, freeze any mobile payment services, and change passwords for accounts that were accessible on the phone. File a police report regardless of whether you expect to recover the device.
This guide walks through each step in sequence, explains what each action does, and covers the SIM swap protection dimension that a phone theft can trigger.
---
## Step 1 — Attempt to Locate the Device
Before locking or erasing, try to locate the device. Location data is destroyed by a remote erase and unavailable after a lock in some configurations.
### Apple Find My (iPhone, iPad, Apple Watch, Mac)
Apple Find My requires that the device was signed in to an Apple ID with Find My enabled before it was lost. Access it at [icloud.com/find](https://www.icloud.com/find) from any browser, or through the Find My app on another Apple device signed in to the same Apple ID.
Find My shows the device's last known location on a map. If the device is online and location services are active, the position updates in near real time. If the device is offline, Find My displays the last recorded location with the time it was recorded.
From Find My you can:
- **Play Sound** — causes the device to emit an alert tone even if it is on silent, useful if the device is nearby.
- **Mark as Lost** — activates Lost Mode, which locks the device with your passcode, displays a custom message and contact number on the lock screen, and suspends Apple Pay. The device continues to report its location to Find My while Lost Mode is active.
- **Erase This Device** — remotely wipes all data. After an erase, the device can no longer be tracked through Find My.
Apple Activation Lock, which is part of Find My, ties the device to your Apple ID. A device with Activation Lock enabled cannot be set up or reactivated without your Apple ID credentials, even after a factory reset.
### Google Find My Device (Android)
Google Find My Device requires that the device was signed in to a Google account with Find My Device enabled before it was lost. Access it at [google.com/android/find](https://www.google.com/android/find) from any browser, or through the Find My Device app on another Android device.
From Find My Device you can:
- **Play Sound** — plays an alert at full volume for five minutes even if the device is on silent.
- **Secure Device** — locks the device with your screen lock PIN, pattern, or password. You can optionally set a recovery message and phone number displayed on the lock screen. The device can no longer be used to make Google Pay purchases in stores.
- **Erase Device** — remotely wipes all data. Once erased, the device can no longer be tracked.
If the device is offline at the time you issue a command, the command queues and executes the next time the device connects to the internet.
### What to Do If You Did Not Enable Find My or Find My Device
Remote location, lock, and erase functions require the tracking service to have been enabled before the loss occurred. If it was not enabled, these options are not available. In this case:
- Proceed directly to suspending your line (Step 2).
- Provide your IMEI to your carrier to request device blacklisting.
- File a police report with the IMEI (Step 6).
---
## Step 2 — Contact Your Carrier to Suspend the Line
Once you have attempted to locate the device (or confirmed location is not possible), contact your carrier immediately to suspend the line.
### What a Line Suspension Does
A temporary suspension stops your SIM from making or receiving calls, sending or receiving texts, and using mobile data. It also prevents anyone who has the device — or has removed the SIM — from racking up charges on your account.
Importantly, a suspension is different from cancelling your contract. Your phone number is preserved during a suspension, and you can reactivate the line when you recover the device or obtain a replacement. For strategies to hold a number long-term during a replacement period, see [How to Keep a Phone Number You're Not Using](/en/guides/number-storage/).
### How to Request a Suspension
Contact your carrier through one of the following channels from a device other than the lost phone:
- **Carrier app or website.** Most major carriers provide a self-service option to suspend a line through their account portal. This is typically the fastest method.
- **Carrier customer service phone line.** Use the number on your carrier's website. Do not rely on a number stored only in the lost device.
- **Carrier retail store.** Bring a government-issued photo ID and any account information you have access to.
You will need to verify your identity. Carriers typically require your account number, account PIN, or answers to security questions. The specific requirements vary by carrier and country.
### Billing During Suspension
Carrier policies on billing during a suspension differ. Some carriers suspend all billing for the duration; others continue charging a reduced plan fee or the full monthly plan cost. Ask your carrier explicitly what charges, if any, continue during the suspension period.
---
## Step 3 — Request a SIM Reissue
Once the line is suspended, the existing SIM (whether physical or eSIM) linked to your number is deactivated. To restore service on a new or replacement device, you will need a new SIM.
### Physical SIM Replacement
Visit a carrier store or, in some cases, request a replacement SIM by post through the carrier's website. Bring government-issued photo ID and your account credentials. The carrier issues a new physical SIM linked to your existing phone number and account. The deactivated SIM — including any SIM that may remain in the lost or stolen device — becomes permanently inactive.
### eSIM Reissue
For eSIM accounts, the carrier issues a new eSIM profile. This is typically done through the carrier's app or website. The process generates a new QR code or activation code that you install on the replacement device. The previous eSIM profile is deactivated.
Because eSIM transfer does not require a physical card, the reissue can often be completed entirely online. The specific steps depend on your carrier and the device you are transferring to.
### What Happens to the Lost Device
After a SIM replacement or reissue, the SIM linked to the lost device is no longer active. If the device was locked remotely or wiped, it cannot be accessed without your credentials. Your phone number is preserved on the new SIM.
---
## Step 4 — Stop Carrier Billing and Freeze Mobile Payments
### Mobile Payment Services (Apple Pay, Google Pay)
Remote lock via Find My (Lost Mode) or Find My Device (Secure Device) suspends Apple Pay and Google Pay on the device immediately. If you have not been able to issue a remote lock, you can also suspend these services through the respective account portals:
- **Apple Pay:** Log in to [icloud.com](https://www.icloud.com) → Account Settings → your device → Remove. This removes all cards from Apple Pay on that device.
- **Google Pay:** Log in to [pay.google.com](https://pay.google.com) → Payment methods, and remove cards associated with the lost device or contact your bank to freeze any cards linked to Google Pay.
Contact your bank or card issuer directly if you suspect any fraudulent charges have already occurred.
### Carrier Billing and Premium Services
Some carriers allow you to add charges to your phone bill — for app purchases, premium SMS services, or carrier-billed subscriptions. If your account was accessible on the lost device, contact your carrier to review recent charges and request a billing freeze or investigation if unauthorised charges appear.
---
## Step 5 — Change Passwords for Apps Accessible on the Device
A stolen unlocked device — or a device where someone has bypassed the screen lock — gives access to every app that was logged in. Act quickly on accounts in this priority order:
### Priority 1: Email Accounts
Your email account controls password recovery for almost every other service. If an attacker resets your email password, they can then reset passwords for banking, social media, and other accounts.
- Change your email password from a device or browser that was not the lost phone.
- Revoke all active sessions (most email providers have a "Sign out of all other sessions" or "Manage devices" option).
- Check that the recovery email address and phone number on the account have not been changed.
### Priority 2: Banking and Financial Apps
- Change passwords for any banking, brokerage, or payment apps that were installed on the device.
- Review recent transaction history for unauthorised activity.
- Contact your bank's fraud line if you see any suspicious transactions.
### Priority 3: Social Media and Other Accounts
- Change passwords for social media accounts, especially any with payment methods attached or a large following.
- Review connected apps and third-party access grants, and revoke any you do not recognise.
### Session Revocation
Most modern platforms allow you to sign out of all active sessions from an account settings page. Do this for any account that was logged in on the lost device, regardless of whether the account has a strong password, because the session token on the device may still be valid until explicitly revoked.
---
## Step 6 — File a Police Report
File a report with your local police, even if you do not expect the device to be recovered. A police report serves several concrete functions:
- **Insurance claims.** Device insurance policies almost universally require a police report number before processing a theft claim.
- **IMEI blacklisting.** Carriers in many countries will add a device to the stolen device registry (Equipment Identity Register) only after a police report has been filed. An IMEI-blacklisted device cannot register on cooperating networks regardless of which SIM is inserted.
- **Fraudulent account activity.** Financial institutions often require a police report number to process fraud claims related to the loss of a device.
- **Carrier investigation.** If the theft results in SIM swap fraud or unauthorised port-out, the carrier's security team will ask for a police report reference.
Provide the police with: the device make and model, the IMEI (if you recorded it in advance), the approximate time and location of the loss, and any serial number from the original packaging.
### Record Your IMEI Before You Need It
The most effective preparation is to record your IMEI before a loss occurs, so it is available from another device when you need it.
Your IMEI can be found by dialling `*#06#` on any phone — the number appears on screen without placing a call. It is also in Settings (iPhone: Settings → General → About; Android: Settings → About Phone → Status → IMEI Information) and printed on the original device box.
Store the IMEI in at least one location that is not on the phone itself: a password manager, a cloud document, or on the original device box in a safe place. On a dual-SIM device, record both IMEI numbers.
For a full explanation of how the IMEI is structured and how stolen device blacklisting works, see [IMEI, PIN, and PUK Codes Explained](/en/guides/imei-pin-puk/).
---
## Step 7 — Check for SIM Swap Fraud
Phone theft is sometimes accompanied by a SIM swap attempt. An attacker who physically possesses your phone may be able to extract your account details (from stored emails, messages, or account apps) and use those details to impersonate you to your carrier and request a SIM swap — transferring your number to a SIM they control.
Signs that a SIM swap has occurred alongside the theft:
- Your line shows "No Service" not because of the suspension you requested, but before you had a chance to contact the carrier.
- You receive notifications that account passwords have been changed for services you did not touch.
- Your email or banking login is rejected despite the correct credentials.
If you suspect a SIM swap occurred, contact your carrier immediately and ask whether any SIM swap or port-out request was made on your account in the past 24 to 72 hours.
After recovering your line, take these steps to prevent future SIM swap attacks:
- Enable your carrier's account lock or SIM lock feature (called Wireless Lock at AT&T, Number Lock at Verizon, SIM lock at T-Mobile, or an equivalent at your carrier).
- Set a carrier account PIN that is not derived from your date of birth, address, or account number digits.
- Move high-value accounts away from SMS-based two-factor authentication to authenticator apps or hardware security keys. See [How to Receive SMS 2FA Codes Abroad](/en/guides/sms-2fa-abroad/) for guidance on stronger alternatives to SMS 2FA.
- If your carrier's SIM is not already SIM-locked to your device, enable [SIM Lock](/en/guides/sim-lock/) features where available to reduce unauthorised port-out risk.
For the full SIM swap prevention guide, see [SIM Swap Fraud: How It Works and How to Protect Yourself](/en/guides/sim-swap/).
---
## International Considerations
The steps above apply universally, but the specific procedures differ by carrier and country.
**Carrier suspension.** All major carriers in every market offer temporary line suspension, but the method (app, website, phone, or store) and the identity verification required vary. Some carriers require in-person verification with photo ID for a suspension; others allow it entirely online. Contact your carrier's support channel directly.
**IMEI blacklisting coverage.** IMEI blacklisting is effective only if carriers in the country where the device is being used participate in the Equipment Identity Register and share data with the country where the theft occurred. International IMEI blacklist sharing exists between some countries (particularly within the EU and between the US, UK, Canada, and Australia) but is not universal. A device stolen in one country may still function on networks in another country that does not participate in the shared registry.
**Police reporting.** The process for filing a police report varies by country. In some countries this can be done online; in others you must attend a police station in person. If you were travelling when the device was lost or stolen, you may need to file a report in the country where the incident occurred in addition to (or instead of) your home country.
**Mobile payment regulations.** Regulations governing liability for fraudulent mobile payments differ by country. In the EU, EU payment services rules (PSD2 and its successors) provide consumer protections for unauthorised electronic payments. In the US, Regulation E covers unauthorised electronic fund transfers. Contact your card issuer or bank for specific guidance under the applicable rules in your jurisdiction.
### Quick-Reference Checklist
| Action | When | Notes |
|---|---|---|
| Open Find My / Find My Device | Immediately | Lock (not erase) first if you may recover the device |
| Play sound | Immediately | Useful if the device is nearby |
| Issue remote lock | Within first minutes | Suspends Apple Pay / Google Pay |
| Call carrier to suspend line | Within first hour | Preserve phone number; confirm billing during suspension |
| Request SIM reissue | When you have a replacement device | Physical SIM or eSIM depending on your carrier |
| Remove cards from Apple Pay / Google Pay | Within first hour | Via icloud.com or pay.google.com from another device |
| Change email password and revoke sessions | Within first hour | Email controls recovery for all other accounts |
| Change banking passwords and check transactions | Within first hour | Contact fraud line if suspicious activity found |
| Change other account passwords | Same day | Prioritise accounts with payment methods attached |
| File police report | Same day | Required for insurance and IMEI blacklisting |
| Report IMEI to carrier | Same day | Enables device blacklisting across cooperating networks |
| Check for SIM swap on account | Same day | Ask carrier if any SIM swap or port-out was requested |
| Enable carrier account lock | After line is restored | Prevents future SIM swap attempts |
---
## FAQ
See the frontmatter for structured FAQ entries compatible with schema.org/FAQPage.
**Can I track a phone that has been turned off?**
A device that is powered off cannot transmit its location in real time. Apple Find My can show the last location recorded before the device lost power. On supported Apple devices, the Find My network (which uses Bluetooth signals detected by other Apple devices nearby) can report an approximate location even when the device is powered off, though this depends on the device model and iOS version. Google Find My Device relies on an active internet connection and does not have an equivalent offline network.
**What if I did not enable a screen lock on the lost phone?**
A device without a screen lock gives whoever has it immediate access to all installed apps and their stored sessions. If your phone was not screen-locked, treat every account that was installed on the device as potentially compromised. Prioritise changing email and banking passwords and revoking sessions before changing anything else.
**My carrier is asking for a PIN or account number I do not remember — what can I do?**
Carriers have fallback identity verification procedures for customers who cannot recall their account PIN. You will typically be asked to verify with other account information: billing address, the last four digits of a national ID number, a recent invoice amount, or an email-based verification link sent to the address on the account. Visit a carrier store with government-issued photo ID as a last resort, as in-person verification typically has fewer restrictions.
**Does a remote erase void my carrier contract or insurance?**
No. A remote erase deletes data from the device but has no effect on your carrier contract, insurance policy, or your phone number. Your contract obligations and insurance coverage remain unchanged after an erase. If you later recover the device, contact your carrier and Apple or Google support to determine whether data backed up to iCloud or Google One can be restored.
---
## Related Guides
- [SIM Swap Fraud: How It Works and How to Protect Yourself](/en/guides/sim-swap/) — How attackers hijack your phone number after a theft, and the carrier locks that prevent it
- [IMEI, PIN, and PUK Codes Explained](/en/guides/imei-pin-puk/) — How to find and record your IMEI, how SIM PIN protection works, and the 10-attempt PUK limit
- [SIM Lock and SIM-Free Explained](/en/guides/sim-lock/) — How carrier locks differ from device locks, and how to check your phone's lock status
- [How to Keep a Phone Number You're Not Using](/en/guides/number-storage/) — Options for holding your phone number during a suspension or replacement period
- [How to Receive SMS Two-Factor Authentication (2FA) Codes Abroad](/en/guides/sms-2fa-abroad/) — Why SMS 2FA becomes a security risk when a SIM is compromised, and stronger alternatives
================================================================================
# Set Up eSIM with a Manual Code (SM-DP+ Address) When QR Won't Work
URL: https://sim-finder.com/en/guides/manual-code/
Type: guides (en)
Published: 2026-04-20
If you cannot scan a QR code to install an eSIM, manual code entry is the alternative defined in the GSMA SGP.22 specification. You enter two pieces of text — an SM-DP+ address and an activation code — directly into your device's Settings, and the eSIM profile downloads exactly as it would from a QR code scan. The result is identical; only the input method differs.
This guide covers when manual entry is needed, what information you require, how to get it, and the exact steps for iPhone and Android.
---
## When Manual Code Entry Is Needed
Manual entry is the correct approach in three specific situations:
**Camera failure or hardware issue.** If the camera on the device you are setting up is broken or unavailable, QR scanning is not possible. Manual entry is the only path that does not require a second device.
**QR code scan fails repeatedly.** A damaged QR code, low-resolution printout, or persistent scan errors can make QR-based setup unreliable. If the QR code is present but will not scan cleanly, entering the underlying code strings manually is faster than continuing to troubleshoot the scan.
**QR code is on the same device you are setting up.** When you buy an eSIM and the QR code is sent to the same device you intend to configure, you cannot use that device's camera to scan a code on its own screen. On iOS 17.4 and later, you can long-press the QR code image to trigger eSIM setup directly — see [How to Set Up eSIM on iPhone via QR Code](/en/guides/qr-code-iphone/) for that method. On Google Pixel, you can use the "Use photo instead" option — see [How to Set Up eSIM on Android via QR Code](/en/guides/qr-code-android/). If neither of those workarounds applies to your situation, manual entry resolves the problem without requiring a second device.
---
## What You Need
Before starting, gather the following from your carrier or eSIM provider:
**SM-DP+ Address** (also called the activation server address or RSP server address)
A domain name such as `rsp.example.com` or `consumer.globalplatform.com`. This is the address of the server that holds your eSIM profile. Without it, your device does not know where to connect.
**Activation Code** (also called Matching ID or Confirmation Code Token)
A string of characters — typically alphanumeric — that identifies your specific eSIM profile on the SM-DP+ server. It functions as a one-time access token.
**Confirmation Code** (optional — carrier-dependent)
Some carriers require a secondary verification code at the point of installation. If yours does, the code is usually delivered by email or SMS at the time you initiate the setup. Not all providers use this.
**EID** (sometimes required before issuance)
The EID (eUICC Identifier) is a permanent 32-digit serial number identifying your device's eUICC chip. Some carriers ask you to submit your EID before they issue an activation code, so they can bind the profile to your specific hardware. To find your EID:
- **iPhone**: Settings > General > About — scroll to "EID"
- **Android (Pixel)**: Settings > About phone > SIM status — or Settings > About phone and search for "EID"
- **Android (Samsung)**: Settings > About phone > Status information > EID
---
## How to Get the SM-DP+ Address and Activation Code
### From Your Carrier or eSIM Provider
The most direct route: check the confirmation email from your carrier or eSIM provider. Most providers include the SM-DP+ address and activation code as plain text alongside the QR code image, specifically to enable manual entry.
If not in email, log in to your carrier's app or member portal and look for an option labeled **SIM Management**, **eSIM Settings**, **Add eSIM**, or **Manage Plans**. The SM-DP+ address and activation code are often displayed there once a plan is provisioned.
If you cannot locate them in either place, contact the carrier's support and ask for the activation code and SM-DP+ server address for your plan. Every carrier that issues eSIM profiles via QR code must have these values available.
### By Decoding the QR Code
If you have the QR code but cannot scan it with the device you are configuring, you can decode it using another device to read the text it contains. The QR code for eSIM encodes a text string in the LPA activation code format (described in the [Understanding the LPA Activation Code Format](#understanding-the-lpa-activation-code-format) section below). Decoding gives you the SM-DP+ address and activation code as readable text that you can then type in manually.
**On a second smartphone:** Open the camera app and point it at the QR code. Instead of tapping "Add eSIM", tap the text that appears in the camera view to copy the full string. The SM-DP+ address and activation code are the second and third segments of that string, separated by `$` characters.
**On a computer:** Use any QR code reader app or an online QR code decoder (search for "QR code decoder" in your browser). Paste or photograph the QR code to reveal the encoded text.
---
## Manual Entry on iPhone
Apple documents manual eSIM entry as a standard option on all eSIM-capable iPhones. The menu path differs slightly between iOS versions.
### On iOS 17.4 and Later
1. Open **Settings**
2. Tap **Cellular**
3. Tap **Add eSIM** (or **Add Cellular Plan**)
4. Tap **Use QR Code** (this intermediate screen may appear on some iOS versions)
5. At the bottom of the screen, tap **Enter Details Manually**
6. Enter the **SM-DP+ Address** in the first field
7. Enter the **Activation Code** in the second field
8. Tap **Next** — the download begins
9. If prompted for a **Confirmation Code**, enter it and tap **Next**
10. Tap **Done** when the profile is installed
### On iOS 17.3 and Earlier
The path to manual entry is slightly different on older iOS versions:
1. Open **Settings**
2. Tap **Cellular** (or **Mobile Data**)
3. Tap **Add Cellular Plan**
4. Tap **Enter Details Manually** (this option may appear directly without the "Use QR Code" intermediate screen)
5. Enter the SM-DP+ Address and Activation Code, then proceed
### After Installation
iOS will prompt you to label the new line (for example, "Travel" or "Work") and configure dual-SIM settings. If you are using the eSIM for travel, go to **Settings > Cellular** and make sure **Cellular Data** is set to the new eSIM line. If the eSIM is from a carrier in another country, also enable **Data Roaming** for that line.
If installation succeeds but data does not work, see [eSIM Activation Failed: Troubleshooting](/en/guides/activation-failed/) for a step-by-step diagnosis.
---
## Manual Entry on Android
### Google Pixel
1. Open **Settings**
2. Tap **Network & internet**
3. Tap **SIMs**
4. Tap **Add SIM** or the **+** icon
5. On the "Download a SIM instead?" screen, tap **Next**
6. On the QR scan screen, look for **Need help?** and tap **Enter it manually** (label may appear as **Enter code manually** on older Android versions)
7. Enter the activation code in the format `LPA:1$$` — or enter the SM-DP+ address and activation code in separate fields if the screen provides them separately
8. Tap **Download** and wait for the profile to install
If a Confirmation Code is required, a prompt appears after step 8.
### Samsung Galaxy (One UI)
1. Open **Settings**
2. Tap **Connections**
3. Tap **SIM card manager** or **SIM manager** (label depends on model, region, and One UI version)
4. Tap **Add mobile plan** or **Add eSIM**
5. Tap **Enter activation code** (Samsung's official label; some builds or carrier versions may show **Add manually**)
6. Enter the SM-DP+ address and activation code as prompted
7. Tap **Add** or **Download** to proceed
After installation, Samsung may prompt a device restart. Once restarted, go to **Settings > Connections > SIM card manager** to assign mobile data, calls, and SMS to the correct SIM.
### Other Android Phones
The manual entry option follows the same pattern on other Android brands (OnePlus, Motorola, Xiaomi, and others). Navigate to your SIM or eSIM settings, initiate "Add eSIM" or "Download SIM", and look for an option to enter a code manually rather than scan a QR code. The entry fields and the activation process are the same regardless of manufacturer.
---
## Understanding the LPA Activation Code Format
When a carrier generates an eSIM QR code, the QR code encodes a text string following the LPA (Local Profile Assistant) activation code format defined in GSMA SGP.22. Understanding this format explains how the SM-DP+ address and activation code relate to each other and to the QR code.
The format is:
```
LPA:1$$[$]
```
Each segment is separated by a `$` character. The optional confirmation code segment appears in brackets — it is present only when the carrier requires a secondary verification step.
**Example:**
```
LPA:1$rsp.example.com$ABCD-EFGH-1234-5678
```
In this example:
- `LPA:1` — indicates this is a version 1 LPA activation string (defined in SGP.22)
- `rsp.example.com` — is the SM-DP+ address (enter this in the "server address" field)
- `ABCD-EFGH-1234-5678` — is the activation code / Matching ID (enter this in the "activation code" field)
When you scan a QR code, your device decodes this string automatically and populates the fields. Manual entry bypasses the scan step and puts the same values in directly.
This specification is defined in GSMA SGP.22 (RSP Technical Specification for Consumer Devices). For background on how SM-DP+ servers and eUICC chips work in the broader eSIM architecture, see [What Is an eSIM?](/en/guides/what-is-esim/).
---
## Troubleshooting Manual Code Issues
### "Invalid Activation Code" or "Invalid Code" Error
**Most likely cause:** A typo in the SM-DP+ address or activation code. These strings are case-sensitive on some systems and must be entered exactly as provided.
**What to check:**
- Re-read the code character by character. Common typos include confusing `0` (zero) with `O` (letter O), `1` (one) with `I` (letter I) or `l` (lowercase L), and `$` separators with spaces
- If you copied the code from an email, make sure you did not include a trailing space or line break
- Confirm with your carrier that the activation code is still valid — expiration windows vary widely by provider, from a few hours for some traditional carriers to 30+ days or longer for most travel eSIM providers
**If the code is correct but still rejected:** Contact your carrier and confirm that the eSIM profile has been provisioned on the SM-DP+ server for your account. Occasionally a profile is created on the carrier's system but not yet pushed to the server.
---
### "Cannot Connect to SM-DP+ Server" or Timeout
**Most likely cause:** A network connectivity issue, or the SM-DP+ address was entered incorrectly.
**What to check:**
1. Confirm you have a working internet connection — open a browser and load a webpage
2. Re-enter the SM-DP+ address carefully. It should be a domain name (e.g., `rsp.example.com`) — not a URL path (do not include `https://` or `/` characters)
3. Try a different Wi-Fi network. Some hotel or corporate networks block the ports used by eSIM provisioning servers
4. Restart the device and try again — the device's LPA client may have cached a failed state
5. Wait 15–30 minutes and retry. SM-DP+ servers occasionally have brief downtime
For more network-related troubleshooting, including APN settings and roaming configuration, see [eSIM Activation Failed: Troubleshooting](/en/guides/activation-failed/).
---
### Confirmation Code Required (Unexpected Prompt)
If a Confirmation Code prompt appears and you were not provided with one, the carrier requires secondary verification that was not communicated to you.
**What to do:** Check your email (including spam/junk) for a message from your carrier sent at the moment you initiated the manual entry. The Confirmation Code is often sent in real time as a separate email or SMS when the device contacts the SM-DP+ server.
If you do not receive it, contact your carrier and ask them to resend the Confirmation Code for your pending eSIM installation request.
---
### Profile Installs but No Data Connection
Manual code entry and QR code scanning produce the same installed profile — so if data does not work after successful manual entry, the cause is the same as in any other eSIM setup: data routing, data roaming, or APN configuration.
Work through the full diagnosis in [eSIM Activation Failed: Troubleshooting](/en/guides/activation-failed/), starting from Symptom D.
---
## FAQ
### What is an SM-DP+ address?
SM-DP+ (Subscription Manager Data Preparation) is the server that stores and delivers eSIM profiles. The SM-DP+ address is the server's domain name — for example, `rsp.yourcarrier.com`. It tells your device where to connect to download the eSIM profile. This server is defined in the GSMA SGP.22 specification.
### Where do I find my SM-DP+ address and activation code?
Your carrier or eSIM provider supplies both pieces of information. Check the confirmation email you received after purchase, your carrier's app under "SIM Management" or "eSIM Settings", or the carrier's member portal. If you have a QR code but cannot scan it, you can decode the QR code to extract the SM-DP+ address and activation code as text.
### Can I use the same activation code more than once?
No. An activation code is single-use. Once the eSIM profile has been downloaded using that code, the code is invalidated on the SM-DP+ server. If you need to reinstall the eSIM on the same or a different device, contact your carrier or provider to issue a new code.
### My iPhone asks for a Confirmation Code during manual setup. What is it?
A Confirmation Code is an optional secondary security check defined in GSMA SGP.22. Not all carriers require it. If yours does, it is typically a short numeric code sent to your email or phone number at the time of eSIM setup. Check your inbox or SMS for a message from your carrier at that moment.
### What is the difference between an activation code and an EID?
An activation code (also called Matching ID) authenticates the download request to the SM-DP+ server. An EID (eUICC Identifier) is a permanent serial number identifying your device's eUICC chip — analogous to an IMEI for the eSIM hardware. Some carriers ask for your EID to pre-register the device before issuing an activation code.
### Can I use manual code entry on any Android phone, not just Pixel and Samsung?
The manual entry option is available on any Android device that supports eSIM. The exact menu path varies by manufacturer. Look for "Enter code manually", "Manual activation", or a similar option on your device's Add eSIM screen. If the manual entry option is not present, check your manufacturer's support page for the correct path.
---
## Related Guides
This guide covers the manual code entry path specifically. For the QR code path, see the setup guides for your device:
- [How to Set Up eSIM on iPhone via QR Code](/en/guides/qr-code-iphone/) — ES-01: standard iPhone setup via camera scan, including the iOS 17.4 long-press workaround
- [How to Set Up eSIM on Android via QR Code](/en/guides/qr-code-android/) — ES-02: Google Pixel and Samsung Galaxy QR setup, including the Pixel "Use photo instead" option
- [What Is an eSIM?](/en/guides/what-is-esim/) — how eUICC chips, SM-DP+ servers, and the SGP.22 specification fit together
- [eSIM Activation Failed: Troubleshooting](/en/guides/activation-failed/) — FE-01: diagnosis and fixes for every common activation error, regardless of whether you used a QR code or manual entry
- [Your First Travel eSIM: Complete Guide](/en/guides/first-time-guide/) — TE-02: end-to-end walkthrough for purchasing and using a travel eSIM abroad
To compare eSIM plans for your destination, use [SimFinder Travel →](/en/travel/)
---
Sources:
- [Set up eSIM on iPhone - Apple Support](https://support.apple.com/en-us/118669)
- [eSIM Consumer and IoT Specifications - GSMA](https://www.gsma.com/solutions-and-impact/technologies/esim/esim-specification/)
- [Get a SIM or eSIM & add it to your Pixel phone - Pixel Phone Help](https://support.google.com/pixelphone/answer/7086887)
- [How do I add an eSIM on my Samsung Galaxy phone? - Samsung Support](https://www.samsung.com/ae/support/mobile-devices/how-do-i-add-an-esim-on-my-samsung-galaxy-phone/)
================================================================================
# MNO vs MVNO vs Sub-Brand — Which Carrier Type Is Right for You?
URL: https://sim-finder.com/en/guides/mno-vs-mvno-comparison/
Type: guides (en)
Published: 2026-05-20
When you shop for a mobile plan, you will encounter three types of operator: the major carriers (MNOs), their in-house sub-brands, and independent MVNOs. All three sell you phone service. All three may run on the same towers. But their ownership structure, pricing, network priority, and service model differ in ways that matter in daily use.
This article compares the three types across eight practical dimensions and ends with a decision tree to match your usage profile to the right category. If you are new to MVNOs, [What Is an MVNO?](/en/guides/what-is-mvno/) covers the technical foundation — this article assumes that background.
---
## The Three Operator Types: At a Glance
**MNO (Mobile Network Operator)**
An MNO holds a government-issued radio spectrum licence and owns the physical infrastructure: towers, base stations, antennas, and core network. In the US, the three national MNOs are AT&T, T-Mobile, and Verizon. In the UK: EE, O2, and VodafoneThree (formed by the merger of Vodafone UK and Three UK, which completed in May 2025). In Australia: Telstra and Optus are the primary MNOs with nationwide coverage.
**Sub-Brand**
A sub-brand is a brand owned and operated by an MNO, positioned at a lower price point than the parent's flagship plans. It runs on the same network as the parent. Examples:
- US: Cricket (AT&T), Metro by T-Mobile, Visible (Verizon), Mint Mobile (T-Mobile, acquired May 2024)
- UK: giffgaff (O2-owned), VOXI (Vodafone), Smarty (Three/VodafoneThree)
- The line between "sub-brand" and "wholly-owned MVNO" is sometimes blurred — what matters is whether the parent MNO controls the brand's network access terms
**Independent MVNO**
An independent MVNO leases wholesale capacity from an MNO and operates as a separate company with no ownership tie to its host network. Examples:
- US: US Mobile, Consumer Cellular (primarily AT&T), Google Fi (T-Mobile and others)
- UK: Lebara (Vodafone network), Tesco Mobile (O2 joint venture)
- AU: Aldi Mobile (Telstra network)
For plain-English definitions of all terms in this article, see the [SIM & Mobile Glossary](/en/guides/glossary-index/).
---
## Comparison Table — 8 Axes
| Axis | MNO | Sub-Brand | Independent MVNO |
|------|-----|-----------|-----------------|
| **Network coverage** | Maximum — owns the infrastructure | Same as parent MNO | Same as host MNO |
| **Peak-time speed** | Highest priority | Higher than independent MVNOs | Lowest priority (shared POI) |
| **Price** | Highest | Moderate | Often lowest |
| **Customer service** | Full retail + phone + online | Varies; sometimes shares MNO stores | Mostly online-only |
| **Contract flexibility** | Postpaid contracts common; some prepaid | Mix of prepaid and postpaid | Predominantly month-to-month |
| **Perks and bundles** | Streaming, device trade-in, family discounts | Limited | Rare |
| **5G access** | Full, subject to rollout | Typically yes (inherited from parent) | Requires specific wholesale negotiation |
| **International roaming** | Widest coverage | Varies by brand | Often limited |
The table is a generalisation. Individual plans within each category vary considerably — use [SimFinder](/en/) to compare specific plans in your market.
---
## Network Coverage and Quality
All three operator types deliver service over the same physical towers. If you are on an AT&T MVNO in the US, your signal comes from AT&T towers. If you are on a Vodafone MVNO in the UK, your signal comes from VodafoneThree towers. Coverage maps for any operator type are therefore a proxy for the host MNO's coverage.
This has a practical consequence: before choosing between an MNO and any MVNO or sub-brand, the first question to answer is **which MNO's network you need**. If AT&T has better coverage in your area than T-Mobile or Verizon, then AT&T, Cricket, and Consumer Cellular will all give you that same coverage — regardless of which brand you choose.
What does differ is how that coverage is allocated to you during congestion. That is the subject of the next section.
**A note on coverage edge cases:** In very rural fringe areas, some wholesale agreements restrict MVNOs from accessing domestic roaming (partner networks that fill gaps). MNO direct subscribers may be able to connect to a partner network in a fringe area while an MVNO subscriber on the same host cannot. This is not universal, but it is worth checking if you live or work in a marginal coverage area.
---
## Speed at Peak Times: Deprioritization
Deprioritization is the most important structural difference between MNOs, sub-brands, and independent MVNOs. Understanding it precisely helps you decide how much it matters for your use case.
### How Deprioritization Works
An MNO's radio network has finite capacity. When demand exceeds available capacity — typically during morning and evening rush hours, at concerts, sports venues, or major public events — the network must queue traffic. The MNO's own direct subscribers are served first. After them come sub-brand subscribers (the MNO controls this priority internally). Independent MVNO traffic is delivered through a shared Point of Interface (POI) and is typically served last.
The result is not an outage. It is a slowdown: page loads take longer, videos buffer, real-time apps like video calls may degrade in quality. During off-peak periods — late evenings, early mornings, low-density areas — the difference between MNO and MVNO speeds is often negligible because the network is not congested.
### What This Actually Looks Like
A user on an independent MVNO in a dense urban area during the evening commute might experience speeds that are noticeably slower than a user on the same host MNO's direct plan. The same MVNO user at noon in a suburban area may see speeds functionally identical to the MNO.
The severity of deprioritization depends on:
- **The host MNO's total network capacity in your area** — a well-invested network experiences less congestion
- **The MVNO's total subscriber load** — a smaller MVNO with fewer subscribers competing for the same POI bandwidth
- **How much bandwidth the MVNO has purchased** at the POI — this is invisible to consumers but affects peak-time performance
### Sub-Brands: A Middle Ground
Sub-brands (wholly MNO-owned) generally receive better treatment than independent MVNOs because the MNO can configure its internal priority policy. Visible, for example, runs on Verizon's network and benefits from that ownership relationship — though it may still be deprioritized relative to Verizon's premium direct plans during heavy congestion. The gap between sub-brand and full MNO is typically smaller than the gap between independent MVNO and full MNO.
---
## Price and Plan Flexibility
### Why MVNOs Are Cheaper
MVNOs carry none of the capital expenditure that drives MNO costs: no spectrum licence fees, no tower construction, no antenna upgrades. Their cost base is structurally lower, and that saving is partly passed on through lower monthly charges. Independent MVNOs can price more aggressively than sub-brands, which must avoid cannibalising the parent MNO's own plan sales.
No specific prices are quoted in this article because they change frequently. Use [SimFinder](/en/) to compare current pricing in your market.
### Contract Flexibility
Independent MVNOs are overwhelmingly prepaid and month-to-month. This is one of their strongest advantages for consumers who dislike lock-in: cancel anytime, no exit fees. Sub-brands vary — some offer postpaid options, others are prepaid-only. MNOs offer the full range, including long-term postpaid contracts that may come with device financing but also with early termination fees.
If you want to try a carrier without commitment, an independent MVNO or prepaid sub-brand is the right category. If you need a device subsidy or corporate billing, an MNO postpaid plan is more likely to meet that need.
### "Unlimited" Plan Fine Print
All three carrier types now offer "unlimited" plans. In most cases, "unlimited" means unlimited data at full speed up to a threshold, after which speeds are reduced (throttled) or deprioritized. Read the Fair Use Policy carefully:
- What is the high-speed threshold?
- After throttling, what speed can you expect?
- Are video streaming speeds capped?
These terms vary significantly between plans, and the difference between a well-specified unlimited plan and a poorly specified one matters more than the nominal price.
---
## Customer Service and Perks
### Service Channels
MNOs maintain large retail networks with in-store staff capable of handling SIM activations, device issues, and account problems in person. This is a meaningful advantage if you are not comfortable troubleshooting technical issues online, or if you need a SIM activation while travelling with no access to a computer.
Sub-brands vary considerably. Cricket and Metro (both US) have extensive retail presences because they inherited store infrastructure from their parent carriers. VOXI (Vodafone UK) and Smarty (Three UK) are primarily online. giffgaff (O2 UK) operates entirely through community forums and online support — no phone line, no store.
Independent MVNOs are mostly online-only. Google Fi has broad user documentation. US Mobile has active community channels. Consumer Cellular targets older adults and specifically offers telephone support, making it an outlier in the MVNO category. For most independent MVNOs, if you need help with APN configuration, eSIM activation, or a billing dispute, your support channel is chat or email.
If you are likely to need in-person help — for example, if you are setting up a plan for a family member who is not comfortable with online accounts — consider a sub-brand with a physical retail presence, or the MNO itself.
For setup questions like APN configuration after switching, [What Is a SIM Card?](/en/guides/what-is-sim/) covers the underlying mechanics, and the [SIM & Mobile Glossary](/en/guides/glossary-index/) is a useful reference for technical terms you may encounter.
### Perks and Bundles
MNOs bundle streaming subscriptions, device trade-in programmes, roadside assistance, international calling credits, and family plan discounts into their higher-tier plans. These perks have real value for some users and zero value for others. If you already subscribe to the streaming services being bundled, the effective cost of an MNO plan after accounting for the bundle may be competitive with an MVNO.
Sub-brands occasionally offer limited perks (Visible's device deals, for example). Independent MVNOs rarely offer perks beyond the plan itself — their value proposition is price and simplicity.
---
## Decision Tree by User Profile
Use this as a starting point, not a prescription. Individual plans within each category vary widely.
### Budget Shoppers
**Profile:** Price is the primary criterion; willing to manage online; usage is mostly off-peak (evenings at home, light daytime use).
**Likely fit:** Independent MVNO on the MNO with the best coverage in your area. The peak-time deprioritization trade-off matters least for off-peak users. Month-to-month flexibility is a bonus.
**Watch out for:** Roaming terms if you travel. Check whether the MVNO has negotiated the 5G access tier you expect.
---
### Heavy Data Users (Video, Remote Work)
**Profile:** Streams video daily, uses mobile data as a primary connection, sensitive to speed drops during peak hours.
**Likely fit:** MNO direct plan or a well-funded sub-brand (e.g. Visible Plus tier or Metro by T-Mobile's top tier, which offer deprioritization protections at an additional cost). The peak-time speed advantage of being on the MNO directly is most valuable for this profile.
**Watch out for:** "Unlimited" plan throttling thresholds. Even on an MNO, verify that your plan tier does not deprioritize after a usage cap.
---
### International Travelers
**Profile:** Needs a usable connection in multiple countries; roaming is a regular need.
**Likely fit:** Either an MNO with a strong international roaming plan, or a travel eSIM supplementing your home SIM. Independent MVNOs often have limited roaming; check terms before relying on them abroad. For a full comparison of connectivity options while travelling, see [4 Ways to Stay Connected Abroad](/en/guides/four-options/). If your device supports eSIM, [What Is an eSIM?](/en/guides/what-is-esim/) covers how to add a travel profile alongside your home SIM.
**Watch out for:** MVNOs with no or restricted roaming. Budget sub-brands sometimes exclude international roaming entirely from their lowest-tier plans.
---
### Families
**Profile:** Multiple lines, mix of heavy and light users, potentially includes children or older adults who may need in-person support.
**Likely fit:** MNO family plan, or a sub-brand that offers multi-line discounts (Metro by T-Mobile, Cricket). The in-store support availability is particularly relevant when setting up plans for less technically confident family members.
**Watch out for:** Per-line pricing on MVNOs — sometimes buying 4–5 MVNO lines is competitive with a family plan; calculate carefully before assuming an MNO family plan is cheaper.
---
### Business Users
**Profile:** Needs reliable speed during business hours, device management, invoicing, SLA guarantees.
**Likely fit:** MNO postpaid business plan. Independent MVNOs rarely offer the account management features, SLA commitments, or IoT/fleet connectivity options that business plans require.
**Watch out for:** Overpaying for consumer-oriented MNO perks (streaming bundles) if your business plan includes them unnecessarily.
---
### IoT / Data-Only Devices
**Profile:** Fleet tracking, point-of-sale terminals, connected sensors; needs low-cost data without voice.
**Likely fit:** Specialised MVNO with data-only IoT plans, or MNO directly for large-volume commercial contracts. Some MVNOs offer exceptionally competitive data-only rates at IoT scale. The standard consumer comparison (MNO vs MVNO on peak-time speed) is less relevant here — reliability, API management, and SIM lifecycle management matter more.
---
## Ownership Changes to Watch
The mobile market changes faster than most consumers realise. Brands that appear independent may become MNO subsidiaries, and network relationships between MVNOs and host MNOs can change. Key examples:
**Mint Mobile (US):** Acquired by T-Mobile in May 2024. Mint is now a T-Mobile subsidiary, not an independent MVNO. Plans remain distinct from T-Mobile's main line-up, but the independence that defined Mint's original positioning is gone.
**Visible (US):** Has been a wholly-owned Verizon subsidiary since its launch (rebranded "Visible by Verizon" in 2022). Often listed alongside independent MVNOs in comparison articles, but it is not independent.
**VodafoneThree (UK):** The merger of Vodafone UK and Three UK completed on 31 May 2025, creating VodafoneThree. MVNOs that previously hosted on either Vodafone or Three now sit under the same corporate entity. Network integration is ongoing; wholesale agreements are not necessarily affected immediately, but the competitive landscape for UK MVNOs has changed.
**Smarty (UK):** Owned by Three UK / VodafoneThree post-merger. Positioned as an independent-feeling brand, but fully owned by the same parent as the host network.
**TracFone (US):** Became a Verizon subsidiary in 2021. TracFone's brands (Straight Talk, Total by Verizon, Simple Mobile, Walmart Family Mobile) are Verizon-owned.
**Amaysim (AU):** Acquired by Optus in 2021. Now an Optus subsidiary, not an independent MVNO.
The practical implication: before choosing a brand because it appears independent, verify its current ownership. Check the operator's "About" page or an authoritative telecommunications news source. Ownership changes the network priority dynamics, customer service integration, and long-term pricing independence of the brand.
---
## FAQ
The structured FAQ answers are in the frontmatter above for schema.org/FAQPage compatibility.
**Can a sub-brand get deprioritized too?**
Yes, but generally less than independent MVNOs. The parent MNO can configure its own internal traffic policy to give its sub-brands different priority levels than wholesale MVNOs. In practice, some sub-brands (particularly lower-tier plans within a sub-brand) may still be deprioritized relative to the parent MNO's premium postpaid customers. Read the plan's terms for any explicit deprioritization language.
**Does switching from an MNO to an MVNO require a new SIM?**
Yes, in most cases. An MVNO issues its own SIM or eSIM profile with its own credentials. You cannot simply change a billing profile; you need a new SIM or eSIM from the new carrier. The exception is if you are switching between plans within the same parent company (for example, from AT&T to Cricket), where some streamlined migration paths may exist.
**Is 5G on an MVNO as fast as 5G on the MNO?**
Not necessarily. 5G access must be specifically negotiated in the wholesale agreement. Even if an MVNO offers 5G, the agreement may cover only mid-band 5G (the widely available, broadly useful tier) and not mmWave 5G (the ultra-fast, short-range tier). Additionally, sub-brand and MVNO 5G traffic is subject to the same deprioritization dynamics as 4G LTE. Peak-time 5G speeds on an MVNO may be slower than peak-time 5G speeds on the host MNO's direct plan.
---
## Related Guides
- [What Is an MVNO?](/en/guides/what-is-mvno/) — Technical foundation: POI leasing, deprioritization mechanics, and the MVNO business model
- [What Is a SIM Card?](/en/guides/what-is-sim/) — How SIM credentials work across all three operator types
- [What Is an eSIM?](/en/guides/what-is-esim/) — How to add a second carrier profile to your device (relevant for adding a travel plan alongside your main plan)
- [4 Ways to Stay Connected Abroad](/en/guides/four-options/) — Full comparison of roaming, local SIM, travel eSIM, and pocket Wi-Fi
- [SIM & Mobile Glossary](/en/guides/glossary-index/) — Plain-English definitions of MNO, MVNO, POI, deprioritization, and 20+ more terms
================================================================================
# Number Porting Step by Step: How to Keep Your Number When Switching
URL: https://sim-finder.com/en/guides/mnp-step-by-step/
Type: guides (en)
Published: 2026-06-04
Number porting follows the same underlying sequence in every country: obtain a transfer credential from your current carrier, provide it to your new carrier, and wait for the port to complete. The differences lie in what that credential is called and how you obtain it — and in whether you need to contact your old carrier at all.
This guide walks through the complete port process step by step, with the exact credential and method for the UK, US, France, Australia, and Japan. It then covers what happens on the day of cutover and how to confirm the port is complete.
For a technical explanation of how number portability databases and call routing work, see [Mobile Number Portability (MNP) Explained](/en/guides/what-is-mnp/).
---
## The Universal Port Sequence
Every country with mandated number portability follows the same five-stage process. What varies is the credential name and who contacts whom.
1. **Gather your account details.** Before doing anything else, collect your account number with the current carrier and the exact registered name and billing address on the account. A mismatch at any point causes the port to be rejected.
2. **Obtain a transfer credential from your current carrier** — or authorise your new carrier to request it on your behalf. The credential type and how you get it differs by country; each is described in the sections below.
3. **Sign up with your new carrier and provide the credential.** The new carrier submits a port-in request to the national number portability database. At this point, the clock starts on the regulatory completion window.
4. **Wait for the cutover.** Your old SIM loses service first. A few minutes to a couple of hours later, your new SIM acquires signal with the ported number.
5. **Verify the port is complete.** Make a test call and send a test SMS before treating the switch as finished.
Before completing step 1, confirm that your device is SIM-unlocked — a successful port on a locked device leaves you with a working number but no usable service. For how to check, see [SIM Lock and SIM-Free Explained](/en/guides/sim-lock/).
---
## Step 1 — Gather Your Account Information
The information you need varies slightly by country, but most port-in forms ask for the same core set:
| Field | Where to find it |
|-------|-----------------|
| Phone number to port | Your own number |
| Account number | Billing statement or carrier account portal |
| Registered name | Account portal — copy the name character for character |
| Billing address | Account portal or latest bill |
| Transfer credential | Varies by country — see below |
The account number is an internal identifier, not your phone number. It is on your bill or visible in your carrier's online account portal after login.
**Name matching is critical.** A difference of one character — a hyphen, a middle initial, "Jr." appended or missing — is sufficient to cause a rejection. Before submitting the port request, log in to your current carrier's portal and screenshot the exact name as displayed. Use that spelling when filling in the new carrier's form.
If your line is on a family or shared plan, confirm whether you are listed as the primary account holder. In most markets, a port request must be authorised by the account holder. If you are not the account holder, the holder may need to provide the transfer credential or authorise the transfer on your behalf.
---
## Step 2 — Obtain Your Transfer Credential
This is the step that differs most by country.
### United Kingdom — PAC Code (text 65075)
Text **PAC** to **65075** from the number you want to port. Ofcom rules require your current carrier to send the Porting Authorisation Code (PAC) within 60 seconds, free of charge. The PAC is valid for 30 days.
If you want to leave your carrier without keeping your number, text **STAC** to **75075** instead. This returns a Service Termination Authorisation Code.
Give the PAC to your new carrier. Ofcom rules require the port to complete within one working day of the new carrier receiving a valid PAC.
Source: [Ofcom: Switching — mobile](https://www.ofcom.org.uk/phones-and-broadband/switching-provider/switching-mobile)
### United States — Number Transfer PIN
In the US, porting is governed by the FCC's Local Number Portability (LNP) mandate. To port your number, you need:
- Your **account number** with the current carrier.
- A **Number Transfer PIN** — a code that is distinct from your account login password, billing PIN, or SIM card PIN.
Most US carriers now require customers to set up a Number Transfer PIN in their account portal or app. If you have not set one, do this before contacting the new carrier. The new carrier submits the port request using the account number and transfer PIN together.
The FCC mandates that simple ports be processed within one business day.
Source: [FCC: Porting — Keeping Your Phone Number When You Change Providers](https://www.fcc.gov/consumers/guides/porting-keeping-your-phone-number-when-you-change-providers)
### France — RIO Code (call 3179)
Call **3179** from the mobile number you want to port. The call is free of charge and available 24 hours a day, seven days a week. An automated message reads out your RIO (Relevé d'Identité Opérateur) code. The RIO remains valid while your contract is active.
Provide the RIO to your new carrier when signing up. The gaining carrier submits the port request. Under ARCEP Decision No. 2022-2148, simple prepaid ports must complete within one working day; postpaid ports may take up to three working days.
Porting is free of charge in France.
### Australia — Gaining-Carrier Model
In Australia, you do not need to contact your current carrier or obtain a transfer code. The gaining carrier handles the entire port-out process on your behalf.
When you sign up with the new carrier, they will ask you to authorise the transfer and will verify your identity before proceeding. This identity verification step — which may include an SMS OTP sent to the number being ported or another approved verification method — was introduced by the *Telecommunications (Mobile Number Pre-Porting Additional Identity Verification) Industry Standard 2020* to combat port-out fraud.
ACMA industry service levels require 90% of simple mobile ports to complete within three hours. Porting is free.
Source: [ACMA: Keep or transfer your phone number](https://www.acma.gov.au/keep-or-port-your-phone-number)
### Japan — One-Stop MNP and Reservation Number
Japan operates two parallel methods.
**One-Stop MNP (since May 24, 2023):** Complete the entire transfer on the new carrier's website without contacting the old carrier at all. This method is available online only and for eligible carrier combinations. The new carrier requests the transfer directly from the current carrier's system.
**Traditional MNP:** Obtain an MNP reservation number (MNP予約番号) from your current carrier — by phone, app, or in-store. The reservation number is valid for 15 days. Provide it when signing up with the new carrier.
Source: [MIC Japan — One-Stop MNP](https://www.soumu.go.jp/menu_kyotsuu/important/kinkyu02_000515.html)
### Other Markets
In Germany, the gaining carrier initiates the port request on your behalf under §59 TKG; you do not need a separate code, though the carrier will verify your identity. In Canada, you provide your account number and transfer PIN to the new carrier, which submits the port under CRTC number-portability rules (Telecom Decision CRTC 2005-72); simple wireless ports must complete within 2.5 hours.
EU member states generally follow one of two models: a customer-obtained code (similar to the UK or France) or a gaining-carrier-initiates model (similar to Australia or Germany). Within the EU, the European Electronic Communications Code (Directive 2018/1972) requires that porting complete within one working day and be free of charge. Individual member states determine the specific credential mechanism.
---
## Step 3 — Sign Up with Your New Carrier
During the sign-up flow, your new carrier will ask for the account details you gathered in step 1 and the transfer credential from step 2.
**Timing matters here.** Do not sign up with the new carrier and activate your new SIM or eSIM before you have the transfer credential in hand. Activating the new SIM without a port request means the SIM gets a new number, and any subsequent port request has to start from scratch.
When filling in the sign-up form:
- Use the registered name exactly as it appears on your current carrier's account.
- Use the account number, not your phone number, in the account number field.
- Enter the transfer credential (PAC, Number Transfer PIN, RIO, or equivalent) exactly as received.
Once the new carrier submits the port request, you will typically receive a confirmation — by email or SMS to a secondary number — with an estimated completion time.
While selecting a new carrier, compare current plans using [SimFinder](/en/sim/) — plans change frequently, so check current offers before committing.
---
## Step 4 — Wait for the Cutover
After the port request is submitted, the number moves through a technical process: the current carrier updates its porting database record, routing tables propagate across networks, and the new carrier's switch activates the number on its infrastructure.
During this window, which typically lasts from a few minutes to a few hours depending on the country:
- Your old SIM will lose service first. This is normal.
- SMS messages may not be reliably delivered to either SIM.
- Calls to your number may fail intermittently.
**Do not trigger any SMS-based two-factor authentication logins during this period.** If you need to log in to a banking, email, or work account during the port window, use an authenticator app or a backup code instead of waiting for an SMS code. For a full explanation of how to prepare for this, see [Pre-Switch Checklist](/en/guides/pre-switch-checklist/).
Do not cancel your current account. In most markets, the current carrier automatically closes the account when the port completes. If you cancel manually before the port is done, your number returns to the carrier's number pool and may be impossible to recover.
**If you are porting to an eSIM:** Some platforms prompt you to download and activate the eSIM profile during the sign-up flow, before the port-out from the old carrier completes. Do not activate the eSIM profile until your new carrier explicitly confirms the port is complete. Activating early can create a state where the eSIM has network access but the ported number is not yet routed to it. Wait for the confirmation, then tap activate.
---
## Step 5 — Day-of Cutover Verification
When the port completes, your new SIM will show network signal and your ported number will be active on the new carrier.
**Verify the port is complete before discarding the old SIM:**
1. **Make a test call.** Call a known number — a friend, a voicemail service, or a secondary line — and confirm it connects through the new carrier.
2. **Send a test SMS.** Send a message to yourself from another device, or ask a contact to send one. Confirm it arrives.
3. **Check mobile data.** Open a website that does not use cached content to confirm data connectivity on the new plan.
4. **Confirm your number is displayed correctly.** Some devices take a few minutes to refresh the displayed number in Settings after a port.
If the new SIM shows signal but calls fail, the routing update may still be propagating. Wait 15–30 minutes before concluding there is a problem.
If the port has not completed within the regulatory window for your country — one working day in the UK and most EU markets, 2.5 hours in Canada, three hours for 90% of Australian simple ports — contact your new carrier's support first. They can check the port request status and identify whether it was rejected. If neither carrier resolves the issue within the regulatory window, contact the relevant authority: Ofcom (UK), FCC (US), ACMA (Australia), ARCEP (France), or Bundesnetzagentur (Germany).
---
## What Cannot Be Ported
Number portability transfers one thing only: the phone number. Nothing else moves between carriers automatically.
| What moves | What does not move |
|------------|-------------------|
| Your phone number | Voicemail messages |
| — | Call logs and SMS history |
| — | Carrier app loyalty points or credits |
| — | Carrier email addresses |
| — | Promotional data credits or roaming packages |
| — | Any data stored on the old carrier's servers |
**Voicemail:** Messages stored on your old carrier's voicemail servers remain accessible only through the old carrier's system, for a limited time after the account closes. Listen to and note any important voicemails before the port begins. If you use visual voicemail, take screenshots or notes of any messages you need to keep.
**Carrier email:** Addresses in a carrier's domain stop working when the account closes. This is a separate issue from number portability. Switch to a provider-independent address before the switch and update every service that uses your carrier address.
**Numbers between countries:** MNP is a national framework. A number cannot be ported from one country to another. If you need to maintain a number from one country while using a carrier in another, a VoIP number or dual-SIM setup is the available workaround — not porting.
---
## Common Port Rejection Reasons
Most failed ports fall into one of four categories:
**Name or address mismatch.** The name submitted to the losing carrier does not exactly match the account. Check character for character — a hyphen, a middle initial, or abbreviated company name is enough to cause rejection.
**Wrong credential type.** Providing an account login password, billing PIN, or SIM card PIN instead of the specific Number Transfer PIN (US) or PAC code (UK). These are different. Request the specific transfer credential before starting the port.
**Account lock.** In the US, carriers offer voluntary account locking features (such as Verizon's Number Lock or AT&T's Wireless Account Lock, introduced in 2025) as fraud prevention. If you have enabled such a lock, disable it in your carrier's app before requesting a port. Some carriers also apply a temporary hold after a recent SIM swap or account modification.
**Inactive or closed account.** A prepaid account with a zero or very low balance may have expired, making it ineligible to port. Top up to confirm the account is active before submitting the port request.
If your port is rejected, the new carrier is required to notify you of the reason. Fix the specific issue — do not start over from scratch — and resubmit. The process restarts from step 3, not step 1.
---
## Checklist Summary
Use this before the day of the switch:
- [ ] Account number with current carrier located
- [ ] Registered name on account confirmed — exact spelling noted
- [ ] Billing address on account confirmed
- [ ] Transfer credential obtained or method confirmed (PAC / Number Transfer PIN / RIO / gaining-carrier model / one-stop)
- [ ] Device SIM-unlock status confirmed
- [ ] SMS 2FA services identified — logged in or authenticator app configured
- [ ] Voicemail messages noted or saved
- [ ] Carrier email address migration planned
- [ ] Contract end date and ETF confirmed
- [ ] Device installment balance confirmed
For full preparation detail on each of these items, see [Pre-Switch Checklist](/en/guides/pre-switch-checklist/).
---
## FAQ
*(See structured FAQ items in the frontmatter above for display in site search and rich results.)*
### What if my old carrier refuses to give me a PAC or transfer code?
In the UK, Ofcom rules require carriers to deliver a PAC within 60 seconds of texting 65075 — refusal or delay is a regulatory violation. In France, the 3179 service is mandated by ARCEP. In the US, the FCC prohibits carriers from refusing or delaying a port based on an outstanding balance. If your carrier fails to provide the credential or stalls the process without a valid reason, file a complaint with the relevant national regulator.
### My port completed but my phone shows the old network name. Is that a problem?
No — this is typically a display cache issue. Restart the device, or toggle Airplane Mode off and on. If the problem persists after 30 minutes, go to Settings and manually select your new carrier's network. Confirm that the correct network name appears in the carrier settings on your new SIM's account page.
### Can I port a number that is currently on a prepaid account?
Yes — prepaid number portability is mandated in the same countries as postpaid. The process is identical. The one practical difference: ensure your prepaid account is active (not expired due to zero balance) before initiating the port. An expired prepaid number may have already been released back to the carrier's pool.
### How do I check which carrier to switch to before porting?
Choosing a new carrier involves comparing coverage, data allocation, contract terms, and pricing. Use [SimFinder](/en/sim/) to compare current plans, and [How to Choose a Travel eSIM: 5 Key Criteria](/en/guides/how-to-choose/) for a framework covering the factors that matter most. For a side-by-side breakdown of plan structures across providers, see [Travel eSIM Provider Comparison](/en/guides/provider-comparison/).
---
## Related Guides
- [Mobile Number Portability (MNP) Explained](/en/guides/what-is-mnp/) — Technical background on how porting databases and call routing work, plus country-by-country timing tables.
- [Pre-Switch Checklist](/en/guides/pre-switch-checklist/) — Full preparation checklist: SIM lock, 2FA migration, ETF, voicemail, carrier email, and device backup.
- [SIM Lock and SIM-Free Explained](/en/guides/sim-lock/) — How to confirm your device is unlocked before the port, and how carrier unlock policies work by region.
- [How to Choose a Travel eSIM: 5 Key Criteria](/en/guides/how-to-choose/) — Framework for evaluating a new carrier before you commit to switching.
- [Travel eSIM Provider Comparison](/en/guides/provider-comparison/) — Side-by-side comparison of major plan providers for those switching to a global or travel plan.
================================================================================
# How to Reset Network Settings (and What It Affects)
URL: https://sim-finder.com/en/guides/network-reset/
Type: guides (en)
Published: 2026-06-04
Resetting network settings removes all saved Wi-Fi passwords, Bluetooth pairings, VPN profiles, APN configuration, and cellular preferences from your device. It does not erase personal data, apps, or installed eSIM profiles. On iPhone and Android, this reset takes under two minutes and is one of the most effective ways to resolve persistent connectivity problems that survive simpler fixes.
**When to use it:** after a [No Service](/en/guides/no-service/) or [mobile data failure](/en/guides/no-data/) has not responded to the standard steps (Airplane Mode toggle, restart, network selection, APN correction), a network settings reset clears any corrupted stored configuration that may be preventing the device from connecting.
---
## What a Network Settings Reset Removes
A network settings reset is scoped exclusively to connectivity configuration. The following table shows exactly what is and is not affected.
| Setting | Removed by reset? |
|---------|-------------------|
| Saved Wi-Fi networks and passwords | Yes — all |
| Bluetooth pairings | Yes — all |
| APN settings (manual and carrier-pushed) | Yes — reset to carrier defaults |
| VPN configurations and profiles | Yes — all |
| Cellular network preferences | Yes — reset to automatic |
| Preferred network type (5G/LTE/3G setting) | Yes — reset to automatic |
| eSIM profiles | **No — preserved** |
| Physical SIM settings | **No — preserved** |
| Personal data (photos, contacts, messages) | **No — unaffected** |
| Installed apps and app data | **No — unaffected** |
| Apple ID, Google account, email accounts | **No — unaffected** |
| Device passcode and Face/Touch ID | **No — unaffected** |
The key point for eSIM users: on both iPhone and Android (Pixel and Samsung), installed eSIM profiles are managed by the LPA (Local Profile Assistant) and stored in the eUICC chip — architecturally separate from the network settings layer that is cleared by a reset. In practice, eSIM profiles are not removed by a network reset. However, Google and Samsung do not explicitly document this behavior; if you are concerned, confirm with your eSIM provider before performing the reset.
---
## When to Reset Network Settings
A network settings reset is appropriate after other targeted fixes have not resolved the problem. It is not a first step — it removes settings (especially Wi-Fi passwords and VPN configs) that must be re-entered manually, so use it when there is a clear reason to do so.
### No Service That Persists After Restart and Airplane Mode Toggle
If your device continues to show "No Service," "Searching," or zero signal bars after:
- Toggling Airplane Mode on and off
- Restarting the device
- Setting network selection to Automatic
- Confirming the SIM line is enabled
...then the network registration configuration stored on the device may be corrupted. A reset clears it. For the full no-service diagnostic sequence before reaching this step, see [No Service on Your Phone?](/en/guides/no-service/).
### Mobile Data Not Working After APN Is Confirmed Correct
If you have verified the APN settings, confirmed Data Roaming is on (where required), and confirmed your plan is active and has data remaining, but mobile data still does not work, a reset removes any conflicting or corrupted cellular configuration that may be overriding the correct APN. For the complete data troubleshooting sequence, see [No Mobile Data?](/en/guides/no-data/).
### Unstable Connection After Carrier or Plan Change
When you switch carriers, move from a physical SIM to an eSIM, or change plans within the same carrier, the device may retain old network configuration that conflicts with the new setup. A network reset starts from a clean state. If data connects after the reset but speeds remain consistently slow or unstable, see [Slow Mobile Data Speeds — How to Diagnose and Fix](/en/guides/slow-speed/) for further steps. If the issue started when a new eSIM or SIM would not activate correctly in the first place, see [eSIM Won't Activate? How to Fix Common Setup Issues](/en/guides/activation-failed/) — a network reset is one of the steps covered there.
### Persistent Wi-Fi or Bluetooth Problems
A network reset also clears corrupted Wi-Fi state (for example, a device that keeps disconnecting from the same network despite correct password entry) or Bluetooth pairing issues. Note that all Wi-Fi passwords are erased, not just the problematic one.
---
## How to Reset Network Settings on iPhone
Apple's path for resetting network settings on iPhone has remained consistent since iOS 15. The option is located in the device reset menu, not in the network settings menu itself.
**Steps:**
1. Open **Settings**.
2. Tap **General**.
3. Scroll to the bottom and tap **Transfer or Reset iPhone**.
4. Tap **Reset**.
5. Tap **Reset Network Settings**.
6. Enter your device passcode when prompted.
7. Tap **Reset Network Settings** on the confirmation dialog.
The device restarts automatically. After restart, the carrier name and signal bars should reappear within 30–60 seconds as the device re-registers on the network.
**What happens during the reset:**
- All saved Wi-Fi networks are removed.
- Bluetooth pairings are cleared (paired devices must be reconnected).
- VPN profiles installed via Settings are removed.
- APN settings are reset. If your carrier has an automatic carrier settings update, iOS will re-apply it. If not, you will need to re-enter APN values manually.
- eSIM profiles are not affected.
**Note:** The "Reset Network Settings" option is separate from "Erase All Content and Settings," which performs a full factory reset. Confirm you are tapping the correct option.
---
## How to Reset Network Settings on Android (Pixel)
Google Pixel devices use "Reset Wi-Fi, mobile & Bluetooth" as the network settings reset function.
**Steps:**
1. Open **Settings**.
2. Tap **System**.
3. Tap **Reset options**.
4. Tap **Reset Wi-Fi, mobile & Bluetooth**.
5. Review the summary of what will be reset, then tap **Reset settings**.
6. Enter your PIN, pattern, or password if prompted.
The reset completes without a full device restart on most Pixel versions. Wait 30–60 seconds and check the status bar for network registration.
**Note on Android versions:** The path above applies to Pixel devices running Android 12 through Android 15. On older Android versions, the path may differ — check Settings → System for available reset options.
**Note on Android 14+ Pixel models:** On some Pixel devices running Android 14 or later, the unified "Reset Wi-Fi, mobile & Bluetooth" option may be split into two separate entries: **"Reset Mobile Network Settings"** and **"Reset Bluetooth & Wi-Fi"**. If you see this split, select both options to perform a complete network reset equivalent to the unified option on earlier versions.
---
## How to Reset Network Settings on Android (Samsung)
Samsung Galaxy devices use a separate "Reset mobile network settings" option within the General management menu.
**Steps:**
1. Open **Settings**.
2. Tap **General management**.
3. Tap **Reset**.
4. Tap **Reset mobile network settings**.
5. If you have multiple SIM cards, select which SIM's settings to reset, or select both.
6. Tap **Reset settings** and confirm.
The reset completes without a full restart. Check signal after 30–60 seconds.
**One UI version note:** On older One UI versions (prior to One UI 4), the path is Settings → General management → Reset → Reset mobile network settings. The option name and location have been consistent across recent One UI releases.
---
## How to Reset Network Settings on Other Android Devices
Android network reset paths vary by manufacturer. The general principle is the same across devices: look for a "Reset" or "Reset options" section within System or General management settings.
**Common paths by manufacturer:**
| Manufacturer | Path |
|---|---|
| OnePlus / OxygenOS | Settings → System → Reset options → Reset Wi-Fi, mobile & Bluetooth |
| Xiaomi / MIUI | Settings → Additional settings → Backup and reset → Reset network settings |
| Oppo / ColorOS | Settings → Additional settings → Back up and reset → Reset network settings |
| Sony Xperia | Settings → System → Reset options → Reset Wi-Fi, mobile & Bluetooth |
| Motorola | Settings → System → Reset options → Reset Wi-Fi, mobile & Bluetooth |
If your device is not listed, search within Settings for "reset network" or "reset Wi-Fi." The option is present on all Android devices as it is part of the Android base system, though the path varies by manufacturer skin.
---
## What to Reconfigure After the Reset
A network settings reset removes configuration that must be re-entered manually. Prepare for these steps before performing the reset.
### Wi-Fi Passwords
All saved Wi-Fi networks are removed. You will need to rejoin each network and re-enter the password. On iPhone, if you use iCloud Keychain, the passwords may be restored automatically from iCloud — this depends on your iCloud settings and whether the password was saved to Keychain rather than stored locally only.
### VPN Profiles
VPN configurations installed through Settings are removed. Reinstall the VPN app's configuration or re-import the VPN profile from your VPN provider.
### APN Settings
This is the most important reconfiguration step for users on MVNOs or travel eSIMs.
- **MNO (major carrier) users**: the carrier typically pushes APN settings automatically after the reset, via a carrier settings update on iPhone or an OTA profile on Android. No manual action needed in most cases.
- **MVNO users**: MVNOs often do not push automatic APN profiles. You will need to re-enter the APN values manually. For iPhone users, see the full APN setup instructions in [APN Setup Guide for iPhone](/en/guides/apn-setup-iphone/).
- **Travel eSIM users**: most major travel eSIM providers (such as Airalo, Holafly, Nomad, and Saily) embed APN configuration inside the eSIM profile itself. Because the eSIM profile is preserved through the reset, APN configuration from these providers is typically restored automatically. If data does not work after the reset, check your provider's setup documentation for manual APN values.
### Bluetooth Devices
All paired Bluetooth devices (headphones, car systems, smartwatches, keyboards) must be re-paired. Power each device into pairing mode and reconnect from Settings → Bluetooth on iPhone, or Settings → Connected devices on Android.
### Cellular Preferences
The device reverts to automatic network selection and the default preferred network type (which allows the full range from 5G down to 3G where available). If you had manually set a specific network type — for example, LTE-only to avoid 5G instability in a specific area — you will need to re-apply that setting.
---
## Verifying the Reset Worked
After the reset and device registration, verify connectivity with these checks.
### Check Cellular Registration
Look at the status bar. The carrier name and signal bars should reappear within 60 seconds. If "No Service" or "Searching" persists beyond 60 seconds, check that the SIM line is enabled:
- **iPhone:** Settings → Cellular → confirm the line toggle is on.
- **Android (Pixel):** Settings → Network & internet → SIMs → confirm the SIM toggle is on.
- **Android (Samsung):** Settings → Connections → SIM card manager → confirm the SIM toggle is on.
### Test Mobile Data
Open a browser and navigate to a simple, reliable page. If data does not connect:
1. Confirm the Cellular Data (iPhone) or Mobile data (Android) toggle is on.
2. Confirm Data Roaming is on if your plan requires it (travel eSIMs and some MVNOs).
3. Check that the APN is configured correctly — see [APN Setup Guide for iPhone](/en/guides/apn-setup-iphone/) or your Android carrier's setup documentation.
### Check Bluetooth
Open Settings → Bluetooth (iPhone) or Settings → Connected devices (Android) and re-pair any devices you need. Paired devices from before the reset will not reconnect automatically — they must go through the pairing process again.
---
## Network Reset vs. Factory Reset: Key Difference
A network settings reset and a full factory reset are not the same operation.
| | Network Settings Reset | Factory Reset (Erase All) |
|---|---|---|
| Wi-Fi passwords | Erased | Erased |
| APN / VPN / cellular config | Reset | Erased |
| eSIM profiles | Preserved | Erased (varies by device) |
| Apps | Preserved | Erased |
| Photos and personal data | Preserved | Erased |
| Accounts (Apple ID, Google) | Preserved | Signed out |
A factory reset erases everything and should only be performed when a network settings reset and all other troubleshooting steps have failed. For network connectivity issues, a network settings reset is the appropriate tool.
---
## Frequently Asked Questions
### Will resetting network settings delete my photos, apps, or contacts?
No. Reset Network Settings only removes network-related configuration: saved Wi-Fi passwords, Bluetooth pairings, APN settings, VPN profiles, and cellular network preferences. Personal data — photos, apps, contacts, messages, and app data — is completely unaffected.
### Will resetting network settings delete my eSIM?
On iPhone, Reset Network Settings does not delete eSIM profiles stored on the device. Your installed eSIM plans remain intact. On Android (Pixel), the equivalent "Reset Wi-Fi, mobile & Bluetooth" also preserves installed eSIM profiles. On Android (Samsung), "Reset mobile network settings" likewise preserves eSIM profiles. In all cases, eSIM profiles are managed by the LPA/eUICC, which is architecturally separate from the network settings layer — in practice they are not removed, but Google and Samsung do not explicitly document this; confirm with your eSIM provider if concerned.
### How long does a network settings reset take?
On iPhone, the device restarts automatically and is ready in about 60–90 seconds. On Android (Pixel and Samsung), the reset completes without a full restart and typically takes under 30 seconds. After the reset, wait an additional 30–60 seconds for the device to register on the cellular network before testing.
### After the reset, do I need to re-enter my APN settings?
It depends on your carrier. Most major carriers (MNOs) push APN configuration automatically after a network reset. If you use an MVNO, a travel eSIM, or any carrier that does not push automatic APN profiles, you will need to re-enter the APN manually. Have your APN values from your carrier's setup documentation ready before performing the reset.
### When should I reset network settings versus doing a full factory reset?
Reset Network Settings is appropriate when the problem is connectivity-specific — persistent No Service, mobile data that will not work, or an unstable connection that other steps have not resolved. A full factory reset (which erases all data) is a much more drastic step and is not warranted for network issues alone. Try Reset Network Settings first.
---
## Related Guides
- [No Service on Your Phone? A Step-by-Step Fix](/en/guides/no-service/) — full diagnostic sequence for zero signal bars or "No Service" before using a network reset
- [No Mobile Data? How to Fix Data Connection Problems](/en/guides/no-data/) — step-by-step fix for when signal is present but mobile data does not work
- [APN Setup Guide for iPhone](/en/guides/apn-setup-iphone/) — how to reconfigure APN settings on iPhone after a network reset
- [Slow Mobile Data Speeds — How to Diagnose and Fix](/en/guides/slow-speed/) — if data connects but speed is poor after the reset
- [eSIM Won't Activate? How to Fix Common Setup Issues](/en/guides/activation-failed/) — if the issue started after a new eSIM installation and a reset did not resolve it
Use [SimFinder](/en/) to compare mobile plans, or [SimFinder Travel](/en/travel/) to find travel eSIM plans compatible with your destination and device.
================================================================================
# No Connection Abroad? How to Fix It
URL: https://sim-finder.com/en/guides/no-connection-abroad/
Type: guides (en)
Published: 2026-06-04
When you land abroad and your phone has no data or signal, the cause is almost always one of six things: Data Roaming is off, the eSIM profile is not active, the network selection is stuck on the wrong operator, the APN is missing, your device lacks the frequency bands used locally, or your home carrier has no roaming agreement with the destination. This guide works through each in a logical order, starting with the fastest fixes.
For pre-departure preparation that prevents most of these problems, skip to [Before You Depart](#before-you-depart) first.
---
## First: Toggle Airplane Mode and Check the Basics
Before changing any settings, perform two quick resets that resolve most connection failures.
**Toggle Airplane Mode:**
1. Open Control Center (swipe down on iPhone; swipe from the top or bottom on Android depending on model).
2. Tap the Airplane Mode icon to turn it **on**.
3. Wait **10 seconds** to let the radio fully power down.
4. Tap Airplane Mode again to turn it **off**.
5. Wait up to 30 seconds. Watch the status bar for the carrier name and network type (5G, LTE, 4G) to appear.
This forces the modem to drop its current (failed) registration and re-scan every available network from scratch. A stale or failed registration attempt is the most common cause of no-connection symptoms immediately after landing.
**Restart the device** if Airplane Mode toggle does not help:
- **iPhone**: Hold side button + volume button → slide to power off → wait 10 seconds → hold side button to power on.
- **Android**: Hold power button → tap Restart.
A restart reloads the carrier profile and clears any software state in the radio subsystem that the Airplane Mode toggle does not reach.
---
## Check That Data Roaming Is On
Data Roaming is a device-level switch that must be explicitly turned on to use mobile data on a visited network. Most devices default to Data Roaming off. Voice calls and SMS work even with Data Roaming off; mobile data does not.
**iPhone:**
1. Settings → Cellular (or Mobile Data in some regions).
2. Tap the SIM line you are using abroad.
3. Tap **Cellular Data Options** (or Mobile Data Options).
4. Find **Data Roaming** and turn it on.
On dual-SIM iPhones (iPhone XS and later), each line has its own Data Roaming toggle. Check the correct line — the home SIM and the travel eSIM each have their own switch. For a full guide on running both lines together, including which line to set as primary for data, see [Using Dual SIM for Travel](/en/guides/dual-sim-for-travel/).
**Android (Pixel):**
1. Settings → Network & internet → SIMs.
2. Select the SIM you want to use abroad.
3. Enable **Roaming**.
**Android (Samsung One UI):**
1. Settings → Connections → Mobile networks.
2. Enable **Data roaming**.
For other Android manufacturers: use the Settings search function and search "roaming" if the path differs. The toggle is present on all Android devices.
For a full walkthrough of Data Roaming settings across all device types, including dual-SIM configuration, see [Data Roaming Settings: How to Turn It On/Off Safely](/en/guides/roaming-settings/).
---
## Confirm Your eSIM Profile Is Active
An installed eSIM profile and an active cellular line are not the same state. A profile can be installed on the device but not turned on.
**iPhone:**
1. Settings → Cellular.
2. Under SIM & Cellular Plans, confirm your plan appears in the list.
3. Tap the plan name. Confirm **Turn On This Line** is enabled (green toggle).
4. If you have two lines, confirm the correct line is set as the data SIM: Settings → Cellular → Cellular Data → select the travel eSIM.
**Android (Pixel):**
1. Settings → Network & internet → SIMs.
2. Confirm the toggle for the travel eSIM is on.
3. Confirm it is selected for Mobile Data.
**Android (Samsung):**
1. Settings → Connections → SIM card manager.
2. Confirm the eSIM is toggled on.
3. Under Preferred SIMs, confirm Data is assigned to the travel eSIM.
If the line is on and Data Roaming is on but there is still no data, check whether the plan has a validity period that may not have started yet, or has already expired. Travel eSIM validity typically starts on first connection in the destination country, but the exact trigger varies by provider — check the provider's app or account page.
---
## Select the Right Local Network Manually
Your device selects a network automatically by default. When automatic selection picks a network that has no roaming agreement with your home carrier, or picks a travel eSIM partner that is temporarily unavailable, you get no data. Manual selection lets you override this.
**iPhone:**
1. Settings → Cellular → tap the SIM line in use.
2. Scroll to **Network Selection**.
3. Turn off **Automatic**.
4. The device scans for available networks. This takes 15–30 seconds.
5. Select a network from the list. Try the first result; if data does not work, try the next one.
6. Turn Automatic back on after the trip to prevent the selected network from causing issues when you return home.
**Android (Pixel):**
1. Settings → Network & internet → Internet → tap the SIM.
2. Disable **Automatically select network**.
3. Tap the network you want from the scan list.
4. If data still does not work, try another network from the list.
**Android (Samsung):**
1. Settings → Connections → Mobile networks → Network operators.
2. Tap **Search now**.
3. Select a network from the results.
When selecting manually, look for networks that match your home carrier's stated roaming partner for the destination. Your carrier's roaming coverage page lists which local operators it partners with in each country.
If you are using a travel eSIM, the eSIM's coverage depends on the specific networks the provider has contracted with in the destination country, not your home carrier's agreements. The eSIM provider's app or support page lists the covered local operators.
---
## Check and Configure Your APN
APN (Access Point Name) is the configuration that routes your device's mobile data through the correct network gateway. Without a valid APN, your device registers on the network but cannot transmit data — you may see a carrier name in the status bar with no data working.
**When APN configuration is automatic:**
Physical SIMs from major carriers push APN settings automatically via the carrier profile on the SIM. Travel eSIMs also deliver APN settings as part of the eSIM profile in most cases. If automatic configuration worked correctly, you do not need to enter APN settings manually.
**When to configure APN manually:**
If you installed a travel eSIM and data is not working despite the line being active with Data Roaming on, the APN may be missing. This can happen when:
- The eSIM profile was installed without an internet connection, and the carrier profile did not fully download.
- The provider requires manual APN entry as part of setup (documented in the provider's setup guide).
**iPhone — manual APN entry:**
1. Settings → Cellular → Cellular Data Network (if visible; some carrier SIM profiles hide this menu).
2. Under Cellular Data, enter the APN name provided by the eSIM provider.
3. Enter Username and Password if the provider specifies them (many travel eSIMs leave these blank).
4. Return to the main settings screen. The device reconnects using the new APN.
If the Cellular Data Network option does not appear, the SIM profile locks those fields. Contact the eSIM provider for assistance — they can push a corrected carrier profile.
**Android — manual APN entry:**
1. Settings → Network & internet → SIMs → select the eSIM.
2. Tap **Access Point Names**.
3. Tap the **+** icon to add a new APN.
4. Enter the APN name, Username, and Password as specified by the provider.
5. Tap the three-dot menu and select **Save**.
6. Select the new APN entry to activate it.
---
## Verify Band and Frequency Compatibility
Every mobile network uses specific radio frequency bands. A device designed for one region may not support all the bands used in your destination country. This is a hardware limitation — settings changes cannot override it.
**Common mismatch scenarios:**
- A phone purchased in North America used in Europe, Southeast Asia, or Japan — LTE band allocations differ significantly.
- A phone purchased in Asia used in the US — US carriers use specific LTE bands that many non-US devices do not include.
- A budget or import device with a limited band list used in a country that relies on a newer band for coverage.
- 5G mmWave vs sub-6 GHz: mmWave 5G (deployed in a limited number of venues and dense urban zones, even in countries that have launched it) requires specific hardware support. Devices without mmWave still connect via sub-6 GHz 5G or LTE.
**How to check:**
- Your device's official specifications page (manufacturer's website) lists supported frequency bands.
- Your home carrier and travel eSIM provider's coverage page specifies which bands they use at the destination.
- Use [SimFinder Travel](/en/travel/) to search travel eSIM plans and filter by your device and destination — plan listings indicate coverage approach.
**What to do if bands are incompatible:**
- Change the preferred network type from 5G to LTE: Settings → Cellular → [SIM line] → Voice & Data → select LTE (iPhone); Settings → Network & internet → SIMs → [SIM] → Preferred network type → LTE (Android Pixel). This forces the device to use 4G LTE bands, which are more broadly compatible than 5G bands.
- If LTE bands are also incompatible, the device cannot get signal in that area regardless of settings. In this case, a portable Wi-Fi router with a local SIM, or Wi-Fi calling over a Wi-Fi connection, are the practical alternatives.
---
## Check Your Carrier's Roaming Agreement
Your home SIM connects abroad through a bilateral roaming agreement (GSMA AA.12) between your home carrier and the destination carrier. If no agreement exists for your destination, the home SIM cannot register for data on any network there — regardless of signal strength.
**How to verify:**
- Check your home carrier's roaming coverage page before departure. Most carriers publish a searchable list of destination countries and the partner networks available there.
- If the destination is listed, confirm whether data is included or whether it requires activating a roaming pass.
- If the destination is not listed, your home SIM will not work for data there.
**If no agreement exists:**
A travel eSIM from a provider with dedicated coverage in the destination country is the standard alternative. Travel eSIM providers establish their own network partnerships, which are independent of your home carrier's agreements.
For travelers within the EU and EEA (plus Ukraine and Moldova from January 2026), the Roam Like At Home (RLAH) regulation means that carriers based in EU/EEA countries cannot charge extra roaming surcharges within the zone. See [EU Roaming Explained](/en/guides/eu-roaming/) for the full list of covered countries and applicable rules.
For a comparison of home SIM roaming versus travel eSIM as connectivity options, see [International Roaming Explained](/en/guides/international-roaming/).
---
## Before You Depart
Most connection problems abroad are preventable with checks done before leaving home.
**1. Verify your carrier's roaming coverage for the destination.**
Log in to your carrier's app or website and confirm the destination country is covered and which pricing model applies — pay-per-use, a day pass, or included in your plan.
**2. Check device band compatibility.**
If you are traveling with a device purchased in a different region from your destination, compare the device's supported LTE/5G bands against the bands used by carriers in the destination country.
**3. Confirm SIM lock status.**
A carrier-locked device can only register on its locked carrier's network. On iPhone: Settings → General → About → Carrier Lock. "No SIM restrictions" means unlocked. If locked, contact your carrier to request an unlock before travel.
**4. Install and activate the travel eSIM before departure.**
eSIM profiles require an internet connection to download. Install the profile at home over Wi-Fi. After installation, confirm the line appears in Cellular settings. Do not scan the QR code at the airport — eSIM QR codes are single-use by GSMA design and cannot be re-scanned if the download is interrupted.
**5. Configure Data Roaming intentionally.**
Decide in advance which line will carry data: your home SIM on a roaming plan, or a travel eSIM. Set Data Roaming on for that line and off for the other. Leaving Data Roaming on for the home SIM while also using a travel eSIM for data can result in unexpected home-carrier data charges if the device switches lines.
**6. Note the APN for your travel eSIM.**
Open the provider's setup guide before you travel and note the manual APN settings in case automatic configuration fails abroad without a Wi-Fi connection.
**7. Enable Wi-Fi Calling as a fallback.**
If your carrier supports Wi-Fi Calling, enable it before departure. Wi-Fi Calling lets you make and receive calls and SMS on your home number over any Wi-Fi connection, with no cellular signal required. This provides a baseline fallback if the cellular connection does not work at your destination.
For the full pre-departure setup checklist — including offline maps, cloud backup settings, and SMS 2FA preparation — see [Pre-Trip Connectivity Checklist](/en/guides/pre-trip-checklist/).
---
## Reset Network Settings as a Last Resort
If every step above has been followed and mobile data is still not working, a corrupted network configuration stored on the device may be the cause. Resetting network settings removes this configuration without affecting apps, photos, or accounts. It does erase saved Wi-Fi passwords, VPN profiles, and any manually entered APN settings — note those before proceeding.
**iPhone:**
1. Settings → General → Transfer or Reset iPhone → Reset.
2. Tap **Reset Network Settings**.
3. Enter your passcode. The device restarts.
4. After restart, re-enter Wi-Fi passwords and re-check Cellular settings (Data Roaming, active line, APN).
Note: on iPhone, Reset Network Settings does not delete installed eSIM profiles. Your cellular plans remain intact.
**Android (Pixel):**
1. Settings → System → Reset options.
2. Tap **Reset Wi-Fi, mobile & Bluetooth**.
3. Confirm. Wait 30 seconds, then check signal.
**Android (Samsung):**
1. Settings → General management → Reset → Reset network settings.
2. Confirm and wait for completion.
On Android, Reset Network Settings also preserves installed eSIM profiles.
After the reset, return to the beginning of this guide and re-apply Data Roaming, APN, and network selection settings from the beginning.
For further troubleshooting of "No Service" conditions — including SIM lock, IMEI blacklisting, and carrier account issues — see [No Service on Your Phone? A Step-by-Step Fix](/en/guides/no-service/).
---
## FAQ
See the FAQ items in the frontmatter above for answers to common questions including:
- Phone shows carrier name abroad but no data
- Whether you need to enter APN settings for a travel eSIM
- How to manually select a network when abroad
- Travel eSIM installed but showing no signal
- Phone worked abroad last trip but not this one
---
## Related Guides
- [International Roaming Explained](/en/guides/international-roaming/) — How GSMA AA.12 agreements and IPX routing keep your home SIM working abroad, and the three roaming pricing models
- [Data Roaming Settings: How to Turn It On/Off Safely](/en/guides/roaming-settings/) — Full walkthrough of the Data Roaming toggle on iPhone and Android, including dual-SIM configuration
- [No Service on Your Phone? A Step-by-Step Fix](/en/guides/no-service/) — Fixes for no signal and no carrier registration, including SIM lock and IMEI issues
- [EU Roaming Explained](/en/guides/eu-roaming/) — Roam Like At Home regulation: 32 covered countries and the rules that apply
- [Using Dual SIM for Travel](/en/guides/dual-sim-for-travel/) — Running your home SIM alongside a travel eSIM: line assignment, SMS 2FA, and returning home
================================================================================
# No Mobile Data? How to Fix Data Connection Problems on iPhone and Android
URL: https://sim-finder.com/en/guides/no-data/
Type: guides (en)
Published: 2026-04-19
Your phone shows signal bars — one, two, or even full bars — but when you open Safari, Chrome, or any app that needs the internet, nothing loads. This is a data connection failure, not a signal problem.
**This guide covers the situation where signal is present but mobile data does not work.** If your device shows zero bars, "No Service," or "Searching," the cause is different — see [No Service on Your Phone? A Step-by-Step Fix](/en/guides/no-service/) first. Come back here once signal is confirmed but data still does not work.
---
## Is It Actually a Data Problem? (Quick Diagnostic)
Before changing any settings, confirm which problem you actually have. These two checks take under a minute.
### Check 1: Signal vs. No Internet
Look at the top of your screen (the status bar):
- **Carrier name + signal bars visible** — your device is registered on a network. This is the starting point for this guide.
- **"No Service" / "Searching" / zero bars** — your device is not registered on any network. Stop here and go to [No Service on Your Phone?](/en/guides/no-service/).
After confirming signal is present, open a browser and try to load a simple, reliable page such as `google.com`. If you get a "No internet connection," "Could not connect to server," or similar error — not a DNS error page from your carrier — mobile data is the issue.
### Check 2: Is It Mobile Data or the App?
If only one app is not working (say, a specific social media app) but others load fine, the problem is app-level, not connection-level. Jump to [App-Specific Data Problems](#app-specific-data-problems) below.
If no app can reach the internet — browser, maps, messaging — continue with the steps in order.
### Check 3: Try Airplane Mode Toggle
Toggle Airplane Mode on, wait 10 seconds, then toggle it off. This forces the modem to reconnect to the network and re-establish the data path. If data works immediately after the toggle, the issue was a transient state glitch. If data still does not work, continue.
---
## Check Data Roaming and Cellular Data Toggles
The two most common and fastest-to-fix causes of missing mobile data are a disabled Cellular Data toggle and an off Data Roaming switch.
### Cellular Data Toggle
**iPhone:**
1. Settings → Cellular (or Mobile Data depending on your region).
2. Confirm the top toggle — **Cellular Data** — is on (green).
3. If it was off, turn it on and wait 5–10 seconds for data to connect.
**Android (Pixel):**
1. Settings → Network & internet → SIMs.
2. Tap the SIM name.
3. Confirm **Mobile data** is toggled on.
**Android (Samsung):**
1. Settings → Connections → Mobile networks.
2. Confirm **Mobile data** is on.
### Data Roaming
Data Roaming is a separate switch that allows your device to send data through a network other than your home carrier's. This switch must be on in two situations:
- You are travelling internationally and using your home SIM.
- You are using a travel eSIM or MVNO SIM that routes data via a host carrier (roaming by design).
Many users are surprised to find that Data Roaming must be enabled even for a travel eSIM that is supposedly "local" — this is because the eSIM connects your device to the local network as a roaming session at the protocol level.
**iPhone:**
1. Settings → Cellular → tap the active SIM line (or Cellular Data Options if you have one line). Data Roaming is toggled from the same screen (under Cellular Data Options on single-SIM devices).
2. Find **Data Roaming** and turn it on.
**Android (Pixel):**
1. Settings → Network & internet → SIMs → tap the SIM → Roaming → enable.
**Android (Samsung):**
1. Settings → Connections → Mobile networks → **Data roaming** → enable.
### Low Data Mode
If Low Data Mode is on, iOS restricts background app refresh and some automatic data tasks, but it does not block all data. However, if it is on together with other issues, it can make symptoms harder to identify.
**iPhone:** Settings → Cellular → tap the SIM line (or **Cellular Data Options** on single-SIM devices) → **Low Data Mode** → turn off for troubleshooting.
**Android (Pixel):** Settings → Network & internet → Data Saver → confirm it is off.
---
## Verify Your Data Plan Status
If the toggles are correct but data is still not working, the next step is to confirm your plan is active and has remaining data.
### Check Data Usage on the Device
**iPhone:**
1. Settings → Cellular → scroll down past the toggle list.
2. The list shows how much data each app has used since the last reset.
3. The total at the top ("Current Period") shows cumulative usage. Note that this counter does not reset automatically with your billing cycle — you need to tap **Reset Statistics** manually at the end of each billing period to keep it aligned with your plan's reset date.
**Android (Pixel):**
1. Settings → Network & internet → SIMs → tap the SIM name.
2. Tap **Data usage** to see your current cycle total and app-by-app breakdown.
3. You can also set a warning or hard limit from this screen.
**Android (Samsung):**
1. Settings → Connections → Data usage → Mobile data usage.
2. The cycle period is shown at the top with total usage.
### Data Cap and Throttling
Most mobile plans (prepaid and postpaid) have either a hard data cap or a soft cap with speed throttling:
- **Hard cap**: when you reach the limit, data stops entirely until the plan renews or you purchase an add-on.
- **Soft cap (throttling)**: after the limit, data continues at a very low speed — typically too slow for most apps to function usefully.
If you have reached the cap, the carrier's app or account portal will show this. Options are to wait for the billing cycle to reset, purchase a data add-on, or upgrade your plan.
### Check Your Carrier Account
Log in to your carrier's app or website to see:
- Current plan status (active, suspended, expired)
- Remaining data balance
- Any account-level holds or payment issues
For prepaid plans, an expired validity period stops service even if you have remaining data — the validity date and the data balance are two separate counters.
---
## APN Settings
APN (Access Point Name) is a configuration string that tells your device's modem which gateway to use when routing mobile data traffic. Without the correct APN, the device is registered on the network (so signal bars appear) but cannot send or receive internet data.
### How APN Configuration Works
When you insert a physical SIM or activate an eSIM, the carrier typically sends an APN configuration profile to the device automatically. On iPhone, this arrives as a carrier settings update. On Android, the values are usually pre-loaded or pushed over the air. For background on how eSIMs handle profiles differently from physical SIMs, see [What Is an eSIM?](/en/guides/what-is-esim/).
Automatic configuration does not always happen, or can be overwritten. Situations where you typically need to set APN manually include:
- **MVNO SIMs**: MVNOs often use the same network as a major carrier but use their own APN values, not the host carrier's.
- **Travel eSIM**: most major travel eSIMs (Airalo, Holafly, Nomad, Saily) auto-configure the APN on modern devices. Manual entry is occasionally required — more commonly on Android than on iOS. The required values are published in the provider's setup documentation or onboarding email.
- **Manually transferred SIMs**: a SIM moved from a different device that stored different APN values.
- **After a factory reset or network settings reset**: saved APN configurations are cleared.
### How to Check and Edit APN on iPhone
On iPhone, APN settings are accessed at:
Settings → Cellular → Cellular Data Network (the exact menu name varies by iOS version and carrier — it may also appear as "Mobile Data Network" or simply not be visible).
**If the menu is not visible**, your carrier has locked APN editing through a carrier profile. This is common on locked devices and carrier-managed plans. For details on how to check if your device itself is carrier-locked, see [SIM Lock and SIM-Free Explained](/en/guides/sim-lock/). In this case, you cannot edit the APN directly from Settings. Contact your carrier's support and ask them to push the correct APN profile, or follow their documented instructions for your plan.
**If the menu is visible**, you will see fields for:
- **APN** — the access point name string (e.g., `internet` or `data.carrier.com`)
- **Username** — usually blank for consumer plans
- **Password** — usually blank for consumer plans
Enter the values exactly as published by your carrier or eSIM provider. The values are case-sensitive.
After saving, toggle Airplane Mode off and on to force the modem to reconnect using the new APN.
### How to Check and Edit APN on Android
**Android (Pixel):**
1. Settings → Network & internet → SIMs → tap the SIM name.
2. Tap **Access Point Names**.
3. If the list is empty, tap the **+** icon to add a new APN.
4. If an entry exists, tap it to review the current values.
**Android (Samsung):**
1. Settings → Connections → Mobile networks → **Access Point Names**.
2. Tap the **+** or the three-dot menu → **New APN** to add one.
Enter the APN name, APN value, and any username or password provided by your carrier. Tap **Save**, then tap the new entry to select it as the active APN. Toggle mobile data off and on to apply.
### Travel eSIM and APN
Travel eSIMs are a particularly common source of APN problems, for two reasons:
1. **Carrier profile not pushed**: unlike a domestic SIM with a long-standing carrier relationship, a travel eSIM provider may not push an automatic APN profile.
2. **Profile is correct but Data Roaming is off**: even with a correct APN, data will not flow if Data Roaming is disabled (see the Data Roaming section above).
Always check your travel eSIM provider's setup guide for the APN values specific to your plan. If you installed the eSIM but never set up the APN, start there. For a complete travel eSIM setup walkthrough, see [Your First Travel eSIM: Step-by-Step Guide](/en/guides/first-time-guide/). If the eSIM itself failed to activate, see [eSIM Won't Activate? How to Fix Common Setup Issues](/en/guides/activation-failed/).
---
## App-Specific Data Problems
If one specific app cannot reach the internet while others work fine, the issue is app-level rather than a system-wide data failure.
### Cellular Data Permission for Individual Apps
iOS and Android both allow you to restrict which apps can use mobile data. If an app's cellular data permission was revoked — either deliberately or after an OS update — it will show no content on mobile data while Wi-Fi still works.
**iPhone:**
1. Settings → Cellular → scroll down to the app list.
2. Find the app that is not working.
3. If the toggle next to it is off (grey), turn it on.
**Android (Pixel):**
1. Settings → Apps → tap the app name.
2. Tap **Mobile data & Wi-Fi**.
3. Confirm **Background data** and the main data toggle are on.
**Android (Samsung):**
1. Settings → Apps → tap the app → Mobile data.
2. Confirm **Allow background data usage** is on.
### Background App Refresh (iPhone)
If an app only fails to load content when it is in the background (but works when opened directly), Background App Refresh may be off for that app.
Settings → General → Background App Refresh → find the app and enable it.
### Restricted Data (Android)
Android's Data Saver mode or a per-app "Restrict data usage" setting can prevent background data. Even with Data Saver off, some apps have an individual "restrict background data" flag set.
Settings → Apps → [app name] → Data usage → turn off **Restrict app data usage**.
### App Cache and Stale Configuration
Some apps cache network configuration internally. If an app's internal configuration is stale or corrupted, clearing the app cache can resolve connectivity issues that affect only that app.
**Android:** Settings → Apps → [app name] → Storage → **Clear Cache**.
**iPhone:** iOS does not offer a direct per-app cache clear from Settings. The equivalent is to offload the app (Settings → General → iPhone Storage → [app] → Offload App) and reinstall it.
---
## DNS and VPN Issues
### VPN Profile Interference
A VPN profile left active — or a VPN that is set to auto-connect — can route all traffic through a server that is currently unavailable, resulting in no data appearing to work even though the cellular connection is functional.
**iPhone:**
1. Settings → VPN & Device Management → VPN.
2. If any VPN is shown as Connected, tap the (i) button next to it and disconnect.
3. To prevent auto-reconnect: Settings → General → VPN & Device Management → VPN → tap the (i) on the profile → **Connect On Demand** → turn off.
**Android (Pixel):**
1. Settings → Network & internet → VPN.
2. If a VPN is connected, tap it and tap **Disconnect**.
If data works after disconnecting the VPN, the VPN server or its configuration is the cause. Contact the VPN service or reconfigure the profile.
### Private DNS Override (Android)
Android's **Private DNS** feature (also known as DNS-over-TLS) sends all DNS queries to a specified server. If that server is down, misconfigured, or blocked by your carrier, all DNS resolution fails and no app can reach the internet — even though the cellular data connection itself is working.
**Android (Pixel):**
1. Settings → Network & internet → Private DNS.
2. If set to a custom hostname (e.g., `dns.google` or a custom provider), try changing it to **Automatic** temporarily.
3. If data returns, the custom DNS server was the cause. You can restore it later once the DNS issue is resolved.
**Android (Samsung):**
1. Settings → Connections → More connection settings → Private DNS.
2. Switch to **Automatic** to test.
### Carrier-Side DNS Blocking
Some carriers block specific services or domains at the network level. If all browsing fails except for pages hosted on the carrier's own infrastructure, this can indicate a carrier-side issue rather than a device issue. If this is suspected, using a different network (Wi-Fi) to confirm that the same sites load correctly is the clearest diagnostic step.
---
## Reset Options
If no specific cause has been found, resetting network settings removes all stored network configuration and returns it to factory defaults. This resolves issues caused by corrupted APN settings, leftover VPN configs, or conflicting cellular settings.
### What Gets Erased by a Network Settings Reset
| Setting | iPhone | Android (Pixel) |
|---------|--------|-----------------|
| Wi-Fi passwords | Erased | Erased |
| Bluetooth pairings | Erased | Erased |
| VPN configurations | Erased | Erased |
| APN settings | Reset to defaults | Reset to defaults |
| eSIM profiles | **Preserved** | **Preserved** |
| App data, photos, contacts | Not affected | Not affected |
Note your Wi-Fi passwords and VPN details before proceeding.
### iPhone: Reset Network Settings
1. Settings → General → Transfer or Reset iPhone → Reset.
2. Tap **Reset Network Settings**.
3. Enter your passcode. The device restarts.
4. After restart, check cellular data. If the carrier does not push APN settings automatically, re-enter them manually.
### Android (Pixel): Reset Network Settings
1. Settings → System → Reset options.
2. Tap **Reset Wi-Fi, mobile & Bluetooth**.
3. Tap **Reset settings** and confirm.
4. Check mobile data after the process completes.
### Android (Samsung): Reset Network Settings
1. Settings → General management → Reset.
2. Tap **Reset network settings** → confirm.
### APN Reset to Default
If you suspect only the APN is the issue and do not want to lose all network settings, you can reset only the APN entries.
**iPhone:** Delete the carrier profile if one was manually installed (Settings → General → VPN & Device Management), then restart to trigger a fresh automatic profile push.
**Android:** In the Access Point Names screen, tap the three-dot menu → **Reset to default**. This removes any manually added APN entries and restores the carrier defaults. If the carrier defaults are also missing, you will need to re-enter your APN settings manually.
---
## Frequently Asked Questions
### My signal bars are full but Safari and Chrome won't load anything. What is wrong?
Signal bars only confirm that your device is registered on a cellular network — they do not indicate that mobile data is working. The most common causes when bars are present but data is not working are: Data Roaming is off (especially on a travel or international SIM), a data cap has been reached and the carrier has throttled or cut the connection, the APN settings are incorrect or missing, or a VPN profile is blocking traffic. Start by checking Data Roaming and Cellular Data toggles in Settings, then verify your data plan balance with your carrier.
### Why does my mobile data stop working after I reach a certain amount of usage?
Many mobile plans enforce a data cap — a fixed limit on how much high-speed data you can use per billing period. Once you exceed the cap, the carrier either cuts data access entirely or reduces speed to a very low rate (sometimes called throttling). On iPhone, go to Settings → Cellular and scroll down to the app-by-app usage list to see how much data has been used since the last reset. On Android (Pixel), go to Settings → Network & internet → SIMs, tap the SIM, and check data usage. Log in to your carrier's app or account portal to confirm your plan's current status and remaining balance.
### What is APN and why does it affect my data connection?
APN stands for Access Point Name. It is a configuration parameter that tells your device how to connect to the carrier's data gateway. Without correct APN settings, the device cannot route internet traffic even if it is registered on the network. Most carriers push APN settings automatically when you insert a SIM or activate an eSIM. When automatic configuration does not happen — most often with MVNOs, travel eSIMs, or manually managed profiles — you need to enter the APN values manually. Your carrier or eSIM provider will publish the required APN name, username, and password in their setup documentation.
### How do I check APN settings on iPhone and Android?
On iPhone: Settings → Cellular → Cellular Data Network (or Mobile Data Network, depending on iOS version). If this menu is not visible, your carrier may have hidden it through a carrier profile — check your carrier's support site for their APN values and instructions. On Android (Pixel): Settings → Network & internet → SIMs, tap the SIM name, then Access Point Names. On Samsung: Settings → Connections → Mobile networks → Access Point Names. If the list is empty or shows incorrect values, add the APN settings provided by your carrier.
### Will resetting network settings fix my data connection?
Resetting network settings removes all saved Wi-Fi passwords, Bluetooth pairings, and VPN configurations, and restores cellular settings to defaults. This can resolve data problems caused by corrupted APN settings or conflicting VPN profiles. On iPhone, it does not delete eSIM profiles. On Android (Pixel), "Reset Wi-Fi, mobile & Bluetooth" also preserves installed eSIM profiles. After the reset, you may need to re-enter your APN settings manually if your carrier does not push them automatically.
### My data works on Wi-Fi but not on mobile. Is this an APN issue?
If Wi-Fi works but mobile data does not, the issue is specific to the cellular data path — not your device's software or your account in general. The most likely causes are: APN settings are missing or incorrect, Data Roaming is off and your SIM requires roaming to route data (common with MVNOs and travel eSIMs), or your data plan is exhausted. Check the APN settings section of this guide and verify your plan status with your carrier.
---
## Related Guides
- [No Service on Your Phone? A Step-by-Step Fix](/en/guides/no-service/) — if the problem is zero signal bars rather than missing data
- [eSIM Won't Activate? How to Fix Common Setup Issues](/en/guides/activation-failed/) — if data never worked since first installing an eSIM
- [Your First Travel eSIM: Step-by-Step Guide](/en/guides/first-time-guide/) — end-to-end travel eSIM setup including APN and Data Roaming
- [What Is an eSIM?](/en/guides/what-is-esim/) — how eSIM profiles and carrier configuration work
- [SIM Lock and SIM-Free Explained](/en/guides/sim-lock/) — if your device may be carrier-locked and rejecting a different carrier's SIM
Use [SimFinder Travel](/en/travel/) to compare travel eSIM plans by destination, or [SimFinder](/en/) to compare domestic mobile plans.
================================================================================
# No Service on Your Phone? A Step-by-Step Fix for Signal Problems
URL: https://sim-finder.com/en/guides/no-service/
Type: guides (en)
Published: 2026-04-18
Your phone is showing "No Service," "Out of Service," or zero signal bars. In most cases, this resolves in under a minute with an Airplane Mode toggle or a device restart. If it does not, the cause is usually one of four things: a network registration glitch, a misconfigured setting, a SIM or device issue, or a genuine coverage problem. This guide walks through each systematically so you can identify the exact cause.
**This guide covers no-service conditions that occur after setup.** If you cannot connect immediately after installing an eSIM for the first time, the issue is likely an activation problem rather than a signal problem — see [eSIM Won't Activate? How to Fix Common Setup Issues](/en/guides/activation-failed/) first.
---
## Quick Checks (30 Seconds)
Start here before changing any settings. These two steps resolve the majority of no-service incidents.
### Toggle Airplane Mode
1. Open Control Center (swipe down on iPhone, swipe down or up on Android depending on model).
2. Tap the Airplane Mode icon to turn it **on**.
3. Wait **10 seconds** — long enough for the radio to fully power down.
4. Tap Airplane Mode again to turn it **off**.
5. Watch the status bar for the carrier name and signal bars to reappear. This typically takes 5–15 seconds.
What this does: it forces the modem to drop its network registration and re-scan for available networks from scratch. A brief signal loss or a stale network association is the most common cause of a sudden No Service display, and Airplane Mode toggle clears it immediately.
### Restart the Device
If toggling Airplane Mode does not restore service, restart the device.
**iPhone:** Press and hold the side button and a volume button until the slide to power off slider appears. Slide to turn off. Wait 10 seconds, then hold the side button to power on.
**Android:** Press and hold the power button (or power + volume down on some models) and tap Restart.
A full restart reinitialises the radio stack, reloads the carrier profile, and clears any software state that the radio subsystem may be stuck in.
### Confirm the Signal Bars Location
After restart, look at the status bar at the top of the screen. Check:
- **Carrier name** — is your carrier name shown next to the signal bars? If it shows "No Service" or is blank, the device is not registered.
- **Network type indicator** — do you see 5G, LTE, 4G, or 3G next to the bars? If absent, the modem has not established a connection.
- **Signal bar count** — one or two bars is weak but functional. Zero bars or the word "Searching" indicates no network contact.
If the carrier name appears but data or calls still do not work, move to the Verify Your Carrier Connection section.
---
## Verify Your Carrier Connection
### Check the Carrier Name in Settings
The status bar can sometimes be too small to read clearly. Verify the carrier registration directly in Settings.
**iPhone:** Settings → Cellular → the carrier name is shown at the top of the screen under the active SIM line label.
**Android (Pixel):** Settings → Network & internet → Internet → the carrier name appears next to the SIM entry.
**Android (Samsung):** Settings → Connections → SIM card manager → the carrier name is shown next to each active SIM.
If the carrier name is missing or replaced by "Unknown" or "No service", the device is not registered on any network. Continue with the steps below.
### Confirm the SIM or eSIM Line Is Active
**iPhone:**
1. Settings → Cellular.
2. Under SIM & Cellular Plans, check that your plan line is listed.
3. Tap the line — confirm "Turn On This Line" is enabled (green toggle).
4. If the line is off, turn it on and wait 10–15 seconds for registration.
**Android (Pixel):**
1. Settings → Network & internet → SIMs.
2. Confirm the SIM toggle next to your carrier is on.
3. If multiple SIMs are listed, confirm the correct one is set as the active mobile data SIM.
**Android (Samsung):**
1. Settings → Connections → SIM card manager.
2. Confirm the SIM or eSIM toggle is on.
3. Under Preferred SIMs, check that the correct line is assigned to calls and mobile data.
### Check the Active Line on Dual-SIM Setups
When two SIMs are active — whether two physical SIMs, one physical and one eSIM, or two eSIMs — each must be explicitly assigned. A device with two active lines but no line assigned to mobile data will show connectivity for calls but not data, or vice versa.
**iPhone:** Settings → Cellular → Default Voice Line / Cellular Data → confirm the correct line is selected for each.
**Android (Pixel):** Settings → Network & internet → SIMs → Mobile data → select the correct SIM.
**Android (Samsung):** Settings → Connections → SIM card manager → Preferred SIMs → confirm Data and Calls are set to the intended lines.
For eSIM-specific dual-SIM configuration, see [What Is an eSIM?](/en/guides/what-is-esim/) for a detailed explanation of how eSIM lines are managed.
---
## Network Selection and Preferred Network Type
### Switch Network Selection to Automatic
Manual network selection — where you pick a specific carrier by name — is sometimes left on by accident, particularly after international travel. If the manually selected network is no longer available in your current location, the device shows No Service even when other networks are present.
**iPhone:**
1. Settings → Cellular → tap the active SIM line.
2. Scroll down to Network Selection.
3. Turn on **Automatic** (disable manual selection).
4. The phone will scan and register on the best available network within 10–30 seconds.
**Android (Pixel):**
1. Settings → Network & internet → Internet → tap the SIM name.
2. Tap **Automatically select network** to enable it.
3. If it was already on, turn it off, wait 5 seconds, then turn it on again to force a new scan.
**Android (Samsung):**
1. Settings → Connections → Mobile networks → Network operators.
2. Tap **Select automatically**.
### Change Preferred Network Type
If your device is set to use only 5G but the area has no 5G coverage, it may fail to fall back to LTE. Similarly, if set to 3G only, it will miss LTE coverage.
**iPhone:**
1. Settings → Cellular → tap the SIM line → Voice & Data.
2. Options are typically 5G On, 5G Auto, LTE, and 3G. **LTE** or **5G Auto** (which falls back to LTE automatically) is the most broadly compatible choice.
**Android (Pixel):**
1. Settings → Network & internet → Internet → tap the SIM name → Preferred network type.
2. **LTE (recommended)** or **Automatic (recommended)** gives the widest coverage.
**Android (Samsung):**
1. Settings → Connections → Mobile networks → Network mode.
2. **LTE/3G/2G (auto connect)** is the broadest fallback option.
### Band Compatibility Note
Every carrier uses specific radio frequency bands. A device purchased in a different country may not support all the bands used in your current location, which limits coverage even when other phones nearby work fine.
This is most common in these scenarios:
- A phone purchased in Asia used in North America (or vice versa)
- A budget or import device used with a carrier that relies heavily on newer bands
- A phone that supports a band on paper but only at lower power levels
To check whether your device supports a specific carrier's bands, use [SimFinder](/en/travel/) to filter by device compatibility, or check your carrier's official device compatibility page. The technical band requirements are carrier-specific and change as networks expand.
---
## SIM Lock and Physical SIM Issues
### Check for Carrier Lock
A carrier-locked device can only register on the network of the carrier that sold it. If you are trying to use a SIM or eSIM from a different carrier — including a travel eSIM, an MVNO plan, or a SIM from another country — a carrier lock will cause No Service or an immediate error.
How to check:
**iPhone:** Settings → General → About → Carrier Lock. "No SIM restrictions" means unlocked.
**Android:** Insert a physical SIM from a different carrier. If calls and data work, the device is unlocked. A network scan (Settings → Network & internet → Mobile network → Network operators) can list available carriers, but a successful SIM swap test is the more reliable check.
For a full explanation of carrier lock, how to check your status, and how to request an unlock from your carrier, see [SIM Lock and SIM-Free Explained](/en/guides/sim-lock/).
### Reseat the Physical SIM (Physical SIM Only)
If you use a physical SIM card rather than eSIM, the SIM may have shifted in the tray or accumulated dust on its contacts.
1. Power off the device completely before removing the SIM tray.
2. Use the SIM ejector tool (or a straightened paperclip) to open the tray.
3. Remove the SIM card and inspect the gold contacts on the chip.
4. If visible dust or debris is present, gently clean the contacts with a dry, lint-free cloth. Do not use liquids.
5. Re-seat the SIM firmly in the tray, confirm the orientation is correct (the notched corner aligns with the tray cutout), and reinsert the tray until it clicks.
6. Power the device on and check for signal.
### Clean the SIM Tray
Even without visible dirt, the SIM tray contacts inside the phone can oxidise or accumulate fine dust over time. Use a can of compressed air to clear the slot before reinserting the SIM. Avoid metal tools inside the SIM slot.
---
## Device-Specific Troubleshooting
If none of the steps above have restored service, the issue may be a corrupted network configuration stored on the device. Resetting network settings removes this without affecting apps, photos, or accounts. However, it does erase saved Wi-Fi passwords, VPN profiles, and Bluetooth pairings — note those before proceeding.
### iPhone: Reset Network Settings
1. Settings → General → Transfer or Reset iPhone → Reset.
2. Tap **Reset Network Settings**.
3. Enter your passcode when prompted.
4. The device restarts. After restart, wait 30–60 seconds for network registration.
5. Test for signal. If service returns, re-enter your Wi-Fi passwords and reconfigure VPN if needed.
### Android (Pixel): Reset Network Settings
1. Settings → System → Reset options.
2. Tap **Reset Wi-Fi, mobile & Bluetooth**.
3. Tap Reset settings and confirm.
4. The device applies the reset (no full restart required on some versions). Check signal after 30 seconds.
### Android (Samsung): Reset Network Settings
1. Settings → General management → Reset.
2. Tap **Reset network settings**.
3. Confirm and wait for completion.
### IMEI Check
If service does not return after a network settings reset, the device's IMEI may have been blacklisted. This happens when a device is reported stolen or lost to a carrier — the carrier reports it to a shared blacklist database, and participating networks refuse to register it.
To display your IMEI: dial `*#06#` on any device. On iPhone, it also appears at Settings → General → About → IMEI.
If you suspect a blacklisted IMEI — especially on a second-hand device — check [GSMA Device Check](https://devicecheck.gsma.com/) or your carrier's own IMEI lookup page. A blacklisted device can only be cleared by the carrier that reported it (usually the original selling carrier, but not always if a subsequent owner reported a theft or loss); there is no third-party workaround.
---
## International Travel Scenarios
### Verify Data Roaming Is On
When using your home SIM abroad, data roaming must be explicitly enabled. On most devices, it is off by default. Voice calls may still work in some configurations even with roaming off, but data will not.
**iPhone:** Settings → Cellular → tap your plan line → Data Roaming → turn on.
**Android (Pixel):** Settings → Network & internet → Internet → tap the SIM → Roaming → enable.
**Android (Samsung):** Settings → Connections → Mobile networks → Data roaming → enable.
If roaming is already on but data is not working, confirm that the carrier you are registered on (visible in the status bar) actually has a roaming agreement with your home carrier. Manual network selection (see the section above) can help you switch to a different local network if the auto-selected one has no agreement.
### Travel eSIM-Specific Issues
A travel eSIM that was working stops showing signal, or shows the carrier name but no data:
1. **Confirm the travel eSIM line is set as the active data line** — not your home SIM. Check Settings → Cellular → Cellular Data (iPhone) or the SIM data assignment on Android.
2. **Check that Data Roaming is on for the travel eSIM line** — travel eSIMs route data through the local network as a roaming session, so Data Roaming must be enabled even though it is the "local" SIM for your trip.
3. **Verify the eSIM plan has not expired** — travel eSIM validity periods range from days to weeks depending on the provider and plan. If the plan has expired, service stops.
4. **Check your remaining data balance** — if the plan's data allowance is exhausted, some travel eSIM providers cut service entirely rather than throttling.
If the travel eSIM was never showing signal since you installed it, the issue is more likely an activation problem. See [eSIM Won't Activate?](/en/guides/activation-failed/) and [Your First Travel eSIM: A Complete Setup Guide](/en/guides/first-time-guide/).
For help choosing a travel eSIM before your next trip, [4 Ways to Stay Connected Abroad](/en/guides/four-options/) covers travel eSIM, local SIM, roaming, and pocket Wi-Fi. Use [SimFinder Travel](/en/travel/) to compare plans by destination.
### Band and Frequency Compatibility Abroad
When travelling, the network bands available in your destination country may differ from those your device was designed for. This is not a settings problem — it is a hardware limitation.
Common mismatch patterns:
- **North America vs Europe/Asia**: Different 4G LTE band allocations. A device optimised for one region may have partial coverage in another.
- **5G millimeter-wave (mmWave) vs sub-6 GHz**: mmWave is used in dense urban areas in a small number of countries. Devices without mmWave support cannot use it, but they still connect via sub-6 GHz 5G or LTE.
- **Older 3G band shutdowns**: Many carriers have shut down 3G networks. Devices that relied on 3G as a fallback may show No Service in areas where only 4G is available, if the device does not support the local 4G bands.
To check whether a specific travel eSIM provider's coverage is compatible with your device, use [SimFinder Travel](/en/travel/) to search by destination. For technical band specifications, refer to your device manufacturer's specifications page.
---
## When to Contact Your Carrier
If every step in this guide has been followed and service has not returned, the remaining causes require carrier-side investigation.
### Check for a Carrier Outage
Before calling support, check whether there is a network outage in your area. Most carriers publish outage status pages. Independent outage trackers also collect real-time user reports. A widespread outage is not something you can fix on your end — wait it out and monitor the carrier's status page.
### Account-Level Issues
Carriers can suspend service at the account level for reasons including:
- **Non-payment** — a missed payment can result in immediate service suspension on some plans.
- **Suspicious activity flag** — automated fraud detection systems can lock accounts without notice.
- **Port-out request** — if a number port request was initiated (by you or fraudulently), the original service may stop before the port completes.
- **Contract or plan expiry** — prepaid plans with a set validity period stop service at the end of the term.
Log in to your carrier's account portal to check for notifications. If you cannot log in, contact carrier support directly.
### What to Provide When Contacting Support
To speed up diagnosis, have the following ready:
- Your phone number and account PIN or password
- Device model and IMEI (dial `*#06#` or check Settings → General → About)
- EID (for eSIM — Settings → General → About → EID on iPhone; Settings → About phone → EID on Android)
- The exact error message shown on the device
- Steps already tried (Airplane Mode toggle, restart, network settings reset)
- Whether the issue is new or has recurred before
---
## Frequently Asked Questions
### Why does my phone say "No Service" after I restart it?
A restart clears the radio stack, which is often enough to recover a dropped network registration. If No Service persists after restart, check that Airplane Mode is fully off, that the correct SIM or eSIM line is set as the active cellular line, and that automatic network selection is turned on in the mobile network settings.
### Is "No Service" the same as "Out of Service"?
The two messages mean the same thing: the device is not registered on any cellular network. The exact wording varies by device manufacturer and iOS/Android version. Some devices show a signal bar with an X, an empty bar area, or the text "Searching" instead.
### My eSIM shows as installed but the signal bars are empty — what should I do?
An installed eSIM profile and an active cellular connection are not the same. First, confirm the eSIM line is turned on in Settings. If you have two SIMs, set the eSIM as the preferred data line. For travel or international eSIMs, verify that Data Roaming is enabled for that line. If the profile was just installed and no service appears after 5 minutes, the issue may be eSIM activation — see the [eSIM activation troubleshooting guide](/en/guides/activation-failed/).
### Why do I have No Service in a specific area but full bars elsewhere?
This is almost always a coverage gap — the carrier's physical network does not reach that location. Underground parking, basements, rural areas, and dense urban canyons are common dead zones. Moving to a window or outdoors often resolves it. If the issue affects areas where you previously had signal, check for a carrier outage at that time.
### Will resetting network settings delete my eSIM?
On iPhone, "Reset Network Settings" does not delete eSIM profiles stored on the device — it only removes Wi-Fi passwords, VPN configs, and Bluetooth pairings. Your cellular plans stay intact. On Android (Pixel), "Reset Wi-Fi, mobile & Bluetooth" also preserves installed eSIM profiles.
### My phone shows No Service only when I use 5G. How do I fix it?
Some areas have 5G coverage that is inconsistent or uses millimeter-wave (mmWave) frequencies with limited range. Open your mobile network settings and change the preferred network type from "5G Auto" or "5G On" to "LTE/4G". If service returns, the 5G coverage in your area is insufficient for stable use. You can set it back to 5G later once you are in a reliably covered area.
---
## Related Guides
- [eSIM Won't Activate? How to Fix Common Setup Issues](/en/guides/activation-failed/) — if the problem started immediately after eSIM installation
- [SIM Lock and SIM-Free Explained](/en/guides/sim-lock/) — carrier lock check and unlock request process
- [What Is an eSIM?](/en/guides/what-is-esim/) — how eSIM profiles work and why they differ from physical SIM
- [Your First Travel eSIM: A Complete Setup Guide](/en/guides/first-time-guide/) — end-to-end setup for travel eSIM
- [4 Ways to Stay Connected Abroad](/en/guides/four-options/) — comparing travel eSIM, roaming, local SIM, and pocket Wi-Fi
Use [SimFinder](/en/) to compare mobile plans, or [SimFinder Travel](/en/travel/) to find travel eSIM plans compatible with your destination and device.
================================================================================
# How to Keep a Phone Number You're Not Using
URL: https://sim-finder.com/en/guides/number-storage/
Type: guides (en)
Published: 2026-06-04
If you are moving abroad, taking an extended break from a device, or simply pausing a second line you use irregularly, the default outcome is straightforward: do nothing, and the number eventually disappears. Most carriers reclaim inactive numbers and reassign them to new subscribers. Once reassigned, a number cannot be recovered.
There are five practical ways to prevent that: stay on the cheapest available plan, keep the number on an eSIM or secondary line, port to a low-cost prepaid or MVNO, use a carrier suspension service if one is offered, or move the number to a VoIP service. Each approach has a different cost profile, reachability level, and level of effort. This guide explains how each works and when to choose it.
---
## Why Phone Numbers Get Reclaimed
Phone numbers are a finite resource, allocated to carriers by national numbering authorities under the ITU-T E.164 framework. Carriers are required to return numbers they are not actively using to ensure the pool does not run dry. When your account closes — or when a prepaid SIM goes inactive long enough — the carrier treats the number as unused and eventually makes it available to a new subscriber.
The reclamation timeline is not standardised. In the United States, regulations set a minimum of 45 days before reassignment, though carriers often wait longer; timelines differ significantly in other countries. Carriers do not typically notify you before reassignment begins.
The practical consequence is that any service you have registered to that number — SMS two-factor authentication for banking, accounts, or messaging — will send codes to a stranger after reassignment. This is both a continuity problem and a [security risk](/en/guides/sim-swap/). Maintaining an active account that holds the number is the only reliable way to prevent it.
---
## Option 1: Downgrade to the Cheapest Available Plan
The simplest approach to holding a number is to stay with your current carrier on the lowest-cost plan available. Rather than cancelling, you change to a minimal plan — often a low-data or voice-only tier — and pay the reduced monthly cost to keep the line active.
### When This Makes Sense
- You want minimal setup effort and no change of carrier.
- You may return to heavier usage within a predictable timeframe.
- Your current carrier offers a meaningful step-down in price.
- You want the number to remain fully reachable (calls, texts, data) during the hold period.
### Trade-offs
A downgraded plan keeps your number on the same carrier with the same number reachability it always had. Inbound calls and SMS arrive normally; eSIM profiles and device settings remain unchanged.
The cost depends entirely on what your carrier offers at the low end. Some carriers offer significant reductions; others do not have a meaningful low tier — they offer only their standard plans or nothing. If the cheapest available plan still represents a significant monthly cost for a number you may not use at all, one of the other approaches below is worth considering.
Check your [contract terms](/en/guides/contract-terms/) before downgrading. Some carriers impose a plan-change fee or require you to remain on a new plan for a minimum period. If you are within a minimum-term commitment on your current plan, early plan changes may trigger penalties.
A useful reference point: many carriers also offer a formal suspension service (covered in Option 4 below) that is cheaper than their cheapest active plan. Check both options before deciding.
---
## Option 2: Keep the Number on an eSIM or Secondary Line
If you already have a [dual-SIM capable device](/en/guides/dual-sim-for-travel/), keeping a number as a secondary eSIM alongside a primary SIM is one of the most flexible approaches. The number stays active on its original carrier, the eSIM profile remains installed on the device, and you can receive calls or texts on that number whenever the eSIM is enabled.
### How eSIM Retention Works
An eSIM profile is a software credential stored on your device's eUICC (embedded Universal Integrated Circuit Card) chip. Once installed, it persists on the device even when the line is disabled — you do not need to download it again when you re-enable the line. The profile corresponds to a real active account on the carrier's network, so the number remains registered and reachable as long as the account stays in good standing.
You can disable the eSIM line in Settings when you do not want it to consume data or battery, and re-enable it when you need to receive calls or check messages. Switching takes seconds.
### Limitations to Understand
An eSIM profile is tied to the device on which it was activated. If you replace your phone, you will need to re-provision the eSIM on the new device by contacting the carrier. Most carriers support this online, but some require a support request.
eSIM profiles can also be deleted accidentally during a device reset or software restoration. Before performing a factory reset or major OS migration, confirm whether your eSIM profile will survive or whether you need to re-download it first. On iPhone, iOS 16 and later provide an option to back up and transfer eSIM profiles to a new device, but only during a device-to-device transfer — not from a backup restore.
The secondary line still needs to be on an active plan with some cost. The goal is to choose the cheapest plan the carrier offers for that secondary line, not to avoid cost entirely.
---
## Option 3: Port the Number to a Low-Cost Prepaid or MVNO
[Mobile Number Portability (MNP)](/en/guides/what-is-mnp/) lets you transfer a number from one carrier to another while keeping the number unchanged. Porting to a carrier with a cheaper entry-level plan or pay-as-you-go option reduces the holding cost, often substantially.
### Why an MVNO or Prepaid Carrier Can Be Cheaper
[MVNOs](/en/guides/mno-vs-mvno-comparison/) lease capacity from MNOs and resell it, often at lower prices for low-usage or no-frills tiers. For holding a number without significant usage, the specific data speed and coverage tier matter less — what matters is cost and whether the account can remain active with minimal activity.
Pay-as-you-go prepaid options are especially relevant here: you pay only when you actually use the number. If months pass without a call or text, you pay only what is necessary to prevent the SIM from deactivating (see the caveat about minimum activity below).
### The Port Process
Porting requires a transfer credential from your current carrier (a PAC code in the UK, a Number Transfer PIN in the US, a RIO code in France, and similar credentials in other markets) and a new account opened at the receiving carrier. In most countries with mandated MNP, the process completes within one working day for a simple consumer port, and porting is free of charge. See the [MNP guide](/en/guides/what-is-mnp/) for country-specific steps.
Once ported, the number lives on the new carrier. Any calls or texts sent to that number route to the new carrier's network.
### Minimum Activity Requirements on Prepaid Plans
Most prepaid plans require at least one qualifying activity — a call, text, data session, or top-up — within a rolling window, typically ranging from 60 days to 12 months depending on the carrier, to keep the line active. If the window passes with no activity, the SIM deactivates and the number enters the reclamation queue.
Before porting to a prepaid carrier for number holding, confirm:
- What counts as qualifying activity (some plans require a purchase, not just network usage).
- How long the activity window is.
- Whether there is a minimum balance required to keep the account open.
- Whether the number can be ported out again later if you want to return to a full-service carrier.
---
## Option 4: Use a Number Parking or Suspension Service
Some carriers offer a formal account suspension or number-hold service. Under this arrangement, the number remains registered in the carrier's system — not in the active number pool — but the account is not fully active. Monthly cost is typically lower than the cheapest active plan, and sometimes nominal.
### Where Number Parking Exists
Carrier-level suspension services are not universal. Their availability, cost, and duration limits vary by carrier and country.
**United Kingdom**: Some UK carriers offer account suspension for documented reasons (travel, medical grounds). The terms vary by carrier, and most have duration limits.
**Australia**: Some Australian carriers may offer temporary account suspension on request — terms vary and should be confirmed directly with the carrier.
**Japan**: au (KDDI) offers a temporary suspension service specifically designed for subscribers living or travelling abroad (up to 5 years). The number is preserved while the account is suspended, and service can be reactivated on return. Other Japanese carriers have their own suspension programs with varying terms.
**United States**: No major carrier offers a standardised number-parking product for the general public. Verizon, AT&T, and T-Mobile offer military deployment suspensions, which pause billing for active-duty members. Outside of military status, the closest US equivalent is moving the line to the lowest available plan, or porting the number to a VoIP service. Some carriers also allow a temporary suspension for documented medical situations, but these are case-by-case and not universally available.
**Germany and EU**: Under the European Electronic Communications Code (Directive 2018/1972), subscribers retain number portability rights regardless of account status, but no standardised suspension product exists at the EU regulatory level. Individual carriers in Germany and other EU countries may offer voluntary suspension programs.
### What to Verify Before Using a Suspension Service
- Maximum suspension duration (most carriers cap it at 90 days, 6 months, or 12 months).
- Whether the number can be ported out during or after the suspension.
- Whether the suspension renews automatically or requires manual extension.
- Cost during suspension (sometimes a nominal fee, sometimes zero).
- What happens at the end of the suspension period if you do not act — does the account return to a standard plan automatically, or does it cancel?
Contact your carrier's customer service directly to confirm current suspension terms. Published terms on carrier websites for these programs may not be updated frequently.
---
## Option 5: Port the Number to a VoIP Service
Porting a number to a Voice over IP (VoIP) service transfers it out of the mobile carrier network entirely and places it on an internet-based voice infrastructure. The number remains yours, inbound calls and texts arrive via the VoIP app, and the cost is typically lower than maintaining a mobile plan.
### How VoIP Number Holding Works
VoIP providers that accept mobile number ports — such as Google Voice in the United States, or similar services in other markets — take over the number through the same MNP process used for carrier-to-carrier ports. Once ported, inbound calls arrive through the VoIP app on any internet-connected device. SMS messages can be received through the app interface.
Because the number is no longer on a mobile carrier's network, it does not require a SIM card, an eSIM profile, or any hardware. The account stays active as long as you maintain the VoIP service.
### Trade-offs and Limitations
**SMS OTP compatibility**: Some financial institutions, banks, and online services restrict SMS-based one-time password delivery to numbers registered on carrier networks, and block or fail to deliver to numbers identified as VoIP or landline. If any of your accounts require SMS OTP delivery, test delivery to the VoIP number before fully committing to this approach. Alternatively, migrate those accounts to authenticator-app-based two-factor authentication before porting.
**Outbound calling**: Outbound calls from a VoIP number may display as "Unknown" or show a different caller ID on some recipients' phones, depending on the VoIP provider and the recipient's carrier.
**Emergency calls**: VoIP numbers may have limited or no emergency services (911 in the US, 999 in the UK, 112 in the EU) connectivity compared to mobile carrier lines. Do not rely on a VoIP-only number as your primary contact for emergency situations.
**Portability back to mobile**: VoIP numbers are generally portable back to a mobile carrier under MNP rules, but this depends on whether the VoIP provider supports port-out requests. Confirm port-out support before committing to a VoIP holding strategy, especially if you plan to return the number to a carrier at some point.
**Geographic restrictions**: VoIP number porting is available in some countries (notably the US, UK, Canada, and Australia) but not universally. In countries without regulated VoIP number portability, this option may not be available.
---
## Comparing the Five Approaches
The right choice depends on three factors: how long you need to hold the number, whether you need it to be reachable in real time, and what cost is acceptable.
| Approach | Reachability | Minimum Ongoing Cost | Best For |
|---|---|---|---|
| Downgrade to cheapest plan | Full (calls, SMS, data) | Low monthly fee | Short to medium holds; same carrier preferred |
| eSIM / secondary line | Full when enabled | Low monthly fee | Device already supports dual eSIM; flexible enable/disable |
| Port to prepaid / MVNO | Full | Pay-as-you-go or low monthly | Long holds; cost reduction is the priority |
| Carrier suspension service | None or limited | Nominal or zero | Short holds where carrier offers the service |
| Port to VoIP | Inbound via app; no mobile SMS | Low or zero | Number rarely used; no SMS OTP dependency |
No approach is cost-free: maintaining any number on any platform requires some ongoing engagement, whether a monthly fee, a periodic minimum usage event, or a subscription to a VoIP service.
---
## The SMS Two-Factor Authentication Dependency
Across all five approaches, the most practically important question is whether any of your accounts send SMS-based one-time passwords to the number you are holding.
If yes, and you let the number expire or port it to a VoIP service that those accounts do not recognise, you may lose access to those accounts entirely — or the codes may be delivered to whoever eventually receives the reassigned number.
Before pausing, suspending, or porting a number:
1. Identify every account that uses this number for SMS OTP.
2. For each account: either update the SMS OTP to a different number you are keeping active, or migrate to an authenticator app where the service allows it.
3. For accounts that only support SMS OTP and cannot be updated easily (some financial institutions), ensure the number remains reachable throughout the hold period.
The [SIM swap fraud guide](/en/guides/sim-swap/) covers the broader security implications of SMS OTP dependency on mobile numbers and why authenticator apps are preferable for sensitive accounts.
---
## eSIM Retention When Changing Devices
If you are holding a number on an eSIM and plan to change your device during the hold period, understand that the eSIM profile does not automatically transfer.
Steps to preserve the eSIM when switching devices:
1. Before resetting or surrendering the old device, confirm whether your carrier supports eSIM transfer online or requires a support request.
2. On iPhone, use the direct device-to-device transfer (Quick Start) method — iOS 16 and later support eSIM transfer during this process. A restore from iCloud backup does not transfer eSIM profiles.
3. On Android, contact the carrier to re-issue the eSIM profile to the new device. The process varies by carrier but typically involves logging into your account and selecting the new device.
4. After setting up the new device, verify that the held eSIM line appears in Settings and that the number is still active.
If you are holding a number for an extended period without actively using the device it is on, consider whether porting to a low-cost prepaid SIM on a physical card — or to a VoIP service — simplifies the situation, since those approaches are device-agnostic.
---
## Choosing an Approach by Situation
**Moving abroad for six months or less**: If your current carrier offers a suspension service, that is the simplest option. If not, downgrade to the cheapest active plan or port to a pay-as-you-go prepaid at home.
**Moving abroad indefinitely**: Port the number to a VoIP service or to a pay-as-you-go prepaid that a trusted contact can maintain if needed. Assess SMS OTP dependencies before acting.
**Pausing a second line you use infrequently**: Keep it on a low-cost prepaid with minimal monthly or periodic cost — or consider a dedicated [sub-line](/en/guides/sub-line/) designed for exactly this purpose. eSIM works well here if the device supports it — the line can be disabled when not needed and re-enabled in seconds.
**Preserving a number for eventual return**: Port to a low-cost prepaid or MVNO. Confirm that MNP port-out is available from that carrier when you eventually want to return the number to full service.
**Number with significant SMS OTP registrations**: Do not port to VoIP until you have audited and migrated or updated all dependent accounts. A downgrade or suspension service that keeps the number on the mobile network is safer in this case.
---
## FAQ
*(Structured FAQ items are in the frontmatter above for schema.org/FAQPage display.)*
**Can a carrier refuse to let me port my number to a prepaid plan or VoIP service?**
In markets with mandated MNP — including the US, UK, Australia, EU member states, Canada, and Japan — carriers generally cannot refuse a valid port request on the basis of account type or destination. They can reject a port if the account credentials do not match or if there is an active account lock. Outstanding contract balances or early termination fees are still owed after the port completes, but the balance cannot be used to block the port itself. See the [MNP guide](/en/guides/what-is-mnp/) for country-specific details on port refusal and escalation to regulators.
**How do I know when a prepaid SIM is about to deactivate?**
Most carriers send an SMS reminder before the activity window closes, but this is not universal and some carriers do not send any warning. Do not rely on reminder messages alone. Instead, record the carrier's expiry policy in a calendar application and set a recurring reminder to trigger a qualifying usage event (a call, a text, a small data session, or a top-up, depending on what the carrier requires) well before the deadline.
**If my number gets reassigned to someone else, can I get it back?**
Generally no. Once a number has been reassigned and the new subscriber's account is established, the original holder has no recourse through normal carrier processes. Some carriers maintain a grace period after reclamation before the number is actively reassigned, but this period is not standardised and carriers do not advertise it. Attempting to port a number that has already been reassigned will fail because the account credentials no longer match. If the number was associated with critical accounts, contact those services immediately to update or disable the SMS OTP linked to that number.
**Does keeping a number on a prepaid SIM affect its portability later?**
No — MNP applies regardless of whether a number is held on a prepaid or postpaid account. When you want to port the number back to a full-service carrier, you initiate the port through the new carrier, provide the transfer credential from the prepaid carrier, and the port completes normally. Some prepaid carriers impose a minimum account age before allowing port-out (typically 30–90 days from activation), so if you have recently ported in, there may be a brief waiting period before you can port out again. Check the specific carrier's port-out terms when setting up the holding arrangement.
---
## Related Guides
- [Mobile Number Portability (MNP) Explained](/en/guides/what-is-mnp/) — How MNP works, country-specific steps, and what to prepare before initiating a port.
- [Backup Line: Adding a Second SIM for Outage Resilience](/en/guides/sub-line/) — How to set up a low-cost secondary SIM for network redundancy and SMS 2FA continuity.
- [Using Dual SIM for Travel](/en/guides/dual-sim-for-travel/) — Running a home SIM alongside a travel eSIM, with line assignment and SMS 2FA strategy.
- [Contract Terms: Lock-In, Termination Fees, and Setup Costs](/en/guides/contract-terms/) — How minimum-term commitments and early-termination fees affect your options when pausing a plan.
- [SIM Swap Fraud: How It Works and How to Protect Yourself](/en/guides/sim-swap/) — The security implications of SMS OTP dependency and how to protect accounts tied to a number you are holding.
================================================================================
# How to Set Up Parental Controls on a Child's Phone
URL: https://sim-finder.com/en/guides/parental-control/
Type: guides (en)
Published: 2026-06-05
Parental controls cannot substitute for a conversation with your child about what a phone is for — but they provide a technical backstop while those conversations happen over years. The short version: iOS Screen Time and Android Family Link both cover daily time limits, app and content restrictions, purchase approval, and location sharing; neither is unbypassable; carrier-level filtering adds a network layer that neither replaces. Set controls with your child rather than around them.
This guide covers what each platform's controls actually do (per Apple and Google official documentation), how carrier-level filtering works, and how to approach the setup as your child grows.
---
## What iOS Screen Time Does
Screen Time is Apple's built-in parental control system, available on iPhone, iPad, and iPod touch. It is configured on the device itself and, when enabled as a Family Sharing child account, can be managed remotely from a parent's device via the Screen Time section of Settings.
**Daily time limits (App Limits and Downtime)**
App Limits let you set a maximum daily usage time for individual apps or app categories (Social, Entertainment, Games, and so on). When the limit is reached, the app icon dims and shows a timer icon. The child can request more time, which sends a notification to the parent's device for approval. Downtime schedules a period during which only allowed apps and phone calls are accessible — this is useful for enforcing no-phone hours at bedtime or during school.
**Content and privacy restrictions**
The Content & Privacy Restrictions section lets you:
- Set a maximum age rating for App Store apps, movies, TV shows, books, and music (explicit content toggle)
- Restrict web content in Safari to "Unrestricted", "Limit Adult Websites" (automatic filtering), or "Allowed Websites Only" (allowlist-only mode)
- Block specific websites by URL
- Prevent changes to accounts, passcode, location settings, or cellular data settings
On "Limit Adult Websites" mode, Safari uses Apple's on-device content classification to block known adult sites and allows you to add explicit allows and blocks manually. This filtering applies in Safari only — third-party browsers are not controlled by this setting unless blocked via App Limits.
**App purchases and downloads**
Under Content & Privacy Restrictions → iTunes & App Store Purchases, you can require a password for every purchase (including free downloads), or set purchases to "Don't Allow" entirely. For children under 18 in a Family Sharing group, Ask to Buy is available: the child initiates a purchase, and a notification is sent to the family organiser's device for approval or denial.
**Location sharing and Find My**
A child's device can be shared in the family's Find My group, making their location visible to family members on the Find My app. The child sees that location sharing is enabled. This uses the same Apple network described in [What to Do If Your Phone Is Lost or Stolen](/en/guides/lost-stolen/) — the device location is visible even when the device is offline on supported models.
**Communication limits**
Screen Time can restrict who the child can call and message during allowed hours and during Downtime, based on contacts in the phone's address book. This applies to Phone, FaceTime, and Messages.
**Setting a Screen Time passcode**
When Screen Time is managed remotely (Family Sharing + Screen Time), the parent sets a four-digit Screen Time passcode that is separate from the device's unlock PIN or passcode. The child cannot change Screen Time settings without this code. If this passcode is not set, Screen Time settings are accessible to anyone who unlocks the device.
For the complete configuration path: on the child's device, go to **Settings → Screen Time**. If managing from the parent's device via Family Sharing: **Settings → Screen Time → Family → [child's name]**.
Source: [Apple Support — Use parental controls on your child's iPhone, iPad, and iPod touch](https://support.apple.com/en-us/105121)
---
## What Android Family Link Does
Family Link is Google's parental supervision system for Android devices and Chromebooks. Unlike Screen Time, which is configured device-locally, Family Link works through supervised Google Accounts: the child's Google Account is a supervised account, and the parent manages it from the Family Link app on their own Android or iOS device.
**Daily time limits and Downtime**
Family Link lets you set daily screen time limits by app or as a total device limit. You can also lock the device at a scheduled time (Bedtime) or remotely lock it immediately from the Family Link app. When the child reaches their daily limit, they can send a request for more time, which appears as a notification on the parent's device.
**App approvals and Google Play**
By default, Family Link requires parental approval for every app download and in-app purchase from Google Play. The parent receives a notification with the app name, category, and rating, and can approve or decline. You can also allow certain apps without per-download approval by marking them as "always approved" in the Family Link app.
**Content filters in Chrome and Google Search**
Family Link can set Google SafeSearch to locked (preventing the child from changing it) and can restrict Chrome browsing to approved sites only, or to block explicit content using Google's filters. As with iOS, this filtering applies in Chrome — other installed browsers are not covered by this setting.
**App visibility and activity reports**
The Family Link app shows the parent a weekly activity report: how much time the child spent in each app, how many times the device was unlocked, and which apps were most used. The parent can view the child's installed apps and remotely uninstall apps they find inappropriate.
**Location sharing**
Family Link shares the child's device location with the parent in the Family Link app, updated periodically. The child's device shows a "supervised by [parent name]" indicator in Settings, so the child is aware of the supervision.
**Age of digital consent and account graduation**
Family Link supervision continues until the child's Google Account reaches the age of digital consent in their country — typically 13 in most markets. When that age is reached, Google notifies both parent and child that the child is now old enough to manage their own account. However, a child under 18 needs a parent's approval to stop supervision; turning 13 does not let the child remove supervision on their own. A parent can also choose to stop supervision at any time once the child has reached the age of consent. Once a child turns 18, they can manage their account independently.
For the setup process: the parent downloads the Family Link app on their device, then uses it to create or link the child's Google Account. The child's Android device must then be signed in to that supervised account.
Source: [Google Family Link Help — Set up parental controls](https://support.google.com/families/answer/7103025)
---
## Carrier-Level Content Filtering
Many mobile carriers offer network-level content filtering as an opt-in (or sometimes opt-out) service. This filtering operates at the carrier's network infrastructure, blocking or categorising traffic before it reaches the device, regardless of which browser or app the device uses.
**What carrier filtering covers**
Network-level filtering typically blocks by content category — adult content, gambling, violence — using URL classification databases maintained by the carrier or a third-party filtering provider. Because it operates at the network level, it applies to any app or browser on the device, including third-party browsers that are not covered by device-level content restrictions.
**What carrier filtering does not cover**
- Wi-Fi connections: carrier filtering applies only to the carrier's mobile data network. When the device is connected to Wi-Fi (home, school, public), carrier filtering has no effect.
- Screen time limits and usage monitoring: carrier filtering does not know or control how long a child uses a device or individual apps.
- In-app purchases and app downloads: these go through the platform's app store, not through carrier filtering.
- End-to-end encrypted traffic: filtering systems cannot inspect content carried over end-to-end encrypted protocols (for example, some messaging apps) and can only act on destination URLs and IP addresses.
**Legal obligations vary by country**
Some countries have legislation requiring carriers to offer child-safe filtering options or to block specific categories of illegal content by default. These obligations differ significantly between jurisdictions — what is legally mandated in one country may be entirely voluntary in another. Check your carrier's account settings or customer service page to see what filtering options are available and whether any are pre-enabled on your plan.
**Using carrier filtering alongside device controls**
Carrier filtering and device-level controls (Screen Time, Family Link) are complementary. Carrier filtering provides network-level coverage that applies to all apps and survives the removal of device-level apps. Device-level controls provide time limits, purchase approval, and location sharing that carrier filtering cannot offer. Using both provides broader coverage than either alone.
If you are concerned about what your child accesses over public Wi-Fi — where carrier filtering does not apply — see [How to Use Public Wi-Fi Safely](/en/guides/public-wifi-safety/) for network-level risks and mitigations.
---
## Age-Appropriate Setup: A Graduated Approach
The right level of restriction depends on the child's age and maturity. Applying maximum restriction to a 15-year-old is less appropriate than applying it to an 8-year-old, and a single static configuration rarely serves a child well as they grow.
**Younger children (roughly 6–10)**
At this stage, the goal is to establish healthy habits from the start rather than correct entrenched ones. Tight defaults work well: short daily time limits, Allowed Websites Only or equivalent in the browser, app approval required for all downloads, and no social media or messaging apps. Location sharing is appropriate for safety reasons and is usually accepted without friction at this age.
Downtime set to align with bedtime and school hours avoids battles about putting the phone down — the limit is presented as a rule the phone follows, not a negotiation point.
**Older children (roughly 11–14)**
The approach shifts from blocking to shaping. Moving from Allowed Websites Only to content filtering (Limit Adult Websites) gives more browsing freedom while maintaining a backstop. App Limits can be widened or set by category rather than total time. Purchase approval remains important at this age, as in-app purchases can accumulate quickly in games.
Involving the child in setting the limits — "you have two hours of free time on weeknights, how do you want to split it between YouTube and games?" — is more effective than unilateral configuration. Controls that the child understands and has partially agreed to are harder to resent and easier to enforce.
**Teenagers (roughly 15+)**
At this stage, moving toward monitoring rather than blocking is developmentally appropriate. Android Family Link automatically prompts a graduation discussion at 13; iOS Screen Time requires a conscious parental decision to reduce restrictions.
Keeping location sharing active (with explicit agreement from the teenager) serves safety without functioning as a restriction. Moving App Limits to advisory (notifications without hard locks) allows the teenager to self-regulate while maintaining awareness. Regular check-ins about what they are seeing online are more valuable than content filters that can be circumvented.
---
## Establishing a Family Agreement Before Handing Over the Device
Technical controls are more effective when they accompany a clear family agreement. Setting controls without discussion invites adversarial behaviour — the child's goal becomes bypassing the restriction rather than understanding its purpose.
A family agreement for a child's first phone might cover:
- What the phone is for (school, staying in touch with family, specific apps agreed in advance)
- Daily time limits and why they exist (sleep, homework, family time)
- Which apps require a conversation before downloading
- Privacy expectations: that the parent may ask to review the phone, and under what circumstances
- Consequences for breaking the agreement, agreed in advance
The agreement changes as the child grows. Reviewing it annually — or when the child asks for more freedom — is a practical cadence.
For families who are concerned about SMS-based two-factor authentication on accounts the child uses, see [Why SMS Two-Factor Authentication Is Not Enough](/en/guides/sms-2fa-risk/) for an explanation of why authenticator apps are preferable. If you are setting up accounts for your child, use an authenticator app rather than SMS 2FA where the service supports it.
---
## Setting Up Location Sharing Correctly
Both platforms provide location sharing as a feature of parental supervision. The setup details differ.
**iOS Family Sharing + Find My**
In a Family Sharing group, all members can optionally share their location with other family members. Location sharing for the family group is managed via Find My and Screen Time settings; each family member's device appears in the Find My app once sharing is enabled.
The child sees that their location is being shared and can see the parent's location as well (sharing is mutual within the family group). To share only in one direction, the child would need to turn off their own location sharing in Find My, which they can do unless location settings are restricted in Screen Time.
**Android Family Link**
Location sharing is built into the supervised account model — the parent sees the child's device location in the Family Link app by default. The child cannot disable this while the supervised account is active.
**What location sharing does and does not tell you**
Device location sharing shows the location of the device, not necessarily the location of the child. A child who leaves their phone at home before going somewhere they should not be has circumvented location sharing without any technical bypass. Location sharing is a safety tool for genuine emergencies, not a comprehensive monitoring system.
If a device is lost or stolen, location sharing via Find My or Find My Device can assist in recovery — see [What to Do If Your Phone Is Lost or Stolen](/en/guides/lost-stolen/) for the full recovery process.
---
## Protecting the Child's SIM and Account
A child's SIM is exposed to the same security risks as an adult's. For a child's account, where a parent may be managing the carrier account, the relevant protections are the same as for any account.
SIM swap fraud — where an attacker convinces a carrier to transfer a number to a new SIM — can affect any account, including a child's. Carriers in several countries have introduced account lock features and notification requirements in response to regulatory guidance. Enabling any available account lock or SIM swap notification on the carrier account is a practical step. For a full explanation of how SIM swap works and how to protect against it, see [SIM Swap: What It Is and How to Protect Your Number](/en/guides/sim-swap/).
For accounts the child uses independently (school email, gaming platforms, social media), prefer authenticator apps over SMS for two-factor authentication where the service supports it. If the child is old enough to use a VPN — particularly on public Wi-Fi — [How to Choose and Use a VPN](/en/guides/vpn-guide/) covers what a VPN does and does not protect.
---
## What Parental Controls Cannot Do
Being clear about the limits of these systems avoids false confidence.
**Technical controls cannot replace ongoing conversation.** A child who understands why certain content or time limits exist is less likely to seek workarounds than one who sees controls as arbitrary restrictions. Technical enforcement is a supplement to trust, not a substitute.
**Neither Screen Time nor Family Link is unbypassable.** Both can be circumvented by determined children with access to technical resources (online bypass guides exist for both platforms). A second device without controls, a friend's device, or a factory reset can all defeat device-level controls. The goal is friction, not an absolute barrier.
**Content filters have false positives and false negatives.** "Limit Adult Websites" in Safari and Google SafeSearch will miss some inappropriate content and block some legitimate content. They are heuristic filters, not curated allowlists.
**Carrier filtering does not cover Wi-Fi.** Every session on a home router, school Wi-Fi, or public hotspot bypasses carrier filtering entirely. Device-level controls are the relevant layer for Wi-Fi connections.
**Location sharing shows device location, not child location.** A phone left at home, lent to a friend, or switched to airplane mode does not accurately represent the child's location.
---
## Summary: A Practical Setup Checklist
For iOS (managed via Family Sharing):
1. Add the child as a Family Sharing member under 18 and enable Ask to Buy.
2. On the child's device, open **Settings → Screen Time → Turn On Screen Time** → select "This is my child's iPhone".
3. Set a Screen Time passcode (different from the device unlock code).
4. Configure Downtime and App Limits to match agreed daily limits.
5. Under Content & Privacy Restrictions: set age-appropriate app, movie, and content ratings; set web content to Limit Adult Websites or Allowed Websites Only.
6. Enable location sharing via Find My (family members appear in Find My once sharing is active).
For Android (Family Link):
1. Install the Family Link app on the parent's device.
2. Follow the in-app setup to create or link the child's supervised Google Account.
3. On the child's Android device, sign in with the supervised Google Account.
4. In the Family Link app: set Daily screen time limits and Bedtime.
5. Set app approval to required for all downloads.
6. Review the web filter settings in the child's Chrome profile.
In both cases: discuss the setup with your child, explain what the controls do, and agree on a review schedule for when limits will be revisited.
---
## Related Guides
- [How to Use Public Wi-Fi Safely](/en/guides/public-wifi-safety/) — risks on shared networks that carrier filtering does not cover, and what to do about them
- [How to Choose and Use a VPN](/en/guides/vpn-guide/) — what a VPN does and when it is useful for an older child's device
- [What to Do If Your Phone Is Lost or Stolen](/en/guides/lost-stolen/) — how Find My and Find My Device work for recovery, and what to do if a child's phone goes missing
- [Why SMS Two-Factor Authentication Is Not Enough](/en/guides/sms-2fa-risk/) — why authenticator apps are preferable to SMS 2FA on accounts a child uses
- [SIM Swap: What It Is and How to Protect Your Number](/en/guides/sim-swap/) — protecting the SIM account that underlies a child's phone number
================================================================================
# How Pay-As-You-Go and Tiered Plans Work
URL: https://sim-finder.com/en/guides/pay-as-you-go/
Type: guides (en)
Published: 2026-06-04
Pay-as-you-go and tiered billing models give you control over spending by linking what you pay to what you actually use. The core distinction: tiered plans charge a fixed fee per allowance bracket and, in many markets, auto-step to the next bracket when you exceed the limit — though some carriers instead apply overage charges or throttle speed rather than stepping to a higher bracket fee; true metered PAYG charges only for units consumed with no fixed minimum; top-up models add purchasable add-ons on top of a base plan. Each suits different usage patterns — variable, low, or unpredictable consumption in particular.
All three models sit at the flexible end of a spectrum between rigid monthly contracts (fixed cost, fixed allowance, fixed term) and fully open-ended billing (no commitment, no ceiling, pay as events occur). The trade-off across the spectrum is between cost certainty and cost optimisation: rigid contracts are more predictable but may over-provision; PAYG optimises for low-usage periods but produces higher per-unit costs when usage rises.
## What "Pay Only for What You Use" Actually Means
The phrase "pay only for what you use" appears across three distinct billing structures that work differently in practice. Understanding the mechanic behind each prevents bill surprises.
**Tiered (stepped) billing** divides plans into brackets. You pay the fee for a given bracket and receive its included allowance. If you stay within the bracket, you pay that bracket's fee. If you exceed it, the plan automatically steps to the next bracket up — and you pay the higher fee, not just the excess. The jump is automatic; you do not need to opt in. Some carriers notify you by SMS or push notification before or at the moment of a step; others apply the step silently. Verify the notification policy of any tiered plan before committing.
**True metered PAYG** charges per unit of consumption — typically per megabyte of data, per minute of voice, or per SMS message — without a fixed monthly base fee. You pay nothing in months where you use nothing (or pay only a minimum SIM-active fee if one exists). The per-unit rate is usually higher than the effective per-GB rate on a monthly plan, making this model cost-effective only when usage is genuinely low or infrequent.
**Top-up (base + add-on)** combines a base plan — which may include a small monthly allowance or charge zero per month — with purchasable add-on packages. When your base allowance runs out, you buy a data pack, voice pack, or combined topping. This model gives you the predictability of a base plan for expected usage and the flexibility of on-demand additions for unexpectedly heavy months.
These three structures share the common principle that higher consumption should produce a higher bill. The difference lies in how that relationship is structured — in steps, per unit, or through add-on purchase decisions.
One additional distinction matters across all three models: the difference between prepaid and postpaid billing. In a prepaid context, tier steps or PAYG charges are drawn from your prepaid balance immediately; if the balance cannot cover the step, service may be suspended. In a postpaid context, tier steps and overages accumulate and appear on your end-of-cycle invoice. The billing model (prepaid vs postpaid) and the usage pricing model (tiered, PAYG, top-up) are independent variables — tiered plans exist in both prepaid and postpaid forms.
See [How to Choose a Travel eSIM: 5 Key Criteria](/en/guides/how-to-choose/) for how pricing model fits into the broader set of plan selection factors.
## Tiered Plans: How Steps Work in Practice
In a tiered structure, the key detail is the step trigger and what the step costs. Steps are triggered by crossing the top of a data bracket. The new fee applies for the full remainder of that billing period or grants the new bracket's full allowance — the exact implementation varies by carrier.
Two common implementations exist:
**Automatic upgrade**: When you exceed the current tier's data cap, the plan automatically moves to the next tier and you are billed the difference between the two tiers' fees. If you exceed that tier too, it steps again. This continues until you reach the plan's ceiling tier, at which point some carriers throttle speed rather than adding further charges.
**Overage charges**: Instead of stepping to a new tier, the carrier charges a per-MB or per-GB rate for every unit consumed above the included allowance. Overage rates are frequently higher per gigabyte than the effective rate within the tier. This is technically distinct from tiered billing but appears in similar market contexts — read the plan terms carefully to distinguish the two before assuming a plan is capped.
The predictability of tiered billing is conditional: if your usage consistently falls within one bracket, your bill is stable. If your usage varies across bracket boundaries from month to month, the bill fluctuates. The frequency of crossing a tier boundary determines how much variability to expect. Reviewing at least three months of actual usage history before selecting a tier helps identify whether usage is bracket-stable or bracket-crossing.
One practical implication of tiered billing: deliberately managing usage near a tier boundary can reduce your bill. If you know a tier boundary is approaching and you can defer a large data transfer (such as a software update or a file download) to a Wi-Fi network, you may avoid a tier step for that month. Techniques for reducing mobile data consumption are covered in [Data-Saving Techniques](/en/guides/save-data/).
For detailed guidance on estimating which data bracket your usage habits fall into, see [How Much Mobile Data Do You Need?](/en/guides/data-usage-guide/).
## True Metered PAYG: When Per-Unit Billing Applies
True metered PAYG is structurally the simplest model: consumption directly produces cost, with no bracket effects. It is most cost-effective in the following scenarios:
- **Backup or emergency SIMs**: A SIM kept for infrequent use — a tablet used occasionally, a device left in a vehicle for emergencies, or a second phone used only while travelling — where the cost of a monthly plan would exceed the value of actual usage.
- **Variable-income or seasonal users**: People whose usage drops to near-zero in certain months and rises in others, where a fixed monthly plan charge would represent a significant overpayment in low periods.
- **Secondary lines kept barely active**: A second number maintained for a specific purpose (for example, receiving specific contacts or keeping an old number from lapsing) where usage is minimal and the objective is low cost, not high usage.
- **Short-term visitors**: Travellers purchasing a local SIM for a brief stay who need only a small, defined amount of data and voice.
The critical variable in any PAYG plan is the per-unit rate and what constitutes a "unit." Some plans charge per kilobyte; others per megabyte; others in larger increments. The billing unit determines how much is charged for small data transfers, which matters for users who check email frequently or use low-data apps regularly.
One structural feature to confirm before selecting PAYG is whether unused credit rolls over between periods. In some PAYG structures, credit expires after a defined period regardless of whether it was used — commonly 30, 90, or 180 days from the last top-up or last chargeable event. In others, credit accumulates indefinitely until spent. Credit expiry combined with a mandatory minimum top-up to keep the SIM active can significantly raise the effective monthly cost for infrequent users who fail to account for it.
Another feature to verify: whether true PAYG includes a zero-fee option for keeping the SIM active without use, or whether some minimum activity (a chargeable event, or a minimum balance top-up) is required within a defined window to prevent the number from being recycled. Carriers periodically reclaim numbers from inactive SIMs — the inactivity window before this occurs varies significantly by carrier and country. For users maintaining a backup SIM over many months without regular use, confirming the inactivity threshold prevents the unexpected loss of the number.
## Top-Up Models: Base Plan Plus Add-Ons
Top-up (or topping) models separate the base plan from additional capacity. The base plan may carry a fixed monthly fee, a zero monthly fee that merely keeps the number active, or a small minimum charge required to prevent SIM inactivity. When the base allowance is exhausted, additional capacity is purchased on demand.
When the base allowance runs out, three outcomes are possible depending on the carrier's policy:
- The carrier throttles data speed to a low floor (commonly 128 kbps to 1 Mbps) rather than cutting data off entirely, until you purchase a top-up to restore full speed.
- The carrier cuts data access entirely until a top-up is purchased or the next billing cycle begins.
- The carrier allows voice calls and SMS to continue while blocking data, requiring a data-specific top-up to restore mobile internet access.
Top-up packages are sold in fixed increments — a defined number of gigabytes valid for a defined period. The validity window of a top-up may differ from your main billing cycle. A 7-day data pack purchased on day 20 of a 30-day cycle may expire before your cycle renews, creating a gap. Where your billing cycle and top-up validity do not align, you may end up buying a second top-up to cover the period before your next cycle — a cost that should be factored into monthly estimates.
For travel users, top-ups serve a specific function: extending data mid-trip without purchasing an entirely new plan. The [Travel eSIM Provider Comparison](/en/guides/provider-comparison/) covers which providers support mid-trip top-ups versus requiring a full new plan purchase — a relevant distinction when you are in a location with limited Wi-Fi access and need data quickly.
One practical detail for top-up users: confirm which network the top-up purchase process itself requires. Some top-up flows require an active internet connection to complete the in-app or web purchase — which creates a circular problem if you have run out of data and have no Wi-Fi available. Providers that allow top-up via SMS command or via a dedicated USSD shortcode (a phone number sequence dialled from the call screen) avoid this dependency, since those methods work even without a data connection.
## Who Tiered and PAYG Models Suit
These billing structures are not universally optimal. They match specific usage profiles and circumstances. Identifying which profile describes your situation is the key to selecting the right model.
**Tiered plans suit users who:**
- Have usage that consistently falls within a single bracket month after month.
- Want a predictable monthly cost without needing to monitor usage continuously.
- Occasionally exceed their typical amount but want a structured ceiling above which costs are defined in advance rather than open-ended.
- Can tolerate the automatic step charge in exchange for not needing to manually purchase add-ons.
**True PAYG suits users who:**
- Use mobile data infrequently — a few days or a few hours per month.
- Need a backup line active and available but rarely use it.
- Travel occasionally and need a local SIM for a brief stay without committing to a recurring monthly plan.
- Have reliable Wi-Fi access for most tasks and use mobile data only as a fallback when Wi-Fi is unavailable.
- Have usage so irregular that averaging across months would result in chronic overpayment on a fixed plan.
**Top-up models suit users who:**
- Want a low base cost with the ability to add capacity on demand in months when more is needed.
- Have usage that is near-zero some months and moderately high in others, and prefer paying for the variation only when it occurs.
- Prefer the control of actively deciding to buy more data over the automation of a tier step.
For users with consistently moderate to high usage, a flat-rate monthly allowance plan typically offers a lower effective cost per gigabyte than any of these three structures. The comparison between models becomes most meaningful when usage is variable, low, or unpredictable. Review your actual usage history before choosing — see [How Much Mobile Data Do You Need?](/en/guides/data-usage-guide/) for a step-by-step method.
One nuance worth noting: carrier type interacts with model availability. Large MNOs typically offer the widest range of tiered options across multiple brackets. MVNOs — which resell capacity on an MNO's network — more commonly offer fixed monthly bundles and may have a limited top-up infrastructure or fewer tier options. If PAYG or top-up flexibility is important to you, verify that the specific carrier you are considering actually offers that structure for your market, rather than assuming the model is available because the carrier appears in a general PAYG search. See [What Is an MVNO?](/en/guides/what-is-mvno/) for context on how MVNOs differ from the network operators whose infrastructure they use.
## How Top-Up Mechanics Vary by Carrier and Market
The term "top-up" describes several distinct mechanics depending on the carrier and market. Knowing which type a plan uses matters for planning.
**Balance top-up**: You add monetary credit to a prepaid account balance. That balance is drawn down at the per-unit rates applicable to your plan — per MB of data, per minute of voice, per message. This form gives flexibility across services (voice, data, SMS) from a single balance pool but offers less price certainty per unit than a data-specific package.
**Data add-on package**: You purchase a defined quantity of data valid for a defined period, sold at a package rate. The rate per gigabyte in the add-on is often lower than the base PAYG per-MB rate for that carrier. This is the most common modern implementation of "topping" for data-centric plans, and the one most relevant for users who primarily need additional mobile internet access.
**Validity extension**: Some carriers sell products that extend the active life of your SIM and preserve your existing balance or allowance without adding new data. This addresses the specific problem of SIM inactivity expiry for users who want to keep a number active during a low-usage period without purchasing data they will not consume.
**Voice or SMS add-on**: Separate from data, some plans allow purchase of additional voice minutes or message bundles. These are relevant for users whose PAYG base rate for calls or messages is high and who occasionally make a volume of calls that warrants a specific bundle.
Market conventions for purchasing top-ups vary. In some markets, top-up credit has historically been loaded via physical scratch cards available at convenience stores and petrol stations. In others, top-up is handled entirely through a carrier app or online portal. For MVNOs, the channels available for top-up are typically narrower than for the host network operator — the MVNO's own app or website is usually the only option rather than retail vouchers. See [What Is an MVNO?](/en/guides/what-is-mvno/) for background on how MVNOs differ structurally from full network operators.
## Watching for Hidden Mechanics in PAYG Plans
Several plan terms affect the real-world cost of PAYG and tiered plans in ways the headline rate does not reveal. These terms are almost always documented in the carrier's full plan details or fair-use policy rather than on marketing pages.
**Minimum charge per session**: Some PAYG plans apply a connection fee or minimum charge per data session regardless of how much data is actually consumed in that session. If you connect frequently for small transfers — checking email, receiving a push notification, opening a map briefly — session minimums accumulate and can make the effective per-MB cost much higher than the stated rate. Verify whether a per-session charge exists before comparing plans on a raw per-MB basis.
**Daily activation fees**: Certain plans — particularly some travel-focused or low-usage plans — charge a daily access fee that activates data for the calendar day, above which usage is charged at a per-MB rate or drawn from a daily included allowance. This model is cost-effective for consecutive-day trips but expensive for users who connect briefly on many separate days separated by inactive periods.
**Data rounding**: Some carriers round each session's consumption up to the nearest megabyte, 100 kilobytes, or other increment. For users who transfer many small amounts — receiving notifications, syncing email headers, loading brief web pages — rounding applied per-session can add up to significantly more than the stated rate per MB of actual payload. Rounding rules are documented in the plan's terms and conditions.
**Expiry of credit versus expiry of data packs**: When you hold both a monetary balance and a purchased data pack, each may carry different expiry dates. The data pack may expire before your general credit, or vice versa. Allowing either to expire without use is effectively wasted spend. Track the expiry schedules for each element separately.
**Throttle behaviour at tier ceiling**: In tiered plans with a maximum tier, reaching that ceiling may result in throttling rather than additional charges. The throttle speed at the ceiling varies by carrier — some floor at 1 Mbps, others lower. If your usage regularly approaches or exceeds the maximum tier, know the throttle speed before selecting the plan.
**Rollover policy**: Some tiered plans carry unused data from the current period into the next if you renew before expiry. Others do not roll over any unused allowance. The rollover policy affects the real value of a tier: a plan with rollover delivers more value to users who fluctuate below their tier ceiling, while a plan without rollover produces zero residual value from unused capacity. Rollover is more commonly found in postpaid tiered plans than in prepaid bundles.
**Family or multi-line sharing**: Some carriers allow multiple lines to share a single tiered data pool. In a shared pool, the tier step is triggered by the combined consumption of all lines rather than per-line. This can make a higher-tier plan cost-effective for a household where usage is uneven across members — one heavy user and two light users may fit comfortably within a shared pool that all three would individually exceed in a per-line tiered structure.
## Understanding Value in Each Model
Selecting the lowest-cost model requires calculating the effective total cost under your actual usage pattern, not comparing headline rates in isolation. The calculation differs by model type.
| Model | Key calculation |
|-------|-----------------|
| Tiered | Identify which bracket your average monthly usage lands in. Then calculate the annual cost assuming your usage crosses to the next tier N times per year. |
| True PAYG | Multiply your average monthly data volume by the PAYG per-GB equivalent rate. Compare against the cost of the cheapest fixed monthly plan that covers the same volume. |
| Top-up | Add the base plan fee to your average monthly top-up spend. Compare the total against a flat plan that covers your typical combined volume. |
The calculation should include both average months and high-usage months. A model that is cheapest on average but produces a large spike in high-usage months may have a higher annual total than a slightly more expensive but stable alternative.
For each model, specific terms to obtain before finalising the calculation:
- **Tiered**: the fee for each available bracket; the fee difference between brackets; whether notification is sent before a step; whether the plan has a ceiling tier and what happens at that ceiling.
- **True PAYG**: the per-unit rate; the billing increment (per KB, per MB, or other); whether a per-session connection fee applies; the credit expiry policy.
- **Top-up**: the base plan fee; available add-on package sizes and their validity windows; whether add-ons can be purchased mid-cycle; the throttle policy when the base allowance is exhausted.
Use SimFinder to compare current plans by structure and filter for the type relevant to your situation. Comparing plans side by side with your estimated usage as the anchor point — rather than evaluating each plan's price without a reference usage level — produces a more accurate cost comparison.
For guidance on reducing consumption to stay within a lower tier or to reduce top-up frequency, see [Data-Saving Techniques](/en/guides/save-data/).
## PAYG and Tiered Plans in International Context
Pay-as-you-go as a category exists in mobile markets worldwide but is implemented differently, and the terminology does not map consistently across markets. The label "PAYG," "pay-per-use," "prepaid," or "flex" does not guarantee the same billing mechanic in every market. In some markets, "prepaid" refers to any plan paid in advance — including fixed monthly allowance plans — rather than specifically to per-unit billing.
**Markets with traditional per-unit PAYG**: Many European markets have regulatory requirements that carriers publish per-unit rates clearly for voice, SMS, and data, in part to satisfy consumer protection obligations. Per-second voice billing and per-KB or per-MB data billing have existed as standard prepaid options in several European markets for many years. These are not universal — specific carrier and plan terms apply.
**Markets where fixed-allowance prepaid dominates**: In several markets across Asia, the Middle East, and Latin America, prepaid plans are predominantly sold as fixed-allowance bundles valid for 7, 30, or 90 days. Unused allowance at the end of the validity period typically expires rather than rolling over. The concept of a running per-unit balance exists but is less common than the fixed-window bundle.
**Top-up access as a near-universal feature**: Across markets and billing models, the ability to add credit or data to an existing prepaid account is nearly universal. The purchase channel (carrier app, website, retail voucher, ATM, convenience store) varies by carrier, market maturity, and whether the carrier is an MNO or MVNO.
When evaluating international plans — whether comparing a local SIM in a destination country against a travel eSIM, or comparing plans across markets in SimFinder — verify the billing model in the plan's actual terms. The label on a marketing page does not reliably identify the billing mechanic. Use the [Travel eSIM Provider Comparison](/en/guides/provider-comparison/) to see which providers offer plans with explicit top-up support for specific destinations.
The international variation in PAYG terminology is also relevant when reading reviews or forum discussions about plans: a review written about a "PAYG plan" in one country may describe a fixed-allowance bundle with automatic renewal, while the same phrase in another country's context describes genuine per-KB billing. When drawing on secondary sources to evaluate a plan, confirm the market context before applying the conclusions.
## Choosing Between Models When Usage Is Variable
Variable usage is the scenario where model selection has the largest financial impact. In a low-usage month, true PAYG or a low-tier plan wins. In a high-usage month, a higher flat plan often wins. Since you typically choose a plan structure before knowing how usage will vary across months, the selection requires estimating a usage distribution across time — not just an average.
A structured approach to choosing:
1. **Review at least three months of historical usage** to identify your low, typical, and high-usage months. Device settings on both iPhone and Android show per-app and total usage; carrier apps typically show billing-cycle history.
2. **Calculate the effective monthly cost under each model for your low month and your high month separately.** The model that produces the lowest total across the full year — weighting your typical month most heavily — is likely the better fit.
3. **Factor in the consequence of running out.** In true PAYG, running out means your data stops unless you top up. In a tiered plan with automatic step-up, your service continues but at a higher cost. In a capped tiered plan, speed may throttle. Determine which consequence is more disruptive for your use case — and which carrier response better matches your risk tolerance.
4. **Estimate top-up frequency realistically.** If you choose a low base-cost plan with the expectation of occasional top-ups, count how many top-up events realistically occur in a year and include that cost in your comparison. Underestimating top-up frequency is a common cause of disappointment with these models.
For users whose usage is genuinely unpredictable month to month, a mid-range monthly flat plan often reduces cognitive overhead — the ongoing need to monitor usage and decide whether to top up — and reduces total cost variance even when it is not the theoretical minimum in every individual month.
A final consideration: switching cost. If you choose a PAYG or tiered model and find it does not match your actual usage after two or three months, switching to a different plan type incurs at minimum the effort of cancellation and setup. Prepaid plans generally allow switching without contract-break fees, but any remaining balance or unused data may not be refunded. Factor the risk of a mismatch into your initial selection, particularly if your usage pattern is new (for example, a new job, a new commute, or a change in work-from-home frequency) and historical data is limited.
If you want to keep your phone number when switching between plan types, Mobile Number Portability (MNP) applies — you can carry your existing number to a new plan or carrier. Check that the new plan supports inbound number ports before initiating the transfer, and confirm the timing: porting typically cancels your existing plan at the point of completion, so any remaining prepaid balance or unused allowance on the old plan is usually forfeited.
## Finding PAYG and Tiered Plans on SimFinder
SimFinder's plan search lets you compare prepaid, PAYG, and top-up-capable plans side by side. Filter by your market and usage level to see how plans compare — the pricing in SimFinder reflects current plan data, not the rates in this article, which contains no specific prices.
When using SimFinder to compare these plan types:
- Compare the effective cost per gigabyte across tiered brackets by anchoring to your expected monthly usage.
- Look for whether a plan explicitly describes top-up support or whether data add-ons are available.
- Check the plan's validity period and whether unused data rolls over or expires.
- Note which plans include automatic step notifications and which do not.
- For prepaid plans, check whether there is a minimum top-up amount to keep the SIM active and whether unused credit expires on a fixed schedule.
- For tiered plans on postpaid contracts, confirm whether a minimum term commitment applies and whether the tier structure can be changed mid-contract without penalty.
- For true PAYG, confirm the per-unit billing increment and whether any fixed fee applies per day or per session regardless of usage volume.
The plan-type filter in SimFinder removes the need to manually read through dozens of plan documents to identify which ones match your billing model preference. Once you have identified candidate plans, review the full terms for each — particularly the points on tier steps, top-up validity, and inactivity policies — before committing. The combination of SimFinder's structured plan data and the full plan document from the carrier's own website gives you the information needed to make a well-grounded choice.
**[Search and compare plans on SimFinder →](/en/)**
---
Choosing the right billing model for variable usage is primarily a data problem: the more accurately you can characterise your own usage distribution — not just the average but the variance — the more confidently you can select a tier level, decide whether true PAYG is cost-effective, or estimate how often you will need to top up. Take the time to gather that usage data before committing to a structure.
## Related Guides
- [How to Choose a Travel eSIM: 5 Key Criteria](/en/guides/how-to-choose/)
- [How Much Mobile Data Do You Need?](/en/guides/data-usage-guide/)
- [What Is an MVNO?](/en/guides/what-is-mvno/)
- [Travel eSIM Provider Comparison](/en/guides/provider-comparison/)
- [Data-Saving Techniques](/en/guides/save-data/)
================================================================================
# After Switching Carriers: Post-Switch Setup
URL: https://sim-finder.com/en/guides/post-switch-setup/
Type: guides (en)
Published: 2026-06-04
Switching to a new carrier involves more than inserting a SIM or downloading an eSIM profile. The line activates, but several services — mobile data, SMS-based authentication, messaging apps, and mobile wallets — each require their own post-activation check. This guide covers every step in order, from APN configuration through 2FA re-authentication and mobile payments, so nothing gets missed.
Key points:
- Major MNOs push APN configuration automatically; MVNOs often require manual setup
- Connectivity should be verified for voice, SMS, and data separately — each uses different network systems
- Apps that use your phone number for authentication need attention whenever your number changes
---
## Step 1: APN Configuration
The APN (Access Point Name) is the identifier that connects your device to your carrier's mobile data gateway. Without the correct APN, your device can register on the network and show signal bars, but no data will flow.
### When APN Is Configured Automatically
Major network operators (MNOs) — typically including AT&T, T-Mobile, and Verizon in the US; EE, O2, Three, and Vodafone in the UK; Telstra, Optus, and Vodafone in Australia — submit carrier bundles to Apple and maintain OTA configuration profiles for Android. If your carrier supports automatic configuration (iOS 16+ / recent Android), the device receives APN settings automatically when you insert their SIM or activate their eSIM. You do not need to take any action.
eSIM profiles from major providers embed the APN data inside the profile itself. If you downloaded an eSIM from a well-established carrier, APN configuration is typically included.
### When APN Requires Manual Setup
MVNOs (virtual operators) frequently require manual APN entry because they operate their own billing and data gateway infrastructure separate from the host network. The MVNO may not have an Apple carrier bundle or an Android OTA configuration profile.
Signs that manual APN setup is needed:
- Signal bars are present but no web pages load over mobile data
- The APN field in Settings is blank
- Your carrier's setup documentation includes an APN string
**iPhone:** Settings → Cellular → Cellular Data Network. Enter the APN string from your carrier's official support page exactly as documented — the string is case-sensitive on some carrier implementations. If the Cellular Data Network menu is not visible, your carrier has locked APN editing; install the `.mobileconfig` profile from your provider's website instead. Full instructions: [APN Setup Guide for iPhone](/en/guides/apn-setup-iphone/).
**Android (Pixel):** Settings → Network & Internet → SIMs → tap the SIM → Access Point Names → tap the existing entry or add a new one. **Android (Samsung):** Settings → Connections → Mobile networks → Access Point Names. Enter the APN name, APN string, and any username or password your carrier specifies. Full instructions: [APN Setup Guide for Android](/en/guides/apn-setup-android/).
After entering APN values, toggle Airplane Mode on for 10 seconds, then off. This forces the modem to open a new data session using the updated configuration.
---
## Step 2: Connectivity Verification
Voice, SMS, and mobile data are separate services at the network level. Confirming one works does not confirm the others. Run all three checks before assuming setup is complete.
### Voice Call Test
Dial a known number — a voicemail service or a contact who can confirm receipt. Let the call ring long enough to confirm it connects rather than reaching a network error tone. A brief ring followed by voicemail pickup indicates the line is registered. A fast busy tone or "call failed" message indicates the line is not yet active or has a configuration issue; contact your carrier.
If you ported your number from the old carrier, the port is complete when calls to your old number route to the new SIM. During the port window, there is typically a brief period — seconds to minutes — when neither SIM is active. The [SIM Activation guide](/en/guides/activation/) covers number port timing in detail.
### SMS Test
Send a text message to a contact and ask them to reply. Verify both outbound delivery and inbound receipt. Some prepaid plans require a first top-up or a specific activation step before SMS is enabled, even if the voice line works. If SMS is not working after a few minutes, check your carrier's app or dashboard for any pending activation steps.
If you changed your phone number as part of the switch, note that apps and services still have your old number on file. You will need to update them individually — this is covered in the sections below.
### Mobile Data Test
Turn off Wi-Fi (Settings → Wi-Fi → off on iPhone; Settings → Network & Internet → Wi-Fi → off on Android). Open a browser and navigate to any page. If the page loads, mobile data is working.
If data does not load but signal bars are present, check APN settings as described in Step 1. Also confirm that the Cellular Data toggle (iPhone) or Mobile data toggle (Android) is enabled, and that Data Roaming is on if your plan routes data via a roaming session — common with travel eSIMs and some MVNOs even when you are physically in the plan's coverage region.
---
## Step 3: Two-Factor Authentication and SMS-Based Verification
This is the step most commonly overlooked after switching carriers. Many services use your phone number to send one-time codes (OTPs) for login and for transaction verification. If you kept the same number (via number porting), SMS-based 2FA codes will arrive on the new SIM automatically — no reconfiguration is needed for the OTP delivery itself.
If you changed your phone number, you must update it in every service that holds the old number as a 2FA method **before** the old number is cancelled or reassigned. Attempting to update 2FA after losing access to the old number typically requires identity verification directly with each service, which can be time-consuming.
### Banking and Financial Services
Most banking apps detect SIM changes or device changes and trigger an additional identity verification step — this is a deliberate anti-fraud measure, not a malfunction. After your new SIM is active, open your banking apps. If prompted to re-verify your identity, complete the verification using the method the app offers (biometric confirmation, in-app code, or a call to customer support). This step protects against SIM swap fraud and is standard practice for regulated financial services.
If you changed your number: log in to your bank's website and update the phone number registered for OTP delivery before your old number is cancelled. Banks typically require a separate, out-of-band verification step to change your 2FA phone number.
### Other Online Services
Review any service that uses SMS for:
- Login verification (two-step authentication)
- Account recovery codes sent via SMS
- Transaction approvals
Common categories that use SMS 2FA: email providers, social media accounts, e-commerce accounts, and work productivity tools. If you changed your number, update the registered phone number in each service's security settings.
**Authenticator apps (Google Authenticator, Authy, Microsoft Authenticator):** These generate codes locally on the device and do not depend on your SIM or phone number. They continue to work after a carrier switch without any changes. No re-registration is needed unless you also changed devices.
---
## Step 4: Messaging Apps That Use Your Phone Number
Messaging apps that tie accounts to a phone number require action if your number changed. If you kept the same number via porting, these apps continue to work on the active device without reconfiguration.
### If You Changed Your Phone Number
**WhatsApp:** Go to Settings → Account → Change Number. WhatsApp's built-in number-change flow migrates your account, contacts, and group memberships to the new number. Completing this before cancelling the old number is recommended — the process sends a verification code to the new number. Group members see the number change automatically; to notify individual contacts, enable Notify Contacts in the Change Number flow.
**Signal:** In Signal, go to Settings → Account → Change Phone Number. Signal sends a verification code to the new number and migrates your account and contacts. After the change, your existing conversations remain on the device.
**Telegram:** Go to Settings → Phone Number → Change Number. Telegram sends a verification code to the new number. Your messages, groups, and channel subscriptions transfer to the new number.
**iMessage and FaceTime (iPhone):** If you changed your number, go to Settings → Messages → Send & Receive and Settings → FaceTime → You can be reached. Remove the old number and confirm the new number is listed. If the new number does not appear automatically after activation, sign out of iMessage and FaceTime (Settings → Messages → toggle iMessage off, then on), which triggers the number registration process.
**RCS (Android):** Google Messages RCS is tied to your phone number and Google account. RCS re-registration after a carrier switch is not always automatic and may take longer or require carrier action. Do NOT toggle Chat features off and on — Google Messages warns this can remove you from group chats. If RCS shows as disabled after switching, confirm Google Messages is your default messaging app, ensure mobile data is on, and if it persists, contact your new carrier to confirm RCS support.
---
## Step 5: Carrier Email Address (If Applicable)
Some carriers provide an email address that uses the carrier's domain (for example, `@t-mobile.com`, `@verizon.net`, or country-specific equivalents). These addresses belong to the carrier and cease to function after you leave that carrier unless you take specific action.
**Before cancelling the old plan:**
- Forward any important contacts and messages to a non-carrier email address (Gmail, Outlook, or a custom domain)
- Notify contacts of the address change
- Update the email registered with any services that use the carrier email for login or recovery
**Carrier email portability services:** Some carriers offer a paid email retention service that allows you to keep using the address for a period after leaving. The availability and pricing of these services vary by carrier and country. If this option is important to you, check with your old carrier before cancelling the line — enrollment windows are typically limited to a short period around the cancellation date.
If you did not use a carrier email address, this step does not apply.
---
## Step 6: Mobile Wallet and Contactless Payments
**Apple Pay and Google Pay** store payment card credentials on the device's secure element, linked to your bank account — not to your SIM or carrier. Switching carriers does not remove stored cards, and contactless payments continue to work without any changes.
**What may require attention:**
If your bank sends OTPs to your phone number to authorise high-value transactions, contactless payments for large amounts may prompt for a code. As long as SMS is working on your new SIM, these codes will arrive as normal. If you changed your phone number, update it in your banking app before making the first large payment.
**Transit cards and NFC passes:** Cards stored in Apple Wallet (iPhone) or Google Wallet (Android) — including transit cards, boarding passes, and loyalty cards — are tied to the device and the relevant app account, not to the carrier. They continue to function after a carrier switch.
**Carrier-billing payment methods:** If you used "charge to phone bill" for in-app purchases (Google Play carrier billing, Apple App Store direct carrier billing), these may need to be re-activated with the new carrier. Open the relevant store's payment settings and confirm whether the new carrier is listed as an available billing option. Not all carriers support carrier billing.
---
## Step 7: Update Your Phone Number in Key Services
If your number changed, the following categories of service commonly need updating:
| Service category | Where to update |
|---|---|
| Banking and financial apps | App settings → Profile or Security → Phone number |
| Email providers | Account security settings → Recovery phone |
| Social media accounts | Account settings → Security or Privacy → Phone number |
| Workplace tools (Slack, Microsoft 365) | Account security settings or IT administrator |
| Delivery and e-commerce accounts | Profile → Contact information |
| Healthcare portals | Patient portal → Contact preferences |
Work through this list while your old number is still active. If any service requires sending a verification code to the old number for the update, you can complete that step immediately while the old SIM is still in service or the old number is still active.
---
## Step 8: What to Do If It Does Not Connect
If the new line is active but voice, SMS, or data is not working, work through these steps in order before concluding there is a network fault.
### Toggle Airplane Mode
Turn Airplane Mode on, wait 10 seconds, then turn it off. This clears the current network registration and forces the device to search again. Many connectivity failures after a carrier switch resolve with this single step.
### Restart the Device
A full device restart reinitialises the modem stack and forces a new network search from a clean state. After restart, wait 60 seconds and check the status bar for the carrier name and signal indicator.
### Re-check the APN
If data still does not connect after an Airplane Mode toggle and restart, return to the APN settings and verify every character of the APN string against your carrier's official documentation. The APN string is case-sensitive on some implementations, and a single incorrect character (a hyphen instead of a period, an extra space, a wrong letter case) prevents data from connecting.
Common APN errors:
- Leaving the APN field blank after a network reset
- Entering an outdated APN string from an unofficial source
- Using the host network's APN instead of the MVNO's specific APN
### Reset Network Settings
If APN verification and restarts have not resolved the issue, a network settings reset clears all stored cellular configuration and forces the device to start from a clean state. On iPhone: Settings → General → Transfer or Reset iPhone → Reset → Reset Network Settings. On Pixel: Settings → System → Reset options → Reset Wi-Fi, mobile & Bluetooth. On Samsung: Settings → General management → Reset → Reset mobile network settings.
**What is preserved:** eSIM profiles and personal data are not removed. **What is cleared:** Wi-Fi passwords, VPN profiles, APN settings, and Bluetooth pairings. After the reset, re-enter the APN manually and reconnect to Wi-Fi networks. Full details: [How to Reset Network Settings](/en/guides/network-reset/).
### Check for No Service
If the status bar shows "No Service" or zero bars after all the above steps, the device may not be finding the network at all. Common causes after a carrier switch: the device is carrier-locked to the old carrier, or the SIM has not been fully activated on the carrier's backend. Full diagnostic sequence: [No Service on Your Phone?](/en/guides/no-service/).
To check if your iPhone is carrier-locked: Settings → General → About → Carrier Lock. If the value is not "No SIM restrictions," contact your previous carrier to complete the unlock before using the new SIM. Carrier lock status can be checked on Android devices in the SIM card management section, though the exact path varies by manufacturer.
---
## FAQ
### Do I need to set up an APN after switching carriers?
It depends on your new carrier. Major MNOs push APN configuration automatically when you insert the SIM or download the eSIM profile. MVNOs frequently require manual APN setup because they maintain their own gateway infrastructure separate from the host network. Check your new provider's setup documentation immediately after activation — if data does not connect within a few minutes of activation, the APN is the most likely missing step.
### My new SIM has signal bars but no data. What should I do first?
Signal bars confirm the radio link to the tower, but data requires a correctly configured APN. Open your carrier's setup guide and verify the APN string in Settings → Cellular → Cellular Data Network (iPhone) or Settings → Network & Internet → SIMs → Access Point Names (Android). If the field is blank or contains outdated values, enter the correct APN from your carrier's official support page. Then toggle Airplane Mode off and on to force a new data session.
### Which apps typically need re-authentication after a SIM swap?
Banking apps and financial services re-verify your identity when they detect a SIM change or new device — this is a deliberate security measure. Any app that uses SMS-based two-factor authentication will send a code to your new number as soon as it is active; the authentication itself does not require re-setup unless you also changed your phone number. Messaging apps (WhatsApp, Telegram, Signal) tie their account to your phone number and require you to re-register with the new number if you changed it.
### Will my mobile wallet stop working after I switch carriers?
Apple Pay and Google Pay are tied to your device and payment card, not to your SIM or carrier. Switching carriers does not disable stored cards. However, if your bank uses your mobile number for payment verification — for example, to send an OTP for large transactions — update your number in the banking app before making high-value payments. Transit cards and loyalty-based NFC passes should continue to work without any changes.
### How do I know if my number port completed successfully?
Your old SIM will lose network registration at the moment the number transfers. The new SIM gains registration within seconds to a few minutes. Make a test call or send a test SMS from the new SIM — if the call connects and SMS delivers, the port is complete. You can also ask a contact to call your old number; it should now ring the new SIM.
### Should I keep my old SIM after switching?
Do not discard the old SIM immediately. Keep it for at least a few days as a backup while you confirm all services (data, calls, SMS, app authentication) are working on the new line. Once you have verified 2FA re-registration and received at least one OTP on the new number, it is safe to discard or store the old SIM.
---
## Related Guides
- [APN Setup Guide for iPhone](/en/guides/apn-setup-iphone/) — full instructions for configuring APN settings on iPhone, including profile installation and manual entry
- [APN Setup Guide for Android](/en/guides/apn-setup-android/) — step-by-step APN configuration for Pixel and Samsung Galaxy after a carrier switch
- [SIM Activation: How to Get Your Line Working](/en/guides/activation/) — covers the activation process, identity verification, number port timing, and post-activation connectivity checks
- [How to Reset Network Settings (and What It Affects)](/en/guides/network-reset/) — when and how to perform a network reset on iPhone, Pixel, and Samsung if connectivity problems persist
- [No Service on Your Phone? A Step-by-Step Fix](/en/guides/no-service/) — full diagnostic sequence for zero signal bars or "No Service" after a carrier switch
Use [SimFinder](/en/) to compare SIM and mobile plans by country, or [SimFinder Travel](/en/travel/) to find travel eSIM plans.
================================================================================
# Pre-Switch Checklist: What to Check Before Changing Carriers
URL: https://sim-finder.com/en/guides/pre-switch-checklist/
Type: guides (en)
Published: 2026-06-04
Switching carriers takes less than an hour on the day itself, but the preparation matters. Arriving at the new carrier's sign-up flow without a transfer code, with a locked phone, or without migrating your two-factor authentication (2FA) accounts can cause delays, failed ports, or temporary loss of access to critical services.
This checklist covers the eight categories to verify before you switch. Work through them in the order shown — each step builds on the one before. Allow two to four weeks for the full preparation so no single step becomes a last-minute blocker.
---
## 1. Confirm Your Phone Number Portability Status
Number portability — the right to keep your number when switching carriers — is a legal mandate in most countries with significant mobile markets. The process requires a transfer credential from your current carrier. Without it, your new carrier cannot initiate the port.
The name of this credential varies by country:
| Country / Region | Transfer credential | How to obtain it |
|-----------------|---------------------|------------------|
| United Kingdom | PAC (Porting Authorisation Code) | Text "PAC" to 65075; delivered in 60 seconds |
| United States | Number Transfer PIN | Set up in your carrier's account portal or app |
| France | RIO (Relevé d'Identité Opérateur) | Call 3179 from your mobile (free, 24/7) |
| Germany | Rufnummernmitnahme-Code | Request via your carrier's portal or hotline |
| Canada | Account number + transfer PIN | Available in your account portal |
| Australia | Not required separately | The gaining carrier verifies your identity directly; under ACMA 2020 pre-porting identity verification rules, the carrier must confirm your identity — typically via an SMS OTP or a callback to the number being ported — before the port proceeds |
Confirm that your account is eligible for porting. Most carriers require your account to be active and in good standing. Some carriers apply a temporary porting hold after recent account changes such as a SIM swap or address update; the duration varies by carrier, so check before requesting a transfer credential.
For a full explanation of how number portability works and what to do if a port fails, see [Mobile Number Portability (MNP) Explained](/en/guides/what-is-mnp/).
---
## 2. Check Your Phone's SIM Lock Status
A carrier-locked phone only connects to the carrier that applied the lock. Even if your number ports successfully, a locked device will show no service on the new carrier's SIM until the lock is removed.
**iPhone:** Open Settings → General → About → Carrier Lock. If it reads "No SIM restrictions," your phone is unlocked. Any other message means it is locked.
**Android:** Insert a SIM card from a different carrier. If mobile data and calls work, the phone is unlocked. If you see "SIM not supported" or "Invalid SIM," the phone is locked.
If your phone is locked, request an unlock from your current carrier before initiating the switch. Processing times vary:
- In the **UK**, Ofcom banned the sale of locked handsets from 17 December 2021. Phones bought after that date are already unlocked.
- In the **US**, each carrier sets its own policy. Verizon unlocks automatically once the device payment plan is paid off. AT&T requires at least 60 days from purchase plus a paid-off balance. T-Mobile unlocks devices purchased on or after January 27, 2026 once fully paid.
- In most other markets, request an unlock through the carrier's website or app. Online requests are typically free; in-store requests may carry a fee at some carriers.
Allow several business days for the unlock to process. Confirm the unlock is active before the day you switch.
For a full breakdown of how to check lock status and how unlock policies work by region, see [SIM Lock and SIM-Free Explained](/en/guides/sim-lock/).
---
## 3. Audit Your Two-Factor Authentication (2FA) Methods
This is the most time-sensitive preparation step. Many services use your phone number for SMS-based two-factor authentication. During a carrier switch, there is a window — ranging from a few minutes to a couple of hours — when SMS delivery is unreliable on both the old and new SIM. Triggering an SMS 2FA request during this window can lock you out of a service temporarily.
**Before switching, do the following:**
1. List every account that sends a verification code or login alert to your phone number. Start with banking, email, brokerage, and any work account.
2. Log in to each account before the switch begins, while SMS delivery is reliable.
3. Where possible, migrate from SMS 2FA to an authenticator app (such as Google Authenticator, Apple Passwords, or Authy). Authenticator apps generate codes locally and are unaffected by carrier transitions.
4. If SMS 2FA is the only option for a service, note it, and avoid logging out of that service on any device until after the port completes.
Backup codes for authenticator apps and recovery codes for accounts are distinct from SMS codes. Download and store them securely before the switch.
If you use SMS 2FA specifically for secure access to your email or cloud backup, resolve this before your phone number moves to a new carrier.
A further risk worth noting: some financial institutions and workplace systems automatically flag a number change as suspicious activity and may freeze login access pending a manual review. If you manage accounts with this behaviour, notify the relevant institution in advance or confirm their process for number changes.
---
## 4. Check Your Contract End Date and Early-Termination Fees
Switching before a minimum contract term ends typically triggers an early-termination fee (ETF). The fee amount and calculation method vary by carrier and country.
**What to check:**
- The contract end date. This is shown in your carrier's account portal, on your paper contract, or on your monthly bill.
- Whether an ETF applies and, if so, how it is calculated. Some carriers calculate it as a flat fee; others base it on the number of months remaining.
- Whether the ETF reduces over time (many contracts pro-rate it across the term).
In most countries, carriers are not permitted to use an outstanding ETF to block a number port — they can only demand payment. However, the obligation to pay the fee remains after the port completes.
If you are within a few weeks of your contract end date, it is generally worth waiting to avoid the fee. If you are early in a contract, compare the ETF against the savings from switching — use the [provider comparison](/en/guides/provider-comparison/) to size up what competing carriers currently offer before you run the numbers. Factor in the first month of the new carrier's service when making this comparison — some carriers bill a partial first month plus the following full month on the first invoice.
Also check whether your current carrier is in a promotional period that provides a discount or bonus data allocation. These perks are account-level and expire when the account closes; they do not transfer with the number.
Prepaid accounts typically do not have ETFs. Month-to-month postpaid contracts also typically do not carry ETFs.
---
## 5. Check Your Device Installment Balance
If you purchased your phone through the carrier on a device financing or installment plan, the balance is separate from your service contract. In most countries, you can port your number even with an outstanding balance — carriers cannot block the port — but you remain liable for the remaining payments.
**What to check:**
- The remaining installment balance. This is on your monthly bill or in the account portal.
- Whether your carrier requires the balance to be paid in full before they will unlock the device. Unlock eligibility and porting eligibility are separate. Even if the port proceeds, a locked phone will not work on the new network.
- Whether paying off the balance early incurs any interest or fee.
If the installment plan balance is large and you want to avoid parallel payments, pay it off before switching — or factor those payments into the total cost comparison between your current and new carrier.
---
## 6. Collect the Account Details Your New Carrier Will Ask For
Porting requires your new carrier to submit a request on your behalf. A mismatch between the details you provide and what the current carrier holds on file is the most common reason ports fail.
**Gather the following before starting sign-up:**
- **Phone number** you want to port.
- **Account number** with the current carrier — this is an internal identifier, not your phone number. It is on your bill or in your carrier's online portal.
- **Transfer credential** (PAC, Number Transfer PIN, RIO, or equivalent — see section 1 above).
- **Registered name** on the account, exactly as it appears. A middle name or suffix difference can cause a rejection.
- **Billing address** on the account.
- **Account PIN** if your carrier uses one (distinct from the transfer PIN in some systems).
If you are on a family or shared plan, confirm whether your line is owned by a primary account holder and whether that person needs to authorise the port.
If any detail is uncertain, log in to your current carrier's account portal and download or screenshot the account summary page. Having this on hand prevents delays during the new carrier's sign-up form.
---
## 7. Back Up Your Device and Note What Will Not Transfer
The port transfers only your phone number. Content stored on your device or the carrier's servers does not move automatically.
**What to back up before switching:**
- **Device backup**: Use iCloud (iPhone) or Google One / Google Photos (Android) to create a full backup. This preserves contacts, messages, app data, and photos if anything goes wrong during the transition.
- **Voicemail messages**: Voicemail stored on your carrier's servers is not ported. It remains accessible on the old carrier's system for a limited time after the account closes. Listen to and note any important messages. If you use visual voicemail, screenshotting or noting the content is the simplest approach.
- **Call logs and SMS history**: These are stored on the device, not on the carrier. A device backup preserves them.
- **Carrier app data**: Some carriers store loyalty points, usage credits, or promotional balances in their apps. These do not transfer. Redeem or note them before closing the account.
- **eSIM profile**: If you are switching away from an eSIM-only setup, confirm whether the new carrier requires you to delete the old eSIM profile before or after the port. On most devices, the old eSIM profile becomes inactive automatically after the port completes, but check the new carrier's instructions to avoid activation errors.
A device backup also ensures you can restore your phone quickly if something goes wrong during the transition — for example, if you need to factory-reset to fix an activation issue.
---
## 8. Decide What to Do with Your Carrier Email Address
Carrier email addresses — addresses that end in the carrier's domain — are tied to your service account. When the account closes, those addresses stop receiving mail, typically within a few weeks to a few months — check your carrier's policy for the exact window.
**Options:**
1. **Switch to a provider-independent address before you switch carriers.** Free services such as Gmail, Outlook, and iCloud Mail belong to you regardless of which carrier you use. Update every service that uses your carrier address to the new one.
2. **Use a paid mail portability service if your carrier offers one.** In Japan, NTT Docomo, au, and SoftBank each offer a paid carrier email portability service (application must be made within 31 days of account closure in the case of Docomo). Similar services are not universally available; check your carrier's website.
3. **Set up a mail forwarding rule from the carrier address** while you still have access, redirecting incoming mail to a permanent address.
The safest long-term approach is option 1. Carrier email addresses cannot be transferred to another carrier's domain, and the portability services that exist require ongoing payment and vendor lock-in to the old carrier.
---
## The Day-of-Switch Sequence
Once all eight checklist items are complete, the day of the switch follows a fixed order:
1. **Do not cancel your current account first.** Cancelling before porting releases your number back to the carrier's pool.
2. **Sign up with your new carrier** and provide your number portability transfer credential.
3. **Do not trigger any SMS 2FA logins** during the porting window.
4. **Wait for the port to complete.** Your old SIM will lose service, and your new SIM will acquire signal and the ported number.
5. **Test with a call and a message** before treating the switch as done.
6. **Confirm your old account is closed** or follow up if your carrier does not automatically close it on port-out.
**Timing tip:** Initiate the switch on a weekday morning if possible. Most carriers have support staff available to resolve port issues during business hours. Starting on a Friday evening or over a public holiday risks the port stalling with no support available until the next working day.
---
## Common Pre-Switch Mistakes
**Requesting the transfer code too early.** PAC codes (UK) and equivalent codes in other markets have expiry dates — typically 30 days from issue. If your carrier switch takes longer than expected, the code may expire and need to be reissued.
**Skipping the lock status check.** A successful port to an unlocked number on a locked phone leaves you with a working number but no usable service. Check before, not after.
**Assuming the new carrier holds the account open.** Some carriers automatically close the old account on port-out; others require a separate cancellation call. Check your current carrier's policy to avoid being charged for a service month you are not using.
**Overlooking paired devices.** Smartwatches and tablets on a cellular plan are often on a separate line within the same account. Verify whether you want to port or cancel those lines separately.
**Forgetting about roaming add-ons or promotional credits.** Pre-paid international roaming packages and promotional data credits are account-level, not number-level. They do not follow the number to the new carrier.
**Not confirming the new carrier's coverage at your locations.** A cheaper plan on a carrier with worse coverage in your home, workplace, or commute route provides less value than it appears. Check coverage maps for the specific addresses that matter to you — not just the city-level overview — before committing. If you are still deciding which carrier to move to, [how to choose](/en/guides/how-to-choose/) covers the five criteria worth evaluating before you sign up.
---
## FAQ
*(See structured FAQ items in the frontmatter above for display in site search and rich results.)*
### What if I need to switch immediately with no preparation time?
The minimum viable preparation is: (1) obtain your transfer credential, (2) confirm your phone is unlocked or request an unlock on an expedited basis, and (3) log in to any critical banking or email account before the port starts so you have an active session during the SMS 2FA gap. Everything else — voicemail backup, carrier email migration, 2FA app migration — can be done after the switch completes, though it is easier before.
### My phone is still under a financing plan. Can I still switch?
Yes. In most countries, a carrier cannot block a port because of an outstanding device installment balance. However, the carrier can and will continue billing you for the remaining installments after the port. Additionally, confirm that the installment balance being outstanding does not affect the carrier's willingness to unlock your device — some carriers tie unlock eligibility to payment completion.
### What should I do if the port does not complete within the expected window?
Contact your new carrier's support first. They can check the port request status and identify whether it was rejected by the current carrier. Common rejection reasons are a name mismatch, an incorrect or expired transfer credential, or an active account lock. If the port stalls and neither carrier resolves it within the timeframe set by your country's regulator, file a complaint with the relevant authority (FCC in the US, Ofcom in the UK, ACMA in Australia, ARCEP in France, Bundesnetzagentur in Germany).
### Can I switch and keep the same phone number on two separate SIMs (dual SIM)?
No. Number portability moves the number from one carrier to another. A phone number can only be active on one carrier at a time. If you want two active numbers, you need two separate numbers on two lines. For information on running two lines simultaneously on one phone, see the guides on [dual-SIM setups for travel](/en/guides/dual-sim-for-travel/) and [eSIM Quick Transfer for iPhones](/en/guides/transfer-iphone/).
---
## Related Guides
- [Mobile Number Portability (MNP) Explained](/en/guides/what-is-mnp/) — How number porting works technically, country-by-country timing, and common failure modes.
- [SIM Lock and SIM-Free Explained](/en/guides/sim-lock/) — How to check your lock status in seconds and how unlock policies work by carrier and region.
- [How to Choose a Travel eSIM: 5 Key Criteria](/en/guides/how-to-choose/) — Evaluating new carrier plans before committing to a switch.
- [Travel eSIM Provider Comparison](/en/guides/provider-comparison/) — Side-by-side comparison of major eSIM providers if you are switching to a travel or global plan.
- [eSIM Quick Transfer: Move an eSIM to Another iPhone](/en/guides/transfer-iphone/) — How to move an eSIM profile to a new device during or after a carrier switch.
================================================================================
# Pre-Trip Connectivity Checklist — From 2 Weeks Out to Airport Departure
URL: https://sim-finder.com/en/guides/pre-trip-checklist/
Type: guides (en)
Published: 2026-04-23
Connectivity problems abroad are almost always avoidable. The most common issues — bill shock from unexpected roaming charges, no signal on arrival, 2FA codes that never arrive — share one root cause: preparation left to the last minute.
This checklist walks you through every step from two weeks before departure to the moment you clear customs. Follow it in order, and you will arrive connected, aware of your costs, and with a fallback plan ready.
---
## Why a Pre-Trip Checklist Matters
Leaving connectivity to chance costs money and wastes time. Roaming charges on an unmanaged home SIM can become significant for a week abroad, depending on your carrier's per-megabyte or per-day rates. An eSIM that fails to install at the airport — because the only available Wi-Fi is behind a captive portal — leaves you without data in an unfamiliar place.
None of this is difficult to prevent. The steps below take roughly 30 minutes in total, spread over two weeks. The payoff is a trip where connectivity is never a distraction.
---
## 2 Weeks Before: Choose Your Connectivity and Book
Your first decision is which connectivity option you will use. The four main options are international roaming, a local SIM card, a travel eSIM, and a portable Wi-Fi hotspot. Our guide to [the four ways to stay connected abroad](/en/guides/four-options/) walks through the cost, setup effort, and quality trade-offs in detail. The short summary:
- **International roaming** is the easiest option but can be the most expensive. Confirm your home carrier's exact rates or pass options before committing.
- **Local SIM card** gives you local pricing and full network access, but requires an unlocked device and a stop at a carrier store or kiosk on arrival. *(Local SIM purchasing guide — coming soon.)*
- **Travel eSIM** combines the convenience of pre-purchase with competitive data rates. No physical card, no store visit, but your device must support eSIM and be carrier-unlocked.
- **Portable Wi-Fi hotspot** shares one connection across multiple devices. Worth considering for groups or for devices with no SIM slot. *(Wi-Fi rental guide — coming soon.)*
### Checklist: 2 Weeks Before
- [ ] Decide which connectivity option(s) you will use
- [ ] If using a travel eSIM: confirm your device supports eSIM (see below) and purchase the plan
- [ ] If using international roaming: check your carrier's destination roaming rates or day-pass options
- [ ] If using a local SIM: identify which carrier to use at the destination and note airport or store locations
- [ ] Check your device's SIM lock status (see the next section)
### Checking eSIM Compatibility
On iPhone, go to **Settings → Cellular** (or Mobile Data). If you see an option labeled **Add eSIM** or **Add Data Plan**, your device supports eSIM. iPhone XS, XR, and all later models support eSIM, as documented in Apple's official compatibility data.
On Android, the path varies by manufacturer. On Google Pixel, go to **Settings → Network & internet → SIMs → Add SIM**. On Samsung Galaxy, go to **Settings → Connections → SIM card manager → Add mobile plan**. Google Pixel 4 and later broadly support eSIM (Pixel 3 support is limited by region and carrier variant); Samsung Galaxy S20 and later support eSIM on most variants, though regional and carrier-lock exceptions exist.
---
## 1 Week Before: Prepare Your Device
### Check and Remove SIM Lock
A SIM-locked device cannot use a SIM or eSIM from a carrier other than the one that sold it. If you plan to use a travel eSIM or local SIM, resolve this before departure — carrier unlock requests typically take one to several business days to process, and turnaround varies by carrier.
**iPhone**: Go to **Settings → General → About → Carrier Lock**. If it shows **No SIM restrictions**, your device is unlocked. If it shows a carrier name, contact that carrier to request an unlock. Most carriers unlock devices at no charge once any contract or installment period is complete, as confirmed by AT&T and T-Mobile official unlock policies.
**Android**: The most reliable check is a SIM swap test — insert a SIM from a different carrier and verify that calls and data work. Network scanning alone is not reliable, as some locked devices still display other carriers in scan results but reject them at connection time.
### Verify APN Settings
APN (Access Point Name) settings tell your device how to connect to your carrier's data network. Most travel eSIM providers configure APN automatically when the profile installs. Some, however, require manual configuration — this is documented in the provider's setup guide. Check your provider's instructions and note the APN details in case you need to enter them manually at the destination.
### Decide on Data Roaming Policy
Choose now — not on the plane — whether Data Roaming should be on or off for your home SIM.
If you are using a travel eSIM for data and want to keep your home SIM active only for calls and SMS, turn off Data Roaming on the home SIM line. On iPhone: **Settings → Cellular → [home SIM line] → Cellular Data Options → Data Roaming: Off**. Also turn off **Allow Cellular Data Switching** to prevent your device from silently falling back to the home SIM for data if the travel eSIM signal drops.
If you are relying on international roaming, enable Data Roaming — but only after confirming your carrier's rates or activating a roaming pass. For a full breakdown of how roaming charges work and how to control them, see our [international roaming guide](/en/guides/international-roaming/).
### Migrate SMS-Based 2FA Before You Travel
Travel eSIMs are data-only. They cannot receive SMS. If any of your accounts use SMS-based two-factor authentication — banking, email, social platforms — those codes will only arrive on your home SIM line. If your home SIM is roaming without a voice plan, or if SMS delivery is unreliable in the destination country, you risk being locked out of an account mid-trip.
The solution is to migrate critical accounts to an authenticator app (Google Authenticator, Microsoft Authenticator, or Authy) before departure. Do this at home, confirm each account works with the app, then proceed.
### Checklist: 1 Week Before
- [ ] Check SIM lock status; submit unlock request if needed
- [ ] Review eSIM APN requirements with your provider
- [ ] Set Data Roaming policy for each SIM line
- [ ] Migrate critical SMS-based 2FA accounts to an authenticator app
- [ ] Verify your bank or payment apps work internationally
---
## Day Before Departure: Install eSIM and Pre-Download
The day before departure is the right time for tasks that require a reliable home Wi-Fi connection.
### Install Your Travel eSIM Profile
If you are using a travel eSIM, install the profile today — not at the airport.
Your provider will send a QR code by email or display it in their app. On iPhone: go to **Settings → Cellular → Set Up Cellular** (labelled **Add eSIM** or **Add Cellular Plan** on some iOS versions) and scan the QR code. On iOS 17.4 and later, you can also long-press a QR code image in Mail, Photos, or Safari to trigger the eSIM setup directly.
On Android (Google Pixel): go to **Settings → Network & internet → SIMs → Add SIM**. On Samsung Galaxy: **Settings → Connections → SIM card manager → Add mobile plan**.
**Install, but do not activate yet.** Most travel eSIM validity periods start on first network connection in the destination country, not on installation — but this varies by provider. Activating at home may start consuming your allotted days before the trip begins. Our [first-time travel eSIM guide](/en/guides/first-time-guide/) covers the install and activation sequence in full detail.
eSIM QR codes are single-use by GSMA design. Once scanned and linked to your device, the code cannot be used again. Save or screenshot the QR code image before scanning, in case you need to contact your provider for a replacement profile.
### Pre-Download Offline Maps
Google Maps uses roughly 3–20 MB per hour for turn-by-turn navigation, based on third-party measurements. But map search lookups and initial map loading require a live data connection. Downloading your destination region now means navigation works even without signal.
**Google Maps**: Search for a city or region → tap the area name at the bottom → three-dot menu → Download offline map.
**Apple Maps** (iOS 17 and later): Tap your profile icon → Offline Maps → Download New Map → select the region.
Download over Wi-Fi today, not at the airport.
### Pre-Download Entertainment for the Flight
Streaming HD video consumes 3 GB or more per hour. Downloading in advance costs nothing after the fact. See our [data usage guide](/en/guides/data-usage-guide/) for consumption figures by app and quality setting if you want to estimate how much mobile data your trip activities will require.
### Checklist: Day Before
- [ ] Install travel eSIM profile over home Wi-Fi (do not activate yet)
- [ ] Screenshot or save the QR code image before scanning
- [ ] Verify eSIM appears in Settings under Cellular / SIM
- [ ] Download offline maps for destination region(s)
- [ ] Download entertainment for the flight (Netflix, Spotify, etc.) over Wi-Fi
- [ ] Charge all devices and portable battery to full
---
## Departure Day / Airport: Final Checks and Airplane Mode
### At Home Before You Leave
Run a final settings review before walking out the door:
- Confirm Data Roaming is set correctly on each SIM line
- Confirm Allow Cellular Data Switching is off (iPhone, if using a travel eSIM for data)
- Confirm the travel eSIM profile is installed and visible in Settings, but not yet set as the active data line
### At the Airport
Most airports offer free Wi-Fi, but it typically requires accepting terms via a captive portal — a browser page that blocks all other traffic until you tap "Accept." If you still need to complete any connectivity setup and only have airport Wi-Fi, connect to the network first and complete the captive portal step in your browser before going into Settings.
**Enable Airplane Mode** when you board. This prevents your home SIM from attempting to register on any network during the flight, which on some carriers can trigger unexpected roaming charges. Your downloaded maps, offline entertainment, and the installed eSIM profile remain on the device regardless of Airplane Mode.
### Checklist: Departure Day
- [ ] Final settings review — Data Roaming and Allow Cellular Data Switching
- [ ] Travel eSIM installed, not yet activated as data line
- [ ] Phone and portable battery fully charged
- [ ] Emergency contacts saved offline (screenshot or written copy)
- [ ] Enable Airplane Mode at boarding
---
## On Arrival: Connect and Fallback
### Activating Your Travel eSIM
After landing and clearing customs, disable Airplane Mode. If using a travel eSIM:
1. Go to **Settings → Cellular**
2. Select the travel eSIM line
3. Enable it and set it as the **Cellular Data** line
4. Confirm **Data Roaming is on** for the travel eSIM line (required for the eSIM to connect to the local network)
5. Confirm **Data Roaming is off** on your home SIM line
Wait 30–60 seconds for the device to register on a local network. The network name should appear in the status bar.
Our [dual SIM for travel guide](/en/guides/dual-sim-for-travel/) explains the full line-assignment configuration for running your home SIM alongside a travel eSIM — including which line handles calls, which handles data, and how to prevent accidental home-SIM roaming charges.
### Troubleshooting: No Signal on Arrival
Work through these steps in order:
1. **Toggle Airplane Mode**: On for 10–15 seconds, then off. Forces a fresh network search.
2. **Check Data Roaming**: Confirm it is enabled for the active SIM line.
3. **Select network manually**: iPhone: **Settings → Cellular → Network Selection → Manual**. Android: **Settings → Network & internet → Mobile Network → Network Operators**. Select any available carrier to test.
4. **Verify APN settings**: If your provider requires manual APN configuration, confirm the values match the provider's documentation.
5. **Contact your provider**: Most travel eSIM providers offer live chat support through their app or website. Use airport Wi-Fi if mobile data is unavailable.
As a fallback, most international airports have physical SIM card kiosks near the arrivals area. A locally purchased SIM is a reliable backup if your travel eSIM cannot connect after exhausting the steps above.
---
## Essential Apps Checklist
Install these before departure. App stores require an internet connection to download.
### Navigation
- **Google Maps** — offline map download, turn-by-turn navigation, transit directions; available on iOS and Android
- **Apple Maps** (iOS 17+) — offline maps; integrated with iPhone and Apple Watch
- **Maps.me** — detailed offline maps useful for hiking trails and areas with limited coverage
### Messaging and Calls
Travel eSIMs are data-only. Voice calls and SMS must go through an internet-based app:
- **WhatsApp** — widely used globally; voice calls, video calls, group chats
- **Signal** — end-to-end encrypted; voice and video calls; smaller global install base than WhatsApp
- **Telegram** — large file support, channels, voice calls; useful where WhatsApp is less common
On Apple devices, **FaceTime Audio** works over Wi-Fi and mobile data between Apple users at no additional setup.
### Translation
- **Google Translate** — offline language pack downloads; camera-based text and sign translation; iOS and Android
- **DeepL** — higher accuracy for European and East Asian languages; iOS and Android
Download offline language packs while on Wi-Fi at home.
### Two-Factor Authentication
- **Google Authenticator** (iOS / Android)
- **Microsoft Authenticator** (iOS / Android)
- **Authy** (iOS / Android) — multi-device cloud backup of tokens
### Payments
- Your bank's official app — confirm it works internationally and note the customer support number in case a card is blocked abroad
- **Google Pay** or **Apple Pay** — verify your cards are loaded before departure
- A currency converter (or simply ask Google: "100 USD to EUR")
---
## Bill-Shock Prevention Settings Summary
Bill shock — unexpectedly large charges on your home carrier bill — most commonly results from: Data Roaming left on, Allow Cellular Data Switching left on (iPhone), or background apps sending data through the wrong SIM line.
### Key Settings for Travel eSIM Users
| Setting | Location | Recommended |
|---|---|---|
| Data Roaming — home SIM | Settings → Cellular → [home SIM] | **Off** |
| Data Roaming — travel eSIM | Settings → Cellular → [travel eSIM] | **On** |
| Allow Cellular Data Switching | Settings → Cellular → Cellular Data | **Off** |
| Cellular Data line | Settings → Cellular → Cellular Data | Travel eSIM |
### Data Usage Alerts
**iPhone**: Review per-app cellular usage under **Settings → Cellular → [travel eSIM line]**. iOS does not have a built-in hard data cap, so use your travel eSIM provider's companion app for remaining data alerts if one is available.
**Android**: **Settings → Network & internet → Data usage → Data warning & limit**. Set a warning threshold slightly below your plan's allotment.
### Restrict Background Data
Some apps — cloud photo sync, app updates, news feeds — consume data in the background without any action from you.
**iPhone**: **Settings → [App name] → Cellular Data → Off** (per app). Or enable **Low Data Mode** for the travel eSIM line: **Settings → Cellular → [travel eSIM] → Low Data Mode: On**.
**Android**: **Settings → Network & internet → Data usage → [App name] → Background data: Off**.
For a full breakdown of per-app data consumption and the most effective ways to reduce usage, see our [data usage guide](/en/guides/data-usage-guide/).
---
## FAQ
**When should I install my travel eSIM?**
Install before leaving home on your own Wi-Fi. See frontmatter FAQ item 1 for full details.
**Do I need to unlock my phone?**
Yes, if you plan to use a travel eSIM or local SIM. See frontmatter FAQ item 2.
**How do I avoid roaming charges?**
Turn off Data Roaming on the home SIM and Allow Cellular Data Switching. See frontmatter FAQ item 3.
**Which apps do I need?**
Maps, messaging, translation, and an authenticator app. See frontmatter FAQ item 4.
**No signal after landing — what do I do?**
Cycle Airplane Mode, check Data Roaming, select network manually. See frontmatter FAQ item 5.
**How much data do I need for a week?**
3–5 GB for light use; 5–10 GB for moderate; 10+ GB for heavy or streaming. See frontmatter FAQ item 6.
**Can I reuse my travel eSIM?**
Depends on the provider's reinstall policy. See frontmatter FAQ item 7.
---
## Related Guides
- [4 Ways to Stay Connected Abroad](/en/guides/four-options/) — compare roaming, local SIM, travel eSIM, and pocket Wi-Fi at a glance
- [International Roaming Explained](/en/guides/international-roaming/) — how GSMA AA.12 roaming agreements work and how to avoid bill shock
- [Your First Travel eSIM: Step-by-Step Guide](/en/guides/first-time-guide/) — detailed install and activation walkthrough for first-time eSIM users
- [Using Dual SIM for Travel](/en/guides/dual-sim-for-travel/) — run your home number alongside a travel eSIM with correct line assignment
- [How Much Mobile Data Do You Need?](/en/guides/data-usage-guide/) — per-app consumption figures and how to estimate your data needs
================================================================================
# Prepaid vs Postpaid: Differences and How to Choose
URL: https://sim-finder.com/en/guides/prepaid-vs-postpaid/
Type: guides (en)
Published: 2026-06-04
Prepaid and postpaid are the two fundamental billing models for mobile service. Prepaid charges you in advance; postpaid charges you after the fact. The billing difference flows through to contract terms, identity requirements, flexibility, and the type of plan available. This guide explains how each model works, where the two differ in practice, and which suits which usage profile.
## How Prepaid Billing Works
On a prepaid plan, you pay — or load credit — before the service is available to use. There is no monthly invoice; your balance or allowance is consumed as you make calls, send messages, and use data. When it runs out, service stops until you top up or renew.
The two common prepaid structures are:
- **Credit-based prepaid**: You maintain a monetary balance that is drawn down at per-unit rates for calls, texts, and data. Once the balance reaches zero, service is suspended.
- **Bundle-based prepaid**: You purchase a defined allowance — for example, a set amount of data, a number of call minutes, and SMS — that is valid for a fixed period (commonly 30 days). Unused allowance at the end of the period expires unless explicitly rolled over.
Some carriers combine both structures: a data bundle is purchased upfront, and once the bundle is exhausted, usage continues against a credit balance at pay-per-use rates.
Prepaid accounts can be topped up through multiple channels depending on the carrier: online account portals, carrier apps, convenience stores, retail vouchers, or in-store at carrier points of sale. The method varies by country and carrier.
Because prepaid service stops when the balance or allowance is exhausted, the spending ceiling is fixed. This is structurally different from postpaid, where usage beyond the included allowance can generate additional charges. For users who want to avoid unexpected bills, prepaid provides a hard limit on monthly spending.
## How Postpaid Billing Works
On a postpaid plan, the carrier extends you access to the network first and bills you at the end of each billing cycle — typically monthly. The bill reflects usage that has already occurred.
Most postpaid plans are structured as monthly allowances: a defined amount of data, calls, and messages is included in the base fee. If you exceed your allowance, excess charges are applied (on older plan types) or speeds are reduced or service is temporarily suspended (on more modern plans with soft caps).
Because the carrier is effectively extending credit — you use the service before paying — a credit assessment is standard practice before a postpaid account is approved.
Postpaid accounts may also support direct billing for third-party purchases, device insurance, or carrier-managed services that are added to the monthly invoice. These features are not available on prepaid, where no billing relationship exists.
## Identity Checks vs Credit Checks: A Critical Distinction
This is one of the most practically important differences between prepaid and postpaid.
**Prepaid: identity check only**
Regulators in most jurisdictions require carriers to verify the identity of anyone purchasing a SIM, including prepaid SIMs. This is typically accomplished with a government-issued photo ID — a passport, national identity card, or driver's licence. The purpose is to associate a SIM with an identifiable person, not to assess creditworthiness.
An identity check does not access your credit history and does not affect your credit score. It confirms who you are, not how you pay your bills.
Mandatory SIM registration requirements exist in a large number of countries. The specific documents accepted, whether registration is done at point of sale or online, and the data retained by carriers are governed by national telecommunications regulations. These differ country to country.
**Postpaid: identity check plus credit check**
Because postpaid service is consumed before payment is made, the carrier needs to assess the likelihood that you will pay. This requires a credit check — a review of your financial track record with banks, lenders, or credit bureaus.
A credit check may result in:
- Approval with a standard plan and credit limit
- Approval with a lower credit limit or a security deposit requirement
- Rejection, in which case the carrier may offer a prepaid alternative
Credit checks typically leave a record on your credit report (a "hard inquiry" in markets like the US, UK, and Australia — particularly for plans that include device financing; SIM-only postpaid may involve only a soft check in some markets), which can affect your credit score if you apply to multiple carriers in a short period. Prepaid applications do not create this record.
In markets where credit bureaus are not widely used, carriers may rely on internal scoring, deposit requirements, or local bank account verification instead of a formal credit report.
## Contract Terms and Lock-In
Prepaid and postpaid differ significantly in the degree of commitment they require.
**Prepaid: no lock-in**
Prepaid plans carry no minimum contract period. You pay for a period of service and you are free to switch carriers, let the plan expire, or move to a different plan at any time without penalty. Early termination fees do not apply because there is no term to terminate early.
This freedom is one of the clearest structural advantages of prepaid. It is particularly relevant in competitive markets where better offers appear frequently, or for users who are uncertain how long they will remain in a location.
**Postpaid: contracts vary widely**
Postpaid plans range from month-to-month arrangements with no commitment to 12 or 24-month contracts. Longer contracts often come with:
- **Device financing**: The cost of a handset is spread over the contract term. If you cancel early, the remaining device balance becomes due.
- **Early termination fees**: A fee charged when you exit a fixed-term contract before it ends. The amount is often tied to the number of remaining months.
- **Lower monthly rate**: Some carriers discount the monthly service fee in exchange for a longer commitment.
Month-to-month postpaid plans exist and share the flexibility of prepaid, but they may not include device financing and may cost more per month than equivalent fixed-term plans.
## Network Priority and Available Plans
The prepaid/postpaid distinction interacts with carrier type — MNO, sub-brand, and MVNO — in ways that affect both network priority and plan selection.
On most carriers, postpaid subscribers receive higher network priority than prepaid subscribers during congestion. This mirrors the broader deprioritisation pattern where paying customers on higher-tier plans are served before those on lower-tier or prepaid plans. The gap varies by carrier and becomes noticeable primarily during busy periods in high-density areas.
In practice, many consumers who choose prepaid through an MVNO experience this deprioritisation effect not because of the prepaid billing model itself, but because MVNOs are subject to deprioritisation relative to the host MNO's own subscribers. Billing model and carrier type are separate variables, but they frequently appear together in the same plan.
Independently, MNOs typically offer their widest range of plans — including postpaid device financing, family multi-line discounts, and streaming bundles — under their flagship brand. MVNOs and sub-brands lean predominantly toward prepaid and month-to-month postpaid. For a detailed breakdown of how carrier types compare, see [MNO vs MVNO vs Sub-Brand](/en/guides/mno-vs-mvno-comparison/).
The overlap between prepaid and MVNO plans is significant: many MVNO plans are technically prepaid (or month-to-month with no lock-in), which is why budget-focused options frequently appear in the prepaid category. The carrier-type and billing-model dimensions are separate but correlated. For a deeper explanation of MVNOs, see [What Is an MVNO?](/en/guides/what-is-mvno/).
## Roaming Differences
International roaming availability and cost can differ between prepaid and postpaid.
Postpaid plans on major carriers typically include roaming options — either bundled international access or add-on day passes. The carrier extends roaming credit because the billing relationship is established.
Prepaid plans vary considerably. Many prepaid plans from MVNOs or budget sub-brands offer limited or no international roaming. Larger MNO prepaid plans often include roaming capabilities, but the options are usually narrower than on postpaid.
For frequent travellers, a travel eSIM purchased separately — a separate data-only profile added to your device alongside your home SIM — is often more practical than relying on any home plan's roaming terms. For a comparison of travel connectivity options and a methodology for evaluating travel eSIM plans, see [How to Choose a Travel eSIM](/en/guides/how-to-choose/).
## The Market Distribution Differs by Country
Prepaid and postpaid are not equally distributed globally. In some markets, prepaid is the dominant or near-universal model; in others, postpaid is standard for most subscribers.
Markets where prepaid is prevalent tend to share characteristics: large populations with limited credit infrastructure, high price sensitivity, or a tradition of pay-as-you-go mobile use. In these markets, postpaid plans may exist but are concentrated among business users and high-income segments.
Markets where postpaid is prevalent tend to have well-established credit systems, high smartphone penetration financed through carrier contracts, and a strong MNO retail presence offering device subsidies.
Neither model is inherently better. The right choice depends on your individual circumstances, not on which model is most common in your market. If you are moving to or visiting a new country, check which model is most accessible to newcomers — prepaid is typically easier to obtain without a local credit history.
## Prepaid eSIM Plans
The prepaid model extends to eSIM plans, including travel eSIMs. A travel eSIM — a downloadable carrier profile added to a device that supports eSIM — is almost always prepaid: you purchase a data package in advance, and it is consumed until it runs out or the validity period ends.
This makes travel eSIMs a practical option for visitors or short-term travellers who need data without entering into a local postpaid agreement. No local credit history is required. The purchase is completed online, and the eSIM profile is downloaded before or during travel.
For a structured comparison of travel eSIM providers, including coverage and plan types, see [Travel eSIM Provider Comparison](/en/guides/provider-comparison/).
One practical note: because a travel eSIM is always prepaid, there is no credit check or local address requirement. This makes it accessible regardless of your credit standing in the destination country — a meaningful advantage over local postpaid SIMs that might require a national ID or residency proof. The purchase is completed online, and the profile is downloaded to the device without visiting a store or waiting for a physical SIM.
## Estimating How Much Data You Need
Whether you choose prepaid or postpaid, you will need to select a plan with enough data for your actual usage. Overestimating data need costs money; underestimating leads to overage charges or throttled speeds.
On prepaid bundle plans this question is especially important because unused data at period end is typically forfeited. Choosing a bundle that matches your actual consumption — rather than rounding up significantly — reduces waste.
The [data usage guide](/en/guides/data-usage-guide/) provides per-app consumption figures — streaming video, video calls, navigation, messaging — that help you estimate a realistic monthly figure before committing to a plan. Working through that estimate before selecting a plan size is a practical step for both prepaid and postpaid.
## Which Billing Model Suits Which Profile
The following profiles are starting points. Individual plans within each category vary, and the best plan for your situation depends on specific terms, not just billing model.
**Prepaid suits you if:**
- You want no lock-in and the ability to switch at any time
- You have limited or no local credit history
- You are a visitor or short-term resident in a country
- You want predictable spending with no risk of unexpected overage charges
- You use mobile data sporadically rather than continuously
- You are purchasing a travel data plan for a specific trip duration
**Postpaid suits you if:**
- You want device financing included in your plan
- You travel internationally and need carrier-backed roaming
- Your employer pays the bill (corporate plans are typically postpaid)
- You want access to multi-line family discounts
- You value bundled extras — streaming subscriptions, technical support — and have verified that the bundle value exceeds the plan premium
- You need a billing relationship for direct-carrier billing services
**Neither is strictly required for families or heavy users.** A family on prepaid plans from a sub-brand or MVNO can spend less than a family on an MNO postpaid family plan, depending on the specific plans involved. Use [SimFinder](/en/) to compare actual plan terms side by side rather than assuming that postpaid is the right fit for high usage or families.
## A Note on "Unlimited" Plans in Both Models
Both prepaid and postpaid plans are now widely sold as "unlimited." In nearly all cases, "unlimited" means unlimited at full speed up to a threshold, after which speeds are reduced. The fair-use threshold varies significantly between plans and is not always prominently disclosed.
When evaluating an "unlimited" plan — regardless of billing model — read the fine print:
- What is the high-speed data threshold per billing cycle?
- What speed applies after the threshold is reached?
- Are video streaming speeds separately capped?
A well-specified unlimited plan with a generous threshold and a reasonable throttle speed is functionally different from one with a low threshold and severe speed reduction. The plan label is not sufficient; the terms determine the experience.
This applies equally to prepaid unlimited plans (common in the travel eSIM market, where daily unlimited data plans with a fair-use cap are sold) and postpaid unlimited plans from MNOs.
The term "unlimited" is used across both billing models and all carrier types. Its meaning is determined entirely by the fair-use policy in the plan's terms and conditions — not by the billing model. Evaluating the threshold and post-threshold speed is necessary regardless of whether the plan is prepaid or postpaid.
## Switching Between Prepaid and Postpaid
Switching billing models does not require you to lose your phone number. Mobile Number Portability (MNP) allows you to transfer your existing number when moving between carriers regardless of billing model — from prepaid to postpaid, postpaid to prepaid, or between carriers of the same type.
To port your number:
1. Do not cancel your current plan before the transfer is complete. Cancelling first releases the number and you will lose it.
2. Contact the new carrier and initiate the port. You will need your current account details and, in some markets, a porting authorisation code from your existing carrier.
3. The transfer typically completes within one business day in many markets (e.g. UK Ofcom and US FCC both require simple ports within one business day), though complex ports can take a few business days.
4. Once porting is confirmed, your old plan is automatically cancelled.
When switching from postpaid to prepaid mid-contract, verify whether early termination fees apply. If your current postpaid plan includes a financed device, the remaining device balance may become due at cancellation.
## Prepaid vs Postpaid in Practice: A Summary Table
| Dimension | Prepaid | Postpaid |
|-----------|---------|----------|
| Payment timing | Before use | After use (end of cycle) |
| Credit check | No | Yes (typically) |
| Identity check | Yes (most countries) | Yes |
| Contract commitment | None | Month-to-month to 24 months |
| Early termination fee | Not applicable | Possible on fixed-term contracts |
| Device financing | Not available | Available on fixed-term contracts |
| Network priority | Often lower | Often higher |
| International roaming | Limited to none (varies) | Typically available |
| Overage risk | Service stops (no surprise bill) | Possible excess charges on older plans |
| Who it suits | Budget users, visitors, short stays | Device buyers, frequent travellers, corporate |
This table is a generalisation. Individual plans vary — verify the specific terms of any plan you are considering.
## Using SimFinder to Compare Plans
SimFinder lets you search and filter plans in your market by data amount, price, carrier type, and contract term. Use the search to compare current prepaid and postpaid options side by side rather than relying on any published price, which changes frequently.
For estimating how much data a plan needs to include, the [data usage guide](/en/guides/data-usage-guide/) provides per-app figures as a starting point. Combining a realistic data estimate with a live plan comparison gives you the information needed to choose a plan that matches both your usage pattern and your billing model preference.
Remember that billing model is one variable among several — carrier type, network coverage, and specific plan terms all matter. The goal is a plan that fits your actual situation, not one that merely belongs to the "right" billing category.
---
## Related Guides
- [How to Choose a Travel eSIM](/en/guides/how-to-choose/) — Criteria for selecting a travel data plan, including validity periods and pricing models
- [What Is an MVNO?](/en/guides/what-is-mvno/) — How virtual operators work and why they are predominantly prepaid or month-to-month
- [Travel eSIM Provider Comparison](/en/guides/provider-comparison/) — Side-by-side comparison of major travel eSIM providers
- [MNO vs MVNO vs Sub-Brand](/en/guides/mno-vs-mvno-comparison/) — How carrier type interacts with contract flexibility and network priority
- [How Much Mobile Data Do You Need?](/en/guides/data-usage-guide/) — Per-app data consumption figures to size your plan correctly
================================================================================
# Travel eSIM Provider Comparison: Airalo vs Holafly vs Nomad vs Saily and More
URL: https://sim-finder.com/en/guides/provider-comparison/
Type: guides (en)
Published: 2026-04-18
You already know what to look for in a travel eSIM — coverage network quality, data volume, validity period, pricing model, and activation method. If you have not covered those foundations yet, start with [How to Choose a Travel eSIM: 5 Key Criteria](/en/guides/how-to-choose/) before continuing here.
This article takes the next step: applying those criteria to the actual providers available to you. Each provider below has a distinct profile — different strengths, coverage approaches, and plan structures. The goal is to give you an honest picture of each so you can narrow down to two or three candidates, then use [SimFinder Travel](/en/travel/) to compare their current plans for your specific destination.
Specific prices are not included in this article. Plan pricing changes frequently, and any number published here will become outdated. All price comparisons are available in real time through SimFinder Travel.
---
## Major Travel eSIM Providers at a Glance
The table below summarizes the providers covered in this article. All data is sourced from provider records in SimFinder's database.
| Provider | Primary Strength | Plan Types | Coverage Style | Multi-country | Tethering | Support Languages |
|----------|-----------------|------------|----------------|:-------------:|:---------:|-------------------|
| **Airalo** | Broad plan catalog, multilingual | Single-country, regional, global | Marketplace (many local partners) | Yes | Yes | Multilingual |
| **Holafly** | Unlimited data plans | Single-country, regional | Direct provider | Yes | Yes | 20 languages |
| **Nomad** | Clear pricing display, simple UX | Single-country, regional | Direct provider | Yes | Yes | Multilingual |
| **Saily** | Affordable + security credibility | Single-country, regional | Direct provider | Yes | Yes | 14 languages |
| **aloSIM** | 200+ country coverage | Single-country, regional | Direct provider | Yes | Yes | Multilingual |
| **Ubigi** | NTT Group backing, iPad integration | Single-country, regional, global | Direct provider (NTT Group via Transatel) | Yes | Yes | Multilingual |
| **GigSky** | Global coverage, cruise & in-flight plans | Single-country, regional, global | Direct provider (MVNO, 400+ networks) | Yes | Yes | Multilingual |
---
## Provider Profiles
### Airalo
Airalo operates as a marketplace for travel eSIMs — rather than selling only its own plans, it aggregates plans from multiple local provider partners around the world. This model gives Airalo broad destination coverage and a large number of plan options among consumer travel eSIM stores. The tagline on SimFinder's records describes it as the "World's First eSIM Store," reflecting its early entry into the category.
The marketplace structure has a practical advantage for travelers: you can often find a country-specific plan backed by a named local carrier, which tends to deliver better network quality than plans routed through a single international hub. Before purchasing, confirm which local carrier the specific plan uses for your destination.
Airalo's app and website support an extensive range of languages, making it accessible to travelers across most major language markets. Multi-country and regional plans are available alongside single-country options.
**Best for:** Travelers who want a broad selection of country-specific plans in one place, travelers who need support in a less common language, and first-time eSIM buyers who prefer a large platform with established customer service.
---
### Holafly
Holafly's market position centers on unlimited data plans. Rather than selling fixed data packages, Holafly's primary offering is plans with no data cap — travelers pay for a set number of days rather than a specific gigabyte amount. This removes the anxiety of watching a data balance during a trip.
The trade-off is the fair-use throttle that applies after the daily high-speed threshold. Once that daily limit is reached, speeds drop significantly for the remainder of the day. This throttled speed is generally sufficient for messaging and light browsing but not for continuous video streaming or large uploads. Check the specific plan's fair-use policy before purchasing — the daily threshold varies by plan and destination.
One important note: most Holafly plans are data-only. They do not include a local phone number for voice calls or SMS. For calls, you will need a VoIP app over the data connection, and for SMS-based authentication codes, keeping your home SIM active in a dual-SIM setup is the reliable approach. For more on managing calls and SMS while traveling, see [Your First Travel eSIM](/en/guides/first-time-guide/).
Holafly supports 20 languages and offers both single-country and regional multi-country plans.
**Best for:** Travelers who use a lot of data and prefer not to track a balance, remote workers who plan moderate video calls but not extended streaming, and travelers who want a straightforward per-trip pricing model.
---
### Nomad
Nomad covers 200+ destinations with single-country and regional plans. It presents itself as a direct provider with a clean, uncomplicated purchasing experience — the plan catalog is focused rather than exhaustive, and pricing information is presented clearly at each step.
Tethering is supported, making Nomad a workable option for travelers who want to share data from their phone with a laptop or tablet. Multi-country plans are available for travelers crossing multiple borders on a single trip.
Nomad's app and website support 13 languages, including English, Japanese, Korean, Chinese, Thai, Vietnamese, German, French, Spanish, Portuguese, Italian, and Indonesian.
**Best for:** Travelers who want a direct purchasing experience without navigating a large marketplace, users comfortable with a focused plan catalog, and travelers in Asia who prefer multilingual support in regional languages.
---
### Saily
Saily is developed by the team behind NordVPN, a company established in the cybersecurity space. Its positioning combines travel eSIM functionality with pricing that sits at the more affordable end of the market compared to some competitors.
The connection to NordVPN's development team is primarily a credibility signal rather than a technical feature difference — Saily functions as a standard travel eSIM provider with single-country and regional plans, tethering support, and app-based management. It does not bundle VPN functionality into eSIM plans.
Saily supports 14 languages including English, Japanese, Korean, Chinese (Simplified and Traditional), German, French, Spanish, Portuguese, Italian, Czech, Lithuanian, Polish, and Dutch.
**Best for:** Budget-conscious travelers who want a recognizable brand with a security-focused company background, and travelers in European markets where Saily's supported languages are a good fit.
---
### aloSIM
aloSIM covers 200+ countries and territories with both single-country and regional plans. Tethering is supported across its plan catalog. The provider's app supports multiple languages; specific language coverage varies by app store listing and region, so verify support for your preferred language before purchase.
aloSIM's app is available on both iOS and Android, and plan management — including purchasing additional data — is handled through the app.
**Best for:** Travelers heading to destinations in the Middle East, South Asia, or less common regions where some providers have limited coverage, and travelers who want a provider focused on fixed-data single-country plans across a wide country range.
---
### Ubigi
Ubigi is operated by Transatel, a subsidiary of NTT Communications since 2019 (NTT Group). This corporate backing gives Ubigi infrastructure stability less common among newer travel eSIM entrants. Ubigi has been in the eSIM market longer than most consumer-facing providers, with integrations across several connected-car manufacturers (BMW, MINI, Toyota, Stellantis, Jaguar Land Rover) and Apple — Ubigi is selectable from an iPad's **Settings → Cellular Data → Add a New Plan** menu, enabling plan purchase directly from the device without installing the Ubigi app.
A distinguishing feature of Ubigi's account model is long eSIM profile validity: the profile remains active for up to 18 months of inactivity without being removed. This suits travelers who take multiple international trips over a year without wanting to reinstall the profile each time.
Ubigi supports multiple languages and offers single-country, regional, and global plan options with tethering.
**Best for:** iPad users who want direct plan purchase from device settings, travelers who take multiple trips across a year and want their eSIM profile to remain active between trips, and travelers who prefer a provider with established carrier-level infrastructure behind it.
---
### GigSky
GigSky offers single-country, regional, and global plans with a focus on broad international coverage. As a full MVNO, GigSky maintains roaming agreements with 400+ mobile networks across 190+ destinations. A notable differentiator is support for cruise ships and in-flight connectivity plans, which most travel-eSIM providers do not address.
Tethering is supported, and GigSky's plan catalog includes global options suited to travelers visiting multiple regions on extended trips. The provider offers multilingual app support; verify specific language availability on the App Store or Google Play listing before purchase.
**Best for:** Travelers visiting multiple continents or undertaking extended international travel, users who want global plan flexibility with carrier partnership coverage in key markets.
---
## How to Match a Provider to Your Trip
The profiles above give you the "what" for each provider. This section maps trip types to which providers are worth comparing first.
**Single-country trip of one to two weeks (Europe, Asia, or Americas)**
Start with Airalo and Nomad for single-country plan options. Both support a wide range of destinations and display the local carrier partner for each plan, which lets you evaluate network quality before purchasing. Compare current plan pricing and data amounts on SimFinder Travel.
**Unlimited data for remote work or frequent video calls**
Holafly's unlimited plans are the most direct fit. Confirm the daily high-speed threshold for your destination plan before purchasing — if the threshold is too low for your usage pattern, a large fixed-data plan from Nomad or Airalo may serve you better without unexpected throttling.
**Multi-country trip crossing three or more borders**
Evaluate Airalo's and GigSky's regional or global plans, and check Nomad's multi-country plan coverage. Compare which plan covers all your specific destinations — not just the region name — and check the listed network partner for each country included. Ubigi is also worth checking for its global plan if the trip spans multiple continents.
**Extended stay or multiple trips over a year**
Ubigi's eSIM profile stays active for up to 18 months without a top-up, which suits travelers who alternate short trips over several months without wanting to reinstall the profile each time. Check current plan terms for your region before purchase.
**First-time eSIM user who wants accessible customer support**
Airalo's broad multilingual support and established platform make it an accessible starting point for first-time users. A large platform with documented support processes reduces friction if something goes wrong. Read [Your First Travel eSIM](/en/guides/first-time-guide/) before purchasing to understand what to expect during installation.
**Travelers prioritizing cost over brand**
Compare Saily and aloSIM alongside Nomad for the destination in question. Pricing varies by destination and plan length, so use SimFinder Travel to compare current rates rather than assuming a fixed ranking. Per-gigabyte cost is the metric to calculate for fixed-data plans.
---
## Red Flags to Avoid
Not all travel eSIM providers operate with the same transparency. When evaluating any provider — including ones not covered in this article — watch for the following:
**Coverage claims without named network partners**
A trustworthy provider lists the local carrier partner for each destination plan, not just a shaded map. If the provider's website shows only a colored map with no mention of which network your device will connect to, you cannot verify coverage quality. Ask before purchasing, or choose a provider that discloses this information clearly.
**5G claims without verifiable partner networks**
5G availability in travel eSIM plans depends entirely on whether the local partner network in your destination supports 5G and whether the eSIM plan explicitly enables it. Vague 5G branding without a named local carrier offering 5G service is a marketing claim, not a functional guarantee. If 5G matters for your trip, confirm the specific partner network and its 5G footprint at your destination.
**Unclear refund and top-up policies**
Before purchasing, verify two things: whether you can get a refund if your trip is cancelled before you activate the eSIM, and whether you can purchase additional data mid-trip without buying an entirely new plan. Providers with unclear or restrictive policies on both points create unnecessary friction if your plans change.
**No app-based management**
Managing a travel eSIM — tracking data usage, purchasing top-ups, contacting support — is significantly easier through a provider app than through email or a website alone. If a provider offers no app, plan management during the trip becomes more cumbersome. All seven providers profiled in this article offer app-based management.
**Unusually low pricing without explanation**
Pricing that is substantially lower than comparable plans from established providers warrants scrutiny. Travel eSIM providers incur real network costs. Plans priced far below market norms sometimes indicate limited local network access (routing through lower-quality international hubs), very restrictive data throttling terms, or simply inaccurate advertised prices. Verify the terms carefully before purchasing.
---
## FAQ
For answers to common questions about this comparison, see the FAQ section above.
For foundational questions about what travel eSIMs are and how they work, see [What is an eSIM?](/en/guides/what-is-esim/) and [Four Options for Staying Connected Abroad](/en/guides/four-options/).
For estimating how much data you need, see [How Much Mobile Data Do You Need?](/en/guides/data-usage-guide/).
---
## Compare Plans with SimFinder Travel
Provider profiles are useful for narrowing your shortlist, but plan details — data amount, validity, pricing — change regularly and differ by destination. The comparison in this article reflects general provider characteristics, not live plan data.
[SimFinder Travel](/en/travel/) lets you search by destination and see current plans from multiple providers side by side, including the local network partner for each plan. Use it to compare the specific plans available for your trip rather than relying on any static article.
**[Search travel eSIM plans for your destination →](/en/travel/)**
================================================================================
# How to Use Public Wi-Fi Safely
URL: https://sim-finder.com/en/guides/public-wifi-safety/
Type: guides (en)
Published: 2026-06-04
Public Wi-Fi risks are real but manageable. The spread of HTTPS (TLS) across the web has significantly reduced the harm a passive attacker on the same network can cause — your data in transit is encrypted to the destination server. The remaining risks come from rogue access points, evil-twin networks, and apps or services that do not use encryption. Five measures address the majority of practical risk: verify you are connecting to the correct network, use a VPN, keep HTTPS-only mode on, turn off auto-join for public networks, and switch to mobile data for banking and sensitive logins.
This guide explains each threat and what to do about it, without speculation about attacker capabilities that cannot be verified.
---
## Why Public Wi-Fi Is Different From Your Home Network
On your home or office Wi-Fi, you control who has the password and who has physical access to the router. On a public network in a café, hotel, airport, or library, anyone in range can join the same network — including attackers.
On a shared network, another device on the same subnet can:
- Passively observe unencrypted traffic (traffic sent without HTTPS)
- Attempt ARP spoofing or similar techniques to redirect traffic through their device
- Set up a rogue access point mimicking the legitimate network
What an attacker on the same network **cannot** do, assuming correct HTTPS implementation on the site you are visiting:
- Read the content of your HTTPS-encrypted sessions
- Learn which specific pages within an HTTPS site you are viewing (though the domain name may be visible via DNS or TLS Server Name Indication)
The practical implication: widespread adoption of HTTPS has reduced but not eliminated the risk of using public Wi-Fi. The threats that remain are worth understanding and defending against.
---
## Threat 1: Passive Eavesdropping on Unencrypted Traffic
When a website or application sends data without encryption — using plain HTTP rather than HTTPS — any other device on the same network can read that traffic. This includes login credentials, session cookies, and any information you submit in forms.
Most major websites now redirect HTTP connections to HTTPS automatically. However, some older or poorly maintained sites and applications still send data in plaintext. Apps that use unencrypted API connections are particularly difficult to identify because the user sees no visible difference.
**What to do:**
- In your browser, enable HTTPS-only mode. In Chrome and Firefox on desktop, this can be configured in security settings. On iOS, Safari enforces HTTPS warnings by default.
- Check for the padlock icon (or equivalent) in your browser's address bar before submitting any login or payment information.
- Treat any site that serves over plain HTTP on a public network as insecure for any sensitive interaction.
---
## Threat 2: Man-in-the-Middle Attacks
A man-in-the-middle (MITM) attack occurs when a device positions itself between your device and the router, intercepting traffic before it reaches the internet. This can be accomplished on a local network through ARP spoofing (also called ARP poisoning), where the attacker convinces your device that their MAC address corresponds to the router's IP address.
If the attacker can intercept your traffic before a TLS connection is established, they can potentially see the content of that traffic — or serve you a fake version of a site to capture credentials.
TLS certificate validation is a defence against MITM: if an attacker tries to impersonate an HTTPS site, the browser will warn you that the certificate is invalid (unless the attacker has somehow installed a trusted root certificate on your device, which would require prior compromise of the device).
**What to do:**
- Do not dismiss browser certificate warnings on public networks. A certificate error on a public network may indicate a MITM attack rather than a simple configuration issue.
- Use a VPN (see the VPN section below). A VPN establishes an encrypted tunnel to a server before any application traffic is sent, so a local MITM attacker sees only VPN-encrypted data.
---
## Threat 3: Evil-Twin and Rogue Access Points
An evil-twin attack involves setting up a Wi-Fi access point with the same network name (SSID) as a legitimate network. If you — or your device's auto-join — connects to the attacker's access point, all your traffic passes through the attacker's equipment before reaching the internet.
Unlike a MITM attack on a shared network, an evil-twin positions the attacker as the network infrastructure itself. The attacker does not need to exploit any protocol weakness to intercept your traffic — they see it by design.
Rogue access points can also be set up in locations without any legitimate network, advertising open Wi-Fi to attract connections.
**What to do:**
- Confirm the exact network name and, where possible, the network password with a staff member before connecting in airports, hotels, or cafés.
- Disable auto-join for all public networks (see the auto-join section below).
- Use a VPN immediately upon connecting to any public network, before performing any browsing or application activity.
---
## Threat 4: Auto-Join Connecting You Without Your Knowledge
Most operating systems save the name (SSID) of every Wi-Fi network you join and automatically reconnect when that SSID is detected again. An attacker can broadcast any SSID — including common names like "Starbucks", "Airport WiFi", or the name of your home network — and nearby devices with auto-join enabled may connect automatically.
This is not a theoretical risk. Network probing by devices broadcasting saved SSIDs is a known technique used in wireless security assessments.
**What to do:**
On iPhone and iPad (as of publication):
- Go to **Settings → Wi-Fi**, tap the **More Info button (shown as (i) on older iOS)** next to any saved public network → set **Auto-Join** to off, or tap **Forget This Network** after each session.
- **Settings → Wi-Fi → Auto-Join Hotspot** controls automatic joining of personal hotspots from contacts, not general public networks — these are separate settings.
On Android (as of publication, varies by manufacturer):
- Go to **Settings → Network & Internet → Wi-Fi → Saved networks** to view and remove saved public networks after use.
- Some manufacturers offer a per-network auto-connect toggle in the network detail screen.
For any public network you do not intend to return to: remove it from saved networks rather than simply turning auto-join off. An SSID that is saved but has auto-join disabled on iOS will still appear in the network list and may auto-join if a policy changes in an OS update.
---
## The Role of HTTPS (TLS) in Reducing Wi-Fi Risk
HTTPS uses TLS (Transport Layer Security) to encrypt the content of communications between your browser and the server. As of publication, [Let's Encrypt](https://letsencrypt.org/), a free certificate authority operated by the non-profit Internet Security Research Group (ISRG), has significantly reduced the cost and friction of deploying HTTPS, contributing to broad adoption across websites and applications.
HTTPS protects the **content** of your communication — what you submit in forms, what the server sends back — from a passive observer on the same network. It does not conceal the destination domain (visible in DNS queries and TLS Server Name Indication by default) or the fact that you are communicating with a given server.
Browser initiatives have pushed HTTP towards effective deprecation for authenticated interactions. The major browsers — Chrome, Firefox, Safari, Edge — display warnings or block forms submitted over plain HTTP.
**What HTTPS does not protect against:**
- Connecting to an evil-twin AP before a TLS session is established with the legitimate server
- Applications that do not implement HTTPS (this is increasingly rare for major services but still exists)
- Certificate errors that users dismiss without understanding the risk
**What this means in practice:** HTTPS has substantially reduced the risk of passive eavesdropping on public Wi-Fi. For ordinary browsing of major HTTPS sites, a passive attacker on the network learns very little. Active attacks — rogue APs, MITM — require more effort and remain possible, which is why additional measures (VPN, auto-join controls) are still warranted.
---
## Using a VPN on Public Wi-Fi
A VPN (Virtual Private Network) creates an encrypted tunnel between your device and a VPN server before routing your internet traffic. From the perspective of the local network — including any rogue access point — all outbound traffic from your device is the VPN tunnel; the contents are opaque.
**What a VPN provides on public Wi-Fi:**
- Encrypts traffic between your device and the VPN server, preventing local network observers from reading it
- Prevents local ARP spoofing or evil-twin attacks from seeing your application traffic
- Routes DNS queries through the VPN tunnel, preventing local observation of your DNS lookups
**What a VPN does not provide:**
- Protection against the VPN server itself (the VPN provider can see your traffic if they choose to log it)
- Anonymity on the destination server side — the destination sees the VPN server's IP address, but your traffic is visible to the VPN provider
- Protection if the VPN is not connected at the moment of attack (a VPN that drops connection and fails open does not protect against a race condition)
**Choosing a VPN provider:**
- Look for providers with independently audited no-logs policies. Several established commercial VPN providers have published audit reports from firms such as Cure53 or KPMG. Audits confirm the technical architecture but cannot guarantee future behaviour — they audit a snapshot.
- Operating system built-in VPN (IKEv2/IPsec, L2TP, WireGuard) can be configured with a self-hosted VPN server if you prefer to route traffic through infrastructure you control.
- A VPN built into a browser (such as the Opera browser VPN) only protects traffic from that browser, not from other apps.
**On mobile (iOS and Android):** Enable the VPN before connecting to a public network. If your VPN app supports an "always-on VPN" or "kill switch" mode, enable it — this prevents your device from sending any traffic outside the VPN tunnel if the VPN connection drops.
On iOS (as of publication): **Settings → General → VPN & Device Management → VPN** — you can configure an always-on VPN here if your MDM profile supports it, or use a VPN app that implements the kill switch via the Network Extension framework.
On Android (as of publication): **Settings → Network & Internet → VPN** — tap the gear icon on your configured VPN and enable **Always-on VPN** and **Block connections without VPN**.
---
## Captive Portals and What Happens When You First Connect
Many public Wi-Fi networks — in hotels, airports, cafés, and transit systems — use a captive portal: a web page that intercepts your first HTTP request after connection and requires you to accept terms, enter a room number, or pay before granting full internet access.
Captive portals present a specific security challenge: to display the portal page, your device must send unencrypted HTTP traffic that the portal can intercept and respond to. During this window, before you authenticate to the portal, your device is on the network without a VPN tunnel established, because the VPN itself may be blocked until the portal is completed.
**What to do with captive portals:**
- Complete captive portal authentication before attempting to connect your VPN, or enable the VPN in the device settings so it attempts to connect automatically after portal authentication.
- Use your browser's captive portal login page rather than entering credentials into an app or other interface — the browser displays the site's certificate, giving you a basis to verify you are on the legitimate portal.
- Some VPN apps include a "captive portal detection" mode that temporarily allows unencrypted traffic for portal authentication only. Check your VPN provider's documentation.
- On iOS (as of publication), the system automatically detects captive portals and opens a browser window for authentication. On Android, a notification appears prompting you to sign in.
Do not submit any personal account credentials (email, passwords) during the captive portal flow itself — captive portals require only network-level authentication (terms acceptance, payment code, or room number), not your personal account passwords.
After completing captive portal authentication, connect your VPN before proceeding to any other application or website.
---
## Avoid Sensitive Actions on Public Wi-Fi — Use Mobile Data Instead
Even with a VPN, some situations call for extra caution. For financial transactions, online banking, accessing email accounts, or any service where a credential compromise carries significant consequences, the lowest-risk approach is to switch to mobile data (turn Wi-Fi off entirely) before proceeding.
Mobile data travels over the cellular network. An attacker in a coffee shop or airport cannot passively observe your cellular traffic — they would need access to cellular network infrastructure. This is a categorically different threat model from public Wi-Fi.
**The practical workflow:**
1. Before logging into your bank, payment service, or work email from a public location: turn Wi-Fi off.
2. Perform the sensitive action over mobile data.
3. Turn Wi-Fi back on after completing the session and logging out.
For travellers using a dual-SIM setup with a local eSIM for data and a home SIM kept in reserve, your home SIM's data connection can serve as a fallback for sensitive tasks. See [Using Dual SIM for Travel](/en/guides/dual-sim-for-travel/) for how to configure line assignments. If you are on a limited data plan, be aware of data costs — see [How Much Mobile Data Do You Need?](/en/guides/data-usage-guide/) and [Data-Saving Techniques](/en/guides/save-data/) for context on consumption.
---
## Keep Your Operating System and Apps Updated
Operating system updates frequently include security patches for network-related vulnerabilities. The same applies to browser updates, which address TLS implementation issues, certificate validation bugs, and other security weaknesses.
An unpatched operating system on a public network is a more exposed target than a fully patched one — vulnerabilities in network stack components can sometimes be exploited by other devices on the same network without any action from the user.
**Practical steps:**
- On iPhone: **Settings → General → Software Update → Automatic Updates** — enable both "Download iOS Updates" and "Install iOS Updates". Allow major updates to download on Wi-Fi at home.
- On Android: **Settings → System → System Update** — enable automatic updates. The path varies by manufacturer.
- Update your browser independently of the OS on platforms where this applies (Chrome and Firefox update independently of the OS on Windows and macOS).
Perform major OS updates on a trusted network (your home Wi-Fi or mobile data) rather than a public Wi-Fi connection. Major updates can be several gigabytes in size — see [Data-Saving Techniques](/en/guides/save-data/) for how to restrict large downloads to Wi-Fi or mobile data you trust.
---
## Summary: Five Steps for Safer Public Wi-Fi Use
1. **Verify before connecting.** Confirm the exact network name with a staff member. Avoid connecting to open networks you did not seek out.
2. **Enable a VPN immediately.** Connect your VPN before doing anything else on the network. Use always-on / kill switch mode if available.
3. **Keep HTTPS-only mode active.** Do not dismiss certificate warnings.
4. **Turn off auto-join for public networks.** Remove public networks from saved networks after each session.
5. **Use mobile data for sensitive actions.** Switch to your cellular connection for banking, financial accounts, and sensitive logins — do not rely on Wi-Fi for those tasks even with a VPN.
If you use public Wi-Fi frequently when travelling, a Wi-Fi Calling–enabled SIM can let you receive calls and messages over trusted Wi-Fi at home or abroad without exposing your call content to the local network — see [Wi-Fi Calling (VoWiFi)](/en/guides/wifi-calling/) for how that works. For managing connectivity across multiple countries, [International Roaming Explained](/en/guides/international-roaming/) covers how your home SIM behaves abroad.
---
## Related Guides
- [Wi-Fi Calling (VoWiFi): Calling Where Signal Is Weak](/en/guides/wifi-calling/) — how calls and SMS over Wi-Fi work, and how they differ from public Wi-Fi browsing
- [How Much Mobile Data Do You Need?](/en/guides/data-usage-guide/) — per-app data consumption figures to inform your mobile-data-for-sensitive-tasks decision
- [Data-Saving Techniques](/en/guides/save-data/) — iOS and Android settings to reduce mobile data use when switching off Wi-Fi for security
- [Using Dual SIM for Travel](/en/guides/dual-sim-for-travel/) — keeping your home number active alongside a travel eSIM, with line assignment for data and calls
- [International Roaming Explained](/en/guides/international-roaming/) — how your home SIM works abroad and when it may be preferable to public Wi-Fi for data
================================================================================
# How to Set Up eSIM on Android via QR Code
URL: https://sim-finder.com/en/guides/qr-code-android/
Type: guides (en)
Published: 2026-04-16
Setting up an eSIM on Android takes under 10 minutes when you have the QR code ready. The exact menu path differs by manufacturer — Google Pixel and Samsung Galaxy are the two most common cases and are covered in detail below.
A stable Wi-Fi connection and an unlocked device are the two requirements you must confirm before you start.
## Before You Begin
### 1. Verify eSIM compatibility
Check that your device supports eSIM:
- **Google Pixel**: Pixel 3 and later generally support eSIM. Pixel 7 and later support two active eSIMs simultaneously (dual eSIM). US-market Pixel 10, 10 Pro, and 10 Pro XL are eSIM-only (no physical SIM slot).
- **Samsung Galaxy**: Galaxy S20 and later flagship models support eSIM. Galaxy Z Fold and Z Flip series also support eSIM. Availability varies by region and carrier variant — some carrier-locked or China-market models do not support eSIM.
- **Other Android brands**: Many recent OnePlus, OPPO, Motorola, and Xiaomi models support eSIM. The quickest check is to open Settings and look for an "Add eSIM" or "Download SIM" option under your mobile network settings. If the option is absent, the device likely does not support eSIM.
### 2. Confirm your device is unlocked
A carrier-locked device will either hide the eSIM menu or fail during activation. If you purchased your phone through a carrier, check with them to confirm unlock status or submit an unlock request before proceeding.
### 3. Connect to Wi-Fi
eSIM profile downloads require a stable internet connection. Wi-Fi is recommended for reliability. Set up the eSIM at home or on a reliable network. Once the profile is downloaded, you do not need Wi-Fi to use the eSIM for mobile data.
### 4. Have your QR code ready
Obtain the QR code from your carrier or travel eSIM provider:
- **Mobile carriers**: After completing eSIM activation online, the carrier sends the QR code to your registered email or displays it in their app or member portal.
- **Travel eSIM providers** (Airalo, Holafly, Nomad, and others): The QR code is delivered via email and inside the provider's app immediately after purchase.
Display the QR code on a second device (laptop, tablet, or a second phone) or print it. If the QR code is only available on the phone you are setting up, take a screenshot before starting — you will need it.
---
## Setup on Google Pixel
Google Pixel phones run Android as developed by Google directly, with minimal manufacturer UI customization compared to Samsung One UI or other Android skins, so these steps also apply to many non-Samsung Android phones.
**Steps:**
1. Open **Settings**
2. Tap **Network & internet**
3. Tap **SIMs**
4. Tap **Add SIM** or the **+** icon
5. On the "Download a SIM instead?" screen, tap **Next**
6. Point the camera at your QR code to scan it
7. When your carrier name appears, tap **Download**
8. After the download completes, tap **Activate**
**If your QR code is only on this phone:** At step 6, tap **Use photo instead** and select the screenshot you saved earlier.
**If "Add SIM" does not appear:** The device may not support eSIM, or it is carrier-locked. See the [eSIM activation troubleshooting guide](/en/guides/activation-failed/) for next steps.
---
## Setup on Samsung Galaxy (One UI)
Samsung's One UI uses different menu names from stock Android. These steps apply to Galaxy S20 through S25 series and Z Fold/Flip series running One UI 4.1 or later.
**Steps:**
1. Open **Settings**
2. Tap **Connections**
3. Tap **SIM card manager**
4. Tap **Add mobile plan** or **Add eSIM**
5. Select **Scan carrier's QR code**
6. Point the camera at your QR code to scan it
7. Tap **Add** or **Download** when prompted
8. After installation, you may be prompted to restart the device — follow the on-screen instruction
**After restart:** Go to **Settings > Connections > SIM card manager** to set which SIM handles mobile data, calls, and SMS.
---
## Setup on Other Android Phones
For OnePlus, OPPO, Motorola, Xiaomi, and other Android brands, the underlying process is the same. Look for one of these menu paths:
- **Settings > Network > SIM settings > Add eSIM**
- **Settings > Mobile network > Add mobile plan**
- **Settings > Connections > Mobile networks > Add eSIM**
Menu names vary by manufacturer and Android version, but you are looking for an option to add or download a new SIM or mobile plan. Once you find that screen, the QR scan process is identical to the steps above.
---
## Dual SIM Setup After Installation
Once your eSIM is installed, configure how your two SIMs (eSIM + physical SIM, or eSIM + eSIM) divide tasks.
**On Google Pixel:**
Go to **Settings > Network & internet > SIMs** and assign each SIM to:
- **Mobile data** — which SIM carries data traffic
- **Calls** — which SIM is used for outgoing calls (or ask each time)
- **SMS** — which SIM sends text messages
**On Samsung Galaxy:**
Go to **Settings > Connections > SIM card manager** for the same options.
**Common dual SIM setup for travelers:** Set the travel eSIM as the mobile data SIM and keep your home SIM active for calls and SMS. This lets you use local data rates without losing access to your regular phone number. For a full walkthrough of using dual SIM with a travel eSIM, see the [first travel eSIM guide](/en/guides/first-time-guide/).
---
## Troubleshooting
### QR code scan fails or shows an error
- Check that the QR code display is clean, undamaged, and free from screen glare
- Verify your Wi-Fi connection is stable
- Confirm the QR code has not already been used — eSIM QR codes are single-use
- Switch to manual entry: your carrier should provide an SM-DP+ server address and an activation code alongside the QR code
### The eSIM installs but data does not work
- Confirm mobile data is assigned to the new eSIM in your SIM settings
- For travel eSIMs, enable **data roaming** — travel eSIMs use roaming agreements to provide connectivity
- If your carrier requires a specific APN, enter it manually under mobile network settings
### "Add SIM" option is missing entirely
- Verify eSIM support on your device manufacturer's support page
- Check whether the device is carrier-locked and request an unlock if necessary
- Ensure you are running Android 11 or later (required for eSIM on most devices)
For additional error codes and carrier-specific issues, see the [eSIM activation troubleshooting guide](/en/guides/activation-failed/).
---
## Related Articles
For an overview of what eSIM is and how it compares to a physical SIM, see [What Is an eSIM?](/en/guides/what-is-esim/). If you plan to use two SIMs together, [What Is Dual SIM?](/en/guides/what-is-dual-sim/) explains DSDS, DSDV, and DSDA configurations.
If you are setting up a travel eSIM for an international trip, the [First Travel eSIM Guide](/en/guides/first-time-guide/) covers the full flow from purchase to first connection abroad.
For a broader comparison of eSIM and physical SIM across cost, convenience, and security, see the blog article [eSIM vs SIM Card for International Travel](/en/blog/esim-vs-sim-card-international-travel/).
The iPhone QR code setup process is covered in a separate guide — [How to Set Up eSIM on iPhone via QR Code](/en/guides/qr-code-iphone/).
================================================================================
# How to Set Up eSIM on iPhone via QR Code
URL: https://sim-finder.com/en/guides/qr-code-iphone/
Type: guides (en)
Published: 2026-04-16
To add an eSIM to your iPhone via QR code, you need three things in place: a compatible iPhone, a Wi-Fi connection (or an active SIM), and a QR code from your carrier. The setup itself takes under five minutes.
If you're new to eSIM technology, read [What Is an eSIM?](/en/guides/what-is-esim/) first. If your setup fails partway through, [eSIM Activation Failed: Troubleshooting](/en/guides/activation-failed/) covers every common error.
---
## Before You Start: 3 Prerequisites
### 1. Confirm Your iPhone Supports eSIM
QR code eSIM setup works on iPhone XS (2018) and every model released after it. Here is the current compatibility breakdown based on Apple's official support page:
| Model | Configuration |
|-------|---------------|
| iPhone XS / XS Max / XR (2018) | Physical SIM + 1 eSIM |
| iPhone 11 / 11 Pro / 11 Pro Max | Physical SIM + 1 eSIM |
| iPhone SE (2nd generation) | Physical SIM + 1 eSIM |
| iPhone 12 series | Physical SIM + 1 eSIM |
| iPhone 13 series | Physical SIM + 2 eSIMs (dual eSIM) |
| iPhone SE (3rd generation) | Physical SIM + 2 eSIMs (dual eSIM) |
| iPhone 14 series (outside the US) | Physical SIM + eSIM |
| iPhone 15 series (outside the US) | Physical SIM + eSIM |
| iPhone 16 series (outside the US) | Physical SIM + eSIM |
| iPhone 16e | Physical SIM + eSIM (most regions) |
| **iPhone 14–16e (US models)** | **eSIM-only — no physical SIM slot** |
| **iPhone 17 series (US, Canada, Mexico, Japan, and several other regions)** | **eSIM-only — no physical SIM slot** |
| iPhone Air (all regions) | eSIM-only — no physical SIM slot |
**US travelers and US-purchased iPhones:** If you bought an iPhone 14 or later in the United States, your phone has no physical SIM slot. It can only use eSIM. This makes QR code setup the standard activation method — you do not need to visit a store or handle a card.
To check eSIM support on your device without looking it up: open **Settings > Cellular**. If you see **Add eSIM** or **Set Up Cellular**, your iPhone supports eSIM.
### 2. Check That Your iPhone Is Carrier-Unlocked
A carrier-locked iPhone can only use eSIM plans from the carrier it's locked to.
To check: go to **Settings > General > About** and look for **Carrier Lock**. If it says **No SIM restrictions**, your iPhone is unlocked and compatible with any carrier's eSIM.
If it says locked, contact your current carrier to request an unlock. Most carriers unlock devices online at no charge once any contract or installment period is complete.
### 3. Have a Stable Internet Connection
You need internet access to download the eSIM profile from the carrier's server. Connect to a Wi-Fi network before starting. If you have a physical SIM with active data in the same iPhone, that connection also works.
**If you're setting up a travel eSIM before a trip:** do it at home on reliable Wi-Fi. Airport Wi-Fi is often unstable, and a failed download just before boarding is stressful.
---
## How to Get a QR Code
The QR code comes from whoever sold you the eSIM plan.
### From a Mobile Carrier (New Plan or eSIM Switch)
Log in to your carrier's app or website. Look for an option labeled **Switch to eSIM**, **Add eSIM**, **eSIM Activation**, or **SIM Management**. After you complete any required identity verification, the carrier generates your QR code — usually displayed on screen or sent to your email.
The exact location of this option varies by carrier. If you don't see it, use the carrier's live chat or call support.
### From a Travel eSIM Provider
Providers like Airalo, Holafly, Nomad, and Saily send your QR code by email and also display it in their app after purchase. Most travel eSIMs are data-only — they do not include a voice or SMS line. For a full walkthrough of buying and using a travel eSIM, see [Your First Travel eSIM: Complete Guide](/en/guides/first-time-guide/).
---
## Step-by-Step Setup Instructions
### Standard Method (Scanning with Camera)
Use this when the QR code is on a separate screen or printed on paper.
**Step 1 — Open the QR code on a second device**
Display the QR code on a laptop, tablet, or another phone — not on the iPhone you're configuring. If the QR code is printed, have it in front of you.
**Step 2 — Go to Settings > Cellular**
On your iPhone, open the **Settings** app and tap **Cellular** (or **Mobile Data** in some regions).
**Step 3 — Tap "Add eSIM"**
Tap **Add eSIM** or **Add Cellular Plan**. The label differs slightly depending on your iOS version and whether you already have a line active.
**Step 4 — Scan the QR code**
The camera activates. Point it at the QR code. When the code is recognized, a notification or pop-up appears: **Cellular Plan Detected**.
**Step 5 — Confirm and add**
Tap **Continue** and then **Add Cellular Plan**. Your carrier may ask for a confirmation code at this point — check your email or SMS for a short numeric code.
**Step 6 — Wait for the download**
The eSIM profile downloads from your carrier's server. This takes a few seconds to about a minute depending on your connection. When you see **Cellular Plan Added**, the installation is complete.
**Step 7 — Configure your lines**
iOS will prompt you to set a label for the new line (for example, "Travel" or "Work") and to choose default settings. See the [Dual SIM setup section](#setting-up-dual-sim-after-adding-an-esim) below for what to configure.
---
### If the QR Code Is Already on Your iPhone (iOS 17.4 and Later)
When the carrier sends the QR code by email or you have it saved as a photo, you cannot use the camera to scan it from the same device. iOS 17.4 added a direct workaround:
1. Open the QR code image in the **Mail**, **Photos**, or **Safari** app.
2. **Long-press** the image.
3. Tap **Add eSIM** from the pop-up menu.
This triggers the same installation flow as the camera scan.
**On iOS 17.3 and earlier:** transfer the QR code to a second device and scan it normally with your iPhone's camera.
---
### During Initial iPhone Setup (Out-of-Box)
When setting up a brand-new iPhone for the first time, iOS shows a **Set Up Cellular** screen. Tap **Use QR Code**, then scan with the camera. The process is identical to the standard method above.
This is the primary activation path for eSIM-only iPhones (US iPhone 14 and later), since there is no physical SIM to insert.
---
## Setting Up Dual SIM After Adding an eSIM
Adding an eSIM creates a two-line (dual SIM) configuration. You need to decide how each line is used.
Go to **Settings > Cellular** to see both lines and configure the following:
| Setting | What to Choose |
|---------|----------------|
| **Default Voice Line** | The line you use for outgoing calls |
| **Default Line for SMS/iMessage** | The line used for non-iMessage texts |
| **Cellular Data** | The line used for mobile data |
| **Allow Cellular Data Switching** | See note below |
**Allow Cellular Data Switching:** When enabled, iOS can use either line for data depending on coverage. If you add a travel eSIM and leave this on, your home SIM may use roaming data without warning. **Turn it off** when using a travel eSIM abroad to keep data usage on the travel line only.
For a deeper explanation of dual SIM modes (DSDS vs dual eSIM), see [What Is Dual SIM?](/en/guides/what-is-dual-sim/).
---
## Troubleshooting Common Problems
**"Unable to Add Cellular Plan" error**
This usually means one of the following: the QR code has already been used on another device, the QR code has expired, or you have reached the number of stored eSIM profiles your device allows (iPhones can store 8 or more eSIMs, but check with your carrier if you frequently install and delete plans). Request a new QR code from your carrier.
**QR code scans but nothing happens**
Clean your camera lens. Try adjusting the distance between the code and the camera to around 10–30 cm. Make sure the code is in focus and well-lit. If the code is damaged or very low resolution, switch to the manual entry method: [Set Up eSIM with a Manual Code (SM-DP+ Address)](/en/guides/manual-code/).
**eSIM installed but no mobile data**
Installing the profile and turning on data are separate actions. In **Settings > Cellular**, find your new eSIM line and verify that **Cellular Data** is switched on. Then confirm it is selected under **Cellular Data** as the active line. If data roaming is required (e.g., you're using a local SIM abroad), also enable **Data Roaming**.
**Carrier Lock message during setup**
Your iPhone is locked to another carrier. Contact your carrier to unlock it before proceeding. Unlocking is typically free once your device is paid off or your contract term has ended.
For issues not listed here, see [eSIM Activation Failed: Troubleshooting](/en/guides/activation-failed/).
---
## After Setup: What Comes Next
Once your eSIM is running, you can manage it fully from **Settings > Cellular**:
- Rename the line for clarity (e.g., "Home", "Travel Japan")
- Toggle the line on or off without deleting it
- Switch which line handles calls, SMS, or data at any time
**Transferring or reinstalling your eSIM:** If you upgrade your iPhone or need to reinstall the eSIM, note that each QR code is single-use. You will need to request a new QR code from your carrier. Some carriers support [eSIM Quick Transfer](/en/guides/transfer-iphone/), which lets compatible iPhones transfer an eSIM directly without a QR code.
To browse eSIM plans for your destination, [search on SimFinder Travel →](/en/travel/)
---
Sources:
- [Set up eSIM on iPhone - Apple Support](https://support.apple.com/en-us/118669)
================================================================================
# How to Read Network Quality Metrics
URL: https://sim-finder.com/en/guides/quality-metrics/
Type: guides (en)
Published: 2026-06-05
Choosing a mobile plan based on advertised download speed is like judging a road by its maximum speed limit without checking whether there are traffic jams, potholes, or dead ends. Download speed is one data point. Six dimensions together define network quality: download and upload throughput, latency, jitter, packet loss, geographic coverage, and congestion stability. Each affects a different aspect of daily use. Understanding all six is essential for making a genuinely informed comparison.
The key points covered in this article:
- What each of the six quality dimensions measures and why it matters
- How each dimension affects real-world applications: video, voice calls, gaming, web browsing
- Why speed is a poor single proxy for quality
- How to self-measure and what the limitations of speed tests are
- How SimFinder's quality score brings these dimensions together for multi-carrier comparison
---
## Why Speed Alone Is Misleading
Most carrier advertising leads with peak download speed. The figure is memorable, easy to compare, and looks impressive in a headline. However, it describes only one aspect of a connection — and not the aspect that matters most for many common tasks.
Consider two hypothetical connections on the same device, same location:
- **Connection A**: 200 Mbps download, 80 ms latency, 25 ms jitter
- **Connection B**: 60 Mbps download, 20 ms latency, 3 ms jitter
For downloading a large file, Connection A finishes faster. For everything else a smartphone typically does — loading a webpage (dozens of small parallel requests each requiring a round-trip), making a video call (continuous low-latency bidirectional stream), navigating maps (frequent small requests), playing an online game (response time measured in milliseconds) — Connection B delivers a noticeably better experience.
Speed tests measure throughput under a single ideal burst. They do not capture latency under load, jitter variability, how performance degrades during peak hours, or how consistent coverage is across the geography you actually use. A balanced quality assessment requires all six dimensions examined below.
---
## Dimension 1: Download and Upload Speed (Mbps)
**What it measures.** Throughput is the volume of data transferred per unit of time, expressed in megabits per second (Mbps). Download speed describes the transfer from network to device; upload speed describes the reverse.
**How it affects real experience.**
| Application | Minimum workable | Comfortable |
|-------------|-----------------|-------------|
| Web browsing | 1–2 Mbps | 5+ Mbps |
| HD video streaming (1080p) | 5–8 Mbps sustained | 15+ Mbps |
| 4K video streaming | 20–25 Mbps sustained | 40+ Mbps |
| Video call (HD) | 1.5–2.5 Mbps up+down | 5+ Mbps |
| Large file download | Higher is better | — |
Upload speed matters for video calls (your camera stream), cloud backup, and sharing files. Carriers often provision significantly less upload capacity than download capacity on mobile networks because the traffic pattern of most consumer devices is asymmetric — they download far more than they upload. An upload speed of 10–20 Mbps supports HD video calls comfortably; upload speeds below 2 Mbps will constrain video call quality.
**Limitation.** Advertised speeds are peak figures measured in ideal single-user conditions. Real-world speeds depend on distance from the base station, signal strength, number of concurrent users on the cell, and device capability. For context on the underlying radio technology that sets the ceiling on achievable speeds, see [4G/LTE vs 5G: What They Are and How They Differ](/en/guides/4g-5g-explained/).
---
## Dimension 2: Latency (ms, Ping)
**What it measures.** Latency — commonly called ping — is the round-trip time for a small data packet to travel from a device to a server and back, measured in milliseconds (ms). A lower number is better.
**How it affects real experience.** Latency is the governing metric for anything interactive. When you tap a link, the browser sends a request and waits for the server's response before rendering content. That wait is dominated by latency, not throughput. A connection with 10 Mbps but 15 ms latency will load most pages faster than a connection with 100 Mbps but 120 ms latency, because each of the dozens of resources on a modern webpage requires its own round-trip.
For voice and video calls, latency above 150 ms in one direction (300 ms round-trip) creates noticeable conversational awkwardness because one party is still speaking when the other perceives silence and begins to respond. At 300 ms one-way (600 ms round-trip), most people find conversation frustrating.
For online gaming, the required latency depends on the game type. Turn-based or strategy games are tolerant of 100–200 ms. First-person shooters and real-time competitive games require consistent sub-50 ms latency to avoid the hit-registration problems commonly described as "lag."
**Typical mobile latency ranges.** On a well-maintained 4G LTE network with moderate load, round-trip latency is typically in the 20–60 ms range. 5G Standalone networks are designed with lower latency targets, with typical consumer connections in the 10–30 ms range on mid-band 5G SA. These figures vary by carrier, load, and geography; they are not guarantees.
---
## Dimension 3: Jitter
**What it measures.** Jitter is the statistical variation in round-trip latency across successive packets. If ten consecutive packets arrive with round-trip times of 22 ms, 21 ms, 23 ms, 22 ms, the jitter is very low. If they arrive at 22 ms, 55 ms, 18 ms, 80 ms, the jitter is high even if the average latency appears moderate.
**How it affects real experience.** Real-time applications that depend on a steady stream of data — voice calls, video calls, live audio, online gaming — are most sensitive to jitter. These applications use a technique called a jitter buffer: incoming packets are held briefly and released at a steady rate, smoothing out delivery. When jitter is low, the buffer can be small and end-to-end latency remains low. When jitter is high, the application must use a larger buffer to avoid dropouts, which increases effective latency. If jitter exceeds the buffer size, the application drops packets, resulting in choppy audio, frozen video frames, or missed inputs in a game.
Jitter is rarely displayed in standard speed test results. Applications designed for VoIP quality testing — such as those conforming to ITU-T P-series recommendations — report jitter separately. For most consumers, high jitter manifests as intermittent audio dropouts during calls despite an apparently adequate average speed.
**What causes jitter on mobile.** Radio interference, handover between base stations as a device moves, and network congestion at intermediate routing points all contribute to jitter. It is more pronounced on mobile networks than on wireline connections because the radio medium is inherently variable.
---
## Dimension 4: Packet Loss
**What it measures.** Packet loss is the percentage of data packets sent that never reach their destination. In a lossless connection, every packet sent arrives; in practice, no wireless network achieves this. Packet loss is expressed as a percentage and is considered a quality indicator when measured over a sustained period.
**How it affects real experience.** The impact of packet loss depends on the application protocol:
- **TCP applications** (web browsing, file downloads, most app traffic): TCP automatically detects lost packets and retransmits them. The user experiences a slowdown rather than a visible error, because the sender must wait for an acknowledgement before sending subsequent data. High packet loss causes throughput to degrade significantly and can cause TCP connections to stall.
- **UDP applications** (voice calls, video streaming, gaming): UDP does not retransmit lost packets. Applications built on UDP use their own application-layer mechanisms to handle loss. Voice codecs can interpolate over brief gaps, but sustained loss above approximately 1–2% causes perceptible audio degradation. Video conferencing applications similarly degrade — freezes, pixelation, and dropped frames all indicate packet loss.
A packet loss rate below 0.5% is generally considered acceptable for mobile networks in normal conditions. Rates above 2–3% indicate a problem — insufficient signal, severe congestion, or a network configuration issue. Loss rates above 5% will degrade nearly all real-time applications noticeably.
---
## Dimension 5: Coverage
**What it measures.** Coverage describes the geographic area within which a network provides a usable signal. It is typically presented as a percentage of population covered or as a map. Coverage is distinct from throughput: a cell on the edge of coverage may provide adequate signal for voice and basic data but insufficient signal strength for high-speed data or 5G.
**How it affects real experience.** Coverage is the binary precondition for all other quality dimensions. No amount of low latency or high throughput helps if the device has no signal. Coverage quality considerations include:
- **Indoor penetration.** Low-band frequencies (below 1 GHz) propagate through building materials more effectively than mid-band and high-band frequencies. A carrier's 5G coverage map may show coverage based on outdoor signal; indoor coverage at the same location may rely on 4G LTE low-band.
- **Rural and suburban coverage.** A carrier may have 5G coverage in dense urban areas but revert to 4G LTE or even 3G in rural regions. For users who travel outside major cities, the breadth of 4G LTE coverage is often more relevant than 5G peak speeds.
- **MVNOs and host network coverage.** MVNOs lease capacity from MNOs and generally inherit the host network's geographic coverage. However, the coverage available to an MVNO subscriber may be subject to restrictions in the wholesale agreement. For more on how this relationship works, see [What Is an MVNO?](/en/guides/what-is-mvno/).
For information on how specific frequency bands influence indoor penetration and range, see [Frequency Bands and Device Compatibility](/en/guides/frequency-bands/).
---
## Dimension 6: Congestion Stability
**What it measures.** Congestion stability describes how consistently a network performs when the cell or backhaul is heavily loaded — typically during peak hours (evening commutes, lunch breaks, large public events). A network may show excellent quality metrics in off-peak testing but degrade significantly when demand on the cell peaks.
**How it affects real experience.** For most users, congestion is the most frustrating source of poor performance because it appears as unpredictable slowdowns that are difficult to diagnose. A speed test run at 2 AM may show 80 Mbps; the same location at 7 PM may deliver 5 Mbps with elevated latency and jitter. Both measurements are technically accurate for the time they were taken.
Congestion affects MVNOs differently from MNOs. The capacity an MVNO purchases from its host MNO is provisioned at a wholesale connection point (POI — Point of Interface). When demand from the MVNO's subscriber base exceeds the provisioned capacity at the POI, all MVNO subscribers on that connection experience speed throttling simultaneously, even if the host MNO's own customers on the same cell are unaffected. This is the structural mechanism behind the common observation that MVNO speeds degrade more severely during peak hours than MNO speeds on the same physical network. Why MVNOs slow down at peak times and how to evaluate carriers for congestion resilience is covered in depth in [Why MVNOs Slow Down at Peak Hours](/en/guides/why-mvno-slow/).
Network quality in congested conditions is the hardest dimension for consumers to measure independently because it requires testing at different times and locations over multiple days.
---
## How to Self-Measure Network Quality
Speed test applications — available for both iOS and Android — measure download speed, upload speed, and round-trip latency with a single button press. Results are reported in Mbps (speed) and ms (latency). Running a test takes under 30 seconds.
**Steps for a meaningful self-assessment.**
1. **Test at multiple times of day.** Run tests in the morning, at midday, in the evening peak (roughly 18:00–22:00 in most markets), and late at night. Evening and midday results reveal congestion behaviour; off-peak results show the best-case performance.
2. **Test in representative locations.** Test where you actually use your device — at home, at work, on your commute, in locations you frequent. A single result from one location is not representative.
3. **Note the connected technology.** Check whether the device is on 4G LTE, 5G NSA, or 5G SA when each test runs. The radio generation significantly affects throughput and latency results.
4. **Run multiple tests in sequence.** Latency and speed can vary significantly between tests on the same connection. Three to five runs in the same location gives a more reliable picture than a single result.
5. **Record and compare.** Manual tracking across carriers, times, and locations is the most rigorous way to compare options in your specific geography.
**Limitations of speed tests.**
Speed tests are useful but have structural limitations as quality indicators:
- They measure a single sustained download or upload, not the many small parallel requests that constitute real browsing.
- Latency is reported as a point-in-time figure, not as a distribution. Jitter is not included in most consumer speed test reports.
- Packet loss is not measured by most speed tests.
- Server location affects results; a test server near the device underestimates real-world latency for connections to distant services.
- Performance may be influenced by the device's processor and Wi-Fi chip, not only the network.
- Results at one time of day do not predict peak-hour behaviour.
Specialist network measurement tools — used by independent benchmarking organisations such as Ookla and Opensignal — address some of these limitations by aggregating millions of measurements across diverse conditions. Country-level median speed and latency benchmarks from these sources provide a more statistically reliable picture of carrier quality than individual speed tests, but they still cannot capture your specific location and usage pattern.
---
## The SimFinder Quality Score
Because real-world network quality is multidimensional, SimFinder's quality score is designed to reflect more than peak download speed. When you compare plans on [SimFinder](/en/), the quality score for each carrier synthesises available data across the dimensions described in this article — including coverage breadth and congestion-period performance where data is available — to give a single comparable figure that weights dimensions relevant to typical consumer use.
No single number can capture every nuance of network quality for every user in every location. The score is a starting point for comparison, not a substitute for personal testing in your area. Where an MVNO uses a host MNO's infrastructure, the score reflects the network quality of that host, adjusted for the typical impact of POI capacity constraints on peak-hour performance.
The [SimFinder quality score methodology](/en/guides/simfinder-score/) is documented separately, including the sources used, update cadence, and the weighting of each quality dimension. The underlying network quality data is updated periodically from independent benchmark sources; the methodology page describes how those sources are applied.
---
## Practical Implications When Choosing a SIM
Understanding the six quality dimensions translates into more targeted questions when evaluating a carrier or plan.
**For video and music streaming:** Download speed is the primary concern, with coverage across your commute route a secondary consideration. A minimum of 5–8 Mbps sustained is needed for 1080p streaming; 25 Mbps or more for 4K. Jitter and latency matter less for buffered streaming than for live content.
**For voice and video calls:** Latency and jitter are more important than raw speed. An upload speed of at least 1.5–2.5 Mbps is needed for HD video call quality. Packet loss above 1–2% will cause noticeable audio degradation.
**For remote work:** All dimensions matter. Latency affects responsiveness of cloud applications and collaboration tools. Upload speed determines the quality of your video call stream. Congestion stability during business hours is critical — a connection that degrades at 10 AM in your home office is a practical problem regardless of its off-peak performance.
**For gaming:** Latency consistency and low jitter are the defining factors. Peak download speed has minimal relevance to gaming experience once the game is loaded.
**For general browsing and app use:** Latency and a moderate download speed (10–20 Mbps) cover the majority of use cases. Geographic coverage in all locations you use your device is the baseline requirement.
**For MVNOs specifically:** Congestion stability during peak hours and the quality of the host MNO's underlying network are key considerations, alongside the advertised speeds. See [What Is an MVNO?](/en/guides/what-is-mvno/) for a full explanation of how MVNOs access the host network and why performance can differ from the host MNO even on the same physical infrastructure.
---
## Per-Use-Case Quick Reference
The table below consolidates the quality thresholds discussed in this article. Values represent typical requirements for a smooth experience under normal conditions; demanding scenarios (4K streaming, competitive gaming) are noted separately.
| Use Case | Min Download | Comfortable Download | Min Upload | Max Latency (round-trip) | Max Jitter | Max Packet Loss |
|----------|-------------|---------------------|-----------|--------------------------|------------|-----------------|
| Web browsing | 2 Mbps | 10+ Mbps | — | 200 ms | 50 ms | 2% |
| HD video streaming (1080p) | 5 Mbps | 15+ Mbps | — | 500 ms† | 100 ms† | 1% |
| 4K video streaming | 20 Mbps | 40+ Mbps | — | 500 ms† | 100 ms† | 0.5% |
| VoIP / voice call | 0.1 Mbps | 0.5 Mbps | 0.1 Mbps | 150 ms | 30 ms | 1% |
| HD video call | 1.5 Mbps | 5+ Mbps | 1.5 Mbps | 100 ms | 20 ms | 0.5% |
| Remote desktop / cloud apps | 2 Mbps | 10+ Mbps | 1 Mbps | 80 ms | 20 ms | 0.5% |
| Casual online gaming | 1 Mbps | 5+ Mbps | 0.5 Mbps | 150 ms | 30 ms | 1% |
| Competitive / FPS gaming | 1 Mbps | 5+ Mbps | 0.5 Mbps | 50 ms | 10 ms | 0.1% |
| Large file download | Higher is better | — | — | Not critical | Not critical | 2% |
| Cloud backup / upload | — | — | 10+ Mbps | Not critical | Not critical | 1% |
†Buffered video streaming is tolerant of higher latency because the player pre-loads content. These thresholds apply to live streaming; on-demand content with a large buffer can tolerate latency in the seconds range without any visible effect.
The critical observation from this table is that most everyday use cases are not limited by download speed once a moderate threshold is crossed, but are instead constrained by latency, jitter, and packet loss — dimensions that speed test headlines do not convey.
---
## How to Interpret a Speed Test Result
Speed test applications report three primary figures: download speed (Mbps), upload speed (Mbps), and ping (round-trip latency in ms). Here is what each number actually tells you and what it does not.
**Download speed result.** The test opens a TCP connection to a nearby server and saturates it with data for several seconds, measuring how fast data arrives. This models a single large file download. It does not model the request-response pattern of web browsing, where the browser makes dozens of small requests, each requiring a full round-trip before the next batch can be fetched. A connection that scores high on download may still feel sluggish for browsing if latency is elevated.
**Upload speed result.** The symmetric measurement in the opposite direction. This is the primary constraint for video calls, cloud backup, and file sharing. Upload speeds on mobile networks are typically 20–50% of download speeds, reflecting the asymmetric provisioning of most consumer mobile services.
**Ping result.** The test sends a small probe packet to the server and measures the round-trip time. This is a single measurement — not an average and not a distribution. A ping of 35 ms on one test could coexist with occasional spikes to 200 ms that would cause noticeable disruption on a video call. To get a more reliable latency picture, look for applications that run continuous ping tests and report both the average and the maximum, or observe the variance across five to ten individual tests run in quick succession.
**What the result does not tell you.** A standard speed test result contains no information about jitter, packet loss, performance under load (when the cell is shared with many other users), or how the result will change at peak hours. It also reflects conditions at one point in time; the same test run one hour later during a local congestion event may yield significantly different numbers. Use speed test results as one data point in a larger picture, not as a definitive quality assessment.
**Server proximity effects.** Most speed test applications automatically select the nearest available server. This minimises measured latency and maximises measured throughput — giving the most favourable possible figures for the connection. When you actually use the internet, requests travel to servers that may be located in different cities or countries. Real-world latency to a distant service will be higher than the speed test ping result to a local server.
---
## Coverage Versus Speed: The Real Tradeoff
A common mistake when evaluating carriers is optimising for peak speed at the expense of consistent coverage. In practice, having a signal is always more valuable than having a fast signal, and the tradeoff is not merely theoretical — it is built into the physics of radio frequency propagation.
High-band frequencies (above 3 GHz, including most 5G mmWave and some mid-band deployments) carry far more data per unit of time than low-band frequencies, but their signals attenuate rapidly with distance and are blocked by building materials. A 5G cell operating on high-band frequencies may cover only a few hundred metres in urban conditions and provide negligible indoor coverage. Moving outside that small radius drops the device to a lower-frequency fallback.
Low-band frequencies (below 1 GHz) carry less data per unit time but propagate over kilometres and penetrate buildings effectively. A single low-band cell can provide baseline coverage over a rural area where a high-band cell would be inaudible.
**What this means for users.** A carrier that has invested heavily in high-band 5G infrastructure will show impressive peak speeds in dense urban environments but may deliver a worse practical experience than a carrier with extensive low-band 4G LTE coverage in locations where users are indoors, on the urban periphery, or in suburban and rural areas. For the majority of time that a typical device spends connected — inside homes, offices, and transit infrastructure — low-band coverage quality is more consequential than peak 5G speed.
When comparing carriers, check coverage maps for the specific areas you use your device most, and distinguish between outdoor and indoor coverage claims. For a detailed explanation of how frequency bands influence coverage, indoor penetration, and achievable speeds, see [Frequency Bands and Device Compatibility](/en/guides/frequency-bands/).
---
## FAQ
See the frontmatter above for structured FAQ entries. The questions below address additional topics.
**How do I check latency without a speed test app?**
On Android and iOS, dedicated network diagnostic applications can display real-time latency and packet loss. Some speed test applications include a "ping" or "latency" tab that allows continuous monitoring rather than a single point-in-time test. For a rough check on any device, loading a simple, low-resource webpage and noting how quickly it responds gives an approximate sense of latency — though this conflates server response time with network latency.
**What is a realistic download speed on 4G LTE?**
Median real-world 4G LTE download speeds on well-maintained networks in urban areas typically fall in the 20–80 Mbps range, with significant variation by country, carrier, time of day, and device. Peak theoretical figures (300 Mbps for base LTE Release 8) are achievable only under ideal single-user conditions with maximum spectrum allocation. The figures published by independent benchmarking organisations for a specific market and carrier are the most reliable reference.
**Does network quality affect battery life?**
Indirectly, yes. A device in weak-signal conditions increases transmit power to maintain the connection, which increases power consumption. Devices that frequently switch between network technologies — for example, cycling between 5G and 4G as coverage boundaries are crossed — also consume additional power during the transition. A network with consistent strong signal and stable technology selection will generally result in lower battery drain from the radio modem than a network with patchy coverage.
**What is upload speed used for on a smartphone?**
Upload speed governs any data sent from the device to a remote server: the video stream in a video call, photos and videos backed up to cloud storage, files shared with colleagues, social media posts, and data reported by apps. For users who primarily consume content rather than produce it, 5–10 Mbps upload is adequate for most tasks. For users who make frequent HD video calls or upload large files regularly, higher upload speeds provide a tangible benefit.
---
## Related Guides
- [What Is an MVNO?](/en/guides/what-is-mvno/) — How MVNOs lease network capacity from MNOs and why POI constraints affect peak-hour performance
- [4G/LTE vs 5G: What They Are and How They Differ](/en/guides/4g-5g-explained/) — The radio technology generations that set the ceiling on achievable speed and latency
- [Frequency Bands and Device Compatibility](/en/guides/frequency-bands/) — How different frequency bands affect coverage range, indoor penetration, and achievable throughput
- [SimFinder Quality Score Methodology](/en/guides/simfinder-score/) — How the six dimensions are weighted in SimFinder's carrier quality score
- [Why MVNOs Slow Down at Peak Hours](/en/guides/why-mvno-slow/) — A detailed explanation of POI capacity constraints and congestion behaviour
================================================================================
# Regional Connectivity Guide for Travelers
URL: https://sim-finder.com/en/guides/regional-overview/
Type: guides (en)
Published: 2026-06-06
Connectivity works differently depending on which region of the world you visit. The regulatory environment, local SIM rules, eSIM adoption, and network infrastructure vary enough across Asia, Europe, North America, Oceania, Latin America, and Africa that the same strategy does not serve all destinations equally well. This guide maps those differences region by region, then explains the general conditions under which a travel eSIM outperforms a local SIM — and vice versa.
For a full comparison of all four connectivity options — roaming, local SIM, travel eSIM, and portable Wi-Fi — see [4 Ways to Stay Connected Abroad](/en/guides/four-options/).
---
## Regional Snapshot
The table below summarizes the key characteristics of each region at a glance. Each row reflects general tendencies as of publication — individual countries within each region vary.
| Region | eSIM Adoption | SIM Registration | Rural Coverage | Travel eSIM Suitability |
|--------|--------------|-----------------|---------------|------------------------|
| **Asia** | High (JP/KR/SG) to low (SE Asia, South Asia) | Varies widely by country; biometric required in Thailand | Sparse outside cities in most countries | Strong for JP/KR/SG; mixed for SE Asia |
| **Europe** | High in Western Europe | Generally passport-only; stricter in Germany | Good in Western Europe; more variable in Balkans | Excellent for multi-country EU trips; EU carriers use RLAH domestically |
| **North America** | High (US, Canada) | No registration required for prepaid | Variable in rural US/Canada interior | Very strong; low friction |
| **Oceania** | High in AU/NZ | No registration required | Major rural gaps in Australia outback | Good for AU/NZ urban; local SIM better for rural AU |
| **Latin America** | Growing; uneven | Local ID often required | Major gap outside cities | Good for multi-country trips; local SIM better for extended stays |
| **Africa** | Growing; uneven | Passport/ID required in most markets | Sparse outside major cities | Good for urban-itinerary trips; local SIM better for rural reach |
---
## Asia
Asia covers the widest spectrum of connectivity conditions of any region. Network infrastructure in major urban centers — Tokyo, Seoul, Singapore, Bangkok, Hong Kong — is among the strongest in the world, with dense 4G/LTE coverage and rapidly expanding 5G. Rural and mountainous areas in countries such as Nepal, Myanmar, Cambodia, and parts of Indonesia tell a different story, with coverage dropping off quickly outside main roads and populated centers.
**SIM registration requirements vary significantly by country.** Japan requires passport-based identity verification for all SIM purchases, including tourist prepaid SIMs sold at airports and electronics stores. South Korea requires registration and, for some operators, in-person verification. Thailand tightened its rules substantially: as of August 2025, biometric liveness detection is required for all SIM registrations, and foreign visitors must present a physical passport. Vietnam similarly requires passport registration. In contrast, Hong Kong and Singapore have historically had lighter registration requirements for tourist SIMs, though policies can change.
**eSIM adoption varies widely across the continent.** Japan, South Korea, and Singapore are among the earliest and most complete eSIM markets globally, with major carriers offering eSIM onboarding through apps or QR codes and near-universal device support in the premium segment. Much of South and Southeast Asia is still building out eSIM infrastructure at the carrier level, meaning local eSIM options from national carriers may be limited or available only from a subset of operators. Travel eSIM providers serving these markets typically use a roaming-based model rather than a true local network integration, which can affect speeds compared to a country-specific plan with a named local carrier partner.
**China** is in a category of its own: international visitor SIM access is managed through dedicated roaming services and specific prepaid SIM products, and most overseas travel eSIM providers do not offer local network integration there. Travelers should research China connectivity separately from the rest of Asia.
**South Asia** (India, Sri Lanka, Bangladesh, Nepal) ranges from India's large, competitive LTE market with mature prepaid options to Nepal and Bhutan, where coverage outside the Kathmandu Valley and major trekking corridors is sparse. India now allows eSIM for domestic subscribers, but tourist SIM options have specific registration requirements that vary by telecom circle.
**For Japan, South Korea, and Singapore**, a travel eSIM from a major provider is often the lowest-friction option: no registration queue, no physical SIM, and strong local network partnerships mean good speeds in urban areas. **For Southeast Asia**, the calculus is more mixed: local physical SIMs are inexpensive and widely available, but registration requirements and language barriers at point of sale add friction. A travel eSIM removes the in-store step at the cost of a higher per-GB price.
For per-country plan comparisons across Asia, including coverage maps by local carrier
partner, use [SimFinder Travel](/).
---
## Europe
Europe is the most regulated and traveler-friendly mobile market for roaming in the world, largely because of the EU's **Roam Like At Home (RLAH)** framework. Established by EU Regulation 531/2012 and extended through June 2032 by Regulation (EU) 2022/612, RLAH prohibits carriers licensed in EU and EEA member states from charging domestic customers additional roaming surcharges when traveling within the EU/EEA zone. The result: if your home carrier is based in an EU or EEA country, you can use your existing plan in other EU/EEA countries at domestic rates, up to the fair-use threshold your carrier applies.
**RLAH covers the 27 EU member states plus Iceland, Norway, and Liechtenstein — 30 countries in total under the original framework.** Switzerland — despite its geographic position inside Europe — is not an EEA member and falls outside RLAH's scope. The UK departed the EU and is no longer bound by RLAH; as of publication, UK carriers have taken varying approaches to EU roaming, with some voluntarily maintaining free EU roaming and others reintroducing charges. For the full country list and the implications for non-EU travelers, see [EU Roaming Explained](/en/guides/eu-roaming/).
**For non-EU travelers visiting Europe**, RLAH provides no benefit. A US, Japanese, Australian, or any non-EU SIM is subject to the home carrier's standard international roaming rates when used in EU countries. For these travelers, a Europe-focused regional eSIM from a travel provider is typically the most cost-effective approach for multi-country trips. Regional eSIM providers offer plans spanning 40+ European countries under a single purchase, which removes the need to buy a new SIM at each border.
Western European networks (Germany, France, Netherlands, UK) are generally mature, with strong 4G coverage and growing 5G deployment in urban areas. Eastern European and Balkan countries have solid urban coverage but more variable rural reach. Switzerland, despite its geographic quirks, has strong independent network coverage across most of its territory including major ski areas.
**Prepaid physical SIMs are available across Europe**, typically at airports, convenience stores, and phone shops. Many countries allow tourist SIM purchases without identity registration (or with only a passport scan), though Germany requires identity verification for all SIM purchases under its telecommunications law. For EU travelers, the RLAH framework typically makes their existing domestic plan the most convenient and cost-effective option — no new SIM required at all.
For travelers from outside the EU wondering how roaming costs work when their home carrier charges full international rates, see [International Roaming Explained](/en/guides/international-roaming/).
---
## North America
North America — primarily the United States and Canada — is characterized by strong prepaid and postpaid eSIM availability, a competitive travel eSIM market, and no roaming regulatory framework equivalent to the EU's RLAH. Pricing is determined entirely by individual carrier policy, and there is no regulation capping what carriers can charge for international roaming.
**The United States** has three major network operators (AT&T, T-Mobile/Metro by T-Mobile, and Verizon) whose combined coverage reaches the vast majority of populated areas. Coverage in rural areas, national parks, and the interior West can be highly variable depending on which carrier's infrastructure is present. There is no federal requirement for carriers to roam on each other's networks in the US, which means coverage gaps exist that are specific to individual carriers. Urban 5G coverage is dense in major metro areas across the country.
**Prepaid eSIM options** are widely available for visitors, both from US carriers directly (often requiring no long-term contract) and from international travel eSIM providers. The US has no SIM registration requirement for prepaid purchases, which means setup is low-friction: a visitor can purchase and activate a travel eSIM before departure or upon arrival without presenting identity documents. This makes North America one of the most frictionless regions for travel eSIM setup.
**Canada** follows a similar pattern in urban areas, with Rogers, Bell, and Telus (via sub-brands including Koodo and Fido) providing strong coverage in populated corridors along the US border and in major cities. Remote and northern Canada — the Yukon, Northwest Territories, Nunavut, and much of the interior — has significant coverage gaps where no carrier provides reliable signal. Travel eSIMs for Canada often operate on roaming agreements with one of the major Canadian carriers.
**Cross-border US-Canada use** is a common scenario for travelers. Regional eSIM plans covering both countries are available and can simplify travel that crosses the border — though individual country plans from each market are also straightforward given low registration barriers on both sides. Mexico is often included in North America regional plans as well; see the Latin America section for Mexico-specific context.
For how to handle voice calls when using a data-only travel eSIM in North America, see [Calling Abroad: Voice Options for International Travelers](/en/guides/calls-abroad/).
---
## Oceania
Oceania — principally Australia, New Zealand, and the Pacific Island nations — presents a distinctive challenge: large geographic footprints with most of the population concentrated in a small number of coastal urban centers, leaving vast rural and outback areas with limited or no coverage.
**Australia** completed its 3G network shutdown in 2024 (Telstra in October 2024, Optus in November 2024, TPG Telecom in January 2024). All networks now operate on 4G/LTE as the baseline, with 5G deployment concentrated in major cities. Telstra holds the broadest rural coverage footprint by geography, though its prepaid plans are priced higher than competitors. Optus and TPG (Vodafone) have denser urban coverage at lower price points. For international travelers, prepaid SIMs are readily available at airports and supermarkets without identity registration requirements. Travel eSIMs serving Australia typically partner with one of these three networks — the partner choice matters for rural destinations.
**Rural and outback coverage gaps are significant.** The Australian outback, much of Western Australia, and large parts of the Northern Territory have coverage only along major highways — and sometimes not even that. Travelers planning off-road, four-wheel-drive, or remote camping itineraries should research satellite-based connectivity options rather than relying on cellular coverage, regardless of which SIM or eSIM they use. Cellular coverage maps from each carrier can help identify where signal ends.
**New Zealand** has a more compact geography that makes nationwide coverage more achievable, though the South Island's terrain creates gaps in alpine areas. Spark, One NZ (formerly Vodafone NZ), and 2degrees are the main networks. Prepaid SIMs are available at airports without registration barriers. New Zealand is often included in Oceania-focused regional eSIM plans alongside Australia.
**Pacific Island nations** (Fiji, Vanuatu, Samoa, Tonga, and others) vary widely. Main islands typically have urban 4G coverage; outer islands may have no cellular service at all. Local SIMs on the dominant carrier for each island nation are generally the only practical option; travel eSIM coverage in these markets is limited or non-existent. Travelers to remote Pacific destinations should plan for extended connectivity gaps and consider satellite-based personal locator beacons for safety in areas without cellular.
---
## Latin America
Latin America encompasses 20+ countries with highly variable regulatory environments, infrastructure maturity, and SIM availability — making it one of the more complex regions to navigate as a traveler.
**Country-to-country variation is high.** Brazil has a large, sophisticated telecommunications market with nationwide LTE and growing 5G in urban centers. Mexico similarly has mature coverage in cities and major tourist destinations, with a dominant operator holding a large share of the market and competitors providing alternatives. Argentina, Chile, and Colombia have solid urban coverage with more variable reach in rural areas. Countries such as Bolivia, Paraguay, Honduras, Guatemala, and Nicaragua have more limited infrastructure, with coverage often concentrated in capital cities and main road corridors.
**Prepaid SIM availability and registration rules vary.** Many Latin American countries require a local tax identification number or national ID for SIM purchases, which is a barrier for tourists who lack these documents. Some carriers in tourist-heavy markets — Mexico's Pacific and Caribbean coastal zones, major Brazilian cities — have adapted their prepaid offerings for visitors, but practices differ by carrier and change over time. Language is also a practical factor: many carrier retail experiences are conducted in Spanish or Portuguese only, with limited English-language support.
**Regional eSIM plans for Latin America** are available from major providers and can cover 15–20 countries under one purchase, which is practical for travelers visiting multiple countries on a single trip. However, regional plans in Latin America tend to show more variation in partner network quality than their European counterparts, reflecting the underlying diversity in national carrier maturity across the continent.
**Urban vs. rural connectivity gap** is pronounced across most of the region. Major cities and coastal tourist zones are generally well covered. Highland areas, the Amazon basin, and remote rural regions can have no signal at all. Travelers planning adventure itineraries in Peru's highlands, Bolivia's Andes, Ecuador's cloud forests, or remote Patagonia should plan accordingly and research satellite options where cellular coverage is unlikely.
For selecting between a single-country eSIM and a regional plan when crossing multiple Latin American borders, see [How to Choose a Travel eSIM](/en/guides/how-to-choose/).
---
## Africa
Africa is the region where the gap between urban and rural connectivity is most extreme, and where prepaid mobile adoption is highest in the world by subscriber percentage — yet where the infrastructure supporting those subscribers is most concentrated in cities and along main transport corridors.
**Urban-centric coverage is the defining characteristic.** Nairobi, Lagos, Cairo, Cape Town, Accra, Addis Ababa, and other major urban centers often have strong 4G LTE coverage and, in some cases, early 5G rollouts. Outside urban boundaries, coverage diminishes quickly. Rural sub-Saharan Africa has significant areas with 2G-only coverage or no coverage at all. Travelers to game reserves, remote national parks, or off-road destinations should not expect reliable cellular data and should research the specific coverage of the dominant carrier in each area before departure.
**Prepaid SIM adoption is very high.** In most African markets, prepaid SIMs account for the large majority of mobile subscriptions. Local prepaid SIMs are inexpensive and widely available at airports, carrier shops, and informal street markets. Many countries require a passport or national ID for registration. In some markets, there are limits on how many SIMs a foreign national can hold, and the registration process can involve in-person steps. Purchasing a local SIM on arrival is generally straightforward in major cities and airports.
**Travel eSIM availability in Africa is growing but uneven.** Major providers offer eSIM coverage in South Africa, Kenya, Nigeria, Egypt, Ghana, and several other markets, but the partner networks available are sometimes limited to one carrier in each country. Data speeds over a travel eSIM in Africa can vary more than in Europe or North America, depending on the quality of the specific local partner network. Before purchasing an Africa regional eSIM plan, verify which network is listed as the partner for each country on your itinerary.
**South Africa** stands out as the most developed travel connectivity market on the continent, with Vodacom, MTN, and Cell C offering competitive prepaid options and reasonable tourist SIM access. Kenya (Safaricom) is another strong market with widespread coverage and a mature mobile infrastructure. **North Africa** (Egypt, Morocco, Tunisia) has generally better coverage continuity than sub-Saharan Africa and more developed tourist SIM options, with major carriers in Morocco and Egypt offering airport SIM availability.
For travelers on fixed itineraries passing through well-covered African cities, a regional Africa travel eSIM from a major provider is a low-friction option. For extended travel across multiple markets including rural areas, purchasing a local SIM in each country from the dominant carrier gives the best coverage reach and typically the lowest per-GB cost. For comparing providers available for African destinations, see [Travel eSIM Provider Comparison](/en/guides/provider-comparison/).
---
## When a Travel eSIM Works Well
A travel eSIM is the right choice in most of the following situations:
**Short to medium trips (1–4 weeks) to countries with strong eSIM infrastructure.**
Japan, South Korea, Western Europe, the US, Canada, and Australia all have mature eSIM
markets where travel eSIM providers partner with quality local networks. Setup before
departure is seamless and avoids any in-country registration step.
**Multi-country itineraries within a single region.**
A Europe regional eSIM covering 40+ countries, or a Latin America plan covering 15+
countries, removes the need to buy a new SIM at each border. The convenience premium
over country-specific SIMs is usually justified when crossing two or more borders.
**Destinations with SIM registration barriers.**
Where buying a local SIM requires a passport, biometric check, or local ID number — as
in Thailand, Japan, Germany, and many Latin American markets — a pre-installed travel
eSIM removes that friction entirely.
**When you need a working connection immediately on landing.**
A travel eSIM installed on home Wi-Fi before departure connects to a local network as
soon as your plane lands, without queuing at an airport SIM kiosk.
**Dual-SIM configuration.**
Keeping your home SIM active for calls and SMS while using a travel eSIM for data is the
most common setup for travelers who need to remain reachable on their home number.
This setup keeps your home number available for receiving two-factor authentication codes
and calls, while the travel eSIM handles data at local rates.
**When your home carrier's roaming coverage or rates are unfavorable.**
In destinations where your home carrier has no roaming agreement, or where roaming
charges would be high, a travel eSIM provides a cost-predictable alternative. Use
[International Roaming Explained](/en/guides/international-roaming/) to understand how
to check whether your plan includes a meaningful roaming benefit before deciding.
---
## When a Local SIM Wins
A local SIM from a carrier in your destination typically beats a travel eSIM in the
following situations:
**Long stays (one month or longer).**
Monthly prepaid plans from local carriers are usually substantially cheaper per gigabyte
than travel eSIM plans priced for short trips. Beyond a certain length of stay, the
registration process and in-store purchase are worth the effort.
**Destinations with limited travel eSIM coverage.**
Pacific Island nations, remote African markets, and parts of Latin America may have no
travel eSIM provider offering meaningful local network coverage. A local SIM from the
dominant carrier in that country is the only way to get a strong local signal.
**Rural and off-road itineraries where carrier selection matters.**
In large-geography countries like Australia, the US, and Brazil, the difference in rural
coverage between carriers is significant enough that choosing the right local carrier —
and its SIM — can determine whether you have signal at all. Travel eSIMs are not always
backed by the carrier with the best rural coverage in a given country.
**When cost is the primary concern and you will be in one country for more than a few days.**
Local prepaid SIMs are almost always cheaper on a per-GB basis than travel eSIMs. For a
week or more in a single country, the cost difference can be meaningful, particularly in
markets where prepaid data is inexpensive — Southeast Asia, South Asia, and parts of
Africa often fall into this category.
**When you need a local phone number.**
Most travel eSIMs are data-only and do not include a voice number in the destination
country. If you need a local number — for example, to call local businesses, receive
a delivery, or verify an account with a local service — a local SIM with a voice plan
is the right tool. For VoIP-based alternatives that work over a travel eSIM's data
connection, see [Calling Abroad: Voice Options for International Travelers](/en/guides/calls-abroad/).
---
## Finding the Right Plan for Your Destination
The regional summaries above describe general tendencies. Network quality, carrier availability, SIM registration rules, and eSIM partner depth all change over time and vary at the country level within each region. A plan that worked well in one country may not reflect what is available in a neighboring country with a very different regulatory and market environment.
Use [SimFinder Travel](/) to compare current travel eSIM plans by destination, data volume, validity, and provider — with the local network partner listed for each plan so you can evaluate coverage quality before purchasing. For background on the criteria to evaluate when choosing between plans, see [How to Choose a Travel eSIM](/en/guides/how-to-choose/) and [Travel eSIM Provider Comparison](/en/guides/provider-comparison/).
---
## FAQ
See the FAQ items in the frontmatter for answers to the following:
- Is a travel eSIM always cheaper than roaming abroad?
- Which regions have the most SIM registration barriers?
- Does a regional eSIM plan work equally well across all countries in the plan?
---
## Related Guides
- [International Roaming Explained](/en/guides/international-roaming/) — How roaming works technically and how to avoid bill shock
- [EU Roaming Explained](/en/guides/eu-roaming/) — Roam Like At Home in full detail: covered countries, fair use policy, data caps
- [Calling Abroad: Voice Options for International Travelers](/en/guides/calls-abroad/) — Voice call options when using a data-only travel eSIM
- [How to Choose a Travel eSIM](/en/guides/how-to-choose/) — 5 criteria for evaluating plans: coverage, data, validity, pricing, activation
- [Travel eSIM Provider Comparison](/en/guides/provider-comparison/) — Airalo, Holafly, Nomad, Saily and more compared by coverage and plan type
================================================================================
# Data Roaming Settings: How to Turn It On/Off Safely
URL: https://sim-finder.com/en/guides/roaming-settings/
Type: guides (en)
Published: 2026-06-04
Data Roaming is the device-level switch that controls whether your phone uses mobile data on a visited network abroad. Turning it off blocks all background and foreground mobile data over the foreign network while leaving calls and SMS working. Turning it on lets data flow — and lets charges accumulate if your plan does not cover roaming. This guide explains exactly where to find the toggle on iPhone and Android, what the setting does and does not control, and the additional settings that prevent bill shock.
For a full explanation of how international roaming works at the network level — GSMA AA.12 agreements, IPX routing, and pricing models — see [International Roaming Explained](/en/guides/international-roaming/).
---
## What Data Roaming Is and What Controlling It Does
Data Roaming is the use of mobile data on a network other than your home carrier's network. When you travel abroad and your phone connects to a local carrier's network, any data your device sends or receives passes through that foreign network and is billed at roaming rates — either pay-per-use, a pass fee, or consumed from an included roaming allowance, depending on your home carrier's plan.
The Data Roaming toggle in your device settings controls mobile data on that foreign connection. When it is off:
- Your phone registers on the visited network and can make and receive voice calls and SMS normally.
- All mobile data — foreground apps, background sync, automatic updates, iCloud or Google account sync — is blocked over the visited network.
- Wi-Fi continues to work normally and is unaffected by this toggle.
When Data Roaming is on, your device behaves on the visited network roughly as it does on your home network: all apps that have permission to use mobile data will use it, including in the background.
The default state of Data Roaming depends on your device and, more specifically, on the carrier profile loaded on your SIM. Some carrier SIM profiles set Data Roaming to off by default; others set it to on. Do not assume a default — check the toggle before traveling.
If you have a SIM from an EU or EEA carrier and are traveling within the EU/EEA, you may not incur any extra roaming charge at all — the [EU Roaming Regulation (Roam Like At Home)](/en/guides/eu-roaming/) requires carriers to let customers use their domestic allowance across all 32 participating countries without surcharges (27 EU member states, Iceland, Norway, and Liechtenstein, plus Ukraine and Moldova from 1 January 2026).
---
## How to Toggle Data Roaming on iPhone
Apple's iOS exposes a Data Roaming toggle per SIM line, accessible in the Cellular settings.
### Single-SIM iPhone
1. Open **Settings**.
2. Tap **Cellular** (labeled "Mobile Data" in some regions).
3. Tap **Cellular Data Options** (or "Mobile Data Options").
4. Find the **Data Roaming** toggle.
5. Turn it on or off as needed.
When Data Roaming is off, the toggle appears grey. When it is on, it appears green. iOS displays a confirmation dialog when you attempt to enable Data Roaming, warning that it may incur additional charges — this dialog appears as a reminder, not a permission request.
### Dual-SIM iPhone (iPhone XS and Later)
On iPhone models that support dual SIM (a physical nano-SIM plus an eSIM, or two eSIMs), each line has its own Data Roaming toggle.
1. Open **Settings**.
2. Tap **Cellular**.
3. Tap the name of the line you want to configure (for example, "Primary" or "Travel").
4. Tap **Cellular Data Options**.
5. Adjust the **Data Roaming** toggle for that line.
6. Repeat for the second line if needed.
If you are using a travel eSIM for data and want to keep your home SIM protected, disable Data Roaming on the home SIM line and enable it (or leave it on) for the travel eSIM line. See [Using Dual SIM for Travel](/en/guides/dual-sim-for-travel/) for the full dual-SIM configuration process.
### Confirming the Setting
After adjusting the toggle, return to the main Cellular screen. Under your SIM line name, the description line will reflect whether Data Roaming is active. When you land abroad and your phone connects to the visited network, the carrier name in the status bar changes to the local operator — that is confirmation your phone has registered on the roaming network.
---
## How to Toggle Data Roaming on Android
Android's roaming setting is in a similar location across most devices, though the exact path varies by manufacturer and Android version.
### Stock Android (Pixel and Similar)
On Android 12 and later with stock Android (Pixel devices and Android One devices):
1. Open **Settings**.
2. Tap **Network & internet**.
3. Tap **SIMs** (or "Mobile network" on older Android versions).
4. Select the SIM you want to configure.
5. Find the **Roaming** toggle and enable or disable it.
On Android 11 and earlier stock builds, the path is typically **Settings > Network & internet > Mobile network > Roaming**.
### Samsung One UI
On Samsung devices running One UI (Galaxy S and A series):
1. Open **Settings**.
2. Tap **Connections**.
3. Tap **Mobile networks**.
4. Find **Data roaming** and toggle it.
Samsung may show a confirmation dialog when you enable Data Roaming, reminding you of potential charges — behavior varies by One UI version and region.
### Other Android Manufacturers
The Roaming toggle is present on all Android devices but the path varies:
- **OnePlus / OxygenOS**: Settings > Wi-Fi & network > SIM & network > [SIM name] > Data roaming
- **Xiaomi / MIUI**: Settings > SIM cards & mobile networks > [SIM name] > Data roaming
- **Sony Xperia**: Settings > Network & internet > Mobile network > Data roaming
- **Motorola**: Settings > Network & internet > Mobile network > Roaming
If you cannot locate the toggle, use the Settings search function and search for "roaming."
### Dual-SIM Android
On dual-SIM Android devices, the Roaming toggle appears separately for each installed SIM. Navigate to the SIM selection screen (typically **Settings > Network & internet > SIMs**) and configure each SIM independently.
---
## Settings That Prevent Bill Shock
Turning Data Roaming off is the most direct protection, but several additional settings reduce risk when you need to use data while roaming.
### Data Usage Warnings and Limits (Android)
Android provides a built-in data usage monitor with configurable warning and hard-limit thresholds:
1. Go to **Settings > Network & internet > Mobile network** (or **Data usage**).
2. Tap **Data warning & limit**.
3. Enable **Set data warning** and enter a threshold — for example, the amount included in your roaming pass.
4. Enable **Set data limit** to set a hard cap. When this limit is reached, Android cuts off mobile data for all apps until the counter resets or you raise the limit.
Set the warning well below your actual budget or pass limit to give yourself time to react before hitting the ceiling.
iOS does not have a built-in hard data cap, but Settings > Cellular shows cumulative data usage per line. Tap **Reset Statistics** at the start of each billing cycle or trip to track roaming usage from a known baseline.
### Per-App Data Restrictions on iPhone
iOS lets you disable mobile data access for individual apps:
1. Go to **Settings > Cellular**.
2. Scroll down to the app list.
3. Toggle off any app that should not use mobile data.
This applies to both home and roaming contexts. For travel, consider turning off apps that generate large background traffic: photo library sync, podcast auto-download, video streaming apps, and cloud backup services. For a list of high-consumption apps and their typical data rates, see the [Data Usage Guide](/en/guides/data-usage-guide/).
### Data Saver and Background Data on Android
Android's Data Saver mode (Android 7.0 and later) blocks background data for all apps except those you explicitly allow:
1. Go to **Settings > Network & internet > Data Saver**.
2. Enable **Use Data Saver**.
3. Tap **Unrestricted data** to allow specific apps through the restriction.
With Data Saver on, apps can only receive data when they are actively in the foreground, preventing background sync, push notifications over data, and automatic updates from running silently. The [Data-Saving Techniques guide](/en/guides/save-data/) covers additional per-app controls for high-consumption services.
### Disable Automatic App Updates
Both iOS and Android can download app updates automatically over mobile data.
- **iPhone**: On iOS 18: Settings > Apps > App Store > turn off **App Updates** under Automatic Downloads. On iOS 17 and earlier: Settings > App Store > turn off **App Updates** under Automatic Downloads.
- **Android**: Google Play Store > Settings > Network preferences > Auto-update apps > select "Over Wi-Fi only."
App updates can be large — tens or hundreds of megabytes per app — and will run in the background without prompting you.
---
## Roaming Control in Dual-SIM Devices
Dual-SIM devices introduce a configuration that is increasingly common for travelers: running a home SIM alongside a travel eSIM or local SIM. In this setup, roaming control becomes per-line rather than per-device.
### The Standard Travel Dual-SIM Configuration
The most common and cost-effective dual-SIM travel setup:
- **Home SIM**: Data Roaming **off**. Voice calls and SMS continue to work on your home number. No mobile data runs on this line, so your home carrier does not see any roaming data usage.
- **Travel eSIM (or local SIM)**: Data Roaming **on** (or simply set as the primary data SIM). All data traffic runs on the travel SIM at local or regional rates.
Your home number remains reachable for calls and messages without any roaming data cost. When a caller dials your home number, the call still routes through the visited network's voice path — but voice is not controlled by the Data Roaming toggle.
### Line Assignment for Data
On both iPhone and Android, you designate which SIM handles mobile data:
- **iPhone**: Settings > Cellular > Cellular Data — select the SIM to use for data. This is typically the travel SIM when traveling.
- **Android**: Settings > Network & internet > SIMs > Mobile data — select the SIM.
Setting the travel SIM as the data SIM means Data Roaming is not engaged on the home line even if it is technically turned on — the home SIM is not being asked to provide data. However, explicitly turning Data Roaming off on the home SIM provides an additional safeguard against any background data switching.
For the complete step-by-step setup, including SMS two-factor authentication considerations and returning to home-only configuration, see [Using Dual SIM for Travel](/en/guides/dual-sim-for-travel/).
---
## The Difference Between Data Roaming, SMS Roaming, and Voice Roaming
Data Roaming is one of three types of roaming service:
| Type | Controlled by Data Roaming toggle | Notes |
|------|----------------------------------|-------|
| **Data roaming** | Yes | Mobile internet access on the visited network |
| **SMS roaming** | No | Text messages work independently of the Data Roaming toggle |
| **Voice roaming** | No | Calls work independently of the Data Roaming toggle |
When you turn Data Roaming off, your phone does not go silent. Incoming and outgoing voice calls and SMS continue to function through the visited network's circuit-switched and SMS paths, which are separate from the data infrastructure.
If you want to block voice and SMS roaming charges as well, you must either:
- Enable **Airplane Mode** (blocks all radio), then re-enable Wi-Fi manually, or
- Contact your home carrier to restrict international voice and SMS at the account level.
Some carriers offer account-level controls through their apps or web portals that restrict roaming usage by service type. Check your carrier's app for these options before traveling.
---
## Resetting After Returning Home
When you return to your home country, your phone reconnects to your home carrier's network automatically. A few settings are worth confirming to restore normal operation:
**1. Verify Data Roaming state.**
Whether you want it on or off at home is a personal preference, but confirm it is in the state you expect. Some carrier SIM profiles toggle it back automatically; most do not.
**2. Reassign the data SIM (dual-SIM devices).**
If you switched mobile data to a travel eSIM while abroad, switch it back to your home SIM. The travel SIM may no longer have active data once its plan expires or the destination-limited plan becomes inactive.
**3. Re-enable automatic app updates and background data.**
If you disabled these to save roaming data, re-enable them after returning to your home network.
**4. Reset the data usage counter.**
On iPhone (Settings > Cellular > Reset Statistics), reset the counter at the start of each billing cycle. This gives you an accurate view of next month's usage separate from any roaming consumption.
**5. Check your carrier app for usage charges.**
Review your account before the billing period closes to catch any unexpected roaming charges while there is still time to raise a query with your carrier.
---
## What to Check Before Your Next Trip
A brief pre-departure checklist for data roaming settings:
1. **Confirm your plan's roaming coverage** — verify your destination is covered and which pricing model applies (pay-per-use, day pass, or included).
2. **Decide your data strategy** — home SIM roaming, travel eSIM, or local SIM. This determines which lines should have Data Roaming on or off.
3. **Set Data Roaming** to the correct state on each SIM line.
4. **Configure data usage warnings** — set a threshold on Android, or note the current Usage counter baseline on iPhone.
5. **Disable automatic app updates** over mobile data.
6. **Turn off apps you do not need abroad** using per-app controls.
7. **Install a travel eSIM before departure** if using one — eSIM profile downloads require an internet connection, ideally done over Wi-Fi at home.
For a comprehensive list of settings to verify before any international trip, see the [Pre-Trip Connectivity Checklist](/en/guides/pre-trip-checklist/).
---
## FAQ
See the FAQ items above for answers to:
- Where to find Data Roaming on iPhone
- Where to find Data Roaming on Android (including Samsung One UI and Pixel)
- What happens when Data Roaming is off
- Whether turning Data Roaming off affects calls and SMS
- How to set a data warning or cap
- How to restrict individual apps from using roaming data
- How to configure Data Roaming on dual-SIM devices
---
## Related Guides
- [International Roaming Explained](/en/guides/international-roaming/) — How GSMA AA.12 agreements and IPX routing keep your home SIM working abroad
- [EU Roaming Explained](/en/guides/eu-roaming/) — Roam Like At Home regulation: 32 countries covered (27 EU + EEA + Ukraine/Moldova from 2026) and who benefits
- [How Much Mobile Data Do You Need?](/en/guides/data-usage-guide/) — Per-app data consumption estimates to plan your roaming budget
- [Using Dual SIM for Travel](/en/guides/dual-sim-for-travel/) — Keep your home number while routing data through a travel eSIM
- [Data-Saving Techniques](/en/guides/save-data/) — iOS and Android settings that cut mobile data use
================================================================================
# Satellite Connectivity: Direct-to-Phone Is Here
URL: https://sim-finder.com/en/guides/satellite/
Type: guides (en)
Published: 2026-06-04
Satellite-to-phone connectivity has moved from a specialised tool requiring dedicated handsets into mainstream smartphones. Two distinct implementations are now commercially active: Apple's Emergency SOS via satellite, which routes emergency messages through a dedicated satellite link built into iPhone 14 and later; and Starlink Direct to Cell, a SpaceX service designed to allow standard LTE phones to connect to LEO satellites as if they were ground-based cell towers. Both operate under the 3GPP Non-Terrestrial Network (NTN) framework standardised in Release 17 (2022).
Key points in this article:
- What Direct-to-Cell (NTN) satellite connectivity is and how it differs from legacy satellite phones
- How Apple Emergency SOS via satellite works and what it can and cannot do
- How Starlink Direct to Cell works, its phased capability rollout, and which carriers have launched it
- What 3GPP NTN standardisation means for device compatibility
- The limitations that apply to all current satellite-to-phone services — indoors, for voice, for data
- What to expect from satellite connectivity when you have [no service](/en/guides/no-service/) in a remote area
---
## What Is Direct-to-Cell Satellite Connectivity?
**Direct-to-Cell** — also called **Direct-to-Device** or **Non-Terrestrial Network (NTN)** in 3GPP specifications — describes a satellite link between a standard smartphone and a low Earth orbit (LEO) satellite acting as a flying base station.
This is architecturally different from traditional satellite phones such as those using Iridium or Thuraya networks, which required proprietary handsets with specialised antennas, dedicated satellite modems, and separate subscription plans. Direct-to-Cell is designed to work with unmodified smartphones by having the satellite emulate the radio interface of a standard cellular base station.
The 3GPP NTN framework is defined in **Release 17**, published in June 2022. Release 17 introduced changes to NR (New Radio) and LTE specifications to account for the characteristics of satellite links: propagation delay longer than terrestrial cells (for LEO at ~600 km, one-way delay is approximately 2 ms, rising with lower elevation angles), Doppler shift caused by satellite movement, and the need for timing advance adjustments to compensate for the changing distance between the satellite and the device.
LEO satellites orbit at approximately 500–2,000 km altitude. This is substantially lower than geostationary (GEO) satellites at approximately 35,786 km, which are the basis of older satellite broadband and satellite phone systems. The lower altitude reduces round-trip propagation delay and allows smartphones to communicate using their existing cellular radio, rather than requiring the high-gain antennas that GEO communication demands.
Apple's approach and Starlink's approach represent two distinct technical paths within the broader Direct-to-Cell/NTN space, and they have different capability scopes.
---
## Apple Emergency SOS via Satellite
Apple introduced Emergency SOS via satellite with the **iPhone 14** lineup in September 2022. It was the first mass-market smartphone satellite connectivity feature aimed at consumer safety.
### What It Does
Emergency SOS via satellite allows an iPhone 14 or later — in a location with no cellular or Wi-Fi signal — to send an emergency text message to emergency services. The feature also includes **Find My** location sharing via satellite, allowing users to share their GPS coordinates with trusted contacts even in areas with no cellular coverage.
iPhone 14 and later include a Qualcomm-based modem plus custom Apple-designed RF hardware and software that enable the satellite link (Globalstar band n53). This hardware is present only in iPhone 14 and later — it is not a software update for older models.
### How It Works
When a user initiates Emergency SOS with no cellular signal available, the iPhone displays a guided interface pointing toward the satellite. Because satellite bandwidth on this link is narrow, the interface asks the user a set of structured questions (type of emergency, number of people, medical conditions) and compresses the response into a short message for transmission. The process can take approximately 15 seconds to several minutes depending on satellite positioning and obstruction.
Apple operates this service through a partnership with **Globalstar** and its LEO satellite constellation. The feature's satellite link uses band n53 (in the 2.4 GHz range, 2483.5–2500 MHz), which is distinct from the LTE/NR bands used by terrestrial cellular networks.
### What It Cannot Do
Emergency SOS via satellite is specifically scoped to:
- Emergency service messaging
- Find My location sharing via satellite
It does **not** support:
- Standard SMS or iMessage to arbitrary contacts
- Voice calls
- Mobile data / internet access
Apple has separately introduced **Roadside Assistance via Satellite** (launched in the US in 2023 for iPhone 14 and later), extending the satellite messaging capability to non-emergency roadside assistance services. This uses the same underlying infrastructure and is not a general-purpose messaging service.
### Regional Availability
Apple has progressively expanded Emergency SOS via satellite since its initial launch in the United States and Canada in November 2022. As of publication, the service covers a number of countries across North America, Europe, Australia, and other regions. Apple publishes a current country list on its support pages; availability continues to expand. The service is not available in all countries where iPhone 14 or later is sold.
---
## Starlink Direct to Cell
SpaceX's **Starlink Direct to Cell** is a different architectural approach: it places the equivalent of a cellular base station on LEO satellites, allowing standard unmodified LTE smartphones to connect to satellites using existing cellular protocols, without any satellite-specific app or configuration.
### Architecture
Direct to Cell satellites carry an eNodeB (LTE base station) payload. From the perspective of an LTE smartphone, the satellite appears as a standard LTE cell. The phone uses its existing LTE radio to register, send, and receive data — the 3GPP NTN timing and frequency corrections are handled at the network side.
In the United States, the service uses T-Mobile's PCS 1900 MHz spectrum (LTE Band 25), with the FCC authorizing roughly 5 MHz for supplemental coverage from space. This spectrum arrangement is country- and carrier-specific; other markets use the spectrum of their respective partner carriers. Partner agreements with terrestrial carriers are required for the service to work, as the subscriber's SIM must be authenticated through the carrier's network.
### Phased Rollout
SpaceX has publicly expanded Direct to Cell capabilities in stages: SMS first (live 2025), then data (added October 2025), with voice in beta as of late 2025; IoT is also part of the 2025 expansion. As of publication, SMS and data are commercially available with select carrier partners, while voice remains in beta. Specific availability by country and carrier should be verified against current SpaceX announcements.
### Carrier Partnerships
Direct to Cell requires a carrier agreement, because the satellite acts as an extension of the carrier's network and the subscriber's SIM is authenticated through the carrier's existing infrastructure. Carrier partners announced as of publication include T-Mobile (United States), which publicly disclosed its Direct to Cell partnership with SpaceX in August 2022. Partnerships with carriers in other countries have been separately announced; the specific list of carriers and countries with active commercial service is subject to change and should be verified on SpaceX's Starlink website.
### Device Compatibility
Because the satellite emulates an LTE base station using 3GPP NTN protocols, SpaceX has stated that standard LTE-capable smartphones should be compatible without hardware changes. This includes both Android and iPhone models that support LTE on the relevant spectrum band. Actual compatibility in practice depends on whether the device's modem supports the specific LTE band used and whether the carrier has enabled the NTN cell selection logic on the SIM profile.
---
## The 3GPP NTN Standards Foundation
Both Direct-to-Cell services — and future satellite-to-phone services from other providers — are grounded in the 3GPP **Non-Terrestrial Network (NTN)** specifications introduced in Release 17.
### Release 17: NR-NTN and IoT-NTN
3GPP Release 17 (Stage 3 frozen June 2022) defined two NTN tracks:
- **NR-NTN**: New Radio (5G NR) over non-terrestrial networks, including LEO and GEO orbits. Specified in 3GPP TS 38.811 (study item) and updated in subsequent technical specifications.
- **IoT-NTN**: NB-IoT and eMTC over non-terrestrial networks, targeting low-power devices. Starlink Direct to Cell's LTE-based approach for smartphones is more accurately described as supplemental coverage from space (SCS) rather than a formal IoT-NTN deployment.
The key technical adaptations in NTN specifications address:
- **Propagation delay compensation**: NTN cells have timing advance values far larger than terrestrial cells. For LEO at ~600 km altitude, the one-way propagation delay is approximately 2 ms, compared to under 0.1 ms for a typical terrestrial cell. The NTN specifications extend the HARQ process timing and random-access procedures to accommodate this.
- **Doppler shift correction**: A LEO satellite moves at approximately 7.5 km/s relative to the Earth's surface. This causes a Doppler frequency shift that must be corrected before the device's LTE/NR signal can be decoded. In NTN, frequency pre-compensation can be applied at the satellite (transparent relay) or at the network side.
- **Ephemeris data**: The device may receive satellite orbit parameters (ephemeris) to assist with timing and frequency pre-correction, reducing the burden on the satellite.
### Release 18 and Beyond
3GPP Release 18 (5G Advanced, Stage 3 frozen 2024) extended NTN support with improvements to IoT-NTN (for low-power devices), enhanced mobility between terrestrial and satellite cells, and reduced-capability (RedCap) NTN device profiles. These extensions are relevant for future generations of Direct-to-Cell services that may provide higher throughput or more seamless integration with terrestrial networks.
---
## What Satellite Connectivity Can and Cannot Do Today
Current Direct-to-Cell implementations — both Apple's and Starlink's — operate under structural constraints that define what is realistically possible.
### What It Can Do
- **Emergency messaging**: Apple Emergency SOS via satellite delivers structured emergency messages to emergency services in supported countries.
- **Location sharing**: Find My via satellite shares GPS coordinates with trusted contacts without cellular or Wi-Fi.
- **SMS (Starlink phase 1)**: Standard SMS text messages to and from any phone number, via carrier partners that have enabled the service.
### What It Cannot Do
- **Voice calls**: As of publication, no current mass-market Direct-to-Cell implementation supports standard voice calls in a no-coverage area on an unmodified smartphone. (Legacy satellite phone services such as Iridium support voice, but require dedicated devices.)
- **Mobile data / internet access**: Browsing, app use, streaming, and VoIP over a satellite data connection are not available in current phases.
- **Indoor use**: All current implementations require a clear sky view. The satellite signal does not penetrate building materials.
- **Real-time communication**: The structured, compressed message flow used in emergency satellite messaging is not equivalent to a real-time text conversation. Latency and bandwidth constraints mean that the experience is fundamentally different from cellular SMS.
- **Roaming SIM compatibility**: Satellite connectivity currently works through specific carrier agreements. A SIM from a carrier without a Direct to Cell partnership will not register on the satellite, even if the device hardware supports it. See [International Roaming Explained](/en/guides/international-roaming/) for how carrier agreements govern network access in general.
---
## Device and Region Availability
Availability of Direct-to-Cell satellite connectivity is governed by three independent variables: hardware, carrier, and country.
### Hardware
**Apple Emergency SOS via satellite** requires:
- iPhone 14 or later (includes the Qualcomm-based modem and custom Apple RF hardware that enable the Globalstar band n53 satellite link)
- iOS 16.0 or later for the initial Emergency SOS feature
- iOS 17.0 or later for Find My via satellite and Roadside Assistance via Satellite
**Starlink Direct to Cell** is designed for:
- Any LTE-capable smartphone supporting the relevant LTE band
- No hardware modification required — the feature works through existing radio hardware if the carrier enables it
### Carrier
Both services require an active carrier relationship. Apple's Emergency SOS via satellite is operated by Apple directly through its Globalstar partnership — subscribers do not need a carrier agreement because emergency services bypass normal carrier billing. Starlink Direct to Cell requires the subscriber's home carrier to have a Direct to Cell partnership with SpaceX. A SIM from a carrier without this agreement will not connect.
### Country / Regulatory Approval
Satellite spectrum use requires regulatory approval in each country. SpaceX must obtain national regulatory clearance for Starlink Direct to Cell in each market. Apple's Emergency SOS via satellite availability is similarly country-specific. Both providers publish current country lists that should be verified before relying on satellite connectivity for a specific destination. Country lists change as approvals are granted.
---
## Satellite Connectivity vs. No Service on a Terrestrial Network
Satellite Direct-to-Cell is specifically designed for situations where [no terrestrial network signal is available](/en/guides/no-service/). Understanding the difference matters for setting expectations.
When your phone shows "No Service" in a remote area, it means no terrestrial cell tower is within range. Satellite connectivity fills this gap — but only within the capability scope described above (emergency messaging, SMS via participating carrier, and future phases).
Satellite connectivity is not a substitute for choosing [how to stay connected abroad](/en/guides/four-options/). If you are traveling internationally and your home SIM has no roaming agreement in the destination country, satellite messaging (if available via your carrier) may be the only connectivity option in rural or remote areas. But in areas with any terrestrial coverage, a local SIM or travel eSIM will always provide more capability than satellite messaging.
For travelers using [dual SIM configurations](/en/guides/dual-sim-for-travel/), satellite connectivity (if supported by the home carrier) could serve as a backstop on the home SIM while a travel eSIM handles regular data. In practice, satellite emergency messaging works without a data connection on the travel SIM.
---
## Limitations and Practical Expectations
Several structural limitations apply to all current satellite-to-phone implementations and are worth stating plainly.
**Satellite connectivity is not always-on.** In current NTN implementations, the phone does not maintain a permanent satellite connection. The satellite link is established when needed (for an emergency message, for example) and requires pointing toward a visible satellite. In areas with dense obstructions, this may take longer or fail.
**Bandwidth is narrow.** The satellite link in current implementations is designed for short messages, not continuous data streams. Emergency SOS via satellite compresses structured responses into a small number of bytes. Starlink Direct to Cell SMS operates at SMS data volumes. Neither provides broadband connectivity.
**Latency is higher than terrestrial cellular.** For LEO at ~600 km, one-way propagation delay is approximately 2 ms, giving a round-trip of roughly 4 ms at zenith; this rises with lower satellite elevation angles. Both figures are small by GEO standards but still higher than typical terrestrial LTE latency of under 1 ms in good conditions. For emergency messaging, this is irrelevant. For any real-time application (voice, video, live messaging), it becomes a constraint.
**Service continuity depends on the satellite's pass.** A LEO satellite at ~600 km altitude has a horizon-to-horizon pass duration of approximately 10–15 minutes over a fixed point on the ground. Continuous connectivity requires either a dense enough constellation that another satellite is always in view (as Starlink is designed to provide) or a session model that completes the transaction within a single pass.
**Feature availability is expanding.** Both Apple and SpaceX have disclosed roadmaps for additional capabilities. What satellite connectivity can do in 12 or 24 months from publication will likely be broader than what it can do today. This guide describes verifiable, currently launched capabilities only.
---
## What This Means for SIM and Plan Choice
Satellite connectivity does not yet change the fundamentals of choosing a SIM or plan for everyday use. The factors covered in [What Is a SIM Card?](/en/guides/what-is-sim/) — authentication, carrier agreements, network coverage — still determine whether your phone works in a given location.
For most users, satellite connectivity is a safety net for rare situations: emergencies in remote areas, SMS in a dead zone via a participating carrier. It does not affect the daily calculus of which plan to buy, how much data you need, or whether a local SIM makes sense for a trip abroad.
Where satellite connectivity does matter for plan choice:
- If you travel frequently to remote areas (backcountry, offshore, rural), an iPhone 14+ on a carrier with Emergency SOS via satellite in your destination country provides meaningful safety coverage that no terrestrial plan can replicate.
- If your home carrier has a Starlink Direct to Cell agreement, the ability to send and receive SMS in a dead zone is available without buying any additional device or subscription.
- If you are evaluating carriers for a plan and your carrier does not have a Direct to Cell agreement, this is a differentiating feature to compare — particularly if you spend time in areas with partial or no terrestrial coverage.
Use [SimFinder](/en/) to compare plans by carrier and country, including network coverage data.
---
## FAQ
See the frontmatter for structured FAQ entries compatible with schema.org/FAQPage.
**When did satellite-to-phone connectivity become available on consumer smartphones?**
Apple Emergency SOS via satellite launched commercially on November 15, 2022, for iPhone 14 models in the United States and Canada. This was the first mass-market satellite connectivity feature on a standard consumer smartphone. The service reached additional countries through 2023 and 2024.
**How is Direct-to-Cell different from a satellite phone service like Iridium?**
Traditional satellite phone services such as Iridium require a dedicated handset with a proprietary satellite modem and a large, external antenna. They operate on their own networks and require separate subscriptions. Direct-to-Cell uses standard LTE (Starlink's approach) or a Qualcomm-based modem with custom Apple RF hardware (in Apple's case) built into a regular smartphone, and is designed to work without any additional equipment. The tradeoff is capability: current Direct-to-Cell services support only messaging (and emergency messaging), while dedicated satellite phones support voice calls.
**Will satellite connectivity replace terrestrial mobile networks?**
No. LEO satellite constellations have finite channel capacity that is shared across all users on a beam footprint. Terrestrial cellular networks — with densely deployed base stations — provide far greater per-user throughput and lower latency. Satellite NTN is designed for coverage extension in areas where terrestrial infrastructure is absent, not to replace it where it exists.
**What does "3GPP NTN Release 17" mean in practice?**
3GPP Release 17 is the specification that allows standard LTE and 5G NR protocols to be adapted for satellite links. In practice it means that a phone's existing LTE radio hardware can — if the carrier and satellite operator implement it — communicate with a satellite using the same protocol stack as a ground cell tower, with adjustments for timing and Doppler. This is what enables Direct-to-Cell to work with unmodified handsets on the Starlink network, rather than requiring dedicated satellite modems in every phone.
---
## Related Guides
- [International Roaming Explained](/en/guides/international-roaming/) — How carrier agreements govern network access when you cross borders, including what happens in areas with no terrestrial coverage
- [No Service: Why Your Phone Has No Signal and How to Fix It](/en/guides/no-service/) — Diagnosing and resolving loss of signal, and when satellite connectivity is the only fallback
- [4 Ways to Stay Connected Abroad](/en/guides/four-options/) — Full comparison of roaming, local SIM, travel eSIM, and satellite options for international travel
- [What Is a SIM Card?](/en/guides/what-is-sim/) — How IMSI and carrier authentication work — the foundation that satellite carrier agreements build on
- [Using Dual SIM for Travel](/en/guides/dual-sim-for-travel/) — How to combine a travel eSIM with your home SIM, including how satellite emergency coverage interacts with a dual-SIM setup
================================================================================
# Data-Saving Techniques — iPhone and Android App Settings That Cut Mobile Data Use
URL: https://sim-finder.com/en/guides/save-data/
Type: guides (en)
Published: 2026-04-22
The biggest data drains on most phones are video quality settings and background activity you never chose to turn on. Fixing those two areas can cut monthly data consumption by 30–60% without changing how you use your phone day-to-day.
This guide covers the practical settings across iOS and Android — plus the major streaming, audio, and social apps — that have the largest impact. For background on how much data specific apps consume, see the companion article [How Much Mobile Data Do You Need?](/en/guides/data-usage-guide/).
---
## Data-Saving Strategy: Measure First, Target the Biggest Sources
Before touching any settings, check where your data actually goes. Changing the wrong settings costs you effort for minimal gain.
**On iPhone (as of publication):**
Settings → Mobile Data (or Cellular) → scroll down. You will see cumulative data used per app since the last reset. Tap **Reset Statistics** at the start of each billing cycle so the numbers reflect the current month.
**On Android (stock Android, as of publication):**
Settings → Network & Internet → Data Usage. Select your SIM, set the date range to match your billing cycle, and view per-app consumption sorted by highest first.
Once you know which apps are consuming the most, the rest of this guide helps you address them in order of impact. Video streaming apps are almost always at the top.
---
## OS-Level Settings: Low Data Mode (iOS) and Data Saver (Android)
These system-wide settings are the fastest way to reduce background data consumption across all apps at once.
### iOS: Low Data Mode
**As of publication**, Low Data Mode is available on iOS 13 and later.
To enable it for cellular: **Settings → Cellular → Cellular Data Options → Data Mode → Low Data Mode** (toggle on).
If you use a dual-SIM setup, each line has its own Low Data Mode toggle. You can enable it for one SIM while leaving it off for another — useful if one line has a limited data plan and the other does not.
What Low Data Mode does:
- Signals apps to reduce background network activity
- Pauses automatic iCloud Photo syncing over cellular
- Reduces background fetch in Mail, News, and other system apps
- Prevents automatic app updates over cellular
What it does not do: it does not block apps from using data when you are actively using them, and not all third-party apps implement the signal.
You can also enable Low Data Mode for **Wi-Fi** separately (Settings → Wi-Fi → tap the network name → Low Data Mode). This is useful on metered or capped Wi-Fi connections.
### Android: Data Saver
**As of publication**, on stock Android (Pixel phones): **Settings → Network & Internet → Data Saver**.
On Samsung Galaxy devices, the path may differ: **Settings → Connections → Data Usage → Data Saver**.
What Data Saver does:
- Blocks background data for all apps unless individually whitelisted
- Apps can still use data when you are actively in the foreground
- Notifications from apps that require background data (e.g., some messaging apps) may be delayed
To whitelist an app that needs background data (for example, a messaging app you need to receive notifications from): go into Data Saver settings and find the **Unrestricted data** or **Allow app while Data Saver on** option.
### Android: Per-App Mobile Data Restriction
Beyond Data Saver, you can restrict individual apps from using mobile data entirely.
**As of publication** on stock Android: **Settings → Network & Internet → Data Usage → tap the app → toggle off "Mobile data"**. The app will only connect to the internet when Wi-Fi is available.
This is a harder restriction than Data Saver — the app gets no cellular data at all, even in the foreground. Reserve this for apps you only want to use on Wi-Fi (large download managers, backup apps, etc.).
### Android: Data Usage Warning and Limit
Stock Android lets you set a data warning and a data limit for a billing cycle.
Settings → Network & Internet → Data Usage → (SIM name) → **Data warning & limit**.
- **Data warning**: you receive a notification when you reach the specified amount
- **Data limit**: the phone cuts off all mobile data when the limit is reached
Set the limit slightly below your plan's included data to avoid overage charges. Note that carrier apps typically show more accurate remaining data figures than the OS counter, as system measurements do not always account for carrier promotions or rollover data.
---
## Video Apps: YouTube, Netflix, Amazon Prime Video, TikTok
Video is the dominant data consumer on most phones. Quality settings are the most impactful change you can make.
### YouTube
YouTube defaults to **Auto** quality, which selects the highest resolution the connection supports — often 720p or 1080p on a strong 4G/5G signal. On a limited data plan, this can consume 1.2–3.0 GB per hour.
**To set a data-saving default (as of publication):**
YouTube app → profile icon → Settings → Video Quality Preferences → **Mobile networks** → set to **Data saver (lower picture quality)**.
On **Data saver**, YouTube selects a lower resolution (typically around 360p) regardless of connection speed. At 360p, estimated consumption drops to roughly 0.3–0.45 GB per hour, compared to approximately 1.2–1.8 GB at 720p — a reduction of around 75%.
You can also change quality on a per-video basis by tapping the three-dot menu → Quality while a video is playing.
### Netflix
Netflix provides dedicated mobile data controls in its app.
**As of publication:** Netflix app → profile icon → App Settings → **Video Playback** → **Mobile Data Usage** (or **Cellular Data Usage** on some versions).
Options:
- **Automatic**: approximately 1 GB per 4 hours of viewing
- **Save Data**: approximately 1 GB per 6 hours of viewing
- **Maximum Data**: highest quality, consumes significantly more data
- **Wi-Fi Only**: prevents all streaming over cellular
Select **Save Data** to get the best tradeoff between data usage and video quality on a limited plan. You can still adjust quality per-title from the playback screen.
Netflix also allows **offline downloads** for mobile viewing. Download series episodes and films on Wi-Fi before leaving home to eliminate streaming data entirely. Downloads are available in the Netflix app for most (not all) titles depending on licensing.
### Amazon Prime Video
**As of publication:** Prime Video app → profile icon → Settings → **Stream & Download** (or similar path depending on app version) → **Streaming Quality** → set to **Good** or **Better** rather than **Best** for cellular use.
You can set separate quality levels for Wi-Fi and cellular. Setting cellular to **Good** (approximately equivalent to 480p) reduces consumption significantly versus **Best** (HD or higher).
Prime Video also supports offline downloads. Set download quality in **Download Quality** to **Good** to save storage space and keep file sizes manageable.
### TikTok
TikTok streams short videos continuously, which can consume 0.5–1.0 GB per hour at default settings.
**As of publication:** TikTok app → Profile → three-line menu (top right) → Settings and Privacy → **Data Saver** (toggle on).
Data Saver in TikTok reduces video quality and disables autoplay for some content. The exact reduction depends on your connection and content type.
Note: Screen Time Management (under Digital Wellbeing settings) limits total daily usage time and indirectly reduces data consumption, but it is a usage-time control rather than a data-quality setting.
---
## Audio Apps: Spotify, Apple Music, Podcasts
Audio consumes far less data than video, but streaming music all day still adds up. Downloading for offline use is the most effective strategy.
### Spotify
Spotify offers granular quality controls per connection type.
**As of publication:** Spotify app → profile picture → Settings and privacy → **Media Quality** → set **Cellular streaming** to **Normal** (approximately 96 kbps, ~43 MB/hour) or **Low** (approximately 24 kbps, ~11 MB/hour) rather than **High** (approximately 160 kbps, ~72 MB/hour) or **Very High** (approximately 320 kbps, ~144 MB/hour, Premium only).
Also in Settings → **Downloads**: enable **Only download over Wi-Fi** to prevent accidental large downloads on cellular.
For maximum data savings: use Spotify's **Download** feature (Premium) to save playlists and albums offline over Wi-Fi. Once downloaded, music plays with zero streaming data.
**Data Saver mode** is also available: Settings and privacy → Data Saver → toggle on. This reduces streaming quality and disables Canvas (animated art) and other visual elements. It does not affect offline playback.
### Apple Music
**As of publication (iOS 18 and later):** Settings → Apps → Music → **Audio Quality** → set **Cellular Streaming** to **High Efficiency** rather than **High Quality** or **Lossless**. On earlier iOS versions, the path is Settings → Music → Cellular Data.
Hi-Res Lossless (24-bit/192 kHz) can consume significantly more data than standard High Quality. Unless you are connected to high-quality audio equipment, the difference is inaudible on typical mobile headphones.
Download playlists and albums over Wi-Fi for offline listening: tap the download icon (cloud with downward arrow) on any playlist, album, or song.
### Apple Podcasts and Other Podcast Apps
**As of publication:** Settings → Apps → Podcasts → **Cellular Data** (iOS 18 and later; on earlier iOS: Settings → Podcasts → Cellular Data) — you can allow or disallow both streaming and downloads over cellular independently.
In the Podcasts app itself: Settings → **Downloads** → disable **Download Episodes on Cellular** to ensure new episodes only download on Wi-Fi.
Most other podcast apps (Overcast, Pocket Casts, etc.) have similar settings under Download or Network preferences.
---
## Social and Messaging Apps: Instagram, X, WhatsApp, Messenger
Social apps consume more data than most users expect, because they autoplay video in feeds and preload upcoming content in the background.
### Instagram
Instagram autoplays Reels and Stories videos in the feed, which accounts for most of its data consumption. Browsing can use approximately 0.3–1.0 GB per hour depending on how video-heavy the content is.
**As of publication:** Instagram app → profile icon → three-line menu → Settings and privacy → **Data usage and media quality** → toggle **Use less mobile data** on.
This reduces video quality in the feed when on cellular. Instagram does not provide a numerical quality setting — it is a binary toggle.
### X (formerly Twitter)
X autoplays videos in the timeline. Text-heavy browsing uses roughly 100–200 MB per hour, but video-heavy sessions can use significantly more.
**As of publication:** X app → profile icon → Settings and Support → Settings and privacy → **Accessibility, display, and languages** → **Data usage** → set **Video autoplay** to **Never** or **Wi-Fi only**.
Disabling autoplay stops videos from loading until you tap them, which eliminates most incidental video data consumption on X.
### WhatsApp
WhatsApp's main data cost comes from automatic media downloads. Voice and text messages use very little data — text messages use negligible amounts, and voice calls use approximately 15–50 MB per hour.
**As of publication:** WhatsApp → Settings → Storage and Data → **Media auto-download** → under "When using mobile data", set Photos, Audio, Videos, and Documents to **Never** or limit to Photos only.
This prevents WhatsApp from automatically downloading large files (videos especially) to your camera roll when you receive them in chats.
You can also reduce call quality: Settings → Storage and Data → **Use less data for calls** (toggle on). This reduces audio quality slightly but cuts call data consumption.
### Facebook Messenger and Other Messaging Apps
Most messaging apps have similar media auto-download controls. In Messenger: profile icon → Phone/Data → **Data Saver** (toggle on). This stops automatic video and GIF playback in chat and reduces media auto-download.
---
## Stop Unnecessary Background Activity
Several background processes consume data without any direct user action.
### iOS: Disable Automatic App Updates Over Cellular
**As of publication:** Settings → App Store → under **Automatic Downloads**, turn off **App Updates**.
iOS major updates range from 3–5 GB; app updates vary from tens of MB to several hundred MB each. Keeping these Wi-Fi-only prevents unexpected large downloads on a limited plan.
Also turn off: **Apps** (prevents automatic re-download of apps from iCloud) and optionally **App Downloads** if you prefer to manually trigger all installs.
### Android: Disable Automatic App Updates Over Mobile Data
**As of publication (Google Play Store):** Play Store app → profile icon → Settings → Network preferences → **Auto-update apps** → select **Over Wi-Fi only**.
### iOS: Restrict iCloud Photo Sync to Wi-Fi
If you use iCloud Photos, your camera roll uploads to iCloud continuously. On a busy day with many photos or videos, this can consume significant data.
**As of publication:** Settings → Photos → **Mobile Data** → toggle off to block all cellular syncing, or leave on and disable **Unlimited Updates** to prevent iCloud from uploading large batches of photos and videos over cellular in the background.
### Android: Google Photos / Backup Settings
**As of publication:** Google Photos app → profile icon → Photos settings → Backup → **Backup over mobile data** → toggle off (or set a size limit for videos).
### iOS: Background App Refresh
**As of publication:** Settings → General → **Background App Refresh** → set to **Off** or **Wi-Fi** instead of **Wi-Fi & Mobile Data**.
You can also control this per-app: scroll down in the same screen to see individual toggles. Disable Background App Refresh for apps that do not need to stay current (games, utilities, less-used social apps) and keep it enabled for apps where fresh content matters (calendar, email, navigation).
### Analytics and Diagnostics
**On iPhone:** Settings → Privacy & Security → Analytics & Improvements → turn off **Share iPhone Analytics** and **Share iCloud Analytics**. These periodically send usage data to Apple and may consume small amounts of data on cellular.
**On Android:** Settings → Privacy → **Usage & diagnostics** → toggle off. Location: may vary by manufacturer.
---
## Wi-Fi Strategy and Pre-Downloading
The most reliable way to reduce mobile data consumption is to complete data-heavy tasks before leaving a Wi-Fi network.
### Pre-Download Before You Leave
- **Netflix**: download episodes and films from the app on home Wi-Fi the night before travel
- **Spotify**: download playlists and podcasts for the commute or journey
- **YouTube Premium**: download videos for offline viewing
- **Maps**: download offline map areas in Google Maps (tap your profile icon → Offline maps → Select your own map) or Apple Maps (search an area → tap the location name → Download)
Downloaded content consumes zero mobile data during playback or navigation.
### Trust Known Wi-Fi Networks
On both iOS and Android, you can configure your device to automatically connect to saved Wi-Fi networks. When you are on a trusted network, data-intensive tasks (backups, updates, large file transfers) happen automatically without touching your mobile data.
**Caution**: avoid performing sensitive tasks (banking, email with attachments, large file transfers) on public Wi-Fi without a VPN. If you use public Wi-Fi frequently while traveling, consider a VPN. For more on travel connectivity options, see [The Four Ways to Get Data Abroad](/en/guides/four-options/).
### Set Apps to Wi-Fi-Only for Heavy Tasks
Many apps let you restrict heavy operations to Wi-Fi:
- **Dropbox / Google Drive / OneDrive**: set sync and camera backup to Wi-Fi only in each app's settings
- **Podcast apps**: download new episodes on Wi-Fi only
- **Cloud storage apps**: disable automatic photo uploads over cellular
If you are planning an international trip and want to understand how eSIM options compare to roaming or pocket Wi-Fi, the [first-time buyer's guide](/en/guides/first-time-guide/) walks through what to look for. If you are unfamiliar with the technology itself, [What Is an eSIM?](/en/guides/what-is-esim/) covers how it works and which phones support it.
---
## Monitor Your Usage
Knowing your consumption pattern helps you decide whether your current plan is right-sized, or whether specific data-saving measures are working. For a detailed explanation of typical app consumption figures, refer to [How Much Mobile Data Do You Need?](/en/guides/data-usage-guide/).
### iPhone: Monthly Tracking
Settings → Mobile Data → scroll to the bottom → **Reset Statistics**. Do this on the same day each month (or match your billing cycle start date). After a month, return to the same screen to see total cellular usage and per-app breakdown.
Notable limitation: iPhone statistics show cumulative data and do not reset automatically. You must reset them manually to get a per-month view.
### Android: Usage Period and Warnings
Settings → Network & Internet → Data Usage → (SIM card) → you can set a **Billing cycle** start date, a **Data warning** threshold, and a **Data limit**. Android will notify you when you reach the warning level and (optionally) cut data when you hit the limit.
### Carrier Apps
Most carriers have official apps that show real-time remaining data for the current billing period. These tend to be more accurate than OS-level counters because they are sourced from the carrier's billing system, which accounts for rollover data, bonus data, and promotional allowances that the phone's own counter does not know about.
### Third-Party Usage Monitors
If you want more granular visibility, apps like My Data Manager (iOS and Android) provide per-session tracking and alerting. However, be aware that third-party data monitors require a VPN permission to intercept traffic for measurement purposes, which introduces its own tradeoffs.
---
## Related Guides
If this guide raised questions about which plan type suits you, or how to get data when traveling:
- [How Much Mobile Data Do You Need?](/en/guides/data-usage-guide/) — per-app consumption figures and a method to estimate your monthly needs
- [What Is an eSIM?](/en/guides/what-is-esim/) — how eSIM technology works, and which phones support it
- [The Four Ways to Get Data Abroad](/en/guides/four-options/) — roaming, local SIM, travel eSIM, and pocket Wi-Fi compared
- [First-Time Buyer's Guide to Travel eSIMs](/en/guides/first-time-guide/) — what to look for when buying your first travel eSIM
- [Mobile Terms Glossary](/en/guides/glossary-index/) — definitions for technical terms used across these guides
---
## FAQ
See the FAQ items in the frontmatter above for structured answers to common questions. Additional context below.
**Q: Does using 5G consume more data than 4G LTE?**
Not inherently — 5G does not use more data than 4G for the same task. However, a faster connection means apps may default to higher-quality streams (for example, YouTube's auto-quality algorithm may select 4K on a strong 5G signal rather than 720p on 4G). The data-saving settings in this guide apply regardless of connection type.
**Q: My plan is marketed as "unlimited." Do I still need to save data?**
Possibly. Many unlimited plans apply speed throttling after a defined high-speed threshold (often in the range of a few GB to tens of GB per month, depending on the carrier and plan tier). After that threshold, speeds may drop to levels that make video streaming impractical. Check your plan's terms for the specific fair-use or speed management policy. For a breakdown of what "unlimited" typically means in practice, the [glossary](/en/guides/glossary-index/) covers throttling and fair-use policies.
**Q: Is there a way to see exactly which app downloaded what, and when?**
iOS does not provide a per-session log in the native data usage screen — only cumulative totals. Android's built-in Data Usage screen shows totals per app over a selected period but not individual download events. For that level of detail, a dedicated data monitoring app is required (see the Third-Party Usage Monitors section above).
================================================================================
# How to Insert and Remove a SIM Card
URL: https://sim-finder.com/en/guides/sim-insertion/
Type: guides (en)
Published: 2026-06-04
Inserting a SIM card correctly takes less than a minute, but incorrect orientation or skipping the power-off step can leave you with a "No SIM" error or a bent tray. The physical SIM card — a Nano-SIM in nearly all current devices — must be inserted in the correct direction, with gold contacts facing the right way and the notched corner aligned to the tray's matching cutout. This guide covers the complete process: opening the tray, reading the orientation notch, loading single and dual-SIM trays on iPhone and Android, confirming the card is recognised, and what to do when things go wrong.
Key points covered:
- How to eject the tray safely with a SIM pin or paperclip
- How to read the notched-corner orientation on any SIM card or tray
- iPhone and Android insertion sequences, including dual-SIM trays
- How to confirm recognition and trigger network registration
- What to check if the tray won't open or the SIM is not detected
For background on what a SIM card stores and how it works, see [What Is a SIM Card?](/en/guides/what-is-sim/) If you are deciding between a physical SIM and an eSIM, [Physical SIM vs eSIM](/en/guides/sim-vs-esim/) compares activation, profile storage, and travel use.
---
## What You Need Before You Start
You need three things before opening the tray:
1. **A SIM card** — Nano-SIM (4FF, 12.3 × 8.8 × 0.67 mm) in almost all cases. This has been the standard for smartphones since 2012. If you are unsure of the size your device requires, check the manufacturer's specification page or inspect the slot shape in the tray from the previous SIM.
2. **A SIM eject pin** — most boxed smartphones include one in the packaging. A straightened standard paper clip also works. Do not use a sewing needle or any tool with a tapered tip that could score the ejection hole.
3. **A clean, flat surface** — SIM trays and cards are small. Working over a table prevents loss.
If the device is on, power it off before proceeding. Manufacturers including Apple recommend this to allow the modem to shut down cleanly and avoid file system activity on the SIM when it is physically displaced.
**Check for SIM lock before inserting a different carrier's SIM.** If you are inserting a SIM from a different carrier than the one the device was originally set up with, the device must be unlocked (SIM-free) to accept it. A SIM-locked device will reject SIMs from other carriers with an "Invalid SIM" or similar error. If you are inserting your existing carrier's SIM into a new device — or re-inserting after a reset — SIM lock is not a concern. For details on how to check lock status and request an unlock, see [Physical SIM vs eSIM](/en/guides/sim-vs-esim/).
**Deciding between physical SIM and eSIM:** If your device supports eSIM, you have the option to activate a carrier line without inserting any physical card. This is often faster for travel SIMs and for carriers that support remote provisioning. See [Physical SIM vs eSIM](/en/guides/sim-vs-esim/) for a full comparison to help decide which is the better option for your situation.
---
## How to Open the SIM Tray
The SIM tray sits in a slot on the side of the device — on current iPhones (iPhone 12 and later) it is on the left side; older models were on the right — confirm for your specific model. On Android the tray is on the right or left side depending on the manufacturer and model. Beside the slot is a circular ejection hole, approximately 0.8 mm in diameter.
**To open the tray:**
1. Hold the device with the ejection hole visible and accessible.
2. Insert the SIM pin or straightened paper clip straight into the hole — not at an angle.
3. Apply light, steady pressure until you feel a soft click and the tray springs out a few millimetres.
4. Pull the tray out fully with your fingertips.
The mechanism is spring-loaded and requires only light pressure — roughly the force of pressing a ballpoint pen tip. If the tray does not move with moderate straight pressure, stop. Forcing it can bend the internal spring or the tray. See the troubleshooting section below for alternatives.
**After the tray is out:** Keep the tray in view at all times once you remove it. Trays are small and easy to lose. Place it on a flat surface directly in front of you while working with the SIM card. If the tray falls and you cannot find it, contact the device manufacturer or a third-party parts supplier — SIM trays are available as replacement parts for most major phone models.
**If the tray won't open:** Confirm the pin is entering straight and that no protective case is covering or misaligning the ejection hole. Remove any case completely before trying again. If the hole is visibly obstructed by lint or debris, use a wooden toothpick to clear it before inserting the pin. If the tray still does not release with moderate straight pressure, take the device to an authorised repair centre rather than applying more force — a broken spring requires a tray replacement.
---
## Reading the SIM Card Orientation
Every SIM card has one corner cut at an angle — the **orientation notch**. The tray has a matching cutout in the same position. These features ensure the card can only be inserted one way.
**Before placing the card:**
- Identify which corner has the notch.
- Locate the matching notch cutout in the tray.
- Align the two: the notched corner of the SIM goes into the cutout corner of the tray.
Follow the tray's printed silhouette and the notch alignment, which ensures correct seating regardless of contact direction. Confirm the card lies flat and flush in the tray recess before sliding it back in.
If the card does not sit flush without any force, it is in the wrong orientation. Flip it or rotate it 180 degrees and try again. Never press a card that is not correctly seated — this can bend the contacts or crack the card.
**The notch is the same regardless of size.** The orientation notch is present on all physical SIM sizes — Mini-SIM (2FF), Micro-SIM (3FF), and Nano-SIM (4FF). The chip area and contact pad arrangement are the same across all three sizes; only the surrounding plastic frame changes. If you are transitioning from an older device that used Micro-SIM, the notch orientation logic is identical on the smaller Nano-SIM.
**Trays with a diagram:** Many device trays have a small printed silhouette showing the correct card orientation. If your tray has one, match the card to the diagram. This is the fastest orientation check available and eliminates guesswork.
---
## Inserting a SIM on iPhone
Apple has used a Nano-SIM slot on iPhones since the iPhone 5 (2012). The procedure is the same across all models with a physical SIM slot; on current iPhones (iPhone 12 and later) the tray is on the left side of the device — older models were on the right, so confirm for your specific model.
**Steps:**
1. Power off the iPhone (hold side button + volume button → slide to power off, or Settings → General → Shut Down).
2. Locate the SIM tray — on the left side on current iPhones (iPhone 12 and later); older models were on the right. It has a small circular ejection hole.
3. Insert the SIM pin into the ejection hole and press gently until the tray ejects.
4. Pull the tray out fully.
5. Place the Nano-SIM in the tray following the tray's printed silhouette and aligning the notched corner with the tray cutout.
6. Slide the tray back into the device in the same orientation it came out — there is only one correct direction. Do not force it.
7. Press in until the tray sits flush with the device body.
8. Power the iPhone on.
After startup, the carrier name and signal bars appear in the status bar within a few seconds to one minute once network registration succeeds. On the iPhone, a "No SIM" alert at startup means the tray is not fully seated — press it in until flush and restart.
**Note on eSIM-only models:** iPhone 14 models sold in the United States do not have a physical SIM slot — they are eSIM-only. If your iPhone has no visible tray, it is a US iPhone 14 or later model. See [Physical SIM vs eSIM](/en/guides/sim-vs-esim/) for activation options.
**Note on dual SIM on iPhone:** iPhone models from iPhone XS (2018) onward support one physical SIM and one eSIM simultaneously. This is implemented as DSDS (Dual SIM Dual Standby) — both lines can receive calls and messages, but only one line uses mobile data at a time. The physical SIM insertion process is the same whether you are using one line or both.
**If the tray slides in unevenly:** The SIM tray has a keyed profile that allows it to enter in one orientation only. If it does not slide back in smoothly, do not force it. Pull it back out, rotate 180 degrees, and try again. A tray pushed in with incorrect orientation can jam inside the slot.
---
## Inserting a SIM on Android
Android devices vary in tray location and orientation across manufacturers; the ejection mechanism is the same as on iPhone. Common locations include the upper-right side (many Pixel models), the left side (many Samsung Galaxy models), and the top edge on some older devices. If you cannot locate the tray, consult the device's quick-start guide or search the manufacturer's support site for your model name and "SIM tray location".
**Steps:**
1. Power off the device.
2. Locate the SIM tray and the ejection hole.
3. Eject the tray using the SIM pin or paper clip.
4. Note the tray orientation before inserting the card — some Android trays hold the card contacts-up (gold pads visible when you look down at the tray), others contacts-down. Many Android trays have a printed silhouette diagram showing the correct card direction. The recess is shaped to accept the SIM in one orientation only.
5. Place the Nano-SIM so the notched corner aligns with the tray cutout and the card lies flat.
6. Slide the tray back into the device in the correct orientation.
7. Power the device on.
After startup, look for the carrier name in the status bar. On Android you can also check **Settings → Network & Internet → SIMs** (Google Pixel) or **Settings → Connections → SIM card manager** (Samsung Galaxy) to confirm the SIM is detected. On Android, a notification "SIM card added" may appear when the SIM is detected at startup — this is a normal indication that the SIM registration process has begun.
**Note on first-time activation:** A brand-new SIM purchased from a carrier may not be active when you receive it. Activation can require calling the carrier's activation line, visiting a store, or completing a step on the carrier's website or app. If the SIM is correctly inserted but shows "No Service" and the carrier is not listed in the status bar, check whether the SIM still needs to be activated through your carrier's required activation process.
**Note on SIM card adapters on Android:** If you are using a SIM adapter (for example, placing a Nano-SIM into a Micro-SIM adapter frame for an older device), ensure the adapter and card are flush and stable before inserting the tray. A loose adapter can jam inside the slot. When in doubt, use the correct form factor for the device rather than an adapter.
---
## Dual-SIM Trays
Many Android phones and some iPhones support two SIMs simultaneously. Physical implementations vary.
**Single tray with two SIM recesses:** Some devices have one tray with two separate shaped recesses side by side or stacked. Insert each Nano-SIM into its respective recess with the correct orientation. After insertion, go to Settings to assign which SIM handles calls, SMS, and mobile data — on most devices, the primary SIM defaults to all functions and can be changed independently per function.
**Hybrid tray (SIM + microSD):** Some Android devices share one slot between a second SIM and a microSD card. The tray has two recesses of different sizes: the smaller for Nano-SIM, the larger for microSD. Check the device manual to confirm which is which before inserting — they are not always labelled on the tray itself.
**One physical SIM + eSIM:** Devices supporting one physical SIM and one eSIM do not have a second tray. Insert the physical card normally and configure the eSIM separately in Settings. For eSIM setup steps, see [Set Up eSIM with a Manual Code](/en/guides/manual-code/).
When both physical slots are used, label or note which slot is SIM 1 and SIM 2. The device assigns these slots fixed roles in Settings; swapping physical cards between slots may require reassigning data or call settings.
**Assigning data and call functions:** On a dual-SIM Android device, after both SIMs are inserted and detected, the first-time setup screen typically prompts you to assign which SIM handles mobile data and which handles calls. You can change this at any time in Settings → Network & Internet → SIMs (Pixel) or Settings → Connections → SIM Manager (Samsung). On iPhone with physical SIM + eSIM, the assignment is at Settings → Cellular → Default Voice Line and Default Mobile Data.
**Labelling SIMs:** When two physical SIMs are in use, Android allows you to assign a custom name to each line (for example, "Work" and "Personal"). Set these names at the time of first insertion so the correct line is selected when making calls or sending SMS. Mis-selecting the line when making international calls from a roaming SIM can result in unexpected charges.
---
## Confirming Recognition and Network Registration
After inserting the SIM and powering the device on, allow up to one minute for network registration to complete.
**Signs the SIM is recognised and active:**
- Carrier name is visible in the status bar
- Signal bars or a network-generation indicator (4G, 5G) appears
- Settings shows the SIM with the carrier name under the cellular or mobile network section
**If nothing appears after one minute:**
1. Toggle Airplane Mode on, wait five seconds, then off. This forces the modem to re-scan and re-register.
2. Restart the device.
3. Open Settings and navigate to the cellular or SIM section. If the SIM is listed but shows "No Service", the hardware is detecting the card but registration is failing — likely a coverage, activation, or APN issue rather than a physical problem.
4. If the SIM does not appear at all in Settings after restart, remove it, check orientation, clean the contacts with a dry cloth, and re-insert.
**When the SIM is detected but mobile data is not working:**
The carrier name and signal bars show that authentication succeeded. The most common remaining issue is an APN (Access Point Name) that has not been applied automatically. On Android, see [APN Setup Guide for Android](/en/guides/apn-setup-android/) for the manual setup path. On iPhone, go to Settings → Cellular → Cellular Data Network and verify the APN field matches your carrier's published APN string.
For a systematic fix if the status bar continues to show "No Service" after the steps above, see [No Service on Your Phone?](/en/guides/no-service/)
**SIM not recognised vs SIM not registered:** These are different failure modes. "No SIM" or an empty SIM slot in Settings means the hardware is not detecting the physical card — a tray, orientation, or contact issue. "No Service" with the SIM listed in Settings means the hardware detects the SIM but the network is not accepting registration — an activation, coverage, APN, or SIM-lock issue.
---
## Removal Precautions and Safe Storage
**Power off first.** Removing a SIM while the modem is active can cause write errors to the SIM's internal file system (contacts stored on SIM, PLMN preference list). Powering off is the manufacturer-recommended procedure.
**Do not touch the gold contact pads.** Oils and debris from fingers can impede the electrical connection between the SIM and the device's tray pins. Hold the card by its edges.
**Do not bend the card.** Nano-SIM is 0.67 mm thick and will crack if flexed. When removing from the tray, press up from the short edge rather than prying from the centre.
**Store removed SIMs immediately.** A SIM left loose on a desk is easily lost, scratched, or confused with another card. Place it in a SIM card holder, a small labelled envelope, or the original SIM packaging.
**Keep the SIM PIN in mind.** If you have enabled a SIM PIN on the outgoing SIM, that PIN is specific to that SIM card — it does not transfer to a replacement SIM. Write the PIN down before moving or storing the card, and request the PUK (Personal Unblocking Key) from your carrier if you ever need to unblock a locked SIM. The PUK is typically printed on the original SIM packaging. Entering the PUK incorrectly ten consecutive times permanently disables the SIM, so request a new one from your carrier rather than guessing.
**Do not leave the SIM slot exposed for extended periods.** The contact pins inside the slot can collect dust and lint, which may cause intermittent read failures. If you remove the SIM and do not intend to insert another card immediately, slide the empty tray back into the slot to protect the internal pins.
**Environment precautions.** Avoid inserting or removing a SIM in very humid environments or immediately after transitioning from a cold environment into a warm one. Condensation on the card or tray pins can cause temporary connection failures. If the device or SIM appears to have moisture on it, wait until both are dry before proceeding.
---
## FAQ
See the frontmatter above for structured FAQ entries (compatible with schema.org/FAQPage). Additional answers:
**Can I insert the SIM while the phone is on?**
Many devices tolerate SIM insertion during standby. However, device manufacturers recommend powering off before insertion or removal to avoid modem errors. Powering off first is the safest practice.
**The SIM tray came out but the SIM is stuck inside the slot — what do I do?**
Power off the device immediately. Do not insert any tool into the slot. Take the device to a manufacturer-authorised repair centre. Attempting extraction with a pin or clip risks damaging the internal contact pins.
**My carrier sent a multi-size punch-out card. Which size do I use?**
Push out the Nano-SIM — the smallest piece in the punch-out card. Almost all smartphones released after 2014 use Nano-SIM (12.3 × 8.8 mm). Verify your device's required size on the manufacturer's website before punching out any portion, as a punched card cannot be reassembled.
**After inserting the SIM, can I start using data immediately?**
Voice and SMS registration typically completes within seconds. Mobile data requires a working APN. On many devices the correct APN is applied automatically when the SIM is inserted. If data does not work after a few minutes, check the APN settings manually.
**How do I know if my SIM card is damaged?**
Signs of a damaged SIM include: the device does not detect the SIM at all, intermittent "No SIM" errors that come and go, and visible cracks or scratches across the gold contact pads. A chip that is scratched along the contacts may read inconsistently. If the card appears physically intact but the device still cannot detect it after trying in a second compatible device, the SIM's internal chip may have failed — contact your carrier for a replacement.
**Can I reuse my old SIM card in a new phone?**
Yes, as long as the form factor is compatible and the SIM has not been damaged. If your new phone uses Nano-SIM and your old SIM is also Nano-SIM, you can transfer it directly. If the form factors differ, ask your carrier for a free SIM replacement of the correct size — your number and account settings transfer automatically with a replacement SIM from the same carrier.
**What should I do with an old SIM card I no longer need?**
Do not throw a SIM card in general waste. The card stores subscriber credentials. Contact your carrier to formally deactivate the SIM before disposal. Once deactivated, the card can be disposed of as electronic waste according to your local recycling rules. Physically cutting the card before disposal adds a practical step against misuse.
---
## Related Guides
- [What Is a SIM Card?](/en/guides/what-is-sim/) — How a SIM works, size generations (1FF through Nano-SIM), and what IMSI and Ki do
- [Physical SIM vs eSIM](/en/guides/sim-vs-esim/) — Full comparison of physical SIM and eSIM for activation, switching carriers, travel, and device loss scenarios
- [APN Setup Guide for Android](/en/guides/apn-setup-android/) — How to configure mobile data settings on Android after inserting a SIM
- [No Service on Your Phone?](/en/guides/no-service/) — Step-by-step fix for "No Service" or zero-bar problems after SIM insertion
- [Set Up eSIM with a Manual Code](/en/guides/manual-code/) — eSIM activation by entering an SM-DP+ address manually, the fallback when QR scanning is unavailable
================================================================================
# SIM Lock and SIM-Free Explained: How to Check and Unlock Your Phone
URL: https://sim-finder.com/en/guides/sim-lock/
Type: guides (en)
Published: 2026-04-16
A SIM-locked phone only works with the carrier that sold it. Check your iPhone in three taps — Settings → General → About → Carrier Lock — or test an Android by inserting a different carrier's SIM. If your phone is locked, unlocking is free in many countries, though the exact steps and waiting periods vary by carrier and region.
---
## What SIM Lock and SIM-Free Mean
### SIM Lock (Carrier Lock)
A SIM-locked phone contains a software restriction that prevents it from connecting to any mobile network other than the one that applied the lock. The restriction is set by the carrier, not by the device hardware or any cellular standard. For example, a phone locked to Carrier A will reject SIM cards from Carrier B, C, or any travel eSIM from another provider.
Carriers historically used SIM locks to recoup the subsidy paid on devices sold below retail price on postpaid contracts. The economics have shifted in many markets — subsidised bundles are less common — but SIM locks still appear on devices sold by carriers in countries without a mandatory ban.
### SIM-Free (Unlocked)
An unlocked phone accepts any SIM card compatible with its supported radio frequencies. Buying travel eSIMs, swapping to a cheaper local SIM abroad, or switching carriers without buying a new device all require an unlocked phone. The term "SIM-free" is used primarily in the UK and parts of Europe; "unlocked" is the more common term in the US and globally.
### SIM Lock and eSIM
The lock applies to eSIMs as well as physical SIMs. A carrier-locked iPhone or Android phone may refuse to install or activate an eSIM profile from a different carrier. If you try to add a travel eSIM and receive an error during activation, the first thing to check is whether your phone is carrier-locked. The [eSIM activation troubleshooting guide](/en/guides/activation-failed/) covers the most common errors and their causes.
---
## How to Check Your Phone's Lock Status
### iPhone
Apple provides a built-in carrier lock status indicator in every iPhone. The check takes under a minute:
1. Open **Settings**
2. Tap **General**
3. Tap **About**
4. Scroll to find **Carrier Lock**
If the field reads **"No SIM restrictions"**, the phone is unlocked. Any other message — for example, a carrier name or "SIM locked" — indicates the phone is restricted to that carrier.
This check is available on all iPhones running modern iOS versions and is confirmed by Apple's official support page.
### Android
Android does not have a single unified carrier lock indicator across all manufacturers. There are two reliable methods:
**Method 1: Insert a different carrier's SIM card**
The most direct test. If calls and mobile data work normally with the new SIM, the phone is unlocked. If you see "SIM not supported," "Invalid SIM," or "No service" after inserting a valid SIM from a different carrier, the phone is locked.
**Method 2: Network operator scan (Pixel and stock Android)**
Go to Settings → Network & Internet → Mobile Network → Network Operators, then tap "Search networks." If multiple carriers appear in the results, the phone is likely unlocked — but the physical SIM test described above remains the most reliable confirmation.
**Samsung Galaxy**
Go to Settings → Connections → SIM card manager. Some Samsung models show a lock indicator there. The safest test remains inserting a different carrier's SIM.
**Finding your IMEI**
Dial `*#06#` from the phone app, or check Settings → About Phone → IMEI. The IMEI is required when requesting an unlock from a carrier.
---
## How SIM Lock Policy Varies by Region
### United States — No Unified Rule
The US has no federal regulation mandating SIM-free sales. Each carrier sets its own unlock policy. The main conditions as of early 2026:
| Carrier | Postpaid unlock | Prepaid unlock |
|---------|----------------|----------------|
| **Verizon** | Automatic once device payment plan is paid off | 365 days of paid active service required |
| **T-Mobile** | Devices bought from 27 Jan 2026: unlocked once paid. Devices bought before that date: unlock eligible after 40 days of active service | Varies by plan |
| **AT&T** | Must be at least 60 days from purchase; balance paid and account in good standing | At least 6 months of active service required |
Carrier unlock policies change. Check your carrier's current policy page before submitting a request.
### United Kingdom — Locked Sales Banned Since December 2021
Ofcom banned UK mobile operators from selling locked handsets from **17 December 2021**. Phones purchased after that date from EE, Vodafone, Three, O2, and Tesco Mobile are sold unlocked. Phones bought before that date may still carry a lock — contact the carrier to request a free unlock.
### European Union — Largely Unlocked in Practice
EU member states each set their own rules, but competitive market pressure means most new phones sold through carriers in France, Germany, and other EU countries are sold unlocked or with short lock periods. Some carriers in specific countries still apply brief lock periods on heavily subsidised contracts; check local regulations or the carrier's terms.
### Other Regions
Policies in Australia, Canada, South Korea, Japan, Singapore, and elsewhere vary considerably. As a general rule, a phone purchased directly from the device manufacturer (Apple Store, Samsung Store, Google Store) or from a retailer rather than a carrier is more likely to be unlocked. Always verify before buying a used phone internationally.
---
## How to Get Your Phone Unlocked
### US Carriers
Contact your carrier through their website, app, or customer service line and submit an unlock request. Most US carriers process eligible requests automatically within one to two business days. You will need your IMEI and account information. Once the unlock is applied, restart the phone with a different carrier's SIM inserted (for physical SIM locks) or attempt to add an eSIM from another provider.
The [best SIM plans for the US](/en/blog/best-sim-plans-usa-2026/) article covers carriers and plans available once your phone is unlocked.
### UK Carriers
If your phone was purchased before 17 December 2021, contact the carrier to request a free unlock. Processing times differ by carrier but are typically a few business days. Phones purchased after that date do not need an unlock request — they are already sold unlocked.
### Third-Party Unlock Services
Avoid paid third-party unlock services when the manufacturer or carrier provides a free official route. Official unlocks update the device's lock status on the carrier's servers; unofficial methods may not work on newer devices and can void warranties.
---
## Buying a Used Phone — What to Check
Used phones present additional risks because the SIM lock status and history may not be transparent.
### Verify Carrier Lock Status Before Buying
Use the iPhone settings check or Android SIM test described above. Do not rely solely on the seller's claim that the phone is "unlocked." On iPhones, the Settings → General → About → Carrier Lock screen is the definitive check.
### Check the IMEI Blacklist
Phones reported stolen, lost, or flagged for fraud may be added to carrier blacklists and blocked from activating on any network. Run the IMEI through a reputable IMEI check service before purchasing a used device.
### eSIM and Used Phones
On a used iPhone or Android, check whether a previous eSIM profile is still installed:
- **iPhone:** Settings → Cellular (or Mobile Service) — look for any active eSIM line
- **Android (Pixel):** Settings → Network & Internet → SIMs — check for any installed eSIM
A previous owner's eSIM profile on a phone can be deleted, but on some devices the eSIM slot may remain locked to the previous carrier if the device was not properly reset. Factory-resetting the phone before use is the safest approach when buying secondhand.
---
## SIM-Free Status and Traveling Internationally
Using a travel eSIM or a local SIM card at your destination requires an unlocked phone. If your phone is carrier-locked, neither a physical local SIM nor a travel eSIM from a third-party provider will activate.
For an overview of all the options for staying connected while traveling — including international roaming, travel eSIMs, local SIMs, and portable Wi-Fi — see [4 Ways to Stay Connected Abroad](/en/guides/four-options/).
If you have confirmed your phone is unlocked and want to set up a travel eSIM, [Your First Travel eSIM: Step-by-Step Guide](/en/guides/first-time-guide/) walks through the full process from purchase to first connection.
---
## Summary
- A SIM-locked phone only connects to the carrier network that applied the lock. The restriction is software-based and removable.
- Check lock status on iPhone via Settings → General → About → Carrier Lock ("No SIM restrictions" = unlocked).
- Check lock status on Android by inserting a SIM from a different carrier, or scanning available networks.
- The UK has banned the sale of locked handsets since 17 December 2021. US carriers apply their own individual unlock policies — most require the device payment to be paid off plus a minimum period of service.
- Travel eSIMs and local SIMs abroad require an unlocked phone. Unlock your device before your trip.
================================================================================
# SIM Card Not Detected? How to Fix It
URL: https://sim-finder.com/en/guides/sim-not-detected/
Type: guides (en)
Published: 2026-06-04
A "No SIM" or "Invalid SIM" error means your device cannot detect or authenticate the SIM card. In most cases, the fix takes less than two minutes: remove the SIM, check the orientation, clean the contacts, re-insert, and restart. This guide covers every fix in order from fastest to most involved — starting with the physical steps for a standard SIM card, then eSIM-specific steps, then network settings reset, and finally what to do when the issue requires carrier involvement.
Key points:
- "No SIM" (hardware cannot detect the card) and "Invalid SIM" (card detected but rejected) have different causes and different fixes
- Testing the SIM in a second device isolates whether the problem is the SIM or the phone
- eSIM "No SIM" errors are caused by a disabled line or a carrier activation issue, not a physical contact problem
---
## Understand the Error Before You Start
Two distinct error messages appear when a SIM is not working. Identifying which one you see determines where to begin.
**"No SIM" / "No SIM Card Installed"**
The device modem cannot detect any SIM card in the slot. This is a hardware-level failure: the electrical contact between the SIM's gold pads and the tray pins is not being made. Causes include incorrect orientation, a partially ejected tray, debris on the contacts, or a damaged SIM or tray.
**"Invalid SIM" / "SIM Not Supported" / "SIM Failure"**
The modem detects a card but cannot authenticate or accept it. The physical connection is working. Causes include carrier lock (the device is locked to a different carrier), an unactivated SIM that has never been provisioned by the carrier, or a SIM that has been damaged in a way that corrupts the stored credentials.
For a physical SIM: start with [Reseat and Inspect the SIM Card](#reseat-and-inspect-the-sim-card) below.
For an eSIM showing "No SIM": jump to [eSIM-Specific Steps](#esim-specific-steps).
For "Invalid SIM": skip to [Invalid SIM Errors](#invalid-sim-errors).
---
## Reseat and Inspect the SIM Card
The most common cause of "No SIM" is that the SIM card is not making a solid electrical contact with the tray pins. Reseating corrects this in most cases.
**Step 1: Power the device off completely.**
It is good practice to power off first; removing a SIM while the modem is active can cause registration errors. This step is recommended, not mandatory, but skipping it occasionally leads to the device failing to detect the SIM until restarted.
**Step 2: Eject the tray.**
Insert the SIM ejection pin (or a straightened paperclip) straight into the ejection hole — not at an angle. Apply light, steady pressure until you feel the spring release and the tray ejects a few millimetres. Pull the tray out fully with your fingertips.
**Step 3: Remove the SIM and inspect it.**
Pick up the SIM card by its edges only — do not touch the gold contact pads. Look at the gold pads under a light source. Check for:
- Visible dust, lint, or debris in the pad area
- Scratches running across the contact pads
- Cracks in the plastic body or the chip area
If the pads are clean and the card shows no physical damage, proceed to the orientation check. If there is visible debris, clean it first (see next section).
**Step 4: Check the orientation.**
Every SIM card has one corner cut at an angle — the orientation notch. The tray has a matching cutout in the same position. The card can only be inserted correctly when the notched corner aligns with the cutout. The tray also carries a printed silhouette on many devices: match the card to that diagram. If there is no diagram, align the notched corner with the notched corner of the tray recess.
Lay the SIM flat in the tray recess. It should sit flush and level without any pressure. If it does not sit flush, it is in the wrong orientation — flip or rotate it and try again. Never press a card that is not correctly seated.
For a full illustrated explanation of SIM orientation and tray mechanics, see [How to Insert and Remove a SIM Card](/en/guides/sim-insertion/).
**Step 5: Re-insert the tray and power on.**
Slide the tray back into the slot in the same orientation it came out — there is one correct direction. Press until flush with the device body. Power the device on and wait up to 60 seconds for the carrier name to appear in the status bar.
---
## Clean the SIM Contacts
If the SIM pads or the tray contacts have debris or light oxidation, the electrical connection is intermittent or absent. Cleaning often resolves persistent "No SIM" errors that reseating alone does not fix.
**To clean the SIM card:**
Wipe the gold contacts with a dry, lint-free cloth — the microfiber cloth included with glasses is ideal. Wipe gently in one direction. Do not use abrasive materials or liquids on the SIM card.
**To clean the SIM tray slot on the device:**
Use a can of compressed air to blow out the SIM slot briefly before reinserting the tray. Hold the can upright and use short bursts at a safe distance. Do not insert any metal object into the slot itself — the contact pins inside are fragile.
**After cleaning:**
Re-insert the SIM using the orientation steps above, power the device on, and check the status bar.
---
## Restart and Toggle Airplane Mode
After reseating and cleaning, if the error persists, two software-level steps force the modem to re-scan.
**Restart the device.**
A full restart reinitialises the radio stack. On iPhone, hold the side button and a volume button until the power slider appears, slide to power off, wait 10 seconds, then press the side button to power on. On Android, hold the power button and tap Restart.
**Toggle Airplane Mode.**
If a full restart is not practical, toggling Airplane Mode achieves a similar effect for the radio subsystem:
1. Enable Airplane Mode in Control Center (iPhone) or the Quick Settings panel (Android).
2. Wait 10 seconds.
3. Disable Airplane Mode.
4. Watch the status bar for the carrier name to appear within 15–30 seconds.
What this does: it forces the modem to drop its current state and begin a fresh network registration scan. A stale modem state is a common cause of a "No SIM" display that appears after the device wakes from sleep or recovers from a brief battery issue.
---
## Test the SIM in a Second Device
Testing the SIM in a different compatible device isolates whether the problem is with the SIM card itself or with your original phone.
**To test:**
1. Power off both devices.
2. Remove the SIM from the problem device.
3. Insert it into the second device (confirm the second device accepts Nano-SIM and is SIM-unlocked or on the same carrier).
4. Power the second device on.
5. Wait 60 seconds and check whether the SIM is detected.
**What the result tells you:**
| Result | Conclusion |
|--------|------------|
| SIM detected in second device | SIM is functional; problem is in the original device (tray damage, SIM lock, or device-level fault) |
| SIM not detected in second device | SIM itself is faulty or unactivated; contact the carrier for a replacement |
| "Invalid SIM" in second device | SIM may be locked to a specific carrier; the original device may be from a different carrier |
If the SIM is detected in the second device but not in the original, continue with the device-specific steps below.
---
## Check the SIM Tray for Physical Damage
If reseating and cleaning did not resolve the error, inspect the tray and slot for physical damage.
**SIM tray:**
- Are the contact pins on the underside of the tray (the metal pins that press against the SIM pads) bent, broken, or missing?
- Is the tray warped or cracked?
- Does the tray slide in and out smoothly, or does it stick?
A tray with bent or missing pins cannot make a reliable electrical contact with the SIM. Replacement SIM trays are available as official spare parts for most major phone models from the manufacturer or authorised service centres.
**SIM slot inside the device:**
If the tray appears undamaged, the issue may be with the contact pins inside the device's SIM slot. This requires inspection by an authorised repair centre — do not insert tools or sharp objects into the slot to check.
---
## Invalid SIM Errors
"Invalid SIM", "SIM Not Supported", or "SIM Failure" messages mean the device detects the card but rejects it. The physical connection is working. The causes differ from "No SIM".
### Check for Carrier Lock
A carrier-locked device only accepts SIM cards from the carrier that sold it. Inserting a SIM from a different carrier — including SIMs from MVNOs, travel SIMs, or SIMs purchased in another country — will produce an "Invalid SIM" or "SIM Not Supported" error.
**How to check:**
- **iPhone:** Settings → General → About → Carrier Lock. "No SIM restrictions" means the device is unlocked.
- **Android:** There is no universal check. Insert a SIM from a different carrier — if it is rejected with a clear error message, the device is likely carrier-locked. Contact the original carrier to confirm.
**How to unlock:**
Contact the carrier that originally sold the device. Most carriers unlock devices through their online account portal, typically at no charge once the device payment is complete or the contract has ended. The specific conditions vary by carrier and country. After unlocking, restart the device before inserting a SIM from a different carrier.
For a full guide to carrier lock and the unlock process, see [No Service on Your Phone?](/en/guides/no-service/) which covers the carrier lock check in detail.
### Confirm the SIM Is Activated
A brand-new SIM purchased from a carrier is not always active when you receive it. Some carriers require a separate activation step — calling an activation line, visiting a web page, or completing a step in the carrier's app — before the SIM is provisioned on the network.
An unactivated SIM may show "Invalid SIM", "No Service", or may simply show the carrier name with no signal. Check whether your carrier requires an activation step by reviewing the documentation that came with the SIM or by calling the carrier's support line.
---
## eSIM-Specific Steps
For an eSIM, "No SIM" does not indicate a physical contact failure — it means the device has no active eSIM line turned on, or the installed eSIM profile has a problem.
### Confirm the eSIM Line Is Enabled
An installed eSIM profile and an active cellular line are not the same. After installation, the line must be explicitly enabled.
**iPhone:**
1. Settings → Cellular.
2. Under SIM & Cellular Plans, locate the eSIM entry.
3. Tap it and confirm "Turn On This Line" is toggled on (green).
**Android (Pixel):**
1. Settings → Network & internet → SIMs.
2. Confirm the toggle next to the eSIM line is on.
**Android (Samsung):**
1. Settings → Connections → SIM card manager.
2. Confirm the eSIM toggle is on.
If the line is already on but the status bar shows "No SIM", toggle the line off, wait five seconds, toggle it back on, then restart the device.
### Confirm No SIM Profile Was Accidentally Deleted
If an eSIM profile was deleted from the device — either manually or after a factory reset or device transfer — reinstalling it requires the carrier to re-issue the profile. Many eSIM profiles — particularly from travel and prepaid providers — are single-use once deleted; the original QR code or activation code no longer works. Major domestic carriers, however, typically allow re-provisioning via their account portal without issuing a new code.
Contact the carrier or eSIM provider and request a new provisioning code. You will need to provide your account details and, in most cases, the device EID (the eSIM hardware identifier).
**To find the EID:**
- **iPhone:** Settings → General → About → EID
- **Android (Pixel/Samsung):** Settings → About phone → Status information → EID (path varies by One UI version)
### eSIM Activation Issues
If the eSIM was just installed and immediately shows "No SIM" or "No Service", the issue may be an activation problem rather than an eSIM detection problem. For a complete symptom-by-symptom walkthrough of eSIM activation failures, see [eSIM Won't Activate? How to Fix Common Setup Issues](/en/guides/activation-failed/).
---
## Reset Network Settings
If all physical and eSIM-specific steps have been followed and the SIM is still not detected or not working, resetting network settings removes corrupted device-level configuration that may be interfering with SIM detection.
**What network settings reset removes:** Wi-Fi passwords, VPN configurations, Bluetooth pairings, and saved cellular settings (including APN configurations). It does not remove apps, photos, contacts, or accounts. On iPhone and Samsung, the reset does not delete stored eSIM profiles. On Pixel devices using a Google Fi eSIM, the network reset may delete eSIM data and require reactivation — check with Google Fi before proceeding if that applies to your setup.
**iPhone:**
1. Settings → General → Transfer or Reset iPhone → Reset.
2. Tap Reset Network Settings.
3. Enter your passcode and confirm.
4. The device restarts. After restart, wait 60 seconds for the SIM to be re-detected.
**Android (Pixel):**
1. Settings → System → Reset options.
2. Tap Reset Wi-Fi, mobile & Bluetooth.
3. Confirm.
**Android (Samsung):**
1. Settings → General management → Reset.
2. Tap Reset network settings.
3. Confirm.
After the reset, re-enter your Wi-Fi credentials and check whether the SIM is now detected. For a full breakdown of what network settings reset does and does not affect on each device type, see [How to Reset Network Settings (and What It Affects)](/en/guides/network-reset/).
If the SIM is detected after the reset, the previous configuration was the cause. You may also need to re-enter your APN settings if mobile data does not work after the reset. For APN setup, see [What Is an APN? Why You Need to Configure It](/en/guides/what-is-apn/).
---
## When to Contact Your Carrier
If none of the steps above have resolved the error, the remaining causes require carrier-side access.
**Reasons to contact your carrier:**
- The SIM was never activated — the carrier needs to provision it on their network
- The SIM appears damaged (cracked, deeply scratched contacts) — the carrier can issue a replacement SIM for the same number and account
- An eSIM profile cannot be re-downloaded — the carrier needs to issue a new provisioning code
- Carrier lock is confirmed and needs to be removed — only the original carrier can do this
- Suspected account-level suspension — non-payment or a fraud flag can prevent SIM registration
**What to have ready when you call:**
- Your phone number and account PIN or password
- Device model and IMEI (dial `*#06#` on any phone, or find it at Settings → General → About on iPhone)
- EID if using eSIM (Settings → General → About → EID on iPhone; Settings → About phone → Status information → EID on Android, path varies by One UI version)
- The exact error message the device is showing
- Whether the SIM was previously working in this device, and when it stopped
Most carriers can provision or replace a SIM over the phone or through their account portal without requiring a store visit.
---
## Frequently Asked Questions
See the structured FAQ entries in the frontmatter above (compatible with schema.org/FAQPage). Additional answers:
**The SIM works intermittently — sometimes detected, sometimes not. What causes this?**
Intermittent detection is almost always a contact problem. The SIM tray pin contacts may be slightly bent, or there may be microscopic debris causing an unreliable connection. Remove the tray, clean the SIM contacts and the tray with a dry lint-free cloth, and re-insert firmly. If intermittent errors continue, the tray contact pins may need replacement by an authorised service centre.
**Can I damage my phone by inserting the SIM incorrectly?**
Forcing a SIM into an incorrect position can bend the tray's contact pins. However, a SIM in the wrong orientation that is placed in the tray without force and simply does not sit flush will not cause damage — remove it, re-orient it, and try again. The tray is designed so a correctly sized SIM in the wrong orientation will not drop fully into the recess.
**I dropped my phone and now the SIM is not detected. Is the SIM damaged?**
A physical shock can cause the SIM tray to shift slightly in the slot, breaking the electrical contact. Remove and re-seat the tray first. If the SIM is detected in a second device but still not in the dropped phone, the SIM slot pins inside the device may have been displaced by the impact — take the device to an authorised repair centre.
---
## Related Guides
- [How to Insert and Remove a SIM Card](/en/guides/sim-insertion/) — correct orientation, tray mechanics, and dual-SIM trays on iPhone and Android
- [No Service on Your Phone?](/en/guides/no-service/) — step-by-step fix for signal problems after the SIM is detected
- [eSIM Won't Activate? How to Fix Common Setup Issues](/en/guides/activation-failed/) — eSIM-specific activation failures including QR code errors and carrier lock
- [What Is an APN? Why You Need to Configure It](/en/guides/what-is-apn/) — how to configure mobile data after the SIM is successfully detected
- [How to Reset Network Settings (and What It Affects)](/en/guides/network-reset/) — full breakdown of what the network reset removes and preserves on each device
================================================================================
# SIM Card Sizes and How to Convert Between Them
URL: https://sim-finder.com/en/guides/sim-sizes/
Type: guides (en)
Published: 2026-06-04
SIM cards have shrunk from the size of a credit card to smaller than a fingernail across four removable form factors — and then disappeared into the device altogether as eSIM. The standard in every modern smartphone is the Nano-SIM (4FF), measuring 12.3 × 8.8 mm per ETSI TS 102 221. All four removable form factors carry the same electrical chip; only the surrounding plastic frame differs.
The key points covered in this article:
- Exact dimensions and ETSI designations for each form factor (2FF, 3FF, 4FF)
- Why all three sizes are electrically interchangeable despite different physical dimensions
- How SIM cutters and carrier adapters work, and where the chip-damage risk lies
- How to identify an unknown SIM size without tools
- How eSIM relates to (and replaces) the physical card
- What to do when switching to a device that requires a different SIM size
For a broader explanation of what a SIM card does and how it authenticates to a mobile network, see [What Is a SIM Card?](/en/guides/what-is-sim/) For a direct comparison of physical SIM and eSIM, see [Physical SIM vs eSIM: Differences and How to Choose](/en/guides/sim-vs-esim/).
---
## The Four Physical Form Factors (ETSI TS 102 221)
ETSI TS 102 221 — "Smart Cards; UICC-Terminal interface; Physical and logical characteristics" — is the primary standard that defines the physical dimensions, contact pad layout, and electrical characteristics of removable UICC cards. The latest version is available from etsi.org (release 18 series).
The standard defines four removable form factors, referred to as FF (Form Factor) designations:
| Form Factor | Common Name | Dimensions | Thickness | Approximate Introduction |
|---|---|---|---|---|
| 1FF | Full-size SIM | 85.6 × 54 mm | 0.76 mm | ~1991 |
| 2FF | Mini-SIM | 25 × 15 mm | 0.76 mm | ~1996 |
| 3FF | Micro-SIM | 15 × 12 mm | 0.76 mm | ~2010 (ETSI TS 102 671, April 2010) |
| 4FF | Nano-SIM | 12.3 × 8.8 mm | 0.67 mm | 2012 |
The 1FF format follows the ISO/IEC 7816 ID-1 credit card standard. The 2FF through 4FF formats progressively trim the plastic carrier around the same chip area. The 4FF (Nano-SIM) is also slightly thinner at 0.67 mm, compared to 0.76 mm for all earlier removable formats.
Note that eSIM (eUICC) is not listed here as a "form factor" in the removable-card sense. It is covered in the section below on the eSIM relationship.
---
## Full-Size SIM (1FF) — The Credit Card Era
The first commercial SIM cards, deployed with GSM networks in the early 1990s, matched the ISO/IEC 7816 ID-1 format used by payment and identity cards: 85.6 × 54 mm, the same footprint as a standard credit card. Early GSM handsets (such as the Nokia 1011, launched November 1992) were large enough to accommodate a dedicated slot of this size.
The 1FF is obsolete in consumer devices. No smartphone manufactured in the past two decades uses a 1FF slot. The contact pad geometry defined in ISO/IEC 7816 for the 1FF — the C1–C7 pad arrangement — is the same geometry inherited, at reduced scale, by every subsequent form factor.
---
## Mini-SIM (2FF) — The Long-Running Standard
The Mini-SIM, measuring 25 × 15 × 0.76 mm, became the dominant form factor from the mid-1990s through to approximately 2010–2012. It remains the format most people associate with "a SIM card." The plastic body is trimmed significantly relative to the 1FF, but the chip and contact pad region — the functional area — are unchanged.
Carrier multi-punch cards issued since the Micro-SIM era often include the Mini-SIM footprint as the outermost breakout. If you receive a new SIM with three nested punch lines, the largest size is the 2FF.
Mini-SIM trays are now uncommon in smartphones but still found in some older feature phones, M2M modems, and industrial routers. If your device is more than ten years old and has never had its SIM replaced, it likely uses a 2FF.
---
## Micro-SIM (3FF) — The Transition Size
The Micro-SIM (3FF) measures 15 × 12 × 0.76 mm. It retains the same 0.76 mm thickness as the 2FF and the same chip and contact pad area — the reduction is entirely in the surrounding plastic border.
ETSI standardised the 3FF in ETSI TS 102 671, published April 2010. Mass consumer adoption came immediately, catalysed by Apple's use of Micro-SIM in the iPhone 4 (released June 2010). Most Android flagship phones adopted 3FF during 2011–2012, and carriers began issuing combination Mini/Micro punch-out cards as a standard.
The 3FF is now a transitional size. It appears in devices from roughly 2010 to 2014. If your current phone is from that era, or if you are handing down a phone from that period, it likely requires a Micro-SIM.
---
## Nano-SIM (4FF) — The Current Standard
The Nano-SIM (4FF) measures 12.3 × 8.8 × 0.67 mm. The chip and contact pad area are the same as on 2FF and 3FF; only the plastic border is trimmed further, and the card is slightly thinner (0.67 mm vs 0.76 mm).
Apple introduced 4FF with the iPhone 5 in September 2012. The format was adopted across Android flagships during 2013–2014, and by 2015 it had become the universal standard for new consumer smartphones. Today, any smartphone released within the past decade almost certainly uses a Nano-SIM slot.
The slight thickness reduction to 0.67 mm is relevant when using adapters: adapters designed for 3FF (0.76 mm) will be too thick for a 4FF card without shims, and an adapter that is too thick can jam the SIM tray or prevent the drawer from closing.
---
## How iPhone and Android Drove the Transition to Nano-SIM
The history of consumer SIM miniaturisation is largely the history of Apple iPhone hardware decisions, with Android following within one to two years each time.
**iPhone SIM history:**
- **iPhone (2007) through iPhone 3GS (2009):** standard SIM (2FF, which Apple labels "original SIM").
- **iPhone 4 (2010):** Apple switched to Micro-SIM (3FF), making it the first major consumer device to mandate 3FF at scale. Carriers responded by issuing combination Mini/Micro punch-out cards within months.
- **iPhone 5 (2012):** Apple introduced Nano-SIM (4FF) alongside ETSI's formal ratification of the standard. The iPhone 5 remains the reference point for the 4FF transition. Every iPhone model from the 5 onward uses Nano-SIM (or eSIM only, from the iPhone 16 in the United States).
- **iPhone XS / XR (2018):** Apple added dual SIM support via a physical Nano-SIM slot plus an eSIM.
- **iPhone 14 (US, 2022):** Nano-SIM slot removed in the US market; US models are eSIM-only.
**Android convergence on Nano-SIM:**
Android flagship phones adopted 3FF (Micro-SIM) during 2011–2012 and began transitioning to 4FF (Nano-SIM) during 2013–2014. By 2015, Nano-SIM was the universal default across Android flagships from Samsung, Google, LG, Sony, and HTC. Mid-range and budget Android phones completed the transition to Nano-SIM by approximately 2016–2017.
The practical result: if your Android device was released in 2016 or later, it almost certainly uses a Nano-SIM (4FF). Devices from 2013–2015 may use either Nano-SIM or Micro-SIM depending on manufacturer and release date; check the product specification page to confirm.
---
## Why All Three Sizes Are Electrically Identical
Despite the size differences, 2FF, 3FF, and 4FF cards are electrically identical. ETSI TS 102 221 specifies the same contact pad geometry (C1–C7, per ISO/IEC 7816-2) and the same electrical interface for all form factors. The chip itself — the integrated circuit that holds the IMSI, authentication key, and subscriber data — does not change between sizes.
This means:
- A carrier can manufacture a single chip and mount it in any of the three form factors.
- SIM data (IMSI, carrier profile, contacts if stored on SIM) is on the chip, not on the plastic carrier, and survives any size conversion.
- Signal quality, data speed, 4G/5G compatibility, and all network functions are identical regardless of physical size.
The practical implication: if your carrier provides a replacement SIM of a different size for the same account, no information is lost and no network capability changes.
---
## SIM Cutters: How They Work and Where the Risk Lies
A SIM cutter is a guillotine-type tool with a die cut to the exact 3FF or 4FF outline. You place the larger SIM in the tray, press the handle, and the blade punches out the smaller footprint. They are sold by aftermarket accessory retailers and are not an official carrier service.
**How the cut works mechanically:** The die aligns the chip area to the centre of the new footprint. Because the chip occupies only a small portion of the overall card, trimming the plastic border can be done without touching the chip — provided the SIM is seated correctly in the cutter's tray and the die dimensions are accurate.
**Where damage occurs:**
- **Misalignment:** If the SIM is not seated squarely, the blade may cut across the chip or its bond wires rather than through plastic only. The chip is approximately 12 mm × 8 mm, which leaves almost no margin for error when cutting to 4FF dimensions.
- **Thin plastic residue / burrs:** Even a well-aligned cut can leave a small plastic burr along the edge. Inserting a card with a rough edge can scratch the SIM tray contacts or cause the card to seat unevenly.
- **Thickness inconsistency:** The cutter does not thin the card. A 2FF or 3FF card cut to 4FF dimensions retains its original 0.76 mm thickness. For most devices this difference (0.76 mm vs the specified 0.67 mm) is accommodated by tray tolerance, but in tight trays the card may be difficult to remove.
**Practical guidance:** Cutting is most reliable when going from 2FF to 3FF (Mini to Micro), because the margins around the chip are larger. Cutting from 2FF or 3FF to 4FF leaves minimal margin and carries higher damage risk. Requesting a free or low-cost replacement SIM from your carrier is the recommended approach whenever possible.
---
## Carrier Adapters: Going from Smaller to Larger
A carrier adapter (also called a SIM adapter or SIM tray adapter) is a thin plastic shell that holds a smaller SIM card within the footprint of a larger slot. Common configurations:
- **4FF in a 3FF slot:** Nano-SIM in a Micro-SIM adapter
- **4FF in a 2FF slot:** Nano-SIM in a Mini-SIM adapter
- **3FF in a 2FF slot:** Micro-SIM in a Mini-SIM adapter
Adapters do not modify the SIM electrically; they purely provide the mechanical mounting to fill the larger tray.
**Using adapters safely:**
- Ensure the adapter thickness matches the target form factor. A 3FF slot is 0.76 mm deep; a 4FF card is 0.67 mm thick. A properly made 4FF→3FF adapter adds 0.09 mm of plastic to reach the correct thickness.
- Do not use adapters that are warped, cracked, or do not grip the SIM securely. A loose SIM inside an adapter can slide, jam the tray, or leave the card stuck in the slot when the tray is withdrawn.
- Remove the SIM from the adapter before inserting it into a new device, and insert the SIM alone (without the adapter) into any 4FF slot — adapters are for up-sizing only.
**Tray-jam failure cases:**
The most common adapter failure mode is the SIM separating from the adapter inside the tray. When the tray is pushed back into the device, the SIM card alone can slip below the tray edge into the internal slot housing. Retrieving a stuck SIM from inside the slot requires either a carrier service appointment or careful extraction with a thin tool — some devices require partial disassembly. This risk is highest with:
- Low-quality adapters that do not grip the SIM firmly around all four edges.
- Adapters that have been used many times and have lost clamping tension.
- Nano-SIM cards whose edges have been trimmed (e.g., by a SIM cutter), leaving a narrower card that sits loosely in the adapter.
If you need to use an adapter regularly (for example, when alternating a card between two devices of different sizes), replace the adapter once it shows any sign of loose grip.
---
## Identifying an Unknown SIM Size Without Tools
If you have a SIM of unknown size — for example, from an old device or a foreign carrier — you can identify it by measurement or comparison:
**By measurement:**
- 12.3 mm × 8.8 mm → Nano-SIM (4FF)
- 15 mm × 12 mm → Micro-SIM (3FF)
- 25 mm × 15 mm → Mini-SIM (2FF)
- 85.6 mm × 54 mm → Full-size (1FF, obsolete)
A standard ruler is sufficient. Measure the longest edge (length) and the shorter edge (width) of the plastic body.
**By visual comparison:**
- Nano-SIM is roughly the size of a small fingernail — noticeably smaller on both dimensions than Micro-SIM.
- Micro-SIM is clearly smaller than a Mini-SIM but larger than Nano-SIM, with a visible plastic border around the chip on all sides.
- Mini-SIM has a wide plastic border with the chip centred, and is about the size of a small postage stamp.
**By tray fit:**
Place the SIM next to a known tray (from a current smartphone). A Nano-SIM tray is the smallest; if the SIM is clearly wider or taller, it is a larger format.
**By the multi-punch card:**
If you have the original carrier packaging and it is a multi-punch card, the outermost perforation is 2FF, the middle is 3FF, and the innermost punch is 4FF.
---
## Checking Your SIM Size When Changing Devices
When moving a SIM from an old device to a new one — or purchasing a new SIM for a new device — confirm the form factor before ordering or visiting a carrier store.
**Step 1: Find the new device's SIM specification.** Check the manufacturer's product page under "Specifications" or "Connectivity." The entry will state "Nano-SIM," "Micro-SIM," or a dual-SIM combination such as "Nano-SIM + eSIM."
**Step 2: Check your current SIM.** Compare against the size table above, or measure with a ruler.
**Step 3: If sizes differ:**
- **Current SIM is larger than required:** Request a free SIM swap from your carrier (most carriers provide this at no charge or for a nominal fee). Your number and plan transfer automatically. Alternatively, use a SIM cutter if you accept the risk described above.
- **Current SIM is smaller than required:** Use a carrier adapter as described above.
- **New device uses eSIM only:** Contact your carrier to convert your number to an eSIM profile. For the activation process, see [What Is an eSIM?](/en/guides/what-is-esim/) and, for iPhone specifically, [How to Set Up eSIM on iPhone via QR Code](/en/guides/apn-setup-iphone/).
**Step 4: After inserting the new SIM**, verify that the device shows carrier name and signal bars. If mobile data does not connect automatically, you may need to configure the APN. For iPhone, see [APN Settings on iPhone: How to View and Configure](/en/guides/apn-setup-iphone/). For activation codes from your carrier app, see [How to Activate eSIM with a Manual Code](/en/guides/manual-code/).
---
## eSIM and Its Relationship to Physical Form Factors
eSIM (embedded SIM) is not a fifth physical form factor in the removable-card sense. It is a chip soldered directly to the device's mainboard. The underlying standard is still ETSI TS 102 221 for the UICC logic and GSMA SGP.22 for the consumer remote provisioning protocol.
Key distinctions:
- **No removable card.** There is no card slot; the chip is physically part of the device and cannot be transferred.
- **Remote profile download.** Instead of inserting a carrier-issued card, you download a carrier profile over the internet (via QR code, carrier app, or activation code).
- **Same electrical functions.** The eUICC chip performs the same four functions as a physical SIM: subscriber authentication, phone number binding, encryption key generation, and subscriber data storage.
- **Multiple profiles.** A single eUICC can store multiple carrier profiles and switch between them in Settings without physically swapping anything.
For devices that support both a physical SIM slot and eSIM (the most common configuration in current smartphones), you can run two lines simultaneously — one physical SIM and one eSIM. For a full side-by-side comparison, see [Physical SIM vs eSIM: Differences and How to Choose](/en/guides/sim-vs-esim/).
**eSIM eliminates the physical-size problem entirely.** Every question covered in this article — which form factor fits your device, whether cutting is safe, how to use an adapter without jamming the tray — becomes irrelevant for lines provisioned on eSIM. There is no card to cut, no adapter to carry, and no tray to jam. When switching carriers or adding a second line on an eSIM-capable device, the only step is downloading the new carrier profile. This is the practical advantage that has driven manufacturers toward eSIM-only designs for at least one SIM slot on flagship devices since 2018, and eSIM-only devices (no physical slot at all) in certain markets since 2022.
---
## FAQ
**What is the difference between 2FF, 3FF, and 4FF?**
These are the ETSI TS 102 221 designations for Mini-SIM (25 × 15 mm), Micro-SIM (15 × 12 mm), and Nano-SIM (12.3 × 8.8 mm) respectively. The "FF" stands for Form Factor. Each number corresponds to a generation of miniaturisation. All three carry the same electrical chip and contact pads; only the surrounding plastic border differs in size.
**My carrier sent a "triple-cut" SIM. What does that mean?**
A triple-cut (or triple-punch) SIM card is a single card produced at Mini-SIM dimensions with two additional perforated punch lines scored into the plastic. Pressing out the outermost punch gives a Mini-SIM (2FF); pressing the next gives a Micro-SIM (3FF); pressing the innermost gives a Nano-SIM (4FF). This allows carriers to ship one card that fits any device. The chip is always at the centre, and all three sizes are pre-scored on the same blank.
**Can a SIM chip survive cutting if I use a good-quality cutter?**
A high-quality, correctly sized cutter with a sharp, well-aligned die reduces — but does not eliminate — the risk of chip damage. The margin between the edge of the chip area and the 4FF border is minimal (approximately 0.15 mm on the narrow side) (engineering estimate based on published card dimensions). If you proceed, test the cut SIM immediately in the target device before discarding the original packaging, so you can request a carrier replacement if the card does not register.
**Do all four contact pads on the SIM work the same way across sizes?**
Yes. ISO/IEC 7816-2 defines the contact pad layout (C1 = VCC, C2 = RST, C3 = CLK, C5 = GND, C6 = VPP, C7 = I/O) and this layout is identical across 1FF, 2FF, 3FF, and 4FF. The device's SIM reader makes electrical contact with these pads regardless of the physical form factor. This is why the same reader hardware, with appropriate tray geometry, can support any of the removable sizes.
---
## Related Guides
- [What Is a SIM Card?](/en/guides/what-is-sim/) — How IMSI, Ki, and UICC authentication work underneath the physical card
- [Physical SIM vs eSIM: Differences and How to Choose](/en/guides/sim-vs-esim/) — Side-by-side comparison of removable and embedded options
- [What Is an eSIM?](/en/guides/what-is-esim/) — How eUICC and GSMA SGP.22 work, and which devices support eSIM
- [APN Settings on iPhone: How to View and Configure](/en/guides/apn-setup-iphone/) — Required after a SIM swap if mobile data does not connect automatically
- [How to Activate eSIM with a Manual Code](/en/guides/manual-code/) — Entering a carrier activation code when switching to eSIM
================================================================================
# SIM Swap Fraud: How It Works and How to Protect Yourself
URL: https://sim-finder.com/en/guides/sim-swap/
Type: guides (en)
Published: 2026-04-16
SIM swap fraud gives an attacker control of your phone number — and within minutes they can drain your bank account, take over your email, and empty a crypto wallet. The attack does not require malware on your device; it relies entirely on social engineering your mobile carrier.
This guide explains exactly how SIM swap works, how to recognize it before or as it happens, and the specific steps you can take today to make your account significantly harder to attack.
## How SIM Swap Fraud Works
### The attack chain
A SIM swap attack typically follows this sequence:
1. **Reconnaissance.** The attacker gathers your personal information — name, address, phone number, last four digits of your Social Security Number (or equivalent), account number, and email address. This data comes from data breaches, phishing emails, social media, or the dark web.
2. **Impersonation.** The attacker contacts your carrier's customer service — by phone, chat, or in person at a retail store — and claims to be you. They say your SIM was lost or damaged and ask to transfer your number to a new SIM they control.
3. **Social engineering the carrier.** If the agent is convinced by the information provided, they execute the transfer. Authentication failures on the agent's part are the primary enabling factor in most reported attacks.
4. **Number takeover.** Your phone immediately loses service. The attacker's device now receives all calls and SMS messages sent to your number.
5. **Account takeover.** The attacker triggers "forgot password" flows on your email, banking, or crypto accounts. Password reset codes arrive via SMS to their device. They set new passwords and lock you out — often within minutes.
### Why SMS-based 2FA is the critical vulnerability
SMS two-factor authentication was designed to add a second layer of security. In the context of SIM swap, it becomes the attack's primary target. Once an attacker controls your number, SMS codes are delivered directly to them. The protection inverts: the 2FA mechanism intended to protect you now helps the attacker take over your account.
This is why security researchers and regulators recommend moving high-value accounts away from SMS-based 2FA toward authenticator apps or hardware security keys.
### Who are the primary targets?
Any account that uses SMS-based 2FA is theoretically at risk, but attackers concentrate effort where the payoff is highest:
- Cryptocurrency exchange accounts and wallets
- Online banking and brokerage accounts
- Primary email accounts (which are used for password recovery on everything else)
- Social media accounts with large followings or monetization
Prominent cases have involved losses in the hundreds of thousands to millions of dollars. The FBI's IC3 recorded 982 SIM swap complaints in the US in 2024, with reported losses of approximately $26 million — averaging over $26,000 per victim.
## Warning Signs and Immediate Response
### Signs you are under attack right now
- **Sudden loss of mobile service.** Your phone shows "No Service," "SOS Only," or similar, even in an area with normal coverage. This is the most reliable real-time indicator.
- **Unexpected carrier notification.** A text or email from your carrier saying a SIM change was requested or completed.
- **Locked out of accounts.** You receive "password changed" or "new login" alerts for accounts you did not touch.
- **Calls and texts not being received.** Friends report calling you but reaching a different voicemail or getting no answer.
### What to do immediately
If you suspect a SIM swap is in progress:
1. Call your carrier from a landline or a different phone immediately. Do not wait.
2. Ask the carrier to reverse the SIM swap and lock your account against further changes.
3. Change your email password from a device not connected to your phone number.
4. Revoke active sessions on email, banking, and cryptocurrency accounts.
5. Enable a new, stronger authentication method on critical accounts.
6. File reports with:
- FBI Internet Crime Complaint Center: [ic3.gov](https://www.ic3.gov)
- US Federal Trade Commission: [reportfraud.ftc.gov](https://reportfraud.ftc.gov)
- Your local police (required by some financial institutions for fraud claims)
## How to Protect Yourself
### Step 1: Enable your carrier's SIM lock or account lock
This is the single highest-impact protective action. All three major US carriers now offer free account lock features:
**AT&T — Wireless Lock**
AT&T introduced Wireless Account Lock in 2025. When enabled, it blocks 12 categories of account changes, including SIM swaps, device changes, number transfers (port-outs), and certain billing modifications. Enable it via the myAT&T app under account security settings.
**Verizon — SIM Protection and Number Lock**
Verizon offers two separate controls: SIM Protection (blocks unauthorized SIM or device changes) and Number Lock (prevents your number from being ported out). Both are free and available through the My Verizon app.
**T-Mobile — SIM Lock**
T-Mobile allows customers to lock their SIM against swaps and block unauthorized port-outs through the T-Mobile app or their online account.
Carriers in other countries have equivalent features under various names — check your carrier's account security settings or security center.
**Important:** Under FCC rules adopted in 2023 and fully effective in 2025, US wireless providers are required to offer customers a free account lock option and to notify customers immediately when a SIM swap or port-out request is received on their account. If your carrier does not appear to offer this, contact their support and request it explicitly.
### Step 2: Set a carrier account PIN
A separate PIN (distinct from your phone's screen lock) adds a second authentication factor that a customer service agent must verify before making account changes. Choose a PIN that is not derived from your birthday, address, or the last four digits of your Social Security Number — all of which may be available to an attacker.
### Step 3: Replace SMS 2FA on high-value accounts
Move your most critical accounts from SMS-based 2FA to one of these stronger alternatives:
- **Authenticator app** (Google Authenticator, Authy, Microsoft Authenticator): Generates time-based one-time passwords (TOTP) locally on your device. Not vulnerable to SIM swap because codes are never sent over your phone number.
- **Hardware security key** (YubiKey, Google Titan Key): Physical device that must be plugged in or tapped near your phone. The strongest protection available for consumer accounts.
- **Passkeys**: A newer standard replacing passwords entirely, tied to your device's biometrics. Increasingly supported by major platforms as of 2024–2025.
Priority order for migrating away from SMS 2FA: primary email account first (because it controls password recovery everywhere else), then financial accounts, then cryptocurrency, then other accounts.
### Step 4: Minimize your public footprint
Attackers build their dossier from publicly available information. Audit what personal data is visible:
- Review your social media profiles and remove or restrict your phone number, address, and date of birth.
- Opt out of data broker sites that aggregate and sell personal information (services like DeleteMe or manual opt-outs).
- Use a separate email address for financial accounts — one that is not publicly associated with your name or phone number.
- Be cautious about what you post after travel, purchases, or financial events that might mark you as a high-value target.
### Step 5: Add a passphrase or verbal password to your carrier account
Many carriers allow you to set a verbal passphrase or secondary password that agents must ask for when handling account changes in person or over the phone. This is different from the account PIN used for automated authentication. Enable both if your carrier supports them.
## eSIM and SIM Swap Risk
### Does eSIM eliminate the risk?
eSIM (embedded SIM) offers meaningful security improvements over physical SIM in the context of SIM swap:
- There is no physical card to claim was "lost" or "damaged." This removes the most common pretext used in in-store attacks.
- eSIM activation requires digital authentication, typically involving QR codes, account passwords, and device-level verification.
- Your carrier can see that the eSIM is bound to a specific device, making unauthorized transfers more detectable.
As a result, eSIM is considered more resistant to social engineering attacks at the physical point of sale.
However, eSIM does not eliminate all risk. Account-level attacks — where an attacker convinces a carrier's phone support team to transfer an eSIM profile to a new device — remain possible. UK data shows eSIM-related fraud cases rising from 18 in 2022 to 763 in 2024 as eSIM adoption increased.
**The practical conclusion:** Switching to eSIM and enabling your carrier's account lock together provide substantially better protection than either measure alone. eSIM without an account lock leaves you exposed to phone-based social engineering.
For more on how eSIM works and its security architecture, see the [eSIM guide](/en/guides/what-is-esim/).
### Dual SIM and SMS 2FA abroad
A related concern: if you travel internationally with a travel eSIM for data, ensure your home SIM remains active for receiving 2FA codes. Removing or deactivating your home SIM while abroad can leave you unable to receive authentication codes for banking and other services. See the [travel eSIM guide](/en/guides/first-time-guide/) for how to set up dual SIM correctly for travel.
## International Perspective
SIM swap fraud is a global problem, with particularly high case volumes in the United States, United Kingdom, and South Africa.
- **United States:** The most documented market. FBI IC3 data shows 2,026 complaints in 2022 ($72.6M in losses), dropping to 1,075 in 2023 and 982 in 2024 ($26M in losses). The decrease coincides with FCC rule changes and carrier security improvements.
- **United Kingdom:** Cifas reported nearly 3,000 unauthorized SIM swaps in 2024, with a reported 1,055% surge in cases. UK cases often involve telecom insider threats where retail employees are recruited by criminal networks.
- **Australia:** IDCARE reported a 240% increase in people seeking help for phone porting and SIM swap fraud in 2024 versus 2023.
- **South Africa:** Reports high rates of SIM swap fraud, commonly used against banking customers via "one-time password" interception.
The underlying mechanism is identical across markets — only the carrier procedures and regulatory protections vary. The protective steps in this guide apply universally; the specific lock/PIN feature names vary by carrier and country.
## Summary: Your Protection Checklist
| Action | Priority | Effort |
|--------|----------|--------|
| Enable carrier account lock (AT&T Wireless Lock / Verizon Number Lock / T-Mobile SIM lock) | Critical | 5 minutes |
| Set a carrier account PIN (not birthday or SSN digits) | Critical | 5 minutes |
| Move primary email to authenticator app 2FA | High | 15 minutes |
| Move banking accounts to authenticator app 2FA | High | 15 minutes |
| Move crypto accounts to hardware key or authenticator app | High | 30 minutes |
| Remove phone number from public social media profiles | Medium | 15 minutes |
| Set a verbal passphrase on your carrier account | Medium | 10 minutes |
| Consider switching to eSIM | Medium | Varies by carrier |
No single measure provides complete protection. Combining a carrier account lock, a strong carrier PIN, and authenticator-app-based 2FA on your most important accounts eliminates the overwhelming majority of SIM swap attack vectors.
================================================================================
# Physical SIM vs eSIM: Differences and How to Choose
URL: https://sim-finder.com/en/guides/sim-vs-esim/
Type: guides (en)
Published: 2026-06-04
The choice between physical SIM and eSIM comes down to four questions: Can you move the SIM between devices without contacting your carrier? Do you need multiple profiles on one device? Is eSIM supported by your carrier? And does your device support eSIM? This article compares both technologies across every dimension that matters for everyday use and helps you choose based on your actual situation.
Key findings:
- Physical SIM wins when you need instant device portability or are in a carrier/country where eSIM is not yet offered.
- eSIM wins when you want instant remote activation, multiple stored profiles, or a dual-SIM travel setup without carrying a second card.
- Most modern smartphones support both; the decision is made by your carrier options and use case, not the hardware.
For the technical background on how each technology works, see [What Is a SIM Card?](/en/guides/what-is-sim/) and [What Is an eSIM?](/en/guides/what-is-esim/).
---
## The Core Technical Difference
A physical SIM card — in its current Nano-SIM (4FF) form — is a removable UICC (Universal Integrated Circuit Card) defined in ETSI TS 102 221. It is manufactured with carrier credentials pre-loaded: the IMSI (International Mobile Subscriber Identity) and Ki (Authentication Key) that authenticate your device to the network. To activate a physical SIM, you insert the card and the device reads those credentials directly.
An eSIM uses an eUICC (embedded Universal Integrated Circuit Card) — the same underlying UICC technology, but soldered to the device's motherboard. Credentials are not pre-loaded at manufacture; instead, a carrier profile is downloaded from a remote SM-DP+ server (Subscription Manager Data Preparation+, defined in GSMA SGP.22) after you sign up. The GSMA SGP.22 specification — currently at v2.6.1 (April 2025) and v3.1 (December 2023) — governs how profiles are issued, stored, switched, and deleted on consumer devices.
Both technologies authenticate to mobile networks using the same underlying mechanism (3GPP TS 31.102 for USIM). The difference is entirely in how credentials reach the chip: physical delivery for SIM cards, remote provisioning for eSIM.
---
## Side-by-Side Comparison
The table below covers the axes that matter most for a subscriber choosing between physical SIM and eSIM.
| Dimension | Physical SIM (Nano-SIM / UICC) | eSIM (eUICC / SGP.22) |
|---|---|---|
| **Hardware** | Removable card inserted into a slot | Chip soldered to the device motherboard |
| **Standard** | ETSI TS 102 221 (4FF) | GSMA SGP.22 (consumer devices) |
| **How to activate** | Insert card; sometimes configure APN manually | Scan QR code, enter activation code, or use carrier app; requires internet connection |
| **Switching carriers** | Swap physical cards | Download a new profile in device Settings |
| **Profiles per device** | One card = one active carrier | Store 8+ profiles (iPhone); switch in Settings |
| **Simultaneous profiles** | Not possible (one slot = one carrier) | Possible on SGP.22 v3.0 MEP devices (Android 13+); dual-SIM physical+eSIM on most devices |
| **Device loss or failure** | Move card to replacement instantly | Carrier must re-issue profile to new device |
| **Carrier availability** | Universal among carriers with a SIM issuing process | Requires carrier to deploy SGP.22 provisioning infrastructure |
| **Device compatibility** | Any device with a compatible slot and bands | Requires eUICC hardware and carrier eSIM support |
| **Profile reinstallation** | Not applicable | Some providers restrict reinstallation; verify policy before deleting |
| **Initial setup connectivity** | None required | Wi-Fi or mobile data required (eSIM-only iPhone models may activate without Wi-Fi in some regions) |
---
## How Issuance and Activation Differ
### Physical SIM Issuance
A carrier manufactures SIM cards in bulk, loading each with a unique IMSI and Ki pair. Cards are distributed through retail stores, by post, or at airport vending machines. The subscriber inserts the card and the device is immediately authenticated to the carrier's network. No internet connection is needed for this step.
Because the credentials are on the physical card, anyone who possesses the card can use it in any compatible, unlocked device. This is both the main strength and the main security consideration of physical SIM.
### eSIM Issuance
When a carrier activates an eSIM plan, their system prepares a profile on an SM-DP+ server defined in GSMA SGP.22. The subscriber receives a QR code (or an activation code for manual entry) that contains the SM-DP+ server address and a matching token. The device connects to that server and downloads the profile. From that point, the eUICC authenticates to the carrier network as a traditional SIM would.
Three standard methods exist for downloading a profile: scanning a QR code, entering an activation code by hand, and using a carrier app that handles the download automatically. A fourth method — eSIM Quick Transfer — moves a profile directly between devices without a new server download (supported on iPhone and select Android models with carrier approval).
An internet connection is required for the initial profile download. This dependency is worth planning around: if you are setting up a new SIM in a location without Wi-Fi, a physical SIM does not have this constraint.
---
## Profile Storage and Switching
### Physical SIM: One Card, One Carrier
A physical SIM stores the credentials for exactly one carrier subscription. If you want to use a second carrier — for travel, for a data-only line, or for a work number — you either swap the card or carry a second device. Dual-physical-SIM devices exist (two SIM slots) but are less common in flagship smartphones since eSIM has become standard.
### eSIM: Multiple Profiles, Selectable in Settings
Under SGP.22 v2.x, an eUICC can store multiple carrier profiles but only one can be active at a time. The number of profiles that can be stored is limited by the eUICC chip's memory, not by a fixed specification limit. Apple states that iPhone can store 8 or more eSIM profiles. You switch between them from the device's Settings app — no card handling required.
SGP.22 v3.0 introduced MEP (Multiple Enabled Profiles) as an optional feature. MEP allows more than one profile to be active simultaneously on a single eUICC. Android 13 and later support MEP (Multiple Enabled Profiles); Android 14 and later additionally support the MEP-A1 and MEP-B variants. This enables eSIM-only devices to function as dual-SIM phones without any physical SIM slot.
The practical result: with eSIM you can maintain a home plan, a travel profile, and a data-only plan all on one device, switching between them without physical card management.
---
## Device Loss, Failure, and Switching Phones
This is the most consequential difference between physical SIM and eSIM for most users.
### Physical SIM: Instant Portability
If your phone is damaged, lost, or stolen, and you have the physical SIM card, you can insert it into any compatible unlocked device and be back on the network immediately. No carrier contact is needed. This instant portability is a meaningful practical advantage when continuity of service matters.
If the SIM itself is lost alongside the phone, contact your carrier to deactivate it (to prevent misuse) and request a replacement SIM linked to the same number.
### eSIM: Carrier Re-issue Required
Because the eUICC is soldered into the device, you cannot physically remove and transfer an eSIM to a replacement phone. If you change devices — whether due to upgrade, loss, or damage — you must contact your carrier to re-issue the eSIM profile to the new device. The carrier provisions a new profile via QR code or app. Some carriers charge a re-issue fee; check your carrier's policy in advance.
One exception: eSIM Quick Transfer on iPhone (and cross-platform via iOS 26 and Android 16 with supported carriers) lets you transfer a profile directly between compatible devices without a full carrier re-issue. Carrier support for Quick Transfer varies by region.
---
## Dual SIM: Combining Physical SIM and eSIM
Most eSIM-capable smartphones support dual SIM in a physical SIM + eSIM configuration. This means you can use both technologies simultaneously on a single device. Common configurations:
- **Home SIM (physical) + travel eSIM**: Keep your primary number and data plan on a physical SIM while adding a local travel eSIM when abroad.
- **Work SIM (eSIM) + personal SIM (physical)**: Separate lines for each context without carrying two phones.
- **Two eSIMs**: On devices supporting MEP (Android 13+) or dual eSIM (iPhone 13+), both lines can be eSIM with no physical card needed.
Dual SIM operates in one of two primary modes defined in GSMA TS.37:
- **DSDS (Dual SIM Dual Standby):** both SIMs receive calls and messages, but only one transmits data at a time. Apple implements dual SIM as DSDS.
- **DSDA (Dual SIM Dual Active):** both SIMs maintain independent network connections simultaneously, at the cost of higher battery usage. Supported on select Android flagships using Qualcomm Snapdragon 8 Gen 2 and later SoCs.
For the complete dual SIM picture on iPhone specifically, see [Dual SIM on iPhone: How to Use Physical SIM and eSIM Together](/en/guides/dual-sim-iphone/).
---
## Travel Use Cases
### Physical SIM for Travel
To use a local data plan abroad with a physical SIM, you either: (a) purchase a local SIM card on arrival and swap it out, storing your home SIM safely; or (b) use international roaming on your home SIM. Swapping means your home number is unreachable while the travel SIM is inserted, unless your device has a second SIM slot.
### eSIM for Travel
eSIM removes the card-swap step. You purchase a travel eSIM profile before departure — or after landing if you have Wi-Fi access — download it, and activate it. Your home SIM (whether physical or eSIM) remains on a separate line, so you can keep receiving calls and SMS on your home number while the travel eSIM handles local data.
This dual-SIM travel setup is particularly useful for receiving SMS-based two-factor authentication codes from banks and online services, which are sent to your home number. For a full guide to planning connectivity before a trip, see [The Four Options for Mobile Data Abroad](/en/guides/four-options/).
---
## Carrier and Device Support Considerations
### Carrier Support Is Not Universal
The GSMA SGP.22 specification defines a global technical standard, but each carrier must independently build and deploy the SM-DP+ provisioning infrastructure to issue eSIM profiles. As of 2026, major carriers in North America, Europe, Japan, South Korea, and Australia generally offer eSIM. Coverage is more limited in parts of Southeast Asia, Africa, and Latin America, where some carriers have not yet deployed eSIM provisioning systems. Physical SIM remains universally available wherever a carrier operates.
Before choosing an eSIM-based plan, confirm that the specific carrier and the specific country support eSIM issuance, not just that eSIM hardware exists in your phone.
### Device Compatibility
A device must have eUICC hardware to use eSIM. eSIM support on smartphones began with the iPhone XS, XS Max, and XR (2018) and with the Google Pixel 3 (2018, limited to Google Fi/Sprint; broader carrier support began with the Pixel 3a). Most flagship Android devices released since 2020 include eUICC hardware, though carrier-locked variants may have eSIM disabled.
Some devices — iPhone 14 through iPhone 16e (US market), iPhone 17 (US, Canada, Mexico, Japan, and additional regions), and US-market Google Pixel 10 — are eSIM-only with no physical SIM slot. The iPhone Air ships eSIM-only in many regions including the US and Japan; configuration varies by region (see the [eSIM-Compatible Devices guide](/en/guides/esim-compatible-devices/) for details). On these devices, you have no choice but to use eSIM.
Budget Android devices released before 2022 often lack eUICC hardware entirely. Check the device manufacturer's specification page to confirm.
---
## How to Choose: A Decision Framework
The right choice depends on your specific situation. Use these axes to decide.
### Choose physical SIM if:
- Your carrier does not support eSIM issuance in your country.
- Your device does not have eUICC hardware.
- You frequently swap the same SIM between multiple devices (e.g., between a phone and a tablet, or between your phone and a backup device).
- You need to hand your SIM to someone else immediately (e.g., a family member using your phone temporarily).
- You are travelling to a destination where eSIM carrier support is limited and you plan to buy a local SIM on arrival.
### Choose eSIM if:
- Your carrier supports eSIM and your device has eUICC hardware.
- You want to activate a new plan instantly without visiting a store or waiting for post.
- You travel frequently and want to add local data profiles without swapping cards.
- You want to run two lines on one device without a second physical SIM slot.
- You want to store multiple carrier profiles and switch between them on demand.
### If you have both options available:
Many users with eSIM-capable devices end up using eSIM as their primary plan and keeping a physical SIM slot open (or a stored eSIM profile inactive) as a backup. This is a valid configuration that maximises flexibility.
For a broader view of your options — including roaming, Wi-Fi calling, and portable routers — see [The Four Options for Mobile Data Abroad](/en/guides/four-options/).
---
## Profile Deletion and Reinstallation
One asymmetry between physical SIM and eSIM that frequently catches users off guard: what happens when you delete a profile or cancel a plan.
With a physical SIM, cancelling a plan does not destroy the card. You can keep the SIM in a drawer and reactivate it or port the number later. Deactivated SIMs remain physically intact.
With eSIM, deleting a profile from your device removes the downloaded credentials from the eUICC. Whether you can reinstall the same profile depends entirely on the carrier or eSIM provider's policy. Travel eSIM providers frequently restrict reinstallation: once deleted, the profile cannot be re-downloaded, and a new purchase is required. Some carriers allow re-provisioning via their app at no charge; others charge a fee. Check the provider's policy before deleting any eSIM profile you may want to use again.
For more on this, including how to transfer an eSIM before deleting it, see [How to Transfer Your eSIM to a New iPhone](/en/guides/transfer-iphone/).
---
## Setting Up Your First eSIM
If you have decided to try eSIM, the most common activation method is QR code scanning. Your carrier emails or displays a QR code that encodes the SM-DP+ server address and your activation token. On iPhone:
1. Go to **Settings → Cellular (or Mobile Data) → Add Cellular Plan**.
2. Scan the QR code your carrier provided.
3. When the "Cellular Plan Detected" notification appears, follow the prompts to confirm.
On iOS 17.4 and later, you can also long-press a QR code image in Mail, Photos, or Safari to get an "Add eSIM" option directly.
For the complete step-by-step process, see [How to Set Up eSIM on iPhone via QR Code](/en/guides/qr-code-iphone/).
---
## Summary
| | Physical SIM | eSIM |
|---|---|---|
| **Standard** | ETSI TS 102 221 (UICC, 4FF Nano-SIM) | GSMA SGP.22 (eUICC) |
| **Activation** | Insert card; no internet needed | Download profile; internet required |
| **Carrier switch** | Swap cards | Download new profile in Settings |
| **Device change** | Move card instantly | Carrier re-issue required |
| **Multiple profiles** | One card = one carrier | Store 8+ profiles; switch in Settings |
| **Simultaneous active profiles** | Not possible | Yes, on MEP-capable devices (SGP.22 v3.0+) |
| **Profile deletion** | Card persists; reactivate anytime | Provider policy governs reinstallation |
| **Best for** | Universal compatibility; instant device swap | Instant remote activation; travel; multi-line |
Physical SIM and eSIM are not opposites — most modern devices support both, and the most flexible setup uses them together. The decision is primarily about which carriers are available to you and which use cases you need to cover.
Use [SimFinder](/en/) to search and compare plans with eSIM and physical SIM filters across multiple countries.
---
## Related Guides
- [What Is an eSIM?](/en/guides/what-is-esim/) — How eUICC works, the SGP.22 standard, and which devices support eSIM
- [What Is a SIM Card?](/en/guides/what-is-sim/) — IMSI, Ki, UICC form factors, and the shift to eSIM
- [The Four Options for Mobile Data Abroad](/en/guides/four-options/) — Roaming, local SIM, travel eSIM, and Wi-Fi router compared
- [How to Set Up eSIM on iPhone via QR Code](/en/guides/qr-code-iphone/) — Step-by-step QR code activation on iPhone
- [Dual SIM on iPhone: How to Use Physical SIM and eSIM Together](/en/guides/dual-sim-iphone/) — Configuration guide for running two lines on one iPhone
- [How to Transfer Your eSIM to a New iPhone](/en/guides/transfer-iphone/) — How to move your eSIM profile before switching devices
================================================================================
# How the SimFinder Quality Score Works
URL: https://sim-finder.com/en/guides/simfinder-score/
Type: guides (en)
Published: 2026-06-05
SimFinder assigns every mobile plan a **quality score** — a 0–100 number that represents estimated network quality, separate from price. In the default search view, quality contributes 50% to the plan ranking, and you can adjust that weight to prioritise whichever axis matters more to you.
The score is computed from carrier quality data stored in SimFinder's database, adjusted by a degradation factor based on carrier type. MNOs receive their base score unchanged. Sub-brands receive 95% of their parent MNO's score. MVNOs receive 85%.
Key points this article covers:
- What the quality score represents and what it does not
- How the score is computed from the implementation in `src/lib/scoring/engine.ts` and `src/lib/scoring/types.ts`
- Why MVNO and sub-brand plans score below their host MNO, and by how much
- How the score combines with price to produce the total ranking
- How to read the score display and adjust the Quality Weight slider
- Honest limitations: this is a design-based indicator, not a live field measurement
---
## What the Quality Score Is
The quality score is an estimate of the **network quality level you can expect** when using a particular plan, expressed on a 0–100 scale. A higher number means better estimated quality. It is derived from per-carrier quality data that SimFinder collects and stores, then adjusted for carrier type.
The score does not represent price, data allowance, or any contract term. It is a single-axis quality signal designed to sit alongside the price axis in the ranking formula. If you care only about the cheapest plan, you can weight quality to zero. If you care about network reliability and are willing to pay more for it, you can weight quality higher.
The quality axis is also **independent of data allowance**. A plan offering 3 GB and a plan offering unlimited data from the same carrier will receive the same quality score — data volume is handled separately by the price score and the search filters.
The score is also **not a live measurement**. It reflects data collected as of the last update cycle. For real-time field conditions, external speed-test services such as Ookla Speedtest Intelligence or nperf are the appropriate tool.
Each plan card shows a `qualityVerified` indicator. When this is `true`, the score is based on quality data collected specifically for that carrier or its confirmed parent MNO. When it is `false`, the score is an estimate derived from the average across other carriers in the dataset.
---
## The Three Carrier Types and Their Degradation Factors
SimFinder distinguishes three carrier types — `mno`, `sub_brand`, and `mvno` — and applies a multiplier to each when computing the quality score. These values come directly from `DEFAULT_SCORING_CONFIG` in `src/lib/scoring/types.ts`:
| Carrier type | Quality factor |
|---|---|
| MNO | 1.0 (no change) |
| Sub-brand | 0.95 |
| MVNO | 0.85 |
An MNO receives 100% of its own stored quality score. A sub-brand receives 95%. An MVNO receives 85%.
These factors reflect a structural reality of how wholesale mobile networks work. MVNOs do not own spectrum. They purchase capacity from an MNO through a Point of Interface (POI) and share that bandwidth with the MNO's own subscribers. When the network is congested, the MNO's direct subscribers are served first; MVNO traffic can be deprioritised. Sub-brands are MNO-owned and typically receive better internal priority than independent MVNOs — hence a smaller degradation (0.95 rather than 0.85).
The factor values are applied uniformly across all carriers of each type. There is no per-MVNO tuning in the default configuration. Whether one MVNO has a better wholesale agreement than another, or a sub-brand is more tightly integrated with its parent than another, is not captured by these factors. The factors model a category-level structural tendency, not an operator-specific measurement.
For a deeper explanation of how MVNO network architecture drives this speed difference, the [Why Is My MVNO Plan Slow?](/en/guides/why-mvno-slow/) guide covers POI congestion in detail. For a side-by-side comparison of the three carrier types across multiple dimensions, see [MNO vs MVNO vs Sub-Brand](/en/guides/mno-vs-mvno-comparison/).
---
## How MVNOs Inherit the Parent MNO's Score
When SimFinder computes the quality score for an MVNO plan, it looks up the plan's `carrierId` in the quality map. If no quality data exists for that carrier directly, it falls back to the `parentMnoId` field on the plan and uses that MNO's `overallScore` instead.
The relevant logic from `src/lib/scoring/engine.ts`:
```
let baseScore = qualityMap[plan.carrierId]?.overallScore ?? null;
if (baseScore === null && plan.parentMnoId) {
baseScore = qualityMap[plan.parentMnoId]?.overallScore ?? null;
}
```
After finding the base score, the MVNO factor (0.85) is applied:
```
const factor = config.mvnoQualityFactors[plan.carrierType] ?? 1.0;
const score = baseScore * factor;
```
The result is clamped to the 0–100 range.
This means that **two MVNOs running on the same host MNO will receive the same base quality score before the factor is applied**. The factor itself is uniform across all MVNOs. Individual MVNO differences — customer service, app quality, specific network agreements — are not captured by this score.
The `isVerified` flag on the quality data entry carries through to the plan card. If a carrier's quality data is marked unverified in SimFinder's dataset, the plan's `qualityVerified` field shows `false` even when a base score is available. An unverified score should be read with more caution than a verified one.
For background on what MVNOs are and how they operate, [What Is an MVNO?](/en/guides/what-is-mvno/) is the foundational reference.
---
## What Happens When Quality Data Is Missing
If SimFinder has no quality data for a carrier and no `parentMnoId` to inherit from, the engine computes the average `overallScore` across all carriers that do have data. If no quality data exists at all, the fallback value is 50. In both fallback cases, the `qualityVerified` flag is set to `false`.
There are three distinct situations that lead to `qualityVerified: false`:
1. **No carrier-level data and no parent MNO** — the score is set to the dataset average.
2. **Inheriting from a parent MNO whose data is marked unverified** — the inherited score is used but the unverified status carries through.
3. **Carrier data exists but is marked unverified** — the score is used but the flag is false.
In all three cases, the MVNO or sub-brand factor is still applied normally. The flag only indicates the verification status of the underlying quality data, not whether the factor was applied.
You can see this flag on each plan card. When `qualityVerified` is false, the score shown is an estimate that should be weighted less heavily in your decision. Plans from well-documented carriers show `qualityVerified: true`, meaning their score comes from confirmed quality data for that carrier or its verified parent MNO.
---
## How the Quality Score Combines With Price
The quality score is one of three components in the total ranking score. The other two are the price score and the bonus score. All three are added together using the formula below, and the result is what determines plan order in the results list.
```
totalScore = priceScore × (1 − w) + qualityScore × w + bonusScore
```
Where `w` is the quality weight (0 to 1), set by the Quality Weight slider in the search interface. The default is 0.5 (50%), which weights price and quality equally.
**priceScore** is a 0–100 normalised score within the current search result set. The cheapest plan in the results scores 100; the most expensive scores 0. This means price score is relative to the plans shown — it is not an absolute affordability measure.
**bonusScore** adds up to 10 points for two features: data rollover (+3 points) and family discount (+5 points if you have selected the family discount filter). These bonuses are capped at 10 total. They are independent of both quality and price. A plan that qualifies for both features gains 8 bonus points — below the 10-point cap. The two removed bonus types (`exactDataMatch` and `unlimitedForHeavyUser`) are defined in the config but are no longer applied by the engine, as noted in the source code comments.
The total score is rounded to two decimal places. When two plans tie on total score, the ranking tie-breaks first by lower predicted monthly price (after adding any voice option fees), then by more data. Unlimited data plans are ranked above capped plans in the data tie-break.
This means a plan's position in the list can shift depending on the voice minute input in the search form, because voice costs affect the predicted monthly price, which in turn affects the price score normalisation.
---
## Reading the Score in Search Results
Each plan card in SimFinder search results displays three score values:
- **Total score** — the weighted combination used for ranking (shown prominently)
- **Price score** — where this plan sits on the price axis within your current results
- **Quality score** — the adjusted quality estimate for this plan's carrier type
When you filter by carrier type (for example, showing only MVNOs), the price score recalculates relative to that filtered set. The quality score does not change based on filtering — it is an absolute value for the carrier, not relative to the visible result set.
**Sorting by quality** surfaces plans where the combination of network quality and your chosen weight is highest. Because an MNO plan at the top of a quality-sorted list may cost substantially more than an MVNO plan near it, comparing the two alongside the price column gives a complete picture.
The carrier type label on each card — MNO, sub-brand, or MVNO — directly indicates which factor was applied to compute the quality score. If you see two plans with identical quality scores from different carriers, they are likely on the same host network with the same base data.
The [MNO vs MVNO vs Sub-Brand](/en/guides/mno-vs-mvno-comparison/) comparison article describes how these carrier types differ in practice, which can help you calibrate what quality difference actually matters for your usage pattern.
---
## The Quality Weight Slider
The Quality Weight slider in the SimFinder search interface controls the `qualityWeight` parameter passed to the scoring engine. Moving it to 0% ranks results by price alone; moving it to 100% ranks by quality alone. The default of 50% balances both.
Adjusting this slider does not change which plans are shown — it reorders them. A plan that ranks first at 0% quality weight (cheapest) may rank much lower at 100% if its quality score is below average for the result set.
Note that the slider setting is not saved between sessions by default. If you return to SimFinder with a fresh search, the weight resets to 50. If you have a strong preference for one axis, adjust the slider as the first step of any search session.
Practical guidance on when to move the slider:
- If you use mobile data heavily during commute hours in a dense urban area, a higher quality weight helps surface plans less likely to be congested.
- If most of your usage is on home Wi-Fi and you want the lowest monthly outlay, a lower quality weight is more appropriate.
- If you are comparing plans in a country where you have little prior experience with local carriers, a moderate quality weight (the default 50%) is a reasonable starting point.
- If you are specifically comparing MNO-only plans, quality differences between them may be smaller than quality differences between carrier types; at that point, moving the weight lower may give more useful ordering by price.
For an explanation of the underlying quality metrics — speed, latency, and coverage — that feed into the `overallScore` stored in SimFinder's data, see [Understanding Mobile Network Quality Metrics](/en/guides/quality-metrics/).
---
## Limitations of the Quality Score
The quality score is a useful comparative signal, but it has several structural constraints you should be aware of:
**It is design-based, not field-measured.** The score reflects stored quality data, not real-time conditions on the network. Network conditions vary by location, time of day, and device. A plan with a score of 80 may perform better or worse than a plan with a score of 75 depending on where you use it.
**MVNO factor is uniform.** All MVNOs on the same host MNO receive the same 0.85 factor. This does not distinguish between MVNOs with dedicated bandwidth agreements and those running on shared wholesale capacity. Actual MVNO performance varies considerably by operator.
**Sub-brand factor is uniform.** All sub-brands receive 0.95 of their parent MNO's score regardless of how integrated they actually are with the parent network. Some MNO-owned sub-brands effectively operate at MNO priority; others do not.
**Quality data has a lag.** The `overallScore` in the quality data was accurate as of its collection date. Carrier infrastructure changes — network upgrades, congestion increases, new spectrum deployments — are not reflected until the data is updated.
**It is country-scoped.** The quality data and scoring configuration apply to the country selected in your search. Quality assessments from one country do not transfer to another.
**Missing data falls back to averages.** A plan showing `qualityVerified: false` has a score estimated from the average of other carriers in the dataset, not from direct measurement of that carrier.
For limitations specific to the connection between MVNO network architecture and real-world speed, [What Is an MVNO?](/en/guides/what-is-mvno/) explains the underlying POI mechanism that the degradation factor models.
---
## How the Score Is Not Used
Knowing what the score excludes is as useful as knowing what it includes:
- The quality score has **no influence on which plans appear** in search results. Filtering (by data size, carrier type, voice, family discount) determines the candidate set. Scoring only determines the order within that set.
- The score does **not reflect customer service quality**, app usability, SIM delivery speed, or contract flexibility.
- The score does **not factor in 5G vs 4G availability** as a separate dimension. Network generation differences may be partially captured in the `overallScore` data, but there is no explicit 5G weighting in the scoring engine.
- The score does **not penalise for data caps or speed throttling**. A plan with a 3 GB hard cap and a plan with an unlimited-but-throttled allowance on the same carrier receive the same quality score.
- The score does **not reflect geographic coverage differences** within a carrier. A carrier may have excellent urban coverage but poor rural coverage; the `overallScore` is a single aggregate, not a location-specific value.
- The bonus score (data rollover, family discount) is **separate from the quality score** and adds directly to the total. A plan with a lower quality score can rank above a higher-quality plan if it offers rollover and family discount and the user has those filters active.
---
## Using the Score to Make a Decision
The quality score is most useful as a **tie-breaker and a filter for eliminating outliers**, rather than as a primary selection criterion.
A practical approach:
1. Set your data requirement and any voice filter in the search form.
2. Leave the Quality Weight at 50% to see a balanced ranking.
3. Identify plans in the top 5–10 results. Check whether any have `qualityVerified: false` — those carry more uncertainty.
4. If two plans are close in total score but one has a higher quality score, consider whether the quality difference matters for your typical usage (urban commute vs home-heavy usage).
5. Use the [MNO vs MVNO vs Sub-Brand](/en/guides/mno-vs-mvno-comparison/) guide to understand what the carrier type difference means in practice before finalising.
If the top-ranked plans are all from the same carrier type (for example, all MVNOs), the quality score differences between them reflect only the quality data differences of their respective host MNOs — not individual MVNO quality. In that case, the quality score is less useful as a differentiator and price or bonus features may be the better selection axis.
What the score cannot do is replace a short trial period with the carrier. A score of 78 vs 74 is a marginal difference; a score of 90 vs 60 is a larger signal worth weighing. Many carriers offer short-term plans or trial periods — combining the SimFinder ranking with a direct trial gives the most reliable outcome.
For an explanation of the sub-brand category — MNO-owned brands that occupy the space between full MVNOs and the main carrier — see [What Is a Sub-Brand?](/en/guides/what-is-sub-brand/).
---
## Related Guides
- [What Is an MVNO?](/en/guides/what-is-mvno/)
- [MNO vs MVNO vs Sub-Brand](/en/guides/mno-vs-mvno-comparison/)
- [Understanding Mobile Network Quality Metrics](/en/guides/quality-metrics/)
- [Why Is My MVNO Plan Slow?](/en/guides/why-mvno-slow/)
- [What Is a Sub-Brand?](/en/guides/what-is-sub-brand/)
================================================================================
# Slow Mobile Data Speeds — How to Diagnose and Fix
URL: https://sim-finder.com/en/guides/slow-speed/
Type: guides (en)
Published: 2026-04-25
Your mobile data worked fine yesterday, but now pages load slowly, videos buffer constantly, or speed tests return results far below what your plan promises. Slow data is one of the most common mobile problems — and one of the most varied, because the cause can sit anywhere from your device's settings to a congested cell tower to a carrier-applied speed cap.
**This guide walks through each major cause of slow mobile data in order of likelihood and ease of diagnosis.** Start with the speed test to establish a baseline, then work through the sections that match your situation.
If your mobile data has stopped working entirely rather than just running slowly, see [No Mobile Data? How to Fix Data Connection Problems](/en/guides/no-data/) first — that covers the case where no data flows at all.
---
## Why Mobile Data Slows Down — Main Causes
Slow data falls into four broad categories. Knowing which category applies tells you where to look first.
### Device-Side Causes
- Outdated modem firmware or carrier settings
- Airplane Mode toggled recently and modem state not fully recovered
- Misconfigured APN (Access Point Name) — correct enough to connect, but not optimal
- Background apps consuming bandwidth
- VPN routing traffic through a distant or overloaded server
- Network mode locked to 3G instead of 4G/5G
### Network-Side Causes
- Cell tower congestion at peak times (rush hours, events, dense locations)
- Weak signal forcing the device to fall back to a slower generation (5G → 4G → 3G)
- Physical obstructions — buildings, underground car parks, dense urban areas
- MVNO bandwidth limits at the Point of Interface (POI) — see [What Is an MVNO?](/en/guides/what-is-mvno/)
### Plan-Side Causes
- Data cap reached — carrier applies throttling (speed floor) or cuts high-speed data
- "Unlimited" plan with a daily or monthly fair-use threshold beyond which speed is reduced
- Deprioritization policy on lower-tier plans during congestion
### Environment-Side Causes
- Inside a building with poor signal penetration
- Moving vehicle passing through coverage gaps
- Interference from other wireless devices or industrial equipment
- Weather rarely affects mobile signals meaningfully, but it can degrade microwave backhaul on some tower links
Understanding which bucket your problem falls into is the first diagnostic step. The sections below guide you through each one.
---
## How to Run a Reliable Speed Test
A speed test gives you a concrete number — download speed in Mbps (megabits per second), upload speed in Mbps, and ping (latency in milliseconds). Without a measurement, you are guessing.
### Recommended Tools
Three tools are widely used and produce comparable results:
- **Speedtest by Ookla** — speedtest.net or the iOS/Android app. Connects to a nearby server from a large global network. Shows download, upload, and ping. Results are generally representative of peak single-connection throughput.
- **Cloudflare Speed Test** — speed.cloudflare.com (browser-based). Also tests latency and network responsiveness (RPM — round trips per minute). Useful for diagnosing high-latency situations.
- **Fast.com** — powered by Netflix infrastructure. Measures download only in a simple interface. Useful for a quick check without signing up or installing an app.
Each tool measures slightly differently (server location, measurement methodology), so results will not be identical. For troubleshooting purposes, consistency across time matters more than the exact number.
### How to Run a Meaningful Speed Test
1. **Disable Wi-Fi before testing.** On iPhone: Settings → Wi-Fi → toggle off. On Android: Settings → Wi-Fi → toggle off. Running a speed test on Wi-Fi does not measure cellular speed.
2. **Disable VPN if active.** VPN overhead skews results; test the raw cellular connection first.
3. **Run three tests** 30 seconds apart and note the median result, not just the single highest.
4. **Note your location and time.** Results from your desk at 9 AM Tuesday will differ from results at a park on a Saturday afternoon.
5. **Check the result against your plan.** If your plan advertises up to 150 Mbps on 4G and you are getting 2 Mbps consistently in the same location, something is wrong. If you are getting 0.2 Mbps and your plan has a throttle speed of 200 kbps after the cap, the numbers are consistent with a throttle being applied.
### What the Numbers Mean
| Speed range | Practical capability |
|-------------|----------------------|
| Below 1 Mbps | Messaging and basic maps work; web pages load slowly; streaming fails |
| 1–5 Mbps | Standard web browsing works; SD video (480p) may work with buffering |
| 5–25 Mbps | Comfortable for most browsing, HD video (720p), video calls |
| 25–100 Mbps | Smooth HD streaming, fast downloads, reliable video conferencing |
| 100+ Mbps | 4K streaming, large file transfers, no practical limitation for typical use |
Note that Mbps (megabits per second) is not the same as MB/s (megabytes per second). Network speeds are almost always quoted in Mbps. To convert: divide by 8. A 10 Mbps connection downloads roughly 1.25 MB per second. For definitions of these and other mobile terms, see the [SIM and Mobile Glossary](/en/guides/glossary-index/).
For context on how different apps consume data, see [How Much Mobile Data Do You Need?](/en/guides/data-usage-guide/).
---
## Diagnosing Data Cap Throttling
Throttling is one of the most common and easiest-to-confirm causes of persistently slow speeds. If your speed is consistently slow across all locations and times of day, throttling is the first thing to rule out.
### What Throttling Looks Like
A throttled connection shows:
- Consistently low speed (often 128 kbps–1 Mbps) at all hours and locations
- Speed is the same whether you are in a clear outdoor area or a building
- The problem appeared mid-billing-cycle or right after unusually heavy usage
- Speed returns to normal at the start of your next billing cycle
### Throttling vs. Deprioritization
These are two different mechanisms that produce similar symptoms:
**Throttling** is a hard speed cap applied by the carrier once you cross a data threshold. Your speed is reduced to a fixed ceiling — commonly 128 kbps, 512 kbps, or 1 Mbps depending on your plan — and stays there until the billing cycle resets or you purchase an add-on.
**Deprioritization** is a dynamic policy. Your traffic is ranked lower than subscribers on premium tiers. During quiet periods, you get full speed. During congestion (rush hour, crowded venues), your speed drops because higher-priority traffic gets served first. Deprioritization alone, without a hard throttle, will produce variable rather than consistently low speeds.
Many MVNO plans and budget MNO tiers combine both: a hard throttle after a cap, plus deprioritization during congestion on any remaining capacity.
### How to Check If You Have Been Throttled
1. **Check your carrier's app or account portal.** Log in and look for remaining high-speed data. If it reads "0 GB remaining" or "high-speed data exhausted," you are throttled.
2. **Check plan documents.** Your plan's fair-use policy or product description will specify the throttle speed and the threshold that triggers it.
3. **Run a speed test at 2–4 AM local time** when network congestion is minimal. If the result is still the same low number (e.g., 0.2 Mbps), the cause is throttling rather than congestion.
### Options When Throttled
- **Wait for the billing cycle to reset.** The cap resets automatically on your plan's renewal date.
- **Purchase a data add-on (top-up).** Most carriers offer this via their app. Check whether the top-up restores full speed or a different speed tier.
- **Upgrade to a higher-tier plan.** If you regularly hit the cap, a higher-allowance plan may be more cost-effective.
- **Use Wi-Fi.** While throttled on cellular, route as much traffic as possible through trusted Wi-Fi networks to preserve the remaining high-speed cellular allocation for when you need it.
---
## Time of Day and Location Congestion
Even without throttling, a fast plan can feel slow when the tower serving your location is handling too many simultaneous connections.
### When Congestion Typically Peaks
Congestion follows human activity patterns:
- **Morning commute (7–9 AM)** — high smartphone activity on trains, buses, and at transit hubs
- **Lunchtime (noon–1 PM)** — people step outside and check phones in dense areas
- **Evening commute (5–7 PM)** — often the worst period in dense urban areas
- **Large events** — stadiums, concert venues, festivals, and convention centres can overwhelm the nearest towers even with good signal
These patterns vary by country and city density. If your slow speed follows this pattern — fast in the morning, slow at lunchtime, fast late at night — the cause is almost certainly congestion rather than a device or plan issue.
### Congestion vs. Coverage
Congestion and poor coverage produce similar symptoms (slow speed) but have different solutions:
- **Congestion**: signal bars are normal or good (2–4 bars), but speed is slow. Speed improves significantly off-peak or in a less busy area nearby.
- **Coverage gap**: signal bars are low (0–1 bar), device may show 3G or "E" (EDGE), and speed is slow regardless of time of day.
If you are in a coverage gap, moving to a window or stepping outside may help. Switching network mode is covered in [5G/4G, APN, and Network Mode Checks](#5g4g-apn-and-network-mode-checks) below.
### MVNO Users and POI Congestion
For MVNO subscribers, there is an additional congestion point beyond the tower: the Point of Interface (POI). This is where MVNO traffic merges with the host MNO's core network. The MVNO buys a fixed bandwidth allocation at this interface — if many MVNO subscribers are active simultaneously, they share that allocation. This can cause slow speeds even when the local tower is not congested and even when MNO subscribers on the same tower are getting full speed. This is discussed further in [MVNO-Specific Considerations](#mvno-specific-considerations-deprioritization) below.
---
## Device-Side Fixes (Restart, Airplane Mode, Network Reset)
Try these steps before investigating configuration or carrier issues — they take minutes and resolve a substantial proportion of slow-data complaints.
1. **Toggle Airplane Mode on, wait 10 seconds, toggle off.** Forces a fresh modem registration and clears transient data-session issues. **iPhone:** Control Centre or Settings → Airplane Mode. **Android:** quick settings tile or Settings → Network & internet → Airplane mode.
2. **Restart the device.** A full power cycle clears modem state and DNS caches more thoroughly than Airplane Mode alone.
3. **Check for a carrier settings update (iPhone).** Settings → General → About. If a prompt appears, tap **Update**. Carrier updates can include modem optimisations and APN corrections.
4. **Check for an OS update.** Outdated modem firmware can degrade radio performance. **iPhone:** Settings → General → Software Update. **Android (Pixel):** Settings → System → System update.
5. **Reset network settings** if slowness started after a SIM change or OS update. Erases Wi-Fi passwords, VPN configs, and custom APN settings, but does **not** delete eSIM profiles.
- **iPhone:** Settings → General → Transfer or Reset iPhone → Reset → **Reset Network Settings**
- **Android (Pixel):** Settings → System → Reset options → **Reset Wi-Fi, mobile & Bluetooth**
- **Android (Samsung):** Settings → General management → Reset → **Reset network settings**
After the reset, re-enter APN settings if your carrier does not push them automatically. For APN specifics on iPhone, see [APN Setup Guide for iPhone](/en/guides/apn-setup-iphone/).
---
## 5G/4G, APN, and Network Mode Checks
### Forcing 4G LTE When 5G Causes Problems
5G mmWave has very short range and can produce unstable throughput at the edge of its coverage area — the device shows "5G" but signal is marginal. Locking the network mode to 4G LTE can produce higher, more stable speeds in these cases.
- **iPhone:** Settings → Cellular → tap the active SIM → **Voice & Data** → switch from **5G Auto** to **LTE**. Test speed; switch back to 5G Auto for general use.
- **Android (Pixel):** Settings → Network & internet → SIMs → tap the SIM → **Preferred network type** → **LTE** or **LTE/3G/2G (auto)**.
- **Android (Samsung):** Settings → Connections → Mobile networks → **Network mode** → **LTE/3G/2G (auto connect)**.
### APN and Slow Data
A misconfigured APN can reduce speed even when data flows. This is more likely after an OS update or SIM profile change. Verify your APN matches your carrier's published settings. For iPhone procedures and common MVNO APN strings, see [APN Setup Guide for iPhone](/en/guides/apn-setup-iphone/).
### Signal Strength Check (Advanced)
Signal strength in dBm is more informative than the bar display. On **iPhone**, dial `*3001#12345#*` to enter field test mode — values between −50 and −80 dBm are strong; −100 to −110 dBm is weak; below −110 dBm is very weak. (Note: detailed signal information was reduced in some intermediate iOS versions; iOS 18 reliably exposes RSRP/SINR readings.) On **Android (Pixel)**, check Settings → About phone → SIM status → Signal strength. If signal is at or below −100 dBm, moving closer to a window or outside may improve both signal and speed.
---
## Background Apps, Priority, and VPN Impact
### Background Apps Consuming Bandwidth
Background processes — cloud photo uploads, app updates, streaming caches, sync services — compete for the same cellular bandwidth as your foreground app. If your browser or maps feel slow, check whether a large sync or update is running.
**iPhone:** Settings → Cellular → scroll down and toggle off cellular access for apps that do not need background data. Or enable **Low Data Mode** (Settings → Cellular → Cellular Data Options → Low Data Mode) to pause most background activity.
**Android:** Settings → Network & internet → Data Saver → turn on, then add essential apps to the unrestricted list.
### App and OS Updates Running in the Background
A large OS update or app download can consume most available bandwidth. On iPhone, long-press a loading app icon in the dock and tap **Pause Download**. On Android, open Google Play → library to check for active downloads and pause them.
### VPN Impact on Speed
A VPN encrypts traffic and routes it through a remote server, adding latency and reducing throughput — especially if the server is in a distant region or under load. To test: disconnect the VPN, run a speed test, then reconnect and compare.
If VPN is the cause: switch to a closer server, try WireGuard protocol (lower overhead than OpenVPN on cellular), or configure split tunnelling so only specific apps use the VPN.
---
## Tethering and Wi-Fi Router Issues
If you are using a mobile hotspot or pocket Wi-Fi router, the bottleneck may be the Wi-Fi link rather than the cellular connection.
**Isolate the bottleneck:** run a speed test directly on the hotspot device (or a device with its own SIM), then run the same test on a device connected via Wi-Fi. If the Wi-Fi-connected result is significantly slower, the issue is between the hotspot and your device — not the carrier.
Common Wi-Fi hotspot causes of slow speeds:
- Distance or obstructions between the hotspot and your device
- 2.4 GHz band congestion from neighbouring networks (switch to 5 GHz if the router supports it — look for a `_5G` suffix in the network name)
- Too many devices sharing the hotspot simultaneously (most portable hotspots support 5–10 devices, depending on model and chipset; performance degrades as connections increase)
- Hotspot plan has a separate, lower data cap or different priority tier than a direct SIM — confirm remaining data on the hotspot plan specifically
---
## MVNO-Specific Considerations (Deprioritization)
If you are on an MVNO plan (sometimes called a budget carrier or virtual operator), slow speeds during peak hours have a specific technical explanation that differs from MNO congestion.
### How MVNO Speed Works
An MVNO does not own radio towers. It buys wholesale network access from a licensed MNO (the physical network owner) and resells it. The interface between the MVNO's network and the MNO's core is called the **Point of Interface (POI)**. The MVNO pays for a fixed bandwidth allocation at this interface.
When many MVNO subscribers are active simultaneously, they share this fixed allocation. If the POI allocation is undersized relative to demand, all MVNO subscribers on that host network experience speed reduction — even when the cell tower itself is not congested. This is why MVNO subscribers sometimes see slowdowns that MNO subscribers on the same tower do not experience.
For a detailed explanation of how MVNOs lease network capacity, see [What Is an MVNO?](/en/guides/what-is-mvno/).
### Deprioritization During Congestion
Most MVNO wholesale agreements include a deprioritization clause: during network congestion, the MNO routes its own subscriber traffic first. MVNO traffic is queued behind MNO traffic. This means:
- On a lightly loaded network: MVNO subscribers get full speed.
- During congestion: MVNO speeds drop more than MNO speeds on the same tower.
This is a fundamental trade-off in MVNO pricing — lower monthly cost in exchange for lower network priority.
### Distinguishing POI Congestion from Coverage Issues
| Symptom | POI/Deprioritization | Coverage |
|---------|---------------------|----------|
| Speed during off-peak (2 AM) | Normal | Still slow |
| Speed in a different location (less dense area) | Often better | May still be slow if coverage is thin |
| Signal bars | Normal (2–4) | Low (0–1) |
| Affects all MVNO users at similar times | Yes | No — coverage is individual |
### What to Do About MVNO Slow Speeds
1. **Verify the slowness is peak-time only.** Run speed tests at 2–4 AM. If speeds are much faster, POI congestion or deprioritization is the cause, not a plan or device issue.
2. **Check whether a higher-tier plan on the same MVNO offers better priority.** Some MVNOs sell "premium" tiers with better POI capacity or higher deprioritization ranking.
3. **Consider switching host networks.** In many markets, the same MVNO offers plans on multiple MNO networks. The MNO with better coverage in your area will generally perform better.
4. **Consider a sub-brand.** MNO-owned sub-brands (such as Cricket by AT&T, Metro by T-Mobile, or UQ Mobile by KDDI in Japan) typically receive higher network priority than independent MVNOs, because the sub-brand's traffic and the parent MNO's traffic are handled under the same company.
### When to Contact Carrier Support
Contact your carrier or MVNO's support if:
- Speed test results are consistently below the throttle speed stated in your plan documentation (e.g., your plan says throttle speed is 1 Mbps but you are getting 0.1 Mbps) — this suggests a technical issue, not just a policy limit.
- Speed is slow even in areas with excellent coverage and during off-peak hours, and your data balance shows high-speed data remaining.
- Speed issues started immediately after an account change (plan upgrade, SIM swap, profile change).
- You are experiencing slow speeds on a new SIM or eSIM that has not connected properly since activation — this may be an APN or network registration issue rather than a speed problem. See [No Mobile Data](/en/guides/no-data/) for activation-stage troubleshooting.
When contacting support, provide: the results of at least three speed tests (tool used, time, location), your current plan name, and your approximate data balance. This gives the support agent the information needed to diagnose without back-and-forth.
---
## Frequently Asked Questions
### What is the difference between throttling and deprioritization?
Throttling is a hard speed cap the carrier applies once you cross a data threshold — your speed drops to a fixed floor (often 128 kbps–1 Mbps) regardless of network conditions. Deprioritization is conditional: during congestion, higher-priority subscribers are served first and your speed drops only when the cell is busy. Throttling affects you on an empty network; deprioritization does not.
### My speed test shows 0.2 Mbps. Is my plan throttled?
Speeds in the 100–500 kbps range mid-billing-cycle are consistent with a throttle. Check your carrier's app for remaining high-speed data. If the balance reads zero, a soft cap has been applied. Throttled speeds of 128 kbps are sufficient only for messaging and basic maps.
### Why is my mobile data fast at home but slow at work or a stadium?
Location-based congestion. A single tower serving a dense area can be overwhelmed at peak times (lunchtime, rush hour, events). Speed typically returns once the area clears. Switching between 5G and 4G may help if one band has more headroom at that moment.
### Does a VPN slow down mobile data?
Yes. VPN traffic is encrypted, routed to a remote server, then forwarded — adding latency and reducing throughput. Test with VPN off versus on to confirm the impact. Switching to a closer server or to WireGuard protocol can reduce overhead.
### How do I distinguish MVNO throttling from network congestion?
Run speed tests at off-peak hours (2–6 AM). If speeds recover, the cause is congestion or deprioritization. If speeds stay consistently low regardless of time after you hit your data cap, throttling is more likely.
### Will resetting network settings fix slow data?
It can help if slowness started after a software update or SIM change, by clearing stale APN or radio settings. It will not fix congestion, throttling, or a weak signal. Note that it erases Wi-Fi passwords and VPN configs.
### Can background apps slow my connection?
They do not slow the cellular link itself, but they compete for bandwidth. With multiple apps syncing simultaneously, your foreground app receives only leftover throughput. Use Low Data Mode (iPhone) or Data Saver (Android) to restrict background consumption.
---
## Related Guides
- [No Mobile Data? How to Fix Data Connection Problems](/en/guides/no-data/) — for when data has stopped working entirely rather than just slowing down
- [How Much Mobile Data Do You Need?](/en/guides/data-usage-guide/) — understanding data consumption by app and estimating your needs
- [What Is an MVNO?](/en/guides/what-is-mvno/) — how MVNO network access and deprioritization work
- [APN Setup Guide for iPhone](/en/guides/apn-setup-iphone/) — APN configuration and troubleshooting for iPhone and MVNO plans
- [SIM and Mobile Glossary](/en/guides/glossary-index/) — definitions for throttling, deprioritization, POI, Mbps, and other terms
Use [SimFinder](/en/) to compare domestic mobile plans, or [SimFinder Travel](/en/travel/) to compare travel eSIM plans by destination.
================================================================================
# How to Receive SMS Two-Factor Authentication (2FA) Codes Abroad
URL: https://sim-finder.com/en/guides/sms-2fa-abroad/
Type: guides (en)
Published: 2026-06-03
Receiving SMS two-factor authentication codes abroad is straightforward when you understand which settings to configure. The three reliable methods are: keeping your home SIM active in a dual SIM setup with Data Roaming off, enabling international roaming on the home SIM for SMS, and using Wi-Fi Calling if your carrier supports it. The root-cause solution — which removes the dependency entirely — is migrating time-sensitive accounts to an authenticator app or passkey before you travel.
This guide covers all four methods and closes with a pre-departure checklist so you can verify your setup before you board.
---
## Why SMS 2FA Delivery Can Fail Abroad
SMS-based two-factor authentication works by having the service send a short text message containing a one-time code to your registered phone number. For that message to reach you, two things must be true: your home carrier must be able to route the SMS to a network where your device is reachable, and your device must be registered on that network.
Failures happen for three reasons:
**Home SIM not registered on a visited network.** If the home SIM line is disabled, or if your device has no cellular coverage from a roaming partner, the carrier has no path to deliver the SMS. The message may queue and deliver late, or the service may time out the code before it arrives.
**Data Roaming confusion.** Data Roaming controls whether your SIM can use the visited network for internet access. It does not control SMS delivery. Some travelers turn off the entire SIM line thinking this prevents charges — but disabling the line also prevents SMS reception. The correct configuration is: SIM line enabled, Data Roaming off, home SIM's data not in use.
**No roaming agreement at the destination.** Your home carrier's SMS gateway routes messages via SS7/Diameter signaling to the visited network. If your carrier has no roaming partner at your destination, incoming SMS cannot be delivered over cellular. This is the one scenario where cellular-based methods fail completely, and Wi-Fi Calling or an authenticator app becomes the only option.
Understanding this separation — SMS travels on the signaling network, not on the data plane — is the key insight this guide builds on.
---
## Method 1: Dual SIM with Home SIM Active for SMS
The most common and practical configuration for travelers is to run a travel eSIM for data alongside the home SIM for calls and SMS. This is the standard dual SIM travel setup described in [Using Dual SIM for Travel](/en/guides/dual-sim-for-travel/).
### How SMS Reception Works in This Configuration
When your home SIM line is active, your device registers on a partner carrier's network at your destination — the same registration process that handles voice calls. The visited network stores your location in its Visitor Location Register (VLR) and notifies your home carrier's Home Location Register (HLR) or Home Subscriber Server (HSS). When a service sends an SMS to your home number, your home carrier's SMS gateway routes it via SS7 signaling to the visited network, which delivers it to your device.
This signaling path is entirely separate from mobile data. The message arrives regardless of whether Data Roaming is on or off for your home SIM.
### The Correct Settings
| Setting | Home SIM | Travel eSIM |
|---------|----------|-------------|
| Line enabled | On | On |
| Data Roaming | **Off** | On |
| Cellular data source | No | Yes |
| Voice / SMS | Yes | No (data-only plans have no number) |
With Data Roaming off on the home SIM, the SIM registers on the visited network for voice and SMS purposes only. Background apps cannot use the home SIM for internet access, so no roaming data charges accumulate.
### Voice Roaming and SMS
On most carriers, the SIM registers on the visited network for voice and SMS simply by having the line active — the Voice Roaming toggle only enables or disables whether you can make and receive calls, not whether the registration happens. On some carriers, Voice Roaming must be explicitly enabled for inbound SMS to be delivered.
If you are uncertain about your carrier's behavior, leave Voice Roaming enabled on the home SIM. The registration costs nothing; charges apply only when you make or receive an actual call.
Verify your home carrier's roaming policy in their international roaming documentation before departure. The [International Roaming guide](/en/guides/international-roaming/) explains the carrier agreements (GSMA AA.12) that determine which networks your home SIM can register on at your destination.
### One Risk: Home-SIM Data Roaming Charges
If Data Roaming is accidentally left on for your home SIM while the travel eSIM is also active, your home SIM can accumulate roaming data charges from background app activity — email syncing, push notifications, app updates — without you noticing. Confirm Data Roaming is off before boarding.
On iPhone: Settings > Cellular > [home SIM line] > Data Roaming — set to off.
On Android (Pixel): Settings > Network & Internet > SIMs > [home SIM] > toggle Mobile data to off.
On Samsung: Settings > Connections > SIM card manager > [home SIM] — disable mobile data for that line.
---
## Method 2: International Roaming on the Home SIM for SMS
If you are not using a travel eSIM and are relying on your home SIM for all connectivity, enabling international roaming on that SIM also ensures SMS 2FA codes are delivered. The difference from Method 1 is that here the home SIM handles data as well — at roaming rates.
SMS delivery itself works the same way: when Data Roaming is on, the SIM is registered on the visited network, and inbound SMS arrives via the carrier's signaling network.
The practical concern with this method is cost management for data. Roaming data charges vary significantly by carrier and destination — some postpaid plans include data in covered countries at no extra cost, while others charge per-megabyte or per-day rates. The [International Roaming guide](/en/guides/international-roaming/) describes the three main pricing models (pay-per-use, day passes, and included roaming) in detail.
For SMS-only needs — receiving 2FA codes without using the home SIM for browsing — Data Roaming can remain off even in this scenario. The key point: enabling Data Roaming is not required for SMS receipt, but if your home SIM is your only SIM, you will want it on for general internet access anyway.
To compare whether roaming or a travel eSIM is the better connectivity approach for your trip, see [4 Ways to Stay Connected Abroad](/en/guides/four-options/).
---
## Method 3: Wi-Fi Calling for SMS Reception
Wi-Fi Calling (also called Voice over Wi-Fi or VoWiFi) allows your home carrier to deliver calls and SMS to your device over an internet connection rather than over the cellular network. When your device is connected to Wi-Fi and Wi-Fi Calling is active, your home number remains reachable — including for SMS 2FA codes — even if your home SIM has no cellular signal at the destination.
This method is particularly useful in two situations: when your carrier has no roaming partner at your destination, and when you want to avoid any cellular roaming registration on the home SIM entirely.
### Technical Basis
Wi-Fi Calling uses IPsec-encrypted tunnels to connect your device to your home carrier's IMS (IP Multimedia Subsystem) core over the internet. The carrier delivers SMS through this tunnel the same way it would over a cellular connection. From the SMS sending service's perspective, the message was delivered to your number — the underlying transport is transparent.
### How to Enable It
**On iPhone:** Settings > Cellular > [home SIM line] > Wi-Fi Calling. Enable the toggle. The option is only visible if your carrier supports Wi-Fi Calling for that line.
**On Android (Pixel):** Settings > Network & Internet > SIMs > [home SIM] > Wi-Fi calling. Enable the toggle.
**On Samsung:** Settings > Connections > SIM card manager > [home SIM] > Wi-Fi calling.
Enable it while still on your home network and verify the status bar shows "Wi-Fi Calling" or equivalent text. Some carriers require you to register an emergency address before Wi-Fi Calling activates.
### Limitations
Wi-Fi Calling availability varies by carrier. Not all carriers offer it, and some that do restrict it to domestic use or to certain destination countries. If your home carrier disables Wi-Fi Calling in the country you are visiting, this method will not work there.
Additionally, Wi-Fi Calling requires a working Wi-Fi connection. If you are in a location with no Wi-Fi — a moving train, a remote area — it provides no SMS coverage.
Because of these limitations, Wi-Fi Calling works best as a complement to Method 1 (dual SIM), not as a standalone solution for all destinations.
---
## Method 4: Migrate to an Authenticator App or Passkeys
The methods above all preserve SMS 2FA — they keep the system working while you travel. This method eliminates the dependency: if your accounts use a TOTP authenticator app or passkey instead of SMS, you never need to worry about SMS delivery at all.
### TOTP Authenticator Apps
TOTP (Time-based One-Time Password) authenticator apps implement RFC 6238. They generate a 6-digit code every 30 seconds using a shared secret (set up at enrollment) and the current time. The code is computed on-device — no network connection is needed. Common options include Google Authenticator, Microsoft Authenticator, and Authy.
To migrate an account:
1. Go to the account's security settings and look for "authenticator app," "TOTP," or "two-factor authentication."
2. The service displays a QR code containing the shared secret.
3. Open your authenticator app and scan the QR code.
4. The app begins generating codes. Enter the current code in the service's enrollment flow to confirm it is working.
5. Store the backup codes the service provides (see the Pre-Departure Checklist section below).
Do this migration before traveling. Some services impose a short delay after changing 2FA methods, and you want to verify the authenticator is working on your home Wi-Fi before you need it abroad.
### Passkeys
Passkeys use public-key cryptography (FIDO2/WebAuthn specification) to authenticate without a password or a second factor. The private key stays on your device, protected by biometrics or a device PIN. There is no code to enter and no SMS required. Authentication works offline — you do not need any network connection on the device for the passkey operation itself (though a connection may be required to complete the login flow on the service side).
Support for passkeys varies by service. Check whether your bank, email provider, or other high-sensitivity services offer passkeys as an authentication option in their security settings.
### Priority Accounts to Migrate
Before traveling, migrate these account categories first:
- Online banking and financial services
- Primary email accounts
- Password managers
- Work or enterprise accounts
- Any service where account lockout would create a serious problem during your trip
Less time-sensitive accounts — streaming services, social media — can be lower priority if the service allows backup code entry or has account recovery options that work without a second factor.
---
## Pre-Departure Checklist for SMS 2FA
Run through this before departure. The [Pre-Trip Smartphone Checklist](/en/guides/pre-trip-checklist/) covers the full connectivity setup; this section focuses on 2FA specifically.
### Two Weeks Before
**Identify which accounts use SMS 2FA.** Review your most-used and highest-sensitivity accounts. Most services list the active 2FA method in account security settings.
**Migrate critical accounts to an authenticator app.** Follow the steps in Method 4 above. Verify each migration is working before moving to the next account.
**Download backup codes for each migrated account.** Most services provide 8–10 single-use backup codes when you set up a new 2FA method. Download or print them and store them in a password manager or secure offline location.
### One Week Before
**Check your home carrier's roaming coverage for your destination.** Confirm that your carrier has a roaming partner where you are traveling. Log in to your carrier's app or website — coverage maps on roaming pages reflect active GSMA AA.12 agreements.
**Check whether your carrier requires Voice Roaming for SMS delivery.** Review the carrier's international roaming FAQ or call support if the documentation is unclear.
**Enable Wi-Fi Calling on your home SIM** if your carrier supports it. Do this while on your home network so you can confirm it activates correctly.
### Day Before / At the Airport
**Confirm Data Roaming is off on your home SIM** (if using a travel eSIM for data).
**Confirm the home SIM line is enabled** — not just present, but active in Settings.
**Test SMS receipt.** Ask a contact to send you an SMS to verify delivery works before you lose access to your home network. Alternatively, trigger a test 2FA code from a non-critical account.
**Confirm your authenticator app is working.** Open the app and verify it generates codes for your migrated accounts. Codes refresh every 30 seconds; watch one cycle to confirm timing is correct.
**Note your backup codes are accessible.** Confirm you can open your password manager or access your offline backup while in a scenario with no mobile data.
---
## Device Considerations for Dual SIM
Not all devices support dual SIM. If your device does not, Method 1 is not available — you must rely on roaming (Method 2), Wi-Fi Calling (Method 3), or the authenticator app migration (Method 4).
**iPhone:** Dual SIM (physical SIM + eSIM) is supported on iPhone XS and later. Dual eSIM (two eSIM profiles simultaneously active) is supported on iPhone 13, iPhone SE (3rd generation), and later models. iPhones use DSDS (Dual SIM Dual Standby) as confirmed by Apple's support documentation — both SIMs remain on standby and receive calls and SMS simultaneously, but during an active call on one line, the other line's data pauses.
iPhone 14 and later models sold in the United States have no physical SIM slot (eSIM-only). If your home carrier provides only a physical SIM, ask them to convert it to an eSIM before departure.
**Google Pixel:** Pixel 3a and later support physical SIM + eSIM. Pixel 7 and later support dual eSIM via the MEP (Multiple Enabled Profiles) feature introduced in GSMA SGP.22 v3.0. Pixel 10, 10 Pro, and 10 Pro XL sold in the United States are eSIM-only; the Pixel 10 Pro Fold retains a physical SIM slot.
**Samsung Galaxy:** Galaxy S20 and later support eSIM alongside a physical SIM on most variants. eSIM availability depends on region and whether the device is carrier-locked. Dual eSIM support (two simultaneous eSIM profiles) is not universal across Samsung models — confirm your specific device's specifications.
For a broader comparison of dual SIM modes (DSDS, DSDV, DSDA), see [What Is Dual SIM?](/en/guides/what-is-dual-sim/).
---
## Which Method Is Right for Your Trip?
| Scenario | Recommended method |
|----------|--------------------|
| Traveling with a dual SIM-capable device and a travel eSIM | Method 1: dual SIM, home SIM active for SMS |
| Single SIM device, short trip, strong included-roaming plan | Method 2: international roaming on home SIM |
| Home carrier supports Wi-Fi Calling, good Wi-Fi coverage expected | Method 3: Wi-Fi Calling as supplement to Method 1 or 2 |
| Destination with no roaming partner for your home carrier | Method 3 (Wi-Fi Calling) + Method 4 (authenticator app) |
| High-security accounts (banking, email) on any trip | Method 4: migrate to authenticator app or passkey |
| Single SIM device traveling to a destination with no roaming coverage | Method 4 only — no cellular SMS path is available |
The most resilient setup combines Methods 1 and 4: a dual SIM configuration ensures SMS codes still arrive for services not yet migrated, while authenticator apps handle critical accounts without any cellular dependency.
For travelers setting up their first travel eSIM, [SimFinder Travel](/en/travel/) lists current plans with coverage, data amount, and validity period by destination. Use it to find a plan that works alongside your home SIM for the dual SIM configuration described in Method 1.
---
## Frequently Asked Questions
### Will I receive SMS 2FA codes if my home SIM has Data Roaming turned off?
Yes. SMS delivery does not require Data Roaming to be enabled. When your home SIM line is active and the device is registered on a visited network in roaming mode, inbound SMS are routed through the carrier's signaling network (SS7/Diameter), not through the data plane. Turn Data Roaming off to avoid data charges, but leave the home SIM line itself enabled.
### What is a TOTP authenticator app and how does it replace SMS 2FA?
A TOTP app such as Google Authenticator, Microsoft Authenticator, or Authy generates a 6-digit code on your device using a shared secret and the current time, following the algorithm defined in RFC 6238. It works entirely offline — no SMS or network connection is required. Migrate accounts in the service's security settings by scanning the QR code the service provides.
### Does my home carrier need Voice Roaming turned on for me to receive SMS abroad?
It depends on the carrier. Many carriers deliver inbound SMS as long as the SIM is registered on a visited network, regardless of the Voice Roaming toggle. Others require Voice Roaming to be explicitly enabled. Check your home carrier's roaming documentation before departure. If unsure, leave Voice Roaming on — charges apply only when you actually make or receive a call, not for the registration itself.
### What are backup codes and how should I use them?
Backup codes are single-use recovery codes generated by a service when you set up 2FA. Each code works once and bypasses the 2FA requirement. Download and store them in a password manager or secure offline location before traveling. Treat them as credentials — a backup code grants the same account access as a second factor.
### Can Wi-Fi Calling deliver SMS from my home number while abroad?
Yes, when supported. If your home carrier offers Wi-Fi Calling and your device is connected to Wi-Fi, the carrier routes calls and SMS over an IPsec-encrypted tunnel to your device using your home number. This works even if the home SIM has no cellular signal. Wi-Fi Calling availability varies by carrier and by destination country — verify your carrier's coverage before relying on it.
---
## Related Guides
- [Using Dual SIM for Travel](/en/guides/dual-sim-for-travel/) — Full configuration for keeping your home number active alongside a travel eSIM
- [Pre-Trip Smartphone Checklist](/en/guides/pre-trip-checklist/) — Complete timeline from two weeks out to departure, including connectivity and 2FA preparation
- [International Roaming Explained](/en/guides/international-roaming/) — How GSMA AA.12 agreements work and the three roaming pricing models
- [4 Ways to Stay Connected Abroad](/en/guides/four-options/) — Compare roaming, local SIM, travel eSIM, and portable Wi-Fi
- [What Is Dual SIM?](/en/guides/what-is-dual-sim/) — DSDS, DSDV, and DSDA modes explained, and which your device supports
================================================================================
# The Risks of SMS Two-Factor Authentication and Safer Alternatives
URL: https://sim-finder.com/en/guides/sms-2fa-risk/
Type: guides (en)
Published: 2026-06-04
SMS one-time passwords are the weakest form of two-factor authentication still in widespread use. NIST SP 800-63B classifies them as a "restricted" authenticator because the delivery channel — the public telephone network — was not designed for authentication and carries exploitable vulnerabilities. The two primary attacks are SIM swap fraud, which redirects your number to a device an attacker controls, and SS7 signaling exploitation, which can intercept SMS in transit without affecting your SIM at all. Phishing and real-time relay attacks round out the threat model.
Migrating high-value accounts from SMS OTP to a TOTP authenticator app or a passkey eliminates the delivery-channel risk entirely. TOTP generates codes locally on the device with no carrier involvement; passkeys (FIDO2/WebAuthn) are additionally phishing-resistant because the private key is cryptographically bound to the legitimate service domain.
This guide explains each threat in detail, covers the NIST SP 800-63B classification, and provides a concrete migration path for moving from SMS OTP to a stronger alternative.
---
## What Makes SMS OTP Structurally Weak
An SMS one-time password depends on two assumptions: that your phone number reaches only your device, and that the message is delivered privately. Both assumptions can be broken.
**The phone number assumption fails in SIM swap.** Your phone number is a carrier-level identifier, not a device-level one. A carrier can reassign it to any SIM card — including one an attacker controls. The reassignment requires no access to your device and no knowledge of your passwords.
**The private delivery assumption fails in SS7 exploitation.** The signaling protocol that routes SMS between carriers worldwide was designed for a closed network of trusted operators in an era before adversarial network access. Entities with SS7 access can issue commands that reroute or copy your SMS without visible indication on your device.
**Phishing compounds both.** Even without SIM swap or SS7 access, an attacker can build a real-time phishing proxy that relays your SMS code to a target service within the code's validity window. You enter the code into what appears to be the real login page; the proxy forwards it instantly and completes the attacker's login.
These are not theoretical edge cases. NIST SP 800-63B restricts PSTN-based OTP because the telephone network was not designed for authentication — SIM swap and SS7 exploitation are the documented real-world attack mechanisms that make that restriction necessary.
---
## NIST SP 800-63B: The Restricted Authenticator Classification
NIST Special Publication 800-63B — *Digital Identity Guidelines: Authentication and Lifecycle Management* — is the US federal standard for authenticator assurance levels. The current edition (SP 800-63B-4, 2025) defines the category of "restricted authenticators" in Section 3.2.9, with PSTN-based delivery addressed in Section 3.1.3.3.
A restricted authenticator is one that the NIST guidelines allow agencies to use, but only with additional conditions:
- The agency must monitor and assess threats against the authenticator type and offer users an alternative.
- The agency must provide a migration path away from the restricted authenticator when risk levels increase.
- Users must be informed that the authenticator is restricted and offered the alternative.
NIST SP 800-63B identifies the public switched telephone network (PSTN) as the delivery channel under restriction, covering both SMS OTP and voice call OTP delivery. The concern is that the security of authentication depends on the PSTN, which was not built for this purpose.
The practical implication: any organization following NIST guidance must treat SMS OTP as a transitional mechanism, not a long-term security control.
---
## SIM Swap Fraud: Redirecting Your Number
SIM swap fraud exploits the carrier's account management process. An attacker who has gathered enough personal information — typically from data breaches, phishing, or social engineering — contacts your carrier and impersonates you to request a SIM replacement. If the agent is convinced, your number is transferred to a SIM the attacker controls.
From that moment, every SMS sent to your number arrives on the attacker's device. Any account using SMS OTP as its second factor is now accessible: the attacker triggers a password reset, the code arrives on their device, and they set a new password before you notice your own service has been disrupted.
The visible sign of an active SIM swap is the sudden loss of mobile service on your device. Calls stop connecting. SMS stops arriving. Your phone shows no service in an area where it normally has coverage. By that point, the attacker may already have received their first authentication codes.
The FBI's Internet Crime Complaint Center recorded 982 SIM swap complaints in the United States in 2024, with reported losses of approximately $26 million — an average of more than $26,000 per victim. The UK's Cifas reported nearly 3,000 unauthorized SIM swaps in 2024. South Africa has documented SIM swap as a primary vector for banking fraud. The attack is not limited to any single market.
For the full attack chain and carrier-level protections (SIM locks, account PINs, port-out blocking), see the [SIM Swap Fraud guide](/en/guides/sim-swap/).
---
## SS7 Signaling Vulnerabilities: Interception Without Touching the SIM
SS7 (Signaling System No. 7) is a suite of telephony signaling protocols developed from the 1970s and standardized by the ITU in the 1980s, still used to route calls and SMS between carriers worldwide. SS7 was designed for a network of trusted telecommunications operators — mutual authentication between network nodes was not built in, because the assumption was that only authorized carriers could send SS7 messages.
That assumption no longer holds. Research published by Positive Technologies and presented at the 2014 Chaos Communication Congress demonstrated that an entity with access to an SS7 node — which can include rogue carriers, compromised network equipment, or parties who purchase wholesale SS7 access — can send MAP (Mobile Application Part) protocol commands to redirect or intercept SMS messages.
The specific SS7 capability exploited for SMS interception is the `SendRoutingInfoForSM` query, which is used legitimately by carriers to locate a subscriber before delivering an SMS. When this query is answered with attacker-controlled routing information, subsequent SMS messages intended for the victim can be delivered to the attacker's equipment instead.
In 2017, attackers exploited SS7 to intercept SMS banking OTPs and drain German bank accounts, with the attacks reported through carrier O2 Telefónica and affecting ordinary banking customers. Senator Ron Wyden and Rep. Ted Lieu also pressed the FCC on SS7 vulnerabilities in 2017. The FCC opened a formal inquiry into SS7 and SS7-based attacks on US networks.
Unlike SIM swap, an SS7 attack leaves no visible sign on the victim's device. Your phone continues to show service. Messages appear to be sent. The interception occurs in the network before the message reaches your carrier's delivery infrastructure.
SS7-based SMS interception requires access to SS7 infrastructure, which limits it to actors with carrier-level resources. It is not a mass-scale consumer attack. However, for high-value targets — financial accounts, government personnel, individuals with significant assets — it represents a credible threat that SMS OTP cannot defend against.
---
## Phishing and Real-Time OTP Relay
A third attack category requires neither SS7 access nor a SIM swap. A phishing proxy attack works as follows:
1. The attacker creates a convincing copy of a login page (bank, email provider, or similar).
2. The victim visits the fake page and enters their username, password, and — when prompted — their SMS OTP.
3. The proxy relays the credentials and OTP to the real service in real time, completing a login as the victim.
4. The SMS OTP is valid only for a short window (typically 30–120 seconds), but the relay is automated and fast enough to use it before it expires.
This attack works because SMS OTP provides no binding to the legitimate site. The code is a number; it does not encode the site's identity or the session. The victim has no way to know the code is being used on a different session.
TOTP authenticator apps are equally vulnerable to real-time phishing proxy attacks — the 6-digit TOTP code has the same relay window problem. Passkeys (FIDO2/WebAuthn) are specifically designed to resist this attack: the private key only responds to a cryptographic challenge from the legitimate origin domain. A phishing site on a different domain receives a response that is cryptographically invalid for the real service.
---
## Authenticator Apps (TOTP): Eliminating the Delivery Channel
A TOTP (Time-based One-Time Password) authenticator app removes the telephone network from the authentication path entirely. The app implements RFC 6238 and generates a 6-digit code every 30 seconds using a shared secret established at enrollment and the current time. The code is computed locally on the device; no SMS, no carrier, and no network connection is required.
Common authenticator apps include Google Authenticator, Microsoft Authenticator, and Authy. All implement RFC 6238 and are interchangeable for most services.
**What TOTP protects against:**
- SIM swap: No SMS is sent, so redirecting your number accomplishes nothing.
- SS7 interception: There is no SMS to intercept.
**What TOTP does not protect against:**
- Real-time phishing proxy: A TOTP code can be relayed in the same way as an SMS OTP if the attacker's fake page submits it fast enough.
- Malware on the device that reads the authenticator app's codes.
**Migration steps:**
1. Open the target account's security settings and select the option to add an authenticator app or change the 2FA method.
2. The service displays a QR code containing the shared secret.
3. Open your authenticator app and tap the option to add a new account. Scan the QR code.
4. The app immediately begins generating codes. Enter the current code in the service's enrollment flow to confirm it works.
5. Download and securely store the backup codes the service provides. These are single-use recovery codes that bypass 2FA if you lose access to the authenticator.
6. Once confirmed, remove SMS as the active 2FA method if the service allows it.
Migrate in priority order: primary email first (since email is used for password recovery on most other services), then banking, then any account where compromise would have serious consequences.
---
## Passkeys (FIDO2/WebAuthn): Phishing-Resistant Authentication
Passkeys implement the FIDO2 standard, which consists of the W3C Web Authentication (WebAuthn) API and the FIDO Client to Authenticator Protocol (CTAP). They replace both the password and the second factor with a single, phishing-resistant credential.
**How passkeys work:**
When you register a passkey with a service, the device generates an asymmetric key pair. The private key is stored in the device's secure enclave, protected by biometrics (fingerprint or face) or a device PIN. The service stores the public key. The private key never leaves the device.
When you authenticate, the service sends a challenge. Your device signs the challenge with the private key after verifying your biometrics or PIN. The service verifies the signature with the stored public key. No code is generated or transmitted.
**Phishing resistance:** The private key is bound to the service's origin (domain). The FIDO2 protocol embeds the requesting origin in the signed assertion. A phishing site operating on a different domain receives a signature that is cryptographically invalid for the real service — the relay attack that works against SMS OTP and TOTP codes does not work against passkeys.
**Current support:** Passkey support varies by service. As of 2024–2025, major platforms (Google, Apple, Microsoft) and a growing number of banks and web services support passkey enrollment in account security settings. The FIDO Alliance publishes a directory of services with passkey support at passkeys.dev.
**Hardware security keys** (such as YubiKey or Google Titan Key) implement the same FIDO2 standard using a physical device rather than the platform authenticator. They provide the same phishing resistance properties and work across devices without requiring device-specific enrollment.
---
## If SMS Is Your Only Option
Some services do not offer TOTP or passkey alternatives. When SMS OTP is the only available second factor:
**Enable your carrier's SIM lock.** All major US carriers offer a free account lock feature that blocks unauthorized SIM swaps and number port-outs. AT&T's Wireless Lock, Verizon's SIM Protection and Number Lock, and T-Mobile's SIM lock all block the social engineering step that enables SIM swap. Carriers in other countries offer equivalent features under various names — check your carrier's account security settings. Under FCC rules effective in 2025, US wireless providers are required to offer customers a free account lock option.
**Set a carrier account PIN.** A separate PIN (distinct from your screen lock) that carrier agents must verify before making account changes adds an additional barrier to impersonation. Choose a PIN that is not derivable from publicly available information — not your birthday, address, or national ID digits.
**Enable carrier notifications for SIM changes.** Many carriers send immediate alerts when a SIM swap or port-out is requested. Enabling these notifications gives you a narrow window to contact your carrier and halt an attack before it completes.
**Use a number not publicly associated with your identity** for accounts where SMS OTP is mandatory. A number used only for authentication and not shared on social media or public registrations is harder for attackers to target by name.
These measures reduce SIM swap risk substantially. They do not address SS7 interception, which requires carrier-level resources to exploit and is a less common threat for most individuals.
For SIM lock setup instructions by carrier, see the [SIM Lock guide](/en/guides/sim-lock/).
**If you suspect an active SIM swap** — sudden loss of mobile service is the primary real-time indicator — act immediately:
1. Call your carrier from a landline or a different phone. Report the unauthorized SIM swap and ask them to reverse it and lock the account against further changes.
2. From a device not dependent on your phone number, change your primary email password first. Email is the recovery path for most other accounts.
3. Revoke active sessions on banking, email, and any account that used SMS 2FA. Most services offer a "sign out all devices" option in security settings.
4. Re-enroll each account with an authenticator app or passkey as you regain access.
5. File a report with the relevant authority:
- United States: FBI IC3 at ic3.gov; FTC at reportfraud.ftc.gov
- United Kingdom: Action Fraud at actionfraud.police.uk
- Australia: ReportCyber at cyber.gov.au
- Other markets: your national cybercrime reporting agency
If you travel internationally and rely on SMS OTP, see [How to Receive SMS 2FA Codes Abroad](/en/guides/sms-2fa-abroad/) for roaming configuration guidance.
**Authenticator method comparison:**
| Method | SIM Swap Risk | SS7 Interception Risk | Phishing Resistance | Works Offline |
|--------|--------------|----------------------|---------------------|---------------|
| SMS OTP | High | Present | None | No |
| TOTP (authenticator app) | None | None | Low (relay window) | Yes |
| Passkey / FIDO2 hardware key | None | None | High (origin-bound) | Yes (auth step) |
The migration priority is: passkey where supported → TOTP authenticator app → SMS OTP with carrier lock and PIN enabled.
For MNP (number portability) and its implications for phone number security when switching carriers, see the [MNP guide](/en/guides/what-is-mnp/). For device and SIM PIN security features, see the [IMEI, PIN, and PUK guide](/en/guides/imei-pin-puk/).
---
## Frequently Asked Questions
The questions below address the most common points of confusion about SMS OTP security and the migration to stronger alternatives. For SIM-swap-specific questions, additional detail is in the [SIM Swap Fraud guide](/en/guides/sim-swap/).
### Why does NIST classify SMS OTP as a restricted authenticator?
NIST SP 800-63B (current edition: SP 800-63B-4, 2025) designates SMS OTP as a restricted authenticator because the delivery channel — the public switched telephone network — was not designed for authentication. The restriction is grounded in the PSTN's structural inability to provide authentication-grade security; SIM swap and SS7 exploitation are the documented real-world attack mechanisms. Agencies subject to NIST guidelines must offer users an alternative authenticator and provide a migration path away from SMS OTP.
### What is SS7 and how can it be used to intercept SMS?
SS7 (Signaling System No. 7) is the protocol suite that routes calls and SMS between carriers worldwide, developed from the 1970s and standardized by the ITU in the 1980s for a closed network of trusted operators. It lacks strong mutual authentication between network nodes. An entity with SS7 access can send MAP protocol commands — specifically `SendRoutingInfoForSM` — that redirect SMS delivery to attacker-controlled equipment, intercepting one-time passwords without any visible indicator on the victim's device.
### Is SMS 2FA better than no 2FA at all?
Yes. CISA states that enabling any form of MFA substantially reduces the risk of account compromise from automated attacks. The recommendation to move away from SMS OTP applies specifically to high-value accounts where an attacker has strong motivation to invest in SIM swap or SS7 exploitation. For most accounts, SMS OTP is a meaningful improvement over a password alone.
### How do I migrate from SMS 2FA to a TOTP authenticator app?
In the account's security settings, select the option to add an authenticator app. Scan the QR code with your authenticator app (Google Authenticator, Microsoft Authenticator, or Authy). Enter the code displayed to confirm enrollment. Save the backup codes the service provides in a password manager or secure offline location. Remove SMS as the active 2FA method once the authenticator is confirmed working.
### What is a passkey and how is it different from a TOTP code?
A passkey uses FIDO2/WebAuthn public-key cryptography. The private key stays on your device, protected by biometrics or a PIN, and never leaves the device. Authentication uses a signed cryptographic challenge — no code is generated or entered. Unlike TOTP, passkeys are origin-bound: the private key only responds to the legitimate service domain, blocking phishing proxy relay attacks that work against both SMS OTP and TOTP codes.
### What should I do if SMS is the only 2FA option available?
Enable your carrier's SIM lock feature (AT&T Wireless Lock, Verizon SIM Protection, T-Mobile SIM Lock, or your carrier's equivalent) to block unauthorized SIM swaps. Set a carrier account PIN. Enable carrier notifications for SIM changes. Use a phone number not publicly associated with your identity for mandatory SMS OTP accounts. These steps substantially reduce SIM swap risk. SS7 interception risk requires carrier-level resources to exploit and affects a narrower threat population.
---
## Related Guides
- [How to Receive SMS 2FA Codes Abroad](/en/guides/sms-2fa-abroad/) — Configuration for SMS OTP delivery while traveling internationally
- [SIM Swap Fraud: How It Works and How to Protect Yourself](/en/guides/sim-swap/) — Full SIM swap attack chain, carrier lock setup, and immediate response steps
- [SIM Lock: How to Lock Your SIM Card](/en/guides/sim-lock/) — Carrier SIM lock and account lock by carrier
- [What Is MNP (Mobile Number Portability)?](/en/guides/what-is-mnp/) — How number porting works and its implications for phone number security
- [IMEI, SIM PIN, and PUK Explained](/en/guides/imei-pin-puk/) — Device and SIM-level identifiers and PIN security
================================================================================
# Backup Line: Adding a Second SIM for Outage Resilience
URL: https://sim-finder.com/en/guides/sub-line/
Type: guides (en)
Published: 2026-04-25
A single SIM line on a single carrier is a single point of failure. Major outages — some lasting hours, one stretching to nearly a full day — have demonstrated that even large, well-established carriers can go dark without warning. A second SIM on a different network is the most straightforward way to stay connected when that happens.
This guide covers what a backup line is, what makes a good one, which providers to consider in the US and UK, and how to handle the practical details around SMS two-factor authentication and plan maintenance.
---
## What Is a Backup Line and Why Have One
A backup line (sometimes called a sub-line or secondary SIM) is a second mobile plan, kept active on a separate carrier alongside your primary SIM. It sits dormant on most days, serving as insurance rather than a daily driver. When your primary carrier goes offline, you switch your data or calls to the backup — no waiting for the outage to clear.
### Real Outages That Would Have Made a Backup Line Useful
Carrier outages are not hypothetical. Several high-profile incidents illustrate the pattern:
**October 2021 — Facebook / Meta infrastructure outage.** The Facebook BGP routing error took down Facebook, Instagram, and WhatsApp globally for approximately six hours. Because WhatsApp is the primary messaging and voice-call channel for hundreds of millions of people worldwide, many users found themselves suddenly without a functional communication channel. The underlying cause was unrelated to any mobile carrier, but it underscores how a single dependency can eliminate communication capability without warning.
**July 2022 — Rogers Communications Canada.** A Rogers network failure caused by a routing policy update during a maintenance window disabled voice, data, and SMS for approximately 12 million Canadian subscribers, with most critical services restored within approximately 15 hours and full restoration taking up to 26 hours. Emergency services (911) access was impaired in some areas. Subscribers on Bell or Telus were unaffected. Customers with a backup SIM on either of those carriers had working phones throughout the outage.
**July 2022 — KDDI Japan.** A KDDI (au) communications failure originating from a router malfunction affected approximately 39 million users affected, with the total disruption lasting approximately 61 hours and 25 minutes per KDDI's official incident report to Japan's Ministry of Internal Affairs and Communications. Calls on au and its MVNO partners running on the au network were affected. Subscribers with a secondary SIM on NTT Docomo or SoftBank were not affected.
**February 2024 — AT&T United States.** An AT&T network outage disabled voice and data for a reported tens of millions of users for approximately 12 hours (per FCC report). T-Mobile and Verizon customers were unaffected. The incident prompted significant media coverage of the value of having a second line on a different carrier.
These incidents share a common lesson: the outage affects a carrier, not a device. A phone with SIMs from two different carriers survived each of these events with one working line.
---
## Three Core Requirements
Not every second SIM makes a good backup. Three requirements set an effective backup line apart from one that fails when you actually need it.
### 1. Different Carrier (and Different Network Infrastructure)
The backup SIM must run on a different network from your primary SIM — not just a different brand. An MVNO on the same host network as your primary SIM is vulnerable to the same outage. If your primary plan uses Carrier A, your backup must use Carrier B's physical towers and infrastructure.
This matters particularly in markets where [MVNOs](/en/guides/what-is-mvno/) are common. An MVNO running on the same host MNO as your primary carrier provides no outage protection. When choosing a backup MVNO, verify which MNO it uses and confirm it is different from your primary.
### 2. Low Maintenance Cost
A backup line should be cheap to maintain. You are not paying for high-speed data or a large monthly allowance — you are paying to keep a number active and usable in an emergency. Pay-as-you-go plans, low-minimum monthly plans, or plans that accept minimal periodic top-ups are the right category. Plans that require a significant monthly spend to stay active increase the total cost of ownership without providing additional resilience.
### 3. eSIM Support
[eSIM](/en/guides/what-is-esim/) is the most practical format for a backup line on supported devices. There is no physical SIM to lose or damage, the profile is installed once and persists on the device, and you can disable the line when it is not needed to avoid battery drain. When an outage occurs, you switch to the backup line in Settings. On a device with a physical SIM slot and eSIM support, you can carry your primary physical SIM and a backup eSIM simultaneously at no additional hardware cost.
---
## Backup Line Candidates by Market
The following examples illustrate the type of low-cost, low-maintenance plans that suit a backup line. Prices change frequently — use [SimFinder](/en/) to verify current pricing in your market before signing up.
### United States
The US market has several providers that offer low-cost or pay-as-you-go options well suited to a backup role.
**T-Mobile Prepaid** — T-Mobile operates its own infrastructure independently of AT&T and Verizon. T-Mobile prepaid plans include eSIM activation. If your primary SIM is on AT&T or Verizon (or an MVNO hosted on either), T-Mobile prepaid is a natural backup choice.
**US Mobile** — An [MVNO](/en/guides/what-is-mvno/) that offers access to both T-Mobile and Verizon networks, with the ability to choose which network to use. This flexibility allows you to pick a network that is different from your primary carrier's infrastructure.
**Mint Mobile** — Runs on T-Mobile's network. Mint Mobile is a T-Mobile subsidiary following its 2024 acquisition. Suitable as a backup if your primary is on AT&T or Verizon; not suitable if your primary is also T-Mobile or a T-Mobile-hosted MVNO.
**Visible** — A Verizon subsidiary (rebranded as Visible by Verizon). Suitable as a backup if your primary is on AT&T or T-Mobile infrastructure.
**Carrier diversification for US users:**
- Primary on AT&T or AT&T MVNO → backup on T-Mobile or Verizon infrastructure
- Primary on T-Mobile or T-Mobile MVNO → backup on AT&T or Verizon infrastructure
- Primary on Verizon or Verizon MVNO → backup on AT&T or T-Mobile infrastructure
### United Kingdom
The UK has three main network owners: EE (owned by BT), O2 (owned by Virgin Media O2), and Vodafone. Three operated its own network and merged with Vodafone on 31 May 2025 to form VodafoneThree. Diversification means choosing a backup on a different underlying network.
**giffgaff PAYG** — giffgaff is an O2-owned flanker brand running on O2's network. PAYG (pay-as-you-go) credit does not expire as long as the SIM is used at least once every 180 days and the account is kept active. Suitable as a backup if your primary is not on O2 or an O2-hosted MVNO.
**Lebara** — Uses Vodafone's network. Suitable as a backup if your primary is not on Vodafone infrastructure.
**Tesco Mobile** — A joint venture operating on O2's network. Similar diversification logic to giffgaff.
**Carrier diversification for UK users:**
- Primary on EE/BT → backup on O2 or Vodafone infrastructure
- Primary on O2 or O2 MVNO → backup on EE, Vodafone, or Three
- Primary on Vodafone or Vodafone MVNO → backup on EE, O2, or Three
### General Principle: Any Low-Cost Prepaid eSIM
Beyond these specific markets, the principle is the same everywhere: look for a prepaid eSIM plan with no monthly minimum or pay-as-you-go charging, from a provider on a different network from your primary. Many regional operators and MVNOs offer SIM-only plans that can be kept dormant for months at minimal cost.
---
## Main + Backup Carrier Diversification
Choosing the right combination is more important than choosing any particular plan. The goal is zero shared infrastructure at the network layer.
**Questions to ask before choosing a backup:**
1. Which MNO does my primary SIM connect to (directly or via MVNO)?
2. Does my backup candidate use a different MNO at the infrastructure level?
3. If my backup is an MVNO, which host network does it use — and is that network different from my primary?
In markets with only two major network owners (common in smaller countries), diversification is still possible — it just means your backup must be on the other one. In markets with three or four network owners (US, UK, Japan), you have more options.
**Watch out for MVNO overlap.** In the US, a large share of MVNOs run on T-Mobile's infrastructure. If your primary carrier is T-Mobile and you add a Mint Mobile, Metro by T-Mobile, or Google Fi backup — all of which use T-Mobile infrastructure — you have not achieved any network redundancy. The 2024 AT&T outage would have left customers with these backup SIMs just as dependent on T-Mobile as before.
---
## Dual SIM Operation
Running a backup line and a primary line simultaneously is the most convenient configuration — you receive calls and data on either line without manually switching. This requires a [dual SIM](/en/guides/what-is-dual-sim/) device.
Most modern smartphones support dual SIM in some form:
- **iPhone 13 and later**: supports dual eSIM (two eSIM profiles active simultaneously) on most models. iPhone 14 and later US models are eSIM-only.
- **iPhone XS through iPhone 12**: physical SIM + one eSIM active simultaneously.
- **Google Pixel 7 and later**: dual eSIM supported.
- **Android devices with a physical SIM slot + eSIM support**: primary physical SIM + backup eSIM.
For iPhone-specific configuration, including line labeling, setting default data, and the Allow Cellular Data Switching option, see [Dual SIM Setup on iPhone](/en/guides/dual-sim-iphone/). For Android setup details, see [Dual SIM Setup on Android](/en/guides/dual-sim-android/).
In a dual SIM configuration, you can leave both lines active and configure which line handles data by default. During an outage on the primary carrier, switch the default data line to the backup in Settings — the change takes effect immediately.
If your device only supports a single SIM at a time, a backup line still has value. Keep the backup eSIM installed and inactive. When your primary carrier goes down, enable the backup line in Settings. This takes slightly longer than switching in a dual SIM configuration but is still faster than waiting for the outage to resolve.
---
## Activating and Switching to Your Backup
### Initial Setup
1. **Install the backup eSIM before you need it.** eSIM activation requires a working internet connection (Wi-Fi or mobile data). If your primary carrier is already down when you try to activate the backup, you cannot complete the activation. Install the backup eSIM while both networks are available.
2. **Make a test call or send a test message.** Confirm the backup line is active and functioning. Some prepaid plans require an initial activation step beyond profile installation.
3. **Label both lines clearly.** In Settings, name your lines (e.g., "Primary" and "Backup") so there is no confusion during an outage.
### Switching During an Outage
**On iPhone:**
- Settings > Cellular > Cellular Data → select the backup line
- Optionally, turn off the primary line under Settings > Cellular > [Primary Line Name] → Turn On This Line (off)
**On Android (varies by manufacturer):**
- Settings > Network & internet > SIMs → select the preferred SIM for data
- On Samsung: Settings > Connections > SIM card manager → select default data SIM
The process takes under a minute. No call to customer service is required.
### Keeping the Backup Active
After the outage ends and you switch back to your primary, return the data SIM setting to normal. Do not delete the backup eSIM profile — leave it installed so it is ready for the next incident.
---
## SMS 2FA: Backup vs. Main Carrier
Two-factor authentication (2FA) via SMS — where a one-time code is sent to your phone number — is the most common form of 2FA for banking, payments, and online services. This creates a direct dependency between your phone number and your access to critical accounts.
### The Core Decision
Which phone number do you register with your bank, financial accounts, and other critical services?
- **Register your primary number only**: convenient, but if your primary SIM fails or is inaccessible, you may not receive OTP codes during the outage.
- **Register your backup number for critical accounts**: ensures OTP delivery continues during a primary carrier outage. However, you must keep the backup number active and ensure the SIM stays accessible.
- **Use an authenticator app instead of SMS where possible**: TOTP apps (Google Authenticator, Authy, Apple Passwords, etc.) generate codes on the device itself without requiring any carrier connectivity. This eliminates the carrier dependency entirely for those services.
### Practical Guidance
For most users, the most robust approach is:
1. **Migrate high-value accounts (banking, email, brokerage) to authenticator-app-based 2FA** wherever the service supports it. This removes carrier dependency for the accounts where loss of access is most damaging.
2. **For services that only offer SMS 2FA**, consider which number they use and whether that SIM will be accessible during an outage on your primary carrier. If a service is registered to your primary number and that carrier goes down, having a backup data SIM does not help you receive that OTP.
3. **Do not assume SMS 2FA is secure against determined attackers.** SIM-swap fraud targets SMS 2FA specifically. An authenticator app is resistant to SIM-swap attacks; an SMS OTP is not.
The backup line solves the outage problem for SMS 2FA. It does not solve the security problem — that requires moving away from SMS 2FA entirely for sensitive accounts.
---
## Caveats
### Minimum Usage Requirements
Many prepaid plans require some form of activity to keep the number alive. This may be:
- A minimum monthly spend
- At least one call, text, or data session within a rolling window (commonly 60 days to 12 months depending on the provider, with some plans requiring usage every 90 or 180 days to keep the line active)
- A mandatory top-up within a set period
Check your backup plan's specific terms. Set a recurring calendar reminder to trigger before the expiry window closes. A small data session — even loading a single webpage — typically counts as sufficient activity for providers that use session-based activity requirements.
### Auto-Renewals
Some plans marketed as "prepaid" auto-renew by charging a stored payment method. If you do not want automatic charges, check whether auto-renewal is enabled and disable it, or choose a plan that does not auto-renew. The alternative is to top up manually each time and track expiry dates yourself.
### Prepaid Expiry and Number Reclamation
When a prepaid SIM expires, the associated number is eventually returned to the carrier's number pool and reassigned to a new customer. If you lose your backup number, any services registered to that number for SMS 2FA will send codes to whoever receives the reassigned number. This is both a usability issue and a security risk.
Avoid expiry by treating the minimum-usage requirement as a non-optional maintenance task. For a backup line carrying SMS 2FA for critical accounts, this is especially important.
### Number Portability
If you want to port your backup number away from its original carrier at some point — for example, if the provider discontinues a plan or raises prices — check the port-out terms before signing up. Most carriers in the US, UK, and other major markets support Mobile Number Portability (MNP), but some prepaid plans impose a minimum account age or activity requirement before porting is permitted.
### eSIM Profile and Device Lock-In
An eSIM profile is tied to the device on which it was activated. If you replace your phone, you will need to re-provision the backup eSIM on the new device. Contact your backup carrier before or shortly after switching devices to transfer the profile. Some carriers allow this online; others require a support request.
---
## FAQ
The structured FAQ answers are in the frontmatter above for schema.org/FAQPage compatibility. Below are additional details.
**Can I use a travel eSIM as a permanent backup line?**
Travel eSIMs (from providers like Airalo, Holafly, and similar) are designed for short-term international use and are typically data-only — they do not provide a local phone number or SMS capability. They are not suitable as a backup for SMS 2FA or for receiving calls. A backup line for outage resilience should come from a domestic carrier with a local number and SMS support.
**Does the backup line need to be on a postpaid contract?**
No. A prepaid plan is usually preferable for a backup line specifically because it avoids long-term commitments. The requirement is that the plan stays active, not that it provides a large monthly data allowance.
**What if I am in a country with only one or two carriers?**
In smaller markets with limited carrier choice, you may not have the option of full network diversification. In that case, consider whether a second SIM on the other available carrier provides partial resilience. An MVNO on a different host network from your primary is better than nothing, even if the choice is between two networks rather than three.
**Will a backup line on a different carrier always work when my primary fails?**
Not necessarily. Some outage scenarios — such as device failure, widespread power infrastructure failure, or natural disasters damaging tower density in a specific area — affect all carriers simultaneously. A backup line provides resilience against carrier-specific outages, not against all possible failure modes.
---
## Related Guides
- [What Is Dual SIM?](/en/guides/what-is-dual-sim/) — How DSDS, DSDV, and DSDA work, and which mode your device supports
- [Dual SIM Setup on iPhone](/en/guides/dual-sim-iphone/) — Step-by-step configuration for line labels, default data, and Allow Cellular Data Switching
- [Dual SIM Setup on Android](/en/guides/dual-sim-android/) — Android-specific dual SIM configuration by device type
- [What Is an eSIM?](/en/guides/what-is-esim/) — How eSIM profiles work, how to install them, and which devices support them
- [What Is an MVNO?](/en/guides/what-is-mvno/) — How MVNOs lease capacity from MNOs, and why MVNO choice affects outage resilience
================================================================================
# How to Switch from a Physical SIM to an eSIM
URL: https://sim-finder.com/en/guides/switch-physical-to-esim/
Type: guides (en)
Published: 2026-06-04
Switching from a physical SIM to an eSIM does not change your number or carrier. Your carrier reissues your existing subscription as an eSIM profile; you download it to your device, and the physical card is deactivated. The conversion takes under fifteen minutes in most cases. The main prerequisites are that your device supports eSIM and that your carrier offers an eSIM reissue for existing subscribers.
For background on what eSIM is and how it differs from a physical SIM, read [What Is an eSIM?](/en/guides/what-is-esim/) and [Physical SIM vs eSIM](/en/guides/sim-vs-esim/) before continuing. For setting up eSIM via QR code on iPhone, see [How to Set Up eSIM on iPhone via QR Code](/en/guides/qr-code-iphone/).
---
## Before You Start: Data Backup and Compatibility Check
Back up your device before making any carrier-level change — use iCloud Backup (iPhone) or Google One / local backup (Android). Switching SIM type does not affect device storage, but a backup provides a recovery point if something goes wrong.
Also confirm your account is in good standing. Some carriers temporarily block eSIM issuance for accounts with a past-due balance or a recent SIM swap.
---
## Check the Prerequisites
Before contacting your carrier, confirm three things.
### 1. Your Device Supports eSIM
Not every device has eUICC hardware. eSIM on iPhone begins with iPhone XS, XS Max, and XR (2018). On Android, Google Pixel 3 and later generally support eSIM; Samsung Galaxy S20 and later, and flagship devices from other manufacturers, also include eSIM on most variants. Budget Android phones released before 2022 often lack eUICC hardware entirely.
To check quickly on iPhone: go to **Settings > Cellular**. If you see **Add eSIM** or **Set Up Cellular**, your device supports eSIM.
For a full device compatibility reference, see [eSIM-Compatible Devices](/en/guides/esim-compatible-devices/).
### 2. Your Device Is Carrier-Unlocked
A carrier-locked device can only use eSIM profiles from the carrier it is locked to. If you are converting your SIM with your current carrier, this is not an issue — your locked phone can still accept an eSIM from the same carrier. If you plan to switch carriers as part of or after this conversion, unlock your device first.
On iPhone: **Settings > General > About > Carrier Lock**. If it reads **No SIM restrictions**, the device is unlocked.
### 3. Your Carrier Offers eSIM Reissue for Existing Subscribers
eSIM reissue for existing customers (as opposed to new activations) requires the carrier to have deployed SM-DP+ provisioning infrastructure for this purpose. Most major carriers in North America, Europe, Japan, South Korea, and Australia support it. Confirm the option is available on your carrier's website or app before proceeding.
---
## Online Conversion Method
Most carriers allow existing subscribers to request an eSIM reissue through their website or app without visiting a store. The exact steps vary by carrier, but the general flow is consistent.
**Step 1 — Log in to your carrier's website or app**
Open your carrier's official app or website and sign in to your account.
**Step 2 — Find the SIM management section**
Look for a section labeled **SIM Management**, **Manage SIM**, **Switch to eSIM**, or **eSIM Conversion**. This is often under account settings or device settings.
**Step 3 — Verify your identity**
Carriers require identity verification before issuing a new eSIM. This step varies by carrier and may include:
- Confirming your account PIN or password
- Entering a verification code sent by SMS to your current number
- Completing an ID check via a third-party identity verification service (uploading a government-issued ID and a selfie)
The purpose is to prevent unauthorized SIM swaps.
**Step 4 — Receive your eSIM profile**
After identity verification, the carrier generates an eSIM profile. You receive it as:
- A **QR code** displayed on screen or sent by email, or
- An **activation link** that redirects you to your device's eSIM setup, or
- A notification to open the **carrier app** on your device, which initiates the download automatically
**Step 5 — Download the eSIM profile to your device**
Follow the instructions for your device:
- **iPhone (QR code method):** Go to **Settings > Cellular > Add eSIM > Use QR Code** and scan the code. Full instructions: [How to Set Up eSIM on iPhone via QR Code](/en/guides/qr-code-iphone/).
- **Android (QR code method):** Go to **Settings > Network & Internet > SIMs > Add eSIM** and scan the code. Full instructions: [How to Set Up eSIM on Android via QR Code](/en/guides/qr-code-android/).
- **Carrier app:** Follow the in-app prompts. The app communicates directly with the carrier's SM-DP+ server and handles the download automatically.
**Step 6 — Confirm the switch**
Once the profile is downloaded, your carrier deactivates the physical SIM and activates the eSIM profile on your number. This transition typically takes a few minutes. Keep your physical SIM in the device until the eSIM is confirmed active.
---
## In-Store Conversion Method
If your carrier does not offer online eSIM reissue, or if you prefer in-person assistance, visit a carrier store or authorized retailer.
Bring the following:
- **Your device** (with the physical SIM installed)
- **Government-issued photo ID** — the same ID you used when you opened the account, or current government ID if the account was opened long ago
- **Your account credentials or PIN** — in most cases you will need to verify ownership of the account
A store representative will initiate the eSIM reissue from the carrier's backend system, then guide you through the profile download on your device. The physical SIM is deactivated when the eSIM becomes active. The process takes approximately ten to thirty minutes at the store, depending on queue and system response time.
Some carriers charge a conversion or SIM swap fee when the conversion is done in-store but process it at no charge online. Check your carrier's fee schedule in advance.
---
## The "Convert to eSIM" Option on iPhone
On iPhone, iOS offers a built-in shortcut for converting a physical SIM to eSIM on supported carriers — without initiating the process through the carrier's website or app first.
To access it: **Settings > Cellular > Convert to eSIM**
This option appears only if:
- Your iPhone model supports eSIM (iPhone XS or later), and
- Your installed physical SIM is from a carrier that has enabled this conversion path with Apple
When you tap **Convert to eSIM**, your iPhone communicates with the carrier's systems directly to initiate the reissue. You may still be required to complete identity verification steps on your device as part of the flow. After the carrier approves the conversion, the eSIM profile downloads automatically and the physical SIM is deactivated.
If **Convert to eSIM** does not appear in Settings, use the standard online or in-store method described above.
---
## What Happens to the Physical SIM Card
Once the eSIM profile is active and your carrier confirms the transition, the physical SIM is deactivated by the carrier's system. It can no longer connect to any network.
You can safely discard the physical SIM card. The card itself holds only the IMSI and Ki credentials needed to authenticate to the carrier's network; the deactivation voids those credentials on the carrier's end. No personal data such as contacts or messages is stored on modern SIM cards in a way that would pose a risk after deactivation.
If your device has a physical SIM slot, leaving the deactivated card in the slot after conversion causes no harm. However, removing it prevents potential confusion — for example, if you later factory-reset the device and iOS or Android prompts you to set up the SIM found in the slot.
---
## Brief Service Downtime During the Conversion
Expect a short period — typically a few minutes — when your phone has no mobile service. This occurs because the carrier must deactivate the physical SIM profile on their system before the eSIM profile becomes active. The timing gap between these two steps is brief but unavoidable.
To minimize disruption:
- Complete the conversion when you do not need mobile connectivity urgently.
- Download the eSIM profile onto your device before the physical SIM is deactivated, if your carrier's flow allows this sequence.
- If you need to make calls during the transition, use Wi-Fi calling or a messaging app over Wi-Fi.
If your service does not restore within fifteen minutes after the eSIM profile is marked as active, restart your device. If service is still absent, contact your carrier — the eSIM profile may not have been activated on the carrier's backend.
---
## Dual SIM Configuration After Conversion
If your device has a physical SIM slot that remains empty after the conversion, you can add a second eSIM or, on devices that support it, insert a physical SIM from another carrier. This creates a dual-SIM configuration.
After installing the eSIM profile, configure how each line is used from **Settings > Cellular** (iPhone) or **Settings > SIMs** (Android):
| Setting | What to configure |
|---|---|
| Default voice line | Which line is used for outgoing calls |
| Default SMS / iMessage line | Which line sends text messages |
| Mobile data line | Which line handles data traffic |
For a complete explanation of dual SIM options on iPhone, see [How to Set Up eSIM on iPhone via QR Code](/en/guides/qr-code-iphone/).
---
## If the Conversion Fails
### The QR code does not work
eSIM QR codes are single-use. If you scanned the code but the download failed (for example, due to a dropped Wi-Fi connection), the code may be invalidated. Contact your carrier and request a new QR code.
If your carrier provides an SM-DP+ address (also called an activation code or LPA string) instead of or in addition to a QR code, you can enter it manually. On iPhone, go to **Settings > Cellular > Add eSIM > Enter Details Manually** and type in the SM-DP+ address and activation code. On Android, look for **Add eSIM > Enter activation code manually** in your SIM settings. Manual entry produces the same result as scanning the QR code.
### The eSIM is installed but the physical SIM is still active
Some carriers' systems take a few minutes to complete the deactivation on their backend. Wait up to fifteen minutes, then restart your device. If the physical SIM is still active and the eSIM is not, call your carrier to confirm the backend activation was completed.
### "Unable to Add Cellular Plan" error on iPhone
This error typically means one of the following: the QR code has already been used or expired, your iPhone is carrier-locked to a different carrier, or your account has not yet been cleared for eSIM issuance on the carrier's system. Confirm each with your carrier before requesting a new code.
### Carrier says your device is not eSIM-eligible
Some carriers maintain device eligibility lists that restrict eSIM issuance to specific models. If your device is listed as incompatible but you believe it supports eSIM, escalate to carrier support with your device model and IMEI. Carriers update eligibility lists periodically.
---
## Reissue Fees
Carrier policies on fees for converting a physical SIM to eSIM vary. Some carriers process the conversion at no additional charge regardless of channel; others charge a SIM reissue or conversion fee, particularly for in-store conversions. A small number of carriers charge a fee for any SIM type change. Check your carrier's current fee schedule on their website or in their app before initiating the conversion — the FAQ entry at the top of this guide covers the general landscape.
---
## Keep Your eSIM Details Until Activation Is Confirmed
Save or screenshot your eSIM QR code, SM-DP+ address, or any carrier-issued activation details before beginning the installation. Retain them until the eSIM profile is visible in your device's SIM settings and you have confirmed mobile service on that line. Some failures are silent — the profile appears to install but is not active on the carrier's backend — and having the original details lets you retry without contacting carrier support again.
---
## When to Remove the Physical SIM Card
Leave the physical SIM in the tray until the eSIM profile is downloaded, your number is on the eSIM line, and the carrier has confirmed the physical SIM is deactivated. Once those conditions are met, remove it if you want the slot for a second SIM, or leave it — a deactivated card causes no interference. Do not remove it during the conversion itself, as some carrier flows require the physical SIM present in the device to verify account ownership before issuing the eSIM profile.
---
## Cautions and Things to Verify First
**Device must support eSIM hardware.** This is a hardware requirement — a software update cannot add eSIM support to a device that lacks an eUICC chip.
**Carrier must support eSIM reissue for existing subscribers.** Not all carriers that offer eSIM for new activations also support converting existing physical SIM subscriptions to eSIM. Verify before starting.
**eSIM QR codes may be invalidated after a download attempt.** Scan only after you are ready to complete the installation. If the download fails partway, the code may be invalidated; if it is, request a new code from your carrier.
**Some eSIM profiles have reinstallation restrictions.** Once you delete an eSIM profile from your device, reinstatement requires another reissue from your carrier. Some carriers restrict re-provisioning frequency. Keep the eSIM profile active unless you have a reason to delete it.
**Downtime is short but real.** If you rely on your phone number for two-factor authentication (SMS codes from banks or other services), schedule the conversion at a time when you will not urgently need those codes.
---
## Summary
| Step | Online | In-Store | Convert to eSIM (iPhone) |
|---|---|---|---|
| Start | Carrier website or app | Visit a carrier store | Settings > Cellular > Convert to eSIM |
| Identity verification | Account PIN, SMS code, or ID upload | Government photo ID | Device-based, carrier-dependent |
| Profile delivery | QR code, activation link, or carrier app | Staff-assisted, QR code or app | Automatic, in Settings |
| Physical SIM | Deactivated by carrier system | Deactivated by carrier system | Deactivated by carrier system |
| Typical time | Under 15 minutes | 10–30 minutes at store | Under 15 minutes |
To find eSIM-compatible plans, use [SimFinder](/en/).
---
## Related Guides
- [What Is an eSIM?](/en/guides/what-is-esim/) — How eUICC and the GSMA SGP.22 standard work, and which devices support eSIM
- [Physical SIM vs eSIM](/en/guides/sim-vs-esim/) — Full comparison of both technologies across activation, portability, and profiles
- [How to Set Up eSIM on iPhone via QR Code](/en/guides/qr-code-iphone/) — Step-by-step QR code activation on iPhone
- [How to Set Up eSIM on Android via QR Code](/en/guides/qr-code-android/) — Step-by-step QR code activation on Android
- [eSIM-Compatible Devices](/en/guides/esim-compatible-devices/) — Full device compatibility reference for iPhone, Android, and tablets
================================================================================
# SIM and eSIM for a Temporary Return Home
URL: https://sim-finder.com/en/guides/temporary-return/
Type: guides (en)
Published: 2026-06-06
When you live abroad and return home for a visit, you face a connectivity problem that is the reverse of the usual travel scenario: you need to function in a country you know well but no longer have a local line for. This guide is written specifically for that situation — short stays measured in days to weeks, not a permanent return.
The core question is whether to roam on your current foreign line, buy a short-stay prepaid SIM or eSIM, or revive a home-country number you kept stored. The right answer depends on how long you will be there, whether you need a local phone number for calls and SMS, and what each option actually costs for your specific itinerary.
For the separate question of what to do with your home number before you leave — how to park it, suspend it, or port it — see the [number storage guide](/en/guides/number-storage/). For a broader framework on managing connectivity when you first move abroad, see [Connectivity Strategy for Moving Abroad](/en/guides/expat-strategy/).
---
## Why a Temporary Return Is a Distinct Connectivity Problem
A standard travel scenario — visiting a foreign country — means dealing with a network you have no prior relationship with. A temporary return is different in three ways.
**You may already have infrastructure to revive.** If you held onto a home-country number through a suspension, a cheap plan, or a VoIP port, you already have a number that contacts can reach. The question is whether it is in a usable state and what it costs to activate it for the duration of your visit.
**Your foreign line may not roam well at home.** Not all foreign carriers have strong roaming agreements with home-country networks. Even if your destination is covered, roaming rates on a foreign plan can be high precisely because your home country is a common destination for your carrier's subscribers. Check the rates before assuming roaming is the convenient option.
**You have local identity documents.** As a returning citizen or resident, you typically satisfy any SIM registration requirements immediately, without the friction that foreign visitors face. This makes buying a prepaid SIM faster and cheaper for you than for a tourist visiting for the first time.
---
## Option 1: Roam on Your Current Foreign Line
The zero-effort option is to leave your foreign SIM active and let your phone roam on a home-country network. No new SIM, no new eSIM, no account setup.
### When This Works Well
Roaming on your foreign line makes sense when:
- Your foreign carrier's roaming rates or day passes for your home country are reasonable relative to the length of your stay.
- You need your foreign number available for calls or messages — colleagues abroad, apps tied to your current number, or services that require a callback on your foreign line.
- Your visit is very short — a few days where the cost of acquiring and returning a SIM is not worth the savings.
- You already have a postpaid plan that includes roaming as a standard benefit, making the effective incremental cost minimal.
### When Roaming Becomes Expensive
The cost calculation shifts quickly. If your foreign carrier charges day-pass rates that accumulate over a longer stay, or if you need high volumes of data for work, the per-day cost of roaming will typically exceed what a short-stay prepaid SIM would cost for the same usage.
Also check whether your foreign carrier has strong coverage in your home country at all. The fact that a carrier has a roaming agreement does not mean the selected partner network has good signal everywhere you plan to go. For the technical detail on how roaming agreements work and how your device selects a partner network, see [International Roaming Explained](/en/guides/international-roaming/).
### Practical Steps for Roaming on Your Foreign Line
1. Before departure, confirm your home country is covered on your foreign carrier's roaming page.
2. Verify the pricing model: pay-per-use, day pass, or included.
3. If using a day pass, check whether it activates on first network contact or first data use — arriving late at night in a new time zone can trigger a full day's charge before you intend to start using your phone.
4. Keep Data Roaming off until you have confirmed the rates and are ready to use data.
---
## Option 2: Short-Stay Prepaid SIM or eSIM
A prepaid SIM or eSIM from a home-country carrier gives you local rates for calls and data, a local number if the plan includes voice, and no ongoing commitment after you leave. This is the most cost-effective option for stays of around a week or more, and it avoids accumulating roaming charges on your foreign line.
### Data-Only vs. Voice-Capable Plans
**Data-only prepaid SIMs and eSIMs** are available from most carriers and many MVNOs. They are typically the cheapest option if you do not need a local phone number — you handle calls through WhatsApp, FaceTime, or similar apps over data, and SMS is not required. Most travel eSIMs fall into this category. The [How to Choose a Travel eSIM guide](/en/guides/how-to-choose/) covers the criteria for selecting a data-only plan in detail, including coverage, data amount, validity period, and activation method.
**Voice-capable prepaid plans** assign you a local number and support standard calls and SMS. They are more expensive than data-only plans but necessary if you need to receive calls at a local number — from family who do not use messaging apps, from businesses, or to receive SMS verification codes from home-country services. Not all carriers offer voice-capable prepaid plans alongside their eSIM product line; some require a physical SIM for plans that include a local number.
### eSIM Voice Plans for Short Stays
Some home-country carriers now offer eSIM plans that include both a data allowance and a local voice number. These can be downloaded before you leave — installed on your home Wi-Fi abroad — so you arrive with a working home-country number and data connection already in place. The activation model varies: some plans start the validity clock on install, others on first network connection in the home country.
Before purchasing a voice-capable eSIM from your home-country carrier, confirm:
- The plan includes a phone number (not all carrier eSIM products do, even for voice plans)
- Whether installation before arrival starts the validity period
- Whether the eSIM can coexist with your foreign line in a dual-SIM configuration
For a step-by-step guide to installing a new eSIM profile, see [Your First Travel eSIM](/en/guides/first-time-guide/).
### Short-Stay Plan Lengths
Prepaid and travel plans cluster around standard durations:
| Stay length | Typical plan options |
|---|---|
| 1–3 days | Day-pass roaming on foreign line, or short-validity prepaid (3–7 day plans) |
| 4–7 days | Short-stay prepaid SIM or eSIM (7-day plans are common) |
| 2–4 weeks | Standard prepaid (14-day, 15-day, or 30-day plans) |
| 1–3 months | Monthly prepaid or a low-cost MVNO plan, possibly with auto-renewal |
| 3+ months | Consider a full local plan; see [After Returning Home](/en/guides/after-return/) |
For stays of three months or more, you are likely past the point where a short-stay approach makes financial or practical sense. A longer-term local plan — possibly postpaid if you qualify — typically costs less per month and provides better service.
---
## Option 3: Reviving a Stored Home-Country Number
If you kept a home-country number active while living abroad, a temporary return is an opportunity to use it in its intended network. The practicalities depend on how the number is being held.
### If the Number Is on a Low-Cost Plan or Carrier Suspension
The simplest case: the number is already on an active account. If the SIM is a physical card, you may need to locate it and ensure the account is topped up or out of suspension. If it was on an eSIM, you may need to re-enable the profile or confirm the account is in active status.
Check with your home carrier whether the suspension terms require any action to reactivate for the period of your visit. Some suspension services transition automatically to normal billing when you use the line; others require a manual reactivation request.
### If the Number Was Ported to a VoIP Service
A number held on a VoIP platform such as Google Voice (in the United States) or similar services in other markets remains reachable via the VoIP app regardless of where you are in the world. During your home visit, the number continues to route through the VoIP platform — you receive calls and SMS through the app, not through a local carrier network. Inbound calls work the same as when you are abroad. Outbound calls to local numbers are possible through the app, subject to the VoIP service's calling rates.
One practical constraint: some services reject VoIP numbers for SMS two-factor authentication. If you need to receive OTP codes from home-country banks or services during your visit, a VoIP-held number may not be sufficient. In that case, you may need a physical SIM or a voice-capable eSIM for the period of your return.
For a full comparison of number retention approaches — downgrading plans, using a sub-line, porting to VoIP, and more — see the [number storage guide](/en/guides/number-storage/).
### If the Number Has Been Cancelled
If you cancelled your home-country line without a retention strategy and the number has been reclaimed and reassigned by the carrier, recovery is not possible. Phone numbers are returned to the national numbering pool and reallocated to new subscribers once reclamation timelines have passed. A cancelled number cannot be transferred back.
In this case, a short-stay prepaid SIM is your only option for a local number. It will be a new number, not your former one.
---
## Identity Verification for Short-Stay SIMs
Most countries require identity verification for prepaid SIM purchases. For a citizen or registered resident returning home, this is typically straightforward, but the exact requirements and process depend on the country and carrier.
### Common Documentation Requirements
In most markets, prepaid SIM registration requires at least one form of government-issued identification. Common accepted documents include:
- National identity card
- Passport
- Driver's licence
- Residency registration document (in countries where this is a separate document)
As a returning citizen, your national ID or passport is almost always sufficient. Carriers do not typically require proof of a current local address for prepaid SIM activation, though postpaid contract applications often do require one.
### eSIM Registration
Registering an eSIM at a home-country carrier typically follows the same identity verification process as a physical SIM, with the difference that installation is digital. Most carriers allow eSIM registration and plan purchase through their app or website with identity document upload, rather than requiring a visit to a carrier store. This makes it practical to complete the registration process before you travel and have the profile ready to install on arrival — or to install it on home Wi-Fi abroad and have it auto-connect when your phone lands.
### Countries with Strict Real-ID Registration
Some countries apply strict real-name SIM registration requirements, including requirements to match SIM ownership to government databases. In these markets, the registration process may take longer than a walk-in purchase at a carrier kiosk, particularly if the verification system needs to confirm your identity against records that have not been updated since you left. Allow more time for activation in markets with stricter registration systems.
---
## Airport Pickup vs. Pre-Installed eSIM
Two practical timing choices exist: buying a SIM at the airport upon landing, or installing an eSIM before departure and arriving already connected.
### Airport SIM Kiosk Purchase
Most major airports in developed markets have carrier-operated kiosks or retail stores selling prepaid SIMs in the arrivals hall. Advantages:
- No advance planning required.
- You can evaluate plans on arrival with current pricing.
- Physical SIM cards are available for devices without eSIM support.
Disadvantages:
- Airport kiosk pricing is sometimes higher than online or in-store pricing elsewhere.
- You have no data connection while queuing for the SIM — useful if you need to reach someone immediately after landing.
- If your device uses a nano-SIM or has a tray you would need to eject, you need to handle the physical swap at the airport with your baggage.
### Pre-Installed eSIM
For eSIM-capable devices, the alternative is to purchase a plan from a home-country carrier or travel eSIM provider before you leave, download the profile over Wi-Fi, and arrive with the line already installed. Advantages:
- Data is active the moment your phone connects to the home-country network on landing.
- No time spent at a kiosk or store.
- You can compare plans carefully before purchasing, without the time pressure of the arrival process.
Disadvantages:
- Requires advance planning and eSIM-compatible device.
- Some plans start their validity period on installation, not first use — check before purchasing to avoid wasting days before you land.
- If you need a physical SIM for any reason (device not eSIM-capable, plan requires physical SIM for voice), this option is not available.
The pre-installed eSIM approach is particularly effective for expats who return to the same home country regularly. Once you identify a reliable short-stay plan, you can reuse the same provider for each return trip.
---
## Choosing by Stay Length
The right approach shifts significantly with the duration of your visit.
### A Few Days (1–4 days)
At this length, the effort of acquiring a new SIM may not justify the savings over roaming. If your foreign carrier has a reasonable day-pass option for your home country, or if your plan includes roaming as a standard benefit, roaming is the path of least resistance.
If you do need a local number — to make or receive local calls, or to receive SMS from home-country services — a short-validity prepaid SIM or a pre-installed eSIM makes sense even for a short stay.
### About a Week (5–10 days)
For a typical week-long visit, a short-stay prepaid SIM or eSIM (7-day plans are widely available) usually costs less than accumulated roaming charges and provides better local service quality. Pre-installing an eSIM before departure is particularly practical for this duration.
Consider whether you need voice. A data-only plan plus VoIP apps handles most communication needs; add voice if you have contacts who will call your number directly or services that send SMS to a local number.
### Two to Four Weeks
At this length, a standard monthly prepaid plan from a home-country carrier or MVNO typically represents the best value. Many carriers offer 30-day plans with data and voice at prices significantly below what travel plans charge for the same period.
If you already have a stored number from a carrier suspension or low-cost plan, this is also the length of stay where reactivating that number for a month makes the most sense — you use it during your visit and return it to suspended or minimal status before you leave.
### Several Months (3 months or more)
At this length, you are no longer in a short-stay situation. You are returning home for an extended period and should evaluate whether to re-establish a full local plan. The considerations for that decision — reconnecting to the home carrier ecosystem, updating account details, and planning for another departure — are covered in [After Returning Home](/en/guides/after-return/).
---
## Managing Two Lines During Your Visit
If you maintain your foreign line during a home visit — whether to remain reachable at your abroad number or to preserve ongoing commitments — you will be running two SIM lines simultaneously. Modern smartphones support this natively through dual-SIM or eSIM, but the configuration requires attention.
### Dual-SIM Configuration
On a device with physical + eSIM, or eSIM + eSIM (on supported devices), you can run both your foreign line and a home-country SIM simultaneously. Each line handles its own calls and SMS independently. For data, you designate one line as the primary data line — typically the home-country line during your visit, to use local rates.
The important setting on iPhone is "Allow Cellular Data Switching" (Settings > Cellular > Cellular Data > Allow Cellular Data Switching). This controls whether the device can fall back to the secondary line's data if the primary has no signal. For most visits, this should be set to Off on the foreign line to prevent your foreign SIM from roaming for data when you are temporarily outside the home-country SIM's coverage.
On Android, the default data SIM setting is at Settings > Network & Internet > SIMs > Mobile Data. Set the home-country SIM as the default data SIM for the duration of your visit.
### Keeping Your Foreign Number Reachable
Your foreign number continues to receive calls and SMS when your foreign SIM is in roaming mode at home. This is typically low-cost for incoming calls and SMS even if outgoing calls are expensive, but confirm your foreign carrier's inbound roaming rates before relying on this.
For managing the long-term balance between your abroad line and your home-country presence, see [Connectivity Strategy for Moving Abroad](/en/guides/expat-strategy/) for the full framework.
---
## Using SimFinder to Compare Short-Stay Options
SimFinder's travel eSIM search lets you filter by destination, data amount, and validity period. When your destination is your home country, the same tool applies — enter your home country as the destination to see plans available from travel eSIM providers, including short-validity options.
Home-country carriers may not appear in travel eSIM search results (as they target visitors rather than returning residents), but their own eSIM products are available directly through their apps or websites. Compare provider plans through SimFinder for data-only travel eSIM pricing, then check your home carrier directly for voice-capable plans.
---
## FAQ
See the frontmatter above for answers to these questions:
- Do I need to buy a local SIM for a short trip back?
- Can I use my foreign eSIM line while visiting my home country?
- How do I get my old home-country number working again temporarily?
- Can I buy a prepaid SIM at the airport on arrival?
---
## Related Guides
- [How to Choose a Travel eSIM: 5 Key Criteria](/en/guides/how-to-choose/) — Criteria and checklist for selecting a short-stay data or voice eSIM plan
- [Connectivity Strategy for Moving Abroad](/en/guides/expat-strategy/) — The full framework for managing connectivity when you live abroad long-term
- [How to Keep a Phone Number You're Not Using](/en/guides/number-storage/) — Five strategies for holding a home-country number while you are away
- [International Roaming Explained](/en/guides/international-roaming/) — How roaming works technically and when it makes sense vs. a local SIM
- [After Returning Home](/en/guides/after-return/) — What to do with your connectivity setup when a temporary return becomes permanent
================================================================================
# How Tethering Works and How to Set It Up
URL: https://sim-finder.com/en/guides/tethering/
Type: guides (en)
Published: 2026-06-04
Tethering lets you share your phone's mobile data connection with other devices — a laptop, tablet, or another phone. Your phone acts as a router, bridging the cellular network and the tethered device. Three connection methods are available on most smartphones: Wi-Fi hotspot, USB, and Bluetooth, each with different speed, battery, and setup trade-offs.
This guide explains how each method works, how to enable tethering on iPhone and Android, and when plans restrict or block tethering entirely.
---
## What Tethering Is and How It Works
When you enable tethering, your phone creates a network access point that other devices can join. The phone's cellular radio continues to communicate with the carrier's mobile network as normal; tethering adds a second radio layer (Wi-Fi, USB, or Bluetooth) that forwards traffic between the tethered device and the carrier network.
From the carrier's perspective, tethered traffic and direct phone traffic both consume from the same mobile data allocation — tethering does not create a separate data stream from the carrier side unless the plan explicitly separates hotspot data from device data (which many plans do).
The term "mobile hotspot" refers specifically to the Wi-Fi variant of tethering. "Tethering" covers all three connection methods. The functions are often grouped together in phone settings under a single menu.
---
## The Three Connection Methods: Speed and Trade-offs
### Wi-Fi Hotspot
The phone's Wi-Fi radio switches into access point mode, broadcasting a network that other devices join using a password. This is the most common method because it works wirelessly and supports multiple connected devices simultaneously.
**Typical speeds**: limited by the cellular connection; the Wi-Fi link itself is rarely the bottleneck on modern phones supporting Wi-Fi 5 (802.11ac) or Wi-Fi 6 (802.11ax).
**Maximum simultaneous devices**: varies by phone model, OS version, and carrier plan. Check your device documentation and plan terms for the limit that applies to your setup.
**Battery impact**: running the Wi-Fi radio in access point mode is more power-intensive than using Wi-Fi as a client. Expect noticeably faster battery drain compared to normal use.
**Best for**: general use when no USB cable is available, connecting multiple devices, connecting devices that lack USB-C or USB-A ports compatible with the phone.
**2.4 GHz vs 5 GHz**: 2.4 GHz has longer range and better wall penetration, but is more congested in areas with many Wi-Fi networks. 5 GHz offers higher throughput at shorter range. If the phone and tethered device are within a meter of each other, 5 GHz generally performs better. If walls or distance are a factor, 2.4 GHz is more reliable.
### USB Tethering
The phone connects to the computer via USB cable. The computer treats the phone as a network adapter. No wireless radio is involved on the tethered connection side.
**Typical speeds**: USB removes the wireless overhead, so tethered speeds more closely reflect the raw cellular connection speed. USB 2.0 has a theoretical maximum throughput of 480 Mbps, well above any current cellular connection speed.
**Battery impact**: the computer typically provides power to the phone through the USB cable during tethering, which can slow battery drain or maintain charge level. Under heavy data use the balance depends on the cable, adapter, and computer output.
**Device limit**: one device per USB connection.
**Best for**: sustained heavy use on a single laptop where battery preservation matters, situations where Wi-Fi interference is a concern.
### Bluetooth Tethering
The phone creates a Bluetooth PAN (Personal Area Network) connection to another device. This is the slowest method.
**Typical speeds**: Bluetooth Classic (BR/EDR) used for PAN offers practical throughput significantly below Wi-Fi — roughly 1–3 Mbps in practice (gross air rate has been 3 Mbps since Bluetooth 2.0+EDR; usable net throughput is lower). PAN is suitable for light browsing and email but not video streaming or large downloads.
**Battery impact**: Bluetooth radio consumes less power than the Wi-Fi radio in hotspot mode, making this the lowest-drain wireless option.
**Best for**: emergencies or situations where Wi-Fi is unavailable and only minimal data transfer is needed — for example, checking email on a tablet when the Wi-Fi radio is malfunctioning.
---
## Setting Up a Wi-Fi Hotspot on iPhone
**As of publication**, the path on iOS is:
**Settings → Personal Hotspot → Allow Others to Join** (toggle on).
Set a Wi-Fi password on the same screen. Apple requires a password for Personal Hotspot; connecting without a password is not supported.
**Name of the hotspot**: the network name defaults to your iPhone's device name (Settings → General → About → Name).
**Band selection**: on iPhone models that support it, you can select the Wi-Fi band for the hotspot. Older devices (Wi-Fi 4/5) broadcast on 2.4 GHz only; newer models support 2.4 GHz and 5 GHz. The 5 GHz band offers higher speeds and lower interference in congested environments but shorter range.
**Maximize Compatibility**: iOS includes a toggle under Personal Hotspot settings labeled "Maximize Compatibility." Enabling it broadcasts at 2.4 GHz only, which is slower but connects older devices that do not support 5 GHz. Turn it off if all devices you connect support 5 GHz.
**USB tethering on iPhone**: connect the iPhone to a Mac or Windows PC via Lightning or USB-C cable. iOS prompts you to trust the computer the first time. Once trusted, the computer recognizes the iPhone as a network adapter and routes traffic through it automatically, provided Personal Hotspot is enabled.
**Bluetooth tethering on iPhone**: pair the iPhone with the target device via Bluetooth (Settings → Bluetooth), then on the target device, connect to the iPhone as a Bluetooth network device.
**Auto-join and visibility**: when Personal Hotspot is active and "Allow Others to Join" is on, nearby Apple devices signed into the same iCloud account can join the hotspot without entering a password (using Apple's Instant Hotspot feature via Continuity). Devices on other Apple accounts must enter the password manually. The hotspot network is visible in the Wi-Fi list of nearby devices.
---
## Setting Up a Wi-Fi Hotspot on Android
The path varies by manufacturer and Android version. On stock Android (Pixel phones) **as of publication**:
**Settings → Network & Internet → Hotspot & tethering → Wi-Fi hotspot** (toggle on).
On Samsung Galaxy devices, the path is typically:
**Settings → Connections → Mobile Hotspot and Tethering → Mobile Hotspot** (toggle on).
**Configure the hotspot**: tap the hotspot name or gear icon to set the network name (SSID), password, and security type (WPA3 or WPA2; WPA3 is recommended for modern devices).
**Band selection**: Android allows selecting 2.4 GHz, 5 GHz, or automatic. The automatic setting selects the band based on which devices are connected. On newer Pixels and Samsung flagships, 6 GHz (Wi-Fi 6E) is also available on supported hardware.
**USB tethering on Android**: connect the phone to a computer via USB-C cable. On stock Android: **Settings → Network & Internet → Hotspot & tethering → USB tethering** (toggle on). The computer installs drivers automatically on most systems. On macOS, USB tethering requires no additional drivers; the phone appears as a network adapter.
**Bluetooth tethering on Android**: **Settings → Network & Internet → Hotspot & tethering → Bluetooth tethering** (toggle on). Pair the phone to the target device via Bluetooth first if not already paired.
**Auto-off (timeout) setting**: many Android phones include an option to automatically turn off the hotspot after no devices have been connected for a set period (for example, 5 or 10 minutes). This is useful for preserving battery when you walk away from the tethered setup. The setting is found inside the Wi-Fi hotspot configuration screen on stock Android and Samsung devices.
---
## How Much Data Tethering Uses
Tethering itself does not add data overhead to what the tethered device is doing. A laptop loading a 2 MB webpage consumes approximately 2 MB from the mobile plan, the same as if that page were loaded on the phone directly.
The practical issue is behavioral: tethered devices often consume more data than phones because:
- **Default quality settings are higher**: browsers on laptops load full desktop page resources; video services default to higher resolutions on larger screens.
- **Background processes activate**: OS updates, cloud backups, and application auto-updates may start automatically on a laptop connected to a new network. Windows and macOS include "metered connection" options that reduce background data on limited connections (see below).
- **Multiple devices multiply consumption**: if five devices are connected to a hotspot, each device's consumption adds to the total.
For a breakdown of how much data specific activities consume, see [How Much Mobile Data Do You Need?](/en/guides/data-usage-guide/).
To avoid rapid data consumption when tethering:
**On Windows (as of publication)**: connect to the tethered Wi-Fi network, then go to **Settings → Network & Internet → Wi-Fi → [network name] → Metered connection** and toggle it on. This setting applies to the currently connected network and reduces automatic updates and background sync over that connection.
**On macOS**: macOS does not have a built-in metered connection toggle equivalent to Windows. Manually pause iCloud syncing, defer OS updates, and check that Time Machine backup is not running over the tethered connection.
For more techniques to reduce data consumption on tethered devices, see [Data-Saving Techniques](/en/guides/save-data/).
---
## When Tethering Is Restricted or Blocked
Several situations exist where tethering may be unavailable or limited even when the phone has an active data connection.
### Plan-Level Tethering Restrictions
Many mobile plans separate "hotspot data" from general on-device data. Common structures include:
- **No tethering allowed**: some budget plans, particularly on MVNOs, block tethering entirely. The phone detects the device type and blocks hotspot traffic at the carrier network level. [Understanding what an MVNO is](/en/guides/what-is-mvno/) can help you anticipate where these restrictions are most common.
- **Separate hotspot allowance**: the plan includes a defined amount of hotspot data (for example, 20 GB) at full speed; after that, hotspot speeds are throttled to a lower rate while on-device data continues at full speed.
- **Throttled tethering from the start**: some plans allow tethering but cap hotspot speeds at a fixed rate (for example, 1 Mbps or 5 Mbps) regardless of the available network speed.
If you experience speed differences between on-device browsing and tethered browsing, a carrier-applied tethering speed cap is a likely cause. See [Slow Mobile Data Speeds](/en/guides/slow-speed/) for a diagnostic approach.
The distinction between "no tethering allowed" and "throttled tethering" matters when choosing a plan: a throttled plan still lets you check email on a laptop, while a blocked plan produces no connectivity at all on tethered devices. Check the plan documentation, not just the marketing description, to identify which applies.
### Roaming Tethering Restrictions
International roaming plans frequently restrict tethering more severely than domestic plans. Some roaming add-ons exclude hotspot use entirely. Travel eSIM plans from third-party providers vary: some allow tethering on all data, others apply a separate tethering data cap or prohibit it.
Always verify tethering permissions in the plan terms before purchasing a roaming add-on or travel eSIM for use cases that depend on laptop connectivity.
### How Carriers Detect Tethering
Carriers detect tethered traffic through several mechanisms: TTL (Time To Live) inspection (tethered devices typically send packets with a different TTL than the phone itself), DPI (Deep Packet Inspection) of HTTP User-Agent headers, and DNS traffic patterns that indicate a desktop operating system. If a carrier's plan blocks tethering, the restriction is enforced at the network level using these signals, not solely by the phone's settings. Enabling a VPN on the phone can in some cases alter detection behavior, but using a VPN to circumvent carrier tethering restrictions may violate the carrier's terms of service.
### Network-Type Limitations
On some older network configurations, tethering requires specific APN settings distinct from the default data APN. If tethering connects but produces no internet access on the tethered device, an APN configuration issue may be the cause. Most modern SIM activations configure tethering APNs automatically.
### Device-Level Carrier Locks
Some carrier-sold phones are configured to block or charge for tethering independently of the data plan. This is more common on older devices and in markets where tethering was historically a separately billed feature. Unlocking the phone does not necessarily remove carrier-applied tethering restrictions; those are typically enforced at the network level using IMEI-based or APN-based detection.
---
## Tethering and Battery Management
Running a mobile hotspot accelerates battery drain from two sources: the Wi-Fi radio in access point mode and the cellular radio handling increased data throughput.
Practical steps to reduce drain during extended tethering sessions:
- **Use USB tethering** when a cable is available and the computer can supply charge to the phone. Even if the net power flow is neutral, this prevents rapid battery depletion.
- **Reduce screen brightness or keep the screen off**: iOS and Android keep the screen on while Personal Hotspot is active by default on some versions. Locking the screen manually reduces display power consumption.
- **Disconnect unused devices**: each connected device's traffic adds load on the cellular radio.
- **Enable Low Power Mode (iOS) or Battery Saver (Android)** if hotspot performance is acceptable at reduced processor speeds.
- **Use the Android auto-off timeout**: if running a hotspot intermittently, the auto-off timeout (described in the Android setup section above) prevents the hotspot from running in the background when no devices are connected.
- **Airplane mode is not compatible with tethering**: enabling Airplane mode cuts all radios including cellular. Toggling cellular off while leaving Wi-Fi on (possible on iOS and most Android versions) does not maintain tethering because tethering depends on the cellular connection.
---
## Security Considerations for Wi-Fi Hotspot
A mobile hotspot that other devices can connect to is a network access point with the same security considerations as any Wi-Fi network.
**Use WPA2 or WPA3 security**: both iOS and Android default to WPA2 or WPA3. Do not set the hotspot to "open" (no password) unless the use case specifically requires it, as any nearby device could connect and consume your data.
**Set a strong password**: default hotspot passwords generated by iOS are randomly generated and reasonably strong. Android defaults vary by manufacturer; replace any short or predictable default with a stronger one (12+ characters recommended).
**Monitor connected devices**: on iOS, the Personal Hotspot screen shows the number of connected devices. On Android, the hotspot settings show a connected device list. If an unexpected device appears, change the password.
**Hotspot on public transport or in public spaces**: connected clients on the hotspot network can potentially communicate with each other depending on client isolation behavior. Client isolation behavior varies by phone model and OS version. Do not assume devices connected to your hotspot are isolated from each other; treat it like any shared Wi-Fi network, especially with devices you do not control.
---
## Checking Tethering Permissions Before You Buy
Before selecting a plan for a use case that involves regular laptop tethering, confirm the following in the plan's terms:
1. **Is tethering permitted?** Some plans explicitly prohibit it.
2. **Is there a separate hotspot data allowance?** If so, how much, and at what speed?
3. **Does roaming use apply to tethering?** If the plan includes international roaming data, does tethering count against the same allowance?
4. **Are there speed caps on tethered data?** A plan marketed as "unlimited" may still apply lower speeds to hotspot use.
For guidance on evaluating travel SIM and eSIM plan terms, see [How to Choose a Travel eSIM](/en/guides/how-to-choose/).
Use SimFinder to compare plans side-by-side — filter by country and check each plan's tethering policy before committing to a data allowance sized for laptop use.
---
## Related Guides
- [How Much Mobile Data Do You Need?](/en/guides/data-usage-guide/) — per-app consumption figures and a method to estimate monthly needs, relevant for calculating how much data tethering sessions will consume
- [Data-Saving Techniques](/en/guides/save-data/) — iOS and Android settings to reduce background data consumption on tethered devices
- [Slow Mobile Data Speeds — How to Diagnose and Fix](/en/guides/slow-speed/) — troubleshooting steps when tethered connections are slower than expected
- [How to Choose a Travel eSIM: 5 Key Criteria](/en/guides/how-to-choose/) — evaluating plan terms including tethering permissions before purchase
- [What Is an MVNO?](/en/guides/what-is-mvno/) — understanding why MVNO plans more commonly restrict tethering than MNO plans
================================================================================
# Tethering Not Working? Causes and Fixes
URL: https://sim-finder.com/en/guides/tethering-blocked/
Type: guides (en)
Published: 2026-06-04
Your phone has a strong signal and mobile data works on the phone itself — but when you turn on the hotspot and connect a laptop or tablet, nothing loads. This guide identifies every common cause of tethering failure and gives a step-by-step fix for each.
The most time-efficient approach is to work through the causes in order: plan restrictions and data caps first (account-level issues you cannot fix on the device), then APN settings, then device and OS configuration.
**Quick diagnostic — which symptom applies?**
| Symptom | Most likely cause |
|---------|------------------|
| Hotspot toggle turns on but tethered device finds no network to join | Plan does not include tethering; carrier blocks the hotspot at the network level |
| Tethered device joins the hotspot but shows "No Internet" or "Limited" | Hotspot data exhausted, wrong tethering APN, or wrong password entered |
| Tethered device joins and internet works, but very slowly | Hotspot data cap reached and speed is throttled; or carrier-applied hotspot speed limit |
| Hotspot option is missing from phone settings entirely | Plan not provisioned for tethering; carrier profile may need updating |
| Only the phone has internet after connecting via USB | USB tethering not enabled in phone settings; computer driver not installed |
Use this table to jump directly to the relevant cause below.
---
## Cause 1: The Plan Does Not Include Tethering
Many mobile plans, particularly budget plans and older MVNO plans, do not permit tethering at all. When tethering is blocked at the carrier network level, the phone's hotspot toggle may turn on without error, but tethered devices receive no internet access regardless of any device-side settings.
**How to check:**
1. Open your carrier's official app or log in to the account portal.
2. Navigate to the active plan details — specifically the full plan terms, not the marketing summary.
3. Search for "hotspot", "tethering", or "Personal Hotspot".
4. If tethering is permitted, the terms will state the allowance. If there is no mention, contact carrier support directly.
**Fix:**
If the plan excludes tethering, the only solutions are to upgrade to a plan that includes it or to add a tethering add-on if the carrier offers one. No device-side setting can enable tethering that the carrier network blocks.
For context on why MVNOs more commonly restrict tethering than MNOs, see [How Tethering Works and How to Set It Up](/en/guides/tethering/).
---
## Cause 2: The Hotspot Data Allowance Is Exhausted
Many plans separate "hotspot data" from general on-device data. A plan may allow, for example, 20 GB of full-speed hotspot data; after that, hotspot speeds are throttled to a very low rate — often 600 kbps or lower — while on-device data continues at full speed.
When the hotspot allowance is exhausted, the tethered device may appear to connect to the hotspot but receives no usable internet access because the data rate is too low to complete requests.
**How to identify this cause:**
- Check your carrier app for remaining hotspot data. This figure is usually shown separately from your general data balance.
- If both phone and tethered device have had zero connectivity since a specific date in the billing cycle, that date may correspond to when the hotspot allowance ran out.
**Fix:**
Wait for the billing cycle to reset, or purchase a hotspot data add-on if your carrier offers one. Throttled hotspot data is a plan-level restriction — it cannot be resolved on the device.
**Note on unlimited plans:** A plan marketed as "unlimited data" may still apply a separate hotspot data cap. General device data and hotspot data are frequently tracked as separate allowances within the same plan, so exhausting hotspot data does not affect the phone's own browsing or streaming.
For a breakdown of how quickly different activities consume hotspot data, see [How Much Mobile Data Do You Need?](/en/guides/data-usage-guide/).
---
## Cause 3: Missing or Wrong Tethering APN
The APN (Access Point Name) governs how your device's traffic is routed through the carrier's network. On many carriers — particularly MVNOs — the APN configuration has a separate field for tethering or "Personal Hotspot" traffic in addition to the standard data APN. If this tethering APN is blank or incorrect, the phone's data works normally, but tethered devices either get no internet or connect to the hotspot network without receiving an IP address from the carrier.
**On iPhone:**
1. Go to **Settings → Cellular → Cellular Data Network** (or **Settings → Mobile Data → Mobile Data Network** on international builds).
2. Locate the **Personal Hotspot** section at the bottom.
3. Compare the **APN** field in that section to your carrier's documented tethering APN.
If the Cellular Data Network menu is not visible, your carrier has locked APN editing through a carrier profile. Install the configuration profile from your carrier's support page. See [APN Setup Guide for iPhone](/en/guides/apn-setup-iphone/) for the full installation procedure.
**On Android:**
The path varies by manufacturer. On stock Android (Pixel): **Settings → Network & Internet → Internet → [carrier name] → APN → [active APN]**, then check the **Type** field. A tethering-capable APN entry typically includes `dun` in the type list (e.g., `default,dun`). If there is no APN entry with the `dun` type, add one using the values from your carrier's support page, or add `dun` to the type field of the existing APN.
On Samsung Galaxy: **Settings → Connections → Mobile Networks → Access Point Names → [active APN]**, then look at the **APN type** field.
**Why the DUN APN matters:**
`dun` stands for Dial-Up Networking. It is the APN type that carriers use to route tethering traffic through a separate gateway or to apply the tethering data policy. When a carrier wants to track or throttle hotspot traffic separately from device traffic, they require tethered devices to use the DUN APN. If only the `default` type is configured, the carrier may block tethering traffic at the network edge.
---
## Cause 4: Wrong Hotspot Password on the Client Device
This is the simplest cause and is worth checking early. If the tethered device entered an incorrect password, it may show "connected" or "obtaining IP address" indefinitely without completing the connection.
**Fix:**
1. On the tethered device, forget the hotspot network: go to Wi-Fi settings, find the hotspot network name, and select "Forget" (iOS) or "Forget network" (Android/Windows/macOS).
2. On the phone, go to hotspot settings and note the current password exactly, including capitalisation and any symbols.
3. On the tethered device, reconnect to the hotspot and enter the password again carefully.
**iPhone hotspot password location:** Settings → Personal Hotspot → Wi-Fi Password.
**Android hotspot password location:** Settings → Network & Internet → Hotspot & tethering → Wi-Fi hotspot → [tap hotspot name or gear icon].
**Changing the hotspot password:** If you change the password after devices have already connected, all previously connected devices lose their connection and must reconnect using the new password. This is useful if you suspect an unknown device is using your hotspot and consuming data.
---
## Cause 5: OS and Software Settings Blocking Connectivity
Even when the hotspot connection succeeds, software settings on either the phone or the tethered device can block internet access.
### On the phone:
**Check that Cellular Data is on:** On iPhone, Settings → Cellular → Cellular Data must be toggled on (green). On Android, Settings → Network & Internet → Data usage → Mobile data must be on. A phone can share its Wi-Fi connection via hotspot even with mobile data off, resulting in the tethered device connecting to a network with no internet route.
**Check that the correct SIM provides data on dual-SIM phones:** On iPhone with two SIMs, Settings → Cellular → Cellular Data shows which line handles data. The hotspot shares only the active data SIM. If the wrong SIM is selected, and that SIM does not have an active data plan, the hotspot produces no internet access.
**Check VPN on the phone:** If a VPN app is running on the phone with a configuration that routes all tethered traffic, a VPN server outage or authentication failure can block tethered connectivity even though the phone itself still has internet. Disable the VPN temporarily to test.
### On the tethered device:
**Windows metered connection settings:** A metered connection flag does not block internet access, but it causes Windows to defer automatic updates and some background sync — this is expected and not a fault.
**Firewall or security software:** Corporate security software on a laptop may block connections on networks classified as unknown or public. If the laptop connects successfully to other Wi-Fi networks but not the hotspot, check whether security software is interfering.
**IP address not obtained:** If the tethered device shows "connected" but "No Internet" or "Limited", confirm it has received a valid IP address. On Windows: **ipconfig** in Command Prompt — the assigned address should be in the 172.20.x.x range (the typical hotspot subnet used by iOS) or a similar private range. If the address shows 169.254.x.x, the DHCP process failed. Toggling the hotspot off and on on the phone and reconnecting on the client usually resolves this.
**Data Roaming required for travel SIMs:** If you are using a travel SIM or travel eSIM and the phone itself has internet but the hotspot does not work, verify that Data Roaming is enabled for that SIM line. Travel eSIMs connect via a roaming session at the protocol layer; if Data Roaming is off, the tethering session cannot establish a data path even though the phone's own traffic works through a cached session. On iPhone: Settings → Cellular → [travel SIM line] → Data Roaming (on). For a full diagnostic sequence when the phone itself shows no data, see [No Mobile Data? How to Fix Data Connection Problems](/en/guides/no-data/).
---
## Cause 6: Device-Level Carrier Restrictions
Some phones sold by carriers are configured to block tethering, or to redirect tethering traffic to a carrier add-on purchase page, independently of the current plan. This configuration is applied at the device level by the carrier's firmware profile, not at the network level.
**Identifying device-level restrictions:**
- The hotspot toggle turns on, but attempting to connect a device opens a browser page on the tethered device prompting you to add a tethering feature to your plan.
- This behaviour persists even when tethering is listed as included on your plan.
- The phone's Personal Hotspot toggle is greyed out or hidden entirely, even though the carrier's plan documentation states tethering is permitted.
**Fix:**
Contact the carrier to confirm tethering is provisioned for your account. In some cases, the carrier needs to send a provisioning message (a behind-the-scenes SMS or data update that re-enables the hotspot feature at the account level) or update the account settings on their end.
Unlocking the phone (SIM unlock) does not remove carrier-applied tethering restrictions, as these are typically enforced through the carrier's APN-based detection methods at the network level rather than through the phone's unlock status.
If the Personal Hotspot option is missing from Settings on iPhone, one additional step is to verify that Cellular Data is enabled and that the SIM is fully activated. iOS hides the Personal Hotspot option on some MVNO plans until a provisioning update from the carrier is received. Toggling Airplane Mode on and off, or rebooting the phone after contacting the carrier, allows the provisioning update to take effect.
---
## Cause 7: How Carriers Detect Tethering — TTL and DPI
Understanding how carriers identify tethered traffic explains why some detection-based restrictions are difficult to bypass and why device-side changes alone cannot override network-level blocks.
Carriers use two primary detection methods:
**TTL (Time To Live) inspection:** Every IP packet includes a TTL field that decrements by one at each network hop. Your phone's own packets reach the carrier at the phone's default TTL (64 on iOS/Android). When you tether, the phone acts as a NAT router and decrements the tethered device's packet TTL by 1 before forwarding it. If the tethered device starts at a different default TTL — for example, Windows uses 128 — its packets arrive at the carrier at 127, a value the carrier recognises as not originating from the phone itself. (Devices that also start at TTL 64, like macOS, arrive at 63 and may instead be identified by other signals such as User-Agent strings.) Carriers read these differences to identify tethered traffic.
**DPI (Deep Packet Inspection) of User-Agent headers:** HTTP/HTTPS traffic from desktop browsers includes User-Agent strings identifying the operating system (e.g., "Windows NT 10.0"). A carrier can identify that the request originated from a Windows device rather than the phone itself, even though the traffic flows through the phone.
If a carrier's plan blocks tethering, the restriction is enforced at the network level using these signals. The phone's own setting to enable hotspot is not the enforcement point — the enforcement is upstream at the carrier's packet gateway.
This is informational context only. Whether to use methods that alter TTL or packet headers is a decision governed by your carrier's terms of service; using any method to circumvent a carrier's tethering restriction may be a breach of those terms.
---
## Restart and Reset Steps
After checking causes 1–7, if tethering still does not work, these steps resolve many persistent issues caused by modem state and cached settings.
### Step 1: Toggle Airplane Mode
On the phone, toggle Airplane Mode on, wait 10 seconds, then toggle it off. This forces the modem to re-establish the data session with fresh parameters. Wait 20–30 seconds for the cellular connection to restore before testing the hotspot.
### Step 2: Restart the Phone
A full power cycle (power off completely, then power on) re-initialises the modem stack. This resolves stuck states that an Airplane Mode toggle does not.
### Step 3: Reset Network Settings
If the above two steps do not resolve the issue and you have already confirmed the plan includes tethering and the APN values are correct, a network settings reset removes all APN customisations and prompts the carrier to push a fresh profile.
**On iPhone:** Settings → General → Transfer or Reset iPhone → Reset → Reset Network Settings. This clears Wi-Fi passwords, VPN configurations, and APN settings. eSIM profiles are preserved.
**On Android (Pixel):** Settings → System → Reset options → Reset Wi-Fi, mobile & Bluetooth.
**On Samsung Galaxy:** Settings → General management → Reset → Reset network settings.
After the reset, the carrier may automatically push a new APN profile when you reconnect to the cellular network. Test tethering again before manually entering APN settings. See [How to Reset Network Settings (and What It Affects)](/en/guides/network-reset/) for details on what each platform's reset does and does not clear.
---
## Checking Carrier Restrictions Before You Buy
If you rely on tethering regularly — for example, using a laptop at locations without Wi-Fi — verify tethering terms before purchasing a plan rather than after.
When reading a plan's terms, look for:
1. **Is tethering explicitly permitted?** Some plans prohibit it without mentioning restrictions in the marketing copy.
2. **Is there a separate hotspot data allowance?** If so, what happens after the allowance is exhausted — complete block or speed throttle?
3. **Does tethering apply to roaming?** International roaming plans frequently exclude tethering or apply a smaller separate allowance to hotspot use.
4. **Are there speed caps on tethered data?** A plan described as "unlimited" may throttle hotspot data to a lower speed from the start.
If tethering is critical for your use case, select a plan where the full plan terms — not the marketing description — explicitly state tethering is included at the speed you need.
Plans that include a listed hotspot GB allowance are preferable to plans that mention tethering only in fine print or fair-use policies, because the allowance amount and post-cap behaviour are stated in advance.
Use [SimFinder](/en/) to compare plans, filter by tethering support, and check hotspot data allowances before committing to a plan.
---
## Related Guides
- [How Tethering Works and How to Set It Up](/en/guides/tethering/) — explains what tethering is, the three connection methods, and how to enable it on iPhone and Android, which provides useful context for diagnosing when it fails
- [How Much Mobile Data Do You Need?](/en/guides/data-usage-guide/) — per-activity consumption figures for estimating how quickly a hotspot data cap will be reached
- [APN Setup Guide for iPhone](/en/guides/apn-setup-iphone/) — full procedure for installing a carrier configuration profile or manually entering APN values, including the Personal Hotspot APN field
- [No Mobile Data? How to Fix Data Connection Problems](/en/guides/no-data/) — the broader mobile data troubleshooting sequence for when the phone itself has no data, as distinct from hotspot-specific failures
- [How to Reset Network Settings (and What It Affects)](/en/guides/network-reset/) — detailed breakdown of what a network reset clears on iPhone, Pixel, and Samsung, and what is preserved
================================================================================
# How to Move an eSIM Between iPhone and Android
URL: https://sim-finder.com/en/guides/transfer-cross-platform/
Type: guides (en)
Published: 2026-06-06
Moving an eSIM between iPhone and Android requires your carrier to issue a new eSIM profile for the destination device. Unlike moving from one iPhone to another — where Apple's eSIM Quick Transfer handles the process device-to-device — there is no equivalent cross-platform mechanism supported by most carriers. You contact your carrier, they re-issue the eSIM profile, and you install it on the new device via QR code or a carrier app.
This guide covers the full process in both directions (iPhone to Android and Android to iPhone), what to expect, and a recent exception on the newest OS versions that changes this picture for some carrier and device combinations.
---
## Why Direct Cross-Platform Transfer Is Not Available
eSIM Quick Transfer is an Apple feature. It relies on a short-range wireless connection between two iPhones and requires carrier support on the network side. Google has not built an equivalent feature for Android devices, and Apple has not extended Quick Transfer to Android (with the narrow exception described below).
The underlying reason is architectural: an eSIM profile is tied to the eUICC chip of the receiving device. Moving a profile from one eUICC to another requires the carrier's SM-DP+ server to authorize the transfer and issue a new profile bound to the destination chip. Apple's Quick Transfer automates this handshake between two iPhones when the carrier supports it. No equivalent automation exists for the iPhone-to-Android or Android-to-iPhone path for most carriers.
For background on how eSIM profiles are managed at the chip and specification level, see [What Is an eSIM?](/en/guides/what-is-esim/) and [eSIM Profile Limits: How Many You Can Store and Use](/en/guides/esim-profile-limits/).
---
## The Cross-Platform Quick Transfer Exception
Apple introduced an extension to eSIM Quick Transfer: when both the carrier and the destination Android device support the feature, eSIM Quick Transfer can operate across platforms (iPhone to Android). The reverse direction — Android to iPhone — follows a similar path where supported.
This extension is available only on the newest OS versions and only where the carrier has explicitly enabled it. Apple's support pages note the iPhone must run the latest iOS version that supports the feature and the Android device a recent compatible Android version, with the exact minimum versions differing by transfer direction. Support is limited and carrier-specific, so check your carrier's and Apple's current support pages ([Transfer an eSIM from iPhone or iPad to Android](https://support.apple.com/en-us/126058), [Transfer your eSIM from Android to iPhone](https://support.apple.com/en-us/123878)) for the requirements that apply.
Carrier support for this feature is limited. In Japan, KDDI (covering its au, UQ mobile, and povo brands) was the first carrier to enable cross-platform Quick Transfer, in early 2026. Support elsewhere varies — check your carrier. If your carrier has not announced cross-platform Quick Transfer support, assume the standard carrier re-issue process applies.
If your use case is iPhone to iPhone, the full Quick Transfer guide is at [eSIM Quick Transfer: Move an eSIM to Another iPhone](/en/guides/transfer-iphone/).
---
## Before You Start: Back Up and Note Your Details
Before making any carrier-level change, complete these steps on the old device:
1. **Back up the device fully.** Use iCloud Backup for iPhone or Google One / a local backup for Android. A backup provides a recovery point if the transfer process encounters an error.
2. **Note your carrier account credentials.** You will need your account login, PIN, or password to verify identity during the re-issue request.
3. **Do not delete the eSIM profile from the old device yet.** Keep it active until the new profile is confirmed working on the new device. Deleting the profile before the new one is active causes a gap in service.
4. **Check that your new device supports eSIM.** eSIM support is a hardware requirement. For a full compatibility reference, see [eSIM-Compatible Devices and How to Check Yours](/en/guides/esim-compatible-devices/).
5. **Note your plan name and phone number.** After completing the transfer, verify that the plan name and number shown in the new device's SIM settings match. Discrepancies indicate a provisioning issue that needs carrier attention before relying on the new device for service.
6. **Confirm your two-factor authentication (2FA) situation.** If your phone number is registered as a 2FA method for email, banking, or other accounts, schedule the eSIM transfer at a time when you will not urgently need to receive SMS verification codes. Service is typically interrupted for a few minutes during provisioning.
---
## General Cross-Platform Transfer Flow
Regardless of direction (iPhone to Android or Android to iPhone), the process follows the same three-stage structure.
### Stage 1: Remove or Disable the eSIM on the Old Device
You do not need to delete the eSIM profile before contacting your carrier — in fact, it is better not to. The carrier deactivates the old profile when they issue the new one. However, if your carrier instructs you to delete the profile first as part of their verification process, follow their guidance.
To remove an eSIM on iPhone: **Settings → Cellular → tap the plan → Remove Cellular Plan**.
To remove an eSIM on Android: the exact path varies by manufacturer. On Pixel devices: **Settings → Network & Internet → SIMs → tap the eSIM → Delete eSIM**. On Samsung Galaxy: **Settings → Connections → SIM card manager → tap the eSIM → Delete**.
### Stage 2: Contact Your Carrier and Request a Re-Issue
Reach your carrier through their app, website, or phone support. Tell them you are switching to a new device on a different platform and need an eSIM profile re-issued for the new device.
Carriers use various terms for this process: "eSIM transfer", "eSIM re-issue", "profile transfer to new device", or "eSIM swap". The key information you will need to provide:
- Your account verification credentials (PIN, password, or last four digits of your ID)
- The **EID** of the new device — the unique identifier for the eUICC chip, equivalent to an IMEI but for the eSIM slot
On Android: dial `*#06#` to display the EID (it appears alongside the IMEI). Alternatively, go to **Settings → About Phone → SIM status** and look for the EID field.
On iPhone: go to **Settings → General → About** and scroll to the **EID** field.
**Possible re-issue fee:** Some carriers charge a SIM reissue fee for issuing a new profile to a different device. The amount varies by carrier and whether the request is made online or in-store. Check your carrier's fee schedule before proceeding.
### Stage 3: Install the eSIM on the New Device
After the carrier issues the new profile, they provide either a QR code or an activation code (SM-DP+ address). Install it on the new device using the standard method for that platform.
**For iPhone (QR code):** Go to **Settings → Cellular → Add eSIM → Use QR Code** and scan the code. See [How to Set Up eSIM on iPhone via QR Code](/en/guides/qr-code-iphone/) for the full step-by-step.
**For Android (QR code):** Go to **Settings → Network & Internet → SIMs → Add eSIM** (on Pixel) or **Settings → Connections → SIM card manager → Add mobile plan** (on Samsung). Scan the QR code when prompted.
Once the new profile is downloaded and active, the carrier deactivates the old profile automatically.
---
## iPhone to Android: Specific Notes
When moving from iPhone to Android, confirm the following before contacting your carrier:
**Carrier lock status on the Android device.** A carrier-locked Android device can only accept eSIM profiles from the carrier it is locked to. If your new Android device is locked to a different carrier, unlock it before proceeding.
**Android version and eSIM support.** eSIM on Android became broadly available with Android 9 and later, but actual support depends on the device manufacturer and model. Budget Android devices released before 2022 often lack eUICC hardware. Verify by checking **Settings → Network & Internet → SIMs** for an "Add eSIM" option, or by dialing `*#06#` and checking whether an EID is displayed.
**APN settings.** After installing the eSIM on Android, you may need to configure APN settings manually if your carrier's profile does not set them automatically. Your carrier's support page lists the correct APN values for Android.
**Dual SIM configuration after the move.** If your Android device has a physical SIM slot, that slot is available for a second line after the eSIM is active. Configure which line handles calls, SMS, and data from **Settings → Network & Internet → SIMs** (Pixel) or **Settings → Connections → SIM card manager** (Samsung).
---
## Android to iPhone: Specific Notes
When moving from Android to iPhone, Apple's support documentation ([Transfer your eSIM from Android to iPhone](https://support.apple.com/en-us/123878)) notes that some carrier and device combinations support a transfer from Android to iPhone directly, while others require contacting the carrier for a new eSIM profile. Check Apple's documentation and your carrier's guidance for your specific combination.
For the standard carrier re-issue path, the process is the same as described in the general flow: contact your carrier, request a new eSIM profile for your iPhone, then install it using the QR code or manual entry method. See [How to Set Up eSIM on iPhone via QR Code](/en/guides/qr-code-iphone/) for installation instructions.
**Physical SIM to eSIM conversion at the same time.** If you are also switching from a physical SIM to eSIM as part of this device change, the process is the same — your carrier re-issues your subscription as an eSIM profile for the new iPhone. For the full conversion flow, see [How to Switch from a Physical SIM to an eSIM](/en/guides/switch-physical-to-esim/).
---
## Contrast: iPhone to iPhone (Same Platform)
For reference, same-platform transfers between two iPhones work differently. If your carrier supports eSIM Quick Transfer, you can move the eSIM from the old iPhone to the new iPhone device-to-device — no carrier contact required, no QR code, and the process completes in a few minutes.
Quick Transfer requires iOS 16 or later on both devices, physical proximity, and carrier support on the network side. The full process is documented in [eSIM Quick Transfer: Move an eSIM to Another iPhone](/en/guides/transfer-iphone/).
If your carrier does not support Quick Transfer for iPhone-to-iPhone moves either, the same carrier re-issue flow described in this guide applies.
**Android-to-Android transfers** follow the same general pattern as cross-platform moves: no direct device-to-device transfer mechanism exists. Contact your carrier, request a new eSIM profile for the new Android device, and install it via QR code or activation code.
---
## What Happens to the Old eSIM Profile
When the carrier issues a new eSIM profile for the new device, they deactivate the old profile on their system. You do not need to take action on the old device for this — the carrier's network deactivates the old profile when the new one activates.
However, the deactivated profile may remain visible in the old device's settings until you delete it manually. To keep settings tidy:
- **iPhone:** Settings → Cellular → tap the old plan → Remove Cellular Plan.
- **Android:** Settings → Network & Internet → SIMs → tap the eSIM → Delete eSIM.
If you are handing the old device to someone else, erase all content and settings before doing so. On iPhone: **Settings → General → Transfer or Reset iPhone → Erase All Content and Settings**. On Android: **Settings → General management → Reset → Factory data reset**.
---
## Troubleshooting
### Carrier says your new device is not eSIM-eligible
Some carriers maintain device eligibility lists and restrict eSIM issuance to specific models. If the carrier says your device is not eligible but you believe it supports eSIM, escalate with your device model and EID. Carriers update eligibility lists periodically.
### QR code does not work
eSIM QR codes are single-use. If the code was scanned but the download did not complete, the code may be invalidated. Contact your carrier and request a new QR code. Do not attempt to reuse a code from a previous failed attempt.
### New eSIM installed but no mobile service
After installing the eSIM profile, wait two to five minutes for the network to register the new device. If service does not appear, toggle Airplane Mode on and off to force network re-registration. If the problem persists, restart the device. Confirm with your carrier that the new profile is marked as active on their backend — silent provisioning failures are possible.
### "Transfer From Nearby iPhone" option does not appear (cross-platform Quick Transfer)
This option appears only on the newest OS versions when your carrier supports cross-platform Quick Transfer. If the option does not appear, your carrier likely does not support the feature for your specific combination, or your OS version does not meet the requirement. Use the standard carrier re-issue process described in this guide.
### Service not restored after re-issue on Android
If the eSIM profile appears installed in Settings but data or calls do not work, check the APN configuration. On Pixel: **Settings → Network & Internet → SIMs → tap the eSIM → Access Point Names**. On Samsung: **Settings → Connections → Mobile networks → Access Point Names**. If no APN is listed, add one manually using the values from your carrier's support page. Restart the device after saving APN settings.
### Carrier charges a re-issue fee you did not expect
If your carrier applies a fee and you believe it should not apply — for example, because their website describes the service as free — gather evidence before contacting support: a screenshot of the relevant support page or terms, the date you accessed it, and the channel you used for the request (app, website, or in-store). Fees and their conditions change, and customer service agents can sometimes waive a fee or match what a published policy states. If the carrier's online self-service channel charges a fee but their in-store channel does not (or vice versa), completing the request through the other channel is a practical alternative.
### Old device still shows the eSIM as active after re-issue
After the carrier issues a new profile for the new device, the old profile is deactivated on the network side. The old device's Settings may still display the profile as present — and in some cases as "active" — because the device cannot check its own network deactivation status without a data connection. This is cosmetic: the profile cannot register to the network after deactivation. To remove the stale entry, delete the profile manually: on iPhone, go to **Settings → Cellular → tap the plan → Remove Cellular Plan**; on Android, follow the path for your manufacturer noted above. If you are selling or transferring the old device, delete all eSIM profiles and perform a factory reset before handing it over.
---
## Transfer Method Comparison
| Scenario | Direct device-to-device? | Carrier contact needed? | Typical time |
|---|---|---|---|
| iPhone → iPhone (Quick Transfer, carrier supported) | Yes | No | A few minutes |
| iPhone → iPhone (no Quick Transfer support) | No | Yes — new QR code | 10–30 minutes |
| iPhone → Android (most carriers) | No | Yes — new QR code | 10–30 minutes |
| iPhone → Android (newest OS + carrier supported) | Yes | No | A few minutes |
| Android → iPhone | No (in most cases) | Yes — new QR code | 10–30 minutes |
| Android → Android | No | Yes — new QR code | 10–30 minutes |
---
## FAQ
### Can I transfer my eSIM directly from iPhone to Android?
In most cases, no. Direct eSIM transfer between iPhone and Android is not supported by the majority of carriers. You need to contact your carrier and request a new eSIM profile (re-issue) for the Android device. The exception is the cross-platform Quick Transfer feature on the newest OS versions: Apple extended eSIM Quick Transfer to cross-platform pairs where the carrier has specifically enabled the feature. Check your carrier's support page to confirm.
### Will my phone number change when I move my eSIM to a new platform?
No. Moving your eSIM to a different device — whether iPhone or Android — is a profile transfer, not a number port. Your phone number, plan, and contract stay the same. Only the eSIM profile is re-issued to a new device.
### Does my carrier charge a fee to re-issue an eSIM for a new device?
Carrier policies vary. Some carriers re-issue at no additional charge; others apply a SIM reissue or conversion fee. Check your carrier's website or contact their support before initiating the process. The fee structure can differ between online and in-store requests.
### What should I do before removing my eSIM from the old device?
Back up the old device fully before making any carrier-level change. Note down your carrier's customer support contact and account credentials. Do not delete the eSIM profile from the old device until the new profile is confirmed active on the new device.
### Can I use the same QR code to install the eSIM on the new device?
No. eSIM QR codes are single-use. Once a QR code has been scanned and used for a profile download — even if the download did not complete — the code is invalidated. When your carrier re-issues an eSIM profile for your new device, they will provide a new QR code or activation code.
---
## Related Guides
- [eSIM Quick Transfer: Move an eSIM to Another iPhone](/en/guides/transfer-iphone/) — ES-06: the iPhone-to-iPhone transfer path, including Quick Start setup-time and post-setup flows
- [How to Switch from a Physical SIM to an eSIM](/en/guides/switch-physical-to-esim/) — full conversion guide for existing subscribers switching SIM type
- [What Is an eSIM?](/en/guides/what-is-esim/) — how eUICC chips and the GSMA SGP.22 specification work
- [eSIM Profile Limits: How Many You Can Store and Use](/en/guides/esim-profile-limits/) — how many profiles your device can hold and what happens when it reaches capacity
- [eSIM-Compatible Devices and How to Check Yours](/en/guides/esim-compatible-devices/) — full compatibility reference for iPhone, Android phones, and tablets
To compare eSIM plans for your destination, use [SimFinder Travel →](/en/travel/)
---
Sources:
- [Set up eSIM on iPhone - Apple Support](https://support.apple.com/en-us/118669)
- [Transfer your eSIM from Android to iPhone - Apple Support](https://support.apple.com/en-us/123878)
- [Transfer your eSIM to a new iPhone - Apple Support](https://support.apple.com/en-us/108349)
- [Get a SIM or eSIM & add it to your Pixel phone - Google Pixel Help](https://support.google.com/pixelphone/answer/7086887)
- [Multiple enabled profiles - Android Open Source Project](https://source.android.com/docs/core/connect/esim-mep)
================================================================================
# eSIM Quick Transfer: Move an eSIM to Another iPhone
URL: https://sim-finder.com/en/guides/transfer-iphone/
Type: guides (en)
Published: 2026-04-20
When you get a new iPhone, you have two paths for moving your eSIM. If your carrier supports it, **eSIM Quick Transfer** handles the entire transfer device-to-device in a few minutes — no carrier app, no QR code, no store visit. If your carrier does not support Quick Transfer, you contact them to get a new QR code or activation code and install the eSIM on the new iPhone from scratch.
This guide covers both paths. Quick Transfer is specific to iPhone (iOS 16 and later) and requires carrier support. The carrier re-issue fallback works regardless of carrier.
---
## When You Need to Transfer an eSIM
An eSIM is embedded in your device (see [What Is an eSIM?](/en/guides/what-is-esim/) for the technical background). You cannot physically remove it and insert it into another iPhone the way you would a nano-SIM card. This means any of the following situations require deliberate action to move your plan to a new device:
- **Upgrading to a new iPhone** — the eSIM does not move automatically when you restore from a backup.
- **Device replacement after loss or theft** — the eSIM remains associated with the lost device until your carrier transfers or re-issues it.
- **Hardware repair requiring a device swap** — if Apple or a repair center replaces your iPhone unit, your eSIM does not carry over.
In all three situations, the starting point is the same: confirm whether your carrier supports eSIM Quick Transfer. If yes, use the Quick Transfer method. If not, use the carrier re-issue method.
---
## eSIM Quick Transfer: What It Is and What It Requires
eSIM Quick Transfer is an Apple feature available on iPhone that lets you move an eSIM from one iPhone to another without requesting a new profile from your carrier. Apple introduced this with iOS 16 in 2022.
The transfer works over a short-range wireless connection. Your carrier's network validates the request on the server side and authorizes the profile to move to the new device.
**Requirements for eSIM Quick Transfer:**
| Requirement | Detail |
|-------------|--------|
| iOS version | iOS 16 or later on **both** the source and destination iPhone |
| Proximity | Both iPhones must be physically close to each other during the transfer |
| Connectivity | Both iPhones need an internet connection (Wi-Fi or an active mobile line) |
| Carrier support | The carrier that issued the eSIM must support Quick Transfer |
**Carriers known to support eSIM Quick Transfer:**
In the United States, AT&T, T-Mobile, and Verizon document eSIM Quick Transfer flows on their own support pages and appear in Apple's carrier support list. Support outside the United States varies by carrier and region. Check your carrier's support page or contact them directly to confirm.
If your carrier is not listed as supporting Quick Transfer — or if you cannot confirm support — use the carrier re-issue method described later in this guide.
---
## Transfer During iPhone Setup (Quick Start)
The easiest time to transfer an eSIM is when you are setting up a new iPhone for the first time. iOS presents the option automatically as part of the Quick Start setup flow.
**What you need before starting:**
- Your current (source) iPhone nearby, turned on, and running iOS 16 or later
- Your new (destination) iPhone, powered on and not yet set up
- Both devices connected to power or with sufficient battery
**Steps:**
1. **Place both iPhones close together.** When you power on the new iPhone, the Quick Start screen appears. Bring your current iPhone close to it.
2. **Follow the Quick Start prompts.** Your current iPhone shows an animation. Use it to scan the pattern displayed on the new iPhone. This authenticates the transfer.
3. **Choose how to transfer data.** You can restore from an iCloud backup, restore from a local backup, or transfer directly from the old iPhone. All three paths preserve your eSIM transfer option.
4. **When prompted to transfer your phone number.** During setup, iOS displays a screen asking whether to transfer your cellular plan. Tap **Transfer** when this screen appears.
5. **Confirm on the source iPhone.** Your current iPhone displays a confirmation prompt. Tap **Transfer** to approve. The eSIM transfer begins.
6. **Wait for the transfer to complete.** A progress indicator appears. Keep both devices close together and do not interrupt the process. When complete, the eSIM is active on the new iPhone.
7. **Verify the transfer.** On the new iPhone, go to **Settings > Cellular** and confirm the plan appears and shows as active. Make a test call or open a webpage using cellular data to verify connectivity.
The eSIM is removed from the old iPhone once the transfer is confirmed. If no other cellular line remains active on the old iPhone, the status bar shows "No SIM".
---
## Transfer After Setup (Settings → Cellular)
If you have already completed the initial setup of your new iPhone without transferring the eSIM, you can still initiate a Quick Transfer afterward — as long as your carrier supports it and both devices meet the requirements.
**Steps:**
1. **On the destination iPhone (your new iPhone),** open **Settings**.
2. **Tap Cellular.**
3. **Tap Add eSIM** (or **Add Cellular Plan**, depending on your iOS version).
4. **Tap Transfer From Nearby iPhone** (this option appears if iOS detects a compatible source device nearby).
5. **On the source iPhone (your old iPhone),** a notification or prompt appears asking you to confirm the transfer. Tap **Transfer**.
6. **Wait for the transfer to complete.** Keep both iPhones close together. A progress screen is shown on the destination iPhone.
7. **Verify the eSIM is active.** In **Settings > Cellular** on the new iPhone, confirm the plan is present and the line is turned on.
If the **Transfer From Nearby iPhone** option does not appear in step 4, it means either the source iPhone is not nearby, one of the devices does not meet the iOS version requirement, or your carrier does not support Quick Transfer. In that case, proceed to the carrier re-issue method.
---
## If Your Carrier Does Not Support Quick Transfer
When Quick Transfer is not available, the process shifts to a standard eSIM re-issue. Your carrier issues a new eSIM profile for your existing plan, and you install it on the new iPhone. Your plan, phone number, and contract remain unchanged — only the eSIM profile is replaced.
**Step 1: Contact your carrier.**
Reach your carrier through their app, website, or phone support. Tell them you are moving to a new iPhone and need to transfer your eSIM. Carriers refer to this process using various terms: "eSIM transfer", "eSIM switch", "re-issue", or "port eSIM to new device".
**Step 2: Complete any verification required.**
Your carrier will verify your identity before issuing the new profile. This typically involves confirming your account details or entering a verification code sent to your registered email or number.
**Step 3: Receive the new QR code or activation code.**
The carrier provides one of the following:
- A QR code (delivered on-screen or by email)
- An SM-DP+ address and activation code (for manual entry)
**Step 4: Install the eSIM on the new iPhone.**
- For a QR code: follow the steps in [How to Set Up eSIM on iPhone via QR Code](/en/guides/qr-code-iphone/)
- For manual entry: follow the steps in [Set Up eSIM with a Manual Code (SM-DP+ Address)](/en/guides/manual-code/)
Once the new profile is installed and active, your old eSIM profile is invalidated. You do not need to take any action on the old iPhone for this — the carrier's network deactivates the old profile when the new one activates.
---
## Transferring Between Different Operating Systems (iPhone to Android)
eSIM Quick Transfer is an Apple feature. It does not work between iPhone and Android.
If you are switching from an iPhone to an Android device, there is no device-to-device transfer mechanism. You must contact your carrier and request a new eSIM profile for the Android device. The carrier issues either a QR code or an activation code. The setup process on the Android side follows the standard Android eSIM installation flow, not the iPhone Quick Transfer process.
The reverse direction is more nuanced: Apple's ["Transfer your eSIM from Android to iPhone"](https://support.apple.com/en-us/123878) support page indicates that some carrier/device combinations support a transfer from Android to iPhone, while others require contacting the carrier for a new eSIM profile. Check Apple's documentation and your carrier's guidance for your specific case.
---
## After the Transfer
### On the New iPhone
After a successful transfer, verify the following in **Settings > Cellular**:
- The plan appears under your cellular lines
- **Turn On This Line** is enabled
- **Cellular Data** is set to the transferred eSIM (especially important if you have more than one line)
- The plan name and phone number are correct
Make a test call and load a webpage over cellular data to confirm the line is fully active.
### On the Old iPhone
After a Quick Transfer, the eSIM is removed from the source iPhone automatically. You do not need to delete it manually. However, if you are handing the old iPhone to someone else — or selling it — you should erase all content and settings: **Settings > General > Transfer or Reset iPhone > Erase All Content and Settings**.
If the transfer was done via carrier re-issue, the old eSIM profile remains visible in Settings on the old iPhone but is deactivated on the carrier's network. Delete it to keep your Settings tidy: **Settings > Cellular > tap the old plan > Remove Cellular Plan**.
---
## Troubleshooting
### "Transfer From Nearby iPhone" option does not appear
This option appears only when iOS detects a compatible source device nearby. Check the following:
- Both iPhones are running iOS 16 or later (confirm in **Settings > General > About > Software Version**)
- The source iPhone is powered on, unlocked, and within Bluetooth/Wi-Fi range
- Both devices have Wi-Fi or cellular internet enabled
- Your carrier supports eSIM Quick Transfer — if not, this option will not appear regardless of device conditions
If all conditions are met and the option still does not appear, restart both devices and try again.
---
### Transfer appears to complete but eSIM is not active on new iPhone
1. Go to **Settings > Cellular** on the new iPhone. If the eSIM line is listed but turned off, tap it and enable **Turn On This Line**.
2. Confirm **Cellular Data** is set to the transferred line.
3. Toggle Airplane Mode on and off to force the device to re-register on the network.
4. Wait two to five minutes — network-side propagation can take a short time after a transfer.
If the plan does not appear at all in Settings, contact your carrier. Provide your account details and the IMEI of the new iPhone (found in **Settings > General > About**).
---
### "This carrier doesn't support this feature"
This message confirms your carrier does not support eSIM Quick Transfer. Use the carrier re-issue method described above. The carrier will provide a new QR code or activation code to install the eSIM on your new iPhone.
---
### eSIM missing from both iPhones after a failed transfer
If a transfer was interrupted and the eSIM no longer appears on either device, contact your carrier immediately. The carrier can see the current status of your eSIM profile on their system and can re-issue it or restore it to the source device. Do not attempt to reinstall from a previously saved QR code — that code is single-use and will not work after the transfer was initiated. For broader activation errors not specific to transfer, see [eSIM Won't Activate? How to Fix Common Setup Issues](/en/guides/activation-failed/).
---
## FAQ
### Does eSIM Quick Transfer delete the eSIM from my old iPhone?
Yes. eSIM Quick Transfer moves the profile — it does not copy it. Once the transfer is confirmed, the eSIM is removed from the source iPhone and activated on the destination iPhone. The carrier's network reflects this change automatically.
### Which carriers support eSIM Quick Transfer?
In the United States, AT&T, T-Mobile, and Verizon support eSIM Quick Transfer. Support varies by country and carrier. Check your carrier's support page or contact them directly to confirm whether they support the feature before starting a transfer.
### Do both iPhones need to be on iOS 16 or later?
Yes. eSIM Quick Transfer requires iOS 16 or later on both devices (Apple introduced Quick Transfer in iOS 16 in 2022). Apple's current documentation recommends iOS 18.4 or later on both devices for the most reliable experience. If either device runs an older iOS version, the transfer option will not appear. Update both devices before attempting the transfer.
### Can I transfer an eSIM from iPhone to Android?
No. eSIM Quick Transfer is an Apple feature and does not work between iPhone and Android. To use an eSIM on an Android phone, you need to contact your carrier and request a new QR code or activation code for the Android device.
### What happens if the transfer is interrupted halfway through?
If the transfer is interrupted — for example, by the devices moving out of range or a network error — the eSIM may remain on the source iPhone or be left in an inconsistent state. Do not move the devices apart during transfer. If the transfer fails, restart both devices and try again. If the eSIM is no longer visible on either device, contact your carrier to re-issue it.
### Can I transfer a travel eSIM using Quick Transfer?
eSIM Quick Transfer requires carrier support on the network side. Travel eSIM providers generally do not support Quick Transfer. To move a travel eSIM to another device, contact the provider and ask whether they can re-issue the profile. Policies vary widely by provider. If you are installing a travel eSIM on a new device for the first time, see [Your First Travel eSIM: Step-by-Step Guide](/en/guides/first-time-guide/).
---
## Related Guides
- [How to Set Up eSIM on iPhone via QR Code](/en/guides/qr-code-iphone/) — ES-01: installing a new eSIM via QR code scan, including the iOS 17.4 long-press workaround
- [Set Up eSIM with a Manual Code (SM-DP+ Address)](/en/guides/manual-code/) — ES-03: entering the SM-DP+ address and activation code by hand when QR scanning is not available
- [What Is an eSIM?](/en/guides/what-is-esim/) — B-02: how eUICC chips, SM-DP+ servers, and the SGP.22 specification work together
- [eSIM Won't Activate? How to Fix Common Setup Issues](/en/guides/activation-failed/) — FE-01: diagnosis and fixes for every common activation error after installing a new eSIM profile
- [Your First Travel eSIM: Complete Guide](/en/guides/first-time-guide/) — TE-02: end-to-end walkthrough for purchasing and using a travel eSIM abroad
To compare eSIM plans for your destination, use [SimFinder Travel →](/en/travel/)
---
Sources:
- [Set up eSIM on iPhone - Apple Support](https://support.apple.com/en-us/118669)
- [Transfer your eSIM to a new iPhone - Apple Support](https://support.apple.com/en-us/108349)
- [Learn which type SIM your iPhone or iPad uses - Apple Support](https://support.apple.com/en-us/118569)
================================================================================
# The Reality of Unlimited Data Plans
URL: https://sim-finder.com/en/guides/unlimited-reality/
Type: guides (en)
Published: 2026-06-04
Nearly every plan labelled "unlimited" imposes speed limits after a defined data threshold. The word "unlimited" means you will not be charged extra for using more data — it does not mean all your data is delivered at the same speed throughout the billing cycle. Understanding the conditions attached to unlimited plans lets you choose the right tier and avoid unexpected slowdowns.
This guide explains fair-use policies, throttling, deprioritization, hotspot caps, and how to evaluate the terms that matter when comparing unlimited plans.
---
## What "Unlimited" Actually Means
The term "unlimited" in a mobile plan context means that your connection will not be cut off and you will not receive an overage charge when you consume beyond a specified amount of data. It does not guarantee consistent speed across all usage.
Most unlimited plans are structured in layers:
1. **High-speed allocation** — a defined quantity of data (the FUP threshold) delivered at the plan's advertised peak speed.
2. **Throttled tier** — once the high-speed allocation is consumed, speeds drop to a floor defined in the plan terms, typically between 128 kbps and 3 Mbps.
3. **Congestion management** — regardless of where you are in the billing cycle, speeds may further reduce during peak hours based on network load and your plan's priority level.
The practical implication: a plan marketed as "unlimited 5G" may deliver fast speeds for the first 30–50 GB of a billing cycle, then revert to speeds that make HD video streaming impossible for the remaining days of the month.
---
## Fair-Use Policies (FUP): The Threshold That Matters
A Fair-Use Policy (FUP) is the clause in a plan's terms and conditions that defines when speed management begins. It is the most important number to find when comparing unlimited plans.
**What the FUP specifies:**
- The quantity of high-speed data included (e.g., 30 GB, 50 GB, 100 GB, or sometimes "unlimited" with a note about network management)
- The speed that applies after that threshold (commonly 1 Mbps, 3 Mbps, or "up to" a stated figure)
- Whether the high-speed allocation resets each billing cycle or carries over
- Whether video streaming is treated differently from other traffic (some plans reduce video resolution to 480p or 720p by default, separate from the FUP threshold)
**Where to find it:** The FUP is almost never in the headline advertising copy. It appears in the plan's full terms and conditions, product description page, or a separate "network management policy" document. Checking these before signing up avoids surprises.
A practical reference point: at 1 Mbps (a common post-threshold speed), standard-definition video streaming (480p) is marginal, HD video at 720p is generally not possible, and video calls are degraded. At 128 kbps, only messaging and basic text browsing work reliably. The [How Much Mobile Data Do You Need?](/en/guides/data-usage-guide/) guide provides per-activity bandwidth requirements for comparison.
---
## Throttling After the Cap
Throttling is the carrier's mechanism for enforcing the FUP. Once your high-speed data allocation is exhausted, the carrier applies a hard speed cap to your connection.
**Key characteristics of throttling:**
- It is deterministic — the speed reduction applies regardless of network congestion or time of day
- It persists until the billing cycle resets (or until you purchase a data add-on, if your carrier offers one)
- It applies to the SIM card, not the device, so switching to a different phone does not remove a throttle
**Throttle speeds vary significantly by plan tier.** Budget-tier unlimited plans often throttle to 128 kbps–512 kbps. Mid-tier plans may throttle to 1 Mbps–3 Mbps. Some premium unlimited plans throttle to speeds of 5 Mbps or higher, which is sufficient for standard-definition streaming and video calls. Note that the lower end of this range (128 kbps) is more characteristic of MVNO and prepaid tiers; current major-carrier postpaid unlimited plans typically throttle to higher floor speeds.
At 1 Mbps throttle speed, the practical experience is:
| Activity | Usable at 1 Mbps? |
|----------|--------------------|
| Text messaging | Yes |
| Web browsing (text-heavy pages) | Yes, with slow load times |
| Voice calls (VoIP) | Yes |
| Maps and navigation | Yes |
| Video calls (Zoom, Meet) | Degraded — acceptable for audio-only |
| SD video (480p) streaming | Marginal — depends on service and buffering |
| HD video (720p+) streaming | No |
| Large file downloads | Very slow |
If you regularly stream video or join video calls away from Wi-Fi, the post-threshold speed is a critical factor. For data-reduction techniques that extend your high-speed allocation, see [Data-Saving Techniques](/en/guides/save-data/).
---
## Deprioritization During Congestion
Deprioritization is separate from throttling and operates on a different mechanism. Instead of a hard speed cap, deprioritization is a traffic management policy that applies during network congestion.
**How it works:**
When a cell tower is handling more simultaneous traffic than it can serve at full speed for everyone, the carrier's network equipment sorts subscribers by priority tier and serves higher-priority traffic first. Lower-priority subscribers receive available capacity after higher-priority subscribers have been served.
**When deprioritization affects you:**
- During rush hours in dense urban areas
- At large events (concerts, stadiums, conventions)
- In locations served by a single tower with many simultaneous users
If the network is not congested, deprioritized subscribers receive the same speeds as other subscribers. The impact of deprioritization is therefore variable — speeds may be normal at 2 AM and significantly reduced at 6 PM in the same location.
**Priority tiers on the same network:**
Carriers typically assign higher priority to subscribers on premium unlimited plans compared to those on budget or prepaid unlimited plans, even if both plans share the same underlying infrastructure. A subscriber on a carrier's highest-tier unlimited plan will generally see less speed degradation during congestion than one on the entry-level unlimited plan of the same carrier.
MVNO subscribers (virtual operators leasing capacity from a licensed network operator) are typically deprioritized relative to the host carrier's own subscribers. This is a structural feature of wholesale network agreements, not an anomaly. For a detailed explanation, see [Slow Mobile Data Speeds](/en/guides/slow-speed/).
---
## Hotspot and Tethering Caps
Many unlimited plans treat on-device data and tethering (hotspot) data as separate buckets with different speed limits and thresholds.
**Common structure:**
- On-device data: unlimited at high speed up to the FUP threshold, then throttled
- Tethering data: a separate allocation, often smaller — for example, 20 GB of full-speed hotspot, then throttled to 600 kbps–1 Mbps regardless of the status of the on-device allowance
This means a plan that provides 50 GB of high-speed on-device data may simultaneously cap high-speed tethering at 15 GB or 20 GB. A user who relies on their phone's hotspot for laptop or tablet use will reach the tethering throttle well before the general data allowance.
**What to check for tethering:**
1. Whether tethering is permitted at all (some plans prohibit it entirely)
2. The high-speed tethering threshold (not the general data threshold)
3. The throttle speed for tethered connections after that threshold
4. Whether international roaming plans apply the same tethering policy or a stricter one
Some premium unlimited tiers remove the separate tethering cap or set it equal to the general FUP threshold. These plans are typically priced higher. If you regularly use your phone as a hotspot for other devices, this distinction determines whether the plan is practical for your use case.
---
## Video Streaming Restrictions
Some carriers apply video quality caps as a separate layer from the general FUP, restricting streaming resolution on unlimited plans regardless of how much high-speed data remains.
**Common implementations:**
- SD cap: entry-tier unlimited plans may restrict video to 480p (SD) by default; higher tiers typically allow HD (720p+) or offer it as an opt-in
- HD unlock: subscribers must opt into an add-on or a higher-tier plan to stream at 720p or above
- Resolution reduction without speed throttling: the carrier intercepts the video stream and transcodes it to a lower resolution, which reduces data consumption but also reduces quality
These restrictions are independent of the FUP threshold. A subscriber who has used only 5 GB of a 50 GB allocation may still have video capped at 480p if their plan tier includes a streaming quality limit.
Where this applies, it is stated in the plan's terms. Look for terms such as "video streaming optimized to SD quality" or "HD video available on premium plans."
---
## International Roaming and Unlimited Plans
Unlimited plan benefits typically do not extend automatically to international roaming. Most plans that advertise unlimited domestic data apply stricter limits when the device is roaming on a foreign network.
**Common roaming structures on unlimited plans:**
- A separate, smaller roaming data allowance (e.g., 5–15 GB of high-speed roaming data at normal plan speeds, after which roaming is throttled or blocked)
- Reduced roaming speeds from the start of the trip, regardless of consumption
- A roaming add-on required to activate data abroad
- Roaming blocked entirely until an add-on is purchased
**EU exception:** Within the European Union, regulations require carriers licensed in EU or EEA member states to allow subscribers to use their domestic data allowance while roaming across the EU/EEA at no additional charge, within a fair-use limit. For plans with a finite high-speed allocation, that allocation generally applies during EU travel. For plans marketed as unlimited, EU regulations (Regulation 2022/612) permit carriers to apply a calculated fair-use roaming data cap, which may be significantly lower than the domestic unlimited allocation. The fair-use limits under this framework are governed by regulation rather than individual carrier policy.
For travel-specific considerations, the [How to Choose a Travel eSIM](/en/guides/how-to-choose/) guide and the [Travel eSIM Provider Comparison](/en/guides/provider-comparison/) cover how travel eSIM plans handle data limits and speed.
---
## Network Generations and Speed Labelling
A plan described as "unlimited 5G" means the plan includes access to the carrier's 5G network where available — it does not guarantee 5G speeds everywhere or at all times.
**What affects the actual speed you receive:**
- 5G coverage is not universal; outside covered areas, devices fall back to 4G LTE or 3G
- 5G sub-6 GHz (the most widely deployed form) delivers speeds broadly comparable to 4G LTE in many real-world conditions
- 5G mmWave offers much higher speeds but has very limited range and is concentrated in specific indoor and outdoor locations
- The FUP and deprioritization policies described above apply to 5G data exactly as they apply to 4G
An unlimited plan on a 4G LTE network may deliver consistently higher practical speeds than an unlimited plan on a 5G network with aggressive deprioritization, if the latter plan has a lower priority tier or a lower FUP threshold.
---
## Five Things to Check Before Choosing an Unlimited Plan
Before selecting a plan based on "unlimited" marketing, locate and compare these five terms:
1. **FUP threshold** — the quantity of high-speed data before throttling begins. Higher is better; "truly unlimited" at full speed (no FUP) is rare and usually premium-priced.
2. **Post-threshold speed** — the speed floor after the FUP is reached. The difference between 128 kbps and 3 Mbps is the difference between a connection that supports only text and one that supports SD video.
3. **Deprioritization policy** — whether your plan tier receives lower priority during congestion, and how the carrier describes this. Plans labelled "premium" or "priority" data often include a buffer before deprioritization begins.
4. **Tethering allowance** — the separate high-speed hotspot threshold and the tethered throttle speed. If you use a hotspot regularly, this figure matters as much as the general FUP.
5. **Video streaming cap** — whether video quality is restricted independently of data consumption, and what resolution limit applies to your plan tier.
Use SimFinder to compare plans side by side, including data thresholds and plan conditions, to find an option matched to your actual usage pattern.
**[Compare mobile plans on SimFinder →](/en/)**
---
## Related Guides
- [How Much Mobile Data Do You Need?](/en/guides/data-usage-guide/) — per-app consumption figures and a method to calculate your monthly data needs before choosing a plan
- [Data-Saving Techniques](/en/guides/save-data/) — iOS and Android settings that extend your high-speed allocation before the FUP threshold is reached
- [Slow Mobile Data Speeds](/en/guides/slow-speed/) — how to diagnose whether slow data is caused by throttling, deprioritization, congestion, or a device issue
- [How to Choose a Travel eSIM: 5 Key Criteria](/en/guides/how-to-choose/) — applying similar criteria to travel data plans, where FUP and speed limits vary widely between providers
- [Travel eSIM Provider Comparison](/en/guides/provider-comparison/) — how major travel eSIM providers structure their unlimited and high-volume plans
---
## Frequently Asked Questions
See the FAQ items in the frontmatter above for structured answers to the most common questions about unlimited plan terms.
**Q: Why do carriers call plans "unlimited" if they apply speed limits?**
The term is technically accurate in a narrow sense: there is no hard cap on the total volume of data you may consume, and you will not receive an overage charge for high usage. The speed restrictions are disclosed in the plan's fair-use or network management terms. Regulatory standards for what carriers may claim in advertising vary by country — in some markets, regulators have required greater transparency in how speed-limited plans are described.
**Q: If I buy a data add-on after throttling, will full speed be restored?**
In most cases, yes — purchasing a top-up or add-on through your carrier's app restores high-speed data until the top-up allocation is exhausted. However, the top-up's price-per-GB is typically higher than the base plan's effective rate. If you consistently exhaust the FUP threshold before the end of your billing cycle, comparing a higher-tier plan against the cost of frequent add-ons often makes economic sense.
**Q: Do unlimited plans on MVNOs work the same way?**
The same FUP, throttling, and deprioritization structures apply, but MVNO subscribers have an additional layer to consider: wholesale bandwidth purchased from the host network. Even before hitting their personal FUP threshold, MVNO subscribers may experience slower speeds during peak hours if the MVNO's shared bandwidth allocation at the network interface is under heavy load from other subscribers on the same MVNO. This is separate from the general network deprioritization policy and is discussed in [Slow Mobile Data Speeds](/en/guides/slow-speed/).
**Q: Does the billing cycle reset date affect when throttling lifts?**
Yes. Throttling from a depleted FUP allocation lifts at the start of your next billing cycle — not at the end of the calendar month, unless your plan renews on the first of each month. If your plan renews on the 15th and you exhaust the allocation on the 20th, you will be on reduced speeds until the 15th of the following month. Check your carrier's app to confirm your exact renewal date, not just the date you signed up. Some carriers also offer mid-cycle top-ups to restore high-speed data before the renewal date.
================================================================================
# VoLTE and VoNR Explained — How Voice Calls Work on 4G and 5G
URL: https://sim-finder.com/en/guides/volte-vonr/
Type: guides (en)
Published: 2026-04-24
When you make a phone call on a modern smartphone, the voice almost certainly travels as IP packets over your 4G or 5G connection — not through a separate circuit-switched path as it did in the 2G and 3G era. That shift is what VoLTE and VoNR describe, and understanding it matters far more than it used to: with 3G networks now shut down across the United States, much of Europe, Australia, and Japan, a device that cannot register for VoLTE on your carrier simply cannot make calls.
The key points covered in this article:
- What VoLTE is, the IMS architecture that makes it work, and how SIP signalling and dedicated QoS bearers separate a voice call from ordinary data traffic
- How VoNR extends the same system to 5G Standalone networks
- Why 3G network shutdowns raised the stakes for VoLTE compatibility, with specific dates for major markets
- The practical steps for checking whether an unlocked phone will work with VoLTE on a target carrier
- How Wi-Fi Calling (VoWiFi) relates to VoLTE and why the two complement each other
- What actually happens — including to emergency calls — when a device lacks VoLTE support
For background on what a SIM card is and how it authenticates you to a network, see [What Is a SIM Card?](/en/guides/what-is-sim/) For plain-English definitions of every term used in this article, the [SIM & Mobile Glossary](/en/guides/glossary-index/) is the reference starting point.
---
## What Is VoLTE?
**VoLTE** stands for **Voice over LTE**. It is the technology that carries voice calls and SMS as IP packets over a 4G LTE network, using an IMS (IP Multimedia Subsystem) core. The commercial specification is defined by GSMA PRD IR.92 ("IMS Profile for Voice and SMS"), which builds on 3GPP's IMS MMTel (Multimedia Telephony) solution.
Before VoLTE, 4G LTE was a data-only technology. LTE was specified in 3GPP Release 8 (frozen December 2008) as a purely packet-switched network: it had no native mechanism to carry traditional circuit-switched (CS) voice. When a 2G or 3G subscriber made a call, the network switched to a dedicated circuit — a physical or virtual channel reserved exclusively for that conversation. LTE had no such circuit plane.
The interim solution was **CS Fallback (CSFB)**: when a VoLTE-incapable device or a carrier without IMS needed to make a call, the LTE device would temporarily fall back to the 3G (or even 2G) network for the duration of the call, then return to LTE for data. CSFB works, but it adds several seconds of call-setup delay, interrupts the LTE data connection, and depends entirely on having a 3G network to fall back to.
VoLTE eliminates CSFB. The call stays on LTE from start to finish, using a dedicated QoS bearer — a concept explained in detail in the next section. The world's first commercial VoLTE service launched on 7 August 2012, when US operator MetroPCS deployed voice calls on LTE using the LG Connect 4G, the first VoLTE-capable smartphone. By September 2020, 226 operators across 97 countries had launched commercial VoLTE services.
---
## How VoLTE Works: IMS, SIP, and QoS Bearers
VoLTE is not simply "voice over data." It is a precisely engineered system that allocates dedicated network resources for each voice session and applies the same signalling protocol used in fixed-line telephony infrastructure.
### The IMS Core
The **IP Multimedia Subsystem (IMS)** is a standardised framework developed by 3GPP (first introduced in Release 5, 2002) for delivering multimedia services — voice, video, messaging — over IP networks. IMS provides:
- A **SIP (Session Initiation Protocol)** layer for call signalling: setting up, modifying, and tearing down sessions
- **SDP (Session Description Protocol)** for negotiating codec parameters (bitrate, codec type)
- A policy and charging function that ties each session to the subscriber's account
When you dial a number on a VoLTE device, your phone registers with the carrier's IMS core over the LTE data bearer. The IMS P-CSCF (Proxy Call Session Control Function) receives the SIP INVITE message, routes it through the S-CSCF (Serving CSCF), and completes the session setup to the called party. This is conceptually identical to how a SIP softphone on a corporate IP-PBX works, but the IMS adds carrier-grade authentication, charging hooks, and tight integration with the 3GPP access network.
### Dedicated QoS Bearers
On LTE, all traffic does not travel on the same pipe. The network supports multiple **EPS bearers** (Evolved Packet System bearers), each with its own Quality of Service class. An LTE device always has a default bearer for general data (best-effort, QCI 9). When a VoLTE call begins, the network establishes a **dedicated bearer** for the voice session with a specific **QCI (QoS Class Identifier)**:
- **QCI 1**: used for the voice media (RTP stream) — guaranteed bit-rate, very low target packet-error rate, 100 ms target packet delay budget
- **QCI 5**: used for the IMS SIP signalling — non-guaranteed bit-rate but high priority
This is what separates VoLTE from simply running a VoIP app like WhatsApp over LTE data. A VoIP app competes for the best-effort data bearer. A VoLTE call gets its own bearer with network-enforced priority and bandwidth guarantees. The carrier's Policy and Charging Enforcement Function (PCEF) activates these bearers dynamically at the start of each call and releases them at the end, based on instructions from the IMS core.
The voice codec most commonly used in VoLTE is **AMR-WB (Adaptive Multi-Rate Wideband)**, which delivers the audio improvement referred to commercially as **HD Voice**. AMR-WB samples audio at 16 kHz (versus 8 kHz for older narrowband AMR), capturing frequencies up to 7 kHz and producing noticeably clearer, more natural-sounding calls.
### The Result: Simultaneous Voice and Data
Because the voice call occupies a dedicated bearer rather than the entire LTE connection, VoLTE allows **full simultaneous voice and LTE data use**. With CSFB, your phone dropped to 3G (or paused LTE data) for the duration of the call. With VoLTE, you can browse, stream, or use any data service during a call without interruption.
---
## Benefits of VoLTE
VoLTE improves on legacy circuit-switched voice in three measurable ways.
**HD Voice quality.** The AMR-WB codec samples at 16 kHz rather than the 3.1 kHz bandwidth of traditional narrowband voice. This allows speech in the range of 50–7,000 Hz to be transmitted, making voices sound fuller and more natural, and making it significantly easier to distinguish similar-sounding consonants. Background noise is also reduced because the wideband codec encodes it differently from speech.
**Faster call setup.** CSFB typically added 5–8 seconds to call setup time while the device dropped to 3G and re-registered on a CS network. VoLTE call setup over IMS typically completes in under 3 seconds.
**Simultaneous voice and data.** As described above, VoLTE's dedicated bearer means data services are not interrupted during a call. This matters for navigation, email, and any app that maintains a background connection.
Beyond individual call quality, VoLTE also increases spectral efficiency at the network level. Because IP packet transmission is more efficient than circuit switching for encoding and transmitting voice, a given amount of spectrum can support roughly three times as many VoLTE calls as the equivalent 2G circuit-switched voice, according to 3GPP documentation. This freed spectrum is part of what enabled carriers to retire 3G and reallocate those frequencies to LTE and 5G.
---
## VoNR: Voice on 5G
**VoNR** stands for **Voice over New Radio**. It is the 5G equivalent of VoLTE, defined in GSMA NG.114 and standardised in 3GPP Release 15 (5G NR SA specification, Main drop functionally frozen June 2018, ASN.1 freeze completed September 2018).
### What Changes with VoNR
The IMS architecture is essentially the same: SIP signalling, QoS bearers, AMR-WB codec compatibility. What changes is the access layer:
- **5G NR radio** replaces the LTE radio access network. VoNR uses a 5QI (5G QoS Identifier) — the 5G equivalent of LTE's QCI — to request dedicated resources for voice traffic.
- **5G SA Core (5GC)** replaces the LTE EPC (Evolved Packet Core). The 5G core uses a service-based architecture with new network functions: AMF (Access and Mobility Management Function) replaces MME, SMF replaces PGW/SGW, and UPF handles user-plane forwarding.
- **EVS (Enhanced Voice Services)** codec support becomes practical. EVS (3GPP TS 26.445) is a superwideband and fullband codec sampling at up to 32 kHz, delivering even higher audio quality than AMR-WB. It was introduced in 3GPP Release 12 but is more consistently implemented in VoNR-capable devices and networks.
### VoNR Requires 5G SA
This is a critical constraint: VoNR requires a **5G Standalone (SA) network**. Many carriers launched 5G as **NSA (Non-Standalone)**, where 5G NR handles data but the control plane still runs on an LTE core. On NSA 5G networks, voice calls fall back to VoLTE on the LTE layer. True VoNR only works once a carrier has deployed a full 5G SA core.
### VoNR Deployment Status
As of 2026, VoNR is in commercial service on a growing number of SA-capable networks, including several major carriers in South Korea, China, the United States (T-Mobile), and Japan (NTT Docomo); KDDI also operates 5G SA commercially. However, VoLTE remains the dominant voice technology on 4G-first networks globally, and many VoNR-compatible devices fall back to VoLTE when the 5G SA signal is unavailable.
---
## The 3G Shutdown Context
The retirement of 3G networks across major markets transformed VoLTE from a premium feature into a basic requirement. The table below lists confirmed shutdown dates for several major markets.
| Market | Operator | Shutdown completed |
|---|---|---|
| United States | AT&T | February 2022 |
| United States | T-Mobile (including Sprint legacy) | July 2022 |
| United States | Verizon | December 2022 |
| Japan | KDDI (au) | March 2022 |
| Japan | NTT Docomo | March 2026 |
| Japan | SoftBank | April 2024 |
| Australia | Telstra | October 2024 |
| Australia | Optus | October 2024 |
| United Kingdom | EE, Three, Vodafone, O2 | Various: EE/Vodafone 2024, Three 2025, O2 early 2026 |
When 3G was shut down, CSFB became impossible: there was no longer a circuit-switched network to fall back to. Any device that relied on CSFB for voice — meaning any device that could not register for VoLTE on the new 4G-only network — lost the ability to make and receive calls entirely. Data and text over LTE might still function, but voice would show "No service" or "Emergency calls only."
This is why the 3G shutdown directly impacts anyone using an older unlocked device or a phone purchased in a different market. A handset that worked perfectly for calls in 2019 on CSFB may be unable to make any calls on the same carrier's network today.
For consumers choosing a SIM or carrier, it is also worth noting that MVNOs inherit their host network's VoLTE infrastructure. An MVNO running on an MNO that has completed its VoLTE rollout will generally pass VoLTE through to subscribers — but the MVNO must negotiate VoLTE explicitly in its wholesale agreement, and device IMS profile support must still be present. See [What Is an MVNO?](/en/guides/what-is-mvno/) for how MVNOs lease network services from host carriers.
---
## Checking VoLTE Compatibility on an Unlocked Phone
Band compatibility and IMS profile support are the two independent requirements for VoLTE on a specific carrier. Both must be satisfied.
### Step 1: Verify Band Compatibility
VoLTE operates on specific LTE frequency bands. Carriers designate one or more bands as their primary VoLTE bearer band. For example:
- AT&T deploys VoLTE primarily on Band 17 (700 MHz) and Band 4 (AWS)
- T-Mobile deploys VoLTE on Band 12 (700 MHz), Band 4, and Band 66
- EE (UK) uses Band 20 (800 MHz) for VoLTE
- KDDI (Japan) uses Band 18/26 (850 MHz) for VoLTE
If your device's modem does not support the carrier's designated VoLTE band, it cannot register. Check your phone's supported bands against the carrier's VoLTE band list. This information is available on the carrier's network page or from third-party databases such as GSMA's terminal compatibility information.
Buying a device unlocked in the US and using it in Japan, or vice versa, is a common mismatch scenario: US-market phones are often engineered for North American band plans, while Japanese-market phones target a different set. Even if the device technically supports LTE on some overlapping band, the VoLTE-specific band required by the local carrier may be absent.
### Step 2: Verify IMS Profile (Carrier Bundle / Carrier Configuration)
Band support is necessary but not sufficient. VoLTE also requires that the device's modem firmware contain the **carrier's IMS profile** — sometimes called a carrier bundle, carrier configuration, or carrier profile. This is a set of parameters that tells the device how to connect to the IMS core of that specific carrier: the P-CSCF discovery address, authentication parameters, and policy settings.
On iPhones, Apple manages carrier bundles and distributes them as part of iOS updates. A carrier must be on Apple's list for VoLTE to be enabled on that carrier's network. On Android, carrier profiles are often embedded by the manufacturer at the factory for the market the device is destined for. A global unlocked phone sold for one market may lack the IMS profile for a carrier in a different market.
Practical ways to check:
1. **The carrier's device compatibility page.** Most major carriers publish a list of approved or certified devices. If your model is on the list, VoLTE is expected to work. If it is not on the list, the carrier has not tested it, and VoLTE may not function even if bands match.
2. **The carrier's IMEI checker.** Enter your device's 15-digit IMEI (dial `*#06#` to retrieve it). Some carriers' online tools will confirm whether VoLTE is supported for that specific IMEI.
3. **Test SIM method.** Insert a trial or pay-as-you-go SIM from the target carrier. Go to mobile network settings (Settings → Cellular → Calls or equivalent) and look for a "VoLTE" or "HD Voice" toggle or indicator. If the option does not appear or cannot be enabled, the IMS profile is missing.
4. **Signal diagnostic apps.** On Android, field test modes (accessible via codes such as `*#*#4636#*#*`) can show whether the device is registered on an IMS network. An IMS registration status of "Registered" confirms VoLTE is active.
### A Note on eSIM and VoLTE
An eSIM profile downloaded from a carrier typically includes the carrier's IMS configuration. If you are setting up a new line via eSIM — particularly on a travel eSIM — confirm with the eSIM provider whether VoLTE and SMS are included, since many travel data-only eSIMs explicitly exclude voice registration. See [What Is an eSIM?](/en/guides/what-is-esim/) for how eSIM profiles are structured and what they contain.
---
## VoLTE and Wi-Fi Calling (VoWiFi)
**VoWiFi** — commonly marketed as **Wi-Fi Calling** — uses the same IMS core infrastructure as VoLTE, but the access network is a Wi-Fi connection rather than the LTE radio interface.
When Wi-Fi Calling is enabled on a supported device and carrier, the phone establishes a secure IPsec tunnel to the carrier's **ePDG (evolved Packet Data Gateway)** over the Wi-Fi connection. The voice and signalling traffic then enter the IMS core exactly as they would over LTE. The call quality, codec, and charging rules are the same; only the first-mile transport differs.
This has several practical consequences:
- **Indoor coverage gaps.** If you have weak LTE signal inside a building but a strong Wi-Fi connection, Wi-Fi Calling can take calls that would otherwise drop or fail to connect.
- **International travel.** On some carriers, Wi-Fi Calling allows you to receive calls to your home number even while connected to a foreign Wi-Fi network, without incurring roaming charges — depending on carrier policy.
- **Seamless handoff.** Devices with both VoLTE and VoWiFi can move a live call between LTE and Wi-Fi without interruption, provided both the device and carrier support it. This is handled transparently at the IMS level.
VoWiFi availability on an unlocked phone is subject to the same IMS profile requirement as VoLTE. The carrier bundle must include the ePDG address and the IPsec credentials for the Wi-Fi interface. An unlocked phone that lacks the carrier's IMS profile will not be able to use Wi-Fi Calling on that carrier, even if it technically supports the feature on other networks.
For a SIM-locked device, the relationship is even closer: a carrier-locked phone that supports VoLTE and VoWiFi on the locking carrier will lose those features if used with a foreign SIM, even after the lock is removed if the IMS profile for the new carrier is not loaded. See [SIM Lock and SIM-Free Explained](/en/guides/sim-lock/) for how to verify and remove carrier restrictions.
---
## Risks if Your Device Doesn't Support VoLTE
In a market where 3G has been retired, a VoLTE-incapable device faces a clear set of problems.
### No Voice Calls
The most immediate risk is the inability to make or receive any voice call. The device may still connect to 4G LTE for data — web browsing, apps, streaming — because data does not require IMS registration. But the voice call path has been severed: there is no 3G CS network to fall back to, and the 4G network will not route a call to a device that has not registered on IMS.
This affects not just outgoing calls but also incoming: if your number is associated with that SIM and device, callers to your number will reach voicemail or receive an unavailable signal.
### Emergency Call Restrictions
Emergency calls (911 in the US, 112 in Europe, 110 in Japan) are subject to special handling. Regulatory rules in most markets require carriers to attempt emergency calls from any device on the network, including devices without a SIM or with a locked SIM. However, on a fully 4G-only network, if the device cannot register for VoLTE, some networks may be unable to complete even an emergency call to that device. The precise behaviour depends on whether the carrier has implemented emergency fallback over IMS or another access technology such as Wi-Fi Calling.
Carriers are aware of this risk and typically maintain some form of emergency VoLTE registration that works independently of full IMS profile support — but this cannot be universally guaranteed across all unlocked or foreign-market devices. The practical advice is not to rely on an incompatible device for emergency communication.
### SMS and Messaging
Traditional SMS (Short Message Service) has two paths. On a VoLTE-enabled network, SMS is delivered over the IMS as SMs over IMS (SMs over IP), part of the same IR.92 profile. Some carriers also route SMS through a separate channel. Devices without VoLTE registration may or may not receive SMS depending on whether the carrier has maintained a legacy SMS gateway path. Rich Communications Services (RCS), the successor to SMS, is always IMS-dependent and will not function on non-VoLTE devices.
### What to Do
If you are using an older or foreign-market device and suspect it lacks VoLTE support:
1. Check the carrier's approved device list or IMEI checker before committing to a plan.
2. If possible, test with a short-term SIM before porting your number.
3. If VoLTE is confirmed unsupported, consider upgrading to a device that includes the carrier's IMS profile, or use an unlocked device sold specifically for your target market.
You can compare plan options across carriers — including filtering by network features — on [SimFinder](/en/).
---
## FAQ
See the frontmatter for structured FAQ entries compatible with schema.org/FAQPage. The questions below address topics not covered in the main body.
**When did VoLTE first launch commercially?**
The world's first commercial VoLTE service launched on 7 August 2012, when US carrier MetroPCS deployed voice over LTE using the LG Connect 4G smartphone. South Korean operator SK Telecom followed on 8 August 2012, within hours.
**Does VoLTE work on MVNOs?**
VoLTE on an MVNO depends on two conditions: the host MNO must have deployed VoLTE and agreed to pass it through to the MVNO in the wholesale agreement, and the device must carry the host carrier's IMS profile — not the MVNO's brand profile, because MVNOs typically do not maintain separate IMS cores. Most MVNOs on major VoLTE-capable networks do pass VoLTE through, but it is worth confirming with the specific MVNO before switching. See [What Is an MVNO?](/en/guides/what-is-mvno/) for the technical relationship between MVNOs and their host networks.
**Can I force my phone to use VoLTE?**
In most cases, the VoLTE indicator is determined by the carrier's IMS registration, not a user-accessible setting. On Android, a "VoLTE" or "Enhanced 4G LTE" toggle may appear in mobile network settings — but this toggle only works if the IMS profile is already loaded. Toggling it does not install a missing profile. On iPhone, the option appears as "Voice & Data" → "LTE" or "5G" with a VoLTE indicator; again, it requires the carrier bundle to be present.
**What is the difference between VoLTE and RCS?**
VoLTE handles voice calls; RCS (Rich Communication Services) handles enhanced messaging — group chats, high-resolution media sharing, read receipts, and so on. Both run over IMS and use the same network registration. RCS is defined in GSMA IR.94 and requires IMS just as VoLTE does. A device without IMS registration cannot use either. Google's rollout of RCS on Android and Apple's addition of RCS in iOS 18 have made the distinction more visible to consumers.
---
## Related Guides
- [What Is a SIM Card?](/en/guides/what-is-sim/) — How IMSI and Ki authenticate you to any mobile network
- [SIM Lock and SIM-Free Explained](/en/guides/sim-lock/) — How to check and remove carrier restrictions that can block VoLTE on foreign SIMs
- [What Is an MVNO?](/en/guides/what-is-mvno/) — How virtual operators inherit VoLTE from their host MNO
- [What Is an eSIM?](/en/guides/what-is-esim/) — How eSIM profiles carry IMS configuration for VoLTE activation
- [SIM & Mobile Glossary](/en/guides/glossary-index/) — Plain-English definitions of IMS, SIP, QCI, EPS bearer, and related terms
================================================================================
# VPN Basics and How to Choose One
URL: https://sim-finder.com/en/guides/vpn-guide/
Type: guides (en)
Published: 2026-06-05
A VPN (Virtual Private Network) creates an encrypted tunnel between your device and a VPN server before your internet traffic reaches the local network. On an untrusted network — public Wi-Fi in a café, hotel, or airport — this prevents local observers, including rogue access points, from reading your traffic. What a VPN does not do: it does not stop malware or phishing, it does not make you anonymous, and it does not replace HTTPS. Understanding what a VPN actually protects is as important as knowing when to use one. If you have access to mobile data, using it instead of public Wi-Fi is often the simpler and more robust choice.
This guide covers how a VPN works at a practical level, how it relates to HTTPS, what to look for in a provider, when to use mobile data instead, and what the common misconceptions are. It does not recommend specific VPN products by name, because provider quality and policies change over time; the criteria here let you evaluate any provider on their current merits.
---
## How a VPN Works: The Encrypted Tunnel
When you connect to the internet without a VPN, your traffic flows from your device to the local network (your home router, or a public Wi-Fi access point), then to your internet service provider or mobile carrier, and then to the destination server. Each of these intermediary points can observe your traffic unless it is encrypted at the application layer.
A VPN inserts an additional step. Before sending any application traffic, your device establishes an encrypted connection — the tunnel — to a VPN server operated by your VPN provider. All subsequent traffic is wrapped inside this tunnel. From the perspective of:
- **The local network** (including any rogue access point or attacker on the same Wi-Fi): all outbound traffic from your device appears as encrypted VPN data. The attacker cannot read its contents.
- **Your ISP or mobile carrier**: they see encrypted traffic to the VPN server's IP address, not the destinations you are visiting.
- **The VPN server**: it can see your traffic in plaintext (for HTTP) or the domain and metadata (for HTTPS), because it decrypts the tunnel to forward requests to the internet on your behalf.
- **Destination websites and services**: they see the VPN server's IP address, not your device's IP address.
The key implication: **the VPN provider replaces your ISP and local network as the party with visibility into your traffic**. This is why the trustworthiness of the VPN provider matters as much as the technology.
One additional detail matters in practice. A VPN protects traffic that passes through the tunnel. If a VPN app is configured in split-tunnel mode — where only some traffic routes through the VPN and the rest goes directly — then the directly-routed traffic is not protected. Most VPN apps default to routing all traffic through the tunnel (full-tunnel mode), but this is worth confirming in the app's settings, particularly on mobile where battery or performance considerations can influence the default.
---
## What a VPN Protects — and What It Does Not
Understanding the exact scope of VPN protection prevents the most common mistakes in using one.
**What a VPN does protect:**
- Traffic from passive eavesdropping on a shared local network (the primary use case for public Wi-Fi)
- Traffic from rogue or evil-twin access points (since the tunnel is established before application traffic is sent)
- DNS queries, which are routed through the VPN tunnel rather than to a DNS server visible to the local network
- Your IP address from destination services (they see the VPN server's IP)
**What a VPN does not protect:**
- **Malware already on your device.** A VPN is a network-layer control. If malware is running on your device, it can exfiltrate data through the VPN tunnel along with your legitimate traffic — the VPN encrypts both.
- **Phishing attacks.** If you navigate to a fake login page and enter your credentials, the VPN transmits those credentials to the phishing server faithfully. The VPN has no way to distinguish a legitimate site from a spoofed one.
- **Your identity on services where you are logged in.** Logging in to an account tells the service who you are, regardless of which IP address the request came from.
- **Content you submit.** A VPN encrypts traffic in transit, but the destination server receives your data in plaintext once the tunnel terminates at the VPN server.
- **Traffic if the VPN is not connected.** This sounds obvious but matters: if the VPN connection drops momentarily and no kill switch is active, your device may send traffic directly.
- **Account takeover via credential reuse.** If an attacker obtains your password from a data breach elsewhere and reuses it on another service, the attacker authenticates as you — the VPN is uninvolved in this attack path.
---
## A VPN and HTTPS: How They Relate
Most internet traffic today uses HTTPS (TLS), which encrypts the content of communications between your browser and the destination server. HTTPS is independent of a VPN and applies end-to-end: even the VPN provider cannot read the content of your HTTPS-protected communications.
This raises a reasonable question: if HTTPS already encrypts your traffic, what does a VPN add?
The answer depends on the threat. HTTPS protects the **content** of a connection that has been correctly established with the legitimate server. It does not protect against:
- An evil-twin access point that intercepts your traffic before your device can establish a TLS connection with the legitimate server
- A local attacker who can observe which domains you are visiting (visible in DNS queries and TLS Server Name Indication before ECH is universally deployed)
- An attacker who can present a fraudulent certificate if the user accepts a certificate warning
A VPN addresses these gaps differently. By establishing the encrypted tunnel before any application traffic is sent, a VPN ensures that the local network sees only tunnel traffic — the evil-twin attack has nothing to observe before the TLS connection reaches the legitimate server.
**In practice:** HTTPS-only mode in your browser is a necessary baseline. A VPN is an additional layer that specifically addresses the local-network threat. For public Wi-Fi, both together provide the strongest practical protection. For ordinary browsing on your home network or mobile data, HTTPS alone is generally sufficient for most threat models.
One nuance worth noting: Encrypted Client Hello (ECH), a TLS extension designed to encrypt the SNI field and prevent domain leakage to local observers, is an emerging standard that partially addresses one of the gaps that VPNs fill. ECH is not yet universally deployed by servers or supported across all networks, so it does not replace a VPN's local-network protections in practice as of publication.
If you want to understand the related risk of mobile identity — particularly where SMS-based authentication intersects with network security — see [SMS 2FA Security Risks](/en/guides/sms-2fa-risk/) for how SS7-based interception differs from local Wi-Fi threats.
---
## Choosing a VPN Provider: Key Criteria
**No-logs policy, independently audited**
A no-logs policy is a provider's commitment not to store records of your traffic, IP addresses, or connection timestamps. The strength of this claim depends on whether it has been verified. Several established VPN providers have commissioned independent audits of their logging architecture from security firms (such as Cure53, Deloitte, or KPMG). Published audit reports are a meaningful signal, but audits evaluate a snapshot in time and cannot guarantee future behaviour or policy changes following an acquisition or ownership change.
Look for providers that publish their audit reports, specify which firm conducted the audit, and include the date. Avoid providers who describe themselves as "no-logs" without any independent verification.
**Jurisdiction**
The country where a VPN provider is incorporated determines which legal frameworks can compel data disclosure. Providers in countries with strong data protection laws and no mandatory data retention requirements have fewer legal obligations to hand over records. This matters most in high-sensitivity use cases; for the typical public-Wi-Fi use case, jurisdiction is a secondary concern relative to the no-logs policy itself.
**Protocol**
The VPN protocol determines the cryptographic mechanisms and handshake used to establish and maintain the tunnel. Current options and their practical implications:
- **WireGuard**: A modern protocol with a small, auditable codebase (less than 4,000 lines of code for the Linux kernel implementation, compared to tens of thousands for OpenVPN including its cryptographic library dependencies). Delivers high throughput and low latency. Widely adopted by commercial VPN providers as a default option.
- **OpenVPN**: A mature, open-source protocol with a long audit history. More complex than WireGuard but highly configurable. A safe choice, particularly for users who need a proven, well-understood implementation.
- **IKEv2/IPsec**: Well-suited to mobile devices because it re-establishes connections quickly after a network change (e.g., switching from Wi-Fi to cellular). Supported natively by iOS and Android for manual VPN configuration.
- **Avoid PPTP**: PPTP uses cryptographic mechanisms that are considered broken by current standards. No new deployment should use PPTP.
Most commercial VPN apps select the protocol automatically and default to WireGuard where available. Manual protocol selection is rarely necessary.
**Kill switch**
A kill switch blocks all internet traffic if the VPN connection drops, preventing your device from falling back to an unprotected direct connection. On public Wi-Fi, a momentary VPN disconnect without a kill switch can expose traffic during the reconnection window. A kill switch is an important feature for security-focused VPN use. Confirm that the VPN app you choose includes a kill switch and that it is enabled by default or requires explicit opt-in.
**Speed and infrastructure**
VPN performance depends on server locations, server load, and the protocol used. A VPN adds latency because traffic is routed through an additional server. Providers with large server networks in many countries generally offer better performance by allowing connection to a server geographically close to you. Speed is a practical concern for video calls and streaming, but not a security consideration.
**Multi-hop and additional features**
Some VPN providers offer multi-hop configurations (also called double VPN), where traffic routes through two VPN servers before reaching the destination. This increases the cost for an adversary trying to correlate your traffic across both endpoints, but also increases latency. For most public-Wi-Fi use cases, a single-hop VPN is sufficient. Multi-hop is relevant for users with specific, elevated privacy requirements.
A related feature is DNS leak protection: when active, it ensures that DNS queries are resolved exclusively through the VPN tunnel and not sent to your ISP or the local network's DNS server if the VPN connection is interrupted. Confirm that any VPN app you evaluate includes and enables DNS leak protection.
---
## The Risk with Free VPNs
Providing VPN infrastructure — servers, bandwidth, support, security audits — has real ongoing costs. Free VPN services must cover those costs through some mechanism.
Documented issues with some free VPN services include:
- Logging and selling user traffic data to third parties
- Injecting advertising into web pages served through the VPN
- Sharing bandwidth with other users, effectively turning devices into exit nodes
- Bundling malware or adware in the application
None of these apply to all free VPN services, but the business model creates structural incentives that conflict with the stated purpose of protecting user traffic. For a service whose value is precisely that it handles your network traffic, the question of how the provider sustains itself financially is directly relevant.
Paid VPN subscriptions with a clear business model and published independent audits provide stronger guarantees. Some providers in this category offer free tiers with data or speed limits that are sufficient for limited use on public Wi-Fi.
One category worth distinguishing: VPN features built into browsers (such as Opera's integrated VPN or Brave's optional VPN product) only encrypt traffic from that specific browser. Other apps on your device — system processes, other browsers, mail clients — are not routed through the tunnel. For general device protection on public Wi-Fi, a system-level VPN app that routes all traffic is more appropriate than a browser-level VPN.
---
## Setting Up and Using a VPN Effectively
**On iPhone and iPad**
Most VPN providers offer an app available through the App Store. Within the app, enable the kill switch option if one is available. You can also configure VPN connections manually at **Settings → General → VPN & Device Management → VPN** for IKEv2 connections.
For always-on VPN enforcement across all apps — where the device blocks all traffic if the VPN is not connected — full enforcement requires a Mobile Device Management (MDM) profile, which is typically only applicable in enterprise environments. VPN apps implement a software-level kill switch via the Network Extension framework, which provides practical protection for most users.
**On Android**
Go to **Settings → Network & Internet → VPN** → tap the gear icon on your configured VPN → enable **Always-on VPN** and **Block connections without VPN**. This is a system-level kill switch, separate from any toggle within a VPN app.
**When to connect**
Connect the VPN before doing anything else on an untrusted network, including before the captive portal login on hotel or airport Wi-Fi. Note that some captive portals require unencrypted HTTP traffic to display their login page; your device or VPN app may need to temporarily allow this. After completing captive portal authentication, reconnect the VPN before any other activity.
**On an ongoing basis**
If you use public Wi-Fi regularly — in your daily commute, at a co-working space, or while travelling — enabling always-on VPN or kill switch at the system level removes the need to remember to connect manually. The cost is a small increase in battery consumption and a slightly higher chance of connection issues in environments with unusual network configurations (some corporate networks, for example, block common VPN ports). For most users, the security benefit on untrusted networks outweighs the occasional connectivity friction.
For more context on captive portals and the sequencing of VPN connection on public Wi-Fi, see [How to Use Public Wi-Fi Safely](/en/guides/public-wifi-safety/).
---
## Mobile Data as an Alternative to Public Wi-Fi
The scenarios where a VPN matters most — public Wi-Fi with a rogue access point, an evil-twin network, passive eavesdropping by other network users — do not apply to mobile data. When your device uses a cellular data connection, traffic travels over the radio link between your device and the carrier's cell tower, encrypted at the cellular layer. An attacker in the same coffee shop cannot passively observe your cellular traffic; that would require access to the carrier's network infrastructure.
This has a practical implication: for sensitive activities — online banking, accessing work systems, logging in to accounts that control financial or identity assets — switching to mobile data entirely is a simpler and often more reliable protection than running a VPN on public Wi-Fi.
If you frequently travel internationally and use your home SIM's data abroad, the cost of switching to cellular for sensitive tasks depends on your roaming plan. See [Roaming Settings](/en/guides/roaming-settings/) for how to configure data roaming, and see [Lost or Stolen Device](/en/guides/lost-stolen/) for what to do if the device carrying your SIM is compromised.
For travellers who use a separate local eSIM for data abroad, having a local data connection on the destination network reduces reliance on public Wi-Fi throughout the trip — removing the context in which VPN is most needed. This is a practical benefit of the local eSIM approach that is worth factoring into your connectivity planning before departure. Using [SimFinder](/) to compare local SIM or eSIM options for your destination can identify whether a local data plan is cost-effective compared to relying on public Wi-Fi.
---
## Common Misconceptions About VPNs
**"A VPN makes me anonymous."**
A VPN replaces your ISP and local network as the party observing your traffic with the VPN provider. Services you log in to still know who you are. Your device's fingerprint, browser fingerprint, and authentication cookies are unaffected by a VPN.
**"A VPN protects me from hackers."**
The phrase is vague. A VPN protects against specific threats: traffic interception on a shared local network, and exposure of your IP address. It does not protect against phishing, credential theft, software vulnerabilities, or malware. Account security — strong passwords, hardware security keys or authenticator apps rather than SMS for two-factor authentication — addresses the risks that a VPN cannot. See [SIM Swap Fraud: What It Is and How to Protect Yourself](/en/guides/sim-swap/) for an example of an attack that bypasses VPN entirely by targeting your phone number.
**"HTTPS makes a VPN unnecessary on public Wi-Fi."**
HTTPS protects the content of connections that are correctly established with legitimate servers. It does not prevent interception at the local network layer before the TLS connection is established, which is where evil-twin and MITM attacks operate. A VPN specifically addresses this gap.
**"A VPN encrypts everything on my device."**
A VPN encrypts traffic sent through the VPN tunnel. Some apps or operating system components may use network interfaces that bypass the VPN tunnel; VPN app documentation typically clarifies whether all traffic is routed through the tunnel or only selected traffic.
**"Any VPN is better than no VPN."**
Not necessarily. A free VPN run by an unknown provider with no audit history and a data-monetisation business model may introduce risks that are worse than operating without a VPN on a specific network.
---
## Summary: What to Look For and When to Use It
A VPN is a targeted tool that addresses a specific threat: traffic interception on untrusted networks. It is most useful when you are on a network you do not control — particularly public Wi-Fi. Key criteria when choosing:
1. **No-logs policy with published independent audit** — the single most important selection factor
2. **WireGuard or OpenVPN protocol** — current, well-audited cryptographic implementations
3. **Kill switch enabled** — prevents traffic leakage on VPN disconnect
4. **DNS leak protection** — ensures DNS queries stay within the tunnel
5. **Clear business model** — avoid free services with no disclosed revenue source
What a VPN does not replace:
- Strong, unique passwords and a password manager
- Hardware security keys or authenticator apps (rather than SMS) for two-factor authentication
- Keeping your operating system and apps up to date
- Caution about which links you click and which files you open
VPN use is one layer in a broader set of security practices. Its specific contribution is protecting traffic in transit on networks you do not control. The other layers protect your accounts and device regardless of what network you are on.
When you are on mobile data, the local-network threat that VPNs address is absent. For sensitive tasks on any connection, switching to mobile data is the lowest-friction protection — no VPN required, no configuration risk. Where a local SIM option exists at your destination, using it reduces your dependence on public Wi-Fi and the scenarios in which a VPN is critical.
---
## Related Guides
- [How to Use Public Wi-Fi Safely](/en/guides/public-wifi-safety/) — detailed breakdown of each public Wi-Fi threat and the role of VPN in context
- [SMS 2FA Security Risks](/en/guides/sms-2fa-risk/) — why SMS-based two-factor authentication has weaknesses that a VPN cannot address
- [SIM Swap Fraud: What It Is and How to Protect Yourself](/en/guides/sim-swap/) — phone-number-based attacks that operate independently of your network connection
- [Lost or Stolen Device](/en/guides/lost-stolen/) — steps to take when the physical device carrying your SIM and credentials is compromised
- [Roaming Settings](/en/guides/roaming-settings/) — how to configure mobile data roaming so you can use cellular as a fallback for sensitive tasks abroad
================================================================================
# What Is an APN? Why You Need to Configure It
URL: https://sim-finder.com/en/guides/what-is-apn/
Type: guides (en)
Published: 2026-06-04
An APN (Access Point Name) is a short configuration string that tells your device which gateway to use when connecting to the mobile internet. Without a valid APN, your phone can show full signal bars but cannot load any data. This is the most common reason mobile data fails after switching to an MVNO or activating a travel eSIM.
**This article explains what an APN is technically, why carriers require it, why MVNOs often need manual configuration, and how to approach fixing it.** For step-by-step setup instructions on a specific device, see the [APN Setup Guide for iPhone](/en/guides/apn-setup-iphone/) or the [APN Setup Guide for Android](/en/guides/apn-setup-android/).
---
## What an APN Is — the Technical Definition
APN stands for **Access Point Name**. It is defined in **3GPP TS 23.003** — the 3GPP specification for numbering, addressing, and identification — as the identifier that selects a **packet data gateway** (called the PGW in 4G LTE, or the UPF in 5G) on the carrier's core network.
When your device connects to a cellular network and requests a data session, the network reads the APN to determine which gateway to route your traffic through. That gateway connects the mobile network to the external internet (or a private data network).
An APN string has two logical components:
- **Network Identifier** (mandatory): identifies the external packet data network, such as `internet`, `wholesale`, or `fast.t-mobile.com`
- **Operator Identifier** (optional): encodes the PLMN (Public Land Mobile Network) of the GPRS support node; most consumer APN strings omit this component
The maximum encoded length of an APN is **100 octets**, as specified in 3GPP TS 23.003.
The APN is not a password or a security credential — it is a routing label. It tells the network core where to send your data, not whether you are authorised to access it (that is handled by the SIM credentials and network authentication).
---
## How the APN Fits Into the Mobile Network Architecture
To understand why the APN matters, it helps to see where it appears in the network path.
When you open an app that needs internet access, the following sequence occurs:
1. Your device requests a **PDN connection** (Packet Data Network connection) from the serving base station
2. The base station forwards the request to the **MME** (Mobility Management Entity in 4G) or **AMF** (Access and Mobility Management Function in 5G)
3. The MME/AMF reads the APN from the request and selects the appropriate **PGW** (Packet Gateway in 4G) or **UPF** (User Plane Function in 5G)
4. The selected gateway establishes a data tunnel between the network and your device
5. Your data traffic flows through that gateway to and from the internet
The APN is the critical input at step 3. If it is missing or incorrect, the network cannot identify the gateway, and the data session fails to establish. Your device is on the network — it just cannot get anywhere.
---
## Why 5G Uses DNN Instead of APN
In **5G systems**, the equivalent concept is the **DNN (Data Network Name)**, defined in **3GPP TS 23.003 Clause 9A**. The DNN serves the same routing function as the APN but is used within the 5G core architecture (5GC).
From a device-configuration standpoint, the APN string you enter in your device settings applies to both 4G and 5G connections. Devices that support 5G use the same APN field in their settings menus; the underlying protocol translates it to a DNN when communicating with a 5G core.
You do not need to configure anything differently for 5G. The distinction between APN and DNN exists in network architecture documents and carrier back-end systems, not in what you type into your phone.
---
## Why MVNOs Require APN Configuration
This is the most practical reason most users encounter the APN concept. Understanding it explains why switching from a major MNO to an MVNO so often requires an extra setup step.
### How MVNOs Use the Host Network
An [MVNO (Mobile Virtual Network Operator)](/en/guides/what-is-mvno/) does not own radio towers. It purchases wholesale network access from an MNO and resells it under its own brand. The MVNO typically operates its own:
- Billing and account management systems
- Customer-facing support
- Packet data gateway (in some cases)
Even though an MVNO's SIM uses the same physical towers as the host MNO, the data traffic is routed differently. The MVNO's APN directs data to the MVNO's own gateway infrastructure, where the MVNO can apply its own data policies, throttling rules, and billing logic.
### Why the APN String Differs
Because the MVNO has its own gateway, the APN for that MVNO is a different string than the MNO's APN. For example, an MVNO running on T-Mobile's network might use `wholesale` as its APN, while T-Mobile's own postpaid APN is `fast.t-mobile.com`. Both use the same radio infrastructure, but the data is routed to completely different backend systems.
When you insert an MVNO SIM, the network needs to know which gateway to use. If no APN is configured (or if your device is still using the previous carrier's APN), the network either cannot establish a data session or routes you to the wrong gateway — both result in no data.
### When Configuration Is Automatic vs. Manual
Many MVNOs handle this automatically:
- **iOS carrier settings update**: If the MVNO has submitted a carrier bundle to Apple, iOS downloads and installs the correct APN automatically when you insert the SIM
- **eSIM profile push**: When an MVNO or travel eSIM provider delivers an eSIM profile, they can embed APN configuration in that profile
- **Android provisioning**: Some Android devices receive APN settings over-the-air from the network when they register
Manual configuration is required when none of the above applies. This is most common with smaller MVNOs and regional resellers that have not submitted carrier bundles to Apple or Google. It is also required after a device network settings reset, which clears saved APN data.
---
## The Structure of an APN String
APN strings look like domain names but function as routing identifiers, not internet addresses. Examples:
| APN String | Usage |
|-----------|-------|
| `internet` | Generic, used by many carriers globally |
| `fast.t-mobile.com` | T-Mobile US postpaid (published on T-Mobile support) |
| `wholesale` | Mint Mobile US (T-Mobile MVNO), per Mint Mobile setup guide |
| `everywhere` | EE UK (published on EE support) |
| `telstra.internet` | Telstra Australia (published on Telstra support) |
The string is not a URL you can visit in a browser. It is interpreted by the carrier's core network equipment to look up the correct gateway configuration. This is why a typo — even just a missing period or a capital letter — prevents data from working.
---
## When You Will Encounter APN Configuration
You are likely to need APN information in these situations:
**Switching to an MVNO**: The most common trigger. If your MVNO does not configure the APN automatically, you need to enter it manually. The correct string is always published on the MVNO's official support or setup page.
**No mobile data after SIM swap**: If you replaced a SIM (whether from a carrier swap or a damaged SIM replacement) and data stopped working, the APN may not have carried over. This is especially common when switching between carriers on Android.
**Data stopped working after a settings reset**: Resetting network settings on iOS or Android clears APN configuration. After a reset, you may need to re-enter the APN or wait for automatic provisioning.
**Travel eSIM without automatic configuration**: Most major travel eSIM providers embed APN settings in their profiles. Some smaller providers require manual entry. If a travel eSIM connects but data does not flow, a missing APN is the primary suspect. For a complete diagnostic sequence, see [No Mobile Data?](/en/guides/no-data/).
**"No Service" scenarios**: If your device shows "No Service" rather than a data failure with signal present, the issue is likely not the APN — it is a network registration problem. Start with [No Service? How to Troubleshoot Signal Problems](/en/guides/no-service/) instead.
---
## What an APN Does Not Control
Understanding the scope of APN helps avoid misdiagnosis.
The APN controls:
- Which packet data gateway handles your data session
- Which external network (internet, corporate intranet, etc.) your data is routed to
The APN does not control:
- Voice calls (handled by a separate IMS/circuit-switched path)
- SMS (routed separately from data)
- Network authentication (handled by the SIM's IMSI and Ki via USIM authentication)
- Signal strength or network registration
- Data speeds or throughput
If calls and SMS work but data does not, the APN is the first thing to check. If nothing works (no signal, no calls, no SMS), the APN is not the problem — see [No Service?](/en/guides/no-service/).
---
## APN and Multiple Data Profiles
Some carriers and devices support multiple APN entries simultaneously, each for a different purpose:
- **Default / Internet APN**: used for general mobile data
- **MMS APN**: used specifically for sending/receiving MMS picture messages (often a different APN string)
- **Tethering / Hotspot APN**: some carriers use a separate APN for mobile hotspot traffic to apply different policies
On most consumer setups, only the default internet APN needs to be configured. The MMS APN is separate — having the correct internet APN will not fix MMS if the MMS APN is wrong, and vice versa.
If you are troubleshooting MMS specifically (picture messages not sending or receiving), check whether your carrier requires a separate MMS APN. The internet APN and MMS APN can have different strings, and your device's settings may require both to be entered.
---
## How to Find the Correct APN for Your Carrier
The only reliable source for an APN string is your carrier's official support documentation. Third-party APN databases are frequently outdated and may list deprecated values.
To find your APN:
1. Go to your carrier or MVNO's official website
2. Search for "APN settings," "APN setup," or "network settings"
3. Locate the APN string for your country and device type (iOS or Android may have different instructions)
Once you have the correct string, follow the setup steps for your device:
- **iPhone users**: [APN Setup Guide for iPhone](/en/guides/apn-setup-iphone/) — covers configuration profiles (.mobileconfig) and manual entry
- **Android users**: [APN Setup Guide for Android](/en/guides/apn-setup-android/) — covers the Settings > Mobile Networks > APN path and manual entry fields
If your carrier is not publishing an APN string, it is likely because your device receives the configuration automatically. In that case, check that you have accepted any carrier settings update prompts.
---
## Entering the APN Manually — What to Expect
If you need to enter APN settings by hand, you will typically encounter these fields in your device settings:
| Field | What to Enter |
|-------|---------------|
| **APN** | The APN string from your carrier (required) |
| **Username** | Carrier-specified value, or leave blank |
| **Password** | Carrier-specified value, or leave blank |
| **MCC** | Mobile Country Code — usually auto-filled |
| **MNC** | Mobile Network Code — usually auto-filled |
| **Authentication type** | PAP, CHAP, or None — follow carrier guidance |
| **APN type** | `default` for internet; `mms` for MMS — follow carrier guidance |
Enter the APN string exactly as your carrier specifies. Although the 3GPP standard treats APN labels as case-insensitive, some carrier provisioning systems are stricter, so enter the APN exactly as your carrier publishes it (including case). Do not add spaces before or after the string.
For the manual code (network selection) process when switching carriers, see the [Manual Network Code Entry guide](/en/guides/manual-code/).
---
## FAQ
### What does APN stand for?
APN stands for Access Point Name. It is defined in 3GPP TS 23.003 as the identifier that selects a packet data gateway on the carrier's core network. Every mobile device that uses cellular data must have a valid APN configured.
### Why do MVNOs need a different APN than the host carrier?
An MVNO operates its own billing systems and packet data gateway on top of the host MNO's radio network. The APN routes your data session to that MVNO-specific gateway rather than the MNO's own gateway. Even though both use the same towers, the backend destination is different, so the APN string is different.
### What happens if the APN is wrong or missing?
Your device will show signal bars and can make calls, but mobile data will not work. The network has no valid gateway to route your data session to. You may see a "No internet connection" error or pages will simply fail to load despite having cellular signal.
### Is an APN the same as a 5G DNN?
Functionally yes. In 5G systems, the equivalent concept is the DNN (Data Network Name), defined in 3GPP TS 23.003 Clause 9A. The APN string you enter on a device works for both 4G and 5G connections. The term changes in the 5G core architecture documents, but from a device-configuration perspective the setting is identical.
### Does my carrier set the APN automatically?
Major MNOs and many MVNOs push APN configuration automatically when you insert a SIM or activate an eSIM — either via a carrier settings update (on iPhone) or a provisioned configuration. However, some MVNOs, especially smaller resellers, do not have automatic configuration, which is why manual setup is sometimes required.
### Can I use any APN string, or does it have to be exact?
It must match exactly what your carrier specifies. Although the 3GPP standard treats APN labels as case-insensitive, some carrier provisioning systems are stricter, so enter the APN exactly as your carrier publishes it (including case). Extra spaces or incorrect characters will also prevent the data session from establishing. Always copy the APN from your carrier's official support documentation.
---
## Related Guides
- [APN Setup Guide for iPhone](/en/guides/apn-setup-iphone/) — configuration profiles, manual entry, and carrier-specific APN strings for iOS
- [APN Setup Guide for Android](/en/guides/apn-setup-android/) — manual APN entry steps for Android devices
- [No Service? How to Troubleshoot Signal Problems](/en/guides/no-service/) — when the issue is network registration, not APN
- [No Mobile Data? How to Fix Data Connection Problems](/en/guides/no-data/) — full diagnostic sequence when data does not work
- [What Is an MVNO?](/en/guides/what-is-mvno/) — how virtual carriers work and why they use different network settings
================================================================================
# What Is Dual SIM? — DSDS, DSDV, and DSDA Explained
URL: https://sim-finder.com/en/guides/what-is-dual-sim/
Type: guides (en)
Published: 2026-04-13
Dual SIM lets you run two phone lines on a single device — each with its own number, carrier, and data plan. The key difference between modes is whether both lines stay active simultaneously, and what happens to one line when the other is in a call. Understanding the mode your device supports helps you choose the right setup.
---
## The Four Dual SIM Modes
There are four distinct modes for dual SIM operation. Each defines how many SIMs can stay on standby, which network generations are supported, and whether both lines remain active during a call.
### DSSS (Dual SIM Single Standby)
Only one SIM is active at a time. You can insert two SIMs, but you must manually switch which one is active. The inactive SIM cannot receive calls or texts while the other is in use. This mode is found only on older devices and is rarely encountered today.
### DSDS (Dual SIM Dual Standby)
Both SIMs are on standby simultaneously, so you can receive calls and texts on either number without switching. However, when one SIM uses a 4G or 5G connection, the other SIM is pushed down to 3G. In regions where 3G has been shut down, this can mean the second SIM loses connectivity during active data use on the first.
### DSDV (Dual SIM Dual VoLTE)
Both SIMs maintain 4G or 5G connections at the same time. Because both lines use VoLTE (Voice over LTE), calls are delivered over the data network rather than a 3G circuit — making DSDS's 3G fallback unnecessary. This is the current mainstream mode on modern smartphones.
One limitation remains: during an active call on one SIM, data on the other SIM is paused. You cannot, for example, take a call on SIM A while streaming video over SIM B.
### DSDA (Dual SIM Dual Active)
Two separate radio transceivers are used — one per SIM. Both SIMs remain fully active and independent at all times. You can take a call on SIM A while SIM B continues data transmission without interruption. This eliminates all the restrictions of DSDS and DSDV.
The tradeoff is higher battery consumption, since two transceivers draw power simultaneously. DSDA is found on select high-end Android devices.
### Mode Comparison
| Mode | Both SIMs on standby | Both SIMs on 4G/5G | Data during call |
|------|:---:|:---:|:---:|
| DSSS | No | No | No |
| DSDS | Yes | No (one drops to 3G) | No |
| DSDV | Yes | Yes | Second SIM paused |
| DSDA | Yes | Yes | Yes (both active) |
---
## Device Support
### iPhone
iPhones support DSDS but do not support DSDA. Apple's official documentation uses the term DSDS. Both SIMs can make and receive calls, send texts, and use data — though data on the second SIM pauses during an active call on the first.
- **iPhone XS, XS Max, XR (2018) and later**: physical SIM + eSIM dual SIM configuration
- **iPhone 13 series and later (including iPhone SE 3rd gen)**: dual eSIM — two eSIM profiles active simultaneously
- **US-sold iPhone 14 and later**: eSIM-only (no physical SIM slot); dual eSIM only
In Settings > Cellular, you can assign each line to calls and data independently. The detailed setup walkthrough is covered in [Dual SIM Setup on iPhone: Complete Configuration Guide](/en/guides/dual-sim-iphone/).
### Google Pixel
- **Pixel 3a and later**: DSDS — physical SIM + eSIM
- **Pixel 7 and Pixel 7 Pro (2022) and later**: dual eSIM — the first Android devices to support two eSIMs simultaneously
- **US-sold Pixel 10, 10 Pro, and 10 Pro XL**: eSIM-only (Pixel 10 Pro Fold retains a physical SIM slot)
Dual eSIM on Pixel 7+ is implemented via MEP (Multiple Enabled Profiles), introduced in Android 13 and defined in GSMA SGP.22 v3.0.
### Samsung Galaxy
Samsung Galaxy S20 and later flagship models support eSIM alongside physical SIM for dual SIM configurations. eSIM availability depends on the region and whether the device is carrier-locked. A carrier-locked Galaxy may not expose the eSIM option even if the hardware supports it.
---
## Common Use Cases
### Separate Work and Personal Numbers
Keep a work number and a personal number on one device. You can assign different ringtones to each line, route calls to the correct number, and avoid carrying two phones. You set which line handles calls and which handles data — each independently.
### Reduce Data Costs Without Sacrificing Call Quality
Use your primary carrier for voice calls while routing all data through a lower-cost plan on the second SIM. This is a common setup in markets where MNOs (large carriers) charge a premium for data but offer reliable call quality, while MVNOs provide cheaper data on the same underlying network. Use [SimFinder](/en/) to compare available plans side by side.
### Backup Line for Network Outages
Carrier networks experience outages. With a second SIM on a different network, your connectivity continues even if your primary carrier goes down. This is especially relevant for people who rely on mobile data for work or remote access.
### Travel: Keep Your Home Number + Add Local Data
This is the most widely used travel configuration:
- Keep your home SIM active for calls and SMS
- Add a local travel eSIM for data at local rates (no international roaming charges)
- Your home number remains reachable for SMS two-factor authentication codes from banks and apps
Most travel eSIMs are data-only — they do not include a phone number or SMS capability. Voice calls over the travel eSIM are handled via VoIP apps such as WhatsApp or FaceTime. This is covered in detail in [4 Ways to Stay Connected Abroad](/en/guides/four-options/).
Install the travel eSIM profile before departure while on a Wi-Fi connection, and it typically activates when your device first connects to a supported network at your destination.
---
## Things to Know Before You Start
### Explicitly Set Your Preferred Data SIM
In a dual SIM setup, the device needs to know which SIM to use for mobile data. If you do not configure this, the device may default to the more expensive line. On iPhone, go to Settings > Cellular > Cellular Data and select the SIM you want for data.
### Calls Interrupt Data on the Other SIM (DSDV/DSDS)
On DSDV and DSDS devices, answering a call on SIM A pauses data on SIM B for the duration of the call. This affects background downloads, active VoIP calls, and streaming. If continuous data on both lines is a requirement — for example, running a video call through one SIM while the other handles incoming calls — you need a DSDA-capable device.
### eSIM + Physical SIM Requires No Extra Slots
If your device has one physical SIM slot and eSIM support, you already have everything needed for a dual SIM configuration. The physical SIM handles one line; the eSIM handles the other. You do not need a dual-SIM hardware variant. For more on how eSIM works, see [What Is eSIM?](/en/guides/what-is-esim/).
### Carrier Lock Can Block eSIM Access
A device purchased through a carrier may be SIM-locked or have eSIM activation restricted to that carrier. Even if the hardware supports eSIM, the option may be hidden or disabled until the device is unlocked. Check your carrier's unlock policy if you plan to add a second line from a different provider.
---
## Summary
| Topic | Detail |
|-------|--------|
| Definition | Use two SIMs on one device simultaneously. Defined in GSMA TS.37. |
| Modes | DSSS (legacy) → DSDS (3G fallback) → DSDV (both 4G/5G, mainstream) → DSDA (fully simultaneous) |
| iPhone support | DSDS. Dual eSIM from iPhone 13+. No DSDA. |
| Pixel support | DSDS from Pixel 3a+. Dual eSIM from Pixel 7+. |
| Main use cases | Work + personal lines, cheaper data plan, backup connectivity, travel eSIM |
To compare plans for a dual SIM setup, use [SimFinder](/en/) to search by carrier, data, and price.
================================================================================
# What Is an eSIM? How It Works, Benefits, and Supported Devices
URL: https://sim-finder.com/en/guides/what-is-esim/
Type: guides (en)
Published: 2026-04-13
An eSIM is a chip permanently built into your device that lets you activate a mobile plan by downloading a carrier profile — no physical card required. Activation takes minutes, and you can store multiple profiles on a single device and switch between them from your settings. The trade-off: if your device is lost or broken, you cannot pull out the eSIM and swap it into another phone.
This article explains how eSIM works, its advantages and limitations, and which devices support it. For step-by-step activation guides, see [How to Set Up eSIM on iPhone via QR Code](/en/guides/qr-code-iphone/) and [How to Set Up eSIM on Android via QR Code](/en/guides/qr-code-android/).
---
## How eSIM Works
### The eUICC Chip and Profiles
An eSIM (embedded SIM) follows a global standard defined by the GSMA known as SGP.22 (RSP Technical Specification for Consumer Devices). The latest published versions are SGP.22 v2.6.1 (released April 2025) and SGP.22 v3.1 (released December 2023).
The hardware is an eUICC (embedded Universal Integrated Circuit Card) — a chip soldered to the device's motherboard. It securely stores carrier profiles, which contain the credentials needed to authenticate with a mobile network.
When you sign up with a carrier, their system prepares a profile on an SM-DP+ server (Subscription Manager Data Preparation, defined in GSMA SGP.22). Your device connects to that server and downloads the profile. From that point on, the device can authenticate to the carrier's network just as a traditional SIM card would.
### How to Add a Carrier Profile
There are three standard ways to download an eSIM profile from a carrier's SM-DP+ server:
1. **Scan a QR code** — the carrier emails or displays a QR code you scan in Settings
2. **Enter an activation code manually** — type the SM-DP+ server address and activation code by hand
3. **Use a carrier app** — some carriers offer an app that handles the download automatically
A fourth option — **eSIM Quick Transfer** — lets you transfer an eSIM between compatible devices without re-issuing from the carrier (supported on iPhone and select Android models with carrier approval). This is a device-to-device transfer, not a download from an SM-DP+ server.
### Storing and Switching Profiles
Under SGP.22 v2.x, an eUICC can store multiple carrier profiles, but only one profile can be active at a time. The number of profiles a device can store depends on the eUICC chip's memory — there is no fixed limit in the specification itself. Apple states that iPhone can store 8 or more eSIMs, and profiles can be switched from the device's Settings app.
SGP.22 v3.0 introduced MEP (Multiple Enabled Profiles) as an optional feature, allowing more than one profile to be active simultaneously on a single eUICC. Android 13 and later support MEP-A1; Android 14 and later additionally support MEP-B. This enables eSIM-only dual SIM devices without a physical SIM slot.
### GSMA Specifications at a Glance
| Specification | Purpose |
|---|---|
| SGP.22 | Consumer devices (smartphones, tablets) |
| SGP.02 | Machine-to-machine (M2M) devices |
| SGP.32 | IoT devices (published May 2023) |
---
## Benefits of eSIM
### Instant Activation — No Waiting for a Card
With a physical SIM, you wait for a card to arrive by post, which can take several days. With eSIM, once a carrier approves your application, you download the profile and start using your plan within minutes. This is especially useful when you need connectivity immediately — at an airport, upon arriving in a new country, or after switching carriers on a weekend.
### Easier Dual SIM
Most eSIM-capable smartphones support dual SIM: one physical SIM slot plus one eSIM, or two eSIMs simultaneously. This means you can keep your primary number active while adding a local data plan for travel, or separate work and personal lines on a single device — without needing two physical SIM slots or swapping cards.
Dual SIM works in two main modes, defined in GSMA TS.37:
- **DSDS (Dual SIM Dual Standby):** both SIMs receive calls and messages, but only one can transmit data at a time
- **DSDA (Dual SIM Dual Active):** both SIMs maintain independent network connections simultaneously, at the cost of higher battery usage
### Store Multiple Profiles and Switch Freely
You can keep several carrier profiles on your device at once. For example: your home plan, a travel eSIM for Europe, and a separate data eSIM for Asia. Switching between them takes a few taps — no physical card exchange required. iPhone can store 8 or more eSIM profiles according to Apple.
### Slimmer Devices and Better Water Resistance
Removing the physical SIM slot gives manufacturers more flexibility to reduce device thickness, improve waterproofing, and use the freed space for battery or other components. The eSIM-only design adopted by iPhone 14 and later (for the US market) is a direct consequence of this trend.
### Convenient for International Travel
You can purchase and install a travel eSIM before you leave home, then activate it the moment you land. If your home SIM is also an eSIM, you can run both simultaneously: keep receiving calls and SMS on your home number while using the travel eSIM for data. This dual-SIM setup is also useful for receiving SMS-based two-factor authentication codes from your bank or other services while abroad.
---
## Limitations of eSIM
### Re-issue Required When Changing Devices
Because the eSIM chip is soldered inside the device, you cannot physically move it to another phone. If you upgrade, lose, or break your device, you need to contact your carrier to re-issue the eSIM to the new device. Some carriers charge a fee for this, and the process may take longer than simply inserting a physical SIM. Check your carrier's re-issue policy before you rely on eSIM as your only SIM.
### Not All Devices Support eSIM
eSIM support varies by device model, production region, and carrier lock status. Carrier-locked devices may not support eSIM even if the hardware is otherwise capable. Budget Android phones released in 2022 or earlier often lack eSIM support. Always confirm eSIM compatibility on the manufacturer's official support page before purchasing a plan.
### Some eSIM Profiles Cannot Be Reinstalled
Travel eSIM providers and some carriers restrict reinstallation: once you delete a profile, you may not be able to download it again without purchasing a new plan. This is particularly common with travel eSIMs from third-party providers. Before deleting any eSIM profile, confirm the provider's reinstall policy.
### Internet Connection Required for Initial Setup
Downloading an eSIM profile requires an active Wi-Fi or mobile data connection. If you are setting up a new device in a location without connectivity, you cannot activate an eSIM until you have access to the internet. Plan ahead — download your travel eSIM profile before departure, while you still have a reliable Wi-Fi connection.
---
## Supported Devices
### iPhone
eSIM support on iPhone starts with the iPhone XS, iPhone XS Max, and iPhone XR (2018 models). All iPhone models released since then support eSIM.
iPhone 13 and later (including iPhone SE 3rd generation) support dual eSIM — two eSIM profiles active at the same time, without needing a physical SIM slot for the second line.
iPhone 14 through iPhone 16e sold in the US are eSIM-only with no physical SIM card slot. Starting with iPhone 17 (2025), eSIM-only models expanded to additional regions: Canada, Mexico, Japan, UAE, Saudi Arabia, Bahrain, Kuwait, Oman, Qatar, Guam, and the U.S. Virgin Islands.
For a full list of eSIM-compatible iPhone models by region, see Apple's official support page.
### Android (Google Pixel)
Google Pixel 3 and later generally support eSIM, though support on Pixel 3 varies by region and carrier variant. Google Pixel 7 and Pixel 7 Pro were the first Android smartphones to support dual eSIM — two eSIM profiles simultaneously active — at launch in October 2022. Pixel 7 and all later Pixel models support dual eSIM. US-market Pixel 10 models are eSIM-only with no physical SIM slot.
Samsung Galaxy S20 and later, as well as flagship models from other Android manufacturers (Motorola, Nokia, and others), also support eSIM on many variants. Availability depends on the region and whether the device is carrier-locked. Always verify on the manufacturer's support page.
### iPad and Tablets
iPad Pro (M4) and iPad Air (M2) are eSIM-only (no physical SIM slot). Earlier iPad Pro and iPad Air models with Wi-Fi + Cellular connectivity generally support eSIM as well. Cellular-capable tablets from other manufacturers increasingly include eSIM support; check device specifications before purchasing.
---
## Summary
| | Physical SIM | eSIM |
|---|---|---|
| Form | Removable card (nano, micro, mini) | Chip soldered inside the device |
| Activation | Insert card, sometimes configure APN | Download profile via QR code, app, or manual code |
| Switching carriers | Swap cards | Download new profile in Settings |
| When device is lost | Move card to replacement instantly | Carrier re-issue required |
| Multiple profiles | One card = one carrier | Store 8+ profiles, switch in Settings |
| Specification | ETSI TS 102 221 | GSMA SGP.22 |
To find plans that support eSIM, use the eSIM filter on [SimFinder](/en/).
================================================================================
# What Is iSIM? The Next Step After eSIM
URL: https://sim-finder.com/en/guides/what-is-isim/
Type: guides (en)
Published: 2026-06-04
iSIM (integrated SIM) takes the SIM function one step further than eSIM: instead of a discrete eUICC chip soldered to the motherboard, the SIM's secure element is built directly into the device's SoC (System-on-Chip). The result is no separate SIM component at all — subscriber authentication is handled inside the main processor package. Like eSIM, iSIM uses GSMA remote provisioning, so carrier profiles are downloaded over the air rather than delivered on a physical card.
Key points:
- iSIM eliminates the separate eUICC chip by integrating the secure element into the SoC.
- The remote provisioning protocol (GSMA SGP.22 for consumer devices, SGP.32 for IoT) is the same as eSIM — carriers issue profiles the same way.
- iSIM is in early commercial deployment as of mid-2026, primarily in IoT and select smartphone chipsets.
- For everyday consumers, eSIM is the practical technology today; iSIM becomes relevant when evaluating wearables, IoT modules, and next-generation chipset designs.
For background on how eSIM works before reading this article, see [What Is an eSIM?](/en/guides/what-is-esim/).
---
## The SIM Evolution: From Physical Card to Integrated Silicon
To understand where iSIM fits, it helps to trace the SIM's hardware evolution.
The original SIM was a full-size removable card (1FF, defined in ETSI GSM 11.11) containing a dedicated integrated circuit that stored the IMSI, authentication key (Ki), and network credentials — for a detailed look at how a SIM card works, see [What Is a SIM Card?](/en/guides/what-is-sim/). Over time, the card shrank through Mini-SIM (2FF), Micro-SIM (3FF), and Nano-SIM (4FF) — each change reduced the card area while keeping the same contact interface.
eSIM (embedded SIM) removed the removable form factor entirely. An eUICC (embedded Universal Integrated Circuit Card) chip is soldered to the device motherboard and loaded with carrier profiles remotely, following the GSMA SGP.22 standard for consumer devices. The credential store moved off the swappable card and onto a chip that is permanently part of the device.
iSIM continues this trajectory by eliminating even that discrete chip. Instead of an eUICC soldered alongside the application processor, iSIM places the secure element function inside the SoC itself — in a hardware-isolated partition called a secure enclave or Trusted Execution Environment (TEE). The result is that the SIM function is no longer a separate component on the PCB.
This progression — removable card → soldered discrete chip → integrated into SoC — reflects the sustained industry pressure to reduce device size, component count, and power consumption, especially for IoT and wearable applications.
---
## How iSIM Works: The Hardware Architecture
### The Secure Element Inside the SoC
A traditional eSIM uses a separate eUICC chip that communicates with the application processor over an ISO/IEC 7816 or SPI interface. The eUICC contains its own secure memory, cryptographic coprocessor, and operating environment, isolated from the main processor.
iSIM moves this secure element inside the SoC boundary. The SoC vendor (Qualcomm, MediaTek, Samsung LSI, or others) integrates a hardware-isolated security domain — sometimes referred to as an iSIM partition — within the same silicon package as the application processor and modem. This partition has:
- Dedicated secure storage for IMSI, Ki, and carrier profiles
- A cryptographic processor for authentication computations
- Hardware isolation from the rest of the SoC, preventing unauthorized access by the application processor or operating system
From the network's perspective, iSIM authenticates identically to a traditional UICC or eUICC. The 3GPP authentication algorithms (MILENAGE, TUAK) run inside the secure partition; the resulting authentication vectors are passed to the modem. The carrier's network sees no difference.
### Remote Provisioning
iSIM retains the remote provisioning model that eSIM introduced. Carrier profiles — containing credentials, network configuration, and IMSI — are downloaded from an SM-DP+ server (Subscription Manager Data Preparation, defined in GSMA SGP.22) for consumer devices, or managed by an eIM (eSIM IoT Remote Manager) for IoT devices following GSMA SGP.32.
Profile download and management follow the same GSMA-defined procedures as eSIM:
- For consumer devices: QR code scan, activation code entry, or carrier app
- For IoT devices (SGP.32): server-initiated push via eIM, without requiring user interaction
Multiple carrier profiles can be stored within the SoC's secure element. Profile switching is handled the same way as eSIM — through the device's settings interface on consumer devices, or through the eIM on IoT devices.
---
## iSIM vs eSIM: What Actually Differs
Both technologies use the same GSMA remote provisioning standards and the same underlying authentication protocols. The functional difference is solely in hardware placement.
| Dimension | eSIM (eUICC) | iSIM |
|---|---|---|
| **Hardware location** | Discrete chip soldered to motherboard | Integrated into SoC secure enclave |
| **PCB footprint** | Requires dedicated chip area and routing | No separate chip; part of SoC package |
| **Remote provisioning** | GSMA SGP.22 (consumer) / SGP.32 (IoT) | Same standards |
| **Profile storage** | eUICC chip memory | SoC secure element memory |
| **Authentication** | On eUICC chip | Inside SoC secure partition |
| **Carrier support** | Requires carrier SGP.22/SGP.32 infrastructure | Same requirement |
| **Consumer availability** | Mainstream — standard on flagship smartphones | Early commercial — selected chipsets |
The table shows that from a subscriber perspective — how you activate, switch, and manage carrier plans — iSIM and eSIM are functionally equivalent. The difference is entirely in the hardware that implements those functions.
---
## GSMA Specifications Governing iSIM
The GSMA maintains three eSIM specifications. Understanding which applies to iSIM depends on the device type.
### SGP.22 — Consumer Devices
GSMA SGP.22 (RSP Technical Specification for Consumer Devices) defines remote provisioning for smartphones, tablets, and wearables. The GSMA publishes multiple active version branches of SGP.22; refer to the GSMA website for the current release.
SGP.22 governs the SM-DP+ provisioning server, the LPA (Local Profile Assistant) on the device, and the profile download and management procedures. iSIM implementations on consumer devices — where the secure element is in the SoC — operate under the same SGP.22 procedures as conventional eSIM. The specification does not mandate a specific hardware form; it defines the software and protocol interfaces.
### SGP.32 — IoT Devices
GSMA SGP.32 v1.0, published May 2023, is specifically designed for constrained IoT devices — sensors, trackers, meters — that typically lack a user interface. The key architectural difference from SGP.22 is that SGP.32 uses an eIM (eSIM IoT Remote Manager) for server-initiated profile management: the eIM can push profile changes to the device without user interaction.
SGP.32 is particularly relevant to iSIM because the primary commercial driver for iSIM integration has been IoT. Devices using Qualcomm's Snapdragon X35, for example, combine LTE-M/NB-IoT connectivity with an integrated iSIM and are positioned for IoT deployments where an external SIM chip would be too large, too power-hungry, or too costly.
### SGP.02 — Machine-to-Machine (M2M)
SGP.02 is the earlier M2M specification, predating consumer eSIM. It uses a push-based provisioning model managed by an SM-SR (Subscription Manager Secure Routing). SGP.32 is the successor specification for IoT devices; new designs typically target SGP.32 rather than SGP.02.
---
## Benefits of iSIM
### Board Space Reduction
Removing the discrete eUICC chip frees PCB area. For a smartphone, the gain is relatively modest — eUICC chips are small. For IoT devices — particularly wearables, medical sensors, and miniaturized trackers where every square millimeter matters — eliminating an external component can be the difference between a feasible design and one that does not fit within physical constraints.
### Power Efficiency
A discrete eUICC chip requires its own power supply circuitry and draws standby current independently. Integrating the SIM function into the SoC allows the SIM's power state to be managed alongside other SoC subsystems, enabling more coordinated power gating. In battery-constrained IoT devices — especially those targeting multi-year battery life — this is a meaningful efficiency gain.
### Reduced Component Count and Supply Chain Complexity
Every discrete component added to a device introduces procurement risk, assembly steps, and potential failure points. Integrating iSIM into the SoC removes one vendor, one component, and one solder joint from the BOM. For high-volume IoT deployments this simplification has manufacturing and logistics value.
### Same Security Model
iSIM does not reduce security by integrating the secure element into the SoC. The SoC vendor implements hardware isolation — verified through industry certification programs such as GlobalPlatform TEE and Common Criteria EAL — to ensure that the iSIM partition cannot be accessed by the application processor or operating system. The cryptographic operations and credential storage remain isolated even though they share the same silicon package.
---
## Current Adoption Status
iSIM has moved from research and prototype stages into early commercial chipset integration. Adoption is concentrated in IoT modules and wearable-class SoCs rather than flagship consumer smartphones, reflecting where the space and power benefits are greatest relative to the cost of integration.
### Chipsets with Integrated iSIM
iSIM integration in commercially available chipsets is in early deployment as of mid-2026. Verified examples include:
- **Qualcomm + Thales GSMA-compliant iSIM** (announced MWC February 2023): built on a modified Snapdragon 8 Gen 2 variant — a reference/early-commercial platform demonstrating on-SoC iSIM, not a standard shipping consumer SKU.
- **Qualcomm Snapdragon X35 5G Modem-RF System** (announced MWC February 2023): targets LTE-M/NB-IoT IoT applications; reported to include iSIM capability in conjunction with the modem subsystem.
- **Arm Kigen iSIM**: Arm's dedicated iSIM IP family, targeting IoT and wearable SoC designs; licensable by chipset vendors for integration into their own SoCs.
- **Galaxy Watch4 / Watch5**: use eSIM via a discrete eUICC chip — not an on-SoC iSIM. The Exynos W920 SoC in these devices does not integrate iSIM.
Mainstream consumer smartphone SoCs — Qualcomm Snapdragon 8 Gen series, Apple A-series, Samsung Exynos flagship — as of mid-2026 continue to use a discrete eUICC chip for eSIM rather than an on-SoC iSIM integration. The transition to iSIM in flagship smartphones has not yet reached broad commercial availability.
### IoT as the Primary Adoption Driver
The earliest and most consistent deployment of iSIM has been in IoT and wearable segments, where the space and power arguments are strongest. Industrial IoT, cellular-connected wearables, asset tracking, and smart metering are the primary application areas where iSIM's component-reduction advantage is most relevant.
### Carrier and Ecosystem Support
Carriers that have deployed GSMA SGP.22 provisioning infrastructure for eSIM can support iSIM on consumer devices without additional carrier-side changes. For IoT deployments using SGP.32, carriers and connectivity platform providers must support the eIM interface. The remote provisioning protocol is the same; the change is on the device hardware side.
For IoT connectivity at scale, some enterprises use connectivity management platforms (from providers such as Emnify, Eseye, or Tele2 IoT) that sit between the carrier and the device fleet, managing profile assignment and switching across multiple carrier agreements. These platforms must support the SGP.32 eIM interface to manage iSIM-equipped IoT devices. The underlying GSMA standard defines the interface; platform support varies by vendor.
---
## Limitations and Considerations
### Limited Consumer Device Availability
As of mid-2026, iSIM is not yet available in mainstream consumer smartphones from Apple, Samsung (flagship Android), or Google (Pixel). Users evaluating iSIM as a consumer technology will find eSIM far more widely supported across the current device market. For device compatibility information, see [eSIM-Compatible Devices](/en/guides/esim-compatible-devices/).
### SoC Vendor Dependency
With eSIM, the eUICC chip vendor is separate from the SoC vendor. Manufacturers can select a preferred eUICC supplier (Infineon, ST, NXP, and others) and change suppliers independently of the SoC. With iSIM, the secure element is part of the SoC, making the SIM capability dependent on the SoC vendor's implementation and certification. This reduces design flexibility.
### Re-issue Logistics on Device Failure
Because iSIM is inside the SoC — which is part of the device motherboard — device failure or damage means the SIM function is inaccessible along with the rest of the hardware. This is the same situation as eSIM: carriers must re-issue the profile to a replacement device. There is no physical SIM card to extract.
### Certification and Compliance
SoC-integrated secure elements must obtain relevant security certifications (GlobalPlatform, Common Criteria) to be accepted by carriers and regulators. The certification process for iSIM is analogous to eUICC certification for eSIM, but it must be conducted for each SoC design where iSIM is integrated. This adds cost and time to chipset development.
The GSMA also maintains a Security Accreditation Scheme (SAS) for remote provisioning infrastructure. Both the device-side secure element and the carrier-side SM-DP+ (or eIM for SGP.32) must meet defined security requirements. These requirements apply equally to eSIM and iSIM deployments.
---
## iSIM and IoT: The Core Use Case
The GSMA SGP.32 specification, published in May 2023, was developed specifically in response to the needs of IoT device manufacturers. SGP.32 differs from the consumer eSIM specification (SGP.22) in a critical way: it does not require user interaction for profile management.
In a consumer eSIM setup, the user scans a QR code or taps through a carrier app. An IoT sensor embedded in agricultural equipment or a utility meter has no screen and no user. SGP.32 addresses this with the eIM (eSIM IoT Remote Manager), which manages profile operations — download, enable, disable, delete — from the server side, without requiring any interaction at the device.
iSIM's hardware characteristics align with SGP.32's use case: IoT devices benefit from reduced component count, low power draw, and small form factor. The combination of iSIM hardware and SGP.32 provisioning is positioned as the basis for large-scale cellular IoT deployments where deploying and managing SIMs manually would be operationally infeasible.
SGP.32 also supports constrained network environments. Unlike SGP.22, which is designed for devices with stable broadband connectivity, SGP.32 includes support for CoAP over UDP with DTLS — lightweight protocols suitable for NB-IoT and LTE-M networks where bandwidth and packet size are restricted. This makes iSIM with SGP.32 suitable for devices that communicate intermittently over low-bandwidth cellular links.
---
## How iSIM Relates to Frequency Bands and Network Access
iSIM does not change which frequency bands a device supports. Band support is determined by the modem and RF front end, not by the SIM or iSIM. A device with an iSIM accesses the same LTE, 5G NR, NB-IoT, or LTE-M frequencies as a device with a conventional SIM, provided the modem supports those bands.
One area where integration matters: when iSIM is combined with the modem in the same SoC package — as in Qualcomm's X35 design — the modem and SIM can share a more tightly integrated power management scheme. This does not affect which bands are supported, but it can reduce the overall power budget for the connectivity subsystem.
For background on how frequency bands affect coverage and roaming, see [Frequency Bands Explained](/en/guides/frequency-bands/).
One important note for roaming: iSIM devices use the same roaming authentication procedures as devices with physical SIM or eSIM. Band support determines which networks are accessible; the SIM technology (iSIM, eSIM, or physical) does not affect roaming eligibility.
---
## Summary: Physical SIM vs eSIM vs iSIM — and How to Choose
For a practical side-by-side comparison of physical SIM and eSIM — including which to choose for travel, flexibility, and everyday use — see [Physical SIM vs eSIM: Differences and How to Choose](/en/guides/sim-vs-esim/).
| | Physical SIM | eSIM | iSIM |
|---|---|---|---|
| **Hardware** | Removable card (Nano-SIM 4FF) | Discrete eUICC chip on motherboard | SIM function inside SoC |
| **Standard** | ETSI TS 102 221 | GSMA SGP.22 (consumer), SGP.32 (IoT) | GSMA SGP.22 / SGP.32 (same) |
| **Carrier activation** | Insert card | Download profile (QR / app / code) | Download profile (QR / app / eIM) |
| **Profile management** | One card = one profile | Remote provisioning; multiple stored profiles | Remote provisioning; multiple stored profiles |
| **PCB footprint** | SIM slot + card | Discrete eUICC chip | No separate SIM component |
| **Primary use case** | Universal consumer and IoT | Consumer smartphones, tablets, wearables | IoT, wearables, next-gen devices |
| **Consumer availability** | Universal | Standard on flagship smartphones | Early commercial (selected chipsets) |
iSIM is not a new provisioning standard — it reuses the GSMA remote SIM provisioning infrastructure that carriers have already built for eSIM. What changes is the hardware: the secure element moves into the SoC, removing a discrete component and enabling smaller, lower-power designs.
For users comparing plans on current devices, eSIM is the relevant technology. iSIM becomes the practical consideration when evaluating IoT module specifications, wearables, or next-generation chipsets. Use [SimFinder](/en/) to search and filter plans by eSIM support across multiple countries.
---
## Related Guides
- [What Is an eSIM?](/en/guides/what-is-esim/) — How eUICC works, the SGP.22 standard, and which devices support eSIM
- [Physical SIM vs eSIM: Differences and How to Choose](/en/guides/sim-vs-esim/) — Side-by-side comparison and a use-case decision framework
- [eSIM-Compatible Devices](/en/guides/esim-compatible-devices/) — Which iPhones, Android phones, and tablets support eSIM
- [What Is a SIM Card?](/en/guides/what-is-sim/) — IMSI, Ki, UICC form factors, and the shift from physical SIM to eSIM
- [Frequency Bands Explained](/en/guides/frequency-bands/) — How LTE and 5G frequency bands affect coverage, speed, and roaming
================================================================================
# What Is an MNO? How Mobile Network Operators Differ from MVNOs
URL: https://sim-finder.com/en/guides/what-is-mno/
Type: guides (en)
Published: 2026-06-04
An MNO — Mobile Network Operator — is the type of operator that owns the licensed radio spectrum and physical network infrastructure that every mobile phone ultimately depends on. MVNOs, sub-brands, and resellers all deliver service through MNO infrastructure. Understanding what makes an operator an MNO clarifies why coverage, network priority, and pricing work the way they do across all carrier types.
The key points covered in this article:
- The ITU definition of an MNO and what spectrum licensing means in practice
- What physical infrastructure an MNO owns and operates
- How MNOs differ from MVNOs, sub-brands, and resellers
- Why MNO status affects network priority and what that means for subscribers
- How to identify which MNO underlies any plan you are considering
If you are already familiar with MNOs and want a direct side-by-side comparison of all three carrier types, jump to [MNO vs MVNO vs Sub-Brand](/en/guides/mno-vs-mvno-comparison/). If you are new to the space, this article is the right starting point — it explains the foundation that the comparison builds on.
For definitions of all terms used here, see the [SIM & Mobile Glossary](/en/guides/glossary-index/).
---
## The ITU Definition: Spectrum Licensing as the Threshold
The International Telecommunication Union (ITU) identifies spectrum ownership as the defining threshold between an MNO and an MVNO. An MNO holds a government-issued licence to use specific radio frequency bands within a defined territory. An MVNO does not hold such a licence — it is the absence of licensed spectrum that makes an operator "virtual."
This distinction has structural consequences. A spectrum licence is issued by the national telecommunications regulator of the territory concerned — the FCC in the US, Ofcom in the UK, BNetzA in Germany, and equivalent bodies elsewhere. Licences are typically awarded through competitive auctions or beauty contests and carry legal obligations: network coverage targets, build-out timelines, quality-of-service minimums, and, in some jurisdictions, wholesale access requirements.
Because spectrum is a finite shared resource, regulators limit the number of licences per frequency band. This is why most developed markets have only a small number of MNOs — spectrum scarcity prevents unlimited entry. In contrast, there is no licence barrier to becoming an MVNO: any company that can negotiate a wholesale agreement with an MNO can in principle enter the market, which is why more than 1,986 active MVNOs were operating globally at the end of 2022, according to GSMA Intelligence.
---
## What an MNO Actually Owns
### The Radio Access Network
The radio access network (RAN) is the part of the mobile network that communicates wirelessly with subscriber devices. An MNO builds, maintains, and upgrades the RAN, which consists of:
- **Base stations and antennas** — the equipment installed on towers, rooftops, and other structures that transmits and receives radio signals on licensed frequencies
- **Backhaul connections** — the links (often fibre, but also microwave) that connect each base station to the rest of the network
- **Radio access controllers** — systems that coordinate how radio resources are allocated across devices in a cell
Building out a RAN requires substantial capital and ongoing operational expenditure. Sites must be leased, equipment purchased, planning permissions obtained, and maintenance performed continuously. This infrastructure cost is the primary reason MNO plan prices are structurally higher than MVNO prices: MNOs must recover the cost of the physical network, while MVNOs do not.
Because the RAN is an MNO's most significant asset, its quality — density of sites, spectrum used per cell, upgrade cycle — directly determines what every operator on that network can deliver to subscribers, regardless of whether they are MNO direct, sub-brand, or MVNO.
### The Core Network
Behind the radio access network sits the core network, which handles:
- **Authentication** — verifying that each SIM is permitted to access the network
- **Routing** — directing calls, texts, and data to their destinations
- **Subscriber records** — maintaining databases (historically called HLR; in 4G and 5G, called HSS and UDM) that track which SIM belongs to which subscriber and what services they are entitled to
- **Interconnect** — the points where the MNO's network connects to other mobile networks, the public telephone network, and the internet
MVNOs that operate as "full MVNOs" may own portions of a core network, but they still rely on the MNO for the radio access layer. Simpler MVNO types (light MVNOs, resellers) rely on the MNO for both the radio access and core network functions.
### Spectrum Bands and Generations
A spectrum licence specifies which frequency bands the MNO may use. Different bands have different propagation characteristics: lower frequencies (e.g. 700 MHz, 850 MHz) travel farther and penetrate buildings better, making them suited for wide-area and rural coverage. Higher frequencies (e.g. 3.5 GHz for 5G mid-band, mmWave for ultra-fast short-range 5G) carry more data but over shorter distances.
An MNO's spectrum portfolio shapes the character of its network. An operator with strong low-band holdings can cover large rural areas efficiently. An operator with mid-band and high-band spectrum can deliver higher throughput in dense urban areas. Because MVNOs and sub-brands inherit coverage from their host MNO's spectrum portfolio, the choice of host MNO is effectively a choice about which spectrum assets back your service.
---
## How MNOs Relate to MVNOs
### The Wholesale Agreement
An MNO that hosts MVNOs grants them access to its radio network at the Point of Interface (POI) — a logical connection point between the MNO's core network and the MVNO's systems. The MVNO purchases a defined amount of bandwidth through this connection, measures like 100 Mbps or 1 Gbps, and uses it to serve all its subscribers simultaneously.
The terms of the wholesale agreement determine:
- Which network generations (4G, 5G) the MVNO can offer
- What roaming agreements (if any) the MVNO can extend to its subscribers
- The priority level the MVNO's traffic receives relative to the MNO's own direct subscribers
From a consumer perspective, choosing an MVNO means choosing the host MNO's coverage area while accepting that the network priority terms are set by wholesale agreement rather than by direct subscription. For a detailed explanation of how the POI model and deprioritization work, see [What Is an MVNO?](/en/guides/what-is-mvno/)
### Network Priority: The Structural Difference
During congestion, an MNO's traffic management systems must decide whose data gets served first. The MNO's own direct subscribers are served before MVNO traffic passing through the shared POI. This is not a sign of poor MVNO quality — it is a built-in property of the wholesale access model.
In practical terms: during off-peak hours (evenings, early mornings, low-density areas), the POI bandwidth is typically under-utilised and MNO and MVNO speeds are similar. During congestion — morning and evening commutes, large events, dense urban areas — MVNO subscribers may experience slower speeds than direct MNO subscribers on the same physical network.
An MNO direct subscriber avoids this bottleneck because their traffic never passes through a shared POI — it is handled on the MNO's dedicated capacity.
The severity of this difference in practice depends on three variables: how congested the MNO's network is in your area, how much bandwidth the specific MVNO has purchased at its POI, and how many subscribers that MVNO has competing for that bandwidth at any given moment. These variables are not visible to consumers, which makes real-world speed tests in your specific location a more reliable guide than operator type alone.
---
## Sub-Brands: MNO-Owned, Lower-Priced
Sub-brands occupy a distinct middle position between the MNO's flagship plans and independent MVNOs. A sub-brand is a brand **fully owned and operated by an MNO**, positioned at a lower price point.
Examples:
- **Cricket Wireless** — owned by AT&T; operates on AT&T's network
- **Metro by T-Mobile** — owned by T-Mobile; operates on T-Mobile's network
- **Visible** — a wholly-owned Verizon subsidiary (branded "Visible by Verizon" since June 2022)
- **UQ mobile** (Japan) — owned by KDDI (au)
- **Y!mobile** (Japan) — owned by SoftBank
Because a sub-brand is part of the same corporate structure as the MNO, the MNO can configure its internal traffic policy to give sub-brand traffic better treatment than wholesale MVNO traffic. Sub-brands typically sit between the MNO's premium direct plans and independent MVNOs on the network priority hierarchy.
Sub-brands also usually share the parent MNO's retail store network for activations and in-person support, which independent MVNOs — mostly online-only operators — cannot offer.
The distinction matters when comparing plans: a sub-brand priced between the MNO and a budget MVNO often reflects a genuine difference in network priority, not just marketing. For a detailed comparison of all three types across eight practical dimensions, see [MNO vs MVNO vs Sub-Brand](/en/guides/mno-vs-mvno-comparison/).
---
## How Many MNOs Are There?
The number of licensed MNOs in a market is set by the availability of spectrum and regulatory policy. Most developed markets have between two and four national MNOs.
Fewer MNOs means less network-level competition; more MNOs means more wholesale capacity for MVNOs to lease, which generally benefits MVNO pricing and availability. This structural dynamic is one reason why MVNO ecosystems vary so widely between countries — a three-MNO market with mandated wholesale access will typically support a more competitive MVNO landscape than a two-MNO market with voluntary wholesale arrangements.
| Market | Primary National MNOs |
|--------|-----------------------|
| United States | AT&T, T-Mobile, Verizon |
| United Kingdom | EE, O2, VodafoneThree (formed May 2025) |
| Germany | Deutsche Telekom, Vodafone, Telefónica (O2) |
| Australia | Telstra, Optus, TPG Telecom |
| Japan | NTT Docomo, KDDI (au), SoftBank, Rakuten Mobile |
| South Korea | SK Telecom, KT, LG Uplus |
This list covers primary national MNOs and is not exhaustive. Some countries have regional MNOs in addition to national operators. Market structure changes over time through mergers, acquisitions, and new spectrum awards — the 2025 merger of Vodafone UK and Three UK into VodafoneThree is a recent example.
The number of MNOs matters to consumers because every MVNO and sub-brand in a market is hosted on one of the MNOs in that market. If a country has three MNOs, then every MVNO in that country is ultimately dependent on one of those three networks. Identifying which MNO underlies any plan you consider is the first step in evaluating coverage.
---
## What MNO Status Means for 5G
An MNO deploys and manages its own 5G network, including spectrum allocation, base station rollout, and the introduction of 5G Standalone (SA) architecture as it matures. MNO direct subscribers gain access to whatever 5G tier the carrier has deployed in their area.
MVNOs and sub-brands do not automatically inherit the same 5G access:
- A sub-brand hosted on an MNO typically receives 5G access, but at the priority level determined by the parent MNO's internal policy.
- An independent MVNO must specifically negotiate 5G access in its wholesale agreement. Even if an MVNO offers 5G, the agreement may cover only certain 5G tiers (for example, sub-6 GHz 5G but not mmWave).
This means that when evaluating 5G coverage claims from any operator other than a direct MNO, it is worth confirming which 5G tiers are included and whether the underlying host MNO's 5G rollout covers your area.
---
## MNO Advantages for Specific User Profiles
### Heavy Data Users
For users who rely on fast mobile data during commuting hours or at crowded events — video calls, real-time streaming, cloud-connected work tools — being on an MNO direct plan provides the most predictable peak-time performance. The absence of POI-based deprioritization means congestion affects MNO direct subscribers last.
### International Travelers
MNOs negotiate their own international roaming agreements with partner networks around the world. These agreements are typically broader in geographic scope than what an MVNO can offer its subscribers, since MVNO roaming rights are a subset of the host MNO's roaming rights and must be specifically negotiated in the wholesale agreement. For users who need reliable connectivity in multiple countries, an MNO's direct roaming plan is often the most straightforward option. For travel-specific alternatives, [4 Ways to Stay Connected Abroad](/en/guides/four-options/) covers the full range of options including travel eSIMs, which can be more cost-effective than roaming. If you decide a travel eSIM fits your needs better than your home MNO's roaming plan, [How to Choose a Travel eSIM](/en/guides/how-to-choose/) walks through the five criteria to evaluate, and [Travel eSIM Provider Comparison](/en/guides/provider-comparison/) compares the leading providers by coverage and plan structure.
### Users Who Need In-Person Support
MNOs maintain retail store networks staffed to handle SIM activations, device issues, and account problems in person. Independent MVNOs are predominantly online-only. If you anticipate needing face-to-face support — for example, when setting up service for a family member who is not comfortable with online account management — an MNO or a sub-brand with a shared retail presence is the more accessible choice.
### Business Users
MNOs offer business and enterprise plans with dedicated account management, SLA commitments, and IoT fleet connectivity options that independent MVNOs rarely match. For companies managing dozens or hundreds of SIMs across multiple devices, an MNO business plan provides the account control and reliability guarantees that consumer-grade MVNO plans do not.
---
## MNO vs MVNO: When the MVNO Is the Better Choice
Being clear about what an MNO is does not mean an MNO direct plan is always the right choice. For users whose mobile data use is primarily off-peak, who are comfortable with online-only support, and who want month-to-month flexibility, an independent MVNO on the same host network can provide essentially the same day-to-day experience at a lower monthly cost.
The structural advantage of an MNO — higher network priority — is most valuable during peak-time congestion. If your usage pattern is not congestion-sensitive, paying for that advantage may not be necessary.
Use [SimFinder](/en/) to compare current plans across MNOs and MVNOs in your country and see whether the price difference reflects a trade-off that matters for your specific usage. For guidance on which type of carrier fits different usage profiles, the [MNO vs MVNO vs Sub-Brand](/en/guides/mno-vs-mvno-comparison/) comparison walks through a decision framework by user type.
---
## Identifying the MNO Behind Any Plan
Because every MVNO and sub-brand is hosted on an MNO, identifying the underlying MNO is the first practical step when evaluating coverage. Methods:
1. **Check the operator's website.** Most MVNOs disclose their host network under a "Coverage" or "How it works" section, often in legal terms or FAQs.
2. **Check your phone's network name after inserting the SIM.** In some configurations, the status bar shows the underlying MNO name rather than the MVNO brand.
3. **Use the host MNO's coverage map.** Once you know which MNO underlies a plan, check that MNO's coverage map directly — it is the most accurate indicator of signal strength in specific locations.
If you are evaluating a backup or secondary SIM on a different MNO's network for resilience, [Backup Line: Adding a Second SIM for Outage Resilience](/en/guides/sub-line/) explains the options and trade-offs.
### A Note on "Network" vs "Coverage" Claims
Operators and comparison sites sometimes use the terms "network" and "coverage" loosely. A claim that an MVNO "uses the Verizon network" tells you about the underlying infrastructure — it does not mean the MVNO plan includes every feature Verizon offers (such as domestic roaming onto partner networks in fringe areas, or full 5G tier access). Read the plan's terms alongside the coverage claim to understand exactly what is and is not included.
---
## FAQ
The structured FAQ answers are in the frontmatter above for schema.org/FAQPage compatibility. Below are expanded answers to common questions.
**Is an MNO always more expensive than an MVNO?**
Structurally, yes — MNOs carry capital and operational costs that MVNOs do not, so their baseline cost structure is higher. However, the price gap varies by market, plan tier, and promotional pricing. An MNO's mid-tier prepaid plan may be competitively priced against a well-established MVNO in the same market. No specific prices are quoted in this article because pricing changes frequently. Use [SimFinder](/en/) to compare current pricing in your country.
**Can an MNO block an MVNO from accessing its network?**
This depends on the regulatory environment. In some markets, regulators mandate that MNOs offer wholesale access to MVNOs. In others, wholesale access is voluntary and commercial. Where access is mandatory, MNOs must offer it on regulated terms. Where it is voluntary, an MNO can decline to host MVNOs or can decline to renew existing agreements.
**What happens to MVNO subscribers if their host MNO is acquired or merges?**
Wholesale agreements are commercial contracts; a merger or acquisition does not automatically terminate them. However, the new parent entity may renegotiate terms, absorb the MVNO into its own sub-brand portfolio, or allow the agreement to lapse. The VodafoneThree merger in the UK (May 2025) is a recent example of a structural change that affected MVNOs hosted on both predecessor networks. Subscribers are typically notified in advance of any service changes.
**Does choosing an MNO guarantee the best network performance?**
An MNO direct plan gives you the highest network priority on that MNO's infrastructure, but network performance also depends on the MNO's investment level, spectrum holdings, and network density in your specific area. An MNO with lighter investment in a given region may deliver weaker real-world performance than a well-funded competitor's sub-brand in the same area. Coverage maps and independent speed test data are more reliable indicators of real-world performance than operator type alone.
---
## Related Guides
- [What Is an MVNO?](/en/guides/what-is-mvno/) — How MVNOs lease capacity from MNOs, how the POI model works, and what deprioritization means in practice
- [MNO vs MVNO vs Sub-Brand](/en/guides/mno-vs-mvno-comparison/) — Side-by-side comparison across eight dimensions: coverage, peak-time speed, price, customer service, 5G access, roaming, perks, and contract flexibility
- [Travel eSIM Provider Comparison](/en/guides/provider-comparison/) — When an MNO roaming plan is not the most cost-effective travel option, these providers offer alternatives
- [Backup Line: Adding a Second SIM for Outage Resilience](/en/guides/sub-line/) — How to use a second MNO's network as a backup to your primary carrier
- [How to Choose a Travel eSIM](/en/guides/how-to-choose/) — Five criteria for evaluating travel data plans when you are away from your home MNO's network
================================================================================
# Mobile Number Portability (MNP) Explained — How to Keep Your Number When Switching Carriers
URL: https://sim-finder.com/en/guides/what-is-mnp/
Type: guides (en)
Published: 2026-05-20
Mobile Number Portability (MNP) lets you keep your phone number when you move to a different carrier. You do not need to hand out a new number to contacts, update business cards, or re-register with every service you use.
The process involves three things: collecting a transfer credential from your current carrier, providing it to your new carrier, and waiting for the port to complete — a matter of hours in most countries.
This guide explains how the system works technically, the exact steps for the US, UK, and Australia, what can go wrong, and how to protect services that rely on SMS during the switch.
---
## What Is Mobile Number Portability?
MNP is a regulatory and technical framework that allows a mobile subscriber to retain their phone number when transferring service to a different carrier. Without it, your number would belong to the carrier, not to you, and switching would mean losing it permanently.
Phone numbers are assigned within the ITU-T E.164 numbering plan, which gives each country a country code and allocates number ranges to carriers. Historically, this meant a number was permanently tied to the carrier that owned the range. MNP breaks that tie by introducing a routing layer that redirects calls and messages to wherever the number currently lives.
The first country to implement MNP was Singapore in 1997. The ITU subsequently published Recommendation Q.769.1 (1999), which defined the signalling protocol for number portability within SS7 networks. Today, most countries with significant mobile markets have mandated MNP by law.
The regulatory goal is competition: if switching carriers means losing your number, many customers will stay with a carrier they dislike rather than go through the disruption. MNP removes that barrier.
---
## How MNP Works Technically
Understanding the technical mechanics helps explain why porting takes time and why certain failure modes exist.
### The Porting Database
When a number is ported, it is registered in a central or distributed porting database — sometimes called a Number Portability Database (NPDB) or a Ported Number Register. Different countries use different architectures: some use a single national database, others use decentralised query systems between carriers.
Every time a call or message is routed toward a ported number, the originating network queries this database to find which carrier currently hosts the number, then routes traffic accordingly. This lookup happens in real time using SS7 signalling.
### ENUM and IP Routing
For VoIP and IP-based messaging networks, ENUM (E.164 Number Mapping, defined in IETF RFC 6116) provides an equivalent DNS-based lookup mechanism. ENUM maps a telephone number to a URI, allowing VoIP systems to locate the correct endpoint without relying solely on SS7. This is how services like WhatsApp and iMessage can find the right destination for a number that has been ported.
### MSRN and Call Routing
In GSM and UMTS networks, a Mobile Station Roaming Number (MSRN) is used for call delivery. When a call arrives at the carrier that previously owned the number range, that carrier (or the routing layer) uses the ported number database to obtain an MSRN, which points to the number's current home network. The call is then forwarded transparently — the caller hears nothing unusual.
### The Port-In / Port-Out Model
Every port has two sides:
- **Port-out**: your current (losing) carrier releases the number.
- **Port-in**: your new (gaining) carrier claims it and updates the routing database.
In most countries, the gaining carrier initiates the process after you provide authorisation. The losing carrier validates your identity details, confirms no contractual block exists, and releases the number on the agreed date.
---
## The MNP Process: Step-by-Step
The exact steps differ by country, but the underlying sequence is the same.
1. **Gather your account details** — You need your account number with the current carrier and a transfer credential (PIN, transfer code, or authorisation code depending on the country). In most markets, these are not the same as your online login password.
2. **Request a transfer code from your current carrier** — In the US this is called a Number Transfer PIN. In the UK it is a PAC code obtained by texting 65075. In Australia the gaining carrier handles identity verification directly, so you do not need a separate code.
3. **Sign up with your new carrier** — During the sign-up flow, provide your number and the transfer credential. The new carrier submits the port request to the database on your behalf.
4. **Activate your new SIM or eSIM** — Your new carrier will issue a physical [SIM card](/en/guides/what-is-sim/) or an [eSIM](/en/guides/what-is-esim/) profile. Do not activate it until the port request has been submitted; activating early can sometimes interfere with the transfer.
5. **Wait for the port to complete** — You will lose service on your old SIM for a period ranging from a few minutes to a few hours. When the new SIM shows signal and your number works for calls and texts, the port is done.
6. **Confirm and keep your old SIM until verified** — Before discarding or returning the old SIM, send a test message to yourself and receive a call. Only then is it safe to dispose of the old SIM.
---
## How Long Does Porting Take?
Port timing is set by national regulation and varies significantly.
| Country | Typical completion time | Regulatory basis |
|---------|------------------------|-----------------|
| United Kingdom | Within 1 working day of PAC submission | Ofcom switching rules (2019) |
| Australia | ~3 hours for simple ports | ACMA industry standard |
| United States | 1 business day (simple port) | FCC Local Number Portability rules |
| European Union | Within 1 working day | Directive 2002/22/EC / EECC 2018/1972 |
| Germany | 1 working day (gaining carrier initiates) | Bundesnetzagentur, §59 TKG |
| France | 1 working day for prepaid; up to 3 days for postpaid | ARCEP Decision No. 2022-2148 |
| Canada | 2.5 hours for wireless simple ports | CRTC Wireless Code (2013, revised 2017) |
| Japan | Same day to next business day (online) | Ministry of Internal Affairs guidelines |
"Simple port" typically means a standard postpaid or prepaid consumer line. Business accounts with multiple lines, or ports involving a change of account holder name, may take longer.
---
## Country-Specific Rules
### United States
The FCC's Local Number Portability (LNP) mandate requires US carriers to port numbers upon a valid customer request. To port your number, you need:
- Your **account number** — visible on your bill or in your carrier's account portal.
- A **Number Transfer PIN** — a separate code (distinct from your account password or billing PIN) that most carriers now require you to set up in advance. If you have not set one, do this before contacting the new carrier.
In practice, US carriers generally do not charge porting fees, and the FCC prohibits carriers from refusing a port due to an outstanding balance. ([FCC: Porting — Keeping Your Phone Number When You Change Providers](https://www.fcc.gov/consumers/guides/porting-keeping-your-phone-number-when-you-change-providers))
The FCC mandates that simple ports be processed within one business day, though the actual SIM activation window may extend several hours into that period.
### United Kingdom
Ofcom introduced the Text-to-Switch system in July 2019. To get your PAC code:
1. Text **PAC** to **65075** from the number you want to port.
2. Your current carrier must send the PAC within 60 seconds, free of charge.
3. The PAC is valid for 30 days.
4. Give the PAC to your new carrier when signing up. The port must complete within one working day of the new carrier receiving a valid PAC.
([Ofcom: Switching — mobile](https://www.ofcom.org.uk/phones-and-broadband/switching-provider/switching-mobile))
If you want to leave your carrier without keeping your number, text **STAC** to 75075 instead. You will receive a Service Termination Authorisation Code.
### Australia
In Australia, the gaining carrier — not the customer — handles the port-out process. You authorise the new carrier to request the transfer on your behalf. ACMA rules require the gaining carrier to verify your identity before proceeding, as a measure against fraudulent porting.
Industry service levels require 90% of simple mobile ports to complete within 3 hours and 99% within 2 business days. There is no fee for porting. ([ACMA: Keep or transfer your phone number](https://www.acma.gov.au/keep-or-port-your-phone-number))
The pre-porting identity verification requirement was strengthened by the *Telecommunications (Mobile Number Pre-Porting Additional Identity Verification) Industry Standard 2020*, introduced specifically to combat port-out fraud.
### European Union
EU Directive 2002/22/EC (the Universal Service Directive) requires that subscribers be able to retain their phone numbers when switching providers, and that the process must complete within one working day. Porting must be free of charge. Note: this directive has been superseded by the European Electronic Communications Code (Directive 2018/1972), which maintains and reinforces these number portability obligations for member states.
Individual member states vary in how they implement the request process — some use a PAC-style code system, others have the gaining carrier handle the transfer directly.
### Germany
Germany implements the EU number portability rules through §59 of the Telekommunikationsgesetz (TKG). The gaining carrier initiates the port request on the customer's behalf. The Bundesnetzagentur (Federal Network Agency) mandates completion within one working day for standard consumer ports. The process is free of charge for the subscriber. If you hold a German number under a contract with a minimum term, you remain liable for any early termination fee, but the fee cannot be used to block the port itself.
### France
French number portability is regulated by ARCEP (Autorité de Régulation des Communications Électroniques et des Postes). Decision No. 2022-2148 requires that simple mobile ports complete within one working day for prepaid lines. Postpaid ports may take up to three working days in practice. Porting is free of charge. The gaining carrier handles the port request after you provide your RIO (Relevé d'Identité Opérateur) code — obtain it by calling 3179 from your current mobile line (free of charge, available 24/7). The RIO is valid for 30 days.
### Canada
The CRTC (Canadian Radio-television and Telecommunications Commission) Wireless Code mandates that simple wireless port requests complete within 2.5 hours. Porting is free. You provide your account number and transfer PIN to the new carrier, which initiates the port. The CRTC Code also prohibits carriers from imposing a cancellation fee solely for porting away; however, remaining device financing obligations or contract early termination fees still apply.
### Japan (brief note)
Japan operates two parallel systems. The traditional method requires obtaining a reservation number (MNP予約番号) from the current carrier, valid for 15 days. Since May 24, 2023, a One-Stop MNP system allows the entire transfer to be completed on the new carrier's website, without contacting the old carrier. The One-Stop system is online-only. ([MIC Japan](https://www.soumu.go.jp/menu_kyotsuu/important/kinkyu02_000515.html))
---
## What You Need to Provide
Regardless of country, you will be asked for some combination of the following:
- **Phone number** to be ported (the number you want to keep).
- **Account number** with the current carrier — this is not your phone number; it is an internal identifier on your billing account.
- **Transfer credential** — a PIN, transfer code, or authorisation code (PAC in the UK; Number Transfer PIN in the US). In Australia, the gaining carrier verifies your identity directly.
- **Registered name** — the name exactly as it appears on the account. Even small discrepancies (a middle name, a hyphen) can cause the port to be rejected.
- **Registered address** — the billing or service address on the account.
For [eSIM](/en/guides/what-is-esim/) ports, the process is the same. After the port completes, your eSIM profile on the new carrier's network will respond to your ported number.
If your current carrier's device is [SIM-locked](/en/guides/sim-lock/), resolve that before initiating a port. A locked device will not connect to the new carrier even after the number transfers successfully.
Some carriers require you to have been a customer for a minimum period (typically 30–90 days) before they will unlock a device. Plan ahead if you are approaching the end of a contract and want to port out immediately upon expiry.
---
## Common Failure Modes
The majority of failed or delayed ports fall into a small number of categories.
**Name or address mismatch** — The most frequent cause. The name submitted to the losing carrier must match the account exactly. If your account shows "Robert Smith" and you submit "Bob Smith," the port will be rejected. Check your carrier's online portal for the exact registered name before initiating a switch.
**Wrong transfer credential** — Using your account login password, billing PIN, or SIM card PIN instead of the specific Number Transfer PIN (US) or PAC code (UK). These are different things. Request the correct credential from your current carrier before starting the process.
**Account under contract lock or administrative hold** — Some carriers place a 60-day lock on accounts after a recent SIM swap or account change. If your account has been recently modified, contact your carrier to confirm whether a porting hold applies.
**Outstanding balance** — While carriers in the US and most other markets cannot legally refuse to port because of a balance, some carriers may attempt to delay the process or notify the customer. If this happens, contact your national regulator.
**Prepaid account with insufficient balance** — Some prepaid accounts must have a non-zero balance to remain active long enough to complete a port. Top up before initiating if in doubt.
**eSIM activation race condition** — When porting to a carrier that issues an eSIM, some platforms prompt you to download and activate the eSIM profile immediately after submission — before the port-out from the old carrier has completed. If you activate the eSIM too early, the profile may bind to the new carrier's network before the number transfer registers, resulting in the eSIM showing signal but the ported number not yet routed correctly. The fix is to wait for an explicit confirmation from the new carrier that the port is complete before tapping "Activate" on the eSIM install prompt. Typically this takes 15–60 minutes after submission; do not rush the activation step.
**Account locked by the customer** — Since the FCC's 2023 SIM-Swap and Port-Out Fraud rules (FCC 23-95) came into effect, US carriers offer free account locking features that block port-out requests as a fraud prevention measure. Verizon offers separate SIM Protection and Number Lock features; AT&T introduced Wireless Account Lock in 2025. If you have enabled such a lock, disable it before requesting a port.
---
## Risks During the Port
### SMS 2FA Interruption
The most practically important risk. During the window when the number is transitioning — which can range from minutes to a couple of hours — SMS messages may not be reliably delivered to either SIM. If you trigger an SMS-based two-factor authentication request (for a bank, email account, trading platform, etc.) during this window, you may not receive the code and could be locked out temporarily.
**Mitigation:** Before you start the port, identify any critical services that send 2FA codes to your number. Log in to those services before initiating the port, or wait until you have confirmed the port is complete before using them.
A further mitigation strategy is to temporarily switch critical accounts from SMS-based 2FA to an authenticator app (such as Google Authenticator, Authy, or Apple Passwords) before the port. Authenticator apps generate codes locally and do not depend on SMS delivery, so they continue to work without interruption throughout the port window. After the port completes, you can keep the authenticator app active — doing so also improves your long-term security posture, since SMS 2FA is vulnerable to SIM-swap attacks.
### Voicemail Loss
Voicemail messages stored on your old carrier's servers are not transferred during a port. They remain accessible only on the losing carrier's system, usually for a limited period after the account closes. Download or note any important voicemails before the port completes.
To preserve access to voicemails that arrive during the transition window, set up call forwarding on your old number to a secondary number or a VoIP number before initiating the port. This way, any calls that land on the old routing path can still reach you while the porting database updates propagate across networks — a process that can take several hours for international carriers.
Alternatively, consider switching to a third-party visual voicemail application (such as Google Voice in the US, or YouMail) before the port. These services store voicemails in the cloud independently of your carrier, so they survive a carrier switch without any data loss. Once the port completes, re-link the app to your ported number on the new carrier.
### Family Plan and Shared Account Complications
If your line is part of a shared family plan, porting one line may affect billing for the whole account. The remaining lines may move to a different pricing tier. Confirm with your carrier how a partial port-out affects the remaining plan members.
Most family plans use line-count tiers for pricing — for example, a four-line plan at a lower per-line rate than a three-line plan. Removing one line via a port-out may automatically bump the remaining lines to the higher-priced tier, increasing the monthly bill for everyone still on the account. Before porting, ask your current carrier for the exact new rate that would apply to the remaining lines.
Additionally, lines on a family plan are typically owned by the primary account holder, not by the individual line user. If you are not the primary account holder, you may need the account holder to authorise the port-out on your behalf — either by providing the account PIN or by contacting the carrier directly. Without this authorisation, the losing carrier will reject the port request. In some cases, where the primary account holder is no longer reachable (e.g., a deceased family member or a former employer), you may need to initiate a formal account ownership transfer before the port can proceed.
### Business Accounts
Business accounts with multiple lines often have different porting procedures. They may require a letter of authorisation (LOA) or involve longer processing times. Individual lines on a business account generally cannot be ported individually without the account holder's authorisation.
For bulk ports — where a company is moving all lines from one carrier to another — carriers typically provide a dedicated migration team and a structured port window (often scheduled overnight or over a weekend to minimise operational disruption). Bulk ports require a signed LOA listing all numbers to be transferred, and the account's tax identification number or business registration number is usually required for identity verification. Allow at least two weeks of lead time when coordinating a bulk business port.
### International Number Porting
MNP is a national framework — numbers cannot be ported between countries. If you are an international resident who wants to keep a foreign number while using a local carrier, you will need a separate solution (such as a VoIP number or a dual-SIM setup). For more on how [MVNOs](/en/guides/what-is-mvno/) compare on international features, see the [MNO vs MVNO comparison guide](/en/guides/mno-vs-mvno-comparison/).
Some travellers and expatriates use a dual-SIM or dual-eSIM device to maintain both a home country number and a local data SIM simultaneously. On modern iPhones and Android devices that support two active eSIM profiles, this allows receiving SMS on a home number (important for 2FA) while routing data calls through a cheaper local plan. This is not number porting — both numbers remain on their original carriers — but it is an effective workaround when cross-border porting is not possible.
---
## FAQ
*(See structured FAQ items in the frontmatter above for display in site search and rich results.)*
### Will I lose my number if I cancel first?
Yes. Never cancel your old account before the port completes. Cancellation releases the number back to the carrier's pool. Once released, it can be reassigned to another subscriber, and recovery is either impossible or requires a lengthy dispute process with the carrier. Always wait for explicit confirmation from your new carrier that the port is complete before contacting your old carrier about cancellation.
### What if my port is rejected?
The new carrier is required to inform you of the rejection reason. The most common reasons are a name or address mismatch, an incorrect transfer PIN, or an active account lock. Fix the specific mismatch, re-request the port with corrected details, and the process restarts. If the losing carrier refuses to port without a valid regulatory reason, you can file a complaint with your national regulator (FCC in the US, Ofcom in the UK, ACMA in Australia, or Bundesnetzagentur in Germany).
### Can I port an eSIM to a physical SIM, or vice versa?
Yes. The port process is credential-based, not tied to the physical form of the SIM. When porting from a physical SIM carrier to a carrier that issues eSIMs, the new carrier will provide a QR code or activation code after the port completes. When moving from eSIM back to a physical SIM, the new carrier ships or provides a physical card, and the port transfers the number onto it. The transition window and risks are the same regardless of SIM type.
---
## Related Guides
- [What Is a SIM Card?](/en/guides/what-is-sim/) — Understanding the physical credential that MNP transfers between carriers.
- [What Is an eSIM?](/en/guides/what-is-esim/) — How porting works when your new carrier issues an eSIM instead of a physical card.
- [SIM Lock Explained](/en/guides/sim-lock/) — Check whether your device is locked to your current carrier before you port.
- [What Is an MVNO?](/en/guides/what-is-mvno/) — Many people port to an MVNO to reduce costs; understand what you are moving to.
- [MNO vs MVNO vs Sub-Brand Comparison](/en/guides/mno-vs-mvno-comparison/) — Side-by-side analysis of network quality, peak-time speeds, pricing, customer service, and 5G access by carrier type, with a decision tree by user profile.
================================================================================
# What Is an MVNO? — How Mobile Virtual Network Operators Work
URL: https://sim-finder.com/en/guides/what-is-mvno/
Type: guides (en)
Published: 2026-04-24
An MVNO — Mobile Virtual Network Operator — lets you buy mobile service from a company that has no radio towers of its own. The operator leases network capacity from a licensed carrier and sells it under its own brand and pricing structure. The result: competitive plans without the infrastructure overhead that drives up prices at traditional carriers.
The key points covered in this article:
- The formal ITU definition and how MVNOs differ legally from MNOs
- How network capacity is leased through the Point of Interface (POI), and the role of MVNE and MVNA intermediaries
- The spectrum from full MVNOs to light MVNOs to resellers — and why the distinction matters to you as a consumer
- Who the major MVNOs are in the US, UK, and other markets
- Where the price advantage comes from, and what you give up
- How to tell an independent MVNO apart from an MNO-owned sub-brand
For a quick look at how a SIM card works in general — whether issued by an MNO or an MVNO — see [What Is a SIM Card?](/en/guides/what-is-sim/) For plain-English definitions of every term used in this article, the [SIM & Mobile Glossary](/en/guides/glossary-index/) is the reference starting point.
---
## What Is an MVNO?
### The ITU Definition
The International Telecommunication Union (ITU) defines an MVNO as an operator that provides mobile services to end users **without holding a government licence for radio spectrum**. That single distinction separates MVNOs from all traditional carriers (MNOs, or Mobile Network Operators): an MNO wins a spectrum auction, builds towers, and transmits signals over licensed frequencies. An MVNO does none of those things.
The ITU's framing — from its 2001 overview and reiterated in subsequent policy documents — identifies spectrum ownership as the threshold. Everything else an MVNO does (billing, customer service, pricing, app development, SIM manufacturing) is optional and varies by business model.
### The MNO Behind Every MVNO
Because an MVNO has no radio network, every call you make, every text you send, and every megabyte of data you consume physically travels over an MNO's infrastructure. The MVNO is a commercial layer on top of that infrastructure, not a separate radio network. When you see "No service" on an MVNO SIM, the problem is almost certainly the host MNO's coverage, not the MVNO itself.
At the end of 2022, GSMA Intelligence counted more than **1,986 active MVNOs** operating in over 80 countries. MVNOs range from global travel SIM providers to hyper-local brands targeting specific communities or use cases.
An MNO (Mobile Network Operator) holds a spectrum licence from the government of the territory in which it operates and owns the radio access network — antennas, base stations, backhaul, and core network — that makes wireless communication physically possible. You can read more about how SIMs work across both MNO and MVNO networks in [What Is a SIM Card?](/en/guides/what-is-sim/)
---
## How an MVNO Leases Network Capacity
### The Point of Interface (POI)
The most technically significant concept in MVNO economics is the **Point of Interface**, commonly abbreviated POI. The POI is the logical connection point at which an MNO's network hands off traffic to (or receives traffic from) an MVNO's systems.
Picture it as a shared data pipe between the MNO's core network and the MVNO's infrastructure. The MVNO purchases a specified amount of bandwidth through this pipe — measured in units such as 100 Mbps or 1 Gbps. That capacity is the ceiling for all traffic combined across every subscriber on that MVNO at any given moment.
This has a direct consequence for users: **when many MVNO subscribers are active simultaneously, the shared POI bandwidth fills up, and speeds slow down.** The MNO's own direct subscribers are not subject to this bottleneck because their traffic does not pass through the MVNO's POI — it remains on the MNO's own dedicated capacity. This is the structural root of network deprioritization, which is covered in detail later in this article.
### MVNE and MVNA — The Middlemen
Not every company that wants to launch an MVNO service builds its own interconnect with an MNO. Two types of intermediary make it easier to enter the market:
**MVNE (Mobile Virtual Network Enabler)**
An MVNE is a technology and services platform provider. It builds and operates the back-end infrastructure that an MVNO needs: SIM management, billing systems, customer management platforms, and the technical connection to the host MNO's POI. An MVNO using an MVNE focuses entirely on its brand, marketing, and customer relationships, while the MVNE handles the plumbing.
**MVNA (Mobile Virtual Network Aggregator)**
An MVNA sits one layer above. It negotiates wholesale capacity agreements with one or more MNOs, then sub-licenses that capacity to multiple MVNOs at commercial terms. The MVNA consolidates volume across many small brands, enabling each one to access better wholesale rates than they could negotiate individually.
The chain therefore runs: **MNO → MVNA (optional) → MVNE (optional) → MVNO → End user.** In practice, some operators combine roles — a company may be both an MVNA and an MVNE, or an MVNO may negotiate directly with an MNO and build its own enabler infrastructure.
### Types of MVNO by Infrastructure Depth
The MVNO label covers a broad range of business models depending on how much of the mobile infrastructure the operator controls:
| Type | What the operator owns | Typical examples |
|------|------------------------|-----------------|
| **Full MVNO** | Its own core network (HLR/HSS, billing, authentication), negotiates directly with MNO for radio only | Large, sophisticated MVNOs with millions of subscribers |
| **Light MVNO** (Thick MVNO) | SIM management and some back-end functions; relies on MVNE for deeper infrastructure | Mid-size retail brands entering mobile |
| **Reseller / Branded Reseller** | Essentially nothing — resells MNO plans under a different brand with its own pricing | Smallest operators, loyalty schemes, retail chains |
A **full MVNO** has maximum control over pricing, features, and network configuration. It can implement its own quality of service policies and innovate independently of the host MNO. A **reseller** has minimum overhead but is almost entirely dependent on the host MNO for every technical capability.
From a consumer perspective, the depth of MVNO infrastructure rarely changes your day-to-day experience — what matters is the host MNO's coverage in your area and the terms of the wholesale agreement.
---
## Examples of MVNOs Around the World
MVNOs exist in virtually every developed mobile market. The following are illustrative examples; this is not an exhaustive list.
### United States
The US market has hundreds of MVNOs operating on the networks of AT&T, T-Mobile, and Verizon. Well-known independent MVNOs include:
- **Consumer Cellular** — primarily AT&T network (historically T-Mobile too); targeted at older adults; strong customer service reputation
- **US Mobile** — T-Mobile and Verizon networks; flexible multi-network plans
- **Google Fi Wireless** — T-Mobile, US Cellular, and Wi-Fi calling; targeted at Android users
Note: Some brands commonly grouped with independent MVNOs are actually carrier-owned. **Mint Mobile** was acquired by T-Mobile in May 2024 and is now a T-Mobile subsidiary. **Visible** is a wholly-owned Verizon subsidiary (rebranded as "Visible by Verizon" in June 2022). **TracFone** has been a Verizon subsidiary since 2021. These are covered in the [MVNO vs Sub-Brand section](#mvno-vs-sub-brand-whats-the-difference) below.
Note that some brands commonly grouped with MVNOs in casual conversation are actually MNO-owned sub-brands — this distinction is covered in the [MVNO vs Sub-Brand section](#mvno-vs-sub-brand-whats-the-difference) below.
### United Kingdom
- **giffgaff** — O2 network; community-run support model; popular prepaid SIMs. Note: giffgaff is an O2-owned flanker brand (technically a sub-brand), not a fully independent MVNO.
- **Tesco Mobile** — O2 network (joint venture with Tesco); large subscriber base driven by retail presence
- **Lebara** — Vodafone network; targets international calling markets
- **Lyca Mobile** — multiple host networks; strong international calling features
### Australia
- **Amaysim** — Optus network (Optus-owned since 2021); popular for no-contract plans
- **Aldi Mobile** — Telstra network; broad national coverage at low prices
### Europe
- **MVNO penetration is particularly high** in countries such as Germany, France, the Netherlands, and Belgium. Major retail chains, banks, and media companies frequently operate MVNOs as complementary services to their core offering.
### Asia-Pacific and Japan
In Japan, dozens of MVNOs (locally called 格安SIM, *kakuyasu SIM*, meaning "cheap SIM") operate on NTT Docomo, KDDI (au), and SoftBank networks. Well-known examples include IIJmio, OCN Mobile ONE, and mineo.
To compare available plans and their real-world pricing across countries, use the [SimFinder plan comparison tool](/en/).
---
## Benefits of Choosing an MVNO
### Lower Plan Prices
The primary reason most people choose an MVNO is price. Because MVNOs carry none of the capital expenditure associated with building and maintaining a radio network — no spectrum licence fees, no tower construction, no antenna upgrades — their cost base is structurally lower than an MNO's. That saving is partly passed on to consumers through lower monthly charges.
An IoT Analytics benchmark study found that MVNO pricing averages roughly 32% lower than MNO pricing for comparable data volumes (MNO average approximately USD 7.30/month vs MVNO average approximately USD 4.98/month in the IoT data segment). In some markets, independent MVNOs undercut the cheapest MNO plan by up to 84%. While those figures are drawn from IoT plan data, the directional trend holds for consumer plans as well.
No specific plan prices are quoted in this article because they change frequently. Use [SimFinder](/en/) to compare current pricing in your country.
### Flexible, Short-Term Commitments
Many MVNOs — especially in prepaid markets — offer month-to-month or even shorter-term plans with no lock-in contracts. This is particularly useful if you need data connectivity for a trip, want to test a network before committing, or simply dislike long-term contracts. For context on how prepaid and contract options compare for different travel scenarios, see [4 Ways to Stay Connected Abroad](/en/guides/four-options/).
### Specialised Plans for Specific Needs
Because MVNOs are not trying to serve every possible customer, many focus on niches:
- International calling plans for diaspora communities (e.g. Lebara, Lyca)
- Data-heavy plans for streaming-focused users
- Basic voice-and-text plans for older users who prefer simplicity
- Business-oriented plans with device management features
This specialisation can deliver better value than a generic MNO plan if your usage profile matches the MVNO's focus.
### Online-First Management
Many MVNOs operate primarily or entirely online: no physical store, manage everything via an app or website. For users comfortable with self-service, this means faster account changes and sometimes lower prices (the overhead of maintaining retail stores is eliminated). For those who prefer face-to-face support, this can be a drawback — which leads into the next section.
---
## Drawbacks and the Deprioritization Question
### Network Deprioritization at Congestion
Deprioritization is the most consequential practical limitation of most MVNO plans, and it is worth understanding precisely.
When an MNO's network becomes congested — typically during commuting hours, at large events, or in dense urban areas — the MNO must decide whose traffic gets served first. In most wholesale agreements, the MNO's own direct subscribers take priority. MVNO traffic, flowing through the shared POI, is queued behind it.
The result: during congestion, MVNO subscribers may experience noticeably slower data speeds than subscribers on the host MNO's direct plans. This is not a sign of a bad MVNO; it is a built-in structural characteristic of the POI model. It does not typically cause complete outages — it manifests as slower-than-usual page loads, video buffering, or reduced streaming quality during busy periods.
Understanding your data consumption needs before choosing a plan helps you assess how much this matters in practice. The [How Much Mobile Data Do You Need?](/en/guides/data-usage-guide/) guide walks through data consumption by app category and can help you estimate whether a lower-bandwidth MVNO plan will meet your needs.
### Fewer Customer Service Channels
MNO-owned stores, phone support lines, and online chat represent a considerable overhead — but they also provide accessible help when things go wrong. Many MVNOs, particularly online-only operators, offer support primarily through chat, email, or community forums. If you are not comfortable troubleshooting technical issues without in-person help, the support model of a given MVNO is worth investigating before signing up.
### Potential Roaming Limitations
International roaming agreements for MVNOs are negotiated separately from the host MNO's roaming agreements. An MVNO may offer roaming in fewer countries than its host MNO, may charge higher roaming rates, or may restrict data roaming entirely on budget plans. Always check the roaming terms before travelling if you plan to use your MVNO SIM abroad.
### No Carrier-Specific Perks
MNOs often bundle streaming subscriptions, device trade-in programmes, family plan discounts, and priority support into their higher-tier plans. MVNOs rarely offer equivalent perks — the value proposition is price and simplicity rather than ecosystem benefits.
### Emergency Services and Coverage Edge Cases
Both MNO and MVNO SIMs must support emergency calling as required by national regulations — your MVNO SIM will connect to emergency services even with no credit remaining. However, in fringe coverage areas where the host MNO's signal is marginal, MVNO subscribers may have less access to alternative networks (domestic roaming) depending on their wholesale agreement.
---
## MVNO vs Sub-Brand: What's the Difference?
A common source of confusion is the distinction between an independent MVNO and an MNO-owned sub-brand. Both offer lower prices than the parent MNO's flagship plans, but they are structurally very different.
### MNO-Owned Sub-Brands
A sub-brand is a brand created and fully owned by an MNO, operated as a lower-cost tier of the same network. Examples:
- **Cricket Wireless** — owned by AT&T; runs on AT&T's network
- **Metro by T-Mobile** — owned by T-Mobile; runs on T-Mobile's network
- **Boost Mobile** — owned by EchoStar. Previously operated as a fourth national carrier with its own spectrum, but following large spectrum sales to AT&T and SpaceX in 2025, Boost shut down its own wireless network in November 2025 and now operates primarily as an MVNO on AT&T's network.
- **UQ mobile** (Japan) — owned by KDDI (au)
- **Y!mobile** (Japan) — owned by SoftBank
Because the sub-brand is part of the same corporate structure as the MNO, it often receives **higher network priority** than independent MVNOs on the same physical network. The MNO controls how much bandwidth the sub-brand receives and can configure its network policy to favour its own brands.
Sub-brands also typically have access to the MNO's retail store network for activations and support — a significant advantage for users who want in-person help.
### Independent MVNOs
An independent MVNO — such as US Mobile (T-Mobile/Verizon networks), Lebara (Vodafone network), giffgaff (O2 network; see note below), or Tesco Mobile (O2 network) — is a separate company with no ownership relationship to its host MNO. It negotiates wholesale terms at arm's length.
Key practical differences:
| Dimension | MNO Sub-Brand | Independent MVNO |
|-----------|--------------|-----------------|
| Corporate ownership | Subsidiary of the MNO | Separate company |
| Network priority | Typically higher (MNO sets the policy) | Subject to standard POI wholesale terms |
| Plan prices vs MNO flagship | Moderately lower | Often significantly lower |
| Retail store presence | Often yes (shared with MNO) | Varies — many are online-only |
| Innovation independence | Limited by parent MNO | Higher — can differentiate on features |
### Why Does This Matter?
When comparing plans, knowing whether a brand is a sub-brand or an independent MVNO helps you set realistic expectations for network performance. A sub-brand on the same MNO network will generally outperform an independent MVNO during peak hours — but it will also typically cost more. The right trade-off depends on how congestion-sensitive your use case is.
---
## How to Choose an MVNO
Choosing an MVNO comes down to five questions.
### 1. Which Network Does It Use in Your Area?
An MVNO is only as good as its host MNO in the places you actually use your phone. If the host MNO has weak coverage in your home, office, or commute route, the MVNO will have the same problem. Check the MNO's coverage map before choosing an MVNO on that network.
### 2. How Congestion-Sensitive Is Your Usage?
If you rely on fast data during commuting hours or at events, deprioritization may noticeably affect your experience. Consider:
- Do you mainly use mobile data in off-peak hours (evenings at home)?
- Do you mostly need data for messaging, email, and occasional maps — or for video streaming and video calls?
For data-heavy users, the [How Much Mobile Data Do You Need?](/en/guides/data-usage-guide/) article is worth reading to quantify your needs before choosing a plan.
### 3. What Support Model Is Acceptable to You?
If you are comfortable managing everything online and can troubleshoot activation or APN settings yourself, the online-only MVNO model works well. If you anticipate needing in-person help — especially for things like SIM activation problems, eSIM transfer, or device unlocking — look for an MVNO with physical support options or a sub-brand affiliated with an MNO's retail network.
### 4. Do You Need Roaming?
If you travel internationally and want to use one SIM across multiple countries, check the MVNO's roaming terms before committing. An MVNO with limited roaming coverage may cost you more when travelling than a more expensive MNO plan with broad roaming included. For travel-specific connectivity options, [4 Ways to Stay Connected Abroad](/en/guides/four-options/) compares roaming, local SIMs, travel eSIMs, and pocket Wi-Fi. If you are considering an eSIM-capable MVNO plan, [What Is an eSIM?](/en/guides/what-is-esim/) covers the technical side.
### 5. What Are the Contract Terms?
Many MVNOs offer genuinely no-contract options — cancel any time, no exit fees. Others may require a minimum commitment period or automatic rollover. Read the terms for:
- Minimum term and cancellation conditions
- Fair Use Policy — especially for "unlimited" plans, which almost always carry a deprioritization or throttling threshold
- Data rollover — does unused data carry forward?
---
## FAQ
The structured FAQ answers are in the frontmatter above for schema.org/FAQPage compatibility. Below are expanded answers to common questions.
**Is an MVNO SIM slower than an MNO SIM?**
Not inherently. During off-peak hours when the shared POI bandwidth is under-utilised, MVNO speeds can match or closely approach the host MNO's speeds. The difference becomes evident during congestion: MVNO traffic queues behind MNO direct subscribers at the POI. How much this matters in practice depends on the host MNO's network density in your area, the MVNO's total subscriber load, and how much bandwidth the MVNO has purchased.
**Can I use a 5G phone on an MVNO?**
Yes — if the MVNO has negotiated 5G access in its wholesale agreement, has the right host MNO, and your device supports the relevant 5G bands. 5G is not automatically included in an MVNO's capacity lease; it must be specifically contracted. Check the MVNO's plan descriptions to confirm 5G availability and the host network's 5G coverage in your area.
**What happens when I switch from an MNO to an MVNO — can I keep my number?**
Yes. Mobile Number Portability (MNP) is available in most markets, including the US, UK, EU, Japan, and Australia. Initiate the port through your new MVNO — they will handle the transfer from your current carrier. Do not cancel your current service first; cancelling before porting is complete can result in losing your number.
**How do I know which MNO my MVNO uses?**
The MVNO is required to disclose its host network in most jurisdictions as part of consumer protection regulations. The information is typically on the MVNO's website under "coverage" or "how it works." You can also check the network name displayed in your phone's status bar after inserting the SIM: in some configurations it shows the MVNO brand, in others it shows the underlying MNO, depending on how the MVNO has set up its network identification.
**Are MVNOs safe and legitimate?**
MVNOs operate under the same consumer protection and telecommunications regulations as MNOs in their jurisdiction. In the EU, they are regulated by national telecom authorities. In the US, by the FCC. In the UK, by Ofcom. A legitimate MVNO is a licensed operator — the "virtual" in its name refers to the absence of radio infrastructure, not to any lack of legal standing or accountability.
---
## Related Guides
- [What Is a SIM Card?](/en/guides/what-is-sim/) — How SIM credentials work, and the difference between a carrier SIM and an MVNO SIM
- [What Is an eSIM?](/en/guides/what-is-esim/) — How the SIM chip evolved into an embedded, remotely programmable component
- [SIM & Mobile Glossary](/en/guides/glossary-index/) — Plain-English definitions of MVNO, MNO, POI, MVNE, MVNA, and 20+ more terms
- [4 Ways to Stay Connected Abroad](/en/guides/four-options/) — Comparing roaming, local SIM, travel eSIM, and pocket Wi-Fi
- [How Much Mobile Data Do You Need?](/en/guides/data-usage-guide/) — Data consumption by app category to help you choose the right plan size
================================================================================
# What Is a SIM Card? — How It Works, Sizes, and the Shift to eSIM
URL: https://sim-finder.com/en/guides/what-is-sim/
Type: guides (en)
Published: 2026-04-24
A SIM card is the small chip that proves your identity to a mobile network. Without it, your phone cannot register to any carrier, make calls, send SMS, or use mobile data. Even on the newest smartphones — many of which have replaced the physical card with a built-in eSIM — the same underlying logic applies: your device must present a subscriber credential to the network before it can communicate.
This article explains what a SIM card actually does, how it has shrunk from the size of a credit card to something smaller than a fingernail, and how the industry is moving away from physical cards entirely.
The key points covered:
- What IMSI and Ki are, and why they are never transmitted over the air
- The four distinct functions every SIM performs every time you connect
- How dimensions changed across five generations, from the credit-card-sized 1FF to the sub-centimetre Nano-SIM, and then to the embedded eSIM
- How to handle loss, theft, SIM lock, and replacement
- The practical differences between a carrier (MNO) SIM and a virtual operator (MVNO) SIM
For a closer look at the eSIM technology replacing physical SIMs, see [What Is an eSIM?](/en/guides/what-is-esim/) For definitions of terms used throughout, see the [SIM & Mobile Glossary](/en/guides/glossary-index/). If you need two lines on a single device, [What Is Dual SIM?](/en/guides/what-is-dual-sim/) covers DSDS, DSDV, and DSDA modes.
---
## What Is a SIM Card?
### The Formal Definition
SIM stands for **Subscriber Identity Module**. It is an integrated circuit that stores the credentials a mobile subscriber needs to authenticate to a cellular network. The SIM application was originally defined for GSM networks in the early 1990s under ETSI GSM 11.11.
In practice, what most people call a "SIM card" is a **UICC** — Universal Integrated Circuit Card — defined in ETSI TS 102 221 (current version V18.2.0, published June 2024). The UICC is the physical hardware. The SIM application runs on top of that hardware, alongside the USIM (Universal Subscriber Identity Module) application introduced for UMTS (3G) networks. Because modern UICC chips run both applications simultaneously, the terms "SIM card" and "UICC" are used interchangeably in everyday language.
The GSMA defines the global ecosystem of SIM standards and ensures interoperability between manufacturers, carriers, and devices.
### IMSI and Ki — the Two Core Credentials
Two pieces of data make a SIM unique:
- **IMSI (International Mobile Subscriber Identity):** a 15-digit number that uniquely identifies you as a subscriber on any network worldwide. It encodes the country code (MCC), network code (MNC), and your subscriber number (MSIN). Your carrier's network looks up your account using the IMSI.
- **Ki (Authentication Key):** a 128-bit secret key stored on both the SIM and the carrier's Authentication Centre (AuC). The network sends the device a random challenge; the SIM applies a cryptographic algorithm using Ki to generate a response. If the response matches what the AuC computed independently, authentication succeeds. The Ki itself never travels over the air.
This challenge-response mechanism is defined in 3GPP TS 31.102 for USIM and forms the basis of all authentication on 2G through 5G networks.
---
## The Four Roles a SIM Performs
A SIM card does more than prove identity. Every time your phone connects to a mobile network, the SIM is performing four distinct functions in the background.
### 1. Subscriber Authentication
When your phone powers on or moves to a new cell, it registers with the network by presenting its IMSI and responding to a cryptographic challenge using the Ki. The network verifies the response without ever receiving Ki directly. This mutual authentication prevents rogue base stations from impersonating legitimate networks — a protection significantly strengthened with each generation, from GSM to UMTS to LTE and 5G.
### 2. Phone Number Binding
Your mobile phone number (MSISDN) is not stored on the SIM itself. It is stored in the carrier's Home Subscriber Server (HSS) or, in 5G, the Unified Data Management (UDM) function, and linked to your IMSI. This is why you can keep the same phone number when you move your SIM to a different handset: the number follows the IMSI, not the device hardware. Number portability across carriers works on the same principle — the IMSI changes when you get a new SIM from the new carrier, but your number is re-mapped accordingly.
### 3. Encryption Key Generation
In addition to authentication, the SIM generates the session keys used to encrypt voice and data traffic over the air interface. On LTE networks, the EPS-AKA procedure defined in 3GPP TS 33.401 derives CK (Cipher Key) and IK (Integrity Key) from the underlying UMTS AKA mechanism in 3GPP TS 33.102, then uses them to derive the K_ASME key that secures the LTE air interface. On 5G networks, the key derivation is further enhanced (5G-AKA, SUPI/SUCI). Without the SIM's cryptographic computation, the air interface would remain unencrypted and susceptible to interception.
### 4. Storage of Subscriber Data
A UICC can store a limited amount of data on the card itself. Under 3GPP TS 31.102, writable files include:
- **ADN (Abbreviated Dialling Numbers):** contact entries saved to the SIM (typically 200–250 depending on memory)
- **SMS messages** stored directly on the card
- **PLMN (Public Land Mobile Network) preferences:** the priority list of networks the device should prefer when roaming
- **Service parameters:** indicators of which bearer services and supplementary services the subscription supports
In practice, most users do not actively manage SIM storage — smartphones store contacts in the cloud or device memory — but this storage layer was central to early mobile phones.
---
## Evolution of SIM Sizes
The physical size of SIM cards has shrunk dramatically over five generations, each reduction driven by the need to fit more components into smaller devices.
### The Five Form Factors (ETSI TS 102 221)
ETSI TS 102 221 defines four physical form factors for UICC cards:
| Generation | Code | Dimensions | Approximate intro |
|---|---|---|---|
| Full-size SIM | 1FF | 85.6 × 54 mm (credit card) | ~1991 |
| Mini-SIM | 2FF | 25 × 15 × 0.76 mm | ~1996 |
| Micro-SIM | 3FF | 15 × 12 × 0.76 mm | ~2003 (popularised ~2010) |
| Nano-SIM | 4FF | 12.3 × 8.8 × 0.67 mm | 2012 |
| eSIM | eUICC | No removable card | 2016 (consumer, GSMA SGP.22) |
A note on eSIM: while eSIM is not a "form factor" in the traditional sense — it is a chip soldered to the motherboard rather than a removable card — it represents the logical continuation of miniaturisation, taking the UICC from a card slot to an embedded component.
### Full-size SIM (1FF) — The Credit Card Era
The first commercial SIM cards, deployed with GSM networks in the early 1990s, were the size of a standard credit card (ISO/IEC 7816 ID-1 format). They were designed to fit into dedicated slots on early mobile handsets, which were larger and heavier than today's devices. The gold contact pads that communicate with the device are still defined by the same ISO/IEC 7816 electrical standard used today.
### Mini-SIM (2FF) — The Dominant Standard for Two Decades
The Mini-SIM, measuring 25 × 15 mm, became the de facto standard from the mid-1990s onward and remained the most common form factor until smartphones began their ascent around 2010. If you owned a basic phone in the 2000s, it almost certainly used a Mini-SIM. The card you receive from a carrier today is typically still produced at Micro-SIM or a punched card size but includes the larger frame as a breakable adapter.
### Micro-SIM (3FF) — The iPhone 4 Catalyst
The Micro-SIM was defined as 3FF in the ETSI specifications around 2003, but it was Apple's decision to use it in the iPhone 4 (2010) that drove mass adoption. At 15 × 12 mm, it is the same thickness as a Mini-SIM but has the surrounding plastic trimmed away, exposing more of the chip. Many carriers began pre-cutting SIM cards as punch-out Micro-SIM trays around 2011–2012.
### Nano-SIM (4FF) — Today's Standard
The Nano-SIM measures 12.3 × 8.8 mm and is slightly thinner (0.67 mm vs 0.76 mm). Apple introduced it in the iPhone 5 in September 2012. Today, virtually every smartphone sold uses a Nano-SIM slot. The physical chip itself has not changed between 2FF, 3FF, and 4FF — only the surrounding plastic frame differs, which is why cutting adaptations are possible.
### eSIM — The Shift to Embedded
The GSMA published the SGP.22 specification for consumer-facing eSIM in 2016. An eSIM (embedded SIM) replaces the removable card with a chip soldered to the device's mainboard. Rather than inserting a physical card, you download a carrier profile over the air. The underlying UICC standard (ETSI TS 102 221) still applies — the difference is hardware integration rather than a new electrical interface.
For the full picture of how eSIM works and which devices support it, see [What Is an eSIM?](/en/guides/what-is-esim/)
---
## Physical SIM vs eSIM
The table below compares the practical differences between a physical SIM card and an eSIM for everyday use.
| | Physical SIM (Nano-SIM 4FF) | eSIM |
|---|---|---|
| Form | Removable chip in a tray | Soldered to device motherboard |
| Activation | Insert card, sometimes configure APN | Download profile via QR code, app, or manual code |
| Switching carriers | Swap cards physically | Download new profile in Settings |
| When device is lost or broken | Move SIM to replacement instantly | Carrier re-issue required |
| Multiple profiles on one device | One card = one carrier at a time | Store 8+ profiles, switch in Settings |
| Physical specification | ETSI TS 102 221 (4FF) | GSMA SGP.22 |
| Main advantage | Works on any compatible device immediately | No card to handle; instant remote activation |
| Main limitation | Easy to lose; can be removed by others | Cannot be physically transferred to a new device |
### Which Should You Choose?
If your device supports eSIM, it is usually the more convenient option: activation takes minutes, you can keep multiple carrier profiles, and there is no card to lose. The main scenario where physical SIM wins is when you need to hand a SIM to someone else immediately, or when you are in a country where eSIM support is limited at the carrier level.
If you are setting up an eSIM for the first time on an iPhone, [How to Set Up eSIM on iPhone via QR Code](/en/guides/qr-code-iphone/) walks through the process step by step.
---
## SIM Management: Lock, Replacement, and Loss
### SIM Lock and SIM-Free
A **SIM-locked** (carrier-locked) device contains a software restriction that prevents it from connecting to any carrier other than the one that applied the lock. This restriction applies to both physical SIMs and eSIM profiles: a locked iPhone will refuse to install an eSIM from a different carrier, just as it would reject a physical SIM.
A **SIM-free** (unlocked) device accepts any SIM card or eSIM profile compatible with its supported frequency bands.
Key points:
- The lock is software-based, not hardware. It can be removed by the carrier once eligibility conditions are met (typically: device payment complete and minimum service period elapsed).
- The UK banned the sale of locked handsets from 17 December 2021 (Ofcom ruling).
- Japan prohibited carriers from applying SIM locks to new devices from 1 October 2021 (Ministry of Internal Affairs and Communications guideline).
- The US has no federal ban; each carrier sets its own unlock policy under voluntary CTIA commitments from 2014. The FCC published an NPRM for a mandatory 60-day unlock rule in 2024, but it is not yet enacted as binding regulation.
For a full explanation — including how to check your lock status in seconds and how to request an unlock from US, UK, and other carriers — see [SIM Lock and SIM-Free Explained](/en/guides/sim-lock/).
### Replacing a SIM Card
Carriers replace SIM cards in three common situations:
1. **Upgrade from a larger form factor.** If you are moving to a newer phone that takes a Nano-SIM and you have a Mini- or Micro-SIM, the carrier issues a replacement Nano-SIM with the same number.
2. **Damaged or worn SIM.** A SIM that reads intermittently, shows "No SIM" errors, or has a visibly damaged chip can be replaced. Most carriers provide a replacement at a store or by post.
3. **Carrier switch with number portability.** When you move your number to a new carrier (MNP — Mobile Number Portability), the new carrier issues a fresh SIM bound to your ported number.
### SIM Loss and Theft
If your SIM card is lost or stolen:
1. **Contact your carrier immediately** to deactivate (bar) the SIM. Once barred, it cannot be used to make calls or access data.
2. **Request a replacement SIM** bound to the same number.
3. **Change passwords for accounts** that use your number for SMS-based two-factor authentication, since a thief in possession of your SIM could receive those one-time codes before you manage to bar it.
A lost SIM is also the attack vector for SIM swap fraud, where an attacker convinces a carrier to transfer your number to a SIM they control. Keep your carrier account secured with a strong PIN and, where available, an account lock feature. The FBI IC3 2024 Annual Report recorded 982 SIM-swap complaints with reported losses of approximately USD 26 million.
### SIM PIN and PUK
A SIM PIN (Personal Identification Number) is an optional 4–8 digit code that locks access to the SIM. When enabled, your phone prompts for the PIN each time it powers on. After three consecutive incorrect PIN entries, the SIM locks. It can then only be unlocked using the PUK (Personal Unblocking Key), an 8-digit code supplied by your carrier. Entering the PUK incorrectly ten times in a row permanently disables the SIM. The PIN and PUK mechanism is defined in ETSI ETS 300 922 and 3GPP TS 51.011.
Most carriers disable SIM PIN protection by default. Enabling it adds a meaningful layer of security: even if someone physically removes your SIM, they cannot use it without the code.
---
## Carrier SIM vs MVNO SIM
### MNO (Carrier) SIM
An MNO (Mobile Network Operator) is a carrier that holds a government spectrum licence and owns its own radio access network — the towers, antennas, and core network infrastructure. Examples include AT&T, Verizon, T-Mobile (US), EE, Vodafone, Three (UK), Telstra, Optus (Australia), NTT Docomo, KDDI, SoftBank (Japan). When you buy a SIM directly from one of these operators, you are connecting to their proprietary network.
MNO SIMs typically offer the widest network coverage, priority data access, and the most straightforward customer service. They also tend to cost more, particularly for high-data plans.
### MVNO SIM
An MVNO (Mobile Virtual Network Operator) is a carrier that does not own radio infrastructure. Under the ITU definition, it is an operator that provides mobile services without holding a government wireless licence. MVNOs buy wholesale network capacity from one or more MNOs through a Point of Interface (POI) and resell it under their own brand.
Because MVNOs share bandwidth capacity through the POI, you may notice slower speeds during peak hours when that shared capacity reaches its limit. In exchange, MVNO SIMs are generally cheaper than MNO plans for comparable data allowances. GSMA Intelligence reported more than 1,986 active MVNOs at the end of 2022, operating in dozens of countries worldwide.
A detailed side-by-side comparison of how MNOs and MVNOs differ on speed, coverage, price, and customer service is the subject of [MNO vs MVNO vs Sub-Brand: Which Is Right for You?](/en/guides/mno-vs-mvno-comparison/). For now, comparing specific carriers in your country side by side on [SimFinder](/en/) is the most practical way to evaluate the trade-off.
### Which SIM Type Should You Choose?
The right choice depends on your priorities:
- **Prioritise coverage and reliability:** MNO SIM, especially if you travel to rural or low-coverage areas.
- **Prioritise cost savings with acceptable trade-offs:** MVNO SIM on the same network, with the expectation of occasional congestion during peak hours.
- **Using a device SIM-locked to a specific carrier:** you are limited to that carrier's SIM until the device is unlocked.
You can compare plans from both MNOs and MVNOs across multiple countries on [SimFinder](/en/).
---
## Common Misconceptions
### "My phone number is stored on the SIM"
Your MSISDN (phone number) is not stored in permanent memory on the SIM card. It is stored in your carrier's subscriber database and linked to your IMSI. The SIM stores the IMSI; the carrier's system maps that IMSI to your phone number. This is why changing your SIM to a new carrier changes your IMSI — but number portability keeps the external number pointing to you.
### "A bigger SIM has more storage or better signal"
All modern UICC-based SIMs follow the same electrical standard regardless of physical size. A Nano-SIM and a Mini-SIM cut from the same carrier stock are electrically identical. The form factor change is purely mechanical — the chip area and the contact pads remain the same. Signal quality is determined by the network and the device's antenna, not by the SIM card.
### "Removing the SIM protects my data"
Removing the SIM prevents your phone from authenticating to a cellular network and sending SMS — but it does not protect data stored on the device itself. If your phone is lost or stolen, the device memory, contacts, and photos remain accessible without a SIM. Use a strong device PIN and full-device encryption to protect local data.
### "SIM cards can be used in any phone"
A SIM will work in any device that: (a) uses the same physical form factor, or accepts it via an adapter; (b) supports the same frequency bands for the carrier you use; and (c) is not carrier-locked to a different operator. Frequency band compatibility is especially relevant when buying a phone for use in another country — a device sold for the US market may lack the bands used by European carriers and vice versa.
### "eSIM is a completely different technology from SIM"
The eSIM is the same UICC technology in a different physical form. The chip performs the same four functions: authentication, number binding, key generation, and storage. The difference is that the chip is soldered into the device and programmed remotely rather than manufactured with credentials pre-loaded and handed to you as a card.
---
## FAQ
See the frontmatter for structured FAQ entries compatible with schema.org/FAQPage. Below are answers to the most common questions in long-form.
**Can I use a SIM card from another country in my phone?**
Yes, as long as your phone is unlocked and supports the frequency bands used by the foreign carrier. Inserting a foreign SIM and using it in your home country is known as international roaming in reverse — you will be charged according to the foreign carrier's plans. Many travellers instead use a local SIM purchased at the destination, or a travel eSIM purchased in advance, to avoid high roaming rates.
**How do I know which SIM size my phone needs?**
Check the manufacturer's product page or the specifications section of your device's manual. Almost all smartphones released after 2014 use Nano-SIM (4FF). If your carrier's SIM is a larger size, ask for a replacement Nano-SIM at a carrier store — the number and account stay the same.
**Is a SIM card the same as a memory card?**
No. A SIM card authenticates you to a mobile network and stores a small amount of subscriber data. A microSD (memory card) stores files such as photos, music, and apps. They go into separate slots on phones that accept both, and they serve entirely different functions.
**What is a SIM PIN and what happens if I enter it wrong?**
A SIM PIN is a 4–8 digit code that prevents anyone who obtains your SIM from using it without authorisation. When enabled, the phone prompts for the PIN at every power-on before connecting to the network. If you enter the PIN incorrectly three times in a row, the SIM locks and can only be unblocked with a PUK (Personal Unblocking Key) — an 8-digit code provided by your carrier. If you enter the PUK incorrectly ten consecutive times, the SIM is permanently disabled and must be replaced. The PIN and PUK mechanism is standardised in ETSI ETS 300 922. Most carriers ship SIMs with PIN protection disabled by default; you can enable it in your phone's settings.
**Can two people share the same SIM card?**
No. A SIM card is associated with a single subscriber account and a single IMSI. Sharing the physical card between two devices is possible (by physically swapping it), but it cannot be used in two devices simultaneously. eSIM makes this even more explicit: the profile is bound to one device's eUICC. If you need two people to be reachable on separate numbers, each person needs their own SIM or eSIM profile linked to their own carrier account.
---
## Related Guides
- [What Is an eSIM?](/en/guides/what-is-esim/) — How the SIM chip evolved into an embedded, remotely programmable component
- [SIM Lock and SIM-Free Explained](/en/guides/sim-lock/) — How to check and remove carrier restrictions on your device
- [What Is Dual SIM?](/en/guides/what-is-dual-sim/) — DSDS, DSDV, and DSDA modes for running two lines on a single device
- [SIM & Mobile Glossary](/en/guides/glossary-index/) — Plain-English definitions of IMSI, Ki, UICC, USIM, and 20+ more terms
- [How to Set Up eSIM on iPhone via QR Code](/en/guides/qr-code-iphone/) — Step-by-step activation guide once you are ready to move to eSIM
================================================================================
# What Is a Carrier Sub-Brand?
URL: https://sim-finder.com/en/guides/what-is-sub-brand/
Type: guides (en)
Published: 2026-06-05
A carrier sub-brand is a budget-tier label that an MNO (Mobile Network Operator) owns and runs directly — not a separate company leasing capacity, but an internal brand on the same network. This ownership distinction is what separates sub-brands structurally from independent MVNOs and is why sub-brand subscribers typically receive better network treatment than MVNO subscribers on the same physical infrastructure.
The key points covered in this article:
- What makes an operator a sub-brand versus an independent MVNO
- Where sub-brands sit in the network priority hierarchy (flagship MNO → sub-brand → MVNO)
- Illustrative examples from multiple markets — with important caveats about how ownership details can change
- A comparison table across the three main carrier types
- Pros, cons, and which user profiles sub-brands suit best
---
## The Core Distinction: Ownership vs. Capacity Leasing
To understand what a sub-brand is, the clearest starting point is what it is not.
An independent MVNO — as explained in detail in [What Is an MVNO?](/en/guides/what-is-mvno/) — is a company that buys wholesale network access from a licensed MNO at arm's length. There is no common ownership between the two; the commercial relationship is governed by a wholesale capacity agreement. The MVNO's traffic travels through a shared Point of Interface (POI), and during network congestion, MNO subscribers are generally served before MVNO traffic queued at that POI.
A sub-brand has a fundamentally different structure. It is a brand that the MNO itself created, owns, and operates — a lower-priced tier of the same company, presented under a different name. There is no capacity leasing, no external wholesale agreement, and no separate corporate entity. The sub-brand is simply another product line of the MNO.
The practical consequence: because the MNO controls its own internal traffic policy, it can and typically does give its sub-brand subscribers higher network priority than it gives independent MVNOs. This places sub-brands in a distinct middle tier: lower-priced than the parent MNO's flagship plans, but generally better-treated during congestion than independent MVNOs on the same physical network.
This is the structural foundation that [What Is an MNO?](/en/guides/what-is-mno/) describes when explaining how network priority works across carrier types.
---
## Where Sub-Brands Fit in the Carrier Hierarchy
Mobile carrier types form a three-tier structure, from the highest network priority to the lowest:
1. **MNO flagship plans** — the parent carrier's own premium tiers; highest priority by definition because the MNO controls the entire network
2. **MNO-owned sub-brands** — a lower-priced label owned and operated by the same MNO; the MNO sets internal policy to give sub-brand traffic priority over external wholesale customers
3. **Independent MVNOs** — separate companies leasing capacity through a POI; their traffic is subject to the wholesale terms negotiated with the host MNO, and during congestion they are typically served last
This three-tier model is the framework used in the full side-by-side analysis at [MNO vs MVNO vs Sub-Brand](/en/guides/mno-vs-mvno-comparison/). This article focuses specifically on the sub-brand tier: what it is, where it appears, and what it means in practice.
---
## Illustrative Examples Across Markets
The following brands are commonly cited as sub-brands in their respective markets. Ownership structures in the mobile industry change over time through acquisitions, corporate restructuring, and regulatory interventions, so the descriptions below represent general understanding as of the article's publication date rather than legally verified ownership statements. For the current status of any carrier, the operator's own website and official corporate filings are the authoritative sources.
### United States
- **Metro by T-Mobile** — commonly cited as a T-Mobile-owned sub-brand, having operated as MetroPCS before T-Mobile's acquisition. It operates on T-Mobile's network.
- **Visible** — marketed as "Visible by Verizon" and generally described as a Verizon subsidiary. Operates on Verizon's network with an online-only, no-contract model.
- **Cricket Wireless** — generally described as an AT&T subsidiary operating on AT&T's network.
The US market is one of the clearer examples of sub-brand structures, though the line between "sub-brand" and "MNO-owned MVNO" is not always defined consistently across industry sources.
### United Kingdom
- **VOXI** — offered by Vodafone UK; marketed as a younger-demographic brand. Generally described as a Vodafone label rather than an independent MVNO.
The UK market underwent significant consolidation when Vodafone UK and Three UK merged (reported as completing in 2025). Brand structures associated with the merged entity may continue to evolve.
### Australia
- **Telstra's Belong** — commonly cited as a Telstra-operated budget brand. Telstra's corporate filings and public statements describe Belong as a Telstra brand.
Note on **Boost Mobile Australia**: Boost Mobile Australia has historically been associated with Telstra's network, but corporate structures for Boost vary significantly between Australia and the US — these should not be assumed to be equivalent arrangements.
### Japan
Japan's market has well-established sub-brand examples that are transparently owned:
- **UQ mobile** — a KDDI (au) group brand
- **Y!mobile** — a SoftBank group brand
In Japan, these are sometimes classified by the regulator and industry as distinct from independent MVNOs (locally called 格安SIM, *kakuyasu SIM*), and the network priority difference is formally acknowledged in carrier documentation.
### A Note on Market Variation
The sub-brand category is not equally distinct in every country. In some markets, the practical and regulatory boundary between a sub-brand, an MNO-owned MVNO, and a prepaid label is blurry:
- Some MNOs operate brands through wholly owned subsidiary legal entities — which some analysts call "sub-brands" and others call "MNO-owned MVNOs"
- Prepaid labels offered directly by an MNO may function identically to sub-brands despite lacking a distinct brand identity
- Regulatory disclosure requirements vary by jurisdiction, meaning the ownership of some brands is not always publicly transparent
The safest approach when evaluating any budget-tier carrier: check whether the brand is owned by the MNO or is a separate entity with a wholesale capacity agreement. That distinction — not the marketing label — determines where the brand sits in the network priority structure.
---
## Sub-Brand vs MVNO vs Flagship MNO: Comparison Table
The table below summarises the practical differences across the three carrier types on dimensions that matter most to consumers. These are general patterns, not universal rules — individual operators vary.
| Dimension | Flagship MNO | Sub-Brand | Independent MVNO |
|-----------|-------------|-----------|-----------------|
| **Corporate ownership** | The MNO itself | Owned by the MNO | Separate company |
| **Network infrastructure** | MNO owns it | Uses parent MNO's network | Leases from an MNO via POI |
| **Network priority during congestion** | Highest — served first | Typically between flagship and MVNO | Lowest — queued at the POI |
| **Price positioning** | Highest | Moderate — lower than flagship | Often lowest |
| **Retail store presence** | Full MNO retail network | Often shared with parent MNO | Mostly online-only |
| **Customer support channels** | In-store, phone, online | Often in-store + online | Primarily online / chat |
| **5G access** | Full access on rollout | Typically available; priority level set by parent | Must be specifically negotiated |
| **Roaming terms** | Broadest; MNO negotiates directly | Subset of parent's roaming; check terms | Separately negotiated; often narrower |
| **Plan flexibility** | Varies; often contract options | Often prepaid / no-contract | Often month-to-month |
| **Innovation independence** | Full | Limited — parent sets network policy | Higher — can differentiate on features |
For a deeper analysis of how network priority affects real-world speeds during peak hours, [Why MVNO Speeds Slow Down](/en/guides/why-mvno-slow/) explains the POI mechanism in detail.
---
## Why Sub-Brands Exist: The Business Logic
MNOs operate sub-brands for two complementary reasons.
**Price-sensitive customer retention.** Without a lower-cost option under their own umbrella, MNOs risk losing subscribers who want cheaper plans to independent MVNOs. A sub-brand captures those subscribers while keeping them on the parent's network — and keeping their data in-house.
**Market segmentation.** Sub-brands allow MNOs to serve different customer segments under different brand identities without cannibalising their flagship plans. A younger-demographic or online-only brand can be marketed differently from the parent MNO without undermining the flagship brand's premium positioning.
From a consumer perspective, this means sub-brands are a deliberate strategic tool — not an accidental pricing tier. Their existence reflects the MNO's interest in keeping you on its network, which is part of why sub-brands tend to receive better treatment than external MVNOs.
---
## Advantages of Sub-Brands
### Better Network Treatment Than Independent MVNOs
During network congestion, sub-brand subscribers typically receive higher priority than independent MVNO traffic queued at the POI. This is the most structurally significant advantage. For users who need reliable data speeds during rush hours, commutes, or crowded events, a sub-brand on a strong MNO is likely to deliver more consistent performance than an independent MVNO on the same physical network.
The degree of priority difference varies. Not all MNOs configure their networks identically, and not all sub-brands receive the same internal priority level. Real-world speed tests in your specific location are a more reliable indicator than operator type alone.
### Shared Retail Infrastructure
Many sub-brands have access to the parent MNO's store network for activations, SIM replacements, and in-person support. This matters for users who are not comfortable handling everything online — a significant advantage over independent MVNOs, which are predominantly online-only.
### Lower Price Than the Parent MNO's Flagship
Sub-brands are positioned to cost less than the parent MNO's premium tiers. The trade-off is that they may lack some features of the flagship plans — check the specific terms for items like 5G tier access, roaming, hotspot/tethering, and international calling.
### No Capacity Leasing Overhead
Because the sub-brand does not pay a wholesale capacity premium to access the network, more of its cost savings can be passed to consumers compared to an independent MVNO that must build a margin into its wholesale cost structure.
---
## Limitations of Sub-Brands
### Still More Expensive Than Many Independent MVNOs
The price advantage of a sub-brand is real relative to the parent MNO's flagship, but independent MVNOs on the same network often undercut sub-brand pricing further. If cost is the primary driver, an independent MVNO may offer lower monthly charges — at the cost of lower network priority. Use [SimFinder](/en/) to compare current plans and see whether that cost gap is large enough to matter for your budget.
### Limited Differentiation From Parent MNO
Sub-brands are constrained by their parent's network policy, technology roadmap, and feature set. An independent MVNO can innovate beyond what the host MNO offers in its wholesale terms — building niche products for specific communities or use cases. Sub-brands rarely have that freedom.
### Ownership Changes Over Time
Mobile industry consolidation means that a brand's ownership status can change. A brand that was an independent MVNO can become a sub-brand through acquisition; a sub-brand can be absorbed into the parent's flagship; corporate structures that existed when a plan was marketed may not reflect current reality. Always verify current ownership directly with the operator.
### Geographic Availability
Sub-brands are market-specific. The sub-brands described in this article exist in specific countries and are not available globally. Travellers or people relocating internationally will need to evaluate local options from scratch.
---
## Who Sub-Brands Suit Best
Sub-brands tend to be a strong fit for users who meet most of these criteria:
- **Want lower prices than the parent MNO's flagship**, but are willing to pay more than the absolute cheapest independent MVNO
- **Value network performance during peak hours** and are not prepared to accept the lowest-priority MVNO tier
- **Prefer in-person support** or want the option to visit a store (where the sub-brand shares the MNO's retail network)
- **Are on the parent MNO's coverage area** — sub-brands inherit the parent's coverage exactly; if the parent MNO has weak signal in your area, a sub-brand will have the same problem
- **Want a no-contract or prepaid model** — many sub-brands are structured as prepaid or no-contract products
Sub-brands are typically not the best fit for:
- **Pure price minimisers** — independent MVNOs on the same network usually offer lower monthly costs
- **Users who need the full flagship feature set** — premium roaming bundles, highest 5G tiers, device trade-in programmes, and enterprise features are typically restricted to the parent MNO's flagship plans
- **Users in markets without sub-brands** — not every country has clearly defined sub-brand tiers; in those markets, the choice is between MNO flagship plans and independent MVNOs
---
## How to Identify Whether a Brand Is a Sub-Brand
There is no universal labelling requirement that forces carriers to disclose their ownership structure in plain terms. To determine whether a brand is a sub-brand or an independent MVNO:
1. **Check the "About" or "Legal" section of the carrier's website.** Sub-brands are often registered under the parent MNO's corporate name, which may appear in the Terms and Conditions or company registration details.
2. **Look for explicit disclosure.** Some operators, especially in markets with strong consumer protection requirements, disclose the host network or parent company on their coverage page or FAQ.
3. **Check coverage maps.** If a budget brand's coverage map is identical to a major MNO's map, it is likely either a sub-brand or an MVNO on that network. Identical maps do not distinguish sub-brand from MVNO, but they narrow down the host network.
4. **Read independent analysis.** Telecommunications industry publications and regulator filings often document ownership structures in detail.
If you cannot determine the ownership structure, the functionally important question remains the same: which MNO's towers does this plan use, and what are the priority terms? Those two factors determine real-world performance more directly than the label.
---
## The Blurry Edges: Where Sub-Brand Definitions Break Down
In practice, the term "sub-brand" is used loosely in different markets and by different analysts. Several types of ambiguity are worth being aware of:
**MNO-owned MVNOs.** Some MNOs have acquired previously independent MVNOs. The acquired MVNO continues to operate as a separate legal entity, but is now ultimately owned by the MNO. Whether this should be called a "sub-brand" or an "MNO-owned MVNO" depends on how the network policy is configured — specifically, whether the acquired brand's subscribers receive higher priority than other external MVNOs.
**Wholly-owned subsidiaries vs internal brand teams.** A brand can be legally structured as a wholly-owned subsidiary company while still having its network policy set entirely by the parent. The corporate structure matters less for consumer purposes than the actual network priority treatment.
**Prepaid labels.** Some MNOs sell prepaid plans under a distinct brand identity that is, in practice, indistinguishable from a sub-brand. The distinction between "sub-brand" and "MNO's own prepaid tier with a different name" is essentially marketing.
The key takeaway: when evaluating any budget-tier carrier, focus on the ownership relationship and the network priority treatment, not on whether it carries the "sub-brand" label. The [MNO vs MVNO vs Sub-Brand](/en/guides/mno-vs-mvno-comparison/) comparison guide walks through how to apply this framework across a range of real decisions.
Understanding how network speed and quality are measured — including what "network priority" actually translates to in download speeds and latency — is covered in [Understanding Network Quality Metrics](/en/guides/quality-metrics/).
---
## FAQ
The structured FAQ answers are in the frontmatter above for schema.org/FAQPage compatibility. Below are expanded answers to common questions.
**Is a sub-brand available in every country?**
No. Sub-brands are market-specific products. Some markets have clearly structured sub-brand tiers — the US has well-known examples, as does Japan. Others have a less distinct landscape where the line between an MNO's own budget label and an independent MVNO is blurry or where the regulatory environment does not require disclosure of ownership structure.
**If a sub-brand uses the same towers as the parent MNO, why is it cheaper?**
Sub-brands typically cost less because they offer fewer features, lighter support, and are often prepaid or online-only. The parent MNO invests heavily in store networks, enterprise support, premium device deals, and the highest tiers of 5G deployment — none of which is included in a sub-brand plan at the same price. The infrastructure is shared; the feature set is not.
**How do I know if an MVNO I'm considering was recently acquired?**
Acquisitions in the mobile industry are covered in telecommunications news sources and regulatory filings. The operator's own website is the most direct reference: after an acquisition, operators typically update their Terms and Conditions and "About" pages to reflect the new corporate structure. Industry news sources covering telecom M&A are also useful for tracking ownership changes.
**Do sub-brand subscribers get the same 5G access as flagship subscribers?**
Not automatically. The parent MNO sets internal policy on which 5G tiers — sub-6 GHz, mmWave in the US, SA vs NSA architectures — are available to sub-brand subscribers versus flagship subscribers. In many cases, sub-brands receive access to the same physical 5G infrastructure, but may be deprioritised on 5G bands during congestion. Check the sub-brand's plan terms for specific 5G access details.
**Should I choose a sub-brand or an independent MVNO?**
This depends on how you weigh price against network priority. If you need consistently fast data during commuting hours or in crowded areas, a sub-brand's better network treatment may be worth the higher price over an independent MVNO. If your data usage is mostly off-peak and price is the primary driver, an independent MVNO on the same host network may deliver similar day-to-day performance at a lower monthly cost. [SimFinder](/en/) lets you compare current plans across both types.
---
## Related Guides
- [What Is an MVNO?](/en/guides/what-is-mvno/) — How MVNOs lease capacity from MNOs, how the POI model works, and what deprioritization means for subscribers
- [What Is an MNO?](/en/guides/what-is-mno/) — Licensed spectrum ownership, radio infrastructure, and why MNO status determines network priority
- [MNO vs MVNO vs Sub-Brand](/en/guides/mno-vs-mvno-comparison/) — Side-by-side comparison across eight dimensions: coverage, peak-time speed, price, customer service, 5G access, roaming, perks, and contract flexibility
- [Why MVNO Speeds Slow Down](/en/guides/why-mvno-slow/) — The POI mechanism and deprioritization explained in depth
- [Understanding Network Quality Metrics](/en/guides/quality-metrics/) — What speed, latency, and stability figures mean in practice
================================================================================
# Why Are MVNO Speeds Slower?
URL: https://sim-finder.com/en/guides/why-mvno-slow/
Type: guides (en)
Published: 2026-06-05
Budget SIM plans are structurally slower during peak hours — not because of weaker hardware, but because MVNOs purchase shared capacity at a Point of Interface (POI) with the host MNO, and MNO direct subscribers are served first when that capacity fills up. Understanding this mechanism helps you predict when slowdowns will occur and decide whether an MVNO plan is the right fit for your usage.
Key points in this article:
- The POI capacity model that limits total MVNO bandwidth
- How network deprioritization works and when it affects you
- Why sub-brands are less affected than independent MVNOs
- The economics behind why MVNOs accept these terms
- How to detect whether slowdowns are deprioritization-related
- How the SimFinder quality score reflects these differences
For background on what an MVNO is and how it leases network capacity, see [What Is an MVNO?](/en/guides/what-is-mvno/) For an explanation of what an MNO owns that an MVNO does not, see [What Is an MNO?](/en/guides/what-is-mno/)
---
## The POI Capacity Model — Root Cause of MVNO Speed Limits
### What the Point of Interface Is
When an MVNO signs a wholesale agreement with a host MNO, the two networks connect at a logical junction called the **Point of Interface** (POI). All traffic — data, calls, SMS — flowing between the MVNO's subscribers and the wider internet passes through this connection point.
The MVNO pays for a defined amount of bandwidth at the POI. Think of it as a pipe with a fixed diameter. The total throughput available to every subscriber on that MVNO at any given moment is capped by the size of that pipe.
This is the structural origin of MVNO speed limitations. It is not a flaw or a sign of a poor-quality operator — it is how the wholesale capacity market works. Every MVNO that leases capacity from an MNO operates through some version of this model.
### Shared Capacity vs Dedicated Capacity
MNO direct subscribers do not pass through the MVNO's POI. Their traffic stays within the MNO's own dedicated capacity pools, which are sized to serve the MNO's own subscriber base. This means the capacity constraint that limits MVNO throughput simply does not apply to MNO direct subscribers.
The practical consequence: when many MVNO subscribers are active at the same time — such as during a weekday morning commute — the shared POI bandwidth fills up and the excess traffic is queued. MNO direct subscribers on the same physical towers experience no equivalent bottleneck during the same period.
### Interconnect Capacity Purchasing
MVNOs negotiate with MNOs over how much bandwidth to buy at the POI. Buying more capacity reduces congestion but increases the MVNO's wholesale costs, which in turn limits the price advantage it can pass on to consumers. This trade-off is at the heart of the MVNO cost model: lower prices are partly funded by purchasing less total capacity than the MNO keeps for its own subscribers.
---
## Network Deprioritization — The Second Layer of Slowdown
### How Deprioritization Works
Deprioritization is a traffic management policy, not a hardware limitation. When an MNO's radio network becomes congested — meaning demand for airtime exceeds available capacity in a given cell or area — the network must decide in what order to serve competing traffic. In standard wholesale agreements, the MNO's own direct subscribers are served first. MVNO traffic is served after.
This operates at the network level, not the device level. Your MVNO SIM and an MNO direct SIM on the same phone would experience different throughput during the same congestion event — the MNO direct SIM would receive faster service, not because the signal is different, but because the scheduling firmware in the base station assigns it higher priority.
Deprioritization does not cause disconnection. It causes slower data transfer — longer page loads, video buffering pauses, and degraded streaming quality. Outside congested periods, MVNO speeds can closely approach the MNO's headline network speeds because the priority hierarchy only activates under load.
### When Congestion Occurs
Congestion follows predictable patterns driven by human behaviour:
- **Weekday commute hours**: 07:30–09:30 and 17:00–21:00 in urban and suburban areas
- **Lunch breaks**: 12:00–13:30, particularly in city centres
- **Large public gatherings**: concerts, sporting events, crowded tourist sites
- **Dense urban areas at any time**: high-density cell sites serving many simultaneous users
Rural and low-traffic areas experience significantly less congestion. An MVNO plan used primarily in rural or suburban off-peak contexts may rarely trigger deprioritization at all.
### The Deprioritization Threshold Concept
Some MVNO plans include a usage-based layer of deprioritization on top of the standard network-level policy. Plan terms may note that after a subscriber has consumed a certain amount of high-speed data within a billing period, their traffic may be deprioritized further during congestion — even relative to other MVNO subscribers who have not yet crossed that threshold.
This is distinct from hard throttling, where the entire plan's speed is capped regardless of network conditions. Usage-triggered deprioritization only takes effect when the network is actually congested. During off-peak hours, subscribers past the threshold may still experience speeds close to the POI's available capacity.
The specific thresholds at which this applies vary by MVNO and plan tier. These terms are typically disclosed in the MVNO's Fair Use Policy or plan terms and conditions rather than in headline marketing materials.
---
## Why Sub-Brands Are Less Affected
### Corporate Structure and Priority Policy
An MNO-owned sub-brand is not a separate company leasing capacity at arm's length — it is a brand within the same corporate group as the host network. The parent MNO controls how its internal traffic scheduling system categorises different subscriber classes.
Because the MNO sets the priority rules and manages capacity allocation for its own brands directly, sub-brands occupy a structurally advantaged position relative to independent MVNOs that negotiate at arm's length. However, the actual congestion priority tier assigned to a sub-brand may in practice be similar to that of independent MVNOs on the same network — for example, Cricket (AT&T-owned) and Metro (T-Mobile-owned) are deprioritized below their respective parent's postpaid customers. The key difference is not necessarily a strict priority uplift over every independent MVNO, but rather the parent MNO's direct control over how capacity is allocated and how scheduling policies evolve over time.
This is the central practical difference between a sub-brand and an independent MVNO: both run on the same towers, but the sub-brand benefits from being inside the parent's infrastructure decisions rather than subject to fixed wholesale terms negotiated at arm's length. See [What Is a Sub-Brand?](/en/guides/what-is-sub-brand/) for a full comparison of sub-brands and independent MVNOs.
### The Trade-Off for Consumers
Sub-brands bridge the gap between the lowest-priority MVNO tier and full MNO-flagship priority. They typically cost more than independent MVNOs on the same network while costing less than the parent carrier's flagship plans. If you use data heavily during peak urban hours, the extra cost of a sub-brand plan may be justified by materially better peak-hour performance.
---
## The Economics of Why MVNOs Accept Lower Priority
### Cost Structure of MVNO Operations
MVNOs exist to offer cheaper mobile plans. Their structural cost advantage comes from not owning spectrum or radio infrastructure — but that same lack of ownership is why they accept subordinate network priority.
An MNO has every incentive to protect the quality of service for its own direct subscribers. Wholesale capacity agreements are commercial transactions, not partnerships. The MNO sells excess capacity to MVNOs at a price that reflects the fact that MVNO traffic will be served residually — after the MNO's own subscribers. This lower service tier is what makes the wholesale capacity affordable enough for MVNOs to undercut MNO pricing at the retail level.
If MVNOs paid for guaranteed equal priority with MNO direct subscribers, their wholesale costs would be much higher, and the retail price difference that motivates consumers to choose them would shrink or disappear.
### Volume Aggregation
MVNOs that route through an MVNA (Mobile Virtual Network Aggregator) — an intermediary that bundles multiple MVNOs' capacity purchases from the same MNO — typically achieve lower wholesale rates by aggregating volume. However, aggregation doesn't change the priority class; it only reduces per-unit cost. For a full description of how the MVNO leasing chain works, see [What Is an MVNO?](/en/guides/what-is-mvno/)
### Why This Matters for the Market
The deprioritization model is not a consumer protection failure — it is the mechanism that enables price-competitive mobile plans to exist. In many markets, regulators permit it provided the terms are disclosed, because wholesale MVNOs are legally required to disclose their network priority status in plan terms. The disclosure obligation exists specifically so consumers can make informed trade-offs between price and peak-hour performance.
---
## Full MVNO vs Light MVNO vs Reseller — Does the Type Matter?
### Infrastructure Depth and Control
MVNO types differ in how much of their own network infrastructure they operate. A full MVNO runs its own core network (HLR/HSS) and negotiates directly with the MNO for radio access only. A light MVNO delegates more infrastructure to an MVNE intermediary. A reseller effectively just repackages MNO or MVNE plans under a different brand.
From a network priority perspective, the type of MVNO has limited direct impact. Priority is determined by the wholesale agreement between the MNO and the MVNO (or MVNA), not by how much back-end infrastructure the MVNO owns. A full MVNO with its own core network negotiating directly with the MNO is in a better position to negotiate tighter SLA terms around quality — but the fundamental deprioritization structure remains.
### What the Wholesale Agreement Actually Covers
A typical MVNO wholesale agreement covers:
- Total POI bandwidth purchased
- Data priority class (standard MVNO tier vs elevated)
- Permitted use cases (consumer, IoT, data-only, etc.)
- Roaming terms (separate from domestic capacity)
- 5G access (specifically negotiated, not automatically included)
MVNOs that negotiate elevated priority — sometimes called "premium MVNO" or "enhanced quality" agreements — exist in some markets, but they pay higher wholesale rates, which reduces their ability to compete on price.
---
## How to Detect Whether Your Slowdowns Are Deprioritization
### Speed Testing Protocol
The most reliable way to diagnose deprioritization is systematic speed testing across different times of day using a consistent test server:
1. Run a speed test during peak commute hours (07:30–09:30 or 17:00–21:00 local time)
2. Run the same test in the same physical location during off-peak hours (22:00–06:00)
3. Compare the two results
A large discrepancy — fast off-peak, slow during rush hour — in the same location is the characteristic signature of congestion-driven deprioritization. It rules out coverage issues, APN misconfiguration, and device problems, all of which cause consistently poor performance regardless of time of day.
### Other Causes of Slow MVNO Speeds
Not every speed problem on an MVNO plan is deprioritization. Before attributing slowdowns to the POI model, rule out:
- **APN misconfiguration**: An incorrect APN setting can prevent the device from connecting at full speed or prevent data from working at all. Check the MVNO's published APN settings and verify the device configuration.
- **Coverage edge cases**: Near the edge of a network's coverage area, signal strength is low regardless of subscriber tier. Both MNO direct and MVNO subscribers experience poor speeds in genuine coverage gaps.
- **Device band compatibility**: If your device does not support the frequency bands used by the host MNO in your area, it may fall back to slower bands (e.g., 3G or lower-frequency LTE) even when the MNO's preferred bands are available.
- **Network reset required**: Background radio stack states occasionally become stale. Toggling airplane mode on/off or performing a network settings reset can restore normal speeds in some cases.
- **Tethering restrictions**: Some MVNO plans restrict mobile hotspot (tethering) use or apply separate, lower speed caps to tethered devices.
---
## How to Mitigate MVNO Speed Slowdowns
### Time-Shift Data-Heavy Tasks
The simplest mitigation is temporal: schedule large data downloads, software updates, video streaming sessions, and cloud backups for off-peak hours. If you work irregular hours or work from home, this may be straightforward. If your usage is concentrated in commute hours, the trade-off needs to be weighed against the cost difference.
### Choose an MVNO on a Less Congested Host Network
Not all host MNOs experience the same level of congestion in a given area. In markets with multiple national MNOs, the carrier with the largest subscriber base in a given city may have more congested cells than a carrier with a smaller urban base, even if both provide the same geographic coverage. Comparing the host networks of competing MVNOs in your area can be a meaningful differentiator.
### Consider a Sub-Brand If Peak Hours Are Critical
If your use case requires reliable speeds during peak commute hours — mobile hotspot for a laptop, video calls during lunch breaks, navigation in dense urban areas — a sub-brand plan on the same network provides materially better peak-hour priority at a moderate price premium over independent MVNOs. Use [SimFinder](/en/) to compare current plan pricing across MVNO and sub-brand tiers on the same host network.
### Check the Plan's Fair Use Policy Before You Buy
Review the MVNO plan's terms for any usage-triggered deprioritization threshold before committing. If the plan states that speeds may be reduced after a monthly data threshold during congestion, assess whether your typical monthly usage puts you above or below that threshold.
---
## SimFinder Quality Score and MVNO Comparisons
### What the Quality Score Reflects
SimFinder's quality score for each plan incorporates network tier as a key factor. The score accounts for whether a plan is on an MNO direct tier, an MNO sub-brand tier, or an independent MVNO tier, and weights the congestion risk associated with each. Plans on the same host network but at different priority tiers will receive different quality scores, making the tier difference visible in a side-by-side comparison.
The quality score methodology is documented in the [SimFinder Score](/en/guides/simfinder-score/) guide. For a plain-language explanation of the metrics used to evaluate mobile plan quality, see the [Quality Metrics](/en/guides/quality-metrics/) guide.
### Comparing Plans Across the Priority Spectrum
When using [SimFinder](/en/) to compare plans, sorting by quality score rather than price alone surfaces the priority-tier trade-off. A low-cost MVNO plan and a more expensive sub-brand plan on the same network may have similar headline data allowances, but the quality score reflects the expected difference in congestion performance.
For a structured comparison of MNO direct, sub-brand, and independent MVNO across multiple dimensions — not just speed — the [What Is an MNO?](/en/guides/what-is-mno/) guide covers the full spectrum.
---
## FAQ
The structured FAQ answers are in the frontmatter above for schema.org/FAQPage compatibility. Expanded answers to common questions are below.
**Does off-peak MVNO speed match the MNO's advertised speed?**
During genuine off-peak periods when the shared POI bandwidth is under-utilised, MVNO speeds can approach the MNO's advertised network speed. The gap between advertised and actual is not primarily an MVNO-specific problem — advertised speeds reflect maximum theoretical throughput under ideal conditions, not average real-world performance. What is MVNO-specific is the additional congestion penalty during peak hours.
**Is 5G on an MVNO affected by the same deprioritization?**
Yes. 5G access on an MVNO must be explicitly negotiated in the wholesale agreement — it is not automatically included with 4G/LTE capacity. An MVNO that has 5G access is still subject to the standard POI capacity model and deprioritization relative to MNO direct subscribers on the same 5G cells. The faster headline speeds of 5G reduce the absolute magnitude of congestion slowdowns, but the relative priority structure remains the same.
**Can I check my MVNO plan's priority tier?**
Most MVNOs do not prominently advertise their priority tier, but the information is typically disclosed in plan terms, Fair Use Policy documents, or network coverage FAQs. Phrases such as "traffic may be managed during periods of congestion," "data speeds may be reduced during network congestion," or "subject to network management" indicate standard MVNO deprioritization terms. The absence of such language — combined with explicit MNO-level priority claims — would indicate an elevated agreement.
**Does using Wi-Fi calling help during peak hours?**
Wi-Fi calling routes voice calls and SMS through a broadband internet connection rather than the cellular network. It bypasses the cellular congestion issue entirely for calls and texts during peak hours — useful if you have reliable Wi-Fi access. However, it does not help with mobile data performance, which still routes through the cellular connection and is subject to the POI capacity and deprioritization constraints described in this article.
---
## Related Guides
- [What Is an MVNO?](/en/guides/what-is-mvno/) — How MVNOs lease capacity, the POI model, and full vs light vs reseller types
- [What Is an MNO?](/en/guides/what-is-mno/) — What a licensed network operator owns and how that determines subscriber priority
- [What Is a Sub-Brand?](/en/guides/what-is-sub-brand/) — How MNO-owned sub-brands differ from independent MVNOs in terms of priority and cost
- [SimFinder Score Explained](/en/guides/simfinder-score/) — How the SimFinder quality score is calculated and what it measures
- [Quality Metrics for Mobile Plans](/en/guides/quality-metrics/) — The signal, congestion, and reliability metrics behind plan quality ratings
================================================================================
# Wi-Fi Calling (VoWiFi): Calling Where Signal Is Weak
URL: https://sim-finder.com/en/guides/wifi-calling/
Type: guides (en)
Published: 2026-06-04
Wi-Fi Calling routes voice calls and SMS through a Wi-Fi connection rather than the cellular radio, using a secure tunnel to your carrier's network. It is most useful when you are indoors or in an area with weak cellular signal but have access to Wi-Fi. Support varies by carrier and device: both must be on the approved list, and the feature must be enabled in settings before it activates.
The key points covered in this article:
- How Wi-Fi Calling works technically (IPsec/IKEv2, ePDG, IMS)
- The relationship between Wi-Fi Calling and VoLTE
- Prerequisites: carrier support, compatible device, and settings
- What happens when you move between Wi-Fi and cellular mid-call
- How Wi-Fi Calling helps with receiving calls and SMS while abroad
- Emergency call support over Wi-Fi Calling
- How to enable it on iPhone and Android
For the technical foundation of how voice calls work over 4G and 5G using IMS, see [VoLTE and VoNR Explained](/en/guides/volte-vonr/). For the broader context of keeping your home SIM working abroad, see [International Roaming Explained](/en/guides/international-roaming/).
---
## What Wi-Fi Calling Is
**Wi-Fi Calling** — also referred to as **VoWiFi** (Voice over Wi-Fi) — is a carrier-managed service that allows voice calls and SMS to be sent and received over a Wi-Fi connection instead of the cellular radio interface. Once a call is placed via Wi-Fi Calling, your phone number and caller ID remain unchanged. The call is billed under your standard plan, just as a cellular voice call would be, unless your carrier applies a specific Wi-Fi Calling rate.
The technology is standardised in GSMA IR.51, "IMS Profile for Voice, Video and SMS over untrusted Wi-Fi access," which is the companion document to GSMA IR.92, the standard that defines VoLTE. IR.51 defines how the same IMS core used for VoLTE is accessed over a Wi-Fi path rather than the LTE radio.
Wi-Fi Calling is not a third-party VoIP application. It does not use a separate VoIP account or a different phone number. It is an extension of the carrier's voice infrastructure, accessible over Wi-Fi through a defined gateway architecture.
---
## How the Connection Works: ePDG and IPsec/IKEv2
When a device initiates Wi-Fi Calling, it does not send voice traffic directly to the carrier's core. Instead, it establishes a secure tunnel through a dedicated network element.
### The ePDG
The **ePDG (evolved Packet Data Gateway)** is a carrier-operated gateway defined in 3GPP TS 23.402 that provides secure access to the carrier's packet core from untrusted non-3GPP access networks — of which Wi-Fi is the primary example. "Untrusted" in this context means that the Wi-Fi network is not operated by the carrier and its security cannot be assumed.
The ePDG sits at the boundary between the public internet and the carrier's IMS core. Its role is to:
1. Authenticate the device using IKEv2 (Internet Key Exchange version 2), validating the device's credentials via AAA/HSS (Home Subscriber Server).
2. Establish an **IPsec ESP (Encapsulating Security Payload)** tunnel between the device and the ePDG, encrypting all traffic end-to-end across the untrusted Wi-Fi and internet path.
3. Forward authenticated traffic into the carrier's PDN (Packet Data Network) gateway and on to the IMS core.
The combination of IKEv2 for authentication and IPsec ESP for encryption means that voice traffic over Wi-Fi Calling is protected even if the Wi-Fi network itself is open or insecure.
### IMS Registration Over Wi-Fi
Once the IPsec tunnel is established, the device registers with the carrier's IMS P-CSCF (Proxy Call Session Control Function) over that tunnel, using the same SIP signalling used by VoLTE. From the IMS core's perspective, the access path is transparent: it sees an authenticated subscriber registration and handles the call through the same call routing, charging, and number management as any VoLTE session.
This architecture is why Wi-Fi Calling preserves your real phone number, integrates with voicemail, and can be handed off mid-call to the cellular network — all are properties of IMS, not of Wi-Fi itself.
---
## The Relationship Between Wi-Fi Calling and VoLTE
Wi-Fi Calling and VoLTE share the same underlying IMS infrastructure. The difference is the access path:
| | VoLTE | Wi-Fi Calling (VoWiFi) |
|---|---|---|
| Access network | 4G LTE radio | Wi-Fi (untrusted) |
| Security layer | LTE air-interface encryption | IPsec/IKEv2 tunnel |
| Gateway | eNB → EPC | Wi-Fi router → internet → ePDG |
| IMS registration | Over LTE bearer | Over IPsec tunnel |
| Call quality codec | AMR-WB (HD Voice) | AMR-WB (HD Voice) |
| Phone number | Unchanged | Unchanged |
Because both use the same IMS core, a carrier can hand off a live call from Wi-Fi Calling to VoLTE — or vice versa — without interrupting the conversation. This is called **seamless handover**, and it is defined in GSMA IR.51. The handover is transparent: a call that starts on Wi-Fi inside a building can transition to LTE as you walk outside, or switch to Wi-Fi if cellular signal drops indoors.
Not all devices and carriers support seamless handover. On devices or networks without it, moving between Wi-Fi and cellular may drop the call and require it to be re-established.
For a detailed explanation of how IMS, SIP signalling, and QoS bearers work in VoLTE, see [VoLTE and VoNR Explained](/en/guides/volte-vonr/).
---
## Benefits of Wi-Fi Calling
Wi-Fi Calling is useful in specific situations that cellular radio does not handle well.
### Indoor Coverage
Cellular signals attenuate significantly as they pass through building materials — concrete, metal, and low-emission glass all reduce signal strength. A device showing one or two bars indoors may struggle to establish or maintain a call. Wi-Fi, by contrast, is typically deployed specifically for indoor coverage. If a Wi-Fi access point is reachable, Wi-Fi Calling can deliver a full-quality call regardless of cellular signal.
### Basements and Underground Spaces
The same attenuation applies to basements, underground transit stations, and parking structures where cellular coverage may be absent but Wi-Fi is deployed.
### Areas with Carrier Coverage Gaps
Rural or remote areas with weak carrier coverage may have Wi-Fi at specific locations (a hotel, a café, a house). Wi-Fi Calling allows calls and SMS to reach you at those locations using your home number.
### Receiving Calls and SMS While Connected to Foreign Wi-Fi
For travellers, this is a significant use case. If your home carrier supports Wi-Fi Calling internationally, you can receive calls and SMS to your home number over any Wi-Fi connection, without needing cellular coverage on your home SIM. This is discussed further in the section on international use below.
---
## Prerequisites
Three things must be in place for Wi-Fi Calling to work.
### 1. Carrier Support
Your carrier must operate an ePDG and support VoWiFi on your account. Availability varies by carrier and country. Wi-Fi Calling is widely available on major carriers in the United States (AT&T, T-Mobile, Verizon), the United Kingdom (EE, Vodafone, Three, O2), and many carriers in Western Europe, South Korea, Japan, and Australia. Smaller carriers and MVNOs may or may not support it depending on their wholesale agreement with the host MNO.
Because carrier support changes over time, the most reliable check is your carrier's official feature page or its device compatibility list. SimFinder's carrier information pages link to official feature documentation where available.
### 2. Compatible Device with Carrier IMS Profile
Your device must support VoWiFi and carry the carrier's IMS profile for Wi-Fi Calling. This is the same IMS profile requirement that applies to VoLTE: the device's modem firmware must contain the carrier's ePDG address, IKEv2 credentials, and policy parameters.
On iPhones, Apple distributes carrier bundles via iOS updates. If your carrier is on Apple's list, the Wi-Fi Calling configuration is included in the carrier bundle. On Android, manufacturers embed IMS profiles for the markets their devices are sold in; an unlocked device sold for a different market may not include the ePDG profile for your carrier.
An unlocked device that can use VoLTE on a carrier will generally also be able to use Wi-Fi Calling on the same carrier, provided the carrier bundle includes the ePDG configuration. However, this is not guaranteed: some carriers deploy VoLTE and VoWiFi on separate approval timelines, and device compatibility lists for each may differ.
### 3. Enabling the Feature in Device Settings
Wi-Fi Calling is typically off by default and must be enabled in the device's cellular or SIM settings. On iPhone, the path is **Settings → Cellular → Wi-Fi Calling**. On Android (stock), it is usually under **Settings → Network & Internet → Calls & SMS** or **Settings → Connections → Wi-Fi Calling**, depending on the manufacturer. The toggle will only appear if both the carrier and the device support the feature.
When you first enable Wi-Fi Calling on many carriers, the device prompts you to confirm or enter a registered address for emergency call location purposes.
---
## Wi-Fi Calling and International Use
The behaviour of Wi-Fi Calling abroad is carrier-policy-dependent and should be verified before travel.
**Carriers that allow international Wi-Fi Calling** will route calls and SMS to your home number over any Wi-Fi connection regardless of country. This means you can receive calls to your home number — and receive SMS 2FA codes — over the hotel Wi-Fi in another country, even if your home SIM has no cellular coverage there. Some carriers charge a per-minute rate for Wi-Fi Calling internationally; others treat it identically to domestic Wi-Fi Calling.
**Carriers that restrict Wi-Fi Calling to domestic use** will not activate the ePDG tunnel when the device is outside the home country. The feature will appear inactive even if Wi-Fi is available.
**Carriers that disable Wi-Fi Calling in specific countries** may do so due to local regulatory restrictions. Some countries require communications to traverse domestic infrastructure, which a foreign carrier's ePDG may not satisfy.
Before relying on Wi-Fi Calling abroad to receive SMS 2FA codes or stay reachable on your home number, check your carrier's international Wi-Fi Calling documentation explicitly. For a full strategy on receiving SMS 2FA codes while travelling — including Wi-Fi Calling, dual SIM, and roaming options — see [How to Receive SMS 2FA Codes Abroad](/en/guides/sms-2fa-abroad/).
For the broader question of how your home SIM operates in a foreign country's cellular network, see [International Roaming Explained](/en/guides/international-roaming/).
---
## Wi-Fi Calling on Dual SIM Devices
On a dual SIM device, Wi-Fi Calling typically applies to the SIM line designated for calls — the "primary" or "preferred" voice line. Some devices support Wi-Fi Calling independently on both lines; others support it only on one line at a time.
A common travel configuration is to keep a home SIM for receiving calls and SMS (with Wi-Fi Calling enabled, Data Roaming off) and add a local data eSIM for mobile data. In this setup:
- The home SIM receives incoming calls and SMS via Wi-Fi Calling when connected to Wi-Fi, without incurring cellular roaming data charges.
- The local eSIM provides mobile data for apps and browsing.
This configuration depends on the home carrier supporting international Wi-Fi Calling (as described above). If it does not, the home SIM will need roaming enabled to receive calls and SMS.
For a detailed guide to this dual SIM travel configuration, see [Using Dual SIM for Travel](/en/guides/dual-sim-for-travel/).
---
## Emergency Calls Over Wi-Fi Calling
Wi-Fi Calling can support emergency calls when no cellular signal is available. In the United States, the FCC requires carriers that offer Wi-Fi Calling to support 911 over it under the FCC's E911 rules for wireless providers (47 CFR Part 9). Because Wi-Fi Calling has no cell-tower location data, the device transmits the registered emergency address you provide when enabling the feature; device-derived location (such as GPS) is also used where available. Carriers must transmit location information with emergency calls placed over Wi-Fi Calling.
Outside the US, emergency call support over Wi-Fi Calling varies by country and carrier. Not all carriers in all countries have implemented emergency services over VoWiFi. Where it is supported, the device typically sends its registered address (entered when Wi-Fi Calling was first activated) as the emergency location.
A key limitation: **Wi-Fi Calling emergency support is carrier- and country-specific and cannot be assumed to work in all situations.** If you are in a location with no cellular signal and need to place an emergency call, attempt the call even with no bars — the device may be able to route it — but do not rely solely on Wi-Fi Calling if other options are available.
For the broader issue of what to do when your phone shows no service, see [No Service on Your Phone?](/en/guides/no-service/).
---
## How to Enable Wi-Fi Calling
### On iPhone
1. Open **Settings → Cellular** (or **Settings → Mobile Service** in some regions).
2. Tap the SIM line you want to configure (on dual SIM devices, each line has separate settings).
3. Tap **Wi-Fi Calling**.
4. Toggle **Wi-Fi Calling on This iPhone** on.
5. If prompted, enter or confirm your emergency address.
The Wi-Fi Calling icon (a phone handset with Wi-Fi signal bars) will appear in the status bar when an active Wi-Fi Calling connection is established.
### On Android (Stock)
The path varies by manufacturer and Android version. Common locations:
- **Settings → Network & Internet → Calls & SMS → Wi-Fi Calling**
- **Settings → Connections → Wi-Fi Calling** (Samsung One UI)
- **Settings → Mobile network → Wi-Fi Calling** (some Qualcomm-based devices)
If the Wi-Fi Calling option does not appear in any of these locations, the feature is not supported for your SIM on your device. This may be because the carrier is not supported, the device lacks the IMS profile for your carrier, or the device manufacturer has not enabled the feature for your market variant.
---
## Limitations and Things to Check
**No cellular required, but carrier registration is.** Wi-Fi Calling works when there is zero cellular signal, but it requires the carrier to authenticate your subscription. A suspended account, an expired plan, or a SIM that has not been activated on the network will fail to establish the ePDG tunnel.
**NAT traversal.** The IPsec/IKEv2 protocol used by Wi-Fi Calling requires the device to be reachable through the Wi-Fi router's NAT. Most home and hotel routers handle this correctly, but corporate firewalls or heavily restricted networks (captive portals that do not pass IPsec traffic) may block the tunnel. If Wi-Fi Calling fails to connect on a specific network, the most common cause is firewall or NAT policy.
**MVNOs and host network profiles.** An MVNO's subscribers use Wi-Fi Calling only if the host MNO passes VoWiFi through in the wholesale agreement and the device carries an IMS profile that includes the host MNO's ePDG. An MVNO does not operate its own ePDG. Some MVNOs explicitly advertise Wi-Fi Calling support; others do not — check with the MVNO directly.
**Travel eSIMs are typically data-only.** Travel eSIMs sold by third-party providers for international data are almost universally data-only: they do not include voice or IMS registration, and Wi-Fi Calling is not available through them. Wi-Fi Calling for your home number requires using your home carrier's SIM, not a travel eSIM.
---
## FAQ
See the frontmatter for structured FAQ entries compatible with schema.org/FAQPage.
**Is Wi-Fi Calling the same as using WhatsApp or FaceTime over Wi-Fi?**
No. WhatsApp, FaceTime, and similar apps use their own signalling servers and peer-to-peer media paths over the data connection, independent of the carrier's infrastructure. Wi-Fi Calling uses the carrier's IMS core via the ePDG and carries the call on your registered phone number, interoperating with all phones on the PSTN. The two are technically unrelated.
**Does Wi-Fi Calling consume mobile data?**
No. Wi-Fi Calling routes voice traffic over the Wi-Fi connection, not the cellular data connection. It does not consume your mobile data allowance. It does use Wi-Fi bandwidth, though the amount is small — AMR-WB voice, the codec used in IMS calls, typically produces 12–25 kbps.
**If my carrier supports Wi-Fi Calling, why might the option not appear in my settings?**
The most common reason is that the device does not carry the carrier's IMS profile for VoWiFi — either because it was sold for a different market, is an older model that predates the carrier's VoWiFi deployment, or the manufacturer disabled the feature in the firmware for that device variant. Check the carrier's approved device list, or test by inserting a SIM from the carrier and looking for the Wi-Fi Calling toggle.
**Can I use Wi-Fi Calling if I am on an MVNO?**
Only if the MVNO explicitly supports it. The host MNO must enable VoWiFi pass-through in the wholesale agreement, and the MVNO must provision it for subscribers. Some MVNOs on major carriers do support Wi-Fi Calling; others do not. Check the MVNO's feature list or its support documentation.
---
## Related Guides
- [VoLTE and VoNR Explained](/en/guides/volte-vonr/) — How IMS, SIP, and QoS bearers work for voice calls on 4G and 5G — the same core infrastructure Wi-Fi Calling uses
- [International Roaming Explained](/en/guides/international-roaming/) — How your home SIM connects to foreign networks, and what charges to expect when abroad
- [How to Receive SMS 2FA Codes Abroad](/en/guides/sms-2fa-abroad/) — Strategies for keeping 2FA codes reachable while travelling, including Wi-Fi Calling, dual SIM, and TOTP migration
- [Using Dual SIM for Travel](/en/guides/dual-sim-for-travel/) — How to run your home SIM alongside a local data eSIM, with Wi-Fi Calling on the home line
- [No Service on Your Phone?](/en/guides/no-service/) — Step-by-step diagnostics when your phone shows no signal, including what to check if Wi-Fi Calling is not activating
================================================================================
# SIM Choices for a Working Holiday or Study Abroad
URL: https://sim-finder.com/en/guides/working-holiday/
Type: guides (en)
Published: 2026-06-06
A working holiday or extended study abroad program puts you in a different category from a tourist. You need connectivity that works on arrival, scales to months or over a year of use, and costs less than a succession of tourist SIM purchases. The right strategy depends on two factors above all else: how long you are staying, and what your visa allows in terms of obtaining local services.
The short version: use a travel eSIM or airport SIM for the first days of arrival. Once you have a local address — typically within the first two to four weeks — move to a local carrier plan. If you need your home number reachable, keep your home SIM active in a dual-SIM setup.
---
## Arrival Days: Start With a Travel eSIM or Airport SIM
The first 24 to 72 hours in a new country are when connectivity is most critical and hardest to arrange. You need maps, translation apps, accommodation confirmations, and a way to contact people — before you have a local address or know which carrier to choose.
A **travel eSIM** installed on home Wi-Fi before departure is the lowest-friction option. It activates automatically when you land and connects to a local partner network, with no queue, no language barrier, and no in-store registration step. For countries with a strong local eSIM infrastructure — Australia, New Zealand, the United Kingdom, Japan, South Korea, much of Western Europe, Canada — travel eSIM coverage and speeds are generally reliable in urban areas.
An **airport SIM** — a physical prepaid SIM sold at arrival terminals — is the alternative for countries where travel eSIM coverage is thinner, or if your device does not support eSIM. Airport SIMs from a major local carrier typically offer better local coverage than a travel eSIM's roaming-based connection in markets where carrier eSIM depth is limited.
For a full comparison of the four connectivity options — roaming, travel eSIM, local SIM, and portable Wi-Fi — see [How to Choose a Travel eSIM](/en/guides/how-to-choose/).
**How long to use arrival connectivity:** most working holiday and study abroad travelers transition to a local carrier plan within two to four weeks, once they have a registered address. Some transition in the first few days if an arrival address (such as a student dormitory or shared accommodation) is available immediately.
---
## Short Stays (Up to 4 Weeks): Travel eSIM May Be Sufficient
If your program or working holiday is four weeks or shorter, a travel eSIM or tourist prepaid SIM may cover the entire stay without needing to engage with local carrier onboarding.
**Travel eSIM** plans with 30-day validity are widely available and can be the entire SIM solution for a month-long language course or short-term academic exchange. Compare plans for your destination using [SimFinder Travel](/) — look at the local network partner for each plan, not just the headline data amount.
**Tourist prepaid SIMs** from local carriers are another option for this length of stay. In many markets, these are sold at airports, electronics stores, and convenience stores without a local address requirement. Refer to the [Regional Connectivity Guide](/en/guides/regional-overview/) for which countries have low-friction tourist SIM access and which have registration barriers.
For stays of under four weeks, a local carrier contract is rarely worth the setup cost in time and paperwork. The main exception: if your destination has very strong local prepaid plans available to foreigners on arrival (common in parts of Southeast Asia and South Asia), a local prepaid SIM often undercuts travel eSIM pricing substantially, especially for high-data usage.
---
## Long Stays (1 Month to 1 Year): Move to a Local Carrier Plan
For stays of one month or longer, a local carrier plan is almost always the right long-term solution.
### Why Local Plans Win on Cost
Local carrier prepaid and postpaid plans are priced for residents, not tourists. They offer substantially more data per unit of cost than travel eSIM plans, which carry a convenience premium for short-trip use. For a stay measured in months, this cost difference compounds significantly.
Use [SimFinder Travel](/) to compare travel eSIM plans for your destination, then check the local carrier offerings in the country to get a sense of the relative value. For a framework on choosing between plan types, see [Travel eSIM Provider Comparison](/en/guides/provider-comparison/).
### What Local SIM Onboarding Typically Requires
Local carrier onboarding requirements for working holiday and study abroad visitors typically include one or more of the following:
- **Passport** — universally required for identity verification
- **Proof of local address** — a rental agreement, dormitory enrollment letter, or similar document
- **Local tax number or resident ID** — required in some countries, particularly for postpaid plans
- **Visa documentation** — some carriers verify visa type and duration; a working holiday or student visa is generally acceptable
**Prepaid plans** usually have lighter requirements than postpaid. Many countries allow foreigners on working holiday or student visas to access prepaid plans with only a passport and an address. Postpaid plans — which include monthly contracts and often better per-GB pricing — may require a local bank account or credit record in addition to the above.
**eSIM onboarding at local carriers** varies. In countries with mature eSIM infrastructure (Australia, New Zealand, UK, Japan, South Korea, Germany), the major carriers support eSIM activation through their apps or QR codes with no physical SIM needed. In countries where eSIM rollout at local carriers is less complete, a physical SIM from the carrier may be the only option.
### Getting a Local Voice Number
Most travel eSIMs are data-only. A local carrier SIM gives you a phone number in the destination country, which matters for:
- Calling local landlords, employers, or schools
- Receiving SMS verification codes from local services
- Setting up local bank accounts or payment apps (common in Japan, South Korea, and parts of Southeast Asia)
- Job applications that require a local contact number
For working holiday participants who plan to work in their destination country, a local voice number is often practically necessary within the first weeks.
---
## Extended Stays (1 Year or More): Consider a Full Local Contract
For stays of a year or more, a postpaid contract with a local carrier is worth pursuing if your visa and circumstances allow. Postpaid contracts in many markets offer significantly better per-GB pricing, priority network access, and monthly carryover of unused data compared to prepaid.
Requirements for postpaid contracts as a foreign national vary substantially by country:
- **Australia and New Zealand:** major carriers typically offer month-to-month postpaid plans to working holiday visa holders with a valid passport and Australian/NZ address. No permanent residency is required, though credit checks may apply.
- **UK:** postpaid SIM-only plans are widely available to residents on any valid visa category. A UK bank account is useful but some carriers accept international accounts or require a deposit.
- **Japan:** postpaid contracts require a Japanese address, passport, and in most cases a Japanese bank account. Working holiday visa holders are eligible but the process requires in-person registration at a carrier shop. MVNOs may have lighter requirements than the three major carriers.
- **South Korea:** postpaid contracts require a registration number from the foreigner registration card (외국인등록증), which is issued after 90 days of residency. Working holiday and student visa holders can apply for the card at their local immigration office.
- **Germany and EU countries:** postpaid contracts are available to long-term residents with a registered address (Anmeldung in Germany). A German bank account (IBAN) is typically required for direct debit. Registration requirements for prepaid plans also apply in Germany.
For a detailed look at the long-term local carrier strategy including MVNO options and plan transitions, see [Local Carrier Contracts for Long-Term Stays](/en/guides/local-contract/) and [Expat SIM Strategy](/en/guides/expat-strategy/).
---
## General Tendencies by Common Destination
The following describes general patterns for countries frequently visited on working holiday visas. Individual carrier policies, registration rules, and eSIM availability change over time — treat these as starting points for your own research.
### Australia and New Zealand
Both markets generally have low-friction local SIM onboarding. In Australia, major carriers sell prepaid SIMs at airports, supermarkets, and convenience stores with a passport; an address is not required at point of sale, though it may be collected for account management. In New Zealand, registration requirements vary by carrier — some allow activation without an address while others require it upfront, so check the specific carrier's current onboarding process. eSIM is widely supported by all major carriers. For rural Australia, the choice of carrier matters significantly for coverage — see the [Regional Connectivity Guide](/en/guides/regional-overview/) for the rural coverage context.
### United Kingdom
Prepaid SIMs are available without registration. Postpaid SIM-only plans are accessible to residents on most visa types, typically requiring a UK address and bank details. eSIM is fully supported by all major UK carriers. The UK is outside the EU's RLAH framework, so EU roaming is not guaranteed and depends entirely on the home carrier's own policy. Some UK carriers include EU roaming at no extra charge under their own commercial terms; others apply a daily fee.
### Japan
All SIM purchases — including tourist prepaid SIMs — require passport-based identity verification. Airport and electronics store tourist SIMs are widely available with passport registration. For longer stays, working holiday visa holders can access local carrier plans after registering an address, but the registration process is in-person at carrier shops and largely conducted in Japanese. Some MVNOs specifically targeting foreign residents — including English-language services such as Sakura Mobile and GTN Mobile — offer simpler onboarding for foreigners. Most mainstream value MVNOs operate in Japanese only. eSIM is widely available from major carriers and most MVNOs. A Japanese bank account is required for most postpaid contracts.
### South Korea
SIM registration requires passport verification for all purchases. Tourist SIMs are available at airports and convenience stores. For postpaid access, the foreigner registration card is required, which is available after 90 days of residency under a working holiday or student visa. eSIM is widely available from major carriers.
### Western Europe (EU countries)
Registration requirements vary by country. Germany requires identity verification for all SIM purchases. Most other EU countries allow tourist SIM purchases with a passport or light documentation. EU carriers operating under RLAH can use their domestic plan across EU/EEA countries — if your home carrier is EU-based, your existing plan may cover travel within the EU at domestic rates. For non-EU visitors, a local SIM in your EU destination country provides the most cost-effective connectivity for a longer stay. The [Regional Connectivity Guide](/en/guides/regional-overview/) covers EU roaming in more detail.
### Canada
Prepaid SIMs require no registration and are available without identity verification. Major carrier postpaid plans are accessible to residents on valid visas. eSIM is widely supported. Rural coverage in the interior and northern Canada is limited regardless of carrier.
---
## Keeping Your Home Number Reachable
Working holiday participants frequently need to stay reachable on their home number for banking, professional contacts, and family communication. The most common approach is a **dual-SIM setup**: keep your home SIM active in the phone alongside a local SIM or travel eSIM for data.
On a dual-SIM device (most modern smartphones support physical SIM + eSIM simultaneously), you can:
- Receive calls and SMS on your home number via international roaming
- Use a local SIM or travel eSIM for data at local rates
- Make outgoing calls using VoIP apps over the data connection
**Data switching control:** on iPhone, turn off "Allow Cellular Data Switching" in Settings to ensure data uses the local SIM only. Without this setting, the phone may switch to the roaming home SIM for data, incurring unexpected charges.
**Home carrier cost management:** if you need your home SIM only for incoming calls and SMS — not outgoing calls or data — check whether your carrier offers a low-cost retention option, a suspension plan, or a minimum-spend plan that keeps the number active. Some carriers allow a temporary suspension for extended travel.
**Number forwarding:** some home carriers allow calls to your home number to be forwarded to a destination number or VoIP app. This can reduce or eliminate roaming charges while keeping your home number reachable.
For more on managing calls across two numbers and handling SMS-based authentication abroad, see [Expat SIM Strategy](/en/guides/expat-strategy/).
---
## eSIM Compatibility and Carrier Lock Checks
Before departure, verify:
- **Your device supports eSIM.** On iPhone, check Settings > Cellular — an "Add eSIM" or "Add Cellular Plan" option confirms eSIM support. On Android, check Settings > Network & internet > SIMs for an "Add SIM" option.
- **Your device is not carrier-locked.** A SIM-locked device cannot use SIMs from other carriers, including local SIMs and travel eSIMs. On iPhone, check Settings > General > About > Carrier Lock. If the device is locked, contact your home carrier to request an unlock before departure.
- **Your device supports the frequency bands used in your destination.** Most recent flagship devices sold globally support the main frequency bands used in popular working holiday destinations. Devices purchased in one region may have limited band support in others — check your device's specifications against the destination carrier's band list if in doubt.
For a full device compatibility check and eSIM profile limits (some devices limit the number of stored eSIM profiles), see [eSIM Compatible Devices](/en/guides/esim-compatible-devices/).
---
## Planning Your Transition
The practical sequence for most working holiday and study abroad travelers:
1. **Before departure:** install a travel eSIM on home Wi-Fi. Check device eSIM support and carrier lock status. Identify which local carrier plans are available in your destination for the medium term.
2. **On arrival:** use the travel eSIM for immediate connectivity. Find your accommodation and register an address as soon as possible — this is the key prerequisite for most local SIM onboarding.
3. **Within the first 2–4 weeks:** visit a local carrier shop or complete online onboarding for a local prepaid or postpaid plan. Transfer data usage to the local SIM. Deactivate or pause the travel eSIM.
4. **For stays of 1 year+:** evaluate postpaid contract options once your visa status and residency situation is established. Consider whether a local bank account (often required for postpaid) is practical to set up.
5. **Throughout:** keep your home SIM active in a dual-SIM setup if you need your home number reachable for banking, professional contacts, or family calls.
Use [SimFinder Travel](/) to compare travel eSIM plans for your arrival period, and refer to the [Regional Connectivity Guide](/en/guides/regional-overview/) for country-specific context on SIM registration rules and eSIM availability in your destination.
---
## Visa Length and How It Shapes Your SIM Choice
Working holiday and study abroad visas span a wide range of durations, and the permitted length of stay is the single most important variable in your SIM strategy.
**Stays of under 4 weeks** sit closest to the tourist experience. A travel eSIM or airport prepaid SIM handles the full stay without requiring local carrier onboarding. You may not need a local phone number at all, and the higher per-GB cost of a travel eSIM is an acceptable trade-off for the convenience of not dealing with carrier registration in a foreign language.
**Stays of 1 to 3 months** are the transition zone. A travel eSIM for the first week or two remains practical, but the cost difference versus a local carrier plan grows week by week. For this length of stay, the question is whether you will be in one place long enough to justify the setup cost of local carrier onboarding — usually yes if you have a fixed accommodation address from the start.
**Stays of 3 to 6 months** nearly always benefit from a local carrier plan as the primary SIM. The cumulative cost of running a travel eSIM for this duration is substantial, and a local plan gives you a real phone number, which is increasingly necessary as you interact with local employers, landlords, banks, and services.
**Stays of 6 months to 1 year** — the standard working holiday visa duration in many countries — make a local carrier plan essentially mandatory for cost and practicality. For the latter part of the stay, if postpaid plans are accessible under your visa, they often offer substantially better value than month-to-month prepaid top-ups. The [Local Carrier Contracts for Long-Term Stays](/en/guides/local-contract/) guide covers the transition from prepaid to postpaid in detail.
**Stays beyond 1 year** move into expat territory. Visa extensions, changes in residency status, and accumulating local financial history (credit records, bank accounts) all open additional options. The [Expat SIM Strategy](/en/guides/expat-strategy/) guide addresses the considerations specific to multi-year stays.
---
## Budgeting Connectivity Over a Long Stay
Connectivity is a recurring monthly cost that is easy to underestimate at the planning stage. A few principles help keep it predictable.
**Separate arrival costs from ongoing costs.** A travel eSIM or airport SIM is a one-time arrival expense — budget it as such, not as a model for what you will pay monthly. The ongoing cost is what you pay once you have transitioned to a local carrier plan, and that figure is typically much lower per gigabyte.
**Factor in your home SIM.** If you intend to keep your home number active throughout the stay, your home carrier's minimum monthly cost is a recurring expense on top of your local SIM costs. Check your home carrier's retention, suspension, and minimum-spend options before you leave — some carriers allow a reduced-cost hold for extended travel periods, which can cut this cost significantly.
**Data requirements tend to grow with stay length.** In the first weeks you may rely heavily on Wi-Fi at accommodation. As you settle into regular routines — commuting, working, navigating less-familiar areas — mobile data usage often increases. Budget for a plan with room to grow rather than optimising for minimum data on arrival.
**Roaming from your destination is a separate cost.** If your working holiday or study program involves travel to nearby countries — for example, weekend travel within Europe or between Southeast Asian countries — your local SIM's roaming policy matters. Some local prepaid plans offer no roaming, making a travel eSIM the practical supplement for side trips. The [Travel eSIM Provider Comparison](/en/guides/provider-comparison/) covers the major providers whose plans are suited for multi-country use from a fixed base.
**Compare total cost of ownership, not headline prices.** When evaluating local carrier plans, compare the effective monthly cost inclusive of any activation fees, mandatory SIM costs, or minimum top-up requirements. A plan with a lower headline price but a high upfront SIM cost may cost more over a three-month stay than a slightly more expensive plan with no activation fee.
---
## What to Arrange Before You Fly
Preparation before departure reduces friction on arrival and prevents the scenarios where you land without connectivity for hours or days while resolving an avoidable issue.
**Check eSIM compatibility and carrier lock status.** Verify that your device supports eSIM (Settings > Cellular on iPhone; Settings > Network on Android) and is not carrier-locked. A locked device cannot use foreign SIMs or travel eSIMs until unlocked. Contact your home carrier to request an unlock at least a week before departure — processing times vary. See [How to Choose a Travel eSIM](/en/guides/how-to-choose/) for the full device compatibility checklist.
**Install a travel eSIM before departure.** Once you have confirmed eSIM support, purchase and install a travel eSIM plan for your destination while on home Wi-Fi. Downloading an eSIM profile requires a stable internet connection and takes a few minutes; doing this at home eliminates the risk of needing to download a profile on airport Wi-Fi or a slow cellular connection on arrival.
**Research local carrier options for your medium-term plan.** Identify two or three local carrier or MVNO options for your destination before you leave. Note their onboarding requirements — specifically whether they need an address, a tax ID, or an in-person visit. Knowing this in advance means you arrive with a plan rather than starting research from scratch when you are tired from travel. The [Regional Connectivity Guide](/en/guides/regional-overview/) provides a useful starting point for the documentation and registration context in common working holiday destinations.
**Arrange your home SIM's status.** Decide whether you will keep your home SIM fully active, switch to a minimal retention plan, or suspend it. Contact your home carrier to make this change before departure if a lead time is required. For banking SMS codes and two-factor authentication, keeping your home number active in a dual-SIM configuration is the most reliable approach.
**Note accommodation address details.** Local carrier SIM onboarding almost always requires a proof-of-address document or at minimum a local address to enter. If you have pre-arranged accommodation — a dormitory, a guesthouse, or a short-term rental — note the full address, including any post code or administrative code format required in the destination country.
---
## Common Mistakes Working-Holiday Travellers Make With SIMs
**Using a travel eSIM for the entire stay.** Travel eSIMs are priced for the short-trip market. Running one for six or twelve months costs substantially more than a local carrier plan would for the same data. The most common version of this mistake is staying on the arrival eSIM out of inertia after settling into accommodation — the setup of a local SIM gets postponed and never happens.
**Assuming a tourist SIM is the only option.** Many working holiday travellers assume their visa status limits them to tourist-tier SIM access. In most popular destinations, a working holiday or student visa is sufficient for standard local prepaid plans — and often for postpaid plans too, once you have a registered address. Check the actual requirements rather than assuming the most restrictive case.
**Letting home carrier roaming run unchecked.** Some devices default to using the home SIM for data if the local SIM connection is briefly unavailable, or if data-switching is not disabled. On a dual-SIM phone keeping a home SIM active, a few days of accidental roaming data charges can be unexpectedly large. Disable data roaming on the home SIM explicitly, and confirm the setting after switching to your local SIM.
**Not getting a local phone number early enough.** A local voice number is needed earlier than most travellers expect: for confirming rental accommodation, for employer contact during job applications, and for setting up local bank accounts or payment apps. Planning to get a local number "eventually" can create real friction in the first weeks when the number is needed most. Treating local number acquisition as a week-one task rather than a later step makes subsequent logistics significantly smoother.
**Overlooking MVNO options.** Major carrier shops are the most visible option in most countries, but MVNOs — which resell capacity on the same networks at lower cost — frequently offer better value for working holiday travellers, and often provide English-language customer support. The [Local Carrier Contracts for Long-Term Stays](/en/guides/local-contract/) and [Expat SIM Strategy](/en/guides/expat-strategy/) guides both cover MVNO access as part of the long-term SIM strategy.
---
## Related Guides
- [Local Carrier Contracts for Long-Term Stays](/en/guides/local-contract/) — Onboarding requirements, prepaid vs postpaid, and MVNO options for extended stays
- [Expat SIM Strategy](/en/guides/expat-strategy/) — Managing home and local SIMs for multi-year stays, number retention, and dual-SIM setups
- [Regional Connectivity Guide for Travelers](/en/guides/regional-overview/) — eSIM adoption, SIM registration rules, and rural coverage across 6 regions
- [How to Choose a Travel eSIM](/en/guides/how-to-choose/) — 5 criteria for evaluating travel eSIM plans: coverage, data, validity, pricing, activation
- [Travel eSIM Provider Comparison](/en/guides/provider-comparison/) — Major providers compared by coverage, plan structure, and destination depth
================================================================================
# ahamo vs LINEMO 徹底比較2026 — 料金・速度・機能の違いを解説
URL: https://sim-finder.com/ja/blog/ahamo-vs-linemo-comparison-2026/
Type: blog (ja)
Published: 2026-03-26T00:00:00+09:00
## 【結論】ahamoとLINEMO、あなたに合うのはどっち?
先に結論を述べる。
- **月30GB使う人で通信速度を重視するなら → [ahamo](/ja/jp/carriers/jp-ahamo/)**
- **月10GB以下で十分、またはLINEを大量に使うなら → [LINEMO](/ja/jp/carriers/jp-linemo/)**
- **月110GBの大容量が必要なら → ahamoの大盛りプラン一択**
両社とも大手キャリアのオンライン専用ブランドで、料金・品質ともに高水準だ。30GBプランは月額2,970円で完全に同額のため、差が出るのは「通信品質」「小容量プランの有無」「独自機能」の3点になる。
以下、全項目を比較していく。
**[SimFinderで自分に合ったプランを検索する →](/ja/jp/search/)**
---
## 目次
- [基本スペック比較表](#基本スペック比較表)
- [料金比較 — 同データ量で並べると](#料金比較)
- [通信品質比較 — docomo vs SoftBank](#通信品質比較)
- [通話オプション比較](#通話オプション比較)
- [独自機能比較 — 海外利用 vs LINEギガフリー](#独自機能比較)
- [こんな人におすすめ](#こんな人におすすめ)
- [ユーザーの声(SNS)](#ユーザーの声)
- [よくある質問(FAQ)](#よくある質問)
- [まとめ](#まとめ)
---
## 基本スペック比較表
全プランを横並びで比較する。
| 項目 | [ahamo 30GB](/ja/jp/plans/ahamo-30gb/) | [ahamo大盛り 110GB](/ja/jp/plans/ahamo-110gb/) | [LINEMO ベストプラン 3GB](/ja/jp/plans/linemo-best-3gb/) | [LINEMO ベストプラン 10GB](/ja/jp/plans/linemo-best-10gb/) | [LINEMO ベストプランV 30GB](/ja/jp/plans/linemo-bestv-30gb/) |
|------|-------|---------|---------|---------|---------|
| 月額料金 | 2,970円 | 4,950円 | 990円 | 2,090円 | 2,970円 |
| データ容量 | 30GB | 110GB | 3GB | 10GB | 30GB |
| eSIM対応 | ○ | ○ | ○ | ○ | ○ |
| 5分かけ放題 | 無料(標準付帯) | 無料(標準付帯) | 550円/月 | 550円/月 | 無料(標準付帯) |
| 完全かけ放題 | 1,100円/月 | 1,100円/月 | 1,650円/月 | 1,650円/月 | 1,100円/月 |
| 回線 | docomo 5G | docomo 5G | SoftBank 5G | SoftBank 5G | SoftBank 5G |
| 契約期間 | なし | なし | なし | なし | なし |
| 解約金 | 0円 | 0円 | 0円 | 0円 | 0円 |
| データ繰り越し | × | × | × | × | × |
| 家族割引 | × | × | × | × | × |
両社ともeSIM対応・契約縛りなしで、オンラインブランドとしての基本構成は共通している。違いはプランの刻み方と付帯サービスに現れる。
---
## 料金比較
### 同データ量で並べた場合
| 月間データ使用量 | ahamo | LINEMO | 差額 |
|----------------|-------|--------|------|
| 3GB以下 | 2,970円(30GBプランのみ) | 990円 | **LINEMOが1,980円安い** |
| 10GB | 2,970円(30GBプランのみ) | 2,090円 | **LINEMOが880円安い** |
| 30GB | 2,970円 | 2,970円 | **同額** |
| 110GB | 4,950円 | 提供なし | ahamo一択 |
### 料金面のポイント
**月10GB以下の人はLINEMOが明確に有利。** ahamoには30GB未満のプランが存在しないため、月に3GBしか使わない人でも2,970円を支払うことになる。LINEMOなら990円で済む。年間で23,760円の差が出る計算だ。
**30GBプランは完全に同額(2,970円)。** 料金では差がつかないため、後述する通信品質・独自機能が選択の決め手になる。なお、LINEMOのベストプランは段階制を採用しており、3GB→10GBの間でデータ使用量に応じて料金が自動で調整される。月によって使用量にバラつきがある人にとっては合理的な仕組みだ。
**110GBの大容量はahamoのみ。** 動画視聴やテザリングを多用する人は[ahamo大盛り 110GB](/ja/jp/plans/ahamo-110gb/)(月額4,950円)が選択肢になる。LINEMOには30GBを超えるプランがない。
---
## 通信品質比較
両社の回線品質を、OpenSignal Q1 2026のデータに基づいて比較する。SimFinderでは独自の[品質スコアリング](/ja/blog/scoring-system-guide/)を用いて各キャリアを評価している。
| 指標 | ahamo(docomo 5G) | LINEMO(SoftBank 5G) |
|------|-------------------|---------------------|
| **品質スコア(総合)** | **90** | 83 |
| 下り平均速度 | **150.3 Mbps** | 110.5 Mbps |
| 上り平均速度 | **18.5 Mbps** | 14.8 Mbps |
| レイテンシ | **22 ms** | 26 ms |
| カバレッジ | **95%** | 92% |
出典: OpenSignal Japan Mobile Network Experience Report Q1 2026
### 通信品質の評価
**全指標でahamoが上回っている。** 特に下り速度は150.3Mbps対110.5Mbpsで約36%の差がある。動画のストリーミングや大容量ファイルのダウンロードでは体感差が出る場面がある。
レイテンシ(遅延)はahamo 22ms、LINEMO 26msで、いずれもオンラインゲームや動画通話に十分な水準だ。ただし、ahamoの方が4ms低く、リアルタイム性が求められる用途ではわずかに有利になる。
カバレッジはahamo 95%、LINEMO 92%。docomoは山間部や地方での基地局展開に歴史的な強みがあり、地方在住や登山・キャンプが趣味の人にはこの3%の差が意味を持つ場合がある。
一方で、110.5Mbpsという下り速度は日常利用においてまったく不足のない速度であり、LINEMOの通信品質が低いわけではない。都市部での通常利用であれば、体感差はほぼないと考えてよい。
なお、ahamo・LINEMOはそれぞれdocomo・SoftBankの[サブブランド(MNO回線)](/ja/blog/mno-mvno-difference-guide/)であり、MVNO(格安SIM)と異なり回線品質の低下が起きにくい構造になっている。
---
## 通話オプション比較
| 項目 | ahamo | LINEMO(ベストプラン 3GB/10GB) | LINEMO(ベストプランV 30GB) |
|------|-------|------|------|
| 5分以内かけ放題 | **無料(標準付帯)** | 550円/月 | **無料(標準付帯)** |
| 完全かけ放題 | 1,100円/月 | 1,650円/月 | **1,100円/月** |
### 通話面のポイント
**ahamoは全プランで5分かけ放題が標準付帯。** 短い電話を頻繁にかける人には追加費用がかからない点で有利だ。
**LINEMOは30GBプラン(ベストプランV)ならahamoと同条件。** 5分かけ放題が標準付帯で、完全かけ放題も同額の1,100円。しかし、3GB・10GBプランでは5分かけ放題が月額550円のオプション扱いとなるため、通話が多い人は月額に加算して考える必要がある。
例として、10GBプランで5分かけ放題を付けた場合:
- LINEMO: 2,090円 + 550円 = **2,640円**
- ahamo: **2,970円**(5分かけ放題込み)
差額は330円で、ahamoの方が高いが30GBまで使える。通話を含めたコストパフォーマンスでは、使い方次第で逆転する。
---
## 独自機能比較
ahamo・LINEMOにはそれぞれ他社にない独自機能がある。この2つが選択における最大の差別化ポイントだ。
### ahamoの独自機能:海外82カ国データ利用
- 82カ国・地域で月間20GBまで追加料金なし
- 別途申し込み不要。現地に着いたらそのまま使える
- SIMカード交換や海外用Wi-Fiルーターのレンタルが不要
海外渡航が年に1回以上ある人にとっては、これだけでahamoを選ぶ理由になる。海外用Wi-Fiルーターのレンタル費用(1日500〜1,500円程度)を考えると、数日の渡航で数千円の節約になる計算だ。
### LINEMOの独自機能:LINEギガフリー
- LINEアプリのトーク・音声通話・ビデオ通話がデータ消費ゼロ
- 全プランに標準搭載(追加料金なし)
- データ容量を使い切った速度制限中でもLINEは通常速度で利用可能
LINEでの通話・ビデオ通話を日常的に使う人にとっては、実質的にデータ容量の節約になる。特に3GBプランのような小容量で運用する場合、LINEのデータがカウントされないことで容量不足を回避できる。
### 独自機能まとめ
| 機能 | ahamo | LINEMO |
|------|-------|--------|
| 海外データ利用 | **82カ国・20GBまで無料** | なし |
| LINEギガフリー | なし | **全プランで標準搭載** |
| 段階制料金 | なし | **ベストプラン(3GB/10GB)で採用** |
---
## こんな人におすすめ
### ahamoがおすすめな人
1. **月30GB以上使う人** — 30GB/110GBの2プランで大容量ニーズに対応。LINEMOには30GBを超えるプランがない
2. **通信速度を重視する人** — docomo回線の品質スコア90は業界トップクラス。テレワークのビデオ会議や動画視聴が多い人に向く
3. **海外渡航が多い人** — 82カ国・20GBの追加料金なし海外利用は他社にない強力な特典
4. **短い通話を頻繁にする人(30GB未満は不要な場合)** — 5分かけ放題が標準付帯で追加料金なし
→ [ahamoの詳細を見る](/ja/jp/carriers/jp-ahamo/)
### LINEMOがおすすめな人
1. **月10GB以下で十分な人** — 990円(3GB)〜2,090円(10GB)でahamoより大幅に安い
2. **LINEでの通話・ビデオ通話が多い人** — LINEギガフリーでデータ消費ゼロ。LINEを主な連絡手段にしている人に最適
3. **月によって使用量が変動する人** — 段階制料金(3GB↔10GB自動調整)で無駄が少ない
4. **とにかく月額を抑えたい人** — 月額990円は大手キャリア系ブランドで最安水準
→ [LINEMOの詳細を見る](/ja/jp/carriers/jp-linemo/)
**[あなたに合ったプランをSimFinderで比較する →](/ja/jp/search/)**
---
## ユーザーの声
X(旧Twitter)上での実際のユーザーの投稿を紹介する。
> 「人混みでahamoが激遅になるので乗り換えました!ahamoとLINEMO、30GBなら2970円で毎月の料金が同じです。5分通話無料もついてる。」
> — @kayococco_1224([元の投稿](https://x.com/kayococco_1224/status/1950862503027818876))
> 「ついでにahamoからLINEMOに乗り換えるか、マジで繋がらなさすぎる」
> — @gien0honnin([元の投稿](https://x.com/gien0honnin/status/2009807187632431612))
通信品質のデータではahamoが全国平均で上回っているが、特定のエリアや混雑時間帯では逆転するケースもあるようだ。通信品質は地域差が大きいため、全国平均だけで判断せず、自分の生活圏での実績も考慮に入れるとよい。
*※ 上記はX(旧Twitter)上の実際の投稿から引用しています。個人の感想であり、通信品質は地域・時間帯により異なります。*
---
## よくある質問
### Q. ahamoとLINEMOはどちらが安いですか?
使うデータ量による。月3GB以下ならLINEMOが月額990円で圧倒的に安く、10GBでもLINEMOが2,090円。30GBでは両社とも2,970円で同額。110GB必要な場合はahamoの大盛りプラン(4,950円)が唯一の選択肢になる。
### Q. 通信速度はどちらが速いですか?
OpenSignal Q1 2026のデータでは、ahamo(docomo回線)が下り150.3Mbps、LINEMO(SoftBank回線)が下り110.5Mbpsで、ahamoが約36%速い。レイテンシもahamo 22ms vs LINEMO 26msとahamoが優位。ただし、これは全国平均であり、エリアや時間帯によって変動する。
### Q. LINEMOのLINEギガフリーとは何ですか?
LINEアプリのトーク・音声通話・ビデオ通話のデータ消費がゼロになる機能。全プランに標準搭載で追加料金はかからない。データ容量を使い切った速度制限中でもLINEは通常速度で利用できる。
### Q. ahamoの海外利用はどのような仕組みですか?
82カ国・地域で、月間のデータ容量のうち20GBまでを追加料金なしでそのまま使える。別途申し込みや現地SIM購入が不要で、到着後すぐにデータ通信が可能。
### Q. ahamoからLINEMOへの乗り換えに手数料はかかりますか?
どちらも契約期間の縛りはなく、解約金は0円。MNP転出手数料も無料のため、乗り換えにかかる費用は基本的にない。LINEMOは期間限定で事務手数料無料キャンペーンを実施していることもある。
### Q. データの繰り越しはできますか?
ahamo・LINEMOともにデータの翌月繰り越しには対応していない。余ったデータは月末にリセットされる。
### Q. 家族割引はありますか?
ahamo・LINEMOともに家族割引の設定はない。ただし、ahamoはdocomoの家族グループにカウント対象として参加でき、docomo回線の家族の割引額に貢献できる(ahamo自体の料金は変わらない)。
---
## まとめ
| 比較軸 | 優位 | 理由 |
|--------|------|------|
| 月額料金(小容量) | **LINEMO** | 3GB 990円、10GB 2,090円で大幅に安い |
| 月額料金(30GB) | **引き分け** | 両社とも2,970円 |
| 月額料金(大容量) | **ahamo** | 110GB 4,950円、LINEMOには30GB超のプランなし |
| 通信速度 | **ahamo** | 下り150.3Mbps vs 110.5Mbps |
| カバレッジ | **ahamo** | 95% vs 92% |
| 通話オプション(30GB) | **引き分け** | 両社とも5分かけ放題無料 |
| 海外利用 | **ahamo** | 82カ国・20GB無料 |
| LINEヘビーユーザー | **LINEMO** | LINEギガフリー標準搭載 |
| 料金の柔軟性 | **LINEMO** | 段階制で使った分だけ |
どちらも大手キャリアのサブブランドとして高品質な通信を提供しており、「どちらを選んでも失敗」というレベルの差はない。自分の使い方(データ量・通話頻度・海外渡航・LINE依存度)に合わせて選ぶのが正解だ。
**[SimFinderであなたに最適なプランを見つける →](/ja/jp/search/)**
---
※ 料金は税込表記です。2026年3月時点の情報に基づいています。最新の情報は各キャリアの公式サイトでご確認ください。
※ 通信速度・カバレッジデータの出典: OpenSignal Japan Mobile Network Experience Report Q1 2026。品質スコアはSimFinder独自の評価基準によるものです([スコアリングの詳細](/ja/blog/scoring-system-guide/))。
※ 実際の通信速度は利用エリア・時間帯・端末・ネットワーク混雑状況により異なります。
================================================================================
# Airalo完全ガイド — 料金・使い方・メリット・デメリット
URL: https://sim-finder.com/ja/blog/airalo-review-guide-2026/
Type: blog (ja)
Published: 2026-03-25
## 結論: [Airalo](/ja/travel/providers/airalo/)は「必要な分だけ安く買いたい人」に最適
| 評価項目 | スコア |
|---------|-------|
| 料金の安さ | ★★★★★ |
| プランの豊富さ | ★★★★★ |
| 対応国の多さ | ★★★★★ |
| 日本語対応 | ★★★★☆ |
| 使いやすさ | ★★★★☆ |
| 速度・品質 | ★★★★☆ |
[Airalo](/ja/travel/providers/airalo/)は、世界200以上の国・地域に対応し、1GB $4(約600円)からデータを購入できる旅行eSIMプロバイダーだ。無制限プランに頼らず「必要なデータ量を必要な分だけ買う」スタイルのユーザーにとって、料金面で最も優れた選択肢になる。
一方で、無制限プランには1日3GBの実質的な速度制限があり、電話番号が付かないプランが大半を占める。データ使用量を気にしたくない人には[Holafly](/ja/travel/providers/holafly/)、通話も必要な場合は渡航先に応じた他のプロバイダーも検討する価値がある。
**[SimFinderで渡航先のeSIMプランを比較する →](/ja/travel/)**
---
## 目次
- [Airaloとは](#airaloとは)
- [料金体系 — 国別プラン一覧](#料金体系--国別プラン一覧)
- [メリット — Airaloが選ばれる理由](#メリット--airaloが選ばれる理由)
- [デメリット — 購入前に知っておくべきこと](#デメリット--購入前に知っておくべきこと)
- [他社との比較 — Airalo vs Holafly vs Nomad](#他社との比較--airalo-vs-holafly-vs-nomad)
- [使い方ガイド — 購入から利用開始まで](#使い方ガイド--購入から利用開始まで)
- [おすすめの人 / おすすめしない人](#おすすめの人--おすすめしない人)
- [よくある質問](#よくある質問)
- [まとめ](#まとめ)
---
## [Airalo](/ja/travel/providers/airalo/)とは
[Airalo](/ja/travel/providers/airalo/)(エアラロ)は、2019年にシンガポールで設立された**世界初のeSIMマーケットプレイス**だ。2026年現在、全世界で2,000万人以上のユーザーを抱え、旅行eSIM市場で最大級のシェアを持つ。
### 基本情報
| 項目 | 内容 |
|------|------|
| 設立 | 2019年(シンガポール) |
| 対応国・地域 | 200以上 |
| ユーザー数 | 2,000万人以上 |
| プラン形態 | 国別プラン / リージョナル(周遊)プラン / グローバルプラン |
| テザリング | 全プラン対応 |
| サポート言語 | 44言語(日本語対応) |
| アプリ | iOS / Android |
[Airalo](/ja/travel/providers/airalo/)の最大の特徴は「マーケットプレイス」型のモデルだ。渡航先の現地通信事業者が提供するeSIMプランを、[Airalo](/ja/travel/providers/airalo/)のアプリやウェブサイトから一括で比較・購入できる。そのため、同じ渡航先でも複数のプラン(データ量・期間・価格の組み合わせ)が用意されている。
---
## 料金体系 — 国別プラン一覧
[Airalo](/ja/travel/providers/airalo/)の料金は渡航先・データ量・期間によって異なる。以下は日本人旅行者に人気の4カ国のプラン一覧だ。
### 日本向けプラン
| データ量 | 期間 | 料金(USD) | 料金(円換算) |
|---------|------|-----------|-------------|
| 1 GB | 7日間 | $4.00 | 約600円 |
| 2 GB | 15日間 | $6.50 | 約975円 |
| 3 GB | 30日間 | $8.00 | 約1,200円 |
| 5 GB | 30日間 | $11.00 | 約1,650円 |
| 10 GB | 30日間 | $18.00 | 約2,700円 |
| 20 GB | 30日間 | $25.00 | 約3,750円 |
| 無制限 | 10日間 | $35.00 | 約5,250円 |
※ 無制限プランは1日3GB超過後1Mbpsに速度制限
### 韓国向けプラン
| データ量 | 期間 | 料金(USD) | 料金(円換算) |
|---------|------|-----------|-------------|
| 1 GB | 7日間 | $4.50 | 約675円 |
| 2 GB | 15日間 | $7.00 | 約1,050円 |
| 3 GB | 30日間 | $9.00 | 約1,350円 |
| 5 GB | 30日間 | $11.00 | 約1,650円 |
| 10 GB | 30日間 | $20.00 | 約3,000円 |
| 20 GB | 30日間 | $32.00 | 約4,800円 |
| 無制限 | 10日間 | $32.00 | 約4,800円 |
| 無制限 | 30日間 | $62.00 | 約9,300円 |
※ 無制限プランは1日3GB超過後5Mbpsに速度制限
### タイ向けプラン
| データ量 | 期間 | 料金(USD) | 備考 |
|---------|------|-----------|------|
| 1 GB | 7日間 | $4.00 | データのみ |
| 2 GB | 15日間 | $5.50 | データのみ |
| 3 GB | 30日間 | $6.00 | データのみ |
| 5 GB | 30日間 | $8.00 | データのみ |
| 50 GB | 10日間 | $9.90 | 通話100分付き |
| 10 GB | 30日間 | $11.00 | データのみ |
| 20 GB | 30日間 | $18.00 | データのみ |
| 無制限 | 10日間 | $35.00 | 3GB/日超過後1Mbps |
タイ向けには通話付きの50GB/10日間プラン($9.90)があり、コストパフォーマンスに優れる。
### アメリカ向けプラン(主要プラン抜粋)
| データ量 | 期間 | 料金(USD) | 備考 |
|---------|------|-----------|------|
| 1 GB | 7日間 | $4.00 | データのみ |
| 2 GB | 15日間 | $7.00 | データのみ |
| 3 GB | 30日間 | $9.00 | データのみ |
| 5 GB | 30日間 | $14.00 | データのみ |
| 5 GB | 30日間 | $19.00 | 通話50分+SMS50通 |
| 10 GB | 30日間 | $23.00 | データのみ |
| 10 GB | 30日間 | $30.00 | 通話100分+SMS100通 |
| 20 GB | 30日間 | $37.00 | データのみ |
| 50 GB | 30日間 | $59.00 | 通話500分+SMS500通 |
| 無制限 | 10日間 | $35.00 | 3GB/日超過後1Mbps |
アメリカ向けはデータのみプランと通話付きプランの2系統がある。通話が不要ならデータのみプランを選ぶことで大幅に節約できる。
**料金は2026年3月時点のデータです。最新料金は [SimFinderの旅行eSIM検索](/ja/travel/) で確認できます。**
---
## メリット — [Airalo](/ja/travel/providers/airalo/)が選ばれる理由
### 1. 圧倒的な料金の安さ
[Airalo](/ja/travel/providers/airalo/)の最大の強みは、少量データプランの安さだ。1GB/7日間が$4(約600円)から購入でき、レンタルWiFiの1日あたり500〜1,000円、キャリアの海外ローミング(1日最大2,980円)と比較すると破格の安さとなる。
特に「地図アプリとメッセージアプリが使えれば十分」というライトユーザーにとって、1〜3GBプランのコストパフォーマンスは他社を含めても最高水準だ。
### 2. 200以上の国・地域に対応
[Airalo](/ja/travel/providers/airalo/)は200以上の渡航先をカバーしている。アジア、ヨーロッパ、北米、南米、アフリカ、オセアニアのほぼ全域で利用可能だ。1つのアプリで世界中のeSIMを購入できるため、複数国を周遊する場合でもアプリを使い分ける必要がない。
また、リージョナルプラン(アジア周遊、ヨーロッパ周遊など)やグローバルプラン(Discover+: 137カ国対応)も提供しており、複数国の旅行にも対応する。
### 3. テザリング全プラン対応
[Airalo](/ja/travel/providers/airalo/)は全プランでテザリング(インターネット共有)に対応している。スマートフォンをWiFiルーター代わりにして、PCやタブレットでもデータ通信を利用可能だ。テザリング非対応の旅行eSIMプロバイダーも存在する中、[Airalo](/ja/travel/providers/airalo/)は全プランで対応している点は大きなメリットとなる。
### 4. 日本語サポートを含む44言語対応
[Airalo](/ja/travel/providers/airalo/)のアプリとウェブサイトは日本語を含む44言語に対応している。チャットサポートも日本語で利用可能だ。英語に不安がある場合でも、購入から設定、トラブル対応まで日本語で完結できる。
### 5. アプリ完結で簡単操作
プランの検索・購入からeSIMのインストール、データ残量の確認、追加購入(トップアップ)まで、すべて[Airalo](/ja/travel/providers/airalo/)アプリ内で完結する。QRコードの読み取りすら不要で、アプリから直接eSIMをインストールできる。操作画面もシンプルで、eSIMを初めて使うユーザーでも迷いにくい設計になっている。
### 6. プランの選択肢が豊富
同じ渡航先でも、データ量(1GB〜50GB〜無制限)と期間(3日〜30日)の組み合わせで複数のプランが用意されている。「短期旅行で少量」「長期滞在で大容量」など、自分の旅行スタイルに合った最適なプランを選べる柔軟性がある。
---
## デメリット — 購入前に知っておくべきこと
### 1. 電話番号が付かないプランが大半
[Airalo](/ja/travel/providers/airalo/)のプランは大半がデータ通信専用で、電話番号は付与されない。一部の国(アメリカ、タイなど)では通話・SMS付きプランもあるが、選択肢は限られる。レストランの予約確認やタクシーの手配で現地の電話番号が必要な場合は不便に感じる場面がある。
対処法としては、LINEやWhatsAppなどのVoIPアプリを活用するか、通話付きプランがある渡航先ではそちらを選択する。
### 2. 無制限プランの速度制限
[Airalo](/ja/travel/providers/airalo/)の「無制限」プランには実質的な制限がある。1日あたり3GBを超えると、速度が1Mbps(渡航先によっては5Mbps)に制限される。1Mbpsではメッセージの送受信やSNSの閲覧は可能だが、動画のストリーミングやビデオ通話は難しい。
「データ量を気にせず使いたい」という理由で無制限プランを選ぶ場合は、この制限を理解した上で購入する必要がある。速度制限なしの無制限データが必要な場合は、[Holafly](/ja/travel/providers/holafly/)など他のプロバイダーを検討した方がよい。
### 3. 通話付きプランは割高
通話・SMS付きプランは、データのみのプランと比較して大幅に割高になる。例えばアメリカ向け5GB/30日間の場合、データのみは$14.00だが、通話50分+SMS50通付きは$19.00と$5の差がある。通話をほとんど使わない場合は、データのみプランを選んでVoIPアプリで通話する方がコスパが良い。
### 4. 事前のeSIM対応確認が必須
これは[Airalo](/ja/travel/providers/airalo/)に限らないが、eSIM自体がすべてのスマートフォンに対応しているわけではない。iPhone XR/XS(2018年)以降、Google Pixel 3a(2019年)以降など、対応端末であることを渡航前に確認する必要がある。
---
## 他社との比較 — [Airalo](/ja/travel/providers/airalo/) vs [Holafly](/ja/travel/providers/holafly/) vs [Nomad](/ja/travel/providers/nomad/)
旅行eSIM市場で特に人気のある3社を比較する。
### 基本スペック比較
| 項目 | [Airalo](/ja/travel/providers/airalo/) | [Holafly](/ja/travel/providers/holafly/) | [Nomad](/ja/travel/providers/nomad/) |
|------|--------|---------|-------|
| 対応国 | 200以上 | 200以上 | 200以上 |
| 最低料金 | $4(1GB/7日) | $3.90(無制限/1日) | $4(1GB/7日) |
| テザリング | 対応 | 対応 | 対応 |
| 日本語サポート | 対応(44言語) | 対応(20言語) | 対応(13言語) |
| 複数国プラン | あり | あり | あり |
| 通話付きプラン | 一部あり | なし | なし |
### 日本向けプラン料金比較
| プラン | [Airalo](/ja/travel/providers/airalo/) | [Holafly](/ja/travel/providers/holafly/) | [Nomad](/ja/travel/providers/nomad/) |
|-------|--------|---------|-------|
| 1GB/7日 | **$4.00** | — | $4.00 |
| 3GB/30日 | $8.00 | — | **$7.50** |
| 5GB/30日 | **$11.00** | — | $10.00 |
| 10GB/30日 | $18.00 | — | **$17.00** |
| 無制限/7日 | — | **$27.30** | $23.00 |
| 無制限/10日 | $35.00 | $36.90(10日) | — |
※ [Holafly](/ja/travel/providers/holafly/)は無制限プランのみ。[Nomad](/ja/travel/providers/nomad/)は容量プラン+無制限プランの両方を提供
### 使い分けの指針
- **[Airalo](/ja/travel/providers/airalo/)** → 必要なデータ量が決まっている人、最安値で購入したい人。少量〜中量データの料金は3社中最安水準
- **[Holafly](/ja/travel/providers/holafly/)** → データ量を気にしたくない人。全プランが無制限データで速度制限の公開情報なし(ただし1日あたりの料金は高め)
- **[Nomad](/ja/travel/providers/nomad/)** → [Airalo](/ja/travel/providers/airalo/)と似た料金体系で、容量プランの一部は[Airalo](/ja/travel/providers/airalo/)より安い場合がある。無制限プランもあり、バランス型
料金は渡航先や時期によって変動する。**[SimFinderの旅行eSIM検索](/ja/travel/)** で最新の料金を渡航先ごとに比較できる。
**[SimFinderで渡航先のeSIMプランを比較する →](/ja/travel/)**
---
## 使い方ガイド — 購入から利用開始まで
[Airalo](/ja/travel/providers/airalo/)の利用は4ステップで完了する。詳しい端末別の設定手順は **[旅行用eSIMの設定方法 — iPhone/Android完全図解ガイド](/ja/blog/esim-setup-guide-iphone-android/)** を参照。
### ステップ1: アプリのダウンロードとアカウント登録
1. App Store(iPhone)またはGoogle Play(Android)から「[Airalo](/ja/travel/providers/airalo/)」アプリをダウンロード
2. メールアドレスまたはGoogleアカウントで登録
3. アプリの言語設定を日本語に変更
### ステップ2: プランの検索と購入
1. 渡航先の国名で検索
2. データ量・期間・料金を比較してプランを選択
3. 支払い方法を選択(クレジットカード、Apple Pay、Google Pay対応)
4. 購入完了
### ステップ3: eSIMのインストール(出発前に実施推奨)
1. 購入完了後、「マイeSIM」からインストールを開始
2. 方法1: アプリから直接インストール(推奨)
3. 方法2: QRコードを読み取ってインストール
4. インストールが完了したら、eSIMの名称を「旅行用」など分かりやすい名前に変更しておく
**WiFi環境が必要なため、出発前の自宅で済ませておくのがポイント。** インストールしただけではデータ消費は始まらない。
### ステップ4: 現地到着後の利用開始
1. 渡航先に到着したら、スマートフォンの設定でデータ通信を[Airalo](/ja/travel/providers/airalo/)のeSIMに切り替える
2. 自動でアクティベーション(利用開始)される
3. [Airalo](/ja/travel/providers/airalo/)アプリでデータ残量を確認可能
4. データが足りなくなった場合は、アプリから追加購入(トップアップ)
---
## おすすめの人 / おすすめしない人
### [Airalo](/ja/travel/providers/airalo/)をおすすめする人
- **少量データで十分な人** — 地図、メッセージ、SNS閲覧が中心で、動画はホテルのWiFiで見る
- **コスト重視の人** — 1GBあたりの単価を最小限に抑えたい
- **複数国を周遊する人** — リージョナルプランやグローバルプランで1つのeSIMで完結
- **海外出張が多い人** — 200以上の渡航先をアプリ1つで管理
- **eSIM初心者** — 日本語対応のアプリとサポートで安心
### [Airalo](/ja/travel/providers/airalo/)をおすすめしない人
- **データ量を一切気にしたくない人** → [Holafly](/ja/travel/providers/holafly/)の無制限プランの方が適している
- **現地の電話番号が必要な人** → 対応国が限られるため、現地SIMカードの方が確実
- **動画視聴やビデオ通話を大量に行う人** → 無制限プランの速度制限(1Mbps)に注意
- **通信速度を最優先する人** → 現地キャリアの直接契約の方が安定する場合がある
**[SimFinderで渡航先のeSIMプランを比較する →](/ja/travel/)**
---
## よくある質問
**Q. [Airalo](/ja/travel/providers/airalo/)は日本語に対応している?**
はい。[Airalo](/ja/travel/providers/airalo/)のアプリとウェブサイトは日本語に対応している。サポート対応言語も日本語を含む44言語に対応しており、日本語でのチャットサポートが利用可能だ。
**Q. [Airalo](/ja/travel/providers/airalo/)のテザリング(インターネット共有)は使える?**
はい。[Airalo](/ja/travel/providers/airalo/)は全プランでテザリングに対応している。スマートフォンをモバイルルーター代わりにして、PCやタブレットでもデータ通信を共有できる。
**Q. [Airalo](/ja/travel/providers/airalo/)の無制限プランは本当に無制限?**
実質的には制限がある。[Airalo](/ja/travel/providers/airalo/)の無制限プランでは、1日あたり3GBを超えると速度が1Mbps(国によっては5Mbps)に制限される。メッセージやSNSの閲覧は可能だが、動画視聴やビデオ通話には支障が出る場合がある。
**Q. [Airalo](/ja/travel/providers/airalo/)で電話はできる?**
ほとんどのプランはデータ通信専用で電話番号は付与されない。ただし、一部の国(アメリカ、タイなど)では通話・SMS付きプランも提供されている。通話が必要な場合はLINEやWhatsAppなどのVoIPアプリの利用が現実的だ。
**Q. [Airalo](/ja/travel/providers/airalo/)は出発前に設定できる?**
はい。出発前にeSIMのインストール(QRコード読み取りまたはアプリからの直接インストール)まで済ませておける。アクティベーション(利用開始)は渡航先で現地ネットワークに接続した時点で自動的に行われるため、データ消費は現地到着後から始まる。
**Q. [Airalo](/ja/travel/providers/airalo/)とレンタルWiFiはどちらがお得?**
短期旅行で少量のデータなら、[Airalo](/ja/travel/providers/airalo/)の方が大幅に安い。例えば日本向け1GB/7日間は$4(約600円)で、レンタルWiFiの1日500〜1,000円と比べて圧倒的に安価だ。ただし大容量データが必要で複数人でシェアする場合は、レンタルWiFiの方がコスパが良い場合もある。
**Q. [Airalo](/ja/travel/providers/airalo/)のデータを追加購入(トップアップ)できる?**
はい。有効期限内であれば、アプリから同じ渡航先のデータパッケージを追加購入できる。旅行中にデータが足りなくなった場合でも、その場で容量を追加できるため便利だ。
---
## まとめ
[Airalo](/ja/travel/providers/airalo/)は「必要な分だけ、安く」データを購入したい旅行者にとって最適なeSIMプロバイダーだ。200以上の渡航先対応、1GB $4〜の業界最安水準の料金、テザリング全プラン対応、日本語サポートという基本スペックの高さが強みとなる。
一方、無制限プランの速度制限(1日3GB超過後1Mbps)や、電話番号が付かないプランが大半という点は購入前に理解しておく必要がある。
旅行eSIMプロバイダーの選択に迷ったら、まず[Airalo](/ja/travel/providers/airalo/)の少量プランから試してみるのが手堅い選択だ。1GB $4(約600円)と失敗してもダメージが小さく、アプリの使い勝手や通信品質を実体験で判断できる。
**[SimFinderで渡航先のeSIMプランを比較する →](/ja/travel/)**
渡航先が決まっている場合は、SimFinderの検索機能で[Airalo](/ja/travel/providers/airalo/)を含む11社のプランを料金・データ量・期間で横断比較できる。最適なプランを見つけてほしい。
旅行eSIMの全体像や他のプロバイダーの詳細については **[海外旅行用eSIM完全ガイド2026](/ja/blog/travel-esim-complete-guide-2026/)** を参照。端末別の設定手順は **[旅行用eSIMの設定方法 — iPhone/Android完全図解ガイド](/ja/blog/esim-setup-guide-iphone-android/)** で解説している。
---
*この記事にはアフィリエイトリンクが含まれています。リンク経由で購入された場合、SimFinderに紹介手数料が支払われます。記事内容(レビュー・評価・推奨)は広告主の影響を受けず、実データに基づいて記述しています。料金データは2026年3月16日時点の情報です。最新料金は各プロバイダーの公式サイトまたは [SimFinderの旅行eSIM検索](/ja/travel/) でご確認ください。*
================================================================================
# Android 17、iPhoneからeSIMもアプリ不要で移行可能に
URL: https://sim-finder.com/ja/blog/android-17-iphone-esim-transfer-2026/
Type: blog (ja)
Published: 2026-07-23T09:00:00+09:00
Googleは2026年7月22日(日本時間)、Android 17に搭載される新しいデータ移行機能を発表しました。最大の注目点は、iPhoneからAndroid端末への乗り換え時に、写真や連絡先といった基本データに加えて、**Wi-Fi認証情報やeSIMまでアプリ不要で無線引き継ぎできる**ようになったことです。SIMの乗り換えや端末の買い替えを検討している人にとって、移行のハードルが下がる動きといえます。
## 何が発表されたのか
Google公式ブログ「[Switch from iPhone to Android](https://blog.google/products-and-platforms/platforms/android/galaxy-unpacked-switch-from-iphone-to-android/)」(2026年7月22日)によると、Android 17に組み込まれた新しい移行機能では、iPhoneから次のデータを引き継げます。
- 写真・動画
- 連絡先・メッセージ・カレンダー
- Googleアカウント情報
- パスワード
- **Wi-Fi認証情報**
- **eSIM**
このうちWi-Fi認証情報とeSIMは今回新たに移行対象へ加わったデータです。Googleは公式ブログで「移行用アプリのダウンロードが不要で、重要なデータを無線で引き継げる」と説明しています。国内でもImpress Watch([2026年7月23日の記事](https://www.watch.impress.co.jp/docs/news/2127172.html))やケータイWatchが同様の内容を報じています。
## 対応端末と提供状況
Google公式ブログによれば、この移行機能は一部のPixelシリーズで既にロールアウトが始まっています。また、同じく7月22日に発表されたSamsungの新型折りたたみスマートフォン「Galaxy Z Flip8」「Galaxy Z Fold8」シリーズでも利用可能です。Googleは今後、より多くのAndroid端末へ対応を広げる予定としています。
なお、移行に必要なiOS側の条件については、今回参照した各記事では具体的なバージョンが明記されていません。実際に移行を行う際は、Googleの案内ページで最新の対応条件を確認するのが確実です。
## SIM乗り換えユーザーへの影響
この機能がSimFinderの読者にとって重要なのは、**eSIMが移行対象に含まれた点**です。従来、iPhoneからAndroidへ乗り換える際にeSIMを使い続けるには、キャリアでのeSIM再発行や、新端末でのプロファイル再設定といった手間が発生するケースがありました。移行フローにeSIMが組み込まれることで、こうした作業が簡素化される可能性があります。
ただし、eSIMの移行が実際にスムーズに行えるかどうかは、契約している通信事業者(MNO/MVNO)側の対応状況にも左右されます。格安SIMを含め、事業者ごとにeSIMの取り扱いや再発行手数料の有無は異なるため、乗り換え前に自分の契約先の案内を確認しておくと安心です。
## まとめ
Android 17の新移行機能は、iPhoneからの乗り換えで長年の課題だった「連携データの引き継ぎ」を大きく前進させるものです。特にeSIMとWi-Fi認証情報がアプリ不要で移せるようになった点は、端末の買い替えやSIMの見直しを考えるユーザーにとって実務的なメリットになります。まずはPixelおよびGalaxy Z Flip8/Fold8から順次利用可能となっており、今後の対応端末拡大が期待されます。
*出典: [Google公式ブログ(2026年7月22日)](https://blog.google/products-and-platforms/platforms/android/galaxy-unpacked-switch-from-iphone-to-android/) / [Impress Watch(2026年7月23日)](https://www.watch.impress.co.jp/docs/news/2127172.html)*
================================================================================
# オーストラリアのSIMカード完全ガイド2026 — 8社25プランを徹底比較
URL: https://sim-finder.com/ja/blog/best-sim-plans-australia-2026/
Type: blog (ja)
Published: 2026-03-19
> **この記事はワーホリ・留学・駐在などオーストラリアに長期滞在する方向けの、現地SIMプラン比較ガイドです。**
> 短期旅行用のeSIMをお探しの方は「[海外旅行用eSIM完全ガイド](/ja/blog/travel-esim-complete-guide-2026/)」をご覧ください。
## 結論: オーストラリアSIMのおすすめ3選
| おすすめ | プラン | 月額 | ポイント |
|---------|-------|------|---------|
| **最安** | [ALDI Mobile](/ja/au/carriers/aldi/) Basic 12GB | $23 | [Telstra](/ja/au/carriers/telstra/)ネットワーク、繰り越しあり |
| **バランス** | [Belong](/ja/au/carriers/belong/) 100GB | $49 | [Telstra](/ja/au/carriers/telstra/) 5G、繰り越しあり、最も多くの人に最適 |
| **速度重視** | [amaysim](/ja/au/carriers/amaysim/) 15GB | $30 | [Optus](/ja/au/carriers/optus/) 5G(最速145 Mbps)、繰り越しあり |
**[SimFinderでオーストラリアの全25プランを比較する →](/ja/au/search/)**
以下、8社25プランのデータを元に詳しく解説する。
## 目次
- [3大ネットワーク — カバレッジが全てを決める](#オーストラリアの3大ネットワーク--カバレッジが全てを決める)
- [格安キャリアの圧倒的なコスパ](#格安キャリアの圧倒的なコスパ--mnoとの価格差3055)
- [目的別おすすめプラン](#目的別おすすめプラン)
- [データ繰り越し — 隠れた優位性](#データ繰り越し--格安キャリアだけの隠れた優位性)
- [5GとeSIM対応状況](#5gとesim--対応状況)
- [ワーホリ・留学生向けポイント](#ワーホリ留学生が知っておくべきポイント)
- [ユーザーの声](#ユーザーの声)
- [よくある質問](#よくある質問)
- [まとめ](#まとめ)
---
オーストラリアには物理ネットワークが3つしかない。[Telstra](/ja/au/carriers/telstra/)、[Optus](/ja/au/carriers/optus/)、[Vodafone](/ja/au/carriers/vodafone/)だ。残りの5社は、この3社のネットワークを借りて割安にサービスを提供する格安キャリア(MVNO・サブブランド)にすぎない。
SimFinderのデータベースでは**8社25プラン**を追跡している。全プランが契約縛りなし、eSIM対応、通話かけ放題。月額AUD $23〜$99の範囲で、同じネットワーク上でも価格差は最大2倍以上ある。
---
## オーストラリアの3大ネットワーク — カバレッジが全てを決める
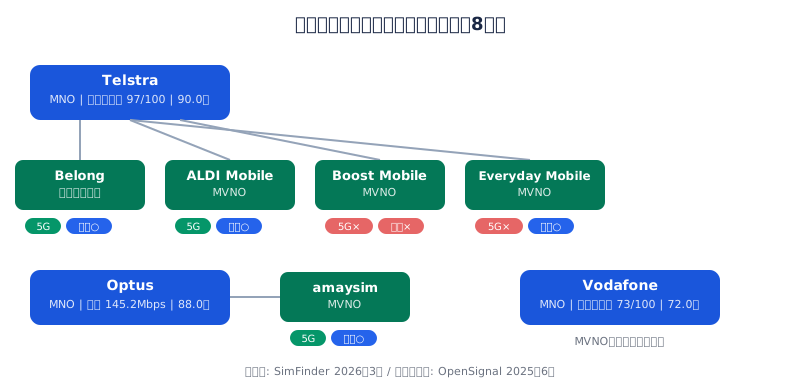 オーストラリアは国土面積がアメリカ本土とほぼ同じだが、人口は約2,600万人。都市部を出ると通信環境は急激に悪化するため、キャリア選びで最も重要なのは**カバレッジ**だ。
| ネットワーク | タイプ | カバレッジ | 総合スコア | ダウンロード速度 | このネットワークを使うキャリア |
|---|---|---|---|---|---|
| **[Telstra](/ja/au/carriers/telstra/)** | MNO | 97/100 | 90/100 | 97.4 Mbps | [Telstra](/ja/au/carriers/telstra/), [Belong](/ja/au/carriers/belong/), [ALDI Mobile](/ja/au/carriers/aldi/), [Boost Mobile](/ja/au/carriers/boost/), [Everyday Mobile](/ja/au/carriers/woolworths/) |
| **[Optus](/ja/au/carriers/optus/)** | MNO | 88/100 | 88/100 | 145.2 Mbps | [Optus](/ja/au/carriers/optus/), [amaysim](/ja/au/carriers/amaysim/) |
| **[Vodafone](/ja/au/carriers/vodafone/)** | MNO | 73/100 | 72/100 | — | Vodafone のみ |
*品質データ: OpenSignal 2025年6月計測*
**8社中5社が[Telstra](/ja/au/carriers/telstra/)ネットワーク**を使用している。カバレッジ97/100は圧倒的で、地方・郊外まで安定してつながる唯一の選択肢だ。
[Optus](/ja/au/carriers/optus/)はダウンロード速度で最速(145.2 Mbps)、レイテンシも最良(20ms)。都市部に住む人にとっては、速度面で[Telstra](/ja/au/carriers/telstra/)を上回る。
Vodafoneはデータ単価が最安だが、カバレッジ73/100は主要都市限定と考えたほうがいい。
---
## 格安キャリアの圧倒的なコスパ — MNOとの価格差30〜55%
同じネットワーク上でも、MNO直契約と格安キャリアの価格差は大きい。全25プランを料金順に並べると、格安キャリアの優位性が明確になる。
### MNOプラン(3社9プラン)
| キャリア | プラン | 月額 | データ | 5G |
|---|---|---|---|---|
| [Optus](/ja/au/carriers/optus/) | Small Choice Plus 50GB | $55 | 50GB | 対応 |
| Vodafone | Small 65GB | $58 | 65GB | 対応 |
| [Optus](/ja/au/carriers/optus/) | Medium Choice Plus 200GB | $65 | 200GB | 対応 |
| Vodafone | Medium 220GB | $68 | 220GB | 対応 |
| [Telstra](/ja/au/carriers/telstra/) | Basic 50GB | $74 | 50GB | 対応 |
| Vodafone | Large 420GB | $78 | 420GB | 対応 |
| [Telstra](/ja/au/carriers/telstra/) | Essential 180GB | $84 | 180GB | 対応 |
| [Optus](/ja/au/carriers/optus/) | Large Choice Plus 400GB | $85 | 400GB | 対応 |
| [Telstra](/ja/au/carriers/telstra/) | Premium 300GB | $99 | 300GB | 対応 |
### 格安キャリア(5社16プラン)
| キャリア | ネットワーク | プラン | 月額 | データ | 5G | 繰り越し |
|---|---|---|---|---|---|---|
| [ALDI Mobile](/ja/au/carriers/aldi/) | [Telstra](/ja/au/carriers/telstra/) | Basic 12GB | $23 | 12GB | × | ○ |
| [Everyday Mobile](/ja/au/carriers/woolworths/) | [Telstra](/ja/au/carriers/telstra/) | 22GB | $25 | 22GB | × | ○ |
| [ALDI Mobile](/ja/au/carriers/aldi/) | [Telstra](/ja/au/carriers/telstra/) | 5G 29GB | $29 | 29GB | ○ | ○ |
| [amaysim](/ja/au/carriers/amaysim/) | [Optus](/ja/au/carriers/optus/) | 15GB | $30 | 15GB | ○ | ○ |
| [Everyday Mobile](/ja/au/carriers/woolworths/) | [Telstra](/ja/au/carriers/telstra/) | 30GB | $30 | 30GB | × | ○ |
| [Belong](/ja/au/carriers/belong/) | [Telstra](/ja/au/carriers/telstra/) | 25GB | $34 | 25GB | ○ | ○ |
| [Everyday Mobile](/ja/au/carriers/woolworths/) | [Telstra](/ja/au/carriers/telstra/) | 50GB | $35 | 50GB | × | ○ |
| [Boost Mobile](/ja/au/carriers/boost/) | [Telstra](/ja/au/carriers/telstra/) | 30GB | $39 | 30GB | × | × |
| [Belong](/ja/au/carriers/belong/) | [Telstra](/ja/au/carriers/telstra/) | 40GB | $39 | 40GB | ○ | ○ |
| [ALDI Mobile](/ja/au/carriers/aldi/) | [Telstra](/ja/au/carriers/telstra/) | 5G 75GB | $39 | 75GB | ○ | ○ |
| [amaysim](/ja/au/carriers/amaysim/) | [Optus](/ja/au/carriers/optus/) | 80GB | $40 | 80GB | ○ | ○ |
| [Belong](/ja/au/carriers/belong/) | [Telstra](/ja/au/carriers/telstra/) | 100GB | $49 | 100GB | ○ | ○ |
| [amaysim](/ja/au/carriers/amaysim/) | [Optus](/ja/au/carriers/optus/) | 120GB | $50 | 120GB | ○ | ○ |
| [Boost Mobile](/ja/au/carriers/boost/) | [Telstra](/ja/au/carriers/telstra/) | 45GB | $59 | 45GB | × | × |
| [Belong](/ja/au/carriers/belong/) | [Telstra](/ja/au/carriers/telstra/) | 160GB | $59 | 160GB | ○ | ○ |
| [Boost Mobile](/ja/au/carriers/boost/) | [Telstra](/ja/au/carriers/telstra/) | 100GB | $74 | 100GB | × | × |
**注目すべき価格差**: [Belong](/ja/au/carriers/belong/) 100GB($49)は、[Telstra](/ja/au/carriers/telstra/)の同一ネットワーク上で[Telstra](/ja/au/carriers/telstra/) Basic 50GB($74)より安い月額で、データ量は2倍の100GBを提供している。
**[オーストラリアのSIMプランを比較する →](/ja/au/search/)**
---
## 目的別おすすめプラン
### 最安プラン — WiFi中心の人向け
**[ALDI Mobile](/ja/au/carriers/aldi/) $23 12GB** — オーストラリア最安値。[Telstra](/ja/au/carriers/telstra/)ネットワーク、データ繰り越しあり、eSIM対応。5G非対応だが、この価格なら十分。
### バランス重視 — 日常使いに最適
**[amaysim](/ja/au/carriers/amaysim/) $30 15GB** — [Optus](/ja/au/carriers/optus/)ネットワーク(速度145.2 Mbps、総合88/100)上で5G・eSIM・データ繰り越し全対応。導入プロモ終了後の継続データ量は15GBに減っており、データ重視なら[ALDI Mobile](/ja/au/carriers/aldi/)の5G 29GB($29)の方がお得。Optusの速いネットワークを優先したい人向け。
**[Belong](/ja/au/carriers/belong/) $39 40GB** — [Telstra](/ja/au/carriers/telstra/)のカバレッジ97/100が必要なら、[Telstra](/ja/au/carriers/telstra/)のサブブランドである[Belong](/ja/au/carriers/belong/)がベスト。5G・eSIM・データ繰り越し全対応で、親会社より大幅に安い。
### 大容量ユーザー
**[Belong](/ja/au/carriers/belong/) $59 160GB** — [Telstra](/ja/au/carriers/telstra/) 5Gネットワーク上で160GB。[Telstra](/ja/au/carriers/telstra/)直のBasic 50GB($74)より安くてデータ3倍以上。繰り越しありで実質200GB以上も可能。
### 大半の人へのおすすめ
**[Belong](/ja/au/carriers/belong/) $49 100GB** — 多くの人にとって100GBは十分すぎる容量。[Telstra](/ja/au/carriers/telstra/) 5Gネットワーク、データ繰り越しあり。カバレッジ・データ量・速度・価格のバランスが最も良い。
**[SimFinderでオーストラリアの全25プランを比較する →](/ja/au/search/)**
---
## データ繰り越し — 格安キャリアだけの隠れた優位性
データを見て最も目を引くパターンがある。**格安キャリアは全社データ繰り越しあり、MNOは全社なし**([Boost Mobile](/ja/au/carriers/boost/)を除く)。
| データ繰り越し | キャリア |
|---|---|
| **あり** | [Belong](/ja/au/carriers/belong/), [ALDI Mobile](/ja/au/carriers/aldi/), [Everyday Mobile](/ja/au/carriers/woolworths/), [amaysim](/ja/au/carriers/amaysim/) |
| **なし** | [Telstra](/ja/au/carriers/telstra/), [Optus](/ja/au/carriers/optus/), Vodafone, [Boost Mobile](/ja/au/carriers/boost/) |
月によってデータ使用量にバラつきがある場合、繰り越しありのプランは額面以上の価値がある。例えば[Belong](/ja/au/carriers/belong/) 40GB($39)で前月のデータが余っていれば、翌月は60〜80GBを使える計算になる。
[Boost Mobile](/ja/au/carriers/boost/)は格安キャリアの中で唯一データ繰り越しがなく、5Gにも非対応。[Telstra](/ja/au/carriers/telstra/)ネットワーク利用キャリアの中でコスパ最弱。
---
## 5GとeSIM — 対応状況
### eSIM
25プラン全てがeSIM対応 — **100%の対応率**。これは世界的に見ても珍しい水準だ。eSIM対応スマートフォンがあれば、オーストラリアに到着する前にプランを開通できる。
### 5G
25プラン中18プラン(72%)が5G対応。非対応は以下:
| キャリア | 5G | 備考 |
|---|---|---|
| [ALDI Mobile](/ja/au/carriers/aldi/)(12GBプラン) | 4Gのみ | 最安プラン。$29以上のプランは5G対応 |
| [Boost Mobile](/ja/au/carriers/boost/)(全プラン) | 4Gのみ | 全プランで5G非対応 |
| [Everyday Mobile](/ja/au/carriers/woolworths/)(全プラン) | 4Gのみ | 全プランで5G非対応 |
同じ[Telstra](/ja/au/carriers/telstra/)ネットワーク上でも、[Belong](/ja/au/carriers/belong/)や[ALDI Mobile](/ja/au/carriers/aldi/)は5Gを提供しているのに、[Boost Mobile](/ja/au/carriers/boost/)と[Everyday Mobile](/ja/au/carriers/woolworths/)は非対応。2026年時点でこの差は大きい。
---
## ワーホリ・留学生が知っておくべきポイント
オーストラリアにワーキングホリデーや留学で渡航する場合、日本の携帯事情とは異なるポイントがいくつかある。
1. **全プランが契約縛りなし** — 25プラン全てが解約金なし。いつでもキャリアを変更できる。日本の携帯契約のような制約は存在しない。
2. **eSIMで渡航前に開通** — 全キャリアがeSIM対応。日本にいるうちにオンラインで契約し、現地到着と同時に使い始められる。
3. **地方に行くなら[Telstra](/ja/au/carriers/telstra/)ネットワーク一択** — ファーム(農場)ジョブやロードトリップで都市部を離れるなら、カバレッジ97/100の[Telstra](/ja/au/carriers/telstra/)ネットワークが必須。[Belong](/ja/au/carriers/belong/)、[ALDI Mobile](/ja/au/carriers/aldi/)、[Boost Mobile](/ja/au/carriers/boost/)、[Everyday Mobile](/ja/au/carriers/woolworths/)のいずれかを選べば[Telstra](/ja/au/carriers/telstra/)と同じネットワークを使える。
4. **格安キャリアで十分** — MNO直契約は不要。[Belong](/ja/au/carriers/belong/)は[Telstra](/ja/au/carriers/telstra/)のサブブランドで、同じネットワークを半額で使える。
5. **おすすめは[Belong](/ja/au/carriers/belong/) $39 40GB** — [Telstra](/ja/au/carriers/telstra/)カバレッジ(地方OK)、5G、eSIM、データ繰り越し、契約縛りなし。ワーホリの最初のSIMとして過不足がない。
**[SimFinderでプランを比較する →](/ja/au/search/)**
---
## ユーザーの声
オーストラリアでSIMを利用した人たちのリアルな声を紹介する。
> 「オーストラリアの電話番号がないとWoolworthsのアカウントも作れない。到着前にeSIMで開通しておけばこの問題は解決する」
> — @APurpleLifeBlog([元の投稿](https://x.com/APurpleLifeBlog/status/1638271331765571584))
*※ 上記はX(旧Twitter)上の実際の投稿から引用しています。個人の感想であり、通信品質は地域・時間帯により異なります。*
---
## よくある質問
### オーストラリアのSIMに長期契約は必要?
不要。SimFinderが追跡する25プラン全てが契約縛りなし・解約金なし。これはオーストラリアのプリペイド・SIMオンリー市場では標準的。
### 地方やアウトバックで使えるのはどのキャリア?
[Telstra](/ja/au/carriers/telstra/)のみ。カバレッジスコア97/100は[Optus](/ja/au/carriers/optus/)(88)やVodafone(73)を大きく引き離す。都市部を離れる可能性があるなら、[Telstra](/ja/au/carriers/telstra/)直または[Telstra](/ja/au/carriers/telstra/)ネットワーク利用の格安キャリア([Belong](/ja/au/carriers/belong/)、[ALDI Mobile](/ja/au/carriers/aldi/)、[Boost Mobile](/ja/au/carriers/boost/)、[Everyday Mobile](/ja/au/carriers/woolworths/))を選ぶこと。
### オーストラリアで5Gを使うのに追加料金がかかる?
基本的にかからない。格安キャリアでも[ALDI Mobile](/ja/au/carriers/aldi/) 5G 29GB($29/月)や[amaysim](/ja/au/carriers/amaysim/) 15GB($30/月)で5Gが使える。MNO価格を払う必要はない。
### eSIMで日本にいるうちに開通できる?
できる。オーストラリアの全8キャリア・25プランがeSIM対応。オンラインで契約し、QRコードをスキャンすれば開通する。
### [Belong](/ja/au/carriers/belong/)とは何?[Telstra](/ja/au/carriers/telstra/)との違いは?
[Belong](/ja/au/carriers/belong/)は[Telstra](/ja/au/carriers/telstra/)が運営するサブブランド。同じ[Telstra](/ja/au/carriers/telstra/)ネットワーク(カバレッジ97/100)を使いながら、料金は[Telstra](/ja/au/carriers/telstra/)よりかなり安い。[Belong](/ja/au/carriers/belong/) 100GB $49 vs [Telstra](/ja/au/carriers/telstra/) Basic 50GB $74。主な違いは店舗サポートがないことと、料金が安いこと。
---
## まとめ
2026年のオーストラリアSIM市場のポイント:
- **8社25プラン**、全てが契約縛りなし・通話かけ放題・eSIM対応
- **ネットワークは3つ**: [Telstra](/ja/au/carriers/telstra/)(カバレッジ最強97/100)、[Optus](/ja/au/carriers/optus/)(速度最速145.2 Mbps)、Vodafone(安いが73/100)
- **格安キャリアが30〜55%安い**: [Belong](/ja/au/carriers/belong/) 100GBが$49 vs [Telstra](/ja/au/carriers/telstra/) 50GBが$74
- **データ繰り越しは格安キャリアだけ** — MNOは全社なし
- **5Gは72%のプラン**(18/25)が対応。[Boost Mobile](/ja/au/carriers/boost/)と[Everyday Mobile](/ja/au/carriers/woolworths/)は全プランで非対応
- **価格帯**: $23/月(ALDI 12GB)〜 $99/月([Telstra](/ja/au/carriers/telstra/) Premium 300GB)
ネットワーク品質(カバレッジ or 速度)で選び、そのネットワーク上の最安キャリアを使う。これがオーストラリアSIMの最適な選び方。
**[あなたに最適なオーストラリアのSIMを探す →](/ja/au/search/)**
---
*プランデータは2026年7月時点のものです。料金やサービス内容は変更される場合があります。最新情報は各キャリアの公式サイトをご確認ください。*
*全プランの横並び比較は[SimFinderの比較ツール](/ja/au/search/)からどうぞ。*
================================================================================
# 韓国SIMカード完全ガイド2026 — 6社23プランの料金・速度・eSIMを比較
URL: https://sim-finder.com/ja/blog/best-sim-plans-korea-2026/
Type: blog (ja)
Published: 2026-03-20
> **この記事は留学・駐在・長期滞在者向けの、韓国の国内SIMプラン比較ガイドです。**
> 短期旅行用のeSIMをお探しの方は「[韓国旅行におすすめのeSIM](/ja/blog/travel-esim-korea-2026/)」をご覧ください。
## 結論: 韓国SIMのおすすめ3選
| おすすめ | プラン | 月額 | ポイント |
|---------|-------|------|---------|
| **最安** | [KT M Mobile](/ja/kr/carriers/ktmmobile/) 통화맘껏 2.5GB | ₩5,900 | 通話無制限、[KT](/ja/kr/carriers/kt/)ネットワーク(90/100) |
| **バランス(5G)** | [LG U+](/ja/kr/carriers/lguplus/) 5G Slim 5GB | ₩37,000 | MNO 5G最安、eSIM対応 |
| **大容量** | [KT M Mobile](/ja/kr/carriers/ktmmobile/) 100GB+ | ₩38,200 | 100GBでMNO 50GBプランより安い |
**[SimFinderで韓国の全23プランを比較する →](/ja/kr/search/)**
以下、6社23プランのデータを元に詳しく解説する。
## 目次
- [韓国の携帯市場 — 世界最速級5G](#韓国の携帯市場--世界最速級5gと三強体制)
- [キャリア相関図](#キャリア相関図--各社の親子関係)
- [全23プラン料金比較](#全23プラン料金比較)
- [用途別おすすめプラン](#用途別おすすめプラン)
- [eSIM・5G対応の注意点](#esim5g対応の注意点--mnoとmvnoの大きな差)
- [韓国SIMの注意点](#韓国simを選ぶ際の注意点)
- [ユーザーの声](#ユーザーの声)
- [よくある質問](#よくある質問)
- [まとめ](#まとめ)
---
韓国はモバイル通信のインフラが世界トップクラスだ。5Gダウンロード速度は最速200 Mbps([SK Telecom](/ja/kr/carriers/skt/))、3大キャリア全てがカバレッジスコア95以上。日本の楽天モバイルのようなカバレッジの心配はほぼない。
SimFinderのデータベースでは韓国の**6社23プラン**を追跡している。月額4,000ウォン(約440円)から89,000ウォン(約9,800円)まで、MNOとMVNOで最大20倍の価格差がある市場だ。
---
## 韓国の携帯市場 — 世界最速級5Gと「三強」体制
韓国の携帯市場は**[SK Telecom](/ja/kr/carriers/skt/)、[KT](/ja/kr/carriers/kt/)、[LG U+](/ja/kr/carriers/lguplus/)の3社が独占**する構造。日本のような「格安SIM戦国時代」は起きておらず、MVNOは各MNOの子会社的な存在が中心だ。
| 指標 | [SK Telecom](/ja/kr/carriers/skt/) | [KT](/ja/kr/carriers/kt/) | [LG U+](/ja/kr/carriers/lguplus/) |
|---|---|---|---|
| 総合スコア | 93/100 | 90/100 | 88/100 |
| カバレッジ | 97/100 | 96/100 | 95/100 |
| ダウンロード速度 | 200.0 Mbps | 185.5 Mbps | 175.2 Mbps |
| レイテンシ | 18 ms | 20 ms | 21 ms |
*品質データ: OpenSignal 2025年6月計測*
3社の品質差は小さい。カバレッジは全社95以上で、日本のように「地方で圏外」という事態はまず起きない。**速度重視なら[SK Telecom](/ja/kr/carriers/skt/)、コスパ重視なら[LG U+](/ja/kr/carriers/lguplus/)**が若干有利だが、どのMNOを選んでも後悔するような品質差はない。
---
## キャリア相関図 — 各社の親子関係
オーストラリアは国土面積がアメリカ本土とほぼ同じだが、人口は約2,600万人。都市部を出ると通信環境は急激に悪化するため、キャリア選びで最も重要なのは**カバレッジ**だ。
| ネットワーク | タイプ | カバレッジ | 総合スコア | ダウンロード速度 | このネットワークを使うキャリア |
|---|---|---|---|---|---|
| **[Telstra](/ja/au/carriers/telstra/)** | MNO | 97/100 | 90/100 | 97.4 Mbps | [Telstra](/ja/au/carriers/telstra/), [Belong](/ja/au/carriers/belong/), [ALDI Mobile](/ja/au/carriers/aldi/), [Boost Mobile](/ja/au/carriers/boost/), [Everyday Mobile](/ja/au/carriers/woolworths/) |
| **[Optus](/ja/au/carriers/optus/)** | MNO | 88/100 | 88/100 | 145.2 Mbps | [Optus](/ja/au/carriers/optus/), [amaysim](/ja/au/carriers/amaysim/) |
| **[Vodafone](/ja/au/carriers/vodafone/)** | MNO | 73/100 | 72/100 | — | Vodafone のみ |
*品質データ: OpenSignal 2025年6月計測*
**8社中5社が[Telstra](/ja/au/carriers/telstra/)ネットワーク**を使用している。カバレッジ97/100は圧倒的で、地方・郊外まで安定してつながる唯一の選択肢だ。
[Optus](/ja/au/carriers/optus/)はダウンロード速度で最速(145.2 Mbps)、レイテンシも最良(20ms)。都市部に住む人にとっては、速度面で[Telstra](/ja/au/carriers/telstra/)を上回る。
Vodafoneはデータ単価が最安だが、カバレッジ73/100は主要都市限定と考えたほうがいい。
---
## 格安キャリアの圧倒的なコスパ — MNOとの価格差30〜55%
同じネットワーク上でも、MNO直契約と格安キャリアの価格差は大きい。全25プランを料金順に並べると、格安キャリアの優位性が明確になる。
### MNOプラン(3社9プラン)
| キャリア | プラン | 月額 | データ | 5G |
|---|---|---|---|---|
| [Optus](/ja/au/carriers/optus/) | Small Choice Plus 50GB | $55 | 50GB | 対応 |
| Vodafone | Small 65GB | $58 | 65GB | 対応 |
| [Optus](/ja/au/carriers/optus/) | Medium Choice Plus 200GB | $65 | 200GB | 対応 |
| Vodafone | Medium 220GB | $68 | 220GB | 対応 |
| [Telstra](/ja/au/carriers/telstra/) | Basic 50GB | $74 | 50GB | 対応 |
| Vodafone | Large 420GB | $78 | 420GB | 対応 |
| [Telstra](/ja/au/carriers/telstra/) | Essential 180GB | $84 | 180GB | 対応 |
| [Optus](/ja/au/carriers/optus/) | Large Choice Plus 400GB | $85 | 400GB | 対応 |
| [Telstra](/ja/au/carriers/telstra/) | Premium 300GB | $99 | 300GB | 対応 |
### 格安キャリア(5社16プラン)
| キャリア | ネットワーク | プラン | 月額 | データ | 5G | 繰り越し |
|---|---|---|---|---|---|---|
| [ALDI Mobile](/ja/au/carriers/aldi/) | [Telstra](/ja/au/carriers/telstra/) | Basic 12GB | $23 | 12GB | × | ○ |
| [Everyday Mobile](/ja/au/carriers/woolworths/) | [Telstra](/ja/au/carriers/telstra/) | 22GB | $25 | 22GB | × | ○ |
| [ALDI Mobile](/ja/au/carriers/aldi/) | [Telstra](/ja/au/carriers/telstra/) | 5G 29GB | $29 | 29GB | ○ | ○ |
| [amaysim](/ja/au/carriers/amaysim/) | [Optus](/ja/au/carriers/optus/) | 15GB | $30 | 15GB | ○ | ○ |
| [Everyday Mobile](/ja/au/carriers/woolworths/) | [Telstra](/ja/au/carriers/telstra/) | 30GB | $30 | 30GB | × | ○ |
| [Belong](/ja/au/carriers/belong/) | [Telstra](/ja/au/carriers/telstra/) | 25GB | $34 | 25GB | ○ | ○ |
| [Everyday Mobile](/ja/au/carriers/woolworths/) | [Telstra](/ja/au/carriers/telstra/) | 50GB | $35 | 50GB | × | ○ |
| [Boost Mobile](/ja/au/carriers/boost/) | [Telstra](/ja/au/carriers/telstra/) | 30GB | $39 | 30GB | × | × |
| [Belong](/ja/au/carriers/belong/) | [Telstra](/ja/au/carriers/telstra/) | 40GB | $39 | 40GB | ○ | ○ |
| [ALDI Mobile](/ja/au/carriers/aldi/) | [Telstra](/ja/au/carriers/telstra/) | 5G 75GB | $39 | 75GB | ○ | ○ |
| [amaysim](/ja/au/carriers/amaysim/) | [Optus](/ja/au/carriers/optus/) | 80GB | $40 | 80GB | ○ | ○ |
| [Belong](/ja/au/carriers/belong/) | [Telstra](/ja/au/carriers/telstra/) | 100GB | $49 | 100GB | ○ | ○ |
| [amaysim](/ja/au/carriers/amaysim/) | [Optus](/ja/au/carriers/optus/) | 120GB | $50 | 120GB | ○ | ○ |
| [Boost Mobile](/ja/au/carriers/boost/) | [Telstra](/ja/au/carriers/telstra/) | 45GB | $59 | 45GB | × | × |
| [Belong](/ja/au/carriers/belong/) | [Telstra](/ja/au/carriers/telstra/) | 160GB | $59 | 160GB | ○ | ○ |
| [Boost Mobile](/ja/au/carriers/boost/) | [Telstra](/ja/au/carriers/telstra/) | 100GB | $74 | 100GB | × | × |
**注目すべき価格差**: [Belong](/ja/au/carriers/belong/) 100GB($49)は、[Telstra](/ja/au/carriers/telstra/)の同一ネットワーク上で[Telstra](/ja/au/carriers/telstra/) Basic 50GB($74)より安い月額で、データ量は2倍の100GBを提供している。
**[オーストラリアのSIMプランを比較する →](/ja/au/search/)**
---
## 目的別おすすめプラン
### 最安プラン — WiFi中心の人向け
**[ALDI Mobile](/ja/au/carriers/aldi/) $23 12GB** — オーストラリア最安値。[Telstra](/ja/au/carriers/telstra/)ネットワーク、データ繰り越しあり、eSIM対応。5G非対応だが、この価格なら十分。
### バランス重視 — 日常使いに最適
**[amaysim](/ja/au/carriers/amaysim/) $30 15GB** — [Optus](/ja/au/carriers/optus/)ネットワーク(速度145.2 Mbps、総合88/100)上で5G・eSIM・データ繰り越し全対応。導入プロモ終了後の継続データ量は15GBに減っており、データ重視なら[ALDI Mobile](/ja/au/carriers/aldi/)の5G 29GB($29)の方がお得。Optusの速いネットワークを優先したい人向け。
**[Belong](/ja/au/carriers/belong/) $39 40GB** — [Telstra](/ja/au/carriers/telstra/)のカバレッジ97/100が必要なら、[Telstra](/ja/au/carriers/telstra/)のサブブランドである[Belong](/ja/au/carriers/belong/)がベスト。5G・eSIM・データ繰り越し全対応で、親会社より大幅に安い。
### 大容量ユーザー
**[Belong](/ja/au/carriers/belong/) $59 160GB** — [Telstra](/ja/au/carriers/telstra/) 5Gネットワーク上で160GB。[Telstra](/ja/au/carriers/telstra/)直のBasic 50GB($74)より安くてデータ3倍以上。繰り越しありで実質200GB以上も可能。
### 大半の人へのおすすめ
**[Belong](/ja/au/carriers/belong/) $49 100GB** — 多くの人にとって100GBは十分すぎる容量。[Telstra](/ja/au/carriers/telstra/) 5Gネットワーク、データ繰り越しあり。カバレッジ・データ量・速度・価格のバランスが最も良い。
**[SimFinderでオーストラリアの全25プランを比較する →](/ja/au/search/)**
---
## データ繰り越し — 格安キャリアだけの隠れた優位性
データを見て最も目を引くパターンがある。**格安キャリアは全社データ繰り越しあり、MNOは全社なし**([Boost Mobile](/ja/au/carriers/boost/)を除く)。
| データ繰り越し | キャリア |
|---|---|
| **あり** | [Belong](/ja/au/carriers/belong/), [ALDI Mobile](/ja/au/carriers/aldi/), [Everyday Mobile](/ja/au/carriers/woolworths/), [amaysim](/ja/au/carriers/amaysim/) |
| **なし** | [Telstra](/ja/au/carriers/telstra/), [Optus](/ja/au/carriers/optus/), Vodafone, [Boost Mobile](/ja/au/carriers/boost/) |
月によってデータ使用量にバラつきがある場合、繰り越しありのプランは額面以上の価値がある。例えば[Belong](/ja/au/carriers/belong/) 40GB($39)で前月のデータが余っていれば、翌月は60〜80GBを使える計算になる。
[Boost Mobile](/ja/au/carriers/boost/)は格安キャリアの中で唯一データ繰り越しがなく、5Gにも非対応。[Telstra](/ja/au/carriers/telstra/)ネットワーク利用キャリアの中でコスパ最弱。
---
## 5GとeSIM — 対応状況
### eSIM
25プラン全てがeSIM対応 — **100%の対応率**。これは世界的に見ても珍しい水準だ。eSIM対応スマートフォンがあれば、オーストラリアに到着する前にプランを開通できる。
### 5G
25プラン中18プラン(72%)が5G対応。非対応は以下:
| キャリア | 5G | 備考 |
|---|---|---|
| [ALDI Mobile](/ja/au/carriers/aldi/)(12GBプラン) | 4Gのみ | 最安プラン。$29以上のプランは5G対応 |
| [Boost Mobile](/ja/au/carriers/boost/)(全プラン) | 4Gのみ | 全プランで5G非対応 |
| [Everyday Mobile](/ja/au/carriers/woolworths/)(全プラン) | 4Gのみ | 全プランで5G非対応 |
同じ[Telstra](/ja/au/carriers/telstra/)ネットワーク上でも、[Belong](/ja/au/carriers/belong/)や[ALDI Mobile](/ja/au/carriers/aldi/)は5Gを提供しているのに、[Boost Mobile](/ja/au/carriers/boost/)と[Everyday Mobile](/ja/au/carriers/woolworths/)は非対応。2026年時点でこの差は大きい。
---
## ワーホリ・留学生が知っておくべきポイント
オーストラリアにワーキングホリデーや留学で渡航する場合、日本の携帯事情とは異なるポイントがいくつかある。
1. **全プランが契約縛りなし** — 25プラン全てが解約金なし。いつでもキャリアを変更できる。日本の携帯契約のような制約は存在しない。
2. **eSIMで渡航前に開通** — 全キャリアがeSIM対応。日本にいるうちにオンラインで契約し、現地到着と同時に使い始められる。
3. **地方に行くなら[Telstra](/ja/au/carriers/telstra/)ネットワーク一択** — ファーム(農場)ジョブやロードトリップで都市部を離れるなら、カバレッジ97/100の[Telstra](/ja/au/carriers/telstra/)ネットワークが必須。[Belong](/ja/au/carriers/belong/)、[ALDI Mobile](/ja/au/carriers/aldi/)、[Boost Mobile](/ja/au/carriers/boost/)、[Everyday Mobile](/ja/au/carriers/woolworths/)のいずれかを選べば[Telstra](/ja/au/carriers/telstra/)と同じネットワークを使える。
4. **格安キャリアで十分** — MNO直契約は不要。[Belong](/ja/au/carriers/belong/)は[Telstra](/ja/au/carriers/telstra/)のサブブランドで、同じネットワークを半額で使える。
5. **おすすめは[Belong](/ja/au/carriers/belong/) $39 40GB** — [Telstra](/ja/au/carriers/telstra/)カバレッジ(地方OK)、5G、eSIM、データ繰り越し、契約縛りなし。ワーホリの最初のSIMとして過不足がない。
**[SimFinderでプランを比較する →](/ja/au/search/)**
---
## ユーザーの声
オーストラリアでSIMを利用した人たちのリアルな声を紹介する。
> 「オーストラリアの電話番号がないとWoolworthsのアカウントも作れない。到着前にeSIMで開通しておけばこの問題は解決する」
> — @APurpleLifeBlog([元の投稿](https://x.com/APurpleLifeBlog/status/1638271331765571584))
*※ 上記はX(旧Twitter)上の実際の投稿から引用しています。個人の感想であり、通信品質は地域・時間帯により異なります。*
---
## よくある質問
### オーストラリアのSIMに長期契約は必要?
不要。SimFinderが追跡する25プラン全てが契約縛りなし・解約金なし。これはオーストラリアのプリペイド・SIMオンリー市場では標準的。
### 地方やアウトバックで使えるのはどのキャリア?
[Telstra](/ja/au/carriers/telstra/)のみ。カバレッジスコア97/100は[Optus](/ja/au/carriers/optus/)(88)やVodafone(73)を大きく引き離す。都市部を離れる可能性があるなら、[Telstra](/ja/au/carriers/telstra/)直または[Telstra](/ja/au/carriers/telstra/)ネットワーク利用の格安キャリア([Belong](/ja/au/carriers/belong/)、[ALDI Mobile](/ja/au/carriers/aldi/)、[Boost Mobile](/ja/au/carriers/boost/)、[Everyday Mobile](/ja/au/carriers/woolworths/))を選ぶこと。
### オーストラリアで5Gを使うのに追加料金がかかる?
基本的にかからない。格安キャリアでも[ALDI Mobile](/ja/au/carriers/aldi/) 5G 29GB($29/月)や[amaysim](/ja/au/carriers/amaysim/) 15GB($30/月)で5Gが使える。MNO価格を払う必要はない。
### eSIMで日本にいるうちに開通できる?
できる。オーストラリアの全8キャリア・25プランがeSIM対応。オンラインで契約し、QRコードをスキャンすれば開通する。
### [Belong](/ja/au/carriers/belong/)とは何?[Telstra](/ja/au/carriers/telstra/)との違いは?
[Belong](/ja/au/carriers/belong/)は[Telstra](/ja/au/carriers/telstra/)が運営するサブブランド。同じ[Telstra](/ja/au/carriers/telstra/)ネットワーク(カバレッジ97/100)を使いながら、料金は[Telstra](/ja/au/carriers/telstra/)よりかなり安い。[Belong](/ja/au/carriers/belong/) 100GB $49 vs [Telstra](/ja/au/carriers/telstra/) Basic 50GB $74。主な違いは店舗サポートがないことと、料金が安いこと。
---
## まとめ
2026年のオーストラリアSIM市場のポイント:
- **8社25プラン**、全てが契約縛りなし・通話かけ放題・eSIM対応
- **ネットワークは3つ**: [Telstra](/ja/au/carriers/telstra/)(カバレッジ最強97/100)、[Optus](/ja/au/carriers/optus/)(速度最速145.2 Mbps)、Vodafone(安いが73/100)
- **格安キャリアが30〜55%安い**: [Belong](/ja/au/carriers/belong/) 100GBが$49 vs [Telstra](/ja/au/carriers/telstra/) 50GBが$74
- **データ繰り越しは格安キャリアだけ** — MNOは全社なし
- **5Gは72%のプラン**(18/25)が対応。[Boost Mobile](/ja/au/carriers/boost/)と[Everyday Mobile](/ja/au/carriers/woolworths/)は全プランで非対応
- **価格帯**: $23/月(ALDI 12GB)〜 $99/月([Telstra](/ja/au/carriers/telstra/) Premium 300GB)
ネットワーク品質(カバレッジ or 速度)で選び、そのネットワーク上の最安キャリアを使う。これがオーストラリアSIMの最適な選び方。
**[あなたに最適なオーストラリアのSIMを探す →](/ja/au/search/)**
---
*プランデータは2026年7月時点のものです。料金やサービス内容は変更される場合があります。最新情報は各キャリアの公式サイトをご確認ください。*
*全プランの横並び比較は[SimFinderの比較ツール](/ja/au/search/)からどうぞ。*
================================================================================
# 韓国SIMカード完全ガイド2026 — 6社23プランの料金・速度・eSIMを比較
URL: https://sim-finder.com/ja/blog/best-sim-plans-korea-2026/
Type: blog (ja)
Published: 2026-03-20
> **この記事は留学・駐在・長期滞在者向けの、韓国の国内SIMプラン比較ガイドです。**
> 短期旅行用のeSIMをお探しの方は「[韓国旅行におすすめのeSIM](/ja/blog/travel-esim-korea-2026/)」をご覧ください。
## 結論: 韓国SIMのおすすめ3選
| おすすめ | プラン | 月額 | ポイント |
|---------|-------|------|---------|
| **最安** | [KT M Mobile](/ja/kr/carriers/ktmmobile/) 통화맘껏 2.5GB | ₩5,900 | 通話無制限、[KT](/ja/kr/carriers/kt/)ネットワーク(90/100) |
| **バランス(5G)** | [LG U+](/ja/kr/carriers/lguplus/) 5G Slim 5GB | ₩37,000 | MNO 5G最安、eSIM対応 |
| **大容量** | [KT M Mobile](/ja/kr/carriers/ktmmobile/) 100GB+ | ₩38,200 | 100GBでMNO 50GBプランより安い |
**[SimFinderで韓国の全23プランを比較する →](/ja/kr/search/)**
以下、6社23プランのデータを元に詳しく解説する。
## 目次
- [韓国の携帯市場 — 世界最速級5G](#韓国の携帯市場--世界最速級5gと三強体制)
- [キャリア相関図](#キャリア相関図--各社の親子関係)
- [全23プラン料金比較](#全23プラン料金比較)
- [用途別おすすめプラン](#用途別おすすめプラン)
- [eSIM・5G対応の注意点](#esim5g対応の注意点--mnoとmvnoの大きな差)
- [韓国SIMの注意点](#韓国simを選ぶ際の注意点)
- [ユーザーの声](#ユーザーの声)
- [よくある質問](#よくある質問)
- [まとめ](#まとめ)
---
韓国はモバイル通信のインフラが世界トップクラスだ。5Gダウンロード速度は最速200 Mbps([SK Telecom](/ja/kr/carriers/skt/))、3大キャリア全てがカバレッジスコア95以上。日本の楽天モバイルのようなカバレッジの心配はほぼない。
SimFinderのデータベースでは韓国の**6社23プラン**を追跡している。月額4,000ウォン(約440円)から89,000ウォン(約9,800円)まで、MNOとMVNOで最大20倍の価格差がある市場だ。
---
## 韓国の携帯市場 — 世界最速級5Gと「三強」体制
韓国の携帯市場は**[SK Telecom](/ja/kr/carriers/skt/)、[KT](/ja/kr/carriers/kt/)、[LG U+](/ja/kr/carriers/lguplus/)の3社が独占**する構造。日本のような「格安SIM戦国時代」は起きておらず、MVNOは各MNOの子会社的な存在が中心だ。
| 指標 | [SK Telecom](/ja/kr/carriers/skt/) | [KT](/ja/kr/carriers/kt/) | [LG U+](/ja/kr/carriers/lguplus/) |
|---|---|---|---|
| 総合スコア | 93/100 | 90/100 | 88/100 |
| カバレッジ | 97/100 | 96/100 | 95/100 |
| ダウンロード速度 | 200.0 Mbps | 185.5 Mbps | 175.2 Mbps |
| レイテンシ | 18 ms | 20 ms | 21 ms |
*品質データ: OpenSignal 2025年6月計測*
3社の品質差は小さい。カバレッジは全社95以上で、日本のように「地方で圏外」という事態はまず起きない。**速度重視なら[SK Telecom](/ja/kr/carriers/skt/)、コスパ重視なら[LG U+](/ja/kr/carriers/lguplus/)**が若干有利だが、どのMNOを選んでも後悔するような品質差はない。
---
## キャリア相関図 — 各社の親子関係
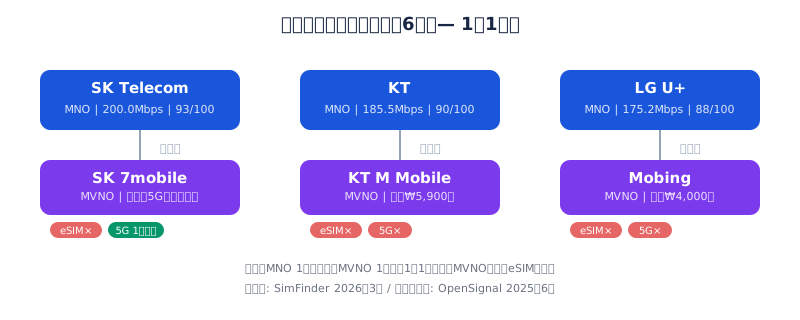 韓国の6キャリアは明快な「1対1」構造になっている。各MNOに1社のMVNOが対応する。
| MNO | MVNO | ネットワーク |
|---|---|---|
| **[SK Telecom](/ja/kr/carriers/skt/)** (93/100) | [SK 7mobile](/ja/kr/carriers/sevenmobile/) | SKTネットワーク |
| **[KT](/ja/kr/carriers/kt/)** (90/100) | [KT M Mobile](/ja/kr/carriers/ktmmobile/) | [KT](/ja/kr/carriers/kt/)ネットワーク |
| **[LG U+](/ja/kr/carriers/lguplus/)** (88/100) | [Mobing](/ja/kr/carriers/mobing/) | [LG U+](/ja/kr/carriers/lguplus/)ネットワーク |
日本やオーストラリアと異なり、1つのMNOに複数のMVNOがぶら下がる構造ではない。各MNOが1社ずつ格安ブランドを持ち、それ以外のMVNOはほぼ存在しない。
この「1対1」構造の結果、**MVNOの選択肢は限られるが、各MVNOの価格は極端に安い**。[SK 7mobile](/ja/kr/carriers/sevenmobile/)、[KT](/ja/kr/carriers/kt/) M Mobile、[Mobing](/ja/kr/carriers/mobing/)の3社で月額1万ウォン以下のプランが3つもある。
---
## 全23プラン料金比較
### MNOプラン(3社14プラン)
全プランが通話かけ放題・eSIM対応・契約縛りなし。家族割は全プランで適用可能。
| キャリア | プラン | 月額 | データ | 5G | 家族割 |
|---|---|---|---|---|---|
| [KT](/ja/kr/carriers/kt/) | LTE Basic | ₩33,000 | 1GB | × | ₩2,000 |
| SKT | T Plan Save | ₩33,000 | 2GB | × | ₩2,000 |
| [LG U+](/ja/kr/carriers/lguplus/) | 5G Slim 5GB | ₩37,000 | 5GB | ○ | ₩3,000 |
| SKT | 5GX Compact | ₩39,000 | 6GB | ○ | ₩3,000 |
| SKT | 5GX Compact Plus | ₩45,000 | 8GB | ○ | ₩3,000 |
| [KT](/ja/kr/carriers/kt/) | 5G Slim 10GB | ₩50,000 | 10GB | ○ | ₩4,000 |
| [KT](/ja/kr/carriers/kt/) | 5G Slim 21GB | ₩58,000 | 21GB | ○ | ₩4,000 |
| [LG U+](/ja/kr/carriers/lguplus/) | 5G Standard 31GB | ₩61,000 | 31GB | ○ | ₩5,000 |
| [KT](/ja/kr/carriers/kt/) | 5G Simple 50GB | ₩63,000 | 50GB | ○ | ₩5,000 |
| [LG U+](/ja/kr/carriers/lguplus/) | LTE Data 無制限 | ₩69,000 | 無制限 | × | ₩5,000 |
| SKT | 5GX Regular | ₩69,000 | 48GB | ○ | ₩5,000 |
| [KT](/ja/kr/carriers/kt/) | 5G Basic Unlimited | ₩80,000 | 無制限 | ○ | ₩7,000 |
| [LG U+](/ja/kr/carriers/lguplus/) | 5G Premier Essential | ₩85,000 | 無制限 | ○ | ₩7,000 |
| SKT | 5GX Prime | ₩89,000 | 無制限 | ○ | ₩7,000 |
### MVNOプラン(3社9プラン)
MVNOは全プランeSIM非対応。5GはSK [7mobile](/ja/kr/carriers/sevenmobile/) 5G 110GB+の1プランのみ。
| キャリア | ネットワーク | プラン | 月額 | データ | 通話 | 5G |
|---|---|---|---|---|---|---|
| [Mobing](/ja/kr/carriers/mobing/) | [LG U+](/ja/kr/carriers/lguplus/) | 100分/3GB | ₩4,000 | 3GB | 100分 | × |
| [KT](/ja/kr/carriers/kt/) M Mobile | [KT](/ja/kr/carriers/kt/) | 통화맘껏 2.5GB | ₩5,900 | 3GB | 無制限 | × |
| [SK 7mobile](/ja/kr/carriers/sevenmobile/) | SKT | LTE 1GB | ₩9,920 | 1GB | 無制限 | × |
| [KT](/ja/kr/carriers/kt/) M Mobile | [KT](/ja/kr/carriers/kt/) | 통화맘껏 10GB | ₩11,900 | 10GB | 無制限 | × |
| [Mobing](/ja/kr/carriers/mobing/) | [LG U+](/ja/kr/carriers/lguplus/) | データ 15GB+ | ₩25,370 | 15GB | 100分 | × |
| [SK 7mobile](/ja/kr/carriers/sevenmobile/) | SKT | LTE 11GB+ | ₩33,000 | 11GB | 無制限 | × |
| [Mobing](/ja/kr/carriers/mobing/) | [LG U+](/ja/kr/carriers/lguplus/) | 毎日5GB+ | ₩37,000 | 無制限(日5GB) | 無制限 | × |
| [KT](/ja/kr/carriers/kt/) M Mobile | [KT](/ja/kr/carriers/kt/) | 모두다맘껏 100GB+ | ₩38,200 | 100GB | 無制限 | × |
| [SK 7mobile](/ja/kr/carriers/sevenmobile/) | SKT | 5G 110GB+ | ₩45,100 | 110GB | 無制限 | ○ |
**MNO最安の₩33,000に対し、MVNOは₩4,000から**。同じネットワーク上で8倍以上の価格差がある。
**[韓国のSIMプランを比較する →](/ja/kr/search/)**
---
## 用途別おすすめプラン
### 最安で使いたい — 月額5,000ウォン以下
**[Mobing](/ja/kr/carriers/mobing/) ₩4,000 3GB** — 韓国最安プラン。[LG U+](/ja/kr/carriers/lguplus/)ネットワーク(カバレッジ95/100)で3GB。通話は100分の制限があるが、月額約440円は圧倒的。WiFi中心の人に。
**[KT](/ja/kr/carriers/kt/) M Mobile ₩5,900 3GB** — [Mobing](/ja/kr/carriers/mobing/)より₩1,900高いが、通話かけ放題が付く。[KT](/ja/kr/carriers/kt/)ネットワーク(90/100)。電話もそこそこ使う人にはこちら。
### 5Gを安く使いたい
**[LG U+](/ja/kr/carriers/lguplus/) 5G Slim 5GB ₩37,000** — MNOの5Gプランで最安。[LG U+](/ja/kr/carriers/lguplus/)の5Gネットワーク、eSIM対応。5GBは少なめだが、WiFi環境が多い人なら問題ない。
**[SK 7mobile](/ja/kr/carriers/sevenmobile/) 5G 110GB+ ₩45,100** — MVNO唯一の5Gプラン。110GBの大容量でMNOの5Gプランより大幅に安い。ただしeSIM非対応。
### 大容量・無制限
**[KT](/ja/kr/carriers/kt/) M Mobile ₩38,200 100GB+** — 100GBで₩38,200は、MNOの5G 50GB(₩63,000)と比べて圧倒的に安い。5GとeSIMは使えないが、データ量重視なら最適。
**[LG U+](/ja/kr/carriers/lguplus/) LTE Data 無制限 ₩69,000** — LTEだがデータ無制限。5G無制限のSKT Prime(₩89,000)や[LG U+](/ja/kr/carriers/lguplus/) Premier(₩85,000)より₩16,000〜₩20,000安い。速度より容量が重要な人に。
---
## eSIM・5G対応の注意点 — MNOとMVNOの大きな差
韓国市場の最大の注意点は、**eSIMと5GがほぼMNO限定**であること。
### eSIM対応状況
| カテゴリ | eSIM対応 | プラン数 |
|---|---|---|
| MNO(SKT, [KT](/ja/kr/carriers/kt/), [LG U+](/ja/kr/carriers/lguplus/)) | **全プラン対応** | 14/14 |
| MVNO([SK 7mobile](/ja/kr/carriers/sevenmobile/), [KT](/ja/kr/carriers/kt/) M Mobile, [Mobing](/ja/kr/carriers/mobing/)) | **全プラン非対応** | 0/9 |
| 合計 | | 14/23(61%) |
eSIMで日本から渡航前に開通したい場合、MVNOは選択肢に入らない。MNO直契約(最安₩33,000)が必要になる。
### 5G対応状況
23プラン中12プラン(52%)が5G対応。内訳:
- **MNO**: 11/14プランが5G対応(LTEプラン3つを除く)
- **MVNO**: 1/9プランのみ([SK 7mobile](/ja/kr/carriers/sevenmobile/) 5G 110GB+)
MVNOで5Gを使いたい場合、[SK 7mobile](/ja/kr/carriers/sevenmobile/) 5G 110GB+(₩45,100)が唯一の選択肢。
---
## 韓国SIMを選ぶ際の注意点
### 契約期間
23プラン中22プランが契約縛りなし。唯一の例外は[Mobing](/ja/kr/carriers/mobing/)の「毎日5GB+」(₩37,000)で、**24ヶ月の契約期間**が必要。それ以外は全てプリペイド式で、いつでも解約可能。
### 通話制限
21プランが通話かけ放題だが、**[Mobing](/ja/kr/carriers/mobing/)の2プラン(3GB ₩4,000、15GB ₩25,370)は通話100分の制限**がある。最安プランを選ぶ場合は通話制限に注意。
### 家族割引
MNOの全14プランに家族割引がある(₩2,000〜₩7,000/回線)。2回線以上で適用される。家族や友人と同じMNOで契約すると毎月の固定費を抑えられる。MVNOには家族割引がない。
### テザリング
MNOのLTE最安プラン2つ([KT](/ja/kr/carriers/kt/) LTE Basic、SKT T Plan Save)はテザリング非対応。それ以外のMNOプランは全て対応。MVNOは[KT](/ja/kr/carriers/kt/) M Mobile 100GB+、[Mobing](/ja/kr/carriers/mobing/) 15GB+/毎日5GB+、[SK 7mobile](/ja/kr/carriers/sevenmobile/) 11GB+/5G 110GB+がテザリング対応。
### データ繰り越し
韓国市場では**全23プランでデータ繰り越しなし**。MNO・MVNO問わず、余ったデータは月末に消滅する。オーストラリアの格安キャリアのような繰り越し制度は存在しない。
**[SimFinderで韓国のSIMプランを比較する →](/ja/kr/search/)**
---
## ユーザーの声
韓国でSIMを利用した人たちのリアルな声を紹介する。
> 「激安系の韓国SIMは、おおむね中国の通信会社のローミングなので、VPNアプリがないとTikTokやChatGPTが使えない点は頭に入れておくと良いです」
> — @fujit_ECbassman([元の投稿](https://x.com/fujit_ECbassman/status/1989545216106492291))
> 「チング通信の月1,700円のSIM半年使ってたけど、月1,100円の所見つけたから乗り換え!eSIMだから家からラクラク開通。이야기알뜰폰や[KT](/ja/kr/carriers/kt/) mobileも外国人登録証あれば申請できるみたい」
> — @ran_seoulife([元の投稿](https://x.com/ran_seoulife/status/1623969461312323584))
> 「仁川国際空港第1ターミナルは日本語で電光掲示板表記もされるし日本語話せる人多いし、SIM会社のお姉さんは日本語の契約書出してくれた上に日本語対応してくれた」
> — @Zin_Flying([元の投稿](https://x.com/Zin_Flying/status/1858063287759655312))
*※ 上記はX(旧Twitter)上の実際の投稿から引用しています。個人の感想であり、通信品質は地域・時間帯により異なります。*
---
## よくある質問
### 韓国のSIMは短期滞在でも契約できる?
MNOプランは契約縛りなし([Mobing](/ja/kr/carriers/mobing/)の1プランを除く)。eSIM対応のMNOプランなら、渡航前にオンラインで契約し、到着後すぐに使い始められる。ただしMVNOはeSIM非対応のため、現地で物理SIMの受け取りが必要。
### どのキャリアを選んでもカバレッジは問題ない?
はい。韓国の3大キャリアはカバレッジスコア95〜97/100で、日本の大手キャリアと同等以上。地方でも都市部でもカバレッジの心配はほぼ不要。
### MVNOのデメリットは?
eSIM非対応、5Gほぼ非対応(1プランのみ)、家族割引なし、一部プランで通話制限([Mobing](/ja/kr/carriers/mobing/) 2プラン)。ただし料金は劇的に安い(最安₩4,000 vs MNO最安₩33,000)。
### 家族割引はどのくらいお得?
MNO全プランで2回線以上から適用。割引額は月₩2,000〜₩7,000/回線。例えばSKT 5GX Prime(₩89,000)を2回線契約すると、1回線あたり₩82,000になる。
### 韓国の5G速度は実際どのくらい?
[SK Telecom](/ja/kr/carriers/skt/)のダウンロード速度は200.0 Mbps(OpenSignal 2025年計測)で世界トップクラス。[KT](/ja/kr/carriers/kt/) 185.5 Mbps、[LG U+](/ja/kr/carriers/lguplus/) 175.2 Mbpsも高速。日本の主要キャリアを上回る水準。
---
## まとめ
2026年の韓国SIM市場のポイント:
- **6社23プラン** — MNO 3社(SKT, [KT](/ja/kr/carriers/kt/), [LG U+](/ja/kr/carriers/lguplus/))とMVNO 3社の「1対1」構造
- **ネットワーク品質は世界トップクラス** — 全MNOがカバレッジ95以上、5G速度は最速200 Mbps
- **MNOとMVNOの価格差は最大20倍** — MVNO最安₩4,000 vs MNO最安₩33,000
- **eSIMはMNO限定**(14/23 = 61%) — 渡航前にeSIMで開通するならMNO一択
- **5Gは52%のプラン**(12/23)が対応 — MVNOの5GはSK [7mobile](/ja/kr/carriers/sevenmobile/) 1プランのみ
- **データ繰り越しは全プランなし** — 日豪と異なり、韓国市場には繰り越し制度がない
- **価格帯**: ₩4,000/月〜₩89,000/月
コスパ最優先ならMVNO、eSIM・5G・家族割引が必要ならMNO。この2択が韓国SIM選びの出発点になる。
**[韓国のSIMプランを探す →](/ja/kr/search/)**
---
*プランデータは2026年3月時点のものです。料金やサービス内容は変更される場合があります。最新情報は各キャリアの公式サイトをご確認ください。*
*全プランの横並び比較は[SimFinderの比較ツール](/ja/kr/search/)からどうぞ。*
================================================================================
# タイの国内SIM完全ガイド2026 — 長期滞在・移住者が知るべきこと
URL: https://sim-finder.com/ja/blog/best-sim-plans-thailand-residents-2026/
Type: blog (ja)
Published: 2026-03-24
## 結論: 長期滞在者向けおすすめ3選
| おすすめ | プラン | 月額 | ポイント |
|---------|-------|------|---------|
| **駐在員** | [AIS](/ja/th/carriers/ais/) Prepaid 50GB | 899 THB | 最高品質ネットワーク(95/100)、5G、eSIM対応 |
| **デジタルノマド** | [TrueMove H](/ja/th/carriers/truemove/) 5G Super Max 40GB | 499 THB | 5G+eSIM対応で最安、250分の通話付き |
| **移住者(コスパ重視)** | [TrueMove H](/ja/th/carriers/truemove/) Prepaid 60GB | 300 THB | 60GBで月300 THB、GB単価5.00 THBは市場最安 |
**[SimFinderでタイの全16プランを比較する →](/ja/th/search/)**
以下、3社16プランのデータを元に、長期滞在者・移住者の視点で詳しく解説する。
## 目次
- [タイの携帯事情 — 外国人でも契約しやすい市場](#タイの携帯事情--外国人でも契約しやすい市場)
- [キャリア相関図](#キャリア相関図--3大mno体制)
- [全16プラン料金比較](#全16プラン料金比較)
- [利用スタイル別おすすめ](#利用スタイル別おすすめプラン)
- [5G・eSIM対応状況](#5gesim対応状況)
- [eSIM vs 現地SIM — どちらを選ぶ?](#esim-vs-現地sim--どちらを選ぶ)
- [契約方法](#契約方法--パスポートがあれば即日開通)
- [注意点](#長期利用の注意点)
- [よくある質問](#よくある質問)
- [まとめ](#まとめ)
---
## タイの携帯事情 — 外国人でも契約しやすい市場
タイは東南アジアの中でも外国人がSIMを契約しやすい国だ。パスポートさえあればプリペイドSIMを即日購入・開通でき、契約縛りもない。SimFinderのデータベースでは**3社16プラン**を追跡しており、月額299 THB(約1,250円)から1,499 THB(約6,250円)まで選択肢がある。
長期滞在者にとって重要なのは、タイの携帯市場には以下の特徴があることだ。
- **全16プランが契約縛りなし** — 解約違約金ゼロ。いつでもキャリア変更可能
- **プリペイド式が主流** — ポストペイド契約はワークパーミットが必要な場合が多い
- **パスポートのみで契約可能** — 空港到着後すぐに開通できる
- **料金は前払い制** — チャージ(トップアップ)でプラン料金を支払う
- **3大MNO全てが5G・eSIM対応** — ただし対応プランは限られる
日本からの駐在員、デジタルノマド、リタイア移住者、いずれの場合でもプリペイドSIMで十分に対応できる。
---
## キャリア相関図 — 3大MNO体制
タイの携帯市場は**[AIS](/ja/th/carriers/ais/)、[TrueMove H](/ja/th/carriers/truemove/)、[DTAC](/ja/th/carriers/dtac/)の3大MNO**が支配する構造だ。唯一のMVNOだったPenguin SIMは2025年8月にNTの電波ライセンス失効に伴いタイでのサービスを終了しており、現在SimFinderが追跡するMVNOは存在しない。
| ネットワーク | タイプ | カバレッジ | 総合スコア | ダウンロード速度 | レイテンシ | 利用キャリア |
|---|---|---|---|---|---|---|
| **[AIS](/ja/th/carriers/ais/)** | MNO | 95/100 | 88/100 | 98.4 Mbps | 20 ms | [AIS](/ja/th/carriers/ais/) |
| **[TrueMove H](/ja/th/carriers/truemove/)** | MNO | 93/100 | 84/100 | 87.3 Mbps | 22 ms | [TrueMove H](/ja/th/carriers/truemove/) |
| **[DTAC](/ja/th/carriers/dtac/)** | MNO | 91/100 | 82/100 | 81.6 Mbps | 24 ms | [DTAC](/ja/th/carriers/dtac/) |
*品質データ: OpenSignal 2025年6月計測*
**[AIS](/ja/th/carriers/ais/)がネットワーク品質で首位**。カバレッジスコア95/100、ダウンロード速度98.4 Mbps、レイテンシ20 msと、全指標でリードしている。バンコク市内では3社の差は体感しにくいが、地方や離島では[AIS](/ja/th/carriers/ais/)の安定感が際立つ。長期滞在でタイ各地を移動する予定があるなら、[AIS](/ja/th/carriers/ais/)のネットワークは信頼性が高い。
[TrueMove H](/ja/th/carriers/truemove/)は2位(93/100、87.3 Mbps)。バンコク、チェンマイ、プーケットなどの主要都市では快適に使える。
[DTAC](/ja/th/carriers/dtac/)は3位(91/100、81.6 Mbps)だが、3社の差は韓国やオーストラリアと比べると小さい。都市部ではどのMNOを選んでも問題ない水準だ。
**True-[DTAC](/ja/th/carriers/dtac/)合併の影響**: True Corporationと[DTAC](/ja/th/carriers/dtac/)は2023年3月に合併した。ただし、[TrueMove H](/ja/th/carriers/truemove/)と[DTAC](/ja/th/carriers/dtac/)は現在も独立したブランド・料金体系・SIM商品として運営されている。利用者にとっては実質的に別キャリアとして選択でき、プラン内容も異なる。
タイ市場には現在SimFinderが追跡するMVNOは存在しない。かつて唯一のMVNOだったPenguin SIMは[AIS](/ja/th/carriers/ais/)のネットワークを使った格安プランを提供していたが、2025年8月にサービスを終了した。本ガイドの16プランは全てMNO3社の直営プランとなる。
---
## 全16プラン料金比較
全プランが契約縛りなし・解約違約金ゼロ。長期滞在者でもいつでもプラン変更・キャリア変更ができる。
### プリペイドプラン(9プラン)
| キャリア | プラン | 月額 | データ | 通話 | 5G | eSIM |
|---|---|---|---|---|---|---|
| [DTAC](/ja/th/carriers/dtac/) | Prepaid 15GB | 299 THB | 15GB | 無制限 | -- | -- |
| [AIS](/ja/th/carriers/ais/) | Prepaid 1GB | 299 THB | 1GB | 100分 | -- | -- |
| [TrueMove H](/ja/th/carriers/truemove/) | Prepaid 60GB | 300 THB | 60GB | 無制限 | -- | -- |
| [AIS](/ja/th/carriers/ais/) | Prepaid 5GB | 399 THB | 5GB | 無制限 | -- | -- |
| [DTAC](/ja/th/carriers/dtac/) | Prepaid 30GB | 499 THB | 30GB | 無制限 | **○** | -- |
| [AIS](/ja/th/carriers/ais/) | Prepaid 10GB | 599 THB | 10GB | 無制限 | **○** | **○** |
| [AIS](/ja/th/carriers/ais/) | Prepaid 20GB | 699 THB | 20GB | 無制限 | **○** | **○** |
| [AIS](/ja/th/carriers/ais/) | Prepaid 30GB | 899 THB | 30GB | 無制限 | **○** | **○** |
| [AIS](/ja/th/carriers/ais/) | Prepaid 50GB | 899 THB | 50GB | 無制限 | **○** | **○** |
### 5Gプラン(7プラン)
全プランeSIM対応・5G対応。通話は分数制限あり。
| キャリア | プラン | 月額 | データ | 通話 | 5G | eSIM |
|---|---|---|---|---|---|---|
| [TrueMove H](/ja/th/carriers/truemove/) | 5G Super Netflix 25GB | 499 THB | 25GB | 150分 | **○** | **○** |
| [TrueMove H](/ja/th/carriers/truemove/) | 5G Super Max 40GB | 499 THB | 40GB | 250分 | **○** | **○** |
| [DTAC](/ja/th/carriers/dtac/) | 5G Super Max 40GB | 499 THB | 40GB | 250分 | **○** | **○** |
| [DTAC](/ja/th/carriers/dtac/) | 5G Super Max 80GB | 899 THB | 80GB | 300分 | **○** | **○** |
| [TrueMove H](/ja/th/carriers/truemove/) | 5G Super Streaming 90GB | 999 THB | 90GB | 300分 | **○** | **○** |
| [TrueMove H](/ja/th/carriers/truemove/) | 5G Unlimited | 1,499 THB | 無制限 | 650分 | **○** | **○** |
| [DTAC](/ja/th/carriers/dtac/) | 5G Unlimited | 1,499 THB | 無制限 | 650分 | **○** | **○** |
### GB単価ランキング
長期滞在者にとって重要なのはGB単価だ。月々のコストを最適化するために確認しておきたい。
| プラン | 月額 | データ | GB単価 |
|---|---|---|---|
| [TrueMove H](/ja/th/carriers/truemove/) Prepaid 60GB | 300 THB | 60GB | **5.00 THB/GB** |
| [TrueMove H](/ja/th/carriers/truemove/) 5G Streaming 90GB | 999 THB | 90GB | 11.10 THB/GB |
| [DTAC](/ja/th/carriers/dtac/) 5G Super Max 80GB | 899 THB | 80GB | 11.24 THB/GB |
| [TrueMove H](/ja/th/carriers/truemove/) 5G Super Max 40GB | 499 THB | 40GB | 12.48 THB/GB |
| [DTAC](/ja/th/carriers/dtac/) 5G Super Max 40GB | 499 THB | 40GB | 12.48 THB/GB |
| [DTAC](/ja/th/carriers/dtac/) Prepaid 30GB | 499 THB | 30GB | 16.63 THB/GB |
| [AIS](/ja/th/carriers/ais/) Prepaid 50GB | 899 THB | 50GB | 17.98 THB/GB |
| [AIS](/ja/th/carriers/ais/) Prepaid 20GB | 699 THB | 20GB | 34.95 THB/GB |
[TrueMove H](/ja/th/carriers/truemove/) Prepaid 60GBのGB単価5.00 THBは2位の2倍以上のコスパで、タイ市場で突出した存在だ。
**[SimFinderでタイのSIMプランを比較する →](/ja/th/search/)**
---
## 利用スタイル別おすすめプラン
### 駐在員 — 安定性・品質重視
駐在員にとって最も重要なのはネットワーク品質と安定性だ。仕事のビデオ会議やVPN接続で遅延やドロップがあると業務に支障が出る。
**[AIS](/ja/th/carriers/ais/) Prepaid 50GB 899 THB** — [AIS](/ja/th/carriers/ais/)の最高品質ネットワーク(カバレッジ95/100、レイテンシ20 ms)で50GBの5Gデータを利用可能。eSIM対応なので日本にいる間に開通し、タイ到着後すぐに使い始められる。通話は無制限。月額899 THB(約3,750円)は日本のキャリアプランと比べて大幅に安い。
50GBで足りない場合は、**[DTAC](/ja/th/carriers/dtac/) 5G Super Max 80GB(899 THB)**が同額で80GBを提供する。ネットワーク品質は[AIS](/ja/th/carriers/ais/)に劣るが(82/100 vs 88/100)、バンコク中心部で使う分には十分。
### デジタルノマド — eSIM・5G・コスパのバランス
コワーキングスペースやカフェからのリモートワークが中心なら、5GとeSIMの両方に対応したプランが便利だ。
**[TrueMove H](/ja/th/carriers/truemove/) 5G Super Max 40GB 499 THB** — 5G+eSIM対応プランの中で最安。40GBあればビデオ会議やクラウドストレージの利用にも十分。250分の通話付き。eSIMなので物理SIMスロットを日本の番号維持用に使える。
データ使用量が多い場合は**[TrueMove H](/ja/th/carriers/truemove/) 5G Super Streaming 90GB(999 THB)**。90GBあればテザリングでPC作業をしても余裕がある。
コストを最小限に抑えたいなら**[TrueMove H](/ja/th/carriers/truemove/) Prepaid 60GB(300 THB)**。5GとeSIMは使えないが、60GBで月300 THB(約1,250円)は圧倒的な安さだ。WiFi環境が充実している場所で作業するノマドなら十分。
### 移住者・リタイア — 低コスト優先
リタイア移住や長期ステイで通信費を抑えたい場合。
**[TrueMove H](/ja/th/carriers/truemove/) Prepaid 60GB 300 THB** — GB単価5.00 THBはタイ市場で突出している。60GBのデータと通話無制限で月300 THB(約1,250円)。5GやeSIMは使えないが、日常利用には十分すぎる容量だ。
さらに節約するなら**[DTAC](/ja/th/carriers/dtac/) Prepaid 15GB 299 THB** — 月額299 THB(約1,250円、[AIS](/ja/th/carriers/ais/) Prepaid 1GBと同額)はPenguin SIMのサービス終了後のタイ市場最安値。データ15GBと通話無制限がついてくる。
### 短期滞在との比較 — 旅行用eSIMは割高
1〜2週間の短期滞在なら旅行用eSIM([Airalo](/ja/travel/providers/airalo/)、[Holafly](/ja/travel/providers/holafly/)等)も選択肢に入るが、1ヶ月以上の長期滞在では現地SIMの方がはるかに割安だ。
| 比較 | 旅行用eSIM(30日間の例) | 現地SIM(月額) |
|---|---|---|
| 代表的な料金 | 3GB: $6.00〜 / 5GB: $14.00〜 | 15GB: 299 THB (~$8.25) |
| データ量 | 3〜20GB | 15GB〜無制限 |
| 通話 | なし(データのみ) | 無制限〜650分 |
| 5G | なし | 12プラン対応 |
| 契約方法 | オンライン即時 | 空港・店舗で即日 |
長期滞在者は現地SIM一択だ。旅行用eSIMは短期出張や旅行のつなぎ用として活用するのがよい。短期旅行のeSIM選びについては[タイ旅行のeSIM比較ガイド](/ja/blog/travel-esim-thailand-2026/)を参照。
**[SimFinderでタイの全16プランを比較する →](/ja/th/search/)**
---
## 5G・eSIM対応状況
### 5G対応
16プラン中12プラン(75%)が5G対応。3大MNO全てが5Gを提供しているが、対応プランは中〜上位に限られる。
| キャリア | 5G対応プラン | 4G専用プラン | 5G最安 |
|---|---|---|---|
| [AIS](/ja/th/carriers/ais/) | 10GB, 20GB, 30GB, 50GB | 1GB, 5GB | 599 THB |
| [TrueMove H](/ja/th/carriers/truemove/) | 5G全プラン(4プラン) | Prepaid 60GB | 499 THB |
| [DTAC](/ja/th/carriers/dtac/) | Prepaid 30GB, 5G全プラン(4プラン) | Prepaid 15GB | 499 THB |
タイの5Gエリアはバンコク、チェンマイ、プーケット、パタヤなどの主要都市に集中している。バンコクのスクンビットやシーロムエリアでは安定した5G接続が期待できるが、地方では4Gにフォールバックする。
### eSIM対応
16プラン中11プラン(69%)がeSIM対応。
| キャリア | eSIM対応プラン | eSIM非対応プラン |
|---|---|---|
| [AIS](/ja/th/carriers/ais/) | Prepaid 10GB, 20GB, 30GB, 50GB(4プラン) | Prepaid 1GB, 5GB |
| [TrueMove H](/ja/th/carriers/truemove/) | 5G全プラン(4プラン) | Prepaid 60GB |
| [DTAC](/ja/th/carriers/dtac/) | 5G全プラン(3プラン) | Prepaid 15GB, 30GB |
eSIMのメリットは、日本を出発する前にオンラインで開通できること。到着後にSIMを購入する手間が省ける。ただしeSIM対応プランは499 THB以上に限られるため、最安プランを求める場合はeSIMは使えない。
---
## eSIM vs 現地SIM — どちらを選ぶ?
長期滞在者にとって、eSIMと物理SIMの選択は重要なポイントだ。
### eSIMが向いている人
- 渡航前にタイの番号を確保したい
- 物理SIMスロットを日本の番号用に残したい(デュアルSIM活用)
- 空港でSIMを買う手間を省きたい
- 5G対応プランを使いたい(eSIM対応 = 5G対応のプランが多い)
### 現地の物理SIMが向いている人
- 月額300 THB以下のプランを使いたい(eSIM対応は499 THB〜)
- [DTAC](/ja/th/carriers/dtac/) Prepaid 15GB(299 THB)などタイ最安クラスのプランを利用したい
- [TrueMove H](/ja/th/carriers/truemove/) Prepaid 60GB(300 THB)を選びたい
- eSIM非対応の端末を使っている
短期旅行者向けの旅行用eSIM([Airalo](/ja/travel/providers/airalo/)や[Holafly](/ja/travel/providers/holafly/)等)との違いについては[タイ旅行のeSIM比較ガイド](/ja/blog/travel-esim-thailand-2026/)を参照。英語での詳細な市場分析は[Best SIM Plans in Thailand 2026(英語版)](/en/blog/best-sim-plans-thailand-2026/)でも解説している。
---
## 契約方法 — パスポートがあれば即日開通
### 必要なもの
- **パスポート**(顔写真ページ)— これだけで契約可能
- **SIM対応スマートフォン** — eSIMの場合はeSIM対応端末
ワークパーミットや在留証明は不要。旅行者も長期滞在者も同じ条件で契約できる。
### 購入場所
1. **空港のキャリアカウンター** — スワンナプーム空港、ドンムアン空港の到着ロビーに[AIS](/ja/th/carriers/ais/)・[TrueMove H](/ja/th/carriers/truemove/)・[DTAC](/ja/th/carriers/dtac/)のカウンターがある。スタッフが設定まで対応してくれるので初めてでも安心。英語対応可能
2. **キャリアショップ** — バンコク市内のショッピングモール(MBK、サイアムパラゴン等)に各キャリアの店舗がある。プラン相談や変更もここで対応可能
3. **コンビニ** — セブンイレブン、ファミリーマートでSIMカードを販売している。ただしプランの選択肢は限られ、スタッフの英語対応も期待しにくい
4. **オンライン(eSIM)** — [AIS](/ja/th/carriers/ais/)、[TrueMove H](/ja/th/carriers/truemove/)、[DTAC](/ja/th/carriers/dtac/)の公式サイトやアプリからeSIMを購入できる。日本にいる間に手続きを完了し、タイ到着後にアクティベートすることも可能
### 開通の流れ
1. 購入場所でパスポートを提示
2. 希望のプランを選択
3. SIMカードを端末に挿入(またはeSIMをスキャン)
4. APN設定が自動で行われる(手動の場合はスタッフが対応)
5. トップアップ(チャージ)してプランを有効化
空港カウンターなら到着から30分程度で使い始められる。
---
## 長期利用の注意点
### 料金は前払い(トップアップ制)
タイのプリペイドSIMは**トップアップ(チャージ)制**だ。コンビニ、銀行アプリ、キャリアアプリ、オンラインでチャージできる。残高が不足するとプランが失効するため、自動チャージの設定を推奨する。
### データの追加購入
月間データ量を使い切った場合、キャリアアプリやUSSDコードでデータを追加購入できる。料金はキャリア・容量により異なるが、プラン変更の方が割安な場合も多い。
### SIM番号の有効期限
トップアップを一定期間行わないとSIM番号が失効する。キャリアにより異なるが、一般的に最後のトップアップから30〜180日が有効期限。長期滞在者は定期的なトップアップを忘れないこと。
### データ繰り越しなし
タイ市場では**全16プランでデータ繰り越しなし**。余ったデータは月末に消滅する。オーストラリアのような繰り越し制度は存在しない。自分の使用量に合ったプランを選ぶことが重要。
### 解約・番号ポータビリティ
全プランが契約縛りなし・解約違約金ゼロなので、いつでもキャリア変更が可能。タイにも番号ポータビリティ(MNP)制度があり、電話番号を維持したまま他キャリアに移行できる。
---
## よくある質問
### タイのSIMは外国人でもパスポートだけで契約できる?
はい。タイでは外国人がパスポートのみでプリペイドSIMを購入できる。空港や街中のキャリアショップ、コンビニ(セブンイレブン等)で即日開通可能。ただしSIM登録にはパスポートの顔写真ページが必要で、1人あたりのSIM枚数に制限(各キャリア5枚まで)がある。
### 長期滞在にはプリペイドとポストペイドのどちらがいい?
SimFinderが追跡する16プランは全て契約縛りなし・解約違約金ゼロ。タイではプリペイド式が主流で、外国人でも手軽に利用できる。ポストペイドはワークパーミット(労働許可証)が必要な場合が多く、駐在員以外にはハードルが高い。プリペイドでも5G・eSIM対応プランが豊富にある。
### タイで最もカバレッジが広いキャリアは?
[AIS](/ja/th/carriers/ais/)がカバレッジスコア95/100でトップ(OpenSignal 2025年6月計測)。[TrueMove H](/ja/th/carriers/truemove/)が93/100、[DTAC](/ja/th/carriers/dtac/)が91/100と続く。バンコク市内では3社とも差は小さいが、地方・離島では[AIS](/ja/th/carriers/ais/)の安定感が際立つ。
### タイでeSIMは使える?
はい。16プラン中11プラン(69%)がeSIM対応。[AIS](/ja/th/carriers/ais/)はプリペイド10GB以上(599 THB〜)、[TrueMove H](/ja/th/carriers/truemove/)と[DTAC](/ja/th/carriers/dtac/)は5Gプラン全て(499 THB〜)でeSIMが使える。(唯一のMVNOだったPenguin SIMは2025年8月にタイでのサービスを終了した。)
### タイの5G速度は実際どのくらい?
[AIS](/ja/th/carriers/ais/)のダウンロード速度は98.4 Mbps、[TrueMove H](/ja/th/carriers/truemove/)が87.3 Mbps、[DTAC](/ja/th/carriers/dtac/)が81.6 Mbps(OpenSignal 2025年計測)。5Gエリアはバンコク、チェンマイ、プーケットなど主要都市に集中。都市部では快適に利用できるが、地方では4Gにフォールバックする。
### Trueと[DTAC](/ja/th/carriers/dtac/)の合併でSIM選びに影響はある?
True Corporationと[DTAC](/ja/th/carriers/dtac/)は2023年3月に合併したが、[TrueMove H](/ja/th/carriers/truemove/)と[DTAC](/ja/th/carriers/dtac/)は現在もそれぞれ独立したブランド・料金体系・SIM商品で運営されている。利用者にとっては実質的に別キャリアとして選択できる。
### タイのSIMで日本への国際電話はできる?
プリペイドSIMの多くは国際電話に対応しているが、別途料金がかかる。日本への通話はLINE通話やWhatsAppなどのVoIPアプリを使うのが一般的で、追加費用がかからない。データプランさえあれば問題なく利用できる。
---
## まとめ
2026年のタイSIM市場のポイント:
- **3社16プラン** — MNO 3社([AIS](/ja/th/carriers/ais/)、[TrueMove H](/ja/th/carriers/truemove/)、[DTAC](/ja/th/carriers/dtac/))のみ。唯一のMVNOだったPenguin SIMは2025年8月にサービス終了し撤退した。全て契約縛りなし
- **ネットワーク品質は[AIS](/ja/th/carriers/ais/)が首位** — カバレッジ95/100、ダウンロード98.4 Mbps
- **価格帯**: 299 THB/月(DTAC 15GB / AIS 1GB、約1,250円)〜 1,499 THB/月(5G無制限、約6,250円)
- **GB単価最安は[TrueMove H](/ja/th/carriers/truemove/) Prepaid 60GB** — 300 THBで60GB、5.00 THB/GBは市場で突出
- **5Gは75%のプラン**(12/16)が対応 — MNO全社で提供、MVNOは市場から撤退
- **eSIMは69%のプラン**(11/16)が対応 — 499 THB以上のプランに集中
- **外国人でもパスポートのみで即日契約可能** — 空港カウンターが最も手軽
- **データ繰り越しは全プランなし** — 月内に使い切る前提で選ぶ
長期滞在者の選び方: **品質・安定性重視なら[AIS](/ja/th/carriers/ais/)**、**コスパ重視なら[TrueMove H](/ja/th/carriers/truemove/) Prepaid 60GB**、**5G+eSIMの便利さなら[TrueMove H](/ja/th/carriers/truemove/)/[DTAC](/ja/th/carriers/dtac/)の5Gプラン**。日本と比べて通信費は大幅に安く、駐在員でも月1,000〜1,500 THB(約4,200〜6,250円)で十分なプランが手に入る。
**[タイのSIMプランを探す →](/ja/th/search/)**
---
*プランデータは2026年3月時点のものです(2026年7月にキャリア構成を再確認、Penguin SIMはサービス終了のため掲載を終了)。料金は7% VAT込み(税込価格)。最新情報は各キャリアの公式サイトをご確認ください。*
*全プランの横並び比較は[SimFinderの比較ツール](/ja/th/search/)からどうぞ。*
================================================================================
# データ容量の選び方 — あなたに必要なGB数がわかるガイド
URL: https://sim-finder.com/ja/blog/data-usage-guide-how-many-gb/
Type: blog (ja)
Published: 2026-03-22
## 結論: データ容量の目安はこの表で分かる
| 利用スタイル | おすすめ容量 | 月額目安 |
|-------------|------------|---------|
| **ほぼWi-Fi**(メール・LINE中心) | 1〜3GB | ¥290〜¥990 |
| **通勤でSNS・動画**(電車で毎日30分〜1時間) | 5〜10GB | ¥950〜¥1,400 |
| **テレワーク・外出多め**(ビデオ会議・地図利用) | 15〜20GB | ¥1,390〜¥2,090 |
| **動画ストリーミング中心**(YouTube・Netflix常用) | 30GB〜無制限 | ¥2,178〜¥3,278 |
格安SIMの月額料金は「データ容量をいくつにするか」で大きく変わる。自分の使い方に合った容量を選べば、**必要十分な通信環境を最安で維持できる**。
まだ自分の使用量が分からない人も、この記事のアプリ別消費量と利用パターン別の目安を読めば、最適な容量が判断できる。
**[SimFinderで自分に合ったプランを探す →](/ja/jp/search/)**
## 目次
- [データ容量(ギガ)とは — 基礎知識](#データ容量ギガとは--基礎知識)
- [アプリ別データ消費量の目安](#アプリ別データ消費量の目安)
- [利用パターン別おすすめ容量](#利用パターン別おすすめ容量)
- [データ容量の節約テクニック](#データ容量の節約テクニック)
- [容量帯別おすすめプラン比較](#容量帯別おすすめプラン比較)
- [データ使用量の確認方法](#データ使用量の確認方法)
- [よくある質問](#よくある質問)
- [まとめ](#まとめ)
---
「ギガが足りない」「月末に速度制限がかかる」——スマホを使っていれば一度は経験する悩みだ。
その原因の多くは、**自分の使い方に合っていないデータ容量のプランを契約していること**にある。大きすぎる容量を契約すれば毎月無駄な出費になるし、小さすぎれば月末に速度制限で使い物にならなくなる。
この記事では、アプリごとのデータ消費量を具体的な数字で示し、あなたのライフスタイルに合った最適なデータ容量を導き出す。さらに、SimFinderのデータベースに登録されている120プランの中から、容量帯別のおすすめプランも紹介する。
格安SIMの選び方全体を知りたい場合は「[格安SIMの選び方完全ガイド2026](/ja/blog/kakuyasu-sim-erabikata-guide-2026/)」を参照してほしい。
---
## データ容量(ギガ)とは — 基礎知識
データ容量とは、スマホでインターネットを使うときに消費される**通信量の上限**のことだ。単位はGB(ギガバイト)で、日常会話では「ギガ」と略される。
### データ容量の仕組み
- **1GB = 1,024MB(メガバイト)**
- スマホでWebサイトを見る、動画を再生する、SNSを使うたびにデータが消費される
- 契約したデータ容量を使い切ると、通信速度が大幅に制限される(多くは128kbps〜1Mbps)
- **Wi-Fi接続中はモバイルデータを消費しない**
つまり、自宅や職場でWi-Fiに接続している時間が長いほど、必要なモバイルデータ容量は少なくて済む。
### 日本人の平均データ使用量
総務省の調査によると、日本のスマートフォンユーザーの月間モバイルデータ使用量の中央値は**約3〜5GB**。ただし、これはWi-Fi利用分を含まない数字であり、動画視聴が多い若年層では10GB以上を消費するケースも珍しくない。
---
## アプリ別データ消費量の目安
「何にどれくらいギガを使うのか」を把握することが、最適な容量選びの第一歩になる。以下は代表的なアプリ・サービスごとのデータ消費量の目安だ。
### メッセージ・SNS
| アプリ | 利用内容 | 1時間あたり | 1日30分で月間 |
|-------|---------|-----------|-------------|
| **LINE** | テキストメッセージ | 約0.002GB | 約0.03GB |
| **LINE** | 音声通話 | 約0.018GB | 約0.27GB |
| **LINE** | ビデオ通話 | 約0.3GB | 約4.5GB |
| **X(旧Twitter)** | タイムライン閲覧 | 約0.15GB | 約2.3GB |
| **Instagram** | フィード・ストーリーズ閲覧 | 約0.6GB | 約9.0GB |
| **TikTok** | 動画視聴 | 約0.7GB | 約10.5GB |
**ポイント**: テキスト中心のLINEはほとんどデータを消費しないが、Instagram・TikTokは画像・動画が中心のため消費量が多い。Instagram・TikTokを外出先で1日30分以上使うなら、3GBでは不足する。
### 動画ストリーミング
| サービス | 画質 | 1時間あたり | 毎日1時間で月間 |
|---------|------|-----------|---------------|
| **YouTube** | 360p(低画質) | 約0.3GB | 約9GB |
| **YouTube** | 480p(標準画質) | 約0.5GB | 約15GB |
| **YouTube** | 720p(HD) | 約1.0GB | 約30GB |
| **YouTube** | 1080p(フルHD) | 約1.5GB | 約45GB |
| **Netflix** | 低画質 | 約0.3GB | 約9GB |
| **Netflix** | 標準画質 | 約0.7GB | 約21GB |
| **Netflix** | 高画質(HD) | 約3.0GB | 約90GB |
| **Amazon Prime Video** | 標準画質 | 約0.6GB | 約18GB |
**ポイント**: 動画は画質設定でデータ消費量が大きく変わる。YouTube 720pとYouTube 360pでは3倍以上の差がある。モバイル回線で動画を見る場合は、画質を下げるだけでデータ消費を大幅に削減できる。
### 音楽ストリーミング
| サービス | 音質 | 1時間あたり | 毎日2時間で月間 |
|---------|------|-----------|---------------|
| **Spotify** | 標準音質(96kbps) | 約0.04GB | 約2.4GB |
| **Spotify** | 高音質(160kbps) | 約0.07GB | 約4.2GB |
| **Spotify** | 最高音質(320kbps) | 約0.14GB | 約8.4GB |
| **Apple Music** | 標準音質(256kbps) | 約0.11GB | 約6.6GB |
**ポイント**: 音楽ストリーミングは動画に比べてデータ消費が少ない。通勤中に毎日2時間聴いても、標準音質なら月間約2.4GB。Wi-Fi環境で事前ダウンロードしておけばモバイルデータの消費をゼロにできる。
### その他のサービス
| サービス | 利用内容 | データ消費量 |
|---------|---------|------------|
| **Zoom** | ビデオ会議(720p) | 約0.8GB/時間 |
| **Google Maps** | ナビ利用 | 約0.01〜0.03GB/時間 |
| **Webブラウジング** | ニュースサイト閲覧 | 約0.1GB/時間 |
| **メール** | 送受信(添付なし) | 約0.001GB/通 |
| **アプリアップデート** | 中規模アプリ | 約0.05〜0.3GB/回 |
| **OSアップデート** | iOS/Android | 約1〜5GB/回 |
**ポイント**: Zoomなどのビデオ会議は1時間で約0.8GB消費する。テレワークで1日2時間のビデオ会議を週5日こなすと、それだけで月間約32GB。テレワーク中心の人は大容量プランか自宅Wi-Fiが必須になる。
---
## 利用パターン別おすすめ容量
ここまでのアプリ別消費量を踏まえて、4つの利用パターン別に最適なデータ容量を整理する。
### パターン1: ほぼWi-Fi — 1〜3GB
**こんな人向け**: 自宅・職場にWi-Fiがあり、外出先ではLINEやメール程度。動画は自宅のWi-Fiでしか見ない。
**月間データ消費の目安**:
- LINE(テキスト・音声通話): 約0.3GB
- Webブラウジング(1日15分): 約1.0GB
- メール送受信: 約0.1GB
- **合計: 約1.4GB**
Wi-Fi環境が充実している人は、3GBでも十分に余裕がある。SimFinderのデータベースでは3GB以下のプランは最安¥290([日本通信SIM](/ja/jp/carriers/nihontsushin/) 1GB)から選べるため、コスト面でも最も有利だ。
### パターン2: 通勤でSNS・動画 — 5〜10GB
**こんな人向け**: 電車での通勤中にSNSをチェックしたり、YouTubeを低〜標準画質で見たりする。
**月間データ消費の目安**:
- LINE + X + Instagram(1日合計30分): 約2.5GB
- YouTube 480p(通勤中1日30分): 約3.8GB
- Webブラウジング・メール: 約0.5GB
- Spotify 標準音質(1日1時間): 約1.2GB
- **合計: 約8.0GB**
通勤時間にSNSと動画を楽しむ人は、5GBだとギリギリで、10GBあれば安心。データ繰り越しのあるプラン([IIJmio](/ja/jp/carriers/iijmio/)、[NUROモバイル](/ja/jp/carriers/nuro-mobile/)など)を選べば、使用量が少ない月の余りを翌月に回せる。
### パターン3: テレワーク・外出多め — 15〜20GB
**こんな人向け**: カフェや外出先でテレワークすることがある、Uber Eatsの配達やGoogleマップを頻繁に使う。
**月間データ消費の目安**:
- パターン2の内容: 約8.0GB
- Zoom ビデオ会議(週2〜3回、各1時間): 約3.2GB
- クラウドストレージ同期: 約1.0GB
- アプリアップデート(外出先で数回): 約0.5GB
- **合計: 約12.7GB**
テレワークの頻度が週2〜3日程度なら15GBで足りる。ただし、ビデオ会議が毎日あるなら20GB以上が安全。20GBで¥1,390([日本通信SIM](/ja/jp/carriers/nihontsushin/))はコスパが高い選択肢だ。
### パターン4: 動画ストリーミング中心 — 30GB〜無制限
**こんな人向け**: 外出先でもYouTubeやNetflixをHD画質で長時間視聴する、自宅にWi-Fi環境がない。
**月間データ消費の目安**:
- YouTube 720p(1日1時間): 約30GB
- SNS・メッセージ: 約3.0GB
- その他Webブラウジング: 約1.0GB
- **合計: 約34GB**
動画をHD画質で毎日1時間以上見るなら、30GBでも心許ない。自宅にWi-Fiがない場合や、スマホをテザリングでPCの通信にも使う場合は、無制限プラン([楽天モバイル](/ja/jp/carriers/rakuten/) ¥3,278)が合理的な選択になる。
**[SimFinderで容量・予算を指定してプランを比較する →](/ja/jp/search/)**
---
## データ容量の節約テクニック
「今のプランで容量が足りない」と感じたら、プランを上げる前にまず以下の節約テクニックを試してみてほしい。設定を変えるだけでデータ消費量を大幅に削減できる場合がある。
### 1. Wi-Fiへの自動接続を有効にする
最も効果的な節約方法。自宅・職場・よく行く場所のWi-Fiに自動接続する設定にしておくだけで、モバイルデータの消費を大幅に減らせる。
- **iPhone**: 「設定」→「Wi-Fi」→ 接続したいネットワークの「自動接続」をオン
- **Android**: 「設定」→「ネットワークとインターネット」→「Wi-Fi」→ ネットワーク設定で「自動接続」をオン
### 2. 動画アプリの画質設定を下げる
動画はデータ消費の最大要因。画質を1段階下げるだけで消費量が半分になることもある。
- **YouTube**: 設定 →「動画の画質設定」→ モバイルネットワーク使用時は「データセーバー」に設定
- **Netflix**: 設定 →「モバイルデータ使用量」→「データ使用量を節約」を選択
- **Amazon Prime Video**: 設定 →「ストリーミングとダウンロード」→ ストリーミング品質を「データ節約」に
### 3. バックグラウンド通信を制限する
使っていないアプリがバックグラウンドで通信し、気づかないうちにデータを消費しているケースは多い。
- **iPhone**: 「設定」→「一般」→「Appのバックグラウンド更新」→ 不要なアプリをオフ
- **Android**: 「設定」→「アプリ」→ 各アプリ →「モバイルデータとWi-Fi」→「バックグラウンドデータ」をオフ
### 4. 写真・動画の自動バックアップ設定を見直す
Google フォトやiCloudの自動バックアップがモバイル回線でも動作する設定になっていると、撮影した写真・動画が自動的にアップロードされ、大量のデータを消費する。
- **Google フォト**: 設定 →「バックアップ」→「モバイルデータ通信を使用してバックアップ」をオフ
- **iCloud**: 「設定」→「写真」→「モバイルデータ通信」をオフ
### 5. アプリの自動アップデートをWi-Fi限定にする
- **iPhone**: 「設定」→「App Store」→「モバイルデータ通信」→「自動ダウンロード」をオフ
- **Android**: Google Play ストア →「設定」→「ネットワーク設定」→「アプリの自動更新」→「Wi-Fi接続時のみ」
### 6. 音楽・動画の事前ダウンロード
SpotifyやYouTube(Premium)、Netflixなどは、Wi-Fi環境であらかじめコンテンツをダウンロードしておくことで、外出先ではデータ消費ゼロで視聴できる。通勤中に視聴するコンテンツを前夜にダウンロードしておく習慣を付ければ、データ消費量は劇的に減る。
---
## 容量帯別おすすめプラン比較
SimFinderのデータベースに登録されている120プランの中から、容量帯別にコストパフォーマンスの高いプランを比較する。料金はすべて税込だ。
### 3GB帯のプラン比較
少容量で足りるライトユーザー向け。
| プラン | 月額 | 分類 | 特徴 |
|-------|------|------|------|
| [日本通信SIM](/ja/jp/carriers/nihontsushin/) 合理的シンプル290 1GB | ¥290 | MVNO | 最安、通話料11円/30秒 |
| [IIJmio](/ja/jp/carriers/iijmio/) 2ギガ | ¥850 | MVNO | データ繰り越しあり、家族割あり |
| [NUROモバイル](/ja/jp/carriers/nuroMobile/) VSプラン 3GB | ¥792 | MVNO | データ繰り越しあり |
| [povo2.0](/ja/jp/carriers/povo/) 3GB/30日 | ¥990 | サブブランド | [au](/ja/jp/carriers/au/)品質、トッピング方式で柔軟 |
| [LINEMO](/ja/jp/carriers/linemo/) ベストプラン 3GB | ¥990 | サブブランド | [ソフトバンク](/ja/jp/carriers/softbank/)品質、LINEデータフリー |
**この容量帯のポイント**: 最安を追求するなら[日本通信SIM](/ja/jp/carriers/nihontsushin/)(¥290)。通信品質を重視するなら、サブブランドの[povo2.0](/ja/jp/carriers/povo/)または[LINEMO](/ja/jp/carriers/linemo/)(¥990)。[LINEMO](/ja/jp/carriers/linemo/)はLINEのトーク・通話がデータ消費ゼロになるため、LINEユーザーには特に有利だ。
### 10GB帯のプラン比較
通勤でSNS・動画を使うユーザー向け。
| プラン | 月額 | 分類 | 特徴 |
|-------|------|------|------|
| [IIJmio](/ja/jp/carriers/iijmio/) 10ギガ | ¥1,400 | MVNO | データ繰り越し・家族割あり |
| [HISモバイル](/ja/jp/carriers/hismobi/) 自由自在2.0 10GB | ¥1,340 | MVNO | 通話料9円/30秒(業界最安水準) |
| [NUROモバイル](/ja/jp/carriers/nuroMobile/) VLプラン 10GB | ¥1,485 | MVNO | データ繰り越しあり |
| [LINEMO](/ja/jp/carriers/linemo/) ベストプラン 10GB | ¥2,090 | サブブランド | [ソフトバンク](/ja/jp/carriers/softbank/)品質、LINEデータフリー |
**この容量帯のポイント**: MVNO同士では[HISモバイル](/ja/jp/carriers/hismobi/)(¥1,340)が最安で、通話料9円/30秒も魅力。[IIJmio](/ja/jp/carriers/iijmio/)(¥1,400)はデータ繰り越し対応で月ごとの使用量にムラがある人向き。通信品質を優先するなら[LINEMO](/ja/jp/carriers/linemo/)(¥2,090)。
### 20GB帯のプラン比較
テレワーク・外出が多いユーザー向け。
| プラン | 月額 | 分類 | 特徴 |
|-------|------|------|------|
| [日本通信SIM](/ja/jp/carriers/nihontsushin/) 合理的みんなのプラン 20GB | ¥1,390 | MVNO | 5分かけ放題 or 70分通話が標準付帯 |
| [HISモバイル](/ja/jp/carriers/hismobi/) 自由自在2.0 20GB | ¥2,090 | MVNO | 6分かけ放題標準付帯、通話料9円/30秒 |
| [IIJmio](/ja/jp/carriers/iijmio/) 15ギガ | ¥1,600 | MVNO | 15GB、データ繰り越し対応 |
| [ahamo](/ja/jp/carriers/ahamo/) 30GB | ¥2,970 | サブブランド | [ドコモ](/ja/jp/carriers/docomo/)品質90相当、5分かけ放題付き |
**この容量帯のポイント**: [日本通信SIM](/ja/jp/carriers/nihontsushin/)(¥1,390)がコスパで圧倒。20GBで5分かけ放題付きという内容を他社で再現しようとすると月額¥2,000以上になる。品質最優先なら[ahamo](/ja/jp/carriers/ahamo/)(¥2,970)で、[ドコモ](/ja/jp/carriers/docomo/)回線品質(総合スコア90/100)が使える。MNO・サブブランドの通信品質については「[MNOとMVNOの違い解説](/ja/blog/mno-mvno-difference-guide/)」で詳しく解説している。
### 無制限帯のプラン比較
動画ヘビーユーザー・自宅Wi-Fiなしの人向け。
| プラン | 月額 | 容量 | 分類 | 特徴 |
|-------|------|------|------|------|
| [日本通信SIM](/ja/jp/carriers/nihontsushin/) 合理的50GBプラン | ¥2,178 | 50GB | MVNO | 5分かけ放題付き、GB単価最高水準 |
| [ahamo](/ja/jp/carriers/ahamo/) 30GB | ¥2,970 | 30GB | サブブランド | [ドコモ](/ja/jp/carriers/docomo/)品質、5分かけ放題付き |
| [LINEMO](/ja/jp/carriers/linemo/)ベストプランV 30GB | ¥2,970 | 30GB | サブブランド | [ソフトバンク](/ja/jp/carriers/softbank/)品質、5分かけ放題付き |
| [楽天モバイル](/ja/jp/carriers/rakuten/) Rakuten最強プラン 無制限 | ¥3,278 | 無制限 | MNO | データ無制限 + Rakuten Link通話無料 |
**この容量帯のポイント**: 50GBで足りるなら[日本通信SIM](/ja/jp/carriers/nihontsushin/)(¥2,178)のコスパが際立つ。完全な無制限が必要な場合は[楽天モバイル](/ja/jp/carriers/rakuten/)(¥3,278)一択。[楽天モバイル](/ja/jp/carriers/rakuten/)はRakuten Linkアプリで国内通話も無料になるため、通話込みの実質コストでは他社を圧倒する。ただし、品質スコアは72/100とMNO4社中最低で、地下やビル内でのつながりやすさは他社に劣る点は理解しておく必要がある。
**[SimFinderで容量・予算を指定して全120プランから絞り込む →](/ja/jp/search/)**
---
## データ使用量の確認方法
最適なプランを選ぶためには、まず自分が毎月どれくらいのデータを使っているかを把握することが重要だ。以下の方法で確認できる。
### iPhoneの場合
1. 「設定」アプリを開く
2. 「モバイル通信」をタップ
3. 「現在までの合計」でデータ使用量を確認
4. アプリごとの使用量も一覧で表示される
**注意**: iPhoneの統計はリセットしない限り累積されるため、月初に「統計情報をリセット」することで月間の使用量を正確に把握できる。
### Androidの場合
1. 「設定」アプリを開く
2. 「ネットワークとインターネット」をタップ
3. 「データ使用量」をタップ
4. 期間を指定してモバイルデータの使用量を確認
Androidでは期間別の使用量が自動的に記録されるため、過去の月間使用量を遡って確認しやすい。
### キャリアのマイページ・公式アプリ
各キャリアが提供するマイページや公式アプリでも、当月のデータ使用量をリアルタイムで確認できる。プラン変更もそのまま行えるため、使用量の確認とプラン見直しを同時に行うなら公式アプリが便利だ。
### おすすめの確認手順
1. まず今月のデータ使用量を確認する
2. 1〜2ヶ月間は意識的に記録を付ける
3. 「多い月」と「少ない月」の差を把握する
4. 多い月の使用量に合わせてプランを選ぶ(少なすぎるプランは速度制限リスクがある)
---
## よくある質問
### Q: スマホのデータ容量は何GBあれば足りる?
自宅や職場にWi-Fiがあり、外出先ではSNSやメール中心なら3GB。通勤中に動画やSNSを見るなら5〜10GB。テレワークや外出先での利用が多いなら15〜20GB。動画ストリーミングを頻繁に使うなら30GB以上が目安。
### Q: YouTubeを1時間見ると何GB消費する?
画質によって大きく異なる。360p(低画質)で約0.3GB、480p(標準画質)で約0.5GB、720p(HD画質)で約1.0GB、1080p(フルHD)で約1.5GB。毎日1時間HD画質で視聴すると月間約30GBになる。
### Q: LINEのトーク・通話はどれくらいデータを使う?
テキストメッセージはほぼゼロに近く、写真送受信が1枚あたり約2〜5MB。音声通話は1時間で約18MB(0.018GB)、ビデオ通話は1時間で約300MB(0.3GB)。テキスト・音声通話中心ならデータ消費は非常に少ない。
### Q: データ容量を節約する方法は?
主な方法は4つ。(1) 自宅・職場のWi-Fiに自動接続する設定にする、(2) 動画アプリの画質設定を下げるかWi-Fi時のみ高画質にする、(3) アプリのバックグラウンド通信をオフにする、(4) 写真・動画の自動バックアップをWi-Fi時のみにする。これだけで月のデータ消費量を半分以下に抑えられることもある。
### Q: データ容量を使い切ったらどうなる?
多くのプランでは通信速度が制限される。制限後の速度はプランにより異なり、一般的には128kbps〜1Mbps。128kbpsではWebサイトの閲覧も困難だが、1MbpsならテキストベースのSNSやメッセージは使える。データチャージ(追加購入)で速度制限を解除することも可能だ。
### Q: 月のデータ使用量はどうやって確認できる?
iPhoneは「設定」→「モバイル通信」で確認できる。Androidは「設定」→「ネットワークとインターネット」→「データ使用量」で確認可能。各キャリアの公式アプリやマイページでも確認できる。まずは1〜2ヶ月間の実際の使用量を把握してからプランを選ぶことを推奨する。
### Q: データ繰り越しがあるプランを選ぶべき?
月によってデータ使用量にムラがある人にはおすすめ。余ったデータ容量を翌月に持ち越せるため、多めの月と少なめの月を平均化できる。[IIJmio](/ja/jp/carriers/iijmio/)、[UQ mobile](/ja/jp/carriers/uqmobile/)、[NUROモバイル](/ja/jp/carriers/nuro-mobile/)、[イオンモバイル](/ja/jp/carriers/aeon/)などが対応。毎月安定して同じくらい使う人なら、繰り越しの有無はそれほど重要ではない。
---
## まとめ
データ容量選びのポイントを整理する。
- **ほぼWi-Fi(メール・LINE中心)**: 1〜3GBで十分。最安¥290([日本通信SIM](/ja/jp/carriers/nihontsushin/))から選べる
- **通勤でSNS・動画**: 5〜10GBが適量。[IIJmio](/ja/jp/carriers/iijmio/) 10ギガ ¥1,400、[HISモバイル](/ja/jp/carriers/hismobi/) 10GB ¥1,340がコスパ良好
- **テレワーク・外出多め**: 15〜20GBが安全圏。[日本通信SIM](/ja/jp/carriers/nihontsushin/) 20GB ¥1,390が5分かけ放題付きで最安水準
- **動画ストリーミング中心**: 30GB〜無制限。[楽天モバイル](/ja/jp/carriers/rakuten/)無制限 ¥3,278、または[日本通信SIM](/ja/jp/carriers/nihontsushin/) 50GB ¥2,178
- **節約テクニック**: Wi-Fi自動接続、動画画質の調整、バックグラウンド通信の制限で消費量を大幅に削減可能
- **まず確認**: プランを変える前に、iPhoneの「モバイル通信」またはAndroidの「データ使用量」で現在の使用量を把握すること
**選び方の手順**:
1. 現在のデータ使用量を確認する
2. この記事の利用パターンと照らし合わせる
3. 節約テクニックで削減できるか検討する
4. 必要な容量帯のプランをSimFinderで比較する
格安SIMの選び方全体(通信品質・通話オプション・eSIM対応なども含む)については「[格安SIMの選び方完全ガイド2026](/ja/blog/kakuyasu-sim-erabikata-guide-2026/)」を参照してほしい。MNO・サブブランド・MVNOの違いによる通信品質の差は「[MNOとMVNOの違い解説](/ja/blog/mno-mvno-difference-guide/)」で詳しく解説している。
**[あなたに最適なプランを探す →](/ja/jp/search/)**
---
*この記事の情報は2026年4月時点のものです。最新の料金・プラン内容は各キャリアの公式サイトでご確認ください。*
*料金の比較・シミュレーションには[SimFinderの比較ツール](/ja/jp/search/)をご利用ください。*
================================================================================
# ドコモ・バイクシェアが全国で一時停止 復旧見通し立たず
URL: https://sim-finder.com/ja/blog/docomo-bikeshare-system-shogai-teishi-2026/
Type: blog (ja)
Published: 2026-08-04T09:00:00+09:00
ドコモ・バイクシェアは2026年8月4日、システム不具合により同日14時30分ごろから全国でシェアサイクルサービスの提供を一時停止したと発表した。同社は「安定したサービス提供の見通しが立っていない」としており、再開時期は未定。原因は調査中となっている。通勤・移動の足として同サービスを使っている人は、当面ほかの交通手段を確保する必要がある。
## 8月3日から貸出・返却できない不具合が発生
Impress Watchおよびケータイ Watchの報道によると、停止に先立つ8月3日ごろから、一部の自転車で貸出・返却ができない、アプリに「システムエラーが発生しました」と表示されるといった事象が全国で発生していた。断続的な不具合が続き、安定した提供が見込めないとして全面停止に踏み切った形だ。
東京都文京区も8月4日、公式サイトで「一部アプリと自転車の利用がしづらい状況」が生じているとして、区内の利用者に向けて停止を告知している。特定エリアに限った障害ではなく、全国のポートが対象になっている点が今回の特徴だ。
## 返却できなかった分は同社が料金を補正、手続きは不要
利用者にとって気がかりなのが、借りたまま返却操作ができなかった場合の扱いだ。ITmedia NEWSによれば、返却操作ができない利用者はポートに駐輪して施錠すれば、同社側が返却処理と利用料金の補正を実施する。不具合によって正常に処理されなかった利用分についても同社が確認したうえで返金処理や料金補正を行うとしており、利用者側での申請などの手続きは不要とされている。月額会員も対象だが、具体的な補正方法は検討中の段階だ。
つまり「返せないまま課金され続ける」ことを心配して自力で対処する必要はない。ポートに戻して施錠する、というのが現時点で案内されている対応となる。
## 背景に8月1日のdアカウント連携ログインへの移行
今回の不具合の背景として各メディアが挙げているのが、8月1日に実施された大規模な仕様変更だ。Impress Watchの報道によれば、同社はログイン方式を従来のID・パスワード方式から、dアカウント・Appleアカウント・Googleアカウントによる外部アカウント連携へと移行。あわせて利用料金の精算タイミングを、月末締め翌月払いから乗車のつど請求する方式に変更していた。この移行の完了が当初予定より遅れ、その後も断続的にシステム不具合が続いていたという。
さらにITmedia NEWSは、同社が9月1日に新ブランド「NOLL」への刷新と料金体系の変更を予定していたことにも触れている。8月1日の変更は、この大型リニューアルに先立つシステム更改という位置づけだった。
ただし、同社は現時点で不具合の原因を調査中としており、8月1日の仕様変更と今回の障害の因果関係は公式には発表されていない。関連を断定できる情報は出ていない点に注意したい。
## キャリアのアカウント基盤に依存するサービスの注意点
ドコモ・バイクシェアはNTTドコモグループのシェアサイクル事業者であり、今回の移行によってログインの入口がdアカウントをはじめとする外部アカウントに一本化された。通信キャリアのアカウント基盤は、決済・ポイント・各種サービスの共通IDとして利用範囲が広がっており、その分だけシステム更改の影響が及ぶ範囲も大きくなる。
回線契約の乗り換えを検討している人にとっても、キャリアのアカウントがどのサービスとひも付いているかを把握しておくことは無駄にならない。今回の件は自転車の貸出という限定的な影響にとどまるが、共通IDの移行が実サービスの停止につながり得ることを示した事例といえる。
最新の復旧状況は、ドコモ・バイクシェアの公式サイトで順次告知される予定となっている。
================================================================================
# ドコモ、7月28日からiPhone値上げ 最大2万5190円
URL: https://sim-finder.com/ja/blog/docomo-iphone-17-neage-zanka-2026/
Type: blog (ja)
Published: 2026-07-25T09:00:00+09:00
NTTドコモが7月28日以降、ドコモオンラインショップで販売するiPhoneの価格を改定します。値上げ幅は機種・容量によって8140円〜2万5190円。同時に、新規契約とMNPを対象に一部機種で「いつでもカエドキプログラム」の24回目残価も変更されます。
一括で買い切るユーザーにとっては単純な負担増ですが、2年後に返却する前提なら影響は機種ごとに大きく分かれます。ドコモ公式のお知らせ(7月24日付)と、同日にITmedia Mobileが報じた内容から要点を整理します。
## 主な機種の改定前後価格
ドコモの発表によると、主な機種の一括価格は次のように変わります。
| 機種 | 改定前 | 改定後 | 差額 |
|--|--|--|--|
| iPhone 16(128GB) | 14万5706円 | 15万6266円 | +1万560円 |
| iPhone 17e(256GB) | 13万1219円 | 13万9810円 | +8591円 |
| iPhone 17e(512GB) | 16万1920円 | 17万60円 | +8140円 |
| iPhone 17(256GB) | 16万4197円 | 17万8552円 | +1万4355円 |
| iPhone 17(512GB) | 19万9870円 | 21万3070円 | +1万3200円 |
| iPhone Air(256GB) | 19万3930円 | 21万2300円 | +1万8370円 |
| iPhone 17 Pro(256GB) | 21万4940円 | 23万340円 | +1万5400円 |
上位容量ほど上げ幅が大きく、最大は2万5190円です。ドコモは今年4月にもiPhone 16/17/17eを値上げしており、今回はそれに続く改定となります。
## 残価が上がる機種と、上がらない機種
今回の改定でポイントになるのが「いつでもカエドキプログラム」の残価です。同プログラムは端末代を24回払いに設定し、24回目の支払い前に端末を返却すると残価分の支払いが免除される仕組みで、返却前提なら**実質的な負担は「一括価格−残価」**になります。
ドコモは新規契約・MNPを対象に、一部機種の残価を引き上げました。iPhone 17e(256GB)は8万7384円から9万5777円(+8393円)、iPhone 17(256GB)は12万384円から13万4519円(+1万4135円)です。
その結果、iPhone 16(128GB)・iPhone 17e(256GB)・iPhone 17(256GB)の3機種は、改定後の一括価格から残価を引いた金額がいずれも**4万4033円**で揃います。ITmedia Mobileの記事も、この3機種については割引施策次第で実質負担額への影響は限定的だと指摘しています。
一方で、iPhone 17 Pro/iPhone 17 Pro Maxなど残価が据え置かれた機種は、値上げ分がそのまま返却時の負担に上乗せされます。iPhone 17 Pro(256GB)なら1万5400円の増加です。ハイエンドを狙うほど影響が大きい構図になっています。
なお、iPhone 17e(512GB)に設定されていた「早期利用特典」の利用料は、7月28日以降に月500円から0円へ変更されます。
## 端末価格と回線を切り離して考える
キャリアの端末価格は為替や調達コストで動き、今回のように年内に複数回改定されることもあります。表示上の「実質負担額」はプログラムの残価設定に左右されるため、返却前提の金額と買い切りの金額はまったく別物として比較する必要があります。
購入前に確認しておきたいのは次の3点です。
- **2年後に返却するか、手元に残すか** — 買い切るなら7月27日までのほうが安く、返却前提なら残価が上がる機種は7月28日以降が有利になり得る
- **端末をどこで買うか** — Appleや家電量販店でSIMフリー版を買い、回線は別で契約する分離購入も選択肢
- **回線側の月額** — 端末代の数千円の差より、月額料金の差のほうが2年間の総額に効くケースは多い
端末を分離購入するなら、回線は月額の安いMVNOやオンライン専用プランを選ぶことで、2年総額を抑えられます。SimFinderの検索では、データ容量・通話時間・こだわり条件から各社プランをスコアリングして比較できます。端末の買い方を決めたうえで、回線側もあわせて見直してみてください。
================================================================================
# ドコモ、iPhone 17を再値上げ 256GBが19万9793円に
URL: https://sim-finder.com/ja/blog/docomo-iphone-17-saineage-199793-2026/
Type: blog (ja)
Published: 2026-09-19T09:00:00+09:00
NTTドコモが「iPhone 17」の販売価格を再び引き上げました。ドコモオンラインショップの2026年9月16日付お知らせによると、9月17日以降、256GBモデルは17万8552円から19万9793円に、512GBモデルは21万3070円から23万560円に変更されています。同時に「いつでもカエドキプログラム」の残価も引き上げられたため、MNPと新規契約では2年返却時の負担額が据え置かれる一方、機種変更では値上げ分がそのまま負担増になります。
## 値上げ幅は256GBで2万1241円
今回の改定内容は、ITmediaやASCII.jpなど複数のメディアが9月18日に報じています。値上げ幅は256GBモデルが2万1241円、512GBモデルが1万7490円です。
| モデル | 改定前 | 改定後 | 差額 |
|--|--|--|--|
| iPhone 17 256GB | 17万8552円 | 19万9793円 | +2万1241円 |
| iPhone 17 512GB | 21万3070円 | 23万560円 | +1万7490円 |
ドコモのiPhone 17は7月28日にも値上げされており、すまほん!!の報道によれば、7月の改定前からの累計上昇額は256GBモデルで3万5596円に達します。背景としては、Appleが9月10日に旧モデルの価格を引き上げたことに合わせた対応とみられます。
## 残価も同額アップ、MNPは「実質33円」を維持
あわせてドコモは、いつでもカエドキプログラムの24回目の支払い(残価)も改定しました。iPhone 17(256GB)の残価は、新規契約とMNPを対象に13万4519円から15万5760円へ、値上げ幅と同額の2万1241円だけ引き上げられています。
残価が値上げ分と同額だけ上がったため、23か月目に端末を返却する場合の支払総額は改定前と変わりません。ドコモが訴求する「2年実質33円」という水準も維持されています。ただしこの33円は、プログラム利用料2万2000円が免除される「ドコモで買替えおトク割」を適用した場合の金額である点に注意が必要です。
一方、残価の引き上げ対象は新規契約とMNPに限られるため、既存ユーザーの機種変更では値上げ分だけ実質負担額が増えることになります。
## 「返却前提」以外の選択肢も検討したい
今回の改定は、キャリアの端末価格が為替や本体価格の改定に応じて短期間で動くことを改めて示しました。iPhone 17は約2か月で2度の値上げを受け、256GBモデルの本体価格は20万円に迫っています。
残価設定型プログラムは2年で返却することを前提にすれば負担を抑えられますが、端末を手元に残したい場合や、返却時の査定条件が気になる場合は、総支払額が大きく変わります。端末はApple直販や中古端末で調達し、回線はSIMのみ契約で格安SIMやオンライン専用プランを選ぶという分離型の買い方も、選択肢として比較する価値があります。
SimFinderでは、SIMのみ契約時の月額料金を条件別にスコアリングして比較できます。端末代と通信料を切り分けて考えると、2年間のトータルコストが見えやすくなります。
================================================================================
# ドコモirumo 0.5GBプランが5G対応、料金・速度は据え置き
URL: https://sim-finder.com/ja/blog/docomo-irumo-05gb-5g-taiou-2026/
Type: blog (ja)
Published: 2026-08-27T09:00:00+09:00
NTTドコモは2026年8月26日、料金プラン「irumo」の0.5GBプランで5G通信への対応を開始した。月額550円という料金も、最大3Mbpsという通信速度の上限も据え置きで、利用者側の手続きは必要ない。すでにirumoの0.5GBプランを契約している人にとっては、負担なく接続方式の選択肢が広がる形の変更となる。
## 8月26日から順次、手続き不要で5Gに
ドコモが公開したお知らせによると、5G通信の提供開始は「2026年8月26日(水)~順次」。対象はirumoの0.5GBプランで、契約者側での申し込みや設定変更は求められない。
条件として挙げられているのは端末側の対応で、公式には「5G通信のご利用には、5G対応機種が必要となります」と明記されている。5Gに対応していないエリアでは、これまで通り4G(LTE)での通信となる。
これまでirumoの0.5GBプランは、エリアにかかわらず4G(LTE)のみを利用する扱いだった。今回の変更で、他の容量帯のプランと同様に5Gネットワークを掴めるようになる。
## 料金・速度の条件は変更なし
今回の対応で変わるのは接続する通信規格の部分だけで、プランの提供条件そのものに変更はない。
- 月額料金: 550円(税込)
- 最大通信速度: 3Mbps
- 規定量超過後の速度: 最大128kbps
ケータイWatchも8月27日付の記事で、料金・最大速度ともに据え置きである点を報じている。
## 3Mbps上限のため「速度が上がる」変更ではない
注意したいのは、5G対応が即座に体感速度の向上を意味するわけではない点だ。irumoの0.5GBプランには最大3Mbpsという速度上限が設けられており、この上限は今回も据え置かれている。つまり5Gエリアに入っても、プランとして出せる速度の天井は変わらない。
一方で、5G基地局に接続できること自体には意味がある。4Gの電波が混み合う場所で5G側に接続できれば、上限の3Mbpsに届きやすくなる場面は考えられる。ただしドコモは今回のお知らせで速度改善を約束しているわけではなく、あくまで「5G通信への対応」という位置づけにとどまる。
## 対象は既存契約者のみ
irumoは2025年6月4日に新規申し込みの受付を終了している。したがって今回の5G対応は、すでにirumoの0.5GBプランを使っている既存契約者に向けた変更であり、これを目当てに新たに契約することはできない。
月額550円で0.5GBという構成は、通話とごく少量のデータ通信だけを求める層に向いたプランだ。同種の低容量帯を検討している場合は、他社の格安SIMを含めて比較したうえで判断したい。SimFinderでは月額料金・データ容量・通信品質をスコア化して比較できるので、あわせて確認してほしい。
================================================================================
# ドコモ ポイ活プラン、12月利用分からポイント“両取り”不可に
URL: https://sim-finder.com/ja/blog/docomo-poikatsu-point-shintei-kaitei-2026/
Type: blog (ja)
Published: 2026-09-01T09:00:00+09:00
NTTドコモは2026年9月1日、「ドコモ ポイ活」系プランのdポイント進呈条件を改定すると発表しました。2026年12月ご利用分(2027年1月ご請求分)から、d払いやdカードでの対象決済に対して進呈された特典ポイント分が、利用料金への還元計算から差し引かれます。決済で受け取ったポイントと利用料金で受け取るポイントを両方フルに得る、いわゆる“両取り”ができなくなる形です。
ポイ活プランを使い倒している人ほど、実質的な受け取りポイントが減ります。ただし還元率そのものの引き下げではないため、影響の大きさは月々の決済額によって変わります。
## 対象は4プラン
改定の対象は「ドコモ ポイ活 MAX」「ドコモ ポイ活 20」「eximo ポイ活」「ahamo ポイ活」の4つです(ドコモ公式お知らせ、および[dポイント進呈条件改定ページ](https://www.docomo.ne.jp/charge/dpoint_kaitei/))。
## 何が変わるのか
これまでは、各種割引を適用した後の利用料金の「全額」がポイント進呈の計算対象でした。改定後は、そこから「対象決済に対する特典」として進呈されたポイント分を除いた金額が計算対象になります。
ケータイWatchが伝えたドコモの例では、「ドコモ ポイ活 MAX」で各種割引後の利用料金が7,680円(税抜)、ポイ活特典として3,500ポイントを獲得したケースで、ポイント計算の対象額が従来の7,680円から4,180円へと下がります。差額の3,500円分は、決済側ですでにポイントを受け取っているとみなされる、という考え方です。
ポイントを利用料金に充当している場合の扱いも整理されました。充当額が決済特典ポイントより少ないときは、特典ポイント分を除いた額に対して還元されます。
ドコモは注釈で、進呈率やポイント種別(期間・用途限定かどうか)に変更はないこと、計算用データの締め切り時期の違いによって進呈ポイント数に差分が生じる場合があり、その差分は後日調整されないことを明記しています。
## 同日発表のdカード改定とセットで見る
同じ9月1日、ドコモはdカード関連の改定も公表しました。ITmedia Mobileとケータイ Watchによれば、一般の「dカード」は2027年1月ご利用分から通常決済のポイント進呈が「100円ごとに1ポイント」から「200円ごとに1ポイント」へ変わり、還元率は実質1%から0.5%になります。年会費も、前年度に利用がない場合に1,650円が発生する形へ改められます。
「dカード PLATINUM」については、最大進呈率が適用される期間が「入会初年度(12か月)」から「入会月から2か月後まで」へ短縮され、ドコモでんきGreenは2026年10月ご利用分、ケータイ・ドコモ光・dカード積立は2026年12月ご利用分から順次適用されます。
なお年会費の返金受付も案内されており、エントリー期限は2026年12月31日とされています。
## SIM選びへの影響
ポイ活プランは「月額料金は高いがポイント還元で実質安い」という前提で選ばれてきました。今回の改定はその前提のうち、還元側の計算方法に手を入れるものです。ドコモ経済圏での決済額が大きい人ほど、除外される特典ポイント分も大きくなり、利用料金側の還元が目減りします。
自分のケースで実際にいくら変わるのかは、直近数か月の「対象決済で受け取ったポイ活特典ポイント」の実績を見れば概算できます。その額が毎月まとまった規模になっているなら、12月利用分以降の実質負担を計算し直したうえで、通信量に見合ったシンプルな料金プランや他社プランと比較検討する価値があります。
================================================================================
# 旅行用eSIMの設定方法 — iPhone / Android 完全図解ガイド
URL: https://sim-finder.com/ja/blog/esim-setup-guide-iphone-android/
Type: blog (ja)
Published: 2026-03-22
## 結論: eSIMの設定は3ステップで完了する
旅行用eSIMの設定は、端末や方式を問わず**3ステップ**で完了する。
1. **購入** — プロバイダーのアプリまたはWebサイトでプランを購入
2. **インストール** — QRコード読み取り、アプリからのインストール、または手動入力
3. **アクティベーション** — 渡航先到着後、データ通信をeSIMに切り替えるだけ
**出発前にステップ2(インストール)まで済ませておくのが鉄則だ。** WiFi環境が必要なため、空港で慌てることなく確実に設定できる。
この記事では、iPhone・Androidそれぞれの具体的な設定手順を、3つのインストール方式(QRコード・アプリ・手動入力)別に解説する。デュアルSIM設定やトラブルシューティングも網羅した。
**[SimFinderで渡航先のeSIMプランを比較する →](/ja/travel/)**
---
## 目次
- [eSIMとは(概要)](#esimとは概要)
- [設定前の準備](#設定前の準備)
- [iPhone — eSIM設定手順](#iphone--esim設定手順)
- [Android — eSIM設定手順](#android--esim設定手順)
- [デュアルSIM設定](#デュアルsim設定)
- [トラブルシューティング](#トラブルシューティング)
- [プロバイダー別の設定方法比較](#プロバイダー別の設定方法比較)
- [よくある質問](#よくある質問)
- [まとめ](#まとめ)
---
## eSIMとは(概要)
eSIM(Embedded SIM)とは、スマートフォンに内蔵されたデジタルSIMのことだ。物理SIMカードの差し替えなしに、QRコードの読み取りやアプリ操作でモバイルデータ通信を利用できる。
旅行用eSIMの最大のメリットは**デュアルSIM運用**だ。日本のSIM(電話番号・SMS)を維持したまま、旅行eSIMをデータ通信専用として追加できる。帰国後は旅行eSIMを削除するだけで元の環境に戻る。
eSIMの基礎知識、プロバイダー11社の料金比較、選び方については**[海外旅行用eSIM完全ガイド2026](/ja/blog/travel-esim-complete-guide-2026/)**で詳しく解説している。この記事では「設定方法」に特化して、具体的な操作手順を説明する。
---
## 設定前の準備
eSIMのインストールを始める前に、以下の3点を確認しておく。
### 1. eSIM対応端末か確認する
すべてのスマートフォンがeSIMに対応しているわけではない。2026年現在の主要な対応端末は以下の通り。
**iPhone(2018年以降):**
| モデル | eSIM対応 | 備考 |
|-------|---------|------|
| iPhone XR / XS / XS Max | 対応 | 物理SIM + eSIM 1枚 |
| iPhone 11 シリーズ | 対応 | 物理SIM + eSIM 1枚 |
| iPhone 12 シリーズ | 対応 | 物理SIM + eSIM 1枚 |
| iPhone 13 シリーズ以降 | 対応 | 物理SIM + eSIM 2枚(デュアルeSIM) |
| iPhone 15 シリーズ(米国版) | 対応 | eSIMのみ(物理SIMスロットなし) |
| iPhone 16 シリーズ | 対応 | eSIMのみ(米国版)/ 物理+eSIM(その他) |
**Android(2019年以降):**
| メーカー | 対応モデル(代表例) |
|---------|-------------------|
| Google Pixel | Pixel 3a 以降の全モデル |
| Samsung Galaxy | Galaxy S20 以降、Galaxy Z Flip/Fold シリーズ |
| OPPO | Find X3 Pro 以降、Reno5 A 以降(一部) |
| Xiaomi | 12T Pro 以降(一部) |
| HUAWEI | P40 Pro 以降 |
| Sony Xperia | Xperia 1 IV 以降、Xperia 10 IV 以降 |
**確認方法:**
- **iPhone**: 「設定」→「モバイル通信」→「eSIMを追加」が表示されれば対応
- **Android**: 「設定」→「ネットワークとインターネット」→「SIM」→「SIMの追加」が表示されれば対応
### 2. SIMロックが解除されているか確認する
SIMロックがかかったままではeSIMを追加できない。
- **2021年10月以降に発売された端末**: 原則SIMロックフリー(確認不要)
- **それ以前の端末**: 各キャリアのマイページからオンラインで無料解除可能
**確認方法:**
- **iPhone**: 「設定」→「一般」→「情報」→「SIMロック」の欄が「SIMロックなし」であればOK
- **Android**: 「設定」→「デバイス情報」→「SIMカードの状態」で確認
### 3. WiFi接続を確保する
eSIMプロファイルのダウンロードにはインターネット接続が必要だ。**自宅やカフェのWiFiで、出発前にインストールまで完了させるのがベストプラクティス。**
空港のフリーWiFiでもインストールは可能だが、接続が不安定な場合がある。出発当日に空港で初めて設定するのは避けたい。
---
## iPhone — eSIM設定手順
iPhoneでのeSIMインストール方法は3つある。プロバイダーによって対応方式が異なる。
### 方式1: QRコード読み取り(最も一般的)
ほとんどのプロバイダーが対応している標準的な方式。購入後にメールまたはアプリ内で表示されるQRコードを読み取る。
**手順:**
1. **「設定」**を開く
2. **「モバイル通信」**をタップ
3. **「eSIMを追加」**をタップ
4. **「QRコードを使用」**を選択
5. プロバイダーから受け取った**QRコードをカメラで読み取る**
6. **「モバイル通信プランを追加」**をタップ
7. プランのラベル名を設定する(例: 「旅行用」「韓国」など分かりやすい名前を推奨)
8. **「続ける」**をタップして完了
**ポイント:**
- QRコードは別のデバイス(PC画面、紙に印刷、別のスマホ)に表示する必要がある。自分のiPhoneの画面に表示されたQRコードを自分のiPhoneで読み取ることはできない
- QRコードは1回しか使えない場合が多い。スクリーンショットを保存しておくと安心
- iOS 17.4以降では、メールやメッセージ内のQRコード画像を長押しするだけでインストールできる
### 方式2: アプリからインストール(最も簡単)
[Airalo](/ja/travel/providers/airalo/)、[Holafly](/ja/travel/providers/holafly/)、[Nomad](/ja/travel/providers/nomad/)などの主要プロバイダーは、専用アプリ内からワンタップでeSIMをインストールできる。QRコードの読み取りが不要なため、最も手軽な方式だ。
**手順([Airalo](/ja/travel/providers/airalo/)の場合):**
1. App Storeから**[Airalo](/ja/travel/providers/airalo/)アプリ**をインストール
2. 渡航先と期間を選んで**プランを購入**
3. 購入完了後、**「eSIMをインストール」**ボタンをタップ
4. iOS側の確認画面で**「許可」**をタップ
5. eSIMプロファイルが自動的にダウンロード・インストールされる
6. プランのラベル名を設定して完了
**ポイント:**
- アプリ方式ならQRコードを別画面に表示する必要がない
- プラン購入〜インストール〜残量確認まですべてアプリ内で完結する
- アプリのプッシュ通知でデータ残量のアラートも受け取れる
### 方式3: 手動入力
QRコードが読み取れない場合やアプリ非対応の場合に使う方法。プロバイダーから提供されるアクティベーション情報を手動で入力する。
**手順:**
1. **「設定」**→**「モバイル通信」**→**「eSIMを追加」**
2. **「QRコードを使用」**を選択
3. 画面下部の**「詳細情報を手動で入力」**をタップ
4. プロバイダーから提供された以下の情報を入力:
- **SM-DP+アドレス**(サーバーURL)
- **アクティベーションコード**
- **確認コード**(必要な場合)
5. **「次へ」**をタップしてインストール完了
**ポイント:**
- 手動入力は誤入力のリスクがあるため、コピー&ペーストを推奨
- 主要プロバイダーではほぼ使うことはない。マイナーなプロバイダーや企業向けeSIMで利用される
---
## Android — eSIM設定手順
AndroidのeSIM設定画面はメーカー・OSバージョンによって多少異なるが、基本的な流れは共通だ。ここではGoogle PixelとSamsung Galaxyの手順を中心に説明する。
### 方式1: QRコード読み取り
**手順(Google Pixel / 標準Android):**
1. **「設定」**を開く
2. **「ネットワークとインターネット」**をタップ
3. **「SIM」**をタップ
4. **「SIMの追加」**(または**「+」**ボタン)をタップ
5. **「SIMをダウンロードしますか?」**→**「次へ」**
6. プロバイダーから受け取った**QRコードを読み取る**
7. **「有効化」**をタップ
8. ダウンロードが完了したら**「完了」**
**手順(Samsung Galaxy):**
1. **「設定」**を開く
2. **「接続」**をタップ
3. **「SIMマネージャー」**をタップ
4. **「eSIMを追加」**をタップ
5. **「QRコードをスキャン」**を選択
6. QRコードを読み取る
7. **「追加」**をタップして完了
### 方式2: アプリからインストール
iPhone同様、[Airalo](/ja/travel/providers/airalo/)・[Holafly](/ja/travel/providers/holafly/)・[Nomad](/ja/travel/providers/nomad/)などはAndroidアプリからもeSIMをインストールできる。
**手順([Airalo](/ja/travel/providers/airalo/)の場合):**
1. Google Playから**[Airalo](/ja/travel/providers/airalo/)アプリ**をインストール
2. 渡航先と期間を選んで**プランを購入**
3. 購入完了後、**「eSIMをインストール」**をタップ
4. Android側の確認画面で**インストールを許可**
5. eSIMプロファイルが自動的にダウンロード・インストールされる
### 方式3: 手動入力
**手順(Google Pixel / 標準Android):**
1. **「設定」**→**「ネットワークとインターネット」**→**「SIM」**→**「SIMの追加」**
2. **「SIMをダウンロードしますか?」**の画面で**「ヘルプ」**または**「手動で入力」**を選択
3. プロバイダーから提供された**アクティベーションコード**を入力
4. **「有効化」**をタップして完了
**手順(Samsung Galaxy):**
1. **「設定」**→**「接続」**→**「SIMマネージャー」**→**「eSIMを追加」**
2. **「アクティベーションコードを入力」**を選択
3. コードを入力して**「追加」**
**Androidの注意点:**
- メーカーごとに設定画面の名称が異なる場合がある(「SIM」「SIMマネージャー」「モバイルネットワーク」など)
- 一部のAndroid端末では、eSIMインストール後に**端末の再起動が必要**な場合がある
- Samsung Galaxy端末は、Samsung独自のUIのため標準Androidとメニュー構成が異なる
---
## デュアルSIM設定
旅行eSIMの最大の利点は、日本のSIMと旅行eSIMを**同時に使える**ことだ。ここではデュアルSIMの最適な設定方法を解説する。
### 推奨設定: データ通信のみeSIM、通話は日本SIM
| 機能 | 使用する回線 | 理由 |
|------|-----------|------|
| **音声通話** | 日本のSIM | 日本の電話番号を維持、SMS受信(二段階認証に必要) |
| **モバイルデータ通信** | 旅行eSIM | 安価な現地データ通信を利用 |
| **SMS** | 日本のSIM | 銀行・決済サービスの認証SMS受信用 |
この設定にすることで、日本の電話番号を維持したまま、データ通信だけ旅行eSIMの安価な回線を使える。
### iPhoneでのデュアルSIM設定
1. **「設定」**→**「モバイル通信」**を開く
2. 2つの回線(日本のSIMと旅行eSIM)が表示されていることを確認
3. **「デフォルトの音声回線」**→**日本のSIM**を選択
4. **「モバイルデータ通信」**→**旅行eSIM**を選択
5. **「モバイルデータ通信の切り替えを許可」**→**オフ**にする(旅行eSIMのデータを優先し、日本のSIMでローミングデータを使わないようにする)
**重要: 日本のSIMのデータローミングをオフにする**
1. **「設定」**→**「モバイル通信」**→**日本のSIM**を選択
2. **「データローミング」**→**オフ**
これを忘れると、日本のキャリアの海外ローミング料金が発生する可能性がある。
### AndroidでのデュアルSIM設定
**Google Pixel:**
1. **「設定」**→**「ネットワークとインターネット」**→**「SIM」**
2. **日本のSIM**をタップ →**「通話」と「SMS」をオン**、**「モバイルデータ」をオフ**
3. **旅行eSIM**をタップ →**「モバイルデータ」をオン**
4. 日本のSIMの**「ローミング」をオフ**に設定
**Samsung Galaxy:**
1. **「設定」**→**「接続」**→**「SIMマネージャー」**
2. **「優先SIM」**をタップ
3. **「通話」**→**日本のSIM**を選択
4. **「メッセージ」**→**日本のSIM**を選択
5. **「モバイルデータ」**→**旅行eSIM**を選択
6. 日本のSIMの**「データローミング」をオフ**に設定
### デュアルSIM設定のチェックリスト
設定後、以下を確認しておく。
- [ ] 旅行eSIMがモバイルデータ通信の優先回線になっている
- [ ] 日本のSIMが音声通話・SMSの優先回線になっている
- [ ] 日本のSIMのデータローミングがオフになっている
- [ ] 旅行eSIMのデータローミングがオンになっている(海外で通信するために必要)
- [ ] 「モバイルデータ通信の切り替えを許可」がオフになっている(iPhone)
---
## トラブルシューティング
eSIM設定で発生しやすい問題と対処法をまとめた。
### eSIMがインストールできない
| 原因 | 対処法 |
|------|--------|
| SIMロックが解除されていない | キャリアのマイページから解除手続きを行う |
| 端末がeSIM非対応 | 「設定 → モバイル通信」にeSIM追加メニューが表示されない場合は非対応 |
| QRコードが正しく読み取れない | 画面の明るさを上げる、QRコードを拡大表示する、別のデバイスで表示する |
| QRコードが期限切れ | プロバイダーに連絡して再発行を依頼する |
| WiFiに接続されていない | WiFi接続を確認。モバイルデータでもインストール可能だが安定したWiFiを推奨 |
| eSIMプロファイルの上限に達している | 不要なeSIMプロファイルを削除してから再試行 |
### データ通信が繋がらない
| 原因 | 対処法 |
|------|--------|
| eSIMが有効化されていない | 「設定 → モバイル通信」でeSIMがオンになっているか確認 |
| モバイルデータ通信の回線設定が違う | デュアルSIM設定で旅行eSIMがモバイルデータ通信に設定されているか確認 |
| データローミングがオフ | **旅行eSIMの**データローミングを**オン**にする(海外では必須) |
| まだアクティベーションされていない | 一部のプロバイダーでは初回接続時に数分かかることがある。端末を再起動して数分待つ |
| ネットワーク選択が手動になっている | 「設定 → モバイル通信 → ネットワーク選択」を**自動**に設定 |
| 機内モードの解除忘れ | 機内モードをオフにし、数秒待ってからデータ通信を確認 |
### APN設定が必要な場合
主要プロバイダー([Airalo](/ja/travel/providers/airalo/)、[Holafly](/ja/travel/providers/holafly/)、[Nomad](/ja/travel/providers/nomad/)など)では、eSIMインストール時にAPN設定が自動的に適用される。手動設定が必要になるのは一部のプロバイダーのみだ。
**iPhoneでのAPN設定:**
1. **「設定」**→**「モバイル通信」**→**旅行eSIM**を選択
2. **「モバイルデータ通信ネットワーク」**をタップ
3. プロバイダーが案内する**APN名**を入力
4. ユーザ名・パスワードがある場合はそれも入力
**AndroidでのAPN設定:**
1. **「設定」**→**「ネットワークとインターネット」**→**「SIM」**→**旅行eSIM**
2. **「アクセスポイント名(APN)」**をタップ
3. **「+」**をタップして新しいAPNを追加
4. プロバイダーが案内するAPN情報を入力
5. 保存して、作成したAPNを選択
**APN情報が分からない場合:**
- プロバイダーのアプリ内に記載されていることが多い
- プロバイダーのサポートに問い合わせる
- プロバイダーのWebサイトのFAQやヘルプセンターを確認する
---
## プロバイダー別の設定方法比較
プロバイダーによって、eSIMのインストール方式や設定の手軽さが異なる。SimFinderのデータベースに登録されている主要プロバイダーの設定方式を比較する。
| プロバイダー | アプリ方式 | QRコード方式 | 手動入力 | 設定の手軽さ |
|------------|----------|------------|---------|------------|
| **[Airalo](/ja/travel/providers/airalo/)** | 対応 | 対応 | 対応 | アプリで完結。QRコード不要。設定が最も簡単 |
| **[Holafly](/ja/travel/providers/holafly/)** | 対応 | 対応 | — | アプリ+QRコードの両対応。日本語サポートあり |
| **[Nomad](/ja/travel/providers/nomad/)** | 対応 | 対応 | — | 日本語アプリ対応。UIが分かりやすい |
| [**Saily**](/ja/travel/providers/saily/) | 対応 | 対応 | — | NordVPN開発元。アプリUIがシンプル |
| [**eSIM2Fly**](/ja/travel/providers/esim2fly/) | — | 対応 | 対応 | メールでQRコード送付。AIS系列の実績 |
| [**GigSky**](/ja/travel/providers/gigsky/) | 対応 | 対応 | — | Apple Watch対応の老舗プロバイダー |
| [**Ubigi**](/ja/travel/providers/ubigi/) | 対応 | 対応 | — | NTTグループ。日本語対応 |
| [**aloSIM**](/ja/travel/providers/alosim/) | 対応 | 対応 | — | 200カ国以上対応 |
| [**Flexiroam**](/ja/travel/providers/flexiroam/) | 対応 | 対応 | — | パッケージ組み合わせが柔軟 |
| [**Yesim**](/ja/travel/providers/yesim/) | 対応 | 対応 | — | 22言語サポート対応 |
| [**Maya Mobile**](/ja/travel/providers/maya/) | — | 対応 | 対応 | 英語サポートのみ |
### 初心者へのおすすめ
eSIMの設定が初めてなら、**アプリ方式に対応しているプロバイダー**を選ぶのが確実だ。特に以下の3社はアプリ内でプラン購入からインストール、残量確認まで完結する。
- **[Airalo](/ja/travel/providers/airalo/)**: 世界最大手。アプリでeSIMインストールが完結し、QRコードの表示すら不要
- **[Holafly](/ja/travel/providers/holafly/)**: 全プラン無制限データ。日本語サポートあり
- **[Nomad](/ja/travel/providers/nomad/)**: 日本語アプリ対応。UIが直感的で迷いにくい
プロバイダーの料金・対応国の詳しい比較は**[海外旅行用eSIM完全ガイド2026](/ja/blog/travel-esim-complete-guide-2026/)**を参照。
**[SimFinderで渡航先のeSIMプランを比較する →](/ja/travel/)**
---
## よくある質問
### eSIMの設定にWiFi接続は必要?
はい。eSIMプロファイルのダウンロードにはインターネット接続が必要だ。自宅やカフェなどのWiFi環境で、出発前にインストールまで済ませておくことを推奨する。機内WiFiが利用できない場合、飛行機内でのインストールはできない。
### eSIMは何回線まで追加できる?
端末によって異なる。iPhone 13以降は最大8つのeSIMプロファイルを保存でき、そのうち2回線を同時に有効化できる。Android端末はメーカー・機種により異なるが、一般的に5〜8プロファイルを保存可能だ。
### eSIMのインストール後、すぐに通信が始まる?
プロバイダーによって異なる。多くの旅行eSIMは、渡航先の現地ネットワークに初めて接続した時点でアクティベーション(利用開始)される。インストールだけなら日本国内で事前に完了でき、データ消費は始まらない。
### SIMロックがかかっているスマホでeSIMは使える?
使えない。eSIMを利用するにはSIMロックが解除されている必要がある。日本では2021年10月以降に発売された端末は原則SIMロックフリーだが、それ以前の端末はキャリアに解除を依頼すること。オンラインで無料で手続きできるキャリアが多い。
### 旅行eSIMを設定したら日本のSIMはどうなる?
日本のSIMはそのまま有効だ。旅行eSIMはデュアルSIMの2回線目として追加されるため、日本の電話番号やSMS受信機能はそのまま維持できる。データ通信のみ旅行eSIMに切り替える設定にすれば、日本のSIMで高額なデータローミング料金が発生することもない。
### 帰国後、旅行eSIMはどうすればいい?
帰国後は旅行eSIMのプロファイルを削除するだけで元の環境に戻る。iPhoneは「設定 → モバイル通信」から該当のeSIMを選んで「eSIMを削除」、Androidは「設定 → ネットワークとインターネット → SIM」から削除できる。削除しなくても無効化するだけでも構わない。
### APN設定とは何?必ず必要?
APN(Access Point Name)はモバイルデータ通信の接続先を指定する設定だ。[Airalo](/ja/travel/providers/airalo/)・[Holafly](/ja/travel/providers/holafly/)・[Nomad](/ja/travel/providers/nomad/)など主要な旅行eSIMプロバイダーはインストール時に自動設定されるため、手動でのAPN設定は通常不要。データ通信が繋がらない場合にのみ、プロバイダーが案内するAPN情報を手動入力すること。
---
## まとめ
旅行用eSIMの設定手順を振り返る。
**設定前の準備:**
- eSIM対応端末であること(iPhone XR以降、Pixel 3a以降、Galaxy S20以降)
- SIMロックが解除されていること
- WiFi接続を確保すること
**インストール方法(3方式):**
- **QRコード方式**: 最も一般的。別デバイスでQRコードを表示して読み取る
- **アプリ方式**: 最も簡単。[Airalo](/ja/travel/providers/airalo/)・[Holafly](/ja/travel/providers/holafly/)・[Nomad](/ja/travel/providers/nomad/)など対応プロバイダーならアプリ内で完結
- **手動入力**: QRコードが使えない場合の代替手段
**デュアルSIM設定のポイント:**
- 音声通話・SMS → 日本のSIM
- モバイルデータ通信 → 旅行eSIM
- **日本のSIMのデータローミングは必ずオフ**にする
**設定のベストプラクティス:**
- **出発前日までにインストールを完了**させる
- プランのラベル名を分かりやすく設定する(「韓国旅行」「タイ7日間」など)
- デュアルSIM設定を済ませておき、渡航先でeSIMを有効化するだけの状態にする
eSIMの設定自体は5分程度で完了する。一度経験すれば2回目以降は迷うことはない。レンタルWiFiの受取・返却や物理SIMの差し替えと比べて、手軽さは圧倒的だ。
通信手段の選択に迷ったら、**[海外旅行用eSIM完全ガイド](/ja/blog/travel-esim-complete-guide-2026/)**でeSIM・レンタルWiFi・海外ローミングの比較も解説している。
渡航先が決まったら、SimFinderでプロバイダー間の料金を比較してみてほしい。
**[SimFinderで旅行eSIMプランを比較する →](/ja/travel/)**
---
*この記事の設定手順は2026年4月時点のiOS / Android最新バージョンに基づいています。OSのアップデートにより設定画面の名称や手順が変更される場合があります。最新の設定手順は各プロバイダーの公式ヘルプも併せてご確認ください。*
*SimFinderは一部プロバイダーとアフィリエイト提携を行っています。ただし、推奨はデータに基づいており、提携の有無で内容を変えることはありません。*
================================================================================
# eSIM vs レンタルWiFi vs 海外ローミング — 海外通信手段を徹底比較
URL: https://sim-finder.com/ja/blog/esim-vs-wifi-vs-roaming-2026/
Type: blog (ja)
Published: 2026-03-19
## 結論: あなたに最適な海外通信手段
| 特徴 | eSIM | レンタルWiFi | 海外ローミング |
|------|------|------------|--------------|
| **一言で** | 安い・身軽・1人向け | 複数人シェア向き | 手間ゼロだが割高 |
| **おすすめ** | 1人旅・出張 | 家族・グループ旅行 | 短期・緊急時 |
| **目安料金** | 600円〜/7日 | 800円〜/日 | 980円〜/日 |
**迷ったらeSIMがおすすめ。** 1人利用で安さと手軽さを両立できる。eSIMの詳しい選び方は[海外旅行用eSIM完全ガイド](/ja/blog/travel-esim-complete-guide-2026/)で解説している。
**[SimFinderで渡航先のeSIMプランを比較する →](/ja/travel/)**
---
## 目次
- [3つの通信手段の概要](#3つの通信手段の概要)
- [7項目比較テーブル](#7項目比較テーブル)
- [eSIMのメリット・デメリット](#esimのメリットデメリット)
- [レンタルWiFiのメリット・デメリット](#レンタルwifiのメリットデメリット)
- [海外ローミングのメリット・デメリット](#海外ローミングのメリットデメリット)
- [シチュエーション別おすすめ](#シチュエーション別おすすめ)
- [具体的な料金比較 — 韓国3泊4日の場合](#具体的な料金比較--韓国3泊4日の場合)
- [eSIMの選び方](#esimの選び方)
- [よくある質問](#よくある質問)
- [まとめ](#まとめ)
---
## 3つの通信手段の概要
海外で使える通信手段は主に3つある。それぞれの仕組みと特徴を整理する。
### eSIM(イーシム)
スマートフォンに内蔵されたデジタルSIMを使い、物理カードの差し替えなしにモバイルデータ通信を利用する方式。オンラインで購入してQRコードを読み取るだけで設定が完了し、現地到着と同時に通信が使える。
2026年現在、[Airalo](/ja/travel/providers/airalo/)・[Holafly](/ja/travel/providers/holafly/)・[Nomad](/ja/travel/providers/nomad/)など**11社以上のプロバイダー**が旅行eSIMを提供しており、7日間1GBが$4(約600円)から利用可能だ。
### レンタルWiFi(モバイルWiFiルーター)
専用のポケットWiFi端末をレンタルし、海外でWiFi経由でインターネットに接続する方式。グローバルWiFiやイモトのWiFiなど、日本の空港で受取・返却ができるサービスが主流だ。
1台のルーターに複数台(通常5〜10台)のデバイスを同時接続できるため、家族やグループ旅行では1台をシェアして使える。
### 海外ローミング
日本で使っている携帯キャリア(ドコモ・au・ソフトバンク・楽天モバイルなど)の回線をそのまま海外で使う方式。渡航先の現地キャリアの回線を日本のキャリア経由で利用する。
追加の端末や設定がほぼ不要で、最も手間がかからない反面、料金は従来型の従量課金だと非常に高額になる。ただし近年はahamoの20GB無料ローミングなど、割安なプランも増えている。
---
## 7項目比較テーブル
| 比較項目 | eSIM | レンタルWiFi | 海外ローミング |
|---------|------|------------|--------------|
| **料金** | 600円〜/7日(1GB) | 800〜1,500円/日 | 980〜2,980円/日 |
| **データ容量** | 1GB〜無制限(プラン選択) | 300MB〜無制限/日 | 従量制 or 定額制 |
| **手軽さ** | QRコード読み取りのみ | 受取・返却・充電が必要 | 設定不要(一部事前申込あり) |
| **通信速度** | 4G/LTE〜5G(現地キャリア直結) | 4G/LTE(端末性能に依存) | 4G/LTE(キャリアに依存) |
| **利用開始** | 即時(事前インストール可) | 受取後すぐ | 渡航先到着後すぐ |
| **複数人利用** | 1人1回線(テザリング可) | 1台で5〜10台接続可 | 1人1回線 |
| **対応端末** | eSIM対応スマホのみ | 端末を問わない | 契約キャリアの端末 |
**総合評価**: 1人利用のコストパフォーマンスではeSIMが優位。グループ利用ではレンタルWiFi。手間を最小にしたいならローミング。
**[SimFinderで渡航先のeSIMプランを比較する →](/ja/travel/)**
---
## eSIMのメリット・デメリット
### メリット
- **料金が安い**: 7日間1GBが約600円〜と3手段の中で最安。従量課金の心配がない
- **荷物が増えない**: 物理的な端末不要。スマホだけで完結する
- **即時利用**: オンラインで購入→QRコード読み取りで設定完了。出発前にインストールしておけば現地到着と同時に使える
- **デュアルSIM運用**: 日本の電話番号を維持したまま、データ通信だけ旅行eSIMに切り替え可能
- **複数プロバイダーから選べる**: SimFinderのデータベースでは11社の料金・対応国を比較でき、渡航先に合った最安プランを見つけやすい
### デメリット
- **eSIM対応端末が必要**: iPhone XR/XS(2018年)以降、Google Pixel 3a以降など。古い端末やeSIM非対応のAndroidでは使えない
- **1人1回線**: 同行者とのデータシェアはテザリングで可能だが、テザリング接続はバッテリー消耗が大きい
- **基本的にデータ通信のみ**: 電話番号は付与されないプロバイダーが多い。通話はLINEやWhatsAppなどのVoIPアプリで代用する
- **設定に最低限のITリテラシーが必要**: QRコード読み取りやAPN設定など、スマホの設定画面を操作する必要がある
---
## レンタルWiFiのメリット・デメリット
### メリット
- **複数人・複数端末で共有可能**: 1台のルーターに5〜10台まで同時接続。家族やグループで割り勘すればコスパが良い
- **端末を問わない**: eSIM非対応のスマホ、タブレット、ノートPCなど、WiFi接続できる端末なら全て使える
- **設定がシンプル**: WiFiパスワードを入力するだけ。スマホ側の特別な設定は不要
- **日本語サポートが充実**: 日本の大手レンタル業者は24時間日本語対応が一般的
### デメリット
- **受取・返却の手間**: 空港カウンターや宅配での受取・返却が必要。返却忘れは延滞料金が発生する
- **充電が必要**: ルーター端末のバッテリー持続は6〜12時間程度。モバイルバッテリーの持参が推奨される
- **荷物が増える**: ルーター端末+充電ケーブル+モバイルバッテリーで荷物がかさむ
- **1人利用だと割高**: 1日800〜1,500円の料金は、1人で使う場合eSIMより高額になる
- **紛失・故障リスク**: 端末を紛失すると弁償金(数万円)が発生する場合がある。補償オプションの加入が推奨される
---
## 海外ローミングのメリット・デメリット
### メリット
- **手間がほぼゼロ**: 追加の端末もアプリもSIMも不要。いつものスマホをそのまま海外で使える
- **電話番号がそのまま使える**: 日本の電話番号で発着信可能。ビジネス利用には安心感がある
- **事前準備不要のプランあり**: ahamoは月20GBまで追加料金なしで海外82カ国で利用可能。楽天モバイルも月2GBまで無料
- **通信品質が安定**: キャリアが提携する現地の大手回線を使うため、通信品質は比較的安定
### デメリット
- **従量課金は非常に高額**: ドコモの海外パケ・ホーダイは1日最大2,980円。従量課金だと数十万円の請求が来るケースもある
- **データ容量制限がシビア**: ahamoの20GB無料ローミングは魅力的だが、動画視聴が多いと短期間で使い切る可能性がある
- **ahamo以外は割高**: 従来の大手キャリアプランは1日980〜2,980円が相場。1週間だと7,000〜21,000円になる
- **キャリア・プランに依存**: 利用条件はキャリアとプランごとに異なり、事前確認が必須。対応国も限られる場合がある
- **意図しない接続に注意**: データローミングを切り忘れると、想定外のキャリアに接続して高額請求が発生するリスクがある
---
## シチュエーション別おすすめ
### 1人旅(短期・アジア圏)
**おすすめ: eSIM**
1人利用で最もコスパが良い。韓国・タイ・台湾など人気渡航先なら7日間1GBで600円程度から利用可能。地図アプリとSNS程度なら1GBで十分だ。
### 家族旅行(3〜4人)
**おすすめ: レンタルWiFi**
1台のルーターを家族全員でシェアすれば、1人あたりの費用を抑えられる。例えば1日1,200円のプランを4人で割ると1人300円/日。子供のスマホやタブレットも同時接続できる点が便利。
ただし、家族全員がeSIM対応端末を持っているなら、各自がeSIMを購入する方が安くなるケースもある。
### 短期出張(1〜3日)
**おすすめ: 海外ローミング(ahamoユーザー)またはeSIM**
ahamoユーザーなら追加料金なしで20GBまで使えるため、最もお得で手間がない。ahamo以外のキャリアの場合は、eSIMの方がコスパが良い。出張先でのビジネスメールやビデオ会議程度なら、eSIMの3〜5GBプランで十分対応できる。
### 長期滞在(2週間以上)
**おすすめ: eSIM**
レンタルWiFiは日数に比例して料金が上がるため、長期滞在では割高になる。eSIMなら30日間10GBで$18〜20(約2,700〜3,000円)程度で済む。[Holafly](/ja/travel/providers/holafly/)の無制限プランなら30日間で$74.90(約11,235円)で容量を気にせず使える。
### 周遊旅行(複数国)
**おすすめ: eSIM(リージョナルプラン)**
[Airalo](/ja/travel/providers/airalo/)・[Holafly](/ja/travel/providers/holafly/)・[Nomad](/ja/travel/providers/nomad/)など11社全てが複数国対応のリージョナルプランを提供している。アジア周遊やヨーロッパ周遊なら、国ごとにeSIMを購入するよりリージョナルプラン1つで済ませる方が安く、切り替えの手間もない。
**[SimFinderで渡航先のeSIMプランを比較する →](/ja/travel/)**
---
## 具体的な料金比較 — 韓国3泊4日の場合
韓国(ソウル)に3泊4日で旅行する場合の、各通信手段の料金を実データで比較する。1日あたりのデータ使用量は1〜2GB(地図・SNS・メッセージ中心)を想定。
### eSIM — SimFinderデータベースの実データ
| プロバイダー | プラン | 料金(USD) | 料金(円換算) |
|------------|-------|-----------|-------------|
| [**Saily**](/ja/travel/providers/saily/) | 7日間 / 1GB | $3.99 | 約599円 |
| **[Nomad](/ja/travel/providers/nomad/)** | 7日間 / 1GB | $4.00 | 約600円 |
| **[Airalo](/ja/travel/providers/airalo/)** | 7日間 / 1GB | $4.50 | 約675円 |
| **[Holafly](/ja/travel/providers/holafly/)** | 5日間 / 無制限 | $20.90 | 約3,135円 |
| **[Nomad](/ja/travel/providers/nomad/)** | 5日間 / 無制限 | $17.00 | 約2,550円 |
※ 1USD=150円で換算。料金は2026年3月時点のSimFinderデータベースの値
**1GBプランの場合、約600円で4日間の通信が賄える。** データ使用量が多い場合は[Nomad](/ja/travel/providers/nomad/)の5日間無制限($17.00)や[Holafly](/ja/travel/providers/holafly/)の5日間無制限($20.90)が選択肢に入る。
### レンタルWiFi — 一般的な料金相場
| サービス | データ容量 | 日額料金 | 4日間合計 |
|---------|----------|---------|----------|
| 大手A社 | 300MB/日 | 約800円 | 約3,200円 |
| 大手B社 | 無制限/日 | 約1,600円 | 約6,400円 |
| 大手C社 | 1GB/日 | 約1,100円 | 約4,400円 |
※ 空港受取・返却の場合。補償オプション(約300〜500円/日)は別途
### 海外ローミング — 大手キャリア料金
| キャリア/プラン | 条件 | 4日間合計 |
|---------------|------|----------|
| **ahamo** | 20GB/月まで追加料金なし | **0円**(月額内) |
| **楽天モバイル** | 2GB/月まで追加料金なし | **0円**(月額内) |
| **ドコモ 世界ギガし放題** | 24時間制 | 約11,920円(2,980円/日) |
| **au 世界データ定額** | 24時間制 | 約7,840円(980円/24h〜) |
| **ソフトバンク 海外あんしん定額** | 24時間制 | 約11,920円(2,980円/日) |
### 料金比較まとめ
| 手段 | 最安ケース | 標準ケース |
|------|----------|----------|
| **eSIM** | **約600円**(1GB) | 約2,550円(無制限) |
| **レンタルWiFi** | 約3,200円(300MB/日) | 約4,400円(1GB/日) |
| **海外ローミング** | **0円**(ahamo) | 約7,840円〜(従来キャリア) |
ahamoユーザーなら海外ローミングが最安だが、そうでなければ**eSIMが圧倒的にコスパが良い**。レンタルWiFiは3人以上でシェアすれば1人あたり1,000円前後に抑えられる可能性がある。
---
## eSIMの選び方
eSIMに興味を持った方は、以下のポイントで選ぶと失敗しにくい。
1. **渡航先の対応を確認** — プロバイダーによって対応国・地域が異なる
2. **データ容量を見積もる** — 地図・SNS程度なら1GB/週、動画視聴するなら5GB以上
3. **料金をプロバイダー間で比較** — 同じ渡航先でもプロバイダーによって2〜3倍の差がある
4. **日本語サポートの有無** — 初めてのeSIM利用なら日本語対応のプロバイダーが安心
5. **テザリング対応を確認** — SimFinderが追跡している11社は全てテザリング対応
eSIMの選び方・設定方法・11社の詳細比較は**[海外旅行用eSIM完全ガイド2026](/ja/blog/travel-esim-complete-guide-2026/)**で網羅的に解説している。初めてeSIMを使う方はまずそちらを参照してほしい。
**[SimFinderで渡航先のeSIMプランを比較する →](/ja/travel/)**
---
## よくある質問
### eSIMとレンタルWiFi、どちらが安い?
1人旅の場合、eSIMの方が安くなる。韓国3泊4日の例では、eSIMが約600円〜1,690円(プロバイダー・容量による)、レンタルWiFiが3,200〜6,400円程度だ。ただし3〜4人で1台のWiFiをシェアする場合は、1人あたりの料金はレンタルWiFiの方が安くなることもある。
### 海外ローミングはなぜ高いの?
海外ローミングでは、渡航先の現地キャリアの回線を日本のキャリア経由で利用するため、仲介コストが上乗せされる。近年はahamoの20GB無料ローミングやソフトバンク「アメリカ放題」のように割安なプランも登場しているが、従来型の従量課金(1MB=1,980円など)を利用すると非常に高額になる。
### eSIMに対応していないスマホではどうすればいい?
eSIM非対応のスマホの場合は、レンタルWiFiか海外ローミングを利用すること。レンタルWiFiは端末を問わず利用でき、複数デバイスを同時接続できるため、eSIM非対応端末でも問題ない。
### レンタルWiFiの返却を忘れたらどうなる?
返却期限を過ぎると延滞料金が発生する。1日あたり数百円〜2,000円程度の延長料金がかかるケースが一般的だ。空港返却ボックスがある業者を選ぶと、帰国時にその場で返却できて安心。
### 海外ローミングは事前申し込みが必要?
キャリアやプランによって異なる。ドコモ「世界ギガし放題」やau「世界データ定額」は事前申込不要で、現地で利用開始操作をするだけだ。ahamoは申込不要で20GBまで追加料金なしで使える。ただし従量課金を避けるため、出発前にプラン内容を必ず確認すること。
### 飛行機の中でeSIMをインストールできる?
eSIMのインストールにはインターネット接続が必要なため、機内WiFiがない場合はインストールできない。出発前の自宅やカフェのWiFi環境でインストールを済ませておくことを推奨する。アクティベーション(利用開始)は現地到着後に自動で行われるプロバイダーが多い。
### eSIMとレンタルWiFiを併用するメリットはある?
基本的に併用は不要だ。ただし、eSIMをメイン通信として使いつつ、eSIM非対応の同行者がいる場合にレンタルWiFiを1台用意するという使い方は合理的。また、長期滞在でeSIMのデータ容量が心配な場合に、レンタルWiFiをバックアップとして用意するケースもある。
---
## まとめ
海外旅行の通信手段は、旅行スタイルと人数によって最適解が変わる。
- **1人旅・出張**: eSIMが最安かつ手軽。SimFinderで渡航先の最安プランを探すのがおすすめ
- **家族・グループ旅行**: レンタルWiFi1台をシェアするか、全員eSIM対応なら個別にeSIM購入
- **ahamo・楽天モバイルユーザー**: 短期旅行なら海外ローミングの無料枠で十分対応可能
- **初めての海外 or IT操作が苦手**: レンタルWiFiが最もシンプル
いずれの手段を選ぶにしても、**出発前の準備**が重要だ。eSIMは事前インストール、レンタルWiFiは事前予約、ローミングはプラン確認。当日の空港で慌てないように準備しておこう。
eSIMの詳しい選び方・設定手順・プロバイダー比較は[海外旅行用eSIM完全ガイド2026](/ja/blog/travel-esim-complete-guide-2026/)を参照。
**[SimFinderで渡航先のeSIMプランを比較する →](/ja/travel/)**
---
*記事中の料金は2026年3月時点のSimFinderデータベースおよび各社公式サイトの情報に基づいています。為替レートは1USD=150円で換算しています。レンタルWiFiおよび海外ローミングの料金は一般的な相場であり、サービス・時期・キャンペーンにより変動します。最新の料金は各サービスの公式サイトでご確認ください。*
================================================================================
# HISモバイル、30GB1999円の「自由自在3.0プラン」を9月17日開始
URL: https://sim-finder.com/ja/blog/his-mobile-jiyujizai-3-0-plan-2026/
Type: blog (ja)
Published: 2026-08-29T09:00:00+09:00
H.I.S.Mobile(HISモバイル)は2026年8月28日、新料金プラン「自由自在3.0プラン」を9月17日(木)から提供開始すると発表した。30GBを月額1999円(税込、以下同)に設定し、音声通話付きの全容量を2000円未満に収めたのが最大の特徴だ。20GBと30GBには6分かけ放題が料金に含まれる。
大容量帯でも2000円を超えないという価格設定は、MVNO各社の20GB〜30GB帯の相場を下回る水準になる。データ量を多めに使いながら通信費を月2000円以内に抑えたいユーザーにとって、有力な選択肢が一つ増えた形だ。
## 全容量が2000円未満、30GBは1999円
ケータイ Watchが報じた料金体系によると、自由自在3.0プランの月額料金は以下の通り。
| データ容量 | 月額料金(税込) |
|---|---|
| 100MB〜1GB | 280円〜550円 |
| 3GB | 770円 |
| 7GB | 990円 |
| 10GB | 1299円 |
| 20GB | 1699円 |
| 30GB | 1999円 |
小容量帯は従来のHISモバイルが得意としてきた価格帯を踏襲しつつ、中〜大容量帯を厚くした構成といえる。3GBで770円、10GBで1299円という水準も、格安SIM全体で見て低価格の部類に入る。
## 20GB・30GBは6分かけ放題が「込み」
注目したいのは通話オプションの扱いだ。20GBプランと30GBプランでは、6分かけ放題が月額料金に含まれる。単体オプションとして契約する場合の6分かけ放題は月額500円、完全かけ放題は月額1480円と案内されている。
つまり30GB+6分かけ放題を1999円で使える計算になる。ほかのMVNOでは大容量プランに通話オプションを足すと2000円台後半〜3000円台になることも珍しくないため、短い通話が多いユーザーほど実質的な差が出やすい。
一方で、長電話が中心のユーザーは完全かけ放題(1480円)を別途足す必要がある。自分の通話スタイルがどちらに近いかで、実際の月額は大きく変わる点は押さえておきたい。
## 海外eSIM「HIS Travel eSIM」を年1回無料で
もう一つの柱が海外向けeSIMだ。HISモバイルは、130以上の国・地域で使える「HIS Travel eSIM powered by VOYE」の4GB・15日間プランを、1電話番号につき年1回無料で提供する。ITmedia Mobileの報道では、この特典の提供開始は10月1日からの予定とされている。
旅行会社のH.I.S.グループというルーツを持つHISモバイルらしい施策で、年に1〜2回海外に出る層にとっては、渡航のたびに別途eSIMを買う手間とコストを一部肩代わりしてくれる内容になる。ただし無料枠は年1回・4GB・15日間で、それを超える分は有料でのチャージが必要になる。長期滞在や大容量利用を前提にするなら、別途プランを比較したほうがよい。
## 乗り換え検討時のチェックポイント
自由自在3.0プランは9月17日開始で、8月29日時点ではまだ提供前の段階だ。既存プランからの変更可否や、現在契約中のプランの受付がどうなるかについては、発表資料および各社報道でも明確には示されていない。既存ユーザーは提供開始後の公式案内を確認してほしい。
また、HISモバイルはドコモ回線を利用するMVNOであり、通信速度は混雑時間帯にMNOやサブブランドと差が出やすい。価格だけでなく、平日昼などの利用シーンで許容できるかを含めて判断したい。
料金だけを見れば、30GB帯で2000円を切りつつ6分かけ放題まで含む構成は、2026年夏時点の国内MVNOのなかでも競争力の高い部類に入る。データ量が中〜大容量で、短い通話が多く、年に一度は海外に行く——という条件に当てはまる人ほど、検討する価値が大きい新プランだ。
================================================================================
# IIJmio、データ専用eSIMを9月1日「タイプI」に改称
URL: https://sim-finder.com/ja/blog/iijmio-esim-type-i-meisho-henko-2026/
Type: blog (ja)
Published: 2026-08-17T09:00:00+09:00
インターネットイニシアティブ(IIJ)は2026年8月17日、格安SIM「IIJmio」で提供するデータ通信専用eSIM(ドコモ網)のタイプ名称を、2026年9月1日(火)から「タイプI」に変更すると告知しました。ケータイWatchも同日付でこの変更を報じています。
利用者にとって重要なのは、**これが表示上の名称変更にとどまる**という点です。IIJの告知には「サービスの提供内容、月額基本料金およびご利用条件に変更はございません」と明記されており、契約中のユーザーが何かを申し込み直す必要もありません。
## 「eSIM」表記が「タイプI」に変わる
変更の中身はシンプルです。これまで契約内容として「SIMタイプ eSIM」と表示されていた箇所が、9月1日以降は「SIMタイプ タイプI」に切り替わります。IIJによれば、適用開始日より会員専用ページの契約内容表示が順次変更されるとのことです。
## 対象は3つのサービス
今回の名称変更が適用されるのは、ドコモ網を利用する以下のデータ通信専用eSIMです。
- IIJmioモバイルサービス ギガプラン
- IIJmio eSIMサービス データプラン ゼロ
- IIJmioモバイルサービス eSIMベータ版
いずれもデータ通信専用のeSIMであり、対象が限定されている点に注意が必要です。
## 「タイプD」「タイプA」は従来どおり
IIJmioは従来から、ドコモ網を「タイプD」、au網を「タイプA」と呼び分けてきました。今回の変更でこの体系が丸ごと置き換わるわけではありません。
IIJは告知の中で「これまで通り、ドコモ網を利用したタイプDの音声SIM/音声eSIM・SMS機能付きSIM・データ通信専用SIMは『タイプD』の名称を継続して使用します」と説明しています。つまり9月1日以降のIIJmioは、**タイプD・タイプA・タイプIの3種類の名称が併存する**構成になります。
同じドコモ網でありながら、データ通信専用eSIMだけが「タイプI」という独立した名称を与えられる形です。なお、名称を変更する理由や背景については、IIJの告知にもケータイWatchの記事にも具体的な説明はありませんでした。
## 利用者への実際の影響
現時点で確認できる範囲では、金銭的・機能的な不利益は生じません。整理すると次のとおりです。
- 月額基本料金の変更:なし
- サービス提供内容・利用条件の変更:なし
- ユーザー側の手続き:不要
- 利用する回線:引き続きドコモ網
影響が出るとすれば、**表記を見たときの混乱**でしょう。契約中の人が会員専用ページを開いて見慣れない「タイプI」という文字を見つけたときに、勝手にプランを変えられたと誤解する可能性はあります。また、これから申し込む人にとっては、申込画面や比較情報でドコモ網のデータ専用eSIMを探す際、「eSIM」ではなく「タイプI」という手がかりで探す必要が出てきます。
IIJmioのeSIMを検討している場合は、9月1日を境に呼び名が変わることを頭に入れておくと、申し込み時に迷わずに済みます。契約内容そのものは変わらないため、既存ユーザーが今すぐ取るべき対応はありません。
================================================================================
# iOS 26.6.2配信、モバイル通信での更新不具合を修正
URL: https://sim-finder.com/ja/blog/ios-26-6-2-mobile-data-update-fix-2026/
Type: blog (ja)
Published: 2026-09-09T09:00:00+09:00
Appleが2026年9月9日、iPhone向けOSの最新版「iOS 26.6.2」の配信を開始した。修正点は1件のみで、**モバイルデータ通信経由でソフトウェアアップデートをダウンロードできない不具合の解消**だ。Wi-Fi環境がなくてもOSを更新したいユーザーにとっては、地味だが実用上の影響が大きい修正といえる。
## 修正内容は「モバイル通信での更新不具合」1点
Apple Developerのリリース一覧によると、iOS 26.6.2のビルド番号は23G90で、開発者向けには現地時間2026年9月8日付で公開された。日本のメディアでは同9日にケータイ Watch、ITmedia Mobileがそれぞれ配信開始を報じている。
ケータイ Watchによれば、修正されたのは「モバイルデータ通信経由でソフトウェアアップデートをダウンロードできない問題」で、対象機種はiPhone 11以降。iPadOS 26.6.2も同じ修正を含めて同時に配信されている。
## 対象機種とアップデート方法
アップデートはiPhoneの「設定」→「一般」→「ソフトウェアアップデート」から実行できる。ITmedia Mobileは、iPhone 17 Proでの更新ファイルサイズが704.6MBだったと伝えている。機種やインストール済みのバージョンによってサイズは変動するため、あくまで目安として捉えたい。
なお、不具合の性質上、モバイル通信でのダウンロードがうまくいかない状態にある端末では、この修正版そのものをWi-Fi経由で取得する必要が生じる可能性がある。手元でうまく進まない場合は、Wi-Fiに接続した状態で試すのが確実だ。
## セキュリティ修正の掲載は確認できず
Appleが公開している「Appleのセキュリティ関連アップデート」一覧ページを2026年9月9日時点で確認したところ、iOS 26.6.2の項目は掲載されていなかった。同ページに掲載されている直近のバージョンはiOS 26.6.1(2026年8月17日リリース)とiOS 26.6(同7月27日リリース)で、今回はCVE番号を伴うセキュリティ修正ではなく、機能面の不具合修正が中心とみられる。
ただし、Appleはセキュリティ情報の掲載を後日追加する場合がある。最新の状況は公式ページで確認してほしい。
## モバイル通信での更新はデータ容量の消費に注意
今回の修正で「Wi-Fiがなくてもモバイル通信でOSを更新できる」状態に戻るわけだが、格安SIMユーザーが気をつけたいのはデータ容量の消費だ。
仮に700MB前後のアップデートをモバイル通信でダウンロードすると、月3GBプランなら残容量の2割強を1回の更新で使うことになる。月1GBクラスの低容量プランでは、1回のOSアップデートだけで容量を使い切りかねない。
一方で、通信量を気にせず端末を最新に保ちたいのであれば、大容量プランや使い放題プランを選ぶ、あるいは自宅のWi-Fi環境を前提に低容量プランで割り切る、という判断軸になる。**OSアップデートを含めた「不定期に発生する大きな通信」をどこで吸収するか**は、プラン選びで見落とされがちなポイントだ。
SimFinderでは月間データ容量ごとにプランを比較できる。自分の使い方でどの容量帯が最適かを、この機会に見直してみるのもいいだろう。
================================================================================
# 格安SIMの選び方完全ガイド2026 — 22社120プランから最適な1枚を見つける方法
URL: https://sim-finder.com/ja/blog/kakuyasu-sim-erabikata-guide-2026/
Type: blog (ja)
Published: 2026-03-17
## 結論: 迷ったらこの3プランから選べば間違いない
| おすすめ | プラン | 月額 | ポイント |
|---------|-------|------|---------|
| **最安** | [日本通信SIM](/ja/jp/carriers/nihontsushin/) 合理的シンプル290 | ¥290 | 通話付き全120プラン最安、eSIM・5G対応 |
| **バランス** | [IIJmio](/ja/jp/carriers/iijmio/) 10ギガ | ¥1,400 | 繰り越し・家族割あり、老舗の安定感 |
| **無制限** | [楽天モバイル](/ja/jp/carriers/rakuten/) Rakuten最強プラン | ¥3,278 | データ無制限 + Rakuten Link通話無料 |
**[SimFinderで全120プランを条件で絞り込む →](/ja/jp/search/)**
以下、22社120プランのデータを元に詳しく解説する。
## 目次
- [格安SIMの全体像 — MNO・サブブランド・MVNOの3分類](#格安simの全体像--mnoサブブランドmvnoの3分類を理解する)
- [選び方の5つの判断基準](#選び方の5つの判断基準)
- [利用スタイル別おすすめプラン](#利用スタイル別おすすめプラン)
- [見落としがちな落とし穴](#格安sim選びで見落としがちな落とし穴)
- [ユーザーの声](#ユーザーの声)
- [よくある質問](#よくある質問)
- [まとめ](#まとめ)
---
スマホの月額料金を下げたいと思っても、キャリアの数が多すぎて「結局どれを選べばいいのか分からない」という声は多い。
2026年8月現在、SimFinderのデータベースには日本国内の**22社・120プラン**が登録されている。月額は最安¥0([povo2.0](/ja/jp/carriers/povo/)基本料)から最高¥11,748([ドコモ](/ja/jp/carriers/docomo/) ポイ活MAX)まで幅広く、選択肢が多い分だけ迷いやすい。
この記事では、SimFinderのデータベースに登録されている全プランの料金・通信品質・機能を横断的に分析し、あなたの利用スタイルに合った格安SIMの選び方を解説する。
---
## 格安SIMの全体像 — MNO・サブブランド・MVNOの3分類を理解する
韓国の6キャリアは明快な「1対1」構造になっている。各MNOに1社のMVNOが対応する。
| MNO | MVNO | ネットワーク |
|---|---|---|
| **[SK Telecom](/ja/kr/carriers/skt/)** (93/100) | [SK 7mobile](/ja/kr/carriers/sevenmobile/) | SKTネットワーク |
| **[KT](/ja/kr/carriers/kt/)** (90/100) | [KT M Mobile](/ja/kr/carriers/ktmmobile/) | [KT](/ja/kr/carriers/kt/)ネットワーク |
| **[LG U+](/ja/kr/carriers/lguplus/)** (88/100) | [Mobing](/ja/kr/carriers/mobing/) | [LG U+](/ja/kr/carriers/lguplus/)ネットワーク |
日本やオーストラリアと異なり、1つのMNOに複数のMVNOがぶら下がる構造ではない。各MNOが1社ずつ格安ブランドを持ち、それ以外のMVNOはほぼ存在しない。
この「1対1」構造の結果、**MVNOの選択肢は限られるが、各MVNOの価格は極端に安い**。[SK 7mobile](/ja/kr/carriers/sevenmobile/)、[KT](/ja/kr/carriers/kt/) M Mobile、[Mobing](/ja/kr/carriers/mobing/)の3社で月額1万ウォン以下のプランが3つもある。
---
## 全23プラン料金比較
### MNOプラン(3社14プラン)
全プランが通話かけ放題・eSIM対応・契約縛りなし。家族割は全プランで適用可能。
| キャリア | プラン | 月額 | データ | 5G | 家族割 |
|---|---|---|---|---|---|
| [KT](/ja/kr/carriers/kt/) | LTE Basic | ₩33,000 | 1GB | × | ₩2,000 |
| SKT | T Plan Save | ₩33,000 | 2GB | × | ₩2,000 |
| [LG U+](/ja/kr/carriers/lguplus/) | 5G Slim 5GB | ₩37,000 | 5GB | ○ | ₩3,000 |
| SKT | 5GX Compact | ₩39,000 | 6GB | ○ | ₩3,000 |
| SKT | 5GX Compact Plus | ₩45,000 | 8GB | ○ | ₩3,000 |
| [KT](/ja/kr/carriers/kt/) | 5G Slim 10GB | ₩50,000 | 10GB | ○ | ₩4,000 |
| [KT](/ja/kr/carriers/kt/) | 5G Slim 21GB | ₩58,000 | 21GB | ○ | ₩4,000 |
| [LG U+](/ja/kr/carriers/lguplus/) | 5G Standard 31GB | ₩61,000 | 31GB | ○ | ₩5,000 |
| [KT](/ja/kr/carriers/kt/) | 5G Simple 50GB | ₩63,000 | 50GB | ○ | ₩5,000 |
| [LG U+](/ja/kr/carriers/lguplus/) | LTE Data 無制限 | ₩69,000 | 無制限 | × | ₩5,000 |
| SKT | 5GX Regular | ₩69,000 | 48GB | ○ | ₩5,000 |
| [KT](/ja/kr/carriers/kt/) | 5G Basic Unlimited | ₩80,000 | 無制限 | ○ | ₩7,000 |
| [LG U+](/ja/kr/carriers/lguplus/) | 5G Premier Essential | ₩85,000 | 無制限 | ○ | ₩7,000 |
| SKT | 5GX Prime | ₩89,000 | 無制限 | ○ | ₩7,000 |
### MVNOプラン(3社9プラン)
MVNOは全プランeSIM非対応。5GはSK [7mobile](/ja/kr/carriers/sevenmobile/) 5G 110GB+の1プランのみ。
| キャリア | ネットワーク | プラン | 月額 | データ | 通話 | 5G |
|---|---|---|---|---|---|---|
| [Mobing](/ja/kr/carriers/mobing/) | [LG U+](/ja/kr/carriers/lguplus/) | 100分/3GB | ₩4,000 | 3GB | 100分 | × |
| [KT](/ja/kr/carriers/kt/) M Mobile | [KT](/ja/kr/carriers/kt/) | 통화맘껏 2.5GB | ₩5,900 | 3GB | 無制限 | × |
| [SK 7mobile](/ja/kr/carriers/sevenmobile/) | SKT | LTE 1GB | ₩9,920 | 1GB | 無制限 | × |
| [KT](/ja/kr/carriers/kt/) M Mobile | [KT](/ja/kr/carriers/kt/) | 통화맘껏 10GB | ₩11,900 | 10GB | 無制限 | × |
| [Mobing](/ja/kr/carriers/mobing/) | [LG U+](/ja/kr/carriers/lguplus/) | データ 15GB+ | ₩25,370 | 15GB | 100分 | × |
| [SK 7mobile](/ja/kr/carriers/sevenmobile/) | SKT | LTE 11GB+ | ₩33,000 | 11GB | 無制限 | × |
| [Mobing](/ja/kr/carriers/mobing/) | [LG U+](/ja/kr/carriers/lguplus/) | 毎日5GB+ | ₩37,000 | 無制限(日5GB) | 無制限 | × |
| [KT](/ja/kr/carriers/kt/) M Mobile | [KT](/ja/kr/carriers/kt/) | 모두다맘껏 100GB+ | ₩38,200 | 100GB | 無制限 | × |
| [SK 7mobile](/ja/kr/carriers/sevenmobile/) | SKT | 5G 110GB+ | ₩45,100 | 110GB | 無制限 | ○ |
**MNO最安の₩33,000に対し、MVNOは₩4,000から**。同じネットワーク上で8倍以上の価格差がある。
**[韓国のSIMプランを比較する →](/ja/kr/search/)**
---
## 用途別おすすめプラン
### 最安で使いたい — 月額5,000ウォン以下
**[Mobing](/ja/kr/carriers/mobing/) ₩4,000 3GB** — 韓国最安プラン。[LG U+](/ja/kr/carriers/lguplus/)ネットワーク(カバレッジ95/100)で3GB。通話は100分の制限があるが、月額約440円は圧倒的。WiFi中心の人に。
**[KT](/ja/kr/carriers/kt/) M Mobile ₩5,900 3GB** — [Mobing](/ja/kr/carriers/mobing/)より₩1,900高いが、通話かけ放題が付く。[KT](/ja/kr/carriers/kt/)ネットワーク(90/100)。電話もそこそこ使う人にはこちら。
### 5Gを安く使いたい
**[LG U+](/ja/kr/carriers/lguplus/) 5G Slim 5GB ₩37,000** — MNOの5Gプランで最安。[LG U+](/ja/kr/carriers/lguplus/)の5Gネットワーク、eSIM対応。5GBは少なめだが、WiFi環境が多い人なら問題ない。
**[SK 7mobile](/ja/kr/carriers/sevenmobile/) 5G 110GB+ ₩45,100** — MVNO唯一の5Gプラン。110GBの大容量でMNOの5Gプランより大幅に安い。ただしeSIM非対応。
### 大容量・無制限
**[KT](/ja/kr/carriers/kt/) M Mobile ₩38,200 100GB+** — 100GBで₩38,200は、MNOの5G 50GB(₩63,000)と比べて圧倒的に安い。5GとeSIMは使えないが、データ量重視なら最適。
**[LG U+](/ja/kr/carriers/lguplus/) LTE Data 無制限 ₩69,000** — LTEだがデータ無制限。5G無制限のSKT Prime(₩89,000)や[LG U+](/ja/kr/carriers/lguplus/) Premier(₩85,000)より₩16,000〜₩20,000安い。速度より容量が重要な人に。
---
## eSIM・5G対応の注意点 — MNOとMVNOの大きな差
韓国市場の最大の注意点は、**eSIMと5GがほぼMNO限定**であること。
### eSIM対応状況
| カテゴリ | eSIM対応 | プラン数 |
|---|---|---|
| MNO(SKT, [KT](/ja/kr/carriers/kt/), [LG U+](/ja/kr/carriers/lguplus/)) | **全プラン対応** | 14/14 |
| MVNO([SK 7mobile](/ja/kr/carriers/sevenmobile/), [KT](/ja/kr/carriers/kt/) M Mobile, [Mobing](/ja/kr/carriers/mobing/)) | **全プラン非対応** | 0/9 |
| 合計 | | 14/23(61%) |
eSIMで日本から渡航前に開通したい場合、MVNOは選択肢に入らない。MNO直契約(最安₩33,000)が必要になる。
### 5G対応状況
23プラン中12プラン(52%)が5G対応。内訳:
- **MNO**: 11/14プランが5G対応(LTEプラン3つを除く)
- **MVNO**: 1/9プランのみ([SK 7mobile](/ja/kr/carriers/sevenmobile/) 5G 110GB+)
MVNOで5Gを使いたい場合、[SK 7mobile](/ja/kr/carriers/sevenmobile/) 5G 110GB+(₩45,100)が唯一の選択肢。
---
## 韓国SIMを選ぶ際の注意点
### 契約期間
23プラン中22プランが契約縛りなし。唯一の例外は[Mobing](/ja/kr/carriers/mobing/)の「毎日5GB+」(₩37,000)で、**24ヶ月の契約期間**が必要。それ以外は全てプリペイド式で、いつでも解約可能。
### 通話制限
21プランが通話かけ放題だが、**[Mobing](/ja/kr/carriers/mobing/)の2プラン(3GB ₩4,000、15GB ₩25,370)は通話100分の制限**がある。最安プランを選ぶ場合は通話制限に注意。
### 家族割引
MNOの全14プランに家族割引がある(₩2,000〜₩7,000/回線)。2回線以上で適用される。家族や友人と同じMNOで契約すると毎月の固定費を抑えられる。MVNOには家族割引がない。
### テザリング
MNOのLTE最安プラン2つ([KT](/ja/kr/carriers/kt/) LTE Basic、SKT T Plan Save)はテザリング非対応。それ以外のMNOプランは全て対応。MVNOは[KT](/ja/kr/carriers/kt/) M Mobile 100GB+、[Mobing](/ja/kr/carriers/mobing/) 15GB+/毎日5GB+、[SK 7mobile](/ja/kr/carriers/sevenmobile/) 11GB+/5G 110GB+がテザリング対応。
### データ繰り越し
韓国市場では**全23プランでデータ繰り越しなし**。MNO・MVNO問わず、余ったデータは月末に消滅する。オーストラリアの格安キャリアのような繰り越し制度は存在しない。
**[SimFinderで韓国のSIMプランを比較する →](/ja/kr/search/)**
---
## ユーザーの声
韓国でSIMを利用した人たちのリアルな声を紹介する。
> 「激安系の韓国SIMは、おおむね中国の通信会社のローミングなので、VPNアプリがないとTikTokやChatGPTが使えない点は頭に入れておくと良いです」
> — @fujit_ECbassman([元の投稿](https://x.com/fujit_ECbassman/status/1989545216106492291))
> 「チング通信の月1,700円のSIM半年使ってたけど、月1,100円の所見つけたから乗り換え!eSIMだから家からラクラク開通。이야기알뜰폰や[KT](/ja/kr/carriers/kt/) mobileも外国人登録証あれば申請できるみたい」
> — @ran_seoulife([元の投稿](https://x.com/ran_seoulife/status/1623969461312323584))
> 「仁川国際空港第1ターミナルは日本語で電光掲示板表記もされるし日本語話せる人多いし、SIM会社のお姉さんは日本語の契約書出してくれた上に日本語対応してくれた」
> — @Zin_Flying([元の投稿](https://x.com/Zin_Flying/status/1858063287759655312))
*※ 上記はX(旧Twitter)上の実際の投稿から引用しています。個人の感想であり、通信品質は地域・時間帯により異なります。*
---
## よくある質問
### 韓国のSIMは短期滞在でも契約できる?
MNOプランは契約縛りなし([Mobing](/ja/kr/carriers/mobing/)の1プランを除く)。eSIM対応のMNOプランなら、渡航前にオンラインで契約し、到着後すぐに使い始められる。ただしMVNOはeSIM非対応のため、現地で物理SIMの受け取りが必要。
### どのキャリアを選んでもカバレッジは問題ない?
はい。韓国の3大キャリアはカバレッジスコア95〜97/100で、日本の大手キャリアと同等以上。地方でも都市部でもカバレッジの心配はほぼ不要。
### MVNOのデメリットは?
eSIM非対応、5Gほぼ非対応(1プランのみ)、家族割引なし、一部プランで通話制限([Mobing](/ja/kr/carriers/mobing/) 2プラン)。ただし料金は劇的に安い(最安₩4,000 vs MNO最安₩33,000)。
### 家族割引はどのくらいお得?
MNO全プランで2回線以上から適用。割引額は月₩2,000〜₩7,000/回線。例えばSKT 5GX Prime(₩89,000)を2回線契約すると、1回線あたり₩82,000になる。
### 韓国の5G速度は実際どのくらい?
[SK Telecom](/ja/kr/carriers/skt/)のダウンロード速度は200.0 Mbps(OpenSignal 2025年計測)で世界トップクラス。[KT](/ja/kr/carriers/kt/) 185.5 Mbps、[LG U+](/ja/kr/carriers/lguplus/) 175.2 Mbpsも高速。日本の主要キャリアを上回る水準。
---
## まとめ
2026年の韓国SIM市場のポイント:
- **6社23プラン** — MNO 3社(SKT, [KT](/ja/kr/carriers/kt/), [LG U+](/ja/kr/carriers/lguplus/))とMVNO 3社の「1対1」構造
- **ネットワーク品質は世界トップクラス** — 全MNOがカバレッジ95以上、5G速度は最速200 Mbps
- **MNOとMVNOの価格差は最大20倍** — MVNO最安₩4,000 vs MNO最安₩33,000
- **eSIMはMNO限定**(14/23 = 61%) — 渡航前にeSIMで開通するならMNO一択
- **5Gは52%のプラン**(12/23)が対応 — MVNOの5GはSK [7mobile](/ja/kr/carriers/sevenmobile/) 1プランのみ
- **データ繰り越しは全プランなし** — 日豪と異なり、韓国市場には繰り越し制度がない
- **価格帯**: ₩4,000/月〜₩89,000/月
コスパ最優先ならMVNO、eSIM・5G・家族割引が必要ならMNO。この2択が韓国SIM選びの出発点になる。
**[韓国のSIMプランを探す →](/ja/kr/search/)**
---
*プランデータは2026年3月時点のものです。料金やサービス内容は変更される場合があります。最新情報は各キャリアの公式サイトをご確認ください。*
*全プランの横並び比較は[SimFinderの比較ツール](/ja/kr/search/)からどうぞ。*
================================================================================
# タイの国内SIM完全ガイド2026 — 長期滞在・移住者が知るべきこと
URL: https://sim-finder.com/ja/blog/best-sim-plans-thailand-residents-2026/
Type: blog (ja)
Published: 2026-03-24
## 結論: 長期滞在者向けおすすめ3選
| おすすめ | プラン | 月額 | ポイント |
|---------|-------|------|---------|
| **駐在員** | [AIS](/ja/th/carriers/ais/) Prepaid 50GB | 899 THB | 最高品質ネットワーク(95/100)、5G、eSIM対応 |
| **デジタルノマド** | [TrueMove H](/ja/th/carriers/truemove/) 5G Super Max 40GB | 499 THB | 5G+eSIM対応で最安、250分の通話付き |
| **移住者(コスパ重視)** | [TrueMove H](/ja/th/carriers/truemove/) Prepaid 60GB | 300 THB | 60GBで月300 THB、GB単価5.00 THBは市場最安 |
**[SimFinderでタイの全16プランを比較する →](/ja/th/search/)**
以下、3社16プランのデータを元に、長期滞在者・移住者の視点で詳しく解説する。
## 目次
- [タイの携帯事情 — 外国人でも契約しやすい市場](#タイの携帯事情--外国人でも契約しやすい市場)
- [キャリア相関図](#キャリア相関図--3大mno体制)
- [全16プラン料金比較](#全16プラン料金比較)
- [利用スタイル別おすすめ](#利用スタイル別おすすめプラン)
- [5G・eSIM対応状況](#5gesim対応状況)
- [eSIM vs 現地SIM — どちらを選ぶ?](#esim-vs-現地sim--どちらを選ぶ)
- [契約方法](#契約方法--パスポートがあれば即日開通)
- [注意点](#長期利用の注意点)
- [よくある質問](#よくある質問)
- [まとめ](#まとめ)
---
## タイの携帯事情 — 外国人でも契約しやすい市場
タイは東南アジアの中でも外国人がSIMを契約しやすい国だ。パスポートさえあればプリペイドSIMを即日購入・開通でき、契約縛りもない。SimFinderのデータベースでは**3社16プラン**を追跡しており、月額299 THB(約1,250円)から1,499 THB(約6,250円)まで選択肢がある。
長期滞在者にとって重要なのは、タイの携帯市場には以下の特徴があることだ。
- **全16プランが契約縛りなし** — 解約違約金ゼロ。いつでもキャリア変更可能
- **プリペイド式が主流** — ポストペイド契約はワークパーミットが必要な場合が多い
- **パスポートのみで契約可能** — 空港到着後すぐに開通できる
- **料金は前払い制** — チャージ(トップアップ)でプラン料金を支払う
- **3大MNO全てが5G・eSIM対応** — ただし対応プランは限られる
日本からの駐在員、デジタルノマド、リタイア移住者、いずれの場合でもプリペイドSIMで十分に対応できる。
---
## キャリア相関図 — 3大MNO体制
タイの携帯市場は**[AIS](/ja/th/carriers/ais/)、[TrueMove H](/ja/th/carriers/truemove/)、[DTAC](/ja/th/carriers/dtac/)の3大MNO**が支配する構造だ。唯一のMVNOだったPenguin SIMは2025年8月にNTの電波ライセンス失効に伴いタイでのサービスを終了しており、現在SimFinderが追跡するMVNOは存在しない。
| ネットワーク | タイプ | カバレッジ | 総合スコア | ダウンロード速度 | レイテンシ | 利用キャリア |
|---|---|---|---|---|---|---|
| **[AIS](/ja/th/carriers/ais/)** | MNO | 95/100 | 88/100 | 98.4 Mbps | 20 ms | [AIS](/ja/th/carriers/ais/) |
| **[TrueMove H](/ja/th/carriers/truemove/)** | MNO | 93/100 | 84/100 | 87.3 Mbps | 22 ms | [TrueMove H](/ja/th/carriers/truemove/) |
| **[DTAC](/ja/th/carriers/dtac/)** | MNO | 91/100 | 82/100 | 81.6 Mbps | 24 ms | [DTAC](/ja/th/carriers/dtac/) |
*品質データ: OpenSignal 2025年6月計測*
**[AIS](/ja/th/carriers/ais/)がネットワーク品質で首位**。カバレッジスコア95/100、ダウンロード速度98.4 Mbps、レイテンシ20 msと、全指標でリードしている。バンコク市内では3社の差は体感しにくいが、地方や離島では[AIS](/ja/th/carriers/ais/)の安定感が際立つ。長期滞在でタイ各地を移動する予定があるなら、[AIS](/ja/th/carriers/ais/)のネットワークは信頼性が高い。
[TrueMove H](/ja/th/carriers/truemove/)は2位(93/100、87.3 Mbps)。バンコク、チェンマイ、プーケットなどの主要都市では快適に使える。
[DTAC](/ja/th/carriers/dtac/)は3位(91/100、81.6 Mbps)だが、3社の差は韓国やオーストラリアと比べると小さい。都市部ではどのMNOを選んでも問題ない水準だ。
**True-[DTAC](/ja/th/carriers/dtac/)合併の影響**: True Corporationと[DTAC](/ja/th/carriers/dtac/)は2023年3月に合併した。ただし、[TrueMove H](/ja/th/carriers/truemove/)と[DTAC](/ja/th/carriers/dtac/)は現在も独立したブランド・料金体系・SIM商品として運営されている。利用者にとっては実質的に別キャリアとして選択でき、プラン内容も異なる。
タイ市場には現在SimFinderが追跡するMVNOは存在しない。かつて唯一のMVNOだったPenguin SIMは[AIS](/ja/th/carriers/ais/)のネットワークを使った格安プランを提供していたが、2025年8月にサービスを終了した。本ガイドの16プランは全てMNO3社の直営プランとなる。
---
## 全16プラン料金比較
全プランが契約縛りなし・解約違約金ゼロ。長期滞在者でもいつでもプラン変更・キャリア変更ができる。
### プリペイドプラン(9プラン)
| キャリア | プラン | 月額 | データ | 通話 | 5G | eSIM |
|---|---|---|---|---|---|---|
| [DTAC](/ja/th/carriers/dtac/) | Prepaid 15GB | 299 THB | 15GB | 無制限 | -- | -- |
| [AIS](/ja/th/carriers/ais/) | Prepaid 1GB | 299 THB | 1GB | 100分 | -- | -- |
| [TrueMove H](/ja/th/carriers/truemove/) | Prepaid 60GB | 300 THB | 60GB | 無制限 | -- | -- |
| [AIS](/ja/th/carriers/ais/) | Prepaid 5GB | 399 THB | 5GB | 無制限 | -- | -- |
| [DTAC](/ja/th/carriers/dtac/) | Prepaid 30GB | 499 THB | 30GB | 無制限 | **○** | -- |
| [AIS](/ja/th/carriers/ais/) | Prepaid 10GB | 599 THB | 10GB | 無制限 | **○** | **○** |
| [AIS](/ja/th/carriers/ais/) | Prepaid 20GB | 699 THB | 20GB | 無制限 | **○** | **○** |
| [AIS](/ja/th/carriers/ais/) | Prepaid 30GB | 899 THB | 30GB | 無制限 | **○** | **○** |
| [AIS](/ja/th/carriers/ais/) | Prepaid 50GB | 899 THB | 50GB | 無制限 | **○** | **○** |
### 5Gプラン(7プラン)
全プランeSIM対応・5G対応。通話は分数制限あり。
| キャリア | プラン | 月額 | データ | 通話 | 5G | eSIM |
|---|---|---|---|---|---|---|
| [TrueMove H](/ja/th/carriers/truemove/) | 5G Super Netflix 25GB | 499 THB | 25GB | 150分 | **○** | **○** |
| [TrueMove H](/ja/th/carriers/truemove/) | 5G Super Max 40GB | 499 THB | 40GB | 250分 | **○** | **○** |
| [DTAC](/ja/th/carriers/dtac/) | 5G Super Max 40GB | 499 THB | 40GB | 250分 | **○** | **○** |
| [DTAC](/ja/th/carriers/dtac/) | 5G Super Max 80GB | 899 THB | 80GB | 300分 | **○** | **○** |
| [TrueMove H](/ja/th/carriers/truemove/) | 5G Super Streaming 90GB | 999 THB | 90GB | 300分 | **○** | **○** |
| [TrueMove H](/ja/th/carriers/truemove/) | 5G Unlimited | 1,499 THB | 無制限 | 650分 | **○** | **○** |
| [DTAC](/ja/th/carriers/dtac/) | 5G Unlimited | 1,499 THB | 無制限 | 650分 | **○** | **○** |
### GB単価ランキング
長期滞在者にとって重要なのはGB単価だ。月々のコストを最適化するために確認しておきたい。
| プラン | 月額 | データ | GB単価 |
|---|---|---|---|
| [TrueMove H](/ja/th/carriers/truemove/) Prepaid 60GB | 300 THB | 60GB | **5.00 THB/GB** |
| [TrueMove H](/ja/th/carriers/truemove/) 5G Streaming 90GB | 999 THB | 90GB | 11.10 THB/GB |
| [DTAC](/ja/th/carriers/dtac/) 5G Super Max 80GB | 899 THB | 80GB | 11.24 THB/GB |
| [TrueMove H](/ja/th/carriers/truemove/) 5G Super Max 40GB | 499 THB | 40GB | 12.48 THB/GB |
| [DTAC](/ja/th/carriers/dtac/) 5G Super Max 40GB | 499 THB | 40GB | 12.48 THB/GB |
| [DTAC](/ja/th/carriers/dtac/) Prepaid 30GB | 499 THB | 30GB | 16.63 THB/GB |
| [AIS](/ja/th/carriers/ais/) Prepaid 50GB | 899 THB | 50GB | 17.98 THB/GB |
| [AIS](/ja/th/carriers/ais/) Prepaid 20GB | 699 THB | 20GB | 34.95 THB/GB |
[TrueMove H](/ja/th/carriers/truemove/) Prepaid 60GBのGB単価5.00 THBは2位の2倍以上のコスパで、タイ市場で突出した存在だ。
**[SimFinderでタイのSIMプランを比較する →](/ja/th/search/)**
---
## 利用スタイル別おすすめプラン
### 駐在員 — 安定性・品質重視
駐在員にとって最も重要なのはネットワーク品質と安定性だ。仕事のビデオ会議やVPN接続で遅延やドロップがあると業務に支障が出る。
**[AIS](/ja/th/carriers/ais/) Prepaid 50GB 899 THB** — [AIS](/ja/th/carriers/ais/)の最高品質ネットワーク(カバレッジ95/100、レイテンシ20 ms)で50GBの5Gデータを利用可能。eSIM対応なので日本にいる間に開通し、タイ到着後すぐに使い始められる。通話は無制限。月額899 THB(約3,750円)は日本のキャリアプランと比べて大幅に安い。
50GBで足りない場合は、**[DTAC](/ja/th/carriers/dtac/) 5G Super Max 80GB(899 THB)**が同額で80GBを提供する。ネットワーク品質は[AIS](/ja/th/carriers/ais/)に劣るが(82/100 vs 88/100)、バンコク中心部で使う分には十分。
### デジタルノマド — eSIM・5G・コスパのバランス
コワーキングスペースやカフェからのリモートワークが中心なら、5GとeSIMの両方に対応したプランが便利だ。
**[TrueMove H](/ja/th/carriers/truemove/) 5G Super Max 40GB 499 THB** — 5G+eSIM対応プランの中で最安。40GBあればビデオ会議やクラウドストレージの利用にも十分。250分の通話付き。eSIMなので物理SIMスロットを日本の番号維持用に使える。
データ使用量が多い場合は**[TrueMove H](/ja/th/carriers/truemove/) 5G Super Streaming 90GB(999 THB)**。90GBあればテザリングでPC作業をしても余裕がある。
コストを最小限に抑えたいなら**[TrueMove H](/ja/th/carriers/truemove/) Prepaid 60GB(300 THB)**。5GとeSIMは使えないが、60GBで月300 THB(約1,250円)は圧倒的な安さだ。WiFi環境が充実している場所で作業するノマドなら十分。
### 移住者・リタイア — 低コスト優先
リタイア移住や長期ステイで通信費を抑えたい場合。
**[TrueMove H](/ja/th/carriers/truemove/) Prepaid 60GB 300 THB** — GB単価5.00 THBはタイ市場で突出している。60GBのデータと通話無制限で月300 THB(約1,250円)。5GやeSIMは使えないが、日常利用には十分すぎる容量だ。
さらに節約するなら**[DTAC](/ja/th/carriers/dtac/) Prepaid 15GB 299 THB** — 月額299 THB(約1,250円、[AIS](/ja/th/carriers/ais/) Prepaid 1GBと同額)はPenguin SIMのサービス終了後のタイ市場最安値。データ15GBと通話無制限がついてくる。
### 短期滞在との比較 — 旅行用eSIMは割高
1〜2週間の短期滞在なら旅行用eSIM([Airalo](/ja/travel/providers/airalo/)、[Holafly](/ja/travel/providers/holafly/)等)も選択肢に入るが、1ヶ月以上の長期滞在では現地SIMの方がはるかに割安だ。
| 比較 | 旅行用eSIM(30日間の例) | 現地SIM(月額) |
|---|---|---|
| 代表的な料金 | 3GB: $6.00〜 / 5GB: $14.00〜 | 15GB: 299 THB (~$8.25) |
| データ量 | 3〜20GB | 15GB〜無制限 |
| 通話 | なし(データのみ) | 無制限〜650分 |
| 5G | なし | 12プラン対応 |
| 契約方法 | オンライン即時 | 空港・店舗で即日 |
長期滞在者は現地SIM一択だ。旅行用eSIMは短期出張や旅行のつなぎ用として活用するのがよい。短期旅行のeSIM選びについては[タイ旅行のeSIM比較ガイド](/ja/blog/travel-esim-thailand-2026/)を参照。
**[SimFinderでタイの全16プランを比較する →](/ja/th/search/)**
---
## 5G・eSIM対応状況
### 5G対応
16プラン中12プラン(75%)が5G対応。3大MNO全てが5Gを提供しているが、対応プランは中〜上位に限られる。
| キャリア | 5G対応プラン | 4G専用プラン | 5G最安 |
|---|---|---|---|
| [AIS](/ja/th/carriers/ais/) | 10GB, 20GB, 30GB, 50GB | 1GB, 5GB | 599 THB |
| [TrueMove H](/ja/th/carriers/truemove/) | 5G全プラン(4プラン) | Prepaid 60GB | 499 THB |
| [DTAC](/ja/th/carriers/dtac/) | Prepaid 30GB, 5G全プラン(4プラン) | Prepaid 15GB | 499 THB |
タイの5Gエリアはバンコク、チェンマイ、プーケット、パタヤなどの主要都市に集中している。バンコクのスクンビットやシーロムエリアでは安定した5G接続が期待できるが、地方では4Gにフォールバックする。
### eSIM対応
16プラン中11プラン(69%)がeSIM対応。
| キャリア | eSIM対応プラン | eSIM非対応プラン |
|---|---|---|
| [AIS](/ja/th/carriers/ais/) | Prepaid 10GB, 20GB, 30GB, 50GB(4プラン) | Prepaid 1GB, 5GB |
| [TrueMove H](/ja/th/carriers/truemove/) | 5G全プラン(4プラン) | Prepaid 60GB |
| [DTAC](/ja/th/carriers/dtac/) | 5G全プラン(3プラン) | Prepaid 15GB, 30GB |
eSIMのメリットは、日本を出発する前にオンラインで開通できること。到着後にSIMを購入する手間が省ける。ただしeSIM対応プランは499 THB以上に限られるため、最安プランを求める場合はeSIMは使えない。
---
## eSIM vs 現地SIM — どちらを選ぶ?
長期滞在者にとって、eSIMと物理SIMの選択は重要なポイントだ。
### eSIMが向いている人
- 渡航前にタイの番号を確保したい
- 物理SIMスロットを日本の番号用に残したい(デュアルSIM活用)
- 空港でSIMを買う手間を省きたい
- 5G対応プランを使いたい(eSIM対応 = 5G対応のプランが多い)
### 現地の物理SIMが向いている人
- 月額300 THB以下のプランを使いたい(eSIM対応は499 THB〜)
- [DTAC](/ja/th/carriers/dtac/) Prepaid 15GB(299 THB)などタイ最安クラスのプランを利用したい
- [TrueMove H](/ja/th/carriers/truemove/) Prepaid 60GB(300 THB)を選びたい
- eSIM非対応の端末を使っている
短期旅行者向けの旅行用eSIM([Airalo](/ja/travel/providers/airalo/)や[Holafly](/ja/travel/providers/holafly/)等)との違いについては[タイ旅行のeSIM比較ガイド](/ja/blog/travel-esim-thailand-2026/)を参照。英語での詳細な市場分析は[Best SIM Plans in Thailand 2026(英語版)](/en/blog/best-sim-plans-thailand-2026/)でも解説している。
---
## 契約方法 — パスポートがあれば即日開通
### 必要なもの
- **パスポート**(顔写真ページ)— これだけで契約可能
- **SIM対応スマートフォン** — eSIMの場合はeSIM対応端末
ワークパーミットや在留証明は不要。旅行者も長期滞在者も同じ条件で契約できる。
### 購入場所
1. **空港のキャリアカウンター** — スワンナプーム空港、ドンムアン空港の到着ロビーに[AIS](/ja/th/carriers/ais/)・[TrueMove H](/ja/th/carriers/truemove/)・[DTAC](/ja/th/carriers/dtac/)のカウンターがある。スタッフが設定まで対応してくれるので初めてでも安心。英語対応可能
2. **キャリアショップ** — バンコク市内のショッピングモール(MBK、サイアムパラゴン等)に各キャリアの店舗がある。プラン相談や変更もここで対応可能
3. **コンビニ** — セブンイレブン、ファミリーマートでSIMカードを販売している。ただしプランの選択肢は限られ、スタッフの英語対応も期待しにくい
4. **オンライン(eSIM)** — [AIS](/ja/th/carriers/ais/)、[TrueMove H](/ja/th/carriers/truemove/)、[DTAC](/ja/th/carriers/dtac/)の公式サイトやアプリからeSIMを購入できる。日本にいる間に手続きを完了し、タイ到着後にアクティベートすることも可能
### 開通の流れ
1. 購入場所でパスポートを提示
2. 希望のプランを選択
3. SIMカードを端末に挿入(またはeSIMをスキャン)
4. APN設定が自動で行われる(手動の場合はスタッフが対応)
5. トップアップ(チャージ)してプランを有効化
空港カウンターなら到着から30分程度で使い始められる。
---
## 長期利用の注意点
### 料金は前払い(トップアップ制)
タイのプリペイドSIMは**トップアップ(チャージ)制**だ。コンビニ、銀行アプリ、キャリアアプリ、オンラインでチャージできる。残高が不足するとプランが失効するため、自動チャージの設定を推奨する。
### データの追加購入
月間データ量を使い切った場合、キャリアアプリやUSSDコードでデータを追加購入できる。料金はキャリア・容量により異なるが、プラン変更の方が割安な場合も多い。
### SIM番号の有効期限
トップアップを一定期間行わないとSIM番号が失効する。キャリアにより異なるが、一般的に最後のトップアップから30〜180日が有効期限。長期滞在者は定期的なトップアップを忘れないこと。
### データ繰り越しなし
タイ市場では**全16プランでデータ繰り越しなし**。余ったデータは月末に消滅する。オーストラリアのような繰り越し制度は存在しない。自分の使用量に合ったプランを選ぶことが重要。
### 解約・番号ポータビリティ
全プランが契約縛りなし・解約違約金ゼロなので、いつでもキャリア変更が可能。タイにも番号ポータビリティ(MNP)制度があり、電話番号を維持したまま他キャリアに移行できる。
---
## よくある質問
### タイのSIMは外国人でもパスポートだけで契約できる?
はい。タイでは外国人がパスポートのみでプリペイドSIMを購入できる。空港や街中のキャリアショップ、コンビニ(セブンイレブン等)で即日開通可能。ただしSIM登録にはパスポートの顔写真ページが必要で、1人あたりのSIM枚数に制限(各キャリア5枚まで)がある。
### 長期滞在にはプリペイドとポストペイドのどちらがいい?
SimFinderが追跡する16プランは全て契約縛りなし・解約違約金ゼロ。タイではプリペイド式が主流で、外国人でも手軽に利用できる。ポストペイドはワークパーミット(労働許可証)が必要な場合が多く、駐在員以外にはハードルが高い。プリペイドでも5G・eSIM対応プランが豊富にある。
### タイで最もカバレッジが広いキャリアは?
[AIS](/ja/th/carriers/ais/)がカバレッジスコア95/100でトップ(OpenSignal 2025年6月計測)。[TrueMove H](/ja/th/carriers/truemove/)が93/100、[DTAC](/ja/th/carriers/dtac/)が91/100と続く。バンコク市内では3社とも差は小さいが、地方・離島では[AIS](/ja/th/carriers/ais/)の安定感が際立つ。
### タイでeSIMは使える?
はい。16プラン中11プラン(69%)がeSIM対応。[AIS](/ja/th/carriers/ais/)はプリペイド10GB以上(599 THB〜)、[TrueMove H](/ja/th/carriers/truemove/)と[DTAC](/ja/th/carriers/dtac/)は5Gプラン全て(499 THB〜)でeSIMが使える。(唯一のMVNOだったPenguin SIMは2025年8月にタイでのサービスを終了した。)
### タイの5G速度は実際どのくらい?
[AIS](/ja/th/carriers/ais/)のダウンロード速度は98.4 Mbps、[TrueMove H](/ja/th/carriers/truemove/)が87.3 Mbps、[DTAC](/ja/th/carriers/dtac/)が81.6 Mbps(OpenSignal 2025年計測)。5Gエリアはバンコク、チェンマイ、プーケットなど主要都市に集中。都市部では快適に利用できるが、地方では4Gにフォールバックする。
### Trueと[DTAC](/ja/th/carriers/dtac/)の合併でSIM選びに影響はある?
True Corporationと[DTAC](/ja/th/carriers/dtac/)は2023年3月に合併したが、[TrueMove H](/ja/th/carriers/truemove/)と[DTAC](/ja/th/carriers/dtac/)は現在もそれぞれ独立したブランド・料金体系・SIM商品で運営されている。利用者にとっては実質的に別キャリアとして選択できる。
### タイのSIMで日本への国際電話はできる?
プリペイドSIMの多くは国際電話に対応しているが、別途料金がかかる。日本への通話はLINE通話やWhatsAppなどのVoIPアプリを使うのが一般的で、追加費用がかからない。データプランさえあれば問題なく利用できる。
---
## まとめ
2026年のタイSIM市場のポイント:
- **3社16プラン** — MNO 3社([AIS](/ja/th/carriers/ais/)、[TrueMove H](/ja/th/carriers/truemove/)、[DTAC](/ja/th/carriers/dtac/))のみ。唯一のMVNOだったPenguin SIMは2025年8月にサービス終了し撤退した。全て契約縛りなし
- **ネットワーク品質は[AIS](/ja/th/carriers/ais/)が首位** — カバレッジ95/100、ダウンロード98.4 Mbps
- **価格帯**: 299 THB/月(DTAC 15GB / AIS 1GB、約1,250円)〜 1,499 THB/月(5G無制限、約6,250円)
- **GB単価最安は[TrueMove H](/ja/th/carriers/truemove/) Prepaid 60GB** — 300 THBで60GB、5.00 THB/GBは市場で突出
- **5Gは75%のプラン**(12/16)が対応 — MNO全社で提供、MVNOは市場から撤退
- **eSIMは69%のプラン**(11/16)が対応 — 499 THB以上のプランに集中
- **外国人でもパスポートのみで即日契約可能** — 空港カウンターが最も手軽
- **データ繰り越しは全プランなし** — 月内に使い切る前提で選ぶ
長期滞在者の選び方: **品質・安定性重視なら[AIS](/ja/th/carriers/ais/)**、**コスパ重視なら[TrueMove H](/ja/th/carriers/truemove/) Prepaid 60GB**、**5G+eSIMの便利さなら[TrueMove H](/ja/th/carriers/truemove/)/[DTAC](/ja/th/carriers/dtac/)の5Gプラン**。日本と比べて通信費は大幅に安く、駐在員でも月1,000〜1,500 THB(約4,200〜6,250円)で十分なプランが手に入る。
**[タイのSIMプランを探す →](/ja/th/search/)**
---
*プランデータは2026年3月時点のものです(2026年7月にキャリア構成を再確認、Penguin SIMはサービス終了のため掲載を終了)。料金は7% VAT込み(税込価格)。最新情報は各キャリアの公式サイトをご確認ください。*
*全プランの横並び比較は[SimFinderの比較ツール](/ja/th/search/)からどうぞ。*
================================================================================
# データ容量の選び方 — あなたに必要なGB数がわかるガイド
URL: https://sim-finder.com/ja/blog/data-usage-guide-how-many-gb/
Type: blog (ja)
Published: 2026-03-22
## 結論: データ容量の目安はこの表で分かる
| 利用スタイル | おすすめ容量 | 月額目安 |
|-------------|------------|---------|
| **ほぼWi-Fi**(メール・LINE中心) | 1〜3GB | ¥290〜¥990 |
| **通勤でSNS・動画**(電車で毎日30分〜1時間) | 5〜10GB | ¥950〜¥1,400 |
| **テレワーク・外出多め**(ビデオ会議・地図利用) | 15〜20GB | ¥1,390〜¥2,090 |
| **動画ストリーミング中心**(YouTube・Netflix常用) | 30GB〜無制限 | ¥2,178〜¥3,278 |
格安SIMの月額料金は「データ容量をいくつにするか」で大きく変わる。自分の使い方に合った容量を選べば、**必要十分な通信環境を最安で維持できる**。
まだ自分の使用量が分からない人も、この記事のアプリ別消費量と利用パターン別の目安を読めば、最適な容量が判断できる。
**[SimFinderで自分に合ったプランを探す →](/ja/jp/search/)**
## 目次
- [データ容量(ギガ)とは — 基礎知識](#データ容量ギガとは--基礎知識)
- [アプリ別データ消費量の目安](#アプリ別データ消費量の目安)
- [利用パターン別おすすめ容量](#利用パターン別おすすめ容量)
- [データ容量の節約テクニック](#データ容量の節約テクニック)
- [容量帯別おすすめプラン比較](#容量帯別おすすめプラン比較)
- [データ使用量の確認方法](#データ使用量の確認方法)
- [よくある質問](#よくある質問)
- [まとめ](#まとめ)
---
「ギガが足りない」「月末に速度制限がかかる」——スマホを使っていれば一度は経験する悩みだ。
その原因の多くは、**自分の使い方に合っていないデータ容量のプランを契約していること**にある。大きすぎる容量を契約すれば毎月無駄な出費になるし、小さすぎれば月末に速度制限で使い物にならなくなる。
この記事では、アプリごとのデータ消費量を具体的な数字で示し、あなたのライフスタイルに合った最適なデータ容量を導き出す。さらに、SimFinderのデータベースに登録されている120プランの中から、容量帯別のおすすめプランも紹介する。
格安SIMの選び方全体を知りたい場合は「[格安SIMの選び方完全ガイド2026](/ja/blog/kakuyasu-sim-erabikata-guide-2026/)」を参照してほしい。
---
## データ容量(ギガ)とは — 基礎知識
データ容量とは、スマホでインターネットを使うときに消費される**通信量の上限**のことだ。単位はGB(ギガバイト)で、日常会話では「ギガ」と略される。
### データ容量の仕組み
- **1GB = 1,024MB(メガバイト)**
- スマホでWebサイトを見る、動画を再生する、SNSを使うたびにデータが消費される
- 契約したデータ容量を使い切ると、通信速度が大幅に制限される(多くは128kbps〜1Mbps)
- **Wi-Fi接続中はモバイルデータを消費しない**
つまり、自宅や職場でWi-Fiに接続している時間が長いほど、必要なモバイルデータ容量は少なくて済む。
### 日本人の平均データ使用量
総務省の調査によると、日本のスマートフォンユーザーの月間モバイルデータ使用量の中央値は**約3〜5GB**。ただし、これはWi-Fi利用分を含まない数字であり、動画視聴が多い若年層では10GB以上を消費するケースも珍しくない。
---
## アプリ別データ消費量の目安
「何にどれくらいギガを使うのか」を把握することが、最適な容量選びの第一歩になる。以下は代表的なアプリ・サービスごとのデータ消費量の目安だ。
### メッセージ・SNS
| アプリ | 利用内容 | 1時間あたり | 1日30分で月間 |
|-------|---------|-----------|-------------|
| **LINE** | テキストメッセージ | 約0.002GB | 約0.03GB |
| **LINE** | 音声通話 | 約0.018GB | 約0.27GB |
| **LINE** | ビデオ通話 | 約0.3GB | 約4.5GB |
| **X(旧Twitter)** | タイムライン閲覧 | 約0.15GB | 約2.3GB |
| **Instagram** | フィード・ストーリーズ閲覧 | 約0.6GB | 約9.0GB |
| **TikTok** | 動画視聴 | 約0.7GB | 約10.5GB |
**ポイント**: テキスト中心のLINEはほとんどデータを消費しないが、Instagram・TikTokは画像・動画が中心のため消費量が多い。Instagram・TikTokを外出先で1日30分以上使うなら、3GBでは不足する。
### 動画ストリーミング
| サービス | 画質 | 1時間あたり | 毎日1時間で月間 |
|---------|------|-----------|---------------|
| **YouTube** | 360p(低画質) | 約0.3GB | 約9GB |
| **YouTube** | 480p(標準画質) | 約0.5GB | 約15GB |
| **YouTube** | 720p(HD) | 約1.0GB | 約30GB |
| **YouTube** | 1080p(フルHD) | 約1.5GB | 約45GB |
| **Netflix** | 低画質 | 約0.3GB | 約9GB |
| **Netflix** | 標準画質 | 約0.7GB | 約21GB |
| **Netflix** | 高画質(HD) | 約3.0GB | 約90GB |
| **Amazon Prime Video** | 標準画質 | 約0.6GB | 約18GB |
**ポイント**: 動画は画質設定でデータ消費量が大きく変わる。YouTube 720pとYouTube 360pでは3倍以上の差がある。モバイル回線で動画を見る場合は、画質を下げるだけでデータ消費を大幅に削減できる。
### 音楽ストリーミング
| サービス | 音質 | 1時間あたり | 毎日2時間で月間 |
|---------|------|-----------|---------------|
| **Spotify** | 標準音質(96kbps) | 約0.04GB | 約2.4GB |
| **Spotify** | 高音質(160kbps) | 約0.07GB | 約4.2GB |
| **Spotify** | 最高音質(320kbps) | 約0.14GB | 約8.4GB |
| **Apple Music** | 標準音質(256kbps) | 約0.11GB | 約6.6GB |
**ポイント**: 音楽ストリーミングは動画に比べてデータ消費が少ない。通勤中に毎日2時間聴いても、標準音質なら月間約2.4GB。Wi-Fi環境で事前ダウンロードしておけばモバイルデータの消費をゼロにできる。
### その他のサービス
| サービス | 利用内容 | データ消費量 |
|---------|---------|------------|
| **Zoom** | ビデオ会議(720p) | 約0.8GB/時間 |
| **Google Maps** | ナビ利用 | 約0.01〜0.03GB/時間 |
| **Webブラウジング** | ニュースサイト閲覧 | 約0.1GB/時間 |
| **メール** | 送受信(添付なし) | 約0.001GB/通 |
| **アプリアップデート** | 中規模アプリ | 約0.05〜0.3GB/回 |
| **OSアップデート** | iOS/Android | 約1〜5GB/回 |
**ポイント**: Zoomなどのビデオ会議は1時間で約0.8GB消費する。テレワークで1日2時間のビデオ会議を週5日こなすと、それだけで月間約32GB。テレワーク中心の人は大容量プランか自宅Wi-Fiが必須になる。
---
## 利用パターン別おすすめ容量
ここまでのアプリ別消費量を踏まえて、4つの利用パターン別に最適なデータ容量を整理する。
### パターン1: ほぼWi-Fi — 1〜3GB
**こんな人向け**: 自宅・職場にWi-Fiがあり、外出先ではLINEやメール程度。動画は自宅のWi-Fiでしか見ない。
**月間データ消費の目安**:
- LINE(テキスト・音声通話): 約0.3GB
- Webブラウジング(1日15分): 約1.0GB
- メール送受信: 約0.1GB
- **合計: 約1.4GB**
Wi-Fi環境が充実している人は、3GBでも十分に余裕がある。SimFinderのデータベースでは3GB以下のプランは最安¥290([日本通信SIM](/ja/jp/carriers/nihontsushin/) 1GB)から選べるため、コスト面でも最も有利だ。
### パターン2: 通勤でSNS・動画 — 5〜10GB
**こんな人向け**: 電車での通勤中にSNSをチェックしたり、YouTubeを低〜標準画質で見たりする。
**月間データ消費の目安**:
- LINE + X + Instagram(1日合計30分): 約2.5GB
- YouTube 480p(通勤中1日30分): 約3.8GB
- Webブラウジング・メール: 約0.5GB
- Spotify 標準音質(1日1時間): 約1.2GB
- **合計: 約8.0GB**
通勤時間にSNSと動画を楽しむ人は、5GBだとギリギリで、10GBあれば安心。データ繰り越しのあるプラン([IIJmio](/ja/jp/carriers/iijmio/)、[NUROモバイル](/ja/jp/carriers/nuro-mobile/)など)を選べば、使用量が少ない月の余りを翌月に回せる。
### パターン3: テレワーク・外出多め — 15〜20GB
**こんな人向け**: カフェや外出先でテレワークすることがある、Uber Eatsの配達やGoogleマップを頻繁に使う。
**月間データ消費の目安**:
- パターン2の内容: 約8.0GB
- Zoom ビデオ会議(週2〜3回、各1時間): 約3.2GB
- クラウドストレージ同期: 約1.0GB
- アプリアップデート(外出先で数回): 約0.5GB
- **合計: 約12.7GB**
テレワークの頻度が週2〜3日程度なら15GBで足りる。ただし、ビデオ会議が毎日あるなら20GB以上が安全。20GBで¥1,390([日本通信SIM](/ja/jp/carriers/nihontsushin/))はコスパが高い選択肢だ。
### パターン4: 動画ストリーミング中心 — 30GB〜無制限
**こんな人向け**: 外出先でもYouTubeやNetflixをHD画質で長時間視聴する、自宅にWi-Fi環境がない。
**月間データ消費の目安**:
- YouTube 720p(1日1時間): 約30GB
- SNS・メッセージ: 約3.0GB
- その他Webブラウジング: 約1.0GB
- **合計: 約34GB**
動画をHD画質で毎日1時間以上見るなら、30GBでも心許ない。自宅にWi-Fiがない場合や、スマホをテザリングでPCの通信にも使う場合は、無制限プラン([楽天モバイル](/ja/jp/carriers/rakuten/) ¥3,278)が合理的な選択になる。
**[SimFinderで容量・予算を指定してプランを比較する →](/ja/jp/search/)**
---
## データ容量の節約テクニック
「今のプランで容量が足りない」と感じたら、プランを上げる前にまず以下の節約テクニックを試してみてほしい。設定を変えるだけでデータ消費量を大幅に削減できる場合がある。
### 1. Wi-Fiへの自動接続を有効にする
最も効果的な節約方法。自宅・職場・よく行く場所のWi-Fiに自動接続する設定にしておくだけで、モバイルデータの消費を大幅に減らせる。
- **iPhone**: 「設定」→「Wi-Fi」→ 接続したいネットワークの「自動接続」をオン
- **Android**: 「設定」→「ネットワークとインターネット」→「Wi-Fi」→ ネットワーク設定で「自動接続」をオン
### 2. 動画アプリの画質設定を下げる
動画はデータ消費の最大要因。画質を1段階下げるだけで消費量が半分になることもある。
- **YouTube**: 設定 →「動画の画質設定」→ モバイルネットワーク使用時は「データセーバー」に設定
- **Netflix**: 設定 →「モバイルデータ使用量」→「データ使用量を節約」を選択
- **Amazon Prime Video**: 設定 →「ストリーミングとダウンロード」→ ストリーミング品質を「データ節約」に
### 3. バックグラウンド通信を制限する
使っていないアプリがバックグラウンドで通信し、気づかないうちにデータを消費しているケースは多い。
- **iPhone**: 「設定」→「一般」→「Appのバックグラウンド更新」→ 不要なアプリをオフ
- **Android**: 「設定」→「アプリ」→ 各アプリ →「モバイルデータとWi-Fi」→「バックグラウンドデータ」をオフ
### 4. 写真・動画の自動バックアップ設定を見直す
Google フォトやiCloudの自動バックアップがモバイル回線でも動作する設定になっていると、撮影した写真・動画が自動的にアップロードされ、大量のデータを消費する。
- **Google フォト**: 設定 →「バックアップ」→「モバイルデータ通信を使用してバックアップ」をオフ
- **iCloud**: 「設定」→「写真」→「モバイルデータ通信」をオフ
### 5. アプリの自動アップデートをWi-Fi限定にする
- **iPhone**: 「設定」→「App Store」→「モバイルデータ通信」→「自動ダウンロード」をオフ
- **Android**: Google Play ストア →「設定」→「ネットワーク設定」→「アプリの自動更新」→「Wi-Fi接続時のみ」
### 6. 音楽・動画の事前ダウンロード
SpotifyやYouTube(Premium)、Netflixなどは、Wi-Fi環境であらかじめコンテンツをダウンロードしておくことで、外出先ではデータ消費ゼロで視聴できる。通勤中に視聴するコンテンツを前夜にダウンロードしておく習慣を付ければ、データ消費量は劇的に減る。
---
## 容量帯別おすすめプラン比較
SimFinderのデータベースに登録されている120プランの中から、容量帯別にコストパフォーマンスの高いプランを比較する。料金はすべて税込だ。
### 3GB帯のプラン比較
少容量で足りるライトユーザー向け。
| プラン | 月額 | 分類 | 特徴 |
|-------|------|------|------|
| [日本通信SIM](/ja/jp/carriers/nihontsushin/) 合理的シンプル290 1GB | ¥290 | MVNO | 最安、通話料11円/30秒 |
| [IIJmio](/ja/jp/carriers/iijmio/) 2ギガ | ¥850 | MVNO | データ繰り越しあり、家族割あり |
| [NUROモバイル](/ja/jp/carriers/nuroMobile/) VSプラン 3GB | ¥792 | MVNO | データ繰り越しあり |
| [povo2.0](/ja/jp/carriers/povo/) 3GB/30日 | ¥990 | サブブランド | [au](/ja/jp/carriers/au/)品質、トッピング方式で柔軟 |
| [LINEMO](/ja/jp/carriers/linemo/) ベストプラン 3GB | ¥990 | サブブランド | [ソフトバンク](/ja/jp/carriers/softbank/)品質、LINEデータフリー |
**この容量帯のポイント**: 最安を追求するなら[日本通信SIM](/ja/jp/carriers/nihontsushin/)(¥290)。通信品質を重視するなら、サブブランドの[povo2.0](/ja/jp/carriers/povo/)または[LINEMO](/ja/jp/carriers/linemo/)(¥990)。[LINEMO](/ja/jp/carriers/linemo/)はLINEのトーク・通話がデータ消費ゼロになるため、LINEユーザーには特に有利だ。
### 10GB帯のプラン比較
通勤でSNS・動画を使うユーザー向け。
| プラン | 月額 | 分類 | 特徴 |
|-------|------|------|------|
| [IIJmio](/ja/jp/carriers/iijmio/) 10ギガ | ¥1,400 | MVNO | データ繰り越し・家族割あり |
| [HISモバイル](/ja/jp/carriers/hismobi/) 自由自在2.0 10GB | ¥1,340 | MVNO | 通話料9円/30秒(業界最安水準) |
| [NUROモバイル](/ja/jp/carriers/nuroMobile/) VLプラン 10GB | ¥1,485 | MVNO | データ繰り越しあり |
| [LINEMO](/ja/jp/carriers/linemo/) ベストプラン 10GB | ¥2,090 | サブブランド | [ソフトバンク](/ja/jp/carriers/softbank/)品質、LINEデータフリー |
**この容量帯のポイント**: MVNO同士では[HISモバイル](/ja/jp/carriers/hismobi/)(¥1,340)が最安で、通話料9円/30秒も魅力。[IIJmio](/ja/jp/carriers/iijmio/)(¥1,400)はデータ繰り越し対応で月ごとの使用量にムラがある人向き。通信品質を優先するなら[LINEMO](/ja/jp/carriers/linemo/)(¥2,090)。
### 20GB帯のプラン比較
テレワーク・外出が多いユーザー向け。
| プラン | 月額 | 分類 | 特徴 |
|-------|------|------|------|
| [日本通信SIM](/ja/jp/carriers/nihontsushin/) 合理的みんなのプラン 20GB | ¥1,390 | MVNO | 5分かけ放題 or 70分通話が標準付帯 |
| [HISモバイル](/ja/jp/carriers/hismobi/) 自由自在2.0 20GB | ¥2,090 | MVNO | 6分かけ放題標準付帯、通話料9円/30秒 |
| [IIJmio](/ja/jp/carriers/iijmio/) 15ギガ | ¥1,600 | MVNO | 15GB、データ繰り越し対応 |
| [ahamo](/ja/jp/carriers/ahamo/) 30GB | ¥2,970 | サブブランド | [ドコモ](/ja/jp/carriers/docomo/)品質90相当、5分かけ放題付き |
**この容量帯のポイント**: [日本通信SIM](/ja/jp/carriers/nihontsushin/)(¥1,390)がコスパで圧倒。20GBで5分かけ放題付きという内容を他社で再現しようとすると月額¥2,000以上になる。品質最優先なら[ahamo](/ja/jp/carriers/ahamo/)(¥2,970)で、[ドコモ](/ja/jp/carriers/docomo/)回線品質(総合スコア90/100)が使える。MNO・サブブランドの通信品質については「[MNOとMVNOの違い解説](/ja/blog/mno-mvno-difference-guide/)」で詳しく解説している。
### 無制限帯のプラン比較
動画ヘビーユーザー・自宅Wi-Fiなしの人向け。
| プラン | 月額 | 容量 | 分類 | 特徴 |
|-------|------|------|------|------|
| [日本通信SIM](/ja/jp/carriers/nihontsushin/) 合理的50GBプラン | ¥2,178 | 50GB | MVNO | 5分かけ放題付き、GB単価最高水準 |
| [ahamo](/ja/jp/carriers/ahamo/) 30GB | ¥2,970 | 30GB | サブブランド | [ドコモ](/ja/jp/carriers/docomo/)品質、5分かけ放題付き |
| [LINEMO](/ja/jp/carriers/linemo/)ベストプランV 30GB | ¥2,970 | 30GB | サブブランド | [ソフトバンク](/ja/jp/carriers/softbank/)品質、5分かけ放題付き |
| [楽天モバイル](/ja/jp/carriers/rakuten/) Rakuten最強プラン 無制限 | ¥3,278 | 無制限 | MNO | データ無制限 + Rakuten Link通話無料 |
**この容量帯のポイント**: 50GBで足りるなら[日本通信SIM](/ja/jp/carriers/nihontsushin/)(¥2,178)のコスパが際立つ。完全な無制限が必要な場合は[楽天モバイル](/ja/jp/carriers/rakuten/)(¥3,278)一択。[楽天モバイル](/ja/jp/carriers/rakuten/)はRakuten Linkアプリで国内通話も無料になるため、通話込みの実質コストでは他社を圧倒する。ただし、品質スコアは72/100とMNO4社中最低で、地下やビル内でのつながりやすさは他社に劣る点は理解しておく必要がある。
**[SimFinderで容量・予算を指定して全120プランから絞り込む →](/ja/jp/search/)**
---
## データ使用量の確認方法
最適なプランを選ぶためには、まず自分が毎月どれくらいのデータを使っているかを把握することが重要だ。以下の方法で確認できる。
### iPhoneの場合
1. 「設定」アプリを開く
2. 「モバイル通信」をタップ
3. 「現在までの合計」でデータ使用量を確認
4. アプリごとの使用量も一覧で表示される
**注意**: iPhoneの統計はリセットしない限り累積されるため、月初に「統計情報をリセット」することで月間の使用量を正確に把握できる。
### Androidの場合
1. 「設定」アプリを開く
2. 「ネットワークとインターネット」をタップ
3. 「データ使用量」をタップ
4. 期間を指定してモバイルデータの使用量を確認
Androidでは期間別の使用量が自動的に記録されるため、過去の月間使用量を遡って確認しやすい。
### キャリアのマイページ・公式アプリ
各キャリアが提供するマイページや公式アプリでも、当月のデータ使用量をリアルタイムで確認できる。プラン変更もそのまま行えるため、使用量の確認とプラン見直しを同時に行うなら公式アプリが便利だ。
### おすすめの確認手順
1. まず今月のデータ使用量を確認する
2. 1〜2ヶ月間は意識的に記録を付ける
3. 「多い月」と「少ない月」の差を把握する
4. 多い月の使用量に合わせてプランを選ぶ(少なすぎるプランは速度制限リスクがある)
---
## よくある質問
### Q: スマホのデータ容量は何GBあれば足りる?
自宅や職場にWi-Fiがあり、外出先ではSNSやメール中心なら3GB。通勤中に動画やSNSを見るなら5〜10GB。テレワークや外出先での利用が多いなら15〜20GB。動画ストリーミングを頻繁に使うなら30GB以上が目安。
### Q: YouTubeを1時間見ると何GB消費する?
画質によって大きく異なる。360p(低画質)で約0.3GB、480p(標準画質)で約0.5GB、720p(HD画質)で約1.0GB、1080p(フルHD)で約1.5GB。毎日1時間HD画質で視聴すると月間約30GBになる。
### Q: LINEのトーク・通話はどれくらいデータを使う?
テキストメッセージはほぼゼロに近く、写真送受信が1枚あたり約2〜5MB。音声通話は1時間で約18MB(0.018GB)、ビデオ通話は1時間で約300MB(0.3GB)。テキスト・音声通話中心ならデータ消費は非常に少ない。
### Q: データ容量を節約する方法は?
主な方法は4つ。(1) 自宅・職場のWi-Fiに自動接続する設定にする、(2) 動画アプリの画質設定を下げるかWi-Fi時のみ高画質にする、(3) アプリのバックグラウンド通信をオフにする、(4) 写真・動画の自動バックアップをWi-Fi時のみにする。これだけで月のデータ消費量を半分以下に抑えられることもある。
### Q: データ容量を使い切ったらどうなる?
多くのプランでは通信速度が制限される。制限後の速度はプランにより異なり、一般的には128kbps〜1Mbps。128kbpsではWebサイトの閲覧も困難だが、1MbpsならテキストベースのSNSやメッセージは使える。データチャージ(追加購入)で速度制限を解除することも可能だ。
### Q: 月のデータ使用量はどうやって確認できる?
iPhoneは「設定」→「モバイル通信」で確認できる。Androidは「設定」→「ネットワークとインターネット」→「データ使用量」で確認可能。各キャリアの公式アプリやマイページでも確認できる。まずは1〜2ヶ月間の実際の使用量を把握してからプランを選ぶことを推奨する。
### Q: データ繰り越しがあるプランを選ぶべき?
月によってデータ使用量にムラがある人にはおすすめ。余ったデータ容量を翌月に持ち越せるため、多めの月と少なめの月を平均化できる。[IIJmio](/ja/jp/carriers/iijmio/)、[UQ mobile](/ja/jp/carriers/uqmobile/)、[NUROモバイル](/ja/jp/carriers/nuro-mobile/)、[イオンモバイル](/ja/jp/carriers/aeon/)などが対応。毎月安定して同じくらい使う人なら、繰り越しの有無はそれほど重要ではない。
---
## まとめ
データ容量選びのポイントを整理する。
- **ほぼWi-Fi(メール・LINE中心)**: 1〜3GBで十分。最安¥290([日本通信SIM](/ja/jp/carriers/nihontsushin/))から選べる
- **通勤でSNS・動画**: 5〜10GBが適量。[IIJmio](/ja/jp/carriers/iijmio/) 10ギガ ¥1,400、[HISモバイル](/ja/jp/carriers/hismobi/) 10GB ¥1,340がコスパ良好
- **テレワーク・外出多め**: 15〜20GBが安全圏。[日本通信SIM](/ja/jp/carriers/nihontsushin/) 20GB ¥1,390が5分かけ放題付きで最安水準
- **動画ストリーミング中心**: 30GB〜無制限。[楽天モバイル](/ja/jp/carriers/rakuten/)無制限 ¥3,278、または[日本通信SIM](/ja/jp/carriers/nihontsushin/) 50GB ¥2,178
- **節約テクニック**: Wi-Fi自動接続、動画画質の調整、バックグラウンド通信の制限で消費量を大幅に削減可能
- **まず確認**: プランを変える前に、iPhoneの「モバイル通信」またはAndroidの「データ使用量」で現在の使用量を把握すること
**選び方の手順**:
1. 現在のデータ使用量を確認する
2. この記事の利用パターンと照らし合わせる
3. 節約テクニックで削減できるか検討する
4. 必要な容量帯のプランをSimFinderで比較する
格安SIMの選び方全体(通信品質・通話オプション・eSIM対応なども含む)については「[格安SIMの選び方完全ガイド2026](/ja/blog/kakuyasu-sim-erabikata-guide-2026/)」を参照してほしい。MNO・サブブランド・MVNOの違いによる通信品質の差は「[MNOとMVNOの違い解説](/ja/blog/mno-mvno-difference-guide/)」で詳しく解説している。
**[あなたに最適なプランを探す →](/ja/jp/search/)**
---
*この記事の情報は2026年4月時点のものです。最新の料金・プラン内容は各キャリアの公式サイトでご確認ください。*
*料金の比較・シミュレーションには[SimFinderの比較ツール](/ja/jp/search/)をご利用ください。*
================================================================================
# ドコモ・バイクシェアが全国で一時停止 復旧見通し立たず
URL: https://sim-finder.com/ja/blog/docomo-bikeshare-system-shogai-teishi-2026/
Type: blog (ja)
Published: 2026-08-04T09:00:00+09:00
ドコモ・バイクシェアは2026年8月4日、システム不具合により同日14時30分ごろから全国でシェアサイクルサービスの提供を一時停止したと発表した。同社は「安定したサービス提供の見通しが立っていない」としており、再開時期は未定。原因は調査中となっている。通勤・移動の足として同サービスを使っている人は、当面ほかの交通手段を確保する必要がある。
## 8月3日から貸出・返却できない不具合が発生
Impress Watchおよびケータイ Watchの報道によると、停止に先立つ8月3日ごろから、一部の自転車で貸出・返却ができない、アプリに「システムエラーが発生しました」と表示されるといった事象が全国で発生していた。断続的な不具合が続き、安定した提供が見込めないとして全面停止に踏み切った形だ。
東京都文京区も8月4日、公式サイトで「一部アプリと自転車の利用がしづらい状況」が生じているとして、区内の利用者に向けて停止を告知している。特定エリアに限った障害ではなく、全国のポートが対象になっている点が今回の特徴だ。
## 返却できなかった分は同社が料金を補正、手続きは不要
利用者にとって気がかりなのが、借りたまま返却操作ができなかった場合の扱いだ。ITmedia NEWSによれば、返却操作ができない利用者はポートに駐輪して施錠すれば、同社側が返却処理と利用料金の補正を実施する。不具合によって正常に処理されなかった利用分についても同社が確認したうえで返金処理や料金補正を行うとしており、利用者側での申請などの手続きは不要とされている。月額会員も対象だが、具体的な補正方法は検討中の段階だ。
つまり「返せないまま課金され続ける」ことを心配して自力で対処する必要はない。ポートに戻して施錠する、というのが現時点で案内されている対応となる。
## 背景に8月1日のdアカウント連携ログインへの移行
今回の不具合の背景として各メディアが挙げているのが、8月1日に実施された大規模な仕様変更だ。Impress Watchの報道によれば、同社はログイン方式を従来のID・パスワード方式から、dアカウント・Appleアカウント・Googleアカウントによる外部アカウント連携へと移行。あわせて利用料金の精算タイミングを、月末締め翌月払いから乗車のつど請求する方式に変更していた。この移行の完了が当初予定より遅れ、その後も断続的にシステム不具合が続いていたという。
さらにITmedia NEWSは、同社が9月1日に新ブランド「NOLL」への刷新と料金体系の変更を予定していたことにも触れている。8月1日の変更は、この大型リニューアルに先立つシステム更改という位置づけだった。
ただし、同社は現時点で不具合の原因を調査中としており、8月1日の仕様変更と今回の障害の因果関係は公式には発表されていない。関連を断定できる情報は出ていない点に注意したい。
## キャリアのアカウント基盤に依存するサービスの注意点
ドコモ・バイクシェアはNTTドコモグループのシェアサイクル事業者であり、今回の移行によってログインの入口がdアカウントをはじめとする外部アカウントに一本化された。通信キャリアのアカウント基盤は、決済・ポイント・各種サービスの共通IDとして利用範囲が広がっており、その分だけシステム更改の影響が及ぶ範囲も大きくなる。
回線契約の乗り換えを検討している人にとっても、キャリアのアカウントがどのサービスとひも付いているかを把握しておくことは無駄にならない。今回の件は自転車の貸出という限定的な影響にとどまるが、共通IDの移行が実サービスの停止につながり得ることを示した事例といえる。
最新の復旧状況は、ドコモ・バイクシェアの公式サイトで順次告知される予定となっている。
================================================================================
# ドコモ、7月28日からiPhone値上げ 最大2万5190円
URL: https://sim-finder.com/ja/blog/docomo-iphone-17-neage-zanka-2026/
Type: blog (ja)
Published: 2026-07-25T09:00:00+09:00
NTTドコモが7月28日以降、ドコモオンラインショップで販売するiPhoneの価格を改定します。値上げ幅は機種・容量によって8140円〜2万5190円。同時に、新規契約とMNPを対象に一部機種で「いつでもカエドキプログラム」の24回目残価も変更されます。
一括で買い切るユーザーにとっては単純な負担増ですが、2年後に返却する前提なら影響は機種ごとに大きく分かれます。ドコモ公式のお知らせ(7月24日付)と、同日にITmedia Mobileが報じた内容から要点を整理します。
## 主な機種の改定前後価格
ドコモの発表によると、主な機種の一括価格は次のように変わります。
| 機種 | 改定前 | 改定後 | 差額 |
|--|--|--|--|
| iPhone 16(128GB) | 14万5706円 | 15万6266円 | +1万560円 |
| iPhone 17e(256GB) | 13万1219円 | 13万9810円 | +8591円 |
| iPhone 17e(512GB) | 16万1920円 | 17万60円 | +8140円 |
| iPhone 17(256GB) | 16万4197円 | 17万8552円 | +1万4355円 |
| iPhone 17(512GB) | 19万9870円 | 21万3070円 | +1万3200円 |
| iPhone Air(256GB) | 19万3930円 | 21万2300円 | +1万8370円 |
| iPhone 17 Pro(256GB) | 21万4940円 | 23万340円 | +1万5400円 |
上位容量ほど上げ幅が大きく、最大は2万5190円です。ドコモは今年4月にもiPhone 16/17/17eを値上げしており、今回はそれに続く改定となります。
## 残価が上がる機種と、上がらない機種
今回の改定でポイントになるのが「いつでもカエドキプログラム」の残価です。同プログラムは端末代を24回払いに設定し、24回目の支払い前に端末を返却すると残価分の支払いが免除される仕組みで、返却前提なら**実質的な負担は「一括価格−残価」**になります。
ドコモは新規契約・MNPを対象に、一部機種の残価を引き上げました。iPhone 17e(256GB)は8万7384円から9万5777円(+8393円)、iPhone 17(256GB)は12万384円から13万4519円(+1万4135円)です。
その結果、iPhone 16(128GB)・iPhone 17e(256GB)・iPhone 17(256GB)の3機種は、改定後の一括価格から残価を引いた金額がいずれも**4万4033円**で揃います。ITmedia Mobileの記事も、この3機種については割引施策次第で実質負担額への影響は限定的だと指摘しています。
一方で、iPhone 17 Pro/iPhone 17 Pro Maxなど残価が据え置かれた機種は、値上げ分がそのまま返却時の負担に上乗せされます。iPhone 17 Pro(256GB)なら1万5400円の増加です。ハイエンドを狙うほど影響が大きい構図になっています。
なお、iPhone 17e(512GB)に設定されていた「早期利用特典」の利用料は、7月28日以降に月500円から0円へ変更されます。
## 端末価格と回線を切り離して考える
キャリアの端末価格は為替や調達コストで動き、今回のように年内に複数回改定されることもあります。表示上の「実質負担額」はプログラムの残価設定に左右されるため、返却前提の金額と買い切りの金額はまったく別物として比較する必要があります。
購入前に確認しておきたいのは次の3点です。
- **2年後に返却するか、手元に残すか** — 買い切るなら7月27日までのほうが安く、返却前提なら残価が上がる機種は7月28日以降が有利になり得る
- **端末をどこで買うか** — Appleや家電量販店でSIMフリー版を買い、回線は別で契約する分離購入も選択肢
- **回線側の月額** — 端末代の数千円の差より、月額料金の差のほうが2年間の総額に効くケースは多い
端末を分離購入するなら、回線は月額の安いMVNOやオンライン専用プランを選ぶことで、2年総額を抑えられます。SimFinderの検索では、データ容量・通話時間・こだわり条件から各社プランをスコアリングして比較できます。端末の買い方を決めたうえで、回線側もあわせて見直してみてください。
================================================================================
# ドコモ、iPhone 17を再値上げ 256GBが19万9793円に
URL: https://sim-finder.com/ja/blog/docomo-iphone-17-saineage-199793-2026/
Type: blog (ja)
Published: 2026-09-19T09:00:00+09:00
NTTドコモが「iPhone 17」の販売価格を再び引き上げました。ドコモオンラインショップの2026年9月16日付お知らせによると、9月17日以降、256GBモデルは17万8552円から19万9793円に、512GBモデルは21万3070円から23万560円に変更されています。同時に「いつでもカエドキプログラム」の残価も引き上げられたため、MNPと新規契約では2年返却時の負担額が据え置かれる一方、機種変更では値上げ分がそのまま負担増になります。
## 値上げ幅は256GBで2万1241円
今回の改定内容は、ITmediaやASCII.jpなど複数のメディアが9月18日に報じています。値上げ幅は256GBモデルが2万1241円、512GBモデルが1万7490円です。
| モデル | 改定前 | 改定後 | 差額 |
|--|--|--|--|
| iPhone 17 256GB | 17万8552円 | 19万9793円 | +2万1241円 |
| iPhone 17 512GB | 21万3070円 | 23万560円 | +1万7490円 |
ドコモのiPhone 17は7月28日にも値上げされており、すまほん!!の報道によれば、7月の改定前からの累計上昇額は256GBモデルで3万5596円に達します。背景としては、Appleが9月10日に旧モデルの価格を引き上げたことに合わせた対応とみられます。
## 残価も同額アップ、MNPは「実質33円」を維持
あわせてドコモは、いつでもカエドキプログラムの24回目の支払い(残価)も改定しました。iPhone 17(256GB)の残価は、新規契約とMNPを対象に13万4519円から15万5760円へ、値上げ幅と同額の2万1241円だけ引き上げられています。
残価が値上げ分と同額だけ上がったため、23か月目に端末を返却する場合の支払総額は改定前と変わりません。ドコモが訴求する「2年実質33円」という水準も維持されています。ただしこの33円は、プログラム利用料2万2000円が免除される「ドコモで買替えおトク割」を適用した場合の金額である点に注意が必要です。
一方、残価の引き上げ対象は新規契約とMNPに限られるため、既存ユーザーの機種変更では値上げ分だけ実質負担額が増えることになります。
## 「返却前提」以外の選択肢も検討したい
今回の改定は、キャリアの端末価格が為替や本体価格の改定に応じて短期間で動くことを改めて示しました。iPhone 17は約2か月で2度の値上げを受け、256GBモデルの本体価格は20万円に迫っています。
残価設定型プログラムは2年で返却することを前提にすれば負担を抑えられますが、端末を手元に残したい場合や、返却時の査定条件が気になる場合は、総支払額が大きく変わります。端末はApple直販や中古端末で調達し、回線はSIMのみ契約で格安SIMやオンライン専用プランを選ぶという分離型の買い方も、選択肢として比較する価値があります。
SimFinderでは、SIMのみ契約時の月額料金を条件別にスコアリングして比較できます。端末代と通信料を切り分けて考えると、2年間のトータルコストが見えやすくなります。
================================================================================
# ドコモirumo 0.5GBプランが5G対応、料金・速度は据え置き
URL: https://sim-finder.com/ja/blog/docomo-irumo-05gb-5g-taiou-2026/
Type: blog (ja)
Published: 2026-08-27T09:00:00+09:00
NTTドコモは2026年8月26日、料金プラン「irumo」の0.5GBプランで5G通信への対応を開始した。月額550円という料金も、最大3Mbpsという通信速度の上限も据え置きで、利用者側の手続きは必要ない。すでにirumoの0.5GBプランを契約している人にとっては、負担なく接続方式の選択肢が広がる形の変更となる。
## 8月26日から順次、手続き不要で5Gに
ドコモが公開したお知らせによると、5G通信の提供開始は「2026年8月26日(水)~順次」。対象はirumoの0.5GBプランで、契約者側での申し込みや設定変更は求められない。
条件として挙げられているのは端末側の対応で、公式には「5G通信のご利用には、5G対応機種が必要となります」と明記されている。5Gに対応していないエリアでは、これまで通り4G(LTE)での通信となる。
これまでirumoの0.5GBプランは、エリアにかかわらず4G(LTE)のみを利用する扱いだった。今回の変更で、他の容量帯のプランと同様に5Gネットワークを掴めるようになる。
## 料金・速度の条件は変更なし
今回の対応で変わるのは接続する通信規格の部分だけで、プランの提供条件そのものに変更はない。
- 月額料金: 550円(税込)
- 最大通信速度: 3Mbps
- 規定量超過後の速度: 最大128kbps
ケータイWatchも8月27日付の記事で、料金・最大速度ともに据え置きである点を報じている。
## 3Mbps上限のため「速度が上がる」変更ではない
注意したいのは、5G対応が即座に体感速度の向上を意味するわけではない点だ。irumoの0.5GBプランには最大3Mbpsという速度上限が設けられており、この上限は今回も据え置かれている。つまり5Gエリアに入っても、プランとして出せる速度の天井は変わらない。
一方で、5G基地局に接続できること自体には意味がある。4Gの電波が混み合う場所で5G側に接続できれば、上限の3Mbpsに届きやすくなる場面は考えられる。ただしドコモは今回のお知らせで速度改善を約束しているわけではなく、あくまで「5G通信への対応」という位置づけにとどまる。
## 対象は既存契約者のみ
irumoは2025年6月4日に新規申し込みの受付を終了している。したがって今回の5G対応は、すでにirumoの0.5GBプランを使っている既存契約者に向けた変更であり、これを目当てに新たに契約することはできない。
月額550円で0.5GBという構成は、通話とごく少量のデータ通信だけを求める層に向いたプランだ。同種の低容量帯を検討している場合は、他社の格安SIMを含めて比較したうえで判断したい。SimFinderでは月額料金・データ容量・通信品質をスコア化して比較できるので、あわせて確認してほしい。
================================================================================
# ドコモ ポイ活プラン、12月利用分からポイント“両取り”不可に
URL: https://sim-finder.com/ja/blog/docomo-poikatsu-point-shintei-kaitei-2026/
Type: blog (ja)
Published: 2026-09-01T09:00:00+09:00
NTTドコモは2026年9月1日、「ドコモ ポイ活」系プランのdポイント進呈条件を改定すると発表しました。2026年12月ご利用分(2027年1月ご請求分)から、d払いやdカードでの対象決済に対して進呈された特典ポイント分が、利用料金への還元計算から差し引かれます。決済で受け取ったポイントと利用料金で受け取るポイントを両方フルに得る、いわゆる“両取り”ができなくなる形です。
ポイ活プランを使い倒している人ほど、実質的な受け取りポイントが減ります。ただし還元率そのものの引き下げではないため、影響の大きさは月々の決済額によって変わります。
## 対象は4プラン
改定の対象は「ドコモ ポイ活 MAX」「ドコモ ポイ活 20」「eximo ポイ活」「ahamo ポイ活」の4つです(ドコモ公式お知らせ、および[dポイント進呈条件改定ページ](https://www.docomo.ne.jp/charge/dpoint_kaitei/))。
## 何が変わるのか
これまでは、各種割引を適用した後の利用料金の「全額」がポイント進呈の計算対象でした。改定後は、そこから「対象決済に対する特典」として進呈されたポイント分を除いた金額が計算対象になります。
ケータイWatchが伝えたドコモの例では、「ドコモ ポイ活 MAX」で各種割引後の利用料金が7,680円(税抜)、ポイ活特典として3,500ポイントを獲得したケースで、ポイント計算の対象額が従来の7,680円から4,180円へと下がります。差額の3,500円分は、決済側ですでにポイントを受け取っているとみなされる、という考え方です。
ポイントを利用料金に充当している場合の扱いも整理されました。充当額が決済特典ポイントより少ないときは、特典ポイント分を除いた額に対して還元されます。
ドコモは注釈で、進呈率やポイント種別(期間・用途限定かどうか)に変更はないこと、計算用データの締め切り時期の違いによって進呈ポイント数に差分が生じる場合があり、その差分は後日調整されないことを明記しています。
## 同日発表のdカード改定とセットで見る
同じ9月1日、ドコモはdカード関連の改定も公表しました。ITmedia Mobileとケータイ Watchによれば、一般の「dカード」は2027年1月ご利用分から通常決済のポイント進呈が「100円ごとに1ポイント」から「200円ごとに1ポイント」へ変わり、還元率は実質1%から0.5%になります。年会費も、前年度に利用がない場合に1,650円が発生する形へ改められます。
「dカード PLATINUM」については、最大進呈率が適用される期間が「入会初年度(12か月)」から「入会月から2か月後まで」へ短縮され、ドコモでんきGreenは2026年10月ご利用分、ケータイ・ドコモ光・dカード積立は2026年12月ご利用分から順次適用されます。
なお年会費の返金受付も案内されており、エントリー期限は2026年12月31日とされています。
## SIM選びへの影響
ポイ活プランは「月額料金は高いがポイント還元で実質安い」という前提で選ばれてきました。今回の改定はその前提のうち、還元側の計算方法に手を入れるものです。ドコモ経済圏での決済額が大きい人ほど、除外される特典ポイント分も大きくなり、利用料金側の還元が目減りします。
自分のケースで実際にいくら変わるのかは、直近数か月の「対象決済で受け取ったポイ活特典ポイント」の実績を見れば概算できます。その額が毎月まとまった規模になっているなら、12月利用分以降の実質負担を計算し直したうえで、通信量に見合ったシンプルな料金プランや他社プランと比較検討する価値があります。
================================================================================
# 旅行用eSIMの設定方法 — iPhone / Android 完全図解ガイド
URL: https://sim-finder.com/ja/blog/esim-setup-guide-iphone-android/
Type: blog (ja)
Published: 2026-03-22
## 結論: eSIMの設定は3ステップで完了する
旅行用eSIMの設定は、端末や方式を問わず**3ステップ**で完了する。
1. **購入** — プロバイダーのアプリまたはWebサイトでプランを購入
2. **インストール** — QRコード読み取り、アプリからのインストール、または手動入力
3. **アクティベーション** — 渡航先到着後、データ通信をeSIMに切り替えるだけ
**出発前にステップ2(インストール)まで済ませておくのが鉄則だ。** WiFi環境が必要なため、空港で慌てることなく確実に設定できる。
この記事では、iPhone・Androidそれぞれの具体的な設定手順を、3つのインストール方式(QRコード・アプリ・手動入力)別に解説する。デュアルSIM設定やトラブルシューティングも網羅した。
**[SimFinderで渡航先のeSIMプランを比較する →](/ja/travel/)**
---
## 目次
- [eSIMとは(概要)](#esimとは概要)
- [設定前の準備](#設定前の準備)
- [iPhone — eSIM設定手順](#iphone--esim設定手順)
- [Android — eSIM設定手順](#android--esim設定手順)
- [デュアルSIM設定](#デュアルsim設定)
- [トラブルシューティング](#トラブルシューティング)
- [プロバイダー別の設定方法比較](#プロバイダー別の設定方法比較)
- [よくある質問](#よくある質問)
- [まとめ](#まとめ)
---
## eSIMとは(概要)
eSIM(Embedded SIM)とは、スマートフォンに内蔵されたデジタルSIMのことだ。物理SIMカードの差し替えなしに、QRコードの読み取りやアプリ操作でモバイルデータ通信を利用できる。
旅行用eSIMの最大のメリットは**デュアルSIM運用**だ。日本のSIM(電話番号・SMS)を維持したまま、旅行eSIMをデータ通信専用として追加できる。帰国後は旅行eSIMを削除するだけで元の環境に戻る。
eSIMの基礎知識、プロバイダー11社の料金比較、選び方については**[海外旅行用eSIM完全ガイド2026](/ja/blog/travel-esim-complete-guide-2026/)**で詳しく解説している。この記事では「設定方法」に特化して、具体的な操作手順を説明する。
---
## 設定前の準備
eSIMのインストールを始める前に、以下の3点を確認しておく。
### 1. eSIM対応端末か確認する
すべてのスマートフォンがeSIMに対応しているわけではない。2026年現在の主要な対応端末は以下の通り。
**iPhone(2018年以降):**
| モデル | eSIM対応 | 備考 |
|-------|---------|------|
| iPhone XR / XS / XS Max | 対応 | 物理SIM + eSIM 1枚 |
| iPhone 11 シリーズ | 対応 | 物理SIM + eSIM 1枚 |
| iPhone 12 シリーズ | 対応 | 物理SIM + eSIM 1枚 |
| iPhone 13 シリーズ以降 | 対応 | 物理SIM + eSIM 2枚(デュアルeSIM) |
| iPhone 15 シリーズ(米国版) | 対応 | eSIMのみ(物理SIMスロットなし) |
| iPhone 16 シリーズ | 対応 | eSIMのみ(米国版)/ 物理+eSIM(その他) |
**Android(2019年以降):**
| メーカー | 対応モデル(代表例) |
|---------|-------------------|
| Google Pixel | Pixel 3a 以降の全モデル |
| Samsung Galaxy | Galaxy S20 以降、Galaxy Z Flip/Fold シリーズ |
| OPPO | Find X3 Pro 以降、Reno5 A 以降(一部) |
| Xiaomi | 12T Pro 以降(一部) |
| HUAWEI | P40 Pro 以降 |
| Sony Xperia | Xperia 1 IV 以降、Xperia 10 IV 以降 |
**確認方法:**
- **iPhone**: 「設定」→「モバイル通信」→「eSIMを追加」が表示されれば対応
- **Android**: 「設定」→「ネットワークとインターネット」→「SIM」→「SIMの追加」が表示されれば対応
### 2. SIMロックが解除されているか確認する
SIMロックがかかったままではeSIMを追加できない。
- **2021年10月以降に発売された端末**: 原則SIMロックフリー(確認不要)
- **それ以前の端末**: 各キャリアのマイページからオンラインで無料解除可能
**確認方法:**
- **iPhone**: 「設定」→「一般」→「情報」→「SIMロック」の欄が「SIMロックなし」であればOK
- **Android**: 「設定」→「デバイス情報」→「SIMカードの状態」で確認
### 3. WiFi接続を確保する
eSIMプロファイルのダウンロードにはインターネット接続が必要だ。**自宅やカフェのWiFiで、出発前にインストールまで完了させるのがベストプラクティス。**
空港のフリーWiFiでもインストールは可能だが、接続が不安定な場合がある。出発当日に空港で初めて設定するのは避けたい。
---
## iPhone — eSIM設定手順
iPhoneでのeSIMインストール方法は3つある。プロバイダーによって対応方式が異なる。
### 方式1: QRコード読み取り(最も一般的)
ほとんどのプロバイダーが対応している標準的な方式。購入後にメールまたはアプリ内で表示されるQRコードを読み取る。
**手順:**
1. **「設定」**を開く
2. **「モバイル通信」**をタップ
3. **「eSIMを追加」**をタップ
4. **「QRコードを使用」**を選択
5. プロバイダーから受け取った**QRコードをカメラで読み取る**
6. **「モバイル通信プランを追加」**をタップ
7. プランのラベル名を設定する(例: 「旅行用」「韓国」など分かりやすい名前を推奨)
8. **「続ける」**をタップして完了
**ポイント:**
- QRコードは別のデバイス(PC画面、紙に印刷、別のスマホ)に表示する必要がある。自分のiPhoneの画面に表示されたQRコードを自分のiPhoneで読み取ることはできない
- QRコードは1回しか使えない場合が多い。スクリーンショットを保存しておくと安心
- iOS 17.4以降では、メールやメッセージ内のQRコード画像を長押しするだけでインストールできる
### 方式2: アプリからインストール(最も簡単)
[Airalo](/ja/travel/providers/airalo/)、[Holafly](/ja/travel/providers/holafly/)、[Nomad](/ja/travel/providers/nomad/)などの主要プロバイダーは、専用アプリ内からワンタップでeSIMをインストールできる。QRコードの読み取りが不要なため、最も手軽な方式だ。
**手順([Airalo](/ja/travel/providers/airalo/)の場合):**
1. App Storeから**[Airalo](/ja/travel/providers/airalo/)アプリ**をインストール
2. 渡航先と期間を選んで**プランを購入**
3. 購入完了後、**「eSIMをインストール」**ボタンをタップ
4. iOS側の確認画面で**「許可」**をタップ
5. eSIMプロファイルが自動的にダウンロード・インストールされる
6. プランのラベル名を設定して完了
**ポイント:**
- アプリ方式ならQRコードを別画面に表示する必要がない
- プラン購入〜インストール〜残量確認まですべてアプリ内で完結する
- アプリのプッシュ通知でデータ残量のアラートも受け取れる
### 方式3: 手動入力
QRコードが読み取れない場合やアプリ非対応の場合に使う方法。プロバイダーから提供されるアクティベーション情報を手動で入力する。
**手順:**
1. **「設定」**→**「モバイル通信」**→**「eSIMを追加」**
2. **「QRコードを使用」**を選択
3. 画面下部の**「詳細情報を手動で入力」**をタップ
4. プロバイダーから提供された以下の情報を入力:
- **SM-DP+アドレス**(サーバーURL)
- **アクティベーションコード**
- **確認コード**(必要な場合)
5. **「次へ」**をタップしてインストール完了
**ポイント:**
- 手動入力は誤入力のリスクがあるため、コピー&ペーストを推奨
- 主要プロバイダーではほぼ使うことはない。マイナーなプロバイダーや企業向けeSIMで利用される
---
## Android — eSIM設定手順
AndroidのeSIM設定画面はメーカー・OSバージョンによって多少異なるが、基本的な流れは共通だ。ここではGoogle PixelとSamsung Galaxyの手順を中心に説明する。
### 方式1: QRコード読み取り
**手順(Google Pixel / 標準Android):**
1. **「設定」**を開く
2. **「ネットワークとインターネット」**をタップ
3. **「SIM」**をタップ
4. **「SIMの追加」**(または**「+」**ボタン)をタップ
5. **「SIMをダウンロードしますか?」**→**「次へ」**
6. プロバイダーから受け取った**QRコードを読み取る**
7. **「有効化」**をタップ
8. ダウンロードが完了したら**「完了」**
**手順(Samsung Galaxy):**
1. **「設定」**を開く
2. **「接続」**をタップ
3. **「SIMマネージャー」**をタップ
4. **「eSIMを追加」**をタップ
5. **「QRコードをスキャン」**を選択
6. QRコードを読み取る
7. **「追加」**をタップして完了
### 方式2: アプリからインストール
iPhone同様、[Airalo](/ja/travel/providers/airalo/)・[Holafly](/ja/travel/providers/holafly/)・[Nomad](/ja/travel/providers/nomad/)などはAndroidアプリからもeSIMをインストールできる。
**手順([Airalo](/ja/travel/providers/airalo/)の場合):**
1. Google Playから**[Airalo](/ja/travel/providers/airalo/)アプリ**をインストール
2. 渡航先と期間を選んで**プランを購入**
3. 購入完了後、**「eSIMをインストール」**をタップ
4. Android側の確認画面で**インストールを許可**
5. eSIMプロファイルが自動的にダウンロード・インストールされる
### 方式3: 手動入力
**手順(Google Pixel / 標準Android):**
1. **「設定」**→**「ネットワークとインターネット」**→**「SIM」**→**「SIMの追加」**
2. **「SIMをダウンロードしますか?」**の画面で**「ヘルプ」**または**「手動で入力」**を選択
3. プロバイダーから提供された**アクティベーションコード**を入力
4. **「有効化」**をタップして完了
**手順(Samsung Galaxy):**
1. **「設定」**→**「接続」**→**「SIMマネージャー」**→**「eSIMを追加」**
2. **「アクティベーションコードを入力」**を選択
3. コードを入力して**「追加」**
**Androidの注意点:**
- メーカーごとに設定画面の名称が異なる場合がある(「SIM」「SIMマネージャー」「モバイルネットワーク」など)
- 一部のAndroid端末では、eSIMインストール後に**端末の再起動が必要**な場合がある
- Samsung Galaxy端末は、Samsung独自のUIのため標準Androidとメニュー構成が異なる
---
## デュアルSIM設定
旅行eSIMの最大の利点は、日本のSIMと旅行eSIMを**同時に使える**ことだ。ここではデュアルSIMの最適な設定方法を解説する。
### 推奨設定: データ通信のみeSIM、通話は日本SIM
| 機能 | 使用する回線 | 理由 |
|------|-----------|------|
| **音声通話** | 日本のSIM | 日本の電話番号を維持、SMS受信(二段階認証に必要) |
| **モバイルデータ通信** | 旅行eSIM | 安価な現地データ通信を利用 |
| **SMS** | 日本のSIM | 銀行・決済サービスの認証SMS受信用 |
この設定にすることで、日本の電話番号を維持したまま、データ通信だけ旅行eSIMの安価な回線を使える。
### iPhoneでのデュアルSIM設定
1. **「設定」**→**「モバイル通信」**を開く
2. 2つの回線(日本のSIMと旅行eSIM)が表示されていることを確認
3. **「デフォルトの音声回線」**→**日本のSIM**を選択
4. **「モバイルデータ通信」**→**旅行eSIM**を選択
5. **「モバイルデータ通信の切り替えを許可」**→**オフ**にする(旅行eSIMのデータを優先し、日本のSIMでローミングデータを使わないようにする)
**重要: 日本のSIMのデータローミングをオフにする**
1. **「設定」**→**「モバイル通信」**→**日本のSIM**を選択
2. **「データローミング」**→**オフ**
これを忘れると、日本のキャリアの海外ローミング料金が発生する可能性がある。
### AndroidでのデュアルSIM設定
**Google Pixel:**
1. **「設定」**→**「ネットワークとインターネット」**→**「SIM」**
2. **日本のSIM**をタップ →**「通話」と「SMS」をオン**、**「モバイルデータ」をオフ**
3. **旅行eSIM**をタップ →**「モバイルデータ」をオン**
4. 日本のSIMの**「ローミング」をオフ**に設定
**Samsung Galaxy:**
1. **「設定」**→**「接続」**→**「SIMマネージャー」**
2. **「優先SIM」**をタップ
3. **「通話」**→**日本のSIM**を選択
4. **「メッセージ」**→**日本のSIM**を選択
5. **「モバイルデータ」**→**旅行eSIM**を選択
6. 日本のSIMの**「データローミング」をオフ**に設定
### デュアルSIM設定のチェックリスト
設定後、以下を確認しておく。
- [ ] 旅行eSIMがモバイルデータ通信の優先回線になっている
- [ ] 日本のSIMが音声通話・SMSの優先回線になっている
- [ ] 日本のSIMのデータローミングがオフになっている
- [ ] 旅行eSIMのデータローミングがオンになっている(海外で通信するために必要)
- [ ] 「モバイルデータ通信の切り替えを許可」がオフになっている(iPhone)
---
## トラブルシューティング
eSIM設定で発生しやすい問題と対処法をまとめた。
### eSIMがインストールできない
| 原因 | 対処法 |
|------|--------|
| SIMロックが解除されていない | キャリアのマイページから解除手続きを行う |
| 端末がeSIM非対応 | 「設定 → モバイル通信」にeSIM追加メニューが表示されない場合は非対応 |
| QRコードが正しく読み取れない | 画面の明るさを上げる、QRコードを拡大表示する、別のデバイスで表示する |
| QRコードが期限切れ | プロバイダーに連絡して再発行を依頼する |
| WiFiに接続されていない | WiFi接続を確認。モバイルデータでもインストール可能だが安定したWiFiを推奨 |
| eSIMプロファイルの上限に達している | 不要なeSIMプロファイルを削除してから再試行 |
### データ通信が繋がらない
| 原因 | 対処法 |
|------|--------|
| eSIMが有効化されていない | 「設定 → モバイル通信」でeSIMがオンになっているか確認 |
| モバイルデータ通信の回線設定が違う | デュアルSIM設定で旅行eSIMがモバイルデータ通信に設定されているか確認 |
| データローミングがオフ | **旅行eSIMの**データローミングを**オン**にする(海外では必須) |
| まだアクティベーションされていない | 一部のプロバイダーでは初回接続時に数分かかることがある。端末を再起動して数分待つ |
| ネットワーク選択が手動になっている | 「設定 → モバイル通信 → ネットワーク選択」を**自動**に設定 |
| 機内モードの解除忘れ | 機内モードをオフにし、数秒待ってからデータ通信を確認 |
### APN設定が必要な場合
主要プロバイダー([Airalo](/ja/travel/providers/airalo/)、[Holafly](/ja/travel/providers/holafly/)、[Nomad](/ja/travel/providers/nomad/)など)では、eSIMインストール時にAPN設定が自動的に適用される。手動設定が必要になるのは一部のプロバイダーのみだ。
**iPhoneでのAPN設定:**
1. **「設定」**→**「モバイル通信」**→**旅行eSIM**を選択
2. **「モバイルデータ通信ネットワーク」**をタップ
3. プロバイダーが案内する**APN名**を入力
4. ユーザ名・パスワードがある場合はそれも入力
**AndroidでのAPN設定:**
1. **「設定」**→**「ネットワークとインターネット」**→**「SIM」**→**旅行eSIM**
2. **「アクセスポイント名(APN)」**をタップ
3. **「+」**をタップして新しいAPNを追加
4. プロバイダーが案内するAPN情報を入力
5. 保存して、作成したAPNを選択
**APN情報が分からない場合:**
- プロバイダーのアプリ内に記載されていることが多い
- プロバイダーのサポートに問い合わせる
- プロバイダーのWebサイトのFAQやヘルプセンターを確認する
---
## プロバイダー別の設定方法比較
プロバイダーによって、eSIMのインストール方式や設定の手軽さが異なる。SimFinderのデータベースに登録されている主要プロバイダーの設定方式を比較する。
| プロバイダー | アプリ方式 | QRコード方式 | 手動入力 | 設定の手軽さ |
|------------|----------|------------|---------|------------|
| **[Airalo](/ja/travel/providers/airalo/)** | 対応 | 対応 | 対応 | アプリで完結。QRコード不要。設定が最も簡単 |
| **[Holafly](/ja/travel/providers/holafly/)** | 対応 | 対応 | — | アプリ+QRコードの両対応。日本語サポートあり |
| **[Nomad](/ja/travel/providers/nomad/)** | 対応 | 対応 | — | 日本語アプリ対応。UIが分かりやすい |
| [**Saily**](/ja/travel/providers/saily/) | 対応 | 対応 | — | NordVPN開発元。アプリUIがシンプル |
| [**eSIM2Fly**](/ja/travel/providers/esim2fly/) | — | 対応 | 対応 | メールでQRコード送付。AIS系列の実績 |
| [**GigSky**](/ja/travel/providers/gigsky/) | 対応 | 対応 | — | Apple Watch対応の老舗プロバイダー |
| [**Ubigi**](/ja/travel/providers/ubigi/) | 対応 | 対応 | — | NTTグループ。日本語対応 |
| [**aloSIM**](/ja/travel/providers/alosim/) | 対応 | 対応 | — | 200カ国以上対応 |
| [**Flexiroam**](/ja/travel/providers/flexiroam/) | 対応 | 対応 | — | パッケージ組み合わせが柔軟 |
| [**Yesim**](/ja/travel/providers/yesim/) | 対応 | 対応 | — | 22言語サポート対応 |
| [**Maya Mobile**](/ja/travel/providers/maya/) | — | 対応 | 対応 | 英語サポートのみ |
### 初心者へのおすすめ
eSIMの設定が初めてなら、**アプリ方式に対応しているプロバイダー**を選ぶのが確実だ。特に以下の3社はアプリ内でプラン購入からインストール、残量確認まで完結する。
- **[Airalo](/ja/travel/providers/airalo/)**: 世界最大手。アプリでeSIMインストールが完結し、QRコードの表示すら不要
- **[Holafly](/ja/travel/providers/holafly/)**: 全プラン無制限データ。日本語サポートあり
- **[Nomad](/ja/travel/providers/nomad/)**: 日本語アプリ対応。UIが直感的で迷いにくい
プロバイダーの料金・対応国の詳しい比較は**[海外旅行用eSIM完全ガイド2026](/ja/blog/travel-esim-complete-guide-2026/)**を参照。
**[SimFinderで渡航先のeSIMプランを比較する →](/ja/travel/)**
---
## よくある質問
### eSIMの設定にWiFi接続は必要?
はい。eSIMプロファイルのダウンロードにはインターネット接続が必要だ。自宅やカフェなどのWiFi環境で、出発前にインストールまで済ませておくことを推奨する。機内WiFiが利用できない場合、飛行機内でのインストールはできない。
### eSIMは何回線まで追加できる?
端末によって異なる。iPhone 13以降は最大8つのeSIMプロファイルを保存でき、そのうち2回線を同時に有効化できる。Android端末はメーカー・機種により異なるが、一般的に5〜8プロファイルを保存可能だ。
### eSIMのインストール後、すぐに通信が始まる?
プロバイダーによって異なる。多くの旅行eSIMは、渡航先の現地ネットワークに初めて接続した時点でアクティベーション(利用開始)される。インストールだけなら日本国内で事前に完了でき、データ消費は始まらない。
### SIMロックがかかっているスマホでeSIMは使える?
使えない。eSIMを利用するにはSIMロックが解除されている必要がある。日本では2021年10月以降に発売された端末は原則SIMロックフリーだが、それ以前の端末はキャリアに解除を依頼すること。オンラインで無料で手続きできるキャリアが多い。
### 旅行eSIMを設定したら日本のSIMはどうなる?
日本のSIMはそのまま有効だ。旅行eSIMはデュアルSIMの2回線目として追加されるため、日本の電話番号やSMS受信機能はそのまま維持できる。データ通信のみ旅行eSIMに切り替える設定にすれば、日本のSIMで高額なデータローミング料金が発生することもない。
### 帰国後、旅行eSIMはどうすればいい?
帰国後は旅行eSIMのプロファイルを削除するだけで元の環境に戻る。iPhoneは「設定 → モバイル通信」から該当のeSIMを選んで「eSIMを削除」、Androidは「設定 → ネットワークとインターネット → SIM」から削除できる。削除しなくても無効化するだけでも構わない。
### APN設定とは何?必ず必要?
APN(Access Point Name)はモバイルデータ通信の接続先を指定する設定だ。[Airalo](/ja/travel/providers/airalo/)・[Holafly](/ja/travel/providers/holafly/)・[Nomad](/ja/travel/providers/nomad/)など主要な旅行eSIMプロバイダーはインストール時に自動設定されるため、手動でのAPN設定は通常不要。データ通信が繋がらない場合にのみ、プロバイダーが案内するAPN情報を手動入力すること。
---
## まとめ
旅行用eSIMの設定手順を振り返る。
**設定前の準備:**
- eSIM対応端末であること(iPhone XR以降、Pixel 3a以降、Galaxy S20以降)
- SIMロックが解除されていること
- WiFi接続を確保すること
**インストール方法(3方式):**
- **QRコード方式**: 最も一般的。別デバイスでQRコードを表示して読み取る
- **アプリ方式**: 最も簡単。[Airalo](/ja/travel/providers/airalo/)・[Holafly](/ja/travel/providers/holafly/)・[Nomad](/ja/travel/providers/nomad/)など対応プロバイダーならアプリ内で完結
- **手動入力**: QRコードが使えない場合の代替手段
**デュアルSIM設定のポイント:**
- 音声通話・SMS → 日本のSIM
- モバイルデータ通信 → 旅行eSIM
- **日本のSIMのデータローミングは必ずオフ**にする
**設定のベストプラクティス:**
- **出発前日までにインストールを完了**させる
- プランのラベル名を分かりやすく設定する(「韓国旅行」「タイ7日間」など)
- デュアルSIM設定を済ませておき、渡航先でeSIMを有効化するだけの状態にする
eSIMの設定自体は5分程度で完了する。一度経験すれば2回目以降は迷うことはない。レンタルWiFiの受取・返却や物理SIMの差し替えと比べて、手軽さは圧倒的だ。
通信手段の選択に迷ったら、**[海外旅行用eSIM完全ガイド](/ja/blog/travel-esim-complete-guide-2026/)**でeSIM・レンタルWiFi・海外ローミングの比較も解説している。
渡航先が決まったら、SimFinderでプロバイダー間の料金を比較してみてほしい。
**[SimFinderで旅行eSIMプランを比較する →](/ja/travel/)**
---
*この記事の設定手順は2026年4月時点のiOS / Android最新バージョンに基づいています。OSのアップデートにより設定画面の名称や手順が変更される場合があります。最新の設定手順は各プロバイダーの公式ヘルプも併せてご確認ください。*
*SimFinderは一部プロバイダーとアフィリエイト提携を行っています。ただし、推奨はデータに基づいており、提携の有無で内容を変えることはありません。*
================================================================================
# eSIM vs レンタルWiFi vs 海外ローミング — 海外通信手段を徹底比較
URL: https://sim-finder.com/ja/blog/esim-vs-wifi-vs-roaming-2026/
Type: blog (ja)
Published: 2026-03-19
## 結論: あなたに最適な海外通信手段
| 特徴 | eSIM | レンタルWiFi | 海外ローミング |
|------|------|------------|--------------|
| **一言で** | 安い・身軽・1人向け | 複数人シェア向き | 手間ゼロだが割高 |
| **おすすめ** | 1人旅・出張 | 家族・グループ旅行 | 短期・緊急時 |
| **目安料金** | 600円〜/7日 | 800円〜/日 | 980円〜/日 |
**迷ったらeSIMがおすすめ。** 1人利用で安さと手軽さを両立できる。eSIMの詳しい選び方は[海外旅行用eSIM完全ガイド](/ja/blog/travel-esim-complete-guide-2026/)で解説している。
**[SimFinderで渡航先のeSIMプランを比較する →](/ja/travel/)**
---
## 目次
- [3つの通信手段の概要](#3つの通信手段の概要)
- [7項目比較テーブル](#7項目比較テーブル)
- [eSIMのメリット・デメリット](#esimのメリットデメリット)
- [レンタルWiFiのメリット・デメリット](#レンタルwifiのメリットデメリット)
- [海外ローミングのメリット・デメリット](#海外ローミングのメリットデメリット)
- [シチュエーション別おすすめ](#シチュエーション別おすすめ)
- [具体的な料金比較 — 韓国3泊4日の場合](#具体的な料金比較--韓国3泊4日の場合)
- [eSIMの選び方](#esimの選び方)
- [よくある質問](#よくある質問)
- [まとめ](#まとめ)
---
## 3つの通信手段の概要
海外で使える通信手段は主に3つある。それぞれの仕組みと特徴を整理する。
### eSIM(イーシム)
スマートフォンに内蔵されたデジタルSIMを使い、物理カードの差し替えなしにモバイルデータ通信を利用する方式。オンラインで購入してQRコードを読み取るだけで設定が完了し、現地到着と同時に通信が使える。
2026年現在、[Airalo](/ja/travel/providers/airalo/)・[Holafly](/ja/travel/providers/holafly/)・[Nomad](/ja/travel/providers/nomad/)など**11社以上のプロバイダー**が旅行eSIMを提供しており、7日間1GBが$4(約600円)から利用可能だ。
### レンタルWiFi(モバイルWiFiルーター)
専用のポケットWiFi端末をレンタルし、海外でWiFi経由でインターネットに接続する方式。グローバルWiFiやイモトのWiFiなど、日本の空港で受取・返却ができるサービスが主流だ。
1台のルーターに複数台(通常5〜10台)のデバイスを同時接続できるため、家族やグループ旅行では1台をシェアして使える。
### 海外ローミング
日本で使っている携帯キャリア(ドコモ・au・ソフトバンク・楽天モバイルなど)の回線をそのまま海外で使う方式。渡航先の現地キャリアの回線を日本のキャリア経由で利用する。
追加の端末や設定がほぼ不要で、最も手間がかからない反面、料金は従来型の従量課金だと非常に高額になる。ただし近年はahamoの20GB無料ローミングなど、割安なプランも増えている。
---
## 7項目比較テーブル
| 比較項目 | eSIM | レンタルWiFi | 海外ローミング |
|---------|------|------------|--------------|
| **料金** | 600円〜/7日(1GB) | 800〜1,500円/日 | 980〜2,980円/日 |
| **データ容量** | 1GB〜無制限(プラン選択) | 300MB〜無制限/日 | 従量制 or 定額制 |
| **手軽さ** | QRコード読み取りのみ | 受取・返却・充電が必要 | 設定不要(一部事前申込あり) |
| **通信速度** | 4G/LTE〜5G(現地キャリア直結) | 4G/LTE(端末性能に依存) | 4G/LTE(キャリアに依存) |
| **利用開始** | 即時(事前インストール可) | 受取後すぐ | 渡航先到着後すぐ |
| **複数人利用** | 1人1回線(テザリング可) | 1台で5〜10台接続可 | 1人1回線 |
| **対応端末** | eSIM対応スマホのみ | 端末を問わない | 契約キャリアの端末 |
**総合評価**: 1人利用のコストパフォーマンスではeSIMが優位。グループ利用ではレンタルWiFi。手間を最小にしたいならローミング。
**[SimFinderで渡航先のeSIMプランを比較する →](/ja/travel/)**
---
## eSIMのメリット・デメリット
### メリット
- **料金が安い**: 7日間1GBが約600円〜と3手段の中で最安。従量課金の心配がない
- **荷物が増えない**: 物理的な端末不要。スマホだけで完結する
- **即時利用**: オンラインで購入→QRコード読み取りで設定完了。出発前にインストールしておけば現地到着と同時に使える
- **デュアルSIM運用**: 日本の電話番号を維持したまま、データ通信だけ旅行eSIMに切り替え可能
- **複数プロバイダーから選べる**: SimFinderのデータベースでは11社の料金・対応国を比較でき、渡航先に合った最安プランを見つけやすい
### デメリット
- **eSIM対応端末が必要**: iPhone XR/XS(2018年)以降、Google Pixel 3a以降など。古い端末やeSIM非対応のAndroidでは使えない
- **1人1回線**: 同行者とのデータシェアはテザリングで可能だが、テザリング接続はバッテリー消耗が大きい
- **基本的にデータ通信のみ**: 電話番号は付与されないプロバイダーが多い。通話はLINEやWhatsAppなどのVoIPアプリで代用する
- **設定に最低限のITリテラシーが必要**: QRコード読み取りやAPN設定など、スマホの設定画面を操作する必要がある
---
## レンタルWiFiのメリット・デメリット
### メリット
- **複数人・複数端末で共有可能**: 1台のルーターに5〜10台まで同時接続。家族やグループで割り勘すればコスパが良い
- **端末を問わない**: eSIM非対応のスマホ、タブレット、ノートPCなど、WiFi接続できる端末なら全て使える
- **設定がシンプル**: WiFiパスワードを入力するだけ。スマホ側の特別な設定は不要
- **日本語サポートが充実**: 日本の大手レンタル業者は24時間日本語対応が一般的
### デメリット
- **受取・返却の手間**: 空港カウンターや宅配での受取・返却が必要。返却忘れは延滞料金が発生する
- **充電が必要**: ルーター端末のバッテリー持続は6〜12時間程度。モバイルバッテリーの持参が推奨される
- **荷物が増える**: ルーター端末+充電ケーブル+モバイルバッテリーで荷物がかさむ
- **1人利用だと割高**: 1日800〜1,500円の料金は、1人で使う場合eSIMより高額になる
- **紛失・故障リスク**: 端末を紛失すると弁償金(数万円)が発生する場合がある。補償オプションの加入が推奨される
---
## 海外ローミングのメリット・デメリット
### メリット
- **手間がほぼゼロ**: 追加の端末もアプリもSIMも不要。いつものスマホをそのまま海外で使える
- **電話番号がそのまま使える**: 日本の電話番号で発着信可能。ビジネス利用には安心感がある
- **事前準備不要のプランあり**: ahamoは月20GBまで追加料金なしで海外82カ国で利用可能。楽天モバイルも月2GBまで無料
- **通信品質が安定**: キャリアが提携する現地の大手回線を使うため、通信品質は比較的安定
### デメリット
- **従量課金は非常に高額**: ドコモの海外パケ・ホーダイは1日最大2,980円。従量課金だと数十万円の請求が来るケースもある
- **データ容量制限がシビア**: ahamoの20GB無料ローミングは魅力的だが、動画視聴が多いと短期間で使い切る可能性がある
- **ahamo以外は割高**: 従来の大手キャリアプランは1日980〜2,980円が相場。1週間だと7,000〜21,000円になる
- **キャリア・プランに依存**: 利用条件はキャリアとプランごとに異なり、事前確認が必須。対応国も限られる場合がある
- **意図しない接続に注意**: データローミングを切り忘れると、想定外のキャリアに接続して高額請求が発生するリスクがある
---
## シチュエーション別おすすめ
### 1人旅(短期・アジア圏)
**おすすめ: eSIM**
1人利用で最もコスパが良い。韓国・タイ・台湾など人気渡航先なら7日間1GBで600円程度から利用可能。地図アプリとSNS程度なら1GBで十分だ。
### 家族旅行(3〜4人)
**おすすめ: レンタルWiFi**
1台のルーターを家族全員でシェアすれば、1人あたりの費用を抑えられる。例えば1日1,200円のプランを4人で割ると1人300円/日。子供のスマホやタブレットも同時接続できる点が便利。
ただし、家族全員がeSIM対応端末を持っているなら、各自がeSIMを購入する方が安くなるケースもある。
### 短期出張(1〜3日)
**おすすめ: 海外ローミング(ahamoユーザー)またはeSIM**
ahamoユーザーなら追加料金なしで20GBまで使えるため、最もお得で手間がない。ahamo以外のキャリアの場合は、eSIMの方がコスパが良い。出張先でのビジネスメールやビデオ会議程度なら、eSIMの3〜5GBプランで十分対応できる。
### 長期滞在(2週間以上)
**おすすめ: eSIM**
レンタルWiFiは日数に比例して料金が上がるため、長期滞在では割高になる。eSIMなら30日間10GBで$18〜20(約2,700〜3,000円)程度で済む。[Holafly](/ja/travel/providers/holafly/)の無制限プランなら30日間で$74.90(約11,235円)で容量を気にせず使える。
### 周遊旅行(複数国)
**おすすめ: eSIM(リージョナルプラン)**
[Airalo](/ja/travel/providers/airalo/)・[Holafly](/ja/travel/providers/holafly/)・[Nomad](/ja/travel/providers/nomad/)など11社全てが複数国対応のリージョナルプランを提供している。アジア周遊やヨーロッパ周遊なら、国ごとにeSIMを購入するよりリージョナルプラン1つで済ませる方が安く、切り替えの手間もない。
**[SimFinderで渡航先のeSIMプランを比較する →](/ja/travel/)**
---
## 具体的な料金比較 — 韓国3泊4日の場合
韓国(ソウル)に3泊4日で旅行する場合の、各通信手段の料金を実データで比較する。1日あたりのデータ使用量は1〜2GB(地図・SNS・メッセージ中心)を想定。
### eSIM — SimFinderデータベースの実データ
| プロバイダー | プラン | 料金(USD) | 料金(円換算) |
|------------|-------|-----------|-------------|
| [**Saily**](/ja/travel/providers/saily/) | 7日間 / 1GB | $3.99 | 約599円 |
| **[Nomad](/ja/travel/providers/nomad/)** | 7日間 / 1GB | $4.00 | 約600円 |
| **[Airalo](/ja/travel/providers/airalo/)** | 7日間 / 1GB | $4.50 | 約675円 |
| **[Holafly](/ja/travel/providers/holafly/)** | 5日間 / 無制限 | $20.90 | 約3,135円 |
| **[Nomad](/ja/travel/providers/nomad/)** | 5日間 / 無制限 | $17.00 | 約2,550円 |
※ 1USD=150円で換算。料金は2026年3月時点のSimFinderデータベースの値
**1GBプランの場合、約600円で4日間の通信が賄える。** データ使用量が多い場合は[Nomad](/ja/travel/providers/nomad/)の5日間無制限($17.00)や[Holafly](/ja/travel/providers/holafly/)の5日間無制限($20.90)が選択肢に入る。
### レンタルWiFi — 一般的な料金相場
| サービス | データ容量 | 日額料金 | 4日間合計 |
|---------|----------|---------|----------|
| 大手A社 | 300MB/日 | 約800円 | 約3,200円 |
| 大手B社 | 無制限/日 | 約1,600円 | 約6,400円 |
| 大手C社 | 1GB/日 | 約1,100円 | 約4,400円 |
※ 空港受取・返却の場合。補償オプション(約300〜500円/日)は別途
### 海外ローミング — 大手キャリア料金
| キャリア/プラン | 条件 | 4日間合計 |
|---------------|------|----------|
| **ahamo** | 20GB/月まで追加料金なし | **0円**(月額内) |
| **楽天モバイル** | 2GB/月まで追加料金なし | **0円**(月額内) |
| **ドコモ 世界ギガし放題** | 24時間制 | 約11,920円(2,980円/日) |
| **au 世界データ定額** | 24時間制 | 約7,840円(980円/24h〜) |
| **ソフトバンク 海外あんしん定額** | 24時間制 | 約11,920円(2,980円/日) |
### 料金比較まとめ
| 手段 | 最安ケース | 標準ケース |
|------|----------|----------|
| **eSIM** | **約600円**(1GB) | 約2,550円(無制限) |
| **レンタルWiFi** | 約3,200円(300MB/日) | 約4,400円(1GB/日) |
| **海外ローミング** | **0円**(ahamo) | 約7,840円〜(従来キャリア) |
ahamoユーザーなら海外ローミングが最安だが、そうでなければ**eSIMが圧倒的にコスパが良い**。レンタルWiFiは3人以上でシェアすれば1人あたり1,000円前後に抑えられる可能性がある。
---
## eSIMの選び方
eSIMに興味を持った方は、以下のポイントで選ぶと失敗しにくい。
1. **渡航先の対応を確認** — プロバイダーによって対応国・地域が異なる
2. **データ容量を見積もる** — 地図・SNS程度なら1GB/週、動画視聴するなら5GB以上
3. **料金をプロバイダー間で比較** — 同じ渡航先でもプロバイダーによって2〜3倍の差がある
4. **日本語サポートの有無** — 初めてのeSIM利用なら日本語対応のプロバイダーが安心
5. **テザリング対応を確認** — SimFinderが追跡している11社は全てテザリング対応
eSIMの選び方・設定方法・11社の詳細比較は**[海外旅行用eSIM完全ガイド2026](/ja/blog/travel-esim-complete-guide-2026/)**で網羅的に解説している。初めてeSIMを使う方はまずそちらを参照してほしい。
**[SimFinderで渡航先のeSIMプランを比較する →](/ja/travel/)**
---
## よくある質問
### eSIMとレンタルWiFi、どちらが安い?
1人旅の場合、eSIMの方が安くなる。韓国3泊4日の例では、eSIMが約600円〜1,690円(プロバイダー・容量による)、レンタルWiFiが3,200〜6,400円程度だ。ただし3〜4人で1台のWiFiをシェアする場合は、1人あたりの料金はレンタルWiFiの方が安くなることもある。
### 海外ローミングはなぜ高いの?
海外ローミングでは、渡航先の現地キャリアの回線を日本のキャリア経由で利用するため、仲介コストが上乗せされる。近年はahamoの20GB無料ローミングやソフトバンク「アメリカ放題」のように割安なプランも登場しているが、従来型の従量課金(1MB=1,980円など)を利用すると非常に高額になる。
### eSIMに対応していないスマホではどうすればいい?
eSIM非対応のスマホの場合は、レンタルWiFiか海外ローミングを利用すること。レンタルWiFiは端末を問わず利用でき、複数デバイスを同時接続できるため、eSIM非対応端末でも問題ない。
### レンタルWiFiの返却を忘れたらどうなる?
返却期限を過ぎると延滞料金が発生する。1日あたり数百円〜2,000円程度の延長料金がかかるケースが一般的だ。空港返却ボックスがある業者を選ぶと、帰国時にその場で返却できて安心。
### 海外ローミングは事前申し込みが必要?
キャリアやプランによって異なる。ドコモ「世界ギガし放題」やau「世界データ定額」は事前申込不要で、現地で利用開始操作をするだけだ。ahamoは申込不要で20GBまで追加料金なしで使える。ただし従量課金を避けるため、出発前にプラン内容を必ず確認すること。
### 飛行機の中でeSIMをインストールできる?
eSIMのインストールにはインターネット接続が必要なため、機内WiFiがない場合はインストールできない。出発前の自宅やカフェのWiFi環境でインストールを済ませておくことを推奨する。アクティベーション(利用開始)は現地到着後に自動で行われるプロバイダーが多い。
### eSIMとレンタルWiFiを併用するメリットはある?
基本的に併用は不要だ。ただし、eSIMをメイン通信として使いつつ、eSIM非対応の同行者がいる場合にレンタルWiFiを1台用意するという使い方は合理的。また、長期滞在でeSIMのデータ容量が心配な場合に、レンタルWiFiをバックアップとして用意するケースもある。
---
## まとめ
海外旅行の通信手段は、旅行スタイルと人数によって最適解が変わる。
- **1人旅・出張**: eSIMが最安かつ手軽。SimFinderで渡航先の最安プランを探すのがおすすめ
- **家族・グループ旅行**: レンタルWiFi1台をシェアするか、全員eSIM対応なら個別にeSIM購入
- **ahamo・楽天モバイルユーザー**: 短期旅行なら海外ローミングの無料枠で十分対応可能
- **初めての海外 or IT操作が苦手**: レンタルWiFiが最もシンプル
いずれの手段を選ぶにしても、**出発前の準備**が重要だ。eSIMは事前インストール、レンタルWiFiは事前予約、ローミングはプラン確認。当日の空港で慌てないように準備しておこう。
eSIMの詳しい選び方・設定手順・プロバイダー比較は[海外旅行用eSIM完全ガイド2026](/ja/blog/travel-esim-complete-guide-2026/)を参照。
**[SimFinderで渡航先のeSIMプランを比較する →](/ja/travel/)**
---
*記事中の料金は2026年3月時点のSimFinderデータベースおよび各社公式サイトの情報に基づいています。為替レートは1USD=150円で換算しています。レンタルWiFiおよび海外ローミングの料金は一般的な相場であり、サービス・時期・キャンペーンにより変動します。最新の料金は各サービスの公式サイトでご確認ください。*
================================================================================
# HISモバイル、30GB1999円の「自由自在3.0プラン」を9月17日開始
URL: https://sim-finder.com/ja/blog/his-mobile-jiyujizai-3-0-plan-2026/
Type: blog (ja)
Published: 2026-08-29T09:00:00+09:00
H.I.S.Mobile(HISモバイル)は2026年8月28日、新料金プラン「自由自在3.0プラン」を9月17日(木)から提供開始すると発表した。30GBを月額1999円(税込、以下同)に設定し、音声通話付きの全容量を2000円未満に収めたのが最大の特徴だ。20GBと30GBには6分かけ放題が料金に含まれる。
大容量帯でも2000円を超えないという価格設定は、MVNO各社の20GB〜30GB帯の相場を下回る水準になる。データ量を多めに使いながら通信費を月2000円以内に抑えたいユーザーにとって、有力な選択肢が一つ増えた形だ。
## 全容量が2000円未満、30GBは1999円
ケータイ Watchが報じた料金体系によると、自由自在3.0プランの月額料金は以下の通り。
| データ容量 | 月額料金(税込) |
|---|---|
| 100MB〜1GB | 280円〜550円 |
| 3GB | 770円 |
| 7GB | 990円 |
| 10GB | 1299円 |
| 20GB | 1699円 |
| 30GB | 1999円 |
小容量帯は従来のHISモバイルが得意としてきた価格帯を踏襲しつつ、中〜大容量帯を厚くした構成といえる。3GBで770円、10GBで1299円という水準も、格安SIM全体で見て低価格の部類に入る。
## 20GB・30GBは6分かけ放題が「込み」
注目したいのは通話オプションの扱いだ。20GBプランと30GBプランでは、6分かけ放題が月額料金に含まれる。単体オプションとして契約する場合の6分かけ放題は月額500円、完全かけ放題は月額1480円と案内されている。
つまり30GB+6分かけ放題を1999円で使える計算になる。ほかのMVNOでは大容量プランに通話オプションを足すと2000円台後半〜3000円台になることも珍しくないため、短い通話が多いユーザーほど実質的な差が出やすい。
一方で、長電話が中心のユーザーは完全かけ放題(1480円)を別途足す必要がある。自分の通話スタイルがどちらに近いかで、実際の月額は大きく変わる点は押さえておきたい。
## 海外eSIM「HIS Travel eSIM」を年1回無料で
もう一つの柱が海外向けeSIMだ。HISモバイルは、130以上の国・地域で使える「HIS Travel eSIM powered by VOYE」の4GB・15日間プランを、1電話番号につき年1回無料で提供する。ITmedia Mobileの報道では、この特典の提供開始は10月1日からの予定とされている。
旅行会社のH.I.S.グループというルーツを持つHISモバイルらしい施策で、年に1〜2回海外に出る層にとっては、渡航のたびに別途eSIMを買う手間とコストを一部肩代わりしてくれる内容になる。ただし無料枠は年1回・4GB・15日間で、それを超える分は有料でのチャージが必要になる。長期滞在や大容量利用を前提にするなら、別途プランを比較したほうがよい。
## 乗り換え検討時のチェックポイント
自由自在3.0プランは9月17日開始で、8月29日時点ではまだ提供前の段階だ。既存プランからの変更可否や、現在契約中のプランの受付がどうなるかについては、発表資料および各社報道でも明確には示されていない。既存ユーザーは提供開始後の公式案内を確認してほしい。
また、HISモバイルはドコモ回線を利用するMVNOであり、通信速度は混雑時間帯にMNOやサブブランドと差が出やすい。価格だけでなく、平日昼などの利用シーンで許容できるかを含めて判断したい。
料金だけを見れば、30GB帯で2000円を切りつつ6分かけ放題まで含む構成は、2026年夏時点の国内MVNOのなかでも競争力の高い部類に入る。データ量が中〜大容量で、短い通話が多く、年に一度は海外に行く——という条件に当てはまる人ほど、検討する価値が大きい新プランだ。
================================================================================
# IIJmio、データ専用eSIMを9月1日「タイプI」に改称
URL: https://sim-finder.com/ja/blog/iijmio-esim-type-i-meisho-henko-2026/
Type: blog (ja)
Published: 2026-08-17T09:00:00+09:00
インターネットイニシアティブ(IIJ)は2026年8月17日、格安SIM「IIJmio」で提供するデータ通信専用eSIM(ドコモ網)のタイプ名称を、2026年9月1日(火)から「タイプI」に変更すると告知しました。ケータイWatchも同日付でこの変更を報じています。
利用者にとって重要なのは、**これが表示上の名称変更にとどまる**という点です。IIJの告知には「サービスの提供内容、月額基本料金およびご利用条件に変更はございません」と明記されており、契約中のユーザーが何かを申し込み直す必要もありません。
## 「eSIM」表記が「タイプI」に変わる
変更の中身はシンプルです。これまで契約内容として「SIMタイプ eSIM」と表示されていた箇所が、9月1日以降は「SIMタイプ タイプI」に切り替わります。IIJによれば、適用開始日より会員専用ページの契約内容表示が順次変更されるとのことです。
## 対象は3つのサービス
今回の名称変更が適用されるのは、ドコモ網を利用する以下のデータ通信専用eSIMです。
- IIJmioモバイルサービス ギガプラン
- IIJmio eSIMサービス データプラン ゼロ
- IIJmioモバイルサービス eSIMベータ版
いずれもデータ通信専用のeSIMであり、対象が限定されている点に注意が必要です。
## 「タイプD」「タイプA」は従来どおり
IIJmioは従来から、ドコモ網を「タイプD」、au網を「タイプA」と呼び分けてきました。今回の変更でこの体系が丸ごと置き換わるわけではありません。
IIJは告知の中で「これまで通り、ドコモ網を利用したタイプDの音声SIM/音声eSIM・SMS機能付きSIM・データ通信専用SIMは『タイプD』の名称を継続して使用します」と説明しています。つまり9月1日以降のIIJmioは、**タイプD・タイプA・タイプIの3種類の名称が併存する**構成になります。
同じドコモ網でありながら、データ通信専用eSIMだけが「タイプI」という独立した名称を与えられる形です。なお、名称を変更する理由や背景については、IIJの告知にもケータイWatchの記事にも具体的な説明はありませんでした。
## 利用者への実際の影響
現時点で確認できる範囲では、金銭的・機能的な不利益は生じません。整理すると次のとおりです。
- 月額基本料金の変更:なし
- サービス提供内容・利用条件の変更:なし
- ユーザー側の手続き:不要
- 利用する回線:引き続きドコモ網
影響が出るとすれば、**表記を見たときの混乱**でしょう。契約中の人が会員専用ページを開いて見慣れない「タイプI」という文字を見つけたときに、勝手にプランを変えられたと誤解する可能性はあります。また、これから申し込む人にとっては、申込画面や比較情報でドコモ網のデータ専用eSIMを探す際、「eSIM」ではなく「タイプI」という手がかりで探す必要が出てきます。
IIJmioのeSIMを検討している場合は、9月1日を境に呼び名が変わることを頭に入れておくと、申し込み時に迷わずに済みます。契約内容そのものは変わらないため、既存ユーザーが今すぐ取るべき対応はありません。
================================================================================
# iOS 26.6.2配信、モバイル通信での更新不具合を修正
URL: https://sim-finder.com/ja/blog/ios-26-6-2-mobile-data-update-fix-2026/
Type: blog (ja)
Published: 2026-09-09T09:00:00+09:00
Appleが2026年9月9日、iPhone向けOSの最新版「iOS 26.6.2」の配信を開始した。修正点は1件のみで、**モバイルデータ通信経由でソフトウェアアップデートをダウンロードできない不具合の解消**だ。Wi-Fi環境がなくてもOSを更新したいユーザーにとっては、地味だが実用上の影響が大きい修正といえる。
## 修正内容は「モバイル通信での更新不具合」1点
Apple Developerのリリース一覧によると、iOS 26.6.2のビルド番号は23G90で、開発者向けには現地時間2026年9月8日付で公開された。日本のメディアでは同9日にケータイ Watch、ITmedia Mobileがそれぞれ配信開始を報じている。
ケータイ Watchによれば、修正されたのは「モバイルデータ通信経由でソフトウェアアップデートをダウンロードできない問題」で、対象機種はiPhone 11以降。iPadOS 26.6.2も同じ修正を含めて同時に配信されている。
## 対象機種とアップデート方法
アップデートはiPhoneの「設定」→「一般」→「ソフトウェアアップデート」から実行できる。ITmedia Mobileは、iPhone 17 Proでの更新ファイルサイズが704.6MBだったと伝えている。機種やインストール済みのバージョンによってサイズは変動するため、あくまで目安として捉えたい。
なお、不具合の性質上、モバイル通信でのダウンロードがうまくいかない状態にある端末では、この修正版そのものをWi-Fi経由で取得する必要が生じる可能性がある。手元でうまく進まない場合は、Wi-Fiに接続した状態で試すのが確実だ。
## セキュリティ修正の掲載は確認できず
Appleが公開している「Appleのセキュリティ関連アップデート」一覧ページを2026年9月9日時点で確認したところ、iOS 26.6.2の項目は掲載されていなかった。同ページに掲載されている直近のバージョンはiOS 26.6.1(2026年8月17日リリース)とiOS 26.6(同7月27日リリース)で、今回はCVE番号を伴うセキュリティ修正ではなく、機能面の不具合修正が中心とみられる。
ただし、Appleはセキュリティ情報の掲載を後日追加する場合がある。最新の状況は公式ページで確認してほしい。
## モバイル通信での更新はデータ容量の消費に注意
今回の修正で「Wi-Fiがなくてもモバイル通信でOSを更新できる」状態に戻るわけだが、格安SIMユーザーが気をつけたいのはデータ容量の消費だ。
仮に700MB前後のアップデートをモバイル通信でダウンロードすると、月3GBプランなら残容量の2割強を1回の更新で使うことになる。月1GBクラスの低容量プランでは、1回のOSアップデートだけで容量を使い切りかねない。
一方で、通信量を気にせず端末を最新に保ちたいのであれば、大容量プランや使い放題プランを選ぶ、あるいは自宅のWi-Fi環境を前提に低容量プランで割り切る、という判断軸になる。**OSアップデートを含めた「不定期に発生する大きな通信」をどこで吸収するか**は、プラン選びで見落とされがちなポイントだ。
SimFinderでは月間データ容量ごとにプランを比較できる。自分の使い方でどの容量帯が最適かを、この機会に見直してみるのもいいだろう。
================================================================================
# 格安SIMの選び方完全ガイド2026 — 22社120プランから最適な1枚を見つける方法
URL: https://sim-finder.com/ja/blog/kakuyasu-sim-erabikata-guide-2026/
Type: blog (ja)
Published: 2026-03-17
## 結論: 迷ったらこの3プランから選べば間違いない
| おすすめ | プラン | 月額 | ポイント |
|---------|-------|------|---------|
| **最安** | [日本通信SIM](/ja/jp/carriers/nihontsushin/) 合理的シンプル290 | ¥290 | 通話付き全120プラン最安、eSIM・5G対応 |
| **バランス** | [IIJmio](/ja/jp/carriers/iijmio/) 10ギガ | ¥1,400 | 繰り越し・家族割あり、老舗の安定感 |
| **無制限** | [楽天モバイル](/ja/jp/carriers/rakuten/) Rakuten最強プラン | ¥3,278 | データ無制限 + Rakuten Link通話無料 |
**[SimFinderで全120プランを条件で絞り込む →](/ja/jp/search/)**
以下、22社120プランのデータを元に詳しく解説する。
## 目次
- [格安SIMの全体像 — MNO・サブブランド・MVNOの3分類](#格安simの全体像--mnoサブブランドmvnoの3分類を理解する)
- [選び方の5つの判断基準](#選び方の5つの判断基準)
- [利用スタイル別おすすめプラン](#利用スタイル別おすすめプラン)
- [見落としがちな落とし穴](#格安sim選びで見落としがちな落とし穴)
- [ユーザーの声](#ユーザーの声)
- [よくある質問](#よくある質問)
- [まとめ](#まとめ)
---
スマホの月額料金を下げたいと思っても、キャリアの数が多すぎて「結局どれを選べばいいのか分からない」という声は多い。
2026年8月現在、SimFinderのデータベースには日本国内の**22社・120プラン**が登録されている。月額は最安¥0([povo2.0](/ja/jp/carriers/povo/)基本料)から最高¥11,748([ドコモ](/ja/jp/carriers/docomo/) ポイ活MAX)まで幅広く、選択肢が多い分だけ迷いやすい。
この記事では、SimFinderのデータベースに登録されている全プランの料金・通信品質・機能を横断的に分析し、あなたの利用スタイルに合った格安SIMの選び方を解説する。
---
## 格安SIMの全体像 — MNO・サブブランド・MVNOの3分類を理解する
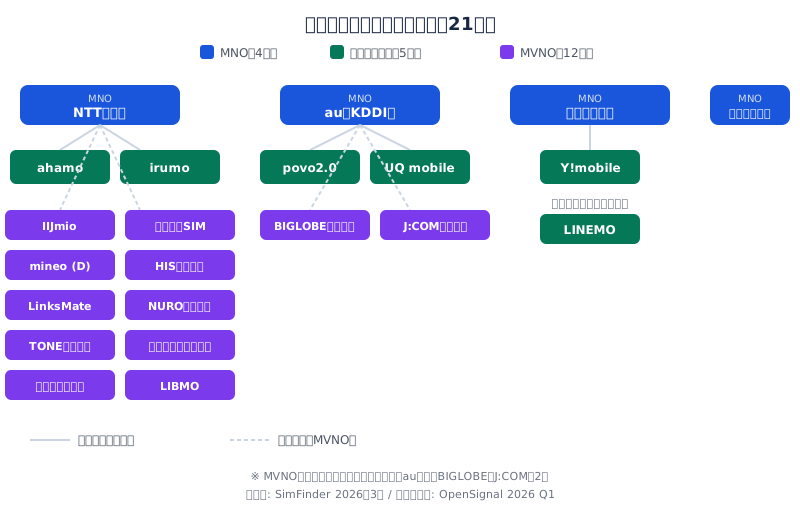 まず押さえておくべきなのが、日本の携帯キャリアは大きく**3つのタイプ**に分かれるという点だ。
| 分類 | 概要 | キャリア数 | プラン数 | 月額平均 |
|------|------|-----------|---------|---------|
| **MNO(大手キャリア)** | 自社で通信回線を保有する事業者 | 4社 | 7プラン | 約¥2,701 |
| **サブブランド** | MNOが直接運営する格安ブランド | 5社 | 16プラン | 約¥2,752 |
| **MVNO(格安SIM)** | MNOの回線を借りて提供する事業者 | 12社 | 63プラン | 約¥1,593 |
※MNOの7プランは[楽天モバイル](/ja/jp/carriers/rakuten/)(4プラン)と[LINEMO](/ja/jp/carriers/linemo/)(3プラン)。[NTTドコモ](/ja/jp/carriers/docomo/)・[au](/ja/jp/carriers/au/)は個人向けプランをサブブランド経由で提供している。
### MNO(4社)
[NTTドコモ](/ja/jp/carriers/docomo/)、[au](/ja/jp/carriers/au/)([KDDI](/ja/jp/carriers/au/))、[ソフトバンク](/ja/jp/carriers/softbank/)、[楽天モバイル](/ja/jp/carriers/rakuten/)の4社。自社の通信インフラを持つため通信品質が高いが、料金も高め。ただし[楽天モバイル](/ja/jp/carriers/rakuten/)は¥1,078〜¥3,278の段階制で、MNOとしては異例の低価格を実現している。[ソフトバンク](/ja/jp/carriers/softbank/)はオンライン専用ブランドの[LINEMO](/ja/jp/carriers/linemo/)(¥990〜¥2,970)を直接運営している。
### サブブランド(5社)
MNOが直接運営する低価格ブランド。親キャリアの通信網をそのまま使えるため、MVNOより通信品質が安定している傾向がある。
| サブブランド | 親キャリア |
|-------------|-----------|
| [ahamo](/ja/jp/carriers/ahamo/) | [NTTドコモ](/ja/jp/carriers/docomo/) |
| [irumo](/ja/jp/carriers/irumo/) | [NTTドコモ](/ja/jp/carriers/docomo/) |
| [povo2.0](/ja/jp/carriers/povo/) | [au](/ja/jp/carriers/au/)([KDDI](/ja/jp/carriers/au/)) |
| [UQ mobile](/ja/jp/carriers/uqmobile/) | [au](/ja/jp/carriers/au/)([KDDI](/ja/jp/carriers/au/)) |
| [Y!mobile](/ja/jp/carriers/ymobile/) | [ソフトバンク](/ja/jp/carriers/softbank/) |
### MVNO(12社)
MNOの回線を借りて運営する格安事業者。料金はサブブランドより平均で約¥1,159安いが、通信速度が混雑時に低下する場合がある。
日本のMVNOの多くは[ドコモ](/ja/jp/carriers/docomo/)回線を利用している。SimFinderのデータでは、[ドコモ](/ja/jp/carriers/docomo/)回線を借りるMVNOが10社、[au](/ja/jp/carriers/au/)回線が2社([BIGLOBEモバイル](/ja/jp/carriers/biglobe/)、[J:COMモバイル](/ja/jp/carriers/jcom/))という構成だ。
---
## 選び方の5つの判断基準
格安SIMを選ぶ際に比較すべきポイントは5つある。優先度の高い順に解説する。
### 1. データ容量と月額料金のバランス
最も重要な判断基準。自分の月間データ使用量に合ったプランを選ぶことで、無駄な出費を防げる。
SimFinderのデータベースから、データ容量帯別の代表的なプランをピックアップした。
| 利用スタイル | 月間目安 | おすすめプラン | 月額 |
|-------------|---------|--------------|------|
| メール・LINE中心 | 1〜3GB | [日本通信SIM](/ja/jp/carriers/nihontsushin/) 合理的シンプル290 1GB | ¥290 |
| SNS・Web閲覧 | 3〜5GB | [IIJmio](/ja/jp/carriers/iijmio/) 5ギガ | ¥950 |
| 動画もそこそこ | 10〜15GB | [HISモバイル](/ja/jp/carriers/hismobi/) 自由自在2.0 10GB | ¥1,340 |
| 動画をよく見る | 20〜30GB | [日本通信SIM](/ja/jp/carriers/nihontsushin/) 合理的みんなのプラン 20GB | ¥1,390 |
| ヘビーユーザー | 50GB以上 | [日本通信SIM](/ja/jp/carriers/nihontsushin/) 合理的50GBプラン | ¥2,178 |
| データ無制限 | 制限なし | [楽天モバイル](/ja/jp/carriers/rakuten/) Rakuten最強プラン 無制限 | ¥3,278 |
**コストパフォーマンスの観点**では、[日本通信SIM](/ja/jp/carriers/nihontsushin/)の合理的50GBプラン(¥2,178で50GB、5分かけ放題付き、GB単価22.9MB/円)が全プラン中最も優れている。大容量プランでは、[ahamo](/ja/jp/carriers/ahamo/)大盛り(¥4,950で110GB、22.2MB/円)も高いコスパを示している。
### 2. 通信品質(ネットワーク速度とカバレッジ)
格安SIMは「安かろう悪かろう」ではないが、キャリアによって通信品質には明確な差がある。
SimFinderに登録されている2026年Q1の品質スコアを見てみよう。
| キャリア | 下り速度 | 上り速度 | レイテンシ | カバレッジ | 総合スコア |
|---------|---------|---------|-----------|-----------|-----------|
| [NTTドコモ](/ja/jp/carriers/docomo/) | 150.3Mbps | 18.5Mbps | 22ms | 95/100 | **90/100** |
| [au](/ja/jp/carriers/au/)([KDDI](/ja/jp/carriers/au/)) | 120.7Mbps | 15.2Mbps | 25ms | 93/100 | **85/100** |
| [ソフトバンク](/ja/jp/carriers/softbank/) | 110.5Mbps | 14.8Mbps | 26ms | 92/100 | **83/100** |
| [楽天モバイル](/ja/jp/carriers/rakuten/) | 80.2Mbps | 20.1Mbps | 30ms | 82/100 | **72/100** |
*データソース: OpenSignal 2026 Q1 / 計測日: 2026-01-15*
**ポイント**: サブブランド([ahamo](/ja/jp/carriers/ahamo/)、[povo](/ja/jp/carriers/povo/)、[UQ mobile](/ja/jp/carriers/uqmobile/)、[Y!mobile](/ja/jp/carriers/ymobile/)、[irumo](/ja/jp/carriers/irumo/))は親キャリアと同じ回線を使うため、上記と同等の品質が期待できる。一方、MVNOは回線を借りているため、特にお昼休み(12:00〜13:00)や夕方(17:00〜19:00)の混雑時間帯に速度が低下しやすい。
通信品質を重視するなら、[ドコモ](/ja/jp/carriers/docomo/)系の[ahamo](/ja/jp/carriers/ahamo/)(総合スコア90相当)、[au](/ja/jp/carriers/au/)系の[povo2.0](/ja/jp/carriers/povo/)や[UQ mobile](/ja/jp/carriers/uqmobile/)(同85相当)が有力な選択肢となる。
### 3. eSIM対応の有無
eSIM(組み込みSIM)に対応していれば、物理SIMカードの差し替えなしにオンラインで即時開通できる。機種変更やデュアルSIM運用も簡単になる。
SimFinderのデータでは、全120プラン中**93プラン(78%)がeSIM対応**している。
**eSIM対応キャリア(音声通話プランあり)**:
[ahamo](/ja/jp/carriers/ahamo/)、[povo2.0](/ja/jp/carriers/povo/)、[UQ mobile](/ja/jp/carriers/uqmobile/)、[Y!mobile](/ja/jp/carriers/ymobile/)、[irumo](/ja/jp/carriers/irumo/)、[楽天モバイル](/ja/jp/carriers/rakuten/)、[LINEMO](/ja/jp/carriers/linemo/)、[IIJmio](/ja/jp/carriers/iijmio/)、[HISモバイル](/ja/jp/carriers/hismobi/)、[mineo](/ja/jp/carriers/mineo/)、[日本通信SIM](/ja/jp/carriers/nihontsushin/)、[LinksMate](/ja/jp/carriers/linksmate/)、[J:COMモバイル](/ja/jp/carriers/jcom/)、[TONEモバイル](/ja/jp/carriers/tone/)
**eSIM非対応キャリア**:
[イオンモバイル](/ja/jp/carriers/aeon/)、[BIGLOBEモバイル](/ja/jp/carriers/biglobe/)、[エキサイトモバイル](/ja/jp/carriers/excite/)、[LIBMO](/ja/jp/carriers/libmo/)、[NUROモバイル](/ja/jp/carriers/nuro-mobile/)
eSIM対応を重視するなら、サブブランド6社は全てeSIM対応しているので安心だ。MVNOでは[IIJmio](/ja/jp/carriers/iijmio/)、[HISモバイル](/ja/jp/carriers/hismobi/)、[mineo](/ja/jp/carriers/mineo/)が対応している。
### 4. 5G対応
2026年現在、5Gエリアは都市部を中心に拡大しているが、地方ではまだ4Gが主力というエリアも多い。全120プランのうち**98プラン(82%)が5G対応**している。
**5G非対応のキャリア**: [BIGLOBEモバイル](/ja/jp/carriers/biglobe/)(全プラン非対応)、[エキサイトモバイル](/ja/jp/carriers/excite/)(全プラン非対応)、[LIBMO](/ja/jp/carriers/libmo/)(全プラン非対応)、[TONEモバイル](/ja/jp/carriers/tone/)(全プラン非対応)
都市部在住で5Gを活用したいなら、これらのキャリアは選択肢から外れることになる。
### 5. 通話オプションと付加価値
通話をよくする人にとっては、かけ放題オプションの有無とその料金も重要な判断ポイントだ。
| キャリア | かけ放題の特徴 |
|---------|--------------|
| [楽天モバイル](/ja/jp/carriers/rakuten/) | Rakuten Linkアプリ経由で**国内通話が無料**(追加料金なし) |
| [ahamo](/ja/jp/carriers/ahamo/) | **5分かけ放題が標準付帯**(追加料金なし) |
| [日本通信SIM](/ja/jp/carriers/nihontsushin/) | 合理的みんなのプラン以上で**5分かけ放題 or 70分通話が標準付帯** |
| [HISモバイル](/ja/jp/carriers/hismobi/) | 20GB以上のプランで**6分かけ放題が標準付帯**、通話料9円/30秒(業界最安水準) |
| [LINEMO](/ja/jp/carriers/linemo/) | LINEデータフリー(LINEのトーク・通話はデータ消費ゼロ) |
通話料金を含めたトータルコストで比較すると、[楽天モバイル](/ja/jp/carriers/rakuten/)はRakuten Linkによる通話無料が強力な差別化要因となる。電話をよくかける人なら、月額¥1,078〜で通話し放題は他社にない圧倒的なメリットだ。
---
## 利用スタイル別おすすめプラン
ここまでの5つの判断基準を踏まえて、利用スタイル別にSimFinderのデータベースからおすすめプランを選出した。
### とにかく安く使いたい人
**[日本通信SIM](/ja/jp/carriers/nihontsushin/) 合理的シンプル290(1GB): 月額¥290**
通話付きプランとして全120プラン中最安。通話料11円/30秒もMVNOの標準(22円/30秒)の半額だ。eSIM対応・5G対応で、必要最低限の機能は揃っている。月1GB以下の利用なら、これ以上安い選択肢は存在しない。
ただし、通話も含めて一切使わない「予備回線」目的なら、[povo2.0](/ja/jp/carriers/povo/)(基本料¥0、180日に1回トッピング購入が必要)という選択肢もある。
### バランス重視の人(5〜15GB)
**[IIJmio](/ja/jp/carriers/iijmio/) 10ギガ: 月額¥1,400**
[IIJmio](/ja/jp/carriers/iijmio/)は老舗MVNOとしての安定感があり、10GBで¥1,400は価格と容量のバランスが良い。eSIM対応、5G対応、データ繰り越しあり、家族割(2回線以上で-¥100/回線)もある。通話料は11円/30秒と標準の半額。
サブブランドの安心感を求めるなら、**[LINEMO](/ja/jp/carriers/linemo/) ベストプラン〜10GB(¥2,090)**が候補。LINEデータフリーが付帯し、[ソフトバンク](/ja/jp/carriers/softbank/)品質スコア83相当の通信品質が使える。
### データたっぷり使いたい人(20GB以上)
**[日本通信SIM](/ja/jp/carriers/nihontsushin/) 合理的みんなのプラン(20GB): 月額¥1,390**
20GBで¥1,390は全プラン中で最もコスパが高い水準。5分かけ放題(または70分通話)が標準付帯なので、通話オプションを別途契約する必要がない。
さらに上の容量が必要なら**[ahamo](/ja/jp/carriers/ahamo/) 30GB(¥2,970)**。[ドコモ](/ja/jp/carriers/docomo/)回線を直接使えるため通信品質は最高クラス(総合スコア90相当)、5分かけ放題標準付帯、海外ローミング20GBも込み。
### データ無制限が必要な人
**[楽天モバイル](/ja/jp/carriers/rakuten/) Rakuten最強プラン 無制限: 月額¥3,278**
データ無制限プランで月額¥3,278は、大手キャリアの無制限プラン(通常¥7,000前後)と比較して圧倒的に安い。Rakuten Linkで国内通話も無料。eSIM・5G対応。
ただし、[楽天モバイル](/ja/jp/carriers/rakuten/)の品質スコアは72/100とMNO4社中最低で、カバレッジスコアも82/100。地下や山間部でつながりにくい場面がある点には注意が必要だ。
110GBで足りるなら、通信品質で優位な**[ahamo](/ja/jp/carriers/ahamo/)大盛り(¥4,950)**も検討する価値がある。[ドコモ](/ja/jp/carriers/docomo/)品質スコア90相当で110GBが使え、GB単価22.2MB/円は[楽天](/ja/jp/carriers/rakuten/)無制限に次ぐコスパだ。
---
## 格安SIM選びで見落としがちな落とし穴
### 契約縛りと解約金
2026年現在、SimFinderに登録されている**全120プランが契約縛りなし・解約金なし**。総務省の規制により、2021年以降に新設されたプランでは原則として違約金が撤廃されている。これは大きな変化で、気軽にキャリアを乗り換えられる環境が整っている。
### テザリングの制限
多くのプランでテザリング(インターネット共有)が利用可能だが、一部のプランではテザリング時のデータ上限が異なる場合がある。テザリングを多用するなら、契約前に公式サイトで制限の有無を確認しておこう。
### データ繰り越しの有無
余ったデータ容量を翌月に持ち越せる「データ繰り越し」は、月によって使用量にムラがある人には重要な機能。[イオンモバイル](/ja/jp/carriers/aeon/)、[IIJmio](/ja/jp/carriers/iijmio/)、[mineo](/ja/jp/carriers/mineo/)、[UQ mobile](/ja/jp/carriers/uqmobile/)、[エキサイトモバイル](/ja/jp/carriers/excite/)、[NUROモバイル](/ja/jp/carriers/nuro-mobile/)、[BIGLOBEモバイル](/ja/jp/carriers/biglobe/)などが対応している。一方、[ahamo](/ja/jp/carriers/ahamo/)、[LINEMO](/ja/jp/carriers/linemo/)、[楽天モバイル](/ja/jp/carriers/rakuten/)、[povo2.0](/ja/jp/carriers/povo/)にはデータ繰り越しがない。
### [povo2.0](/ja/jp/carriers/povo/)の「180日ルール」
[povo2.0](/ja/jp/carriers/povo/)は基本料¥0で注目されるが、180日以内に有料トッピング(最安¥330)を購入しないと利用停止になる。完全に無料で維持し続けることはできない点に注意。
---
## SimFinderでプランを比較してみよう
ここまで読んで「自分に合うプランはだいたい分かったけど、もう少し詳しく比較したい」と思ったら、SimFinderの比較ツールを使ってみてほしい。
データ容量、月額予算、通話の有無、eSIM対応など、あなたの条件を入力すると、全120プランの中から条件に合うプランを絞り込んで比較できる。
**[SimFinderでプランを比較する →](/ja/jp/search/)**
---
## ユーザーの声
格安SIMに実際に乗り換えた人たちのリアルな声を紹介する。
> 「[ワイモバイル](/ja/jp/carriers/ymobile/)から[日本通信SIM](/ja/jp/carriers/nihontsushin/)に乗り換えた。ワイモバは基本料金990円だが通話料で膨らむのが悩みだった。[日本通信SIM](/ja/jp/carriers/nihontsushin/)は10GB+無料通話70分で1,390円と安く、品質も問題なし。テザリングでの仕事も快適」
> — @pop_o_writer([元の投稿](https://x.com/pop_o_writer/status/1681485160548794370))
> 「クレカ持ってるなら[日本通信SIM](/ja/jp/carriers/nihontsushin/)超おすすめ。1,400円程で20GB+通話も何回でも5分無料 or 月70分無料か選べる。もし通信速度に不満が生じたら290円で番号持てるので、[povo](/ja/jp/carriers/povo/)とかとデータ通信専用プランでデュアル運用すれば格安で持てる」
> — @dodo_dodoitsu([元の投稿](https://x.com/dodo_dodoitsu/status/1974826990965518734))
> 「乗り換えばっかお得になってるけど、継続してる人の機種変更こそ特典つけるべきでは?ってずっと思ってる(5年くらい[楽天モバイル](/ja/jp/carriers/rakuten/)ユーザーで機種変2回しました)」
> — @mizu393([元の投稿](https://x.com/mizu393/status/1968627147691696151))
*※ 上記はX(旧Twitter)上の実際の投稿から引用しています。個人の感想であり、通信品質は地域・時間帯により異なります。*
---
## よくある質問
### Q: 格安SIMに乗り換えると電話番号は変わる?
変わらない。MNP(携帯番号ポータビリティ)を利用すれば、今の電話番号をそのまま新しいキャリアに引き継げる。2023年5月からはMNPワンストップ方式が導入され、転出元への連絡が不要になった。
### Q: 格安SIMに変えるとLINEは使えなくなる?
使えなくなることはない。LINEアカウントはスマホ本体に紐づいているため、SIMカードを差し替えても引き続き利用できる。ただし、機種変更を同時に行う場合は事前にLINEのアカウント引き継ぎ設定をしておくこと。
### Q: 格安SIMでも緊急通報(110/119)はできる?
音声通話付きプランなら、格安SIMでも緊急通報は可能。ただし、データ専用プラン([IIJmio](/ja/jp/carriers/iijmio/) eSIMデータプラン、[イオンモバイル](/ja/jp/carriers/aeon/) データ専用プランなど)では緊急通報ができないため、メイン回線としては音声通話付きプランを選ぶことを推奨する。
### Q: MVNOの通信速度は本当に遅い?
一日を通して常に遅いわけではない。混雑時間帯(特に12:00〜13:00のお昼休み)に速度が低下しやすいのは事実だが、それ以外の時間帯ではMNOと大きな差がないケースも多い。速度を最優先するなら、MNOのサブブランド([ahamo](/ja/jp/carriers/ahamo/)、[povo](/ja/jp/carriers/povo/)、[UQ mobile](/ja/jp/carriers/uqmobile/)、[Y!mobile](/ja/jp/carriers/ymobile/)、[LINEMO](/ja/jp/carriers/linemo/))を選ぶと、親キャリアと同等の速度で利用できる。
### Q: eSIMと物理SIMはどちらがいい?
eSIM対応スマホを持っているなら、eSIMの方が便利。オンラインで即時開通でき、物理SIMカードの到着を待つ必要がない。デュアルSIM運用(メイン回線 + サブ回線)も簡単にできる。ただし、海外で現地SIMカードを使う場合や、古い端末を使っている場合は物理SIMの方が都合がよいこともある。
---
## まとめ
2026年3月現在の格安SIM市場のポイントを整理する。
- **全体像**: 日本国内には22社・120プランが存在。月額¥0〜¥11,748と幅広い
- **MNO vs サブブランド vs MVNO**: MVNOの平均月額(約¥1,593)はサブブランド(約¥2,752)より約¥1,159安い。ただし通信品質は混雑時に差が出る
- **通信品質**: [ドコモ](/ja/jp/carriers/docomo/)が総合90/100で最高、[楽天](/ja/jp/carriers/rakuten/)が72/100で最低。サブブランドは親キャリアと同等
- **eSIM対応**: 全プランの78%(93/120)がeSIM対応。サブブランドは全社対応
- **5G対応**: 全プランの82%(98/120)が5G対応
- **契約縛り**: 全プランが縛りなし・解約金なし
**選び方の結論**:
1. まず自分の月間データ使用量を確認する
2. 通話の頻度に応じてかけ放題の要否を判断する
3. 通信品質を重視するならサブブランド、コストを重視するならMVNOを選ぶ
4. eSIMと5Gが必要かどうかで候補を絞り込む
具体的なプランの比較は、SimFinderの比較ツールで条件を入力して確認してほしい。
**[あなたに最適なプランを探す →](/ja/jp/search/)**
---
*この記事の情報は2026年3月時点のものです。最新の料金・プラン内容は各キャリアの公式サイトでご確認ください。*
*料金の比較・シミュレーションには[SimFinderの比較ツール](/ja/jp/search/)をご利用ください。*
================================================================================
# 格安SIMおすすめランキング2026年最新版 — 22社120プランを独自採点
URL: https://sim-finder.com/ja/blog/kakuyasu-sim-osusume-ranking-2026/
Type: blog (ja)
Published: 2026-03-25
## 結論: 格安SIMおすすめ総合ランキング Top 5
| 順位 | キャリア | おすすめプラン | 月額 | ポイント | 申込 |
|------|---------|--------------|------|---------|------|
| **1位** | [日本通信SIM](/ja/jp/carriers/nihontsushin/) | 合理的みんなのプラン 20GB | ¥1,390 | 20GB + 5分かけ放題付き、GB単価最強クラス | 提携なし |
| **2位** | [IIJmio](/ja/jp/carriers/iijmio/) | ギガプラン 各容量 | ¥850〜 | 2〜25GBの幅広い選択肢、繰り越し・家族割あり | 公式で見る |
| **3位** | [ahamo](/ja/jp/carriers/ahamo/) | [ahamo](/ja/jp/carriers/ahamo/) 30GB | ¥2,970 | [ドコモ](/ja/jp/carriers/docomo/)品質スコア90 + 5分かけ放題付き | 公式で見る |
| **4位** | [楽天モバイル](/ja/jp/carriers/rakuten/) | Rakuten最強プラン | ¥1,078〜 | データ無制限¥3,278 + Rakuten Link通話無料 | 公式で見る |
| **5位** | [HISモバイル](/ja/jp/carriers/hismobi/) | 自由自在290/2.0 | ¥550〜 | 1GB ¥550〜、通話料9円/30秒で業界最安水準 | 提携なし |
「申込」欄のリンクは広告(アフィリエイトリンク)。「提携なし」の2社は当サイトに広告提携がないため、キャリア名のリンクから公式サイトを確認してほしい。**順位は広告の有無と無関係に、料金・品質・容量・サービスの4軸スコアだけで決めている**(採点基準は次章)。
**[SimFinderで全120プランを条件で絞り込む →](/ja/jp/search/)**
まず押さえておくべきなのが、日本の携帯キャリアは大きく**3つのタイプ**に分かれるという点だ。
| 分類 | 概要 | キャリア数 | プラン数 | 月額平均 |
|------|------|-----------|---------|---------|
| **MNO(大手キャリア)** | 自社で通信回線を保有する事業者 | 4社 | 7プラン | 約¥2,701 |
| **サブブランド** | MNOが直接運営する格安ブランド | 5社 | 16プラン | 約¥2,752 |
| **MVNO(格安SIM)** | MNOの回線を借りて提供する事業者 | 12社 | 63プラン | 約¥1,593 |
※MNOの7プランは[楽天モバイル](/ja/jp/carriers/rakuten/)(4プラン)と[LINEMO](/ja/jp/carriers/linemo/)(3プラン)。[NTTドコモ](/ja/jp/carriers/docomo/)・[au](/ja/jp/carriers/au/)は個人向けプランをサブブランド経由で提供している。
### MNO(4社)
[NTTドコモ](/ja/jp/carriers/docomo/)、[au](/ja/jp/carriers/au/)([KDDI](/ja/jp/carriers/au/))、[ソフトバンク](/ja/jp/carriers/softbank/)、[楽天モバイル](/ja/jp/carriers/rakuten/)の4社。自社の通信インフラを持つため通信品質が高いが、料金も高め。ただし[楽天モバイル](/ja/jp/carriers/rakuten/)は¥1,078〜¥3,278の段階制で、MNOとしては異例の低価格を実現している。[ソフトバンク](/ja/jp/carriers/softbank/)はオンライン専用ブランドの[LINEMO](/ja/jp/carriers/linemo/)(¥990〜¥2,970)を直接運営している。
### サブブランド(5社)
MNOが直接運営する低価格ブランド。親キャリアの通信網をそのまま使えるため、MVNOより通信品質が安定している傾向がある。
| サブブランド | 親キャリア |
|-------------|-----------|
| [ahamo](/ja/jp/carriers/ahamo/) | [NTTドコモ](/ja/jp/carriers/docomo/) |
| [irumo](/ja/jp/carriers/irumo/) | [NTTドコモ](/ja/jp/carriers/docomo/) |
| [povo2.0](/ja/jp/carriers/povo/) | [au](/ja/jp/carriers/au/)([KDDI](/ja/jp/carriers/au/)) |
| [UQ mobile](/ja/jp/carriers/uqmobile/) | [au](/ja/jp/carriers/au/)([KDDI](/ja/jp/carriers/au/)) |
| [Y!mobile](/ja/jp/carriers/ymobile/) | [ソフトバンク](/ja/jp/carriers/softbank/) |
### MVNO(12社)
MNOの回線を借りて運営する格安事業者。料金はサブブランドより平均で約¥1,159安いが、通信速度が混雑時に低下する場合がある。
日本のMVNOの多くは[ドコモ](/ja/jp/carriers/docomo/)回線を利用している。SimFinderのデータでは、[ドコモ](/ja/jp/carriers/docomo/)回線を借りるMVNOが10社、[au](/ja/jp/carriers/au/)回線が2社([BIGLOBEモバイル](/ja/jp/carriers/biglobe/)、[J:COMモバイル](/ja/jp/carriers/jcom/))という構成だ。
---
## 選び方の5つの判断基準
格安SIMを選ぶ際に比較すべきポイントは5つある。優先度の高い順に解説する。
### 1. データ容量と月額料金のバランス
最も重要な判断基準。自分の月間データ使用量に合ったプランを選ぶことで、無駄な出費を防げる。
SimFinderのデータベースから、データ容量帯別の代表的なプランをピックアップした。
| 利用スタイル | 月間目安 | おすすめプラン | 月額 |
|-------------|---------|--------------|------|
| メール・LINE中心 | 1〜3GB | [日本通信SIM](/ja/jp/carriers/nihontsushin/) 合理的シンプル290 1GB | ¥290 |
| SNS・Web閲覧 | 3〜5GB | [IIJmio](/ja/jp/carriers/iijmio/) 5ギガ | ¥950 |
| 動画もそこそこ | 10〜15GB | [HISモバイル](/ja/jp/carriers/hismobi/) 自由自在2.0 10GB | ¥1,340 |
| 動画をよく見る | 20〜30GB | [日本通信SIM](/ja/jp/carriers/nihontsushin/) 合理的みんなのプラン 20GB | ¥1,390 |
| ヘビーユーザー | 50GB以上 | [日本通信SIM](/ja/jp/carriers/nihontsushin/) 合理的50GBプラン | ¥2,178 |
| データ無制限 | 制限なし | [楽天モバイル](/ja/jp/carriers/rakuten/) Rakuten最強プラン 無制限 | ¥3,278 |
**コストパフォーマンスの観点**では、[日本通信SIM](/ja/jp/carriers/nihontsushin/)の合理的50GBプラン(¥2,178で50GB、5分かけ放題付き、GB単価22.9MB/円)が全プラン中最も優れている。大容量プランでは、[ahamo](/ja/jp/carriers/ahamo/)大盛り(¥4,950で110GB、22.2MB/円)も高いコスパを示している。
### 2. 通信品質(ネットワーク速度とカバレッジ)
格安SIMは「安かろう悪かろう」ではないが、キャリアによって通信品質には明確な差がある。
SimFinderに登録されている2026年Q1の品質スコアを見てみよう。
| キャリア | 下り速度 | 上り速度 | レイテンシ | カバレッジ | 総合スコア |
|---------|---------|---------|-----------|-----------|-----------|
| [NTTドコモ](/ja/jp/carriers/docomo/) | 150.3Mbps | 18.5Mbps | 22ms | 95/100 | **90/100** |
| [au](/ja/jp/carriers/au/)([KDDI](/ja/jp/carriers/au/)) | 120.7Mbps | 15.2Mbps | 25ms | 93/100 | **85/100** |
| [ソフトバンク](/ja/jp/carriers/softbank/) | 110.5Mbps | 14.8Mbps | 26ms | 92/100 | **83/100** |
| [楽天モバイル](/ja/jp/carriers/rakuten/) | 80.2Mbps | 20.1Mbps | 30ms | 82/100 | **72/100** |
*データソース: OpenSignal 2026 Q1 / 計測日: 2026-01-15*
**ポイント**: サブブランド([ahamo](/ja/jp/carriers/ahamo/)、[povo](/ja/jp/carriers/povo/)、[UQ mobile](/ja/jp/carriers/uqmobile/)、[Y!mobile](/ja/jp/carriers/ymobile/)、[irumo](/ja/jp/carriers/irumo/))は親キャリアと同じ回線を使うため、上記と同等の品質が期待できる。一方、MVNOは回線を借りているため、特にお昼休み(12:00〜13:00)や夕方(17:00〜19:00)の混雑時間帯に速度が低下しやすい。
通信品質を重視するなら、[ドコモ](/ja/jp/carriers/docomo/)系の[ahamo](/ja/jp/carriers/ahamo/)(総合スコア90相当)、[au](/ja/jp/carriers/au/)系の[povo2.0](/ja/jp/carriers/povo/)や[UQ mobile](/ja/jp/carriers/uqmobile/)(同85相当)が有力な選択肢となる。
### 3. eSIM対応の有無
eSIM(組み込みSIM)に対応していれば、物理SIMカードの差し替えなしにオンラインで即時開通できる。機種変更やデュアルSIM運用も簡単になる。
SimFinderのデータでは、全120プラン中**93プラン(78%)がeSIM対応**している。
**eSIM対応キャリア(音声通話プランあり)**:
[ahamo](/ja/jp/carriers/ahamo/)、[povo2.0](/ja/jp/carriers/povo/)、[UQ mobile](/ja/jp/carriers/uqmobile/)、[Y!mobile](/ja/jp/carriers/ymobile/)、[irumo](/ja/jp/carriers/irumo/)、[楽天モバイル](/ja/jp/carriers/rakuten/)、[LINEMO](/ja/jp/carriers/linemo/)、[IIJmio](/ja/jp/carriers/iijmio/)、[HISモバイル](/ja/jp/carriers/hismobi/)、[mineo](/ja/jp/carriers/mineo/)、[日本通信SIM](/ja/jp/carriers/nihontsushin/)、[LinksMate](/ja/jp/carriers/linksmate/)、[J:COMモバイル](/ja/jp/carriers/jcom/)、[TONEモバイル](/ja/jp/carriers/tone/)
**eSIM非対応キャリア**:
[イオンモバイル](/ja/jp/carriers/aeon/)、[BIGLOBEモバイル](/ja/jp/carriers/biglobe/)、[エキサイトモバイル](/ja/jp/carriers/excite/)、[LIBMO](/ja/jp/carriers/libmo/)、[NUROモバイル](/ja/jp/carriers/nuro-mobile/)
eSIM対応を重視するなら、サブブランド6社は全てeSIM対応しているので安心だ。MVNOでは[IIJmio](/ja/jp/carriers/iijmio/)、[HISモバイル](/ja/jp/carriers/hismobi/)、[mineo](/ja/jp/carriers/mineo/)が対応している。
### 4. 5G対応
2026年現在、5Gエリアは都市部を中心に拡大しているが、地方ではまだ4Gが主力というエリアも多い。全120プランのうち**98プラン(82%)が5G対応**している。
**5G非対応のキャリア**: [BIGLOBEモバイル](/ja/jp/carriers/biglobe/)(全プラン非対応)、[エキサイトモバイル](/ja/jp/carriers/excite/)(全プラン非対応)、[LIBMO](/ja/jp/carriers/libmo/)(全プラン非対応)、[TONEモバイル](/ja/jp/carriers/tone/)(全プラン非対応)
都市部在住で5Gを活用したいなら、これらのキャリアは選択肢から外れることになる。
### 5. 通話オプションと付加価値
通話をよくする人にとっては、かけ放題オプションの有無とその料金も重要な判断ポイントだ。
| キャリア | かけ放題の特徴 |
|---------|--------------|
| [楽天モバイル](/ja/jp/carriers/rakuten/) | Rakuten Linkアプリ経由で**国内通話が無料**(追加料金なし) |
| [ahamo](/ja/jp/carriers/ahamo/) | **5分かけ放題が標準付帯**(追加料金なし) |
| [日本通信SIM](/ja/jp/carriers/nihontsushin/) | 合理的みんなのプラン以上で**5分かけ放題 or 70分通話が標準付帯** |
| [HISモバイル](/ja/jp/carriers/hismobi/) | 20GB以上のプランで**6分かけ放題が標準付帯**、通話料9円/30秒(業界最安水準) |
| [LINEMO](/ja/jp/carriers/linemo/) | LINEデータフリー(LINEのトーク・通話はデータ消費ゼロ) |
通話料金を含めたトータルコストで比較すると、[楽天モバイル](/ja/jp/carriers/rakuten/)はRakuten Linkによる通話無料が強力な差別化要因となる。電話をよくかける人なら、月額¥1,078〜で通話し放題は他社にない圧倒的なメリットだ。
---
## 利用スタイル別おすすめプラン
ここまでの5つの判断基準を踏まえて、利用スタイル別にSimFinderのデータベースからおすすめプランを選出した。
### とにかく安く使いたい人
**[日本通信SIM](/ja/jp/carriers/nihontsushin/) 合理的シンプル290(1GB): 月額¥290**
通話付きプランとして全120プラン中最安。通話料11円/30秒もMVNOの標準(22円/30秒)の半額だ。eSIM対応・5G対応で、必要最低限の機能は揃っている。月1GB以下の利用なら、これ以上安い選択肢は存在しない。
ただし、通話も含めて一切使わない「予備回線」目的なら、[povo2.0](/ja/jp/carriers/povo/)(基本料¥0、180日に1回トッピング購入が必要)という選択肢もある。
### バランス重視の人(5〜15GB)
**[IIJmio](/ja/jp/carriers/iijmio/) 10ギガ: 月額¥1,400**
[IIJmio](/ja/jp/carriers/iijmio/)は老舗MVNOとしての安定感があり、10GBで¥1,400は価格と容量のバランスが良い。eSIM対応、5G対応、データ繰り越しあり、家族割(2回線以上で-¥100/回線)もある。通話料は11円/30秒と標準の半額。
サブブランドの安心感を求めるなら、**[LINEMO](/ja/jp/carriers/linemo/) ベストプラン〜10GB(¥2,090)**が候補。LINEデータフリーが付帯し、[ソフトバンク](/ja/jp/carriers/softbank/)品質スコア83相当の通信品質が使える。
### データたっぷり使いたい人(20GB以上)
**[日本通信SIM](/ja/jp/carriers/nihontsushin/) 合理的みんなのプラン(20GB): 月額¥1,390**
20GBで¥1,390は全プラン中で最もコスパが高い水準。5分かけ放題(または70分通話)が標準付帯なので、通話オプションを別途契約する必要がない。
さらに上の容量が必要なら**[ahamo](/ja/jp/carriers/ahamo/) 30GB(¥2,970)**。[ドコモ](/ja/jp/carriers/docomo/)回線を直接使えるため通信品質は最高クラス(総合スコア90相当)、5分かけ放題標準付帯、海外ローミング20GBも込み。
### データ無制限が必要な人
**[楽天モバイル](/ja/jp/carriers/rakuten/) Rakuten最強プラン 無制限: 月額¥3,278**
データ無制限プランで月額¥3,278は、大手キャリアの無制限プラン(通常¥7,000前後)と比較して圧倒的に安い。Rakuten Linkで国内通話も無料。eSIM・5G対応。
ただし、[楽天モバイル](/ja/jp/carriers/rakuten/)の品質スコアは72/100とMNO4社中最低で、カバレッジスコアも82/100。地下や山間部でつながりにくい場面がある点には注意が必要だ。
110GBで足りるなら、通信品質で優位な**[ahamo](/ja/jp/carriers/ahamo/)大盛り(¥4,950)**も検討する価値がある。[ドコモ](/ja/jp/carriers/docomo/)品質スコア90相当で110GBが使え、GB単価22.2MB/円は[楽天](/ja/jp/carriers/rakuten/)無制限に次ぐコスパだ。
---
## 格安SIM選びで見落としがちな落とし穴
### 契約縛りと解約金
2026年現在、SimFinderに登録されている**全120プランが契約縛りなし・解約金なし**。総務省の規制により、2021年以降に新設されたプランでは原則として違約金が撤廃されている。これは大きな変化で、気軽にキャリアを乗り換えられる環境が整っている。
### テザリングの制限
多くのプランでテザリング(インターネット共有)が利用可能だが、一部のプランではテザリング時のデータ上限が異なる場合がある。テザリングを多用するなら、契約前に公式サイトで制限の有無を確認しておこう。
### データ繰り越しの有無
余ったデータ容量を翌月に持ち越せる「データ繰り越し」は、月によって使用量にムラがある人には重要な機能。[イオンモバイル](/ja/jp/carriers/aeon/)、[IIJmio](/ja/jp/carriers/iijmio/)、[mineo](/ja/jp/carriers/mineo/)、[UQ mobile](/ja/jp/carriers/uqmobile/)、[エキサイトモバイル](/ja/jp/carriers/excite/)、[NUROモバイル](/ja/jp/carriers/nuro-mobile/)、[BIGLOBEモバイル](/ja/jp/carriers/biglobe/)などが対応している。一方、[ahamo](/ja/jp/carriers/ahamo/)、[LINEMO](/ja/jp/carriers/linemo/)、[楽天モバイル](/ja/jp/carriers/rakuten/)、[povo2.0](/ja/jp/carriers/povo/)にはデータ繰り越しがない。
### [povo2.0](/ja/jp/carriers/povo/)の「180日ルール」
[povo2.0](/ja/jp/carriers/povo/)は基本料¥0で注目されるが、180日以内に有料トッピング(最安¥330)を購入しないと利用停止になる。完全に無料で維持し続けることはできない点に注意。
---
## SimFinderでプランを比較してみよう
ここまで読んで「自分に合うプランはだいたい分かったけど、もう少し詳しく比較したい」と思ったら、SimFinderの比較ツールを使ってみてほしい。
データ容量、月額予算、通話の有無、eSIM対応など、あなたの条件を入力すると、全120プランの中から条件に合うプランを絞り込んで比較できる。
**[SimFinderでプランを比較する →](/ja/jp/search/)**
---
## ユーザーの声
格安SIMに実際に乗り換えた人たちのリアルな声を紹介する。
> 「[ワイモバイル](/ja/jp/carriers/ymobile/)から[日本通信SIM](/ja/jp/carriers/nihontsushin/)に乗り換えた。ワイモバは基本料金990円だが通話料で膨らむのが悩みだった。[日本通信SIM](/ja/jp/carriers/nihontsushin/)は10GB+無料通話70分で1,390円と安く、品質も問題なし。テザリングでの仕事も快適」
> — @pop_o_writer([元の投稿](https://x.com/pop_o_writer/status/1681485160548794370))
> 「クレカ持ってるなら[日本通信SIM](/ja/jp/carriers/nihontsushin/)超おすすめ。1,400円程で20GB+通話も何回でも5分無料 or 月70分無料か選べる。もし通信速度に不満が生じたら290円で番号持てるので、[povo](/ja/jp/carriers/povo/)とかとデータ通信専用プランでデュアル運用すれば格安で持てる」
> — @dodo_dodoitsu([元の投稿](https://x.com/dodo_dodoitsu/status/1974826990965518734))
> 「乗り換えばっかお得になってるけど、継続してる人の機種変更こそ特典つけるべきでは?ってずっと思ってる(5年くらい[楽天モバイル](/ja/jp/carriers/rakuten/)ユーザーで機種変2回しました)」
> — @mizu393([元の投稿](https://x.com/mizu393/status/1968627147691696151))
*※ 上記はX(旧Twitter)上の実際の投稿から引用しています。個人の感想であり、通信品質は地域・時間帯により異なります。*
---
## よくある質問
### Q: 格安SIMに乗り換えると電話番号は変わる?
変わらない。MNP(携帯番号ポータビリティ)を利用すれば、今の電話番号をそのまま新しいキャリアに引き継げる。2023年5月からはMNPワンストップ方式が導入され、転出元への連絡が不要になった。
### Q: 格安SIMに変えるとLINEは使えなくなる?
使えなくなることはない。LINEアカウントはスマホ本体に紐づいているため、SIMカードを差し替えても引き続き利用できる。ただし、機種変更を同時に行う場合は事前にLINEのアカウント引き継ぎ設定をしておくこと。
### Q: 格安SIMでも緊急通報(110/119)はできる?
音声通話付きプランなら、格安SIMでも緊急通報は可能。ただし、データ専用プラン([IIJmio](/ja/jp/carriers/iijmio/) eSIMデータプラン、[イオンモバイル](/ja/jp/carriers/aeon/) データ専用プランなど)では緊急通報ができないため、メイン回線としては音声通話付きプランを選ぶことを推奨する。
### Q: MVNOの通信速度は本当に遅い?
一日を通して常に遅いわけではない。混雑時間帯(特に12:00〜13:00のお昼休み)に速度が低下しやすいのは事実だが、それ以外の時間帯ではMNOと大きな差がないケースも多い。速度を最優先するなら、MNOのサブブランド([ahamo](/ja/jp/carriers/ahamo/)、[povo](/ja/jp/carriers/povo/)、[UQ mobile](/ja/jp/carriers/uqmobile/)、[Y!mobile](/ja/jp/carriers/ymobile/)、[LINEMO](/ja/jp/carriers/linemo/))を選ぶと、親キャリアと同等の速度で利用できる。
### Q: eSIMと物理SIMはどちらがいい?
eSIM対応スマホを持っているなら、eSIMの方が便利。オンラインで即時開通でき、物理SIMカードの到着を待つ必要がない。デュアルSIM運用(メイン回線 + サブ回線)も簡単にできる。ただし、海外で現地SIMカードを使う場合や、古い端末を使っている場合は物理SIMの方が都合がよいこともある。
---
## まとめ
2026年3月現在の格安SIM市場のポイントを整理する。
- **全体像**: 日本国内には22社・120プランが存在。月額¥0〜¥11,748と幅広い
- **MNO vs サブブランド vs MVNO**: MVNOの平均月額(約¥1,593)はサブブランド(約¥2,752)より約¥1,159安い。ただし通信品質は混雑時に差が出る
- **通信品質**: [ドコモ](/ja/jp/carriers/docomo/)が総合90/100で最高、[楽天](/ja/jp/carriers/rakuten/)が72/100で最低。サブブランドは親キャリアと同等
- **eSIM対応**: 全プランの78%(93/120)がeSIM対応。サブブランドは全社対応
- **5G対応**: 全プランの82%(98/120)が5G対応
- **契約縛り**: 全プランが縛りなし・解約金なし
**選び方の結論**:
1. まず自分の月間データ使用量を確認する
2. 通話の頻度に応じてかけ放題の要否を判断する
3. 通信品質を重視するならサブブランド、コストを重視するならMVNOを選ぶ
4. eSIMと5Gが必要かどうかで候補を絞り込む
具体的なプランの比較は、SimFinderの比較ツールで条件を入力して確認してほしい。
**[あなたに最適なプランを探す →](/ja/jp/search/)**
---
*この記事の情報は2026年3月時点のものです。最新の料金・プラン内容は各キャリアの公式サイトでご確認ください。*
*料金の比較・シミュレーションには[SimFinderの比較ツール](/ja/jp/search/)をご利用ください。*
================================================================================
# 格安SIMおすすめランキング2026年最新版 — 22社120プランを独自採点
URL: https://sim-finder.com/ja/blog/kakuyasu-sim-osusume-ranking-2026/
Type: blog (ja)
Published: 2026-03-25
## 結論: 格安SIMおすすめ総合ランキング Top 5
| 順位 | キャリア | おすすめプラン | 月額 | ポイント | 申込 |
|------|---------|--------------|------|---------|------|
| **1位** | [日本通信SIM](/ja/jp/carriers/nihontsushin/) | 合理的みんなのプラン 20GB | ¥1,390 | 20GB + 5分かけ放題付き、GB単価最強クラス | 提携なし |
| **2位** | [IIJmio](/ja/jp/carriers/iijmio/) | ギガプラン 各容量 | ¥850〜 | 2〜25GBの幅広い選択肢、繰り越し・家族割あり | 公式で見る |
| **3位** | [ahamo](/ja/jp/carriers/ahamo/) | [ahamo](/ja/jp/carriers/ahamo/) 30GB | ¥2,970 | [ドコモ](/ja/jp/carriers/docomo/)品質スコア90 + 5分かけ放題付き | 公式で見る |
| **4位** | [楽天モバイル](/ja/jp/carriers/rakuten/) | Rakuten最強プラン | ¥1,078〜 | データ無制限¥3,278 + Rakuten Link通話無料 | 公式で見る |
| **5位** | [HISモバイル](/ja/jp/carriers/hismobi/) | 自由自在290/2.0 | ¥550〜 | 1GB ¥550〜、通話料9円/30秒で業界最安水準 | 提携なし |
「申込」欄のリンクは広告(アフィリエイトリンク)。「提携なし」の2社は当サイトに広告提携がないため、キャリア名のリンクから公式サイトを確認してほしい。**順位は広告の有無と無関係に、料金・品質・容量・サービスの4軸スコアだけで決めている**(採点基準は次章)。
**[SimFinderで全120プランを条件で絞り込む →](/ja/jp/search/)**
PR
どれか1つ選ぶなら IIJmio(2位)。1位の日本通信SIMは20GB固定で¥1,390という一点突破型なのに対し、IIJmioは2GB ¥850から25GBまで9段階あり、余ったデータは翌月繰り越し、家族4回線までまとめられる。「自分に必要な容量がまだ分からない」段階で失敗しにくいのはこちら。
IIJmio ギガプランの料金を見る →
以下、22社120プランの全データを元にランキングを詳しく解説する。
## 目次
- [ランキングの採点基準](#ランキングの採点基準)
- [総合ランキング Top 10](#総合ランキング-top-10)
- [容量帯別ランキング](#容量帯別ランキング)
- [カテゴリ別ランキング](#カテゴリ別ランキング)
- [キャリア系統図で見る全体像](#キャリア系統図で見る全体像)
- [乗り換え時の注意点](#乗り換え時の注意点)
- [よくある質問](#よくある質問)
- [まとめ](#まとめ)
---
## ランキングの採点基準
このランキングは、SimFinderのデータベースに登録されている全22社120プランを対象に、以下の4軸で総合評価している。「なんとなくおすすめ」ではなく、全プランの実データに基づいた採点だ。
### 1. 料金(月額の安さ・GB単価)
月額料金そのものに加え、1GBあたりの単価(コストパフォーマンス)を評価。通話オプションが標準付帯の場合はその分も加味する。
### 2. 通信品質(速度・カバレッジ)
OpenSignal 2026 Q1のデータに基づく。MNOの品質スコアを基準とし、サブブランドは親MNOと同等、MVNOは回線借用による品質劣化を考慮する。
| キャリア | 下り速度 | カバレッジ | 総合スコア |
|---------|---------|-----------|-----------|
| [NTTドコモ](/ja/jp/carriers/docomo/) | 150.3Mbps | 95/100 | **90/100** |
| [au](/ja/jp/carriers/au/)([KDDI](/ja/jp/carriers/au/)) | 120.7Mbps | 93/100 | **85/100** |
| [ソフトバンク](/ja/jp/carriers/softbank/) | 110.5Mbps | 92/100 | **83/100** |
| [楽天モバイル](/ja/jp/carriers/rakuten/) | 80.2Mbps | 82/100 | **72/100** |
*データソース: OpenSignal 2026 Q1 / 計測日: 2026-01-15*
### 3. データ容量
プランが提供するGB数。無制限プランの有無、段階制プランの柔軟性も考慮する。
### 4. サービス(付加価値)
eSIM対応、5G対応、データ繰り越し、かけ放題の標準付帯、家族割引、テザリング対応などの機能面を評価。
---
## 総合ランキング Top 10
全22社120プランのデータを上記4軸で総合評価した結果を発表する。
### 1位: [日本通信SIM](/ja/jp/carriers/nihontsushin/) — 合理的みんなのプラン 20GB
| 項目 | 内容 |
|------|------|
| 月額 | **¥1,390** |
| データ容量 | 20GB |
| 通話 | 5分かけ放題 または 月70分通話(選択制・標準付帯) |
| 通話料 | 11円/30秒(超過分) |
| 品質 | [ドコモ](/ja/jp/carriers/docomo/)回線(MVNO) |
| eSIM / 5G | 対応 / 対応 |
**選出理由**: 20GBで¥1,390は全プラン中で最もコストパフォーマンスが高い水準。5分かけ放題(または70分通話)が追加料金なしで付帯し、通話を含めたトータルコストが抑えられる。通話料も11円/30秒と標準の半額。eSIM・5G対応で機能面にも不足がない。
さらに上の容量が必要なら合理的50GBプラン(¥2,178、50GB、5分かけ放題付き)もある。GB単価約¥43.6/GBは[ahamo](/ja/jp/carriers/ahamo/)大盛り(¥45/GB)を上回る。
### 2位: [IIJmio](/ja/jp/carriers/iijmio/) — ギガプラン
| 項目 | 内容 |
|------|------|
| 月額 | **¥850〜¥2,000**(2GB〜25GB) |
| 代表プラン | 10ギガ ¥1,400 |
| 通話料 | 11円/30秒 |
| 品質 | [ドコモ](/ja/jp/carriers/docomo/)回線(MVNO) |
| eSIM / 5G | 対応 / 対応 |
| 特徴 | データ繰り越しあり、家族割(-¥100/回線) |
**選出理由**: 2GB(¥850)から25GB(¥2,000)まで5段階の容量を揃え、自分の使い方に合わせて選びやすい。データ繰り越しに対応しており、月によって使用量にムラがある人にも適している。家族割(2回線以上で-¥100/回線)もあり、家族での利用に向く。通話料11円/30秒、eSIM対応と、MVNOとして総合力が高い。
eSIMデータ専用プランなら2GB ¥440〜55GB ¥3,540とさらに安い。サブ回線やデュアルSIM用途にも使える。
### 3位: [ahamo](/ja/jp/carriers/ahamo/) — 30GB
| 項目 | 内容 |
|------|------|
| 月額 | **¥2,970** |
| データ容量 | 30GB(大盛り110GBは¥4,950) |
| 通話 | 5分かけ放題(標準付帯) |
| 品質 | [ドコモ](/ja/jp/carriers/docomo/)回線(サブブランド、品質スコア90相当) |
| eSIM / 5G | 対応 / 対応 |
**選出理由**: サブブランドの中で最も総合バランスが良い。[ドコモ](/ja/jp/carriers/docomo/)品質スコア90相当の通信品質で、5分かけ放題が標準付帯。30GBあれば大半のユーザーの月間使用量をカバーできる。MVNOと比べて昼休みや夕方の速度低下がなく、通信品質を重視する人に向いている。大盛りオプション追加で110GB(¥4,950)にも拡張可能。
### 4位: [楽天モバイル](/ja/jp/carriers/rakuten/) — Rakuten最強プラン
| 項目 | 内容 |
|------|------|
| 月額 | **¥1,078〜¥3,278**(段階制) |
| データ容量 | 〜3GB / 3〜20GB / 20GB〜無制限 |
| 通話 | Rakuten Link経由で国内通話無料 |
| 品質 | [楽天](/ja/jp/carriers/rakuten/)回線(MNO、品質スコア72) |
| eSIM / 5G | 対応 / 対応 |
**選出理由**: データ無制限で¥3,278は、大手MNOの無制限プラン([ドコモ](/ja/jp/carriers/docomo/) MAX ¥8,448、[ソフトバンク](/ja/jp/carriers/softbank/) メリハリ無制限+ ¥7,425)と比較して半額以下。段階制なので使わない月は¥1,078で済む。Rakuten Linkによる国内通話完全無料も他社にない強み。
ただし、品質スコア72/100はMNO4社中最低。カバレッジスコア82/100と、地下や建物内でつながりにくい場面がある。通信品質を最優先する人には向かない。
### 5位: [HISモバイル](/ja/jp/carriers/hismobi/) — 自由自在290/2.0プラン
| 項目 | 内容 |
|------|------|
| 月額 | **¥550〜¥2,970**(1GB〜30GB) |
| 代表プラン | 自由自在290 7GB ¥990 |
| 通話料 | 9円/30秒(業界最安水準) |
| 品質 | [ドコモ](/ja/jp/carriers/docomo/)回線(MVNO) |
| eSIM / 5G | 対応 / 対応 |
**選出理由**: 通話料9円/30秒は全22社中最安。かけ放題を付けるほどではないが、たまに電話する人にとってはトータルコストが安く済む。7GBで¥990は小〜中容量帯でトップクラスの安さ。1GBプランは¥550で[日本通信SIM](/ja/jp/carriers/nihontsushin/)(¥290)に次ぐ安さ。
### 6位: [LINEMO](/ja/jp/carriers/linemo/) — ベストプラン/ベストプランV
| 項目 | 内容 |
|------|------|
| 月額 | **¥990〜¥2,970** |
| データ容量 | 3GB / 10GB(段階制)/ 30GB |
| 品質 | [ソフトバンク](/ja/jp/carriers/softbank/)回線(サブブランド、品質スコア83相当) |
| eSIM / 5G | 対応 / 対応 |
| 特徴 | LINEデータフリー(LINEのトーク・通話はデータ消費ゼロ) |
**選出理由**: LINEデータフリーが最大の差別化ポイント。LINEのトーク・通話がデータ消費ゼロなので、LINEを多用する人には実質的なデータ容量が増える。ベストプランは3GB超〜10GBで自動的に¥2,090に切り替わる段階制。ベストプランV(30GB、¥2,970)は5分かけ放題が標準付帯で[ahamo](/ja/jp/carriers/ahamo/)と同額。[ソフトバンク](/ja/jp/carriers/softbank/)品質スコア83相当の通信品質も安心。
### 7位: [mineo](/ja/jp/carriers/mineo/) — マイピタ
| 項目 | 内容 |
|------|------|
| 月額 | **¥1,298〜¥2,948**(3GB〜50GB) |
| 代表プラン | マイピタ 30GB ¥2,178 |
| 品質 | [ドコモ](/ja/jp/carriers/docomo/)回線(MVNO) |
| eSIM / 5G | 対応 / 対応 |
| 特徴 | 独自コミュニティ「マイネ王」、パケットシェア |
**選出理由**: 3GB〜50GBまで5段階の容量を揃え、30GBで¥2,178はMVNOの中でも競争力がある。かけ放題オプションも10分 ¥550、時間無制限 ¥1,210と他社より安め。独自のコミュニティ機能やパケットシェアなど、サービス面の付加価値が高い。データ専用プランも3GB ¥880〜と安い。
### 8位: [povo2.0](/ja/jp/carriers/povo/)
| 項目 | 内容 |
|------|------|
| 月額 | **¥0**(基本料)+ トッピング |
| 代表トッピング | 3GB/30日 ¥990、5GB ¥1,380、30GB ¥2,780 |
| 品質 | [au](/ja/jp/carriers/au/)回線(サブブランド、品質スコア85相当) |
| eSIM / 5G | 対応 / 対応 |
**選出理由**: 基本料¥0は全プラン中唯一。使いたいときだけトッピングを購入する仕組みで、月によって使用量が大きく変動する人や、予備回線として持っておきたい人に最適。[au](/ja/jp/carriers/au/)品質スコア85相当の通信品質をベースに使える。ただし、180日に1回は有料トッピング(最安¥330)の購入が必要。
### 9位: [nuroモバイル](/ja/jp/carriers/nuro-mobile/) — バリュープラス/NEOプラン
| 項目 | 内容 |
|------|------|
| 月額 | **¥792〜¥3,980**(3GB〜55GB) |
| 代表プラン | VSプラン 3GB ¥792、NEOプラン 35GB ¥2,699 |
| 品質 | [ドコモ](/ja/jp/carriers/docomo/)回線(MVNO) |
| eSIM / 5G | 対応 / 対応 |
| 特徴 | データ繰り越しあり |
**選出理由**: 3GBで¥792は小容量帯で[HISモバイル](/ja/jp/carriers/hismobi/)(¥770)に次ぐ安さ。NEOプランは35GBで¥2,699と[ahamo](/ja/jp/carriers/ahamo/)(30GB ¥2,970)より安くデータ量も多い。データ繰り越しにも対応しており、月によって使用量にムラがある人に向く。
### 10位: [日本通信SIM](/ja/jp/carriers/nihontsushin/) — 合理的シンプル290(1GB)
| 項目 | 内容 |
|------|------|
| 月額 | **¥290** |
| データ容量 | 1GB |
| 通話料 | 11円/30秒 |
| 品質 | [ドコモ](/ja/jp/carriers/docomo/)回線(MVNO) |
| eSIM / 5G | 対応 / 対応 |
**選出理由**: 音声通話付きプランとして全120プラン中最安。月1GBで足りるライトユーザーや、メイン回線とは別のサブ回線として持つのに最適。通話料11円/30秒も標準の半額で、最低限の利用ならこれ以上安い選択肢は存在しない。
**[SimFinderで全120プランを条件指定で比較する →](/ja/jp/search/)**
---
## 容量帯別ランキング
用途に応じた容量帯ごとに、コストパフォーマンスの高いプランをランキングした。
### 小容量(1〜3GB): メール・LINE中心の人向け
| 順位 | キャリア | プラン | 月額 | GB |
|------|---------|-------|------|-----|
| **1位** | [日本通信SIM](/ja/jp/carriers/nihontsushin/) | 合理的シンプル290 | ¥290 | 1GB |
| **2位** | [HISモバイル](/ja/jp/carriers/hismobi/) | 自由自在290 1GB | ¥550 | 1GB |
| **3位** | [HISモバイル](/ja/jp/carriers/hismobi/) | 自由自在290 3GB | ¥770 | 3GB |
[日本通信SIM](/ja/jp/carriers/nihontsushin/)の¥290は音声通話付きプラン最安。通話料も11円/30秒と安い。[HISモバイル](/ja/jp/carriers/hismobi/)は通話料9円/30秒で、電話をたまにかける人ならトータルコストが逆転する場合もある。
3GB帯では、[HISモバイル](/ja/jp/carriers/hismobi/)(¥770)、[nuroモバイル](/ja/jp/carriers/nuro-mobile/) VSプラン(¥792)、[IIJmio](/ja/jp/carriers/iijmio/) 2ギガ(¥850)の順に安い。サブブランドの安心感が欲しいなら、[povo2.0](/ja/jp/carriers/povo/) 3GB/30日(¥990)や[LINEMO](/ja/jp/carriers/linemo/) ベストプラン 3GB(¥990)が候補になる。
### 中容量(5〜10GB): SNS・Web閲覧が中心の人向け
| 順位 | キャリア | プラン | 月額 | GB |
|------|---------|-------|------|-----|
| **1位** | [IIJmio](/ja/jp/carriers/iijmio/) | 5ギガ | ¥950 | 5GB |
| **2位** | [HISモバイル](/ja/jp/carriers/hismobi/) | 自由自在290 7GB | ¥990 | 7GB |
| **3位** | [IIJmio](/ja/jp/carriers/iijmio/) | 10ギガ | ¥1,400 | 10GB |
[IIJmio](/ja/jp/carriers/iijmio/)の5ギガ(¥950)は5GB帯で最安クラス。繰り越しと家族割もある。[HISモバイル](/ja/jp/carriers/hismobi/)の7GB ¥990はGB単価が優秀で、5GBでは足りないが10GBほどは必要ない人にちょうどいい。10GBなら[IIJmio](/ja/jp/carriers/iijmio/)(¥1,400)が安い。
サブブランドの品質を求めるなら、[LINEMO](/ja/jp/carriers/linemo/) ベストプラン〜10GB(¥2,090、段階制)が選択肢になる。
### 大容量(20GB以上): 動画視聴・テレワークの人向け
| 順位 | キャリア | プラン | 月額 | GB |
|------|---------|-------|------|-----|
| **1位** | [日本通信SIM](/ja/jp/carriers/nihontsushin/) | 合理的みんなのプラン | ¥1,390 | 20GB |
| **2位** | [日本通信SIM](/ja/jp/carriers/nihontsushin/) | 合理的50GBプラン | ¥2,178 | 50GB |
| **3位** | [ahamo](/ja/jp/carriers/ahamo/) | [ahamo](/ja/jp/carriers/ahamo/) 30GB | ¥2,970 | 30GB |
[日本通信SIM](/ja/jp/carriers/nihontsushin/)が圧倒的なコスパを見せる。20GBで¥1,390、50GBで¥2,178はいずれも同容量帯で最安。さらに5分かけ放題(または70分通話)が追加料金なしで付帯する。通信品質を重視するなら、[ドコモ](/ja/jp/carriers/docomo/)品質スコア90相当の[ahamo](/ja/jp/carriers/ahamo/)(30GB ¥2,970)が安心。
110GBが必要なヘビーユーザーには[ahamo](/ja/jp/carriers/ahamo/)大盛り(¥4,950)一択。GB単価¥45/GBで[ドコモ](/ja/jp/carriers/docomo/)品質が使える。
### 無制限: データを気にせず使いたい人向け
| 順位 | キャリア | プラン | 月額 | 品質スコア |
|------|---------|-------|------|-----------|
| **1位** | [楽天モバイル](/ja/jp/carriers/rakuten/) | Rakuten最強プラン 無制限 | ¥3,278 | 72/100 |
| **2位** | [ソフトバンク](/ja/jp/carriers/softbank/) | メリハリ無制限+ | ¥7,425 | 83/100 |
| **3位** | [NTTドコモ](/ja/jp/carriers/docomo/) | [ドコモ](/ja/jp/carriers/docomo/) MAX 無制限 | ¥8,448 | 90/100 |
データ無制限プランは3つだけ。[楽天モバイル](/ja/jp/carriers/rakuten/)の¥3,278は他2社の半額以下で、Rakuten Link通話無料も付く。ただし品質スコア72/100は3社中最低。[ドコモ](/ja/jp/carriers/docomo/) MAX 無制限(¥8,448)は品質スコア90/100で最高だが、料金もトップ。「品質は多少妥協してもよいから安く無制限を使いたい」なら[楽天モバイル](/ja/jp/carriers/rakuten/)、「品質最優先」なら[ドコモ](/ja/jp/carriers/docomo/) MAX。
なお、[楽天モバイル](/ja/jp/carriers/rakuten/)には Rakuten最強 U-NEXT(¥4,268)もある。データ無制限 + U-NEXT見放題のセットプランで、U-NEXTを契約している人なら実質お得になる。
**[SimFinderで自分の条件に合うプランを比較する →](/ja/jp/search/)**
---
## カテゴリ別ランキング
### 料金の安さ Top 3(音声通話付きプラン)
| 順位 | キャリア | プラン | 月額 | GB |
|------|---------|-------|------|-----|
| **1位** | [日本通信SIM](/ja/jp/carriers/nihontsushin/) | 合理的シンプル290 | **¥290** | 1GB |
| **2位** | [HISモバイル](/ja/jp/carriers/hismobi/) | 自由自在290 1GB | **¥550** | 1GB |
| **3位** | [HISモバイル](/ja/jp/carriers/hismobi/) | 自由自在290 3GB | **¥770** | 3GB |
※ [povo2.0](/ja/jp/carriers/povo/)は基本料¥0だが、180日に1回のトッピング購入が必須のため、純粋な月額プランとしては別枠で扱う。
### 通信速度 Top 3(品質スコア順)
| 順位 | キャリア(サブブランド含む) | 親MNO品質スコア | 代表プラン | 月額 |
|------|--------------------------|----------------|-----------|------|
| **1位** | [ahamo](/ja/jp/carriers/ahamo/) / [irumo](/ja/jp/carriers/irumo/) | 90/100([ドコモ](/ja/jp/carriers/docomo/)) | [ahamo](/ja/jp/carriers/ahamo/) 30GB | ¥2,970 |
| **2位** | [povo2.0](/ja/jp/carriers/povo/) / [UQ mobile](/ja/jp/carriers/uqmobile/) | 85/100([au](/ja/jp/carriers/au/)) | [povo](/ja/jp/carriers/povo/) 3GB/30日 | ¥990 |
| **3位** | [Y!mobile](/ja/jp/carriers/ymobile/) / [LINEMO](/ja/jp/carriers/linemo/) | 83/100([ソフトバンク](/ja/jp/carriers/softbank/)) | [LINEMO](/ja/jp/carriers/linemo/) 3GB | ¥990 |
MVNOはMNOから回線を借りているため、特にお昼休み(12:00〜13:00)と夕方(17:00〜19:00)に速度が低下しやすい。通信品質を重視するなら、サブブランド6社([ahamo](/ja/jp/carriers/ahamo/)、[povo](/ja/jp/carriers/povo/)、[UQ mobile](/ja/jp/carriers/uqmobile/)、[Y!mobile](/ja/jp/carriers/ymobile/)、[irumo](/ja/jp/carriers/irumo/)、[LINEMO](/ja/jp/carriers/linemo/))またはMNOを選ぶと安心。
### eSIM対応キャリア一覧
2026年4月現在、全120プランの約78%がeSIM対応。eSIM対応ならオンラインで即時開通でき、物理SIMカードの到着を待つ必要がない。
**eSIM対応(17社)**:
| 分類 | キャリア |
|------|---------|
| MNO | [NTTドコモ](/ja/jp/carriers/docomo/)、[au](/ja/jp/carriers/au/)、[ソフトバンク](/ja/jp/carriers/softbank/)、[楽天モバイル](/ja/jp/carriers/rakuten/) |
| サブブランド | [ahamo](/ja/jp/carriers/ahamo/)、[povo](/ja/jp/carriers/povo/)、[UQ mobile](/ja/jp/carriers/uqmobile/)、[Y!mobile](/ja/jp/carriers/ymobile/)、[irumo](/ja/jp/carriers/irumo/)、[LINEMO](/ja/jp/carriers/linemo/) |
| MVNO | [IIJmio](/ja/jp/carriers/iijmio/)、[HISモバイル](/ja/jp/carriers/hismobi/)、[mineo](/ja/jp/carriers/mineo/)、[日本通信SIM](/ja/jp/carriers/nihontsushin/)、[nuroモバイル](/ja/jp/carriers/nuro-mobile/)、[LinksMate](/ja/jp/carriers/linksmate/)、[J:COMモバイル](/ja/jp/carriers/jcom/)、[トーンモバイル](/ja/jp/carriers/tone/) |
**eSIM非対応(4社)**:
[イオンモバイル](/ja/jp/carriers/aeon/)、[BIGLOBEモバイル](/ja/jp/carriers/biglobe/)、[exciteモバイル](/ja/jp/carriers/excite/)、[LIBMO](/ja/jp/carriers/libmo/)
eSIM対応を重視するなら、非対応の4社は候補から外れる。デュアルSIM運用(メイン回線 + サブ回線)を考えている人には特に重要なポイントだ。
> 格安SIMの選び方の基本については「[格安SIMの選び方完全ガイド2026](/ja/blog/kakuyasu-sim-erabikata-guide-2026/)」で、データ使用量の目安については「[データ使用量ガイド — 自分に必要なGB数の調べ方](/ja/blog/data-usage-guide-how-many-gb/)」で詳しく解説している。
**[SimFinderで全120プランを条件指定で比較する →](/ja/jp/search/)**
---
## キャリア系統図で見る全体像
日本の携帯キャリアはMNO(自社回線保有)4社を頂点に、サブブランド6社、MVNO 12社の計22社で構成されている。
| 分類 | キャリア数 | プラン数 | 月額平均 |
|------|-----------|---------|---------|
| **MNO** | 4社 | 7プラン | 約¥2,701 |
| **サブブランド** | 5社 | 16プラン | 約¥2,752 |
| **MVNO** | 12社 | 63プラン | 約¥1,593 |
MVNOの平均月額(約¥1,593)はサブブランド(約¥2,752)より約¥1,159安い。ただし、通信品質は混雑時間帯にMVNOが不利になりやすい。この「料金 vs 品質」のトレードオフが格安SIM選びの核心であり、自分の優先順位で選ぶべきだ。
MNO・サブブランド・MVNOの違いについて詳しく知りたい場合は「[MNOとMVNOの違いをわかりやすく解説](/ja/blog/mno-mvno-difference-guide/)」を参照してほしい。
---
## 乗り換え時の注意点
ランキング上位のプランに乗り換えを検討する際、見落としがちなポイントをまとめる。
### MNPワンストップ方式で乗り換えは簡単に
2023年5月から導入されたMNPワンストップ方式により、転出元への連絡が不要になった。乗り換え先の申し込みだけで番号ポータビリティが完了する。2026年現在、全120プランが契約縛りなし・解約金¥0なので、金銭的なハードルもない。
### キャリアメールが使えなくなる
大手キャリアからの乗り換えで最も多い相談が「@[docomo](/ja/jp/carriers/docomo/).ne.jp」「@[au](/ja/jp/carriers/au/).com」「@[softbank](/ja/jp/carriers/softbank/).ne.jp」のメールアドレスについて。各社とも月額¥330の「メール持ち運びサービス」を提供しているが、この機会にGmail等のフリーメールに移行するのが長期的にはおすすめ。
### [povo2.0](/ja/jp/carriers/povo/)の「180日ルール」
[povo2.0](/ja/jp/carriers/povo/)は基本料¥0で注目されるが、180日以内に有料トッピング(最安¥330)を購入しないと利用停止になる。完全に無料で維持し続けることはできない。
### MVNOの混雑時速度低下
MVNOはMNOから回線を借りているため、お昼休み(12:00〜13:00)や夕方(17:00〜19:00)に速度が低下しやすい。仕事中にテザリングでPCを使う人や、動画のライブ配信を見る人は、サブブランド([ahamo](/ja/jp/carriers/ahamo/)、[povo](/ja/jp/carriers/povo/)、[UQ mobile](/ja/jp/carriers/uqmobile/)、[Y!mobile](/ja/jp/carriers/ymobile/)、[LINEMO](/ja/jp/carriers/linemo/))を選ぶ方が安全。
### データ繰り越しの有無
月によってデータ使用量にムラがある人は、データ繰り越し対応のプランを選ぶと無駄が減る。対応しているのは[IIJmio](/ja/jp/carriers/iijmio/)、[nuroモバイル](/ja/jp/carriers/nuro-mobile/)、[UQ mobile](/ja/jp/carriers/uqmobile/)、[イオンモバイル](/ja/jp/carriers/aeon/)など。[ahamo](/ja/jp/carriers/ahamo/)、[LINEMO](/ja/jp/carriers/linemo/)、[楽天モバイル](/ja/jp/carriers/rakuten/)、[povo2.0](/ja/jp/carriers/povo/)には繰り越しがない。
---
## よくある質問
### Q: 格安SIMのランキングはどのような基準で作成している?
SimFinderでは料金(月額の安さ・GB単価)、通信品質(OpenSignal 2026 Q1データに基づく速度・カバレッジ)、データ容量(GB数・無制限の有無)、サービス(eSIM対応・5G対応・繰り越し・かけ放題付帯など)の4軸で独自採点している。全22社120プランのデータベースから、各カテゴリで総合的に評価した。
### Q: 2026年で一番安い格安SIMはどれ?
音声通話付きプランで最安は[日本通信SIM](/ja/jp/carriers/nihontsushin/)の合理的シンプル290(1GB)で月額¥290。基本料¥0で持てる[povo2.0](/ja/jp/carriers/povo/)もあるが、180日に1回は有料トッピング(最安¥330)の購入が必要。データ専用プランなら[IIJmio](/ja/jp/carriers/iijmio/) eSIMデータプラン 2GBの¥440が最安。
### Q: 格安SIMで通信速度が速いのはどこ?
通信品質はMNOの回線をそのまま使えるサブブランドが有利。具体的には[ahamo](/ja/jp/carriers/ahamo/)・[irumo](/ja/jp/carriers/irumo/)([ドコモ](/ja/jp/carriers/docomo/)品質スコア90)、[povo2.0](/ja/jp/carriers/povo/)・[UQ mobile](/ja/jp/carriers/uqmobile/)([au](/ja/jp/carriers/au/)品質スコア85)、[Y!mobile](/ja/jp/carriers/ymobile/)・[LINEMO](/ja/jp/carriers/linemo/)([ソフトバンク](/ja/jp/carriers/softbank/)品質スコア83)が上位。MVNOは昼休みや夕方に速度低下しやすい傾向がある。
### Q: データ無制限で一番おすすめの格安SIMは?
データ無制限プランは3つ。[楽天モバイル](/ja/jp/carriers/rakuten/) Rakuten最強プラン 無制限(月額¥3,278)が最も安く、Rakuten Linkで国内通話も無料。[ドコモ](/ja/jp/carriers/docomo/) MAX 無制限(¥8,448)や[ソフトバンク](/ja/jp/carriers/softbank/) メリハリ無制限+(¥7,425)と比べて半額以下。ただし[楽天モバイル](/ja/jp/carriers/rakuten/)の品質スコアは72/100でMNO中最低。
### Q: 格安SIMに乗り換えるとどのくらい安くなる?
大手キャリアの平均月額(¥5,000〜¥8,000程度)から格安SIMに乗り換えると、月額¥1,000〜¥3,000程度になるケースが多く、年間で¥30,000〜¥60,000以上の節約になる。例えば[ドコモ](/ja/jp/carriers/docomo/) MAX 無制限(¥8,448)から[楽天モバイル](/ja/jp/carriers/rakuten/)無制限(¥3,278)に乗り換えると年間約¥62,000の節約。
### Q: eSIM対応の格安SIMはどこ?
2026年4月現在、サブブランド6社([ahamo](/ja/jp/carriers/ahamo/)、[povo](/ja/jp/carriers/povo/)、[UQ mobile](/ja/jp/carriers/uqmobile/)、[Y!mobile](/ja/jp/carriers/ymobile/)、[irumo](/ja/jp/carriers/irumo/)、[LINEMO](/ja/jp/carriers/linemo/))は全てeSIM対応。MVNOでは[IIJmio](/ja/jp/carriers/iijmio/)、[HISモバイル](/ja/jp/carriers/hismobi/)、[mineo](/ja/jp/carriers/mineo/)、[日本通信SIM](/ja/jp/carriers/nihontsushin/)、[nuroモバイル](/ja/jp/carriers/nuro-mobile/)、[LinksMate](/ja/jp/carriers/linksmate/)、[J:COMモバイル](/ja/jp/carriers/jcom/)、[トーンモバイル](/ja/jp/carriers/tone/)が対応。非対応は[イオンモバイル](/ja/jp/carriers/aeon/)、[BIGLOBEモバイル](/ja/jp/carriers/biglobe/)、[exciteモバイル](/ja/jp/carriers/excite/)、[LIBMO](/ja/jp/carriers/libmo/)の4社。
### Q: 乗り換えに違約金はかかる?
2026年現在、SimFinderに登録されている全120プランが契約縛りなし・解約金¥0。MNP(番号ポータビリティ)もワンストップ方式で転出元への連絡が不要になっており、乗り換えのハードルは低い。
---
## まとめ
2026年4月時点の格安SIMおすすめランキングのポイントを整理する。
- **総合1位**: [日本通信SIM](/ja/jp/carriers/nihontsushin/) 合理的みんなのプラン(20GB ¥1,390、5分かけ放題付き)
- **料金最安**: [日本通信SIM](/ja/jp/carriers/nihontsushin/) 合理的シンプル290(1GB ¥290、音声通話付き最安)
- **通信品質最高**: [ahamo](/ja/jp/carriers/ahamo/) 30GB(¥2,970、[ドコモ](/ja/jp/carriers/docomo/)品質スコア90相当)
- **データ無制限最安**: [楽天モバイル](/ja/jp/carriers/rakuten/) Rakuten最強プラン 無制限(¥3,278、通話無料付き)
- **バランス型**: [IIJmio](/ja/jp/carriers/iijmio/) ギガプラン(2〜25GB、繰り越し・家族割あり)
- **全22社120プラン**: 契約縛りなし・解約金¥0、eSIM対応78%、5G対応82%
**選び方の手順**:
1. 月間のデータ使用量を確認する(分からなければ「[データ使用量ガイド](/ja/blog/data-usage-guide-how-many-gb/)」を参照)
2. 通話の頻度からかけ放題の要否を判断する
3. 通信品質を重視するならサブブランド、コストを重視するならMVNOを選ぶ
4. eSIMと5Gの対応状況で最終候補を絞る
具体的なプランの比較は、SimFinderの比較ツールで条件を入力して確認してほしい。
**[あなたに最適なプランを探す →](/ja/jp/search/)**
---
*この記事の情報は2026年4月時点のものです。最新の料金・プラン内容は各キャリアの公式サイトでご確認ください。料金はすべて税込表示です。*
*料金の比較・シミュレーションには[SimFinderの比較ツール](/ja/jp/search/)をご利用ください。*
================================================================================
# KDDI、次世代衛星Starlink Mobile V2契約 圏外でVoLTE通話へ
URL: https://sim-finder.com/ja/blog/kddi-starlink-mobile-v2-keiyaku-2026/
Type: blog (ja)
Published: 2026-09-15T09:00:00+09:00
KDDIは2026年9月15日、米SpaceXと次世代衛星「Starlink Mobile V2」のサービス提供契約を締結したと発表しました。契約締結日は2026年8月10日で、KDDIによればStarlink Mobile V2のサービス提供契約はアジアで初めてとなります。圏外エリアで使える「au Starlink Direct」を拡張し、**2027年内に高速データ通信と音声通話(VoLTE)の提供開始を目指す**という内容です。
読者にとってのポイントは、これが「いま使える新サービス」ではなく、**2027年内を目標とした将来計画の契約段階**だという点です。現時点で開始日・対象プラン・料金は発表されていません。
## 何が発表されたのか
KDDIのニュースリリースによると、今回の契約はau Starlink Directにおいて圏外エリアでの高速データ通信と音声通話を提供することを目的としたものです。ITmedia Mobileおよびマイナビニュースも同日付で同内容を報じています。
現在のau Starlink Directは、空が見える場所であればメッセージの送受信や一部の対応アプリでのデータ通信ができる、というのが提供範囲です。今回の契約は、その体験を「日常利用により近い」水準に引き上げることを狙ったものと位置づけられています。
## 第1世代からの性能向上
KDDIのリリースでは、Starlink Mobile V2衛星の性能について次の数値が示されています。
| 項目 | 内容 |
|------|------|
| スループット | 衛星1基あたり約20倍 |
| データ密度 | 約100倍 |
いずれも第1世代衛星との比較です。ITmedia Mobileの記事によれば、アンテナの大型化と通信ビームの増加によってこの向上が実現されるとされています。
この性能向上によって、現在はテキスト中心にとどまっている衛星直接通信が、ブロードバンド通信と音声通話(VoLTE)に対応できる水準になる、というのがKDDIの説明です。
## IoT・ドローンへの展開も
KDDIはあわせて、IoTデバイスやAIドローンとの直接通信などへの展開にも言及しています。スマートフォン向けの圏外対策にとどまらず、基地局の届かない場所で動く機器の通信インフラとしての活用を視野に入れた内容です。
## 「アジア初」の根拠
リリース内の「アジア初」という表現には、「2026年9月15日時点、KDDI調べ」という注記が付されています。第三者機関による認定ではなく自社調べである点は、読み取る際に留意しておきたい部分です。
## SIM選びへの影響は当面限定的
今回の発表は契約締結のアナウンスであり、料金プランの変更や新プランの追加を伴うものではありません。したがって、**いま格安SIMやキャリアプランを選ぶ判断材料としての影響は、現時点では限定的**です。
ただし、衛星直接通信は各社が力を入れている領域であり、将来的に「圏外での通話ができるかどうか」がキャリア選びの比較軸のひとつになる可能性はあります。山間部や離島、登山・キャンプなど電波の届きにくい環境を日常的に利用する人にとっては、2027年に向けた動きとして押さえておく価値のある発表です。
実際の提供条件(対象プラン、追加料金の有無、対応端末)は今後の発表を待つ必要があります。SimFinderでは料金プランへの反映が判明し次第、プラン情報を更新します。
================================================================================
# LINEMO、9月1日から衛星通信と海外データ通信が追加料金なしに
URL: https://sim-finder.com/ja/blog/linemo-starlink-kaigai-data-tsuika-ryokin-nashi-2026/
Type: blog (ja)
Published: 2026-08-07T09:00:00+09:00
ソフトバンクは2026年8月7日、オンライン専用ブランド「LINEMO」のサービスを9月1日に拡充すると発表しました。月額料金は据え置いたまま、衛星通信サービス「SoftBank Starlink Direct」と、200以上の国・地域で使える無制限の海外データ通信(毎月最大7日間分)が追加料金なしで利用できるようになります。対象は「LINEMOベストプラン」と「LINEMOベストプランV」で、すでに契約している利用者にも適用されます。
## 月額料金は据え置き、中身だけが増える
今回の発表で重要なのは、**プランの値上げを伴わない機能追加**である点です。LINEMO公式サイトによると、LINEMOベストプランは〜3GBが月額990円、〜10GBが月額2,090円。LINEMOベストプランVは〜30GBで5分以内の国内通話無料が付いて月額2,970円です。ソフトバンクのニュースリリースは「各料金プランの月額料金はそのまま」と明記しており、この価格を維持したまま2つのサービスが上乗せされます。
格安ブランドの競争は、ここ数年ギガ単価の引き下げ合戦が中心でした。今回のLINEMOの動きは、価格ではなく「同じ料金でどれだけ付加サービスを積めるか」という方向での差別化と読めます。
## SoftBank Starlink Direct:圏外エリアでのメッセージ送受信
「SoftBank Starlink Direct」は、基地局の電波が届かない場所でも衛星経由でメッセージの送受信などが行える衛星通信サービスです。LINEMOでは、これまで2026年7月以降は月額1,650円のオプションサービスへの申し込みが必要でした。
9月1日以降の提供方法は2段階に分かれます。ケータイWatchおよびソフトバンクのリリースによると、**9月1日から2026年冬(予定)まで**は、オプションサービスに申し込んだうえで月額1,650円が全額割り引かれる形となり、実質的な負担はゼロになります。そして**2026年冬以降**は申し込み自体が不要になり、追加料金なしで自動的に利用できるようになる予定です。
つまり、移行期間中は「申し込みという一手間は必要だが、支払いは発生しない」という扱いになります。9月1日を迎えたら、まず申し込み手続きの要否を確認しておくのが確実です。
## 海外データ通信:毎月最大7日間分が無制限
もう一方の柱が海外データ通信です。ソフトバンクによると、200以上の国・地域を対象に、**毎月最大7日間分**の無制限データ通信が追加料金なしで利用できるようになります。既存の「海外あんしん定額」に対して割引が適用される仕組みです。
こちらも段階的な展開となります。ケータイWatchによれば、2026年冬までは1日〜7日間のプランを利用した場合に最大6,860円(7日分相当)が割引の対象となり、冬以降は1日〜31日間のすべてのプランが対象に拡大され、そのうち最大7日分が追加料金なしになる予定です。ITmedia Mobileも同様に、冬以降は1〜31日間の全プランで最大7日間分が利用できると報じています。
年に数回、1週間程度の海外出張や旅行に出るユーザーにとっては、渡航のたびに旅行用eSIMを別途購入する必要性が薄れる可能性があります。一方で、7日を超える長期滞在では超過分の料金が発生するため、滞在日数によっては引き続き現地SIMや旅行eSIMとの比較検討が有効です。
## 何を確認しておくべきか
現時点で公表されているのは上記の枠組みまでで、既存契約者への変更日など細かな運用については別途案内されるとされています。検討する際のポイントを整理すると次の通りです。
- **料金プランの見直しは不要**:月額料金が変わらないため、現行契約者は基本的に待っていれば拡充が適用される
- **9月1日〜冬は申し込みの要否を確認**:衛星通信は移行期間中のみオプション申し込みが必要(料金は全額割引)
- **海外利用は「最大7日間」が目安**:それを超える滞在では追加費用の有無を渡航前に確認する
ソフトバンクは今回の拡充について、LINEMOベストプランとベストプランVが「国内外でより安心・快適に」なるものと位置付けています。詳細な提供条件は、ソフトバンクのニュースリリースおよびLINEMO公式サイトで確認してください。
(出典:ソフトバンク ニュースリリース 2026年8月7日、ケータイWatch 2026年8月7日、ITmedia Mobile 2026年8月7日)
================================================================================
# メルカリモバイル、データ専用eSIM開始 4GB月770円
URL: https://sim-finder.com/ja/blog/mercari-mobile-data-esim-2026/
Type: blog (ja)
Published: 2026-07-30T09:00:00+09:00
メルカリは2026年7月30日、モバイルサービス「メルカリモバイル」でデータ通信専用eSIMの提供を開始しました。月額料金は4GBで770円(税込)から。ドコモ回線を使い、本人確認なしで申し込みからオンライン完結で開通できます。サブ回線やタブレット用の追加回線を安く確保したい人にとって、選択肢が1つ増えたことになります。
## 料金は4段階、音声プランより一律220円安い
同社のプレスリリースによると、データ専用eSIMの料金は以下の4段階です(いずれも税込)。
| データ容量 | 月額料金 |
|---|---|
| 4GB | 770円 |
| 10GB | 1,510円 |
| 20GB | 2,170円 |
| 40GB | 3,480円 |
契約開始時には登録手数料3,300円(税込)が別途かかります。
注目したいのは、既存の音声通話付きプランとの差です。プレスリリースに併記された音声プランの月額基本料金は4GBが990円、10GBが1,730円、20GBが2,390円、40GBが3,700円。つまりデータ専用eSIMは全容量で一律220円安いという構成になっています。音声プランは通話オプション(月額500円〜1,320円)が別途必要なので、通話をまったく使わない用途では差がさらに開きます。
## 回線はドコモ、1名義で最大5回線
利用回線はドコモです。SIMタイプはeSIMのみで、物理SIMの提供はありません。iPhoneやAndroidなどeSIM対応端末で利用できます。契約数は1名義につき最大5回線まで。
申し込み時の本人確認は不要で、外国籍の利用者も申し込めるとしています。支払い方法はケータイ Watchの報道によると、メルペイのクレジット機能、メルカード、各種クレジットカードに対応します。
なお、ITmedia Mobileは実機での確認として、端末のピクトエリア(画面上部のキャリア表示部分)に「mercari」と表示される点を報じています。
## 「ギガ売買」もデータ専用eSIMで使える
メルカリモバイルの特徴機能である「ギガ売買」は、データ専用eSIMでも利用できます。余ったデータ容量をメルカリのように出品したり、他のユーザーから購入したりできる仕組みです。
プレスリリースによれば、平均取引価格は1GBあたり約60円(2026年5月時点)。相場は変動しますが、この水準を基準に考えると、月によってデータ使用量がぶれる人は小容量プランを契約して足りない分を買い足す、あるいは余った分を売るという運用ができます。4GB 770円は1GBあたり約193円なので、購入相場の約60円/GBは単純比較では割安な水準です。
## サブ回線・タブレット用途で検討価値あり
データ専用eSIMは、通話をメイン回線に任せてデータだけを別回線で確保したい人に向いた設計です。特に、本人確認不要でeSIM完結という申し込みの手軽さと、余った容量を売れるギガ売買の組み合わせは、他のMVNOにはあまりない組み合わせです。
一方で、登録手数料3,300円は初期コストとしては軽くありません。4GBプランなら月額差220円を回収するのに音声プラン比で15か月かかる計算になるため、短期利用前提なら手数料込みの総額で判断したいところです。また音声通話・SMSが使えないため、SMS認証が必要なサービスを新規登録する用途には使えません。メイン回線としてではなく、あくまで2枚目・3枚目の回線として位置づけるのが現実的でしょう。
================================================================================
# スマホ月額料金が4198円に上昇 MM総研調査で201円増
URL: https://sim-finder.com/ja/blog/mm-souken-smartphone-ryokin-4198yen-2026/
Type: blog (ja)
Published: 2026-08-06T09:00:00+09:00
MM総研は2026年8月6日、スマートフォン利用者の月額利用料金が平均4198円となり、前回調査から201円上昇したとする調査結果を発表しました。端末の購入金額も8万1747円と2976円上がっており、通信費・端末代の両方が上昇局面に入っています。一方でMVNO(格安SIM)利用者の月額料金は1979円にとどまり、大手キャリアとの差はさらに開きました。値上げが続く局面では、プランの見直し効果がこれまで以上に大きくなります。
## 月額料金は4198円、全カテゴリで上昇
MM総研のプレスリリース「インフレの波でスマートフォン月額料金は4,198円に上昇」によると、2026年7月に実施した調査でスマートフォン利用者全体の月額利用料金は4198円でした。前回調査比で201円の上昇です。
ブランド区分別の内訳は次の通りです。
| 区分 | 月額利用料金 |
|------|------------|
| スマートフォン全体 | 4198円 |
| MNO4ブランド | 4853円 |
| サブブランド | 3296円 |
| MVNO | 1979円 |
ケータイ Watchの報道によれば、MNO4ブランド・サブブランド・MVNOのいずれも前回調査から上昇しており、特定の層だけの動きではありません。月額利用料金の設問における有効回答数は8564件です。
注目すべきは差額です。MNO4ブランド(4853円)とMVNO(1979円)の差は月2874円で、単純計算で年間約3万4000円になります。サブブランド(3296円)と比較しても、MVNOとは月1317円の開きがあります。
## 値上げの背景は半導体価格の高騰と円安
MM総研は料金上昇の要因として、半導体メモリー(DRAM・NAND)の価格高騰と円安を挙げています。そのうえで、大手MNOによる各種コスト上昇分のプラン料金への転嫁は今後も続くと見込んでいます。
つまり今回の201円増は一時的な変動ではなく、原価構造に由来する継続的な上昇圧力の表れという整理です。一度きりの値上げで終わらない可能性を織り込んで、契約プランを点検しておく価値があります。
## 端末購入金額は8万1747円、iPhoneは11万4234円
端末の割引前購入金額も上昇しました。スマートフォン利用者全体で8万1747円となり、前回調査から2976円上がっています。
OS別では、iOS(iPhone)が11万4234円、Androidが6万2612円。ケータイ Watchによれば、iPhoneはAndroidスマートフォンより5万1622円高くなっています。いずれも前回調査から上昇しました。
通信料金と端末代金が同時に上がっているため、実際の家計負担の増加幅は月額料金の201円増だけでは測れません。端末の買い替えサイクルを含めた総額での比較が重要になります。
## データ通信量は平均13.94GB、中央値は4GB
月間モバイルデータ通信量は平均13.94GB、中央値は4GBでした(有効回答数1万3077件)。MM総研によれば、中央値が4GBに達したのは今回が初めてです。
一方で、利用者の54.2%は月4GB以下の利用にとどまっています。平均値の13.94GBは一部の大容量ユーザーに引き上げられた数字であり、実態としては過半数が小容量帯にいる構図です。
この分布は、プラン選びにそのまま影響します。平均値を基準に20GBや無制限プランを選ぶと、半数以上のユーザーにとっては使い切らない容量に料金を払うことになります。自分の実際の月間使用量は、各キャリアの公式アプリやスマートフォンの設定画面(iPhoneなら「設定」→「モバイル通信」、Androidなら「設定」→「ネットワークとインターネット」)から確認できます。
## 値上げ局面で見直すべきポイント
今回の調査結果から、料金を抑えるうえで確認したい点は3つです。
**1. 実際のデータ使用量を数字で把握する**
過半数が月4GB以下という調査結果を踏まえると、まず直近3か月の実使用量を確認するのが先決です。感覚で「足りないと困る」と大容量プランを選んでいるケースは少なくありません。
**2. MNOとMVNOの差額を年額で見る**
月2874円の差は、年間で約3万4000円です。ただしMVNOは混雑時間帯の通信速度や店舗サポートの有無で大手キャリアと条件が異なるため、料金だけでなく自分の使い方との相性で判断する必要があります。
**3. 端末代と通信料を分けて考える**
端末購入金額が8万円を超える水準では、端末代が実質的な月額負担に占める割合が大きくなります。通信プランの見直しと、端末を分離して購入・継続利用する選択肢の検討は、別々に効果があります。
## まとめ
MM総研の2026年7月調査では、スマートフォンの月額利用料金が4198円(前回比201円増)、端末購入金額が8万1747円(同2976円増)と、いずれも上昇しました。背景には半導体メモリーの価格高騰と円安があり、MM総研は料金への転嫁が今後も続くと見ています。
データ通信量は平均13.94GB・中央値4GBで、54.2%が月4GB以下。MVNO利用者の月額1979円という水準と合わせて考えると、使用量に合ったプランへの見直しは、値上げが続く局面ほど効果が大きくなります。SimFinderでは実際のデータ使用量や通話頻度を入力して最適なプランを比較できます。
================================================================================
# 格安SIM認知度63.9%、認知のきっかけ首位は「知人の紹介」MMD調査
URL: https://sim-finder.com/ja/blog/mmd-mvno-ninchido-63-percent-2026/
Type: blog (ja)
Published: 2026-07-17T09:00:00+09:00
MMD研究所は2026年7月17日、「2026年通信8サービスの認知・利用ファネル調査」の結果を公開した。格安SIM(MVNO)を「認知している」と答えた人は63.9%で、ブランドを知ったきっかけの首位は「家族や友人・知人からの紹介」(17.8%)だった。口コミという身近な情報源が、依然として格安SIM選びの入り口になっている実態が浮かび上がる。ITmedia Mobileも同日、この調査結果を報じている。
## 認知は約6割、ただし「現在利用中」は13.2%
MMD研究所の発表によると、格安SIM(MVNO)の認知状況は次の通りだった。
- 認知している:63.9%
- うち内容理解している:36.6%
- うち利用経験あり:17.8%
- うち現在利用中:13.2%
- 聞いたことはあるが内容は不明:27.3%
- 知らない:36.1%
「認知している」が約6割に達する一方で、内容まで理解している人は36.6%、実際に「現在利用中」の人は13.2%にとどまる。名前は知られていても、仕組みや料金メリットの理解、そして乗り換えの実行までにはまだ距離があることが分かる。
## 認知のきっかけ、首位は「紹介」
ブランドを知ったきっかけとして多かった上位3項目は以下の通り。
1. 家族や友人・知人からの紹介:17.8%
2. Webニュースサイトやネット広告:12.3%
3. 比較サイト・比較記事:9.9%
対人の口コミが最も強い入り口である一方、「比較サイト・比較記事」が3位に入った点は注目に値する。さらにMMD研究所によると、サービスを理解するための情報源では「公式サイト」が45.5%で最多、「比較サイト」が18.0%と続いた。認知から検討・理解へ進む段階で、比較コンテンツが一定の役割を担っていることを示している。
## サブブランドの認知は7割超
調査ではブランド別の認知率も公開された。ahamoが79.7%、povoが73.0%、LINEMOが70.5%と、大手キャリアのオンライン専用ブランド・サブブランドは7〜8割の高い認知を得ている。一方、現在利用率で見るとahamoが8.7%、povoが4.4%、IIJmioが2.6%となり、認知の高さがそのまま利用に直結していないこともうかがえる。
## SimFinderの見方
今回の調査は、格安SIMが「名前は広く知られているが、内容理解と乗り換え実行にはギャップがある」というこれまでの傾向を、数値で改めて裏づけた。とりわけ、知人からの紹介に次いで比較サイトが認知・理解の情報源として機能している点は、料金や通信品質を客観的に見比べたいというニーズの表れと言える。SimFinderでは、利用状況に合わせて最適なプランをスコアで比較できる。まずは自分の使い方に合う一枚を、数字で確かめてみてほしい。
※本記事はMMD研究所「2026年通信8サービスの認知・利用ファネル調査」(2026年7月17日公開、調査期間7月1〜2日、予備調査34,490人・本調査1,600人)およびITmedia Mobileの報道に基づく。
================================================================================
# MVNO満足度1位は日本通信SIM、シェア1位はIIJmio MMD調査
URL: https://sim-finder.com/ja/blog/mmd-mvno-share-manzokudo-2026-08/
Type: blog (ja)
Published: 2026-08-26T09:00:00+09:00
MMD研究所は2026年8月25日、「2026年8月 MVNOのシェア・満足度調査」の結果を公開した。5サービスを対象にした総合満足度では日本通信SIMが1000点満点中791ptで1位、メイン利用のシェアではIIJmioが13.1%で1位となった。MVNO全体のメイン利用率は9.3%で、半年前の前回調査から0.4ポイント上昇している。
満足度で首位のサービスとシェアで首位のサービスが別、という構図が続いており、格安SIMを選ぶ際に「使っている人が多い」と「使っている人の評価が高い」は必ずしも一致しないことを示す結果になった。
## 調査の概要
MMD研究所の発表によると、予備調査は18歳〜79歳の男女40,000人を対象に2026年8月1日〜8月6日に実施。本調査はIIJmio、mineo、日本通信SIM、イオンモバイル、J:COM MOBILEの5サービスの利用者を各150人、合計750人を対象としている。ITmedia Mobileおよびアスキーも同日付で同調査を報じており、数値は一致している。
## MVNO全体のシェアは9.3%に上昇
メインで利用しているスマートフォンの契約先がMVNOだと回答した人は9.3%。2026年2月調査の8.9%から0.4ポイントの上昇となった。大手キャリアのオンライン専用プランやサブブランドとの競争が続くなかでも、MVNO全体の存在感はわずかながら拡大している。
MVNO利用者のなかでのサービス別シェアは、1位がIIJmioで13.1%、2位がmineoで12.8%、3位がOCN モバイル ONEで11.9%。上位3サービスが1ポイント強の差にひしめく接戦となっている。アスキーの記事によれば、このシェアはMVNO利用者3,415人を母数としたものだ。
前回2月調査との比較では、J:COM MOBILEが2.7ポイント増と最も伸び、イオンモバイルも0.7ポイント増加した。
## 総合満足度は日本通信SIMが791ptで首位
5サービスを対象にした総合満足度スコアは以下の通り。
| 順位 | サービス | 総合満足度 |
|--|--|--|
| 1位 | 日本通信SIM | 791pt |
| 2位 | mineo | 768pt |
| 3位 | イオンモバイル | 766pt |
日本通信SIMは2位以下に20pt以上の差をつけて首位に立った。同社は月290円からの低価格プランで知られ、総務省のシェア統計でも順位を上げている。
## NPSでも日本通信SIMがトップ
他者への推奨度を示すNPS(ネット・プロモーター・スコア)でも、日本通信SIMが12.0でトップ。IIJmioが0.7、mineoが-1.3と続いた。NPSはプラス圏に乗るサービス自体が少ない指標で、日本通信SIMの12.0は5サービス中で突出した水準といえる。
## 利用者層はサービスごとに明確な差
ITmedia Mobileおよびアスキーの報道によると、利用者のボリュームゾーンはサービスごとに分かれている。IIJmioとmineoは50代、日本通信SIMは40代、イオンモバイルは60代、J:COM MOBILEは70代が中心だ。
契約経路にも差が出ており、多くのサービスがオンライン中心である一方、イオンモバイルは店舗での契約が多数を占める。アスキーはイオンモバイルのオフライン契約比率を80.2%と報じている。実店舗網を持つ強みが、シニア層の獲得と契約経路の両面に表れた格好だ。
## 格安SIM選びへの示唆
今回の調査から読み取れるのは、シェアの大きさと満足度の高さが必ずしも連動しないという点だ。IIJmioは利用者数で首位ながら満足度上位3位には入らず、逆に日本通信SIMは満足度とNPSの両方で1位を取っている。
一方で、満足度は「その人が求める条件にサービスが合っていたか」の結果でもある。データ容量をあまり使わず通信費を最小限に抑えたい人と、端末セット購入や店舗サポートを重視する人とでは、最適な選択肢は変わる。ランキングを出発点にしつつ、自分の使い方に沿って料金・容量・通話条件を比較することが重要だ。
SimFinderでは、月間データ容量や通話時間などの条件を入力して、日本国内のMNO・MVNOのプランを横断的に比較できる。今回上位に入った各サービスの実際の料金水準も、条件別に確認できる。
================================================================================
# MNOとMVNOの違いをわかりやすく解説 — 格安SIM選びの基礎知識
URL: https://sim-finder.com/ja/blog/mno-mvno-difference-guide/
Type: blog (ja)
Published: 2026-03-18
## 結論: MNO・サブブランド・MVNOの違いは「回線の持ち方」で決まる
| 分類 | 特徴 | 通信品質 | 料金 |
|------|------|---------|------|
| **MNO** | 自社回線を保有 | 最も安定 | 高め |
| **サブブランド** | MNO直営の低価格ブランド | MNOとほぼ同等 | 中間 |
| **MVNO** | MNOから回線を借りる | 混雑時に低下しやすい | 安い |
**品質を重視するならMNOまたはサブブランド、コストを重視するならMVNO**。この基本を押さえれば、格安SIM選びで大きく失敗することはない。
自分の利用スタイルに合ったプランを具体的に探すなら、SimFinderの比較ツールが便利だ。品質スコア・料金・データ容量を条件指定して全120プランから絞り込める。
**[SimFinderで自分に合ったプランを探す →](/ja/jp/search/)**
## 目次
- [MNOとは — 自社回線を持つ4社](#mnoとは--自社回線を持つ4社)
- [MVNOとは — 回線を借りて安く提供する仕組み](#mvnoとは--回線を借りて安く提供する仕組み)
- [サブブランドとは — MNO品質を低価格で使える選択肢](#サブブランドとは--mno品質を低価格で使える選択肢)
- [キャリア系統図で見る親子関係](#キャリア系統図で見る親子関係)
- [品質スコアで見るMNO・サブブランド・MVNOの違い](#品質スコアで見るmnoサブブランドmvnoの違い)
- [どう選ぶ?利用スタイル別おすすめ](#どう選ぶ利用スタイル別おすすめ)
- [よくある質問](#よくある質問)
- [まとめ](#まとめ)
---
格安SIMを検討するとき、「MNO」「MVNO」「サブブランド」という用語が出てくる。この3つの違いが分かれば、自分に合ったプランを選ぶための判断軸が明確になる。
この記事では、SimFinderのデータベースに登録されている日本国内22社・120プランの実データを使って、MNO・サブブランド・MVNOそれぞれの特徴と違いを解説する。
格安SIMの選び方全体を知りたい場合は「[格安SIMの選び方完全ガイド2026](/ja/blog/kakuyasu-sim-erabikata-guide-2026/)」も参考にしてほしい。
---
## MNOとは — 自社回線を持つ4社
MNOは「Mobile Network Operator(移動体通信事業者)」の略で、**自社で基地局やアンテナなどの通信インフラを保有・運営している事業者**を指す。
日本には4つのMNOが存在する。
| MNO | 品質スコア | 特徴 |
|-----|-----------|------|
| [**NTTドコモ**](/ja/jp/carriers/docomo/) | 90/100 | 下り150.3Mbps、カバレッジ95/100。品質スコア国内最高 |
| [**au(KDDI)**](/ja/jp/carriers/au/) | 85/100 | 下り120.7Mbps、カバレッジ93/100。安定した通信品質 |
| [**ソフトバンク**](/ja/jp/carriers/softbank/) | 83/100 | 下り110.5Mbps、カバレッジ92/100。[LINEMO](/ja/jp/carriers/linemo/)を直接運営 |
| [**楽天モバイル**](/ja/jp/carriers/rakuten/) | 72/100 | 下り80.2Mbps、カバレッジ82/100。段階制¥1,078〜¥3,278 |
*品質スコア: OpenSignal 2026 Q1 / 計測日: 2026-01-15*
MNOの最大のメリットは**通信品質の高さと安定性**にある。自社設備を使っているため、混雑時間帯でも安定した速度を維持できる。一方で料金は高めになりやすい。
ただし、[楽天モバイル](/ja/jp/carriers/rakuten/)は例外的で、MNOでありながら段階制料金(3GBまで¥1,078、20GBまで¥2,178、無制限¥3,278)を採用しており、料金面ではMVNOに近い。その代わり、カバレッジスコアは82/100と他の3社(92〜95)より低く、地下やビル内でつながりにくい場面がある。
### MNOが高い理由
MNOの料金が高い最大の理由は、通信インフラの維持・拡張コストにある。基地局の設置・運用、周波数帯の取得、5Gエリアの拡大など、莫大な設備投資が必要になる。この設備投資コストが月額料金に反映されている。
---
## MVNOとは — 回線を借りて安く提供する仕組み
MVNOは「Mobile Virtual Network Operator(仮想移動体通信事業者)」の略で、**MNOの通信回線を借りてサービスを提供する事業者**を指す。「仮想(Virtual)」の名の通り、自社で基地局やアンテナを持っていない。
SimFinderのデータベースには、日本国内で12社のMVNOが登録されている。
| MVNO | 利用回線 | 特徴 |
|------|---------|------|
| [IIJmio](/ja/jp/carriers/iijmio/) | [ドコモ](/ja/jp/carriers/docomo/) | 老舗MVNO、データ繰り越しあり |
| [日本通信SIM](/ja/jp/carriers/nihontsushin/) | [ドコモ](/ja/jp/carriers/docomo/) | 業界最安水準、通話オプション充実 |
| [mineo](/ja/jp/carriers/mineo/) | [ドコモ](/ja/jp/carriers/docomo/) | パケット放題Plus、コミュニティが活発 |
| [HISモバイル](/ja/jp/carriers/hismobi/) | [ドコモ](/ja/jp/carriers/docomo/) | 通話料9円/30秒、旅行系特典 |
| [LinksMate](/ja/jp/carriers/linksmate/) | [ドコモ](/ja/jp/carriers/docomo/) | ゲーム連携、カウントフリー |
| [NUROモバイル](/ja/jp/carriers/nuroMobile/) | [ドコモ](/ja/jp/carriers/docomo/) | NEOプランで専用帯域あり |
| [TONEモバイル](/ja/jp/carriers/tone/) | [ドコモ](/ja/jp/carriers/docomo/) | シニア・子供向け見守り機能 |
| [エキサイトモバイル](/ja/jp/carriers/excite/) | [ドコモ](/ja/jp/carriers/docomo/) | 従量制・定額制の選択可 |
| [イオンモバイル](/ja/jp/carriers/aeon/) | [ドコモ](/ja/jp/carriers/docomo/) | 店舗サポート充実、シニア向け |
| [LIBMO](/ja/jp/carriers/libmo/) | [ドコモ](/ja/jp/carriers/docomo/) | TOKAIグループ、光セット割 |
| [BIGLOBEモバイル](/ja/jp/carriers/biglobe/) | [au](/ja/jp/carriers/au/) | エンタメフリーオプション |
| [J:COMモバイル](/ja/jp/carriers/jcom/) | [au](/ja/jp/carriers/au/) | J:COM利用者向けセット割 |
注目すべきは**回線の偏り**だ。12社中10社が[ドコモ](/ja/jp/carriers/docomo/)回線を利用し、[au](/ja/jp/carriers/au/)回線を利用するのは[BIGLOBEモバイル](/ja/jp/carriers/biglobe/)と[J:COMモバイル](/ja/jp/carriers/jcom/)の2社のみ。[ソフトバンク](/ja/jp/carriers/softbank/)回線を利用するMVNOは、SimFinderのデータベースには登録されていない。
### MVNOが安い理由
MVNOが低価格を実現できる理由は明確だ。
1. **基地局などの設備投資が不要**: MNOの回線を借りるため、数千億円規模の設備投資が不要
2. **オンライン中心の運営**: 実店舗を持たない(または最小限)ことで固定費を削減
3. **帯域幅の仕入れ**: 必要な分だけ回線を借りることでコストを最適化
ただし、この「必要な分だけ借りる」仕組みが、MVNOの弱点でもある。利用者が集中する時間帯には、借りている帯域幅では足りなくなり、通信速度が低下する。特に**お昼休み(12:00〜13:00)**と**夕方(17:00〜19:00)**は速度低下が起きやすい。
---
## サブブランドとは — MNO品質を低価格で使える選択肢
サブブランドは、**MNOが自ら運営する低価格ブランド**だ。MVNOとは異なり、親キャリアの回線を借りるのではなく、**親キャリアの回線設備をそのまま利用できる**。そのため、通信品質はMNOとほぼ同等ながら、料金はMNOより安い。
日本のサブブランドは5社。
| サブブランド | 親MNO | 親の品質スコア | 特徴 |
|-------------|-------|--------------|------|
| [ahamo](/ja/jp/carriers/ahamo/) | [NTTドコモ](/ja/jp/carriers/docomo/) | 90/100 | 30GB ¥2,970、5分かけ放題標準付帯 |
| [irumo](/ja/jp/carriers/irumo/) | [NTTドコモ](/ja/jp/carriers/docomo/) | 90/100 | 0.5GB ¥550〜、[ドコモ](/ja/jp/carriers/docomo/)ショップ対応 |
| [povo2.0](/ja/jp/carriers/povo/) | [au](/ja/jp/carriers/au/)([KDDI](/ja/jp/carriers/au/)) | 85/100 | 基本料¥0、トッピング方式 |
| [UQ mobile](/ja/jp/carriers/uqmobile/) | [au](/ja/jp/carriers/au/)([KDDI](/ja/jp/carriers/au/)) | 85/100 | 店舗サポートあり、節約モード |
| [Y!mobile](/ja/jp/carriers/ymobile/) | [ソフトバンク](/ja/jp/carriers/softbank/) | 83/100 | 家族割充実、Yahoo!連携特典 |
※ [ソフトバンク](/ja/jp/carriers/softbank/)はオンライン専用ブランドの[LINEMO](/ja/jp/carriers/linemo/)も運営しており、これもサブブランドに近い位置づけで、[ソフトバンク](/ja/jp/carriers/softbank/)回線品質(スコア83相当)で利用できる。
### サブブランドが「ちょうどいい」理由
サブブランドの立ち位置を整理すると、次のようになる。
- **通信品質**: MNOとほぼ同等(親MNOの品質スコアがそのまま適用される)
- **料金**: MNOより安い。MVNOよりはやや高い
- **混雑時の速度低下**: MVNOのような帯域制限がないため、混雑時間帯でも安定
- **サポート**: [UQ mobile](/ja/jp/carriers/uqmobile/)と[Y!mobile](/ja/jp/carriers/ymobile/)は実店舗あり。[ahamo](/ja/jp/carriers/ahamo/)・[povo](/ja/jp/carriers/povo/)・[irumo](/ja/jp/carriers/irumo/)はオンライン中心
品質と価格のバランスで「MNOの安心感とMVNOの手頃さのいいとこ取り」ができるのがサブブランドの強みだ。
---
## キャリア系統図で見る親子関係
上の系統図で示している通り、日本の22社はすべて4つのMNOのいずれかに紐づいている。
- **[NTTドコモ](/ja/jp/carriers/docomo/)系**: サブブランド2社([ahamo](/ja/jp/carriers/ahamo/)、[irumo](/ja/jp/carriers/irumo/)) + MVNO 10社
- **[au](/ja/jp/carriers/au/)([KDDI](/ja/jp/carriers/au/))系**: サブブランド2社([povo2.0](/ja/jp/carriers/povo/)、[UQ mobile](/ja/jp/carriers/uqmobile/)) + MVNO 2社
- **[ソフトバンク](/ja/jp/carriers/softbank/)系**: サブブランド1社([Y!mobile](/ja/jp/carriers/ymobile/)) + [LINEMO](/ja/jp/carriers/linemo/)
- **[楽天モバイル](/ja/jp/carriers/rakuten/)**: サブブランド・MVNO なし(自社のみ)
この親子関係を理解しておくと、「このMVNOの通信品質はどの程度か」が推測できる。例えば、[IIJmio](/ja/jp/carriers/iijmio/)は[ドコモ](/ja/jp/carriers/docomo/)回線を利用しているので、[ドコモ](/ja/jp/carriers/docomo/)の品質スコア(90/100)をベースに、MVNOの帯域制限による劣化を考慮すれば大まかな目安になる。
**[SimFinderでキャリアの品質スコアを確認する →](/ja/jp/search/)**
---
## 品質スコアで見るMNO・サブブランド・MVNOの違い
通信品質をデータで比較してみよう。以下はSimFinderに登録されている2026年Q1のMNO品質スコアだ。
| キャリア | 分類 | 下り速度 | レイテンシ | カバレッジ | 総合スコア |
|---------|------|---------|-----------|-----------|-----------|
| [NTTドコモ](/ja/jp/carriers/docomo/) | MNO | 150.3Mbps | 22ms | 95/100 | **90/100** |
| [au](/ja/jp/carriers/au/)([KDDI](/ja/jp/carriers/au/)) | MNO | 120.7Mbps | 25ms | 93/100 | **85/100** |
| [ソフトバンク](/ja/jp/carriers/softbank/) | MNO | 110.5Mbps | 26ms | 92/100 | **83/100** |
| [楽天モバイル](/ja/jp/carriers/rakuten/) | MNO | 80.2Mbps | 30ms | 82/100 | **72/100** |
*データソース: OpenSignal 2026 Q1 / 計測日: 2026-01-15*
### サブブランドの品質
サブブランドは親MNOの回線をそのまま利用するため、上記と同等の品質が期待できる。
- **[ahamo](/ja/jp/carriers/ahamo/)・[irumo](/ja/jp/carriers/irumo/)** → [ドコモ](/ja/jp/carriers/docomo/)品質(総合90相当)
- **[povo2.0](/ja/jp/carriers/povo/)・[UQ mobile](/ja/jp/carriers/uqmobile/)** → [au](/ja/jp/carriers/au/)品質(総合85相当)
- **[Y!mobile](/ja/jp/carriers/ymobile/)** → [ソフトバンク](/ja/jp/carriers/softbank/)品質(総合83相当)
つまり、[ahamo](/ja/jp/carriers/ahamo/)を使えば[NTTドコモ](/ja/jp/carriers/docomo/)と同じ回線品質で、月額¥2,970(30GB・5分かけ放題込み)で利用できるということだ。
### MVNOの品質
MVNOは親MNOの回線を借りているが、帯域幅に制限があるため、常にMNOと同じ速度が出るわけではない。SimFinderでは、MVNOの品質スコアは親MNOのスコアにMVNO劣化率を適用して算出している。
特に影響が出やすいのが以下の場面だ。
- **お昼休み(12:00〜13:00)**: 多くの人が一斉にスマホを使うため、回線が最も混雑する時間帯
- **夕方(17:00〜19:00)**: 帰宅時間帯で利用者が集中
- **イベント・災害時**: 特定エリアに利用者が集中する場面
ただし、上記以外の時間帯(早朝、午前中、深夜など)はMNOと大差ないケースも多い。「MVNOだから常に遅い」というわけではない。
### 3分類の品質・料金ポジション
| | 品質 | 月額平均 | 混雑時速度 |
|---|------|---------|-----------|
| **MNO** | 総合72〜90 | 約¥2,701 | 安定 |
| **サブブランド** | 親MNOと同等 | 約¥2,752 | 安定 |
| **MVNO** | 親MNOより低下 | 約¥1,593 | 低下しやすい |
MVNOの月額平均(約¥1,593)はサブブランド(約¥2,752)より約¥1,159安い。この差額で通信品質の差を許容できるかが、選択の分かれ目になる。
---
## どう選ぶ?利用スタイル別おすすめ
MNO・サブブランド・MVNOの違いを踏まえて、3つの利用スタイル別に選び方を整理する。
### パターン1: 品質最優先 — MNOまたはサブブランド
**こんな人向け**: 仕事でビデオ通話を多用する、外出先でテザリングをよく使う、混雑時間帯にストレスなく使いたい
| おすすめ | 月額 | ポイント |
|---------|------|---------|
| [ahamo](/ja/jp/carriers/ahamo/) 30GB | ¥2,970 | [ドコモ](/ja/jp/carriers/docomo/)品質90相当、5分かけ放題付き |
| [UQ mobile](/ja/jp/carriers/uqmobile/) | ¥2,178〜 | [au](/ja/jp/carriers/au/)品質85相当、店舗サポートあり |
| [楽天モバイル](/ja/jp/carriers/rakuten/) 無制限 | ¥3,278 | MNO品質で無制限、Rakuten Link通話無料 |
[ドコモ](/ja/jp/carriers/docomo/)品質(総合スコア90/100)をフルに活かすなら[ahamo](/ja/jp/carriers/ahamo/)が有力。30GBで5分かけ放題標準付帯、海外ローミング20GB込みで¥2,970は、品質対価格で考えると合理的な選択だ。
### パターン2: コスパ重視 — MVNO
**こんな人向け**: 月額をとにかく抑えたい、お昼の速度低下は許容できる、Wi-Fi環境がメイン
| おすすめ | 月額 | ポイント |
|---------|------|---------|
| [日本通信SIM](/ja/jp/carriers/nihontsushin/) 1GB | ¥290 | 音声付き最安、通話料11円/30秒 |
| [IIJmio](/ja/jp/carriers/iijmio/) 10ギガ | ¥1,400 | データ繰り越しあり、老舗の安定感 |
| [日本通信SIM](/ja/jp/carriers/nihontsushin/) 20GB | ¥1,390 | 5分かけ放題付き、20GBで最安水準 |
MVNOの平均月額は約¥1,593。自宅や職場にWi-Fiがあり、外出先での利用が限定的な人は、MVNOの速度低下を実感する場面は少ない。コスト削減効果は大きく、MNO(約¥2,701)から乗り換えると月額で約¥1,100、年間で約¥13,000の節約になる。
### パターン3: バランス型 — サブブランド
**こんな人向け**: 品質もコストもどちらも大事、格安SIMへの乗り換えが初めてで不安がある
| おすすめ | 月額 | ポイント |
|---------|------|---------|
| [Y!mobile](/ja/jp/carriers/ymobile/) | ¥2,178〜 | 家族割あり、店舗サポート充実 |
| [povo2.0](/ja/jp/carriers/povo/) | ¥0〜(トッピング制) | 使う月だけ課金、[au](/ja/jp/carriers/au/)品質85相当 |
| [irumo](/ja/jp/carriers/irumo/) 3GB | ¥880 | [ドコモ](/ja/jp/carriers/docomo/)ショップ対応、少容量向け |
初めて格安SIMに乗り換える場合は、サブブランドから始めるのがリスクが少ない。MNOと同等の品質を維持しつつ、料金はMNOより下がる。MVNOに乗り換えた後に速度が不満で出戻る、というケースも避けられる。
**[SimFinderで全120プランを条件指定で比較する →](/ja/jp/search/)**
---
## よくある質問
### Q: MNOとMVNOの一番大きな違いは何?
MNOは自社で通信回線設備(基地局・アンテナ)を保有・運営する事業者、MVNOはMNOから回線を借りてサービスを提供する事業者。この違いが通信品質と料金の差に直結する。MNOは品質が高いが料金も高め、MVNOは混雑時に速度低下しやすいが料金が安い。
### Q: サブブランドとMVNOはどう違う?
サブブランドはMNOが直接運営する低価格ブランド([ahamo](/ja/jp/carriers/ahamo/)、[povo](/ja/jp/carriers/povo/)、[UQ mobile](/ja/jp/carriers/uqmobile/)、[Y!mobile](/ja/jp/carriers/ymobile/)、[irumo](/ja/jp/carriers/irumo/))で、親キャリアの回線をそのまま使えるため通信品質はMNOとほぼ同等。MVNOは独立した事業者がMNOの回線を帯域幅に制限付きで借りるため、特に混雑時間帯に速度が落ちやすい。
### Q: MVNOの通信速度が遅くなるのはなぜ?
MVNOはMNOから借りている回線の帯域幅(通信の太さ)に上限があるため。利用者が集中するお昼休み(12:00〜13:00)や夕方(17:00〜19:00)は回線が混雑し、速度が低下しやすくなる。サブブランドにはこの帯域制限がなく、親MNOと同等の速度で使える。
### Q: [楽天モバイル](/ja/jp/carriers/rakuten/)はMNO?MVNO?
[楽天モバイル](/ja/jp/carriers/rakuten/)は2020年4月に自社回線でのサービスを開始した日本で4番目のMNO。自社の基地局を持って通信サービスを提供している。ただし、品質スコアは72/100とMNO4社中最低で、カバレッジスコアも82/100。他の3社(92〜95)と比較するとカバレッジにまだ差がある。
### Q: 格安SIMに乗り換えると通話品質は下がる?
MVNOでもMNOでも、通常の電話回線を使った音声通話の品質に違いはない。通話品質はデータ通信とは別の仕組み(回線交換方式)で提供されるため。ただし、IP電話アプリ([楽天モバイル](/ja/jp/carriers/rakuten/)のRakuten Linkなど)を使う場合は、データ通信品質の影響を受ける場合がある。
### Q: MNOからMVNOに乗り換える際の注意点は?
MNP(携帯番号ポータビリティ)で電話番号はそのまま引き継げる。注意点は3つ。(1) キャリアメール(@[docomo](/ja/jp/carriers/docomo/).ne.jpなど)が使えなくなる(月額330円のメール持ち運びサービスあり)、(2) 端末の残債がある場合は支払いが続く、(3) キャリア独自のポイントや特典が失われる。2026年現在、全プランが解約金なし・契約縛りなしなので、乗り換え自体のハードルは低い。
---
## まとめ
MNO・サブブランド・MVNOの違いを整理する。
- **MNO(4社)**: [NTTドコモ](/ja/jp/carriers/docomo/)、[au](/ja/jp/carriers/au/)、[ソフトバンク](/ja/jp/carriers/softbank/)、[楽天モバイル](/ja/jp/carriers/rakuten/)。自社回線を保有し、品質スコアは72〜90/100。料金は平均約¥2,701
- **サブブランド(5社)**: [ahamo](/ja/jp/carriers/ahamo/)、[irumo](/ja/jp/carriers/irumo/)、[povo](/ja/jp/carriers/povo/)、[UQ mobile](/ja/jp/carriers/uqmobile/)、[Y!mobile](/ja/jp/carriers/ymobile/)。親MNOと同等の品質で、料金は平均約¥2,752
- **MVNO(12社)**: [IIJmio](/ja/jp/carriers/iijmio/)、[日本通信SIM](/ja/jp/carriers/nihontsushin/)、[mineo](/ja/jp/carriers/mineo/)など。MNOの回線を借りるため混雑時に速度低下しやすいが、料金は平均約¥1,593と安い
- **回線の偏り**: MVNO 12社中10社が[ドコモ](/ja/jp/carriers/docomo/)回線を利用。[au](/ja/jp/carriers/au/)回線は2社のみ
- **品質と料金はトレードオフ**: MVNOはサブブランドより月約¥1,159安いが、混雑時の速度低下というデメリットがある
**選び方の目安**:
1. 品質最優先 → MNOまたはサブブランド([ahamo](/ja/jp/carriers/ahamo/)、[UQ mobile](/ja/jp/carriers/uqmobile/)など)
2. コスト最優先 → MVNO([日本通信SIM](/ja/jp/carriers/nihontsushin/)、[IIJmio](/ja/jp/carriers/iijmio/)など)
3. バランス重視 → サブブランド([Y!mobile](/ja/jp/carriers/ymobile/)、[irumo](/ja/jp/carriers/irumo/)、[povo](/ja/jp/carriers/povo/)など)
自分の利用スタイルに合ったプランの比較は、SimFinderで条件を入力して確認してほしい。品質スコア・料金・データ容量で全22社120プランを横断的に比較できる。
**[あなたに最適なプランを探す →](/ja/jp/search/)**
---
*この記事の情報は2026年3月時点のものです。最新の料金・プラン内容は各キャリアの公式サイトでご確認ください。*
*品質スコアの比較・プランの絞り込みには[SimFinderの比較ツール](/ja/jp/search/)をご利用ください。格安SIMの選び方全般については「[格安SIMの選び方完全ガイド2026](/ja/blog/kakuyasu-sim-erabikata-guide-2026/)」も参照してください。*
================================================================================
# 日本通信、MVNOシェアで初のトップ5入り 月290円プランが牽引
URL: https://sim-finder.com/ja/blog/nihon-tsushin-mvno-share-top5-2026/
Type: blog (ja)
Published: 2026-07-16T09:00:00+09:00
日本通信がMVNO(仮想移動体通信事業者)のSIMカード型サービスでシェア4.8%となり、初めて上位5位に入りました。総務省が公表した2025年度第4四半期(3月末)の電気通信サービス契約数・シェアデータで明らかになったもので、ITmedia Mobileが2026年7月15日に報じました。月額290円からの「合理的プラン」を軸にした低価格戦略が着実に契約数を伸ばしています。
## MVNOシェアで初のトップ5入り
総務省の四半期データによると、SIMカード型MVNOサービスの事業者別シェアは、1位がインターネットイニシアティブ(IIJ)で24.9%、2位オプテージ(mineo)が8.2%、3位NTTドコモ(旧NTTレゾナント、OCN モバイル ONE)が5.6%、4位NTTドコモビジネスが4.8%と続きます。ここに日本通信が4.8%で並び、5位に入りました。
日本通信によると、総務省が四半期ごとに公表するMVNOサービスの事業者シェアで上位5位以内に入るのは、今回が初めてとのことです(ITmedia Mobile、2026年7月15日)。独立系のMVNOがドコモ・IIJ・オプテージといった大手グループが上位を占める市場でトップ5に食い込んだ形です。
## 「合理的プラン」の低価格戦略が奏功
シェア拡大を牽引しているのが、シンプルで低価格な料金体系です。日本通信は月額290円で1GBから使える「合理的シンプル290プラン」を筆頭に、月額1390円で20GBの「合理的みんなのプラン」、月額2178円で50GBの「合理的50GBプラン」などを展開しています。大容量帯でも2000円台に収まる価格設定が、通信費を抑えたい利用者から支持を集めています。
MVNO市場全体では、SIMカード型を含むMVNOサービスの契約数が着実に増加しており、総務省の同データでMVNOサービス契約数は4277万に達しています。大手キャリアのサブブランドやオンライン専用プランとの競争が続くなかでも、独立系MVNOが存在感を高めていることを示す結果といえます。
## 格安SIM選びへの影響
今回のデータは、日本通信が価格を重視する層から一定の評価を得ていることを裏付けています。1GBあたりの単価や大容量プランの割安感を重視するなら、日本通信の合理的プランは有力な選択肢のひとつです。一方で、通信品質や店舗サポート、通話定額の条件などは事業者ごとに差があるため、自分の使い方に合った容量・料金を比較したうえで選ぶことが重要です。
(出典:ITmedia Mobile「日本通信がMVNOサービスでシェア5位に」2026年7月15日、および総務省2025年度第4四半期データを整理したorefolder.jpの分析)
================================================================================
# Pixel 11、量販店でSIMフリー版を初取り扱い 8月20日発売
URL: https://sim-finder.com/ja/blog/pixel-11-simfree-kaden-ryohanten-2026/
Type: blog (ja)
Published: 2026-08-13T09:00:00+09:00
Googleは8月12日、スマートフォンの新モデル「Pixel 11」シリーズを発表しました。注目したいのは価格やカメラ性能だけではありません。**今回初めて、一部の家電量販店でSIMフリーモデル(オープンマーケットモデル)が購入できるようになります**。発売は8月20日で、予約はすでに始まっています。
格安SIMを使うために「回線と端末を別々に買う」というスタイルを選んでいる人にとって、これは地味ですが実用的な変化です。
## 家電量販店でSIMフリー版が買えるように
Google公式ブログには「さらに今回初めて、一部の量販店において SIM フリーモデルをご購入いただけるようになります」と明記されています。これまでPixelのSIMフリー版はGoogle Storeでの購入が基本で、家電量販店で並んでいるのはドコモ・au・ソフトバンク・楽天モバイル向けのキャリアモデルが中心でした。
ケータイWatchの8月13日の記事によると、SIMフリーモデルを取り扱うのはエディオン、ビックカメラ、ヤマダデンキ、ヨドバシカメラのECサイトおよび一部店舗です。ただし取り扱いは店舗によって異なる可能性があるため、店頭で買う場合は事前確認が確実です。
販売チャネル自体は、Google Storeのほかドコモ、KDDI(au)・沖縄セルラー電話、ソフトバンク、楽天モバイルと、従来どおり幅広く用意されています。
## 価格は13万6800円から
Google Storeでの税込価格は次のとおりです。
| モデル | 容量 | 価格(税込) |
|--------|------|--------------|
| Pixel 11 | 256GB | 13万6800円 |
| Pixel 11 Pro | 256GB | 17万4800円 |
| Pixel 11 Pro | 512GB | 19万4800円 |
| Pixel 11 Pro | 1TB | 23万4800円 |
| Pixel 11 Pro XL | 256GB | 20万7800円 |
| Pixel 11 Pro XL | 512GB | 22万7800円 |
| Pixel 11 Pro XL | 1TB | 26万7800円 |
予約はオンラインで8月12日から、Google Store表参道など店頭では8月13日から。発売日は8月20日です。ITmedia Mobileも8月12日の記事で、Pro/Pro XLの発売日を8月20日、直販価格を17万4800円からと伝えています。
## 格安SIMユーザーにとって何が変わるか
MVNOや格安プランを使う場合、端末は自分で用意する必要があります。これまでPixelのSIMフリー版を買う主な選択肢はGoogle Storeのオンライン購入で、実機を触ってから決めるのが難しい状況でした。
家電量販店で扱われるようになると、次のような点が変わります。
- **実機を確認してから買える**:サイズや重量、カメラの写りを店頭で試せる
- **量販店のポイントが使える/貯まる**:各社のポイント還元を購入原資に充てられる
- **キャリアモデルとの比較がしやすい**:同じ売り場で条件を並べて検討できる
一方で、キャリアの端末購入プログラム(残価設定型の割賦など)はキャリアモデル限定のものが多く、SIMフリー版では利用できません。「総額で安いのはどちらか」は、回線側の料金プランと合わせて計算する必要があります。
## 購入前に確認したいポイント
SIMフリー版を選ぶ際は、以下を確認しておくと失敗が減ります。
1. **利用予定の回線のバンド対応**:Pixelは主要4キャリアの回線に幅広く対応しますが、契約先の公式動作確認端末リストで確認しておくのが安全です
2. **eSIM/物理SIMの構成**:PixelはeSIMに対応しており、eSIM専用プランや旅行用eSIMとの併用がしやすいモデルです
3. **量販店ごとの取り扱い状況**:SIMフリー版はECサイトと一部店舗が対象のため、来店前に在庫と取り扱いの有無を確認する
端末代の負担を抑えたい場合は、月額料金の安いプランと組み合わせて2〜3年の総支出で比較するのが基本です。SimFinderのプラン検索では、データ量や通話条件から月額料金を試算できます。端末は量販店でSIMフリー版、回線は自分の使い方に合ったプランという組み合わせが、以前よりも取りやすくなりました。
**出典**: [Google Japan Blog(2026年8月12日)](https://blog.google/intl/ja-jp/products/devices-services/google-pixel-11-pro-xl/) / [ケータイWatch(2026年8月13日)](https://k-tai.watch.impress.co.jp/docs/news/2132472.html) / [ITmedia Mobile(2026年8月12日)](https://www.itmedia.co.jp/mobile/articles/2608/12/news103.html)
================================================================================
# povo、5G SAを提供開始 eSIM再発行は当面無料
URL: https://sim-finder.com/ja/blog/povo-5g-sa-teikyo-kaishi-2026/
Type: blog (ja)
Published: 2026-08-25T09:00:00+09:00
KDDI・沖縄セルラー電話・KDDI Digital Lifeは2026年8月25日、オンライン専用ブランド「povo2.0」で5G SA(スタンドアローン)サービスの提供を開始した。対象は「通話+データ」プランの契約者で、月額利用料は無料。新規登録なら手数料もかからないが、既に使っているユーザーは5G SA対応SIMへの再発行手続きが必要になる。
povoは料金の安さで選ばれることが多いブランドだが、これまで5G SAには非対応だった。今回の対応で、通信品質面での大手キャリアとの差が一段縮まった形だ。
## 5G SAとは何が違うのか
5Gには、4G LTEの設備を土台にして5Gの電波を乗せる「NSA(ノンスタンドアローン)」と、コアネットワークまで5G専用で構成する「SA(スタンドアローン)」の2方式がある。povoがこれまで提供していたのは前者だ。
ケータイWatchおよびImpress Watchの報道によれば、SA化によって4G LTEの混雑状況に左右されない5G専用の通信が可能になり、高速・大容量の通信が期待できるという。KDDIの発表では、Sub6(3.7GHz帯/4.0GHz帯)対応エリア全域で提供し、カバー率90%超を達成する見込みとされている。ただしpovo公式のニュースリリースには「一部エリアでの提供となります」との注記もあり、実際に5G SAにつながるかは居住エリア次第となる点は押さえておきたい。
## 利用に必要な条件と手数料
利用条件は次の2つだ。
- **5G SA対応スマートフォンを使っていること**(KDDI・povoの発表では対応機種の個別名は示されていない)
- **5G SA対応SIMを申し込むこと**(SIMカード/eSIMのいずれか)
手数料は、これからpovoに新規登録する場合はSIMカード・eSIMとも無料。一方、既にpovo2.0を契約しているユーザーは再発行扱いとなり、SIMカードは3,850円、eSIMは440円がかかる。ただしpovoの発表では、eSIMの再発行手数料は当面無料とされている。既存ユーザーが5G SAを試すなら、実質的にはeSIMでの切り替えが現実的な選択肢になる。
なお対象は「通話+データ」プランのみで、データ専用プランは対象外だ。
## 「今後有料になる可能性」の注記に注意
見落とせないのが、KDDIおよびpovoの発表に記載された「5G SAは、今後任意加入の有料サービスとして提供する場合があります」という一文だ。現時点では追加料金なしで使えるが、将来的にオプション課金へ移行する可能性が明示されている。povoはトッピング課金型の料金設計をとるブランドであり、5G SAが有料トッピング化された場合、月額の実負担が変わり得る。長期のコスト比較をする際は、この点を前提に置いておきたい。
また、povo・KDDIは提供開始を記念して、2026年8月25日から10月31日までに5G SA対応SIMを申し込み・有効化したユーザー全員に「データ使い放題(24時間)」のプロモコードを1回線あたり1回配布するとしている(期間限定の施策のため、条件は公式サイトで確認してほしい)。
## SimFinderの見方
今回の発表はキャンペーンではなく、povoのネットワーク仕様そのものの前進だ。格安ブランドを選ぶ際の懸念として「通信品質」が挙げられることは多いが、povoはau回線を直接使うMNOのサブブランド的な位置づけであり、5G SA対応によって品質面の訴求材料が増えたことになる。
一方で、5G SAの恩恵を受けられるかは対応端末とエリアという2つの条件に強く依存する。手数料が実質無料で試せる今のうちに、自分の端末が5G SA対応かどうか、生活圏がSub6エリアに入っているかを確認したうえで判断するのがよいだろう。
出典:[povo ニュースリリース](https://povo.jp/news/newsrelease/20260825_01/)、[KDDI ニュースルーム](https://newsroom.kddi.com/news/detail/kddi_nr-1134_4684.html)、[ケータイ Watch](https://k-tai.watch.impress.co.jp/docs/news/2135317.html)
================================================================================
# 楽天モバイル、買い替え超トクプログラムの故障費用を製品別に改定
URL: https://sim-finder.com/ja/blog/rakuten-kaikae-tokupro-koshou-hiyou-kaitei-2026/
Type: blog (ja)
Published: 2026-07-24T09:00:00+09:00
楽天モバイルは2026年7月23日、端末購入プログラム「楽天モバイル買い替え超トクプログラム」の故障費用を、これまでの一律2万2000円から製品別の設定金額へ改定しました。折りたたみスマホのGalaxy Z Fold8/Ultraは6万8000円、Galaxy Z Flip8は4万円に引き上げられる一方、iPhoneを含むそのほかの機種は2万2000円で据え置かれます。楽天モバイルの公式お知らせで発表されました。
## 何が変わったのか
「買い替え超トクプログラム」は、対象端末を48回払いで購入し、25カ月目以降に端末を返却すると残りの支払いが不要になる仕組みです。返却時に端末が楽天モバイルの指定する状態を満たさない場合、各種保証サービスに未加入だと「故障費用」が発生します。
今回の改定で変わったのは、この故障費用の金額体系です。ケータイWatchおよび楽天モバイル公式お知らせによると、内容は以下のとおりです。
- **改定前**(2026年7月23日8時59分までの購入):全製品一律 2万2000円
- **改定後**(2026年7月23日9時00分以降の購入):製品別に設定
- Galaxy Z Fold8/Galaxy Z Fold8 Ultra:6万8000円
- Galaxy Z Flip8:4万円
- その他のAndroid端末・iPhone全モデル:2万2000円
適用の基準は「端末を購入した日時」です。改定日時より前に購入した製品には従来の2万2000円が適用されるため、すでにプログラムを利用中のユーザーの条件が後から変わるわけではありません。
## 折りたたみ機だけが引き上げ対象
金額が引き上げられたのは、いずれもサムスンの折りたたみスマホです。ヒンジやフレキシブルディスプレイを備える折りたたみ機は構造が複雑で修理コストが高く、返却時の状態基準を満たさなかった場合の負担が大きいことが背景にあると考えられます。
一方で、販売台数の多いiPhoneや一般的なAndroid端末は2万2000円のまま据え置かれました。多くのユーザーにとっては、今回の改定による実質的な影響はないといえます。
## 利用者が確認すべきこと
故障費用は、あくまで保証サービスに未加入で、返却時に指定の状態を満たさなかった場合に発生する費用です。買い替え超トクプログラムで折りたたみ機の購入を検討している場合は、保証サービスへの加入や、返却条件(画面割れ・水濡れの有無など楽天モバイルが指定する状態)をあらかじめ確認しておくと安心です。
端末購入プログラムは、月々の実質負担を抑えられる魅力がある一方で、返却時の状態次第で追加費用が発生する点に注意が必要です。プランや端末購入方法を選ぶ際は、こうした返却条件も含めて総額で比較することをおすすめします。
================================================================================
# 楽天Link v3.8.0でSIMなしでもmy楽天モバイル利用可能に
URL: https://sim-finder.com/ja/blog/rakuten-link-my-rakuten-mobile-sim-free-2026/
Type: blog (ja)
Published: 2026-07-03T09:00:00+09:00
楽天モバイルは2026年7月、通話アプリ「Rakuten Link」に契約管理アプリ「my 楽天モバイル」の機能を統合すると発表しました(楽天モバイル公式お知らせ/ケータイWatch)。最大の変更点は、Rakuten Link アプリ **バージョン3.8.0以降で、楽天モバイルのSIMが挿入されていない端末でも「my 楽天モバイル」機能が使えるようになる**ことです。これまでSIM未挿入端末ではRakuten Linkを利用できませんでしたが、この制約が緩和されます。
## 何が変わるのか
楽天モバイル公式お知らせ(初出2026年6月30日、7月2日更新)によると、変更点は次の通りです。
- **Rakuten Link v3.8.0以降**で、SIM挿入の有無にかかわらず、**楽天IDでのログイン**によりアプリ内の「my 楽天モバイル」機能が利用可能になる
- 従来、SIM未挿入端末ではRakuten Link自体が利用できなかった
- v3.8.0は**2026年7月中に配信予定**
つまり、楽天モバイルのSIMを物理的に挿していない端末でも、楽天IDでログインすれば契約内容やデータ利用量の確認といった「my 楽天モバイル」の機能にアクセスできるようになります。
## my 楽天モバイルアプリは8月5日に提供終了
今回の統合にともない、単体の「my 楽天モバイル」アプリは**2026年8月5日(水)で提供終了**となります。以降はアプリの使用およびストアでの新規ダウンロードができなくなり、機能はRakuten Linkアプリに引き継がれます。新しいバージョンが配信されるまでは、引き続き従来の「my 楽天モバイル」アプリを利用するよう案内されています。
## 注意点:OS要件が引き上げられる
見落としやすいのが動作環境の変更です。Rakuten Link v3.8.0以降は、**Android 10以上、またはiOS 16以上**が必要となります。Android 9以下・iOS 15以下の端末は対象外となるため、該当する場合はOSアップデートや端末の買い替えが必要です。古い端末をサブ機として使っているユーザーは、8月5日以降に契約管理ができなくならないよう、事前に確認しておくと安心です。
## 読者への影響
今回の変更は、特に以下のようなユーザーにメリットがあります。
- **他社回線をメインにし、楽天モバイルをサブ回線で契約している人** — 楽天SIMを常時挿していなくても、楽天IDで契約管理が可能に
- **デュアルSIM運用や機種変更時に端末を使い分ける人** — SIM差し替えなしで利用状況を確認できる
一方で、対象外OSの端末を使っている場合は事前対応が必要です。楽天モバイルの料金プラン「Rakuten最強プラン」自体の内容や価格に変更はなく、今回はあくまでアプリの統合と利用条件の変更である点に留意してください。最新の詳細は必ず楽天モバイル公式お知らせで確認することをおすすめします。
================================================================================
# 楽天モバイル vs ahamo 徹底比較2026 — コスパと安定性、どっちを選ぶ?
URL: https://sim-finder.com/ja/blog/rakuten-mobile-vs-ahamo-comparison-2026/
Type: blog (ja)
Published: 2026-03-26T00:00:00+09:00
## 【結論】楽天モバイルとahamo、あなたに合うのはどっち?
先に結論を述べる。
**[楽天モバイル](/ja/jp/carriers/jp-rakuten/)が向いている人:**
- 月々の料金をできるだけ抑えたい(3GB以下なら月¥1,078)
- データ無制限で使いたい(月¥3,278)
- 通話料を完全にゼロにしたい(Rakuten Linkアプリ利用)
- 月によってデータ使用量にばらつきがある(段階制料金)
**[ahamo](/ja/jp/carriers/jp-ahamo/)が向いている人:**
- 通信速度と安定性を最優先したい(docomoクオリティ)
- 地方や山間部でも確実に繋がる必要がある(カバレッジ95%)
- 海外出張・旅行が多い(82カ国で20GBまで追加料金なし)
- 通話品質にこだわりたい(VoLTEの5分無料通話)
どちらも解約金¥0、最低契約期間なしなので、合わなければ乗り換えればいい。重要なのは自分の使い方に合ったプランを選ぶことだ。
**[SimFinderで自分に合ったプランを検索する →](/ja/jp/search/)**
---
## 目次
- [基本スペック比較表](#基本スペック比較表)
- [料金比較 — 段階制 vs 固定制](#料金比較)
- [通信品質比較 — 楽天72点 vs docomo90点](#通信品質比較)
- [通話オプション比較 — Rakuten Link無料 vs 5分無料](#通話オプション比較)
- [独自機能比較 — 段階制料金・海外利用・家族割](#独自機能比較)
- [こんな人におすすめ — 4パターン](#こんな人におすすめ)
- [よくある質問(FAQ)](#よくある質問)
- [まとめ](#まとめ)
---
## 基本スペック比較表
| 項目 | 楽天モバイル | ahamo |
|------|------------|-------|
| 回線種別 | [MNO(自社回線)](/ja/blog/mno-mvno-difference-guide/) | docomoサブブランド |
| 品質スコア | [72点](/ja/blog/scoring-system-guide/) | [90点](/ja/blog/scoring-system-guide/) |
| 料金体系 | 段階制(¥1,078〜¥3,278) | 固定制(¥2,970 / ¥4,950) |
| データ容量 | 3GB / 20GB / 無制限 | 30GB / 110GB |
| eSIM対応 | あり | あり |
| 5G対応 | あり(Rakuten 5G) | あり(docomo 5G) |
| 通話 | Rakuten Link無料 | 5分無料(標準付帯) |
| 最低契約期間 | なし | なし |
| 解約金 | ¥0 | ¥0 |
| データ繰り越し | なし | なし |
| 家族割 | ¥110引き/回線(2回線以上) | なし |
| 海外利用 | 70カ国・2GBまで無料 | 82カ国・20GBまで追加料金なし |
---
## 料金比較
楽天モバイルとahamoの料金体系は根本的に異なる。楽天モバイルは「使った分だけ支払う」段階制、ahamoは「固定容量・固定料金」制だ。
### 全プラン料金一覧
**楽天モバイル(Rakuten最強プラン):**
| プラン | 月額料金 | データ容量 |
|--------|---------|-----------|
| [〜3GB](/ja/jp/plans/rakuten-3gb/) | ¥1,078 | 3GB |
| [3〜20GB](/ja/jp/plans/rakuten-20gb/) | ¥2,178 | 20GB |
| [無制限](/ja/jp/plans/rakuten-unlimited/) | ¥3,278 | 無制限 |
**ahamo:**
| プラン | 月額料金 | データ容量 |
|--------|---------|-----------|
| [ahamo 30GB](/ja/jp/plans/ahamo-30gb/) | ¥2,970 | 30GB |
| [ahamo大盛り 110GB](/ja/jp/plans/ahamo-110gb/) | ¥4,950 | 110GB |
### データ使用量別の比較
料金の有利不利は、月のデータ使用量によって大きく変わる。
- **月3GB以下**:楽天モバイル ¥1,078 vs ahamo ¥2,970 → **楽天が¥1,892安い**
- **月10GB前後**:楽天モバイル ¥2,178 vs ahamo ¥2,970 → **楽天が¥792安い**
- **月20GB前後**:楽天モバイル ¥2,178 vs ahamo ¥2,970 → **楽天が¥792安い**(ただしahamoは30GBまで使える)
- **月30GB前後**:楽天モバイル ¥3,278(無制限) vs ahamo ¥2,970 → **ahamoが¥308安い**
- **月50GB以上**:楽天モバイル ¥3,278(無制限) vs ahamo ¥4,950(110GB) → **楽天が¥1,672安い**
楽天モバイルの段階制は、月によってデータ使用量が変動する人に有利だ。Wi-Fi環境が多い月は自動的に安くなる。一方、ahamoは毎月安定して20〜30GB使う人にとって、1GBあたりの単価(約¥99/GB)が優れている。
なお、楽天モバイルには2回線以上の契約で¥110/回線の家族割がある。家族で複数回線を契約する場合は、さらに楽天モバイルのコスト優位性が高まる。ahamoには家族割の仕組みはない。
### 年間コストの差
20GB利用を前提にした年間コスト:
- 楽天モバイル:¥2,178 × 12 = **¥26,136**
- ahamo:¥2,970 × 12 = **¥35,640**
- **年間差額:¥9,504**
この約1万円の差をどう見るかは、次に述べる通信品質の差と合わせて判断する必要がある。
---
## 通信品質比較
通信品質は、両者の間でもっとも差が大きいポイントだ。
### ネットワーク性能データ(OpenSignal Q1 2026)
| 指標 | 楽天モバイル | ahamo(docomo) | 差 |
|------|------------|----------------|-----|
| 品質スコア | 72 | 90 | docomo +18 |
| ダウンロード速度 | 80.2 Mbps | 150.3 Mbps | docomo 約1.9倍 |
| アップロード速度 | 20.1 Mbps | 18.5 Mbps | 楽天がやや上 |
| レイテンシ(遅延) | 30 ms | 22 ms | docomo 8ms速い |
| エリアカバレッジ | 82% | 95% | docomo +13% |
出典:OpenSignal Q1 2026 Japan Mobile Network Experience Report
### 通信品質の解説
**ahamoの強み**はdocomoの回線をフルに使える点にある。ダウンロード速度150.3Mbpsは楽天モバイルの約1.9倍で、動画ストリーミングや大容量ファイルのダウンロードで体感差が出る。レイテンシ22msはオンラインゲームやビデオ通話でも快適な水準だ。
**楽天モバイルの弱点として正直に指摘すべきなのは、エリアカバレッジ82%という数字だ。** docomoの95%と比較して13ポイントの差があり、都市部では問題なく使えるものの、地方・山間部・建物内では電波が届かない場所が残っている。楽天モバイルは参入後の基地局整備を急速に進めてきたが、まだdocomoとは差がある。これは楽天モバイルを検討する際にもっとも慎重に確認すべきポイントだ。
一方、アップロード速度は楽天モバイル20.1Mbps、ahamo 18.5Mbpsと楽天がわずかに上回っている。SNSへの写真・動画投稿が多い人には意外なメリットかもしれないが、実用上大きな差ではない。
> 通信品質のスコアの算出方法について詳しくは[SimFinderのスコアリングガイド](/ja/blog/scoring-system-guide/)を参照。
---
## 通話オプション比較
通話の仕組みは両者で大きく異なる。
### 楽天モバイルの通話
| オプション | 料金 | 内容 |
|-----------|------|------|
| Rakuten Link | 無料(標準) | 国内通話完全無料(アプリ使用) |
| 15分かけ放題 | ¥1,100/月 | 標準電話で15分以内の国内通話無料 |
### ahamoの通話
| オプション | 料金 | 内容 |
|-----------|------|------|
| 5分無料通話 | 無料(標準付帯) | 5分以内の国内通話無料 |
| かけ放題 | ¥1,100/月 | 国内通話完全無料 |
### Rakuten Linkの実態
楽天モバイル最大のセールスポイントは「Rakuten Linkアプリで国内通話完全無料」だ。追加料金なしで何分でも何回でもかけられるのは、通話が多い人にとって大きなメリットに見える。
ただし、Rakuten Linkの通話品質には注意が必要だ。Rakuten LinkはVoLTE(通常の電話回線)ではなく、IP電話(RCS)ベースで通話する。そのため:
- **音質**:通常の電話と比較すると劣る場合がある。特に相手側の声が聞き取りにくいという声がある
- **遅延**:インターネット回線を経由するため、通常の電話回線より遅延が大きくなることがある
- **接続安定性**:Wi-FiやLTEの接続状況に依存するため、電波が弱い環境では通話が不安定になる
- **着信**:相手がRakuten Linkを使っていない場合、着信はOS標準の電話アプリに入る
ビジネスの電話や重要な通話が多い人は、ahamoの5分無料通話(VoLTEベース)のほうが品質面で安心だ。一方、友人や家族との日常的な通話がメインなら、Rakuten Linkの「完全無料」は十分実用的だ。
ahamoで完全かけ放題が必要な場合は月¥1,100の追加が必要になる。楽天モバイルなら追加料金なしで無制限通話が可能なので、通話時間が長い人は年間¥13,200の差になる。
---
## 独自機能比較
### 段階制料金 vs 固定制料金
楽天モバイルの段階制料金は、他社にはないユニークな仕組みだ。
- Wi-Fi環境が充実していて月3GB以下で済む月は¥1,078
- 外出が多くデータを多く使った月は¥2,178(20GBまで)や¥3,278(無制限)
「先月は1,078円、今月は2,178円」のように自動的に最適な料金になる。固定プランのように「使わなかった分が無駄」ということがない。
ahamoは30GBで¥2,970の固定。毎月安定して使う人にはシンプルでわかりやすい。「今月はいくらだろう」と気にする必要がない。
### 海外利用
海外利用の差は大きい。
| 項目 | 楽天モバイル | ahamo |
|------|------------|-------|
| 対応国数 | 70カ国 | 82カ国 |
| 無料データ量 | 2GB | 20GB |
| 追加料金 | 2GB超過後は速度制限 | 追加料金なし(20GBまで) |
ahamoの「82カ国で20GBまで追加料金なし」は、海外旅行や出張が多い人にとって非常に大きなメリットだ。現地SIMを購入したりWi-Fiルーターをレンタルする手間とコストが不要になる。
楽天モバイルの海外2GBは、メールやメッセージ程度なら足りるが、地図やSNS、ビデオ通話を普通に使えば数日で使い切る。海外利用を重視するなら、ahamoが圧倒的に有利だ。
### 家族割
楽天モバイルは2回線以上の契約で¥110/回線の家族割が適用される。家族4人なら月¥440、年¥5,280の割引になる。小さな金額に見えるが、長期利用では積み重なる。
ahamoには家族割の仕組みがない。ただし、ドコモの「みんなドコモ割」のカウント対象にはなるため、家族にドコモユーザーがいる場合はそちらの割引に貢献できる(ahamo自体の料金は変わらない)。
---
## こんな人におすすめ
### パターン1:月額料金をとにかく抑えたい人 → 楽天モバイル
自宅にWi-Fiがあり、外出先でのデータ利用が少ない人は、[楽天モバイルの3GBプラン(¥1,078)](/ja/jp/plans/rakuten-3gb/)が最安クラス。月によってデータ使用量が変動しても、段階制なら無駄がない。Rakuten Linkで通話料もゼロにできるため、トータルの通信費を最小限に抑えられる。
### パターン2:速度と安定性を重視する人 → ahamo
仕事でビデオ会議を頻繁に行う人、オンラインゲームをプレイする人、地方在住で電波の安定性が重要な人は、[ahamo 30GB(¥2,970)](/ja/jp/plans/ahamo-30gb/)が適している。docomoの品質スコア90、カバレッジ95%は現時点で国内トップクラスだ。
### パターン3:データ無制限で使いたい人 → 楽天モバイル
テザリングでPCを使う人、動画を大量に視聴する人、データ使用量を気にしたくない人は、[楽天モバイル無制限プラン(¥3,278)](/ja/jp/plans/rakuten-unlimited/)が最適。ahamoの大盛り110GB(¥4,950)と比べて¥1,672安く、しかも容量無制限だ。
### パターン4:海外利用が多い人 → ahamo
海外出張や旅行が年に複数回ある人は、[ahamo 30GB](/ja/jp/plans/ahamo-30gb/)一択と言っていい。82カ国で20GBまで追加料金なしで使えるのは、他のキャリアにはない強みだ。現地でSIMを買う手間も、Wi-Fiルーターをレンタルするコストも不要になる。
**[あなたの使い方に合ったプランをSimFinderで比較する →](/ja/jp/search/)**
---
## よくある質問
### Q. 楽天モバイルとahamoはどちらが安いですか?
月3GB以下なら楽天モバイルが¥1,078で圧倒的に安い。20GB帯では楽天モバイルが¥2,178、ahamoが¥2,970(30GB含む)で、楽天モバイルのほうが¥792安い。ただしahamoは30GBまで使えるため、1GBあたりの単価ではahamoが有利になる。
### Q. 通信速度はどちらが速いですか?
ahamoが大幅に優れている。ダウンロード速度はahamo 150.3Mbps、楽天モバイル 80.2Mbpsで、約1.9倍の差がある(OpenSignal Q1 2026調べ)。
### Q. 楽天モバイルのRakuten Linkの通話品質はどうですか?
Rakuten LinkはIP電話(RCS)ベースのため、通常の電話回線(VoLTE)と比較すると音質が劣る場面がある。特にネットワーク接続が不安定な場所では遅延やノイズが発生することがある。安定した通話品質を重視する場合は、ahamoの5分無料通話(VoLTE)のほうが適している。
### Q. 海外利用はどちらが便利ですか?
ahamoが圧倒的に有利。ahamoは82カ国で20GBまで追加料金なしで使える。楽天モバイルは70カ国で2GBまでの無料で、差が大きい。海外旅行・出張が多い人はahamoを選ぶべきだ。
### Q. 楽天モバイルのエリアカバレッジは大丈夫ですか?
楽天モバイルのカバレッジは82%で、ahamoが利用するdocomo回線の95%と比較するとまだ差がある。都市部では問題なく使えるが、地方や山間部では繋がりにくい場所が残っている。契約前に楽天モバイルのエリアマップで自分の生活圏を確認することを強くおすすめする。
### Q. 契約期間の縛りや解約金はありますか?
楽天モバイル・ahamoともに最低契約期間なし、解約金¥0。どちらもリスクなく試せる。
### Q. データの繰り越しはできますか?
楽天モバイル・ahamoともにデータ繰り越しには対応していない。余ったデータは翌月に持ち越せないため、毎月使い切る前提でプランを選ぶ必要がある。
---
## まとめ
楽天モバイルとahamoは、それぞれ異なる強みを持つキャリアだ。
**[楽天モバイル](/ja/jp/carriers/jp-rakuten/)**は、段階制料金(¥1,078〜¥3,278)、データ無制限、Rakuten Linkによる通話完全無料が強み。月々の出費を最小限に抑えたい人、データ使用量が月によって変動する人、通話が多い人に向いている。ただし、エリアカバレッジ82%という弱点があり、生活圏の電波状況は事前確認が必須だ。
**[ahamo](/ja/jp/carriers/jp-ahamo/)**は、docomo品質の通信(速度150.3Mbps、カバレッジ95%)、82カ国で20GBの海外利用が強み。通信品質を最優先する人、地方在住の人、海外利用が多い人に適している。料金は30GBで¥2,970と楽天モバイルよりやや高いが、そのぶん安定性で上回る。
どちらも解約金¥0なので、迷ったらまず試してみるのが一番だ。
**[SimFinderであなたに最適なプランを見つける →](/ja/jp/search/)**
---
※ 料金は税込表記です。2026年3月時点の情報に基づいています。最新の情報は各キャリアの公式サイトでご確認ください。
※ 通信速度・品質スコアはOpenSignal Q1 2026 Japan Mobile Network Experience Reportのデータに基づいています。実際の速度は時間帯・場所・端末により変動します。
================================================================================
# 楽天モバイル、Nothing Phone (3)を最大3万円値下げ 9万5990円に
URL: https://sim-finder.com/ja/blog/rakuten-nothing-phone-3-nesage-2026/
Type: blog (ja)
Published: 2026-08-18T09:00:00+09:00
楽天モバイルが2026年8月18日、Nothing「Phone (3)」の販売価格を改定しました。256GBモデルが11万9900円から**9万5990円**へ2万3910円、512GBモデルが13万8900円から**10万8900円**へ3万円の値下げです。期間限定の割引クーポンではなく本体価格そのものの改定で、値下げ後の価格は楽天モバイル公式の製品ページでも確認できます。
Nothing Phone (3) は国内キャリアでは楽天モバイルのみが取り扱うモデルです。フラッグシップ帯の端末が実質2割前後下がったことになり、乗り換えとセットで端末を買い替えたい人にとっては選択肢が動く水準の改定といえます。
## 値下げ後の価格
| モデル | 従来価格 | 改定後 | 値下げ額 |
|--------|---------|--------|---------|
| 256GB | 11万9900円 | 9万5990円 | 2万3910円 |
| 512GB | 13万8900円 | 10万8900円 | 3万円 |
いずれも税込み価格です。ITmedia Mobile、ケータイ Watch、ASCII.jp が同日に報じており、3媒体とも同じ改定額を伝えています。
## MNPと組み合わせた場合
他社から電話番号を引き継いで(MNP)「Rakuten最強プラン」または「Rakuten最強U-NEXT」を契約し、一括払いまたは24回払いで購入すると、最大4万円引きが適用されます。この場合の支払額は256GBが**5万5990円**、512GBが**6万8900円**です。
さらに端末を分割で購入して一定期間後に返却する「買い替え超トクプログラム」を利用し、25カ月目に返却した場合の負担額は、ケータイ Watch によると256GBが2万1360円、512GBが3万960円とされています。加えて最大1万6000ポイントの還元を受けられる条件では、256GBは5360円まで下がると報じられています。
ただし、この4万円引きやポイント還元は本体価格の改定とは別枠の販促施策で、適用条件や実施期間は変更される可能性があります。申し込み前に楽天モバイル公式サイトで現在の条件を必ず確認してください。
## Phone (3a) Lite も対象拡大
あわせて、下位モデルの「Nothing Phone (3a) Lite」が買い替え超トクプログラムの対象に追加されました。MNPで乗り換えて25カ月目に返却する場合の負担額は24円、新規申し込みや製品のみの購入では1万8000円とされています。
## 端末価格だけで判断しない
端末が安く見えても、実際の負担は「毎月の通信料金 × 利用月数 + 端末代」で決まります。返却前提のプログラムは2年後に端末が手元に残らないため、同じ端末を長く使いたい人にはコスト面で不利になることもあります。
楽天モバイルのRakuten最強プランはデータ利用量に応じた段階制で、使い方によって月額は大きく変わります。乗り換えを検討する際は、端末値引きの額だけでなく、自分のデータ使用量に対して月額がいくらになるかを先に確認しておくと判断を誤りません。SimFinderの検索では、データ量や通話条件を入力して各社プランの実質月額を比較できます。
出典:[楽天モバイル公式 Nothing Phone (3) 製品ページ](https://network.mobile.rakuten.co.jp/product/smartphone/phone-3/)、[ITmedia Mobile(2026年8月18日)](https://www.itmedia.co.jp/mobile/articles/2608/18/news074.html)、[ケータイ Watch(2026年8月18日)](https://k-tai.watch.impress.co.jp/docs/news/2133406.html)、[ASCII.jp(2026年8月18日)](https://ascii.jp/elem/000/004/427/4427249/)
================================================================================
# SimFinderのスコアリング解説 — 料金・通信品質・機能から最適プランを算出する仕組み
URL: https://sim-finder.com/ja/blog/scoring-system-guide/
Type: blog (ja)
Published: 2026-03-25
## 結論: SimFinderのスコアは3要素の加重平均で決まる
SimFinderの「おすすめ順」は以下の計算式で決まる:
```
総合スコア = 価格スコア × (1 - w) + 品質スコア × w + ボーナス
```
- **価格スコア**: 安いほど高い(0〜100点)
- **品質スコア**: Opensignalの実測データに基づく(0〜100点)
- **w(重み)**: あなたが品質優先度スライダーで調整する(0〜1.0)
- **ボーナス**: データ繰越や家族割で加点(最大10点)
**重要な点: アフィリエイト報酬はスコアに一切影響しない。** 計算に使うのは「料金」「品質」「機能」の3つだけ。この記事では、実際にサイトで動いている計算ロジックをそのまま公開する。
**[SimFinderで実際にスコアを見ながらプランを比較する →](/ja/jp/search/)**
## 目次
- [なぜスコアリングを公開するのか](#なぜスコアリングを公開するのか)
- [Step 1: 価格スコアの計算](#step-1-価格スコアの計算)
- [Step 2: 通信品質スコアの計算](#step-2-通信品質スコアの計算)
- [Step 3: ボーナス加点](#step-3-ボーナス加点)
- [Step 4: 加重平均で総合スコアを算出](#step-4-加重平均で総合スコアを算出)
- [品質優先度スライダーの使い方](#品質優先度スライダーの使い方)
- [通話オプションの自動最適化](#通話オプションの自動最適化)
- [よくある質問](#よくある質問)
- [まとめ](#まとめ)
---
## なぜスコアリングを公開するのか
SIM比較サイトの多くは「当サイト独自の基準でランキング」と書くが、**その基準が公開されていない**。読者からすれば、アフィリエイト報酬の高い順に並べているのではないかという疑念を抱いて当然だ。
SimFinderはスコアリングの計算式を完全に公開する。理由は単純で、**隠す理由がないから**。アフィリエイト報酬はスコア計算のコードに一切含まれていないし、含める仕組みもない。
これから解説する計算式は、実際にSimFinderの本番サイトで動いているものと同一。ソースコードはTypeScriptで書かれており、この記事の数式はコードから直接引用している。
---
## Step 1: 価格スコアの計算
価格スコアは「検索結果に表示されている全プランの中で、そのプランがどれだけ安いか」を0〜100で表す。
### 計算式
```
価格スコア = (最高価格 − そのプランの価格) ÷ (最高価格 − 最安価格) × 100
```
- **最安プラン** → 100点(満点)
- **最高価格プラン** → 0点
- **中間の価格** → 価格に比例した点数
### 具体例
検索結果に以下の3プランが表示されたとする:
| プラン | 月額 | 価格スコア |
|--------|------|-----------|
| 日本通信SIM 合理的シンプル290 | ¥290 | **(5,258 − 290) ÷ (5,258 − 290) × 100 = 100点** |
| IIJmio 10ギガプラン | ¥1,400 | (5,258 − 1,400) ÷ (5,258 − 290) × 100 = **77.7点** |
| Y!mobile シンプル3 L | ¥5,258 | (5,258 − 5,258) ÷ (5,258 − 290) × 100 = **0点** |
**注意**: 価格スコアは「検索条件に合致したプラン群の中での相対評価」。検索条件を変えるとスコアも変わる。全プランの中での絶対評価ではない。
### 通話料金も含めた「予測月額」
SimFinderの価格スコアは基本月額だけでなく、**あなたの月間通話時間に基づく予測月額**で計算する。
例えば、月30分通話する場合:
- 基本月額 ¥290 + 通話料(30分 × ¥44/分 超過分)= 予測月額
- かけ放題オプションがある場合は、オプション付きの方が安いかを自動判定
この仕組みの詳細は[通話オプションの自動最適化](#通話オプションの自動最適化)で解説する。
---
## Step 2: 通信品質スコアの計算
品質スコアは「そのキャリアの通信品質がどれだけ良いか」を0〜100で表す。
### データソース
品質スコアの元データは **Opensignal社の通信品質レポート(2026年Q1版)** から取得している。Opensignalは世界中のスマートフォンから匿名の通信データを収集し、キャリア別の品質を第三者として評価している組織。
日本の大手4キャリアの品質データ:
| キャリア | DL速度 | UL速度 | レイテンシ | カバレッジ | **総合スコア** |
|---------|--------|--------|-----------|-----------|---------------|
| NTTドコモ | 150.3 Mbps | 18.5 Mbps | 22 ms | 95 | **90** |
| au (KDDI) | 120.7 Mbps | 15.2 Mbps | 25 ms | 93 | **85** |
| ソフトバンク | 110.5 Mbps | 14.8 Mbps | 26 ms | 92 | **83** |
| 楽天モバイル | 80.2 Mbps | 20.1 Mbps | 30 ms | 82 | **72** |
### キャリアタイプ別の係数
大手キャリア(MNO)と格安SIM(MVNO)では、同じ回線を使っていても実際の通信品質に差がある。MVNOは回線を借りているため、混雑時間帯に速度が低下しやすい。
SimFinderではこの差を以下の係数で反映する:
| キャリアタイプ | 係数 | 説明 |
|--------------|------|------|
| MNO(大手キャリア) | **1.00**(100%) | ドコモ、au、ソフトバンク、楽天モバイル |
| サブブランド | **0.95**(95%) | ahamo、povo、UQ mobile、Y!mobile、LINEMO |
| MVNO(格安SIM) | **0.85**(85%) | IIJmio、mineo、nuroモバイルなど |
### 計算式
```
品質スコア = 親キャリアの総合スコア × キャリアタイプ係数
```
### 具体例
| プラン | 親キャリア | 総合スコア | 係数 | **品質スコア** |
|--------|-----------|-----------|------|---------------|
| ドコモ ギガホ | ドコモ(90) | 90 | ×1.00 | **90.0** |
| ahamo 30GB | ドコモ(90) | 90 | ×0.95 | **85.5** |
| IIJmio 10ギガ | ドコモ(90) | 90 | ×0.85 | **76.5** |
| 楽天モバイル | 楽天(72) | 72 | ×1.00 | **72.0** |
### 品質データがないキャリアの扱い
一部のMVNOはOpensignalのデータに含まれていない。その場合:
1. まず**親MNO(回線提供元)のスコア**を使う
2. 親MNOも不明なら、**その国の全キャリアの平均スコア**を使う
3. UI上では推定値に **「※」マーク** を表示し、実測データではないことを明示
---
## Step 3: ボーナス加点
便利な機能を持つプランに追加ポイントを付与する。
| 機能 | ボーナス | 条件 |
|------|---------|------|
| データ繰越 | **+3点** | プランにデータ繰越機能がある場合 |
| 家族割 | **+5点** | 検索時に「家族割」にチェックを入れ、かつプランが家族割に対応 |
**ボーナス上限: 最大10点**
ボーナスは「あったら嬉しい」機能への小さな加点。基本の価格・品質スコアを覆すほどの大きな影響は与えない設計。
---
## Step 4: 加重平均で総合スコアを算出
ここまでの3要素を組み合わせて最終スコアを出す。
### 計算式
```
総合スコア = 価格スコア × (1 − w) + 品質スコア × w + ボーナス
```
**w = 品質優先度スライダーの値 ÷ 100**
### 具体例: 品質優先度50%(デフォルト)の場合
| プラン | 価格スコア | 品質スコア | ボーナス | **総合スコア** |
|--------|-----------|-----------|---------|---------------|
| IIJmio 10ギガ | 77.7 | 76.5 | +3(繰越) | 77.7×0.5 + 76.5×0.5 + 3 = **80.1** |
| ahamo 30GB | 60.0 | 85.5 | 0 | 60.0×0.5 + 85.5×0.5 + 0 = **72.8** |
| 日本通信SIM | 100.0 | 76.5 | 0 | 100×0.5 + 76.5×0.5 + 0 = **88.3** |
### 同点時のtie-breakルール
スコアが同じ場合は以下の順で決着をつける:
1. **月額が安い方**が上
2. 月額も同じなら**データ無制限プラン**が上
3. それも同じなら**データ容量が多い方**が上
**[この計算で実際にプランを比較してみる →](/ja/jp/search/)**
---
## 品質優先度スライダーの使い方
SimFinderの検索ページにある「ネットワーク品質の優先度」スライダーは、価格と品質のバランスを自分で調整できる機能。
| スライダー位置 | w値 | 価格の重み | 品質の重み | おすすめする人 |
|--------------|-----|-----------|-----------|-------------|
| **0%(価格重視)** | 0.0 | 100% | 0% | とにかく月額を下げたい |
| **25%(やや価格重視)** | 0.25 | 75% | 25% | 基本は安さ重視だが最低限の品質は欲しい |
| **50%(バランス型)** | 0.50 | 50% | 50% | **デフォルト。迷ったらここ** |
| **75%(やや品質重視)** | 0.75 | 25% | 75% | テレワークや動画視聴が多い |
| **100%(品質重視)** | 1.0 | 0% | 100% | 速度と安定性を最優先 |
**ポイント**: スライダーを動かすとリアルタイムでプランの順位が変わる。「安い順」と「品質が高い順」の結果が全く違うことを体験してほしい。
---
## 通話オプションの自動最適化
SimFinderは「月間通話時間」を入力すると、各プランの通話オプションの中から**月額が最安になる組み合わせ**を自動で選ぶ。
### なぜこの機能が必要か
格安SIMの通話料金は複雑だ:
- 基本料金に通話料は含まれない(従量課金: 22〜44円/分)
- 5分かけ放題オプション(月550〜880円)
- 10分かけ放題オプション(月700〜1,100円)
- 完全かけ放題オプション(月1,100〜1,980円)
「月15分通話する人」にとって、5分かけ放題を付けるべきか従量課金のままがいいかは、プランごとに異なる。SimFinderはこの計算を全プラン分自動で行い、**通話料込みの予測月額**でスコアリングする。
### 計算ロジック
1. 通話オプションなし(従量課金)の月額を計算
2. 各通話オプション付きの月額を計算
3. 最も安い組み合わせを自動選択
これにより、「基本料金は安いが通話料金が高い」プランと「基本料金は高いがかけ放題付き」プランを**同じ土俵で比較**できる。
**[あなたの通話時間を入力して最適プランを探す →](/ja/jp/search/)**
---
## よくある質問
**Q: スコアリングにアフィリエイト報酬は影響する?**
一切影響しない。スコアリングの入力値は「月額料金」「通信品質スコア」「データ繰越」「家族割」の4要素のみで、アフィリエイト契約の有無・報酬額はコードレベルで計算に含まれていない。この記事で公開している計算式がそのまま本番で動いている。
**Q: 通信品質スコアのデータはどこから取得している?**
Opensignal社が公開している通信品質レポート(2026年Q1版)を使用している。ダウンロード速度・アップロード速度・レイテンシ・カバレッジの4指標を総合した overall_score を基準としている。
**Q: MVNOの品質スコアが低いのはなぜ?**
MVNOは大手キャリアの回線を借りて運営しているため、混雑時間帯に速度が低下しやすいのが一般的。SimFinderでは、実測データがないMVNOには親MNOのスコアに0.85の係数をかけて推定値を算出している。この係数は業界の実態に基づいているが、推定値には「※」マークを表示している。
**Q: 品質優先度スライダーはどう使えばいい?**
デフォルトの50%(バランス型)は、料金と品質を同じ重みで評価する。とにかく安さを重視するなら0%寄りに、速度や安定性を重視するなら100%寄りに。テレワークや動画視聴が多い人は70〜100%がおすすめ。
**Q: スコアが同じプランがあったらどちらが上に来る?**
同点の場合は3段階のtie-breakルールで決まる。①月額が安い方が優先 → ②データ無制限プランが優先 → ③データ容量が多い方が優先。つまり、同じスコアなら安くてデータが多いプランが上に来る。
---
## まとめ
SimFinderのスコアリングは「**価格**」「**通信品質**」「**機能ボーナス**」の3要素だけで計算される、シンプルで透明な仕組み。
- 計算式は本記事で完全公開済み
- アフィリエイト報酬はスコアに影響しない
- 品質データは第三者機関(Opensignal)のレポートに基づく
- 品質優先度スライダーで自分の価値観に合わせて調整できる
**「このサイトのおすすめ順は信頼できるのか」** という疑問に対する答えは、この計算式そのもの。読者自身で検算できる。
**[SimFinderでスコアを見ながら最適なプランを探す →](/ja/jp/search/)**
---
*当サイトはアフィリエイト広告を利用しています。ただし、アフィリエイト契約の有無・報酬額はプランのランキングやスコアに一切影響しません。スコアリングは料金・通信品質・機能のみに基づいています。*
*料金・プラン内容は2026年3月時点の情報です。最新情報は各キャリアの公式サイトでご確認ください。*
================================================================================
# ソフトバンク、学校向けAIこころのケア「メンタリ」提供開始
URL: https://sim-finder.com/ja/blog/softbank-mentari-ai-kokoro-care-2026/
Type: blog (ja)
Published: 2026-08-28T09:00:00+09:00
ソフトバンクは2026年8月27日、教師による児童・生徒のこころのケアを支援するサービス「メンタリ」の提供を開始した。学校で定期実施されるアンケートをデジタル化し、回答内容をAIで分析することで、支援が必要な子どもを早期に把握できるようにするものだ。小学校・中学校・高等学校などが対象で、利用開始から一定期間は効果検証を目的に無償で提供される。
## アンケートのAI分析で「気づき」を早める
ソフトバンクの発表によると、メンタリはアンケートの作成・回収・分析を一元化し、自由記述を含む回答内容をAIが自動で分析する。緊急性が高いと判断された相談内容は教師に通知される仕組みで、紙の運用では見落とされやすかったサインを拾い上げることを狙う。
さらに、専門家や精神科医の監修による類似事例と対応方法を教師に提示する機能も備える。カウンセリングの専門知識を持たない教師でも、次に取るべき行動の手がかりを得られるようにする設計だ。
## 「先生に相談しづらい」を埋めるAIチャット
生徒側にもAIチャットが用意される点が特徴だ。ケータイWatchの報道によれば、サービスのキャラクター「モフ」が登場し、生徒が気軽に悩みを相談できる。モフは生徒に直接アドバイスをせず「聞くこと」に特化し、悩みの言語化や相談内容の整理に努めるとされている。教師に直接は言い出しにくい内容を、いったん言葉にする場を用意するという発想である。
## 開発の背景は教師の業務負荷とカウンセラー不足
ソフトバンクは開発の背景として、文部科学省の「いじめの防止等のための基本的な方針」に基づき学校で定期的に実施されているアンケートを挙げている。同社は、紙での運用による業務負荷やスクールカウンセラーの不足などにより、児童や生徒ひとりひとりへ十分に対応することが難しいという課題があると説明する。メンタリは、この収集と分析の工程をAIで肩代わりすることで、教師が対応そのものに時間を割けるようにする位置づけだ。
## 料金は「一定期間無償」、その後は月額150円との報道
料金について、ソフトバンクのプレスリリースは「利用開始から一定期間は効果検証を目的として無償で提供する」と述べるにとどまり、本格提供時の価格には触れていない。一方、ケータイWatchは約1年間のトライアル期間後の料金を、生徒・教師ともに1アカウントあたり月額150円と報じている。
## 通信キャリアの非通信領域はどこまで広がるか
メンタリは携帯電話の料金プランやSIMとは直接関係しないが、通信キャリアが本業の外側でAIサービスを展開する動きの一例として押さえておきたい。ソフトバンクに限らず各社は近年、法人・自治体・教育分野へのソリューション提供を収益の柱のひとつに育てようとしている。個人がスマホプランを選ぶ際の判断材料になるものではないものの、キャリア各社の事業構造が「回線を売る」だけではなくなりつつあることを示す動きといえる。
================================================================================
# ソフトバンク、OPPO Find X9 UltraのSIMフリー版を発売
URL: https://sim-finder.com/ja/blog/softbank-oppo-find-x9-ultra-simfree-2026/
Type: blog (ja)
Published: 2026-07-08T09:00:00+09:00
ソフトバンクは2026年7月8日、SIMフリースマートフォンを販売する「SoftBank Free Style」で、OPPOのフラッグシップ機「OPPO Find X9 Ultra」を発売しました。価格は26万9808円で、ソフトバンク回線契約者は月額5621円×48回の分割払いでも購入できます。SIMフリーモデルのため、格安SIMを含む好みの回線と組み合わせて使える点が特徴です。
## 何が発表されたのか
ソフトバンクの公式リリースによると、同社は「SoftBank Free Style」でOPPO Find X9 Ultraの取り扱いを7月8日に開始しました。カラーはツンドラアンバーとキャニオンオレンジの2色展開です。SoftBank Free Styleは、キャリア回線への縛りがないSIMフリー端末を扱うオンライン販売チャネルで、これまでにもOPPO Find X9などが投入されてきました。
ケータイWatch(7月8日掲載)は価格を26万9808円と報じており、ソフトバンク回線を契約しているユーザー向けには月額5621円×48回の分割払いが用意されると伝えています。
## OPPO Find X9 Ultraの主なスペック
ケータイWatchの記事によると、本機はカメラ性能を前面に押し出したハイエンドモデルです。主な仕様は以下の通りです。
- **プロセッサ**: Qualcomm Snapdragon 8 Elite Gen 5
- **メモリ / ストレージ**: 12GB / 512GB
- **バッテリー**: 7050mAh
- **カメラ**: メイン・望遠が各2億画素、超望遠5000万画素(光学10倍ズーム対応)、超広角5000万画素、マルチスペクトルセンサー搭載
- **OS**: Android
大容量バッテリーと複数の高画素カメラを備え、撮影用途を重視するユーザーに向いた構成といえます。
## SIMフリー版を選ぶ意味
SoftBank Free Styleで販売されるのはSIMフリーモデルであり、回線契約とは独立して端末だけを購入できます。つまり、端末はソフトバンク経由で入手しつつ、通信は格安SIM(MVNO)やサブブランドなど自分に合ったプランで契約する、という使い分けが可能です。
ただし、ソフトバンクの案内では、同社でeSIMを契約していてOPPO Find X9 UltraにeSIMを移行する場合には手数料が発生する場合があるとされています。物理SIMの対応や具体的な対応バンドについては公式リリースでは詳細が明記されていないため、他社回線での利用を検討する場合は購入前に製品ページで対応周波数帯を確認することをおすすめします。
## まとめ
26万円台のハイエンド機であるOPPO Find X9 Ultraが、回線縛りのないSIMフリー形態でソフトバンクから入手可能になりました。端末をキャリアで買いつつ通信費は格安SIMで抑える、といった選択肢が広がる発表です。プラン選びと併せて、自分の使い方に合った端末・回線の組み合わせを検討してみてください。
(出典: [ソフトバンク公式ニュース](https://www.softbank.jp/mobile/info/personal/news/product/20260708a/)、[ケータイWatch](https://k-tai.watch.impress.co.jp/docs/news/2123371.html))
================================================================================
# ソフトバンク、新トクするサポート+査定改定 Dランク最大4.4万円負担
URL: https://sim-finder.com/ja/blog/softbank-shin-tokusuru-support-plus-satei-kaitei-2026/
Type: blog (ja)
Published: 2026-08-09T09:00:00+09:00
ソフトバンクが、端末購入プログラム「新トクするサポート+」の査定基準と故障時負担金を2026年8月19日から変更する。同社の[プログラム公式ページ](https://www.softbank.jp/mobile/products/new-tokusuru-support-plus/)で告知されており、ケータイ Watchが8月6日に報じた。新たに「Cランク」「Dランク」の区分が設けられ、Dランクと判定された場合の負担額は最大4万4000円(不課税)に達する。端末を2年で返却して残債を免除してもらう使い方を前提にしている人にとっては、実質負担額の試算が変わりうる改定だ。
## 何が変わるのか
対象は、2026年8月19日(水)以降に「新トクするサポート+」へ加入し、対象機種を48回払いで購入した利用者。8月18日までに加入した人には、これまでどおり変更前の内容が適用される。つまり、すでにプログラムを利用中の契約が遡って不利になるわけではなく、これから加入する人が判断すべき条件変更という位置づけになる。
変更点は大きく2つある。1つは返却時の査定基準の細分化、もう1つは故障時負担金の算出方法だ。
ケータイ Watchの報道によれば、従来の故障時負担金は25〜48回目の分割支払金の合計額に応じて定められ、上限は最大2万2000円だった。改定後は、査定結果のランクごとに上限額が設定され、Dランクでは最大4万4000円と従来上限の倍額になる。
## CランクとDランクの判定基準
公式ページおよびケータイ Watchの記事によると、新設される区分の内容は次のとおり。
- **Cランク(最大2万2000円・不課税)** — 画面や筐体に爪が引っかかるキズ、打痕、へこみがある状態、塗装はがれなどの汚れがある場合
- **Dランク(最大4万4000円・不課税)** — 画面や筐体のヒビ割れ、カメラレンズのキズ、ボタンやSIMトレーといった部品の破損および欠落など、より深刻なダメージがある場合
ポイントは、Cランクの基準に「塗装はがれ」や打痕といった、ケースに入れて使っていても起こりうるレベルの劣化が含まれている点だ。画面割れのような明確な破損だけでなく、日常使用による外装のダメージも負担金の対象になりうる。
## 負担金の計算式も変更
故障時負担金の算出方法も改められる。公式ページの記載では、「特典B残債務(税込)の金額から、適用される特典利用料(税込)を差し引いた金額に95%を乗じた金額」と「査定結果に基づくランクごとの最大額」を比較し、**いずれか少ない方**が請求される。
この式は、残債が小さい場合には上限額まで請求されないことを意味する。返却時点で免除されるはずだった残債が少なければ、負担金もそれに応じて抑えられる。一方で残債が大きい状態で損傷ありと判定されると、ランク別の上限額がそのまま効いてくる。高額機種を早いタイミングで返却するケースほど、上限額に張り付きやすい構造だ。
## 保証パック加入で免除される
回避策も用意されている。端末の購入時から特典利用の申し込み完了時点まで「あんしん保証パックサービス」に継続加入していれば、Cランク・Dランク・付属品NGと判定されても故障時負担金は免除される。
ただし保証サービスは月額料金がかかる。免除のために保証へ加入するなら、その月額を2年分積み上げた金額と、想定される負担金リスクを比べて判断する必要がある。傷なく使い切れる自信があるなら保証なし、返却時の査定リスクを固定費に置き換えたいなら保証あり、という整理になる。
## 端末の「実質価格」をどう見るか
端末購入プログラムは、返却を前提にした実質負担額の安さが訴求点になっている。しかし今回のように返却時の査定条件が変わると、広告上の実質価格と最終的な支払総額が乖離する可能性が出てくる。
SimFinderで扱うSIM・スマホプランの比較でも、端末代と通信料はできるだけ切り分けて考えることを推奨している。端末購入プログラムを使う場合は、月々の通信料に加えて「返却できなかった場合の残債」「査定で減額された場合の負担金」「保証サービスの月額」までを含めて総額を見積もっておきたい。特に8月19日以降にソフトバンクで機種変更・新規購入を検討している人は、加入前に最新の査定基準を公式ページで確認しておくことをすすめる。
================================================================================
# ソフトバンク、Apple Watchが5G接続のまま通話可能に 追加料金なし
URL: https://sim-finder.com/ja/blog/softbank-vonr-5g-redcap-wearable-2026/
Type: blog (ja)
Published: 2026-09-18T09:00:00+09:00
ソフトバンクは2026年9月18日、5G RedCap対応のウェアラブル端末向けに「VoNR(Voice over NR)」による音声通話サービスを、9月15日から順次提供開始したと発表しました。これにより、Apple WatchのCellularモデルなどが4Gに切り替わることなく、5G SAに接続したまま発着信・通話できるようになります。
利用にあたって特別な申し込みは不要で、追加料金も発生しません。対象端末とエリアの条件さえ満たしていれば、ユーザー側の手続きなしで恩恵を受けられる形です。ケータイ Watchは、5G RedCap対応端末でのVoNR提供は「国内では初とみられ」と報じています。
## VoNRとは?5G接続のまま通話まで完結する仕組み
VoNRは、5G SA(スタンドアローン)のネットワーク上で音声通話を行う技術です。
これまでのスマートフォンや腕時計型端末は、5Gでデータ通信をしていても、音声通話が発生すると4GのVoLTEに切り替えて通話する仕組みが一般的でした。VoNRではこの切り替えが不要になり、5G SAに接続したまま通話が完結します。BUSINESS NETWORKはこれを「5G SA上で音声通信まで完結」する形だと説明しています。
一方の「5G RedCap」は、スマートウォッチなどのウェアラブル端末やIoT機器向けに最適化された5Gの通信規格です。通常の5Gより機能を絞ることで、消費電力や端末コストを抑えられるのが特徴で、ソフトバンクは2025年9月にネットワーク対応の開始を発表していました。今回は、その5G RedCap対応端末で音声通話までカバーした格好になります。
## 対応するのはApple Watch 5機種
ソフトバンクおよび各報道によると、VoNRに対応するウェアラブル端末は次のとおりです。
- Apple Watch Series 12
- Apple Watch Ultra 4
- Apple Watch Series 11
- Apple Watch SE 3
- Apple Watch Ultra 3
いずれもCellular(セルラー)モデルが対象で、watchOS 27以降が必要です。Series 12とUltra 4は9月18日発売の新モデルですが、Series 11・SE 3・Ultra 3といった既存モデルもOSを更新すれば対象に含まれる点は見逃せません。
## iPhone側はiOS 26.4以上が必要
ITmedia Mobileによると、VoNRの対応機種にはウェアラブル端末だけでなくスマートフォンも含まれ、iPhoneではiOS 26.4以上が必要とされています。対応機種としてiPhone Duo、iPhone 18 Pro/18 Pro Max、iPhone 17シリーズ、iPhone 16シリーズ、iPhone 15シリーズなどが挙げられているほか、Galaxy Z Fold8/Flip8、Galaxy S26シリーズ、AQUOS R11、AQUOS sense10、Xperia 1 VIII、Xperia 10 VIIといったAndroid端末の名前も並んでいます。
Apple WatchのCellularモデルはペアリングするiPhoneとセットで使うため、実際にVoNRの恩恵を受けるにはiPhone側のOS更新も確認しておくのが確実です。
## エリアは「一部から順次拡大」
注意したいのが提供エリアです。ソフトバンクの発表では、5G SAエリアの一部で提供を開始し、順次拡大するとされています。BUSINESS NETWORKによれば、5G RedCapとVoNRの両方に対応したエリアが条件になります。
つまり、対応端末を持っていても、現時点では全国どこでもVoNRで通話できるわけではありません。エリア外では従来どおり4GのVoLTEでの通話となるため、体感的な変化がすぐには分からないケースもありそうです。
## 格安SIMユーザーへの影響は
今回の発表はソフトバンクブランドとしての案内で、ワイモバイルやLINEMO、ソフトバンク回線を借りるMVNOでの提供可否については触れられていません。格安SIMでApple WatchのCellularモデルを使いたい場合は、そもそもウォッチ向けの回線サービス(ナンバーシェア等)を提供しているかどうかがまず前提条件になります。
とはいえ、5G SAの整備が進み、音声通話まで5Gで完結する流れが広がれば、将来的にはサブブランドやMVNOの利用者にも波及していく可能性があります。povoが2026年8月に5G SAの提供を開始するなど、各社とも5G SA対応を進めている段階で、その上に乗るサービスとしてVoNRが本格化してきたという位置づけです。
まずはソフトバンクのApple Watchユーザーが、追加負担なく恩恵を受けられる形でのスタートとなりました。
## 出典
- ソフトバンク「5G SAを活用した『VoNR』による音声通話サービスを提供開始」(2026年9月18日)
- ケータイ Watch「Apple Watchが5Gで通話できる、ソフトバンクが提供開始」(2026年9月18日)
- ITmedia Mobile「ソフトバンク、5G RedCap対応ウェアラブル端末で『VoNR』の音声通話サービスを提供開始」(2026年9月18日)
- BUSINESS NETWORK「ソフトバンク、5G RedCapによる音声通話を提供開始 Apple Watchが対応」(2026年9月18日)
================================================================================
# ソラコムとKDDI、SGP.32対応IoT SIMを共同開発
URL: https://sim-finder.com/ja/blog/soracom-kddi-sgp32-esim-iot-sim-2026/
Type: blog (ja)
Published: 2026-07-03T09:00:00+09:00
ソラコムとKDDIは、IoT機器向けの次世代eSIM規格「SGP.32」に対応したIoT SIMおよびプロファイル管理機能を共同開発したと発表しました。SIMを物理的に差し替えることなく、通信プロファイルを遠隔で切り替えられるのが特徴です。ソラコムは2026年7月7日から順次提供を開始し、KDDIは2026年度下期からの提供を予定しています(ソラコム公式プレスリリース、2026年7月1日)。
## 何が発表されたのか
SGP.32は、IoT機器向けに策定された次世代のeSIM規格です。ソラコムの発表によると、この規格に対応することで「IoT SIMの物理的な交換を行うことなく、IoT SIM内のプロファイルを遠隔操作で切り替えることが可能」になります。さらに、ソラコムやKDDIのプロファイルに加えて、他社通信事業者のプロファイルも含めて管理・選択・切り替えができるとしています。
ITmedia Mobile(2026年7月3日)も、複数の回線プロファイルを一つのSIMで管理し、遠隔で自動切り替えできる仕組みとして報じています。国内の通信事業者がSGP.32に対応したIoT SIMとプロファイル管理機能を商用提供するのは初めてとされています。
## 海外利用と障害時の切り替え
海外での利用にも対応します。ソラコムのプレスリリースでは、ローミングに規制がある国でも「現地の通信事業者が提供する許可されたプロファイルを遠隔で追加や切り替えて利用することが可能」と説明されています。
また、ITmedia Mobileの報道によれば、通信障害が発生した際にバックアップ用のプロファイルへ自動的に切り替える運用も想定されています。機器を現地に設置したまま、状況に応じて最適な回線を選べる点が、従来のIoT SIMからの大きな進化点といえます。
## 開発の背景
この共同開発は、両社が2025年3月に締結したIoT分野の協業に関する包括契約に基づくものです。ソラコムとKDDIは相互の技術協力により、商用化に向けた検証を完了したとしています。
## 個人ユーザーへの影響
今回の発表は、あくまでIoT機器向けのSIMとプロファイル管理機能に関するものです。スマートフォン向けの個人プランを対象とした発表ではないため、格安SIMやスマホ料金プランが直接変わるわけではありません。
一方で、SGP.32のような「SIMを差し替えずに回線を遠隔で切り替える」技術は、eSIMの利便性を象徴する動きでもあります。将来的にコンシューマー領域でも回線切り替えがより手軽になっていく流れの一つとして、注目しておきたいニュースです。
================================================================================
# 海外旅行用eSIM完全ガイド2026 — 選び方・設定・おすすめプロバイダー
URL: https://sim-finder.com/ja/blog/travel-esim-complete-guide-2026/
Type: blog (ja)
Published: 2026-03-17
## 結論: 旅行eSIMプロバイダーおすすめ3選
| おすすめ | プロバイダー | 特徴 | 7日間の目安料金 |
|---------|------------|------|--------------|
| **最安で始めたい** | [Airalo](/ja/travel/providers/airalo/) | 1GB $4〜、必要な分だけ買える従量制 | $4〜(1GB) |
| **データ無制限がいい** | [Holafly](/ja/travel/providers/holafly/) | 全プラン無制限データ、日本語サポート | $27.30(無制限) |
| **コスパ重視** | [Nomad](/ja/travel/providers/nomad/) | 200カ国以上対応、日本語アプリ対応 | $4〜(1GB) |
**[SimFinderで渡航先のeSIMプランを比較する →](/ja/travel/)**
以下、旅行eSIMの基礎知識から11社の詳細比較まで解説する。
## 目次
- [eSIMとは? — 初心者向け解説](#esimとは--初心者向け解説)
- [旅行eSIMの選び方 — 5つのポイント](#旅行esimの選び方--5つのポイント)
- [旅行eSIMプロバイダー11社比較](#旅行esimプロバイダー11社比較)
- [国・地域別おすすめ](#国地域別おすすめ)
- [eSIM vs レンタルWiFi vs 海外ローミング](#esim-vs-レンタルwifi-vs-海外ローミング)
- [eSIMの設定方法](#esimの設定方法)
- [よくある質問](#よくある質問)
- [まとめ](#まとめ)
---
海外旅行で「ネットが使えない」というストレスから解放されるもっとも手軽な方法が、旅行用eSIMだ。物理SIMカードの差し替え不要、渡航前にスマホだけで設定が完了し、現地到着と同時にデータ通信が使える。
2026年現在、旅行eSIM市場には**11社以上のプロバイダー**が参入しており、7日間1GBが$4(約600円)から利用可能だ。ただし料金体系や対応国、サポート品質はプロバイダーごとに大きく異なる。
このガイドでは、SimFinderのデータベースに登録されている11社の旅行eSIMプロバイダーを実データで比較し、渡航先・予算・利用スタイルに合った最適な選び方を解説する。
---
## eSIMとは? — 初心者向け解説
eSIM(Embedded SIM)とは、スマートフォンに内蔵されたデジタルSIMのことだ。従来の物理SIMカードと違い、カードの抜き差しなしにモバイルデータ通信を利用できる。
### 物理SIMとeSIMの違い
| 項目 | 物理SIM | eSIM |
|------|--------|------|
| 入手方法 | 店舗・郵送で受け取り | オンラインで即時購入 |
| 設定方法 | SIMカードを挿入 | QRコードをスキャン |
| 切り替え | カードの差し替え | 設定画面で切り替え |
| 複数回線 | 1枚ずつ差し替え | デュアルSIMで同時利用可能 |
| 紛失リスク | あり(小さいカード) | なし(端末内蔵) |
### 旅行でeSIMが便利な理由
旅行者にとってeSIMの最大のメリットは**デュアルSIM運用**ができることだ。日本のSIM(電話番号)を維持したまま、旅行用eSIMをデータ通信専用として追加できる。これにより、以下が実現する。
- 日本の電話番号でSMS受信が可能(二段階認証に必要)
- 渡航先では旅行eSIMで安価にデータ通信
- 帰国後は旅行eSIMを削除するだけで元の環境に戻る
### eSIM対応端末
2026年現在、主要なeSIM対応端末は以下の通り。
- **iPhone**: XR / XS(2018年)以降の全モデル
- **Google Pixel**: 3a(2019年)以降の全モデル
- **Samsung Galaxy**: S20(2020年)以降のほとんどのモデル
- **その他**: OPPO Find X3 Pro以降、Xiaomi 12T Pro以降、HUAWEI P40 Pro以降など
確認方法: iPhoneの場合は「設定 → モバイル通信 → eSIMを追加」が表示されれば対応している。Androidの場合は「設定 → ネットワークとインターネット → SIM」で確認できる。
---
## 旅行eSIMの選び方 — 5つのポイント
旅行eSIMを選ぶ際に確認すべきポイントは5つある。
### 1. 対応国・地域
渡航先がプロバイダーの対応国に含まれているかを最初に確認する。SimFinderが追跡している11社全てが**複数国対応プラン**を提供しているが、カバーしている国の数は異なる。
アジア周遊やヨーロッパ周遊など複数国を訪れる場合は、リージョナルプラン(地域プラン)やグローバルプランの有無も重要だ。国ごとに個別のeSIMを購入するより、周遊プランの方が割安になるケースが多い。
### 2. データ容量
データ容量は大きく分けて**容量制限付きプラン**と**無制限プラン**の2種類がある。
- **容量制限付き(1GB〜20GB)**: 地図やSNS程度の軽い使い方なら1日0.5〜1GBが目安。7日間の旅行なら3〜5GBで足りることが多い
- **無制限プラン**: 動画視聴やテザリングを多用する場合に向いている。ただし「無制限」でも1日あたりの高速通信量に上限があるプロバイダーもある
### 3. 料金
同じ渡航先・同じデータ容量でも、プロバイダーによって料金が大きく異なる。SimFinderのデータから代表的な例を挙げる。
**日本向け7日間プランの料金比較(一例):**
| プロバイダー | データ容量 | 料金 |
|------------|----------|------|
| [Airalo](/ja/travel/providers/airalo/) | 1GB | $4.00 |
| [Holafly](/ja/travel/providers/holafly/) | 無制限 | $27.30 |
| [Airalo](/ja/travel/providers/airalo/) | 無制限(3GB/日後に1Mbps) | $35.00(10日間) |
安さだけで選ぶとサポートや速度が不十分な場合がある。逆に高額なプランが必ずしも品質が良いとは限らない。**1GBあたりの単価**と**1日あたりの料金**の両方で比較するのが正確だ。
### 4. 設定の簡単さ
プロバイダーによってeSIMのインストール方法が異なる。
- **QRコード方式**: メール等で送られるQRコードをカメラで読み取る(大半のプロバイダー)
- **アプリ方式**: 専用アプリからワンタップでインストール([Airalo](/ja/travel/providers/airalo/)、[Holafly](/ja/travel/providers/holafly/)、[Nomad](/ja/travel/providers/nomad/)など)
- **手動入力**: アクティベーションコードを手動で入力(まれ)
初心者にはアプリ方式が最も簡単だ。アプリ内でプラン購入からインストール、残量確認まで完結する。
### 5. サポート体制と日本語対応
海外でトラブルが発生した場合、現地時間に関係なく問い合わせできるサポート体制は重要だ。**日本語でサポートを受けられるかどうか**は、英語に不安がある場合の決定的な差になる。
SimFinderのデータによると、11社中**9社が日本語サポートに対応**している。
**[SimFinderで渡航先のeSIMプランを比較する →](/ja/travel/)**
---
## 旅行eSIMプロバイダー11社比較
SimFinderのデータベースに登録されている11社の旅行eSIMプロバイダーを比較する。全社テザリング対応、複数国プランありだ。
### 一覧比較表
| プロバイダー | 特徴 | 日本語サポート | 無制限プラン |
|------------|------|-------------|------------|
| **[Airalo](/ja/travel/providers/airalo/)** | 世界初のeSIMマーケットプレイス | あり | あり(速度制限付き) |
| **[Holafly](/ja/travel/providers/holafly/)** | 全プラン無制限データ | あり | あり(全プラン) |
| **[GigSky](/ja/travel/providers/gigsky/)** | 世界中で繋がるeSIM | あり | — |
| **[Maya Mobile](/ja/travel/providers/maya/)** | 世界200以上の渡航先対応 | — | — |
| **[eSIM2Fly](/ja/travel/providers/esim2fly/)** | AIS系列の旅行用eSIM | あり | — |
| **[Nomad](/ja/travel/providers/nomad/)** | 200以上の渡航先対応 | あり | — |
| **[Saily](/ja/travel/providers/saily/)** | NordVPN開発元による旅行用eSIM | あり | — |
| **[aloSIM](/ja/travel/providers/alosim/)** | 200カ国以上対応の旅行用eSIM | あり | あり |
| **[Flexiroam](/ja/travel/providers/flexiroam/)** | 自由にローミング | あり | — |
| **[Ubigi](/ja/travel/providers/ubigi/)** | NTTグループのグローバルeSIM | あり | — |
| **[Yesim](/ja/travel/providers/yesim/)** | 200以上の渡航先対応のプリペイドeSIM | あり | — |
### 各プロバイダーの詳細
#### [Airalo](/ja/travel/providers/airalo/) — 最大手のeSIMマーケットプレイス
世界初のeSIMストアとして知られる[Airalo](/ja/travel/providers/airalo/)は、プロバイダーの中で最も選択肢が多い。1GBの小容量プランから無制限プランまで幅広く、渡航先ごとに複数のプランを比較できる。
- **料金目安**: 7日間1GB $4.00〜(日本向け)
- **無制限プラン**: あり(10日間 $35.00、1日3GB超過後1Mbps制限)
- **日本語**: サポート対応あり
- **強み**: 小容量を安く買える、プラン数が最多
#### [Holafly](/ja/travel/providers/holafly/) — データ無制限の安心感
[Holafly](/ja/travel/providers/holafly/)は全プランがデータ無制限という明確な特徴を持つ。料金は日数ベースで、データ残量を気にせず使えるのが強み。
- **料金目安**: 7日間 $27.30(日本向け・無制限)、30日間 $74.90
- **無制限プラン**: 全プランが無制限
- **日本語**: サポート対応あり
- **強み**: データ残量を気にしない旅行、動画視聴やテザリングに向いている
#### [GigSky](/ja/travel/providers/gigsky/) — シンプルなプラン構成
[GigSky](/ja/travel/providers/gigsky/)は「世界中で繋がるeSIM」をコンセプトに、シンプルなプラン構成が特徴。
- **日本語**: サポート対応あり
- **強み**: Apple Watchとの連携実績がある老舗プロバイダー
#### [Maya Mobile](/ja/travel/providers/maya/) — 200カ国以上対応
[Maya Mobile](/ja/travel/providers/maya/)は対応国の多さが特徴。英語圏中心のサポート体制だが、対応渡航先が広い。
- **日本語**: サポート非対応(英語・スペイン語・フランス語・ドイツ語・イタリア語)
- **強み**: マイナーな渡航先もカバーしている
#### [eSIM2Fly](/ja/travel/providers/esim2fly/) — タイAIS系列の実績
タイの大手キャリアAISの系列サービス。東南アジア方面に強く、音声通話対応プランがある点が他社にない特徴だ。
- **日本語**: サポート対応あり
- **強み**: 音声通話対応プランあり、東南アジアに強い
#### [Nomad](/ja/travel/providers/nomad/) — 日本語アプリ対応
[Nomad](/ja/travel/providers/nomad/)は日本語を含む13言語に対応したアプリを提供。200カ国以上をカバーし、使い勝手の良さに定評がある。
- **料金目安**: 渡航先・容量により異なる
- **日本語**: サポート対応あり
- **強み**: 日本語アプリ対応、UIが分かりやすい
#### [Saily](/ja/travel/providers/saily/) — NordVPNチームによる信頼性
VPNサービス大手NordVPNの開発チームが手がけるeSIMサービス。セキュリティ意識の高いユーザーからの支持がある。
- **日本語**: サポート対応あり
- **強み**: セキュリティ関連の実績がある開発元
#### [aloSIM](/ja/travel/providers/alosim/) — 無制限プランあり
[aloSIM](/ja/travel/providers/alosim/)は200カ国以上対応で、無制限プランも提供している。
- **料金目安**: 7日間 $4.50〜(日本向け)
- **日本語**: サポート対応あり
- **強み**: 容量制限プランと無制限プランの両方を選べる
#### [Flexiroam](/ja/travel/providers/flexiroam/) — 柔軟なローミング
[Flexiroam](/ja/travel/providers/flexiroam/)は「自由に旅し、自由にローミング」をコンセプトに、柔軟なプラン構成を提供する。
- **日本語**: サポート対応あり
- **強み**: パッケージの組み合わせが柔軟
#### [Ubigi](/ja/travel/providers/ubigi/) — NTTグループの安心感
NTTグループ傘下のeSIMサービス。日本企業グループという安心感がある。
- **日本語**: サポート対応あり
- **強み**: NTTグループの信頼性、Windows PCでも利用可能
#### [Yesim](/ja/travel/providers/yesim/) — 200以上の渡航先対応
[Yesim](/ja/travel/providers/yesim/)は200以上の渡航先に対応するプリペイドeSIMサービス。22言語でのサポート対応は11社中で最多だ。
- **日本語**: サポート対応あり
- **強み**: サポート言語の幅が広い
**[SimFinderで渡航先のeSIMプランを比較する →](/ja/travel/)**
---
## 国・地域別おすすめ
渡航先によって最適なプロバイダーは異なる。SimFinderでは国別に旅行eSIMプランの料金比較ができる。以下は人気渡航先の傾向をまとめたものだ。
### 韓国
韓国向けeSIMは[Airalo](/ja/travel/providers/airalo/)の7日間1GB $4.50が最安級。データを多く使う場合は[Holafly](/ja/travel/providers/holafly/)の無制限プランも選択肢に入る。
詳しくは[韓国旅行におすすめのeSIM 2026](/ja/blog/travel-esim-korea-2026/)で11社の料金・速度・設定を比較している。 → [韓国の旅行eSIMを比較する](/ja/travel/kr/)
### タイ
タイは旅行eSIMの料金が安い渡航先の一つ。[Airalo](/ja/travel/providers/airalo/)の7日間1GBが$4.00〜、タイ10日間50GB(音声通話100分付き)が$9.90と、大容量プランも割安だ。
詳しくは[タイ旅行におすすめのeSIM 2026](/ja/blog/travel-esim-thailand-2026/)で11社の料金・データ量を比較している。 → [タイの旅行eSIMを比較する](/ja/travel/th/)
### 台湾
台湾も旅行eSIMの選択肢が豊富。短期旅行なら容量制限付きプラン、1週間以上ならリージョナルプラン(アジア周遊)も検討したい。
台湾旅行eSIMガイドは準備中です。 → [台湾の旅行eSIMを比較する](/ja/travel/tw/)
### アメリカ
アメリカは国土が広いためカバレッジが重要。利用する現地キャリアはプロバイダーによって異なるため、都市部以外を訪れる場合は事前に確認すべきだ。
アメリカ旅行eSIMガイドは準備中です。 → [アメリカの旅行eSIMを比較する](/ja/travel/us/)
### ヨーロッパ周遊
複数国を周遊する場合はリージョナルプラン(ヨーロッパプラン)が便利。[Airalo](/ja/travel/providers/airalo/)や[Holafly](/ja/travel/providers/holafly/)など主要プロバイダーはヨーロッパ30カ国以上をカバーする周遊プランを提供している。
**[SimFinderで渡航先の旅行eSIMを比較する →](/ja/travel/)**
---
## eSIM vs レンタルWiFi vs 海外ローミング
海外でネットを使う方法は主に3つある。それぞれのメリット・デメリットを比較する。
| 項目 | 旅行eSIM | レンタルWiFi | 海外ローミング |
|------|---------|------------|------------|
| **料金(7日間目安)** | $4〜$30 | 5,000〜10,000円 | 1日980〜2,980円 |
| **手軽さ** | スマホだけで完結 | 受取・返却が必要 | 申込のみ |
| **荷物** | なし | ルーター持ち歩き | なし |
| **複数端末** | テザリングで対応 | 最大5〜10台 | 1端末のみ |
| **通信品質** | 現地キャリア品質 | 現地キャリア品質 | 現地キャリア品質 |
| **電話番号** | データ専用(番号なし) | なし | 日本の番号利用可 |
| **紛失リスク** | なし | ルーター紛失で弁償 | なし |
**結論**: 1人での旅行ならeSIMが最もコスパが良い。グループ旅行でWiFiを共有したい場合はレンタルWiFiが便利。仕事で日本の電話番号での発着信が必須な場合は海外ローミングが必要だ。
[eSIM vs レンタルWiFi vs 海外ローミングの比較記事](/ja/blog/esim-vs-wifi-vs-roaming-2026/)で詳しく解説している。
---
## eSIMの設定方法
eSIMの設定は大きく3ステップだ。
### ステップ1: 購入
プロバイダーのWebサイトまたはアプリで、渡航先・期間・データ容量を選んで購入する。支払い完了後、QRコードがメールまたはアプリ内に表示される。
### ステップ2: インストール(出発前に推奨)
WiFi環境で以下の操作を行う。
**iPhoneの場合:**
1. 「設定」→「モバイル通信」→「eSIMを追加」
2. QRコードをカメラで読み取る
3. プランが追加されたことを確認
**Androidの場合:**
1. 「設定」→「ネットワークとインターネット」→「SIM」→「SIMの追加」
2. QRコードを読み取る
3. プランが追加されたことを確認
### ステップ3: アクティベーション(現地到着後)
多くのプロバイダーでは、現地のネットワークに接続した時点で自動的にアクティベーションされる。手動で設定が必要な場合は、「モバイルデータ通信」を旅行eSIMに切り替えるだけだ。
**注意点:**
- 日本のSIMのデータローミングはオフにする(高額請求を防ぐ)
- 旅行eSIMを「モバイルデータ通信」に設定する
- 日本のSIMは「デフォルトの音声回線」として残しておく
詳しくは[旅行用eSIMの設定方法 — iPhone / Android 完全図解ガイド](/ja/blog/esim-setup-guide-iphone-android/)で具体的な操作手順を解説している。
---
## よくある質問
### eSIMに対応していないスマホでも使える?
使えない。eSIMはハードウェア(端末内蔵チップ)が必要なため、ソフトウェアアップデートでは対応できない。iPhone XR/XS以降、Google Pixel 3a以降、Samsung Galaxy S20以降など2018年以降のモデルの多くが対応している。渡航前に「設定 → モバイル通信」でeSIMの追加メニューが表示されるか確認すること。
### 旅行eSIMで電話の発着信はできる?
ほとんどの旅行eSIMはデータ通信専用で、電話番号は付与されない。通話が必要な場合はLINEやWhatsAppなどのVoIPアプリを利用するか、音声通話対応プランがある一部プロバイダー([eSIM2Fly](/ja/travel/providers/esim2fly/)など)を検討すること。
### 日本の携帯番号はそのまま維持できる?
はい。旅行eSIMはデュアルSIMとして追加されるため、日本のSIMはそのまま有効だ。日本のSIMのデータローミングをオフにし、旅行eSIMをデータ通信用に設定すれば、日本の番号でSMS受信も可能。
### 複数国を周遊する場合はどうすればいい?
リージョナルプラン(アジア周遊、ヨーロッパ周遊など)やグローバルプランを提供するプロバイダーを選ぶのが便利だ。SimFinderが追跡している11社全てが複数国対応プランを提供している。国ごとに別のeSIMを購入するより割安な場合が多い。
### 旅行eSIMの通信速度は遅い?
渡航先の現地キャリアの回線を使うため、通常は4G/LTE速度で利用できる。ただし無制限プランの場合、1日あたりのデータ量を超えると速度制限がかかるケースがある(例: [Airalo](/ja/travel/providers/airalo/)は1日3GB超過で1Mbpsに制限)。容量制限付きプランであれば速度制限はかからない。
### 出発前に設定しておくべき?
はい。出発前にeSIMのインストール(QRコード読み取り)まで済ませておくことを推奨する。WiFi環境が必要なため、空港のWiFiを探す手間が省ける。アクティベーション(利用開始)は現地到着後に自動で行われるプロバイダーが多い。
### テザリング(インターネット共有)は使える?
SimFinderが追跡している11社全てがテザリングに対応している。PCやタブレットでの利用も可能だ。
---
## まとめ
2026年の旅行eSIM市場の要点をまとめる。
- **11社のプロバイダー**がしのぎを削っており、全社テザリング対応・複数国プランあり
- **最安**: [Airalo](/ja/travel/providers/airalo/)の7日間1GB $4.00〜。小容量で十分な短期旅行に向いている
- **無制限**: [Holafly](/ja/travel/providers/holafly/)が全プラン無制限。データ残量を気にしたくない場合の第一選択
- **日本語サポート**: 11社中9社が日本語に対応。英語に不安があっても選択肢は多い
- **料金差**: 同じ渡航先でもプロバイダーによって2〜5倍の料金差がある。比較は必須
- **設定**: スマホだけで完結。出発前にインストールまで済ませておくのがベスト
旅行eSIMは「安い・手軽・荷物なし」の三拍子が揃った海外データ通信手段だ。レンタルWiFiのように受取・返却の手間がなく、海外ローミングのように高額請求の心配もない。
SimFinderでは渡航先ごとに11社のeSIMプランを料金・データ容量・期間で比較できる。渡航先が決まったら、まず料金を比較してみてほしい。
**[SimFinderで旅行eSIMプランを比較する →](/ja/travel/)**
---
*プラン料金は2026年3月時点のデータに基づいています。料金は為替レートやプロバイダーの価格改定により変動する可能性があります。最新の料金は各プロバイダーの公式サイトまたはSimFinderの比較ページでご確認ください。*
*SimFinderは一部プロバイダーとアフィリエイト提携を行っています。ただし、ランキングや推奨はデータに基づいており、提携の有無で順位を変えることはありません。*
================================================================================
# 韓国旅行におすすめのeSIM 2026 — 11社の料金・速度・設定を比較
URL: https://sim-finder.com/ja/blog/travel-esim-korea-2026/
Type: blog (ja)
Published: 2026-03-21
## 結論: 韓国旅行におすすめのeSIM Top 3
| おすすめ | プロバイダー | 韓国向けプラン | 7日間の目安料金 |
|---------|------------|-------------|--------------|
| **最安で始めたい** | [Maya Mobile](/ja/travel/providers/maya/) / [Saily](/ja/travel/providers/saily/) | 5日間1GB $3.99 | $3.99〜(1GB) |
| **データ無制限がいい** | [Holafly](/ja/travel/providers/holafly/) | 全プラン無制限 | $29.90(7日間無制限) |
| **コスパ+日本語アプリ** | [Nomad](/ja/travel/providers/nomad/) | 1GB〜無制限まで幅広い | $4.00(1GB)〜$23.00(無制限) |
**[SimFinderで韓国の旅行eSIMを比較する →](/ja/travel/kr/search/)**
以下、11社の韓国向けeSIMプランを料金データで比較し、旅行日数・データ容量別のおすすめを解説する。
## 目次
- [韓国旅行でeSIMが便利な理由](#韓国旅行でesimが便利な理由)
- [プロバイダー別 韓国向けeSIM比較表](#プロバイダー別-韓国向けesim比較表)
- [データ容量別おすすめ](#データ容量別おすすめ)
- [旅行日数別おすすめ](#旅行日数別おすすめ)
- [旅行eSIM vs 現地SIM — どちらを選ぶべきか](#旅行esim-vs-現地sim--どちらを選ぶべきか)
- [設定方法](#設定方法)
- [注意点](#注意点)
- [よくある質問](#よくある質問)
- [まとめ](#まとめ)
---
## 韓国旅行でeSIMが便利な理由
韓国は**世界でもっとも通信インフラが整った国の一つ**だ。[SK Telecom](/ja/kr/carriers/skt/)(ダウンロード速度200Mbps)、[KT](/ja/kr/carriers/kt/)(185.5Mbps)、[LG U+](/ja/kr/carriers/lguplus/)(175.2Mbps)の3大キャリアがカバレッジ95〜97/100を達成しており、ソウルはもちろん地方都市でも安定した通信が可能。
旅行eSIMはこれらの現地キャリア回線を利用するため、**観光客でも韓国の高速モバイル通信の恩恵を受けられる**。
### なぜeSIMが便利か
- **出発前にスマホだけで購入・設定が完結** — SIMカードの受取不要
- **日本の電話番号を維持したまま使える** — デュアルSIMで日本のSMSも受信可能
- **仁川空港でSIMカウンターに並ぶ必要なし** — 到着後すぐにデータ通信が使える
- **帰国後はeSIMを削除するだけ** — 元の環境に即復帰
韓国旅行では**Naver Map**(韓国ではGoogle Mapsより正確)や**Kakao Map**のナビ利用、**KakaoTalk**でのコミュニケーション、**T-money**アプリでの交通決済など、モバイルデータ通信が必須の場面が多い。カフェや地下鉄のフリーWiFiだけでは移動中のナビやリアルタイム検索に対応できないため、eSIMでのデータ通信確保を推奨する。
eSIMの基本(対応端末、仕組み、選び方の5つのポイント)は[海外旅行用eSIM完全ガイド](/ja/blog/travel-esim-complete-guide-2026/)を参照してほしい。本記事では韓国に特化したプラン比較とおすすめに絞って解説する。
**[SimFinderで韓国の旅行eSIMを比較する →](/ja/travel/kr/search/)**
---
## プロバイダー別 韓国向けeSIM比較表
SimFinderのデータベースに登録されている**11社の韓国向けプラン**を一覧で比較する。全社テザリング対応、複数国プランありだ。
### 容量制限付きプラン(1GB〜50GB)— 代表プラン
| プロバイダー | 7日/1GB | 30日/3GB | 30日/5GB | 30日/10GB | 30日/20GB | 日本語 |
|------------|---------|---------|---------|----------|----------|-------|
| **[Airalo](/ja/travel/providers/airalo/)** | $4.50 | $9.00 | $11.00 | $20.00 | $32.00 | あり |
| **[aloSIM](/ja/travel/providers/alosim/)** | $4.50 | — | — | — | — | あり |
| **[eSIM2Fly](/ja/travel/providers/esim2fly/)** | $2.50 | $4.60 | $6.20 | $9.90 | $15.60 | あり |
| **[Flexiroam](/ja/travel/providers/flexiroam/)** | — | — | — | $20.00 | — | あり |
| **[GigSky](/ja/travel/providers/gigsky/)** | $4.99 | — | $21.99 | $39.99 | — | あり |
| **[Maya Mobile](/ja/travel/providers/maya/)** | — | — | $9.99 | $16.99 | $27.99 | なし |
| **[Nomad](/ja/travel/providers/nomad/)** | $4.00 | $8.00 | $10.00 | $18.00 | — | あり |
| **[Saily](/ja/travel/providers/saily/)** | $3.99 | $8.99 | $10.99 | $18.99 | $29.99 | あり |
| **[Ubigi](/ja/travel/providers/ubigi/)** | $4.00 | $9.00 | — | $16.00 | — | あり |
| **[Yesim](/ja/travel/providers/yesim/)** | — | — | — | $16.00 | $26.00 | あり |
*料金は2026年3月時点。「—」はその容量帯のプランが提供されていないことを示す。*
**注目ポイント:**
- **1GBの最安は[eSIM2Fly](/ja/travel/providers/esim2fly/)**の7日間$2.50(約375円)。[eSIM2Fly](/ja/travel/providers/esim2fly/)はAIS(タイの大手キャリア)系列で低価格
- **3GB以上でも[eSIM2Fly](/ja/travel/providers/esim2fly/)が圧倒的に安い** — 30日/10GBが$9.90は他社の半額以下
- **[Saily](/ja/travel/providers/saily/)・[Nomad](/ja/travel/providers/nomad/)・[Airalo](/ja/travel/providers/airalo/)が$4前後**で1GBプランを提供しており、ライトユーザーの選択肢が豊富
### 無制限プラン — 代表プラン
| プロバイダー | 3日間 | 5日間 | 7日間 | 10日間 | 15日間 | 30日間 | 速度制限 |
|------------|------|------|------|-------|-------|-------|---------|
| **[Airalo](/ja/travel/providers/airalo/)** | — | — | — | $32.00 | — | $62.00 | 3GB/日超で5Mbps |
| **[aloSIM](/ja/travel/providers/alosim/)** | $12.50 | $20.50 | $29.50 | $35.00 | $49.00 | $72.50 | — |
| **[GigSky](/ja/travel/providers/gigsky/)** | $19.99 | $28.99 | $37.99 | — | — | $89.99 | — |
| **[Holafly](/ja/travel/providers/holafly/)** | $12.90 | $20.90 | $29.90 | $36.90 | $50.90 | $74.90 | — |
| **[Maya Mobile](/ja/travel/providers/maya/)** | — | $14.99 | — | $19.99 | $29.99 | $59.99 | — |
| **[Nomad](/ja/travel/providers/nomad/)** | $11.00 | $17.00 | $23.00 | $31.00 | — | — | — |
| **[Saily](/ja/travel/providers/saily/)** | — | $18.99 | — | $34.99 | $48.99 | $71.99 | — |
| **[Ubigi](/ja/travel/providers/ubigi/)** | — | — | $25.00 | — | $39.00 | $59.00 | — |
| **[Yesim](/ja/travel/providers/yesim/)** | — | — | $23.00 | — | $36.00 | $55.00 | — |
*[Flexiroam](/ja/travel/providers/flexiroam/)は5日間$30.50〜15日間$75.00の無制限プランを提供。[GigSky](/ja/travel/providers/gigsky/)は1日間$6.99・14日間$59.99・21日間$74.99も提供。[Holafly](/ja/travel/providers/holafly/)は1日単位で1日$6.90〜30日$74.90まで全日数対応。*
**注目ポイント:**
- **無制限の最安は[Nomad](/ja/travel/providers/nomad/)** — 3日間$11.00(約1,650円)、7日間$23.00(約3,450円)
- **[Holafly](/ja/travel/providers/holafly/)は1日単位で購入可能** — 1日$6.90〜30日$74.90。旅行日数にぴったり合わせられる柔軟性が強み
- **[Maya Mobile](/ja/travel/providers/maya/)は5日間$14.99**と無制限プランの短期利用で割安
- **[Airalo](/ja/travel/providers/airalo/)の無制限は速度制限あり** — 1日3GB超過で5Mbpsに低下。動画視聴には注意
**[SimFinderで韓国のeSIMプランを比較する →](/ja/travel/kr/search/)**
---
## データ容量別おすすめ
韓国旅行でのデータ使用量の目安と、容量帯ごとのおすすめプランを整理する。
### 1GB — WiFi中心のライトユーザー
**使い方の目安:** ホテルやカフェのWiFiがメイン。移動中のナビ・メッセージ確認に使う程度。
| プロバイダー | プラン | 料金 |
|------------|------|------|
| [eSIM2Fly](/ja/travel/providers/esim2fly/) | 7日間/1GB | **$2.50** |
| [Maya Mobile](/ja/travel/providers/maya/) | 5日間/1GB | $3.99 |
| [Saily](/ja/travel/providers/saily/) | 7日間/1GB | $3.99 |
| [Nomad](/ja/travel/providers/nomad/) | 7日間/1GB | $4.00 |
**おすすめ:** [eSIM2Fly](/ja/travel/providers/esim2fly/) 7日間1GB $2.50。7日間で$2.50は他社の半額以下。AIS系列の信頼性もある。
### 3〜5GB — 標準的な旅行者
**使い方の目安:** 地図ナビ常用、SNS投稿、メッセージのやりとりを日常的に。動画視聴は控えめ。
| プロバイダー | プラン | 料金 | 1GBあたり |
|------------|------|------|----------|
| [eSIM2Fly](/ja/travel/providers/esim2fly/) | 15日間/3GB | **$4.30** | $1.43 |
| [eSIM2Fly](/ja/travel/providers/esim2fly/) | 30日間/5GB | **$6.20** | $1.24 |
| [Maya Mobile](/ja/travel/providers/maya/) | 5日間/5GB | $5.99 | $1.20 |
| [Nomad](/ja/travel/providers/nomad/) | 30日間/3GB | $8.00 | $2.67 |
| [Nomad](/ja/travel/providers/nomad/) | 30日間/5GB | $10.00 | $2.00 |
**おすすめ:** [eSIM2Fly](/ja/travel/providers/esim2fly/) 30日間5GB $6.20。1GBあたり$1.24と圧倒的なコスパ。30日間の有効期限も余裕がある。
### 10GB以上 — 動画・テザリングも使う
**使い方の目安:** 動画視聴、テザリングでPC接続、SNSへの写真・動画アップロードなど。
| プロバイダー | プラン | 料金 | 1GBあたり |
|------------|------|------|----------|
| [eSIM2Fly](/ja/travel/providers/esim2fly/) | 30日間/10GB | **$9.90** | $0.99 |
| [eSIM2Fly](/ja/travel/providers/esim2fly/) | 30日間/20GB | **$15.60** | $0.78 |
| [Ubigi](/ja/travel/providers/ubigi/) | 30日間/10GB | $16.00 | $1.60 |
| [Yesim](/ja/travel/providers/yesim/) | 30日間/10GB | $16.00 | $1.60 |
| [Maya Mobile](/ja/travel/providers/maya/) | 30日間/10GB | $16.99 | $1.70 |
| [Nomad](/ja/travel/providers/nomad/) | 30日間/10GB | $18.00 | $1.80 |
**おすすめ:** [eSIM2Fly](/ja/travel/providers/esim2fly/) 30日間10GB $9.90。1GBあたり$0.99を切る価格は韓国向けeSIMで最安レベル。20GBでも$15.60と破格。
### 無制限 — データ残量を気にしたくない
| プロバイダー | 7日間 | 特徴 |
|------------|------|------|
| [Nomad](/ja/travel/providers/nomad/) | **$23.00** | 7日間無制限で最安級 |
| [Yesim](/ja/travel/providers/yesim/) | $23.00 | [Nomad](/ja/travel/providers/nomad/)と同額 |
| [Ubigi](/ja/travel/providers/ubigi/) | $25.00 | NTTグループの安心感 |
| [Holafly](/ja/travel/providers/holafly/) | $29.90 | 1日単位で柔軟に購入可能 |
**おすすめ:** [Nomad](/ja/travel/providers/nomad/) 7日間無制限 $23.00。日本語アプリ対応で使い勝手も良い。データ残量を一切気にしたくないなら[Holafly](/ja/travel/providers/holafly/)(1日単位で購入可能)も魅力的。
**[SimFinderで韓国の旅行eSIMを比較する →](/ja/travel/kr/search/)**
---
## 旅行日数別おすすめ
### 2〜3日間 — 週末ソウル旅行
短期旅行はコスパより手軽さが重要。
| 選択肢 | プロバイダー | 料金 | 内容 |
|--------|------------|------|------|
| **最安** | [eSIM2Fly](/ja/travel/providers/esim2fly/) | $2.50 | 7日間/1GB |
| **無制限(最安)** | [Nomad](/ja/travel/providers/nomad/) | $11.00 | 3日間/無制限 |
| **無制限(1日単位)** | [Holafly](/ja/travel/providers/holafly/) | $12.90 | 3日間/無制限 |
**おすすめ:** SNS・ナビ程度なら[eSIM2Fly](/ja/travel/providers/esim2fly/) 1GB $2.50で十分。動画やテザリングも使うなら[Nomad](/ja/travel/providers/nomad/) 3日間無制限$11.00。
### 5〜7日間 — 一般的な韓国旅行
もっとも需要の多い旅行期間。選択肢が最も豊富だ。
| 選択肢 | プロバイダー | 料金 | 内容 |
|--------|------------|------|------|
| **最安** | [eSIM2Fly](/ja/travel/providers/esim2fly/) | $2.50 | 7日間/1GB |
| **コスパ(5GB)** | [eSIM2Fly](/ja/travel/providers/esim2fly/) | $6.20 | 30日間/5GB |
| **無制限(最安)** | [Nomad](/ja/travel/providers/nomad/) | $23.00 | 7日間/無制限 |
| **無制限(柔軟)** | [Holafly](/ja/travel/providers/holafly/) | $20.90〜$29.90 | 5〜7日間/無制限 |
**おすすめ:** 標準的な使い方なら[eSIM2Fly](/ja/travel/providers/esim2fly/) 5GB $6.20が鉄板。無制限が欲しいなら[Nomad](/ja/travel/providers/nomad/) 7日間$23.00。[Holafly](/ja/travel/providers/holafly/)は5日$20.90・6日$24.90・7日$29.90と日数ぴったりで選べるのが強み。
### 2週間以上 — 長期旅行・出張
2週間以上の旅行では、旅行eSIMと現地SIMの両方が選択肢に入る。
| 選択肢 | プロバイダー | 料金 | 内容 |
|--------|------------|------|------|
| **容量制限(安い)** | [eSIM2Fly](/ja/travel/providers/esim2fly/) | $9.90 | 30日間/10GB |
| **無制限(旅行eSIM)** | [Yesim](/ja/travel/providers/yesim/) | $36.00 | 15日間/無制限 |
| **無制限(旅行eSIM)** | [Holafly](/ja/travel/providers/holafly/) | $50.90 | 15日間/無制限 |
| **現地SIM(最安)** | [KT M Mobile](/ja/kr/carriers/ktmmobile/) | 約$4.20/月 | 3GB/月・通話かけ放題 |
2週間以上で無制限が必要な場合、旅行eSIMは$36〜$51になる。一方、韓国の現地SIMならMVNOで月額₩5,900(約$4.20)から契約できる。ただしMVNOはeSIM非対応のため、現地で物理SIMの受け取りが必要。eSIMで開通したいならMNOプラン(月額₩33,000〜)が最低ラインになる。
**おすすめ:** 2週間程度なら[eSIM2Fly](/ja/travel/providers/esim2fly/) 30日間10GB $9.90がコスパ最強。1ヶ月以上なら現地SIMも検討すべき。
**[SimFinderで韓国の旅行eSIMを比較する →](/ja/travel/kr/search/)**
---
## 旅行eSIM vs 現地SIM — どちらを選ぶべきか
韓国は国内SIMプランが23種類あり、現地SIM契約という選択肢もある。旅行eSIMと現地SIMの違いを整理する。
| 項目 | 旅行eSIM | 韓国の現地SIM(MNO) | 韓国の現地SIM(MVNO) |
|------|---------|-------------------|---------------------|
| **月額目安** | $4〜$75(期間による) | ₩33,000〜₩89,000 | ₩4,000〜₩45,100 |
| **契約方法** | オンラインで即時 | オンライン or 店舗 | 店舗のみ |
| **eSIM対応** | 全プロバイダー対応 | 全プラン対応 | **非対応** |
| **電話番号** | なし(データ専用) | 韓国番号あり | 韓国番号あり |
| **5G** | プロバイダーによる | 11/14プラン対応 | 1/9プランのみ |
| **日本語サポート** | 9/11社対応 | 限定的 | ほぼなし |
### 旅行eSIMが向いている人
- **1〜2週間の短期旅行**
- 韓国の電話番号が不要
- 出発前に設定を済ませたい
- 日本語サポートが欲しい
### 現地SIMが向いている人
- **1ヶ月以上の長期滞在・留学・駐在**
- 韓国の電話番号が必要(ウェイティングリスト、配達アプリ等)
- 5Gの高速通信を使いたい
- MVNOの月額₩4,000〜の格安プランを活用したい
現地SIMの詳細は[韓国SIMカード完全ガイド](/ja/blog/best-sim-plans-korea-2026/)を参照してほしい。6社23プランの料金・速度・eSIM対応を全て比較している。
---
## 設定方法
旅行eSIMの設定は3ステップで完了する。韓国旅行の場合、**出発前にステップ2まで済ませておく**のが鉄則だ。
### ステップ1: 購入
プロバイダーのWebサイトまたはアプリで韓国向けプランを選んで購入。支払い完了後、QRコードがメールまたはアプリ内に表示される。
### ステップ2: インストール(出発前・WiFi環境で)
**iPhoneの場合:**
1. 「設定」→「モバイル通信」→「eSIMを追加」
2. QRコードをカメラで読み取る
3. プランが追加されたことを確認
**Androidの場合:**
1. 「設定」→「ネットワークとインターネット」→「SIM」→「SIMの追加」
2. QRコードを読み取る
3. プランが追加されたことを確認
### ステップ3: 現地到着後の切り替え
1. 日本のSIMのデータローミングを**オフ**にする(高額請求防止)
2. 旅行eSIMを**モバイルデータ通信**に設定する
3. 日本のSIMは**デフォルトの音声回線**として維持する
多くのプロバイダーでは、韓国のネットワークに接続した時点で自動アクティベーションされる。仁川空港に着いた瞬間からデータ通信が使える。
eSIM設定の詳しい手順は、[海外旅行用eSIM完全ガイド](/ja/blog/travel-esim-complete-guide-2026/)の設定方法セクションを参照してほしい。
---
## 注意点
### テザリング
11社全てがテザリングに対応しているが、**無制限プランでテザリングを多用すると速度制限に達しやすい**。[Airalo](/ja/travel/providers/airalo/)の無制限プランは1日3GB超過で5Mbpsに制限される。テザリングでPC作業をする場合は、容量制限付きの大容量プラン(10GB以上)の方が速度制限を気にせず使える。
### 電話番号
旅行eSIMは**データ通信専用**で、韓国の電話番号は付与されない。以下の場面で注意が必要だ。
- **飲食店のウェイティング** — 韓国の電話番号を要求されることがある。KakaoTalkで代替できる店舗も増えている
- **配達アプリ(Coupang Eats等)** — 韓国の電話番号が必要なサービスが多い
- **通話** — LINEやKakaoTalkのVoIP機能で代用可能
韓国の電話番号が必要な場合は、現地SIMの契約を検討してほしい。
### eSIM対応端末
以下の端末がeSIMに対応している。
- **iPhone**: XR / XS(2018年)以降の全モデル
- **Google Pixel**: 3a(2019年)以降の全モデル
- **Samsung Galaxy**: S20(2020年)以降のほとんどのモデル
確認方法: iPhoneは「設定 → モバイル通信 → eSIMを追加」が表示されれば対応。Androidは「設定 → ネットワークとインターネット → SIM」で確認。
### 中国経由のローミングに注意
SNS上では、格安系のeSIMプロバイダーが中国の通信会社のローミングを使用しているケースが報告されている。
> 「激安系の韓国SIMは、おおむね中国の通信会社のローミングなので、VPNアプリがないとTikTokやChatGPTが使えない点は頭に入れておくと良いです」
> — @fujit_ECbassman([元の投稿](https://x.com/fujit_ECbassman/status/1989545216106492291))
SimFinderが追跡している11社はいずれも主要なeSIMプロバイダーだが、利用する現地キャリアはプロバイダーごとに異なる。特に格安プランでは中国キャリア経由のローミングになる可能性がある点に留意すべきだ。
---
## よくある質問
### 韓国旅行にeSIMは必要?WiFiだけで足りる?
韓国はカフェや地下鉄で無料WiFiが使えるが、移動中やナビ利用には不十分。地図アプリ(Naver Map/Kakao Map)やT-moneyアプリの利用にはモバイルデータ通信が必要だ。7日間1GBなら$2.50〜と安価なので、WiFi併用でもeSIMは持っておくことを推奨する。
### 韓国のeSIMで通話やSMS受信はできる?
旅行eSIMは基本的にデータ通信専用で、韓国の電話番号は付与されない。通話はLINEやKakaoTalkのVoIP機能で代用できる。日本のSIMはデュアルSIMで維持できるため、日本の番号でのSMS受信(二段階認証等)は可能。
### 韓国向けeSIMの通信速度はどのくらい?
韓国の通信インフラは世界トップクラスで、旅行eSIMも現地キャリア(SKT/[KT](/ja/kr/carriers/kt/)/[LG U+](/ja/kr/carriers/lguplus/))の回線を使う。4G/LTEで下り100〜200Mbps程度が期待できる。ただし無制限プランの場合、[Airalo](/ja/travel/providers/airalo/)は1日3GB超過で5Mbpsに制限される。
### [Airalo](/ja/travel/providers/airalo/)、[Holafly](/ja/travel/providers/holafly/)、[Nomad](/ja/travel/providers/nomad/)の違いは?
[Airalo](/ja/travel/providers/airalo/)は1GB $4.50〜と小容量が安く、必要な分だけ買いたい人向け。[Holafly](/ja/travel/providers/holafly/)は全プラン無制限データでデータ残量を気にしたくない人向け。[Nomad](/ja/travel/providers/nomad/)は日本語アプリ対応で使いやすさ重視の人向け。3社とも日本語サポートに対応している。
### 韓国に着いてからeSIMを買える?
購入自体はオンラインでいつでも可能だが、eSIMのインストールにはWiFi接続が必要。仁川空港にはフリーWiFiがあるが、出発前に自宅WiFiでインストールまで済ませておく方が確実だ。
### テザリング(インターネット共有)はできる?
SimFinderが追跡している11社全てがテザリングに対応している。PCやタブレットでの利用も可能。ただし無制限プランでテザリングを多用すると、1日あたりの速度制限に達しやすくなる。
### 韓国旅行用eSIMと現地SIMはどちらが得?
短期旅行(1〜2週間)なら旅行eSIMが手軽で安価。1ヶ月以上の長期滞在や韓国の電話番号が必要な場合は、現地キャリアのSIM契約(MNO月額₩33,000〜)が適している。[韓国SIMカード完全ガイド](/ja/blog/best-sim-plans-korea-2026/)で23プランの詳細を比較している。
---
## まとめ
2026年の韓国旅行eSIM市場のポイント:
- **11社のプロバイダー**が韓国向けeSIMを提供 — 全社テザリング対応
- **最安は[eSIM2Fly](/ja/travel/providers/esim2fly/)** — 7日間1GBが$2.50(約375円)、30日間10GBでも$9.90(約1,485円)
- **無制限の最安は[Nomad](/ja/travel/providers/nomad/)** — 7日間$23.00(約3,450円)
- **日数ぴったりで選ぶなら[Holafly](/ja/travel/providers/holafly/)** — 1日単位で1日$6.90〜30日$74.90
- **日本語サポート** — 11社中9社が対応([Maya Mobile](/ja/travel/providers/maya/)と[Flexiroam](/ja/travel/providers/flexiroam/)が非対応)
- **韓国の通信品質は世界トップクラス** — 旅行eSIMでも下り100〜200Mbps級が期待できる
- **2週間以内の旅行なら旅行eSIM一択** — 現地SIMより手軽で、日本語サポートもある
- **1ヶ月以上なら現地SIMも検討** — MVNO月額₩4,000〜の格安プランあり
韓国旅行では、eSIMでのモバイルデータ確保が快適な旅の基盤になる。Naver Mapでのナビ、KakaoTalkでのコミュニケーション、T-moneyでの交通決済など、スマホが旅の中心ツールだからだ。
SimFinderでは11社の韓国向けeSIMプランを料金・データ容量・期間で横並び比較できる。渡航日数が決まったら、まず料金を比較してみてほしい。
**[SimFinderで韓国の旅行eSIMを比較する →](/ja/travel/kr/search/)**
---
*プラン料金は2026年3月時点のデータに基づいています。料金は為替レートやプロバイダーの価格改定により変動する可能性があります。最新の料金は各プロバイダーの公式サイトまたは[SimFinderの比較ページ](/ja/travel/kr/search/)でご確認ください。*
*SimFinderは一部プロバイダーとアフィリエイト提携を行っています。ただし、ランキングや推奨はデータに基づいており、提携の有無で順位を変えることはありません。*
================================================================================
# タイ旅行におすすめのeSIM 2026 — 11社の料金・データ量で比較
URL: https://sim-finder.com/ja/blog/travel-esim-thailand-2026/
Type: blog (ja)
Published: 2026-03-23
## 結論: タイ旅行におすすめのeSIM Top 3
| おすすめ | プロバイダー | タイ向けプラン | 7日間の目安料金 |
|---------|------------|-------------|--------------|
| **最安で始めたい** | [eSIM2Fly](/ja/travel/providers/esim2fly/) / [Saily](/ja/travel/providers/saily/) | 7日間1GBが$1.70〜 | $1.70〜(1GB) |
| **データ無制限がいい** | [Holafly](/ja/travel/providers/holafly/) | 全プラン無制限・1日単位 | $21.90(7日間無制限) |
| **コスパ+日本語アプリ** | [Nomad](/ja/travel/providers/nomad/) | 50GB〜無制限まで幅広い | $5.00(1GB)〜$14.00(無制限10日) |
**[SimFinderでタイの旅行eSIMを比較する →](/ja/travel/th/search/)**
以下、11社のタイ向けeSIMプランを料金データで比較し、旅行日数・データ容量別のおすすめを解説する。
## 目次
- [タイ旅行でeSIMが便利な理由](#タイ旅行でesimが便利な理由)
- [プロバイダー別 タイ向けeSIM比較表](#プロバイダー別-タイ向けesim比較表)
- [データ容量別おすすめ](#データ容量別おすすめ)
- [旅行日数別おすすめ](#旅行日数別おすすめ)
- [旅行eSIM vs 現地SIM — どちらを選ぶべきか](#旅行esim-vs-現地sim--どちらを選ぶべきか)
- [設定方法](#設定方法)
- [注意点](#注意点)
- [よくある質問](#よくある質問)
- [まとめ](#まとめ)
---
## タイ旅行でeSIMが便利な理由
タイは**東南アジアでトップクラスの通信インフラ**を持つ国だ。[AIS](/ja/th/carriers/ais/)(ダウンロード速度98.4Mbps、カバレッジ95/100)、[TrueMove H](/ja/th/carriers/truemove/)(87.3Mbps、カバレッジ93/100)、[DTAC](/ja/th/carriers/dtac/)(81.6Mbps、カバレッジ91/100)の3大キャリアがタイ全土をカバーしており、バンコクの都市部だけでなくチェンマイ・プーケット・パタヤなどの観光地でも安定した通信が可能。
旅行eSIMはこれらの現地キャリア回線を利用するため、**観光客でもタイの高速モバイル通信を利用できる**。
### なぜeSIMが便利か
- **出発前にスマホだけで購入・設定が完結** — SIMカードの受取不要
- **日本の電話番号を維持したまま使える** — デュアルSIMで日本のSMSも受信可能
- **スワンナプーム空港でSIMカウンターに並ぶ必要なし** — 到着後すぐにデータ通信が使える
- **帰国後はeSIMを削除するだけ** — 元の環境に即復帰
タイ旅行では**Grab**(配車アプリ・タクシー代わり)、**Google Maps**でのナビ、**LINE**での連絡(タイ人もLINEを多用)、**Klook / kkday**での現地アクティビティ予約など、モバイルデータ通信が必須の場面が多い。バンコクのBTS/MRTでの移動中や、島嶼部(ピピ島・サムイ島等)ではフリーWiFiに頼れないため、eSIMでのデータ通信確保を推奨する。
eSIMの基本(対応端末、仕組み、選び方の5つのポイント)は[海外旅行用eSIM完全ガイド](/ja/blog/travel-esim-complete-guide-2026/)を参照してほしい。本記事ではタイに特化したプラン比較とおすすめに絞って解説する。
**[SimFinderでタイの旅行eSIMを比較する →](/ja/travel/th/search/)**
---
## プロバイダー別 タイ向けeSIM比較表
SimFinderのデータベースに登録されている**11社のタイ向けプラン**を一覧で比較する。全社テザリング対応、複数国プランありだ。
### 容量制限付きプラン(1GB〜20GB)— 代表プラン
| プロバイダー | 7日/1GB | 30日/3GB | 30日/5GB | 30日/10GB | 30日/20GB | 日本語 |
|------------|---------|---------|---------|----------|----------|-------|
| [**Airalo**](/ja/travel/providers/airalo/) | $4.00 | $6.00 | $8.00 | $11.00 | $18.00 | あり |
| [**aloSIM**](/ja/travel/providers/alosim/) | $3.50 | — | — | — | — | あり |
| **[eSIM2Fly](/ja/travel/providers/esim2fly/)** | $2.80 | $4.50 | $5.90 | $8.50 | $12.70 | あり |
| [**Flexiroam**](/ja/travel/providers/flexiroam/) | — | — | — | — | — | あり |
| [**GigSky**](/ja/travel/providers/gigsky/) | $4.99 | — | $21.99 | $42.99 | — | あり |
| [**Maya Mobile**](/ja/travel/providers/maya/) | $3.99 | — | $9.99 | $16.99 | $27.99 | なし |
| **[Nomad](/ja/travel/providers/nomad/)** | $5.00 | — | — | $12.00 | — | あり |
| **[Saily](/ja/travel/providers/saily/)** | $2.99 | $5.99 | $7.99 | $10.99 | $19.99 | あり |
| [**Ubigi**](/ja/travel/providers/ubigi/) | $3.90 | $6.90 | — | $13.90 | — | あり |
| [**Yesim**](/ja/travel/providers/yesim/) | — | — | — | $11.00 | $17.00 | あり |
*料金は2026年3月時点。「—」はその容量帯のプランが提供されていないことを示す。[Flexiroam](/ja/travel/providers/flexiroam/)は3日10GB $10.00〜の大容量プランのみ。*
**注目ポイント:**
- **1GBの最安は[eSIM2Fly](/ja/travel/providers/esim2fly/)**の7日間$2.80(約420円)。[eSIM2Fly](/ja/travel/providers/esim2fly/)は[AIS](/ja/th/carriers/ais/)(タイの最大手キャリア)系列で、タイ国内での通信品質に期待できる
- **[Saily](/ja/travel/providers/saily/)も7日間1GB $2.99**と安く、NordVPN開発元の信頼性がある
- **10GB以上でも[eSIM2Fly](/ja/travel/providers/esim2fly/)が圧倒的に安い** — 30日/10GBが$8.50は他社の半額以下
- **[Airalo](/ja/travel/providers/airalo/)の10日間50GBプラン$9.90は通話100分付き** — タイ向けeSIMでは珍しい音声通話対応
### 無制限プラン — 代表プラン
| プロバイダー | 3日間 | 5日間 | 7日間 | 10日間 | 15日間 | 30日間 | 速度制限 |
|------------|------|------|------|-------|-------|-------|---------|
| **[Airalo](/ja/travel/providers/airalo/)** | — | — | — | $35.00 | — | — | 3GB/日超で1Mbps |
| **[aloSIM](/ja/travel/providers/alosim/)** | $11.50 | $19.00 | $27.00 | $35.00 | $39.00 | $49.00 | — |
| **[GigSky](/ja/travel/providers/gigsky/)** | $19.99 | $28.99 | $37.99 | — | — | $89.99 | — |
| **[Holafly](/ja/travel/providers/holafly/)** | $9.90 | $15.90 | $21.90 | $31.90 | $46.90 | $72.90 | — |
| **[Maya Mobile](/ja/travel/providers/maya/)** | — | $14.99 | — | $19.99 | $29.99 | $59.99 | — |
| **[Nomad](/ja/travel/providers/nomad/)** | — | — | — | $14.00 | $19.00 | $33.00 | — |
| **[Saily](/ja/travel/providers/saily/)** | — | $18.99 | $28.99 | $34.99 | $48.99 | $71.99 | — |
| **[Ubigi](/ja/travel/providers/ubigi/)** | — | — | $22.90 | — | $48.00 | $57.90 | — |
| **[Yesim](/ja/travel/providers/yesim/)** | — | — | $18.00 | — | $27.00 | $38.00 | — |
*[Flexiroam](/ja/travel/providers/flexiroam/)は7日間$43.00〜30日間$102.50の無制限プランを提供。[GigSky](/ja/travel/providers/gigsky/)は1日間$6.99・14日間$59.99・21日間$74.99も提供。[Holafly](/ja/travel/providers/holafly/)は1日単位で1日$3.90〜30日$72.90まで全日数対応。*
**注目ポイント:**
- **無制限の最安は[Holafly](/ja/travel/providers/holafly/)** — 3日間$9.90(約1,485円)、7日間$21.90(約3,285円)
- **[Nomad](/ja/travel/providers/nomad/)は10日間$14.00**と無制限プランの中期利用でコスパが高い
- **[Maya Mobile](/ja/travel/providers/maya/)は5日間$14.99、10日間$19.99**と短期〜中期で割安
- **[Holafly](/ja/travel/providers/holafly/)は1日単位で購入可能** — 1日$3.90〜30日$72.90。旅行日数にぴったり合わせられる
- **[Yesim](/ja/travel/providers/yesim/)は7日間$18.00**と無制限7日間プランでは最安級
- **[Airalo](/ja/travel/providers/airalo/)の無制限は速度制限あり** — 1日3GB超過で1Mbpsに低下
> 「タイ バンコク旅行でも[Airalo](/ja/travel/providers/airalo/)のeSIMを使いました」
> — @ryu_sshin([元の投稿](https://x.com/ryu_sshin/status/1887814284694130789))
**[SimFinderでタイのeSIMプランを比較する →](/ja/travel/th/search/)**
---
## データ容量別おすすめ
タイ旅行でのデータ使用量の目安と、容量帯ごとのおすすめプランを整理する。
### 1GB — WiFi中心のライトユーザー
**使い方の目安:** ホテルやカフェのWiFiがメイン。移動中のナビ・メッセージ確認に使う程度。
| プロバイダー | プラン | 料金 |
|------------|------|------|
| [eSIM2Fly](/ja/travel/providers/esim2fly/) | 7日間/1GB | **$2.80** |
| [Saily](/ja/travel/providers/saily/) | 7日間/1GB | $2.99 |
| [aloSIM](/ja/travel/providers/alosim/) | 7日間 | $3.50 |
| [Ubigi](/ja/travel/providers/ubigi/) | 7日間/1GB | $3.90 |
| [Maya Mobile](/ja/travel/providers/maya/) | 5日間/1GB | $3.99 |
**おすすめ:** [eSIM2Fly](/ja/travel/providers/esim2fly/) 7日間1GB $2.80。[AIS](/ja/th/carriers/ais/)系列の信頼性に加え、約420円という価格は他社より安い。[Saily](/ja/travel/providers/saily/)の$2.99も僅差で選択肢に入る。
### 3〜5GB — 標準的な旅行者
**使い方の目安:** Grabでの移動、Google Mapsナビ常用、SNS投稿、LINEのやりとり。動画視聴は控えめ。
| プロバイダー | プラン | 料金 | 1GBあたり |
|------------|------|------|----------|
| [eSIM2Fly](/ja/travel/providers/esim2fly/) | 15日間/3GB | **$4.30** | $1.43 |
| [eSIM2Fly](/ja/travel/providers/esim2fly/) | 30日間/3GB | **$4.50** | $1.50 |
| [eSIM2Fly](/ja/travel/providers/esim2fly/) | 30日間/5GB | **$5.90** | $1.18 |
| [Saily](/ja/travel/providers/saily/) | 30日間/3GB | $5.99 | $2.00 |
| [Maya Mobile](/ja/travel/providers/maya/) | 5日間/5GB | $5.99 | $1.20 |
| [Airalo](/ja/travel/providers/airalo/) | 30日間/3GB | $6.00 | $2.00 |
**おすすめ:** [eSIM2Fly](/ja/travel/providers/esim2fly/) 30日間5GB $5.90。1GBあたり$1.18と圧倒的なコスパ。30日間の有効期限も余裕がある。
### 10GB以上 — 動画・テザリングも使う
**使い方の目安:** 動画視聴、テザリングでPC接続、SNSへの写真・動画アップロードなど。
| プロバイダー | プラン | 料金 | 1GBあたり |
|------------|------|------|----------|
| [eSIM2Fly](/ja/travel/providers/esim2fly/) | 30日間/10GB | **$8.50** | $0.85 |
| [Airalo](/ja/travel/providers/airalo/) | 10日間/50GB(通話付き) | **$9.90** | $0.20 |
| [Nomad](/ja/travel/providers/nomad/) | 10日間/50GB | $9.00 | $0.18 |
| [Saily](/ja/travel/providers/saily/) | 30日間/10GB | $10.99 | $1.10 |
| [Airalo](/ja/travel/providers/airalo/) | 30日間/10GB | $11.00 | $1.10 |
| [Yesim](/ja/travel/providers/yesim/) | 30日間/10GB | $11.00 | $1.10 |
| [eSIM2Fly](/ja/travel/providers/esim2fly/) | 30日間/20GB | **$12.70** | $0.64 |
**おすすめ:** [eSIM2Fly](/ja/travel/providers/esim2fly/) 30日間10GB $8.50。1GBあたり$0.85は最安レベル。短期で大容量が必要なら[Nomad](/ja/travel/providers/nomad/) 10日間50GB $9.00や[Airalo](/ja/travel/providers/airalo/) 10日間50GB $9.90(通話100分付き)も魅力的。
### 無制限 — データ残量を気にしたくない
| プロバイダー | 7日間 | 特徴 |
|------------|------|------|
| [Yesim](/ja/travel/providers/yesim/) | **$18.00** | 7日間無制限で最安 |
| [Holafly](/ja/travel/providers/holafly/) | $21.90 | 1日単位で柔軟に購入可能 |
| [Ubigi](/ja/travel/providers/ubigi/) | $22.90 | NTTグループの安心感 |
| [aloSIM](/ja/travel/providers/alosim/) | $27.00 | 3日$11.50〜段階的に選べる |
**おすすめ:** [Yesim](/ja/travel/providers/yesim/) 7日間無制限 $18.00が最安。データ残量を一切気にしたくないなら[Holafly](/ja/travel/providers/holafly/)(1日単位で購入可能)の柔軟性も魅力的。10日以上なら[Nomad](/ja/travel/providers/nomad/) 10日間無制限 $14.00が圧倒的にコスパが高い。
**[SimFinderでタイの旅行eSIMを比較する →](/ja/travel/th/search/)**
---
## 旅行日数別おすすめ
### 2〜3日間 — 週末バンコク弾丸旅行
短期旅行はコスパより手軽さが重要。
| 選択肢 | プロバイダー | 料金 | 内容 |
|--------|------------|------|------|
| **最安** | [eSIM2Fly](/ja/travel/providers/esim2fly/) | $1.70 | 7日間/0.1GB |
| **1GB** | [eSIM2Fly](/ja/travel/providers/esim2fly/) | $2.80 | 7日間/1GB |
| **無制限(最安)** | [Holafly](/ja/travel/providers/holafly/) | $9.90 | 3日間/無制限 |
| **無制限** | [aloSIM](/ja/travel/providers/alosim/) | $11.50 | 3日間/無制限 |
**おすすめ:** SNS・ナビ程度なら[eSIM2Fly](/ja/travel/providers/esim2fly/) 1GB $2.80で十分。動画やテザリングも使うなら[Holafly](/ja/travel/providers/holafly/) 3日間無制限$9.90。
### 5〜7日間 — 一般的なタイ旅行
もっとも需要の多い旅行期間。選択肢が最も豊富だ。
| 選択肢 | プロバイダー | 料金 | 内容 |
|--------|------------|------|------|
| **最安** | [eSIM2Fly](/ja/travel/providers/esim2fly/) | $2.80 | 7日間/1GB |
| **コスパ(5GB)** | [eSIM2Fly](/ja/travel/providers/esim2fly/) | $5.90 | 30日間/5GB |
| **大容量** | [Nomad](/ja/travel/providers/nomad/) | $9.00 | 10日間/50GB |
| **無制限(最安)** | [Yesim](/ja/travel/providers/yesim/) | $18.00 | 7日間/無制限 |
| **無制限(柔軟)** | [Holafly](/ja/travel/providers/holafly/) | $15.90〜$21.90 | 5〜7日間/無制限 |
**おすすめ:** 標準的な使い方なら[eSIM2Fly](/ja/travel/providers/esim2fly/) 5GB $5.90が鉄板。大容量なら[Nomad](/ja/travel/providers/nomad/) 10日間50GB $9.00。無制限が欲しいなら[Yesim](/ja/travel/providers/yesim/) 7日間$18.00。[Holafly](/ja/travel/providers/holafly/)は5日$15.90・6日$18.90・7日$21.90と日数ぴったりで選べるのが強み。
### 10〜14日間 — バンコク+地方周遊
バンコクからチェンマイ・プーケット・アユタヤなどを回る中期旅行。
| 選択肢 | プロバイダー | 料金 | 内容 |
|--------|------------|------|------|
| **容量制限(安い)** | [eSIM2Fly](/ja/travel/providers/esim2fly/) | $8.50 | 30日間/10GB |
| **大容量+通話** | [Airalo](/ja/travel/providers/airalo/) | $9.90 | 10日間/50GB・通話100分 |
| **無制限(コスパ最強)** | [Nomad](/ja/travel/providers/nomad/) | $14.00 | 10日間/無制限 |
| **無制限(長め)** | [Nomad](/ja/travel/providers/nomad/) | $19.00 | 15日間/無制限 |
| **無制限(1日単位)** | [Holafly](/ja/travel/providers/holafly/) | $31.90〜$43.90 | 10〜14日間/無制限 |
**おすすめ:** [Nomad](/ja/travel/providers/nomad/) 10日間無制限 $14.00がコスパ最強。10GBで足りるなら[eSIM2Fly](/ja/travel/providers/esim2fly/) 30日間10GB $8.50。通話が必要なら[Airalo](/ja/travel/providers/airalo/) 10日間50GB+通話100分 $9.90。
### 2週間以上 — 長期旅行・ノマドワーク
2週間以上の旅行では、旅行eSIMと現地SIMの両方が選択肢に入る。
| 選択肢 | プロバイダー | 料金 | 内容 |
|--------|------------|------|------|
| **容量制限(安い)** | [eSIM2Fly](/ja/travel/providers/esim2fly/) | $8.50 | 30日間/10GB |
| **無制限(旅行eSIM)** | [Nomad](/ja/travel/providers/nomad/) | $19.00 | 15日間/無制限 |
| **無制限(旅行eSIM)** | [Yesim](/ja/travel/providers/yesim/) | $27.00 | 15日間/無制限 |
| **無制限(30日)** | [Nomad](/ja/travel/providers/nomad/) | $33.00 | 30日間/無制限 |
| **現地SIM** | [AIS](/ja/th/carriers/ais/)(空港カウンター) | 約299バーツ(≈$8.50) | 8日間/15GB |
2週間以上で無制限が必要な場合、旅行eSIMは$19〜$73になる。一方、タイの空港では[AIS](/ja/th/carriers/ais/)・[TrueMove H](/ja/th/carriers/truemove/)・[DTAC](/ja/th/carriers/dtac/)の旅行者向けSIMが299〜599バーツ(約$8.50〜$17)で購入できる。タイの現地SIM事情については、各キャリア([AIS](/ja/th/carriers/ais/)・[TrueMove H](/ja/th/carriers/truemove/)・[DTAC](/ja/th/carriers/dtac/))の公式サイトを確認してほしい。
**おすすめ:** 2週間程度なら[Nomad](/ja/travel/providers/nomad/) 15日間無制限 $19.00がベスト。1ヶ月なら同じく[Nomad](/ja/travel/providers/nomad/) 30日間無制限$33.00。データ量を抑えられるなら[eSIM2Fly](/ja/travel/providers/esim2fly/) 30日間10GB $8.50が最安。
**[SimFinderでタイの旅行eSIMを比較する →](/ja/travel/th/search/)**
---
## 旅行eSIM vs 現地SIM — どちらを選ぶべきか
タイは空港でのSIMカード販売が充実しており、現地SIM購入という選択肢もある。旅行eSIMと現地SIMの違いを整理する。
| 項目 | 旅行eSIM | タイの現地SIM(空港購入) |
|------|---------|----------------------|
| **料金目安** | $1.70〜$73(期間・容量による) | 299〜599バーツ(約$8.50〜$17)/8〜15日間 |
| **契約方法** | オンラインで即時 | 空港カウンター(パスポート提示) |
| **eSIM対応** | 全プロバイダー対応 | 一部プランのみ |
| **電話番号** | なし(データ専用)※一部例外あり | タイ番号あり |
| **データ量** | 0.1GB〜無制限 | 15GB〜無制限(プランによる) |
| **日本語サポート** | 9/11社対応 | なし |
| **テザリング** | 全社対応 | プランによる |
| **購入待ち時間** | なし(事前購入) | 空港カウンターで10〜30分 |
### 旅行eSIMが向いている人
- **1〜2週間の短期旅行**
- タイの電話番号が不要
- 出発前に設定を済ませたい
- 日本語サポートが欲しい
- スワンナプーム空港の混雑を避けたい
### 現地SIMが向いている人
- **1ヶ月以上の長期滞在・ノマドワーク**
- タイの電話番号が必要(Grab登録、フードデリバリー等)
- [AIS](/ja/th/carriers/ais/)や[TrueMove H](/ja/th/carriers/truemove/)の高速回線を直接使いたい
- 空港到着時に余裕がある
タイの現地SIM事情の詳細は、[AIS](/ja/th/carriers/ais/)・[TrueMove H](/ja/th/carriers/truemove/)・[DTAC](/ja/th/carriers/dtac/)の各キャリア公式サイトを参照してほしい。
---
## 設定方法
旅行eSIMの設定は3ステップで完了する。タイ旅行の場合、**出発前にステップ2まで済ませておく**のが鉄則だ。
### ステップ1: 購入
プロバイダーのWebサイトまたはアプリでタイ向けプランを選んで購入。支払い完了後、QRコードがメールまたはアプリ内に表示される。
### ステップ2: インストール(出発前・WiFi環境で)
**iPhoneの場合:**
1. 「設定」→「モバイル通信」→「eSIMを追加」
2. QRコードをカメラで読み取る
3. プランが追加されたことを確認
**Androidの場合:**
1. 「設定」→「ネットワークとインターネット」→「SIM」→「SIMの追加」
2. QRコードを読み取る
3. プランが追加されたことを確認
### ステップ3: 現地到着後の切り替え
1. 日本のSIMのデータローミングを**オフ**にする(高額請求防止)
2. 旅行eSIMを**モバイルデータ通信**に設定する
3. 日本のSIMは**デフォルトの音声回線**として維持する
多くのプロバイダーでは、タイのネットワークに接続した時点で自動アクティベーションされる。スワンナプーム空港やドンムアン空港に着いた瞬間からデータ通信が使える。
eSIM設定の詳しい手順(スクリーンショット付き)は、[eSIM設定ガイド — iPhone・Android対応](/ja/blog/esim-setup-guide-iphone-android/)を参照してほしい。
---
## 注意点
### テザリング
11社全てがテザリングに対応しているが、**無制限プランでテザリングを多用すると速度制限に達しやすい**。[Airalo](/ja/travel/providers/airalo/)の無制限プランは1日3GB超過で1Mbpsに制限される。テザリングでPC作業をする場合は、容量制限付きの大容量プラン(10GB以上)の方が速度制限を気にせず使える。
### 電話番号
旅行eSIMは**データ通信専用**で、タイの電話番号は付与されない([Airalo](/ja/travel/providers/airalo/)の50GBプランは例外で通話100分付き)。以下の場面で注意が必要だ。
- **Grab登録** — すでに日本の番号で登録済みならそのまま使える。新規登録には電話番号のSMS認証が必要
- **フードデリバリー(Grab Food・LINE MAN)** — タイの電話番号があると便利だが、なくても利用可能な場合が多い
- **通話** — LINEのVoIP機能で代用可能。タイではLINEが広く普及しているため、現地の人との連絡もLINEで完結することが多い
### eSIM対応端末
以下の端末がeSIMに対応している。
- **iPhone**: XR / XS(2018年)以降の全モデル
- **Google Pixel**: 3a(2019年)以降の全モデル
- **Samsung Galaxy**: S20(2020年)以降のほとんどのモデル
確認方法: iPhoneは「設定 → モバイル通信 → eSIMを追加」が表示されれば対応。Androidは「設定 → ネットワークとインターネット → SIM」で確認。
### タイ特有の注意点
- **離島(ピピ島・タオ島等)ではカバレッジが弱い場所がある** — [AIS](/ja/th/carriers/ais/)回線のeSIMが最もカバレッジが広い(95/100)
- **寺院やワット内ではWiFiが使えない** — 移動中のナビにはモバイルデータが必須
- **タイの祝日(ソンクラーン等)は空港SIMカウンターが混雑** — eSIMなら事前購入で回避できる
---
## よくある質問
### タイ旅行にeSIMは必要?フリーWiFiだけで足りる?
タイはカフェやショッピングモールにフリーWiFiがあるが、速度が不安定で移動中は使えない。Grab(配車アプリ)やGoogle Mapsのナビ、LINE通話にはモバイルデータが必要だ。7日間1GBなら$1.70〜と安価なので、WiFi併用でもeSIMは持っておくことを推奨する。
### タイのeSIMで通話やSMS受信はできる?
旅行eSIMは基本的にデータ通信専用で、タイの電話番号は付与されない。通話はLINEのVoIP機能で代用できる。日本のSIMはデュアルSIMで維持できるため、日本の番号でのSMS受信(二段階認証等)は可能。[Airalo](/ja/travel/providers/airalo/)の一部プラン(10日間50GB $9.90)には100分の通話が付属する。
### タイ向けeSIMの通信速度はどのくらい?
タイの3大キャリア([AIS](/ja/th/carriers/ais/)・[TrueMove H](/ja/th/carriers/truemove/)・[DTAC](/ja/th/carriers/dtac/))はいずれも4G/LTEで下り80〜100Mbps程度の速度が出る。[AIS](/ja/th/carriers/ais/)が最も高速(下り98.4Mbps)でカバレッジも95/100と広い。旅行eSIMはこれら現地キャリアの回線を使うため、バンコクはもちろん地方でも安定した通信が期待できる。
### [Airalo](/ja/travel/providers/airalo/)、[Holafly](/ja/travel/providers/holafly/)、[Nomad](/ja/travel/providers/nomad/)の違いは?
[Airalo](/ja/travel/providers/airalo/)は1GB $4.00〜と中容量帯が充実し、50GB+通話付きプラン$9.90が目玉。[Holafly](/ja/travel/providers/holafly/)は全プラン無制限データで1日単位で購入可能(1日$3.90〜)。[Nomad](/ja/travel/providers/nomad/)は日本語アプリ対応で使いやすく、10日間無制限$14.00と割安。3社とも日本語サポートに対応している。
### タイに着いてからeSIMを買える?
購入自体はオンラインでいつでも可能だが、eSIMのインストールにはWiFi接続が必要。スワンナプーム空港にはフリーWiFiがあるが、出発前に自宅WiFiでインストールまで済ませておく方が確実だ。
### テザリング(インターネット共有)はできる?
SimFinderが追跡している11社全てがテザリングに対応している。PCやタブレットでの利用も可能。ただし無制限プランでテザリングを多用すると速度制限に達しやすくなる。
### タイ旅行用eSIMと現地SIMはどちらが得?
短期旅行(1〜2週間)なら旅行eSIMが手軽で安価。1ヶ月以上の長期滞在やタイの電話番号が必要な場合は、空港でのSIM購入([AIS](/ja/th/carriers/ais/) 299バーツ/8日間〜)が適している。詳しくは[Best SIM Plans for Thailand 2026(英語)](/en/blog/best-sim-plans-thailand-2026/)をご覧ください。
---
## まとめ
2026年のタイ旅行eSIM市場のポイント:
- **11社のプロバイダー**がタイ向けeSIMを提供 — 全社テザリング対応
- **最安は[eSIM2Fly](/ja/travel/providers/esim2fly/)** — 7日間1GBが$2.80(約420円)、30日間10GBでも$8.50(約1,275円)
- **無制限の最安は[Yesim](/ja/travel/providers/yesim/)** — 7日間$18.00(約2,700円)
- **コスパ最強の無制限は[Nomad](/ja/travel/providers/nomad/)** — 10日間$14.00(約2,100円)
- **日数ぴったりで選ぶなら[Holafly](/ja/travel/providers/holafly/)** — 1日単位で1日$3.90〜30日$72.90
- **通話付きプランが欲しいなら[Airalo](/ja/travel/providers/airalo/)** — 10日間50GB+通話100分で$9.90
- **日本語サポート** — 11社中9社が対応([Maya Mobile](/ja/travel/providers/maya/)と[Flexiroam](/ja/travel/providers/flexiroam/)が非対応)
- **タイの通信品質は[AIS](/ja/th/carriers/ais/)がトップ** — 下り98.4Mbps、カバレッジ95/100
- **2週間以内の旅行なら旅行eSIM一択** — 現地SIMより手軽で、日本語サポートもある
- **1ヶ月以上なら現地SIMも検討** — 空港で[AIS](/ja/th/carriers/ais/)/[TrueMove H](/ja/th/carriers/truemove/)/[DTAC](/ja/th/carriers/dtac/)の旅行者向けSIMが299バーツ〜
タイ旅行では、eSIMでのモバイルデータ確保が快適な旅の基盤になる。Grabでの移動、Google Mapsでのナビ、LINEでのコミュニケーション、Klookでのアクティビティ予約など、スマホが旅の中心ツールだからだ。
SimFinderでは11社のタイ向けeSIMプランを料金・データ容量・期間で横並び比較できる。渡航日数が決まったら、まず料金を比較してみてほしい。
**[SimFinderでタイの旅行eSIMを比較する →](/ja/travel/th/search/)**
---
*プラン料金は2026年3月時点のデータに基づいています。料金は為替レートやプロバイダーの価格改定により変動する可能性があります。最新の料金は各プロバイダーの公式サイトまたは[SimFinderの比較ページ](/ja/travel/th/search/)でご確認ください。*
*SimFinderは一部プロバイダーとアフィリエイト提携を行っています。ただし、ランキングや推奨はデータに基づいており、提携の有無で順位を変えることはありません。*
================================================================================
# UQモバイル vs Y!mobile 徹底比較2026 — au系とSoftBank系サブブランドの違い
URL: https://sim-finder.com/ja/blog/uqmobile-vs-ymobile-comparison-2026/
Type: blog (ja)
Published: 2026-03-26T00:00:00+09:00
## 結論:UQモバイルとY!mobile、どちらを選ぶべきか
**UQモバイルとY!mobileは、大手キャリアのサブブランドという同じ立ち位置にある2社だ。** 通信品質はどちらも高く、店頭サポートあり、eSIM対応、データ繰り越しありと、基本スペックは酷似している。そのため「どっちでも同じ」と感じるかもしれないが、料金体系と特典エコシステムに明確な違いがある。
**UQモバイルが向いている人:**
- 月額料金を少しでも抑えたい(同容量でY!mobileより110〜1,430円安い)
- Pontaポイント経済圏を活用している
- Netflix・Apple Music・YouTube Premiumをお得に使いたい
- au回線の通信品質(品質スコア85)を重視する
**Y!mobileが向いている人:**
- 家族3回線以上で使う予定(家族割¥1,100/回線はUQの2倍)
- Yahoo!ショッピングをよく利用する(7%還元)
- LINEスタンプを頻繁に使う(LYPプレミアムで使い放題)
- SoftBank回線を希望する
**[SimFinderで自分に合ったプランを検索する →](/ja/jp/search/)**
---
## 目次
- [基本スペック比較表](#基本スペック比較表)
- [料金比較 — 同容量での差額はいくら?](#料金比較)
- [通信品質比較 — au回線 vs SoftBank回線](#通信品質比較)
- [通話オプション比較](#通話オプション比較)
- [特典・エコシステム比較 — Pontaポイント vs Yahoo!経済圏](#特典エコシステム比較)
- [家族割比較 — ¥550 vs ¥1,100の差](#家族割比較)
- [こんな人におすすめ](#こんな人におすすめ)
- [ユーザーの声(SNS)](#ユーザーの声)
- [よくある質問(FAQ)](#よくある質問)
- [まとめ](#まとめ)
---
## 基本スペック比較表
まず、両社の基本情報を一覧で確認する。
| 項目 | [UQモバイル](/ja/jp/carriers/jp-uqmobile/) | [Y!mobile](/ja/jp/carriers/jp-ymobile/) |
|------|-------|---------|
| 親ブランド | au(KDDI) | SoftBank |
| 回線種別 | au 5G | SoftBank 5G |
| 品質スコア | 85 | 83 |
| eSIM対応 | 対応 | 対応 |
| データ繰り越し | あり | あり |
| 最低利用期間 | なし | なし |
| 解約金 | ¥0 | ¥0 |
| 店頭サポート | あり(auショップ) | あり(ソフトバンク/Y!mobileショップ) |
次に、同データ容量のプランを横並びで比較する。
### 5GBプラン比較
| | [UQモバイル トクトクプラン2 ~5GB](/ja/jp/plans/uqmobile-tokutoku2-5gb/) | [Y!mobile シンプル3 S 5GB](/ja/jp/plans/ymobile-s-5gb/) |
|---|---|---|
| 月額料金 | **¥2,948** | ¥3,058 |
| データ容量 | 5GB | 5GB |
| 差額 | — | +¥110 |
### 30GBプラン比較
| | [UQモバイル トクトクプラン2 30GB](/ja/jp/plans/uqmobile-tokutoku2-30gb/) | [Y!mobile シンプル3 M 30GB](/ja/jp/plans/ymobile-m-30gb/) |
|---|---|---|
| 月額料金 | **¥4,048** | ¥4,158 |
| データ容量 | 30GB | 30GB |
| 差額 | — | +¥110 |
### 35GBプラン比較
| | [UQモバイル コミコミプランバリュー 35GB](/ja/jp/plans/uqmobile-komikomi-value-35gb/) | [Y!mobile シンプル3 L 35GB](/ja/jp/plans/ymobile-l-35gb/) |
|---|---|---|
| 月額料金 | **¥3,828** | ¥5,258 |
| データ容量 | 35GB | 35GB |
| 差額 | — | +¥1,430 |
35GBプランでは月額¥1,430の差がある。UQモバイルのコミコミプランバリューは10分かけ放題が無料で付帯しているため、通話オプション込みで比較するとさらに差が広がる。
---
## 料金比較
### 単独契約の場合(家族割なし)
すべてのデータ容量帯でUQモバイルが安い。
| データ容量 | UQモバイル | Y!mobile | 差額(年間) |
|-----------|-----------|----------|------------|
| 5GB | ¥2,948 | ¥3,058 | ¥110/月(年間¥1,320) |
| 30GB | ¥4,048 | ¥4,158 | ¥110/月(年間¥1,320) |
| 35GB | ¥3,828 | ¥5,258 | ¥1,430/月(年間¥17,160) |
特に35GBプランの差額は大きい。UQモバイルのコミコミプランバリューは10分かけ放題込みで¥3,828なのに対し、Y!mobileのシンプル3 L(通話オプションなし)が¥5,258。Y!mobileに10分かけ放題(¥880)を追加すると¥6,138となり、差額は¥2,310/月に拡大する。
### 家族割適用時の比較(2回線の場合)
| データ容量 | UQモバイル(家族割 -¥550) | Y!mobile(家族割 -¥1,100) | 差額 |
|-----------|--------------------------|--------------------------|------|
| 5GB | ¥2,398 | **¥1,958** | UQが¥440高い |
| 30GB | ¥3,498 | **¥3,058** | UQが¥440高い |
| 35GB | **¥3,278** | ¥4,158 | Y!mobileが¥880高い |
家族割を適用すると、5GBと30GBではY!mobileが逆転して安くなる。Y!mobileの家族割¥1,100はUQモバイルの¥550の2倍であるため、家族割の恩恵が大きいためだ。ただし35GBプランは元の価格差が大きいため、家族割適用後もUQモバイルが安い。
**判断基準:** 5〜30GBで家族2回線以上ならY!mobile、35GBまたは単独契約ならUQモバイル、という切り分けになる。
**[SimFinderで自分の条件で料金を比較する →](/ja/jp/search/)**
---
## 通信品質比較
通信品質はOpenSignal Q1 2026のデータに基づく。
| 指標 | UQモバイル(au回線) | Y!mobile(SoftBank回線) |
|------|------|------|
| 品質スコア(総合) | **85** | 83 |
| 下り平均速度 | **120.7 Mbps** | 110.5 Mbps |
| 上り平均速度 | **15.2 Mbps** | 14.8 Mbps |
| レイテンシ | **25 ms** | 26 ms |
| カバレッジ | **93%** | 92% |
出典: OpenSignal Q1 2026 Japan Mobile Network Experience Report
数値上はUQモバイル(au回線)がすべての項目でやや優位だが、差は小さい。下り速度の差は約10Mbps、レイテンシの差は1ms。日常のウェブ閲覧や動画視聴で体感差が出る水準ではない。
ただし、地域によって差が出る可能性はある。au回線とSoftBank回線では基地局の配置が異なるため、自宅や職場での電波状況は実際に試してみないとわからない。両社とも解約金¥0なので、通信品質に不満があれば気軽に乗り換えられる点は共通のメリットだ。
品質スコアの算出方法について詳しくは「[SimFinderの品質スコアガイド](/ja/blog/scoring-system-guide/)」を参照。また、サブブランドとMVNOの違いについては「[MNO・MVNOの違い解説ガイド](/ja/blog/mno-mvno-difference-guide/)」で解説している。
---
## 通話オプション比較
| オプション | UQモバイル | Y!mobile |
|-----------|-----------|----------|
| 10分かけ放題 | ¥880/月 | ¥880/月 |
| 完全かけ放題 | ¥1,980/月 | ¥1,980/月 |
通話オプションの料金は完全に同一。差別化ポイントはUQモバイルの**コミコミプランバリュー(35GB)に10分かけ放題が無料で含まれている**点だ。
コミコミプランバリューで完全かけ放題にアップグレードする場合も¥1,100の追加で済む(通常¥1,980より¥880安い)。35GB + 通話オプションを組み合わせるユーザーには、UQモバイルのコミコミプランバリューが明確に有利。
一方、5GBや30GBプランで通話オプションを追加する場合は、両社で同額のため差はつかない。
---
## 特典・エコシステム比較
両社の大きな違いは、紐づくポイント経済圏とエンタメ特典にある。
### UQモバイルの特典
| 特典 | 内容 |
|------|------|
| ポイント経済圏 | **Pontaポイント** |
| エンタメ割引 | Netflix / Apple Music / YouTube Premium(Pontaポイント還元) |
| ショッピング連携 | au PAYマーケット |
UQモバイルはNetflix・Apple Music・YouTube Premiumの割引(Pontaポイント還元)が特徴。サブスクサービスを複数利用しているユーザーにはメリットが大きい。
### Y!mobileの特典
| 特典 | 内容 |
|------|------|
| ポイント経済圏 | **PayPayポイント** |
| LYPプレミアム | LINEスタンプ使い放題 + Yahoo!ショッピング7%還元 |
| ショッピング連携 | Yahoo!ショッピング(7%還元) |
Y!mobileはLYPプレミアム特典が付帯。LINEスタンプ使い放題とYahoo!ショッピングでの7%還元が常時適用される。Yahoo!ショッピングで月¥10,000以上買い物する人なら、還元額だけで月¥700以上になる。
### どちらの経済圏が合うか
| 利用サービス | 有利な方 |
|------------|---------|
| Netflix / Apple Music / YouTube Premium | UQモバイル |
| Yahoo!ショッピング | Y!mobile |
| LINEスタンプ | Y!mobile |
| au PAYマーケット | UQモバイル |
| コンビニ(ローソン等Ponta加盟店) | UQモバイル |
普段使うサービスによって最適な方が変わる。ポイント経済圏の選択は、携帯料金以上に生活全体のコストに影響するため、自分の消費行動に合った方を選ぶべきだ。
---
## 家族割比較
| 項目 | UQモバイル | Y!mobile |
|------|-----------|----------|
| 家族割引額 | ¥550/回線 | **¥1,100/回線** |
| 適用条件 | 2回線以上 | 2回線以上 |
Y!mobileの家族割はUQモバイルの2倍。家族の回線数が多いほど、Y!mobileの方が有利になる。
### 家族3回線の場合の合計月額(5GBプラン)
| | UQモバイル | Y!mobile |
|---|---|---|
| 基本料金 × 3 | ¥8,844 | ¥9,174 |
| 家族割 × 3 | -¥1,650 | -¥3,300 |
| **合計** | **¥7,194** | **¥5,874** |
| 差額 | — | **¥1,320安い** |
### 家族3回線の場合の合計月額(30GBプラン)
| | UQモバイル | Y!mobile |
|---|---|---|
| 基本料金 × 3 | ¥12,144 | ¥12,474 |
| 家族割 × 3 | -¥1,650 | -¥3,300 |
| **合計** | **¥10,494** | **¥9,174** |
| 差額 | — | **¥1,320安い** |
家族3回線×5GBまたは30GBの場合、Y!mobileが月¥1,320(年間¥15,840)安くなる。家族での利用がメインなら、Y!mobileの家族割の強さは無視できない。
ただし35GBプランに限っては、UQモバイルの元値が¥1,430安いため、家族割の差(¥550)を差し引いてもUQモバイルが安い。
---
## こんな人におすすめ
### 1. 一人で使う、料金を抑えたい → UQモバイル
単独契約の場合、全データ容量帯でUQモバイルが安い。特に35GBの[コミコミプランバリュー](/ja/jp/plans/uqmobile-komikomi-value-35gb/)は10分かけ放題込みで¥3,828と、Y!mobileより¥1,430安い。
### 2. 家族3回線以上、5〜30GB → Y!mobile
家族割¥1,100/回線の恩恵が大きく、5GBの[シンプル3 S](/ja/jp/plans/ymobile-s-5gb/)なら家族割適用後¥1,958/回線。家族全員の合計で見ると年間¥15,000以上の差になる。
### 3. Netflix・Apple Music・YouTube Premiumを使う → UQモバイル
エンタメサブスクの割引(Pontaポイント還元)はUQモバイル独自の特典。月額料金の安さと合わせて、サブスクユーザーには[UQモバイル](/ja/jp/carriers/jp-uqmobile/)が合理的な選択。
### 4. Yahoo!ショッピングとLINEをフル活用 → Y!mobile
LYPプレミアム特典(LINEスタンプ使い放題 + Yahoo!ショッピング7%還元)は[Y!mobile](/ja/jp/carriers/jp-ymobile/)ならではの価値。Yahoo!ショッピングのヘビーユーザーなら、還元額が料金差を上回る可能性がある。
**[SimFinderで条件を指定して最適プランを検索 →](/ja/jp/search/)**
---
## ユーザーの声
X(旧Twitter)での実際のユーザーの投稿を紹介する。
> 「auからUQモバイルに変えて1週間ぐらい経ったけど何一つ不自由は無いや。通信速度も今の所ほぼ変わらない。無制限プランではなくなったからそこだけ気をつけないとだけど」
> — @kakihurai_8([元の投稿](https://x.com/kakihurai_8/status/1974789967869334012))
> 「ワイモバ親子割がまじでやばくて笑える シンプル3 Mが858円~に ワイモバイルがやばすぎる。普通に使っても最強レベルで安いのに この割引は子どもだけじゃなく家族割グループ全員割引対象」
> — @yamorigogo([元の投稿](https://x.com/yamorigogo/status/2013167054103404932))
UQモバイルについては「auからの乗り換えで通信品質に差を感じない」という声、Y!mobileについては「家族割の割引額が大きい」という声が目立つ。どちらもサブブランドとしての安定感を評価するユーザーが多い。
*※ 上記はX(旧Twitter)上の実際の投稿から引用しています。個人の感想であり、通信品質は地域・時間帯により異なります。*
---
## よくある質問
### Q. UQモバイルとY!mobileはどちらが安いですか?
同じデータ容量で比較すると、UQモバイルの方が月額110〜1,430円安い。5GBプランでUQモバイル¥2,948 vs Y!mobile ¥3,058(差額110円)、35GBプランではUQモバイル¥3,828 vs Y!mobile ¥5,258(差額1,430円)と、大容量ほど差が開く。
### Q. 家族で使うならどちらがお得ですか?
家族割の割引額はY!mobileが¥1,100/回線、UQモバイルが¥550/回線。5〜30GBプランで家族2回線以上ならY!mobileが安くなる。ただし35GBプランはUQモバイルの元の価格が大幅に安いため、家族割適用後もUQモバイルが安い。
### Q. 通信速度はどちらが速いですか?
OpenSignal Q1 2026のデータでは、UQモバイル(au回線)の下り平均120.7Mbps・レイテンシ25msに対し、Y!mobile(SoftBank回線)は下り平均110.5Mbps・レイテンシ26ms。UQモバイルがやや優位だが、日常利用で体感差が出るレベルではない。
### Q. UQモバイルとY!mobileに解約金はありますか?
どちらも最低利用期間なし、解約金¥0。契約の縛りがないため、気軽に試せる。
### Q. eSIMに対応していますか?
UQモバイル・Y!mobileともに全プランでeSIM対応。オンラインで即日開通も可能。
### Q. データの繰り越しはできますか?
両社ともデータ繰り越しに対応。当月未使用分を翌月に持ち越せる。
### Q. 店頭でサポートを受けられますか?
どちらも全国の実店舗で対面サポートを受けられる。UQモバイルはauショップ、Y!mobileはソフトバンクショップおよびY!mobileショップで対応。MVNOと比べたサブブランドの大きなメリットのひとつ。
---
## まとめ
UQモバイルとY!mobileは「大手キャリアのサブブランド」という同じカテゴリにあり、通信品質・店頭サポート・eSIM対応・データ繰り越しなど基本スペックはほぼ同等。選択の決め手は以下の3点に集約される。
| 判断基準 | UQモバイル | Y!mobile |
|---------|-----------|----------|
| 単独契約の料金 | 安い(全プランで¥110〜1,430安い) | — |
| 家族割の割引額 | ¥550/回線 | ¥1,100/回線(UQの2倍) |
| 経済圏 | Pontaポイント + Netflix等割引 | PayPayポイント + Yahoo!ショッピング7%還元 |
**一人で使うなら料金の安いUQモバイル、家族で使うならY!mobile、あとは普段使う経済圏で決める。** これが結論だ。
**[SimFinderであなたに最適なプランを見つける →](/ja/jp/search/)**
---
※ 料金は税込表記です。2026年3月時点の情報に基づいています。最新の情報は各キャリアの公式サイトでご確認ください。
※ 通信速度データの出典: OpenSignal Q1 2026 Japan Mobile Network Experience Report。品質スコアはSimFinder独自の評価基準によるものです([スコアリングの詳細](/ja/blog/scoring-system-guide/))。
================================================================================
# アメリカでSIMを契約する方法 — 日本人留学生・駐在員の完全ガイド
URL: https://sim-finder.com/ja/blog/us-sim-guide-for-japanese/
Type: blog (ja)
Published: 2026-03-20
## 結論: 日本人向けおすすめ3選
| おすすめ | プラン | 月額 | ポイント |
|---------|-------|------|---------|
| **留学生** | [Mint Mobile](/ja/us/carriers/mint/) 17GB | $20 | SSN不要、12ヶ月前払い、5G・eSIM・データ繰り越し |
| **駐在員** | [Visible](/ja/us/carriers/visible/) Base | $25 | SSN不要、[Verizon](/ja/us/carriers/verizon/)ネットワーク(カバレッジ96/100)、無制限、契約縛りなし |
| **短期出張** | 旅行eSIM([Saily](/ja/travel/providers/saily/) / [Airalo](/ja/travel/providers/airalo/)) | $3.99〜 | 日本で事前設定、数日〜1ヶ月、データのみ |
**[SimFinderでアメリカの全40プランを比較する →](/ja/us/search/)**
以下、日本人がアメリカでSIMを契約する際に知っておくべき全てを解説する。
## 目次
- [日本とアメリカの携帯事情の違い](#日本とアメリカの携帯事情の違い)
- [アメリカの3大ネットワークと格安キャリア](#アメリカの3大ネットワークと格安キャリア)
- [契約方法別ガイド — SSN不要プランを中心に](#契約方法別ガイド--ssn不要プランを中心に)
- [主要プラン比較表](#主要プラン比較表)
- [利用スタイル別おすすめ](#利用スタイル別おすすめ)
- [5GとeSIM対応状況](#5gとesim対応状況)
- [ユーザーの声](#ユーザーの声)
- [契約時の注意点](#契約時の注意点)
- [よくある質問](#よくある質問)
- [まとめ](#まとめ)
---
## 日本とアメリカの携帯事情の違い
日本からアメリカに渡航する人がまず直面するのは、携帯契約の仕組みが根本的に異なることだ。
### SSN(社会保障番号)とクレジットヒストリー
アメリカのMNO([T-Mobile](/ja/us/carriers/tmobile/)、[AT&T](/ja/us/carriers/att/)、[Verizon](/ja/us/carriers/verizon/))でポストペイド契約をするには、**SSN(Social Security Number)とクレジットヒストリー**が必要になる。日本の携帯ショップのように「パスポートだけで契約」はできない。
渡米直後の留学生や駐在員はSSNがないか、クレジットヒストリーがゼロの状態。この場合、MNOのポストペイド契約は事実上不可能で、高額なデポジット($500前後)を要求されることもある。
**解決策**: プリペイドプランかMVNOを使う。これらはクレジットチェックなし、SSN不要で契約できる。
### 料金体系 — 税別表示が標準
アメリカの携帯料金は**税別表示**が一般的。州や市によって税率が異なるため、実際の請求額は表示価格より数%〜15%程度高くなる。本記事の料金は全て税別。
### 契約縛りはほぼ消滅
日本では「2年縛り」が長らく標準だったが、アメリカのプリペイド・SIMオンリー市場では**契約縛りなしが標準**。SimFinderが追跡する40プランのうち31プランが月単位で解約可能。残りの8プラン([Mint Mobile](/ja/us/carriers/mint/) 4プラン + [US Mobile](/ja/us/carriers/usmobile/) Unlimited Flex + [Visible](/ja/us/carriers/visible/) 年額3プラン)は12ヶ月前払いだが、解約金はない。
---
## アメリカの3大ネットワークと格安キャリア
アメリカには**物理ネットワークが3つ**しかない。どのキャリアと契約しても、この3つのいずれかの回線を使う。
| ネットワーク | タイプ | ダウンロード速度 | カバレッジ | 総合スコア | このネットワークを使うキャリア |
|---|---|---|---|---|---|
| **[T-Mobile](/ja/us/carriers/tmobile/)** | MNO | 156.4 Mbps | 92/100 | 88/100 | [T-Mobile](/ja/us/carriers/tmobile/), [Metro](/ja/us/carriers/metro/), [Mint Mobile](/ja/us/carriers/mint/), [Google Fi](/ja/us/carriers/googlefi/), [Tello](/ja/us/carriers/tello/), [US Mobile](/ja/us/carriers/usmobile/) |
| **[AT&T](/ja/us/carriers/att/)** | MNO | 122.8 Mbps | 95/100 | 86/100 | [AT&T](/ja/us/carriers/att/), [Cricket Wireless](/ja/us/carriers/cricket/), [US Mobile](/ja/us/carriers/usmobile/) |
| **[Verizon](/ja/us/carriers/verizon/)** | MNO | 131.5 Mbps | 96/100 | 87/100 | [Verizon](/ja/us/carriers/verizon/), [Visible](/ja/us/carriers/visible/), [US Mobile](/ja/us/carriers/usmobile/) |
*品質データ: OpenSignal 2026年Q1計測*
SimFinderのデータベースでは**10社40プラン**を追跡している。内訳は以下のとおり。
- **MNO(3社)**: [T-Mobile](/ja/us/carriers/tmobile/)、[AT&T](/ja/us/carriers/att/)、[Verizon](/ja/us/carriers/verizon/) — 自社ネットワークを保有。料金は$50〜$100/月
- **サブブランド(3社)**: Metro([T-Mobile](/ja/us/carriers/tmobile/)系)、Cricket([AT&T](/ja/us/carriers/att/)系)、[Visible](/ja/us/carriers/visible/)([Verizon](/ja/us/carriers/verizon/)系) — 親会社のネットワークを利用。$25〜$60/月
- **MVNO(4社)**: [Mint Mobile](/ja/us/carriers/mint/)、[US Mobile](/ja/us/carriers/usmobile/)、Google Fi、[Tello](/ja/us/carriers/tello/) — ネットワークを借りて割安に提供。$9〜$65/月
**日本人に重要なポイント**: [T-Mobile](/ja/us/carriers/tmobile/)はダウンロード速度が最速(156.4 Mbps)で、格安キャリアの選択肢も最も多い(6社中4社が[T-Mobile](/ja/us/carriers/tmobile/)ネットワーク)。一方、[Verizon](/ja/us/carriers/verizon/)はカバレッジスコアが最高(96/100)で、地方や郊外での接続安定性が高い。
---
## 契約方法別ガイド — SSN不要プランを中心に
### SSN不要で契約できるプラン
日本人が渡米直後に最も現実的な選択肢。以下のキャリアは**SSN・クレジットチェック不要**で契約できる。
| キャリア | ネットワーク | 最安プラン | 無制限プラン | eSIM |
|---|---|---|---|---|
| [Tello](/ja/us/carriers/tello/) | [T-Mobile](/ja/us/carriers/tmobile/) | $9/月 (1GB) | $25/月 | 対応 |
| [US Mobile](/ja/us/carriers/usmobile/) | [T-Mobile](/ja/us/carriers/tmobile/)/[Verizon](/ja/us/carriers/verizon/) | $10/月 (2GB) | $20/月 | 対応 |
| [Mint Mobile](/ja/us/carriers/mint/) | [T-Mobile](/ja/us/carriers/tmobile/) | $15/月 (6GB) | $30/月 | 対応 |
| [Visible](/ja/us/carriers/visible/) | [Verizon](/ja/us/carriers/verizon/) | $25/月 (無制限) | $25/月 | 対応 |
| [Cricket](/ja/us/carriers/cricket/) | [AT&T](/ja/us/carriers/att/) | $30/月 (10GB) | $35/月 | 対応 |
| [Metro](/ja/us/carriers/metro/) | [T-Mobile](/ja/us/carriers/tmobile/) | $25/月 (無制限) | $25/月 | 対応 |
**渡米前に日本でできること**: [Visible](/ja/us/carriers/visible/)、[Mint Mobile](/ja/us/carriers/mint/)、[Tello](/ja/us/carriers/tello/)、[US Mobile](/ja/us/carriers/usmobile/)はeSIMに対応しているため、日本にいるうちにオンラインで契約し、QRコードで開通できる。空港到着時にはもうデータ通信が使える状態にできる。
### プリペイドプラン
MNO([T-Mobile](/ja/us/carriers/tmobile/)、[AT&T](/ja/us/carriers/att/)、[Verizon](/ja/us/carriers/verizon/))もプリペイドプランを提供している。上のMVNO/サブブランドに比べると料金は高いが、MNOの店舗で直接契約できるメリットがある。英語での手続きに自信がない場合、店舗で対面契約するのも一つの手段。
ただし、**MNOプリペイドの料金はサブブランドやMVNOより高い**。[T-Mobile](/ja/us/carriers/tmobile/) Essentials Saver($50/月)とMetro Flex Unlimited($25/月)は同じ[T-Mobile](/ja/us/carriers/tmobile/)ネットワークだが、価格は2倍。
### 旅行用eSIM — 日本で出発前に設定可能
1ヶ月未満の短期滞在なら、旅行用eSIMが最も手軽。アメリカ向けには**11のプロバイダーから168プラン**が利用可能。
| プロバイダー | 7日間プラン例 | 30日間プラン例 | 日本語サポート |
|---|---|---|---|
| [Saily](/ja/travel/providers/saily/) | 1GB $3.99 | 無制限 $71.99 | 対応 |
| [Airalo](/ja/travel/providers/airalo/) | 1GB $4.00 | 3GB $9.00 | 対応 |
| [Ubigi](/ja/travel/providers/ubigi/) | 1GB $4.00 | 無制限 $65.00 | 対応 |
| [Holafly](/ja/travel/providers/holafly/) | 無制限 $27.30 | 無制限 $74.90 | 対応 |
| [Nomad](/ja/travel/providers/nomad/) | 1GB $5.00 | 3GB $10.00 | 対応 |
旅行用eSIMはデータ通信専用(音声通話なし)が多いが、[Airalo](/ja/travel/providers/airalo/)の一部プランは音声通話・SMSにも対応。短期出張で電話番号が不要なら、旅行eSIMで十分。
**[旅行eSIMプランを比較する →](/ja/travel/us/)**
---
## 主要プラン比較表
### MNOプラン(3社11プラン)
[AT&T](/ja/us/carriers/att/)は2026年3月にラインナップを刷新し、Value Plus・Unlimited Starter・Unlimited Extra・Unlimited Premiumの4プランを廃止して、Value 2.0($40)・Extra 2.0($50)・Premium 2.0($60)・Elite 2.0($80)の4プラン体制になった。表示価格はいずれも1回線・ペーパーレス請求の$10/月割引適用後で、税・手数料は別途かかる。
| キャリア | プラン | 月額 | データ | テザリング | 契約 |
|---|---|---|---|---|---|
| [AT&T](/ja/us/carriers/att/) | Value 2.0 | $40 | 無制限 | 対応 | なし |
| [T-Mobile](/ja/us/carriers/tmobile/) | Essentials Saver | $50 | 無制限 | 対応 | なし |
| [T-Mobile](/ja/us/carriers/tmobile/) | Essentials | $60 | 無制限 | 対応 | なし |
| [Verizon](/ja/us/carriers/verizon/) | Unlimited Welcome | $65 | 無制限 | 非対応 | なし |
| [AT&T](/ja/us/carriers/att/) | Extra 2.0 | $50 | 無制限 | 対応 | なし |
| [T-Mobile](/ja/us/carriers/tmobile/) | Go5G | $75 | 無制限 | 対応 | なし |
| [Verizon](/ja/us/carriers/verizon/) | Unlimited Plus | $80 | 無制限 | 対応 | なし |
| [T-Mobile](/ja/us/carriers/tmobile/) | Go5G Plus | $85 | 無制限 | 対応 | なし |
| [AT&T](/ja/us/carriers/att/) | Premium 2.0 | $60 | 無制限 | 対応 | なし |
| [AT&T](/ja/us/carriers/att/) | Elite 2.0 | $80 | 無制限 | 対応 | なし |
| [Verizon](/ja/us/carriers/verizon/) | Unlimited Ultimate | $95 | 無制限 | 対応 | なし |
| [T-Mobile](/ja/us/carriers/tmobile/) | Go5G Next | $100 | 無制限 | 対応 | なし |
MNOは全プランがデータ無制限。料金帯は$50〜$100/月。SSNとクレジットヒストリーが必要な点に注意。
### サブブランドプラン(3社10プラン)
| キャリア | ネットワーク | プラン | 月額 | データ | テザリング | 契約 |
|---|---|---|---|---|---|---|
| Metro | [T-Mobile](/ja/us/carriers/tmobile/) | Flex Unlimited | $25 | 無制限 | 対応 | なし |
| [Visible](/ja/us/carriers/visible/) | [Verizon](/ja/us/carriers/verizon/) | Base | $25 | 無制限 | 対応 | なし |
| Cricket | [AT&T](/ja/us/carriers/att/) | Sensible 10GB | $30 | 10GB | 対応 | なし |
| Cricket | [AT&T](/ja/us/carriers/att/) | Unlimited | $35 | 無制限 | 非対応 | なし |
| [Visible](/ja/us/carriers/visible/) | [Verizon](/ja/us/carriers/verizon/) | [Visible](/ja/us/carriers/visible/)+ | $35 | 無制限 | 対応 | なし |
| Metro | [T-Mobile](/ja/us/carriers/tmobile/) | Flex Starter Plus | $40 | 無制限 | 対応 | なし |
| Cricket | [AT&T](/ja/us/carriers/att/) | Smart Unlimited | $45 | 無制限 | 対応 | なし |
| [Visible](/ja/us/carriers/visible/) | [Verizon](/ja/us/carriers/verizon/) | [Visible](/ja/us/carriers/visible/)+ Pro | $45 | 無制限 | 対応 | なし |
| Cricket | [AT&T](/ja/us/carriers/att/) | Supreme Unlimited | $55 | 無制限 | 対応 | なし |
| Metro | [T-Mobile](/ja/us/carriers/tmobile/) | Flex Plus | $60 | 無制限 | 対応 | なし |
サブブランドは**$25/月からデータ無制限**が手に入る。MNOの半額。SSN不要。
### MVNOプラン(4社14プラン)
| キャリア | ネットワーク | プラン | 月額 | データ | テザリング | 契約 | 繰り越し |
|---|---|---|---|---|---|---|---|
| [Tello](/ja/us/carriers/tello/) | [T-Mobile](/ja/us/carriers/tmobile/) | 1GB | $10 | 1GB | 対応 | なし | × |
| [US Mobile](/ja/us/carriers/usmobile/) | 複数 | Light 2GB | $10 | 2GB | 非対応 | なし | × |
| [Tello](/ja/us/carriers/tello/) | [T-Mobile](/ja/us/carriers/tmobile/) | 5GB | $15 | 5GB | 対応 | なし | × |
| [Mint Mobile](/ja/us/carriers/mint/) | [T-Mobile](/ja/us/carriers/tmobile/) | 6GB | $15 | 6GB | 対応 | 12ヶ月 | ○ |
| [US Mobile](/ja/us/carriers/usmobile/) | 複数 | Unlimited Flex 10GB | $17.50 | 10GB | 対応 | 12ヶ月 | × |
| Google Fi | [T-Mobile](/ja/us/carriers/tmobile/) | Flexible 1GB | $20 | 1GB | 対応 | なし | × |
| [Mint Mobile](/ja/us/carriers/mint/) | [T-Mobile](/ja/us/carriers/tmobile/) | 17GB | $20 | 17GB | 対応 | 12ヶ月 | ○ |
| [US Mobile](/ja/us/carriers/usmobile/) | 複数 | Unlimited Starter | $25 | 無制限 | 対応 | なし | × |
| [Mint Mobile](/ja/us/carriers/mint/) | [T-Mobile](/ja/us/carriers/tmobile/) | 20GB | $25 | 20GB | 対応 | 12ヶ月 | ○ |
| [Tello](/ja/us/carriers/tello/) | [T-Mobile](/ja/us/carriers/tmobile/) | Unlimited | $25 | 無制限 | 対応 | なし | × |
| [US Mobile](/ja/us/carriers/usmobile/) | 複数 | Unlimited Premium | $25 | 無制限 | 対応 | なし | × |
| [Mint Mobile](/ja/us/carriers/mint/) | [T-Mobile](/ja/us/carriers/tmobile/) | Unlimited | $30 | 無制限 | 対応 | 12ヶ月 | × |
| Google Fi | [T-Mobile](/ja/us/carriers/tmobile/) | Unlimited Essentials | $35 | 無制限 | 対応 | なし | × |
| Google Fi | [T-Mobile](/ja/us/carriers/tmobile/) | Unlimited Standard | $50 | 無制限 | 対応 | なし | × |
| Google Fi | [T-Mobile](/ja/us/carriers/tmobile/) | Unlimited Premium | $65 | 無制限 | 対応 | なし | × |
MVNOは**$10/月から**契約可能。SSN不要、eSIM対応で、日本にいるうちに契約できるものが多い。[Mint Mobile](/ja/us/carriers/mint/)は12ヶ月前払いだが、その分月額が安く、データ繰り越しがある。
**[SimFinderで全プランを比較する →](/ja/us/search/)**
---
## 利用スタイル別おすすめ
### 留学生(1年間)
**[Mint Mobile 17GB — $20/月](/ja/us/carriers/mint/)**
12ヶ月前払い($240/年)で月あたり$20。[T-Mobile](/ja/us/carriers/tmobile/)ネットワーク(速度156.4 Mbps)、5G対応、eSIM対応、データ繰り越しあり。SSN不要。大学のWiFiが使える環境なら17GBで十分。データを多く使う場合は[Mint Mobile](/ja/us/carriers/mint/) Unlimited($30/月、年$360)も選択肢。
### 駐在員(2-3年)
**[Visible Base — $25/月](/ja/us/carriers/visible/)**
[Verizon](/ja/us/carriers/verizon/)ネットワーク(カバレッジ96/100)でデータ無制限。契約縛りなし、SSN不要。駐在で車移動が多い場合、カバレッジが広い[Verizon](/ja/us/carriers/verizon/)ネットワークが有利。テザリングも対応。
SSNを取得後、家族分も含めるなら**[AT&T](/ja/us/carriers/att/) Value 2.0**(2回線以上で$15/回線)が検討候補。ファミリー割引でMVNOと同等の価格になり、MNOの優先接続が付く。
### 短期出張(1-2週間)
**旅行eSIM — [Saily](/ja/travel/providers/saily/) 7日間1GB $3.99 / [Airalo](/ja/travel/providers/airalo/) 7日間1GB $4.00**
日本で事前にインストールし、アメリカ到着時に有効化するだけ。電話番号は不要なケースがほとんど。データを多く使うなら[Holafly](/ja/travel/providers/holafly/) 7日間無制限($27.30)。
### 旅行者(1-4週間)
**旅行eSIM — [Airalo](/ja/travel/providers/airalo/) 30日間3GB $9.00 / [Ubigi](/ja/travel/providers/ubigi/) 30日間無制限 $65.00**
1ヶ月以内の観光旅行なら旅行eSIMが手軽。GoogleマップやSNS程度なら3GBで足りる。動画視聴もするなら無制限プランを選ぶ。
**[SimFinderでアメリカの全40プランを比較する →](/ja/us/search/)**
---
## 5GとeSIM対応状況
### eSIM
SimFinderが追跡する**40プラン全てがeSIM対応**。対応率100%。これは世界的にも高い水準で、日本人にとってはeSIM対応端末さえあれば物理SIMカードを受け取る必要がない。
### 5G
**40プラン全てが5G対応**。対応率100%。[Tello](/ja/us/carriers/tello/)の$10/月プランでも5Gが使える。アメリカ市場では5Gは差別化要素ではなく、標準仕様になっている。
日本から持ち込むスマートフォンは、アメリカの5G周波数帯(n41、n71、n77など)に対応しているか事前に確認すること。iPhone 12以降であればグローバルモデルで問題ない。
---
## ユーザーの声
アメリカでSIMを利用した日本人のリアルな声を紹介する。
> 「日本に帰国したけど、念のためアメリカで使ってた番号はまだ残してる。[Tello](/ja/us/carriers/tello/)なら、日本にいてもアメリカの番号で電話できたりテキストできるのがありがたい」
> — @chotar0([元の投稿](https://x.com/chotar0/status/1774184292417175687))
*※ 上記はX(旧Twitter)上の実際の投稿から引用しています。個人の感想であり、通信品質は地域・時間帯により異なります。*
---
## 契約時の注意点
### 1. 税金は別
アメリカの携帯料金は税別表示。州・市によって税率が異なり、カリフォルニア州では約8〜10%、ニューヨーク市では約12%が加算される。月額$25のプランでも実際の請求は$27〜$28になる。
### 2. オートペイ設定
多くのキャリアがオートペイ(自動引き落とし)設定で割引を提供している。日本のクレジットカードでも登録できるが、住所がアメリカのものでないとエラーになるケースがある。渡米後にアメリカの銀行口座やデビットカードを作ってから設定するのが確実。
### 3. 解約方法
プリペイド・MVNOの多くは、支払いを停止すれば自動的にサービスが終了する。日本のように「解約手続き」を別途行う必要がないキャリアが多い。ただし、番号を別キャリアに引き継ぐ(MNP)場合は手続きが必要。
### 4. デュアルSIM活用
日本の番号を維持したまま、アメリカのSIMも使いたい場合は**デュアルSIM**が便利。iPhone XS以降は物理SIM + eSIMのデュアルSIMに対応している。日本のキャリアで番号保管サービスを利用し、アメリカのeSIMをメイン回線にすれば、1台で両方の番号を管理できる。
### 5. 国際電話・SMS
アメリカ国内の通話・SMSは全プランでかけ放題だが、日本への国際電話は別料金。LINE通話やWhatsApp通話(WiFi/データ通信経由)を使えば無料で通話できる。SMSでの2段階認証が必要な日本のサービス(銀行アプリなど)は、日本の番号を維持しておくと安心。
---
## よくある質問
### SSN(社会保障番号)がなくてもSIMを契約できる?
できる。プリペイドプランとMVNO([Mint Mobile](/ja/us/carriers/mint/)、[Tello](/ja/us/carriers/tello/)、[Visible](/ja/us/carriers/visible/)、[US Mobile](/ja/us/carriers/usmobile/)など)はSSN不要で契約可能。MNOのポストペイドプラン([AT&T](/ja/us/carriers/att/)、[T-Mobile](/ja/us/carriers/tmobile/)、[Verizon](/ja/us/carriers/verizon/)の本体契約)はクレジットチェックがあるためSSNが必要。
### 日本にいるうちにアメリカのSIMを開通できる?
できる。SimFinderが追跡する40プラン全てがeSIM対応。[Visible](/ja/us/carriers/visible/)、[Mint Mobile](/ja/us/carriers/mint/)、[Tello](/ja/us/carriers/tello/)などはオンラインで契約し、QRコードをスキャンすれば日本で開通できる。渡米後すぐにデータ通信が使える状態にできる。
### アメリカで一番安いSIMプランは?
[Tello](/ja/us/carriers/tello/) 1GB($10/月)と[US Mobile](/ja/us/carriers/usmobile/) Light 2GB($10/月)が最安タイ。データ無制限で最安は$25/月の[Tello](/ja/us/carriers/tello/) Unlimited・[US Mobile](/ja/us/carriers/usmobile/) Unlimited Starter・[Visible](/ja/us/carriers/visible/)・[Metro](/ja/us/carriers/metro/) Flex Unlimited(年払いの Visible Annual なら月換算$22.92)。いずれもSSN不要・eSIM対応・5G対応・契約縛りなし。
### 留学で1年間使うならどのプランがおすすめ?
[Mint Mobile](/ja/us/carriers/mint/) 17GB($20/月、12ヶ月前払い)がコスパに優れる。[T-Mobile](/ja/us/carriers/tmobile/)ネットワーク、5G対応、eSIM対応、データ繰り越しあり。データを多く使うなら[Mint Mobile](/ja/us/carriers/mint/) Unlimited($30/月)も選択肢。
### 駐在員で家族分も必要な場合は?
MNOのファミリープランが有利。[AT&T](/ja/us/carriers/att/) Value 2.0は1回線$50だが、2回線以上で$15/回線に下がる。[T-Mobile](/ja/us/carriers/tmobile/) Go5Gも$75→$45/回線。SSNがあれば、ファミリー割引でMVNOと同等の価格になる。
### 短期出張(1-2週間)ならどうすればいい?
旅行用eSIMが最適。[Saily](/ja/travel/providers/saily/) 7日間1GB($3.99)や[Airalo](/ja/travel/providers/airalo/) 7日間1GB($4.00)など、短期間・低価格のプランがある。データを多く使うなら[Holafly](/ja/travel/providers/holafly/) 7日間無制限($27.30)も選択肢。日本で事前にインストールできる。
### デュアルSIMで日本の番号を維持できる?
できる。日本のキャリアで番号保管サービス(月額数百円)を利用し、アメリカのeSIMをもう一方のSIMスロットに入れれば、1台のスマホで両方の番号を維持できる。iPhone XS以降、多くのAndroid端末がデュアルSIM(物理+eSIM)に対応している。
---
## まとめ
2026年のアメリカSIM市場を日本人視点で整理すると:
- **10社40プラン** — $10/月([Tello](/ja/us/carriers/tello/) 1GB / [US Mobile](/ja/us/carriers/usmobile/) Light 2GB)から$100/月([T-Mobile](/ja/us/carriers/tmobile/) Go5G Next)まで
- **SSN不要で契約可能**: MVNO・サブブランド([Mint Mobile](/ja/us/carriers/mint/)、[Tello](/ja/us/carriers/tello/)、[Visible](/ja/us/carriers/visible/)、[US Mobile](/ja/us/carriers/usmobile/)、Cricket、Metro)は渡米直後でもOK
- **3大ネットワーク**: [T-Mobile](/ja/us/carriers/tmobile/)(速度最速156.4 Mbps)、[Verizon](/ja/us/carriers/verizon/)(カバレッジ最高96/100)、[AT&T](/ja/us/carriers/att/)(バランス型95/100)
- **格安キャリアで50〜75%安い**: [Visible](/ja/us/carriers/visible/) $25無制限 vs [Verizon](/ja/us/carriers/verizon/) $65無制限。[US Mobile](/ja/us/carriers/usmobile/) $20無制限 vs [T-Mobile](/ja/us/carriers/tmobile/) $50
- **5GとeSIMは全プラン対応** — 100%の対応率
- **旅行eSIMは11プロバイダー168プラン** — $3.99〜の短期プランで出張・旅行に対応
- **ファミリー割引**: SSN取得後はMNOのファミリープランも検討。[AT&T](/ja/us/carriers/att/) Value 2.0は2回線で$15/回線
日本人がアメリカでSIMを選ぶ戦略は明確だ。SSNがなければMVNO/サブブランドのプリペイド一択。SSN取得後に家族分が必要ならMNOのファミリープランを検討。短期滞在なら旅行eSIMが最も手軽。
**[あなたに最適なアメリカのSIMプランを探す →](/ja/us/search/)**
---
*プランデータは2026年3月時点のものです(AT&T・Verizon・Telloの料金は2026年7月に再確認。AT&Tは2026年3月にプランを刷新、Verizonは2026年5月にUnlimited Ultimateを値上げ)。料金は税別で、州・市により税額が異なります。最新情報は各キャリアの公式サイトをご確認ください。*
*全プランの横並び比較は[SimFinderの比較ツール](/ja/us/search/)からどうぞ。*
================================================================================
# ワイモバイル、SIMフリー端末販売「Y!mobile Free Style」開始
URL: https://sim-finder.com/ja/blog/ymobile-free-style-simfree-start-2026/
Type: blog (ja)
Published: 2026-07-09T09:00:00+09:00
ワイモバイルは2026年7月9日、SIMフリースマートフォンをオンラインストアで販売する新サービス「Y!mobile Free Style」を開始しました。従来は自社ブランド端末が中心でしたが、回線契約とひも付かないSIMフリー端末を公式に取り扱う新しい販売形態です。開始時点のラインアップはシャオミの「POCO M8 5G」「POCO X8 Pro」「POCO X8 Pro Max」と、「OPPO Find X9」の4機種です。ケータイ WatchやITmedia Mobileも同日付で報じています。
## 回線セット購入で最大2万4024円割引
Y!mobile Free Styleの端末は、ワイモバイル回線とのセット購入で割引が適用されます。公式ページおよびケータイ Watchによる各機種の通常価格・セット価格は次の通りです。
- **POCO M8 5G**: 3万8208円 → セット1万9800円(1万8408円割引)
- **POCO X8 Pro**: 7万224円 → セット4万9800円(2万424円割引)
- **POCO X8 Pro Max**: 9万1824円 → セット6万7800円(2万4024円割引)
- **OPPO Find X9**: 14万9808円 → セット12万8000円(2万1808円割引)
回線とまとめて購入すると、いずれの機種でも2万円前後の値引きが受けられる構成です。
## 端末単独購入でもPayPayポイント還元
回線を契約せず端末だけを購入する場合も、PayPayポイントが進呈されます。ITmedia Mobileおよび公式ページによると、POCOの3機種は3000円相当、OPPO Find X9は2万円相当の還元です。POCO X8 Proの公式ページでは、ポイントは購入の翌々月に付与され、出金・譲渡は不可とされています。
ただし、割引額とポイント還元額を比べると、多くのケースでセット購入の割引の方が金額的には大きくなります。すでにワイモバイル回線を使っている人や乗り換えを検討している人は、セット購入の方が総額を抑えやすいでしょう。
## SIMフリー端末を選びやすくなる新チャネル
今回のポイントは、単発のキャンペーンではなくSIMフリー端末を扱う販売チャネル自体が新設されたことです。POCO X8 Proの公式ページでは提供期間が「2026年7月9日(木)から 終了日未定」と記載されており、当面は継続的に購入できる見込みです。最短当日発送・送料無料といった条件も案内されています。
格安SIMやサブブランドを検討する際、端末を回線とセットで安く買うか、SIMフリー端末を自分で選ぶかは重要な判断ポイントです。Y!mobile Free Styleは、その両方を1つのストアで比較しながら選べる選択肢を増やすものと言えます。購入前には、最新の価格・在庫・特典の条件を必ずワイモバイル公式ページで確認してください。
================================================================================
# ワイモバイル・LINEMO、iPhone 18 ProのeSIM動作確認
URL: https://sim-finder.com/ja/blog/ymobile-linemo-iphone-18-pro-esim-2026/
Type: blog (ja)
Published: 2026-09-14T09:00:00+09:00
ソフトバンクは2026年9月14日、通信ブランド「ワイモバイル」と「LINEMO」において、**iPhone 18 ProとiPhone 18 Pro MaxのeSIM動作確認が取れた**と公表しました。4G・5Gのデータ通信、音声通話、SMS、テザリングのすべてが問題なく動作するとしています。ただし両ブランドは端末本体を販売しないため、利用者はSIMフリー端末を自分で用意する必要があります。
## 確認された内容
ワイモバイルの発表ページ(2026年9月14日付)によると、対象はiPhone 18 ProとiPhone 18 Pro Maxの2機種で、確認された機能は次の4項目です。
- データ通信(4G・5G)
- 音声通話
- SMS
- テザリング
LINEMOの対応iPhone案内ページでも同日付で同じ2機種・同じ4項目が○として掲載されており、ケータイWatchも同日18時台にこの内容を報じています。サブブランド・オンライン専用ブランドの双方で、発売日前に主要機能の動作確認が揃った形です。
## iPhone Duoは「確認中」
一方、同時に発表された「iPhone Duo」については、ワイモバイル・LINEMOとも**「確認中」**とされ、9月14日時点で結果は公表されていません。LINEMOの対応iPhone案内ページにも同機種の記載はありません。Duoの購入を検討していて、ワイモバイルやLINEMOへの乗り換えを同時に考えている場合は、各ブランドの動作確認端末ページで続報を待つのが安全です。
## iPhone 18 Proは日本でもeSIM専用
今回の発表が重要なのは、iPhone 18 Pro/Pro Maxが**日本向けモデルも物理SIMスロットを持たないeSIM専用機**だからです。eSIMを提供していない事業者は、そもそもこの2機種に対応できません。「気になる、記になる…」が9月14日にまとめた各社の動作確認状況によると、ahamo、irumo、povo2.0、UQ mobile、LINEMO、ワイモバイルといったオンライン専用プラン・サブブランドが対応を公表しています。端末の発売日は9月18日です。
裏を返せば、物理SIMのみを扱うMVNOを使っている人がiPhone 18 Proに機種変更する場合、**回線側もeSIMに切り替えられるか**が乗り換え可否を分けます。契約中のプランがeSIMに対応しているか、eSIM再発行に手数料がかかるかを、端末購入前に確認しておきたいところです。
## 乗り換え時のチェックポイント
ワイモバイル・LINEMOとも端末を販売しないため、流れは「Apple Storeなどで本体を購入 → 回線をeSIMで契約または再発行 → プロファイルを設定」となります。すでにワイモバイル・LINEMOを物理SIMで使っている人が機種変更する場合は、eSIMへの変更手続きが別途必要です。
また、iPhone 18 Pro/Pro MaxはeSIMを2回線分使ったデュアルSIM運用ができます。メイン回線を大手のサブブランド、サブ回線をデータ専用の格安プランにして月額を抑える、といった組み合わせも取りやすくなります。自分の通信量と通話頻度に合ったプランは、SimFinderの検索機能から条件を指定して比較できます。
**出典**: [ワイモバイル公式発表](https://www.ymobile.jp/info/press/2026/26091401.html)、[LINEMO公式](https://www.linemo.jp/lp/iphone/)、[ケータイWatch(2026年9月14日)](https://k-tai.watch.impress.co.jp/docs/news/2140747.html)、[気になる、記になる…(2026年9月14日)](https://taisy0.com/2026/09/14/227597.html)
================================================================================
# 4G/LTE・5Gとは — 違いと仕組みを解説
URL: https://sim-finder.com/ja/guides/4g-5g-explained/
Type: guides (ja)
Published: 2026-06-04
スマートフォンの電波表示で「4G」「LTE」「5G」という文字を目にする。これらはすべて異なる世代の移動通信規格を示しており、それぞれ速度・遅延・カバレッジの特性が異なる。
この記事では、4G LTEと5Gの技術的な違いを3GPP規格の観点から整理し、NSA/SA構成の違い、Sub-6/ミリ波の特性、VoLTE/VoNRとの関係、そして日本での展開状況を解説する。
---
## 1. 4G/LTEとは — 3GPP Release 8から始まった規格
**LTE(Long-Term Evolution)**は、**3GPP(3rd Generation Partnership Project)のRelease 8**で規格化された移動通信方式だ。Release 8は2008年12月に凍結された。
LTEがITU(国際電気通信連合)の「4G(IMT-Advanced)」要件を厳密に満たしたのは、**3GPP Release 10のLTE-Advanced**からだ。LTE-Advancedは2011年に完成し、IMT-Advanced要件を満たす正式な4G技術として認定された。ただし業界慣行として、Release 8のLTEも「4G」と呼ばれることが定着している。
LTEの主な技術的特徴を整理する。
- **OFDMAアクセス方式**: 下りリンクにOFDMA(Orthogonal Frequency Division Multiple Access)、上りリンクにSC-FDMA(Single-Carrier FDMA)を採用。周波数を効率的に複数ユーザーで共有する。
- **MIMO**: 複数のアンテナを送受信で使うMIMO(Multiple Input Multiple Output)技術により、空間多重化で伝送容量を向上させる。
- **オールIPネットワーク**: 音声・データをすべてIPパケットで処理するアーキテクチャ(EPS: Evolved Packet System)を採用した。
Release 10で追加された**キャリアアグリゲーション(CA)**は、複数の周波数帯(コンポーネントキャリア)を束ねて同時に使うことで実効速度を高める技術だ。CAは**3GPP Release 10で最初に規格化**され、最大5コンポーネントキャリア(各最大20MHz)で最大100MHzの帯域幅を扱える。
SIMカードとネットワーク認証の仕組みについては、[SIMとは何か — 基礎知識と選び方](/ja/guides/what-is-sim/)で解説している。
LTE-Advanced以降もリリースは継続されており、Release 12でのProSe(端末間直接通信)、Release 13でのNB-IoT規格化など、4Gは単一の「固定された規格」ではなく段階的に拡張されてきた。現在も4Gは全国規模のカバレッジインフラとして機能しており、5Gが未整備のエリアでは4Gが主力であり続ける。VoLTE対応など音声通話の基盤としても4Gの役割は大きく、今後数年は4Gと5Gの併用が続く見込みだ。
---
## 2. 5G NRとは — 3GPP Release 15以降の規格
**5G NR(New Radio)**は、**3GPP Release 15以降**で規格化された次世代移動通信方式だ。Release 15はNSA(Non-Standalone)版の最初の仕様が2017年12月にリリース(ASN.1凍結は2018年3月)され、SA(Standalone)版は機能凍結2018年6月・ASN.1凍結2018年9月に完成した。
5G NRは3つの主要ユースケースを定義している。
| ユースケース | 略称 | 特性 |
|------------|------|------|
| 超高速大容量 | eMBB | 動画ストリーミング・AR/VRなど大容量通信 |
| 超低遅延高信頼 | URLLC | 自動運転・遠隔医療など遅延に敏感な用途 |
| 大量端末接続 | mMTC | IoT機器など多数の低消費電力端末の同時接続 |
5G NRは4G LTEとの後方互換性を持ちながら、新しいフレーム構造(NR numerology)と周波数レンジの拡張によって性能を高めている。
eMBBは現在の商用5Gで最も広く活用されているユースケースで、大容量動画配信やライブストリーミングなどが該当する。URLLCやmMTCはより専門的な産業用途向けであり、特にURLLCはSA構成と組み合わせることで初めてその低遅延特性を十分に引き出せる。現時点の一般消費者向け5Gサービスは主にeMBBの恩恵を受ける形となっている。
---
## 3. 5G NSAと5G SA — 2つのアーキテクチャ
5G NRの商用展開では、2つの異なるアーキテクチャが使われている。
### NSA(Non-Standalone)
**NSA(Non-Standalone)**は、5G NR無線基地局(gNB)と既存の4G LTEコアネットワーク(EPC: Evolved Packet Core)を組み合わせた構成だ。5G NRは無線アクセス側のみを担い、コアネットワークはLTE世代のままとなる。
NSAの利点はLTEインフラを再利用できるため展開コストと時間を抑えられることだ。日本のキャリアが当初5Gを展開した際もNSA構成が中心だった。ただし、コアがLTE(EPC)のままであるため、5G SAでのみ実現できる機能(ネットワークスライシング、VoNRなど)は使えない。
### SA(Standalone)
**SA(Standalone)**は、5G NR無線基地局(gNB)と5G世代のコアネットワーク(5GC: 5G Core Network)を組み合わせた構成だ。NSAとの違いはコアネットワークも5G世代(5GC)に置き換わる点にある。
SAを利用することで以下の機能が有効になる。
- **ネットワークスライシング**: 用途ごとに論理的に分離されたネットワーク(スライス)を構成できる。
- **VoNR(Voice over New Radio)**: 5G NR上での音声通話。詳細は後述。
- **より低い遅延特性**: 5GCの新しいプロトコルスタック(SBA: Service-Based Architecture)により、制御プレーンの遅延が改善される。
日本のキャリアは5G SA対応エリアを順次拡大中だが、現時点ではSA対応エリアは限定的であり、SA対応エリア外では5G NSAまたは4G LTEにフォールバックする。
利用者の観点では、NSAとSAの切り替えは端末が自動的に行うため、通常は意識する必要がない。ただし、ネットワークスライシングを利用したサービス(特定のアプリやビジネス用途で帯域保証を受けるケースなど)はSA対応エリアでのみ利用可能となる。一般的なデータ通信・通話の利用では、NSAとSAの差は体感しにくいことが多い。
---
## 4. Sub-6とミリ波 — 5Gが使う周波数帯
5G NRは使用する周波数帯によって特性が大きく異なる。3GPPはFrequency Range 1(FR1)とFrequency Range 2(FR2)の2つに分類している。
### FR1(Sub-6GHz帯)
**FR1**は6GHz以下の周波数帯で、**Sub-6**とも呼ばれる。3GPP NR仕様でFR1の上限は7.125GHzまで拡張されている(3GPP Release 17以降でFR1の上限が7.125GHzに拡張)。
Sub-6の特性は以下のとおりだ。
- **エリアカバレッジ**: 低い周波数ほど電波の回り込みが大きく、建物内や遮蔽環境でもある程度届く。
- **通信速度**: ミリ波より帯域幅が限られるため最大速度はミリ波より低い。
- **日本での展開**: 日本のキャリアは主にSub-6帯(例:3.7GHz帯、4.5GHz帯)を使って5Gエリア拡大を進めている。
### FR2(ミリ波帯)
**FR2**は24GHz以上の高周波帯で、**ミリ波(mmWave)**と呼ばれる。
- **超高速・超大容量**: 広い帯域幅を確保できるため、理論上の最大速度が大幅に高くなる。
- **短距離・直進性**: 周波数が高いほど電波の直進性が高く、遮蔽物に弱い。建物の壁や人体でも大幅に減衰する。
- **用途**: 競技場・駅・空港など特定エリアへの高密度展開に向いている。
現在の5G対応スマートフォンの多くはSub-6(FR1)のみに対応しており、ミリ波に対応しているのは一部の上位モデルに限られる。5G端末を購入する際に「Sub-6対応」と「ミリ波対応」を区別して確認することが重要だ。日本国内でのミリ波展開はまだ限定的なエリアにとどまっているため、現時点では多くのユーザーにとってSub-6対応かどうかが実質的な判断基準となる。
---
## 5. 4Gと5Gの性能比較
4G LTEと5G NRの技術的な性能を比較する。ここで示す数値は規格上の理論値または典型的な目安であり、実際の速度はエリア・端末・利用状況によって大きく異なる。具体的な速度については断定を避け、特性の違いとして理解してほしい。
| 項目 | 4G LTE(Release 8〜) | 5G NR(Release 15〜) |
|-----|----------------------|----------------------|
| 主なアクセス方式 | OFDMA(DL)/ SC-FDMA(UL) | OFDMA(DL/UL) |
| 典型的な遅延 | 数十ms程度 | SAで数ms〜十数ms程度(理論値) |
| 同時接続密度 | 〜10万台/km²(目安) | 〜100万台/km²(mMTCユースケース目標) |
| 最高周波数帯 | 最大6GHz未満 | Sub-6 + ミリ波(FR2) |
| コアネットワーク | EPC(Evolved Packet Core) | NSA:EPC / SA:5GC |
| ネットワークスライシング | なし | SAで利用可能 |
遅延の数値は、特にURLLC(超低遅延)ユースケースにおける5G SAの理論目標値だ。現在の商用ネットワークでの実測値はこれより大きくなる場合がある。
なお、4Gと5Gで同じ量のデータを転送する場合、消費するデータ通信量は変わらない。5Gで速度が上がるとダウンロードが速く完了するが、転送したデータ量(バイト数)は同じだ。ただし、速度が高いことで高画質動画を選びやすくなるなど、間接的にデータ消費量が増えるケースはある。また、実際の通信速度は使用する周波数帯・基地局との距離・周辺の利用者数(混雑状況)・端末の性能によって変化するため、規格上の理論値がそのまま実測値になることはない。
---
## 6. VoLTE・VoNRとの関係
音声通話の技術は、使用するネットワーク世代によって異なる。
**4G(LTE)環境**: 音声通話は**VoLTE(Voice over LTE)**が担う。VoLTEはIMS(IP Multimedia Subsystem)を使って音声をIPパケットで伝送する技術で、GSMA PRD IR.92で仕様が定義されている。
**5G NSA環境**: コアネットワークがLTE(EPC)のままであるため、音声通話はVoLTEが引き続き使われる。
**5G SA環境**: コアが5GC(5G Core)に移行することで、**VoNR(Voice over New Radio)**が利用可能になる。VoNRは3GPP Release 15で規格化された5G NR上の音声通話技術で、EVS(Enhanced Voice Services)コーデックによるさらに高音質な通話が可能だ。
[VoLTEとVoNRとは — 4G/5Gで通話する仕組みと対応端末](/ja/guides/volte-vonr/)では、IMS・SIPシグナリング・QoSの仕組みから3G停波後の注意点まで詳しく解説している。
---
## 7. 日本における5G展開の現状
日本の大手キャリア(NTTドコモ・KDDI/au・ソフトバンク・楽天モバイル)はいずれも5G NRの商用サービスを展開している。
日本の5G展開に関して確実に言えることは以下のとおりだ。
- **Sub-6帯が中心**: 日本のキャリアは主にSub-6帯(3.7GHz帯・4.5GHz帯など)を使って5Gエリアの拡大を進めている。
- **NSAからSAへ移行中**: 多くのキャリアは当初5G NSA構成で展開し、SA対応エリアを順次拡大している。SA対応エリアはキャリアの公式エリアマップで確認できる。
- **エリアはまだ拡大中**: 都市部を中心に整備が進んでいるが、地方や建物内での5G利用は4G LTEにフォールバックする状況が続いている。
5Gを活用する際は、自分が使うエリアとキャリアの5G対応状況(NSA/SA、対応バンド)を事前に確認することが重要だ。端末が5G対応でも、契約キャリアの5Gバンドに端末が非対応だと5Gの恩恵を受けられない。
5G対応端末であっても、5Gエリア外では自動的に4G LTEにフォールバックして動作する。これはユーザーが設定を変更しなくても端末が自動で行う処理であり、フォールバック中でも通話・データ通信は継続して利用できる。地方や建物の奥まった場所では4G接続が常態となるケースも多く、5G端末を持っていることが常に5G接続を保証するわけではない点は理解しておきたい。
端末の周波数バンド対応については[周波数バンドとは — 対応バンドの確認方法](/ja/guides/frequency-bands/)で詳しく解説している。
MNO(大手キャリア)とMVNOの関係については[MNOとは — 大手キャリアの仕組み](/ja/guides/what-is-mno/)で解説している。5G展開はMNOが行い、MVNOはMNO回線を借りる形でサービスを提供するため、5Gを利用できるかどうかはMVNO各社の対応状況にも依存する。
また、現在も4Gは5Gを補完するインフラとして重要な役割を担っている。VoLTEは4G LTE上で動作するため、5G NSA環境での通話は依然として4G LTEのコアネットワークを使う。このことからも、4Gが当面の間、5Gと並行して運用されていく理由がわかる。日本の3G停波後も、4G/LTE網は継続して維持される見込みだ。
---
## 8. SIM選びと4G/5Gの関係
4G/5Gの技術知識は、SIMカード・プランを選ぶ際の判断基準に直結する。
**5G対応SIMが必要か確認する**: すべてのSIM・プランが5Gに対応しているわけではない。5Gを使いたい場合は、契約するキャリア・MVNOのプランが5G対応であることを確認する。
**端末と周波数バンドの整合性**: SIMフリー端末を購入する際は、契約予定のキャリアが使う5G周波数バンドを端末がサポートしているかを確認する。特に海外モデルの端末は、日本キャリアのバンドに対応していない場合がある。
**データ節約との関係**: 5Gエリアでは速度が高いため、意図せず多くのデータを消費することがある。データ節約の方法については[データ通信量の節約方法](/ja/guides/save-data/)で解説している。
**SIMと端末の互換性**: SIMカードそのものとeSIMの違い、対応端末については[SIMとeSIMの違い — 選び方と切り替え方法](/ja/guides/sim-vs-esim/)で確認できる。
海外での5Gローミング利用については[国際ローミングとは — 海外でのSIM利用ガイド](/ja/guides/international-roaming/)で解説している。ローミング時の5G対応可否はローミング協定の内容に依存する。
SIMプランを選ぶ際に「5G対応」と記載されていても、実際に5G通信を体験できるかどうかは生活エリア・使用端末・キャリアの展開状況の3つが揃って初めて決まる。これらを事前に確認することが、プラン選択で後悔しないための実践的なポイントだ。
---
## FAQ
### 4GとLTEは同じものですか?
厳密には異なります。LTE(Long-Term Evolution)は3GPP Release 8で規格化された通信方式で、国際電気通信連合(ITU)の「4G」要件(IMT-Advanced)を当初は満たしていませんでした。その後、LTE-Advanced(Release 10)がIMT-Advanced要件を満たし、正式な4G技術となりました。現在は「4G/LTE」としてほぼ同義に使われています。
### 5G NSAと5G SAはどう違いますか?
NSA(Non-Standalone)は5G NR無線と4G LTEコアネットワーク(EPC)を組み合わせる構成です。SA(Standalone)は5G NR無線と5Gコアネットワーク(5GC)を両方5G世代に置き換えた構成です。SAのほうが低遅延・ネットワークスライシングなど5Gの特性をフルに発揮できます。現在の日本では5G NSAの展開が中心で、SA対応エリアは順次拡大中です。
### Sub-6とミリ波の違いは何ですか?
Sub-6(サブ6)は6GHz以下の周波数帯を使う5G NRで、電波の遮蔽に強くエリアカバレッジが広い反面、ミリ波より最大速度は低くなります。ミリ波(mmWave)は24GHz以上の高周波帯で超高速・超大容量ですが、電波の直進性が高く遮蔽物に弱いため屋内や遠距離での利用が難しいです。日本では現在、Sub-6帯を中心に5G展開が進んでいます。
### 5G対応端末を持っていても5Gが使えない場合があるのはなぜですか?
主な理由は3つです。①エリア外:5Gエリアに居ない場合は4G LTEにフォールバックします。②バンド非対応:端末が契約キャリアの5G周波数バンドに対応していない場合があります(特に海外モデル端末)。③NSA/SA非対応:一部端末はSA構成の5Gに対応していない場合があります。
### 4Gと5Gで通話の仕組みは変わりますか?
4G環境ではVoLTE(Voice over LTE)が音声通話を担います。5G NSA環境でも音声通話はVoLTEが使われます。5G SA環境ではVoNR(Voice over New Radio)が利用可能になりますが、SA対応エリア外ではVoLTEにフォールバックします。VoLTEとVoNRの詳しい仕組みは[VoLTEとVoNRとは — 4G/5Gで通話する仕組みと対応端末](/ja/guides/volte-vonr/)で解説しています。
---
## まとめ
- **4G LTE**は3GPP Release 8で規格化。LTE-Advanced(Release 10)でITU IMT-Advanced要件を満たした。
- **5G NR**は3GPP Release 15以降で規格化。eMBB・URLLC・mMTCの3ユースケースを定義。
- **NSA**はLTEコア+5G NR無線の構成。**SA**は5GC+5G NR無線で、VoNRやネットワークスライシングが利用可能。
- **Sub-6(FR1)**は広域カバレッジ向き。**ミリ波(FR2)**は超高速・短距離向き。日本はSub-6中心に展開中。
- 音声通話は4G・5G NSAではVoLTE、5G SAではVoNRが使われる。
- **5G対応端末でも5Gエリア外では4G LTEに自動フォールバック**する。実際に5Gを利用できるかは、エリア・端末バンド対応・プランの3点を確認することが重要。
- **4Gと5Gで同量のデータ転送であればデータ消費量は同じ**。速度向上が高画質コンテンツ選択を促す間接的な影響はある。
---
## 関連ガイド
- [VoLTEとVoNRとは — 4G/5Gで通話する仕組みと対応端末](/ja/guides/volte-vonr/)
- [MNOとは — 大手キャリアの仕組み](/ja/guides/what-is-mno/)
- [SIMとeSIMの違い — 選び方と切り替え方法](/ja/guides/sim-vs-esim/)
- [国際ローミングとは — 海外でのSIM利用ガイド](/ja/guides/international-roaming/)
- [データ通信量の節約方法](/ja/guides/save-data/)
================================================================================
# 5Gの帯域 — Sub-6とミリ波の違い
URL: https://sim-finder.com/ja/guides/5g-bands/
Type: guides (ja)
Published: 2026-06-04
5Gと聞いて「速い」というイメージはあっても、なぜ場所によって速度がまったく異なるのか、疑問に思ったことはないだろうか。その答えの多くは「どの周波数帯(バンド)を使っているか」に行き着く。
5G NRには大きく2種類の周波数帯区分がある。6 GHz以下のSub-6(FR1)と、24 GHz以上のミリ波(FR2)だ。この2つは速度・到達距離・屋内外の特性が根本的に異なり、それぞれの特性を知ることで自分に合った端末選びとエリア判断ができるようになる。
この記事では、3GPPが定めるFR1/FR2の定義からバンド命名規則、Sub-6とミリ波の性能トレードオフ、屋内外特性の違い、対応端末の確認方法まで、技術仕様に基づいて整理する。
---
## 1. 5G NRの周波数範囲区分:FR1とFR2
3GPP(3rd Generation Partnership Project)は5G NR(New Radio)の周波数範囲を**FR1**と**FR2**の2つに区分している。仕様は3GPP TS 38.101(NR; User Equipment (UE) radio transmission and reception)に定義されている。
| 区分 | 名称 | 周波数範囲 | 通称 |
|------|------|-----------|------|
| FR1 | Frequency Range 1 | 410 MHz〜7125 MHz | Sub-6 GHz(サブ6) |
| FR2 | Frequency Range 2 | 24250 MHz〜52600 MHz | ミリ波(mmWave) |
FR1の上限が「7125 MHz」となっているのは、6 GHz帯(いわゆる「Sub-7 GHz」とも呼ばれる上限付近)まで含めているためだ。通称として「Sub-6」が定着しているが、厳密にはFR1は7.125 GHzまでを含む。
FR2の周波数は24.25 GHz〜52.6 GHzであり、波長がミリメートル単位(約5〜12 mm)になることから「ミリ波(millimeter wave、mmWave)」と呼ばれる。
5Gには現在この2つのFR区分が存在するが、将来的には7.125 GHz〜24.25 GHzの「FR3」についても研究が進んでいる(3GPP Release 19以降で研究段階)。本記事では商用展開済みのFR1・FR2を対象とする。
---
## 2. 5G NRバンドの命名規則
LTE(4G)が「Band 1」「Band 3」のように番号で表記するのに対し、5G NRのバンドには**「n」のプレフィックス**が付く。これは3GPP TS 38.101で定められた命名規則だ。
### FR1(Sub-6)の主要バンド
FR1のバンドはn1〜n100番台に割り当てられている。代表的なバンドを示す。
| バンド | 周波数帯 | 複信方式 | 主な用途 |
|--------|---------|---------|---------|
| n1 | 2100 MHz | FDD | LTE Band 1と同じ周波数帯(4G/5G共用化が進む) |
| n3 | 1700 MHz | FDD | 都市部の容量拡大 |
| n28 | 700 MHz | FDD | 広域カバー(APT700バンド) |
| n77 | 3300〜4200 MHz | TDD | 5G主力バンド(広域) |
| n78 | 3300〜3800 MHz | TDD | n77のサブセット・5G主力バンド |
| n79 | 4400〜5000 MHz | TDD | 高容量エリア |
n77とn78はいずれも3.5〜4 GHz帯(通称「Cバンド」または「3.5 GHzバンド」)であり、多くの国で5G主力帯域として商用展開されている。
### FR2(ミリ波)の主要バンド
FR2のバンドはn257〜n261に割り当てられている。FR1とは番号が大きく離れており、一目でミリ波バンドとわかる体系だ。
| バンド | 周波数帯 | 複信方式 | 主な用途 |
|--------|---------|---------|---------|
| n257 | 26500〜29500 MHz(28 GHz帯) | TDD | 日本・欧州・韓国等 |
| n258 | 24250〜27500 MHz(24 GHz帯) | TDD | 欧州・米国等 |
| n260 | 37000〜40000 MHz(39 GHz帯) | TDD | 米国主体 |
| n261 | 27500〜28350 MHz(28 GHz帯) | TDD | 米国・日本等 |
日本のキャリアはミリ波帯として**n257(28 GHz帯)**を主に使用している。総務省は2019年に大手4キャリアへミリ波(28 GHz帯)の5G用周波数を割り当てた。
複信方式について補足すると、FDD(Frequency Division Duplex:周波数分割複信)は上り・下りで異なる周波数帯を使い、TDD(Time Division Duplex:時分割複信)は同じ周波数帯を時間で分割して上り・下りに使う。ミリ波はすべてTDD方式で運用される。
LTE(4G)と5G NRのバンド番号の詳細な対応関係や日本のキャリア別バンド一覧は、[周波数帯(バンド)と端末互換性 — LTE・5Gバンド番号の見方と確認方法](/ja/guides/frequency-bands/)でも整理している。
---
## 3. Sub-6(FR1)の特性:広域カバーと安定性
Sub-6 GHzの電波は、周波数が低いほど**到達距離が長く**なり、**障害物を回り込む性質(回折性)が高い**という物理的特性を持つ。
### 到達距離と基地局密度
n77/n78(3.5 GHz帯)を例にとると、1つの基地局がカバーできる半径はおおよそ数百メートルから1〜2 km程度(地形・建物密度により異なる)であり、LTEと同等か、Sub-6帯域の周波数がLTEより高い場合はやや狭くなる。
ただし700 MHz帯(n28)のような低周波数のSub-6バンドは、LTEプラチナバンドと同等の広域カバー特性を持ち、地方・山間部・建物内でのカバレッジを担う。
### 屋内・屋外特性
Sub-6 GHzの電波は鉄筋コンクリートの壁や建物ガラスへの浸透力があり、屋内でも一定の接続性が期待できる。屋外から屋内への「建物透過損失」は周波数が高くなるほど増加するため、3.5 GHz帯のn77/n78はLTEの2.1 GHz帯(n1)と比べると屋内浸透は若干低下するが、ミリ波と比較すれば大幅に優れている。
### 速度の特性
Sub-6の速度は使用する帯域幅に依存する。5G NRでは最大100 MHz幅の帯域を1バンドで使用でき、4G LTE(通常10〜20 MHz幅)より広い帯域を確保しやすいため、理論上のピーク速度はLTEより高い。ただし実際の通信速度は、エリア内の同時接続ユーザー数・基地局との距離・端末性能など多くの要因に左右されるため、記事上での具体的な速度値の断定は行わない。
---
## 4. ミリ波(FR2)の特性:超高速と極短距離
ミリ波は5G NRの中で最も高速な通信を実現できる周波数帯だが、その物理特性から展開シナリオが大きく限定される。
### 超広帯域による高速性
ミリ波の最大の特徴は、利用できる帯域幅の広さだ。FR2では1バンドあたり最大400 MHzの帯域幅を使用でき、さらにキャリアアグリゲーションで束ねることで理論上数Gbpsの下り速度を実現できる。これは数十〜数百人が同時に超高解像度動画をストリーミングしたり、大量IoTデバイスが同時接続したりするシナリオで有効だ。
### 到達距離の短さ
ミリ波は波長が短く、大気中での減衰(自由空間損失)がSub-6より大幅に大きい。1つのミリ波基地局がカバーできる半径は一般的に数十メートルから数百メートル程度とされており、Sub-6と比べて桁違いに狭い。
### 障害物への脆弱性
ミリ波の直進性は強く、障害物によって著しく減衰する。
- **建物の壁**: 鉄筋コンクリートや金属フレームの建物内にはほぼ到達しない
- **雨・霧**: 降雨による減衰(雨減衰)がSub-6より顕著に大きい
- **植物**: 葉や木の枝でも数dB〜十数dBの減衰が発生する
- **人体**: 端末を手で握るだけで指向性アンテナの利得が低下する場合がある
この特性のため、ミリ波は**屋外の見通し線(Line of Sight: LoS)が確保できる特定エリアに限定的に展開**される。
### 主要な展開シナリオ
| 場所 | 理由 |
|------|------|
| 大型スタジアム・アリーナ | 多数の観客が狭いエリアに集中するため帯域需要が極めて高い |
| 鉄道駅・空港の待合エリア | 見通し距離が確保でき、利用者が密集する |
| 大型ショッピングモール内 | 屋内展開(ミリ波は屋内での専用設備が必要) |
| 展示会・イベント会場 | 一時的な超高密度接続需要 |
こうした場所ではミリ波基地局を天井や柱に近距離で多数設置することで面的なカバレッジを形成する。街中の屋外や一般の屋内建物ではSub-6が主役であり、ミリ波はあくまで特定の高密度スポットを補完する位置づけだ。
---
## 5. Sub-6とミリ波のトレードオフ比較
2つの周波数帯の特性を横並びで比較すると、それぞれが異なるニーズを担っていることが明確になる。
| 比較軸 | Sub-6(FR1) | ミリ波(FR2) |
|--------|-------------|-------------|
| 周波数範囲 | 410 MHz〜7125 MHz | 24250 MHz〜52600 MHz |
| 代表バンド(日本) | n77、n78、n79、n28 | n257(28 GHz帯) |
| 到達距離 | 数百m〜数km | 数十m〜数百m |
| 障害物透過 | 良好〜中程度 | 非常に弱い |
| 屋内利用 | 可能(減衰あり) | 困難(専用設備が必要) |
| 雨天時 | ほぼ影響なし | 減衰が顕著 |
| 利用可能帯域幅 | 最大100 MHz/バンド | 最大400 MHz/バンド |
| 主な展開形態 | 広域カバー・一般利用 | 超高密度スポットカバー |
この表は物理特性の整理であり、実際の通信速度は環境・キャリア設備・端末性能により大幅に異なる。
---
## 6. 日本における5Gバンドの展開状況
日本のキャリア(NTTドコモ・KDDI/au・SoftBank・楽天モバイル)は、総務省による5G周波数割当てに基づいてSub-6とミリ波の両方を保有している。
主要なSub-6帯域割当ては以下の通りだ(3.5 GHz帯・4.5 GHz帯)。
| キャリア | Sub-6主要バンド | ミリ波バンド |
|---------|---------------|-----------|
| NTTドコモ | n78(3.4/3.5 GHz帯)、n79(4.5 GHz) | n257(28 GHz) |
| KDDI(au) | n77(3.7 GHz帯)、n78(3.4/3.5 GHz帯) | n257(28 GHz) |
| SoftBank | n77(3.7 GHz帯) | n257(28 GHz) |
| 楽天モバイル | n77(3.7 GHz帯) | n257(28 GHz) |
2026年時点の日本の5Gエリアは、実用上のカバレッジのほぼすべてをSub-6帯が担っている。ミリ波は主要都市の特定スポット(駅・スタジアム・商業施設等)で展開されているが、一般的な街中・住宅地・地方部ではSub-6のみが対象だ。
5Gサービスの展開形態には2種類ある。現在普及しているのは**NSA(Non-Standalone)**構成で、5G NR無線をLTE(4G)コアネットワーク上で動作させる。将来的に普及が期待される**SA(Standalone)**は5G専用コアネットワーク(5GC)を使い、5G本来の低遅延・ネットワークスライシングを実現する。SA構成はVoNRの前提にもなる(詳しくは[VoLTEとVoNRとは — 4G/5Gで通話する仕組みと対応端末](/ja/guides/volte-vonr/)を参照)。
MNO(大手キャリア)とMVNO(格安SIM)の5G提供の違いについては、[MNO(大手キャリア)とは — MVNO・サブブランドとの違い](/ja/guides/what-is-mno/)で解説している。
---
## 7. 対応端末の確認方法
5Gに対応しているかどうか、またSub-6のみかミリ波にも対応しているかを確認するには、以下の手順を踏む。
### メーカー公式スペックページを確認する
端末の5G NR対応バンドはメーカー公式サイトの仕様ページ(Specifications / Tech Specs)に記載されている。確認のポイントは3つだ。
**1. 端末のリージョンモデルを特定する**
同じ製品名でも販売地域によって対応バンドが異なる場合がある。日本向けモデルか、北米向け・欧州向けモデルかを特定したうえで仕様を確認する。例えばiPhoneはモデル番号(A2や型番の末尾)によってリージョンを識別できる。
**2. 「5G NR」欄のバンドリストを確認する**
仕様ページに「5G NR Sub-6 GHz」と「5G NR mmWave」が別欄で記載されていることが多い。mmWave欄があれば(例:n257、n260等)ミリ波対応端末だ。日本で購入できる端末でミリ波に対応しているのは一部の高性能モデルに限られる。
**3. 使用キャリアのバンドが含まれているか照合する**
自分が使うキャリアのSub-6主力バンド(例:ドコモならn78/n79、auならn77/n78)が端末の対応バンドリストにあるかを確認する。
### MVNOで5Gを使う場合の注意
MVNO(格安SIM)が5Gサービスを提供しているかどうか、また5G接続に必要なSIM設定(APN等)が対応しているかを事前に確認する必要がある。MVNOは元のMNO回線を利用しているため、5G対応自体はMNO次第だが、MVNOとしての5G提供状況はMVNOごとに異なる。
SIMフリー端末を別キャリアで使う際の全般的な注意については、[SIMロックとは — 解除方法と注意点](/ja/guides/sim-lock/)を参照してほしい。
海外旅行時に5G接続を期待する場合も、現地キャリアが提供するバンドと端末のバンド対応を照合する必要がある。詳しくは[国際ローミングの仕組みと料金 — 海外でキャリアSIMを使う方式](/ja/guides/international-roaming/)を参照。
---
## 8. 5G対応SIMや端末を選ぶ際の考え方
5G対応かどうかは、利用目的と使う場所によって重要度が変わる。
**都市部・主要エリアが中心の場合**: Sub-6(n77/n78/n79)対応端末であれば、日本国内の主要都市の屋外では5G接続が期待できる。ミリ波対応は必須ではない。
**地方・山間部・屋内が多い場合**: 5G NRの対応バンドよりも、LTEのプラチナバンド(Band 19/18/8/28)対応が通信安定性に直結することが多い。現状の5G Sub-6(3.5〜4.5 GHz帯)は低周波のLTEバンドより広域カバー性が低いため、5G接続できない場面ではLTE接続が主役になる。
**海外旅行・ローミング**: 旅行先の国・キャリアが使う5Gバンドは日本と異なる場合がある。特にミリ波バンドは国によって使用バンド(n257/n258/n260/n261)が異なる。旅行eSIMを選ぶ場合も、対応バンドとエリアを事前に確認することが有益だ。
どのプランや端末が自分の用途に合うかは条件によって大きく異なる。[自分に合ったSIMの選び方 — 用途別チェックリスト](/ja/guides/how-to-choose/)では具体的な選び方の観点を整理している。
---
## FAQ
### Sub-6とミリ波はどう違いますか?
Sub-6(FR1)は6 GHz以下の周波数帯で、到達距離が長く障害物を回り込みやすいため広いエリアをカバーできます。ミリ波(FR2)は24 GHz以上の高周波帯で、非常に広い帯域幅により超高速・大容量通信が可能ですが、到達距離が短く建物・雨・植物によって大幅に減衰します。日本の5Gエリアは現状ほぼSub-6で構成されています。
### FR1とFR2とは何ですか?
3GPP TS 38.101が定める5G NRの周波数範囲区分です。FR1(Frequency Range 1)は410 MHz〜7125 MHzのSub-6 GHz帯、FR2(Frequency Range 2)は24250 MHz〜52600 MHzのミリ波帯を指します。5G NRバンドはFR1はn1〜n100番台、FR2はn257〜n261のように番号が割り当てられています。
### 5G対応端末かどうかはどこで確認できますか?
メーカー公式サイトの仕様ページ(Specifications / Tech Specs)の「5G NR」欄を確認してください。iPhoneはApple公式、PixelはGoogle公式の仕様ページに対応バンドが列挙されています。Sub-6対応かミリ波対応かも記載されているため、購入地域のモデル番号を特定したうえで確認するのが確実です。
### ミリ波対応端末でないと5Gは使えませんか?
Sub-6(FR1)対応であれば5G NRネットワークに接続できます。ミリ波(FR2)は対応端末かつミリ波対応エリアでのみ利用可能で、一般の街中や屋内では通常Sub-6が使われます。日本ではミリ波対応端末は一部の高性能スマートフォンに限られており、ミリ波サービスエリアも特定のスポットに限定されています。
### 5GのSub-6(n77/n78)とLTE(Band 3/Band 1)は何が違いますか?
周波数帯と使用する通信規格が異なります。LTE Band 3(1.7 GHz)やBand 1(2.1 GHz)はLTE(4G)規格のバンドで、3GPP TS 36.101で規定されています。5G NR n77(3.3〜4.2 GHz)やn78(3.3〜3.8 GHz)は5G NR規格のバンドで、3GPP TS 38.101で規定されています。5G NRは広い帯域幅と新しい変調方式(最大256QAM等)、ビームフォーミング技術により、同じ周波数利用効率でもより高い通信速度と大容量通信を実現します。
---
## まとめ
- **FR1(Sub-6 GHz)**は410 MHz〜7125 MHzの広域カバー向け帯域。n77(3.3〜4.2 GHz)・n78(3.3〜3.8 GHz)・n79(4.4〜5 GHz)が日本の5G主力バンド。障害物への強さと到達距離に優れる。
- **FR2(ミリ波)**は24250 MHz〜52600 MHzの超高速・大容量向け帯域。日本はn257(28 GHz)を使用。超広帯域で数Gbps級が可能だが、到達距離・屋内浸透・降雨減衰の制約から特定スポットへの展開に限られる。
- **3GPP NRバンド命名**はプレフィックス「n」で識別。FR1はn1〜n100番台、FR2はn257〜n261が割り当てられている。
- **日本の現状**はSub-6が実用カバレッジのほぼすべてを担い、ミリ波は主要都市の特定スポットのみ。
- **端末選びの基本**はメーカー公式スペックページで「5G NR」対応バンドを確認し、利用キャリアの主力バンドとの照合を行うこと。
通信規格に関連する用語を体系的に確認したい場合は[通信用語集 — SIM・eSIM・MNO/MVNOの基礎用語](/ja/guides/glossary-index/)を参照してほしい。
================================================================================
# SIMの開通手続き・アクティベーション — 物理SIM・eSIM別の手順と確認方法
URL: https://sim-finder.com/ja/guides/activation/
Type: guides (ja)
Published: 2026-06-04
SIMの「開通」とは、回線が実際に使えるようになること(アクティベーション)を指す。SIMの受け取りや挿入・インストールだけでは開通が完了しない場合がある。この記事では、物理SIMとeSIMそれぞれの開通手順、日本独自の本人確認(eKYC)の流れ、MNP転入時の注意点、開通後のAPN・通信確認まで、一連の流れを順を追って解説する。
---
## 開通(アクティベーション)とは何か
SIMカードやeSIMの「開通」とは、**キャリアのネットワークに回線が接続可能な状態になること**だ。開通前の状態では、SIMが端末に認識されていても通話・SMS・データ通信のいずれも使えない。
開通は大きく2つのフェーズに分かれる。
| フェーズ | 内容 |
|---------|------|
| 1. SIMの取得 | 物理SIMの受け取り / eSIMプロファイルのダウンロード |
| 2. 開通手続き | キャリアのWebサイト・アプリで回線を有効化する操作 |
フェーズ2が完了して初めて回線が開通する。フェーズ1だけでは開通しない点に注意が必要だ。
---
## 物理SIMの開通手順
物理SIMの開通は、SIMカードを端末に挿入した後、キャリアの開通手続きを完了することで行われる。
### ステップ1: SIMカードを挿入する
SIMカードの挿入手順については「[SIMカードの挿入方法と取り出し方法](/ja/guides/sim-insertion/)」で詳しく解説している。サイズの確認やSIMピンの扱い方も含めて確認してほしい。
端末の電源を落とした状態でSIMを挿入し、電源を入れた後にキャリアのネットワーク名(「NTT DOCOMO」「au」「SoftBank」「楽天モバイル」等)が表示されるかを確認する。ネットワーク名が表示されれば、端末がSIMを正しく認識している。
### ステップ2: 本人確認が必要か確認する
日本では、携帯電話不正利用防止法(携帯音声通信事業者による契約者等の本人確認等及び携帯音声通信役務の不正な利用の防止に関する法律)に基づき、SIMの新規契約・MNP転入時には本人確認が必要だ。確認方法はキャリアによって異なる。
**主な本人確認方法:**
- **eKYC(オンライン本人確認)**: スマートフォンのカメラで身分証明書(運転免許証・個人番号カード等)を撮影し、オンラインで本人確認を行う方式。多くのオンライン専用ブランドで採用されている
- **対面確認**: 店舗窓口でスタッフが書類を確認する方式。ドコモショップ・auショップ・ソフトバンクショップ等
SIMカードを郵送で受け取り、後日Webまたはアプリで本人確認と開通手続きを行う流れが一般的だ。
### ステップ3: 開通手続きを行う
キャリアの指定する方法(Web・アプリ)で開通手続きを実施する。手続き完了後、端末を機内モードに切り替えてからオフに戻すか、再起動することで回線が有効になる場合がある。
---
## eSIMの開通手順
eSIMの開通は、プロファイルのダウンロードと開通手続きが一体になっているケースと、分かれているケースがある。
### eSIM開通の前提条件
1. **eSIM対応端末であること**: iPhoneはXS/XR以降、Android(Pixel)は4以降が日本国内では基本的に対応している(Pixel 3/3aの日本版は非対応)。詳細は「[eSIM対応端末一覧](/ja/guides/esim-compatible-devices/)」を参照
2. **SIMロックが解除されていること**: 2021年10月以降に日本国内で発売された端末は原則SIMロックフリー。それ以前の端末は各キャリアのオンライン手続きで解除が必要
3. **インターネット接続があること**: プロファイルのダウンロードにはWi-Fiまたはモバイルデータ通信が必要
### QRコードによるeSIM開通(iPhone)
多くのキャリアはQRコードでeSIMプロファイルを発行する。QRコードを使ったiPhoneでの設定手順については「[eSIM QRコードの読み取り方(iPhone)](/ja/guides/qr-code-iphone/)」で詳しく解説している。
QRコードが使えない場合(同一端末でQRコードが表示されている等)は、SM-DP+アドレスとアクティベーションコードを手動入力する方法に切り替えることができる。
### アプリ経由のeSIM開通
楽天モバイルはeSIM発行・開通を「my 楽天モバイル」アプリ経由で行う(レジストリ確認済み)。アプリ内でeSIM申し込みと本人確認を完了すると、最短で数分後に開通手続きに進める。QRコードを使わずアプリ完結でeSIMプロファイルが発行される。
### Web経由のeSIM開通
ahamo・povo・LINEMO・UQモバイル・ワイモバイル等はWebサイト(マイページ)経由でeSIM発行手続きを行う。手続き後にQRコードが発行されるか、アクティベーションコードが表示される。
---
## 本人確認(eKYC)の流れ
日本では携帯電話不正利用防止法(携帯音声通信事業者による契約者等の本人確認等及び携帯音声通信役務の不正な利用の防止に関する法律)に基づき、SIM・eSIMの新規契約時に本人確認が義務付けられている。オンライン申し込みが主流になった現在、**eKYC(electronic Know Your Customer)**と呼ばれるオンライン本人確認が多くのキャリアで採用されている。
### eKYCの一般的な流れ
1. キャリアのWebサイトまたはアプリで申し込み手続きを開始
2. 本人確認書類の種類を選択(運転免許証・個人番号カード・在留カード等)
3. スマートフォンのカメラで身分証明書の表面・裏面・厚みを撮影
4. 顔写真の撮影(身分証明書の顔写真と照合するため)
5. 審査完了の通知(メール等)を受け取る
審査にかかる時間はキャリアによって異なり、数分で完了するケースから数時間かかるケースまである。夜間・休日は翌営業日になる場合があるため、余裕を持ったスケジュールで手続きすることを推奨する。
### 対面確認が必要なケース
以下のケースでは店舗での対面確認が必要になる場合がある。
- eKYCに対応していない本人確認書類しか持っていない場合
- 未成年者の契約(親権者の同席・書類が必要)
- 本人確認書類の有効期限が切れている場合
---
## MNP転入時の回線切替タイミング
MNP(Mobile Number Portability:携帯電話番号ポータビリティ)で他社から乗り換える場合、回線切替のタイミングに注意が必要だ。
### MNP転入の流れ
1. **現在のキャリアでMNP予約番号を取得する**: My docomoやMy auなどのマイページ、または電話で取得できる。取得後、有効期限(一般に15日間)内に転入手続きを行う必要がある。なお、MNPワンストップ方式ではMNP予約番号の取得が不要
2. **転入先キャリアで申し込みを完了する**: MNP予約番号を入力して申し込みを行う
3. **本人確認を完了する**
4. **SIM(またはeSIM)を受け取る**
5. **開通手続き(回線切替)を実行する**
### 回線切替の実行タイミングと注意点
**開通手続き(回線切替)を実行した瞬間に、旧キャリアの回線は自動的に解約される。**
このため、開通手続き前に以下を済ませておくことを推奨する。
- **キャリアメールのバックアップ**: キャリアメール(@docomo.ne.jp等)のデータを別のメールサービスに転送・バックアップする。乗り換え後はキャリアメールへのアクセスが変わる(キャリアメール持ち運びサービス利用の場合は別途申し込みが必要)
- **二段階認証(2FA)の確認**: キャリアのSMS宛に届く2FA設定がある場合、乗り換え後の番号でも機能するか確認する
- **旧SIMの返却先確認**: キャリアによっては旧SIMの返却が必要な場合がある
乗り換え前のチェックリスト全般については「[乗り換え前チェックリスト](/ja/guides/pre-switch-checklist/)」も合わせて参照してほしい。
---
## 開通後のAPN・通信確認
SIMの開通手続きが完了した後、実際にデータ通信が使えるかを確認する。
### APNとは
APN(Access Point Name)は、3GPP TS 23.003で定義されたネットワーク識別子で、端末がモバイルデータ通信を行う際の接続先を指定する設定だ。APNが正しく設定されていないと、電波は表示されていてもデータ通信のみが使えない状態になる。
### APN設定が不要なケース
以下の場合はAPN設定の手動操作が原則不要だ。
- **大手MNO(NTTドコモ・au・ソフトバンク・楽天モバイル)のSIM/eSIM**: SIMのアクティベーション時またはキャリア設定アップデート経由で自動設定される
- **サブブランド・オンライン専用ブランド(povo・UQモバイル・ワイモバイル・LINEMO)**: Appleのキャリア設定アップデート経由でiPhoneへの自動設定が基本
- **GSMA SGP.22準拠のeSIMプロファイル**: APN情報(DNN)を含むプロファイルが配信されるため、多くの場合は手動設定が不要
### APN設定が必要なケース
以下の場合はAPN設定の手動操作が必要になることがある。
| 状況 | 対応 |
|------|------|
| MVNOのSIM(格安SIM)をSIMフリー端末で使う | 構成プロファイルのインストール(iPhone)または手動入力(Android) |
| ahamo(ドコモ系)のiPhone利用 | ahamo公式サイトから構成プロファイルをインストール |
| ネットワーク設定リセット後 | APNが消去されるため再設定が必要 |
iPhoneでのAPN設定方法は「[APN設定の手順(iPhone)](/ja/guides/apn-setup-iphone/)」、Androidでの設定方法は「[APN設定の手順(Android)](/ja/guides/apn-setup-android/)」で詳しく解説している。
### 開通後の動作確認チェックリスト
開通手続き完了後、以下を順番に確認する。
1. **電波表示を確認する**: ステータスバーにキャリア名と電波バーが表示されているか
2. **モバイルデータ通信がオンになっているか**: 「設定→モバイル通信→モバイルデータ通信」(iPhone)または「設定→ネットワークとインターネット」(Android)を確認
3. **デュアルSIM構成の場合**: データ通信に使うSIMが正しく選択されているか確認
4. **ブラウザでWebページにアクセスする**: 実際にデータ通信が使えることを確認
5. **通話・SMSの確認**: 必要に応じて発着信・SMS送受信を確認
---
## 海外のSIM開通と本人確認
日本以外の国でも、SIM・eSIMの契約時に本人確認を義務付ける動向が広がっている。国によって要件が異なるが、パスポート等の身分証明書の提示が求められるケースが多い。一部の国では生体認証(指紋・顔認証)を組み合わせたeKYCの活用が広がっており、手続きの電子化が進んでいる。
日本国内で旅行先の現地SIMを契約する際(空港購入等)は、パスポートの提示が求められることが一般的だ。オンラインで海外eSIMを申し込む場合は、プロバイダーの本人確認方針を事前に確認しておくとよい。
---
## 開通できない場合のトラブルシューティング
開通手続きが完了しているにもかかわらず通信ができない場合は、以下を試すこと。
1. **機内モードをオン・オフする**: 接続をリフレッシュする
2. **端末を再起動する**
3. **キャリアのサービスステータスを確認する**: 一時的なネットワーク障害が発生している場合がある
4. **APNを確認する**: 特にMVNOのSIMを使う場合
症状別の詳細な対処法は「[eSIMが設定できないときの対処法](/ja/guides/activation-failed/)」で解説している。
---
## よくある質問
### SIMを挿入・インストールしたのに開通しません。どうすればよいですか?
まず機内モードをオン・オフして通信状態をリセットしてください。それでも開通しない場合は、キャリアが指定する開通手続き(Webまたはアプリ)が完了しているかを確認してください。物理SIMでもeSIMでも、SIMの受け取りと開通手続きは別のステップです。
### 本人確認(eKYC)が完了するまでどのくらい時間がかかりますか?
オンライン本人確認(eKYC)は、スマートフォンで運転免許証や個人番号カードを撮影して送信する方式が一般的です。審査はキャリアによって数分から数時間かかる場合があります。夜間・休日は翌営業日になる場合があります。各キャリアの公式サポートページで目安時間を確認してください。
### MNP転入時はいつ旧回線が使えなくなりますか?
MNP転入の開通手続きを完了した時点で、旧キャリアの回線は自動的に解約されます。開通手続きを実行する前に、旧回線での必要な作業(キャリアメールのバックアップ等)を済ませておいてください。
### 開通後にAPN設定は必要ですか?
大手MNO(NTTドコモ・au・ソフトバンク・楽天モバイル)とサブブランド(povo・UQモバイル等)はAPN自動設定が基本です。MVNOの場合は構成プロファイル(iPhone)または手動APN入力(Android)が必要な場合があります。
### eSIMの開通にQRコードが必要ですか?
多くのキャリアはQRコードでeSIMプロファイルを発行します。ただし、SM-DP+アドレスとアクティベーションコードを手動入力する方法にも対応しているキャリアがほとんどです。キャリアのアプリ経由で発行する場合はQRコードが不要な場合もあります。
---
## 関連ガイド
- **[APN設定の手順(iPhone)](/ja/guides/apn-setup-iphone/)** — 構成プロファイルのインストール手順と主要MVNO・キャリアのAPN一覧
- **[APN設定の手順(Android)](/ja/guides/apn-setup-android/)** — Androidでの手動APN設定方法とキャリア別設定値
- **[eSIM QRコードの読み取り方(iPhone)](/ja/guides/qr-code-iphone/)** — QRコードを使ったeSIMプロファイルのインストール手順
- **[eSIMが設定できないときの対処法](/ja/guides/activation-failed/)** — SIMロック・QRコードエラー・サーバー接続エラーなど症状別の対処法
- **[SIMカードの挿入方法と取り出し方法](/ja/guides/sim-insertion/)** — 物理SIMのサイズ確認・挿入・取り出し手順
SIMプランの比較は [SimFinder](/ja/jp/search/) で行えます。
================================================================================
# eSIMが設定できないときの対処法
URL: https://sim-finder.com/ja/guides/activation-failed/
Type: guides (ja)
Published: 2026-04-13
eSIMが設定できない場合、原因の大半は「SIMロック未解除」「端末の非対応」「QRコードの使用済み・期限切れ」「インターネット接続なし」の4つのいずれかだ。この記事では症状ごとに原因と対処法を順番に確認できる形で解説する。
---
## eSIM設定の前提条件を確認する
まずeSIMが使える状態かどうかを確認する。以下の4つをすべてクリアしている必要がある。
### 条件1: eSIM対応端末である
すべてのスマートフォンがeSIMに対応しているわけではない。
**iPhoneの場合:**
- iPhone XS・XS Max・XR(2018年モデル)以降の全モデルがeSIMに対応している
- iPhone 13シリーズ以降はデュアルeSIM(2つのeSIMを同時有効化)に対応している
- 米国販売モデルのiPhone 14以降および日本販売モデルのiPhone 17以降はeSIM専用(物理SIMスロットなし)
**Androidの場合:**
- Google Pixel 3以降は基本的にeSIM対応(地域・キャリア版により例外あり)
- Samsung Galaxy S20以降のフラグシップ・Zシリーズはほぼ対応(地域・キャリアロック版は非対応の場合あり)
- 廉価モデルや古い機種は非対応の場合がある
**確認方法:**
- **iPhone**: 「設定」→「モバイル通信」→「eSIMを追加」または「モバイル通信プランを追加」が表示されればeSIM対応
- **Android (Pixel)**: 「設定」→「ネットワークとインターネット」→「SIM」→「SIMの追加」が表示されれば対応
- **Android (Samsung)**: 「設定」→「接続」→「SIMマネージャー」→「eSIMを追加」が表示されれば対応
これらのメニューが表示されない場合、その端末はeSIMに非対応か、キャリアロックがかかっている。
### 条件2: SIMロックが解除されている
SIMロックがかかったままではeSIMを設定できない。
日本では2021年10月1日以降に発売された端末は、総務省のガイドライン改正により原則SIMロックフリーの状態で販売されている。それ以前に購入した端末はキャリアに解除手続きが必要だ。
**解除手順(無料・オンラインで完結):**
- **ドコモ**: My docomoにログイン→「サービス一覧」→「SIMロック解除を申し込む」
- **au**: My auにログイン→「サポート」→「操作・設定」→「SIMロック解除手続き」
- **ソフトバンク**: My SoftBankにログイン→「契約・オプション管理」→「SIMロック解除手続き」
- **楽天モバイル**: SIMロック不要(SIMフリー端末のみ取り扱い)
解除後、端末を再起動してから再度eSIMの設定を試みること。
**確認方法:**
- **iPhone**: 「設定」→「一般」→「情報」→「SIMロック」の欄が「SIMロックなし」であればOK
### 条件3: インターネット接続がある
eSIMプロファイルのダウンロードにはインターネット接続が必要だ。Wi-Fiに接続するか、別のSIMによるモバイルデータ通信が利用できる状態で設定を行う。
接続なしでは「eSIMをダウンロードできません」「サーバーに接続できません」などのエラーが表示される。
### 条件4: eSIMプロファイルの保存枠に空きがある
iPhoneはApple公式によると8個以上のeSIMプロファイルを保存できるが、上限はeUICCチップのメモリ容量に依存する。上限に達している場合は「eSIMを追加できません」エラーが表示される。
使用していない古いeSIMプロファイルを削除して空きを作ってから再試行すること。
---
## 症状別の対処法
### 症状A: 「SIMロックがかかっています」「このキャリアでは使用できません」
**原因:** 端末がSIMロックされている。
**対処法:** 上記「条件2」の手順でSIMロックを解除する。解除後に端末を再起動してから再度試みること。
---
### 症状B: QRコードを読み取れない・「無効なQRコード」エラー
**原因と対処法:**
| 原因 | 対処法 |
|------|--------|
| QRコードがすでに使用済み | キャリア・プロバイダーに連絡してQRコードの再発行を依頼する |
| QRコードの有効期限が切れている | 同上。有効期限はプロバイダーにより異なる(数時間〜数十日) |
| 画面の明るさ不足・反射 | QRコードを表示する画面の明るさを最大にし、反射が少ない角度で読み取る |
| QRコードが小さすぎる | QRコードを表示するデバイス(PCなど)で拡大表示する |
| 同じ端末のスクリーンショットを読み取ろうとしている | QRコードは別の端末(PC画面・別のスマホ・印刷物)に表示して読み取る。自分の端末に表示したQRコードを自分の端末のカメラで読み取ることはできない |
QRコードを使用せず、SM-DP+アドレスとアクティベーションコードを手動で入力する方法に切り替えることも有効だ。
**iPhoneでの手動入力手順:**
1. 「設定」→「モバイル通信」→「eSIMを追加」
2. 「QRコードを使用」を選択
3. 画面下部「詳細情報を手動で入力」をタップ
4. SM-DP+アドレスとアクティベーションコードを入力
**Android (Pixel) での手動入力手順:**
1. 「設定」→「ネットワークとインターネット」→「SIM」→「SIMの追加」
2. 「ヘルプ」または「手動で入力」を選択
3. アクティベーションコードを入力
---
### 症状C: 「サーバーに接続できません」「タイムアウト」エラー
**原因:** インターネット接続の問題か、プロバイダーのサーバー側の問題。
**対処法(順番に試す):**
1. **Wi-Fiの接続を確認する** — Wi-Fiマークが表示されていても実際に通信できない場合がある。ブラウザで任意のページにアクセスして通信状態を確認する
2. **別のWi-Fiネットワークを試す** — 現在のWi-Fiがブロックしている可能性がある
3. **機内モードをオン/オフする** — 接続をリフレッシュする
4. **端末を再起動する**
5. **時間をおいて再試行する** — プロバイダーのサーバーが一時的に混雑・メンテナンス中の場合がある
---
### 症状D: eSIMはインストールされたがデータ通信に繋がらない
インストール(プロファイルのダウンロード)とアクティベーション(実際の通信開始)は別のステップだ。インストール完了後に以下を確認する。
**手順1: eSIMが有効化されているか確認する**
- **iPhone**: 「設定」→「モバイル通信」→eSIMのプランを選択→「回線を有効にする」がオンになっているか確認
- **Android**: 「設定」→「ネットワークとインターネット」→「SIM」→eSIMがオンになっているか確認
**手順2: データ通信の優先回線を設定する(デュアルSIMの場合)**
デュアルSIM構成では、どのSIMでデータ通信を行うかを明示的に設定する必要がある。
- **iPhone**: 「設定」→「モバイル通信」→「モバイルデータ通信」→追加したeSIMを選択
- **Android (Pixel)**: 「設定」→「ネットワークとインターネット」→「SIM」→「データ通信」→eSIMを選択
- **Android (Samsung)**: 「設定」→「接続」→「SIMマネージャー」→「優先SIM」→「モバイルデータ」→eSIMを選択
**手順3: データローミングを確認する**
旅行用eSIMや海外キャリアのeSIMを使う場合、データローミングをオンにする必要がある。
- **iPhone**: 「設定」→「モバイル通信」→eSIMを選択→「データローミング」をオン
- **Android**: 「設定」→「ネットワークとインターネット」→「SIM」→eSIMを選択→「ローミング」をオン
**手順4: ネットワーク選択を自動に戻す**
手動でネットワーク選択している場合、繋がらない場合がある。
- **iPhone**: 「設定」→「モバイル通信」→eSIMを選択→「ネットワーク選択」→「自動」をオン
- **Android**: 「設定」→「ネットワークとインターネット」→「SIM」→eSIM→「ネットワークの自動選択」をオン
**手順5: APNを確認する**
APN(Access Point Name)はモバイルデータ通信の接続先を指定する設定で、3GPP TS 23.003で定義されている。主要キャリアのeSIMはプロファイルインストール時に自動設定されるが、正しく適用されていない場合がある。
日本の主要キャリアのAPN確認方法:
- **ドコモ系**: APNは「spmode.ne.jp」(ahamoは「spmode.ne.jp」)
- **au系**: APNは「uno.au-net.ne.jp」(povo・UQモバイルは「povo.jp」または「uqmobile.jp」)
- **ソフトバンク系**: APNは「plus.4g」(ワイモバイルは「plus.acs.jp」、LINEMOは「plus.acs.jp」)
- **楽天モバイル**: APNは「rakuten.jp」
APN設定はキャリアのサポートページで最新の情報を確認すること。
---
### 症状E: 「eSIMを追加できません」エラー(プロファイル上限)
**原因:** 端末に保存できるeSIMの上限に達している。
**対処法:** 使用していない古いeSIMプロファイルを削除する。
- **iPhone**: 「設定」→「モバイル通信」→削除したいeSIMのプランを選択→「eSIMを削除」
- **Android**: 「設定」→「ネットワークとインターネット」→「SIM」→削除したいeSIMを選択→「削除」
削除したeSIMは再インストールに手数料がかかるキャリアもある。削除前にキャリアのポリシーを確認することを推奨する。
---
## 日本の主要キャリア別の注意点
日本の大手MNO 4社(NTTドコモ・au・ソフトバンク・楽天モバイル)はすべてeSIMサービスを提供している。各社のサブブランド・オンライン専用ブランドであるahamo・povo・UQモバイル・ワイモバイル・LINEMOもeSIMに対応している。
キャリアごとにeSIMの発行方式が異なる点に注意が必要だ。
| キャリア/ブランド | eSIM発行方式 | 主な注意点 |
|----------------|------------|-----------|
| NTTドコモ | アプリ・Web | My docomoからオンライン手続き可能 |
| au | アプリ・Web | My auからオンライン手続き可能 |
| ソフトバンク | アプリ・Web | My SoftBankからオンライン手続き可能 |
| 楽天モバイル | アプリ | my 楽天モバイルアプリから発行 |
| ahamo | Web | ドコモのMy docomoでeSIM変更 |
| povo | アプリ | povoアプリからeSIM切り替え |
| UQモバイル | Web・店舗 | My UQ mobileからオンライン手続き可能 |
| ワイモバイル | Web・店舗 | My Y!mobileからオンライン手続き可能 |
| LINEMO | Web | LINEMOマイページから手続き |
**物理SIMからeSIMへの切り替え(SIM変更)手続きと、新規契約のeSIM発行では手順が異なる**場合がある。現在の契約状況に応じた手順をキャリアのサポートページで確認すること。
---
## 上記を試してもエラーが解消されない場合
以下の手順で端末のネットワーク設定を初期化する。ただしWi-FiのパスワードやVPN設定など、保存されたネットワーク情報がすべて削除されるため注意が必要だ。
**iPhone:**
1. 「設定」→「一般」→「転送またはiPhoneをリセット」→「リセット」
2. 「ネットワーク設定をリセット」をタップ
3. 端末が再起動したら再度eSIMの設定を試みる
**Android (Pixel):**
1. 「設定」→「システム」→「リセットオプション」
2. 「Wi-Fi、モバイル、Bluetoothをリセット」をタップ
ネットワーク設定リセット後もエラーが継続する場合は、キャリアまたはeSIMプロバイダーのカスタマーサポートに連絡することを推奨する。
正しいeSIMの設定手順については[eSIMセットアップガイド](/ja/blog/esim-setup-guide-iphone-android/)を参考にしてください。
---
## よくある質問
### eSIMの設定(インストール)にWi-Fiは必要ですか?
はい。eSIMプロファイルのダウンロードにはインターネット接続が必要だ。Wi-Fi、または既存のモバイルデータ通信(他のSIMが有効な場合)で接続した状態で設定を行うこと。
### QRコードを読み取ったのに「無効なQRコード」と表示されます
QRコードは通常1回しか使えない。すでに別の端末で使用済みか、有効期限が切れている可能性がある。キャリアまたはeSIMプロバイダーのサポートに連絡してQRコードの再発行を依頼すること。
### SIMロックはどうやって解除しますか?
各キャリアのマイページからオンラインで無料解除できる。日本では2021年10月以降に発売された端末は原則SIMロックフリーだ。それ以前の端末はドコモ・au・ソフトバンクそれぞれのオンラインサポートページから手続きすること。
### 「eSIMを追加できません」というエラーが出ます
端末に保存できるeSIMプロファイルの上限に達している可能性がある。使用していない古いeSIMプロファイルを削除してから再試行すること。iPhoneは8個以上のeSIMを保存できるが、上限はeUICCのメモリ容量に依存する。
### eSIMをインストールしたのにデータ通信が使えません
インストールとアクティベーション(開通)は別のステップだ。デュアルSIM設定でeSIMをモバイルデータ通信の優先回線に設定し、データローミングをオンにする必要がある。それでも繋がらない場合はAPN設定を確認すること。
### 日本の大手キャリアのeSIMはどうやって設定しますか?
NTTドコモ・au・ソフトバンク・楽天モバイルの大手4社はすべてeSIMに対応している。基本的な手順は各社の公式アプリまたはWebサイトからeSIM発行手続きを行い、発行されたQRコードを端末で読み取る流れだ。各社の具体的な手順はサポートページを確認すること。
---
eSIMの仕組みや用語の基礎知識は「[eSIMとは — 仕組み・メリット・デメリット](/ja/guides/what-is-esim/)」で解説している。国内SIMプランでeSIM対応プランを探すには[SimFinderで絞り込める](/ja/)。
================================================================================
# 帰国後にSIMが繋がらない時の対処
URL: https://sim-finder.com/ja/guides/after-return/
Type: guides (ja)
Published: 2026-06-06
海外から帰国した直後に日本の回線が繋がらない場合、原因は大きく6つに絞られる。(1)データローミングがONのまま、(2)APNが海外SIM向けのまま残っている、(3)海外eSIM・物理SIMが有効回線になったまま、(4)モバイルデータ通信の対象回線が正しくない、(5)ネットワーク設定の蓄積による不整合、(6)一時的なソフトウェア異常。この記事では原因を順に確認しながら対処する手順を解説する。
帰国後に起きる回線トラブルは「海外では繋がっていたのに帰国後に繋がらない」という状態が典型的だ。これは渡航中に行った設定変更(ローミング有効化・海外SIM挿入・旅行eSIM有効化など)がそのまま残っているために起きる。原因が判明していれば対処は単純なので、以下の手順を上から順番に確認してほしい。
---
## 1. 最初に試すこと — 機内モードのトグルと再起動
原因の特定より前に、まず端末の無線モジュールをリセットする。帰国時の電波環境の変化で一時的な接続失敗が起きることがあり、機内モードのトグルで解消することが多い。
### 機内モードをオン・オフする
- **iPhone**: コントロールセンターを開き、飛行機アイコンをタップ → 10秒待つ → 再度タップしてオフにする
- **Android**: クイック設定パネルまたは「設定」→「ネットワークとインターネット」から機内モードをオン → 10秒待つ → オフにする
機内モードをオフにした後、ステータスバーにキャリア名とLTE・5Gの表示が出るまで1〜2分待つ。これで繋がれば原因は一時的な接続失敗だった。引き続き繋がらない場合は次のセクションに進む。
### 端末を再起動する
機内モードのトグルで解消しない場合は端末を完全に再起動する。ベースバンドモデムを含むハードウェアが初期化され、渡航中に蓄積したソフトウェア状態の多くがリセットされる。再起動後に1〜2分待ってもキャリア名が表示されない場合は、設定側の問題として以下を確認する。
---
## 2. データローミングの状態を確認する
渡航中にデータローミングをONにした場合、帰国後もONのままになっていることがある。データローミングをONのままにしておくと、国内にいても海外通信網への接続を試みてローミング課金が発生するリスクがある。また、デュアルSIM環境で海外SIMが有効なままの場合、データ経路の競合が起きることがある。
また逆に、渡航中に意図せずデータローミングをOFFにしたまま帰国したケースでは、ONに戻さないとデータ通信ができない。
データローミングの詳細な設定手順は[データローミングの設定](/ja/guides/roaming-settings/)で解説している。
### iPhoneでのデータローミング確認
**シングルSIM構成の場合:**
1. 「**設定**」→「**モバイル通信**」を開く
2. 「**通信のオプション**」をタップ
3. 「**データローミング**」の状態を確認する — 国内利用時はOFFが基本
**デュアルSIM構成の場合:**
1. 「**設定**」→「**モバイル通信**」を開く
2. 日本の回線名をタップ →「**通信のオプション**」→「**データローミング**」の状態を確認する
3. 海外SIM(旅行eSIM等)が有効になっている場合は、その回線のデータローミングもOFFにする
### Androidでのデータローミング確認
**Google Pixel(Android標準):**
1. 「**設定**」→「**ネットワークとインターネット**」→「**SIM**」を開く
2. 使用するSIMを選択 → 「**ローミング**」の状態を確認する
**Samsung Galaxy:**
1. 「**設定**」→「**接続**」→「**モバイルネットワーク**」を開く
2. デュアルSIM構成の場合はSIMを選択 → 「**データローミング**」の状態を確認する
---
## 3. APNが海外SIM向けのままになっていないか確認する
渡航中に旅行eSIMや現地SIMを使い、APN設定を変更した場合、帰国後もそのAPNが有効なままになっていることがある。APNが海外SIM向けの設定のままだと、日本のSIMを挿していても正しいゲートウェイに接続できずデータ通信のみ使えない状態になる。
信号バーは立っているのにデータ通信だけ使えない場合は、このAPNの不一致が原因である可能性が高い。
### iPhoneでAPNの状態を確認する
iPhoneのAPN設定は構成プロファイル(.mobileconfig)経由で適用されることが多い。
1. 「**設定**」→「**一般**」→「**VPNとデバイス管理**」を開く
2. 「構成プロファイル」セクションに海外SIMプロバイダーのプロファイルが残っていないか確認する
3. 日本で使う回線に不要なプロファイルがある場合は削除する(プロファイル名をタップ → 「プロファイルを削除」)
日本の大手MNO(NTTドコモ・au・ソフトバンク・楽天モバイル)のSIMを使っている場合、Wi-Fiに接続した状態で「設定」→「一般」→「情報」を開き、キャリア設定アップデートが保留中であれば「アップデート」をタップする。これで日本向けのAPN設定が自動適用される。
iPhoneのAPN設定の詳細な手順は[APN設定の手順(iPhone)](/ja/guides/apn-setup-iphone/)を参照してほしい。
### AndroidでAPNを確認・再設定する
**Google Pixel:**
1. 「**設定**」→「**ネットワークとインターネット**」→「**インターネット**」を開く
2. 日本のSIM横の歯車アイコンをタップ → 「**アクセスポイント名(APN)**」を開く
3. 設定されているAPN名を確認する。海外SIM向けのAPN(例: 旅行eSIMプロバイダー名)が設定されている場合は削除するか、日本キャリアのAPN情報に変更する
**Samsung Galaxy:**
1. 「**設定**」→「**接続**」→「**モバイルネットワーク**」を開く
2. デュアルSIM構成の場合は日本のSIMを選択 → 「**アクセスポイント名**」を確認する
3. 海外向けのAPNエントリが残っている場合は削除する
APN設定はキャリアによって異なる。日本のMVNO(格安SIM)を使っている場合はキャリアの公式サポートページに記載されているAPN情報を参照して設定する。AndroidのAPN設定手順は[APN設定の手順(Android)](/ja/guides/apn-setup-android/)で解説している。
---
## 4. 海外eSIM・物理SIMが有効回線のままになっていないか確認する
旅行中に旅行eSIMをインストールした場合、または現地SIMを端末に挿した場合、帰国後もそのSIMが有効な状態になっていると、モバイルデータ通信が海外SIMに向かったままになることがある。
### iPhoneでeSIMの有効状態を確認する
1. 「**設定**」→「**モバイル通信**」を開く
2. 有効になっている回線の一覧を確認する
3. 旅行eSIMの回線が「オン」になっている場合は「この回線をオフにする」をタップして無効化する(プロファイルを削除しなくてもよい。後で再利用する可能性がある場合はオフにするだけでよい)
### AndroidでeSIMの有効状態を確認する
**Google Pixel:**
1. 「**設定**」→「**ネットワークとインターネット**」→「**SIM**」を開く
2. 旅行eSIMのSIMが表示されている場合はトグルをオフにして無効化する
**Samsung Galaxy:**
1. 「**設定**」→「**接続**」→「**SIMマネージャー**」を開く
2. 旅行eSIMのSIMが「有効」になっている場合はオフにする
### 物理SIMが残っている場合
海外で現地の物理SIMを使い、帰国後に日本のSIMに入れ替え忘れた場合は、SIMトレイを確認して日本のSIMに差し替える。SIMトレイを開けるには付属のSIM取り出しツールまたはペーパークリップを使用する。
---
## 5. モバイルデータ通信の対象回線を確認する
デュアルSIM構成(日本SIM+海外SIM)で、モバイルデータ通信の優先回線が海外SIMに設定されたままになっている場合、帰国後も海外SIM経由でのデータ通信が試みられて通信できない状態になる。
### iPhoneでデータ通信の優先回線を確認する
1. 「**設定**」→「**モバイル通信**」を開く
2. 「**モバイルデータ通信**」をタップ
3. 日本の回線が選択されているかを確認する。海外SIMが選択されている場合は日本の回線に変更する
### Androidでデータ通信の優先回線を確認する
**Google Pixel:**
1. 「**設定**」→「**ネットワークとインターネット**」→「**SIM**」を開く
2. 「**データ用SIM**」として日本のSIMが設定されているかを確認する
**Samsung Galaxy:**
1. 「**設定**」→「**接続**」→「**SIMマネージャー**」を開く
2. 「**モバイルデータ**」が日本のSIMに設定されているかを確認する
---
## 6. ネットワーク設定をリセットする
上記の手順(データローミング・APN確認・SIM有効化状態・データ通信優先回線の確認)を試してもなお繋がらない場合は、ネットワーク設定のリセットを試みる。
ネットワーク設定のリセットで削除されるもの:
- Wi-Fiの保存済みパスワード
- 手動設定したAPN情報
- VPN設定
eSIMのプロファイル本体はiPhoneでは削除されない。また写真・連絡先・アプリのデータには一切影響しない。実行前にWi-Fiパスワードをメモしておくことを推奨する。
ネットワーク設定リセットの詳細な手順と注意事項は[ネットワーク設定のリセット方法と注意点](/ja/guides/network-reset/)を参照してほしい。
### iPhoneでのネットワーク設定リセット
1. 「**設定**」→「**一般**」→「**転送またはiPhoneをリセット**」を開く
2. 「**リセット**」をタップ
3. 「**ネットワーク設定をリセット**」をタップ
4. iPhoneのパスコードを入力する
5. 確認ダイアログで「ネットワーク設定をリセット」をタップする
6. iPhoneが自動的に再起動する
再起動後、Wi-Fiに接続した状態で「設定」→「一般」→「情報」を開く。「キャリアのアップデートが利用可能です」と表示されたらタップして適用する。これで大手MNOのAPN設定が自動適用される。
### Androidでのネットワーク設定リセット
**Google Pixel:**
1. 「**設定**」→「**システム**」→「**リセットオプション**」を開く
2. 「**Wi-Fi、モバイル、Bluetoothをリセット**」をタップ
3. 「**設定をリセット**」をタップして実行する
**Samsung Galaxy:**
1. 「**設定**」→「**一般管理**」→「**リセット**」を開く
2. 「**ネットワーク設定をリセット**」をタップ
3. 「**設定をリセット**」をタップして実行する
Androidでのリセット後は、MVNOを使用している場合はAPN設定を手動で再入力する必要がある。使用しているMVNOの公式サポートページでAPN情報を確認してから再設定すること。
---
## 7. キャリア設定アップデートの確認(iPhone)
iPhoneでは、渡航中にキャリア設定が古いままになっていると帰国後に接続に影響が出ることがある。Wi-Fiに接続した状態で以下を確認する。
1. 「**設定**」→「**一般**」→「**情報**」を開く
2. 「キャリアのアップデートが利用可能です」と表示された場合は「**アップデート**」をタップする
3. アップデート適用後に端末を再起動する
キャリア設定アップデートにはAPN情報・VoLTE設定などが含まれており、最新の設定を適用することで接続安定性が改善することがある。
---
## 8. 確認チェックリスト — 帰国後の回線トラブル対処
帰国後に日本の回線が繋がらない場合の確認項目をまとめる。上から順番に確認することを推奨する。
| 確認項目 | iPhone | Android |
|---------|--------|---------|
| 機内モードをオン→オフ | コントロールセンターから | クイック設定パネルから |
| 端末の再起動 | 電源ボタン長押しからシャットダウン | 同左 |
| データローミングの状態確認 | 設定→モバイル通信→通信のオプション | 設定→ネットワーク→SIM→ローミング |
| APNの確認(不要なプロファイル削除) | 設定→一般→VPNとデバイス管理 | 設定→ネットワーク→SIM→APN |
| 海外eSIM・物理SIMの有効状態確認 | 設定→モバイル通信 | 設定→SIMマネージャー |
| モバイルデータ通信の対象回線確認 | 設定→モバイル通信→モバイルデータ通信 | 設定→SIM→データ用SIM |
| キャリア設定アップデート(iPhone) | 設定→一般→情報 | — |
| ネットワーク設定リセット(最終手段) | 設定→一般→転送またはリセット | 設定→システム→リセット |
---
## 帰国後も使える海外SIMの管理
旅行eSIMは次回の渡航時に再利用できる場合がある(プロバイダーや有効期限による)。無効化して保持しておくことで、再度インストールする手間が省けることがある。ただし旅行eSIMプロバイダーによって再利用可否やデータ残量の保持期間が異なるため、プロバイダーの公式サポートページで確認すること。
海外で繋がらない問題の全般的な診断(渡航中のトラブル)については[海外で通信できないときの対処法](/ja/guides/no-connection-abroad/)で解説している。
---
## よくある質問
**Q. 帰国後に日本の回線が繋がらない最も多い原因は何ですか?**
最も多い原因はデータローミングがONのまま、またはAPNが海外SIM向けのまま残っているケースです。帰国後は(1)データローミングをOFFにする、(2)モバイルデータ通信の対象回線が日本の回線に設定されているかを確認してください。それでも繋がらない場合は、挿した海外SIMや有効化した海外eSIMが有効回線のままになっていないかを確認してください。
**Q. 帰国後にデータローミングはOFFにするべきですか?**
国内で使う分にはデータローミングはOFFで問題ありません。日本国内のキャリア電波に接続している限りローミング課金は発生しませんが、ONのままにしておくと、国内にいても海外通信網への接続を試みてローミング課金が発生するリスクがあります。また、デュアルSIM環境で海外SIMが有効なままの場合、データ経路の競合が起きることがあります。デュアルSIM構成で海外SIMと日本SIMを両方有効にしている場合は、海外SIM側のデータローミングをOFFにし、日本SIM側をデータ通信の優先回線に設定してください。
**Q. iPhoneでAPNが海外SIMのままになっている場合、どう確認しますか?**
「設定」→「一般」→「VPNとデバイス管理」を開き、海外SIMプロバイダーの構成プロファイルが残っていないかを確認します。不要なプロファイルがある場合は削除してください。また「設定」→「一般」→「情報」でキャリア設定アップデートが保留中の場合は適用します。
**Q. 帰国後に圏外から回復しない場合、最終手段は何ですか?**
機内モードのトグル→再起動→各種設定確認を試した後も回復しない場合は、ネットワーク設定のリセットを検討してください。ネットワーク設定リセットはWi-Fiパスワード・手動APN設定・VPN設定が削除されますが、写真やアプリのデータには影響しません。実行前にWi-Fiパスワードをメモしておくことを推奨します。
---
## 関連ガイド
- **[海外で通信できないときの対処法](/ja/guides/no-connection-abroad/)** — 渡航中に繋がらない場合の原因別チェックリスト
- **[APN設定の手順(iPhone)](/ja/guides/apn-setup-iphone/)** — 構成プロファイルのインストールと手動APN設定
- **[APN設定の手順(Android)](/ja/guides/apn-setup-android/)** — Android端末でのAPN手動設定手順
- **[データローミングの設定](/ja/guides/roaming-settings/)** — iPhone・AndroidでのON/OFF手順とデュアルSIM環境の制御
- **[ネットワーク設定のリセット方法と注意点](/ja/guides/network-reset/)** — リセットで削除されるものと再設定手順
================================================================================
# APN設定の手順(Android) — Pixel・Samsung Galaxy別の設定ガイド
URL: https://sim-finder.com/ja/guides/apn-setup-android/
Type: guides (ja)
Published: 2026-04-25
AndroidでMVNO(格安SIM)や海外のSIM・eSIMを使い始めるとき、データ通信が使えない原因の多くは**APN設定の未完了**にある。iPhoneと異なり、Androidは標準でAPN手動入力画面にアクセスできるため、構成プロファイルのインストールは不要だ。ただしメーカーによって設定画面のパスが異なるため、自分の端末に合った手順を把握しておく必要がある。
この記事ではAPN(Access Point Name)の役割から、Pixel・Samsung Galaxy(One UI)別のAPN設定手順、主要日本MVNO・キャリアのAPN情報一覧、認証タイプ・APN type・IPバージョンの意味、そして設定後もデータが繋がらない場合の対処まで順を追って解説する。
iPhoneでのAPN設定手順は「[APN設定の手順(iPhone) — 構成プロファイルのインストールと手動設定](/ja/guides/apn-setup-iphone/)」を参照してほしい。
---
## APNとは — 役割と仕組み
### 3GPP TS 23.003によるAPNの定義
APN(Access Point Name)は、3GPP TS 23.003(Numbering, addressing and identification)で定義されたネットワーク識別子だ。モバイルネットワーク(GSM・GPRS・3G・4G・5G)とインターネット等の外部データネットワークを接続するゲートウェイを指し、端末がパケット交換ネットワークに接続する際に参照される。
APNは**ネットワーク識別子(Network Identifier、必須)**と**オペレータ識別子(Operator Identifier、任意)**の2つの部分で構成される。エンコード後の最大長は100オクテット(Network Identifier単体は63オクテット)と規定されている。
5Gシステムでは、APNに対応する概念として**DNN(Data Network Name)**が3GPP TS 23.003 Clause 9Aで定義されている。機能的にはAPNと同等だが、5GコアネットワークアーキテクチャのS-NSSAI(ネットワークスライス識別子)と組み合わせてPDUセッションを識別する。
APN・DNN・3GPPなどの通信用語の定義一覧は「[用語集 — SIM・eSIM・通信](/ja/guides/glossary-index/)」にまとめている。SIM自体の基礎から理解したい場合は「[SIMカードとは — 役割・種類・選び方](/ja/guides/what-is-sim/)」も参照してほしい。
### APNが必要な理由
ユーザーの視点で言い換えると、APNは「SIMカードがどの通信経路を通じてインターネットに接続するか」を端末に伝える設定だ。APNが正しく設定されていない場合、端末はネットワークに登録(電波バーは表示)されていても、データ通信のみ利用不能になる。これが「電波は立っているのにインターネットに繋がらない」状態の典型的な原因の一つだ。
キャリアはAPN情報を使って以下を制御する。
- どのPGW(Packet Gateway)・UPF(User Plane Function)を経由してインターネットに接続するか
- 認証方式(PAP/CHAP)
- IPアドレスの払い出し方式(IPv4・IPv6・デュアルスタック)
---
## AndroidでAPN設定が必要な場合・不要な場合
### APN設定が不要なケース
以下のケースでは、Androidのデータ通信は原則として手動APN設定なしで利用できる。
**大手MNO(NTTドコモ・au・ソフトバンク・楽天モバイル)のSIM/eSIM**
大手キャリアはSIMアクティベーション時にAPNを自動設定する。キャリアが販売した端末ではキャリア設定ファイルがプリセットされており、SIMを挿入するだけで通信できる。
**対応機種で購入したサブブランド・オンライン専用ブランド(povo・UQモバイル・ワイモバイル・LINEMO)**
これらのブランドもキャリア販売端末では自動設定が基本だ。ただし他社購入のSIMフリー端末や中古端末ではAPN手動設定が必要になる場合がある。UQ mobileの公式サポートページでは「UQ mobile/auで購入した端末は原則設定不要、他社購入端末では手動設定が必要」と案内されている。
**楽天モバイル(楽天回線対応製品)**
楽天モバイルは楽天回線対応製品ではAPN自動設定に対応しており、APN「rakuten.jp」が自動設定される。APN自動設定に対応していない機種では手動設定が必要だ。
### APN設定が必要なケース
| 状況 | 理由 |
|------|------|
| MVNOのSIMをSIMフリー端末に挿入 | キャリア設定がプリセットされていない場合がある |
| 他社から購入した中古端末でSIMを使う | 前オーナーのキャリア設定が残っている、または削除されている場合がある |
| ネットワーク設定をリセットした後 | APN設定がリセット(消去)される |
| 海外SIM・現地SIMをAndroidで使う | 海外キャリアのAPN設定がプリセットされていない場合がある |
| 旅行eSIMのAPN自動設定が失敗した場合 | 端末・機種の組み合わせによる互換性問題 |
---
## PixelのAPN設定手順
Google Pixel(Android標準に近いUI)でのAPN設定手順を説明する。Androidのバージョンやキャリアカスタマイズによりメニュー名が若干異なる場合があるが、基本的な流れは同じだ。
**手順1: 設定を開く**
「設定(Settings)」アプリを開く。
**手順2: 「ネットワークとインターネット」を開く**
「ネットワークとインターネット(Network & internet)」をタップする。
**手順3: 「SIM」を開く**
「SIM」(または「インターネット」→SIMを選択)をタップする。デュアルSIM構成の場合は、APNを設定したいSIMを選択する。
**手順4: 「アクセスポイント名」を開く**
「アクセスポイント名(Access Point Names)」をタップする。現在設定されているAPNの一覧が表示される。
**手順5: 新しいAPNを追加する**
画面右上の「+」ボタンまたは「新しいAPN(New APN)」をタップして新規APNの入力画面を開く。
**手順6: APN情報を入力する**
キャリア・MVNOが指定するAPN情報を入力する。入力項目については「[主要日本MVNOのAPN情報一覧](#主要日本mvnoのapn情報一覧)」を参照してほしい。
| 入力項目 | 内容 |
|---------|------|
| 名前(Name) | 任意(例: 「mineo-D」など識別しやすい名前) |
| APN | キャリア指定のAPN文字列(例: `mineo-d.jp`) |
| ユーザー名 | 指定がある場合のみ入力(不要な場合は空欄) |
| パスワード | 指定がある場合のみ入力(不要な場合は空欄) |
| 認証タイプ | CHAP / PAP(キャリア指定の方式を選択) |
| APNタイプ | `default,supl` 等(キャリア指定に従う) |
| APNプロトコル | IPv4/IPv6 等(キャリア指定に従う) |
**手順7: 保存して選択する**
メニューの「保存(Save)」をタップする。APN一覧に戻り、追加したAPNの左側のラジオボタンをタップして選択状態(塗りつぶし)にする。
**手順8: ネットワーク接続を確認する**
機内モードをオン→オフにしてネットワーク接続をリセットし、ブラウザで任意のWebページにアクセスしてデータ通信が使えることを確認する。
> **注意**: Pixel 9シリーズ(Android 15)では、設定の一部メニュー名が変更されている場合がある。「ネットワークとインターネット→インターネット」から使用中のSIM名をタップ→「アクセスポイント名」の順にアクセスすることもある。
>
> **Android 12/13 以前の Pixel(第6・第7世代など)をお使いの場合**: 設定パスが「設定→ネットワークとインターネット→モバイルネットワーク→詳細設定→アクセスポイント名」となる場合がある。上記手順の手順3〜4に相当する箇所で「SIM」ではなく「モバイルネットワーク→詳細設定」と表示されていたらこの経路をたどること。
---
## Samsung GalaxyのAPN設定手順
Samsung Galaxy(One UI)は、Pixelとは異なる設定パスを使用する。以下はOne UI 6/7系のパスだ。
**手順1: 設定を開く**
「設定(Settings)」アプリを開く。
**手順2: 「接続」を開く**
「接続(Connections)」をタップする。
**手順3: 「モバイルネットワーク」を開く**
「モバイルネットワーク(Mobile networks)」をタップする。デュアルSIM構成の場合は、画面上部でAPNを設定したいSIMを選択する。
**手順4: 「アクセスポイント名(APN)」を開く**
「アクセスポイント名(Access Point Names)」をタップする。
**手順5: 新しいAPNを追加する**
画面右上の「+」ボタンをタップして新規APNの入力画面を開く。
**手順6: APN情報を入力して保存する**
Pixelと同じ要領でAPN情報を入力し、右上の「保存(Save)」をタップする。APN一覧に戻り、追加したAPNの左側のラジオボタンをタップして選択する。
> Samsung GalaxyのOne UIはバージョンによって一部メニュー名が異なる場合がある。One UI 5以前では「設定→接続→モバイルネットワーク→APN(アクセスポイント名)」のパスで同様にアクセスできる。
---
## その他メーカーの差異(Xperia・AQUOS等)
Pixel・Samsung Galaxy以外の主要Androidメーカーでは、設定パスが以下のように異なる。
| メーカー | APN設定パス |
|---------|-----------|
| **Xperia(Sony)** | 設定→ネットワークとインターネット→SIM→アクセスポイント名(機種・Androidバージョンにより「モバイルネットワーク→詳細設定」経由の場合あり) |
| **AQUOS(Sharp)** | 設定→ネットワークとインターネット→モバイルネットワーク→APN(機種・Androidバージョンにより異なる)|
| **OPPO / OnePlus** | 設定→モバイルネットワーク→アクセスポイント名(または「設定→接続&共有→モバイルネットワーク→アクセスポイント名」) |
| **Xiaomi / Redmi(HyperOS)** | 設定→SIMカードとモバイルネットワーク→対象SIMタップ→アクセスポイント名 |
XperiaはAndroid標準UIに近いパスを採用しており、Pixelと同様の手順でほぼ対応できる。AQUOSはメーカー独自のカスタマイズが入っているが、Androidの標準設定パス(設定→ネットワークとインターネット)からアクセスできる場合が多い。
各メーカーで「アクセスポイント名(APN)」の項目が見つからない場合は、設定アプリ内の検索機能で「APN」または「アクセスポイント」と検索すると直接アクセスできる。
---
## 主要日本MVNOのAPN情報一覧
以下の表は、ファクトレジストリで一次ソース確認済みのAPN情報だ(確認日2026年4月時点)。設定値はキャリアの方針変更で変わる可能性があるため、**必ず各キャリア公式サポートページで最新情報を確認すること**。
MVNOとは何かについては「[MVNOとは — 仕組み・メリット・注意点](/ja/guides/what-is-mvno/)」で詳しく解説している。
### 大手MNO・サブブランド・オンライン専用ブランド
| キャリア / ブランド | APN | ユーザー名 | パスワード | 備考 |
|---------------------|-----|-----------|-----------|------|
| NTTドコモ | `spmode.ne.jp` | — | — | ドコモ公式確認済み |
| ahamo | `spmode.ne.jp` | — | — | ドコモ本体と同一。ahamo公式FAQ確認済み |
| au(4G LTE) | `uno.au-net.ne.jp` | `685840734641020@uno.au-net.ne.jp` | `KpyrR6BP` | au公式確認済み |
| au(5G) | `uad5gn.au-net.ne.jp` | — | — | au公式確認済み。※5G APNはユーザー名 `au@uad5gn.au-net.ne.jp` / パスワード `au` / 認証 CHAP が必要(au公式ガイドブック参照) |
| povo2.0 | `povo.jp` | `user@povo.jp`(端末による)| `povo`(端末による)| povo公式FAQ確認済み |
| UQモバイル | `uqmobile.jp` | `uq@uqmobile.jp` | `uq` | UQモバイル公式確認済み |
| ソフトバンク | `plus.4g` | `plus` | `4g` | ソフトバンク公式 |
| ワイモバイル | `plus.acs.jp.v6` | `ym` | `ym` | IPv6対応APN。ワイモバイル公式確認済み |
| LINEMO | `plus.acs.jp.v6` | `lm` | `lm` | IPv6対応APN。LINEMO公式確認済み |
| 楽天モバイル | `rakuten.jp` | — | — | 楽天モバイル公式FAQ確認済み |
### 主要MVNO(格安SIM)のAPN情報
| MVNO | APN | ユーザー名 | パスワード | 認証 | 備考 |
|------|-----|-----------|-----------|------|------|
| IIJmio(タイプD) | `iijmio.jp` | `mio@iij` | `iij` | CHAP | ドコモ回線 |
| IIJmio(タイプA) | `iijmio.jp` | `mio@iij` | `iij` | CHAP | au回線 |
| mineo(Aプラン/au) | `mineo.jp` | `mineo@k-opti.com` | `mineo` | CHAP | au回線。mineo公式確認済み |
| mineo(Dプラン/ドコモ) | `mineo-d.jp` | `mineo@k-opti.com` | `mineo` | CHAP | ドコモ回線。mineo公式確認済み |
| mineo(Sプラン/ソフトバンク) | `mineo-s.jp` | `mineo@k-opti.com` | `mineo` | CHAP | ソフトバンク回線。mineo公式確認済み |
> **注意**: IIJmioのAPN情報はファクトレジストリへの一次ソース登録が未完了(pending扱い)。上記の値は公式サポートページ掲載の情報だが、利用前に必ず公式ページ(`help.iijmio.jp`)で最新値を確認すること。
**その他のMVNO**については、各社の公式サポートページに「APN設定」「初期設定ガイド」として手順が掲載されている。各MVNO名と「APN設定」「Android」で検索してアクセスしてほしい。
---
## 認証タイプ・APN type・IPバージョンの意味
### 認証タイプ(CHAP / PAP)
| 認証タイプ | 概要 |
|-----------|------|
| **CHAP(Challenge Handshake Authentication Protocol)** | チャレンジ値とパスワードから生成したハッシュを送信する方式。PAPより安全性が高く、多くの日本のMVNOが推奨している |
| **PAP(Password Authentication Protocol)** | パスワードを平文で送信する方式。古い端末や一部キャリアとの互換性を保つために使用されることがある |
| **なし(None)** | 認証なしで接続する方式。一部の旅行SIMや海外キャリアのAPN設定で使用される場合がある |
指定がある場合は必ずキャリアの指示に従う。迷った場合はCHAPを試し、繋がらなければPAPを試す。
### APN type(APNタイプ)の意味
APN typeは、そのAPN設定をどの種類のデータ通信に使用するかを指定するフィールドだ。複数の種類をカンマ区切りで指定できる。
| APN type | 用途 |
|----------|------|
| `default` | 通常のインターネットデータ通信(必須) |
| `supl` | Secure User Plane Location(SUPL) — A-GPS 補助データの取得によるGPS測位精度の向上 |
| `mms` | MMS(マルチメディアメッセージ)の送受信 |
| `dun` | テザリング(モバイルルーター機能)でのデータ通信 |
| `hipri` | 高優先度のデータ通信 |
| `ia` | LTE初期接続(Initial Attach)時に必要なキャリアで使用。通常はキャリア設定で自動適用される |
多くのMVNO設定では `default,supl` または `default,supl,mms` を指定する。キャリアが特定の値を指定している場合はそれに従う。
### IPバージョン(APNプロトコル)
| 設定値 | 内容 |
|--------|------|
| **IPv4** | IPv4アドレスのみを使用する。古い端末や一部のキャリアとの互換性が高い |
| **IPv6** | IPv6アドレスのみを使用する。一部のキャリアがIPv6専用APNを提供している |
| **IPv4/IPv6**(IPv4v6、デュアルスタック) | IPv4とIPv6を両方使用する。日本のMVNOの多くはこの設定を推奨している |
ワイモバイル・LINEMOのAPN「plus.acs.jp.v6」はIPv6対応APNであるため、APNプロトコルにはIPv6またはIPv4/IPv6を選択する。繋がらない場合はIPv4に戻して試してみることも一つの方法だ。
---
## 旅行eSIMのAPN設定(Android)
### 多くの旅行eSIMは自動設定
GSMA SGP.22に準拠した旅行eSIMプロファイルにはAPN情報(DNN)を含めることが技術仕様上可能だ。Airalo・Holafly・Nomadなど主要プロバイダーの旅行eSIMはプロファイルインストール時にAPN設定も同時に行われるため、別途手動設定は不要な場合がほとんどだ。
旅行eSIMの全体的な選び方・設定手順は「[初めての旅行eSIM完全ガイド](/ja/guides/first-time-guide/)」で解説している。最新の旅行eSIMプランの比較は [SimFinder Travel](/ja/travel/) を活用してほしい。
### 手動設定が必要になるケースへの対応
| ケース | 対応方法 |
|--------|---------|
| eSIMプロファイルにAPN情報が含まれていない | プロバイダーのサポートページでAPN設定値を確認して手動入力 |
| Android端末・機種の互換性問題でAPN自動設定が失敗 | プロバイダーのサポートに問い合わせ。端末・OSのアップデートで解消する場合もある |
| 現地でAPN設定が消えた(ネットワーク設定リセット等) | 手順に従いAPNを再設定する |
### データローミング設定の確認
旅行eSIMを使う際は、Androidの**データローミング設定のオン**が必要な場合がある。
- **Pixel**: 「設定→ネットワークとインターネット→SIM→旅行eSIMを選択→データローミング」をオンにする
- **Samsung Galaxy**: 「設定→接続→モバイルネットワーク→データローミング」をオンにする
日本のSIMを主回線とした状態で旅行eSIMを追加した場合、端末が「ローミング中」と判断するためデータローミングをオンにする必要がある。また、デュアルSIM構成でデータ通信に使うSIMを旅行eSIMに切り替えることも忘れずに確認してほしい。
---
## APN設定後もデータが繋がらない時の対処
APN設定を保存した後も繋がらない場合は、以下のチェックリストを順番に確認してほしい。
### ステップ1: APNが選択されているか確認する
「アクセスポイント名(APN)」の一覧で、新しく追加したAPNの**左側のラジオボタンが塗りつぶし(選択)状態**になっているかを確認する。選択されていない場合は、そのAPNをタップしてから右上のメニュー(「保存」または「APNを保存」)を選択するか、APNをタップして直接選択する。
### ステップ2: 機内モードでリセットする
機内モードをオン(10秒程度待機)→オフにしてネットワーク接続をリセットする。
### ステップ3: モバイルデータ通信がオンになっているか確認する
- **Pixel**: 「設定→ネットワークとインターネット→SIM」でモバイルデータがオンになっているか確認する
- **Samsung Galaxy**: 「設定→接続→モバイルネットワーク」でモバイルデータがオンになっているか確認する
### ステップ4: APN入力値を再確認する
APNの文字列に**全角文字・余分なスペース・タイポ**が含まれていないかを再確認する。半角英数字のみを使用すること。ユーザー名・パスワードも同様に確認する。
### ステップ5: 複数APNの優先順位を確認する
端末に複数のAPN設定が保存されている場合、意図しないAPNが選択されている可能性がある。「アクセスポイント名(APN)」の一覧で、現在どのAPNが選択(ラジオボタンが塗りつぶし状態)されているかを確認し、使用するAPNを明示的に選択する。
### ステップ6: APNをリセットして再入力する
メニューから「デフォルトに戻す(Reset to default)」でAPN設定を初期状態に戻してから、改めてMVNOが指定するAPN情報を手動入力する。初期化でプリセットされたキャリアのAPNが復元された場合は、それに加えて自分のMVNOのAPNを新規追加して選択する。
### ステップ7: 端末を再起動する
APN設定の変更後に端末を完全に再起動することで、設定が正しく反映されることがある。
詳細なデータ通信トラブルの診断手順(APN以外の原因を含む総合診断)は「[モバイルデータに繋がらないときの対処法](/ja/guides/no-data/)」を参照してほしい。
---
## よくある質問
### AndroidはiPhoneと違ってAPN設定画面が標準で表示されると聞きましたが本当ですか?
はい、Androidは標準でAPN手動入力画面にアクセスできます。Pixelなら「設定→ネットワークとインターネット→SIM→アクセスポイント名」、Samsung Galaxy(One UI)なら「設定→接続→モバイルネットワーク→アクセスポイント名」から確認・編集が可能です。iPhoneのように構成プロファイルをインストールする必要はありません。
### APN設定はどんな時に手動でする必要がありますか?
主に(1)MVNOや格安SIMのSIMカードを挿入した時、(2)SIMフリー端末に初めてSIMを入れた時、(3)ネットワーク設定をリセットした後、(4)海外SIMや旅行eSIMのAPN自動設定が正常に機能しなかった時です。大手キャリア(ドコモ・au・ソフトバンク・楽天モバイル)のSIMや対応機種では自動設定されることが多く、手動操作は不要です。
### 認証タイプはCHAPとPAPのどちらを選べばよいですか?
MVNOの公式サポートページで指定されている方を使ってください。多くの日本のMVNOはCHAPを推奨しています。CHAPはチャレンジ値とパスワードから生成したハッシュを送信するため、PAPより安全性が高い方式です。指定がない場合または両方試してもつながらない場合は「なし(なし/None)」を試してみてください。
### APN typeの「default」と「supl」はどう違いますか?
「default」は通常のインターネットデータ通信に使われるAPNタイプです。「supl」はGPS補助(A-GPS: Assisted GPS)に使用され、位置情報の精度向上に関わります。「mms」はMMSメッセージ送受信、「dun」はテザリング(モバイルルーター機能)に使われます。MVNO設定では通常「default,supl」または「default,supl,mms」と複数を組み合わせて指定します。
### IPv4/IPv6の設定はどれを選べばよいですか?
多くの場合「IPv4/IPv6」(デュアルスタック)を選択するのが無難です。日本のMVNOの多くはIPv4/IPv6デュアルスタックに対応しています。ただし「IPv4v6」や「IPv6」を指定するMVNOもあります。ワイモバイル・LINEMOのAPN「plus.acs.jp.v6」のようにIPv6対応APNを使用するキャリアの場合はIPv6またはIPv4/IPv6を選択してください。
### APN設定を保存したのにデータ通信が繋がりません。何を確認すればよいですか?
まず(1)機内モードをオン→オフしてネットワーク接続をリセットしてください。次に(2)「設定→ネットワークとインターネット」でモバイルデータが有効になっているか確認、(3)複数APNがある場合は新しく追加したAPNの左側の丸(ラジオボタン)が選択(塗りつぶし)されているか確認してください。それでも繋がらない場合はAPNの各項目を再確認し、空白や全角文字が混入していないかチェックしてください。
### 旅行eSIMのAPN設定はAndroidでも自動でできますか?
GSMA SGP.22に準拠した旅行eSIMプロファイルにはAPN情報(DNN)を含めることができ、Airalo・Holafly・Nomadなど主要プロバイダーの旅行eSIMはプロファイルインストール時にAPN設定も同時に行われるため、別途手動設定は不要な場合がほとんどです。ただしAndroidの端末メーカーや機種によって自動設定が正常に機能しないケースもあります。繋がらない場合はeSIMプロバイダーの公式サポートページで手動設定のAPN値を確認してください。
---
## まとめ / 関連ガイド
AndroidでのAPN設定の要点をまとめる。
- APN(Access Point Name)は3GPP TS 23.003で定義された識別子で、モバイルデータ通信の接続先を指定する。5GではDNN(Data Network Name)が対応する概念
- Androidは標準でAPN手動入力画面にアクセスできる。Pixelは「設定→ネットワークとインターネット→SIM→アクセスポイント名」、Samsung Galaxyは「設定→接続→モバイルネットワーク→アクセスポイント名」
- 大手MNO・サブブランドは自動設定されることが多いが、SIMフリー端末でのMVNO利用では手動設定が必要
- 認証タイプはMVNO指定の方式(多くはCHAP)を使い、APN typeは`default,supl`が基本
- 旅行eSIMは多くの場合APN自動設定済みだが、データローミングをオンにする設定は必要
- 設定後も繋がらない場合は、APNが選択されているか・全角文字が混入していないか・機内モードでリセット、の順で確認する
**関連ガイド**:
- **[APN設定の手順(iPhone)— 構成プロファイルのインストールと手動設定](/ja/guides/apn-setup-iphone/)** — iPhone版のAPN設定手順(A-02)
- **[SIMカードとは — 役割・種類・選び方](/ja/guides/what-is-sim/)** — SIMの基礎知識(B-01)
- **[MVNOとは — 仕組み・メリット・注意点](/ja/guides/what-is-mvno/)** — MVNO・格安SIMの仕組み(C-02)
- **[モバイルデータに繋がらないときの対処法](/ja/guides/no-data/)** — APN以外の原因を含む総合診断(FX-02)
- **[用語集 — SIM・eSIM・通信](/ja/guides/glossary-index/)** — APN・DNN・3GPPなど通信用語の一覧
SIMプランの比較は [SimFinder](/ja/jp/search/) で、旅行eSIMの比較は [SimFinder Travel](/ja/travel/) で行えます。
================================================================================
# APN設定の手順(iPhone) — 構成プロファイルのインストールと手動設定
URL: https://sim-finder.com/ja/guides/apn-setup-iphone/
Type: guides (ja)
Published: 2026-04-24
iPhoneでMVNO(格安SIM)や海外のSIM・eSIMを使い始めるとき、データ通信が使えない原因の多くは**APN設定の未完了**にある。大手キャリアと異なり、MVNOや旅行eSIMではAPNを手動で設定する必要がある場面がある。
この記事ではAPN(Access Point Name)の役割から、iPhoneでの構成プロファイルのインストール手順、主要日本MVNO・キャリアのAPN情報一覧、旅行eSIMの注意点、そしてAPN設定後もデータが繋がらない場合の対処まで順を追って解説する。
データ通信が繋がらない問題の全般的な診断手順(APN以外の原因も含む)は「[モバイルデータに繋がらないときの対処法](/ja/guides/no-data/)」も合わせて参照してほしい。
---
## APNとは — 定義と役割
### 3GPP TS 23.003によるAPNの定義
APN(Access Point Name)は、3GPP TS 23.003(Numbering, addressing and identification)で定義されたネットワーク識別子だ。モバイルネットワーク(GSM・GPRS・3G・4G・5G)とインターネット等の外部データネットワークを接続するゲートウェイを指し、端末がパケット交換ネットワークに接続する際に参照される。
3GPP TS 23.003の仕様では、APNは**ネットワーク識別子(Network Identifier、必須)**と**オペレータ識別子(Operator Identifier、任意)**の2つの部分で構成される。エンコード後の最大長は100オクテット(Network Identifier単体は63オクテット)と規定されている。
5Gシステムでは、APNに対応する概念として**DNN(Data Network Name)**が3GPP TS 23.003 Clause 9Aで定義されている。機能的にはAPNと同等だが、5Gコアネットワーク(5GC)アーキテクチャ向けに定義が拡張されており、S-NSSAI(ネットワークスライス識別子)と組み合わせてPDUセッションを識別する。
### APNの実際の役割
ユーザーの視点で言い換えると、APNは「SIMカードやeSIMがどの通信経路を通じてインターネットに接続するか」を端末に伝える設定だ。
キャリアはAPN情報を使って以下を制御する。
- どのPGW(Packet Gateway)・UPF(User Plane Function)を経由してインターネットに接続するか
- 認証方式(PAP/CHAP)
- IPアドレスの払い出し方式(IPv4・IPv6・デュアルスタック)
APNが正しく設定されていない場合、端末はネットワークに登録(電波バーは表示)されていても、データ通信のみ利用不能になる。これが「電波は立っているのにインターネットに繋がらない」状態の典型的な原因の一つだ。
APN・DNN・3GPPなどの通信用語の定義一覧は「[用語集 — SIM・eSIM・通信](/ja/guides/glossary-index/)」にまとめている。
SIM・eSIMの基礎から理解したい場合は「[SIMカードとは — 役割・種類・選び方](/ja/guides/what-is-sim/)」および「[eSIMとは — 仕組み・メリット・デメリット](/ja/guides/what-is-esim/)」も参照してほしい。
---
## iPhoneでAPN設定が必要な場合・不要な場合
### APN設定が不要なケース
以下のケースでは、iPhoneのAPN設定は手動操作不要だ。
**大手MNO(NTTドコモ・au・ソフトバンク・楽天モバイル)のSIM/eSIM**
大手キャリアは、SIMアクティベーション時またはAppleのキャリア設定アップデート経由でAPNを自動設定する。新しいiPhoneにSIMを挿入後、「設定→一般→情報」を開いたときに「キャリアのアップデートが利用可能です」と表示された場合は「アップデート」をタップするだけでよい。
**サブブランド・オンライン専用ブランド(povo・UQモバイル・ワイモバイル・LINEMO)**
これらのブランドもAppleのキャリア設定アップデートに対応しており、iPhoneへの自動設定が基本となっている。povo公式FAQでは「iPhoneはiOS 15以降でAPN設定不要」と案内されている。
**ahamo(ドコモ回線オンライン専用ブランド)**
ahamoはiPhoneで**構成プロファイルのインストールが必要**な場合がある。ahamo公式FAQでは、iPhoneで利用する際に構成プロファイルをダウンロード・インストールするよう案内している(出典: [ahamo公式FAQ](https://faq.ahamo.com/faq/show/1517))。SIM挿入後にキャリア設定アップデートで自動適用されない場合は、ahamo公式サイトから構成プロファイルを取得してインストールすること。
**GSMA SGP.22準拠のeSIMプロファイル(旅行eSIM含む)**
GSMA SGP.22に準拠したeSIMプロファイルには、APN情報(DNN)を含めることが技術仕様上可能だ。主要な旅行eSIMプロバイダー(Airalo・Holafly・Nomadなど)は、APN設定を含んだプロファイルを配信する実装を採用しているため、多くの場合は別途手動設定が不要となっている。ただしプロバイダーの実装方針によって異なる場合があるため、不明な場合は各プロバイダーの公式ガイドを確認すること。
### APN設定が必要なケース
以下のケースでは、手動でのAPN設定(構成プロファイルのインストール)が必要になる場合がある。
| 状況 | 理由 |
|------|------|
| MVNOのSIMをSIMフリーiPhoneに挿入 | Appleのキャリア設定アップデートに対応していないMVNOがある |
| 機種変更・iPhoneを中古購入してMVNOのSIMを使う | 前オーナーのキャリア設定が残っている場合がある |
| 海外MNO・現地SIMをiPhoneで使う | 海外キャリアのキャリア設定アップデートが配信されていない場合がある |
| ネットワーク設定をリセットした後 | APN設定がリセット(消去)される |
| 旅行eSIMのAPN自動設定が失敗した場合 | 端末・OSの組み合わせによる互換性問題 |
---
## 構成プロファイル(.mobileconfig)のインストール手順
iPhoneでAPNを設定する標準的な方法は、キャリアまたはMVNOが提供する**構成プロファイル(.mobileconfig)**をインストールすることだ。
### 構成プロファイルとは
構成プロファイル(.mobileconfig)は、Apple社が定義するiOS/macOS向けの設定ファイル形式だ。APN情報のほかに、Wi-Fi・VPN・メール・証明書などの設定をiPhoneに一括適用できる。MVNOは主にAPN設定を含むプロファイルをユーザー向けに提供している。
プロファイルの内容は、インストール前に「設定→一般→VPNとデバイス管理」で確認できる。必要な設定(APNのみ)以外の項目が含まれていないかを確認してからインストールすることを推奨する。
### インストール手順(iOS 17 / iOS 18)
**手順1: プロファイルをダウンロードする**
iPhoneのSafariブラウザで、利用中のMVNO公式サイトにアクセスする。「iPhone APN設定」「構成プロファイル」などのページを開き、.mobileconfigファイルのリンクをタップする。
> Safariを使うこと。Chrome・Firefoxでは.mobileconfigファイルのダウンロードが正常に機能しない場合がある。
**手順2: ダウンロード完了後に「設定でプロファイルを確認」をタップする**
Safari上に「プロファイルがダウンロードされました」または「設定でプロファイルを確認してください」という表示が出る。そのメッセージをタップする、またはいったんSafariを閉じて次の手順に進む。
**手順3: 「設定→一般→VPNとデバイス管理」を開く**
1. 「設定」→「一般」→「VPNとデバイス管理」を開く
2. 「ダウンロードされたプロファイル」セクションに.mobileconfigが表示されている
3. プロファイル名をタップする
**手順4: プロファイルの内容を確認してインストールする**
1. プロファイルの詳細(発行元・含まれる設定)を確認する
2. 「インストール」をタップする
3. iPhoneのパスコードを入力する
4. 警告が表示された場合は内容を確認し、信頼できる発行元であれば「インストール」を選択する
5. 「インストール済み」と表示されたら完了
**手順5: インストール後の確認**
1. 端末を再起動、または機内モードをオン→オフにしてネットワーク接続をリセットする
2. ブラウザで任意のWebページにアクセスしてデータ通信が使えることを確認する
### インストールがうまくいかない場合
- **プロファイルが「ダウンロードされたプロファイル」に表示されない**: Safariで再度ダウンロードを試みる。それでも表示されない場合はiPhoneを一度再起動してから再試行する
- **「インストールできません」と表示される**: iPhoneがMDM(モバイルデバイス管理)プロファイルにより制限されている可能性がある。会社支給端末の場合は管理者に問い合わせること
- **プロファイルの発行元が「確認済みでない」と表示される**: 多くのMVNOは有料の認証局証明書を使用していないため、この警告が表示されることがある。公式サイトからダウンロードしたプロファイルであれば通常は問題ない。ただし出所が不明なプロファイルはインストールしないこと
---
## 構成プロファイルが提供されない場合の手動設定
iPhoneは標準状態ではAPN手動入力画面を表示しない。ただし、大手MNOのSIMが入っていない状態(またはキャリア設定アップデートが適用されていない状態)では、「設定→モバイル通信→モバイルデータ通信ネットワーク」(環境によっては「APNを構成」)メニューが表示される場合がある。
### iOS上でAPNを手動入力できるケース
- SIMフリーiPhoneに未対応のキャリアのSIMを挿入した場合
- ネットワーク設定リセット直後
- Apple公式キャリア設定データベースに登録されていない海外キャリアのSIMを使う場合
手順:
1. 「設定」→「モバイル通信」を開く
2. 使用するSIMをタップ(デュアルSIM構成の場合はAPNを設定したいSIMを選ぶ)
3. 「モバイルデータ通信ネットワーク」(環境によっては「APNを構成」)をタップ
4. 「APN設定」の欄にキャリア指定のAPNを入力する
5. 必要に応じてユーザー名・パスワードを入力する
6. 「保存」をタップ
> 「モバイルデータ通信ネットワーク」(または「APNを構成」)メニューが表示されない場合は、すでにキャリア設定アップデートによりAPNが設定されているか、または端末が制限されている。大手MNOのSIMが正常に機能しているiPhoneでは、このメニューが表示されないことが多い。
### Android端末でのAPN手動設定(参考)
iPhoneと異なり、Androidは標準でAPN手動入力画面にアクセスできる。
- **Pixel系**: 「設定」→「ネットワークとインターネット」→「インターネット」→使用するSIM横の歯車→「アクセスポイント名」
- **Samsung系**: 「設定」→「接続」→「モバイルネットワーク」→「アクセスポイント名」
Androidを使う場合のより詳細な手順については、各MVNOの公式サポートページに端末別手順が掲載されているため、そちらを参照してほしい。
---
## 主要日本MVNOのAPN情報一覧
以下の表は、ファクトレジストリで一次ソース確認済みのAPN情報だ(確認日2026年4月時点)。設定値はキャリアの方針変更で変わる可能性があるため、**必ず各キャリア公式サポートページで最新情報を確認すること**。
MVNOとは何かについては「[MVNOとは — 仕組み・メリット・注意点](/ja/guides/what-is-mvno/)」で詳しく解説している。
### 大手MNO・サブブランド・オンライン専用ブランド
| キャリア / ブランド | APN | 備考 |
|---------------------|-----|------|
| NTTドコモ | `spmode.ne.jp` | ドコモ公式確認済み |
| ahamo | `spmode.ne.jp` | ドコモ本体と同一。ahamo公式FAQ確認済み |
| au(4G LTE) | `uno.au-net.ne.jp` | au公式確認済み |
| au(5G) | `uad5gn.au-net.ne.jp` | au公式確認済み |
| povo2.0 | `povo.jp` | povo公式FAQ確認済み。iPhoneはiOS 15以降不要 |
| UQモバイル | `uqmobile.jp` | UQモバイル公式確認済み |
| ソフトバンク | `plus.4g` | ユーザー名: plus、パスワード: 4g |
| ワイモバイル | `plus.acs.jp.v6` | ユーザー名: ym、パスワード: ym。IPv6対応APN |
| LINEMO | `plus.acs.jp.v6` | ユーザー名: lm、パスワード: lm。IPv6対応APN。LINEMO公式確認済み |
| 楽天モバイル | `rakuten.jp` | 楽天モバイル公式FAQ確認済み。iPhoneはAPN設定不要 |
### 主要MVNO(格安SIM)のAPN情報
| MVNO | APN | ユーザー名 | パスワード | 認証 | 備考 |
|------|-----|-----------|-----------|------|------|
| IIJmio(タイプD) | `iijmio.jp` | `mio@iij` | `iij` | CHAP | ドコモ回線 |
| IIJmio(タイプA) | `iijmio.jp` | `mio@iij` | `iij` | CHAP | au回線 |
| mineo(Aプラン/au) | `mineo.jp` | `mineo@k-opti.com` | `mineo` | CHAP | au回線 |
| mineo(Dプラン/ドコモ) | `mineo-d.jp` | `mineo@k-opti.com` | `mineo` | CHAP | ドコモ回線 |
| mineo(Sプラン/ソフトバンク) | `mineo-s.jp` | `mineo@k-opti.com` | `mineo` | CHAP | ソフトバンク回線 |
> **注意**: IIJmioおよびmineoのAPN情報はファクトレジストリへの一次ソース登録が未完了(pending扱い)。上記の値は各社公式サポートページから確認した情報だが、利用前に必ず公式ページで最新値を確認すること。IIJmio: `help.iijmio.jp` / mineo: `support.mineo.jp`
**その他のMVNO**については、各社の公式サポートページに「APN設定」「初期設定ガイド」として手順が掲載されている。URLは変更されることがあるため、各MVNO名と「APN設定」で検索してアクセスすること。
### iPhoneでのキャリア別APN設定の補足
**ドコモ**: SIMフリーiPhoneでも、SIM挿入後にキャリア設定アップデートが自動配信されることが多い。「設定→一般→情報」を開いてアップデートがあれば適用すること。
**ahamo**: iPhoneでの利用時は、構成プロファイルのインストールが必要な場合がある。ahamo公式サイトから構成プロファイルを取得してインストールすること(APN: `spmode.ne.jp`)。キャリア設定アップデートで自動適用される場合もあるが、繋がらない場合はプロファイルのインストールを試みること。
**楽天モバイル**: 楽天回線対応製品のiPhoneではAPN設定が不要。ただし、Androidでは手動設定が必要な場合がある(APN: `rakuten.jp`)。
**povo2.0**: iPhoneでは構成プロファイル不要。auのキャリア設定アップデートが自動適用される。ただし180日以内にトッピングの購入がないとサービスが停止されるため、定期的なトッピング購入が必要(povo公式仕様)。
---
## 旅行eSIMのAPN設定
### 多くの旅行eSIMは自動設定
GSMA SGP.22に準拠した旅行eSIMプロファイルには、APN情報(DNN)を含めることが技術仕様上可能だ。Airalo・Holafly・Nomadなど主要プロバイダーは、APN設定を含んだプロファイルを配信する実装を採用しており、プロファイルインストール時にAPN設定も同時に行われるため、多くの場合は別途手動設定が不要となっている。
旅行eSIMの選び方・インストール手順の全体像は「[初めての旅行eSIM完全ガイド](/ja/guides/first-time-guide/)」で解説している。最新の旅行eSIMプランを比較したい場合は [SimFinder Travel](/ja/travel/) を活用してほしい。
### 手動設定が必要になるケース
旅行eSIMで例外的に手動APN設定が必要になるケースがある。
| ケース | 対応方法 |
|--------|---------|
| eSIMプロファイルにAPN情報が含まれていない | プロバイダーのサポートページでAPN設定値を確認して手動入力 |
| 端末・OSバージョンとの互換性問題でAPN自動設定が失敗 | プロバイダーのサポートに問い合わせ。端末・OSのアップデートで解消する場合もある |
| 現地でAPN設定が消えた(ネットワーク設定リセット等) | 機内モードのオン・オフで解消しない場合はプロファイルを再インストール |
### 旅行eSIMを使う際のデータローミング設定
旅行eSIMを使う際、iPhoneの**データローミング設定のオン**が必要な場合がある。iPhoneは日本SIMを主回線とした状態で旅行eSIMを追加した場合、端末が「ローミング中」と判断するためデータローミングをオンにする必要がある。
設定場所: 「設定」→「モバイル通信」→旅行eSIMをタップ→「データローミング」をオン
また、デュアルSIM構成で旅行eSIMをデータ通信に使う場合は、「設定→モバイル通信→モバイルデータ通信」から旅行eSIMを選択する必要がある。
---
## APN設定後もデータが繋がらない時の対処
構成プロファイルをインストールした後も、以下のチェックリストを順番に確認してほしい。
### ステップ1: 基本設定を確認する
- **モバイルデータ通信がオンになっているか**: 「設定→モバイル通信→モバイルデータ通信」がオン
- **デュアルSIM構成の場合、正しいSIMがデータ通信に選択されているか**: 「設定→モバイル通信→モバイルデータ通信」でAPNを設定したSIMを選択
- **機内モードのトグルでリセット**: 機内モードをオン(10秒待機)→オフ
### ステップ2: キャリア設定アップデートを確認する
Wi-Fiに接続した状態で「設定→一般→情報」を開く。「キャリアのアップデートが利用可能です」と表示された場合は「アップデート」をタップする。大手MNOやサポートされているMVNOでは、このアップデートでAPN設定が自動適用される。
### ステップ3: データローミングの設定を確認する
**海外SIMまたは旅行eSIM**の場合は、データローミングをオンにする必要がある。
- 「設定→モバイル通信」→該当SIMをタップ→「データローミング」をオン
日本国内でMVNOのSIMを使う場合は、データローミングはオフが基本だ(オンにすることで干渉が起きるケースは少ないが、不要な場合はオフにしておく)。
### ステップ4: プロファイルが正しくインストールされているか確認する
「設定→一般→VPNとデバイス管理」を開く。使用中のMVNOのプロファイルが「構成プロファイル」セクションに表示されているか確認する。表示されていない場合はプロファイルが削除されているため、再インストールが必要だ。
### ステップ5: ネットワーク設定をリセットする
上記で解決しない場合は、ネットワーク設定をリセットする。**この操作でWi-Fiパスワード・VPN設定・APN設定がすべて削除される**ため、実行前にWi-FiパスワードとMVNOのAPN設定情報をメモしておくこと。
1. 「設定→一般→転送またはiPhoneをリセット」
2. 「リセット→ネットワーク設定をリセット」をタップ
3. 端末が再起動後、MVNOの構成プロファイルを再インストールして通信を確認する
詳細なデータ通信トラブルの診断手順は「[モバイルデータに繋がらないときの対処法](/ja/guides/no-data/)」を参照してほしい。
---
## プロファイルの削除と切り替え
### 構成プロファイルを削除する手順
MVNOを解約した場合や、プロファイルの競合が疑われる場合には、不要なプロファイルを削除する。
1. 「設定」→「一般」→「VPNとデバイス管理」を開く
2. 削除したいプロファイルをタップする
3. 「プロファイルを削除」をタップする
4. iPhoneのパスコードを入力して確認する
プロファイルを削除するとそのプロファイルに含まれるAPN設定も削除されるため、削除後はデータ通信が使えなくなる(新しいキャリアのSIMを使う場合は新しいプロファイルをインストールする)。
### 複数プロファイルが存在する場合の注意
iPhoneはAPN構成プロファイルを**1スロットにつき1つ**しか保持できない。2つ目のプロファイルをインストールしようとすると、既存プロファイルの削除を求めるメッセージが表示される。
MVNOを乗り換える際は、旧プロファイルを先に削除してから新プロファイルをインストールすること。旧プロファイルが残ったままだと、削除を求められるか、または設定が正常に適用されない可能性がある。
### MVNOを乗り換えた後のプロファイル管理
1. 旧MVNOのプロファイルを削除する(「VPNとデバイス管理」から)
2. 旧SIMを取り出し、新しいSIMを挿入する
3. 新しいMVNOの公式サイトにSafariでアクセスし、新しいプロファイルをインストールする
4. 機内モードをオン→オフにして接続を確認する
---
## よくある質問
### iPhoneではAPN設定が手動でできないと聞きましたが本当ですか?
はい、iPhoneはAndroidと異なり、APNを直接入力できる画面が標準では表示されません。iPhoneでAPNを設定するには、キャリアが提供する構成プロファイル(.mobileconfig)をインストールする方法が基本です。ただし、大手MNO(ドコモ・au・ソフトバンク・楽天モバイル)やサブブランド(povo・LINEMO等)では、iPhoneに対してキャリア設定アップデートを通じてAPNが自動適用されるため、手動操作は原則不要です。なおahamoはiPhoneで構成プロファイルのインストールが必要な場合があります。
### 構成プロファイルをインストールするのは安全ですか?
公式のMVNOやキャリアが提供するプロファイルであれば、APN設定とメール・MMS設定のみが含まれており基本的に安全です。ただし、出所不明のサイトからダウンロードしたプロファイルはVPNや証明書が埋め込まれている可能性があり危険です。プロファイルは必ず利用中のMVNO公式サイトからダウンロードしてください。
### 構成プロファイルをインストールしてもデータ通信ができません。どうすればよいですか?
インストール直後の場合は、一度端末を再起動するか、機内モードをオン・オフして接続をリセットしてみてください。それでも繋がらない場合は、(1)データローミングの設定(海外SIMの場合はオンが必要)、(2)モバイルデータ通信がオンになっているか、(3)デュアルSIM構成の場合に正しいSIMがデータ通信に選択されているか、を確認してください。
### 複数の構成プロファイルをインストールした場合、どちらが優先されますか?
iPhoneはAPN構成プロファイルを1スロットにつき1つしか保持できません。2つ目のプロファイルをインストールしようとすると、既存プロファイルの削除を求めるメッセージが表示されます。MVNOを乗り換える際は、旧プロファイルを先に削除してから新プロファイルをインストールしてください。「設定→一般→VPNとデバイス管理」で不要なプロファイルを削除できます。
### 旅行eSIMもAPN設定が必要ですか?
ほとんどの旅行eSIMは、プロファイルのインストール時にAPN情報も同時に設定されるため、別途手動での設定は不要です。ただし、一部のeSIMプロバイダーや端末・OSバージョンの組み合わせによっては自動設定が正常に機能しないケースがあります。その場合はeSIMプロバイダーのサポートページでAPN設定情報を確認してください。
### iOS 17と18でAPN設定の手順は違いますか?
基本的な流れは同じです。構成プロファイルのインストールはSafariからダウンロード後、「設定→一般→VPNとデバイス管理」からインストールする手順で変わりありません。ただし、iOS 16以前は設定の別の場所からプロファイルをインストールする場合がありました(「設定→プロファイルがダウンロードされました」等)。iOS 17・18では表示が統一されています。
### キャリア設定アップデートとは何ですか?APNと関係ありますか?
キャリア設定アップデートは、Appleとキャリアが連携して配信するiOSの補助設定ファイルです。APN情報・VoLTE設定・Wi-Fi Calling設定などが含まれており、インストールすることでiPhoneがそのキャリアで最適に動作するよう設定されます。大手MNOやサブブランドはこのキャリア設定アップデートでAPNを自動設定するため、iPhoneユーザーは手動操作不要です。「設定→一般→情報」を開くと保留中のアップデートがあれば通知されます。
---
## まとめ / 関連ガイド
iPhoneでのAPN設定の要点をまとめる。
- APN(Access Point Name)は3GPP TS 23.003で定義された識別子で、モバイルデータ通信の接続先を指定する
- 大手MNO(ドコモ・au・ソフトバンク・楽天モバイル)とサブブランドはキャリア設定アップデートで自動設定されるため手動操作不要
- MVNOや海外SIMでは、キャリア提供の**構成プロファイル(.mobileconfig)**をSafariからダウンロードしてインストールする
- プロファイルは必ずMVNO公式サイトから取得し、「設定→一般→VPNとデバイス管理」でインストールする
- 旅行eSIMは多くの場合APN自動設定済みだが、データローミングをオンにする設定は必要
- 設定後もデータが繋がらない場合は機内モードのオン・オフ→キャリア設定アップデート確認→ネットワーク設定リセットの順で対処する
**関連ガイド**:
- **[SIMカードとは — 役割・種類・選び方](/ja/guides/what-is-sim/)** — SIMの基礎知識(B-01)
- **[eSIMとは — 仕組み・メリット・デメリット](/ja/guides/what-is-esim/)** — eSIMの基礎知識(B-02)
- **[MVNOとは — 仕組み・メリット・注意点](/ja/guides/what-is-mvno/)** — MVNO・格安SIMの仕組み(C-02)
- **[モバイルデータに繋がらないときの対処法](/ja/guides/no-data/)** — APN以外の原因を含む総合診断(FX-02)
- **[用語集 — SIM・eSIM・通信](/ja/guides/glossary-index/)** — APN・DNN・3GPPなど通信用語の一覧
SIMプランの比較は [SimFinder](/ja/jp/search/) で、旅行eSIMの比較は [SimFinder Travel](/ja/travel/) で行えます。
================================================================================
# アプリでeSIMを設定する方法
URL: https://sim-finder.com/ja/guides/app-setup/
Type: guides (ja)
Published: 2026-06-06
プロバイダーの専用アプリを使ってeSIMを設定する方法は、QRコードのスキャンも手動コード入力も不要で、アプリの画面指示に従うだけでインストールが完了する。設定後はトップアップ(データの追加購入)・残量確認・複数eSIMの管理もアプリ上で行える点が大きな特徴だ。
eSIMの仕組みや基本概念は「[eSIMとは — 仕組み・メリット・デメリット](/ja/guides/what-is-esim/)」で解説している。QRコードを使った設定手順は「[QRコードでeSIMを設定する(iPhone)](/ja/guides/qr-code-iphone/)」を参照してほしい。
---
## アプリ経由設定とは何か
eSIMのインストール方法はGSMA SGP.22仕様で定義されており、主に3つの方式がある。
| 方式 | 操作 | 特徴 |
|------|------|------|
| QRコードスキャン | カメラで読み取る | 別端末・印刷物が必要 |
| 手動入力 | SM-DP+アドレスとアクティベーションコードを入力 | 文字入力の手間あり |
| **アプリ経由** | **プロバイダーアプリを操作** | **アプリがプロセスを自動処理** |
アプリ経由の設定では、ユーザーがQRコードを別の端末で表示したりコードを手入力したりする必要がなく、アプリがeSIMプロファイルの取得から端末へのダウンロード指示まで一連の処理を担当する。技術的にはアプリがSM-DP+サーバーと通信してプロファイルを取得するが、操作上は端末のOSが提供するeSIM設定画面に自動で誘導される流れになる。
---
## QRコード・手動入力との違い
アプリ経由の設定は、QRコードや手動入力と本質的な仕組みは同じだ(eSIMプロファイルをSM-DP+サーバーからダウンロードする)。異なるのは操作の起点と管理機能だ。
**QRコードや手動入力の場合**、eSIMのインストールは1回限りの操作になりやすい。プロバイダーとの接点はインストール時のみで、追加のデータ購入や残量確認には別途Webサイトへのアクセスが必要になることが多い。
**アプリ経由の場合**、インストール後もアプリを通じてeSIMの状態やデータ残量をリアルタイムで把握でき、追加購入や有効化・無効化の切り替えもアプリ内で完結する設計になっているサービスが多い。
手動入力との比較については「[SM-DP+アドレスで手動設定する](/ja/guides/manual-code/)」も参照してほしい。
なお、Androidスマートフォンを使っている場合はQRコードを用いた設定フローも利用できる。詳細は「[QRコードでeSIMを設定する(Android)](/ja/guides/qr-code-android/)」を参照してほしい。アプリ経由とQRコード経由は同じeSIMプロファイルをダウンロードするが、プロバイダーがどちらの方式をサポートしているかは事前に確認する必要がある。
---
## アプリ経由でeSIMを設定する一般的な流れ
プロバイダーやキャリアによって画面構成や細部のステップは異なるが、アプリ経由のeSIM設定は概ね以下の流れで進む。
### Step 1: アプリをダウンロードする
eSIMを提供しているプロバイダーまたはキャリアの公式アプリをApp Store(iOS)またはGoogle Play(Android)からインストールする。アプリは設定したい端末にインストールする必要がある。
### Step 2: アカウントを作成・ログインする
アプリを起動してアカウントを作成するか、既にアカウントがあればログインする。初回利用の場合は、メールアドレス・電話番号などの基本情報の登録と本人確認手続きが求められることが多い。
### Step 3: プランを選択または確認する
アプリ内でeSIMプランを選択して購入するか、既に購入済みのeSIMプランを確認する。旅行eSIMの場合は対象国・データ量・有効期間を選んで決済まで完了させる。
### Step 4: eSIMをダウンロードする
「eSIMをインストール」「eSIMを追加」などのボタンをタップすると、アプリが端末のeSIM設定機能を呼び出す。iPhoneではiOSのeSIM追加確認画面が表示されるので、画面の指示に従って「続ける」等をタップすると、プロファイルのダウンロードが開始される。
ダウンロード中はインターネット接続が維持されている必要がある。通常数秒〜1分程度で完了する。
### Step 5: 回線を切り替えて利用を開始する
eSIMのインストールが完了したら、デバイスの設定でeSIMをアクティブな回線として設定する。
- **iPhone**: 「設定」→「モバイル通信」で追加されたeSIMラインのデータ通信をオンにする
- **Android**: 「設定」→「ネットワークとインターネット」(またはメーカー別の設定メニュー)でeSIMをデフォルトのデータ回線に設定する
旅行eSIMを追加した場合は、ホームキャリアのSIMでデータローミングが発生しないよう、データ通信の優先回線をeSIMに切り替えることを忘れずに確認する。
---
## どのプロバイダーがアプリ経由設定を提供しているか
### 旅行eSIMプロバイダー
海外旅行向けのeSIMサービスを提供するプロバイダーの多くが専用アプリを提供している。これらのアプリは購入・インストール・データ残量確認・追加購入(トップアップ)の全工程をアプリ内で完結できるよう設計されていることが多い。
旅行eSIMの選び方や比較については[SimFinder Travelで国別に検索](/ja/travel/)できる。
### 日本のMVNO・キャリア
日本では、大手キャリア(NTTドコモ・au・ソフトバンク・楽天モバイル等)のeSIM設定はWebブラウザのマイページまたはキャリア公式アプリ経由で行うことが多く、対応状況はキャリアにより異なる。一部のサービスはアプリからeSIM設定画面へ誘導する機能を提供しているが、アプリの対応状況はサービスによって異なる。MVNOについても同様で、アプリ経由のeSIM設定に対応しているかどうかはサービスごとに確認が必要だ。
国内eSIM対応プランを比較したい場合は[SimFinderで絞り込める](/ja/)。
---
## アプリ管理のメリット
### データ残量をリアルタイムで確認できる
アプリに対応したeSIMでは、残量をアプリ内で直接確認できる場合が多い。端末のOS設定からデータ使用量を確認する方法より直感的で、特にプリペイド型のデータプランでは残量管理がしやすい。
### トップアップがアプリ内で完結する
旅行中にデータが不足した場合、アプリからその場で追加データを購入(トップアップ)できるサービスがある。Webブラウザで購入ページを開く手間なく、移動中でもスムーズに対応できる。
### 複数のeSIMをまとめて管理できる
複数の国に対応したeSIMや複数のプロファイルを持っている場合、アプリ上で一覧表示・有効化・無効化の切り替えができるサービスがある。国をまたいで移動するような旅程では、その都度設定画面を開かずにアプリ上で切り替えられると利便性が高い。
なお、端末側でのeSIMプロファイルの管理(有効化・削除)については「[eSIMの削除と再インストール](/ja/guides/reinstall-esim/)」で詳しく解説している。
### アカウント情報と紐づいた再発行がしやすい
アプリに紐づいたeSIMは、機種変更時や端末故障時にプロバイダーのアカウントを通じて再発行手続きを行いやすい。プロバイダーのポリシーによっては、アプリ内から再インストール操作を完了できる場合もある。
---
## アプリ経由設定の注意点
### アプリがアンインストールされてもeSIMは残る
eSIMプロファイルは端末のeUICCチップに格納されており、アプリを削除してもeSIM自体は端末に残る。ただしアプリを削除するとトップアップや残量確認ができなくなるため、eSIMが有効な期間中はアプリを維持しておくことを推奨する。
### eSIM設定にはインターネット接続が必要
アプリ経由の設定も、QRコードや手動入力と同様に、eSIMプロファイルのダウンロード時にインターネット接続が必要だ。旅行先でeSIMを設定する場合は、ホテルのWi-Fiや空港のWi-Fiを使うか、日本国内で事前に設定を完了させておくことを推奨する。
### アプリの対応OSバージョンを確認する
プロバイダーのアプリは、対応しているiOS・Androidのバージョンが指定されている場合がある。古いOSバージョンの端末ではアプリがインストールできないか、一部機能が利用できない場合がある。App StoreやGoogle Playの「必要条件」欄で確認すること。
### 端末のeSIM対応が前提条件
アプリ経由であっても、設定先の端末がeSIMに対応していることは必須条件だ。端末のeSIM対応状況はiPhoneなら「設定」→「モバイル通信」に「eSIMを追加」メニューがあるかどうかで確認できる(Apple公式情報)。eSIM対応端末の一覧は「[eSIMとは](/ja/guides/what-is-esim/)」を参照してほしい。
### SIMロックがかかっている端末では設定できない
キャリアロックがかかったままの端末では、アプリ経由でも他社のeSIMを設定することができない。SIMロック解除が必要な場合は、現在利用中のキャリアのサポートページで手続きを行う。
---
## アプリ経由設定でよくあるトラブル
### インストールボタンをタップしても何も起こらない
端末のOSバージョンが古い場合やeSIM関連の権限設定に問題がある場合に起こりやすい。まず端末のOSを最新バージョンに更新してから再試行する。また、アプリ自体のバージョンも最新にしておくこと。
### 「eSIMのインストールに失敗しました」と表示される
Wi-Fiやモバイルデータの接続を確認し、安定したネットワーク環境で再試行する。繰り返し失敗する場合はプロバイダーのサポートに問い合わせること。eSIMプロファイルが期限切れになっている可能性もある。
### アプリにeSIMが表示されない(インストール後)
アプリとeSIMのデータ同期に時間がかかる場合がある。アプリを再起動するか、しばらく待ってから再度確認する。それでも表示されない場合はアプリのキャッシュをクリアするか、プロバイダーのサポートに確認する。
### インストール後にデータ通信が繋がらない
eSIMのインストール(プロファイルのダウンロード)と、eSIMの有効化(回線のアクティベーション)は別のステップだ。「設定」→「モバイル通信」でeSIMラインがオンになっているか、そのラインがモバイルデータ通信の優先回線に設定されているかを確認する。旅行eSIMの場合、プロバイダーによっては現地のネットワークに接続した時点で有効期間が開始されるものもあるため、有効期間の開始条件もアプリやプロバイダーのFAQで確認しておくこと。
---
## アプリ経由設定が使えないケースと対処
アプリ経由のeSIM設定は便利だが、使えない・使いにくい状況もある。
### プロバイダーがアプリを提供していない
eSIMプロバイダーの中には、アプリを提供せずQRコードまたは手動入力のみに対応しているサービスもある。プロバイダーの公式サイトで「インストール方法」を事前に確認し、アプリ対応かどうか把握しておく必要がある。
### 設定したい端末にアプリをインストールできない
古い端末や古いOSバージョンでは、プロバイダーのアプリが動作しない場合がある。この場合はQRコード経由または手動入力での設定が代替手段になる。QRコードを使った設定手順は「[QRコードでeSIMを設定する(iPhone)](/ja/guides/qr-code-iphone/)」または「[QRコードでeSIMを設定する(Android)](/ja/guides/qr-code-android/)」で確認できる。
### 機内モードやWi-Fiなしの環境でアプリを起動している
アプリの起動自体はオフラインでもできるが、eSIMのダウンロード・アクティベーション・残量同期はインターネット接続が必要だ。接続環境が整ってから操作を行う。
### アプリのログインができない
アカウントのパスワードを忘れた場合や二段階認証の手続きが煩雑な場合は、設定完了までに時間がかかることがある。旅行直前に焦って設定するより、出発前の余裕あるタイミングで設定しておくことを推奨する。
---
## 主要なeSIM管理アプリの種類
eSIM管理アプリはサービスの性格によって大きく2種類に分けられる。
### 旅行eSIMプロバイダー系アプリ
短期の海外渡航向けにデータのみのプリペイドeSIMを提供するプロバイダーが運営するアプリ。データの購入・インストール・残量確認・トップアップをアプリ内で完結できるよう設計されているものが多い。複数の国や地域に対応したプランをまとめて管理できるサービスもある。旅行eSIMを選ぶ際はアプリの使いやすさも選定基準の一つとなる。
このタイプのアプリは世界中の旅行者向けに提供されており、英語・日本語などの多言語対応を謳うサービスも増えている。
### キャリア・MVNO系アプリ
国内外のキャリアやMVNOが提供するマイページアプリ。契約情報・請求・サポートなど包括的なアカウント管理機能を備えており、その一部としてeSIM設定への誘導やeSIMの有効化機能を組み込んでいるものがある。
国内キャリアの場合、eSIM設定はWebブラウザのマイページまたは公式アプリ経由で行うことが多く、対応方法はキャリアにより異なる。一方、海外の通信キャリアではアプリ完結型のeSIM発行フローを採用しているケースも多い。
---
## アプリ設定後の回線切替・優先設定
eSIMのインストールが完了しても、データ通信がeSIM経由に切り替わるまでには手動での設定が必要な場合がほとんどだ。
### iPhoneの場合
「設定」→「モバイル通信」を開くと、インストール済みのeSIMと物理SIMが一覧表示される。「モバイルデータ通信」に使用する回線を選択し、eSIMに切り替える。デュアルSIM利用中は、どの回線を「デフォルトの音声通話」「モバイルデータ」「iMessage・FaceTime」に使うかをそれぞれ設定できる。
旅行eSIMを使う際は「データローミング」がeSIM側でオンになっているかも確認する。ホームキャリアのSIMはローミングをオフにしておくと意図しない課金を防ぎやすい。
### Androidの場合
メーカー・Androidバージョンによって設定メニューの位置が異なる。多くの場合「設定」→「ネットワークとインターネット」(または「接続」→「SIM管理」)からeSIMを選択し、データ通信の優先SIMとして指定する。設定後は「データ通信をeSIMで行う」旨の確認ダイアログが表示される。
Androidにおける詳細な切替手順は「[QRコードでeSIMを設定する(Android)](/ja/guides/qr-code-android/)」でも解説しているので、あわせて確認してほしい。
### 設定後に確認すべき項目
- データ通信の優先回線がeSIMになっているか
- モバイルデータがオンになっているか
- eSIMのアクティベーション(有効期間の開始)条件をプロバイダーのFAQで確認しているか
- ホームキャリアのSIMのローミング設定が意図した状態になっているか
eSIMをアンインストールする際や機種変更時の再インストールについては「[eSIMの削除と再インストール](/ja/guides/reinstall-esim/)」を参照してほしい。
---
## よくある質問
**アプリ経由のeSIM設定にWi-Fiは必要ですか?**
はい。アプリ経由でeSIMプロファイルをダウンロードするには、インターネット接続が必要です。安定したWi-Fi環境で設定することを推奨します。既存の物理SIMが有効であればそのモバイルデータ通信でも可能ですが、ダウンロードが大きい場合はWi-Fiが確実です。
**アプリで設定したeSIMをあとからQRコードで再インストールできますか?**
多くの場合、アプリ経由で発行されたeSIMプロファイルはQRコードへの変換はできません。eSIMを削除した後に再インストールしたい場合は、同じアプリからプロファイルの再発行・再ダウンロード手続きを行うのが一般的です。プロバイダーによって再インストールポリシーが異なるため、削除前に確認してください。
**日本のキャリアはeSIM設定にアプリを使いますか?**
国内の主要キャリア(NTTドコモ・au・ソフトバンク・楽天モバイル等)はeSIM設定をWebブラウザのマイページまたはキャリア公式アプリ経由で行うことが多く、対応状況はキャリアにより異なります。旅行eSIMプロバイダーはアプリ中心の設定フローを採用しているサービスが多数あります。
**アプリ経由で設定したeSIMを別の端末で使えますか?**
eSIMプロファイルは1台の端末に紐づけられており、別の端末にそのまま移すことはできません。機種変更時は同じアプリからeSIMの再発行または転送手続きを行う必要があります。プロバイダーのポリシーによっては再発行手数料が発生する場合があります。
---
## 関連ガイド
QRコードによる標準的な設定手順は「[QRコードでeSIMを設定する(iPhone)](/ja/guides/qr-code-iphone/)」と「[QRコードでeSIMを設定する(Android)](/ja/guides/qr-code-android/)」を参照してほしい。QRコードもアプリも使えない場合の代替手段として「[SM-DP+アドレスで手動設定する](/ja/guides/manual-code/)」がある。インストール済みのeSIMを削除・再インストールする方法は「[eSIMの削除と再インストール](/ja/guides/reinstall-esim/)」で解説している。eSIMの基礎から学びたい場合は「[eSIMとは — 仕組み・メリット・デメリット](/ja/guides/what-is-esim/)」を参照してほしい。
国内eSIM対応プランを探すには[SimFinderで絞り込める](/ja/)。海外旅行用のeSIMは[SimFinder Travelで国別に検索](/ja/travel/)できる。
================================================================================
# デュアルSIM最強の組み合わせ
URL: https://sim-finder.com/ja/guides/best-combinations/
Type: guides (ja)
Published: 2026-06-06
デュアルSIMは「2枚のSIMを挿すだけ」ではなく、**何を目的にどの組み合わせを選ぶかで効果が大きく変わる**。通信障害への備え、月額コストの削減、通話品質の維持、eSIMの活用など、目的によって最適な組み合わせのパターンは異なる。この記事では日本のユーザーが選びやすい4つの組み合わせパターンを整理し、それぞれの考え方と向くユーザー像を解説する。
デュアルSIMの仕組み(DSDS・DSDV・DSDA)については[デュアルSIMとは — DSDS・DSDV・DSDAの仕組みと活用法](/ja/guides/what-is-dual-sim/)で解説しているので、基礎から確認したい場合はそちらを先に読んでほしい。
---
## 4つの目的別パターンの全体像
まず4パターンをひとつの表で整理する。
| パターン | 主な目的 | 主な組み合わせ方向 |
|---------|---------|-----------------|
| ① 通信障害対策 | 障害時の継続通信 | 異系統MNO+異系統MNO(またはサブブランド) |
| ② コスト最適化 | 月額コストの削減 | 通話用の最小プラン+データ用の大容量MVNO |
| ③ 通話品質重視 | 安定した音声通話 | VoLTE対応メイン回線+データ専用サブ回線 |
| ④ eSIM活用 | 手軽な2回線管理 | 物理SIM+eSIM(メイン維持しながら追加) |
各パターンは排他的ではない。たとえば「② コスト最適化」と「④ eSIM活用」は同時に成り立つ。自分の優先事項がどれに当たるかを確認してから組み合わせを決めると判断しやすい。
---
## パターン① 通信障害対策 — 異系統MNOで冗長化する
### 考え方
このパターンの核心は「回線系統の分散」だ。メイン回線と副回線が同じキャリアの設備に乗っている場合、そのキャリアで障害が発生すると2回線とも使えなくなる。異なるMNO(移動体通信事業者)の回線を持つことで、一方が障害になっても通信を継続できる。
日本には4つのMNO(NTTドコモ・au/KDDI・ソフトバンク・楽天モバイル)がある。メイン回線がドコモ系であれば、副回線はau系・ソフトバンク系・楽天モバイルのいずれかを選ぶ。この「系統違い」の原則はサブブランドにも適用する。UQ mobile(au系)やY!mobile(ソフトバンク系)はMNO本体と同じ設備を使うため、メインとサブが同系統のMNOになる組み合わせは避ける。
MVNOを副回線として使う場合は、そのMVNOが使用しているMNO回線を必ず確認する。IIJmioならドコモ回線とau回線のマルチキャリア対応など、MVNOによって使用回線が異なるためだ。
### 副回線に求める仕様
通信障害対策の副回線に必要な要素は3つだ。
- **音声通話・SMS対応**: 障害時にSMS認証が必要なサービスへのアクセスを維持するため、データ専用SIMは避ける
- **eSIM対応**: 物理SIMスロットを空けておき、平時からデュアルSIM構成で常時待ち受けできる形にする
- **低コスト維持**: 普段ほとんど使わない回線に高い維持費をかけ続けるのは合理的でない
副回線の選び方と維持管理については[副回線の選び方 — 通信障害に備える日本市場ガイド](/ja/guides/sub-line/)で詳しく解説している。
### 向くユーザー
- スマートフォンを仕事や生活のインフラとして使っており、数時間でも通信が途絶えることが困る人
- 自然災害の多い地域に住んでいる、あるいは在宅勤務でネット接続が途絶えることが業務に直結する人
- 銀行・決済サービスのSMS認証を頻繁に使う人
---
## パターン② コスト最適化 — 通話用最小プラン+データ用MVNO
### 考え方
大手キャリア(MNO)の通話プランは、データ通信の単価が高い傾向がある。一方でMVNOはMNOから回線を卸売購入し、より安価にデータ通信を提供する。このコスト構造の差を活かす組み合わせがこのパターンだ。
典型的な構成は「通話・SMS受信はMNO(またはサブブランド)の最小プランで維持し、大容量のデータ通信はMVNOの大容量プランで賄う」というものだ。通話品質や番号の安定性はMNOに任せ、データのコストパフォーマンスはMVNOで確保する。
ただし注意点がある。このパターンで使うMVNOは「データ通信専用」または「音声通話付きのMVNO大容量プラン」のどちらかになる。データ専用SIMを選ぶ場合は、通話・SMSは必ずもう一方のMNO回線で対応できる構成にしておく必要がある。
### MVNOの回線系統にも注意する
コスト最適化パターンでは通信障害対策は副次的な目的になるが、MVNOがメインのMNOと同系統の回線を使っている場合、そのMNOの障害時には2回線ともデータが使えなくなるリスクがある。コスト重視でありながらリスクも抑えたい場合は、メイン回線と異なる系統のMNO回線を使うMVNOを選ぶほうがよい。
### MNOとMVNOの違いについて
MNO・MVNO・サブブランドの違いと通信品質の傾向については[MNO vs MVNO vs サブブランド — 違いと選び方](/ja/guides/mno-vs-mvno-comparison/)で解説している。
### 向くユーザー
- 月額の通信費を下げたい人
- 通話は少ないがデータ通信は大容量使いたい人
- 仕事用番号はキャリアで維持しつつ、個人のデータ通信を格安SIMで賄いたい人
---
## パターン③ 通話品質重視 — VoLTE対応メイン+データ専用サブ
### 考え方
音声通話の品質は回線の種類と規格に依存する。VoLTE(Voice over LTE)はLTE(4G)回線を使った高音質通話規格であり、従来の3G回線を使った通話より音質が改善される。一方、データ専用SIMはそもそも音声通話の経路を持たない。
このパターンは「通話はMNOのVoLTE対応プランで確保し、データ通信はサブ回線(データ専用または別のMNOの安価なプラン)で補完する」という構成だ。
通話回線として選ぶMNO・サブブランドが確実にVoLTE(またはVoNR)に対応していることを確認する。日本では3Gサービスが順次終了しており、3G通話に依存する旧来のプランは選択肢から外れつつある。VoLTE・VoNRの仕組みについては[VoLTE・VoNRとは — 4G/5G音声通話の仕組み](/ja/guides/volte-vonr/)を参照してほしい。
### 通話中のデータ通信制限を理解する
デュアルSIM端末の方式(DSDV)では、通話中はもう一方のSIMのデータ通信が停止する場合がある。通話しながら別のSIMのデータ通信を継続したいなら、DSDAに対応した端末が必要だ。iPhoneは現在DSDAに対応していないため、通話中はデータが一時停止することを前提に使う必要がある。
### 向くユーザー
- ビジネス用途など通話品質を重視する人
- コールセンター等への通話が多く、3Gサービス終了後の品質低下を避けたい人
- 通話はメイン回線で完結させ、データのバックアップとしてサブ回線を持ちたい人
---
## パターン④ eSIM活用 — 物理SIM+eSIMで2回線
### 考え方
このパターンは「形式」の話であり、上記①〜③と組み合わせられる。物理SIMスロットが1つしかない端末でも、eSIMを追加することで2回線を同時に保持できる。
eSIMは端末に内蔵されたチップにキャリアプロファイルをダウンロードする技術で、物理的なSIMカードを交換せずに回線を追加できる。たとえば、手元にある物理SIMカード(メイン回線)をそのままにしながら、別キャリアのeSIMプランを後から追加するだけで2回線構成が完成する。
iPhoneのeSIMはiPhone XS・XR(2018年)以降、Google Pixel系はPixel 3a以降で対応している。iPhone 13以降はeSIM×eSIMのデュアルeSIM構成にも対応しており、物理SIMスロットへの依存度が下がっている。
### 海外旅行でのeSIM活用
物理SIM(国内キャリア)を維持しながら旅行先のeSIMをデータ専用で追加する構成は、旅行時のコスト削減と日本の番号維持を両立できる定番の組み合わせだ。詳しい運用方法は[海外旅行でのデュアルSIM活用 — 日本のSIMを維持しながら現地eSIMを使う](/ja/guides/dual-sim-for-travel/)で解説している。
### 向くユーザー
- 物理SIMスロットが1つしかない端末を使っている人
- 今の物理SIMカードをそのまま維持しながら2回線目を追加したい人
- 頻繁に渡航し、旅行ごとに現地eSIMを追加したい人
---
## 組み合わせ選びの3つの判断軸
4つのパターンを紹介したが、実際に組み合わせを選ぶ際には以下の3つの軸で判断すると整理しやすい。
### 軸1: 回線系統の分散
最も重要な軸だ。メインとサブが同じMNOの回線系統を使っている場合、障害リスクの分散にならない。前述のとおり、MNO・サブブランド・MVNOの親回線の系統を確認し、異なるMNOになるよう選ぶ。
この軸は通信障害対策パターン(①)だけでなく、他のパターンでも意識したほうがよい。コスト目的(②)の組み合わせでも、結果的に同系統になっていれば冗長性はゼロだ。
### 軸2: 対応バンドとエリア
使用する端末が2回線それぞれのキャリアの周波数バンドに対応しているかを確認する。楽天モバイルは長期間プラチナバンドを持たず1.7GHz帯(Band 3)中心で屋内カバレッジが課題とされてきたが、2024年6月から700MHz帯(Band 28)の商用提供を開始し改善が進んでいる。組み合わせの相手回線を選ぶ際は、対応バンドとエリアカバレッジを確認するとよい。
バンドの違いはエリアカバレッジに直結する。自分がよく使う地域(職場・自宅・移動ルート)でのカバレッジを各キャリアの公式エリアマップで確認することを推奨する。
### 軸3: テザリング可否
サブ回線をモバイルルーター代わりに使いたい場合、そのプランでテザリング(インターネット共有)が許可されているかを事前に確認する。MVNOの一部プランではテザリングが制限されているか、別途オプション加入が必要な場合がある。
---
## 組み合わせ別の設定手順の流れ
組み合わせを決めたら、端末での設定が必要だ。2回線を登録したあと、「通話・SMSに使う回線」と「データ通信に使う回線」をそれぞれ明示的に設定する。設定しないまま使うと、意図しない回線でデータが消費されるリスクがある。
パターン別に設定の優先度が異なる点を押さえておくと作業がスムーズになる。
**① 通信障害対策パターン**: メイン・サブともに常時待ち受けが必要なため、iPhoneでは「モバイル通信プラン」の設定でどちらの回線もデータ・音声に応答するよう設定する。AndroidのDSDA対応機種では同時待ち受けが有効になっているかを確認する。
**② コスト最適化パターン**: データ通信に使う回線(MVNO)を「モバイルデータ通信」に明示的に指定する。通話・SMS受信には別の回線を指定し、SIM選択を固定する。iPhoneでは「デフォルトの音声回線」「モバイルデータ通信」「iMessage・FaceTime」をそれぞれ個別に設定する必要がある。
**③ 通話品質重視パターン**: メイン回線(VoLTE対応MNO)を通話・SMSに、副回線をデータ通信専用に設定する。iPhoneでは通話中にデータが停止する場合があるため、通話とデータを同時に使うシーンが多い場合はDSDA対応のAndroid端末を検討する。
**④ eSIM活用パターン**: eSIMプロファイルをダウンロードする前に、Wi-Fi接続が有効であること、またはeSIMダウンロード専用の物理SIM通信が使えることを確認する。QRコードによるeSIMの追加は1回しか使えないキャリアが多いため、QRコードを撮影前に誤って閉じないよう注意する。
詳細な操作手順は端末別に異なる。[デュアルSIMの設定(iPhone) — 物理SIM・eSIMを組み合わせる手順](/ja/guides/dual-sim-iphone/)と[デュアルSIMの設定(Android) — Pixel・Samsung別の手順](/ja/guides/dual-sim-android/)でそれぞれ確認してほしい。
---
## 組み合わせを選ぶときの失敗例と回避法
デュアルSIM運用でよく発生する失敗パターンと、その回避策を整理する。
### 失敗例1: メインとサブが同系統MNOになっていた
副回線としてMVNOを選んだが、そのMVNOがメイン回線と同じMNO回線を使っていたため、障害時に両方が止まった。
**回避法**: MVNOの契約前に、そのMVNOが使用するMNO回線(ドコモ/au/ソフトバンク/楽天)をキャリアの公式サイトまたはSimFinderで確認する。IIJmioのようにマルチキャリアMVNOの場合は、契約時に選択した回線種別を記録しておく。なお、IIJmioのデータ専用eSIMはタイプD(ドコモ回線)のみの提供であり、タイプAには音声/SMS付きプランが必要な点も合わせて確認すること。
### 失敗例2: データ専用SIMを副回線にしてSMS認証が届かなくなった
障害対策のためにサブ回線を用意したが、データ専用SIMだったためSMS認証コードを受信できなかった。
**回避法**: 通信障害対策を目的とする場合は、副回線には必ず**音声通話・SMS対応プラン**を選ぶ。データ専用SIMは副回線としての障害対策機能を果たさない。
### 失敗例3: テザリング不可のプランをサブ回線に選んだ
大容量データを売りにするMVNOのプランを選んだが、契約後にテザリングが有料オプションまたは不可であることに気づいた。
**回避法**: テザリング(インターネット共有)の可否を契約前に確認する。SimFinderではテザリング可否を絞り込み条件として使用できる。
### 失敗例4: 端末のバンドが片方の回線に対応していなかった
中古・海外版スマートフォンを使用していたため、副回線のキャリアが使う周波数バンドの一部に非対応で、一部エリアで圏外になった。
**回避法**: 端末のバンド対応表(メーカー仕様ページ)とキャリアの使用バンド一覧を照合する。特に楽天モバイル(Band 3/Band 28)や地方でのエリアカバレッジは、キャリア公式のエリアマップで確認する。
---
## eSIM対応端末での2回線運用の注意点(プロファイル数上限)
eSIMを使ったデュアルSIM運用には、物理SIMにはない固有の制約がある。
### eSIMプロファイルの保存数上限
eSIM対応端末は複数のキャリアプロファイルを保存できる(iPhoneでは8件以上保存可能)。同時に有効化できる件数は機種によって異なる点に注意が必要だ。
- **iPhone 13以降・iPhone SE(第3世代)以降**: 2件のeSIMを同時に有効化できる。物理SIM+eSIM1件でも、eSIM×eSIM2件でも運用可能。
- **iPhone XS〜iPhone 12シリーズ**: 同時有効化は1件のみ。複数のeSIMを使い分けるには「有効なeSIM」を都度切り替える操作が必要。
- **物理SIM+eSIM2回線を常時維持するには**: 旧機種(XS〜12)では物理SIM+eSIM1件の組み合わせ、iPhone 13以降ではeSIM×eSIM構成も選択肢に入る。
### プロファイルの転送・削除の制限
eSIMプロファイルはキャリアの規定によっては**端末間の転送が制限される**。機種変更時に新端末へeSIMを引き継ぐには、キャリアのeSIM再発行手続きが必要な場合がある。また一部のMVNO・キャリアは、プロファイルを削除すると再ダウンロードに追加手続きが必要になる。
eSIM対応端末の選び方と注意点については[海外旅行でのデュアルSIM活用 — 日本のSIMを維持しながら現地eSIMを使う](/ja/guides/dual-sim-for-travel/)でも触れているので合わせて確認してほしい。
### デュアルeSIM(eSIM×eSIM)構成の現状
iPhone 13以降・iPhone 14以降(米国版はnano-SIMスロット廃止)はeSIM×eSIMのデュアルeSIM構成に対応している。日本国内販売の端末はnano-SIMスロットを持つモデルが多いが、eSIM×eSIMも利用可能だ。iPhone 13以降は2件のeSIMを同時に有効化できるため、物理SIMスロットがなくても2回線を常時維持できる。
Android機種のeSIMデュアル対応状況は[デュアルSIMの設定(Android) — Pixel・Samsung別の手順](/ja/guides/dual-sim-android/)を参照してほしい。
---
## 乗り換え時に組み合わせを見直すタイミング
一度決めたデュアルSIMの組み合わせは固定ではない。以下のタイミングでは現在の組み合わせが最適かを見直すことを推奨する。
### 端末を買い替えたとき
新端末のeSIM対応状況・対応バンドが旧端末と異なる場合がある。特に物理SIM2スロット構成からeSIM対応機への移行時は、eSIM×物理SIMの構成に変更できる機会でもある。新端末のバンド対応表を確認し、現在の副回線キャリアとの相性を再チェックする。
### 主な利用場所が変わったとき
転居・転職・引越しにより、よく使うエリアが変わると各キャリアのエリアカバレッジが変わる。副回線が新しい生活圏でエリア外になっていないかを確認するタイミングだ。特に地方移住・山間部・地下鉄の多い都市部への移動は確認が重要になる。
### 使用中のMNO・MVNOがプラン体系を大きく変えたとき
キャリアの合併・ブランド統合・プラン廃止によって現在の組み合わせが維持できなくなることがある。楽天モバイルの参入時(2020年)やソフトバンク系ブランドの整理のように、市場環境の変化は組み合わせの見直し機会になる。使用中のプランが廃止・変更される告知が来たら、改めて[SimFinderで検索](/ja/)して最新の選択肢を確認する。
### 月の通話量・データ量が大きく変わったとき
ライフスタイルの変化(在宅勤務の増減・子育て・副業など)で通話やデータの使用パターンが変わることがある。特にコスト最適化パターン(②)を採用している場合、通話が増えたならMNO側プランの見直し、データが増えたならMVNO側プランの容量変更が必要になる。半年〜1年に1度は使用量を振り返る習慣が、最適な組み合わせを維持するうえで有効だ。
---
## 組み合わせを比較・検索する
各パターンで「どのプランを使うか」を決めるには、実際のプラン一覧を確認することが必要だ。料金・容量・テザリング可否・対応バンドなどの条件で絞り込むには[SimFinderで検索](/ja/)を活用してほしい。具体的な料金はプランの変更で随時変わるため、この記事では記載せず、SimFinderの最新データを参照することを推奨する。
---
## まとめ
| パターン | 核心 | 主な判断軸 |
|---------|------|---------|
| ① 通信障害対策 | 異系統MNOで冗長化 | 回線系統の分散(必須) |
| ② コスト最適化 | 通話はMNO・データはMVNO | コスト対効果・テザリング可否 |
| ③ 通話品質重視 | VoLTE対応メイン+データ専用サブ | VoLTE対応・DSDV/DSDA方式 |
| ④ eSIM活用 | 物理SIM+eSIMで手軽に2回線 | 端末のeSIM対応・バンド確認 |
4つのパターンは組み合わせて使えるものもある。まず「自分が一番困っていること」を起点にパターンを決め、そこから回線系統・バンド・テザリング可否の3軸で絞り込んでいくと、最適な組み合わせにたどり着きやすい。
デュアルSIMの基礎から確認したい場合は[デュアルSIMとは — DSDS・DSDV・DSDAの仕組みと活用法](/ja/guides/what-is-dual-sim/)を、副回線の維持管理については[副回線の選び方 — 通信障害に備える日本市場ガイド](/ja/guides/sub-line/)を参照してほしい。
---
## よくある質問
---
## 関連ガイド
- [デュアルSIMとは — DSDS・DSDV・DSDAの仕組みと活用法](/ja/guides/what-is-dual-sim/)
- [海外旅行でのデュアルSIM活用 — 日本のSIMを維持しながら現地eSIMを使う](/ja/guides/dual-sim-for-travel/)
- [副回線の選び方 — 通信障害に備える日本市場ガイド](/ja/guides/sub-line/)
- [デュアルSIMの設定(iPhone) — 物理SIM・eSIMを組み合わせる手順](/ja/guides/dual-sim-iphone/)
- [デュアルSIMの設定(Android) — Pixel・Samsung別の手順](/ja/guides/dual-sim-android/)
================================================================================
# 乗り換えのベストタイミング — いつ乗り換えるとお得か
URL: https://sim-finder.com/ja/guides/best-timing/
Type: guides (ja)
Published: 2026-06-04
乗り換えのタイミングを間違えると、旧キャリアと新キャリアの料金が重なったり、解約月の満額請求が生じたりして余分なコストが発生します。
この記事では、日本のキャリア乗り換えで料金上の損失を最小化するために把握しておくべき「解約月の日割計算の有無」「新キャリアの初月請求の仕組み」「更新月・最低利用期間との関係」「月末か月初かの考え方」を整理します。
契約条件(違約金・更新月・最低利用期間)の詳細については「[契約期間・違約金・初期費用 — 契約条件の見方](/ja/guides/contract-terms/)」を、乗り換え前の準備全般については「[乗り換え前チェックリスト](/ja/guides/pre-switch-checklist/)」を参照してください。
---
## 「タイミング」が重要な理由
乗り換えにかかるコストは、月額料金の安さだけで決まりません。乗り換えのタイミングによって、以下の2つの要因が変動します。
1. **旧キャリアで発生する費用**: 解約月の料金計算方式(日割りか満額か)、契約解除料(違約金)の有無
2. **新キャリアで発生する費用**: 初月の料金計算方式(日割りか満額か、それとも翌月から起算か)
この2つをあわせて考えることで、「いつ申し込むと総コストを抑えられるか」を判断できます。
---
## 旧キャリアの解約月 — 日割りか満額か
### 多くのキャリアは月額満額請求
日本の大手MNO(NTTドコモ・au・ソフトバンク)およびそのサブブランド・オンライン専用ブランドの多くは、月額料金を日割り計算せず、月の途中で解約しても解約月は1ヶ月分の月額料金が発生します。
たとえば月の1日に解約しても、月の末日に解約しても、解約した月の請求額は同じになります(このルールが適用される場合)。
楽天モバイルは、解約月の料金をデータ利用量に応じた従量精算とする方式をとっています。多くのキャリアは月額満額請求ですが、楽天モバイルはデータ利用量に応じた従量精算となります。各社の重要事項説明で確認してください。
### 一部のMVNOは日割りを適用
格安SIM(MVNO)の中には、解約月の利用日数に応じて日割り計算を適用する事業者もあります。日割り計算の有無は事業者・プランによって異なるため、申し込み前に各社の「重要事項説明」または「サービス利用規約」で確認してください。
### 確認方法
解約月の計算方式を確認するには以下の場所を参照します。
- 各キャリア・MVNOの「重要事項説明」
- サービス利用規約の「解約」または「料金の計算」に関する条項
- 不明な場合はカスタマーサポートへ問い合わせ
旧キャリアが満額請求である場合、「月末近くに解約する」ことで解約月に使える残り日数を多くする考え方があります。逆に月初に解約しても月末に解約しても費用が変わらないため、解約を急ぐ必要がない場合は月末まで利用を続けてから手続きを進める選択肢があります。
### 重要事項説明の確認手順
重要事項説明は申し込み前に必ず確認すべき文書です。以下の手順でアクセスできます。
1. 各キャリア・MVNOの公式サイトのフッターまたはサービス案内ページに「重要事項説明」のリンクが掲載されている
2. 申し込みページの途中に同意確認として表示されることも多い
3. 「料金の計算方法」「解約」に関する条項を探し、「日割り計算」「月額満額」「解約月の取り扱い」といったキーワードを確認する
わかりにくい場合はチャットサポートや電話サポートで「解約月の料金はどう計算されますか」と直接確認するのが確実です。
---
## 新キャリアの初月 — 日割りか翌月起算か
新キャリアに乗り換えた場合、月の途中から利用を開始した初月の請求方式もキャリアによって異なります。
### 初月日割り
月の途中から利用を開始した場合、その月の利用日数に応じた料金のみ請求するキャリア・MVNOがあります。この場合、月末に近いタイミングで申し込んでも初月の請求額は少なくなります。
### 初月無料または翌月から起算
初月を無料とするか、または翌月1日から1ヶ月分として起算するキャリア・MVNOもあります。このケースでは、月の何日に申し込んでも初月の負担が同じになる(または初月無料)ため、申し込みのタイミングが料金に与える影響が小さくなります。
### 初月満額
月の途中から利用を開始した場合でも、その月を1ヶ月分として請求するキャリアもあります。この場合は月初に申し込むほうが初月の利用日数が多くなり、コストあたりの利用量が増えます。
### 申し込み前の確認方法
MNO・サブブランド・MVNOいずれも、初月の請求方式は重要事項説明に記載されています。申し込み前に確認し、解約するキャリアの解約月の計算方式と合わせて判断してください。
### 初月の計算方式と「開通月」の考え方
新キャリアによっては「開通月」と「翌請求月」を分けて管理しているケースがあります。申し込みを完了した日(申し込み日)と回線が実際に開通した日(開通日)がずれると、初月の起算日が変わることがあります。特にeSIMで即日開通する場合と、SIMカード到着後に開通手続きをする場合では、同じ申し込み日でも初月の計算が異なることがあるため、利用開始日の定義を申し込みページや重要事項説明で確認してください。
---
## 二重課金を避ける考え方
旧キャリアの解約と新キャリアの利用開始が重なる期間は、両方の料金が発生する「二重課金」の状態になります。
### MNPの場合(電話番号を引き継ぐ場合)
MNP(番号ポータビリティ)で乗り換える場合、旧キャリアの解約日と新キャリアの利用開始日は、MNP転出のタイミングによって基本的に同日または近接した日になります。
ただし、旧キャリアが解約月を月額満額請求し、新キャリアが初月を月額満額請求する場合、両者の料金が同じ月に発生します。これは二重課金というより「2社分の月額が同月に発生する」状態であり、ゼロにはできませんが、タイミングを調整することでその月に占める割合を調整できます。
MNPの仕組みと手順については「[MNP(番号ポータビリティ)とは — 手順・費用・注意点](/ja/guides/what-is-mnp/)」で詳しく解説しています。
### 新電話番号で契約する場合
電話番号を引き継がない新規契約の場合、旧契約と新契約を任意のタイミングで切り替えられます。旧キャリアを解約してから新キャリアに申し込む、あるいは新キャリアに申し込んだ後に旧キャリアを解約するなど、順序を選べます。ただし旧回線をすぐ解約すると連絡先として機能しなくなるため、移行のタイミングを計画してください。
### 典型的な二重課金が発生するケース
以下のパターンが二重課金(または同月に2社分の料金が発生する状態)の典型例です。
- **ケース1**: 旧キャリアが解約月満額請求のプランで月初に乗り換え、新キャリアも初月満額請求のプランに申し込んだ。その月は両社への月額が発生する
- **ケース2**: MNPで乗り換えたが回線切替の手続きを失念し、旧回線が翌月以降も一時的に生きている状態になった(MNPでは通常起きないが、手続きミスによる遅延で生じることがある)
- **ケース3**: eSIMを追加で申し込んだまま旧プランを解約し忘れ、2回線分の月額が続いた
対策の基本は「乗り換え後に旧回線が確実に解約されているかを確認する」ことです。マイページや請求書で旧キャリアからの請求が止まったことを確認するまで、解約が完了したと判断しないようにしてください。
---
## 更新月・最低利用期間とタイミングの関係
### 更新月がある場合
現在の契約に「契約更新月」(縛り)の設定がある場合、更新月以外のタイミングで解約すると契約解除料が発生する可能性があります。
2019年10月施行の改正電気通信事業法により、契約解除料の上限は定額の低額上限へと引き下げられています。改正以前に比べ解約コストは大幅に低下していますが、更新月内に解約することで契約解除料を避けられる場合はその方が経済的です。
**更新月の確認方法**
- My docomo・My au・My SoftBank・my楽天モバイルなど各キャリアのマイページにログイン
- 「契約情報」または「ご利用中のプラン」から「契約更新月」「解約可能期間」を確認
- 不明な場合はカスタマーサポートへ問い合わせ
### 最低利用期間がある場合
最低利用期間内に解約すると費用が発生するプランがあります。最低利用期間はプランによって異なり、設定がないプランもあります。現在の契約の重要事項説明で最低利用期間の有無と期間を確認し、期間終了後に乗り換えを計画することで費用を避けられます。
契約条件の読み方全般については「[契約期間・違約金・初期費用 — 契約条件の見方](/ja/guides/contract-terms/)」を参照してください。
### 最低利用期間と更新月の違い
「最低利用期間」と「更新月(契約更新月)」は別の概念です。混同しないように整理しておきます。
| | 最低利用期間 | 更新月(縛り) |
|--|------------|-------------|
| 意味 | 契約から一定期間は解約できない、または解約時に費用が発生する期間 | 定期契約の満了月。この月に解約すれば契約解除料が不要 |
| 期間の特徴 | 一定期間(例: 12ヶ月)が終われば以降はいつでも解約可能 | 2年ごとなど繰り返し設定されることが多い |
| 確認場所 | 重要事項説明・申し込み時の契約内容 | マイページの「契約更新月」「解約可能期間」 |
最低利用期間が終了した後でも、更新月が設定されているプランでは更新月以外に解約すると契約解除料が発生する場合があります。どちらの制約があるかを別々に確認してください。
---
## 月末か月初か — タイミングの整理
旧キャリアが月額満額請求(日割りなし)の場合、解約のタイミングで料金が変わらないため、「いつ解約するか」よりも「いつまで使うか」という観点で判断します。
| 旧キャリアの解約月計算 | 有利なタイミング | 理由 |
|---------------------|----------------|------|
| 満額(日割りなし) | 月末近く | 解約月の残り日数を最大化できる |
| 日割り | タイミングによる影響が少ない | 使った日数分のみ請求される |
新キャリアの初月計算と組み合わせると、最適なタイミングは以下のパターンに整理できます。
| 旧キャリア解約月 | 新キャリア初月 | 推奨タイミングの考え方 |
|---------------|-------------|-------------------|
| 満額 | 日割り | 月末近くに乗り換え。旧側は月末まで使い切り、新側は残り日数分のみ請求 |
| 満額 | 満額(または月初起算) | 月初に乗り換え。新キャリアを1ヶ月フルに利用できる |
| 日割り | 日割り | タイミングの影響が少ない。更新月・最低利用期間の条件を優先 |
| 日割り | 満額 | 月初に乗り換え。新キャリアを1ヶ月フルに利用できる |
実際には更新月や最低利用期間の条件が料金計算方式よりも優先されるケースがあります。双方の条件を確認したうえで総合的に判断してください。
---
## MNOとMVNOで違う料金計算の傾向
### MNO・サブブランド・オンライン専用ブランド
NTTドコモ・au・ソフトバンク、およびahamo・povo・LINEMO・UQモバイル・ワイモバイルなどのサブブランド・オンライン専用ブランドは、解約月を月額満額請求とするケースが一般的です。楽天モバイルはデータ利用量に応じた従量精算方式が適用されます。ただし各プランの詳細は重要事項説明で確認が必要です。
MNOとMVNOの違いについては「[MNO・MVNO・サブブランドの違い — 料金・品質・選び方](/ja/guides/mno-vs-mvno-comparison/)」を参照してください。
### MVNO(格安SIM)
MVNOは事業者によって日割り計算を適用しているところとそうでないところがあります。IIJmio・mineo・NUROモバイルなど事業者ごとに異なるため、申し込み前に各社の重要事項説明を必ず確認してください。プロバイダー選びの視点については「[旅行eSIMプロバイダー比較](/ja/guides/provider-comparison/)」も参考になります(旅行eSIM向けですが、プロバイダーを選ぶ考え方は共通しています)。
---
## eSIMは乗り換えタイミングの自由度が高い
物理SIMの乗り換えでは、SIMカードの郵送を待つ必要があるため、申し込みから利用開始までに数日かかることがあります。eSIMはプロファイルのダウンロードで切り替えが完了するため、申し込みから利用開始までを短縮でき、回線切替のタイミングを調整しやすいというメリットがあります。
eSIMを利用する場合、最短で申し込み当日から利用を開始できる場合があります。ただし本人確認の審査状況や申し込み時間帯によっては翌日以降になることもあるため、「月末に申し込んで翌月1日から本格利用」のようなスケジュールを組む場合は余裕を持った計画を立ててください。
---
## チェックリスト — 乗り換えタイミングを決める前に確認すること
乗り換えのタイミングを決める前に、以下を確認します。
| 確認項目 | 確認方法 |
|---------|---------|
| 現在のプランに更新月(縛り)はあるか | マイページ「契約情報」または重要事項説明 |
| 更新月はいつか(ある場合) | マイページ「契約更新月」「解約可能期間」 |
| 最低利用期間はいつ終わるか(設定がある場合) | 重要事項説明・申し込み履歴 |
| 解約月の料金計算方式(日割り or 満額) | 重要事項説明・約款 |
| 新キャリアの初月料金計算方式 | 乗り換え先の重要事項説明・申し込みページ |
| 端末の分割払い残債があるか | マイページ・請求書 |
乗り換え前の確認事項全般は「[乗り換え前チェックリスト](/ja/guides/pre-switch-checklist/)」にまとめています。
---
## 端末の分割残債と乗り換えタイミング
端末を分割払いで購入している場合、乗り換えタイミングには残債の扱いも関わります。
端末の分割払い(割賦販売)の残債は、通常の分割払い契約であれば解約・乗り換え後も月払いを継続できます。ただし、残価設定型プログラム(将来の下取り価格を前提に月額を抑えるタイプ)や特定の端末購入補助プログラムを利用している場合は、乗り換えによって適用条件が変わることがあります。現在の端末購入契約の内容を確認してください。
確認すべき点は以下の通りです。
- 分割払いはいつ終わるか
- 現在の契約が通常の割賦販売か、残価設定型・補助プログラム付きかを確認する
- 残価設定型や補助プログラムの場合、乗り換えによって条件がどう変わるかをキャリアに確認する
- キャリアの「下取りプログラム」や「返却プログラム」を利用している場合、乗り換えによって条件が変わるか
残債がある状態でも乗り換え自体は可能ですが、乗り換え後の月額は「新プランの月額 + 元キャリアへの端末分割払い」になるため、実質的な月額負担を事前に把握してください。
---
## キャンペーン適用条件とタイミング
乗り換えを検討する際、新キャリアのキャンペーンも重要な要素です。ただしキャンペーンには適用条件が設定されており、タイミングを誤ると特典を受けられないことがあります。
よくある適用条件の例は以下の通りです(キャリア・キャンペーンによって異なります)。
- **MNP転入限定**: 新規契約ではなくMNPで転入した場合のみ適用
- **申し込み期間**: キャンペーンの適用期間内に申し込みを完了していること
- **プラン指定**: 特定のプランへの申し込みであること
- **回線利用開始条件**: 申し込みだけでなく、指定期日までに回線を開通・利用していること
キャンペーンの適用条件は申し込みページまたは公式の「キャンペーン詳細」ページに記載されています。「申し込んだがキャンペーンが適用されなかった」というトラブルを避けるため、申し込み前に条件を精読してください。
---
## SimFinderで乗り換え先を比較する
乗り換えのタイミングが決まったら、次のステップは乗り換え先のプランを選ぶことです。
[SimFinderの国内SIM検索](/ja/jp/)では、MNO・サブブランド・MVNOのプランを通信品質・データ容量・eSIM対応などの条件で一括比較できます。乗り換えのタイミングに合わせた最適なプランを探してください。
---
## 関連ガイド
- [契約期間・違約金・初期費用 — 契約条件の見方](/ja/guides/contract-terms/)
- [乗り換え前チェックリスト — キャリア変更前に確認すべきこと](/ja/guides/pre-switch-checklist/)
- [MNP(番号ポータビリティ)とは — 手順・費用・注意点](/ja/guides/what-is-mnp/)
- [MNO・MVNO・サブブランドの違い — 料金・品質・選び方](/ja/guides/mno-vs-mvno-comparison/)
- [旅行eSIMプロバイダー比較 — Airalo・Holafly・Nomad・Saily・Ubigiを用途別に選ぶ](/ja/guides/provider-comparison/)
================================================================================
# 通話プランの選び方を解説
URL: https://sim-finder.com/ja/guides/call-plans/
Type: guides (ja)
Published: 2026-06-06
通話プランは①従量課金・②かけ放題(完全または時間制限付き)・③アプリ通話(LINE・IP電話)の3タイプに大別できる。自分の月間通話時間と通話先の傾向を把握すれば、どのタイプが合うかは機械的に判断できる。
この記事では日本の通話プラン体系を整理し、タイプ別の選び方の基準と、VoLTE・留守電・国際通話といった周辺の論点を解説する。具体的な料金は各社が随時変更するため記載しない。最新のプランは[SimFinderの国内SIM検索](/ja/jp/search/)で比較してほしい。
---
## 日本の通話課金の基本構造
日本の音声通話料金は、通話した時間に応じて課金される**従量制**が出発点だ。課金の単位は30秒ごとが一般的で、30秒未満の端数も1単位として計算される。つまり31秒通話すると2単位分の料金になる。
MNO(NTTドコモ・KDDI/au・ソフトバンク・楽天モバイル)と多くのMVNO(格安SIM)は、プランに応じて以下の組み合わせを提供している。
| タイプ | 仕組み | 主な対象ユーザー |
|--------|--------|----------------|
| 従量課金 | 30秒ごとに課金、上限なし | 月の通話が短時間・低頻度 |
| 時間制限付きかけ放題(5分・10分等) | 1回あたり一定分以内の通話が月額固定 | 短めの通話が一定頻度ある |
| 完全かけ放題 | 通話時間・回数に関係なく月額固定 | 長時間・高頻度の通話がある |
| アプリ通話(LINE・IP電話) | データ通信経由、相手がアプリを使っていれば無料 | 通話先が限られる、コスト重視 |
このどれをメインにするかがプラン選択の核心になる。なお、通話オプションの選択はデータプランとは独立して設定されることが多い。[プリペイド vs ポストペイドの選び方](/ja/guides/prepaid-vs-postpaid/)でも触れているが、通話オプションはポストペイドプランで選択肢が広い。
---
## 従量課金プラン — 通話が少ない人向けの基本形
従量課金は通話した分だけ料金が発生する。月に数回、合計10〜15分程度しか通話しないユーザーにとっては、かけ放題オプションの月額より実際の通話料金の方が安くなる場合が多い。
### 従量課金が向いている人
- 月の通話時間が短く、主にメッセージで済ませている
- 通話はほぼ自分からかけることがなく、受信のみ
- 副回線やデータ専用回線のサブとして通話を持つ
### 従量課金の注意点
上限がないため、予想外に通話量が増えた月は請求が高くなる。長電話が発生しやすい問い合わせ(病院・役所・カスタマーサポート)が多い場合は、従量課金だけでは費用が読みづらい。
[段階制プランの仕組みと選び方](/ja/guides/pay-as-you-go/)で解説しているように、データ料金と同様に通話料金も変動が大きい月は費用の見積もりが難しい。通話頻度に合わせてオプションを選ぶ考え方はデータ容量の選び方と共通している。
---
## かけ放題プラン — 通話量が多い人の定額化
かけ放題オプションを付けると、一定条件内の通話が月額固定料金に収まる。従量課金の不確定さをなくし、毎月の通話費を固定できる。
### 時間制限付きかけ放題(5分・10分かけ放題)
1回の通話ごとに一定分(5分・10分など)までを月額固定で使える。超過した場合は、超過分が従量課金として加算される。
- 短い通話(問い合わせ・確認)が多い人に向く
- 1回あたりの通話が制限時間内に収まるかどうかを確認する
- ビジネス用途で長い商談・交渉が多い場合は超過が積み上がるリスクがある
### 完全かけ放題
通話時間・回数に上限なく、国内の携帯電話・固定電話への通話が月額固定になる(一部プランでは指定番号・プレフィックス番号への制限あり)。
- 1回の通話が長くなりやすい人に向く
- 月の通話頻度が高い人(複数の担当者への連絡が多い業務等)に向く
- 時間制限付きかけ放題より月額が高いため、実際の通話量が少ない場合は割高になる
### どちらを選ぶかの考え方
目安として、自分の過去の通話履歴を確認し、1回あたりの通話時間が中央値でどれくらいかを把握する。大半の通話が5分以内に収まるなら5分かけ放題で十分なケースが多い。1回あたり10〜20分を超える通話が定期的にある場合は完全かけ放題を検討する。
[契約期間・違約金・初期費用の見方](/ja/guides/contract-terms/)で解説している通り、かけ放題オプションの追加・解約はプランによって制限がある場合があるため、変更の柔軟性も事前に確認しておくと良い。
---
## アプリ通話による節約 — LINEとIP電話の活用
スマートフォンのアプリを使えば、データ通信経由で音声通話ができる。通話料金の節約手段として広く使われている。
### LINE通話
LINE同士であれば、音声通話・ビデオ通話ともに無料だ。友人・家族との通話が大半をLINEで済ませられるなら、通話オプションを付けずに済むケースがある。
ただし以下の制限がある。
- 相手がLINEを使っていない場合(固定電話・携帯電話宛て)は有料(LINE Out)
- 通話品質はデータ通信の状況に依存する
- Wi-Fiのない環境では、モバイルデータを消費する
### IP電話
050番号を使うIP電話サービスは、固定電話や携帯電話への発信料金が従量課金より安く設定されているものが多い。ただし、以下の点を把握しておく必要がある。
- 050番号への着信は別途設定が必要なサービスもある
- 緊急通報(110・119・118)にはIP電話の050番号から発信できない
- 通話品質はネットワーク環境に影響される
### アプリ通話の使いどころ
アプリ通話はすでにSNS・メッセージアプリを日常的に使っている相手との通話に向いている。一方で、初めて連絡する相手・業務上の公式な問い合わせ・緊急時の通報には通常の電話番号が必要だ。アプリ通話を軸に置く場合でも、緊急通報用として最低限の音声通話機能(SIMの電話番号)を確保しておく必要がある。
---
## 自分の通話時間から最適タイプを選ぶ
3つのタイプの選び方を、通話パターン別に整理する。
### ステップ1: 月間通話時間を把握する
スマートフォンの通話履歴から、直近3ヶ月の通話時間の合計と平均をざっくり確認する。iPhoneは「電話」アプリの「最近の履歴」から、Androidは通話ログから確認できる。
目安の区分:
- **短時間ユーザー(月15分未満)**: 従量課金で十分な場合が多い
- **中程度ユーザー(月15〜60分)**: 時間制限付きかけ放題との比較が有効
- **高頻度ユーザー(月60分超)**: かけ放題(時間制限付きまたは完全)が割安になりやすい
### ステップ2: 通話先の傾向を確認する
通話相手のほとんどがLINEを使っている場合と、固定電話・業者・公共機関への通話が多い場合では、選ぶべきオプションが変わる。
- 通話の大半がLINE仲間 → アプリ通話メインで従量プランを最小構成に
- 固定電話・携帯番号への発信が多い → かけ放題オプションを検討
- 業務上の長電話が定期的にある → 完全かけ放題が安定する
### ステップ3: SimFinderでプランを比較する
タイプを絞ったら、[SimFinderの国内SIM検索](/ja/jp/search/)で通話オプションの条件を指定して比較する。SimFinderは通話オプションを含めたスコアリングで最適なプランを提示するため、自分の通話パターンを入力することで候補を絞り込める。
---
## VoLTE — 現代の通話はIPで動く
日本では現在の音声通話の主流が**VoLTE(Voice over LTE)**だ。4G LTEネットワーク上でIPパケットとして音声を伝送する仕組みで、従来の3G回線交換通話と比べて以下の点が優れている。
- 通話接続が速い(呼び出しまでの時間が短い)
- 音声品質が高い(HDボイス対応)
- データ通信と同時に利用できる(通話中にネット検索が可能)
NTTドコモは2026年3月末に3Gサービスを終了しており、KDDIは2022年3月末に終了済みだ。3G非対応・VoLTE非対応の端末では、現在日本の主要キャリアで音声通話が使えない。
### MVNOでのVoLTE対応
MVNOはMNOのネットワークを借りてサービスを提供するが、VoLTEへの対応状況はMVNOによって異なる。申し込み前に以下を確認する。
1. 使う端末がVoLTE対応かどうか
2. 申し込むMVNOがVoLTEに対応しているかどうか
3. 端末がそのMVNO(=MVNOが使う親MNO)のVoLTEに対応しているかどうか
SIMフリー端末を使う場合は特に注意が必要で、端末メーカーが公表している対応キャリアの一覧を確認することが基本だ。[VoLTE・VoNRの仕組みと対応端末](/ja/guides/volte-vonr/)で詳しく解説している。
---
## 通話品質に影響する要因
かけ放題やVoLTE対応を確保しても、実際の通話品質は環境に左右される。
### 電波状況
建物の内部・地下・山間部などでは電波が弱くなり、通話が途切れることがある。MVNOはMNOと同じ基地局を使うが、混雑時の帯域優先度がMNOより低い場合がある。通話品質を重視する場合は、MNOまたはサブブランドの選択が安定しやすい。
### Wi-Fi通話(VoWiFi)
一部のキャリアは、Wi-Fiネットワーク経由で音声通話を行う**Wi-Fi通話(VoWiFi)**に対応している。地下や室内など電波が届きにくい環境でも、Wi-Fiがあれば通話できる。端末とキャリアの両方が対応している必要があり、設定は「設定」→「電話」→「Wi-Fi通話」から行う(iPhoneの場合)。
---
## 留守番電話の扱い
留守番電話(ボイスメール)は、キャリアのオプションサービスとして提供されていることが多い。設定方法と利用条件はキャリアによって異なる。
主要な確認ポイント:
- 留守番電話サービスへの月額(無料のキャリア・有料のキャリアがある)
- 保存件数・保存期間の上限
- 再生方法(電話での再生のみか、アプリやSMSでの通知があるか)
- かけ放題オプションと留守番電話サービスの組み合わせ条件
MVNOでは留守番電話サービスを提供していない事業者も多い。留守番電話を必ず使いたい場合は、事業者の対応状況を申し込み前に確認しておく。
---
## 国際通話の扱い
日本から海外への通話(国際電話)は、通常のかけ放題オプションの対象外になる。かけ放題が適用されるのは国内の携帯電話・固定電話への発信が基本だ。
### 国際通話の主な選択肢
**キャリアの国際電話オプション**
MNOは海外向けの国際通話オプションを別途提供している場合がある。料金は通話先の国によって異なり、あらかじめキャリアのサポートページで確認する。
**国際通話対応IP電話**
国際電話に対応したIP電話サービス(050番号を使うもの)は、通常の国際電話より安価に発信できるケースが多い。通話品質はネットワーク環境に依存する。
**アプリ通話(LINE・WhatsApp・FaceTime等)**
相手が同じアプリを使っていれば、海外への通話もデータ通信経由で無料または低価格で利用できる。ただし通話先が固定電話や通常の携帯番号の場合は有料になる。
海外でスマートフォンを使う際のSIM・データ通信については、[国際ローミングガイド](/ja/guides/international-roaming/)も参照されたい。
---
## 家族間での通話プランの考え方
家族で複数回線を持つ場合、通話プランは回線ごとに最適化するよりも家族全体の通話パターンで考える方が効率的なことが多い。
家族間の通話は、LINE等のアプリ通話を活用することで通話料金をほぼゼロにできる。一方で、個々のメンバーが外部への電話(仕事・学校・行政)をどれだけかけるかによって、かけ放題の要否が変わる。
家族プランの組み方とセット割の活用については、[家族プランの選び方](/ja/guides/family-plans/)で詳しく解説している。
---
## データ無制限プランと通話オプションの関係
「データ無制限プラン」と「かけ放題」は別のオプションだ。データが無制限でも通話は従量課金のままというプランは多い。
逆に、アプリ通話をメインにする場合はデータ容量の消費が増える点も考慮が必要だ。通話をアプリに置き換える分だけデータ消費が増えるため、データ容量と通話オプションのコストをセットで考える。
[データ無制限プランの実態](/ja/guides/unlimited-reality/)でも解説しているが、「無制限」プランでも公平利用ポリシー(FUP)による速度制限が存在する。アプリ通話を多用する場合は、通信速度が安定しているかどうかも重要な選定基準になる。
---
## SimFinderで通話プランを最適化する
SimFinderは、通話オプションを含めたスコアリングで国内プランを比較する機能を持つ。通話時間の目安・かけ放題の有無・データ容量などの条件を指定することで、自分の使い方に合ったプランが絞り込める。
具体的な料金額はキャリアが随時変更するため、この記事では記載していない。最新のプランデータは[SimFinderの国内SIM検索](/ja/jp/search/)で確認してほしい。
---
## よくある質問
### かけ放題の「固定電話」は0120・0570番号も含まれますか?
多くのかけ放題オプションでは、0570(ナビダイヤル)・0180・0990などの「他社が料金を設定する接続サービス」への通話はかけ放題の対象外です。一方、0120(フリーダイヤル)は着信者負担のため、料金プランに関わらず発信者側は無料です。対象外番号の扱いは事前にキャリアの重要事項説明で確認してください。
### かけ放題オプションは月の途中から変更できますか?
変更可否・反映タイミングはキャリアによって異なります。月の途中から翌月分として反映されるケースと、当月内に即時反映されるケースがあります。追加の場合と解約の場合でタイミングが異なるキャリアもあるため、変更前にキャリアのマイページまたはサポートで確認してください。
### 050番号のIP電話から緊急通報できますか?
できません。050番号から110(警察)・119(消防・救急)・118(海上保安庁)への通報はできない仕様です。緊急通報はキャリアが付与する090・080・070などの通常の電話番号、または市外局番付きの固定電話番号から行う必要があります。IP電話をメインの通話手段にする場合でも、緊急通報用として通常の回線を確保しておく必要があります。
---
## 関連ガイド
- [プリペイド vs ポストペイド — 違いと選び方](/ja/guides/prepaid-vs-postpaid/)
- [契約期間・違約金・初期費用 — 契約条件の見方](/ja/guides/contract-terms/)
- [家族プランの選び方](/ja/guides/family-plans/)
- [データ無制限プランの実態 — 「無制限」の落とし穴](/ja/guides/unlimited-reality/)
- [段階制プランの仕組み — 使った分だけ支払う](/ja/guides/pay-as-you-go/)
================================================================================
# 通話品質が悪いときの原因と対処 — 音切れ・こもり・遅延を解消する手順
URL: https://sim-finder.com/ja/guides/call-quality/
Type: guides (ja)
Published: 2026-06-04
通話品質の問題(音が途切れる・こもる・遅延・ノイズ・エコー)は、原因が「電波状況」「VoLTE/VoNRの設定」「Wi-Fi Calling」「端末ハードウェア」「ネットワーク障害」の5つに大別される。まず電波状況とVoLTE有効化を確認し、それ以外の原因へと順に絞り込む。
この記事では、症状ごとの原因の切り分け方と、iPhone・Android双方で試せる対処手順を順を追って解説する。
---
## 症状から原因を絞り込む
対処を始める前に、症状のパターンで原因の当たりをつける。
| 症状 | 可能性が高い原因 |
|------|----------------|
| 音が頻繁に途切れる・ブツブツ鳴る | 電波が弱い・VoLTE無効・パケット損失 |
| 相手の声がこもる・低音になる | AMR-NBコーデック(VoLTE未対応)に落ちている |
| 会話が0.5秒以上ズレる(遅延) | 電波状況の悪化・ネットワーク経路の問題 |
| ノイズ・雑音が常に聞こえる | 端末マイク/スピーカーの物理的問題 または 電波干渉 |
| エコーが聞こえる(自分の声が返ってくる) | ネットワーク遅延による音声回り込み |
| 特定の場所でだけ悪い | その場所の電波環境の問題 |
| 特定の相手との通話だけ悪い | 相手側の端末・ネットワークの問題 |
| Wi-Fi接続時だけ悪い | Wi-Fi Callingの切り替え問題 |
---
## 電波状況を確認する
音が途切れる・遅延するといった症状で最も多い原因は電波状況の悪化だ。
VoLTEは音声パケットにQCI 1(最優先クラス)を割り当てるが、電波が弱い状態ではパケット損失そのものは避けられない。電波バーが1〜2本以下の環境では通話品質の低下が起きやすい。
**確認手順:**
1. 端末のステータスバーで電波バーの本数を確認する
2. 「LTE」「4G」「5G」のいずれかが表示されているか確認する(「E」「H」「3G」が表示されている場合はVoLTEが使えない状態)
3. 電波バー3本以上かつ「LTE/4G/5G」表示の場所に移動して通話を試す
電波が弱い根本的な原因(地下・建物内・郊外など)の対処方法は「[「圏外」「サービスなし」の対処法](/ja/guides/no-service/)」で詳しく解説している。
---
## VoLTE / VoNRの有効化を確認する
**VoLTE(Voice over LTE)**は4G LTE上でIPパケットを使って音声を伝送する技術であり、AMR-WB(HD Voice)コーデックによる高音質通話(50〜7,000 Hzの音声帯域)を実現する。VoLTEが無効・非対応の状態では、音声が3G相当のAMR-NB(300〜3,400 Hz)にフォールバックし、こもった通話品質になる。
VoLTEの仕組みと日本のキャリアの対応状況の詳細は「[VoLTEとVoNRとは — 4G/5Gで通話する仕組みと対応端末](/ja/guides/volte-vonr/)」で解説している。
### iPhoneでVoLTEを有効化する手順
1. 「設定」→「モバイル通信」を開く
2. 使用しているSIM(または回線名)をタップする
3. 「音声とデータ」(Voice & Data)で「4G」または「5G」が選択されているか確認する
4. 「4G」を選択し直す(「3G」「2G」になっている場合はVoLTEが使われない)
5. 「VoLTEを有効化」トグルが表示されている場合はオンにする
### AndroidでVoLTEを有効化する手順
メーカー・OSバージョンによってメニュー名が異なるが、一般的な手順は以下の通りだ。
**Android(Pixel):**
1. 「設定」→「ネットワークとインターネット」→「通話設定」
2. 「HD通話」または「VoLTE通話」がオンになっているか確認する
**Android(Samsung):**
1. 「設定」→「接続」→「モバイルネットワーク」
2. 「VoLTE通話」トグルがオンになっているか確認する
### MVNOでVoLTEが使えない場合
格安SIM(MVNO)を利用している場合、MNOとMVNOの双方がVoLTE利用を許可している必要がある。MVNOによってはVoLTE対応を「対応端末リスト(ホワイトリスト)」で管理しており、リスト外の端末ではVoLTEが使えないことがある。
確認方法:
- 利用中のMVNOの公式サポートページで「VoLTE対応端末リスト」「VoLTE対応状況」を検索する
- 端末の機種名が対応リストに含まれているか確認する
---
## Wi-Fi Callingの設定を確認する
Wi-Fi接続中に通話品質が悪化する場合、**Wi-Fi Calling(VoWiFi)**の設定が影響している可能性がある。
Wi-Fi Callingは、Wi-Fiネットワーク経由でIMSに接続して音声通話を行う技術だ。安定したWi-Fi環境ではVoLTEより良好な通話品質が得られるが、Wi-Fiが不安定な状態ではかえって通話品質が低下する場合がある。Wi-Fi CallingとVoLTEの切り替えの仕組みについては「[Wi-Fi Calling(VoWiFi)とは — 電波が弱い場所での通話](/ja/guides/wifi-calling/)」で詳しく解説している。
### Wi-Fi CallingがオンでWi-Fiが不安定な場合の対処
1. Wi-Fiをオフにして、VoLTEのみで通話を試す
2. 通話品質が改善する場合は、Wi-Fiルーターの再起動や5GHz帯への切り替えを試みる
3. 頻繁に不安定なWi-Fi環境に置かれる場合は、Wi-Fi Callingを「携帯電話優先」に設定する
**iPhone(Wi-Fi Calling設定):**
- 「設定」→「モバイル通信」→「Wi-Fi通話」→「Wi-Fi通話をオン」のトグルを確認する
- 「Wi-Fi電話の優先度」を「携帯電話優先」に変更して試す
**Android(Pixel):**
- 「設定」→「ネットワークとインターネット」→「通話設定」→「Wi-Fi通話」
- 「Wi-Fi優先」「携帯電話ネットワーク優先」を切り替えて試す
---
## 3G停波の影響を確認する
日本では主要キャリアの3Gサービスが順次終了した。VoLTE非対応端末や、VoLTE設定が無効の状態では、通話そのものができなくなる可能性がある。
| キャリア | 3Gサービス終了日 |
|---------|----------------|
| KDDI(au) | 2022年3月31日 |
| ソフトバンク | 2024年7月31日(石川県以外は4月15日に終了) |
| NTTドコモ | 2026年3月31日 |
| 楽天モバイル | 3Gネットワークを持たなかった |
「音声とデータ」設定が「3G」または「2G」になっている端末は、3G停波後のキャリアでは通話ができない。前述の手順でVoLTEを有効化することが必要だ。
---
## 端末の再起動・ネットワーク設定リセット
ソフトウェアの一時的な不具合で通話品質が低下する場合がある。以下の手順を順番に試す。
### ステップ1: 機内モードのオン・オフ
機内モードをオンにして10秒待ち、オフに戻す。端末の無線モジュールがネットワークへの再接続をゼロから開始するため、一時的な接続状態の乱れが解消される場合がある。
### ステップ2: 端末の再起動
完全にシャットダウンして再起動する。ベースバンドモデム(通信制御チップ)を含めたハードウェアを初期化状態から起動し直す。
### ステップ3: ネットワーク設定のリセット
ここまでで改善しない場合、ネットワーク設定をリセットする。この操作でWi-Fiの保存済みパスワード・VPN設定・APN設定が削除される。アプリ・写真などの個人データは消えない。
詳細な手順(iPhone・Android各機種別)は「[ネットワーク設定のリセット方法と影響範囲](/ja/guides/network-reset/)」で確認できる。
---
## 端末側かネットワーク側かを切り分ける
ノイズ・エコー・こもりの原因が端末ハードウェアにあるのか、ネットワーク・設定の問題なのかを判断する手順を示す。
### 切り分け手順
**ステップ1: 別の通話方法で試す**
- 同じ端末でLINE通話・Zoom通話など、VoIP経由の通話を試す
- VoIP通話で音質が良好な場合、問題はVoLTEネットワーク側にある可能性が高い
- VoIP通話でも同様のノイズ・こもりがある場合、端末のマイク/スピーカーの物理的問題が疑われる
**ステップ2: イヤホンで試す**
- 有線イヤホン(Lightning / USB-C接続)を使って通話を試す
- イヤホン使用時にノイズが消える場合、端末の内蔵スピーカーまたはマイクに問題がある
**ステップ3: 別の端末に同じSIMを挿して試す**
- 別の端末に同じSIMカードを挿して同じ相手に通話する
- 別端末で通話品質が正常な場合 → 元の端末ハードウェアの問題
- 別端末でも同様に悪い場合 → SIM設定またはネットワーク側の問題
**ステップ4: 相手を変えて試す**
- 複数の異なる相手に電話して、特定の相手との通話のみ悪いかを確認する
- 特定の相手だけ悪い場合は、相手側の端末・環境・ネットワークに問題がある可能性がある
---
## ノイズ・エコーの対処
### ノイズの場合
- 端末のマイク穴(底部・前面)にケース・指・手のひらが当たっていないか確認する
- 通話中にハンズフリー(スピーカーフォン)に切り替えて症状が変わるか確認する
- マイク穴に繊維・ほこりが詰まっている場合は、エアダスターまたは乾いた綿棒で清掃する
- それでも改善しない場合は、上述の「別端末でのテスト」で端末ハードウェアの問題か否かを判定する
### エコーの場合
エコー(自分の声が返ってくる現象)は多くの場合、ネットワーク遅延と音声の回り込みが組み合わさることで発生する。
- 通話相手にスピーカーフォンをオフにしてもらうよう依頼する(スピーカーフォンは音が回り込みやすい)
- 電波バーが低い場所(1〜2本)であれば、電波の強い場所に移動する
- エコーが自分に聞こえている場合は相手側の問題。相手に端末の再起動・ハンズフリーのオフを依頼する
---
## 通信速度が遅い状態での通話品質
データ通信速度が極端に低下している状態(速度制限・POI混雑時)は、通話品質への影響がMNO直契約とMVNO経由で異なる。
**MNO直契約の場合**: VoLTE音声パケットにはQCI 1(最優先クラス)が割り当てられており、データ速度制限の影響を受けない設計だ。速度制限中でも通話品質への直接的な影響は限定的である。
**MVNO経由の場合**: MNOとMVNOを接続するPOI(相互接続点)の帯域が逼迫している状況では、QoS優先制御がエンドツーエンドで保証されないことがある。POI帯域の逼迫時には通話音声にも影響が出る場合がある。
なお、VoWiFi(Wi-Fi Calling)を利用している状態でWi-Fiのスループットが極端に低い場合は、MNO・MVNOにかかわらず通話音声に影響が出る場合がある。
データ通信速度の問題については「[通信速度が極端に遅い場合の対処法](/ja/guides/slow-speed/)」を参照してほしい。
---
## キャリア障害情報の確認
突然通話品質が悪化した場合、キャリアのネットワーク障害が原因の可能性がある。各キャリアの障害情報は以下で確認できる。
- **NTTドコモ**: [サービス障害情報](https://www.docomo.ne.jp/info/service_status/)
- **au**: [通信障害等に関するお知らせ](https://www.au.com/information/notice_mobile/network/)
- **ソフトバンク**: [障害情報](https://www.softbank.jp/mobile/info/personal/important/)
- **楽天モバイル**: [障害情報のお知らせ](https://network.mobile.rakuten.co.jp/information/failure/)
障害情報で該当エリア・サービスが報告されている場合は、復旧を待つ以外に対処方法はない。
---
## よくある質問
### 通話中に音が途切れる原因は何ですか?
最も多い原因は電波状況の悪化です。電波バーが1〜2本以下の状態では、VoLTE音声パケットの損失が発生し、音が途切れます。次に多い原因はVoLTEが有効になっていないことです。端末の機内モードをオン・オフしてネットワークを再接続し、電波バーが3本以上ある場所で通話を試してください。
### 相手だけ声がこもって聞こえると言われます。こちら側の問題ですか?
相手が「こもる」と感じている場合、問題は発信側(あなた)のマイクか、発信側のネットワークにある可能性が高いです。端末のマイク穴に指や手が当たっていないか確認し、ハンズフリー通話に切り替えて改善するか試してください。改善しない場合はネットワーク設定のリセットを試みてください。
### VoLTEが有効かどうか、どうやって確認しますか?
iPhoneでは「設定」→「モバイル通信」→該当SIMをタップ→「音声とデータ」で「4G」または「5G」が選択されているか確認します。Androidでは「設定」→「ネットワークとインターネット」→「通話設定」(または「詳細設定」)→「VoLTE通話」がオンになっているか確認します。端末・キャリアによってメニュー名が異なる場合があります。
### 通話中にWi-Fiをオフにしたらノイズがなくなりました。なぜですか?
Wi-Fi接続が不安定な状態でWi-Fi Callingが有効になっていると、VoLTEとVoWiFiの間で意図しない切り替えが発生し、通話品質が乱れる場合があります。不安定なWi-FiをオフにするとVoLTEのみの通信に切り替わり、品質が安定することがあります。
### ノイズ・エコーは端末側の問題とネットワーク側のどちらですか?
エコーは多くの場合ネットワーク側(遅延+回り込み)が原因です。ノイズには端末のマイク・スピーカーの物理的な問題と、電波状況悪化によるパケット損失の両方の可能性があります。別の端末に同じSIMを挿して通話品質が改善する場合は端末側の問題、改善しない場合はネットワーク・SIM設定の問題です。
---
## 関連ガイド
- **[VoLTEとVoNRとは — 4G/5Gで通話する仕組みと対応端末](/ja/guides/volte-vonr/)** — VoLTE・VoNRの仕組みとSIMフリー端末での対応確認方法
- **[「圏外」「サービスなし」の対処法](/ja/guides/no-service/)** — 電波が届かない根本原因の解消手順
- **[通信速度が極端に遅い場合の対処法](/ja/guides/slow-speed/)** — データ通信速度低下の原因切り分けと対処
- **[Wi-Fi Calling(VoWiFi)とは — 電波が弱い場所での通話](/ja/guides/wifi-calling/)** — Wi-Fi Callingの仕組みと有効化手順
- **[ネットワーク設定のリセット方法と影響範囲](/ja/guides/network-reset/)** — iPhone・Androidのネットワーク設定リセット詳細手順
通話品質の良いプランを探す場合は [SimFinderの比較ツール](/ja/jp/search/) で品質スコアを参考にできる。
================================================================================
# 海外での通話・SMS節約術
URL: https://sim-finder.com/ja/guides/calls-abroad/
Type: guides (ja)
Published: 2026-06-06
海外での通話・SMSは、何も対策をしなければローミング料金によって高額になりやすい。しかし手段を選べば通話コストを大幅に抑えることができる。
**この記事の要点:**
- 海外での音声通話・SMSには発信・着信どちらにもローミング料金が発生しうる
- IP電話アプリ(LINE・WhatsApp・FaceTime)をデータ回線で使うことが最も手軽な節約策
- Wi-Fi CallingはキャリアのSIMで日本の番号を使ったまま無料(データ消費のみ)で通話できる
- SMS認証コードの受信は海外では届かないリスクがあり、事前の対策が必要
---
## 1. 海外での通話・SMSのコスト構造
### 発信料金と着信料金
国際ローミング中の通話では、**発信だけでなく着信にも料金が発生しうる**という点を押さえておく必要がある。
発信料金はわかりやすい。自分から電話をかけた場合に課金される。これに対し着信課金とは、海外ローミング中に日本の番号あての電話を受けた場合に、受信側にも課金が発生する仕組みである。仕組みとしては、発信者からの通話がまず日本(ホームネットワーク)に着信し、そこから渡航先(ビジテッドネットワーク)へ転送される形になる。このホームネットワーク⇄ビジテッドネットワーク間の転送に費用が生じるため、着信側に課金される。
ただしキャリアとプランによって着信が無料のケースもある。利用中のキャリアの公式情報を必ず確認してほしい。
### SMSの料金
SMSについても同様に、送信・受信それぞれで料金体系が異なる。多くのキャリアでSMS受信は無料または低額に設定されているが、送信は有料のケースが多い。海外からのSMS送信は発信扱いとなり、渡航先・キャリア・プランによって料金が変わる。
### SMSはデータ回線とは独立した経路
SMS(ショートメッセージサービス)は、モバイルデータ通信(インターネット)とは独立した信号経路で届く。このため、端末のデータローミングをオフにしていても、ホームSIMが有効な状態であればSMSを受信できる場合がある。ただし渡航先でホームキャリアのローミングパートナーが存在しない地域や、特定の条件下では届かないケースもある。
国際ローミングの仕組みや料金モデルの詳細については[国際ローミングの仕組みと料金](/ja/guides/international-roaming/)で体系的に解説している。
---
## 2. 節約策①:IP電話アプリをデータ回線で使う
最も手軽で広く使われている節約策が、**LINE・WhatsApp・FaceTime等のIP電話アプリをデータ回線(インターネット)経由で使う**方法だ。
### 仕組み
IP電話アプリは音声をデータパケットとしてインターネット経由で送受信する。これはVoIP(Voice over IP)と呼ばれる技術であり、通話はモバイルネットワークの「音声チャネル」ではなく「データチャネル」を通る。このためキャリアの音声ローミング料金は発生しない。
代わりにデータ通信を消費する。Wi-Fi接続中であれば実質的に無料(または通話コストのみ)で通話できる。モバイルデータを使う場合はデータ容量を消費するが、一般的なVoIP通話のデータ消費量は音声通話1時間あたり数十MB程度(アプリや通話品質により異なる)であり、動画ストリーミングと比べると非常に少ない。
### 主なIP電話アプリ
**LINE**
- アプリユーザー同士は音声・ビデオ通話が無料(データ消費のみ)
- 「LINE Out」機能を使えばLINE未登録の固定電話・携帯電話にも発信可能(有料)
- 日本国内での普及率が高く、家族・友人との通話手段として最も実用的
**WhatsApp**
- アプリユーザー同士の音声・ビデオ通話が無料
- 国際的な利用者が多く、海外の現地ユーザーや外国人との通話に適している
- エンドツーエンド暗号化が標準搭載
**FaceTime**
- AppleデバイスとAppleデバイスの間で音声・ビデオ通話が無料
- iOS 7以降のiPhone、iPad、Mac間で利用できる
- 非AppleユーザーはFaceTimeリンク経由での参加が可能(iOS 15以降)だが、FaceTime Audioの直接発信はAppleデバイス間のみに限定される
### 活用上の注意点
IP電話アプリは通話先にも同じアプリのインストールが必要(または相応の手段)となる。また、モバイルデータ経由で使う場合はデータローミングがオンになっていることが前提だ。Wi-Fi環境を基本として使い、外出中はデータ通信を節約しながら利用するのが現実的な運用方法となる。
---
## 3. 節約策②:Wi-Fi Callingの活用
**Wi-Fi Calling(Wi-Fiコール)**は、Wi-Fiネットワーク経由でキャリアの電話サービスを利用する仕組みで、日本の電話番号をそのまま使って通話できる。
### IP電話アプリとの違い
IP電話アプリはアプリ内の独自番号・アカウント間でのみ通話できる(LINE Outなど有料サービスを除く)のに対し、Wi-Fi Callingは「日本のキャリアSIMの電話番号」でそのまま発着信できる点が異なる。相手がLINEを使っていなくても、日本の電話番号への発信・着信が可能だ。
### 仕組み
Wi-Fi CallingはVoWiFi(Voice over Wi-Fi)とも呼ばれる。スマートフォンがWi-Fiに接続している状態で、通話をWi-Fiネットワーク経由でキャリアのネットワークにルーティングする技術だ。Wi-Fi Callingの詳細な技術仕組みについては[Wi-Fi Callingの仕組みと設定方法](/ja/guides/wifi-calling/)で解説している。
### 海外での活用シーン
- ホテルや空港のWi-Fiに接続しながら、日本の番号で家族・ビジネス相手に電話できる
- モバイルデータローミング料金を気にせず通話できる(Wi-Fi接続中のみ)
- 現地のモバイルネットワークの電波が弱い場所でも、Wi-Fiがあれば通話が成立する
### 対応状況の確認が必要
Wi-Fi Callingの利用にはキャリアと端末の両方が対応していることが必要だ。日本の大手キャリアでは提供状況がキャリアやプランによって異なっており、対応状況は各社の公式サイトで確認する必要がある。MVNOでの対応は非常に限定的である(詳細は後述の関連ガイド参照)。
---
## 4. 節約策③:現地SIM・旅行eSIM+IP電話の組み合わせ
データ通信を現地SIMや旅行eSIMで確保し、その上でIP電話アプリを使う組み合わせが、コスト面で最も有利になりやすい。
### 旅行eSIMはデータ専用が主流
旅行eSIMの多くはデータ通信専用であり、音声通話・SMS機能は含まれない。このため日本のホームSIMを維持しながら旅行eSIMでデータ通信を行い、通話はIP電話アプリで行うデュアルSIM構成が現実的だ。
この場合の通話・SMSの使い分けは次のようになる:
- **音声通話**: IP電話アプリ(LINE・WhatsApp等)を旅行eSIMのデータで使用
- **SMS受信(認証コード等)**: ホームSIM経由で受信(データローミング不要)
- **SMS送信**: ホームSIMの料金体系に従う(費用が気になる場合はIP電話アプリのチャット機能で代替)
旅行eSIMを使った海外通信の基本については[初めての旅行eSIM完全ガイド](/ja/guides/first-time-guide/)で解説している。
### 現地SIMの場合
現地SIMを購入すると日本の電話番号とは別に現地の番号が付与される。日本への音声発信は現地SIMの国際通話料金が発生するため、IP電話アプリで代替するのが合理的だ。現地SIMの利点は通信コストが低くデータを大容量使える点にある。
---
## 5. 節約策④:国際通話アプリ(有料発信)
IP電話アプリはアプリ同士のユーザー間では無料だが、相手がアプリを使っていない場合は有料の国際通話サービスを経由する必要がある。この用途に向けた選択肢として以下がある。
### LINE Out
LINEのOut機能では、LINE未登録の相手の電話番号(固定電話・携帯電話)に向けて発信できる。クレジット(有料)を購入して使う。国際電話をアプリ経由で行うため、キャリアの国際通話料金より安価になるケースがある。
### Skype・Google Voice
SkypeのSkype Creditや、Google Voiceはいずれも有料で一般電話番号あての発信ができる。どちらもインターネット経由のため、Wi-Fiまたはモバイルデータがあれば海外からも利用できる。
### 使い分けの考え方
- 通話先がIP電話アプリを使っている → 無料アプリ通話で十分
- 通話先がアプリを使っていない、かつ頻繁に国際電話が必要 → 有料国際通話アプリを検討
- 日本の番号での着信が必要 → Wi-Fi Callingが適している(キャリア対応が前提)
---
## 6. SMS認証コード受信への注意
### SMS 2FAが海外で届かないリスク
銀行アプリ・各種Webサービスのログイン・決済認証など、多くのサービスがSMSで認証コードを送信する2段階認証(SMS 2FA)を採用している。海外にいる場合でも日本のホームSIMが有効であればSMSを受信できるケースが多いが、以下の状況では届かないリスクがある:
- 渡航先とホームキャリアのローミング協定が存在しない、または品質が低い地域
- 端末の設定でSMSが制限されている
- 発信元のサービスが国際SMSの送信に制限を設けている場合
### 事前に行うべき対策
SMS認証に依存したままの状態で海外渡航する前に、以下を確認・対応しておくことを強く推奨する:
1. **認証アプリへの移行**: TOTP(時刻ベースのワンタイムパスワード)方式の認証アプリ(Google Authenticator・Authy・Microsoft Authenticator等)は、インターネット接続なしで30秒ごとに認証コードを生成できる。SMSに依存せず、かつオフラインで動作するため海外でも安定して使える。
2. **バックアップコードの取得**: 重要なサービスのバックアップコードを渡航前に取得・保存しておく。
3. **Wi-Fiテスト**: 渡航前の国内でWi-Fi環境下でのSMS受信を確認しておく(これは海外でもホームSIMのSMS受信が正常かを事前確認する参考になる)。
SMS認証コードの受信リスクと代替手段の詳細については[海外でのSMS認証コード受信問題と対策](/ja/guides/sms-2fa-abroad/)で詳しく解説している。
---
## 7. データローミングとSMSの設定管理
### データローミングをオフにした場合の挙動
端末のデータローミングをオフにすると:
- **データ通信(インターネット)**: 停止する
- **音声通話**: 通常は維持される(ローミング中の音声チャネルは有効)
- **SMS**: 通常は受信できる(SMSはデータ回線とは別経路)
この特性を活かして、データローミングをオフにしてSMSと音声通話のみ有効にしておき、データ通信は現地SIMや旅行eSIM、またはWi-Fiで行う、という運用が可能だ。
### iPhoneの設定
- 「設定」→「モバイル通信」→「モバイルデータ通信のオプション」→「データローミング」でON/OFF
デュアルSIM構成でiPhoneを使う場合、「モバイルデータ通信の切り替えを許可」(Allow Cellular Data Switching)をオフにしておくことで、ホームSIMのデータが意図せず消費されるのを防げる。
### Androidの設定
- 「設定」→「ネットワークとインターネット」→「SIM」→対象SIMを選択→「ローミング」でON/OFF
- 機種・OSバージョンによりメニュー名が異なる場合がある
---
## 8. EUなど地域別の通話・SMS環境
渡航先の地域によって、通話・SMSの使いやすさは大きく変わる。
### EU/EEA域内
EU/EEA域内では、EU/EEAのキャリアSIMを持つ加入者を対象にRLAH(Roam Like at Home)規制が適用されており、音声通話・SMS・データ通信の追加料金が原則として禁止されている。日本のキャリアSIMはこの規制の直接対象外だが、EUを周遊する旅行者はEU対応の旅行eSIMを使うことで複数国にわたるデータ通信を効率よく確保できる。EUローミングの詳細は[EUローミング完全ガイド](/ja/guides/eu-roaming/)を参照してほしい。
### 中東・東南アジア・その他
地域によってVoIPアプリの使用がブロックまたは制限されている国がある。UAE(アラブ首長国連邦)では規制当局TDRAによりWhatsApp・FaceTime等のVoIP通話が制限されており、一般的なVoIP通話アプリが使えない状態が続いている。一部の中東諸国でも同様の制限がある。渡航先でVoIP通話が利用できるかどうかは、規制状況が変化する場合もあるため、渡航前に最新情報を確認すること。アジア各国の通信環境の比較については[渡航先別・地域別SIM選びガイド](/ja/guides/regional-overview/)でまとめている。
---
## 9. まとめ:用途別の選び方
| 状況 | 推奨する手段 |
|------|------------|
| 相手もLINEやWhatsAppを使っている | IP電話アプリ(無料) |
| 日本の番号で着信を受ける必要がある | Wi-Fi Calling(キャリア対応が前提) |
| 長期滞在・データ大量消費 | 現地SIM・旅行eSIM+IP電話アプリ |
| 短期渡航・少量通信 | 国際ローミング定額パック or IP電話アプリ活用 |
| SMS認証コードの受信が必要 | ホームSIM維持(データローミングオフでも受信可) |
---
## FAQ
以下によくある質問をまとめる。
**Q. 海外でLINE通話を使えばローミング通話料金はかかりませんか?**
LINEなどのIP電話アプリはデータ通信(インターネット)を使って通話するため、音声ローミング料金は発生しません。ただしデータ通信を使うため、ローミングのデータ通信料金またはデータプランの消費が発生します。Wi-Fi環境下ではデータ消費もゼロです。
**Q. 海外で日本の電話番号あてに着信が来ると料金がかかりますか?**
国際ローミング中に日本の電話番号あてに着信を受けた場合、キャリアのプランによっては着信側にも料金が発生します(着信課金)。着信料金が気になる場合は、日本のSIMのデータローミングをオフにしてSMS・音声のみ有効にするか、IP電話アプリで対応する方法があります。詳細は利用中のキャリアの公式サイトで確認してください。
**Q. 海外でSMS認証コードを受信できますか?**
ホームSIMが有効な状態であれば、SMSはデータローミングとは独立した経路で届くため、データローミングをオフにしていても受信できる場合があります。ただし渡航先の地域やキャリアのローミング協定によっては届かないケースもあります。[海外でのSMS認証コード受信問題と対策](/ja/guides/sms-2fa-abroad/)で詳しく解説しています。
**Q. Wi-Fi CallingはどのSIMでも使えますか?**
Wi-Fi Callingはキャリアとデバイスの両方が対応している必要があります。日本の大手キャリアではWi-Fi Callingの提供状況がキャリアやプランによって異なります。利用中のキャリアの公式サイトで対応状況を確認してください。
**Q. 現地SIMを使う場合、日本への発信はどうすればよいですか?**
現地SIMは現地の電話番号を持つため、日本への音声発信は国際通話料金が発生します。現地SIM+LINEやWhatsAppなどのIP電話アプリを組み合わせるのが一般的な節約策です。IP電話アプリ経由であれば現地SIMのデータ通信で日本へ通話でき、音声国際通話料金を回避できます。
---
## 関連ガイド
- [国際ローミングの仕組みと料金](/ja/guides/international-roaming/) — ローミングの技術的仕組みと料金モデル(発着信料金の詳細)
- [EUローミング完全ガイド](/ja/guides/eu-roaming/) — EU/EEA域内でのRLAH規制と日本人渡航者への影響
- [Wi-Fi Callingの仕組みと設定方法](/ja/guides/wifi-calling/) — VoWiFiの技術仕様とキャリア別対応状況
- [海外でのSMS認証コード受信問題と対策](/ja/guides/sms-2fa-abroad/) — SMS 2FAのリスクと認証アプリへの移行
- [渡航先別・地域別SIM選びガイド](/ja/guides/regional-overview/) — アジア・欧州・中東など地域別の通信環境比較
================================================================================
# 契約期間・違約金・初期費用 — 契約条件の見方
URL: https://sim-finder.com/ja/guides/contract-terms/
Type: guides (ja)
Published: 2026-06-04
携帯・SIMの契約は、月額料金だけでなく「契約条件」の読み方が重要です。
契約期間(縛り)・違約金・初期費用の仕組みを正しく理解しないまま申し込むと、解約や乗り換えの際に想定外の費用が発生します。この記事では、契約条件を構成する各要素の意味と確認方法、および2019年の法改正による規制の内容を整理します。
具体的な乗り換え手順については「[乗り換え前チェックリスト](/ja/guides/pre-switch-checklist/)」を、MNPの仕組みは「[MNP(番号ポータビリティ)とは](/ja/guides/what-is-mnp/)」を参照してください。
---
## 契約条件を構成する4つの要素
携帯・SIMの契約には、料金とは別に以下の4つの条件が含まれます。
| 要素 | 意味 | 発生タイミング |
|------|------|-------------|
| 初期費用(契約事務手数料・SIM発行手数料) | 契約成立時に1回だけかかる費用 | 申し込み時 |
| 最低利用期間 | 最低限この期間は利用することが前提となる期間 | 契約開始から |
| 契約期間(縛り)・更新月 | 自動更新型の契約で、更新月以外の解約に制約がある仕組み | 更新月以外の解約時 |
| 違約金・解約金・契約解除料 | 契約条件を満たさずに解約した場合に発生する費用 | 解約・転出時 |
これら4つは独立した費用・条件です。「縛りがないプラン」でも初期費用は発生し、最低利用期間の設定がある場合があります。
---
## 初期費用 — 契約事務手数料とSIM発行手数料
### 契約事務手数料
契約成立時に1回だけ発生する手数料です。一般的に「事務手数料」または「契約事務手数料」という名称で呼ばれます。
オンラインでの申し込みと店舗での申し込みで金額が異なる場合があります。多くのキャリア・MVNOはオンライン申し込みで事務手数料を無料または低額にしており、店舗申し込みの場合に費用が発生するケースがあります。
### SIM発行手数料
物理SIMカード(nanoSIM・microSIM)を発行・郵送する際に発生する手数料です。eSIM(電子SIM)を選択した場合、物理カードの発行・郵送が不要なため、この手数料が発生しないか、物理SIM発行より低額に設定しているキャリア・MVNOがあります。
### 初期費用の注意点
- 初期費用は返金されません。解約・乗り換えの際も還付の対象外です
- 申し込み前に、事務手数料とSIM発行手数料の両方を確認してください
- オンライン申し込み専用の優遇(手数料無料など)がある場合は、申し込み経路によって費用が変わります
旅行eSIMプロバイダーとの比較については「[旅行eSIMプロバイダー比較](/ja/guides/provider-comparison/)」を参照してください。
---
## 最低利用期間 — 契約開始から一定期間の利用前提
### 最低利用期間とは
最低利用期間とは、契約開始から一定の期間は利用を続けることを前提とした条件です。この期間内に解約した場合、期間内解約に伴う費用が発生するプランがあります。
最低利用期間と契約解除料(違約金)の有無・金額はプランによって異なります。プランによっては最低利用期間の設定がない(いつでも解約可能)ものもあります。
### 最低利用期間の確認方法
申し込み前に、各社の「重要事項説明」または「サービス利用規約」に記載されている最低利用期間の条件を確認します。プランの申し込みページにも記載があります。
月の途中での解約については、多くのキャリアが日割り計算を適用せず、1日でも利用した月は1ヶ月分の月額料金を請求します。この点は最低利用期間とは別の料金計算上の問題ですが、解約のタイミングを決める際に考慮が必要です。
---
## 契約期間(縛り)と更新月 — 自動更新型の仕組み
### 契約期間(縛り)とは
一般的に「縛り」と呼ばれる契約期間は、契約が一定の周期で自動更新される仕組みです。更新月(更新タイミング)以外の月に解約・転出すると、契約解除料(違約金)が発生するプランがありました。
### 2019年改正電気通信事業法による規制強化
2019年10月1日に施行された改正電気通信事業法および関連省令により、以下の規制が導入されました。
**契約解除料(違約金)の上限規制**
改正法施行後に締結・更新された契約については、契約解除料の上限が関連省令による定額上限へと引き下げられました。施行前の契約では数千円規模の解除料が一般的でしたが、改正後は低額の定額上限へと大幅に引き下げられました。また、期間拘束ありとなしのプランの月額料金差にも上限が設けられました。
**解約コストの大幅低下**
解除料の定額上限化により、更新月以外のタイミングで解約した場合でも解約コストが大幅に下がりました。改正前は更新月以外の解約に数千円規模の費用が生じるケースが多かった点が改善されています。
この法改正は2019年10月1日施行であり、施行後に締結・更新された契約から適用されます。
### 縛りなしプランの普及
2019年の法改正以降、国内大手キャリアおよびサブブランド・MVNOでは、契約期間の縛りなしプランへの移行が進みました。現在では、縛りのないプランを提供するキャリア・MVNOが多数存在します。
ただし「縛りなし」であっても、最低利用期間や初期費用は別途設定されている場合があります。プラン名や広告の「縛りなし」という表現だけで判断せず、重要事項説明を読んで確認することが重要です。
### 更新月の確認と活用
現在の契約に更新月の設定がある場合、更新月に解約・転出することで契約解除料を避けられます。
**更新月の確認方法**
- My docomo・My au・My SoftBank・my楽天モバイルなど、各キャリアのマイページにログインする
- 「契約情報」または「ご利用中のプラン」の画面を開く
- 「契約更新月」「解約可能期間」などの項目を確認する
- 不明な場合はカスタマーサポートへ電話または問い合わせ
更新月が近い場合は、月末まで待って翌月以降に解約手続きをするか、更新月の特定の日付内に間に合わせるかを計画的に判断してください。
**SimFinderで乗り換え先を比較する**
契約更新月が近づいた際の乗り換え先の選定には、[SimFinderの国内SIM検索](/ja/jp/)でMNO・サブブランド・MVNOのプランを一覧比較できます。料金・データ容量・eSIM対応などの条件で絞り込みができます。
---
## 違約金・解約金・契約解除料の読み方
### 呼称の整理
「違約金」「解約金」「契約解除料」は、文脈や事業者の呼び方によって使い分けられますが、いずれも契約条件を満たさずに解約した際に発生する費用を指します。法律上は「契約解除料」という表現が一般的に使われます。
### 発生条件を確認する
契約解除料が発生するのは、以下の条件が重なる場合が典型的です。
1. 最低利用期間内または更新月以外のタイミングでの解約
2. プランに契約解除料の設定がある
プランによっては「解約時の契約解除料なし」と明記されているものもあります。こうしたプランでも、初期費用(契約事務手数料・SIM発行手数料)は返金されません。
### MNP転出時の扱い
MNP(番号ポータビリティ)による転出は、契約の解約と同等の扱いになります。転出のタイミングが契約解除料の発生条件に該当する場合、転出時に契約解除料が発生します。
2021年4月施行の総務省ガイドライン改正により、MNP転出手数料(転出手続きそのものの手数料)はオンライン手続きの場合は原則無料となりました。これは契約解除料とは別の費用です。
MNP転出の手順については「[MNP(番号ポータビリティ)とは](/ja/guides/what-is-mnp/)」で詳しく解説しています。
---
## 契約条件と乗り換えコストの関係
### 解約コストを試算する
乗り換えを検討する際は、現在の契約の残存条件から発生しうる費用を確認します。
| 確認項目 | 確認方法 |
|---------|---------|
| 現在のプランに契約解除料の設定があるか | マイページ・重要事項説明を確認 |
| 契約解除料が発生するタイミング(更新月はいつか) | マイページ「契約情報」で確認 |
| 最低利用期間はいつ終わるか | 重要事項説明・申し込み履歴で確認 |
| 端末の分割払い残債があるか | マイページ・請求書で確認 |
乗り換えに伴う費用は、契約解除料だけではありません。乗り換え先の初期費用、端末代金の扱いなどを含めてトータルで検討することが重要です。乗り換え前の準備については「[乗り換え前チェックリスト](/ja/guides/pre-switch-checklist/)」にまとめています。
### SIMロック解除の確認
現在の端末にSIMロックがかかっている場合、乗り換え先のSIMが利用できない場合があります。SIMロックの確認と解除手順については「[SIMフリーとSIMロック — 確認方法と解除手順](/ja/guides/sim-lock/)」を参照してください。
2021年10月以降に発売された端末は原則SIMロックなしで販売されています。それ以前の端末を使っている場合は、申し込み前にSIMロックの状態を確認してください。
---
## MNO・サブブランド・MVNOで異なる契約条件の傾向
### MNO(NTTドコモ・au・ソフトバンク・楽天モバイル)
大手4キャリアは複数のプラン体系を持っており、プランによって契約条件が異なります。2019年の法改正以降、縛りのないプランが増えていますが、旧来の2年縛りプランを継続している契約者もいます。現在の契約がどの料金プランかを確認し、そのプランの解除料の有無・金額・更新月を個別に把握する必要があります。
### オンライン専用ブランド(ahamo・povo・LINEMO 等)
オンライン専用ブランドは一般的に契約期間の縛り(2年契約・自動更新)がなく、解除料も低額または無しに設計されています。ただし一部ブランドでは短期解約時の手数料や利用停止条件がある場合があります。初期費用の設定も各社で異なります。申し込みページの重要事項説明で必ず確認してください。
### MVNO(格安SIM)
MVNOは縛りなし・解除料なしのプランを多数提供していますが、一部の事業者では最低利用期間の設定があります。また、初期費用(事務手数料・SIM発行手数料)は事業者ごとに異なります。
プロバイダーごとの特徴の比較は「[旅行eSIMプロバイダー比較](/ja/guides/provider-comparison/)」も参考にしてください(旅行eSIM向けの記事ですが、プロバイダーを選ぶ考え方は共通しています)。国内SIMのプロバイダー比較は[SimFinderの国内SIM検索](/ja/jp/)で条件を指定して確認してください。
---
## 契約前に確認すべき書類
### 重要事項説明
キャリア・MVNOはサービス申し込み時に「重要事項説明」を提示する義務があります。この文書には以下の情報が記載されています。
- 月額基本料金
- 初期費用(契約事務手数料・SIM発行手数料)
- 最低利用期間
- 契約解除料の金額と発生条件
- 更新月(自動更新がある場合)
申し込み確認画面または申し込み完了メールに重要事項説明へのリンクが含まれていることが多いです。申し込み前に必ず確認してください。
### 約款・利用規約
重要事項説明よりも詳細な条件は、各社の約款または利用規約に記載されています。重要事項説明で不明な点があれば、約款を参照するか、カスタマーサポートへ問い合わせてください。
---
## eSIMと物理SIMで契約条件は変わるか
eSIMと物理SIMは、通信サービスとしての契約条件(最低利用期間・契約解除料・更新月)に原則として差はありません。契約条件はSIMの形態ではなく、申し込むプランによって決まります。
異なる点としては以下が挙げられます。
- SIM発行手数料: eSIMの場合、物理SIM発行・郵送が不要なため、この手数料が発生しないまたは低額に設定しているキャリアがある
- 回線切替のスピード: eSIMはプロファイルのダウンロードで切り替えが完了するため、物理SIMの郵送を待つ必要がなく、乗り換え手続きが早く完了する
eSIMの基本的な仕組みについては「[SIMフリーとSIMロック — 確認方法と解除手順](/ja/guides/sim-lock/)」で関連情報を確認できます。
---
## 契約条件の確認を乗り換えの起点にする
契約条件の読み方をまとめます。
| 確認項目 | 何を見るか | 確認タイミング |
|---------|-----------|-------------|
| 初期費用(契約事務手数料・SIM発行手数料) | 申し込みページ・重要事項説明 | 申し込み前 |
| 最低利用期間の有無・期間 | 重要事項説明・約款 | 申し込み前 |
| 契約解除料の有無・金額・発生条件 | 重要事項説明・マイページ | 申し込み前・乗り換え検討時 |
| 更新月(自動更新型の場合) | マイページ「契約情報」 | 乗り換え検討時 |
| 端末の分割払い残債 | マイページ・請求書 | 乗り換え検討時 |
乗り換えの手順全体は「[乗り換え前チェックリスト](/ja/guides/pre-switch-checklist/)」で確認してください。
---
## SimFinderで乗り換え先のプランを比較する
現在の契約条件を把握したら、次のステップは乗り換え先のプランを比較することです。
[SimFinderの国内SIM検索](/ja/jp/)では、MNO・サブブランド・MVNOのプランを通信品質・データ容量・eSIM対応などの条件で一括比較できます。プランの選び方の基準については「[旅行eSIMの選び方](/ja/guides/how-to-choose/)」も参考にしてください(旅行eSIM向けですが、プランを評価する視点は国内SIMにも応用できます)。
---
## 関連ガイド
- [旅行eSIMの選び方 — 5つの比較ポイントと失敗しないコツ](/ja/guides/how-to-choose/)
- [MNP(番号ポータビリティ)とは — 手順・費用・注意点](/ja/guides/what-is-mnp/)
- [SIMフリーとSIMロック — 確認方法と解除手順](/ja/guides/sim-lock/)
- [乗り換え前チェックリスト — キャリア変更前に確認すべきこと](/ja/guides/pre-switch-checklist/)
- [旅行eSIMプロバイダー比較 — Airalo・Holafly・Nomad・Saily・Ubigiを用途別に選ぶ](/ja/guides/provider-comparison/)
================================================================================
# データ通信量の目安 — 自分に合ったギガ数の見つけ方
URL: https://sim-finder.com/ja/guides/data-usage-guide/
Type: guides (ja)
Published: 2026-04-13
ほとんどの人は月3〜20GBで日常の通信をまかなえる。動画をWi-Fi以外でほぼ見ない人は3GB前後で十分で、通勤中にYouTubeやSNSを使う人は10〜15GBが目安になる。動画をHD画質で毎日長時間視聴する場合のみ30GB以上が必要になる。
この記事では、アプリ別のデータ消費量を表形式で整理し、自分の使用パターンから必要量を算出する方法を説明する。現在の使用量の確認手順とデータ節約のポイントも収録している。
---
## アプリ別データ消費量の目安
「何にどれくらいギガを使うのか」を把握することが、最適な容量選びの第一歩になる。以下は主要なアプリ・サービスの1時間あたりのデータ消費量の目安だ。
### 動画ストリーミング
| サービス | 画質 | 1時間あたりの消費量 |
|---------|------|-------------------|
| YouTube | 360p(低画質) | 約 0.3 GB |
| YouTube | 480p(標準) | 約 0.5〜0.7 GB |
| YouTube | 720p(HD) | 約 1.5 GB |
| YouTube | 1080p(フルHD) | 約 2.5 GB |
| Netflix | 低画質 | 最大 0.3 GB |
| Netflix | 標準画質 | 最大 0.7 GB |
| Netflix | HD | 最大 3.0 GB |
| Netflix | 4K UHD | 最大 7.0 GB |
Netflixの数値は公式ヘルプセンター(help.netflix.com)に掲載されている値を参照している。YouTubeは公式ヘルプに画質別の具体的な数値表はなく、上記は一般的な計測結果に基づく目安値であることに注意してほしい。
動画は画質設定でデータ消費量が大きく変わる。YouTube 720pとYouTube 360pを比べると約5倍の差がある。外出先で動画を見る機会が多い場合は、画質を下げるだけで消費量を大幅に削減できる。
### SNS・メッセージ
| アプリ | 利用内容 | 1時間あたりの消費量 |
|-------|---------|-------------------|
| LINE | テキストメッセージ | 約 0.002 GB |
| LINE | 音声通話 | 約 0.018 GB |
| LINE | ビデオ通話 | 約 0.3〜0.5 GB |
| Instagram | フィード・ストーリーズ閲覧 | 約 1.0 GB |
| TikTok | 動画視聴 | 約 0.5〜1.0 GB |
| X(旧Twitter) | タイムライン閲覧 | 約 0.15 GB |
LINEのテキストメッセージはほとんどデータを消費しない。音声通話も1時間あたり約18MBと非常に少ない。一方、Instagram・TikTokは画像や動画が中心のため消費量が多い。外出先でInstagramを毎日1時間閲覧すると月間30GB相当になる計算になる。
### ビデオ会議
| サービス | 品質 | 1時間あたりの消費量 |
|---------|------|-------------------|
| Zoom | 映像あり | 約 0.8〜1.5 GB |
| Zoom | 音声のみ | 約 0.07 GB |
| Google Meet | 映像あり | 約 1.0 GB |
| Microsoft Teams | 映像あり | 約 0.8 GB |
Zoomの数値は複数の実測値の範囲を示している。映像品質やネットワーク状況によって消費量は変動する。テレワークでビデオ会議が多い人は、モバイル回線での消費量に注意が必要だ。
### 音楽ストリーミング
| サービス | 音質 | 1時間あたりの消費量 |
|---------|------|-------------------|
| Spotify | 標準(96kbps) | 約 0.04 GB |
| Spotify | 高音質(160kbps) | 約 0.07 GB |
| Spotify | 最高音質(320kbps) | 約 0.14 GB |
音楽ストリーミングは動画に比べてデータ消費が少ない。通勤中に毎日2時間聴いても、標準音質なら月間約2.4GB程度に収まる。Wi-Fi環境で事前ダウンロードしておけばモバイルデータの消費をゼロにできる。
### その他
| 用途 | データ消費量の目安 |
|------|-----------------|
| ウェブブラウジング | 約 0.1 GB/時間 |
| Google マップ(ナビ) | 約 0.01〜0.03 GB/時間 |
| アプリのアップデート | 約 0.05〜0.3 GB/回 |
| OS アップデート | 約 1〜5 GB/回 |
OSアップデートは数GBになることもある。モバイル回線で実施すると予想外に大量のデータを消費するため、Wi-Fi環境で行うことを推奨する。
---
## 自分の使用パターンから必要量を算出する方法
アプリ別の消費量を把握したうえで、自分の利用パターンと照らし合わせると必要なデータ量を見積もれる。以下の4パターンを参考にしてほしい。
### パターン1: Wi-Fi中心 — 目安 3GB前後
**こんな人向け**: 自宅・職場にWi-Fiがあり、外出先ではLINEやメール・マップ程度。動画はWi-Fiでのみ視聴する。
**月間消費量の内訳(例)**:
- LINE(テキスト・音声通話): 約 0.3 GB
- ウェブブラウジング(1日15分): 約 0.8 GB
- マップ・その他: 約 0.2 GB
- **合計: 約 1.3 GB**
余裕を見て3GBのプランで安全に運用できる。
### パターン2: 通勤中にSNS・動画 — 目安 10〜15GB
**こんな人向け**: 電車の通勤中にSNSをチェックしたり、YouTubeを低〜標準画質で見たりする。
**月間消費量の内訳(例)**:
- LINE + Instagram + X(1日合計30分): 約 2.5 GB
- YouTube 480p(通勤中1日30分): 約 9 GB
- ウェブブラウジング・マップ: 約 0.5 GB
- Spotify(1日1時間、標準音質): 約 1.2 GB
- **合計: 約 13 GB**
10GBだとギリギリで、15GBあれば余裕を持って使える。
### パターン3: テレワーク・外出多め — 目安 15〜20GB
**こんな人向け**: カフェや外出先でテレワークすることがある。Zoomなどのビデオ会議を週に数回使う。
**月間消費量の内訳(例)**:
- SNS・ブラウジング・メール等の基本利用: 約 4 GB
- Zoom ビデオ会議(週2〜3回、各1時間): 約 10 GB
- クラウドストレージ同期・その他: 約 2 GB
- **合計: 約 16 GB**
テレワークの頻度が週2〜3日程度なら15GBで足りる。ビデオ会議が毎日あるなら20GB以上が安全圏だ。
### パターン4: 動画ストリーミング中心 — 目安 30GB以上
**こんな人向け**: 外出先でもYouTubeやNetflixをHD画質で長時間視聴する、または自宅にWi-Fi環境がない。
**月間消費量の内訳(例)**:
- YouTube 720p(1日1時間): 約 45 GB
- SNS・メッセージ: 約 3.0 GB
- その他ブラウジング: 約 1.0 GB
- **合計: 約 49 GB**
動画をHD画質で毎日1時間以上モバイル回線で視聴するなら、30GBでも余裕がない。自宅にWi-Fiがない場合やテザリングでPCも使う場合は、無制限プランが選択肢に入る。具体的なアプリ別のデータ使用量については[データ通信量ガイド](/ja/blog/data-usage-guide-how-many-gb/)で詳しく解説しています。
---
## 現在のデータ使用量を確認する方法
最適なプランを選ぶためには、まず自分が毎月どれくらいのデータを実際に使っているかを把握することが重要だ。プランを選ぶ前に必ず確認することを推奨する。
### iPhoneの場合
1. 「設定」アプリを開く
2. 「モバイル通信」をタップ
3. 「現在までの合計」でデータ使用量を確認する
4. アプリごとの使用量も一覧で表示される
**注意点**: iPhoneの統計はリセットしない限り累積されるため、月初に「統計情報をリセット」しておくと月間の正確な使用量を把握できる。
### Androidの場合
1. 「設定」アプリを開く
2. 「ネットワークとインターネット」をタップ
3. 「データ使用量」をタップ
4. 期間を指定してモバイルデータの使用量を確認する
Androidは期間別の使用量が自動的に記録されるため、過去の月間使用量を遡って確認しやすい。
### キャリアの公式アプリ
各キャリアの公式アプリでも当月のデータ使用量をリアルタイムで確認できる。プランの残量アラート機能を設定しておくと、使い過ぎを事前に防げる。
**確認の手順として推奨するのは以下の流れだ**:
1. 今月のデータ使用量を確認する
2. 1〜2ヶ月は意識的に記録を付ける
3. 「多い月」と「少ない月」の差を把握する
4. 多い月の使用量を基準にプランを選ぶ(少なすぎると速度制限リスクがある)
---
## データ節約のポイント(概要)
現在のプランで容量が足りないと感じた場合、プランを変更する前に節約で対応できることがある。主な方法を以下に示す。
- **Wi-Fiへの自動接続**: 自宅・職場のWi-Fiに自動接続する設定にするだけで、モバイルデータ消費を大幅に削減できる
- **動画の画質設定を下げる**: YouTubeの「データセーバー」設定や、Netflixの「データ使用量を節約」設定を活用する
- **バックグラウンド通信を制限する**: 使っていないアプリがバックグラウンドで通信していないか確認する
- **写真・動画の自動バックアップをWi-Fi限定にする**: Google フォトやiCloudの設定を見直す
- **アプリの自動アップデートをWi-Fi限定にする**: App Store / Google Play の設定を変更する
- **音楽・動画の事前ダウンロード**: Wi-Fi環境で事前にダウンロードしておき、外出先ではオフライン再生する
データ節約テクニックの詳細は[データ通信量の節約テクニック — iPhone/Androidのアプリ別設定と実践ガイド](/ja/guides/save-data/)で詳しく解説している。
---
## データ容量超過時の速度制限
日本のスマートフォンプランでは、月間データ容量を使い切ると通信速度が自動的に制限される。制限は翌月1日に自動解除されるのが基本で、それまでの間は低速状態が続く。この仕組みをあらかじめ理解しておくと、プラン選びや使い方の判断に役立つ。
### 大手キャリア(MNO)の速度制限ルール
大手3キャリアの基本的なルールは共通しているが、プランによって制限後の速度が異なる。
**NTTドコモ**
データ容量を超過した場合、送受信最大128kbps〜300kbpsに制限される。制限後の具体的な速度はプランによって異なる。irumo(ドコモのサブブランド)では0.5GBプランが超過後128kbps、3GB・6GB・9GBプランが超過後300kbpsとなっている(公式サイトより)。データを追加購入することで即時解除できるほか、翌月1日に自動解除される。
**au**
通常のデータ定量プランでは、月間容量超過後に送受信最大128kbpsに制限される。大容量・無制限プランでは月間200GBを超えた場合に最大5Mbpsへの制限が適用される。テザリング・データシェア利用分には合計60GBの上限があり、超過後は128kbpsとなる。制限は翌月1日に自動解除される(au公式サポートより)。
**ソフトバンク**
対象プランで月間容量を超過した場合、送受信最大128kbpsへ低速化する。「メリハリ無制限+」「ペイトク無制限」などの無制限プランでは、スマホとテザリングの合計利用量が月間200GBを超えた場合に最大4.5Mbpsに制限される(ソフトバンク公式サイトより)。制限は請求月末まで続き、翌月1日に自動解除される。
### MVNO(格安SIM)の速度制限パターン
MVNOは大手キャリアよりも低価格なぶん、データ容量超過後の制限速度がプランによって幅広い。
| 制限後の速度 | 代表的な例 | 特徴 |
|------------|---------|------|
| 128 kbps | 一部の低価格プラン | 最も厳しい制限。テキストメッセージ程度に限られる |
| 200〜300 kbps | IIJmio(バースト通信対応)など | ページ閲覧やLINEは可能。動画は実用困難 |
| 1 Mbps | UQモバイル、LINEMO など | 低画質動画を断続的に視聴できるレベル |
MVNOの中には、一定速度(主に1Mbps)での通信を「低速モード」として切り替え可能にしているサービスもある。容量を温存したい場面で任意に切り替えられる点が特徴だ。なお、各社のプラン条件は変更されることがあるため、最新情報はSimFinderで確認することを推奨する。
### 速度制限時にできること・できないこと
制限後の速度は主に128kbps・300kbps・1Mbpsの3段階に分類される。
**128kbps(最も厳しい制限)**
- できること: LINEのテキストメッセージ、メール(テキストのみ)
- 困難になること: ウェブページ閲覧(画像が多いページは実質不可)、地図アプリ、SNS、動画再生(すべての画質)
**300kbps**
- できること: LINEのテキスト・スタンプ、メール、テキスト中心のウェブ閲覧
- 困難になること: 動画再生(240p以下なら断続的に可能だが360p以上は実用困難)、Instagram等の画像が多いSNS
**1Mbps**
- できること: LINEの通話・動画通話(品質は低下)、SNS閲覧、低画質の動画再生(240p〜360p程度)
- 困難になること: YouTube 720p以上のHD動画再生、Zoom等のビデオ会議(品質低下が大きい)
なお上記は一般的な目安であり、ネットワーク混雑状況や端末・アプリの設定によって実際の体感は異なる。
### 速度制限を回避するための対策
速度制限に引っかからないようにするには、消費量を把握したうえで使い方を調整することが有効だ。
**使用量の把握**
- 端末の設定画面(iPhone: 「設定」→「モバイル通信」、Android: 「設定」→「ネットワークとインターネット」→「データ使用量」)で当月の消費量を定期的に確認する
- キャリアの公式アプリで残量アラートを設定すると、制限が近づいた時点で通知を受け取れる
**データ消費を抑える行動**
- Wi-Fiへの自動接続を有効にする(自宅・職場のWi-Fiに接続していればモバイルデータを消費しない)
- 動画の画質設定を下げる(YouTubeの「データセーバー」、Netflixの「データ使用量を節約」)
- 音楽・ポッドキャストをWi-Fi環境でダウンロードしてオフライン再生する
- OSアップデートとアプリの自動更新をWi-Fi限定に設定する
**制限がかかってしまった場合**
- データ追加購入で即時解除できる(各キャリア・MVNOで対応しているが、費用が発生する)
- 翌月1日を待てば自動解除される
- 急を要する通信はWi-Fi環境を探して対応する
プランの月間容量・制限後の速度・データ追加の条件はキャリアやプランによって異なる。SimFinderでプランを比較する際は、これらの条件も確認することを推奨する。
---
## SimFinderで自分に合ったプランを探す
必要なデータ量の目安が分かったら、SimFinderの検索ツールで条件に合うプランを比較できる。容量帯・料金・通信品質スコアでフィルタリングして、自分の使用量に最適なプランを見つけてほしい。
**[SimFinderで日本のSIMプランを探す →](/ja/jp/search/)**
================================================================================
# デジタルノマドの通信戦略
URL: https://sim-finder.com/ja/guides/digital-nomad/
Type: guides (ja)
Published: 2026-06-06
デジタルノマドの通信戦略は3つの軸で整理すると判断しやすい。**①グローバル/地域eSIMで国境ごとに切り替える**、**②現地SIMで滞在が長い国はコストを最適化する**、**③メイン番号(本国)はデュアルSIMで維持する**、の3軸だ。
この3つをどの比率で組み合わせるかは、移動の頻度・各国の滞在期間・仕事の種類(ビデオ会議の多さなど)によって変わる。本記事では各軸の選択基準と、[SimFinder Travel](/ja/travel/)を国移動のたびに活用する方法を体系的に整理する。
料金の具体的な数値は時期・地域・プロバイダーによって頻繁に変わるため記載しない。各プランの最新の料金・容量・有効期限は[SimFinder Travel](/ja/travel/)でリアルタイムに比較してほしい。
---
## デジタルノマドの通信が旅行者と異なる理由
短期旅行者であれば、1回の旅行につき1つのトラベルeSIMを購入するだけで大半の需要は満たせる。しかしデジタルノマドの通信には、旅行とは構造的に異なる要件が重なる。
**移動の継続性**: 旅行は「出発→帰国」という完結した構造を持つが、ノマドは「移動→滞在→移動→滞在」が連続する。1つのeSIMプランの有効期限が切れたとき、次の国にいる可能性がある。
**仕事に必要な安定性**: 観光中心の旅行者と異なり、ビデオ会議・ファイル送受信・クラウドツール常時接続という業務上の帯域要件がある。ネットワークが切れると直接的な仕事への影響が出る。
**本国との継続的な接点**: 銀行・税務・行政手続きのSMS認証が本国の電話番号に紐づいていることが多く、番号を手放すと後で回復が困難になる。
**コスト積み上がりのリスク**: 毎月複数のeSIMプランを購入し続けると、1カ国専用の現地SIMに切り替えるべきタイミングを逃すことでコストが割高になり続けるケースがある。
これらの要件を念頭に置いた上で、3つの軸を順番に解説する。
---
## 軸①:グローバル/地域eSIMで国境ごとに切り替える
国境を越えるたびに現地SIMを購入・開通するのは、短滞在では現実的ではない。この場面で機能するのがリージョナルプランとグローバルプランだ。
### リージョナルプランが適切なケース
複数国を移動するが、移動先が特定の地域(ヨーロッパ・東南アジアなど)に集中している場合、その地域をカバーするリージョナルプランが手間とコストのバランスで優れることが多い。
旅行eSIMプロバイダーのヨーロッパ地域プランは一般的に40カ国以上をカバーしており、EU/EEA内を移動するノマドには1枚のeSIMで移動を完結できる。東南アジア・アジア太平洋向けのリージョナルプランも主要プロバイダーから提供されている。
[旅行eSIMの選び方](/ja/guides/how-to-choose/)では1カ国プラン・リージョナルプラン・グローバルプランのコスト差を整理している。複数国移動時のプラン選択基準をここで確認しておくと、購入判断がスムーズになる。
### グローバルプランが適切なケース
複数大陸をまたぐ移動が続く場合や、旅程が直前まで確定しない場合はグローバルプランの柔軟性が価値を持つ。1枚のeSIMで世界中をカバーする代わりに、1GBあたりの単価はシングルカントリープランより高くなる傾向がある。
グローバルプランを選ぶ判断基準は「単価の割高さよりも、プラン管理の手間削減と移動の不確実性への対応価値の方が大きいか」だ。旅程が固まっている月はシングルカントリーや地域プランに切り替えてコストを下げる、という使い分けも有効だ。
### eSIM複数枚の管理
デュアルeSIM対応端末(iPhoneは複数eSIMプロファイルの保存に対応)であれば、複数のプロバイダーのプロファイルを端末に保存しておき、国移動のタイミングで切り替えることができる。eSIMプロファイルの保存可能枚数は端末モデルによって異なるため、自分の端末の仕様を確認しておくことが必要だ。
主要プロバイダーの対応地域・テザリング可否・プラン形態(固定容量/無制限)の比較は[旅行eSIMプロバイダー比較](/ja/guides/provider-comparison/)でまとめている。
---
## 軸②:現地SIMで滞在が長い国はコストを最適化する
特定の1カ国に2週間以上滞在することが確定している場合、その国の現地SIMへの切り替えを検討する価値がある。一般的に、国別専用eSIMや現地プリペイドSIMはグローバル・リージョナルプランより1GBあたりの単価が安く、現地の主要ネットワークに直接接続するため速度面でも有利なことが多い。
### 現地SIMへの切り替えを判断する目安
- **滞在期間**: 2〜4週間以上の滞在なら現地SIMが有利になりやすい
- **必要なデータ量**: 大容量が必要(ビデオ会議・動画・ファイル転送)であるほど単価差が大きく影響する
- **SIM登録義務**: 現地SIMを購入するには、多くの国でパスポートなどの本人確認が必要(後述)
### 現地SIMの入手方法
多くの国の主要都市の空港・ショッピングモール・コンビニでプリペイドSIMが入手できる。アプリ・オンラインで事前購入できるeSIM形式の現地プランを提供しているキャリアも増えている。
現地SIM購入後は、データ通信の開通確認・APN設定が必要な場合がある。設定方法は[SimFinderの国別ページ](/ja/travel/)で確認できる。
### SIM登録義務がある国での注意点
世界157カ国(GSMA 2021年調査)でSIM購入時に政府発行の身分証明書の提示が義務化されている。具体的な手続き内容は国によって異なり、パスポート提示のみで完結する国もあれば、生体認証が必要な国もある。
例として、タイでは2025年8月18日以降、全SIM登録(新規・SIMスワップ・番号保持を含む)に生体認証(ライブネス検知)が義務化されており、外国人は1プロバイダーあたり最大3枚のSIMに制限される。
各地域のSIM登録義務の一般的な傾向については[地域別の海外通信事情ガイド](/ja/guides/regional-overview/)にまとめている。移動先の地域をここで確認しておくと、現地SIM購入時の準備がスムーズになる。
### トラベルeSIMを使い続けるべきケース
次の条件に当てはまる場合は、滞在が長くても現地SIMへの切り替えより旅行eSIMの継続利用が合理的なことがある。
- 1カ月以内に次の国へ移動する予定がある
- 現地SIM登録手続きの言語的ハードルが高い(英語以外の窓口対応など)
- コワーキングスペースや宿泊先のWi-Fi環境が充実しており、モバイルデータの大量消費が不要
---
## 軸③:メイン番号(本国)はデュアルSIMで維持する
ノマド生活で見落としやすいのが、本国の電話番号の維持だ。旅行であれば帰国後に再開できるが、長期のノマド滞在中も本国番号が必要になる場面は多い。
### 本国番号を維持すべき主な理由
**SMS 2FA(二段階認証)**: 銀行・証券・各種サービスのSMS認証が本国の電話番号に紐づいている場合、番号を解約すると将来的にアクセスが困難になる。
**本国との連絡**: 家族や仕事上の関係者との連絡に、本国の番号が必要なケースがある。
**行政手続き**: 確定申告・各種証明書の申請など、本国の行政手続きで本国の番号が必要になる場合がある。
### デュアルSIM構成による維持方法
デュアルSIM対応端末(eSIM+物理SIM、またはeSIM+eSIM)であれば、本国のSIMと現地SIM/旅行eSIMを同時に使用できる。実用上の設定として重要なのは、本国SIMをデータ通信オフ・着信のみの状態にすることだ。これにより意図しない本国のデータローミング料金の発生を防ぎながら、SMSと音声着信は受け取れる状態を維持できる。
iPhoneではデュアルSIM構成時に「モバイルデータ通信の切り替えを許可」(Allow Cellular Data Switching)設定が表示される。旅行eSIMでのデータ通信中にこの設定をオフにすることで、本国SIMが意図せずデータ通信に切り替わることを防げる。
デュアルSIM構成の詳細な設定方法は[海外旅行でのデュアルSIM活用](/ja/guides/dual-sim-for-travel/)で解説している(注: このガイドは旅行向けだが、構成の考え方はノマド用途にも適用できる)。
### 本国のコスト最小化
本国SIMを長期間ほぼ使わずに維持するためには、維持コストが最も低い選択肢を選ぶことが重要だ。日本の場合、povo2.0(KDDI)のように基本料0円のプランが選択肢になる。ただし各プランには最低利用条件があるため、長期不在でも条件を満たせるかを事前に確認すること。
[海外移住時の通信戦略ガイド](/ja/guides/expat-strategy/)では、日本の電話番号を長期間維持するための選択肢を詳しく解説している。ノマドとして本国を不在にしながら番号を維持したい場合に参考になる。
---
## リモートワークに必要な通信品質の確保
デジタルノマドの通信戦略において、コストと同等かそれ以上に重要なのが通信品質だ。観光旅行なら「繋がればいい」で済むが、仕事用途では速度・遅延・安定性・テザリング可否が直接的な業務品質に影響する。
### 最低限必要な帯域の目安
Zoom 1:1 HD品質のビデオ会議に必要な帯域要件は1.2Mbps(上下)だ(Zoom公式サポートより)。グループビデオ会議(720p HD)では2.6Mbps(アップ)/1.8Mbps(ダウン)が推奨されている。
Google Meetの帯域要件はGoogleの公式ドキュメントで確認できる。標準品質(SD)では最低1Mbps程度、HD品質ではさらに高い帯域が推奨され、参加人数によって必要帯域が変動する。
これらの数値は最低要件であり、実際のモバイル通信では電波状況の変動があるため、実用上は3〜5Mbps以上を安定的に出せる環境が望ましい。
### プラン選択時に確認すべき点
**テザリング(モバイルホットスポット)の可否**: ノートPC・タブレットなど複数デバイスでの業務が前提なら、テザリング対応が必須だ。主要な旅行eSIMプロバイダーの多くはテザリングに対応しているが、一部のプランは不可のものもある。購入前に必ず確認する。
**速度制限(フェアユースポリシー)の条件**: 無制限プランには一般的にフェアユースポリシー(FUP)が設けられており、1日あたりの高速通信量の上限を超えると低速(128〜512kbps程度)に制限される場合がある。この速度ではビデオ会議は困難になる。制限後の速度と閾値はプロバイダーによって大きく異なるため、購入前にプロバイダーのFUP条件を確認しておくことが重要だ。
**5G/4G LTEの対応状況**: 接続先のネットワーク名が明示されているプロバイダーを選ぶことで、渡航先での品質を事前に確認できる。「5G対応」と表記されていてもプラン詳細に具体的なネットワーク名や対象国が記載されていないプランには注意が必要だ。
**接続の安定性(コワーキング環境との組み合わせ)**: 重要な会議はコワーキングスペースや宿泊施設の有線・Wi-Fi環境をメインにしつつ、モバイルデータをバックアップとして構成するのが現実的なアプローチだ。モバイルデータ単体で全ての業務をカバーしようとすると、電波が弱い環境での会議中断リスクが高まる。
---
## 国移動ごとのSimFinder Travel活用
デジタルノマドの通信費を最適化するには、毎回の国移動のタイミングでプランを見直す習慣が重要だ。
### SimFinder Travelでの比較手順
[SimFinder Travelの国別比較](/ja/travel/)では、渡航先の国を選択することでその国向けのトラベルeSIMプランを横断比較できる。確認すべき項目は以下の通りだ。
- **プロバイダー**: 複数プロバイダーを比較して、以前の国での使用感・アプリの使いやすさを考慮する
- **データ容量と有効期限**: 滞在日数に合わせた容量・期間のプランを選ぶ
- **テザリング可否**: 必ずフィルタで確認する
- **接続ネットワーク名**: プロバイダーページで確認し、現地の主要キャリアに繋がるプランを選ぶ
### 1カ国の滞在前後での判断フロー
1. 次の国での滞在期間を確認する
2. 2週間以上 → 現地SIMへの切り替えを検討、[SimFinder Travel](/ja/travel/)で現地SIMと旅行eSIMのコスト差を比較する
3. 2週間未満 → 旅行eSIMを継続、移動日の前日までにプランを購入しインストールしておく
4. 移動が多い月 → リージョナル/グローバルプランで1枚にまとめる方が管理が楽
---
## 各国のSIM登録義務と注意すべき規制
前述のとおり、世界157カ国(GSMA 2021年調査)でSIM購入に本人確認が義務化されている。デジタルノマドとして複数国を移動する際に注意が必要な点を整理する。
### トラベルeSIMとSIM登録義務の関係
トラベルeSIMは、プロバイダーが購入時にアカウント登録を経由して提供するため、多くの場合は渡航先での追加的な本人確認なしに使用できる。これはSIM登録義務が厳しい国でもトラベルeSIMが利便性を持つ主な理由だ。
ただし、国によっては現地での本人確認を外国人に求める場合もある。渡航前に渡航先の規制状況を確認する習慣を持つことが重要だ。
### 現地SIM購入時の注意点
現地SIMを購入する場合は、以下を準備しておくと手続きがスムーズになる。
- パスポート原本(多くの国で必要)
- 現地の住所(宿泊先の住所で代替できる場合が多い)
- 購入数の制限(タイのような1プロバイダーあたりの枚数制限がある国があるため事前確認)
各地域の詳細なSIM登録義務の状況は[地域別の海外通信事情ガイド](/ja/guides/regional-overview/)を参照してほしい。
---
## 国際ローミングとの比較
本国のキャリアSIMをそのままデータ通信に使う国際ローミングは、設定が最もシンプルで本国番号がそのまま使える利点がある。しかしデジタルノマドのような長期・複数国の移動では、月単位でローミング費用が積み上がるとコストが割高になりやすい。
国際ローミングの仕組み(GSMA AA.12の技術的な仕組み・日本の大手4社の料金モデル)については[国際ローミングの仕組みと料金](/ja/guides/international-roaming/)で詳しく解説している。本国SIMのデータをオフにして着信専用として使いながら、別のeSIMでデータ通信するというデュアルSIM構成を検討する際の背景知識として参照されたい。
---
## デジタルノマドとエクスパットの通信戦略の違い
デジタルノマドと海外移住(エクスパット)は、いずれも長期の海外滞在という点では共通するが、通信戦略の観点では重要な違いがある。
| | デジタルノマド | エクスパット |
|---|---|---|
| 基本的な拠点 | 複数国を移動し続ける | 1カ国に定住・長期滞在 |
| 現地SIM | 移動に応じて切り替え | 現地キャリアとの本格契約が中心 |
| 本国番号 | デュアルSIM等で維持 | 解約または休止が多い |
| 最大の課題 | 通信の継続性とコスト管理 | 現地キャリア契約の要件(住所証明等) |
長期間1カ国に定住する予定がある場合、または移住先で現地キャリアとの本格契約を検討している場合は[海外移住時の通信戦略ガイド](/ja/guides/expat-strategy/)が参考になる。現地キャリアとの契約要件・日本の番号を長期維持する方法・移住後の恒久回線の開設手順を体系的にまとめている。
---
## よくある質問
**Q. 複数国をまたいで同じeSIMを使い続けると何が起きますか?**
リージョナルプランやグローバルプランであれば、対応国であれば1枚のeSIMで継続して使用できる。ただし、プランの有効期限(日数)とデータ残量は国境を越えても変わらず消費されていく点に注意が必要だ。1カ国専用のeSIMを別の国で使おうとすると接続できない。
**Q. Wi-Fiのみでモバイルデータなしのノマド生活は現実的ですか?**
都市部・主要なコワーキングスペースのみを移動するスタイルであれば、コスト削減のためにWi-Fi中心で運用するノマドもいる。ただし移動中(空港・電車・バス)や、Wi-Fiが不安定な宿泊先・カフェでのビデオ会議には対応できないため、モバイルデータをバックアップとして持つことを推奨する。
**Q. 本国のSIMをデータ通信オフで長期維持する場合、バッテリーへの影響はありますか?**
デュアルSIM構成(2つのSIMラインを同時に有効化)ではシングルSIMと比較してバッテリー消耗が増加する。特に本国SIMの電波が弱い場合に顕著で、最大20%程度の追加消耗が報告されている。本国SIMの電波が届かない国では、そのSIMラインを一時的に無効化することでバッテリー消耗を抑えられる。
**Q. 旅行eSIMのデータが予想より早く減った場合はどうすればいいですか?**
主要プロバイダーの多くはアプリからのデータ追加購入(トップアップ)に対応している。ただし追加購入不可のプロバイダーもあるため、購入前に確認しておくことが重要だ。また、業務での大量データ消費を想定する場合は最初から大容量プランまたは無制限プランを選ぶ方がトップアップを繰り返すより合理的なことが多い。
---
## 関連ガイド
- [旅行eSIMプロバイダー比較](/ja/guides/provider-comparison/) — 主要プロバイダーの対応地域・テザリング・日本語サポートの比較
- [旅行eSIMの選び方](/ja/guides/how-to-choose/) — 1カ国プラン・リージョナル・グローバルプランの選択基準
- [地域別の海外通信事情ガイド](/ja/guides/regional-overview/) — 各地域のeSIM普及度・SIM登録義務の傾向
- [国際ローミングの仕組みと料金](/ja/guides/international-roaming/) — 本国キャリアSIMを海外で使う方式の解説
- [海外移住時の通信戦略ガイド](/ja/guides/expat-strategy/) — 長期定住に向けた通信戦略(日本番号維持・現地回線開設)
================================================================================
# デュアルSIMの設定(Android) — Pixel・Galaxyの設定手順
URL: https://sim-finder.com/ja/guides/dual-sim-android/
Type: guides (ja)
Published: 2026-04-22
AndroidでデュアルSIMを使うには、端末の設定画面から2枚目のSIM(物理SIMまたはeSIM)を追加し、データ通信・通話・SMSそれぞれに使う回線を明示的に指定する必要がある。設定を省略すると意図しない回線でデータ通信が発生する可能性があるため、追加後の設定まで一連の流れで完了させることが重要だ。
デュアルSIMの仕組み(DSDS・DSDV・DSDA)については「[デュアルSIMとは](/ja/guides/what-is-dual-sim/)」で解説している。iPhoneでの設定手順は「[デュアルSIMの設定(iPhone)](/ja/guides/dual-sim-iphone/)」を参照してほしい。eSIMの仕組みは「[eSIMとは](/ja/guides/what-is-esim/)」で確認できる。
---
## 対応Android端末
### Google Pixel
Google Pixelのデュアル SIM対応状況を以下にまとめる(Google公式情報)。
| モデル | 構成 | 日本版 |
|--------|------|--------|
| Pixel 3(一部地域版) | 物理SIM + eSIM | **非対応**(日本版はeSIM非対応) |
| Pixel 3a(一部地域版) | 物理SIM + eSIM | **非対応**(日本版はeSIM非対応) |
| Pixel 4以降 | 物理SIM + eSIM | **対応** |
| Pixel 7以降 | 物理SIM + eSIM / eSIM×2 | **対応**(デュアルeSIM対応) |
| Pixel 10/10 Pro/10 Pro XL(米国向け) | eSIM専用(eSIM×2) | 米国向けのみ |
**日本版Pixel 4以降がeSIM対応**であることは重要な点だ。Pixel 3・3aの日本版はeSIMに対応していないため、物理SIM1枚のみの構成になる。
Pixel 7以降はAndroid端末におけるデュアルeSIM(2つのeSIMを同時有効化)対応の先駆けの1つであり、物理SIMスロットがなくてもeSIM×2のデュアルSIM構成が実現できる(Google公式情報)。
### Samsung Galaxy
Samsung Galaxyのデュアル SIM対応状況を以下にまとめる(Samsung公式情報)。
| モデルシリーズ | eSIM対応 | 備考 |
|--------------|---------|------|
| Galaxy S20 / S20+ / S20 Ultra | 対応 | 米国モデルは eSIM 非対応。海外購入品・並行輸入品を使う場合は原産国仕様を要確認 |
| Galaxy S20 FE(Fan Edition) | **非対応**(大半の地域) | S20シリーズの例外 |
| Galaxy S21〜S25シリーズ(フラグシップ) | 対応 | |
| Galaxy Z Fold / Z Flip シリーズ | 対応 | |
| 一部の廉価・地域向けモデル | 地域・キャリアにより異なる | Samsung公式で確認 |
**Galaxy S20 FEはeSIM非対応**であることに注意が必要だ。Galaxy S20以降のフラグシップという大まかな目安が用いられることがあるが、S20 FEは例外となる。
対応状況はキャリアロック版かどうかによっても変わる。キャリアロックがかかった端末はeSIMを使用できない場合があるため、購入したキャリアのSIMロック解除手続きを先に完了させる。
---
## 事前準備
SIM追加前に以下を確認する。
1. **SIMロック解除**: 他社SIMを追加するには端末がSIMロックフリーである必要がある。Pixelは「設定」→「ネットワークとインターネット」→「SIM」に「SIMを追加」メニューが表示されるか確認、Galaxyは「設定」→「接続」→「SIM カード マネージャー」→「eSIMを追加」が表示されるか確認する。表示されない場合はキャリアへSIMロック解除を申請する。日本では2021年10月1日以降に発売された端末は原則SIMロックフリーだ。
2. **Androidのアップデート**: 「設定」→「システム」→「システムアップデート」から最新版にしておくことを推奨する。
3. **Wi-Fi接続**: eSIMプロファイルのダウンロードには安定したインターネット接続が必要だ。
4. **QRコードの準備**: eSIMを追加する場合は、キャリアからQRコードまたはSM-DP+アドレスを入手しておく。詳細手順は「[QRコードでeSIMを設定する(Android)](/ja/guides/qr-code-android/)」を参照してほしい。
---
## 2枚目のSIMを追加 — Google Pixel
Google PixelはAndroidに最も近い標準UIを採用しており、メーカーによるカスタマイズが少ない端末だ。
### eSIMを追加する手順
1. 「設定」を開く
2. 「ネットワークとインターネット」→「SIM」を開く
3. 「SIMを追加」または「+」アイコンをタップする
4. 「代わりにSIMをダウンロードしますか?」の画面で「次へ」をタップする
5. カメラが起動するので、キャリアのQRコードをスキャンする(端末の画面上にしかQRコードがない場合は「写真からスキャン」オプションを使う)
6. キャリア名が表示されたら「ダウンロード」をタップする
7. ダウンロード完了後、eSIMを「有効化」する
### 物理SIMを追加する(Pixel)
端末の電源を切ってからSIMトレイにnano-SIMを挿入し、電源を入れ直す。「設定」→「ネットワークとインターネット」→「SIM」にSIMが自動認識される。
---
## 2枚目のSIMを追加 — Samsung Galaxy
Samsung GalaxyはAndroidをカスタマイズしたOne UIを搭載しているため、メニュー名や手順がPixelと異なる。
### eSIMを追加する手順
1. 「設定」を開く
2. 「接続」→「SIM カード マネージャー」を開く(One UIのバージョンによっては「SIM マネージャー」と表示される)
3. 「モバイルプランを追加」または「eSIMを追加」をタップする
4. 「サービスプロバイダーのQRコードをスキャン」を選択してQRコードを読み取る
5. 「追加」または「ダウンロード」をタップする
6. 再起動を促す画面が表示された場合は指示に従って再起動する
7. 再起動後、「SIM カード マネージャー」でデータ通信に使うSIMを設定する(後述参照)
### 物理SIMを追加する(Galaxy)
端末の電源を切ってからSIMトレイにnano-SIMを挿入し、電源を入れ直す。「設定」→「接続」→「SIM カード マネージャー」にSIMが自動認識される。
---
## 2枚目のSIMを追加 — その他Android(概要)
Google PixelとSamsung Galaxy以外のAndroid端末(OPPO・Xiaomi・motorola等)でも基本的な操作の流れは共通だ。
設定アプリから「ネットワーク」「SIM設定」「モバイルネットワーク」「デュアルSIM」などの項目を探し、「eSIMを追加」「モバイルプランを追加」に相当するメニューを選択する。
メーカーやAndroidバージョンによってメニュー名・階層が異なるが、操作の流れは同じだ。「eSIMを追加」メニューが見当たらない場合は、端末のeSIM対応状況またはSIMロックの状態を確認する。
---
## ラベルとデフォルト回線の設定
SIMを追加したら、各回線にわかりやすいラベルを付け、データ通信・通話・SMSそれぞれに使う回線を明示的に設定する。この設定が最も重要なステップだ。
### Google Pixelでの設定
「設定」→「ネットワークとインターネット」→「SIM」を開く。「優先SIM」からデータ・通話・SMSそれぞれに使うSIMを選択できる。各SIM名をタップして「日本SIM」「データ専用」「仕事用」など任意のラベルに変更しておくと管理がしやすい。
### Samsung Galaxyでの設定
「設定」→「接続」→「SIM カード マネージャー」を開く。「データ」「通話」「テキストメッセージ(SMS)」それぞれで使うSIMを選択できる。SIM名の変更は各SIMをタップして行う。
格安SIM(MVNO)をデータ専用として追加する構成であれば、「データ」にMVNO回線を設定し「通話」にメイン回線(MNO)を設定するのが一般的だ。IIJmioやmineoなど国内MVNOのデュアルSIM運用でも同様の手順で設定できる。
---
## アクティブなデータ回線の切り替え
設定したデータ回線は、必要に応じていつでも切り替えられる。
### Google Pixel
「設定」→「ネットワークとインターネット」→「SIM」→「優先SIM」→「データ」から変更するSIMを選択する。Android 12以降はクイック設定パネルの「インターネット」タイルからも素早く切り替えられる。
### Samsung Galaxy
「設定」→「接続」→「SIM カード マネージャー」→「データ」から変更するSIMを選択する。One UIのクイックパネルで「モバイルデータ」タイルを長押しするとSIM選択画面に素早くアクセスできる(バージョンにより異なる)。
---
## SIMの管理(オフ・削除)
### SIMを一時的にオフにする
使わない回線を一時的に無効化するとバッテリー消耗を抑えられる。
- **Google Pixel**: 「設定」→「ネットワークとインターネット」→「SIM」→対象のSIMをタップ→「SIMを使用」のトグルをオフにする
- **Samsung Galaxy**: 「設定」→「接続」→「SIM カード マネージャー」→対象SIMのトグルをオフにする
無効化した回線はプロファイルが削除されるわけではなく、再度トグルをオンにすれば即時復帰する。
### eSIMプロファイルを削除する
- **Google Pixel**: 「設定」→「ネットワークとインターネット」→「SIM」→対象のeSIMをタップ→「削除」
- **Samsung Galaxy**: 「設定」→「接続」→「SIM カード マネージャー」→対象のeSIMをタップ→「削除」
**注意**: eSIMプロファイルを削除すると多くの場合そのプロファイルは再利用できなくなる(GSMAのセキュリティ仕様)。再度使うにはキャリアへの再発行手続きが必要となる。再発行に手数料が発生するキャリア・プロバイダーもあるため、削除前にポリシーを確認することを推奨する。
---
## Android固有の注意点
### プライベートDNSの設定
Androidにはプライベートドメインネームサービス(DNS over TLS)の設定がある。デュアルSIM環境でこれを有効にしている場合、データ回線の切り替え時にDNS解決が一時的に失敗しアプリ通信が不安定になることがある。問題が発生する場合は「設定」→「ネットワークとインターネット」→「プライベートDNS」(Samsung Galaxyは「接続」→「その他の接続設定」→「プライベートDNS」)を「自動」または「オフ」に切り替えて確認する。
### バックグラウンドデータの制御
格安SIM(MVNO)の低容量プランをデータ回線にしている場合は、データセーバーの活用を検討する。
- **Google Pixel**: 「設定」→「ネットワークとインターネット」→「データセーバー」
- **Samsung Galaxy**: 「設定」→「接続」→「データ使用量」→「データセーバー」
データセーバーを有効にすると一部アプリのバックグラウンド同期に影響が出る場合がある。
### 旅行中のデータ自動切り替え
一部のAndroid端末は設定したデータ回線の電波が弱い場合にもう一方のSIMへ自動切り替えを行う機能を持つ場合がある。旅行eSIMをデータ回線として使用中にこれが発生すると、日本のホームSIMのデータローミングが意図せず起動するリスクがある。旅行中の具体的な設定は「[海外旅行でのデュアルSIM活用](/ja/guides/dual-sim-for-travel/)」を参照してほしい。
---
## よくある質問
**AndroidのデュアルSIMで通話中にデータ通信が止まることはありますか?**
端末の対応方式によります。DSDV対応端末では通話中はもう一方のSIMのデータ通信が停止する場合があります。DSDA(Dual SIM Dual Active)対応のハイエンドAndroid端末では、通話中もデータ通信を継続できます。お使いの端末の仕様はメーカーの公式ページで確認してください。デュアルSIMの方式についての詳しい解説は「[デュアルSIMとは](/ja/guides/what-is-dual-sim/)」を参照してください。
**Pixelで「SIMを追加」メニューが表示されません。**
主な原因は3つです。①端末がeSIM非対応(日本版Pixel 3・3aなど)。②端末がキャリアロックされている。③Android のバージョンが古い。設定メニューを確認し、該当する場合はキャリアへSIMロック解除を申請してください。解決しない場合は「[eSIMが設定できないときの対処法](/ja/guides/activation-failed/)」を参照してください。
**MVNOのeSIMとMNOの物理SIMを組み合わせて使えますか?**
使えます。例えば、物理SIMスロットにMNOのnano-SIMを挿入し、IIJmioやmineoなどのMVNO eSIMをダウンロードして追加する構成が可能です。この場合は通話用をMNO回線、データ用をMVNO回線に設定するパターンが一般的です。ただしMVNOごとにeSIM対応状況・動作確認端末が異なるため、契約前にMVNO公式の情報を確認してください。
**旅行用eSIMをデータ回線にする場合、日本のSIMは通話のみで使えますか?**
はい。「データ」に旅行eSIMを設定し、「通話・SMS」に日本のSIMを設定することで、現地データは旅行eSIMを使いながら、日本の電話番号でSMS受信(銀行などの2FA認証)や通話待ち受けを維持できます。旅行中の設定の詳細は「[海外旅行でのデュアルSIM活用](/ja/guides/dual-sim-for-travel/)」を参照してください。
**Samsung GalaxyのOne UIでメニュー名が異なる場合はどうすればよいですか?**
One UIのバージョンによって「SIM カード マネージャー」「SIM マネージャー」「デュアルSIM」など表示が異なる場合があります。「接続」または「ネットワーク」カテゴリ内を探してください。具体的なメニュー名が不明な場合は、設定アプリの検索機能に「SIM」と入力すると該当メニューが表示されます。
**Pixelで複数のeSIMをダウンロードしておき、後で切り替えることはできますか?**
はい。Pixelでは複数のeSIMプロファイルを端末に保存しておき、使用するeSIMを切り替えることができます。「設定」→「ネットワークとインターネット」→「SIM」から有効化するeSIMを選択できます。デュアルSIM構成(eSIM2枚同時有効化)はPixel 7以降で対応しています。なお、eSIMを削除すると多くの場合再利用できないため、不要になっても削除前にキャリアのポリシーを確認してください。
---
## 関連ガイド
デュアルSIMの仕組みや方式(DSDS・DSDV・DSDA)の詳細については「[デュアルSIMとは — DSDS・DSDV・DSDAの仕組みと活用法](/ja/guides/what-is-dual-sim/)」を参照してほしい。
iPhoneでのデュアルSIM設定手順は「[デュアルSIMの設定(iPhone) — 物理SIM・eSIMを組み合わせる手順](/ja/guides/dual-sim-iphone/)」で解説している。
AndroidでeSIMをQRコードで追加する詳細手順は「[QRコードでeSIMを設定する(Android)](/ja/guides/qr-code-android/)」にまとめている。
旅行中に日本のSIMを維持しながら旅行eSIMをデータ回線として使う運用方法は「[海外旅行でのデュアルSIM活用](/ja/guides/dual-sim-for-travel/)」で詳しく解説している。渡航前に確認すべき設定も網羅している。
eSIMの仕組みや物理SIMとの違いは「[eSIMとは — 仕組み・メリット・デメリット](/ja/guides/what-is-esim/)」を参照してほしい。
国内SIMのeSIM対応プランを比較するには[SimFinderで絞り込める](/ja/)。海外旅行用のeSIMは[SimFinder Travelで渡航先別に検索](/ja/travel/)できる。
================================================================================
# 海外旅行でのデュアルSIM活用 — 日本のSIMを維持しながら現地eSIMを使う
URL: https://sim-finder.com/ja/guides/dual-sim-for-travel/
Type: guides (ja)
Published: 2026-04-20
このガイドは「設定を終えた後、旅行中にどう使い分けるか」に特化している。旅行eSIMの仕組みや対応端末については[デュアルSIMとは](/ja/guides/what-is-dual-sim/)を、eSIMのインストール手順については[初めての旅行eSIM完全ガイド](/ja/guides/first-time-guide/)を参照してほしい。渡航前に確認すべき事前準備は[渡航前のスマホ準備チェックリスト](/ja/guides/pre-trip-checklist/)にまとめている。
本記事では「日本のSIM(ホームSIM)を維持しながら、旅行先のeSIM(旅行eSIM)をデータ回線として使う」構成を前提に、旅行中の実際の運用方法を解説する。
---
## 旅行用の標準デュアルSIM構成
日本人旅行者にとって最も実用的なデュアルSIM構成は次のとおりだ。
| 役割 | SIM |
|------|-----|
| データ通信 | 旅行eSIM(現地ネットワーク接続) |
| 通話・SMS受信 | 日本のホームSIM(物理SIMまたは日本キャリアのeSIM) |
この構成のメリットは3点ある。
1. **日本の電話番号を維持できる** — 銀行・決済サービス・SNSのSMS認証コードを受信し続けられる
2. **国際ローミング料金が発生しない** — データ通信はすべて旅行eSIMを経由するため、ホームSIMのローミング課金を回避できる
3. **帰国後の手続きが不要** — 帰国後にデータ回線を日本SIMに戻せばそれだけで完了する
この構成を実現するには、端末がデュアルSIM対応である必要がある。iPhone XS・XR(2018年)以降、Google Pixel 3a以降など現行の主要端末は対応している。デュアルSIMの方式(DSDS/DSDV/DSDA)の詳細は[デュアルSIMとは](/ja/guides/what-is-dual-sim/)で解説している。
旅行eSIMのプランをまだ選んでいない場合は、[旅行eSIMの選び方](/ja/guides/how-to-choose/)および[SimFinderの旅行eSIM検索](/ja/travel/)で渡航先・期間・容量を指定して比較できる。
---
## 各回線の役割を設定する
旅行eSIMをインストールしたら、端末の設定画面で2回線の役割を明示的に割り当てる。設定しないまま使うと意図しない課金が発生する可能性がある。
### iPhone での設定
「設定」→「モバイル通信」を開くと、登録されている回線の一覧が表示される。
**データ通信回線の指定**
「モバイルデータ通信」をタップし、旅行eSIMの回線を選択する。これにより、モバイルデータは旅行eSIMのみから消費されるようになる。
**「モバイルデータ通信の切り替えを許可」の設定**
「モバイルデータ通信」の設定画面に「モバイルデータ通信の切り替えを許可」というトグルがある(Apple公式の正式名称。support.apple.com/ja-jp/109317)。
この機能はカバレッジや可用性に応じて、両方のSIMのデータを自動的に切り替える機能だ。旅行中は**必ずOFFに設定する**。ONのままにしておくと、旅行eSIMの電波が弱い場面でホームSIMのデータが自動使用され、日本キャリアのローミング課金が発生するリスクがある。
**通話・SMSに使う回線の確認**
「デフォルトの音声回線」でホームSIM(日本のSIM)が選択されていることを確認する。
**ホームSIMのデータローミング設定**
「モバイル通信」の回線一覧からホームSIM(日本のSIM)を選択し、「データローミング」がOFFになっていることを確認する。OFFになっていれば、日本のSIMでモバイルデータが消費されることはない。
### Android(Google Pixel)での設定
「設定」→「ネットワークとインターネット」→「SIM」を開く。
- 「優先SIM」または「データSIM」で旅行eSIMを選択する
- 「通話SIM」でホームSIM(日本のSIM)を選択する
- ホームSIMの設定を開き「ローミング」をOFFにする
Samsung Galaxy の場合、「設定」→「接続」→「SIMカードマネージャー」から各SIMの役割を設定できる。メーカーや Android バージョンによって設定メニューの名称が異なる場合があるため、画面の表示に従って操作する。
---
## 旅行中のSMS 2FA受信
日本の主要サービスは SMS を使った 2FA(二段階認証)を広く採用している。旅行中にホームSIMを維持することで、これらのコードを引き続き受信できる。
### SMS認証を使う主なサービス
日本では以下のようなサービスがSMS認証を採用している。
- **銀行・ネット証券**: 三井住友銀行・みずほ銀行・楽天銀行など多くの金融機関がSMSまたは専用アプリで 2FA を実施している
- **決済・EC**: メルカリ・楽天市場・PayPay など
- **SNS**: LINE・X(旧Twitter)・Instagram など
旅行中にこれらのサービスへのログインや取引が発生した場合、SMS 認証コードはホームSIM(日本の電話番号)に届く。デュアルSIM構成でホームSIMの電波が入っていれば、海外からでも受信できる。
### SMSが届く仕組みと注意点
SMS はデータ通信回線(モバイルデータ)とは別の経路で届く。ホームSIMの「データローミング」を OFF にしていても、SMS 受信の機能は維持される。
ただし以下の状況では SMS が届かない可能性がある。
- **端末が機内モード中**: 両方の回線が遮断される。機内モードを解除後に未着の SMS が届く場合がある
- **ホームSIMが圏外または「使用しない」設定**: ホームSIMを一時的に無効化している場合は SMS も受信できない
- **現地の電波環境の問題**: 建物の地下など電波の届きにくい場所では遅延や不達が起こりうる
SMS 認証の受信が特に重要なサービス(銀行アプリなど)については、旅行前に認証アプリ(Google Authenticator・Authy・Microsoft Authenticator 等)への移行を検討することも有効だ。認証アプリへの移行は各サービスのセキュリティ設定から行える。SMS 認証のリスクについては[SIMスワップ詐欺とは](/ja/guides/sim-swap/)も参照してほしい。
---
## ホームSIMでの着信電話への応答
デュアルSIM構成でホームSIMを有効にしていれば、日本の番号への着信を海外でも受けられる。
ただし注意点がある。ホームSIMに着信した電話を受けた際に、キャリアの「国際ローミング着信課金」が発生するかどうかは、ご契約のプランによって異なる。着信だけで課金される場合があるため、旅行前に各キャリアの海外ローミング着信に関するプラン内容を確認することを推奨する。
**データローミングと着信課金は別の概念だ。** データローミングを OFF にしても、音声通話の着信ローミングが自動的に無効になるわけではない。
旅行中に日本への発信が必要な場合は、旅行eSIMのデータ回線を使って LINE・WhatsApp などの VoIP アプリを使うのが一般的だ。旅行eSIMの多くはデータ専用であり音声通話機能を持たないが、VoIP アプリによる通話はデータ通信として扱われるため使用できる。
---
## ホームSIM側で必ずオフにすべき設定
ホームSIMに関するいくつかの設定を適切に制御しないと、意図しないローミング課金が発生する可能性がある。渡航直前に以下を確認する。
### データローミング(必須)
ホームSIMの「データローミング」は必ず OFF にする。これをONのままにしていると、旅行先で日本キャリアの国際データローミング料金が発生する。
- **iPhone**: 「設定」→「モバイル通信」→ホームSIMの回線を選択→「データローミング」をOFF
- **Android**: 「設定」→「ネットワークとインターネット」→ホームSIMを選択→「ローミング」をOFF
### モバイルデータ通信の切り替えを許可(iPhone のみ・必須)
前述のとおり、iPhone の「モバイルデータ通信の切り替えを許可」は旅行中は OFF に設定する。
### キャリアが提供する国際ローミングサービスへの加入状況
日本の大手キャリアは海外でのデータ通信向けに専用のオプションや自動適用のサービスを提供している(サービス名・条件・料金はキャリアや時期により変わるため、具体的な金額の記載は行わない)。
これらのサービスが有効になっていると、ホームSIMでのデータ通信が発生した際に自動的に適用される。旅行eSIMでデータ通信を完結させる場合、ホームSIMのデータローミングを OFF にしておけば、これらのサービスが起動することはない。
ただし万が一、設定の操作ミスや端末の自動切替によってホームSIMでデータが使われてしまった場合の保険として、各キャリアのローミングサービスの仕組みを把握しておくと安心だ。渡航前にキャリアの公式サイトで現行のサービス内容を確認することを推奨する。
### iMessageと Wi-Fi Calling(iPhone)
iPhone の iMessage は Wi-Fi 接続時にも SMS のように機能する。設定が有効になっていると旅行eSIMのデータを使ってメッセージの送受信を行う場合がある。旅行中のデータ消費を制御したい場合は「設定」→「メッセージ」→「iMessage」の状態を確認する。
Wi-Fi Calling(Wi-Fi 通話)は日本国内の大手キャリアでの対応は限定的で、提供状況や条件はキャリア・契約により異なる。対応しているキャリアを利用している場合は旅行先でも Wi-Fi 経由で音声通話が可能になる。対応状況・利用条件は各キャリアの公式情報で確認する。
---
## 帰国後の設定戻し
帰国後は以下の設定を確認・復元する。
### 手順
**1. データ通信回線をホームSIMに戻す**
- **iPhone**: 「設定」→「モバイル通信」→「モバイルデータ通信」→ホームSIM(日本のSIM)を選択
- **Android**: 「設定」→「ネットワークとインターネット」→「SIM」→「データSIM」でホームSIMを選択
**2. 旅行eSIMのデータローミングをOFFに戻す(任意)**
旅行eSIMを次の旅行まで保持する場合、eSIM側の「データローミング」を OFF にしておく。国内で旅行eSIMが起動していてもデータが消費されることはないが、明示的に OFF にしておくと管理がしやすい。
**3. 「モバイルデータ通信の切り替えを許可」の再設定(iPhone のみ)**
旅行中にOFFにした「モバイルデータ通信の切り替えを許可」を、必要に応じて元の設定(通常はON)に戻す。この設定は国内の通常利用では機能し、副回線が必要な場面でデータをカバーしてくれる。
**4. 旅行eSIMプロファイルの管理**
旅行eSIMのプロファイルは、次の旅行でも同じ渡航先・プロバイダーを使う予定があれば削除せずに保持することができる(プロバイダーの再利用ポリシーを事前に確認すること)。不要であれば削除してeSIM一覧を整理する。
- **iPhone**: 「設定」→「モバイル通信」→該当の旅行eSIM回線→「eSIMを削除」
- **Android(Pixel)**: 「設定」→「ネットワークとインターネット」→「SIM」→該当のeSIM→「削除」
---
## 端末の制約
デュアルSIM運用にあたって知っておくべき端末側の制約をまとめる。
### iPhone の制約
iPhoneはApple公式表記のDSDSに対応しているが、DSDAには対応していない。
- **通話中はデータ通信が停止する可能性がある**: ホームSIM で着信に応答している間、旅行eSIM のデータ通信が一時停止することがある(DSDVの挙動)
- **物理SIMスロット1つ+eSIM**: iPhone XS〜iPhone 12 の組み合わせは物理SIM+eSIM。iPhone 13 以降はeSIM×2(デュアルeSIM)も可能
- **SIMロック**: iPhone が以前のキャリアのSIMロックを受けている場合、旅行eSIMが使えない。「設定」→「一般」→「情報」→「キャリアロック」で「SIMの制限なし」と表示されていることを確認する
- **iPhone 16 以降(国内版)**: Apple公式の発表によると物理SIMスロットを持つ。eSIM対応は従来と同様
### Android の制約
Android 端末はメーカーやモデルによって対応状況が異なる。
- **DSDA対応端末**: 一部のハイエンド Android 端末は DSDA に対応しており、通話中もデータ通信を継続できる
- **デュアルeSIM対応**: Pixel 7(2022年)以降はeSIM×2の同時有効化に対応している
- **メーカーによる設定UI の差異**: Samsung・OPPO・Xiaomi 等のメーカー端末では設定メニューの名称や手順が異なる場合がある
### バッテリー消費
デュアルSIM構成(2回線を同時に有効化)では、シングルSIM運用と比較してバッテリー消耗が増える場合がある。特にホームSIMの電波が弱い環境では、端末がネットワークを探索し続けるため消耗が増えやすい。バッテリーが気になる場合、用件がないときにホームSIMを一時的に無効化することで消耗を抑えられる。
---
## よくある質問
---
## 関連ガイド
デュアルSIM全般の仕組みについては[デュアルSIMとは — DSDS・DSDV・DSDAの仕組みと活用法](/ja/guides/what-is-dual-sim/)を参照。旅行eSIMのインストール・有効化手順は[初めての旅行eSIM完全ガイド](/ja/guides/first-time-guide/)で詳しく解説している。渡航前の準備全体は[渡航前のスマホ準備チェックリスト](/ja/guides/pre-trip-checklist/)にまとめている。通信手段全体の選択肢については[海外でスマホを使う4つの方法](/ja/guides/four-options/)、プランの選定基準は[旅行eSIMの選び方](/ja/guides/how-to-choose/)が参考になる。SMS認証のセキュリティリスクについては[SIMスワップ詐欺とは](/ja/guides/sim-swap/)も合わせて読んでほしい。
---
## SimFinderで旅行eSIMを比較する
渡航先・旅行期間・必要なデータ容量を入力すると、複数プロバイダーのプランをまとめて比較できる。デュアルSIM構成で使うデータ専用プランの選定に活用してほしい。
**[SimFinderで旅行eSIMを比較する →](/ja/travel/)**
================================================================================
# デュアルSIMの設定(iPhone) — 物理SIM・eSIMを組み合わせる手順
URL: https://sim-finder.com/ja/guides/dual-sim-iphone/
Type: guides (ja)
Published: 2026-04-20
iPhoneでデュアルSIMを使うには、「設定」→「モバイル通信」から2回線目(eSIM)を追加し、通話・SMS・データ通信それぞれに使う回線を明示的に指定する必要がある。設定を省略すると意図しない回線でデータ通信が発生する可能性があるため、追加後の設定まで一連の流れで完了させることが重要だ。
デュアルSIMの仕組み(DSDS・DSDV・DSDA)については「[デュアルSIMとは](/ja/guides/what-is-dual-sim/)」で解説している。旅行中の活用法は「[海外旅行でのデュアルSIM活用](/ja/guides/dual-sim-for-travel/)」を参照してほしい。
---
## 対応iPhoneモデル
日本向けiPhoneのデュアルSIM対応状況は以下の通りだ(Apple公式情報)。
| モデル(シリーズ) | 構成 | 備考 |
|---|---|---|
| iPhone XS / XS Max / XR(2018年〜) | 物理SIM + eSIM 1枚 | デュアルSIM開始モデル |
| iPhone 11 / 11 Pro / 11 Pro Max | 物理SIM + eSIM 1枚 | |
| iPhone SE(第2世代) | 物理SIM + eSIM 1枚 | |
| iPhone 12シリーズ | 物理SIM + eSIM 1枚 | |
| iPhone 13シリーズ | 物理SIM + eSIM 2枚 | デュアルeSIM対応 |
| iPhone SE(第3世代) | 物理SIM + eSIM 1枚 / eSIM 2枚 | デュアルeSIM対応(Apple公式Tech Specs) |
| iPhone 14シリーズ(日本向け) | 物理SIM + eSIM | |
| iPhone 15シリーズ(日本向け) | 物理SIM + eSIM | |
| iPhone 16シリーズ(日本向け) | 物理SIM + eSIM | |
| iPhone 16e | 物理SIM + eSIM | |
| iPhone 17シリーズ(日本向け) | eSIM専用 | 物理SIMスロットなし(eSIM 2枚構成) |
| iPhone Air(全世界モデル) | eSIM専用 | 物理SIMスロットなし(eSIM 2枚構成) |
**iPhone 17シリーズ(日本向け)はeSIM専用モデル**となった(Apple公式情報)。物理SIMスロットがないため、デュアルSIM構成は自動的にeSIM×2(デュアルeSIM)になる。
iPhoneは業界標準用語でのDSDS(Dual SIM Dual Standby)に対応しているが、DSDA(Dual SIM Dual Active)には対応していない。通話中はもう一方のSIMのデータ通信が停止する点に注意が必要だ。
---
## 事前準備
### SIMロックを確認する
他社のeSIMを追加する前に、iPhoneがSIMロックフリーであることを確認する。
「設定」→「一般」→「情報」→「キャリアロック」の欄を確認する。「SIMロックなし」(iOSバージョンにより「SIMの制限なし」と表示される場合もある)と表示されていれば問題ない。「SIMロックあり」と表示されている場合は、現在利用中のキャリアのマイページからSIMロック解除手続きを行う必要がある。
日本では2021年10月1日以降に発売された端末は原則SIMロックフリーのため、その後に購入した端末はこの確認を省略できる。
### iOSを最新版にアップデートする
「設定」→「一般」→「ソフトウェアアップデート」から最新版のiOSにアップデートしておくことを推奨する。古いiOSではeSIM設定メニューの表示が異なる場合がある。
### Wi-Fiに接続する
eSIMプロファイルのダウンロードには安定したインターネット接続が必要だ。自宅のWi-Fiまたは既存の物理SIMのモバイルデータ通信があれば問題ない。
### 2回線目のeSIMを用意する
追加するeSIMのQRコードまたはSM-DP+アドレスをキャリアから入手しておく。国内キャリアはすべてのMNO(NTTドコモ・au・ソフトバンク・楽天モバイル)およびサブブランド(ahamo・povo・UQモバイル・ワイモバイル・LINEMO)がeSIMに対応している(Apple公式キャリア一覧で確認)。
QRコードによるeSIM設定の詳細手順は「[QRコードでeSIMを設定する(iPhone)](/ja/guides/qr-code-iphone/)」を参照してほしい。
---
## 2回線目(eSIM)の追加
iPhoneにeSIMを追加する手順を説明する。
**Step 1: 「設定」→「モバイル通信」を開く**
ホーム画面から「設定」アプリを開き、「モバイル通信」をタップする。
**Step 2: 「eSIMを追加」をタップする**
「モバイル通信プランを追加」または「eSIMを追加」をタップする(iOSのバージョンや既存SIMの有無によって表示名が異なる)。
**Step 3: QRコードをスキャンする(またはコードを手動入力する)**
カメラが起動するので、キャリアから入手したQRコードをフレーム内に収める。「モバイル通信プランが検出されました」という通知が表示されれば認識成功だ。
QRコードが設定したいiPhone上にある場合(メール・写真等)は以下を使う。
- **iOS 17.4以降**: QRコード画像を長押しして「eSIMを追加」を選択する
- **iOS 17.4未満**: 別端末でQRコードを表示し、iPhoneのカメラでスキャンする
QRコードがない場合はキャリアから受け取ったSM-DP+アドレスとアクティベーションコードを手動入力する(「[SM-DP+アドレスで手動設定する](/ja/guides/manual-code/)」参照)。
**Step 4: 「続ける」→「モバイル通信プランを追加」をタップする**
画面の指示に従ってタップする。キャリアによっては確認コードの入力を求められる場合がある。
**Step 5: ダウンロード完了を待つ**
プロファイルのダウンロードには数秒〜1分程度かかる。「モバイル通信プランが追加されました」と表示されれば追加完了だ。
この時点ではまだ各回線の役割は設定されていない。次のセクション以降で設定を完了させる。
---
## 回線にラベルを付ける
eSIMを追加すると「ライン1」「ライン2」などのデフォルトラベルが自動設定される。用途が分かる名前に変更しておくと、以降の設定と日常の管理がしやすくなる。
**設定手順:**
1. 「設定」→「モバイル通信」を開く
2. ラベルを変更したい回線をタップする
3. 「ラベルの変更」をタップする
4. 「個人用」「仕事用」「データ専用」「日本SIM」「旅行eSIM」など任意の名前を設定する
Apple公式ページでは「個人用」「仕事用」「副回線」など用途別のラベル例が案内されており、任意のカスタム名も入力できる(support.apple.com/ja-jp/109317)。iOSバージョンにより定型ラベルや表記が異なる場合がある。
---
## デフォルト回線の設定(音声/データ/iMessage)
デュアルSIM環境では通話・SMS/iMessage・モバイルデータ通信の各機能について「どちらの回線を優先するか」を明示的に設定する必要がある。
「設定」→「モバイル通信」を開くと、登録されている回線の一覧と以下の設定項目が表示される。
### デフォルトの音声回線
「デフォルトの音声回線」をタップして、発信時に使う回線を選択する。着信はどちらの番号でも両方の回線で受けられる(デュアルSIMの待ち受け機能)。
日常的に通話するメイン番号の回線を設定しておくことを推奨する。
### iMessage・FaceTimeの回線
「iMessage・FaceTimeへの返信先」をタップして、iMessageの送受信と着信転送に使う回線を選択する。
日本の電話番号(SMS)で認証を受けるサービスを使っている場合は、その番号が紐づいている回線を設定しておくと混乱しにくい。
### モバイルデータ通信
「モバイルデータ通信」をタップして、データ通信に使う回線を選択する。
**この設定が最も重要だ。** 設定しないと意図しない回線(料金プランが割高な方)でデータ通信が発生する可能性がある。格安SIM(MVNO)をデータ専用で追加する構成であれば、格安SIMの回線をここで選択する。
---
## モバイルデータ通信の切り替えを許可
「モバイルデータ通信」の設定画面内に「モバイルデータ通信の切り替えを許可」というトグルがある(Apple公式サポートに記載、support.apple.com/ja-jp/109317。iOSバージョンにより表記が若干異なる場合がある)。
この機能は、選択したデータ回線のカバレッジや可用性が低下したとき、もう一方のSIMのデータを自動的に使えるようにする設定だ。
**国内で副回線を維持している場合**: メイン回線の電波が入らない場所で副回線のデータを自動使用する補完機能として有効だ。ただし意図せずデータが消費されることがあるため、各回線のデータ残量を考慮して設定を判断する。
**旅行eSIMを追加している場合**: この設定は**必ずOFFにする**。ONのままにしていると、旅行eSIMの電波が弱い場所でホームSIM(日本のSIM)のデータが自動使用され、日本キャリアのローミング課金が発生するリスクがある。旅行中の設定の詳細は「[海外旅行でのデュアルSIM活用](/ja/guides/dual-sim-for-travel/)」を参照してほしい。
---
## アクティブな回線の切り替え
設定したデフォルト回線は、必要に応じていつでも切り替えられる。
### コントロールセンターから切り替える
iPhoneのコントロールセンターを開き、「モバイルデータ通信」のアイコンを長押しすると回線の切り替えメニューが表示される(iOS 18以降)。
### 設定から切り替える
「設定」→「モバイル通信」→「モバイルデータ通信」から変更したい回線を選択する。
### 発信時に回線を選択する
電話アプリから発信する際、連絡先のページから発信元の回線を選択できる。「設定」→「モバイル通信」→「デフォルトの音声回線」で設定した回線とは異なる回線から発信したいとき(例: 仕事番号で折り返す等)に使う。
---
## 回線の管理(オフ・削除)
### 回線を一時的にオフにする
使わない回線の電波状態チェックをオフにしてバッテリー消耗を減らしたい場合は、回線を無効化できる。
「設定」→「モバイル通信」→無効にしたい回線をタップ→「この回線をオンにする」のトグルをオフにする。
無効化した回線はプロファイルが削除されるわけではなく、再度トグルをオンにすれば即時復帰する。バッテリーを節約したい場面や、しばらく使わない副回線を休止させる際に有用だ。
### eSIMプロファイルを削除する
eSIMのプロファイルを完全に削除する場合は以下の手順で行う。
「設定」→「モバイル通信」→削除したい回線をタップ→「eSIMを消去」(iOSバージョンにより「eSIMを削除」と表示される場合がある)をタップする。
**注意**: eSIMプロファイルを削除すると、そのプロファイルは再利用できなくなる(同じQRコードを再スキャンしても設定不可。GSMAのセキュリティ仕様)。再度使うにはキャリアへのeSIM再発行手続きが必要になる。プロバイダーによっては再発行に手数料が発生する。削除前にキャリアのポリシーを確認することを推奨する。
### iPhoneに保存できるeSIM数
iPhoneはApple公式によると「8個以上(8 or more)のeSIM」を保存でき、設定画面から有効化するeSIMを切り替えられる。同時に有効化できるのはモデルによって異なる(iPhone 12以前は1枚、iPhone 13以降はデュアルeSIM対応で2枚同時有効化が可能)。
---
## よくある質問
**iPhoneのデュアルSIMは何枚まで登録できますか?**
プロファイルの保存はApple公式によると8個以上(8 or more)対応している。ただし同時に有効化できる枚数はモデルにより異なる。iPhone 12以前は1枚(+物理SIM1枚)、iPhone 13以降はeSIM2枚を同時に有効化できるデュアルeSIM対応となっている。
**eSIMを追加したら物理SIMは使えなくなりますか?**
なりません。物理SIMとeSIMは独立して管理されます。eSIM追加後も物理SIMは引き続き有効です。「設定」→「モバイル通信」で各回線の状態を確認してください。
**デュアルSIM使用中に通話するとデータ通信が止まることがありますか?**
iPhoneは業界標準用語でのDSDS(Dual SIM Dual Standby)に対応しています。DSDVと同様の挙動として、通話中はもう一方のSIMのデータ通信が停止する場合があります。DSDA(両SIM同時アクティブ)には対応していません。
**デュアルSIM設定後、データ通信が繋がらない場合は?**
「設定」→「モバイル通信」→「モバイルデータ通信」で目的のeSIMが選択されているか確認してください。選択できているのに繋がらない場合は、対象回線の「データローミング」設定や回線のオン/オフも確認してください。それでも解消しない場合は「[eSIMが設定できないときの対処法](/ja/guides/activation-failed/)」を参照してください。
**eSIMを別のiPhoneに移す場合はどうすればよいですか?**
eSIM Quick Transfer(iOS 16以降)を使う方法と、キャリアへの再発行手続きを使う方法があります。詳細は「[eSIMを別のiPhoneに転送する](/ja/guides/transfer-iphone/)」で解説しています。
**日本のeSIM非対応MVNOを物理SIMで使いながら、eSIMを別回線として追加できますか?**
できます。物理SIMスロットにMVNOのnano-SIMを挿入し、別のキャリア(eSIM対応のMNO・サブブランド・旅行eSIM等)をeSIMとして追加する構成が可能です。この場合は通話用回線とデータ用回線をそれぞれどちらのSIMにするか設定から指定してください。
---
## 関連ガイド
デュアルSIMの仕組みやDSDS・DSDV・DSDAの方式比較については「[デュアルSIMとは](/ja/guides/what-is-dual-sim/)」を参照してほしい。
旅行中に日本のSIMと旅行eSIMをどう使い分けるかは「[海外旅行でのデュアルSIM活用](/ja/guides/dual-sim-for-travel/)」で詳しく解説している。渡航前に確認すべき設定も網羅している。
eSIMの追加方法(QRコードスキャン)の詳細手順は「[QRコードでeSIMを設定する(iPhone)](/ja/guides/qr-code-iphone/)」を参照してほしい。eSIMの基礎知識は「[eSIMとは](/ja/guides/what-is-esim/)」で確認できる。
初めて旅行eSIMを追加する場合は「[初めての旅行eSIM完全ガイド](/ja/guides/first-time-guide/)」も合わせて参照してほしい。
国内SIMのeSIM対応プランを比較するには[SimFinderで絞り込める](/ja/)。海外旅行用のeSIMは[SimFinder Travelで渡航先別に検索](/ja/travel/)できる。
================================================================================
# eSIM対応端末一覧と確認方法
URL: https://sim-finder.com/ja/guides/esim-compatible-devices/
Type: guides (ja)
Published: 2026-06-04
eSIM対応かどうかは端末のハードウェアとモデル・販売地域で決まる。iPhoneはXS・XR(2018年モデル)以降の全モデルが対応し、Google PixelはPixel 4以降が幅広く対応、Samsung GalaxyはS20以降のフラグシップモデルが基本的に対応している。自分の端末がeSIM対応かどうかは設定画面のEID表示で最も確実に確認できる。
この記事では主要端末のeSIM対応状況と、自分の端末を確認する具体的な手順を解説する。eSIMの仕組みそのものは「[eSIMとは — 仕組み・メリット・デメリット](/ja/guides/what-is-esim/)」で詳しく解説している。
---
## iPhone のeSIM対応状況
### 対応モデル一覧
eSIM対応iPhoneモデルは、iPhone XS・iPhone XS Max・iPhone XR(2018年モデル)以降の全モデルだ。Apple公式サポートページ(support.apple.com/en-us/118569)で確認されている対応モデルは以下のとおりだ。
| 世代 | モデル | デュアルeSIM対応 |
|------|--------|----------------|
| 2018年 | iPhone XS / XS Max / XR | なし(物理SIM+eSIMのみ) |
| 2020年 | iPhone SE(第2世代) | なし(物理SIM+eSIMのみ) |
| 2020〜2021年 | iPhone 12・13シリーズ | iPhone 13以降: あり |
| 2022年 | iPhone SE(第3世代) | あり |
| 2022年〜 | iPhone 14・15・16・16eシリーズ | あり |
| 2025年 | iPhone 17シリーズ(17 / Air / 17 Pro / 17 Pro Max / 17e) | あり |
iPhone 13シリーズ以降・iPhone SE(第3世代)は、2つのeSIMを同時に有効化するデュアルeSIM構成に対応している。iPhone 12以前のモデルは物理SIM+eSIM1枚の組み合わせのみで、eSIMを2枚同時に有効化することはできない。
iPhoneは設定画面から8個以上のeSIMプロファイルを保存でき、使う回線を切り替えて利用できる。
### eSIM専用iPhoneモデル(物理SIMスロットなし)
一部の地域向けモデルは物理SIMスロットを持たないeSIM専用仕様だ。
- **iPhone 14〜16eシリーズ(米国向け)**: 物理SIMスロットなし・eSIM専用
- **iPhone 17シリーズ(米国・カナダ・メキシコ・日本・UAE・サウジアラビア・バーレーン・クウェート・カタール・オマン・グアム・米領バージン諸島向け)**: eSIM専用
- **iPhone Air(米国・カナダ・メキシコ・日本・UAE・サウジアラビア・バーレーン・クウェート・カタール・オマン・グアム・米領バージン諸島向け)**: eSIM専用
これら以外の地域向けモデル(欧州・豪州・シンガポール・韓国など)のiPhone 17/17 Pro/17 Pro Max・iPhone Airは、nano-SIM+eSIMの構成を採用している。
### 中国本土・香港・マカオ向けモデルの注意点
中国本土向けiPhoneの多くはeSIM非対応だ(iPhone 17eとiPhone Airは例外的に対応)。香港・マカオ向けは一部モデルのみ対応している。海外で購入したiPhoneを日本で使う場合や、日本のeSIMを海外購入端末で利用する場合は、Apple公式サポートページで地域別の対応状況を必ず確認すること。
---
## Android のeSIM対応状況
### Google Pixel
Google Pixel 4以降のモデルは、キャリアロックのかかっていない端末であれば基本的にeSIMに対応している。Google公式サポートページ(support.google.com/pixelphone/answer/7086887)で対応状況を確認できる。
| モデル | eSIM対応 | デュアルeSIM対応 |
|--------|---------|----------------|
| Pixel 3 | 条件付き(米国・カナダのSprintおよびGoogle Fiのみ。日本・豪州・台湾向けは非対応) | なし |
| Pixel 3a以降〜Pixel 6以前 | 基本対応 | なし |
| Pixel 7 / 7 Pro以降 | 対応 | あり |
| Pixel 10 / 10 Pro / 10 Pro XL(米国向け) | eSIM専用(物理SIMスロットなし) | あり |
| Pixel 10 Pro Fold(全地域) | 対応(物理SIMスロットあり) | あり |
Google Pixel 7およびPixel 7 Proは、2022年10月のリリース時点でAndroid端末として初めてデュアルeSIM(2つのeSIMを同時に有効化)に対応した。デュアルeSIMはAndroid 13でのMEP(Multiple Enabled Profiles)実装に基づく機能だ。
### Samsung Galaxy
Samsung Galaxy S20・S20+・S20 Ultra以降のGalaxyフラグシップモデルは、基本的にeSIMに対応している。Samsung公式のeSIM対応端末ページ(samsung.com/sg/support/mobile-devices/galaxy-esim-and-supported-network-carriers/)に最新の対応モデル一覧が掲載されている。
注意点が2つある。
1. **Galaxy S20 FE(Fan Edition)は大半の地域でeSIM非対応**だ。FEモデルは対応フラグシップとは別に確認が必要。
2. **地域・キャリア版による違い**: 中国向けモデルや一部キャリアロック版ではeSIM非対応の場合がある。日本で購入したSIMフリー版であれば対応していることが多いが、Samsung公式で個別確認を推奨する。
Galaxy Z FoldシリーズおよびZ FlipシリーズもeSIMに対応している。Samsung公式のeSIM対応端末リストにGalaxy Z Fold7・Flip7・Flip7 FEおよび旧世代モデルが含まれている。
### その他のAndroid端末
SonyのXperiaシリーズ、Motorola、OPPO、OnePlusなど他のAndroidブランドでもeSIM対応モデルが増加している。ただし機種・世代・販売地域によって対応状況が異なるため、メーカー公式サポートページまたはキャリアのeSIM対応端末一覧で個別に確認すること。
---
## 自分の端末がeSIM対応か確認する方法
### 方法1: EIDを確認する(最確実)
EID(eUICC Identifier)はeSIMチップの固有識別番号だ。EIDが表示される端末はeSIM対応ハードウェアを搭載している。
**iPhoneでの確認手順**
1. 「設定」を開く
2. 「一般」→「情報」の順にタップする
3. 「EID」という項目が表示されていればeSIM対応だ
**Androidでの確認手順**(機種・メーカーにより表記が異なる)
1. 「設定」を開く
2. 「端末情報」または「スマートフォン情報」を開く
3. 「SIM情報」または「IMEI情報」を確認する
4. 「EID」が表示されていればeSIM対応だ
EIDは通常32桁の数字(89049032XXXXXXXXXXXXXXXXXXXXXXXXXX の形式)で表示される。
### 方法2: *#06# をダイヤルして確認する
電話アプリから `*#06#` をダイヤルすると、IMEIとともにEIDが表示される端末がある。すべての端末でこの方法が使えるわけではないが、設定メニューが深い場合に手早く確認できる。
表示された番号の中に「EID」という項目があればeSIM対応だ。
### 方法3: 設定画面でeSIM追加メニューを探す
**iPhoneの場合**
1. 「設定」を開く
2. 「モバイル通信」をタップする
3. 「eSIMを追加」または「モバイル通信プランを追加」というメニューが表示されていればeSIM対応だ
**Androidの場合**(Samsung Galaxy の例)
1. 「設定」を開く
2. 「接続」→「SIMカードマネージャー」または「SIM」をタップする
3. 「eSIMを追加」というメニューが表示されていればeSIM対応だ
Pixel の場合は「設定」→「ネットワークとインターネット」→「SIM」から確認できる。
### 方法4: キャリアの対応端末リストで確認する
使いたいeSIMプランのキャリアが公式サイトで「eSIM対応端末一覧」を公開している場合、そのリストで自分の端末が含まれているか確認できる。キャリアによっては端末本体がeSIM対応でも、そのキャリアの手続き方法に非対応なケースがある。特に海外キャリアのeSIMを日本の端末で利用する場合は、端末のeSIM対応だけでなくキャリアとの互換性も確認することを推奨する。
---
## eSIM非対応端末との見分け方
端末本体でeSIMの設定操作を試みても「eSIM追加」メニューが表示されない場合は、以下の2点を順番に確認する。
1. **EIDが表示されるか確認する**: 「設定」→「一般」→「情報」(iPhone)または「設定」→「端末情報」(Android)でEID項目がなければ、その端末はeSIM非対応のハードウェアだ
2. **モデル番号を確認する**: 型番をメーカー公式のeSIM対応端末一覧と照合する。モデル番号は設定画面の「端末情報」またはiPhoneの場合はApple公式サポートページで確認できる
EIDが表示されていてもeSIMメニューが出ない場合は、キャリアロックによりeSIM機能が無効化されている可能性がある。SIMロック解除の手続きについては利用中のキャリアに問い合わせること。
---
## SIMフリー端末とeSIM専用端末の動向
### SIMフリーとeSIM対応は別の条件
「SIMフリー」とは、特定キャリアへの回線ロックが解除された端末を指す。eSIM対応はeUICCチップが搭載されているかどうかで決まるため、SIMフリーであることとeSIM対応であることは別の条件だ。
- SIMフリー かつ eSIM対応 → eSIMが利用可能
- SIMフリー だが eSIM非対応 → eSIMは利用不可
- キャリアロック端末でもeSIM対応ハードウェアを持つ場合 → eSIM機能が制限される場合がある
eSIMプランに乗り換える前には「端末がeSIM対応か」「SIMフリーか」の2点を確認する習慣をつけると、手続きのつまずきを避けやすい。
### eSIM専用端末の普及
eSIM専用端末(物理SIMスロットを持たないモデル)は増加傾向にある。米国市場では既にiPhone 14以降・Pixel 10(一部機種・米国向け)・一部地域向けiPhone 17シリーズがeSIM専用となっている。iPhone Airは米国・カナダ・メキシコ・日本・UAE・サウジアラビア・バーレーン・クウェート・カタール・オマン・グアム・米領バージン諸島向けにeSIM専用で発売されている。その他の地域向けはnano-SIM+eSIM構成だ。
eSIM専用端末を使う場合、物理SIMが必要なシーンでは代替手段がない点に注意が必要だ。たとえばeSIM非対応の格安SIMしか使えない環境、またはeSIMの手続きができない状況では通信手段を確保できなくなる。渡航先での利用を含め、利用するキャリアがeSIM対応かどうかを事前に確認することを推奨する。
物理SIMとeSIMの特性を比較した詳しい解説は「[物理SIM vs eSIM — 違いと選び方を比較](/ja/guides/sim-vs-esim/)」を参照してほしい。
---
## 地域モデルの違いと注意点
同一ブランド・同一機種名であっても、販売地域によってeSIM対応状況が異なることがある。特に注意が必要な点を以下に示す。
**iPhone の地域差**
- 中国本土向けモデルの多くはeSIM非対応
- 日本向けiPhone 17シリーズはeSIM専用(物理SIMスロットなし)
- 欧州・豪州・韓国向けiPhone 17/17 Pro/17 Pro Maxは物理SIM+eSIMの構成
**Android の地域差**
- Google Pixel 3は一部地域・キャリア向けのみeSIM対応(日本向けPixel 3はeSIM非対応)
- Samsung Galaxyの中国向けモデルはeSIM非対応の場合がある
- キャリアロック版端末はeSIM機能が制限されている場合がある
海外旅行でeSIMを使う計画がある場合は、出発前に端末のEIDを確認し、eSIM対応を確かめておくことを推奨する。eSIMを使った海外通信の具体的な活用方法は「[物理SIM vs eSIM — 違いと選び方を比較](/ja/guides/sim-vs-esim/)」でも触れている。
---
## 端末別のeSIM設定手順へのリンク
対応確認が完了したら、次のステップはeSIMの設定だ。
- **iPhone**: 「[QRコードでeSIMを設定する(iPhone)](/ja/guides/qr-code-iphone/)」にQRコードスキャンから開通までの手順を詳しく解説している
- **Android**: 「[QRコードでeSIMを設定する(Android)](/ja/guides/qr-code-android/)」にSamsung Galaxy・Google Pixel別の操作手順を掲載している
- **iPhoneでのデュアルSIM設定**: 「[デュアルSIMの設定(iPhone)](/ja/guides/dual-sim-iphone/)」に物理SIM+eSIMの組み合わせ手順を解説している
---
## まとめ
| 端末 | eSIM対応の目安 | 確認先 |
|------|------------|-------|
| iPhone | XS・XR(2018年)以降の全モデル | Apple公式サポート / 設定>一般>情報 |
| Google Pixel | Pixel 4以降(条件あり) | Google公式サポート / 設定>端末情報 |
| Samsung Galaxy | S20以降のフラグシップ(地域・モデルによる) | Samsung公式eSIM対応端末ページ |
| その他Android | 機種・地域による | メーカー公式または設定のEID確認 |
自分の端末がeSIM対応かどうかを最も確実に確認する方法は、設定画面でEIDの表示を確認することだ。EIDが表示されていれば、その端末にはeUICCチップが搭載されており、eSIMを利用できるハードウェア条件を満たしている。
eSIM対応端末であることを確認したら、[SimFinderで「eSIM対応」フィルターを使ってプランを絞り込み](/ja/)、自分に合ったプランを探してみてほしい。
---
## よくある質問
### EIDとIMEIは何が違いますか?
IMEIは端末本体の識別番号(15桁の数値)で、SIMの有無にかかわらず全モバイル端末が持つ。EIDはeUICCチップの識別番号(数字32桁)で、eSIM対応端末のみが持つ。両方が表示された場合、その端末はeSIM対応のハードウェアを搭載していることを意味する。IMEIについての詳細は「[eSIMとは — 仕組み・メリット・デメリット](/ja/guides/what-is-esim/)」のeSIM基礎知識も参照してほしい。
### キャリアロックされた端末でもeSIMは使えますか?
キャリアロック端末はeSIM機能が制限または無効化されている場合がある。eSIMを利用するには原則としてSIMフリー(キャリアロック解除済み)の状態が必要だ。日本では2021年以降に発売された端末について、総務省ガイドラインに基づきキャリア各社が原則としてSIMロック解除に応じている。
### iPad はeSIM対応ですか?
iPad Pro(M4)およびiPad Air(M2)モデルはeSIM専用(物理SIMスロットなし)だ。それ以前の一部iPad Pro・iPad Air(Wi-Fi + Cellularモデル)もeSIMに対応している。ただしiPadのeSIM対応状況はiPhoneより複雑で、モデル・世代・Wi-Fi+Cellularモデルかどうかによって異なるため、Apple公式ページで個別確認を推奨する。
### SIMフリー版と日本キャリア版でeSIM対応状況は変わりますか?
iPhoneの場合、日本キャリア版とSIMフリー版のeSIM対応状況は基本的に同一だ。Androidでは、日本キャリアが独自にeSIM機能を制限しているモデルが存在した例がある。現在は大手4キャリアいずれもeSIM対応を推進しているが、旧モデルのキャリア版端末については公式サポートページで確認することを推奨する。
================================================================================
# iPadでeSIMを使う方法 — 対応モデル・設定手順・iPhoneとの違い
URL: https://sim-finder.com/ja/guides/esim-on-ipad/
Type: guides (ja)
Published: 2026-06-04
iPadでeSIMを使えるのはWi-Fi + Cellularモデルのみだ。設定手順はiPhoneと近く「設定」→「セルラーデータ」→「eSIMを追加」からQRコードをスキャンする(iPhoneとは一部メニュー名が異なる)。ただしiPadのeSIMプランはデータ専用が基本で、音声通話・電話番号の付与はない点がiPhoneとの大きな違いだ。
この記事では、iPadでeSIMを使うための対応モデルの確認・設定手順・旅行eSIMの追加・iPhoneとの相違点を解説する。eSIMの仕組みそのものは「[eSIMとは — 仕組み・メリット・デメリット](/ja/guides/what-is-esim/)」を参照してほしい。
---
## iPadでeSIMが使える条件
### Wi-Fi + CellularモデルのみeSIM対応
iPadには「Wi-Fi専用モデル」と「Wi-Fi + Cellularモデル」の2種類がある。eSIMはCellularモデルにのみ搭載されたeUICCチップを使う技術であるため、**Wi-Fi専用モデルにeSIMを追加することはできない**。
購入済みの端末がどちらのモデルかを確認する方法は2つある。
1. **箱・本体背面の型番を確認する**: Cellularモデルは型番に「Cellular」または「5G」と記載されていることが多い
2. **設定から確認する**: 「設定」→「一般」→「情報」を開き「EID」という項目が表示されていれば、そのiPadはeSIM対応ハードウェアを搭載している
「EID」は32桁の16進数で、eUICCチップ固有の識別番号だ。この番号が画面に表示されない場合は、Wi-Fi専用モデルか、eSIM非対応の旧世代Cellularモデルである可能性がある。Appleの仕様ページ(apple.com/jp/ipad/compare/)では購入前にモデルごとのeSIM対応状況を一覧で確認できる。
### eSIM対応のiPadモデル
Apple公式サポートページ(support.apple.com/en-us/118569)で確認されているeSIM対応iPadの世代は以下のとおりだ。
| モデル | 対応世代(Wi-Fi + Cellular) |
|--------|--------------------------|
| iPad Pro 12.9インチ | 第3世代〜第6世代 |
| iPad Pro 11インチ | 第1世代〜第4世代 |
| iPad Air | 第3世代〜第5世代 |
上記モデルは物理SIMスロット+eSIMの構成に対応している。なお、iPad mini(第5世代以降)やiPad(第7世代以降)も対応世代に含まれるモデルがある。この表は網羅的なリストではないため、正確な対応状況はApple公式サポートページ(support.apple.com/en-us/118569)で確認すること。
### eSIM専用のiPadモデル(物理SIMスロットなし)
iPad Pro(M4)とiPad Air(M2)は**eSIM専用モデル**であり、物理SIMカードスロットを持たない。これらのモデルでは物理SIMカードを挿入できないため、eSIMのみで通信する。
eSIM対応モデルの全一覧と確認方法の詳細は「[eSIM対応端末一覧と確認方法](/ja/guides/esim-compatible-devices/)」で解説している。
---
## iPadのeSIM設定手順
### 必要な準備
設定を開始する前に以下の3点を確認する。
1. **Wi-Fiまたは既存のモバイルデータ通信に接続されていること**: eSIMプロファイルのダウンロードにはインターネット接続が必要だ
2. **キャリアまたはeSIMプロバイダーからQRコード(またはアクティベーションコード)を取得済みであること**
3. **iPad本体がキャリアロックされていないこと**: 「設定」→「一般」→「情報」→「キャリアロック」で「SIMの制限なし」と表示されていればよい
### QRコードでeSIMを追加する手順
**Step 1: 「設定」を開く**
iPadのホーム画面から「設定」アプリを起動する。
**Step 2: 「セルラーデータ」をタップする**
設定メニューの中から「セルラーデータ」(iPadOSの表記。iPhoneでは「モバイルデータ通信」と表示される場合がある)をタップする。
**Step 3: 「eSIMを追加」をタップする**
「モバイルデータ通信プランを追加」または「eSIMを追加」というメニューを選択する。iOSのバージョンや既存SIMの有無によって表示名が変わる場合がある。
**Step 4: QRコードをスキャンする**
設定内のカメラが起動するので、キャリアから取得したQRコードをフレームに収める。また、iPadの標準カメラアプリでQRコードをスキャンした際に「モバイル通信プランを検出」という通知が表示されたら、それをタップしてeSIM追加画面に進む方法もある。QRコードが別の端末や印刷物で表示されていない場合(同じiPad上にQRコードの画像がある場合)は、画像を長押しして「eSIMを追加」を選択する方法(iOS 17.4以降)を使う。
**Step 5: 「続ける」をタップしてダウンロードを完了する**
画面の指示に従って進む。キャリアによっては確認コード(数桁の番号)の入力を求められる場合がある。このコードはキャリアからのメールまたはSMSで通知されている。
**Step 6: eSIMラインの設定を確認する**
ダウンロード完了後、「セルラーデータ」の設定画面でeSIMのラインが有効になっていることを確認する。複数のeSIMを保存している場合は、どのラインをデータ通信に使うかを明示的に選択する必要がある。
### SM-DP+アドレスを手動入力する方法
QRコードが使えない場合(画質が悪い・紙での印刷がない等)は、SM-DP+アドレスとアクティベーションコードを手動で入力することもできる。「eSIMを追加」の画面で「詳細情報を手動で入力」または「アクティベーションコードを使用」を選択して入力する。
iPhoneでのQRコード設定の詳細手順は「[QRコードでeSIMを設定する(iPhone)](/ja/guides/qr-code-iphone/)」を参照してほしい。iPadでの操作はiPhoneとほぼ同一のUIで行える。
---
## キャリアのeSIMを追加する(国内プラン)
### 国内主要キャリアのiPad向けeSIM
NTTドコモ・au・ソフトバンク・楽天モバイルの大手4キャリアおよびUQモバイル・ワイモバイル・LINEMO等のサブブランドは、iPad向けeSIMプランを提供している。手続きは各社のマイページまたはキャリアアプリから行い、QRコードが発行される。
国内キャリアのeSIMをiPadに設定する場合、以下の点に注意する。
- **iPad向けプランとiPhone向けプランは区別されることがある**: キャリアによってはiPad専用のデータSIMプランを提供している。契約時にiPadで使用する旨を確認すること
- **音声通話オプションはないのが基本**: iPadには電話機能がないため、通話SIMは不要だ
- **開通(アクティベーション)のタイミング**: プロファイルのインストール後、キャリア側の開通処理が完了するまで数分かかる場合がある。開通の一般的な流れは「[SIMの開通手続き・アクティベーション](/ja/guides/activation/)」で解説している
### MVNOのiPad向けeSIM
IIJmio・mineo・NURO Mobile等の主要MVNOもiPad向けeSIMを提供している。MVNOは一般的にMNOよりもデータプランの月額が低い傾向がある。各社のiPad対応状況と最新プランは[SimFinderで「eSIM対応」フィルターを使って比較](/ja/)できる。
---
## 旅行eSIMをiPadに設定する
### 旅行eSIMの追加手順
旅行eSIM(Airalo・Holafly・Nomad・Saily等のプロバイダーが提供)のiPadへの追加手順は、国内キャリアのeSIM追加と同じだ。購入後にメールまたはプロバイダーのアプリ内でQRコードを受け取り、「設定」→「セルラーデータ」→「eSIMを追加」からスキャンする。
### 旅行中の回線切り替え
複数のeSIMプロファイルをiPadに保存している場合(例: 国内プラン+旅行先プラン)、「設定」→「セルラーデータ」で使用するラインを切り替えられる。旅行中は旅行eSIMのラインをデータ通信に指定し、国内プランのモバイルデータをオフにすることで意図しないローミング通信を防げる。
### データ専用であることの確認
旅行eSIMのほとんどはデータ通信専用で、音声通話・SMS機能はない。iPadで旅行eSIMを使う場合も同様にデータ専用での利用が基本となる。SMSを受信したい場合(二段階認証など)は別途iPhoneのSIMで対応する必要がある点に注意する。
iPadで旅行eSIMを使うユースケースとして特に多いのが、海外出張・旅行中のテザリング元として活用するパターンだ。iPadを大容量の旅行eSIMで接続し、iPhoneや他のデバイスへWi-Fiテザリングで共有することで、複数デバイスを1枚のeSIMでカバーできる。データ容量や通信速度はプロバイダーによって差があるため、事前に[SimFinder Travelで目的地の旅行eSIMプランを比較](/ja/travel/)しておくとよい。
iPadでeSIMを設定する具体的な手順は、本記事内の「iPadのeSIM設定手順」セクションを参照してほしい。eSIM対応端末の確認は「[eSIM対応端末一覧と確認方法](/ja/guides/esim-compatible-devices/)」で行える。
---
## iPhoneとの違い
iPadのeSIM利用はiPhoneと共通点が多いが、いくつかの重要な違いがある。
| 項目 | iPhone | iPad |
|------|--------|------|
| 電話番号 | 付与される(音声SIMの場合) | 付与されない(データ専用が基本) |
| 音声通話 | 対応(eSIM経由でも可) | 不可(電話アプリが存在しない) |
| SMS受信 | 対応 | 不可(携帯番号でのSMS) |
| デュアルeSIM | iPhone 13以降・SE(第3世代)が対応 | 対応状況はモデルによる(下記参照) |
| 主なeSIM用途 | 国内メイン回線・旅行eSIM・デュアルSIM管理 | データ通信専用(Wi-Fi補完・旅行先データ) |
### iPadのデュアルeSIM対応状況
iPhoneではiPhone 13シリーズ以降が2つのeSIMを同時に有効化するデュアルeSIM構成に対応している(「[デュアルSIMの設定(iPhone)](/ja/guides/dual-sim-iphone/)」参照)。iPadのデュアルeSIM対応状況はモデルによって異なり、Apple公式サポートページで個別確認が必要だ。
### iPadのeSIMをiPhoneと一緒に活用する
iPadと手持ちのiPhoneを組み合わせて使う場合、それぞれ別のeSIMプロファイルを設定し、端末ごとに役割を分けるのが一般的な使い方だ。たとえば「iPhoneは国内通話・データ兼用」「iPadは旅行先のデータ専用eSIM」のように使い分けられる。
eSIMクイック転送(端末間でeSIMを転送する機能)については、KDDIを含む一部キャリアでiPad→iPad間の転送に対応している(「設定」→「セルラーデータ」→「iPadのプランを転送」)。ただしiPhone→iPad間の転送は非対応だ。eSIMクイック転送の利用可否は契約キャリアのサポートページで確認すること。キャリアが対応していない場合は、キャリアからQRコードを取得するか、各社のマイページで再発行手続きを行う必要がある。
---
## eSIMの削除・管理
### 不要なeSIMプロファイルを削除する
「設定」→「セルラーデータ」で管理したいeSIMのラインを選択し、「モバイル通信プランを削除」をタップする。
**削除前に必ず確認すること**: キャリアやeSIMプロバイダーのポリシーによっては、一度削除したeSIMプロファイルを再インストールできない場合がある。旅行eSIMを旅行後に削除するケースで特に注意が必要だ。再インストールが可能かどうかはプロバイダーのサポートページまたは購入時のメールで確認すること。
### iPadのeSIMを別のiPadに引き継ぐ
端末を買い替えた場合、KDDIを含む一部キャリアはeSIMクイック転送(「設定」→「セルラーデータ」→「iPadのプランを転送」)によるiPad→iPad間の転送に対応している。対応していないキャリアではキャリアへの再発行手続きが必要だ。手続き方法はキャリアごとに異なるため、各社のサポートページで確認すること。
---
## トラブルシューティング
### 「eSIMを追加できません」と表示される場合
以下の順番で確認する。
1. **端末がeUICC対応か**: 「設定」→「一般」→「情報」でEIDが表示されているか確認する。表示されなければその端末はeSIM非対応のハードウェアだ
2. **Wi-FiまたはCellular接続が有効か**: インターネット接続なしではプロファイルをダウンロードできない
3. **キャリアロックされていないか**: 「設定」→「一般」→「情報」→「キャリアロック」を確認する
4. **QRコードが使用済みではないか**: QRコードはGSMAのセキュリティ仕様により1端末で1回のみ使用できる。使用済みの場合はキャリアに再発行を依頼する
エラーの詳細な対処法は「[eSIMが設定できないときの対処法](/ja/guides/activation-failed/)」にまとめている。
### eSIMを設定したのにデータ通信が繋がらない場合
プロファイルのインストールと開通(アクティベーション)は別のステップだ。インストール完了後に「設定」→「セルラーデータ」でeSIMのラインがオンになっているか、そのラインがデフォルトのデータ回線に設定されているかを確認する。
設定が正しくても繋がらない場合は、iPadを再起動するか、「設定」→「一般」→「転送またはiPadをリセット」→「ネットワーク設定をリセット」を試みる。ネットワーク設定のリセットはWi-Fiパスワードも消去されるため、事前にパスワードを控えておくこと。キャリア側の開通処理が完了していない場合は数分から数十分待ってから再度確認する。
---
## まとめ
| 確認項目 | 内容 |
|----------|------|
| 対応モデル | Wi-Fi + Cellularモデルのみ(iPad Pro第3世代以降・iPad Air第3世代以降など) |
| eSIM専用モデル | iPad Pro(M4)・iPad Air(M2)は物理SIMスロットなし |
| 設定手順 | 設定→セルラーデータ→eSIMを追加→QRコードスキャン |
| iPhoneとの主な違い | データ専用・電話番号なし・音声通話不可 |
| 旅行eSIM | 国内プランと同手順で追加可能・データ専用 |
| 削除時の注意 | 一部プロバイダーは再インストール不可。削除前にポリシーを確認 |
iPadでeSIMを利用するキャリアのプランを探すには[SimFinderで「eSIM対応」フィルターを使って絞り込める](/ja/)。旅行先でのデータ通信に使う旅行eSIMは[SimFinder Travelで国別に検索](/ja/travel/)できる。
---
## よくある質問
### Wi-Fi専用iPadにeSIMを追加することはできますか?
できない。eSIMを使えるのはWi-Fi + Cellularモデルのみだ。Wi-Fi専用モデルにはeUICCチップが搭載されていないため、eSIM機能を利用できない。購入前にどちらのモデルかを確認することを推奨する。
### iPadのeSIMで電話はできますか?
一般的にiPadのeSIMプランは音声通話・SMS機能なしのデータ専用プランだ。iPadには電話アプリが存在せず、iPadのeSIMで発着信することはできない。iPhoneのような電話番号が付与されるプランも通常は提供されない。
### iPadに保存できるeSIMの数に上限はありますか?
eUICCチップのメモリ容量に依存しており、上限は端末によって異なる。Apple公式では8個以上のeSIMを管理できるとされている。不要になったeSIMプロファイルは「設定」→「セルラーデータ」から削除して管理することを推奨する。
### 旅行eSIMをiPadに設定するにはどうすればよいですか?
国内eSIMと同じ手順だ。「設定」→「セルラーデータ」→「eSIMを追加」からQRコードをスキャンするか、アクティベーションコードを手動入力してプロファイルをダウンロードする。設定完了後に「セルラーデータ」で旅行eSIMのラインをオンにしてほしい。
### eSIM専用のiPadでも国内キャリアのSIMを使えますか?
iPad Pro(M4)・iPad Air(M2)のeSIM専用モデルは物理SIMスロットがないため、物理SIMカードを挿入することはできない。これらのモデルでは、eSIM対応プランのみ利用可能だ。NTTドコモ・au・ソフトバンク・楽天モバイルを含む国内主要キャリアはiPad向けeSIMプランを提供している。
================================================================================
# スマートウォッチでeSIMを使う方法
URL: https://sim-finder.com/ja/guides/esim-on-smartwatch/
Type: guides (ja)
Published: 2026-06-06
スマートウォッチのセルラーモデルは、ペアリングしたスマートフォンの電話番号をウォッチでも共有する「ナンバーシェア」方式が一般的だ。Apple Watch GPS + Cellularモデル、Wear OS搭載端末、Galaxy Watchのセルラーモデルはいずれもこの仕組みを採用している。日本では大手4キャリア(NTTドコモ・au・ソフトバンク・楽天モバイル)がApple Watch向けのナンバーシェアサービスに対応しており、月額の通信オプションを追加することでiPhoneやAndroidスマートフォンなしでも通話・メッセージが使える。ただしトラベルeSIMはスマートウォッチ単独では基本的に利用できない点に注意が必要だ。
eSIMの基本的な仕組みは「[eSIMとは — 仕組み・メリット・デメリット](/ja/guides/what-is-esim/)」を参照してほしい。eSIM対応端末の一般的な確認方法は「[eSIM対応端末一覧と確認方法](/ja/guides/esim-compatible-devices/)」にまとめている。
---
## スマートウォッチのセルラー機能の仕組み
### ナンバーシェア方式とは
スマートウォッチのセルラー機能は、スマートフォンとは独立した新しい電話番号を持つのではなく、ペアリングしたスマートフォンの電話番号をウォッチでも使えるようにする「ナンバーシェア」(番号共有)方式が基本だ。
仕組みの概略は以下のとおりだ。
1. ウォッチのeUICCに、ペアリングするスマートフォンと同じ電話番号で通信できるeSIMプロファイルが書き込まれる
2. キャリアのネットワーク上で、1つの電話番号に対してスマートフォンとウォッチの2台が紐付けられる
3. スマートフォンへの着信・メッセージをウォッチでも受信・応答できるようになる
この方式により、スマートウォッチは独立した通信デバイスとして動作するが、電話番号はスマートフォンと共有される。ウォッチ専用の電話番号は付与されない。
### スマートウォッチのeSIMはスマートフォンと異なる
スマートフォンやタブレットのeSIMは、利用者がキャリアやeSIMプロバイダーを自由に選んでプロファイルをダウンロードする汎用的な仕組みだ。一方、スマートウォッチのセルラー機能はキャリアのナンバーシェアサービスと密接に連携しており、以下の制約がある。
- **対応するスマートフォンとのペアリングが前提**: 初期設定はスマートフォン(iPhoneまたはAndroid端末)を経由して行う
- **対応キャリアが限定される**: すべてのキャリアがウォッチのナンバーシェアに対応しているわけではない
- **汎用eSIMプロバイダーは利用不可**: AiraloやHolaflyのようなトラベルeSIMはウォッチには対応していない
---
## Apple Watch のセルラー機能
### GPS + Cellular モデルとは
Apple Watchには「GPS」モデルと「GPS + Cellular」モデルがある。セルラー機能を持つのはGPS + Cellularモデルのみで、eUICCチップを搭載している。Apple公式(apple.com/jp/apple-watch-series-10/)で各モデルのスペックを確認できる。
GPS + Cellularモデルは、ペアリングしたiPhoneのBluetooth・Wi-Fi圏外においても、キャリアのセルラーネットワーク経由で以下を単独で利用できる。
- 電話の発着信(iPhoneと同じ番号で)
- メッセージの送受信(iMessageおよびSMS)
- Siri
- Apple Watchに対応したAppの一部機能(音楽ストリーミング・マップ等)
ただしiPhoneが圏外の場合と比べて利用できる機能は制限される。Apple公式サポート(support.apple.com/ja-jp/111893)にサポートされる機能の詳細が掲載されている。
### ペアリングしたiPhoneとのeSIM共有
Apple WatchのセルラーはiPhoneと完全に独立しているわけではなく、Appleが「ファミリー共有設定」と呼ぶ構成(家族のiPhoneとウォッチをペアリングする形式)を除き、基本的にウォッチのオーナーが持つiPhoneとペアリングする必要がある。eSIMプロファイルの書き込みはiPhoneのWatchアプリから行う。
### 日本でのApple Watch セルラー対応キャリア
日本でApple Watch Cellularのナンバーシェアに対応しているのはNTTドコモ・au・ソフトバンク・楽天モバイルの大手4キャリアだ。楽天モバイルは「電話番号シェアサービス」として提供している。対応状況は変更される可能性があるため、最新情報は各キャリアの公式サイトで確認すること。
### Apple Watch の設定の流れ
Apple公式の手順(support.apple.com/ja-jp/111893)を要約すると以下のとおりだ。
1. **iPhoneのWatchアプリを開く**: 「マイウォッチ」タブ→「モバイル通信」をタップする
2. **モバイル通信を設定**: 画面の指示に従い、対応キャリアのナンバーシェアサービスを契約する
3. **eSIMプロファイルのダウンロード**: キャリアの認証が完了すると、eSIMプロファイルがApple Watchに自動的に書き込まれる
4. **接続確認**: Watchアプリで「モバイル通信」がオンになっていることを確認する
キャリアとの契約(ナンバーシェアオプションの追加)はキャリアのマイページやショップで別途行う必要がある。月額のオプション料金が発生するのが一般的だ。具体的な料金は各キャリアの公式サイトで確認すること。
なおApple WatchのeSIM設定にはwatchOSおよびiOSが最新バージョンである(またはキャリアが推奨するバージョン以上である)ことが推奨される。設定前にiPhoneとApple Watch両方のソフトウェアアップデートを確認することを推奨する。
---
## Android 系スマートウォッチのセルラー機能
### Wear OS のセルラー対応
Wear OSはGoogleが開発するスマートウォッチ向けOSで、Qualcomm等のSoCを搭載したウォッチで動作する。Wear OSのセルラーモデルもeSIMを内蔵しており、ナンバーシェア方式でAndroidスマートフォンと連携する。
Wear OS搭載のセルラーウォッチとしては、GoogleのPixel Watchシリーズが代表的だ。Google公式サポート(support.google.com/wearos/answer/6321304)にセルラーウォッチでの通話・通信に関する案内が掲載されている。
Wear OSのセルラーウォッチの設定はスマートフォンのWear OSアプリまたはGalaxy Wearable(Samsung端末の場合)から行う。セルラープランの追加方法や対応キャリアはウォッチの製造元とキャリアによって異なる。
### Galaxy Watch のセルラー機能
Samsung Galaxy Watchのセルラーモデルは、Androidスマートフォン(特にGalaxy端末)との連携を想定した設計だ。Samsung公式(samsung.com/jp/)のGalaxy Watch製品ページで各モデルのセルラー対応状況を確認できる。
Samsung Galaxy WatchのセルラーモデルはAndroidスマートフォン連携が前提だ。Galaxy Watch 4以降のWear OS搭載モデルはiOSに対応していない。旧Tizen OS搭載モデル(Galaxy Watch 3以前)は一部iPhoneとペアリングできたが、現行モデルではiPhoneとの組み合わせによるセルラー利用はできない。最新の対応状況はSamsung公式サポートページで確認すること。
日本での対応キャリアについては、Samsungの日本向けサポートページ(samsung.com/jp/support/)で確認できる。
### Wear OS / Galaxy Watch の一般的な設定の流れ
1. **スマートフォン側のアプリを開く**: Android端末の場合はWear OSアプリ(またはGalaxy Wearableアプリ)、iPhoneの場合はGalaxy Wearableアプリを開く
2. **セルラーの設定を開始**: 「接続」や「モバイルネットワーク」等の項目からセルラー設定に進む
3. **キャリアのナンバーシェアサービスを設定**: キャリアの指示に従い、ウォッチへのeSIMプロファイルの書き込みを行う
4. **動作確認**: ウォッチ単体でスマートフォンなしに通話が発信・着信できることを確認する
手順はOSのバージョン・ウォッチモデル・キャリアにより異なるため、利用するキャリアの公式手順を必ず確認すること。
Wear OS/Galaxy Watchのセルラー機能を使うには、ウォッチとペアリングするスマートフォンがWear OS対応(Android 6.0以降、あるいはiPhone(Galaxy Wearableアプリ利用時))であることが前提となる。対応OSバージョンの詳細はウォッチの製品ページで確認すること。
---
## キャリア対応が必要な点
### ナンバーシェアはキャリアの対応が前提
スマートウォッチのセルラー機能はキャリア側のネットワーク対応が不可欠だ。ウォッチのハードウェアがeSIM対応であっても、利用するキャリアがウォッチ向けナンバーシェアサービスを提供していなければ、セルラー機能を有効化できない。
日本では大手4キャリア(NTTドコモ・au・ソフトバンク・楽天モバイル)がApple Watch向けのナンバーシェアサービスを提供しており、楽天モバイルは「電話番号シェアサービス」として提供している。Wear OS/Galaxy Watchについてはキャリアごとに対応状況が異なる。ただしすべてのウォッチモデルがすべてのキャリアに対応しているわけではなく、組み合わせによって対応状況が異なる。利用前に端末とキャリアの組み合わせを各キャリアの公式サイトで確認することを推奨する。
### キャリアのウォッチ通信オプション
日本の大手4キャリア(NTTドコモ・au・ソフトバンク・楽天モバイル)はスマートウォッチ向けのナンバーシェアサービスを月額有料オプションとして提供している。スマートフォンのプランとは別に、ウォッチ用の通信オプションを追加する手続きが必要だ。具体的な月額料金はキャリアごとに異なり、変更される可能性があるため、各社の公式サイトで最新の料金を確認すること。
デュアルSIM・複数回線の使い方については「[デュアルSIMとは何か](/ja/guides/what-is-dual-sim/)」で基本概念を解説している。
---
## トラベルeSIM はスマートウォッチには使えない
海外旅行で通信コストを抑えるためにAiraloやHolaflyなどのトラベルeSIMを活用している方も多いが、**トラベルeSIMをスマートウォッチ単独に設定することは基本的にできない**。
理由は以下の2点だ。
1. **スマートウォッチのeSIMはキャリアのナンバーシェア専用**: ウォッチのeUICCに書き込めるプロファイルは、対応キャリアのナンバーシェアサービスのものに限定されている。汎用eSIMプロバイダーがウォッチ向けプロファイルを提供していない。
2. **スマートウォッチにはSM-DP+からの汎用プロファイルダウンロード機能がない**: スマートフォンのeSIM設定画面のように、QRコードをスキャンして任意のeSIMプロバイダーのプロファイルをダウンロードするUIがスマートウォッチには存在しない。
海外でスマートウォッチをセルラー接続で使いたい場合の選択肢は以下のとおりだ。
- **ペアリングしたスマートフォンに旅行eSIMを設定し、スマートフォン経由でウォッチを接続する**: Bluetooth・Wi-Fi経由でスマートフォンとペアリングしている場合はウォッチもデータ通信を利用できる
- **国内キャリアの国際ローミングを利用する**: ナンバーシェアサービスの国際ローミング対応をキャリアに確認する(対応状況はキャリアにより異なる)
iPadでの旅行eSIM活用については「[iPadでeSIMを使う方法](/ja/guides/esim-on-ipad/)」も参照してほしい。
---
## eSIM プロファイルの管理
### スマートウォッチのeSIMプロファイルの特性
スマートウォッチのeSIMプロファイルはスマートフォンのeSIMとは管理方法が異なる。
- **プロファイルの追加・削除はスマートフォンのアプリから行う**: ウォッチ本体の操作メニューからeSIMプロファイルを直接管理することは通常できない
- **契約キャリアを変更した場合は再設定が必要**: 新しいキャリアのナンバーシェアサービスを契約し、旧プロファイルを削除した上で新プロファイルを書き込む手続きが発生する
- **ウォッチを買い替えた場合も再設定が必要**: 新しいウォッチに同じeSIMプロファイルを引き継ぐことはできず、キャリアでの再手続きが必要だ
eSIMプロファイルの保存数や有効化数の仕組みについては「[eSIMプロファイルの保存数・有効化数の上限](/ja/guides/esim-profile-limits/)」で詳しく解説している。
### スマートフォンとウォッチのeSIMは独立している
スマートフォンのeSIMとスマートウォッチのeSIMは、同じ電話番号を共有していても別々のeUICCチップに書き込まれた独立したプロファイルだ。スマートフォンのeSIMを削除・変更してもウォッチのeSIMには直接影響しないが、ナンバーシェアサービスの契約状況によってはウォッチのセルラー機能も利用できなくなる。キャリアでナンバーシェアの解約手続きをした場合、ウォッチのeSIMプロファイルを別途削除する手順が求められることがある。
---
## トラブルシューティング
### セルラーが圏外になる・繋がらない
以下の順で確認する。
1. **ナンバーシェアオプションがキャリアで有効になっているか**: キャリアのマイページからオプションの契約状況を確認する
2. **ウォッチのeSIMプロファイルが正常に書き込まれているか**: スマートフォンのWatchアプリまたはWear OSアプリでモバイル通信の設定状態を確認する
3. **ウォッチのキャリア設定が最新か**: iPhoneのWatchアプリでキャリア設定のアップデートがある場合は適用する
4. **ウォッチを再起動する**: 一時的な接続障害の場合、ウォッチを再起動することで解消することがある
5. **iPhoneとのペアリングを解除して再設定する**: Apple Watchの場合、iPhoneのWatchアプリで「Appleウォッチとのペアリングを解除」→再ペアリングを行うと、eSIMプロファイルが再度書き込まれることがある。この操作はApple Watchを工場出荷時の状態に戻すため、事前にバックアップが取られていることを確認すること
### セルラー設定のメニューが表示されない
ウォッチがGPSのみのモデル(セルラー非対応)か、対応キャリアのサービスが利用不可な地域にいる可能性がある。ウォッチのモデルとキャリアの対応状況を再確認すること。
Apple Watchの場合、iPhoneのWatchアプリで「マイウォッチ」→「モバイル通信」が表示されない場合は、対応キャリアのeSIMサービスに未加入の可能性がある。事前にキャリアでナンバーシェアオプションを契約してから設定を再試行することを推奨する。
### セルラー設定中にエラーが発生する場合
キャリアのサーバー側でeSIMプロファイルの発行処理中にエラーが発生することがある。この場合は以下を試みる。
- 数分待ってから再試行する
- ウォッチとスマートフォンを両方再起動してから再試行する
- キャリアのカスタマーサポートに連絡し、eSIMプロファイルの再発行を依頼する
---
## まとめ
| 項目 | 内容 |
|------|------|
| 仕組み | ナンバーシェア方式。スマートフォンと同じ電話番号をウォッチで共有 |
| 対応端末 | GPS + CellularモデルのApple Watch、Wear OS/Galaxy Watchのセルラーモデル |
| 日本のキャリア対応(Apple Watch) | NTTドコモ・au・ソフトバンク・楽天モバイルの大手4キャリアが対応 |
| 月額オプション | 別途ウォッチ向け通信オプションが必要(金額は各キャリア公式で確認) |
| トラベルeSIM | スマートウォッチ単独では利用不可 |
| 設定方法 | スマートフォンのWatchアプリ/Wear OSアプリから行う |
| 対応確認先 | Apple公式・Samsung公式・Google公式・各キャリア公式サイト |
スマートウォッチのセルラー対応状況は端末・キャリアの組み合わせに依存する部分が大きい。最新の対応状況は必ずApple公式(support.apple.com/ja-jp/111893)、Google公式(support.google.com/wearos/)、Samsung公式(samsung.com/jp/support/)、および各キャリアの公式サイトを確認してほしい。スマートフォン向けのeSIM対応プランは[SimFinderで「eSIM対応」フィルターを使って比較](/ja/)できる。
---
## よくある質問
### スマートウォッチのeSIMはスマホと別の電話番号になりますか?
日本の大手キャリアが提供するナンバーシェアサービスを使う場合、スマートウォッチにはペアリングしたスマートフォンと同じ電話番号が割り当てられる。ウォッチ単独の電話番号は付与されない。
### トラベルeSIMをスマートウォッチに設定できますか?
基本的にできない。スマートウォッチのセルラー機能は、対応するスマートフォンとのペアリングおよびキャリアのナンバーシェアサービスを前提とした設計だ。Airalo・Holaflyなどのトラベルコンシューマー向けeSIMはスマートウォッチ単独には対応していない。海外でのデータ通信はペアリングしたスマートフォン経由で行うことになる。
### Apple WatchのセルラーはiPhoneなしでも使えますか?
Apple Watch GPS + Cellularモデルは、ペアリングしたiPhoneのBluetooth・Wi-Fi圏外でも、登録したキャリアの番号共有サービスを通じて通話・メッセージ・Appの一部機能を単独で利用できる。ただし初期設定はiPhoneとのペアリングが必要で、利用できる機能はiPhone接続時よりも制限される。なお「ファミリー共有設定」を使えば、iPhoneを持っていない家族(子供など)のApple WatchをiPhoneオーナーが管理する形でセルラー利用できる。
### スマートウォッチのeSIMに月額オプションは必要ですか?
日本の大手4キャリア(NTTドコモ・au・ソフトバンク・楽天モバイル)はいずれもスマートウォッチ向けの番号共有オプションを月額有料で提供している。楽天モバイルは「電話番号シェアサービス」として提供している。具体的な金額はキャリアごとに異なり変更される可能性があるため、各社の公式サイトで確認すること。
================================================================================
# eSIMプロファイルの保存数・有効化数の上限
URL: https://sim-finder.com/ja/guides/esim-profile-limits/
Type: guides (ja)
Published: 2026-06-04
eSIMプロファイルは端末のeUICCチップに複数保存できるが、同時に有効化できる数は規格・端末モデルによって異なる。iPhoneはApple公式が「8個以上」の保存に対応すると明示している。同時有効化については、GSMA SGP.22 v2.x準拠の端末では1つのみ、iPhone 13以降はデュアルeSIM(2つ同時有効化)、Android 13以降のMEP対応端末でも2つ同時有効化が可能だ。
保存上限に達した場合は既存のプロファイルを削除する必要があるが、削除すると再インストールできないケースがある点が重要だ。保存(Stored)・有効化(Enabled)・削除(Deleted)の違いを理解して管理することが、eSIMを複数使いこなす上での基本となる。
この記事では、eSIMプロファイルの保存数と同時有効化数の上限を規格ごとに整理し、保存上限に達したときの対処と、デュアルSIM構成での考え方を解説する。eSIMの基本的な仕組みについては「[eSIMとは — 仕組み・メリット・デメリット](/ja/guides/what-is-esim/)」を、対応端末一覧については「[eSIM対応端末一覧と確認方法](/ja/guides/esim-compatible-devices/)」を参照してほしい。
---
## eSIMプロファイルとは
eSIM(embedded SIM)は、端末のマザーボードに半田付けされたeUICC(embedded Universal Integrated Circuit Card)チップにキャリアのプロファイルをダウンロードして使うSIM技術だ。プロファイルとはIMSI(国際移動加入者識別番号)・認証キー・キャリア設定を一まとめにしたデータセットで、1つのプロファイルが1つのeSIM契約に対応する。
物理SIMが「1枚のカード = 1契約」であるのに対し、eUICCは複数のプロファイルを格納できる。どのプロファイルをいくつ保存・有効化できるかは、GSMAの規格(SGP.22)とeUICCのメモリ容量、端末の実装によって決まる。
プロファイルの状態は「Enabled(有効)」「Disabled(無効)」「Deleted(削除済み)」の3つで管理される。Enabledのプロファイルだけが実際にキャリアネットワークへの認証に使われる。DisabledのプロファイルはeUICC上に存在し続け、次の有効化操作まで待機状態になる。DeletedのプロファイルはeUICC上から除去され、再インストールにはキャリア側での再プロビジョニングが必要になる。
eSIMプロファイルの管理(保存・有効化・削除)の詳細については「[物理SIM vs eSIM — 違いと選び方を比較](/ja/guides/sim-vs-esim/)」も参照してほしい。
---
## GSMA SGP.22 v2.x — 同時有効化は1つのみ
GSMA SGP.22(RSP Technical Specification for Consumer Devices)はeSIMの消費者デバイス向け標準規格だ。SGP.22 v2.x系の最新版はv2.6.1(2025年4月25日公開)で、現在市場に流通している大多数のeSIM対応端末がSGP.22 v2.x準拠のeUICCを搭載している。なお、v3.0/v3.1は別ラインとして管理されており、v2.x系とは独立した仕様系統だ。
SGP.22は消費者デバイス向けの規格であり、M2M(機器間通信)向けのSGP.02、IoTデバイス向けのSGP.32(2023年5月公開)とは別の仕様として管理されている。本記事ではスマートフォン・タブレット向けのSGP.22のみを扱う。
SGP.22 v2.x仕様における重要な制約は以下のとおりだ。
| 項目 | 仕様 |
|------|------|
| **保存数の上限** | eUICCのメモリ容量に依存(仕様上の固定値なし) |
| **同時有効化数** | **1つのみ** |
| **切り替え方法** | 設定画面でプロファイルを選択して手動切り替え |
保存数に仕様上の固定上限はない。実際にいくつまで保存できるかはeUICCチップのフラッシュメモリ容量で決まるため、端末によって異なる。
「同時に有効化できるのは1つ」という制約は、v2.x世代の全端末に共通だ。複数のキャリアプロファイルを保存しておいて切り替えて使うことはできるが、2つ以上を同時にオンにすることはできない。
プロファイルを有効化(Enable)・無効化(Disable)する操作はeUICC上でのソフトウェア処理であり、物理SIMの抜き差しとは異なり即座に完了する。有効化されていないプロファイルはeUICCに保存されたまま待機状態になるため、次回の切り替え時に改めてダウンロードし直す必要はない。
---
## iPhoneの保存数 — 「8個以上」
Apple公式サポートページは、iPhoneのeSIM保存数について「8 or more eSIMs(8個以上のeSIM)」と記載している。
この「8個以上」という表現は、ハードウェアの設計上の最低保証値を示したものだ。Apple公式は特定の最大値を示しておらず、eUICCのメモリ容量に依存するため機種ごとに上限が異なる。現実的な利用では、複数の旅行用eSIMや国内MVNO複数社のeSIMを保存しておいても8個に達することは少ない。
同時有効化数についてはモデルによって異なる。
| iPhoneモデル | 同時有効化できるeSIM数 | 物理SIMとの組み合わせ |
|-------------|-------------------|--------------------|
| iPhone XS〜iPhone 12シリーズ | 1つ | 物理SIM 1枚 + eSIM 1つ |
| iPhone 13以降・iPhone SE(第3世代)を含む(デュアルeSIM対応) | **2つ** | eSIM 2つ(または物理SIM + eSIM) |
iPhone 13以降(iPhone SE第3世代を含む)はeSIM 2つを同時に有効化する「デュアルeSIM」構成に対応している。これにより物理SIMスロットに物理SIMを挿入しながらeSIMを追加する構成(物理SIM + eSIM)と、2枚のeSIMを同時利用する構成(eSIM + eSIM)の両方が選べる。iPhoneのデュアルSIM設定については「[デュアルSIMの設定(iPhone)— 物理SIM・eSIMを組み合わせる手順](/ja/guides/dual-sim-iphone/)」で手順を解説している。
---
## GSMA SGP.22 v3.0 MEP — 複数プロファイルの同時有効化
SGP.22 v3.0で新たに導入されたMEP(Multiple Enabled Profiles)は、1つのeUICC上で複数のeSIMプロファイルを同時に有効化できるオプション機能だ。SGP.22 v3.1(2023年12月公開)でMEPはさらに拡張されている。
MEPはオプション機能であるため、SGP.22 v3.0準拠のeUICCを搭載していても端末がMEPを実装するかどうかはメーカーの判断による。
MEPには以下の2つの実装方式がある。
| MEP方式 | 概要 |
|---------|------|
| **MEP-A1** | ISD-R(管理ドメイン)をポート0に固定し、プロファイルを他ポートで選択する方式 |
| **MEP-B** | どのポートにも管理ドメインを割り当てられる方式 |
MEP-A1はMEP-Bより実装が容易で、既存のeUICCアーキテクチャとの互換性が高い。
MEPはeSIM間の干渉を防ぐため、有効化されたプロファイルごとに独立したセキュアドメインを用意する仕組みをとる。これにより2つのeSIMプロファイルが互いの認証情報にアクセスできないよう隔離される。MEPを利用するには、端末側(モデム)とeUICC側の両方がMEPをサポートしている必要がある。
---
## AndroidのMEPサポート — Android 13以降
Androidプラットフォームは以下のバージョンからMEPをサポートしている。
| Androidバージョン | サポートするMEP |
|----------------|---------------|
| Android 13以降 | MEP-A1 |
| Android 14以降 | MEP-A1 および MEP-B |
MEPサポートにより、AndroidはeSIM専用のデュアルSIM構成(物理SIMスロットなしで2回線同時利用)を実現できる。ただしAndroid 13/14以降であっても、端末のeUICCがMEPに対応していなければこの機能は使えない。MEP対応端末については各メーカーの公式仕様を確認する必要がある。
Google Pixel 7以降はデュアルeSIM(eSIM 2つの同時有効化)に対応している。米国向けPixel 10シリーズはeSIM専用(物理SIMスロットなし)で、MEPを活用したデュアルeSIM構成に対応している。
なお、MEP対応の確認は端末のAndroidバージョンだけでは不十分だ。端末のEIDが存在すること(eSIMチップ搭載の確認)に加え、各メーカーがMEPを端末ファームウェアに実装しているかどうかを確認する必要がある。端末のeSIM対応状況全般については「[eSIM対応端末一覧と確認方法](/ja/guides/esim-compatible-devices/)」を参照してほしい。
---
## 保存上限に達したときの対処
eSIMプロファイルの保存上限(iPhoneは8個以上)に達すると、新しいeSIMをダウンロードする前に既存のプロファイルを削除する必要がある。
削除する前に必ず確認すべき点がある。
**キャリアや旅行用eSIMプロバイダーによっては、削除したeSIMプロファイルを再インストールできない場合がある。** 特に旅行用の短期データeSIMは、一度削除すると再購入が必要になるケースが多い。国内大手キャリア(ドコモ・au・ソフトバンク・楽天モバイル)は再発行手続き経由での再インストールに対応しているが、手数料が発生するキャリアもある。
eSIM削除前の確認と再インストール手順については「[eSIMの削除と再インストール — 削除前の注意と再発行手順](/ja/guides/reinstall-esim/)」で詳しく解説している。
削除するプロファイルの選び方の目安は以下のとおりだ。
- 旅行から帰国し、再利用予定のない旅行用eSIM(再インストール可能かを事前確認)
- 解約済みキャリアのプロファイル(無効なプロファイルは削除しても問題ない)
- 複数のMVNO試用プロファイルで不要になったもの
削除対象の見極めにあたり、設定画面でプロファイルの「ラベル(名前)」を分かりやすく付けておくと管理しやすい。
### iPhoneでのプロファイル削除手順
iPhone上でeSIMを削除するには「設定 → モバイル通信 → 削除したいeSIMを選択 → eSIMを削除」の順に操作する。削除前に「このeSIMを削除しますか?」という確認ダイアログが表示されるため、誤操作での削除は起きにくい設計になっている。ただし確認後に削除を実行した場合、eUICCからプロファイルが完全に除去される。再インストール可否はキャリア・プロバイダーのポリシーに依存するため、削除実行前に確認しておくことを推奨する。
---
## デュアルSIM構成での上限の考え方
デュアルSIM端末では「保存数の上限」と「同時有効化数の上限」を区別して考える必要がある。
**保存数の上限**(例: iPhoneは8個以上)は、eUICCに格納できるプロファイルの総数だ。有効化されていないプロファイルも含めてカウントされる。
**同時有効化数の上限**は、同時にオンにできるプロファイルの数だ。通常のデュアルSIM端末では2つが上限だ。
たとえばiPhone 13以降でeSIM 2つを同時有効化して使う「デュアルeSIM」構成の場合、端末には8個以上のプロファイルを保存できるが、そのうち同時に使えるのは2つまでとなる。残りのプロファイルは保存したまま待機状態になり、必要に応じて有効なeSIMを切り替えられる。
物理SIM+eSIMのデュアルSIM構成でも考え方は同じだ。物理SIMスロットには物理SIMが1枚、eUICCには複数のeSIMプロファイルが保存でき、そのうち有効化するeSIMは1つという構成になる。
| 構成 | 保存できるeSIM数 | 同時有効化できる回線数の合計 |
|------|----------------|--------------------------|
| 物理SIM×1 + eSIM(iPhone XS〜12) | 8以上 | 2(物理SIM 1+eSIM 1) |
| eSIM×2(iPhone 13以降・デュアルeSIM) | 8以上 | 2(eSIM 2つ) |
| 物理SIM×1 + eSIM(Android MEP以前) | 端末依存 | 2(物理SIM 1+eSIM 1) |
| eSIM×2(Android MEP対応端末) | 端末依存 | 2(eSIM 2つ) |
#### 典型的な利用シーンでの整理
**旅行中に国内eSIMと旅行用eSIMを同時利用する場合**: iPhone 13以降またはデュアルeSIM対応Androidであれば、国内eSIM(有効)+旅行用eSIM(有効)の2つを同時有効化できる。保存数の上限には達していないため、旅行用eSIMをインストールする前に他のeSIMを削除する必要はない。
**副回線として複数のeSIMを保存管理する場合**: メインのeSIMを有効にしたまま、別のキャリアのeSIMを無効状態で保存しておくことができる。保存上限(iPhoneは8個以上)に達しない限り、新しいプロファイルを追加し続けられる。有効化するeSIMをその都度切り替えるだけで、物理SIMの抜き差しなしに複数のキャリアを使い分けられる。
### 規格と端末対応の対照表
| 規格 | 同時有効化上限 | 主な対応端末 |
|------|-------------|------------|
| SGP.22 v2.x(単一有効) | 1つのみ | iPhone XS〜12・多くのAndroid端末 |
| SGP.22 v2.x + デュアルeSIM(Apple独自実装) | 2つ(eSIM×2) | iPhone 13以降 |
| SGP.22 v3.0/v3.1 MEP | 複数(実装依存) | MEP対応Android端末(Android 13以降) |
iPhone 13以降のデュアルeSIM対応はAppleの独自実装であり、SGP.22 v3.0のMEPとは異なるアプローチだ。iPhoneはSGP.22 v2.x系の仕様に基づきながら、eSIM 2つを同時有効化するデュアルeSIM機能をiOS上で実現している。
---
## プロファイル管理の実務ポイント
eSIMプロファイルを複数保存・管理する場面での実践的な注意点をまとめる。
**新しいeSIMをダウンロードする前に空き容量を確認する**: 設定 → モバイル通信(iPhone)またはネットワークとインターネット → SIM(Android)からプロファイル一覧を確認し、不要なものがないか確認する。
**プロファイルに分かりやすいラベルを付ける**: iPhoneでは各eSIMに任意のラベルをつけられる(例: 「海外用eSIM」「サブ回線」)。後から管理しやすくなる。
**削除前にプロバイダーの再インストールポリシーを確認する**: 特に旅行用eSIMは削除前に再インストール可否を確認すること。再インストール可能であっても手順が必要な場合がある。詳細は「[eSIMの削除と再インストール — 削除前の注意と再発行手順](/ja/guides/reinstall-esim/)」を参照してほしい。
**デュアルSIM構成ではデフォルト回線を設定する**: iPhone・Androidともに、通話・データ通信・SMSでどの回線を優先するかを設定できる。設定を明示しておくと意図しない回線の使用を防げる。
**SimFinderでeSIM対応プランを絞り込む**: 国内のeSIM対応プランをデータ容量・月額・キャリア種別などの条件で比較したい場合は[SimFinderの比較ツール](/ja/jp/search/)でeSIM対応フィルターを使って絞り込める。複数のeSIMプロファイルを使い分ける前に、どのキャリアのプランが自分の使い方に合っているかを確認しておくと、後のプロファイル管理も整理しやすくなる。
---
## FAQ
**Q. iPhoneでeSIMを8個以上保存しようとするとどうなりますか?**
A. 新しいeSIMをダウンロードしようとした際に保存上限に達している場合、既存のeSIMを削除してから再試行するよう求められます。削除前にそのeSIMが再インストール可能かをプロバイダーに確認してください。
**Q. 保存済みのeSIMは有効化していなくても残りますか?**
A. はい。有効化していないeSIMプロファイルもeUICCに保存されたままになります。意図的に削除しない限り自動的には消えません。ただし、有効期限付きのeSIM(一部の旅行用eSIM)はプロバイダーが定めた期限後に利用不可になることがあります(プロファイル自体はeUICCに残る場合があります)。iPhoneでは「設定 → モバイル通信」のeSIM一覧で保存中の全プロファイルを確認できます。
**Q. iPhone 13以降でeSIM 2つを同時に有効化すると、どちらでも通話とデータが使えますか?**
A. 通話・SMS・データ通信のそれぞれについてどちらの回線をデフォルトにするかを設定できます。データ通信に使う回線は一方のみですが、「低データモードをオン」にした状態でデータ切り替えを手動で行う運用も可能です。設定の詳細は「[デュアルSIMの設定(iPhone)— 物理SIM・eSIMを組み合わせる手順](/ja/guides/dual-sim-iphone/)」で解説しています。
**Q. Android端末のeSIM保存上限は何個ですか?**
A. Androidの場合、eUICCメモリ容量は端末メーカーとチップセットの仕様に依存するため、一律の数値はありません。Pixel等のAndroidも複数保存に対応しますが、具体的な上限数はメーカー公式で確認してください。
**Q. eSIM専用端末(物理SIMスロットなし)でデュアルSIMを使うにはどうすればいいですか?**
A. MEP対応のAndroid端末(Android 13以降)またはiPhone 13以降のデュアルeSIM対応モデルが必要です。いずれも2つのeSIMプロファイルを同時有効化することで、物理SIMスロットなしに2回線を同時利用できます。端末がMEPまたはデュアルeSIMに対応しているかは「[eSIM対応端末一覧と確認方法](/ja/guides/esim-compatible-devices/)」で確認できます。
**Q. eSIMのプロファイルを無効(Disabled)にするのと削除するのは何が違いますか?**
A. 無効化(Disable)はプロファイルをeUICC上に保持したまま、そのeSIMによるネットワーク認証を停止する操作です。再び有効化(Enable)すれば同じプロファイルをダウンロードし直さずに使えます。削除(Delete)はeUICCからプロファイルを完全に除去する操作です。削除後に再度使うにはキャリア側での再発行(再プロビジョニング)が必要になります。旅行用eSIMや再インストール不可のeSIMは削除ではなく無効化で運用することを推奨します。
---
## 関連ガイド
eSIMプロファイルの管理・デュアルSIM設定・端末選びに関連するガイドは以下で詳しく解説している。
- [eSIMとは — 仕組み・メリット・デメリット](/ja/guides/what-is-esim/)
- [eSIM対応端末一覧と確認方法](/ja/guides/esim-compatible-devices/)
- [物理SIM vs eSIM — 違いと選び方を比較](/ja/guides/sim-vs-esim/)
- [eSIMの削除と再インストール — 削除前の注意と再発行手順](/ja/guides/reinstall-esim/)
- [デュアルSIMの設定(iPhone)— 物理SIM・eSIMを組み合わせる手順](/ja/guides/dual-sim-iphone/)
================================================================================
# EUローミング完全ガイド — Roam Like at Home(RLAH)の仕組みと対象国
URL: https://sim-finder.com/ja/guides/eu-roaming/
Type: guides (ja)
Published: 2026-05-20
EU域内を旅行または移動する際に知っておくべき通信規制が「RLAH(Roam Like at Home)」である。EU/EEAのキャリアと契約した加入者がEU/EEA圏内をローミングしても追加料金を取られないことを原則として定めた規制だ。
**この記事の要点:**
- RLAHは2017年6月15日施行・EU 2022/612で2032年6月30日まで延長
- 対象はEU/EEAの30カ国 + 2026年1月1日よりウクライナ・モルドバの計**32カ国**。スイス・英国・モナコ・バチカンは対象外
- **日本のキャリアSIMはこの規制の直接の対象外**——日本人渡航者は旅行eSIMで対応するのが現実的
他の海外通信手段との全体比較は[海外でスマホを使う4つの方法](/ja/guides/four-options/)で解説している。国際ローミングの仕組みについては[国際ローミングの仕組みと料金](/ja/guides/international-roaming/)を参照してほしい。
---
## 1. RLAH(Roam Like at Home)とは
RLAHとは、EU/EEAの通信事業者が加入者に対してEU/EEA圏内のローミングに追加料金を課すことを原則として禁止するEU規制の通称である。
正式な法的基盤は**Regulation (EU) 531/2012**(ローミング規則)を起点とし、2015年のRegulation (EU) 2015/2120、2017年のRegulation (EU) 2017/920による改正を経て、2017年6月15日に「小売ローミング追加料金の撤廃」が実現した。この日付がRLAH施行日として広く知られている。
その後、**Regulation (EU) 2022/612**(2022年4月13日発効・同年7月1日適用開始)によりさらなる強化と期間延長が行われた。主な追加内容は以下のとおりである:
- RLAHの適用期限を**2032年6月30日**まで延長
- 卸売ローミング上限価格の段階的な引き下げ
- 品質保証の追加(同等ネットワーク利用時に国内同等の速度・品質を保証)
- 緊急サービスへのアクセス改善
規制の主な受益者は、EU/EEAに加盟する国のキャリアと契約している加入者である。
---
## 2. RLAHの対象国・対象外の国
### 対象国(32カ国)
RLAHが適用されるのは以下の32カ国である。
**EU加盟27カ国:**
オーストリア、ベルギー、ブルガリア、クロアチア、キプロス、チェコ、デンマーク、エストニア、フィンランド、フランス、ドイツ、ギリシャ、ハンガリー、アイルランド、イタリア、ラトビア、リトアニア、ルクセンブルク、マルタ、オランダ、ポーランド、ポルトガル、ルーマニア、スロバキア、スロベニア、スペイン、スウェーデン
**EEA非EU加盟3カ国:**
アイスランド、ノルウェー、リヒテンシュタイン
**2026年1月1日より追加(EU Council 2025年7月25日採択):**
ウクライナ、モルドバ
ウクライナとモルドバは、EU/EEA非加盟国としては初めてRLAHエリアに統合された国となる。EU Councilが2025年7月25日に採択した決定により、2026年1月1日から正式に加入している([EU Council プレスリリース](https://www.consilium.europa.eu/en/press/press-releases/2025/07/25/eu-mobile-roaming-benefits-extended-to-moldova-and-ukraine-as-of-2026/))。
これらの国のいずれかのキャリアと契約していれば、残り31カ国を旅行・移動する際に自国と同じ料金水準でサービスが利用できる(公正利用ポリシーの範囲内で)。
### 対象外の国(注意が必要)
以下の国・地域はEU/EEAに属していないため、RLAH規制の対象外となる:
| 国・地域 | 理由 |
|---------|------|
| **スイス** | EEA非加盟(1992年国民投票で否決)。独自の通信規制を持つ |
| **英国** | EU脱退(Brexit)。2020年以降はEU/EEAに属さない |
| **モナコ** | EU加盟国でない(フランスと特別協定) |
| **バチカン市国** | EU加盟国でない |
| **アンドラ** | EU/EEAに属さない |
| **サンマリノ** | EU/EEAに属さない |
スイスはEEA非加盟のため、EU/EEAのキャリアSIMを持ちフランスやイタリアでRLAHを活用できている人でも、スイスに入国した時点でローミング追加料金が発生する可能性がある。欧州旅行でスイスを含む旅程を組む際には特に注意が必要だ。
英国については、Brexit以前(2020年末まで)は英国もRLAHの恩恵を受けていたが、現在は英国のキャリアがそれぞれ独自のEUローミングポリシーを定めている。英国キャリアSIMでEU圏内を旅行する場合は各キャリアの最新ポリシーを確認する必要がある。
---
## 3. RLAHが適用される契約
RLAHはすべてのモバイルサービス利用者を対象とするわけではない。以下の条件を満たす契約に適用される。
### 適用の前提条件
1. **EU/EEAに属するキャリアとの契約**:EU/EEAの通信事業者(MNOまたはMVNO)と契約していること
2. **自国(ホーム国)での定常的な利用**:RLAH規制は「自国に住み、そこを中心に生活している人がEU/EEA圏内を旅行する」ことを前提としている
### MVNOにも適用される
EU/EEAの規制は大手キャリア(MNO)だけでなく、仮想移動体通信事業者(MVNO)にも適用される。EU/EEA域内のMVNOと契約している場合も、RLAH規制の対象となる。MNOとMVNOの違いについては[国内SIM・MVNO関連のガイド](/ja/guides/glossary-index/)で確認できる。
### プリペイドSIMにも適用される
ポストペイド(月額契約)だけでなく、プリペイドSIMにも原則としてRLAHが適用される。ただしプリペイドSIMの場合、残高の扱いや速度制限のポリシーはキャリアにより異なる。
### 対象外の契約
- **日本のキャリアSIM**:日本の通信事業者(NTTドコモ・KDDI/au・ソフトバンク・楽天モバイルなど)との契約はEU法の適用対象外
- **スイス・英国・その他EEA非加盟国のキャリアSIM**:前述のとおり適用外
- **旅行eSIM(多くの場合)**:EU向けに特化した旅行eSIMプロバイダーは、RLAH規制上の「ホームキャリア」とは異なる立場にある場合が多い
---
## 4. 4ヶ月ルールと公正利用ポリシー
RLAHは無条件に適用されるわけではなく、正当な利用(genuine roaming)を前提として設計されている。
### 4ヶ月ルール(定住判定)
EU/EEAのキャリアは、加入者が以下の状況にあると判断した場合に対応できる:
- **継続的に4ヶ月以上**、自国以外のEU/EEA国に滞在している
- かつ訪問国での通信量がホーム国での通信量を継続的に上回っている(または契約の主たる利用場所が訪問国になっている)
この場合、キャリアは加入者に対して追加料金の請求や、ローミング利用に関する通知・同意取得の手続きを行うことができる。ただし一方的に追加料金を課すためには事前の通知と合理的な猶予期間が必要であり、プロセスはEUの規制ガイドラインに従う必要がある。
**注意点**: 4ヶ月は「継続した滞在」の目安であり、合計日数ではない。短期出張・観光の繰り返しでは通常この規定は適用されない。
### 公正利用ポリシー(FUP)とデータ通信量上限
RLAH適用中のデータ通信量には、公正利用ポリシー(Fair Use Policy)に基づく上限が設けられる場合がある。この上限は以下の計算式で算出される:
**基本的な考え方:**
- ホームプランの月額料金(税抜)を、EUが定める卸売ローミング上限単価(1GB当たりの上限)で除した値が「追加料金なしで提供できるローミングデータ量の下限」となる
- 具体的な上限はホームプランの価格水準と卸売単価に依存するため、プランごとに異なる
**実務上の影響:**
- 安価なプランほど公正利用ポリシー上限が低くなる傾向がある
- 上限を超えた場合、キャリアは卸売上限価格を上回らない範囲で追加料金を請求できる
- 上限超過前に利用者への通知が義務付けられている
EU 2022/612の施行後、卸売上限価格は段階的に引き下げられており、利用者が受け取れるローミングデータ量は経年的に増加する傾向にある。
---
## 5. 日本人渡航者にRLAHは関係するか
これが多くの日本人読者にとって最も重要なポイントである。**結論として、日本のキャリアSIMを使って欧州を旅行する日本人は、RLAHの直接的な対象外となる。**
### なぜ対象外なのか
RLAHはEU法であり、EU/EEAの通信事業者に対する規制である。日本の通信事業者(NTTドコモ・KDDI/au・ソフトバンク・楽天モバイル・各MVNO)はEU法の管轄外にあるため、これらの事業者との契約に基づいてEU/EEA圏内でローミングしても、RLAH規制の恩恵は受けられない。
日本のSIMでEU圏内をローミングする場合に適用されるのは、日本の各キャリアが独自に設定した国際ローミング料金体系である。これは一般的に以下の3種類がある(詳しくは[国際ローミングの仕組みと料金](/ja/guides/international-roaming/)を参照):
- 従量課金型
- 定額パック型
- プラン内包型(楽天モバイルの月2GB無料枠など)
### 例外的に恩恵を受けられるケース
以下のケースでは、日本人であってもRLAHの恩恵を間接的または実質的に享受できる:
1. **EU/EEAのキャリアSIMを別途保有している場合**:例えばドイツに留学中でドイツのキャリアSIMを持っている場合は、そのSIMでEU/EEA圏内を旅行する際にRLAHが適用される
2. **EU/EEAのキャリアが発行する旅行者向けSIM・eSIM**:EU域内をカバーするプランとしてEU域内のキャリアが提供するものの一部はRLAH対象となることがある(ただし旅行eSIMプロバイダーの多くはRLAHの枠組みとは別の商業モデルで運営している)
---
## 6. EU内で使える旅行eSIM・ローミングの選択肢
日本人がEUを旅行する際の実用的な通信手段として、以下の選択肢が現実的である。
### 選択肢①:日本キャリアの国際ローミング
最も手軽だが費用は相対的に高くなりやすい。日本の電話番号を維持しながらEU各国を移動できる点が利点だ。EU複数国を短期間で周遊する場合でも、ローミング先の各国で個別に設定を変える必要がない。
ただし長期滞在・大容量通信の場合はコストが積み上がりやすい。渡航前に[渡航前のスマホ準備チェックリスト](/ja/guides/pre-trip-checklist/)も確認しておくとよい。
### 選択肢②:EU複数国対応の旅行eSIM
Airalo・Holafly・Saily・Nomadなどの旅行eSIMプロバイダーが「ヨーロッパ周遊」型のプランを提供している。1枚のeSIMで複数のEU/EEA加盟国をカバーするプランが多く、日本のSIMはそのまま維持しながらeSIMでデータ通信を行うデュアルSIM運用が可能である。
**特徴:**
- EU加盟国を周遊する旅程に対応しやすい
- プロバイダーによって対応国数・速度・データ量が異なる
- RLAH規制上の「ホームキャリア」ではないが、複数国対応のため旅行用途に適している
旅行eSIMの購入・設定手順は[初めての旅行eSIM完全ガイド](/ja/guides/first-time-guide/)で解説している。
### 選択肢③:訪問国ごとの旅行eSIM
特定の1カ国のみを訪問する場合は、その国専用のeSIMが最も割安になることが多い。フランスやドイツなどの主要国は専用eSIMプランの選択肢が豊富である。
### 選択肢④:現地SIM
長期滞在の場合は訪問国で現地SIMを購入する選択肢もある。EU域内の現地SIMを取得すれば、取得国の契約としてRLAH規制の対象となり、他のEU/EEA国への移動でも追加料金なしで使える可能性がある。ただし現地でのSIM登録には身分証明書(パスポート)の提示が必要な国が多い。
EU圏の旅行eSIM・ローミングプランの料金比較は[SimFinderの旅行eSIM検索](/ja/travel/)で確認できる。
---
## 7. EU圏外(スイス・英国等)での扱い
### スイス
前述のとおり、スイスはEEAに属していないためRLAH規制の対象外である。スイスはフランス・ドイツ・イタリア・オーストリア・リヒテンシュタインに囲まれており、欧州旅行でスイスを経由・滞在するケースは少なくない。
- EU/EEAのキャリアSIMでスイスに入国した場合は、通常のローミング料金が適用される
- スイス独自の通信規制(2021年改正電気通信法)は存在するが、EU RLAHとは別の枠組みである
- リヒテンシュタインはEEA加盟国であり対象国に含まれる点に注意(スイスとは異なる)
### 英国
Brexit(EU離脱)により、英国は2020年12月31日以降にEU/EEAの管轄から外れている。英国在住者がEU圏内を旅行する際や、EU/EEAのキャリアSIM保有者が英国でローミングする際はRLAHが適用されない。
英国の各キャリア(EE・Vodafone・O2・Three等)は独自のEUローミングポリシーを持っており、無料でEU内ローミングを提供しているキャリアもあれば、追加料金を設けているキャリアもある。英国SIMを保有する場合は各キャリアのWebサイトで最新のポリシーを確認する必要がある。
### その他の欧州諸国
トルコ・北マケドニア・セルビア・アルバニアなどの欧州の国々は、EU/EEAに加盟していないためRLAHの対象外である。これらの国を訪問する場合も、日本のSIMと同様に個別の国際ローミング料金または旅行eSIMを利用することになる。
---
## 8. EU内データ通信量上限の計算式
EU 2022/612が定める公正利用ポリシー(FUP)上のデータ通信量上限は、以下の仕組みで算出される。
### 基本算式
Commission Implementing Regulation 2016/2286 Annex I が定める正式な算式は以下のとおりである:
```
IDV(追加料金なしのローミングデータ量下限、GB)
≥ 2 × (ホームプランの月額料金(税抜、ユーロ)÷ 卸売ローミング上限単価(ユーロ/GB))
```
**重要:** 実際の保障量は「月額料金 ÷ 卸売単価」の計算値の **2倍以上が下限**となる(Commission Implementing Regulation 2016/2286 Annex I: IDV ≥ 2 × (税抜料金 ÷ 卸売単価))。単純な除算ではなく、この2倍係数が適用される点に注意が必要だ。
卸売ローミング上限単価はEU規則により定められており、EU 2022/612施行以降は段階的に引き下げられている。
### 計算例(概念的な説明)
- ホームプランが月額10ユーロ・卸売単価が1.30ユーロ/GB(2025年時点)と仮定すると、追加料金なしで提供すべきローミングデータは少なくとも約15.4GB(= 2 × 10 ÷ 1.30)
- ホームプランが月額5ユーロ(安価なプラン)の場合は約7.7GBとなる
- すなわち**安いプランほどFUP上限が低くなる傾向**があるが、卸売単価の引き下げにより年々保障量は増加する
### 上限を超えた場合
FUP上限を超えてもデータ通信が即座に遮断されるわけではない。超過分については、EUが定める卸売上限単価を上回らない範囲でキャリアが追加料金を請求できる。ただし超過前に利用者への通知が義務付けられている(上限の80%・100%に達した時点での通知が一般的な業界慣行)。
### 音声・SMSへの適用
データ通信量以外に、音声通話の分・SMSの件数についてもFUP上の制限が設けられる場合があるが、大半のプランでは実用的な範囲内では制限に達しにくい水準に設定されている。
---
## 9. 5G/4Gの取扱い
EU 2022/612では、ローミング中の通信品質についても規定が強化された。
### 品質保証の義務化
EU 2022/612施行後、EU/EEAのキャリアは**同等ネットワーク利用時に国内と同等の速度・品質を保証する義務**を負う。これは「ローミング時は意図的に通信速度を低下させてはならない」ことを意味する。
具体的には:
- 訪問先国に4Gネットワークが存在し、かつホームプランが4G対応の場合、ローミング中でも4G速度が保証される
- 5Gネットワークが訪問先で利用可能であれば、ホームプランの5G対応状況に応じて5G速度の保証も適用されうる
- ただし訪問先ネットワークの物理的なカバレッジ外であれば、これらの保証は適用されない
### 旅行eSIMの場合
RLAH規制外の旅行eSIMを使う場合、この品質保証義務は直接適用されない。旅行eSIMのプロバイダーが各訪問国でどのネットワークを使用し、どの通信速度を提供するかはプロバイダーごとの契約・仕様による。購入前にプロバイダーのWebサイトで各国のカバレッジ・対応ネットワーク(4G/5G)を確認することを推奨する。
---
## FAQ
**Q. EUのキャリアSIMを持っている場合、EU域内を移動するたびに設定変更が必要ですか?**
通常は必要ありません。RLAH規制により、EU/EEA域内では自動的にローミングされ、ホームと同じ料金水準が適用されます。ただし端末側でローミングが有効化されていることを確認してください。
**Q. EU留学中の日本人はRLAHを活用できますか?**
留学中にEU/EEAのキャリアSIMを契約すれば、そのSIMについてはRLAH規制が適用されます。日本のSIMについては引き続きRLAHの対象外です。4ヶ月以上在住する場合は「定住者」とみなされ、RLAH規制の適用方法がホームキャリアの判断に依存する場合があります。
**Q. EU圏内での緊急電話はローミング中でも無料ですか?**
はい。EU 2022/612において、EU/EEAのキャリア加入者は圏内のどの国でも「112」などの欧州統一緊急番号への発信が無料で保障されています。日本のキャリアSIMを使う場合も、現地の緊急サービス(119や110に相当する番号)にはローミング中であっても通常接続できますが、料金発生の有無はキャリアによって異なります。
**Q. RLAHはSMSにも適用されますか?**
はい。EU/EEAのキャリアSIMを持つ加入者のEU/EEA域内ローミング中のSMS送受信にもRLAHが適用されます。国際SMS(EU/EEA域外への送信)はRLAHの対象外となります。
**Q. リヒテンシュタインはEUのRLAHに含まれますか?**
はい。リヒテンシュタインはEEA加盟国であり、RLAH対象の32カ国に含まれます。隣国スイスはEEA非加盟のため対象外である点と混同しないよう注意が必要です。
---
## まとめ / 関連ガイド
RLAH(Roam Like at Home)規制は、EU/EEAの加入者がEU/EEA圏内をローミングする際の追加料金を原則禁止する制度であり、2017年6月15日施行・EU 2022/612により2032年6月30日まで延長されている。対象は**32カ国**(EU27カ国 + アイスランド・ノルウェー・リヒテンシュタイン + 2026年1月1日よりウクライナ・モルドバ)であり、スイス・英国・モナコ・バチカンは対象外だ。
日本人渡航者にとっての実務上のポイントは以下のとおりである:
1. **日本のキャリアSIMはRLAHの対象外**——国際ローミング料金または旅行eSIMで対応する
2. **スイスを含む旅程では注意**——EU/EEAのキャリアSIMでもスイスは対象外
3. **EU向け旅行eSIMが最も手軽な代替手段**——複数国対応プランが豊富
4. **EU滞在が4ヶ月を超える場合**——定住判定の可能性を把握しておく
**関連ガイド:**
- [海外でスマホを使う4つの方法](/ja/guides/four-options/) — 国際ローミング・現地SIM・旅行eSIM・ポケットWi-Fiの比較
- [国際ローミングの仕組みと料金](/ja/guides/international-roaming/) — ローミングの技術的仕組みと料金モデル
- [初めての旅行eSIM完全ガイド](/ja/guides/first-time-guide/) — EU向け旅行eSIMの購入から設定まで
- [渡航前のスマホ準備チェックリスト](/ja/guides/pre-trip-checklist/) — 欧州旅行前の確認事項
- [SIM・モバイル通信用語集](/ja/guides/glossary-index/) — RLAH・EEA・ローミング関連用語の定義
================================================================================
# 海外移住時の通信戦略ガイド
URL: https://sim-finder.com/ja/guides/expat-strategy/
Type: guides (ja)
Published: 2026-06-06
海外移住時の通信戦略は、①日本の電話番号をどうするか、②渡航直後の通信確保、③現地での恒久回線の開設、の3段階で考えると整理しやすい。旅行と異なり「長期にわたって現地を拠点とする」という前提が通信の選び方に大きく影響する。
この記事では、海外への長期移住を具体的に検討・準備している人を対象に、上記3段階それぞれで何を判断し、どう行動するかを体系的に解説する。移住先の地域によって状況が変わる部分は地域別に整理する。
---
## なぜ移住時の通信戦略は旅行と異なるのか
旅行であれば、日本のキャリアの国際ローミングや短期のトラベルeSIMで大半のケースが解決できる。しかし長期移住となると、状況が変わる。
- **日本の番号の扱いが問題になる**: 使い続けるには月額コストがかかり、解約すると銀行・行政手続きが困難になるリスクがある
- **現地キャリアとの本格契約が現実的な選択肢になる**: 長期滞在では現地の月額プランのほうがコスト面で有利になることが多い
- **渡航直後の「つなぎ」の通信が必要になる**: 現地SIM契約が整うまでの数日〜数週間をどう乗り越えるかを考えなければならない
- **通信環境の整備が生活インフラの一部になる**: 仕事・住居・銀行口座の開設など、移住後の各種手続きにスマートフォンが不可欠なため、通信の途絶が直接的なリスクになる
この3段階の問題を順番に解決していくことが、移住時の通信戦略の基本的な考え方だ。
---
## 第1段階:日本の電話番号をどうするか
移住前に最初に検討すべきなのが、日本で使っている電話番号の扱いだ。選択肢は大きく「維持する」と「解約する」の2つに分かれる。
### 番号を維持すべきケース
以下のいずれかに該当する場合は、番号を維持することを強く推奨する。
**日本の銀行・証券口座のSMS認証に使っている**
日本の金融機関の多くは、本人確認にSMS認証を使用している。日本の電話番号に紐づいたSMS認証が必要な口座を持っている場合、番号を解約すると将来的にログイン・手続きが困難になることがある。
**日本の行政手続きがまだ残っている**
確定申告・マイナンバー関連・社会保険の脱退手続きなど、移住後も日本の行政機関と連絡が必要なケースでは、日本の電話番号があると手続きがスムーズになる。
**帰国予定がある**
数年後に日本に戻る予定がある場合、番号を維持しておくほうが再契約の手間を省けることがある。
**日本の知人・取引先との連絡に必要**
仕事や個人的な連絡で日本の番号が必要な状況が継続する場合も、維持の理由になる。
### 番号維持の手段
番号を維持するための主な手段は4つある。詳しくは[電話番号の維持・保管方法](/ja/guides/number-storage/)で解説しているため、ここでは概要を整理する。
**1. 大手キャリアの番号保管サービス(休止)**
NTTドコモ・au(KDDI)・ソフトバンクが提供する、回線を休止状態にしながら番号だけを保持するサービスだ。通話・SMS・データ通信は使えなくなるが、番号は維持される。保管料が月額で発生し、最大保管期間が設定されている点に注意が必要だ。楽天モバイルはこのサービスを提供していない。
**2. 最安プランへの変更**
解約せずに最小容量・最低価格のプランへ変更することで、番号を維持しながらコストを抑える方法だ。通話・SMS・最低限のデータ通信が維持されるため、SMS認証を使う必要が生じた際にも対応できる。
**3. povo2.0(KDDI)を使った低コスト維持**
povo2.0は基本料0円のプランだが、180日以内にトッピング購入(最低限の費用が発生)または一定額以上の通話・SMS利用がなければ契約が継続されない点に注意が必要だ。完全0円での維持は実質困難であり、定期的なトッピング購入コストを織り込んだ上でコスト比較を行うことを推奨する。それでも大手キャリアの通常プランと比べてコストを抑えられるため、低コスト維持の選択肢の一つになる。
**4. MNPで格安SIMへ乗り換えてeSIM維持**
MNP(番号ポータビリティ)を使って格安SIM(MVNO)に移行し、eSIMで維持する方法もある。デュアルSIM端末であれば、現地のSIMと日本のeSIMを同時に保持できる。
### 解約してよいケース
以下のすべてに該当する場合は、解約を選んでも大きな支障が生じにくい。
- 日本の金融機関・行政機関に日本の電話番号が登録されていない(または登録変更済み)
- 帰国予定がない、または帰国後に新規契約する予定
- 日本の番号への着信が必要な業務・人間関係がない
ただし、移住後に「やはり番号が必要だった」と気づいても、一度解約した番号は元に戻せない。判断が不確かな場合は、初年度は維持コストを支払って様子を見ることを推奨する。
---
## 第2段階:渡航直後の通信確保
現地の恒久回線(現地キャリアとの月額契約)が整うまでの間、通信手段を確保しておく必要がある。この「つなぎ」の期間は、現地の状況によって数日から数週間になることがある。
### トラベルeSIMが最も手軽
渡航直後の通信確保として最も準備しやすいのが、出発前に日本から購入できるトラベルeSIMだ。
トラベルeSIMの主なメリットは以下の通り。
- 日本にいるうちに購入・設定を完了させられる
- 現地到着後すぐにデータ通信を開始できる
- 現地でのSIM購入手続き(窓口での書類提出・言語の壁)を省略できる
- 現地SIMとデュアルSIM構成にすることで、日本の番号も維持できる
旅行eSIMの選び方・購入方法については[初めての旅行eSIM完全ガイド](/ja/guides/first-time-guide/)で詳しく解説している。
### 国際ローミングをつなぎとして使う場合
日本のキャリアの国際ローミングを使う方法もある。ただし、国際ローミングのコスト構造は「短期利用向け」に設計されており、長期移住の文脈では数週間継続すると費用が積み上がりやすい。つなぎ期間が明確に数日以内に収まる見込みがある場合や、楽天モバイルのRakuten最強プランのように月2GB無料の海外データ枠があるケースを除き、コスト管理に注意が必要だ。国際ローミングの仕組みと料金の詳細は[国際ローミングの仕組みと料金](/ja/guides/international-roaming/)で解説している。
### 空港SIMという選択肢
渡航先によっては、空港到着ロビーでプリペイドSIMを購入できる場合がある。これもつなぎとして有効だが、窓口の混雑・言語・登録手続き(パスポート提示が必要な国が多い)などの手間を考えると、出発前にトラベルeSIMを準備しておくほうが確実なことが多い。
---
## 第3段階:現地での恒久回線の開設
移住先での生活が落ち着いたら、現地キャリアとの本格的な契約(ポストペイドまたはプリペイドの長期利用)に移行することが多い。
### なぜ現地回線が必要になるか
トラベルeSIMは渡航直後のつなぎには便利だが、長期移住において継続的に使い続けることが適切でない場合もある。
- 有効期間ごとに買い直す手間・コストが発生する
- 現地の通話番号が必要な場面(現地の銀行口座開設・医療機関の受診・就職・賃貸契約など)では、現地の電話番号が求められることがある
- 長期的なデータ通信コストとして、現地キャリアの月額プランのほうが割安になることが多い
現地キャリアとの契約方法・手続きの一般的な流れ・注意点については[現地キャリアとの契約ガイド](/ja/guides/local-contract/)で詳しく解説している。
### 現地契約に必要になる書類・条件の一般的な傾向
現地キャリアとの契約手続きは国によって大きく異なるが、一般的に以下が求められることが多い。
- **パスポートなどの政府発行の身分証明書**: ほぼすべての国で必要
- **現地の住所証明**: ポストペイド(後払い)契約では特に求められることが多い
- **在留資格・ビザの種類**: 就労ビザ・居住ビザなど、現地での長期滞在を証明する書類が必要な場合がある
- **現地の銀行口座**: ポストペイド契約では引き落とし口座として求められることがある
プリペイドプランはポストペイドよりも手続きが簡易なことが多く、移住初期に在留資格・住所証明が整っていない段階ではプリペイドから始めることが現実的な選択肢になる。
世界157カ国(GSMA 2021年調査)でSIM購入時に政府発行の身分証明書の提示が義務化されており、アジア・中南米・アフリカの多くの国がこれに含まれる。
---
## 移住先地域による通信事情の違い
どの地域に移住するかによって、通信環境の整備しやすさは大きく変わる。地域別の詳細は[地域別の海外通信事情ガイド](/ja/guides/regional-overview/)に整理しているが、移住の観点から重要なポイントを以下にまとめる。
### EU/EEA諸国への移住
EU/EEA内でのローミングはRLAH(Roam Like At Home)規制(2017年6月施行、EU 2022/612により2032年まで延長)により、加盟国間の小売追加料金が原則禁止されている。これは「EU加盟国の現地SIM1枚で、EU内の他の国でも追加ローミング料金なく利用できる」ことを意味する。
例えばドイツに移住して現地のSIMを契約した場合、EU内の他の加盟国を旅行・出張する際もそのSIMをそのまま使える(利用上限等は各プランの条件による)。ただしスイスはEEA非加盟のため、この規制の対象外となる。
EU移住においては、現地のeSIM対応が整っている場合は日本のeSIMとデュアルSIM構成にすることで、日本の電話番号も維持しやすい環境にある。
### アジア諸国への移住
日本・韓国・シンガポール・香港・台湾などは通信インフラが高度に整備されており、eSIM対応も進んでいる。一方、東南アジア・南アジアでは国ごとの差が大きい。
SIM登録義務についてはアジアの多くの国で本人確認が義務付けられており、渡航先によっては現地特有の手続きが必要な場合がある。タイでは2025年8月以降、全SIM登録に生体認証(ライブネス検知)が義務化され、外国人は1プロバイダーあたり最大3枚までの制限が設けられている。
### 北米(米国・カナダ)への移住
米国は大手3キャリア(Verizon・AT&T・T-Mobile)いずれもeSIMに対応している。米国では連邦法・州法としてのSIM購入時の身分証明義務は設けられておらず、現地プリペイドSIMの入手は比較的容易だ。ただし規制当局が要件を検討する動きもあり、今後変更される可能性がある。長期移住においてはポストペイドの月額プランが一般的な選択肢になる。
### 中南米・アフリカへの移住
中南米・アフリカでは国ごとの差が大きく、eSIM対応が限定的な国もある。SIM登録義務がある国が多く、現地の書類準備に時間がかかる場合もある。移住先が都市部か農村部かによっても通信環境が大きく変わるため、事前のリサーチが特に重要だ。
---
## 移住フェーズ別の通信チェックリスト
移住準備から現地定着まで、フェーズ別に確認すべき事項を整理する。
### 出発前(日本にいる間に完了させること)
- [ ] 日本の電話番号の維持・解約を判断し、手続きを完了させる
- [ ] 維持する場合は番号保管・プラン変更・MNP乗り換えのいずれかを実行する
- [ ] 渡航直後のつなぎ用トラベルeSIMを購入し、端末への設定を完了させる
- [ ] 移住先のSIM登録に必要な書類(パスポート等)を確認する
- [ ] 端末がSIMフリー(またはキャリアロック解除済み)であることを確認する
端末のSIMフリー確認・キャリアロック解除の方法については[SIMロックの確認と解除](/ja/guides/sim-lock/)も参照してほしい。
### 渡航直後(現地に到着後、数日以内)
- [ ] トラベルeSIMのデータ通信が正常に動作することを確認する
- [ ] 現地キャリアのショップ・オンラインでプリペイドSIMを取得する(ポストペイド契約の準備が整う前の措置として)
- [ ] 日本の番号でのSMS受信が必要な手続きが残っている場合、完了させる
### 現地定着後(住所・在留資格が整った後)
- [ ] 現地キャリアのポストペイドプランへの切り替えを検討する
- [ ] 現地の電話番号が必要な手続き(銀行口座・医療機関登録等)を進める
- [ ] 日本のeSIM回線のコストと利用頻度を見直し、維持継続か解約かを再判断する
---
## 日本のデジタルノマドとの違い
海外移住とデジタルノマド(国を転々としながらリモートワークする働き方)は、通信戦略の考え方が一部異なる。
デジタルノマドは複数の国を短中期で移動するため、汎用性の高いグローバルトラベルeSIMやローミング対応プランを中心に据えることが多い。一方、海外移住は特定の国に腰を据えることが前提のため、現地キャリアとの本格契約が合理的な選択になりやすい。
どちらの生活スタイルが自分に当てはまるかが通信戦略の分岐点になる。ノマド的な働き方と移住を組み合わせているケースや、移住先から頻繁に他国へ出張するケースでは、[デジタルノマドの通信戦略ガイド](/ja/guides/digital-nomad/)で整理している考え方が参考になる。
---
## FAQ
**Q. 海外移住後も日本の電話番号を維持する必要がありますか?**
必ずしも全員に必要ではありません。ただし日本の銀行・証券口座・行政手続きのSMS認証が日本の電話番号に紐づいている場合、番号を手放すと各種手続きが著しく困難になることがあります。帰国予定がある場合も、番号を維持しておくほうがスムーズです。維持コストと実際の利用頻度を比較した上で判断してください。
**Q. 渡航直後、現地のSIMを契約するまでの間はどうやって通信を確保しますか?**
出発前に購入しておいた渡航先対応のトラベルeSIMが最も手軽です。日本のキャリアの国際ローミングを使う方法もありますが、長期滞在にはコストが積み上がりやすいため、現地の恒久回線が確保できるまでのつなぎとして割り切って使うことを推奨します。
**Q. 現地キャリアとの契約には何が必要ですか?**
パスポートなどの身分証明書は基本的に必要です。国によっては現地の住所証明・在留資格を示す書類・現地の銀行口座が求められる場合もあります。要件は国ごとに異なるため、移住先のキャリア公式サイトか現地の情報を事前に確認してください。詳しくは[現地キャリアとの契約ガイド](/ja/guides/local-contract/)を参照してください。
**Q. povo2.0で日本の番号を安く維持できますか?**
povo2.0(KDDI)は基本料0円ですが、180日以内にトッピング購入(最低限の費用が発生)または一定額以上の通話・SMS利用がなければ契約が継続されません。完全0円での維持は実質困難であり、定期的なトッピング購入コストを見込んでおく必要があります。それでも大手キャリアの通常プランと比べてコストを抑えられるため、低コスト維持の選択肢の一つです。
**Q. 移住先地域によって通信戦略は変わりますか?**
変わります。EU/EEA諸国ではRLAH規制により域内ローミングが実質無料になるため、現地SIM1枚で複数国をカバーできます。アジアや中南米では国ごとのSIM登録義務・eSIM普及状況の差が大きいため、個別確認が必要です。地域別の詳細は[地域別の海外通信事情ガイド](/ja/guides/regional-overview/)を参照してください。
---
## 関連ガイド
- [電話番号の維持・保管方法](/ja/guides/number-storage/) — 番号保管・MNP格安SIM維持・povo2.0を使った低コスト維持の選択肢と注意点
- [現地キャリアとの契約ガイド](/ja/guides/local-contract/) — 各国の契約手続き・必要書類・注意点
- [国際ローミングの仕組みと料金](/ja/guides/international-roaming/) — キャリアSIMをそのまま使う方法と費用
- [地域別の海外通信事情ガイド](/ja/guides/regional-overview/) — 6地域の通信インフラ・SIM登録義務・eSIM普及状況
- [デジタルノマドの通信戦略ガイド](/ja/guides/digital-nomad/) — 複数国を移動しながらリモートワークする場合の通信設計
================================================================================
# 家族プラン・学割の選び方
URL: https://sim-finder.com/ja/guides/family-plans/
Type: guides (ja)
Published: 2026-06-06
家族向けSIMプランを選ぶ際の結論は一つだ——家族全員のキャリアを揃えてMNO家族割を受けるか、MNOより安いMVNOを各自で契約するかの二択になる。どちらが有利かは家族の人数・通話の頻度・データ使用量によって変わる。この記事では、日本の家族向け割引の4類型(家族割・データシェア・学割・みまもり/キッズ向けプラン)の仕組みと注意点を整理する。
具体的なプランの料金・容量は随時変更されるため、[SimFinderの国内SIM検索](/ja/jp/)で最新のプランを比較してほしい。
---
## 家族向け割引の4類型
日本のキャリアが提供する家族向けの制度は、大きく4つに分類できる。
| 類型 | 概要 | 主な提供元 |
|------|------|----------|
| 家族割 | 複数回線の月額料金を割引する | 大手MNO |
| データシェア | 契約したデータ容量を家族で分け合う | 一部MNO・サブブランド |
| 学割 | 学生向けの期間限定割引 | 大手MNO |
| みまもり/キッズ向けプラン | 子供・高齢者向けの安全機能付きプラン | 大手MNO |
それぞれの仕組みと選ぶ際の判断軸を以下で解説する。
---
## 家族割 — 複数回線をまとめることで月額が下がる仕組み
### 家族割とは何か
家族割(ファミリー割引)とは、同一キャリアに複数の回線を契約した場合に、回線ごとの月額料金を割引する制度だ。大手4キャリア(NTTドコモ・au・ソフトバンク・楽天モバイル)がそれぞれ独自の名称と条件で提供している。
「家族の回線数が増えるほど1回線あたりの割引が大きくなる」「3回線以上で最大割引率が適用される」といった段階制を採用しているキャリアが多い。
### 家族割の主な特徴
**複数回線割引(月額割引)**
対象回線数に応じて、1回線あたりの月額料金が割引される。2回線・3回線・4回線以上といった段階で割引額が変わる構成が一般的だ。
**家族間通話無料**
同一キャリアの家族間通話が無料になる特典が付くプランがある。ただしすべての家族割プランに含まれるわけではなく、別途通話オプションの加入が必要なケースもある。通話頻度が高い家族構成では、通話プランとの組み合わせ方が重要になる。通話オプションの詳細は[通話プランの選び方](/ja/guides/call-plans/)で整理している。
### 家族割の適用条件と注意点
**対象回線の定義**
家族割の対象になるには、「同一キャリアの回線であること」が大前提だ。家族の中に別キャリアのユーザーがいると、その回線は割引対象に含まれない。
「家族」の定義はキャリアによって異なる。「同一姓」「同一住所」「家族として登録手続きを行った者」など、条件の設け方が各社で違う。内縁関係・婚姻届未提出のパートナー・同姓パートナーが対象になるかどうかも、キャリアのプランごとに確認が必要だ。
**申込手続き**
家族割の申し込みは、各キャリアのオンラインマイページまたは店舗で行う。新規回線の追加と同時に申し込む場合と、既存回線に後から家族グループとして登録する場合の2パターンがある。手続きに必要な書類(本人確認書類・家族関係を確認する書類等)は各社の申し込みページで確認すること。
**割引が適用されるプランの制限**
家族割の割引対象になるプランは限定されている場合がある。「オンライン専用プランは家族割対象外」「特定の旧プランには適用されない」といったケースが存在する。現在の契約プランが家族割対象かどうかを、申し込み前にマイページまたは問い合わせで確認することが重要だ。
契約条件の読み方と確認手順は[契約条件の見方](/ja/guides/contract-terms/)にまとめている。
---
## データシェア — 家族で容量をまとめて管理する
### データシェアとは何か
データシェアは、親回線が契約したデータ容量のプールを、複数の子回線で分け合う仕組みだ。たとえば親回線が大容量プランを契約し、その容量枠から家族の各端末が通信量を消費するイメージになる。
### データシェアのメリットとデメリット
**メリット**
- 家族全体のデータ使用量をまとめて管理できる
- 余った容量を家族間で融通できる
- 全員が少量プランを個別契約するより合計コストが下がる場合がある
**デメリット**
- 特定のメンバーが大量消費すると他の家族のデータ残量が影響を受ける
- データシェアに対応しているプランが限られる
- 親回線と子回線の契約構造が複雑になりやすい
### データシェアの提供状況
データシェアは大手MNOおよび一部サブブランドが提供しているが、プラン体系の変更・廃止が行われることも多い制度だ。提供条件・月額料金・シェア可能な回線数は随時変わるため、[SimFinderの国内SIM検索](/ja/jp/)で現在の対応プランを確認することを勧める。
MVNOはデータシェアをほとんど提供していない。複数回線でデータシェアを活用したい場合は、MNOまたはサブブランドを選ぶ必要がある。MNOとMVNOの構造的な違いは[MNO vs MVNO vs サブブランドの比較記事](/ja/guides/mno-vs-mvno-comparison/)で解説している。
---
## 学割 — 学生向けの期間限定割引
### 学割の仕組み
学割は、学生(主に中学生・高校生・大学生・専門学校生)を対象とした期間限定の割引制度だ。大手MNOが毎年一定の期間(主に1月〜4月の新学期前後)に集中的にキャンペーンを実施する。
学割の割引内容はキャリア・年度によって異なるが、以下のような形式が一般的だ。
- 月額基本料の一定期間の月額割引
- データ量の増量(追加費用なしで通常より多い容量が付与される)
- セット割引(端末購入や特定オプションとのセット条件)
### 学割の申し込み時に確認すべきこと
**在学証明書類の種類**
多くのキャリアでは申し込み時に在学証明書・学生証・合格通知書などの提出が必要だ。受け付ける書類の種類はキャリアごとに異なる。入学予定の場合は「合格通知書」で申し込めるキャリアと、入学後の証明書のみ受け付けるキャリアがある。
**割引の適用期間**
学割の割引期間はキャリア・プランによって異なり、「申込から一定期間」のような期間固定型と、「○歳まで」のような年齢到達型がある。期間終了後は通常料金に移行する。移行が自動で行われるか、手続きが必要かを事前に確認すること。
**家族割との併用**
学割と家族割を同時に適用できるかどうかは、プランによって異なる。在学中の子供の回線に学割を適用しつつ、家族割も受けられる場合と、いずれか一方しか選べない場合がある。申し込み前に両方の適用可否を確認するのが重要だ。
**学割終了後のプラン見直し**
学割が終了した後は、契約内容を見直すタイミングになる。継続するか、MNOのままプランを変えるか、MVNOに乗り換えるかを改めて検討する機会だ。乗り換えを検討する場合の準備は[プリペイド vs ポストペイドの違い](/ja/guides/prepaid-vs-postpaid/)や[契約条件の見方](/ja/guides/contract-terms/)も参考にしてほしい。
---
## みまもり・キッズ向けプラン — 子供・高齢者向けの安全機能
### みまもりプランの概要
大手MNOは、子供や高齢者向けに以下のような機能を含む専用プランやオプションを提供している。
- **位置情報共有**: 端末の現在地を親・家族が確認できる機能
- **フィルタリング**: 有害サイト・不適切コンテンツへのアクセスを制限する機能
- **利用制限**: 通話・データ通信の使用可能時間帯・利用上限の設定
- **緊急呼び出し**: 特定の操作(ボタン長押し等)で家族に通知を送る機能
### 青少年インターネット環境整備法とフィルタリング義務
日本では「青少年インターネット環境整備法」(青少年が安全に安心してインターネットを利用できる環境の整備等に関する法律)により、通信事業者は18歳未満のユーザーに対してフィルタリングサービスを提供することが求められている。
この法律に基づき、18歳未満の利用者がいる契約ではキャリアがフィルタリングの確認・案内を行う。フィルタリングを利用しない場合はその旨の意思確認手続きが必要になることがある。
### OSレベルのペアレンタルコントロールとの使い分け
キャリア提供のフィルタリング・みまもりサービスに加え、iOSの「スクリーンタイム」とAndroidの「Family Link(ファミリーリンク)」を活用することで、より細かい利用管理が可能だ。
| 管理の種類 | キャリアサービス | OSのペアレンタルコントロール |
|----------|---------------|--------------------------|
| フィルタリング | 対応 | 対応 |
| 位置情報 | 対応(GPS追跡) | 対応(Family Link等) |
| 利用時間制限 | キャリアにより対応 | 対応(スクリーンタイム等) |
| アプリの利用制限 | 限定的 | 詳細に設定可能 |
| 課金制限 | 一部対応 | 対応 |
iOSスクリーンタイムとAndroid Family Linkの具体的な設定方法は[子供のスマホ安全設定ガイド](/ja/guides/parental-control/)で詳しく解説している。
---
## MVNOでの家族利用 — 割引が薄い理由と選び方
### MVNOの家族割が限定的な構造的理由
MVNO(格安SIM事業者)は、大手MNOから通信回線を卸売購入してサービスを提供している。自社でネットワークインフラを持たないため、MNOのように「複数回線まとめ契約」という概念でのコスト削減が構造的に難しい。
その結果、MNOが提供するような複数回線間の月額割引(家族割)を実施しているMVNOは少数にとどまる。一部のMVNOが「複数回線割引」や「家族向けセット」を設けているが、MNO家族割の割引幅と比べると小さいケースが一般的だ。
### MVNO複数回線利用のメリット
MNO家族割の恩恵はないが、MVNOを家族で使う場合のメリットも存在する。
- MNO家族割の割引後の料金よりも、MVNOの通常月額の方が安い場合がある
- 家族全員を同じキャリアに統一するコスト・手続きが不要
- 各自が用途に合ったMVNOを選べる柔軟性がある
### MVNOを選ぶ際の判断軸
MNO家族割 vs MVNO個別契約の比較は、家族の人数と現在のキャリアの組み合わせによって答えが変わる。「MNO家族割の割引後の合計額」と「MVNO複数回線の合計額」を比較する際は[SimFinderの国内SIM検索](/ja/jp/)で条件を絞り込んで確認することを勧める。
MVNOを選ぶ際に理解しておくべき通信品質の違いは[MNO vs MVNO vs サブブランドの比較記事](/ja/guides/mno-vs-mvno-comparison/)で整理している。
---
## 家族プランを選ぶ際の判断フロー
以下の順序で確認すると、家族に合う選択肢が絞り込みやすくなる。
### ステップ1: 家族の回線数と現在のキャリアを確認する
家族全員のキャリアが既に同一であれば、家族割の申し込みを検討する優先度が高い。バラバラの場合は、まとめることによる割引と手続きコストを天秤にかける。
### ステップ2: 子供が含まれるかを確認する
未成年の子供がいる場合は、以下を合わせて検討する必要がある。
- フィルタリングの設定(キャリアサービスまたはOSの機能)
- みまもりプランの加入要否
- 学割の対象年齢・在籍状況
### ステップ3: データシェアが必要かを判断する
家族の使用パターンが「特定のメンバーは大量使用、他は少量」という偏りがある場合はデータシェアが有効だ。全員が均等に使う場合は個別プランの方がシンプルな場合が多い。
### ステップ4: MNO家族割 vs MVNO個別契約を比較する
MNO家族割後の合計月額と、全員をMVNOに移行した場合の合計月額を比較する。この比較には家族間通話の頻度も考慮する必要がある。家族間通話が多い場合はMNOの家族間通話無料が価値を持つが、LINEやFaceTimeを活用している場合は通話無料の価値が下がる。
---
## 申込手続きの全体像
家族プランの申し込みは、以下の流れで進む。
**MNO家族割の申し込みの流れ**
1. 現在の契約プランが家族割対象かを確認する(マイページ・問い合わせ)
2. 家族として登録する回線の情報(電話番号等)を準備する
3. オンラインマイページまたは店舗で「家族割」「ファミリー割引」等の申し込みを行う
4. 必要な書類(本人確認書類・家族関係確認書類)を提出する
5. 適用開始月を確認する(翌月からの適用になるケースが多い)
**みまもりプランの申し込みの流れ**
1. 子供・高齢者の回線を管理者(親・家族)のアカウントに紐付ける
2. フィルタリング・位置情報・利用制限の各オプションを設定する
3. OSのペアレンタルコントロール(スクリーンタイム/Family Link)と並行して設定する
---
## 家族プランでよくある失敗パターン
家族向けプランの申し込みで見落とされやすいポイントをまとめる。
**家族割対象外のプランで申し込んでいた**
オンライン専用プランや特定の格安プランが家族割の対象外になっているケースがある。申し込み後に「このプランは割引対象外でした」と気づくと修正に手続きが必要になる。
**学割の終了時期を見落とした**
学割の割引期間が終了し、気づかないまま通常料金を払い続けるケースがある。割引終了のタイミングで、継続か乗り換えかを改めて判断する習慣を持つことが重要だ。
**データシェアの偏った消費を想定していなかった**
特定のメンバーがデータシェアの容量を一人で大量消費し、他のメンバーの残量が月の途中でなくなるケースがある。データシェアを利用する場合は、各メンバーの使用量上限の設定機能があるかを確認しておく。
**フィルタリングをキャリアに任せすぎた**
キャリアのフィルタリングだけに頼ると、アプリ内のコンテンツや特定のプラットフォームが制御できないことがある。OSのペアレンタルコントロールと組み合わせてより細かく管理することを勧める。
---
## SimFinderで家族分のプランをまとめて比較する
家族プランの最適解は、家族の人数・キャリア構成・データ使用量・通話頻度によって変わる。具体的な料金を比較するには[SimFinderの国内SIM検索](/ja/jp/)で条件を設定し、MNO・サブブランド・MVNOのプランを一覧で確認してほしい。
---
## 関連ガイド
- [通話プランの選び方](/ja/guides/call-plans/)
- [契約期間・違約金・初期費用 — 契約条件の見方](/ja/guides/contract-terms/)
- [プリペイド vs ポストペイド — 違いと選び方](/ja/guides/prepaid-vs-postpaid/)
- [MNO vs MVNO vs サブブランド — 違いと選び方](/ja/guides/mno-vs-mvno-comparison/)
- [子供のスマホ安全設定ガイド](/ja/guides/parental-control/)
================================================================================
# 初めての旅行eSIM完全ガイド — 購入から帰国まで
URL: https://sim-finder.com/ja/guides/first-time-guide/
Type: guides (ja)
Published: 2026-04-13
旅行eSIMを使えば、プランをオンラインで購入し、出発前にインストールして、現地到着と同時にデータ通信を開始できる。物理SIMカードの入手や差し替えは不要だ。このガイドでは、端末の確認から帰国後の管理まで、7つのステップで全工程を解説する。
---
## Step 1: 端末がeSIM対応かどうかを確認する
旅行eSIMを購入する前に、端末が2つの条件を満たしているか確認する。「eSIMに対応していること」と「SIMロックが解除されていること」だ。
### eSIM対応の確認
**iPhoneの場合**: 「設定」→「モバイル通信」を開き、「eSIMを追加」または「モバイル通信プランを追加」のメニューが表示されればeSIM対応端末だ。iPhone XS・XS Max・XR(2018年)以降の全モデルがeSIMに対応している。
**Android(Google Pixel)の場合**: 「設定」→「ネットワークとインターネット」→「SIM」→「SIMを追加」からeSIMのセットアップ画面が表示されれば対応している。Google Pixel 3以降のモデルは基本的にeSIMに対応しているが、Pixel 3は地域・キャリアによって非対応の場合がある。
**Samsung Galaxyの場合**: 「設定」→「接続」→「SIMカードマネージャー」で「モバイルプランを追加」または「SIMをダウンロード」のオプションが表示されれば対応している。Galaxy S20以降のほとんどのモデルはeSIMに対応している。
設定画面にeSIM追加のオプションが表示されない場合、その端末はeSIM非対応か、eSIM機能がキャリアによって無効化されている場合がある。
### SIMロックの確認
キャリアがロックをかけた端末では、他のキャリアのeSIMプロファイルを使用できない場合がある。日本では2021年10月1日以降に発売された端末は、総務省のガイドライン改正によりSIMロックの初期設定が原則禁止されているため、その時期以降に購入した新品端末はSIMフリーの状態で販売されている。
それ以前にキャリアで購入した端末や、中古端末の場合は、購入先キャリアに解除を依頼する。多くのキャリアはオンラインから無料で手続きできる。
---
## Step 2: 旅行eSIMプランを選ぶ
### 単国プランと複数国プラン
旅行eSIMには主に2種類ある。
- **単国プラン**: 特定の1カ国のみ有効。同じ国に長く滞在する場合にコストパフォーマンスが高いことが多い。
- **複数国・リージョナルプラン**: 複数の国や地域をまとめてカバーする(例: アジア周遊プラン、ヨーロッパ周遊プランなど)。複数国を訪問する旅行に適している。ただし国内でのパートナー網によって速度が異なる場合がある。
### 必要なデータ量の目安
購入前に必要なデータ量を大まかに見積もる。参考として、Google マップなどのナビアプリは1時間あたり約3〜20MBを消費する。Netflixなどの動画ストリーミングは標準画質で1時間あたり最大0.7GBを消費する(HD画質では最大3GB)。
1週間の旅行で、地図・メッセージ・軽いブラウジングが中心であれば、5〜10GBが目安になる。動画視聴やリモートワークを想定する場合は10〜20GBまたは無制限プランを検討する。
詳しいアプリ別データ消費量の目安は[データ通信量の目安](/ja/guides/data-usage-guide/)を参照。
### 有効期限の確認
旅行eSIMプランには有効期限があり、7日・14日・30日・90日などが一般的だ。有効期限がインストール時から始まるプランと、初回アクティベーション時から始まるプランの2種類がある。購入前にどちらの方式かを必ず確認し、旅行日数より数日余裕を持った期間のプランを選ぶ。
### ほとんどの旅行eSIMはデータ通信専用
前述のとおり、ほとんどの旅行eSIMはデータ通信専用であり、個別の電話番号は付与されない。音声通話・SMS送受信はWi-FiやLINE・WhatsApp・FaceTime Audioなどのインターネット経由アプリで対応できる。
デュアルSIM設定で日本のSIMを維持していれば、日本の番号への着信・SMS受信(二段階認証など)は引き続き可能だ。
**[SimFinderで渡航先の旅行eSIMプランを比較する →](/ja/travel/)**
---
## Step 3: eSIMを購入し、QRコードを受け取る
旅行eSIMはプロバイダーの公式サイトまたはアプリから購入する。支払い完了後に届くものは次のいずれかだ。
- **QRコード**: メールで届くか、プロバイダーのアプリ内に表示される
- **手動入力コード**: SM-DP+サーバーアドレスとアクティベーションコードが記載されている
QRコードまたはコードの内容は、モバイルデータ通信なしでアクセスできる場所に保存しておく。スクリーンショット、印刷、または別のデバイスのメモアプリに控えておくのが確実だ。
QRコードは各端末に1回しかスキャンできない。他人に共有しないこと。
---
## Step 4: 出発前にeSIMプロファイルをインストールする
eSIMプロファイルは自宅のWi-Fi環境でインストールする。プロファイルのダウンロードにはインターネット接続が必要だ。
### iPhoneの手順
1. 「設定」→「モバイル通信」を開く
2. 「eSIMを追加」をタップ
3. 「QRコードを使用」を選択してプロバイダーのQRコードをスキャンする
4. 手動入力の場合は「詳細を手動で入力」からSM-DP+アドレスとアクティベーションコードを入力する
5. 画面の指示に従ってダウンロードを完了する
6. 回線のラベルを設定するとき、「旅行eSIM」など分かりやすい名前を付ける
7. **データ通信の回線を旅行eSIMに切り替えない** — 現地到着まで日本のSIMをデータ回線のままにしておく
インストール後すぐに有効化するか尋ねられた場合は、現地到着まで有効化しないことを選択する。
### Android(Google Pixel)の手順
1. 「設定」→「ネットワークとインターネット」→「SIM」を開く
2. 「SIMを追加」をタップ
3. 「QRコードをスキャン」を選択してコードをスキャンするか、「アクティベーションコードを入力」で手動入力する
4. 画面の指示に従ってプロファイルをダウンロードする
5. インストール完了後、旅行eSIMを有効化しない — 現地到着まで待つ
### Samsung Galaxyの手順
1. 「設定」→「接続」→「SIMカードマネージャー」を開く
2. 「モバイルプランを追加」または「SIMをダウンロード」をタップ
3. QRコードをスキャンするか、アクティベーションコードを手動入力する
4. インストール完了後、渡航先に到着するまで有効化しない
インストール後、eSIMプロファイルは端末のeUICCチップに保存される。有効化するまでデータは消費されない。
具体的なeSIM設定手順については[eSIMセットアップガイド](/ja/blog/esim-setup-guide-iphone-android/)で詳しく解説しています。
---
## Step 5: 現地到着後にeSIMをアクティベートする
現地に到着し、端末が現地ネットワークを検出したら旅行eSIMに切り替える。
### 旅行eSIM回線を有効化する
**iPhoneの場合:**
1. 「設定」→「モバイル通信」を開く
2. インストールした旅行eSIMの回線をタップ
3. 「この回線をオンにする」を有効にする
4. 「モバイルデータ通信」に戻り、旅行eSIMをデータ通信回線に設定する
5. 旅行eSIM回線の「データローミング」を有効にする
**Android / Samsungの場合:**
1. SIMマネージャー設定を開く
2. 旅行eSIM回線を有効化する
3. 優先データSIMとして設定する
### デュアルSIM設定の確認
日本のSIMを旅行eSIMと並行して使う場合、各回線の役割を確認する。
- **通話・SMS**: 日本のSIMを使用(日本の番号を維持するため)
- **モバイルデータ**: 旅行eSIMを使用
- iPhoneでは「モバイルデータ通信の切り替えを許可」をオフにすると、電波が弱い場所で自動的に日本のSIMのデータに戻るのを防げる(日本のSIMのデータローミング料金発生を避けるため)
### eSIMが繋がらない場合の対処
アクティベーション後に旅行eSIMが自動接続しない場合:
1. 旅行eSIM回線のデータローミングが有効になっているか確認する
2. 機内モードをオンにして5秒待ってからオフにする
3. 「設定 → モバイル通信 → 通信事業者」(iPhone)または「モバイルネットワーク設定」(Android)からネットワークを手動選択する
4. それでも解決しない場合はeSIMプロバイダーのサポート(アプリ内チャット・公式サイト)に連絡する
---
## Step 6: 旅行中のeSIM管理
### データ残量の確認
長い旅程では定期的にデータ残量を確認する。ほとんどのプロバイダーはアプリまたは公式サイトのダッシュボードで残量を表示している。iPhoneでは「設定 → モバイル通信 → 回線名」からも利用量を確認できる。
残量が少なくなった場合、一部プロバイダーはアプリからQRコード不要でデータを追加購入(トップアップ)できる。
### 通話・メッセージの利用
ほとんどの旅行eSIMはデータ通信専用のため、音声通話・テキストメッセージはインターネット経由のアプリで行う。
- **LINE / WhatsApp**: 通話は1時間あたり約15〜50MBを消費。テキストメッセージのデータ消費はほぼゼロ
- **FaceTime Audio**: Appleデバイス間で利用可能
- **Signal**: 全プラットフォーム対応、暗号化通話・メッセージ
- **Google Meet / Zoom**: ビデオ会議; 1対1 HD品質のビデオ通話は1時間あたり約0.9〜1.1GBを消費
デュアルSIMで日本のSIMを維持している場合、日本のSIMでの発信は日本キャリアの国際通話料金が適用される。
### バッテリー消費の注意
2回線を同時に使うデュアルSIM状態はシングルSIMより電池の消費が増える。長時間の外出でバッテリーが心配な場合は、日本のSIMのデータ通信のみをオフにしておく(通話・SMS受信は可能な状態を保ちながら)とバッテリー消費を抑えられる。
---
## Step 7: 帰国後の処理
### 日本のSIMに戻す
帰国したら次の手順で元の設定に戻す。
1. 「設定 → モバイル通信」を開く
2. 日本のSIMまたは日本のeSIMをデータ回線に設定する
3. 旅行eSIMのデータローミングをオフにするか、旅行eSIM回線全体を無効にする
### eSIMプロファイルの処理
旅行eSIMに残データが残っており、同じプロバイダーが再利用を許可している場合は、次の旅行に備えてプロファイルをそのまま保持できる。
期限が切れ、再度その地域を訪れる予定がなければ、プロファイルを削除してeSIM一覧を整理する。
**iPhoneの場合**: 設定 → モバイル通信 → 該当の旅行eSIM回線 → eSIMを削除
**Androidの場合**: SIMマネージャー設定 → 該当の旅行eSIM回線 → 削除(Delete/Remove)
削除する前に、プロバイダーの再インストールポリシーを確認する。アプリから再インストールできるプロバイダーもあるが、一度削除すると別途費用が必要なプロバイダーもある。
---
## 旅行eSIM 完了チェックリスト
旅行前・旅行中に活用してほしい。
**出発前**
- [ ] 端末がeSIM対応か確認(iPhoneは「設定 → モバイル通信」、AndroidはSIMマネージャー)
- [ ] 端末がSIMフリー(SIMロック解除済み)か確認
- [ ] 旅行日数・利用スタイルに合ったデータ量を見積もる
- [ ] 渡航先と期間に合ったeSIMプランを購入する
- [ ] QRコードまたはアクティベーションコードを保存・スクリーンショット
- [ ] 自宅のWi-Fiでプロファイルをインストールする
- [ ] 回線ラベルを「旅行eSIM」など分かりやすい名前に設定する
- [ ] 旅行eSIMを無効のままにしておく(アクティベーション前)
**現地到着後**
- [ ] 旅行eSIM回線を有効化する
- [ ] 旅行eSIMをデータ通信回線に設定する
- [ ] 旅行eSIMのデータローミングを有効にする
- [ ] 端末が現地ネットワークに接続されていることを確認する
- [ ] ブラウザやアプリでデータ通信が動作するかテストする
**旅行中**
- [ ] プロバイダーのアプリでデータ残量を確認する
- [ ] 通話・メッセージはLINE・WhatsApp・FaceTimeなどを使う
- [ ] データ残量が少なくなったらトップアップを検討する(プロバイダーによる)
**帰国後**
- [ ] データ通信回線を日本のSIMに戻す
- [ ] 旅行eSIMプロファイルを保持するか削除するかを決める
- [ ] 削除前にプロバイダーの再インストールポリシーを確認する
---
## よくある質問
### 旅行eSIMは出発前にインストールしておく必要がありますか?
はい。eSIMプロファイルのダウンロードにはインターネット接続が必要だ。自宅のWi-Fi環境で出発前にインストールまで済ませること。アクティベーション(データ通信の開始)は現地到着後に行う。インストールしただけではデータは消費されない。
### 旅行eSIMを使っている間、日本の電話番号は使えますか?
デュアルSIM対応端末であれば、日本のSIM(電話番号)を維持したまま旅行eSIMをデータ通信専用として使える。設定画面でデータ通信回線を旅行eSIMに切り替えても、日本のSIMは通話・SMS受信に引き続き使用できる。
### 旅行eSIMで電話の発信やSMS送信はできますか?
ほとんどの旅行eSIMはデータ通信専用だ。電話番号は付与されないため、従来の音声通話やSMSには使えない。通話はLINE・WhatsApp・FaceTime AudioなどのVoIPアプリで代替できる。デュアルSIM設定で日本のSIMを維持していれば、日本の番号への着信・SMS受信は引き続き可能だ。
### 現地に到着してもeSIMが繋がらない場合はどうすればいいですか?
まず旅行eSIM回線のデータローミングが有効になっているか確認する。次に機内モードをオン・オフして端末を再起動し、現地ネットワークの再検索を促す。それでも繋がらない場合は、設定画面の「通信事業者」でネットワークを手動選択すること。以上で解決しない場合はeSIMプロバイダーのサポートに連絡すること。
### 同じeSIMを次の旅行でも使い回せますか?
プロバイダーとプランの種類による。残データがあり有効期限内であれば継続利用できるものもある。一部プロバイダーはアプリからデータの追加購入(トップアップ)に対応している。一方、一度削除すると再インストールできない使い捨てプロファイルもある。削除前にプロバイダーの再インストールポリシーを確認すること。
### 帰国後、旅行eSIMはどうすればいいですか?
まずデータ通信回線を日本のSIMに戻す。残データがあり次の旅行でも同じ地域に行く予定があれば、eSIMプロファイルをそのまま保持できる(プロバイダーが許可している場合)。不要であれば削除してeSIM一覧を整理すること。
---
## 関連ガイド
- [海外でスマホを使う4つの方法](/ja/guides/four-options/) — 旅行eSIM・現地SIM・国際ローミング・Wi-Fiレンタルを比較
- [eSIMとは](/ja/guides/what-is-esim/) — eSIMの仕組みを理解してから設定に進む
- [データ通信量の目安](/ja/guides/data-usage-guide/) — アプリ別の消費量から必要GB数を算出する
- [SIM・モバイル通信用語集](/ja/guides/glossary-index/) — このガイドで使われている技術用語の定義
- [旅行eSIMの選び方 — 5つの比較ポイントと失敗しないコツ](/ja/guides/how-to-choose/) — 選定基準、プロバイダー比較、注意点
- [海外旅行でのデュアルSIM活用](/ja/guides/dual-sim-for-travel/) — 日本のSIMを維持しながら旅行eSIMを使う方法
================================================================================
# 海外でスマホを使う4つの方法 — 料金・手軽さ・通信品質で比較
URL: https://sim-finder.com/ja/guides/four-options/
Type: guides (ja)
Published: 2026-04-13
海外旅行中のスマホ通信手段は、国際ローミング・現地SIM・旅行eSIM・ポケットWi-Fiの4種類に分類できる。どれが適しているかは端末の対応状況・旅行期間・人数によって異なる。この記事では各手段の仕組みと特徴を整理し、選び方の指針を提示する。
---
## 4つの通信手段の概要
### 1. 国際ローミング
日本で契約しているキャリアのSIMをそのまま海外で使う方式。渡航先の現地キャリアとホームキャリアがローミング協定(GSMAのAA.12に基づくキャリア間協定)を結ぶことで実現する。
追加の端末や設定操作がほぼ不要で、電話番号もそのまま使えるため、手間を最小に抑えたい旅行者に向いている。一方、料金はキャリア・プランによって大きく差があり、事前にプランを確認せずに使うと高額になるケースもある。
キャリアによっては追加料金なしで海外でも一定量のデータを使えるプランがある。詳細は利用中のキャリアの国際ローミング案内ページで確認してほしい。
**メリット**
- 端末・SIMを変えずに出発できる。事前準備は料金プランの確認のみ
- 日本の電話番号がそのまま使えるため、銀行の二要素認証SMSや緊急連絡を確実に受けられる
- ビジネス渡航など、日本番号での着信が必須の場合に唯一の選択肢になるケースがある
- データローミングをOFFにするだけでSMS受信専用として使い続けられる(月額基本料の範囲内)
**デメリット**
- 料金が割高になりやすい。プランを確認せずに使うと1日あたり数千円を超えるケースもある
- 提携先の現地キャリアの回線を使うため、直接契約に比べて速度・優先度が低い場合がある
- キャリアによっては特定の国・地域でローミングの対応帯域が制限される
### 2. 現地SIM
渡航先の国や地域で販売されているSIMカードを現地で購入して使う方式。現地キャリアと直接接続するため、通信品質が現地ユーザーと同等水準になりやすい点が特徴。
購入場所は空港内の通信会社カウンター・コンビニ・電気店などが一般的。購入時にパスポートなどの身分証明書の提示を求める国も多い(タイでは生体認証が必要、ドイツでは本人確認手続き(VideoIdent・PostIdent等)が必要など、国ごとに要件が異なる)。
端末がSIMフリーであること、および渡航先の通信バンドに端末が対応していることが前提条件。
**メリット**
- 現地料金でのデータ通信が可能。長期滞在ほどコスト差が大きくなる
- 現地ユーザーと同等水準の通信品質・速度を得られる
- 渡航先によっては音声通話付きのプランも選べる
**デメリット**
- 渡航先の到着後に購入が必要。深夜着・乗り継ぎ便など時間的制約がある場合に不便
- 日本のSIMと同時に使うにはデュアルSIM端末が必要。シングルSIM端末では日本番号への着信が受けられなくなる
- 購入時にパスポートの提示が求められる国が多く、国によっては生体認証・オンライン本人確認などの登録が追加で必要
- 帰国後のSIMの廃棄・保管の判断が必要になる
### 3. 旅行eSIM
渡航先で使えるデータ通信プランをeSIMのプロファイルとしてオンラインで購入し、QRコードを読み取るだけで設定が完了するサービス。現地到着前に設定でき、空港でのSIM交換が不要。
eSIM(embedded SIM)はGSMAが定めるSGP.22仕様に基づくデジタルSIMであり、端末に内蔵されたeUICCチップにプロファイルをインターネット経由でダウンロードして利用する。対応端末であればQRコード読み取りのみで設定が完了する。
旅行eSIMの多くはデータ通信専用で、日本の電話番号での発着信はできない。通話はLINE・WhatsAppなどのVoIPアプリで代替するのが一般的。
**メリット**
- 出発前に自宅でセットアップ完了。空港到着と同時にデータ通信が始まる
- 物理SIMスロットが残っていれば日本のSIMと同時使用が可能(デュアルSIM構成)
- プロバイダーが多数あり、渡航先・期間・容量に応じて価格比較がしやすい
- 帰国後はプロファイルを削除するだけで完了。返却・廃棄の手間がない
**デメリット**
- eSIM対応端末が必要。eSIM非対応のiPhone(iPhone XS以前)やAndroid端末では使えない
- ほとんどのプランがデータ通信専用。現地番号での音声通話はできない
- プロファイルを削除すると再インストールできない場合がある(プロバイダーのポリシーによる)
- 端末がSIMロックされている場合は旅行eSIMも使えない
### 4. ポケットWi-Fi(Wi-Fiレンタル)
専用のモバイルWi-Fiルーター端末をレンタルし、複数のデバイスをWi-Fi接続して使う方式。日本の空港カウンターや宅配で受け取り・返却ができるサービスが国内では普及している。
1台のルーターに複数台(一般に5〜10台)のデバイスを同時接続できるため、複数人での利用に向いている。端末の種類を問わず使えるため、eSIM非対応の古い端末でも利用可能。
**メリット**
- eSIM非対応・SIMロック端末でも使える。デバイスの種類を問わない
- 1台のルーターで複数人・複数デバイスを同時接続できる
- タブレット・ノートPCなど、SIMスロットのないデバイスもまとめてカバーできる
**デメリット**
- ルーター本体のバッテリーが6〜12時間程度が多く、終日外出の場合はモバイルバッテリーが別途必要
- 端末を紛失・破損した場合に高額な弁償費用が発生する場合がある
- 受け取り・充電・返却という物理的な手間が発生する
- 日割り料金のため、滞在日数が増えるほど旅行eSIMとの費用差が広がりやすい
---
## 4手段の比較
| 比較項目 | 国際ローミング | 現地SIM | 旅行eSIM | ポケットWi-Fi |
|---------|-------------|--------|---------|-------------|
| **事前準備** | プランの確認のみ | 渡航先で購入 | オンラインで事前購入・設定 | 事前予約・空港受取 |
| **手軽さ** | 端末追加不要・設定最小 | 空港等での購入が必要 | QRコード読み取りのみ | 受取・充電・返却が必要 |
| **料金水準** | キャリア・プランにより幅広い | 比較的安い(現地料金) | 比較的安い | 日数に比例して高くなる |
| **電話番号** | 日本番号そのまま使える | 現地番号が付与 | 原則データのみ | 端末側の契約による |
| **通信品質** | キャリアが提携する現地回線 | 現地ユーザーと同水準 | 現地回線(プロバイダー依存) | ルーターの回線品質による |
| **複数人利用** | 1人1回線 | 1人1回線 | 1人1回線(テザリング可) | 1台で複数台接続可 |
| **端末条件** | 契約端末であること | SIMフリー端末 | eSIM対応SIMフリー端末 | なし(Wi-Fi接続できれば可) |
| **帰国後の処理** | 自動終了 | SIM廃棄・返却 | プロファイル削除のみ | 端末返却必須 |
---
## 旅行スタイル別の選び方
### 短期旅行(3日以内)・手間を省きたい場合
国際ローミングが最も手軽。渡航先でそのまま使えるプランを事前に確認しておくだけで準備が完了する。電話番号がそのまま使えるため、ビジネス渡航や緊急連絡が多い場合にも安心。
### 1人旅・eSIM対応端末を持っている場合
旅行eSIMが手軽さと料金のバランスが取れた選択肢。事前にオンラインで購入してQRコードを読み取るだけで設定が完了し、荷物も増えない。渡航先や期間に合ったプランをSimFinderで比較できる。
**[SimFinderで旅行eSIMを比較する →](/ja/travel/)**
### 複数人旅行(3人以上)・eSIM非対応端末が含まれる場合
ポケットWi-Fiが1台あれば全員で共有できる。特に子供の端末など、eSIM非対応のデバイスが含まれる場合に有効。
### 1週間以上の滞在・コストを抑えたい場合
渡航先での現地SIM購入か旅行eSIMが選択肢になる。現地SIMは購入の手間はあるが、長期滞在向けの大容量プランが豊富。旅行eSIMは事前購入できる点で利便性が高い。
---
## eSIM対応端末かどうか確認する方法
旅行eSIMを使うには、端末がeSIMに対応していることが必要。
iPhone の場合、iPhone XR・iPhone XS(2018年発売)以降のモデルがeSIMに対応している。2018年より前のiPhoneはeSIM非対応。
Androidの場合は機種・メーカーによって対応状況が異なる。Google Pixel 3以降のモデルは基本的にeSIMに対応しているが、同じ機種でも販売地域やキャリアロックの有無によって対応状況が変わることがある。
端末の設定画面で「eSIMを追加」「モバイル通信プランを追加」などのメニューが表示されれば、eSIMに対応している。
また、端末がSIMロックされている場合は、eSIMを含む別キャリアのSIMが使えない場合がある。日本では2021年10月以降に発売された端末はSIMロックの初期設定が総務省のガイドラインに基づき原則禁止されているが、それ以前の端末は各キャリアの解除手続きが必要な場合がある。
---
## 現地SIMを購入するときに知っておくべきこと
### 購入場所と手続きの流れ
空港内のキャリアカウンターが最初の選択肢として最も確実。主要な観光地の国際空港では、到着ロビーに大手キャリアのカウンターが出店しており、国際旅行者への対応に慣れたスタッフが常駐していることが多い。英語が通じるケースが大半で、プランを指差して選ぶだけで購入・SIM挿入・動作確認まで対応してもらえる場所もある。
空港以外では、市内のキャリアショップ・大型電気店・コンビニでも購入できる国が多い。ただし郊外や小規模店舗では英語が通じない場合もある。
### 身分証明書の要否と国別の本人確認要件
SIM購入時に本人確認が必要かどうかは渡航先によって異なる。
- **パスポート提示のみ(多くの国)**: タイ・シンガポール・マレーシア・韓国など、観光客向けのSIM購入にパスポート提示のみを求める国が多い。カウンターでパスポートを渡せば、スタッフが手続きを進めてくれる
- **生体認証が必要(タイ)**: タイでは2022年の規制変更以降、SIM購入時に顔認証などの生体情報登録が義務付けられている。空港のカウンターでは専用端末を使って手続きを行う
- **厳格な本人確認が必要(ドイツ)**: ドイツではすべてのSIM購入に対して本人確認手続きが義務付けられており、VideoIdent・PostIdent・店舗内での本人確認書類照合のいずれかが必要になる。手続きに時間がかかるため、到着直後に購入する場合は余裕を見ておくことを推奨する
### プリペイドSIMの有効期限と残高
多くの渡航先で販売されているプリペイドSIMには有効期限がある。旅行者向けプランは7日・14日・30日などの期間設定が一般的で、期限を過ぎると残余のデータ容量も失効する。短期旅行の場合は有効期限と日程が一致しているプランを選ぶこと。
長期滞在でデータ容量を使い切った場合は、同じSIMにトップアップ(チャージ)できる国が多い。現地キャリアのアプリまたはコンビニ等での購入が一般的。
### 端末条件の事前確認
現地SIMを挿入する前に以下を確認する。
- 端末がSIMフリーであること(Androidは設定→SIM管理から確認、iPhoneは設定→一般→情報→キャリアロックで「SIMの制限なし」と表示されることを確認)
- 渡航先のキャリアが使用する周波数帯(通信バンド)に端末が対応していること。最新のフラグシップモデルであれば大半の地域で問題ないが、古い端末や特定地域向けモデルは事前確認が必要
---
## 海外で日本の電話番号を維持する方法
海外旅行中も日本の電話番号で着信・SMS受信が必要なケースは多い。銀行やオンラインサービスの二要素認証(SMS認証コード)、緊急連絡、ビジネス用途での日本番号維持がその典型例。
### デュアルSIM構成が最も確実
デュアルSIM対応端末であれば、日本のSIMと旅行eSIMを同時に有効化できる。データ通信は旅行eSIMを使い、日本のSIMは通話・SMS受信専用として動作させる構成が実現できる。
**iPhone でのデュアルSIM構成**
- **iPhone 13以降**: 物理SIMスロットのあるモデルは「物理SIM+eSIM」または「eSIM+eSIM」のデュアル構成が可能。iPhone 13以降はeSIM2回線を同時有効化(デュアルeSIM)に対応している(Apple公式確認済み)
- **iPhone XS〜iPhone 12**: 「物理SIM1枚+eSIM1枚」の組み合わせ。2つのeSIMの同時有効化は不可
- **設定方法**: 設定→モバイル通信で各回線の用途(データ通信回線・通話回線・SMS回線)を個別に割り当てられる。旅行eSIMをデータ通信専用に、日本SIMを通話・SMS専用に設定する
**Android でのデュアルSIM構成**
Google Pixel 7以降はeSIM2回線の同時有効化(デュアルeSIM)に対応している。それより前のPixelモデルは「物理SIM+eSIM」構成。Samsung Galaxy S20以降も基本的にデュアルSIM対応だが、機種・地域によって構成が異なる。
### 日本のSIMをeSIM化してから出発する
日本の物理SIMをeSIM化しておくと、物理SIMスロットを現地SIM用に空けられる。国内主要キャリアはいずれも物理SIM→eSIM変更手続きに対応している。
- **NTTドコモ**: オンライン手続き(iPhoneの場合はeSIMクイック転送対応)
- **au**: My auからオンライン申請。オンライン手続きは手数料無料
- **ソフトバンク**: オンラインショップで手続き後、eSIMプロファイルをダウンロード
- **楽天モバイル**: my楽天モバイルで手続き可能。手数料無料
eSIM化後は物理SIMスロットが空き、旅行先で現地物理SIMを挿入しながら日本のeSIMも同時に使えるようになる。出発前に必ずeSIM化とデュアルSIM設定の動作確認を済ませること。
### eSIM化せずに日本番号を維持する方法
eSIM対応端末を持っていない場合や、eSIM化の手続きが間に合わない場合の代替手段として、以下が考えられる。
- **国際ローミングをデータOFF・SMS受信ONで使う**: 日本のSIMでデータローミングをOFFにした状態でも、SMSの受信は可能なキャリアが多い。データ通信はポケットWi-Fiか別端末の旅行eSIMで行い、日本のSIMはSMS受信専用として使う方法
- **VoIPアプリへの切り替え**: 完全に日本番号での着信が不要な場合は、WhatsApp・LINE・FaceTimeなどのVoIPアプリで連絡先に通知した上で、日本のSIMを一時停止する選択肢もある
---
## よくある質問
---
## まとめ
4つの通信手段にはそれぞれ特徴がある。
- **国際ローミング**: 手間が最小。料金はキャリア・プランに依存するため事前確認が必要
- **現地SIM**: 現地料金で使えるが購入の手間がある。長期滞在に向いている
- **旅行eSIM**: eSIM対応端末なら事前準備が最も少なく、料金も抑えやすい
- **ポケットWi-Fi**: 複数人での共有・eSIM非対応端末に有効。返却が必要
eSIM・WiFiレンタル・ローミングの詳しい比較については[eSIM vs WiFiレンタル vs ローミング](/ja/blog/esim-vs-wifi-vs-roaming-2026/)をご覧ください。
どの手段を選ぶにせよ、出発前の準備が重要。ローミングはプランの確認、現地SIMはSIMフリー端末の確認、旅行eSIMは事前インストール、ポケットWi-Fiは事前予約を、それぞれ出発前に済ませておくことを推奨する。
旅行eSIMのプロバイダーと料金の比較は、SimFinderの旅行eSIM検索で行える。
**[SimFinderで旅行eSIMを比較する →](/ja/travel/)**
---
## 関連ガイド(準備中)
以下のガイド記事は現在制作中です。
- [国際ローミングの仕組みと料金](/ja/guides/international-roaming/)
- [旅行eSIMの選び方 — 5つの比較ポイントと失敗しないコツ](/ja/guides/how-to-choose/)
- [初めての旅行eSIM完全ガイド](/ja/guides/first-time-guide/)
- [渡航前のスマホ準備チェックリスト](/ja/guides/pre-trip-checklist/)
- [現地SIMカードの入手方法 — 空港・市内・オンラインでの購入ガイド](/ja/guides/local-sim/)
- [Wi-Fiレンタルの選び方 — ポケットWi-Fiとモバイル/eSIMの使い分け](/ja/guides/wifi-rental/)
- [海外旅行でのデュアルSIM活用](/ja/guides/dual-sim-for-travel/)
================================================================================
# 周波数帯(バンド)と端末互換性 — LTE・5Gバンド番号の見方と確認方法
URL: https://sim-finder.com/ja/guides/frequency-bands/
Type: guides (ja)
Published: 2026-06-04
「バンド」という言葉はスマートフォンの仕様表で目にしても、意味がわかりにくいと感じる人は多い。しかし端末選びでバンド対応を確認しないと、SIMを挿しても電波が圏外、または4Gが使えないという事態が起きる。
この記事では、LTEと5G NRのバンド番号の仕組み、日本の主要キャリア(ドコモ・au・SoftBank・楽天モバイル)が使う具体的なバンド一覧、「プラチナバンド」の意味、そして海外端末購入時の互換性確認の考え方を体系的に整理する。
---
## 1. 周波数帯(バンド)とは何か
モバイル通信は、電波という有限の資源を「周波数」で分割して使う。各国の電波行政機関が通信事業者に特定の周波数帯域を免許で割り当て、事業者はそこに基地局を整備する。
この「割り当て済み周波数帯域」に3GPP(3rd Generation Partnership Project)が国際標準の番号を付けたものが**バンド番号**(Band番号)だ。同じ物理的な周波数でも、LTEと5G NRでは別系列の番号が割り当てられる。
- **LTE(4G)**: FDD(周波数分割複信)バンドには1番台から割り当てられ、TDD(時分割複信)バンドは33番以降に割り当てられる。拡張により100番台超のバンドも存在する(3GPP TS 36.101で規定)
- **5G NR(New Radio)**: n1、n3、n77、n78などのように「**n**」のプレフィックスが付く番号で識別される(3GPP TS 38.101で規定)
例えば「Band 1」はLTEの2.1 GHz帯、「n78」は5G NRの3.5 GHz帯(3,300〜3,800 MHz)を指す。同じ物理周波数であっても、LTEとNRでは番号体系が異なることに注意が必要だ。
---
## 2. 周波数の特性:高い帯域 vs 低い帯域
バンドを理解するうえで、周波数の高低が通信に与える影響を把握しておくと選択の基準が明確になる。
| 特性 | 低周波数帯(〜1 GHz) | 中周波数帯(1〜6 GHz) | 高周波数帯(ミリ波 24 GHz〜) |
|------|----------------------|----------------------|------------------------------|
| 伝搬距離 | 長い | 中程度 | 短い |
| 障害物への強さ | 強い(回折性が高い) | 中程度 | 弱い(直進性が強い) |
| 屋内浸透 | 良好 | 普通 | 困難 |
| 最大データ速度 | 遅い | 中〜高速 | 超高速 |
| 主な用途 | エリアカバー基盤 | データ容量確保 | 超高密度エリア |
低周波数帯(700〜900 MHz)は業界で「**プラチナバンド**」と呼ばれる。プラチナとは貴重な資源であることを意味し、少ない基地局数で広大なエリアをカバーでき、かつ建物内や地下でもつながりやすいため、通信インフラの基盤として非常に価値が高い。
高周波数帯(ミリ波)は速度は高いが、雨や建物で著しく減衰するため、現時点では駅ホームや大型スタジアムなど特定のスポットカバーに使われる。
---
## 3. 日本のキャリア別・主要バンド一覧
日本で使われている主要なLTEバンドと5G NRバンドを以下に示す。各キャリアが割り当てを受けた周波数に基づくバンドであり、実際の展開状況はエリアにより異なる。
### NTTドコモ
| 規格 | バンド | 周波数帯 | 特徴 |
|------|--------|----------|------|
| LTE | Band 1 | 2.1 GHz | 主要都市の屋外データ通信 |
| LTE | Band 3 | 1.7 GHz | 屋内・高密度エリア |
| LTE | Band 19 | 800 MHz | **プラチナバンド**・広域カバー |
| LTE | Band 21 | 1.5 GHz | 地方エリア補完 |
| LTE | Band 28 | 700 MHz | APT700・広域カバー |
| 5G NR | n78 | 3.5 GHz (Sub-6) | 5G主力バンド |
| 5G NR | n79 | 4.5 GHz (Sub-6) | 高容量エリア |
### KDDI(au)
| 規格 | バンド | 周波数帯 | 特徴 |
|------|--------|----------|------|
| LTE | Band 1 | 2.1 GHz | 主要都市のデータ通信 |
| LTE | Band 18 | 800 MHz | **プラチナバンド**(Band 26の一部に含まれる) |
| LTE | Band 26 | 850 MHz | Band 18を包含する拡張バンド |
| LTE | Band 28 | 700 MHz | APT700・広域カバー |
| 5G NR | n77 | 3.7 GHz (Sub-6) | 5G主力バンド |
| 5G NR | n78 | 3.5 GHz (Sub-6) | 5G主力バンド |
### SoftBank
| 規格 | バンド | 周波数帯 | 特徴 |
|------|--------|----------|------|
| LTE | Band 1 | 2.1 GHz | 主要都市のデータ通信 |
| LTE | Band 3 | 1.7 GHz | 屋内・高密度エリア |
| LTE | Band 8 | 900 MHz | **プラチナバンド**・広域カバー |
| LTE | Band 28 | 700 MHz | APT700・広域カバー |
| 5G NR | n77 | 3.7 GHz (Sub-6) | 5G主力バンド |
| 5G NR | n3 | 1.7 GHz (Sub-6) | 都市部補完 |
| 5G NR | n28 | 700 MHz | **5Gプラチナバンド** |
### 楽天モバイル
| 規格 | バンド | 周波数帯 | 特徴 |
|------|--------|----------|------|
| LTE | Band 3 | 1.7 GHz | 自社エリアの主力バンド |
| LTE | Band 18 | 800 MHz | au回線パートナーエリア(旧) |
| 5G NR | n77 | 3.7 GHz (Sub-6) | 5G主力バンド |
楽天モバイルは自社4G回線ではBand 3のみを持つ。都市部カバーは主要4バンドの中で最も少なく、地方・山間部ではエリア外になりやすい点に注意が必要だ。
キャリアの種別(MNO・MVNO・サブブランド)について詳しくは[MNO(大手キャリア)とは — MVNO・サブブランドとの違い](/ja/guides/what-is-mno/)で解説している。
---
## 4. プラチナバンドの意味と重要性
「プラチナバンド」は3GPPや総務省が公式に定義した用語ではなく、業界・メディアが広く使う通称だ。一般的に700〜900 MHz帯の低周波数帯全体を指す。
プラチナバンドが重要とされる理由は2点ある。
**1. 広域カバー性**: 周波数が低いほど電波は減衰しにくく、1つの基地局から電波が届く半径が広くなる。同じエリアをカバーするために必要な基地局数が少なくて済み、キャリアにとっては投資効率が高い。
**2. 屋内・地下での接続性**: 低周波数の電波は建物の壁や地面への浸透力が高い。地下鉄の構内や鉄筋コンクリートの建物内で「電波が入りやすい」のは、プラチナバンドが使われているためだ。
楽天モバイルは2023年以前、プラチナバンドを自社では保有していなかった。2024年6月27日からBand 28(700 MHz)の商用サービスを開始し、屋内・地下での接続性が改善されつつある。
SIMフリー端末でMVNOを使う場合も、端末がバンド19(ドコモ系回線)やバンド18/26(au系回線)に対応しているかどうかが、地方や屋内での繋がりやすさに直結する。
---
## 5. 海外端末が国内で繋がりにくい理由
海外で購入した端末を日本で使うと「圏外」や「4Gが繋がらない」という問題が起きる場合がある。主な原因は以下の2点だ。
### バンドの非対応
端末は販売地域ごとに対応バンドが異なる場合がある。北米向けモデルはAWSバンド(Band 4: 1700/2100 MHz)やBand 12/13/14(700 MHz)など北米固有のバンドを優先して搭載する一方、日本固有のBand 19(ドコモのプラチナバンド、800 MHz)やBand 21(ドコモ1.5 GHz)に非対応のことがある。
例えば欧州向けモデルは日本と共通するBand 1・Band 3・Band 8などを持つことが多いが、Band 19は非対応の場合がある。この場合、ドコモ系回線では都市部ではつながっても、地方・建物内でプラチナバンドに切り替わるタイミングで圏外になる可能性がある。
### 技術基準適合(技適)
日本の電波法は、国内で使用する無線機器に技術基準適合証明(いわゆる「技適マーク」)の取得を義務付けている。技適を取得していない端末は、SIMが物理的に刺さって動作しても、日本国内での使用は電波法上認められない。
海外の技適相当マーク(FCC:米国、CE:欧州など)を取得していても、日本の技適とは別物だ。日本向け正規品として販売されている端末には技適マークが付いているが、並行輸入品や個人輸入品では技適取得状況を確認する必要がある。
[SIMロックとSIMフリー — 確認方法と解除手順](/ja/guides/sim-lock/)では、端末を別キャリアで使う際のロック解除手順も詳しく説明している。
---
## 6. 対応バンドの確認方法
### メーカー公式スペックページで確認する
最も正確な方法は、端末メーカーの公式サイトにある仕様ページを参照することだ。
- **iPhone**: Appleサポートサイト(support.apple.com)から各モデルのTech Specsページを参照する(例: iPhone 16の場合は「iPhone 16 - 技術仕様」ページ)
- **Google Pixel**: Google ストアの各モデル仕様欄
- **Samsung Galaxy**: Samsung サポートの製品仕様ページ
仕様ページには「Cellular & Wireless」または「通信方式」の項目があり、対応バンドの一覧が記載されている。
### IMEIを使った確認
IMEI(International Mobile Equipment Identity)は端末ごとに割り当てられた15桁の識別番号だ(3GPP TS 23.003で規定)。IMEIから端末のモデル・リージョン・対応バンドを調べられるサードパーティサービス(kimovil.com、IMEI.info等)が存在する。
IMEIは端末の設定アプリ(「設定」→「一般」→「情報」(iPhone)または「設定」→「端末情報」(Android))で確認できる。または `*#06#` をダイヤルすると表示される端末も多い。
ただしサードパーティのIMEIルックアップサービスは、データの正確性やリアルタイム性をメーカーが保証していない。確認の入口として使い、最終確認は必ずメーカー公式スペックページで行うこと。
### キャリアの動作確認リストで確認する
SIMフリー端末のバンド対応だけでなく、キャリアがその端末での動作を確認しているかどうかも重要だ。ドコモ・au・SoftBank・楽天モバイルは各自のWebサイトで「SIMフリー端末動作確認済み一覧」を公開している。リストに掲載されていない端末は、技術的には対応バンドでも動作が保証されない場合がある。
VoLTE(音声通話)の互換性については、バンド対応に加えてキャリアのホワイトリスト登録が必要なケースがある。詳しくは[VoLTEとVoNRとは — 4G/5Gで通話する仕組みと対応端末](/ja/guides/volte-vonr/)で解説している。
---
## 7. 海外端末購入時の互換性確認の考え方
海外で端末を購入する、または海外版のSIMフリー端末を日本で使う場合は、以下の順序で互換性を確認する。
**ステップ1:メーカー公式スペックページで対応バンドを確認**
購入予定の端末の地域モデル(例:日本向けSM-S921B/DSなどのモデル番号)を特定し、対応バンドを確認する。
**ステップ2:使用するキャリアの主要バンドと照合**
本記事の第3節の表を参考に、自分が使うキャリアのプラチナバンドを端末がサポートしているか確認する。特にエリア基盤となる低周波数帯(Band 19、Band 18/26、Band 8、Band 28)の対応有無が重要だ。
**ステップ3:技適マーク・国内販売状況を確認**
日本国内で合法的に使用するため、技適取得済みかどうかを確認する。
**ステップ4:キャリアの動作確認リストを参照**
特にVoLTE通話やテザリングを使う予定がある場合は、キャリアの動作確認済みリストに掲載されているかを確認する。
MVNOで使う場合も、MVNOの回線を提供する元のMNO(ドコモ系・au系・SoftBank系)のバンドに対応しているかが判断基準になる。MVNOの仕組みについては[格安SIM(MVNO)とは — 仕組みとメリット・デメリット](/ja/guides/what-is-mvno/)で解説している。
海外旅行中に現地SIMや旅行eSIMを使う際のバンド互換性については、[国際ローミングの仕組みと料金 — 海外でキャリアSIMを使う方式](/ja/guides/international-roaming/)も参考になる。
---
## 8. キャリアアグリゲーション(CA)と複数バンドの活用
現代のスマートフォンとネットワークは、単一のバンドを使うだけでなく、複数のバンドを同時に束ねて通信速度を高める「キャリアアグリゲーション(CA)」を活用している。
CAは3GPP Release 10(LTE-Advanced)で初めて規格化された技術で、複数の「コンポーネントキャリア(CC)」を束ねることで下り速度を大幅に向上させる。5G NRでも同様にCA対応が拡大している。
この仕組みがあるため、端末が複数のバンドに対応しているほど、キャリアが提供する高速通信(5CC CAなど)の恩恵を受けやすくなる。スペック表で多くのバンドに対応している端末ほど、CAによる速度向上の機会が増える。
ただし、対応バンドが多くても、エリアによってCAで束ねられるバンドの組み合わせはキャリアの設備によって異なる。端末の最大速度(カタログスペック)は最適条件下の値であり、実際の利用環境では異なる。
旅行eSIMやSIMフリー端末の選び方については[旅行eSIMの選び方 — 5つの比較ポイントと失敗しないコツ](/ja/guides/how-to-choose/)も参照してほしい。
---
## FAQ
### バンドとは何ですか?
バンド(Band)は、モバイル通信に割り当てられた特定の周波数範囲に付けられた番号です。例えば「Band 1」は2.1 GHz帯、「Band 19」は800 MHz帯を指します。3GPPが国際標準として番号を割り当てており、LTEはFDDバンドに1番台から、TDDバンドに33番以降の番号が割り振られ、拡張により100番台超のバンドも存在します。5G NRバンドはn1、n77、n78のように「n」のプレフィックスが付きます。
### プラチナバンドとは何ですか?
プラチナバンドとは、おおむね700〜900 MHz帯の低周波数帯を指す業界の通称です。低周波数の電波は障害物を回り込む性質(回折性)が高く、建物内や地下、山間部など電波が届きにくい場所でもつながりやすい特性があります。一般的にデータ速度は高周波数帯より遅くなりますが、広いエリアをカバーできるため、各キャリアのエリア基盤として機能します。
### 海外で買ったスマートフォンが日本で使えないのはなぜですか?
端末がサポートする周波数バンドは販売地域ごとに異なる場合があるためです。北米向けモデルはAWS(1700/2100 MHz)など日本で使われないバンドを優先している一方、日本固有のバンド(Band 19、Band 21など)に非対応のケースがあります。また、技術基準適合(技適)を取得していない端末は日本国内での使用が電波法上認められません。
### 端末のバンド対応状況はどこで確認できますか?
端末の対応バンドはメーカー公式サイトの仕様ページ(Specifications / Tech Specs)に記載されています。iPhoneはAppleサポートサイト、PixelはGoogleストア、Samsung GalaxyはSamsungサポートで確認できます。また、端末のIMEIを使って「kimovil.com」「IMEI.info」などのサードパーティサービスでバンド対応状況を調べることも可能ですが、最終的な情報は必ずメーカー公式を確認してください。
### 5GのSub-6 GHzとミリ波(mmWave)はどう違いますか?
Sub-6 GHz(サブ6)は6 GHz以下の周波数帯(主に3.4〜4.9 GHz)を使い、LTEより高速で広いエリアをカバーできます。ミリ波(mmWave)は24〜100 GHz帯を使い、超高速通信(数Gbps超)が可能ですが、直進性が強く障害物に弱いため、スタジアムや駅構内など特定の高密度エリアに限定されます。日本の5Gは現状Sub-6 GHzが主体です。
---
## まとめ
- **バンド番号**はモバイル通信の周波数帯域に付けた識別番号。LTEはBand N(3GPP TS 36.101)、5G NRはnN(3GPP TS 38.101)の番号体系を使う。
- **プラチナバンド**(700〜900 MHz)は広域カバーと屋内浸透力を持つ基盤周波数帯。Band 19(ドコモ)・Band 18/26(au)・Band 8(SoftBank)・Band 28(ドコモ・au・SoftBank)が該当する。
- **日本の5G主力バンド**はSub-6 GHz帯(n77: 3.7 GHz、n78: 3.5 GHz、n79: 4.5 GHz)。ミリ波(n257等)は特定エリアのみ。
- **海外端末が国内で使いにくい原因**は、バンドの非対応と技適未取得の2点。特にプラチナバンド対応の有無が地方・屋内カバーに直結する。
- **互換性確認の方法**はメーカー公式スペックページが最優先。IMEIルックアップは補助的な用途に限定し、最終確認は必ず公式で行う。
通信用語全般については[通信用語集 — SIM・eSIM・MNO/MVNOの基礎用語](/ja/guides/glossary-index/)も参考にしてほしい。
================================================================================
# SIM・モバイル通信用語集
URL: https://sim-finder.com/ja/guides/glossary-index/
Type: guides (ja)
Published: 2026-04-13
SIM・eSIM・モバイル通信の基本用語をまとめたリファレンスです。各用語は定義→技術背景→日本での文脈の順で解説します。見慣れない用語に出会ったとき、この用語集を参照してください。
## 基本用語(SIMとキャリア)
### SIM(シム)
**Subscriber Identity Module**の略。加入者識別情報・認証キー・ネットワーク資格情報を安全に格納するICカードまたは集積回路。端末をモバイルネットワークに接続するために必要で、IMSI(国際移動加入者識別番号)とKi(認証キー)を内蔵する。1990年代初頭にGSM標準の一部として規格化された。
物理的な形状で分類すると、Mini-SIM(2FF)、Micro-SIM(3FF)、Nano-SIM(4FF)の3種類がある。現在の日本向けスマートフォンのほとんどはNano-SIMを使用する。
### eSIM(イーシム)
**embedded SIM**の略。eUICCチップに端末製造時から内蔵されており、インターネット経由でキャリアのプロファイルをダウンロードして使用する。GSMA(世界移動通信事業者協会)が策定した消費者向け仕様SGP.22に基づく。物理的なSIMカードを差し替えることなくキャリアを切り替えられる点が特徴。
eSIMには複数のプロファイルを保存できるが、SGP.22 v2.x仕様では同時に有効化できるプロファイルは1つのみ。SGP.22 v3.0以降のMEP(Multiple Enabled Profiles)機能で複数同時有効化が可能になった。
### iSIM(アイシム)
**integrated SIM**の略。eSIM機能をデバイスのチップセットに直接統合した技術。eUICCチップを別途搭載するeSIMと異なり、SoC(System on Chip)の一部として組み込まれるため、端末のさらなる小型化・省電力化が可能。IoT向けGSMA仕様SGP.32(2023年5月公開)に対応する。
### MNO(エムエヌオー)
**Mobile Network Operator**(移動体通信事業者)の略。政府から無線周波数の使用免許を取得し、自社の無線ネットワークインフラを所有・運営する通信事業者。日本では「大手キャリア」とも呼ばれ、NTTドコモ・KDDI(au)・ソフトバンク・楽天モバイルの4社がMNOにあたる。
### MVNO(エムブイエヌオー)
**Mobile Virtual Network Operator**(仮想移動体通信事業者)の略。自社では無線ネットワークインフラを保有せず、MNOからネットワーク帯域を卸売購入してモバイルサービスを提供する事業者。日本では「格安SIM」とも呼ばれる。ITUの定義では「無線周波数の政府免許を持たずモバイルサービスを提供する事業者」とされる。
### サブブランド
MNOの関連会社が提供する低価格の通信サービス。親会社と同じネットワークを使用するため、一般的なMVNOより通信品質が高く安定している傾向がある。日本の代表例はUQ mobile(KDDI/au系)とY!mobile(ソフトバンク系)。MVNOより高く、MNO本体より安い中間的な価格帯に位置する。
### プリペイド
使用前に料金を支払う契約形態。一定額または一定のデータ量・通話時間を前払いし、それを使い切るか有効期限が切れたら終了する。旅行者向けの旅行eSIMの多くはプリペイド型。
### ポストペイド(後払い)
使用後に月額料金を請求される通常の契約形態。日本のキャリアの標準的なプラン形式。月額固定料金または使用量に応じた料金が翌月に請求される。
---
## 設定・手続き関連
### APN(エーピーエヌ)
**Access Point Name**の略。モバイルネットワーク(GSM・GPRS・3G・4G・5G)と外部データネットワーク(主にインターネット)を接続するゲートウェイの名称。3GPP TS 23.003で定義される。MVNOのSIMを使う場合、通常はAPN設定が必要になる。5GシステムではDNN(Data Network Name)が対応する概念として使われる。
### MNP(エムエヌピー)
**Mobile Number Portability**(番号ポータビリティ)の略。現在の電話番号を維持したままキャリアを変更できる仕組み。1997年にシンガポールが世界初の実施国となり、ITU勧告Q.769.1(1999年)で技術標準化された。
日本では2023年5月より、元のキャリアへの連絡不要でオンライン完結できる「ワンストップMNP」が導入され、従来の「MNP予約番号」方式と並存している。
### プロファイル(eSIMプロファイル)
eSIMにダウンロードして使用するキャリアの接続情報一式。ネットワーク認証情報・APN設定・電話番号などが含まれる。SM-DP+サーバーから端末のeUICCにダウンロードされ、設定アプリから有効化・無効化・削除ができる。
### QRコード設定
eSIMを設定する方法の一つ。キャリアから発行されたQRコードを端末カメラで読み取ることでeSIMプロファイルをダウンロードする。iPhoneではカメラアプリまたは設定アプリの「eSIMを追加」から読み取る。1つのQRコードは原則1回のみ使用可能。
### SM-DP+(エスエムディーピープラス)
**Subscription Manager Data Preparation+** の略。eSIMプロファイルの作成・管理・配布を担うサーバー。GSMA SGP.22で定義される消費者向けeSIMアーキテクチャの中核コンポーネント。キャリアまたはeSIMプロバイダーが運営し、端末側のLPA(Local Profile Assistant)がSM-DP+に接続してプロファイルをダウンロードする。手動設定の場合はSM-DP+のアドレス(URLまたはIPアドレス)と、アクティベーションコードを入力する。
### PIN・PUK(ピン・ピューク)
**PIN(Personal Identification Number)**: SIMカードのロック解除に使う4〜8桁の暗証番号。紛失・盗難時に第三者がSIMを悪用するのを防ぐ。誤入力を一定回数(通常3回)繰り返すとSIMがロックされる。
**PUK(PIN Unblocking Key)**: PINロックを解除するための8桁のコード。通常はキャリアから提供され、SIMパッケージや契約書に記載されている。PUKも一定回数(通常10回)誤入力すると、SIMが永久的に使用不能になる。
### IMEI(アイエムイーアイ)
**International Mobile Equipment Identity**(国際移動体装置識別番号)の略。モバイル端末ごとに割り当てられた世界で固有の15桁の数値識別子。3GPP TS 23.003で規定され、GSM・UMTS・LTEネットワーク全体で端末の識別・管理・盗難防止に使用される。`*#06#`をダイヤルするか、設定→システム情報から確認できる。
---
## 通信技術関連
### 3G・4G(LTE)・5G
モバイル通信の世代を表す規格。
- **3G**(第3世代): WCDMA/CDMA2000等の規格。日本では主要キャリアが3G停波を進め、KDDI(2022年3月)・ソフトバンク(2024年4月)・NTTドコモ(2026年3月)の順に完了した。
- **4G/LTE**(第4世代): 「LTE」は**Long-Term Evolution**の略で、3GPP Release 8で規格化。日本で現在最も広く使われている通信規格。
- **5G**(第5世代): 3GPP Release 15以降で規格化。Sub-6GHz帯とミリ波帯を活用し、超高速・大容量・低遅延を実現。
### 帯域(バンド)
モバイル通信に使用する電波の周波数帯。バンドX(例:バンド1、バンド28など)という形で表現される。キャリアにより使用するバンドが異なり、海外で購入した端末を日本で使う場合などに互換性の確認が必要。
日本の4G主要バンド例: Band 1(2.1GHz)、Band 3(1.8GHz)、Band 8(900MHz)など。
Band 19・26(850MHz、プラチナバンド)、Band 28(700MHz)、Band 42(3.5GHz)なども広く使われている。
### SIMロック
端末を販売したキャリア以外のSIMカードを使えないようにする制限。日本では総務省が2021年10月以降、キャリアによる新端末へのSIMロック初期設定を原則禁止とした(ガイドラインに基づく)。それ以前に購入した端末は各キャリアの解除手続きが必要な場合がある。
### SIMフリー
どのキャリアのSIMでも使用できる状態の端末。SIMロックがかかっていない端末。海外製端末や直販モデルの多くはSIMフリー。旅行先で現地SIMや旅行eSIMを使いたい場合、端末がSIMフリーであることが前提条件となる。
### デュアルSIM
1台のデバイスで2枚のSIM(物理SIMまたはeSIM)を使用できる機能。GSMA TS.37で定義される。主な方式は以下の2種類。
- **DSDS(Dual SIM Dual Standby)**: 1つのトランシーバを共有。通話中はもう一方のSIMのネットワーク接続が一時的に切断される。
- **DSDA(Dual SIM Dual Active)**: 2つのトランシーバを持つ。両方のSIMを常時アクティブに保てるが、消費電力が大きい。
### VoLTE(ボルテ)
**Voice over LTE**の略。4G LTEネットワーク上でIMS(IP Multimedia Subsystem)を使い、音声通話・SMSをIPパケットで伝送する技術。GSMA PRD IR.92で仕様が定義され、3GPP IMS MMTelソリューションに基づく。最初の商用サービスは2012年8月(米国MetroPCS)。VoLTE非対応環境では通話時に3Gへのフォールバックが発生する。
### VoNR(ボンアール)
**Voice over New Radio**の略。5G NR(New Radio)ネットワーク上でIMSを使い、音声・ビデオ通話・メッセージングをIPパケットで伝送する技術。VoLTEの5G版にあたる。3GPP Release 15(2018年完成)で規格化。5G SA(Standalone)ネットワーク環境が必要。VoLTEより高品質なEVS(Enhanced Voice Services)コーデックを採用できる。
### ローミング
加入者が自社のホームネットワーク外(主に海外)に移動した際、訪問先ネットワークを通じてモバイルサービスを継続して利用できる仕組み。GSMAのAA.12(International Roaming Agreement)に基づくキャリア間ローミング協定が必要。データローミングは別途有効化が必要で、利用料金はホームキャリアの国際ローミング料金に従う。
### RLAH(アールラー)
**Roam Like At Home**の略。EU/EEA(欧州経済領域)内でのローミングについて、自国と同じ料金でモバイルサービスを使えるようにしたEU規制の通称。2017年6月15日から施行(EU規則531/2012等に基づく)。2022年の改正規則(EU 2022/612)により2032年まで延長・強化された。ただしスイスはEEA非加盟のためRLAH対象外。フェアユースポリシーが適用され、長期滞在時には制限を受ける場合がある。
### Wi-Fi Calling(ワイファイコーリング)
Wi-Fiネットワークを通じて音声通話を行う技術。VoWiFi(Voice over Wi-Fi)とも呼ばれる。セルラーの電波が弱い・届かない場所でも通話できる。3GPP仕様に準拠したキャリアのサポートが必要で、端末側の対応と設定でのON/OFFが必要。日本では対応キャリア・端末が限られる。
### テザリング
スマートフォンのモバイルデータ通信を他のデバイス(PC・タブレット等)と共有する機能。モバイルホットスポット(Wi-Fiで共有)・USBテザリング・Bluetoothテザリングの3方式がある。MVNOや格安プランではテザリングが制限される場合があり、契約プランの確認が必要。
### キャリアアグリゲーション(CA)
複数の周波数帯(コンポーネントキャリア)を束ねて同時に使用し、通信速度を向上させる技術。3GPP Release 10(LTE-Advanced、2011年仕様凍結)で初めて規格化された。Release 10では最大5つのコンポーネントキャリアを束ねることができ、最大100MHzの帯域幅を実現する。5Gでも同様の技術が活用されている。
---
## MNP関連の日本固有用語
### MNP予約番号
従来のMNP手続きで使用された「転出用の番号」。現在のキャリアに電話またはWebで申請して発行してもらい、乗り換え先のキャリアに提示する方式。MNP予約番号の有効期限は発行から15日間。ワンストップMNP導入後も、一部の手続きでは予約番号方式を選択できる。
---
## よくある質問
---
## 関連ガイド(準備中)
以下のガイド記事は現在制作中です。
- [SIMカードとは — 仕組み・種類・サイズの歴史と選び方](/ja/guides/what-is-sim/)
- [eSIMとは — 仕組み・メリット・デメリット](/ja/guides/what-is-esim/)
- [MVNO(格安SIM)とは — 仕組み・メリット・注意点と選び方](/ja/guides/what-is-mvno/)
- [MNP(番号ポータビリティ)とは — 手順・費用・注意点](/ja/guides/what-is-mnp/)
- [APN設定の手順(iPhone) — 構成プロファイルのインストールと手動設定](/ja/guides/apn-setup-iphone/)
- [APN設定の手順(Android) — Pixel・Samsung Galaxy別の設定ガイド](/ja/guides/apn-setup-android/)
- [VoLTEとVoNRとは — 4G/5Gで通話する仕組みと対応端末](/ja/guides/volte-vonr/)
- [デュアルSIMとは](/ja/guides/what-is-dual-sim/)
================================================================================
# 旅行eSIMの選び方 — 5つの比較ポイントと失敗しないコツ
URL: https://sim-finder.com/ja/guides/how-to-choose/
Type: guides (ja)
Published: 2026-04-16
旅行eSIMで失敗するケースの多くは、通信エリアの確認不足またはプランのスコープ(1カ国・複数国・グローバル)と旅程のミスマッチが原因だ。この記事では、プランを選ぶ際に確認すべき5つの比較ポイントと、購入前チェックリストを整理する。
## 5つの比較ポイント
### 1. 通信エリアとネットワーク品質
通信エリアは、購入後に取り返しがつかない唯一の要素だ。データ容量がいくら多くても、渡航先のネットワークが弱ければ意味がない。
購入前に確認すること:
- **渡航先でどのローカルネットワークを使うか。** プロバイダーの対応国ページには、接続する提携ネットワーク名(例:「T-Mobile」「Vodafone」)が明記されているはずだ。一般的なカバレッジマップだけでは不十分で、具体的なネットワーク名を確認する。[用語集](/ja/guides/glossary-index/)でバンド関連の用語も参照できる。
- **端末の対応周波数帯(バンド)との互換性。** 海外の販路から購入した端末を使う場合、渡航先ネットワークのバンドに対応しているかを確認する。
- **5G対応かどうか。** 多くの旅行者にはLTE(4G)で十分だが、5Gが必要な場合はプロバイダーのプラン詳細で明示的に確認する。
リージョナルプランやグローバルプランは、複数国をカバーする利便性がある反面、ローカルネットワークの直接接続ではなく国際中継ネットワーク経由になる場合がある。その場合、1カ国専用プランと比較して速度が低下することがある。接続品質を重視するなら、提携ネットワーク名が明記された1カ国専用プランが有利だ。
### 2. データ容量と利用パターン
旅行eSIMは固定容量プラン(例: 1GB・5GB・10GB・20GB)と、デイリー制限付きの「無制限」プランの2種類に大別される。
**固定容量プラン**は、地図・メッセージ・軽いブラウジング中心の旅行者に適している。一般的な1週間の旅行では5〜10GBが一つの目安だ。動画ストリーミングやリモートワークを行う場合はより多くの容量を見込む必要がある(Netflix HD画質は1時間あたり最大3GB、YouTube 1080pは1時間あたり約2〜3GBを消費する)。アプリ別の消費量の目安は[データ通信量ガイド](/ja/guides/data-usage-guide/)を参照されたい。
**無制限プラン**は容量を気にしなくて済む安心感がある一方、ほとんどのプランは1日あたりの利用量がしきい値を超えると速度制限がかかる。メッセージや軽いブラウジングは制限後も可能なことが多いが、動画視聴やビデオ通話には支障が出る場合がある。
また、**データのカウント方法**がプロバイダーによって異なる。ダウンロードのみを計測するものと、アップロードも合算するものがある。ビデオ通話や写真のアップロードを多用する場合は、この点にも注意が必要だ。
### 3. 有効期限と開始タイミング
旅行eSIMプランには固定の有効期間がある(一般的に7日・14日・15日・30日)。有効期間の開始タイミングはプロバイダーによって異なる:
- **インストール日起算** — eSIMプロファイルをデバイスにインストールした時点から有効期間が始まる。渡航前にインストールすると、現地に到着する前に日数が消費される。
- **現地ネットワーク接続時起算** — 渡航先のネットワークに端末が接続した時点で開始する。旅行者にとって最も都合の良いモデルだ。
- **データ利用開始時起算** — 初めてデータ通信を行った時点で開始する。
購入前に必ずどのモデルかを確認する。インストール日起算のプランを出発数日前にインストールすると、渡航前に有効日数を無駄に消費してしまう。
複数都市を周遊する旅程では、残データが次のプランに繰り越されるかどうか、または有効期限切れで失効するかどうかも確認しておくとよい。
### 4. 料金体系
旅行eSIMプロバイダーの料金体系は主に以下の3種類だ:
| 体系 | 向いている用途 | 注意点 |
|------|-------------|--------|
| **固定容量(GB単位)** | 使用量が読めるユーザー | 旅行中に使い切る可能性 |
| **無制限(日数または旅行単位)** | 動画・テレワーク利用者 | 速度制限のしきい値を確認 |
| **従量制・繰り越し** | 一部のプロバイダーのみ提供 | 単価が高くなりやすい |
具体的な料金はプロバイダーや渡航先によって頻繁に変わるため、この記事では記載しない。[SimFinderの旅行eSIM検索](/ja/travel/)で渡航先のプランをリアルタイムで比較できる。プロバイダー・データ容量・有効期間・価格を一覧で確認できる。
表示金額だけで比較しないこと。固定容量プランは1GBあたりの単価で比較し、無制限プランは公正利用ポリシーの内容を読んで判断する。
### 5. 設定方法(アクティベーション方式)
旅行eSIMのアクティベーション方式は主に4種類ある:
- **QRコード** — 最も一般的な方式。メールまたはアプリ内で発行されたQRコードをカメラでスキャンする。eSIM対応端末であれば機種を問わず利用できる。
- **プロバイダーアプリ** — 専用アプリからeSIMプロファイルをインストールする方式。データ追加購入も同アプリで完結するため便利だが、アプリへの依存が発生する。
- **手動コード(SM-DP+アドレス)** — サーバーアドレスとアクティベーションコードを手動入力する。QRコードのスキャンが困難な場合(同一画面上のQRコードを読み取れない場合等)に使える代替手段だ。
- **プロファイルの直接配信** — キャリアがプロファイルをデバイスに自動的に配信する方式。旅行eSIMでは一般的ではない。
各方式の詳細な手順は[初めての旅行eSIM完全ガイド](/ja/guides/first-time-guide/)で解説している。
一点、全ての旅行eSIMに共通するルールがある。**QRコードは1回のみ使用可能で、1台のデバイスにのみ紐付けられる。** インストールが途中で失敗した場合、同じQRコードを再スキャンしてもアクティベーションは成功しない。プロバイダーに連絡して新しいコードを発行してもらう必要がある。
---
## 1カ国プラン・リージョナルプラン・グローバルプランの違い
プランのスコープと旅程が合っていないことは、不必要な出費の主な原因の一つだ。
### 1カ国プラン
特定の1カ国向けに設計されたプランは、その国の1〜2社のネットワーク提携先に接続し、通常は最も安価で通信速度も高い。滞在先が1カ国のみであれば、まずこのタイプを検討する。
制約として、国境を越えた時点でプランが使えなくなるか、高額なローミングに切り替わる点がある。
### リージョナルプラン
1回の購入で複数の国をカバーするプランだ。主なグループはヨーロッパ(一般的に30〜40カ国)・アジア・中南米・中東・アフリカなど。複数の国をまたぐ旅程で、都度eSIMを購入し直す手間とコストを省ける。
トレードオフとして、1カ国専用プランと比べてGB単価が高くなることが多く、地域内の国によってネットワーク品質にばらつきがある。2〜3カ国をまたぐ旅程、特に通信インフラが整備されているヨーロッパでは十分な選択肢になる。
### グローバルプラン
世界中のほぼ全ての渡航先を1つのeSIMでカバーするプランだ。4カ国以上の渡航や長期の世界旅行に最も柔軟に対応できる。
GB単価が高くなる傾向があり、ローカルネットワーク直接接続と比べて速度が低くなることもある。購入前に自分の渡航先が対象国に含まれているか、各国のネットワーク接続先も合わせて確認しておく。
---
## データのみか、通話付きかの選択
ほとんどの旅行eSIMは**データ通信専用**だ。電話番号は付与されず、通常のSMS受信や音声通話はできない。
LINEやWhatsApp、FaceTime Audio(Appleデバイス間)などのVoIPアプリをデータ接続経由で使えるため、通常の旅行者の通信ニーズはカバーできる。詳しい使い分けは[海外旅行用eSIM完全ガイド(ブログ)](/ja/blog/travel-esim-complete-guide-2026/)も参照されたい。
ただし、データのみのeSIMでは対応できないケースがある:
- **銀行やオンラインサービスのSMS認証(二段階認証)の受信。** SMS認証に非対応のサービスに限った話だが、特定の金融機関では認証アプリへの切り替えができない場合がある。
- **現地の電話番号への通常の発着信。**
- **電話番号を要求するサービスの本人確認。**
これらが必要な場合は、日本のSIMを[デュアルSIM構成](/ja/guides/what-is-dual-sim/)で維持するのが確実な対策だ。日本のSIMで国際ローミングを使って通話・SMSを受信しつつ(ローミング料金が発生する場合がある)、データ通信は旅行eSIMを使う構成だ。旅行eSIMをデータ通信回線として使用する際は、日本のSIMのデータローミングをオフにするか、iPhoneの「モバイルデータ通信の自動切替」設定をオフにして、意図せず日本SIMのローミングデータを消費しないようにすること。
音声通話付きのeSIMプランを提供するプロバイダーも一部存在するが、プラン数は少なく料金も高め。必要性と追加コストを天秤にかけて判断する。
---
## 購入前チェックリスト
購入を確定する前に、以下の各項目を確認する:
**端末の条件**
- [ ] 端末がeSIMに対応している(iPhone XS/XR以降、Pixel 3以降、Samsung Galaxy S20以降 — 設定の「eSIMを追加」メニューで確認)
- [ ] 端末がSIMフリー(キャリアロック解除済み)である(iPhoneは「設定 → 一般 → 情報 → キャリアロック」で確認。「SIMの制限なし」と表示されればアンロック済み)
- [ ] 端末が渡航先ネットワークの対応バンドをサポートしている
**プランの内容**
- [ ] 渡航先の具体的な接続ネットワーク名がプロバイダーページに明示されている
- [ ] 有効期間の開始トリガーを確認済み(インストール日・初回接続・初回データ利用のどれか)
- [ ] 必要であれば、テザリング(インターネット共有)の可否を確認済み
- [ ] データ追加購入(トップアップ)の可否と方法を確認済み
- [ ] 返金・キャンセルポリシーが許容範囲内である
**実際の設定**
- [ ] 出発前に自宅のWi-Fiでプロファイルをインストール済み
- [ ] 旅行eSIMの回線は、現地に到着するまで「オフ」にしておく(有効化すると有効期限のカウントや課金が始まる場合がある)
- [ ] デュアルSIM利用の場合、iPhoneでは「モバイルデータ通信の自動切替」をオフにして日本SIMのローミング課金を防ぐ
- [ ] QRコードまたはアクティベーション情報を別途バックアップ済み(再インストールに備えて)
---
## SimFinderで最適なプランを探す
[SimFinderの旅行eSIM検索](/ja/travel/)では渡航先・データ容量・有効期間・プロバイダーを条件に絞り込んで比較できる。接続ネットワーク名も表示されるため、購入前にカバレッジの質を確認できる。
この記事に具体的な料金を記載しないのは、プロバイダーの価格が頻繁に変わり情報がすぐ古くなるためだ。リアルタイムのプランデータを検索ツールで確認することを推奨する。
購入からインストール・現地利用・帰国後の管理まで一通りの手順を確認したい場合は、[初めての旅行eSIM完全ガイド](/ja/guides/first-time-guide/)を参照されたい。
インストールや設定でトラブルが発生した場合は、[eSIMが設定できない — トラブルシューティング](/ja/guides/activation-failed/)を参照されたい。
================================================================================
# IMEIブラックリストとは — 中古端末購入時の注意
URL: https://sim-finder.com/ja/guides/imei-blacklist/
Type: guides (ja)
Published: 2026-06-04
中古端末を購入した後に通信ができなくなるトラブルの主な原因が「IMEIブラックリスト」への登録だ。盗難・紛失・分割未払いの端末はキャリアがIMEIをブラックリストデータベースに登録し、モバイル通信を遮断する。日本では「ネットワーク利用制限」と呼ばれ、○・△・×・-の4段階で状態が公開されている。
この記事では、IMEIブラックリストの仕組みと登録理由、日本の確認手順、中古端末購入で失敗しないためのチェック方法を解説する。
---
## IMEIブラックリスト(EIR)の仕組み
### EIRとは何か
EIR(Equipment Identity Register)は、モバイルネットワークに接続しようとする端末のIMEIを検証するデータベースだ。端末がネットワークに接続を要求する際、ネットワーク側がEIRに問い合わせを行い、IMEIのステータスを確認する。
EIRが管理するIMEIのステータスは一般的に3つのリストに分類される。
| リスト | 意味 |
|--------|------|
| ホワイトリスト | 問題のない端末。接続を許可する |
| グレーリスト | 監視対象端末。接続は許可するが記録する |
| ブラックリスト | 利用制限端末。接続を拒否する |
ブラックリストに登録された端末がネットワーク接続を試みると、認証段階でアクセスを拒否される。その結果、音声通話・SMS・モバイルデータ通信のすべてが利用できなくなる。Wi-Fiによるインターネット接続はIMEIチェックの対象外のため影響を受けない。
なお、IMEIブラックリスト(ネットワーク利用制限)とSIMロックはまったく別の仕組みだ。IMEIブラックリストは「端末そのものが通信できない状態」であり、SIMロックは「特定キャリアのSIM以外が使えない状態」だ。×判定(赤ロム)の端末はどのSIMを挿しても通信不可になる一方、SIMロック端末は対応キャリアのSIMであれば通常通り利用できる。
### IMEIが15桁である理由
IMEI(International Mobile Equipment Identity)は3GPP TS 23.003で規定された15桁の端末識別番号だ。最初の8桁はTAC(Type Allocation Code)で端末モデルを識別し、次の6桁はSNR(Serial Number)で個体を識別し、最後の1桁はLuhnアルゴリズムによるチェックディジットだ。この体系により、全世界で同一IMEIを持つ端末が生じないよう管理されている。
IMEIの確認方法や構造の詳細は「[IMEI・PIN・PUKコードとは — 意味と確認・解除方法](/ja/guides/imei-pin-puk/)」で解説している。
---
## GSMAのEIRネットワーク間共有
### IMEIデータベースの国際共有
GSMAはIMEI中央登録システムとして**GSMA Device Registry**を管理している。各国のキャリアはEIRを自社で保有するが、GSMAのシステムを通じて盗難端末情報を国際的に共有することが可能だ。
ただし、この国際共有に参加するかどうかはキャリアや各国の方針により異なる。日本の大手キャリアは独自のネットワーク利用制限を管理している。GSMA Device Registry等の国際的なブラックリスト共有への各キャリアの参加状況は公式には確認しづらく、国をまたいだ制限の適用範囲は一律ではない。
### 登録されるケースと登録者
EIRへの登録はキャリアが実施する。利用者が自分でブラックリストに登録することはできない。登録が発生する主なケースは以下の通りだ。
**盗難・紛失の申告**
端末の盗難または紛失をキャリアに申告すると、キャリアはその端末のIMEIをEIRのブラックリストに登録する。これにより、端末を不正に取得した第三者がSIMカードを差し替えても通信できない状態にする。
**分割払いの長期未払い**
端末をキャリアの分割払い(割賦)で購入した場合、支払いが長期間滞ると、キャリアが債権回収の手段としてIMEIをブラックリストに登録することがある。
---
## 日本の「ネットワーク利用制限」とは
### 4段階の判定区分
日本の大手キャリア(ドコモ・au・ソフトバンク)は、端末のIMEIを入力すると「ネットワーク利用制限」の状態を公開している。判定は4種類だ。
| 判定 | 意味 |
|------|------|
| ○(まる) | 利用制限なし。問題なく通信できる |
| △(さんかく) | 分割払いの支払いが残っている。現時点では通信可能だが、未払いが続くと×になる可能性がある |
| ×(ばつ) | 利用制限あり。通信が遮断されている状態(いわゆる赤ロム) |
| -(ハイフン) | 該当なし、または確認対象外 |
**中古端末を購入する場合は○判定の端末を選ぶことが原則だ。** △判定の端末は現時点では使えても、前の所有者の分割払いが滞ると×に変わるリスクがある。購入者は分割払い残債の当事者ではないため、後から×判定になっても利用者側では解除できない。
### 確認ページへのアクセス
各キャリアが独自の確認ページを提供している。確認手順はどのキャリアも共通で、対象端末のIMEIを入力する形式だ。IMEIは電話アプリで`*#06#`をダイヤルするか、「設定」→「端末情報」から確認できる。
ネットワーク利用制限の確認は中古端末の購入前に必ず実施することを推奨する。
---
## 赤ロムとは
### 用語の定義
「赤ロム」は、キャリアのネットワーク利用制限で通信が遮断された端末を指す俗称だ。ネットワーク利用制限の×判定と実質的に同義で使われる。「赤ロム端末」「赤ロム化」という表現が中古スマホ市場で一般的に使われる。
対義語として「白ロム」があり、こちらはSIMカードが挿入されていない(または利用制限のない)端末を指す。○判定の端末は「白ロム」と呼ばれることが多い。
### 赤ロムになるタイミング
購入時点では○判定(白ロム)だった端末が、後から×判定(赤ロム)になる「後赤ロム」が中古市場でのトラブルとして知られている。前の所有者の分割払いが購入後に滞った場合、△判定から×判定に移行する。中古端末販売店が提供する「赤ロム保証」は、購入後一定期間内に×判定になった場合の返金・交換を保証するサービスだ。
○判定は分割払い残債がない状態を示すため、後から×になることはほぼないが、盗難申告のタイミングが購入後にずれ込むなど、可能性がゼロではないケースも存在する。中古端末を購入した後は、定期的にネットワーク利用制限確認ページで状態を確認する習慣をつけることが望ましい。
---
## 中古端末を購入する前のIMEIチェック手順
### ステップ1: 販売端末のIMEIを確認する
購入前に販売者にIMEIを提示してもらうか、実機を手にして`*#06#`をダイヤルしてIMEIを確認する。フリマアプリ(メルカリ・ラクマなど)での購入では、出品者に「IMEIを教えてください」とメッセージで依頼し、確認してから購入手続きに進むのが原則だ。
デュアルSIM端末の場合は2つのIMEIがある。キャリアの確認ページではSIM1(IMEI1)のIMEIを確認することが一般的だ。
### ステップ2: キャリアのネットワーク利用制限確認ページで調べる
対象端末を購入したキャリアの確認ページでIMEIを入力する。購入キャリアが不明な場合は、ドコモ・au・ソフトバンクの3社すべてで確認することを推奨する。
**確認結果の判断基準**
- ○判定 → 購入可
- △判定 → リスクあり(回避を推奨)
- ×判定 → 購入しない
- -判定 → そのキャリアの端末ではない可能性がある
SIMロック状態の確認も合わせて実施することを推奨する。SIMロックが残っている端末は、購入したキャリア以外のSIMカードが使えない。**IMEIブラックリスト(ネットワーク利用制限)とSIMロックは別の制限**であり、○判定でもSIMロックが残っている端末は他社SIMが使えない点に注意が必要だ。SIMロックの確認と解除手順については「[SIMフリーとSIMロック — 確認方法と解除手順](/ja/guides/sim-lock/)」で解説している。
### ステップ3: 販売元の信頼性を確認する
ネットワーク利用制限の確認に加え、販売元の信頼性も重要な判断基準だ。中古スマホ専門店では「赤ロム保証」を提供している店舗がある。これは購入後一定期間内に×判定(赤ロム化)が発生した場合に返金・交換対応を受けられる保証で、△判定端末を購入する際のリスクヘッジとして機能する。フリマアプリの個人出品では一般的にこの保証はないため、○判定の端末のみを対象とするか、評価実績が豊富な出品者を選ぶことが重要だ。
---
## eSIMと中古端末のIMEIチェック
### eSIM専用端末の注意点
eSIM専用端末(米国版iPhone 14以降など)はSIMトレイを持たない。物理SIMカードのないこれらの端末でも、IMEIによるネットワーク利用制限の確認は可能だ。`*#06#`のダイヤルまたは「設定」→「一般」→「情報」からIMEIを確認できる。
eSIM自体の仕組みについては「[SIMカードとは — 仕組み・種類・サイズの歴史と選び方](/ja/guides/what-is-sim/)」で解説している。
### eSIM転用(物理SIM→eSIM変換)と端末売却
端末をeSIMに転用(物理SIM→eSIM変換)した後に端末を売却する場合、前の所有者がeSIMプロファイルの削除と端末の工場出荷状態リセットを行っているかが重要だ。これはIMEIブラックリストとは直接関係しないが、中古端末としての使用準備に影響する。
---
## 端末の紛失・盗難時の対応
### キャリアへの申告と利用停止
端末を紛失・盗難被害に遭った場合は、速やかにキャリアへ申告する。申告により、キャリアは当該端末のIMEIをEIRに登録し、不正使用を防止する。
申告後は以下が発生する。
- SIMカードの利用停止(音声・SMS・データ通信の遮断)
- IMEIのブラックリスト登録(端末単位での利用制限)
SIMカードの利用停止とIMEIのブラックリスト登録は独立した処理であることに注意が必要だ。SIM停止のみでは、第三者が別のSIMを差し替えれば通信できてしまう。IMEIをブラックリストに登録することで、SIMを差し替えた場合でも端末レベルで通信を遮断できる。
**申告を取り消した場合**(端末が見つかった場合など)は、キャリアに連絡して利用停止を解除してもらう必要がある。解除が完了すれば、EIRのブラックリストからも削除される。
### 端末売却・譲渡前の確認
端末を売却・譲渡する前に以下を確認する。
1. 紛失・盗難申告をしている場合は、キャリアへ申告の取り消しを依頼し、×判定が解除されているか確認する
2. 分割払いが完了しているか確認する(完了前の売却は△または×判定のまま)
3. ネットワーク利用制限確認ページで○判定であることを確認してから売却する
端末の乗り換え・売却に関連して、電話番号を引き継ぐMNP(番号ポータビリティ)の手順は「[MNP(番号ポータビリティ)とは — 手順・費用・注意点](/ja/guides/what-is-mnp/)」で解説している。
---
## SIMスワップとIMEIブラックリストの違い
### 攻撃対象が異なる
SIMスワップは電話番号(SIMカードの認証情報)を狙う攻撃で、端末本体のIMEIは関係しない。一方、IMEIブラックリストは端末のハードウェアを識別番号で制限する仕組みだ。
| 項目 | SIMスワップ | IMEIブラックリスト |
|------|------------|------------------|
| 対象 | SIMカード(電話番号) | 端末(IMEI) |
| 発生原因 | 攻撃者によるなりすまし申告 | 盗難申告・分割未払い |
| 主な影響 | 電話番号の乗っ取り | 端末での通信遮断 |
| 対策 | 本人確認強化・認証アプリ移行 | 購入前のIMEI確認 |
SIMスワップ詐欺の仕組みと対策については「[SIMスワップ詐欺とは — 手口・兆候・防ぎ方](/ja/guides/sim-swap/)」で詳しく解説している。
---
## FAQ
**Q. 中古でiPhoneを購入しましたが、すでに△判定です。そのまま使い続けて大丈夫ですか?**
A. △判定は現時点では通信できますが、前の所有者の分割払いが滞ると×判定(通信遮断)になるリスクがあります。販売者に分割払いの残高状況を確認するか、リスクを了承したうえで購入する判断が必要です。購入後の赤ロム化リスクが懸念される場合は、赤ロム保証付きの販売店を利用することを推奨します。
**Q. ×判定(赤ロム)の端末を購入してしまいました。通信を復活させる方法はありますか?**
A. 基本的にはありません。×判定の解除はIMEIを登録したキャリアが行う手続きで、利用者が自分で解除することはできません。前の所有者の分割払いが完済されるか、盗難申告が取り消されるかでないと解除されません。×判定端末を購入してしまった場合は、販売店への返品・交換対応を求めることが最初のステップです。
**Q. Wi-Fiしか使わない場合でも、IMEIブラックリストの影響を受けますか?**
A. Wi-Fi接続のみでの使用はIMEIブラックリストの影響を受けません。IMEIチェックはモバイルネットワーク(キャリア回線)への接続時にのみ実施されます。ただしWi-Fiのみの端末として使用することは、モバイル通信が必要な用途には対応できません。
**Q. 海外から購入した端末(並行輸入品)はIMEIブラックリストの対象になりますか?**
A. 日本のキャリアのEIRは主として日本国内で販売・契約された端末を管理しています。海外の並行輸入品が日本のキャリアのネットワーク利用制限の対象になるかは端末によって異なります。並行輸入品を購入する際も、日本のキャリアの確認ページでIMEIを調べることが推奨されます。
---
## まとめ / 関連ガイド
- **EIR(Equipment Identity Register)**: モバイルネットワークが端末のIMEIを検証するデータベース
- **ブラックリスト登録の理由**: 盗難・紛失申告、分割払いの長期未払い
- **日本の判定区分**: ○(利用制限なし)・△(分割残あり)・×(利用制限)・-(対象外)
- **赤ロム**: ×判定端末の俗称。Wi-Fiは使えるがモバイル通信は遮断される
- **中古端末購入前の手順**: `*#06#`でIMEI確認 → キャリアのネットワーク利用制限ページで○判定を確認
- **IMEIブラックリストとSIMロックは別物**: ○判定でもSIMロックが残っていると他社SIMは使えない
- **フリマ・中古ショップでの確認**: フリマは個人出品のため赤ロム保証なし。中古ショップでは保証の有無を事前確認
- **△判定の後赤ロムリスク**: 購入後に前の所有者の分割払いが滞ると×判定に移行する。購入者側では解除不可
### 関連ガイド
- [IMEI・PIN・PUKコードとは — 意味と確認・解除方法](/ja/guides/imei-pin-puk/)
- [SIMフリーとSIMロック — 確認方法と解除手順](/ja/guides/sim-lock/)
- [SIMスワップ詐欺とは — 手口・兆候・防ぎ方](/ja/guides/sim-swap/)
- [MNP(番号ポータビリティ)とは — 手順・費用・注意点](/ja/guides/what-is-mnp/)
- [SIMカードとは — 仕組み・種類・サイズの歴史と選び方](/ja/guides/what-is-sim/)
================================================================================
# IMEI・PIN・PUKコードとは — 意味と確認・解除方法
URL: https://sim-finder.com/ja/guides/imei-pin-puk/
Type: guides (ja)
Published: 2026-06-04
IMEI・PIN・PUKはいずれもSIM・端末セキュリティに関わるコードだが、それぞれ役割が異なる。IMEIは端末の固有識別番号、SIM PINはSIMカードへのアクセスを制御する暗証番号、PUKはPINロックを解除するための回復コードだ。
この記事では、3つのコードの定義・確認方法・違い、そしてPINロックが発生したときの正しい対処手順を解説する。
---
## IMEIとは(端末識別番号)
### 定義と仕様
IMEI(International Mobile Equipment Identity、国際移動体端末識別番号)は、モバイル端末ごとに割り当てられた15桁の数値識別子だ。3GPP TS 23.003で規定される国際標準であり、世界中で同一のIMEIを持つ端末は存在しないよう管理されている。
IMEIの構造は以下の通りだ。
| 桁 | 名称 | 内容 |
|----|------|------|
| 1〜8桁 | TAC(Type Allocation Code) | 端末モデルを識別するコード |
| 9〜14桁 | SNR(Serial Number) | 同一モデル内の個体番号 |
| 15桁 | CD(Check Digit) | Luhnアルゴリズムによる検証桁 |
最後の1桁はLuhnアルゴリズム(ISO/IEC 7812)によるチェックディジットで、入力ミスや不正なIMEIを検出するために使われる。
## IMEIの確認方法
**電話アプリから確認する(最も簡単)**
電話アプリを開き、「`*#06#`」をダイヤルする。発信ボタンを押さなくても、入力と同時に画面にIMEIが表示される。デュアルSIM端末では2つのIMEIが表示される場合がある。
**設定画面から確認する**
- iPhone: 「設定」→「一般」→「情報」→「IMEI」
- Android: 「設定」→「端末情報」(または「デバイス情報」)→「IMEI情報」
**本体・外箱から確認する**
iPhoneはSIMトレイ(ナノSIM搭載モデル)または本体背面(印刷されているモデル)にIMEIが記載されている。端末購入時の箱(外箱)の側面にも記載されている。端末が手元にない場合(紛失・盗難時など)は箱を確認するのが確実だ。
## IMEIの主な用途
**SIMロック確認・解除手続き**
キャリアのオンラインSIMロック確認・解除ページでIMEIを入力して手続きを行う。SIMロックの仕組みと解除手順の詳細は「[SIMフリーとSIMロック — 確認方法と解除手順](/ja/guides/sim-lock/)」で解説している。
**端末の盗難・紛失時の利用停止申請**
キャリアや警察にIMEIを伝えることで、盗難・紛失端末のネットワーク利用を停止する手続きができる。IMEIはGSMAが管理するEIR(Equipment Identity Register)に登録され、ブラックリストに登録された端末は多くのネットワークで通信できなくなる。
**海外渡航時のネットワーク対応確認**
IMEIには端末モデルの情報が含まれており、利用予定のネットワーク(周波数帯)と端末の対応状況を確認する際に使われる。周波数帯の確認方法については「[周波数帯(バンド)とは — 4G/5Gの対応確認方法](/ja/guides/frequency-bands/)」で解説している。
### IMEIに関する注意点
- IMEIは端末固有の識別情報のため、不特定多数に公開しないことが推奨される
- ソフトウェアによるIMEI書き換えは多くの国で違法行為にあたる
- デュアルSIM端末は通常IMEI1とIMEI2の2つを持つ
---
## SIM PINとは(SIMカード暗証番号)
### 定義と仕様
SIM PIN(Personal Identification Number)は、SIMカードへのアクセスを制御する4〜8桁の暗証番号だ。ETSI ETS 300 922および3GPP TS 51.011で規定されている。
SIM PINを設定すると、端末の起動時またはSIMカードを別端末に挿し込んだ際に、PINの入力が要求される。正しいPINを入力しなければ、通話・SMS・モバイルデータ通信を含むすべてのSIM機能が使えない。
SIM PINを3回連続で誤入力すると、SIMカードはロック状態になる。このロックはSIM PINでは解除できず、PUKコードが必要になる。
### SIM PINの初期値について
SIMカードを契約した際、キャリアによって初期PINが設定されている場合がある。初期PINはキャリアの契約書類や、SIMカードが入っていたパッケージカードに記載されていることが多い。
**初期PINのまま使い続けることは避けるべきだ。** 0000や1234などの単純な数字は推測されやすく、SIMを悪用されるリスクがある。初期PINは設定画面から変更できる。
## SIM PINの設定・変更方法
**iPhoneの場合**
1. 「設定」→「モバイル通信」→「SIM PIN」を開く
2. 「SIM PINをオン」をタップしてPINを設定(または「PINを変更」で変更)
デュアルSIM構成の場合は、物理SIMとeSIMそれぞれのPINを個別に設定できる。
**Androidの場合**
メーカーや機種によって操作画面が異なるが、一般的な手順は以下の通りだ。
1. 「設定」→「セキュリティ」→「SIMカードロック設定」を開く
2. 「SIMカードのロック」をオンにして設定
### SIM PINを設定すべき理由
**スマートフォンの画面ロックとの違い**
スマートフォンの画面ロック(パスコード・指紋・顔認証)はあくまでも端末本体へのアクセスを制御するものだ。画面ロックが有効でも、SIMカードを取り出して別の端末に挿せば、SIM PINなしには通話・SMS・データ通信が利用できる状態になる。
SIM PINを設定することで、SIMカード単体での不正使用を防止できる。
**SIMスワップ詐欺への対策**
SIMスワップ詐欺(SIMのっとり)は、攻撃者がキャリアに不正にSIM再発行を依頼し、被害者の電話番号を乗っ取る手口だ。SIM PINはキャリア側での不正再発行そのものを防ぐものではないが、物理的なSIMカードの不正使用に対する防御層として機能する。
---
## PUKとは(PINロック解除コード)
### 定義と仕様
PUK(Personal Unblocking Key)は、SIM PINが3回連続で誤入力された後にSIMのロックを解除するための8桁のコードだ。ETSI ETS 300 922で規定されており、SIM PINとは独立したコードとして管理されている。
**PUKとSIM PINの主な違い**
| 項目 | SIM PIN | PUK |
|------|---------|-----|
| 桁数 | 4〜8桁 | 8桁(固定) |
| 利用者による変更 | 変更可能 | 変更不可 |
| 提供元 | SIMカード出荷時にキャリアが設定 | キャリアが管理・提供 |
| 誤入力の上限 | 3回でSIMロック | 10回でSIM永久ロック |
### PUKの確認方法
PUKはキャリアが管理するコードであり、利用者が自由に変更できない。以下の方法で確認する。
**キャリアの契約書類から確認する**
SIM契約時の書類(SIMカードが封入されていたパッケージ、契約確認書など)にPUKが記載されている場合がある。パッケージ自体に印刷されているキャリアも多い。
**キャリアのマイページから確認する**
多くのキャリアではオンラインのマイページ(My docomo、My au、My SoftBankなど)でPUKを確認できる。端末が使えなくてもPCやほかのスマートフォンからマイページにアクセスすれば確認可能だ。
**キャリアのカスタマーサポートに問い合わせる**
電話またはチャットサポートで本人確認を行ったうえでPUKを確認できる。端末が使えない状態でも、固定電話や別のスマートフォンから問い合わせ可能だ。
### PUKを入力する際の絶対的な注意事項
**PUKを10回連続で誤入力すると、SIMカードは永久に使用不能になる。**
この状態は技術的に回復できない。キャリアに連絡しても元のSIMを復活させることはできず、SIMカードの再発行(新規SIM発行)が必要になる。PUKを入力する際は以下を厳守する。
- **推測で入力しない**: PUKは必ずキャリアの書類またはマイページから正確に確認してから入力する
- **慎重に入力する**: 8桁の数字を一桁ずつ確認しながら入力する
- **入力前に残り試行回数を確認する**: 端末によっては残り試行回数が画面に表示される
---
## PINロックが発生したときの対処手順
SIM PINを3回誤入力してPINロック状態になった場合の手順を示す。
### ステップ1: 慌てずにPUKを確認する
端末にPUKの入力を求める画面が表示されるが、**この段階では入力しない。** 先にPUKを正確に確認することが最優先だ。
確認手順は以下の優先順で行う。
1. SIM契約時の書類・パッケージを探す
2. 別のデバイス(PC・別のスマートフォン)からキャリアのマイページにアクセスしてPUKを確認する
3. キャリアのカスタマーサポートに電話し、本人確認のうえPUKを確認する
### ステップ2: PUKを正確に入力する
PUKが確認できたら、端末の画面に表示されているPUK入力欄に8桁のコードを入力する。正しいPUKを入力すると、次に新しいSIM PINの設定を求められる。
### ステップ3: 新しいSIM PINを設定する
PUKによるロック解除後、新しいSIM PINを設定する。このとき推測されにくい数字の組み合わせを選ぶ。0000・1111・1234などの連続した数字や生年月日は避けることが推奨される。
### PUKでも解除できない場合(10回誤入力後)
PUKを10回誤入力した場合、SIMは永久に使用不能になる。この場合はキャリアのショップまたはオンラインでSIMカードの再発行を申し込む必要がある。再発行後は電話番号を引き続き使用できるが、SIMカード自体は新しくなる。
SIMカードの開通でトラブルが発生した場合の対処法は「[eSIM・SIMが開通しない — 原因と対処法](/ja/guides/activation-failed/)」で解説している。また、ネットワーク接続ができない場合は「[圏外・電波なし — 原因別チェックリストと解決手順](/ja/guides/no-service/)」も参照してほしい。
---
## IMEI・PIN・PUKの違いをまとめる
3つのコードの違いを改めて整理する。
| コード | 対象 | 桁数 | 管理者 | 変更 | 失敗上限 |
|--------|------|------|--------|------|---------|
| IMEI | 端末 | 15桁 | メーカーが製造時に割り当て | 不可(書き換えは多くの国で違法) | — |
| SIM PIN | SIMカード | 4〜8桁 | 利用者 | 変更可能 | 3回でPINロック |
| PUK | SIMカード | 8桁 | キャリア | 変更不可 | 10回でSIM永久ロック |
**SIMカードそのものの仕組みについて**は「[SIMカードとは — 仕組み・種類・サイズの歴史と選び方](/ja/guides/what-is-sim/)」で解説している。
---
## FAQ
**Q. IMEIを確認する必要があるのはどんな場面ですか?**
A. 主に以下の4つの場面でIMEIが必要になります。(1)SIMロックの確認・解除手続き、(2)端末の盗難・紛失時のキャリアへの利用停止申請、(3)海外でのネットワーク対応確認、(4)端末を売却・下取りに出す際の本体識別です。IMEIは電話アプリで「*#06#」をダイヤルするか、設定画面の端末情報から確認できます。
**Q. SIM PINを忘れてしまいました。どうすればいいですか?**
A. SIM PINを忘れた場合は、当てずっぽうで試行しないことを強く推奨します。誤入力3回でPINロックがかかるため、確実でないPINは入力しないでください。まずキャリアのマイページまたは契約書類でPUK(PINロック解除コード)を確認し、手元に用意してから対処してください。PINを完全に無効化(オフ)すれば以降は入力不要になります。
**Q. eSIMにもSIM PINとPUKはありますか?**
A. はい。eSIM(eUICC)にもSIM PINとPUKの仕組みがあります。物理SIMカードと同様に、eSIMのPINを3回誤入力するとSIMがロックされ、PUKでの解除が必要になります。eSIMのPINはiPhoneの場合「設定」→「モバイル通信」から対象のeSIMを選択して確認・設定できます。
**Q. 機種変更するときIMEIは変わりますか?**
A. はい、IMEIは端末固有の識別番号のため、機種変更(端末を変える)するとIMEIは新しい端末のものになります。電話番号はSIMカードに紐付いているため、SIMを差し替えれば同じ番号を引き続き使えますが、IMEIは変わります。
---
## まとめ / 関連ガイド
- **IMEI**: 端末ごとに固有の15桁識別番号(3GPP TS 23.003準拠)。`*#06#` で確認できる
- **SIM PIN**: SIMカードへのアクセスを制御する4〜8桁の暗証番号。3回誤入力でPINロック
- **PUK**: PINロックを解除するための8桁コード。10回誤入力でSIM永久ロック(回復不可)
PUK入力時は必ずキャリアの書類またはマイページで正確なコードを確認してから入力すること。推測での試行は絶対に避ける。
### 関連ガイド
- [SIMカードとは — 仕組み・種類・サイズの歴史と選び方](/ja/guides/what-is-sim/)
- [SIMフリーとSIMロック — 確認方法と解除手順](/ja/guides/sim-lock/)
- [周波数帯(バンド)とは — 4G/5Gの対応確認方法](/ja/guides/frequency-bands/)
- [圏外・電波なし — 原因別チェックリストと解決手順](/ja/guides/no-service/)
- [eSIM・SIMが開通しない — 原因と対処法](/ja/guides/activation-failed/)
================================================================================
# 国際ローミングの仕組みと料金 — 海外でキャリアSIMを使う方式
URL: https://sim-finder.com/ja/guides/international-roaming/
Type: guides (ja)
Published: 2026-04-22
日本で契約しているキャリアのSIMをそのまま海外で使う手段が「国際ローミング」である。追加の端末やSIMを用意する必要がなく、日本の電話番号もそのまま維持できる一方、料金体系は複雑で、プランを確認せずに利用すると高額になるケースがある。
この記事では国際ローミングの技術的な仕組みから料金モデル・日本の大手4社の方式・利用上の注意点までを体系的に解説する。他の海外通信手段との比較は[海外でスマホを使う4つの方法](/ja/guides/four-options/)を参照してほしい。
---
## 1. 国際ローミングとは(GSMA AA.12を起点に)
国際ローミングとは、加入者が自社のホームネットワーク外(主に海外)に移動した際、訪問先のネットワーク(ビジテッドネットワーク)を通じてモバイルサービスを継続して利用できる仕組みである。
この仕組みの基盤となるのが、**GSMAのAA.12(International Roaming Agreement)**と呼ばれるキャリア間ローミング協定の標準文書だ。ホームキャリアとローミングパートナー(訪問先キャリア)が双方向のローミング協定を締結することにより、互いの加入者を受け入れる仕組みが成立する。GSMAのWAS(Wholesale Agreements and Solutions Group)がこの標準化(AA.12/13/14)を担当している。
利用者からは「同じSIMをそのまま挿したまま海外で通話・SMSが届いた」という経験として現れる。その裏側では、端末がホームキャリアのネットワークを離れ、訪問先のネットワークに認証された上でサービスが提供されている。
---
## 2. 国際ローミングの仕組み — ホームキャリア⇄ローミングパートナー
### 技術的な接続の流れ
1. **端末が訪問先ネットワークを検出する**: 端末は電源ON時または機内モード解除時に利用可能なネットワークをスキャンし、ホームキャリアのネットワーク識別子(PLMN)がない場合はローミング対応のパートナーネットワークを探す。
2. **認証と登録**: 訪問先ネットワークがホームキャリアに加入者の認証情報(IMSI、Ki)を照会し、接続を許可する。このプロセスはHLR/HSS(加入者情報管理サーバー)間の通信で行われる。
3. **通信の経路**: データ通信の経路はキャリアの設計・ネットワーク世代(4G/5G等)によって異なる。LTEローミングでは歴史的にホームキャリアのゲートウェイを経由する Home-Routed 方式が主流で、これが遅延の原因になることがある。5G では訪問先のネットワークで直接インターネット接続する Local Breakout の採用も進んでいる。
4. **課金情報の交換**: キャリア間の課金精算は、TAP3(Transferred Account Procedure v3)やその後継として GSMA が推進する BCE(Billing and Charging Evolution)などの標準フォーマットで通信量・課金情報が交換される。協定情報・ネットワーク情報の交換は IR.21(RAEX)のフォーマットで行われる。
### IREG/TADIGテスト
新たにローミング協定を締結したキャリア間では、IREG(International Roaming Expert Group)が定める技術テストと、TADIGが定める課金テストを実施することが一般的な業界慣行とされている。これにより技術的・課金的な動作が事前に確認される。
### ローミングパートナーの選択
渡航先では複数のキャリアがローミング対応している場合がある。端末は通常「自動」モードで最適なネットワークを選択するが、場合によっては手動でネットワークを選択した方が品質が安定することもある。
---
## 3. 料金モデルの3パターン
国際ローミングの料金モデルは大きく3種類に分類できる。
### パターン①:従量課金型
データ通信量・通話時間・SMS件数に応じて課金される方式。事前手続きが不要で使った分だけ課金される反面、データ通信量が多い場合は高額になりやすい。旅行前にプランを確認せずに利用した場合に「高額ローミング請求」が発生しやすいのはこのパターンである。
### パターン②:定額パック型(日単位/旅行日程単位)
1日単位または一定日数のパックを申し込むことで、決められた範囲内でデータ通信・通話が使える方式。日本の大手キャリアが典型的に提供する形態で、使い過ぎのリスクを抑えられる。ただし使用日数分の費用がかかるため、短期滞在でもパックが発動する最低日数制限がある場合もある。
渡航前に申し込みが必要なケースが多いため、**出発前に利用中のキャリアの公式ページで申し込み手順を確認**しておくことを推奨する。
### パターン③:無料通信枠型(プラン内包型)
国内プランにあらかじめ一定量の海外データ通信枠が含まれている方式。追加申し込みなしで海外でも通信できる一方、枠を超えた場合の課金方式を事前に確認しておく必要がある。
---
## 4. 日本の大手キャリアのローミング方式
以下は2026年4月時点の一般的な方式の説明であり、具体的な料金・対応国・サービス名は変更される場合がある。**各社の公式サイトで最新情報を必ず確認すること。**
### NTTドコモ
「世界そのままギガ」「世界ギガし放題」などの名称で国際ローミングサービスを提供している。パケット定額オプションと従量課金の両方の仕組みが用意されており、渡航先の地域によって利用可能なオプションが異なる場合がある。「ahamoの海外ローミング」のように、オンライン専用プランでも利用できるケースがある。
- 公式: [NTTドコモ 海外サービス](https://www.docomo.ne.jp/service/international/)
### au(KDDI)
「au海外放題」「世界データ定額」などのオプションサービスを提供している。渡航先ごとに対象プランや利用条件が異なる場合がある。povo等のオンライン専用プランの海外ローミング対応状況については各公式サイトで確認が必要だ。
- 公式: [au 海外サービス](https://www.au.com/mobile/service/international/)
### ソフトバンク
「海外あんしん定額」などのオプションを提供。ワイモバイル・LINEMO等のサブブランド・オンライン専用プランのローミング対応状況はそれぞれ異なる。
- 公式: [ソフトバンク 海外サービス](https://www.softbank.jp/mobile/international/)
### 楽天モバイル(Rakuten最強プラン)
Rakuten最強プランでは、海外データ通信について**月2GBまで無料で利用できる**と案内されている(2GBを超えると速度制限または追加料金が発生)。この無料通信枠はパターン③(プラン内包型)に該当し、追加申し込み不要で利用できる点が他社との大きな差異となっている。
**ただしプラン内容・対象国・上限量は改定の可能性がある。**利用前に必ず[楽天モバイル公式の海外ローミングページ](https://network.mobile.rakuten.co.jp/service/international-roaming/)で最新情報を確認すること。
---
## 5. 国際ローミングが向いているケース/向かないケース
### 向いているケース
- **超短期の渡航(数日以内)**: 接続のセットアップ時間を省きたい場合
- **通信量が少ない**: メール確認・地図閲覧程度で済む場合
- **日本の電話番号での着信が必須**: ビジネス渡航・緊急連絡待機が必要な場合
- **eSIM非対応端末を使っている**: 旅行eSIMという選択肢がない場合
- **楽天モバイルのRakuten最強プランを契約中**: 月2GB無料枠の範囲内であれば追加コストゼロ(公式で最新情報を確認)
### 向かないケース
- **長期滞在(1週間以上)でデータ消費量が多い**: コストが積み上がりやすい
- **動画視聴・テレワークなど大容量通信が必要**: 定額パックの上限を超えやすい
- **コストを最小限に抑えたい**: 旅行eSIMや現地SIMの方が一般的に割安なことが多い
- **訪問先キャリアとのローミング協定が弱い地域**: 通信品質が不安定になるリスクがある
データ消費量の目安については[データ通信量の目安ガイド](/ja/guides/data-usage-guide/)も参照してほしい。
---
## 6. 渡航前・渡航先での設定注意点
### 渡航前にやること
1. **料金プランの確認**: 利用中のキャリアのローミングオプションを確認し、必要に応じてパックを申し込む
2. **データローミングの設定確認**: 端末のデータローミングがONになっているか確認する(渡航先でONにする必要がある場合もある)
3. **通知設定**: キャリアによっては一定の通信量に達すると通知が来る設定がある場合がある
### 渡航先での設定
**iPhoneの場合**:
- 「設定」→「モバイル通信」→「モバイルデータ通信のオプション」→「データローミング」でON/OFFを切り替えられる
- データローミングをOFFにすると通話・SMSは使えるがデータ通信は止まる
**Androidの場合(例:Google Pixel)**:
- 「設定」→「ネットワークとインターネット」→「SIM」→対象のSIMを選択→「ローミング」でON/OFFを切り替えられる
- 機種・OSバージョンによりメニュー構造が異なる場合がある
### 現地到着後の注意点
- 機内モードを解除した直後、端末がネットワークを検索してローミング接続が確立されるまで数分かかる場合がある
- ネットワークが安定しない場合は「設定」→「通信事業者」から手動でネットワークを選択することで改善する場合がある
- デュアルSIM環境の場合は、どちらのSIMでデータ通信を行うかを明示的に設定しておくことが重要だ([デュアルSIMで海外旅行する方法](/ja/guides/dual-sim-for-travel/)も参照)
---
## 7. 高額請求を避けるための実務ポイント
### バックグラウンド通信に注意
スマートフォンはアプリの自動更新・クラウドバックアップ・メールの同期など、利用者が意識しないバックグラウンド通信を常時行っている。ローミング環境でこれらが動作すると、気づかないうちにデータを消費することがある。
対策として以下のいずれかを実施することが一般的だ:
- 渡航前にアプリの自動更新を「Wi-Fiのみ」に設定する
- データローミングをOFFにしてWi-Fiのみ使う運用にする
- データローミングをONにする場合は低消費量に抑えるため動画・クラウド同期を停止する
### 定額パックの有効期間を確認する
定額パックには有効期間があり、期間終了後は従量課金に戻る場合がある。複数日にまたがる渡航では、パックの期間が正確に何日間カバーするかを出発前に確認しておくことが重要だ。
### 利用明細をこまめに確認する
多くのキャリアはアプリやWeb上でリアルタイムまたは近リアルタイムの通信量確認機能を提供している。長期滞在の場合は定期的に確認し、想定外の消費が発生していないか確認する習慣をつけることを推奨する。
---
## 8. 代替手段との比較
国際ローミング以外の海外通信手段として、以下の3つがある。詳しい比較は[海外でスマホを使う4つの方法](/ja/guides/four-options/)で解説しているので参照してほしい。
| 手段 | 手軽さ | コスト | 電話番号 | データ量が多い場合 |
|------|--------|--------|----------|------------------|
| **国際ローミング** | 高(端末そのまま) | 中〜高 | 維持できる | 高額になりやすい |
| **旅行eSIM** | 中(事前設定要) | 低〜中 | 別番号 | 大容量プランあり |
| **現地SIM** | 低(現地購入要) | 低 | 別番号 | 大容量プランあり |
| **ポケットWi-Fi** | 中(端末要) | 中 | 維持(電話は使えない) | 大容量プランあり |
旅行eSIMの活用とデュアルSIM構成について詳しくは[デュアルSIMで海外旅行する方法](/ja/guides/dual-sim-for-travel/)を参照。初めてeSIMを使う場合は[初めての旅行eSIM完全ガイド](/ja/guides/first-time-guide/)が参考になる。
**EUローミングについて**: EU/EEA域内でのローミングは2017年6月から施行されたRLAH(Roam Like At Home)規制により、EU加盟国間で自国と同じ料金水準での利用が原則保証されている(2022年改正規則EU 2022/612により2032年まで延長)。ただしスイスはEEA非加盟のためこの規制の対象外となる。EUローミングの詳細については「[EUローミング完全ガイド — Roam Like at Home(RLAH)の仕組みと対象国](/ja/guides/eu-roaming/)」を参照してほしい。
---
## FAQ
以下によくある質問をまとめる。
**Q. 国際ローミングは事前申し込みが必要ですか?**
キャリアによって異なります。自動的に有効化されるケースもありますが、定額パックを利用する場合は事前申し込みが必要なことが多いです。渡航前に利用中のキャリアの公式サイトで確認してください。
**Q. 渡航先でデータローミングをONにすると料金が発生しますか?**
データローミングをONにするだけでは通常料金は発生しません。ただしデータ通信を行った時点から課金が始まります。従量課金型の場合は少量の通信でも高額になる場合があるため、出発前に料金プランを確認した上で操作することを推奨します。
**Q. 楽天モバイルは海外でも使えますか?**
Rakuten最強プランは海外データ通信が月2GBまで無料で利用できると案内されています(2GBを超えると速度制限または追加料金)。プラン内容は改定の可能性があるため、[楽天モバイル公式](https://network.mobile.rakuten.co.jp/service/international-roaming/)で必ず確認してください。
**Q. ローミング中に電話を受けると料金がかかりますか?**
一般的に、ローミング中の音声着信は着信料金が発生する場合があります。キャリア・プランによっては着信料無料の場合もあります。SMS受信については多くのキャリアで無料または低額です。詳細は利用中のキャリアに確認してください。
**Q. 意図せず高額なローミング料金が発生するのはどのような場合ですか?**
主なケースは、(1) 機内モード解除後にデータローミングが自動的にONになりバックグラウンド通信が走る、(2) 定額パックを申し込まず従量課金のまま大容量通信を行う、(3) 渡航先でローミングパートナーが複数存在し、低品質な高額パートナーに接続される、の3つです。出発前の設定確認が重要です。
**Q. 国際ローミングと旅行eSIMはどちらが適していますか?**
短期渡航・緊急の出張・少量通信で済む場合は、端末を変えず即座に使える国際ローミングが適しています。1週間以上の滞在でデータ消費量が多い場合や、コストを重視する場合は旅行eSIMが有利なことが多いです。[海外でスマホを使う4つの方法](/ja/guides/four-options/)で詳しく比較しています。
**Q. ローミング中でもWi-FiはSIMなしで使えますか?**
はい。Wi-Fi接続はSIMやローミングとは独立して動作します。データローミングをOFFにした状態でWi-Fiのみ使う運用が可能です。ただし一部のアプリがモバイルデータを使おうとする場合があるため設定を確認してください。
---
## まとめ / 関連記事
国際ローミングはGSMA AA.12に基づくキャリア間協定を基盤とし、ホームキャリア⇄ローミングパートナー間で技術的・課金的な仕組みが確立している。料金モデルは従量課金型・定額パック型・無料通信枠型の3種類があり、利用シーンと契約プランに応じた選択が重要だ。
日本の大手4社はそれぞれ海外ローミングの仕組みを提供しているが、具体的な料金・対応国・オプション名は頻繁に変わるため、渡航前に各社の公式ページで最新情報を確認することを強く推奨する。
高額請求を避けるためのポイントは、(1) 出発前に料金プランを確認・申し込む、(2) バックグラウンド通信を制限する設定を行う、(3) 利用明細を定期的に確認する、の3点に集約される。本稿で登場する PLMN・HLR/HSS・TAP3 等の専門用語の定義は[SIM・モバイル通信用語集](/ja/guides/glossary-index/)で確認できる。
**関連ガイド**:
- [海外でスマホを使う4つの方法](/ja/guides/four-options/) — 国際ローミング・現地SIM・旅行eSIM・ポケットWi-Fiの比較
- [データ通信量の目安ガイド](/ja/guides/data-usage-guide/) — 用途別のデータ消費量を把握する
- [デュアルSIMで海外旅行する方法](/ja/guides/dual-sim-for-travel/) — 日本SIM+旅行eSIMの組み合わせ構成
- [初めての旅行eSIM完全ガイド](/ja/guides/first-time-guide/) — eSIM購入から現地設定まで
- [SIM・モバイル通信用語集](/ja/guides/glossary-index/) — ローミング関連用語の定義を確認
================================================================================
# 海外で現地キャリアと契約する方法
URL: https://sim-finder.com/ja/guides/local-contract/
Type: guides (ja)
Published: 2026-06-06
海外で現地キャリアと契約すると、トラベルeSIMや国際ローミングより大容量・低単価のプランを使えることが多い。一方で、SIM登録義務・必要書類・審査要件は国ごとに異なり、外国人には日本での契約とは異なるハードルが生じる場合もある。
この記事では**プリペイドとポストペイドの違い**、**必要書類の一般的な傾向**、**SIM登録義務の仕組み**、**店頭・オンライン・eSIMの選択肢**を体系的に整理する。各国の具体的な通信事情については[地域別の海外通信事情ガイド](/ja/guides/regional-overview/)、国際ローミングとの比較は[国際ローミングの仕組みと料金](/ja/guides/international-roaming/)を参照してほしい。
---
## 1. プリペイドとポストペイドの違い
海外キャリアとの契約形態は大きく2種類に分けられる。
### プリペイド(前払い方式)
料金を先払いし、残高・データ残量の範囲内でサービスを使う方式。**SIM購入=契約**に近い形で、解約手続き不要・月次請求なしという手軽さが特徴だ。
- **主な形態**: プリペイドSIM(物理SIM)、プリペイドeSIMプラン
- **必要書類**: パスポートのみで購入できる国が多い(後述のSIM登録義務が適用される場合)
- **信用審査**: 原則なし
- **外国人の利用しやすさ**: 高い。短期・中期渡航の旅行者・留学生に広く使われる
- **プランの特徴**: 有効期間付きのデータプラン(7日・30日・90日など)が一般的
### ポストペイド(後払い・月額契約)
毎月の使用量に応じて後払いする方式。日本の「月額プラン」に相当し、長期的に固定の電話番号と月次プランを利用できる。
- **主な形態**: 月額SIM契約、家族プラン
- **必要書類**: パスポートに加え、現地住所証明・現地銀行口座・ビザが必要になる国が多い
- **信用審査**: キャリアによっては信用スコアの審査が入る場合がある
- **外国人の利用しやすさ**: 低〜中。現地での生活基盤(住所・銀行口座)が整っていない段階では申し込みを断られることがある
- **向いているケース**: 長期滞在(1カ月以上)、駐在、ワーキングホリデー
#### プリペイドが外国人に選ばれやすい理由
ポストペイドは現地の信用履歴や住所が求められるため、渡航直後の外国人には申し込みのハードルが高くなりやすい。長期滞在でも最初はプリペイドを使い、現地住所・銀行口座が整った後にポストペイドへ移行するパターンが一般的だ。
---
## 2. 必要書類の一般的傾向
### パスポート(ほぼ全世界で必須)
海外でSIMを購入・契約する外国人にとって、パスポートは事実上の万能書類だ。GSMA 2021年調査によると、世界157カ国でSIM購入時に政府発行の身分証明書の提示が法的に義務付けられており、外国人にとってパスポート原本が実質的に必須となる国が大半を占める。
**パスポートは常に原本を携帯すること**。コピーや写真では受け付けられないキャリア・国もある。
### ビザ(長期滞在・ポストペイドで必要になることがある)
ポストペイドや長期滞在向けプランでは、在留資格(ビザ)の確認を求めるキャリアがある。観光ビザ・就労ビザ・学生ビザなどビザの種類によって申し込めるプランが変わる場合もある。
### 現地住所証明
ポストペイド契約では、現地の住所証明(賃貸契約書・公共料金の請求書など)の提出を求めるキャリアが多い。ホテルの住所や一時滞在先の住所が使える国もあれば、本人名義の住所証明に限定される国もある。プリペイドでは一般的に不要だ。
### 現地銀行口座(ポストペイドで一部の国)
ポストペイド契約では、月次請求の引き落とし先として現地銀行口座を求めるキャリアがある。クレジットカードで代替できる国・キャリアも存在するが、外国発行のカードが使えない場合もある。
### 書類の組み合わせ例
| 契約形態 | 一般的に必要な書類 |
|---------|----------------|
| プリペイドSIM(短期渡航) | パスポート原本 |
| プリペイドeSIM(オンライン) | 国・キャリアによりパスポートスキャンまたは不要 |
| ポストペイド(長期滞在) | パスポート + ビザ + 現地住所証明(+ 現地銀行口座) |
---
## 3. SIM登録義務と生体認証
### 世界157カ国でSIM登録が義務化
GSMA 2021年調査では、世界157カ国でSIMカード購入時にパスポートまたは政府発行の身分証明書の提示が法律で義務付けられている。アジア・中東・中南米・アフリカの多くの国が対象だ。ドイツでは2017年7月以降、電気通信法(Telekommunikationsgesetz)の改正により、プリペイド・ポストペイドを問わず全SIM購入時に本人確認が義務化されている。
一方、米国は連邦レベルでSIM購入時の本人確認義務が法令上存在せず(2026年時点)、英国も同様に法的義務はない。ただし一部のキャリアが独自に本人確認を求める場合もある。
### 生体認証を義務化している国もある
単純なパスポート提示より厳格な本人確認を義務付けている国もある。タイではNBTCの規制により2025年8月18日以降、全SIM登録に生体認証(ライブネス検知)が義務化されており、外国人はパスポート原本の提示が必要だ。また外国人は1プロバイダーあたり最大3枚のSIM制限とSIMの有効期限60日の制限が設けられている。
地域別の登録義務の傾向については[地域別の海外通信事情ガイド](/ja/guides/regional-overview/)で整理している。
### SIM登録の手続きの流れ(一般的な例)
1. キャリアショップ・空港カウンター・コンビニ等でSIMを選ぶ
2. パスポート原本を提示する(一部の国では顔写真撮影・フォームへの記入も必要)
3. 電話番号が割り当てられ、SIMカードを受け取る(eSIMの場合はQRコードまたはアプリ)
4. 端末に挿入・設定してアクティベーション完了
---
## 4. 店頭契約 vs オンライン・eSIM
### 店頭契約(物理SIM)
最も確実な方法は、現地キャリアの公式ショップまたは公認代理店の窓口で対面契約することだ。スタッフのサポートを受けながら本人確認・SIM設定・アクティベーションまで完了できる。
- **メリット**: 言語の壁があっても対面でサポートを受けられる。その場でSIMを受け取り即使える
- **デメリット**: 店頭での待ち時間が発生することがある。空港のカウンターは市内の店舗より料金が高めに設定されているケースもある
- **おすすめの場面**: 初めての国で確実に設定したい場合、生体認証など複雑な手続きが必要な国
#### 店頭契約当日の流れ(一般的な例)
店頭での手続きの流れは国・キャリアによって異なるが、一般的な流れは以下のとおりだ。
1. **プランを選ぶ**: スタッフに滞在日数・必要なデータ容量・通話の有無を伝える。英語対応店舗では希望を伝えるだけで候補を提示してもらえることが多い
2. **本人確認書類を提示する**: パスポート原本を渡す。国によっては顔写真の撮影・フォームへの手書き記入・ビザの確認が加わる。タイのように生体認証(指紋・顔認識)が必要な国もある
3. **SIMを受け取る**: 物理SIMの場合はSIMカードを渡される。eSIM対応プランの場合はQRコードまたはアプリ経由でのプロビジョニングになることがある
4. **端末に挿入・アクティベーションする**: スタッフが端末の設定を確認してくれる店舗もある。APNの設定が必要な場合もあるため、設定完了まで店頭で確認するのが確実だ
5. **受取書・レシートを確認する**: 電話番号・データ容量・有効期限・料金が記載された書面を受け取り、その場で内容を確認する。後からトラブルが生じたときに必要になる場合がある
待ち時間は繁忙時間帯(特に空港の到着ロビー)で30分以上になることがある。市内の公式ショップは空港カウンターより空いていることが多く、料金面でも有利なことがある。
### コンビニ・スーパー・量販店(物理SIM)
多くの国では、キャリアの物理SIMがコンビニ・スーパー・電器量販店でも購入できる。公式ショップと同じSIMを入手できる場合が多いが、セットアップのサポートは受けられないことが多い。
- **おすすめの場面**: 既に手続きに慣れている場合、短期渡航でプリペイドSIMを素早く購入したい場合
### オンライン購入・eSIM
渡航前や現地でインターネットがある環境ならば、キャリア公式サイトやeSIMプロバイダーのアプリ経由でオンライン完結できるプランが増えている。
- **メリット**: 渡航前から日本で購入・設定が完了できる。空港到着直後から通信が使える。店頭の待ち時間なし
- **デメリット**: 本人確認書類のオンラインアップロードが必要な場合がある。eSIMに非対応の端末には使えない。ポストペイドのオンライン申込みは現地住所・銀行口座の入力が求められる場合がある
- **おすすめの場面**: eSIM対応端末を持つ短期〜中期の渡航者。出発前に準備を整えたい場合
eSIM端末の対応確認方法・設定手順については[初めての旅行eSIM完全ガイド](/ja/guides/first-time-guide/)に詳しく解説している。
---
## 5. ポストペイドで外国人に生じる主な障壁
長期滞在(ワーキングホリデー・駐在・留学など)でポストペイド契約を希望する際に外国人が直面しやすい障壁を整理する。
### 信用審査
ポストペイド契約では、国によってはキャリアが現地の信用スコアや過去の支払い履歴を確認する。外国人は現地の信用履歴がゼロからのスタートになるため、審査で落とされたり、デポジット(保証金)の支払いを求められたりする場合がある。
### 現地住所・銀行口座の問題
現地での生活基盤が整っていない渡航直後は、契約に必要な書類が揃わないことが多い。一般的な対処法として、まずプリペイドSIMで生活を始め、住所と銀行口座が確保された後にポストペイドへ切り替えるアプローチが取られる。
### 在留資格の有効期間
キャリアによっては、ビザの残存有効期間が一定以上ないとポストペイドの申し込みを受け付けない場合がある。観光ビザのような短期在留では、ポストペイドの申し込み自体が断られることが一般的だ。
### 言語の壁
ポストペイドの契約書類は現地語で作成されることが多く、英語対応が限られているキャリアもある。主要都市の公式ショップでは英語対応のスタッフがいることが多いが、地方では現地語のみのケースもある。
ワーキングホリデーや長期滞在における通信プランの選び方については[ワーキングホリデーのSIM・通信ガイド](/ja/guides/working-holiday/)でまとめている。
---
## 6. 現地契約前のチェックリスト
実際に現地でSIMを契約する前に確認しておくと準備がスムーズになる。
### 渡航前に確認すること
1. **SIM登録義務の有無**: 渡航先の国にSIM登録義務があるかを事前確認する。パスポート原本を必ず持参する
2. **eSIM対応確認**: eSIMで申し込む場合、自分の端末がeSIM対応かつSIMフリー状態であることを確認する
3. **必要書類の確認**: ポストペイドを検討しているなら、ビザ・住所証明・銀行口座の要件をキャリア公式サイトで事前調査しておく
4. **言語対応の確認**: 公式ショップの英語対応状況を事前に調べる(特に地方・小規模国)
### 現地での注意点
- 空港内のキャリアカウンターは利便性は高いが、市内店舗より割高な場合があることを念頭に置く
- 購入時に渡されるSIMの有効期限・データ量・電話番号を必ず書面やレシートで確認する
- ポストペイドの解約手続き(特にオンライン対応が限られているキャリア)についても事前に確認しておく
長期滞在から帰国した後のSIM・通信の整理については[海外から帰国後のSIM手続きガイド](/ja/guides/after-return/)を参照してほしい。
---
## 7. トラベルeSIM・国際ローミングとの使い分け
現地キャリア契約は万能ではない。渡航目的・滞在期間・端末の状況によってはトラベルeSIMや国際ローミングの方が適している場合もある。
| 手段 | 向いているケース | 向かないケース |
|------|---------------|-------------|
| **現地プリペイドSIM** | 1カ国に1週間以上滞在・大容量データが必要 | 複数国を短期移動・事前設定したい場合 |
| **現地ポストペイド** | 長期滞在・現地番号が必要・住所と銀行口座あり | 短期渡航・赴任直後・信用履歴なし |
| **トラベルeSIM** | 短期・複数国移動・事前設定できる端末あり | eSIM非対応端末・現地通話番号が必要 |
| **国際ローミング** | 超短期・日本番号での着信必須・少量通信 | 長期滞在・大容量通信・コスト最小化 |
駐在や長期移住における通信戦略については[海外在住者のSIM戦略ガイド](/ja/guides/expat-strategy/)で詳しく解説している。
---
## 8. 地域別の契約事情の一般的傾向
現地キャリアとの契約は地域によって手続きの難易度や利便性が大きく異なる。[地域別の海外通信事情ガイド](/ja/guides/regional-overview/)で整理されている地域特性のうち、現地契約に直結する傾向をここで補足する。
### 欧州(EU/EEA圏)
西欧・北欧の主要国ではeSIM対応が進んでおり、外国人がプリペイドSIMを購入する際の手続きは比較的シンプルな傾向がある。ドイツでは2017年7月以降、電気通信法の改正によりプリペイド・ポストペイドを問わず全SIM購入時に本人確認が義務化されており、パスポートの提示が必要だ。フランス・スペイン・イタリアなど主要国の空港や家電量販店でも外国人向けのプリペイドSIMを購入できる場合が多い。
EU/EEA加盟国のキャリアのSIMを持っていれば、RLAH規制(2017年〜2032年)により加盟国間の移動でも追加ローミング料金がかからない。1カ国に長期滞在する場合は、その国のキャリアでプリペイドまたはポストペイドを契約すると、EU内を移動する際にも同じSIMを使い続けられるメリットがある。
外国人がポストペイドを申し込む際には、現地の居住証明や銀行口座の要件は他地域と同様に存在する。英語対応の公式ショップは主要都市に多い。
### アジア
アジアは国ごとの規制差が大きく、プリペイドSIMの取得難易度の幅も広い。シンガポール・香港・台湾・日本・韓国などでは空港・コンビニ・量販店でのプリペイドSIM購入が比較的容易な傾向がある。一方、タイでは2025年8月以降、全SIM登録に生体認証が義務化されており、外国人はパスポート原本の提示と顔認識を経る手続きが必要だ。また1プロバイダーあたりのSIM枚数制限(最大3枚)も設けられている。
東南アジアの一部の国では、外国人がポストペイドを申し込む際に必要な書類(在留許可証・現地口座など)の要件が厳しく、短期・中期滞在の旅行者にはプリペイドが実質的に唯一の選択肢となるケースが多い。[ワーキングホリデーのSIM・通信ガイド](/ja/guides/working-holiday/)では、長期滞在での現地契約の進め方についても触れている。
### 北米
米国はSIM購入時の本人確認義務が連邦レベルで法令化されていないため(2026年時点)、外国人が現地プリペイドSIMを購入する際の手続きは他地域と比べて簡便なことが多い。空港・スーパーマーケット・家電量販店で外国人向けのプリペイドSIMを購入できる場合が多く、本人確認書類の提示なしで購入できるケースも存在する。
ただし、外国人がポストペイド(月額契約)を申し込む場合は、社会保障番号(SSN)または個人納税者番号(ITIN)、現地住所、クレジット履歴の確認が求められるキャリアが多く、滞在直後には困難なことが一般的だ。カナダでも主要キャリアがeSIM対応済みであり、プリペイドプランは空港・通信専門店で購入できる。長期滞在の場合、現地口座と住所が整った後にポストペイドへ移行するパターンが取られる。
---
## 9. 契約後に起きやすいトラブルと対処
現地でSIMを取得した後にも、いくつかのトラブルが起きやすい。事前に知っておくと対処がスムーズになる。
### 開通しない・データ通信が使えない
SIMを挿入またはeSIMをアクティベートしたにもかかわらず、データ通信が使えない場合がある。主な原因と確認手順は以下のとおりだ。
- **APN設定が未設定・誤設定**: 現地SIMの多くは、端末のAPN(アクセスポイント名)設定を手動で行う必要がある。キャリアの公式サイトまたはスタッフからAPN情報を入手し、端末の「モバイルネットワーク」または「SIM設定」から入力する
- **アクティベーション待ち**: 登録後に数分〜数十分かかることがある。端末を再起動すると解消するケースもある
- **SIMのカットサイズ不一致**: 物理SIMのサイズ(標準SIM・microSIM・nanoSIM)が端末のスロットと合わない場合、スタッフに切り直しを依頼する。自己判断でのカットは推奨しない
- **SIMフリー未対応端末**: キャリアロックがかかった端末では海外SIMが認識されないことがある。渡航前に端末がSIMフリー状態であることを確認しておく
### SMS認証が届かない
アプリの登録・オンラインバンク・各種サービスのSMS認証が、現地SIMの電話番号に届かないケースがある。
- **日本の電話番号宛のSMS認証**: 現地SIMの番号は日本のサービスのSMS認証には使えないことがある。日本のキャリアのSIMを維持したまま現地SIMをデータ専用として使うデュアルSIM運用、または日本番号のeSIMとの組み合わせが有効な場合がある。詳しくは[海外在住者のSIM戦略ガイド](/ja/guides/expat-strategy/)を参照してほしい
- **SMS認証が届くまで時間がかかる**: 国際SMS(現地SIMに他国からSMSが届く場合)は遅延が発生することがある。数分待ってから再試行する
- **番号のSMS受信が無効になっている**: プリペイドのデータ専用プランの場合、SMSが付帯していないことがある。購入前にSMS送受信の可否をプランの説明で確認する
### 解約・期限切れに関するトラブル
- **プリペイドSIMの有効期限切れ**: 使用しないまま有効期限を過ぎると残高・データが失効する。長期滞在中でも定期的な利用または残高チャージが必要なキャリアがある
- **ポストペイドの解約手続き**: オンライン解約に対応していないキャリアの場合、帰国前に店頭または電話での解約手続きが必要になることがある。解約しないまま帰国すると、月次料金の請求が続く場合がある。長期滞在から帰国する際の手続きについては[海外から帰国後のSIM手続きガイド](/ja/guides/after-return/)でまとめている
---
## 10. SimFinderで各国のプランを比較する
現地SIMの購入を検討する際には、渡航先の通信事情を事前に把握しておくことが重要だ。[SimFinder Travelの国別比較](/ja/travel/)では渡航先の国を選んでトラベルeSIMのプランを比較できる。現地SIMとの使い分けの判断材料として活用してほしい。
---
## FAQ
**Q. 海外でSIMを契約するとき、パスポートは必ず必要ですか?**
多くの国では法律でSIM購入時の本人確認が義務化されており、外国人にとってパスポートが事実上の必須書類になります。GSMA 2021年調査では世界157カ国でSIM登録時の政府発行IDの提示が法的に義務付けられています。一部の国(米国・英国など)では法的義務がない場合もありますが、渡航先に応じた事前確認が重要です。
**Q. 外国人がポストペイド(月額契約)を結ぶことはできますか?**
技術的には可能な国もありますが、外国人には信用スコアや現地住所証明・銀行口座の要件が課される場合が多く、短期滞在や赴任直後には現実的でないことが多いです。長期滞在(ワーキングホリデー・駐在など)で現地住所・銀行口座が整った後に申し込むのが一般的です。
**Q. タイでSIMを購入するとき、生体認証は必要ですか?**
タイではNBTCの規制により2025年8月18日以降、全SIM登録(新規・SIMスワップ・番号保持を含む)に生体認証(ライブネス検知)が義務化されています。外国人はパスポート原本の提示が必要で、1プロバイダーあたり最大3枚のSIM制限とSIMの有効期限60日の制限があります。
**Q. eSIMで現地契約する場合、店頭に行く必要はありますか?**
国・キャリア・プランによって異なります。オンライン完結で購入・アクティベーションできるeSIMプランが増えていますが、一部の国やポストペイド契約では本人確認のために店頭訪問が求められる場合があります。事前にキャリアの公式サイトで確認してください。
---
## 関連ガイド
- [地域別の海外通信事情ガイド](/ja/guides/regional-overview/) — アジア・欧州・北米など6地域の通信事情とSIM登録義務の傾向
- [国際ローミングの仕組みと料金](/ja/guides/international-roaming/) — キャリアSIMをそのまま海外で使う方法と現地SIMとの比較
- [ワーキングホリデーのSIM・通信ガイド](/ja/guides/working-holiday/) — 長期滞在における通信プランの選び方
- [海外在住者のSIM戦略ガイド](/ja/guides/expat-strategy/) — 駐在・長期移住での通信戦略
- [海外から帰国後のSIM手続きガイド](/ja/guides/after-return/) — 帰国後のSIM整理・解約・番号移行
================================================================================
# 現地SIMカードの入手方法 — 空港・市内・オンラインでの購入ガイド
URL: https://sim-finder.com/ja/guides/local-sim/
Type: guides (ja)
Published: 2026-05-20
渡航先で現地SIMカードを購入すると、現地ユーザーと同等水準の料金でデータ通信が利用できる。ただし購入場所・本人確認要件・端末条件は国によって大きく異なり、事前の準備なしに到着後すぐ購入できるとは限らない。
この記事では現地SIMの定義から購入場所・国別の特性・購入時チェックリスト・リスクまでを体系的に整理する。海外通信手段の全体像は[海外でスマホを使う4つの方法](/ja/guides/four-options/)で確認してほしい。
---
## 1. 現地SIMとは、なぜ選ぶか
現地SIMとは、渡航先の国または地域で販売されているSIMカードのことだ。現地キャリアと直接契約(プリペイドが主流)することで、ローミング手数料なしに現地料金でデータ通信・音声通話が利用できる。
**現地SIMを選ぶ主な理由**
- **料金**: [国際ローミング](/ja/guides/international-roaming/)と比較して総じて安価。長期滞在ほどコスト差が大きい
- **データ量**: 旅行者向けのデータ容量が豊富なプランが多く、現地の動画・地図アプリを気兼ねなく使える
- **通信品質**: 現地キャリアと直接接続するため、ローミング経由のホームキャリア接続と比べて速度・優先度が高いことが多い
- **音声通話**: 現地番号での通話が必要な場合(ホテル予約・タクシー手配・現地サポートへの連絡など)に対応できる
- **長期滞在対応**: 30日・90日以上の長期プランや、SIMを維持しながらトップアップ(チャージ)で延長できるプランが揃っている
一方で、端末がSIMフリーであること・購入のために現地到着後に時間が必要なこと・日本の電話番号が一時的に使えなくなることは考慮が必要だ。どの通信手段が自分の旅行スタイルに合うかは、[海外でスマホを使う4つの方法](/ja/guides/four-options/)の比較表を参照してほしい。
---
## 2. 主な購入場所4種
### 空港カウンター
最初の選択肢として最も確実。主要な国際空港の到着ロビーには、現地大手キャリアの公式カウンターまたは正規代理店が出店していることが多い。
- **メリット**: 英語対応スタッフが常駐していることが多い。購入・SIM挿入・動作確認まで対応してもらえる。到着直後から通信が始められる
- **デメリット**: 市内の店舗より料金が高めに設定されている場合がある。深夜到着の場合はカウンターが閉まっている可能性がある
空港価格が市内より割高になることは広く知られており、料金より利便性を重視する場合の選択肢として位置付けるとよい。
### 市内キャリアショップ(公式店舗)
各キャリアの直営店・公認代理店。品揃えが豊富で、複数プランを比較しながら選べる。
- **メリット**: プランの種類が豊富。スタッフが手続きをサポートしてくれる。本人確認が必要な国でも正規の手続きができる
- **デメリット**: 土地勘がないと場所を探すのに時間がかかる。繁忙時は待ち時間が発生する場合がある
### コンビニ・スーパーマーケット
タイ・韓国・英国などでは大手コンビニチェーンやスーパーマーケットでプリペイドSIMが販売されている。
- **メリット**: 幅広い場所で手軽に購入できる。営業時間が長い
- **デメリット**: 店員による手続きサポートがなく、自力でのAPN設定が必要な場合がある。英語説明がない商品もある
### 家電量販店・オンライン事前購入
電気街や大型家電量販店でもSIMを販売している国がある(韓国のYongsan・日本のビックカメラのSIM取り扱いなど)。また、一部のプロバイダーは渡航前に日本国内からオンラインで購入し、郵送または現地受け取りで利用できるサービスを提供している。
- **メリット**: 渡航前に準備を完了できる。日本語対応のサービスも存在する
- **デメリット**: 国・プロバイダーによって選択肢は限られる。郵送の場合は受け取り準備が必要
---
## 3. 国別の購入特性
各国のSIM購入に関する制度・慣習は大きく異なる。以下は主要な渡航先の特性をまとめたものだ。
### タイ
NBTCの規制により、**2025年8月18日以降、全SIM登録(新規・SIMスワップ・番号保持を含む)に生体認証(ライブネス検知)が義務化された**(出典: Biometric Update, 2025年8月「Thailand mandates biometric liveness detection for SIM registration」)。外国人はパスポート原本の提示が必要で、店舗・モバイルアプリ・ライセンスディーラーで手続きが可能。外国人は1プロバイダーあたり最大3枚、SIMの有効期限は60日に制限されている。
空港(スワンナプーム・ドンムアン)にはTrueMove H・AIS・DTACの公式カウンターが出店しており、旅行者向けプランの購入が可能。
### 米国
米国では連邦レベルでのSIM購入時の本人確認義務は法令上存在しない(出典: GSMA, 2021 / prepaid-data-sim-card.fandom.com)。プリペイドSIMはT-Mobile・AT&T・Verizonなどの大手キャリアのほか、CVS・Walgreens・Walmart等のコンビニやドラッグストアで広く販売されている。
クレジットカードまたは現金で購入できる。連邦法上のID提示義務はないが、大手3社(AT&T・T-Mobile・Verizon)の音声付きプリペイドプランをアクティベートする際には、外国人観光客がパスポート提示を求められるケースが一般的である。ただし端末のSIMロック解除状況については、米国は連邦統一規制が存在せず、キャリアごとの自主基準(CTIAのガイドライン)に基づいて運用されているため、購入前に端末のロック解除状態を確認しておく必要がある(出典: FCC「Cell Phone Unlocking」)。
### 英国
英国ではOfcomによる規制があり、2021年12月以降は携帯端末のSIMロック販売が禁止された(出典: Ofcom「Mobile firms to be banned from selling 'locked' handsets」)。そのためSIMフリー端末を持っているユーザーは容易に現地SIMを利用できる。
主要キャリア(EE・Three・O2・Vodafone)のSIMはコンビニ(Tesco・Boots等)・スーパー・キャリアショップで販売されている。**PAYG(Pay As You Go)と呼ばれるプリペイド方式が旅行者に広く使われており、比較的安価で入手しやすい。** 購入時の本人確認義務は法令上なく(出典: prepaid-data-sim-card.fandom.com)、レジで現金またはカードで購入できる。
### 欧州(EU/EEA内)
EU/EEA加盟国で発行されたSIMカードは、**RLAH(Roam Like At Home)規制**により他のEU/EEA加盟国内でも自国と同等の料金でデータ通信・通話・SMSが利用できる(出典: EU規則531/2012、2017年6月15日施行)。2022年の改正規則(EU 2022/612)によりこの規制は2032年6月30日まで延長された。
ただしスイスはEEA非加盟のためRLAH対象外である(出典: BAKOM「Roaming - Swiss Federal Office of Communications」)。
2026年1月1日以降、ウクライナ・モルドバも「Roam Like at Home」エリアに加入し、対象は計32カ国(EU加盟27カ国+EEA3カ国+ウクライナ+モルドバ)となっている(出典: EU Council 2025-07-25)。
各国でのSIM購入時の本人確認要件は国によって異なる。例えばドイツでは2017年7月以降、電気通信法(TKG)の改正によりプリペイド・ポストペイドを問わず全SIM購入に本人確認が義務付けられており(VideoIdent・PostIdent・店舗での対面確認のいずれか)、手続きに時間がかかる場合がある(出典: Bundesnetzagentur(連邦ネットワーク庁)「Prepaid-SIM-Karten」; ZeroID Blog「SIM Registration Laws in Germany」)。
EU圏内を複数国旅行する場合は、最初に訪問するEU加盟国でSIMを購入すれば他国でも同一料金で使える可能性がある。ただしキャリアの「フェアユースポリシー」(長期にわたる国外利用への上限)が適用される場合があるため、プランの条件を事前に確認することを推奨する。
### 韓国
韓国では外国人観光客向けに特化したプリペイドSIMが充実している。仁川国際空港・金浦空港のKT・SKT・LGU+の公式カウンターのほか、空港内のコンビニ(CU・GS25・セブン-イレブン)でも購入できる。
パスポートの提示が必要。韓国の外国人向けSIMは一般的に実名登録が必要だが、観光客向けプランは空港での手続きが簡便に整備されている。Seoul市内の電気街(龍山エレクトロニクスセンター)でも各キャリアのSIMを購入できる。
データ通信に加えて国内通話付きのプランも存在する。韓国はLTE・5Gのカバレッジが高く、通信品質は全般的に良好だ。
### 中国
中国では**実名制(真实名制)登録**が法律で義務付けられており、外国人はパスポートの提示と実名登録が必須。中国移動(China Mobile)・中国聯通(China Unicom)・中国電信(China Telecom)の3キャリアが外国人向けSIMを提供しており、主要国際空港の入国ロビーや市内の公式店舗で購入できる。
なお中国本土ではGoogle・YouTube・LINE・WhatsApp等の主要サービスへのアクセスが制限されており(グレートファイアウォール)、現地SIMを購入しただけではこれらのサービスには接続できない点に注意が必要だ。
---
## 4. SIMの種類 — プリペイド vs ポストペイド
旅行者が購入するSIMの大半はプリペイド(前払い)方式だ。
| 種別 | 概要 | 旅行者への適合性 |
|------|------|----------------|
| **プリペイド** | 購入時に一定のデータ容量・通話時間・有効期限が付与される前払い方式。残高がなくなると通信が止まる | 短期・長期問わず旅行者向け。契約不要・解約手続き不要 |
| **ポストペイド** | 月末にまとめて請求される後払い方式。現地の住所・銀行口座が必要なことが多い | 短期旅行者には非現実的。長期滞在・就労・留学で現地契約が必要な場合に検討 |
旅行者が検討するのはほぼ例外なくプリペイドSIMだ。プリペイドの中にも「データ専用」「データ+音声通話」「データ+音声+SMS」と種類があり、渡航先や用途に応じて選ぶ。プリペイド・ポストペイドなど本記事で登場する通信用語の定義は[SIM・モバイル通信用語集](/ja/guides/glossary-index/)を参照してほしい。
---
## 5. 購入前の準備
### SIMフリー端末の確認
現地SIMを使うには、端末がSIMフリーであることが前提条件だ。
**iPhoneの確認方法**: 「設定」→「一般」→「情報」→「キャリアロック」を開き、「SIMの制限なし」と表示されれば対応している。「SIMロック」が解除されていない端末では現地SIMを挿入しても通信できない。
**Androidの確認方法**: 「設定」→「ネットワークとインターネット」(または「モバイルネットワーク」)→「通信事業者」でネットワーク手動検索を試みる方法があるが、この方法は信頼性が低い場合がある。最も確実な確認方法は、実際に別キャリアのSIMを挿入して通信が可能かを確認するテストだ(出典: Android Police「Is your phone carrier locked?」)。
日本では2021年10月以降に発売された端末はSIMロックの初期設定が総務省のガイドラインに基づき原則禁止されているが、それ以前の端末は各キャリアへの解除手続きが必要な場合がある。[SIMロックと解除の仕組み](/ja/guides/sim-lock/)も参照してほしい。
端末の準備の完全な手順は[渡航前のスマホ準備チェックリスト](/ja/guides/pre-trip-checklist/)にまとめてある。
### 通信バンド(周波数帯)の確認
渡航先のキャリアが使用する周波数帯(バンド)に端末が対応していなければ、SIMを挿入しても通信できない。最新のフラグシップモデルは主要バンドに幅広く対応しているが、数年前の端末や特定地域向けモデルは注意が必要だ。端末の仕様ページ(Apple・Google・各メーカーの公式サイト)で「Cellular & Wireless」欄の対応バンドを確認し、渡航先キャリアのバンドと照合する。
### APN設定の知識
SIMを挿入後、インターネットに接続するためにAPN(Access Point Name)の設定が必要になる場合がある。最近の端末・SIMの組み合わせでは自動設定されるケースが増えているが、手動設定が必要な場合に備えて、購入するSIMのAPN情報(APN名・ユーザー名・パスワード)を事前にメモしておくか、スクリーンショットを保存しておくとよい。
APN設定の手順については[APN設定(iPhone)](/ja/guides/apn-setup-iphone/)または[APN設定(Android)](/ja/guides/apn-setup-android/)を参照。
### プランの有効期限と容量の把握
旅行者向けプリペイドSIMには有効期限がある。7日・14日・30日・90日などのプランが一般的で、有効期限を過ぎると残余のデータ容量も失効する。渡航日程と有効期限が一致するプランを選ぶこと。また、データ容量を使い切った場合にトップアップ(追加購入)できるかどうかも事前に確認しておくと安心だ。
---
## 6. 購入時のチェックリスト
現地SIMを購入する際には以下を確認する。
- **パスポートを持参する**: 世界155カ国以上でSIM購入時にパスポートなどの政府発行身分証の提示が義務付けられている(出典: GSMA Mobile for Development "Access to Mobile Services and Proof of Identity 2021")
- **現地通貨またはクレジットカードを準備する**: 空港カウンターはカード払いに対応していることが多いが、コンビニや小規模店舗では現金のみの場合がある
- **英語対応スタッフがいるか事前に確認する**: 空港の公式カウンターや大都市のキャリアショップは英語対応が比較的充実しているが、郊外・小規模店舗は現地語のみの場合がある
- **開通(アクティベーション)サポートを依頼する**: SIM挿入後に電波が立つかどうか、データ通信が可能かどうかを店舗で確認してもらう。問題があればその場で対応してもらえる
- **プランの有効期限・データ容量を確認する**: 購入後に改めてパッケージの記載内容を確認し、渡航日程に合っているか確かめる
- **領収書・パッケージを保管する**: カスタマーサポートへの問い合わせ時やSIMの設定情報確認のために役立つ
---
## 7. リスクと注意点
### 偽SIM・粗悪品のリスク
観光客が多い地域では、空港外の露店・無認可の小規模店舗で偽物や非正規のSIMが販売されているケースが報告されている。偽SIMは通信ができない、またはサービス品質が著しく低い場合がある。対策としては、**キャリアの公式カウンター・公認代理店・大手コンビニチェーンでの購入を徹底する**ことが最も有効だ。
### 空港カウンター価格の高さ
空港のキャリアカウンターは利便性が高い分、市内の店舗と比較して料金が高めに設定されていることが多い。短期旅行で利便性を優先するなら空港購入で構わないが、長期滞在の場合は市内の公式ショップやコンビニでの購入を検討する価値がある。
### 本人確認義務と手続き時間
前述のとおり、世界155カ国以上(出典: GSMA, 2021)でSIM購入時の本人確認が義務付けられている。タイの生体認証・ドイツの書類審査(VideoIdent・PostIdentなど)のような複雑な手続きを要する国では、購入に予想以上の時間がかかる場合がある。深夜到着や乗り換えが多いスケジュールの際は、翌日に市内で購入する計画を立てておくと安心だ。
### デュアルSIM未対応端末での日本番号の喪失
シングルSIM端末に現地SIMを挿入すると、日本のSIMが使えなくなり日本番号への着信・SMS受信ができなくなる。銀行や各種オンラインサービスのSMS認証が受け取れなくなるため、事前に認証アプリへの移行や代替連絡手段の設定が必要だ。デュアルSIM環境の構築方法については[海外旅行でのデュアルSIM活用](/ja/guides/dual-sim-for-travel/)で詳しく解説している。
---
## 8. 現地SIM vs 旅行eSIM — どちらを選ぶか
現地SIMと旅行eSIMはいずれも「現地料金でのデータ通信」を実現する手段だが、特性が異なる。
| 比較項目 | 現地SIM | 旅行eSIM |
|---------|---------|---------|
| **購入タイミング** | 現地到着後 | 出発前(オンライン) |
| **端末条件** | SIMフリー端末(物理SIMスロット) | eSIM対応SIMフリー端末 |
| **音声通話** | 通話付きプランあり | 原則データ専用 |
| **設定の手間** | APN設定が必要な場合あり | QRコード読み取りのみ |
| **デュアルSIM** | 物理SIMスロット残数に依存 | スロットを使わずeSIM追加が可能 |
| **長期滞在** | 豊富な長期プランあり | プロバイダーによる |
| **偽物リスク** | 購入場所に注意が必要 | 公式プロバイダーサイトなら低い |
**旅行eSIMが向いているケース**
- eSIM対応端末を持っていて、出発前に設定を完了させたい
- 物理SIMスロットを日本のSIMに使っており、スロットを空けたくない
- 短〜中期旅行で、音声通話はVoIPアプリで十分
- SimFinderで複数プロバイダーを比較してコストを最適化したい([旅行eSIMを比較する →](/ja/travel/))
**現地SIMが向いているケース**
- eSIM非対応の端末を使っている
- 音声通話付きのプランが必要(現地番号でのタクシー・ホテル・緊急連絡)
- 1か月以上の長期滞在でトップアップしながら継続利用したい
- 渡航先のキャリアのほうが旅行eSIMより安価・データ量が多い
旅行eSIMの詳しい選び方は[初めての旅行eSIM完全ガイド](/ja/guides/first-time-guide/)を参照してほしい。
---
## 9. よくある質問
---
## 10. まとめ
現地SIMは現地料金での通信品質・音声通話・長期対応力において旅行者にとって有力な選択肢だ。ただし端末のSIMフリー確認・パスポート持参・本人確認手続きの把握など、事前の準備が結果を左右する。
- **購入場所**: 空港カウンターが最も確実。コスト優先なら市内公式ショップ
- **本人確認**: 世界155カ国以上で義務化。タイでは生体認証が必須(2025年8月18日以降)
- **端末準備**: SIMフリー確認、対応バンドの確認、APN情報の把握
- **偽SIM回避**: 公式カウンター・認定代理店・大手チェーンのみで購入
- **日本番号の維持**: デュアルSIM端末があれば[デュアルSIM構成](/ja/guides/dual-sim-for-travel/)を検討
渡航前の準備全体については[渡航前のスマホ準備チェックリスト](/ja/guides/pre-trip-checklist/)を、海外通信手段の全体比較は[海外でスマホを使う4つの方法](/ja/guides/four-options/)を参照してほしい。
---
## 関連ガイド
- [海外でスマホを使う4つの方法](/ja/guides/four-options/) — 国際ローミング・現地SIM・旅行eSIM・ポケットWi-Fiの全体比較
- [国際ローミングの仕組みと料金](/ja/guides/international-roaming/) — ローミング方式とコスト詳細
- [渡航前のスマホ準備チェックリスト](/ja/guides/pre-trip-checklist/) — 出発2週間前からの時系列手順
- [初めての旅行eSIM完全ガイド](/ja/guides/first-time-guide/) — eSIMの購入・設定・帰国後管理
- [用語集](/ja/guides/glossary-index/) — SIM・モバイル通信用語リファレンス
================================================================================
# スマホを紛失・盗難されたときの対処 — 回線停止からSIM再発行まで
URL: https://sim-finder.com/ja/guides/lost-stolen/
Type: guides (ja)
Published: 2026-06-04
スマホを紛失・盗難された場合、まず端末のリモートロックをかけ、次にキャリアへ連絡して回線を停止する。この2つを素早く行うことで、不正利用・情報漏洩・SMS認証の悪用を最小化できる。
以下では、紛失・盗難発覚から回線停止・SIM再発行・各種アカウント保護・警察への届出まで、時系列順に解説する。
---
## ステップ1: 端末を探す・リモートロックをかける
### iPhoneの場合(「探す」)
AppleはiOS向けに「探す(Find My)」機能を提供している。iCloudアカウントに紐付いた別のAppleデバイス、またはPC・スマートフォンのブラウザから `icloud.com` にアクセスすることで操作できる。
主な操作:
- **サウンドを再生**: 端末を鳴らして近くにある場合に気づけるようにする
- **紛失モード(Lost Mode)**: 端末をリモートロックし、画面に連絡先を表示する。端末の現在地を継続的に記録する
- **消去**: 端末内のデータを遠隔で消去する。消去後は位置情報を追跡できなくなるため、回収の見込みがない場合に最終手段として使う
紛失モードをオンにすると、端末がロックされた状態が維持される。Apple PayなどのNFCによるタップ決済も一時停止される。
「探す」機能を使うには、紛失前に「iPhoneを探す」が有効になっていること、および「最後の位置情報を送信」設定がオンになっていることが前提だ。
### Androidの場合(「デバイスを探す」)
GoogleはAndroid向けに「デバイスを探す(Find My Device)」機能を提供している。`google.com/android/find` にアクセスするか、別のAndroid端末の「デバイスを探す」アプリから操作できる。
主な操作:
- **着信音を鳴らす**: 最大5分間、着信音を鳴らす
- **デバイスを保護**: リモートロックをかけ、Googleアカウントのパスワードを要求する。ロック画面にメッセージや連絡先を表示できる
- **デバイスを消去**: 出荷時の状態にリセットする。消去後は位置情報が追跡できなくなる
「デバイスを探す」機能を使うには、紛失前に設定が有効になっていることが前提だ。
---
## ステップ2: キャリアに連絡して回線を停止する
自分のスマホが使えない状態でも、固定電話・家族の端末・公衆電話・PCのWeb手続きからキャリアに連絡できる。
### 各キャリアの紛失時連絡先
| キャリア | 電話 | Web |
|---------|------|-----|
| NTTドコモ | 0120-524-360(24時間) | My docomo |
| au(KDDI) | 0077-7-113(24時間) | My au |
| ソフトバンク | 0800-919-0157(24時間) | My SoftBank |
| 楽天モバイル | 0800-600-0500(24時間年中無休) | my 楽天モバイル |
各キャリアとも、電話・Webどちらの方法でも回線の一時停止手続きが可能だ。手続き時には契約者本人確認(氏名・生年月日・暗証番号等)が必要になる。
### 一時停止と解約の違い
**一時停止(利用停止)**: 回線を止めるが、電話番号・契約は維持される。端末が見つかれば再開できる。
**解約**: 契約そのものを終了する。番号を手放したくない場合は一時停止を選ぶこと。解約してしまった電話番号は、他者に付与されるまでの期間が過ぎると回収できない。
番号を維持したまま休眠させる方法については「[電話番号の維持・保管方法](/ja/guides/number-storage/)」で詳しく解説している。
### ネットワーク利用制限(IMEI登録)
日本では、盗難端末のIMEIをキャリアに申請することで、ネットワーク利用制限(端末のネットワーク接続を拒否する措置)を申請できる。手続きはキャリアの窓口または電話で行う。
IMEIは「端末の電話アプリで `*#06#` をダイヤル」するか「設定 → 端末情報」で確認できるが、手元に端末がない場合は購入時の外箱の側面に記載されている。IMEIの詳細については「[IMEI・PIN・PUKコードとは](/ja/guides/imei-pin-puk/)」を参照してほしい。
---
## ステップ3: SIMを再発行する
回線を一時停止した後、端末が見つからない場合はSIMカードの再発行を依頼する。再発行手続きはキャリアのショップまたはWeb(オンライン申請に対応しているキャリアの場合)で行う。
再発行後の流れ:
1. 旧SIM(紛失・盗難端末に挿さっていたもの)は即時使用不能になる
2. 新しいSIMカードに同じ電話番号が引き継がれる
3. 新しい端末にSIMを挿し込み、初期設定を行う
eSIMを使っていた場合は、SIM再発行ではなくeSIMプロファイルの再発行(再ダウンロード)となる。手続きはキャリアのアプリまたはWebから行う。新しい端末へのeSIMの移行手順については「[物理SIMからeSIMへの切り替え](/ja/guides/switch-physical-to-esim/)」も参考になる。
---
## ステップ4: キャリア決済・モバイル決済を停止する
スマホを紛失・盗難された場合、以下のサービスが不正使用される可能性がある。
**キャリア決済(ドコモ払い・auかんたん決済・ソフトバンクまとめて支払いなど)**: 回線停止と同時に利用停止になる場合が多いが、各キャリアの案内に従い確認する。
**Apple Pay / Google Pay(タップ決済)**:
- iPhone: 「探す」の紛失モードをオンにすると、Apple Payが一時停止される。Appleサポート(0120-277-535)に連絡してApple Pay上のカードを削除することも可能
- Android: Google Payのカードはアカウント設定画面から削除できる
**QRコード決済(PayPay・楽天ペイ・d払いなど)**: 各アプリの公式サポートに連絡し、アカウントをロックする。多くのサービスは不正ログインが疑われる場合の緊急停止窓口を設けている。
**モバイルSuica・交通系ICカード**: JR東日本の「Suica」アプリやモバイルSuicaサポートに連絡して利用停止できる。全使用停止措置が完了した時点の残高が保護される(停止手続き完了前に使われた分は戻らない)。
---
## ステップ5: SNS・銀行アプリのパスワードを変更する
スマホを他人に操作された場合、ロックが突破されなくても、回線を通じたSMS認証が悪用される可能性がある。回線を停止したうえで、以下の手順を実行する。
**SMS二段階認証を設定しているサービス**
SMS認証コードの送信先が紛失端末の電話番号になっている場合、回線停止によってそのリスクは抑えられる。しかし回線を停止する前の短時間に悪用される可能性もあるため、重要なアカウントのパスワードを別のデバイスから変更する。
優先順位:
1. **メールアカウント**: 他のすべてのサービスのパスワードリセットに使われるため、最優先で対処する。別デバイスからログインし、すべての端末のセッションを無効化する
2. **銀行・証券口座**: 各金融機関のアプリまたはWebサイトから不正アクセスがないか確認し、パスワードを変更する。不審な取引がある場合はすぐに金融機関のサポートに連絡する
3. **SNSアカウント**: X(旧Twitter)・Instagram・LINE等のアカウントを別デバイスから確認し、「他のデバイスからログアウト」処理を実行する
**LINEについての注意点**
LINEは電話番号とアカウントが紐付いている。新しいデバイスに同じ電話番号でLINEを再ログインすると、紛失端末のLINEセッションが自動的に切れる。ただし移行には端末へのアクセス(SMS認証または旧端末からの確認)が必要な場合があるため、LINEサポートへの問い合わせが必要になることがある。
海外渡航中にスマホを紛失した場合、SMS認証が受け取れない状況への対処については「[海外でSMS二段階認証を受け取れない場合の対処](/ja/guides/sms-2fa-abroad/)」が参考になる。
---
## ステップ6: 警察に届出をする
### 遺失届(落とした場合)
スマホを落とした(盗難ではない)場合は、最寄りの警察署または交番に「遺失届」を提出する。オンラインでの届出が可能な都道府県もある(各都道府県警察のWebサイトを確認)。
届出後に「遺失届番号」が発行される。これは端末が見つかった際の照合、および保険・補償サービスの申請に必要になる場合がある。
### 被害届(盗まれた場合)
盗難の場合は「被害届」を提出する。手続きの場所・方法は遺失届と同様だ。
被害届を出す際に用意しておくべき情報:
- 端末の機種名・色・IMEI番号
- 購入時期・購入店舗
- 盗難の状況(日時・場所・状況)
### 警察への届出が重要な理由
届出番号は、端末のキャリアへのIMEI申請時、携帯補償サービスの申請時、クレジットカードの補償申請時など複数の手続きで求められることがある。届出後はその番号を控えておくことが重要だ。
---
## SIMスワップ詐欺への発展リスク
スマホを他人に入手された場合、SIMカードが悪用される可能性がある。SIMスワップ詐欺(SIMハイジャック)は、攻撃者がキャリアの窓口に不正に連絡してSIMを別のカードに差し替え、電話番号を乗っ取る攻撃だ。
紛失・盗難後に以下が発生した場合はSIMスワップの可能性を疑うこと:
- 自分の契約回線が突然使えなくなる(圏外になる)
- キャリアから「SIM変更を受け付けた」旨の通知が届く
- ログインしていないサービスから「パスワードが変更された」アラートが来る
SIMスワップ詐欺の仕組み・対策については「[SIMスワップ詐欺とは — 手口・兆候・防ぎ方](/ja/guides/sim-swap/)」で詳しく解説している。
また、SIMロック(SIMフリーかどうか)の状態は、紛失端末を第三者が別の回線で悪用できるかに影響する場合がある。SIMロックの仕組みについては「[SIMフリーとSIMロック — 確認方法と解除手順](/ja/guides/sim-lock/)」を参照してほしい。
---
## 紛失前に備えておくべきこと
紛失・盗難が発生してから慌てないために、以下を事前に確認・設定しておくことを推奨する。
**端末の準備**
- 「探す(Find My)」(iPhone)または「デバイスを探す」(Android)をオンにしておく
- 端末のIMEIを記録しておく(外箱を保管する、またはどこかにメモする)
- 画面ロック(パスコード・生体認証)を必ず設定しておく
- SIM PINを設定しておく(SIMを抜き出されて別端末で使われることを防ぐ)
SIM PINの設定方法については「[IMEI・PIN・PUKコードとは](/ja/guides/imei-pin-puk/)」で解説している。
**アカウントの準備**
- 重要アカウントの二段階認証を認証アプリに切り替える(SMSではなく)
- キャリアのMy Page(My docomo・My au・My SoftBank等)にログインできる状態を別デバイスで確認しておく
- キャリアの緊急連絡先電話番号を手帳やPCにメモしておく
---
## 対処手順チェックリスト
| 優先度 | 対処 | 手段 |
|--------|------|------|
| 即時 | 端末をリモートロック(紛失モード/デバイスを保護) | iCloud.com / google.com/android/find |
| 即時 | キャリアに連絡・回線を一時停止 | 別の電話または各社Web |
| 速やか | Apple Pay / Google Pay を停止 | iCloud・Googleアカウント設定 |
| 速やか | QRコード決済・キャリア決済を停止 | 各サービスサポート |
| 速やか | メールアカウントのパスワードを変更・セッション無効化 | PC・別のスマートフォン |
| 速やか | 銀行・証券口座の不正利用確認・パスワード変更 | 各金融機関Web |
| 速やか | SNSの「他のデバイスからログアウト」実行 | PC・別のスマートフォン |
| 後日 | 警察に遺失届または被害届を提出 | 最寄りの警察署・交番 |
| 後日 | SIMカードの再発行(端末が見つからない場合) | キャリアショップ・Webまたは店舗 |
| 後日 | IMEI申請によるネットワーク利用制限 | キャリア窓口 |
---
## FAQ
**Q. スマホを落とした直後、Wi-Fiのみ接続できる状態でも「探す」機能は使えますか?**
A. iPhoneの「探す」はWi-Fiでも位置情報を送信できます。さらに「探す」ネットワーク(Find My Network)機能がオンになっていれば、Wi-FiにもモバイルデータにもつながっていないオフラインのiPhoneでも、周辺にある他のAppleデバイスを経由してBluetooth信号を中継し、位置情報を送信できます。Androidの「デバイスを探す」は、Find Hubネットワーク(旧「オフライン端末を探す」)を通じて、一部のオフライン状態でも近くのAndroid端末を経由して位置情報を共有できます。ただしこの機能の対応状況は端末とAndroidのバージョンによって異なります。
**Q. 回線停止するとSMSも受け取れなくなりますか?認証コードが届かなくなって困りませんか?**
A. 回線を一時停止すると、SMSも届かなくなります。パスワードの変更など二段階認証が必要な手続きは、回線停止前または回線再開後に行うのが原則です。認証アプリ(Google AuthenticatorやMicrosoft Authenticatorなど)でTOTP二段階認証を使っているサービスは、SMS依存ではないため回線停止中でも認証コードを生成できます。海外渡航中など、SMS認証の受け取りに問題が生じる状況への対処は「[海外でSMS二段階認証を受け取れない場合の対処](/ja/guides/sms-2fa-abroad/)」を参照してください。
**Q. 端末が見つかった場合、一時停止した回線をすぐに再開できますか?**
A. はい。回線の一時停止はキャリアへの電話またはWebの「My Page」から再開手続きができます。端末が手元に戻り、SIMが物理的に問題なければ、再開手続き後すぐに使い始められます。ただし紛失中にSIMカードを再発行した場合は、旧SIMは使えなくなっているため、新しいSIMを端末に挿す必要があります。
**Q. 海外旅行中にスマホを紛失した場合、日本のキャリアに連絡できますか?**
A. できます。日本の大手キャリアは国際電話でも対応しています。NTTドコモは海外からの紛失・盗難の連絡先として +81-3-6832-6600 を案内しています(ドコモのケータイからは無料、一般電話・他社回線からは国際通話料がかかります)。au・ソフトバンク・楽天モバイルも海外からの問い合わせ連絡先を公式サイトに掲載しています。また、各キャリアのWebサイトにPCからアクセスすれば回線停止手続きもオンラインで行えます。
---
## まとめ
スマホを紛失・盗難された際の最優先行動は2つだ。まず「探す」または「デバイスを探す」でリモートロックをかけ、次に別の電話からキャリアに連絡して回線を一時停止する。この2つを素早く行うことで、不正通話・SMS認証の悪用・決済サービスの不正使用をまとめて防げる。
SIM再発行・各種アカウント保護・警察への届出はその後の対応だが、いずれも速やかに進めることが重要だ。
### 関連ガイド
- [SIMスワップ詐欺とは — 手口・兆候・防ぎ方](/ja/guides/sim-swap/)
- [IMEI・PIN・PUKコードとは — 意味と確認・解除方法](/ja/guides/imei-pin-puk/)
- [SIMフリーとSIMロック — 確認方法と解除手順](/ja/guides/sim-lock/)
- [電話番号の維持・保管方法 — 使わない番号を残すには](/ja/guides/number-storage/)
- [海外でSMS二段階認証を受け取れない場合の対処](/ja/guides/sms-2fa-abroad/)
================================================================================
# SM-DP+アドレスで手動設定する — QRコードが使えない場合のeSIMインストール手順
URL: https://sim-finder.com/ja/guides/manual-code/
Type: guides (ja)
Published: 2026-04-20
QRコードが使えない場合、SM-DP+アドレスとアクティベーションコードを手動で入力することでeSIMをインストールできる。QRコードの読み取りに失敗したとき、メールでLPAコードを受け取ったとき、QRコードが表示できる別端末がないときに使う手順だ。
QRコードを使った通常の手順は「[QRコードでeSIMを設定する(iPhone)](/ja/guides/qr-code-iphone/)」「[QRコードでeSIMを設定する(Android)](/ja/guides/qr-code-android/)」を参照してほしい。eSIMの設定後にデータ通信が繋がらない場合は「[eSIMが設定できないときの対処法](/ja/guides/activation-failed/)」を確認すること。
---
## 手動入力が必要になる場面
次のいずれかに当てはまる場合、手動入力が選択肢になる。
**QRコードが読み取れない場合**
- QRコードが印刷物で汚損・劣化している
- QRコードが設定したい端末の画面上にしか表示されておらず、別端末がない(iOSでいうと、iOS 17.4未満でこの状況に陥りやすい。iOS 17.4以降はQRコード画像を長押しして「eSIMを追加」を選択できるため、多くの場合は手動入力なしで解決できる)
- 低解像度のメール・PDFに掲載されたQRコードがスキャンできない
**プロバイダーがLPAコードをテキストで送ってくる場合**
一部のeSIMプロバイダーはQRコード画像を発行せず、`LPA:1$rsp.example.com$ACTIVATION_CODE` 形式のテキストコードをメールまたはアプリ内で提供する。このコードは手動入力フォームに貼り付けるか、各フィールドに分割して入力する。
**キャリアがEIDを事前に要求する場合**
一部のキャリアやMVNOはeSIM発行前に端末のEIDを申告させる。この場合、EIDを伝えた上でSM-DP+アドレスとアクティベーションコードが発行される。
---
## 必要な情報
手動インストールに必要な情報は次の通りだ。
| 情報 | 概要 | 必須 |
|------|------|------|
| **SM-DP+アドレス** | eSIMプロファイルが置かれているサーバーのドメイン(例: `rsp.truphone.com`) | 必須 |
| **アクティベーションコード** | プロファイルを取得するための一回使い切りのトークン | 必須 |
| **Confirmation Code** | 不正利用防止のための追加確認コード。プロバイダーが設定した場合のみ必要 | オプション |
| **EID** | 端末のeUICCチップの固有識別番号。一部キャリアが事前申告を要求する場合がある | キャリアによる |
SM-DP+アドレスはドメイン形式(例: `rsp.example.com`)で、`http://` や `https://` は含まない。アクティベーションコードは英数字の文字列で、プロバイダーによって形式・長さが異なる。
---
## SM-DP+アドレスとアクティベーションコードの取得方法
### プロバイダーのメール・アプリから確認する
QRコードと同じメールまたはアプリ内に「SM-DP+アドレス」「有効化コード」「アクティベーションコード」「LPAコード」などの名称でテキストが記載されている場合がある。プロバイダーによって表記が異なるため、eSIM購入後の案内メール全文を確認すること。
「LPA:1$」から始まるテキストが届いた場合の見方は「[LPAアクティベーションコードの形式](#lpaアクティベーションコードの形式)」で解説する。
### QRコードをデコードして取得する
手元にQRコードがあるが、スキャンできない状況の場合はQRコードをデコードして内容を取り出せる。
**スマートフォンのカメラアプリ以外でデコードする方法:**
1. QRコードの画像を用意する(スクリーンショット・写真・PDF)
2. ブラウザでQRコードデコーダーサービス(例: zxing.org/w/decode.jspx)を開く
3. 画像をアップロードするとテキストとして表示される
4. 「LPA:1$」から始まるテキストを確認し、SM-DP+アドレスとアクティベーションコードを取り出す
取り出したコードはコピーしてメモアプリ等に保存してから入力作業に臨むと、誤入力を防げる。
### キャリア・プロバイダーのサポートに問い合わせる
メールに届いたQRコードが壊れている場合や、SM-DP+アドレスが見当たらない場合は、プロバイダーのサポートに「SM-DP+アドレスとアクティベーションコードをテキストで教えてほしい」と伝えると対応してもらえる場合がある。
---
## iPhoneでの手動入力
iPhoneでのSM-DP+アドレス手動入力手順を解説する。
### iOS 17.4以降
iOS 17.4以降のiPhoneではQRコード画像の長押しや写真アプリからの「eSIMを追加」が利用できるため、手動入力に頼る機会は減っている(Apple公式情報)。それでも手動入力が必要な場合の手順は次の通りだ。
**Step 1: 「設定」→「モバイル通信」を開く**
**Step 2: 「eSIMを追加」をタップする**
iOS・端末の構成によって「モバイル通信プランを追加」と表示される場合もある。
**Step 3: 「QRコードを使用」画面で「詳細情報を手動で入力」をタップする**
QRコードスキャン画面の下部に「詳細情報を手動で入力」リンクがある(Apple公式情報)。
**Step 4: SM-DP+アドレスを入力する**
「SM-DP+アドレス」フィールドにサーバーアドレス(例: `rsp.example.com`)を入力する。`http://` は不要だ。
**Step 5: アクティベーションコードを入力する**
「アクティベーションコード」フィールドに英数字のコードを入力する。コピー&ペーストを使うと誤字を防げる。
**Step 6: Confirmation Codeを入力する(必要な場合のみ)**
プロバイダーからConfirmation Codeが案内されている場合のみ入力する。フィールドが表示されない場合やコードの案内がない場合は省略できる。
**Step 7: 「次へ」をタップしてダウンロードを待つ**
入力内容が正しければSM-DP+サーバーに接続し、プロファイルのダウンロードが始まる。Wi-Fi環境によって数秒〜1分程度かかる。
**Step 8: eSIMのラベルとデータ通信設定を行う**
ダウンロード完了後、eSIMに任意のラベルをつけ、モバイルデータ通信の優先回線をeSIMに設定する。
### iOS 17.3以前
iOS 17.3以前でも手動入力フィールドの場所は同じだ(「設定」→「モバイル通信」→「eSIMを追加」→「詳細情報を手動で入力」)。ただし、iOS 17.4未満はQRコード画像を長押ししてeSIMを追加する機能がないため、設定したい端末の画面上にしかQRコードが表示されていない場合は手動入力が事実上唯一の選択肢になる。
---
## AndroidでのeSIM手動入力
AndroidはメーカーごとにUIが異なる。Google PixelとSamsung Galaxyの手順を解説する。
### Google Pixelでの手動入力
**Step 1: 「設定」→「ネットワークとインターネット」→「SIM」を開く**
**Step 2: 「SIMを追加」または「+」アイコンをタップする**
**Step 3: 「ヘルプ」または「手動で入力」を選択する**
QRコードスキャン画面でこのリンクを探す。端末とAndroidバージョンによって「コードを手動で入力」「アクティベーションコードを入力」などの表記が異なる場合がある(Google Pixel公式情報)。
**Step 4: アクティベーションコードを入力する**
Pixelの場合、SM-DP+アドレスとアクティベーションコードを含む1行のLPAコード(例: `LPA:1$rsp.example.com$ACTIVATION_CODE`)をそのまま貼り付けられる画面が表示される場合がある。入力フォームの指示に従うこと。
**Step 5: 「ダウンロード」をタップしてインストールを待つ**
**Step 6: eSIMを有効化する**
インストール完了後、「eSIMを有効にする」の確認画面でオンにする。その後モバイルデータ通信の優先SIMをeSIMに切り替える。
### Samsung Galaxyでの手動入力
**Step 1: 「設定」→「接続」→「SIMカードマネージャー」(One UI 6以降は「SIMマネージャー」)を開く**
**Step 2: 「モバイルプランを追加」または「eSIMを追加」をタップする**
**Step 3: 「アクティベーションコードを使用」または「コードを手動で入力」を選択する**
QRコードスキャン画面に「コードを手動で入力」または「アクティベーションコード入力」の選択肢がある(Samsung公式情報)。
**Step 4: SM-DP+アドレスとアクティベーションコードを入力する**
Samsungの入力フォームはSM-DP+アドレスとアクティベーションコードを別フィールドで受け付ける場合と、「LPA:1$アドレス$コード」形式を1行で受け付ける場合がある。画面の指示に従うこと。
**Step 5: 「追加」または「ダウンロード」をタップする**
**Step 6: 端末の再起動が促された場合は再起動する**
インストール後、再起動を求めるダイアログが表示された場合は指示に従う。
---
## LPAアクティベーションコードの形式
GSMA SGP.22で規定されるLPA(Local Profile Assistant)のアクティベーションコードは次の形式をとる。
```
LPA:1$$<アクティベーションコード>[$]
```
| 要素 | 説明 | 例 |
|------|------|----|
| `LPA:1` | LPAプロトコルバージョン識別子(固定値) | `LPA:1` |
| `$` | フィールド区切り文字 | — |
| SM-DP+アドレス | プロファイル配布サーバーのFQDN | `rsp.example.com` |
| アクティベーションコード | プロファイルを取得するためのトークン | `01E8-23XP-...` |
| Confirmation Code | オプション。プロバイダーが設定した場合のみ存在 | `123456` |
例:
```
LPA:1$rsp.example.com$01E8-23XP-9A4F-B7C2[$123456]
```
角括弧 `[...]` の部分はオプションであり、Confirmation Codeが設定されていない場合は省略される。QRコードはこのテキスト全体をエンコードしたものだ。
端末のiOS・Androidの手動入力フォームはこのコードから必要なフィールドを分割して受け取る。「LPA:1$」の接頭辞は入力不要で、アドレスとコードを別々のフィールドに入力する画面が一般的だ(端末によっては1行入力形式の場合もある)。
eSIMの仕組みやSM-DP+の役割については「[eSIMとは — 仕組み・メリット・デメリット](/ja/guides/what-is-esim/)」で詳しく解説している。
---
## 手動入力時のトラブルシューティング
### 「SM-DP+サーバーに接続できません」エラー
**原因と対処法(順番に試す):**
1. **インターネット接続を確認する** — Wi-Fiまたはモバイルデータが通信できているかブラウザで任意のページを開いて確認する
2. **SM-DP+アドレスの入力を確認する** — 先頭・末尾のスペース、`http://` や `https://` の有無、スラッシュの有無を確認する。正しい形式はFQDNのみ(例: `rsp.example.com`)
3. **アクティベーションコードを再確認する** — 文字列の誤入力・文字化けがないか確認する。コピー&ペーストを使うことを推奨
4. **別のWi-Fiネットワークを試す** — 一部のWi-Fiはファイアウォールで特定のポートをブロックしている場合がある
5. **時間をおいて再試行する** — プロバイダーのサーバーが一時的に混雑・メンテナンス中の場合がある
### 「無効なアクティベーションコード」エラー
アクティベーションコードはQRコードと同様に1回のみ使用可能だ(GSMA SGP.22仕様)。すでに別の端末で使用済みまたは期限切れの場合はコードが無効化される。新しいコードの発行はプロバイダーのサポートに依頼すること。
### 「Confirmation Codeが不正です」エラー
Confirmation Codeに誤りがある。プロバイダーから案内されたコードを再確認すること。Confirmation Codeの案内がない場合、フィールドは空欄のまま進む。
### 入力できたがプロファイルのダウンロードが完了しない
プロファイルのダウンロードには通常数秒〜1分かかる。Wi-Fiの電波状況が不安定な場合はより時間がかかる。3分以上待っても完了しない場合は接続を確認してから再試行する。
### iPhoneで「詳細情報を手動で入力」が表示されない
「設定」→「モバイル通信」→「eSIMを追加」の手順を踏んでいるかを確認する。「eSIMを追加」のメニュー自体が見当たらない場合は、端末のeSIM非対応またはSIMロックの可能性がある。「[eSIMが設定できないときの対処法](/ja/guides/activation-failed/)」を参照すること。
---
## よくある質問
**SM-DP+アドレスはどこで確認できますか?**
eSIMプロバイダーのアプリまたはメール(「eSIM情報」「アクティベーション情報」といった件名)に記載されています。QRコードがある場合はQRコードをデコードすると確認できます。「$」区切りのLPAコード(例: `LPA:1$rsp.example.com$ACTIVATION_CODE`)が送られてきた場合は、最初の「$」と次の「$」の間がSM-DP+アドレスです。
**アクティベーションコードとSM-DP+アドレスは別々に入力しますか?**
iPhoneでは「SM-DP+アドレス」と「アクティベーションコード」を別フィールドに分けて入力します。AndroidのPixelでは両者を含む1行のLPAコード(`LPA:1$アドレス$コード`形式)をそのまま貼り付けることができる場合があります。端末の入力画面の指示に従ってください。
**Confirmation Code(確認コード)は必ず必要ですか?**
いいえ。Confirmation CodeはGSMA SGP.22の仕様上オプション項目であり、プロバイダーが設定した場合のみ必要です。コードが必要な場合はプロバイダーから別途案内されます。案内がない場合は空欄のままで構いません。
**QRコードと手動入力は同じeSIMプロファイルを使いますか?**
はい。QRコードはSM-DP+アドレスとアクティベーションコードをエンコードしたものです。どちらの方法でも同じeSIMプロファイルをダウンロードするため、どちらかで成功した時点でもう一方は使えなくなります。
**手動入力後もeSIMが有効化されません**
入力完了はプロファイルのダウンロード(インストール)です。有効化(アクティベーション)は別のステップで、「設定」→「モバイル通信」でeSIMラインをオンにし、モバイルデータ通信の回線に設定する必要があります。それでも繋がらない場合は「[eSIMが設定できないときの対処法](/ja/guides/activation-failed/)」を参照してください。
**EIDとは何ですか?なぜ必要なのですか?**
EID(eUICC Identifier)はeSIMチップに固有の識別番号です。通常はeSIMのインストールに不要ですが、一部のキャリアやMVNOがeSIMプロファイルを特定の端末に紐づける際に事前にEIDの申告を求めることがあります。iPhoneでは「設定」→「一般」→「情報」→「EID」で確認できます。Androidでは「設定」→「端末情報」→「IMEI情報」またはダイヤルパッドで `*#06#` を入力すると表示される場合があります(端末モデルにより異なる)。
---
## 関連ガイド
eSIMの設定に初めて取り組む場合は「[初めての旅行eSIM完全ガイド](/ja/guides/first-time-guide/)」で全体の流れを確認できる。eSIMの仕組み・SM-DP+の役割・LPAの概念については「[eSIMとは — 仕組み・メリット・デメリット](/ja/guides/what-is-esim/)」で基礎から解説している。
QRコードを使った通常の設定手順は「[QRコードでeSIMを設定する(iPhone)](/ja/guides/qr-code-iphone/)」と「[QRコードでeSIMを設定する(Android)](/ja/guides/qr-code-android/)」を参照してほしい。SM-DP+アドレスを正しく入力してもeSIMが有効化されない場合の詳しいトラブルシューティングは「[eSIMが設定できないときの対処法](/ja/guides/activation-failed/)」にまとめている。
国内SIMでeSIM対応プランを探すには[SimFinderで絞り込める](/ja/)。海外旅行用のeSIMは[SimFinder Travelで国別に検索](/ja/travel/)できる。
================================================================================
# MNO vs MVNO vs サブブランド — 違いと選び方
URL: https://sim-finder.com/ja/guides/mno-vs-mvno-comparison/
Type: guides (ja)
Published: 2026-04-13
日本の携帯プランは「MNO(大手キャリア)」「サブブランド」「MVNO(格安SIM)」の3種類に大別できる。MNOは最も品質が高く料金も高め、MVNOは料金を抑えられるが混雑時の速度低下リスクがある、サブブランドはその中間に位置する。どれが自分に合うかは、通信品質への要求と月額コストの優先順位で決まる。
自分に合ったプランを条件で絞り込みたい場合は、[SimFinderの比較ツール](/ja/jp/search/)を活用してほしい。
---
## MNO・サブブランド・MVNOの仕組みの違い
3種類のキャリアは「誰がネットワークを所有・運営するか」という構造で根本的に異なる。
### MNO(大手キャリア)の仕組み
MNO(Mobile Network Operator、移動体通信事業者)は、政府から無線周波数の使用免許を取得し、自社で基地局・アンテナなどの無線インフラを保有・運営する通信事業者を指す。
日本には4つのMNOが存在する。
| MNO | 特徴 |
|-----|------|
| **NTTドコモ** | 広いカバレッジを持つ。法人・個人ともに最大手 |
| **au(KDDI)** | 都市部・郊外ともに安定した品質。楽天回線との提携ローミングも |
| **ソフトバンク** | 都市部でのカバレッジが強い。Yahoo!グループとの連携サービスあり |
| **楽天モバイル** | 2020年4月参入の4番目のMNO。段階制料金で他社と差別化 |
MNOが高品質を維持できる理由は、自社インフラへの継続的な設備投資にある。基地局の設置・拡張、5Gエリアの整備、コアネットワークの運営には数千億円規模の費用がかかる。この費用が月額料金に反映される。
### MVNO(格安SIM)の仕組み
MVNO(Mobile Virtual Network Operator、仮想移動体通信事業者)は、自社では無線ネットワークインフラを保有せず、MNOからネットワーク帯域を卸売購入してモバイルサービスを提供する事業者を指す。「仮想(Virtual)」は「自社のネットワークを持たない」ことを意味する。
MVNOが低価格を実現できる主な理由は以下の3点だ。
1. **基地局などの設備投資が不要**: MNOのインフラを借りるため、数千億円規模の設備投資がかからない
2. **オンライン中心の運営**: 実店舗を最小限にすることで固定費を抑えられる
3. **帯域の仕入れ最適化**: 必要な分だけ帯域を借りることでコストを最適化できる
MVNOの弱点は、この「必要な分だけ借りる」仕組みに起因する。利用者が集中する時間帯に借りている帯域幅が不足すると、通信速度が低下する。この現象は混雑時間帯(お昼休み・夕方)に起きやすい。
### サブブランドの仕組み
サブブランドは、MNOの関連会社(または直属部門)が運営する低価格ブランドを指す。日本の代表例はUQ mobile(KDDIグループ)とY!mobile(ソフトバンクグループ)だ。
サブブランドの最大の特徴は、**親MNOのネットワーク設備を優先的に使用できること**にある。MVNOのように帯域幅を制限付きで借りるのではなく、親MNOのリソースをより有利な条件で利用できる。そのため、通信品質はMNOとほぼ同等になる。
日本の主なサブブランドは以下の通りだ。
| サブブランド | 親MNO | 特徴 |
|-------------|-------|------|
| **ahamo** | NTTドコモ | オンライン専用、5分かけ放題標準付帯 |
| **ドコモ mini** | NTTドコモ | ドコモショップで対応可能、少容量向け(2025年6月〜) |
| **povo2.0** | au(KDDI) | 基本料0円、トッピング方式 |
| **UQ mobile** | au(KDDI) | 店舗サポートあり、一部プランで節約モード搭載 |
| **Y!mobile** | ソフトバンク | 家族割充実、Yahoo!連携特典 |
※ソフトバンクが運営するLINEMOもサブブランドに近い位置づけで、ソフトバンク回線品質で利用できる。
※ahamo・povo2.0・LINEMOはMNOが直接提供するオンライン専用プランであり、厳密にはサブブランドではないが、料金・サービス体系がサブブランドに近いため本記事ではまとめて紹介する。
---
## 3種類を比較する3つの軸
MNO・サブブランド・MVNOを選ぶ際に重要な比較軸は「通信品質」「料金」「混雑時の速度」の3つだ。
### 軸1: 通信品質(平常時)
平常時(混雑していない時間帯)の通信品質は、どの種類のキャリアを使うかより、どのMNOの回線を使うかで決まる。
- MNO本体を直接使う場合: その事業者の回線品質がそのまま適用される
- サブブランドを使う場合: 親MNOと同等の品質が期待できる
- MVNOを使う場合: 利用しているMNO回線の品質をベースに、帯域制限の影響を加味した品質になる
「IIJmioはドコモ回線を使っているので、ドコモの品質をベースに帯域制限の影響を差し引いた品質」という考え方で整理すると分かりやすい。
### 軸2: 料金
具体的な料金は時期により変動するため記載しない。SimFinderの検索ツールで最新のプランを比較してほしい。
大まかな傾向として、同じデータ容量で比較すると以下の順になる。
```
MNO本体 > サブブランド ≥ MVNO
```
ただし楽天モバイルはMNOでありながら料金がサブブランドと同等水準の場合があるため、例外的な位置づけになる。
[SimFinderでプランを料金・容量で比較する →](/ja/jp/search/)
### 軸3: 混雑時の速度
混雑時(お昼12時〜13時、夕方17時〜19時)の速度は3種類で大きく異なる。
| キャリア種別 | 混雑時の速度 | 理由 |
|------------|------------|------|
| **MNO** | 安定 | 自社設備を優先的に使用 |
| **サブブランド** | ほぼ安定 | 親MNOの設備を優先的に利用できる |
| **MVNO** | 低下しやすい | 借りている帯域幅に上限がある |
MVNOの混雑時速度低下は、以下の仕組みで起きる。
1. MVNOはMNOの特定のネットワーク接続ポイント(POI: Point of Interface)を通じてトラフィックをやり取りする
2. この接続ポイントには帯域上限が設定されている
3. 利用者が集中すると、この上限に達して速度が落ちる
ただし、MVNOが「常に遅い」わけではない。午前中や深夜などの非混雑時間帯では、MNOと大差ない速度が出ることも多い。
---
## 自分に合う選択の判断基準
3種類の違いを踏まえた選択の考え方を整理する。
### MNOまたはサブブランドが向く場面
以下に当てはまる場合は、MNOまたはサブブランドが適している。
- 仕事でビデオ通話やオンライン会議を外出先で頻繁に行う
- テザリングをメインPCに使いながら作業することがある
- お昼休みや夕方にスマホをよく使う
- 通信品質の安定性に高い基準を求める
- 初めて格安SIMに乗り換えるため、リスクを最小化したい
サブブランドはMNOと同等に近い品質を維持しながら、料金はMNOより抑えられる点で「品質と料金のバランス型」として有力な選択肢になる。
### MVNOが向く場面
以下に当てはまる場合は、MVNOが適している。
- 自宅・職場にWi-Fi環境が整っており、外出先での通信は補助的
- お昼休みにスマホの動画を見るほどには使わない
- 月額コストを最優先で抑えたい
- 通勤中はLINEやメールなど軽い用途が中心
MVNOは月額コストをMNOより大幅に抑えられる。コスト削減額はプランの選択次第だが、SimFinderの比較で具体的な差額を確認できる。格安SIMの選び方については[格安SIM選び方ガイド](/ja/blog/kakuyasu-sim-erabikata-guide-2026/)で詳しく比較しています。
### 迷ったときの判断フロー
```
「仕事でビデオ通話を外出先でよく使う」→ YES → MNOまたはサブブランド
↓ NO
「お昼休みや夕方にスマホを頻繁に使う」→ YES → サブブランド(まず試してみる)
↓ NO
「自宅・職場Wi-FiでほとんどOK」 → YES → MVNOで問題ない可能性が高い
```
[SimFinderで自分の条件に合うプランを探す →](/ja/jp/search/)
---
## 日本のキャリア構成を把握する
日本では4つのMNO(NTTドコモ・KDDI/au・ソフトバンク・楽天モバイル)を頂点に、複数のサブブランドとMVNOが存在する。MVNOはどこかのMNOの回線を借りているため、「どのMNOの回線か」も選択の参考になる。
- **NTTドコモ系**: 多数のMVNOがドコモ回線を利用
- **KDDI/au系**: KDDI系のMVNOが利用
- **ソフトバンク系**: 一部のMVNOが利用
- **楽天モバイル**: サブブランド・MVNOなし(自社サービスのみ)
特定のMVNOを検討する際は、そのMVNOがどのMNO回線を使っているかを確認することで、カバレッジの目安が分かる。
---
## 速度実測の参考データ
MNOとMVNOの速度差を客観的に把握するために、第三者機関が公開している調査データを紹介する。
### MMD研究所「2026年3月 MNO4サービスの通信速度調査」
[MMD研究所](https://mmdlabo.jp/investigation/detail_2531.html)は2026年3月、東京(新宿駅・SHIBUYA109前)と大阪(大阪駅・道頓堀戎橋)の計4地点でMNO4社のダウンロード速度を実測した(調査端末: iPhone 16 Pro、計測アプリ: Speedtest by Ookla)。
**主要2都市全体のダウンロード速度中央値**
| MNO | 朝(9〜10時台) | 昼(12〜13時台) | 夕(17〜18時台) |
|-----|-----------------|-----------------|-----------------|
| SoftBank | 352.0 Mbps | 235.5 Mbps | 206.5 Mbps |
| au | 290.5 Mbps | 198.5 Mbps | 130.5 Mbps |
| docomo | 214.5 Mbps | 173.0 Mbps | 142.0 Mbps |
この調査はMNO4社を対象としており、MVNOは含まれない。MNO本体の速度は昼の混雑時間帯でも100Mbpsを大きく超えており、動画視聴やビデオ通話に十分な品質を維持していることが分かる。
### Opensignal「Japan Mobile Network Experience Report(2025年10月)」
[Opensignal](https://insights.opensignal.com/reports/2025/10/japan/mobile-network-experience)は2025年7月11日〜10月8日の90日間、実ユーザーの実端末から収集したデータに基づき、日本のMNO4社を比較した。
**ダウンロード速度(全国平均、実ユーザーデータ)**
| MNO | ダウンロード速度 | 備考 |
|-----|----------------|------|
| SoftBank | 55.7 Mbps | Download Speed Experience 受賞 |
| NTT docomo | 50.5 Mbps | Coverage Experience 受賞 |
| Rakuten Mobile | — | Upload Speed Experience 受賞(15.3 Mbps) |
Opensignalのレポートはメインのモバイルネットワーク4社(MNO)を対象とし、MVNOは含まれない。MVNOはこれらMNOの回線を借りているため、MVNOの速度はMNO速度をベースに帯域制限の影響を差し引いた水準となる。
### MVNO(格安SIM)の速度の傾向
第三者機関がMVNOの速度を継続的に測定している複数の専門サイトのデータを総合すると、以下の傾向が確認されている。
**時間帯による速度変動(MVNOの典型例)**
| 時間帯 | MVNOの速度傾向 | 備考 |
|--------|--------------|------|
| 朝(8〜11時) | 比較的速い(30〜80Mbps程度) | 混雑が少ない |
| 昼(12〜13時) | 低下しやすい(3〜30Mbps程度) | POI帯域の逼迫 |
| 夕方(17〜19時) | やや低下(10〜40Mbps程度) | 事業者差が大きい |
| 夜(21〜23時) | 比較的安定(20〜50Mbps程度) | |
※上記の速度範囲は複数のMVNOの実測データを参考にした目安であり、事業者・時期・地域・使用回線(ドコモ系/au系/SB系)によって異なる。
**昼時間帯の速度低下の仕組み**
MVNOはMNOの基地局ではなく、MNOとの接続点(POI: Point of Interface)で帯域を借りている。この帯域に上限があるため、12時〜13時の昼休みに利用者が集中すると、POIが混雑して速度が低下する。一方、MNOはPOIを経由せず自社設備を直接使うため、同じ時間帯でも安定した速度を維持できる。
この構造的な差が「混雑時はMNOまたはサブブランドを選ぶ」という判断の根拠となる。
---
## よくある質問
### MVNO同士でも速度に差はありますか?
はい、差があります。各MVNOがMNOから確保している帯域幅の量や、POI(接続ポイント)の増強頻度によって、同じ時間帯でも速度が異なります。また、MVNOによっては「3日間で◯GB以上使用すると速度制限」のような利用量制限も異なります。SimFinderの品質スコアを参考に比較してください。
### サブブランドとMVNOを兼ねて使うことはできますか?
デュアルSIMに対応した端末であれば、サブブランドのSIMとMVNOのSIMを1台で使い分けることができます。「メイン回線はサブブランドで安定した通信、データ専用としてMVNOの低料金SIMを追加」という使い方が可能です。
---
*この記事の情報は2026年4月時点のものです。各キャリアのプラン内容・料金は変更される場合があります。最新情報は[SimFinderの比較ツール](/ja/jp/search/)および各キャリアの公式サイトでご確認ください。*
================================================================================
# 番号ポータビリティ(MNP)の手順 — 乗り換えの全ステップ
URL: https://sim-finder.com/ja/guides/mnp-step-by-step/
Type: guides (ja)
Published: 2026-06-04
MNP(番号ポータビリティ)の乗り換えは、**ワンストップ方式**(2023年5月24日開始)か**予約番号方式**(従来方式)の2通りの手順があります。
ワンストップ方式は乗り換え先のWebサイトだけで完結し、予約番号方式は現在のキャリアからMNP予約番号を取得してから申し込む2段階の手続きです。
この記事では、両方式の具体的な手順、当日の回線切替の流れ、開通確認までを段階的に解説します。
---
## 乗り換え前に確認すること
手続きを始める前に、以下の状態になっているかを確認します。
**確認項目**
- SIMロックが解除されている(2021年10月以前購入の端末)
- 本人確認書類(運転免許証・マイナンバーカード・パスポートなど)が手元にある
- 支払い用クレジットカードが準備できている
- データのバックアップが完了している
SIMロックの確認・解除手順については「[SIMフリーとSIMロック — 確認方法と解除手順](/ja/guides/sim-lock/)」を参照してください。2021年10月1日以降に発売された端末は原則SIMロックなしで販売されているため、確認不要です。
乗り換え前の全チェック項目(おサイフケータイの移行・キャリアメール・2FA設定など)は「[乗り換え前チェックリスト](/ja/guides/pre-switch-checklist/)」でまとめています。
---
## ステップ1:乗り換え方式を確認する
乗り換え先のキャリア・MVNOがワンストップMNPに対応しているかどうかで、手順が分かれます。
乗り換え先の公式サイトで「ワンストップMNP」または「MNP ワンストップ」の記載を確認してください。
| 方式 | 対象 | 手順数 |
|------|------|--------|
| ワンストップ方式 | 対応事業者への乗り換え | 少ない(現在のキャリアへの連絡不要) |
| 予約番号方式 | 未対応の事業者への乗り換え | 多い(2段階) |
2023年5月24日のサービス開始当初、NTTドコモ・KDDI(au)・ソフトバンク・楽天モバイル・日本通信が対応し、その後対応事業者が順次拡大しています。現時点で未対応の多くのMVNOへの乗り換えには予約番号方式を使います。
MNPの仕組みや2方式の詳しい説明は「[MNP(番号ポータビリティ)とは](/ja/guides/what-is-mnp/)」で解説しています。
---
## ステップ2-A:ワンストップ方式の手順
ワンストップ方式に対応した乗り換え先に申し込む場合の手順です。
### 1. 乗り換え先のWebサイトで申し込みを開始する
乗り換え先のWebサイトまたはアプリを開き、新規申し込みまたはMNP転入の画面に進みます。申し込みフォームで「ワンストップMNP」または「MNP ワンストップ」を選択します。
### 2. 本人確認書類をアップロードする
本人確認書類(運転免許証・マイナンバーカード・パスポート等)の画像をアップロードします。有効期限が切れていないことを事前に確認してください。
### 3. 現在のキャリアのマイページで確認する
申し込みフォームを進めると、現在のキャリアのマイページに自動で遷移します。ログインして、MNP転出に関する重要事項を確認し、同意します。
この操作によって、現在のキャリアへの転出手続きが自動的に行われます。現在のキャリアに電話したり、MNP予約番号を取得したりする必要はありません。
### 4. SIMまたはeSIMプロファイルを受け取る
- **物理SIMの場合**: 指定した住所にSIMカードが郵送されます。到着まで数日かかります。
- **eSIMの場合**: 審査完了後にQRコードまたはeSIMプロファイルのダウンロード案内がメール等で届きます。
### 5. 回線切替操作を行う
SIMまたはeSIMの準備が整ったら、乗り換え先の案内に従って回線切替の操作を行います(詳細は後述のステップ4を参照)。
---
## ステップ2-B:予約番号方式の手順
ワンストップ方式に未対応の乗り換え先に申し込む場合の手順です。
### 1. 現在のキャリアからMNP予約番号を取得する
MNP予約番号は、以下の方法で取得できます。
- **Webサイト・アプリ(マイページ)**: ドコモ・au・ソフトバンク・楽天モバイルはいずれもオンラインでの取得が可能です。
- **電話窓口**: 各キャリアのカスタマーサポートに電話して取得します。
- **店頭**: キャリアのショップで取得します。
オンライン手続きでの転出は原則無料です。電話・店頭での手続きは1,000円(税別)以下のガイドライン上限が設定されており、多くのキャリアが無料化しています(総務省ガイドライン準拠)。
MNP予約番号は**取得日を含めて15日間**が有効期限です(NTTドコモFAQ確認済み)。
### 2. 予約番号の残日数を確認する
多くのMVNOは、申し込み時にMNP予約番号の残日数が**10日以上**あることを要求します。取得後はできるだけ早く申し込みを開始してください。
乗り換え先の申し込みページで、残日数の要件を事前に確認してから取得することも有効です。
### 3. 乗り換え先のWebサイトで申し込む
乗り換え先のWebサイトまたはアプリで新規申し込みまたはMNP転入の画面に進み、以下の情報を入力します。
- MNP予約番号(10〜11桁の番号)
- 予約番号の有効期限
- 本人確認書類(アップロード)
- 支払い情報(クレジットカード等)
### 4. SIMまたはeSIMプロファイルを受け取る
- **物理SIMの場合**: 審査完了後にSIMカードが郵送されます。
- **eSIMの場合**: 審査完了後にeSIMプロファイルのダウンロード案内が届きます。
---
## ステップ3:乗り換え先のプランを選ぶ
申し込み前またはプロセス中に、乗り換え先のプランを選びます。
料金だけでなく、通信品質・データ容量・eSIM対応・通話オプションを比較してから選ぶことが重要です。[SimFinderの国内SIM検索](/ja/jp/)では、MNO・サブブランド・MVNOのプランを条件で絞り込んで一括比較できます。
旅行用のeSIMプロバイダーへの乗り換えを検討している場合は、「[旅行eSIMプロバイダー比較](/ja/guides/provider-comparison/)」で主要プロバイダーの特徴を確認できます。また、旅行先でのeSIM選びのポイントは「[旅行eSIMの選び方](/ja/guides/how-to-choose/)」で解説しています。
---
## ステップ4:回線切替と開通操作
SIMカードが届いた、またはeSIMプロファイルのダウンロード準備ができたら、回線切替の操作を行います。
### 物理SIMの場合
1. 古いSIMカードを端末から取り出す
2. 新しいSIMカードを挿入する
3. 端末を再起動する
4. 乗り換え先の案内に従って開通操作(アクティベーション)を行う
端末によっては、SIMカード挿入後にアクティベーション画面が自動表示されます。
### eSIMの場合
**iPhoneの場合**
1. 「設定」→「モバイル通信」→「eSIMを追加」を開く
2. 乗り換え先から届いたQRコードを読み取る(または「詳細情報を手動で入力」を選択してアクティベーションコードを入力)
3. 画面の指示に従ってeSIMプロファイルをインストールする
4. 「モバイル通信プラン」の設定でインストールしたeSIMを有効にする
**Androidの場合**
1. 「設定」→「ネットワークとインターネット」(または「接続」)→「SIM」→「SIMを追加」を開く
2. QRコードを読み取るかアクティベーションコードを入力する
3. 画面の指示に従ってeSIMプロファイルをインストールする
メーカー・機種によってメニュー名や操作手順が異なる場合があります。乗り換え先のeSIM設定案内を合わせて参照してください。
### 回線切替中の不通時間
回線切替の処理中は、数分〜数時間程度、音声通話・SMSが利用できなくなる場合があります。処理中はWi-Fiでのインターネット接続は維持できます。
この時間帯は以下の操作を避けてください。
- 銀行・証券・各種サービスのSMS認証
- 重要なオンライン手続き
---
## ステップ5:開通確認と後処理
### APN設定(必要な場合)
開通後にモバイルデータ通信が使えない場合、APN(アクセスポイント名)の手動設定が必要なことがあります。乗り換え先のキャリアまたはMVNOで購入した端末は通常APN設定が自動で行われます。SIMフリー端末や他社から持ち込んだ端末では手動設定が必要になる場合があります。
iPhoneのAPN設定手順は「[iPhoneのAPN設定方法](/ja/guides/apn-setup-iphone/)」、AndroidのAPN設定手順は「[AndroidのAPN設定方法](/ja/guides/apn-setup-android/)」で確認できます。
### 開通確認
以下の項目を順番に確認します。
1. **電話の発信・着信**: 実際に別の電話番号に発信し、通話できることを確認する
2. **SMS送受信**: SMSを送受信して届くことを確認する
3. **モバイルデータ通信**: モバイルデータをオンにし、ブラウザでWebサイトを開けることを確認する(Wi-Fiはオフにして確認)
4. **電話番号の確認**: 発信先に表示される番号が、引き継いだ番号と一致することを確認する
### 旧キャリアの後処理
**キャリアメールの持ち運び申し込み**
@docomo.ne.jp・@au.com・@softbank.ne.jp などのキャリアメールを継続して使いたい場合、各キャリアの「メール持ち運びサービス」に申し込みます。NTTドコモ・au・ソフトバンクの3社がこのサービスを提供しており、月額は各社330円(税込)です。NTTドコモ(ドコモメール持ち運び)は、解約日を含む31日以内に申し込みが必要です。解約当日の同時申し込みも可能です。
**旧SIMカードの廃棄**
物理SIMカードを交換した場合、旧SIMカードは不要になります。個人情報保護の観点から、ハサミで切断するなどして廃棄します。
**分割払いの残債確認**
端末の分割払いが残っている場合、乗り換え後も支払い義務が残ります。残債の金額と支払いスケジュールを旧キャリアのマイページまたは請求書で確認してください。
---
## よくある質問
よく寄せられる疑問をまとめます。
**MNP転出に費用はかかりますか?**
オンライン手続きの場合、原則無料です。総務省のガイドライン改正(2021年4月1日施行)により、転出手数料はオンライン手続きで原則無料、電話・店頭での手続きは1,000円(税別)以下が上限です。NTTドコモは2021年4月1日から全方法で無料化しています。
**申し込みから開通まで何日かかりますか?**
eSIMの場合、審査が完了すれば当日開通が可能です。ただし、開通受付時間(例:9時〜21時など、キャリアにより異なる)外に申し込むと、完了が翌日になる場合があります。物理SIMの場合、SIMカードの郵送に2〜5日程度かかるのが一般的です(キャリア・時期によって異なります)。
---
## まとめ
| 手順 | ワンストップ方式 | 予約番号方式 |
|------|----------------|-------------|
| 現在のキャリアへの連絡 | 不要(自動処理) | MNP予約番号を取得する |
| 予約番号の取得 | 不要 | 必要(有効期限15日間) |
| 乗り換え先での申し込み | 乗り換え先サイトのみ | 予約番号を入力して申し込む |
| SIM受け取り | eSIMまたは郵送 | eSIMまたは郵送 |
| 開通操作 | SIM差し替えまたはeSIMインストール | SIM差し替えまたはeSIMインストール |
| 回線切替の不通時間 | 数分〜数時間 | 数分〜数時間 |
乗り換え先のプラン選びには[SimFinderの国内SIM検索](/ja/jp/)を活用してください。
---
## 関連ガイド
- [MNP(番号ポータビリティ)とは — 手順・費用・注意点](/ja/guides/what-is-mnp/)
- [乗り換え前チェックリスト — キャリア変更前に確認すべきこと](/ja/guides/pre-switch-checklist/)
- [SIMフリーとSIMロック — 確認方法と解除手順](/ja/guides/sim-lock/)
- [旅行eSIMの選び方 — 5つの比較ポイントと失敗しないコツ](/ja/guides/how-to-choose/)
- [旅行eSIMプロバイダー比較 — Airalo・Holafly・Nomad・Saily・Ubigiを用途別に選ぶ](/ja/guides/provider-comparison/)
================================================================================
# ネットワーク設定のリセット方法と影響範囲
URL: https://sim-finder.com/ja/guides/network-reset/
Type: guides (ja)
Published: 2026-06-04
ネットワーク設定のリセットは、圏外・データ不通・接続不安定が他の手段で解消しない場合に試す手順だ。削除されるのはWi-Fiパスワード・手動APN設定・VPN設定など。Bluetoothペアリング情報についてはiPhoneでは原則削除されないがAndroid(Pixel等)では削除される。写真・連絡先・アプリのデータは一切消えない。リセット後は削除された設定の再入力が必要になるため、実行前に保存しておくべき情報を確認することが重要だ。
「圏外」「サービスなし」状態になっている場合は、まず「[「圏外」「サービスなし」の対処法](/ja/guides/no-service/)」の基本手順(機内モードトグル・再起動・ネットワーク選択確認)を先に試してほしい。ネットワーク設定のリセットはその後の手段として位置づける。
---
## ネットワーク設定のリセットで削除されるものと残るもの
リセットを実行する前に、何が消えて何が残るかを正確に把握しておくことが重要だ。
### 削除される設定
| 設定 | 詳細 |
|------|------|
| **Wi-Fiの保存済みパスワード** | これまで接続したすべてのWi-Fiのパスワードが削除される。再接続時には再入力が必要 |
| **APN設定(手動設定分)** | MVNOや旅行eSIMの手動APN設定が削除される。構成プロファイル(.mobileconfig)経由でインストールしたAPN設定はプロファイル本体が残るため削除されない |
| **VPN設定** | 端末に保存されたVPNプロファイル・サーバーアドレス・認証情報がすべて削除される |
| **Bluetoothのペアリング情報(Androidのみ)** | Android(Pixel等)ではBluetoothペアリング情報が削除される。iPhoneでは原則削除されない(Appleの公式削除対象に含まれず) |
### 削除されない設定・データ
- **写真・動画・連絡先・カレンダーデータ**: 一切削除されない
- **アプリと内部データ**: 削除されない
- **eSIMのプロファイル本体**: インストールされたeSIMプロファイルはiPhoneでは保持される。ネットワーク設定のリセットとeSIM削除(「設定」→「モバイル通信」→「プランを削除」)は別の操作であり、ネットワーク設定リセットではeSIMは消えない(ただし手動APN設定は別途再設定が必要な場合がある)
- **iCloudや各サービスのログイン状態**: 変更されない
- **端末のパスコード・Touch ID・Face ID設定**: 変更されない
- **通知・プライバシー・アクセシビリティ設定**: 変更されない
- **Cellular/モバイル通信の基本設定(データローミングのオン・オフ等)**: リセット後に初期値に戻ることがある(端末・OSバージョンにより異なる)
---
## リセット前に準備・確認すべきこと
リセット後に必要な情報を収集してから実行すること。
### Wi-Fiパスワードのメモ
リセット後にすべてのWi-Fiネットワークへの再接続が必要になる。自宅・職場・よく使う場所のWi-FiパスワードをメモするかiCloudキーチェーンに保存されていることを確認する。
iPhoneでWi-Fiパスワードを確認する方法(iOS 16以降):
1. 「設定」→「Wi-Fi」を開く
2. 確認したいネットワーク名の右にある「i」アイコンをタップ
3. 「パスワード」の欄をタップし、Face ID・Touch ID・パスコードで認証するとパスワードが表示される
Androidでは端末の設定からWi-Fiパスワードを確認できる機能はメーカー・バージョンにより異なるため、事前にルーターの底面や管理画面でパスワードを確認しておくことを推奨する。
### MVNOのAPN設定情報のメモ
MVNOの格安SIMを使用している場合、リセット後にAPN設定の再入力が必要になる。以下の情報をメモしておくこと。
- APN名
- ユーザー名・パスワード(MVNOによっては不要)
- 認証タイプ(CHAP または PAP)
iPhoneで構成プロファイル(.mobileconfig)経由でAPN設定をインストールしている場合、プロファイル本体はネットワーク設定リセットでは削除されないため、原則として再インストールは不要だ。手動でAPN情報を入力していた場合は削除されるため、MVNOのダウンロードURLをメモしておくと再インストールしやすい。構成プロファイルのインストール手順は「[APN設定の手順(iPhone)](/ja/guides/apn-setup-iphone/)」を参照してほしい。
大手MNO(NTTドコモ・au・ソフトバンク・楽天モバイル)のSIMはリセット後もキャリア設定アップデートで自動設定されることが多く、手動での再設定は原則不要だ。
### VPN設定情報のメモ
VPNを使用している場合、サーバーアドレス・ユーザー名・認証情報をメモするかVPNアプリの設定をスクリーンショットで保存しておくこと。企業VPNを使用している場合はIT管理者に設定情報の再取得方法を確認しておく。
### Bluetoothペアリングの確認(Androidのみ)
AndroidではBluetoothペアリング情報がリセットで削除されるため、よく使うBluetooth機器(ワイヤレスイヤホン・スマートウォッチ等)の再ペアリング手順を確認しておく。多くの機器は電源オフ・オンかリセットボタンで再ペアリングモードに入れる。iPhoneはネットワーク設定リセットの対象にBluetoothペアリング情報が含まれないため、この手順は不要だ。
---
## iPhoneでのネットワーク設定リセット手順
### iOS 15以降の手順
1. 「設定」→「一般」を開く
2. 一番下付近の「**転送またはiPhoneをリセット**」をタップ
3. 「リセット」をタップ
4. 「**ネットワーク設定をリセット**」をタップ
5. iPhoneのパスコードの入力を求められたら入力する
6. 確認ダイアログで「ネットワーク設定をリセット」をタップして実行する
7. iPhoneが自動的に再起動する
再起動後、Wi-Fiの接続状態がリセットされた状態になる。ステータスバーのWi-Fiアイコンが消えていることで確認できる。BluetoothについてはiPhoneのネットワーク設定リセットでは原則影響を受けないため、既存のペアリングは維持される。
### iOS 14以前の手順(参考)
iOS 14以前では手順が若干異なる。
1. 「設定」→「一般」→「**リセット**」をタップ
2. 「**ネットワーク設定をリセット**」をタップ
3. パスコードを入力して実行する
### リセット後のiPhoneの確認
1. **Wi-Fiに再接続する**: 「設定」→「Wi-Fi」で自宅・職場のWi-Fiを選択し、パスワードを再入力する
2. **キャリア設定アップデートを確認する**: Wi-Fi接続後に「設定」→「一般」→「情報」を開く。「キャリアのアップデートが利用可能です」と表示された場合は「アップデート」をタップする
3. **MVNOのAPN設定を確認する**: 構成プロファイル(.mobileconfig)経由でAPN設定をしていた場合はプロファイルが保持されるため再インストール不要。手動でAPN情報を入力していた場合はキャリア公式サイトから構成プロファイルをSafariでダウンロードし、「設定」→「一般」→「VPNとデバイス管理」からインストールする
4. **モバイル通信の接続を確認する**: ステータスバーにキャリア名と「LTE」「5G」などのデータアイコンが表示されることを確認する
---
## Androidでのネットワーク設定リセット手順
Androidはメーカー・OSバージョンによってメニューの名称や階層が異なる。代表的なメーカー別の手順を以下に示す。
### Pixel(Android標準)
1. 「設定」→「**システム**」を開く
2. 「**リセットオプション**」をタップ
3. 「**Wi-Fi、モバイル、Bluetoothをリセット**」をタップ
4. 「**設定をリセット**」をタップして実行する
5. PINまたはパスワードを求められた場合は入力する
6. 端末が再起動せずにリセットが完了することが多い(Bluetoothのペアリング情報は即時削除される)
### Samsung Galaxy
1. 「設定」→「**一般管理**」を開く
2. 「**リセット**」をタップ
3. 「**ネットワーク設定をリセット**」をタップ
4. 「**設定をリセット**」をタップして実行する
5. PINを求められた場合は入力する
6. 「リセットが完了しました」と表示されたら完了
### OPPO / ColorOS
1. 「設定」→「**追加設定**」を開く
2. 「**バックアップとリセット**」をタップ
3. 「**ネットワーク設定をリセット**」をタップ
4. 確認画面で「リセット」をタップする
> **注意**: ColorOSのバージョンによりメニューの階層が異なる場合がある。ColorOS 14以降では「設定→接続→ネットワーク設定をリセット」のように変更されていることがある。
### Xiaomi / HyperOS(MIUI)
1. 「設定」→「**接続とシェア**」を開く
2. 「**その他の接続設定**」をタップ
3. 「**ネットワーク設定をリセット**」をタップ
4. 「**リセット**」をタップして実行する
> **注意**: MIUI 14以前と現在のHyperOSではメニュー構造が異なる場合がある。MIUI 14以前は「設定→一般設定→バックアップとリセット→設定をリセット」からアクセスできることがある。
### リセット後のAndroidの確認
1. **Wi-Fiに再接続する**: 「設定」→「ネットワーク」(またはPixelは「ネットワークとインターネット」)からWi-Fiを選択し、パスワードを再入力する
2. **APNを再設定する**: MVNOを使用している場合は、使用するSIMのAPN設定を手動で再入力する。各MVNOの公式サポートページに記載されているAPN情報を参照すること
3. **モバイル通信の接続を確認する**: ステータスバーのアイコンでLTE・5G接続が表示されることを確認する
4. **Bluetooth機器を再ペアリングする**: AndroidではBluetoothペアリング情報がリセットで削除されるため、よく使う機器を再ペアリングする
---
## リセットで解消されることが多い問題
ネットワーク設定リセットが有効なのは、次のような状況だ。
### APN設定の競合・破損
MVNOのSIMに切り替えた後でも旧キャリアのAPN情報が残っていると、データ通信が正常に機能しないことがある。リセットでAPN設定をクリアしてから新しいMVNOの設定を入力し直すことで解消することが多い。
データ通信のみ使えない問題の診断全般は「[モバイルデータに繋がらないときの対処法](/ja/guides/no-data/)」で詳しく解説している。
### VPNプロファイルの残留による通信障害
以前インストールしたVPNプロファイルが通信を妨害していることがある。VPNアプリをアンインストールしてもプロファイルが残る場合があり、ネットワーク設定リセットでプロファイルごと削除することで解消することがある。
### ネットワーク自動選択の異常
キャリア変更後や長期間使用後に、端末が誤ったネットワークを参照し続けて圏外になることがある。機内モードのトグルや再起動で解消しない場合、リセットでネットワーク選択の設定がクリアされて正常な自動選択に戻ることがある。
圏外・サービスなし状態の総合的な対処は「[「圏外」「サービスなし」の対処法](/ja/guides/no-service/)」を参照してほしい。
---
## リセット後のAPN再設定
ネットワーク設定リセット後、大手MNOは自動でAPN設定が適用されるが、MVNOはキャリアによって手動設定が必要だ。
### iPhoneのAPN再設定
iPhoneで構成プロファイル(.mobileconfig)経由でAPN設定をインストールしていた場合、ネットワーク設定リセットではプロファイル本体は削除されないため再インストールは原則不要だ。手動でAPN情報を入力していた場合は削除されるため、MVNOが提供する構成プロファイルをSafariでダウンロードして再インストールする。
大手MNO(NTTドコモ・au・ソフトバンク・楽天モバイル)とサブブランド(povo・UQモバイル・ワイモバイル・LINEMO)は、Wi-Fi接続後に「設定」→「一般」→「情報」を開くと「キャリアのアップデートが利用可能です」と表示されることがあり、これをインストールするだけでAPN設定が自動適用される。
MVNOの構成プロファイルのインストール手順の詳細は「[APN設定の手順(iPhone)](/ja/guides/apn-setup-iphone/)」を参照してほしい。
### AndroidのAPN手動再設定
Androidのネットワーク設定リセット後は、MVNOのSIMを使用している場合にAPN設定を手動で再入力する必要がある。
**Pixel系:**
1. 「設定」→「ネットワークとインターネット」→「インターネット」→使用するSIM横の歯車アイコン
2. 「アクセスポイント名」→「+」で新規追加または既存エントリを編集する
3. APN名・ユーザー名・パスワード・認証タイプを使用するMVNOの指定値で入力する
**Samsung系:**
1. 「設定」→「接続」→「モバイルネットワーク」→「アクセスポイント名」
2. 「+」または「追加」で新規APN作成画面を開く
3. 各項目を入力して「保存」する
APN設定情報は必ず使用するMVNO・キャリアの公式サポートページで確認すること。
### 旅行eSIMの再設定
旅行eSIMを使用中にネットワーク設定をリセットした場合、eSIMプロファイル本体はiPhoneでは保持される(ネットワーク設定リセットとeSIM削除は別の操作)。手動でAPN設定を行っていた場合はリセットで削除されるが、旅行eSIMの多くは構成プロファイル経由で設定されるため再設定が不要な場合も多い。旅行eSIMプロバイダーのサポートページで確認し、必要であれば手順に従って再設定すること。
旅行eSIMの問題全般は「[eSIMが設定できないときの対処法](/ja/guides/activation-failed/)」も参照してほしい。
---
## リセットで解消しない場合の次の手順
ネットワーク設定リセット後も症状が改善しない場合、問題の原因はネットワーク設定の蓄積ではない可能性がある。
### 通信速度の問題
リセットを行っても通信速度が極端に遅い場合は、速度制限(データ上限超過)やMVNOの混雑が原因のことが多い。「[通信速度が極端に遅い場合の対処法](/ja/guides/slow-speed/)」で診断手順を確認してほしい。
### SIMカードや端末のハードウェア問題
同じSIMを別の端末に挿入して動作確認を行うことで、問題が端末側にあるかSIM側にあるかを切り分けることができる。別端末で正常に動作する場合は端末のハードウェア(アンテナ・通信モジュール)の異常が疑われる。
### キャリアへの問い合わせ
以下の情報を用意してキャリアのサポートに連絡することで、キャリア側での原因特定が可能になる。
- 端末の機種名とOSバージョン
- SIMカードのICCID(iPhoneは「設定」→「一般」→「情報」→「ICCID」で確認可能)
- 問題が発生する場所・時間帯
- すでに試した対処手順のリスト
---
## ネットワーク設定リセットを実施するタイミングの目安
ネットワーク設定のリセットは毎回の対処として行うものではない。以下の条件がすべて揃ったときに実施を検討する。
1. 圏外・データ不通・接続不安定の症状がある
2. 機内モードのトグル・端末の再起動・ネットワーク自動選択の確認をすでに試してもなお改善しない
3. APN設定の再入力やキャリア設定アップデートでも解消しない
4. SIMカードの問題(SIMロック・ICCIDのキャリア認証失敗)の可能性が排除されている
この4つを確認した上で、他の手段で解消しない場合の手段として実施する。
---
## よくある質問
### ネットワーク設定をリセットすると写真やアプリのデータは消えますか?
消えない。ネットワーク設定のリセットで削除されるのは、Wi-Fiの保存済みパスワード、VPN設定、手動APN設定などだ。写真・連絡先・アプリ・アプリ内データは一切削除されない。Bluetoothのペアリング情報については端末・OSにより挙動が異なり、iPhoneでは原則削除されないが、Android(Pixel等)では削除される。
### eSIMのプロファイルはリセットで消えますか?
消えない。ネットワーク設定のリセットとeSIMプロファイルの削除は別の操作であり、iPhoneのネットワーク設定リセットではeSIMプロファイル本体は保持される。手動で設定したAPN情報はリセットされるが、構成プロファイル(.mobileconfig)経由でインストールしたAPN設定はプロファイル本体が残るため再設定は不要だ。
### どんなときにネットワーク設定のリセットをすべきですか?
(1)機内モードのトグルや再起動で回復しない圏外・通信不可、(2)MVNOのAPN設定を何度やり直しても繋がらない、(3)特定のWi-FiやVPNの設定が原因で通信に問題が起きているといった状況で、他の手順で解決しない場合の手段だ。日常的に行う操作ではない。
### リセット後にWi-Fiパスワードを再入力せずに済む方法はありますか?
iPhoneはiCloudキーチェーンを使用していれば、同じApple IDでサインインしているデバイス間でWi-Fiパスワードが同期されているため、リセット後も再接続時に自動入力候補が表示される場合がある。Androidは端末でのパスワード保存なので、リセット前にWi-Fiパスワードを別の方法(メモ・スクリーンショット等)で控えておくことを推奨する。
### Androidのメーカーによってリセットのメニューはどこにありますか?
Pixelは「設定→システム→リセットオプション→Wi-Fi、モバイル、Bluetoothをリセット」、Samsungは「設定→一般管理→リセット→ネットワーク設定をリセット」、OPPOはColorOSのバージョンにより異なるが多くは「設定→追加設定→バックアップとリセット→ネットワーク設定をリセット」、Xiaomiは旧MIUI14以前と現HyperOSでパスが変わっており多くは「設定→接続とシェア→その他の接続設定→ネットワーク設定をリセット」だ。OSバージョンアップにより手順が変わる場合があるため、公式サポートページも参照すること。
---
## 関連ガイド
- **[「圏外」「サービスなし」の対処法](/ja/guides/no-service/)** — 圏外・ネットワーク未検出時の総合診断手順(FX-01)
- **[モバイルデータに繋がらないときの対処法](/ja/guides/no-data/)** — 電波はあるのにデータ通信のみ不通な場合の対処(FX-02)
- **[APN設定の手順(iPhone)](/ja/guides/apn-setup-iphone/)** — 構成プロファイルのインストールと手動APN設定(DS-03)
- **[通信速度が極端に遅い場合の対処法](/ja/guides/slow-speed/)** — 速度制限・混雑・バンド問題の診断(FX-03)
- **[eSIMが設定できないときの対処法](/ja/guides/activation-failed/)** — eSIMのインストール・アクティベーション失敗の対処(FE-01)
SIMやeSIMのプランを探す場合は [SimFinder](/ja/jp/search/) で条件を入力して比較できる。
================================================================================
# 海外で通信できないときの対処法 — 原因別チェックリストと設定手順
URL: https://sim-finder.com/ja/guides/no-connection-abroad/
Type: guides (ja)
Published: 2026-06-04
海外でスマートフォンが繋がらない原因は大きく5つに分類できる。(1)データローミングがOFFのまま、(2)旅行eSIMのプロファイルが有効化されていない、(3)端末が現地のバンドに対応していない、(4)APN設定が未設定または誤り、(5)キャリアのローミング契約・対応国の問題、だ。この記事では原因別に対処手順を順番に解説する。
eSIMのインストール(アクティベーション)そのものが失敗している場合は「[eSIMが設定できないときの対処法](/ja/guides/activation-failed/)」を参照してほしい。本稿はeSIM・物理SIMがすでに設定済みで、海外到着後に通信できない状態を扱う。国際ローミングの仕組みと料金全般は[国際ローミングの仕組みと料金](/ja/guides/international-roaming/)で詳しく解説している。
---
## 1. まず30秒でやること — 機内モードのトグルと再起動
海外に到着直後・機内モード解除直後は、端末がネットワーク再スキャン中で一時的に繋がらないことがある。最初に以下の2ステップを試す。
### 機内モードをオン・オフする
端末の無線モジュールが一時的に接続に失敗した「掴み外し」状態の場合、機内モードのトグルでリセットして回復することが多い。
- **iPhone**: コントロールセンターから飛行機アイコンをタップ → 10秒待つ → 再度タップ
- **Android**: クイック設定パネルまたは設定→「ネットワークとインターネット」から機内モードをオン → 10秒待つ → オフ
### 端末を再起動する
機内モードのトグルで解決しない場合、端末を完全にシャットダウンして再起動する。ベースバンドモデムを含めてハードウェアが初期化され、一時的なソフトウェア異常の多くが解消される。
再起動後、信号バーとキャリア名(または回線名)が表示されるまで1〜2分程度待つ。これらが表示されていればネットワークへの登録は完了しているため、次のセクション以降でデータ通信の問題を確認する。
---
## 2. データローミング設定の確認(最多の原因)
海外でデータ通信が使えない最も多い原因がデータローミングのOFF設定だ。iPhoneはデフォルトでOFFになっている。
実際にデータ通信を行った時点から課金が始まるのが一般的だが、キャリアやプランにより異なる場合がある。ONにするとバックグラウンド通信が意図せず走って課金される可能性があるため、ローミングプランを確認した上でONにすることが重要だ。
データローミングの詳細な設定手順と注意点は[データローミングの設定](/ja/guides/roaming-settings/)で解説している。
### iPhoneでのデータローミング確認手順
**シングルSIM(物理SIMまたはeSIM1枚)の場合:**
1. 「**設定**」→「**モバイル通信**」を開く
2. 「**通信のオプション**」をタップ
3. 「**データローミング**」がオンになっているか確認する
**デュアルSIM(SIM2枚構成)の場合:**
1. 「**設定**」→「**モバイル通信**」を開く
2. 通信に使いたいSIM回線名をタップ
3. 「**通信のオプション**」→「**データローミング**」をオンにする
### Androidでのデータローミング確認手順
**Google Pixel(Android標準):**
1. 「**設定**」→「**ネットワークとインターネット**」→「**SIM**」を開く
2. 使用するSIMを選択 → 「**ローミング**」をオンにする
**Samsung Galaxy:**
1. 「**設定**」→「**接続**」→「**モバイルネットワーク**」を開く
2. デュアルSIMの場合はSIMを選択 → 「**データローミング**」をオンにする
**その他の機種:** 設定アプリの検索機能で「ローミング」と入力すると設定箇所を特定できる。
### 注意: データ通信とSMS・音声通話の違い
データローミングをOFFにしていても、SMS受信と音声着信は通常維持される(音声・制御チャネルを使用するため)。「電話は受けられるがデータが使えない」状態はデータローミングがOFFである典型的な症状だ。
---
## 3. 旅行eSIMのプロファイル有効化確認
旅行eSIMを使っている場合、プロファイルをインストールしただけでは有効にならないケースがある。「インストール済みだが無効」の状態では圏外のまま動作しない。
### eSIMプロファイルの有効状態を確認する
**iPhone:**
1. 「**設定**」→「**モバイル通信**」を開く
2. 旅行eSIMの回線名が一覧に表示されているか確認する
3. 回線名をタップし「**この回線をオンにする**」が表示されていたらタップして有効化する
**Android (Google Pixel):**
1. 「**設定**」→「**ネットワークとインターネット**」→「**SIM**」を開く
2. 旅行eSIMが表示されているか確認する
3. 表示されている場合はトグルが「オン」になっているか確認する
**Android (Samsung):**
1. 「**設定**」→「**接続**」→「**SIMマネージャー**」を開く
2. 旅行eSIMのSIMが「有効」状態になっているか確認する
### デュアルSIM環境でのデータ通信優先SIMの確認
旅行eSIMが有効になっていても、モバイルデータ通信の優先SIMが日本のホームSIMに設定されたままだとデータ通信に旅行eSIMが使われない。
**iPhoneでのデータ通信優先SIM確認:**
1. 「設定」→「モバイル通信」→「**モバイルデータ通信**」を開く
2. 旅行eSIMに対応する回線を選択する
**Android (Pixel) でのデフォルトデータ回線確認:**
1. 「設定」→「ネットワークとインターネット」→「SIM」を開く
2. 旅行eSIMに対して「データ用SIM」として設定されているか確認する
デュアルSIM運用の詳細な設定手順は[デュアルSIMで海外旅行する方法](/ja/guides/dual-sim-for-travel/)で解説している。
---
## 4. ネットワークの手動選択で改善する場合
端末が現地の複数のキャリアのうち品質の低いキャリアに自動接続している場合、手動で別のキャリアを選択することで通信品質が改善することがある。
国際ローミングでは、ホームキャリア(日本のキャリア)がローミング協定を持つ訪問先キャリアが複数存在する国がある。端末が自動選択したキャリアが最適でない場合もある。
### ネットワーク手動選択の手順
**iPhone:**
1. 「設定」→「モバイル通信」→該当SIMをタップ
2. 「**ネットワーク選択**」をタップ
3. 「**自動**」をオフにする
4. スキャン完了後、一覧から別のキャリアを選択して試す
5. 改善しない場合は「自動」に戻す
**Android (Pixel):**
1. 「設定」→「ネットワークとインターネット」→「SIM」→SIM横の歯車アイコン
2. 「**ネットワークの自動選択**」をオフにする
3. 一覧からキャリアを選択して試す
**Android (Samsung):**
1. 「設定」→「接続」→「モバイルネットワーク」→「**ネットワーク事業者**」
2. 「自動的に検索」をオフにして一覧からキャリアを選択する
手動選択後に問題が解決したら、「自動」設定に戻すか、安定しているキャリアのまま使い続けるかを判断する。手動選択のまま帰国すると国内で不具合が起きる場合があるため、帰国前には「自動」に戻すことを推奨する。
---
## 5. APN設定の確認(旅行eSIM・格安SIM)
APN(Access Point Name)はモバイルデータ通信とインターネットを接続するゲートウェイの識別名だ。多くの旅行eSIMは購入時にAPN設定を自動で構成するが、一部のプロバイダーでは手動での入力が必要になることがある。
APN設定が正しくない場合、信号バーは立っているのにデータ通信だけ使えない状態になる。
### APN設定を確認・入力する手順
**iPhone:**
1. 「設定」→「モバイル通信」→「モバイルデータ通信ネットワーク」(またはSIM選択後に同名の項目)
2. 「APN」欄に旅行eSIMプロバイダーが案内するAPN名を入力する
3. 多くの場合、ユーザー名・パスワードは空欄でよい(プロバイダーの案内を確認する)
**Android (Pixel):**
1. 「設定」→「ネットワークとインターネット」→「SIM」→該当SIMをタップ
2. 「アクセスポイント名(APN)」をタップ
3. +ボタンで新規APNを追加し、プロバイダーが案内するAPN情報を入力して保存する
**Android (Samsung):**
1. 「設定」→「接続」→「モバイルネットワーク」→「アクセスポイント名」
2. +ボタンでAPN情報を追加する
APN情報は旅行eSIMの購入確認メールまたはプロバイダーのサポートページに記載されている。正しいAPN名を入力した後は端末を再起動してから通信を試す。
APN設定の詳細な解説は[APNとは何か — 設定の仕組みとよくあるエラー](/ja/guides/what-is-apn/)を参照してほしい。
---
## 6. バンド互換性の確認
端末が渡航先の通信バンドに対応していない場合、電波自体を掴めず圏外になる。この問題は機内モードのトグルや設定変更では解決できないため、渡航前に確認しておくことが重要だ。
### バンド互換性の問題が起きやすいケース
- 海外モデルのスマートフォンを日本で使っている
- 日本国内専用モデルのスマートフォンを特定の国(とくに米国・中南米・アジアの一部)で使っている
- 古い端末を使っており4G/5Gバンドの対応数が少ない
### 確認方法
1. 端末のスペック表で「対応バンド(LTE / 5G NR)」を確認する(メーカー公式ページまたは購入時のスペック情報)
2. 渡航先のキャリアが使用するバンドをキャリアの公式ページまたはGSMA Mobile World Liveのデータベースで確認する
3. 両者を照合してバンドが一致しているか確認する
### 対処方法
バンド非対応の問題は端末側を変えないと根本解決しない。渡航先対応のバンドを持つ端末を別途用意するか、SIMフリーのグローバルモデル(多くの国のバンドに対応した端末)を使うことが根本的な対処になる。
短期的な回避策として、接続できるバンドに通信方式の優先順位を変更することがある。たとえば5Gを優先している設定を「4G/LTE」に変更することで、4G対応バンドが存在する場合に接続できるようになることがある。
**iPhone(通信方式の変更):**
1. 「設定」→「モバイル通信」→該当SIMをタップ
2. 「音声・データ」から「LTE」または「5G自動」を選択する
3. 「5G自動」はApple推奨のデフォルト設定で、5Gが使えない環境で自動的にLTEに切り替える
**Android(優先ネットワーク種類の変更):**
1. 「設定」→「ネットワークとインターネット」→「SIM」→該当SIMを選択
2. 「優先ネットワークの種類」から「LTE(推奨)」または「4G/3G/2G(自動)」を選択する
---
## 7. キャリアのローミング契約・対応国の確認
国際ローミングを利用するには、利用中のキャリアが渡航先の国のキャリアとローミング協定を持っている必要がある。また、キャリアのプランやオプションによってはローミングが制限される場合がある。
### ローミング利用可否の確認
契約中のキャリアの公式ページで以下を確認する。
- 渡航先の国が対応国リストに含まれているか
- 利用中のプランでローミングが使えるか(格安SIM・MVNOの一部はローミング非対応のプランがある)
- ローミングオプションの追加申し込みが必要かどうか
国内の格安SIM(MVNO)はローミングに対応していない場合や、対応していても利用できる国・地域が限られる場合がある。渡航前にキャリアの公式サポートページで必ず確認すること。
### 楽天モバイルの海外データローミング
Rakuten最強プランは海外データ通信について月2GBまで無料で利用できると案内されている(2GBを超えると最大128kbpsに速度制限される。高速通信に戻す場合はデータチャージが必要)。ただしプラン内容・対象国・上限量・チャージ条件は改定の可能性があるため、[楽天モバイル公式の海外ローミングページ](https://network.mobile.rakuten.co.jp/service/international-roaming/)で最新情報を確認すること。
### EU/EEA域内でのローミング
EU/EEA域内のキャリアと契約している場合、RLAH(Roam Like at Home)規制によりEU/EEA域内では自国と同じ料金水準でのローミングが原則保証されている。ただし日本のキャリアSIMはこの規制の直接の対象外だ。EU渡航時のローミング事情は[EUローミング完全ガイド](/ja/guides/eu-roaming/)で詳しく解説している。
---
## 8. それでも繋がらない場合の追加手順
上記の手順をすべて試してもなお繋がらない場合、以下を順番に確認する。
### ネットワーク設定のリセット
ネットワーク設定のリセットは、保存済みのWi-Fiパスワード・VPN設定・手動APN設定が削除されるが、アプリや写真などのデータには影響しない。実行前にWi-Fiパスワードをメモしておくことを推奨する。
**iPhone:**
1. 「設定」→「一般」→「転送またはiPhoneをリセット」
2. 「リセット」→「ネットワーク設定をリセット」
**Android (Pixel):**
1. 「設定」→「システム」→「リセットオプション」
2. 「Wi-Fi、モバイル、Bluetoothをリセット」
**Android (Samsung):**
1. 「設定」→「一般管理」→「リセット」
2. 「ネットワーク設定をリセット」
ネットワーク設定リセットの詳細手順と注意事項は[ネットワーク設定リセットの方法と注意点](/ja/guides/network-reset/)を参照してほしい。
### キャリア設定のアップデートを確認する(iPhone)
iPhoneでは、Wi-Fiに接続した状態で「設定」→「一般」→「情報」を開くとキャリア設定のアップデートが利用可能な場合にアラートが表示される。アップデートが表示された場合は「アップデート」をタップして適用する。
### プロバイダーのサポートへ連絡する
旅行eSIMが繋がらない場合、旅行eSIMプロバイダーのサポートに連絡する。問い合わせ時に準備しておくとよい情報は以下の通りだ。
- 端末の機種名とOSバージョン
- eSIMのICCID(iPhoneは「設定」→「一般」→「情報」→「ICCID」で確認)
- 渡航先の国名と接続しようとしたキャリア名
- 試した対処法のリスト
圏外・接続不良のより広範な対処手順は[「圏外」「サービスなし」の対処法](/ja/guides/no-service/)を参照してほしい。
---
## 出発前の確認チェックリスト
海外での通信トラブルの多くは出発前の確認で防げる。以下を渡航前に確認しておくことを強く推奨する。
### キャリアSIM(国際ローミング)を使う場合
1. **ローミング対応国の確認**: 渡航先がキャリアのローミング対応国リストに含まれているか
2. **ローミングオプションの申し込み**: 定額パック型のプランを使う場合は事前申し込みが必要なことが多い
3. **データローミングのON設定**: 端末のデータローミングが渡航先でONにできる状態か確認する
4. **バックグラウンド通信の制限**: バックグラウンドAppの更新をWi-Fiのみに変更しておくと意図しないデータ消費を防げる
### 旅行eSIMを使う場合
1. **eSIMプロファイルのインストールと有効化**: 渡航前に自宅のWi-Fi環境でインストールを完了しておく(現地到着後では電波がないためインストールできない)
2. **データローミング設定のON確認**: 旅行eSIMも「データローミング」をONにする必要がある場合がある
3. **APN設定の確認**: プロバイダーがAPN情報を案内している場合は事前に設定を済ませる
4. **デュアルSIM設定の確認**: どちらのSIMでデータ通信を行うかを明示的に設定する
5. **バンド対応の確認**: 渡航先の国のバンドに端末が対応しているか確認する
旅行前の確認事項を網羅したチェックリストは[海外渡航前のSIMチェックリスト](/ja/guides/pre-trip-checklist/)を参照してほしい。
---
## FAQ
**Q. 海外でデータ通信だけ使えないのはなぜですか?**
最も多い原因は「データローミングがOFFになっている」です。信号バーが立っていてもデータローミングをONにしなければデータ通信は使えません。iPhoneでは設定→モバイル通信→該当SIM→データローミングをONにしてください。それでも繋がらない場合はAPN設定(旅行eSIMの場合)またはキャリアのローミングプランの加入状況を確認してください。
**Q. 旅行eSIMをインストールしたのに圏外のままです。**
以下の3点を順番に確認してください。(1)eSIMプロファイルが「有効」になっているか(インストールしただけでは有効化されていない場合があります)、(2)「モバイルデータ通信」の優先SIMが旅行eSIMに設定されているか、(3)旅行eSIMのデータローミングがONになっているか。これらを確認してもなお圏外の場合は機内モードのトグルを試してください。
**Q. 電波は立っているのに地図アプリやSNSが使えません。**
信号バーは音声ネットワークへの登録を示すだけで、データ通信の可否とは別です。データ通信には(1)データローミングのON、(2)正しいAPN設定(旅行eSIMの一部で必要)、(3)キャリアのローミングプラン加入、の3つが揃う必要があります。旅行eSIMで事前にAPN情報が案内されていた場合は、その手順に従って設定してください。
**Q. ネットワークを手動で選択すると改善しますか?**
現地に複数のキャリアが存在する場合、端末が自動で接続したキャリアより別のキャリアの方が品質がよいことがあります。iPhoneは設定→モバイル通信→該当SIM→ネットワーク選択→自動をOFFにして手動選択、AndroidはSIM設定→ネットワークの自動選択をOFFにして一覧から選べます。試した後は「自動」に戻すことを推奨します。
**Q. 出発前にやっておくべき確認事項は何ですか?**
(1)キャリアのローミングプラン加入状況と対応国の確認、(2)データローミングのON設定、(3)端末が渡航先のバンドに対応しているかの確認、(4)旅行eSIMを使う場合はプロファイルのインストールと有効化、(5)旅行eSIM使用時のAPN設定が必要かどうかの確認、の5点が基本です。これらを出発前に済ませておけば現地での通信トラブルのほとんどを防げます。
---
## まとめ / 関連記事
海外で通信できない場合の対処は、(1)機内モードのトグル・再起動、(2)データローミングのON確認、(3)旅行eSIMのプロファイル有効化とデータ通信優先SIM設定、(4)ネットワーク手動選択、(5)APN設定の確認、(6)バンド互換性の確認、(7)キャリアのローミング契約確認、の順番で試すのが最も効率的だ。
出発前のチェックリストを完了しておけばこれらの問題の大部分を現地で遭遇する前に防げる。海外で使うSIMや旅行eSIMを選ぶ際は[SimFinder Travel](/ja/travel/)で渡航先・日数・データ量を入力して比較することができる。
**関連ガイド:**
- [国際ローミングの仕組みと料金](/ja/guides/international-roaming/) — GSMA AA.12の仕組み・料金モデル・日本4キャリアの方式を体系的に解説
- [データローミングの設定](/ja/guides/roaming-settings/) — iPhone・AndroidでのON/OFF手順、バックグラウンド通信制限、デュアルSIM環境の制御
- [「圏外」「サービスなし」の対処法](/ja/guides/no-service/) — 国内・海外を問わず圏外になったときの包括的なトラブルシューティング
- [EUローミング完全ガイド](/ja/guides/eu-roaming/) — RLAH規制と対象国、EU旅行時のローミング事情
- [デュアルSIMで海外旅行する方法](/ja/guides/dual-sim-for-travel/) — 日本SIM+旅行eSIMの組み合わせ設定とデータ通信優先SIMの設定手順
================================================================================
# モバイルデータに繋がらないときの対処法 — 電波はあるのに通信できない場合
URL: https://sim-finder.com/ja/guides/no-data/
Type: guides (ja)
Published: 2026-04-19
電波バー(信号強度アイコン)が表示されているのにブラウザやアプリが通信できない場合、原因は「圏外」とは異なる。この記事は **電波は立っているのにデータ通信のみ不通** な状態を扱う。
端末がネットワーク自体を検出できない「圏外」「サービスなし」状態の対処法は「[「圏外」「サービスなし」の対処法](/ja/guides/no-service/)」を参照してほしい。eSIMのインストール(アクティベーション)そのものが失敗している場合は「[eSIMが設定できないときの対処法](/ja/guides/activation-failed/)」が該当する。
---
## まずは診断 — 本当にデータの問題か?
### ステップ1: ステータスバーのアイコンを確認する
ステータスバーに表示されるアイコンで、現在の接続状態を確認する。
| アイコン | 意味 |
|--------|------|
| キャリア名+「LTE」「5G」「4G」 | データ通信が可能な状態でネットワーク登録済み |
| キャリア名のみ(データアイコンなし)| 音声ネットワークに登録されているが、データ通信が無効か制限されている |
| 「E」(Edge)または「H」「H+」 | 2G/3G接続(通信速度が非常に低い) |
| 「圏外」「SOS」 | ネットワーク未検出。この記事ではなく[圏外の対処法](/ja/guides/no-service/)を参照 |
キャリア名は表示されているが「LTE」「5G」などのデータアイコンが見当たらない場合や、アイコンはあるのにアプリが通信できない場合、この記事の手順を順番に試していく。
### ステップ2: Wi-Fiをオフにして確認する
Wi-Fiがオンのままだとモバイルデータの問題かWi-Fiの問題かが区別できない。Wi-Fiを一時的にオフにしてからブラウザで任意のページにアクセスし、モバイルデータのみで通信できるか確認する。
Wi-Fiをオフにすると接続できるなら、問題はモバイルデータではなくWi-Fiネットワーク側にある。
### ステップ3: 機内モードのトグルと再起動
まず機内モードをオン(10秒待つ)→オフにしてネットワーク接続をリセットする。それでも改善しない場合は端末を完全に再起動する。一時的なソフトウェア状態の問題はこれで解消することが多い。
### 問題の切り分けフロー
以下のフローで自分の状態を判断してから、該当するセクションに進むと効率がよい。
```
電波バーが出ていない
└→ [「圏外」の対処法](/ja/guides/no-service/) を参照(この記事ではない)
電波バーはあるがデータアイコン(LTE/5Gなど)がない
└→ H2「モバイルデータ・データローミングの基本設定」へ
電波バー+データアイコンはあるが通信できない
└→ H2「データプランの状態確認」→「APN設定の確認と修正」の順で確認
特定アプリだけ繋がらない(ブラウザは通信できる)
└→ H2「特定アプリだけ繋がらない場合」へ
VPN・カスタムDNSを使っている
└→ H2「DNS/VPN関連の問題」へ
```
---
## モバイルデータ・データローミングの基本設定
### モバイルデータがオンになっているか確認する
**iPhone:**
1. 「設定」→「モバイル通信」を開く
2. 「モバイルデータ通信」スイッチがオンになっているか確認する
3. デュアルSIM構成の場合は「モバイルデータ通信」の項目で正しいSIMが選択されているか確認する
**Android(Pixel):**
1. 「設定」→「ネットワークとインターネット」→「インターネット」を開く
2. 使用するSIMの横にある歯車アイコンをタップ
3. 「モバイルデータ」スイッチがオンになっているか確認する
**Android(Samsung):**
1. 「設定」→「接続」→「モバイルネットワーク」を開く
2. 「モバイルデータ」スイッチがオンになっているか確認する
### データローミングのオン・オフを確認する
データローミングの設定は以下の2つの場面で特に重要になる。
1. **海外滞在中に国内キャリアのSIMを使う場合**: データローミングをオンにしないとデータ通信が使えない
2. **旅行eSIM/海外キャリアのeSIMを使う場合**: 端末が「ローミング中」と判断するためオンが必要なことが多い
なお、**日本国内でMVNOのSIMを使う場合**: データローミング設定は原則不要だが、MVNOの種類や端末の設定状態によってオンになっていると干渉するケースがある。手順を進めながら状態を確認すること。
**iPhone:**
1. 「設定」→「モバイル通信」→該当のSIMをタップ
2. 「データローミング」の状態を確認する
**Android(Pixel):**
1. 「設定」→「ネットワークとインターネット」→「インターネット」→使用するSIM横の歯車
2. 「ローミング」の状態を確認する
**Android(Samsung):**
1. 「設定」→「接続」→「モバイルネットワーク」
2. 「データローミング」の状態を確認する
海外でデータ通信が使えない場合、データローミング設定がオフになっていることが原因として多い。設定を確認すること。iOS/Androidのデフォルト値はバージョンや初期プロビジョニングにより異なる場合がある。
---
## データプランの状態確認
### 通信量上限の超過(速度制限)
多くのキャリア・MVNOでは、月間データ通信量が上限に達すると通信速度を大幅に制限する(「速度制限」「低速モード」などと呼ぶ)。速度制限状態では、電波バーは表示されたまま、ブラウザの読み込みがほぼ停止するほど遅くなる場合がある。
**端末でのデータ使用量確認:**
- **iPhone**: 「設定」→「モバイル通信」→下部にアプリ別使用量が表示される。「統計情報をリセット」で集計期間をリセットできる(Apple公式サポート: support.apple.com/ja-jp/HT201299)
- **Android(Pixel)**: 「設定」→「ネットワークとインターネット」→「インターネット」→使用するSIM横の歯車→「データ使用量」
- **Android(Samsung)**: 「設定」→「接続」→「データ使用量」→「モバイルデータ使用量」
ただし、端末側の集計は必ずしもキャリアの請求基準と一致しない。最も確実な確認方法は、**キャリア・MVNOのマイページまたは専用アプリで残量を直接確認すること**だ。
### 低速モード(節約モード)が有効になっていないか確認する
一部のMVNOは、アプリやマイページから手動で低速モード(節約モード)に切り替える機能を提供している。代表例としてIIJmioは「クーポンON/OFF」(みおぽん / My IIJmio)、mineoは「mineoスイッチ」で節約モード(最大200kbps)への切替が可能。過去に操作した覚えがない場合でも、意図せずオンになっていることがある。利用中のキャリア/MVNOに該当機能があるかは各社公式サポートで確認すること(楽天モバイルは2023年6月のRakuten最強プラン開始時に国内の「データ高速モード」切替機能を廃止し、現在は海外ローミング時のみ切替可能。UQモバイルは現行の主力プラン「コミコミプランバリュー」「トクトクプラン2」等では節約モードが廃止されており、ワイモバイルには手動切替機能がない)。
各キャリアの専用アプリまたはマイページで「低速モード」「節約モード」の状態を確認し、オフにすることで通常速度に戻る場合がある。
### 通信速度だけが遅い場合
データ通信は繋がるが速度が極端に遅い場合は、速度制限(通信量上限超過)以外にも以下の原因が考えられる。
- **電波状況の問題**: 現在地の電波が弱く、「E(Edge)」「H(HSPA)」など低速規格で接続されている
- **ネットワーク混雑**: 特定の時間帯(通勤時間帯・夜間など)に混雑する場合がある
- **MVNOの帯域制限**: MVNOは親MNO回線を借り受けるため、MNOより混雑の影響を受けやすいことがある
速度の遅さそのものの原因と対処法は「[通信速度が極端に遅い場合の対処法](/ja/guides/slow-speed/)」で詳しく解説している。
### 料金未払い・契約停止の確認
料金未払い状態になると、多くのキャリアはデータ通信を停止する。音声通話・SMSは引き続き使える場合があるため、「電話はできるがデータが使えない」状態は契約停止の典型症状でもある。キャリアのマイページで請求・支払い状況を確認すること。
---
## APN設定の確認と修正
### APNとは何か
APN(Access Point Name)はモバイルデータ通信の接続先を指定する設定だ。3GPP TS 23.003で定義される識別子で、端末がパケット交換ネットワークに接続する際に使用する。
大手キャリア(NTTドコモ・au・ソフトバンク・楽天モバイル)のSIMカードやeSIMは、プロビジョニング時にAPNを自動設定することが多い。一方、**MVNOのSIMや旅行eSIM**では、手動でAPNを設定する必要があるケースがある。eSIMと物理SIMでAPNプロファイルの扱いが異なる点については「[eSIMとは — 仕組み・メリット・デメリット](/ja/guides/what-is-esim/)」で基礎を解説している。
### APNの確認方法
**iPhone(iOS):**
1. 「設定」→「モバイル通信」→「APNを構成」(または「ネットワーク設定」)を開く
2. 「APNの設定」に正しいAPNが入力されているか確認する
なお、iPhoneは一部のキャリアでは「APNを構成」メニュー自体が表示されない(キャリアプロファイルにより制御される)。メニューが表示されない場合でも、eSIMまたはキャリアプロファイルにAPN情報が含まれているため、手動設定は不要なことが多い。
**Android(Pixel):**
1. 「設定」→「ネットワークとインターネット」→「インターネット」→使用するSIM横の歯車
2. 「アクセスポイント名」(APN)をタップ
3. 現在設定されているAPNを確認する。空白や誤った値の場合は新規作成または編集する
**Android(Samsung):**
1. 「設定」→「接続」→「モバイルネットワーク」→「アクセスポイント名」
2. 現在のAPNが正しいか確認する
### 日本の主要キャリアのAPN
以下は、ファクトレジストリで一次ソース確認済みのAPN情報だ(2026年4月時点)。ただし設定値はキャリアの方針変更で変わる可能性があるため、**必ず各キャリアの公式サポートページで最新の情報を確認すること**。
| キャリア / ブランド | APN | 備考 |
|-------------------|-----|------|
| NTTドコモ / ahamo | `spmode.ne.jp` | ドコモ公式確認済み |
| au(4G LTE) | `uno.au-net.ne.jp` | au公式確認済み |
| au(5G) | `uad5gn.au-net.ne.jp` | au公式確認済み |
| povo2.0 | `povo.jp` | povo公式FAQ確認済み |
| UQモバイル | `uqmobile.jp` | UQモバイル公式確認済み |
| ソフトバンク | `plus.4g` | — |
| ワイモバイル / LINEMO | `plus.acs.jp` | ソフトバンク本体とは異なる |
| 楽天モバイル | `rakuten.jp` | 楽天モバイル公式FAQ確認済み |
**MVNO(格安SIM)のAPN設定:**
IIJmio・mineo・OCNモバイルONE・NUROモバイルなど多くのMVNOは、それぞれ独自のAPNを使用している。MVNO各社のAPNはキャリアとは異なるため、**必ず使用するMVNOの公式サポートページまたは設定マニュアルで確認すること**。
一般的な設定項目(MVNOのマニュアルに従って入力する):
- APN名(必須)
- ユーザー名・パスワード(MVNOにより不要な場合あり)
- 認証タイプ(CHAP または PAP — MVNOのマニュアルに従う)
- APNタイプ(Android のみ: `default,supl` または `default,ia,mms,supl,hipri`)
MVNOのSIMを新しい端末に差し替えた場合や、ネットワーク設定のリセット後は、APNが消去されるためMVNOのサポートページを参照して再設定が必要になる。
### APN設定ができない・保存できない場合(Android)
Android端末でAPNを新規作成しようとしても保存できない場合がある。これは、キャリアが提供するキャリア設定(キャリア構成プロファイル)によりAPN編集が制限されているためだ。
対処法:
1. 既存のAPNエントリを新規作成ではなく「コピーして編集」する
2. APNタイプの欄に `default,supl` と入力する(空欄のままだと保存できない端末がある)
3. キャリア設定の配信を一度リセットする(機内モードのトグルや端末再起動で解消することがある)
4. それでも保存できない場合は、MVNOのサポートページにある端末別APN設定手順を確認する(機種固有の手順が記載されている場合がある)
---
## 特定アプリだけ繋がらない場合
端末のブラウザでWebページにアクセスできるのに、特定のアプリだけ通信できない場合は、モバイルデータ全体の問題ではなくアプリ固有の問題だ。
### アプリへのモバイルデータ使用許可を確認する
**iPhone:**
1. 「設定」→「モバイル通信」を開く
2. 下部のアプリ一覧で、問題のアプリがオンになっているか確認する
3. オフになっていればオンにする
**Android(Pixel):**
1. 「設定」→「ネットワークとインターネット」→「データセーバー」
2. 「データセーバー」がオンの場合、「無制限のデータアクセス」から問題のアプリがホワイトリストに入っているか確認する
**Android(Samsung):**
1. 「設定」→「接続」→「データ使用量」→「データセーバー」の状態を確認する
2. データセーバーがオンの場合、「データの使用を制限しないアプリ」で該当アプリを確認する
### アプリのキャッシュ・データをリセットする
アプリ固有の設定ファイルやキャッシュが破損すると、通信エラーが発生することがある。
**Android:**
1. 「設定」→「アプリ」→問題のアプリを選択
2. 「ストレージ」→「キャッシュを削除」(データの消去を行う前にキャッシュのみ試す)
**iPhone:** アプリを完全に削除して再インストールすることでキャッシュを含む設定がリセットされる。ただしアプリ内データ(ローカル保存のもの)も削除されるため注意すること。
### バックグラウンドデータ・省電力設定の確認
省電力モードやバックグラウンドデータ制限がオンになっていると、特定のアプリがバックグラウンドで通信できなくなることがある。
**iPhone:**
- 「設定」→「バッテリー」→「省電力モード」の状態を確認する
- 「設定」→「一般」→「Appのバックグラウンド更新」→問題のアプリが有効になっているか確認する
**Android:**
- 「設定」→「バッテリー」→「バッテリーセーバー」の状態を確認する
- 「設定」→「アプリ」→問題のアプリ→「バッテリー」→「バックグラウンドで制限」がオフになっているか確認する
---
## DNS / VPN関連の問題
### VPNがデータ通信を妨害している場合
VPNアプリを使用している場合、VPNの接続状態に問題があると一部または全部のデータ通信がブロックされることがある。特にモバイルデータに切り替えた直後やキャリア変更後に接続が切断されることがある。
確認手順:
1. VPNアプリを一時的にオフにする
2. モバイルデータで通信できるか確認する
3. VPNをオフにして通信できる場合は、VPNアプリの設定またはサーバーの変更を試みる
### カスタムDNSが原因の場合
端末にカスタムDNSサーバーを設定している場合(1.1.1.1や8.8.8.8など)、そのDNSサーバーへの接続に問題があるとブラウザやアプリがドメイン名を解決できずに「接続できません」エラーが出ることがある。電波は立っていてデータ通信自体は可能な状態でも、DNS解決に失敗するとページが表示されない。
**iPhone でカスタムDNSを無効化する:**
1. 「設定」→「Wi-Fi」ではなく「設定」→「一般」→「VPNとデバイス管理」を確認する
2. カスタムDNSが設定されたプロファイルがあれば削除する
**Android でカスタムDNSを無効化する:**
1. 「設定」→「ネットワークとインターネット」→「プライベートDNS」
2. 「オフ」または「自動」に戻す(プロバイダーのホスト名が設定されている場合はそれが原因の可能性がある)
---
## ネットワーク設定のリセット
ここまでの手順で解決しない場合、端末のネットワーク設定を初期化する。この操作でWi-FiパスワードやBluetooth接続・VPN設定・APN設定がすべて削除される。アプリや写真などのデータには影響しない。
**実行前に必ず確認すること:**
- Wi-Fiパスワードをメモするかクラウドに保存してあるか
- MVNOのAPN設定情報をメモしてあるか(リセット後に再設定が必要)
- VPN設定の情報(サーバーアドレス・認証情報)を控えてあるか
### iPhone: ネットワーク設定のリセット
1. 「設定」→「一般」→「転送またはiPhoneをリセット」
2. 「リセット」→「ネットワーク設定をリセット」をタップ
3. パスコードの入力を求められたら入力する
4. 端末が再起動したらWi-Fiに接続し、キャリア接続とデータ通信を確認する
リセット後、大手キャリアのSIMであれば通常APNは自動設定される。MVNOや旅行eSIMは手動でAPNを再設定する必要がある。
あわせてキャリア設定のアップデートも確認する:
1. Wi-Fiに接続した状態で「設定」→「一般」→「情報」を開く
2. 「キャリアのアップデートが利用可能です」が表示された場合は「アップデート」をタップする
### Android(Pixel): ネットワーク設定のリセット
1. 「設定」→「システム」→「リセットオプション」
2. 「Wi-Fi、モバイル、Bluetoothをリセット」をタップ
3. 「設定をリセット」を確認してタップ
4. 端末が再起動したら接続を確認する
### Android(Samsung): ネットワーク設定のリセット
1. 「設定」→「一般管理」→「リセット」
2. 「ネットワーク設定をリセット」→「設定をリセット」をタップ
---
## 日本国内でよくあるケース
### MVNOのAPN設定が消えている場合
MVNOのSIMは端末のネットワーク設定リセットや機種変更のタイミングでAPN設定が消えることが多い。MVNO各社はサポートページにAPN設定手順を掲載しているため、使用しているMVNOの公式ページで確認して再設定すること。
iPhoneの場合、MVNOが提供するキャリアプロファイル(構成プロファイル)をインストールすることでAPNを自動設定できる場合がある。各MVNO公式サイトの「iPhone APN設定」ページを確認してほしい。
主要MVNOの公式APN設定ページは各社の「初期設定ガイド」または「APN設定方法」のページを検索してアクセスすること(URLは変更される場合があるため直接リンクは掲載しない)。IIJmio・mineo・LINEMO・楽天モバイル・NUROモバイル・日本通信SIMなどは、それぞれの公式サイトにAndroid・iPhone別のAPN設定手順が掲載されている。
### 楽天モバイルのデータ残量と速度制限挙動
楽天モバイル公式FAQによれば、「Rakuten最強プラン」ではテザリングに明示的な月間上限は設定されておらず、楽天回線・パートナー回線(au)いずれのエリアでもデータ通信量に上限はない(旧プラン「Rakuten UN-LIMIT VII」で設けられていたパートナー回線月5GB制限は、2023年6月の「Rakuten最強プラン」開始時に撤廃された)。ただし公平なサービス提供のため通信速度の制御が行われる場合がある。
「my 楽天モバイル」アプリまたはWebマイページでテザリングのデータ使用量と残量を確認できる。
なお、楽天モバイルはAPNが「rakuten.jp」で固定されている。Android端末で手動APN設定が必要な場合は、楽天モバイル公式のFAQ(https://network.mobile.rakuten.co.jp/faq/detail/00001495/)の手順に従うこと。iPhoneはAPN設定が不要となっている(楽天モバイル公式確認済み)。
### ahamoのデータ残量確認
ahamoはMy docomoアプリまたはahamoのWebマイページからデータ残量を確認できる。ahamoのAPNはドコモ本体と同じ「spmode.ne.jp」。ahamoで購入した端末やドコモ系端末を継続利用する場合は自動設定されることが多いが、SIMフリー端末(特にAndroid)ではahamo公式FAQ(faq.ahamo.com)の手順に従って手動設定が必要。
### povo2.0でデータが使えない場合
povo2.0は基本料金0円のプランで、データ通信を利用するには「データトッピング」の購入が必要だ。有効なトッピングがない場合、データ通信速度は最大128kbpsに制限される(povo公式仕様)。通信ができない・極端に遅い場合はpovoアプリでトッピングの有効状態を確認すること。また180日以内に有料トッピング等の利用がないと利用停止の可能性がある点にも注意。
### 旅行eSIMを日本帰国後に使い続ける場合
旅行eSIMは海外用として設定されているため、帰国後に旅行eSIMがデータ通信の優先回線になったままだと、日本国内ではデータ通信が使えなくなることがある。帰国後は端末の「モバイルデータ通信」の優先回線を日本のSIM(国内キャリア)に戻すこと。
旅行eSIMのプランが有効期限内で残量が残っている場合は、eSIMプロファイルを削除せずに保持しておくことができる(次回の渡航まで端末に入れておく)。ただし、デュアルSIM運用では使わない側のeSIMが電波を探し続けてバッテリー消耗が増えることがある。使わない旅行eSIMは設定画面でオフ(無効化)にしておくとよい。
### IIJmio/mineoなどMVNOで繋がらない場合のチェック項目
日本国内でMVNOのSIMを使っていてデータ通信が使えない場合の確認項目は以下のとおりだ。
1. **APNが正しく設定されているか**: MVNOの公式サポートページで手順を確認する
2. **データローミングがオフになっているか**: 日本国内ではデータローミングはオフが基本
3. **低速モード(節約モード)がオンになっていないか**: MVNOの専用アプリで確認する
4. **端末がMVNOのSIMに対応しているか(SIMフリー端末であるか)**: キャリアロックがかかった端末はMVNOで使えない場合がある
SIMロックの確認・解除については「[SIMフリーとSIMロック — 確認方法と解除手順](/ja/guides/sim-lock/)」を参照してほしい。
---
## 海外旅行中のデータ不通
### データローミングと優先SIMの確認
海外でデータ通信が使えない場合に最初に確認する3点は以下のとおりだ。
1. **データローミングがオンになっているか**: iPhoneはデフォルトでオフ。「設定」→「モバイル通信」→該当SIM→「データローミング」をオンにする
2. **旅行eSIMが「モバイルデータ通信」の優先回線に設定されているか**: デュアルSIM構成では、どのSIMでデータ通信を行うかを明示的に指定しないと日本のSIMが優先されてしまう
3. **eSIMが有効(アクティブ)になっているか**: インストールしただけで有効化されていないeSIMはデータ通信に使われない
**iPhone での設定確認:**
- 「設定」→「モバイル通信」→「モバイルデータ通信」→旅行eSIMを選択
- 「設定」→「モバイル通信」→旅行eSIMをタップ→「この回線をオンにする」がオンか確認
- 「設定」→「モバイル通信」→旅行eSIMをタップ→「データローミング」をオン
**Android(Pixel)での設定確認:**
- 「設定」→「ネットワークとインターネット」→「SIM」→旅行eSIMをタップ→「モバイルデータ」と「ローミング」がオンか確認
- 「設定」→「ネットワークとインターネット」→「インターネット」→「データ通信」で旅行eSIMを選択
### 旅行eSIM固有のAPN問題
旅行eSIM(Airalo・Holafly・Nomad等)は、プロファイルインストール時にAPN情報が含まれているため通常は自動設定される。しかし端末やOSのバージョンによっては自動設定が正常に機能しない場合がある。
このような場合は:
1. 使用している旅行eSIMプロバイダーのサポートページでAPN設定情報を確認する
2. Android端末では手動でAPNを追加する必要があることがある
3. iPhoneでは構成プロファイルをプロバイダーのサポートから再取得する
旅行eSIMのアクティベーション(インストール)そのものに問題がある場合は「[eSIMが設定できないときの対処法](/ja/guides/activation-failed/)」を参照してほしい。旅行eSIMの選び方や全体的な設定手順は「[初めての旅行eSIM完全ガイド](/ja/guides/first-time-guide/)」で解説している。
### 現地ネットワークの手動選択を試みる
旅行eSIMがインストール・設定済みで、データローミングもオンにしているのに接続できない場合、端末が正しい現地キャリアのネットワークに自動接続できていない可能性がある。
**iPhone:**
1. 「設定」→「モバイル通信」→旅行eSIMをタップ
2. 「ネットワーク選択」を開く
3. 「自動」をオフにして手動でネットワーク一覧を取得する
4. 旅行eSIMがサポートするキャリアのネットワークを選択する
5. 接続確認後、「自動」に戻す
**Android(Pixel):**
1. 「設定」→「ネットワークとインターネット」→「インターネット」→旅行eSIM横の歯車
2. 「ネットワークの自動選択」をオフにして手動選択を試みる
ネットワーク一覧に旅行eSIMがサポートするキャリアが表示されない場合は、eSIMの対応バンドと現地ネットワークの互換性の問題が疑われる。旅行eSIMプロバイダーのサポートに問い合わせること。
### キャリア側の障害情報を確認する
海外現地キャリアの障害やメンテナンスが原因でデータ通信が不通になる場合もある。旅行eSIMプロバイダーのアプリまたは公式Webサイト、または現地キャリアの公式SNSで障害情報を確認する。
日本国内で国内キャリアの問題が疑われる場合は、各キャリアが公式Webサイトで障害情報を公開している。
- **NTTドコモ**: [重要なお知らせ(通信障害等)](https://www.docomo.ne.jp/info/network/) / [サービス障害情報](https://www.docomo.ne.jp/info/service_status/)
- **au**: [通信障害等に関するお知らせ](https://www.au.com/information/notice_mobile/network/)
- **ソフトバンク**: [障害情報](https://www.softbank.jp/mobile/info/personal/important/)
- **楽天モバイル**: [障害情報のお知らせ](https://network.mobile.rakuten.co.jp/information/failure/)
---
## よくある質問
### 電波バーが立っているのにデータ通信が使えないのはなぜですか?
電波バー(信号強度アイコン)は音声ネットワークへの登録状態を示すもので、データ通信の可否とは別だ。データ通信には(1)モバイルデータがオン、(2)正しいAPN設定、(3)データプランの残量がある、の3条件がすべて必要だ。
### APN設定とは何ですか?どこで確認しますか?
APN(Access Point Name)はモバイルデータ通信の接続先を指定する設定だ。iPhoneでは「設定→モバイル通信→APNを構成」、AndroidではAndroid 14以前は「設定→ネットワーク→SIM→アクセスポイント名」から確認できる。キャリアが自動設定する場合が多いが、MVNOや旅行eSIMでは手動入力が必要なケースがある。
### データ上限(通信制限)に達したかどうかはどうやって確認しますか?
最も確実な方法は、キャリアやMVNOのマイページ・専用アプリで残量を直接確認することだ。端末でも使用量の確認はできる(iPhoneは「設定→モバイル通信」、Androidは「設定→ネットワークとインターネット→データ使用量」)が、集計基準がキャリアと異なる場合がある。
### 特定のアプリだけ繋がらない場合、何が原因ですか?
主な原因は(1)そのアプリにモバイルデータの使用が許可されていない、(2)VPNがそのアプリの通信をブロックしている、(3)アプリのキャッシュや設定の問題、の3つだ。端末のブラウザで任意のWebページにアクセスして、まず「全体として繋がっているか」を確認してから、アプリ個別の設定を確認するとよい。
### ネットワーク設定をリセットすると何が消えますか?
Wi-Fiの保存済みパスワード、Bluetooth接続履歴、VPN設定、APN設定がすべて削除される。アプリのデータや写真は消えない。実行前にWi-FiパスワードとMVNOのAPN情報をメモしておくことを推奨する。
### 旅行用eSIMで現地に着いてもデータが繋がらない場合、最初に確認すべきことは何ですか?
(1)データローミングがオンになっているか、(2)旅行eSIMが「モバイルデータ通信」の優先回線に設定されているか、(3)機内モードを一度オン・オフして現地ネットワークを再検索しているか、の3点を確認する。eSIMのインストール(アクティベーション)そのものが失敗している場合は「[eSIMが設定できないときの対処法](/ja/guides/activation-failed/)」を参照してほしい。
---
## 関連ガイド
- **[「圏外」「サービスなし」の対処法](/ja/guides/no-service/)** — 電波バー自体が表示されない・ネットワーク未検出の状態の対処法(FX-01)
- **[eSIMが設定できないときの対処法](/ja/guides/activation-failed/)** — eSIMのインストール・アクティベーション失敗の対処法(FE-01)
- **[eSIMとは — 仕組み・メリット・デメリット](/ja/guides/what-is-esim/)** — eSIMの基礎知識(B-02)
- **[初めての旅行eSIM完全ガイド](/ja/guides/first-time-guide/)** — 旅行eSIMの全工程を解説(TE-02)
- **[SIMフリーとSIMロック — 確認方法と解除手順](/ja/guides/sim-lock/)** — SIMロック確認・解除の詳細手順(B-08)
旅行用のeSIMやSIMを探す場合は [SimFinder Travel](/ja/travel/) で渡航先・日数・データ量を入力して比較できる。
================================================================================
# 「圏外」「サービスなし」の対処法 — iPhone・Androidで試すべき手順
URL: https://sim-finder.com/ja/guides/no-service/
Type: guides (ja)
Published: 2026-04-18
「圏外」「サービスなし」が表示されている場合、原因は大きく4つに分類できる。(1)端末の一時的な接続不良、(2)ネットワーク設定の問題、(3)SIMカード・eSIMの状態異常、(4)カバレッジの限界だ。この記事ではこの順番に、試せる手順を網羅的に解説する。
eSIMのインストール(アクティベーション)そのものが失敗している場合は、この記事ではなく「[eSIMが設定できないときの対処法](/ja/guides/activation-failed/)」を先に参照してほしい。この記事はeSIMまたは物理SIMがすでに設定済みで、アクティベーション後に圏外・接続不可になった状態を扱う。
---
## 30秒でできる基本チェック
端末の無線モジュールが一時的に正常状態でない場合、以下の操作で回復することが多い。まずこの3ステップを順番に試してから次のセクションへ進むことを推奨する。
### ステップ1: 機内モードをオン・オフする
機内モードをオンにすると端末はすべての無線接続を切断する。オフにするとネットワーク接続をゼロから再開するため、一時的な「掴み外し」状態のリセットとして機能する。
- **iPhone**: コントロールセンターから飛行機アイコンをタップ → 5〜10秒待つ → 再度タップ
- **Android**: 設定 → 「ネットワークとインターネット」(またはクイック設定パネル)から機内モードをオン → 10秒待つ → オフ
### ステップ2: 端末を完全に再起動する
機内モードのトグルで解決しない場合、端末を完全にシャットダウンして再起動する。ベースバンドモデム(通信制御チップ)を含めたハードウェアを初期化状態から起動し直すため、一時的なソフトウェア異常の多くが解消される。
### ステップ3: 信号アイコンの状態を確認する
再起動後の状態を確認する。
| 表示 | 意味 |
|------|------|
| 信号バー(1〜5本)+キャリア名 | 正常登録済み |
| 「圏外」「圏外です」 | ネットワーク検出なし / 接続拒否 |
| 「サービスなし」「No Service」 | 上と同様。iOS / Android で表示が異なる |
| 「SOS」のみ(iPhone) | 緊急通報のみ可能。通常接続は不可 |
| 「データなし」「E」「H」「LTE」「5G」 | 接続済み(アイコンで世代がわかる) |
ステータスバーにキャリア名が表示されていれば、端末はネットワークに登録されている。この状態でデータ通信のみ使えない場合は「H2: ネットワーク選択と優先通信方式」から先に確認することを推奨する。
---
## キャリア接続の確認
### 設定画面でキャリア名を確認する
キャリア名が設定画面に表示されているかを確認する。
**iPhone:**
1. 「設定」→「モバイル通信」を開く
2. 該当のSIM(または回線名)が一覧に表示されているか確認する
3. SIMをタップ → 「ネットワーク選択」→「自動」がオンになっているか確認する
**Android (Pixel):**
1. 「設定」→「ネットワークとインターネット」→「インターネット」を開く
2. 該当のSIMに「接続済み」と表示されているか確認する
**Android (Samsung):**
1. 「設定」→「接続」→「モバイルネットワーク」を開く
2. 使用するSIMが有効になっているか確認する
### SIM・eSIMの有効状態を確認する(デュアルSIM運用時に特に注意)
eSIMの仕組みや物理SIMとの違いについては「[eSIMとは — 仕組み・メリット・デメリット](/ja/guides/what-is-esim/)」で解説している。デュアルSIM(物理SIM+eSIM、またはeSIM+eSIM)を使用している場合、どちらの回線が音声通話・データ通信に割り当てられているかを確認する。
**iPhone:**
- 「設定」→「モバイル通信」→「デフォルトの音声回線」「モバイルデータ通信」でそれぞれの割り当てを確認する
- 使いたいSIMが「オン」になっているかを確認する(オフになっているSIMは圏外扱いになる)
**Android (Pixel):**
- 「設定」→「ネットワークとインターネット」→「SIM」→各SIMが「有効」になっているか確認する
- 「通話用SIM」「データ通信用SIM」の設定も確認する
**Android (Samsung):**
- 「設定」→「接続」→「SIMマネージャー」→各SIMの有効・無効状態を確認する
- 「優先SIM」の「モバイルデータ」「通話」それぞれに正しいSIMが設定されているか確認する
---
## ネットワーク選択と優先通信方式
### 自動ネットワーク選択を確認する
手動でネットワークを選択したまま放置していると、キャリア変更後や海外ローミング時に以前のキャリアを参照し続けて圏外になる場合がある。
**iPhone:**
1. 「設定」→「モバイル通信」→該当SIMをタップ
2. 「ネットワーク選択」→「自動」がオンになっているか確認する
**Android (Pixel):**
1. 「設定」→「ネットワークとインターネット」→「インターネット」→SIM横の歯車アイコン
2. 「ネットワークの自動選択」がオンになっているか確認する
**Android (Samsung):**
1. 「設定」→「接続」→「モバイルネットワーク」→「ネットワーク事業者」
2. 「自動的に検索」がオンになっているか確認する
### 5G/LTE/3Gの優先モード設定
5Gに対応していない端末や、5Gサービス範囲外のエリアでは、優先通信方式を変更することで接続が改善する場合がある。特に「5G優先」に設定している端末が5G非対応エリアに移動した場合、LTEへのフォールバックが遅れることがある。
**iPhone:**
1. 「設定」→「モバイル通信」→該当SIM
2. 「音声・データ」から「5G自動」「LTE」「3G」「2G」のいずれかを選択する
3. 「5G自動」はAppleが推奨するデフォルト設定で、通常これを使う。圏外問題の場合は一時的に「LTE」に変更して試す
**Android:**
1. 「設定」→「ネットワークとインターネット」→「SIM」(または「モバイルネットワーク」)
2. 「優先ネットワークの種類」(またはPreferred network type)を「LTE/WCDMA/GSM(自動)」などに変更する
### バンド互換性の概要
日本の主要キャリアが使用する主なLTEバンドを以下に示す。端末がこれらのバンドに対応していない場合、電波が届いても接続できない。
| キャリア | 主なLTEバンド |
|--------|-------------|
| NTTドコモ | Band 1, 3, 19, 21, 28, 42 |
| au | Band 1, 11, 18, 26, 28, 42 |
| ソフトバンク | Band 1, 3, 8, 11, 28, 42 |
| 楽天モバイル | Band 3, 28(自社)/ Band 18(au ローミング)※ Band 28 は 2024 年 6 月商用運用開始、カバレッジは段階的拡大中 |
Band 18(auの主力プラチナバンド)と Band 19(ドコモのプラチナバンド)はそれぞれ建物内・地方での繋がりやすさに直結するバンドだ。海外で購入した端末や一部のMVNOから購入した端末がこれらのバンドに非対応の場合、屋内や地方で著しく繋がりにくくなることがある。
日本では700MHz〜900MHz帯(いわゆるプラチナバンド)が建物透過性に優れ、地方・農村部・地下施設でのカバレッジに貢献している。2GHz帯(Band 1)は容量が大きいが建物透過性が低く、都市部の屋外での高速通信に向いている。端末の対応バンドと使用するキャリアのバンド構成を照合することが、繋がりにくさの根本原因を特定する最も確実な方法だ。
端末の対応バンドは、端末のスペック表または製造元の公式ページで確認できる。
---
## SIMロック・物理SIM関連
### SIMロックの確認
SIMロックがかかっている場合、他のキャリアのSIMカードを挿しても「無効なSIM」「SIMカードが使えません」などのエラーが表示され、圏外になる。
**iPhone でのSIMロック確認方法:**
1. 「設定」→「一般」→「情報」→「キャリアロック」
2. 「SIMの制限なし」と表示されていればSIMフリー
SIMロックの確認方法・解除手順の詳細は「[SIMフリーとSIMロック — 確認方法と解除手順](/ja/guides/sim-lock/)」を参照してほしい。
### 物理SIMカードの再挿入
物理SIMカードを使用している場合、端末の電源をオフにしてからSIMトレイを取り出し、SIMカードを一度取り外してから再挿入することで解決する場合がある。
**注意点:**
- 電源を切った状態で作業すること(電源が入ったままSIMを抜くと端末がエラー状態になることがある)
- SIMカードの金色の接点部分を素手で触らないようにする
- SIMトレイが完全に収納されていること(SIMカードが半挿しになっていると接触不良の原因になる)
### SIMカードの清掃
SIMカードの接点に汚れや酸化が発生すると接触不良が起きる。乾いた布や消しゴムでSIMカードの金色接点部分を軽く拭くことで改善することがある。SIMトレイ内部も綿棒で清掃する。
なお、eSIM(物理SIMなし)のみで運用している場合は、清掃や再挿入ではなくeSIMの状態確認(有効・無効の切り替え)が対応手順になる。eSIMの状態確認は前セクション「キャリア接続の確認」を参照すること。
---
## 端末別のトラブルシューティング
基本チェックとSIM確認で解決しない場合、端末のネットワーク設定をリセットする。この操作は保存済みWi-Fiパスワード・Bluetooth接続・VPN設定・APN設定が削除されるが、アプリや写真などのデータには影響しない。実行前にWi-Fiパスワードをメモしておくことを推奨する。
### iPhone: ネットワーク設定のリセット
1. 「設定」→「一般」→「転送またはiPhoneをリセット」
2. 「リセット」→「ネットワーク設定をリセット」をタップ
3. パスコードの入力を求められたら入力する
4. 端末が再起動したら、Wi-Fiに接続してキャリア接続を確認する
キャリア設定のアップデートも確認する。
1. Wi-Fiに接続した状態で「設定」→「一般」→「情報」を開く
2. 「キャリアのアップデートが利用可能です」というアラートが表示された場合は「アップデート」をタップ
### Android(Pixel): ネットワーク設定のリセット
1. 「設定」→「システム」→「リセットオプション」
2. 「Wi-Fi、モバイル、Bluetoothをリセット」をタップ
3. 「設定をリセット」を確認してタップ
4. 端末が再起動したら接続を確認する
### Android(Samsung): ネットワーク設定のリセット
1. 「設定」→「一般管理」→「リセット」
2. 「ネットワーク設定をリセット」→「設定をリセット」をタップ
### IMEIでブラックリストを確認する
端末が盗難・紛失端末として報告されたブラックリスト(IMEI拒否リスト)に登録されている場合、どのSIMを挿入しても接続が拒否される。中古端末を購入した場合や、端末を拾得した場合はこの可能性を確認する。
**IMEIの確認方法:**
- iPhone/Android共通: ダイヤルアプリで `*#06#` を入力するとIMEIが表示される
- iPhone: 「設定」→「一般」→「情報」→「IMEI」
- Android: 「設定」→「端末情報」→「IMEI情報」(メーカーによりメニュー名が異なる)
IMEIを確認したら、各キャリアが提供する「ネットワーク利用制限携帯電話機確認」ページ(ドコモ・au・ソフトバンク・楽天モバイル各社)またはGSMA Device Check(devicecheck.gsma.com)で照合することができる(所管法令は携帯電話不正利用防止法)。また、中古端末購入前にフリマアプリ・中古ショップでIMEI確認を実施することが、購入後に圏外問題に遭遇するリスクを下げる。
IMEI拒否リスト(ブラックリスト)は日本国内のものと、GSMA主導の国際的なもの(IMEI Database)が存在する。国内で購入した端末が海外でブラックリストに登録されている場合も同様に問題が発生することがある。
---
## 日本国内でよくある圏外シーン
### 地下鉄・地下施設
日本の主要都市の地下鉄駅には順次キャリアアンテナが設置されているが、駅ホームには電波が届いても地下通路・改札外エリアはカバレッジ外の場合がある。
また、地下鉄内では端末が地上のアンテナから地下アンテナへの切り替え(ハンドオーバー)に時間がかかることがある。乗車後に一時的に圏外になった場合、機内モードのトグルで接続が回復する場合がある。
### 山間部・農村部
日本のキャリアは都市部・幹線道路沿いのカバレッジを優先して整備しており、山間部・離島・農村部は大手4キャリアでもカバレッジの差が大きい。
一般的なカバレッジ比較(ただし詳細は各社公式エリアマップで確認すること):
- **NTTドコモ・au**: 農村部・山間部での実績が長く、プラチナバンド(Band 19/Band 18)のカバレッジが広い
- **ソフトバンク**: Band 8(900MHz)が主力プラチナバンド。建物内・地方でもカバレッジが広い
- **楽天モバイル**: 自社回線エリアは主に都市部に集中。エリア外ではau回線ローミング(Band 18)を使用するが、ローミングエリアにも限りがある
山間部に出かける前に、各キャリアの公式エリアマップで現地のカバレッジを確認することを推奨する。
### 高層ビル内・地下駐車場
高層ビルの低層フロアや地下駐車場は、ビルの構造材・コンクリートが電波を遮蔽するため繋がりにくい場合がある。高層フロアでも窓から離れた室内は電波が弱くなることがある。
このような環境では端末を窓際に移動させるか、建物外に出ることで接続を確認できる。
一般に周波数の低いバンド(700MHz〜900MHz帯)は建物透過性が高く、コンクリート壁越しでも電波が届きやすい。ソフトバンクのBand 8(900MHz)、ドコモのBand 19(800MHz)、auのBand 18(800MHz)はいずれも屋内・地下での繋がりやすさに寄与するバンドだ。使用キャリアの選択時の参考にしてほしい。
### 楽天モバイル固有の挙動
楽天モバイルは音声通話に「Rakuten Link」アプリの使用を推奨している。Rakuten LinkはVoIP(インターネット電話)を使って通話するアプリで、楽天モバイルの標準通話としてカウントされる。
**Rakuten Link使用時の注意点:**
- Rakuten Linkでの通話はWi-FiまたはモバイルデータのSIM接続が必要。圏外状態では通話不可
- 「パートナー回線(au)」エリアでは、Rakuten Link は引き続きVoIPで動作し、高速データ容量を消費せず通話できる
- Rakuten LinkアプリのUI内に「楽天回線エリア」「パートナー回線エリア」の表示があり、現在の接続状況を確認できる
- 楽天モバイルの標準ダイヤラーから直接発信した場合は、通常の国内通話料(22円/30秒、税込)が発生する
---
## 海外旅行中の圏外
### ローミング設定の確認
海外でSIM(国内キャリアのSIM)を使う場合、データローミングを明示的にオンにする必要がある。
**iPhone:**
1. 「設定」→「モバイル通信」→該当SIMをタップ
2. 「データローミング」をオンにする
**Android (Pixel):**
1. 「設定」→「ネットワークとインターネット」→「SIM」→使用するSIMを選択
2. 「ローミング」をオンにする
**Android (Samsung):**
1. 「設定」→「接続」→「モバイルネットワーク」
2. 「データローミング」をオンにする
iPhoneでは「データローミング」はデフォルトでオフになっている。海外に到着してもデータ通信が繋がらない場合、まずこの設定を確認する。
また、国内キャリアで国際ローミングオプションの加入が必要なプランもある。キャリアのマイページまたはサポートページで、海外ローミングの利用資格を確認することを推奨する。
### 旅行eSIM固有の問題
旅行用eSIMを使用している場合、以下を確認する。
1. **eSIMが有効(アクティブ)になっているか**: インストールしただけで有効化されていないeSIMは圏外のまま
2. **「モバイルデータ通信」の優先SIMが旅行eSIMに設定されているか**: デュアルSIM環境ではデータ通信に使うSIMを明示的に指定する必要がある
3. **データローミングがオンになっているか**: 旅行eSIMも「ローミング」設定のオンが必要な場合がある
旅行eSIMのアクティベーション全般については「[eSIMが設定できないときの対処法](/ja/guides/activation-failed/)」を、旅行eSIMの選び方については「[海外でスマホを使う4つの方法](/ja/guides/four-options/)」と「[海外旅行用SIMのはじめてガイド](/ja/guides/first-time-guide/)」を参照してほしい。
### 地域別バンド互換性の一般論
日本国内向けに販売された端末(いわゆる「SIMフリー国内モデル」)は、日本のバンドに最適化されているが、一部の海外バンドに対応していない場合がある。逆に、海外で購入した端末を日本国内で使う場合、日本のプラチナバンド(Band 18/19)に非対応だと建物内・農村部で繋がりにくいことがある。
渡航先の通信バンドは、滞在国のキャリアが使用するバンドをキャリアの公式サイトまたはGSMAの「Mobile World Live」等のデータベースで確認し、端末のスペック表と照合することが確実だ。
たとえば米国のT-Mobile・AT&TはBand 2/4/12/66などを主要LTEバンドとして使用しており、Band 19/18に対応していても米国のバンドが含まれない端末は現地で繋がりにくい場合がある。逆に、グローバルモデル(国際版)の端末は日米欧の多くのバンドに対応しているためどの地域でも動作しやすい。
端末のスペック表で「対応バンド」を確認する際は、LTE(4G)とNR(5G)のバンドが別々に記載されていることに注意する。
---
## キャリアに問い合わせるタイミング
以下のいずれかに該当する場合は、キャリアまたはメーカーへの問い合わせを検討する。
### 継続的な圏外症状
この記事の手順をすべて試してもなお同じ場所で継続的に圏外になる場合、考えられる原因は2つだ。(1)そのエリアのカバレッジが物理的に届いていない、(2)端末側のハードウェア(アンテナ・通信モジュール)の不具合だ。
後者が疑われる場合は、同じSIMを別の端末に移して動作確認を行う。別端末で正常に動作すれば端末側の問題と判断できる。
### キャリア障害情報の確認
特定の時間帯や特定のエリアで突然繋がらなくなった場合、キャリアのネットワーク障害が原因の可能性がある。各キャリアは公式Webサイトや公式SNSアカウントで障害情報を公開している。
- **NTTドコモ**: [重要なお知らせ(通信障害等)](https://www.docomo.ne.jp/info/network/) / [サービス障害情報](https://www.docomo.ne.jp/info/service_status/)
- **au**: [通信障害等に関するお知らせ](https://www.au.com/information/notice_mobile/network/)
- **ソフトバンク**: [障害情報](https://www.softbank.jp/mobile/info/personal/important/)
- **楽天モバイル**: [障害情報のお知らせ](https://network.mobile.rakuten.co.jp/information/failure/)
障害情報にヒットした場合は復旧を待つしかない。
### 料金未払い・契約停止の確認
料金が未払い状態になるとキャリアは音声通話・データ通信を停止する。この場合、信号バーは表示されることがあるが通話・データ通信のいずれも使えなくなる。各キャリアのマイページで請求・支払い状況を確認する。
### キャリアサポートへの連絡
上記を確認してもなお原因が特定できない場合は、キャリアのカスタマーサポートに連絡する。問い合わせ前に以下の情報を準備しておくとスムーズだ。
- 端末の機種名とOSバージョン
- SIMカードのICCID(iPhoneは「設定」→「一般」→「情報」→「ICCID」で確認可能)
- 圏外が発生する場所・時間帯
- すでに試した対処法のリスト
---
## よくある質問
### 圏外と「サービスなし」の違いは何ですか?
端末の表示上の違いはあるが、どちらも端末が携帯ネットワークに接続できていない状態だ。「圏外」はネットワークが検出されるが接続できない状態、「サービスなし」(iOSでは「No Service」)はネットワーク自体が検出されない、または契約上の問題で接続が拒否されている状態を示すことが多い。対処手順はどちらも同じだ。
### 機内モードをオン・オフするだけで本当に直ることがありますか?
はい。端末の無線モジュールが一時的にネットワーク登録に失敗した状態の場合、機内モードのトグルでリセットされて回復することがある。移動直後や長時間通話後に特に有効だ。まず試すべき最初のステップだ。
### ネットワーク設定のリセットをすると何が消えますか?
Wi-Fiの保存済みパスワード・VPN設定・手動APN設定などが削除される。Bluetoothのペアリング情報については端末・OSにより挙動が異なり、iPhoneでは原則削除されないが、Android(Pixel等)では削除される。写真・連絡先などの個人データは消えない。実行前にWi-Fiパスワードをメモしておくことを推奨する。
### 電波は立っているのにデータ通信だけ使えないのはなぜですか?
電波アイコン(信号バー)は音声ネットワークへの登録状態を表示するが、データ通信には別途APN設定が必要だ。MVNOのSIMを使っている場合はAPN設定が正しく入力されているか確認する。また、データ通信量の上限超過後に通信制限がかかっている場合も、電波は立ってデータだけ繋がらない状態になる。
### 旅行用eSIMが圏外のとき、最初に確認すべきことは何ですか?
(1)データローミングがオンになっているか、(2)eSIMが有効(アクティブ)になっているか、(3)「モバイルデータ通信」の優先SIMが旅行eSIMになっているか、の3点を確認する。この3つの設定ミスが旅行eSIM圏外の原因の大多数を占める。eSIM設定全般の問題は「[eSIMが設定できないときの対処法](/ja/guides/activation-failed/)」も参照してほしい。
### 楽天モバイルが圏外になりやすいのはなぜですか?
楽天モバイルは自社回線(Band 3/Band 28)のカバレッジがまだ拡大中であり、自社回線エリア外ではau回線(ローミング)を使用する。地下深部や建物内深部ではローミング切り替えが遅れたり失敗したりする場合がある。端末が「楽天回線」と「パートナー回線(au)」のどちらに繋がっているかはRakuten Linkアプリまたは設定のネットワーク画面で確認できる。
---
## 関連ガイド
- **[eSIMが設定できないときの対処法](/ja/guides/activation-failed/)** — eSIMのインストール・アクティベーション失敗の対処法(FE-01)
- **[SIMフリーとSIMロック — 確認方法と解除手順](/ja/guides/sim-lock/)** — SIMロック確認・解除の詳細手順(B-08)
- **[eSIMとは — 仕組み・メリット・デメリット](/ja/guides/what-is-esim/)** — eSIMの基礎知識(B-02)
- **[海外でスマホを使う4つの方法](/ja/guides/four-options/)** — 旅行eSIM・国内SIMローミング・ポケットWi-Fi・現地SIMの比較(TR-01)
- **[海外旅行用SIMのはじめてガイド](/ja/guides/first-time-guide/)** — 旅行eSIMの初回設定手順(TE-02)
海外旅行用のSIMやeSIMを探す場合は[SimFinder Travel](/ja/travel/)で渡航先・日数・データ量を入力して比較できる。
================================================================================
# 電話番号の維持・保管方法 — 使わない番号を残すには
URL: https://sim-finder.com/ja/guides/number-storage/
Type: guides (ja)
Published: 2026-06-04
使わなくなった電話番号を維持する方法は複数ある。大手キャリアの番号保管サービス・最安プランへの変更・eSIM副回線としての維持・MNPによる格安SIMへの移行が主な選択肢だ。
維持コスト・維持期間・番号の活用頻度によって最適な手段は変わる。この記事では各方法の仕組みと選び方の考え方を整理する。
---
## なぜ使わない番号を残すのか
電話番号を残したい状況は、大きく次の3つに分類される。
**状況1: 一時的に使わない期間がある**
海外への長期出張・留学・入院など、一時的に日本の回線が不要になる期間が発生する場合。この期間が終われば再び使うため、番号は手放したくない。
**状況2: サブの番号として保持しておきたい**
メインの番号を変えたが、旧番号への着信を一定期間受けたい。あるいは、銀行・金融機関・行政サービスに登録した番号を変えずに維持したい。
**状況3: 海外移住に際して日本の番号を手元に置いておきたい**
日本の銀行口座・証券口座・行政手続きにおけるSMS認証が日本の電話番号に紐づいており、番号が変わることで手続きが煩雑になるリスクを避けたい。
どの状況に該当するかによって、最適な維持方法が異なる。
---
## 方法1: 大手キャリアの番号保管サービス(休止)
### 番号保管サービスとは
NTTドコモ・au(KDDI)・ソフトバンクは、電話番号を維持したまま回線を休止状態にできる「番号保管サービス」(休止サービス)を提供している。
サービスの特徴は以下の通りだ。
- **電話番号は維持される**: 解約ではなく「休止」状態のため、番号は手放さずに保持される
- **通話・SMS・データ通信は利用不可**: 休止中は回線が停止した状態になる
- **月額料金が発生する**: 通常の契約プランの月額よりも低い保管料がかかる有料サービスだ
- **保管できる期間の上限がある**: 各社によって最大保管期間が定められている
### 向いているケース
番号保管サービスが適しているのは、「一定期間だけ回線を使わず、その後確実に再開する予定がある」ケースだ。
- 海外留学・長期出張で1〜2年ほど日本に戻らない
- 入院・療養中で一時的に通信手段が不要になる
期間が長くなると維持コストが積み上がる。最大保管期間を超えると解約扱いになる場合があるため、利用規約の確認が必要だ。
### 各社の保管料・最大期間の確認方法
具体的な料金・最大保管期間はキャリアによって異なり、変更される可能性がある。以下の公式ページで最新情報を確認すること。
- **NTTドコモ**: ドコモ公式サイト「番号保管(電話番号保管)サービス」のページ
- **au(KDDI)**: au公式サイト「一時休止(番号保管)」のページ
- **ソフトバンク**: ソフトバンク公式サイト「電話番号・メールアドレスお預かりサービス」のページ
楽天モバイルは現時点で番号保管サービス(休止サービス)を提供していない。楽天モバイルを契約中の場合は、他の維持手段を検討することになる。
---
## 方法2: 最安プランへの変更で番号を維持する
### 解約せずにプランを変更する
解約すると電話番号は消える。解約せずに最安・最小容量のプランへ変更することで、番号を保ちながら月額コストを最小化できる。
この方法の特点は以下の通りだ。
- **通話・SMS・データ通信が引き続き使える**: 休止と異なり、最低限の通信機能は維持される
- **番号保管サービスより月額が高い場合がある**: 最安プランでも番号保管料より高くなるケースがある
- **いつでも元のプランに戻せる**: 利用頻度が上がればプランを変更すればよい
### 大手キャリアの最小容量プランへの変更
NTTドコモ・au・ソフトバンクは、データ容量の少ない低価格プランを提供している。フルサービスのプランから最小プランへ変更することで、月額コストを下げながら番号を維持できる。
ただし「最も安いプランへ変更するだけ」では、番号保管サービスより月額が高くなる場合がある点は留意が必要だ。
### サブブランド・オンライン専用ブランドへの変更
ahamo(NTTドコモ)・povo2.0(au)・LINEMO(ソフトバンク)などのオンライン専用プランは、大手キャリアの本体プランよりも低価格で利用できる。番号を変えずに乗り換えられるため、コスト削減の選択肢になる。
特にpovo2.0は基本料0円の構造を持つ。ただし「180日以内にトッピングの購入、または一定額以上の通話・SMS利用がない場合、契約が停止・解除される可能性がある」という利用条件がある(2026年6月時点)。詳細はpovo公式サイトで確認すること。
---
## 方法3: eSIM副回線として維持する
### 副回線という選択肢
現在のメイン回線を別のSIMに変更しつつ、旧回線をeSIMの副回線として維持する手段がある。この方法は「番号を保持するだけでなく、緊急時の予備回線としても機能させる」ことが目的の場合に有効だ。
副回線を活用した番号維持の考え方は、「[副回線の選び方 — 通信障害に備える日本市場ガイド](/ja/guides/sub-line/)」で詳しく解説している。
### eSIMで副回線を持つ利点
- デュアルSIM対応端末なら、メイン回線を維持したまま旧番号のeSIMを追加できる
- 海外旅行中も日本の番号で通話・SMS受信ができる(データ通信は旅行eSIM側で行う)
- 物理SIMを差し替える必要がなく、端末の設定画面から切り替え可能
旅行中のデュアルSIM運用については「[海外旅行でのデュアルSIM活用](/ja/guides/dual-sim-for-travel/)」を参照してほしい。
### eSIMとして維持する際の注意点
- eSIMプロファイルを端末から削除すると、再インストールにはキャリアへの再発行申請が必要になる
- 機種変更時はeSIMプロファイルの移行手続きを適切に行う必要がある
- povo2.0等、最低利用条件のあるプランをeSIM副回線として使う場合は、条件の管理が必要だ
---
## 方法4: MNPで格安SIM(MVNO)へ移行して維持する
### MNPを使った番号維持
MNP(番号ポータビリティ)を使えば、電話番号を変えずにキャリアを乗り換えられる。大手キャリアから格安SIM(MVNO)へMNPで移行することで、番号を保持しながら月額コストを抑えられる。
MNPの仕組みについては「[MNP(番号ポータビリティ)とは — 手順・費用・注意点](/ja/guides/what-is-mnp/)」で詳しく解説している。
### MVNOへの移行で注意すること
MVNOは大手キャリアと比べて月額料金が低い傾向があるが、以下の点を事前に確認することが必要だ。
- **契約期間・最低利用期間**: プランによっては一定期間の縛りがある。契約条件の読み方は「[契約期間・違約金・初期費用 — 契約条件の見方](/ja/guides/contract-terms/)」で解説している
- **初期費用・事務手数料**: MNP転入時に初期費用が発生する場合がある
- **通信速度**: MVNOは混雑時間帯(昼・夕方)に速度が低下する傾向がある。緊急時の通信手段として使う場合は品質も考慮すること
MVNOで最安プランを選べば、大手キャリアの番号保管サービスよりも低コストで番号を維持できるケースがある。ただしMNPの手続きには一定の手間がかかる点と、再度大手キャリアに戻りたい場合もMNPが必要になる点を念頭に置くこと。
### SIMスワップリスクへの注意
番号を長期間維持する際は、電話番号を乗っ取る「SIMスワップ詐欺」のリスクにも注意が必要だ。特にキャリアの本人確認が弱い場面では、第三者が不正に電話番号を奪うリスクがある。詳細は「[SIMスワップ詐欺とは — 手口・兆候・防ぎ方](/ja/guides/sim-swap/)」を参照してほしい。
---
## 海外移住時の番号維持の考え方
### 日本の番号が必要になる場面
海外移住後も日本の電話番号が必要になるケースは、主に以下の通りだ。
- 銀行・証券口座のSMS認証(ワンタイムパスワード)
- 行政サービスのオンライン手続き
- 日本国内の取引先・知人との連絡
これらの利用がどれほど頻繁に発生するかを見極めることが、番号維持コストに見合うかどうかの判断基準になる。
### 海外移住時の維持手段の選択
| 維持方法 | 向いているケース |
|---------|--------------|
| 番号保管サービス | 移住期間が1年以内で通信は不要。帰国後に再開予定 |
| 最安プラン or povo2.0 | 年に数回は通話・SMSを使う。維持コストを抑えたい |
| eSIM副回線として維持 | デュアルSIM端末で旧番号も引き続き受信したい |
| MNPで格安SIMへ移行 | 移住が長期間になり、より低コストで番号を維持したい |
| 解約(番号を手放す) | 日本の番号が今後ほぼ不要になる見込みが高い |
### 海外からの操作が難しい手続き
番号保管サービスへの申込み・プラン変更・MNP手続きは、多くのキャリアがオンラインから対応しているが、本人確認書類のアップロードや日本国内の住所への書類送付が必要になる場合がある。移住前に手続きを完了しておくか、手続きのタイミングを計画することを推奨する。
---
## 番号維持コストの考え方
具体的な料金は各社・各プランにより異なり変更されうるため、この記事では金額を掲載しない。以下の観点で自分に合った手段を比較することを推奨する。
| 比較軸 | 確認する内容 |
|--------|------------|
| 月額コスト | 番号保管料 vs 最安プランの月額 vs MVNOの最安プラン月額 |
| 維持期間 | 何ヶ月・何年間維持するか。番号保管には最大期間の上限がある |
| 通信機能の要否 | 維持中も通話・SMS・データ通信を使うか否か |
| 再開・解約の容易さ | 番号を再利用する際の手続き負担 |
| 手続きのしやすさ | オンラインのみで完結するか、店舗が必要か |
現在の各プランの料金・条件は変動するため、[SimFinderの国内SIM検索](/ja/jp/search/)で最新のプランを比較することを推奨する。
---
## 番号維持時の管理注意点
### 最低利用条件の管理
povo2.0のように「一定期間内の利用がなければ契約停止・解除になる」プランで番号を維持する場合、カレンダーにリマインダーを設定するなど、定期的に条件を満たす仕組みを作ることが必要だ。
緊急時に「番号が使えなくなっていた」という事態を防ぐため、年に数回は通話・SMSの動作確認をすることを推奨する。
### eSIMプロファイルの保持
eSIMとして維持している場合、端末からプロファイルを削除しないよう注意する。削除した場合、再インストールにはキャリアへの再発行申請が必要になり、即時復旧は難しい。
機種変更時にはeSIMの移行手順を事前に確認し、旧端末からプロファイルを削除する前に新端末への移行を完了させること。
### 不正利用への備え
使わない番号でも、電話番号が銀行や各種サービスのSMS認証先として登録されている場合は注意が必要だ。長期間放置している番号が不正に利用される(SIMスワップ詐欺)リスクを念頭に置き、キャリアのセキュリティ設定(口頭確認パスワードの設定など)を活用することを推奨する。
---
## よくある質問
### 番号保管サービスは楽天モバイルにもありますか?
楽天モバイルは現時点で番号保管(休止)サービスを提供していません。楽天モバイルで番号を維持したい場合は、最小プランへの変更またはMNPで他社に移行してから維持する方法を検討してください。
### 解約してしまった番号は復活できますか?
原則として、解約後に同じ電話番号を再取得することはできません。解約と同時に番号はキャリアに返却され、一定期間後に別の利用者に割り当てられます。番号を手放す前に、本当に不要かどうかを十分に確認してください。
### 旧番号に登録してある各種サービスの認証はどうなりますか?
解約や番号変更を行う前に、銀行・証券・SNS・行政サービスなど、現在の番号でSMS認証を行っているサービスの登録情報を更新しておくことが必要です。更新を忘れると、番号変更後にそれらのサービスにログインできなくなるリスクがあります。
### MNP後もeSIMとして使い続けられますか?
MNP転出後、転出元キャリアのeSIMプロファイルは無効になります。MNP転入先のキャリアが対応していれば、転入先でeSIMを発行してもらえます。MNP後のeSIM設定については各キャリアの公式手順を確認してください。
---
## まとめ
使わない電話番号を維持する主な選択肢を整理する。
| 方法 | 特徴 | 向いているケース |
|------|------|--------------|
| 番号保管サービス(休止) | 通信機能が停止、保管料が必要、最大期間あり | 一時的な休止で確実に再開する |
| 最安プランへ変更 | 通話・SMS継続可、月額を最小化 | 低頻度で使う可能性を残したい |
| eSIM副回線として維持 | メイン+旧番号を1台で維持 | 予備回線としても活用したい |
| MNPで格安SIMへ移行 | 番号は変えずに月額コストを抑える | 長期間低コストで維持したい |
| 解約 | コストゼロだが番号は消える | 今後ほぼ使わないと確信できる場合 |
番号維持コストが実際の利用価値を上回ると判断したら、解約を選ぶことも合理的な決断だ。逆に銀行・金融・行政サービスのSMS認証が紐づいている番号は、変更手続きの手間を考慮した上で維持コストと天秤にかけることを推奨する。
各社の番号保管サービスの最新条件・プランの月額は、各キャリアの公式サイトまたは[SimFinderの国内SIM検索](/ja/jp/search/)で確認してほしい。
================================================================================
# 子供のスマホ安全設定ガイド
URL: https://sim-finder.com/ja/guides/parental-control/
Type: guides (ja)
Published: 2026-06-05
子供のスマホ管理の結論は一つだ——まずOSの公式ペアレンタルコントロールを有効にし、キャリアのフィルタリングを確認し、子供と使い方のルールを合意する。iOSなら「スクリーンタイム」、Androidなら「Family Link(ファミリーリンク)」が公式の管理ツールだ。
スマートフォンは子供の学習・コミュニケーション・娯楽に役立つ一方で、不適切コンテンツへのアクセス、過剰利用、アプリ内課金といったリスクも伴う。この記事では、Apple・Googleの公式機能に基づき、具体的な設定方法と年齢別の考え方を解説する。
公衆Wi-Fiを使う場面のリスクについては[公衆Wi-Fiの安全な使い方](/ja/guides/public-wifi-safety/)も参照してほしい。
---
## iOSスクリーンタイムでできること
Appleのスクリーンタイム(Screen Time)はiOS 12から導入されたペアレンタルコントロール機能で、iPhone・iPad・iPod touchに対応している。
### スクリーンタイムの有効化
「設定」→「スクリーンタイム」→「スクリーンタイムをオンにする」から有効化できる。子供のデバイスで設定する場合は「このiPhone(またはiPad)は子供用です」を選択する。
Family Sharingを設定している場合、保護者のiPhoneから子供のデバイスのスクリーンタイムを遠隔管理できる。「設定」→「スクリーンタイム」→(ファミリーの子供の名前)の順に進む。
スクリーンタイムパスコードを設定することで、子供が設定を変更できなくなる。パスコードは4桁で、通常のデバイスパスコードとは別に設定する。
### 利用時間の制限(App Limits / Downtime)
**利用制限(App Limits)**ではアプリのカテゴリ(ゲーム・SNS・エンタメ等)または個別アプリごとに1日の使用時間の上限を設定できる。上限に達するとアプリの画面に「使用制限に達しました」と表示され、使用を継続するにはパスコードが必要になる。
**休止時間(Downtime)**では特定の時間帯(就寝時間・食事中等)にデバイスの使用を制限できる。休止時間中は許可されたアプリ以外が使用できなくなる。電話アプリ・時計など必須のアプリは「常に許可」リストで個別に除外できる。
いずれの制限も「さらに1分」「今日は制限を無視する」といったオプションが表示されるが、パスコードが必要な設定にすることで親の承認なしに延長できなくなる。
### コンテンツ制限と年齢レーティング
「コンテンツとプライバシーの制限」では以下を設定できる。
**iTunesおよびApp Storeでの購入**: アプリの新規インストール・アプリ内購入・アプリの削除を個別に「許可」または「許可しない」に設定できる。課金を完全に無効にするにはアプリ内課金を「許可しない」に設定する。
**コンテンツの制限**: 音楽・Podcast・ニュース・Fitness(年齢指定コンテンツのフィルタ)、映画(G / PG / PG-13 / R / NC-17 等)、テレビ番組(TV-Y / TV-14 / TV-MA 等)、App(4歳以上 / 9歳以上 / 12歳以上 / 17歳以上 / すべてのアプリ)の各カテゴリで年齢レーティングを設定できる。
**Webコンテンツ**: SafariのWebコンテンツを「無制限アクセス」「成人向けWebサイトを制限」「許可されたWebサイトのみ」の3段階から選択できる。「成人向けWebサイトを制限」を選ぶと、Appleが不適切と判断したサイトへのアクセスが制限される。
**Siri**: 「わいせつな言葉」「Webでの検索」のオン・オフを設定できる。
### 位置情報の共有
Family Sharingが有効な状態で「設定」→「プライバシーとセキュリティ」→「位置情報サービス」→「位置情報を共有」をオンにすると、ファミリーメンバーがFinde MyアプリまたはFind My Webサイトから位置情報を確認できる。子供側のデバイスで共有設定を変更するにはスクリーンタイムで「位置情報の共有の変更を許可しない」を設定しておくことを推奨する。
### 通信の制限
「通信の制限」では連絡できる相手を管理できる。「全員」「連絡先のみ」から選択できる。休止時間中に通話・FaceTime・メッセージを使用できる連絡先をさらに絞ることも可能だ。
出典: [Apple サポート — iPhone と iPad のスクリーンタイムを使う](https://support.apple.com/ja-jp/108808)
---
## Android Family Linkでできること
Google Family Link(ファミリーリンク)はGoogleが提供するAndroid向けペアレンタルコントロールアプリで、保護者と子供それぞれのデバイスにアプリをインストールして使用する。
### Family Linkのセットアップ
保護者のデバイスにFamily Linkアプリをインストールし、子供のGoogleアカウントを作成(または既存アカウントを管理下に置く)する。
子供のGoogleアカウントを作成する場合、保護者の同意が必要で、子供の生年月日・名前を入力する。Googleは生年月日に基づいて年齢確認を行い、13歳未満のアカウントは自動的にFamily Linkの管理下に入る。
### アプリの管理と承認
子供がGoogle Play Storeからアプリをインストールしようとすると、保護者のFamily Linkアプリに承認リクエストが届く。保護者は「承認」または「拒否」を選択できる。すでにインストール済みのアプリを削除することも保護者側から可能だ。
承認なしでインストールできるコンテンツのカテゴリや年齢レーティングをあらかじめ設定しておくこともできる(Google Play(IARC)の評価基準では「3歳以上」「7歳以上」「12歳以上」「16歳以上」「18歳以上」の5段階に分類)。
### 利用時間の管理
**デイリーアクティビティ**: 子供が使用したアプリとその時間をFamily Linkアプリで確認できる。アプリごとの使用時間も表示される。
**利用時間の設定**: デバイスの1日の使用時間の上限と、デバイスを使用できる時間帯(就寝時間の制限)を設定できる。就寝時間になるとデバイスが自動的にロックされる。
**アプリごとの制限**: 特定のアプリに対して利用時間の上限を個別に設定できる。
### 位置情報の確認
保護者がFamily Linkアプリで子供のデバイスの現在地を確認できる。「現在地を確認」をタップすると子供のデバイスの現在地が地図上に表示される。
### コンテンツフィルタリング
**Google SafeSearch**: Family Linkで管理されているアカウントではGoogleのSafeSearchが強制的にオンになり、検索結果から不適切なコンテンツが除外される。
**YouTube**: YouTubeについては「YouTube Kids」アプリの使用を推奨する。YouTubeアプリ本体のコンテンツ制限はFamily Linkと連携して設定できるが、YouTube Kids の方が子供向けコンテンツに特化した設計になっている。
**Chrome**: SafeSearchが適用され、成人向けサイトへのアクセスが制限される。Androidの場合、Chromeのコンテンツ設定をFamily Linkから変更することはできないが、SafeSearchの強制適用により一定の制限は機能する。
### 課金の管理
Google Playでの購入は保護者の承認が必要な設定にできる。アプリ内購入も同様に承認が必要な設定にすることで、子供が保護者の知らない間に課金することを防げる。
出典: [Google サポート — Family Link で子どもの Android デバイスを管理する](https://support.google.com/families/answer/7103340?hl=ja)
---
## キャリアのフィルタリングサービス
スマートフォンのOS機能によるペアレンタルコントロールに加え、日本の通信事業者はフィルタリングサービスを提供している。
「青少年インターネット環境整備法」(正式名称: 青少年が安全に安心してインターネットを利用できる環境の整備等に関する法律)に基づき、通信事業者には18歳未満のユーザーに対してフィルタリングサービスを提供することが求められている。
フィルタリングサービスはネットワーク側で有害サイトへのアクセスをブロックする仕組みで、端末の設定とは独立して機能する。OSのペアレンタルコントロールと組み合わせることで、より多層的な保護が実現できる。
利用している通信事業者のサポートページで、フィルタリングサービスの詳細と申込み方法を確認してほしい。
---
## SIMカードと本人確認の観点
子供に持たせるSIMカードやスマートフォンの契約形態も重要な管理ポイントだ。
日本では18歳未満が携帯電話・スマートフォンを契約(または使用)する際、通信事業者はフィルタリングサービスの利用意向を確認し、不要の意思表示がない限り提供することが求められている。
SIMが紛失・盗難にあった場合の対処法は[SIM・スマートフォンの紛失・盗難時の対応ガイド](/ja/guides/lost-stolen/)で解説している。子供が持ち歩く端末は特に紛失リスクが高いため、遠隔ロックや位置情報共有の設定を事前にしておくことを強く推奨する。
---
## 年齢別の設定の考え方
ペアレンタルコントロールは「何歳なら何がOK」と一律に決められるものではなく、子供の成熟度・利用目的・家庭環境に応じて段階的に調整するものだ。ここでは一般的な目安を示す。
### 小学校低学年(6〜8歳ごろ)
この年齢では保護者が利用目的を絞ることが基本だ。
- 利用時間: 平日30分〜1時間、休日1〜2時間程度を上限の目安として検討する
- アプリ: 学習アプリ・教育コンテンツに限定し、SNS・ゲームは原則制限
- Webブラウズ: 「許可されたWebサイトのみ」の設定を検討する
- アプリの新規インストール: 必ず保護者の承認を要求する
- 位置情報: 常時共有を有効にする
この年齢のうちにデバイスの使い方について「なぜそのルールがあるのか」を一緒に考えることが、後の自立的な利用につながる。
### 小学校高学年(9〜12歳ごろ)
利用の幅を少しずつ広げながら、意識的な使い方を身につける時期だ。
- 利用時間: 宿題・家事の後という順序付けを条件に、平日1〜2時間程度
- アプリ: ゲームの時間制限を維持しつつ、学習・コミュニケーション目的のアプリを段階的に追加
- SNS: 子供向けサービス(YouTube Kids等)から始め、SNSの利用は年齢・サービス規約を確認の上で判断する
- コンテンツ制限: 「成人向けWebサイトを制限」を継続しつつ、過剰な制限を少しずつ緩める
- 課金: アプリ内課金の承認要求は継続する
友達との比較(「友達は何時間でもやっている」)が出てくる年齢でもある。ルールの理由を説明し、子供の意見も聞きながら合意を更新していく姿勢が大切だ。
### 中学生(13〜15歳ごろ)
自律性を認めながら、リスクへの対処法を伝える段階だ。
- 利用時間: 就寝前1〜2時間はデバイス使用禁止にするなど「時間帯」の制限を主軸に
- SNS: 利用する場合はプライバシー設定・見知らぬ人からのコンタクトへの対処方法を事前に説明する
- 課金: 月額上限を決めて自己管理させることも選択肢の一つ
- 位置情報: 緊急時の確認手段として「お互い見える」設定が受け入れられやすい
- フィルタリング: OS側の制限を少しずつ緩めながら、自分で判断する練習を積む
SMSやメッセージングアプリ経由のフィッシング・不正リンクについては[SMS二段階認証のリスクとより安全な代替](/ja/guides/sms-2fa-risk/)でも触れているが、子供が標的になるケースも増えている。
### 高校生(16〜18歳ごろ)
自立に向けて管理を段階的に手放す時期だ。OSのペアレンタルコントロールを解除するのではなく、子供自身が自分のデバイスを管理できるよう移行を支援する。
- 利用時間管理を自分で設定させる(iOSのスクリーンタイム、Androidのデジタルウェルビーイングを自己管理ツールとして紹介)
- VPNの活用やパスワード管理の基本を伝える(VPNについては[VPNの使い方ガイド](/ja/guides/vpn-guide/)を参照)
- セキュリティ設定(2FA・パスキー)を一緒に確認する
---
## 子供との合意形成
ペアレンタルコントロールは「監視ツール」ではなく「安全のためのルール」として位置づけることが長期的な信頼関係につながる。
### ルール作りの原則
**透明性**: 何を制限しているか、なぜ制限するかを子供に説明する。「ルールを知らないまま制限される」状態は子供の反発を招きやすい。
**子供の参加**: 特に小学校高学年以上では、ルールを一方的に決めるのではなく「何時間までならいい?」「どのアプリを使いたい?」といった形で子供の意見を聞く。合意したルールは守られやすい。
**段階的な緩和**: 制限を永遠に続けるのではなく、「〇ヶ月間ルールを守れたら、この制限を緩める」という見通しを示すと子供が受け入れやすい。
**一貫性**: 子供に制限を設ける場合、保護者自身も食事中はスマートフォンを見ないなど、行動で示すことが重要だ。
### 話し合う内容の例
- 使用時間の合意(平日・休日、就寝前の制限)
- アプリ・SNSの利用ルール(どのサービスを、どのような目的で使うか)
- 見知らぬ人からのコンタクトへの対応方法
- 課金の管理方法(月に使っていい上限、事前相談のルール)
- デバイスを預ける・共有しないことの確認
SIMスワップ詐欺のような電話番号を狙う攻撃は大人だけが標的ではない。詳細は[SIMスワップ詐欺とは — 手口・兆候・防ぎ方](/ja/guides/sim-swap/)で解説しているが、子供のアカウントを通じて保護者の個人情報に到達しようとするケースも報告されている。
---
## アカウントセキュリティと2FA設定
子供のアカウントに設定する2段階認証についても注意が必要だ。
電話番号(SMS)を使った2段階認証はSIMスワップ攻撃に脆弱な側面がある(詳しくは[SMS二段階認証のリスクとより安全な代替](/ja/guides/sms-2fa-risk/)を参照)。子供のアカウントに2段階認証を設定する場合は、認証アプリ(TOTP)またはパスキーの使用を優先したい。
なお、Family Sharingを使っている場合、保護者のApple IDと子供のApple IDは連携しているため、保護者自身のApple IDのセキュリティ強化も重要だ。
---
## まとめ
子供のスマホ安全設定は、ツールの設定だけでは完結しない。OS機能・キャリアフィルタリング・家族間のルールの3つを組み合わせることが現実的なアプローチだ。
1. **OSのペアレンタルコントロールを有効にする** — iOSなら「スクリーンタイム」、Androidなら「Family Link」
2. **キャリアのフィルタリングサービスを確認する** — 18歳未満は青少年インターネット環境整備法に基づくサービスの対象
3. **課金を制限する** — アプリ内課金の承認要求を必ず設定する
4. **位置情報を共有する** — 緊急時の確認手段として、特に小中学生のうちは有効にしておく
5. **子供と合意する** — 透明性のあるルール作りで長期的な信頼関係を構築する
6. **段階的に緩和する** — 成長に合わせて制限を見直し、自律的な管理に移行する
---
## FAQ
**Q: 子供が設定を変更してしまう場合はどうすればいいですか?**
iOSの場合はスクリーンタイムパスコードを設定してください。Androidの場合はFamily Linkアプリをデバイスから削除できないよう設定するか、デバイス管理者としてFamily Linkを登録することで変更を防止できます。いずれも「設定ができない」ではなく「変更するには親の承認が必要」という状態にすることが目標です。
**Q: 子供がVPNアプリをインストールしてフィルタリングを回避する可能性はありますか?**
スクリーンタイムやFamily Linkでアプリのインストールに保護者の承認を要求するよう設定していれば、VPNアプリを勝手にインストールすることはできません。また既存のVPNアプリをiOSのコンテンツ制限でブロックすることも可能です。フィルタリングの回避に使われるアプリ(VPN・プロキシ等)のカテゴリを定期的に確認することを推奨します。VPNの仕組みについては[VPNの使い方ガイド](/ja/guides/vpn-guide/)を参照してください。
**Q: 位置情報の共有は子供のプライバシーを侵害しますか?**
位置情報の共有は「監視」と「安全確認」の間に位置するデリケートな問題です。子供に「緊急時に確認するため」であることを説明し、了解を得た上で設定することを推奨します。また「お互いが見える」設定(子供からも親の位置が見える)にすることで、一方的な監視ではなく相互の安全確認という位置づけになります。
---
## 関連ガイド
- [公衆Wi-Fiの安全な使い方 — リスクと対策を正しく理解する](/ja/guides/public-wifi-safety/)
- [VPNの使い方ガイド](/ja/guides/vpn-guide/)
- [SIM・スマートフォンの紛失・盗難時の対応ガイド](/ja/guides/lost-stolen/)
- [SMS二段階認証のリスクとより安全な代替](/ja/guides/sms-2fa-risk/)
- [SIMスワップ詐欺とは — 手口・兆候・防ぎ方](/ja/guides/sim-swap/)
================================================================================
# 段階制プランの仕組み — 使った分だけ支払う
URL: https://sim-finder.com/ja/guides/pay-as-you-go/
Type: guides (ja)
Published: 2026-06-04
段階制プランは使用量に応じて料金が自動的に変わる仕組みで、使用量が少ない月は低い料金に収まる。これに対しトッピング型は基本料を低く抑え、必要なデータ量やオプションを都度購入する設計だ。どちらも「使った分に近い料金を払う」思想を持つが、構造と向き不向きが異なる。
この記事では、段階制・従量制・トッピング型の仕組みを整理し、それぞれに向いているユーザー像と選び方の指針を解説する。旅行eSIMの選び方については[旅行eSIMの選び方](/ja/guides/how-to-choose/)も参照されたい。
**この記事でわかること**:
- 段階制プランの料金が決まる仕組みと確認すべきポイント
- 従量制が現在どのような文脈で残っているか
- トッピング型(povo型)の構造とサービス維持条件
- 3方式の向き不向きと自分に合った選び方の判断軸
- キャリア種別(MNO・MVNO・サブブランド)ごとの傾向の違い
---
## 段階制プランとは
段階制プランは、月間データ使用量に応じてあらかじめ複数の料金段階(ステップ)が設定されており、使用量がどの段階に収まるかによって月額料金が確定する仕組みだ。
仕組みの概念として整理すると以下のようになる。
| 使用量の範囲 | 料金段階 |
|-------------|---------|
| 〜Xまで | 第1段階(最低料金) |
| X超〜Yまで | 第2段階 |
| Y超〜上限まで | 第3段階(最高料金) |
段階数はプランによって異なり、2〜3段階が日本市場での主流で、プランによっては4段階のものもある。各段階に上限額が定められているため、使用量がどの段階に収まっていても、その段階の上限を超えて請求されることはない。
### 段階制の特徴
**自動的に料金が調整される。** 利用者がプランを変更しなくても、使用量が少ない月は自動的に低い段階の料金になる。逆に多い月は上の段階に移行する。操作不要で使用量に応じた料金になるのが段階制の実用的な利点だ。
**最上段が実質の上限になる。** 段階制プランは最上段(最高料金)に到達した後は、追加データを使っても請求額がそれ以上増えない設計になっていることが多い。「上限青天井」のリスクが低い。
**使用量が少ないほどコストが下がる。** Wi-Fiを積極的に活用してモバイルデータをあまり使わない月は、自然に低い段階の料金になる。データ節約テクニックを実践したい場合の指針は[データ通信量の節約テクニック](/ja/guides/save-data/)で詳しく解説している。
**段階の境界付近は注意が必要。** 使用量が第1段階と第2段階の境界付近になる月は、わずかな差で料金が大きく変わることがある。自分の使用量が段階の区切りに対してどの位置に収まることが多いかを、過去の実績から把握しておくと判断しやすくなる。
### 段階制プランを選ぶ際の確認ポイント
段階制プランを比較するときに確認しておきたい項目を以下に挙げる。
- **何段階構成か、各段階のデータ容量の区切りはどこか。** 2段階・3段階・4段階とプランによって異なる。
- **各段階でのデータ容量上限と、それを超えた場合の挙動。** 次の段階へ自動移行するのか、それとも速度制限がかかるのかを確認する。
- **最上段の料金で確定した後、さらにデータを使った場合の扱い。** 多くのプランでは最上段で頭打ちになるが、プランによっては追加データ購入が必要になることもある。
- **通話料金の扱い。** 段階制の料金変動がデータ部分のみに適用されるのか、通話料金も連動するのかを確認する。
---
## 従量制プランとは
純粋な従量制は、使用したデータ量に一定の単価を掛けた料金が請求される方式だ。使用量がゼロなら料金もゼロに近くなる一方、使用量が増えるほど料金が線形に増加する。
日本のスマートフォンプランにおいて、純粋な従量制(1MBごとに単価を掛ける等の方式)は現在の主流ではない。段階制が「使用量に応じて料金が変わる」点では従量制に近い概念を持ちながらも、各段階に上限額が設けられている点で従量制とは異なる。
従量制の概念が現在も残っている文脈としては以下がある。
- **高速データを使い切った後の追加購入**。多くのプランで、月間データ容量を消費した後に有料でデータを追加できる。この追加分は「1GB当たり〇円」のような従量的な価格設定になっていることが多い。
- **国際ローミングの従量課金**。海外での通信を大手キャリアの従来プランで利用する場合、データ量に応じた料金体系が設定されていることがある。ただし日数定額のローミングプランに移行しているケースも多い。
- **低速での無制限通信**。一部のプランで、高速データを使い切った後も一定の低速(例: 1Mbps)で通信し続けられるオプションがある。この場合、低速通信部分は使用量に関わらず月額固定になることが多い。
プランを比較する際は「段階制」「定額」「従量制」の表記の差異に注意し、各社公式ページで請求の仕組みを確認することを推奨する。[SimFinderの日本SIMプラン検索](/ja/jp/search/)で料金体系ごとのフィルタリングも活用できる。
---
## トッピング型(積み上げ型)プランとは
トッピング型は、基本料金(月額0円または低額)を払い、必要なデータ容量・通話オプション・その他サービスを個別に購入(トッピング)していく方式だ。「必要なものだけを買う」設計が特徴で、日本ではpovo 2.0(au系MNO直営)を筆頭に、MVNO・サブブランドでも採用されている。
### povo型トッピングの仕組み
日本でトッピング型の代表的な例として知られているのがpovo 2.0(au系)だ。基本料0円の状態から、データ容量(1GB・3GB・20GBなど)や24時間データ使い放題などのトッピングを任意のタイミングで購入できる仕組みだ。
ファクトレジストリの検証済み情報によれば、povo 2.0は以下の特性を持つ。
- 基本料0円、eSIM対応
- 180日以内にトッピング購入がないとサービスが停止される
- 副回線としての利用が定番の使い方とされている
povo 2.0の料金・トッピング内容の最新情報はpovo公式サイトで確認すること。この記事では具体的な金額を記載しない。最新プランの比較は[SimFinderで確認](/ja/jp/search/)できる。
### トッピング型の特徴
**使わない期間の費用を最小化できる。** 旅行中や繁忙期など通信量が増える時期だけデータを追加購入し、それ以外の期間は最小限の維持費で運用できる。
**計画的な購入が必要。** 使いたいときに必要量を判断して購入する手間がある。段階制のように自動的に料金が調整されるわけではないため、こまめな管理を好まない人には不向きな場合がある。
**サービス維持に最低限の購入が必要な場合がある。** povo 2.0のように一定期間内に購入実績がないとサービス停止になるルールがある場合がある。契約しているサービスの条件を確認しておくことが重要だ。
**トッピングの有効期限に注意する。** 購入したトッピング(データ容量)には有効期限が設けられているものが多い。有効期限内に使い切れない場合、残量は失効する。購入前に有効期限を確認し、使い切れる量を選ぶことが重要だ。
MVNOやサブブランドの種類・特徴については[MVNO(格安SIM)とは](/ja/guides/what-is-mvno/)で詳しく解説している。
---
## 段階制・従量制・トッピング型の比較
3方式の違いを整理すると以下のようになる。
| 項目 | 段階制 | 従量制 | トッピング型 |
|------|--------|--------|------------|
| 料金の決まり方 | 使用量が収まった段階で確定 | 使用量×単価 | 購入したトッピングの合算 |
| 管理の手間 | 少ない(自動) | 少ない(自動) | 多い(都度購入) |
| 使わない月のコスト | 低い段階の料金 | 使用量に応じて低くなる | 最小限(基本料のみ) |
| 使いすぎた場合 | 最上段の料金で頭打ち | 使用量に比例して増加 | 購入分を使い切ると速度制限 |
| 向いている使用パターン | 使用量が月により変動 | 概念的には少量利用 | 特定期間のみ増量が必要 |
---
## 向いているユーザー像
### 段階制プランに向いている人
- **データ使用量が月によって大きく変動する人。** 旅行や繁忙期で多く使う月もあれば、在宅中心で少ない月もある場合、段階制は使用量の少ない月に自動で料金が下がるため無駄が生じにくい。
- **使用量が全体的に少ない人。** 毎月の使用量が低めで、大容量固定プランでは容量を持て余してしまう場合に段階制が合いやすい。実際に使った量に近い料金に収まる傾向がある。
- **プランをこまめに切り替えたくない人。** 段階制は手動でプランを変更しなくても使用量に応じた料金になるため、管理の手間が少ない。
自分のデータ使用量の傾向をまだ把握していない場合は、まず[データ通信量の目安ガイド](/ja/guides/data-usage-guide/)で使用パターンを確認するとよい。
### トッピング型に向いている人
- **副回線として使いたい人。** メインのSIMカードはすでに契約しており、旅行・緊急時・特定の用途のためだけに2枚目の回線を持ちたい場合、基本料が最小限のトッピング型は維持費を低く抑えられる。
- **特定の時期だけ通信量が集中する人。** 出張や旅行などで一時的にデータが多く必要で、それ以外は普段のプランで十分な場合、必要なときだけトッピングを購入できる。
- **eSIMを活用できるユーザー。** トッピング型のeSIM対応プランをスマートフォンのデュアルSIM機能と組み合わせると、メイン回線を維持したまま柔軟に通信量を管理できる。eSIM対応の端末かどうかは事前に確認が必要だ。
### 段階制・トッピング型が向かない人
- **毎月ほぼ固定で大量にデータを使う人。** 毎月30GBを確実に使い切るような利用パターンの場合、最上段の料金が常に適用されることになる。この場合は大容量固定プランや無制限プランのほうがGB単価として割安になることが多い。
- **通信量の管理を一切意識したくない人。** 「とにかく使い放題で気にしたくない」という場合は無制限プランが合っている。
旅行eSIMのプラン選びについては[旅行eSIMの選び方](/ja/guides/how-to-choose/)を参照されたい。
---
## 日本のプランにおける文脈
日本の通信市場では、大手キャリア(MNO)・サブブランド・MVNO(格安SIM)それぞれで段階制・トッピング型のプランが展開されている。
**大手キャリア(MNO)の段階制プラン例(概念)**: 大手キャリアは少量利用から大容量利用まで複数の料金段階を設け、使用量に応じて料金が変わる設計のプランを提供している。段階数・各段階の料金・上限は各社のプラン設計によって異なる。
**MVNO(格安SIM)の段階制プラン**: MVNO各社もデータ容量に応じた段階制プランを提供しているところが多い。大手キャリアと比較して料金水準が低い傾向があるが、通信品質の差異についても考慮する必要がある。MVNOの仕組みと特性については[MVNO(格安SIM)とは](/ja/guides/what-is-mvno/)で詳しく解説している。
**サブブランドとトッピング型**: 大手キャリアのサブブランドにもトッピング型の設計を採用するサービスがある。サブブランドは親会社と同じネットワークを使用するため、MVNOよりも通信品質が安定している傾向がある。
現在提供されているプランの具体的な内容・料金はキャリアの公式サイトで確認すること。この記事では具体的な金額を記載しない。
### キャリア種別ごとの段階制・トッピング型の傾向
キャリアの種類(MNO・MVNO・サブブランド)によって、段階制・トッピング型プランの料金水準や通信品質に違いがある。以下は一般的な傾向を示したものであり、個別のプランの内容はキャリアの公式ページで確認すること。
| キャリア種別 | 段階制の料金水準 | 通信品質 | 特記事項 |
|-----------|-------------|---------|---------|
| MNO(大手キャリア) | 高め | 安定・高品質 | 自社ネットワーク所有 |
| サブブランド | 中程度 | MNOに準じる | 親会社回線を使用 |
| MVNO(格安SIM) | 低め | プランや時間帯により変動あり | MNO回線を借用 |
各種別の詳しい仕組みと特性は[MVNO(格安SIM)とは](/ja/guides/what-is-mvno/)・[プロバイダー比較ガイド](/ja/guides/provider-comparison/)を参照されたい。
---
## 段階制・トッピング型を選ぶ前に確認すること
**自分の月間使用量の実績を把握する。** 端末の設定画面で過去数ヶ月の使用量を確認し、「多い月」「少ない月」の幅を把握しておく。確認方法は[データ通信量の目安ガイド](/ja/guides/data-usage-guide/)に記載がある。
**各段階の料金区切りと上限を確認する。** 段階制プランは「どの使用量でどの段階になるか」を公式ページで必ず確認する。段階の区切りが自分の使用量の実績と合っているかどうかが重要だ。
**トッピング型のサービス維持条件を確認する。** 一定期間内に購入実績がないとサービス停止になるルールがある場合がある。副回線として長期間維持する予定があれば、最低維持コストを計算しておく。
**速度制限の条件を確認する。** 段階制・トッピング型のどちらも、購入したデータを使い切った後の通信速度制限の条件(制限速度・回復タイミング)をプランの詳細で確認しておくことを推奨する。
**契約期間や解約条件を確認する。** 段階制・トッピング型プランの中には最低利用期間が設定されているものがある。ライフスタイルの変化でプランを変更したい場合に備え、解約・プラン変更の条件も事前に把握しておく。
**他のプランタイプと比較する。** 段階制・トッピング型が自分に合っているかを判断するには、大容量固定プランや無制限プランとのコスト比較も有効だ。自分の使用量実績の「多い月」「少ない月」それぞれに、各プランタイプを当てはめてシミュレーションしてみると判断しやすくなる。月によって大きく異なるなら段階制、特定期間のみ増量が必要なら[サブ回線としてのトッピング型](/ja/guides/save-data/)という組み合わせが有力な選択肢だ。
---
## SimFinderでプランを比較する
段階制プランとトッピング型プランのどちらが自分に合うかは、月間の使用量の実績と変動幅によって変わる。[SimFinderの日本SIMプラン検索](/ja/jp/search/)では、データ容量帯・料金・通信品質スコアでプランを絞り込んで比較できる。
具体的な料金はキャリアが頻繁に改定するため、この記事ではリアルタイムの金額を記載しない。SimFinderで最新のプランデータを確認することを推奨する。
SimFinderでは通信品質スコアも確認できる。段階制やトッピング型プランを提供するMVNOを検討する場合、料金だけでなく通信品質の傾向を把握しておくことがプラン選びの精度を高める。
日本のキャリアの種類(MNO・MVNO・サブブランド)の違いを把握したうえでプランを比較したい場合は、[プロバイダー比較ガイド](/ja/guides/provider-comparison/)も参照されたい。
---
## まとめ
- **段階制**: 使用量に応じて料金が自動的に変わる。使用量が少ない月は低い段階の料金に収まる。管理の手間が少なく、使用量が変動する人や低使用量の人に向いている。
- **従量制**: 使用量×単価の料金体系。日本の現行プランでは純粋な従量制は少なく、段階制や追加データ購入の文脈で概念として残っている。
- **トッピング型**: 基本料が低く、必要なデータ・オプションを都度購入する。副回線や一時的な増量用途に向いている。サービス維持の最低購入条件を要確認。
3方式のいずれが適しているかは、自分の月間データ使用量の実績と変動幅を把握した上で判断することが重要だ。使用量が月によって大きく異なる場合は段階制、ほぼ固定で少量の場合はトッピング型、毎月確実に大量使う場合は固定大容量プランや無制限プランが候補になる。
プラン選びで迷った場合は、現在の月間使用量をまず[データ通信量の目安ガイド](/ja/guides/data-usage-guide/)で把握してから[SimFinderの検索ツール](/ja/jp/search/)で条件に合うプランを絞り込むことを推奨する。
段階制・トッピング型の最大のメリットは「過剰スペックを避けられる点」だ。自分の使用量に合ったプランを正確に把握することが、無駄な支出を抑える第一歩になる。
---
## 関連ガイド
- [旅行eSIMの選び方](/ja/guides/how-to-choose/) — 通信エリア・データ量・有効期限など5つの比較ポイント
- [データ通信量の目安](/ja/guides/data-usage-guide/) — アプリ別消費量と自分に必要なGB数の算出方法
- [MVNO(格安SIM)とは](/ja/guides/what-is-mvno/) — 仕組み・メリット・デメリットを解説
- [プロバイダー比較ガイド](/ja/guides/provider-comparison/) — MNO・MVNO・サブブランドの特徴比較
- [データ通信量の節約テクニック](/ja/guides/save-data/) — iPhone/Androidのアプリ別設定と実践ガイド
================================================================================
# 乗り換え後の初期設定 — 開通後にやること
URL: https://sim-finder.com/ja/guides/post-switch-setup/
Type: guides (ja)
Published: 2026-06-04
乗り換え後(回線切替後)に通信が正常に使えるかを確認し、必要な設定を完了させることが重要だ。開通手続きを終えてもAPN設定の未完了や各アプリの再認証が残っていると、通信・決済・認証サービスが意図せず使えない状態になる。
この記事では、MNO・MVNOへの乗り換え完了直後にやるべき初期設定を、順序立てて解説する。
---
## 乗り換え後の初期設定チェックリスト(全体像)
乗り換え直後に実施すべき作業を優先順で示す。
| 順序 | 作業 | 対象 |
|------|------|------|
| 1 | 通信確認(通話・SMS・データ) | 全員 |
| 2 | APN設定(必要な場合) | MVNO・ahamo等 |
| 3 | キャリアメールの持ち運び申し込み | キャリアメールを継続利用する場合 |
| 4 | 2FA(二段階認証)の再確認 | 2FAにキャリアメールを使っていた場合 |
| 5 | おサイフケータイ・Suicaの動作確認 | 対応端末 |
| 6 | 繋がらない場合の対処 | 必要な場合のみ |
開通手続きの流れ自体は「[SIMの開通手続き・アクティベーション](/ja/guides/activation/)」を参照してほしい。
---
## ステップ1: 通信の動作確認
回線切替後の最初のステップは、通話・SMS・データ通信の3つがすべて使えることを確認することだ。
### データ通信の確認
1. ステータスバーにキャリア名(「NTT DOCOMO」「au」「SoftBank」「楽天モバイル」等)と電波バーが表示されているかを確認する
2. 「設定→モバイル通信→モバイルデータ通信」(iPhone)または「設定→ネットワークとインターネット」(Android)でモバイルデータ通信がオンになっているかを確認する
3. ブラウザで任意のWebページにアクセスし、データ通信が使えることを確認する
デュアルSIM構成(旧SIMを残している場合)では、データ通信に使うSIMが新しい回線に切り替わっているか確認することが重要だ。
- **iPhone**: 「設定→モバイル通信→モバイルデータ通信」で新回線のSIMを選択する
- **Android(Pixel)**: 「設定→ネットワークとインターネット→SIM」でデフォルトのデータSIMを新回線に設定する
### 通話・SMSの確認
1. 別の端末(または知人の端末)に電話をかけ、発着信が正常に機能するかを確認する
2. SMSを送受信して、メッセージが届くかを確認する
MNP(携帯電話番号ポータビリティ)で番号を引き継いだ場合、開通手続きの完了と同時に旧キャリアの回線は自動解約され、旧SIMは使用不能になる。
---
## ステップ2: APN設定(必要な場合)
APN(Access Point Name)は、端末がモバイルデータ通信を行う際の接続先を指定する設定だ。電波は表示されているのにデータ通信のみ使えない場合、APN設定が原因のことが多い。
### APN設定が不要なケース
以下の場合はAPN設定の手動操作は原則不要だ。
- **大手MNO(NTTドコモ・au・ソフトバンク・楽天モバイル)のSIM/eSIM**: SIMのアクティベーション時またはキャリア設定アップデート経由で自動設定される
- **サブブランド・オンライン専用ブランド(povo・UQモバイル・ワイモバイル・LINEMO)**: Appleのキャリア設定アップデートでiPhoneへの自動設定が基本
- **楽天モバイルのiPhone**: 楽天回線対応製品ではAPN設定不要(レジストリ確認済み)
- **povo2.0のiPhone**: iOS 15以降でAPN設定不要(povo公式FAQ確認済み)
### APN設定が必要なケース
| 状況 | 対応 |
|------|------|
| MVNOのSIMをSIMフリー端末で使う | 構成プロファイルのインストール(iPhone)または手動入力(Android) |
| ahamo(ドコモ系)をiPhoneで使う | ahamo公式サイトから構成プロファイルをインストール |
| ネットワーク設定リセット後にMVNOを使う | APN設定が消去されるため再設定が必要 |
### iPhoneでのAPN設定手順
iPhoneでのAPN設定の詳細手順は「[APN設定の手順(iPhone)](/ja/guides/apn-setup-iphone/)」で解説している。簡潔に述べると、利用するMVNOの公式サイトからSafariで構成プロファイル(.mobileconfig)をダウンロードし、「設定→一般→VPNとデバイス管理」からインストールする。
インストール後は機内モードをオン・オフするか再起動して、データ通信が使えることを確認する。
キャリア設定アップデートが配信されているキャリアでは、「設定→一般→情報」を開くと「キャリアのアップデートが利用可能です」と表示されることがある。表示されたら「アップデート」をタップするだけでAPN設定が自動適用される。
### AndroidでのAPN設定手順
Androidでの手動APN設定方法は「[APN設定の手順(Android)](/ja/guides/apn-setup-android/)」で解説している。Androidは標準でAPN手動入力画面が用意されており、使用するMVNO公式サポートページに記載されたAPN情報を入力する。
---
## ステップ3: キャリアメールの移行・持ち運び
### キャリアメール持ち運びサービスとは
NTTドコモ・au・ソフトバンクは「キャリアメール持ち運びサービス」を提供しており、乗り換え後も元のキャリアメールアドレスを継続利用できる。ファクトレジストリ確認済みの情報として、各社とも月額330円のサービスとして提供されている。
**各社の申し込み期限:**
- **NTTドコモ(ドコモメール持ち運び)**: ドコモ回線解約日を含む31日以内に申し込みが必要。解約当日または解約後31日以内に申し込み可能(出典: NTTドコモ公式)
- **au(auメール持ち運び)**: 解約日の翌日から31日以内に申し込みが必要(出典: au公式)
- **ソフトバンク(メールアドレス持ち運び)**: 解約後31日以内に申し込みが必要(出典: ソフトバンク公式)
- **楽天モバイル**: 楽メール持ち運びに対応
> 申し込み期限を過ぎると申し込みができなくなるため、乗り換え後は早めに手続きすること。
### キャリアメール持ち運びを利用しない場合
キャリアメールを持ち運ばない場合、乗り換え後はそのキャリアのメールアドレス宛のメールは受け取れなくなる。事前に重要な連絡先へ新しいメールアドレスを伝えるか、Gmail・Yahoo!メール等の独立したメールサービスへ切り替えることを推奨する。
### 乗り換え前後のメールデータの扱い
キャリアメールのサーバー上のメールデータは、乗り換え後にアクセスできなくなる場合がある。重要なメールは、乗り換え前に端末内に保存するか、別のメールサービスに転送しておくことを推奨する。
---
## ステップ4: 各種アプリの2FA(二段階認証)確認
乗り換え後に意外と見落とされやすいのが、SMS宛に届く2FA(二段階認証)コードの確認だ。
### 電話番号が変わらない場合(MNP利用)
MNP(携帯電話番号ポータビリティ)で電話番号を引き継いだ場合、SMS宛の2FAは原則そのまま使える。ただし、開通手続きから新回線が安定するまでの数分間はSMSが届きにくい場合があるため、切り替え直後にSMS認証が必要な操作(ネットバンキングのログイン等)は少し時間を置いてから実施することを推奨する。
### キャリアメールへの2FA設定を見直す
バンクや各種サービスで、2FAの宛先をキャリアメールアドレスに設定している場合は注意が必要だ。キャリアメール持ち運びサービスを利用しない場合、乗り換え後はそのメールアドレスが使えなくなるため、2FAの受け取り先が機能しなくなる。
乗り換え前に、2FAにキャリアメールを使っているサービスを洗い出し、SMS・認証アプリ(Google Authenticator・Authyなど)・別のメールアドレスに変更しておくことを強く推奨する。
### 認証アプリ(TOTP)は影響なし
Google Authenticator・Authy等のTOTP(Time-based One-Time Password)方式の認証アプリは、SIMや電話番号に依存しないため、乗り換えによる影響は受けない。
---
## ステップ5: おサイフケータイ・Suicaの確認
### SIM変更のみ(機種変更なし)の場合
物理SIMを差し替えるだけの乗り換え(端末はそのまま)では、おサイフケータイ・モバイルSuica等のアプリは原則そのまま使える。乗り換え後に一度アプリを起動して正常に動作することを確認するだけで十分だ。
eSIMへの切り替えで端末が変わらない場合も同様だ。
### 機種変更を伴う乗り換えの場合
乗り換えと同時に端末も変更する場合は、**旧端末でのデータ移行手続きが乗り換え前に必要**だ。
**モバイルSuicaの場合(iPhoneのWallet経由):**
新しいiPhoneのセットアップ時にApple IDでSuicaが自動移行されるか、WalletアプリでSuicaを削除して新端末で追加する。詳細な手順はJR東日本公式の機種変更手順ページを参照すること。旧端末を処分する前に手続きを完了させること。
**AndroidのモバイルSuica(Suicaアプリ):**
Suicaアプリのメニューから「カードを預ける(機種変更)」を実行することで、サーバー側にデータが退避される。新端末でアプリをインストールして引き継ぐ手順になる。
> 機種変更を伴う場合のおサイフケータイの移行手順は機種・アプリによって異なるため、各アプリの公式ガイドまたはサポートページで確認すること。
---
## ステップ6: 繋がらない時の対処
乗り換え後に通信が正常に機能しない場合、以下の手順を順番に試してほしい。
### 基本の対処(まず試すこと)
**1. 機内モードをオン・オフする**
機内モードをオンにして10秒程度待ってからオフにする。端末の無線モジュールが接続をリセットし、ネットワーク登録が再実行される。乗り換え直後の「掴み外し」状態は、これで解消することが多い。
**2. 端末を再起動する**
機内モードトグルで解消しない場合は、端末を完全に再起動する。再起動によりSIMの再認識が行われ、ネットワーク接続が初期化される。
**3. APN設定を確認する**
MVNOのSIMを使用している場合は、APN設定が正しくインストール・入力されているかを確認する。iPhoneは「設定→一般→VPNとデバイス管理」で構成プロファイルが存在するか確認できる。
詳細な「圏外」「サービスなし」への対処は「[「圏外」「サービスなし」の対処法](/ja/guides/no-service/)」で診断手順を確認してほしい。
### それでも解消しない場合
上記の基本対処で解消しない場合は、ネットワーク設定のリセットを検討する。ネットワーク設定のリセットを実行すると、Wi-Fiパスワード・手動APN設定・VPN設定が削除される。実行前に必要な情報を控えておくこと。
ネットワーク設定のリセット手順(iPhone・Android各メーカー別)は「[ネットワーク設定のリセット方法と影響範囲](/ja/guides/network-reset/)」で詳しく解説している。
**iPhoneでのリセット手順(iOS 15以降):**
1. 「設定」→「一般」→「転送またはiPhoneをリセット」
2. 「リセット」→「ネットワーク設定をリセット」をタップ
3. パスコードを入力して実行する
4. 再起動後、MVNOの場合は構成プロファイルを再インストールする
リセット後にMVNOを使う場合は、キャリア公式サイトからSafariで構成プロファイルを再ダウンロードしてインストールする必要がある(「[APN設定の手順(iPhone)](/ja/guides/apn-setup-iphone/)」参照)。
---
## ステップ7: デュアルSIM使用時の追加確認
旧SIMと新SIMを両方挿して使うデュアルSIM構成にする場合は、以下の設定を確認する。
### iPhoneのデュアルSIM設定確認
- **モバイルデータ通信の優先SIM**: 「設定→モバイル通信→モバイルデータ通信」で新回線を選択する
- **デフォルトの音声回線**: 「設定→モバイル通信→デフォルトの音声回線」で主に使う回線を選択する
- **SMSの設定**: 「設定→メッセージ」でiMessageに使用するSIMを確認する
### Androidのデュアルシム設定確認(Pixel)
- 「設定→ネットワークとインターネット→SIM」でデフォルトの通話SIM・データSIMをそれぞれ設定する
---
## よくある質問
### 乗り換え後にAPN設定は必ず必要ですか?
大手MNO(NTTドコモ・au・ソフトバンク・楽天モバイル)とサブブランド(povo・UQモバイル・ワイモバイル・LINEMO等)は、キャリア設定アップデートまたはeSIMプロファイルに自動でAPN情報が含まれるため、手動設定は原則不要です。MVNOへの乗り換えやahamoをiPhoneで使う場合は、キャリアが提供する構成プロファイル(iPhone)または手動入力(Android)が必要な場合があります。
### キャリアメール(@docomo.ne.jpなど)は乗り換え後も使えますか?
NTTドコモ・au・ソフトバンクは「キャリアメール持ち運びサービス」(月額330円)を提供しており、乗り換え後もキャリアメールアドレスを継続利用できます。ドコモは解約日を含む31日以内、au(auメール持ち運び)は解約日の翌日から31日以内、ソフトバンク(メールアドレス持ち運び)は解約後31日以内に申し込む必要があります。楽天モバイルも楽メールの持ち運びに対応しています。
### 乗り換え後にSMSが届かなくなりました。どうすればよいですか?
まず機内モードをオン・オフしてネットワーク接続をリセットしてください。それでも届かない場合は、端末の再起動を試みてください。デュアルSIM構成の場合はSMSに使うSIMが正しく設定されているか確認してください(iPhoneは「設定→メッセージ→iMessageに使用するSIM」と「デフォルトの音声回線」の設定を確認)。新回線の開通が正常に完了していない可能性もあるため、キャリアの開通状況を確認することも推奨します。
### おサイフケータイ・Suicaは乗り換え後に再設定が必要ですか?
SIMの物理的な交換(機種変更なし)であれば、おサイフケータイ・モバイルSuica等のアプリは原則そのまま使えます。機種変更を伴う場合は、旧端末でのデータ移行手続き(Walletアプリ・Suicaアプリ内の「Suicaを転送」等)が必要です。eSIMへの切り替えでも機種変更を伴わない場合は再設定不要なことが多いですが、アプリの動作確認は乗り換え直後に実施してください。
### 2FA(二段階認証)でSMSが使えなくなりますか?
電話番号が変わらない場合(MNP利用)、SMS宛の2FAは原則そのまま使えます。ただし、開通手続きの実行から新回線が安定するまでの数分間はSMSが届きにくい場合があるため、切り替え直後の2FA認証は避けるか、時間を置いて試してください。キャリアのメールアドレス宛に2FAを設定していた場合は、メールアドレスが変わるため別の認証手段への切り替えが必要です。
---
## 関連ガイド
- **[APN設定の手順(iPhone)](/ja/guides/apn-setup-iphone/)** — iPhoneでMVNOのAPNを設定する構成プロファイルのインストール手順と主要MVNO一覧
- **[APN設定の手順(Android)](/ja/guides/apn-setup-android/)** — AndroidでのAPN手動設定方法とキャリア別設定値
- **[SIMの開通手続き・アクティベーション](/ja/guides/activation/)** — 物理SIM・eSIM別の開通手順、eKYC本人確認、MNP転入時の注意点
- **[ネットワーク設定のリセット方法と影響範囲](/ja/guides/network-reset/)** — iPhone・Android各メーカー別のリセット手順と削除される設定の詳細
- **[「圏外」「サービスなし」の対処法](/ja/guides/no-service/)** — 圏外・ネットワーク未検出時の総合診断と対処手順
SIMプランを比較する場合は [SimFinder](/ja/jp/search/) で条件を入力して最新プランを確認できる。
================================================================================
# 乗り換え前チェックリスト — キャリア変更前に確認すべきこと
URL: https://sim-finder.com/ja/guides/pre-switch-checklist/
Type: guides (ja)
Published: 2026-06-04
乗り換えの失敗の多くは、手続き当日に気づく見落としが原因です。
この記事では、キャリア変更前に確認・準備すべき7項目をチェックリスト形式で整理します。
MNPの仕組み(ワンストップ方式・予約番号方式・転出手数料)については「[MNP(番号ポータビリティ)とは](/ja/guides/what-is-mnp/)」で詳しく解説しています。SIMロック解除の手順については「[SIMフリーとSIMロック — 確認方法と解除手順](/ja/guides/sim-lock/)」を参照してください。
---
## チェックリスト全体像
乗り換え前に確認すべき項目を優先度順に示します。
| # | 項目 | 対応タイミング |
|---|------|-------------|
| 1 | MNP方式の確認(ワンストップ or 予約番号) | 申し込み前 |
| 2 | SIMロック解除の確認・手続き | 申し込み前 |
| 3 | 契約更新月・違約金の確認 | 申し込み前 |
| 4 | 支払い方法の準備 | 申し込み前 |
| 5 | データバックアップ | 申し込み前 |
| 6 | 2FA(二段階認証)の確認と移行準備 | 申し込み前 |
| 7 | 日本固有の手続き(メール・おサイフ・残債) | 申し込み前〜解約後 |
---
## 1. MNP方式を確認する
乗り換え先がワンストップMNPに対応しているかどうかで、手続きの流れが変わります。
### ワンストップ方式(対応している場合)
乗り換え先のWebサイトまたはアプリだけで手続きが完結します。現在のキャリアに連絡する必要はなく、MNP予約番号の取得も不要です。2023年5月24日に開始されたこの方式は、対応事業者が順次拡大しています。
### 予約番号方式(未対応の場合)
まず現在のキャリアからMNP予約番号を取得し、その後、乗り換え先のキャリアで申し込みます。MNP予約番号の有効期限は取得日を含めて15日間です。多くのMVNOでは申し込み時に残日数10日以上を要求するため、取得後はすぐに申し込み手続きを開始してください。
**確認方法**: 乗り換え先の公式サイトで「MNP」または「ワンストップ」を検索し、対応状況を確認してください。
### 方式選択の考え方
両方式で番号はそのまま引き継げます。ワンストップ方式は手順が少なく、現在のキャリアに電話・ログインする手間がありません。予約番号方式を使う場合は、番号取得後に申し込み先が要求する残日数(多くのMVNOは10日以上)を満たしているか確認してから申し込みを進めてください。取得後にMNPを利用しなかった場合、有効期限切れとともに自動で失効します。現在のキャリアへのペナルティはありません。
---
## 2. SIMロックを解除する
2021年10月1日以降に発売された端末は日本では原則SIMロックなしで販売されています。それ以前に購入した端末や、中古で購入した端末は、SIMロックがかかっている場合があります。
SIMロックがかかったままでは、別のキャリアのSIMカードやeSIMプロファイルを利用できない場合があります。
### iPhoneでの確認方法
「設定」→「一般」→「情報」→「キャリアロック」を確認します。「SIMの制限なし」と表示されていればSIMフリーです(iOS 14以降)。
### Android端末での確認方法
各キャリアのオンラインサービスでIMEIを入力して確認する方法が確実です。IMEIは「設定」→「端末情報」、または電話アプリで「*#06#」を入力すると表示されます。
### SIMロック解除の手続き
NTTドコモ・au・ソフトバンクはオンライン手続きによるSIMロック解除を無料で提供しています(ドコモは全申込み方法で手数料無料。au・ソフトバンクのオンライン手続きは無料)。楽天モバイルで販売された端末はすべてSIMフリーのため、手続き不要です。
詳しい手順は「[SIMフリーとSIMロック](/ja/guides/sim-lock/)」を参照してください。
### SIMロック確認のタイミング
SIMロック解除は乗り換え申し込み前に完了させておくことが重要です。申し込み後にロック解除手続きをしようとしても、回線切替後は旧キャリアのオンラインサービスにログインできなくなる場合があります。端末を変えない乗り換え(SIMのみ交換)であっても、SIMロックが残っていると新しいSIMが認識されないため、申し込み前のタイミングで必ず確認してください。
---
## 3. 契約更新月と違約金を確認する
乗り換えのタイミングによって、違約金・解約金が発生する場合があります。
### 契約更新月の確認
現在の契約に「更新月」の設定がある場合、更新月以外に解約すると違約金が発生するプランがあります。マイページや契約内容確認画面で「契約更新月」「解約可能期間」を確認してください。
### 料金の日割り計算
多くのキャリアは月額料金を日割りせず、1日でも利用した月は1ヶ月分の料金を請求します。月の途中で解約した場合でも満額請求されるケースが多いため、月末近くに乗り換えると料金上の損失を少なくできます。
### 新しいキャリアの料金開始日
乗り換え先の料金が開始される日も確認してください。旧キャリアと新キャリアで料金が二重にかかる期間が生じないよう、タイミングを調整することが重要です。
### 契約更新月の探し方
更新月はキャリアのマイページ(My docomo・My au・My SoftBank・my楽天モバイルなど)にログインし、「契約情報」または「ご利用中のプラン」から確認できます。電話での確認も可能です。MNOでも格安プランやサブブランドでは違約金のない料金プランに移行済みの場合もあるため、現在の料金プラン名と解約条件を合わせて確認してください。
---
## 4. 支払い方法を準備する
乗り換え先でのお支払い方法を事前に用意します。
### クレジットカード
多くのキャリア・MVNOはオンライン申し込みにクレジットカードを要求します。デビットカードが使えないケースもあるため、事前に対応するカード種別を確認してください。
### 本人確認書類
オンライン申し込みには、運転免許証・マイナンバーカード・パスポートなどの本人確認書類が必要です。スキャン画像または写真撮影でアップロードするため、有効期限が切れていないか確認してください。
---
## 5. データをバックアップする
SIM交換・端末変更を伴う乗り換えの前には、データのバックアップを取ります。
### iPhoneのバックアップ
iCloud バックアップ(「設定」→「Apple ID」→「iCloud」→「iCloudバックアップ」→「今すぐバックアップ」)またはMacのFinderを使ったバックアップを実施します。iCloudの空き容量が不足している場合は、パソコンへのバックアップを選択してください。
### Androidのバックアップ
Google アカウントを通じて連絡先・カレンダー・アプリデータが自動同期される設定になっているか確認します。「設定」→「Google」→「バックアップ」からバックアップ状況を確認できます。
### 独自アプリのデータ
LINEのトーク履歴・ゲームアプリのデータなど、クラウド同期されない場合があるデータは、各アプリの引き継ぎ・バックアップ機能を個別に実行してください。
### バックアップ対象として注意が必要なもの
端末変更を伴う乗り換えでは、以下のデータが移行漏れになりやすい項目です。バックアップ前に一度確認してください。
- LINEのトーク履歴(端末内保存のため、引き継ぎ設定が必要)
- ゲームアプリのセーブデータ(アカウント連携をしていない場合)
- カメラロール・動画(iCloudまたはGoogleフォトの同期状況)
- 認証アプリ(Google Authenticator等)の移行コード
---
## 6. 二段階認証(2FA)を確認する
乗り換えにより電話番号が変わる場合は、2FAの設定変更が必要です。MNPを使って同じ番号を引き継ぐ場合、番号移行後も同じ番号でSMSを受信できるため、基本的に2FAの再設定は不要です。
ただし、番号移行の切り替え処理中(数分〜数時間程度)はSMSが届きにくくなる場合があります。この間に銀行・証券・各種サービスのSMS認証を行う操作は避けてください。
### 番号が変わる場合
電話番号が変わる場合(MNPを使わない場合など)は、各サービスの2FA設定を新しい番号に更新する必要があります。銀行・証券会社・フリマアプリ・SNSなど、SMS認証を設定しているサービスをリストアップして、乗り換え前後に順次更新してください。
### 2FA移行を乗り換え前に済ませる理由
MNPで番号を引き継ぐ場合でも、回線切替の処理中はSMSが届きにくくなる時間帯があります。この時間帯に、銀行アプリのログイン・各種サービスの初回設定・パスワードリセット操作を行うと、SMS認証コードが届かず手続きが中断されます。乗り換え当日は認証操作を避け、事前に認証アプリ(TOTP方式)への切り替えや、バックアップコードの保存を済ませておくことが確実です。
---
## 7. 日本固有の手続きを確認する
日本のキャリアには、乗り換え時に追加で対応が必要な固有の手続きがあります。
### キャリアメールの持ち運び
@docomo.ne.jp・@au.com/@ezweb.ne.jp・@softbank.ne.jp などのキャリアメールは、乗り換えと同時に原則使えなくなります。
継続して使いたい場合は、各キャリアが提供する「メール持ち運びサービス(キャリアメール持ち運びサービス)」に申し込みます。NTTドコモ・au・ソフトバンクの3社がこのサービスを提供しており、月額は各社330円(税込)です。
申し込み期限はキャリアによって異なります。NTTドコモ(ドコモメール持ち運び)は解約日を含む31日以内に申し込みが必要です。解約当日の同時申し込みも可能です。楽天メール(楽天モバイル)も持ち運びに対応しています。
Gmailや独自ドメインのメールを主な連絡先にしている場合は影響がありません。
### おサイフケータイ・モバイルSuicaの移行
**おサイフケータイ(FeliCa)**に登録しているサービス(楽天Edy・WAON・nanaco等)のデータは、端末変更の前に各サービスの専用アプリで「預け入れ」(一時退避)を行い、新端末のアプリで受け取る手順が必要です。手順はサービスごとに異なります。
**モバイルSuica**はSuicaアプリで「Suicaを預ける(サーバーへ退避)」を行い、新端末のSuicaアプリで受け取ることで引き継ぎが完了します。Apple PayのSuicaも同様に、iCloudを経由して新しいiPhoneで受け取ることができます。
SIMだけを差し替える乗り換え(端末を変えない場合)はFeliCaへの影響がありません。端末ごと変更する場合のみ上記の手続きが必要です。
### 端末の分割払い残債
スマートフォンの代金を分割払いしていて残債がある場合でも、MNPによる乗り換え自体は可能です。残債は乗り換え後も支払い義務が残ります。
一部のキャリアでは一括返済を求める場合があります。現在の契約書またはマイページで残債の有無・金額・返済条件を確認してください。
### 乗り換え当日の流れと不通時間の目安
乗り換え当日の回線切替は、申し込み内容の審査が完了してからSIMが有効になるまでの間、一時的に回線が不通になります。オンライン手続きでは切替処理に数分〜数時間かかる場合があります。日中の業務時間中に手続きを行う場合は、Wi-Fi接続の確保と連絡手段(家族・職場等との事前連絡)を準備しておくとスムーズです。eSIM(ダウンロード型)の場合、物理SIMの郵送を待つ必要がないため、切替完了まで時間が短くなる傾向があります。
---
## SimFinderで乗り換え先を探す
乗り換え前の準備が整ったら、次のステップは乗り換え先のプランを選ぶことです。
[SimFinderの国内SIM検索](/ja/jp/)では、MNO・サブブランド・MVNOのプランを通信品質・データ容量・eSIM対応などの条件で一括比較できます。
旅行用eSIMプロバイダーへの乗り換えを検討している場合は、「[旅行eSIMプロバイダー比較](/ja/guides/provider-comparison/)」や「[旅行eSIMの選び方](/ja/guides/how-to-choose/)」も参考にしてください。
iPhone間でeSIMを移行する機種変更を予定している場合は、「[eSIMを別のiPhoneに転送する](/ja/guides/transfer-iphone/)」で詳しい手順を確認できます。
---
## まとめ
| 項目 | ポイント |
|------|---------|
| MNP方式 | ワンストップ方式(乗り換え先サイトのみ)か予約番号方式(15日間有効)か確認 |
| SIMロック | 2021年10月以前購入の端末は要確認。オンライン解除はドコモ・au・ソフトバンクとも無料 |
| 契約更新月 | 更新月以外の解約で違約金が発生する場合あり。月末解約が料金上の損失を少なくできる |
| 支払い方法 | クレジットカード・有効期限内の本人確認書類を準備 |
| バックアップ | iCloud/Google バックアップのほか、LINEなど個別のデータ引き継ぎも確認 |
| 2FA | MNPで番号を引き継ぐ場合は再設定不要。切り替え中はSMS認証を避ける |
| キャリアメール | 持ち運びサービス(各社月額330円)はキャリアごとに申し込み期限あり |
| おサイフケータイ | 端末変更を伴う場合のみ、各サービスアプリで事前に「預け入れ」が必要 |
| 端末残債 | 乗り換え後も支払い義務が残る。一括返済を求めるキャリアもあり |
---
## 関連ガイド
- [MNP(番号ポータビリティ)とは — 手順・費用・注意点](/ja/guides/what-is-mnp/)
- [SIMフリーとSIMロック — 確認方法と解除手順](/ja/guides/sim-lock/)
- [旅行eSIMの選び方 — 5つの比較ポイントと失敗しないコツ](/ja/guides/how-to-choose/)
- [旅行eSIMプロバイダー比較](/ja/guides/provider-comparison/)
- [eSIMを別のiPhoneに転送する — eSIM Quick Transferの手順と注意点](/ja/guides/transfer-iphone/)
================================================================================
# 渡航前のスマホ準備チェックリスト — 出発2週間前から当日までの全手順
URL: https://sim-finder.com/ja/guides/pre-trip-checklist/
Type: guides (ja)
Published: 2026-04-23
海外渡航でスマホの通信トラブルが起きる原因の多くは、出発前の設定不足や準備の後回しにある。高額ローミング請求・現地での通信不能・SMS認証が受けられないといった問題は、出発前の段階的な準備でほぼ防げる。
このチェックリストは、出発2週間前から現地到着直後まで「いつ・何をするか」を時系列で整理したものだ。「どの通信手段を選ぶか」の意思決定については[海外でスマホを使う4つの方法](/ja/guides/four-options/)を先に確認しておくと、このチェックリストの各ステップをより活用しやすくなる。
---
## 1. なぜ渡航前チェックリストが必要か
「とりあえず現地に着いてから考える」という方針は、いくつかのリスクを生む。
**高額請求リスク**: データローミングがONのまま渡航すると、キャリアの従量課金ローミングが自動的に開始される場合がある。バックグラウンドでOSのアップデートや地図のキャッシュ更新が走っただけで、想定外の課金が発生した事例は少なくない。国際ローミングの仕組みと料金については[国際ローミングの仕組みと料金](/ja/guides/international-roaming/)で詳しく解説している。
**通信不能リスク**: 旅行eSIMのインストールには安定したWi-Fi接続が必要だ。現地到着後に初めてeSIMの設定を試みると、インストール先のWi-Fiが見つからない・プロバイダーサポートへの問い合わせに時間がかかる、といった状況に陥りやすい。
**SMS認証が受けられないリスク**: 日本の銀行・決済サービス・各種アカウントはSMS認証に依存しているものが多い。現地SIMや旅行eSIMに切り替えると日本の電話番号が使えなくなるため、事前に代替手段を用意しておく必要がある。
以下、出発2週間前から時系列で手順を解説する。
---
## 2. 出発2週間前 — 通信手段の決定と予約・購入
時間がかかる手続きや意思決定を最初に済ませる。
### 端末の対応状況を確認する
**SIMロック解除状態の確認**
日本では2021年10月1日以降に発売された端末は、原則としてSIMロックなしで販売されている(総務省ガイドライン改正に基づく)。それ以前にキャリアで購入した端末や中古端末はロックがかかっている場合がある。
- **iPhoneの場合**: 「設定」→「一般」→「情報」→「キャリアロック」を確認。「SIMの制限なし」と表示されればSIMフリー
- **Androidの場合**: 各キャリアのオンラインページでIMEIを入力して確認する方法が比較的確実だ
SIMロックがかかっている場合、旅行eSIMも現地SIMも使えない。ドコモ・au・ソフトバンクはオンラインから無料で解除手続きができる(店頭は有料の場合がある)。楽天モバイルで販売する端末はすべてSIMフリーのため解除手続きは不要だ。
**eSIM対応有無の確認**
旅行eSIMを利用する場合は端末がeSIM対応である必要がある。
- **iPhoneの場合**: iPhone XS・XR(2018年)以降のモデルが対象。「設定」→「モバイル通信」に「eSIMを追加」または「モバイル通信プランを追加」が表示されれば対応済み
- **Samsung Galaxyの場合**: Galaxy S20(S20 FEを除く)以降のモデルが一般的に対応。「設定」→「接続」→「SIMカードマネージャー」で「SIMをダウンロード」が表示されれば対応している
- **Google Pixelの場合**: 「設定」→「ネットワークとインターネット」→「SIM」→「SIMを追加」からeSIMセットアップ画面が出れば対応している
### 通信手段を確定する
端末の対応状況を踏まえ、渡航先・旅行期間・同行者の構成に合わせた通信手段を選ぶ。
| 通信手段 | 向いているケース |
|---------|---------------|
| 国際ローミング | 短期・手間を最小にしたい・日本番号が必須 |
| 旅行eSIM | eSIM対応端末あり・コストを抑えたい |
| 現地SIM | 長期滞在・現地料金で使いたい |
| ポケットWi-Fi | 複数人利用・eSIM非対応端末が含まれる |
各手段の詳細な比較は[海外でスマホを使う4つの方法](/ja/guides/four-options/)を参照してほしい。
### 旅行eSIMのプランを選定・購入する
通信手段として旅行eSIMを選んだ場合は、渡航先・旅行期間・用途に合ったプランを購入まで済ませておく(インストールは1週間前〜前日に行う)。
確認すべき主なポイントは以下の通りだ。
- **通信エリア**: 1カ国のみ訪問する場合は単国プランが一般的に安価。複数国を跨ぐ旅行では地域プランが便利
- **データ容量と有効期限**: 「無制限」と表示されていても、フェアユースポリシーにより一定量を超えると低速化されるプランが多い。有効期限の開始タイミング(インストール時か、現地ネットワーク接続時か)もプロバイダーによって異なる
- **音声通話の有無**: 多くの旅行eSIMはデータ通信専用で、音声番号は付与されない。通話はLINE・WhatsApp等のVoIPアプリで代替するのが一般的だ
どれくらいのデータ容量が必要かは[データ通信量の目安](/ja/guides/data-usage-guide/)でシミュレーションできる。
### SMS認証の移行準備
海外渡航中にSMS認証が受信できないと、日本の銀行・決済サービス・各種アカウントへのログインが困難になる可能性がある。
**影響を受けやすいサービスの例**
- 日本の銀行・ネット証券のワンタイムパスワード
- 楽天市場・PayPay・メルカリ等の決済サービス
- GoogleアカウントやApple IDの二要素認証
**対応の選択肢**
デュアルSIM対応端末であれば、旅行eSIMをデータ回線として使いながら日本のSIMでSMS受信を維持できる。デュアルSIM構成での旅行利用については[海外旅行でのデュアルSIM活用](/ja/guides/dual-sim-for-travel/)で詳しく解説している。
デュアルSIM対応でない場合や、より安全に管理したい場合は、Google Authenticator・Authy・Microsoft Authenticatorなどの認証アプリへの移行を検討する。対応しているサービスでは出発前に移行しておくと安心だ。
### その他の2週間前確認事項
- **パスポートの有効期限**: 渡航先によっては入国時に残存有効期間の要件がある(6ヶ月以上必要な国が多いとされる)
- **クレジットカードの海外利用設定**: カードによっては海外利用を一時制限している場合がある。発行会社のアプリやWebサービスで確認・有効化しておく
- **海外旅行保険の確認**: クレジットカード付帯の保険が有効かどうか確認する。スマホ紛失・盗難への補償内容も把握しておく
---
## 3. 出発1週間前 — 端末の準備と設定確認
端末の動作確認・オフライン環境の整備を行う段階だ。
### 旅行eSIMをインストールする
購入済みの旅行eSIMプロファイルを、自宅のWi-Fi環境でインストールする。現地到着後にネットワークがない状態でインストールを試みると手間がかかるため、自宅Wi-Fiでの事前インストールが推奨される。
- **iPhoneの場合**: 「設定」→「モバイル通信」→「eSIMを追加」からQRコードを読み取る。iOS 17.4以降では、メール等で届いたQRコード画像を長押しして直接追加することもできる
- **Androidの場合**: 「設定」→「ネットワークとインターネット」→「SIM」→「SIMを追加」からQRコードを読み取る。Samsung Galaxyは「設定」→「接続」→「SIMカードマネージャー」→「SIMをダウンロード」から行う
**重要**: eSIMのQRコードは1台の端末に1回のみ使用可能だ。誤って削除すると再インストールにはプロバイダーからの新しいQRコードが必要になる。インストール後は出発まで削除しないこと。
インストール(プロファイルの保存)だけではデータは消費されない。アクティベーション(データ通信の開始)は現地到着後に行う。詳細な設定手順は[初めての旅行eSIM完全ガイド](/ja/guides/first-time-guide/)で解説している。
### APN設定の事前確認
旅行eSIMは通常、インストール時にAPN(接続先設定)が自動で設定される。ただし一部のプロバイダーや端末では手動設定が必要なケースがある。プロバイダーのヘルプページでAPN情報を確認しておくと、現地でのトラブル時に参照できる。
国内のキャリアのAPNは、ドコモが「spmode.ne.jp」、povo 2.0が「povo.jp」、楽天モバイルが「rakuten.jp」などキャリアごとに異なる。
### オフラインコンテンツのダウンロード
通信環境が不安定な場面やデータ節約のため、渡航前にオフラインコンテンツを用意しておく。
- **Google マップのオフライン地図**: Google マップアプリで渡航先の地域を検索し、「オフラインマップをダウンロード」から保存する
- **Apple マップのオフライン地図(iOS 17以降)**: 「マップ」アプリ→自分のアイコン→「オフラインマップ」から保存できる
- **翻訳アプリの言語パック**: Google翻訳・DeepLなどで渡航先の言語パックをダウンロードする。言語パックがあればネットワーク接続なしで翻訳できる
- **宿泊・交通の予約情報**: 予約確認メール・バウチャーをスクリーンショットまたはPDF保存しておく
### アプリとOSのアップデート
出発前にOSと主要アプリを最新バージョンに更新しておく。現地の移動中にアップデートが始まると、データ消費と時間的なロスになる。
アップデート完了後は、自動更新を「Wi-Fiのみ」に設定しておく。
- **iPhoneの場合**: 「設定」→「App Store」→「Appのアップデート」を「Wi-Fiのみ」に設定
- **Androidの場合**: Google Playストア→「設定」→「ネットワーク設定」→「アプリの自動更新」を「Wi-Fiのみ」に設定
### 外務省「たびレジ」への登録
「[たびレジ](https://www.ezairyu.mofa.go.jp/tabireg/)」は外務省が提供する海外旅行登録サービスだ。登録すると渡航先の安全情報・スポット情報がメールで届き、緊急時には在外公館から安否確認の連絡を受けられる。登録・利用は無料。
登録後に届くメールアドレスは、現地でも受信できるものを使用すること。
---
## 4. 出発前日 — 最終確認
**eSIMプロファイルの状態確認**: 1週間前にインストールしたeSIMプロファイルが設定画面に回線として表示されているかを確認する。プランの有効期限開始タイミング(インストール時か初回接続時か)も確認しておく。
**充電と機器の準備**: スマートフォンとモバイルバッテリーを満充電にする。充電器・変換プラグを荷物に入れたか確認する(渡航先によってプラグ形状が異なる)。
**緊急連絡先の控え**: 現地でスマホが使えなくなった場合に備え、日本大使館の電話番号・海外旅行保険の連絡先・クレジットカードの紛失連絡先・宿泊施設の電話番号をメモまたは印刷しておく。インターネットに依存しない形で持参することを推奨する。
---
## 5. 出発当日・空港 — 最終確認と機内モード設定
### 機内モードへの切替
離陸前に機内モードをONにする。機内モード中はすべての無線通信が遮断されるため、意図しないローミング接続が発生しない。
**デュアルSIM構成の注意点**: 機内モードをONにすると両方の回線が遮断される。Wi-Fi通話やBluetooth接続が必要な場合は、機内モードON後にWi-FiまたはBluetoothのみ個別に再有効化できる。
### 日本SIMのデータローミング設定の見直し
デュアルSIM構成の場合、機内モードを解除した後に日本のSIMのデータローミングが意図せず有効になっていると、日本キャリアのローミング料金が発生する可能性がある。
- **iPhoneの場合**: 「設定」→「モバイル通信」→日本のSIM回線→「データローミング」がOFFであることを確認。また「モバイルデータ通信の切り替えを許可」(Apple公式UIの設定名称)もOFFにしておくと、旅行eSIMのデータのみが消費される
- **Androidの場合**: 「設定」→「ネットワークとインターネット」→日本のSIMを選択→「ローミング」をOFFに設定する
---
## 6. 現地到着後 — 通信確認とフォールバック
### eSIM有効化 / 現地SIMへの切替
**旅行eSIMの場合**: 入国後、機内モードをOFFにする。eSIM回線のデータローミングがONになっていることを確認し、端末がローカルネットワークを検出するのを待つ。一般的に30秒〜1分程度で自動接続される場合が多い。
- **iPhoneの場合**: 「設定」→「モバイル通信」→旅行eSIMの回線→「データローミング」をONにする
- **Androidの場合**: 「設定」→「ネットワークとインターネット」→旅行eSIMのSIM→「ローミング」をONにする
**現地SIMの場合**: 空港内のキャリアカウンターでSIMを購入し、端末に挿入する。多くの国でパスポート提示が求められる(タイでは生体認証登録が義務化されている)。現地SIMカードの入手方法(準備中)も参照。
### 空港を出る前の接続確認
空港ロビーでブラウザを開き、実際にインターネットに接続できることを確認する。接続できない場合は以下を順番に試す。
1. 機内モードをON→OFFして再接続を促す
2. 「設定」→通信事業者(iPhoneは「通信事業者」、Androidは「モバイルネットワーク」)でネットワークを手動選択する
3. 端末を再起動する
4. eSIMのデータローミング設定がONになっているか再確認する
5. 以上で解決しない場合は空港のWi-Fiを使ってプロバイダーのサポートに問い合わせる
### デュアルSIM構成での認証確認
デュアルSIM構成でSMS認証を維持している場合、日本のSIMが圏外になっていないかを確認する。日本のSIMのデータローミングはOFFのまま、SMS受信のみ有効な状態であれば正常だ。
認証アプリを使用している場合は、アプリが正常に起動しTOTPコードが生成されることを確認する。
---
## 7. 必須アプリのチェックリスト
渡航前にインストール・設定しておくとよいアプリをカテゴリ別に整理する。
**翻訳・語学**: Google翻訳(カメラ翻訳・オフライン対応)、DeepL(欧州語・日本語の精度が高いとされる)、Microsoft翻訳(複数人リアルタイム会話)。渡航先の言語パックを事前にダウンロードしておくとネットワーク接続なしで利用できる。
**地図・ナビゲーション**: Google マップ(オフライン地図・交通案内)、Apple マップ(iOS 17以降でオフライン対応)、Maps.me(OSMベースのオフライン地図)。Google マップのナビゲーションはオンライン利用時でも1時間あたり3〜5MB程度と軽量で、オフライン地図をダウンロード済みであればほぼデータを消費しない(交通情報の更新分のみ)。データ消費量の目安については[データ通信量の目安](/ja/guides/data-usage-guide/)を参照してほしい。
**通話・メッセージ**: 旅行eSIMはデータ専用が主流のため、音声通話にはVoIPアプリを活用する。LINE(日本国内の連絡に広く普及)、WhatsApp(国際的に普及、音声・ビデオ通話対応)、FaceTime Audio(Apple端末間のみ)の2〜3種を目的に応じて使い分けるとよい。
**決済**: 利用中のクレジットカード会社のアプリで海外利用設定を確認しておく。Apple Pay / Google Payも対応店舗で使える。現地で広く使われる決済アプリ(タイのTrueMoney、東南アジアのGrab等)がある地域もある。
**認証アプリ**: SMS認証の代替として Google Authenticator・Authy・Microsoft Authenticator のいずれかを出発前にセットアップしておくと、渡航中のログイン障害リスクを減らせる。
---
## 8. 高額請求を避けるための設定まとめ
渡航中の高額請求を防ぐための設定を整理する。
**日本SIMのデータローミングをOFF**
- iPhone: 「設定」→「モバイル通信」→日本の回線→「データローミング」をOFF
- Android: 「設定」→「ネットワークとインターネット」→日本のSIM→「ローミング」をOFF
**「モバイルデータ通信の切り替えを許可」をOFF(iPhoneのデュアルSIM構成のみ)**
この設定がONになっていると、旅行eSIM使用中に日本のSIMへデータ通信が切り替わりローミング料金が発生する可能性がある。
**バックグラウンド通信の制限**
- iPhone: 「設定」→「一般」→「Appのバックグラウンド更新」を「Wi-Fiのみ」またはOFF
- Android: 「設定」→「ネットワークとインターネット」→「データ節約機能」をON
**自動バックアップのモバイル通信使用を無効化**
- iCloud自動バックアップ: 「設定」→(Apple IDアイコン)→「iCloud」→「iCloudバックアップ」→「モバイルデータ通信を使用」をOFF
- Google フォト: アプリ設定→「バックアップ」→「モバイルデータを使用してバックアップ」をOFF
---
## 9. 全チェックリスト(印刷・スクショ用)
出発前の最終確認に使えるよう、全項目を一覧にまとめた。
### 出発2週間前
- [ ] SIMロック解除状態を確認した(未解除なら手続き開始)
- [ ] eSIM対応有無を確認した(旅行eSIMを選択する場合)
- [ ] OSバージョンを確認した(最新バージョンへのアップデート検討)
- [ ] 通信手段(ローミング/旅行eSIM/現地SIM/ポケットWi-Fi)を確定した
- [ ] 旅行eSIMのプロバイダーとプランを選定・購入した
- [ ] デュアルSIM構成で日本番号を維持するか、認証アプリへ移行するか判断した
- [ ] 重要サービスのSMS認証の扱いを確認した(銀行・楽天・メルカリ等)
- [ ] パスポートの有効期限を確認した
- [ ] クレジットカードの海外利用設定を確認・有効化した
- [ ] 海外旅行保険の加入・補償内容を確認した
### 出発1週間前
- [ ] 旅行eSIMプロファイルを自宅Wi-Fiでインストールした
- [ ] 設定画面でeSIM回線が表示されていることを確認した
- [ ] Google マップ(またはApple マップ)のオフライン地図をダウンロードした
- [ ] 翻訳アプリの言語パックをダウンロードした
- [ ] OSと主要アプリを最新バージョンに更新した
- [ ] アプリの自動更新を「Wi-Fiのみ」に設定した
- [ ] 宿泊・交通の予約確認をスクリーンショットまたはPDF保存した
- [ ] 外務省「たびレジ」に登録した
### 出発前日
- [ ] eSIMプロファイルが設定画面に表示されていることを再確認した
- [ ] プランの有効期限開始タイミングを確認した
- [ ] スマートフォンを満充電にした
- [ ] モバイルバッテリーを満充電にした
- [ ] 緊急連絡先(大使館・カード会社・保険会社)をメモまたは印刷した
- [ ] 充電器・変換プラグを荷物に入れた
### 出発日朝・機内
- [ ] 離陸前に機内モードをONにした
- [ ] 日本のSIMのデータローミングがOFFであることを確認した
- [ ] iPhoneデュアルSIM構成の場合、「モバイルデータ通信の切り替えを許可」がOFFであることを確認した
### 到着直後
- [ ] 機内モードをOFFにした
- [ ] 旅行eSIM回線のデータローミングをONにした
- [ ] ブラウザで実際の接続を確認した(空港を出る前に)
- [ ] デュアルSIM構成の場合、日本SIMのSMS受信が維持されているか確認した
---
## 10. FAQ
---
## SimFinderで旅行eSIMプランを比較する
渡航先・旅行期間・必要なデータ容量を入力すると、複数プロバイダーのプランをまとめて比較できる。プランの選定ステップで活用してほしい。
**[SimFinderで旅行eSIMを比較する →](/ja/travel/)**
---
## 関連ガイド
- [海外でスマホを使う4つの方法 — 料金・手軽さ・通信品質で比較](/ja/guides/four-options/)
- [国際ローミングの仕組みと料金](/ja/guides/international-roaming/)
- [初めての旅行eSIM完全ガイド — 購入から帰国まで](/ja/guides/first-time-guide/)
- [海外旅行でのデュアルSIM活用](/ja/guides/dual-sim-for-travel/)
- [データ通信量の目安 — アプリ別消費量と旅行向けプランの選び方](/ja/guides/data-usage-guide/)
================================================================================
# プリペイド vs ポストペイド — 違いと選び方
URL: https://sim-finder.com/ja/guides/prepaid-vs-postpaid/
Type: guides (ja)
Published: 2026-06-04
プリペイドSIMは通信費を前払いする方式、ポストペイドSIMは翌月以降に請求される後払い方式だ。日本の通常の携帯契約はほぼすべてポストペイドで、プリペイドは訪日外国人・一時利用・与信審査が受けられない層向けの特殊ポジションに位置づけられている。どちらが自分に合うかは、利用期間・本人確認の状況・費用管理の優先度によって変わる。
具体的なプランの料金・容量を比較したい場合は、[SimFinderの比較ツール](/ja/jp/search/)を使ってほしい。
---
## プリペイドとポストペイドの基本的な違い
「前払い」か「後払い」かの違いが、契約形態・審査・費用管理の仕組みを根本から変える。
### 料金の支払いタイミング
**プリペイド(前払い)**は、通信サービスを利用する前に料金をチャージまたはパッケージを購入しておく方式だ。残高が尽きると通信が停止する。追加でチャージするか、新しいパッケージを購入することで再開できる。使った分しか支払わない構造のため、意図しない高額請求が発生しない。
**ポストペイド(後払い)**は、当月に利用したサービスの料金が翌月以降にまとめて請求される方式だ。日本の大手キャリア(NTTドコモ・au・ソフトバンク・楽天モバイル)の通常プランはすべてこの形式で、毎月の請求日に口座引き落としまたはクレジットカード払いで支払う。
| 項目 | プリペイド | ポストペイド |
|------|----------|------------|
| 支払いタイミング | 事前にチャージ/購入 | 利用後に月次請求 |
| 契約期間 | 原則なし | 月単位〜年単位 |
| 信用審査 | 原則なし | あり(与信審査) |
| 口座登録 | 不要 | 必要(引き落とし or カード) |
| 本人確認 | 必要(法令義務) | 必要(法令義務) |
| 電話番号 | 付与される(SIMによる) | 付与される |
### 本人確認と審査の違い
日本の携帯電話不正利用防止法(携帯音声通信事業者による契約者等の本人確認等及び携帯音声通信役務の不正な利用の防止に関する法律、平成17年法律第31号)は、プリペイド・ポストペイドを問わず、SIM契約時の**本人確認を義務づけている**。ただし審査の内容が異なる。
**プリペイドの本人確認**は、パスポートまたは在留カードなどの身分証明書の確認のみで完結するのが一般的だ。クレジットスコアの照会や銀行口座の登録は求められない。短期ビザで入国した訪日外国人でも購入できる製品が多い。
**ポストペイドの本人確認+与信審査**は、身分証明書に加えて、月末に支払い能力があるかを確認する与信審査が伴う。審査では、過去の携帯料金の未払い歴、クレジットスコア、在留資格の種類(外国籍の場合)などが参照される。審査基準はキャリアごとに異なり、非開示だ。審査が通らなければ契約できない。
---
## プリペイドのメリットとデメリット
### メリット
**費用の上限が明確だ。** チャージ残高またはパッケージの容量・有効期間が尽きれば自動的に通信が止まる。月末に想定外の高額請求が来ることがない。
**契約の手続きが少ない。** 口座登録・クレジットカード・与信審査がなく、本人確認のみで購入できる。短期滞在の外国人でも購入しやすい。
**縛りがない。** 使い切ったら終わり、または使い続けるかどうかは利用者が自由に決められる。解約手続きや違約金が発生しない。
**与信審査なしで利用できる。** 信用情報に問題がある場合や、まだ信用履歴が構築されていない場合でも、本人確認さえできれば通信を利用できる。
### デメリット
**継続管理が必要だ。** 残高切れ・有効期限切れに気づかないと、急に通信できなくなる。ポストペイドのように自動更新で継続する仕組みがなく、自分で残高と期限を管理する必要がある。
**月あたりの費用は割高になりやすい。** プリペイドは短期利用・一時利用を前提とした設計のため、同じデータ容量でポストペイドの月額プランと比較すると単価が高くなることが多い。長期利用では費用が上がりやすい。
**電話番号の継続利用に制限がある。** 有効期限が切れた番号が失効した場合、同じ番号を引き継げないことがある。また、プリペイドSIMの多くはMNP(番号ポータビリティ)の転出に対応していない。
**使えるサービスに制限がある場合がある。** 一部のMVNOのポストペイドプランで使えるデータシェア・家族割・ポイント連携といったサービスはプリペイドでは利用できないことが多い。
---
## ポストペイドのメリットとデメリット
### メリット
**長期利用のコスト効率が高い。** 日本のMNO・MVNO・サブブランドのプランはほぼすべてポストペイドであり、月次契約による安定したデータ容量を低コストで確保しやすい。MVNOとMNOの違いについては[MNO・MVNO・サブブランドの比較記事](/ja/guides/mno-vs-mvno-comparison/)で詳しく解説している。
**電話番号が安定して維持できる。** 月次自動更新が基本のため、残高切れによる番号失効が起きない。MNP(番号ポータビリティ)での転出にも対応している。
**サービスの幅が広い。** キャリアメール・データシェア・家族割・ポイントプログラムなど、多くの付加サービスはポストペイド契約が前提だ。
**解約済みアカウントの管理が不要だ。** 複数のSIMを切り替えながら管理するようなシーンでは、ポストペイドの自動請求・自動更新の仕組みが使いやすい。
### デメリット
**与信審査を通過する必要がある。** 信用情報に問題がある場合・外国籍の在留資格によっては審査が通らない場合がある。
**銀行口座またはクレジットカードが必要だ。** 引き落とし先として、日本の銀行口座またはクレジットカードを登録する必要がある。新生活を始めたばかりで口座が整っていない場合は手続きに時間がかかる。
**利用上限を設けていない場合、高額請求のリスクがある。** 国際ローミングを意図せず有効にしたり、オプションサービスに気づかず加入していたりすると、予想外の金額が請求される場合がある。キャリアが提供する利用上限設定機能を活用することで軽減できる。
---
## 日本市場でのプリペイドの位置づけ
日本の一般的な携帯市場はポストペイドが主流だ。NTTドコモ・KDDI(au)・ソフトバンク・楽天モバイルのMNO4社が提供する通常プランはすべてポストペイドであり、MVNO(格安SIM)もその大多数はポストペイドで提供されている。
日本でプリペイドSIMが流通している主な場面は以下の2つだ。
**訪日外国人向け(インバウンド)**: 旅行者・短期ビザでの入国者向けに、空港・コンビニ・家電量販店等で販売されるSIMカードがある。パスポートで本人確認でき、与信審査なしで購入できる。データ通信専用のものが多く、音声通話付きのものもある。有効期間は数日〜30日程度のものが多いが、90日・180日の製品もある。
**一時利用・サブ回線**: 数日から数週間だけ通信手段が必要な場面(デバイスの乗り換え期間中・短期出張用のサブSIMなど)でプリペイドが選ばれる。メイン回線として長期継続して使う想定の製品設計ではない。
日本に住む外国籍の方が長期利用を検討する場合は、在留カードが発行されるタイミングでポストペイドのMVNOに申し込む方が月額費用の面で有利になることが多い。[MVNOとはなにか](/ja/guides/what-is-mvno/)の記事で仕組みと選び方を確認しておくとよい。
---
## プリペイドとポストペイド — 向いている人の整理
どちらが合うかを判断するための軸を整理する。
### プリペイドが向いている人
- 日本に短期間(数日〜1ヶ月程度)しか滞在しない訪日外国人
- 与信審査に不安がある、またはクレジットカードや銀行口座を持っていない
- 「使った分だけ払う」形式で費用をコントロールしたい
- メイン回線以外のサブ回線として短期間だけ利用したい
- 月次の継続契約手続きなしにすぐ使い始めたい
### ポストペイドが向いている人
- 日本に長期滞在・定住しており、安定した通信手段が必要
- 毎月一定のデータ容量を計画的に使いたい
- 電話番号を長期間維持したい(MNP転出も含む)
- 家族割・ポイント連携・キャリアメールなどの付加サービスを使いたい
- 月額コストを抑えて長期運用したい
ポストペイドの中での選択肢(MNO・サブブランド・MVNO)の比較は[MNO vs MVNO vs サブブランドの比較記事](/ja/guides/mno-vs-mvno-comparison/)を参照してほしい。各選択肢の通信品質・料金水準・混雑時の速度の違いを仕組みから解説している。
---
## 費用管理の仕組みの違い
プリペイドとポストペイドでは、費用の上限がどのように決まるかが根本的に異なる。
**プリペイドの費用制御**は構造的だ。チャージ残高またはパッケージが尽きると通信が止まるため、上限を意識しなくても自然に使いすぎが防止される。追加費用を発生させるには、自分でチャージや購入という能動的な操作が必要だ。
**ポストペイドの費用制御**は設定依存だ。利用した分だけ翌月に請求されるため、使い方によっては計画より多い請求になる場合がある。多くのキャリアが月次の利用上限金額の設定機能を提供しているが、機能を使わなければ上限はかからない。
自分の毎月のデータ使用量を把握することは、どちらの方式でも重要な出発点になる。使用量の目安については[データ通信量の目安ガイド](/ja/guides/data-usage-guide/)で確認してほしい。
---
## 本人確認書類と手続きの実際
携帯電話不正利用防止法(平成17年法律第31号)に基づき、キャリアはSIMを契約者に提供する際に本人確認を行う義務がある。プリペイド・ポストペイドのどちらでも、この義務は変わらない。
**プリペイドの場合に一般的に使える本人確認書類**:
- パスポート(短期ビザの外国人でも可)
- 在留カード
- 運転免許証
- マイナンバーカード
**ポストペイドの場合に追加で必要な手続き**:
- 銀行口座の引き落とし設定またはクレジットカードの登録
- 与信審査(結果は通常当日〜数日以内に通知)
プリペイドSIMを店舗で即日購入した場合、本人確認書類の提出と同時にSIMが渡されるのが一般的だ。オンラインで購入する場合は、本人確認書類の画像アップロードと配送を組み合わせた手続きになることが多い。
---
## プリペイドとポストペイドを組み合わせる使い方
メイン回線にポストペイドのMVNOを使いながら、サブ回線にプリペイドSIMを組み合わせる使い方がある。たとえば、デュアルSIM対応の端末を持っているユーザーが、普段使いの番号をポストペイドで維持しつつ、一時的な用途のためにプリペイドSIMを別途用意するケースだ。
この組み合わせが合うシーンの例:
- 旅行中に訪問先の現地SIM(プリペイド)をデータ専用で使いながら、日本のポストペイドSIMで電話番号を維持する
- 業務用と私用の回線を分けたい場合に、一方をプリペイドで費用をコントロールする
デュアルSIMの仕組みと設定については、[キャリア比較・選び方ガイド](/ja/guides/provider-comparison/)も参考にしてほしい。
---
## キャリア乗り換えとMNPの関係
プリペイドからポストペイドへ、またはその逆に変更する際、電話番号の扱いに注意が必要だ。
**ポストペイドへの乗り換えでMNPを使う場合の流れ**:
1. プリペイドSIMがMNP転出に対応しているかを確認する(非対応の製品は番号転出ができない)
2. 対応している場合、MNP予約番号を取得する(プリペイドSIMのサポートページから手続き)
3. ポストペイドのキャリアに新規申し込みをする際にMNP予約番号を入力する
4. ポストペイドSIMが届き・開通した時点でプリペイドSIMは自動解約される
MNP予約番号には有効期限がある(一般的に取得日を含む15日間)。期限内に転入手続きを完了させる必要があるため、番号取得後は速やかに乗り換え先への申し込みを進めること。
MNP非対応のプリペイドSIMで使っていた番号は引き継げない。新しい番号で契約し直す形になる。この点は、番号を長期間使っているかどうかによって判断が変わる。
---
## 支払い方式が利用シーンに与える影響
プリペイドとポストペイドの選択は、通信費の管理方法だけでなく、通信が使えない状態になるリスクの分布にも影響する。
**プリペイドのリスク**: 残高切れ・有効期限切れによる突然の通信停止。自動更新がないため、管理を忘れると業務連絡や地図アプリなど日常的に使うサービスが一時的に使えなくなる。
**ポストペイドのリスク**: 支払いを延滞した場合や、口座残高不足で引き落とし失敗が続いた場合、キャリアから回線が一時停止される場合がある。また、オプションサービスや国際ローミングを意図せず使い続けると高額請求になるリスクがある。
ビジネス用途や緊急連絡手段として必ず通信を維持したい場合は、ポストペイドの自動更新・自動引き落としの仕組みの方が継続性の観点で安定している。
---
## eSIMはプリペイドとポストペイドのどちらで使えるか
eSIM(端末に内蔵されたSIM)は物理SIMカードと異なり、プロファイルをオンラインでダウンロードして使う。プリペイド・ポストペイドのいずれの契約形態でも利用できる。
訪日外国人向けのプリペイドSIMでもeSIM対応製品が増えており、空港到着前にオンラインで購入・インストールを済ませておくことで、到着時からすぐに通信を開始できる。QRコードをスキャンしてプロファイルをダウンロードする形式が一般的だ。
ポストペイドのMVNO・MNOでも、申し込みをオンラインで完結させてeSIMとして開通させるプランが標準になってきている。物理SIMの配送を待たずに当日開通できる点が利点だ。
eSIM対応端末かどうかの確認方法や、プロファイルの設定手順については[旅行eSIM選び方ガイド](/ja/guides/how-to-choose/)で詳しく解説している。
---
## SimFinderでプランを比較する
プリペイド・ポストペイドの違いを理解したうえで、次のステップは具体的なプランを比較することだ。[SimFinder](/ja/jp/search/)では、条件を絞り込んでプランを一覧で比較できる。
この記事に具体的な料金を記載しないのは、プランの料金・容量・条件はキャリアが随時変更するため、記事の情報がすぐ古くなるからだ。最新のプランデータはSimFinderで確認してほしい。
どのMVNOが自分に向いているかをさらに詳しく知りたい場合は、[MVNOとはなにか](/ja/guides/what-is-mvno/)と[キャリア比較ガイド](/ja/guides/provider-comparison/)を合わせて読むことを推奨する。
---
## よくある質問
### プリペイドSIMは日本のコンビニで買えますか?
家電量販店(ヨドバシカメラ・ビックカメラなど)や空港の通信コーナーで販売されているケースが多い。コンビニでの取り扱いはチェーン・店舗によって異なる。購入時にはパスポートまたは在留カードによる本人確認が必要だ。
### ポストペイドに乗り換えるときに現在の番号は引き継げますか?
MNP(番号ポータビリティ)を使えば引き継げる場合が多い。ただし、プリペイドSIMの中にはMNP転出に非対応のものがある。事前にプリペイドSIM提供会社のサポートページで確認してほしい。MNPの仕組みについては[MVNOの選び方ガイド](/ja/guides/what-is-mvno/)でも触れている。
### 訪日外国人向けのプリペイドSIMで通話はできますか?
製品によって異なる。データ通信専用のSIMが主流だが、音声通話付きのプリペイドSIMも一部存在する。購入前にパッケージの仕様を確認してほしい。通話が付いていないSIMでも、LINEやWhatsAppなどのVoIPアプリを使えばインターネット経由で音声・ビデオ通話ができる。
### 法人契約のスマートフォンはプリペイドとポストペイドのどちらですか?
企業が社員に支給するスマートフォンの回線は、ほぼすべてポストペイドで契約される。法人向けのポストペイド契約には、端末管理(MDM)との連携・まとめ請求・社員ごとの利用明細発行といった機能が付随することが多い。
---
## 関連ガイド
- [旅行eSIMの選び方 — 5つの比較ポイント](/ja/guides/how-to-choose/)
- [MVNOとは?仕組みと格安SIMの選び方](/ja/guides/what-is-mvno/)
- [キャリア比較・選び方ガイド](/ja/guides/provider-comparison/)
- [MNO vs MVNO vs サブブランド — 違いと選び方](/ja/guides/mno-vs-mvno-comparison/)
- [データ通信量の目安ガイド](/ja/guides/data-usage-guide/)
================================================================================
# 旅行eSIMプロバイダー比較 — Airalo・Holafly・Nomad・Saily・Ubigiを用途別に選ぶ
URL: https://sim-finder.com/ja/guides/provider-comparison/
Type: guides (ja)
Published: 2026-04-18
[旅行eSIMの選び方(5つの比較ポイント)](/ja/guides/how-to-choose/)でカバレッジ・データ量・有効期限・料金体系・アクティベーション方式の基準を確認したら、次のステップは「その基準を満たすプロバイダーを選ぶこと」だ。この記事はその実践編として、主要プロバイダーのプロフィールを整理し、旅程別のマッチングを示す。
プロバイダー選びで見落とされがちな観点が「日本語サポートの有無」だ。旅行中のトラブル対応は日本時間の深夜帯に起きることが多く、日本語で即応してもらえるかどうかが重要な判断軸になる。この記事では、providers.jsonの実データに基づき、日本語サポート対応の有無を明示する。
具体的な料金はプロバイダーや渡航先・時期によって頻繁に変わる。料金比較は[SimFinderの旅行eSIM検索](/ja/travel/)を使ってリアルタイムで確認してほしい。この記事では料金の数値ではなく、プロバイダーの「性格」と「旅程との相性」に焦点を絞る。
---
## 主要な旅行eSIMプロバイダー一覧
以下は今回紹介する主要プロバイダーの比較表だ。データはproviders.jsonの実データに基づく。
| プロバイダー | 強み | プラン形態 | カバー地域 | 複数国プラン | テザリング | 日本語サポート |
|------------|------|----------|-----------|------------|----------|--------------|
| **Airalo** | 世界初のeSIMマーケットプレイス、プラン数最多 | 固定容量・無制限 | 200以上の国・地域 | あり | 対応 | 対応 |
| **Holafly** | 無制限データ専門 | 無制限のみ | 200以上の国・地域 | あり | 対応 | 対応 |
| **Nomad** | 固定容量・無制限の両方、透明な料金体系 | 固定容量・無制限 | 200以上の渡航先 | あり | 対応 | 対応 |
| **Saily** | NordVPN開発元、セキュリティ訴求 | 固定容量・無制限 | グローバル対応 | あり | 対応 | 対応 |
| **aloSIM** | 200カ国以上の幅広いカバー | 固定容量 | 200以上の国・地域 | あり | 対応 | 対応 |
| **Ubigi** | NTTグループ、デバイス事前搭載実績 | 固定容量 | グローバル対応 | あり | 対応 | 対応 |
| **GigSky** | グローバルカバー、シンプル設計 | 固定容量 | 世界中 | あり | 対応 | 対応 |
> **注記**: eTravelSimは英語UIのみ対応。英語操作に抵抗のない方向けのプロバイダーとして参考まで。
---
## プロバイダー別プロファイル
### Airalo
「世界初のeSIMマーケットプレイス」を掲げるAiraloは、現地通信事業者のeSIMプランをまとめて取り扱うプラットフォーム型のサービスだ。1つのアプリで200以上の国・地域向けプランを一括管理できる。
プラン体系は固定容量(GB単位)が主軸で、一部の渡航先では無制限プランも提供している。固定容量プランは1GBから始まる小容量プランが充実しており、「必要な分だけ購入する」スタイルの旅行者に合う設計だ。
テザリングは全プランで対応している。日本語を含む多言語のアプリUI・カスタマーサポートを提供しており、アプリからeSIMのインストール・データ残量確認・トップアップが完結する。リージョナルプラン(アジア周遊・ヨーロッパ周遊等)とグローバルプランも提供しており、複数国をまたぐ旅程にも対応する。
Airaloの詳細なレビュー(料金体系・メリット・デメリット・他社比較)は[Airalo完全ガイド(ブログ)](/ja/blog/airalo-review-guide-2026/)で解説している。
**おすすめのユーザー層**: 1カ国あたりのデータ使用量が読める旅行者、小容量プランでコストを最適化したい方、複数国周遊で1つのアプリに集約したい方。
---
### Holafly
Holaflyは無制限データプランに特化したプロバイダーだ。固定容量プランは提供しておらず、「容量を気にせず使う」ことを前提とした設計になっている。
**重要な注意点**: Holaflyのプランは音声通話・SMSには対応していない。データ通信専用であることを前提に選ぶ必要がある。通話が必要な場合はLINE・WhatsApp等のVoIPアプリを使うか、デュアルSIM構成で日本のSIMを維持する必要がある([デュアルSIMの活用方法は初めての旅行eSIM完全ガイド](/ja/guides/first-time-guide/)を参照)。
無制限プランには公正利用ポリシー(フェアユースポリシー)が適用される場合がある。一定の利用量を超えると速度制限がかかることがある点は、[旅行eSIMの選び方](/ja/guides/how-to-choose/)の「データ容量と利用パターン」セクションで確認しておくとよい。
テザリングは対応している。アプリは多言語対応で、日本語UIとカスタマーサポートを利用できる。ヨーロッパ・アジア・北米などリージョナルプランも充実している。
**おすすめのユーザー層**: 動画ストリーミングやビデオ通話を多用する旅行者、データ残量を常に気にしたくない方、長期旅行や複数国周遊でデータを大量に使うリモートワーカー。
---
### Nomad
Nomadは固定容量プランと無制限プランの両方を提供しており、旅行スタイルに応じて選べる柔軟性が特徴だ。200以上の渡航先に対応し、1カ国専用プランとリージョナルプランを揃えている。
料金体系が比較的わかりやすく明示されており、同一渡航先・同一データ量でのプロバイダー比較がしやすい。日本語を含む多言語のサポートに対応している。
テザリングは全プランで対応している。アプリからデータ残量の確認・トップアップが可能で、Trustpilotなどのユーザーレビューで高評価を得ている。
**おすすめのユーザー層**: 固定容量と無制限のどちらか旅程に応じて選びたい方、料金のわかりやすさを重視する方、複数のプロバイダーと比較しながら最適なプランを選びたい方。
---
### Saily
SailyはNordVPNを開発したNord Securityが提供する旅行eSIMだ。セキュリティ製品を本業とする企業が手がけるサービスという点が特徴で、プライバシー・セキュリティ意識の高いユーザーに訴求している。
ただし補足が必要な点がある。Sailyの旅行eSIMを使ったからといって、モバイルデータ通信がNordVPNで自動的に暗号化されるわけではない。セキュリティの文脈での強みは、Nord Securityというセキュリティ企業のエコシステム(アカウント管理の信頼性・サービス設計の透明性等)に基づくものと理解するのが正確だ。
日本語サポートに対応しており、テザリングも全プランで利用できる。固定容量プランを中心に、グローバルおよびリージョナルプランを提供している。
**おすすめのユーザー層**: プライバシー・セキュリティ意識が高い旅行者、NordVPNをすでに利用しており同じNord Securityエコシステムで管理したい方、シンプルなアプリUIを好む方。
---
### aloSIM
aloSIMは200カ国以上に対応するグローバルカバーを強みとするプロバイダーだ。幅広い渡航先に対応する固定容量プランを提供しており、マイナーな渡航先を含むプランが揃っている。
日本語サポートに対応しており、テザリングも可能だ。複数国プランも提供している。
providers.jsonに基づくと日本語もサポート言語として登録されているが、aloSIM公式サポートポータルで確認できるUI言語は英語・ドイツ語・スペイン語・フィリピノ語・フランス語・ヒンディー語・イタリア語・ポルトガル語・トルコ語の9言語で、日本語UI提供状況は一次ソースで確認が難しい。英語UIに抵抗のない方向けのプロバイダーとして位置づけるとよい。
**おすすめのユーザー層**: マイナーな渡航先を含む旅行計画がある方、英語操作に問題がない方、幅広いカバレッジから選びたい方。
---
### Ubigi
UbigiはNTT Communicationsの子会社Transatelが運営するeSIMブランドだ。NTT CommunicationsがTransatelを子会社化した2019年以降、NTTグループ傘下に位置づけられる。日本のユーザーにとって、大手通信グループ傘下であることが信頼性の判断材料になる。
Ubigiの特徴は、Apple のiPadや複数の自動車メーカー(BMW・MINI・Toyota・Stellantis・Jaguar Land Rover等のコネクテッドカー)との提携により、これらデバイスの純正インターフェースから直接プラン購入できる点だ。iOS 17.4以降のiPad(セルラーモデル)では「設定→モバイル通信→新しいプランを追加」メニューでUbigiを選択でき、Ubigiアプリのインストールは不要となる。
日本語サポートに対応しており、テザリングも可能だ。複数国プランも提供している。グローバルカバーを持ち、ビジネス利用向けのプランも展開している。
**おすすめのユーザー層**: iPadのセルラーモデルを旅行で使いたい方、NTTグループという安心感を重視する方、日本ユーザーとして信頼できるプロバイダーを選びたい方、ビジネス渡航で利用する方。
---
### GigSky
GigSkyは「The Best Way to Stay Connected」をキャッチフレーズとするグローバルeSIMプロバイダーだ。世界中に対応する幅広いカバーエリアと、シンプルな料金設計が特徴で、旅行頻度が高いビジネス渡航者にも利用されている。
日本語サポートに対応しており、テザリングも可能だ。複数国プランも提供している。固定容量プランが中心で、世界190以上の国・地域で400以上のキャリアとローミング契約を持ち、クルーズ船や航空機内でも利用可能なプランを提供している点が他プロバイダーにない特徴だ。
**おすすめのユーザー層**: シンプルな操作感を好む方、世界各地に出張・旅行する頻度が高いビジネス利用者、グローバルカバーを優先する方。
---
## 旅程別のプロバイダーマッチング
旅程のパターンに合わせて、上記のプロバイダーを選ぶ際の目安を整理する。
### 1カ国に2週間滞在するヨーロッパ旅行
1カ国専用プランが最もコスト効率に優れる。地図・SNS・メッセージが中心であれば固定容量プランを選ぶAiraloかNomadが選択肢に入る。動画やビデオ通話を多用する予定であればHolaflyの無制限プランが適している。
[旅行eSIMの選び方](/ja/guides/how-to-choose/)で「1カ国プラン・リージョナルプラン・グローバルプランの違い」を確認しておくと、コスト差を把握しやすい。
### 無制限データでリモートワークをしながら旅行
ビデオ会議・大容量ファイルの送受信を伴うリモートワーカーには、無制限プランが安定した選択だ。Holaflyの無制限リージョナルプランか、AiraloまたはNomadの無制限プランから選ぶ形になる。
この場合、速度制限のしきい値(フェアユースポリシー)がプロバイダーによって異なる点を購入前に確認しておくことが重要だ。ビデオ会議の帯域要件(Zoom 1:1 HD品質で1.2Mbps程度)を満たせるかを判断基準にするとよい。リモートワーク時のアプリ別データ消費量は[データ通信量の目安](/ja/guides/data-usage-guide/)で確認できる。
### 5カ国以上を周遊するデジタルノマド
複数国・複数大陸をまたぐ旅程では、1つのeSIMで複数国をカバーするリージョナルプランまたはグローバルプランが利便性の面で有利だ。Airaloのグローバルプラン(Discover+等)か、Holaflyのヨーロッパ・アジア等のリージョナルプラン、またはGigSkyのグローバルプランが候補になる。
ただし、グローバルプランは1GBあたりの単価が1カ国専用プランより高くなる傾向がある。渡航先が確定している場合は、各国専用プランを個別に購入する方がコストを抑えられる場合も多い。[SimFinderの旅行eSIM検索](/ja/travel/)で渡航先ごとに比較してほしい。
### 初めてeSIMを使う・日本語サポートを重視する
初めてeSIMを設定する方には、日本語UIとサポートが完備されたプロバイダーを選ぶのが安全だ。Airaloは多言語(日本語を含む)のアプリ内チャットサポートに対応しており、NomadとSailyも日本語サポートに対応している。
eSIMの設定手順を事前に把握しておきたい場合は[初めての旅行eSIM完全ガイド](/ja/guides/first-time-guide/)を参照してほしい。アクティベーションのトラブル時の対処法も含めて解説している。
### コスト最優先の旅行
データ使用量の見積もりが立てられる旅行者には、固定容量プランで必要な分だけ購入するアプローチが最もコスト効率に優れる。AiraloとNomadは小容量プランのバリエーションが豊富で、1GBあたりの単価を抑えやすい。
コスト比較の際は表示価格だけでなく、1GBあたりの単価・有効期間・テザリング可否・トップアップの容易さも合わせて判断することが重要だ。
---
## 避けるべきプロバイダーの特徴(レッドフラッグ)
プロバイダー選びで注意すべき特徴を4つ挙げる。
### 接続ネットワーク名が明示されていない
プロバイダーのプラン詳細ページで「渡航先でどのネットワークに接続するか」が書かれていない場合は注意が必要だ。「利用可能国」の地図だけを見せて、具体的な提携ネットワーク名(例: T-Mobile、Vodafone等)を明記していないプロバイダーは、カバレッジの品質を確認できない。
### 5G対応の根拠が曖昧
「5G対応」と明記しているにもかかわらず、プラン詳細に5G接続の具体的なネットワーク名や対象国が記載されていないプランには注意する。LTEを5Gと誤解させる表記が存在することがある。
### 返金・トップアップポリシーが不透明
購入後のキャンセルや返金が一切不可、かつアプリ内でのデータ追加購入(トップアップ)が提供されていないプロバイダーは、旅行中にデータを使い切ったときのリカバリ手段がない。購入前にキャンセル・返金条件とトップアップの可否をヘルプページで確認すること。
### アプリ内でデータ残量を確認できない
旅行中にデータ残量を把握できないプロバイダーは利用しにくい。主要なプロバイダーのアプリはリアルタイムのデータ残量表示とトップアップ機能を提供している。問い合わせ手段がメール対応のみで、チャットサポートがない場合も対応の遅れが懸念される。
---
## よくある質問
### Airalo・Holafly・Nomadの中でどれを選べばいいですか?
利用スタイルで使い分けが決まります。データ量を自分でコントロールしたい場合はAiralo(豊富な固定容量プラン)、データ量を気にせず使いたい場合はHolafly(無制限専門)、固定容量と無制限の両方から選びたい場合はNomad(日本語対応)が適しています。いずれも日本語サポートに対応しており、テザリングも全プランで可能です。
### 日本語でサポートを受けられるプロバイダーはどこですか?
providers.jsonのデータに基づくと、Airalo・Holafly・Nomad・Saily・aloSIM・Ubigi・GigSky・Flexiroam・Yesim・eSIM2Flyが日本語サポートに対応しています。eTravelSimは英語のみです。
### Ubigiはなぜ日本人ユーザーにおすすめなのですか?
UbigiはNTT Communicationsの子会社Transatelが運営するeSIMサービスで、NTTグループ傘下に位置づけられます。日本ユーザーにとって、プロバイダーの信頼性を判断する材料になります。また、iOS 17.4以降のiPad(セルラーモデル)では「設定→モバイル通信→新しいプランを追加」メニューからUbigiを直接選択でき、Ubigiアプリをインストールせずにプランを購入できる利便性もあります。
### 複数の国を周遊する場合、どのプロバイダーが便利ですか?
今回紹介した全プロバイダーが複数国プランに対応しています。Airaloはアジア・ヨーロッパ・グローバルなど周遊プランのバリエーションが豊富で、一つのアプリで管理できます。Holaflyは無制限データのリージョナルプランに特化しており、長期の周遊旅行でデータ量を気にしたくない旅行者に向いています。
### Sailyはセキュリティ面での強みがあると聞きましたが?
SailyはNordVPNを開発したNord Securityが提供する旅行eSIMです。セキュリティ製品を手がける企業が提供するサービスという点が特徴です。ただし、eSIMのデータ通信そのものがNordVPNで暗号化されるわけではありません。セキュリティを重視する方がVPNサービスと親和性の高い企業のエコシステムを選ぶという観点でのメリットです。
### 旅行eSIMで避けるべき特徴を教えてください。
主なレッドフラッグは4つです。(1)対応国の数だけを強調し、具体的な接続ネットワーク名が明記されていないプロバイダー。(2)「5G対応」と明記しながらプラン詳細で具体的なネットワーク情報がないもの。(3)返金・トップアップのポリシーが明確でないプロバイダー。(4)アプリ内でデータ残量を確認できず、問い合わせ手段もメールのみの場合。購入前にこれらを確認することでトラブルを防げます。
---
## SimFinder Travelでプランを比較する
プロバイダーの性格を把握した次のステップは、自分の旅程に合った具体的なプランを比較することだ。[SimFinderの旅行eSIM検索](/ja/travel/)では、渡航先・データ容量・有効期間・プロバイダーを条件に絞り込んでプランを横断比較できる。
プロバイダーを選んだ後、実際の購入からインストール・現地でのアクティベーション・帰国後の処理まで全工程を確認したい場合は[初めての旅行eSIM完全ガイド](/ja/guides/first-time-guide/)を参照してほしい。
海外旅行の通信手段として旅行eSIM以外の選択肢(現地SIMカード・国際ローミング・Wi-Fiレンタル)との比較は[海外でスマホを使う4つの方法](/ja/guides/four-options/)で解説している。eSIMの仕組みから理解したい場合は[eSIMとは](/ja/guides/what-is-esim/)も参照されたい。
================================================================================
# 公衆Wi-Fiの安全な使い方 — リスクと対策を正しく理解する
URL: https://sim-finder.com/ja/guides/public-wifi-safety/
Type: guides (ja)
Published: 2026-06-04
公衆Wi-Fiの主なリスクは中間者攻撃(MITM)と偽アクセスポイント(Evil Twin)だ。ただし現在はほぼすべての主要サービスがHTTPS(TLS)による通信暗号化に対応しており、以前に比べてリスクは大幅に低下している。それでも銀行・パスワード入力などの機密操作は、モバイル回線(4G/5G)かVPN経由で行うことを推奨する。
この記事では、公衆Wi-Fiで発生し得る脅威の仕組みと、現実的なリスクレベル、具体的な安全対策を解説する。Wi-Fiに接続しながらデータ消費を節約したい場合は[データ通信量の節約テクニック](/ja/guides/save-data/)も参照してほしい。
---
## 公衆Wi-Fiで起こり得る主なリスク
公衆Wi-Fiの脅威を理解するには、まず攻撃者がどのような方法で情報を狙うかを把握する必要がある。
### 中間者攻撃(MITM: Man-in-the-Middle Attack)
中間者攻撃とは、攻撃者がユーザーとサーバーの通信経路に割り込み、通信内容を傍受・改ざんする攻撃手法だ。公衆Wi-Fiでは、同じネットワークに接続しているすべてのデバイス間の通信を傍受できる技術的な余地がある。
ただし現在は多くの通信がHTTPS(TLS)で暗号化されているため、傍受しても暗号化されたデータしか見えない。HTTP(暗号化なし)で通信しているサービスは依然としてリスクが高い。
### 偽アクセスポイント(Evil Twin)
Evil Twinとは、攻撃者が正規のアクセスポイントと同じSSID(ネットワーク名)を持つ偽のWi-Fiアクセスポイントを設置する手法だ。例えば「Airport_Free_WiFi」という名前の偽アクセスポイントを設置し、接続したユーザーの通信を中継して傍受する。
端末はSSIDが一致するネットワークを自動的に選択することがあるため、知らずに偽のアクセスポイントに接続してしまうリスクがある。接続後に通信を傍受されたり、偽のログイン画面(フィッシングページ)に誘導されたりする場合がある。
### 暗号化されていないHTTP通信の盗聴
HTTPSではなくHTTPで通信しているウェブサービスは、通信内容が平文(暗号化なし)で流れる。同じWi-Fiネットワーク上の第三者がパケットキャプチャツールを使えば、その内容を読み取れる。送信したテキスト・ログイン情報・閲覧したURLなどが漏洩する可能性がある。
現在は多くの主要ウェブサイトがHTTPSに移行済みだが、古いサービスや一部のAPIではHTTPが使われることがある。ブラウザのアドレスバーで「https://」から始まることを確認する習慣が有効だ。
---
## HTTPSの普及とリスクの変化
2010年代以降、HTTPS(TLS)の普及により公衆Wi-Fiのリスクは大幅に低下した。現在の状況を正確に把握することが重要だ。
### 現在のHTTPS普及状況
Googleの透明性レポートによると、Chromeでロードされたページのうちhttps://で始まるページの割合は近年大幅に増加している。ほとんどの主要なサービス(SNS・メール・銀行・ショッピングサイト)はHTTPSを採用している。
HTTPSはTLS(Transport Layer Security)プロトコルを使い、以下の2つを提供する。
1. **通信内容の暗号化**: 第三者が通信を傍受しても、暗号化されたデータしか見えない
2. **サーバー証明書による認証**: 接続先が本物のサーバーであることを確認できる
### HTTPSでも残るリスク
HTTPS普及によってリスクは下がったが、ゼロにはなっていない。
- **HSTS未設定サイトへの最初のHTTPアクセス**: HTTPSへのリダイレクト前の短い間、平文通信が発生する可能性がある(SSLストリッピング攻撃に悪用される)
- **フィッシングサイトのHTTPS化**: 攻撃者も正規のHTTPS証明書を取得できるため、URLが「https://」で始まっていても偽サイトである可能性がある
- **組織管理デバイスや誤操作による証明書の手動信頼追加**: 悪意ある証明書を信頼するよう誘導された場合、暗号化が迂回される
---
## 安全に使うための具体的な対策
### 対策1: 自動接続をオフにする
スマートフォンの「保存済みネットワークに自動接続」機能は、過去に接続したSSIDと同じ名前のアクセスポイントに自動接続する。これが Evil Twin攻撃に悪用される主な経路の1つだ。
**iPhoneの場合**(2026年6月時点)
- 「設定」→「Wi-Fi」で各ネットワークの「i」アイコンをタップ
- 「自動接続」をオフにすることで、そのネットワークへの自動接続を無効にできる
**Androidの場合**(2026年6月時点)
- 「設定」→「ネットワークとインターネット」→「Wi-Fi」→保存済みネットワーク
- 各ネットワーク名をタップし「自動接続」をオフにする(機種・バージョンにより操作手順が異なる)
**推奨**: 自宅・職場のWi-Fiは自動接続オンのまま運用してよい。公共の場所(カフェ・空港・ホテル等)のWi-Fiは自動接続をオフにし、必要なときのみ手動接続することを推奨する。
### 対策2: アクセスポイントの正当性を確認する
カフェや空港で公衆Wi-Fiに接続する際は、スタッフや公式看板でSSIDとパスワードを確認してから接続する。「Free_WiFi」「Airport_Open」のような誰でも接続できそうな名前のオープンネットワークは特に注意が必要だ。
正規の公衆Wi-Fiには多くの場合、接続後にキャプティブポータル(ブラウザで開く同意画面)がある。ただしキャプティブポータル自体はHTTPで提供されることも多く、個人情報の入力は求めないのが一般的だ(名前・住所などを入力させるポータルは要注意)。
### 対策3: VPNを活用する
VPN(Virtual Private Network)は、端末からVPNサーバーまでの通信をトンネル暗号化する技術だ。公衆Wi-Fiでの通信全体を暗号化することで、同じネットワーク上の盗聴者から通信内容を保護できる。
**VPNの効果**:
- 同じWi-Fiネットワーク上の第三者による通信の傍受を防ぐ
- 接続先のIPアドレスをVPNサーバーのものにマスクする
- Evil TwinによるHTTP通信の傍受を防ぐ(HTTPSと組み合わせることで効果が高い)
**VPNの限界**:
- VPNサーバーより先(インターネット側)の通信はVPNで保護されない
- VPNプロバイダーが通信ログを記録している場合、プロバイダー自身には見える
- 通信速度が低下することがある
VPNサービスは有料のものと無料のものがあるが、無料サービスは広告収入やログの収集・販売を収益源にしているケースがある。信頼できるプロバイダーを選ぶことが重要だ。
### 対策4: 機密操作はモバイル回線(4G/5G)かVPNで行う
最も確実な対策は、重要な操作を公衆Wi-Fiで行わないことだ。
**公衆Wi-Fiで避けるべき操作の例**:
- インターネットバンキング・証券口座の操作
- クレジットカード情報の入力
- パスワードの変更・アカウント設定の変更
- 仕事の機密データの送受信
これらの操作はモバイル回線(4G/5G)に切り替えて行う。モバイル回線でのデータ消費を気にする場合は、[デュアルSIMで旅行中の通信を管理する方法](/ja/guides/dual-sim-for-travel/)のように副回線を活用する手段もある。
### 対策5: HTTPSを確認する
ブラウザで操作する際は、アドレスバーが「https://」で始まることを確認する。現在の主要ブラウザ(Chrome・Firefox・Safari等)は、HTTP接続のページに「保護されていない通信」の警告を表示する機能がある。
HSTS(HTTP Strict Transport Security)に対応しているサービスでは、ブラウザがHTTPへのアクセスを自動的にHTTPSにアップグレードする。主要なサービスの多くはHSTSを実装している。
### 対策6: OSとアプリを最新の状態に保つ
OSやアプリの脆弱性(セキュリティ上の欠陥)を悪用した攻撃は、アップデートによって修正される。公衆Wi-Fiの利用有無にかかわらず、OSのセキュリティアップデートは速やかに適用することを推奨する。
**iPhoneの場合**(2026年6月時点):
- 「設定」→「一般」→「ソフトウェア・アップデート」→「自動アップデート」をオンにする
- セキュリティアップデートのみを自動適用する設定が可能
**Androidの場合**(2026年6月時点):
- 「設定」→「システム」→「ソフトウェアアップデート」(機種によって表示が異なる)
- Google Play プロテクトがオンになっているか確認する
なお、OSアップデートのファイルサイズは数百MB〜数GBになることがある。公衆Wi-Fiでの大容量ダウンロードはリスクが高いため、セキュリティアップデートは自宅や職場のWi-Fiで行うことを推奨する。データ消費量の管理については[データ通信量の目安](/ja/guides/data-usage-guide/)も参照してほしい。
---
## 特にリスクの高い状況
すべての公衆Wi-Fiが同じリスクレベルというわけではない。状況によってリスクの高さが異なる。
### オープンネットワーク(パスワードなし)
パスワードなしで接続できるオープンネットワークは、WPA2/WPA3による通信の暗号化がない。同じネットワーク上のすべての通信が傍受可能な状態になる。ただしWi-Fi CERTIFIED Enhanced Open(OWE: Opportunistic Wireless Encryption)に対応したアクセスポイントでは、パスワードなしでも各ユーザーに個別の暗号化が適用され受動的な盗聴から保護される。ただしなりすまし(Evil Twin)に対する認証保護は行わず、Enhanced Openの普及は途上で全ての公衆Wi-Fiが対応しているわけではない。HTTPS通信であれば内容の傍受は防げるが、接続先のドメイン名はDNSクエリやTLSハンドシェイクのSNI(Server Name Indication)フィールドに現れる場合がある。
### ホテル・空港・交通機関のWi-Fi
不特定多数のユーザーが同じネットワークを利用するため、リスクが高い環境の1つだ。特に国際線・空港のWi-Fiでは多国籍の利用者が集まり、攻撃者の関心を引きやすい。海外でのモバイル通信の選択肢については[海外でスマホを使う — 国際ローミングガイド](/ja/guides/international-roaming/)で整理している。
### 認証なしでの接続継続
一度接続したWi-Fiへの自動再接続は、前述のEvil Twin攻撃のリスクを高める。特に「Airport_WiFi」「Free_Hotspot」などの汎用的な名前のSSIDを端末が記憶している場合は、同名の偽APに自動接続するリスクがある。定期的に端末の「保存済みネットワーク」を整理することを推奨する。
---
## Wi-Fi Callingと公衆Wi-Fiの組み合わせ
Wi-Fi Calling(VoWiFi)は公衆Wi-Fi経由でも利用できる技術だが、セキュリティ面での考慮が必要だ。
Wi-Fi Callingは端末からキャリアのIMSコアまでIPsecトンネルで暗号化されるため、公衆Wi-Fi経由でも通話内容は保護される設計になっている。ただしキャリアや端末の実装により詳細は異なる。Wi-Fi Callingの仕組みと有効化条件については[Wi-Fi Calling(VoWiFi)とは — 電波が弱い場所での通話](/ja/guides/wifi-calling/)で詳しく解説している。
公衆Wi-FiでWi-Fi Callingを使う場合、通話自体のセキュリティはIPsecで保護されるが、同時に行うブラウジングやアプリ通信は別途対策(HTTPS確認・VPN)が必要になる点に注意してほしい。
---
## リスクを正しく評価する
「公衆Wi-Fiは危険」という認識は正しい部分もあるが、過度に恐れる必要もない。現実的なリスク評価を持つことが重要だ。
### 現在の公衆Wi-Fiのリスクが以前より低い理由
- HTTPS(TLS)がほぼすべての主要サービスに普及し、通信内容の暗号化が標準になった
- 現代のブラウザはHTTP接続に「保護されていない通信」の警告を表示する
- HSTSプリロードリストにより、主要ドメインへの接続は自動的にHTTPSにアップグレードされる
- 多くのアプリが独自の暗号化(TLS/SSL)を実装している
### 依然として存在するリスク
- Evil Twin(偽アクセスポイント)による中間者攻撃
- HTTPのまま残っているサービスへの接続
- フィッシング誘導(URLが正規かどうかを確認しない場合)
- ゼロデイ脆弱性を悪用した攻撃(更新前のOSに対して)
---
## 公衆Wi-Fiを使う際の判断基準
状況に応じて、以下の基準で判断することを推奨する。
| 操作の種類 | 推奨する接続手段 |
|-----------|----------------|
| 銀行・証券・クレジットカード操作 | モバイル回線(4G/5G)またはVPN必須 |
| パスワードの入力・変更 | モバイル回線またはVPN推奨 |
| SNS・メール(HTTPS対応) | 公衆Wi-Fiでも可(Evil Twin注意) |
| 動画視聴・ニュース閲覧(HTTPS) | 公衆Wi-Fiで問題ない場合が多い |
| ファイルのアップロード(機密文書) | モバイル回線またはVPN推奨 |
モバイル回線を使う場合のデータ消費が増える点は避けられない。自分のプランのデータ残量を把握しながら使い分けることが重要だ。
---
## FAQ
**Q: 公衆Wi-FiでLINE通話をするのは危険ですか?**
LINEはEnd-to-End Encryption(E2EE)を一部通話機能に採用しており、サーバー側での傍受に対して保護されています。ただしLINEの通話がE2EEで保護されているかどうかは通話の種類と設定による部分があります。通常の音声通話・ビデオ通話はサーバー経由で暗号化される仕組みになっています。公衆Wi-Fiでの会話内容の傍受は技術的には困難ですが、機密性の高い内容を公衆Wi-Fi経由で話すことは避けることを推奨します。
**Q: VPNを使うとデータ消費量は増えますか?**
VPN接続によるオーバーヘッド(VPNプロトコルのヘッダーや暗号化処理に伴う追加通信)は一般的に数%程度の増加にとどまります。体感できるレベルの大幅な増加にはなりません。ただしVPNサーバーへの接続経路が遠い場合は通信速度の低下が発生することがあります。
**Q: 公衆Wi-Fiに接続しながらBluetoothは安全ですか?**
Wi-FiとBluetoothは独立した無線技術なので、公衆Wi-Fiへの接続がBluetooth通信に直接影響することはありません。ただしBluetoothにも固有のセキュリティリスク(ペアリングの脆弱性等)があるため、不特定多数が集まる場所ではBluetoothの検出可能設定をオフにすることを推奨します。
**Q: カフェの有料Wi-Fi(プリペイドカードで接続)は無料Wi-Fiより安全ですか?**
有料か無料かではなく、暗号化方式(WPA2/WPA3)の有無と、ネットワーク管理者の信頼性が重要です。有料のカフェWi-Fiでも、同じネットワーク上に複数のユーザーが接続している構成は変わらないため、リスクの根本的な違いはありません。どちらの場合もHTTPS確認とVPN活用が有効です。
---
## まとめ
公衆Wi-Fiのリスクは以前と比べて大幅に低下したが、ゼロではない。以下の対策を組み合わせることで、現実的なリスクの大部分に対処できる。
1. **自動接続をオフにする** — 信頼できるネットワーク(自宅・職場)以外は手動接続
2. **SSIDを確認してから接続する** — スタッフや公式看板でネットワーク名を確認
3. **機密操作はモバイル回線かVPNで行う** — 銀行・パスワード変更は公衆Wi-Fiを避ける
4. **HTTPSを確認する** — アドレスバーの「https://」を必ず確認
5. **VPNを活用する** — 公衆Wi-Fiを頻繁に使う場合は信頼できるVPNサービスを検討
6. **OSとアプリを最新に保つ** — セキュリティアップデートは速やかに適用する
---
## 関連ガイド
- [Wi-Fi Calling(VoWiFi)とは — 電波が弱い場所での通話](/ja/guides/wifi-calling/)
- [データ通信量の目安 — 自分に合ったギガ数の見つけ方](/ja/guides/data-usage-guide/)
- [データ通信量の節約テクニック — iPhone/Androidのアプリ別設定と実践ガイド](/ja/guides/save-data/)
- [デュアルSIMで旅行中の通信を管理する方法](/ja/guides/dual-sim-for-travel/)
- [海外でスマホを使う — 国際ローミングガイド](/ja/guides/international-roaming/)
================================================================================
# QRコードでeSIMを設定する(Android)
URL: https://sim-finder.com/ja/guides/qr-code-android/
Type: guides (ja)
Published: 2026-04-16
AndroidでeSIMをQRコードで設定する手順をメーカー別に解説します。
Google PixelとSamsung Galaxyでは操作メニューの名称が異なります。設定前のWi-Fi接続・互換性確認・QRコード取得方法も合わせて説明します。
## 設定前の準備
eSIMの設定を始める前に、以下の3点を確認してください。
### 1. 端末のeSIM対応を確認する
AndroidでeSIMを使うには、端末がeSIMに対応している必要があります。主なeSIM対応Androidモデルは次のとおりです。
**Google Pixel**
- Pixel 3以降の全モデルがeSIMに対応しています(ただしPixel 3の一部地域版・キャリア版を除く)
- Pixel 7以降はデュアルeSIM(2つのeSIMを同時使用)に対応しています
- 米国向けPixel 10/10 Pro/10 Pro XLはeSIM専用(物理SIMスロットなし)です
**Samsung Galaxy**
- Galaxy S20以降のフラグシップモデルがeSIMに対応しています
- Galaxy Z Fold/Flipシリーズも対応しています
- 地域やキャリアロック版では非対応の場合があります
お使いの端末が対応しているか確認する最も簡単な方法は、設定メニューを開いて後述の「eSIMを追加」メニューが表示されるかどうかです。
### 2. SIMロックが解除されていることを確認する
SIMロックがかかった端末ではeSIMを使用できません。購入したキャリアのオンライン手続きまたは窓口でSIMロック解除を申請してください。
### 3. Wi-Fi接続を用意する
eSIMプロファイルのダウンロードには安定したインターネット接続が必要です(Wi-Fiの使用を推奨)。自宅や信頼できるWi-Fi環境でインストールまで完了させることを推奨します。
### 4. QRコードを用意する
キャリアやeSIMプロバイダーからQRコードを入手してください。
- **日本の通信キャリア(MNO/MVNO)**: 新規契約・eSIM転換の手続き完了後に、マイページや登録メールアドレスにQRコードが送付されます
- **旅行eSIM(Airalo・Holafllyなど)**: アプリ内またはメールでQRコードが送られます
QRコードは紙印刷か別デバイス(タブレット・PCなど)への表示を推奨します。設定する端末の画面にのみ表示されている場合は、スクリーンショットを撮っておいてください(後述)。
---
## Google Pixelでの設定手順
Google PixelはAndroidを開発するGoogleが直接製造したスマートフォンで、メーカーによるUIカスタマイズが最も少ない端末のひとつです。
**手順**
1. 「設定」を開く
2. 「ネットワークとインターネット」をタップ
3. 「SIM」をタップ
4. 「SIMを追加」または「+」アイコンをタップ
5. 「代わりにSIMをダウンロードしますか?」の画面で「次へ」をタップ
6. カメラが起動するので、QRコードにかざしてスキャン
7. キャリア名が表示されたら「ダウンロード」をタップ
8. ダウンロード完了後、eSIMを「有効化」する
手順6でQRコードを同じ端末の画面上にしか表示できない場合は、スキャン画面の「写真からスキャン」オプションを選び、事前に撮影したスクリーンショットを選択してください。
**Android 9以降で「SIMを追加」メニューが表示されない場合**は、端末がeSIM非対応かキャリアロックされている可能性があります。[eSIMが設定できない場合の対処法](/ja/guides/activation-failed/)を参照してください。
---
## Samsung Galaxyでの設定手順
Samsung GalaxyはAndroidをカスタマイズしたOne UIを搭載しているため、メニュー名や手順がPixelと異なります。
**手順**
1. 「設定」を開く
2. 「接続」をタップ
3. 「SIM カード マネージャー」をタップ
4. 「モバイルプランを追加」または「eSIMを追加」をタップ
5. 「サービスプロバイダーのQRコードをスキャン」を選択
6. カメラが起動するので、QRコードにかざしてスキャン
7. 「追加」または「ダウンロード」をタップ
8. インストール後、SIM設定でモバイルデータの優先SIMを新しいeSIMに変更する
**端末の再起動が必要な場合があります。** eSIMのダウンロード後、端末の再起動を促す画面が表示されたら、指示に従って再起動してください。
---
## その他のAndroid端末(OnePlus・OPPOなど)
Google PixelとSamsung Galaxy以外のメーカーでも、基本的な手順は共通です。設定アプリから「ネットワーク」「SIM設定」「モバイルネットワーク」などの項目を探し、「eSIMを追加」または「モバイルプランを追加」に相当するメニューを選択してください。
メーカーやAndroidバージョンによってメニュー名が異なりますが、操作の流れは同じです。
---
## デュアルSIM設定(eSIM追加後)
eSIMのダウンロードが完了したら、2つのSIMの使い分けを設定します。
**Google Pixelの場合**
設定 → ネットワークとインターネット → SIM から、以下を設定できます。
- **モバイルデータ**: どちらのSIMでデータ通信するかを選択
- **通話**: 発信時に使うSIMを選択(または毎回確認する設定も可)
- **SMS**: 送信に使うSIMを選択
**Samsung Galaxyの場合**
設定 → 接続 → SIM カード マネージャー から、同様の設定が可能です。
旅行eSIMをデータ専用として使う場合は、モバイルデータを旅行eSIMに設定し、通話・SMSは日本のSIMのままにする構成が一般的です。旅行eSIMを使う際のデュアルSIM活用法については、[初めての旅行eSIM完全ガイド](/ja/guides/first-time-guide/)も参照してください。
---
## トラブルシューティング
### QRコードをスキャンしてもエラーになる
- QRコードが印刷または表示されたものかどうか確認(破損・汚れ・反射がないか)
- Wi-Fi接続が安定しているか確認
- QRコードが既に1回使用済みでないか確認(eSIMのQRコードは1回のみ使用可能)
- 手動コード入力(SM-DP+アドレスと有効化コード)を試す
### 「SIMを追加」メニューが表示されない
- 端末のeSIM対応状況を確認する
- SIMロックが解除されているか確認する
- キャリアロックがかかっている場合は、購入したキャリアへSIMロック解除を依頼する
### eSIMをインストールしたがデータ通信できない
- モバイルデータの優先SIMが新しいeSIMに設定されているか確認する
- データローミングが必要な場合(旅行eSIM)は、データローミングを有効にする
- キャリアから案内されたAPN設定が必要な場合は手動で入力する
より詳しいトラブルシューティングは[eSIMが設定できない場合の対処法](/ja/guides/activation-failed/)を参照してください。
---
## 関連記事
旅行eSIMの購入から設定・利用までの全体の流れは[初めての旅行eSIM完全ガイド](/ja/guides/first-time-guide/)で解説しています。eSIMの仕組みや物理SIMとの違いについては[eSIMとは](/ja/guides/what-is-esim/)、デュアルSIMの使い方は[デュアルSIMとは](/ja/guides/what-is-dual-sim/)も合わせてご覧ください。
iPhoneでQRコードを使ってeSIMを設定する手順は[QRコードでeSIMを設定する(iPhone)](/ja/guides/qr-code-iphone/)で解説しています。
eSIMの設定手順の概要については、[旅行用eSIMの設定方法 — iPhone / Android 完全図解ガイド](/ja/blog/esim-setup-guide-iphone-android/)のブログ記事も参考になります。
================================================================================
# QRコードでeSIMを設定する(iPhone)
URL: https://sim-finder.com/ja/guides/qr-code-iphone/
Type: guides (ja)
Published: 2026-04-16
iPhoneでeSIMをQRコードで設定するには、3つの準備(Wi-Fi接続・対応モデルの確認・QRコードの取得)を整えてから「設定」→「モバイル通信」→「eSIMを追加」と進む。手順全体は5分以内に終わる。
eSIMの基礎知識(仕組み・メリット・デメリット)は「[eSIMとは](/ja/guides/what-is-esim/)」で解説している。エラーが発生した場合は「[eSIMが設定できないときの対処法](/ja/guides/activation-failed/)」を参照してほしい。
---
## 設定前の準備
### 1. iPhoneがeSIMに対応しているか確認する
QRコードによるeSIM設定はiPhone XS以降の全モデルで利用できる。Apple公式が確認しているeSIM対応モデルは以下の通り(日本向けモデル)。
| モデル(シリーズ) | 構成 |
|---|---|
| iPhone XS / XS Max / XR(2018年〜) | 物理SIM + eSIM 1枚 |
| iPhone 11 / 11 Pro / 11 Pro Max | 物理SIM + eSIM 1枚 |
| iPhone SE(第2世代) | 物理SIM + eSIM 1枚 |
| iPhone 12シリーズ | 物理SIM + eSIM 1枚 |
| iPhone 13シリーズ | 物理SIM + eSIM 2枚(デュアルeSIM対応) |
| iPhone SE(第3世代) | 物理SIM + eSIM 1枚(デュアルeSIM対応) |
| iPhone 14シリーズ(日本向け) | 物理SIM + eSIM |
| iPhone 15シリーズ(日本向け) | 物理SIM + eSIM |
| iPhone 16シリーズ(日本向け) | 物理SIM + eSIM |
| iPhone 16e | 物理SIM + eSIM |
| iPhone 17シリーズ(日本向け) | eSIM専用(物理SIMスロットなし) |
| iPhone Air(全世界モデル) | eSIM専用(物理SIMスロットなし) |
日本向けiPhone 17シリーズはeSIM専用モデルとなった(Apple公式情報)。
「設定」→「モバイル通信」を開いて「eSIMを追加」または「モバイル通信プランを追加」が表示されればeSIM対応端末だ。メニューが表示されない場合はeSIM非対応またはキャリアロック中の可能性がある。
### 2. SIMロックが解除されているか確認する
「設定」→「一般」→「情報」→「キャリアロック」の欄に「SIMの制限なし」と表示されていれば問題なく設定できる。「SIMロックあり」と表示されている場合は、現在利用中のキャリアのサポートページからSIMロック解除の手続きを行う必要がある(各社マイページからオンラインで無料手続き可能)。
日本では2021年10月1日以降に発売された端末は原則SIMロックフリーであるため、その後に購入した端末はこの手順を省略できる。
### 3. Wi-Fi接続を確認する
eSIMプロファイルのダウンロードには安定したインターネット接続が必要だ。自宅のWi-FiまたはモバイルWi-Fiで接続した状態で設定を始めること。既存の物理SIMが有効であれば、そのモバイルデータ通信でも設定できる。
空港でギリギリに設定しようとすると、Wi-Fiが不安定で失敗するリスクがある。**出発前に自宅で設定を完了しておくことを強く推奨する。**
### 4. QRコードを用意する
キャリアまたはeSIMプロバイダーから受け取ったQRコードを手元に用意する。次のセクション([QRコードの取得方法](#qrコードの取得方法))で取得方法を解説している。
---
## QRコードの取得方法
eSIM設定に使うQRコードは、申し込みをしたキャリアまたはeSIMプロバイダーから発行される。取得経路はサービスの種類によって異なる。
### 国内キャリア・格安SIM(新規契約・プラン変更)
NTTドコモ・au・ソフトバンク・楽天モバイル・povo・ahamo・UQモバイル・ワイモバイル・LINEMOなどすべての主要サービスがeSIMに対応している。手続きの流れは概ね以下の通りだ。
1. 各社のマイページまたは専用アプリにログインする
2. 「eSIMへの変更」「eSIM発行」「SIM種別変更」等のメニューを探す
3. 本人確認・手続きを完了するとQRコードが発行される
4. QRコードは画面表示またはメール添付で通知される
QRコードをスキャンする端末(eSIMを設定したいiPhone)上でQRコードが表示されている場合は、後述する「スクリーンショットやメールのQRコードをスキャンする方法」を参照すること。
### 旅行eSIM(海外でのデータ通信)
Airalo・Holafly・Nomad・Sailyなどの旅行eSIMプロバイダーは、購入完了後にメールまたはアプリ内でQRコードを提供する。旅行eSIMの選び方については「[初めての旅行eSIM完全ガイド](/ja/guides/first-time-guide/)」を参照してほしい。
旅行eSIMの多くはデータ通信専用であり、音声通話・SMS機能は含まれない点に注意する。
---
## QRコードを使ったeSIM設定手順
### 手順(通常のスキャン方法)
設定後にeSIMを追加する場合の手順を説明する(iPhoneの初期セットアップ時に設定する場合は「セットアップ中の設定手順」を参照)。
**Step 1: QRコードを別の端末・紙に用意する**
スキャンするQRコードは、設定したいiPhone以外の画面(別のスマートフォン・タブレット・PC)か、印刷した紙に表示しておく。同じ端末のスクリーンショットや写真に保存されたQRコードをスキャンする方法は後述する。
**Step 2: 「設定」→「モバイル通信」を開く**
iPhoneのホーム画面から「設定」アプリを開き、「モバイル通信」をタップする。
**Step 3: 「eSIMを追加」をタップする**
「モバイル通信プランを追加」または「eSIMを追加」をタップする(iOSのバージョンや既存SIMの有無によって表示名が異なる)。
**Step 4: QRコードをスキャンする**
カメラが起動するので、用意したQRコードをフレーム内に収める。QRコードが認識されると「モバイル通信プランが検出されました」という通知またはポップアップが表示される。
**Step 5: 「続ける」→「モバイル通信プランを追加」をタップする**
画面の指示に従ってタップする。キャリアによっては確認コード(数桁の番号)の入力を求められる場合がある。このコードはキャリアからのメールまたはSMSで通知されている。
**Step 6: eSIMのダウンロード完了を待つ**
プロファイルのダウンロードが始まる。Wi-Fi環境によって数秒〜1分程度かかる。「モバイル通信プランが追加されました」と表示されれば設定は完了だ。
**Step 7: データ通信回線とラベルを設定する**
追加したeSIMのラベル(任意の名前)を設定し、デフォルトのデータ回線をeSIMに切り替えるかどうかを選択する。複数の回線を管理する場合は分かりやすい名前をつけておくと便利だ。
---
### スクリーンショットや写真のQRコードをスキャンする方法
QRコードが設定したいiPhone上のメール・写真・PDFに保存されている場合、カメラでスキャンすることはできない。以下の方法を使う。
**iOS 17.4以降: QRコード画像を長押しする**
写真アプリ・メールアプリ・Safariなどで表示されているQRコード画像を長押しすると「eSIMを追加」オプションが表示される。これをタップするだけで設定が進む。
**iOS 16以前: QRコードを別の端末に表示する**
設定したいiPhoneでQRコードが表示されている場合は、そのスクリーンショットを別の端末(PC・タブレット等)に転送して表示し、iPhoneのカメラでスキャンする。
---
### セットアップ中(初期設定)にeSIMを追加する場合
新しいiPhoneの初期セットアップ中に「セルラーを設定」画面が表示されたときにも同様の手順でQRコードをスキャンしてeSIMを設定できる。「QRコードを使用」をタップしてカメラを起動し、スキャンする。
---
## デュアルSIM設定(eSIM追加後)
eSIMを追加すると、iPhoneはデュアルSIM(2回線)構成になる。各回線の用途を設定する必要がある。
### 設定場所
「設定」→「モバイル通信」から各ラインの設定ができる。
### 設定すべき項目
| 設定項目 | 推奨設定 |
|---|---|
| デフォルトの通話回線 | 日常的に通話で使う回線を選択 |
| デフォルトのSMS/メッセージ回線 | iMessageを除くSMSで使う回線を選択 |
| モバイルデータ通信 | データ通信に使う回線を選択 |
| モバイルデータ通信の自動切替(Allow Cellular Data Switching) | 旅行eSIM利用時はオフ推奨(ホームSIMのデータが意図せず消費されるのを防ぐ) |
旅行eSIMを追加した場合は「モバイルデータ通信」を旅行eSIMのラインに切り替えることで、日本のSIMでのデータローミング料金が発生しなくなる。デュアルSIMの詳細は「[デュアルSIMとは](/ja/guides/what-is-dual-sim/)」を参照してほしい。
---
## 設定がうまくいかない場合
### よくある症状と対処法
**「eSIMを追加できません」と表示される**
端末に保存できるeSIMプロファイルの上限(eUICCのメモリ容量に依存)に達している可能性がある。使用していない古いeSIMプロファイルを「設定」→「モバイル通信」から削除してから再試行する。
**「無効なQRコード」と表示される**
QRコードは1回のみ使用可能だ(GSMAのセキュリティ仕様)。すでに別の端末で使用済みか、有効期限が切れている可能性がある。キャリアまたはeSIMプロバイダーに新しいQRコードの再発行を依頼すること。
**QRコードをスキャンしたのに反応がない**
カメラのレンズ付近を清潔な布で拭き、QRコードとカメラの距離を10〜30cm程度に調整してみる。照明が暗い場合は明るい場所に移動する。QRコードが傷んでいる・画質が悪い場合は、手動コード入力(SM-DP+アドレス入力)に切り替えることを検討する(「[SM-DP+アドレスで手動設定する](/ja/guides/manual-code/)」を参照)。
**eSIMはインストールできたがデータ通信が繋がらない**
インストール完了後に「モバイルデータ通信」の設定でeSIMのラインを選択していない可能性がある。「設定」→「モバイル通信」→「モバイルデータ通信」から目的のeSIMラインを選択する。また、データローミングが必要な状況(海外ローミング)の場合は「データローミング」もオンにする。
上記以外の症状は「[eSIMが設定できないときの対処法](/ja/guides/activation-failed/)」で詳しく解説している。
---
## eSIM設定後のよくある疑問
eSIMを設定した後の管理については「[eSIMを別のiPhoneに転送する — eSIM Quick Transferの手順と注意点](/ja/guides/transfer-iphone/)」、削除と再インストールについては「[eSIMの削除と再インストール — 削除前の注意と再発行手順](/ja/guides/reinstall-esim/)」を参照。
eSIMの仕組みや対応端末の全一覧については「[eSIMとは](/ja/guides/what-is-esim/)」を参照してほしい。旅行eSIMを初めて設定する場合は「[初めての旅行eSIM完全ガイド](/ja/guides/first-time-guide/)」で全体の流れを確認できる。
キャリア別の違いや旅行時の活用法は「[旅行用eSIM設定ガイド](/ja/blog/esim-setup-guide-iphone-android/)」でも解説している。
国内SIMでeSIM対応プランを比較するには[SimFinderで絞り込める](/ja/)。海外旅行用のeSIMは[SimFinder Travelで国別に検索](/ja/travel/)できる。
本記事で使われている用語の意味は「[SIM・モバイル通信用語集](/ja/guides/glossary-index/)」で確認できる。
================================================================================
# 通信品質の見方を解説
URL: https://sim-finder.com/ja/guides/quality-metrics/
Type: guides (ja)
Published: 2026-06-05
モバイル通信の「品質」は速度だけでは測れない。下り/上り速度・遅延・ジッター・パケットロス・エリアカバレッジ・混雑時の安定性という6つの指標が、それぞれ異なる用途への体感を左右する。
この記事では通信品質を構成する6つの指標を定義し、各指標が動画・通話・ゲーム・Webブラウジングにどう影響するかを整理する。自分で測定する方法とその限界についても解説し、最後にSimFinderの品質スコアを活用した多角的な比較方法を紹介する。
---
## 1. 通信品質を構成する6つの指標
通信品質は単一の数値で表せない。6つの指標が組み合わさって、実際の体感を決定する。
| 指標 | 単位 | 体感への影響 |
|------|------|------------|
| 下り速度 | Mbps | ダウンロード・動画受信の速さ |
| 上り速度 | Mbps | アップロード・ビデオ通話送信の速さ |
| 遅延(レイテンシ) | ms | 操作への応答・通話タイムラグ |
| ジッター | ms | 音声・映像の揺れ・乱れ |
| パケットロス | % | データ再送頻度・通信の途切れ |
| エリアカバレッジ | — | そもそも電波が届くかどうか |
加えて「混雑時の安定性」は、時間帯によって上記指標が変動する度合いを示す。品質スコアを評価する際には、ピーク時間帯での安定性も含めて考える必要がある。
---
## 2. 下り速度と上り速度(Mbps)— 速いほどよいが絶対基準ではない
**下り速度(ダウンリンク)**は、ネットワークから端末へのデータ転送速度だ。動画のストリーミング再生、Webページの読み込み、ファイルのダウンロードが主な用途となる。
**上り速度(アップリンク)**は、端末からネットワークへのデータ転送速度だ。ビデオ通話での自分の映像・音声の送信、写真や動画のアップロード、SNS投稿が該当する。
一般的な用途で必要とされる下り速度の目安を示す。
- **Webブラウジング・メール**: 数Mbps程度で実用上問題ない
- **SD画質の動画ストリーミング**: 数Mbpsあれば安定して再生できる
- **HD/フルHD動画**: 5〜10Mbps程度が安定した再生の目安
- **4K動画**: 20Mbps以上が推奨される(サービスによって異なる)
これらは参考値であり、実際に必要な速度はプラットフォーム・コーデック・バッファリング設定によって異なる。重要なのは「この速度がある程度安定して出るかどうか」であり、瞬間的なピーク値ではない。
[4G/LTEと5Gの速度・遅延の違いについては「4G/LTE・5Gとは — 違いと仕組みを解説」](/ja/guides/4g-5g-explained/)で詳しく解説している。
---
## 3. 遅延(レイテンシ)— ゲームや通話では速度より重要になる
**遅延(レイテンシ)**は、端末がデータを送信してから応答が返ってくるまでの往復時間を指す。単位はミリ秒(ms)で、「ping値」とも呼ばれる。
遅延はネットワーク工学において、データパケットが送信元から宛先サーバーへ到達し、応答が返ってくるまでの時間(RTT: Round-Trip Time)として定義される。
遅延が体感に与える影響は用途によって大きく異なる。
| 用途 | 遅延の影響 | 実用上の目安 |
|------|-----------|------------|
| Webブラウジング | ページ読み込みの初動速度に影響 | 100ms以下で問題なし |
| ビデオ通話 | 会話のタイムラグ・違和感 | 150ms以下を推奨 |
| オンラインゲーム | 操作入力と画面応答のズレ | 50ms以下が快適 |
| 音声通話(VoIP) | 話し声の遅れ・重なり | 150ms以下を推奨 |
遅延が高い状態では、どれほど速度が速くても「もたつき」や「タイムラグ」として体感される。特にリアルタイムのやりとりを必要とするゲームやビデオ通話では、速度より遅延が品質を左右する。
4G LTEの典型的な遅延は数十ms程度、5G SAの理論目標値はそれよりさらに低い値とされているが、実際の商用ネットワークでの遅延は接続状況によって変動する。
---
## 4. ジッターとパケットロス — 安定性の核心
**ジッター(Jitter)**は、連続するパケットの到着間隔のばらつきを示す。単位はms。送信側が一定間隔でパケットを送っても、ネットワークの混雑や経路の変化によって到着間隔が不均一になる現象だ。
ジッターが大きい場合の体感への影響を示す。
- **音声通話・VoIP**: 音声の途切れ・ノイズ・「ロボット声」のような歪み
- **ビデオ通話**: 映像のカクつき・フレームの乱れ
- **動画ストリーミング**: バッファリングが断続的に発生
- **オンラインゲーム**: 動きの不自然なラグ・スタッター
ジッターはバッファリングである程度吸収できるが、リアルタイム通話(低バッファ)では影響が直接出やすい。
**パケットロス(Packet Loss)**は、送信したデータパケットのうち宛先に届かなかった割合を示す(%)。TCP/IPではパケットロスが発生すると再送処理(再送)が行われるが、これには時間がかかる。
パケットロスの体感への影響を示す。
- **1%未満**: 通常の用途では目立たない
- **1〜3%**: ビデオ通話で映像の乱れが生じ始め、許容可能な範囲を超えつつある
- **3〜5%**: 音声通話・ビデオ通話で顕著な品質低下。一般的に許容不可レベルとされる
- **5%以上**: 音声通話・ストリーミングで顕著な品質低下。ゲームでは致命的になる場合がある
パケットロスは主にネットワーク輻輳(過負荷)や電波の不安定さによって発生する。遅延やジッターと組み合わさると、体感品質は数値以上に低下する。
---
## 5. エリアカバレッジ — 「電波が届く」前提条件
どれだけ遅延やジッターが低くても、そもそも電波が届かなければ通信できない。**エリアカバレッジ**は、そのキャリアの電波が届く地理的範囲を指す。
日本の主要MNO(NTTドコモ・KDDI/au・ソフトバンク・楽天モバイル)の4Gカバレッジは都市部で概ね整備されているが、地方・山間部・建物の地下・電車内(特にトンネル)での受信には差がある。
カバレッジを評価する際に注意すべき点がある。
**使用周波数帯とカバレッジの関係**: 低周波帯(700〜900MHz、いわゆる「プラチナバンド」)は電波の回り込み性能が高く、建物内や地下でも届きやすい。高周波帯(2.1GHz以上)は屋外での速度は高いが建物透過性が低い。キャリアが使用する周波数帯によって、同じ「カバレッジ内」でも屋内受信に差が生じる。
日本の4Gおよび5Gで使用される周波数帯の詳細については[周波数バンドとは — 対応バンドの確認方法](/ja/guides/frequency-bands/)で解説している。
**エリアマップは屋外前提**: 公開されているキャリアのエリアマップは、基本的に屋外の受信を前提としている。地下鉄・地下街・山間部・高層ビル内では実際の受信状況がマップと乖離する場合がある。
**MVNOのカバレッジはMNOと同一**: MVNOは借りているMNOの回線と同じカバレッジを持つ。ドコモ回線のMVNOであれば、原則ドコモのカバレッジ内で使用できる。
---
## 6. 混雑時の安定性 — 時間帯別の品質が重要
通信品質の評価で最も見落とされやすいのが「混雑時の安定性」だ。ピーク時間帯(昼12〜13時・夕方17〜19時)での品質が、日常の体感を大きく左右する。
**MNOとMVNOの混雑時の違い**: MNOは自社ネットワーク上で帯域を直接確保する。MVNOはMNOとの接続点(POI: Point of Interface)を通じてネットワークにアクセスし、契約した帯域幅の範囲でトラフィックをやり取りする。利用者がこの帯域上限に達する時間帯に速度が低下する。
MVNOの通信速度がなぜ混雑時に落ちるかの詳細な仕組みは[格安SIMの通信速度はなぜ遅い? — POI・帯域制限の仕組みを解説](/ja/guides/why-mvno-slow/)で解説している。MVNOの基本的な仕組みについては[MVNO(格安SIM)とは — 仕組み・メリット・注意点と選び方](/ja/guides/what-is-mvno/)を参照されたい。
**混雑時と非混雑時の速度差**: MVNO各社の混雑時の速度は事業者によって大きく異なる。帯域を多く確保しているMVNOは混雑時でも安定した速度を保てるが、コスト削減を優先している事業者では昼間の速度が著しく低下する場合がある。
**安定性指標の重要性**: 速度の「最大値」より「最小値」が実用上の品質を決める。混雑時に最低限の速度を確保できているかどうかが、日常的な使い勝手の差として現れる。
---
## 7. 自分で測定する方法とその限界
### 速度測定ツール
一般的な速度測定には以下のようなツールが使われる。
- **Speedtest by Ookla**: 下り速度・上り速度・遅延(ping)・ジッターを同時に計測できる。Webブラウザとスマートフォンアプリの両方で利用可能。
- **Fast.com**: Netflixが提供する速度測定ツール。下り速度とレイテンシを計測する。
- **Google速度テスト**: Google検索で「速度テスト」と入力することで簡易測定が可能。
これらのツールはいずれも「測定時点のスナップショット」を提供する。
### 測定時の注意点
正確に測定するためのポイントを挙げる。
1. **Wi-Fiをオフにする**: モバイル回線のみで計測する
2. **バックグラウンドの通信を止める**: 他のアプリがデータを消費していないか確認する
3. **時間帯を変えて複数回計測する**: 朝・昼・夜の3回が理想的
4. **場所を変えて計測する**: 自宅・職場・移動中など複数地点でのデータが有用
### 自己測定の限界
自分でSpeedtestを実行して得られる数値には、いくつかの本質的な限界がある。
**単点・単時点のデータ**: 1回の測定は「その場所・その時刻」のデータに過ぎない。生活パターン全体での品質を反映しない。
**プラシーボ効果の排除が困難**: 「このキャリアに変えた」という認知が評価に影響しやすい。
**比較基準の欠如**: 単独でSpeedtestを実行しても、他のキャリアと比較するデータがなければ評価ができない。
**測定サーバーへの依存**: Speedtestはサーバーとの間の速度を計測するため、サーバー側の負荷・地理的距離が結果に影響する。
---
## 8. 速度だけでは品質を測れない理由
通信品質の評価に速度のみを用いる場合の問題点を整理する。
**遅延と速度は独立した指標**: 回線速度が高くても遅延が大きければ、ゲームやビデオ通話での応答性は低い。逆に速度が低くても遅延が小さければ、音声通話の体感は良好だ。
**ジッターは速度測定では捕捉できない**: 平均速度の良好なキャリアでも、ジッターが高ければビデオ通話は乱れる。Speedtestの一般的な計測ではジッターは計測されない場合もある。
**パケットロスは速度測定に反映されにくい**: 少量のパケットロスは速度測定値に大きく影響しないが、TCP接続では再送オーバーヘッドとなって実際のアプリ体感に響く。
**混雑時と非混雑時の差が可視化されない**: 昼間の混雑時に著しく速度が落ちるキャリアでも、深夜の測定では高速を示す場合がある。
**エリアの広がりと屋内の受信は別問題**: 速度が高くても、自分の生活圏で電波が安定して届くかどうかは別の軸だ。
---
## 9. SimFinderの品質スコアで多角的に比較する
上記の通り、通信品質は6つの指標を総合的に評価する必要がある。自分で全指標を継続的に計測・比較するのは現実的ではない。
SimFinderは、単一の速度指標ではなく複数の品質要素を組み合わせた品質スコアを各プランに付与している。これにより、速度・遅延・安定性を加味した比較が一つの画面で確認できる。
SimFinderの品質スコアがどのような要素をどのように重み付けしているかの詳細は[SimFinderの品質スコアの仕組み — 速度・遅延・安定性の重み付けを解説](/ja/guides/simfinder-score/)で解説している。
プラン比較では、速度の数値だけでなく品質スコアの合計と内訳を参考にすることで、自分の用途(ゲームに向いているか、ビデオ通話向きか、コスト優先か)に合ったプランを選びやすくなる。
---
## FAQ
### 通信速度が速ければ品質は高いと言えますか?
速度だけでは品質を評価できません。遅延(レイテンシ)が高いと、オンラインゲームや音声通話でのタイムラグが大きくなります。ジッターが高いとビデオ通話の映像が乱れます。パケットロスが多いと再送処理が増え、体感速度は実測値より著しく低くなります。高品質な通信には、速度・遅延・ジッター・パケットロスの4指標がすべて良好であることが必要です。
### SpeedtestアプリのMbps値はどこまで信頼できますか?
Speedtestの結果は「その瞬間・その場所」の速度を示すスナップショットです。時間帯・基地局の混雑状況・端末の向き・測定サーバーとの距離などによって大きく変動します。昼12〜13時や夕方17〜19時などの混雑時間帯に計測すると、実用上の速度に近い傾向があります。ただし1回の測定だけで「このキャリアは速い/遅い」と判断するには不十分で、複数回・複数の時間帯でのデータが必要です。
### 遅延(レイテンシ)はどの程度であれば実用上問題ないですか?
用途により異なります。Webブラウジング・メール・SNSは100ms以下であれば実用上問題ありません。ビデオ通話(Zoom等)は150ms以下が推奨され、それを超えると会話のタイムラグが気になり始めます。リアルタイムのオンラインゲームでは50ms以下が快適とされており、100msを超えると操作の応答が遅れて体感できるレベルになります。これらは一般的なネットワーク工学での目安です。
### エリアカバレッジと屋内での受信はどう違いますか?
エリアカバレッジはキャリアが公開する「電波が届く地域の広さ」を示す指標です。しかし屋内での受信強度は、使用する周波数帯によって大きく異なります。プラチナバンド(700〜900MHz帯)は建物内への浸透性が高く、高周波帯(2.1GHz帯以上)は屋外では速いが屋内・地下では弱くなりやすい特性があります。エリアマップは基本的に屋外での受信を前提としており、屋内の体感とは乖離する場合があります。
### MVNOとMNOで通信品質はどう違いますか?
MVNOはMNOのネットワークを借りてサービスを提供するため、エリアカバレッジはMNOと同等です。ただし、MVNOはMNOとの接続点(POI)で契約した帯域内でトラフィックをやり取りするため、混雑時(昼12〜13時・夕方17〜19時)に速度が低下することがあります。混雑していない時間帯では、遅延・ジッター・パケットロスはMNOとほぼ同等です。ただし混雑時にPOIの帯域が逼迫すると、遅延やジッターも増加する場合があります。MVNOとMNOの品質差は、主に「混雑時の帯域確保の差」です。
---
## まとめ
- 通信品質は**下り/上り速度・遅延・ジッター・パケットロス・エリアカバレッジ・混雑時安定性**の6指標で構成される
- **遅延(レイテンシ)**はゲームや通話で速度以上に重要。50〜150ms以下が用途別の目安
- **ジッター**は音声・映像の品質を左右し、速度測定では捕捉しにくい
- **パケットロス**が1%を超えるとビデオ通話への影響が出始める
- **エリアカバレッジ**はマップの広さだけでなく、使用する周波数帯と屋内での受信も確認が必要
- **SpeedtestのMbps値**は単点スナップショットであり、混雑時を含めた複数回の計測が判断に必要
- **SimFinderの品質スコア**は複数指標を統合した比較を提供する
---
## 関連ガイド
- [MVNO(格安SIM)とは — 仕組み・メリット・注意点と選び方](/ja/guides/what-is-mvno/)
- [4G/LTE・5Gとは — 違いと仕組みを解説](/ja/guides/4g-5g-explained/)
- [周波数バンドとは — 対応バンドの確認方法](/ja/guides/frequency-bands/)
================================================================================
# 地域別の海外通信事情ガイド
URL: https://sim-finder.com/ja/guides/regional-overview/
Type: guides (ja)
Published: 2026-06-06
海外渡航時の通信手段を選ぶ際、渡航先の地域によって「何が使えるか」「何が便利か」は大きく変わる。eSIMの普及度・SIM登録義務・現地キャリアの整備状況など、地域ごとの通信事情を把握しておくと、出発前の準備がスムーズになる。
この記事では世界主要6地域(アジア・欧州・北米・オセアニア・中南米・アフリカ)の通信事情の一般的傾向を概観し、トラベルeSIMと現地SIMの使い分けの指針を整理する。具体的なプランの料金・事業者名は頻繁に変わるため記載しない。各国・各プランの最新状況は[SimFinder Travelの国別比較](/ja/travel/)で確認してほしい。
---
## アジア — 国ごとの規制差が大きい地域
アジアは日本・韓国・シンガポールのような通信インフラが高度に整備された国から、農村部の接続が限られる国まで、地域内のばらつきが大きい。渡航先ごとの個別確認が特に重要な地域だ。
### SIM登録義務
SIM購入時にパスポートなどの本人確認が義務付けられている国が多い。タイでは2025年8月以降、全SIM登録に生体認証(ライブネス検知)が義務化されており、外国人はパスポート原本の提示と、1プロバイダーあたり最大3枚までの制限が設けられている。中国本土では外国人向けのSIM取得に独自の手続きが必要で、一部サービスの利用に制限もある。渡航前に渡航先の最新情報を確認することが重要だ。
### eSIM普及の状況
日本・韓国・香港・シンガポール・台湾などでは主要キャリアがeSIMに対応しており、トラベルeSIMの利用環境が整っている。一方、東南アジア・南アジアの一部の国では現地キャリアのeSIM対応が限定的な場合もあり、渡航先の対応状況を事前確認することが必要だ。
### トラベルeSIMが有効なケース
- 短期渡航(数日〜2週間程度)で複数国を移動する場合
- SIM登録手続きの手間を省きたい場合
- 日本のスマホ番号(SMS認証など)を維持しながらデータ通信を確保したい場合
海外でのSMS認証の取り扱いについては[海外での通話・SMS完全ガイド](/ja/guides/calls-abroad/)で詳しく解説している。
### 現地SIMが有利なケース
- 1カ国に1週間以上滞在し、大容量データが必要な場合
- 現地の通話番号が必要な場合
- 現地キャリアの大容量プランを安価に使いたい場合
---
## 欧州 — RLAHにより域内ローミングが事実上無料
欧州はEU/EEAという政治的・経済的統合体を持つため、他の地域と異なる特有のローミング事情がある。
### RLAH(Roam Like At Home)
EU/EEA加盟国の間では、2017年6月15日に施行されたRLAH規制により、加盟国間のローミングに小売追加料金を課すことが原則禁止されている(Regulation EU 531/2012等に基づく)。2022年改正(EU 2022/612)によりこの規制は2032年6月30日まで延長・強化された。
実質的に、EU/EEA内では日本で契約したキャリアのSIMをそのまま使った場合でも国際ローミングコストが発生するが、EUのキャリアのSIM(現地SIM)を持っていれば、EU内の移動で追加ローミング料金がかからない仕組みだ。この規制の詳細・対象国の一覧・スイスの扱いについては[EUローミング完全ガイド — Roam Like at Home(RLAH)の仕組みと対象国](/ja/guides/eu-roaming/)に詳しくまとめてある。
### eSIM普及
西欧・北欧の主要キャリアはeSIM対応が進んでいる。旅行eSIMプロバイダーのヨーロッパ地域プランは40カ国以上をカバーするものが一般的であり、複数国を移動する旅行者に適している。
### トラベルeSIMが有効なケース
- EU内を複数国またいで移動する旅行者
- 短期・中期の滞在で現地SIM購入の手間を省きたい場合
### 現地SIMが有利なケース
- EU加盟国の1カ国に長期滞在し、現地の通話番号も必要な場合
- EU域内に長期在住または長期滞在する場合(RLAHの恩恵を最大化できる)
---
## 北米 — プリペイドeSIMが充実、手続きは簡便
アメリカ・カナダは大手キャリアおよびMVNOがeSIMに対応しており、プリペイドのトラベルeSIMプランが豊富に揃っている。
### 米国
Verizon・AT&T・T-Mobileの主要3キャリアはいずれもeSIMに対応しており、外国人向けのプリペイドSIMも空港・コンビニ・オンラインで広く入手可能だ。米国ではSIM購入時に身分証明の提示が義務化されていないため(2026年4月時点)、現地SIMの入手が比較的容易である。ただし、SIMスワップ詐欺対策として連邦規制(FCC)や各キャリアのアカウントロック機能が整備されてきており、セキュリティ環境は変化している。
### カナダ
カナダも主要キャリアがeSIM対応済みで、プリペイドプランが整っている。国土が広大なため、農村部・山岳地帯では接続が限られる場合がある。主要観光地・都市間は概ね4G LTEが安定している。
### トラベルeSIMが有効なケース
- 短期渡航で複数の都市を移動する場合
- 出発前に日本からオンラインでプランを購入・設定しておきたい場合
### 現地SIMが有利なケース
- 1カ月以上の長期滞在
- 現地の通話番号が必要な場合
- 大容量データを安く使いたい場合(現地プリペイドSIMの大容量プランがコスト面で有利なことが多い)
---
## オセアニア — 主要ルートは充実、郊外はカバレッジ差あり
オーストラリアとニュージーランドは、主要都市や観光地では通信インフラが整備されている一方、広大な国土の内陸部や離島では接続環境が大きく変わる。
### オーストラリア
Telstra・Optus・TPGなどの主要キャリアが4G/5Gを展開している。ただしオーストラリアは世界6位の国土面積を持ち、内陸部の「アウトバック」と呼ばれる地域では通常のモバイルネットワークが届かない場所も多い。主要都市圏・沿岸部・主要な観光ルート(グレートオーシャンロード等)は概ね4G LTEが安定している。オーストラリアは2024年に3Gネットワークの停波を完了しており、現在は4G/5Gが主体だ。
eSIM対応については、主要キャリアおよびMVNOの対応が進んでいる。現地SIMはプリペイドが広く普及しており、スーパーマーケット・コンビニでも購入できることが多い。
### ニュージーランド
主要キャリア(Spark・One NZ・2degrees)が4G LTEを展開している。フィヨルドランドや主要な登山ルートなど、観光地でも山間部では圏外になる場合がある。
### トラベルeSIMが有効なケース
- 短期の観光旅行で都市部・主要観光地を中心に移動する場合
- 事前設定を済ませてシームレスに使いたい場合
### 現地SIMが有利なケース
- 1ヶ月以上の長期滞在(ワーキングホリデー等)
- 大容量データを継続的に使う必要がある場合
- 郊外やリモートエリアを広範囲に移動する場合(現地キャリアのカバレッジマップを確認した上で選択)
---
## 中南米 — 国差が大きく、個別確認が必要
中南米は国によって通信インフラの整備状況・SIM規制・eSIM普及度に大きな差がある。
### 一般的な傾向
ブラジル・メキシコ・アルゼンチン・チリ・コロンビアなどの主要国の都市部では、4G LTEが整備されている。主要キャリアはClaro・Movistar・Tigoなどが広域展開している。一方、農村部・山岳地帯(アンデス山脈沿いなど)・アマゾン流域では接続が限られる場合がある。
eSIMの普及はアジア・北米・欧州と比較して全体的に遅れており、現地キャリアのeSIM対応が限定的な国もある。SIM登録義務については国ごとに異なり、身分証明を求める国が多い。
### トラベルeSIMが有効なケース
- 複数国を短期間で移動するバックパッカー・ビジネス旅行者
- 現地でのSIM購入手続き(言語の壁・窓口待ち等)を避けたい場合
- 都市部・観光地を中心に移動する場合
### 現地SIMが有利なケース
- 主要国の1カ国に2週間以上滞在する場合
- 現地の通話番号が必要な場合
- 農村部・地方を長期移動する場合(現地キャリアの方が農村部のカバレッジで有利なことがある)
---
## アフリカ — 都市部は4G整備が進む、農村部は格差あり
アフリカは54カ国からなる巨大な地域で、通信インフラの整備状況は都市部と農村部で大きく異なる。
### 一般的な傾向
ナイロビ(ケニア)・ラゴス(ナイジェリア)・ケープタウン(南アフリカ)・カイロ(エジプト)・カサブランカ(モロッコ)など主要都市では4G LTEが広く整備されており、モバイルデータの普及率も高い。アフリカではモバイルファーストの傾向が強く、ファイバー等の固定回線よりもモバイルネットワーク経由のインターネット利用が広く普及している地域も多い。
一方、都市部以外では2G/3Gのみの地域や圏外エリアが残存する国もある。東アフリカ(ケニア・エチオピア等)はモバイル決済・デジタルサービスの普及が進んでいることで知られている。
### SIM登録義務
アフリカの多くの国でSIM購入時にパスポート等の身分証明の提示が義務付けられている。観光客向けのプリペイドSIMは主要都市の空港・商業施設で入手できることが多い。
### eSIM普及
eSIMの対応はアフリカ全体ではまだ限定的だが、南アフリカ・エジプト・モロッコ・ケニアなど一部の国の主要キャリアでは対応が始まっている。多くのアフリカ諸国ではトラベルeSIMプロバイダーのグローバル・アフリカ向けプランが現実的な選択肢になりやすい。
### トラベルeSIMが有効なケース
- 複数国を移動するサファリ旅行・ビジネス渡航
- 現地でのeSIM対応状況が不確実な場合のバックアップ
- 都市部・主要観光地を中心に移動する場合
### 現地SIMが有利なケース
- 特定の1カ国に2週間以上滞在する場合
- 農村部・サバンナ等、現地キャリアのカバレッジが重要になるエリアを移動する場合
---
## トラベルeSIM・現地SIM 地域別傾向まとめ
| 地域 | eSIM対応状況 | 現地SIM登録義務 | トラベルeSIMの適性 |
|------|-------------|---------------|-----------------|
| アジア | 国により大きく差あり | 多くの国で義務あり | 短期・複数国移動に向く |
| 欧州(EU/EEA) | 主要国は対応済み | 一部の国で義務あり | EU内移動はRLAHも考慮 |
| 北米 | 対応が充実 | 米国は義務なし | 短期には便利 |
| オセアニア | 主要キャリア対応済み | 一部義務あり | 観光旅行向き |
| 中南米 | 限定的〜整備中 | 多くの国で義務あり | 複数国移動に向く |
| アフリカ | 限定的 | 多くの国で義務あり | グローバルプランが現実的 |
プロバイダーごとのサービス品質・対応地域の違いを確認するには[旅行eSIMプロバイダー比較](/ja/guides/provider-comparison/)を参照してほしい。
---
## 渡航前に確認すべきこと
渡航先の地域がどこであれ、以下の点を出発前に確認しておくことで、現地での通信トラブルを防ぎやすい。
### 1. SIM登録義務の確認
前述のとおり、世界157カ国(GSMA 2021年調査)でSIM購入時の本人確認が義務化されている。トラベルeSIMを使う場合は事前購入でこの手続きを省略できる場合が多い。
### 2. eSIM対応端末の確認
eSIM対応端末であっても、キャリアロックがかかっている場合は海外のeSIMを利用できないことがある。端末がSIMフリー状態であることを渡航前に確認しておく。確認方法は[旅行eSIMの選び方](/ja/guides/how-to-choose/)にまとめてある。
### 3. データ量の見積もり
渡航先ではWi-Fiが使えない場面が増えるため、国内より多めにデータ量を見積もることが一般的だ。地図アプリ・メッセージング中心なら数GBで収まることが多いが、動画・テレビ会議が必要な場合はより多くの容量が必要になる。
### 4. 国際ローミングとの比較
日本で契約しているキャリアの国際ローミングと、トラベルeSIM・現地SIMを比較検討することも重要だ。国際ローミングはキャリアのSIMをそのまま使える手軽さがある一方、コスト面では旅行eSIM・現地SIMが有利なことが多い。詳細な比較は[国際ローミングの仕組みと料金](/ja/guides/international-roaming/)で解説している。
---
## 各国のプランをSimFinderで比較する
各地域の一般的傾向は以上のとおりだが、実際のプラン選びには渡航先の国・滞在日数・必要なデータ容量の具体的な条件で絞り込むことが重要だ。
[SimFinder Travelの国別比較](/ja/travel/)では渡航先の国を選択してトラベルeSIMのプランを比較できる。接続するネットワーク名・データ容量・有効期間・プロバイダーを一覧で確認できるため、この記事で整理した地域別の傾向と組み合わせることで、自分の旅行に合ったプランを選びやすくなる。
---
## FAQ
**Q. 海外でスマホを使うとき、トラベルeSIMと現地SIMのどちらが有利ですか?**
渡航先の地域・滞在期間・目的によって異なります。短期かつ複数国を移動する場合はトラベルeSIMが便利です。1カ国に長期滞在する場合は現地SIMがデータ単価で有利なことが多いです。SIM登録義務が厳しい国では、パスポートを持参して現地購入の手間を見込む必要があります。
**Q. SIM購入時にパスポートが必要な国はどこですか?**
世界157カ国(GSMA 2021年調査)でSIM購入時に政府発行の身分証明書の提示が義務化されています。アジア・中東・中南米・アフリカの多くの国が対象です。欧州の一部の国でも本人確認が求められます(ドイツでは2017年7月以降、プリペイド・ポストペイドを問わず全SIM購入時に本人確認が義務化されています)。渡航前に渡航先の規制を確認し、パスポート原本を準備しておくことを推奨します。
**Q. EU内の旅行ではローミング料金がかかりますか?**
EU/EEA加盟国間では、2017年6月施行のRLAH(Roam Like At Home)規制により、自国と同じ料金水準でモバイルサービスを使うことが原則保証されています(2022年改正で2032年まで延長)。ただしスイスはEEA非加盟のため対象外です。詳細は[EUローミング完全ガイド](/ja/guides/eu-roaming/)を参照してください。
**Q. オセアニアで郊外に行くと圏外になりますか?**
オーストラリア・ニュージーランドとも、主要都市圏と主要な観光ルート沿いは4G LTEが安定しています。ただし国土が広大なため、内陸部・農村部・離島では圏外または2Gのみとなるエリアが存在します。郊外を移動する場合は、現地の主要キャリアのカバレッジマップを事前に確認することを推奨します。
---
## 関連ガイド
- [国際ローミングの仕組みと料金](/ja/guides/international-roaming/) — キャリアSIMをそのまま海外で使う方法
- [EUローミング完全ガイド](/ja/guides/eu-roaming/) — RLAH規制の仕組みと対象国
- [海外での通話・SMS完全ガイド](/ja/guides/calls-abroad/) — 通話・SMS・SMS認証の海外対応
- [旅行eSIMの選び方](/ja/guides/how-to-choose/) — 5つの比較ポイントと購入前チェックリスト
- [旅行eSIMプロバイダー比較](/ja/guides/provider-comparison/) — 主要プロバイダーの対応地域・特徴の比較
================================================================================
# eSIMの削除と再インストール — 削除前の注意と再発行手順
URL: https://sim-finder.com/ja/guides/reinstall-esim/
Type: guides (ja)
Published: 2026-05-20
eSIMの「削除」は物理SIMを抜くことと根本的に異なる。削除した瞬間、そのQRコードは使用済みとしてサーバー側で無効化され、同じコードでの再インストールはできなくなる。削除前にこの仕組みを理解していないと、端末の初期化や機種変更の際に通信が使えなくなる状況に陥る。
eSIMの基礎知識は「[eSIMとは](/ja/guides/what-is-esim/)」で解説している。本記事では削除操作の具体的なリスク・実際の手順・削除後の再発行手続きを整理する。
---
## eSIMの「削除」と「再インストール」の違い
### 削除(Delete)とは
eSIMの削除とは、端末のeUICCチップに書き込まれたキャリアプロファイルを消去することだ。iOS / Android いずれも設定メニューから操作できる。
削除を実行すると次の2つのことが同時に起こる。
1. **端末側**: eUICCからプロファイルデータが消去され、そのeSIMは端末上で使えなくなる
2. **サーバー側(SM-DP+)**: プロファイルの配布サーバー(SM-DP+)がそのプロファイルを「ダウンロード済み・削除済み」としてマークし、同じQRコードを無効化する
この2点目が重要だ。端末からプロファイルを削除しても、キャリアのサーバー側では「使用済み」の状態が維持される。元のQRコードで再スキャンしても、「すでに使用されたコード」として拒否されてしまう。
### 再インストールとは
再インストールとは、キャリアから**新しいQRコード(またはアクティベーション情報)を発行してもらい**、端末に新たにeSIMプロファイルをダウンロードすることを指す。
- 「削除して元のQRコードで再スキャン」するだけでは再インストールできない
- 再インストールには必ずキャリアへの**再発行手続き**が伴う
### QRコードの単回利用制限(GSMA SGP.22)
eSIMのQRコードが1回しか使えない理由はGSMAのセキュリティ設計にある。GSMA SGP.22(消費者向けeSIM技術仕様)では、1つのeSIMプロファイルは1台のeUICCデバイスに1回だけダウンロードできると規定されている。これはeSIMプロファイルの不正複製・不正転用を防ぐための設計だ(出典: GSMA SGP.22 Technical Specification)。
QRコードのスキャン自体は何度でも行えるが、2回目以降はSM-DP+サーバーが「ダウンロード済み」として返答し、プロファイルのダウンロードを拒否する。
---
## 削除すべきケース/削除すべきでないケース
### 削除すべきケース
| ケース | 理由 |
|--------|------|
| 端末を売却・下取り・譲渡する | 加入者情報の漏えい防止・不正利用の防止 |
| 解約済みのeSIMが不要になった | 使わないプロファイルを整理する |
| eSIM対応スロットが不足し、別のeSIMを追加したい | eUICCのメモリ節約(多くの端末は8枚以上保存可能だが上限がある) |
| キャリアの解約手続きで削除を求められた | キャリアの指示に従う |
### 削除すべきでないケース
| ケース | 推奨代替手段 |
|--------|------------|
| 別のiPhoneに移行したい(機種変更) | [eSIM Quick Transfer](/ja/guides/transfer-iphone/)を使う(iOS 16以降・対応キャリア) |
| 一時的に使わないだけ | 削除せず「無効化(オフ)」にとどめる |
| 端末修理に出す(修理後に戻ってくる場合) | 削除せず持ち込む(多くの場合そのまま保持される) |
| QRコードを手元に保管していない | 削除前に再発行が可能かどうかキャリアに確認する |
**最重要の注意点**: QRコードを保管していない状態でeSIMを削除すると、再インストールには必ずキャリアへの手数料つき再発行手続きが必要になる。削除の前に以下を必ず確認すること。
- 発行済みQRコードの画像・PDFを端末とは別の場所(クラウドストレージ、印刷物など)に保管しているか
- キャリアがオンラインで再発行に対応しているか
- 再発行に手数料が発生するか
---
## iPhoneでのeSIM削除手順
**前提**: 削除する前に「削除すべきでないケース」の表を確認すること。削除は取り消しできない。
### 削除手順
1. 「設定」を開く
2. 「モバイル通信」をタップ
3. 削除したいeSIMのプラン名(キャリア名)をタップ
4. 画面下部の「eSIMを削除」をタップ
5. 確認ダイアログが表示されるので「続ける」をタップして削除を実行する
### 確認事項
- 削除したいeSIMが「有効」の状態で表示されていることを確認する(すでに無効化されている場合も同様の手順で削除できる)
- 複数のeSIMが保存されている場合は、正しいプランを選択していることをキャリア名・プラン名で確認する
- データ通信中の場合は、削除後に別の回線(Wi-Fiまたは物理SIM)に切り替わることを確認する
### 削除後の状態
削除が完了すると「モバイル通信」画面からそのeSIMプランが消える。この状態が「サーバー側でも使用済みとしてマークされた状態」だ。元のQRコードで再スキャンしても設定できない。
---
## Android(Pixel / Samsung)でのeSIM削除手順
### Google Pixelの場合
1. 「設定」を開く
2. 「ネットワークとインターネット」をタップ
3. 「SIM」をタップ
4. 削除したいeSIMをタップ
5. 「SIMを削除」または「eSIMを削除」をタップ
6. 確認画面で「削除」をタップして実行する
(出典: Google Pixel公式ヘルプ)
### Samsung Galaxyの場合(One UI 6以降)
1. 「設定」を開く
2. 「接続」をタップ
3. 「SIMマネージャー」をタップ(One UI 5以前は「SIMカードマネージャー」)
4. 削除したいeSIMをタップ
5. 「削除」をタップして実行する
(出典: Samsung公式サポート)
### Android共通の注意
- AndroidのeSIM削除手順はメーカー・OSバージョンにより異なる場合がある
- One UI 6未満(Samsung)では「SIMカードマネージャー」という表記になる
- eSIM削除後のQRコード単回利用制限はiPhoneと同様にAndroidにも適用される(GSMA SGP.22の仕様に基づく)
---
## QRコード単回利用制限と再発行が必要な理由
eSIMのQRコードが使い捨てである理由を改めて整理する。
### なぜ1回しか使えないのか
GSMA SGP.22の設計では、eSIMプロファイルの配布サーバー(SM-DP+: Subscription Manager Data Preparation)がプロファイルのダウンロード状態を管理している。端末がQRコードをスキャンしてプロファイルをダウンロードした時点で、SM-DP+はそのプロファイルを「Bound(ダウンロード済み)」状態に遷移させる。
Bound状態のプロファイルは同一のeSIMプロファイルIDに対して再ダウンロードができない設計になっている。端末からプロファイルを削除しても、SM-DP+側の状態は「Bound(削除済み)」のままであり、リセットされない。
これはeSIMプロファイルの不正コピーを防ぐセキュリティ機構だ。
### 再発行で何が起きるのか
再発行とは、キャリアのシステムが既存のSIM契約に対して**新しいeSIMプロファイルを生成し、新しいQRコード(またはアクティベーションコード)を発行する**手続きだ。
1. キャリアのシステムで旧プロファイルを無効化
2. 同じ電話番号・契約に対して新しいeSIMプロファイルを生成
3. 新しいQRコード(またはアプリ内のアクティベーション情報)を利用者に提供
4. 利用者が新しい端末(または同じ端末)でQRコードをスキャン
この手続きにより、同じ電話番号・契約のまま新しい端末でeSIMを使い始められる。
---
## 主要事業者の再発行ポリシー
**注意**: 以下の情報は各社の公式FAQを参照しているが、手数料・手続き方法はキャリアが予告なく変更することがある。手続き前に必ず各社の**最新の公式サポートページ**で確認すること。
### MNO(大手4キャリア)
| キャリア | 再発行方法 | 手数料 | 公式出典 |
|--------|-----------|--------|---------|
| NTTドコモ | My docomoアプリ・Web / ドコモショップ | オンラインでの確認を推奨 | [ドコモ公式: eSIMについて](https://www.docomo.ne.jp/support/uimcard/esim/) |
| au(KDDI) | My auアプリ・Web / auショップ | オンラインでの確認を推奨 | [au公式: eSIM](https://www.au.com/support/service/mobile/procedure/sim/esim/) |
| ソフトバンク | My SoftBankアプリ・Web / ソフトバンクショップ | オンラインでの確認を推奨 | [ソフトバンク公式](https://www.softbank.jp/mobile/service/esim/) |
| 楽天モバイル | my 楽天モバイルアプリ・Web | 公式FAQで確認を推奨 | [楽天モバイル公式: eSIM](https://network.mobile.rakuten.co.jp/product/sim/esim/) |
楽天モバイルのeSIM再発行は「my 楽天モバイル」アプリまたはWebサイトから行う(出典: [楽天モバイル公式: eSIM開通方法](https://network.mobile.rakuten.co.jp/guide/verify/ekyc/esim-activation/))。
### オンライン専用ブランド
| キャリア | 再発行方法 | 公式出典 |
|--------|-----------|---------|
| ahamo(ドコモ系) | ahamoアプリ・Web | [ahamo公式FAQ](https://faq.ahamo.com/) |
| povo2.0(au系) | povo公式アプリ・Web | [povo公式](https://povo.jp/) |
| LINEMO(ソフトバンク系) | My SoftBank(LINEMOページ) | [LINEMO公式](https://www.linemo.jp/) |
### MVNO
| キャリア | 再発行方法 | 公式出典 |
|--------|-----------|---------|
| IIJmio | IIJmioサービス(会員専用ページ) | [IIJmio公式](https://www.iijmio.jp/) |
| mineo | マイページ(mineoApp) | [mineo公式](https://mineo.jp/) |
### 海外eSIMプロバイダー
Airalo・Holaflyなど旅行eSIMプロバイダーは一般的に**再発行非対応**であることが多く、削除後は新たに購入が必要となるケースが多い。プロバイダーごとのポリシーは購入前に公式サイトで確認すること。
**重要**: 料金・手数料の具体額は変動するため、本記事では掲載しない。各社の最新の公式FAQで必ず確認すること。
---
## eSIM Quick Transferによる削除回避(iPhone間)
iPhoneからiPhoneへの機種変更であれば、eSIMを削除せずに移行できる方法がある。Apple純正の「eSIM Quick Transfer」だ。詳細は「[eSIMを別のiPhoneに転送する](/ja/guides/transfer-iphone/)」で解説している。
### Quick Transferのポイント
- iOS 16以降のiPhone同士で利用可能
- キャリアがeSIM Quick Transferに対応していることが条件
- 転送中、旧iPhoneのeSIMは自動で無効化される
- 削除→再発行の手続きが不要
### Quick Transferが使えない場合
以下の状況ではQuick Transferが使えず、削除→再発行の手順が必要になる。
- 利用キャリアがQuick Transferに未対応(多くのMVNOは未対応)
- 旧iPhoneのiOSが16未満
- iPhoneからAndroidへの機種変更(一部対応あり: iOS 26以降の対応キャリアのみ)
- 旧iPhoneが故障・紛失して操作できない
### QRコードを保管する重要性
Quick Transferが使えない状況に備えて、eSIMのQRコードは**端末とは別の場所に保管しておく**ことを強く推奨する。
保管場所の例:
- クラウドストレージ(Google Drive、iCloud Drive など)へのPDF/画像保存
- 印刷して封筒に保管
- スクリーンショットを別の端末に保存
QRコード自体を保管していても、一度使用されたQRコードは再利用できないため、「QRコードの保管=再発行手数料の節約」にはならない。しかし、**キャリアに連絡する際にアクティベーションコードや発行日時を示す証跡として使える**場合がある。より重要なのは、再発行が必要になったとき**すぐにキャリアに連絡できる準備**をしておくことだ。
---
## 削除・再インストール時のトラブル対処
### 削除後にQRコードをスキャンしても設定できない
**原因**: 使用済みのQRコードを再スキャンしている。
**対処**: キャリアの公式サポートに連絡し、新しいQRコードの再発行を依頼する。本記事「主要事業者の再発行ポリシー」の各社公式リンクを参照。
### 再発行されたQRコードをスキャンしてもエラーが出る
**考えられる原因と対処**:
1. **インターネット接続がない**: QRコードをスキャンしてプロファイルをダウンロードするにはWi-Fiまたはモバイルデータ通信が必要。別の回線でインターネットに接続してから再試行する
2. **端末がSIMロックされている**: eSIMをインストールしようとしているキャリアが、端末のSIMロック先と異なる場合にエラーが発生する。端末のSIMロック解除状態を確認すること(iPhoneなら「設定」→「一般」→「情報」→「キャリアロック」で「SIMの制限なし」と表示されればSIMフリー)
3. **QRコードの有効期限切れ**: キャリアによってはQRコードに有効期限が設けられている場合がある。再発行から時間が経過している場合はキャリアに新しいQRコードの再発行を依頼する
4. **SM-DP+応答エラー**: キャリアのeSIMプロファイル配布サーバーが一時的に応答できない状態の場合がある。時間をおいて再試行するか、キャリアのサポートに問い合わせる
QRコードを使わずにSM-DP+アドレスとアクティベーションコードを直接入力する方法もある。詳細は「[SM-DP+アドレスで手動設定する](/ja/guides/manual-code/)」を参照。
### 端末を初期化したらeSIMが消えた
**原因**: 「すべてのコンテンツと設定を消去」(iPhoneの場合)を実行すると、eSIMプロファイルも削除される。
**対処**: キャリアに再発行を依頼する。端末の初期化時点でeSIMが削除されているため、同じQRコードは使用できない。
Androidでも同様で、「データの初期化(出荷時状態への初期化)」を実行するとeSIMプロファイルが消去される。一部のAndroid端末では初期化時にeSIMプロファイルの保持/削除を選択できる場合がある(端末・OSバージョンによる)。
### キャリアの再発行審査が通らない・時間がかかる
再発行手続きには本人確認が必要なケースが多い。特に契約者本人以外が手続きする場合や、不正利用が疑われる状況では審査が厳しくなることがある。
- **本人確認書類を準備する**: マイナンバーカード、運転免許証などを準備する
- **契約時の情報を確認する**: 契約者名、メールアドレス、暗証番号など
- **eSIM不正再発行への注意**: フィッシングサイトなどで盗まれたIDを使ったeSIM不正再発行事案が報告されている(出典: [楽天モバイル公式お知らせ 2024年4月](https://network.mobile.rakuten.co.jp/information/news/other/2675/))。身に覚えのない再発行通知が届いた場合はすぐにキャリアに連絡すること
---
## FAQ
**eSIMを削除すると、QRコードで再インストールできますか?**
できません。eSIMのQRコードは1台の端末につき1回のみ使用できます(GSMA SGP.22の仕様)。削除後に同じQRコードで再スキャンしても「使用済み」として拒否されます。再インストールにはキャリアからの新しいQRコード(または再発行されたアクティベーション情報)が必要です。
**誤ってeSIMを削除してしまいました。どうすればよいですか?**
落ち着いてキャリアのサポートに連絡してください。多くのキャリアはオンラインまたは電話で再発行手続きに対応しています。再発行には手数料がかかるキャリアと無料のキャリアがあります。各キャリアの公式FAQで確認してください。
**iPhoneを初期化(リセット)した場合、eSIMも消えますか?**
はい。「すべてのコンテンツと設定を消去」を実行するとeSIMプロファイルも削除されます。初期化前にeSIMを別端末へ転送(eSIM Quick Transfer対応キャリアの場合)するか、キャリアへ再発行申請の準備をしておくことを推奨します。
**端末を売却・下取りに出す場合はeSIMを削除すべきですか?**
はい。売却・下取り前に必ずeSIMを削除してから端末を初期化してください。eSIMのプロファイルには加入者情報が含まれているため、削除せずに譲渡すると不正利用のリスクがあります。削除後はキャリアに再発行を申請してから新端末に設定します。
**eSIM Quick TransferならeSIMを削除せずに移行できますか?**
はい。eSIM Quick Transfer(iOS 16以降・対応キャリア限定)を使うと、旧iPhoneのeSIMを削除せずに新しいiPhoneへ転送できます。転送完了後に旧端末のeSIMは自動で無効化されます。Quick Transferが利用できない場合は削除→再発行の手順が必要です。
**AndroidでeSIMを削除するとどうなりますか?**
iPhoneと同様、削除したeSIMのQRコードは再使用できなくなります。削除前にキャリアの再発行ポリシーを確認し、必要に応じて再発行申請の準備をしてから削除してください。
**eSIMの再発行に時間はどのくらいかかりますか?**
キャリアによって異なります。楽天モバイル・ahamo・povo・LINEMOなどオンライン専用ブランドは最短即日(数分〜数十分)対応が多いです。ドコモ・au・ソフトバンク本体はオンライン手続きで即日〜翌日が目安ですが、店舗での対応が必要な場合は来店予約を含め数日かかることがあります。
---
## まとめ / 関連ガイド
eSIMの削除前に確認すべき重要ポイントをまとめる。
- **削除前に必ず確認**: QRコードは1回しか使えない。削除したら元のQRコードでの再インストールは不可
- **機種変更はQuick Transfer優先**: iPhoneからiPhoneへの移行なら「[eSIM Quick Transfer](/ja/guides/transfer-iphone/)」を使う方が再発行手続き不要でスムーズ
- **一時的に使わないだけなら削除しない**: 無効化(オフ)にとどめておく
- **売却・下取り前は削除必須**: 加入者情報の漏えい防止のため、削除後に初期化する
- **QRコードは別の場所に保管**: 端末が壊れても再発行手続きの際の参照情報として役立つ
| 状況 | 推奨操作 |
|------|--------|
| iPhoneからiPhoneへ移行 | [eSIM Quick Transfer](/ja/guides/transfer-iphone/) |
| 一時的に使わない | eSIMを無効化(削除しない) |
| 売却・下取り | eSIM削除 → 端末初期化 → 新端末で再発行 |
| 誤って削除した | キャリアへ再発行依頼 |
| Androidへ移行 | キャリアへ再発行依頼(一部キャリアはQuick Transfer対応) |
eSIMの初期設定方法は「[QRコードでeSIMを設定する(iPhone)](/ja/guides/qr-code-iphone/)」および「[QRコードでeSIMを設定する(Android)](/ja/guides/qr-code-android/)」で解説している。SM-DP+アドレスを使った手動設定は「[SM-DP+アドレスで手動設定する](/ja/guides/manual-code/)」を参照してほしい。
eSIM対応の国内SIMプランを比較したい場合は[SimFinderの通常検索](/ja/)を、旅行eSIMプランを調べたい場合は[SimFinder Travelで検索](/ja/travel/)できる。
================================================================================
# データローミングの設定 — ON/OFFの切り替えと注意点
URL: https://sim-finder.com/ja/guides/roaming-settings/
Type: guides (ja)
Published: 2026-06-04
海外でスマートフォンを使う際に最初に確認すべき設定が「データローミング」のON/OFFである。設定の意味を正確に理解しておくことで、意図しない高額課金や通信の途切れを防げる。
**この記事の要点:**
- データローミングをONにするだけでは課金されない。実際にデータ通信を行った時点から課金が始まるのが一般的だ(キャリアやプランにより異なる場合がある)
- iPhone・Androidのデータローミング設定箇所と操作手順を解説する
- デュアルSIM環境では「どちらのSIMのローミングを制御するか」が重要になる
国際ローミングの仕組みや料金モデルの詳細は[国際ローミングの仕組みと料金](/ja/guides/international-roaming/)で解説している。EU域内のローミング規制については[EUローミング完全ガイド](/ja/guides/eu-roaming/)を参照してほしい。
---
## 1. データローミングとは何か
データローミングとは、自社のホームネットワーク外(自国外のネットワーク)でモバイルデータ通信を行う機能のことである。端末の「データローミング」設定スイッチは、この機能を有効にするかどうかを制御している。
音声通話やSMSとは異なり、データローミングは端末の設定で独立してON/OFFできる。これにより「電話とSMSは受けたいが、データ通信の課金は避けたい」という運用が可能になっている。
### データローミングのON/OFFが変えるもの
| 設定 | モバイルデータ | 音声通話 | SMS |
|------|--------------|---------|-----|
| データローミングON | 使用可能 | 使用可能 | 使用可能 |
| データローミングOFF | 使用不可 | 使用可能 | 使用可能 |
| 機内モードON | 使用不可 | 使用不可 | 使用不可 |
音声通話とSMSは音声・制御チャネルで処理されるため、データローミングの設定に関わらず動作する。ただしキャリアや設定によって挙動が異なる場合があるため、渡航前にキャリアに確認しておくことが望ましい。
---
## 2. iPhoneでのデータローミング設定手順
iPhoneのデータローミング設定は以下の手順で操作する。
### シングルSIM構成(物理SIMまたはeSIM1枚)の場合
1. 「**設定**」アプリを開く
2. 「**モバイル通信**」をタップ
3. 「**通信のオプション**」をタップ
4. 「**データローミング**」をオン/オフに切り替える
### デュアルSIM構成(SIMが2枚以上)の場合
デュアルSIM環境では、SIMごとにデータローミングを個別に制御できる。
1. 「**設定**」アプリを開く
2. 「**モバイル通信**」をタップ
3. 制御したいSIM回線名をタップ(例:「主回線」「副回線」「旅行eSIM」など)
4. 「**通信のオプション**」をタップ
5. 「**データローミング**」をオン/オフに切り替える
デュアルSIMでの具体的な海外活用方法は[デュアルSIMで海外旅行する方法](/ja/guides/dual-sim-for-travel/)で解説している。
### iOSバージョンによるメニュー構造の違いについて
上記の手順はiOS 16以降のメニュー構造を基準にしている。古いiOSバージョンや将来のアップデートによりメニューの名称・階層が変わる場合がある。設定が見当たらない場合はApple公式サポート(support.apple.com)で最新の手順を確認すること。
---
## 3. Androidでのデータローミング設定手順
Androidのデータローミング設定はメーカーおよびOSバージョンによってメニュー構造が異なる。以下は主要パターンの手順である。
### Google Pixel(Android標準に近い構成)
1. 「**設定**」アプリを開く
2. 「**ネットワークとインターネット**」をタップ
3. 「**SIM**」(または「インターネット」)をタップ
4. 対象のSIMをタップ
5. 「**ローミング**」(またはデータローミング)をオン/オフに切り替える
### Samsung Galaxy
1. 「**設定**」アプリを開く
2. 「**接続**」をタップ
3. 「**モバイルネットワーク**」をタップ
4. デュアルSIM搭載機の場合はSIMを選択
5. 「**データローミング**」をオン/オフに切り替える
### その他の機種
「設定」→「ネットワーク」や「設定」→「通信」から「モバイルネットワーク」や「SIM管理」を探すと見つかることが多い。メニュー構造が見当たらない場合は、設定アプリの検索機能で「ローミング」と入力すると設定箇所を特定できる。
---
## 4. 高額課金を防ぐ設定の組み合わせ
データローミングをONにしている状態でも、以下の設定を組み合わせることで意図しないデータ消費を抑えられる。
### バックグラウンドAppの更新をWi-Fiのみに制限する(iPhone)
スマートフォンはアプリの自動更新・クラウドバックアップ・メール同期などのバックグラウンド通信を常時行っている。ローミング中にこれらが動作すると気づかないうちにデータを消費する。
**設定手順(iPhone):**
1. 「設定」→「一般」→「Appのバックグラウンド更新」
2. 「Wi-Fi」のみを選択(「オフ」または「Wi-Fi」を選ぶ)
**設定手順(Android):**
1. 「設定」→「ネットワークとインターネット」→「データセーバー」をオンにする
2. または「設定」→「アプリ」から個別アプリの「バックグラウンドデータ」を無効化する
データ節約設定のより詳細な手順は[データ通信量の節約テクニック](/ja/guides/save-data/)で解説している。
### データ使用量の上限(警告)を設定する
**Android:** 多くのAndroid端末では「設定」→「ネットワークとインターネット」→「データ使用量」からデータ警告・上限値を設定できる。設定した容量に達すると通知が届く。
**iPhone:** iOS標準にはデータ上限を設定するネイティブ機能はない。キャリアのアプリや通知機能を活用することになる。
### 特定アプリのモバイルデータを無効化する(iPhone)
1. 「設定」→「モバイル通信」を開く
2. アプリ一覧から使用量を抑えたいアプリのスイッチをオフにする
この設定はローミング・国内問わずモバイルデータ通信全体に適用される点に注意する。
---
## 5. デュアルSIM環境でのローミング制御
デュアルSIM(物理SIM+eSIM、またはeSIM2枚)で海外を利用する場合は、SIMごとのローミング設定が重要になる。
### 日本SIM(主回線)+旅行eSIM(副回線)の構成
海外旅行で最もよく使われる構成が「日本のキャリアSIMを主回線として維持しつつ、渡航先向けの旅行eSIMをデータ通信に使う」方法だ。
この構成で推奨される設定は次の通りである。
1. **日本SIM(主回線)のデータローミングをOFF**にする
→ 国際ローミング料金の発生を防ぐ。SMS受信・音声着信は維持される
2. **旅行eSIMをモバイルデータ通信のデフォルト回線に設定**する
→ 現地のデータ通信は旅行eSIMのプランを使う
**iPhoneでモバイルデータ通信の回線を切り替える手順:**
1. 「設定」→「モバイル通信」を開く
2. 「モバイルデータ通信」の項目で旅行eSIMに対応する回線を選択する
**Androidでデフォルトデータ回線を切り替える手順(Google Pixel):**
1. 「設定」→「ネットワークとインターネット」→「SIM」を開く
2. 旅行eSIMの回線に対して「優先SIM」またはデータ通信のデフォルト設定を変更する
デュアルSIM構成のより詳細な解説は[デュアルSIMで海外旅行する方法](/ja/guides/dual-sim-for-travel/)を参照してほしい。
PR
副回線に入れる旅行eSIMが未定なら。Airaloは当サイトが料金を追跡している194の国・地域をカバーしており、韓国・台湾なら1GB / 7日で$4.50、アメリカ・タイなら$4.00から。出発前に日本でインストールと回線設定まで済ませられるので、現地に着いたら上の手順でデータ回線を切り替えるだけで使える。
Airaloで渡航先のeSIMを探す →
渡航先別の料金比較は[SimFinderの旅行eSIM検索](/ja/travel/)でも確認できる。
### 注意: iPhoneの「モバイルデータ通信の切り替えを許可」
iPhoneのデュアルSIM環境では「モバイルデータ通信の切り替えを許可」というオプションが表示される場合がある。これは音声通話中に、音声専用回線が一時的にデータ通信を使用できるようにする設定だ。なおApple公式によればデータローミング使用中はこの機能は動作しない。旅行中に意図せず国際ローミングが発動しないよう、このオプションを無効にしておくことを推奨する。
---
## 6. SMS/音声ローミングとデータローミングの違い
ローミングには「データローミング」以外に「音声ローミング」「SMSローミング」の概念がある。
| 種類 | 内容 | データローミング設定との関係 |
|------|------|--------------------------|
| データローミング | モバイルデータ通信(インターネット接続) | このスイッチで直接制御 |
| 音声ローミング | 音声通話(発信・着信) | データローミングの設定とは独立 |
| SMSローミング | SMSの送受信 | データローミングの設定とは独立 |
SMSはデータ通信とは別の制御チャネルで届くため、データローミングをOFFにしていてもSMSの受信は通常維持される。ただしiMessageやLINEなどアプリ経由のメッセージはモバイルデータを使うため、データローミングOFF時はWi-Fiが必要になる。
音声通話の着信についても同様で、データローミングをOFFにしていても通話の着信は通常維持される。ただしキャリアのローミング協定や契約プランによって異なる場合があるため、重要な着信が予想される場合は渡航前にキャリアに確認しておくことを推奨する。
---
## 7. 帰国後の設定の確認と戻し方
帰国後はデータローミング設定をどうするかを意識的に判断することが重要だ。
### 帰国後にデータローミングをOFFのままにする場合
日本国内ではデータローミングのON/OFFは通常の接続に影響しない。国内のキャリアネットワーク(ホームネットワーク)に接続しているため、ローミング設定は参照されない。OFFのままで使い続けても国内の利用に支障はない。
### 次回の渡航に備えた確認ポイント
次の海外渡航前に以下を確認することを推奨する。
1. **データローミングの設定状態**:OFFのままであれば渡航前にONにするか、キャリアの料金プランを確認した上で判断する
2. **バックグラウンドApp更新の設定**:「Wi-Fiのみ」に変更している場合は国内でも同じ状態が続いていることに注意する
3. **モバイルデータ通信のデフォルト回線**:デュアルSIM構成の場合は、どちらのSIMがデフォルトになっているかを確認する
4. **データ上限の設定**(Androidのみ):国内向けの上限値が設定されている場合は海外渡航前に調整する
---
## 8. ローミング設定を変更する前に確認すること
データローミングをONにする前には以下を確認しておくことが重要だ。
### キャリアのローミングプランを確認する
データローミングをONにしてデータ通信を行った場合、キャリアの国際ローミング料金が適用される。利用前に契約中のキャリアの公式サイトでローミング料金・定額パック・対応国を確認し、必要に応じてローミングパックを申し込んでおくことを推奨する。
国際ローミングの料金モデル(従量課金型・定額パック型・無料通信枠型)の詳細は[国際ローミングの仕組みと料金](/ja/guides/international-roaming/)で解説している。
### データ消費量の目安を把握する
渡航中に行う通信量(地図・SNS・動画など)の目安を事前に把握しておくと、定額パックの容量選択の参考になる。用途別のデータ消費量の目安は[データ通信量の目安ガイド](/ja/guides/data-usage-guide/)を参照してほしい。
### EU圏内の渡航ではRLAH規制を確認する
EU/EEAのキャリアと契約している場合、EU/EEA域内ではRLAH(Roam Like at Home)規制により追加料金なしでデータ通信が利用できる場合がある。ただし日本のキャリアSIMはこの規制の直接の対象外である。EU渡航時のローミング事情は[EUローミング完全ガイド](/ja/guides/eu-roaming/)で詳しく解説している。
---
## FAQ
以下によくある質問をまとめる。
**Q. データローミングをONにしただけで料金は発生しますか?**
データローミングをONにするだけでは料金は発生しません。実際にデータ通信を行った時点から課金が始まるのが一般的です(キャリアやプランにより異なる場合があります)。ただしバックグラウンドで自動的に通信が走ることがあるため、意図しない課金を防ぐにはバックグラウンドAppの更新をWi-Fiのみに制限しておくことを推奨します。
**Q. データローミングをOFFにすると通話やSMSも使えなくなりますか?**
音声通話とSMSはデータ通信とは別の経路(音声・制御チャネル)を使うため、データローミングをOFFにしても着信・通話・SMS受信は通常維持されます。ただし一部のキャリア・プラン・端末設定によって挙動が異なる場合があるため、渡航前に利用中のキャリアで確認することを推奨します。
**Q. デュアルSIM環境ではどのSIMのローミングを制御すればよいですか?**
旅行eSIMを副回線として使う構成では、日本のホームSIM(主回線)のデータローミングをOFFにし、旅行eSIMをモバイルデータ通信に指定する運用が一般的です。これによりホームSIMの国際ローミング料金を発生させずに現地データ通信ができます。
**Q. 帰国後はローミング設定を元に戻す必要がありますか?**
日本国内ではデータローミングの設定はネットワーク接続に影響しないため、OFFのままでも通常の使用に支障はありません。ただし次回の海外渡航前には設定を確認し、意図した状態になっているかを確かめることを推奨します。
**Q. 特定のアプリだけローミング中のデータ通信を許可できますか?**
iPhoneでは「設定」→「モバイル通信」でアプリごとにモバイルデータのON/OFFを切り替えられます。ただしこの設定はローミング・国内を問わずモバイルデータ全体に適用されます。ローミング中だけ制限する専用のアプリ別設定は標準OSには存在しないため、ローミング中は必要なアプリ以外のモバイルデータを無効化するか、データローミング自体をOFFにしてWi-Fiのみ使う運用が現実的です。
---
## まとめ / 関連記事
データローミングの設定はシンプルなON/OFFのスイッチだが、その背景にある「バックグラウンド通信の制御」「デュアルSIM環境でのSIM別制御」「SMS/音声との違い」を理解しておくことで、高額課金を防ぎながら必要な通信を維持できる。
設定操作の要点は、(1) 渡航前にキャリアのローミングプランを確認する、(2) バックグラウンド通信をWi-Fiのみに制限する、(3) デュアルSIM構成の場合はどちらのSIMのデータ通信を有効にするかを明示的に設定する、の3点に集約される。
**関連ガイド:**
- [国際ローミングの仕組みと料金](/ja/guides/international-roaming/) — ローミングの技術的な仕組みと料金モデルを体系的に解説
- [EUローミング完全ガイド](/ja/guides/eu-roaming/) — RLAH規制と対象32カ国・スイス・英国の扱い
- [データ通信量の目安ガイド](/ja/guides/data-usage-guide/) — 用途別の消費量を把握して適切なプランを選ぶ
- [デュアルSIMで海外旅行する方法](/ja/guides/dual-sim-for-travel/) — 日本SIM+旅行eSIMの組み合わせ設定を詳解
- [データ通信量の節約テクニック](/ja/guides/save-data/) — iPhone/Androidのアプリ別節約設定の詳細手順
================================================================================
# 衛星通信 — スマホから直接つながる時代
URL: https://sim-finder.com/ja/guides/satellite/
Type: guides (ja)
Published: 2026-06-04
スマートフォンが地上の基地局なしに衛星と直接通信する技術が、商用段階に入っている。Apple緊急SOS(衛星)の提供開始、Starlink Direct to Cellの段階的展開、3GPP NTN標準の制定——これらは「衛星通信は専用端末が必要」という常識が変わりつつあることを示している。
ただし現時点では、できることと対応状況に大きな差がある。この記事ではDirect-to-Cell/NTN(Non-Terrestrial Network)技術の概要、主なサービス例、何ができて何ができないか、標準規格の位置づけを概念として整理する。特定のサービスの提供国や料金は変化が速いため、本記事では技術的な仕組みの理解に絞って解説する。
---
## 1. Direct-to-Cell/NTNとは
**Direct-to-Cell**(直接衛星通信)とは、スマートフォンが地上の携帯基地局を介さず、衛星と直接無線通信する技術の総称だ。「D2C」「Direct to Device」「Supplemental Coverage from Space(SCS)」など、各社・各標準機関によって呼称が異なるが、本質は同じだ。
従来の衛星電話との違いは**既存のスマートフォンが対象**という点にある。従来のイリジウム・インマルサットなどの衛星電話は専用端末が必要だった。Direct-to-Cellは、4G LTEや5G NRの無線インターフェースを利用し、スマートフォン側のハードウェアを変更せずに衛星接続を実現することを目指している。
この技術を標準規格として整備しているのが**3GPP NTN(Non-Terrestrial Network)**だ。地上ネットワーク(TN: Terrestrial Network)に対して、衛星・高高度プラットフォーム(HAPS: High-Altitude Platform Station)などを「非地上系ネットワーク」として定義し、5G NRの一部として統合する枠組みを作っている。
### 従来の衛星通信との違い
衛星通信自体は新しい技術ではない。イリジウム(Iridium)やインマルサット(Inmarsat)は1990年代から音声・データ通信サービスを提供してきた。しかしこれらは専用端末が必要であり、一般のスマートフォンユーザーが利用するものではなかった。
Direct-to-Cell技術の本質的な新しさは「**既存のスマートフォンを変えずに衛星に接続できる**」点にある。これを実現するために、衛星側が地上の携帯基地局と互換性のある信号を発信する設計をとっている。端末は「どこかの基地局に繋がっている」と認識しており、その基地局が地上ではなく宇宙にあるという事実は端末から見えない。
---
## 2. 3GPP NTNの標準化状況
3GPP NTNは段階的に標準化が進んでいる。
**Release 17**(2022年)で、5G NR over NTN(衛星向けNR)の基礎仕様が凍結された。これにより、既存の5G NRプロトコルを衛星通信環境(高遅延・ドップラーシフト補正等)に適応させるための技術的枠組みが定義された。NR NTNとIoT NTN(NB-IoT/eMTC over NTN)の2系統が規定されている。
**Release 18**(2024年)では、NTNの機能拡張が追加された。
### NTN特有の技術的課題
衛星を相手とする通信には、地上ネットワークにはない技術的課題がある。
- **伝搬遅延**: GEO衛星との往復遅延は約600ms以上で、地上LTE(数十ms以下)と比べると大きい。LEO衛星でも数十ms程度の遅延が加わる
- **ドップラーシフト**: LEO衛星は地表に対して高速で移動するため、電波の周波数がずれる(ドップラー効果)。端末・衛星の双方でこの補正が必要
- **衛星の移動による接続切り替え**: LEO衛星は軌道上を移動するため、端末は定期的に別の衛星に接続し直す必要がある
3GPP NTN仕様はこれらの課題に対応するための技術的補正手順を定義している。
NTNが扱う軌道は主に以下の3種類だ。
| 軌道 | 高度 | 遅延 |
|------|------|------|
| LEO(低軌道) | 約500〜2,000km(物理的軌道範囲は約160kmから) | 数十ms |
| MEO(中軌道) | 約2,000〜20,000km | 100〜600ms |
| GEO(静止軌道) | 約35,786km | 約600ms以上 |
LEOは遅延が小さく、Direct-to-Cellに適している。Starlink(SpaceX)はLEO軌道を利用している。
直接衛星通信の技術的背景については、[国際ローミングの仕組みと料金](/ja/guides/international-roaming/)で解説している地上ネットワークの構造と比較すると理解が深まる。
---
## 3. Apple緊急SOS(衛星)
**Apple緊急SOS(衛星)**は、iPhone 14以降に搭載されている機能で、携帯・Wi-Fiの電波が届かない場所でも衛星経由で緊急サービスに連絡できる(対応地域内に限る)。日本での提供状況はApple公式サイトで確認すること。
仕組みは通常のDirect-to-Cellとは異なる専用設計だ。AppleはGlobalstar社の衛星ネットワークを使用しており、緊急メッセージ(テキスト形式)をAppleのリレーセンターに送信し、そこから地元の緊急サービスに転送する方式をとっている。
### できること
- 緊急サービスへのメッセージ送信(SOS)
- 位置情報の共有(Appleの「探す」ネットワーク経由)
- 一部地域では「衛星経由のメッセージ」機能(友人・家族へのiMessageなど)
### 制約
- **屋外・開けた空間が必要**: 衛星との見通し(LOS: Line of Sight)が確保できない環境では接続できない
- **通話はできない**: テキストメッセージのみ
- **接続に時間がかかる**: 端末の向きを調整しながら衛星を捕捉するため、数十秒〜数分かかる場合がある
- **対応地域に制限がある**: Appleが順次対応地域を拡大中
iPhone 14以降で圏外になった際の対処法については、[「圏外」「サービスなし」の対処法](/ja/guides/no-service/)も参考にしてほしい。
---
## 4. Starlink Direct to Cell
**Starlink Direct to Cell**はSpaceXが展開するサービスで、Starlink LEO衛星にLTE基地局(eNodeBに相当)の機能を搭載し、既存のスマートフォンが直接衛星に接続できる設計をとっている。
通常のLTE Band 25(1.9 GHz帯)を使用しており、端末側にソフトウェア・ハードウェアの追加なしに接続できることが特徴だ。
### 現時点で提供・展開中の機能(段階的)
1. **SMS(テキストメッセージ)**: 2025年に提供開始
2. **低速データ通信**: ベータ段階で展開中
3. **音声通話**: ベータ段階で展開中
提供国・展開状況・機能の詳細は変化が速いため、Starlink公式サイトおよびパートナーキャリアの最新情報を参照すること。各国の規制当局の承認が必要なため、国によって提供状況が異なる。
### キャリアパートナーシップの必要性
Direct-to-Cellサービスは衛星事業者単独で成立するものではない。各国の電波規制において、衛星から発信される電波が既存の携帯周波数帯を利用する場合、当該周波数の免許を持つ地上キャリアとの協力関係(スペクトルシェアリング協定や規制上の承認)が必要になるケースがある。このため、同一の技術・衛星を使っていても、国によって提供可否やサービス内容が異なる。
利用者の立場からは、「海外旅行先でこのサービスが使えるかどうか」は渡航前に確認が必要な情報の一つだ。海外通信の全体的な選択肢については[海外でスマホを使う4つの方法](/ja/guides/four-options/)で整理している。
---
## 5. できること・できないこと
衛星通信技術の現在地を整理すると、次のように分類できる。
### 現在の主な用途(実用段階)
- **緊急SOS送信**: Apple緊急SOS(衛星)が代表例。生命の危機を知らせるメッセージ送信
- **SMSによる連絡**: テキストメッセージの送受信(一部サービス)
- **位置情報の共有**: 遭難時・登山・アウトドアでの位置共有
### 現在困難な用途
- **通常のモバイルブロードバンド(高速データ)**: LEO衛星通信でも通信速度・レイテンシは地上LTEより制約がある
- **動画ストリーミング・大容量転送**: 帯域・遅延の制約から、通常のスマートフォン利用を代替するには至っていない
- **リアルタイム音声通話**: 一部サービスが展開中だが、普及は道半ばの段階
### 端末・地域による差
- **対応端末に差がある**: Apple緊急SOS(衛星)はiPhone 14以降、Starlink Direct to Cellは対応端末・バンドが必要
- **対応地域に差がある**: サービス提供地域は各社が段階的に拡大中
- **規制環境に差がある**: 各国の電波法・規制当局の承認状況が異なる
海外でスマホを使う際の選択肢の整理は[海外でスマホを使う4つの方法](/ja/guides/four-options/)で解説している。
---
## 6. 地上ネットワークとの補完関係
Direct-to-Cell/NTNは、地上ネットワークの**補完(Supplemental Coverage)**として位置づけられることが多い。山間部・離島・洋上・砂漠など、地上基地局の整備が経済的に困難な地域をカバーすることが主な目的だ。
地上LTEネットワークが繋がっている場所では、通常どおり地上ネットワークが優先される。衛星通信は**地上ネットワーク圏外時のバックアップ手段**として機能する設計になっている。
3GPP NTNの枠組みでは、端末が地上セルから衛星セルに切り替わる(ハンドオーバー)際の技術的手順も規定されており、シームレスな切り替えが目指されている。
### なぜ「完全な代替」にならないのか
衛星通信が地上モバイルネットワークの完全な代替にならない理由は複数ある。
**帯域の物理的制約**: LEO衛星1基が対応できる同時接続ユーザー数と帯域幅は、地上基地局1基のそれとは桁が異なる。都市部で地上ネットワークが機能している状況で、すべてのユーザーが衛星通信に移行することは現実的でない。
**コスト構造**: 衛星コンステレーションの構築・維持コストは地上ネットワークと比べて大きく、サービス単価は高くなる傾向がある。
Direct-to-Cell技術は「地上が繋がらない場所でのセーフティネット」として設計されており、地上ネットワークと競合するのではなく、その外縁を埋めるものだ。
---
## 7. 主要SIMの選び方への影響
現時点での衛星通信は「緊急・補完用途」の領域にあり、日常のSIM選びに直接影響することは少ない。ただし以下の観点は今後重要になりえる。
- **端末の対応**: iPhone 14以降のように、端末自体が衛星通信機能を搭載しているかどうか
- **サービスの契約形態**: 衛星通信機能が端末標準搭載か、キャリアとの契約が別途必要かはサービスにより異なる
- **利用シーン**: アウトドア・登山・離島旅行などで圏外になる機会が多い場合は、衛星通信対応端末の選択が実用的な意味を持つ
SIMカードの基本的な仕組みを理解したうえで衛星通信の位置づけを捉えたい場合は、[SIMカードとは](/ja/guides/what-is-sim/)から読むことを推奨する。旅行中のSIM二枚使いとの組み合わせについては[海外旅行でのデュアルSIM活用](/ja/guides/dual-sim-for-travel/)が参考になる。
**衛星通信対応端末を持っているかどうかは、端末の仕様ページか設定画面(緊急SOS関連)から確認できる。**対応端末を持っていない場合でも、地上ネットワーク圏外への対策として[「圏外」「サービスなし」の対処法](/ja/guides/no-service/)で紹介している方法が参考になる。
---
## 8. 今後の技術動向
3GPP NTN標準は進化が続いており、以下の方向性で技術的な改善が進んでいる。
- **NTNと地上ネットワークの統合深化**: Release 18以降でハンドオーバーの改善・QoS制御の精緻化が規定されている
- **LEO衛星コンステレーション拡大**: 打ち上げ衛星数の増加により、カバレッジと通信容量の向上が見込まれる
- **各国規制の整備**: 衛星からの直接通信は各国の電波規制の対象であり、承認国・地域の拡大が必要
ただし、技術の進化速度と商用展開の速度は異なる。規格が策定されても、対応端末の普及・各国規制承認・キャリアとの提携が揃って初めてユーザーが利用できる状態になる。
### 日本での状況
日本での直接衛星通信の商用提供状況は、各キャリアおよび規制当局(総務省)の動向による。電波法の枠組みの中で衛星由来の電波をどう扱うかについては制度的な整備が進行中であり、本記事執筆時点(2026年6月)では、Apple緊急SOS(衛星)の日本提供状況を含め、各社公式情報を個別に確認することを推奨する。
---
## FAQ
### 衛星通信でスマホからインターネットは普通に使えますか?
現在提供されているDirect-to-Cell方式の衛星通信は、通常のモバイルブロードバンドとは異なります。サービスによっては低速なデータ通信やSMSに限定されており、動画ストリーミングや大容量ファイル転送を前提とした設計ではありません。Apple緊急SOS(衛星)は緊急メッセージ送信に特化した機能です。利用可能な機能はサービスと地域によって異なるため、各社の公式情報を確認してください。
### Apple緊急SOS(衛星)はどの端末で使えますか?
Apple緊急SOS(衛星)はiPhone 14以降で提供されています。ただし対応地域はAppleが順次拡大中であり、すべての国・地域で利用できるわけではありません。日本での提供状況についてはApple公式サイトで確認してください。
### 衛星通信は圏外のどんな場所でも使えますか?
衛星通信サービスが利用可能な地域でも、障害物(屋根・ビルの内部・深い谷間)があると衛星との見通し通信ができず接続できない場合があります。Apple緊急SOS(衛星)の場合、Appleは屋外・開けた空間での利用を前提としています。サービスごとに利用条件が異なります。
### 3GPP NTNとは何ですか?
3GPP NTN(Non-Terrestrial Network)は、衛星や成層圏飛行体などの非地上系ネットワークを5G NR(New Radio)に統合するための標準規格です。Release 17(2022年)で基礎仕様が凍結され、衛星からスマートフォンへの直接通信を既存の5G NRプロトコルで実現するための技術的枠組みを定義しています。
### Starlink Direct to Cellとはどのようなサービスですか?
Starlink Direct to Cellは、SpaceXが提供する衛星通信サービスで、対応端末(既存のスマートフォン)が直接Starlink衛星に接続できる技術です。現在はSMSや低速データ通信の提供が段階的に開始されています。提供国・機能の詳細はStarlink公式サイトを参照してください。
---
## まとめ
- **Direct-to-Cell(NTN)**は既存スマートフォンが地上基地局なしに衛星と直接通信する技術。専用端末不要が最大の特徴だ
- **Apple緊急SOS(衛星)**はiPhone 14以降でGlobalstar衛星経由の緊急メッセージ送信を提供。通話は不可で、屋外・開けた場所が前提
- **Starlink Direct to Cell**はLTE Band 25を利用してLEO衛星から既存スマートフォンに直接接続。SMS(2025年提供開始)→低速データ・音声通話(ベータ展開中)の順に段階展開中。提供状況は公式の最新情報を参照
- **3GPP NTN**はRelease 17(2022年)で基礎仕様が凍結され、5G NRの枠組みでNTNを統合する標準規格
- 現段階では**緊急・補完用途**が中心。高速データ通信の代替にはなっていない
- **端末・地域・規制の差**が大きく、サービス提供状況は各社公式で確認が必要
- 日本での提供状況は電波法・規制当局の動向に依存するため、最新情報は各社公式を参照すること
---
関連記事: [海外でスマホを使う4つの方法](/ja/guides/four-options/) / [「圏外」「サービスなし」の対処法](/ja/guides/no-service/) / [国際ローミングの仕組みと料金](/ja/guides/international-roaming/) / [SIMカードとは](/ja/guides/what-is-sim/) / [海外旅行でのデュアルSIM活用](/ja/guides/dual-sim-for-travel/)
================================================================================
# データ通信量の節約テクニック — iPhone/Androidのアプリ別設定と実践ガイド
URL: https://sim-finder.com/ja/guides/save-data/
Type: guides (ja)
Published: 2026-04-22
データ節約の基本は「何が大量に消費しているかを把握し、大きい順に対策する」ことにある。動画ストリーミングが全消費量の大半を占めることが多く、YouTubeの画質を720pから360pに下げるだけで同じ視聴時間でも消費量を約4分の1以下に抑えられる。
この記事では、iPhoneとAndroid両方のOS設定、主要アプリ別の節約設定、自動通信の停止方法、Wi-Fi・事前ダウンロード活用の順で具体的な手順を解説する。自分に合ったプランを検討中の方は[データ通信量の目安](/ja/guides/data-usage-guide/)を、本記事に登場する「バックグラウンド通信」「ビットレート」「速度制限」などの用語解説は[SIM・モバイル通信用語集](/ja/guides/glossary-index/)も併せて参照してほしい。
---
## 1. データ節約の基本戦略
節約の優先順位は消費量の大きいものから対処するのが最も効率的だ。
### ステップ1: 現在の消費量を把握する
まず自分が何にどれくらいのデータを使っているかを確認する。
**iPhoneの場合**(2026年4月時点)
1. 「設定」→「モバイル通信」を開く
2. 画面を下にスクロールすると、アプリごとの消費量一覧が表示される
3. 月初に「統計情報をリセット」しておくと月間の実績が正確に分かる
**Androidの場合**(デバイス・バージョンにより異なる、2026年4月時点)
1. 「設定」→「ネットワークとインターネット」→「インターネット」を開く
2. キャリア名横の歯車アイコン→「データ使用量」を確認する
3. アプリ別の消費量一覧でどのアプリが多いか把握できる
※ Samsungなどメーカーによってメニュー名が異なる場合がある。「データ使用量」または「データ管理」で検索すると見つけやすい。
### ステップ2: 消費量の大きい順に対策する
一般的な消費量の傾向は以下の通りだ。
| 優先度 | カテゴリ | 効果 |
|--------|---------|------|
| 高 | 動画ストリーミング(YouTube・Netflix等) | 画質1段階下げるだけで消費量が数分の1に |
| 高 | バックグラウンド自動アップデート | OS更新1回で1〜5GB消費することも |
| 中 | SNS(Instagram・TikTok等) | 動画リール多用時は月30GB超えも |
| 中 | クラウドバックアップ(iCloud・Google フォト) | 大量写真・動画の同期は予想外に大きい |
| 低 | 音楽・テキスト通信 | 数十〜数百MB/月程度 |
---
## 2. OSレベルの設定
アプリを個別に設定する前に、OS全体のデータ節約設定を有効にすると効果が高い。なお物理SIMかeSIMかによって設定項目の表示が若干異なる場合があるが、基本的な節約機能はどちらでも利用できる(eSIMの仕組みは[eSIMとは — 仕組み・メリット・デメリット](/ja/guides/what-is-esim/)を参照)。
### iPhoneのデータ節約設定
**低データモードの有効化**(2026年4月時点)
「設定」→「モバイル通信」→「通信のオプション」→「低データモード」をオンにする。
低データモードでは以下が自動的に制限される。
- iCloudのバックグラウンド同期
- App Storeの自動アップデート
- 対応アプリのビデオ画質の自動低下
対応アプリ(Netflix、Spotify等)では自動的に低データ設定に切り替わる。ただし低データモードをオンにすると、一部アプリでプッシュ通知の遅延が発生する場合がある点に注意してほしい。
**アプリ別にモバイルデータをオフにする方法**(2026年4月時点)
「設定」→「モバイル通信」→(画面下部のアプリ一覧)で各アプリのトグルをオフにすると、そのアプリはモバイルデータを一切使用しなくなる。Netflixや動画アプリをWi-Fi限定にするのに有効だ。
### Androidのデータセーバー設定
**データセーバーの有効化**(2026年4月時点)
Pixelの場合: 「設定」→「ネットワークとインターネット」→「データセーバー」をオンにする。
Samsungの場合: 「設定」→「接続」→「データ使用量」→「データセーバー」をオンにする。
データセーバーをオンにするとバックグラウンドデータが制限され、アプリはフォアグラウンドにある間のみデータ通信できる。LINEやメールなど常時通知を受けたいアプリは「データセーバーの例外」に追加しておく。
**モバイルデータの上限・警告設定**(2026年4月時点)
Androidではプラン容量に合わせてデータ使用量の警告・上限を設定できる。Pixelの場合「設定」→「ネットワークとインターネット」→「インターネット」→キャリア横の歯車→「データ警告と上限」で設定する。月間容量の80〜90%の時点で警告が出るように設定しておくと使い過ぎを事前に防げる。
---
## 3. 動画アプリの節約設定
動画ストリーミングはデータ消費の最大要因であり、設定変更の効果が最も大きい。
### YouTube
YouTubeは公式ヘルプに画質別の具体的なデータ消費量テーブルを掲載していないが、第三者の計測によると360p(低画質)で約0.3〜0.45GB/時間、480p(標準)で約0.5〜0.7GB/時間、720p(HD)で約1.0〜1.5GB/時間が目安となっている。画質を720pから360pに下げると同じ視聴時間で消費量が約4分の1になる。
**画質を固定する方法**(2026年4月時点)
1. YouTubeアプリのプロフィールアイコン→「設定」→「動画の画質設定」
2. 「モバイルデータ通信」を「360p」または「データ通信量を節約」に設定
なお「データ通信量を節約」オプションの具体的な動作(どの解像度に制限されるか等)はYouTube側のアップデートで変更される場合がある点に注意してほしい。
### Netflix
Netflix公式ヘルプによると、モバイルの設定は以下の3段階に分かれている(2026年4月時点)。
| 設定 | 目安 |
|------|------|
| 自動(Automatic) | 約4時間で1GB |
| データを節約(Save Data) | 約6時間で1GB |
| データをより節約(Maximum Data) | さらに少ない消費 |
**設定変更の手順**(2026年4月時点)
1. Netflixアプリ→プロフィール画像→「アプリ設定」
2. 「モバイルデータ使用量」→「データを節約」を選択
設定はプロフィール単位で管理されるため、家族共有アカウントでは各プロフィールを個別に変更する必要がある。
### Amazon Prime Video
Prime Videoも動画品質をモバイルデータ使用時に下げる設定が用意されている(2026年4月時点)。
1. Primeビデオアプリ→右下の「マイスタッフ」→右上の「設定(歯車)」
2. 「ストリーミングと再生」→「ストリーミング画質」→「データセーバー」または「良い」に変更
### TikTok
TikTokはデフォルト設定でモバイルデータ使用時に約0.5〜1.0GB/時間を消費する(第三者計測の目安値)。
**節約設定の手順**(2026年4月時点)
1. プロフィール→右上の「≡」→「設定とプライバシー」
2. 下にスクロールし「キャッシュとモバイルデータ」→「データセーバー」をオンにする
データ節約モードをオンにすると動画の自動再生が低画質になる。また「Wi-Fiのみ動画を自動再生」設定も合わせて確認しておくとよい。
---
## 4. 音楽・音声アプリの節約設定
音楽アプリは動画に比べてデータ消費が少ないが、最高音質での常時ストリーミングは積み重なると無視できない量になる。
### Spotify
Spotify公式によると音質ティアと消費量の目安は以下の通りだ(2026年4月時点)。
| 音質 | ビットレート目安 | 1時間あたりの消費量目安 |
|------|---------------|----------------------|
| 通常(Normal) | 約96kbps | 約43MB |
| 高音質(High) | 約160kbps | 約72MB |
| 最高音質(Very High) | 約320kbps(Premium限定) | 約144MB |
**音質設定の変更手順**(2026年4月時点)
1. Spotifyアプリ→プロフィール画像→「設定とプライバシー」→「データ節約とオフライン」または「音質」
2. 「モバイルのストリーミング音質」を「通常」または「低」に変更
3. 「モバイルのデータ節約」をオンにすると音質を自動で下げる
**オフライン再生の有効化**
Premiumプランではプレイリスト・アルバム・ポッドキャストをダウンロードできる。Wi-Fi接続時に事前ダウンロードしておけば外出先での消費をゼロにできる。
### Apple Music
Apple Musicも音質設定を調整できる(2026年4月時点)。
1. 「設定」→「ミュージック」→「モバイルデータ通信」
2. 「モバイルデータ通信」の「高品質のストリーミング」をオフにする
3. 「モバイルデータ通信の制限」でダウンロードをWi-Fi限定にする
### ポッドキャスト
iPhoneのPodcastsアプリでは自動ダウンロードをWi-Fi限定に設定できる(2026年4月時点)。
1. 「設定」→「Podcast」→「モバイルデータ通信」
2. 「エピソードのダウンロード」をオフにする(Wi-Fi接続時のみダウンロード)
3. 「バックグラウンドのAppの更新」の制限もあわせて確認する
---
## 5. SNS・メッセージアプリの節約設定
SNSは画像・動画の自動再生や高解像度画像の自動読み込みが主な消費原因となる。
### Instagram
Instagramはフィード・ストーリーズ閲覧で約0.3〜1.0GB/時間(第三者計測の目安値)を消費する。Reelsをよく見る場合はさらに多くなる。
**節約設定の手順**(2026年4月時点)
1. プロフィール→右上の「≡」→「設定とプライバシー」→「データ使用量とメディア品質」
2. 「モバイルデータの通信量を節約」をオンにする
このモードでは動画の自動再生が停止し、画像の読み込み解像度が下がる。
### X(旧Twitter)
Xの自動再生動画はデータを消費するため、モバイルデータ使用時はオフにすることを推奨する(2026年4月時点)。
1. 「設定とサポート」→「設定とプライバシー」→「アクセシビリティ、表示、言語」→「データ利用の設定」
2. 「動画の自動再生」を「Wi-Fiのみ」または「オフ」に変更
3. 「高画質の画像を読み込む」を「Wi-Fiのみ」に変更
### LINE
LINEのテキストメッセージはデータ消費が極めて少ない。主な節約ポイントは自動ダウンロードの設定だ(2026年4月時点)。
1. LINEアプリ→「設定(歯車)」→「写真と動画」
2. 「写真の自動保存」をオフにする
3. 「動画の自動再生」を「Wi-Fiのみ」に変更
LINE通話は音声通話で約18MB/時間、ビデオ通話で約300〜500MB/時間が目安のため、外出先でのビデオ通話は注意が必要だ。
---
## 6. 自動処理を止める
バックグラウンドで知らないうちに動いている自動処理を制限することで、意図しない大量消費を防げる。
### iOSの自動アップデートをWi-Fi限定にする
**App Store の自動アップデート設定**(2026年4月時点)
1. 「設定」→「App Store」
2. 「自動ダウンロード」の「モバイルデータ通信を使用」をオフにする
3. 「Appのアップデート」を「モバイルデータ通信を使用」オフにする
**iOSソフトウェアアップデートの設定**(2026年4月時点)
1. 「設定」→「一般」→「ソフトウェア・アップデート」→「自動アップデート」
2. 「iOSアップデートをダウンロード」がオンになっている場合、モバイルデータでの大容量ダウンロードが実行される可能性がある。Wi-Fi接続時のみ実行されるが、大きなアップデートは必ずWi-Fi環境で手動実行することを推奨する。
### AndroidのApp自動更新設定
**Google Play ストアの設定**(2026年4月時点)
1. Google Play ストア→プロフィールアイコン→「設定」
2. 「ネットワーク設定」→「アプリの自動更新」→「Wi-Fiのみ」を選択
### iCloud写真同期のモバイルデータ制限
**設定方法**(2026年4月時点)
1. 「設定」→「写真」→「モバイルデータ通信」
2. 「モバイルデータ通信」のトグルをオフにする、または「無制限のアップデート」のみオフにする
これにより写真・動画のアップロードはWi-Fi接続時のみ行われる。
### Google フォトの設定
**設定方法**(2026年4月時点)
1. Google フォトアプリ→プロフィールアイコン→「フォトの設定」
2. 「バックアップ」→「モバイルデータでのバックアップ」をオフにする
3. 「モバイルデータの上限」で月間のバックアップ量に上限を設定することもできる
### アプリの分析データ送信
アプリの分析・診断データはバックグラウンドで少量のデータを送信している。完全に止めることは難しいが、iPhoneでは以下の設定で制限できる(2026年4月時点)。
1. 「設定」→「プライバシーとセキュリティ」→「解析と改善」
2. 「iPhoneの解析を共有」をオフにする
3. 「App Developerと共有」をオフにする
---
## 7. Wi-Fi活用と事前ダウンロード戦略
設定変更と並行して、Wi-Fi活用と事前ダウンロードを組み合わせると節約効果が最大化する。
### Wi-Fi自動接続を確実に設定する
**iPhoneのWi-Fi自動接続確認**(2026年4月時点)
1. 「設定」→「Wi-Fi」→接続済みのネットワーク名の横の「i」アイコン
2. 「自動接続」がオンになっているか確認する
信頼できるネットワーク(自宅・職場)では自動接続をオンにし、公共の無料Wi-Fiへの自動接続はセキュリティ上オフにしておくことを推奨する。
**Androidの場合**(2026年4月時点)
「設定」→「ネットワークとインターネット」→「Wi-Fi」で各ネットワークの自動接続設定を管理できる。「保存済みネットワークに自動接続」がデバイス全体の設定として存在する場合もある。
### 事前ダウンロードで消費ゼロにする
外出前にWi-Fi環境でコンテンツをダウンロードしておくと、外出先でのデータ消費をゼロにできる。
**対応しているサービス(代表例)**
- **Netflix**: タイトル詳細画面のダウンロードアイコンから。「スマートダウンロード」機能で視聴済みエピソードを自動削除・次回分をWi-Fi時に自動ダウンロード
- **Spotify Premium**: アルバム・プレイリスト・ポッドキャストをダウンロード可能。「データセーバー」をオンにすると音質が下がりモバイル消費を抑えられる
- **YouTube Premium**: 動画を最大30日間保存可能(対応コンテンツのみ)
- **Amazon Prime Video**: ダウンロード品質を「最高」から「良い」に下げるとストレージ節約にも効果的
- **Apple Music / Amazon Music**: プレイリスト・アルバムの一括ダウンロードに対応
事前ダウンロード時の注意点として、端末のストレージ容量との兼ね合いで保存できる量に限りがある。また一部のサービスではオフライン視聴の有効期限がある(Netflixは最大30日間、または初回再生から48時間など)。海外旅行時にコンテンツをまとめて事前ダウンロードしてから渡航する運用は、旅行eSIMと併用するとさらに節約効果が高い。初めて旅行eSIMを使う場合の手順は[初めての旅行eSIM完全ガイド](/ja/guides/first-time-guide/)で詳しく解説している。
---
## 8. データ消費量をモニタリングする
節約設定を施した後も、消費量を定期的に確認する習慣を持つと使い過ぎを早期に発見できる。
### iPhoneでのモニタリング
**端末の設定で確認する方法**(2026年4月時点)
「設定」→「モバイル通信」を開くと、アプリごとの累積消費量が確認できる。月初に「統計情報をリセット」しておくと月間の実績を正確に把握できる。
キャリアのプランによっては、当月の残量をリアルタイムで確認できる公式アプリが用意されている場合がある。プランの残量アラート機能があれば積極的に活用してほしい。
### Androidでのモニタリング
**データ使用量グラフの確認**(Pixel、2026年4月時点)
「設定」→「ネットワークとインターネット」→「インターネット」→キャリア横の歯車→「データ使用量」でグラフ形式の使用量推移を確認できる。期間を指定して過去の月間使用量も遡れる。
### キャリアアプリとの併用
端末の設定画面のほかに、キャリアの公式アプリでも当月の消費量を確認できる。大手キャリア(NTTドコモ・KDDI・ソフトバンク・楽天モバイル)やMVNOの多くは、リアルタイムの残容量と使用推移を表示するアプリを提供している。残量の少ない段階でアラートが届くよう設定しておくと速度制限を事前に回避しやすい。海外渡航中に普段と同じ節約感覚で使いたい場合は、通信手段自体の選択肢(ローミング・現地SIM・旅行eSIM・ポケットWi-Fi)を整理した[海外でスマホを使う4つの方法](/ja/guides/four-options/)も参考になる。
データ通信量の目安や速度制限の詳細は[データ通信量の目安 — 自分に合ったギガ数の見つけ方](/ja/guides/data-usage-guide/)で詳しく解説している。
---
## 9. FAQ
よくある疑問をまとめた。
**Q: データ節約のためにアプリを削除するべきですか?**
アプリを削除しなくても、バックグラウンドデータ通信をオフにするだけで同程度の節約ができる。アプリを削除するのはストレージ節約が目的の場合に限定し、データ節約は設定変更で対応する方が利便性を損なわない。
**Q: 低データモードと機内モードの違いは何ですか?**
機内モードはすべての無線通信(Wi-Fi・モバイルデータ・Bluetooth・電話)を完全にオフにする。低データモード(iPhoneの設定名)またはデータセーバー(Android)はモバイルデータを制限しつつ通話・Wi-Fi・通知は維持できる。普段の節約には低データモード・データセーバーを使い、機内モードはフライト中や一時的にすべての通信を切りたい場面で使うのが適切だ。
**Q: テザリング利用時にデータ節約設定は効果がありますか?**
iPhoneを親機にしてテザリングしている場合、子機(PCやタブレット)の通信はiPhoneの低データモードの影響を受けない。子機側で別途データ節約設定が必要になる。テザリング全体での消費量はiPhone側の「設定」→「モバイル通信」→「パーソナルホットスポット」で確認できる。
---
## まとめ
データ通信量の節約は特定のアプリの設定を変えるだけで大きな効果が得られることが多い。優先順位の高い対策をまとめると以下の通りだ。
1. 動画アプリの画質設定を下げる(YouTubeを360p/480p固定、Netflixをデータ節約モードに)
2. iOSの低データモード / Androidのデータセーバーを有効にする
3. App Storeの自動アップデートをWi-Fi限定にする
4. iCloud写真・Google フォトのモバイルデータでのバックアップをオフにする
5. SNSの動画自動再生をWi-Fi限定またはオフにする
6. 音楽・動画の事前ダウンロードをWi-Fi環境で行う
節約後も定期的に「設定」→「モバイル通信」(iPhone)または「データ使用量」(Android)で消費量を確認し、設定が意図通りに機能しているかチェックする習慣を持つことを推奨する。
自分に合ったプランの容量を見直したい場合は、[データ通信量の目安](/ja/guides/data-usage-guide/)でアプリ別の消費量一覧と必要ギガ数の算出方法を確認してほしい。
---
## 関連ガイド
- [データ通信量の目安 — 自分に合ったギガ数の見つけ方](/ja/guides/data-usage-guide/)
- [eSIMとは — 仕組み・メリット・デメリット](/ja/guides/what-is-esim/)
- [通信・スマホ用語集](/ja/guides/glossary-index/)
- [旅行時の通信手段を比較する — 4つの選択肢](/ja/guides/four-options/)
- [初めての旅行eSIM完全ガイド](/ja/guides/first-time-guide/)
================================================================================
# SIMカードの挿入・取り出し方法 — SIMピン・向き・挿入後の確認まで
URL: https://sim-finder.com/ja/guides/sim-insertion/
Type: guides (ja)
Published: 2026-06-04
SIMカードを挿入するには、SIMトレイをSIMピン(または代用品)で開け、SIMカードを切り欠きの向きに合わせてトレイにセットし、トレイを押し込んでから端末を再起動する。手順通りに行えば5分以内で完了する。
この記事では、SIMトレイの開け方・SIMカードの向き・iPhone/Android別の挿入手順・デュアルSIMトレイへの対応・挿入後の認識確認・取り出し時の注意・トレイが開かない/SIM認識しない場合の初期対処を解説する。
「物理SIMではなくeSIMを使いたい」という場合は、[SIMカードとeSIMの違い — どちらを選ぶか](/ja/guides/sim-vs-esim/)を先に参照してほしい。
---
## SIMカードの挿入に必要なもの
作業を始める前に、以下が手元にあることを確認する。
- **SIMカード**(キャリアまたはMVNOから届いたもの)
- **SIMピン**(スマートフォンに付属の専用ツール、または代用品)
- **取り出したSIMカードを置く清潔な平面**(ICチップを下に向けないこと)
SIMピンは一般的にスマートフォンの箱内に同梱されている。紛失した場合はペーパークリップ(細い針金部分をまっすぐ伸ばしたもの)が代用できる。先端が硬い針やシャープペンシルの芯(0.9mm程度)も代用可能だが、穴を傷つけないよう慎重に使うこと。
---
## SIMトレイの開け方
SIMトレイはスマートフォンの側面(iPhone・多くのAndroid)または背面カバーの下(一部のAndroid)にある。
### 側面トレイ方式(iPhone・多くのAndroid)
1. **スマートフォンの電源をオフにする**。電源オン中の作業は推奨しない(理由は「[取り出し時の注意](#sim取り出し時の注意点)」を参照)
2. **SIMトレイの小穴を探す**。側面の小さな丸穴がトレイのイジェクト穴だ
3. **SIMピンの先端をイジェクト穴に垂直に挿し込む**。斜めに押すとピンが滑ってトレイが開かない。穴に対して真っ直ぐに押すこと
4. **軽く力を加えてトレイを押し出す**。カチッとした感触とともにトレイが数ミリ飛び出す
5. **トレイをゆっくり引き出す**。無理に引くとトレイや本体側のガイドが破損する場合がある
### 背面カバー方式(一部のAndroid)
1. **スマートフォンの電源をオフにする**
2. **背面カバーを外す**。機種により、カバー端の切り欠きから爪で開けるタイプ、ボタンで外れるタイプなどがある。詳細は端末のマニュアルを参照
3. **バッテリーが着脱式の場合はバッテリーも外す**。SIMスロットがバッテリーの下にある機種が多い
4. **SIMスロットにスライド機構がある場合は、金属製のロックをスライドさせてSIMカードを引き出す**
### 防水パッキンのある端末での注意
防水・防塵対応(IP規格準拠)端末では、SIMトレイの縁にシリコン製の防水パッキンが付いている。トレイを引き出すときにパッキンが歪んだり外れたりすることがあるため、再装着の際はパッキンがトレイの溝にきちんと収まっているかを目視で確認してからトレイを押し込む。パッキンが浮いた状態で無理に押し込むと防水性能が損なわれる。トレイの動きが重い・引っかかる場合は、パッキンが外れていないか確認することを先に行う。
---
## SIMカードの向き(切り欠き)の確認
SIMカードには**切り欠き(コーナーカット)**が1カ所ある。この切り欠きをトレイの対応する形状に合わせることで、正しい向きに固定される。
- **切り欠きが合っていないと、SIMカードはトレイに完全にはまらない**。無理に押し込むと、SIMカードまたはトレイが破損する
- **ICチップ(金色の接点)の向き**:iPhoneでは多くの場合、ICチップが上向き(ディスプレイ側)になる。Androidは機種によって異なる
- **向きの最終確認**:SIMカードをトレイに乗せたとき、トレイの輪郭にぴったり収まり、SIMカードが浮かないことを確認する
SIMカードを無理に押し込もうとしてもはまらない場合は、向きを180度または90度回転させて試す。決して力任せに押し込まないこと。
---
## iPhoneへのSIMカード挿入手順
iPhone(すべてのモデルで共通の基本手順):
1. **電源をオフにする**(サイドボタン+音量ボタン長押し → スライドでパワーオフ)。iPhoneは電源オン中の交換も技術的に可能だが、安全のため電源オフを推奨する(Androidは電源オフが必須)
2. **SIMトレイのイジェクト穴にSIMピンを垂直に押し込む**。iPhoneのSIMトレイはiPhone 12以降のモデルで左側面にある(iPhone 11以前は右側面)。機種により異なるため自分の端末で確認すること
3. **トレイを引き出し、平らな場所に置く**
4. **現在のSIMカードが入っている場合は取り出す**(別項「[SIMカードの取り出し手順](#sim取り出し時の注意点)」参照)
5. **新しいSIMカードをトレイにセットする**。切り欠きをトレイの対応形状に合わせ、ICチップの向きはトレイの窪み・切り欠きに合う向きを優先する(多くの機種でICチップが上向きになるが、機種により異なる)
6. **トレイを端末に戻し、カチッと止まるまでゆっくり押し込む**。途中で引っかかる場合はトレイの向きを確認する(トレイには上下がある)
7. **端末の電源を入れる**
iPhoneのデュアルSIM(SIMカード+eSIM、または2枚の物理SIM)については後述の「[デュアルSIMトレイへの対応](#デュアルsimトレイへの対応)」を参照。
---
## AndroidへのSIMカード挿入手順
Androidのスマートフォンはメーカーによって手順の細部が異なるが、基本的な流れは共通だ。
### 側面トレイ方式(Samsung・Google Pixel・Sony等の多くの機種)
1. **電源をオフにする**
2. **端末側面のSIMトレイのイジェクト穴を探す**。機種によっては側面の異なる箇所(上部・下部)にある場合もある
3. **SIMピンを垂直に挿し込んでトレイを押し出す**
4. **トレイを引き出し、SIMカードをセットする**。切り欠きを合わせ、ICチップが上向き(または機種指定の向き)になっていることを確認する
5. **トレイを端末に戻す**。引っかかる場合は前後・上下の向きを確認する
6. **電源を入れる**
### 背面カバー方式(一部のAndroid機種)
1. **電源をオフにする**
2. **背面カバーを外す**
3. **バッテリーを外す(着脱式の場合)**
4. **SIMスロットにSIMカードをセットする**。スライドロック機構がある場合はロックを閉じる
5. **バッテリーと背面カバーを元に戻す**
6. **電源を入れる**
機種固有の手順はメーカー公式サポートページで確認することを推奨する。
---
## デュアルSIMトレイへの対応
2枚のSIMを使える端末(デュアルSIM対応端末)では、SIMトレイにスロットが2つある場合(または1枚の大きなトレイに2枚分のくぼみがある場合)がある。
### トレイの形状パターン
- **SIM 1スロットとSIM 2スロットが別々のトレイ**:SIM 1用とSIM 2用のトレイが独立しているため、2回イジェクト操作が必要
- **1枚のトレイに2スロット**:1回の操作でトレイを引き出し、2つのくぼみそれぞれにSIMカードをセットする。それぞれの切り欠きの向きを正しく合わせること
- **ナノSIM+MicroSDカード兼用スロット**:一方がSIMカード専用、もう一方がSIMカードまたはMicroSDカードの兼用スロットになっているトレイ。MicroSDカードを使う場合はSIM 2の代わりにMicroSDを挿す形になる
### デュアルSIM使用時の設定
SIMを2枚挿入して端末を起動すると、どちらのSIMを通話・SMS・データ通信のメイン回線にするか選ぶ画面が表示される(またはSIM設定画面で後から変更できる)。設定方法については[Androidでのデュアル回線設定方法](/ja/guides/apn-setup-android/)も参照してほしい。
デュアルSIM端末の仕様(DSDS/DSDV/DSDA)の詳細については「[SIMカードとは — 仕組み・種類・サイズの歴史と選び方](/ja/guides/what-is-sim/)」で解説している。
---
## 挿入後の再起動とSIM認識確認
SIMカードを挿入してトレイを押し込んだら、端末の電源を入れる。
### 認識確認の手順
1. **電源を入れて起動を待つ**。起動完了後、ステータスバーにキャリア名と電波アイコンが表示される
2. **キャリア名が表示されていることを確認する**。「SIMなし」「No SIM」と表示される場合はSIMが認識されていない(後述のトラブル対処を参照)
3. **SIM PIN(暗証番号)の入力を求められる場合は入力する**。SIM PINの詳細は「[SIMカードとは](/ja/guides/what-is-sim/)」を参照
4. **データ通信ができるか確認する**。ブラウザでページを開いてデータ通信を確認する。MVNOのSIMの場合はAPN設定が別途必要になる場合がある(「[APN設定 — Android](/ja/guides/apn-setup-android/)」を参照)
5. **通話・SMSが使えるか確認する**。必要に応じてキャリアへ問い合わせる
SIM認識後にデータ通信ができない場合は、[APN設定ガイド(Android)](/ja/guides/apn-setup-android/)を確認し、APN設定が正しく入力されているかを確認する。
---
## SIMカードの取り出し手順と注意点
SIMカードを取り出すときは挿入時と同じ手順でトレイを引き出す。ただし以下の点に注意する。
### 取り出し前に必ず行うこと
- **端末の電源をオフにする**。電源オン中にSIMを抜くと、SIM上のデータが破損したり端末が誤動作したりする可能性がある。一部のAndroid端末には設定からSIMカードを安全に取り外すオプションがある場合もある
- **取り出したSIMカードの保管先を事前に決めておく**。SIMカードは小さく、紛失しやすい
### ICチップを触れないようにする
SIMカードのICチップ(金色の接点部分)に素手で直接触れると、静電気や皮脂がチップに付着して接触不良の原因になる場合がある。SIMカードは端面(切り欠き側と反対の角付近)を持つように習慣づけること。
### 取り出したSIMカードの保管
- **ICチップを下にして平面に置かない**。ゴミや汚れがチップに付着する
- **折り曲げない**。Nano-SIM(4FF:12.3×8.8mm)は小さく薄いため、強い力が加わると割れる場合がある
- **元の台紙またはSIMカード用の小袋に保管する**。キャリアのSIMカードが届いた台紙を捨てずに保管しておくと、再度差し替えるときに便利だ
---
## トレイが開かない・SIMが認識しない場合の初期対処
作業中に問題が発生した場合、以下を順番に確認する。
### トレイが開かない場合
| 症状 | 確認・対処 |
|------|-----------|
| SIMピンを押してもトレイが出ない | ピンを穴に対して**垂直**に当てているか確認する。斜めになるとピンが穴の内壁を滑るだけで押せない |
| ピンが途中で止まる | 穴に異物(ホコリ・砂)が詰まっている可能性がある。穴に向けてエアダスターで吹き飛ばしてから再試行 |
| トレイが出てきたが途中で引っかかる | 無理に引かず、少し押し戻してから改めてゆっくり引き出す |
| それでも開かない | メーカー公式サポートへ問い合わせる。強引な操作はトレイ破損につながる |
### SIMが認識しない場合
| 症状 | 確認・対処 |
|------|-----------|
| 「SIMなし」と表示される | SIMカードの向きを180度回転させてセットし直す。切り欠きがトレイの形状に合っているか再確認する |
| キャリア名が表示されない | 端末を完全に再起動する(電源オフ → 30秒待つ → 電源オン)。起動後に認識されるケースがある |
| 再起動後も認識しない | 別の端末でそのSIMカードが動作するか確認する(SIMカード自体の不良かどうかを切り分ける) |
| 「圏外」「サービスなし」が続く | SIMは認識しているがネットワークに繋がらない状態の可能性がある。詳細は「[「圏外」「サービスなし」の対処法](/ja/guides/no-service/)」を参照 |
| APN未設定でデータ通信不可 | MVNOのSIMは挿入後にAPN設定が必要。[APN設定ガイド(Android)](/ja/guides/apn-setup-android/)を参照 |
一部のMVNOでは、SIM挿入後にネットワーク事業者コード(MCC/MNC)を手動で選択しないとデータ通信が使えない場合がある。詳細は「[ネットワーク事業者を手動で選択する方法](/ja/guides/manual-code/)」を参照してほしい。
---
## FAQ
**Q. SIMカードを挿入したあと、APN設定は必要ですか?**
A. 大手キャリア(MNO)のSIMカードは、多くの場合APN設定が自動的に行われます。ただしMVNO(格安SIM)のSIMカードでは、データ通信を使うためにAPN設定を手動で行う必要があります。APN設定の手順は「[APN設定 — Android](/ja/guides/apn-setup-android/)」を参照してください。
**Q. 台紙付きのSIMカードはどこで切り取れますか?**
A. キャリアから届くSIMカードは、大きめのカード台紙にNano-SIM(4FF)が組み込まれた形状で届くことがあります。台紙のミシン目に沿って、Nano-SIMサイズの部分のみを切り取ります。ミシン目を超えて切り取るとSIMカードが欠けて認識しなくなるため、慎重に作業してください。不安な場合はキャリアの店頭でカットしてもらうことができます。
**Q. iPhoneにSIMカードを挿入するとき、SIMトレイはどちら側から開きますか?**
A. iPhoneのSIMトレイはiPhone 12以降のモデルで左側面(端末を縦向きにしたときに左の側面)にあります。iPhone 11以前のモデルは右側面です。機種により異なるため自分の端末で確認してください。ただし地域モデルによってはeSIM専用(物理SIMスロットなし)のモデルも存在します。自分の端末が物理SIM対応かどうかは設定アプリ →「一般」→「情報」→「デュアルSIM」の表示で確認できます。
**Q. SIMカードの向きがわからない場合、どう判断しますか?**
A. SIMカードの切り欠き(1カ所だけある角が欠けた部分)をSIMトレイの対応する切り欠きと合わせます。切り欠きが一致すれば自然にSIMカードがトレイに収まります。合わない方向に置くとSIMカードが浮いたり、はみ出したりします。無理に押し込まず、スムーズにはまる向きを探してください。
---
## eSIM専用端末(物理SIMスロットなし)の場合
最近のiPhone(北米向けiPhone 15/16シリーズ等)や一部のAndroid端末はeSIM専用で、端末に物理的なSIMトレイが存在しない。これらの端末ではSIMピンを使う作業は発生せず、SIMカードの挿入自体が不要だ。代わりに、QRコードの読み取りや通信事業者アプリからeSIMプロファイルをダウンロードして開通させる。自分の端末が物理SIMスロットを持つかどうかは、端末の側面にトレイの小穴があるかを確認するか、設定アプリの「一般」→「情報」(iPhoneの場合)でSIM情報の表示形式を確認する。物理SIM非対応端末でこの記事の手順は適用されないため、[SIMカードとeSIMの違い — どちらを選ぶか](/ja/guides/sim-vs-esim/)を参照してほしい。
---
## まとめ / 関連ガイド
SIMカードの挿入はSIMピンでトレイを開け、切り欠きを合わせてセットし、再起動後に認識を確認するという流れで完了する。SIMが認識されない・圏外が続く場合は向きのセットし直しと再起動から始め、それでも解決しない場合は「[「圏外」「サービスなし」の対処法](/ja/guides/no-service/)」と「[ネットワーク事業者を手動で選択する方法](/ja/guides/manual-code/)」を参照してほしい。
自分に合ったSIMプランを探す際は、[SimFinderの比較ツール](/ja/jp/search/)で条件を絞り込んでほしい。
### 関連ガイド
- [SIMカードとは — 仕組み・種類・サイズの歴史と選び方](/ja/guides/what-is-sim/)
- [SIMカードとeSIMの違い — どちらを選ぶか](/ja/guides/sim-vs-esim/)
- [APN設定 — Android](/ja/guides/apn-setup-android/)
- [「圏外」「サービスなし」の対処法](/ja/guides/no-service/)
- [ネットワーク事業者を手動で選択する方法](/ja/guides/manual-code/)
================================================================================
# SIMフリーとSIMロック — 確認方法と解除手順
URL: https://sim-finder.com/ja/guides/sim-lock/
Type: guides (ja)
Published: 2026-04-16
SIMフリーとは、どのキャリアのSIMカードでも使用できる端末の状態を指す。SIMロックとは逆の状態で、日本では2021年10月1日以降に発売された端末はキャリアが原則としてSIMロックをかけずに販売することが義務付けられた。中古端末を購入した場合や2021年10月以前の端末を使っている場合は、SIMロック状態の確認と必要に応じた解除手続きが必要になる。
---
## SIMロックとSIMフリーとは
### SIMロックの定義
SIMロックとは、端末が特定のキャリアのSIMカードのみで動作するよう、ソフトウェア的に制限がかかっている状態だ。たとえばドコモでSIMロックされた端末は、ドコモのSIMカードでのみ通信できる。auやソフトバンク、格安SIMのSIMカードを挿しても通信できない。
SIMロックはキャリアが独自に設定するものであり、国際的な通信規格上の制限ではない。
### SIMフリーの定義
SIMフリー(SIMロック解除済み)とは、キャリアの制限が取り除かれ、対応する周波数帯と通信規格を満たすどのSIMカードでも使用できる状態だ。海外旅行時に現地のSIMカードを使いたい場合や、格安SIM(MVNO)への乗り換えを検討している場合は、端末がSIMフリーであることが前提となる。MNOと格安SIMの違いや選び方については「[MNOとMVNOとサブブランドの違い — 選び方ガイド](/ja/guides/mno-vs-mvno-comparison/)」で解説している。
旅行eSIMを利用する場合も、SIMロックが解除されていなければeSIMプロファイルを追加できない場合がある。SIMフリーが必要な理由については「[海外でスマホを使う4つの方法](/ja/guides/four-options/)」も参照してほしい。
### SIMロックとeSIMの関係
eSIMにはSIMロックが適用される。eSIMの基本的な仕組みと物理SIMとの違いについては「[eSIMとは — 仕組み・メリット・デメリット](/ja/guides/what-is-esim/)」で解説している。日本の総務省ガイドラインでは、2021年8月の改正によりeSIMもSIMロック解除の対象に含められた。SIMロックがかかった端末では、他キャリアのeSIMプロファイルを追加できない場合がある。旅行eSIMのインストール手順については「[旅行用eSIMの設定方法 — iPhone / Android 完全図解ガイド](/ja/blog/esim-setup-guide-iphone-android/)」で詳しく解説している。
---
## 日本のSIMロック規制(2021年10月以降)
### 原則SIMロック禁止への転換
総務省は「移動端末設備の円滑な流通・利用の確保に関するガイドライン」を2021年8月に改正した。2021年10月1日以降に新たに発売される端末についてSIMロックを原則として設定しないことをキャリアに義務付けた。
この改正により、以下が実施された。
- 2021年10月1日以降: 新発売端末へのSIMロック設定が原則禁止
- 2021年11月1日以降: SIMロック状態の確認手段(オンライン・電話問合せ等)の整備義務
- 2022年5月1日以降: オンラインSIMロック解除手続きの24時間対応義務
iPhoneでは2021年9月発売のiPhone 13シリーズ以降の端末が、日本のキャリアでSIMロックなしで販売されている。
### 規制適用前の端末について
2021年10月以前に発売された端末には、SIMロックがかかっている場合がある。該当する端末を使用している場合は、各キャリアのオンライン手続きページでSIMロック状態を確認し、必要に応じて解除申請を行う必要がある。
### SIMロック解除の費用
2023年以降、ドコモ・au・ソフトバンクはオンライン手続きによるSIMロック解除を無料で提供している。店頭での手続きは有料になる場合があるため、オンラインでの手続きを利用することを推奨する。
---
## SIMロック状態の確認方法
### iPhoneでの確認方法
Appleはすべての対応iPhoneでSIMロック状態を設定画面から確認できる手順を公式サポートで案内している。
1. 「設定」を開く
2. 「一般」→「情報」の順に進む
3. 「キャリアロック」の項目を確認する
「SIMの制限なし」と表示されていればSIMフリーの状態だ。別のキャリア名が表示されている場合は、そのキャリアにSIMロックされている。
なお、SIMロック解除済みかどうかの確認はiOS 14以降から可能になった。
### Androidでの確認方法
Androidはメーカーにより確認方法が異なる。一般的な手順は以下の通りだ。
**Xperia(ソニー)の場合**
1. 「設定」→「デバイス情報」→「SIMカードステータス」を確認する
**Galaxy(Samsung)の場合**
1. 「設定」→「端末情報」→「SIMのステータス」→「SIMロックステータス」を確認する(機種・One UIバージョンにより表示が異なる場合がある)
確認方法が不明な場合は、各キャリアのオンラインサービスでIMEIを入力してSIMロック状態を調べる方が確実だ。IMEIは「設定」→「端末情報」か、電話アプリで「*#06#」を入力すると表示される。
### キャリア別のIMEI確認ページ
| キャリア | 確認方法 |
|---------|---------|
| NTTドコモ | My docomoにログイン後、「サービス一覧」→「SIMロック解除」から状態確認 |
| au(KDDI) | My auにログインし、「SIMロック解除」メニューから確認 |
| ソフトバンク | My SoftBankのSIMロック解除受付ページからIMEIを入力して確認 |
| 楽天モバイル | 販売端末はすべてSIMフリーのため確認・解除手続き不要 |
---
## SIMロック解除の手順
SIMロック解除はキャリアのオンラインサービスから申請できる。各キャリア共通で以下の準備が必要だ。
- 端末のIMEI番号(「*#06#」をダイヤルするか設定画面で確認)
- キャリアのオンラインアカウント(My docomo、My au、My SoftBank)へのログイン情報
### NTTドコモの解除手順
1. My docomoにdアカウントでログインする
2. 「サービス一覧」→「SIMロック解除」を選択する
3. 解除する端末のIMEIを入力する
4. 手続き内容を確認して「解除手続きをする」を選択する
手続き完了後、別キャリアのSIMカードを挿入するとアクティベーション画面が表示される。画面の指示に沿って操作するとSIMロック解除が完了する。
### au(KDDI)の解除手順
1. My auにau IDとパスワードでログインする
2. 「SIMロック解除」メニューを選択する
3. 解除する端末のIMEIを入力して申請する
### ソフトバンクの解除手順
1. My SoftBankのSIMロック解除受付ページにSoftBank IDでログインする
2. 解除する端末のIMEIを入力して「次へ」を選択する
3. 手続き内容を確認して「解除手続きをする」を選択する
### 楽天モバイルについて
楽天モバイルで販売された端末はすべてSIMフリー状態で提供されるため、SIMロック解除の手続きは不要だ。
### iPhoneのSIMロック解除完了確認
ソフトウェアアップデート後またはSIMカード差し替え後に解除が完了する。「設定」→「一般」→「情報」→「キャリアロック」で「SIMの制限なし」と表示されれば解除完了だ。
---
## 中古端末購入時の注意点
中古市場で販売されているスマートフォンは、SIMロック状態が一定ではない。購入前に確認すべき点を整理する。
### 購入前の確認事項
**SIMロック状態の確認**
上記の方法でSIMロック状態を確認する。SIMロックがかかっている場合は、購入後に元のキャリアのアカウントを使ってオンラインで解除手続きが必要になる。解除にはそのキャリアの契約者情報が必要になる場合があり、前の所有者が手続きを済ませていない端末は解除が困難なケースもある。
**SIMロック解除済み端末の入手**
中古端末を購入する場合は、「SIMロック解除済み」または「SIMフリー」と明記された端末を選ぶことを推奨する。2021年10月以降に発売された端末は原則としてSIMフリーなので、モデル番号と発売日を確認するのも有効だ。
**IMEIブラックリストの確認**
盗難・紛失端末はIMEIブラックリストに登録され、通信が制限される場合がある。中古端末を購入する際は信頼できる販売店を利用することを推奨する。
### eSIMと中古端末
eSIM専用端末(米国版iPhone 14以降など)や、前の所有者がeSIMを設定した端末を中古で購入した場合、端末を工場出荷状態にリセットしてから使用することが推奨される。前の所有者のeSIMプロファイルが残っている場合でも、アクティブなeSIMを削除してから新しいプロファイルを追加できる。
---
## 海外旅行でSIMフリーが必要な理由
海外旅行時に現地SIMカードや旅行eSIMを使うには、端末がSIMフリーであることが前提だ。
SIMロックがかかった端末では、日本のキャリアが発行したSIM以外の通信手段が使えない。つまり現地の安価なプリペイドSIMや旅行eSIMは動作しない。
海外での通信方法としては旅行eSIMが最も手軽な選択肢の一つだが、SIMフリー端末でないと利用できない。海外でスマホを使う選択肢の全体像については「[海外でスマホを使う4つの方法](/ja/guides/four-options/)」で詳しく解説している。
SIMフリー端末であれば、海外旅行前に旅行eSIMをインストールしておくことで、現地到着後すぐに通信を開始できる。初めての旅行eSIM設定手順については「[初めての旅行eSIM完全ガイド](/ja/guides/first-time-guide/)」を参照してほしい。
eSIMの設定でトラブルが発生した場合は、まず端末のSIMロック状態を確認することが最初のステップだ。SIMロックが原因でeSIMが設定できない場合の対処は「[eSIMが設定できない](/ja/guides/activation-failed/)」で解説している。
---
## まとめ
**SIMロック・SIMフリーの基本**
- SIMロックは特定キャリアのSIMのみ使えるソフトウェア制限で、SIMフリーはどのSIMでも使える状態
- 2021年10月1日以降に発売された端末は日本では原則SIMロックなしで販売
- iPhoneは「設定→一般→情報→キャリアロック」で確認。「SIMの制限なし」がSIMフリーの表示
**解除手続きと実用ポイント**
- ドコモ・au・ソフトバンクのオンラインSIMロック解除は無料で24時間対応
- 楽天モバイルの販売端末はすべてSIMフリーのため解除手続き不要
- 中古端末の購入時は「SIMロック解除済み」と明記された端末を選ぶことを推奨
- 旅行eSIMや格安SIMへの乗り換えにはSIMフリーが必要
本記事で使われている用語の定義は「[SIM・モバイル通信用語集](/ja/guides/glossary-index/)」で確認できる。国内のeSIM対応プランを比較するには[SimFinderで絞り込める](/ja/)。
================================================================================
# SIMカードが認識されないときの対処法 — 「SIMなし」「SIMが無効」表示を解消する
URL: https://sim-finder.com/ja/guides/sim-not-detected/
Type: guides (ja)
Published: 2026-06-04
「SIMなし」「SIMが無効」と表示される場合、原因は大きく3つに分類できる。(1)SIMカードの物理的な接触不良、(2)端末ソフトウェアの一時的な不具合、(3)SIMカードまたは端末のハードウェア異常だ。この記事ではこの順番に、誰でも試せる対処手順を解説する。
eSIMの場合はセクション「[eSIMの場合の対処](#esimの場合の対処)」を先に参照してほしい。SIMは認識しているが圏外・データ通信不可の場合は「[「圏外」「サービスなし」の対処法](/ja/guides/no-service/)」が該当する。
---
## 表示の確認とSIMカードの抜き差し
まずステータスバーとエラー表示の意味を整理する。
| 表示 | 意味 |
|------|------|
| 「SIMなし」(No SIM Card Installed) | 端末がSIMカードを検出できていない |
| 「SIMが無効」(Invalid SIM) | SIMを検出したが認証に失敗した |
| 「SIMカードが挿入されていません」 | 上の「SIMなし」と同義 |
| 「PINを入力してください」 | SIM自体は認識している(SIM PINの入力が必要) |
| 「圏外」「サービスなし」 | SIMは認識しているが、ネットワークに繋がれていない |
「SIMなし」と「圏外」は別の問題だ。「圏外」の場合はこの記事ではなく「[「圏外」「サービスなし」の対処法](/ja/guides/no-service/)」を参照する。「PINを入力してください」の場合はSIMが正常に認識されているため、PINを入力すれば解消する。
最も多い原因はSIMカードの接触不良だ。端末を正しい手順で再セットすることから始める。
### 手順
1. **端末の電源をオフにする** — 電源を切らずにSIMトレイを操作することは推奨しない
2. **SIMピン(または代用品)でトレイを取り出す** — SIMトレイの取り出し方の詳細は「[SIMカードの挿入・取り出し方法](/ja/guides/sim-insertion/)」を参照
3. **SIMカードをトレイから取り出す**
4. **向き(切り欠き)を確認する** — SIMカードの切り欠き(コーナーカット)がトレイの対応形状に合っているか目視で確認する。向きが合わない場合は180度または90度回転させる
5. **SIMカードをトレイに正しくセットする** — トレイの輪郭にぴったり収まり、SIMカードが浮かないことを確認する
6. **トレイを端末に戻し、カチッと止まるまで完全に押し込む** — 半挿し状態では認識しない
7. **電源を入れて認識されるか確認する**
電源を入れてステータスバーにキャリア名が表示されれば認識成功だ。表示されない場合は次のステップへ進む。
---
## SIMカードの接点清掃
SIMカードの金色接点(ICチップ)に汚れや酸化が蓄積すると、端末との電気的接触が悪化して認識しなくなることがある。
### 清掃手順
1. **乾いた清潔な布(メガネ拭きなど)で金色接点を軽く拭く** — Apple・Samsung等のメーカーが推奨する方法。強く擦らず、表面の汚れを落とす程度でよい
2. **SIMトレイのスロット内部も綿棒で清掃する** — 端末側の接点にもゴミが溜まっていることがある
3. **アルコール等の液体は使わない** — 液体が基板に浸入するリスクがある
清掃後、再度SIMカードを挿入して認識されるか確認する。
---
## 再起動と機内モードの切り替え
接触不良でなくソフトウェアの一時的な不具合が原因の場合、再起動または機内モードの切り替えで解消することがある。
### 端末の再起動
- **iPhone**: サイドボタン+音量ボタンを同時長押し → 「スライドでパワーオフ」→ 完全に電源が切れてから電源ボタンを長押しで起動(Appleサポートが推奨する手順)
- **Android**: 電源ボタン長押し → 「再起動」を選択
まず通常の再起動を試す。一部の端末では、完全に電源を切ってから入れ直すと改善する場合もある(非公式)。
### 機内モードのオン・オフ
機内モードをオンにすると端末のすべての無線接続が切断され、オフにするとゼロから接続を再試行する。端末を再起動せずに無線モジュールをリセットする手軽な方法だ。
- **iPhone**: コントロールセンターから飛行機アイコンをタップ → 10秒以上待つ → 再度タップ
- **Android**: クイック設定パネルから「機内モード」をオン → 10秒以上待つ → オフ
この操作でキャリア名が表示された場合、端末とSIMの間の通信は正常だ。認識後もデータ通信が使えない場合はAPN設定を確認する(「[APNとは — なぜ設定が必要なのか](/ja/guides/what-is-apn/)」を参照)。
---
## SIMトレイの状態を確認する
トレイ自体に問題がある場合、SIMカードが正しく挿入されているように見えても認識しないことがある。
### 確認ポイント
| 確認項目 | 症状と対処 |
|---------|-----------|
| トレイが完全に収納されているか | トレイが浮いていると接点が届かない。カチッと止まるまで押し込む |
| トレイの向きが正しいか | 多くのトレイには上下の向きがある。逆向きに挿入しようとすると引っかかる |
| 防水パッキンが外れていないか | SIMトレイ縁のシリコン製パッキンが外れていると、トレイが完全に収まらない場合がある。パッキンを溝に戻してから押し込む |
| トレイ・スロットが変形・破損していないか | 変形が見られる場合はメーカーサポートへ問い合わせる |
---
## 別端末で試す — SIMと端末どちらの問題かを切り分ける
SIMカードの抜き差し・清掃・再起動を試しても解消しない場合、SIMカードと端末のどちらに問題があるかを切り分ける。
### 切り分け方法
1. **同じSIMカードを別の端末(同じSIMサイズ対応)に挿入する**
- 別端末で認識された → SIMカードは正常。元の端末側に問題がある
- 別端末でも認識されない → SIMカード自体に問題がある可能性が高い
2. **元の端末に別のSIMカードを挿入する**
- 別のSIMカードなら認識された → 元のSIMカードに問題がある可能性が高い
- 別のSIMカードも認識されない → 端末のSIMスロットに問題がある可能性がある
**SIMカードに問題があると判断した場合**: キャリアまたはMVNOのサポートに連絡してSIMカードの再発行を依頼する。
**端末に問題があると判断した場合**: ネットワーク設定リセット(次セクション)を試し、解消しない場合はメーカーサポートへ問い合わせる。
---
## ネットワーク設定のリセット
端末のネットワーク関連設定を初期化することで、ソフトウェア上の設定異常が解消されることがある。この操作ではWi-Fiパスワード・VPN設定・手動APN設定が削除されるが、アプリや写真・連絡先などの個人データには影響しない。実行前にWi-Fiパスワードをメモしておくこと。
ネットワーク設定リセットの詳細な手順は「[ネットワーク設定のリセット方法と影響範囲](/ja/guides/network-reset/)」で解説している。
### iPhone
1. 「設定」→「一般」→「転送またはiPhoneをリセット」
2. 「リセット」→「ネットワーク設定をリセット」をタップ
3. パスコードを入力し、端末が再起動したら接続を確認する
### Android(Pixel)
1. 「設定」→「システム」→「リセットオプション」
2. 「Wi-Fi、モバイル、Bluetoothをリセット」→「設定をリセット」をタップ
### Android(Samsung)
1. 「設定」→「一般管理」→「リセット」
2. 「ネットワーク設定をリセット」→「設定をリセット」をタップ
---
## eSIMの場合の対処
eSIMは端末に内蔵されたSIMであり、物理的な抜き差しや接点清掃は関係しない。「SIMなし」「SIMが無効」と表示される場合は以下を順番に確認する。
### eSIMが有効(オン)になっているか確認する
eSIMプロファイルがインストールされていても、有効化されていなければ端末はSIMを認識しない。
- **iPhone**: 「設定」→「モバイル通信」→eSIMのプランをタップ→「回線を有効にする」がオンになっているか確認する
- **Android(Pixel)**: 「設定」→「ネットワークとインターネット」→「SIM」→eSIMがオンになっているか確認する
- **Android(Samsung)**: 「設定」→「接続」→「SIMマネージャー」→eSIMが有効になっているか確認する
### eSIMプロファイルが正しくインストールされているか確認する
設定画面にeSIMプロファイル自体が表示されていない場合、インストールが完了していない。インストール(QRコード読み取りまたはアクティベーションコード入力)を最初からやり直す。
eSIMのインストールに失敗している場合の対処法は「[eSIMが設定できないときの対処法](/ja/guides/activation-failed/)」を参照してほしい。
### 端末を再起動する
eSIMが有効になっているのに「SIMなし」と表示される場合、端末を完全再起動することで回復することがある。
### ネットワーク設定をリセットする
再起動でも解消しない場合は、前セクション「ネットワーク設定のリセット」を実施する。
---
## キャリアへの問い合わせタイミング
以下のいずれかに該当する場合は、キャリアまたはメーカーへの問い合わせを検討する。
- この記事のすべての手順を試しても解消しない
- 別端末でもSIMが認識されない(SIMカード自体の不良が疑われる)
- SIMカードに物理的な破損・変形が見られる
- 端末のSIMスロットが変形しているように見える
**問い合わせ前に準備する情報:**
- 端末の機種名とOSバージョン
- SIMカードのICCID(iPhoneは「設定」→「一般」→「情報」→「ICCID」)
- 試した対処法のリスト
- 「SIMなし」「SIMが無効」のどちらが表示されるか
SIMカードの再発行を依頼する場合、手続きの詳細はキャリアのサポートページで確認すること。
---
## よくある質問
**Q. 「SIMなし」と「圏外」はどう違いますか?**
A. 「SIMなし」は端末がSIMカードを検出できていない状態です。「圏外」はSIMを認識しているが、携帯電話ネットワークの電波が届いていないか接続に失敗している状態です。対処法が異なるため、まず表示を確認してください。「SIMなし」の場合はこの記事、「圏外」の場合は「[「圏外」「サービスなし」の対処法](/ja/guides/no-service/)」を参照してください。
**Q. 「SIMが無効」と「SIMなし」はどちらが深刻ですか?**
A. 「SIMが無効」は端末がSIMを検出できているが認証に失敗している状態です。「SIMなし」より情報が多く、SIMロックや契約状態の問題が原因として考えられます。まずSIMの抜き差しと再起動を試し、解消しない場合はキャリアに問い合わせてください。
**Q. SIMカードをなくした・壊れた場合、どうすれば良いですか?**
A. 契約キャリアまたはMVNOのサポートに連絡してSIMカードの再発行を依頼してください。MNO(大手キャリア)は店舗またはオンラインで再発行手続きが可能です。手数料や対応方法はキャリアにより異なります。
**Q. SIMカードを挿入したのにMVNOのデータ通信が使えません。SIM認識の問題ですか?**
A. ステータスバーにキャリア名が表示されていればSIMは認識されています。MVNOのSIMはAPN設定が別途必要な場合があります。「[APNとは — なぜ設定が必要なのか](/ja/guides/what-is-apn/)」を参照してAPN設定を確認してください。
**Q. 防水スマホなのですが、SIMトレイを開けても大丈夫ですか?**
A. はい、トレイを開ける操作自体は問題ありません。ただしSIMトレイの縁についている防水パッキン(シリコン製のリング)が外れないよう注意してください。再挿入時にパッキンがトレイの溝にきちんと収まっているか確認してからトレイを押し込んでください。パッキンが浮いた状態で無理に押し込むと防水性能が損なわれます。
---
## 関連ガイド
- **[SIMカードの挿入・取り出し方法](/ja/guides/sim-insertion/)** — SIMピン・切り欠きの向き・挿入後の認識確認手順
- **[「圏外」「サービスなし」の対処法](/ja/guides/no-service/)** — SIMは認識しているがネットワークに繋がらない場合
- **[eSIMが設定できないときの対処法](/ja/guides/activation-failed/)** — eSIMのインストール・アクティベーション失敗の対処法
- **[APNとは — なぜ設定が必要なのか](/ja/guides/what-is-apn/)** — MVNOのSIM挿入後にデータ通信が使えない場合の基礎知識
- **[ネットワーク設定のリセット方法と影響範囲](/ja/guides/network-reset/)** — ネットワーク設定リセットの詳細手順と削除される項目
SIMプランの選択や比較は[SimFinderで絞り込める](/ja/jp/search/)。
================================================================================
# SIMカードのサイズと変換方法 — 標準・Micro・Nano・eSIMの寸法と変遷
URL: https://sim-finder.com/ja/guides/sim-sizes/
Type: guides (ja)
Published: 2026-06-04
現在の日本向けスマートフォンのほとんどはNano-SIM(4FF、12.3×8.8mm)を採用しており、Micro-SIM(3FF、15×12mm)やMini-SIM(2FF、25×15mm)を搭載した端末との間でSIMの流用はそのままでは行えない。SIMカッターや変換アダプターで対応する方法はあるが、ICチップ破損のリスクを伴う。端末買い替え時にサイズが変わる場合はキャリアでのSIM再発行が確実な手順だ。
この記事ではETSI規格に基づく各フォームファクタの正確な寸法と変遷、SIMカッター・変換アダプターを使う際の注意点、機種変更時のSIMサイズ確認方法、そしてeSIMによる物理サイズ問題の解消について解説する。
SIMカード自体の仕組み・役割・USIMとの違いについては「[SIMカードとは — 仕組み・種類・サイズの歴史と選び方](/ja/guides/what-is-sim/)」で解説している。
---
## SIMカードのフォームファクタ一覧(ETSI TS 102 221準拠)
SIMカードの物理形状(フォームファクタ)はETSI TS 102 221(「Smart Cards; UICC-Terminal interface; Physical and logical characteristics」)で規定されている。現在定義されているフォームファクタは以下の4種類だ。
| 世代 | 規格名 | 通称 | サイズ(幅×高さ×厚さ mm) | 主な採用時期 |
|------|--------|------|--------------------------|------------|
| 1FF | ID-1 UICC | Standard SIM / フルサイズ | 85.60 × 53.98 × 0.76 | 1991年〜 |
| 2FF | Plug-in UICC | Mini-SIM | 25 × 15 × 0.76 | 1996年〜 |
| 3FF | Mini-UICC | Micro-SIM | 15 × 12 × 0.76 | 2010年前後〜 |
| 4FF | 4th Form Factor | Nano-SIM | 12.3 × 8.8 × 0.67 | 2012年〜 |
**ポイント**: 4FF(Nano-SIM)のみ厚みが0.67mmと薄く、他の3世代(0.76mm)と異なる。変換アダプターを使う際はこの厚みの差が問題になることがある(後述)。
各フォームファクタのICチップ自体の面積はほぼ同等であり、小型化されているのは周辺のプラスチック部分だ。Nano-SIMはMini-SIMのプラスチック枠を極限まで削ったデザインといえる。
---
## 各フォームファクタの詳細と変遷
### 1FF(Standard SIM):クレジットカードサイズ
1991年のGSM商用サービス開始当初に使われた最初のSIMカード。ISO/IEC 7810 ID-1規格のカード(クレジットカード)と同じ外形寸法(85.60 × 53.98 mm)を持つ。現在の消費者向けスマートフォンでは使われていない。
### 2FF(Mini-SIM):切り取り式の定番
1996年頃から普及したサイズで、1FFのカードから切り取って使う「台紙付きSIM」の形が定着した。2000年代のフィーチャーフォンや初代iPhone(2007年)、初期のAndroid端末に広く採用された。現在でも一部の旧型端末や法人向けルーターで見かけることがある。
### 3FF(Micro-SIM):2010年代前半の主流
ETSIで2003年頃に仕様が合意されたが、実際の普及は2010年前後から本格化した。iPhone 4(2010年)での採用をきっかけに広く普及した。その後Android端末にも広まり、2010年代前半のスマートフォンの標準サイズとなった。
日本国内では2012〜2015年頃に発売されたAndroid端末(Xperia・Galaxy・Arrowsなど)の多くがMicro-SIMを採用しており、その世代の端末を現在も使い続けているユーザーがNano-SIM端末へ乗り換える際にサイズ変換が問題になるケースが多い。
### 4FF(Nano-SIM):現在の主流
2012年にETSI TS 102 221に正式追加され、iPhone 5(2012年)が世界初の採用例となった。現在の日本向けスマートフォンのほぼすべてがNano-SIMを採用している。厚みが0.67mmと薄く、ICチップの周囲のプラスチック部分が最小限に削られたデザインが特徴だ。
Android主要機種については、2016年前後を境にNano-SIMへの統一が進んだ。Samsung Galaxy Sシリーズ・Xperia(Sony)・Pixel(Google)・AQUOSなど、現在日本で販売されている主要Androidスマートフォンは全機種Nano-SIMを採用している。
---
## SIMカッターによる小型化加工
### SIMカッターとは
SIMカッターは、大きいフォームファクタのSIMカード(Mini-SIMやMicro-SIM)を小さいサイズ(Micro-SIMやNano-SIM)に切断する専用工具だ。パンチ式の構造でSIMカードを所定のサイズに打ち抜く。
### 物理的に可能なカットの方向
| 変換方向 | 物理的可否 | リスク |
|---------|-----------|--------|
| Mini-SIM(2FF)→ Micro-SIM(3FF) | 可能 | 中程度 |
| Mini-SIM(2FF)→ Nano-SIM(4FF) | 可能 | 高い |
| Micro-SIM(3FF)→ Nano-SIM(4FF) | 可能 | 高い |
| Nano-SIM(4FF)→ より小さいサイズ | 不可 | — |
### ICチップ破損リスク
Nano-SIM(4FF)はICチップの周囲のプラスチック余白が極めて少ない。Mini-SIMやMicro-SIMをNano-SIMサイズにカットする場合、カット位置がわずかにずれるとICチップの端に達し、チップを破損してSIMが使用不能になる可能性がある。
特に以下の点に注意が必要だ。
- **ICチップの位置はSIMごとに若干異なる**: キャリアやロットによってチップの搭載位置が微妙に違うことがある
- **4FFは厚みも異なる**: Nano-SIMは0.67mm厚で、2FF/3FFの0.76mmより薄い。SIMカッターでカットしても厚み差は残るため、スロットへのフィット感が異なる場合がある
- **再発行できなくなるわけではないが費用が発生する**: 破損した場合はキャリアでSIM再発行手続きが必要で、多くのキャリアで再発行手数料がかかる
### SIMカッターによる失敗例
実際に報告されている失敗パターンには以下のものがある。
- **チップ端の切断**: カット位置がわずかにずれてICチップの角に達し、SIMが端末に認識されなくなるケース。外見上はSIMカードとして見えても、内部接点が断線していると電話番号・データ通信ともに使用不能になる
- **斜め切り**: SIMをカッターに正確にセットできず、SIMがわずかに斜めになった状態で打ち抜かれるケース。SIMトレイに入るが端子と接触せず「SIMなし」エラーが発生することがある
- **割れ・欠け**: 古くて硬化したSIMや薄型モデルのSIMをカットする際に、プラスチック部分が割れてICチップ周辺まで亀裂が入るケース
**推奨**: 機種変更でSIMサイズが変わる場合は、SIMカッターを使わずキャリア・MVNOでNano-SIM版のSIMに再発行してもらう手順が確実だ。
---
## 変換アダプターによるサイズ拡張
### 変換アダプターとは
変換アダプターは、小さいSIM(Nano-SIMなど)を大きいスロット(Micro-SIMスロットなど)に挿入するためのプラスチック製フレームだ。Nano-SIMをMicro-SIMサイズに拡張したり、Nano-SIMをMini-SIMサイズに拡張したりするものが市販されている。
### 使用時の注意点
変換アダプターの使用には以下のリスクが伴う。
**スロット内でのアダプター脱落**: アダプターの精度や端末スロットの寸法公差によっては、スロット内でSIMがアダプターから外れて引き出せなくなることがある。この場合、端末を分解するか修理に出す必要が生じる。
**厚み差の影響**: 前述のとおり4FF(Nano-SIM)は0.67mm厚、2FF/3FFは0.76mm厚だ。アダプターが厚みを補正していない場合、スロット内でSIMがガタつき接触不良が起きることがある。
**端末メーカーの非推奨**: 端末メーカーがSIM変換アダプターの使用を公式にサポートしているケースはなく、使用で生じた問題は保証対象外となる場合がある。
### トレイ詰まり・取り出せなくなるリスク
変換アダプターを使用した際の最も深刻な問題が「スロット詰まり」だ。SIMトレイ式(プッシュピンで取り出すタイプ)の端末では、アダプターがトレイの溝にはまり込んでトレイごと取り出せなくなることがある。また、トレイレス(差し込み式)の端末ではアダプターが端末内部で外れると、ピンセットや工具なしでは取り出せない状態になる。
こうした状態になった場合、端末を分解するか正規の修理窓口に持ち込む必要が生じる。保証期間内でも「ユーザー過失」として保証対象外になる場合がある。
### アダプターが適切な用途
一時的な互換確認(動作テスト)や、アダプターとSIMをセットで管理できる環境での利用であれば問題が起きにくい。しかし日常的に持ち歩く端末への常用は推奨しない。
---
## 機種変更時のSIMサイズ確認方法
端末を新しくする際に、新旧端末でSIMサイズが違う場合は事前に把握しておく必要がある。
### 方法1:端末の仕様ページを確認する
**iPhoneの場合**: Appleサポートの「iPhoneの仕様」ページ(support.apple.com)で機種を選択すると「SIMカード」欄にSIMサイズが記載されている。
**Androidの場合**: 各メーカーの公式製品ページ(仕様欄)にSIMサイズが記載されている。Googleの場合はstore.google.com上のPixel製品ページで確認できる。
### 方法2:SIMトレイを取り出して実測する
現在使用中の端末からSIMトレイを取り出し、SIMカードを取り外してサイズを実測する方法だ。定規でSIMカード本体(プラスチック部分)の幅と高さを計測し、上記の寸法一覧と照合すれば現在のサイズが分かる。
### 方法3:キャリア・MVNOの問い合わせ窓口に確認する
キャリアや格安SIMのサポート窓口に「端末の型番」を伝えれば、対応するSIMサイズと再発行の要否を教えてもらえる。特にMVNOのオンライン申し込み時は、申し込み画面でSIMサイズを選択する仕組みになっており、端末型番から自動判別される場合もある。
---
## SIMサイズが分からない場合の確認フロー
```
端末を持っている場合
└── SIMトレイを取り出す
└── SIMカードを確認
├── 12.3 × 8.8 mm → Nano-SIM(4FF)
├── 15 × 12 mm → Micro-SIM(3FF)
└── 25 × 15 mm → Mini-SIM(2FF)
端末を持っていない・購入前の場合
└── 機種名でメーカー公式仕様ページを検索
└── 「SIMカード」欄を確認
```
---
## eSIMによるサイズ問題の解消
eSIM(embedded SIM)は端末に内蔵されたeUICCチップにキャリアプロファイルをダウンロードする方式のため、物理的なSIMカードのサイズ問題が根本的に発生しない。端末の買い替え時にもSIMカードの挿し替えや変換アダプターが不要で、キャリアの手続きもQRコードやアプリ経由でオンライン完結できる。
物理SIMサイズの問題はeSIMへの移行が進むほど自然に解消していく。現時点(2026年)では日本国内の主要MVNOはeSIM発行に対応しており、eSIM対応端末であればSIMカード発行・配送を待たずにオンラインで即時開通できるケースも多い。ただしeSIM対応は端末・キャリア両方の対応が必要であり、旧機種や格安端末ではeSIM非対応のものもある点は注意が必要だ。
eSIMと物理SIMのどちらを選ぶかという判断軸については「[物理SIM vs eSIM — 違いと選び方を比較](/ja/guides/sim-vs-esim/)」で整理している。eSIMの仕組み・メリット・デメリット・対応端末については「[eSIMとは — 仕組み・メリット・デメリット](/ja/guides/what-is-esim/)」を参照してほしい。
---
## iPhoneの機種変更とSIMサイズの変遷
iPhoneの各世代とSIMサイズの対応を把握しておくと、端末買い替え時の参考になる。
| 世代 | 機種の例 | SIMサイズ |
|------|---------|---------|
| 第1〜3世代(2007〜2010年) | iPhone 3GS等 | Mini-SIM(2FF) |
| iPhone 4シリーズ(2010〜2011年) | iPhone 4、4S | Micro-SIM(3FF) |
| iPhone 5以降(2012年〜) | iPhone 5〜15シリーズ等 | Nano-SIM(4FF) |
| iPhone XS以降(一部) | デュアルSIM対応機種 | Nano-SIM(4FF)+ eSIM |
iPhone 14以降の米国モデルはNano-SIMスロット自体が廃止されeSIM専用になっているが、日本向けモデルはNano-SIMスロットを維持している(2026年6月時点)。
新しいiPhoneにeSIMプロファイルを転送・再設定する手順については「[QRコードでeSIMを設定する(iPhone)](/ja/guides/apn-setup-iphone/)」も参照してほしい。海外で現地SIMをアクティベーションコードで手動設定する場合は「[アクティベーションコードでeSIMを設定する](/ja/guides/manual-code/)」が参考になる。
---
## まとめ
SIMカードのフォームファクタはETSI TS 102 221で定義されており、Mini-SIM(2FF:25×15mm)、Micro-SIM(3FF:15×12mm)、Nano-SIM(4FF:12.3×8.8mm)の3種類が現在も使われている。現代のスマートフォンの主流はNano-SIM(4FF)だ。
SIMカッターや変換アダプターで物理的なサイズ変換は可能だが、Nano-SIMへのカットはICチップ破損リスクが高く、変換アダプターはスロット内での脱落リスクがある。端末買い替えでサイズが変わる場合はキャリアでのSIM再発行が最も確実な方法だ。eSIMに対応している端末・キャリアであれば、物理サイズの問題自体が発生しない。
---
## FAQ
**Q. Nano-SIM(4FF)の正確な寸法は何ですか?**
A. Nano-SIM(4FF)の寸法はETSI TS 102 221で12.3mm × 8.8mm × 0.67mmと規定されています。現在の日本向けスマートフォンのほとんどがNano-SIMを採用しています。
**Q. SIMカッターでMicro-SIMをNano-SIMに変換できますか?**
A. 物理的には可能ですが、ICチップに近い部分まで切断するため、カットがわずかにずれるとICチップを破損するリスクがあります。SIMカッターを使う場合は、機種専用のガイドを確認し、自己責任で行う必要があります。キャリア・MVNOでのSIM再発行(Nano-SIM版)への切り替えを強く推奨します。
**Q. 変換アダプターを使ってNano-SIMをMicro-SIMスロットに挿せますか?**
A. Nano-SIM → Micro-SIM(または→ Mini-SIM)の変換アダプターは市販されており、物理的には挿入可能です。ただしアダプターの厚みや精度が合わない場合、スロット内でアダプターが外れて取り出せなくなるリスクがあります。端末メーカーはアダプターの使用を非推奨としているケースが多いです。
**Q. 今使っているSIMのサイズが分からない場合、どうすれば確認できますか?**
A. 端末からSIMトレイを取り出してサイズを実測するか、端末の仕様ページ(メーカー公式サイト)でSIMサイズを確認してください。iPhoneはAppleサポートページ(support.apple.com)の「iPhoneの仕様」で機種別のSIMサイズを確認できます。AndroidはGoogleの機種ページか、メーカー公式サポートで確認できます。
**Q. eSIMに変えればSIMサイズの問題はなくなりますか?**
A. はい。eSIMは端末に内蔵されたeUICCチップにキャリアプロファイルをダウンロードする方式のため、物理的なサイズ差の問題が発生しません。対応端末であれば、SIMカードの挿し替えも変換アダプターも不要です。ただし端末がeSIMに対応している必要があります。
---
## 関連ガイド
- [SIMカードとは — 仕組み・種類・サイズの歴史と選び方](/ja/guides/what-is-sim/)
- [物理SIM vs eSIM — 違いと選び方を比較](/ja/guides/sim-vs-esim/)
- [eSIMとは — 仕組み・メリット・デメリット](/ja/guides/what-is-esim/)
- [APN設定 — iPhone編](/ja/guides/apn-setup-iphone/)
- [アクティベーションコードでeSIMを設定する](/ja/guides/manual-code/)
================================================================================
# SIMスワップ詐欺とは — 手口・兆候・防ぎ方
URL: https://sim-finder.com/ja/guides/sim-swap/
Type: guides (ja)
Published: 2026-04-16
SIMスワップ詐欺は、スマホに触れることなく電話番号を盗み、銀行口座や仮想通貨ウォレットを空にする攻撃だ。マルウェアは不要で、キャリアの窓口スタッフを騙すソーシャルエンジニアリングだけで成立する。日本でも2022年に78件・約3.9億円の被害が確認されており、近年は楽天モバイルでeSIMの不正再発行事案が相次いでいる。
この記事では、SIMスワップの攻撃フロー、気づくためのサイン、そして今日から実施できる具体的な防御策を解説する。
## SIMスワップの仕組みと攻撃フロー
### 攻撃の5ステップ
SIMスワップ攻撃は、おおよそ次の流れで進む。
1. **情報収集**: 攻撃者は被害者の氏名・住所・生年月日・電話番号・口座番号などを事前に入手する。情報源はデータ漏洩、フィッシングメール、SNSの公開プロフィール、ダークウェブ上の流出データなど多岐にわたる。
2. **なりすまし**: 攻撃者はキャリアのカスタマーサポート(電話・チャット・店頭)に連絡し、「SIMカードを紛失した」「スマホを機種変更したい」などと主張して被害者に成り代わる。
3. **キャリアへのソーシャルエンジニアリング**: 収集した個人情報を使って本人確認を突破する。対応するスタッフが確認手続きを適切に行わなかった場合、SIMの差し替えが実行される。
4. **電話番号の乗っ取り**: 被害者のスマホは即座に圏外になる。攻撃者の端末がその電話番号へのすべての着信・SMSを受け取るようになる。
5. **アカウント乗っ取り**: 攻撃者はメール・銀行・仮想通貨取引所などで「パスワードを忘れた」手順を実行する。SMS経由のリセットコードが攻撃者に届き、数分以内にアカウントを完全に制御される。
### なぜSMS二段階認証が弱点になるのか
SMS二段階認証はセキュリティの「第2の鍵」として設計されたが、SIMスワップが成立した瞬間に逆効果になる。電話番号を奪われた後は、その保護機能ごと攻撃者に渡るからだ。これが、セキュリティ研究者がSMS 2FAを「高価値アカウントには不十分」と評価する理由だ。
### 日本での被害事例
**2022年の急増と規制強化**
警察庁の統計によると、2022年前半は15件・約1.2億円だった被害が、後半には63件・約2.7億円に急増した(通年78件・約3.9億円)。2022年9月に警察庁と総務省が連携してキャリアに本人確認の強化を依頼し、2023年上半期には4件・約3,400万円まで激減した。
**神戸の事例(2022年7月)**
被害者を名乗る人物がキャリアショップを訪れ、偽造した運転免許証を使ってMNP手続きを行い、インターネットバンキングから998万円が不正送金された。
**政治家への標的型攻撃(2024年)**
2024年4月に東京都議会議員、同4月末(4月30日)に大阪の八尾市議会議員もSIMスワップ被害を受けた。議員は氏名・住所・電話番号などが公開情報として入手しやすく、マイナンバーカードの偽造に悪用された可能性が指摘されている。
**楽天モバイルのeSIM不正再発行(2024年)**
2024年4月、楽天モバイルはフィッシングサイトで盗んだ楽天IDを使ったeSIMの不正再発行が多発していることを公表した。楽天モバイルのeSIMはオンラインで比較的容易に再発行できる仕組みであったことが被害拡大につながった。物理SIMの店頭偽装だけでなく、eSIMのオンライン不正再発行という新しい攻撃経路が日本でも確認された事案だ。
## 被害に気づくサインと緊急対応
### 今まさに攻撃されているサイン
- **突然の圏外**: 電波が届くはずの場所で「圏外」「SOS」表示になる。これが最も信頼できるリアルタイムの兆候。
- **キャリアからの変更通知**: SIM変更やプロファイル再発行を受け付けたという連絡が届く。
- **アカウントのロックアウト**: 操作していないのに「パスワードが変更された」「新しいデバイスでログインがあった」とアラートが届く。
- **友人から「電話が繋がらない」と言われる**: 着信そのものが攻撃者の端末に向かっている状態。
### 被害を疑ったときの緊急手順
1. **別の電話からすぐにキャリアへ連絡する**: 自分のスマホは使えないため、固定電話・家族の端末・公衆電話を使う。SIM乗っ取りの事実を伝え、回線を停止してもらう。
2. **メールのパスワードを最優先で変更する**: メールアカウントは他の全サービスのパスワードリセットに使われるため、最初に対処する。別デバイスからログインし、他のデバイスのセッションをすべて無効化する。
3. **銀行・証券・仮想通貨口座のパスワードを変更する**: 既存のログインセッションも無効化する。
4. **警察と金融機関に届け出る**: 最寄りの警察署または都道府県のサイバー犯罪相談窓口に被害届を出す。利用している金融機関にも不正利用の申告を行う。
## 今日からできる5つの防御策
### 1. キャリアのアカウントに口頭確認パスワードを設定する
これが単独で最も効果の高い対策だ。日本の大手キャリアでは、窓口や電話での手続き時に本人確認用の口頭パスワード(カスタマーサポートが必ず確認する合言葉)を設定できる場合がある。誕生日・住所・電話番号など攻撃者が推測できる情報は使わないこと。設定できる場合はキャリアのWebサイトまたはアプリから行う。
### 2. SMS二段階認証を認証アプリに切り替える
高価値アカウントのSMS 2FAを、以下のいずれかに移行することを強くすすめる。
- **認証アプリ**(Google Authenticator、Microsoft Authenticator、Authy): 時間ベースのワンタイムパスワード(TOTP)を端末ローカルで生成する。コードは電話番号ではなくデバイスに紐付くため、SIMスワップの影響を受けない。
- **ハードウェアセキュリティキー**(YubiKey等): 物理デバイスを直接接続またはNFCでタッチする。消費者向けでは最も強固な保護。
- **パスキー**: パスワードと2FAを統合した新しい標準規格。主要プラットフォームで2024〜2025年にかけて普及が進んでいる。
移行の優先順位: メールアカウント(他のすべてのパスワードリセットに使われる)→ 銀行・証券口座 → 仮想通貨取引所 → その他。
### 3. 楽天モバイルを使っている場合はeSIMの再発行設定を確認する
楽天モバイルでは、2024年のeSIM不正再発行事案を受けて本人確認の強化が実施された。利用中の場合は以下を確認・実施する。
- 楽天IDのパスワードを他のサービスと使い回していないか確認する。
- ログイン履歴を定期的に確認する。
- 楽天IDのユーザーIDを「メールアドレス以外」に変更する設定が楽天側から推奨されている。
- 楽天IDの二段階認証を認証アプリに移行する。
### 4. 個人情報の公開を最小限にする
攻撃者がソーシャルエンジニアリングに使う情報は、多くがSNSの公開プロフィールや流出データベースから入手される。
- SNSの電話番号・住所・生年月日の公開設定を「非公開」にする。
- フィッシング対策として、キャリアや銀行を騙るメール・SMSのリンクは絶対にクリックしない。
- 重要アカウント(銀行・メール)には、SNSや他のサービスと紐付いていないメールアドレスを使う。
### 5. デュアルSIM活用時のホームSIM管理
海外旅行で旅行eSIMを使う際、自分の日本の電話番号(ホームSIM)が無効化されていると、帰国後に2FA SMSが受け取れなくなる可能性がある。旅行中もホームSIMを有効に保ち、データ通信のみ旅行eSIMに切り替える設定にすることが推奨される。設定方法の詳細は[初めての旅行eSIM完全ガイド](/ja/guides/first-time-guide/)を参照。
## eSIMとSIMスワップリスクの関係
### eSIMが防ぐリスクと防がないリスク
eSIMは物理SIMと比べて一部の攻撃経路を塞ぐ。
- 物理的に「SIMを紛失した」という口実がなくなるため、店頭でのなりすまし発行が難しくなる。
- eSIM有効化にはQRコード・アカウントパスワード・デバイス認証が必要で、店頭に来るだけでは手続きできない。
一方で、eSIM固有のリスクもある。楽天モバイルの事例が示すように、オンラインのeSIM再発行手続きのセキュリティが低い場合、フィッシングでIDを盗んだだけで不正再発行が可能になる。物理SIMでは偽造身分証が必要だったが、eSIMではパスワード1つで再発行できるケースがある。
**結論**: eSIMへの移行はセキュリティ向上に有効だが、認証アプリへの2FA移行と組み合わせてこそ意味がある。eSIM単体では安全を保証できない。
eSIMの仕組みと設定方法については[eSIMとは](/ja/guides/what-is-esim/)を参照。
## 対策チェックリスト
| 対策 | 優先度 | 所要時間 |
|------|--------|---------|
| キャリアアカウントに口頭確認パスワードを設定する | 最優先 | 10分 |
| メールアカウントの2FAを認証アプリに移行する | 最優先 | 15分 |
| 銀行・証券口座の2FAを認証アプリに移行する | 高 | 15分 |
| 仮想通貨取引所の2FAをハードウェアキーまたは認証アプリに移行する | 高 | 30分 |
| SNSの個人情報(電話番号・住所・生年月日)を非公開にする | 中 | 15分 |
| 楽天モバイル利用者はeSIM再発行設定を確認する | 中(楽天モバイル利用者のみ) | 10分 |
単一の対策で完全な保護は得られない。「キャリアの口頭確認パスワード設定」と「認証アプリへの2FA移行」を組み合わせることで、SIMスワップ攻撃の大部分の経路を遮断できる。
================================================================================
# 物理SIM vs eSIM — 違いと選び方を比較
URL: https://sim-finder.com/ja/guides/sim-vs-esim/
Type: guides (ja)
Published: 2026-06-04
物理SIMとeSIMは、どちらもモバイルネットワークへの接続に必要な加入者認証・電話番号紐付けを担う技術だ。違いは「キャリアプロファイルを取り出し可能なICカードに書き込むか、端末に内蔵したeUICCチップにダウンロードするか」という実装方法にある。
この記事では、物理SIMとeSIMを発行・差し替え・複数プロファイル・端末対応・紛失/機種変更・海外利用の各項目で比較し、利用シーン別の選び方をまとめる。物理SIMの仕組みは「[SIMカードとは — 仕組み・種類・サイズの歴史と選び方](/ja/guides/what-is-sim/)」で、eSIMの技術詳細は「[eSIMとは — 仕組み・メリット・デメリット](/ja/guides/what-is-esim/)」でそれぞれ詳しく解説している。
---
## 基本構造の違い
### 物理SIM(UICC/Nano-SIM)
SIM(Subscriber Identity Module)は、IMSI(国際移動加入者識別番号)と認証キー(Ki)を格納するICカードだ。現在の主流はNano-SIM(4FF:12.3×8.8mm)で、端末のSIMスロットに挿入して使う。物理的に端末から取り出せるため、カードを差し替えるだけで別の端末から同じ番号を使える。フルサイズSIM(1FF)→Mini-SIM(2FF)→Micro-SIM(3FF)→Nano-SIM(4FF)という順で小型化が進み、現在はNano-SIMが主流だ。SIMカードのサイズ変遷の詳細は「[SIMカードとは — 仕組み・種類・サイズの歴史と選び方](/ja/guides/what-is-sim/)」を参照してほしい。
物理SIMカード(UICC)の物理・電気・論理仕様はETSI TS 102 221が定義している。現代のスマートフォンに挿入されているカードの実体はUICC上でUSIM(Universal SIM)アプリケーションが動作するものであり、3G/4G/5Gの認証(AKA:Authentication and Key Agreement)に対応している。加入者認証・電話番号紐付け(MSISDN)・通信暗号化・電話帳ストレージという4つの役割は物理SIMもeSIMも同じだ。
### eSIM(eUICC)
eSIM(embedded SIM)は、端末のマザーボードに半田付けされたeUICC(embedded Universal Integrated Circuit Card)チップに、キャリアのプロファイルをインターネット経由でダウンロードして使うSIM技術だ。物理的に取り出すことはできない。eSIMの標準規格はGSMAが定めるSGP.22(RSP Technical Specification for Consumer Devices)であり、最新版はSGP.22 v2.6.1(2025年4月15日公開)およびSGP.22 v3.1(2023年12月公開)だ。
プロファイルの準備・配布にはSM-DP+(Subscription Manager – Data Preparation +)サーバーが使われ、キャリアまたはeSIMプロバイダーが運営する。プロファイルをダウンロードする方法はQRコードスキャン・SM-DP+アドレスの手動入力・キャリア公式アプリ・eSIMクイック転送の4通りだ。
GSMAはeSIM仕様を用途別に3種類定義している。消費者デバイス向けのSGP.22(本記事の対象)、M2M(機器間通信)向けのSGP.02、IoTデバイス向けのSGP.32(2023年5月公開)だ。本記事ではスマートフォン向けのSGP.22のみを扱う。
---
### 項目別の比較表
物理SIMとeSIMの主な違いを整理する。
| 比較軸 | 物理SIM | eSIM |
|--------|---------|------|
| **発行方法** | 店頭受け取り または カード郵送 | QRコード・アプリ・手動コード入力でダウンロード |
| **開通までの時間** | 申し込みから数日(郵送待ち) | 審査通過後に即日開通 |
| **差し替え** | SIMスロットに挿し替えるだけ | プロファイルの切り替え(設定画面から) |
| **複数プロファイル** | 不可(1枚 = 1契約) | 複数保存可・同時有効化は最大1(v2.x)または複数(v3.0 MEP) |
| **端末変更時** | SIMを新端末に挿し替える | キャリアへの再発行手続きまたはeSIM転送 |
| **紛失・故障時** | 別端末に挿し替えて即使用可 | 新端末でキャリアに再発行申請が必要 |
| **海外旅行** | 現地SIMに差し替えるか国際ローミング | 旅行用eSIMを事前インストール・デュアルSIM活用 |
| **端末の物理設計** | SIMスロット分のスペースが必要 | スロット不要(薄型・防水設計に有利) |
以下では各軸をシーン別に詳しく解説する。なお、SIMの形態(物理・eSIM)は料金とは別の話であり、同じキャリア・同じプランであれば物理SIMとeSIMで料金に差はない。通信速度も同様で、開通後の品質差はプランとキャリアのネットワークによって決まる。
---
## 発行と開通
### 物理SIMの発行
物理SIMはキャリアの店頭で即日受け取るか、オンラインで申し込んでSIMカードが郵送されるのを待つ。郵送の場合、申し込みから受け取りまで数日かかるのが一般的だ。急ぎでなければ手順がシンプルで直感的に管理できる。
### eSIMの発行と即日開通
eSIMは審査通過後にQRコードや専用アプリでプロファイルをダウンロードすれば開通できる。iPhoneでの設定手順(QRコードスキャン方式)は「[QRコードでeSIMを設定する(iPhone)](/ja/guides/qr-code-iphone/)」で解説している。
プロファイルのダウンロードにはインターネット接続(Wi-Fiまたはモバイルデータ)が必要だ。通常のiPhoneはeSIM設定にWi-Fiが必要で、一部の国・地域ではeSIM専用iPhoneがWi-FiなしでもアクティベーションできることがApple公式で確認されているが、これは例外的な条件だ。
**選択の指針**: 今すぐ使い始めたい場合はeSIMが有利。窓口での対面手続きを好む場合は物理SIMを選ぶ。
---
## 差し替えとキャリア切り替え
### 物理SIM:SIMスロットに挿し替えるだけ
物理SIMのキャリア切り替えは、現在のSIMを取り出し、新しいキャリアのSIMを挿入するだけで完了する。SIMピンさえあれば数秒の作業だ。端末側に設定変更は不要(APN設定の変更が必要な場合を除く)。
### eSIM:設定画面からプロファイルを切り替える
eSIMのキャリア切り替えは、設定画面からプロファイルを選択・切り替えることで完了する。iPhoneでは「設定 → モバイル通信」からプロファイルを選ぶ。新しいキャリアのeSIMを追加する場合はQRコードのスキャン・アプリ経由のダウンロード・手動コード入力のいずれかで行う。
**選択の指針**: 複数の国のSIMを物理的に持ち歩いて使い分けるスタイルには物理SIMが直感的。プロファイルの保存・切り替えだけで済む使い方にはeSIMが便利。
なお、eSIMのプロファイルは削除するとキャリアによっては再インストールできない場合がある。旅行用eSIM(短期データeSIM)は特に注意が必要で、削除前にプロバイダーの再インストールポリシーを確認することを推奨する。
---
## 複数プロファイルの管理
### 物理SIM:1枚 = 1契約
物理SIMは1枚 = 1契約が基本だ。複数のキャリアを使い分けるには複数枚のSIMカードを持ち歩き、その都度差し替える必要がある。デュアルSIM端末(物理SIMスロットが2つ)であれば同時に2枚のSIMを使えるが、端末の物理的なスロット数が上限になる。
### eSIM:複数プロファイルを端末内に保存
SGP.22 v2.x仕様では、eUICCに複数のキャリアプロファイルを保存できるが、同時に有効化できるプロファイルは1つのみに制限されている。プロファイルの保存数の上限はeUICCチップのメモリ容量に依存し、仕様上の固定上限値は規定されていない。iPhoneはApple公式によると「8個以上のeSIMを保存」できる。
SGP.22 v3.0で導入されたMEP(Multiple Enabled Profiles)は、1つのeUICC上で複数のeSIMプロファイルを同時に有効化できるオプション機能だ。Android 13以降がMEP-A1を、Android 14以降がMEP-A1およびMEP-Bの両方をサポートし、eSIM専用のデュアルSIM構成を実現する。これにより物理SIMスロットがない端末でも2つのeSIMを同時に使えるようになる。
「副回線」として使う典型例は、基本料0円のサブ回線(povo 2.0等)をeSIMでインストールしておき、データが必要なときだけトッピングを購入するスタイルだ。物理SIMスロットが1つしかない端末でも、メインSIM(物理)とeSIM副回線を併用できる。
**選択の指針**: 渡航先ごとのeSIMや「メイン回線 + 副回線」を1台に収めたい場合はeSIMが優位。デュアルSIMの構成別解説は「[デュアルSIM(iPhone)— 設定・使い方・注意点](/ja/guides/dual-sim-iphone/)」で詳しく扱っている。
---
## 端末対応とeSIM専用端末の動向
### 物理SIM:幅広い端末で使える
Nano-SIMスロットを持つ端末であれば、基本的にどのキャリアの物理SIMでも使用できる(SIMロック・周波数帯対応を除く)。古い端末・廉価モデルでも使いやすく、端末の対応確認が不要なケースが多い。
### eSIM:対応端末の確認が必須
eSIMは端末がeUICCチップを搭載している必要がある。eSIM対応iPhoneはiPhone XS・XS Max・XR(2018年モデル)以降の全モデルだ。iPhone 13以降はeSIM 2つを同時に有効化するデュアルeSIM構成に対応している。
AndroidはGoogle Pixel 4以降が広くeSIMに対応している。Pixel 3はキャリアや販売地域によりeSIM非対応の場合がある。Pixel 7以降はデュアルeSIMに対応している。
使用する端末のeSIM対応状況は、メーカーの公式サポートページまたはキャリアの公式ページで確認する必要がある。
### eSIM専用端末の普及
米国で販売されたiPhone 14以降のモデル(iPhone 14・15・16・16eシリーズ)はeSIM専用で物理SIMスロットを持たない。米国・日本を含む複数の地域で販売されたiPhone 17シリーズはeSIM専用で、iPhone Airは米国・日本など多くの地域でeSIM専用として展開されている(対応構成は地域により異なるため、詳細は[eSIM対応端末ガイド](/ja/guides/esim-compatible-devices/)で確認してほしい)。米国向けPixel 10シリーズも同様にeSIM専用(物理SIMスロットなし)だ。これらの端末では物理SIMを選択できないため、「物理SIM vs eSIM」の選択自体が存在しない。
また、SGP.22 v3.0で導入されたMEP(Multiple Enabled Profiles)機能の普及により、将来的にはeSIM専用端末でも複数回線の同時利用が一般化していく方向にある。
**選択の指針**: 端末のeSIM対応有無が最初の確認点。eSIM非対応端末では物理SIM一択。eSIM専用端末では選択の余地がない。
---
## 紛失・故障・機種変更時
### 物理SIM:SIM単体で即座に復旧
端末を紛失・故障した場合、物理SIMカードを取り出して別の端末に挿し替えるだけで即座に同じ番号を使える。端末の修理や代替機の手配を待たずに通信を継続できる点は、物理SIMの大きな利点だ。
ただしSIMカード自体を紛失した場合は、直ちにキャリアに連絡して回線を一時停止し、再発行手続きが必要になる。再発行に手数料がかかるキャリアもある。
機種変更時は新端末のSIMスロットに挿し替えるだけで完了する。SIMスロットのサイズが違う場合(古い端末でMicro-SIMを使っていた等)はSIMの再発行が必要になることがある。
### eSIM:端末ごと紛失・故障すると再発行申請が必要
eSIMは端末のeUICCチップに内蔵されているため、端末が故障・紛失した場合に別の端末にeSIMを移すことはできない。新しい端末でeSIMを使うには、キャリアに再発行手続きを申請する必要がある。キャリアは新しいeSIMプロファイルをQRコードまたはアプリ経由で再プロビジョニングする。
機種変更時はiPhoneの「eSIMクイック転送」機能(対応キャリアであれば端末間で直接転送)またはキャリアへの転送手続きが必要だ。iOS 26以降では対応キャリアのiPhoneとAndroid間の転送にも対応している。機種変更時のeSIM転送手順は「[iPhoneの機種変更 — eSIM転送と物理SIM移行の手順](/ja/guides/transfer-iphone/)」で解説している。
SIMスワップ詐欺(他人がキャリアのサポートを使って自分の番号を不正に別SIMに移す詐欺)は物理SIM・eSIMどちらでも起こりうる。端末を紛失した場合はいずれの形態でも、回線の一時停止をキャリアに連絡することが先決だ。
**選択の指針**: 端末故障時の即時代替を重視する場合は物理SIMが安心。eSIMを選ぶ場合は、万が一の再発行手続きをあらかじめ把握しておく。
---
## 海外旅行・海外利用
### 物理SIM:現地SIMへの差し替えか国際ローミング
物理SIMの場合、現地空港や販売店でSIMカードを購入して差し替えるか、国際ローミングを使うかの選択になる。日本のSIMを差し替えると日本の番号が使えなくなり、SMS二段階認証の受信ができなくなる点に注意が必要だ。国際ローミングを使えば日本のSIMのまま海外でも通信できるが、詳細は「[国際ローミングガイド](/ja/guides/international-roaming/)」を参照してほしい。
### eSIM:旅行用プランを事前にインストール
eSIMは旅行用プランをオンラインで事前購入し、日本にいるうちにプロファイルをインストールしておける。現地到着後はeSIMを有効化するだけでデータ通信が始まる。
国内SIMをeSIMで使っている場合、「物理SIM(国内)+ 旅行用eSIM」または「国内eSIM + 旅行用eSIM(デュアルeSIM対応端末の場合)」の構成で日本の電話番号を維持しながら現地データを使える。この構成ならSMS二段階認証も受信しやすい。デュアルSIMを使った旅行の設定については「[デュアルSIM(iPhone)— 設定・使い方・注意点](/ja/guides/dual-sim-iphone/)」で解説している。
eSIM専用端末(米国版iPhone 14以降等)で旅行する場合、物理SIMスロットがないため現地SIMを差し替えることはできない。旅行用eSIMをインストールする際は、日本のeSIMを削除しないよう注意が必要だ(削除せずプロファイルの有効化を切り替えるだけでよい)。
**選択の指針**: 旅行中も日本の番号を維持したいならeSIMをメイン回線に使いデュアルSIM構成が便利。現地SIMをその都度購入するスタイルには物理SIMで十分。
---
## 利用シーン別の選び方まとめ
| 利用シーン | 推奨 | 理由 |
|-----------|------|------|
| 今すぐ開通したい | **eSIM** | 審査通過後に即日開通 |
| 旧型・廉価Androidを使っている | **物理SIM** | eSIM非対応端末が多い |
| 機種変更を頻繁にする | **物理SIM** | 挿し替えだけで完了 |
| 国内メイン + 旅行用データを1台に | **eSIM(デュアルSIM)** | 物理SIM + eSIM、またはeSIM + eSIM |
| 端末故障時の即時代替を重視 | **物理SIM** | SIM抜き差しで別端末に即切り替え |
| プランを複数保存しておきたい | **eSIM** | 8以上のプロファイルを端末に保存可 |
| eSIM専用端末(iPhone 14 US等) | **eSIM** | 物理SIMスロットなしのため必然 |
プランの選び方全体については「[SIMプランの選び方 — 通話・データ・価格から最適を選ぶ](/ja/guides/how-to-choose/)」も参照してほしい。日本国内のプランを条件(データ容量・eSIM対応・キャリア種別など)で絞り込むには[SimFinderの比較ツール](/ja/jp/search/)を活用できる。
なお、「eSIM対応プランがあるか」と「物理SIMで契約するか・eSIMで契約するか」は別の問題だ。同じキャリアが同じプランで物理SIMとeSIMの両方を提供している場合、どちらを選んでも契約内容は同じになる。選ぶ基準は上記のシーン別の理由に基づいて判断すればよい。
また、SIMの種別(MNO・サブブランド・MVNO)の選び方は「[SIMプランの4つの選択肢 — MNO・サブブランド・MVNO・eSIMを比較](/ja/guides/four-options/)」で解説している。物理SIMとeSIMの選択とは独立した判断なので、まずキャリア種別を選び、次に契約形態(物理・eSIM)を選ぶという順序で考えると整理しやすい。
日本国内で複数のプランを条件で絞り込みたい場合は[SimFinderの比較ツール](/ja/jp/search/)でeSIM対応フィルターを使って絞り込める。
---
## FAQ
**Q. SIMの「形態」(物理かeSIMか)でプランの品質や速度に差はありますか?**
A. ありません。物理SIMとeSIMはプロファイル(契約情報)の届け方が異なるだけで、開通後の通信品質はプランとキャリアのネットワークによって決まります。同じキャリア・同じプランであれば物理SIMとeSIMで通信速度に差はありません。
**Q. 今使っている物理SIMをeSIMに変更できますか?**
A. 多くのキャリアがSIM(物理)からeSIMへの切り替え手続きを提供しています。手続き方法はキャリアによって異なり、オンラインで完結するキャリアも、店頭での手続きが必要なキャリアもあります。SIMの交換・機種変更時の手続き全般は「[SIM・eSIM交換・機種変更ガイド](/ja/guides/sim-swap/)」で解説しています。
**Q. eSIMを削除(消去)すると再インストールできますか?**
A. キャリアや旅行用eSIMプロバイダーのポリシーによって異なります。国内大手キャリアはキャリアへの再発行申請で再プロビジョニングできるケースが多いですが、旅行用eSIM(短期データeSIM)は一度削除すると再インストールできない場合があります。削除前に必ずプロバイダーのポリシーを確認してください。詳しくは「[eSIMを再インストールする方法](/ja/guides/reinstall-esim/)」を参照してください。
**Q. SIMロックがかかった端末でeSIMは使えますか?**
A. SIMロック(キャリアロック)がかかっている端末では、他のキャリアの物理SIMもeSIMも基本的に使えません。SIMロックを解除すれば、他のキャリアのeSIMを追加できるようになります。SIMロックの確認・解除方法は「[SIMフリーとSIMロック — 確認方法と解除手順](/ja/guides/sim-lock/)」で解説しています。
**Q. eSIMと物理SIMで通信速度や品質は変わりますか?**
A. 変わりません。物理SIMとeSIMはプロファイル(加入者情報・認証情報)の格納方法と届け方が異なるだけであり、キャリアのネットワークに接続した後の通信処理は同じです。同じキャリア・同じプランであれば、SIMの形態が速度や品質に影響することはありません。
---
## 関連ガイド
- [eSIMとは — 仕組み・メリット・デメリット](/ja/guides/what-is-esim/)
- [SIMカードとは — 仕組み・種類・サイズの歴史と選び方](/ja/guides/what-is-sim/)
- [SIMプランの4つの選択肢 — MNO・サブブランド・MVNO・eSIMを比較](/ja/guides/four-options/)
- [QRコードでeSIMを設定する(iPhone)](/ja/guides/qr-code-iphone/)
- [デュアルSIM(iPhone)— 設定・使い方・注意点](/ja/guides/dual-sim-iphone/)
- [iPhoneの機種変更 — eSIM転送と物理SIM移行の手順](/ja/guides/transfer-iphone/)
================================================================================
# SimFinder品質スコアの仕組み
URL: https://sim-finder.com/ja/guides/simfinder-score/
Type: guides (ja)
Published: 2026-06-05
SimFinderが検索結果に表示する品質スコアは、キャリアの通信品質を0〜100の数値で表した設計上の指標だ。MVNOについては親MNOの品質スコアを基準に劣化係数を乗じて算出され、価格スコアとは独立した軸として扱われる。この2軸を合成したスコアで検索結果が並び替えられる。
スコアは実測値ではなく設計値である。この前提を踏まえたうえで、スコアの読み方と活用方法を解説する。
---
## 品質スコアとは何か
品質スコアとは、SimFinderが各キャリアに割り当てる0〜100の数値指標で、通信品質の相対的な水準を表す。数値が高いほど品質が良好であることを意味する。
このスコアは「価格」とは独立した軸として設計されている。安いプランでも品質スコアが高ければ、品質重視の条件で検索した際に上位に表示される可能性がある。逆に、高価なプランでも品質スコアが低ければ、品質重視の検索では埋もれる。
品質スコアはキャリア単位で定義される。同じキャリアの複数プランは、同じ品質スコアを基準として使用する。
---
## スコアの算出ロジック(実装に基づく)
品質スコアの算出は `src/lib/scoring/engine.ts` の `calculateQualityScore` 関数で行われる。実装に基づく算出の流れは以下の通りだ。
### ステップ1:キャリア自身のスコアを参照する
まずそのプランの `carrierId` に対応するスコアが品質マップ(`qualityMap`)に存在するか確認する。存在すれば、その `overallScore` を基準スコアとして使用する。
### ステップ2:MVNOは親MNOのスコアを参照する
`carrierId` に対応するエントリが品質マップに存在しない、またはエントリの `overallScore` が `null` の場合、プランに `parentMnoId` が設定されていればそのMNOのスコアを参照する。これがMVNO向けの仕組みの核心部分だ。
MVNOは自社で無線ネットワークを保有しないため、通信品質の基盤はMNOのインフラに依存する。SimFinderはこの構造を反映して、MVNOの品質スコア算出に親MNOのスコアを利用する。[MVNOの仕組みについて詳しくは](/ja/guides/what-is-mvno/)を参照してほしい。MNOの定義については[MNO(大手キャリア)とは — MVNO・サブブランドとの違い](/ja/guides/what-is-mno/)で解説している。
### ステップ3:劣化係数(mvnoQualityFactors)を適用する
基準スコアが確定した後、プランの `carrierType`(`mno` / `sub_brand` / `mvno`)に応じた劣化係数を乗じる。
`src/lib/scoring/types.ts` に定義されているデフォルト係数は以下の通りだ。
| キャリア種別 | デフォルト劣化係数 |
|---|---|
| MNO | 1.0(劣化なし) |
| サブブランド(sub_brand) | 0.95 |
| MVNO | 0.85 |
たとえば親MNOの品質スコアが80の場合、同じ親MNOの回線を使うMVNOの品質スコアは80 × 0.85 = 68となる。[サブブランド](/ja/guides/what-is-sub-brand/)であれば80 × 0.95 = 76となる。
劣化係数は国・地域ごとのスコアリング設定(`ScoringConfig`)に格納されており、国によって異なる値が設定される場合がある。デフォルト値は全国共通で上記の通りだ。
[MNO・サブブランド・MVNOの構造的な違いについては比較記事](/ja/guides/mno-vs-mvno-comparison/)で詳しく解説している。
### ステップ4:スコアが取得できない場合のフォールバック
該当キャリアにも親MNOにも品質スコアデータが存在しない場合、システムは渡された品質マップ(`qualityMap`)に含まれる全キャリアの品質スコアの平均値を代用する。実際の運用では同国のキャリアデータが `qualityMap` として渡されるため、結果として同国キャリアの平均値になる。平均値も算出できない場合は50を使用する。この場合、`isVerified` フラグは `false` になる。
---
## 価格スコアの算出ロジック
品質スコアとともに総合スコアを構成するのが価格スコアだ。
価格スコアは、検索結果の中で最も高い月額予測料金と最も安い月額予測料金の差に対する相対位置で計算される(0〜100)。
```
価格スコア = (最高額 - そのプランの料金) / (最高額 - 最安額) × 100
```
検索対象のプランが1つしかない場合は、価格スコアは100になる。価格スコアは「検索結果内の相対的な安さ」であり、絶対的な料金水準ではない点に注意が必要だ。
---
## 月額予測料金(predictedMonthlyPrice)の算出
価格スコアの基となる月額予測料金は、単純な月額基本料ではない。
SimFinderは検索条件に「月間通話時間(分)」の入力を受け付け、各プランの通話オプションを自動比較して最もコストが低くなる組み合わせを選択する。プランが対応する通話オプションの種別は3種類ある。
- `per_call`(着信ごとの無料分付き通話オプション)
- `monthly_total`(月間合計無料分付き通話オプション)
- `unlimited`(完全無制限通話)
このロジックで選択された通話オプションの追加料金を月額基本料に加算したものが月額予測料金だ。通話なし(データ専用)の条件で検索する場合は月額基本料がそのまま使われる。
---
## 総合スコアの算出
品質スコアと価格スコアは、検索画面の「品質重視」スライダーの設定値(0〜100)に応じた重みで合成される。
```
総合スコア = 価格スコア × (1 − w) + 品質スコア × w + ボーナススコア
```
`w` はスライダーで設定した品質重みを100で割った値だ(スライダー50なら `w = 0.5`)。
スライダーを50(デフォルト)に設定すると、価格と品質が同等の重みで評価される。品質重視側に動かすほど品質スコアの影響が強まり、価格重視側に動かすほど安いプランが上位に来やすくなる。
この設計により、品質スコアと価格スコアは独立した2軸として機能し、どちらを重視するかをユーザーが制御できる。
---
## ボーナススコアの仕組み
総合スコアには、プランの付加価値を反映するボーナススコアが加算される場合がある。
| 条件 | ボーナス点数(デフォルト) |
|---|---|
| データ繰り越し対応 | +3点 |
| 家族割引対応(検索条件で「家族割」を指定した場合のみ) | +5点 |
ボーナスは最大10点までと上限が設定されている。
データ量そのものによるボーナス(以前は「ヘビーユーザー向け無制限」や「ちょうどいいデータ量」ボーナス)は、安くてデータ量が多いプランが不当に低評価される問題があったため実装から削除されている。
---
## 検索結果の並び替えとタイブレーク
総合スコアが高い順に検索結果は並ぶ。同点の場合は以下の優先順位でタイブレークが行われる。
1. 月額予測料金が安い順
2. データ無制限プランを優先
3. データ容量(GB)が多い順
---
## スコアの読み方 — 実際の活用方法
SimFinderの検索結果でスコアを活用する際の考え方を整理する。
**品質重視スライダーを右に動かす場面**: MNOやサブブランドの品質が必要なユーザー(地下鉄・山間部など電波が取りにくい場所での利用が多い、テレワーク中心で通信の安定性が必要など)は、スライダーを品質重視側に設定すると、MNOやサブブランドが上位に並びやすくなる。
**品質重視スライダーを左に動かす場面**: コストを最優先したいユーザーや、Wi-Fi環境が整っていてモバイル通信は補助的に使う場合は、スライダーを価格重視側に設定するとMVNOが上位に来やすくなる。[MVNOのスコアが低めになる構造的な理由については](/ja/guides/mno-vs-mvno-comparison/)を参照してほしい。
**同じプランが常に上位に来る場合**: 検索条件(月間通話分・データ容量・家族割希望)を変えると順位が変動する場合がある。条件の指定が実際の利用パターンに近いほど、月額予測料金の精度が上がる。
---
## スコアの限界と前提
品質スコアを使う際に理解しておくべき限界を正直に示す。
### 実測値ではなく設計値
品質スコアは、SimFinderが設計上定義した指標であり、実際の通信速度を計測したものではない。MVNOのスコアが「親MNOのスコア × 0.85」という方式は、MVNOが借りている帯域制約の傾向を設計上モデル化したものだ。実際のMVNOの速度は時間帯・地域・MVNO事業者ごとに大きく異なる。[MVNOで通信速度が低下する仕組みについては](/ja/guides/why-mvno-slow/)を参照してほしい。
### 劣化係数はすべてのMVNOに一律適用される
現在の実装では、同じ `carrierType = mvno` であれば、どのMVNOでも同一の劣化係数が適用される。帯域を十分確保しているMVNOと、昼時間帯に顕著な速度低下があるMVNOが同じ係数で評価されるという限界がある。
### 品質マップのデータ精度に依存する
品質スコアの基となるデータ(`qualityMap`)は、SimFinderが管理する品質データベースから取得される。このデータが古い場合や、新しいキャリアについてデータが未登録の場合は、フォールバック(平均値)が使われる。フォールバックされたスコアは `isVerified: false` として管理されているが、UIの表示形式によっては検証済みとの区別が見えにくい場合がある。
### 価格スコアは相対値
価格スコアは検索結果内での相対的な安さであり、検索条件を変えると同じプランでも点数が変わる。絶対的な「このプランはいくら安い」という意味ではない。
---
## スコアに関連するよくある誤解
**「スコアが高ければ必ず速い」は誤り**: スコアは設計上の品質指標であり、通信速度の保証ではない。混雑時の速度はスコアに完全には反映されない。
**「MVNOは常に品質が低い」は誤り**: スコアが低めになる設計になっているが、これは統計的な傾向のモデル化であり、特定のMVNOを否定するものではない。実際に速度が安定しているMVNOも存在する。
**「家族割ボーナスは常に加算される」は誤り**: 家族割ボーナスは、検索条件で「家族割希望」を指定し、かつそのプランが家族割に対応している場合のみ加算される。条件を指定しない検索では加算されない。
**「スコアが同じなら品質は同じ」は必ずしも正しくない**: MVNOのスコアはすべて同一の劣化係数で計算されるため、実際の品質に差があっても同じスコアになる場合がある。スコアはキャリア種別(MNO/サブブランド/MVNO)の違いは反映するが、同じ種別内の個体差は現時点では反映されない。
**「価格スコアが高ければ安い」は絶対的には成立しない**: 価格スコアは検索結果内の相対的な位置を示す。検索条件(データ容量・通話分数)を変えると価格スコアの分布が変わり、同じプランでも点数が変わる。
---
## 親MNOが設定されていないMVNOの扱い
MVNOプランのデータに `parentMnoId` が設定されていない場合、システムはキャリア自身の `carrierId` で品質マップを検索する。自身のスコアも存在しない場合は、前述のフォールバック(同国平均 → 50)が適用される。
この状況はデータ品質の問題であり、SimFinderのデータ管理側で改善が必要な項目だ。フォールバックが適用されているプランのスコアは、品質の実態を反映しているとは言えない。
---
## 同点プランの並び順の詳細
総合スコアが完全に同点になることは、検索対象のプランが少ない場合や条件が限定的な場合に起きることがある。この場合のタイブレーク順序は以下の通り実装されている。
1. **月額予測料金が安い順**(同点なら安いほうが上位)
2. **データ無制限プランを優先**(有限容量プランより上位)
3. **データ容量(GB)が多い順**(大容量が上位)
この設計の意図は、スコア同点の場合に「コスト効率が高いプランを優先する」ことにある。
---
## SimFinderでの使い方まとめ
品質スコアは「価格以外の品質軸」として、価格だけでは判断できない選択を補助する目的で設計されている。
具体的な活用手順は以下の通りだ。
1. [SimFinderの比較ツール](/ja/jp/search/)で月間データ容量・通話分数・家族割希望などの条件を設定する
2. 品質重視スライダーを自分の優先順位に合わせて調整する(品質重視なら右、価格重視なら左)
3. 上位に表示されたプランの品質スコアと月額予測料金を確認する
4. データ繰り越しや家族割対応などの付加条件も比較に活用する
スコアはあくまで参考指標だ。最終的な選択には、実際のエリア確認やキャリアの口コミ情報を合わせて参照することを推奨する。SimFinderが品質スコアを算出する際の評価項目や計測方法の詳細は[通信品質スコアの評価指標](/ja/guides/quality-metrics/)にまとめている。
---
## 関連ガイド
- [通信品質スコアの評価指標](/ja/guides/quality-metrics/)
- [MVNOで通信速度が低下する仕組み](/ja/guides/why-mvno-slow/)
- [MVNO(格安SIM)とは — 仕組み・メリット・注意点と選び方](/ja/guides/what-is-mvno/)
- [MNO vs MVNO vs サブブランド — 違いと選び方](/ja/guides/mno-vs-mvno-comparison/)
- [サブブランドとは — MNOとの違いと選び方](/ja/guides/what-is-sub-brand/)
================================================================================
# 通信速度が極端に遅い場合の対処法 — 原因の切り分けと改善ステップ
URL: https://sim-finder.com/ja/guides/slow-speed/
Type: guides (ja)
Published: 2026-04-25
通信速度が極端に遅くなった場合、原因は大きく「データ容量超過」「時間帯・場所の影響」「端末側の問題」「回線設定の問題」「MVNO固有の混雑」の5つに分類できる。この記事では原因を順序立てて切り分け、対処法を説明する。
接続自体が切れていて「電波はあるがデータ通信ができない」状態には、別の原因が考えられる。その場合は「[モバイルデータに繋がらないときの対処法](/ja/guides/no-data/)」を参照してほしい。
---
## なぜ通信速度が遅くなるのか — 主な原因
速度低下の原因を把握することで、無駄な手順を省いて素早く対処できる。以下が主な原因の一覧だ。
| 原因カテゴリ | 代表的な症状 |
|------------|------------|
| **データ容量超過** | 月の途中から急に遅くなった。ブラウザがほぼ表示されない |
| **時間帯・場所の混雑** | 特定の時間帯だけ遅い。昼12時前後や夜21時前後に顕著 |
| **通信障害・メンテナンス** | 急に繋がらなくなった。特定エリアで発生 |
| **端末側の一時的な問題** | 再起動で改善することが多い。電波バーは立っている |
| **5G/4G・回線設定の問題** | 5Gアイコンが表示されているが速度が出ない |
| **アプリ・バックグラウンド通信** | 特定のアプリ使用中だけ遅い |
| **VPNの影響** | VPNオン時のみ遅い |
| **テザリング・Wi-Fi干渉** | テザリング接続機器のみ遅い |
| **MVNO固有のPOI混雑** | 格安SIMで混雑時間帯のみ遅い |
まず次のセクションで速度を計測し、現状を数値で把握してから対処を始めることを勧める。
---
## 速度を測定する方法
対処の前後で速度を数値化しておくと、改善効果の確認と原因の絞り込みに役立つ。以下の無料ツールで計測できる。
### 主要な速度測定ツール
| ツール | URL | 特徴 |
|-------|-----|------|
| **Speedtest by Ookla** | speedtest.net | 世界最大のネットワーク。DL/UL/Ping を計測。最も普及している |
| **Cloudflare Speed Test** | speed.cloudflare.com | Cloudflareのエッジネットワークを利用。レイテンシの詳細も確認できる |
| **Fast.com** | fast.com | NetflixのCDNを使ったDL速度計測。シンプルで使いやすい |
### 計測時の注意点
- **Wi-Fiをオフにした状態で計測する** — モバイルデータの速度を計測する場合はWi-Fiをオフにする
- **VPNをオフにした状態で計測する** — VPNが有効なまま計測すると回線自体の速度が測れない
- **同じ時間帯に複数回計測する** — 1回の計測値はばらつきがある。3回程度計測して傾向を見る
- **時間帯を変えて比較する** — 昼12時と朝10時で速度を比較することで時間帯影響の有無が分かる
### 速度の目安
| 用途 | 必要な速度の目安 |
|-----|---------------|
| LINE・メール・地図 | 1 Mbps 前後 |
| Webブラウジング | 5〜10 Mbps 程度 |
| YouTube 720p 視聴 | 5 Mbps 以上 |
| YouTube 1080p 視聴 | 10 Mbps 以上 |
| ビデオ通話(Zoom 720p) | 1.2 Mbps 以上 |
計測結果が 1 Mbps を大きく下回る(数百kbps程度)場合は、データ容量超過による速度制限が疑われる。Mbps・kbpsなどの通信用語の定義は「[用語集 — 通信用語インデックス](/ja/guides/glossary-index/)」で確認できる。
---
## データ容量超過による速度制限を疑う
速度低下の原因として最も多いのがデータ容量超過だ。月間データ容量の上限に達すると、キャリアは通信速度を大幅に制限する(速度制限・低速モードとも呼ぶ)。
### 速度制限時の典型的な速度
多くのキャリア・MVNOでは、速度制限時の速度を公式で定めている。よく見られる制限値は以下の通りだ。
- **200 kbps** — 多くのMVNO・格安SIMの制限値。ブラウジングはほぼ不可能な速度
- **1 Mbps** — 一部のMNO・サブブランドの制限値。LINEや軽いメールは可能
- **128 kbps** — povo2.0などトッピングなし時の速度。実用上ほぼ通信不可
速度制限中でも、テキスト中心のメッセージや最低画質の音楽ストリーミングは利用可能な場合がある。ただしWebブラウジングや動画視聴はほぼ不可能になる。
### データ残量の確認方法
**最も確実な方法**: キャリア・MVNOのマイページや専用アプリで残量をリアルタイムに確認する。端末側の集計とキャリア側の集計は基準が異なる場合があり、キャリア側の数値が正確だ。
端末での参考確認(あくまで参考値として活用する):
**iPhone:**
- 「設定」→「モバイル通信」→下部にアプリ別使用量が表示される
- 「統計情報をリセット」で起算点をリセットできる(Apple公式サポート: support.apple.com/ja-jp/HT201299)
**Android(Pixel):**
- 「設定」→「ネットワークとインターネット」→「インターネット」→使用するSIM横の歯車→「データ使用量」
**Android(Samsung):**
- 「設定」→「接続」→「データ使用量」→「モバイルデータ使用量」
自分のデータ消費パターンの把握には「[データ通信量の目安 — 自分に合ったギガ数の見つけ方](/ja/guides/data-usage-guide/)」が参考になる。
### MVNO独自の節約モード(低速モード)の確認
一部のMVNOは、アプリやマイページから手動で低速モードに切り替える機能を提供している。意図せずオンになっている場合がある。
- **IIJmio**: 「クーポンON/OFF」(My IIJmio / みおぽんアプリ)。OFFにすると現行ギガプランは最大300kbps相当の節約モードになる(旧プランの mioモバイルは200kbps)
- **mineo**: 「mineoスイッチ」で節約モード(最大200kbps)に切替可能
利用中のMVNOに節約モードがある場合は、アプリまたはマイページで状態を確認してオフにする。
---
## 時間帯・場所による速度低下を疑う
データ残量が十分あるのに速度が遅い場合、時間帯や場所による混雑が原因の可能性がある。
### 繁忙時間帯の影響
モバイル通信は利用者が集中する時間帯に速度が低下しやすい。特に影響が出やすい時間帯は以下の通りだ。
| 時間帯 | 速度低下の傾向 |
|-------|--------------|
| **昼 12時〜13時** | 最も混雑しやすい。都市部では顕著 |
| **夜 21時〜23時** | 帰宅後の利用集中で混雑しやすい |
| **通勤時間帯(7〜9時、17〜19時)** | 特に主要駅・路線上で影響が出ることがある |
時間帯を変えて速度測定を行い、改善するかどうかを確認する。朝10時や深夜に速度が出る場合は、時間帯混雑が原因と考えられる。
### 場所による電波状況
建物の構造や地下・トンネル・郊外では電波が弱くなり、速度が低下することがある。
**電波状況の確認方法:**
- ステータスバーの電波バーの本数を確認する(本数が少ないほど電波が弱い)
- 「LTE」「5G」などのデータアイコンが「E(Edge)」「H(HSPA)」に変わっている場合は低速規格で接続されている状態
場所を変えて速度が改善する場合は、電波環境が原因だ。
### 通信障害・基地局メンテナンスの確認
特定のエリアで突然速度が落ちた場合、キャリアの通信障害や基地局メンテナンスが原因の可能性がある。各キャリアの障害情報ページを確認してほしい。
- **NTTドコモ**: [重要なお知らせ(通信障害等)](https://www.docomo.ne.jp/info/network/) / [サービス障害情報](https://www.docomo.ne.jp/info/service_status/)
- **au**: [通信障害等に関するお知らせ](https://www.au.com/information/notice_mobile/network/)
- **ソフトバンク**: [障害情報](https://www.softbank.jp/mobile/info/personal/important/)
- **楽天モバイル**: [障害情報のお知らせ](https://network.mobile.rakuten.co.jp/information/failure/)
---
## 端末側の対処(再起動・機内モード・ネットワーク設定リセット)
ソフトウェアの一時的な不具合や接続状態の乱れで速度が低下する場合がある。以下の手順で端末側をリセットする。
### 手順1: 機内モードのON/OFF
最も手軽な方法だ。機内モードをオンにして10秒待ち、オフに戻す。端末がネットワークに再接続し、接続状態が改善することがある。
**iPhone/Android共通:**
1. 機内モードをオンにする(コントロールセンター or クイック設定パネルから操作できる)
2. 10秒待つ
3. 機内モードをオフにする
4. データアイコン(LTE/5G)が表示されてから速度を再測定する
### 手順2: 端末の再起動
機内モードのトグルで改善しない場合は、端末を完全に再起動する。再起動によりメモリがクリアされ、ネットワーク接続もリセットされる。
再起動後、データアイコンが表示されてから(通常1〜2分待つ)速度を再測定する。
### 手順3: ネットワーク設定のリセット
ここまでで改善しない場合、ネットワーク設定を初期化することで改善する場合がある。
**この操作で削除されるデータ:**
- Wi-Fiの保存済みパスワード
- Bluetooth接続履歴
- VPN設定
- APN設定(MVNOのSIMを使っている場合は手動で再設定が必要)
アプリのデータや写真には影響しない。実行前にWi-FiパスワードとMVNOのAPN情報を控えておくこと。
**iPhone: ネットワーク設定のリセット**
1. 「設定」→「一般」→「転送またはiPhoneをリセット」
2. 「リセット」→「ネットワーク設定をリセット」をタップ
3. パスコードを入力して実行する
**Android(Pixel): ネットワーク設定のリセット**
1. 「設定」→「システム」→「リセットオプション」
2. 「Wi-Fi、モバイル、Bluetoothをリセット」→「設定をリセット」
**Android(Samsung): ネットワーク設定のリセット**
1. 「設定」→「一般管理」→「リセット」
2. 「ネットワーク設定をリセット」→「設定をリセット」
---
## 5G/4G・APN・回線設定の確認
回線設定の問題が速度低下の原因になる場合がある。
### 5G/4Gの接続モードを確認する
5Gアイコンが表示されているのに速度が出ない場合は、接続モードの設定を確認する。
**iPhone:**
1. 「設定」→「モバイル通信」→該当のSIMをタップ
2. 「音声とデータ」で現在の設定を確認する
3. 「5G自動」または「5G優先」が設定されているか確認する
4. 「4G」に変更して速度が改善するか試す(5G接続の問題を切り分ける)
**Android(Pixel):**
1. 「設定」→「ネットワークとインターネット」→「インターネット」→使用するSIM横の歯車
2. 「優先ネットワークの種類」を確認する
5G SAエリアでない場所では、5Gに接続しても速度差が小さい場合がある。「4G優先」に切り替えることで安定した速度が得られる場合もある。
### APNの確認
APN(Access Point Name)設定が正しくないと速度が低下したり、通信が不安定になることがある。特にMVNOのSIMを使っている場合や、ネットワーク設定をリセットした後は確認が必要だ。
APNの確認・設定手順は「[モバイルデータに繋がらないときの対処法](/ja/guides/no-data/)」の「APN設定の確認と修正」セクションで詳しく解説している。
---
## アプリ・バックグラウンド通信・VPNの影響
速度自体に問題がない場合でも、アプリやVPNの設定が体感速度を下げる原因になることがある。
### バックグラウンドアプリのデータ通信
バックグラウンドで動作するアプリが大量のデータを消費していると、フォアグラウンドのアプリの通信速度が遅く感じられることがある。
**iPhone:**
- 「設定」→「モバイル通信」→アプリ一覧で各アプリのモバイルデータ使用許可を確認する
- 「設定」→「一般」→「Appのバックグラウンド更新」で不要なアプリのバックグラウンド更新をオフにする
- 「設定」→「バッテリー」→「省電力モード」をオンにするとバックグラウンド通信が制限される
**Android(Pixel):**
- 「設定」→「ネットワークとインターネット」→「データセーバー」をオンにすると、バックグラウンドのデータ通信が制限される
- 「設定」→「アプリ」→対象アプリ→「バッテリー」で「バックグラウンドで制限」の状態を確認する
### VPNの影響
VPNを利用している場合、VPNサーバーへの経路・サーバーの負荷・暗号化処理により速度が低下することがある。
**確認手順:**
1. VPNアプリを一時的にオフにする
2. Speedtestで速度を再計測する
3. VPNオフ時に速度が改善する場合は、VPNサーバーの変更やプロトコルの変更を検討する(VPNアプリのサポートを参照)
---
## テザリング・Wi-Fi利用時の対処
スマホをルーターとして使うテザリングや、ポケットWi-FiでのWi-Fi利用時に速度が遅い場合の対処を説明する。
### テザリング利用時
テザリング接続時に速度が遅い場合は、スマホ単体でモバイルデータを使った場合の速度と比較する。
- **スマホ単体では速い → テザリング設定や接続機器の問題**
- 接続台数が多い場合は帯域が分散されるため、不要な端末は切断する
- 接続方式をWi-FiからUSBテザリングに変えると安定することがある(ケーブル接続の場合は干渉がない)
- 接続機器側のWi-Fiアダプタやドライバーを確認する
- **スマホ単体でも遅い → モバイル回線の問題**
- この記事の他のセクションを参照して原因を切り分ける
### Wi-Fi接続時の干渉
2.4 GHz帯のWi-Fiを使っている場合、近隣のWi-FiルーターやBluetooth機器との電波干渉で速度が低下することがある。
- 5 GHz帯での接続に切り替えると改善することがある(ルーターが対応している場合)
- ルーターの再起動で改善するケースもある
- スマホをルーターに近づけて速度を確認し、距離の影響を切り分ける
---
## MVNOの場合の特有の対処
MVNO(格安SIM)を利用している場合、前述のMNO本体と異なる固有の速度低下パターンがある。
### POI混雑による時間帯速度低下
MVNOの速度低下の主要因は、MNOとの接続点であるPOI(Point of Interface)の混雑だ。MVNOはMNOから契約した帯域幅の範囲でしかデータをやり取りできない。昼(12〜13時)や夕方(17〜19時)の利用者集中時にこの帯域上限に達すると、速度が大幅に低下する。
MVNOのPOI混雑の仕組みと、MNO・サブブランドとの品質差の詳しい解説は「[MNO vs MVNO vs サブブランド — 違いと選び方](/ja/guides/mno-vs-mvno-comparison/)」を参照してほしい。また、MVNOの仕組み全般については「[MVNO(格安SIM)とは — 仕組み・メリット・注意点と選び方](/ja/guides/what-is-mvno/)」で解説している。
**対処の選択肢:**
1. **時間帯を変える** — 混雑時間帯(12〜13時・17〜19時)を避けて通信する
2. **MVNOを変える** — 帯域増強に積極的なMVNOに乗り換えることで改善する場合がある。[SimFinderの比較ツール](/ja/jp/search/)で品質スコアを参考にできる
3. **サブブランドまたはMNOに乗り換える** — 仕事でビデオ通話を外出先で頻繁に行うなど、混雑時間帯の安定速度が必要な場合は、サブブランドやMNO本体への乗り換えを検討する
### MVNOの端末・SIMの互換性確認
MVNOのSIMが端末に正しく認識されていない場合、速度が出ないことがある。
- 端末がSIMフリーになっているか確認する(キャリアロックがかかった端末はMVNOで使えない場合がある)
- APNが正しく設定されているか確認する(「[モバイルデータに繋がらないときの対処法](/ja/guides/no-data/)」のAPNセクションを参照)
- MVNOの公式サポートページで「動作確認済み端末リスト」を確認し、自分の端末が含まれているか確認する
### MVNOのサポートに問い合わせる判断基準
以下の条件に当てはまる場合は、利用中のMVNOのカスタマーサポートに連絡することを検討する。
- 時間帯を問わず速度が著しく低い状態が数日以上続いている
- 機内モードのトグル・再起動・ネットワーク設定リセットを試しても改善しない
- 同じ端末で別のSIMを試したところ速度が出た(SIM・契約側の問題の可能性)
- 速度制限の通知を受けていないのに速度が制限値相当まで低下している
問い合わせ時には、計測した速度(Mbpsまたはkbps)・測定日時・場所・使用ツール(Speedtestなど)を伝えると対応がスムーズになる。
---
## よくある質問
### 通信速度が突然遅くなった場合、最初に確認することは何ですか?
まずキャリア・MVNOのマイページかアプリでデータ残量を確認する。月間データ容量を使い切ると速度制限がかかり、200kbps〜1Mbps程度に低下する。残量が十分あれば、端末の再起動と機内モードのON/OFF(各10秒)を試す。それでも改善しない場合は、時間帯による混雑(昼12〜13時・夕方17〜19時)が原因の可能性がある。
### 速度制限と通信障害の違いはどうやって判断しますか?
速度制限の場合は「非常に遅いが通信はできる」状態だ。ブラウザでページが(ゆっくり)読み込まれ、SpeedtestでDL速度が計測できる。通信障害の場合は「接続そのものが確立できない」状態が多く、Speedtestでエラーが出たり、電波バーがあるのに一切の通信ができない。キャリアの障害情報ページを確認することで判断できる。
### MVNOはなぜ昼休みに速度が落ちるのですか?
MVNOはMNOとの接続点(POI: Point of Interface)を通じてMNOのネットワークにアクセスし、契約した帯域幅の範囲でデータをやり取りする。昼(12〜13時)に利用者が集中してこの帯域上限に達すると、通信速度が低下する。MNOやサブブランドはPOIを経由しないため同じ時間帯でも速度が安定する。
### VPNを使うと通信速度は遅くなりますか?
VPNを経由すると通信データが暗号化・再経由されるため、速度が低下することがある。VPNサーバーの場所・負荷・プロトコルによっては顕著に遅くなる場合がある。速度低下に悩んでいる場合は、VPNを一時的にオフにして速度を再計測し、VPNの影響を確認する。
### 5Gエリアにいるのに速度が遅い場合、何が原因ですか?
主な原因は3つだ。(1)5G NSA(ノンスタンドアローン)接続の場合、コアネットワークはLTEを経由するため理論値より速度が出にくいことがある。(2)ミリ波対応エリアでなく、Sub-6GHz帯での接続になっている場合は速度差が小さくなる。(3)基地局への接続が混雑している可能性がある。「4G優先」に切り替えてみて速度が改善する場合は5G接続の問題だ。
### ネットワーク設定をリセットするとAPN設定は消えますか?
はい、消える。ネットワーク設定のリセットでWi-FiパスワードやAPN設定・VPN設定・Bluetooth接続履歴がすべて削除される。大手キャリアのSIMはリセット後に自動再設定されることが多いが、MVNOのSIMは手動でAPNを再設定する必要がある。実行前にMVNOのAPN情報をメモしておく。
### テザリング利用時に速度が遅い場合、何を確認すればよいですか?
まずスマホを単体で使った場合の速度と比較する。スマホ単体では速い場合は、テザリング接続台数が多いか、接続機器側のWi-Fiドライバー・省電力設定の影響が考えられる。スマホのモバイルデータ速度自体が遅ければ、この記事の他の手順を参照する。
---
## 関連ガイド
- **[モバイルデータに繋がらないときの対処法](/ja/guides/no-data/)** — 電波はあるのにデータ通信ができない場合の対処法(FX-02)
- **[データ通信量の目安 — 自分に合ったギガ数の見つけ方](/ja/guides/data-usage-guide/)** — データ消費量の把握と節約方法(P-01)
- **[MVNO(格安SIM)とは — 仕組み・メリット・注意点と選び方](/ja/guides/what-is-mvno/)** — MVNOのPOI仕組みと特性を解説(C-02)
- **[MNO vs MVNO vs サブブランド — 違いと選び方](/ja/guides/mno-vs-mvno-comparison/)** — 3種類のキャリアの速度・品質差を比較(C-01)
- **[用語集 — 通信用語インデックス](/ja/guides/glossary-index/)** — Mbps・kbps・POI・APNなど通信用語を解説
自分に合ったプランを料金・速度・容量で比較したい場合は [SimFinderの比較ツール](/ja/jp/search/) を活用してほしい。
================================================================================
# 海外でSMS二段階認証(2FA)を受信する方法
URL: https://sim-finder.com/ja/guides/sms-2fa-abroad/
Type: guides (ja)
Published: 2026-06-03
海外渡航中に日本の銀行・決済・SNSのSMS 2FAコードを受け取る最も確実な方法は、**デュアルSIM構成で日本のホームSIMを維持し続けること**だ。SMSはデータ通信回線とは別の経路で届くため、データローミングをOFFにしたままでも受信できる。渡航前に設定を済ませておけば、海外でも国内と同じ感覚でSMS認証コードを受け取れる。
---
## SMS 2FAが海外で問題になる理由
日本の銀行・ネット証券・決済アプリの多くはSMSによる二段階認証(2FA)を採用している。ログインや送金などの操作のたびに、登録した日本の電話番号へ確認コードが送られてくる仕組みだ。
海外渡航時にこの仕組みが問題になるのは、端末の設定を誤るとホームSIM(日本のSIM)が無効になったり、圏外になったりするためだ。代表的な落とし穴は次のとおりである。
- 旅行eSIM導入時にホームSIMを「使用しない」に設定してしまう
- 端末を機内モードのまま使い続けてSIM自体が停止している
- ホームSIMのデータローミングをONにしたまま高額課金が発生し、慌ててSIMを無効化してしまう
これらはいずれも事前の設定で防げる。以下に4つの主要な手段を解説する。
---
## 手段1:デュアルSIM構成でホームSIMを維持する(推奨)
最も確実で追加コストが最小の方法が、**デュアルSIM構成**だ。旅行eSIMをデータ回線として使いながら、日本のホームSIM(物理SIMまたは日本キャリアのeSIM)を通話・SMS専用として維持する。
[デュアルSIMで海外旅行する方法](/ja/guides/dual-sim-for-travel/)で詳細を解説しているが、SMS受信の観点でポイントをまとめると次のとおりだ。
### SMSが届く仕組み
SMSはデータ通信回線(モバイルデータ)とは別の信号経路で届く。この経路は音声通話と共通であり、ホームSIMの「データローミング」をOFFにしていても維持される。つまり**データローミングをOFFのままでSMSは届く**。※ネットワーク方式(2G/3G/4G/5G)や訪問先ネットワークの実装によって詳細な配送経路は異なるが、実用上はデータローミングをOFFにした状態でも電波があれば通常どおりSMSを受信できる。
ただし以下の状態では届かない。
| 状態 | SMSが届くか |
|------|------------|
| ホームSIMが有効・電波あり・データローミングOFF | 届く |
| ホームSIMが有効・電波あり・データローミングON | 届く |
| 機内モード中 | 届かない |
| ホームSIM「使用しない」設定 | 届かない |
| ホームSIMが圏外 | 届かない(圏外解消後に届く場合あり) |
### iPhone での設定
「設定」→「モバイル通信」を開き、次を確認する。
1. **「モバイルデータ通信」** で旅行eSIMの回線を選択する(ホームSIMのデータ通信を無効化する)
2. **「モバイルデータ通信の切り替えを許可」** をOFFにする(Apple公式の正式名称。[support.apple.com/ja-jp/109317](https://support.apple.com/ja-jp/109317))。この設定をONのままにすると、旅行eSIMの電波が弱い場所でホームSIMのデータが自動使用され、ローミング課金が発生する
3. **「デフォルトの音声回線」** でホームSIM(日本のSIM)を選択する
4. 「モバイル通信」→ホームSIMを選択→**「データローミング」がOFF**になっていることを確認する
### Android(Google Pixel)での設定
「設定」→「ネットワークとインターネット」→「SIM」を開き、次を設定する。
- 「データSIM」で旅行eSIMを選択する
- 「通話SIM」でホームSIM(日本のSIM)を選択する
- ホームSIMの設定を開き「ローミング」をOFFにする
Samsung Galaxy の場合は「設定」→「接続」→「SIMカードマネージャー」から同様の操作を行う。Android のメーカーやバージョンによって設定メニューの名称が異なる場合があるため、画面の表示に従って操作する。
### 対応端末
この構成にはデュアルSIM対応端末が必要だ。iPhone XS・XR(2018年)以降の全モデルはeSIMに対応し、デュアルSIM構成が可能だ。Google Pixel は Pixel 3a 以降が DSDS(Dual SIM Dual Standby)に対応しているが、日本のキャリアから購入したモデルではeSIM・デュアルSIM機能が制限される場合があるため、端末のモデルと購入元(SIMフリー版か)を事前に確認すること。デュアルSIMの方式(DSDS/DSDV/DSDA)の詳細は[デュアルSIMとは](/ja/guides/what-is-dual-sim/)を参照してほしい。
---
## 手段2:国際ローミングでホームSIMを使い続ける
デュアルSIM非対応端末、または旅行eSIMを導入しない場合の選択肢が**国際ローミング**だ。ホームSIM(日本のキャリアSIM)のまま海外のローミングパートナーネットワークに接続し、SMS・通話・データをすべてホームキャリア経由で使う方式である。
[国際ローミングの仕組みと料金](/ja/guides/international-roaming/)で詳しく解説しているが、SMS受信の観点での注意点は次のとおりだ。
### SMS受信とデータローミングの関係
国際ローミング環境でも、SMSはデータ通信とは別経路で届く。データローミングをOFFにした状態でも、電波が入っていればSMSは受信できる。
### 料金への注意
国際ローミングでデータ通信を行うと、キャリアの定めるローミング料金が発生する。旅行eSIM+デュアルSIM構成(手段1)と比較して、長期滞在や大容量通信ではコストが高くなる場合がある。SMS受信だけが目的であれば、データローミングをOFFにしてSMSのみを受信するという運用も技術的には可能だ。
ただしデータローミングをOFFにしていても、着信した通話や発信したSMSにはキャリアのプランに応じた料金が発生する場合がある。渡航前に利用中のキャリアの公式サイトで最新のローミング料金・条件を確認することを推奨する。[SimFinderで旅行eSIMのプランを比較](/ja/travel/)し、ホームSIMのローミングコストと比較検討するのも有効だ。
---
## 手段3:Wi-Fi Calling 経由でのSMS受信
**Wi-Fi Calling**(Wi-Fi通話)は、モバイルネットワークではなくWi-Fi経由でキャリアのネットワークに接続し、通話やSMSを送受信する技術だ。端末がWi-Fiに接続されている場合、海外でもホームキャリアを通じてSMSを受信できる仕組みである。
ただし日本の大手キャリアによるWi-Fi Callingの提供状況は限定的であり、対応状況・利用条件はキャリア・契約プランによって異なる。Wi-Fi Callingを利用できる場合、海外でホームSIMのモバイル電波がなくてもWi-Fi接続があればSMSを受信できる。利用可能かどうかは、契約中のキャリアの公式情報で確認する。
Wi-Fi Callingはあくまで補助手段として位置づけるのが適切だ。ホテルや空港のWi-Fiに接続できなければ機能しないこと、キャリアの対応状況に依存することから、手段1(デュアルSIM)や手段4(認証アプリ移行)と組み合わせて活用するのが現実的である。
---
## 手段4:認証アプリ(TOTP)・パスキーへの事前移行(根本対策)
海外でのSMS受信に依存しない根本的な対策が、**認証アプリへの事前移行**だ。
### 認証アプリ(TOTP)とは
TOTP(Time-based One-Time Password)は、Google Authenticator・Authy・Microsoft Authenticator等のアプリが30秒ごとに生成する6桁コードを使う認証方式だ。インターネット接続なしで動作するため、海外での電波状況に左右されない。
SMS 2FAと比較した利点は次のとおりだ。
- **電波・SIM不要**: Wi-Fiもモバイルデータも必要なく、オフライン環境でも使える
- **セキュリティが高い**: SMS 2FAはSIMスワップ詐欺(第三者が電話番号を不正に乗っ取る攻撃)に脆弱であり、認証アプリはこのリスクがない
- **速い**: SMSの遅延(特に国際ローミング環境)がなく即座にコードが表示される
### パスキーとは
パスキーはFIDO2/WebAuthn規格に基づく認証方式で、生体認証(顔・指紋)や端末PINを使ってログインする。スマートフォン本体やパスワードマネージャーに保存され、フィッシングやSIMスワップに対して強固だ。対応サービスが順次拡大している。
### 移行手順の概要
認証アプリへの移行は、各サービスのセキュリティ設定から行える。
1. サービスの設定画面で「二段階認証の管理」または「セキュリティ」を開く
2. 「認証アプリを追加」または「Google Authenticatorで設定」等のオプションを選択する
3. QRコードをアプリでスキャンし、表示されたコードで設定を完了する
4. バックアップコード(リカバリコード)を必ず保存する
**渡航前に移行を完了しておくこと**が重要だ。現地で認証の問題が発生してから対処するのは時間・手間ともに大きい。
---
## 主要サービスのSMS 2FA依存度
日本で広く使われているサービスのうち、SMS 2FAへの依存度が高いカテゴリを整理する。
### 要注意カテゴリ
- **銀行・ネット証券**: 三井住友銀行・みずほ銀行・楽天銀行など多くの金融機関がログイン・取引時にSMSまたは専用アプリで2FAを実施している。銀行アプリは認証アプリ(TOTP)への移行に対応していないケースも多く、SMS認証が唯一の手段になっている場合がある
- **決済・EC**: メルカリ・PayPay・楽天市場などはSMS 2FAを採用している
- **SNS**: LINE・X(旧Twitter)・Instagramなど。LINE・XはTOTP認証アプリへの移行が可能
### 銀行アプリが認証アプリ非対応の場合
銀行アプリがTOTP認証アプリへの移行に対応していない場合、海外でSMSコードを受け取り続けるためにはホームSIMを維持する(手段1または2)以外に選択肢がない。この場合、渡航前に[渡航前のスマホ準備チェックリスト](/ja/guides/pre-trip-checklist/)に従って設定を確認・完了しておくことが特に重要になる。
### 認証アプリのバックアップについて
認証アプリへ移行した場合、スマートフォンの紛失・故障・機種変更時に備えてバックアップが必要だ。バックアップの手段はアプリによって異なる。
- **Authy**: クラウドバックアップ機能を内蔵しており、複数デバイスへの復元が可能
- **Google Authenticator**: Googleアカウントへのバックアップに対応(2023年以降)
- **Microsoft Authenticator**: クラウドバックアップをサポート
TOTPに移行する際は、各サービスが提供する**バックアップコード(リカバリコード)**を必ず安全な場所に保管する。バックアップコードは認証アプリを失った場合のリカバリに使う唯一の手段となる場合があるためだ。
---
## 渡航前チェックリスト
出発前に以下を確認・完了しておく。
### 必須確認事項
- [ ] 利用する銀行・決済サービスの2FA方式を確認する(SMSのみか、認証アプリも対応しているか)
- [ ] 認証アプリに移行できるサービスは移行を完了する
- [ ] バックアップコード(リカバリコード)を紙または安全な場所に保存する
- [ ] デュアルSIM構成の場合、ホームSIMのデータローミング設定をOFFにする
- [ ] iPhoneの場合、「モバイルデータ通信の切り替えを許可」をOFFにする
- [ ] ホームSIMのキャリアでローミング中のSMS受信条件を確認する
### デュアルSIM構成の場合の追加確認事項
- [ ] 旅行eSIMをインストール済みであること
- [ ] 旅行eSIM側をデータ回線として設定済みであること
- [ ] ホームSIM側を通話・SMS用として設定済みであること
- [ ] 設定完了後、国内で試験的にSMSを受信できることを確認する
渡航前の準備全体については[渡航前のスマホ準備チェックリスト](/ja/guides/pre-trip-checklist/)にまとめているので、あわせて確認してほしい。
---
## 4手段の比較と選び方
| 手段 | 追加コスト | 事前準備 | 電波依存 | セキュリティ |
|------|-----------|---------|---------|------------|
| デュアルSIM(旅行eSIM+ホームSIM) | 旅行eSIM料金 | 中(eSIMインストール+設定) | ホームSIMの電波が必要 | 標準 |
| 国際ローミング | キャリアのローミング料金 | 低(設定確認のみ) | ホームSIMの電波が必要 | 標準 |
| Wi-Fi Calling | キャリアによる | 低(キャリア対応確認) | Wi-Fiが必要 | 標準 |
| 認証アプリ(TOTP)移行 | 不要 | 高(各サービスで移行作業) | 不要(オフライン動作) | 高 |
### 推奨の組み合わせ
デュアルSIM構成と認証アプリ移行を組み合わせるのが、コスト・利便性・セキュリティのバランスが最もよい。認証アプリに移行できないサービス(一部の銀行アプリ等)はデュアルSIM構成でSMS受信を維持し、移行できるサービスは順次認証アプリに切り替えるという段階的な対応が現実的だ。
### 状況別の選択指針
- **旅行eSIMを使う予定がある**: 手段1(デュアルSIM)+手段4(認証アプリ移行)の組み合わせが最適
- **旅行eSIMを使わず国際ローミングで完結させる**: 手段2(国際ローミング)+手段4の組み合わせ
- **デュアルSIM非対応端末を使っている**: 手段2(国際ローミング)または手段4(認証アプリ移行)を優先する
- **銀行アプリがTOTP非対応**: 手段1または手段2でSMS受信環境を確保することが必須
旅行eSIMのプランは[SimFinderで比較](/ja/travel/)すると渡航先・期間・容量を指定して複数プロバイダーを一括確認できる。海外での通信手段の全体像については[海外でスマホを使う4つの方法](/ja/guides/four-options/)で解説している。
---
## よくある質問
よくある質問はフロントマターの `faqItems` に構造化されている。代表的な5問の要点を以下にまとめる。
- データローミングをOFFにしてもSMS受信は継続できる(データとSMSは別経路のため)
- デュアルSIM対応端末なら旅行eSIMとホームSIMを同時に使いながらSMSを受信できる
- 認証アプリ(TOTP)はSMS 2FAより一般的にセキュリティが高く、海外での電波に依存しない
- SMS受信に関わる国際ローミング料金はキャリアにより異なるため公式情報で要確認
- 日本向けiPhone 15は物理SIM+eSIMのデュアルSIM構成が可能(iPhone 13以降はeSIM×2も対応)
---
## 関連ガイド
- [デュアルSIMで海外旅行する方法](/ja/guides/dual-sim-for-travel/) — 旅行eSIM+ホームSIM構成の設定手順・運用法を解説
- [渡航前のスマホ準備チェックリスト](/ja/guides/pre-trip-checklist/) — 出発前に確認すべき設定を一覧化
- [国際ローミングの仕組みと料金](/ja/guides/international-roaming/) — キャリアSIMをそのまま海外で使う方式の詳細
- [海外でスマホを使う4つの方法](/ja/guides/four-options/) — 国際ローミング・現地SIM・旅行eSIM・ポケットWi-Fiの比較
- [デュアルSIMとは — DSDS・DSDV・DSDAの仕組みと活用法](/ja/guides/what-is-dual-sim/) — デュアルSIMの方式と対応端末
================================================================================
# SMS二段階認証のリスクとより安全な代替
URL: https://sim-finder.com/ja/guides/sms-2fa-risk/
Type: guides (ja)
Published: 2026-06-04
SMS二段階認証(SMS 2FA)は、パスワードに加えて確認コードを要求するセキュリティ層だ。しかし、米国国立標準技術研究所(NIST)は2017年のSP 800-63B改訂でSMS OTPを「制限付き認証器(Restricted Authenticator)」に分類しており、高価値アカウントへの使用に懸念を示している。その理由はSIMスワップ詐欺・SS7の脆弱性・フィッシング・SMS傍受という4つの攻撃経路にある。
この記事では、SMS 2FAの各リスクを根拠とともに解説し、認証アプリ(TOTP)とパスキー(FIDO2)への移行方法を示す。
なお、SMS 2FAは「ないよりはるかにまし」という位置づけであることを最初に明確にしておく。パスワード単体と比べればSMS 2FAは攻撃の難易度を大幅に上げる。まず2FAを有効にすることが最初の一歩であり、その後に認証方式をより安全なものへ段階的に移行していくのが現実的なアプローチだ。
---
## NISTがSMS OTPを制限付き認証器に分類した背景
NIST SP 800-63B(「デジタルアイデンティティガイドライン:認証とライフサイクル管理」)は、PSTN(公衆交換電話網)経由のOTP、すなわちSMSやボイスコールで届くワンタイムパスワードを「制限付き認証器(Restricted Authenticator)」と位置づけた。
同文書が列挙するリスクは次のとおりである。
- 公衆交換電話網(PSTN)は設計上、認証コードの安全な伝送を保証するものではない
- SS7プロトコルの脆弱性によりSMSの傍受・リダイレクトが可能であることが実証されている
- VoIP番号やソフトウェア定義の電話番号はSIMカードと同等の保護を持たない
NISTは同文書の中で、制限付き認証器を採用する機関に対し「リスクアセスメントを実施し、代替認証器への移行計画を策定すること」を求めている。これはSMS 2FAを即座に廃止すべきと主張するものではなく、リスクを把握した上で利用するよう求めたものだ。
出典: [NIST SP 800-63B — Digital Identity Guidelines: Authentication and Lifecycle Management](https://pages.nist.gov/800-63-3/sp800-63b.html)
---
## SMS 2FAのリスク1:SIMスワップ詐欺
SIMスワップ詐欺は、攻撃者がキャリアの窓口・電話サポート・オンライン手続きを悪用し、被害者の電話番号を攻撃者のSIMカードまたはeSIMプロファイルに転送する攻撃だ。
電話番号の転送が完了した瞬間、被害者の端末は圏外になり、SMS経由の認証コードはすべて攻撃者に届くようになる。攻撃者は事前に入手したパスワードと、転送されてきたSMS認証コードを組み合わせて、銀行・メール・仮想通貨取引所などのアカウントを乗っ取れる。
日本での発生状況と防御策は[SIMスワップ詐欺とは — 手口・兆候・防ぎ方](/ja/guides/sim-swap/)で詳しく解説している。
### SIMスワップ詐欺の典型的な手口の流れ
SIMスワップはソーシャルエンジニアリングを中心に構成される攻撃だ。典型的な手順は次のとおりである。
1. **情報収集**: SNS・データ侵害流出リスト・フィッシングで被害者の氏名・生年月日・住所・電話番号を入手する
2. **キャリアへの接触**: 攻撃者が被害者を装いキャリアのカスタマーサポートに電話または来店する
3. **本人確認の突破**: 収集した個人情報を答えることで本人確認をパスし、「機種変更」「端末故障によるSIM再発行」等を口実に電話番号を新しいSIMに移す
4. **乗っ取り完了**: 数分以内に被害者の端末が圏外になり、SMS認証コードが攻撃者に届くようになる
### SMS 2FAが攻撃の前提条件になる理由
SIMスワップが成立していない段階では、攻撃者はパスワードを知っていてもSMS認証コードを取得できない。しかしSIMスワップが成立した後は、SMS 2FAが存在することによって「コードさえあればアクセスできる」という明確な攻撃経路を攻撃者に与える。このため、SMS 2FAは電話番号のセキュリティと不可分に結びついている。
---
## SMS 2FAのリスク2:SS7プロトコルの脆弱性
SS7(Signalling System No. 7)は1970年代に策定された電話ネットワーク向けの信号プロトコルだ。現在も国際電話・SMS配信の基盤として広く使われているが、設計当時はネットワーク参加者を信頼することを前提としており、参加者認証の仕組みを持たない。
2014年12月、ドイツのセキュリティ研究者Karsten Nohl(SRLabs)らが、Chaos Communication Congress(31C3)の講演「Mobile Self-Defense」において、SS7の欠陥を使ってSMS・通話を傍受・リダイレクトできることを公開実証した。さらに2016年4月には、米国CBSの報道番組「60 Minutes」で、Nohlのチームが電話番号だけを手がかりに米国下院議員(本人同意のもと)の通話を傍受・録音しSMSを取得できることを実演した。その後もPositive Technologiesなどの研究機関が複数の実証を発表しており、2017年にはドイツの銀行顧客のSMSを傍受してmTANを盗む攻撃事例が報告された。
### 攻撃に必要な条件とリスクレベル
SS7攻撃を実行するにはSS7ネットワークへの特権的なアクセスが必要であり、一般的な攻撃者が容易に実行できるものではない。そのため、一般ユーザーへの日常的な脅威としての優先度はSIMスワップより低い。しかし、高価値な標的(政治家・経営者・仮想通貨保有者等)を対象とした標的型攻撃では実証されている手法だ。
---
## SMS 2FAのリスク3:フィッシングとリアルタイムOTP中継
SMS 2FAはフィッシング攻撃に対して脆弱な面がある。攻撃者が本物のサービスと見分けのつかない偽サイトを用意し、利用者にログイン情報を入力させると同時に本物のサービスにそれを転送する「中間者フィッシング(AiTM: Adversary-in-The-Middle)」攻撃が確認されている。
この攻撃の流れは次のとおりだ。
1. 攻撃者が偽サイトに被害者を誘導する(フィッシングメール・SMSが多い)
2. 被害者が偽サイトにID・パスワードを入力すると、攻撃者がリアルタイムで本物のサービスにそれを入力する
3. 本物のサービスがSMS認証コードを被害者の電話番号に送信する
4. 被害者が偽サイトに認証コードを入力すると、攻撃者がそれを本物のサービスに転送しログインが完了する
Microsoftの脅威インテリジェンスチームは2022年7月、AiTMフィッシングキットを使った大規模な攻撃キャンペーン(1万を超える組織を標的)を報告している。AiTM攻撃はセッションクッキーを窃取することでMFAをバイパスする手法であり、SMSやTOTPを含むMFAの種別を問わず有効な攻撃手法であることが示された。
出典: [Microsoft Security Blog — From cookie theft to BEC: Attackers use AiTM phishing sites as entry point to further financial fraud (July 2022)](https://www.microsoft.com/en-us/security/blog/2022/07/12/from-cookie-theft-to-bec-attackers-use-aitm-phishing-sites-as-entry-point-to-further-financial-fraud/)
パスキー(FIDO2/WebAuthn)はこの攻撃に対して設計上耐性がある。WebAuthnの認証情報はオリジン(URLのドメイン)に紐付いており、偽ドメインでは本物の認証情報が機能しないためだ。
---
## SMS 2FAのリスク4:SMS傍受と不正ルーティング
SIMスワップやSS7攻撃以外にも、SMSが意図しない経路で傍受・遅延・未着になるリスクが存在する。
- **VoIP番号・番号転送サービスの悪用**: 攻撃者がVoIP電話番号やSMSゲートウェイを使って認証コードを受け取るケースが報告されている。一部のサービスがこれに対応してVoIP番号からのSMS認証を拒否するようになった
- **SMSの配信遅延**: 国際ローミング環境・一部の通信事業者間の接続において、SMSの配信が数分〜数十分遅延することがある。認証コードには有効期限(多くは5〜10分)があるため、遅延が長引くと有効期限切れになる
- **マルウェアによるSMS読み取り**: Androidのセキュリティ権限「READ_SMS」を悪用するマルウェアが過去に確認されており、端末上でSMSを読み取る攻撃も存在する(現在はGoogle Playのポリシーでこの権限の付与は厳しく制限されている)
---
## より安全な代替1:認証アプリ(TOTP)
TOTP(Time-based One-Time Password)はRFC 6238で定義された標準規格であり、Google Authenticator・Microsoft Authenticator・Authy等が実装している。
### TOTPの仕組み
初期設定時にサービスとアプリが共有秘密鍵(シード)を交換する。その後、端末は「共有秘密鍵 + 現在の時刻(30秒単位)」をアルゴリズム(HMAC-SHA-1ベース)で演算し、一般的に6桁のコードを生成する(実装により桁数は異なる)。このコードは端末ローカルで生成されるためインターネット接続不要であり、電話番号やネットワーク回線を経由しない。
出典: [RFC 6238 — TOTP: Time-Based One-Time Password Algorithm](https://datatracker.ietf.org/doc/html/rfc6238)
### SMS 2FAと比較したTOTPの利点
| 攻撃経路 | SMS 2FA | TOTP |
|---------|---------|------|
| SIMスワップ | 脆弱(電話番号ごと乗っ取られる) | 影響なし(電話番号不要) |
| SS7傍受 | 脆弱(SMSが傍受される) | 影響なし(ネットワーク非経由) |
| AiTMフィッシング | 脆弱(リアルタイム中継可) | 脆弱(コードはフィッシングでも転送可能) |
| マルウェア(SMS読取) | 脆弱 | 影響なし(SMSを使わない) |
注意点として、TOTPもAiTMフィッシングに対しては完全な保護を提供しない。コード自体は有効期限内に転送可能なためだ。この点ではパスキー(FIDO2)が優れる。
### TOTPへの移行手順
1. 認証アプリ(Google Authenticator・Authy・Microsoft Authenticator等)をインストールする
2. 移行したいサービスの「セキュリティ設定」または「二段階認証」を開く
3. 「認証アプリを追加」「Authenticatorアプリ」等を選択し、表示されるQRコードをアプリでスキャンする
4. アプリに表示された6桁コードを入力して設定を完了する
5. **バックアップコード(リカバリコード)を必ず安全な場所に保管する**(端末紛失時の唯一のリカバリ手段になる場合がある)
バックアップコードは通常8〜16桁の英数字コードが複数枚発行される。印刷して鍵のかかる場所に保管するか、パスワードマネージャーの安全なメモ欄に保存する。クラウドストレージやスクリーンショットのみへの保存はデバイス紛失・アカウント侵害時にアクセスできなくなるリスクがある。
優先度が高いサービスの移行順序: メールアカウント(全サービスのパスワードリセットに使われるため最優先)→ 銀行・証券口座 → 仮想通貨取引所 → その他
海外渡航中にSMS 2FAが問題になるケースと認証アプリの活用については[海外でSMS二段階認証(2FA)を受信する方法](/ja/guides/sms-2fa-abroad/)も参照してほしい。
---
## より安全な代替2:パスキー(FIDO2/WebAuthn)
パスキーはFIDO Alliance(ファイドアライアンス)とW3Cが共同策定したFIDO2/WebAuthn規格に基づく認証方式だ。パスワードと2FAを統合した形式であり、対応するサービスではパスワード自体が不要になる。
### パスキーの仕組み
初回登録時、端末が公開鍵と秘密鍵のペアを生成する。公開鍵はサービスのサーバーに登録され、秘密鍵は端末(またはパスワードマネージャー)に保管される。ログイン時は端末の生体認証(Face ID・Touch ID・指紋)またはPINで秘密鍵を使って署名を行い、サーバーが公開鍵で検証する。
出典: [FIDO Alliance — Passkeys](https://fidoalliance.org/passkeys/)
出典: [W3C — Web Authentication (WebAuthn) Level 2](https://www.w3.org/TR/webauthn-2/)
### パスキーがAiTMフィッシングに耐性を持つ理由
WebAuthnの認証情報(チャレンジへの署名)はオリジン(`https://example.com`)に紐付いて生成される。攻撃者が`https://example-phishing.com`に誘導しても、本物の`https://example.com`向けの署名は生成されず、サーバーでの検証に失敗する。この設計により、フィッシングサイトではパスキーが機能しない。
### パスキーの対応状況
2024〜2025年にかけて、主要なサービスでパスキーのサポートが拡大した。Google・Apple・Microsoft・1Password・Dashlane等のパスワードマネージャーがパスキーの保管と同期に対応している。日本では一部の金融機関・ECサービスでもパスキー対応が進んでいる。対応状況はサービスごとに異なるため、各サービスのセキュリティ設定で確認する。
### パスキーの端末間同期と引き継ぎ
パスキーはAppleデバイス間(iCloud Keychain)・Googleアカウント(Google パスワードマネージャー)経由で複数端末に同期できる。端末を機種変更した場合でも、同じApple IDまたはGoogleアカウントにサインインすれば既存のパスキーを引き継げる。端末ごとに独立したパスキー(同期しないタイプ)を使っている場合は、新端末で再登録が必要になる。1Password・Bitwarden等のサードパーティパスワードマネージャーに保管すると、OS・デバイスメーカーをまたいだ移行が柔軟になる。
---
## SMSしか選択肢がない場合の対策
認証アプリやパスキーに対応していないサービス(一部の銀行・行政サービス等)でSMS 2FAを使い続ける場合、以下の対策でリスクを低減できる。
### 1. キャリアのアカウントに口頭確認パスワードを設定する
SIMスワップ攻撃の主な突破口はキャリアの本人確認だ。日本の大手キャリアでは、窓口・電話での手続き時に確認する口頭パスワード(任意設定)を設けている場合がある。生年月日・住所・電話番号のように攻撃者が入手できる情報は設定しないこと。
SIMロックについては[SIMロックとは — 解除方法と対応端末の確認](/ja/guides/sim-lock/)を参照してほしい。
### 2. VoIP番号の使用を避ける
一部のサービスはVoIP番号や番号転送サービスへのSMS送信を拒否するようになっているが、すべてのサービスがそうとは限らない。重要なサービスには、実際のSIMカードに紐付いた電話番号を登録する。
### 3. フィッシング対策を徹底する
銀行・決済サービスへのアクセスは、メールのリンクからではなく公式アプリまたはブラウザのブックマークから行う。SMSで届いたリンクをタップしてIDとパスワードを入力するという操作は、AiTMフィッシングの典型的な誘導に合致する。
### 4. SIM PINを設定する
端末のSIM PINを有効にすることで、第三者が物理的にSIMカードを取り出して別の端末に挿入した場合にSIMを使用できなくさせることができる。SIM PINおよびPUKコードの仕組みについては[IMEI・PIN・PUKとは](/ja/guides/imei-pin-puk/)を参照してほしい。
---
## 認証方式の比較まとめ
| 認証方式 | SIMスワップ耐性 | SS7傍受耐性 | AiTMフィッシング耐性 | オフライン動作 |
|---------|--------------|------------|-------------------|-------------|
| パスワードのみ | — | — | — | 不要 |
| SMS 2FA | 低(電話番号を乗っ取られると無効) | 低(傍受可能) | 低(リアルタイム中継可) | 不要 |
| TOTP(認証アプリ) | 高(電話番号不要) | 高(ネットワーク非経由) | 中(コードは転送可能) | 可(オフライン動作) |
| パスキー(FIDO2) | 高(電話番号不要) | 高(ネットワーク非経由) | 高(オリジン紐付きで偽サイトでは機能しない) | 端末PINまたは生体認証が必要 |
| ハードウェアセキュリティキー(FIDO2) | 高 | 高 | 高 | 物理デバイスが必要 |
---
## 移行の優先順位と実践的なアドバイス
すべてのSMS 2FAを一度に移行する必要はない。以下の優先順位で段階的に移行するのが現実的だ。
**最優先**: メールアカウント(他のすべてのサービスのパスワードリセットに使われるため、最初に保護する)
**高優先**: 銀行・証券・仮想通貨取引所(資産への直接アクセス)
**中優先**: SNS・ECサービス・その他
移行時の注意点として、バックアップコード(リカバリコード)の管理を忘れずに行う。認証アプリが入っていた端末を紛失・故障した場合、バックアップコードがなければサービスにアクセスできなくなる。バックアップコードは印刷して安全な場所に保管するか、パスワードマネージャーに保存する。
MNP(キャリア乗り換え)を行う場合、移行前と移行後で電話番号が変わらないが、SMS受信の設定やキャリアのアカウント保護設定を確認する必要がある。MNPの手順は[MNP(番号ポータビリティ)の手順 — ワンストップMNPと予約番号方式](/ja/guides/what-is-mnp/)を参照してほしい。
---
## よくある質問
よくある質問はフロントマターの `faqItems` に構造化されている。主な5問の要点は次のとおりだ。
- SMS 2FAは使わないよりも安全だが、高価値アカウントへの単独使用はNIST SP 800-63BのRestrictedガイダンスに照らしてリスクがある
- TOTPは電話番号不要・オフライン動作・SIMスワップ耐性という点でSMS 2FAより優れる
- パスキー(FIDO2/WebAuthn)はフィッシング耐性を設計に組み込んでおり、TOTPよりもAiTM攻撃への対処が強い
- SS7攻撃は特権的なネットワークアクセスが必要なため一般ユーザーへの即時脅威は低いが、高価値標的では実証例がある
- SMS 2FAしか使えないサービスでは、キャリアのアカウント口頭パスワード設定・フィッシング対策・SIM PINの組み合わせでリスクを低減する
---
## 関連ガイド
- [海外でSMS二段階認証(2FA)を受信する方法](/ja/guides/sms-2fa-abroad/) — 渡航中にSMS 2FAコードを確実に受け取るための設定とデュアルSIM活用法
- [SIMスワップ詐欺とは — 手口・兆候・防ぎ方](/ja/guides/sim-swap/) — SMS 2FAの最大の脅威であるSIMスワップ攻撃の詳細と対策
- [SIMロックとは — 解除方法と対応端末の確認](/ja/guides/sim-lock/) — SIMロックの仕組みとキャリア乗り換え時の注意点
- [MNP(番号ポータビリティ)の手順](/ja/guides/what-is-mnp/) — キャリア変更時に電話番号を維持するMNPの手続き
- [IMEI・PIN・PUKとは](/ja/guides/imei-pin-puk/) — SIM PINの設定方法とPUKコードの扱い
================================================================================
# 副回線の選び方 — 通信障害に備える日本市場ガイド
URL: https://sim-finder.com/ja/guides/sub-line/
Type: guides (ja)
Published: 2026-04-25
副回線とは、メイン回線とは別に用意するサブの通信手段だ。通信障害や自然災害でメインキャリアがつながらなくなったとき、別キャリアの副回線があれば通信を継続できる。維持コストを最小に抑えながらeSIMで手軽に用意できるプランが増えたことで、副回線を持つハードルは大幅に下がった。
---
## 副回線が必要な理由 — 通信障害の実態
通信障害は「まれな出来事」ではない。日本の大手キャリアでも過去に大規模な障害が発生している。
2021年10月、NTTドコモで音声通話・パケット通信に影響する障害が発生したと報じられた。翌2022年7月には、KDDI(au)で過去最大級とされる大規模障害が発生し、音声通話やデータ通信が広範囲で利用しにくい状態が数日間続いたと報道された。2024年1月の能登半島地震では、被災地の基地局が損壊・停電し、複数キャリアのネットワークが利用困難になったと伝えられた。
これらの障害に共通するのは「予告なく発生し、いつ終わるか分からない」という点だ。障害が発生した瞬間に「もう1枚SIMがあれば」と気づいても、その時点から準備するのでは遅い。
副回線を持つことは、「自然な分散リスク管理」として考えるとシンプルだ。メイン回線が使えない時間帯に、最低限の通信ができる保険として機能する。
---
## 副回線に求める3つの要件
副回線として使うSIMに必要な条件を整理する。
### 要件1: メイン回線とは異なるMNOの回線
副回線を持つ最大の目的は障害時の代替手段だ。メイン回線と同じキャリアの回線を2枚持っていても、そのキャリアの障害発生時には両方が使えなくなる。
日本には4つのMNO(NTTドコモ・au/KDDI・ソフトバンク・楽天モバイル)がある。メイン回線がドコモなら、副回線はau・ソフトバンク・楽天モバイルのいずれかから選ぶ。各MNOの違いについては「[MNO vs MVNO vs サブブランド — 違いと選び方](/ja/guides/mno-vs-mvno-comparison/)」で解説している。
MVNOも特定のMNO回線を使っているため、MVNOを副回線として選ぶ場合は「どのMNO回線を使っているか」を確認することが必要だ。
### 要件2: 月額コストの最小化
副回線は「滅多に使わないが、いざという時のための回線」だ。普段ほとんど使わないものに高い維持費を払い続けるのは合理的でない。月額コストを極力ゼロに近い水準で維持できるプランを選ぶことが重要だ。
現在の日本市場では、一定の条件下で実質ほぼ0円から維持できる構造のプランが存在する。ただし「0円維持」には利用条件があり、条件を満たさないと自動的に課金されたり、契約が停止・解除されたりする点に注意が必要だ。
### 要件3: eSIM対応
副回線をデュアルSIMで常時待ち受けするためには、eSIMへの対応が実質的な必須要件だ。
物理SIMの場合、端末に物理SIMスロットが2つ必要になるか、スロットが1つしかない端末では挿し替えが必要になる。緊急時にSIMを探して挿し替えるのは現実的でない。
eSIMなら端末の物理スロットを占有せずに2回線目を追加でき、設定で常時待ち受けにしておける。eSIMの仕組みは「[eSIMとは — 仕組み・メリット・デメリット](/ja/guides/what-is-esim/)」を参照してほしい。
---
## 副回線の主要候補
日本市場で副回線として使いやすい選択肢を整理する。各プランの具体的な料金・条件は変更される可能性があるため、必ず公式サイトで確認すること。
### povo2.0(au/KDDI回線)
副回線の定番として名前が挙がりやすいのがpovo2.0だ。基本料0円から始まり、データ容量や通話定額などの機能を「トッピング」として必要なときに追加購入する仕組みになっている。
eSIMに対応しており、デュアルSIM端末であれば物理SIMと組み合わせて使える。au回線(KDDIのMNO回線)を使用するため、ドコモをメインとするユーザーの副回線として選ぶと、異なるMNOの分散効果が得られる。
注意点は「180日ルール」だ。一定期間内にトッピング購入または一定額以上の通話・SMS利用がない場合、契約が停止・解除される可能性がある。詳細はpovo公式サイトで確認すること。
### 楽天モバイル(楽天回線)
楽天モバイルは日本で4番目のMNOとして2020年4月にサービスを開始した。現在は段階制の料金プラン(Rakuten最強プラン)を採用しており、月のデータ使用量が少ない月は低コストで維持できる設計になっている。eSIMに対応し、デュアルSIM構成が可能だ。
楽天回線を副回線として使うことで、ドコモ・au・ソフトバンクのいずれをメインにしている場合でも異なるMNO回線を確保できる。
副回線として使う場合、楽天モバイルのeSIM再発行は「my 楽天モバイル」アプリ(またはWebサイト)から行う。
### LINEMO(ソフトバンク回線)
LINEMOはソフトバンクが直接提供するオンライン専用プランで、eSIMに対応している。ソフトバンク本体の回線品質をそのまま使える。小容量プランが用意されており、副回線として最低限の容量を低コストで確保したい場合の候補になる。
LINEMOを選ぶことで、ドコモまたはauをメインとするユーザーがソフトバンク系の副回線を持てる。
### IIJmio・mineo等のMVNO最小プラン
MVNO各社も副回線候補になる。IIJmio・mineoなど複数のMVNOが最小容量プランを提供しており、月額コストを抑えながら副回線を持てる。
MVNOは使用するMNO回線により品質が異なる。副回線として「緊急時に確実につながる」ことを優先するなら、混雑時の速度が安定しやすいMNO・サブブランド系のプランを選ぶほうが確実だ。MVNOの仕組みと品質の違いは「[MNO vs MVNO vs サブブランド — 違いと選び方](/ja/guides/mno-vs-mvno-comparison/)」で解説している。
---
## メイン回線と副回線のキャリア組み合わせ方
副回線はメインと異なるMNOから選ぶのが原則だ。以下は典型的な組み合わせの考え方だ。
| メイン回線 | 副回線候補の方向性 |
|----------|----------------|
| ドコモ(NTTドコモ) | au系(povo2.0/UQ mobile)、ソフトバンク系(LINEMO/Y!mobile)、楽天モバイル |
| au(KDDI) | ドコモ系(ahamo/irumo)、ソフトバンク系(LINEMO/Y!mobile)、楽天モバイル |
| ソフトバンク | ドコモ系(ahamo/irumo)、au系(povo2.0/UQ mobile)、楽天モバイル |
| 楽天モバイル | ドコモ系(ahamo/irumo)、au系(povo2.0)、ソフトバンク系(LINEMO) |
MVNOを副回線として選ぶ場合は、そのMVNOが使用しているMNO回線を確認し、メイン回線と異なるMNO系の回線を使うMVNOを選ぶことが必要だ。
### カバレッジも考慮する
各MNOはカバレッジの強い地域・弱い地域がある。例えば地方・山間部での通話の安定性を重視する場合、カバレッジが広い回線を副回線として選ぶことも選択基準になる。
---
## デュアルSIM端末での副回線運用
副回線を平時から使いやすい状態に保つには、デュアルSIM対応端末でeSIMを組み合わせるのが最も効率的だ。
### iPhoneでの運用
iPhoneのデュアルSIM設定は「[デュアルSIMの設定(iPhone) — 物理SIM・eSIMを組み合わせる手順](/ja/guides/dual-sim-iphone/)」で詳しく解説している。要点は以下の通りだ。
- 「設定」→「モバイル通信」から2つの回線を確認できる
- 通話・SMSに使う回線とデータ通信に使う回線をそれぞれ設定できる
- 副回線はデータ通信をオフにし、通話・SMS待ち受けのみにしておくと、メイン回線のデータを優先しながら緊急時に切り替えられる
- 「モバイルデータ通信の切り替えを許可」設定(Allow Cellular Data Switching)をオフにしておくと、意図せずメイン回線でデータが消費されるのを防げる
### Androidでの運用
AndroidのデュアルSIM設定は「[デュアルSIMの設定(Android) — Pixel・Samsung別の手順](/ja/guides/dual-sim-android/)」で解説している。
- Google Pixelでは「設定」→「ネットワークとインターネット」→「SIM」から2つの回線を管理できる
- Samsung Galaxyでは「設定」→「接続」→「SIMマネージャー」から管理できる
- データ通信に使う回線を明示的に設定し、副回線のデータ通信はオフにしておくのが基本構成だ
### 副回線のデータ通信は平時はオフが基本
副回線は通話・SMS待ち受け専用として運用し、データ通信はオフにしておく設定が基本だ。緊急時にはデータ通信を副回線に切り替えることで通信を継続できる。
デュアルSIM端末でも、2つのSIMを同時にアクティブにするとバッテリー消費が増える傾向がある。特に電波の弱いエリアでは消費が顕著になる場合がある。
---
## 副回線の起動と緊急時の切替手順
通信障害が発生した際に落ち着いて操作できるよう、切替手順を事前に把握しておくことを推奨する。
### iPhoneの場合
1. 「設定」→「モバイル通信」を開く
2. 副回線(eSIM)を選択し、データ通信をオンにする
3. 「通信のオプション」→「データ通信用のモバイル通信回線」を副回線に変更する
4. メイン回線のデータ通信をオフにする(バッテリー節約と誤課金防止のため)
### Androidの場合
1. 「設定」→「ネットワークとインターネット」→「SIM」を開く
2. 副回線のデータ通信をオンにする
3. 「優先SIM」または「データSIM」を副回線に変更する
### 事前の確認事項
- 副回線のeSIMプロファイルが正常にインストールされていることを定期的に確認する
- 副回線で実際に通話・SMS・データ通信が動作するかを定期的にテストしておく(障害発生時に「使えない」と気づくことを防ぐため)
- povo2.0等の「利用なし期間ルール」がある場合は、定期的にトッピングを購入するか通話・SMSを使っておく
---
## SMS認証の判断 — 副回線で受けるかメインで受けるか
副回線を持つと「どの回線でSMSを受けるか」という判断が生じる。整理すると以下の通りだ。
### SMS認証の分散リスク
重要なサービス(銀行・決済・SNS等)のSMS認証を全てメイン回線の番号で設定している場合、メイン回線の障害時にSMS認証が届かなくなる。副回線の番号をSMS認証先として設定しておけば、メイン回線障害時でも認証を受けられる。
ただし、この場合は「副回線の維持」が重要なサービスへのアクセスに直結する。副回線の番号が変わる・サービスが停止するといったリスクが生じる点も念頭に置く必要がある。
### 推奨の考え方
| 用途 | 推奨の設定先 |
|------|------------|
| 銀行・金融サービスのSMS認証 | メイン回線(主に使う番号) |
| バックアップ用のSMS認証 | 副回線(一部サービスで設定) |
| 海外旅行時のSMS受信 | 国内SIM(メイン/副回線どちらでも可) |
### データ専用SIMには注意
データ専用プランはSMS機能を持たない場合がある。副回線でSMS認証を受けたいなら、音声通話・SMS対応のプランを選ぶことが必要だ。povo2.0・LINEMO・楽天モバイルの各プランはいずれもSMSの送受信が可能だ。
---
## 副回線維持の注意点
### 最低利用条件と自動停止リスク
副回線として選ぶプランの「最低利用条件」を必ず確認する。povo2.0のように一定期間内の利用がないと契約が停止・解除されるプランがある。条件を見落とすと、いざ使おうとしたときに回線が使えない状態になる。
最低利用条件がある場合の対処例:
- カレンダーに「povo2.0トッピング期限」等のリマインダーを設定する
- 年に数回、意図的にトッピングを購入するか、通話・SMSを利用する
### 自動課金への注意
副回線として加入しているプランが自動で月額課金される場合、「使わないから放置」では毎月費用が発生し続ける。プランの課金タイミングと金額を定期的に確認する習慣が必要だ。
### トッピング期限の管理(povo2.0の場合)
povo2.0でデータ容量トッピングを購入する場合、各トッピングには有効期限がある。期限内に使い切れないと消滅する。副回線として「たまに大容量を追加する」使い方より、「最小限のトッピングを維持のために定期的に購入する」使い方が副回線には向いている。
### eSIMプロファイルの管理
eSIMプロファイルを端末から削除すると、再インストールには通常キャリアへの再発行申請が必要になる。緊急時に削除済みに気づいても即時復旧は難しい。副回線のeSIMは削除しないよう注意し、機種変更時には適切に移行手続きを行う。
---
## よくある質問
### povo2.0を副回線として使う場合の最大の注意点は何ですか?
「180日ルール」(一定期間内に有料トッピングの購入または一定額以上の通話・SMS利用がないと契約停止・解除の可能性)です。副回線は普段使わないからこそ、この条件を見落としやすくなります。カレンダーのリマインダーを設定するなど、定期的に利用条件を満たす仕組みを用意しておくことを推奨します。条件の詳細はpovo公式サイトで必ず確認してください。
### 副回線はどの段階でeSIMをインストールしておくべきですか?
障害が発生する前に済ませておくことが必須です。eSIMのインストールにはWi-Fiまたはモバイルデータ通信が必要です。メイン回線が完全に使えない状況では、Wi-FiがなければeSIMをインストールすることも困難になります。副回線は平時に設定・動作確認まで完了させておきましょう。
### 楽天モバイルをメイン回線にしている場合、副回線の選択肢はありますか?
はい。楽天モバイルはドコモ・au・ソフトバンクとは異なる独立したMNOですので、他の3社(ドコモ・au・ソフトバンク)系のいずれかを副回線として選べます。povo2.0(au系)やLINEMO(ソフトバンク系)、ahamo(ドコモ系)等が候補になります。
### MVNOを副回線にしても意味がありますか?
MVNOも異なるMNO回線を使っていれば、メイン回線の障害時には有効な代替手段になります。ただし、MVNOは混雑時間帯の速度低下リスクがある点と、緊急時に確実につながる安定性を求めるなら、MNO・サブブランド系のプランのほうが安心という側面があります。
---
## まとめ
副回線を持つことの本質は「リスクの分散」だ。費用をかけずに別キャリアの回線をeSIMで常時待ち受けしておけば、いざ障害が発生した際に慌てずに済む。
重要なポイントを整理する。
| 項目 | 内容 |
|------|------|
| キャリア選び | メイン回線と異なるMNOから選ぶ |
| コスト | 最低限の維持コストで済む構造のプランを選ぶ(維持条件を要確認) |
| 形式 | eSIM推奨(デュアルSIM構成で常時待ち受け) |
| SMS対応 | SMS認証に使う可能性があるなら音声+SMS対応プランを選ぶ |
| 定期確認 | 最低利用条件の管理、動作確認、eSIMプロファイルの確認 |
各プランの詳細・現在の料金は各キャリアの公式サイトで確認してほしい。副回線候補のプランを条件で絞り込みたい場合は[SimFinderで検索](/ja/jp/search/)できる。
デュアルSIM端末の選び方・設定については「[デュアルSIMとは — DSDS・DSDV・DSDAの仕組みと活用法](/ja/guides/what-is-dual-sim/)」を参照してほしい。
================================================================================
# 物理SIMからeSIMへの切り替え方法
URL: https://sim-finder.com/ja/guides/switch-physical-to-esim/
Type: guides (ja)
Published: 2026-06-04
物理SIMからeSIMへの切り替えは、キャリアにeSIM再発行を申請してプロファイルをダウンロードするだけで完了する。電話番号・プラン・料金はそのまま引き継がれ、SIMカードの形態だけが変わる。切り替えの大まかな流れは「①端末がeSIM対応か確認 → ②キャリアにeSIM再発行を申請 → ③本人確認 → ④プロファイルをダウンロード(QRコード・アプリ・またはiPhoneのeSIMクイック転送) → ⑤開通確認 → ⑥物理SIMを廃棄」の6ステップだ。
eSIMの基礎知識(eUICC・プロファイルの仕組み)は「[eSIMとは — 仕組み・メリット・デメリット](/ja/guides/what-is-esim/)」で解説している。物理SIMとeSIMの違いについては「[物理SIM vs eSIM — 違いと選び方を比較](/ja/guides/sim-vs-esim/)」を参照してほしい。
---
## 切り替え前に確認すること
### データのバックアップを取る
切り替え作業前に、端末内のデータをバックアップしておくことを推奨する。切り替え自体でデータが失われることはないが、万一の誤操作や端末のリセットに備えておくと安心だ。iPhoneであればiCloudバックアップまたはPCへのバックアップ、Androidであればクラウドバックアップや内部ストレージのコピーが一般的な方法だ。
### 端末がeSIMに対応しているか
切り替えの大前提として、使っている端末がeSIMに対応している必要がある。eUICCチップが搭載されていない端末にはeSIMプロファイルをインストールできない。
対応確認の方法は2つある。
- **iPhoneの場合**: 「設定」→「モバイル通信」を開いて「eSIMを追加」または「モバイル通信プランを追加」が表示されればeSIM対応だ。
- **Androidの場合**: 「設定」→「接続」または「ネットワークとインターネット」→「SIMカード」(表示名は機種により異なる)を開いてeSIM関連の項目があるか確認する。
端末モデル別の対応状況の詳細は「[eSIM対応端末ガイド](/ja/guides/esim-compatible-devices/)」で確認できる。
### SIMロックが解除されているか
SIMロック(キャリアロック)がかかっている端末では、現在の契約キャリアのeSIM以外は追加できない。同じキャリアの物理SIMからeSIMへ切り替える場合はSIMロックの影響はないが、キャリア変更を伴う場合はSIMロックの解除が先に必要だ。
iPhoneのSIMロック状態は「設定」→「一般」→「情報」→「キャリアロック」で確認できる。「SIMの制限なし」と表示されていればSIMフリーだ。
日本では2021年10月1日以降に発売された端末は原則SIMロックなしで販売されているため、その後に購入した端末はこの手順を省略できる。
### Wi-Fi環境を確保する
eSIMプロファイルのダウンロードにはインターネット接続が必要だ。切り替え作業中はモバイル通信が一時的に使えなくなるため、自宅のWi-Fiなど安定したネットワーク環境で作業することを強く推奨する。
---
## キャリアへのeSIM再発行申請
物理SIMからeSIMへの切り替えは、キャリアの「SIM変更」または「eSIM発行」手続きによって行う。同じ番号・プランを維持したまま、SIMの形態を物理からeSIMに変更する申請だ。申請方法はオンラインと店頭の2通りある。
### オンラインでの手続き(推奨)
多くのキャリアは公式Webサイトまたは専用アプリから、店舗に行かずにeSIMへの切り替え手続きを完結できる。
一般的な流れは以下の通りだ。
1. キャリアの公式マイページまたは専用アプリにログインする
2. 「SIM変更」「eSIM発行」「SIM種別変更」などのメニューを探す(メニュー名はキャリアにより異なる)
3. 画面の指示に従って申請を進める
4. 本人確認を行う(詳細は次のセクション参照)
5. 申請が受理されるとeSIM(QRコードまたはアプリ内のプロファイル)が発行される
オンライン手続きは24時間受け付けているキャリアが多く、手続きから発行まで即日完了するケースが一般的だ。
### 店頭での手続き
オンライン手続きに不慣れな場合や、本人確認書類の提出が必要な状況では店頭窓口でも手続きできる。店頭では担当者が手続きを案内してくれるが、混雑時には待ち時間が発生することがある。
店頭手続きの場合、以下を持参する。
- 本人確認書類(運転免許証・マイナンバーカード・パスポートなど、各社の指定するもの)
- 現在使用中のスマートフォン(eSIMをインストールする端末)
- 現在の契約に紐づいた暗証番号(4桁)
---
## 本人確認の方法
eSIM再発行手続きでは、なりすましを防ぐために本人確認が必要だ。確認方法はキャリアや手続き方法によって異なる。
### オンライン本人確認(eKYC)
多くのキャリアのオンライン手続きでは、スマートフォンのカメラを使った本人確認(eKYC)に対応している。本人確認書類(運転免許証・マイナンバーカードなど)を撮影し、顔写真と照合することで確認を完了する方式だ。
### SMS・電話による認証
現在の契約番号へのSMS送信または電話着信により、契約者本人であることを確認する方式もある。物理SIMが現在使える状態であれば、SMSや電話を受け取ることで本人確認を完了できる。
### 店頭での書類確認
店頭手続きの場合は、担当者が本人確認書類を目視確認する。
---
## QRコードまたはアプリでプロファイルを取得する
本人確認と申請が完了すると、キャリアからeSIMプロファイルが発行される。プロファイルの取得方法はキャリアによって異なる。
### iPhoneの「eSIMに変換」(eSIMクイック転送)を使う方法
iPhoneとキャリアの両方がeSIMクイック転送に対応している場合、設定アプリ内から直接「eSIMに変換」を選択するだけで切り替えを完結できる。QRコードのスキャンやキャリアのWebサイトでの別途手続きが不要な点が特徴だ。
日本の主要キャリア(ドコモ・au・ソフトバンク・楽天モバイル・povo・LINEMO・UQモバイル・ワイモバイル等)はeSIMクイック転送に対応している。
手順は以下の通りだ。
1. 「設定」→「モバイル通信」を開く
2. 現在の物理SIMの回線を選択する
3. 「eSIMに変換」をタップする
4. 画面の指示に従って手続きを進める
「eSIMに変換」が表示されない場合は、キャリアまたはiOSのバージョンが対応していない可能性がある。その場合は次のQRコードをスキャンする方法またはキャリアアプリを使う方法で手続きする。
### QRコードをスキャンする方法
QRコードが発行された場合、端末の「設定」からQRコードをスキャンしてプロファイルをダウンロードする。
**iPhoneの場合**の手順は以下の通りだ。
1. 「設定」→「モバイル通信」を開く
2. 「eSIMを追加」または「モバイル通信プランを追加」をタップする
3. カメラが起動するので、発行されたQRコードをスキャンする
4. 「モバイル通信プランが検出されました」と表示されたら「続ける」をタップする
5. eSIMのダウンロードが完了するまで待つ(数秒〜1分程度)
QRコードが同じ端末の画面上に表示されている場合(スキャンできない状態)の対処方法など、iPhoneでのQRコード設定の詳細な手順は「[QRコードでeSIMを設定する(iPhone)](/ja/guides/qr-code-iphone/)」を参照してほしい。
### QRコードが読めないときの手動入力
QRコードが印刷状態の不鮮明さや端末カメラの読み取りエラーでスキャンできない場合、SM-DP+アドレス(サーバーアドレス)とアクティベーションコードを手動入力することでプロファイルを取得できる。
- **iPhoneの場合**: 「設定」→「モバイル通信」→「eSIMを追加」→「詳細情報を手動で入力する」を選択し、キャリアから提供されたSM-DP+アドレスとアクティベーションコードを入力する。
- **Androidの場合**: 「SIMを追加」画面で「手動で入力」または「コードを入力」のオプションを選択し、同様に入力する(機種によりメニュー名が異なる)。
SM-DP+アドレスとアクティベーションコードはキャリアのマイページ、申請完了メール、または店頭で発行される紙に記載されている。QRコードをスキャンした場合と同じプロファイルが取得されるため、機能や使用期限に違いはない。
**Androidの場合**の手順はメーカーや機種によって異なる。一般的には「設定」→「ネットワークとインターネット」→「SIM」または「モバイルネットワーク」→「SIMを追加」と進んでQRコードをスキャンする。Androidでの詳細な手順は「[QRコードでeSIMを設定する(Android)](/ja/guides/qr-code-android/)」を参照してほしい。
### キャリアアプリからダウンロードする方法
QRコードではなく、キャリアの専用アプリ内の操作だけでプロファイルをインストールできるキャリアもある。アプリ内でeSIM発行の申請から、プロファイルのインストールまでを一連の流れで完結できる方式だ。
楽天モバイルはこの方式を採用しており、「my 楽天モバイル」アプリ(またはWebサイト)経由でeSIM発行・開通手続きを行う。
---
## 開通確認
プロファイルのダウンロードが完了したら、eSIMが正常に開通しているか確認する。
確認すべき項目は以下の通りだ。
- 端末の電波状態表示にキャリア名と電波アンテナが表示されているか
- モバイルデータ通信で実際にインターネット接続できるか
- 発信・着信が正常に機能するか(通話プランがある場合)
開通後にモバイルデータ通信が繋がらない場合は、「設定」→「モバイル通信」でeSIMのラインが選択されているか、データ通信がオンになっているかを確認する。それでも繋がらない場合はAPNの設定が必要なことがある。
---
## 物理SIMの扱い
eSIMへの切り替えが完了すると、元の物理SIMは無効化される。物理SIMカードは以後使用できない状態になる。
### 物理SIMを抜くタイミング
eSIMへの切り替え作業中は、物理SIMを挿したまま手続きを進める。プロファイルのダウンロードと開通確認が完了し、eSIMで通信できることを確認してから物理SIMを取り外すのが正しい順序だ。手続きの途中や開通確認前に物理SIMを抜くと、通信が途絶えて作業が中断する可能性がある。
### 物理SIMを安全に廃棄する
物理SIMカードには電話番号・キャリア認証情報などが記録されている。そのまま捨てると個人情報漏えいのリスクがある。廃棄する際はSIMカードのICチップ(金色の部分)に傷をつけて読み取れない状態にするか、SIMカードをハサミで裁断してから廃棄する。
一部のキャリアはSIMカードの回収・廃棄サービスを店頭で提供している。
---
## 切り替え時の主な注意点
### 通信が断絶する時間がある
切り替え作業中(物理SIMの無効化からeSIMの開通確認まで)はモバイル通信が一時的に使えなくなる。プロファイルのダウンロード操作自体は数分程度で完了するが、開通処理はキャリアによって異なり、即時〜最大1時間程度かかる場合がある。緊急の連絡が予想される状況での作業は避け、Wi-Fi環境下で作業することを推奨する。
### 機種がeSIM対応か必ず事前確認する
eUICCチップが搭載されていない端末ではeSIMプロファイルをインストールできない。切り替え手続きを始める前に端末の対応確認を済ませておく。
### 一度発行されたQRコードは1台・1回のみ有効
eSIM発行時に発行されるQRコードは、GSMAのセキュリティ仕様により1台の端末に対して1回しか使用できない。スキャン前に紛失・期限切れになった場合は、キャリアに再発行を申請する必要がある。再発行には手数料が発生するキャリアと無料で対応するキャリアがあり、金額はキャリアによって異なるため、公式サポートページで事前に確認しておくとよい。
### デュアルSIM端末での運用との関係
iPhoneやデュアルeSIM対応のAndroid端末では、物理SIMのスロットを残したまま複数のeSIMプロファイルを保持できる。この記事で解説している「物理SIMからeSIMへの切り替え」は、既存の物理SIMの契約をeSIM形式に変換する手続きであり、切り替え後は物理SIMが無効化される。
一方、デュアルSIM運用を目的に別キャリアのeSIMを追加する場合は、既存の物理SIMを維持したまま新たなeSIMを追加する形になる。これは本記事の手続きとは異なる。副回線としてeSIMを追加したい場合は、物理SIMに手を加えずに新規でeSIMプランを契約するのが一般的な方法だ。
### 旅行用eSIMや副回線eSIMとは別の手続き
この記事で解説している手続きは、現在の国内キャリアとの契約を物理SIMからeSIMに変更するものだ。新たに別のキャリアに乗り換える場合(MNP)や、旅行用eSIMを追加する場合は別の手順が必要になる。
MNPの手続きについては「[MNP乗り換えステップバイステップ](/ja/guides/mnp-step-by-step/)」を、旅行用eSIMの追加については「[初めての旅行eSIM完全ガイド](/ja/guides/first-time-guide/)」を参照してほしい。
---
## 日本の主要キャリアの手続きの一般的な流れ
日本の主要キャリア(NTTドコモ・au・ソフトバンク・楽天モバイルの大手4社、およびahamo・povo・UQモバイル・ワイモバイル・LINEMOなどのサブブランド)はすべてeSIMに対応しており、物理SIMからeSIMへの切り替え手続きを提供している。
各キャリアとも基本的な流れは共通している。
1. **マイページ/アプリにログイン**: 各社の公式マイページまたは専用アプリにアクセスする
2. **SIM変更メニューを選択**: 「SIM変更」「eSIM発行」「SIM種別変更」などのメニューから申請する
3. **本人確認**: eKYCまたは既存の認証方法で確認する
4. **eSIMプロファイルの発行**: QRコードまたはアプリ内操作でプロファイルが発行される
5. **端末でプロファイルをダウンロード**: 上記の手順でインストールする
6. **開通確認**: データ通信・通話の動作を確認する
オンライン専用ブランド(ahamo・povo・LINEMO)はすべての手続きがオンラインで完結する仕組みになっている。
具体的な手続き先や最新の手順については、各キャリアの公式サポートページを確認してほしい。手続き内容は随時更新されるため、公式の案内が最も正確な情報源だ。
eSIM対応プランを比較したい場合は[SimFinderのeSIM対応フィルター](/ja/jp/search/)で絞り込める。
---
## FAQ
**Q. 物理SIMからeSIMに切り替えると電話番号は変わりますか?**
A. 変わりません。同じキャリアの同じプランのまま、SIMの形態を物理からeSIMに変更するだけなので、電話番号・契約内容・月額料金はそのまま引き継がれます。
**Q. 切り替え中にどのくらい通信が止まりますか?**
A. プロファイルのダウンロード操作自体は数分程度で完了しますが、開通処理はキャリアによって異なり、即時〜最大1時間程度かかる場合があります。作業中はモバイル通信が一時的に使えなくなるため、Wi-Fiが使える環境で作業することを推奨します。
**Q. 物理SIMを挿したまま切り替えの手続きを始めてもよいですか?**
A. キャリアのオンライン手続き中は物理SIMを挿したままで構いません。eSIMのプロファイルダウンロードが完了し、開通処理が終わった後に物理SIMを取り外します。手続き途中で物理SIMを抜くと通信が途絶え、手続きが完了できなくなる場合があります。
**Q. 切り替え後に物理SIMはどうすればいいですか?**
A. 切り替え完了後、物理SIMは失効しています。個人情報が含まれているため、SIMカードのICチップ部分に傷をつけるか、専用のSIM廃棄サービスを使って廃棄してください。そのまま捨てるのは避けてください。
**Q. 端末がeSIM非対応でも切り替えできますか?**
A. できません。eSIMへの切り替えには端末がeUICCチップを搭載している必要があります。端末のeSIM対応状況はメーカー公式サポートページで確認してください。対応端末の一覧は「[eSIM対応端末ガイド](/ja/guides/esim-compatible-devices/)」を参照してください。
---
## 関連ガイド
- [eSIMとは — 仕組み・メリット・デメリット](/ja/guides/what-is-esim/)
- [物理SIM vs eSIM — 違いと選び方を比較](/ja/guides/sim-vs-esim/)
- [QRコードでeSIMを設定する(iPhone)](/ja/guides/qr-code-iphone/)
- [QRコードでeSIMを設定する(Android)](/ja/guides/qr-code-android/)
- [eSIM対応端末ガイド](/ja/guides/esim-compatible-devices/)
================================================================================
# 一時帰国時のSIM・eSIM選び
URL: https://sim-finder.com/ja/guides/temporary-return/
Type: guides (ja)
Published: 2026-06-06
海外在住の日本人が一時帰国する際の通信手段は、①一時帰国向けプリペイドSIM・eSIM、②日本の電話番号が必要な場合の音声付きプラン、③現在の海外回線による国際ローミング(高コストに注意)の3つに整理できる。滞在が数日か数ヶ月かによって最適解が変わり、日本の電話番号を維持しているかどうかも判断に影響する。
この記事では「日本から離れて暮らしている人が日本に戻る」という文脈に絞り、渡航前の準備から帰国後の後片付けまでを体系的に解説する。長期的な海外居住の通信戦略全体は[海外移住時の通信戦略ガイド](/ja/guides/expat-strategy/)で整理しているため、併せて参照してほしい。
---
## 1. 一時帰国の通信に何が必要かを整理する
まず自分のケースを確認する。以下の3つの問いに答えることで、必要な手段が絞られる。
**問い1: 日本の電話番号(着信番号)が必要か**
「日本国内の銀行・公官庁・知人への連絡用に日本の電話番号が必要」という場合と、「データ通信さえあれば通話はVoIPアプリで足りる」という場合では選択肢が変わる。データ専用のeSIMは電話番号を持たないため、音声通話が必要な場面には対応できない。
**問い2: 日本の番号をすでに保管・維持しているか**
帰国を見越して[電話番号の維持・保管](/ja/guides/number-storage/)をしていた場合、番号復活の手続きと対応SIM・eSIMが選択肢になる。番号を解約してしまっている場合は、新規で音声付きプランを取得するか、データ専用プランで割り切るかの判断になる。
**問い3: 滞在はどのくらいか**
数日の短期帰国と、数ヶ月の長期帰国では料金・手続きコストのバランスが変わる。短期では簡便なeSIM・プリペイドが優位で、長期では容量・有効期限・コストのバランスが重要になる。
---
## 2. データ専用プリペイドeSIM — 最もシンプルな選択肢
日本の電話番号が不要で「データ通信さえあれば十分」という一時帰国者には、データ専用のプリペイドeSIMが最もシンプルな選択肢だ。
### 特徴
- 出発前に日本のプロバイダーまたはグローバルeSIMプロバイダーからオンラインで購入・設定完了できる
- 空港到着直後からデータ通信を開始できる
- 物理SIMスロットを現在の海外回線に使ったまま、eSIMとのデュアルSIM構成にできる
- 日本国内の通話・SMS機能はない(VoIPアプリで代替可能)
### プリペイドeSIMの大まかな種類
**グローバルeSIMプロバイダー(Airalo・Holafly・Nomad等)の日本向けプラン**
旅行者向けに設計されており、7日・14日・30日などの期間設定があるものが多い。日本向けのプランはSimFinderの[旅行eSIM検索](/ja/travel/)で比較できる。
**日本国内のMVNO・キャリアが提供するeSIM**
IIJmio・楽天モバイル・ahamo・povo・ワイモバイル・LINEMOなど日本の主要プロバイダーがeSIM対応プランを提供している。国内プロバイダーのプランは容量・料金のバリエーションが幅広いが、新規契約には本人確認が必要で、在日の住所や本人確認書類の審査が発生するケースもある。
### 購入タイミングと設定の流れ
グローバルeSIMプロバイダーの場合、一般的な流れは以下の通りだ。
1. プロバイダーのアプリまたはウェブサイトで日本向けプランを選択・購入
2. QRコードまたはアプリ経由でeSIMプロファイルをダウンロード
3. 「今すぐ有効化」または「あとで有効化」を選び、日本到着後に有効化する
4. 帰国後、端末の「モバイル通信」設定から追加したeSIMを選んでオンにする
QRコードを使ったeSIMのインストール手順は[eSIMのQRコード設定(iPhone)](/ja/guides/qr-code-iphone/)または[eSIMのQRコード設定(Android)](/ja/guides/qr-code-android/)で詳しく解説している。
### 注意点
eSIMのプロファイル上限については、iPhoneの場合、機種・OSバージョンによって最大保存可能なeSIMプロファイル数が異なる。Apple公式のドキュメントによれば、iOS 15以降の対応iPhoneはeSIMを複数保存できるが、同時に有効化できる数には制限がある。帰国時に使うプロバイダーを追加する前に、端末のeSIM残容量を確認しておくことを推奨する(出典: Apple サポート「iPhoneでeSIMを使う」)。
---
## 3. 音声付きプリペイドSIM — 日本番号が必要な場合
日本の電話番号(着信番号)が必要な場合は、音声通話・SMSに対応したプリペイドSIMまたは音声eSIMが選択肢になる。
### 音声付きプリペイドSIM
日本国内では、旅行者・外国人向けに音声通話・SMS対応のプリペイドSIMが一部のMVNOから提供されている。
- 物理SIMカードを購入し、端末に挿入して使う形式
- 取得した日本の番号に着信・発信・SMS受信が可能
- 本人確認が必要(パスポートが基本)
**購入場所**: 日本の空港(成田・羽田・関西・中部など)の到着ロビーや、市内の家電量販店・キャリアショップで購入できるケースがある。一部のプロバイダーは日本国外から事前に注文して空港で受け取ったり、郵送で受け取ったりできる。空港での現地SIM購入の一般的な手順は[現地SIMカードの入手方法](/ja/guides/local-sim/)で解説している。
**本人確認**: 多くのMVNOはパスポートを在住外国人・帰国者の本人確認書類として受け付けているが、プロバイダーごとに受け付ける書類・手続き方法が異なる。渡航前に購入予定のプロバイダーの公式サイトで確認すること。
### 音声付きeSIM
一部のプロバイダーはeSIM形式の音声付きプランを提供している。
- 物理SIMスロットが不要で、現在の海外SIMと並行して保持できる
- 日本の電話番号が付与される
- 端末がeSIM対応であること、かつ追加できるeSIMスロットに空きがあることが前提
楽天モバイル・povo・LINEMO・ドコモ・au・ソフトバンク等の主要プロバイダーは音声付きeSIMプランを提供している(出典: Apple サポート「Find wireless carriers that offer eSIM service on iPhone」)。ahamoもeSIMの音声プランを提供している。
---
## 4. 番号保管からの復活 — 元の番号を活かす方法
海外移住の際に大手キャリアの「番号保管サービス(休止)」を利用していた場合、一時帰国に合わせてサービスを復帰させることで元の番号を使い続けられる。
### 番号保管サービスの復活
NTTドコモ・au(KDDI)・ソフトバンクは番号保管(休止)中の回線を再開できる仕組みを持つ(各社のサービス条件・対応方法は公式サイトで確認)。
- 日本に戻る前に、キャリアのオンラインサービスまたは電話で復活手続きができる場合がある
- 復活後は元の電話番号・プランで通話・SMS・データ通信が使える
- 保管期間の上限を超えていた場合は番号が失効しているため、事前に確認が必要
帰国後に再び出国する際も、再度番号保管手続きをすることで番号を維持し続けられる。番号保管の条件・費用・上限期間の詳細は[電話番号の維持・保管方法](/ja/guides/number-storage/)で解説している。
### 最安プランで維持していた番号の利用
番号保管ではなく、povo2.0(基本料0円)や最安プランで番号を維持していた場合は、追加の手続きなく一時帰国中にそのSIM・eSIMをそのまま使える。維持していたプランが必要な容量・速度に足りない場合は、トッピング追加やプラン変更を行う。
---
## 5. 現在の海外回線による国際ローミング — 高コストに注意
日本での通信に現在使っている海外キャリアの国際ローミングをそのまま使う方法もある。ただし料金構造に注意が必要だ。
### ローミングが適しているケース
- 数日の超短期帰国(1〜3日程度)で、通信量が少ない
- 日本着直後から接続が必要で、SIMを調達する余裕がない
- 契約しているキャリアのプランに日本向けのお得なローミングパックが含まれている
### ローミングが適さないケース
多くの国のキャリアは、日本への国際ローミング料金が高く設定されている。定額パックが設定されていても、1週間以上の滞在では費用が累積する。また、帰国中に動画視聴・テレワーク・大量のデータ同期をする場合は、ローミングの上限を超えやすい。国際ローミングの仕組みと料金モデルの詳細は[国際ローミングの仕組みと料金](/ja/guides/international-roaming/)で解説している。
### 出発前に確認すべきこと
- 契約しているキャリアの「日本向けローミング料金」または「パック料金」
- データ上限と超過後の料金体系
- バックグラウンド通信(アプリ自動更新・クラウド同期)の設定をオフにしているか
---
## 6. 滞在期間別の選び方
一時帰国の滞在期間によって最適な手段が変わる。
### 数日〜1週間未満の短期帰国
**日本の番号が不要な場合**
グローバルeSIMプロバイダーの日本向けプリペイドeSIMが最もシンプル。事前に購入・設定し、帰国直後からデータ通信を開始できる。手続きの手間を最小化したい場合の基本選択肢だ。
**日本の番号が必要な場合**
番号保管サービスを利用していれば復活させる。そうでなければ空港での音声付きプリペイドSIM購入が選択肢になる。超短期であれば海外キャリアのローミングで乗り切ることも現実的だが、料金確認は事前に行うこと。
### 1週間〜1ヶ月の中期帰国
帰国中のデータ通信量が増え、VoIPでの通話機会も増える期間だ。グローバルeSIMでは容量が不足するケースもあるため、日本国内プロバイダーのプリペイドプランや、30日有効の大容量プランの検討が必要になる。
ローミングはこの期間では費用が積み上がりやすいため、よほど有利なローミングパックが含まれているキャリアでない限り、日本でのSIM・eSIM調達を推奨する。
### 1ヶ月〜数ヶ月の長期帰国
帰国期間が長い場合は、月額プランが経済的になる。楽天モバイル・IIJmio・ahamo・povo等の日本のMVNO・サブブランドは月単位のeSIMプランを提供しており、必要に応じてプランを選べる。
eSIMで契約する場合は、出発の際に解約する手間がなく、次の帰国時に再加入しやすい。長期帰国が複数回ある場合は、MNPで格安SIMのeSIMを維持したままにするほうがトータルコストが下がるケースもある。帰国後に日本での通信契約を整えたい場合の流れは[帰国後のSIM・スマートフォン手続きガイド](/ja/guides/after-return/)で解説している。
---
## 7. 本人確認 — 短期帰国者向けの確認要件
日本でSIM・eSIMを新規に取得する際は、プロバイダーによって本人確認の方法が異なる。海外在住者として一時帰国している場合に特に確認が必要な点を整理する。
### パスポートが基本
日本の住民票がない海外在住者に対しては、パスポートが最も広く受け付けられている本人確認書類だ。多くのMVNOはパスポートで本人確認を受け付けており、オンラインでの手続き(スマートフォンでのパスポート撮影・顔認証)に対応しているプロバイダーも増えている。
ただし、日本の住所が必要な契約では、帰国中に滞在する住所(実家・ホテル・知人の住所)を記入することになる。仮住所の扱いはプロバイダーによって異なるため、事前に問い合わせることを推奨する。
### SIMフリー端末の確認
物理SIMを使う場合、端末がSIMフリーであることが前提だ。現在使っている端末が海外キャリアのSIMロックありの場合、日本の別キャリアのSIMを挿入しても認識されない。端末のSIMロック状態は、iPhoneであれば「設定」→「一般」→「情報」→「キャリアロック」で確認できる(「SIMの制限なし」の表示が必要)。
### 短期契約・解約手続き
帰国終了後に解約が必要なプランを選ぶ場合、解約手続きがオンラインのみ・日本語のみのプロバイダーでは、出国後の対応が難しい場合がある。帰国中に使うSIM・eSIMプランは、オンラインで日本国外から解約できるかどうかも事前に確認しておくことを推奨する。
---
## 8. 選択肢の比較まとめ
| 手段 | 日本番号 | 手続きの手間 | 短期帰国 | 長期帰国 | 特記事項 |
|------|---------|------------|---------|---------|---------|
| データ専用eSIM(グローバル) | なし | 少(事前購入) | 向く | 容量注意 | 空港不要・事前設定可 |
| データ専用eSIM(日本プロバイダー) | なし | 中(本人確認) | 向く | 向く | 容量・料金が豊富 |
| 音声付きプリペイドSIM | あり | 中〜多 | 短期でも可 | 向く | パスポート要 |
| 音声付きeSIM(日本プロバイダー) | あり | 中(本人確認) | 向く | 向く | 物理SIM不要 |
| 番号保管からの復活 | あり(元の番号) | 少〜中 | 向く | 向く | 保管期間確認必須 |
| 海外キャリアのローミング | なし(海外番号) | なし | 数日なら可 | 高コスト | 料金確認必須 |
---
## FAQ
よくある質問をまとめる。
**Q. 一時帰国中に日本の電話番号が必要な場合、どうすれば取得できますか?**
大きく3つの方法があります。①休眠中の番号保管サービスを復活させる(元の番号を維持していた場合)、②音声付きプリペイドSIMを新規契約する、③音声付きeSIMプランを購入する、です。短期滞在の場合、音声付きプリペイドSIMや音声eSIMが手続きが簡単で利用しやすいです。ただし本人確認(パスポートなどの在留資格証明書)が必要になります。
**Q. 海外在住者は日本でSIMを契約するとき、本人確認書類は何が使えますか?**
パスポートが最も広く通用します。在留カード(日本居住者)や特別永住者証明書が使える場合もありますが、短期帰国者の場合はパスポートが基本です。一部のMVNOや格安SIMは外国人向けの契約手続きを整備していますが、プロバイダーによって受け付ける書類が異なるため、契約前に各社の公式サイトで要件を確認してください。
**Q. 帰国中に使っていた日本のプリペイドSIMは帰国後どうすればいいですか?**
次の帰国に備えて番号を維持したい場合は、有効期限が長いプランを選ぶか、帰国前にトップアップ(チャージ)して有効期限を延長する方法があります。次の帰国タイミングが未定な場合や維持コストを払いたくない場合は、解約して都度新規契約するほうがシンプルです。再帰国時に同じ番号が必要でない場合は解約で問題ありません。
**Q. 現在使っている海外の回線を日本でそのまま国際ローミングとして使うのはどうですか?**
緊急時や数日程度の短期帰国には現実的な選択肢です。ただし多くの国のキャリアは日本への国際ローミング料金が高く設定されており、1〜2週間以上の滞在では料金が大きく積み上がる可能性があります。契約しているキャリアの日本向けローミング料金と条件を出発前に確認し、割高な場合は日本国内でのSIM・eSIM調達を検討してください。
**Q. eSIMのみの端末で一時帰国する場合の選択肢は何ですか?**
eSIM専用端末(物理SIMスロットなし)でも、日本国内でeSIMプランを追加できます。IIJmio・楽天モバイル・ahamo・povo・ソフトバンク・ドコモ等の主要プロバイダーはeSIMに対応しています。ただしeSIMはプロファイル上限があるため、端末のeSIM残容量を事前に確認してください。
---
## 関連ガイド
- [海外移住時の通信戦略ガイド](/ja/guides/expat-strategy/) — 移住前・渡航直後・現地定着後の3段階通信設計
- [電話番号の維持・保管方法](/ja/guides/number-storage/) — 番号保管サービス・povo2.0・MNP格安SIM維持の選択肢
- [現地SIMカードの入手方法](/ja/guides/local-sim/) — 日本の空港・市内・オンラインでのSIM購入ガイド
- [国際ローミングの仕組みと料金](/ja/guides/international-roaming/) — ローミングの仕組みと料金モデル詳細
- [帰国後のSIM・スマートフォン手続きガイド](/ja/guides/after-return/) — 帰国後の通信環境整備と手続き一覧
================================================================================
# テザリングの仕組みと設定 — Wi-Fi・USB・Bluetoothの違いと注意点
URL: https://sim-finder.com/ja/guides/tethering/
Type: guides (ja)
Published: 2026-06-04
テザリングはスマートフォンのモバイルデータ回線をPCやタブレットなどの他の機器に共有する機能であり、3方式(Wi-Fi・USB・Bluetooth)の間で速度と消費電力の特性が大きく異なる。テザリングを使うとスマートフォンのプランデータ容量を消費するため、プランの制限内容の事前確認が重要だ。
この記事では、テザリングの仕組みと3方式の違い、iPhone・Androidそれぞれの設定手順の概要、データ消費の注意点、そしてプランによる制限のケースを整理する。自分に合ったプランのデータ量が不明な場合は[データ通信量の目安](/ja/guides/data-usage-guide/)を、テザリング中のデータ節約設定は[データ通信量の節約テクニック](/ja/guides/save-data/)を参照してほしい。
---
## 1. テザリングの仕組み
テザリング(英: tethering、またはインターネット共有)とは、スマートフォンが持つモバイルデータ通信の接続をアクセスポイントとして機能させ、他のデバイスがそのインターネット接続を共用できるようにする機能だ。
仕組みの骨格は以下の通りだ。
1. スマートフォン(親機)はモバイルネットワーク(4G/5G)を通じてインターネットに接続する
2. 子機(PC・タブレット等)は親機に接続し、親機のモバイルデータ回線を経由してインターネットにアクセスする
3. 子機の通信は全て親機のモバイルデータとして処理されるため、親機のプランのデータ容量から消費される
テザリングは通話機能は共有しない。子機はインターネット接続のみを利用できる。
---
## 2. 3方式の比較:Wi-Fi・USB・Bluetooth
テザリングには接続方式によって3種類がある。速度・消費電力・接続台数の特性が異なるため、用途に応じて使い分けることが重要だ。
### Wi-Fiテザリング(ポータブルWi-Fiホットスポット)
スマートフォンが小型のWi-Fiルーターとして動作し、近くのデバイスがWi-Fi接続で利用する方式だ。
**特徴**
- 同時接続台数:複数台が同時に接続できる(端末の仕様・OSによって上限が異なる)
- 速度:3方式の中で最も高い通信速度が出やすい
- 電力消費:3方式の中で最も大きい。Wi-Fiの電波を常時発信するため、親機のバッテリー消耗が速い
- 接続距離:数メートル〜十数メートル程度(環境による)
- ケーブル:不要
**適した用途**:複数台を同時に接続したい場合、動画など大容量通信が必要な場合
### USBテザリング
親機と子機をUSBケーブルで物理的に接続する方式だ。
**特徴**
- 同時接続台数:1台のみ(ケーブルで直結するため)
- 速度:安定した通信速度が得られる。有線接続のため無線干渉がない
- 電力消費:Wi-Fiより親機の消費電力が少ない傾向がある。また接続中に子機(PC)から親機を充電できる端末の組み合わせも存在し、その場合は実質的なバッテリー消費を抑えられる
- ドライバ:PCによってはUSBテザリング用のドライバが必要な場合がある
**適した用途**:長時間PCで作業する場面、通信の安定性が重要な場面
### Bluetoothテザリング
Bluetoothでスマートフォンとデバイスをペアリングしてインターネット共有を行う方式だ。
**特徴**
- 同時接続台数:原理上1台〜数台(Bluetoothのプロファイル制限による)
- 速度:3方式の中で最も遅い。Bluetoothの帯域幅に上限があるため、大容量通信には向かない
- 電力消費:Wi-Fiよりも親機の消費電力が小さい傾向がある
- 接続距離:数メートル以内(Bluetooth Class 2の場合、環境による)
- ペアリング:接続前に一度ペアリング操作が必要
**適した用途**:軽いブラウジングやメール確認など低速でも十分な用途、電池持ちを優先したい場合
### 3方式の特性まとめ
| 方式 | 速度傾向 | 親機の電力消費 | 同時接続 | ケーブル |
|------|---------|-------------|---------|---------|
| Wi-Fi | 高い | 大きい | 複数台可 | 不要 |
| USB | 安定・高い | Wi-Fiより少ない | 1台 | 必要 |
| Bluetooth | 低い | 中程度 | 1〜数台 | 不要 |
---
## 3. iPhoneのテザリング設定手順
iOSではテザリング機能を「インターネット共有」と呼ぶ。
### 基本的な設定手順(2026年6月時点)
1. 「設定」→「インターネット共有」を開く(または「設定」→「モバイル通信」→「インターネット共有」)
2. 「ほかの人の接続を許可」をオンにする
3. Wi-Fiパスワードを設定する(デフォルトのパスワードを変更することを推奨する)
インターネット共有をオンにすると、iPhoneはWi-Fiホットスポットとして動作を開始する。
**各方式の接続手順**
- **Wi-Fiテザリング**:子機のWi-Fi設定でiPhoneの名前のネットワークを選択し、設定したパスワードを入力する
- **USBテザリング**:iPhoneとPCをLightning/USB-CケーブルまたはUSB-Cケーブルで接続する。インターネット共有をオンにするとPCが自動認識する(Macの場合は「インターネット共有」が自動的に有効になる)
- **Bluetoothテザリング**:iPhoneとPCのBluetooth設定でペアリングを完了した後、PC側でiPhoneを「アクセスポイント」として使用する設定を行う
**注意点**
- テザリング使用中は「インターネット共有」のバナーがiOS画面上部に表示される
- iPhoneがロックされると接続が切れる場合がある。長時間使用する場合は自動ロックの設定を変更するか、定期的に画面を確認する
- 接続中の子機台数が増えるほど親機の通信速度・バッテリーへの影響が大きくなる
---
## 4. Androidのテザリング設定手順
Androidでは「Wi-Fiホットスポット」または「テザリング」という名称が使われる。端末メーカーやAndroidのバージョンによってメニューの場所・表示名が異なる場合がある。
### 基本的な設定手順(2026年6月時点)
**Pixelシリーズの場合**
1. 「設定」→「ネットワークとインターネット」→「ホットスポットとテザリング」を開く
2. 「Wi-Fiホットスポット」をオンにする
3. 「Wi-Fiホットスポット」の設定からSSID(ネットワーク名)とパスワードを確認・変更する
**Samsungシリーズの場合**
1. 「設定」→「接続」→「モバイルホットスポットとテザリング」を開く
2. 「モバイルホットスポット」をオンにする
3. SSIDとパスワードを設定する
**各方式の設定**
- **Wi-Fiテザリング**:上記のホットスポットをオンにするだけで子機がWi-Fi接続できる
- **USBテザリング**:AndroidとPCをUSBケーブルで接続した後、「テザリング」メニューから「USBテザリング」をオンにする。PCによっては認識まで数秒かかる
- **Bluetoothテザリング**:「テザリング」メニューの「Bluetoothテザリング」をオンにし、子機側でBluetoothペアリングを行い「インターネット接続を使用」を有効にする
**注意点**
- セキュリティのためホットスポットのパスワードは英数字を組み合わせた十分な長さに設定することを推奨する
- デフォルトでは省エネのためタイムアウト機能が設定されている場合がある。長時間使用する場合はタイムアウトの設定を確認する
- Android 10以降では「5GHz帯」または「6GHz帯」を選択できる端末もある。5GHz帯は2.4GHz帯より干渉が少なく速度が出やすいが、接続距離が短い
---
## 5. テザリング中のデータ消費の注意点
テザリングを使う際に特に注意が必要なポイントを整理する。
### 子機の通信がすべて親機のデータ容量から差し引かれる
テザリングで子機が行う通信は全て親機のモバイルデータとして計上される。子機でYouTubeを視聴したり、大きなファイルをダウンロードしたりすると、通常のスマートフォン単体の利用よりもはるかに多くのデータを短時間で消費する可能性がある。
具体的なアプリ別消費量の目安は[データ通信量の目安](/ja/guides/data-usage-guide/)で確認できる。
### PCのソフトウェアアップデートに注意する
PCをテザリングに接続した状態でOSやアプリの自動アップデートが起動すると、数GB単位のデータを消費する場合がある。テザリング使用前に子機(PC)の自動アップデート設定をオフにするか、Wi-Fi限定に設定しておくことを推奨する。
Windowsの場合、「設定」→「ネットワークとインターネット」で接続を「従量制課金接続」に設定すると、大容量の自動ダウンロードが制限される。
### 低速モード(速度制限後)でのテザリング
月間データ容量を使い切った後も、テザリング機能そのものは動作する。ただし速度制限状態(多くのプランでは200kbps程度。高速オプションを含む一部プランでは1Mbps程度の場合もある)ではテキストの閲覧程度しか実用的でない。速度制限中の通信に関する詳細は[通信速度が遅い場合の対処法](/ja/guides/slow-speed/)を参照してほしい。
---
## 6. テザリングが使えないケース
テザリングは全てのプランで自由に利用できるわけではない。
### プランによる制限
格安SIM(MVNO)の一部プランでは、テザリングを制限または禁止している場合がある。MVNOについては[MVNOとは — 格安SIMの仕組みとMNOとの違い](/ja/guides/what-is-mvno/)で詳しく解説している。
**確認すべきポイント**
- 契約プランの約款・サービス説明にテザリングに関する記載があるか
- テザリング利用が別料金・別オプションになっていないか
- 低速モード(速度制限)中のテザリングが禁止されていないか
一般的に大手キャリア(MNO)の場合、テザリングは標準機能として提供されているが、データ容量はプランの容量から共用されるため実質的な使用量の増加には注意が必要だ。
### 海外ローミング中のテザリング
海外ローミング中にテザリングを利用できるかどうかは、ローミング先の契約内容による。ローミングパッケージでテザリングが禁止されているケースや、テザリングは別料金体系になっているケースもある。渡航前に契約内容を確認することを推奨する。
### テザリング非対応の端末
極めてまれなケースだが、古い端末ではテザリング機能そのものが搭載されていない場合がある。また、SIMロックがかかった端末でテザリングが制限されることがあった(現在の日本ではSIMロック解除義務化により新規契約はロックなし)。
---
## 7. 自分に合ったプランを選ぶ
テザリングを日常的に利用する場合、テザリング込みのデータ消費量を考慮したプラン選びが重要になる。
テザリングでPCを使うと、スマートフォン単体の利用に比べて月間消費量が大幅に増える可能性がある。例えばテレワークでビデオ会議を多用する場合、1時間のビデオ会議で数百MB〜1GB以上のデータを消費する。
自分に必要なデータ量の見積もり方は[データ通信量の目安](/ja/guides/data-usage-guide/)で解説している。プランの選び方全般については[SIMプランの選び方](/ja/guides/how-to-choose/)も参照してほしい。また、データを効率よく使う方法は[データ通信量の節約テクニック](/ja/guides/save-data/)にまとめている。
SimFinderでは、テザリング利用の有無もプラン比較の参考にできる。自分の利用スタイルに合わせて[SimFinderでプランを比較](/ja/sim/)してみてほしい。
---
## 8. FAQ
よくある疑問をまとめた。
**Q: テザリングとインターネット共有は同じですか?**
同じ機能を指す言葉だ。「テザリング」は日本で広く使われる呼称で、iOSでは「インターネット共有」、Androidでは「テザリング」または「ホットスポット」と表示される。スマートフォンのモバイルデータ回線を他のデバイスに共有するという意味は共通だ。
**Q: テザリング中のデータはどこで確認できますか?**
iPhoneは「設定」→「モバイル通信」→「パーソナルホットスポット」でテザリング分の通信量を確認できる(2026年6月時点)。Androidは「設定」→「ネットワークとインターネット」→「テザリング」→「Wi-Fiホットスポット」の使用量統計から確認できる(端末・バージョンによりメニュー名が異なる)。いずれも通常のモバイルデータと合算してプラン容量から差し引かれる。
**Q: テザリングが使えないのはどんな場合ですか?**
主に2つのケースがある。①プランがテザリング非対応:格安SIM(MVNO)の一部プランはテザリングを制限している。②プランのデータ容量を使い切った場合:速度制限状態でもテザリング自体は機能するが、通信速度が極端に遅くなる。また、格安SIMでは低速モード中のテザリング利用を約款で禁止しているケースもある。
**Q: テザリングで子機のデータ節約設定は有効ですか?**
子機側の節約設定は子機にのみ適用される。親機(スマートフォン)の低データモードやデータセーバー設定は、テザリングで接続した子機の通信には影響しない。子機側でも別途データ節約の設定を行う必要がある。
**Q: Wi-FiテザリングとBluetoothテザリングはどちらを使えばよいですか?**
近くで短時間使う場合はBluetoothテザリングが電池の消耗を抑えられる。PCや複数台の機器を同時に接続したい場合、または動画など大容量の通信をする場合はWi-Fiテザリングが適している。USB接続できる環境でPCにのみ接続するならUSBテザリングが最も安定する。
---
## 関連ガイド
- [データ通信量の目安 — 自分に合ったギガ数の見つけ方](/ja/guides/data-usage-guide/)
- [データ通信量の節約テクニック — iPhone/Androidのアプリ別設定と実践ガイド](/ja/guides/save-data/)
- [通信速度が極端に遅い場合の対処法](/ja/guides/slow-speed/)
- [SIMプランの選び方](/ja/guides/how-to-choose/)
- [MVNOとは — 格安SIMの仕組みとMNOとの違い](/ja/guides/what-is-mvno/)
================================================================================
# テザリングができないときの原因と対処 — プラン・APN・設定を順番に確認する
URL: https://sim-finder.com/ja/guides/tethering-blocked/
Type: guides (ja)
Published: 2026-06-04
テザリング(インターネット共有)が使えない原因は大きく4つに分類できる。①プランがテザリング非対応またはオプション未加入、②テザリングの通信上限に到達、③APN設定の問題(特にdun/テザリング用APN)、④子機側またはOS側の設定ミスだ。この順番で確認することで、多くのケースは解決できる。
テザリングの仕組みや3方式(Wi-Fi・USB・Bluetooth)の違いについては[テザリングの仕組みと設定](/ja/guides/tethering/)を参照してほしい。本記事はトラブル特化で、「つながらない」「使えない」場面の原因特定と対処に絞っている。
---
## 1. まずプランがテザリングに対応しているか確認する
テザリングができない最も多い原因は、**契約プランがテザリング非対応**であることだ。
### 大手キャリア(MNO)の場合
NTTドコモ・au・ソフトバンク・楽天モバイルの主要プランでは、テザリングは標準機能として提供されている。ただしプランによっては以下のような制限がある。
- テザリング専用の月間上限容量が設定されている(この上限とプラン全体の容量は別カウントの場合がある)
- 一部の古い料金プランではテザリングが別オプション扱いになっている
現在の契約プランの約款またはキャリアのマイページで「テザリング」「インターネット共有」の項目を確認すること。
### MVNO(格安SIM)の場合
MVNO(格安SIM)では、プランによってテザリングの取り扱いが大きく異なる。
- テザリング対応と明記されているプランであれば利用可能
- テザリングを明示的に禁止しているプランがある(特に低容量・低価格帯のプラン)
- 一部のMVNOでは低速モード中のテザリングに制限や条件が定められている場合がある。契約プランの利用規約を確認すること
MVNO(格安SIM)の仕組みについては[MVNOとは — 仕組み・メリット・注意点](/ja/guides/what-is-mvno/)で解説している。テザリングの可否はプランの約款に明記されているため、契約前・契約後いずれも必ず確認すること。
**確認場所**: キャリアの公式サイト「サービス仕様」「料金プラン詳細」「よくある質問」のいずれかにテザリングの対応状況が記載されている。
---
## 2. テザリングの通信上限に達していないか確認する
プランがテザリングに対応していても、**使用できる通信量の上限に達している**とテザリングが使えなくなる(または極端に遅くなる)。
### 確認すべき上限の種類
| 上限の種類 | 内容 |
|-----------|------|
| プラン全体の月間データ容量 | テザリングを含む通信全体で共用。使い切ると低速化 |
| テザリング専用の上限 | 一部プランでテザリング分のみに設けられた別上限 |
| 1日あたりの通信量制限 | プランによっては日単位の上限がある場合がある |
### 残量の確認方法
- **キャリア公式アプリ**: マイページや専用アプリでリアルタイムの残量を確認する(最も確実)
- **iPhone**: 「設定」→「モバイル通信」で月間の通信量を確認できる(ただし統計は月初にリセットが必要)
- **Android(Pixel)**: 「設定」→「ネットワークとインターネット」→「インターネット」→使用中のSIMの横の歯車→「データ使用量」で確認できる
アプリ別のデータ消費量の目安は[データ通信量の目安 — 自分に合ったギガ数の見つけ方](/ja/guides/data-usage-guide/)で確認できる。テザリングでPCを使うとスマートフォン単体の利用に比べてデータ消費が大きく増える点に注意が必要だ。
---
## 3. APN設定を確認する(特にdun/テザリング用APN)
テザリングが動作しない原因として、**APN設定の問題**が挙げられる。特にMVNOや一部のキャリアでは、テザリング専用のAPN(dunタイプ)が必要になる場合がある。
### APNとテザリングの関係
APN(Access Point Name)はモバイルデータ通信の接続先を指定する設定だ(詳細は[APN設定の手順(iPhone)](/ja/guides/apn-setup-iphone/)を参照)。APNには用途別の「タイプ」があり、通常のデータ通信に使われる`default`タイプとは別に、テザリング用の`dun`(Dial-Up Networking)タイプが設定されている場合がある。
この`dun`タイプのAPNが正しく設定されていないと、通常のモバイルデータ通信は動作するのにテザリングだけ使えないという状態になる。
### iPhoneでの確認・対処
iPhoneはAPN設定を構成プロファイルまたはキャリア設定アップデートで管理している。
**確認手順**:
1. 「設定」→「一般」→「VPNとデバイス管理」を開く
2. 使用中のMVNOの構成プロファイルが存在するか確認する
3. プロファイルが存在しない場合は、MVNOの公式サポートページからiPhone用の構成プロファイルをSafariでダウンロードしてインストールする
4. プロファイルをインストール済みの場合は、いったん削除して最新版を再インストールする
大手MNO(ドコモ・au・ソフトバンク・楽天モバイル)のSIMを使用中でテザリングのみ動作しない場合は、「設定」→「一般」→「情報」を開いてキャリア設定アップデートが保留中でないか確認し、あればアップデートを適用する。
### AndroidでのAPN確認
Android端末でAPN設定を確認する手順(Pixel系):
1. 「設定」→「ネットワークとインターネット」→「インターネット」を開く
2. 使用中のSIMの横の歯車アイコンをタップ
3. 「アクセスポイント名」をタップ
4. 一覧の中にテザリング用のAPN(APNタイプに`dun`が含まれるもの)が存在するか確認する
テザリング用APNが存在しない場合は、MVNOの公式サポートページでテザリング用APNの設定値を確認して手動で追加する。追加時に「APNタイプ」の欄に`dun`を含む値(例: `default,supl,dun`)を設定する必要がある。
---
## 4. 親機の設定を確認する
### iPhoneの確認手順
1. 「設定」→「インターネット共有」を開く
2. 「ほかの人の接続を許可」がオンになっているか確認する
3. オフになっている場合はオンにする
4. Wi-Fiパスワードが設定されているか確認する(デフォルトのパスワードを変更している場合は子機側で正しいパスワードを使っているか確認する)
デュアルSIM(物理SIM + eSIM)構成の場合は、「設定」→「モバイル通信」→「モバイルデータ通信」で、テザリングに使いたいSIMが選択されているか確認すること。
### Androidの確認手順(Pixel系)
1. 「設定」→「ネットワークとインターネット」→「ホットスポットとテザリング」を開く
2. 「Wi-Fiホットスポット」がオンになっているか確認する
3. 「Wi-Fiホットスポット」の設定でSSIDとパスワードを確認する
**省エネ設定のタイムアウトを確認する**: Androidはバッテリー節約のため、子機が一定時間接続されていないとWi-Fiホットスポットを自動オフにする場合がある。「Wi-Fiホットスポット」の詳細設定で「ホットスポットのタイムアウト」を「タイムアウトなし」に変更する。
---
## 5. 子機側の設定を確認する
親機の設定に問題がなくても、**子機(接続するPC・タブレット等)側の設定**が原因でつながらないことがある。
### Wi-Fi設定の確認
- **Wi-FiがオンになっているかPCやタブレットで確認する**: 機内モードが有効になっているとWi-Fi自体がオフになる
- **正しいSSID(ネットワーク名)を選択しているか確認する**: 親機のSSIDは「設定→インターネット共有」(iPhone)または「設定→ホットスポット」(Android)で確認できる
- **パスワードを正確に入力しているか確認する**: 大文字・小文字が区別される。入力ミスがないよう一文字ずつ確認する
### 過去の接続情報が干渉している場合
以前に同じSSIDで異なるパスワードを設定したことがある場合、子機が古いパスワードを記憶していて接続に失敗することがある。
**対処方法**:
1. 子機側のWi-Fi設定で、親機のSSIDを「このネットワークを削除」(iOSの場合は「このネットワークの設定を削除」)する
2. 改めて親機のSSIDを選択してパスワードを入力し直す
### Windowsの場合の追加確認
WindowsをUSBテザリングで接続する場合、デバイスドライバが正しく認識されていないとネットワークアダプターとして機能しない。「デバイスマネージャー」で不明なデバイスが表示されていないか確認すること。
---
## 6. OSの設定・制限を確認する
### iOSのスクリーンタイム・MDM制限
MDM(Mobile Device Management)管理プロファイルや一部のiOS構成では、インターネット共有(Personal Hotspot)がポリシーで無効化されることがある。スクリーンタイムの「コンテンツとプライバシーの制限」→「モバイルデータ通信の変更」はアプリ別のデータ通信許可を制御するもので、インターネット共有そのものへの効果はApple公式には明記されていない。
MDM管理下にある場合(「設定」→「一般」→「VPNとデバイス管理」に管理プロファイルが存在する場合)は、インターネット共有の制限はMDMポリシーによって行われている可能性がある。ユーザー自身では解除できないため、管理者に問い合わせること。
---
## 7. 再起動・ネットワーク設定リセットを試す
上記の手順を確認しても解決しない場合は、以下の順番で試す。
### ステップ1: 親機と子機を再起動する
最も単純で効果的な対処方法だ。親機(スマートフォン)と子機(PC・タブレット)の両方を再起動し、改めてテザリングの接続を試みる。
### ステップ2: 機内モードのオン・オフ
親機で機内モードをオンにして10秒程度待ち、オフに戻す。これでモバイルネットワークへの再接続が行われ、接続状態がリセットされる。
### ステップ3: ネットワーク設定をリセットする
再起動でも解決しない場合は、親機のネットワーク設定をリセットすることで根本的な設定の問題を解消できる。ただし、**この操作でWi-Fiパスワード・APN設定・VPN設定がすべて削除される**。実行前に必要な情報をメモしておくこと。
ネットワーク設定リセットの詳細な手順と影響範囲は[ネットワーク設定のリセット方法と影響範囲](/ja/guides/network-reset/)を参照してほしい。
**iPhoneのリセット手順**:
1. 「設定」→「一般」→「転送またはiPhoneをリセット」
2. 「リセット」→「ネットワーク設定をリセット」をタップ
3. リセット後、MVNOの構成プロファイルを再インストールしてテザリングを確認する
**Android(Pixel)のリセット手順**:
1. 「設定」→「システム」→「リセットオプション」
2. 「Wi-Fi、モバイル、Bluetoothをリセット」をタップ
---
## 8. キャリアによる制限の確認と問い合わせ
以上の手順をすべて確認しても解決しない場合は、**キャリア側の制限やネットワーク設定の問題**が原因の可能性がある。
### キャリアのサポートに問い合わせる前に確認すること
- 契約プランの名称
- 端末の機種名とOSバージョン
- SIMの種類(物理SIM・eSIM)
- テザリングが使えない状況(いつから、どの方式で試したか)
- 試した対処方法
### 問い合わせ先の確認方法
キャリアの公式サイトの「サポート」または「お問い合わせ」ページにチャット・電話・メールの窓口が案内されている。MVNOの場合はチャットサポートまたはメールサポートが主な窓口になることが多い。
---
## FAQ
よくある疑問をまとめた。
**Q: テザリングがグレーアウトして設定できません。どうすればよいですか?**
主な原因は2つだ。①契約プランがテザリング非対応(または別途オプション加入が必要)な場合、スイッチ自体が操作できなくなることがある。この場合はキャリアの契約内容を確認し、対応プランへの変更またはオプション追加が必要だ。②デュアルSIM構成でテザリングに使用するSIMとデータ通信に使用するSIMの設定が一致していない場合も操作不可になることがある。「設定→モバイル通信→モバイルデータ通信」でテザリングに使いたいSIMが選択されているか確認してほしい。
**Q: 子機でテザリングのWi-Fiを選択してもパスワードエラーになります。**
親機の「インターネット共有」または「Wi-Fiホットスポット」設定画面でパスワードを確認し、子機に正確に入力してほしい。大文字・小文字が区別される。iPhoneは「設定→インターネット共有→Wi-Fiのパスワード」で確認できる。パスワードを一度変更して再度接続を試みる方法も有効だ。
**Q: テザリングで子機が接続できても、インターネットにつながりません。**
親機のモバイルデータ通信自体が動作していない可能性がある。親機のブラウザでWebページを開いて通信できるか確認してほしい。繋がらない場合は親機のAPN設定や速度制限状態の確認が先決だ。親機は通信できるのに子機だけ繋がらない場合は、APN設定のdunタイプが正しく設定されているか確認してほしい。モバイルデータに繋がらない場合の全般的な診断は[モバイルデータに繋がらないときの対処法](/ja/guides/no-data/)を参照してほしい。
**Q: テザリングの上限に達すると完全に止まりますか?**
プランによって異なる。テザリング専用の上限を超えると、テザリング分の通信が低速になるか遮断される。プラン全体のデータ容量を使い切った場合はテザリングを含む通信全体が低速化する。いずれも即時停止ではなく速度制限に移行するケースが多いが、約款で制限内容が異なるため契約プランの条件を確認してほしい。
**Q: iPhoneをロックするとテザリングが切れます。**
iOSは接続中の子機がない状態が続くと、バッテリー節約のためインターネット共有の電波発信を停止することがある。子機が接続済みの状態であれば、iPhoneがロックされても接続は維持される。子機から接続する前にiPhoneがロックされた場合は、iPhoneの画面を一度起こしてから子機で接続し直してほしい。
---
## 関連ガイド
- [テザリングの仕組みと設定 — Wi-Fi・USB・Bluetoothの違いと注意点](/ja/guides/tethering/)
- [データ通信量の目安 — 自分に合ったギガ数の見つけ方](/ja/guides/data-usage-guide/)
- [APN設定の手順(iPhone) — 構成プロファイルのインストールと手動設定](/ja/guides/apn-setup-iphone/)
- [モバイルデータに繋がらないときの対処法](/ja/guides/no-data/)
- [ネットワーク設定のリセット方法と影響範囲](/ja/guides/network-reset/)
================================================================================
# iPhoneとAndroid間でeSIMを移行する
URL: https://sim-finder.com/ja/guides/transfer-cross-platform/
Type: guides (ja)
Published: 2026-06-06
iPhoneからAndroid(またはその逆)へeSIMを移行する際、直接転送は基本的にできない。iOS 26.3以降・Android 16以降の組み合わせで対応キャリアに限りAppleのeSIM Quick Transferによるクロスプラットフォーム転送が可能になったが、2026年6月時点で日本での対応はKDDI(au・UQ mobile)に限られる。大多数のケースでは、キャリアまたはeSIMプロバイダーへのeSIM再発行手続きが必要になる。
eSIMの仕組み(eUICC・プロファイル)については「[eSIMとは — 仕組み・メリット・デメリット](/ja/guides/what-is-esim/)」で解説している。同一プラットフォーム間(iPhone→iPhone)の転送はこの記事のスコープ外であり、「[eSIMを別のiPhoneに転送する](/ja/guides/transfer-iphone/)」を参照してほしい。
---
## なぜiPhone↔Android間の直接転送が難しいのか
### eSIMは物理的に移動できない
eSIMは端末に内蔵されたeUICCチップにプロファイルとして書き込まれており、物理SIMのように抜き差して別の端末に移動させることはできない(GSMA SGP.22仕様)。この制約はiPhone・Android共通だ。
### iOSとAndroidで転送プロトコルが異なる
AppleのeSIM Quick TransferはApple独自の端末間転送機能であり、iOS同士での動作を前提として設計されている。iOS 26.3以降ではAndroid 16以降との異OS間転送にも拡張されたが、これはキャリアが明示的に対応を表明している場合のみ機能する(ファクトレジストリ `esim-specs-what-is-esim-001` 参照)。
AndroidにはAndroid標準のeSIM転送機能(Android 13以降の「Transfer or Reset device」フロー)が存在するが、これはAndroid間の転送に使われる仕組みであり、iPhoneとのやり取りには対応していない。
### 結論: ほとんどの場合はキャリアへの再発行が必要
対応キャリア(2026年6月時点では日本ではKDDI系のみ)でiOS 26.3/Android 16以降の組み合わせに当てはまらない場合、プラットフォームをまたぐeSIM移行の唯一の実用的な方法は、**キャリアへのeSIM再発行手続き**だ。
---
## クロスプラットフォームeSIM移行の一般手順
### ステップ1: 手続き前の確認と準備
移行作業を始める前に以下を確認する。
- **新しい端末がeSIM対応か**: iPhoneは「設定」→「モバイル通信」に「eSIMを追加」が表示されれば対応。Androidは「設定」→「ネットワークとインターネット」または「接続」→「SIM管理」にeSIM関連メニューがあれば対応(「[eSIM対応端末ガイド](/ja/guides/esim-compatible-devices/)」参照)
- **新しい端末がSIMフリー(キャリアロック解除済み)か**: キャリアロックがかかったままの端末では他キャリアのeSIMをインストールできない
- **データのバックアップ**: iCloudまたはGoogleバックアップで端末内のデータを保全しておく
- **Wi-Fi環境の確保**: eSIMプロファイルのダウンロードにはインターネット接続が必要。移行作業中はモバイル通信が一時的に使えなくなる場合があるため、Wi-Fi環境下での作業を推奨する
### ステップ2: 現在の端末でeSIMを無効化または削除する
キャリアに再発行を申請する前に、現在の端末でeSIMを適切に処理する。
**iPhoneの場合(Androidに移行する場合)**
「設定」→「モバイル通信」→削除したいeSIMプランを選択→「eSIMを削除」を実行する。ただし、キャリアによっては申請手続き完了時点でeSIMが自動的に無効化されるため、事前の削除が不要な場合もある。各キャリアの公式手順を確認してほしい。
**Androidの場合(iPhoneに移行する場合)**
機種によって操作場所が異なる。Google Pixelでは「設定」→「ネットワークとインターネット」→「SIM」→削除したいeSIMを選択して削除。Samsung Galaxyでは「設定」→「接続」→「SIMマネージャー」→対象のeSIMを選択して削除。
**注意**: eSIMプロファイルを削除すると、そのプロファイルは再利用できなくなる。別の端末で使い続けるにはキャリアへの再発行が必要だ。
### ステップ3: キャリアにeSIM再発行を申請する
現在契約しているキャリアの公式マイページまたはアプリにログインし、「機種変更(eSIM)」「eSIM再発行」「SIM変更」などのメニューから手続きを進める。
一般的な申請方法は2通りある。
**オンライン手続き(推奨)**
キャリアの公式マイページまたは専用アプリからオンラインで手続きする方法だ。24時間受け付けているキャリアが多く、即日発行が一般的。本人確認はeKYC(スマートフォンカメラによる書類撮影+顔照合)または既存の認証情報(SMS/電話認証)で行う。
**店頭手続き**
本人確認書類(運転免許証・マイナンバーカード等)と契約端末、契約暗証番号を持参して店頭で手続きする方法。オンライン手続きに不慣れな場合や、本人確認に問題が生じた場合に利用する。
### ステップ4: 新しい端末でeSIMをインストールする
再発行されたeSIMはQRコード、アプリ内操作、またはアクティベーションコード(SM-DP+アドレス)のいずれかで提供される。
**新しい端末がiPhoneの場合**
「設定」→「モバイル通信」→「eSIMを追加」→「QRコードを使用」を選択してスキャンする。iOS 17.4以降であれば、メールに届いたQRコード画像を長押しして「eSIMを追加」を選択することもできる。QRコードが読み取れない場合は手動コード入力(「[手動コード入力でeSIMを設定する](/ja/guides/manual-code/)」参照)も可能だ。
**新しい端末がAndroidの場合**
機種によって手順が異なる。Google Pixelでは「設定」→「ネットワークとインターネット」→「SIM」→「SIMを追加」→「QRコードをダウンロード」。Samsung Galaxyでは「設定」→「接続」→「SIMマネージャー」→「モバイルプランを追加」→QRコードをスキャン。メニュー名は機種・Androidバージョンにより異なるため、各端末メーカーの公式サポートを参照すること。
### ステップ5: 開通確認
インストール完了後、以下を確認する。
- 電波アンテナとキャリア名が画面上部に表示されているか
- モバイルデータ通信でインターネットに接続できるか
- 通話・SMSが正常に機能するか(通話プランがある場合)
デュアルSIM構成(eSIM+物理SIMを同時に使う場合)では、どのラインでデータ通信を行うかを明示的に設定する必要がある。
---
## iOS 26.3以降のQuick Transferによるクロスプラットフォーム転送
### 何が変わったのか
iOS 26.3(2026年)以降、対応キャリアの組み合わせに限り、AppleのeSIM Quick TransferがiPhone⇄Androidの双方向転送に対応した。これはApple公式が案内している機能変更であり(ファクトレジストリ `esim-specs-what-is-esim-001`)、対応キャリアのリストはApple公式サポートページ(support.apple.com)で随時更新されている。
### 2026年6月時点の日本での対応状況
日本ではKDDI(au・UQ mobile)が2026年2月18日に国内初の対応を発表し、Apple公式の「eSIMに対応しているキャリア」リストに掲載されている。他のキャリアの対応状況はApple公式リストで確認すること。
### Quick Transferを使う場合の条件
- iPhoneがiOS 26.3以降であること
- 移行先のAndroid端末がAndroid 16以降であること
- 利用中のキャリアがApple公式のクロスプラットフォームeSIM転送対応リストに掲載されていること
- 両端末のBluetoothとWi-Fiがオンであること
これらの条件をすべて満たす場合、iPhoneの「設定」→「モバイル通信」→「eSIMを追加」→「近くのAndroidから転送」(または同等のメニュー)の流れで転送できる。具体的な手順はキャリアおよびApple公式の案内に従うこと。
### Quick Transferが使えない場合
対応キャリア・対応OSバージョンの条件を満たさない場合は、前述の「キャリアへのeSIM再発行手続き」が必要になる。日本では2026年6月時点で多くのキャリアがクロスプラットフォームQuick Transferに未対応であるため、再発行手続きが標準的な移行方法となっている。
---
## iPhone→Android間の移行と同一プラットフォーム内転送の違い
iPhone→iPhoneの転送(eSIM Quick Transfer)は、iOS 16以降・対応キャリアがあれば2台のiPhoneを近づけるだけで完結する。この方法はキャリアへの申請が不要で最も手軽だ。詳細は「[eSIMを別のiPhoneに転送する](/ja/guides/transfer-iphone/)」を参照してほしい。
これに対し、iPhoneからAndroid(またはその逆)へのクロスプラットフォーム移行は次の点が異なる。
| 比較項目 | iPhone→iPhone | iPhone⇄Android |
|----------|--------------|----------------|
| Quick Transfer対応 | iOS 16以降+対応キャリアで利用可 | iOS 26.3以降+Android 16以降+対応キャリア(日本ではKDDI系のみ、2026年6月時点) |
| キャリア申請の要否 | Quick Transfer対応なら不要 | 多くの場合必要 |
| 手続きの複雑さ | 相対的に簡単 | キャリア申請が必要なため複雑になる場合がある |
| 再発行手数料 | 不要(Quick Transfer使用時) | キャリアによって無料または有料 |
物理SIMからeSIMへの切り替えについては「[物理SIMからeSIMへの切り替え方法](/ja/guides/switch-physical-to-esim/)」を参照してほしい。
---
## 旅行eSIMのクロスプラットフォーム移行
### 旅行eSIMは端末変更に非対応が多い
国内キャリアのeSIMとは異なり、旅行eSIM(Airalo・Holaflyなど)は多くの場合、端末間の転送に対応していない。1つのQRコードは1台の端末に対して1回しか使用できないGSMAのセキュリティ仕様により(ファクトレジストリ `esim-qr-single-use-first-time-guide-001`)、別の端末で使い回すことはできない。
端末変更が必要な場合はプロバイダーのカスタマーサポートに問い合わせること。プロバイダーによっては有料で新しいQRコードを再発行できる場合があるが、対応・料金はプロバイダーごとに異なる。
### 旅行eSIMを新しい端末で使いたい場合
機種変更と同時に旅行eSIMを利用したい場合は、新しい端末にセットアップが完了した後に旅行eSIMを新規購入するのが最も確実な方法だ。旅行eSIMの選び方や設定方法は「[初めての旅行eSIM完全ガイド](/ja/guides/first-time-guide/)」で詳しく解説している。
---
## 移行前後の注意点
### 再発行手数料の可能性
キャリアへのeSIM再発行には、無料で対応するキャリアと有料のキャリアがある。手続き前に各キャリアの公式サポートページで料金を確認すること。
### 手続きが事業者ごとに異なる
再発行の申請方法・本人確認の方法・所要時間はキャリアによって大きく異なる。オンラインで即日完了するキャリアもあれば、店頭での手続きや審査に数日かかる場合もある。機種変更前に余裕を持ってキャリアの手順を確認しておくことを推奨する。
### eSIMプロファイルの保存数に注意
端末のeUICCチップには保存できるeSIMプロファイル数に上限がある。iPhoneは8個以上のeSIMを保存可能とAppleが公式に案内しているが(ファクトレジストリ `esim-spec-006`)、古い未使用プロファイルは削除しておくとよい。eSIMプロファイルの保存数と管理については「[eSIMプロファイルの保存数と管理](/ja/guides/esim-profile-limits/)」を参照してほしい。
### 移行中の通信断について
キャリアへの申請からeSIMの開通確認まで、モバイル通信が一時的に使えなくなる場合がある。即時〜最大1時間程度かかるケースもあるため、緊急の連絡が予想される状況での作業は避け、Wi-Fi環境のある場所で行うことを推奨する。
### バックアップを移行前に取る
機種変更を伴う場合は、移行作業前にiCloudまたはGoogleバックアップで端末内データを保全しておくことを強く推奨する。eSIM移行そのものでデータが失われることはないが、万一の初期化や端末トラブルに備えておく価値がある。
---
## トラブルシューティング
### 再発行されたQRコードをスキャンしてもエラーになる
QRコードは1台の端末に対して1回のみ有効だ(GSMA SGP.22仕様)。スキャンに失敗した場合でも、サーバー上では「使用済み」としてマークされることがある。エラーが繰り返される場合はキャリアに新しいQRコードの再発行を依頼する。
### 新しい端末でeSIMが認識されない
端末がeSIM対応か、SIMロックが解除されているかを確認する。eSIM非対応端末や、キャリアロックがかかったままの端末にはeSIMをインストールできない。Android端末の場合はeSIMのサポートにAndroid 11以上が必要な機種もある。
### 設定が完了したのにデータ通信に繋がらない
インストール後、デフォルトのデータ通信回線が正しく設定されているかを確認する。デュアルSIM構成の場合は、どのラインでデータ通信を行うかを明示的に指定する必要がある。それでも解消しない場合は「[eSIMが設定できないときの対処法](/ja/guides/activation-failed/)」を参照してほしい。
---
## よくある質問
**iPhoneからAndroidに機種変更するとき、eSIMはそのまま移せますか?**
原則として直接転送はできません。eSIMのプロファイルはeUICCチップに格納されており、物理SIMのように抜き差しできないうえ、iOSとAndroidで転送プロトコルが異なります。iOS 26.3以降では対応キャリアに限りQuick Transferによるクロスプラットフォーム転送が可能になりましたが、2026年6月時点で日本での対応はKDDI(au・UQ mobile)に限られます。ほとんどの場合はキャリアへのeSIM再発行手続きが必要です。
**eSIM再発行には手数料がかかりますか?**
キャリアによって異なります。無料で再発行できるキャリアもあれば、有料のキャリアもあります。手続き前に各キャリアの公式サポートページで確認してください。なお旅行eSIMプロバイダー(Airalo・Holafly等)は多くの場合、端末変更による再発行に非対応か有料となっています。
**AndroidからiPhoneへの移行手順はiPhone→Androidと同じですか?**
基本的な流れは同じです。現在の端末でeSIMを削除・無効化するか手続きをキャリアに依頼し、キャリアが新しいeSIMプロファイル(QRコードまたはアプリ)を発行します。それをiPhoneにインストールして完了です。どちらの方向でも「キャリアによる再発行」が中心的な手順です。
**iOS 26.3のQuick TransferでiPhone→Androidに転送できるキャリアはどこですか?**
2026年6月時点で日本ではKDDI(au・UQ mobile)がApple公式の対応キャリアリストに掲載されています。最新の対応状況はAppleの「eSIMに対応しているキャリア」公式ページ(support.apple.com)で確認してください。
**旅行eSIMもクロスプラットフォーム移行できますか?**
旅行eSIM(Airalo・Holaflyなど)は多くの場合、端末間の転送に非対応です。端末変更が必要な場合はプロバイダーのサポートに問い合わせてください。プロバイダーによっては有料で再発行できる場合があります。
---
## 関連ガイド
- [eSIMを別のiPhoneに転送する(eSIM Quick Transfer)](/ja/guides/transfer-iphone/)
- [物理SIMからeSIMへの切り替え方法](/ja/guides/switch-physical-to-esim/)
- [eSIMとは — 仕組み・メリット・デメリット](/ja/guides/what-is-esim/)
- [eSIMプロファイルの保存数と管理](/ja/guides/esim-profile-limits/)
- [eSIM対応端末ガイド](/ja/guides/esim-compatible-devices/)
================================================================================
# eSIMを別のiPhoneに転送する — eSIM Quick Transferの手順と注意点
URL: https://sim-finder.com/ja/guides/transfer-iphone/
Type: guides (ja)
Published: 2026-04-20
iPhoneのeSIMを新しいiPhoneへ移すには、iOS 16以降で利用できるApple純正の「eSIM Quick Transfer」を使うのが最も手軽な方法だ。キャリアがこの機能に対応していれば、旧iPhoneと新しいiPhoneを近づけるだけで転送が完了し、キャリアの店舗に出向く必要もない。キャリアが非対応の場合はeSIMを再発行してもらい、新しいiPhoneにインストールする方法を使う。
eSIMは物理SIMと異なり、カードを抜き差しして移動させることができない。eUICCチップに書き込まれたプロファイルは、適切な手順を踏まないと別の端末に移せない仕組みだ。本記事では「Quick Transferで転送できる場合」と「キャリアへの再発行が必要な場合」を整理し、状況に応じた手順を解説する。
新しいiPhoneへのeSIM転送に必要な設定・注意点・トラブルシューティングをひと通り解説する。eSIMの基礎知識は「[eSIMとは](/ja/guides/what-is-esim/)」で、初めてのeSIM設定は「[QRコードでeSIMを設定する(iPhone)](/ja/guides/qr-code-iphone/)」を参照してほしい。
---
## eSIMを転送する必要がある場面
eSIMは端末内蔵のeUICCチップに格納されているため、物理SIMカードのように抜き差しして移動させることはできない(「[eSIMとは](/ja/guides/what-is-esim/)」参照)。転送が必要になる主なケースは以下の通りだ。
- **機種変更**: 旧iPhoneから新しいiPhoneへeSIMを移したい
- **端末修理・交換**: Appleの修理によって端末が交換された(旧端末は返却される場合を除く)
- **デュアルSIM構成の組み替え**: 物理SIMとeSIMの役割を入れ替えたい
- **端末の故障・初期化**: 旧端末のiOSがクラッシュし、初期化後に再設定が必要になった
### eSIMの転送は「削除→再インストール」ではない
物理SIMは抜いて別の端末に挿せばいいが、eSIMの場合は「転送」という概念が存在する。Quick Transferを使う場合は旧端末のeSIMが自動的に無効化されながら新端末に複製される。キャリアへの再発行を使う場合は旧端末のeSIM(または契約)を解除し、新しいeSIMプロファイルを新端末に発行してもらうという流れになる。
どちらの場合も「旧端末と新端末でeSIMを同時に使い続ける」ことはできない。1つのeSIM契約(1つのeSIMプロファイル)は1台の端末でのみ有効化できるのが原則だ(GSMA SGP.22の仕様)。
**端末の故障・紛失で旧iPhoneにアクセスできない場合**は、旧端末でのeSIM削除操作や転送ができない。この場合はキャリアに直接eSIMの再発行を依頼することになる(後述「キャリアがQuick Transferに対応していない場合」の手順を参照)。
---
## eSIM Quick Transferとは(iOS 16以降)
**eSIM Quick Transfer**はAppleが提供するiPhone間のeSIM転送機能だ。iOS 16以降を搭載した2台のiPhone間で、キャリアのサポートページや物理店舗への訪問なしにeSIMを転送できる。
### 主な特徴
- iOS 16以降のiPhone同士で利用可能
- 転送中、旧iPhoneと新しいiPhoneを同一のApple Account(旧Apple ID/iCloudアカウント)で認証する
- BluetoothとWi-Fiを使って2台の端末を直接接続して転送する
- **キャリアがこの機能に対応していることが必須条件**
### 対応キャリアについて
eSIM Quick TransferはAppleとキャリア双方が対応している場合のみ利用できる。日本市場における具体的なキャリアの対応状況は変動するため、**Apple公式の「eSIMに対応しているキャリア」ページ**(support.apple.com)で最新情報を確認してほしい。
日本ではiPhone間のeSIM Quick Transferに主要キャリアが対応しており、ドコモ/ahamoは2023年3月、ソフトバンク/ワイモバイル/LINEMOは2023年9月、au/UQ mobile/povo・楽天モバイルも同時期までに対応している。サブブランド(ahamo・povo・UQ mobile・ワイモバイル・LINEMO)は親キャリアとほぼ同時期に対応している。MVNOは多くがQuick Transfer非対応で、BIGLOBEモバイル・J:COM MOBILEなど一部のKDDI系MVNOのみ対応している。なお、**iPhoneからAndroid(およびその逆)のクロスプラットフォームeSIM転送**(iOS 26 / Android 16以降)については、2026年2月18日にKDDIが国内で初めて対応を発表し、Apple公式リストではau・UQ mobileが掲載されている。最新の対応状況はApple公式「eSIMに対応しているキャリア」ページで確認すること。
Quick Transferに対応しているかどうか確認する手順:
1. 新しいiPhoneで「設定」→「モバイル通信」→「eSIMを追加」を開く
2. 「近くのiPhoneから転送」という選択肢が表示される場合は、利用中のキャリアが対応している可能性が高い
3. 表示されない場合はApple公式の対応キャリアリストを確認するか、キャリアのサポートに問い合わせる
### iOS 26以降:iPhone→Android転送
iOS 26 / Android 16以降では、対応キャリアに限りiPhone⇄Androidの双方向のeSIM転送にも対応した。2026年4月時点で日本ではau・UQ mobileがApple公式のクロスプラットフォームeSIM転送対応キャリアリストに掲載されている。最新の対応状況はApple公式の対応キャリアリストで確認すること。
---
## iPhone初期セットアップ中の転送(クイックスタート)
新しいiPhoneを初めて電源入れたとき、iOSのセットアップ画面内でeSIM転送を完結できる方法がある。機種変更で旧iPhoneを手元に持っている場合に最も推奨される方法だ。セットアップとeSIM転送を同時に行えるため、後から設定する手間が省ける。
### 前提条件
この方法を使うには以下の条件をすべて満たしている必要がある。
- 旧iPhoneがiOS 16以降で動作中であること(「設定」→「一般」→「情報」→「ソフトウェアバージョン」で確認)
- 旧iPhoneと新しいiPhoneが近くにあること(Bluetooth接続のため、推奨Bluetooth通信範囲内(目安として近接))
- 両端末のBluetoothとWi-Fiがオンであること
- 利用中のeSIMキャリアがeSIM Quick Transferに対応していること
- 両端末が同一のApple Account(旧Apple ID/iCloudアカウント)にサインインしている、またはサインインできる状態であること
### 手順
**Step 1: 新しいiPhoneの電源を入れる**
「こんにちは」画面が表示されたら、旧iPhoneを近くに置く。
**Step 2: クイックスタートを開始する**
旧iPhoneに「新しいiPhoneを設定」という通知またはポップアップが表示されるので「続ける」をタップする。
**Step 3: カメラでアニメーションを読み取る**
新しいiPhoneの画面にアニメーションが表示されるので、旧iPhoneのカメラでフレーム内に収める。
**Step 4: サインインを確認する**
旧iPhoneのApple IDで新しいiPhoneにサインインするよう促される。画面の指示に従って確認する。
**Step 5: モバイル通信のセットアップでeSIM転送を選択する**
セットアップの途中で「モバイル通信」の設定画面が表示される。「eSIMを転送」または「現在のeSIMを転送」という選択肢が表示されたら選択する(キャリアが対応していない場合は表示されない)。
**Step 6: 転送の確認と完了を待つ**
旧iPhoneにeSIM転送の確認ダイアログが表示されるので「転送」をタップする。転送にはしばらく時間がかかる場合がある(ネットワーク状態により数秒〜数分)。完了すると旧iPhoneのeSIMは無効化される。
**Step 7: 転送完了後のデータ通信設定を確認する**
セットアップ完了後、新しいiPhoneで「設定」→「モバイル通信」→「モバイルデータ通信」を開き、転送したeSIMがデータ通信に使われるよう設定されているか確認する。デュアルSIM構成の場合はどのラインでデータ通信を行うかを明示的に設定する必要がある。
---
## セットアップ後の転送(設定→モバイル通信)
新しいiPhoneのセットアップを完了した後でも、設定アプリからいつでもeSIM転送を行うことができる。すでに新しいiPhoneを使い始めた後に「eSIMの転送を忘れていた」というケースに使う方法だ。セットアップ中に転送するクイックスタート方式と同じく、Quick Transferを使うためには利用中のキャリアの対応が必要だ。
### 手順
**Step 1: 新しいiPhoneで「設定」→「モバイル通信」を開く**
**Step 2: 「eSIMを追加」または「モバイル通信プランを追加」をタップする**
**Step 3: 「近くのiPhoneから転送」を選択する**
選択肢として「近くのiPhoneから転送」が表示された場合はタップする(表示されない場合はキャリアが未対応か、旧iPhoneがiOS 16未満の可能性がある)。
**Step 4: 旧iPhoneで転送を承認する**
旧iPhoneに確認ダイアログが表示されるので「転送」をタップする。
**Step 5: 転送完了を確認する**
転送が完了すると、新しいiPhoneのモバイル通信設定にeSIMが追加される。旧iPhoneのeSIMは自動的に無効化される。転送完了のメッセージが表示されればOKだ。
**Step 6: データ通信回線を設定する**
新しいiPhoneでeSIMをデフォルトのデータ通信回線に設定する。「設定」→「モバイル通信」→「モバイルデータ通信」から転送したeSIMを選択する。
デュアルSIM構成の場合(物理SIMとeSIMの両方が有効な状態)は、通話・SMS・データのそれぞれでどちらのラインを優先するかも設定しておくとよい。設定場所は「設定」→「モバイル通信」から各ライン名を選択した先にある。
---
## キャリアがQuick Transferに対応していない場合
利用中のキャリアがeSIM Quick Transferに対応していない場合、または何らかの理由でQuick Transferが使えない場合、次の手順でeSIMを移行する。
この方法はキャリアの対応状況に依存せず、どのキャリアでも使える汎用的な手順だ。ただしキャリアのオンライン手続きが必要であり、即日完了する場合と審査に時間がかかる場合がある。
### 手順の概要
1. キャリアにeSIMの再発行を申請する(旧端末でeSIMを削除してからの場合と、旧端末が使えない場合で手順が異なる)
2. 発行されたQRコードまたはアプリ経由のeSIMを新しいiPhoneにインストールする
**旧iPhoneのeSIMは再発行手続き完了時点で無効化されることが多い**ため、旧端末側の削除操作は不要な場合がある。ただしキャリアによって手順が異なるため、各社の公式サポートページで確認すること。
### 旧iPhoneが手元にある場合
旧iPhoneが正常に動作している状態で機種変更するときの手順だ。事前にiCloudバックアップを取っておくことを推奨する。
**Step 1: 旧iPhoneで使用中のeSIMを確認する**
「設定」→「モバイル通信」でeSIMプランの名前(キャリア名)を確認しておく。
**Step 2: キャリアのマイページまたはアプリにアクセスする**
キャリアの公式アプリまたはWebマイページにログインし、「eSIM再発行」「機種変更手続き」「eSIM発行」などのメニューを探す。手続きの呼称はキャリアによって異なるため、各社のサポートページを参照すること。
**Step 3: 手続きを完了してQRコードを受け取る**
本人確認・手続きを完了すると、新しいeSIMのQRコードが発行される(画面表示またはメール)。この時点で旧iPhoneのeSIMが無効化されることが多い。
**Step 4: 新しいiPhoneでQRコードをスキャンする**
QRコードを新しいiPhoneでスキャンしてeSIMをインストールする(「[QRコードでeSIMを設定する(iPhone)](/ja/guides/qr-code-iphone/)」参照)。QRコードがメールで届いた場合は、スキャンするiPhoneとは別の端末でメールを開いてQRコードを表示し、カメラでスキャンするか、iOS 17.4以降であればQRコード画像を長押しして「eSIMを追加」を選択できる。
### 旧iPhoneが故障・紛失している場合
旧iPhoneにアクセスできない場合は、旧端末での削除操作ができない。
**Step 1: キャリアのカスタマーサポートに連絡する**
「端末が使えないため、eSIMを新しい端末に再発行したい」旨を伝える。各社のオンラインサポートまたはコールセンターで対応している。
**Step 2: 本人確認を完了する**
キャリアの指示に従って本人確認手続きを行う。
**Step 3: 新しいeSIMを受け取り、インストールする**
QRコードまたはアプリ経由で新しいeSIMが発行されるので、新しいiPhoneにインストールする。
---
## 異なるOS間の移行(iOS→Android)
iPhoneからAndroidへの機種変更でeSIMを移行する場合、通常は**キャリアへのeSIM再発行手続き**が必要になる。
iOS 26以降では一部対応キャリアに限りiPhone→Android転送がeSIM Quick Transferで行えるようになったが(前述参照)、2026年4月時点での日本での普及状況はApple公式対応リストで確認すること。
### キャリアへの再発行で移行する手順(通常の方法)
キャリアへの再発行手続きは「キャリアがQuick Transferに対応していない場合」と同様の流れになる。
1. キャリアのマイページまたはアプリにログインし、「機種変更(eSIM)」「eSIM再発行」などのメニューから手続きを進める
2. 新しいeSIMが発行されたら、新しいAndroid端末でインストールする
Android端末でのeSIMインストール手順はGoogle Pixel・Samsung Galaxyなど端末ごとに異なる。各端末メーカーおよびキャリアの公式サポートを参照すること。
### この記事はiPhone間の転送に特化している
本記事で解説しているeSIM Quick TransferはiPhone(iOS)固有の機能だ。Androidから別のAndroidへの転送、またはAndroidからiPhoneへの転送については本記事のスコープ外となる。それらの移行を検討している場合はキャリアの公式サポートに問い合わせることを推奨する。
---
## 転送後の旧端末処理
eSIMの転送が完了した後、旧iPhoneを適切に処理することが重要だ。
### 旧iPhoneのeSIM状態を確認する
転送が正常に完了していれば、旧iPhoneのeSIMは自動的に無効化されているはずだ。「設定」→「モバイル通信」で確認し、eSIMプランが「無効」または「このプランは無効です」と表示されていればOKだ。
旧iPhoneでまだeSIMが「有効」と表示されている場合は、転送が完了していない可能性がある。新しいiPhoneでeSIMが正常に動作しているかを先に確認してから、必要であれば旧iPhoneから手動でeSIMを削除する(「設定」→「モバイル通信」→eSIMプランを選択→「eSIMを削除」)。
### 売却・下取り前に必ず初期化する
旧iPhoneを売却・下取り・譲渡する場合は、必ず**すべてのコンテンツと設定を消去**してからにすること。
**初期化手順:**
「設定」→「一般」→「転送またはiPhoneをリセット」→「すべてのコンテンツと設定を消去」
初期化を実行すると、残存しているeSIMプロファイルも消去される。Apple IDとのリンクも解除されるため、購入者が端末を利用できる状態になる。
### eSIMプロファイルだけを削除する場合
売却・譲渡は行わず、旧iPhoneを手元に保管し続ける場合は、eSIMプロファイルのみを削除してもよい。「設定」→「モバイル通信」→削除したいeSIMを選択→「eSIMを削除」を実行する。
**注意**: eSIMプロファイルを削除すると、そのプロファイルは再利用できなくなる(プロバイダーによっては再発行に手数料が発生する)。削除前にキャリアのポリシーを確認することを推奨する。
### Wi-Fiモデルとして活用する場合
eSIMを削除または転送した後の旧iPhoneは、Wi-Fiに接続してサブ端末(音楽・動画・ゲーム専用など)として引き続き使えることが多い。SIMなしでも多くのアプリは動作するため、捨てる前に活用できるか検討してみてほしい。
---
## トラブルシューティング
### 「近くのiPhoneから転送」の選択肢が表示されない
**考えられる原因:**
- 旧iPhoneのiOSが16未満
- 利用中のキャリアがeSIM Quick Transferに未対応
- 旧iPhoneのBluetoothまたはWi-Fiがオフになっている
- 新しいiPhoneと旧iPhoneが別のApple Accountでサインインしている
- 旧iPhoneに有効なeSIMが設定されていない(すでに無効化・削除済み)
**対処法**: 旧iPhoneのiOSバージョンを確認し(「設定」→「一般」→「情報」→「ソフトウェアバージョン」)、iOS 16以上でなければアップデートする。キャリアの対応状況はApple公式リストで確認する。いずれも該当しない場合は「キャリアがQuick Transferに対応していない場合」の手順(eSIM再発行方式)に切り替える。
### 転送中に「エラーが発生しました」と表示される
**対処法(順番に試す):**
1. 両端末のBluetoothとWi-Fiがオンになっているか確認する
2. 両端末を再起動してから再試行する
3. 旧iPhoneと新しいiPhoneをBluetooth通信範囲内(目安として近接)に近づける
4. 別のWi-Fiネットワークで試す
5. 上記すべてを試してもエラーが継続する場合は、キャリアへのeSIM再発行手続きに切り替える
### 転送後もデータ通信に繋がらない
転送完了後は、新しいiPhoneでeSIMがデータ通信に使われる設定になっているか確認する。
「設定」→「モバイル通信」→「モバイルデータ通信」でeSIMのラインが選択されているかを確認すること。
選択できているのに繋がらない場合は「[eSIMが設定できないときの対処法](/ja/guides/activation-failed/)」を参照してほしい。
### 転送後にeSIMのラベルが文字化けする・表示が変わった
eSIMを転送すると、キャリアが設定しているラベル名(プロファイル名)がそのまま引き継がれる場合と、デフォルト名(「ライン1」「モバイル通信」等)にリセットされる場合がある。表示上の問題であれば通信には影響しない。「設定」→「モバイル通信」→eSIMプランを選択→「ラベルの変更」で任意の名前に変更できる。
### キャリアから「転送できない」と言われた場合
キャリアのポリシーによっては、eSIM転送や再発行に一定の制約が設けられている場合がある(例: 契約から一定期間内は転送不可、1日に行える変更回数の制限など)。キャリアのサポートに具体的な条件と代替手段を確認すること。
---
## よくある質問
**eSIM Quick TransferはiOS何以降で使えますか?**
eSIM Quick TransferはiOS 16以降で利用できます。ただし、キャリアがこの機能に対応していることが条件です。対応キャリアはApple公式の「eSIMに対応しているキャリア」リストで確認してください。
**eSIM Quick TransferにBluetoothやWi-Fiは必要ですか?**
はい。Quick Transferは旧iPhoneと新しいiPhone、両方のBluetooth・Wi-Fiがオンになっている状態で使用します。また転送先の新しいiPhoneはインターネット接続(Wi-Fiまたはモバイルデータ)が必要です。
**転送後、旧iPhoneのeSIMはどうなりますか?**
転送が完了すると、旧iPhoneのeSIMは自動的に無効化されます。旧iPhoneを下取りや売却に出す場合は、転送後に「設定」→「一般」→「転送またはiPhoneをリセット」→「すべてのコンテンツと設定を消去」を実行してください。
**キャリアがQuick Transferに対応していない場合、どうすればeSIMを移せますか?**
キャリアがQuick Transferに対応していない場合は、旧iPhoneのeSIMを一度削除し、キャリアの公式サポートからeSIM(QRコードまたはアプリ)を新たに発行してもらい、新しいiPhoneにインストールする方法を使います。
**eSIMをAndroidに転送することはできますか?**
eSIM Quick TransferはiPhone間の機能です。iOS 26以降では対応キャリアに限り、iPhoneからAndroidへの転送にも対応しましたが、2026年4月時点で日本での対応状況はApple公式の対応キャリアリストで確認してください。iPhoneからAndroidに機種変更する場合、基本的にはキャリアへeSIMの再発行手続きを依頼することになります。
**Quick Transferで転送中にエラーが出た場合はどうすればよいですか?**
両端末のBluetooth・Wi-Fiがオンになっているか、互いに近い距離にあるかを確認してください。旧iPhoneのiOSが16以降かどうかも確認してください。それでも解消しない場合は、キャリアへのeSIM再発行手続きに切り替えてください。
---
## 関連ガイドとCTA
eSIMの設定を初めて行う場合や、QRコードによる通常のインストール手順は「[QRコードでeSIMを設定する(iPhone)](/ja/guides/qr-code-iphone/)」(ES-01)に詳しい。本記事との役割分担は以下の通りだ。
| ガイド | 扱う内容 |
|--------|---------|
| 本記事(ES-06) | iPhone間のeSIM転送・Quick Transfer |
| [QRコードで設定する(ES-01)](/ja/guides/qr-code-iphone/) | 新規eSIMのQRコードインストール |
| [手動コード入力(ES-03)](/ja/guides/manual-code/) | SM-DP+アドレスで手動インストール |
| [設定できないときの対処法(FE-01)](/ja/guides/activation-failed/) | エラー別のトラブルシューティング |
| [初めての旅行eSIM(TE-02)](/ja/guides/first-time-guide/) | 旅行eSIM全体の流れ |
### 機種変更後に旅行eSIMを使いたい場合
新しいiPhoneに乗り換えたタイミングで、旅行eSIMの設定もまとめて検討しておくのが効率的だ。国内SIMを物理SIMで運用しつつ、旅行eSIMをeSIMとして追加するデュアルSIM構成を使えば、日本の電話番号を維持しながら現地データを安価に使える。
eSIMの基礎知識については「[eSIMとは — 仕組み・メリット・デメリット](/ja/guides/what-is-esim/)」(B-02)で詳しく解説している。転送後のeSIMがうまく動かない場合は「[eSIMが設定できないときの対処法](/ja/guides/activation-failed/)」(FE-01)を確認してほしい。
海外渡航用のeSIMを新しいiPhoneで使いたい場合は、[SimFinder Travelで渡航先のeSIMプランを検索](/ja/travel/)できる。国内SIMのeSIM対応プランを比較したい場合は[SimFinderの通常検索](/ja/)を利用してほしい。
================================================================================
# データ無制限プランの実態 — 「無制限」の落とし穴
URL: https://sim-finder.com/ja/guides/unlimited-reality/
Type: guides (ja)
Published: 2026-06-04
「データ無制限」と表示されているプランでも、実際には速度制限・優先度低下・テザリング上限の条件が設けられていることがほとんどだ。「無制限」はデータ量の上限がないことを示しているが、速度や通信品質に関しては別途の条件が適用される。
この記事では、「無制限」プランの実態として知っておくべき公平利用ポリシー(FUP)・deprioritization・テザリング制限・キャリア種別による差異の仕組みを解説し、プラン選定時に確認すべきポイントを整理する。具体的なプランの比較は[SimFinderで最新情報を確認](/ja/jp/search/)してほしい。
---
## 「無制限」の定義と実際のギャップ
「データ無制限」が意味するのは「月間のデータ通信量に上限を設けない」ことだ。100GBでも200GBでも、データ量だけで見れば制限はかからない。
しかしモバイル通信の品質は、データ量だけで決まるわけではない。速度・優先度・利用形態(テザリング等)・接続するキャリアの種別は、データ量とは別の条件で制御されることが多い。「無制限」という表記は、あくまでもデータ量に関する記述であって、速度・品質・用途を無制限に保証するものではないことを最初に把握しておく必要がある。
| 項目 | 容量制限プラン | 「無制限」プラン |
|------|------------|-------------|
| データ量の上限 | あり(例: 20GB) | なし |
| 速度制限(FUP閾値超過後) | 容量使い切り後に適用 | FUP閾値超過後に適用されることがある |
| 混雑時の優先度低下 | プランによる | 高量利用者に適用されることがある |
| テザリング上限 | プランによる | プランによっては無制限の場合もあるが、個別上限が設けられているケースも多い |
| 特定サービスの速度上限 | ほぼなし | 動画等に個別制限がある場合がある |
「無制限」プランを検討する際は、データ量だけでなく、上の表のすべての行を確認することが重要だ。自分の月間消費量の把握方法については[データ通信量の目安 — 自分に合ったギガ数の見つけ方](/ja/guides/data-usage-guide/)を参照してほしい。
---
## 公平利用ポリシー(FUP)の仕組み
FUP(Fair Use Policy、公平利用ポリシー)とは、「無制限」プランで全利用者が公平にネットワークを使えるよう、一部の利用者による過剰な帯域占有を防ぐための規約だ。
FUPの典型的な内容は以下の通りだ。
- **閾値の設定**: 月間データ使用量がある閾値(例: 50GB・100GB・200GB)を超えた場合、通信速度を制限する
- **制限後の速度**: 閾値超過後の速度はプランや事業者によって異なる。1Mbps・3Mbps・5Mbpsなどの固定速度に制限される場合が多い
- **翌月のリセット**: 速度制限は翌月1日に自動解除されるのが一般的
- **動画サービスへの個別制限**: 特定の動画配信サービスに対して、FUP閾値とは別に最大速度を設定するプランも存在する
FUP閾値を超えるまでは速度制限なしで利用できる点が、容量制限プランとの違いだ。ただし「制限なしで使えるのはFUP閾値まで」とも言えるため、月間消費量が多い場合は閾値と制限後の速度を事前に確認する必要がある。
### FUP閾値と制限後の速度に注目する理由
FUP閾値が低めに設定されているプランでは、動画を日常的に視聴しているとすぐに閾値に達してしまう。YouTube 720p(HD)画質で毎日1時間視聴すると月間約30〜45GBを消費する(画質の実効ビットレートや接続環境によって幅がある)。FUP閾値が50GBのプランであれば1か月以内に閾値に達する可能性がある。
制限後の速度が1Mbpsの場合、LINEや軽いWebブラウジングは可能だが動画視聴はほぼ実用外になる。3Mbps以上あれば低画質の動画視聴は継続できる。このギャップを把握したうえでプランを選ぶことが重要だ。
速度制限の詳細な仕組みや制限時にできること・できないことについては、[データ通信量の目安 — 自分に合ったギガ数の見つけ方](/ja/guides/data-usage-guide/)でも解説している。
---
## Deprioritization(優先度低下)とは
Deprioritizationは、日本語では「トラフィック管理」「優先度制御」と表現されることが多い概念だ。FUPによる速度制限とは異なる仕組みで動作する点が重要だ。
**速度制限との違い**
| | 速度制限(FUP閾値超過後) | Deprioritization |
|-|---------------------|----------------|
| 発動条件 | 月間データ量が閾値を超えたとき | ネットワークが混雑しているとき |
| 影響の範囲 | 閾値超過後、翌月リセットまで常時 | 混雑している時間帯・場所のみ |
| 空いているときの速度 | 制限後の固定速度のまま | 高速のまま |
| 対象 | 閾値を超えたユーザー全員 | 高量利用者(閾値超過後など) |
Deprioritizationが設定されているプランでは、月間データ量がFUP閾値を超えた後、ネットワークが混雑した際に当該ユーザーのトラフィックが他のユーザーより低い優先度で処理される。空いている時間帯・場所では速度に影響が出ないのが特徴だ。
都市部の混雑した時間帯(昼12〜13時・夕方17〜19時)に「無制限」プランでも速度低下を感じる場合は、このdeprioritizationが機能している可能性がある。時間帯混雑と速度低下の詳細な切り分け手順は[通信速度が極端に遅い場合の対処法](/ja/guides/slow-speed/)も参照してほしい。
---
## テザリング(インターネット共有)の制限
「無制限」プランであっても、テザリング(スマホをモバイルルーターとして使う機能)についてはプランによって条件が異なる。テザリングも無制限としているプランも存在するが、個別の上限が設けられているケースも多い。
典型的なテザリング制限のパターンは以下の通りだ。
- スマホ本体の通信は無制限、テザリングは月間で一定量を超えると低速に切り替わる
- テザリング全体での月間上限と、超過後の速度が個別に定められている
- テザリング経由で接続したPCやタブレットの通信は、テザリング上限の消費としてカウントされる
- 本体のFUP閾値とは別にテザリング専用の閾値が設定されている場合がある
スマホ単体での利用が中心なら影響が少ないが、リモートワークやPCとの併用が多い場合は、テザリングの上限と制限後の速度を必ず確認することを推奨する。
### テザリング制限と「無制限」の実態
「本体は無制限、テザリングは月間30GB」のように分離されているプランでは、PCやタブレットをスマホに接続してインターネットを使う場面では30GBが実質の上限になる。リモートワーク中にビデオ会議(Zoom映像あり: 約1〜1.5GB/時間)を週3回行うと、月間で約14〜18GBを消費する計算だ。テザリング上限を超えるまでの余裕は計算しておく必要がある。
---
## 混雑時間帯と「無制限」の関係
「無制限」プランを提供しているキャリアの種別によっても、混雑時の体感速度は異なる。
MNO(大手キャリア)本体の「無制限」プランでは、自社ネットワークを直接利用するため、MVNO経由の「無制限」プランより混雑耐性が高い傾向がある。一方、MVNOが提供する「無制限」プランは、MNOとの接続点であるPOI(Point of Interface)の帯域が上限となるため、混雑時に速度が低下しやすい。
| キャリア種別 | 混雑時の傾向 | 「無制限」プランの品質特性 |
|-----------|-----------|----------------------|
| MNO(大手キャリア) | 自社設備で帯域管理 → 比較的安定 | FUPあり、deprioritizationあり |
| サブブランド | MNOとほぼ同等の回線品質 | FUP・deprioritizationあり |
| MVNO(格安SIM) | POI帯域が上限 → 混雑時に低下しやすい | POI混雑の影響が加わる |
MVNOの「無制限」プランは価格が抑えられていることが多いが、POI混雑の影響でMNOの「無制限」プランより混雑時間帯の速度が低下しやすい構造になっている。
キャリア種別の違いと品質特性については、データ節約テクニックと並行して確認することも有用だ。[データ通信量の節約テクニック — iPhone/Androidのアプリ別設定と実践ガイド](/ja/guides/save-data/)では、「無制限」プランでもFUP閾値に近づいた際に節約設定が役立つ場面も解説している。
---
## 「無制限」でも制限が大きいケース — 注意すべきプラン構造
「無制限」と表記されていても、実質的に容量制限プランと大差ない場合がある。以下のパターンに注意してほしい。
### FUP閾値が低いケース
FUP閾値が月間20〜30GBに設定されているプランは、動画を多用する場合にすぐ閾値に達してしまう。制限後の速度が低い(1Mbps以下)場合は、容量制限プランで追加購入した方がコスト効率が良い場合もある。
制限後に1Mbpsで生活できるかどうかは用途に依存する。1Mbpsで可能なことと困難なことを把握しておくことが判断の基準になる。
| 制限後の速度 | 可能なこと | 困難なこと |
|------------|---------|---------|
| 128kbps | LINEテキスト、メール(テキストのみ) | ブラウジング、地図、動画すべて |
| 300kbps | LINEテキスト・スタンプ、テキストブラウジング | 動画再生(360p以上)、重い画像読み込み |
| 1Mbps | SNS閲覧、LINEの音声通話、低画質動画 | YouTube 720pの安定した視聴以上、Zoomビデオ会議 |
| 3Mbps以上 | ほぼ通常の利用が可能 | 4K動画・大容量ファイルの高速転送 |
### テザリング上限が実質の制限になるケース
本体通信は「無制限」だが、テザリングが月間10〜20GB程度に制限されているプランでは、PCとの併用を前提にした場合は「無制限」の恩恵が限定的になる。テザリングの上限を確認せずに契約すると、PC作業が月の途中で大幅に制限される事態になる。
### 5G対応と記載があっても実質4G接続になるケース
「5G対応無制限」と記載されていても、5Gエリアの展開状況・端末の対応状況によっては4G接続になることがある。速度はエリアと端末の組み合わせに依存する。5G対応エリアであっても、NSA(ノンスタンドアローン)方式の5G接続では理論最大速度より低い速度になることがある。
### 動画・特定サービスへの個別制限
一部のプランでは「YouTube等の動画配信サービスは最大Xbpsに制限」という規約が設けられている場合がある。FUP閾値とは別に動画の速度上限が存在すると、HD画質での視聴ができなくなる。動画視聴が主な用途の場合は、この点を特に確認する。
---
## 「無制限」が本当に必要なケース
「無制限」プランは容量制限プランより価格が高めに設定されることが多い。実際に「無制限」が必要かどうかは、月間のデータ使用量の実績から判断するのが適切だ。
**「無制限」プランが向いているケース**
- 自宅にWi-Fiがなく、すべての通信をモバイル回線に頼っている
- 外出先でもYouTubeをHD画質で長時間視聴する習慣がある
- テレワークで外出先からのビデオ会議が週に複数回ある
- 月間50GB以上を継続的に消費している、または消費量の予測が難しい
- データ残量を気にせず使いたいため、心理的な安心感を優先する
**容量制限プランの方が適しているケース**
- 自宅・職場のWi-Fiがメインで、外出先での通信は限られている
- 月間20GB以下で収まっている
- データ消費量が月によって大きく変わらない
- テザリングをほぼ使わない
自分の月間使用量が把握できていない場合は、まず端末の設定画面(iPhone: 「設定」→「モバイル通信」、Android: 「設定」→「ネットワークとインターネット」→「データ使用量」)で実績を確認してから判断することを推奨する。データ消費量の算出方法は[データ通信量の目安 — 自分に合ったギガ数の見つけ方](/ja/guides/data-usage-guide/)で詳しく解説している。
---
## プラン選定時の確認ポイント
「無制限」プランを選ぶ際は、以下の5点を必ず確認することを推奨する。
### 確認ポイント1: FUP閾値と制限後の速度
月間何GBを超えたときに速度制限が始まり、制限後の速度は何Mbpsかを確認する。FUP閾値が自分の想定利用量より十分高いか、制限後の速度で最低限の用途(メッセージ・マップ等)をカバーできるかを判断する。
### 確認ポイント2: テザリングの条件
テザリング専用の月間上限の有無、上限を超えた場合の速度、テザリングの消費がFUP閾値のカウントに含まれるかどうかを確認する。PCやタブレットとの併用が前提なら、テザリング上限は最優先で確認すべき項目だ。
### 確認ポイント3: Deprioritizationの有無と条件
公式の利用規約やサービス説明に「混雑時の優先度低下」「トラフィック管理」に関する記述があるかを確認する。何GBを超えた後にdeprioritizationの対象になるかが明記されているかも重要だ。
### 確認ポイント4: キャリアの種別(MNO・サブブランド・MVNO)
どの種別のキャリアが提供するプランかによって、混雑時の速度安定性が異なる。主要プロバイダーの違いについては[旅行eSIMプロバイダー比較](/ja/guides/provider-comparison/)や[旅行eSIMの選び方](/ja/guides/how-to-choose/)も参考になる。
### 確認ポイント5: 動画・特定サービスの速度制限
一部のプランでは「YouTube等の動画サービスは最大Xbpsに制限」という規約が設けられている場合がある。動画視聴が主な用途の場合は、この条件を確認する。
---
## FUP閾値超過後の速度制限を避けるための運用方法
「無制限」プランを使い始めた後も、FUP閾値に近づいた際に消費量を抑える運用は有効だ。
### 当月の消費量を定期的に確認する
キャリアのマイページや公式アプリでは、当月のデータ使用量とFUP閾値との残量をリアルタイムで確認できることが多い。月の半ばで閾値の7〜8割を消費している場合は、後半の節約を意識することで制限を回避しやすくなる。
### データ節約モードを活用する
多くのプランでは、FUP閾値に近づいた際にアプリやマイページから手動で低速モードに切り替える機能を提供している。意図的に低速モードに切り替えてデータ消費を抑え、翌月に持ち越す運用が可能だ。
### 動画の画質設定を下げる
FUP閾値に近づいた際は、動画アプリの画質を一時的に下げるだけで消費ペースを大幅に落とせる。YouTubeを720pから360pに下げると同じ視聴時間でも消費量が約4分の1になる。iPhoneとAndroid別の詳細な節約設定手順は[データ通信量の節約テクニック — iPhone/Androidのアプリ別設定と実践ガイド](/ja/guides/save-data/)で解説している。
---
## 「無制限」プランの利用規約の確認方法
「無制限」プランを契約する前に、公式の利用規約・サービス説明ページで以下の項目を探すことを推奨する。
**利用規約で確認すべき記載**
1. 「公平利用ポリシー」「Fair Use Policy」「FUP」に関する条項
2. 「テザリング」「インターネット共有」の月間上限と制限後の速度
3. 「トラフィック管理」「帯域制御」「優先度制御」に関する条項
4. 「速度制限」の閾値と制限後の速度
5. 「動画配信サービス」「特定のサービス」に対する個別の速度上限
これらの記載がない場合は、キャリアのカスタマーサポートに直接問い合わせて確認することを推奨する。「FUPはありますか」「テザリングの上限はありますか」「deprioritizationはありますか」と具体的に質問すると明確な回答を得やすい。
---
## SimFinderでプランを比較する
「無制限」プランの具体的な条件(FUP閾値・テザリング上限・制限後の速度)はキャリアやプランによって大きく異なる。同じ「無制限」という表記でも、FUP閾値や制限後の速度、テザリング条件が全く異なる場合がある。
SimFinderでは日本のSIMプランを料金・容量・通信品質スコアでフィルタリングして比較できる。「無制限」プランを探す際も、複数のプランの条件を横並びで確認できるため、自分の用途に合ったプランを見つけやすい。
**[SimFinderで日本のSIMプランを探す →](/ja/jp/search/)**
---
## よくある質問
**Q: 「無制限」プランでも通信量の確認は必要ですか?**
FUP閾値の超過状況を把握するために、定期的な確認は推奨する。多くのキャリアはマイページや公式アプリで当月の使用量をリアルタイムで確認できる。閾値に近づいた段階でデータ節約モードに切り替えることで、制限後の速度低下を避けられる場合がある。データ節約の具体的な方法は[データ通信量の節約テクニック](/ja/guides/save-data/)を参照してほしい。
**Q: 「無制限」プランで速度が突然遅くなった場合、何が原因ですか?**
主に3つの原因が考えられる。(1)FUP閾値を超えたことによる速度制限。(2)ネットワーク混雑時のdeprioritization(FUP閾値超過後、かつ混雑時に発動)。(3)時間帯・場所による一時的な混雑。まずキャリアのマイページで当月のデータ使用量を確認し、FUP閾値との関係を確認するのが最初のステップだ。速度低下の切り分け手順は[通信速度が極端に遅い場合の対処法](/ja/guides/slow-speed/)で詳しく解説している。
**Q: 「無制限」プランはデータを使えば使うほどお得ですか?**
使用量が多いほど1GBあたりの単価が下がる計算になるが、FUP閾値を超えて速度制限がかかると使い勝手が大幅に低下する。「無制限」の価値が最大化されるのは、FUP閾値内で使い続けられる場合だ。月間使用量が少ない(20GB以下程度)場合は、容量制限プランの方がコスト効率が良いことが多い。
**Q: 「無制限」プランと容量制限プランはどちらを選べばよいですか?**
月間の実際のデータ使用量を基準に判断するのが最も確実だ。「無制限」プランのFUP閾値が自分の平均消費量より十分高く、かつ価格差が許容範囲であれば「無制限」が有利になる。一方で、FUP閾値が低い「無制限」プランと、容量が十分な定量プランを比べると、後者の方が速度安定性が高いこともある。最新のプラン条件はSimFinderで比較することを推奨する。
**Q: MVNOの「無制限」プランはMNOの「無制限」プランと何が違いますか?**
最大の違いは混雑時の速度特性だ。MVNOはMNOとの接続点(POI: Point of Interface)を経由してネットワークにアクセスするため、POIの帯域上限に達すると速度が低下する。MNO本体の「無制限」プランはPOIを経由しないため、同じ時間帯でも速度が安定しやすい。ただし価格はMVNOの方が低くなる傾向があるため、コストと速度安定性のトレードオフで判断することになる。
---
## まとめ — 「無制限」プランを選ぶ前に確認すること
「データ無制限」はデータ量に上限がないことを示しているが、速度・優先度・テザリングに関しては別途の条件が設けられていることが多い。プランを選ぶ際には以下を確認する。
1. **FUP閾値と制限後の速度**: 月間何GBで速度制限がかかり、制限後は何Mbpsか
2. **テザリングの上限**: スマホ本体とテザリングで条件が異なる場合がある
3. **Deprioritizationの条件**: 混雑時の優先度低下が何GBから適用されるか
4. **キャリア種別**: MNO・サブブランド・MVNOで混雑時の速度特性が異なる
5. **動画等の速度上限**: 特定サービスへの個別制限がある場合がある
自分の月間使用量の実績を確認したうえで、プランの条件と照合することが無駄なく最適なプランを選ぶ近道だ。
最新のプラン条件と料金の比較は[SimFinderの検索ツール](/ja/jp/search/)を活用してほしい。
---
## 関連ガイド
- [データ通信量の目安 — 自分に合ったギガ数の見つけ方](/ja/guides/data-usage-guide/) — アプリ別の消費量と必要GB数の算出方法
- [データ通信量の節約テクニック — iPhone/Androidのアプリ別設定と実践ガイド](/ja/guides/save-data/) — データ節約の具体的な設定手順
- [通信速度が極端に遅い場合の対処法](/ja/guides/slow-speed/) — 速度低下の原因切り分けと改善ステップ
- [旅行eSIMの選び方 — 5つの比較ポイントと失敗しないコツ](/ja/guides/how-to-choose/) — プラン選定の比較軸を整理
- [旅行eSIMプロバイダー比較 — Airalo・Holafly・Nomad・Saily・Ubigiを用途別に選ぶ](/ja/guides/provider-comparison/) — 主要プロバイダーの違いと用途別の選び方
================================================================================
# VoLTEとVoNRとは — 4G/5Gで通話する仕組みと対応端末
URL: https://sim-finder.com/ja/guides/volte-vonr/
Type: guides (ja)
Published: 2026-04-24
スマートフォンで普段何気なくかけている電話は、今やインターネットと同じIPネットワークを通っている。「VoLTE」という表記を端末のステータスバーや通信設定画面で目にしたことがあるかもしれないが、これが現代の音声通話を支える技術だ。
この記事では、VoLTE・VoNRの仕組みを技術的な背景から整理し、日本における3G停波の影響、SIMフリー端末での対応確認方法、VoWiFiとの関係、そして非対応端末のリスクまでを順を追って解説する。
---
## 1. VoLTEとは
**VoLTE(Voice over LTE)**は、4G LTEネットワーク上で音声通話をIPパケットとして伝送する技術だ。従来の3G音声通話が「回線交換(Circuit Switched: CS)」方式だったのに対し、VoLTEは「パケット交換(Packet Switched: PS)」方式でデータ通信と同じIPネットワークを使う。
仕様は**GSMA PRD IR.92**(IMS Profile for Voice and SMS)で定義され、3GPPのIMS(IP Multimedia Subsystem)技術仕様に基づく。初の商用VoLTEサービスは2012年8月7日に米国MetroPCSが開始した。
VoLTEが登場する以前の「LTE時代の音声通話」には**CS Fallback(CSFB)**という方法が使われていた。LTEは本来データ通信専用のネットワークであり、通話が発生すると端末を一時的に3G(または2G)の回線交換ネットワークに接続し直す方式だ。VoLTEはこのCSFBを不要にし、LTEネットワーク上で完結した音声通話を実現した。
SIMの基本的な仕組みについては、[SIMとは何か — 基礎知識と選び方](/ja/guides/what-is-sim/)で解説している。
---
## 2. VoLTEの仕組み:IMS・SIPシグナリング・QoS
VoLTEの通話が成立するには、**IMS(IP Multimedia Subsystem)**と呼ばれるネットワーク基盤が核になる。IMSは3GPP TS 22.228などで仕様化されたアーキテクチャであり、IPネットワーク上でSIP(Session Initiation Protocol)を使って音声・ビデオ・SMSなどのマルチメディアセッションを制御する。
通話の流れを簡単に整理すると以下のようになる。
1. **SIPシグナリング**: 発信側端末がIMSにSIP INVITEリクエストを送り、着信側端末との間でセッションをネゴシエートする。
2. **メディアストリーム(RTP)**: セッション確立後、音声データはRTP(Real-time Transport Protocol)で双方向にパケット送信される。
3. **QoS保証**: LTEネットワークはEPS Bearer(Evolved Packet System Bearer)という仕組みで音声トラフィックに専用の通信優先度(QCI: QoS Class Identifier)を割り当てる。音声専用のQCI 1が使われ、データ通信と帯域を分けて品質を確保する。
このQoS保証こそが、VoLTEで安定した音声品質が得られる理由だ。単純にIPパケットを流すVoIPアプリ(LINEやWhatsApp)と異なり、ネットワーク側で優先制御がかかっている。
---
## 3. VoLTEのメリット
VoLTEには、従来の3G回線交換通話と比べた際に明確なメリットがある。
### 高音質(HD Voice)
3G通話で使われるAMR-NB(Adaptive Multi-Rate Narrowband)コーデックは通話帯域が300〜3,400 Hzと狭い。VoLTEが採用するAMR-WB(AMR Wideband、いわゆる**HD Voice**)は50〜7,000 Hzまで広がり、相手の声が格段にクリアに聞こえる。背景雑音の見分けやすさも向上する。
### データ通信との同時利用
CS Fallbackでは通話中に端末が3Gに切り替わるため、LTEデータ通信が一時中断した。VoLTEはLTE上で通話とデータを並行して処理するため、通話中もLTEのデータ通信が継続できる。地図の検索や資料の確認を通話中に行える実用的なメリットだ。
### 接続時間の短縮
3Gへのフォールバックが不要になるため、発信から相手が呼び出し音を聞くまでの時間(ポストダイヤル遅延)が短縮される。体感上、つながるまでの待ち時間が減る。
---
## 4. VoNRとは — 5G時代の音声通話
**VoNR(Voice over New Radio)**は、5G NR(New Radio)ネットワーク上でIMSを使って音声通話を行う技術だ。VoLTEの5G版にあたり、**3GPP Release 15**(5G NR規格本体、2018年完成)で規格化された。GSMA側では NG.114(IMS Profile for Voice, Video and Messaging over 5GS)として仕様が整備されている。
VoNRにはVoLTEと比べた際の主な特徴が2つある。
**EVSコーデック**: VoNRはEVS(Enhanced Voice Services、3GPP TS 26.445)コーデックをフル活用できる。EVSは16 kHz(スーパーワイドバンド)や最大20 kHz(フルバンド)の音声帯域を扱える(サンプリング周波数は最大48 kHz)、VoLTEのHD Voiceよりさらに高音質な通話が可能だ。
**5G SA必須**: VoNRは5G SA(Standalone)ネットワークが前提条件だ。現在普及している5G NSA(Non-Standalone)ネットワークはLTEと5G NRを組み合わせるが、コアネットワークはLTE(EPC)のままであるため、VoNRではなくVoLTEが使われる。5G SAはコアネットワークごと5G世代(5GC)に置き換えるアーキテクチャで、IMS over 5GSとして音声を扱う。
日本のキャリアは5G SA対応エリアを段階的に拡大中だが、2026年4月時点では対応エリアは限定的であり、SA対応エリア外ではVoLTEにフォールバックする動作となる。
---
## 5. 日本における3G停波スケジュールとVoLTEへの移行
日本の主要キャリアは順次3Gサービスを終了した。ファクトレジストリで検証済みの日付を以下に示す。
| キャリア | 3Gサービス終了日 |
|---------|----------------|
| KDDI(au) | 2022年3月31日 |
| ソフトバンク | 2024年4月15日(石川県は2024年7月31日まで延長) |
| NTTドコモ | 2026年3月31日 |
| 楽天モバイル | 3Gネットワークを持たなかった |
この3G停波によって何が変わるのか。
**VoLTE非対応端末では通話ができなくなる。** 3Gを使ってCSフォールバックで通話していた端末は、3G停波後に音声通話手段を失う。またVoLTE対応端末であっても、SIMロック解除の問題やキャリア間の非互換性から通話できないケースがある(詳細は後述の第6節を参照)。
MVNOの通信品質構造については[MNOとMVNOの違いを徹底解説](/ja/guides/mno-vs-mvno-comparison/)で詳しく解説している。MVNOを利用する場合でも、VoLTEの可否はMNO回線の品質に依存する点を押さえておきたい。
---
## 6. VoLTE対応端末の見分け方:SIMフリー端末を別キャリアで使う場合
SIMフリー端末を購入してMVNOや別キャリアで使う際、VoLTEが使えるかどうかは3つの条件をすべて満たす必要がある。
### 条件1:端末がVoLTEに対応している
端末のスペックシートで「VoLTE対応」の記載を確認する。iPhoneは公式運用上 iPhone 6 以降でキャリアによるVoLTE対応が始まり、現行モデルはすべてVoLTE対応だ。Androidでは機種ごとに異なるため、メーカー公式サイトまたは販売店の仕様欄を確認する。
### 条件2:使用するキャリアのバンドをサポートしている
VoLTEは特定の周波数帯(バンド)上で動作する。日本の主要キャリアが使うLTEバンドの一例を示す。
- **NTTドコモ**: Band 1(2.1 GHz)、Band 3(1.7 GHz)、Band 19(800 MHz)など
- **KDDI(au)**: Band 1(2.1 GHz)、Band 18/26(800 MHz)など
- **ソフトバンク**: Band 1(2.1 GHz)、Band 3(1.7 GHz)、Band 8(900 MHz)など
- **楽天モバイル**: Band 3(1.7 GHz)、Band 70(2 GHz)など
SIMフリー端末は多くのバンドに対応しているが、すべてのバンドに対応しているとは限らない。端末のスペック表で「対応バンド」を確認することが重要だ。
### 条件3:キャリアがその端末のVoLTEを許可している
日本のキャリア(特にドコモ・au・ソフトバンク)は、VoLTEを利用できる端末を「認定端末リスト(ホワイトリスト)」で管理している場合がある。自社で販売していないSIMフリー端末がリストに含まれていなければ、技術的にはバンド対応していてもVoLTEが使えないことがある。
各キャリアの公式サイトで「SIMフリー端末動作確認リスト」や「VoLTE対応端末一覧」を確認することを推奨する。
SIMロックと端末の使い回しについては、[SIMロックとは — 解除方法と注意点](/ja/guides/sim-lock/)で詳しく説明している。
---
## 7. VoWiFi(Wi-Fi Calling)との関係
**VoWiFi(Voice over Wi-Fi、Wi-Fi Calling)**は、モバイルネットワークではなくWi-Fiネットワーク経由でIMSに接続して音声通話を行う技術だ。VoLTEとVoWiFiは同じIMS基盤を使っており、利用者から見た通話品質・操作感はほぼ同じだ。
VoWiFiの利点は主に以下の場面で発揮される。
- **地下や建物内など電波が届きにくい場所**: 通常の携帯電波が弱くてもWi-Fiがあれば通話できる。
- **海外のWi-Fi経由でも日本の電話番号で発着信**: キャリアとの契約維持を前提に、海外Wi-Fi接続時でも日本番号で通話できる場合がある(キャリアの設定・契約内容による)。
VoLTEとVoWiFiの切り替えはシームレスに行われる設計だ。通話中にLTE電波が弱くなってWi-Fiに切り替わっても通話が途切れないよう、ハンドオーバー機能が定義されている。
利用にはキャリアのVoWiFi対応と、端末側のWi-Fi Calling設定が必要だ。日本では大手キャリアを中心にVoWiFiサービスが提供されているが、MVNOでは対応していない場合もある。
MVNOを選ぶ際のポイントについては[格安SIM(MVNO)とは — 仕組みとメリット・デメリット](/ja/guides/what-is-mvno/)で解説している。
---
## 8. VoLTE非対応のリスクと注意点
VoLTE非対応の状況になりうるパターンと、それぞれのリスクを整理する。
### 3G停波後の通話不可
前述のとおり、日本では3G停波が完了した。3G CSフォールバックに依存していた端末・プランでは通話が完全に使えなくなる。古いフィーチャーフォン(3G専用機)や一部の低価格スマートフォンが該当する可能性がある。
### 緊急通報への影響
**最も重要なリスクが緊急通報(110・119・118)への影響だ。** 通常のデータ通信は使えても、VoLTE非対応端末では緊急通報に接続できないケースがある。特に3G停波完了後、VoLTE非対応端末からの緊急通報は不確実性が高い。「インターネットはつながるから大丈夫」という認識は危険だ。
### 低価格・海外モデル端末の注意
日本で技術基準適合(技適)を取得していても、VoLTE関連の設定が日本のキャリアに最適化されていない端末が存在する。特に:
- **海外版スマートフォン**: 日本キャリアのVoLTE対応バンドを持っていても、ホワイトリスト未登録でVoLTEが使えない場合がある。
- **低価格SIMフリー端末**: VoLTE対応を明記していない製品も存在する。購入前にスペックを確認する。
- **デュアルSIM端末の片方のSIM**: DSDS(Dual SIM Dual Standby)構成では、VoLTE対応SIMスロットが1つのみという端末がある。
格安SIM(MVNO)を使う場合は特に注意が必要だ。MVNOはMNOの回線を借りているが、VoLTEの対応可否はMNOとMVNOの双方の設定に依存する。契約前にMVNO公式の「VoLTE対応状況」を確認することを推奨する。
---
## FAQ
### VoLTEとは何ですか?
VoLTE(Voice over LTE)は、4G LTEネットワーク上でIMS(IP Multimedia Subsystem)を使って音声通話をIPパケットで伝送する技術です。GSMA PRD IR.92で仕様が定義されており、従来の3G回線交換通話より高音質・低遅延で、データ通信と同時利用が可能です。
### VoNRとVoLTEはどう違いますか?
VoLTEは4G LTE上の音声通話、VoNR(Voice over New Radio)は5G NR(New Radio)上の音声通話です。VoNRは3GPP Release 15で規格化され、5G SA(Standalone)ネットワークが必要です。音質はEVSコーデック対応でさらに向上しますが、現在の日本では対応エリアが限られます。
### VoLTEに対応していない端末はどうなりますか?
日本では主要3キャリアの3Gサービスが2026年3月までに順次終了しました。VoLTE非対応端末では通話ができなくなる可能性があります。緊急通報(110・119・118)についても、VoLTE非対応端末では接続できないリスクがあるため、端末のVoLTE対応を確認することを強くすすめます。
### SIMフリー端末を別のキャリアで使う場合、VoLTEは使えますか?
SIMフリー端末でVoLTEを使うには、端末がVoLTEに対応しているだけでなく、使用するキャリアのVoLTE対応バンドを端末がサポートしていること、さらにキャリアが当該端末のVoLTEを許可(ホワイトリスト登録)していることが必要です。購入前にキャリアの公式対応端末リストを確認してください。
### VoWiFiとはどういう仕組みですか?
VoWiFi(Wi-Fi Calling)は、Wi-Fiネットワーク経由でIMS基盤に接続し音声通話を行う技術です。地下や建物内など電波が届きにくい場所でもWi-Fiがあれば通話できます。VoLTEと同じIMS基盤を使うため、音質・接続性のメリットも同様です。キャリアと端末の両方が対応している必要があります。
### 海外SIMを日本で使ってもVoLTEは使えますか?
海外発行のSIMを日本で使う場合のVoLTE利用可否は、来訪先キャリア(日本のキャリア)との相互接続設定に依存します。多くの場合、ローミング通話はVoLTEではなく従来方式にフォールバックするため、3G停波後は海外SIMを日本で音声通話に使えなくなる場合があります。
### VoNRは日本でいつから使えますか?
VoNRは5G SA(Standalone)ネットワークが前提です。日本のキャリアは5G SA対応エリアを順次拡大中ですが、2026年4月時点では対応エリアは限定的です。対応端末(5G SA・VoNR対応)であっても、SA対応エリア外ではVoLTEにフォールバックします。
---
## まとめ
- **VoLTE**はLTEネットワーク上でIMSを使って音声をIPパケット伝送する技術(GSMA IR.92)。CS Fallbackを不要にし、高音質・データ並行・接続短縮を実現した。
- **VoNR**は5G NR上の音声通話(3GPP Release 15)。5G SAネットワーク必須で、EVSコーデックによる超高音質通話が可能。
- 日本の3G停波はKDDI 2022年3月、ソフトバンク 2024年4月、ドコモ 2026年3月に完了した。**VoLTE非対応端末は通話・緊急通報に支障をきたすリスクがある。**
- SIMフリー端末を別キャリアで使う場合は「端末のVoLTE対応」「バンド対応」「キャリアのホワイトリスト」の3条件をすべて確認する必要がある。
- VoWiFiはVoLTEと同じIMS基盤をWi-Fi経由で使う技術で、電波が弱い環境での通話を補完する。
関連する用語の意味を体系的に確認したい場合は[通信用語集 — SIM・eSIM・MNO/MVNOの基礎用語](/ja/guides/glossary-index/)を参照してほしい。
================================================================================
# VPNの基礎と選び方を解説
URL: https://sim-finder.com/ja/guides/vpn-guide/
Type: guides (ja)
Published: 2026-06-05
VPNは通信を暗号化されたトンネルで包み、公衆Wi-Fiでの盗聴リスクを低減する。ただしVPNが守れる範囲には明確な限界があり、マルウェアやフィッシングは防げない。また、モバイル回線(eSIM含む)を活用すれば公衆Wi-Fi自体を避けられるため、VPNが不要になる場面も多い。
この記事では、VPNの仕組み・限界・選び方を整理する。公衆Wi-Fi利用時のリスク全体については[公衆Wi-Fiの安全な使い方](/ja/guides/public-wifi-safety/)で詳しく解説している。
---
## VPNの仕組み — 暗号化トンネルとは何か
VPN(Virtual Private Network)は、デバイスとVPNサーバーの間にデータを暗号化したトンネルを作る技術だ。
通常のインターネット接続では、デバイスからルーター・ISP・インターネットを経由して目的のサーバーへ通信が届く。この経路上の各地点で通信内容を観察できる。
VPN接続時の通信の流れは次のとおりだ。
1. デバイスが通信データを暗号化してVPNサーバーへ送信する
2. VPNサーバーが暗号を解いて、目的のサーバーへ通信を中継する
3. 応答はVPNサーバー経由で暗号化されてデバイスに戻る
この仕組みにより、同じWi-Fiネットワーク上の第三者が通信を傍受しても、暗号化されたデータしか見えない。接続先のIPアドレスはVPNサーバーのものとして見えるため、ホームネットワーク外からは実際のIPアドレスが隠れる。
---
## VPNが守るもの、守らないもの
VPNの効果を正確に理解することが重要だ。
### VPNが守るもの
- **公衆Wi-Fiでの通信内容の盗聴**: 同一ネットワーク上の第三者による中間者攻撃(MITM)から通信内容を保護する
- **ISPによるトラフィック監視の制限**: ISPにはVPNサーバーへの暗号化通信しか見えなくなる
- **実IPアドレスの隠蔽**: 接続先サーバーにはVPNサーバーのIPアドレスが通知される
### VPNが守らないもの
- **マルウェア**: デバイスにインストールされたマルウェアはVPNの外側で動作する。VPNは悪意あるソフトウェアの挙動を止めない
- **フィッシング**: 偽サイトへのURL誘導は通信経路とは無関係に発生する。VPN接続中でもフィッシングサイトは危険だ
- **VPNサーバー以降の通信**: VPNサーバーからインターネット側の通信はVPNで保護されない。この区間はHTTPSなど他の手段に依存する
- **VPNプロバイダー自身への露出**: VPNプロバイダーはユーザーの通信を把握できる立場にある。ノーログポリシーの有無と実績が重要になる
### HTTPSとVPNの関係
現在はほぼすべての主要サービスがHTTPS(TLS)による通信暗号化に対応している。HTTPSが確立された通信では、VPNなしでも通信内容は暗号化されている。VPNを使うことでその暗号化された通信をさらに暗号化トンネルで包む二重構造になる。VPNとHTTPSは代替関係ではなく、役割が異なる補完関係にある。
---
## VPNプロトコルの種類と特徴
VPNはさまざまなプロトコルで実装されており、速度・セキュリティ・互換性に違いがある。主要な3種類を整理する。
### WireGuard
WireGuardは2019年頃から注目が高まった新しいプロトコルで、コードベースが4,000行未満(暗号プリミティブ除く)と小規模で監査しやすい設計が特徴だ。ChaCha20(暗号化)・Curve25519(鍵交換)・Poly1305(認証)など現代的な暗号化アルゴリズムを採用している。Linux 5.6カーネル(2020年リリース)から標準統合され、多くのVPNサービスがWireGuardに対応した。
速度は既存プロトコルと比較して高速とされており、モバイル環境でのネットワーク切り替え(Wi-Fiとモバイルデータの切り替え等)にも強い。ただし固定IPが実装によっては残るため、プライバシーを重視する場合はプロバイダーの実装を確認する必要がある。
### OpenVPN
OpenVPNは2001年に開発が始まり2002年にリリースされたオープンソースのプロトコルで、長年にわたる実績がある。OpenSSLライブラリを使ってTLSベースの暗号化を行い、UDP・TCPの両方で動作する。
コードベースが大きく設定の柔軟性が高い反面、設定の複雑さがある。WireGuardと比べると速度面でやや劣る場合があるが、信頼性は高い。多くの商用VPNサービスがOpenVPNを提供しており、サードパーティクライアントからも利用できる。
### IKEv2/IPsec
IKEv2(Internet Key Exchange version 2)はIPsecと組み合わせて使用されるプロトコルだ。ネットワーク切り替え時の再接続(MOBIKE: IKEv2 Mobility and Multihoming Protocol)が速いため、モバイル回線とWi-Fiを頻繁に切り替える用途に向いている。
iOSとmacOSはIKEv2をネイティブサポートしており、システムVPNとして設定できる。
---
## VPNの選び方
VPNサービスを選ぶ際に確認すべき主要な項目を整理する。
### ログポリシー(ノーログポリシー)
最も重要な確認項目の1つだ。「ノーログ(no-log)」または「ゼロログ」を掲げるプロバイダーは、ユーザーの接続ログや通信内容を記録しないと主張している。
ただし主張の確認が重要だ。第三者機関による監査(独立したセキュリティ企業によるログポリシーの検証)を実施し、その報告書を公開しているプロバイダーの方が信頼性を確認しやすい。監査未実施のプロバイダーの場合は主張を鵜呑みにできない。
### 所在地・管轄(Jurisdiction)
VPNプロバイダーが法人登録している国・地域によって、適用される法律が異なる。
- **強制的なデータ保持法がない国**: プロバイダーが技術的に記録を持っていない場合、存在しないデータを提出はできない
- **情報共有協定(Five Eyes・Nine Eyes・14 Eyes等)**: 加盟国の当局間でデータ共有が行われる可能性がある。協定対象国に法人があるプロバイダーは、協定の枠組みで情報提供を求められる場合がある
ただし管轄だけで判断するのは過剰単純化だ。技術的なノーログ実装と監査レポートの方が具体的な根拠になる。
### プロトコルの透明性
前述のWireGuard・OpenVPN・IKEv2などオープンソースまたは標準化されたプロトコルを採用していることが望ましい。独自プロトコルを開発するプロバイダーもあるが、独自プロトコルは外部からの検証が難しい。
### 速度と接続安定性
VPN接続ではVPNサーバーへの迂回と暗号化処理のオーバーヘッドにより、通常よりも通信速度が低下することがある。サーバーの物理的距離・サーバー数・混雑状況が速度に影響する。
接続しようとするサーバーが地理的に遠い場合はレイテンシが増加する。主要国にサーバーを持つプロバイダーを選ぶと速度への影響を抑えやすい。
### 無料VPNのリスク
無料VPNは慎重に評価する必要がある。無料で提供できる理由として、広告収入かユーザーの通信データの収集・販売が考えられる。後者の場合、VPNを使って守ろうとしているプライバシーをVPNプロバイダーに渡すことになる。
無料VPN全般が危険というわけではないが、ビジネスモデルを確認できないプロバイダーは避けることを推奨する。オープンソースで開発され、収益構造が明示されているものは判断しやすい。
---
## VPNの主な用途
### 公衆Wi-Fiでの通信保護
カフェ・空港・ホテルの公衆Wi-Fiを使う際に、VPNを使うことで通信が暗号化されたトンネル内を通り、同一ネットワーク上の盗聴者から保護できる。公衆Wi-Fiの具体的なリスクと対策の詳細は[公衆Wi-Fiの安全な使い方](/ja/guides/public-wifi-safety/)を参照してほしい。
この用途では、後述するモバイル回線への切り替えという代替手段も有効だ。
### 地理的制限のあるコンテンツへのアクセス
一部の動画サービスは地域によって視聴できるコンテンツが異なる。VPNサーバーを目的の国に設定することで、そのサーバーのIPアドレスからのアクセスとして扱われる。ただしサービス利用規約の遵守は利用者の責任であり、地理的制限の回避が禁止されているサービスもある。
### リモートワーク・企業ネットワークへのアクセス
企業では社内ネットワークへのリモートアクセス手段としてVPNを提供している場合がある。この用途では企業が管理するVPNを使うのが一般的で、商用VPNサービスとは別の文脈だ。
### プライバシーの向上
ISPや訪問先サービスによるトラフィックログへの意識がある場合、VPNを使うことでISPには暗号化されたVPNトラフィックのみが見える状態を作れる。ただし完全な匿名性ではなく、VPNプロバイダーへのトラストシフトになる点に注意が必要だ。
---
## VPNに関する誤解
### 「VPNを使えば完全に匿名になる」は誤り
VPNを使ってもIPアドレスがVPNサーバーのものに変わるだけで、VPNプロバイダー自身はユーザーのIPアドレスと接続先を把握できる立場にある。またブラウザのCookieやフィンガープリント、サービスへのログイン状態は変わらないため、サービス側からはアカウントを通じて身元が特定される。
SMSによる二段階認証のリスクについては[SMS 2FAのリスクとより安全な認証方法](/ja/guides/sms-2fa-risk/)で解説している。
### 「VPNを使えばすべてのハッキングを防げる」は誤り
VPNは通信経路のセキュリティを向上させるが、エンドポイント(デバイス自体)のセキュリティとは別問題だ。SIMスワップ詐欺やアカウント乗っ取りのリスクについては[SIMスワップ詐欺とは — 手口・被害・対策を解説](/ja/guides/sim-swap/)で整理している。
また、端末の紛失・盗難時のリスク管理については[スマートフォン紛失・盗難時の対応ガイド](/ja/guides/lost-stolen/)を参照してほしい。
---
## モバイル回線(eSIM)という現実的な選択肢
公衆Wi-Fiのセキュリティリスクへの最も根本的な対策の1つは、公衆Wi-Fiを使わないことだ。
モバイル回線(4G/5G)はLTE/5Gの通信規格で無線区間の暗号化が規定されており、公衆Wi-Fiのように同一ネットワーク上の第三者が通信を傍受できる構造になっていない。
eSIMはスマートフォンに内蔵されており、事前に通信プランをダウンロードしておくと現地に到着した時点から即時にモバイル回線を利用できる。旅行先・出張先でも公衆Wi-Fiに依存せずモバイル回線を維持できる。
海外渡航時のローミング設定と注意点については[ローミング設定の基礎と確認ポイント](/ja/guides/roaming-settings/)で解説している。
モバイル回線でもデータ消費量の増加という課題はあるが、セキュリティリスクとのトレードオフとして現実的な選択肢だ。
---
## VPNの利用を検討すべき場面・不要な場面
### VPNが有効な場面
- 公衆Wi-Fiを頻繁に利用し、モバイル回線への切り替えが難しい状況
- ISPによるトラフィック監視を避けたい場合
- 地理的制限のあるコンテンツへのアクセスが必要な場合
- 企業のリモートアクセス要件がある場合
### VPNを使わなくてもよい場面
- 自宅や職場の信頼できるネットワークのみを使用する場合
- スマートフォンのモバイル回線で通信する場合(公衆Wi-Fiを使わない)
- 訪問するすべてのサービスがHTTPSに対応している場合(通信内容はHTTPSで保護される)
---
## VPN選択時のチェックリスト
VPNサービスを選ぶ際に確認すべき項目をまとめる。
| 確認項目 | 望ましい状態 |
|---------|------------|
| ノーログポリシー | 第三者機関による監査報告書が公開されている |
| 法人所在地 | データ保持義務法の適用がない国・地域 |
| プロトコル | WireGuard・OpenVPN・IKEv2など標準化・オープンソース |
| ビジネスモデル | 有料サブスクリプションまたは明示された収益構造 |
| サーバー数・所在地 | 利用頻度の高い国・地域にサーバーがある |
| オープンソース | クライアントアプリのソースコードが公開されている |
---
## FAQ
**Q: スマートフォンにVPNアプリを入れると端末が遅くなりますか?**
VPN接続中は暗号化処理とVPNサーバーへの迂回によりオーバーヘッドが発生し、速度が低下する場合があります。低下の程度はプロトコルの種類・サーバーとの距離・デバイス性能によって異なります。WireGuardは既存プロトコルと比較して低オーバーヘッドとされていますが、接続する場面に応じてVPNのオン/オフを使い分けることも実用的な方法です。
**Q: VPNはiPhoneとAndroidどちらでも使えますか?**
はい。主要なVPNサービスはiOS・Android向けのアプリを提供しています。iOSはIKEv2・OpenVPN・WireGuardに対応したアプリを利用できます。Androidも同様で、WireGuard公式のAndroidアプリ(wireguard-android)がGoogle Play経由で提供されています。
**Q: 海外旅行中にVPNを使うと問題になる国はありますか?**
VPNの利用を制限または禁止している国があります。中国・ロシア・イラン・北朝鮮などでは政府非認可のVPNの利用が制限される場合があります。渡航先の法律を事前に確認することを推奨します。これは通信規制の観点からも重要で、海外での通信全般については[ローミング設定の基礎と確認ポイント](/ja/guides/roaming-settings/)も参照してほしい。
---
## 関連ガイド
- [公衆Wi-Fiの安全な使い方 — リスクと対策を正しく理解する](/ja/guides/public-wifi-safety/)
- [SMS 2FAのリスクとより安全な認証方法](/ja/guides/sms-2fa-risk/)
- [SIMスワップ詐欺とは — 手口・被害・対策を解説](/ja/guides/sim-swap/)
- [スマートフォン紛失・盗難時の対応ガイド](/ja/guides/lost-stolen/)
- [ローミング設定の基礎と確認ポイント](/ja/guides/roaming-settings/)
================================================================================
# APNとは — なぜ設定が必要なのか
URL: https://sim-finder.com/ja/guides/what-is-apn/
Type: guides (ja)
Published: 2026-06-04
APN(Access Point Name)は、スマートフォンがモバイルデータ通信を確立するために参照する接続先の識別子だ。この設定が正しくなければ、電波バーが立っていてもインターネットには繋がらない。
MVNOや格安SIMに乗り換えたときに「データが使えない」と感じる原因の多くはAPNの未設定にある。本記事ではAPNの定義・仕組み・MVNOで設定が必要な理由・5GにおけるDNNとの関係を体系的に解説する。具体的な設定手順はプラットフォーム別の記事([iPhone](/ja/guides/apn-setup-iphone/)・[Android](/ja/guides/apn-setup-android/))で詳しく説明している。
---
## APNの定義(3GPP TS 23.003)
APN(Access Point Name)は**3GPP TS 23.003**(Numbering, addressing and identification)で定義されたネットワーク識別子だ。
3GPP TS 23.003の仕様では、APNは以下の2つの部分で構成される。
| 構成要素 | 内容 | 必須/任意 |
|---------|------|---------|
| ネットワーク識別子(Network Identifier) | 接続先データネットワークを識別する文字列 | 必須 |
| オペレータ識別子(Operator Identifier) | PLMNを識別するサフィックス(`mnc{MNC}.mcc{MCC}.gprs`形式) | 任意 |
エンコード後のAPNの最大長は**100オクテット**(ネットワーク識別子単体は63オクテット)と規定されている。実際にユーザーが入力・設定する値(例: `iijmio.jp`、`povo.jp`)はネットワーク識別子に相当する部分だ。
端末の設定画面にはAPNの種別(タイプ)を入力するフィールドも存在する。種別は接続の用途を示すもので、代表的な値は次のとおりだ。
| APNタイプ | 用途 |
|-----------|------|
| `default` | 通常のインターネットデータ通信 |
| `ims` | VoLTE・VoNR(音声通話・ビデオ通話)のSIPシグナリング |
| `mms` | MMS(マルチメディアメッセージサービス) |
| `supl` | GPS補助情報(Secure User Plane Location) |
MVNOのAPN設定でユーザーが通常入力するのは`default`タイプだ。`ims`はVoLTE利用に必要だが、多くのMVNOではSIM挿入時にキャリア設定またはプロファイルで自動的に設定される。`mms`は別のAPN値・ユーザー名・パスワードが必要なキャリアも存在する。
---
## モバイルデータ通信におけるAPNの役割
### パケット網への接続点として
モバイルデータ通信の経路を簡略化すると以下のとおりだ。
```
端末(スマートフォン)
→ 無線基地局(eNodeB / gNodeB)
→ コアネットワーク(EPC / 5GC)
→ PGW / UPF(パケットゲートウェイ)
→ インターネット
```
APNはこの経路の中で、**端末がどのPGW(Packet Data Network Gateway)またはUPF(User Plane Function)を通じてインターネットに接続するかを指定**するための識別子だ。端末からの接続要求(PDN接続要求またはPDUセッション確立要求)を受け取ったコアネットワークは、APNをもとに適切なゲートウェイを選択して接続を確立する。
### キャリアによる制御
APNはゲートウェイを特定するだけでなく、キャリアがその接続に対してさまざまなポリシーを適用するための起点にもなる。
- どのIPアドレスを払い出すか(IPv4・IPv6・デュアルスタック)
- 認証方式(PAP / CHAP)
- QoS(サービス品質)の設定
たとえばドコモの`spmode.ne.jp`はドコモのインターネット接続用ゲートウェイを指定し、ahamoでも同じAPNを使用する。UQモバイルの`uqmobile.jp`はauコアネットワーク上のUQ専用ゲートウェイを指す。このようにAPNはキャリアごと、場合によってはブランドごとに異なる。
---
## なぜMVNOではAPN設定が必要なのか
### MNOとMVNOのネットワーク構造の違い
MVNO(Mobile Virtual Network Operator、仮想移動体通信事業者)は自社で無線ネットワークを持たず、MNO(大手キャリア)からネットワークを借りてサービスを提供する。
MVNOはMNOのコアネットワークに**POI(Point of Interface、相互接続点)**を通じて接続しており、MVNOユーザーのデータトラフィックはMNO網内の特定のゲートウェイ(PGW/GW)を経由する。このゲートウェイを識別するためにMVNO固有のAPNが使用される。
つまりMVNOユーザーの端末がデータ通信を開始するには、MVNOが指定するAPNが正しく設定されていなければならない。
### キャリア設定アップデートの仕組みと限界
iPhoneでは、AppleとキャリアがAppleのサーバーに登録した**キャリア設定アップデート**を通じてAPN等の設定を自動配信できる。大手MNO・サブブランドはこの仕組みに対応しており、SIM挿入後に自動でAPNが適用される。
しかし日本に数百社以上存在するMVNOのすべてがAppleのキャリア設定データベースに登録されているわけではない。登録されていないMVNOのSIMを挿入しても、端末はAPNを自動取得できないため、利用者が手動で設定する必要がある。
Androidでは標準でAPN手動入力画面にアクセスできるため、iPhoneのキャリア設定アップデートに依存しない。ただし同様に、MVNOのAPNを手動で設定する必要がある点は同じだ。
詳細な設定手順はプラットフォーム別に解説している。
- iPhone: [APN設定の手順(iPhone)— 構成プロファイルのインストールと手動設定](/ja/guides/apn-setup-iphone/)
- Android: [APN設定の手順(Android)— 手動入力と自動設定の方法](/ja/guides/apn-setup-android/)
---
## APNが未設定のときに起きること
APNが正しく設定されていない(または未設定)の場合、端末は**ネットワークへの登録(電話・SMS)は成功しているが、データセッションを確立できない**状態になる。
利用者の体験としては次のような症状が現れる。
- 電波バーは表示されているのにブラウザがページを開けない
- アプリの通信(SNS・地図・メールなど)が一切機能しない
- 「モバイルデータ通信」はオンになっているのに通信できない
この状態は「圏外(no service)」とは異なる。圏外はネットワークへの登録自体が失敗している状態だが、APN未設定はネットワーク登録は成功しているにもかかわらずデータ経路が確立できない状態だ。
APN設定が必要になる典型的な場面は次のとおりだ。まず**SIM差し替え直後**が最も多い。MNOからMVNOへ乗り換えてSIMを入れ替えた直後は、端末に前のキャリアのAPN情報が残っていたり、新しいMVNOのAPNがまだ存在していなかったりする。次に**キャリア設定が自動で配信されないMVNO**のケースがある。iPhoneではキャリア設定アップデートの対象外のMVNOを利用する場合、プロファイルのインストールまたは手動入力が必要になる。また**データ通信のみ開通しない症状**として現れる場合もある。音声通話・SMSは問題なく使えるが、モバイルデータだけが機能しないケースはAPN未設定または誤設定が原因であることが多い。
電波はあるがデータ通信ができない場合の総合的な診断は「[モバイルデータに繋がらないときの対処法](/ja/guides/no-data/)」を、圏外になった場合の対処は「[圏外・電波なしのときの対処法](/ja/guides/no-service/)」を参照してほしい。
---
## APNの構造 — 実例で理解する
実際のAPN値がどのような意味を持つかを確認してみよう。
| APN値 | キャリア | 回線 |
|-------|---------|------|
| `spmode.ne.jp` | NTTドコモ・ahamo | ドコモ |
| `povo.jp` | povo2.0 | au |
| `uqmobile.jp` | UQモバイル | au |
| `rakuten.jp` | 楽天モバイル | 楽天回線 |
| `iijmio.jp` | IIJmio | ドコモ/au |
これらの値はドメイン名のような形式だが、インターネットのDNSドメインとは別の識別子体系だ。コアネットワーク内で「このAPNを指定した接続要求はどのゲートウェイに転送するか」を決定するためにキャリア内部で使用される。
ユーザー名・パスワードが設定値に含まれる場合(例: UQモバイル・IIJmio等)、これらはゲートウェイとの認証(PAP/CHAP)に使用される。ゲートウェイが認証を要求しないキャリアでは不要な項目だ。
---
## 5GにおけるDNNとの関係
5Gシステムでは、APNに対応する概念として**DNN(Data Network Name)**が3GPP TS 23.003 Clause 9Aで定義されている。
機能的にはAPNと同等だが、5Gコアネットワーク(5GC)アーキテクチャ向けに定義が拡張されている。5GではDNNは**S-NSSAI(Single Network Slice Selection Assistance Information、ネットワークスライス識別子)**と組み合わせ、PDUセッション(Packet Data Unit Session)確立時にルーティング先(SMF/UPF)およびネットワークスライスを選択するために使用される。
利用者の観点からは、端末・SIMが5G対応であってもAPN(DNN)の設定が不要になるわけではない。4G環境で使用していたAPNは5G環境でも引き続き機能する(互換性が保たれている)。キャリアが5G専用APNを別途指定している場合(例: auの5G端末向けAPNである`uad5gn.au-net.ne.jp`)は、そのAPNを使用する。
---
## MNOとMVNO・サブブランドのAPN設定方式の比較
利用するキャリアの種別によって、APN設定が自動か手動かが変わる。
| 種別 | 代表例 | iPhone | Android |
|------|--------|--------|---------|
| 大手MNO | ドコモ・au・ソフトバンク・楽天モバイル | 自動(キャリア設定アップデート) | 自動 |
| サブブランド | UQモバイル・ワイモバイル・povo・LINEMO | 自動(キャリア設定アップデート) | 自動(一部端末では手動) |
| MVNO(格安SIM) | IIJmio・mineo・各社 | 手動(構成プロファイル) | 手動(APN入力) |
| 海外MNO・現地SIM | 各国キャリア | 手動(端末・キャリアによる) | 手動(端末・キャリアによる) |
MVNOのなかでも、Appleのキャリア設定データベースに登録されているブランドはiPhoneでの自動設定が可能な場合がある。不明な場合は利用するMVNOの公式サポートページで確認すること。
MVNOとMNOの仕組みの違いについては「[MVNOとは — 仕組み・メリット・注意点](/ja/guides/what-is-mvno/)」で詳しく解説している。
---
## APNに関連するトラブルシューティング
APNが原因でデータ通信が使えない場合、まず以下を確認する。
**1. APNが正しく設定されているか確認する**
利用中のキャリア公式サポートページで、現在使用中の端末向けのAPN設定値(APN文字列・ユーザー名・パスワード・認証方式)を確認する。設定値はキャリアの方針変更で変わる可能性があるため、古い情報を使い回さないこと。
**2. 設定後に端末の接続をリセットする**
APNを設定または変更した後は、機内モードをオン→オフにして接続をリセットする。それでも繋がらない場合は端末を再起動する。
**3. モバイルデータ通信がオンになっているか確認する**
APNとは別に、端末のモバイルデータ通信スイッチがオフになっていると通信できない。
**4. デュアルSIM構成ではデータ用SIMを確認する**
デュアルSIM環境では、APNを設定したSIMがデータ通信に割り当てられているかを確認する(iPhoneは「設定→モバイル通信→モバイルデータ通信」、Androidはキャリア設定画面)。
**5. APNを間違えたときの典型症状と確認手順**
APNを設定したが値を誤った場合、端末はデータセッション確立を試みるがゲートウェイに拒否される。症状は未設定時と同様(電波バーありのデータ通信不可)だが、認証エラーの場合はiOSでは「モバイルデータ通信の認証に失敗しました」等のメッセージが表示されることがある。確認手順としては、利用中のMVNOの公式サポートページを開いてAPN文字列・ユーザー名・パスワード・認証方式(PAPまたはCHAP)の全項目を照合する。1文字でも誤りがあれば接続は確立しない。
MNOへの接続自体に問題がある場合(圏外・サービスエリア外)はAPNとは別の原因だ。圏外になった場合は「[圏外・電波なしのときの対処法](/ja/guides/no-service/)」を参照してほしい。
SIMを手動でネットワークに接続する手順については「[モバイルネットワークの手動選択](/ja/guides/manual-code/)」も参照できる。
---
## よくある質問
### APNとは何ですか?
APN(Access Point Name)は、スマートフォンがモバイルデータ通信を行うために参照する接続先の識別子です。3GPP TS 23.003で定義され、端末がパケットゲートウェイ(4GではPGW、5GではUPF)を特定するために使用します。正しく設定されていないと、電波は立っているのにインターネットに繋がらない状態になります。
### MVNOではなぜAPN設定が必要なのですか?
大手MNOはiPhone向けにキャリア設定アップデートでAPNを自動配信しますが、Appleのキャリア設定データベースに登録されていないMVNOでは自動配信が行われません。そのため、MVNOのSIMを挿入しても端末はどのゲートウェイに接続すべきかを判断できず、利用者が手動でAPNを設定する必要があります。
### APNが未設定のとき、具体的に何が起きますか?
端末はネットワークへの登録(音声通話・SMS)は成功しても、データ通信セッションを確立できません。端末画面の電波バーは表示されるが、ブラウザやアプリがインターネットに接続できない状態になります。
### 5GになってもAPNは必要ですか?
必要です。5GコアネットワークではDNN(Data Network Name)がAPNに対応する概念として3GPP TS 23.003 Clause 9Aで定義されています。機能的にはAPNと同等であり、端末・SIMが5Gに対応していても引き続きAPNまたはDNNの設定が必要です。
### MNOのSIMではAPNを設定しなくてよいのですか?
大手MNO(NTTドコモ・au・ソフトバンク・楽天モバイル)およびサブブランド(povo・UQモバイル・ワイモバイル・LINEMO)は、SIMアクティベーション時またはキャリア設定アップデートを通じてAPNを自動設定するため、利用者の手動操作は原則不要です。
### APNタイプの「default」「ims」「mms」は何が違うのですか?
`default`は通常のインターネットデータ通信に使用するタイプです。`ims`はVoLTEやVoNRによる音声・ビデオ通話のSIPシグナリングに使用し、`mms`はMMSの送受信に使用します。MVNOのデータ通信を開通させるだけであれば`default`タイプのAPNを設定すれば十分です。
### APNを設定したのにデータが使えません。何を確認すればよいですか?
まず設定したAPN文字列・ユーザー名・パスワード・認証方式(PAP/CHAP)が、利用中のMVNO公式サポートページに記載の値と完全に一致しているか確認してください。次に機内モードをオン→オフして接続をリセットし、それでも繋がらなければ端末を再起動してください。デュアルSIM環境では「データ通信用SIM」の選択が正しいかも確認が必要です。
---
## 関連ガイド
- **[APN設定の手順(iPhone)— 構成プロファイルのインストールと手動設定](/ja/guides/apn-setup-iphone/)** — iPhoneでMVNO・旅行eSIMのAPNを設定する手順
- **[APN設定の手順(Android)— 手動入力と自動設定の方法](/ja/guides/apn-setup-android/)** — AndroidでAPNを設定する手順
- **[圏外・電波なしのときの対処法](/ja/guides/no-service/)** — ネットワーク登録自体が失敗している場合のトラブルシューティング
- **[モバイルデータに繋がらないときの対処法](/ja/guides/no-data/)** — APN以外の原因も含む総合診断
- **[モバイルネットワークの手動選択](/ja/guides/manual-code/)** — SIMを手動でネットワークに登録する手順
- **[MVNOとは — 仕組み・メリット・注意点](/ja/guides/what-is-mvno/)** — MVNOの仕組みとMNOとの違いを解説
================================================================================
# デュアルSIMとは — DSDS・DSDV・DSDAの仕組みと活用法
URL: https://sim-finder.com/ja/guides/what-is-dual-sim/
Type: guides (ja)
Published: 2026-04-13
デュアルSIMとは、1台の端末で2枚のSIM(物理SIMまたはeSIM)を使用できる機能だ。GSMA TS.37で定義されており、2つの電話番号を持ちながら、データ通信回線・通話回線を用途に応じて切り替えられる。方式によって通話中のデータ通信の扱いが異なるため、自分の端末がどの方式に対応しているかを知ることが重要だ。
---
## デュアルSIMの4つの方式
デュアルSIMには主に4つの方式がある。それぞれ同時に使えるネットワークの数と範囲が異なる。
### DSSS(Dual SIM Single Standby)
「デュアルSIMシングルスタンバイ」と呼ぶ。2枚のSIMを挿入できるが、一度に待ち受けできるのは1枚だけだ。どちらのSIMを有効にするかを手動で切り替える必要があり、現在は旧型端末以外ではほぼ使われない。
### DSDS(Dual SIM Dual Standby)
「デュアルSIMデュアルスタンバイ」と呼ぶ。2枚のSIMが同時に待ち受けできる。従来のDSDSでは片方のSIMが4G/5Gを使用すると、もう一方のSIMは3G回線に制限される場合があった。ただし最新のチップセットでは両方が4Gに対応するDSDSも存在する。3Gサービスが終了している地域では端末の対応状況を確認することが必要だ。
### DSDV(Dual SIM Dual VoLTE)
「デュアルSIMデュアルVoLTE」と呼ぶ。両方のSIMで4G/5G回線を維持できる。VoLTE(Voice over LTE)に両SIMが対応しているため、どちらの番号でも高音質通話が可能だ。
ただし通話中はその回線でのみデータ通信ができる。もう一方のSIMのデータ通信は停止する点に注意が必要だ。現在の主流方式はDSDVである。
### DSDA(Dual SIM Dual Active)
「デュアルSIMデュアルアクティブ」と呼ぶ。2つのトランシーバー(無線送受信機)を搭載し、両方のSIMが同時にアクティブな状態を維持できる。片方のSIMで通話しながら、もう一方のSIMでデータ通信を行うことが可能だ。
2系統のトランシーバーを同時駆動するため、バッテリー消費が増える可能性がある。ハイエンドAndroid端末の一部が対応している。
### 方式の比較まとめ
| 方式 | 両SIM待ち受け | 両SIMで4G/5G | 通話中データ通信 |
|------|:---:|:---:|:---:|
| DSSS | × | × | × |
| DSDS | ○ | △(従来型は片方が3Gに制限される場合あり) | × |
| DSDV | ○ | ○ | △(通話中は通話SIMのみ) |
| DSDA | ○ | ○ | ○ |
---
## 主要端末のデュアルSIM対応状況
### iPhone
iPhoneはDSDSに対応しているが、DSDAには対応していない。Appleの公式ドキュメントではDSDSと表記されており、両方のSIMで通話・SMS・データ通信の待ち受けが可能だ。通話中はもう一方のSIMのデータ通信が停止する。
- **iPhone XS/XS Max/XR(2018年)以降**: 物理SIM+eSIMのデュアルSIM構成に対応
- **iPhone 13シリーズ以降**: eSIM+eSIMのデュアルeSIM構成に対応(2つのeSIMを同時に有効化)
- **iPhone SE(第3世代)**: デュアルeSIMに対応
iPhoneのデュアルSIMでは、通話に使う回線とデータ通信に使う回線をそれぞれ指定できる。データ通信回線の切り替えは「設定」→「モバイル通信」から行う。
iPhoneでのデュアルSIM設定の詳しい手順は「[デュアルSIMの設定(iPhone) — 物理SIM・eSIMを組み合わせる手順](/ja/guides/dual-sim-iphone/)」で解説している。
### Android(Google Pixel)
Google Pixel 3a以降はDSDS(物理SIM+eSIM)に対応している。
- **Pixel 7/7 Pro(2022年)以降**: デュアルeSIM(2つのeSIMを同時有効化)に対応。Android端末として初めてのデュアルeSIM対応だった
- **Pixel 10シリーズ(米国向け)**: eSIM専用(物理SIMスロットなし)
AndroidでのデュアルSIM設定の詳しい手順は「[デュアルSIMの設定(Android) — Pixel・Samsung別の手順](/ja/guides/dual-sim-android/)」で解説している。
### Samsung Galaxy
Samsung Galaxy S20以降のフラグシップモデルは基本的にeSIMに対応し、デュアルSIM構成が可能だ。対応状況は地域・キャリアロックの状態により異なる。
---
## デュアルSIMの主な活用シーン
### 仕事用回線と個人用回線を1台で管理する
仕事の電話番号(MNO回線)と個人の電話番号(MVNO回線)を1台の端末に収め、電話帳や着信音で使い分けられる。端末を2台持つ必要がなくなり、バッテリーの管理や荷物の削減につながる。
通話に使う回線・データ通信に使う回線をそれぞれ設定で固定しておくと、誤って高額な通話プランで個人の電話をかけるリスクを減らせる。
### メイン回線+格安SIMでコストを最適化する
大手キャリア(MNO)の回線を通話用に維持しながら、格安SIM(MVNO)の大容量データプランをデータ通信専用として使う構成だ。MNOとMVNOの違いについては「[MNO vs MVNO vs サブブランド — 違いと選び方](/ja/guides/mno-vs-mvno-comparison/)」を参照。一般的にMVNOはMNOよりデータ単価が安いため、通話品質を維持したままデータ費用を抑えられる。必要なデータ量の見積もりには「[データ通信量の目安](/ja/guides/data-usage-guide/)」が参考になる。
各プランの料金比較には[SimFinderで検索](/ja/)できる。
### 副回線として通信障害に備える
メイン回線のキャリアに障害が発生したとき、別のキャリアのサブ回線があれば通信を継続できる。日本ではpovo 2.0のような、最低限の維持費でeSIMを確保できるサービスを副回線として使う方法が定番だ。
副回線の詳しい選び方は「[副回線の選び方 — 通信障害に備える日本市場ガイド](/ja/guides/sub-line/)」で解説している。
### 海外旅行でデュアルSIMを活用する
国内SIM(物理SIM)を維持しながら旅行先のeSIMをデータ専用で追加する構成が便利だ。
- 日本の電話番号でSMSを受信できるため、銀行やSNSのSMS二段階認証を海外でも受け取れる
- 現地のデータ通信はeSIMで利用するため、国際ローミング料金が発生しない
- 渡航前に日本のWi-Fi環境でeSIMプロファイルをインストールしておくと、現地で即時利用できる
旅行用eSIMの多くはデータ通信専用であり、音声通話やSMSの送受信は含まれない。通話はLINEやWhatsAppなどのVoIPアプリで代替するのが一般的だ。旅行eSIM以外の選択肢も含めた比較は「[海外でスマホを使う4つの方法](/ja/guides/four-options/)」を参照。
海外でのデュアルSIM活用の詳細は「[海外旅行でのデュアルSIM活用](/ja/guides/dual-sim-for-travel/)」で解説している。
---
## デュアルSIM利用時の注意点
### データ通信に使う回線を明示的に設定する
デュアルSIM環境では、データ通信に使う回線を設定で明示的に指定する必要がある。設定せずに使うと、意図しない高額プランでデータ通信が発生する場合がある。
iPhoneでは「設定」→「モバイル通信」→「通信のオプション」から「データ通信用のモバイル通信回線」を指定する。
### 通話中のデータ通信制限
DSDVの場合、通話中はもう一方のSIMのデータ通信が停止する。例えばSIM Aで通話しながらSIM Bのデータ通信を使うことはできない。ビデオ会議中に着信に応答するような場面では注意が必要だ。
DSDAに対応した端末であれば、この制限はない。
### eSIMと物理SIMの組み合わせ
eSIM対応の端末なら、物理SIMスロットが1つしかなくても、物理SIM+eSIMのデュアルSIM構成が実現できる。eSIMの仕組みについては「[eSIMとは — 仕組み・メリット・デメリット](/ja/guides/what-is-esim/)」を参照してほしい。
---
## まとめ
| 項目 | 内容 |
|------|------|
| デュアルSIMの定義 | 1台の端末で2枚のSIM(物理SIM/eSIM)を使用できる機能。GSMA TS.37で定義 |
| 主な方式 | DSSS(旧型)→ DSDS(3G制限あり)→ DSDV(現在の主流、4G/5G両対応)→ DSDA(通話中データ通信可) |
| iPhoneの対応 | Apple公式表記はDSDS。両SIMで通話・SMS・データ通信の待ち受けが可能。iPhone 13以降はデュアルeSIM対応。DSDAには非対応 |
| Pixelの対応 | Pixel 3a以降でDSDS対応、Pixel 7以降でデュアルeSIM対応 |
| 主な活用シーン | 仕事・個人の2回線管理、MNO通話+MVNO格安データ、副回線として障害対策、海外旅行でのeSIM追加 |
各プランを比較して最適な2回線の組み合わせを探すには[SimFinderで検索](/ja/)できる。この記事で使われている用語の定義は「[SIM・モバイル通信用語集](/ja/guides/glossary-index/)」を参照。
================================================================================
# eSIMとは — 仕組み・メリット・デメリット
URL: https://sim-finder.com/ja/guides/what-is-esim/
Type: guides (ja)
Published: 2026-04-13
eSIMとは端末に内蔵されたeUICCチップに、キャリアのプロファイルをインターネット経由でダウンロードして使うSIM技術だ。物理カードの郵送・挿し替えが不要で、申し込みから数分で開通できる。一方、端末故障時の即時代替が難しいというデメリットも存在する。
この記事ではeSIMの仕組み・技術背景・メリット・デメリット・対応端末の概要を解説する。eSIM設定の具体的な手順は「[QRコードでeSIMを設定する(iPhone)](/ja/guides/qr-code-iphone/)」「[QRコードでeSIMを設定する(Android)](/ja/guides/qr-code-android/)」を参照してほしい。
---
## eSIMの仕組み
### eUICCとプロファイルのしくみ
eSIM(embedded SIM)はGSMAが定めるグローバル仕様に基づき、モバイルデバイスのリモートSIMプロビジョニングを可能にする技術だ。端末のマザーボードに半田付けされたeUICC(embedded Universal Integrated Circuit Card)チップが、キャリアのプロファイルを安全に格納する。
従来の物理SIMカードはキャリアごとに一枚のカードが発行される。eSIMの場合、SM-DP+(Subscription Manager Data Preparation)と呼ばれるサーバーからプロファイルをダウンロードする方式を採用する。SM-DP+はGSMA SGP.22で定義されるeSIMプロファイルの準備・配布サーバーであり、キャリアまたはeSIMプロバイダーが運営する。
プロファイルのダウンロード手順は主に4通りある。
1. QRコードをスキャンする
2. SM-DP+アドレスと有効化コードを手動で入力する
3. キャリア公式アプリからダウンロードする
4. eSIMクイック転送(iPhone同士、または対応キャリアのiPhoneとAndroid間)
### プロファイルの保存と切り替え
SGP.22 v2.x仕様では、eUICCに複数のキャリアプロファイルを保存できるが、同時に有効化できるプロファイルは1つのみに制限されている。プロファイルの保存数の上限はeUICCチップのメモリ容量に依存し、仕様上の固定上限値は規定されていない。
iPhoneはApple公式によると「8個以上(8 or more)のeSIMを保存」でき、設定画面から有効化するeSIMを切り替えることができる。
SGP.22 v3.0で導入されたMEP(Multiple Enabled Profiles)は、1つのeUICC上で複数のeSIMプロファイルを同時に有効化できるオプション機能だ。Android 13以降がMEP(MEP-A1およびMEP-B)をサポートし、eSIM専用のデュアルSIMデバイスの実現を可能にする。
### 規格の標準化
GSMAのeSIM消費者向け仕様はSGP.22(RSP Technical Specification for Consumer Devices)として定義されている。最新版はSGP.22 v2.6.1(2025年4月15日公開)およびSGP.22 v3.1(2023年12月公開)だ。v3.0以降でMEP(Multiple Enabled Profiles)がオプション機能として導入された。
GSMAはほかにM2M向け(SGP.02)、IoT向け(SGP.32)の3種類のeSIM仕様を定義している。
---
## eSIMのメリット
### 即時開通・郵送待ちが不要
物理SIMは申し込み後、カードが郵送されるまで数日かかる。eSIMは審査通過後にQRコードやアプリ経由でプロファイルをダウンロードすれば、その場で開通できる。空港や旅先で急に通信手段が必要になった場合に特に有効だ。
### デュアルSIMが容易に実現できる
デュアルSIMとは、1台のデバイスで2枚のSIM(物理SIMまたはeSIM)を使用できる機能を指す。GSMA TS.37で定義されており、主な方式にDSDS(Dual SIM Dual Standby)とDSDA(Dual SIM Dual Active)がある。
eSIMを使えば、物理SIMスロットが1つしかない端末でも「国内SIM(物理)+旅行用eSIM」「仕事用SIM+プライベートSIM(eSIM)」などの組み合わせが実現できる。
### 複数プロファイルを管理できる
iPhoneは8個以上のeSIMプロファイルを保存でき、渡航先ごとのeSIMや複数のMVNOのプロファイルを端末内に保持しておける。使う回線を設定画面から切り替えるだけで、カードの入れ替えは不要だ。
### 端末のデザイン・防水性の向上
SIMスロットを設けなくて済むため、メーカーは端末を薄く・軽く設計したり、防水設計を強化したりできる。米国で販売されたiPhone 14以降のモデルはeSIM専用であり、物理SIMカードスロットを持たない。
### 旅行・海外利用が便利
旅行先のeSIMをオンラインで事前購入し、日本にいるうちにプロファイルをインストールしておける。現地到着後はeSIMを有効化するだけでデータ通信が始まる。国内SIMをeSIMにしておけば、デュアルSIM構成で日本の電話番号を維持しながら現地データを使えるため、SMS二段階認証の受信にも対応できる。旅行でのeSIM活用については[海外旅行eSIM完全ガイド](/ja/blog/travel-esim-complete-guide-2026/)で詳しく解説しています。
---
## eSIMのデメリット
### 端末故障・紛失時の復旧に手間がかかる
物理SIMは端末から取り出してほかの端末に差し替えれば即座に使える。eSIMは端末に内蔵されているため、端末が故障・紛失した場合にeSIMを別の端末に移すことはできない。新しい端末でeSIMを使うには、キャリアに再発行手続きを申請する必要がある。再発行に手数料がかかるキャリアもあるため、事前に確認しておくことを推奨する。
### 対応端末に制限がある
eSIM対応iPhoneモデルはiPhone XS・XS Max・XR(2018年モデル)以降だ。Google Pixel 3以降のモデルは基本的にeSIMに対応しているが、地域・キャリア版によって非対応の場合がある。発売から数年経過したAndroid端末や、廉価モデルの一部はeSIMに対応していない場合がある。
使いたい端末がeSIMに対応しているかどうかは、メーカーの公式サポートページまたはキャリアの公式ページで確認する必要がある。
### 一部のeSIMは再インストールに制限がある
eSIMプロファイルはキャリアやeSIMプロバイダーのポリシーにより、削除後の再インストールができない場合がある。旅行用eSIMでは特に注意が必要で、誤って削除すると再度購入が必要になるケースがある。削除前にプロバイダーの再インストールポリシーを確認することを推奨する。
### オフライン環境での初期設定ができない
eSIMのプロファイルダウンロードにはインターネット接続が必要だ。Wi-Fiまたはほかの通信手段がない環境では初期設定を完了できない。海外旅行前には日本のWi-Fi環境でプロファイルをインストールしておくことを推奨する。
---
## 対応端末の概要
### iPhone
eSIM対応iPhoneモデルはiPhone XS・iPhone XS Max・iPhone XR(2018年モデル)以降の全モデルだ。iPhone 13シリーズ以降は、2つのeSIMを同時に有効化するデュアルeSIM構成に対応している。iPhone SE(第3世代)も同様にデュアルeSIMに対応している。
米国で販売されたiPhone 14以降のモデルはeSIM専用であり、物理SIMカードスロットを持たない。
iPhoneのeSIM設定手順は「[QRコードでeSIMを設定する(iPhone)](/ja/guides/qr-code-iphone/)」を参照してほしい。
### Android(Google Pixel)
Google Pixel 3以降のモデルは基本的にeSIMに対応している。Google Pixel 7およびPixel 7 Proは、2022年10月のリリース時点でAndroid端末として初めてデュアルeSIM(2つのeSIMを同時に有効化)に対応した。Pixel 7以降のモデルはデュアルeSIM対応だ。米国向けPixel 10シリーズはeSIM専用(物理SIMスロットなし)だ。
Android端末のeSIM設定手順は「[QRコードでeSIMを設定する(Android)](/ja/guides/qr-code-android/)」を参照してほしい。
### iPad
iPad Pro(M4)およびiPad Air(M2)モデルはeSIM専用(物理SIMスロットなし)だ。それ以前のiPad Pro・iPad Air(Wi-Fi + Cellularモデル)の一部もeSIMに対応している。
### 日本での対応キャリア
NTTドコモ・au・ソフトバンク・楽天モバイルの大手4社すべてがeSIMに対応している。各社のサブブランドであるahamo・povo・UQモバイル・ワイモバイル・LINEMOもeSIM対応だ。
多くのMVNO(格安SIM)もeSIMを提供している。各社のプランをまとめて比較するには[SimFinderで検索](/ja/)できる。
---
## まとめ
| 項目 | 内容 |
|------|------|
| 定義 | 端末内蔵eUICCチップにプロファイルをダウンロードして使うSIM技術 |
| 規格 | GSMA SGP.22(最新版 v2.6.1、2025年4月) |
| メリット | 即時開通・デュアルSIM・複数プロファイル管理・物理カード不要 |
| デメリット | 故障時の復旧に手間・一部eSIMは再インストール不可・初期設定にネット必要 |
| 対応iPhoneの最低モデル | iPhone XS・XR(2018年) |
| 国内対応キャリア | ドコモ・au・ソフトバンク・楽天モバイル(大手4社)+サブブランド・多数のMVNO |
eSIMに対応しているかどうかわからないプランがあれば、[SimFinderで「eSIM対応」フィルターを使って絞り込める](/ja/)。
================================================================================
# iSIMとは — eSIMの次の世代
URL: https://sim-finder.com/ja/guides/what-is-isim/
Type: guides (ja)
Published: 2026-06-04
iSIM(Integrated SIM)は、eSIMの機能をデバイスのSoC(システム・オン・チップ)内部に直接統合したSIM技術だ。独立したeUICCチップを基板に別実装するeSIMとは異なり、チップセットのセキュアエンクレーブにSIM機能を組み込む。省スペース・低消費電力という特性から、IoTデバイスや小型ウェアラブル端末への適用が中心となっている。
この記事では、iSIMの定義・eSIMとの構造的な違い・GSMA仕様との関係・メリット・現時点での商用化の状況を解説する。eSIMの基本的な仕組みについては「[eSIMとは — 仕組み・メリット・デメリット](/ja/guides/what-is-esim/)」を先に参照してほしい。
**この記事で分かること**:
- iSIMとeSIMの構造的な違い(eUICCチップ独立 vs SoC統合)
- GSMA SGP.32仕様とiSIMの関係
- 省スペース・低消費電力のメリットとその仕組み
- 商用化の現状(IoT・ウェアラブル中心、スマートフォンは限定的)
- iSIM・eSIM・物理SIMの位置づけの整理
---
## iSIMとは
iSIM(Integrated SIM)は、従来のeSIMがSoCとは独立したeUICC(embedded Universal Integrated Circuit Card)チップとして実装されていたのに対し、SoC内部のセキュアエンクレーブ(Trusted Execution Environment)にSIM機能を統合した技術だ。
「integrated(統合された)」という名称が示すとおり、SIM専用の独立したシリコンチップを廃し、プロセッサと同一パッケージ内にSIMの役割を持たせる点がiSIMの本質的な特徴である。
eSIMと同様に、iSIMもキャリアプロファイルのリモートプロビジョニング(ダウンロード・切り替え)に対応する。GSMA仕様に基づく加入者認証・プロファイル管理の仕組みはeSIMと共通の枠組みを持つ。
### SIM技術の実装形態の変遷
SIMの実装形態は、「取り出し可能なカード」から「基板実装の独立チップ」、さらに「SoC統合」へと変化してきた。
1. **物理SIM(UICC)** — 取り出し可能なICカード。Nano-SIM(4FF:12.3×8.8mm)が現在の主流。端末のSIMスロットに挿入して使う
2. **eSIM(eUICC)** — 基板に半田付けされた独立チップ。物理カード不要でリモートプロビジョニングに対応
3. **iSIM** — SoC内部にeSIM機能を統合。独立チップすら不要になる
この変遷はSIMカードという「モノ」を小さくしてきた歴史ではなく、加入者認証・プロファイル管理のロジックをどこに実装するかという「実装場所の変化」として理解するのが正確だ。iSIMになっても加入者認証・電話番号紐付けというSIMの本質的な役割は変わらない。
---
## eSIMとiSIMの構造的な違い
### eSIMの実装構造
eSIMは端末のマザーボードに半田付けされたeUICCチップとして実装される。SoC(Application Processor)とは物理的に独立した別チップであり、チップ間はバス経由で通信する。eUICCには電源・通信・セキュリティのための独自の回路が含まれる。
消費者デバイス向けの技術仕様はGSMA SGP.22(RSP Technical Specification for Consumer Devices)として定義されており、最新版はSGP.22 v2.6.1(2025年4月15日公開)およびSGP.22 v3.1(2023年12月公開)だ。詳細は「[eSIMとは — 仕組み・メリット・デメリット](/ja/guides/what-is-esim/)」で解説している。
### iSIMの実装構造
iSIMはSoC(プロセッサ)の内部にSIM機能を統合する。具体的にはSoC内の専用セキュアエンクレーブ(Secure Enclave / Trusted Execution Environment)がeSIMのeUICCに相当する役割を担う。独立したeUICCチップは不要となり、チップ間を接続するバスも省略できる。
この構造により、基板上に独立したeUICCチップを搭載するスペースが不要になる。SIM機能がSoCに統合されているため、外部からeUICCチップを取り外すことはできない。
### 比較表
| 項目 | 物理SIM(UICC) | eSIM(eUICC) | iSIM |
|------|-----------------|---------------|------|
| **実装形態** | 取り出し可能なICカード | 基板実装の独立チップ | SoC内部に統合 |
| **取り外し** | 可能 | 不可 | 不可 |
| **独立チップ** | あり(カード) | あり(eUICC) | なし |
| **リモートプロビジョニング** | 不可 | 可能(SGP.22) | 可能(SGP.32推奨) |
| **省スペース効果** | なし | eUICCチップ分小型化 | eUICCチップ不要でさらに小型化 |
物理SIM・eSIM・iSIMの詳しい違いは「[物理SIM vs eSIM — 違いと選び方を比較](/ja/guides/sim-vs-esim/)」も参照してほしい。
---
## GSMA仕様との関係
### SGP.32(IoT向けeSIM仕様)
GSMAはeSIM仕様を用途別に定義している。消費者デバイス向けのSGP.22、M2M(機器間通信)向けのSGP.02、そしてIoTデバイス向けのSGP.32(v1.0、2023年5月公開)だ。
iSIMに対してはGSMA SGP.32準拠が推奨されている。SGP.32はユーザーインターフェースを持たないIoTデバイス向けに設計されており、eIM(eSIM IoT Remote Manager)によるサーバー主導型のプロファイル管理を採用している。この点で、ユーザーがQRコードをスキャンして自分でプロファイルをダウンロードする消費者デバイス向けSGP.22(ユーザー主導のプル型)とは管理の仕組みが異なる。
SGP.32はNB-IoTやLTE-MなどのLPWAN(低消費電力広域通信)環境に対応しており、接続プロトコルとしてCoAP over UDP with DTLSをサポートしている。
### SGP.22との共存
iSIMを搭載する消費者向けデバイス(スマートウォッチ等)の一部では、SGP.22準拠の消費者向けプロファイル管理も実装されている場合がある。iSIM = SGP.32専用という固定の対応関係があるわけではなく、デバイスのユースケースや製造者の実装によって準拠する仕様が決まる。
### SGP.02(M2M向け)との違い
GSMAが定義するeSIM仕様は3種類ある。消費者デバイス向けSGP.22、M2M向けSGP.02、IoT向けSGP.32だ。M2M向けのSGP.02は主に通信モジュール組み込みの産業機器(スマートメーター等)向けに使われてきたが、SGP.32はより低消費電力・低帯域の環境を想定したIoTデバイス全般を対象としている。iSIMはこのSGP.32との親和性が高い。
---
## iSIMのメリット
### 省スペース
独立したeUICCチップが不要になるため、基板上のチップ搭載スペースが削減される。小型デバイス(IoTセンサー・スマートウォッチ・産業用トラッカー等)にとって、この省スペース効果は設計の自由度を高める。SoC・通信モジュール・SIMを個別のチップとして搭載する構成と比較して、実装面積の削減が期待できる。
### 低消費電力
SoC内部にSIM機能が統合されることで、独立したeUICCチップの駆動電力が不要になる。また、チップ間通信のオーバーヘッドが減ることも消費電力低下に寄与する。電池容量が限られるIoTデバイスにおいて、消費電力の削減は動作時間の延長に直結する。
### IoT・産業用途への適合性
IoTデバイスはユーザーが手元で操作できない設置環境(屋外センサー・インフラ設備等)に配置されることが多い。iSIMとSGP.32の組み合わせにより、デバイスをリモートで管理しキャリアプロファイルを遠隔変更できる。物理的なSIMカードの差し替えが不要であり、大量のIoTデバイスを遠隔で一括管理する運用に適している。
### 物理的な耐久性
取り外し可能なSIMカードスロットがないため、スロット部分からの防水・防塵対策が容易になる。SIMカードを挿し抜きする接点の接触不良や汚染が発生しない点も、産業環境での使用に有利だ。
---
## iSIMの制約と考慮点
### ユーザーによる交換が不可能
eUICCチップとしての独立性がないため、ユーザーがiSIMを別のデバイスに移すことは物理的にできない。キャリアを変更する場合はリモートプロビジョニング(プロファイルの切り替え)によって対応する必要がある。
### デバイス故障時の復旧
デバイスが故障した場合、物理SIMのように取り出して別の端末で使うことはできない。eSIMと同様に、新しいデバイスでキャリアへの再発行手続きが必要になる。端末故障時の対応については「[eSIMとは — 仕組み・メリット・デメリット](/ja/guides/what-is-esim/)」のデメリットセクションも参照してほしい。
### 対応端末の確認が必要
iSIM対応かどうかはデバイスの仕様書や製造者の公式情報で確認する必要がある。eSIM対応・iSIM対応は別の概念であり、「eSIM対応」と表記されているデバイスが必ずしもiSIM実装であるとは限らない。eSIM対応端末の確認方法については「[eSIM対応端末ガイド](/ja/guides/esim-compatible-devices/)」を参照してほしい。
### 初期設定にネットワーク接続が必要
iSIMもeSIMと同様に、プロファイルのダウンロード・プロビジョニングにはネットワーク接続が必要だ。IoTデバイスの場合、初期設定時のネットワーク環境をあらかじめ確保しておく必要がある。
---
## 商用化の現状
### IoTデバイス・ウェアラブルが先行
2026年時点で、iSIMは主にIoTデバイス・スマートウォッチ・産業用通信モジュールへの搭載が進んでいる。一般のスマートフォンへの採用は商用化初期段階にある。
iSIMを採用した製品の例としては、QualcommがThalesと共同で2023年2月(MWC)にGSMA準拠iSIMを発表し改良版Snapdragon 8 Gen 2に統合した取り組みや、Arm Kigenが開発したiSIM搭載SoCが挙げられる。ただし、これらはリファレンス・初期商用段階であり、広く一般消費者端末に出荷されているわけではない。
### スマートフォンへの統合は限定的
スマートフォン市場では、eSIM(独立eUICCチップ)が主流の実装形態である。iPhone・Google Pixelをはじめとする主要スマートフォンのeSIM実装はeSIM(eUICC独立チップ)であり、iSIM(SoC統合型)ではない。現時点では、一般消費者が購入できるiSIM搭載スマートフォンは普及していない。
### 今後の方向性
IoTデバイスの大量普及とSGP.32仕様の成熟に伴い、iSIMの採用範囲は拡大する方向にある。ただし、スマートフォン市場での一般普及時期については明確な予測を示せる段階にはない。日本国内でのSIMプランの比較は[SimFinderの比較ツール](/ja/jp/search/)で確認できる。
### 日本市場における現状
2026年時点で、日本国内の大手キャリア(NTTドコモ・au・ソフトバンク・楽天モバイル)はiSIM向けのプランを個別に区分して提供しているわけではない。一般消費者がiSIMを意識する場面はほとんどなく、eSIM対応のスマートフォンを選ぶ際も「eSIM対応か否か」が判断基準となる。iSIMはあくまでチップレベルの実装の違いであり、通信サービスとしてのeSIMと同じプロセスでキャリアに接続する。
---
## iSIM・eSIM・物理SIMの位置づけ
SIM技術の世代として整理すると、物理SIM(取り出し可能なカード)→ eSIM(基板実装の独立eUICCチップ)→ iSIM(SoC統合型)という方向で、実装が端末に深く統合されてきている。
この流れは「SIMカードという概念の消失」ではなく、「加入者認証・プロファイル管理の仕組みをより小さく・より省電力な形で実装するための進化」として理解するのが正確だ。GSMA仕様に基づくプロファイルのリモートプロビジョニングという枠組みはeSIMもiSIMも共通しており、消費者が体験するキャリア切り替えの流れは基本的に変わらない。
### 消費者が意識すべき違い
一般の消費者(スマートフォンユーザー)にとって、iSIM・eSIM・物理SIMの最も実感しやすい違いを整理すると以下のとおりだ。
| 観点 | 物理SIM | eSIM | iSIM |
|------|---------|------|------|
| 端末購入時の対応確認 | スロットがあれば使える | 端末仕様を確認 | 端末仕様を確認 |
| キャリア変更の手続き | SIM差し替え | プロファイル切り替え | プロファイル切り替え |
| 端末故障時 | SIM取り出して別端末に | キャリアへ再発行申請 | キャリアへ再発行申請 |
| 一般消費者の選択肢 | 幅広い端末で選択可 | eSIM対応端末が必要 | 現状は限定的 |
iSIMとeSIMで消費者の手続きや体験はほぼ同じだ。違いはチップの物理的な構造にあり、それによって端末設計の自由度と省電力性能が変わる。
物理SIMとeSIMの詳しい比較は「[物理SIM vs eSIM — 違いと選び方を比較](/ja/guides/sim-vs-esim/)」で解説している。物理SIMカード(UICC)の仕組みや歴史については「[SIMカードとは — 仕組み・種類・サイズの歴史と選び方](/ja/guides/what-is-sim/)」を参照してほしい。
iSIMや5G対応デバイスで重要な周波数帯の仕様については「[周波数帯ガイド — 4G・5GのBand一覧と対応確認](/ja/guides/frequency-bands/)」を参照してほしい。
---
## まとめ
| 項目 | 内容 |
|------|------|
| 定義 | SoC内部にeSIM機能を統合したSIM技術。独立したeUICCチップを持たない |
| eSIMとの主な違い | eSIMはeUICC独立チップ、iSIMはSoCのセキュアエンクレーブに統合 |
| 推奨GSMA仕様 | SGP.32(IoT向け、2023年5月公開)。消費者向けSGP.22とは別 |
| 主なメリット | 省スペース・低消費電力・物理的耐久性・IoTリモート管理 |
| 主な制約 | ユーザーによる取り外し不可・故障時は再発行申請が必要 |
| 商用化の現状 | IoT・ウェアラブル中心。一般スマートフォンへの普及は初期段階 |
| 消費者の体験 | eSIMとほぼ同じ(プロファイルのダウンロード・切り替えで利用) |
日本国内でeSIM対応のプランを探す場合は[SimFinderの比較ツール](/ja/jp/search/)でeSIM対応フィルターを使って絞り込める。
---
## FAQ
**Q. iSIMとeSIMはどう違いますか?**
A. eSIMはSoCとは独立した別チップ(eUICC)として基板に実装されます。iSIMはeSIM機能をSoC(プロセッサ)内部のセキュアエンクレーブに直接統合したものです。機能的にはどちらもキャリアプロファイルをリモートでダウンロード・切り替えできますが、iSIMはチップの物理的な独立性を持ちません。
**Q. iSIMは一般のスマートフォンで使えますか?**
A. 現時点(2026年)では、iSIMは主にIoTデバイス・スマートウォッチ・産業用機器向けに商用化が進んでいます。一般のスマートフォンでの採用は限定的であり、普及は商用化初期段階にあります。
**Q. iSIMに対応したGSMA仕様はありますか?**
A. はい。GSMAのIoT向けeSIM仕様SGP.32(v1.0、2023年5月公開)がiSIMを含むIoTデバイス向けのeSIM管理を規定しており、iSIMはSGP.32準拠が推奨されています。消費者デバイス向けのSGP.22とは別の仕様です。
**Q. iSIMにするとどのくらい省スペース・省電力になりますか?**
A. 独立したeUICCチップが不要になるため、基板上のチップ搭載スペースが削減されます。また、チップ間通信のオーバーヘッドが減ることで消費電力が低下します。ただし具体的な削減量はSoC設計・デバイス構成によって異なるため、断定的な数値は示しません。
**Q. iSIM搭載端末のキャリア変更はどうやって行いますか?**
A. iSIMもeSIMと同様に、リモートプロビジョニング(キャリアプロファイルのダウンロード・切り替え)によってキャリアを変更します。物理SIMカードの挿し替えは不要です。SGP.32対応のIoTデバイスでは、eIM(eSIM IoT Remote Manager)を通じたサーバー主導型の管理が行われます。
---
## 関連ガイド
- [eSIMとは — 仕組み・メリット・デメリット](/ja/guides/what-is-esim/)
- [物理SIM vs eSIM — 違いと選び方を比較](/ja/guides/sim-vs-esim/)
- [eSIM対応端末ガイド](/ja/guides/esim-compatible-devices/)
- [SIMカードとは — 仕組み・種類・サイズの歴史と選び方](/ja/guides/what-is-sim/)
- [周波数帯ガイド — 4G・5GのBand一覧と対応確認](/ja/guides/frequency-bands/)
================================================================================
# MNO(大手キャリア)とは — MVNO・サブブランドとの違い
URL: https://sim-finder.com/ja/guides/what-is-mno/
Type: guides (ja)
Published: 2026-06-04
MNO(Mobile Network Operator、移動体通信事業者)は、政府から無線周波数の使用免許を取得し、基地局などの無線ネットワークインフラを自社で所有・運営する通信事業者だ。日本ではNTTドコモ・KDDI(au)・ソフトバンク・楽天モバイルの4社がMNOに該当する。
MVNOはMNOからネットワーク帯域を借りてサービスを提供する事業者、サブブランドはMNOの関連会社(または直属部門)が低価格で提供するブランドを指す。この3者の違いを正確に理解することが、日本の携帯プランを選ぶうえでの出発点となる。
自分の条件に合うプランを絞り込みたい場合は、[SimFinderの比較ツール](/ja/jp/search/)を活用してほしい。
---
## MNOとは(定義と役割)
### ITUによる定義
MNO(Mobile Network Operator)は、ITU(国際電気通信連合)の資料において「政府から無線周波数の使用免許を取得し、自社の無線ネットワークインフラを所有・運営する通信事業者」として説明される。ファクトレジストリ `term-mno-001` に記録されている通り、MNOは無線周波数免許を持たないMVNOとは対照的な存在として定義される。
日本語では「移動体通信事業者」が正式な訳語だが、「大手キャリア」「キャリア」という呼称でも広く使われる。法的な文脈では、電波法に基づき総務省から周波数の使用免許を受けた事業者を指す。
「移動体通信事業者」という日本語名称が示す通り、MNOの本質は「移動体(モバイル)通信のためのネットワークを実際に保有・運用すること」にある。この点でMNOは、ネットワークを借りる形でサービスを提供するMVNOと根本的に異なる。用語の定義一覧は[用語集 — SIM・eSIM・通信](/ja/guides/glossary-index/)にまとめている。
### MNOが担う役割
MNOは以下の3つの役割を担う。
1. **無線ネットワークの整備・運営**: 基地局・アンテナを自社で設置・維持し、カバレッジエリアを拡大する
2. **周波数の管理・活用**: 政府から割り当てられた無線周波数を使い、モバイルネットワークを提供する
3. **MVNOへの回線卸売**: MVNOに対して自社ネットワークへのアクセス(卸電気通信役務)を提供し、間接的に多くのユーザーにサービスが届く基盤を作る
この3つ目の役割がMNO・MVNO・サブブランドの関係を理解するうえで重要だ。MVNOは独自のインフラを持たず、MNOから帯域を借りてサービスを提供するため、どのMNOの回線を使うかがサービス品質の基盤となる。MVNOの仕組みの詳細は[MVNO(格安SIM)とは — 仕組み・メリット・注意点と選び方](/ja/guides/what-is-mvno/)で解説している。
---
## 日本の4つのMNO
### 大手3キャリアと第4のMNO
日本には2026年時点で4社のMNOが存在する。NTTドコモ・KDDI(au)・ソフトバンクの3社が長年「大手3キャリア」として日本の通信市場を形成してきた。2020年4月、楽天モバイルが自社基地局での商用サービスを開始し、日本で4番目のMNOとなった。
| MNO | 主な特徴 |
|-----|---------|
| **NTTドコモ** | 広いカバレッジ。法人・個人ともに最大手 |
| **KDDI(au)** | 都市部・郊外ともに安定した品質 |
| **ソフトバンク** | 都市部でのカバレッジ展開が強い。Yahoo!グループとの連携サービスあり |
| **楽天モバイル** | 2020年4月参入の4番目のMNO。カバレッジは他3社より狭い地域がある |
### NTTドコモ
NTTドコモは1992年にNTTの移動通信部門として発足し、日本最大の加入者数を持つMNOだ。全国に広いカバレッジを持ち、法人・個人の両市場で最大手の位置にある。
NTTドコモが直接提供するオンライン専用プランとしてahamoがあり、2021年3月に開始した。ahamoはドコモ回線をそのまま使うオンライン専用のブランドであり、通信品質はドコモ本体と同等だ。また、2025年6月からドコモショップでの対面サポートを受けられる少容量向けの「ドコモ mini」の提供も開始している。ドコモ miniはオンライン専用ではなく、店頭サポートが利用できる点でahamoと異なる。
### KDDI(au)
KDDI(au)は2000年にDDI・KDD・IDOが合併して設立されたMNOで、都市部から郊外まで安定した品質を持つ。
KDDIグループとしての構成は以下の通りだ。
- **povo(povo2.0)**: KDDIが直接提供するオンライン専用プラン。基本料0円でトッピング方式を採用
- **UQ mobile**: KDDIが100%出資するUQコミュニケーションズが運営するサブブランド。店舗サポートあり
### ソフトバンク
ソフトバンクは2006年にボーダフォン日本法人を買収してモバイル事業に参入したMNOだ。ソフトバンクグループとしての構成は以下の通りだ。
- **LINEMO**: ソフトバンクが直接提供するオンライン専用プラン
- **Y!mobile**: ソフトバンクの100%子会社であるワイモバイルが運営するサブブランド。家族割が充実し、Yahoo!との連携サービスがある
### 楽天モバイル
楽天モバイルは2020年4月に自社周波数(1.7GHz帯・3.7GHz帯・28GHz帯)を使った商用サービスを開始した。その後2024年6月にプラチナバンド(700MHz帯)の商用サービスも開始した。自社エリア外ではKDDI回線によるローミングを利用してカバレッジを補完しており、2023年6月の協定でローミング提供は2026年9月末まで延長されている。自社エリアと重複する地域では順次縮小が進められている。
楽天モバイルにはサブブランドもMVNOも存在せず、自社ブランドのみでサービスを提供しているため、他の3社と異なる市場構成となっている。
---
## MNOの所有関係とサブブランドの位置づけ
### 所有関係の全体図
日本の通信市場では、4つのMNOがそれぞれサブブランド・オンラインプランを提供している。以下の表は各社の所有関係を整理したものだ。
| MNO | オンライン専用プラン | サブブランド | 少容量・店頭サポートプラン |
|-----|-------------------|------------|--------------------------|
| NTTドコモ | ahamo | — | ドコモ mini(店頭サポート可) |
| KDDI(au) | povo(povo2.0) | UQ mobile | — |
| ソフトバンク | LINEMO | Y!mobile | — |
| 楽天モバイル | — | — | — |
「ahamo・povo・LINEMO」はMNOが直接提供するオンライン専用プランであり、「UQ mobile・Y!mobile」はMNOの関連会社(子会社)が運営するサブブランドだ。ドコモ miniはオンライン専用ではなく、ドコモショップでの対面サポートが受けられる少容量向けプランとして別に位置づけられる。いずれも親MNOの回線をそのまま使用するため、通信品質はMNO本体と同等またはそれに近い水準になる。
MVNOとサブブランドの詳細な違いは[大手キャリア・サブブランドのサービス比較](/ja/guides/provider-comparison/)で整理している。
### サブブランドがMNOと異なる点
サブブランドはMNOの関連会社・直属部門が運営するブランドであり、MVNOとは根本的に異なる。
| 比較軸 | MNO本体 | サブブランド | MVNO |
|--------|---------|------------|------|
| ネットワーク所有 | 自社所有 | 親MNOの設備を利用 | MNOから借用 |
| 接続形態 | 直接(POI不経由) | 直接(POI不経由) | POI経由 |
| 混雑時の速度 | 安定 | ほぼ安定 | 低下しやすい |
| 店舗サポート | あり(多数) | MNO系列と一部独自 | 限定的 |
「POI(Point of Interface)」はMNOとMVNOの通信が分離される接続ポイントを指す。MVNOはこのPOIを通じてMNOのネットワークにアクセスし、契約した帯域幅の上限に基づいてデータをやり取りする。MNOとサブブランドはPOIを経由しないため、混雑時間帯でも速度が安定する。
---
## MNOが通信品質を維持できる理由
### 設備投資の規模
MNOが高い通信品質を維持できる主な理由は、自社インフラへの継続的な設備投資にある。基地局の設置・拡張、5Gエリアの整備、コアネットワークの運営には数千億円規模の費用がかかる。この費用が月額料金に反映されるため、MNOの月額料金はMVNOより高い傾向にある。
### 周波数免許と帯域の独占性
MNOは政府から割り当てられた無線周波数を専有的に使用できる。この周波数を自社の基地局を通じて直接エンドユーザーに提供するため、帯域の余裕管理が自社でコントロールできる。
MVNOの場合、MNOのネットワークにPOIを通じてアクセスするため、確保できる帯域幅に上限がある。利用者が集中する時間帯にその上限に達すると速度が落ちる構造的な違いがここにある。
### 5Gへの対応
5G(第5世代移動通信システム)のネットワーク整備もMNOが直接担う。日本では各MNOが総務省から5G用の周波数(Sub-6GHz帯およびミリ波帯)の割当を受けており、自社で5G基地局を展開している。
5Gエリアを利用できるかどうかは、直接MNO契約またはサブブランドの場合は親MNOの5G展開状況に依存する。MVNOを利用する場合も、借りているMNOが5Gに対応している回線であれば5Gを利用できる場合がある(MVNOの契約プランによって異なる)。
---
## MNOを選ぶ場面・MVNOを選ぶ場面
### MNOまたはサブブランドが向く場面
以下に当てはまる場合はMNO本体またはサブブランドが適している。
- 外出先でビデオ通話・オンライン会議を頻繁に行う
- お昼休みや夕方にスマホを集中的に使う
- 通信品質の安定性に高い基準を求める
- 店舗でのサポートが必要
サブブランドはMNO本体に近い品質を維持しながら料金をMNOより抑えられるため、「品質と料金のバランス型」として有力な選択肢になる。サブブランドのメリット・注意点の詳細は[副回線・サブ回線の活用法と選び方](/ja/guides/sub-line/)で解説している。
### MVNOが向く場面
以下に当てはまる場合はMVNOが適している。
- 自宅・職場にWi-Fi環境が整っており、外出時の通信は補助的
- お昼休みに動画を視聴するほどは使わない
- 月額コストを最優先で削減したい
- 通勤中はLINEやメールなど軽い用途が中心
「MNO・サブブランド・MVNOのうちどれが自分に合うか」を整理した判断フローは[格安SIMの選び方 — MNO・MVNO・サブブランドを比較して決める](/ja/guides/how-to-choose/)で解説している。また3種類を仕組みから比較した詳細は[MNO vs MVNO vs サブブランド — 違いと選び方](/ja/guides/mno-vs-mvno-comparison/)にまとめている。
### 通信パターンと選択の目安
| 通信パターン | 推奨の方向性 |
|------------|------------|
| 外出先でのビデオ通話・オンライン会議が多い | MNO本体またはサブブランド |
| お昼休みや夕方にスマホを集中的に使う | MNO本体またはサブブランド |
| 自宅・職場のWi-Fi中心で外出時は補助的 | MVNOで月額コスト削減が見込める |
| 店舗でのサポートが必要 | MNO本体または一部サブブランド(UQ mobile等) |
| データ通信よりも通話・SMSが中心 | MVNOの通話中心プランが合いやすい |
[SimFinderで自分の条件に合うプランを探す →](/ja/jp/search/)
PR
上の表で「MVNO」に当てはまった人へ。MVNOの中でもIIJmioは2GB ¥850から25GBまで9段階あり、まず小容量で契約して足りなければ翌月から上げる、という試し方ができる。余ったデータは翌月に繰り越せるので、自分の適正容量が分からない段階でも無駄になりにくい。
IIJmio ギガプランの料金を見る →
---
## 料金の傾向
具体的な料金は時期によって変動するため記載しない。大まかな傾向として、同じデータ容量で比較すると以下の順になる。
```
MNO本体 > サブブランド ≥ MVNO
```
ただし、楽天モバイルはMNOでありながら料金がサブブランドと同等水準になる場合があるため、この順序に収まらない例外的な位置づけとなる。
各プランの最新の料金・条件は[SimFinderの比較ツール](/ja/jp/search/)で確認してほしい。
---
## MNOと楽天モバイルの独自性
楽天モバイルは「第4のMNO」として参入したが、他の3社と異なる特徴がある。
- **カバレッジ**: 他3社より狭い地域がある(後発参入のため)
- **サブブランド・MVNOが存在しない**: 楽天回線を借りて事業をするMVNOは現在ない
- **料金体系**: MNOとしては異例の低価格帯プランを提供しており、サブブランドに近い価格感
この独自性から、3種類の分類(MNO・サブブランド・MVNO)の中で楽天モバイルを「どこに当てはめるか」は文脈によって異なる場合がある。技術的・法的な定義では楽天モバイルはMNOだが、料金感覚ではサブブランドに近いと捉えられることもある。
---
## MNOとMVNOの回線の関係
MVNOは必ずいずれかのMNO回線を借りてサービスを提供する。日本では以下のような系統に分かれる。
- **ドコモ系**: 多くのMVNOがNTTドコモの回線を利用
- **au系**: KDDI回線を利用するMVNO
- **ソフトバンク系**: ソフトバンク回線を利用するMVNO
- **楽天モバイル系**: 楽天モバイルの回線を借りたMVNOは現在存在しない
MVNOが借りているMNO回線によって、カバレッジの範囲や5G対応エリアが変わる。特定のMVNOを検討する際は「どのMNOの回線を使うか」を確認することが重要だ。各事業者の回線系統を含む比較は[格安SIM・eSIMプロバイダー一覧](/ja/guides/provider-comparison/)で参照できる。
---
## まとめ / 関連ガイド
MNOは「政府から無線周波数免許を取得し、自社で基地局・アンテナなどのネットワークインフラを所有・運営する通信事業者」だ。日本ではNTTドコモ・KDDI(au)・ソフトバンク・楽天モバイルの4社が該当する。
サブブランド(UQ mobile・Y!mobile等)はMNOの関連会社が運営する低価格ブランドで、親MNOの回線をそのまま使うため通信品質はMNO本体と同等に近い。MVNOはMNOから帯域を借りる独立した事業者であり、POIを経由する構造から混雑時に速度が低下しやすい。
自分に合うプランを選ぶには、「通信品質の安定性」「月額コスト」「サポート体制」の優先順位を整理することが重要だ。
### 関連ガイド
- [MVNO(格安SIM)とは — 仕組み・メリット・注意点と選び方](/ja/guides/what-is-mvno/)
- [MNO vs MVNO vs サブブランド — 違いと選び方](/ja/guides/mno-vs-mvno-comparison/)
- [格安SIM・eSIMプロバイダー一覧](/ja/guides/provider-comparison/)
- [副回線・サブ回線の活用法と選び方](/ja/guides/sub-line/)
- [格安SIMの選び方 — MNO・MVNO・サブブランドを比較して決める](/ja/guides/how-to-choose/)
================================================================================
# MNP(番号ポータビリティ)とは — 手順・費用・注意点
URL: https://sim-finder.com/ja/guides/what-is-mnp/
Type: guides (ja)
Published: 2026-04-16
MNP(Mobile Number Portability、番号ポータビリティ)を使えば、今の電話番号をそのままにしてキャリアを変更できます。
2021年に転出手数料が原則無料化され、2023年にはワンストップ方式が始まりました。
乗り換えのハードルは大幅に下がっています。
この記事では、MNPの仕組み・2つの手続き方式・注意点を整理します。
---
## MNPとは
MNP(Mobile Number Portability)は、現在の電話番号を維持したままキャリアを変更できる制度です。
ITU-T勧告Q.769.1(1999年)でSS7シグナリングにおける番号ポータビリティ対応が規定されています。
1997年にシンガポールが世界初の実施国となり、日本では2006年10月に導入されました。
電話番号は個人の連絡先として定着しているため、「番号が変わるから乗り換えたくない」という障壁を取り除くのがMNPの目的です。
---
## 2つの手続き方式
日本のMNPには、**ワンストップ方式**と**予約番号方式**の2つが存在します。
### ワンストップ方式(2023年5月24日開始)
乗り換え先のキャリアサイト(またはアプリ)だけで手続きが完結する方式です。
1. 乗り換え先のWebサイトで「ワンストップMNP」を選択して申し込む
2. 現在のキャリアのマイページに自動遷移し、重要事項を確認してログイン
3. 手続きが完了すると、現在のキャリアとの契約が自動的に解約される
現在のキャリアに電話したり予約番号を取得したりする必要がなく、ワンストップで完了します。
2023年5月24日時点の対応事業者はNTTドコモ・KDDI(au)・ソフトバンク・楽天モバイル・日本通信です。対応事業者は順次拡大中です。未対応のキャリアでは予約番号方式を使います。
### 予約番号方式(従来の方式)
2段階の手続きが必要な従来の方式です。
1. **転出元キャリアでMNP予約番号を取得する**(Web・アプリ・店頭・電話)
2. 予約番号の有効期限(取得日を含む15日間)内に乗り換え先のキャリアで申し込む
MNP予約番号の有効期限は取得日を含めて15日間です(NTTドコモFAQ確認済み)。多くのMVNOでは申し込み時に残日数10日以上を要求します。
取得後はすぐに手続きを開始することが推奨されます。ワンストップ方式に未対応のMVNOへ乗り換える場合は、この方式を使います。
---
## 費用(転出手数料)
総務省の「携帯電話・PHSの番号ポータビリティの実施に関するガイドライン」改正(2021年4月1日施行)により、MNPの転出手数料は**オンライン手続きで原則無料**になりました。
- **Webサイト・アプリでの手続き**: 原則無料
- **店頭・電話での手続き**: 1,000円(税別)以下(ガイドラインの上限)
NTTドコモは2021年4月1日から店頭・電話を含めて全て無料化しています。他の大手キャリアも同様に対応しています。乗り換え先への**転入手数料**も無料が一般的です(初期費用・事務手数料とは別)。
---
## 乗り換え前に確認すべき注意点
### キャリアメールの取り扱い
@docomo.ne.jp・@au.com・@softbank.ne.jp などのキャリアメールは、乗り換えと同時に原則使えなくなります。
継続して使いたい場合は、各キャリアが提供する**メール持ち運びサービス**に申し込みます。月額330円程度(税込)の有料サービスです。
各キャリアが定める期間内に申し込みが必要です。申し込み可能期間はキャリアにより異なります(NTTドコモは解約日を含む31日以内。解約当日の同時申し込みも可)。
Gmailやその他の独自ドメインメールを主な連絡先としている場合は影響がありません。
### 端末の分割払い残債
スマートフォンの代金を分割払いしていて残債がある場合でも、MNPは可能です。ただし残債は乗り換え後も支払い義務が残ります。
一部のキャリアでは一括返済を求める場合があります。自分の契約条件を事前に確認してください。
### 解約タイミングと日割り計算
多くのキャリアは月額料金を日割りせず、1日でも利用した月は1ヶ月分の料金を請求します。月の途中で解約した場合でも満額が請求されるケースが多いです。
**月末近くに乗り換えることで料金上の損失を少なくできます。**
新しいキャリアの料金開始日も確認しておきましょう。
### 二段階認証・SMSの移行
銀行・証券・各種サービスの二段階認証が現在の電話番号に紐づいている場合、乗り換え後も同じ番号でSMSを受信できるため基本的に問題ありません。
ただし番号移行が完了するまでの数時間〜1日程度は、SMSが届きにくくなる場合があります。
重要な認証作業は乗り換え手続きの前後に行わないことが無難です。
### SIMロックの確認
2021年10月1日以降に発売された端末はSIMロック禁止の規制対象となっており、原則SIMフリーです。それ以前に購入した端末が別のキャリアのSIMを使えるか事前に確認が必要です。
---
## SimFinderで乗り換え先を比較する
乗り換えの仕組みを理解したら、次のステップは「どのキャリア・プランが自分に合うか」を調べることです。
料金だけでなく通信品質・eSIM対応・データ容量で絞り込むには、[SimFinderの国内SIM検索](/ja/jp/)でMNO・サブブランド・MVNOを一括比較できます。
[MNO vs MVNO比較ガイド](/ja/guides/mno-vs-mvno-comparison/)も参考にしてください。
また、どのくらいのデータ量が必要かを把握してから比較すると選びやすくなります。[データ通信量の目安](/ja/guides/data-usage-guide/)で自分の使用量を確認できます。
乗り換えに必要な費用や料金感をざっくり把握したい場合は、[格安SIMの選び方完全ガイド](/ja/blog/kakuyasu-sim-erabikata-guide-2026/)も参考になります。
MNP・MVNO・eSIM・SIMロックなどの専門用語の定義は「[SIM・モバイル通信用語集](/ja/guides/glossary-index/)」にまとめています。
---
## まとめ
| 項目 | 内容 |
|------|------|
| 転出手数料 | オンライン手続きは原則無料(2021年4月〜) |
| ワンストップ方式 | 2023年5月24日開始。乗り換え先のWebだけで完結 |
| 予約番号方式 | 転出元から予約番号を取得(有効期限15日間)後に申し込み |
| キャリアメール | 乗り換えで原則使用不可。持ち運びサービス(月額330円程度)で継続可 |
| 端末残債 | 残債は乗り換え後も継続。一括返済を求めるキャリアもあり |
| 解約タイミング | 月末近くが料金上の損失を少なくできる |
================================================================================
# MVNO(格安SIM)とは — 仕組み・メリット・注意点と選び方
URL: https://sim-finder.com/ja/guides/what-is-mvno/
Type: guides (ja)
Published: 2026-04-24
MVNO(Mobile Virtual Network Operator、仮想移動体通信事業者)は、自社で無線ネットワークを持たず、大手キャリア(MNO)から帯域を借りてモバイルサービスを提供する事業者だ。「格安SIM」という呼び名でも知られ、月額料金を抑えられる一方、混雑時の速度低下という特性を持つ。
この記事ではMVNOの定義・仕組み・日本市場の歴史・主要事業者・メリット・注意点・サブブランドとの違い・選び方の指針を体系的に解説する。自分に合ったプランを条件で絞り込みたい場合は、[SimFinderの比較ツール](/ja/jp/search/)を活用してほしい。
---
## MVNOとは(定義と仕組み)
### ITUによる定義
MVNO(Mobile Virtual Network Operator)は、ITU(国際電気通信連合)の定義によれば「無線周波数の政府免許を持たずモバイルサービスを提供する事業者」とされる。日本語では「仮想移動体通信事業者」と訳される。「仮想(Virtual)」は「自社の無線インフラを持たない」ことを意味し、物理的な基地局や無線周波数帯を自社で保有しないことが最大の特徴だ。
これに対しMNO(Mobile Network Operator、移動体通信事業者)は、政府から無線周波数の使用免許を取得し、自社で基地局・アンテナなどの無線ネットワークインフラを保有・運営する通信事業者を指す。日本のMNOはNTTドコモ・KDDI(au)・ソフトバンク・楽天モバイルの4社だ。
総務省の電気通信事業法上、MVNOは「第一種電気通信事業者(MNO等)から電気通信役務の提供を受けてサービスを提供する事業者」として整理されており、「卸電気通信役務」の提供を受けることがMVNO事業の法的な前提になっている。MVNO・MNO・POI・卸電気通信役務などの用語の定義一覧は[用語集 — SIM・eSIM・通信](/ja/guides/glossary-index/)にまとめている。
### なぜ「格安SIM」と呼ばれるのか
MVNOは無線インフラへの設備投資が不要なため、MNOに比べて月額料金を大幅に抑えられる。日本では2010年代以降この安さが強調されて「格安SIM」という呼称が定着した。ただし「格安SIM」は俗称であり、料金が安いことに由来する通称で、技術的・法的な定義ではない。
---
## MVNOがMNOから回線を借りる仕組み(POI・卸電気通信役務)
### 卸電気通信役務(卸売契約)
MVNOがMNOのネットワークを使ってサービスを提供できるのは、MNOとの「卸電気通信役務」契約に基づく。MNOはMVNOに対し、自社ネットワークへのアクセスを一定の帯域幅(単位: Mbpsまたは Gbps)で卸売する。
この帯域幅が「ある瞬間に一度に流せるデータ量の上限」に相当し、MVNOはコスト管理のために必要な分だけ帯域を購入する。購入コストを低く抑えれば月額料金を安くできるが、その分、利用者が集中すると速度が低下するトレードオフが生じる。
### POI(Point of Interface)の仕組み
POI(Point of Interface、相互接続点)は、MNOとMVNOの通信が分離される接続ポイントだ。MVNOはこのPOIを通じてMNOのネットワークにアクセスし、契約した帯域幅の上限に基づいてデータをやり取りする。
利用者が集中する時間帯(お昼休み・夕方)にこのPOI帯域の上限に達すると、MVNO利用者の通信速度が低下する。MVNOの速度低下が特定の時間帯に集中するのはこの構造的な理由による。MNO本体やサブブランドの利用者はPOIを経由しないため、同じ時間帯でも速度が安定する。
MNOとサブブランドとMVNOの速度差の全体像については、[MNO vs MVNO vs サブブランドの違いと選び方](/ja/guides/mno-vs-mvno-comparison/)で詳しく解説している。
### MVNOの種類(サービス提供範囲による分類)
MVNOはMNOから借りるネットワーク機能の範囲によって事業形態が異なる。
| 分類 | 提供範囲 | 例 |
|------|---------|---|
| フルMVNO | コアネットワーク設備の一部を自社設置し、より多くの機能を制御 | IIJは2018年にフルMVNOへ移行 |
| ライトMVNO | MNOのコアネットワークをほぼそのまま利用し、サービス面のみ独自展開 | 多くの格安SIM事業者 |
一般ユーザーの観点では、この区別が直接の通信品質に影響するケースは少ないが、フルMVNOは自社でHLR/HSSを持つため、よりきめ細かなサービス設計(通話品質の向上、独自SIMの発行など)が可能になる。
---
## 日本のMVNO市場の歴史と現状
### 制度的な始まり(2001年頃〜)
日本でMVNOが本格的に制度化されたのは2001年前後で、日本通信が国内初のMVNOとして「b-mobile」サービスを開始し、総務省は2002年6月に「MVNOに係る電気通信事業法及び電波法の適用関係に関するガイドライン」を策定して大手キャリアへの帯域開放を促進した経緯がある。
もともとMNOには、自社回線のMVNOへの開放義務はなかったが、総務省が電気通信事業法の運用方針としてMVNO促進政策を進めることで、大手キャリアとMVNOの間で卸電気通信役務契約が締結されるようになった。
### スマートフォン普及と格安SIMブーム(2010年代)
2010年代前半のスマートフォン普及を背景に、IIJmio(IIJ)、OCN モバイル ONE(当時NTTコミュニケーションズ運営)、BIGLOBEモバイル(BIGLOBE)などの格安SIMサービスが相次いで登場した。月額料金の安さが話題を呼び、「格安SIM」という言葉がメディアで広く使われるようになった。
2015年前後には総務省がSIMロック解除義務化やMVNO促進に向けた一連の政策(モバイル創生プラン等)を推進し、大手キャリアから独立したMVNOの活性化に向けた政策的な後押しを行った。この時期にMVNO事業者数が急増し、サービスの多様化が進んだ。
### 現在の市場構成
2026年時点で、総務省統計(2024年12月時点)では届出済みMVNOは約1,991社(およそ2,000社)に上る。ただし一定規模(契約数3万以上)のサービス提供事業者は限られ、利用者シェアの大部分を主要十数社が占める構造になっている。
また、2020年代に入ると大手キャリアが直接低価格プランを提供するようになり(ahamo・povo・LINEMO等)、MVNOとの価格差が縮小した。これにより「格安SIM=MVNOのみ」という構図は変化しつつある。
---
## 主要な日本のMVNO事業者
日本市場で実績のある主要MVNO事業者を以下に示す。各社の料金・プラン内容は変動するため、最新情報は[SimFinderの比較ツール](/ja/jp/search/)または各社の公式サイトで確認してほしい。
| 事業者 | 利用回線 | 特徴 |
|--------|---------|------|
| **IIJmio**(IIJ) | ドコモ・au | フルMVNO。技術志向のユーザーからの支持が厚い |
| **mineo**(オプテージ) | ドコモ・au・ソフトバンク | 3回線対応。コミュニティ機能が充実 |
| **OCN モバイル ONE** | ドコモ | 2023年7月にNTTドコモへ吸収合併、新規受付終了(既存ユーザーのみ継続) |
| **BIGLOBEモバイル**(BIGLOBE・KDDI子会社) | ドコモ・au | 動画サービス向けオプションあり |
| **イオンモバイル**(イオンリテール) | ドコモ・au | 全国のイオン店舗でサポートを受けられる |
| **日本通信SIM** | ドコモ | 通話中心ユーザー向けの独自プランあり |
この一覧はMVNOの代表例であり、網羅的なものではない。シェア・プラン内容は変化するため参考程度にとどめてほしい。
---
## MVNOのメリット
### 1. 月額料金を抑えられる
MVNOが低価格を実現できる主な理由は、基地局などの無線インフラへの設備投資が不要であることにある。MNOのインフラを借りるコスト構造を活かし、月額料金をMNOより大幅に抑えたプランを提供できる。
一般的な傾向として、同じデータ容量・通話条件で比較した場合の月額料金は `MNO本体 > サブブランド ≥ MVNO` の順になる。ただし楽天モバイルはMNOでありながらサブブランドに近い料金帯のプランを提供しているため、一概には言えない部分もある。
データ通信量の目安と自分に合う容量の判断については、[データ通信量の目安と節約ガイド](/ja/guides/data-usage-guide/)を参照してほしい。
### 2. プランの選択肢が豊富
MVNOは少量のデータ容量から大容量まで、多様なプランを揃えている事業者が多い。通話中心・データ通信中心・データシェアなど、用途に合わせた細かいカスタマイズができる場合がある。
### 3. 契約縛りが少ない傾向
MNOが2年縛りや端末代金の分割払いをセットにした長期契約を前提としてきたのに対し、MVNOは最低利用期間なし・違約金なしのプランを主力にしている事業者も多い。ライフスタイルの変化に合わせて柔軟に見直せる点はメリットになる。
---
## MVNOの注意点と速度低下の理由
### 1. 昼休み・夕方の速度低下
前述のPOI構造から、お昼休み(12〜13時)と夕方(17〜19時)の混雑時間帯に通信速度が低下しやすいのがMVNOの最大の注意点だ。この傾向はMVNO事業者によって差があり、帯域をより多く確保している事業者ほど速度低下が少ない。
速度低下が問題になるのは「仕事のビデオ通話を外出先でよく行う」「お昼休みに動画を視聴する」といった場面だ。自宅・職場にWi-Fi環境があり外出先での通信は補助的な用途が中心であれば、速度低下の影響は比較的小さい。
### 2. 店舗サポートの少なさ
MVNOの多くはオンライン中心の運営のため、実店舗でのサポートを受けられる場所が限られる。初めてSIMを設定する、APN(アクセスポイント名)の設定で躓くといった場面では、電話・チャット・メールでのサポートに頼ることになる。
イオンモバイルのように全国の大型店舗でサポートを受けられる事業者も一部あるが、MNOや一部のサブブランドに比べると窓口の数は少ない。
### 3. キャリアメールが使えない
MVNO契約では、ドコモ(@docomo.ne.jp)・au(@ezweb.ne.jp / @au.com)・ソフトバンク(@softbank.ne.jp)などのキャリアメールアドレスは原則使えない。MNOからMVNOへ乗り換える際は、事前にメールの移行・変更を済ませておく必要がある。各MNOは「メールアドレス持ち運びサービス」(2021年12月開始、月額330円。2026年4月時点)を提供しており、乗り換え後も継続利用できる。
### 4. 端末の互換性とAPN設定
MVNOを利用するには、端末がSIMロック解除済みであること(または利用するMVNOの回線に対応したSIMロックであること)が前提だ。日本では総務省のガイドライン改正(2021年10月施行)により、2021年10月1日以降に発売される端末へのSIMロック初期設定が原則禁止されている。
また、MVNOのSIMを使い始める際にAPN(アクセスポイント名)の手動設定が必要になる場合がある(eSIMでは自動設定されるケースが増えている)。SIMカードの仕組みについては[SIMカードとは — 仕組み・種類・サイズの歴史と選び方](/ja/guides/what-is-sim/)を、eSIMについては[eSIMとは — 仕組み・メリット・デメリット](/ja/guides/what-is-esim/)を参照してほしい。
### 5. クレジットカードが必要なケースが多い
MVNOの多くはオンライン申し込みを前提としており、支払方法がクレジットカードのみに限られている事業者が一定数ある。口座振替対応の有無は事業者によって異なる。
---
## MVNOとサブブランドの違い
「格安で使いたいがMVNOの速度低下は避けたい」というニーズに対応する選択肢として、MNO各社のサブブランド・オンラインプランがある。
| 種別 | ブランド例 | 親MNO | 特徴 |
|------|----------|-------|------|
| **オンラインプラン** | ahamo、LINEMO | ドコモ・ソフトバンク | 店舗なし、オンライン手続き完結 |
| **オンラインプラン** | povo2.0 | KDDI(au) | 基本料0円・トッピング方式 |
| **サブブランド** | UQ mobile | KDDI(au) | 店舗サポートあり、一部プランに節約モード |
| **サブブランド** | Y!mobile | ソフトバンク | 家族割充実、Yahoo!連携特典 |
これらはMNOが直接(または関連会社が)運営しており、MVNOのように独立事業者がMNOから帯域を借りる構造ではない。親MNOのネットワーク設備を優先的に利用できるため、混雑時間帯でも速度が安定しやすい。
**MVNOとサブブランドの選択基準の目安**
- 月額料金を最優先に抑えたい → MVNOが有力
- 混雑時間帯の速度安定性も重視したい → サブブランド・オンラインプランが有力
- 実店舗でのサポートが必要 → 一部サブブランド(UQ mobile等)またはMNO本体
3種類の詳細な比較と判断フローは[MNO vs MVNO vs サブブランド — 違いと選び方](/ja/guides/mno-vs-mvno-comparison/)で解説している。なお楽天モバイルはMNOでありながら低価格帯のプランを提供しており、上記の分類には収まらない独自の位置づけとなっている。
---
## MVNOの選び方
MVNOを選ぶ際に確認すべきポイントを整理する。
### 1. 利用回線(どのMNOの電波を使うか)を確認する
MVNOはドコモ系・au系・ソフトバンク系のいずれかの回線を借りている(複数回線に対応する事業者もある)。どのMNO回線を使うかで、カバレッジの広さや使用する周波数帯が変わる。現在の住所・行動範囲で使いたいMNO回線のカバレッジエリアを事前に確認しておくと良い。
### 2. 昼時間帯の速度傾向を事前に調べる
MVNOは事業者によって確保している帯域量が異なるため、同じMNO回線でも昼の速度に差が出る。選定前に複数の速度測定サイトや専門レビューサイトのデータを参照し、昼時間帯の速度傾向を把握しておくことを推奨する。
### 3. 自分の通信パターンと合わせる
| 通信パターン | 推奨の方向性 |
|------------|------------|
| 自宅・職場にWi-Fiがあり外出時は補助的 | MVNOで月額コスト削減が見込める |
| 外出先でビデオ通話や動画をよく使う | サブブランドまたはMNO本体を検討 |
| お昼休みにスマホでYouTube等を視聴する | 昼の速度傾向を重視して選ぶ |
| データ通信はほとんどしない(通話・SMS中心) | MVNOの通話中心プランが合いやすい |
### 4. サポート体制を確認する
SIMの設定や乗り換え時に対面サポートが必要か、オンライン・電話・チャットで対応できるかを事前に確認しておく。店舗サポートが必要な場合はイオンモバイルのような実店舗を持つ事業者や、サブブランド・MNO本体という選択肢も視野に入れる。
### 5. eSIM対応の有無を確認する
近年はMVNOでもeSIM対応が広がっている。eSIMを利用すると郵送を待たず即日開通が可能で、デュアルSIM構成も組みやすくなる。eSIMの仕組みについては[eSIMとは — 仕組み・メリット・デメリット](/ja/guides/what-is-esim/)を参照してほしい。
[SimFinderでMVNOプランを条件で比較する →](/ja/jp/search/)
---
## FAQ
faqItemsに記載のFAQを参照してほしい。
---
## まとめ / 関連ガイド
MVNOは「自社でネットワークを持たず、MNOから帯域を借りてモバイルサービスを提供する事業者」だ。POI(接続ポイント)の帯域上限という構造的な特性から、混雑時間帯に速度が低下しやすい一方、設備投資不要の分だけ月額料金を抑えられる。
日本市場では2001年頃に制度化が始まり、2010年代のスマートフォン普及期に「格安SIM」として広く普及した。現在はMNO自身が低価格のオンラインプラン・サブブランドを提供するようになり、価格差は縮小傾向にある。
自分に合うプランを選ぶ際は、利用回線・昼時間帯の速度傾向・自分の通信パターン・サポート体制の4点を確認することが重要だ。
### 関連ガイド
- [MNO vs MVNO vs サブブランド — 違いと選び方](/ja/guides/mno-vs-mvno-comparison/)
- [SIMカードとは — 仕組み・種類・サイズの歴史と選び方](/ja/guides/what-is-sim/)
- [eSIMとは — 仕組み・メリット・デメリット](/ja/guides/what-is-esim/)
- [用語集 — SIM・eSIM・通信](/ja/guides/glossary-index/)
- [データ通信量の目安と節約ガイド](/ja/guides/data-usage-guide/)
================================================================================
# SIMカードとは — 仕組み・種類・サイズの歴史と選び方
URL: https://sim-finder.com/ja/guides/what-is-sim/
Type: guides (ja)
Published: 2026-04-24
SIM(Subscriber Identity Module)は、スマートフォンがモバイルネットワークに接続するための加入者識別情報・認証キーを格納するICカードだ。端末にSIMを挿入することで、キャリアのネットワークへの認証が通り、電話・SMS・データ通信が使えるようになる。
この記事ではSIMカードの定義・役割・サイズ変遷・物理SIMとeSIMの違い・SIMロック・MVNO(格安SIM)との関係・取扱い上の注意点を体系的に解説する。
---
## SIMカードとは(定義と役割)
### SIMの定義
SIM(Subscriber Identity Module)は、加入者識別情報・認証キー・ネットワーク資格情報を安全に格納する集積回路であり、モバイルネットワークへの認証・接続を可能にするデバイスだ。SIMはIMSI(International Mobile Subscriber Identity、国際移動加入者識別番号)とKi(認証キー)を保持し、GSM標準の一部として1990年代初頭に標準化された。
物理的な形態は時代によって変化しているが、SIMとして果たす機能はほぼ変わっていない。現代のスマートフォンに挿入されているカードの実体はUICC(Universal Integrated Circuit Card)であり、その上でUSIM(Universal SIM)アプリケーションが動作している。日常会話ではこれを総称して「SIMカード」と呼ぶ。
ETSI GSM 11.11でSIMカードとモバイル端末間のインターフェース仕様が定義された。現代の「SIMカード」はUICCハードウェア上のSIMアプリケーションとUSIMアプリケーションを含む。物理SIMカード(UICC)の物理的特性・電気的インターフェース・論理構造・通信コマンドはETSI TS 102 221(「Smart Cards; UICC-Terminal interface; Physical and logical characteristics」)が規定している。記事中で使用する用語の定義一覧は「[用語集 — SIM・eSIM・通信](/ja/guides/glossary-index/)」にまとめている。
---
## SIMが担う4つの役割
SIMカードは単なる「番号を記録したカード」ではない。実際には下記4つの機能を担っている。
### 1. 加入者認証
SIMはキャリアのネットワークに接続する際、端末の正当性を証明するための認証を担う。SIMに格納されたKi(認証キー)とIMSIを使い、ネットワーク側が発行するチャレンジに応答することで認証が成立する。Kiは外部から読み出せない構造になっており、SIM内でのみ演算が行われる。
3G/4G/5GではUSIM(3GPP TS 31.102)アプリケーションがこの認証を担い、より強固なAKA(Authentication and Key Agreement)プロトコルを使用している。
### 2. 電話番号の紐付け(MSISDN)
SIMには電話番号(MSISDN: Mobile Station International Subscriber Directory Number)の情報が格納される。あなたの電話番号は端末ではなくSIMに紐付いており、SIMを挿し替えるだけで異なる端末から同じ番号で通話・SMSを受けられる理由がここにある。
### 3. 暗号鍵の保持(通信の保護)
通話・SMSの暗号化に使われる鍵を生成・保持するのもSIMの役割だ。キャリアとの間で確立するセッションキーにより、無線区間の盗聴を困難にしている。
### 4. 電話帳・SMSのストレージ
SIMカードには最小限のデータ(連絡先・SMS)を保存できるストレージ機能がある。ただし現代のスマートフォンでは端末本体のストレージやクラウドサービス(Googleコンタクト・iCloudなど)の利用が一般的になっており、SIMのストレージ機能が積極的に使われる機会は減っている。
---
## SIMカードのサイズ変遷(Standard → Nano)
SIMカードは長年にわたって小型化が進み、フォームファクタは4世代に分類される。ETSI TS 102 221がこれらのサイズ規格を定義している。
| 世代 | 規格名 | 別名 | サイズ(mm) | 登場時期 |
|------|--------|------|------------|---------|
| 1FF | Full-size | Standard SIM | 85.60 × 53.98 | 1991年 |
| 2FF | Plug-in UICC | Mini-SIM | 25 × 15 | 1996年 |
| 3FF | Mini-UICC | Micro-SIM | 15 × 12 | 2003年 |
| 4FF | 4th Form Factor | Nano-SIM | 12.3 × 8.8 | 2012年 |
### フルサイズ(1FF):クレジットカードサイズ
1991年の商用サービス開始当初に使われた最初のSIMカードで、クレジットカードと同じ ISO/IEC 7810 ID-1 寸法(85.60 × 53.98 mm)だった。現在のスマートフォンでは使われていない。
### Mini-SIM(2FF):切り取り式の原型
1996年頃から採用されたサイズで、フルサイズカードの台紙から切り取って使う形が定着した。2000年代初頭のフィーチャーフォン・スマートフォン(初代iPhone、初期のAndroid端末)に広く採用された。
### Micro-SIM(3FF):2010年代前半の主流
2003年頃にETSIで仕様化が合意されたが、実用面での普及は2010年前後から加速した。Apple iPad(2010年)が採用したことで注目され、その後iPhone 4(2010年)でも採用された。
### Nano-SIM(4FF):現在の主流
2012年にETSI仕様に追加され、iPhone 5(2012年)が世界初の採用例となった。現在の日本向けスマートフォンのほとんどはNano-SIMを使用している。ICチップの面積はほとんどそのままに、周辺のプラスチック部分を極限まで削ったデザインだ。
---
## eSIMの登場と物理SIMとの違い
eSIM(embedded SIM)は、端末に内蔵されたeUICCチップにキャリアのプロファイルをインターネット経由でダウンロードして使うSIM技術だ。GSMAが定めるグローバル仕様(SGP.22)に基づき、物理的なSIMカードの交換なしにキャリアプロファイルを遠隔で切り替えられる。
物理SIMとeSIMの主な違いは以下の通りだ。
| 比較軸 | 物理SIM | eSIM |
|--------|---------|------|
| 形状 | 着脱可能なICカード(Nano-SIM等) | 端末に半田付けされたeUICCチップ |
| キャリア変更 | SIMを差し替える | プロファイルをダウンロード・切り替え |
| 開通方法 | 店頭またはSIMカード郵送 | QRコード・アプリで即日開通 |
| 端末変更時 | SIMを新端末に挿し替える | キャリアへ再発行手続きが必要 |
| 複数プロファイル | 不可(1SIM = 1契約) | 複数プロファイルを保存・切り替え可 |
eSIMの仕組み・対応端末・メリット・デメリットの詳細は「[eSIMとは — 仕組み・メリット・デメリット](/ja/guides/what-is-esim/)」を参照してほしい。eSIMのQRコードを使ったiPhoneへの設定手順は「[QRコードでeSIMを設定する(iPhone)](/ja/guides/qr-code-iphone/)」で解説している。
---
## SIMの管理(SIMロック・再発行・紛失時の対応)
### SIMロックとSIMフリー
SIMロックとは、端末が購入したキャリアのSIMカードのみで動作するよう、ソフトウェア的に制限がかかっている状態だ。SIMロックされた端末は、他のキャリアやMVNOのSIMカードを挿しても通信できない。
日本では総務省のガイドライン(2021年8月改正)により、2021年10月1日以降に新たに発売される端末についてSIMロックの設定が原則として禁止されている。2021年9月発売のiPhone 13シリーズは4キャリアがSIMロックなしで販売した先例だ。
SIMロックの確認方法・解除手順の詳細は「[SIMフリーとSIMロック — 確認方法と解除手順](/ja/guides/sim-lock/)」で解説している。
### SIMの再発行
SIMカードを紛失・破損した場合や、新しい端末のスロットサイズに合わせてサイズを変更したい場合は、キャリアでSIMカードの再発行手続きができる。再発行では多くのキャリアで手数料がかかる。
eSIMへの切り替えや機種変更時の手続きについては「[SIM・eSIM交換・機種変更ガイド](/ja/guides/sim-swap/)」で詳しく解説している。
### 紛失・盗難時の対応
SIMカードを紛失した場合、または端末ごと盗まれた場合は、直ちにキャリアに連絡して回線を一時停止する必要がある。SIMカードには電話番号の紐付け情報が含まれており、第三者に拾われた場合、不正通話や詐欺行為(SIMスワップ詐欺)に悪用されるリスクがある。
SIM PIN(4〜8桁の暗証番号)を設定しておくと、端末起動時にPINを求める設定が有効になり、SIMカードを取り出して別端末に挿しても即座には使えない状態にできる。SIM PINを3回連続で誤入力するとSIMがロックされ、PUK(8桁コード)での解除が必要になる。PUKを10回連続で誤入力するとSIMは永久使用不能になる。
---
## MVNO(格安SIM)とキャリアSIMの違い
### SIMカードの種類は「どのネットワークを使うか」で決まる
日本の携帯キャリアは大きく「MNO(大手キャリア)」「MVNO(格安SIM)」「サブブランド」の3種類に分類される。SIMカードの物理的な形状(Nano-SIM等)に違いはなく、違いはそのSIMが接続するネットワークにある。
**MNO(大手キャリア)のSIM**は、ドコモ・au・ソフトバンク・楽天モバイルが自社ネットワークで提供する。自社インフラへの継続投資による通信品質の安定性が特長だ。
**MVNO(格安SIM)のSIM**は、MNOからネットワーク帯域を卸売購入してサービスを提供する仮想移動体通信事業者が発行する。設備投資が不要なぶん価格を抑えられるが、混雑時にMNOとの帯域接続点(POI: Point of Interface)の容量を使い切ると速度が低下する場合がある。
**サブブランドのSIM**は、MNOの関連会社が運営する低価格ブランドだ。親MNOのネットワークを直接使うため通信品質はMNOとほぼ同等で、MVNOと大手キャリアの中間的な位置づけとなる(例:UQ mobile、Y!mobile)。
MNO・サブブランド・MVNOの仕組みの違いと選び方については「[MNOとMVNOとサブブランドの違い — 選び方ガイド](/ja/guides/mno-vs-mvno-comparison/)」で、MVNOの仕組みや日本市場の事業者一覧については「[MVNO(格安SIM)とは — 仕組み・メリット・注意点と選び方](/ja/guides/what-is-mvno/)」で詳しく解説している。
### SimFinderで自分に合ったSIMを探す
プラン選びの際は、[SimFinderの比較ツール](/ja/jp/search/)を活用すると、条件(データ容量・料金・キャリア種別など)を指定して日本のSIMプランを絞り込める。
---
## SIMカードに関する誤解と事実
以下は初めてSIMカードを扱う方がよく誤解する点をまとめたものだ。
### 誤解1「電話番号は端末に紐付いている」
**事実**: 電話番号はSIMカードに紐付いている。SIMを別の端末に挿し替えると、その端末から同じ番号で発着信できる。
### 誤解2「SIMカードにデータ通信の速度上限が設定されている」
**事実**: 速度上限(速度制限)はSIMカードに設定されるのではなく、キャリアの設備でプランに応じて管理される。物理SIMとeSIMの間に速度面での差はない。
### 誤解3「古いSIMは大きいほど高性能」
**事実**: SIMカードのサイズは物理的な大きさの違いだけで、ICチップの面積や機能には直接の関係はない。Nano-SIMとMini-SIMは同等の機能を持つ。
### 誤解4「SIMを頻繁に差し替えると壊れる」
**事実**: SIMカードとスロットは一定回数の着脱に耐えるよう設計されている。ただし乱暴な操作や不適切な工具の使用はスロットを破損させる場合があるため、取り外しにはSIMピン(スマートフォンに付属の専用ツール)を使うことを推奨する。
### 誤解5「MVNOのSIMは通信品質が悪い」
**事実**: MVNOのSIMはMNOと同じ物理ネットワーク(電波塔・周波数帯)を使っている。速度低下が起きやすいのは、混雑する時間帯にMVNOが契約しているPOI帯域が不足する場合に限られ、平常時はMNOと遜色ない速度が出るケースも多い。
---
## FAQ
**Q. iPhoneにNano-SIMを入れるのはどこですか?**
A. iPhoneのSIMトレイはボディ側面にあります。付属のSIMピン(または先端が細いペーパークリップ)を小さな穴に挿すと、トレイが飛び出します。SIMカードをトレイにセットし、向きを確認してから押し込んでください。
**Q. AndroidスマートフォンのSIMスロットはどこにありますか?**
A. 機種によって異なりますが、側面または背面パネルの下にあることが多いです。SIMトレイ方式(iPhoneと同様の側面挿し)と、背面カバーを外してSIMを直接挿す方式の2種類があります。端末付属のマニュアルまたはメーカー公式サポートページを確認してください。
**Q. 格安SIMに乗り換えるとき、SIMカードはどうなりますか?**
A. 現在使用しているキャリアを解約すると、そのSIMカードは無効になります。新しいMVNOと契約すると、新しいSIMカードが郵送されるか、eSIMの場合はQRコードが発行されます。電話番号をそのまま引き継ぎたい場合はMNP(番号ポータビリティ)の手続きが必要です。詳細は「[MNPとは — 番号そのまま乗り換えの手順](/ja/guides/what-is-mnp/)」で解説しています。
---
## まとめ / 関連ガイド
SIMカードとは、スマートフォンがモバイルネットワークに接続するための加入者認証・電話番号紐付け・通信暗号化・ストレージを担うICカードだ。物理的なサイズはStandard(1FF)→Mini-SIM(2FF)→Micro-SIM(3FF)→Nano-SIM(4FF)と小型化が進み、現在は端末に内蔵されるeSIMへの移行も進んでいる。
自分に合ったSIMプランを探す際は、[SimFinderの比較ツール](/ja/jp/search/)で条件を絞り込んでほしい。
### 関連ガイド
- [eSIMとは — 仕組み・メリット・デメリット](/ja/guides/what-is-esim/)
- [SIMフリーとSIMロック — 確認方法と解除手順](/ja/guides/sim-lock/)
- [MNOとMVNOとサブブランドの違い — 選び方ガイド](/ja/guides/mno-vs-mvno-comparison/)
- [用語集 — SIM・eSIM・通信](/ja/guides/glossary-index/)
- [QRコードでeSIMを設定する(iPhone)](/ja/guides/qr-code-iphone/)
================================================================================
# サブブランドを分かりやすく
URL: https://sim-finder.com/ja/guides/what-is-sub-brand/
Type: guides (ja)
Published: 2026-06-05
サブブランドとは、MNO(大手キャリア)の関連会社または直属部門が直接運営する低価格ブランドのことだ。MVNOのように独立事業者がMNOから帯域を借りる構造ではなく、親MNOの回線設備を直接使用するため、通信品質はMNO本体に近い水準を保つ。
日本の代表例はUQ mobile(KDDI/au)とY!mobile(ソフトバンク)だ。これらは中価格帯で店舗サポートも受けられる「サブブランド」と位置づけられる。一方、ahamo(NTTドコモ)・povo(KDDI)・LINEMO(ソフトバンク)はMNOが直接提供する低価格・オンライン手続き中心の「オンライン専用ブランド」として区別されることが一般的だが、広義では同じ文脈で語られることも多い。
この記事ではサブブランドの定義・仕組み・日本の主要ブランド・MNO/MVNOとの違い・メリット・デメリット・どんな人に向くかを整理する。料金の具体額は変動するため記載しない。最新の料金・プラン比較は[SimFinderの比較ツール](/ja/jp/search/)を活用してほしい。
---
## サブブランドとは(定義と位置づけ)
### MNOが直接運営する低価格ブランド
サブブランドは、MNO(移動体通信事業者)の関連会社または直属部門が運営する低価格の通信サービスブランドだ。「サブ(Sub)」は「下位・補助的な」を意味し、親MNOのメインブランドの補完的な位置づけとして設けられている。
サブブランドの本質は「親MNOと同じネットワークを使用する」点にある。これがMVNOとの根本的な違いだ。
MVNOは「MNOから帯域を卸売で借りる独立した事業者」であり、MNOとの接続点(POI)を通じてネットワークにアクセスする。これに対してサブブランドは親MNOの回線設備をPOIを経由せずに直接使用するため、ネットワーク品質の面でMNO本体に近い水準を実現できる。
MVNOの仕組みについては[MVNO(格安SIM)とは — 仕組み・メリット・注意点と選び方](/ja/guides/what-is-mvno/)で詳しく解説している。
### 「オンライン専用ブランド」との違い
日本市場では「サブブランド」と「オンライン専用ブランド」が区別される場合がある。両者の違いは運営主体の所有形態ではなく、**ブランドの位置づけ**にある。現在はいずれも親MNO本体が提供・運営している点は共通だ。
- **サブブランド(狭義)**: 中価格帯で、店舗での対面サポートを受けられる。回線品質は本体に近い。UQ mobile(KDDI/au)、Y!mobile(ソフトバンク)が該当
- **オンライン専用ブランド**: 低価格で、申込み・手続きがオンライン中心。ahamo(NTTドコモ)、povo / povo2.0(KDDI)、LINEMO(ソフトバンク)が該当
どちらも「親MNOの回線を直接使用し、MVNOより安定した品質を提供する低価格帯のブランド」という共通点がある。一般的な会話や記事では両者をまとめて「サブブランド」「広義のサブブランド」として扱う場面が多い。本記事では両者を区別しながら説明する。
---
## 日本の主要サブブランド・オンライン専用ブランド
### UQ mobile(KDDI/au系・サブブランド)
UQ mobileはKDDI(au)が提供するサブブランドだ。au回線を利用するため、au本体と同等のカバレッジを持つ(旧来はUQコミュニケーションズが運営していたが、2020年10月1日にUQ mobile事業はKDDI本体へ統合された)。店舗でのサポートを受けられる点が特徴で、UQ mobileスポットやauショップの一部での対応が可能だ。
KDDIグループとしては、au(MNO本体)がメインブランド、UQ mobileが中価格帯のサブブランド、povo2.0がオンライン専用の低価格ブランドという構成になっている。
### Y!mobile(ソフトバンク系・サブブランド)
Y!mobileはソフトバンク株式会社が提供するサブブランドだ。ソフトバンク回線を利用する。家族割引や、Yahoo! JAPAN・PayPayとの連携サービスが特徴として挙げられる。全国のY!mobileショップやソフトバンクショップで対応を受けられる。
### ahamo(NTTドコモ系・オンライン専用)
ahamoはNTTドコモが2021年3月に開始したオンライン専用ブランドだ。ドコモ本体が直接提供しており、ドコモ回線をそのまま使用する。オンライン手続き完結が前提だが、ドコモショップで有料の店頭サポート(申込み・手続き補助)を利用できる。
### povo / povo2.0(KDDI系・オンライン専用)
povo2.0はKDDI(au)が直接提供するオンライン専用ブランドだ。基本料0円でトッピング(データ容量・通話定額等)を必要に応じて追加購入するユニークな仕組みを採用している。au回線を使用する。180日以内にトッピング購入がない場合はサービスが停止される点は注意が必要だ。eSIM対応で副回線としての活用実績も多い。
### LINEMO(ソフトバンク系・オンライン専用)
LINEMOはソフトバンク株式会社が直接提供するオンライン専用ブランドだ。ソフトバンク回線を使用し、オンライン手続き完結が前提。LINEのトーク・音声/ビデオ通話のデータ消費がゼロになる「LINEギガフリー」が申込み不要で標準提供される。
---
## サブブランド・オンライン専用ブランドの対応まとめ
いずれも現在は親MNO本体が提供・運営している。違いはブランドの位置づけ(価格帯・サポート形態)にある。
| MNO | サブブランド(中価格帯・店舗サポートあり) | オンライン専用ブランド(低価格・オンライン中心) |
|-----|------------------------------|------------------------------------|
| NTTドコモ | — | ahamo |
| KDDI(au) | UQ mobile | povo(povo2.0) |
| ソフトバンク | Y!mobile | LINEMO |
| 楽天モバイル | — | — |
楽天モバイルにはサブブランドもオンライン専用ブランドも存在しない。自社ブランドのみでサービスを提供している点で他の3社と異なる。
MNO各社の詳細については[MNO(大手キャリア)とは — MVNO・サブブランドとの違い](/ja/guides/what-is-mno/)で解説している。
---
## サブブランド・MVNO・MNO本体の違い(比較表)
サブブランド・オンライン専用ブランドとMVNO・MNO本体の主な違いを整理する。
| 比較軸 | MNO本体 | サブブランド
(UQ mobile等) | オンライン専用
(ahamo等) | MVNO
(格安SIM) |
|--------|---------|------------------------------|--------------------------|------------------|
| ネットワーク所有 | 自社 | 親MNOの設備を利用 | 親MNOの設備を利用 | MNOから借用 |
| 接続形態 | 直接(POI不経由) | 直接(POI不経由) | 直接(POI不経由) | POI経由 |
| 混雑時の速度 | 安定 | ほぼ安定 | ほぼ安定 | 低下しやすい |
| 月額料金の傾向 | 高め | 中間 | 中間 | 低め |
| 店舗サポート | あり(多数) | あり(一部) | なし(または限定) | 限定的 |
| オンライン完結 | 可(店舗も可) | 可(店舗も可) | 基本オンライン完結 | 主にオンライン |
| キャリアメール | あり | なし | なし | なし |
POIを経由しない構造から、サブブランドとオンライン専用ブランドは「混雑時の速度低下が起きにくい」という点でMVNOと根本的に異なる。MVNOの速度低下の原因であるPOI帯域の上限問題については[なぜMVNOは昼間に遅くなるのか — POIと帯域の仕組み](/ja/guides/why-mvno-slow/)で詳しく扱う。
---
## サブブランドのメリット
### 1. 混雑時でも速度が安定しやすい
サブブランドとオンライン専用ブランドは親MNOの回線設備をPOIを経由せずに使用するため、お昼休み(12〜13時)や夕方(17〜19時)の混雑時間帯でも速度が低下しにくい。これはMVNOとの最大の差別点だ。
外出先でのビデオ通話、お昼休みの動画視聴、テレワーク中のオンライン会議など、混雑時間帯に安定した通信品質が求められる場面では大きなアドバンテージになる。
### 2. MNO本体より月額料金が抑えられる
同じデータ容量・通話条件で比較した場合、月額料金の一般的な傾向は以下の通りだ。
```
MNO本体 > サブブランド / オンライン専用ブランド ≥ MVNO
```
MNO本体より安くMVNOより品質が安定している「中間の選択肢」として機能する。
### 3. 5G回線を利用できる
サブブランドおよびオンライン専用ブランドは、親MNOの5G回線をそのまま利用できる。5Gエリアの整備はMNOが担うため、MNO本体と同じ5Gカバレッジにアクセスできる。
### 4. 店舗サポートを受けられる場合がある(一部サブブランド)
UQ mobileやY!mobileは、専用ショップやキャリアショップの一部での対面サポートを受けられる。オンライン中心のMVNOや、オンライン完結が前提のオンライン専用ブランドとは異なり、対面サポートへのアクセスがある点はメリットになる。
---
## サブブランドのデメリット・注意点
### 1. MNO本体より月額料金が高い
MVNOの月額料金はサブブランドより安い傾向にある。月額コストを最優先に抑えたい場合は、MVNOの方が有利になるケースがある。
### 2. キャリアメールが使えない
サブブランドおよびオンライン専用ブランドでは、@docomo.ne.jp・@ezweb.ne.jp(@au.com)・@softbank.ne.jp などのキャリアメールアドレスは使えない。MNO本体から乗り換える際は、メール移行・変更を事前に済ませておく必要がある。
各MNOは「メールアドレス持ち運びサービス」(2021年12月開始、有料)を提供しており、乗り換え後も継続利用できる[^email-fee]。
[^email-fee]: メールアドレス持ち運びサービスの月額料金は各MNOにより異なり、改定される場合がある。最新の料金は各MNO公式サイトで確認してほしい。
### 3. オンライン専用ブランドはサポートが限定的
ahamo・povo・LINEMOはオンライン手続き完結が前提のブランドだ。対面でのサポートを受けたい場合には向かない(ahamoはドコモショップで有料の店頭サポートを利用できるが、契約変更等の手続きはオンライン完結が前提)。
### 4. プランのカスタマイズ性はMVNOより限定的
MVNOは少量データ、通話中心プラン、データシェアなど細かなカスタマイズが可能な事業者が多い。サブブランドはラインナップがシンプルな傾向があり、用途に合わせた細かな調整はしにくい場合がある。
---
## サブブランド・MVNOの選び方 — どんな人に向くか
### サブブランド / オンライン専用ブランドが向く場面
以下に当てはまる場合は、サブブランドまたはオンライン専用ブランドが有力な選択肢になる。
- お昼休みや夕方に外出先でスマホを集中的に使う
- 外出先でのビデオ通話・オンライン会議が多い
- 動画をよく視聴するが、MNO本体の月額料金は高すぎると感じる
- 対面サポートも受けたい(UQ mobile・Y!mobileのショップ網を重視する場合)
- 現在のMNOを変えずにブランドだけ乗り換えて料金を下げたい
### MVNOが向く場面
以下に当てはまる場合は、MVNOの方が合う可能性がある。
- 自宅・職場にWi-Fi環境が整っており、外出時の通信は補助的
- お昼休みに動画を視聴するほどは使わない
- 月額コストを最優先で削減したい
- 通勤中はLINEやメールなど軽い用途が中心
### 通信パターン別の目安
| 通信パターン | 推奨の方向性 |
|------------|------------|
| 外出先でビデオ通話・動画がよくある | MNO本体またはサブブランド |
| 昼休み・夕方に集中してスマホを使う | MNO本体またはサブブランド |
| 自宅・職場Wi-Fi中心で外出時は補助的 | MVNOで月額コスト削減が見込める |
| 店舗サポートが必要 | MNO本体またはUQ mobile・Y!mobile |
| 月額コストを最優先に抑えたい | MVNO |
| 副回線として安く持ちたい | povo2.0(基本料0円)またはMVNO |
[SimFinderで条件に合うプランを比較する →](/ja/jp/search/)
---
## 通信品質の判断軸 — サブブランドの品質はどう評価するか
通信品質を評価する際の主な指標については[通信品質スコアの見方 — SimFinderの品質指標を理解する](/ja/guides/quality-metrics/)で詳しく解説する。ここではサブブランドに関連する基本的な考え方を整理しておく。
### 混雑時速度が重要な指標
平常時(利用者が少ない時間帯)の速度は、MNO・サブブランド・MVNOのどれを使っても、接続しているMNO回線の品質に依存するため大きな差が出にくい。
差が顕著に現れるのは、お昼(12〜13時)や夕方(17〜19時)の混雑時間帯だ。この時間帯の速度安定性こそが、サブブランドとMVNOを分ける最大の指標になる。
サブブランドはPOIを経由しないため混雑時でも速度が安定する一方、MVNOはPOI帯域の上限に達すると速度が低下する。この構造的な違いの詳細は[MNO vs MVNO vs サブブランド — 違いと選び方](/ja/guides/mno-vs-mvno-comparison/)で解説している。
### カバレッジはMNO本体と同等
サブブランドおよびオンライン専用ブランドは親MNOの回線設備をそのまま使用するため、カバレッジエリアはMNO本体と同じだ。田舎や山間部でのカバレッジ不安がある場合は、サブブランド選択時に親MNOのカバレッジエリアを確認すれば良い。
---
## 楽天モバイルとの位置づけの違い
楽天モバイルは日本で4番目のMNOだが、他の3社と異なりサブブランドもオンライン専用ブランドも持っていない。自社ブランドのみでサービスを提供している。
一方、楽天モバイルはMNOとしては異例の低価格帯プランを提供しており、料金感覚ではサブブランドに近い位置づけで語られることがある。
技術的・法的な分類ではMNOだが、「MNO本体 / サブブランド / MVNO」の3分類に当てはめにくい独自の位置づけとなっている。
---
## FAQ
faqItemsに記載のFAQを参照してほしい。
---
## まとめ / 関連ガイド
サブブランドは「MNOの関連会社または直属部門が運営し、親MNOの回線設備をPOIを経由せずに直接使用する低価格ブランド」だ。日本の代表例はUQ mobile(KDDI系)とY!mobile(ソフトバンク系)であり、ahamo・povo・LINEMOはMNO本体が直接提供するオンライン専用ブランドとして区別されることが多い。
MVNOとの最大の違いはPOI経由の有無であり、サブブランドは混雑時間帯でも速度が安定しやすい。MNO本体より月額料金が安い一方、MVNOよりは高い傾向にある「中間の選択肢」だ。
月額コストを最優先に抑えたければMVNOが有力で、混雑時速度の安定性も重視するならサブブランドが有力になる。自分の通信パターンと優先事項を照らし合わせて判断してほしい。
### 関連ガイド
- [MVNO(格安SIM)とは — 仕組み・メリット・注意点と選び方](/ja/guides/what-is-mvno/)
- [MNO(大手キャリア)とは — MVNO・サブブランドとの違い](/ja/guides/what-is-mno/)
- [MNO vs MVNO vs サブブランド — 違いと選び方](/ja/guides/mno-vs-mvno-comparison/)
- [なぜMVNOは昼間に遅くなるのか — POIと帯域の仕組み](/ja/guides/why-mvno-slow/)
- [通信品質スコアの見方 — SimFinderの品質指標を理解する](/ja/guides/quality-metrics/)
================================================================================
# 格安SIMはなぜ昼に遅い?
URL: https://sim-finder.com/ja/guides/why-mvno-slow/
Type: guides (ja)
Published: 2026-06-05
格安SIM(MVNO)は月額料金を安く抑えられる一方、平日の昼休みや夕方に通信速度が低下しやすい。この速度低下は偶然ではなく、MVNOがMNO(大手キャリア)から帯域を借りる仕組みに起因する構造的な特性だ。
この記事では、速度低下の核心にある「POI(Point of Interface)」と「帯域」の仕組み、サブブランドが速度低下しにくい理由、MVNOが帯域を積極的に増強しない経済的な理由、そして速度の問題を回避・比較する方法を解説する。格安SIMの選び方で迷っている場合は[SimFinderの比較ツール](/ja/jp/search/)も活用してほしい。
---
## MVNOの速度が遅くなるのは「帯域の上限」が原因
MVNOの速度低下の根本原因は、MNOから購入している帯域幅(帯域容量)の上限に達することだ。
MNOが日本全国に整備した基地局・アンテナ・コアネットワークは、MVNOが直接保有しているわけではない。MVNOはこのインフラを卸電気通信役務(卸売契約)として借り、自社の利用者のデータをMNOのネットワーク上で送受信している。
この卸売契約の中心に位置するのが帯域幅だ。帯域幅とは「ある瞬間に一度に送受信できるデータ量の上限(単位: Mbpsまたは Gbps)」を意味する。MVNOは契約した帯域幅の範囲内でしか、利用者全員のデータをまとめて流せない。
MVNOが少数の利用者しか持たなかった時代は、この帯域制約が表面化することは少なかった。しかし利用者数が増え、特定の時間帯に多数の利用者が同時にデータ通信を行うと、契約帯域の上限に到達し、速度低下として現れる。
---
## POI(Point of Interface)の仕組みと速度低下の発生場所
### POIとは何か
POI(Point of Interface、相互接続点)は、MNOのネットワークとMVNOのネットワーク(またはMVNOが設置した設備)が論理的に分離・接続される接続ポイントだ。
総務省の接続制度では、MNOは電気通信事業法に基づく相互接続義務の枠組みのもとで、MVNOに対してネットワークへのアクセスを提供することが制度的に定められている。MVNOはこのPOIを通じてMNOのモバイルコアネットワークにアクセスし、利用者のデータをやり取りする。
[MVNOとは何か](/ja/guides/what-is-mvno/)ですでに説明したとおり、MVNOはこのPOIを通じた卸電気通信役務契約によって、MNOの基地局インフラを間借りする形でサービスを提供している。
### データの経路
MVNO利用者が端末からインターネットにアクセスする際のデータの経路は、おおむね次のとおりだ。
1. 利用者の端末 → MNOの基地局(無線区間)
2. MNOの基地局 → MNOのモバイルコアネットワーク(有線区間)
3. MNOのモバイルコアネットワーク → **POI**(← ここがボトルネック)
4. POI → MVNOの設備(またはMVNOが契約したネットワーク機器)
5. MVNOの設備 → インターネット
手順3から4の間にあるPOIの帯域容量が「MVNOが利用者全員のデータをまとめて流せる最大量」になる。この容量を超えると、データは待ち行列(キュー)に積み上がり、速度低下として現れる。
---
## なぜ「昼12時台」と「夕方」に遅くなるのか
### ピーク時間帯の特性
通信速度の低下が特定の時間帯に集中するのは、利用者が同じ時間帯に集中してデータ通信を行うためだ。日本における一般的なピーク時間帯は以下のとおりだ。
- **平日12〜13時台(昼休み)**: 外出先や職場でスマートフォンを使う利用者が急増する
- **平日17〜19時台(帰宅ラッシュ)**: 移動中にスマートフォンを使う利用者が集中する
- **夜21〜23時台(在宅ピーク)**: 自宅で動画視聴などを行う利用者が増加する
MVNOが確保する帯域は、あくまでオフピーク時間帯を含む平均的な需要を想定して設計されている。ピーク時の最大需要に合わせた帯域を購入するとコストが大幅に増加するため、多くのMVNOはピーク時に帯域の上限に達することを許容した設計になっている。
---
## サブブランドが速度低下しにくい理由
ahamo・povo・LINEMO(MNO直轄のオンラインプラン)、UQ mobile(KDDI系)・Y!mobile(ソフトバンク系)などのサブブランドは、同じ時間帯でもMVNOほど速度が低下しないことが多い。この差はネットワーク設備の利用形態と帯域確保のあり方に起因する。
### MNO直轄プランの場合
ahamo(NTTドコモ直轄)・povo(KDDI直轄)・LINEMO(ソフトバンク直轄)は、MNO本体のブランドとして運営されており、MNOのネットワーク設備を直接利用する。独立MVNOのようにPOIを経由する経路をとらないため、帯域のボトルネックが発生しにくい。
### サブブランドの場合
UQ mobile(KDDI)・Y!mobile(ソフトバンク)は、過去には親会社系列のMVNO的な位置づけだったが、現在はそれぞれKDDI・ソフトバンク本体が直接運営するブランドだ(UQ mobileは2020年10月にKDDIへ統合、Y!mobileは2015年にソフトバンクへ統合済み)。本体のネットワーク設備を直接利用し、独立系MVNOのようにPOIを介する経路をとらないため、混雑時間帯でも速度が安定しやすい。これが帯域を絞ってコストを抑える独立系MVNOとの違いだ。
MNO本体・サブブランド・MVNOの3種類の速度差の全体像と選び方の判断基準については[MNO vs MVNO vs サブブランドの違いと選び方](/ja/guides/mno-vs-mvno-comparison/)で詳しく解説している。
---
## MVNOが帯域を増強しない経済的な理由
「なぜMVNOは帯域を増やして速度低下を解消しないのか」という疑問は自然だが、MVNOのコスト構造を考えると答えは明快だ。
### MNOへの帯域使用料の重み
MNOへの帯域使用料はMVNOにとって最大のコスト項目の一つだ。帯域をピーク時の需要に合わせて拡張すると、使用料はピーク帯域に比例して増加する。その増加分は月額料金に転嫁せざるを得ず、「格安SIM」としての価格競争力が失われる。
MVNOのビジネスモデルは「設備投資を抑えて月額料金を安くする」ことが競争優位の根幹だ。帯域を大幅に増強してMNO並みの速度を実現しようとすると、月額料金がサブブランドやMNO直轄プランに近づき、格安SIMとしての存在価値が薄れてしまう。
### 「速度より価格」というトレードオフ
各MVNOは「昼の速度低下を許容する代わりに月額料金を安く抑える」というトレードオフを選択している。この選択が合理的かどうかは利用者の通信パターンによって異なる。
自宅・職場でWi-Fiを使う時間が長く、外出先での通信が補助的な利用にとどまるユーザーには、昼の速度低下の影響は比較的小さい。一方、昼休みに外出先でビデオ会議や動画視聴を頻繁に行うユーザーには、速度低下が実用上の問題になりやすい。
---
## MVNOごとに速度低下の程度が異なる理由
MVNOは事業者によって確保している帯域量が異なる。同じMNO回線を借りていても、帯域に余裕を持たせているMVNOは昼の速度低下が比較的少なく、帯域をギリギリまで絞っているMVNOは速度低下が目立ちやすい。
MVNOが借りているMNO回線(ドコモ系・au系・ソフトバンク系)によっても速度傾向は変わる。各回線のカバレッジや周波数帯の特性が異なるためだ。
さらに、フルMVNOとライトMVNOでは帯域の管理方法に差がある。フルMVNO(IIJ等)は自社コア設備を持つためトラフィック制御の自由度が高い。ただしこの区別が直接、昼の速度低下の大小に直結するわけではなく、確保している帯域量が実際の速度体験により大きく影響する。
---
## 速度低下を見分ける方法
MVNO利用を検討する際は、事前に各社の昼時間帯の速度傾向を調べておくことが重要だ。
### 実測データを参照する
複数の速度測定アプリ(Speedtest by Ookla等)が収集した実測データを参照することで、各MVNOの時間帯別の速度傾向を把握できる。日本の通信専門メディア(ITmedia Mobile・ケータイWatch等)は定期的にMVNOの速度測定比較記事を掲載している。
ただし速度測定の結果は測定場所・測定時間・端末のスペックによって大きく変動する。複数のソースで傾向を確認し、自分の行動範囲に近い測定条件のデータを参考にすることを推奨する。
### 利用者の口コミ・レビューを確認する
各MVNOの昼時間帯の速度体験については、利用者の口コミサイトやレビュー記事も参考になる。特定の時間帯の不満が多く報告されている事業者は注意が必要だ。
### SimFinderの品質指標を使う
[品質指標の見方と解釈](/ja/guides/quality-metrics/)では、MVNOの速度・安定性に関するスコアの算出方法と読み方を解説している。昼時間帯の傾向を含めた品質評価軸を理解することで、実測データや口コミと組み合わせてより精度の高い比較ができる。
---
## SimFinderの品質スコアでMVNOを比較する方法
[SimFinderの比較ツール](/ja/jp/search/)では、各MVNOに対して品質スコアが表示される。このスコアはMVNOが利用しているMNO回線の品質データをベースに、MVNOとしての劣化率を考慮して算出したものだ。
品質スコアは絶対的な速度を示すものではなく、事業者間の相対的な品質傾向を把握するための参考指標として活用してほしい。特に「月額料金は安くしたいが品質もある程度確保したい」という優先順位でMVNOを探す場合に有用だ。
品質スコアの各項目の意味・算出根拠・利用上の注意点については[品質指標の見方と解釈](/ja/guides/quality-metrics/)で詳しく説明している。また、SimFinderのスコアリング体系全体の設計思想については[SimFinderスコアの仕組み](/ja/guides/simfinder-score/)も参照してほしい。
---
## 速度低下を回避・軽減する方法
速度低下を完全に避けることはできないが、生活パターンを工夫することで影響を小さくできる。
### ピーク時間帯を避けてデータ通信する
昼12〜13時・夕方17〜19時のピーク時間帯に動画視聴や大容量のファイルダウンロードが必要な場合は、可能であれば時間をずらすか、Wi-Fiが利用できる環境に移動する。
### Wi-Fiを積極的に活用する
職場・自宅・カフェなどのWi-Fi環境を積極的に活用することで、モバイル回線の使用をオフピーク時間帯に限定できる。データ通信量の節約にもなる。
### 昼の速度傾向が比較的良いMVNOを選ぶ
同じMNO回線でも、確保している帯域量の差からMVNO間で昼の速度傾向に差がある。速度比較データを事前に調べた上でMVNOを選ぶことが有効だ。
### 昼の速度が重要な用途にはサブブランドを選ぶ
昼休みに外出先でビデオ会議や動画視聴を頻繁に行う用途では、MVNOの昼の速度低下が実用上の問題になりやすい。この場合は価格がやや上がってもサブブランドまたはMNO本体を選ぶ判断が合理的だ。
ahamo・UQ mobile・Y!mobileなどのサブブランドの仕組みと特徴については[サブブランドとは — MNO・MVNOとの違いと選び方](/ja/guides/what-is-sub-brand/)で解説している。MNO本体(NTTドコモ・KDDI・ソフトバンク・楽天モバイル)の特徴については[MNOとは — 移動体通信事業者の定義と日本の4キャリア](/ja/guides/what-is-mno/)で解説している。
---
## 速度低下を実際に測る手順
MVNO利用中に「昼に遅い」と感じたとき、または乗り換え前に候補のMVNOの速度傾向を確認したいとき、以下の手順で測定すると客観的なデータが得られる。
### 測定アプリの選択
Speedtest by Ookla(iOS/Android/Web)はサーバー候補から自動的に最適なテストサーバーを選び、下り速度・上り速度・レイテンシ(Ping)を測定する。Fast.com(Netflix提供)は下り速度に特化した簡易測定ツールで操作が簡単だ。
複数のアプリを使い分けると、サーバー経路の差異による誤差を相殺できる。
### 測定のタイミング
速度低下の有無を確認するには、以下の3つの時間帯で比較測定するのが有効だ。
- **ピーク時**: 平日12:00〜13:00(昼休み)または17:00〜19:00(帰宅時間帯)
- **準ピーク時**: 平日10:00〜11:00(午前中)
- **オフピーク時**: 深夜0:00〜6:00、または休日の早朝
同じ場所・同じWi-Fiを使わず、モバイル回線のみで測定することが前提だ。Wi-Fiがオフになっていることをあらかじめ確認する。
### 測定結果の読み方
下り速度が**1〜3Mbps未満**の場合、YouTubeの標準画質(480p)でも途切れが発生しやすい。**3〜10Mbps**では標準画質・HD(720p)の再生は概ね安定するが高解像度動画は厳しい。**10Mbps以上**であれば一般的なストリーミング・Webブラウジングは快適に行える。
レイテンシ(Ping)は動画視聴より、ビデオ会議や音声通話の品質に影響する。Pingが50ms以下であれば遅延はほぼ気にならない。100msを超えると会話のタイムラグとして感じやすくなる。
### 測定結果の注意点
一度の測定で判断するのは危険だ。同じ場所・同じ時間帯でも通信環境は変動するため、少なくとも数日にわたって複数回測定し、平均・最小値を確認する。また、測定場所(屋内/屋外、建物の構造)によって大きく結果が異なる。自分が普段よく利用する場所での測定を優先すること。
---
## 利用シーン別(動画/SNS/通話)の速度低下の影響度
速度低下が実際に問題になるかどうかは、何に使うかによって大きく異なる。
### 動画ストリーミング
YouTubeやNetflixなどの動画ストリーミングは、解像度設定によって必要な速度が変わる。
| 解像度 | 目安の必要帯域 | 速度低下の影響 |
|--------|--------------|-------------|
| 480p(標準) | 約1〜2Mbps | 3Mbps未満で途切れが発生することがある |
| 720p(HD) | 約3〜5Mbps | 5Mbps未満で画質が自動的に下がりやすい |
| 1080p(フルHD) | 約5〜10Mbps | ピーク時のMVNOでは維持が難しいことが多い |
昼のピーク時に動画を視聴する機会が多い場合、MVNOの速度低下は直接的な体験品質の低下につながる。自動画質調整が効く場合でも、解像度が下がることで視聴体験が損なわれる。
### SNS・Webブラウジング
InstagramやX(旧Twitter)のタイムライン閲覧、一般的なWebサイトの閲覧は、動画に比べて必要な帯域が小さい。テキスト中心のWebページは1〜2Mbpsでも閲覧できる。ただし、SNSに埋め込まれた動画の自動再生や、画像の多いメディアサイトでは速度低下の影響が出やすい。
### ビデオ会議・音声通話
ZoomやGoogle Meetなどのビデオ会議は、安定した速度とレイテンシの両方が重要だ。帯域だけでなく、変動の少なさ(ジッター)が通話品質に影響する。
音声のみの通話(VoIP含む)は必要帯域が小さいため、速度低下の影響は小さいことが多い。ただし、平日昼のピーク時に帯域が極度に逼迫しているMVNOではVoIPでも品質が低下する場合がある。
MVNOの速度スコアや品質の数値の見方については、[品質指標の見方と解釈](/ja/guides/quality-metrics/)と[SimFinderスコアの仕組み](/ja/guides/simfinder-score/)で確認できる。
---
## サブブランドとMVNOの使い分け早見表
自分の利用パターンに合わせて、MVNOとサブブランドのどちらが適しているかを整理した。
| 利用パターン | 推奨 | 理由 |
|------------|------|------|
| 自宅・職場のWi-Fi中心で外出先での通信は補助的 | MVNO | 昼の速度低下の影響が小さく、コスト優位性を最大限に活かせる |
| 平日昼に外出先でWebブラウジングやSNSを使う | MVNO(速度傾向の良い事業者) | 軽い用途なら多くのMVNOで実用上問題ない |
| 平日昼に外出先でHD動画やビデオ会議を使う | サブブランド | MVNOのピーク時帯域では安定した品質が確保しにくい |
| テレワークで昼にビデオ会議が多い | サブブランドまたはMNO | 速度・安定性を優先すべき用途。固定回線の補完としてもサブブランドが安定 |
| 通信費を最優先で抑えたい | MVNO | 速度低下を許容できるならコスト面でMVNOが優位 |
| 複数回線を使い分けたい | MVNO + サブブランドの組み合わせ | 重要な用途にサブブランド、補助用途にMVNOという使い分けも有効 |
サブブランド(ahamo・UQ mobile・Y!mobile等)の仕組みや、MVNOとの違いの詳細は[サブブランドとは — MNO・MVNOとの違いと選び方](/ja/guides/what-is-sub-brand/)で確認してほしい。MNOとMVNOの基本的な違いについては[MVNOとは何か](/ja/guides/what-is-mvno/)も参考にしてほしい。
---
## FAQ
faqItemsに記載のFAQを参照してほしい。
---
## まとめ / 関連ガイド
MVNOが昼に遅い理由は、MNOとの接続点(POI)を通じて確保している帯域の容量に利用者が集中するためだ。MVNOが帯域を大幅に増強しないのは、コストが上がり月額料金の競争力が失われるというトレードオフによる。
MNO直轄プラン(ahamo・povo・LINEMO)はPOIを経由しないため速度が安定する。UQ mobile・Y!mobileは現在は親会社(KDDI・ソフトバンク)本体が直接運営するブランドで、本体設備を直接利用するため速度が安定しやすい。MVNO選びでは昼時間帯の速度傾向を事前に調べ、自分の通信パターンと照らし合わせることが重要だ。
### 関連ガイド
- [MVNO(格安SIM)とは — 仕組み・メリット・注意点と選び方](/ja/guides/what-is-mvno/)
- [品質指標の見方と解釈](/ja/guides/quality-metrics/)
- [SimFinderスコアの仕組み](/ja/guides/simfinder-score/)
- [MNOとは — 移動体通信事業者の定義と日本の4キャリア](/ja/guides/what-is-mno/)
- [サブブランドとは — MNO・MVNOとの違いと選び方](/ja/guides/what-is-sub-brand/)
================================================================================
# Wi-Fi Calling(VoWiFi)とは — 電波が弱い場所での通話
URL: https://sim-finder.com/ja/guides/wifi-calling/
Type: guides (ja)
Published: 2026-06-04
Wi-Fi Calling(VoWiFi)は、Wi-Fiネットワーク経由でキャリアのIMSコアに接続し、携帯電話番号のまま音声通話・SMSを利用できる技術だ。地下室・ビルの内部・山小屋など電波が届きにくい場所でも、Wi-Fiさえあれば通常の通話と変わらない操作で発着信できる。
この記事では、Wi-Fi Callingの技術的な仕組み(IMSコアへのIPsecトンネル、GSMA IR.51)から始め、VoLTEとの関係、有効化に必要な条件、日本のキャリアにおける対応状況の特徴、SMSへの影響、そして設定上の注意点まで順を追って解説する。
---
## 1. Wi-Fi Callingとは — VoWiFiの定義
**Wi-Fi Calling**(業界では**VoWiFi**、Voice over Wi-Fiと表記される)は、スマートフォンのモバイル無線(4G/5G)ではなく、Wi-Fiネットワーク経由でキャリアのIMS(IP Multimedia Subsystem)コアに接続して音声通話・SMSを提供する技術だ。
VoWiFiの最大の特徴は、利用者から見た操作感がVoLTEとほぼ同一である点だ。発着信は通常の電話アプリから行い、相手に表示される番号も通常の携帯電話番号と同じだ。「Wi-Fiを使っている」ことを相手が識別する手段はない。
VoLTEとVoWiFiの技術的な違いは「どのアクセス網を使うか」だけだ。どちらもIMSコアを使い、SIPシグナリングとRTPメディアストリームで音声を伝送する。
端末は電波状況に応じてVoLTEとVoWiFiをシームレスに切り替えることが設計上できる。たとえばビルの入口では4G電波でVoLTE通話をしていたとして、室内に移動して4G電波が弱化した場合、通話を切断せずにVoWiFiへ切り替える(ハンドオーバー)ことが仕様上定義されている。ただしこのシームレス切り替えの実現はキャリアと端末の実装に依存する。
VoLTEの仕組みの詳細については[VoLTEとVoNRとは — 4G/5Gで通話する仕組みと対応端末](/ja/guides/volte-vonr/)を参照してほしい。
---
## 2. 技術的な仕組み — IPsecトンネルとIMSコア
VoWiFiの接続が成立するまでの流れを技術的に整理する。
### ePDGへのIPsecトンネル
Wi-Fiは「信頼できない外部ネットワーク(untrusted non-3GPP access)」として扱われる。端末はキャリアネットワーク内に設置された**ePDG(Evolved Packet Data Gateway)**という中継装置に向けて、**IPsecトンネル**(Internet Protocol Security)を確立する。
このトンネルが通話パケットを暗号化・カプセル化してキャリアのコアネットワークまで安全に届ける。ePDGはキャリアが運用するため、利用者はその存在を意識することなく安全に通話できる。
### IMSコアへの接続
IPsecトンネルが確立されると、端末はVoLTEと同じIMS登録手順(SIP REGISTER)をキャリアのIMSコアに対して行う。
登録完了後は、発着信・通話・SMSのすべてがVoLTEと同じSIPシグナリングで処理される。端末から見ると「LTE経由かWi-Fi経由か」の違いは透過的であり、ユーザー操作は変わらない。
### GSMA IR.51
VoWiFiの相互運用性仕様はGSMAが**IR.51**(IMS Profile for Voice, Video and SMS over Wi-Fi)として定義している。IR.51はVoLTEのIR.92を補完する形で策定されており、Wi-Fiアクセス経由でIMSサービスを提供するための要件を規定している。
---
## 3. VoLTEとの共通点・相違点
VoLTEとVoWiFiの主な違いを整理する。
| 項目 | VoLTE | VoWiFi(Wi-Fi Calling) |
|------|-------|------------------------|
| 接続経路 | LTEネットワーク | Wi-Fi → IPsecトンネル → ePDG |
| 使用規格 | GSMA IR.92 | GSMA IR.51 |
| IMS使用 | あり | あり(同じIMSコア) |
| 電話番号 | 携帯番号 | 携帯番号(同じ) |
| QoS保証 | LTE側でQCI制御 | Wi-Fi側のQoSに依存 |
| 電波不要 | 不要ではない | 不要(Wi-Fiのみで動作) |
重要な点は、VoWiFiには**Wi-Fi側のQoS保証がない**ことだ。LTEではQCI 1という専用の優先制御で音声トラフィックを保護するが、一般のWi-Fi(家庭用ルーターや公共Wi-Fi)にはそのような制御がない。通話品質はWi-Fi回線の混雑状況に左右される。
また、緊急通報(110番・119番)の扱いについても違いがある。VoLTEでは端末の位置情報をネットワーク側が把握できるが、VoWiFiでは接続元のIPアドレスから位置を特定するため精度が下がる。
日本では緊急通報をVoWiFi経由でどう扱うかはキャリアの実装に依存しており、**電波が全くない状況での緊急通報はVoLTEや通常の音声通話が確立できる環境を優先すること**が推奨される。
---
## 4. Wi-Fi Callingのメリット
### 電波が弱い場所での通話継続
最も典型的な用途が「電波が届かない屋内での通話」だ。地下駐車場、電波の入りにくいビルの中層階、山間部の山小屋など、4G/5G電波が弱くてもWi-Fiがあれば通話できる。
端末は電波強度とWi-Fi接続状態を自動的に監視し、電波が弱化するとVoWiFiに切り替える設計だ。この切り替えは通話中でもシームレスに行われることが仕様上定義されている(ハンドオーバー)。圏外・電波弱化時の対処全般については[「圏外」「サービスなし」の対処法](/ja/guides/no-service/)も参照してほしい。
### 海外Wi-Fi経由での発着信
キャリアが「海外Wi-Fi利用」を許可している場合、海外のWi-Fi環境(ホテルや空港)から日本の電話番号で発着信できる。国際ローミングの通話料が高額になる状況の代替手段になりうる。
ただしこの利用可否はキャリアのプラン・設定によって大きく異なる。また、着信に対してキャリアが国際転送扱いの課金を適用するかどうかはキャリアのポリシー次第であり、「Wi-Fiを経由しているから無料」とは限らない点に注意が必要だ。国際ローミングの仕組みと料金体系については[国際ローミングとは — 海外でSIMをそのまま使う仕組みと料金](/ja/guides/international-roaming/)で詳しく解説している。
### SMSの送受信
VoWiFiはSMSの送受信にも対応している。Wi-Fi接続中に携帯電話番号宛のSMSを受け取ることができる。
海外滞在中に日本の携帯番号宛のSMS(二段階認証コードなど)を受け取りたい場合に関連する。ただしSMSの送受信がVoWiFi経由で機能するかどうかはキャリアの実装次第であり、音声通話は対応しているがSMSは非対応という場合もある。この点は[海外でSMS二段階認証を受け取る方法](/ja/guides/sms-2fa-abroad/)で詳しく説明している。
---
## 5. 有効化の前提条件
Wi-Fi Callingを使うには以下の3つがすべて揃っている必要がある。
### 条件1: キャリアのVoWiFi対応
VoWiFiはキャリア側のネットワーク設定(ePDGの用意・IMS連携)が必要だ。キャリアが対応していない場合、端末側の設定がどうであっても利用できない。
キャリアが対応していないと判断する最も確実な指標は「端末の設定にWi-Fi通話の項目が存在しない」ことだ。SIMを差し替えてもこの項目が現れない場合、まずキャリアの対応状況を確認することを優先する。日本の対応状況については次節で述べる。
### 条件2: 端末のVoWiFi対応
端末(スマートフォン)がVoWiFiをサポートしている必要がある。近年のiPhone・主要Androidの多くはハードウェア・ソフトウェアともにVoWiFi対応しているが、低価格帯の一部機種では非対応の場合がある。端末の仕様ページで「Wi-Fi Calling」または「VoWiFi」の対応を確認する。
キャリアが自社販売端末のみWi-Fi Callingに対応させている場合、SIMフリー端末では設定項目自体が表示されないことがある。これは端末側のファームウェアにキャリア設定(キャリアプロファイル)が適用されていないためだ。
### 条件3: 端末の設定で有効化
対応端末であっても、初期状態では無効になっている場合がある。
- **iPhone(iOS)**: 「設定」→「モバイル通信」→「Wi-Fi通話」をオンにする
- **Android**: 機種・OSバージョンにより異なるが、「設定」→「ネットワークとインターネット」→「通話の設定」または「Wi-Fi通話」から有効化できる機種が多い
設定メニューの表示はキャリアや端末メーカーがカスタマイズしている場合があり、表記が異なることがある。また、キャリアによっては初回有効化時に「緊急住所の登録」を求める場合がある。これはVoWiFi利用時の位置情報補完のための登録で、ガイドに沿って完了させないと機能が有効化されない場合がある。
---
## 6. 日本のキャリアにおける対応状況
日本国内のWi-Fi Calling対応状況については、重要な特徴がある。
**国内大手MNO(NTTドコモ・au/KDDI・ソフトバンク・楽天モバイル)と主要サブブランド・オンライン専用プランにおいて、VoWiFiを標準機能として提供しているキャリア・プランは2026年6月時点では限定的であり、未対応のキャリア・プランも存在する。** 各社の対応状況はプランや端末によってさらに細分化されており、公式サイトで個別に確認することが必要だ。
また、VoWiFiに対応しているキャリアであっても、**すべての端末で利用できるとは限らない**。自社販売端末のみ対応、あるいは特定の機種に限定している場合がある。SIMフリー端末やMVNOユーザーは特に確認が必要だ。
**MVNOにおいては、VoWiFi(Wi-Fi Calling)に対応している事業者は現時点では非常に限られている。** MVNOはMNO(大手キャリア)の回線を借りてサービスを提供しているが、VoWiFiの提供にはキャリア側のネットワーク設備だけでなくMVNO側での設定・契約が必要になる。この対応コストが高いため、多くのMVNOはVoWiFiを提供していないのが現状だ。
このため、Wi-Fi Callingの利用を検討する場合は、**契約中または契約予定のキャリア・プランの公式サイトで最新の対応状況を確認することが不可欠だ。** ここでは断定的な対応可否一覧を示さない。通信サービスの仕様は変更されることがあり、公式情報が唯一の根拠となる。
MVNOとMNOの違い・サービス範囲の違いについては[格安SIM(MVNO)とは — 仕組みとメリット・デメリット](/ja/guides/what-is-mvno/)(準備中)でも解説している。
---
## 7. VoWiFiとSMS二段階認証
VoWiFiに対応している環境では、Wi-Fi接続中に携帯電話番号宛のSMSを受け取れる。これは**海外でSMS二段階認証を受け取りたいシーン**で特に重要だ。
日本の携帯番号宛に届く2FAコード(銀行・各種ウェブサービスのSMS認証)を海外のWi-Fi経由で受け取るには、以下がすべて必要になる。
1. 契約キャリアが「海外Wi-Fi環境でのVoWiFi」をサポートしている
2. 端末のWi-Fi Callingが有効になっている
3. SMS受信に対応したプランである
ただし海外のWi-Fi環境でのSMS受信には複数の方法があり、VoWiFiはその一つに過ぎない。詳細な方法の比較と注意点は[海外でSMS二段階認証を受け取る方法](/ja/guides/sms-2fa-abroad/)で解説している。
---
## 8. デュアルSIM環境でのWi-Fi Calling
デュアルSIM構成のスマートフォンでWi-Fi Callingを利用する場合、どのSIMに対してWi-Fi Callingが有効かを確認する必要がある。
iPhoneでは、デュアルSIM(物理SIM + eSIM、またはeSIM×2)環境でWi-Fi通話の設定が「メインのSIM」「セカンダリのSIM」それぞれに存在する場合がある。どちらのSIMのWi-Fi通話を有効にするかを個別に設定できる端末と、どちらか一方にのみ有効化できる端末がある。
Androidでは実装が機種・メーカーによって大きく異なる。物理SIM + eSIMのデュアル構成で一方のSIMのみWi-Fi Callingに対応し、もう一方のSIMのキャリアが非対応という状況も起こりうる。
旅行中にeSIMで現地データ通信をしつつ日本のSIMでVoWiFiを有効にするといった使い方を想定している場合は、特に事前に動作確認しておくことが望ましい。
海外旅行でのデュアルSIM活用全般については[海外旅行のデュアルSIM活用ガイド](/ja/guides/dual-sim-for-travel/)で解説している。
---
## 9. Wi-Fi Callingが機能しない場合の確認点
Wi-Fi Calling設定をオンにしたのに通話ができない、または設定項目自体が表示されない場合は以下を確認する。
1. **キャリアのプランが対応しているか** — 設定項目が表示されない場合、契約プランがVoWiFiを提供していない可能性がある
2. **端末がキャリアのVoWiFi対応端末か** — キャリアが認定していない端末では設定項目が表示されない場合がある
3. **Wi-Fi接続が安定しているか** — IPsecトンネルの確立には安定したWi-Fi接続が必要。公共Wi-FiでVPNが強制されている環境では接続できない場合がある
4. **機内モードの確認** — 機内モードをオンにしてWi-Fiのみ有効にした状態でもVoWiFiは機能する設計だが、キャリアの設定によっては動作しない場合がある
5. **キャリア設定のアップデート** — iPhoneでは「一般」→「情報」でキャリア設定のアップデートが表示される場合がある。アップデートを適用することでVoWiFiが有効化される場合がある
上記を確認してもなお設定項目が現れない場合、最も可能性が高い原因は「キャリアがその端末に対してVoWiFiのキャリアプロファイルを配信していない」ことだ。この場合は契約キャリアのサポートに端末型番を伝えて確認するのが確実だ。
### VoLTEが機能しているかも確認する
Wi-Fi CallingはVoLTEと同じIMSコアを使うため、そもそもVoLTEが正常に機能していない端末ではVoWiFiも動作しない場合がある。まず通常の4G/5G電波がある環境でVoLTE通話ができるかを確認し、問題があればVoLTEの有効化から対処する。VoLTEの設定と確認方法については[VoLTEとVoNRとは — 4G/5Gで通話する仕組みと対応端末](/ja/guides/volte-vonr/)を参照してほしい。
---
## FAQ
### Wi-Fi Callingとは何ですか?
Wi-Fi Calling(VoWiFi)は、Wi-Fiネットワーク経由でキャリアのIMSコアに接続し、携帯電話番号で音声通話やSMSを送受信できる技術です。電波が届きにくい場所でもWi-Fiさえあれば通常の通話と同じ番号・品質で利用できます。キャリアと端末の両方が対応している必要があります。
### Wi-Fi CallingはVoLTEとどう違いますか?
VoLTEはLTEネットワーク上でIMSに接続して通話する技術、Wi-Fi Calling(VoWiFi)はWi-Fiネットワーク上でIMSに接続して通話する技術です。どちらも同じIMSコアを使い、同じ電話番号で発着信できます。端末は状況に応じてVoLTEとVoWiFiを自動的に切り替えます。
### Wi-Fi Callingを使うと料金はかかりますか?
Wi-Fiを使う通信自体に対してキャリアが追加料金を課すかどうかは、キャリアの料金プランによります。通話時間に対する課金(通話料)はVoLTE通話と同様に発生するのが一般的です。正確な料金は契約キャリアの公式サイトで確認してください。
### MVNOのSIMでWi-Fi Callingは使えますか?
日本のMVNOでWi-Fi Callingに対応している事業者は現時点では非常に限られています。MVNOはMNOの回線を借りていますが、Wi-Fi Calling(VoWiFi)機能を提供するかどうかはMVNO側の設定・契約に依存します。利用したい場合はMVNO公式サイトで対応状況を確認してください。
### 海外Wi-Fi経由で日本の番号に電話できますか?
キャリアがWi-Fi Callingの「海外Wi-Fi利用」をサポートしており、端末でその機能が有効になっていれば、海外のWi-Fi環境から日本の番号で発着信できます。ただし対応可否はキャリアのプランおよびポリシーによって異なります。契約キャリアの公式ページで海外Wi-Fi利用の可否を確認してください。
### 公共Wi-Fiでもかけられますか?
技術的にはWi-Fiネットワークの種類(家庭用・公共)を問わずWi-Fi CallingはIPsecトンネルで接続するため、セキュリティ上は問題がない設計です。ただし、認証ポータル(接続時にブラウザ認証が必要なホテルWi-Fi等)では最初のIPsecトンネル確立前に認証が必要な場合があります。また、特定のポートをブロックしているWi-Fi環境では機能しない場合があります。
---
## まとめ
- **Wi-Fi Calling(VoWiFi)**は、Wi-Fi経由でIPsecトンネルを確立してキャリアのIMSコアに接続し、携帯電話番号で通話・SMSを利用できる技術。GSMA IR.51で仕様が定義されている。
- VoLTEと同じIMSコアを使うため、電話番号・操作感は変わらない。電波が弱い屋内や建物内での通話継続が主なメリット。
- 利用には「キャリアの対応」「端末の対応」「端末設定の有効化」の3条件がすべて必要。
- 日本国内では大手MNOでも対応状況はキャリア・プランにより異なり、MVNOでの対応は限定的。**必ず公式サイトで最新情報を確認すること。**
- 海外Wi-Fi経由での利用時は、着信課金の扱いがキャリアによって異なる点と、緊急通報(110/119)の位置情報精度が下がりうる点に注意。
- 海外Wi-Fi経由でのSMS受信にも活用でき、[海外でのSMS二段階認証](/ja/guides/sms-2fa-abroad/)との関連が深い。
- 設定項目が表示されない場合はキャリアプロファイルの未適用や契約プランの非対応が原因であることが多く、キャリアサポートへの確認が最短の解決策になる。
================================================================================
# Wi-Fiレンタルの選び方 — ポケットWi-Fiとモバイル/eSIMの使い分け
URL: https://sim-finder.com/ja/guides/wifi-rental/
Type: guides (ja)
Published: 2026-05-20
ポケットWi-Fi(Wi-Fiレンタル)は海外でも複数台のデバイスを同時につなげられる手段として、家族旅行やグループ旅行で広く使われている。一方、1人旅やeSIM対応端末を持っている場合は旅行eSIMや現地SIMのほうが合理的な選択になることが多い。
この記事ではWi-Fiレンタルの仕組みを整理し、日本市場の主なサービスの特徴と、旅行eSIM・現地SIMとの公平な比較を提供する。どの通信手段が自分の旅行スタイルに合うかは[海外でスマホを使う4つの方法](/ja/guides/four-options/)でも整理しているので参考にしてほしい。
---
## 1. Wi-Fiレンタルとは — 仕組みと基本構造
Wi-Fiレンタル(ポケットWi-Fi)とは、モバイルデータ通信機能を内蔵したルーター端末をレンタルし、その端末がWi-Fiアクセスポイントとして機能するサービスだ。
**仕組みの概要**
1. レンタルされたルーター端末が、渡航先の現地モバイルネットワーク(LTE/5G)に接続する
2. ルーター端末がWi-Fiホットスポットとして動作し、手持ちのスマートフォン・タブレット・ノートPCなど複数台に電波を配信する
3. 接続した各デバイスはルーターを経由してインターネットにアクセスできる
つまり「1台のモバイル回線を複数台のデバイスで共有する中継装置」がポケットWi-Fiの本質だ。
**物理SIMとeSIMの違いとの対比**
旅行eSIMや現地SIMが各自の端末に直接回線を持つのに対し、Wi-Fiレンタルは「回線を持つ専用端末を1台追加で携帯する」方式だ。デバイス側への条件はほぼなく、Wi-Fiに接続できれば端末の種類を問わない。
一般的なレンタル端末の同時接続台数は、エントリーモデルで約5台、標準モデルで約10台が目安となっている(出典: HippocketWifi「How Many Devices Can a Pocket WiFi Handle?」)。
---
## 2. 主なWi-Fiレンタルサービス(日本市場)
日本では複数の事業者がWi-Fiレンタルサービスを提供しており、空港受取・宅配・コンビニ受取など複数の受取方法に対応している。以下は国内で流通している代表的なサービスの概要だ。料金の比較は各事業者の公式サイトで確認してほしい。
### イモトのWiFi(エクスコムグローバル)
世界200以上の国・地域に対応をうたうサービス。現地SIMを切り替えず1台の端末で複数国を使い回せる「グローバルプラン」が特徴。長期旅行や多国間の旅行者向けプランが揃っている。
### グローバルWiFi(ビジョン)
国際的なカバレッジと、各渡航先に対応したプランの選択肢が多いサービス。法人利用にも対応。
### Wi-Fi BOX(株式会社テレコムスクエア)
全国650か所以上の空港・駅・コンビニに設置された無人ボックスで非対面受取・返却ができる点が特徴。カウンター待ち不要で出発時刻ぎりぎりでも利用しやすい。対応エリアは約130の国・地域。
### JAL ABC(株式会社JALエービーシー)
JALグループのJALUX傘下・株式会社JALエービーシーが提供するWi-Fiレンタル。空港宅配サービスと並ぶ同社の主力事業のひとつで、成田・羽田・関西・中部・新千歳・伊丹など主要空港で受取・返却に対応している(2023年6月にJALUX子会社化)。
### ププル WiFi(株式会社ププルインターナショナル)
1987年創業の通信機器レンタル事業者(株式会社ププルインターナショナル)が運営するWi-Fiレンタル。長期旅行・留学など長期利用向けのプランが特徴。
> **注意**: 上記はいずれも本記事執筆時点(2026年5月)で日本市場で確認できるサービスの例示であり、特定サービスの推奨ランキングではない。料金・プラン・対応エリアは変動するため、各社公式サイトで最新情報を確認すること。
---
## 3. 利用シーン — 適している場合・適さない場合
Wi-Fiレンタルには明確に向いているシーンと、そうでないシーンがある。
### 適しているシーン
**複数人・家族旅行**
3〜5人でひとつの端末を共有すると、1人あたりのコストを抑えられる可能性がある。子供のタブレット・ゲーム機など複数のデバイスをまとめてカバーできる点も利点だ。
**eSIM非対応端末が含まれる場合**
古いスマートフォンや、eSIMに対応していない機種でも、Wi-Fiに接続できれば利用可能。端末の機種・世代を問わない点はポケットWi-Fiならではの強みだ。
**SIMスロットのないデバイスを多数使う場合**
タブレット(Wi-Fiモデル)・ノートPC・ゲーム機など、SIMスロットを持たないデバイスをまとめてインターネット接続したい場合に有効だ。
**旅行中に一定量の安定通信が必要な場合**
特定の通信品質を確保したい場合、プランを固定しておけるレンタルは使い勝手が良い。
### 適さないシーン
**1人旅・eSIM対応端末を持っている場合**
荷物が増える・バッテリー管理が必要・返却が必要などの手間に対して、旅行eSIMで代替できる部分が多い。
**短期旅行でコストを最優先する場合**
日数制の料金体系では、旅行eSIMと比較して割高になるケースが多い。旅行eSIMの選び方は[初めての旅行eSIM完全ガイド](/ja/guides/first-time-guide/)で詳しく解説している。
**端末を1か所に集めておけないシーン**
観光中に一行が別行動する場面では、1台のルーターを誰が持つかという問題が生じる。
**長期滞在**
1か月以上の滞在では日数累計の費用が大きくなり、現地SIMのほうが割安になりやすい。現地SIMの入手方法は[現地SIMカードの入手方法](/ja/guides/local-sim/)を参照してほしい。
---
## 4. 料金体系の種類
Wi-Fiレンタルの料金モデルは大きく3種類に分類できる。
### 日数制プラン
利用日数に応じた日割り料金。数日〜数週間の旅行に向いている。日程が増えるほど総費用が上がるため、長期滞在では他の手段と比較検討する価値がある。
### 容量制プラン
あらかじめ一定のデータ容量(例: 3GB、10GBなど)を購入し、使い切るまで使う方式。短期でも消費量が少ない用途に向く。容量の見積もりについては[データ通信量の目安](/ja/guides/data-usage-guide/)を参考にしてほしい。
### 無制限(大容量)プラン
「無制限」とうたうプランでも、一日あたりの高速通信量に上限が設けられているケースがほとんどだ。上限を超えると数百kbps程度に低速化し、動画ストリーミングやビデオ通話が実質的に困難になる場合がある。「無制限」の定義は事業者・プランによって大きく異なるため、速度制限の条件(フェアユースポリシー)を申込前に必ず確認すること。
> 旅行eSIMの「無制限」プランも同様の速度制限が適用されることが多い。比較時は速度制限の閾値と低速時の速度を揃えて比較することが重要だ。
---
## 5. 受取・返却方法
Wi-Fiレンタルは端末の受け渡しが発生するという点で、旅行eSIMや現地SIMと根本的に異なる。
### 宅配受取・返却
出発前に自宅で受け取り、帰国後に専用封筒またはコンビニから返送する方式。最も一般的で、空港カウンターの混雑を避けられる。受取は出発日の前日〜数日前までに届くよう予約する必要がある。
### 空港カウンター受取・返却
成田・羽田・関西・中部など主要国際空港に各サービスの受取カウンターが出店している。当日の受取に対応しているケースが多いが、繁忙期は混雑・在庫不足が起きる場合がある。返却は帰国後の空港内カウンター、または搭乗前に専用返却ボックスへ投函する方式が一般的だ。
### コンビニ受取
一部サービスはコンビニエンスストアでの受取に対応している。
### 返却の注意点
- 返却期限を過ぎると延滞料金が発生するサービスがほとんどだ
- 紛失・破損の場合は補償オプションの有無にかかわらず費用が発生する場合がある
- 充電器・ケーブルなど付属品の返却漏れにも注意
---
## 6. 性能の比較ポイント
端末・プランを選ぶ際に確認すべき主な性能指標を整理する。
### バッテリー駆動時間
日本市場で流通する一般的なレンタル端末の実使用時間は6〜12時間程度が目安だ(出典: HippocketWifi「How Long Does Pocket Wifi Battery Last?」)。接続台数の増加・動画ストリーミングなどの高負荷通信により駆動時間は短くなる。終日外出する場合はモバイルバッテリー(5,000〜10,000mAh程度)の併用が現実的だ。
### データ容量と速度制限
上述のとおり、「無制限」プランでも高速通信の日次上限が存在するケースがほとんどだ。特に動画視聴・テレワークを予定している場合は、高速通信の上限(GB単位)と低速時の速度(kbps)を確認する。
### 同時接続台数
エントリーモデルは約5台、標準モデルは約10台が一般的な目安。接続台数が多い場合は1台あたりの帯域が絞られ、速度が低下しやすい。
### 通信規格(LTE/5G)
渡航先のキャリアと対応する通信バンドを使用しているか確認する。5G対応端末は一般的に高速だが、渡航先の5Gカバレッジに依存する。
### 端末の重量・サイズ
1日中持ち歩くことを考えると、端末自体の重量とバッテリーのトレードオフがある。軽量モデルは駆動時間が短いケースが多い。
---
## 7. Wi-Fiレンタル vs 旅行eSIM vs 現地SIM
3つの手段を主要な観点で比較する。
| 比較項目 | Wi-Fiレンタル | 旅行eSIM | 現地SIM |
|---------|------------|---------|--------|
| **端末条件** | Wi-Fi接続できれば不問 | eSIM対応SIMフリー端末が必要 | SIMフリー端末が必要 |
| **複数台接続** | 1台で複数台同時接続可能 | テザリングで代替可能(制限あり) | テザリングで代替可能(制限あり) |
| **事前準備** | 事前予約が必要 | 出発前にオンラインで完結 | 渡航先で現地購入が必要 |
| **音声通話** | 端末側の回線に依存 | 原則データ専用 | 通話付きプランあり |
| **荷物の増加** | ルーター+充電器が増える | なし | なし(SIM交換のみ) |
| **返却手続き** | 帰国後に返却が必要 | 不要(プロファイル削除のみ) | 廃棄のみ |
| **紛失リスク** | 端末の紛失・破損リスクあり | なし | SIM紛失リスクは低 |
| **長期滞在** | 日数に比例してコスト上昇 | プロバイダー・期間に依存 | 長期向けプランが充実 |
| **通信品質** | ルーターが使用する現地回線に依存 | プロバイダーが使用する現地回線に依存 | 現地ユーザーと同水準 |
### まとめると
- **グループ旅行・eSIM非対応端末**: Wi-Fiレンタルが合理的な選択肢になりやすい
- **1人旅・eSIM対応端末**: 旅行eSIMが手軽さ・料金・荷物なしの観点で優位なことが多い
- **長期滞在・音声通話が必要**: 現地SIMが割安かつ機能面で充実していることが多い
- **短期旅行・手間を省きたい**: [国際ローミング](/ja/guides/international-roaming/)も選択肢になる
---
## 8. 失敗しない選び方のチェックリスト
以下の手順で選択肢を絞り込むと失敗が少ない。
### ステップ1: 渡航先・人数・端末条件を整理する
- [ ] 渡航先の国・地域(複数国の場合は全カ国)を確認する
- [ ] 旅行者の人数と、Wi-Fiに接続したいデバイスの台数を数える
- [ ] 各自の端末がeSIM対応かどうかを確認する(iPhoneはXS以降がeSIM対応)
- [ ] 使いたいデバイスにSIMスロットがあるか確認する
### ステップ2: データ消費量を見積もる
- [ ] 1日あたりの想定使用量をざっくり算出する(目安は[データ通信量の目安](/ja/guides/data-usage-guide/)を参照)
- [ ] 動画ストリーミング・ビデオ会議が頻繁な場合は、無制限プランの速度制限条件を確認する
### ステップ3: 受取・返却の利便性を確認する
- [ ] 出発空港にレンタルカウンターがあるか確認する
- [ ] 宅配受取の場合、出発日の何日前までに届くか確認する
- [ ] 帰国時の返却方法(空港ポスト・コンビニ・宅配)を確認する
- [ ] 延滞料金の条件を把握しておく
### ステップ4: 補償オプションを確認する
- [ ] 紛失・破損時の費用(補償なし時の請求額)を確認する
- [ ] 補償オプション(有料)が必要かどうかを検討する
- [ ] 補償の免責事項(補償されないケース)を読む
### ステップ5: 他の手段と比較する
- [ ] 1人あたりのコストで旅行eSIM・現地SIMと比較する
- [ ] eSIM対応端末なら[旅行eSIMをSimFinderで比較する →](/ja/travel/)
- [ ] 1週間以上の滞在で音声通話が必要なら[現地SIMの入手方法](/ja/guides/local-sim/)も確認する
---
## 9. よくある質問
---
## 10. まとめ
Wi-Fiレンタル(ポケットWi-Fi)は複数人での旅行・eSIM非対応端末の接続・SIMスロットのないデバイスの利用をまとめてカバーできる点で、他の通信手段と明確に異なる価値を持つ。一方で端末の持ち歩き・バッテリー管理・返却という物理的な手間が伴い、1人旅では旅行eSIMや現地SIMのほうが合理的になりやすい。
選び方の要点をまとめる。
- **3人以上のグループ・複数台接続が必要**: Wi-Fiレンタルが候補に入りやすい
- **1人旅・eSIM対応端末**: 旅行eSIMが手軽さとコストの両面で優位なことが多い([旅行eSIMを比較する →](/ja/travel/))
- **長期滞在・音声通話が必要**: 現地SIMを現地で購入するほうが割安になりやすい
- **無制限プランの注意点**: 高速通信の日次上限と速度制限の条件を必ず確認する
- **補償オプション**: 端末の紛失・破損リスクに備えて加入可否を検討する
海外通信手段の全体像は[海外でスマホを使う4つの方法](/ja/guides/four-options/)でまとめている。渡航前の準備全体については[初めての旅行eSIM完全ガイド](/ja/guides/first-time-guide/)または[現地SIMカードの入手方法](/ja/guides/local-sim/)も参照してほしい。
---
## 関連ガイド
- [海外でスマホを使う4つの方法](/ja/guides/four-options/) — 国際ローミング・現地SIM・旅行eSIM・ポケットWi-Fiの全体比較
- [国際ローミングの仕組みと料金](/ja/guides/international-roaming/) — ローミング方式とコスト詳細
- [初めての旅行eSIM完全ガイド](/ja/guides/first-time-guide/) — eSIMの購入・設定・帰国後管理
- [現地SIMカードの入手方法](/ja/guides/local-sim/) — 空港・市内・オンラインでの購入ガイド
- [データ通信量の目安](/ja/guides/data-usage-guide/) — アプリ別データ消費量と必要GB数の算出方法
================================================================================
# ワーホリ・留学のSIM選び方
URL: https://sim-finder.com/ja/guides/working-holiday/
Type: guides (ja)
Published: 2026-06-06
ワーホリ・留学(数ヶ月〜1年超)の通信環境は、短期旅行とも国内長期契約とも異なる独自の判断軸が必要だ。渡航直後は日本からの通信手段を確保しつつ、滞在が落ち着いたら現地の割安な契約に移行するという2段階のアプローチが基本になる。
この記事では、ワーホリ・留学の典型的な渡航先(オーストラリア・ニュージーランド・カナダ・英国)を念頭に、滞在フェーズごとのSIM選択の考え方を整理する。料金の具体額はキャリアや時期により変わるため記載しない。最新のプラン比較は[SimFinder Travelの国別検索](/ja/travel/)を活用してほしい。
---
## 結論: 2段階アプローチが基本
| フェーズ | 手段 | 目安期間 |
|---------|------|---------|
| 渡航直後〜住所確定まで | トラベルeSIM または 到着空港SIM(プリペイド) | 1〜4週間 |
| 住所確定後〜長期滞在 | 現地プリペイドSIM または 現地ポストペイド契約 | 以降の滞在期間全体 |
この2段階を念頭に置くと、各フェーズの選択肢と判断軸が整理しやすくなる。
ワーホリ・留学と短期旅行の最大の違いは「滞在期間の長さ」だ。短期旅行では渡航中ずっとトラベルeSIMを使い続けることが合理的だが、数ヶ月〜1年超の滞在では月単位で通信コストが積み重なる。早い段階で現地の割安な通信手段に切り替えることが、総コストを抑える上で重要な判断になる。
---
## フェーズ1: 渡航直後 — トラベルeSIM・空港SIM
### トラベルeSIMで出発前に準備する
渡航前に日本でトラベルeSIMを購入・インストールしておくと、空港到着直後から通信が使える。主なメリットは次の3点だ。
1. **SIM登録手続き不要**: オーストラリアでは2017年の連邦規制(ACMA所管)によりプリペイドSIM購入・開通時に本人確認が法律で義務付けられており、NZ・カナダ・英でも購入時に本人確認を求められる場合がある。トラベルeSIMは日本から事前購入で完結するためこの手続きが不要だ
2. **デュアルSIM構成で日本番号を維持**: データ通信はトラベルeSIMで行いながら、日本のSIMでSMS認証を受け取れる
3. **到着直後の地図・連絡に即座に使える**: ホテルや空港でWi-Fi検索する手間が省ける
トラベルeSIMの選び方の詳細(通信エリアの確認方法・有効期間の開始タイミング・無制限プランの速度制限など)は[旅行eSIMの選び方](/ja/guides/how-to-choose/)にまとめてある。
### 到着空港SIM(プリペイド)を現地購入する方法
トラベルeSIMを持たない場合、または現地プリペイドSIMに早期移行したい場合、主要国際空港の到着ロビーにあるキャリアカウンターや自動販売機でプリペイドSIMを購入できる。
留意点:
- **本人確認書類(パスポート)を準備する**: 渡航先によってSIM購入時の本人確認要件が異なる。各国の一般的な傾向は[地域別の海外通信事情ガイド](/ja/guides/regional-overview/)を参照してほしい
- **端末がSIMフリーであることを確認**: キャリアロックがかかった端末では現地SIMを使えない。2021年10月以降に日本で購入した端末は原則SIMロックなしだが、それ以前の端末はSIMロック解除が必要な場合がある
- **到着空港SIMは短期プランが多い**: 30日有効のプリペイドが一般的だが、長期滞在向けに複数ヶ月対応のプランを選べる場合もある
- **空港のSIMは割高なことがある**: 市街地の携帯ショップやスーパーマーケットで購入できるプランと比較して、空港販売のSIMは割高な場合がある。最初の1〜2週間をしのぐ割り切りで購入し、落ち着いたら乗り換えるという考え方が合理的だ
---
## フェーズ2: 滞在が落ち着いたら現地契約へ移行する
ワーホリ・留学の場合、数週間以内に生活拠点(シェアハウス・ホームステイ・学生寮など)が確定する。この段階で現地の通信契約を本格的に検討するタイミングになる。
### プリペイドとポストペイドの違い
| | プリペイド(前払い) | ポストペイド(後払い) |
|-|------------------|-------------------|
| 必要書類 | パスポートのみが一般的 | パスポート+現地住所+クレジット審査が必要な場合あり |
| 契約開始のしやすさ | 即日・審査なし | 住所・銀行口座の確立後 |
| 料金体系 | 月ごとに前払い、縛りなし | 月払い定額、一定期間の継続義務あり |
| データ量・オプション | 豊富な選択肢あり | 大容量・無制限プランが充実している傾向 |
| 解約 | 期限が来れば自然に終了 | 中途解約時にペナルティがある場合あり |
ワーホリ・留学生は**まずプリペイドで始めて、生活が落ち着いたらポストペイドに移行する**というステップをとることが多い。プリペイドとポストペイドの仕組みの詳細は[プリペイドSIMとポストペイドSIMの違い](/ja/guides/prepaid-vs-postpaid/)を参照されたい。
### 現地契約に必要なもの
一般的に以下が必要になる(国・キャリアによって異なる):
- **パスポート原本**: 本人確認の主要書類
- **現地住所**: ポストペイド契約では必須。学生寮・シェアハウスの住所で対応できる場合が多い
- **現地の支払い手段**: クレジットカード(国際ブランドの日本発行カードで対応できる場合あり)または現地銀行口座
- **ビザ情報**: 国・キャリアによってはビザの種別・有効期間の確認を求める場合がある
現地でのSIM契約手順の詳細は[海外現地SIM契約ガイド](/ja/guides/local-contract/)で国別に整理している。
### ワーホリ・留学ビザと通信契約の関係
ポストペイド(後払い)契約を申し込む際、キャリアによってはビザの残存有効期間が契約期間の下限を上回ることを条件にする場合がある。ワーホリビザ(1〜2年)・学生ビザの有効期間は多くの場合条件を満たすが、初めて申し込む際にビザ情報の提示を求められる可能性を想定しておく。
プリペイドSIMについては、ビザ種別に関係なく購入できることが一般的だ。滞在開始直後でビザや住所書類がまだ揃っていない状況でも、プリペイドであれば問題なく契約できる場合が多い。
---
## 主要渡航先4カ国の一般的な傾向
各国の通信事情の詳細は[地域別の海外通信事情ガイド](/ja/guides/regional-overview/)に一次情報をまとめてある。ここではワーホリ・留学の文脈で特に参考になる傾向を簡単に触れる。
### オーストラリア
Telstra・Optus・TPGなど複数のキャリアが競合しており、プリペイドSIMはスーパーマーケットでも購入できるほど普及している。**2017年の連邦規制(ACMA所管)により、プリペイドSIMの購入・開通時に本人確認が法律で義務付けられている。パスポート等の身分証を必ず携行すること。**(英国ではSIM購入に法的な本人確認義務はなく、対照的だ。)主要都市・沿岸部は4G/5Gが安定しているが、内陸部・農村部ではカバレッジに差がある。eSIM対応は主要キャリアとMVNOで進んでいる。現地[SIM契約の具体的な手順は海外現地SIM契約ガイド](/ja/guides/local-contract/)、長期滞在の通信戦略全般は[海外在住者のSIM戦略](/ja/guides/expat-strategy/)も参照されたい。
### ニュージーランド
Spark・One NZ・2degreesが主要キャリア。プリペイドの取得は比較的容易。観光地でも山間部では圏外になるエリアがある。eSIM対応は進んでいるが、キャリアによって対応状況が異なる。
### カナダ
主要キャリアがeSIM対応済み。プリペイドプランが整っている。国土が広大なため農村部・山岳地帯ではカバレッジが限られる。都市部間は概ね4G LTEが安定している。
### 英国
2021年12月以降、Ofcomの規制によりキャリアはSIMロックなし端末での販売が義務付けられている。主要キャリアはeSIM対応済みで、PAYG(Pay As You Go)と呼ばれるプリペイド方式が広く普及している。EUを離脱したため、欧州との自動ローミング恩恵(RLAH)はEU側キャリアのSIMには適用されないことに注意が必要だ。
英国はRLAH(EU/EEA域内ローミング均一料金規制)の対象外のため、英国在住中にEU内を旅行する際は別途通信手段の検討が必要になる。EU旅行時の通信の考え方については[EUローミング完全ガイド](/ja/guides/eu-roaming/)を参照されたい。
---
## 長期滞在での通信コストを下げる考え方
ワーホリ・留学では通信費を月単位で積み重ねるため、コスト構造の理解が重要になる。
### データ量と月額の関係
長期滞在では「動画ストリーミング・ビデオ通話・SNS」を日常的に使う場面が増える。旅行者と異なり、帰宅後もWi-Fiが使える環境(シェアハウス・学生寮など)が多いため、モバイルデータの必要量は生活スタイルによって大きく変わる。
月に必要なデータ量の目安は[データ通信量ガイド](/ja/guides/data-usage-guide/)で確認できる。
### MNO直接契約とMVNO(仮想移動体通信事業者)
現地キャリアには、ネットワーク設備を持つMNO(大手キャリア)と、そのネットワークを借りるMVNO(格安キャリア)がある。MVNOは一般的にMNOよりも月額料金が安く、データコストの節約になりやすい一方、混雑時の速度やカスタマーサポートの質で差が出る場合がある。
MNOとMVNOの仕組みの違いは[MNOとMVNOの違い](/ja/guides/mno-vs-mvno-comparison/)で解説している。
### 「無制限」プランの実態
長期滞在では動画視聴・ビデオ通話の利用頻度が上がるため、無制限プランを検討することがある。ただし現地キャリアの「無制限」プランも、一定量(フェアユースポリシーの閾値)を超えると速度制限がかかる場合が多い。制限後の速度・閾値はキャリアによって異なる。契約前にフェアユースポリシーの内容を確認することを推奨する。
旅行eSIMの無制限プランの仕組みについては[旅行eSIMの選び方](/ja/guides/how-to-choose/)で詳しく解説しているが、現地キャリアの無制限プランも同様の構造を持つことが多い。
### テザリング(ホットスポット共有)の可否
シェアハウスやホームステイで固定インターネット回線が弱い、または自室にWi-Fiが届かない状況では、スマートフォンのテザリングをノートPC作業に使うケースがある。プランによってテザリングが制限されている場合や、テザリング利用分のデータが別カウントされる場合がある。契約前にテザリングの条件を確認しておく。
---
## 日本の電話番号をどうするか
ワーホリ・留学で長期渡航する際の大きな判断の一つが、**日本の電話番号を維持するかどうか**だ。
### 維持を検討するケース
- **日本の銀行・証券口座のSMS認証が日本番号に紐づいている**: 渡航中に口座操作が必要になる可能性がある場合、番号を維持していないとSMS認証を受け取れなくなる
- **帰国後に同じ番号を使いたい**: 知人・家族への連絡先として番号を継続したい場合
- **各種サービスのアカウントが日本番号に紐づいている**: SNS・決済サービス等の二段階認証
### 手放すことを検討するケース
- 渡航期間が1年を超え、帰国予定が不明確
- 維持コストと実際の利用頻度を比較して費用対効果が低い
- アカウントの認証方法を認証アプリ(Google Authenticator等)やメールに切り替えられる
### 維持する場合の選択肢
日本の番号を維持したまま通信コストを最小化する主な方法は次の3つだ。
1. **大手キャリアの番号保管サービス(休止サービス)**: NTTドコモ・au・ソフトバンクは回線を休止状態にしながら番号を維持できる有料サービスを提供している。通話・SMS・データ通信は使えない
2. **最安プランへの変更**: 月額数百円台の維持費で番号を保ちながら、帰国後に使えるプランに切り替える
3. **MNPで格安SIMに乗り換えて維持**: 乗り換え先の格安SIMで月額コストを下げつつ番号を引き継ぐ
番号維持の詳細な手順と判断基準は[電話番号の維持・保管方法](/ja/guides/number-storage/)で解説している。また、デュアルSIM構成で日本番号を副回線として維持しながら現地SIMをメイン回線にする方法については[旅行・海外赴任時のデュアルSIM活用](/ja/guides/dual-sim-for-travel/)も参考になる。
---
## 渡航前の準備チェック
### 端末のSIMフリー確認
現地SIMを使うには、端末がSIMフリー(キャリアロック解除済み)であることが前提になる。
- **iPhone**: 「設定」→「一般」→「情報」→「キャリアロック」が「SIMの制限なし」であればSIMフリー状態
- **Android**: メーカーにより確認方法が異なる。「ネットワークとインターネット」から「SIM設定」を確認するか、異なるキャリアのSIMを挿入して動作を確認する方法が確実
### eSIM対応端末の確認
現地でeSIMを利用する場合、端末がeSIMに対応しているかを確認する。
- **iPhone**: 「設定」→「モバイル通信」に「eSIMを追加」メニューが表示されればeSIM対応
- **Android**: 「設定」→「ネットワークとインターネット」→「SIM」にeSIM追加メニューの有無で確認
渡航先のeSIM対応プロバイダーの概要は[旅行eSIMプロバイダー比較](/ja/guides/provider-comparison/)で確認できる。
### 渡航前チェックリスト(まとめ)
出発前に確認しておくべき項目を整理する:
- [ ] 端末がSIMフリー状態であることを確認した
- [ ] 端末がeSIM対応(必要な場合)であることを確認した
- [ ] 渡航直後のトラベルeSIMまたは空港SIMを手配済み
- [ ] 日本の電話番号の維持方針を決めた(維持する場合は手続きを完了しておく)
- [ ] 現地SIM契約に必要なもの(パスポート・住所・支払い手段)の準備方針を確認した
- [ ] デュアルSIM利用の場合、iPhoneの「モバイルデータ通信の切り替えを許可」設定をオフにする手順を確認した
---
## 長期海外滞在の通信戦略をより深く知る
ワーホリ・留学は「旅行」と「海外居住」の中間に位置するライフスタイルであり、通信の最適化にも独自の視点が必要だ。現地SIM契約の具体的な手続きフロー(書類・ポートイン・eSIM発行など)については[海外現地SIM契約ガイド](/ja/guides/local-contract/)で渡航先別にまとめている。
より長期の海外赴任・移住(数年単位)を見据えた場合は、現地ポストペイド契約・eSIMポートイン・日本番号の長期管理まで包括的に扱う[海外在住者のSIM戦略](/ja/guides/expat-strategy/)も参照されたい。
---
## FAQ
**Q. ワーホリ・留学でトラベルeSIMをいつまで使い続けるべきですか?**
渡航直後の1〜4週間程度が目安です。住所・身分証明の手続きが完了し、現地SIMを契約できる状態になったら切り替えるのが一般的なステップです。トラベルeSIMは日次・週次コストが現地プリペイドや現地ポストペイドより割高になることが多いため、長期滞在での継続利用はコスト面で不利になりがちです。
**Q. 現地でSIMを契約する際に何が必要ですか?**
一般的にパスポート原本・現地住所・現地の支払い手段が必要です。プリペイドSIMは住所不要・即日発行が一般的ですが、ポストペイド(後払い契約)はクレジット審査・現地住所・現地銀行口座が必要になる場合があります。ワーホリ・留学生は到着直後には住所が確定していないことが多いため、まずプリペイドで開始し、滞在先が固まった段階でポストペイドへ移行する方法が一般的です。
**Q. 日本の電話番号は維持したほうがよいですか?**
日本の銀行・証券口座・行政手続きにSMS認証が紐づいている場合、維持しておくと帰国後の手続きがスムーズです。維持が不要と判断した場合はMNPで番号を解約できます。維持する場合、大手キャリアの番号保管サービス・最安プランへの変更・格安SIMへのMNP移行が主な選択肢です。コストと帰国後の利用頻度を比較して判断してください。
**Q. 現地のeSIM対応状況はどうですか?**
豪・NZ・カナダ・英の主要キャリアはいずれもeSIMに対応しており、オンラインや店舗でのeSIMプロファイル発行が可能です。ただし対応状況はキャリア・プランによって異なるため、契約前に確認してください。地域別の一般的なeSIM普及状況は[地域別の海外通信事情ガイド](/ja/guides/regional-overview/)を参照してください。
---
## 関連ガイド
- [海外現地SIM契約ガイド](/ja/guides/local-contract/) — プリペイド・ポストペイドの手続きフローと必要書類
- [海外在住者のSIM戦略](/ja/guides/expat-strategy/) — 長期在住・海外赴任向けの通信最適化
- [地域別の海外通信事情ガイド](/ja/guides/regional-overview/) — 6地域の通信事情とSIM登録義務の概観
- [旅行eSIMの選び方](/ja/guides/how-to-choose/) — 5つの比較ポイントと購入前チェックリスト
- [旅行eSIMプロバイダー比較](/ja/guides/provider-comparison/) — 主要プロバイダーの対応地域・特徴の比較